

Page 1
ポケット フォト プリンター
MFL71462602
Simple manual/ 简短说明/ 簡短說明/ 簡易マニュアル/ Manual básico/
Kurzanleitung/ Manuel simple/ Краткое руководство
For more details, please refer to the Owner’s Manual at LG Pocket Photo App or
http://popoguide.lge.com.
MODEL :
PD251W/ PD251P/ PD251Y
Copyright © 2015-2019 LG Electronics Inc.
PD251_SIMPLE_GLOBAL_V4.1_MFL71462602.indd 1 2019-04-09 4:06:43
All Rights Reserved.
www.lg.com
Page 2

USA
WARNING: This product contains chemicals known to the State of California to cause cancer and
birth defects or other reproductive harm. Wash hands after handling.
y For more details, please refer to the Owner’s Manual at LG Pocket Photo App or
http://popoguide.lge.com.
y关于更多详细信息,请参见 LG Pocket Photo 应用程序的用户手册或登陆
http://popoguide.lge.com。
y若要瞭解更多詳細資訊,請參見 LG Pocket Photo 應用程式的相關使用手冊或登入 http://popoguide.lge.com
。
y本製品に関する詳細な情報は、LG Pocket Photoアプリまたはウェブ取扱説明書(http://popoguide.lge.
com)からもご覧いただけます。
yPara más detalles, consulte el Manual del Propietario en LG Pocket Photo App o http://popoguide.lge.com.
yWeitere Informationen nden Sie im Bedienerhandbuch der LG Pocket Photo App oder unter
http://popoguide.lge.com.
yPour plus de détails, reportez-vous au Manuel d’utilisateur disponible sur l’App Pocket Photo de LG ou
téléchargeable sur le site http://popoguide.lge.com.
yДля подробной информации, пожалуйста, обратитесь к руководству по использованию на LG Pocket
Photo App или http://popoguide.lge.com.
2
PD251_SIMPLE_GLOBAL_V4.1_MFL71462602.indd 2 2019-04-09 4:06:43
Page 3

yTovábbi részletekért, kérjük tanulmányozza az LG Pocket Photo App felhasználói kézikönyvét vagy a
http://popoguide.lge.com honlapot.
yТолық ақпарат алу үшін, өтінеміз, LG Pocket Photo App қолдану жөніндегі нұсқаулығына немесе
http://popoguide.lge.com жүгініңіз.
yЗа повеќе детали, погледнете го прирачникот за употреба на апликацијата LG Pocket Photo или на
http://popoguide.lge.com.
ySe Brukermanualen på LG Pocket Photo App for ere detaljer, eller http://popoguide.lge.com.
yBy uzyskać więcej informacji proszę zapoznać się z Instrukcją Właściciela w Aplikacji LG Pocket Photo lub na
http://popoguide.lge.com.
yPara obter mais informações consulte o Manual do Proprietário através da Aplicação LG Pocket Photo ou em
http://popoguide.lge.com.
yPara maiores detalhes, consulte o Manual do Proprietário no LG Pocket Photo App ou
http://popoguide.lge.com.
yPara maiores detalhes, consulte o Manual do Proprietário no LG Pocket Photo App ou
http://popoguide.lge.com.
yPentru mai multe detalii, vă rugăm să consultaţi manualul utilizatorului furnizat cu LG Pocket Photo App sau
să acessaţi http://popoguide.lge.com.
yЗа више информација, молимо Вас погледајте корисничко упутство у LG Pocket Photo апликацији или
на http://popoguide.lge.com.
3
PD251_SIMPLE_GLOBAL_V4.1_MFL71462602.indd 3 2019-04-09 4:06:43
Page 4

yViac informácií nájdete v návode na obsluhu aplikácie LG Pocket Photo alebo na stránke
http://popoguide.lge.com.
yZa več podrobnosti glejte uporabniški priročnik aplikacije LG Pocket Photo ali obiščite spletno stran
http://popoguide.lge.com.
yPara más detalles, consulte el Manual del propietario en la aplicación LG Pocket Photo o visite
http://popoguide.lge.com.
yFör mer detaljer, se bruksanvisningen i appen LG Pocket Photo eller gå till http://popoguide.lge.com.
yถ้าหากต้องการทราบรายละเอียดเพิ่มเติม กรุณาอ่านคู่มือผู้ใช้ของ Pocket Photo App หรือ
http://popoguide.lge.com
yDaha fazla bilgi için, lütfen LG Pocket Photo Uygulaması veya http://popoguide.lge.com sitesinde bulunan
Kullanım Kılavuzu’na bakınız.
yБільш детальну інформацію можна знайти у посібнику користувача на LG Pocket Photo App або на сайті
http://popoguide.lge.com.
yĐể biết thêm chi tiết, hãy tham khảo Hướng dẫn người sử dụng trên ứng dụng LG Pocket Photo hoặc trên
http://popoguide.lge.com.
yЗа повече информация, моля, вижте Ръководството за употреба на LG Pocket Photo App или
http://popoguide.lge.com.
y欲瞭解更多詳細資訊,請參見 LG Pocket Photo 應用程式的使用說明書或登入 http://popoguide.lge.com。
yZa više informacija molimo pogledajte korisnički priručnik na LG Pocket Photo aplikaciji ili na
http://popoguide.lge.com.
.
4
PD251_SIMPLE_GLOBAL_V4.1_MFL71462602.indd 4 2019-04-09 4:06:43
Page 5

yVíce informací naleznete v návodu k obsluze pro aplikaci Pocket LG Photo nebo na stránkách
http://popoguide.lge.com.
yFind ere oplysninger i brugervejledningen i LG Pocket Photo App eller på
http://popoguide.lge.com.
yVoor meer informatie verwijzen wij u naar de handleiding van de LG Pocket Photo App of
http://popoguide.lge.com.
yLisätietojen osalta, ks. Käyttöohjekirjaa LG Pocket Photo -sovellukselle tai sivustolla
http://popoguide.lge.com.
yPour de plus amples renseignements, veuillez consulter le manuel de l’utilisateur sur l’application LG Pocket
Photo ou http://popoguide.lge.com.
yΓια περισσότερες πληροφορίες, ανατρέξτε στο Εγχειρίδιο Χρήσης της εφαρμογής LG Pocket Photo ή
επισκεφθείτε τον ιστότοπο http://popoguide.lge.com.
http://popoguide.lge.comLG Pocket Photo
y .
5
PD251_SIMPLE_GLOBAL_V4.1_MFL71462602.indd 5 2019-04-09 4:06:43
Page 6
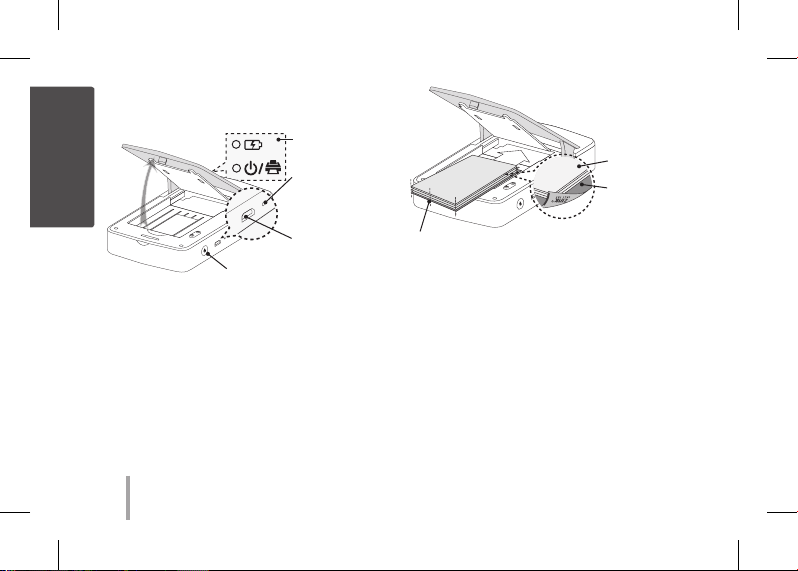
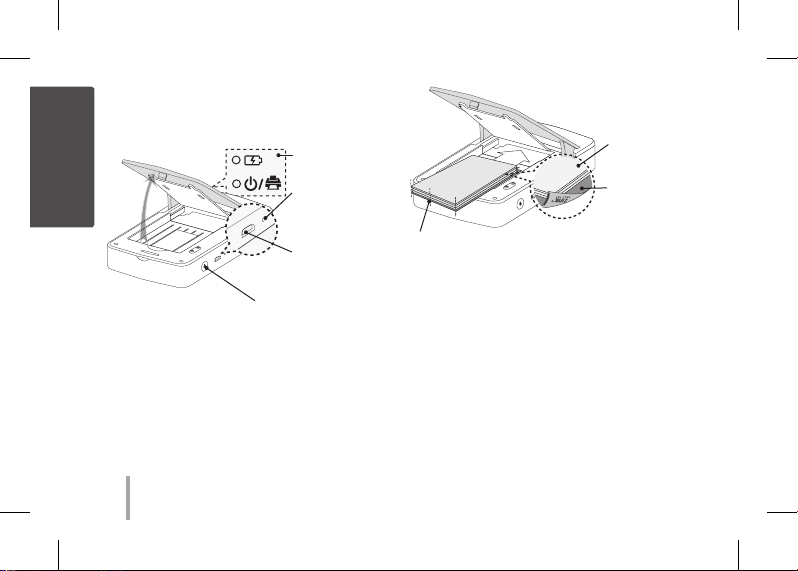
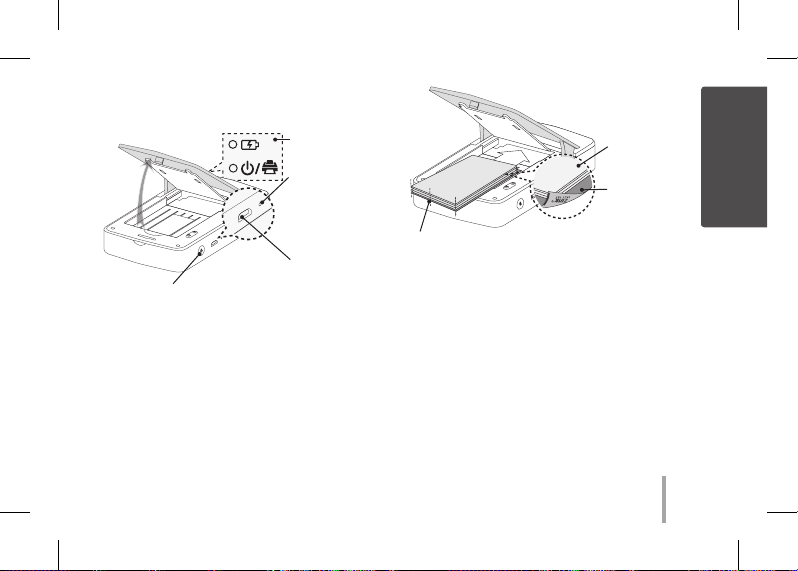
STEP 1 Getting Started
English
1. Basic Operation
LED indicator
OPEN
(1) POWER
button
, This device uses a built-in battery. Before using it,
fully charge the battery using a Smart phone USB
data cable ( Micro 5 pin) or adapter.
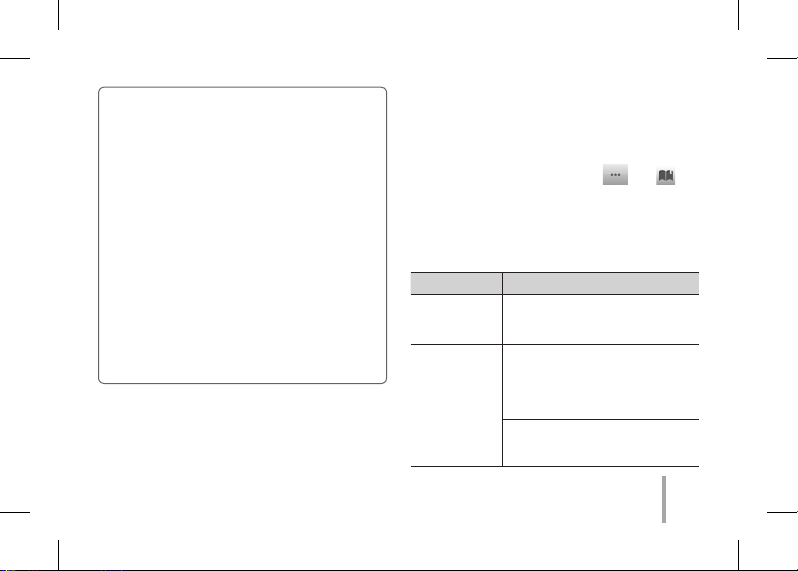
, As shown in the picture on the right, place papers
with the smart sheet aligned and insert them in the
direction of the arrow.
(RESET) Press
reset hole to
initialize.
(CHARGE) Micro
USB port for
recharging
Arrange all papers and smart
sheet to end of rear.
, Smart Sheet cleans printer head and calibrates
colors on photo. Keep the best print quality by
using it repeatedly.
2. Smart sheet (Cleaner)/ Photo Paper
, Smart sheet and photo papers are not supplied.
When you buy the photo paper pouch, the smart
sheet is included with photo papers in the same
pouch.
Photo Papers with
White side up,
Smart Sheet (Blue)
with Barcode side
down
6
PD251_SIMPLE_GLOBAL_V4.1_MFL71462602.indd 6 2019-04-09 4:06:44
Page 7

Note on Smart sheet
When using Smart Sheet, it should be used
with photo papers in the same pouch.
yUsing smart sheet from other pouch may
result in low quality.
yIf print quality is abnormal or low, print
out the smart sheet 3-5 times repeatedly.
yReuse the smart sheet until use up the
photo papers from same pouch.
, Use exclusive photo paper for LG Pocket Photo.
Otherwise, the print quality cannot be
guarranteed, and it may cause damage of
Pocket Photo.
Note on Photo paper
yDo not damage or bend the papers.
yUsing soiled paper may result in malfunction.
yEnsure to use the papers within its valid date.
yOnce unpacked, the papers may begin to
curl up or change the color after a period of
time. It is recommended to use them as soon
as possible.
STEP 2 Installing App
Search for “LG Pocket Photo” from Play Store (Android
market) / App Store (iPhone)/ Windows Phone Store.
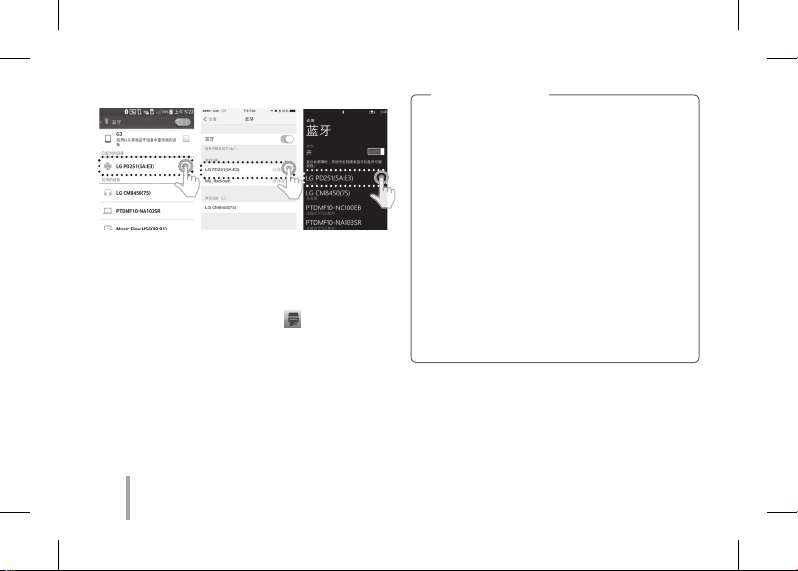
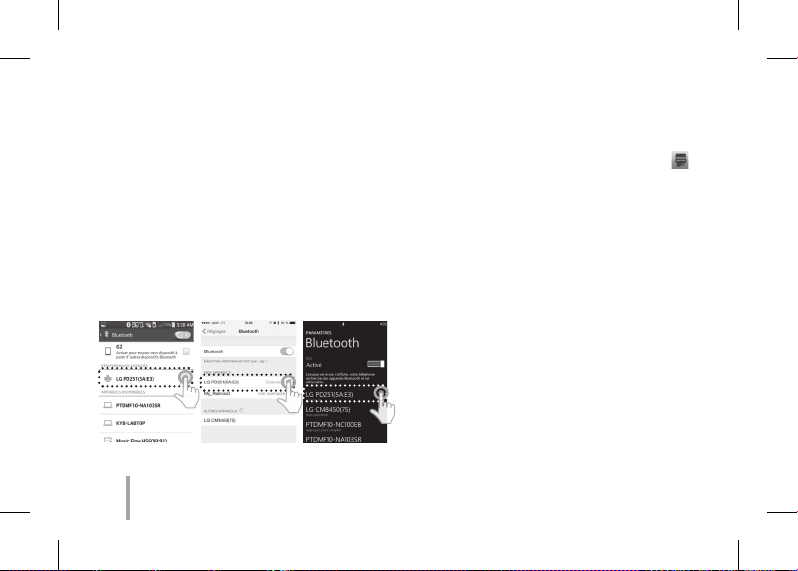
STEP 3 Pairing Bluetooth
1. Turn on the Pocket Photo device.
2. Search for the device to pair through Bluetooth.
ex ) LG PD251 (XX : XX)
3. When you nd the device, touch the model name of
Pocket Photo on the screen.
In case of iPhone/iPad, the last paired iPhone/
iPad is paired to Pocket Photo automatically when
you turn on Pocket Photo if the Bluetooth on your
iPhone/iPad is on.
7
PD251_SIMPLE_GLOBAL_V4.1_MFL71462602.indd 7 2019-04-09 4:06:44
English
Page 8

< Android Phone> < iPhone> <Windows Phone>
STEP 4 Printing Photo
1. After pairing, run LG Pocket Photo App on smart
phone.
2. Select a photo to print, and touch [
If the smart sheet is in the device, the selected image
will be printed after optimizing the image’s quality.
The printed image may dier from the orginal
image due to the printing method (thermal transfer
printing).
].
Note on the print
yUse the lastest App of LG Pocket Photo (when
printing a photo, it optimizes the image.)
yCheck the quality of original image.
(The printed images may dier from the
original image.)
yDo not pull the paper out by force during
printing.
yDo not open the upper cover during printing.
The product may be damaged.
yIf the device is vibrated or given shock, the
quality of the printed photo may be reduced.
yThe higher resolution of the image, the printed
picture has the higher quality. (The proper
resolution is more than 1280 x 2448 pixel.)
yThe printing quality may dier depending on
the original image (When too dark or dim).
Print the image after correcting it using Pocket
photo App.
8
PD251_SIMPLE_GLOBAL_V4.1_MFL71462602.indd 8 2019-04-09 4:06:44
Page 9
yPrinting for Passport / VISA image may be
unsuitable as the case may be. Printing the
image taken in studio is recommended.
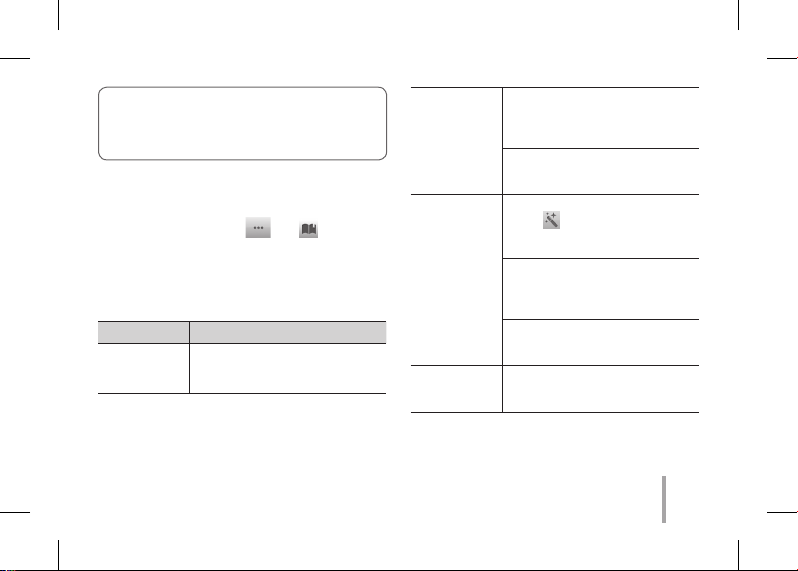
STEP 5 See “User manual” for details
1. Run LG Pocket Photo App on the smartphone.
2. Touch the setting menu [
manual for details.
※This product must always be operated DC 5 V.
Certied/Listed Adaptor which comply with LPS.
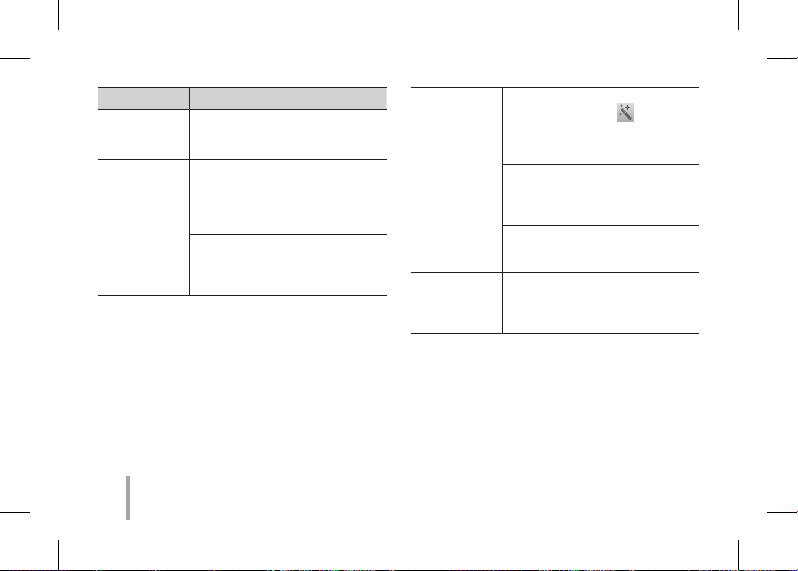
Symptom Cause / Solution
The paper
jammed before
printing.
Turn the device o and on
again then paper is ejected
automatically.
] / [ ] to see user
The printed
photo has
lines.
Quality of
printed photo
is too low.
Above
solutions do
not work.
※All other product and brand names are
trademarks or registered trademarks of their
respective owners.
Open the Upper cover, arrange the
papers and insert them with Smart
Sheet locating at the bottom.
Then try printing again.
When using Smart Sheet, it should
be used with photo papers in the
same pouch.
In case you magnify an image
] menu in the App, the
using [
quality of the printed photo may
be reduced.
Turn o the device and insert
Smart Sheet locating at the
bottom of the papers. Then try
printing again.
Be sure the photo size is bigger
than the proper resolution.
(1280 x 2448 pixels)
Press Reset hole with a pointed
thing like mechanical pencil to
initialize.
9
PD251_SIMPLE_GLOBAL_V4.1_MFL71462602.indd 9 2019-04-09 4:06:44
Page 10

步骤 1 开始
1. 基本操作
中文
打开
, 本设备使用内置电池。使用前,使用智能手机
USB数据线(微型5针)或适配器充满电。
, 如右图所示,将纸张与 Smart Sheet 对齐并将
其沿箭头方向插入。
10
PD251_SIMPLE_GLOBAL_V4.1_MFL71462602.indd 10 2019-04-09 4:06:44
LED 指示灯
(RESET) 按重
设孔进行初始
化。
(CHARGE) 微型
USB端口用于
充电
(1) 电源按钮
照片纸白色面
朝上,
Smart Sheet
(蓝色)的条形
码面朝下
在后端上放好所有的相纸和蓝纸。
, Smart Sheet 清洁打印机针头并校正照片颜
色。通过反复使用来保持最佳打印质量。
2.Smart Sheet/照片纸
, 不提供 Smart Sheet 和照片纸。当您购买照片
纸袋时,Smart Sheet 与照片纸一同包含在纸
袋中。
Page 11

Smart Sheet 注意事项
Smart Sheet 应与其放置在同一袋中的照片
纸一同使用。
y使用其他袋中的 Smart Sheet 可能会降
低质量。
y若打印质量异常或较低,重复 3 - 5 次
打印 Smart Sheet。
y从其他袋中更换新的 Smart Sheet 前,
请重复使用 Smart Sheet。
, 请使用本产品专用的 LG Pocket 照片纸。
如使用其他公司的照片纸,可能无法保证打印
质量或者会损坏 Pocket Photo.
照片纸注意事项
y切勿损坏或弯曲照片纸。
y使用污染的照片纸可能会导致工作异常。
y确保在有效期限内使用照片纸。
y一旦拆开,一段时间后照片纸可能会开始
卷曲或变色。建议尽快使用它们。
步骤 2 安装应用程序
在 Android market /App Store (iPhone) /
Windows Phone Store中搜索 “LG Pocket
Photo” 或 “趣拍得”。
步骤 3 蓝牙配对
1. 打开 Pocket Photo 设备。
2. 搜索要通过 Bluetooth 进行配对的设备。
ex. LG PD251 (XX :XX)
3. 发现设备时,触摸设备屏幕上 Pocket Photo
的型号名称。
如果使用iPhone/iPad,当您开启Pocket Photo
时,如果您iPhone/iPad上的蓝牙功能已经打开,
那么最后一次配对过的iPhone/iPad将自动与
Pocket Photo配对。
11
PD251_SIMPLE_GLOBAL_V4.1_MFL71462602.indd 11 2019-04-09 4:06:44
中文
Page 12
< Android 手机> < iPhone> <Windows Phone>
步骤 4 打印照片
1. 配对后,在智能手机上运行 LG Pocket Photo
应用程序。
2. 选择要打印的照片,并触摸 [
如果设备中已有 Smart Sheet,则会在优化所选图
像质量后对其进行打印。
由于打印方式不同(热转移打印),打印图像可能
会与原始图像有所区别。
]。
打印注意事项
y使用最新 LG Pocket Photo 应用程序(打
印照片时会优化图像)。
y检查原始图像的质量。(实际打印图像可
能会与原始图像不同。 )
y打印时切勿强行拉出照片纸。
y打印时切勿打开上盖,可能会损坏产品。
y如果本设备振动或摇晃,打印的照片质量
可能会降低。
y图像分辨率越高,打印的照片质量就越
高。(适当的分辨率应超过 1280×2448
像素。)
y根据具体情况,护照/签证图像可能不适合
打印。建议打印在照相馆拍摄的图像。
12
PD251_SIMPLE_GLOBAL_V4.1_MFL71462602.indd 12 2019-04-09 4:06:45
Page 13
y打印质量会受原始图像影响(图像太暗或
模糊)。使用 Pocket Photo 应用程序校
正图像后再打印。
步骤 5 更多详情,请参见“用户手册”
1. 在智能手机上运行 LG Pocket Photo 应用程
序。
2. 更多详情,请触摸设置菜单 [
以查看用户手册。
※本产品必须使用通过认证且符合 LPS 要求的
DC 5 V 适配器。
症状 原因/解决方案
打印前卡纸。
关闭本设备,然后重新打开,照
片纸会自动弹出。
] / [ ]
打印的照片有
线条。
打印的照片的
质量太低。
以上解决方案
不起作用。
※所有其他商标都是它们各自所有者的商标。
打开上盖,整理照片纸并将它们
和位于底部的 Smart Sheet 一
同插入。然后尝试再次打印。
Smart Sheet 应与其放置在同一
袋中的照片纸一同使用。
如果您使用应用程序中的 [
菜单来放大图像,打印的照片质
量会降低。
关闭本设备并插入位于照片纸底
部的 Smart Sheet。然后尝试再
次打印。
确保照片尺寸大于合适的分辨
率。(1280 x 2448 pixels)
使用自动铅笔之类的尖状物按复
位孔以进行初始化。
]
13
PD251_SIMPLE_GLOBAL_V4.1_MFL71462602.indd 13 2019-04-09 4:06:45
Page 14
中文(Taiwan)
步驟 1 入門
1. 基本操作
LED 指示燈
開啟
, 本裝置採用內建電池。使用前,請以智慧型手
機 USB 資料線 (Micro 5-pin) 或變壓器將電池充
電。
, 如右圖所示,將紙張與 Smart Sheet 對齊並將其
沿箭頭方向插入。
(RESET) 請按下
重設孔,進行初
始化。
(CHARGE) 用
於充電的 Micro
USB 埠
(1) 電源按鈕
請將所有紙張和 Smart Sheet 安插
在最後。
, Smart Sheet 清潔印表機針頭並校正照片色彩。
透過重複使用它來保持最佳列印品質。
2. Smart sheet/照片紙
未提供 Smart Sheet 與照片紙。購買照片紙袋
時,Smart Sheet 連同照片紙附於同一個袋內。
照片紙的白色面
朝上,
Smart Sheet (藍
色)的條碼面朝下
14
PD251_SIMPLE_GLOBAL_V4.1_MFL71462602.indd 14 2019-04-09 4:06:45
Page 15

Smart Sheet 備註
Smart Sheet 在使用時,應與同一袋中的相片
紙一同使用。
y使用其他袋中的 Smart Sheet 可能會降低品
質。
y若列印品質異常或較低,請重複 3-5 次列
印 Smart Sheet。
y使用其他袋中新的 Smart Sheet 之前,請重
複使用 Smart Sheet。
, 使用本產品的專用 LG Pocket 照片紙。
如使用其他公司的照片紙,將無法保障列印品
質或會損壞 Pocket Photo。
照片紙備註
y切勿損壞或彎曲照片紙。
y使用污染的照片紙可能會導致功能發生問
題。
y確保在有效日期內使用照片紙。
y一旦拆封,一段時間後照片紙可能會開始
捲曲或變色。建議儘快使用它們。
步驟 2 安裝應用程式
從 Play Store (Android Market) /App Store (iPhone) /
Windows Phone Store 中搜尋「LG Pocket Photo」。
步驟 3 藍牙配對
1. 開啟 Pocket Photo 裝置。
2. 搜尋要透過藍牙配對之裝置。
ex. LG PD251(XX :XX)
3. 尋找到裝置後,按裝置螢幕上的 Pocket Photo
型號名稱。
若使用 iPhone/iPad,上一次配對的 iPhone/iPad 會在
開啟 Pocket Photo 時,自動與 Pocket Photo 配對,但
須先開啟 iPhone/iPad 的藍牙功能。
15
PD251_SIMPLE_GLOBAL_V4.1_MFL71462602.indd 15 2019-04-09 4:06:45
中文(Taiwan)
Page 16

<Android 手機> < iPhone> <Windows Phone>
步驟 4 列印照片
1. 配對後,在智慧型手機中執行 LG Pocket Photo
應用程式。
2. 選取要列印的照片,並按 [
若裝置中已有 Smart Sheet,則會在最佳化所選取影
像之品質後將其列印出來。
由於列印方法的不同(熱轉式列印),列印的影像
可能會與原始影像不同。
]。
列印備註
y使用最新的 LG Pocket Photo 應用程式(列
印照片時,可最佳化影像。)
y檢查原始影像的品質。(列印影像可能會
與原始影像不同。
y列印時切勿強行拉出照片紙。
y列印時切勿打開上蓋,可能會損壞產品。
y如果本裝置振動或搖晃,列印的照片的品質
可能會降低。
y影像的解析度越高,照片的列印品質越
高。(合適的解析度應高於 1280 x 2448 像
素。)
y視情況而定,護照/Visa 影像可能不適合列
印。建議列印在攝影室拍攝的影像。
16
PD251_SIMPLE_GLOBAL_V4.1_MFL71462602.indd 16 2019-04-09 4:06:45
Page 17

y列印品質可能會受原始影像的影響(影像
太暗或模糊)。使用 Pocket Photo 應用程式
校正影像後再列印。
步驟 5 更多資訊,請參閱「使用者手冊」
1. 在智慧型手機上執行 LG Pocket Photo 應用程
式。
2. 更多資訊,請觸摸設定功能表 [
檢視使用者手冊。
※本產品必須使用經認證且符合 LPS 要求的
DC 5 V 轉接器。
問題 原因 / 解決方案
列印前夾紙。
關閉本裝置,然後重新開啟,照
片紙會自動退出。
] / [ ] 以
列印的照片有
線條。
列印的照片品
質太低。
以上解決方案
不起作用。
※所有其他商標均為其各自所有者的商標。
開啟上蓋,排列照片紙並將它們
和位於底部的 Smart Sheet 一同插
入。然後嘗試再次列印。
Smart Sheet 在使用時,應與同一
袋中的相片紙一同使用。
如果您使用應用程式中的 [
能表來放大圖像,列印的照片品
質會降低。
關閉本裝置並插入位於照片紙
底部的 Smart Sheet。然後嘗試再
次列印。
確保照片尺寸大於合適的解析
度。(1280 x 2448 像素)
使用自動鉛筆之類的尖狀物按
Reset 孔進行初始化。
] 功
17
PD251_SIMPLE_GLOBAL_V4.1_MFL71462602.indd 17 2019-04-09 4:06:45
Page 18

ステップ1 はじめに
日本語
1. カバーを開ける/ポケットペーパーを入れる
開く
(1)電源ボタン
, 本デバイスは内蔵バッテリーを使用しています。ご使用
になる前に、スマートフォンのUSBデータケーブル(マイ
クロ5ピン)またはアダプターを使用してバッテリーを完
全に充電してください。
, 右図のように、スマートシートとフォトペーパーを矢印の
方向に合わせて正しい位置に挿入してください。
LED表示
(RESET)リセッ
ト穴を押して初期
化します。
(CHARGE)
再充電のためのマ
イクロUSBポート
用紙とスマートシートをすべて後方の
端にそろえます。
, スマートシートはプリンターのヘッドをきれいに
し、写真の色をよりあざやかにします。
2. スマートシート(クリーナー)/ フォトペーパー
, スマートシートとフォトペーパーは付属していません。フ
ォトペーパーパックを購入する時、スマートシートはフォ
トペーパーと同じケースの中に入っています。
18
PD251_SIMPLE_GLOBAL_V4.1_MFL71462602.indd 18 2019-04-09 4:06:45
白い面を上にした
フォトペーパー
バーコード面を
下にした
スマートシート
Page 19

スマートシートについて
スマートシートは、使用するフォトペーパーと同じ袋
に入っているものを使用してください。
y別の袋のスマートシートを使用すると印刷品質
が低下します。
y印刷品質の異常または、低下がみられた場合
は、スマートシートを3 ~ 5 回繰返し出力して
ください。
yスマートシートは同じ袋のフォトペーパーを使い
切るまで再利用してください。
y汚れたフォトペーパーを使うと、故障の原因とな
る場合があります。
yフォトペーパーの有効期限を確認して使用してく
ださい。
y袋を開けたままにしておくと、フォトペー
パーが変形したり、変色したりする場合があり
ます。袋を開けた後は早めに使用すること
をおすすめします。
ステップ2 アプリをインストールする
, フォトペーペーはポケットフォトプリンター専用のものを使
用してください。
他の製品を使用した場合、印刷品質を保証いたしか
ねますとともに、本機を破損させる恐れがあります。
フォトペーパーについて
yフォトペーパーを損傷させたり曲げたりし
ないでくさだい。
PD251_SIMPLE_GLOBAL_V4.1_MFL71462602.indd 19 2019-04-09 4:06:45
「LG Pocket Photo」アプリは、Android Playスト
ア、iOS App Store、および Windows Phone
Storeから無料でダウンロードいただけます。
ステップ3 Bluetoothのペアリング
1. ポケットフォトの電源をオンにします。
2. スマートフォンのBluetooth設定メニューから、
接続可能なBluetooth機器を検索します。
例)LG PD251 (XX:XX)
19
日本語
Page 20
3. 機器を検出したら、画面上のPocket Photoの名前
をタッチします。
iPhoneもしくはiPadの場合、お手持ちのiPhoneもしく
はiPadのBluetoothがオンになっている時にPocket
Photoの電源を入れると、最後にペアリングされた
iPhoneもしくはiPadがPocket Photoに自動的にペア
リングされます。
< Android
スマートフォン> < iPhone>
<Windows Phone>
ステップ4 写真を印刷する
1. ペアリング後、スマートフォンの「LGポケットフォト」
を実行します。
2. 印刷する写真を選択し[
スマートシートが本機の中に入っていると印刷の前
に排出されます。
本機の印刷は熱転写式のため、印刷された写真は
スマートフォンで表示される画像の色味と異なる場合が
あります。
]をタッチしてください。
印刷についてのご注意
yPocket Photoアプリは最新のものを使用し
てください(印刷時に画像が最適化されます)。
y元の画像の品質を確認してください。印刷した
画像は元の画像と異なる場合があります。
y印刷中に無理にフォトペーパーを引っ張らないで
ください。
y印刷の際に上部カバーを開けないでください。製
品に損傷が発生する場合があります。
20
PD251_SIMPLE_GLOBAL_V4.1_MFL71462602.indd 20 2019-04-09 4:06:45
Page 21
y本機に振動や衝撃が加えられると印刷される写
真の品質が低下する場合があります。
y画像解像度が高いほど、写真は高画質に印刷
されます(適正解像度は1280 × 2448ピク
セル以上です)。
y画像(黒っぽい、暗い)により印刷の品質
が元の画像と異なる場合があります。Pocket
Photoアプリで修正した画像を印刷してくださ
い。
ステップ5 困ったときは
1. スマートフォンの「LG Pocket Photo」を実行します。
2. 詳しくは、設定メニューの [
説明書をご確認ください。
※統制品はDC5Vにて作動しなければなりません。
LPSに対応する承認・列挙されたアダプター。
症状 原因/解決方法
印刷の前に紙
が詰まった。
本機の電源をオフにしてから再びオン
にすると、フォトペーパーが自動的に排
出されます。
] / [ ] にある取扱
印刷された写
真に線が入っ
ている。
印刷された写
真の質が非常
に悪い。
上記の方法
で解決でき
ない。
※その他会社名、各製品名は、各社の
商標または登録商標です。
上部カバーを開けて、スマートシートを
一番下に入れてフォトペーパーを整え、
もう一度挿入し印刷してください。
スマートシートを使用するときは、同梱
の写真用紙と一緒に使ってください。
アプリの [
を拡大する場合、印刷された写真の
質が低くなる場合があります。
本機の電源をオフにして、スマートシー
トをフォトペーパーの一番下に入れて挿
入し、印刷してください。
写真サイズが適切な解像度(1280
× 2448ピクセル)以上であることを確
認してください。
シャープペンシルなどで「リセットボタン」
を押して、本機を初期化してください。
] メニューを利用して画像
21
PD251_SIMPLE_GLOBAL_V4.1_MFL71462602.indd 21 2019-04-09 4:06:46
Page 22
PASO 1 Preparación
Español
1. Funcionamiento básico
ABRIR
, Este dispositivo utiliza una batería integrada. Antes
de usarlo, cargue la batería utilizando un cable de
datos USB para smartphone (micro 5 pines) o un
adaptador.
, Como se muestra en la foto de la derecha, coloque
los papeles con la hoja inteligente alineada e
insértelos en la dirección de la echa.
Indicador led
(RESET) Presione
el oricio para
inicializar.
(CHARGE) Puerto
micro USB para
la recarga
(1) Botón de APAGADO/
ENCENDIDO
Deslice el papel y la Smart Sheet
hacia el interior.
, Smart Sheet limpia el cabezal de la impresora y
calibra los colores de la fotografía. Para mantener la
mejor calidad de impresión, utilice la Smart Sheet
repetidamente.
2. Smart sheet (limpiador)/ Papel fotográco
, La Smart Sheet y el papel fotográco no están
incluidos. Cuando compre el paquete de papel
fotográco, la Smart Sheet vendrá incluida junto con
el papel en ese paquete.
Papel fotográco
con la cara blanca
hacia arriba,
Smart Sheet
(azul) con la
cara del código
de barras hacia
abajo
22
PD251_SIMPLE_GLOBAL_V4.1_MFL71462602.indd 22 2019-04-09 4:06:46
Page 23

Nota sobre la Smart sheet
Cuando use la Smart Sheet, debe hacerlo con
papeles para fotos en la misma bolsa.
ySi usa la Smart Sheet de otra bolsa, la calidad
puede verse reducida.
ySi la calidad de impresión es baja o
irregular, imprima la Smart Sheet 3-5 veces
repetidamente.
yReutilice la Smart Sheet hasta que la
cambie por una nueva de otra bolsa.
Nota sobre el papel fotográco
yNo dañe o doble los papeles.
yLa utilización de papel sucio podría causar
errores de funcionamiento.
yAsegúrese de utilizar los papeles dentro de la
fecha de validez.
yDespués de sacarlos de la bolsa, los papeles
pueden ondularse o cambiar de color
pasado un tiempo. Es recomendable utilizar
los papeles lo antes posible.
Español
, Use exclusivamente papel fotográco LG Pocket
Photo para este producto.
Si usa papel fotográco de otra marca, la
calidad de impresión no está garantizada y el
dispositivo Pocket Photo puede resultar dañado.
PASO 2 Instalación de la aplicación
Busque «LG Pocket Photo» en Play Store (mercado
Android) / App Store (iPhone) / Windows Phone Store.
23
PD251_SIMPLE_GLOBAL_V4.1_MFL71462602.indd 23 2019-04-09 4:06:46
Page 24

PASO 3 Vinculación por Bluetooth
1. Encienda el dispositivo Pocket Photo.
2. Busque por Bluetooth el dispositivo que desea
vincular.
ej. ) LG PD251 (XX : XX)
3. Cuando encuentre el dispositivo, toque el nombre
del modelo de Pocket Photo en la pantalla.
En el caso de un iPhone/iPad, el último iPhone/
iPad emparejado se empareja con Pocket Photo
automáticamente cuando se activa Pocket Photo, si
el Bluetooth de su iPhone/iPad está activado.
< Teléfono Android> < iPhone> <Windows Phone>
PASO 4 Impresión de fotografías
1. Tras la vinculación, abra la aplicación fotográca LG
Pocket Photo en el teléfono inteligente.
2. Seleccione una fotografía para imprimir y toque
[
].
Si la Smart Sheet está dentro del dispositivo, se
imprimirá la imagen seleccionada después de optimizar
la calidad de la imagen.
Es posible que la imagen impresa diera de la
imagen original debido al método de impresión
(impresión por transferencia térmica).
Nota sobre la impresión
yUse la última aplicación de LG Pocket Photo
(optimiza la imagen cuando imprime una
fotografía).
yCompruebe la calidad de la imagen original (las
imágenes impresas pueden diferir de la imagen
original).
yNo tire del papel hacia fuera durante la impresión.
24
PD251_SIMPLE_GLOBAL_V4.1_MFL71462602.indd 24 2019-04-09 4:06:46
Page 25
yNo abra la cubierta superior durante la impresión.
Puede dañar el producto.
ySi el dispositivo está sometido a vibraciones o
recibe golpes, la calidad de la fotografía impresa
puede verse reducida.
yCuanto mayor sea la resolución de la imagen,
mayor será la calidad de la fotografía impresa
(la resolución debe ser, al menos, 1280 × 2448
píxeles).
yLa calidad de impresión puede variar en función
de la imagen original (cuando es muy oscura o
atenuada). Use la imagen tras corregirla con la
aplicación fotográca Pocket Photo.
yLa impresión de fotografías para pasaportes
o visados puede no ser adecuada según
corresponda. Se recomienda imprimir una
fotografía tomada en un estudio fotográco.
PASO 5 Consulte el manual del usuario
para obtener más detalles
1. Abra la aplicación fotográca LG Pocket Photo en el
teléfono inteligente.
2. Toque el menú de conguración [
para consultar el manual del usuario y obtener más
detalles.
※Este producto debe siempre operarse con un
Adaptador Cercado/Listado de 5 VCC que cumpla
con LPS.
Síntoma Causa y solución
El papel se
atasca antes de
imprimir.
La foto
impresa tiene
líneas.
Apague y vuelva a encender
el dispositivo, el papel será
expulsado automáticamente.
Abra la cubierta superior, ordene
los papeles e insértelos con la
Smart Sheet colocada en el fondo.
A continuación, intente imprimir
de nuevo.
Cuando use la Smart Sheet, debe
hacerlo con papeles para fotos en
la misma bolsa.
] / [ ]
25
PD251_SIMPLE_GLOBAL_V4.1_MFL71462602.indd 25 2019-04-09 4:06:46
Page 26

La calidad de
la fotografía
impresa es
muy baja.
Superior a
las soluciones
no funcionan.
※Las restantes marcas comerciales y otras marcas
comerciales son propiedad de sus respectivos
propietarios.
Si aumenta el tamaño de una
imagen mediante el menú [
de la aplicación, la calidad de la
fotografía impresa puede verse
reducida.
Apague el dispositivo e inserte
la Smart Sheet colocada al fondo
de los papeles. A continuación,
intente imprimir de nuevo.
Asegúrese de que el tamaño
de la fotografía es mayor que la
resolución adecuada (1280 × 2448
píxeles).
Para inicializar, pulse el agujero de
Reinicio (Reset) con un objeto
alado,como, p. ej., un portaminas.
]
26
PD251_SIMPLE_GLOBAL_V4.1_MFL71462602.indd 26 2019-04-09 4:06:46
Page 27

SCHRITT 1 Erste Schritte
1. Grundfunktionen
GEÖFFNET
(1) Netzschalter
, Dieses Gerät verwendet eine integrierte Batterie. Vor
der Verwendung muss die Batterie über ein USBDatenkabel eines Smartphones (Micro 5-polig) oder
einen Adapter vollständig aufgeladen werden.
, Positionieren Sie das Bild wie im Bild rechts
dargestellt am Smart Sheet ausgerichtet und führen
Sie beide in Richtung des Pfeils ein.
PD251_SIMPLE_GLOBAL_V4.1_MFL71462602.indd 27 2019-04-09 4:06:46
LED indicator
(RESET) ResetTaster zum
Initialisieren
gedrückt halten.
(CHARGE) MicroUSB-Anschluss
zum Auaden
Papier und Smart-Sheet hinten
einlegen.
, Das Smart-Blatt reinigt den Druckkopf und kalibrier t
die Farben auf das Foto. Durch die wiederholte
Verwendung erhalten Sie die beste Druckqualität.
2. Smart-Blatt (Reiniger)/ Fotopapier
, Smart-Sheets und Foto-Papier sind nicht im
Lieferumfang enthalten. Beim Kauf von Fotopapier
liegt ein Smart-Sheet dem Papierstapel bei.
Beim Fotopapier
die weiße Seite
nach oben,
Beim Smart-Blatt
(blau) den
Barcode nach
unten.
27
Deutsch
Page 28

Hinweis zum Smart-Blatt
Bei Verwendung eines Smart-Blattes sollte
dieses gemeinsam mit dem Fotopapier in
derselben Tasche verwendet werden.
yEin Smart-Blatt aus einer anderen Tasche
könnte die Qualität beeinträchtigen.
yWenn die Druckqualität nicht normal oder
zu schlecht ist, bedrucken Sie wiederholt
das Smart-Blatt drei bis fünf mal.
yVerwenden Sie mehrmals das Smart-Blatt
bis Sie es mit einem Smart-Blatt aus der
anderen Tasche tauschen.
Hinweis zum Fotopapier
yDas Papier nicht beschädigen oder knicken.
yDie Verwendung von verschmutztem Papier
kann zu Fehlfunktionen führen.
yStellen Sie sicher, dass sie das
Mindesthaltbarkeitsdatum der Papiere nicht
überschreiten.
yEinmal ausgepackt kann sich das Papier nach
einer gewissen Zeit einrollen oder sich die
Farbe ändern. Es wird empfohlen, das Papier
so bald wie möglich zu benutzen.
, Verwenden Sie ausschließlich LG Pocket-Fotopapier
für dieses Produkt.
Wenn Sie Fotopapier anderer Hersteller
benutzen, kann keine Garantie für die
Druckqualität oder Schäden am Pocket Photo
übernommen werden.
SCHRITT 2 Installation der App
Suchen Sie nach „LG Pocket Photo“ im Play Store
(Android Market) / App Store (iPhone) / Windows
Phone Store.
28
PD251_SIMPLE_GLOBAL_V4.1_MFL71462602.indd 28 2019-04-09 4:06:46
Page 29

SCHRITT 3 Paarung über Bluetooth
1. Schalten Sie das Pocket Photo Gerät ein.
2. Suchen Sie nach dem Gerät, das mithilfe von
Bluetooth gepaart werden soll.
ex ) LG PD251(XX : XX)
3. Wenn Sie das Gerät gefunden haben, tippen Sie
auf den Namen des Pocket Photo Gerätes auf dem
Bildschirm.
Bei einem iPhone/iPad wird das zuletzt verbundene
iPhone/iPad beim Einschalten von Pocket Photo
automatisch mit Pocket Photo verbunden, sofern die
Bluetooth-Funktion auf Ihrem iPhone/iPad aktiviert ist.
< Android Phone> < iPhone> <Windows Phone>
SCHRITT 4 Foto drucken
1. Star ten Sie nach der Paarung die LG Pocket PhotoApp auf dem Android-Telefon.
2. Wählen Sie ein Foto zum ausdrucken und tippen Sie
auf [
].
Wenn sich das Smart-Blatt im Gerät bendet wird das
ausgewählte Bild nach der Optimierung der Bildqualität
gedruckt.
Das gedruckte Bild kann unter Umständen wegen
der gewählten Drucktechnik (Thermotransferdruck)
vom Original abweichen.
29
PD251_SIMPLE_GLOBAL_V4.1_MFL71462602.indd 29 2019-04-09 4:06:46
Page 30

Hinweise zum Drucken
yVerwenden Sie die neueste App vom LG
Pocket Photo (beim Drucken eines Fotos
verbessert es die Bildqualität.)
yÜberprüfen Sie die Qualität des Originals. Das
gedruckte Bild kann vom Original abweichen.
yZiehen Sie während des Druckens kein Papier
mit Gewalt heraus.
yÖnen Sie nicht die Abdeckung während des
Druckvorgangs. Das Gerät kann beschädigt
werden.
yWenn das Gerät geschüttelt oder Stößen
ausgesetzt wird, kann die Qualität der
gedruckten Fotos verringert werden.
yJe höher die Bildauösung desto höher ist
die Qualität des gedruckten Fotos. (Die ideale
Auösung ist höher als 1280 x 2448 Pixel.)
yDie Druckqualität kann unter Umständen je
nach Originalbild unterschiedlich sein (wenn
zu dunkel oder trüb). Verwenden Sie das Bild
nach der Bildkorrektur mit der Pocket PhotoApp.
yDas Drucken von Pass- / VISA-Bilder könnte
je nach Fall ungeeignet sein. Es wird das
Drucken von Bildern empfohlen, die in einem
Fotostudio aufgenommen wurden.
SCHRITT 5 Weitere Informationen
nden Sie in der “Bedienungsanleitung”
1. Star ten Sie die LG Pocket Photo-App auf dem
Smartphone.
2. Tippen Sie auf Einstellungen [
Bedienungsanleitung zu sehen.
※ Dieses Produkt muss in Übereinstimmung mit
LPS stets mit einem zertizieren/gelisteten DC 5
V.-Adapter betrieben werden.
] / [ ] um die
30
PD251_SIMPLE_GLOBAL_V4.1_MFL71462602.indd 30 2019-04-09 4:06:46
Page 31

Störung Ursache / Lösung
Das Papier
staut vor dem
Drucken.
Das
gedruckte
Foto weist
Linien auf.
Die Qualität
des
gedruckten
Fotos ist zu
schwach.
Schalten Sie das Gerät aus und wieder
ein und das Papier wird automatisch
ausgeworfen.
Önen Sie die obere Abdeckung,
ordnen Sie das Papier neu und legen es
zusammen mit dem Smart-Blatt ganz
unten wieder ein. Versuchen Sie danach
erneut zu drucken.
Bei Verwendung eines Smart-Blattes
sollte dieses gemeinsam mit dem
Fotopapier in derselben Tasche
verwendet werden.
Wenn Sie ein Foto über das Menü [
in der App vergrößern, könnte
die Qualität des gedruckten Fotos
schlechter sein.
Schalten Sie das Gerät aus und fügen
Sie ein Smart-Blatt an der Unterseite
des Papiers ein. Versuchen Sie danach
erneut zu drucken.
Achten Sie darauf, dass die Größe des
Fotos größer ist als die eigentliche
Auösung.(1280 x 2448 Pixel)
Die
genannten
Lösungen
funktionieren
nicht.
※ Alle anderen Markennamen sind Markenzeichen
der jeweiligen Eigentümer.
]
Drücken Sie die Reset-Önung mit
einem spitzen
Gegenstand wie Bleistift,
für die Initialisierung.
31
PD251_SIMPLE_GLOBAL_V4.1_MFL71462602.indd 31 2019-04-09 4:06:46
Page 32

FRANÇAIS
ETAPE 1 Prise en main
1. Fonctions de base
Voyants
OUVRIR
POWER
(1) button
, Cet appareil utilise une batterie intégrée. Avant de
l’utiliser, chargez complètement la batterie à l’aide
d’un câble de données micro-USB (5 broches) pour
smartphone ou d’un adaptateur.
, Comme dans l’illustration à droite, placez les papiers
avec la smart sheet alignée et insérez-les dans le
sens de la èche.
lumineux
(RESET) Appuyez
dans l’orice de
réinitialisation
pour réinitialiser
l’appareil.
(CHARGE) Port
micro-USB pour
le chargement
Insérez le papier et la feuille de
nettoyage contre l’arrière.
, Une feuille Smart nettoie la tête de l’imprimante
et règle les couleurs de la photo. Gardez la
meilleure qualité d’impression en l’utilisant de
manière répétitive.
2. Feuille Smart (Nettoyeur)/ papier photo
, La feuille de nettoyage et le papier photo ne sont
pas fournis. Lorsque vous achetez la pochette de
papier photo, la feuille de nettoyage est incluse
dedans.
Papiers photo
avec côté blanc
en haut,
Feuille Smart
(bleue) avec Code
barre côte en bas
32
PD251_SIMPLE_GLOBAL_V4.1_MFL71462602.indd 32 2019-04-09 4:06:46
Page 33

Note à propos de la feuille Smart
Lorsque vous utilisez des feuilles Smart, elles
doivent être utilisées avec des papiers photo
provenants de la même pochette.
yL'utilisation d'une feuille Smart d'une autre
pochette risque de provoquer une qualité
faible.
ySi la qualité d'impression est anormale ou
mauvaise, répétez l'impression de la feuille
Smart 3-5 fois.
yRéutilisez la feuille Smart jusqu'à ce que
vous utilisez une nouvelle feuille Smart
d'une autre pochette.
, Utilisez exclusivement du papier photo LG Pocket
pour ce produit.
Si vous utilisez un papier d’une autre marque,
vous n’aurez pas de garantie sur la qualité
d’impression et risquez d’endommager de la
photo Pocket.
Note à propos du papier photo
yIl ne faut pas endommager ou plier le papier.
yL'utilisation de papier sali risque de provoquer
un dysfonctionnement.
yVeillez à utiliser du papier non périmé.
yUne fois déballé, le papier risque de se
déformer ou de changer de couleur. il est
recommandé de l’utiliser dès que possible.
ETAPE 2 Installation de l’application
Recherche de “LG Pocket Photo” dans la boutique Play
Store (Ore Android) / Boutiques des Applications
(iPhone) / Windows Store de téléphone.
33
PD251_SIMPLE_GLOBAL_V4.1_MFL71462602.indd 33 2019-04-09 4:06:47
FRANÇAIS
Page 34
ETAPE 3 Jumelage du Bluetooth
1. Allumer l’appareil PocketPhoto.
2. Rechercher l’appareil à apparier en Bluetooth.
ex ) LG PD251 (XX : XX)
3. Une fois l’appareil trouvé, touchez le nom de Pocket
Photo sur l’écran.
Dans le cas d’un iPhone/iPad, le dernier iPhone/
iPad est automatiquement couplé au Pocket Photo
lorsque vous allumez le Pocket Photo si la fonction
Bluetooth de votre iPhone/iPad est activée.
< Téléphone
Android> < iPhone> <Windows Phone>
ETAPE 4 Impression d’une photo
1. Après jumelage, lancez l’application LG Pocket
Photo sur le Smartphone.
2. Sélectionnez une photo à imprimer, et touchez [
Si la feuille Smart est dans l’appareil, l’image
sélectionnée sera imprimée après optimisation de la
qualité d’image.
L’image imprimée est susceptible d’être diérente
de l’image originale en raison de la méthode
d’impression (impression par transfert thermique).
].
34
PD251_SIMPLE_GLOBAL_V4.1_MFL71462602.indd 34 2019-04-09 4:06:47
Page 35
Remarques sur l'impression
yUtilisez la dernière application de LG Pocket
Photo (lors de l'impression d'une photo, l'image
est optimisée).
yVériez la qualité de l'image originale.
(Les images imprimées peuvent être diérentes
de l'image originale).
yIl ne faut pas tirer sur le papier lors de
l’impression.
yIl ne faut pas ouvrir le couvercle supérieur lors
de l'impression. Il y a risque d'endommager le
produit.
ySi l'appareil est secoué ou s'il a reçu un choc, la
qualité de la photo risque de diminuer.
yPlus la résolution de l'image est élevée, plus la
qualité de photo imprimée est meilleure.
(La résolution appropriée est plus de 1280 x 2448
pixel).
yLa qualité d'impression peut être diérente
selon l'image originale (s'il fait sombre ou noir).
Utilisez l'image après sa correction en utilisant
l'application Pocket Photo.
yL'impression d'une image de passeport /
VISA peut être inappropriée selon le cas.
L'impression d'une image prise en studio est
recommandée.
ETAPE 5 Consultez le “Guide utilisateur”
pour les détails
1. Lancez l’application LG Pocket Photo sur le
smartphone.
2. Touchez le menu des paramètres [
pour voir le guide utilisateur pour les détails.
※Ce produit doit toujours être utilisé avec un
adaptateur CC 5V certié/autorisé conforme à la
norme LPS.
] / [ ]
35
PD251_SIMPLE_GLOBAL_V4.1_MFL71462602.indd 35 2019-04-09 4:06:47
Page 36
Problème Cause / solution
Bourrage de
papier avant
impression.
La photo
imprimée
comporte des
lignes.
Éteignez puis rallumez l'appareil,
le papier est automatiquement
éjecté.
Ouvrez le couvercle supérieur,
arrangez le papier et insérez-le
avec la feuille Smart avec le codebarres en bas. Ensuite réessayez
d'imprimer.
Lorsque vous utilisez les feuilles
Smart, elles doivent être
utilisées avec des papiers photo
provenants de la même pochette.
La qualité
de la photo
imprimée est
trop faible.
La solution
ci-dessus
ne marche pas.
※Toutes les autres marques sont des marques
commerciales de leurs propriétaires respectifs.
Dans le cas où vous agrandissez
une image utilisant [
dans l'application, la qualité de
la photo imprimée peut être
diminuée.
Éteignez l'appareil et insérez
la feuille Smart située en bas
du papier. Ensuite réessayez
d'imprimer.
Veillez à ce que la taille de la photo
est plus large que la résolution
propre. (1280 x 2448 pixels)
Placez un objet pointu comme
un stylo
dans l'orice Reset
pour une réinitialisation.
] le menu
36
PD251_SIMPLE_GLOBAL_V4.1_MFL71462602.indd 36 2019-04-09 4:06:47
Page 37
ШАГ 1 Начало работы
1. Основные операции
Светодиодный
индикатор
ОТКРЫТО
(1) Кнопка электропитания
, В данном устройстве используется встроенный
аккумулятор. Перед использованием необходимо
полностью зарядить аккумулятор.
, Как показано на рисунке справа, выровняйте
бумагу smart sheet и вставьте ее в направлении
стрелки.
PD251_SIMPLE_GLOBAL_V4.1_MFL71462602.indd 37 2019-04-09 4:06:47
(RESET) Для
инициализации
надавите на
отверстие для
сброса.
(CHARGE) Порт
Micro USB для
подзарядки
Выровняйте все листы бумаги и лист
настройки по тыльной стороне.
, Smart Sheet чистит головку принтера и
выполняет калибровку цвета на фотографии.
Поддерживайте лучшее качество печати,
используя Smart Sheet.
2. Smart sheet (Очиститель)/ Фотобумага
, Лист настройки и фотобумага в комплект не
входят. Лист настройки входит в комплект
поставки фотобумаги.
Фотобумага
белой стороной
вверх,
Smart Sheet
(Синий) штрихкодом вниз
37
РУССКИЙ
Page 38

Замечания по Smart sheet
Если Вы используете Smart Sheet, то
необходимо использовать фотобумагу из
одной и той же пачки.
yИспользование листа smart sheet из
другой пачки может привести к ухудшению
качества печати.
yЕсли качество печати нарушенное или
низкое, выполните печать на smart
sheet 3-5 раза подряд.
yИспользуйте Smart Sheet повторно до
тех пор, пока не возьмете новый smart
sheet из другой пачки.
, С данным изделием используйте только
специальную фотобумагу LG Pocket.
, Если вы будете использовать фотобумагу
других производителей, качество печати
может отличаться от оригинального или
pocket photo может повредиться.
Замечания по фотобумаге
yНе портите и не гните бумагу.
yИспользование грязной бумаги может
привести к неисправности.
yИспользуйте бумагу в течение срока
годности.
yПосле вскрытия упаковки через некоторое
время бумага может начать скручиваться
или менять цвет. Рекомендуется
использовать бумагу как можно скорее.
ШАГ 2 Установка приложения
Найдите “LG Pocket Photo” в Play Store (Android
market) / App Store (iPhone) / Windows Phone
магазин.
38
PD251_SIMPLE_GLOBAL_V4.1_MFL71462602.indd 38 2019-04-09 4:06:47
Page 39

ШАГ 3 Сопряжение по Bluetooth
1. Вк лючите устройство Pocket Photo.
2. Найдите устройство для сопряжения по
Bluetooth.
Пример: LG PD251 (XX : XX)
3. После того как найдете устройство, нажмите на
название модели Pocket Photo на экране.
В случае iPhone/iPad последнее из устройств
iPhone/iPad согласуется с Pocket Photo
автоматически при включении Pocket Photo,
если функция поддержки Bluetooth на вашем
устройстве iPhone/iPad включена.
<Смартфон
Android > < iPhone> <Windows Phone>
ШАГ 4 Печать фотографий
1. Пос ле сопряжения запустите на смартфоне
приложение LG Pocket Photo.
2. Выберите фотографию для печати и,нажмите [
Если в устройстве находится smart sheet, выбранная
фотография будет распечатана после оптимизации
качества изображения.
Распечатанная фотография может отличаться
от оригинального изображения в зависимости
от метода печати (печать с использованием
термопереноса).
].
39
PD251_SIMPLE_GLOBAL_V4.1_MFL71462602.indd 39 2019-04-09 4:06:47
Page 40
Замечания по печати
yИспользуйте последнюю версию
приложения LG Pocket Photo (при печати
фотографий происходит оптимизация
изображения).
yПроверяйте качество исходного
изображения. (Распечатанные изображения
могут отличаться от оригинального
изображения.
yВо время печати не выдергивайте бумагу
силой.
yВо время печати не открывайте верхнюю
крышку. Устройство может выйти из строя.
yЕсли устройство вибрирует, или по нему
нанесен удар, качество печати может
ухудшиться.
yЧем выше разрешение изображения, тем
более высокое качество распечатанной
фотографии. (Правильное разрешение
более 1280 x 2448 пикселей.)
yКачество печати может отличаться
в зависимости от оригинального
изображения (Слишком темно или в
сумерках). Используйте изображение,
откорректированное в приложении Pocket
photo.
yПечать фотографии на паспорт / VISA в
зависимости от ситуации может быть
неподходящей. Рекомендуется печатать
фотографии, сделанные в студии.
ШАГ 5 Для получения дополнительной
информации см. “Р уководство
пользователя”.
1. Запустите на смартфоне приложение LG Pocket
Photo.
2. Выберите меню настроек [
прочитать руководство пользователя для
получения дополнительной информации.
] / [ ], чтобы
40
PD251_SIMPLE_GLOBAL_V4.1_MFL71462602.indd 40 2019-04-09 4:06:47
Page 41

※
Изделие можно подключать только к
сертифицированному/лицензированному
адаптеру (5 В пост. тока), соответствующему LPS.
Симптом
Бумага застряла,
прежде чем принтер
начал печатать.
На распечатанной
фотографии есть
линии.
Причина и способ
устранения
Выключите принтер
и включите его
снова, бумага выйдет
автоматически.
Откройте верхнюю
крышку, аккуратно
сложите бумагу и
вставьте ее вместе с
Smart Sheet, поместив
пленкой вниз.
Попробуйте распечатать
снова.
Если используете
режим смарт-лист,
то необходимо
использовать
фотобумагу из одной и
той же пачки.
Распечатанная
фотография слишком
плохого качества.
Вышеперечисленные
способы устранения
не помогли.
※Другие товарные знаки являются товарными
знаками соответствующих владельцев.
Если вы увеличиваете
изображение при
помощи меню [
в Приложении,
качество распечанной
фотографии может быть
снижено.
Выключите устройство и
вставьте Smart Sheet под
бумагой. Попробуйте
распечатать снова.
Убедитесь, что размер
фотографии больше
нужного разрешения
(1280 х 2448 пикселей)
Нажмите Reset острым
предметом, например,
механическим
карандашом
для активации
устройства.
]
41
PD251_SIMPLE_GLOBAL_V4.1_MFL71462602.indd 41 2019-04-09 4:06:47
Page 42

Appendix
USA
FCC Compliance Statement
This equipment has been tested and found to comply
with the limits for a Class B digital device, pursuant
to Part 15 of the FCC Rules. These limits are designed
to provide reasonable protection against harmful
interference in a residential installation. This equipment
generates, uses, and can radiate radio frequency energy
and, if not installed and used in accordance with the
instructions, may cause harmful interference to radio
communications. However, there is no guarantee that
interference will not occur in a particular installation.
If this equipment does cause harmful interference to
radio or television reception, which can be determined
by turning the equipment o and on, the user is
encouraged to try to correct the interference by one or
more of the following measures:
yReorient or relocate the receiving antenna.
yIncrease the separation between the equipment
and the receiver.
yConnect the equipment to an outlet on a circuit
dierent from that to which the receiver is connected.
PD251_SIMPLE_GLOBAL_V4.1_MFL71462602.indd 42 2019-04-09 4:06:47
yConsult the dealer or an experienced radio/TV
technician for help.
This device complies with part 15 of the FCC Rules.
Operation is subject to the following two conditions:
this device may not cause harmful interference and
(1)
(2)
this device must accept any interference received,
including interference that may cause undesired
operation of the device. Any changes or modications
in construction of this device which are not expressly
approved by the party responsible for compliance could
void the user’s authority to operate the equipment.
FCC RF Radiation Exposure Statement : This
equipment complies with FCC radiation exposure
limits set forth for an uncontrolled environment. This
transmitter must not be co-located or operating in
conjunction with any other antenna or transmitter.
This equipment should be installed and operated with
minimum distance 20 cm (7.8 inches) between the
antenna and your body. Users must follow the specic
operating instructions for satisfying RF exposure
compliance.
Page 43

Responsible Party :
LG Electronics USA, Inc.
1000 Sylvan Ave
Englewood Clis, NJ 07632
Tel: 1-800-243-0000
LG Customer Information Center
1-800-243-0000 USA, Consumer
1-888-865-3026 USA, Commercial
Register your product Online!
www.lg.com
PD251_SIMPLE_GLOBAL_V4.1_MFL71462602.indd 43 2019-04-09 4:06:47
Industry Canada Statement
This device complies with Industry Canada’s licenceexempt RSSs. Operation is subject to the following two
conditions:
(1) This device may not cause interference; and
(2) This device must accept any interference, including
interference that may cause undesired operation of
the device.
CAN ICES-3 (B)/NMB-3 (B)
IC Radiation Exposure Statement
This equipment complies with IC radiation exposure
limits set forth for an uncontrolled environment.
This equipment should be installed and operated with
minimum distance 20 cm (7.8 inches) between the
antenna & your body.
NOTE: THE MANUFACTURER IS NOT RESPONSIBLE
FOR ANY RADIO OR TV INTERFERENCE CAUSED BY
UNAUTHORIZED MODIFICATIONS TO THIS EQUIPMENT.
SUCH MODIFICATIONS COULD VOID THE USER’S
AUTHORITY TO OPERATE THE EQUIPMENT.
Canada
Page 44

WARNING
[For product having the wireless function using 5 GHz
frequency bands]
(i) the device for operation in the band 5150–5250
MHz is only for indoor use to reduce the potential
for harmful interference to co-channel mobile
satellite systems;
(ii) for devices with detachable antenna(s), the
maximum antenna gain permitted for devices in
the bands 5250-5350 MHz and 5470-5725 MHz shall
be such that the equipment still complies with the
e.i.r.p. limit;
(iii) for devices with detachable antenna(s), the
maximum antenna gain permitted for devices in
the band 5725-5850 MHz shall be such that the
equipment still complies with the e.i.r.p. limits
specied for point-to-point and non-point-to-point
operation as appropriate; and
(iv)the worst-case tilt angle(s) necessary to remain
compliant with the e.i.r.p. elevation mask
requirement set forth in Section 6.2.2(3) shall be
clearly indicated.(devices operating in the band
5250-5350 MHz with a maximum e.i.r.p. greater than
200 mW)
PD251_SIMPLE_GLOBAL_V4.1_MFL71462602.indd 44 2019-04-09 4:06:47
(v) High-power radars are allocated as primary users
(i.e. priority users) of the bands 5250–5350 MHz and
5650–5850 MHz and that these radars could cause
interference and/or damage to LE-LAN devices.
LG Customer Information Center
1-888-542-2623 CANADA
Register your product Online!
www.lg.com
Avis d’Industrie Canada
Le présent appareil est conforme aux CNR d’Industrie
Canada applicables aux appareils radio exempts de licence.
L’exploitation est autorisée aux deux conditions suivantes :
1) l’appareil ne doit pas produire de brouillage;
2) l’utilisateur de l’appareil doit accepter tout brouillage
radioélectrique subi, même si le brouillage est
susceptible d’en compromettre le fonctionnement.
CAN ICES-3 (B)/NMB-3 (B)
Avis d’Industrie Canada sur l’exposition aux
rayonnements
Page 45

Cet appareil est conforme aux limites d’exposition
aux rayonnements d’Industrie Canada pour un
environnement non contrôlé.
Cet appareil doit être installé de façon à garder une
distance minimale de 20 cm (7,8 po) entre la source de
rayonnement et votre corps.
REMARQUE : LE FABRICANT N’EST PAS RESPONSABLE
DES INTERFÉRENCES RADIOÉLECTRIQUES CAUSÉES PAR
DES MODIFICATIONS NON AUTORISÉES APPORTÉES À
CET APPAREIL. DE TELLES MODIFICATIONS POURRAIENT
ANNULER L’AUTORISATION ACCORDÉE À L’UTILISATEUR
DE FAIRE FONCTIONNER L’APPAREIL.
AVERTISSEMENTS
[Pour un produit doté de la fonction sans l utilisant la
bande de fréquences 5 GHz]
i) les dispositifs fonctionnant dans la bande de 5 150
à 5 250 MHz sont réservés uniquement pour une
utilisation à l’intérieur an de réduire les risques de
brouillage préjudiciable aux systèmes de satellites
mobiles utilisant les mêmes canaux;
ii) pour les dispositifs munis d’antennes amovibles, le
gain maximal d’antenne permis pour les dispositifs
utilisant les bandes de 5 250 à 5 350 MHz et de 5 470
à 5 725 MHz doit être conforme à la limite de la p.i.r.e;
iii) pour les dispositifs munis d’antennes amovibles, le
PD251_SIMPLE_GLOBAL_V4.1_MFL71462602.indd 45 2019-04-09 4:06:47
gain maximal d’antenne permis (pour les dispositifs
utilisant la bande de 5 725 à 5 850 MHz) doit être
conforme à la limite de la p.i.r.e. spéciée pour
l’exploitation point à point et l’exploitation non point
à point, selon le cas;
iv) les pires angles d’inclinaison nécessaires pour rester
conforme à l’exigence de la p.i.r.e. applicable au
masque d’élévation, et énoncée à la section 6.2.2
3), doivent être clairement indiqués. (les dispositifs
fonctionnant dans la bande de 5 250 à 5 350 MHz et
dont la p.i.r.e. maximale dépasse 200 mW)
v) les utilisateurs de radars de haute puissance sont
désignés utilisateurs principaux (c.-à-d., qu’ils ont
la priorité) des bandes de 5 250 à 5 350 MHz et
de 5 650 à 5 850 MHz et, d’autre part, que ces
radars pourraient causer du brouillage et/ou des
dommages aux dispositifs de RL-EL.
Centre d’information à la clientèle LG
1-888-542-2623 CANADA
Enregistrez votre produit en ligne!
www.lg.com
Page 46

Hong Kong
符合性聲明
本機的插頭握柄是專爲本産品所設計 , 且與附贈
的電源線結合為一體 , 若您因爲任何理由而需截
在此,LG電子聲明 口袋相印機 類型的的無線電
短此電源線時
設備符合 2014/53/EU指令。你可以從以下互聯網
地址獲得歐盟符合性聲明的全文:
http://www.lg.com/global/support/cedoc/cedoc#
PD251_SIMPLE_GLOBAL_V4.1_MFL71462602.indd 46 2019-04-09 4:06:48
應使用全新的插頭以確保連續使用之安全性。
請依據 1994 年之插頭及插座規範的規定 , 將插
頭確實地與電源線結合。
安全注意事項
請勿再使用該插頭
Page 47

Hong Kong
Declaration of Conformity
Hereby, LG Electronics declares that the radio
equipment type POCKET PHOTO is in compliance with
Directive 2014/53/EU. The full text of the EU declaration
of conformity is available at the following internet
address:
http://www.lg.com/global/support/cedoc/cedoc#
PD251_SIMPLE_GLOBAL_V4.1_MFL71462602.indd 47 2019-04-09 4:06:48
IMPORTANT SAFETY NOTICE
The cord grip for the plug tted to this product is
built into the existing power cord as supplied.
If, for any reason you need to shorten the cord.
DO NOT RE-USE THE PLUG.
A new plug must be used to ensure your
continued safety by securing the plug to the
power cord in accordance with Plug & Socket
Regulations 1994.
Page 48

Japan
この装置は、 クラス B 情報技術装置です。 この装置は、 家庭環境で使用することを目的としていますが、
この装置がラジオやテレビジョン受信機に近接して使用されると、 受信障害を引き起こすことがあります。
取扱説明書に従って正しい取り扱いをしてください。 VCCI - B
PD251_SIMPLE_GLOBAL_V4.1_MFL71462602.indd 48 2019-04-09 4:06:48
Page 49

Japan
PD251_SIMPLE_GLOBAL_V4.1_MFL71462602.indd 49 2019-04-09 4:06:48
Page 50

Taiwan
根據 NCC 低功率電波輻射性電機管理辦法 規定 :
第十二條
經型式認證合格之低功率射頻電機,非經許可,公司、商號或使用者均不得擅自變更頻率、加大功率或變
更原設計之特性及功能。
第十四條
低功率射頻電機之使用不得影響飛航安全及干擾合法通信;經發現有干擾現象時,應立即停用,並改善至
無干擾時方得繼續使用。前項合法通信,指依電信法規定作業之無線電通信。低功率射頻電機須忍受合法
通信或工業、科學及醫療用電波輻射性電機設備之干擾。
PD251_SIMPLE_GLOBAL_V4.1_MFL71462602.indd 50 2019-04-09 4:06:48
Page 51
Taiwan
親愛的顧客您好:
感謝您對 LG 產品的愛護與支持
為提供您更快速便捷的產品諮詢及報修服務
為您準備了全新的 “ 瞬間感動
服務內容 :
◎ 微笑服務 , 貼心售後
◎ 一等服務, 感動客戶
◎ 一通電話, 不用等待, 不用催修
LG 售後服務“
請洽
瞬間感動 LG 售後服務專線:
0800-898-899
LG 網址 : http://www.lg.com/tw
台 灣 樂 金 電 器 股 份 有 限 公 司
PD251_SIMPLE_GLOBAL_V4.1_MFL71462602.indd 51 2019-04-09 4:06:48
Page 52
Printed in China
PD251_SIMPLE_GLOBAL_V4.1_MFL71462602.indd 52 2019-04-09 4:06:48
 Loading...