

Page 1
Before connecting, operating or adjusting this product,
please read this instruction booklet carefully and completely.
PORTABLE CD PLAYER
OWNER’S MANUAL
MODEL : PCD-M700
PCD-M710
PCD-M710B
PCD-M710R
Page 2
Explanation Graphical Symbols:
The lightning flash with arrowhead
symbol, within an equilateral triangle
is intended to alert the user to the
presence of uninsulated dangerous
voltage within the product’s enclosure
that may be of sufficient magnitude to
constitute a risk of electric shock to
persons.
The exclamation point within an equilateral triangle is intended to alert the
user to the presence of important
operating and maintenance(servicing)
instructions in the literature accompanying the appliance.
WARNING
TO REDUCE THE RISK OF FIRE OF ELECTRIC
SHOCK, DO NOT EXPOSE THIS APPLIANCE TO RAIN
OR MOISTURE.
To avoid electrical shock, do not open the cabinet. Refer
servicing to qualified personnel only.
The apparatus shall not be exposed to dripping or
splashing and that no objects filled with liquids, such
as vases, shall be placed on the apparatus.
Warning:
Do not install this equipment in a confined space such a
book case or similar unit.
This label is located on the interior.
This Compact Disc Player is classified as a CLASS 1
LASER product.
The CLASS 1 LASER PRODUCT label is located on the
exterior.
Precautions
CAUTION
Use of controls or adjustments or performance of procedures other than those specified herein may result in
hazardous radiation exposure.
Laser component in this product is capable of emitting
radiation exceeding the limit for Class 1.
CAUTION: INVISIBLE LASER RADIATION WHEN
OPEN AND INTERLOCKS DEFEATED. AVOID EXPOSURE TO BEAM.
VARNING: OSYNLIG LASERSTRÅLNING NÄR
DENNA DEL ÄR ÖPPNAD STRÅLEN ÄR FARLIG.
Attention: Quand l'appareil est ouvert, ne pas
s'exposer aux radiations invisibles du faisceau laser.
CLASS 1 LASER PRODUCT
KLASSE 1 LASER PRODUKT
LUOKAN 1 LASER LAITE
KLASS 1 LASER APPARAT
CLASSE 1 PRODUIT LASER
CAUTION:TO REDUCE THE RISK OF ELECTRIC
SHOCK DO NOT REMOVE COVER (OR BACK)
NO USER SERVICEABLE PARTS INSIDE.
REFER SERVICING TO QUALIFIED SERVICE
PERSONNEL.
RISK OF ELECTRIC
SHOCK DO NOT OPEN
CAUTION
This product is manufactured to comply
with the radio interference requirements of EEC DIRECTIVE
89/336/EEC, 93/68/EEC and
73/23/EEC.
Page 3

Table of Contents
Precautions . . . . . . . . . . . . . . . . . .2
Table of Contents . . . . . . . . . . . . . .3
Before Use . . . . . . . . . . . . . . . . . . .4
Control Names and Locations .5-7
Main Unit . . . . . . . . . . . . . . . . . . . .5
Function Display Window . . . . . . .6
Remote Control . . . . . . . . . . . . . . .7
Preparations Before Operation
Battery Installations . . . . . . . . . . . 8
NiMH 1.2V Battery . . . . . . . . . . . . .8
1.5V Cell . . . . . . . . . . . . . . . . . . . .8
Use AC Adaptor . . . . . . . . . . . . . .9
Time to use cell . . . . . . . . . . . . . . .9
HOLD Function . . . . . . . . . . . . . . .10
Use of Earphone / Volume Control
. . .10
Operation
Basic Play . . . . . . . . . . . . . . . . . . .11
POWER On / CD PLAY . . . . . . . .11
STOP/PAUSE . . . . . . . . . . . . . . .11
POWER Off . . . . . . . . . . . . . . . . .12
Forward/ Backward SCAN . . . . . . .12
Forward/ Backward SKIP . . . . . . . .12
Menu Operation . . . . . . . . . . . . . .13
Use Menu . . . . . . . . . . . . . . . . .14-25
Navigation . . . . . . . . . . . . . . . .14-20
Title Mode . . . . . . . . . . . . . . . . . .15
Artist Mode . . . . . . . . . . . . . . . . . .16
Genre Mode . . . . . . . . . . . . . . . . .17
Directory Mode . . . . . . . . . . . . . .18
Playlist Mode . . . . . . . . . . . . . . . .19
All Selection and Cancel Mode . . 20
Repeat . . . . . . . . . . . . . . . . . . . . . .21
Repeat A-B . . . . . . . . . . . . . . . . . .21
E.Q. (EQUALIZER) . . . . . . . . . . . .22
System . . . . . . . . . . . . . . . . . . . . .23
ID3 Tag . . . . . . . . . . . . . . . . . . . .24
Sleep . . . . . . . . . . . . . . . . . . . . . .24
Big Font . . . . . . . . . . . . . . . . . . . .24
Time . . . . . . . . . . . . . . . . . . . . . . .24
Backlight . . . . . . . . . . . . . . . . . . .25
Contrast . . . . . . . . . . . . . . . . . . . .25
Auto Play . . . . . . . . . . . . . . . . . . .25
Language . . . . . . . . . . . . . . . . . . .25
Reset . . . . . . . . . . . . . . . . . . . . . .25
Automatic Power-off Function
. . .26
To Charge . . . . . . . . . . . . . . . . . . .26
Firmware Upgrade . . . . . . . . . . . .27
Reference
Troubleshooting . . . . . . . . . . . . . .28
Specifications . . . . . . . . . . . . . . . .29
Accessory . . . . . . . . . . . . . . . . . . .29
Page 4
Before Use
Handling the unit
When shipping the unit
The original shipping carton and
packing materials come in handy. For
maximum protection, re-pack the unit as
it was originally packed at the factory.
To keep the surfaces clean
Do not use volatile liquids, such as
insecticide spray, near the unit. Do not
leave rubber or plastic products in
contact with the unit for a long period of
time. They will leave marks on the
surface.
Cleaning the unit
To clean the cabinet
Use a soft, dry cloth. If the surfaces are
extremely dirty, use a soft cloth lightly
moistened with a mild detergent solution. Do not use strong solvents such as
alcohol, benzine, or thinner, as these
might damage the surface of the unit.
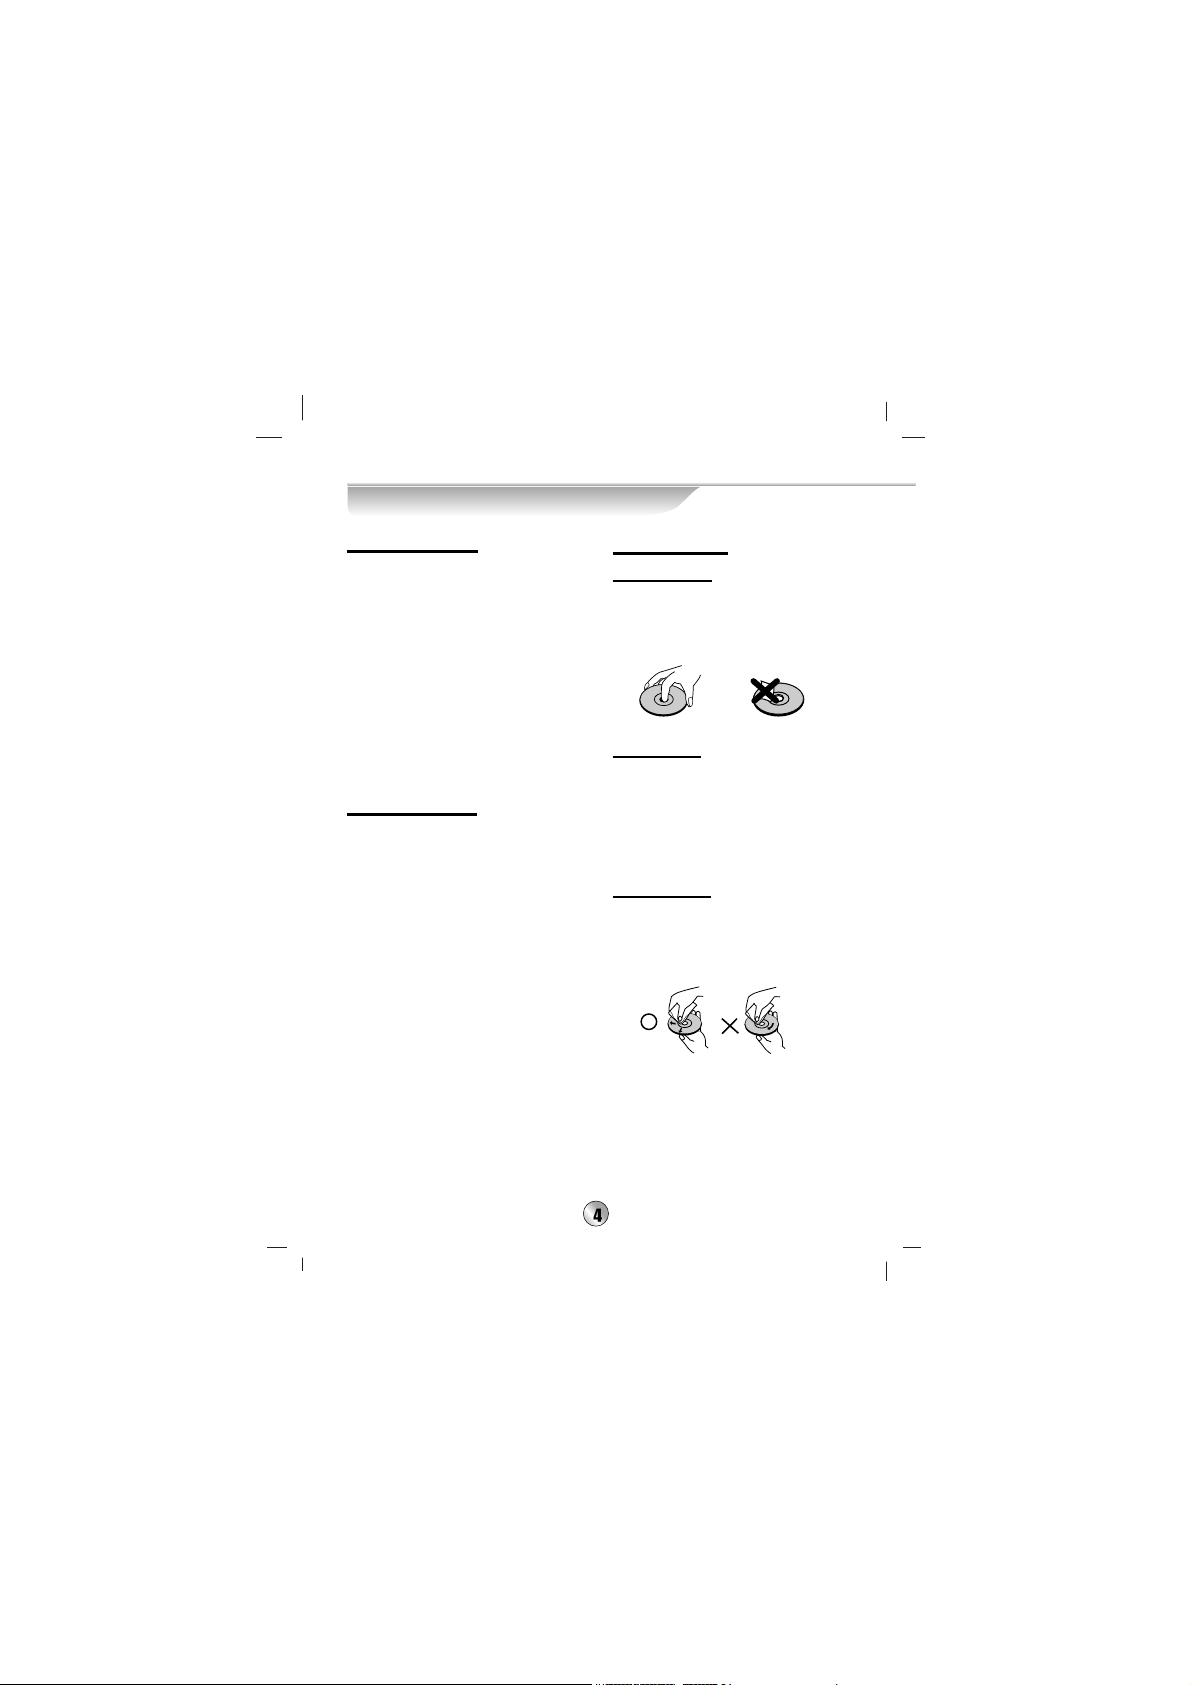
Notes on Discs
Handling discs
Do not touch the playback side of the
disc. Hold the disc by the edges so that
fingerprints will not get on the surface.
Do not stick paper or tape on the disc.
Storing discs
After playing, store the disc in its case.
Do not expose the disc to direct sunlight
or sources of heat, or leave it in a
parked car exposed to direct sunlight,
as there may be a considerable temperature increase inside the car.
Cleaning discs
Fingerprints and dust on the disc can
cause poor sound distortion. Before
playing, clean the disc with a clean
cloth. Wipe the disc from the center out.
Do not use strong solvents such as
alcohol, benzine, thinner, commercially
available cleaners, or anti-static spray
intended for older vinyl records.
Page 5
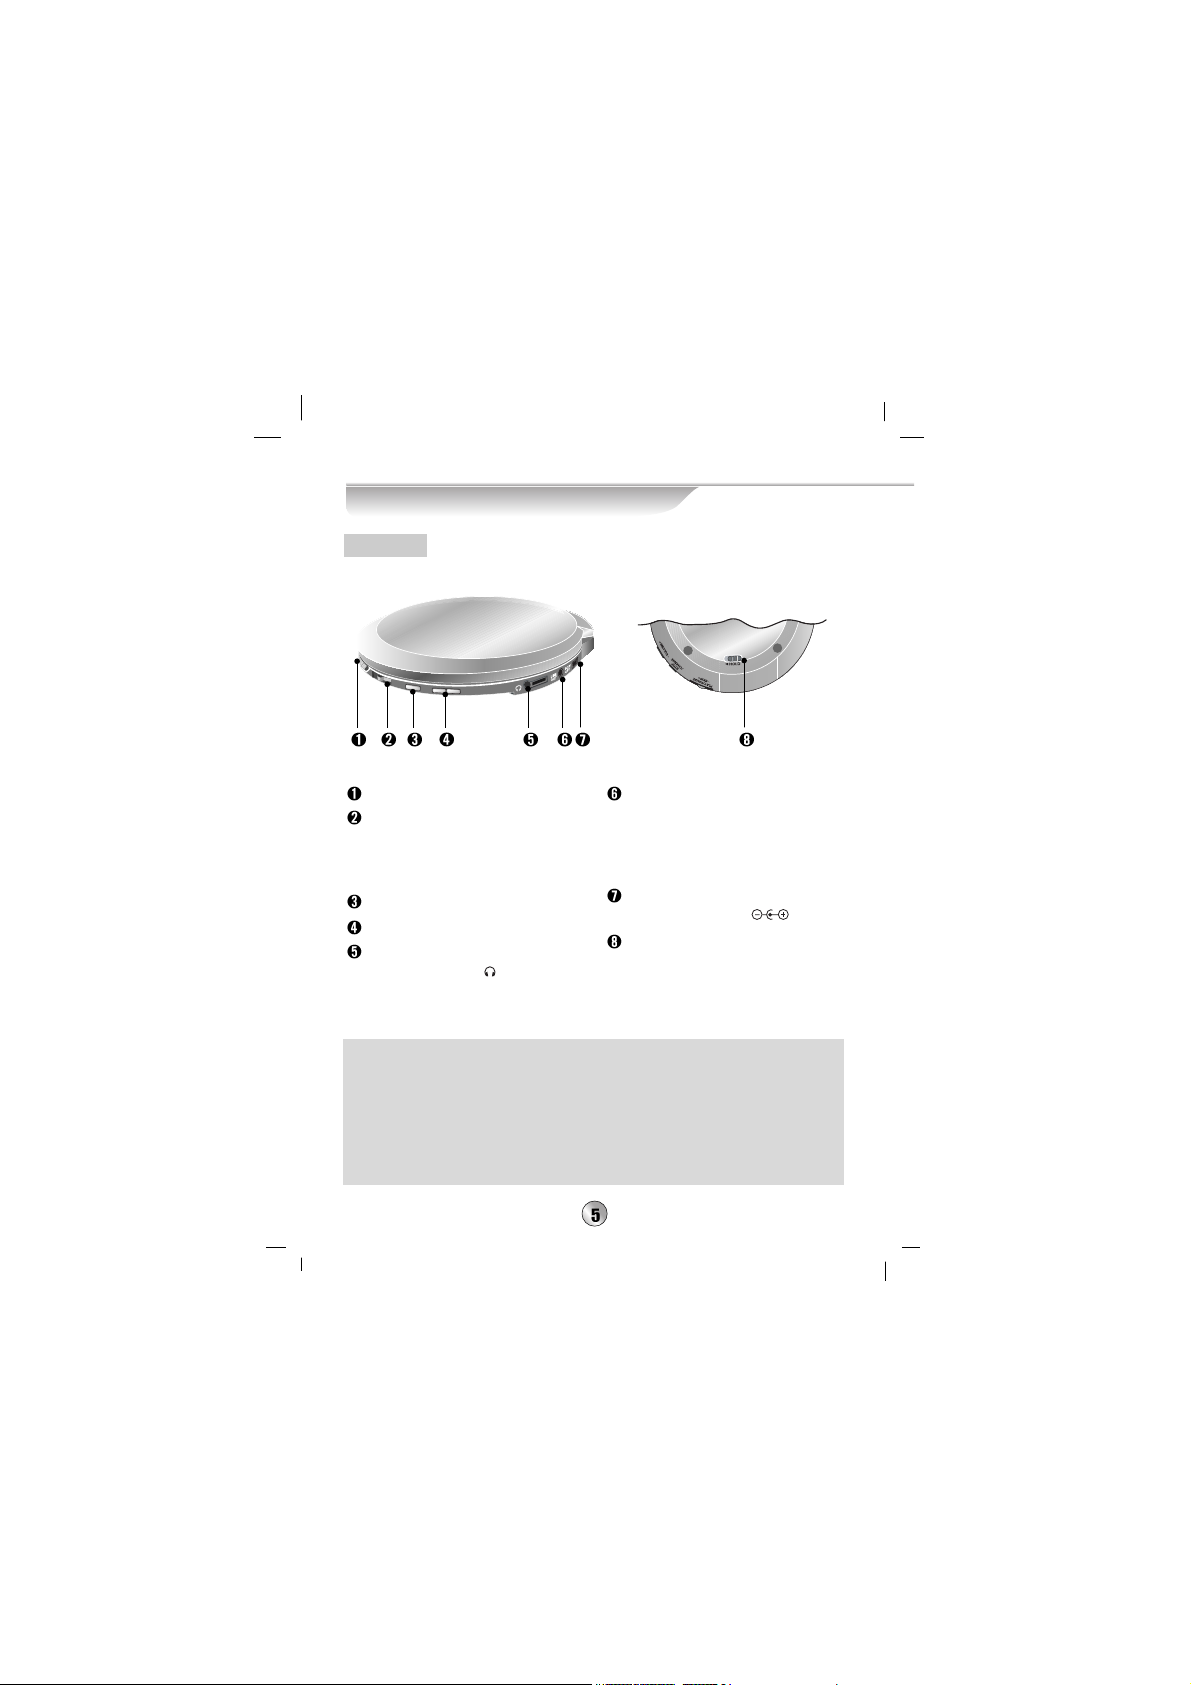
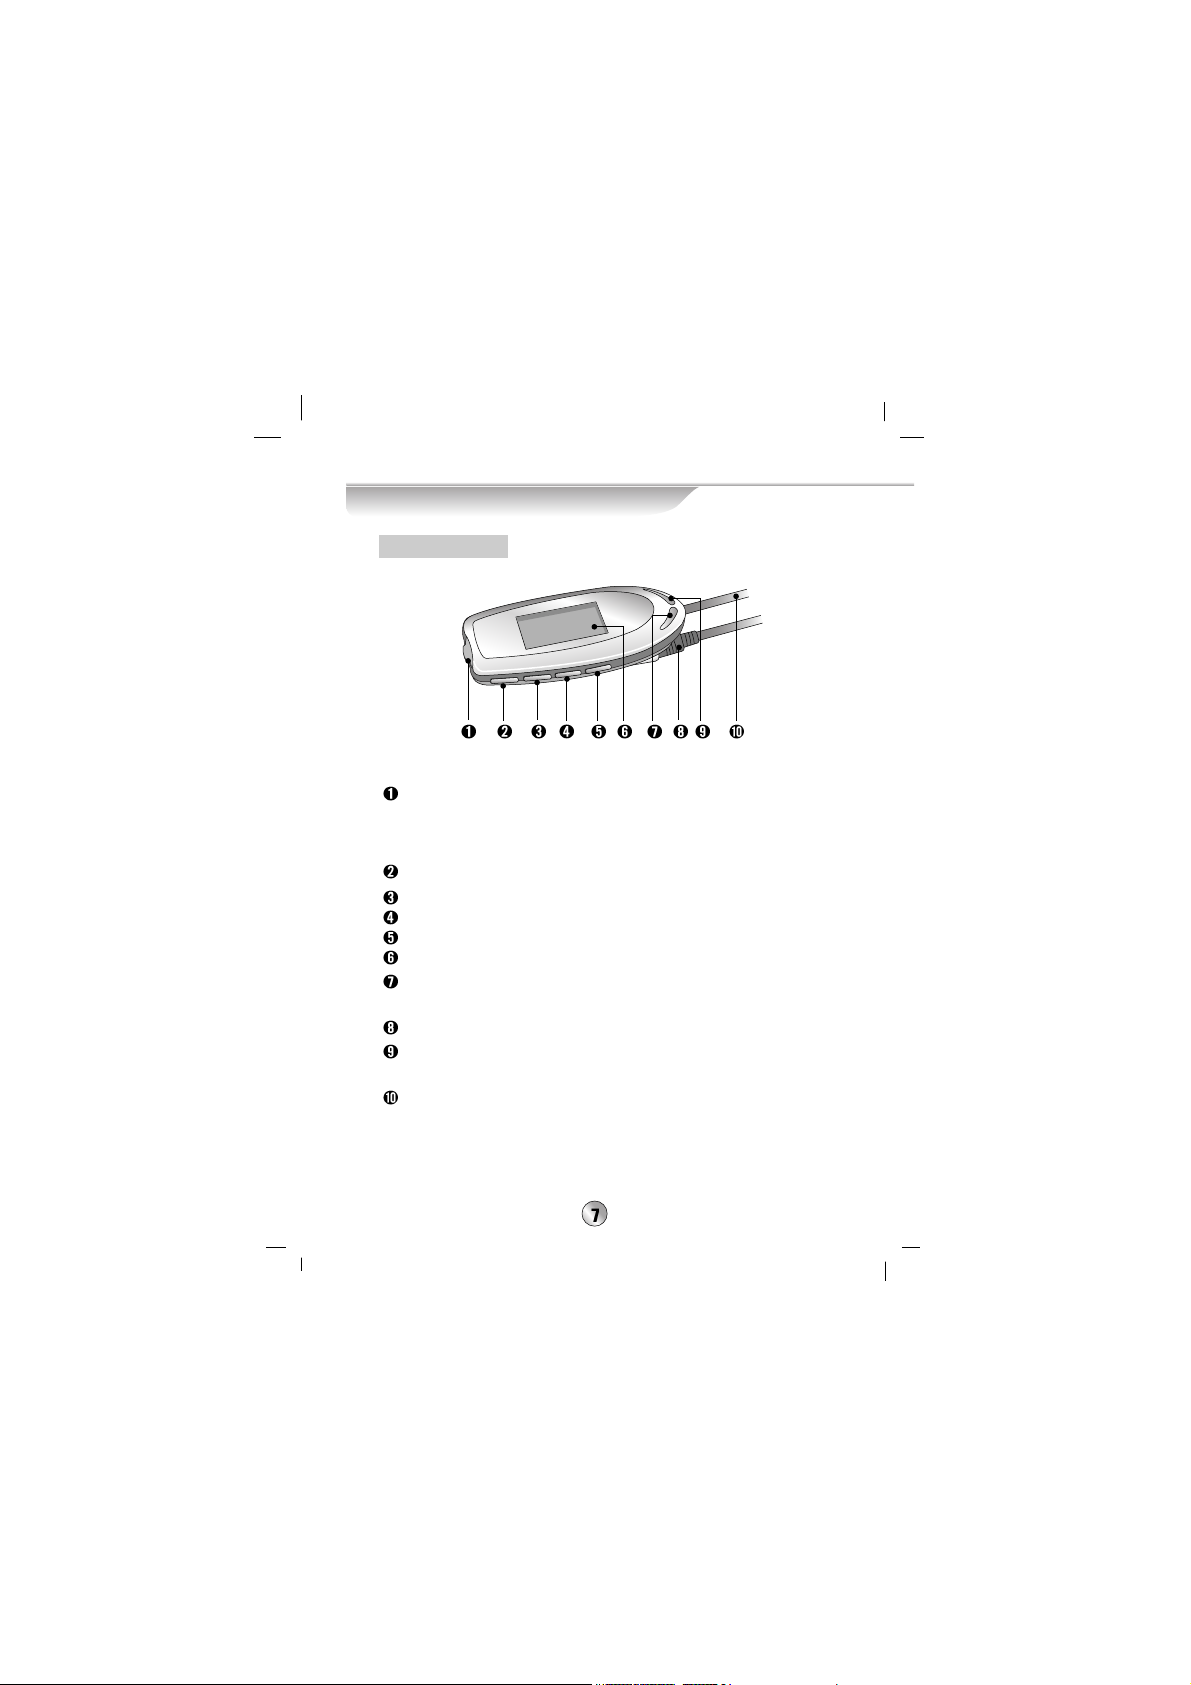
Control Names and Locations
Open switch
POWER on button/
PLAY button/ PAUSE button/
Forward/ Backward
SKIP,
SCAN button.
POWER off/ STOP button
Volume control button
Earphone/ Remote Control
Connection jack( )
LINE OUT (Auxiliary output) jack
: Connect the LINE OUT jack on
the unit to an Auxiliary input jack
on the external speaker or other
audio unit.
DC power adaptor connection
jack (DC IN 4.5V )
HOLD
switch
(HOLD)
ESP(Electronics Shock Protection) function
(Music may be interrupted due to running or application of shock during holding
the CD player. ESP function allows music to be played in spite of vibration or
shock.)
- CD-DA: 160 seconds
- MP3: 480 seconds
- WMA: 960 seconds
*
The ESP switch is not provided separated and is always maintained with ESP ON.
Main Unit
Page 6
Control Names and Locations
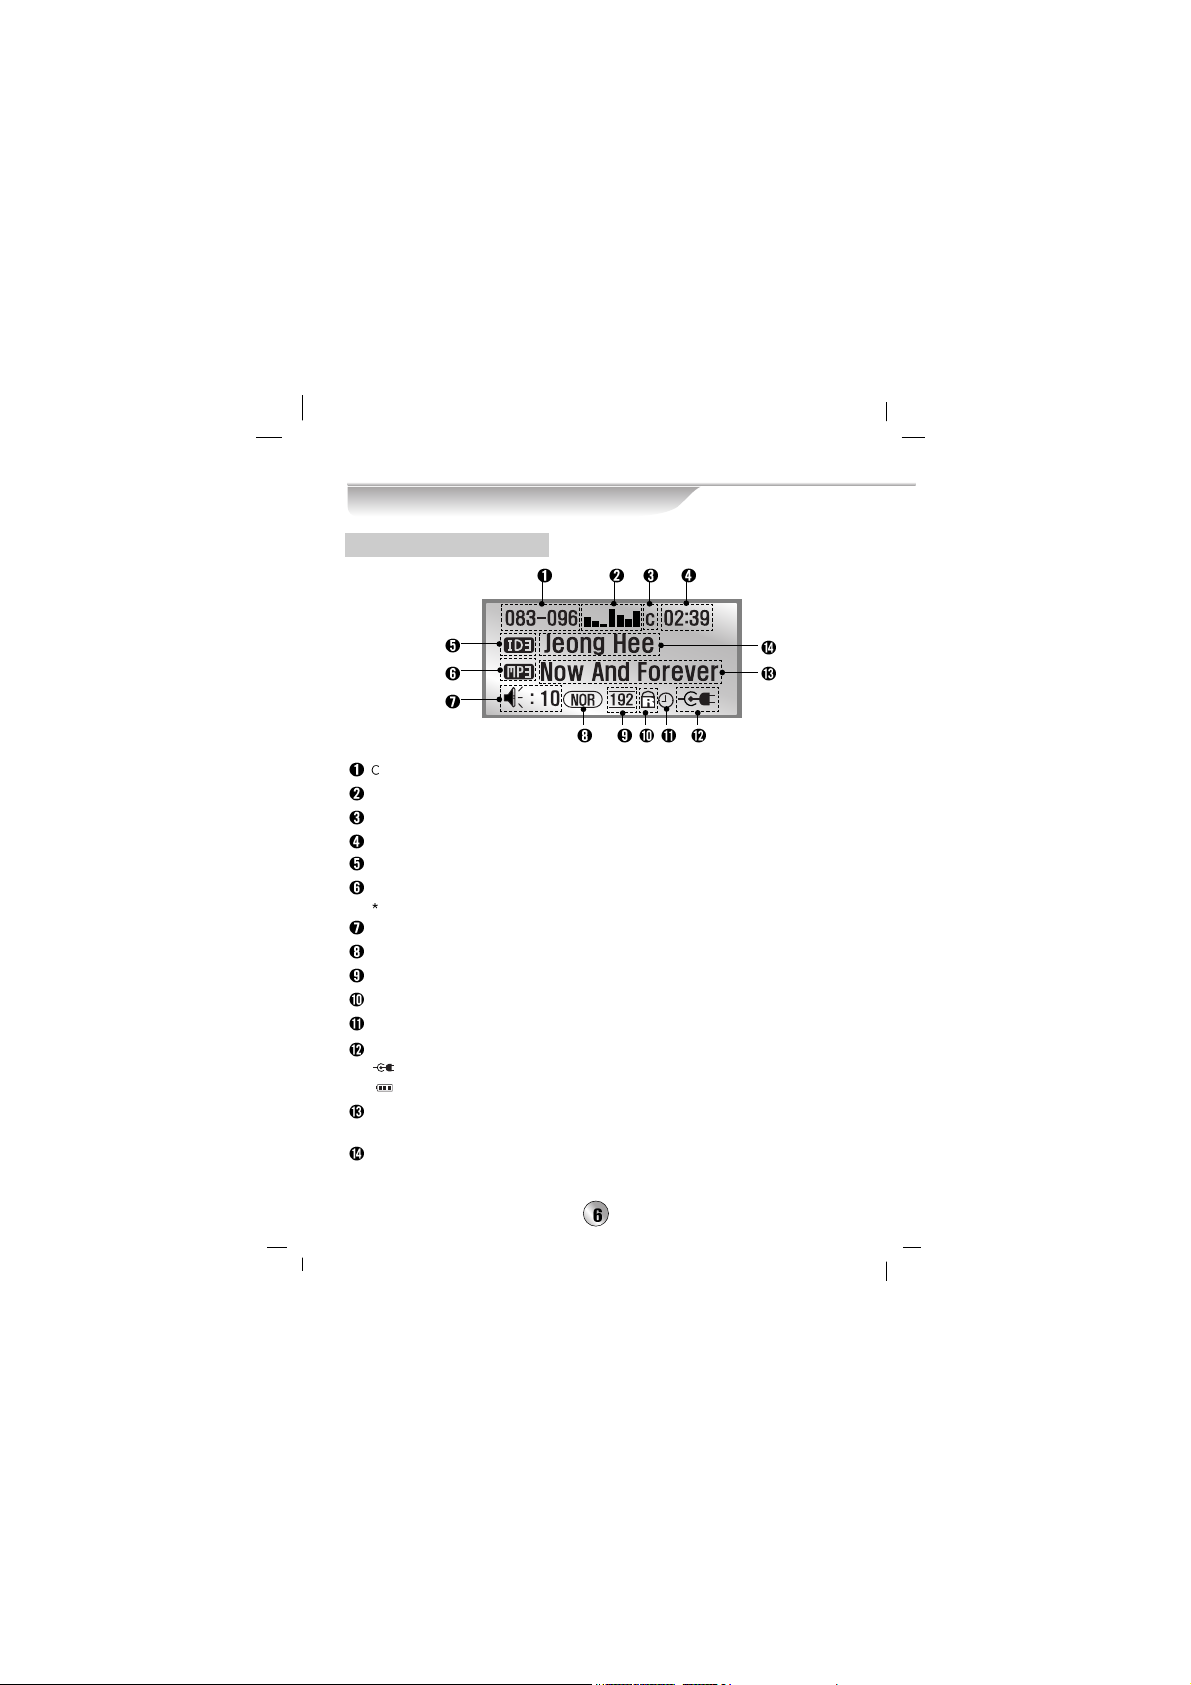
urrent track number - Total track number.
Audio level indicators.
Indicates current E.Q. (Equalizer) mode. (See page 22)
Indicates elapsed time and stop mode.
Indicates ID3 Tag mode is set to on.
Disc type indicator.
This product only plays MP3 disc, WMA disc and Audio CD.
Volume level indicator.
Repeat indicator. (See page 21).
Bit rate indicator.
Indicates Hold function active. (See page 10).
Indicates sleep time is set.
Indicates power source (AC adaptor or 1.5V cell,
NiMH 1.2V
batteryies).
: AC adaptor is being used.
: 1.5V cells are being used and indicates remainder battery power.
For the MP3 CD, indicates title of song.
For the Audio CD, indicates current track number.
For the MP3 CD, indicates singer of song.
For the Audio CD, indicates "Audio CD".
For the MP3 CD
Function Display Window
Page 7
Control Names and Locations
- POWER On / PLAY / PAUSE button
- Forward/ Backward SKIP, SCAN button.
- Button to move to the next screen or the previous screen in the
Menu mode
POWER Off / STOP button
SEL.(Select) button
MENU button
RPT.(Repeat) A-B button
Function Display Window (See page 6)
+VOL. button: To move to the upper part in the Menu mode or to
adjust volume up.
Earphone Connection jack
VOL.- button: To move to the lower part in the Menu mode or to
adjust volume up.
Remote Control and main unit Connection cable
Remote Control
Page 8
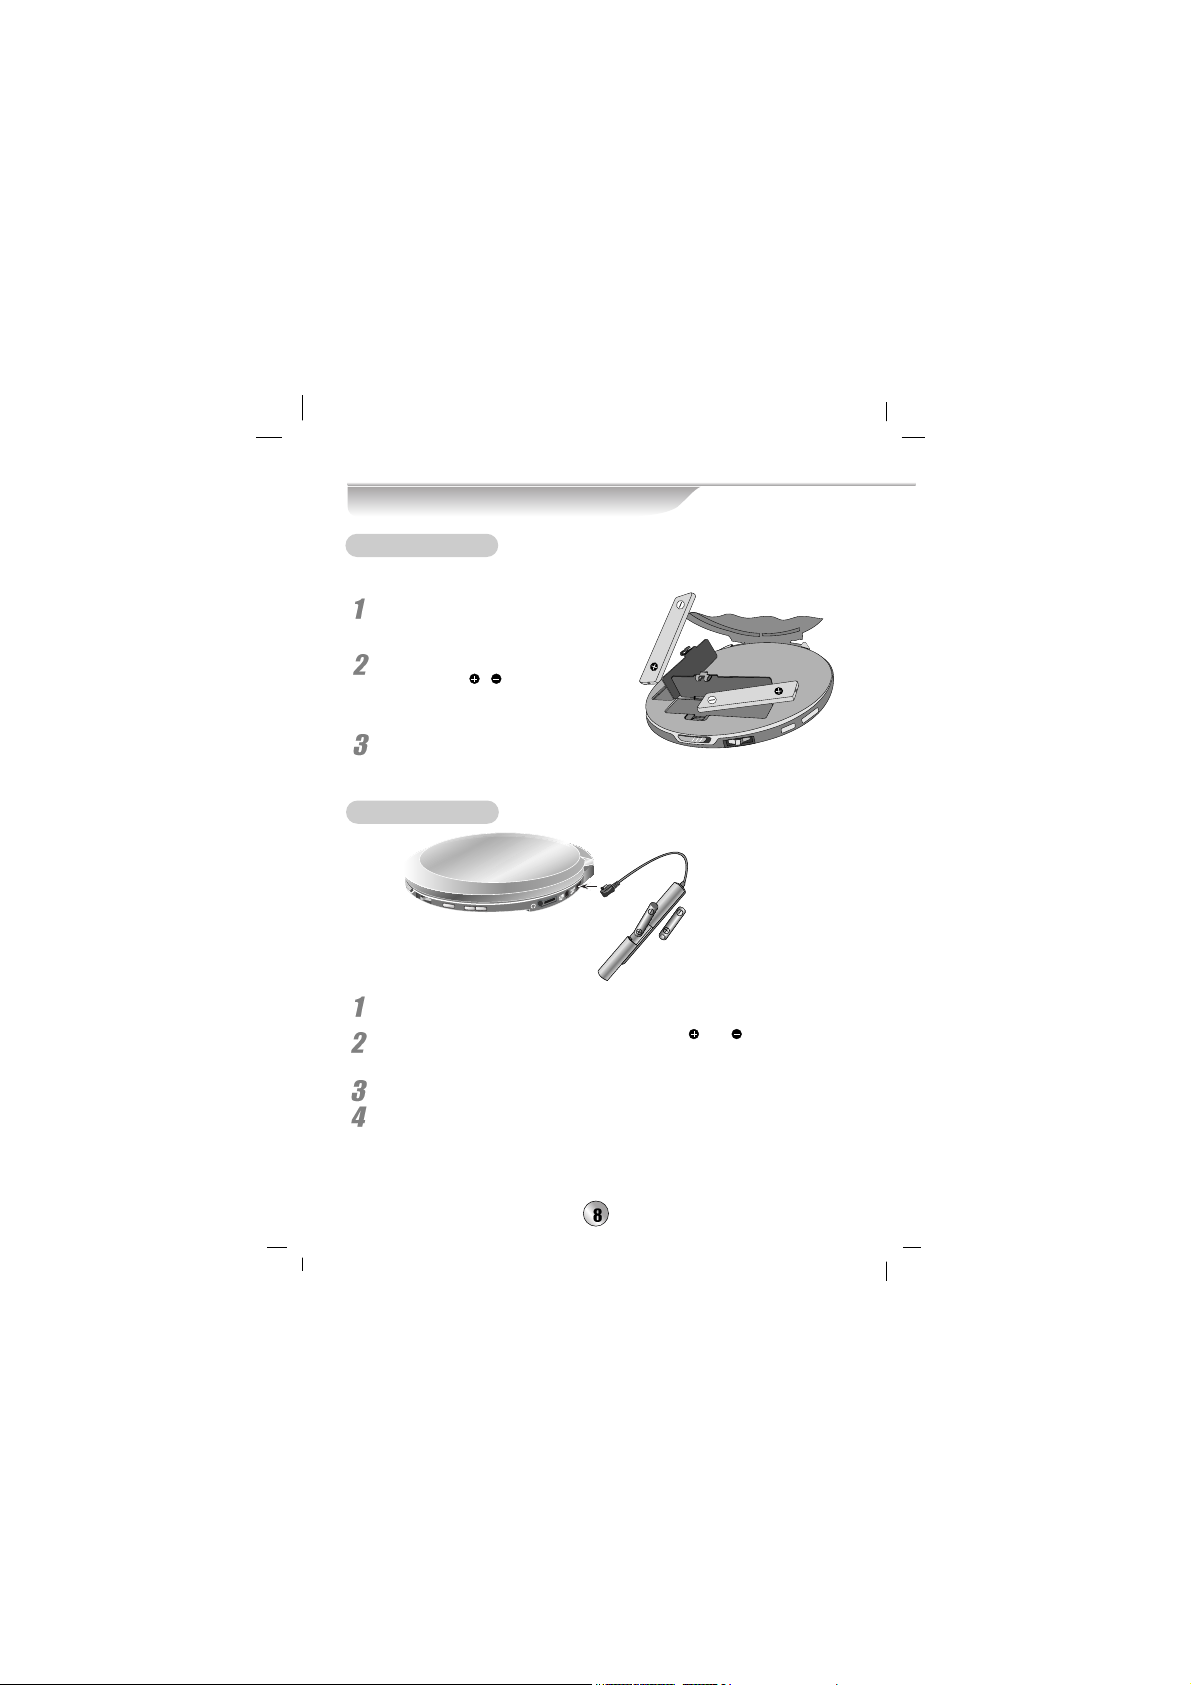
Battery Installations
*
Don't apply heat to the cell or don't throw the battery into fire.
Open the NiMH battery
compartment cover.
Insert two NiMH batteries (1.2V,
1450mA) with
,
aligned
correctly
.
Close the cover.
NiMH 1.2V Battery
Open the 1.5V battery case cover.
Insert optional two 1.5V batteries(size AA) with and aligned
correctly
.
Close the cover.
Connect the battery case to the DC IN 4.5V terminal of the main unit as
described above.
* The NiMH battery compartment is inside main unit.
1.5V Cell
Page 9
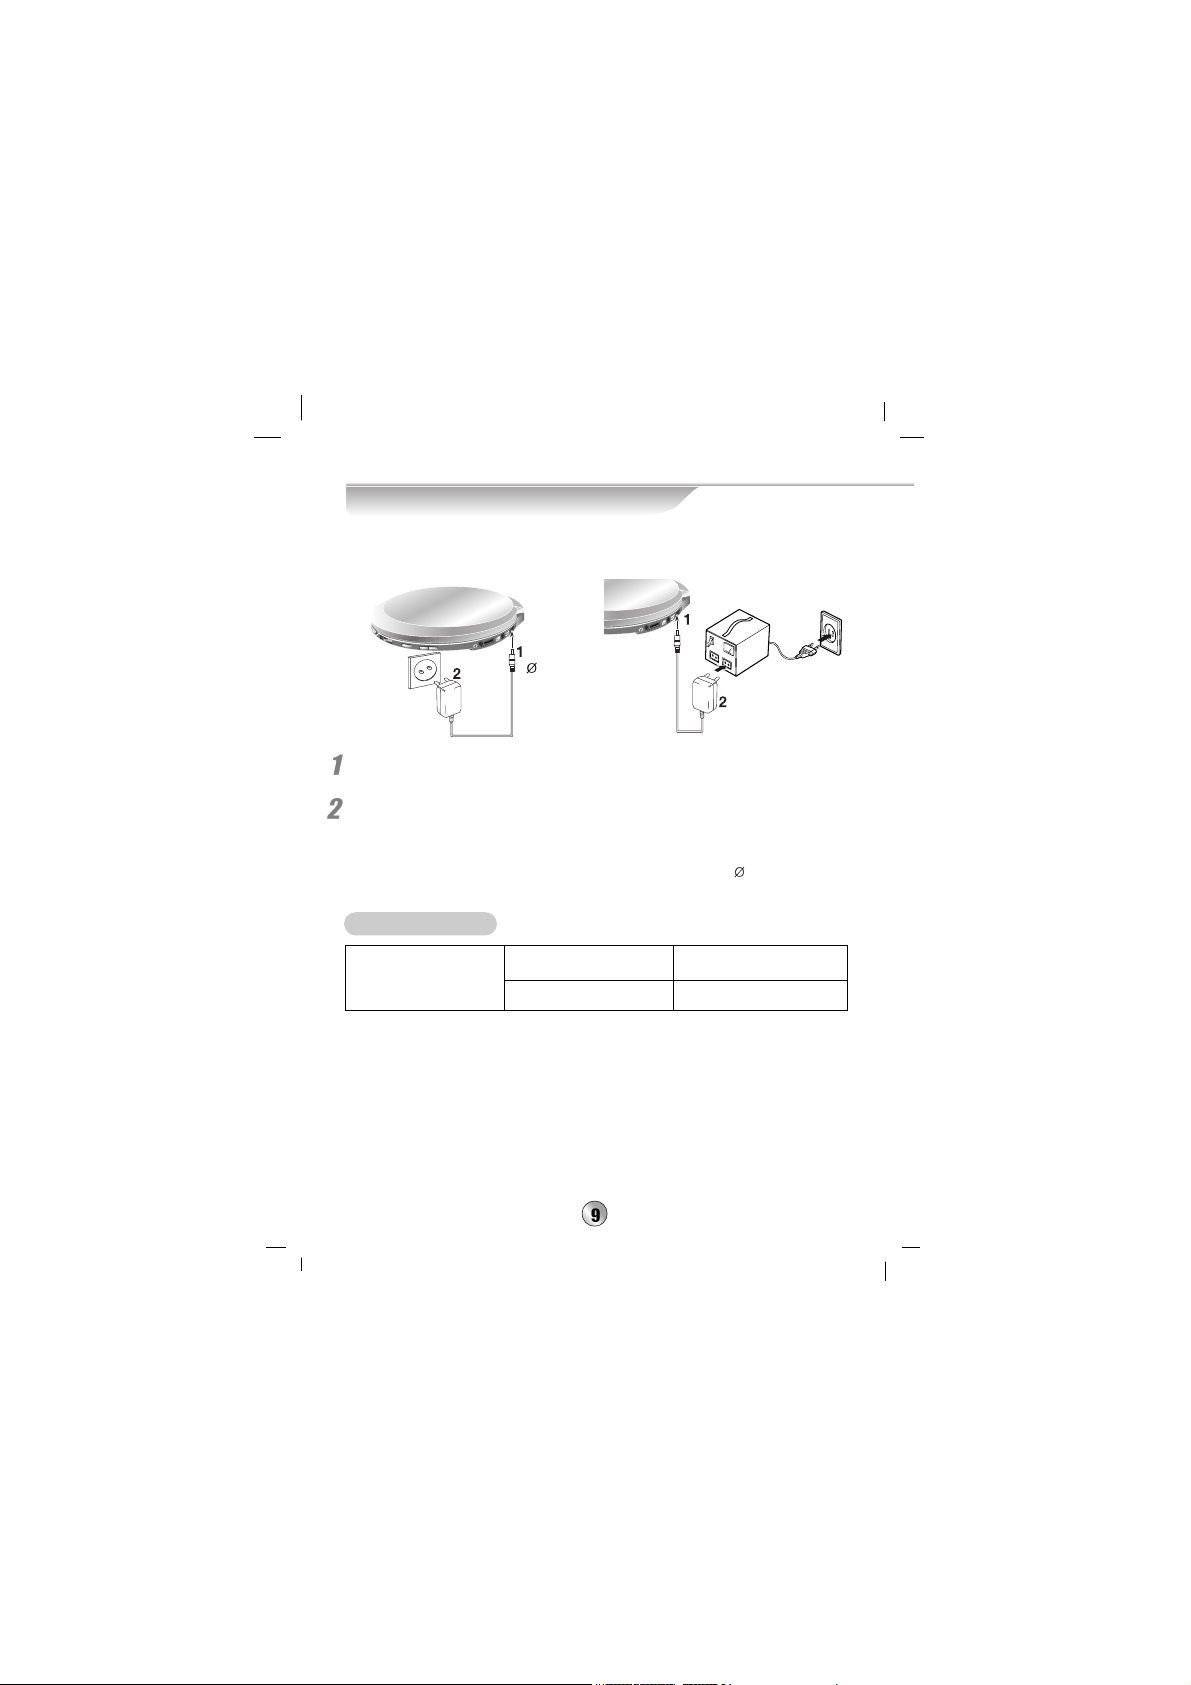
Use AC Adaptor
Use the AC adaptor to supply power source.
The AC adaptor is only for AC 230V.
Plug the AC adaptor power cord into the DC IN 4.5V terminal on the
main unit.
An other plug the AC adaptor power cord into an operating
230V AC outlet.
> When using AC 110V area, use a booster.
> Use only the supplied AC adaptor or epuivalent (4.5V, 600mA,
3.5mm)
AC 110V
AC 230V
Booster
3.5mm
Conditions of time to use (EIAJ standard conditions)
>
Output: 5mW + 5mW (play of the CD consecutively recorded at 1kHz)
>
Sum of time measured by continuously repeating stop for 16 hours after
consecutive play for 4 hours a day.
>
The above contents are measured by using the battery provided with this
product, and play time to use may vary depending on operation condition.
Play time of Audio CD Play time of MP3 disc
Approx 5 hours
Approx 8 hours
Time to use cell
NiMH 1.2V (2EA)
Exterior alkaline cell
1.5V (2EA)
*
The NiMH recharge able battery can be recharged about 350 times.
*
The warranty period of the NiMH recharge able battery is for 6 months.
Page 10

>
Indicator appears on the display window while the hold function of
the remote control is working.
>
Indicator appears on the display window while the hold function of
main unit is working.
(However, the buttons on the remote control can be worked.)
>
Indicator appears on the display window while the hold function of
the remote control and main unit is working.
(All buttons on the remote control and main unit can not be worked.)
* If pressing a button during the Hold function is working, the Hold display window
appears for two seconds on the display and then disappears.
HOLD Function
* This function locks the main unit to prevent it from operating when you
accidentally press a button.
* Unlock it before operating.
Use of Earphone
Insert the remote control connection wire to
the remote control terminal of the main
unit after connecting both earphone and
remote control as shown at the right.
Volume Control
Yon can adjust volume level of earphone
by pressing VOL. (VOLUME) + or - button
on the remote control or main unit.(0~40)
> Pressing shortly is adjusted by a step,
while pressing long is adjusted
consecutively.
> You can find the result from the
display window.
Side of Remote Control
Button of main unit
Use of Earphone / Volume Control
Page 11

Basic Play
Insert a CD to play after opening the CD door by pulling the
CD door open switch to the right.
Press PLAY/PAUSE button of the main unit or the remote control.
> Play starts from first track of the after 15 seconds.
> This player memorizes the user settings for the last track even if you
remove the disc from the player or switch off the player. If you load a
memorized disc again,
the latest track's start position is automatically
recalled.
Additionally, if the power is turned off abnormally , for example unplug the
adaptor during play or remove the battery and cell in force, this player
can not memorize the current song but plays the memorized song right
before the current song from the first part.
POWER On / CD PLAY
STOP / PAUSE
Playable Disc:
CD-DA, CD-R/RW that contains
audio titles, MP3 or WMA files.
(Only WMA 7.0 version supported)
Only WMA 32kbps or more
supported.
Playable Recording Type:
ISO-9660, Multi Session,
Packet-Write, Joliet,
Enhanced-CD (CD-Extra),
Mixed-CD
STOP: Press STOP during playback.
Play starts from last stopped track's start position if pressing the
PLAY/PAUSE button of the main unit or the remote control again.
PAUSE: Press PLAY/PAUSE button during playback.
> To return to playback, press PLAY/PAUSE button again.
> Play time display flashes on the display window during pause.
POWER On / PLAY / PAUSE/
Forward/ Backward SKIP, SCAN button.
POWER Off / STOP button
Page 12

Basic Play
Press and hold STOP button on the main unit or the remote
control for more than one second.
> Power turns off.
Forward/ Backward SCAN
Rotate and hold PLAY/PAUSE button on the main unit or the
remote control to the SKIP+ direction(forward) or
SKIP- direction(backward) for more than a second during play.
> SCAN play continues during holding PLAY/PAUSE to the
SKIP+ direction or SKIP- direction.
>
Increase or reduction of the playing time can be identified on the display window.
> The MP3 CD operates only for the song currently played.
The audio CD operates for the whole song.
Turn SKIP +, SKIP- button of the main unit or the remote control
during play.
> Moves forward or backward track by track whenever turning button.
> Moves the utmost front of the track currently played if moving backward.
> Forward/Backward movement of the track can be identified at
the display window.
POWER Off
Forward/ Backward SKIP
Page 13

Menu Operation
Press MENU button of the remote control.
> The menu list appears on the display window.
Select the desired item by pressing the volume control of the
main unit or the remote control.
Select the desired item by pressing the volume control of the
main unit or the remote control after entering into the lower
menu by turning SKIP + button of the main unit or the remote
control or by pressing SEL. button of the remote control.
Select the desired item by pressing the volume control of the
main unit or the remote control or by pressing SEL. Button of
the remote control.
> To return to the previous function, turn SKIP- button of the
main unit or the remote control.
If pressing MENU button, the menu screen disappears.
Page 14

Use Menu
Menu
Navigation
Repeat
E.Q.
Navigation
Navigation: It is developed so that the user can hear the desired
song easily and conveniently by automatically classifying song Title,
Artist, Genre, Directory or Playlist within the CD.
Advantage of the Navigation
If you edit MP3 or WMA CD to the CD player, you can hear the desired song by
automatically classifying each
Title, Artist, Genre, Directory or Playlist.
To use the Navigation
If you play files, make a name of the MP3 or WMA file.
You should make the name of MP3 or WMA file as shown below.
Artist Title Genre
Artist
Album
Title Genre
Artist
Album
Title
Artist Title
Artist
Album
Title Genre
Artist
Album
Title
Artist Title
Artist Title
Artist
Album
Title
Artist
Title Genre
Artist Title
Artist
Album
Title
Artist Title
Page 15

Use Menu (continued)
This is method to search all songs within the disc by file (Title).
Select the Title mode.
>
(See Menu Operation Method in page 13.)
Make setup by SEL. Button after moving the desired song
Title.
>
All songs selected are added to the play list if moving to the
menu screen after selecting Title.
>
Selected items are highlighted.
> The lower list selected is registered in the playlist.
> All songs are selected in the initial edition.
> The first song selected is selected and is played if pressing
PLAY button after selecting song Title.
> A file for which Title information is not entered is indicated
as "Unknown".
Title Mode
Title
Navigation
Selected
Non-selected
Title
Artist
Genre
Page 16

Use Menu (continued)
This is method used for adding playing song to the playlist
or for play after selecting song by Artist to search all songs
within the disc by file.
Select the Artist mode.
>
(See Menu Operation Method in page 13.)
Make setup by SEL. button after moving
the desired Artist.
>
All songs selected are added to the playlist if moving to the menu
screen after selecting the Artist.
>
Selected items are highlighted.
> The lower list selected is registered in the playlist.
> All songs are selected in the initial edition.
> The first song selected is selected and is played if pressing
PLAY button after selecting
Artist
.
> A file for which Artist information is not entered is indicated
as "Unknown"
Artist Mode
Navigation
Title
Artist
Genre
Artist
Selected
Non-selected
Page 17

Use Menu (continued)
This is method used for adding playing song to the playlist
or for play after selecting song by Genre.
Select the Genre mode.
>
(See Menu Operation Method in page 13.)
Make setup by SEL. button after moving
the desired Genre.
>
All Genre selected are added to the playlist if moving to the
menu screen after selecting the Genre.
>
Selected items are highlighted.
> The lower list selected is registered in the playlist.
>
All Genres are selected in the initial edition.
> A file for which Genre is not entered is indicated as "Unknown"
Genre Mode
Navigation
Title
Artist
Genre
Genre
Selected
Non-selected
Page 18

Use Menu (continued)
Directory Mode
This is method used for adding playing song to the playlist
or for play after selecting song by Directory.
Select the Directory mode.
>
(See Menu Operation Method in page 13.)
Make setup by SEL. button after moving the
desired Directory.
>
The lower list selected is registered in the playlist.
>
Selected items are highlighted.
>
All songs are selected in the initial edition
.
>
The first song of the Directory is selected and played if pressing
PLAY button after selecting the Directory.
=> It means there is a directory with another directory.
Navigation
Selected
Non-selected
Directory
Playlist
Directory
I Will Lead You
Your Song
all by myself
Page 19

Use Menu (continued)
This is method used for selecting or playing song
by the Playlist.
Select the Playlist mode.
>
(See Menu Operation Method in page 13.)
Press and select SEL. button after moving the desired
playlist.
>
The lower list selected is registered in the Playlist.
>
Selected items are highlighted.
>
All songs are selected in the initial edition.
>
The first song of the Playlist is selected and played if pressing
PLAY button after selecting the Playlist.
PlayList Mode
Navigation
Directory
Playlist
Playlist
Appear 96 songs are
currently selected.
Selected
Non-selected
Page 20

Use Menu (continued)
Navigation
Title
Artist
Genre
Title
Title
Select Title, Artist, Genre or Directory item of
the Navigation mode.
> (See Menu Operation Method in page 13.)
Enter into the lower menu of each item and then press
SEL. button of the remote control for more than one
second.
> The menu screen appear.
Title
ALL Select
When selecting all songs in the playlist on the CD,
move to the Select menu by using SKIP + or SKIPbutton or the volume control button of the main unit or
the remote control, and then set up by pressing SEL.
button of the remote control.
ALL Cancel
When cancel all songs in the playlist on the CD, move
to the Remove menu by using SKIP + or SKIP- button
or the volume control button of the main unit or the
remote control, and then set up by pressing SEL.
button of the remote control.
All Selection and Cancel Mode
Page 21

Use Menu (continued)
Repeat
Normal
>
Plays only once
the current selected file.
1
>
Plays
repeatedly the current selected file.
All
>
Plays
repeatedly all file.
Random
>
Plays
randomly continuously.
Intro
>
Plays the first 10 seconds only for each track of the file.
Pressing the PLAY button during the song introduction function causes to
play to the end and returns to the cancel mode.
Press the button of the remote control (RPT. A-B) at a point
for desiring to start repeat play during the current play.
Press the button of the remote control (RPT. A-B) again at a
point for desiring to end repeat play.
> Appears the display window.
Repeat AB : A-> => A<->B => None
To return to the normal play, press the (RPT. A-B) button of
the remote control so that None can be done.
> The sector repeat play is cancelled.
> It can be identified in the display.
Repeat A-B
Select Repeat menu.
> (See Menu Operation Method in page 13.)
Press the SEL. button after selecting the desired Repeat play mode.
> Press the SEL. button of the remote control for more than one second.
You can use the menu conveniently since the repeat play mode is
sequentially played.
* The E.Q . mode is changed if pressing the SEL. button for more
than a second.
Page 22

Use Menu (continued)
You can enjoy music in various sound quality appropriate for
genre of the song played.
Select the E.Q. menu.
>
(See Menu Operation Method in the page 13.)
Make setup by pressing SEL. button after moving to the
desired E.Q..
To return to the normal play, press MENU button of the
remote control.
>
Appears the display window.
E.Q.(EQUALIZER)
Menu
Navigation
Repeat
E.Q.
E.O.(EQUALIZER)
N = Normal
X = X-Live
C = Classical
J = Jazz
R = Rock
P = Pop
Jazz
Rock
E.Q.
Pop
* You can use this menu conveniently since the E.Q mode is
sequentially changed if pressing the SEL. button of the
remote control for more than a second when the Repeat Play
is setup in the menu.
Selected
Non-selected
Page 23

Use Menu (continued)
System
Select the System menu.
(See Menu Operation Method in the page 13.)
Press SEL. button of the remote control after selecting the
desired item of 9 lower items.
>
For the selected item, the right selection display window appears.
Select the desired item by moving the volume control button
of the main unit or the remote control.
Select and setup the desired setting value by pressing SEL.
button or SKIP + button of the remote control.
>
For the selected item, the right selection display window disappears.
To exit from the menu screen, press MENU button of the
remote control.
Menu
System
Page 24

Use Menu (continued)
ID3 Tag (MP3 function)
Reads and displays information of singer and track
from the ID3 tag on the play screen.
*
ID3 Tag display appears only when playing an MP3 file with ID3 Tag
information.
Sleep
This is function to setup so that power turns off if the setup time passes.
OFF: Sleep reservation function is cancelled.
30 min : Automatically turns off after 30 min.
60 min : Automatically turns off after 60 min.
90 min : Automatically turns off after 90 min.
*
Only checking of sleep reservation is available at the display
during sleep reservation function.
Big Font
ON : Title of the played song is displayed at the upper part of the
display in a double size.
OFF : Generally displayed.
*
For the general audio CD, character of the track number is
displayed in a double size.
*
For the On mode, only the played song is displayed.
Time
This is function for setting up the type of time displayed
on the display.
TRACK Time: Play time of song currently being played by now
Track Remain: Remained play time of song currently being played by now
Total Time: Time being played of the whole of CD by now
Total Remain: Play time remained by now of the whole CD
*
For the Audio CD, the above four modes are displayed but only two modes
of Track Time and Track Remain are displayed for the MP3.WMA Disc.
Page 25

Use Menu (continued)
Backlight
ON : The backlight is always maintained with turned on.
4sec : The backlight of the display turns on for 4 seconds
whenever pressing the button.
8sec : The backlight of the display turns on for 8 seconds
whenever pressing the button.
12sec : The backlight of the display turns on for 12 seconds
whenever pressing the button.
OFF : The backlight is always maintained with turned off.
Contrast
Adjusts screen brightness of the screen.
Adjustable by 1-6 step.
Auto Play
This is function that play is done at the same time
as power turns on.
ON : The CD is played at the same time as power turns on.
OFF :
To play is done only by pressing the PLAY button after power-on.
Language
KOR : You can see menu and ID3 Tag display with Korean.
ENG : You can see menu and ID3 Tag display with English.
EUR : You can see the ID3 Tag display with Portuguese, Spanish,
French, Dutch, German, Italian etc.
RUS : You can see the ID3 Tag display with Russian.
Reset
ON : Returns to the initial setup status (product shipment status).
OFF : No returns to the initial setup status.
ID3: OFF Sleep: OFF Big Font: OFF
Time: Track Time Backlight: 4sec Contrast: 3
Auto Play : ON Language: ENG Reset: OFF
Page 26

Automatic Power-off Function
Power automatically turns off after about a minute if no
operation or use is done with stop status of the portable CD
player.
To Charge
Self-charge function is convenient and extends or protects life of
the battery since it includes overcharge-protection function.
> Text "Charging" appears at the display since setup is done at
the charge status if pressing the STOP button with the adaptor
connected and the power turned off.
> The charge mode is cancelled and play is done if pressing the
PLAY button for more than 2 seconds during charge.
> The charge mode is cancelled and Power On status is arrived if
pressing the STOP button for more than 2 seconds during charge.
> Text Charging Complete appears at the display part if 7 hours have
passed after starting charging.
Page 27

Firmware Upgrade
What's Firmware?
Means an operation system to operate the product.
> This product has upgraded firmware for error correction or
function improvement.
You may upgrade the product by manufacturing the empty
CD-R/RW after downloading the recent firmware appropriate for the
product from the SW Data Room, LG Electronics Customer Service
Center at
http://www.lgservice.com
.
Caution
> Check model name and version of the product.
- Method to check version: A loading screen appears if powering
on and displays the current version.
> Don't turn power off or don’t open the unit (door) during
upgrade.
- You must request A/S since opening of the unit (door) or forced
shock may invalidate operation.
> You must not optionally change the name or the extension of
the file to upgrade.
This product is converted to the upgrade mode if pressing the PLAY
button of the main unit while pressing the SEL. button of the remote
button with the CD, where the firmware is manufactured, inserted into
the main unit.
The main unit automatically searches for the file to be upgraded for
progress.
Upgrade will be successfully completed if power turns off after
message of Power Off appears at the display window of the remote
control.
* We recommend to use the adaptor in order to prevent problems that
power turns off during upgrade irrespective of whether the adaptor
will be used or not.
Page 28

Troubleshooting
Correctly insert the cell after
checking polarity (+, -).
Replace the cell.
Set the lock apparatus to cancel position.
Purchase cleaner for the CD
lens from the shop for cleaning.
Completely close the cell door
after correctly inserting the cell.
Correctly press only the
necessary button.
Replace the cell.
Is the cell inserted in
reverse?
Is the cell consumed?
Is the lock apparatus
placed at the lock position?
Is CD operation strange?
Is contact of the cell
unsafe?
Is button manipulation
done forcedly?
Is the cell consumed
completely?
No operation is
done even after
pressing the button
Character at the
display operates
wrongly
Symptom Cause Correction
No operation is
done
The disc is placed upside
down.
Is the disc in the CD
door?
Insert the disc with the
printing surface of disc
upward.
Insert the CD.
"No DISC" marks
appears
Page 29

Specifications
>
Portable case
>
Ear phone
>
Remote control
>
Power adaptor
>
1.5V (size AA) cell case
>
2 batteries (NiMH 1.2V, 1450mA)
>
User's Manual
Power supply
NiMH 1.2V, 2 batteries (NiMH 1.2V, 1450mA),
2pcs of A4-type cells (1.5V), power adaptor 4.5V,
600mA/ exterior battery
(3.0V)
Size (WxDxH)
PCD-M700 . . . . . . . . . . . . . . . . . . . . . . . . . . . . . . . . . . . .134X141X19mm
PCD-M710, PCD-M710B, PCD-M710R . . . . . . . . . . . . . .134X141X18.6mm
Weight
PCD-M700 . . . . . . . . . . . . . . . . . . . . . . . . . . . . . . . . . . . .190g
PCD-M710, PCD-M710B, PCD-M710R . . . . . . . . . . . . . .180g
Allowable ambient temperature . . . . . . . . . . . . . . . . . .
5
C 35 C
Allowable relative humidity . . . . . . . . . . . . . . . . . . . . . .30%~60%
Earphone output . . . . . . . . . . . . . . . . . . . . . . . . . . . . . .14mW+14mW
Frequency characteristics (LINE OUT) . . . . . . . . . . . .20Hz~20kHz
Signal to Noise (S/N) ratio . . . . . . . . . . . . . . . . . . . . . . .85dB
Accessory
With out
batteries
Page 30

P/N : 3834RL0001A
 Loading...