

LG PC389P, PC389S, PC389SF User Manual
Owner’s manual
Please read this manual carefully before operating
your device.
MODEL :
PC389P / PC389S / PC389SF
ENGLISH
The actual device may differ from the image.
You can print easily the photo via
Bluetooth®
2
Safety information
CAUTION: TO REDUCE THE RISK OF ELECTRIC SHOCK
DO NOT REMOVE COVER (OR BACK) NO USERSERVICEABLE PARTS INSIDE REFER SERVICING TO
QUALIFIED SERVICE PERSONNEL.
This lightning ash with arrowhead symbol
within an equilateral triangle is intended
to alert the user to the presence of
uninsulated dangerous voltage within the
product’s enclosure that may be of sufcient magnitude
to constitute a risk of electric shock to persons.
The exclamation point within an equilateral triangle is
intended to alert the user to the presence
of important operating and maintenance
(servicing) instructions in the literature
accompanying the product.
WARNING: TO PREVENT FIRE OR ELECTRIC SHOCK
HAZARD, DO NOT EXPOSE THIS PRODUCT TO RAIN
OR MOISTURE.
WARNING: Do not install this equipment in a conned
space such as a book case or similar unit.
CAUTION: Do not use high voltage products around
this product (ex. Electrical swatter). This product may
malfunction due to electrical shock.
CAUTION: Do not block any ventilation openings. Install
in accordance with the manufacturer’s instructions.
Slots and openings in the cabinet are provided for
ventilation and to ensure reliable operation of the
product and to protect it from over heating. The
openings shall never be blocked by placing the product
on a bed, sofa, rug or other similar surface. This product
shall not be placed in a built-in installation such as a
bookcase or rack unless proper ventilation is provided
or the manufacturer’s instruction has been adhered to.
CAUTION
RISK OF ELECTRIC SHOCK
DO NOT OPEN

3
CAUTION concerning the Power Cord
The Power Plug is the disconnecting device. In case
of an emergency, the Power Plug must remain readily
accessible.
Check the specication page of this owner’s manual to
be certain of the current requirements.
Do not overload wall outlets. Overloaded wall outlets,
loose or damaged wall outlets, extension cords, frayed
power cords, or damaged or cracked wire insulation
are dangerous. Any of these conditions could result in
electric shock or re. Periodically examine the cord of
your device, and if its appearance indicates damage or
deterioration, unplug it, discontinue use of the device,
and have the cord replaced with an exact replacement
part by an authorized service center. Protect the power
cord from physical or mechanical abuse, such as being
twisted, kinked, pinched, closed in a door, or walked
upon. Pay particular attention to plugs, wall outlets, and
the point where the cord exits the device.
This device is equipped with a portable battery or
accumulator.
How to Safely remove the batteries or the battery
pack from the equipment: To Remove the old batteries
or battery pack, follow the assembly steps in reverse
order. To prevent contamination of the environment and
bring on possible threat to human and/or animal health,
the old batteries or the battery pack must be put in an
appropriate container at designated collection points.
Do not dispose of batteries or battery pack together
with other waste. It is recommended that you use local,
free reimbursement systems batteries or battery packs,
(may not be available in your area). The batteries or the
battery pack should not be exposed to excessive heat
such as sunshine, re or the like.
NOTICE: For safety marking information including
product identication and supply ratings, please refer to
the main label inside the apparatus.

4
WARNING:
yThe ash may turn on in dark places.
- Do not use a ash too close to a person’s eyes.
It may temporarily affect your eyesight.
Be especially careful when taking photos of
infants and young children.
- Do not take a photo towards a person driving a
bicycle or car, or riding a horse because the ash
may burst.
It may cause trafc accidents.
yAvoid direct sunlight, heat sources such as heaters,
and do not use or store ammable sprays or
ammable materials near the product.
- There is a risk of explosion or re.
yDo not look through the view nder at the sun or
other strong light.
yDo not wet your pocket photo or hold it with wet
hands. It may cause an electric shock.
yDo not touch the inside of the Insertion part of
Photo cartridge (print head). There is a risk of burns.

5
CAUTION:
yThe apparatus should not be exposed to water
(dripping or splashing) and objects lled with liquids,
such as vases, shouldn’t be placed on the apparatus.
yMinimum distance around the apparatus for
sufcient ventilation, no less than 5 cm.
yThe ventilation should not be impeded by covering
the ventilation openings with items, such as
newspapers, table-cloth, curtains etc.
yNo naked ame sources, such as lighted candles,
should be placed on the apparatus.
yThe unit’s internal lithium battery should only be
serviced by an authorised service centre.
yDo not wet your pocket photo or hold it with wet
hands. It may cause an electric shock.
yIf foreign matter or water enters the pocket photo,
or there is a shock or damage, turn off the pocket
photo immediately.
yThis unit is not waterproof.
yPlace the product on a sturdy, level surface.
yWhen used by children, adult care is required.
yDo not use during exercise, walking or driving.
yDo not wet your pocket photo.
Do not drop or shock your pocket photo. Also, do
not put it in a place where sand is likely to get in.
yDo not leave it in a car interior, high temperature
place, humid place or coast for a long time.
yDo not store Pocket photo and lm in your closet
with insect repellent gas such as naphthalene
because it is harmful to Pocket photo and lm.

6
Device operating temperature
When operating in cold weather, the device shall
not print. Bring it inside from the cold and give
about 10 minutes to adjust to the specied
operating temperature (5 °C - 35 °C). Then
try printing again. (For the appropriate use, it
is recommended not to operate it outdoors in
winter.)
,
Note
CAUTION when using this product in
environments of low humidity
yIt may cause static electricity in environments
of low humidity.
yIt is recommended to use this product after
touching any metal object which conducts
electricity.
>
Caution

7
Contents
Safety information ......................2
STEP 1 Getting Started ..................8
Supplied items ............................. 8
Product Overview . . . . . . . . . . . . . . . . . . . . . . . . . . 8
STEP 2 Inserting Photo Cartridge .........9
About photo cartridge.....................11
STEP 3 Power On / Off..................13
STEP 4 Checking battery status .........14
Charging Battery..........................14
STEP 5 Installing App ...................16
Installing App for Android phone ..........16
App Setting ..............................17
Installing App for iPhone ..................18
Setting Bluetooth of iPhone ..............18
STEP 6 Printing Photo ..................19
Printing using Android phone .............19
Printing using iPhone .....................22
Using the edit mode.......................25
Notes on the printing .....................25
Checking where to buy paper .............27
Updating the device .......................28
STEP 7 Taking photos and
instant printing.........................29
Taking photos .............................29
Printing black-and-white photo ...........32
Using a strap..............................34
Checking Label .........................34
About LED Indicator ....................35
Specifications ..........................38
Troubleshooting ........................40
Paper Jam Solution ........................43
8
STEP 1 Getting Started
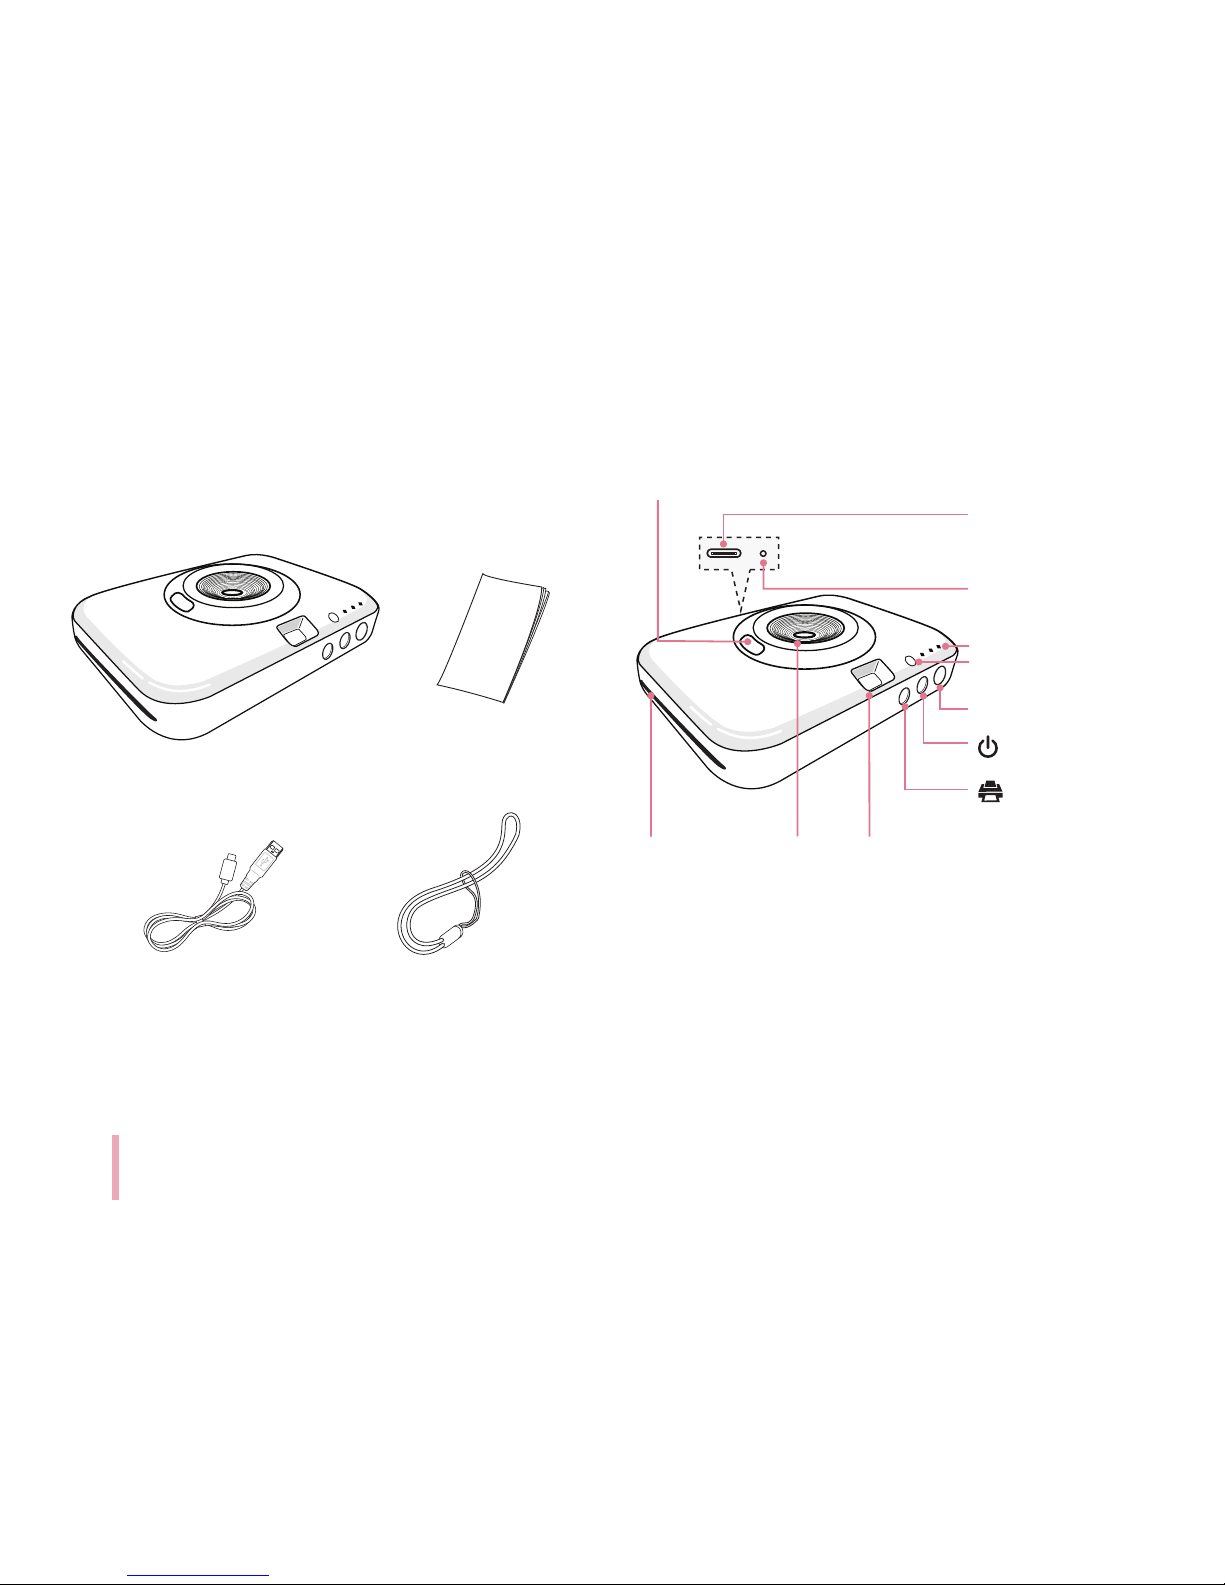
Supplied items
USB cable (Type C)
yDepending on the model or region, supplied
items may differ. (ex. USB cable, strap etc.)
LG Pocket Photo Printer
Simple manual
Product Overview
*Reset hole
LED indicator
Lens cover switch
USB port (Type C)
for recharging
Shutter
(
Power) button
(Reprint) button
View nderPaper exit slot Lens
Flash
Strap
*Reset hole : If you need reset, press the hole.
9
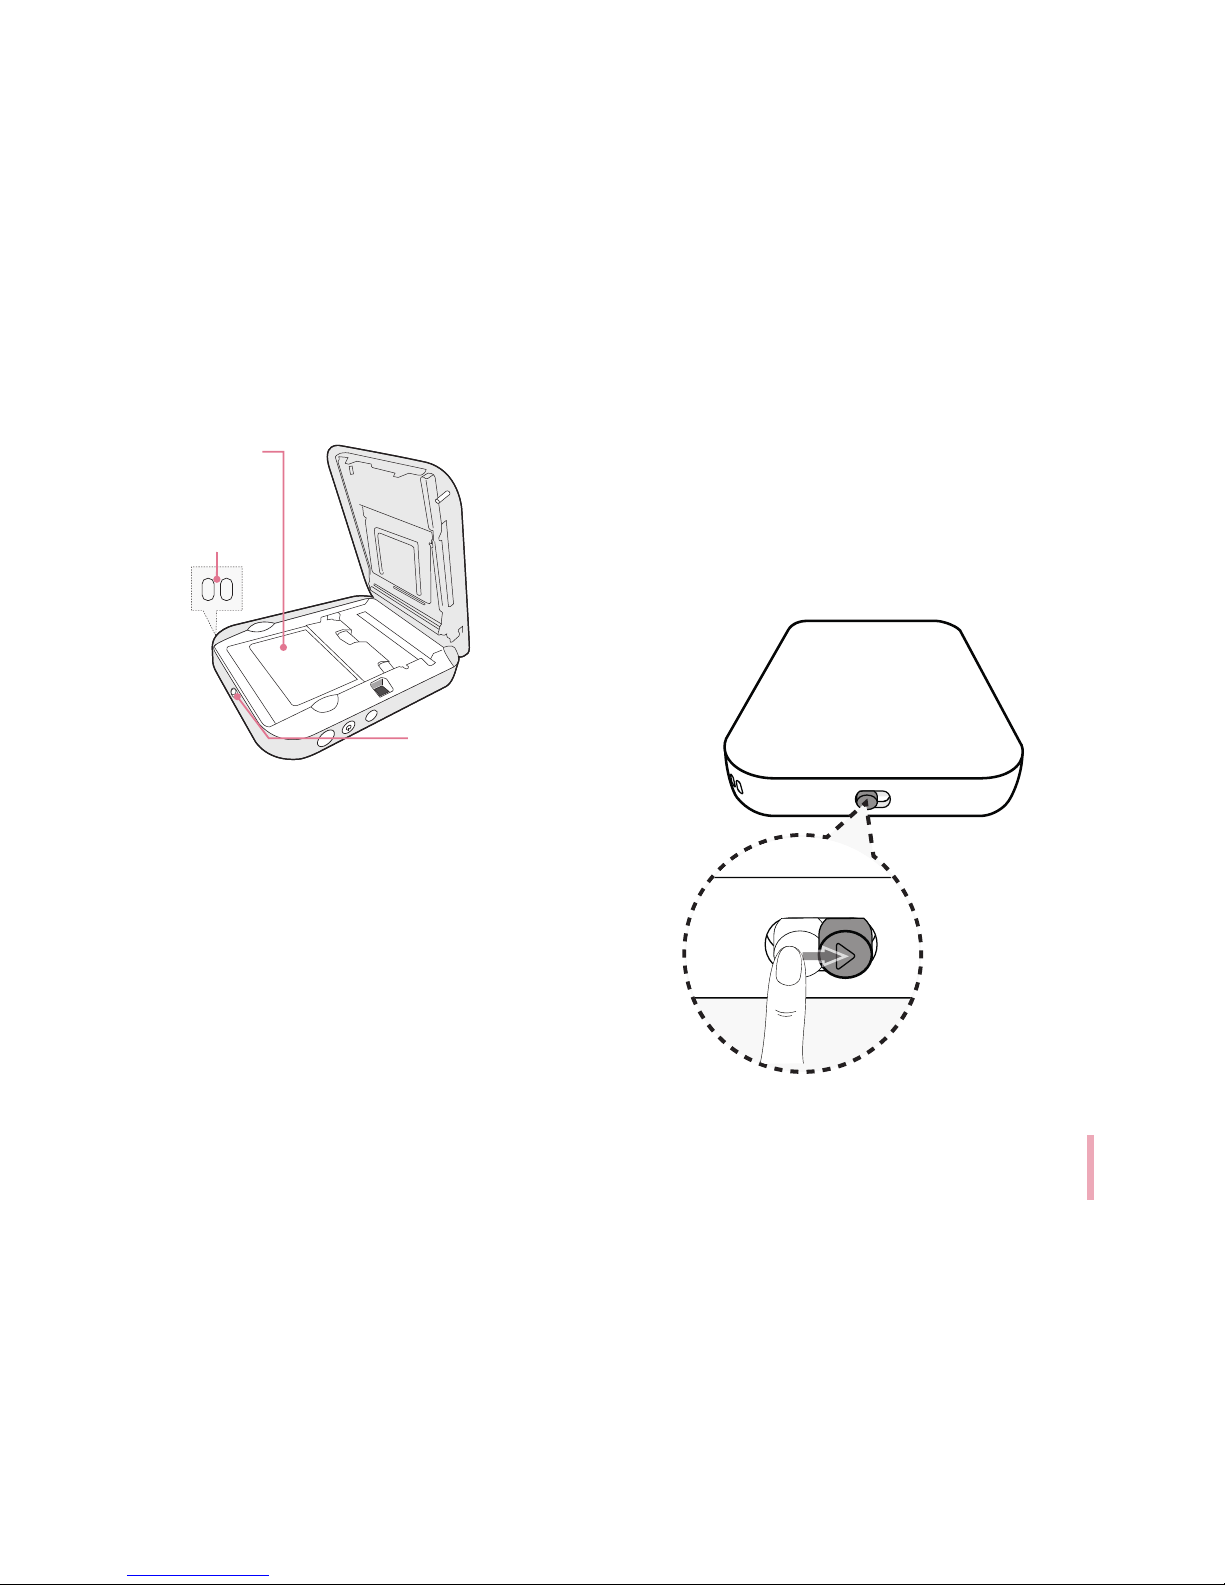
Insertion part of
Photo cartridge
Strap hole
Cover button
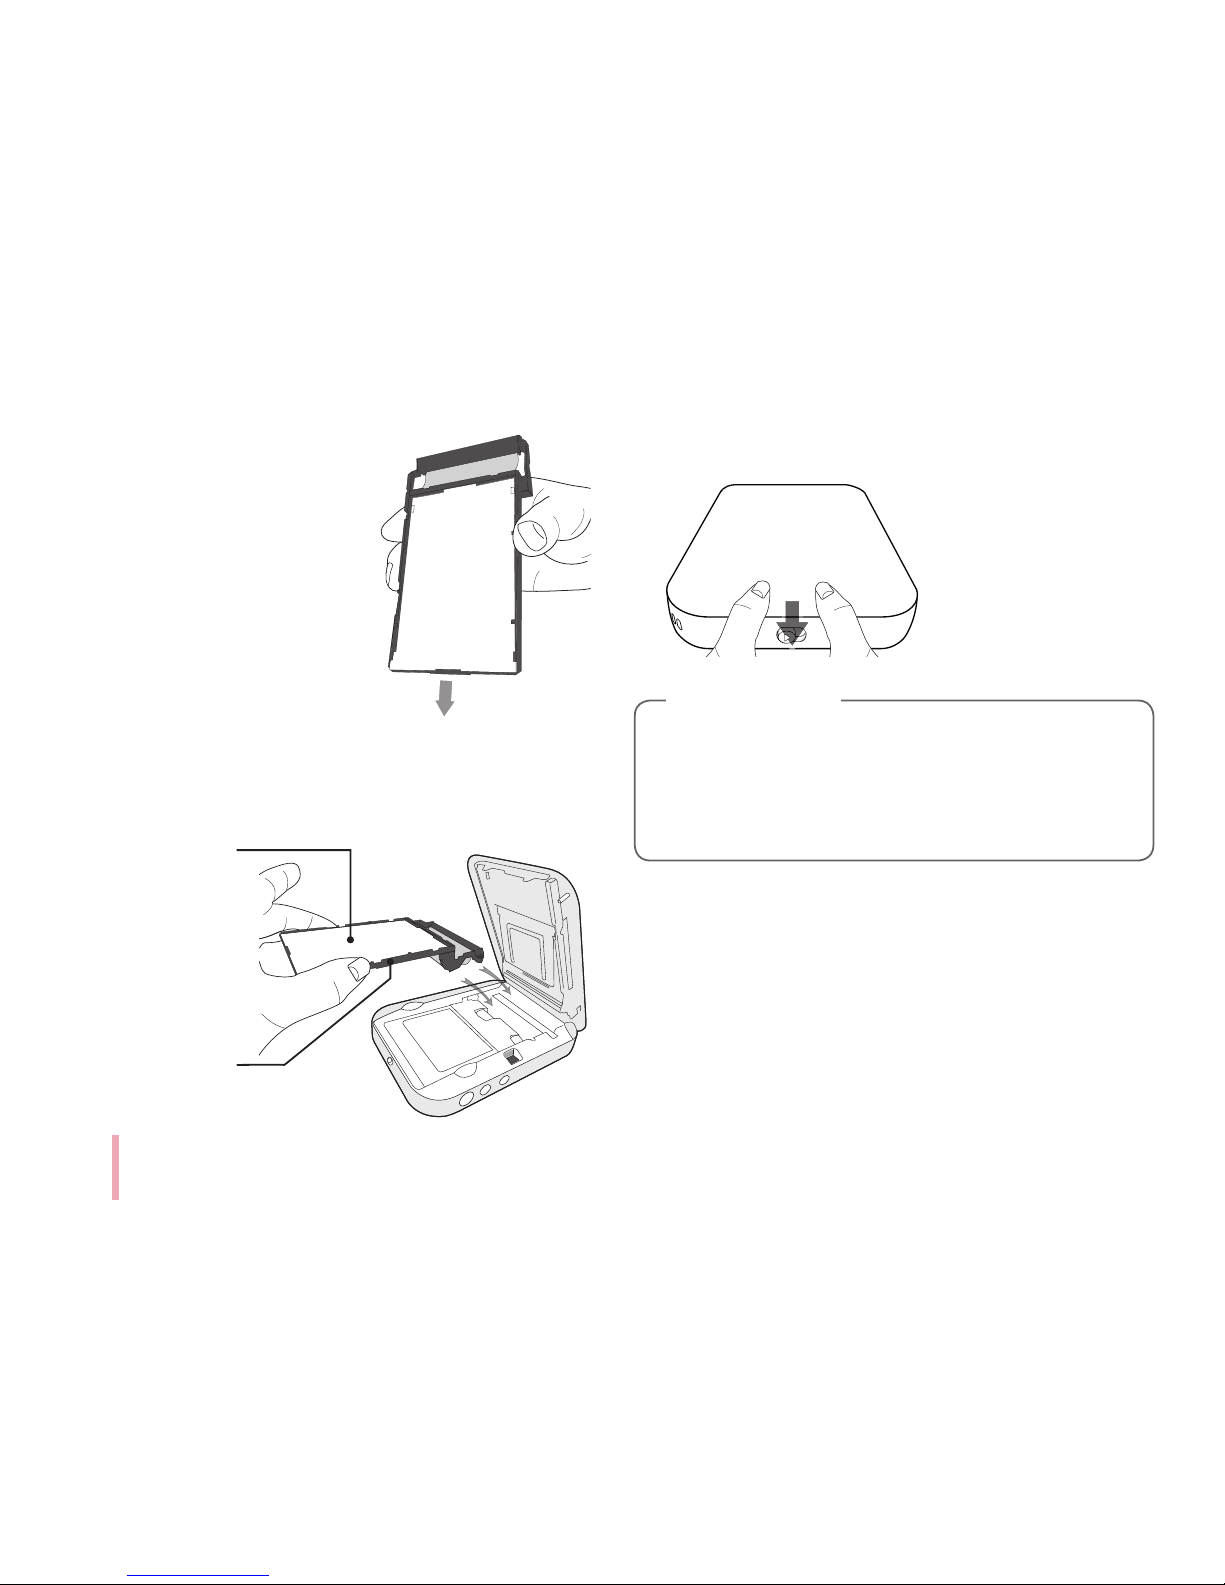
STEP 2 Inserting Photo
Cartridge
1. Slide the cover button sideways to open the bottom
cover.
2. Unpack the photo cartridge you bought.
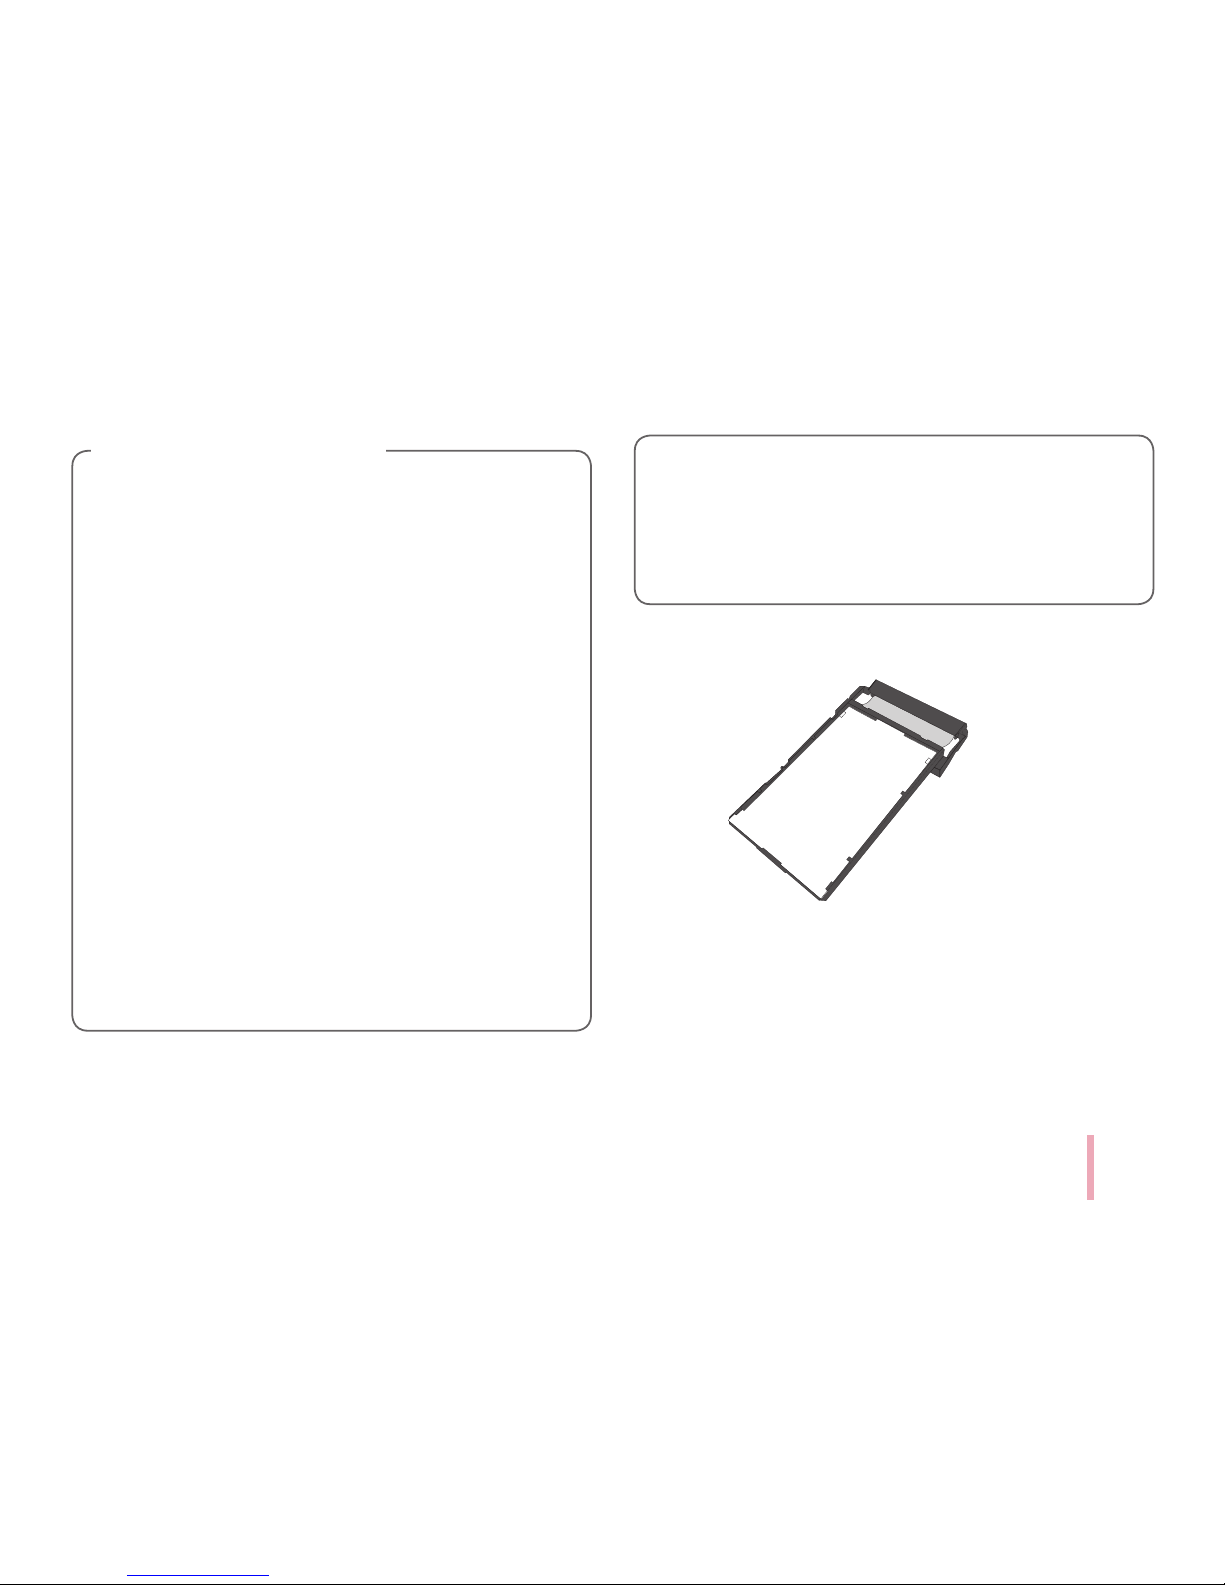
10
As shown in the following
picture, knock lightly the photo
cartridge in the direction of the
arrow 2 or 3 times to align the
paper to the back and put it in
the pocket photo.
3. Insert the photo cartridge
with the color ribbon facing forward as shown in the
following image and close the cover.
Photo Papers with
White side up,
Black side down.
4. Press the cover to close it completely.
You can check the total number of copies printed
through the Pocket Photo app after replacing
photo cartridge. If you have used all photo paper,
replace it with a new photo cartridge.
,
Note
11
yDo not touch the color ribbon and the photo
paper when inserting the cartridge.
yDo not touch the inside of the Insertion part of
Photo cartridge (print head). There is a risk of
burns.
yWhen opening the bottom cover, your hand or
nger may get caught in the paper exit slot.
yUnpack the cartridge in dust free place and
immediately put it into the unit. Handle with
care not to get dirt on, when you touch the
cartridge.
yAfter inserting photo cartridge, do not open
the cover before using all photo paper.
yWhen opening the bottom cover to replace the
photo cartridge, be careful not to touch the
inside of the Insertion part of Photo cartridge
(print head) and its surroundings.
Note on Photo Cartrigde
yIf there is foreign substance on the inside of
the Insertion part of Photo cartridge (print
head), wipe it off with a cotton bud or a soft
cloth.
About photo cartridge
Photo cartridge
Use exclusive photo cartridge for LG Pocket Photo.
Otherwise, the print quality cannot be guaranteed,
and it may cause damage of Pocket Photo.

12
Use exclusive Cartridge for LG Pocket Photo.
yUsing photo cartridge from other company
may result in malfunction, paper jam or low
quality.
yDo not damage or bend the cartridge.
yDo not expose to direct sunlight or moisture.
Avoid the pocket photo from over heating.
yDo not disassemble or modify the photo
cartridge.
yUsing soiled cartridge may result in
malfunction.
yOnce unpacked, the cartridge may begin to
curl up or discolor after a period of time. It is
recommended to use them as soon as possible.
yDo not place inside a car or, expose to direct
sunlight or moisture.
Note on Photo cartridge
yDo not leave in a place where the temperature
or humidity is too high or low. It may reduce
the quality of the printed photo.
yPlease use photo cartridge in pocket photo as
soon as possible.
yIf the photo cartridge is placed at a low or high
temperature, set the photo cartridge to the
proper temperature and then take the picture.
yAvoid airport checked luggage inspection and
other strong X-ray illumination. The eff ect
of fogging, etc. may appear on unused lm.
We recommend that you carry the camera
and/or the lm onto the aircraft as carry-on
luggage. (Check with each airport for more
information).
yStore printed photos in a cool and dry place
away from strong light.
13
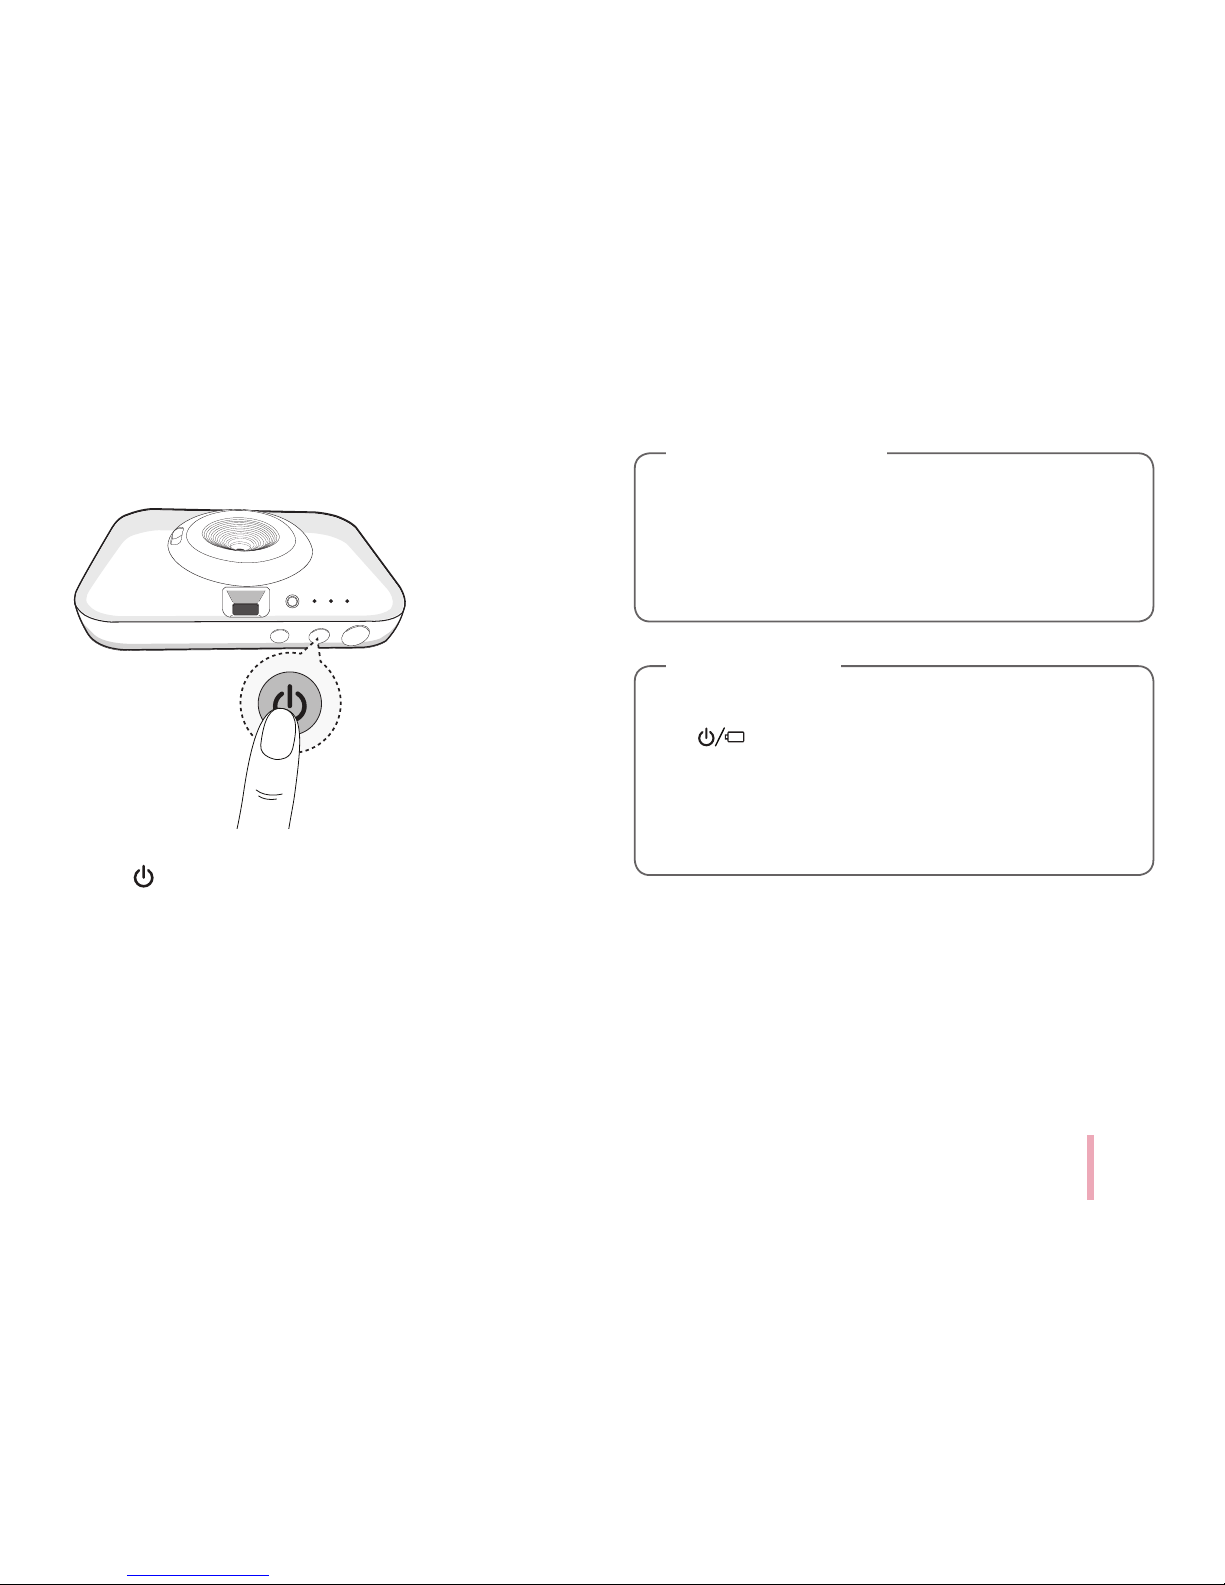
STEP 3 Power On / Off
Press (power) button for 2 seconds to turn
on or off.
Moving a pocket photo from a cold place to a
warm place can cause dew on the inside / outside
and print quality may deteriorate. In this case,
please use after the dew has dried enough.
>
Caution
yWhen turning the device on, LED indicator
ashes for 3 seconds, then printing is
available.
yFor more information, see “About LED
indicator”.
,
Note
14
STEP 4 Checking battery
status
When you disconnect the pocket photo from the
charging cable, you can check the battery charge status
via the LED indicators .
If the power turned on, you can check the charging
status by pressing 1 (Power) button.
The LED indicators will change depending on the
batery charging status.
LED color Condition
Remaining battery is more than
30% / On
Remaining battery is less than 30%
/ On
No battery / Blinks quickly and turn
off.
If the battery is low in use, LED indicators
is
blinks quickly and turn off.
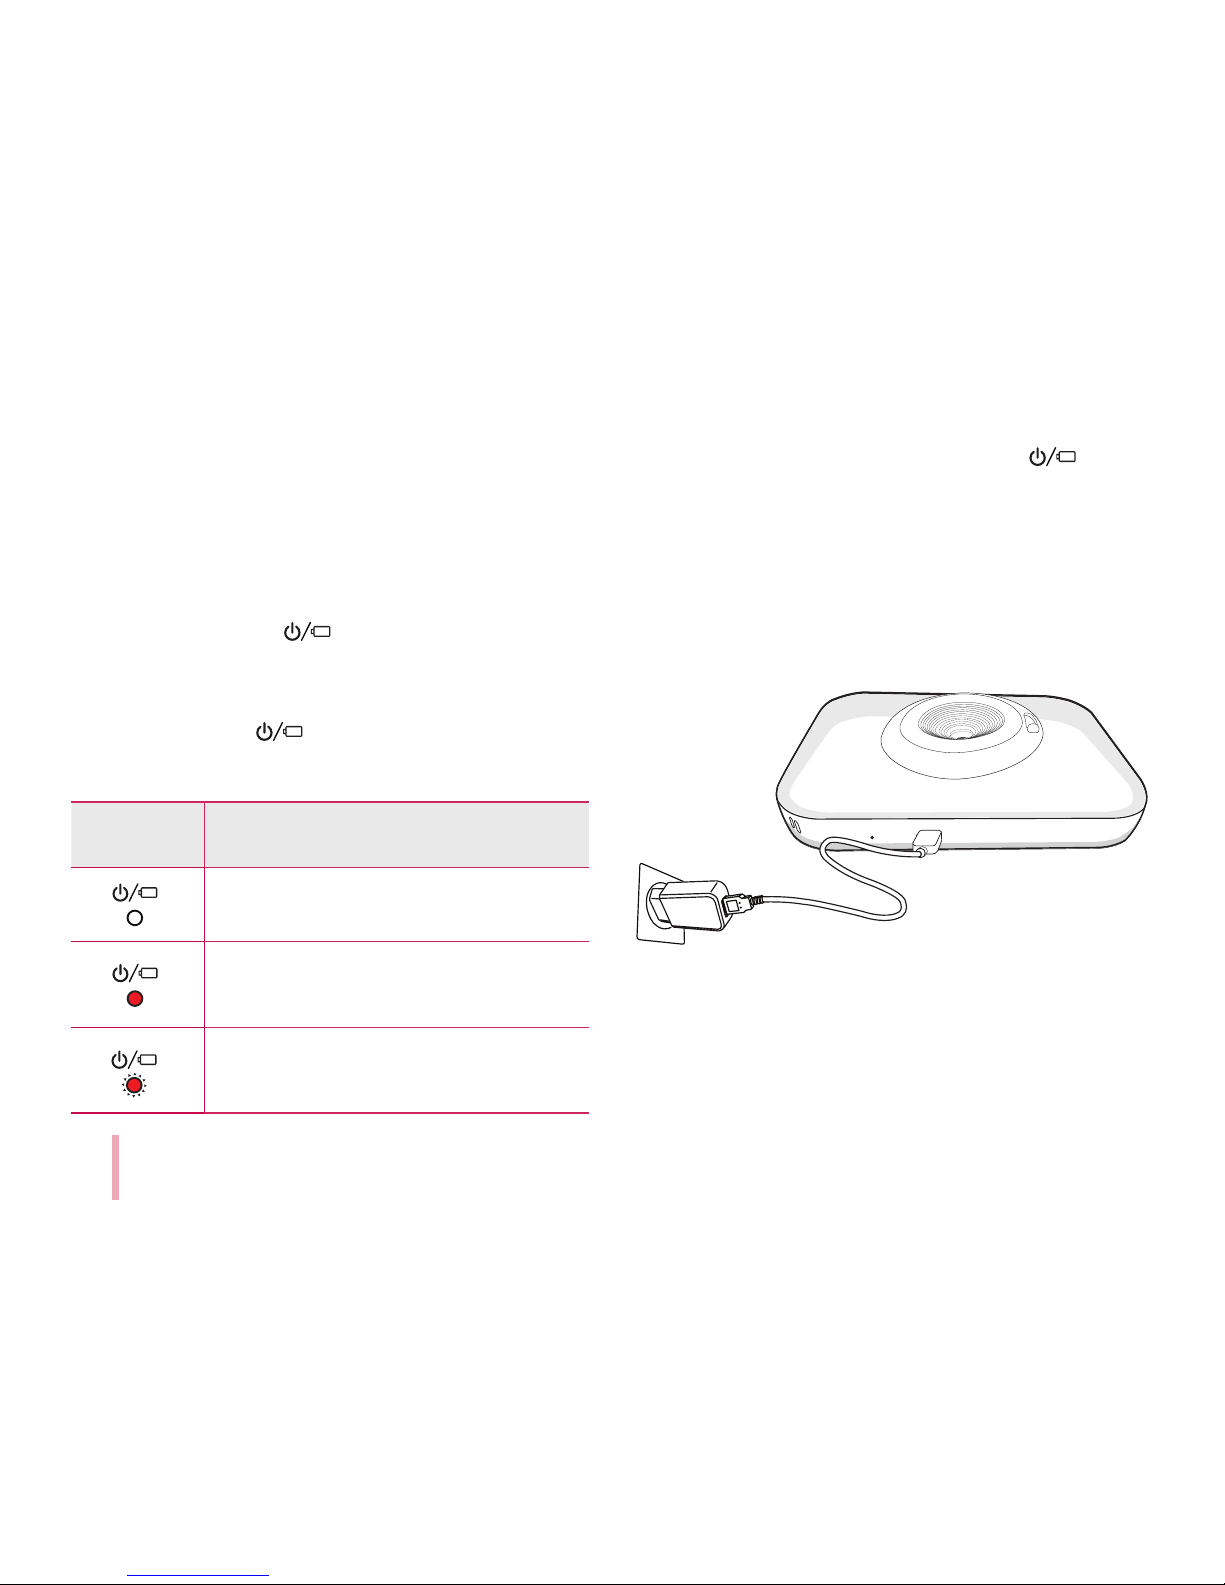
Charging Battery
This device uses a built-in battery. Before using it,
fully charge the battery using a USB cable (Type C) or
adapter. (Refer to below)
 Loading...