

Page 1

OWNER’S MANUAL
MUSIC IN STYLE
DOCKING SPEAKER
Please read this manual carefully before operating
Please read this manual carefully before operating
your set and retain it for future reference.
your set and retain it for future reference.
FOR THE GUARANTEE TERMS & CONDITIONS, PLEASE REFER TO
INNER PAGE OF BACK COVER.
ND1520
ND1520-FI.BGBRLLK_6285-ENG.indd 1 2012-04-19 6:17:29
Page 2

1 Getting Started
Getting Started2
Safety Information
1
Getting Started
CAUTION: TO REDUCE THE RISK OF ELECTRIC
SHOCK DO NOT REMOVE COVER (OR BACK) NO
USER-SERVICEABLE PARTS INSIDE REFER SERVICING
TO QUALIFIED SERVICE PERSONNEL.
enclosure that may be of sucient magnitude to
constitute a risk of electric shock to persons.
instructions in the literature accompanying the
product.
WARNING: TO PREVENT FIRE OR ELECTRIC SHOCK
HAZARD, DO NOT EXPOSE THIS PRODUCT TO RAIN
OR MOISTURE.
WARNING: Do not install this equipment in a
conned space such as a book case or similar unit.
NOTICE : For safety marking information including
product identication and supply ratings, please
refer to the main label on the bottom of the
apparatus.
CAUTION
RISK OF ELECTRIC SHOCK
DO NOT OPEN
This lightning ash with arrowhead
symbol within an equilateral triangle
is intended to alert the user to the
presence of uninsulated dangerous
voltage within the product’s
The exclamation point within an
equilateral triangle is intended
to alert the user to the presence
of important operating and
maintenance (servicing)
CAUTION concerning the Power Cord
Most appliances recommend they be placed upon
a dedicated circuit;
That is, a single outlet circuit which powers only
that appliance and has no additional outlets or
branch circuits. Check the specication page of this
owner’s manual to be certain. Do not overload wall
outlets. Overloaded wall outlets, loose or damaged
wall outlets, extension cords, frayed power cords, or
damaged or cracked wire insulation are dangerous.
Any of these conditions could result in electric
shock or re. Periodically examine the cord of your
appliance, and if its appearance indicates damage
or deterioration, unplug it, discontinue use of the
appliance, and have the cord replaced with an
exact replacement part by an authorized service
center. Protect the power cord from physical or
mechanical abuse, such as being twisted, kinked,
pinched, closed in a door, or walked upon. Pay
particular attention to plugs, wall outlets, and
the point where the cord exits the appliance. To
disconnect power from the mains, pull out the
mains cord plug. When installing the product,
ensure that the plug is easily accessible.
This device is equipped with a portable battery or
accumulator.
Safety way to remove the battery or the
battery from the equipment: Remove the
old battery or battery pack, follow the steps
in reverse order than the assembly. To prevent
contamination of the environment and bring on
possible threat to human and animal health, the
old battery or the battery put it in the appropriate
container at designated collection points. Do
not dispose of batteries or battery together with
other waste. It is recommended that you use
local, free reimbursement systems batteries and
accumulators. The battery shall not be exposed to
excessive heat such as sunshine, re or the like.
CAUTION: The apparatus shall not be exposed to
water (dripping or splashing) and no objects lled
with liquids, such as vases, shall be placed on the
apparatus.
ND1520-FI.BGBRLLK_6285-ENG.indd 2 2012-04-19 6:17:30
Page 3
Getting Started 3
Disposal of your old appliance
1. When this crossed-out wheeled bin
symbol is attached to a product it
means the product is covered by the
European Directive 2002/96/EC.
2. All electrical and electronic products
should be disposed of separately
from the municipal waste stream
via designated collection facilities
appointed by the government or the
local authorities.
3. The correct disposal of your old
appliance will help prevent potential
negative consequences for the
environment and human health.
4. For more detailed information about
disposal of your old appliance,
please contact your city office, waste
disposal service or the shop where
you purchased the product.
Disposal of waste batteries/accumulators
1. When this crossed-out wheeled
bin symbol is attached to batteries/
accumulators of Your product it
means they are covered by European
Directive 2006/66/EC.
2. This symbol may be combined with
chemical symbols for mercury(Hg),
cadmium(Cd) or lead(Pb) if the
battery Contains more that 0.0005%
of mercury,0.002% of cadmium or
0.004% of lead.
3. All batteries/accumulators should
be disposed separately from the
municipal waste stream via designated
collection facilities appointed by the
government or the local authorities.
4. The correct disposal of Your old
batteries/accumulators will help
to prevent potential negative
consequences for the environment,
animal and human health.
5. For more detailed information
about disposal of Your old batteries/
accumulators, please contact Your
city office, waste disposal service or
the shop where You purchased the
product.
LG Electronics hereby declares that this/
these product(s) is/are in compliance
with the essential requirements and
other relevant provisions of Directive
2004/108/EC, 2006/95/EC and
2009/125/EC.
European Standards Centre:
Krijgsman 1, 1186 DM Amstelveen The
Netherlands
Please note that this is NOT a Customer
Service contact point. For Customer
Service Information, see Warranty
Card or contact the dealer that you
purchased this product.
POWER: This unit operates on a mains supply
of 100-240V~, 50/60Hz.
Wiring: This unit is supplied with a BS 1363
approved main plug. When replacing the fuse,
always use of the same rating approved to BS
1362. Never use this plug with the fuse cover
omitted. To obtain a replacement fuse cover
contact your dealer. If the type of plug supplied
is not suitable for the mains sockets in your
home, then the plug should be removed and
a suitable type tted. Please refer to the wiring
instructions below:
Warning: A mains plug removed from the mains
lead of this unit must be destroyed. A mains
plug with bared wires is hazardous if inserted in
a mains socket. Do not connect either wire to
the earth pin, marked with the letter E or with
the earth symbol 6 or coloured green or green
and yellow. If any other plug is tted, use same
rating of fuse in the plug.
Important: The wires in this mains lead are
coloured in accordance with the following
codes:
- BLUE: NEUTRAL, BROWN: LIVE - As the
colours of the wires in the mains lead of this unit
may not correspond with the coloured marking
identifying the terminals in your plug, proceed
as follows: The wire which is coloured blue must
be connected to the terminal which is marked
with the letter N or coloured black. The wire
which is coloured brown must be connected to
the terminal which is marked with the letter L or
coloured red.
1
Getting Started
ND1520-FI.BGBRLLK_6285-ENG.indd 3 2012-04-19 6:17:30
Page 4

Table of Contents4
Table of Contents
1 Getting Started
2 Safety Information
5 Unique Features
5 – Made for iPod/iPhone
5 – Portable In
5 – Alarm
5 – Radio(FM)
5 – Time Sync
5 Accessories
5 Introduction
5 – Symbol Used in this Manual
6 Front panel
7 Back panel
8 Connecting the AC adapter
2 Operating
9 Overall Operation
10 Basic Operations
10 – iPod/iPhone Operations
10 – Compatible iPod/iPhone
11 Setting the Clock
11 – Using your unit as an alarm clock
11 – SNOOZE
11 – Dimmer
12 – Sleep Timer Setting
12 Radio Operations
12 – Antenna Connection
13 – Presetting the Radio Stations
13 Advanced Operation
13 – Listening to music from your external
device
3 Troubleshooting
14 Troubleshooting
4 Appendix
15 Trademarks and Licenses
16 Specifications
17 Handling the Unit
5 Warranty
18 Warranty
ND1520-FI.BGBRLLK_6285-ENG.indd 4 2012-04-19 6:17:30
Page 5
Getting Started 5
Unique Features
Made for iPod/iPhone
Enjoys music from iPod/iPhone with simple
connection.
Portable In
Listens to music from your portable device.
Alarm
Sets alarm which go o at desired time.
Radio(FM)
Listens to the radio.
Time Sync
Sets your unit’s clock automatically by using iPod/
iPhone.
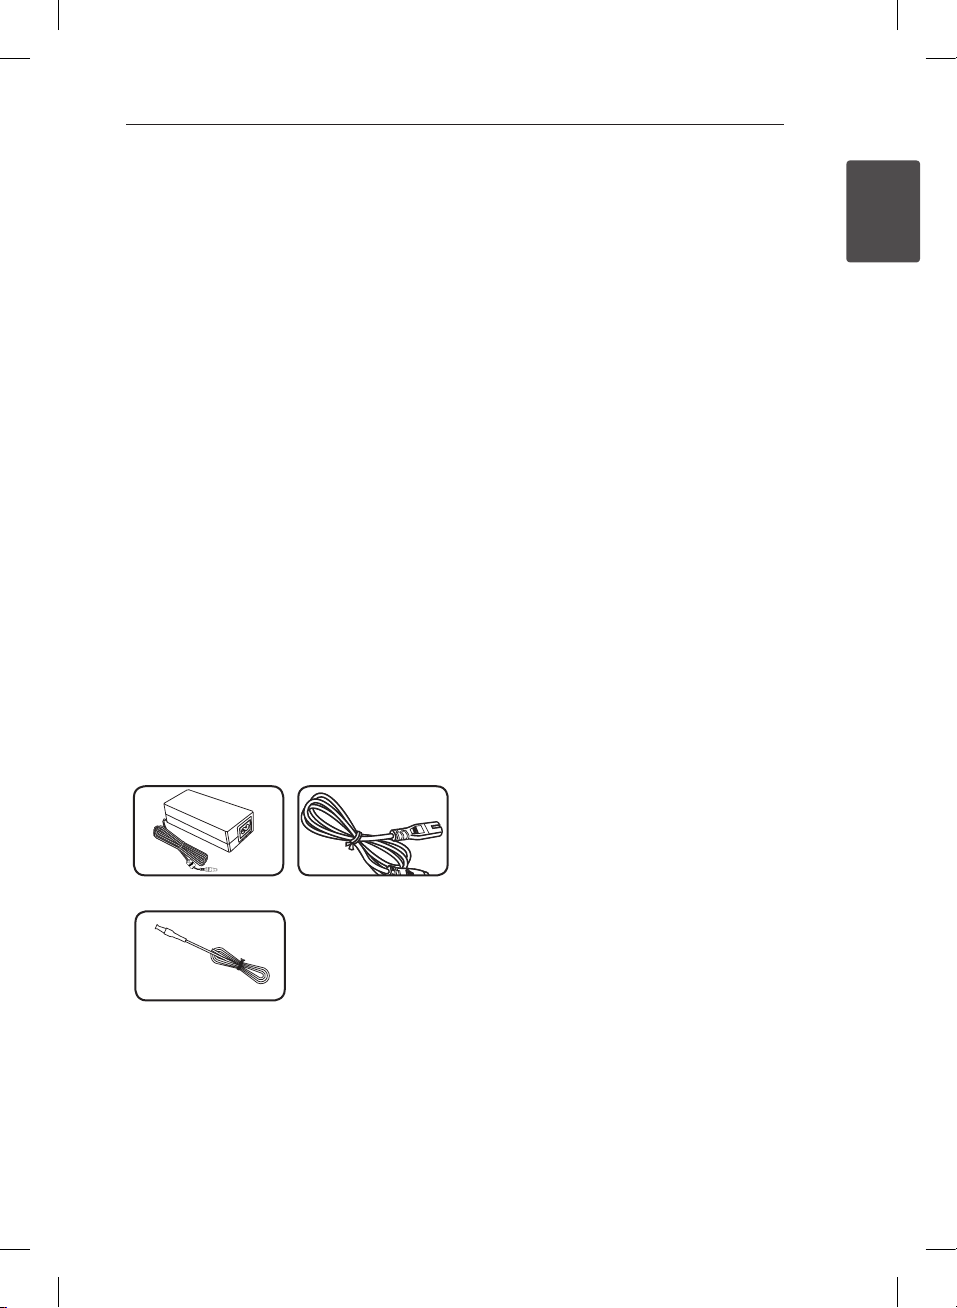
Accessories
Please check and identify the supplied accessories.
Introduction
Symbol Used in this Manual
Note
,
Indicates special notes and operating features.
Caution
>
Indicates cautions for preventing possible damages
from abuse.
1
Getting Started
AC adapter(1) Power cord(1)
FM antenna(1)
ND1520-FI.BGBRLLK_6285-ENG.indd 5 2012-04-19 6:17:30
Page 6
Getting Started6
Front panel
1
Getting Started
SNOOZE/SLEEP
a
- Wakes you up every 10 minutes while alarm
function activates.
- Turns the unit o automatically at specic
time.
- / + (VOLUME)
b
Adjusts speaker volume.
iPod/iPhone Dock
c
Connects an iPod/iPhone.
d P/1
- Selects the function and input source.
- Turns on : Press
- Turns o : Press and hold
P/1.
P/1
.
/Pr
e D
- Selects and listens programme of radio :
Press D/Pr in FM mode.
- Store radio station : Press and hold D/Pr
in FM mode.
- Starts presetting a station.
Display window
f
Shows the status.
/ (SKIP/SEARCH)
g
- Skip : Press / .
- Search : Press and hold / .
- In FM mode, tunes in the desired radio
station and selects a preset number.
Speaker
h
ND1520-FI.BGBRLLK_6285-ENG.indd 6 2012-04-19 6:17:31
Page 7

Back panel
Getting Started 7
1
Getting Started
ALARM
a
- Sets the alarm timer.
- Turns o the alarm .
- Displays alarm setting.
FM ANT.
b
PORT.IN
c
Listens to music from your portable device.
DC.IN 12 V 01.5 A (AC adapter input)
d
ND1520-FI.BGBRLLK_6285-ENG.indd 7 2012-04-19 6:17:31
Page 8

Getting Started8
Connecting the AC adapter
1
Getting Started
1. Connect the supplied AC power cord to the AC
adapter.
2. Connect the AC adapter cable to DC.IN adapter
input.
3. Plug the AC power cord into an AC outlet. Then
the unit goes into standby mode.
Caution
>
Only use the AC adapter supplied with this
device. Do not use a power supply from
another device or manufacturer. Using any
other power cable or power supply may cause
damage to the device and void your warranty.
ND1520-FI.BGBRLLK_6285-ENG.indd 8 2012-04-19 6:17:31
Page 9

Operating 9
Overall Operation
You can operate the unit by using these button. To get more information, refer to the table below.
Mode
Button
- / + - VOL -/+ VOL -/+ VOL -/+ VOL -/+ VOL -/+
Press
P/1
Press
and hold
P/1
/
Press
/Pr
D
Press
and hold
/Pr
D
SNOOZE/
SLEEP
Press
ALARM
Press
and hold
ALARM
Standby IPOD PORT FM
Power on
Power on Power off Power off Power off
-
- Play/Pause -
- - -
-
Activates or
deactivates
alarm
Starts alarm
setting
Changes
each of
function
Skip -/+ - Tune -/+
Sleep
(Dimmer)
Activates or
deactivates
alarm
Starts alarm
setting
Changes
each of
function
Sleep
(Dimmer)
Activates or
deactivates
alarm
Starts alarm
setting
Changes
each of
function
Listens
a preset
station
Selects
a preset
number
Sleep
(Dimmer)
Activates or
deactivates
alarm
Starts alarm
setting
During
alarm
setting
Stops alarm
setting
Changes
each of
function
Stops alarm
setting
Power off
VOL -/+
Sets an hour
and minute
Stores alarm
sources
- -
Stops alarm
setting
Sleep
(Dimmer)
Stops alarm
setting
Stops alarm
setting
During
alarm
operation
2
Operating
Power off
Stops alarm
function
Power off
-
-
SNOOZE
Stops alarm
function
Power off
Stops alarm
function
Power off
ND1520-FI.BGBRLLK_6285-ENG.indd 9 2012-04-19 6:17:31
Page 10

Operating10
Basic Operations
iPod/iPhone Operations
You can enjoy the sound with your iPod/iPhone. For
details about iPod/iPhone, refer to the iPod/iPhone
User Guide.
1. Connect the iPod/iPhone firmly. If you turn
2
Operating
this unit on, your iPod/iPhone is automatically
turned on and starts recharging .
P/1
2. Press
to select IPOD function.
Compatible iPod/iPhone
y The unit supports the models as follows ;
iPod touch
iPod classic
iPod nano
iPhone 4 S
iPhone 4
iPhone 3GS
iPhone 3 G
Depending on your iPod/iPhone’s
software version, you may not control your iPod/
iPhone from the unit.
Depending on your iPod/iPhone device, you may
not control your iPod/iPhone from the unit.
To Do this
Pauses or
restart
During playback, press /
to go to the next le or to return
to the beginning of the current
Skip
Search
ND1520-FI.BGBRLLK_6285-ENG.indd 10 2012-04-19 6:17:32
le.
During playback, press twice
briey to step back to the
previous le.
Press and hold / during
playback and release it at the
point you want to listen to.
Press D/Pr.
Page 11

Note
,
yIf this unit displays an error message, follow
the message. An error message “ERR”.
- Your iPod/iPhone is not connected firmly.
- This unit recognizes your iPod/iPhone as
an unknown device.
- Your iPod/iPhone is exceptionally low in
power.
The battery needs to be charged.
/
If you charge the battery while iPod/
/
iPhone is extremely low in power, it
may take longer to be charged.
yDepending on your iPod/ iPhone ’s software
version, it may not be possible to control
your iPod/iPhone from this unit. We
recommend installing the latest software
version.
yIf you use an application, make a call, or
send and receive SMS text message, etc. on
iPod touch or iPhone, disconnect it from
iPod/iPhone dock of this unit and then use
it.
yIf you have a problem with your iPod/
iPhone, please visit www.apple.com/
support.
yIn standby mode, you can charge your iPod/
iPhone by connecting it to iPod/iPhone
Dock.
yYou may need additional operation for iPod
touch or iPhone, for example “unlock” by
draging the slider.
Operating 11
Setting the Clock
Connect the iPod/iPhone rmly. Then the clock
setting in the display window will synchronize with
your iPod/iPhone.
After the unit synchronized with your iPod/iPhone
for clock setting, there will be a time dierence
between the iPod/iPhone and the unit . In standby
mode, the clock won’t synchronized with your
iPod/iPhone.
Using your unit as an alarm clock
1. Turn the unit on or off.
2. Press and hold ALARM to set the alarm
function.
3. The alarm sound sources blinks. (FM(TUNER)/
IPOD). While each of sound sources blinks,
select the one you want by pressing D/Pr.
If you select FM(TUNER) mode, you can select
the station you set before by pressing / .
4. “ON (TIME)” setting is displayed.
The hour setting blinks. Press / to select
the hour and then press D/Pr to save.
5. The minute setting blinks. Press / to
select the minute and then press D/Pr to save.
6. The volume settings blinks. Press / to
change the volume and then press D/Pr to
save.
7. You can check the setting status.
8. If you want to reset the alarm, repeat steps 2-6.
2
Operating
SNOOZE
While alarm activates, snooze function wakes you
up every 10 minutes if you press SNOOZE/SLEEP. If
the time you set is up, the unit turns on
automatically and the alarm function works. If you
press SNOOZE/SLEEP, the alarm function stops
working. “ZZZ” and “ ” will blink. The alarm sounds
again in 10 minutes.
Dimmer
Press SNOOZE/SLEEP once. The display window
will be darkened by half. To cancel it, press
SNOOZE/SLEEP repeatedly until the display
window get bright.
ND1520-FI.BGBRLLK_6285-ENG.indd 11 2012-04-19 6:17:32
Page 12

Operating12
Note
,
• If you don’t set clock on your iPod/iPhone,
the unit will not be synchronized for the
clock with your iPod/iPhone .
• If you unplug the cord from an outlet, the
clock setting you set won’t be stored.
• After setting a clock function, you can set
alarm function.
2
Operating
• Since the alarm goes o if you don’t press
any button for 30 minute, the alarm will
stop working automatically.
• If you set the clock and alarm, you can
check the time and alarm icon “
pressing ALARM although the unit is stand
by mode.
• If you activate the alarm, the alarm icon “
“ will appear in the display window.
• If you deactivate the alarm, the alarm icon
“
“ will disappear in the display window.
• Alarm function only works when the unit is
turned o.
• If the time you set is up, the unit will be
turned on automatically.
• After alarm function works, you can turn it
o by pressing ALARM or
• You can only set 12 : 00. (for an PM display)
P/1
Sleep Timer Setting
While listening to music or radio, press SNOOZE/
SLEEP repeatedly to select delay time between 10
and 180 minutes. After delay time, the unit will turn
o. (You can see the following order, 180 -> 150
->120 -> 90 -> 80 -> 70 -> 60 -> 50 -> 40 -> 30 -> 20
-> 10)
To cancel the sleep function, press SNOOZE/SLEEP
repeatedly until the display window get bright.
Note
,
• You can check the remaining time before
the unit turns o by pressing SNOOZE/
SLEEP.
• Sleep function will work after dimmer
function.
“ by
.
Radio Operations
Antenna Connection
Connect the FM wire antenna to FM antenna
connector.
1. Press
the display window. The last received station is
tuned in.
2. Auto tuning : Press / for about 2 seconds
until the frequency indication starts changing,
then release. scanning stops when the unit tunes
in a station.
Manual tuning: Press / repeatedly.
3. Adjust the volume by pressing - / + (VOLUME) .
repeatedly until FM appears in
P/1
ND1520-FI.BGBRLLK_6285-ENG.indd 12 2012-04-19 6:17:32
Page 13

Operating 13
Presetting the Radio Stations
You can preset 10 stations for FM.
Before tuning, make sure that you have turned
down the volume.
1. Press
display window.
2. Select the desired frequency by using / .
3. Press and hold D/Pr . A preset number will blink
in the display window.
4. Press / to select the preset number you
want.
5. Press D/Pr. The station is stored.
6. Repeat the steps 2 to 5 to store other stations.
7. To listen a preset station, press D/Pr and then
/ to select a preset station.
• If all stations have already been preset,
“FULL” will appear in the display window for
a moment and then a preset number will
blink. To change the preset number, repeat
the steps 4-5.
• You can not delete preset stations.
• Although all stations were preset, you can
preset a station by overwriting the previous
station.
• While listening to radio if you press and
hold D/Pr , a preset number you listened to
lastly will blink rst to overwrite the previous
station.
• While listening to a preset station if you
want to change it’s preset number at a
same frequency, press and hold D/Pr. And
then change a preset number by pressing
repeatedly until FM appears in the
P/1
Note
,
/ .
Advanced Operation
Listening to music from your external device
The unit can be used to play the music from many
types of external device. (Portable cable is not
supplied as an accessory with this unit.)
1. Connect the external device to the PORT.IN
connector of the unit.
2. Turn the power on by pressing
3. Select the PORT (PORTABLE) function by pressing
4. Turn the external device on and start playing it.
P/1
.
P/1
.
2
Operating
ND1520-FI.BGBRLLK_6285-ENG.indd 13 2012-04-19 6:17:33
Page 14

3 Troubleshooting
Troubleshooting14
Troubleshooting
Problem Correction
No Power.
No sound.
Radio stations cannot be
3
tuned in properly.
Troubleshooting
iPod/iPhone does not
work.
Clock does not displayed.
y Plug in the power cord.
yCheck the condition by operating other electronic devices.
Press
yAdjust its position.
yTune to the station manually.
yPreset some radio stations, see page 13 for details.
Connect iPod/iPhone to the unit correctly.
Connect iPod/iPhone to the unit correctly.
and check the selected function.
P/1
ND1520-FI.BGBRLLK_6285-ENG.indd 14 2012-04-19 6:17:33
Page 15

4 Appendix
Trademarks and Licenses
“Made for iPod” and “Made for iPhone” mean
that an electronic accessory has been designed
to connect specically to iPod or iPhone
respectively, and has been certied by the
developer to meet Apple performance standards.
Apple is not responsible for the operation of
this device or its compliance with safety and
regulatory standards.
Please note that the use of this accessory with
iPod, iPhone may aect wireless performance.
Appendix 15
4
Appendix
ND1520-FI.BGBRLLK_6285-ENG.indd 15 2012-04-19 6:17:33
Page 16

Appendix16
Specifications
General
AC adapter requirements DC 12 V 01. 5 A, 100 - 240 V, 50/60 Hz
Power consumption 18 W
Dimensions (W x H x D) (156 x 87 x 67. 7) mm
Net Weight (Approx.) 0. 57 kg
Operating temperature 5 °C to 35 °C (41 °F to 95 °F)
Operating humidity 5 % to 90 %
Bus Power Supply iPod/iPhone 5V 01A
Inputs
PORT. IN 500mV (3.5 mm stereo jack)
Tuner
4
Appendix
FM Tuning Range 87.5 MHz to 108.0 MHz or 87.50 MHz to 108.00 MHz
Amplier
Output Power 5 W X 1ch (8Ω at 1kHz)
T.H.D 10 %
Speakers
Type built-in
Impedance Rated 8 Ω
Rated Input Power 5 W
Max Input Power 10 W
yDesign and specications are subject to change without notice.
ND1520-FI.BGBRLLK_6285-ENG.indd 16 2012-04-19 6:17:33
Page 17

Handling the Unit
When shipping the unit
Please save the original shipping carton and
packing materials. If you need to ship the unit, for
maximum protection, re-pack the unit as it was
originally packed at the factory.
Keeping the exterior surfaces clean
Do not use volatile liquids such as insecticide spray
near the unit.
Wiping with strong pressure may damage the
surface.
Do not leave rubber or plastic products in contact
with the unit for a long period of time.
Cleaning the unit
To clean the player, use a soft, dry cloth. If the
surfaces are extremely dirty, use a soft cloth lightly
moistened with a mild detergent solution. Do not
use strong solvents such as alcohol, benzine, or
thinner, as these might damage the surface of the
unit.
Appendix 17
4
Appendix
ND1520-FI.BGBRLLK_6285-ENG.indd 17 2012-04-19 6:17:33
Page 18

Warranty18
Technology with the human touch
GUARANTEE
• LG Electronics U.K. Ltd. will provide the following services in order toexpedite this Guarantee.
1. All faulty components which fail due to defective manufacture will be replaced free of charge for a
period of 12 months from the original date of purchase.
2. The dealer (or his service agent) who sold the product will be
reimbursed for any labour provided in the repair of this LG equipment, for a period of 12 months from
the original date of purchase. These claims must be made in accordance with the published scale of
service charges and relevant claims procedure.
PLEASE NOTE:
A. The dealer may restrict the guarantee to the original purchaser.
B. The dealer is not obliged to carry out service under guarantee if unauthorized modifications are made
to the apparatus, or if non standard components are used or if the serial number of the apparatus is
removed, defaced, misused, or altered.
C. Any claims made under guarantee must be directed to the dealer from whom the equipment was
originally purchased. The dealer may, before carrying out service under guarantee, require a receipted
account as evidence of the date of purchase.
D. We respectfully point out that your dealer is not obligated to replace batteries if they become
exhausted or worn in use.
E. Aerial alignment and consumer control adjustments are not covered by this guarantee.
This guarantee does not affect your statutory rights.
• REQUIREMENTS TO MAINTAIN WARRANTY COVERAGE:
RETAIN YOUR RECEIPT TO PROVE DATE OF PURCHASE. A COPY OF YOUR RECEIPT MUST BE
SURRENDERED AT THE TIME GUARANTEE SERVICE IS PROVED.
• Product Registration Card :
It is helpful to complete at least your name, address, phone, model & serial numbers and return it. This
will enable LG to assist you in the future should you lose your receipt, your units be stolen, or should
modifications be necessary.
• To obtain information or assistance: Call 0870 873 5454 Monday-Friday 9.00am-4.30pm
7
Warranty
MODEL NO.* SERIAL NO.* DATE OF PURCHASE.*
In all cases of diculty - consult your LG dealer from whom the product was purchased
LGEUK Website : www.lge.co.uk
( service website : www.lgelectronics.co.uk )
ND1520-FI.BGBRLLK_6285-ENG.indd 18 2012-04-19 6:17:33
Page 19

ND1520-FI.BGBRLLK_6285-ENG.indd 19 2012-04-19 6:17:33
Page 20

ND1520-FI.BGBRLLK_6285-ENG.indd 20 2012-04-19 6:17:33
 Loading...