

Page 1
MBM64138501 (1.0) Printed in China
G
idiii
Welcome
Guia de inicio
Start Guide
Bienvenido
Page 2

By selecting a rate plan and activating your
phone, you agree to the metroPCS Terms
and Conditions of Service available at
metropcs.com.
This Start Guide is to get you up and
running. For the complete User Guide,
please visit www.lg.com/us. After searching
for the model name, click on
PRODUCT SUPPORT on the model page.
Copyright ©2014 LG Electronics, Inc. All rights
reserved. LG and the LG logo are registered
trademarks of LG Group and its related
entities. All other trademarks are the property
of their respective owners.
respectivos titulares.
las demás marcas son propiedad de sus
Group y sus entidades relacionadas. Todas
de LG son marcas registradas de LG
los derechos reservados. LG y el logotipo
Copyright ©2014 LG Electronics, Inc. Todos
página.
haga clic en PRODUCT SUPPORT en la
Después de buscar el nombre del modelo,
completa, por favor visite www.lg.com/us.
uso del teléfono. Para la guía de usuario
Esta Guía de inicio le ayuda a iniciar el
de servicio disponible en metropcs.com.
usted acuerda a los términos y condiciones
Al seleccionar un plan y activar su teléfono,
Page 3

TABLE OF CONTENTS
INTRODUCTION .........................................2
Your Phone .................................................3
Getting Started ...........................................5
Home screen ............................................10
KnockON .................................................12
Unlock screen ..........................................13
Notification Panel ......................................15
Call/Messaging .........................................16
Contacts ..................................................17
Browser ....................................................18
Camera ....................................................19
Video camera ...........................................20
Google account ........................................21
Downloading applications .........................22
Email ........................................................23
QuickMemo ..............................................24
QSlide ......................................................25
Connect your phone with your computer ..26
Mobile Hotspot .........................................27
MetroPCS Accessory Coupon ..................39
1
Page 4

INTRODUCTION
Service
You will need the following information when
activating service:
•
Your name, address and an eight-digit
number that you will use to access your
account (your personal identification
number “PIN”).
•
Your serial number and SIM card number.
To locate the serial number, remove the
phone from the box and remove the battery
cover from the phone. The serial number is
located near the bar code. It will be either
14 or 18 digits. The SIM card number can
be located below the bottom bar code on
the back of the SIM card holder.
•
Your choice of MetroPCS plan and services
including unlimited data, talk and text plans.
•
Install the battery and SIM card in your
new phone by following the step by step
instructions in this phone’s User Guide.
•
Once your phone is powered up, dial
1.888.8metro8 (1.888.863.8768) to connect
with an activation representative who will
assist you in activating your phone. You can
also activate your phone online by visiting
metropcs.com. (As soon as your service
is activated, be sure to fully charge the
phone’s battery before using it again.)
Don’t hesitate to ask your MetroPCS
representative for more information on
additional features and services or visit
metropcs.com.
2
Page 5

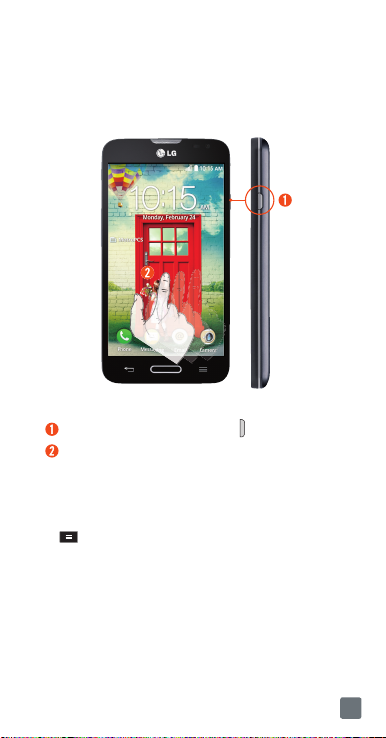
Your Phone
Front view
Earpiece
Back Key
Home Key
Menu Key
Power/Lock Key
Proximity Sensor
Front-Facing
Camera Lens
3.5mm
Headset Jack
Microphone
Microphone
Charger/
Accessory Port
3
Page 6

Side view
Rear view
QuickButton Key
(Customizable)
Volume Keys
Power/Lock Key
Flash
Back Camera Lens
Speaker
4
Page 7
Getting Started
Before you start using the phone, you may
need to insert the Micro SIM card.
Installing the Micro SIM card and
battery
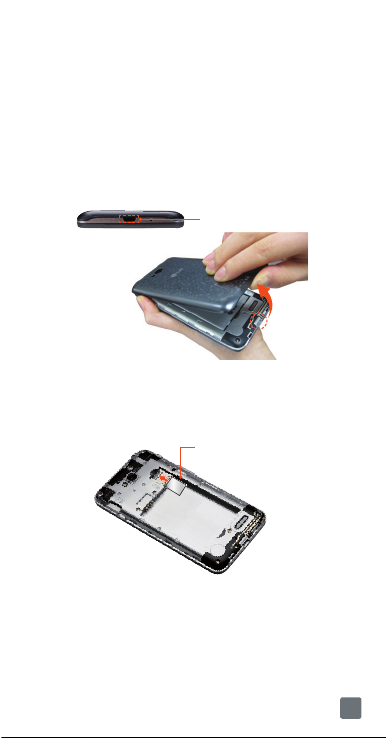
1 Use the fingertip cutout to remove the back
cover.
Fingertip Cutout
2 Insert the Micro SIM card. Make sure the gold
contact area on the card is facing downwards
and the notched side is inserted first (see
image below).
Micro SIM card
5
Page 8
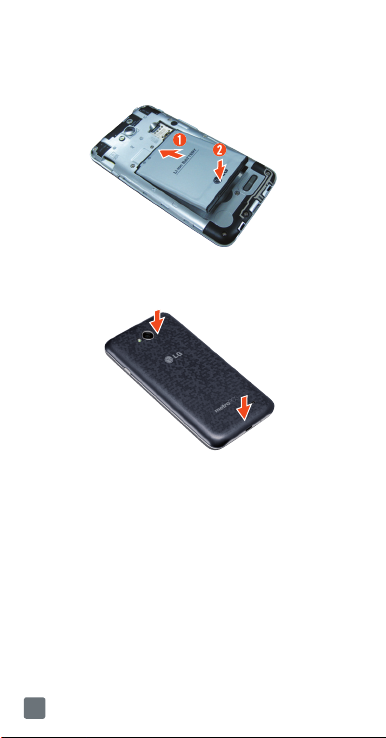
3 To insert the battery, align the gold contacts
on the phone and the battery and press it
down until it clicks into place.
4 Place the back cover over the battery
compartment and press it downwards until it
clicks into place.
6
Page 9

Installing the memory card
To store multimedia files, such as pictures
taken using the camera, to an SD card, you
must insert a memory card into your phone.
1 Use the fingertip cutout to remove the back
cover.
Fingertip Cutout
2 Insert the memory card into the slot.
Make sure the gold contact area is facing
downwards.
NOTE
The memory card is sold separately.
Warning!
Do not remove the memory card
without first unmounting it using the Storage menu.
Otherwise the memory card, as well as your phone,
may become damaged and the data stored on the
memory card may get corrupted. To unmount the
memory card safely, tap the
settings
>
General
card.
Menu Key
>
tab > Storage > Unmount SD
System
7
Page 10

Charging your phone
A rechargeable Li-ion battery is used to power
your phone.
A USB Adapter, which is included with your
phone, is used to charge the battery. Ask
your MetroPCS sales representative for further
details regarding approved batteries and
chargers.
Before using your phone for the first time,
make sure the battery is fully charged. An
uncharged battery will fully recharge after 3
hours.
USB Adapter
USB Cable
NOTE
Make sure the battery is installed before
connecting the USB Adapter. If the battery is not
installed and the USB Adapter is connected, the
phone will not operate properly due to prolonged
power cycling. Also, removing the battery with the
USB Adapter connected may damage the device.
Please unplug the USB Adapter before removing
the battery.
Warning!
If the touchscreen does not function
while the phone is in the process of charging, it
may be due to an unstable power supply. As a
result, disconnect the USB cable from the device or
unplug the USB Adapter from the power outlet.
8
Page 11

1 Connect the USB Adapter and USB cable
(as shown on the previous page).
2 Plug the USB cable (as shown on the next
image) into the phone’s Charger/Accessory
Port.
NOTE
The battery must be fully charged initially to
improve battery lifetime.
NOTE
Your phone has an internal antenna. Be
careful not to scratch or damage this rear area, as
that will cause loss of performance.
When charging your phone with a fully discharged
battery, the keypad LED will briefly flash indicating
charging is occurring in a mode designed to prevent
battery damage. The blinking will stop and normal
charging will commence once a sufficient minimum
charge has been established.
Internal
Antenna
9
Page 12
Home screen
You can customize each screen by adding
widgets or shortcuts to your favorite
applications.
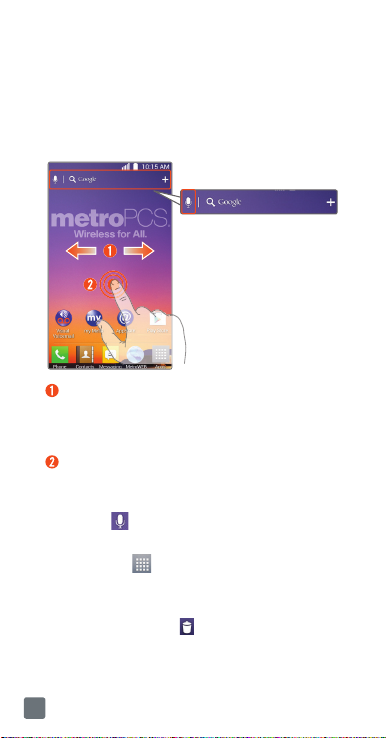
Adding icons to the Home screen
Swipe your finger right or left to move
through the Home screen canvases. Stop
when you get to a canvas where you want
to add items.
Touch and hold an empty area in the Home
screen. Tap the Apps or Widgets tab, then
select the item you want to add.
NOTE
Tap to perform a voice search using
Google.
TIP!
Tap
Apps
then touch and hold the application you want to
add to the Home screen and place it on the desired
canvas. To delete an application, touch and hold its
icon, then drag it to the
to view all of your applications,
icon.
10
Page 13
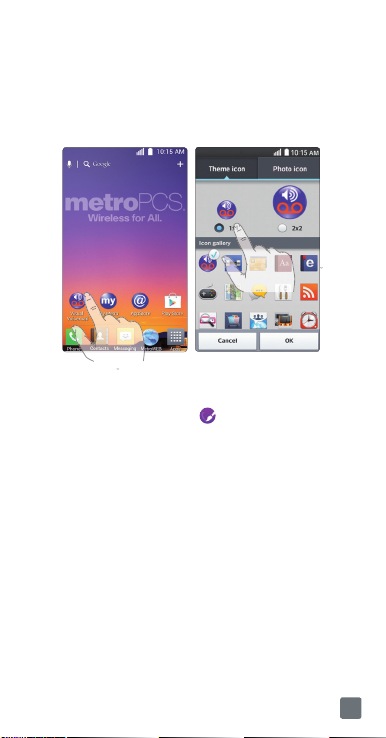
Customizing an application icon on
the Home screen
You can edit the icons on the Quick Keys Bar
and Home screen by creating your own icons
with the camera or Gallery images.
1 Touch and hold an application icon until the
canvas grid is displayed, then release the
icon. The editing icon
upper right side of the application icon.
2 Tap the icon and select the desired icon
design from Theme icon and change the size
(if desired), then tap OK.
- or Tap
Photo icon
the icon, the tap
use for the application icon. Crop the image
if necessary, then tap
>
appears at the
Add new
OK
. Set the size for
. Select the image to
OK
.
11
Page 14

KnockON
The KnockON feature allows you to double-tap
the screen to easily turn it on or off.
To turn the screen on
1 Double-tap the center of the Lock screen to
turn the screen on.
2 Unlock the screen or access any of the
available shortcuts or widgets (if available).
To turn the screen off
1 Double-tap an empty area of the Home
screen or the Status Bar.
2 The screen will turn off.
NOTE
• Tap on the center area of the screen. If
you tap on the bottom or the top area, the
recognition rate may decrease.
• To activate or deactivate the feature, press
Home Key
the
>
Key
Gestures
and tap the
System settings
>
Screen on/off
>
.
Menu
General
tab >
12
Page 15
Unlock screen
After a period of inactivity, the screen you are
currently viewing will be replaced by the lock
screen to conserve battery power.
Unlocking the screen (Default)
Press the Power/Lock Key .
Swipe the screen any direction.
Selecting screen lock options with
more security
1 From the Home screen, tap the Menu Key
> Lock screen settings >
lock
.
2 Select the desired screen lock option from the
list below:
•
None
: No lock screen.
•
Swipe
: Swipe any part of the screen to
unlock the screen.
•
Knock Code
using the four quarters of the screen.
: Create your own lock code
Select screen
13
Page 16

When the screen is off, if you tap the
same sequence anywhere on the screen,
the Home screen can be accessed
directly.
•
Face Unlock
: Unlocks the screen through
facial recognition. Follow the prompts.
You are asked to set a Pattern and/or PIN
as a backup.
•
Pattern
: Opens a set of screens that
guide you through drawing a screen
unlock pattern. It’s recommended that
you enter a backup PIN as well in case
you might lose the pattern. Then, you can
set vibrate on tap or whether to make the
pattern visible.
•
PIN
: Enter a numeric PIN to unlock
screen.
•
Password
: Enter a password to unlock
screen.
3 On-screen instructions will guide you through
the process of setting the lock option.
NOTE
If Knock Code is set, you cannot turn the
screen on using the KnockON feature.
14
Page 17

Notification Panel
Notification icons on the Status Bar report new
messages, calendar events, alarms, as well
as ongoing events. The Notifications Panel is
displayed when the Status Bar is swiped down.
You can also access the QSlide apps and Quick
Settings from this screen.
Tap to quickly access the
settings.
Tap a QSlide app to open as a small
window on your screen. Tap
add, or rearrange QSlide apps.
To close the Notifications Panel, touch and
drag the tap toward the top of the screen.
Tap to clear all the notifications.
Quick Settings Area
• Tap each quick settings key to turn it on/off.
• Touch and hold an option to access the
settings menu of the function.
• Tap
to remove, add, or rearrange the
options.
Tap to open the
Settings
Date & time
to remove,
menu.
15
Page 18
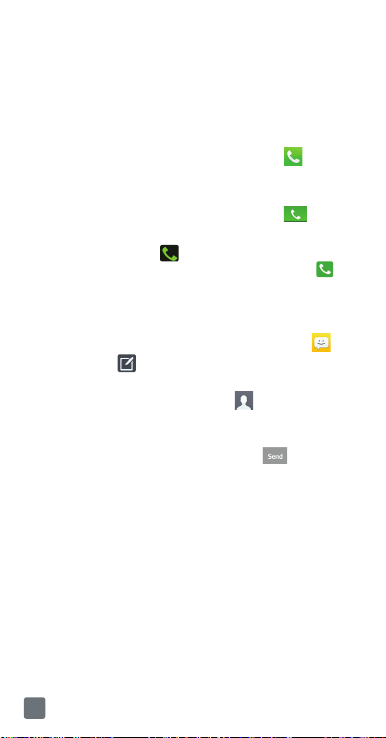
Call/Messaging
It only takes a few taps to make a call or send
a message.
Making a call
1 From the Home screen, tap
2 Dial the number you want to call or start
typing the name of the contact.
3 After the number is entered, tap Call
NOTE
To answer an incoming call while the screen
is locked, swipe the
the screen is unlocked, you just need to tap the
icon to answer.
icon in any direction. When
Sending a message
1 From the Home screen, tap
2 Tap New to create a new message.
3 Enter the name or number you want to
send the message to, or tap
number from Call logs, Contacts, Favorites,
or Groups.
4 Compose your message and tap
NOTE
In order to use all message functions, you
must set the LG Messaging app as the default. If
not, message functions will be limited.
Phone
.
Messaging
to select a
.
.
.
16
Page 19
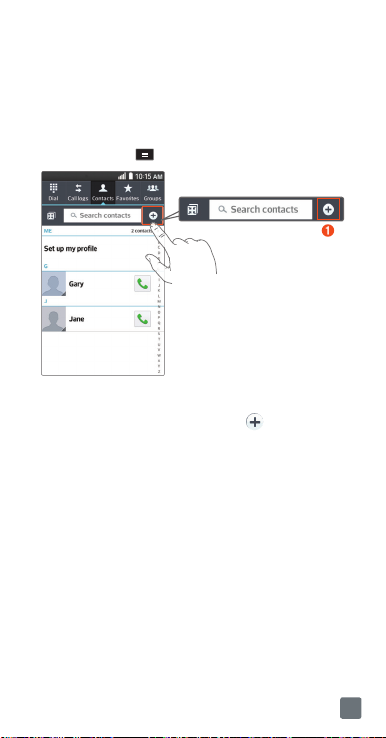
Contacts
You can automatically synchronize the contacts
on the phone with any of your online address
books or even import contacts from another
Micro SIM card. To import/export contacts, tap
the
Menu Key
Creating a new contact
1 To create a new contact, tap , select
the account where you want to save
the contact (if necessary), and enter the
contact’s information.
2 Tap Add another field to add more
categories.
3 Tap Save to save the contact.
NOTE
contacts, locate the number in your Call logs and
tap the number. Then tap
new contact entry or tap
new number to existing contacts.
> Import/Export.
To add a number from a recent call to your
New
contact to create a
Update contact
to add a
17
Page 20

Browser
Use the Web browser to surf the Web with
ease.
Browsing the Web
1 From the Home screen, tap
MetroWEB
2 Tap the URL bar at the top of the screen and
enter the web site address.
3 Tap
web site.
.
on the keyboard to navigate to the
Apps
>
18
Page 21
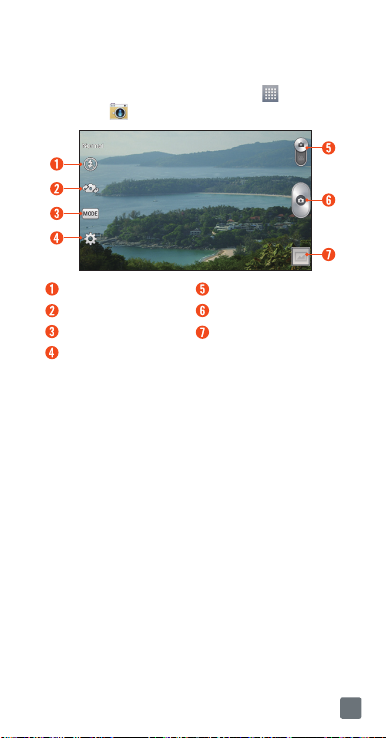
Camera
1 From the Home screen, tap
Camera .
Apps >
Flash
Swap camera
Shot mode
Settings
Mode switch
Capture
Gallery
19
Page 22
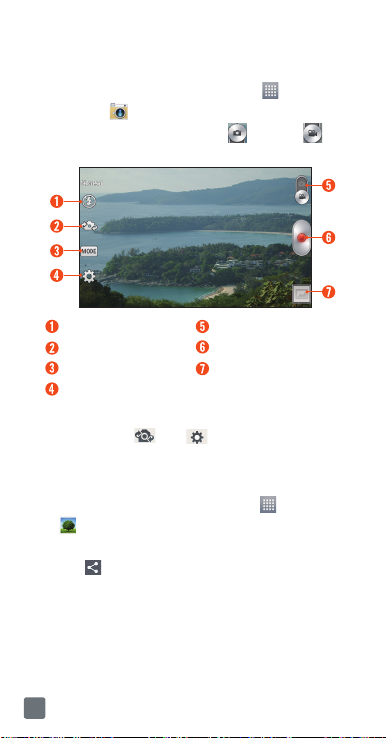
Video camera
1 From the Home screen, tap
Camera .
2 Slide the Mode Switch icon down to to
toggle from Camera to Video camera mode.
Flash
Swap camera
Recording mode
Settings
NOTE
To access the front-facing camera or
camcorder, tap
camera/camcorder settings.
. Tap to view and change
Share Photos or Videos
1 From the home screen, tap
.
2 Tap an album.
and then select the image(s)/video(s)
3 Tap
you wish to share.
4 Tap Share.
5 Select the method you wish to use to share
and send it.
Apps >
Mode switch
Record
Gallery
Apps
>
Gallery
20
Page 23

Google account
The first time you open the Google application,
you need to sign in. If you do not have a
Google account, you will be prompted to
create one.
Creating a Google account
1 From the Home screen, tap
Settings
>
sync > Add account > Google.
2 Tap New to start the Gmail setup wizard.
NOTE
If you already have an account, tap Existing,
enter your account information, and tap
3 You then need to follow the setup instructions
and enter the necessary information to activate
the account. Please wait while the server creates
your account.
TIP!
Once you have created your Gmail account,
you can access Gmail and Google Apps, and use
Google’s many services on the phone.
General
Apps
tab > Accounts &
>
.
21
Page 24

Downloading applications
Using Play Store
1 From the Home screen, tap
Store
.
2 Tap a category from the homepage or tap
to search for an app.
3 Tap INSTALL or the Price button to download
an app.
4 If you agree with the app’s access
requirements, tap ACCEPT.
5 The app will be downloaded and installed.
Managing applications
1 From the Home screen, tap
Settings
> Apps.
2 Swipe to the left or right to change to the
DOWNLOADED, RUNNING, or ALL tab.
3 Tap an app to view detailed information,
uninstall it, or stop it from running in the
background.
Moving applications
To manage the internal storage efficiently, you
can move applications from phone to the
microSD™ card.
1 From the Home screen, tap
Settings
> Apps.
2 Tap the downloaded application and then tap
Move to SD card.
Apps
Apps
Apps
>
>
>
Play
22
Page 25

Email
You can stay connected with MS Exchange
and other popular email providers.
Setting up an account
1 From the Home screen, tap
Settings
>
account
2 Select an email provider.
3 Enter your email address and password, then
tap Next.
4 Follow the remaining instructions.
Accounts & sync
>
Email
.
Sending an email
1 From the Home screen, tap
Email
.
2 Tap Write .
3 Enter your text. Tap Attach
(if needed).
4 Tap Send
TIP!
You can set sound and vibration alerts to notify
you when you receive a new email. While the Email
app is open, tap the Menu Key
tap the desired email account > swipe the screen
down to the NOTIFICATION SETTINGS section and
set the desired option(s).
to send the email.
Apps
>
>
Add
Apps
>
to attach a file
> Settings >
23
Page 26

QuickMemo
The QuickMemo feature allows you to capture
screen shots and create memos on them.
1 To access the QuickMemo feature, slide the
Status Bar downwards and tap
- or Press the Quick Button Key on the left side of
the phone.
2 Select the desired menu option from the tool
bar at the top of the screen. Then create a
memo.
3 Tap in the tool bar to save the memo. To
exit QuickMemo at any time, tap the Back
Key
.
TIP!
Tap to overlay the current memo on the
screen and use other phone features. Tap
select the type of background you want to use. Tap
to share the memo with others via any of the
available applications.
.
OR
to
24
Page 27

QSlide
The QSlide feature enables an overlay on your
phone’s display for easy multi-tasking.
1 Open the Notifications Panel and tap the
desired app from the QSlide apps section.
- or While using an application that supports
QSlide, tap
displayed continuously as a small window
on your screen.
2 The following options are available.
NOTE The QSlide feature can support up to two
windows at the same time.
. The function will be
OR
T
ap to return to
full window view.
Slide to adjust
transparency.
Tap to exit the
QSlide function.
25
Page 28

Connect your phone
with your computer
By connecting your phone to a PC, you can
transfer data to and from directly.
Transferring music, photos and
videos using Media sync (MTP)
mode
1 Connect the phone to your PC using the USB
cable.
2 Select the Media sync (MTP) option on the
USB connection type screen.
3 Your phone will appear as another hard drive
on your computer. Click on the drive to view it.
Copy the files from your PC to the drive folder.
4 When you’re finished transferring files, swipe
the Status Bar down and tap USB connected
> Charge phone. You may now safely unplug
your device.
26
Page 29

Mobile Hotspot
Turn your phone into a portable Wi-Fi hotspot
so you can share your mobile data connection
with up to 8 other devices.
To use your phone’s mobile hotspot capability,
you must have the Smartphone Mobile
Hotspot service as part of your rate plan.
You will see
feature is active.
NOTE
You cannot use Wi-Fi and use your phone
as a hotspot at the same time.
Configure Mobile Hotspot
1 From the Home screen, tap the
, then tap
tab >
Hotspot
2 Tap Configure Mobile Hotspot.
Tap the
network name, if desired.
Tap the
select from the following options.
WPA2 PSK
increased data security and prevents
unauthorized use of your data plan:
•
Open
•
WPA PSK
•
WPA2 PSK
For any security level but Open, tap the
Password
Tap
on the Status Bar when the
System settings
Tethering & networks
.
Network SSID
Security
is recommended due to
field to enter a password.
Save
.
field to enter a new
drop-down menu and
>
Menu key
>
Networks
Mobile
27
Page 30

Wi-Fi Calling
To use Wi-Fi Calling please use the SIM card
shipped with your device. A different SIM card
may not work with the Wi-Fi Calling feature.
You must also have a 911 emergency address
registered with your account. Log into your
account at
your profile and click Customer Info and follow
the menu options to register your address.
NOTE
administrator assistance for 911 Address
registration.
To enable/disable Wi-Fi Calling
1 From any Home screen, tap >
2 Tap the Wi-Fi Calling switch
To change the connection preference for
Wi-Fi Calling
1 From any Home screen, tap >
2 Select your connection preference.
About Wi-Fi Calling
Wi-Fi Calling can improve your coverage and
allows you to make phone calls and send
messages over a Wi-Fi network (when a Wi-Fi
network is available).
http://www.metropcs.com/
Corporate accounts may require
System
settings > Networks tab > Tethering &
networks > Wi-Fi Calling.
to activate/
deactivate the feature.
System
settings > Networks tab > Tethering &
networks > Wi-Fi Calling.
. Go to
28
Page 31

Account Detail
•
Text Message Reminder. MetroPCS
provides a text message reminder on your
phone before payment is due.
•
E-statement. View your statement summary
online.
(Only available in select states.)
•
Call Detail. View your call detail online for
a listing of all local calls made during the
service cycle. (Additional charge applies.)
Payment Options
There are several ways to pay for your
MetroPCS service.
(A convenience fee may apply.)
•
Auto Pay. Your credit or debit card is
automatically debited five days before
payment is due.
•
Express Pay. Pay by credit or debit card
online at metropcs.com.
•
Drop Box.* Drop a check or money order
in a MetroPCS store drop box.
•
By Mail. Include your account number
and phone number on your check or
money order and mail to: MetroPCS, P.O.
Box 5119, Carol Stream, IL 60197-5119.
•
By Phone via Automated System.
Pay by credit or debit card from your
MetroPCS phone by dialing 1.888.8metro8.
(Convenience fee applies.)
29
Page 32

•
Store Payment Machine.* Accepts
cash, debit or credit card (with PIN).
(Convenience fee applies.)
•
Over the Counter.* Pay at an
Authorized Payment Location with cash,
check, credit or debit card. (Fees vary
based on location.)
•
eWallet. Sign up for MyAccount through
metropcs.com and create your own secure
eWallet where you can safely store cards for
quick payment, set up auto pay and add
funds to your MetroConnect
•
Text to Pay. The secure and easy way
®
account.
to pay your monthly MetroPCS service.
Register your credit or debit card with
the MetroPCS eWallet service and simply
respond to a text from PAYNOW (729699)
to pay.
* Not available at all locations.
MyMetro
•
Manage your MetroPCS account right on
®
your phone.
By dialing any of the customer service
numbers you can change your rate plan,
change your features and pay your bill. Just
follow the instructions on your phone.
For Assistance
Please visit your local MetroPCS store or refer
to the following options if you need additional
assistance.
•
Sign up for MyAccount to view account
details, check your balance, make a
payment, manage eWallet and more.
30
Page 33

•
MetroPCS automated customer service
from any phone...............1.888.8metro8
and follow the prompts (1.888.863.8768)
•
Online information..............metropcs.com
Please follow us at:
twitter.com/metropcs
facebook.com/metropcs
Coverage: Coverage and services not
available everywhere. Nationwide long
distance only available to the continental U.S.
and Puerto Rico. Coverage, rates, services
and features subject to change.
Text Messages: Unlimited international
texts are limited to selected countries,
destinations, technologies and carriers and
are subject to change without notice, as are
Terms and Conditions of International Service.
See metropcs.com/world for further details.
Text messages can only be sent while in a
MetroPCS coverage area or in a compatible
roaming area. No guarantee of text message
delivery.
General: Family Plan is limited to five lines
attached to one account and use of qualifying
phones. Limited time offer. Certain restrictions
apply. Phone selection and availability may
vary by store. Compatible MetroPCS 4G or
4G LTE device required; not all features or
plans available with all devices. MetroPCS
features and services for personal use only.
Not all services are available in all covered
areas.
31
Page 34

Data Plans: For unlimited 4G or 4G LTE
data plans, full available speeds apply up to
monthly data allotment; then speeds slowed
to average MetroPCS network speeds for
remainder of billing cycle. Your phone will
continue to indicate that it is receiving a
MetroPCS 4G or 4G LTE signal even if your
usage is not at full available speed. Wi-Fi
usage does not count toward your monthly
data allotment. Use of some content, features,
or services may incur separate, additional
charges and/or require a qualifying data plan
or access to Wi-Fi connection. Some services
or features may experience performance
degradation at CDMA network speeds. Data
Top-Up purchase provides an additional
500MB of high speed data. Data Top-Up
allotments may only be used during the Billing
Cycle in which they were purchased.
Abnormal Usage: Service may be slowed,
suspended, terminated, or restricted for
misuse, abnormal use, interference with our
network or ability to provide quality service to
other users, or roaming usage predominance.
See store or metropcs.com for coverage,
details and Terms and Conditions of Service
(including arbitration provision).
Copyright: MetroPCS related trademarks
and other intellectual property are the
exclusive properties of T-Mobile USA, Inc.
All other trademarks and other intellectual
property are the properties of their respective
owners. Copyright ©2014 T-Mobile USA, Inc.
Use of MetroPCS services acknowledges
acceptance of our Terms and Conditions of
Service found at metropcs.com/terms.
32
Page 35

Your device may not work if you alter its
original software. This device will only operate
with firmware versions that have been
approved for use by MetroPCS and the
device manufacturer. If unauthorized firmware
is placed on the device it will not function.
Hearing aid compatibility: This
phone has been tested and rated for use
with hearing aids for some of the wireless
technologies that it uses. However, there may
be some newer wireless technologies used in
this phone that have not been tested yet for
use with hearing aids. It is important to try the
different features of this phone thoroughly and
in different locations, using your hearing aid
or cochlear implant, to determine if you hear
any interfering noise. Consult your service
provider or the manufacturer of this phone
for information on hearing aid compatibility. If
you have questions about return or exchange
policies, consult your service provider or
phone retailer.
Your phone’s GPS system is enabled by
default in order to permit use of planned
future services; see your phone’s manual for
instructions should you wish to disable your
GPS for non-911 purposes.
33
Page 36

MetroPCS Terms and
Conditions of Service
(“Agreement”)
For the most recent and up-to-date
version of the MetroPCS Terms and
Conditions of Service to which you
agree and will be bound when you
activate, use, change or pay for
your MetroPCS service, please visit
metropcs.com/terms.
Welcome to MetroPCS. We are pleased
that you have selected us as your wireless
carrier. Please use this page as a reference for
questions about your service and the terms
and conditions of service that govern the
service you have purchased from MetroPCS.
These Terms and Conditions of Service apply
to all devices and wireless services provided
by us to you and consist of several parts,
which may be amended from time to time:
•
The MetroPCS Terms and Conditions of
Service
(http://www.metropcs.com/terms);
•
Your MetroPCS Rate Plan
(http://www.metropcs.com/plans);
•
The MetroPCS Privacy Policy
(http://www.metropcs.com/privacy-policy);
•
The MetroPCS Online Terms of Use
(http://www.metropcs.com/metropcs-online-terms-of-use);
•
The MetroPCS Network Disclosure
(www.metropcs.com/terms-network-disclosure);
•
The MetroPCS Wi-Fi Terms of Use
(http://www.metropcs.com/wi-fi-terms-of-use);
and
34
Page 37

•
The terms and conditions relating to any
additional features you may have selected
or as may be included in your Rate Plan,
including, but not limited to
•
MetroWEB® Terms of Use
(http://www.metropcs.com/metroweb-terms-of-use)
•
MetroMUSIC® Terms of Use
(http://www.metropcs.com/metromusic-terms-and-conditions)
•
Bring Your Own Phone Terms of Use
(http://www.metropcs.com/byod-terms-and-conditions)
•
Rhapsody® Unlimited Music Terms of Use
(http://www.metropcs.com/rhapsody-unlimited-music-terms)
•
Metro Block-it® Terms of Use
(http://www.metropcs.com/block-it)
•
Metro411 Terms of Use
(http://www.metropcs.com/metro411-terms-of-use)
•
MyExtras® Terms of Service
(http://www.metropcs.com/myextras-terms-of-use)
•
MetroBACKUPSM Terms and Conditions
(http://www.metropcs.com/metrobackup-terms-and-conditions)
•
MetroPCS International Calling
(http://www.metropcs.com/international-long-distance)
:
In the event that the terms and conditions
relating to a feature you may have selected or
may be included in your Rate Plan conflicts
with the MetroPCS Terms and Conditions of
Service, the Terms and Conditions of Service
shall control.
By: (a) giving us a written or electronic
signature or telling us orally that you accept
the MetroPCS Terms and Conditions of
Service; (b) activating Service (if you are a
new subscriber); (c) using your Service after
35
Page 38

your Service is activated or after you make
a change or addition to your Service; (d)
paying for the Service; or (e) failing to activate
Service within 30 days after the purchase of
your wireless device, unless you return your
wireless device within MetroPCS’ applicable
return period, you agree to the MetroPCS
Terms and Conditions of Service and the
terms and conditions of service and use
related to any feature you may have selected
or may be included in your Rate Plan,
including, but not limited to:
•
You waive your right to a jury trial in
disputes with MetroPCS;
•
Your disputes with MetroPCS will be
decided by an arbitrator;
•
You waive your right to institute or
participate in class action litigation against
MetroPCS;
•
You will provide MetroPCS with accurate
information about yourself;
•
MetroPCS may communicate with you from
time to time about your Service;
•
You will pay all taxes and regulatory fees
even if your rate plan is inclusive of taxes
and regulatory fees; and
•
MetroPCS may terminate your Service if
you fail to timely pay for your Service or
violate the Terms and Conditions of Service
in any way, including abuse of the Service
or violations of applicable laws.
Customer Service. If you have any questions
regarding your Service or information in
this Agreement, you may call our activation
center at 1-888-8metro8.
36
Page 39

Billing for Premium and Third-Party Services
California Residents Only
Certain parties besides MetroPCS have
the ability to place charges on your bill for
premium services. You may access these
services and authorize the placement of
charges on your bill through your phone or
online account. MetroPCS also provides
customers, at no additional cost, with the
ability to restrict the placement of charges
for premium and third-party services on
your account. Contact customer care or go
to www.metropcs.com/cramming for more
information.
37
Page 40

Page 41

MetroPCS Accessory
Coupon
Page 42

Page 43

TABLA DE
CONTENIDOS
INTRODUCCIÓN ........................................2
Su teléfono .................................................4
Página de inicio ..........................................6
Pantalla principal ......................................11
KnockON .................................................13
Desbloqueo de pantalla ............................14
Panel de notificaciones .............................16
Llamar/Mensajería ....................................17
Contactos ................................................18
Navegador ................................................19
Cámara ....................................................20
Videocámara ............................................21
Cuenta de Google ....................................22
Descarga de aplicaciones .........................23
Correo electrónicos ..................................24
QuickMemo ..............................................25
QSlide ......................................................26
Cómo conectar el teléfono
a la computadora .....................................27
Hotspot móvil ...........................................28
Cupón para accesorio de MetroPCS ........41
1
Page 44

INTRODUCCIÓN
Servicio
Necesitarás la siguiente información para
activar el servicio:
•
Tu nombre, dirección y un número de
ocho dígitos que utilizarás para acceder
a tu cuenta (tu número de identificación
personal o “PIN”).
•
Tu número de serie y número de tarjeta
SIM. Para ubicar el número de serie, retira
el teléfono de la caja y quita la cubierta de
la batería del mismo. El número de serie
está ubicado cerca del código de barras.
Constará de 14 ó 18 dígitos. El número de
tarjeta SIM se puede encontrar debajo del
código de barras detrás del portatarjeta
SIM.
•
El plan y servicios de MetroPCS que
deseas, que incluyen planes de datos,
llamadas y textos ilimitados.
•
Instala la batería y la tarjeta SIM en tu
nuevo teléfono siguiendo las siguientes
instrucciones paso a paso en la Guía de
Usuario de este teléfono.
•
Una vez que el teléfono esté encendido,
marca 1.888.8metro8 (1.888.863.8768)
para comunicarte con un representante
de activación que te ayudará a activar su
teléfono. También puedes activar tu teléfono
en línea visitando metropcs.com. (Tan
pronto como se active el servicio, asegúrate
de cargar completamente la batería del
teléfono antes de volver a usarlo).
2
Page 45

No dudes en consultar a un representante
de MetroPCS para obtener más información
sobre las funciones y servicios adicionales o
visita metropcs.com.
3
Page 46

Su teléfono
Vista frontal
4
Auricular
Tecla Atrás
Tecla Inicio
Tecla Menú
Tecla Encender/
Bloquear
Sensor de
proximidad
Lente de la
Cámara frontal
Toma para
auricular de 3.5mm
Micrófono
Micrófono
Puerto para
Cargador/
Accesorios
Page 47

Vista lateral
Vista posterior
Tecla QuickButton
(personalizable)
Teclas de volumen
Tecla Encender/
Bloquear
Flash
Lente de la Cámara
posterior
Altavoz
5
Page 48

Página de inicio
Antes de comenzar a usar el teléfono, puede
ser necesario insertar la tarjeta Micro SIM.
Instalación de la tarjeta Micro SIM
y la batería
1 Utilice la punta del dedo para quitar la tapa
posterior.
Recorte para dedo
2 Inserte la tarjeta Micro SIM. Asegúrese de
que la área de contacto de color dorado en la
tarjeta esté boca abajo y el lado con muesca
se inserte primero (vea la imagen).
Ranura para la
tarjeta Micro SIM
6
Page 49

3 Para insertar la batería en su lugar alinear los
contactos dorados del teléfono y la batería y
presione la batería hacia abajo hasta escuchar
un clic.
4 Coloque la tapa posterior sobre el
compartimiento de la batería y deslícela hacia
abajo hasta que se escuche un clic.
7
Page 50

Instalación de la tarjeta de
memoria
Para almacenar archivos multimedia, como
fotos tomadas con la cámara, a una tarjeta
SD, debe insertar una tarjeta de memoria en
el teléfono.
1 Utilice la punta del dedo para quitar la tapa
posterior.
Recorte para dedo
2 Inserte la tarjeta de memoria en la ranura.
Asegúrese de que el área de contacto dorada
quede orientada hacia abajo.
NOTA
La tarjeta de memoria se vende por
separado.
¡
Advertencia!
sin desmontarla primero usando el menú de
almacenamiento. De lo contrario, podría dañar
la tarjeta de memoria o el teléfono y se podrían
corromper los datos almacenados en la tarjeta de
memoria. Para desmontar la tarjeta de memoria en
forma segura, toque la
del sistema
Desactivar la MicroSD.
8
No retire la tarjeta de memoria
> ficha
Tecla Menú
General
>
> Almacenamiento >
Ajustes
Page 51

Cargue el teléfono
Su teléfono utiliza una batería recargable de
iones de litio.
Para cargar su teléfono se utiliza un
adaptador USB, incluido con el mismo.
Consulte a su representante de ventas de
Metro PCS para obtener más detalles sobre
las baterías y cargadores aprobados.
Antes de usar el teléfono por primera
vez, asegúrese de que la batería esté
completamente cargada. Una batería
descargada se recargará por completo en 3
horas.
Adaptador de
USB
Cable USB
NOTA
Antes de conectar el adaptador de USB
asegúrese de que la batería esté instalada. Si la
batería no está instalada y conecta el adaptador
de USB, el teléfono no funcionará adecuadamente
debido a un ciclo de energía prolongado. Además,
extraer la batería con el adaptador de USB podría
dañar al dispositivo. Desconecta el adaptador de
USB antes de retirar la batería.
¡
Advertencia!
mientras el teléfono se carga, podría deberse
a una alimentación de energía inestable. Como
resultado, desconecte el cable USB de su teléfono
o desconecte el adaptador de USB desde la toma
de corriente.
Si la pantalla táctil no funciona
9
Page 52

1 Conecte el adaptador de USB y el cable
USB (tal como se muestra en la página
anterior).
2 Conecte el cable USB (tal como se muestra
en la imagen siguiente) dentro del Puerto para
Cargador/Accesorios.
NOTA
La batería debe cargarse completamente
antes de usar el teléfono por primera vez para
prolongar su vida útil.
NOTA
Su teléfono cuenta con una antena interna.
Tenga cuidado de no rayar o dañar esta área
posterior, dado que esto puede ocasionar pérdida
del rendimiento.
Al cargar su teléfono con una batería
completamente descargada, el teclado LED
parpadeará brevemente para indicar que se está
cargando en un modo diseñado para evitar que
la batería se dañe. El parpadeo se detendrá y
se iniciará la carga normal una vez que se haya
establecido suficiente carga mínima.
Antena
interna
10
Page 53

Pantalla principal
Puede personalizar cada pantalla agregando
widgets o accesos directos a sus aplicaciones
favoritas.
Cómo agregar iconos a la pantalla
principal
Pase el dedo hacia la derecha o hacia la
izquierda para moverse entre los paneles
de la pantalla principal. Deténgase cuando
obtenga un panel al que desee agregar
elementos.
Toque y mantenga presionada un área
vacía en la pantalla principal. Toque la ficha
Aplicaciones
el elemento que desee agregar.
NOTA
usando Google.
SUGERENCIA
todas sus aplicaciones, luego toque y mantenga
presionada la aplicación que desee agregar en la
pantalla principal y colóquela en el panel deseado. Para
borrar una aplicación, toque y mantenga presionado su
icono, luego arrástrelo hacia el icono
o
Widgets
y luego seleccione
Toque para realizar una búsqueda de voz
Toque Aplicaciones para ver
.
11
Page 54

Personalizar un icono de aplicación
en la pantalla principal
Ahora puede editar los iconos de la barra
de teclas rápidas o de la pantalla principal
creando sus propios iconos con la cámara o
las imágenes de la Galería.
1 Toque y mantenga presionado el icono
hasta que se muestre la cuadrícula del
panel y luego suelte el icono. Un icono de
edición
derecha del icono de la aplicación.
2 Toque el icono y seleccione el diseño de icono
deseado desde Tema del icono y cambie el
tamaño (si así lo desea), luego toque OK.
- o Toque
Establezca el tamaño del icono, luego toque
OK
icono de la aplicación. Corte la imagen si es
necesario, luego toque
aparece en la parte superior
Imagen del ícono
. Seleccione la imagen a utilizar para el
>
Agregar nuevo
OK
.
.
12
Page 55

KnockON
La función de KnockON le permite tocar dos
veces la pantalla para apagarla o encenderla
fácilmente.
Para encender la pantalla.
1 Toque dos veces el centro de la pantalla de
bloqueo para encender la pantalla.
2 Desbloquee la pantalla o acceda a
cualquiera de los accesos directos o
widgets disponibles (si hay alguno)
Para apagar la pantalla.
1 Toque dos veces un área vacía de la
pantalla principal o de la Barra de estado.
2 La pantalla de apagará.
NOTA
• Toque el área central de la pantalla. Si toca
sobre el área inferior o superior, la tasa de
reconocimiento podría disminuir.
• Para activar o desactivar la función,
presione la
Tecla Menú
ficha
pantalla
Tecla Inicio
>
General > Gestos
Ajustes del sistema
.
y toque la
>
Encender/Apagar
>
13
Page 56

Desbloqueo de pantalla
Después de un tiempo de inactividad, la
pantalla que visualiza actualmente cambiará a
una pantalla de bloqueo para ahorrar batería.
Desbloquear la pantalla (por
defecto)
Presione la
Deslice la pantalla en cualquier dirección.
Selección de opciones de bloqueo
de pantalla con mayor seguridad.
1 Desde la pantalla principal, toque la Tecla
Menú
pantalla >
2 Seleccione la opción de bloqueo de pantalla
que desee entre las siguientes:
•
Ninguno
•
Deslizar
pantalla para desbloquear la pantalla.
Tecla Encender/Bloquear
> Ajustes de bloqueo de
Seleccionar bloqueo de pantalla
: Sin bloqueo de pantalla.
: Deslice cualquier parte de la
.
.
14
Page 57

•
Knock Code
: Genere su propio código de
bloqueo utilizando los cuatro cuartos de
pantalla. Cuando la pantalla se encuentra
apagada, si toca la misma secuencia
en cualquier parte de la pantalla, se
puede acceder directamente a la pantalla
principal.
•
Reconocimiento de rostro
: Desbloquea
la pantalla a través del reconocimiento
facial. Siga las instrucciones. Se le pedirá
que establezca un patrón y/o PIN como
respaldo.
•
Pa
trón: Abre un conjunto de pantallas
que lo guían para que defina un patrón
de desbloqueo. Se recomienda que
introduzca también un PIN de respaldo
por si pierde el patrón. Luego puede
establecer vibrar al tocar o si desea hacer
visible el patrón.
•
PIN
: Introduzca un PIN numérico para
desbloquear pantalla.
•
Contraseña
: Escriba una contraseña para
desbloquear pantalla.
3 Las instrucciones en pantalla lo guiarán en el
proceso de establecer la opción de bloqueo.
NOTA
Si se establece un Knock code, usted no
puede encender la pantalla utilizando la función
KnockON.
15
Page 58

Panel de notificaciones
Los iconos de notificación en la Barra de
estado informan sobre mensajes nuevos,
eventos de calendario, alarmas así como
eventos continuos. El Panel de notificaciones
se visualiza cuando la Barra de estado se
desliza hacia abajo. También puede acceder
a las aplicaciones QSlide y a Ajustes Rápidos
desde esta pantalla.
Toque para acceder rápidamente al menú
Fecha y hora
Toque una aplicación QSlide para abrir una
ventana pequeña de la pantalla. Toque
para eliminar, agregar o re-acomodar las
aplicaciones QSlide.
Para cerrar el Panel de notificaciones,
toque y arrastre la ficha hacia la parte
superior de la pantalla.
Toque para borrar todas las notificaciones.
Área de Ajustes rápidos
• Toque cada clave de ajustes rápidos para
encenderla/apagarla.
.
16
Page 59

• Mantenga presionada una opción para
acceder al menú de ajustes de la función.
• Toque
para eliminar, agregar o
re-acomodar las opciones.
Toque para abrir el menú
Ajustes
.
Llamar/Mensajería
Bastan algunos toques para hacer una
llamada o enviar un mensaje.
Realizar una llamada
1 En la pantalla principal, toque
2 Marque el número al que desea llamar o
escriba el nombre del contacto.
3 Una vez ingresado el número, toque Llamar
.
NOTA
Para responder una llamada entrante
mientras la pantalla se encuentra bloqueada,
deslice el icono
la pantalla esté desbloqueada, solo debe tocar el
icono
en cualquier dirección. Cuando
para responder.
Enviar un mensaje
1 En la pantalla principal, toque
2 Toque Nuevo para crear un mensaje nuevo.
3 Ingrese el nombre o el número al que desea
enviar el mensaje o toque
un número de Registros, Contactos,
Favoritos o Grupos.
4 Redacte el mensaje y presione
NOTA
Para que puedas usar todas las funciones
de los mensajes, debes seleccionar la aplicación
Mensajes de LG como predeterminada. De lo
contrario, las funciones de mensajes estarán
limitadas.
Teléfono
.
Mensajes
.
para seleccionar
.
17
Page 60

Contactos
Puede sincronizar automáticamente los
contactos del teléfono con cualquiera de
sus agendas en línea, o incluso importar
contactos desde otra tarjeta Micro SIM. Para
importar/exportar contactos, toque la
Menú
> Importar/Exportar.
Crear un nuevo contacto
1 Para crear un nuevo contacto toque ,
seleccione la cuenta donde desea guardar
el contacto (si es necesario) e ingrese la
información del contacto.
2 Toque Agregar otro campo para agregar más
categorías.
3 Toque Guardar para guardar el contacto.
NOTA
Para agregar un número a sus contactos a
partir de una llamada reciente, busque el número
en el registro de llamadas y toque el número. Toque
Nuevo contacto
contactos o toque
un nuevo número a los contactos existentes.
para crear una nueva entrada de
Actualizar contacto
Tecla
para agregar
18
Page 61

Navegador
Utilice el navegador web para navegar en la
Internet con facilidad.
Explorar la Web
1 Desde la pantalla principal, toque
Aplicaciones
2 Toque la barra URL en la parte superior de la
pantalla e ingrese la dirección del sitio web.
3 Toque
web.
>
MetroWEB
en el teclado para navegar al sitio
.
19
Page 62

Cámara
1 Desde la pantalla principal toque
>
Cámara .
Aplicaciones
Flash
Cambiar de
cámara
Modo de disparo
20
Ajustes
Cambiar de modo
Capturar
Galería
Page 63

Videocámara
1 Desde la pantalla principal toque
>
Cámara .
2 Deslice el icono Cambiar de modo hacia
abajo para
Videocámara.
alternar del modo Cámara a
Aplicaciones
Flash
Cambiar de
cámara
Modo de grabación
Ajustes
NOTA
Para acceder a la cámara o videocámara
frontal, toque
ajustes de la cámara/grabadora.
. Toque para ver y cambiar los
Cambiar de modo
Grabar
Galería
Compartir fotos o videos
1 Desde la pantalla principal, toque
>
Galería
.
2 Toque un álbum.
3 Toque
4 Toque Compartir.
5 Seleccione el método que desea usar para
y luego seleccione la imagen o el
video que desea compartir.
compartir y enviarlo.
Aplicaciones
21
Page 64

Cuenta de Google
La primera vez que abre la aplicación de
Google deberá iniciar sesión. Si no tiene
cuenta en Google, le aparecerá la opción de
crear una.
Creación de una cuenta de
Google
1 Desde la pantalla principal, toque
Aplicaciones
General
Agregar cuenta
2 Toque Nueva para iniciar el asistente para la
configuración de Gmail.
NOTA
ingrese la información de su cuenta y toque
3 Luego debe seguir las instrucciones de
instalación e introducir la información
necesaria para activar la cuenta. Espere
mientras el servidor crea la cuenta.
SUGERENCIA
podrá acceder a Gmail, Google Apps y usar
muchos servicios de Google en el teléfono.
>
>
Si ya tiene una cuenta, toque
Ajustes
Cuentas y sincronización
>
Google
.
Una vez que cree la cuenta Gmail,
>
ficha
Existente
>
,
.
22
Page 65

Descarga de aplicaciones
Uso de la Play Store.
1 Desde la pantalla principal, toque
Aplicaciones >Play Store
2 Toque una categoría desde la página de inicio
o toque
3 Toque INSTALAR o el botón de Precio para
descargar una aplicación.
4 Si está de acuerdo con los requisitos de
acceso de la aplicación, toque ACEPTAR.
5 Las aplicaciones se descargarán e instalarán.
para buscar una aplicación.
Administración de las
aplicaciones
1 Desde la pantalla principal, toque
Aplicaciones
Aplicaciones.
2 Deslice hacia la izquierda o hacia la derecha
para cambiar a la pestaña DESCARGADAS,
EN EJECUCIÓN O TODAS.
3 Toque una aplicación para ver información
detallada, desinstálela o deténgala para que
no se ejecute en el fondo.
>
Ajustes
Mover aplicaciones
Para administrar el almacenamiento interno de
manera eficaz, puede mover las aplicaciones
del teléfono a la tarjeta microSD.
1 Desde la pantalla principal, toque
Aplicaciones
Aplicaciones.
2 Toque la aplicación descargada y luego toque
Mover a la MicroSD.
>
Ajustes
.
>
>
23
Page 66

Correo electrónicos
Puede mantenerse conectado con MS
Exchange y otros proveedores populares de
correo electrónico.
Configuración de una cuenta
1 Desde la pantalla principal, toque
Aplicaciones
sincronización
2 Seleccione un proveedor de correo
electrónico.
3 Escriba su dirección de correo electrónico y
contraseña, a continuación, toque Siguiente.
4 Siga las instrucciones restantes.
Envío de un correo electrónico
1 En la pantalla principal, toque
>
E-mail
2 Toque Escribir .
3 Ingrese su texto Toque Adjuntar
adjuntar un archivo (si es necesario).
4 Toque Enviar
electrónico.
SUGERENCIA
y vibración para recibir notificaciones cuando recibe
un nuevo correo electrónico. Mientras la aplicación
de correo electrónico está abierta, toque la
Menú
>
electrónico deseada > deslizar la pantalla hacia abajo
a la sección de AJUSTES DE NOTIFICACIONES y
establecer la opción deseada (s).
>
Ajustes
>
>
Agregar cuenta
Cuentas y
>
Aplicaciones
.
para enviar el correo
Puede configurar alertas de sonido
Ajustes
> toque la cuenta de correo
E-mail
para
Tecla
.
24
Page 67

QuickMemo
La función QuickMemo le permite realizar
capturas de pantalla y crear notas en ellas.
1 Para acceder a la función QuickMemo,
deslice la Barra de estado hacia abajo y
toque
.
- o Presione la tecla Quick Button del lado
izquierdo del teléfono.
O
2 Seleccione la opción de menú deseada desde
la barra de herramientas en la parte superior
de la pantalla. Luego cree un memo.
3 Toque en la barra de herramientas para
guardar la nota Para salir de la función
QuickMemo en cualquier momento, toque la
Tecla Atrás
SUGERENCIA
actual en la pantalla y usar otras funciones del
teléfono. Toque
fondo que desea utilizar. Toque
la nota con los demás a través de cualquiera de las
aplicaciones disponibles.
.
Toque para mantener el memo
para seleccionar el tipo de
para compartir
25
Page 68

QSlide
La Función QSlide permite una superposición
en la pantalla del teléfono para realizar
fácilmente múltiples tareas.
1 Abra el Panel de notificaciones y toque
la aplicación deseada en la sección de
Aplicaciones QSlide
-o Mientras usa una aplicación compatible con
QSlide
, toque . La función aparecerá en
forma continua en una ventana pequeña en
la pantalla.
2 Están disponibles las opciones siguientes.
NOTA
La función QSlide puede admitir hasta dos
ventanas al mismo tiempo.
.
O
T
oque para volver
a la vista de
pantalla completa.
Deslice para
ajustar la
transparencia.
Toque para salir
de la función
QSlide
.
26
Page 69

Cómo conectar
el teléfono a la
computadora
Al conectar su teléfono a una PC, puede
transferir datos desde y hacia la misma
directamente.
Transferir música, fotos y videos
usando el modo Sincronización
multimedia (MTP)
1 Conecte el teléfono a la PC con el cable USB.
2 Seleccione la opción Sincronización
multimedia (MTP) en la pantalla de conexión
tipo USB.
3 El teléfono aparecerá como otro disco duro
en la computadora. Haga clic en la unidad
para verlo. Copie los archivos desde la PC a
la carpeta de la unidad.
4 Cuando haya terminado de transferir los
archivos, deslice la barra de estado hacia
abajo y toque USB conectado > Cargar
teléfono. Ahora puede desconectar el
dispositivo de forma segura.
27
Page 70

Hotspot móvil
Convierta su teléfono en un punto de Wi-Fi
portátil, para poder compartir su conexión de
datos móviles con hasta 8 dispositivos.
Para utilizar la funcionalidad de Correo de voz
visual de su teléfono, debe tener el servicio
Buzón de voz visual añadido a la tarifa de su
plan.
Verá
en la Barra de estado cuando la
función esté activa.
NOTA
No puedes utilizar Wi-Fi y su teléfono como
un punto de acceso al mismo tiempo.
Configurar Hotspot móvil
1 En la pantalla principal, toque la
>
Ajustes del sistema
Conexiones y Redes > Mobile Hotspot
2 Toque Configurar el Punto de Acceso.
Toque el campo
ingresar un nombre de red nuevo, si así
lo desea.
Toque el menú desplegable
seleccione de las siguientes opciones.
Se recomienda seguridad
debido a la gran seguridad de datos y a
que evita el uso no autorizado de su plan
de datos.
•
Abrir
•
WPA PSK
•
WPA2 PSK
Para cualquier nivel de seguridad que
no sea Abierto, toque el campo de
Contraseña
Toque
Guardar
SSID de red
para ingresar una contraseña.
.
> ficha
WPA2 PSK
Tecla Menú
Redes
.
para
Seguridad
>
y
28
Page 71

Llamada Wi-Fi
Para utilizar la llamada Wi-Fi, utilice la tarjeta
SIM que vino con su teléfono. Una tarjeta
SIM diferente puede que no funcione con
la función de Llamada Wi-Fi. También debe
tener una dirección de emergencia 911
registrada en su cuenta. Inicie sesión en su
cuenta en
Ingrese en su perfil y haga clic en Información
del cliente y siga las opciones del menú para
registrar su dirección.
NOTA
asistencia del administrador para el registro de
Direcciones de 911.
Para habilitar/desactivar Wi-Fi Calling
1 Desde la pantalla principal, toque la
2 Toque el botón Wi-Fi Calling para
Para cambiar las preferencias de
conexión de Wi-Fi Calling
1 Desde la pantalla principal, toque la
2 Seleccione sus preferencias de conexión.
Sobre Wi-Fi Calling
Wi-Fi Calling puede mejorar su cobertura y
permitirle realizar llamadas telefónicas y enviar
mensajes dentro de una red de Wi-Fi (cuando
haya alguna disponible).
http://www.metropcs.com/
Las cuentas corporativas pueden requerir
Menú
>
Redes
Calling
activar/desactivar la función.
Menú
Redes
Calling
Ajustes del sistema
>
Conexiones y Redes
.
>
Ajustes del sistema
>
Conexiones y Redes
.
> ficha
>
Wi-Fi
> ficha
>
Wi-Fi
.
Tecla
Tecla
29
Page 72

Detalles de la cuenta
• Recordatorio por mensaje de texto
MetroPCS envía un recordatorio por
mensaje de texto a tu teléfono antes del
vencimiento del pago.
• Resumen electrónico
cuenta en línea.
estados.)
• Detalle de llamadas
: mira tu resumen de
(Solo disponible en ciertos
: mira tu detalle de
llamadas en línea para consultar un
listado de todas las llamadas locales
realizadas durante el ciclo de servicio.
(Se aplica cargo adicional.)
:
Opciones de pago
Existen varias maneras de pagar tu servicio
MetroPCS.
(Se puede aplicar una tarifa de conveniencia.)
•
Pago automático: se debita
automáticamente de tu tarjeta de crédito
o débito cinco días antes del vencimiento
del pago.
•
Pago Express: paga en línea con tarjeta
de crédito o débito en metropcs.com.
•
Buzón:* puedes dejar un cheque o giro
postal en un buzón de una tienda de
MetroPCS.
•
Por correo: coloca su número de cuenta
y número de teléfono en su cheque o giro
postal y envíalo a: MetroPCS, P.O. Box
5119, Carol Stream, IL 60197-5119.
30
Page 73

•
Por teléfono a través del sistema
automatizado.
para pagar con tarjeta de crédito o débito
desde su teléfono de MetroPCS. (Se aplica
una tarifa de conveniencia.)
•
Terminal de pago en la tienda:*
acepta efectivo y tarjeta de débito o
crédito (con PIN). (Se aplica una tarifa de
conveniencia.)
•
Pago en la tienda:* paga en una
ubicación de pago autorizada con dinero
en efectivo, cheque o tarjeta de crédito
o débito. (Los cargos varían según la
ubicación.)
•
eWallet: suscríbete a Mi Cuenta en
metropcs.com y crea tu propio eWallet
seguro donde puedes guardar tarjetas
para pago rápido, configurar pagos
automáticos y agregar fondos a tu cuenta
MetroConnect
•
Pago por mensaje de texto: la forma
fácil y segura de pagar tu servicio mensual
de MetroPCS. Registra tu tarjeta de crédito
o débito en el servicio eWallet de MetroPCS
y responde un mensaje de texto de
PAYNOW (729699) para pagar.
* No disponible en todas las tiendas.
Marque 1.888.8metro8
®
.
MyMetro®
•
Administra tu cuenta de MetroPCS
directamente desde tu teléfono.
Marcando cualquiera de los teléfonos de
servicio al cliente puedes cambiar tu plan
de tarifas, cambiar tus funciones y pagar tu
factura. Solo sigue las instrucciones en tu
teléfono.
31
Page 74

Para obtener ayuda
Visita tu tienda MetroPCS local o consulta las
siguientes opciones si necesitas más ayuda.
•
Suscríbete a Mi cuenta para ver los detalles
de la cuenta, verificar tu saldo, hacer un
pago, administrar eWallet y más.
•
Servicio automatizado al cliente de MetroPCS
desde cualquier teléfono
y sigue las instrucciones (1.888.863.8768)
•
Información en línea...............metropcs.com
Síguenos en:
twitter.com/metropcs
facebook.com/metropcs
Cobertura: la cobertura y los servicios no
están disponibles en todas partes. El servicio
de larga distancia nacional solo se encuentra
disponible en el territorio continental de los
EE. UU. y Puerto Rico. La cobertura, las
tarifas, los servicios y las funciones están
sujetos a cambios.
Mensajes de texto: los mensajes
de texto internacionales ilimitados están
restringidos a los países, destinos, tecnologías
y proveedores de servicio seleccionados y
están sujetos a cambios sin previo aviso,
al igual que los términos y condiciones
del servicio internacional. Visita metropcs.
com/world para obtener más detalles.
Los mensajes de texto pueden enviarse
únicamente dentro del área de cobertura
de MetroPCS o en un área de roaming
compatible. No se garantiza la entrega de los
mensajes de texto.
.........1.888.8metro8
32
Page 75

General: el Plan familiar está limitado a
cinco líneas asociadas a una cuenta y al uso
de teléfonos elegibles. Oferta por tiempo
limitado. Se aplican ciertas restricciones. La
selección de teléfonos y su disponibilidad
podría variar según la tienda. Se requiere
un dispositivo 4G o 4GLTE compatible de
MetroPCS; no todas las funciones ni todos
los planes están disponibles con todos los
dispositivos. Los servicios y las funciones de
MetroPCS son solo para uso personal. No
todos los servicios están disponibles en todas
las áreas con cobertura.
Planes de datos: para los planes de
datos ilimitados 4G o 4GLTE, se aplican las
velocidades completas disponibles hasta
la asignación de datos mensual; luego, las
velocidades disminuyen a las velocidades
promedio de la red de MetroPCS por el
resto del ciclo de facturación. El teléfono
continuará indicando que recibe una señal
4G o 4GLTE de MetroPCS incluso si su
uso no se encuentra a la velocidad total
disponible. El uso de Wi-Fi no cuenta como
parte de su asignación de datos mensual.
Se podrían cobrar cargos adicionales por
el uso de algunos contenidos, funciones o
servicios, o estos podrían requerir un plan
de datos elegible o acceso a una conexión
Wi-Fi. Algunos servicios o funciones pueden
experimentar degradación de rendimiento a
velocidades de red CDMA. La adquisición de
la recarga de datos Data Top-Up proporciona
500 MB de datos ultrarrápidos. La asignación
de la recarga de datos Data Top-Up solo se
podrá utilizar durante el ciclo de facturación
en el que fue adquirida.
33
Page 76

Uso anormal: se podría disminuir,
suspender, finalizar o restringir el servicio
debido al uso indebido o anormal, a la
interferencia con nuestra red o con nuestra
capacidad para proporcionar un servicio
de calidad para otros usuarios o a la
predominancia del uso de roaming. Visite
una tienda o metropcs.com para obtener
información adicional sobre cobertura,
detalles y Términos y condiciones del servicio
(incluyendo la disposición de arbitraje).
Derecho de autor: las marcas
comerciales y otra propiedad intelectual
relacionada con MetroPCS son propiedad
exclusiva de T-Mobile USA, Inc.Todas las
otras marcas comerciales y propiedad
intelectual pertenecen a sus respectivos
dueños. Copyright ©2014 T-Mobile USA,
Inc. El uso de los servicios de MetroPCS
constituye la aceptación de nuestros Términos
y condiciones de servicio; disponibles en
metropcs.com/terms.
Tu dispositivo podría no funcionar si alteras
el software original. Este dispositivo solo
funcionará con versiones firmware cuyo
uso haya sido aprobado por MetroPCS y el
fabricante del dispositivo. Si se coloca un
firmware no autorizado en el dispositivo, este
no funcionará.
Compatibilidad con audífonos: este
teléfono ha sido probado y calificado para
el uso con audífonos en algunas de las
tecnologías de servicio celular que utiliza. Sin
embargo, este teléfono podría tener algunas
tecnologías de servicio celular que no se
34
Page 77

han probado para el uso con audífonos. Es
importante que pruebes cuidadosamente
las diferentes funciones de este teléfono
en distintas ubicaciones, con tus audífonos
o tu implante coclear, para determinar si
escuchas alguna interferencia. Consulta con
tu proveedor de servicio o con el fabricante
de este teléfono para obtener información
sobre la compatibilidad con audífonos. Si
tienes preguntas sobre las políticas de cambio
o devolución, consulta a tu proveedor de
servicio o al vendedor del teléfono.
El sistema GPS de tu teléfono está habilitado
en forma predeterminada para permitir el uso
de futuros servicios; consulta el manual de tu
teléfono para obtener instrucciones en caso
de que desees deshabilitar tu GPS para fines
no asociados al 911.
Términos y Condiciones
del Servicio de MetroPCS
(“Acuerdo”)
Para obtener la versión más
reciente y actualizada de los
Términos y condiciones de servicio
de MetroPCS, los cuales deberá
aceptar y a los que estará sujeto
cuando active, use, cambie o pague
su servicio de MetroPCS, visite
metropcs.com/terms.
Bienvenido a MetroPCS. Nos complace
que nos haya elegido como su proveedor
de servicio celular. Use esta página como
referencia para preguntas sobre su servicio
y para conocer los términos y condiciones
de servicio que rigen el servicio que ha
35
Page 78

comprado de MetroPCS. Estos Términos y
condiciones de servicio se aplican a todos los
dispositivos y servicios celulares que nosotros
le proporcionamos y constan de varias
partes, las cuales podrán ser modificadas
ocasionalmente:
•
Términos y condiciones del servicio de
MetroPCS
(http://www.metropcs.com/terms);
•
Su plan de tarifas de MetroPCS
://www.metropcs.com/plans);
(http
•
Política de privacidad de MetroPCS
://www.metropcs.com/privacy-policy);
(http
•
Términos de uso del sitio de MetroPCS
(http://www.metropcs.com/metropcs-online-terms-of-use);
•
Divulgación sobre la red de MetroPCS
(www.metropcs.com/terms-network-disclosure);
•
Términos de uso de Wi-Fi de MetroPCS
(http://www.metropcs.com/wi-fi-terms-of-use);
and
•
Los términos y condiciones relacionados
con cualquier función adicional que pueda
haber seleccionado o pueda estar incluida
en su plan de tarifas, incluyendo, entre
otros
:
•
Términos de uso de MetroWEB®
(http://www.metropcs.com/metroweb-terms-of-use)
•
Términos de uso de MetroMUSIC®
(http://www.metropcs.com/metromusic-terms-and-conditions)
•
Términos de uso de Trae tu propio
teléfono
(http://www.metropcs.com/byod-terms-and-conditions)
36
Page 79

•
Términos de uso de música ilimitada
Rhapsody
(http://www.metropcs.com/rhapsody-unlimited-music-terms)
•
Términos de uso de Metro Block-it®
(http://www.metropcs.com/block-it)
•
Términos de uso de Metro411
(http://www.metropcs.com/metro411-terms-of-use)
•
Términos de servicio de MyExtras®
(http://www.metropcs.com/myextras-terms-of-use)
•
Términos y condiciones de
MetroBACKUP
(http://www.metropcs.com/metrobackup-terms-and-conditions)
•
Llamadas internacionales ilimitadas de
®
SM
MetroPCS
(http://www.metropcs.com/international-long-distance)
En caso de que los términos y condiciones
relacionados con alguna función que pueda
haber seleccionado o que pueda estar
incluida en su plan de tarifas creen conflictos
con los Términos y condiciones de servicio de
MetroPCS, regirán estos últimos.
Al: (a) proporcionarnos una firma escrita o
electrónica o comunicarnos en forma verbal
que acepta los Términos y condiciones de
servicio de MetroPCS; (b) activar el Servicio
(si es un nuevo suscriptor); (c) usar su
Servicio después de la activación del mismo
o después de realizar un cambio o una
adición a su Servicio; (d) pagar su Servicio;
o (e) no activar el Servicio dentro de los 30
días posteriores a la compra de su dispositivo
celular, a menos que devuelva su dispositivo
celular dentro del período de devolución
correspondiente de MetroPCS, usted acepta
37
Page 80

los Términos y condiciones de servicio de
MetroPCS y los términos y condiciones de
servicio y uso relacionados con cualquier
función que pueda haber seleccionado o que
pueda estar incluida en su plan de tarifas,
incluyendo, a título enunciativo:
•
Usted renuncia a su derecho a un juicio con
jurado por disputas con MetroPCS;
•
Sus disputas con MetroPCS serán
decididas por un árbitro;
•
Usted renuncia a su derecho de entablar o
participar en litigios de demandas colectivas
contra MetroPCS;
•
Usted proporcionará a MetroPCS
información fidedigna sobre usted;
•
MetroPCS podrá comunicarse con usted
ocasionalmente acerca de su Servicio;
•
Pagará todos los impuestos y tarifas
reglamentarias aun si su plan de tarifas los
incluye; y
•
MetroPCS podrá cancelar su Servicio si
usted no lo paga a tiempo o si viola los
Términos y condiciones de servicio de
alguna manera, incluyendo abuso del
Servicio y quebrantamiento de las leyes
pertinentes.
38
Page 81

Servicio de atención al cliente. Si tiene
alguna pregunta acerca de su Servicio o de
la información en este Acuerdo, puede llame
a nuestro centro de activación al
1-888-8metro8.
Facturación de servicios Premium y de
terceros
Solo residentes de California
Ciertos terceros, aparte de MetroPCS,
pueden aplicar cargos en tu factura por
servicios premium. Puedes acceder a estos
servicios y autorizar que se apliquen los
cargos a tu factura, a través de tu teléfono
o cuenta en línea. MetroPCS también ofrece
a sus clientes, sin costo adicional, la opción
de restringir la aplicación de cargos por
servicios premium y de terceros a tu cuenta.
Comunícate con servicio al cliente o visita
www.metropcs.com/cramming para obtener
más información.
39
Page 82

 Loading...