

Page 1

ENGLISH
OWNER’S MANUAL
LED LCD TV
Please read this manual carefully before operating the
your TV and retain it for future reference.
LED LCD TV MODELS
M2250D
M2350D
M2450D
M2550D
www.lg.com
Page 2

TABLE OF CONTENTS
2
ENGLISH
CONTENTS
4 ASSEMBLING AND PREPARING
4 Unpacking
5 Parts and buttons
6 Lifting and moving the TV
6 Setting up the TV
6 - Attaching the Stand Base
7 - Detaching the Stand Base and Body
7 - Mounting on a table
9 - Tidying cables
9 - Mounting on a wall
11 REMOTE CONTROL
13 WATCHING TV
13 Connecting an antenna or cable
13 - Connecting an antenna or basic cable
13 - Connecting with a cable box
14 Accessing the TV for the first time
15 Watching TV
15 Managing channels
15 - Setting up channels
16 - Using favorite channels
17 - Checking current program info
19 EPG (Electronic Program Guide) (In digi-
19 - NOW/NEXT Guide Mode
19 - 8 Day Guide Mode
19 - Date Setting Mode
20 - Detailed Information Box
20 - Manual Timer Mode
20 - Schedule List Mode
21 Using additional options
21 - Adjusting aspect ratio
22 - Using the input list
23 - Locking the buttons on the TV (Child
24 Using the Quick menu
24 Using the customer support
24 - Testing the Picture / Sound
24 - Using the product or service informa-
tion
25 CONNECTING TO A PC
25 HDMI connection
26 DVI to HDMI connection
26 RGB connection
27 Adjusting the screen
27 - Selecting an image mode
27 - Customizing image options
28 - Customizing PC display options
28 Adjusting the sound
28 - Selecting an sound mode
29 - Customizing sound options
30 ENTERTAINMENT
30 Using integrated media features
30 - Connecting USB storage devices
32 - Browsing files
33 - Viewing Movies
37 - DivX registration code
37 - Deactivating the DivX feature
38 - Viewing Photos
39 - Listening to Music
tal mode)
41 CUSTOMIZING SETTINGS
41 Accessing main menus
42 Customizing settings
42 - CHANNEL settings
43 - PICTURE settings
46 - AUDIO settings
48 - TIME settings
49 - LOCK settings
50 - OPTION settings
Lock)
Page 3

TABLE OF CONTENTS
3
ENGLISH
52 MAKING CONNECTIONS
52 Connection overview
54 Connecting to a Camcorder, Camera,
HD receiver, DVD, VCR player or Gaming
device
54 - HDMI connection
54 - DVI to HDMI connection
54 - Component connection
55 Connecting to an audio system
55 - Digital optical audio connection
55 - Headphone connection
55 Connecting to a USB
56 MAINTENANCE
56 Updating the TV Firmware
57 Cleaning Your TV
57 - Screen and frame
57 - Cabinet and stand
57 - Power cord
76 LICENSES
58 TROUBLESHOOTING
58 General
59 PC mode
61 SPECIFICATIONS
67 IR CODES
68 EXTERNAL CONTROL DEVICE
SETUP
68 RS-232C Setup
68 Type of connector; D-Sub 9-Pin Male
68 Communication Parameters
69 RS-232C configurations
70 Command reference list
71 Transmission / Receiving protocol
Page 4
ASSEMBLING AND PREPARING
4
ENGLISH
ASSEMBLING AND PREPARING
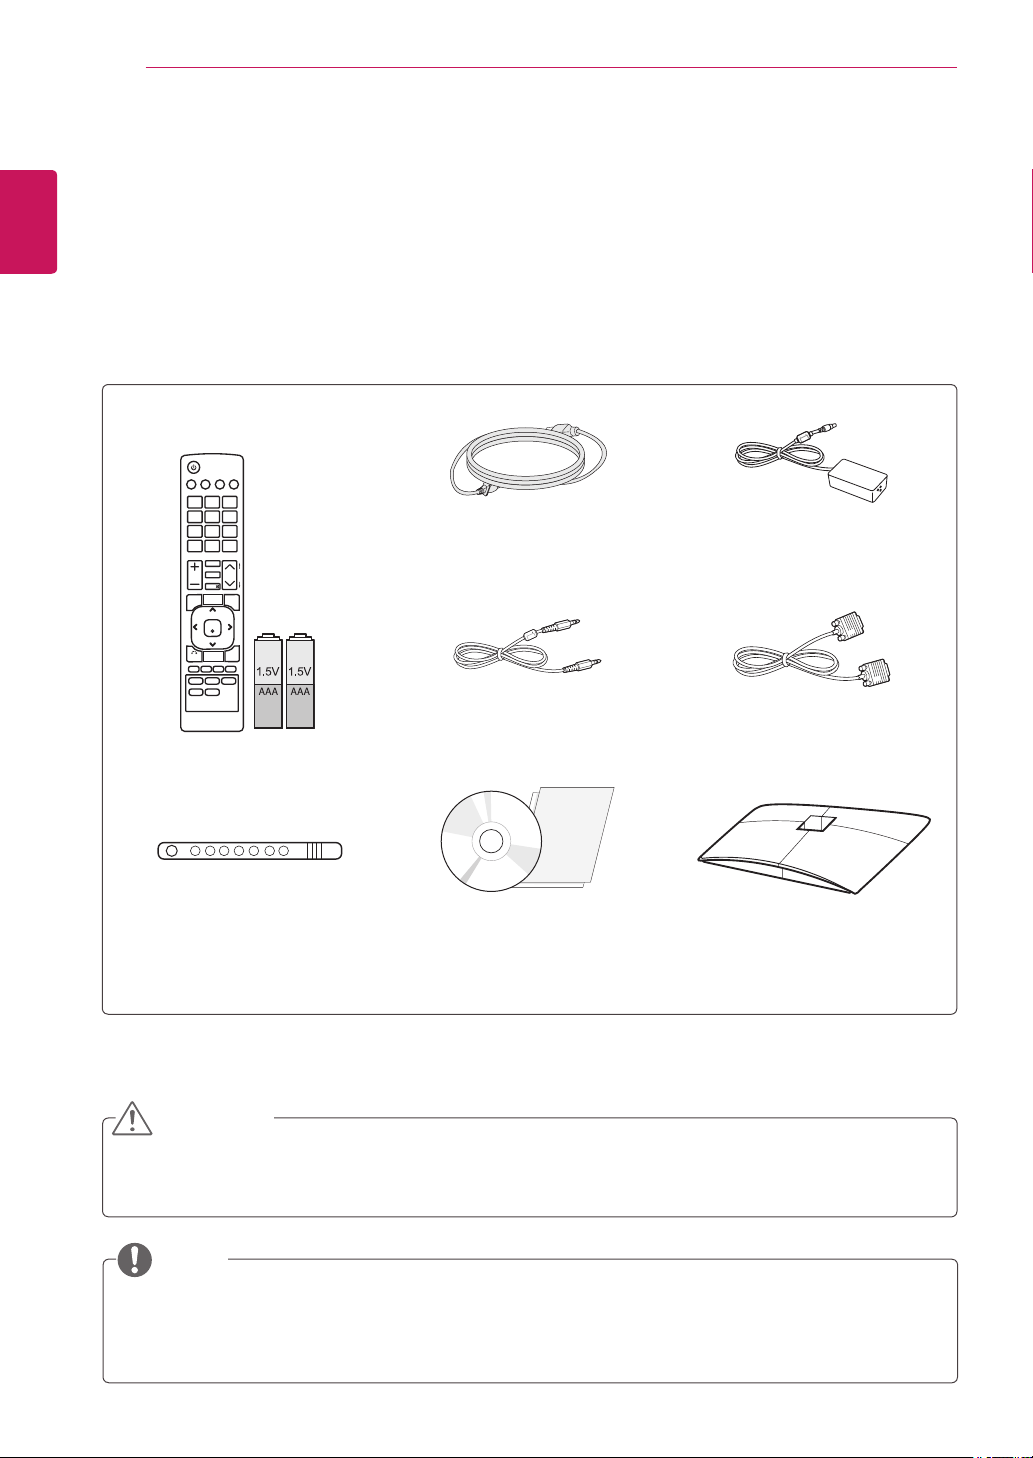
Unpacking
Check your product box for the following items. If there are any missing accessories, contact the local
dealer where you purchased your product. The illustrations in this manual may differ from the actual
product and accessories.
Power Cord
AC-DC Adapter
RGB CableAudio Cable
Remote control and Batteries
Cable Tie
CD (Owner's Manual) /
Card
Stand Base
CAUTION
Do not use any pirated items to ensure the safety and product life span.
Any damages or injuries by using pirated items are not covered by the warranty.
NOTE
The accessories supplied with your product may vary depending on the model.
Product specifications or contents in this manual may be changed without prior notice due to
upgrade of product functions.
Page 5

Parts and buttons
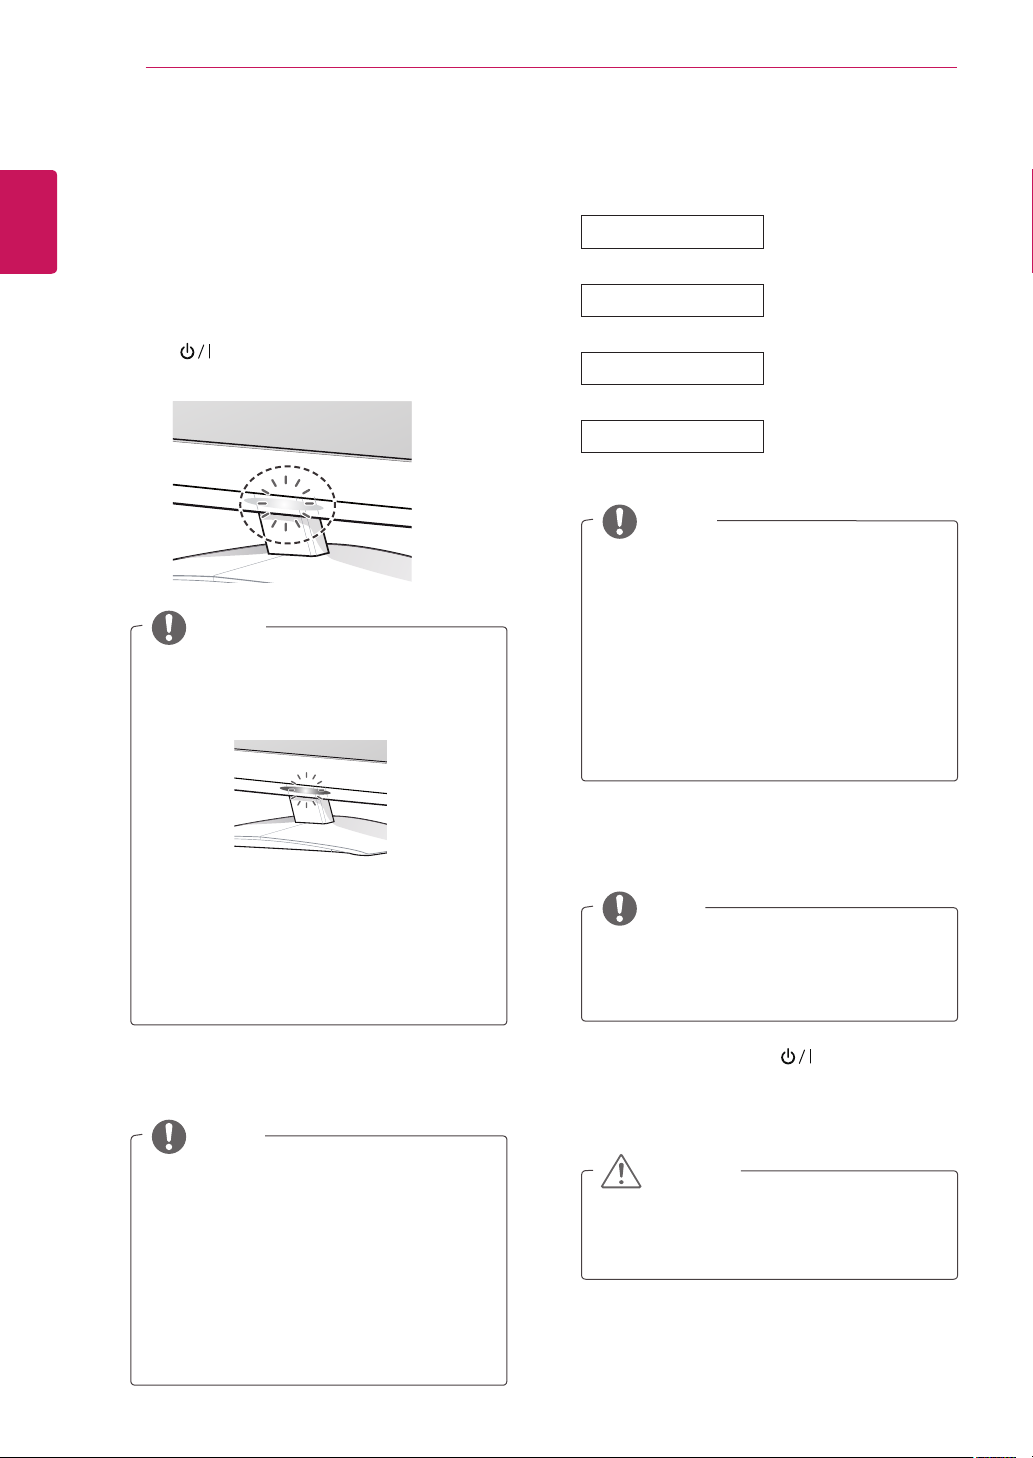
Remote Control Sensor
ASSEMBLING AND PREPARING
Power Indicator
Lighting On: Turned on
Lighting Off: Turned off
Touch Buttons
5
ENGLISH
2
1
Connection panel (See p.52)
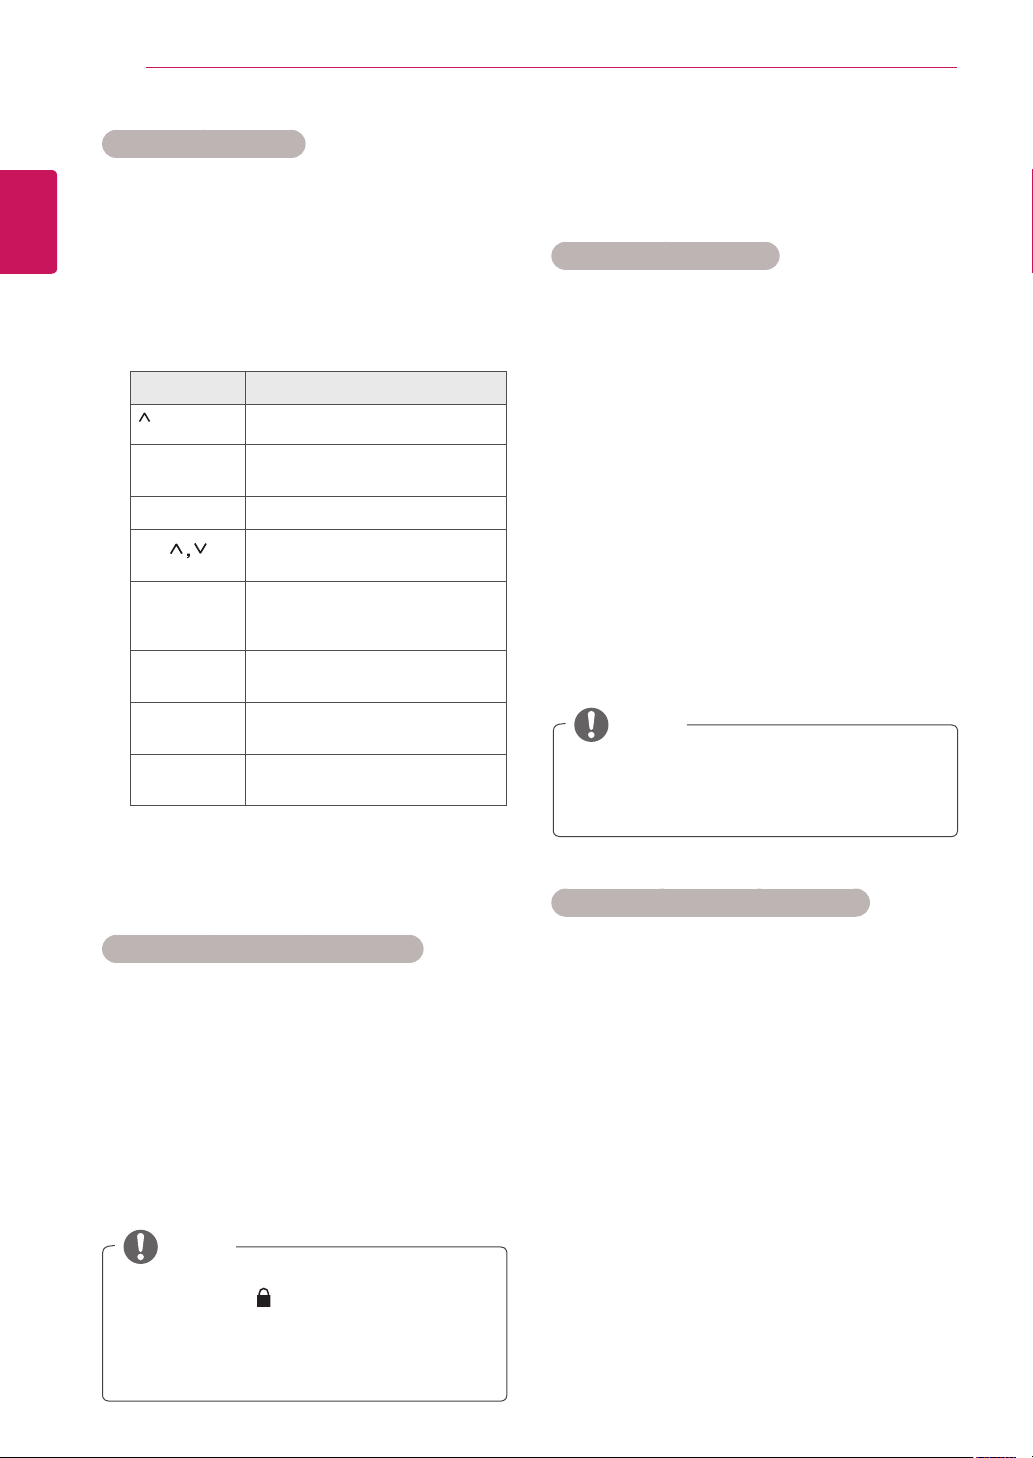
Touch button Description
INPUT Changes the input source.
MENU Accesses the main menus, or saves your input and exits the menus.
ENTER Selects the highlighted menu option or confirms an input.
VOL Adjusts the volume level.
CH Scrolls through the saved channels
/
I
Turns the power on or off.
All of the buttons are touch sensitive and can be operated through simple touch with your finger.
NOTE
You can set the Power indicator to on or off by selecting
OPTION
in the main menus.
Page 6

ASSEMBLING AND PREPARING
6
Lifting and moving the TV
ENGLISH
When moving or lifting the TV, read the following
to prevent the TV from being scratched or
damaged and for save transportation regardless of
its type and size.
CAUTION
Avoid touching the screen at all times, as this
may result in damage to the screen or some
of the pixels used to create images.
It is recommended to move the TV in the
box or packing material that the TV originally
came in.
Before moving or lifting the TV, disconnect
the power cord and all cables.
Hold the top and bottom of the TV frame
firmly. Make sure not to hold the transparent
part, speaker, or speaker grill area.
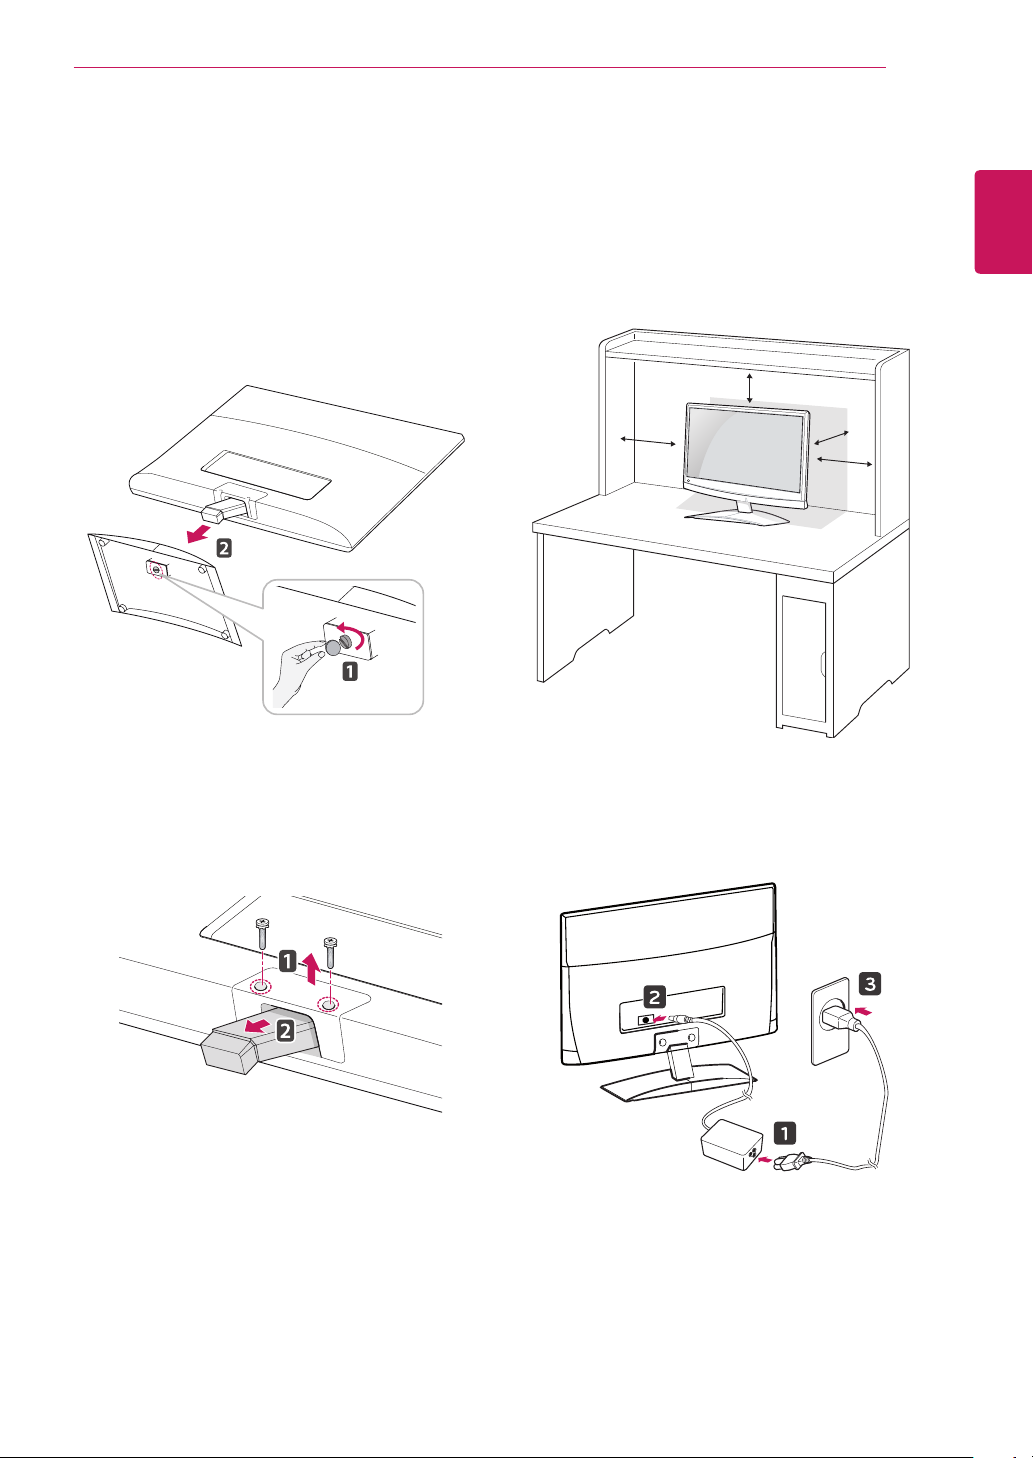
Setting up the TV
Attaching the Stand Base
Place the TV with the screen side down on a
1
flat and cushioned surface.
CAUTION
Lay a foam mat or soft protective cloth
on the surface to protect the screen from
damage.
Attach the
2
the screw to the right with a
Stand Base
from the TV by turning
.
Coin
When holding the TV, the screen should face
away from you to prevent the screen from
scratches.
When transporting the TV, do not expose the
TV to jolts or excessive vibration.
When transporting the TV, keep the TV
upright, never turn the TV on its side, or tilt
towards the left or right.
Page 7
ASSEMBLING AND PREPARING
7
Detaching the Stand Base and Body
Place the TV with the screen side down on a
1
flat and cushioned surface.
Turn the screw to the left, and then pull out
2
the
Stand Base
from the
Stand Body
.
Mounting on a table
Lift and tilt the TV into its upright position on a
1
table.
Leave a 10 cm (minimum) space from the wall
for proper ventilation.
10 cm
10 cm
10 cm
10 cm
ENGLISH
Remove 2 screws and pull out the
3
from the TV.
Stand Body
Connect the
2
to a wall outlet.
AC-DC Adapter
and
Power Cord
Page 8
ASSEMBLING AND PREPARING
8
ENGLISH
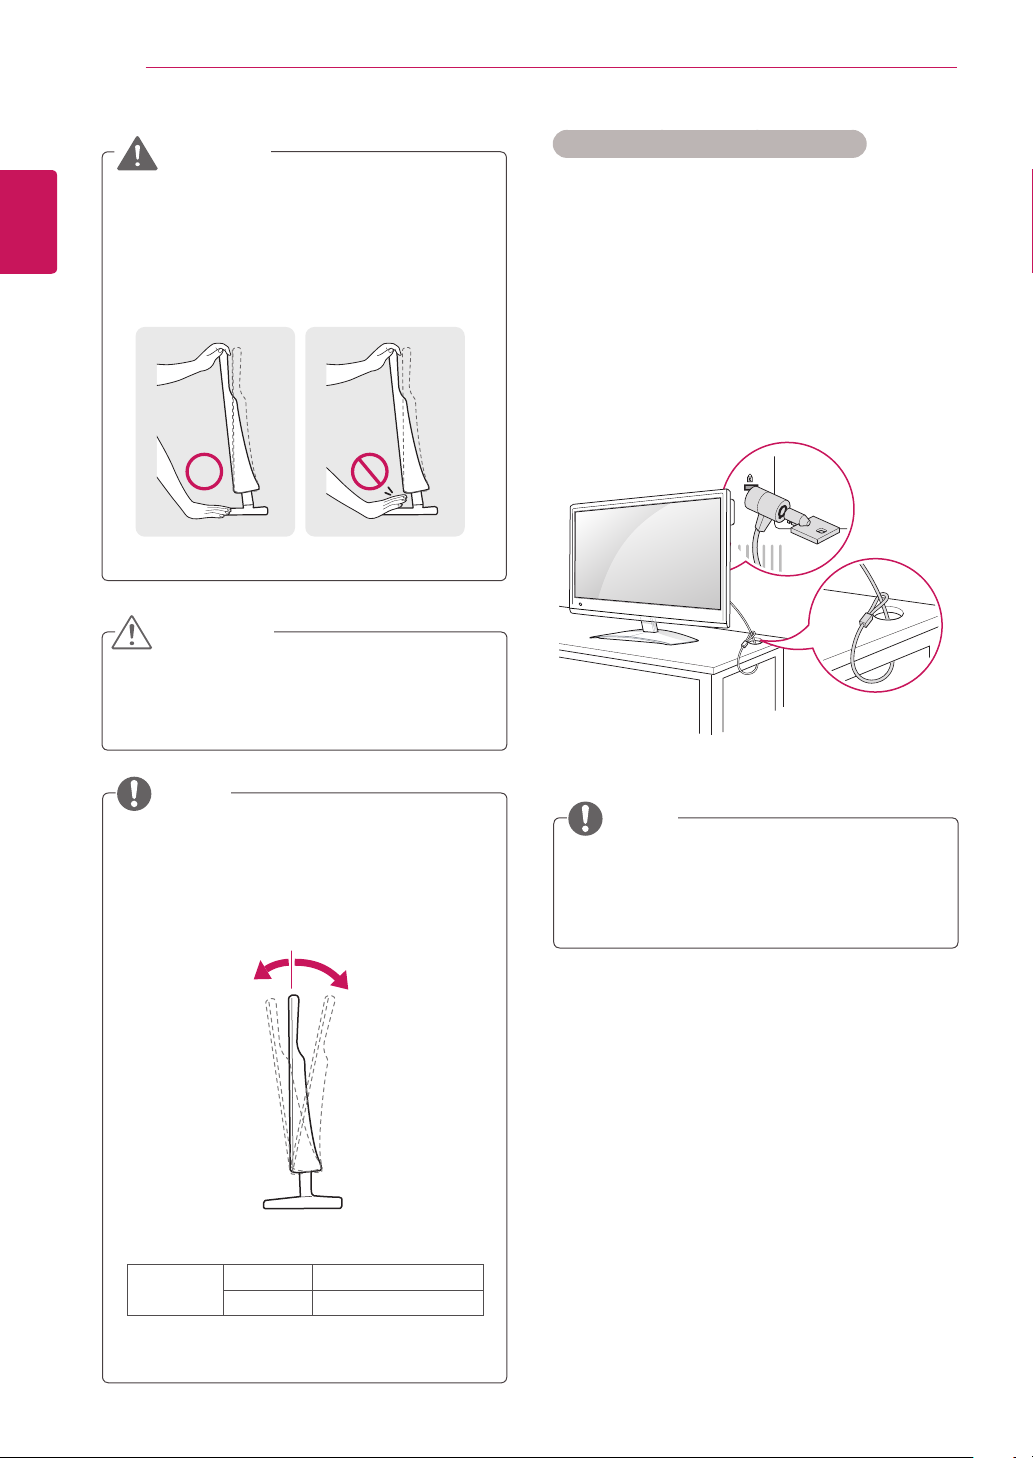
WARNING
When you adjust the angle, do not hold the
buttom of the TV frame as shown on the
following illustration, it may injure your fingers.
CAUTION
Disconnect the power cord first, and then
move or install the TV. Otherwise electric
shock may occur.
Using the Kensington security system
The Kensington security system connector is
located at the back of the TV. For more information
of installation and using, refer to the manual
supplied with the Kensington security system or
visit
http://www.kensington.com
Connect the Kensington security system cable
between the TV and a table.
.
NOTE
Tilt from +10 to -5 degrees up or down to
adjust the angle of the TV to suit your view
BA
Front Rear
Tilt Range Front (A) - 5 °
Rear (B) 10°
NOTE
The Kensington security system is optional.
You can obtain additional accessories from
most electronics stores.
Page 9
ASSEMBLING AND PREPARING
9
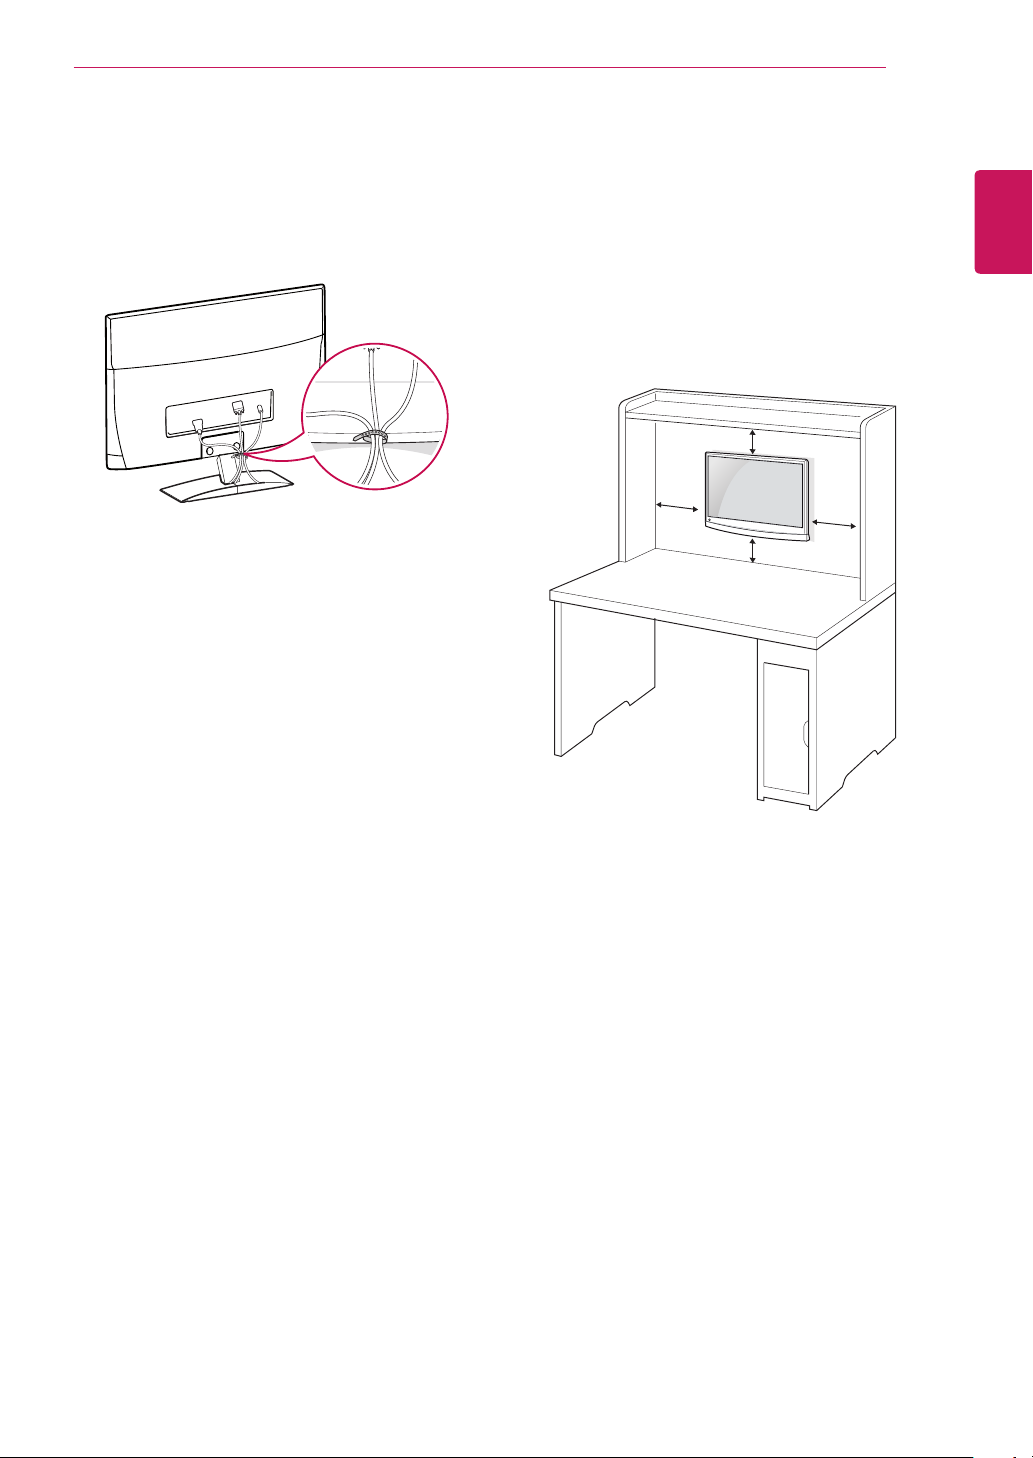
Tidying cables
Gather and bind the cables with the supplied
cable tie.
Mounting on a wall
ENGLISH
For proper ventilation, allow a clearance of 10
cm on each side and from the wall. Detailed
installation instructions are available from your
dealer, see the optional Tilt Wall Mounting
Bracket Installation and Setup Guide.
10 cm
10 cm
10 cm
10 cm
If you intend to mount the TV to a wall, attach
the Wall mounting interface (optional parts) to the
back of the set.
When you install the TV using the wall mounting
interface (optional parts), attach it carefully so it
will not drop.
Please use a wall mount interface in
1
accordance with VESA Standards.
If you use screws longer than standard, the TV
2
might be damaged internally.
If you use improper screws, the product might be
3
damaged and drop from the mounted position.
In this case, LG Electronics is not responsible for
damage.
VESA compatible only with respect to screw
4
mounting interface dimensions and mounting
screw specifications.
Page 10
10
5
ENGLISH
ASSEMBLING AND PREPARING
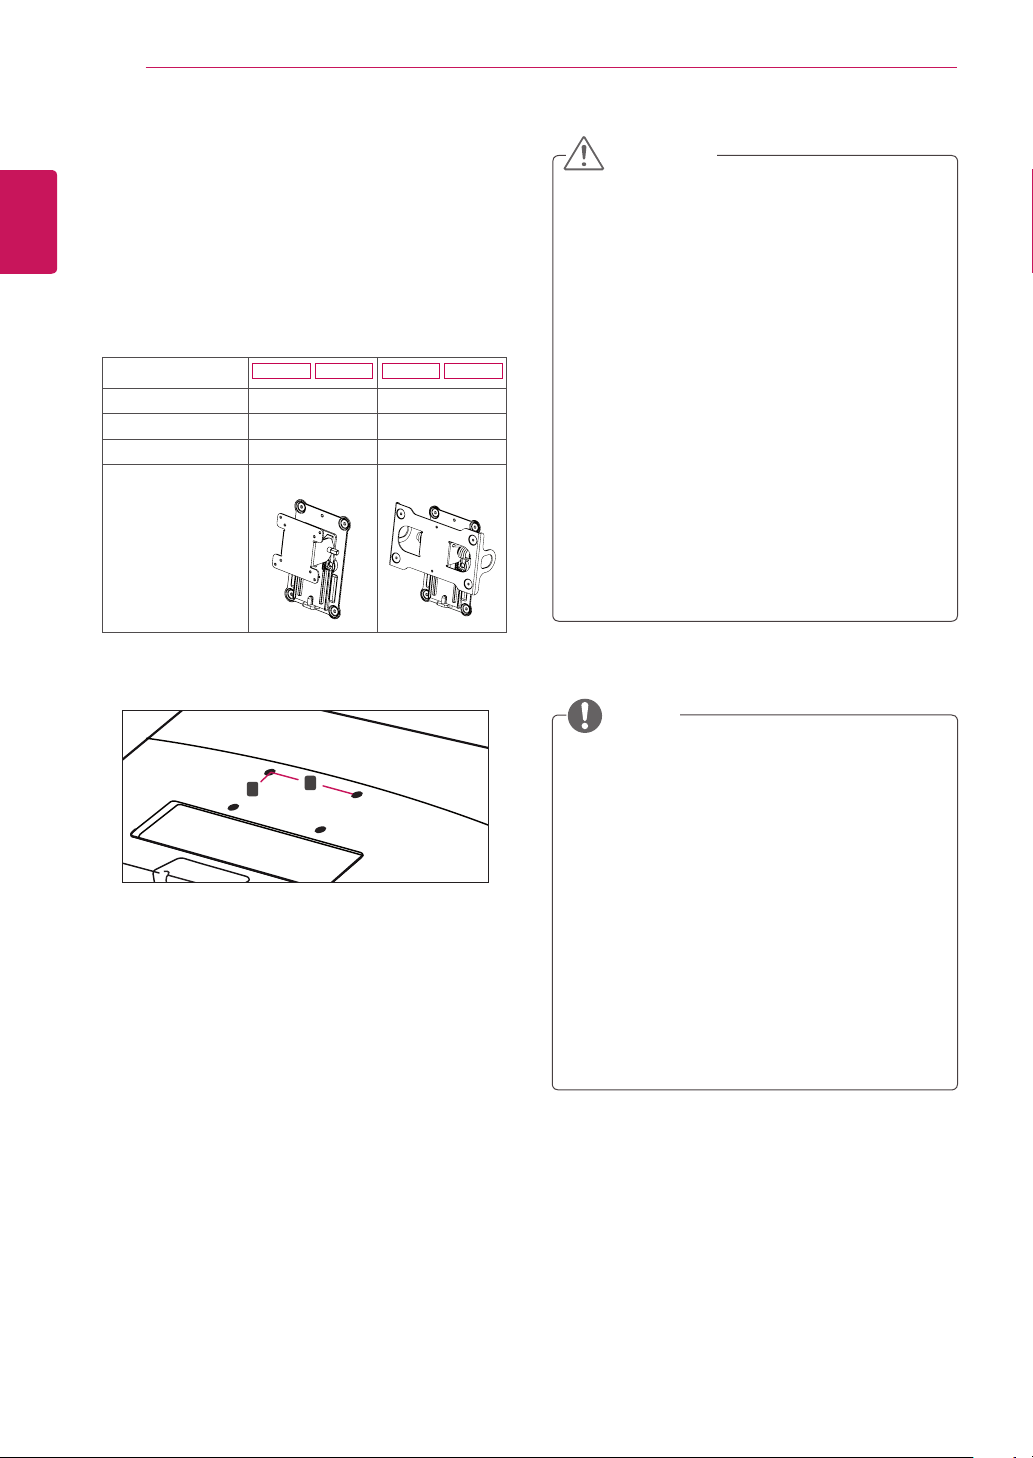
Please use VESA standard as below.
784.8 mm (30.9 inch) and under
* Wall Mount Pad Thickness : 2.6 mm
* Screw : Φ 4.0 mm x Pitch 0.7 mm x
Length 10 mm
787.4 mm (31.0 inch) and above
* Please use VESA standard wall mount pad
and screws.
Model
VESA (A x B) 75 x 75 200 x 100
Standard screw M4 M4
Number of screws 4 4
Wall mount bracket
(optional)
M2250D M2350D M2450D M2550D
RW120 RW240
CAUTION
Disconnect the power cord first, and then
move or install the TV. Otherwise electric
shock may occur.
If you install the TV on a ceiling or slanted
wall, it may fall and result in severe injury.
Use an authorized LG wall mount and
contact the local dealer or qualified
personnel.
Do not over tighten the screws as this may
cause damage to the TV and void your
warranty.
Use screws and a wall mount that complies
with the VESA standard. Any damages or
injuries by misuse or using an improper
accessory are not covered by the warranty.
VESA (A x B)
NOTE
Use the screws that are listed on the VESA
A
B
standard screw specifications.
The wall mount kit includes an installation
manual and necessary parts.
The wall mount bracket is optional. You can
obtain additional accessories from your local
dealer.
The length of screws may differ depending
on the wall mount. Be sure to use the proper
length.
For more information, refer to the
instructions supplied with the wall mount.
Page 11
REMOTE CONTROL
P
A
G
E
1
2
3
4
506
7
8
9
L
Q
TV / PC
INPU
F
11
REMOTE CONTROL
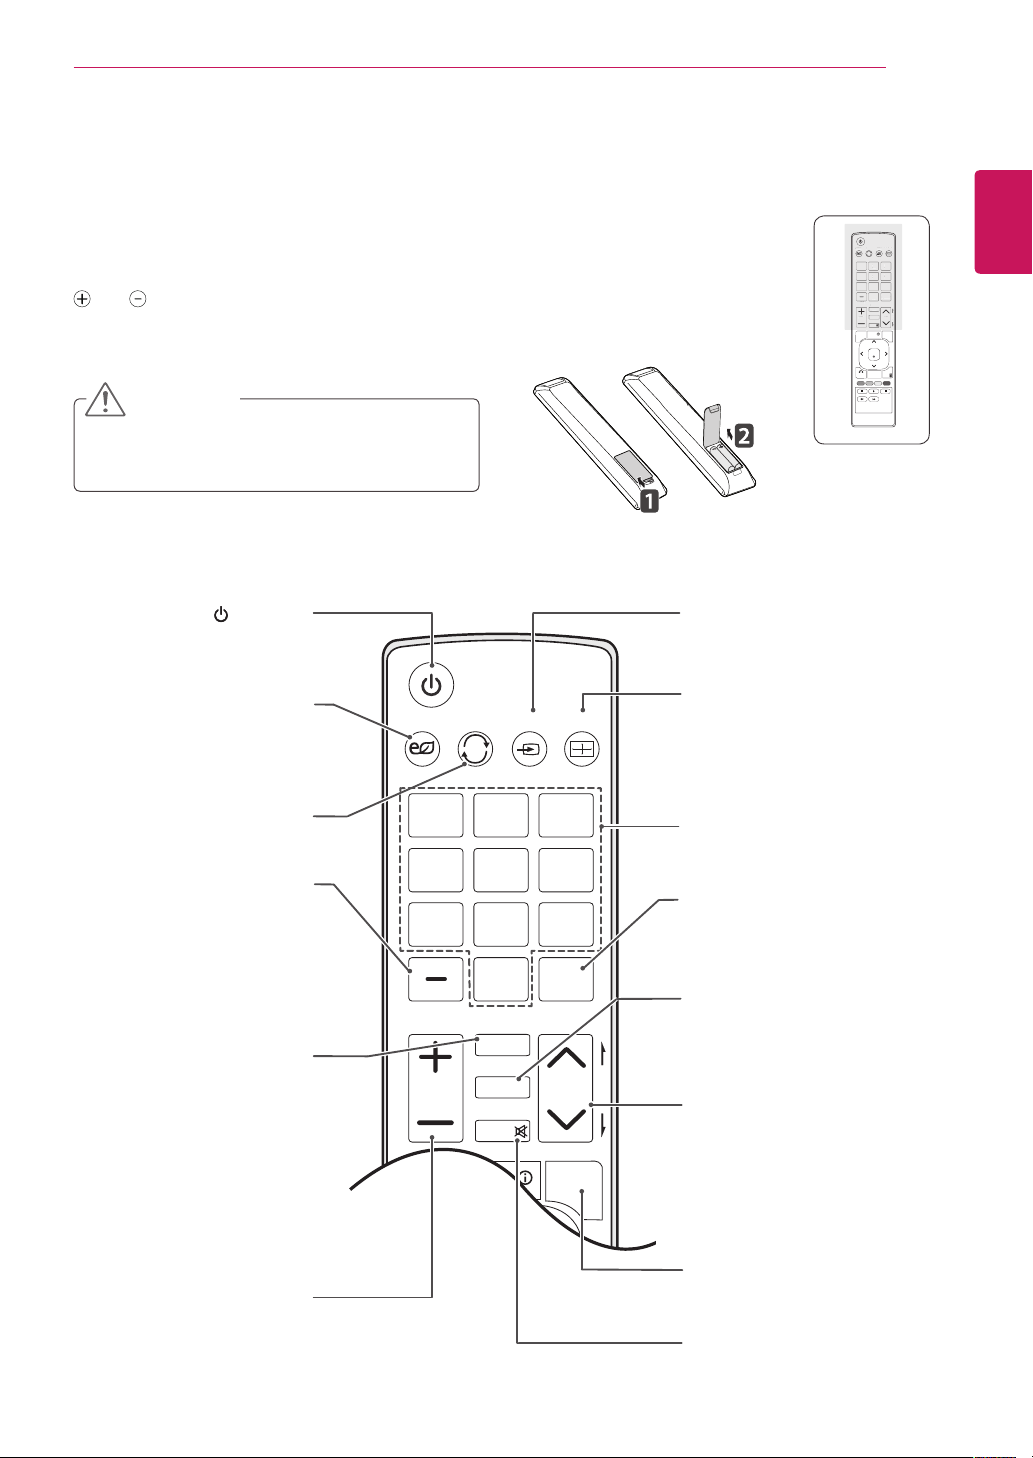
The descriptions in this manual are based on the buttons of the remote control.
Please read this manual carefully and use the TV correctly.
To replace batteries, open the battery cover, replace batteries (1.5 V AAA) matching
and ends to the label inside the compartment, and close the battery cover.
To remove the batteries, perform the installation actions in reverse.
CAUTION
Do not mix old and new batteries, as this may
damage the remote control.
Make sure to point the remote control to the remote control sensor on the TV.
(POWER)
Turns the TV on or off.
ENERGY SAVING
(See p.43)
Adjusts the brightness of
the screen to reduce energy
consumption.
TV / PC INPUT Auto Config.ENERGY
SAVING
INPUT
Selects the input mode.
Auto Config.
Automatically adjusts picture
position and minimizes
image instability.
(See p.22)
SAVING
SAVING
1 2 3
4 506
7 8 9
LIST
IST
VOL CH
VOLCH
MENU
BACK
ENGLISH
TV / PC INPUT Auto Config.ENERGY
TAuto Config.ENERGY
Q.VIEW
.VIEW
MARK
MARK
FAV
AV
P
A
RATIO
RATIO
G
E
MUTE
MUTE
INFO
Q.MENU
ENTER
GUIDE
EXIT
Selects TV or PC mode.
TV/PC
(See p.16)
LIST
Displays the channel table.
- (Dash)
Inserts a dash between
numbers such as 2-1 and 2-2.
MARK
Selects a menu or option.
FAV
Accesses your favorite
channel list.
VOLUME
Adjusts the volume level.
1 2 3
4 5
7 8 9
Q.VIEW
0
LIST
VOL CH
MENU
MARK
FAV
RATIO
MUTE
INFO
6
Q.MENU
Number buttons
Enters numbers.
Q.VIEW
Alternates between the
two last channels selected
(pressing repeatedly).
(See p.21)
RATIO
Resizes an image.
P
A
G
E
CH
Scrolls through the saved
channels.
PAGE
Moves to the previous or
next screen.
Q.MENU
(See p.24)
Accesses the quick menus.
MUTE
Mutes all sounds.
Page 12
12
P
A
1 2 3
4 5
0
6
7 8 9
LIST
FLASHBK
TV / PC INPUT Auto Config.ENERGY
SAVING
MARK
FAV
MENU
Q
K
XIT
G
E
ENGLISH
REMOTE CONTROL
TV / PC INPUT Auto Config.ENERGY
SAVING
1 2 3
4 506
7 8 9
Q.VIEW
LIST
MARK
FAV
P
A
RATIO
VOL CH
G
E
MUTE
INFO
Q.MENU
MENU
ENTER
ENTER
GUIDE
UID
EXIT
E
BACK
BAC
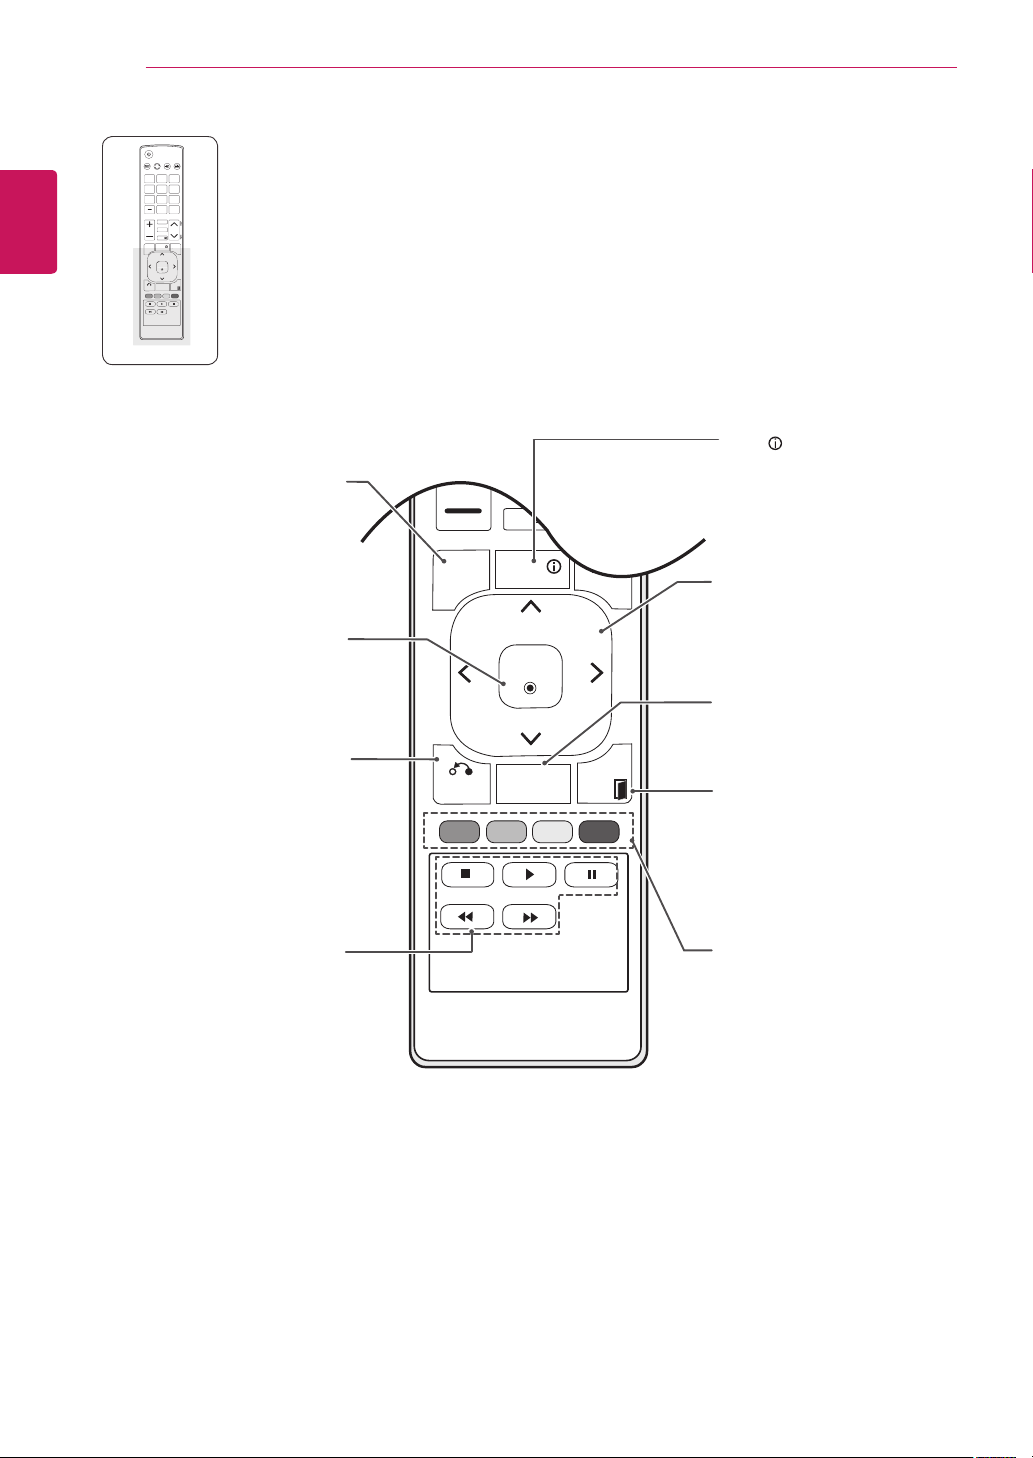
MENU
(See p.41)
Accesses the main menus
or saves your input and exit
menus.
ENTER
Selects menus or options and
confirms your input.
Allows the user to move
return one step in an
interactive application, EPG
or other user interaction
BACK
function.
VOL CH
MENU
RATIO
MUTE
INFO
ENTER
BACK
GUIDE
Q.MENU
EXIT
INFO
Views the information of the
G
E
currently program and the
screen.
Navigation buttons
Scrolls through menus or
options.
GUIDE
Displays the program event
according to time scheduler.
EXIT
Clears all on-screen displays
and returns to TV viewing
from any menu.
USB Menu control
buttons
USB menu(Photo List and
Colored buttons
These access special
functions in some menus.
Music List or Movie List).
Page 13
WATCHING TV
13
WATCHING TV
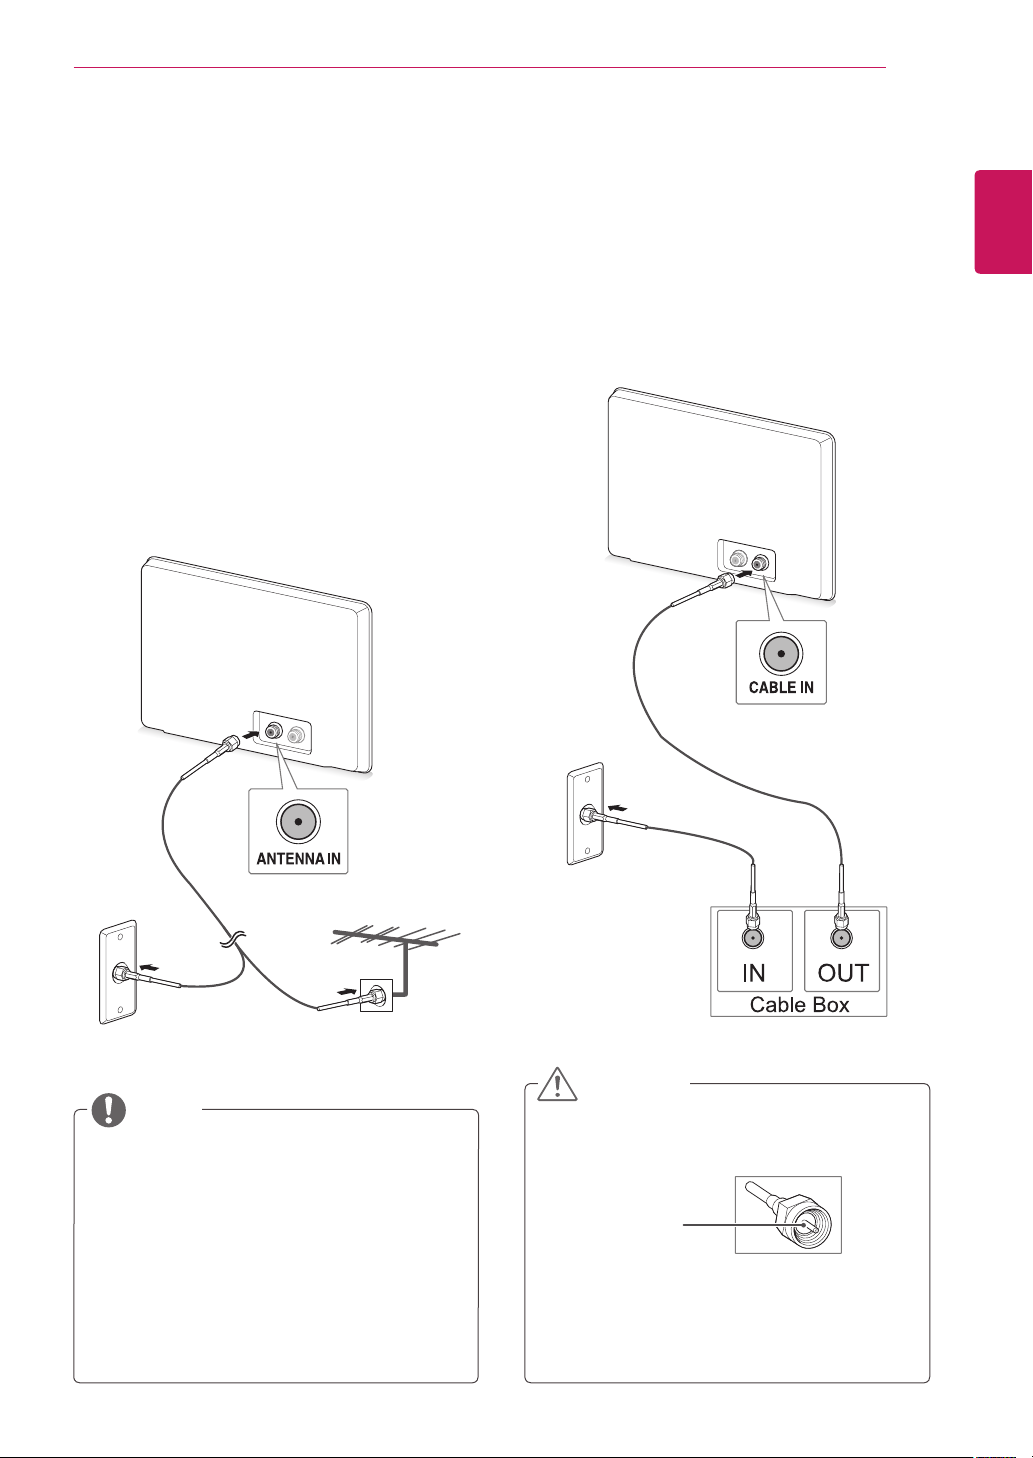
Connecting an antenna or cable
Connect an antenna, cable, or cable box to watch
TV referring to the following. The illustrations may
differ from the actual accessories and an RF cable
is optional.
Connecting an antenna or basic cable
Connect the TV to a wall antenna socket with an
RF cable (75 ohm).
ENGLISH
Connecting with a cable box
Connect the TV to a cable box and the cable box to
a wall antenna socket with 2 RF cables (75 ohm).
Wall Antenna
Socket
Outdoor
Antenna
NOTE
Use a signal splitter to use more than 2 TVs.
If the image quality is poor, install a signal
amplifier properly to improve the image
quality.
If the image quality is poor with an antenna
connected, aim the antenna to the proper
direction.
Visit
http://AntennaWeb.org
information about the antenna and cable
connection.
for more
CAUTION
Make sure not to bend the copper wire of
the RF cable.
Copper wire
Complete all connections instructions
between devices, and then connect the
power cord to the power outlet to prevent
damages to your TV.
Page 14
14
Accessing the TV for the first
ENGLISH
time
WATCHING TV
Follow the on-screen instructions to customize
4
your TV according to your preferences.
When you access the TV for the first time, the
initial setting screen appears. Select a language
and customize the basic settings.
Connect the power cord to a power outlet.
1
Press on the TV to turn the TV on.
2
The Power indicator lighting is turned on.
NOTE
The brightness of the power indicator will
be reduced by 20% when the TV is in
power-saving mode.
Language
Selects a language for
the display.
Selects
Mode Setting
Home Use
the home environment.
Time Zone
Selects the time zone
and daylight saving.
Auto Tuning
NOTE
To display images in the best quality for
your home environment, select
mode.
Use
Store Demo
retail environment.
If you select
previously customized settings will
switch to the default settings of
Demo
mode is suitable for the
Store Demo
mode in 2 minutes.
Scans and saves available
channels automatically.
Home
mode, the
Store
for
If the input mode is RGB-PC or HDMI1/
HDMI2 (with Input Label set to PC), the
cables are connected, and either the
horizontal sync or vertical sync signal is
not present, the Power Saving mode is
enabled.
The initial setting screen appears if you access
3
the TV for the first time.
NOTE
You can also switch the TV from PC
mode to TV mode, press
You can also access
accessing
If you do not operate the TV within
40 seconds when the setting menu
screen appears, the setting menus will
disappear.
OPTION
Initial Setting
in the main menus.
TV/PC
.
by
When the basic settings are complete, press
5
.
ENTER
NOTE
If you do not complete the initial setting, it
will appear whenever you access the TV.
To turn the TV off, press on the TV.
6
The Power Indicator turns off.
CAUTION
Disconnect the power cord from the power
outlet when you do not use the TV for a
long period of time.
Page 15

WATCHING TV
15
Watching TV
Press on the Remote control or on the
1
TV to turn the TV on.
Press
2
Control the TV using the following buttons and
3
menus while you are watching TV.
Button / Menu Description
CH( )
LIST Selects a channel on the saved
Numbers Selects a channel by entering
VOL (+ , -
MUTE Mutes all sounds
Q.MENU Accesses the quick menus
Q.VIEW Alternates between the last
RATIO Resizes an image (See p.21)
To turn the TV off, Press on the Remote
4
control or on the TV.
and select TV.
INPUT
Scrolls through the saved
channels
channel list
numbers
) Adjusts the volume level
two channels selected
Managing channels
Setting up channels
Storing channels
To store channels Automatically,
Press
1
Press the Navigation buttons to scroll to
2
CHANNEL
Press the Navigation buttons to scroll to
3
Auto Tuning
Select
4
The TV scans and saves available channels
automatically.
When you are finished, press
5
When you return to the previous menu, press
BACK
To store channels Manually,
Press
1
Press the Navigation buttons to scroll to
2
CHANNEL
to access the main menus.
MENU
and press
and press
to start automatic tuning.
Start
.
to access the main menus.
MENU
and press
ENTER
ENTER
ENTER
.
EXIT
.
.
.
ENGLISH
Press the Navigation buttons to scroll to
3
Manual Tuning
Scroll through the channel types, and then add
4
or delete channels.
When you are finished, press
5
When you return to the previous menu, press
.
BACK
and press
ENTER
EXIT
.
.
NOTE
The TV will ask for a password if parental
control has been activated (LOCK Menu).
Use the password you set up in the LOCK
Menu to allow a channel search.
When setting the Auto tuning or Manual
tuning, the number of maximum channel you
can store is 1,000. This number is subject to
change depending on the broadcasting signal
environment.
Page 16
WATCHING TV
16
ENGLISH
1
2
3
4
5
Editing your channel list
Press
Press the Navigation buttons to scroll to
CHANNEL
Press the Navigation buttons to scroll to
Channel Edit
Edit channels using the following buttons.
Button Description
Navigation Scrolls through channel types or
ENTER Selects a channel to view
CH ( )
Blue button Adds or deletes a channel.
FAV Registers or cancels the current
Q.MENU Selects your desired favorite
Yellow
button
When you are finished, press
When you return to the previous menu, press
BACK
to access the main menus.
MENU
and press
and press
.
ENTER
ENTER
Highlights the channel type.
channels.
Moves to the previous or next
page.
The deleted channel displays in
blue.
channle in favorite channel list.
channel group.
Blocks or unblocks a channel.
.
EXIT
.
.
Using favorite channels
Add the channels that you watch frequently to the
favorite list.
Setting up your favorite list
Select a channel to add to the favorite list.
1
Press
2
Press the Navigation buttons to select your
3
desired favorite channel group.
Press the
4
the current channel in favorite channel list.
Press the
Press the Navigation buttons to scroll to
5
Favorite
Press
6
the favorite list.
When you are finished, press
7
You can also setup Favorite List in the
CHANNEL
Selecting a channel on the favorite list
FAV
.
ENTER
NOTE
.
button to register or cancel
Yellow
button to move to
Blue
to add the selected channel to
menu -
Channel Edit
Channel Edit
.
EXIT
.
.
Selecting a channel on the channel list
Press
1
- To move to the previous or next page, press
CH (^, v)
- To tune to the “
Edit
Select a channel you want and press
2
to access the channel list.
LIST
.
CHANNEL
”, press
Blue
button.
menu -
Channel
NOTE
The Lock icon ( ) appears in front of a
channel blocked with parental control.
If you select the blocked channel, you will be
prompted to enter your password.
ENTER
Press
1
- To move to the previous or next page, press
CH (^, v)
Select a channel you want and press
2
.
to access the favorite list.
FAV
.
ENTER
.
Page 17
WATCHING TV
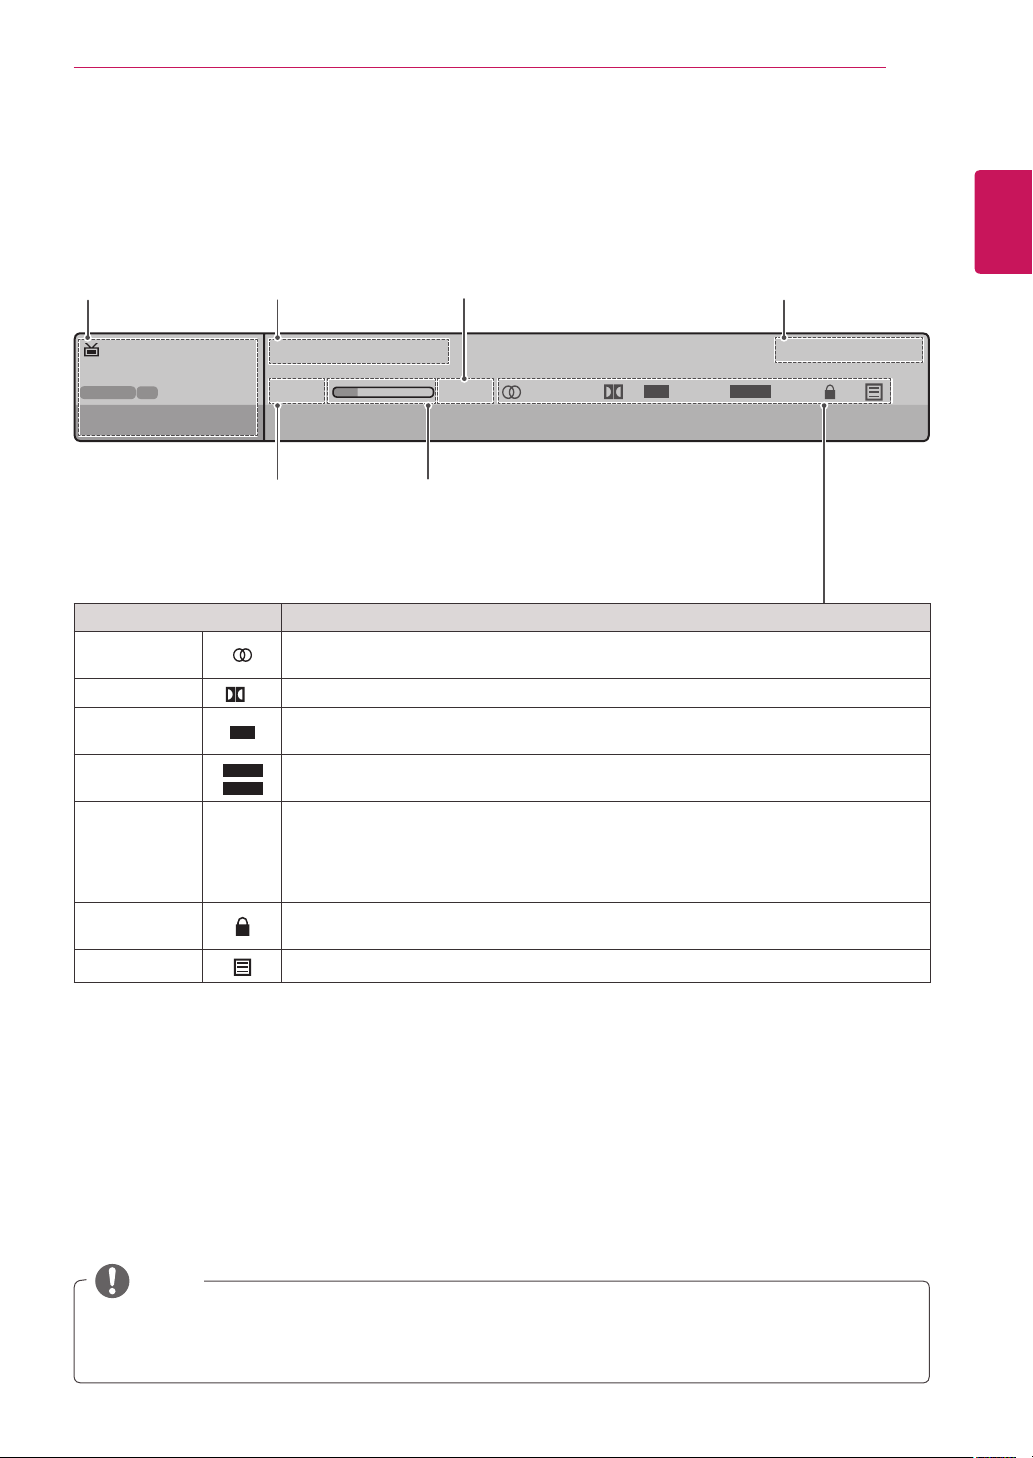
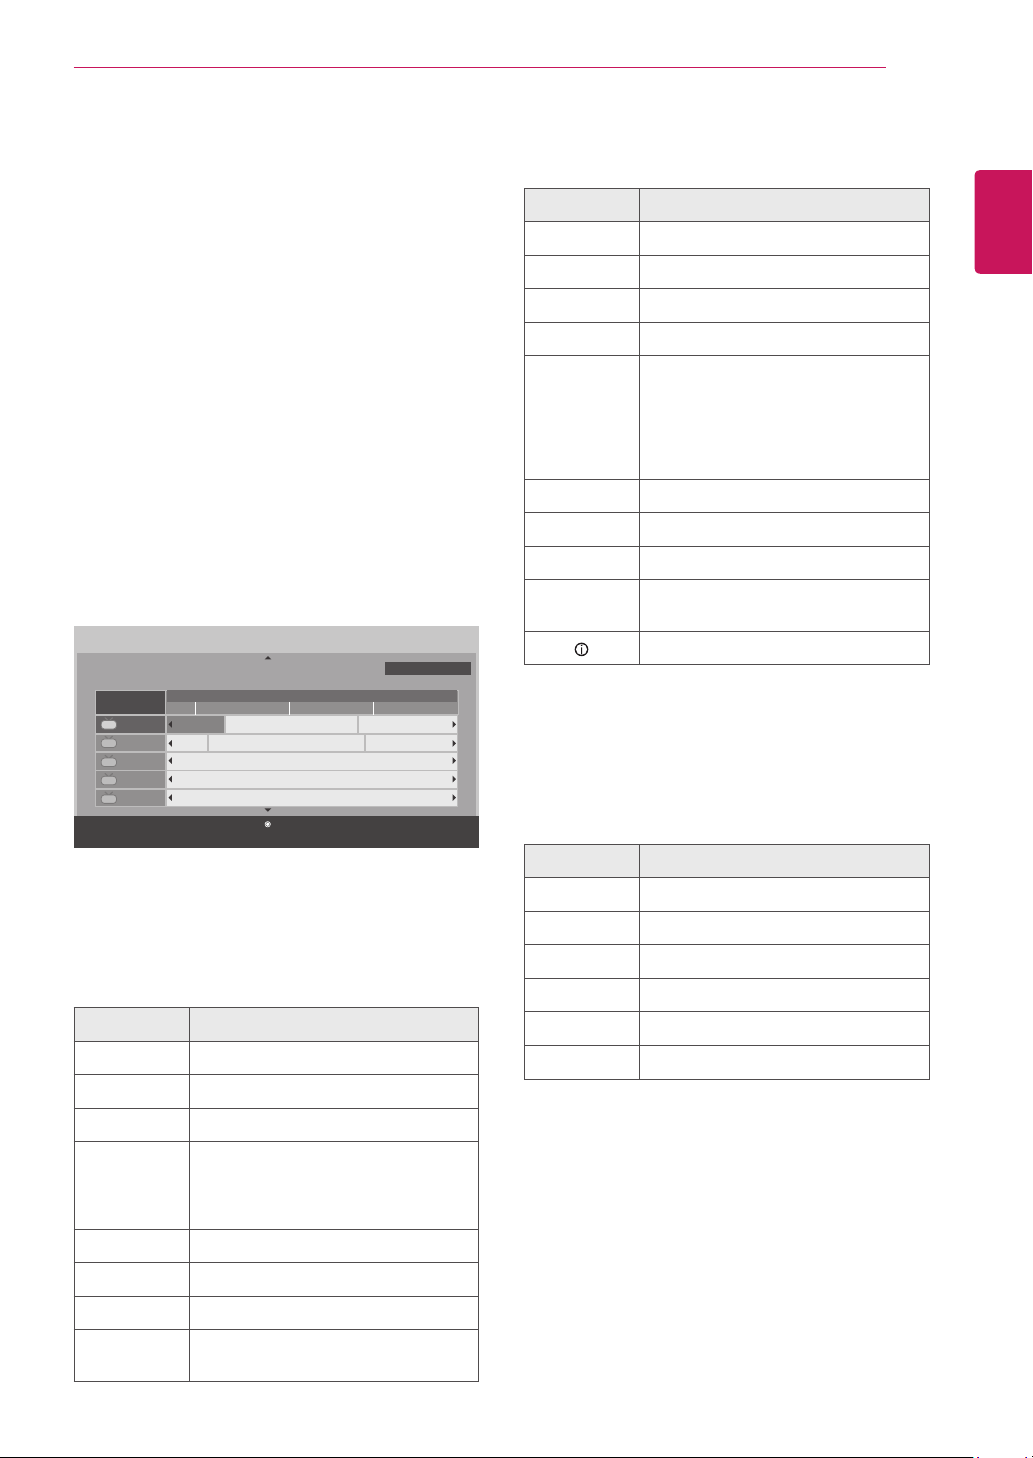
Checking current program info
Press
The following information appears at the top of the screen.
Banner information Program title End time Current time
to view the information of the currently program while you are watching.
ENTER
17
ENGLISH
DTV 8-1 Brief Info Title Test...
HE-AAC
HD
GLOBO-HD
10:10 AM 11:40 AM
Next - 11:40 AM news
Multilingual Caption 14D
CC 16 : 9
Sun, Jul 17, 2011 10:30 AM
1080p
Start time Progress bar
Icon Description
Multilingual The program contains two or more audio language services. You can change the
Dolby Digital The program contains a Dolby Digital audio signal in TV and HDMI input sources.
Caption The program contains one or more language caption services. You can change the
Aspect ratio The original aspect ratio of the video is 4:3.
Resolution 480i
480p
720p
1080i
1080p
Rating The program contains Rating information.
Description Caption description.
audio language using the quick menu.
D
CC
caption language using the main menu.
4 : 3
16 : 9
The original aspect ratio of the video is 16:9 (wide).
The video resolution is 720 x 480i.
The video resolution is 720 x 480p.
The video resolution is 1280 x 720p.
The video resolution is 1920 x 1080i.
The video resolution is 1920 x 1080p.
See “LOCK Settings” page 49.
NOTE
When viewing cable channels, some information will not show if the cable company does not provide
the data in the signal.
Page 18
18
ENGLISH
WATCHING TV
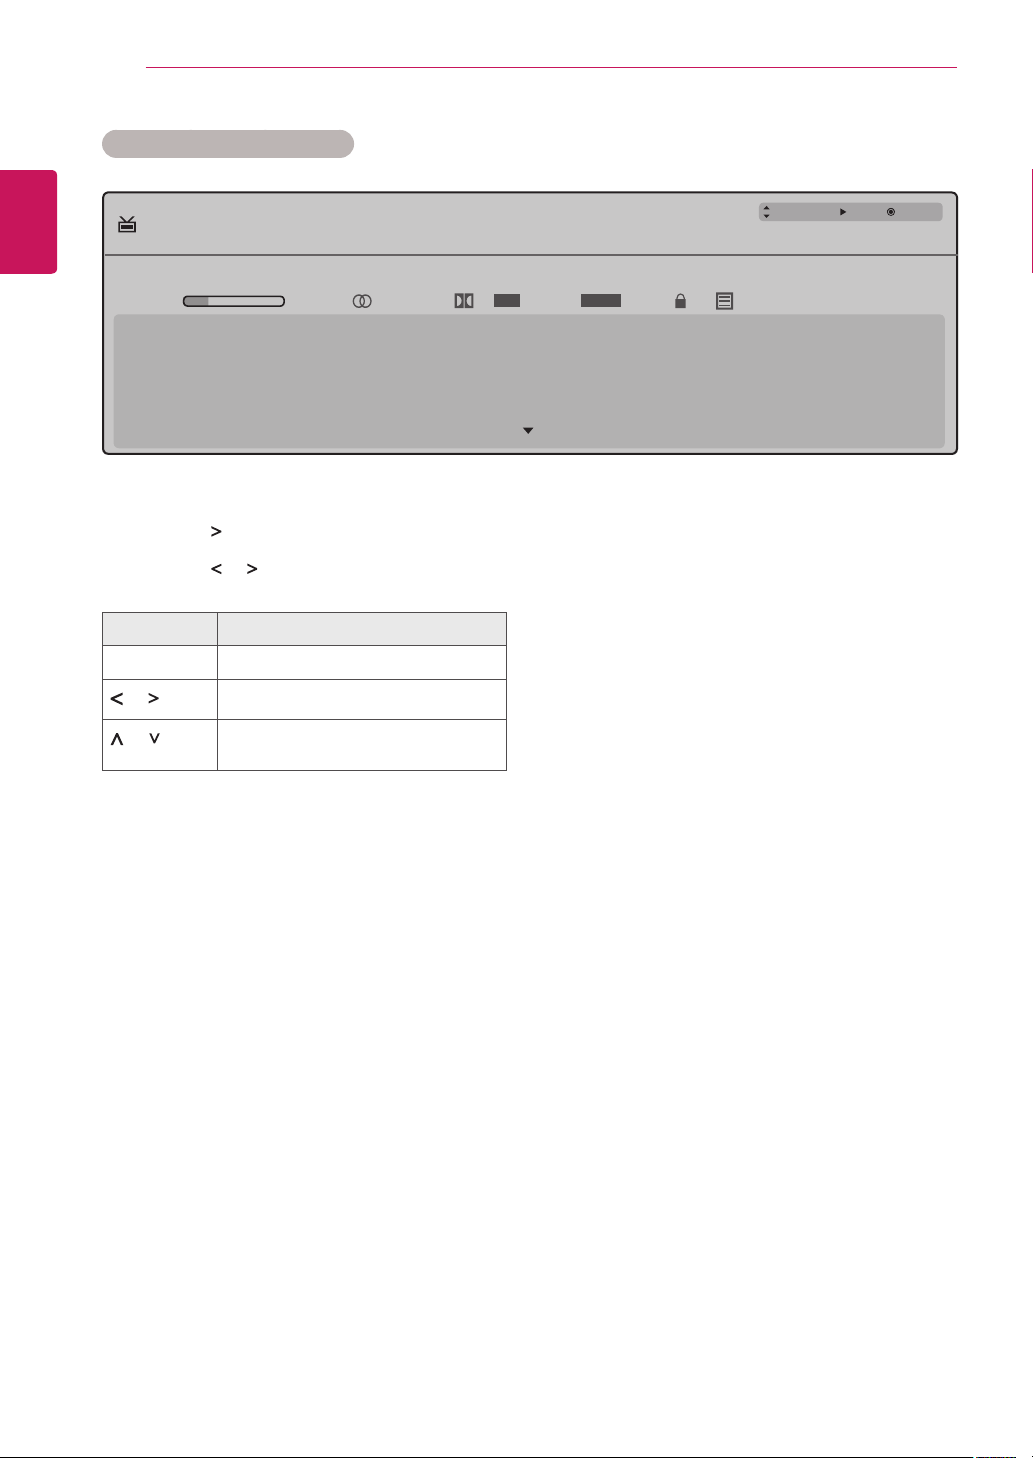
Channel Program Reservation
DTV 8-1 CNN
Ch.Change Next Wacth
Brief Info Title Test...
10:10 AM
No information
Sarah Brandley, Steve Gray anf Brendon Pongia Present the latest in fashion, the arts, enterainment, lifestyle and cooking,
with tegular and special guests.
Sarah Brandley, Steve Gray anf Brendon Pongia Present the latest in fashion, the arts, enterainment, lifestyle and cooking,
Press
1
Press the button to select a next channel program information and press
2
Press the or buttons to scroll to
3
Button Description
INFO Shows current channel information.
or
or
to view the current channel program Information on the screen.
INFO
Shows next program information.
Shows other channel’s program
information.
11:40 AM
Multilingual Caption 14D
Yes
CC 16 : 9
or No and press
ENTER
1080p
.
ENTER
.
Page 19
WATCHING TV
19
EPG (Electronic Program Guide) (In digital mode)
Press
screen.
This system has an Electronic Program Guide (EPG)
to help your navigation through all the possible
viewing options.
The EPG supplies information such as program
listings, start and end times for all available
services. In addition, detailed information about
the program is often available in the EPG (the
availability and amount of these program details
will vary, depending on the particular broadcaster).
This function can be used only when the
EPG information is broadcast by broadcasting
companies.
The EPG displays the program details for next 8
days.
Program Guide
Racing News
᯦
DTV 5-1 Globo HD
'79
'79
'79
'79
'79
᱆
Favorite Watch/Schedule ExitInformation
ᯕ ᯕ
Mode Manual Timer Schedule ListDate
NOW/NEXT Guide Mode
You can view a program being broadcasted and
one scheduled to follow.
Button Description
Red Changes EPG mode.
Yellow Enters Manual Timer mode.
Blue Enters Schedule List mode.
ENTER When ‘Now’ is selected, it is moved
< or > Selects NOW or NEXT Program.
^ or v Selects the Broadcast Program.
PAGE (^, V) Page Up/Down.
GUIDE /
BACK / EXIT
to view the program guide on the
GUIDE
July 18, 2011 9:30 PM ~ 10:15 PM
ALL
5-1 Globo HD
5-2 CCTV-1
7-1 CCTV-2
9-2 BTV-1
9-3 CETV-1
10:00 PM
Racing News Antigues Roadshow
᱑ ᰙ
Mon, July 18
TV2: FARMEN
No Information
No Information
No Information
ᯕ ᯕ
to selected program and EPG
disappears When ‘Next’ is selected, a
reservation pop-up window appears.
Switches off EPG.
11:00 PM
Kungskonsumente
No InformationNo Info
July 18, 2011 10:07 PM
8 Day Guide Mode
Button Description
Red Changes EPG mode.
Green Enters Date setting mode.
Yellow Enters Manual Timer mode.
Blue Enters Schedule List mode.
ENTER When ‘Currently broadcasting
program’ is selected, it is moved to
selected program and EPG disappears.
When ‘Future broadcasting program’
is selected, a reservation pop-up
window appears.
< or > Selects Program.
^ or v Selects the Broadcast Program.
PAGE (^, V) Page Up/Down.
GUIDE /
BACK / EXIT
Switches off EPG.
INFO Displays details.
Date Setting Mode
Button Description
Green Switches off Date setting mode.
ENTER Changes to the selected date.
< or > Selects a date.
^ or v Switches off Date setting mode.
PAGE (^, V) Page Up/Down.
GUIDE / EXIT Switches off EPG.
ENGLISH
Page 20
20
Detailed Information Box
ENGLISH
Manual Timer Mode
WATCHING TV
Button Description
< or > Selects Remind setting mode.
^ or v Text Up/Down
PAGE (^, V) Page Up/Down.
GUIDE / EXIT Switches off EPG.
Button Description
Yellow Changes to Guide mode.
Blue Changes to Schedule List mode.
ENTER Sets Timer Watch.
<, >, ^, v Selects date.
GUIDE Changes to Guide mode.
BACK / EXIT Exits Manual Timer mode.
Schedule List Mode
If you’ve created a schedule list, a scheduled
program is displayed at the scheduled time even
when you are watching a different program at the
time.
Button Description
Yellow Changes to Manual Timer mode.
Blue Changes to Guide mode.
ENTER Selects your desired Option (Modify/
^ or v Selects Schedule List.
PAGE (^, v) Page Up/Down
BACK / EXIT Switches off Schedule List.
Delete/Delete All).
Page 21
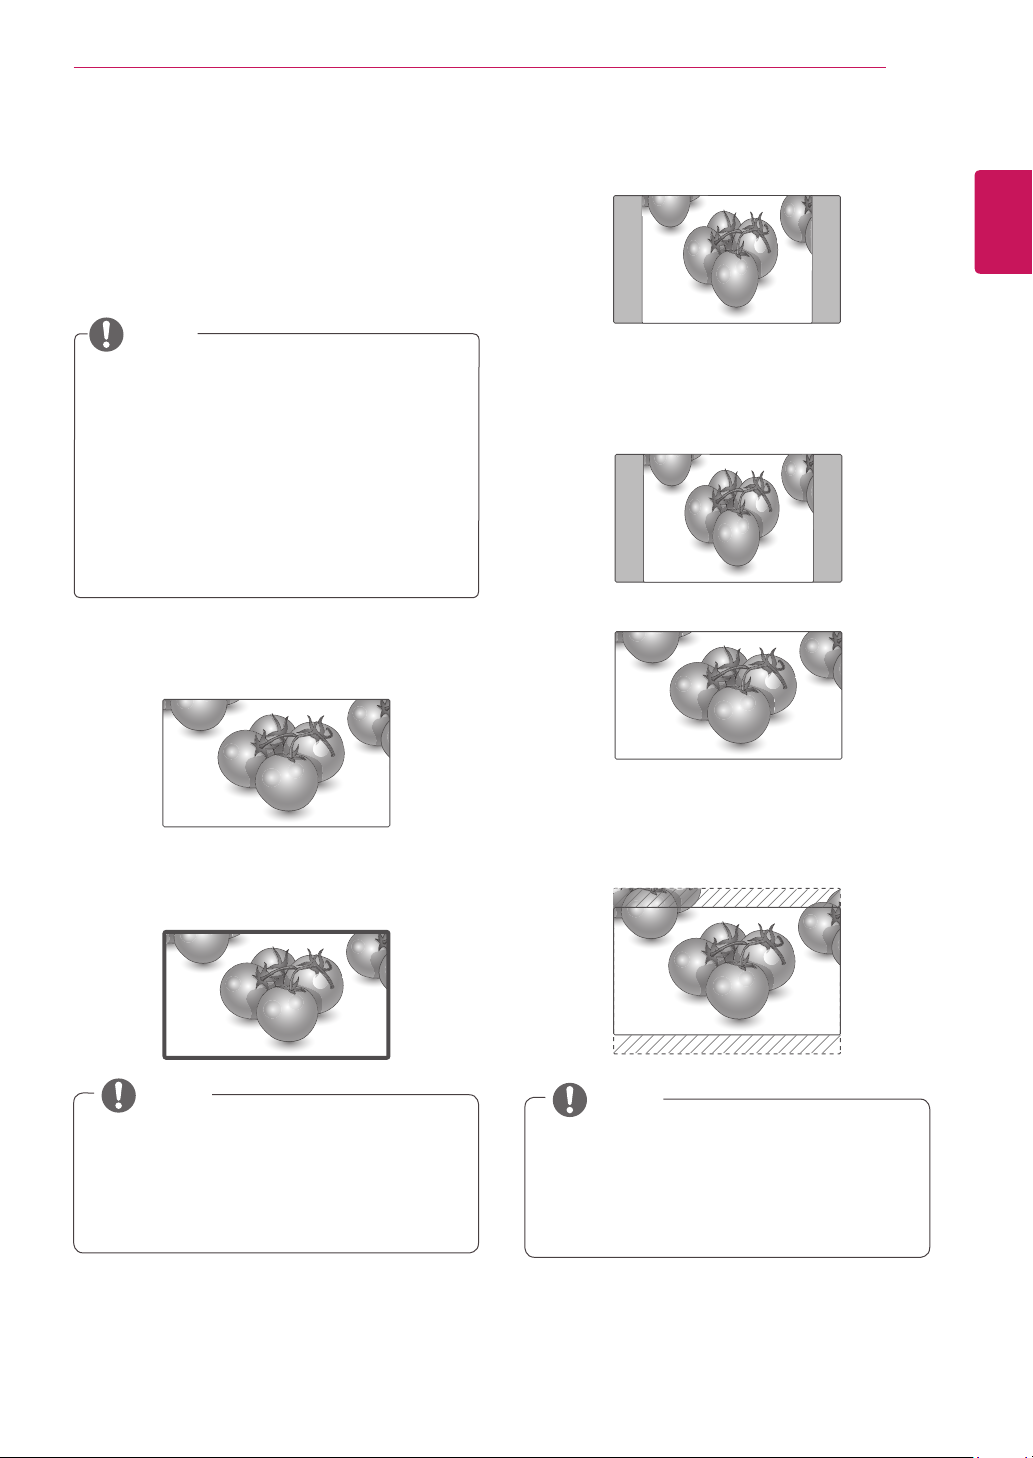
Using additional options
Adjusting aspect ratio
Resize the image to view the image at its optimal
size by pressing
watching TV.
NOTE
You can also change the image size by
pressing Q. MENU or accessing Aspect
Ratio in the PICTURE menu.
The available ratio varies
depending on the input source.
- The input sources: HDMI-PC and
RGB-PC support 4:3 and 16:9.
- The input sources: HDMI-PC 1920 X 1080
supports all of the aspect ratios.
RATIO
or
Q.MENU
while you are
WATCHING TV
-
: Resizes images at the standard 4:3 without
4:3
distortion.
-
Set By Program
aspect ratio with the original image.
: Displays images in the same
(4:3 -> 4:3)
Set By Program
(16:9 -> 16:9)
21
ENGLISH
-
: Resizes images to fit the screen width.
16:9
-
Just Scan
size without cutting off the edges.
: Displays video images in the original
Just Scan
NOTE
If you select
noises at the edge or edges of the screen.
The input sources:
HDMI-DTV
.
Scan
Just Scan
(720p/1080i/1080p), support
, you may see image
DTV, CADTV, Component,
Just
Set By Program
-
width. The top and bottom of the image may
not appear.
: Formats an image to fit the screen
Zoom
NOTE
If you access,
menus,
Press < or > to stretch an image vertically.
Press ^ or v to move the zoom focus up
or down.
Aspect Ratio
in the Quick
Page 22
WATCHING TV
22
-
ENGLISH
screen is sent to the HD with black at the left
side and the right side, this screen can be
extended to be fully displayed with no black
area.
It is enabled at the HD (DTV, Component,
HDMI) input (It is the reference for displaying
‘HD’ at the channel banner if the height is
greater than 480).
-
cinemascope ratio, 2.35:1.
press < or > and its range is from 1 to 16.
press ^ or v.
: With this function, when the SD
Zoom2
Cinema Zoom
To change the ratio of the cinema zoom,
To move the zoom focus up or down,
: Formats an image to the
NOTE
If you enlarge or reduce an image, the
image may be distorted.
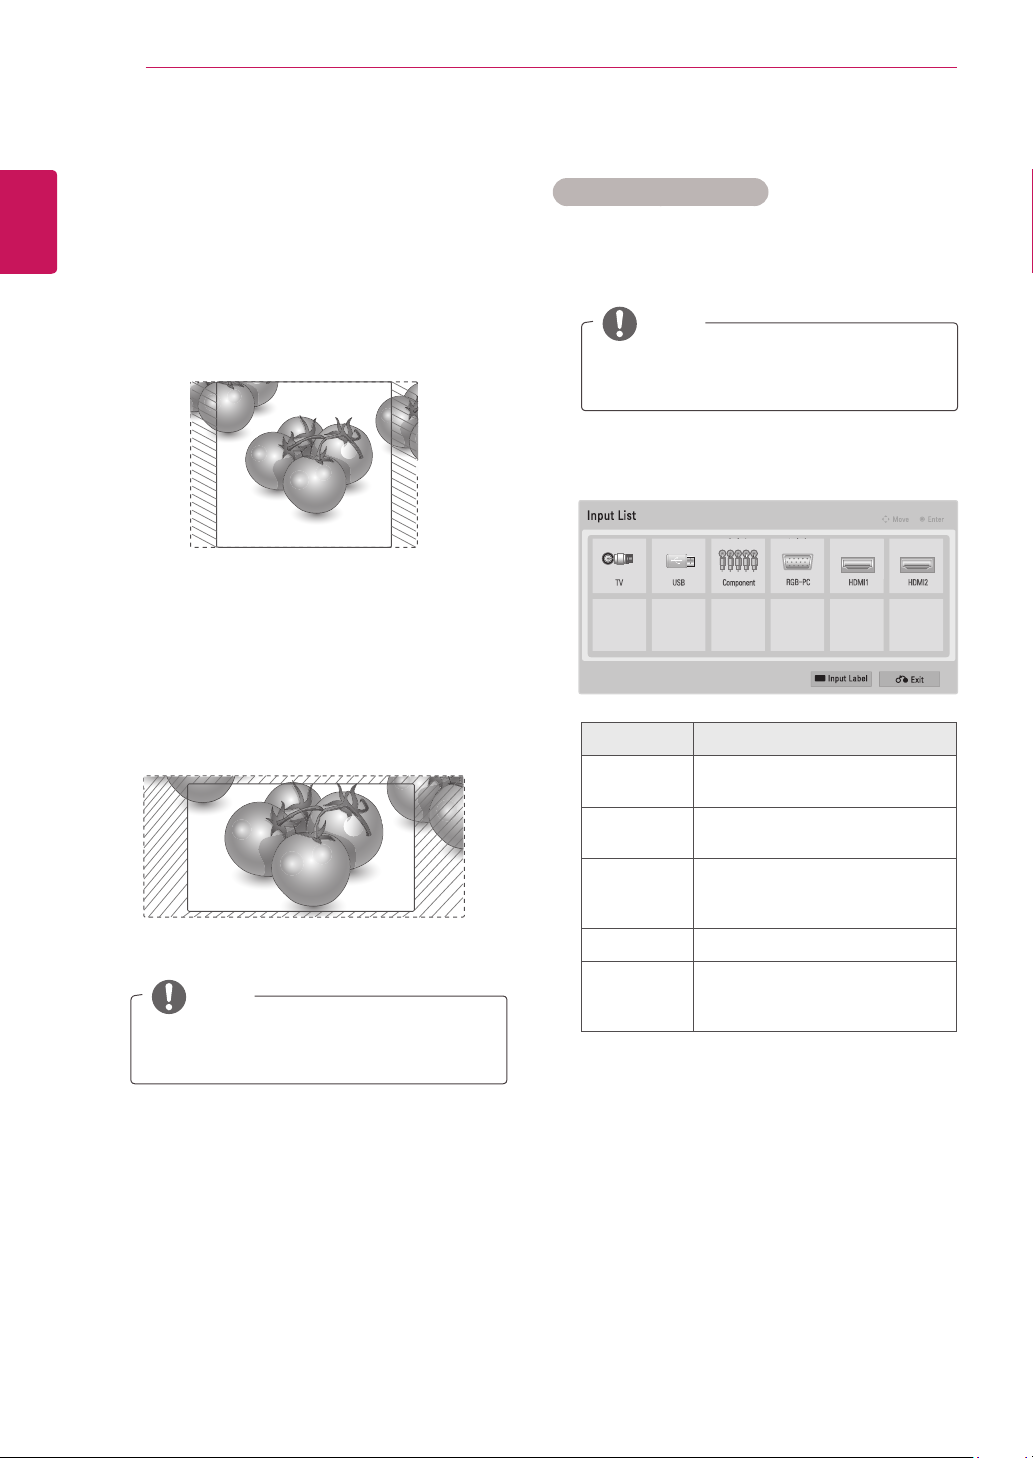
Using the input list
Selecting an input source
Press
1
- The connected device displays on each input
source.
You can also access the input source list
by selecting
Press the Navigation buttons to scroll to one of
2
the input sources and press
Input source Description
TV Watch TV over the air, cable, and
USB Play media files from a thumb
Component Watch the contents in a DVD or
RGB-PC View a PC display on the screen
HDMI1
HDMI2
The connected input source is displayed as
enabled; other input sources are displayed in
gray.
- If you add an input label to each input
sources, you can easily identify a device
connected to each input source.
to access the input source list.
INPUT
NOTE
in the
INPUT
ENTER
digital cable broadcast
drive
other external devices, or through
a digital set-top box
Watch contents in a PC, DVD
or Digital settop box other high
definition devices
MENU
.
.
Page 23
WATCHING TV
23
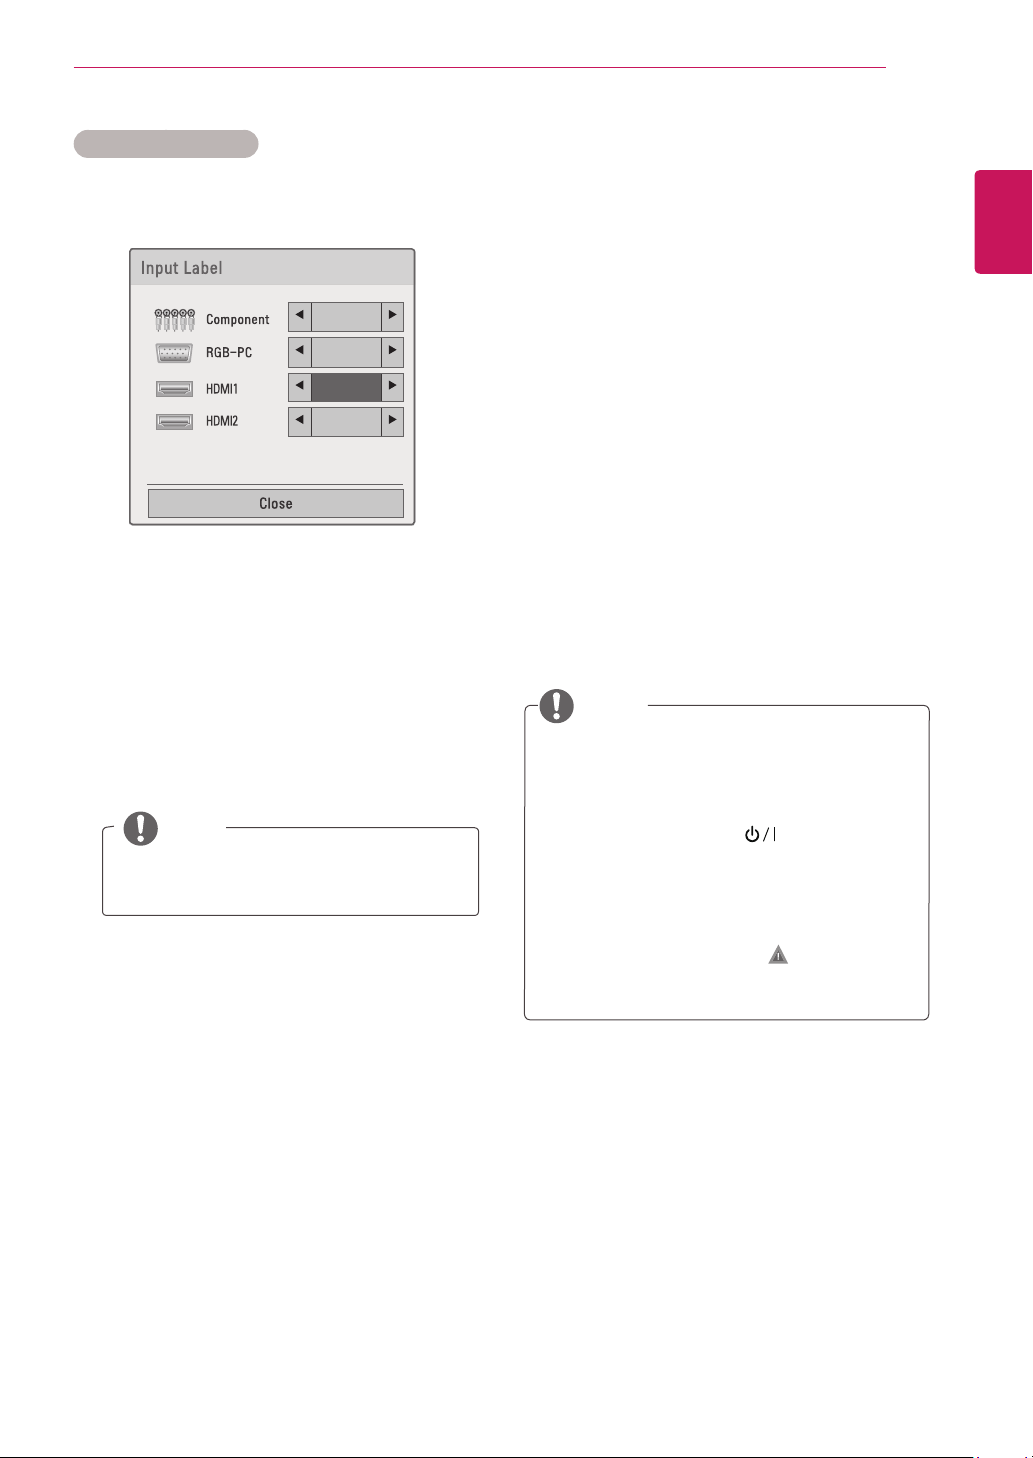
Adding an Input label
Add a label to an input source so that you can
easily identify a device connected to each input
source.
PC
Press
1
Press the
2
Press the Navigation buttons to scroll to the
3
setting or option you want and press
When you are finished, press
4
When you return to the previous menu, press
BACK
to access the menus.
INPUT
button.
Blue
.
EXIT
ENTER
.
NOTE
If you want to use HDMI-PC mode, you
must set the input label to PC mode.
Locking the buttons on the TV (Child Lock)
Lock the buttons on the TV to prevent
any unwanted operations or accidents by children.
Press
1
Press the Navigation buttons to scroll to
2
and press
Input password.
3
Press the Navigation buttons to scroll to
4
Key Lock
Press the Navigation buttons to scroll to On
5
and press
feature.
- To deactivate the Key lock feature, select
When you are finished, press
6
When you return to the previous menu, press
BACK
.
NOTE
The TV is programed to remember the last
setting after you turn the TV off.
If you turn the TV off with the Key lock
feature activated, press
▲,▼
(
-), TV/PC
control.
If you press any button on the TV with the
Key lock feature activated,
appears on the screen.
to access the main menus.
MENU
.
ENTER
and press
to activate the Key lock
ENTER
.
on the TV or
)
or Number buttons on the remote
POWER, INPUT, CH (+,
ENTER
.
.
EXIT
INPUT, CH
Key Lock On
LOCK
Off
.
ENGLISH
Page 24
WATCHING TV
24
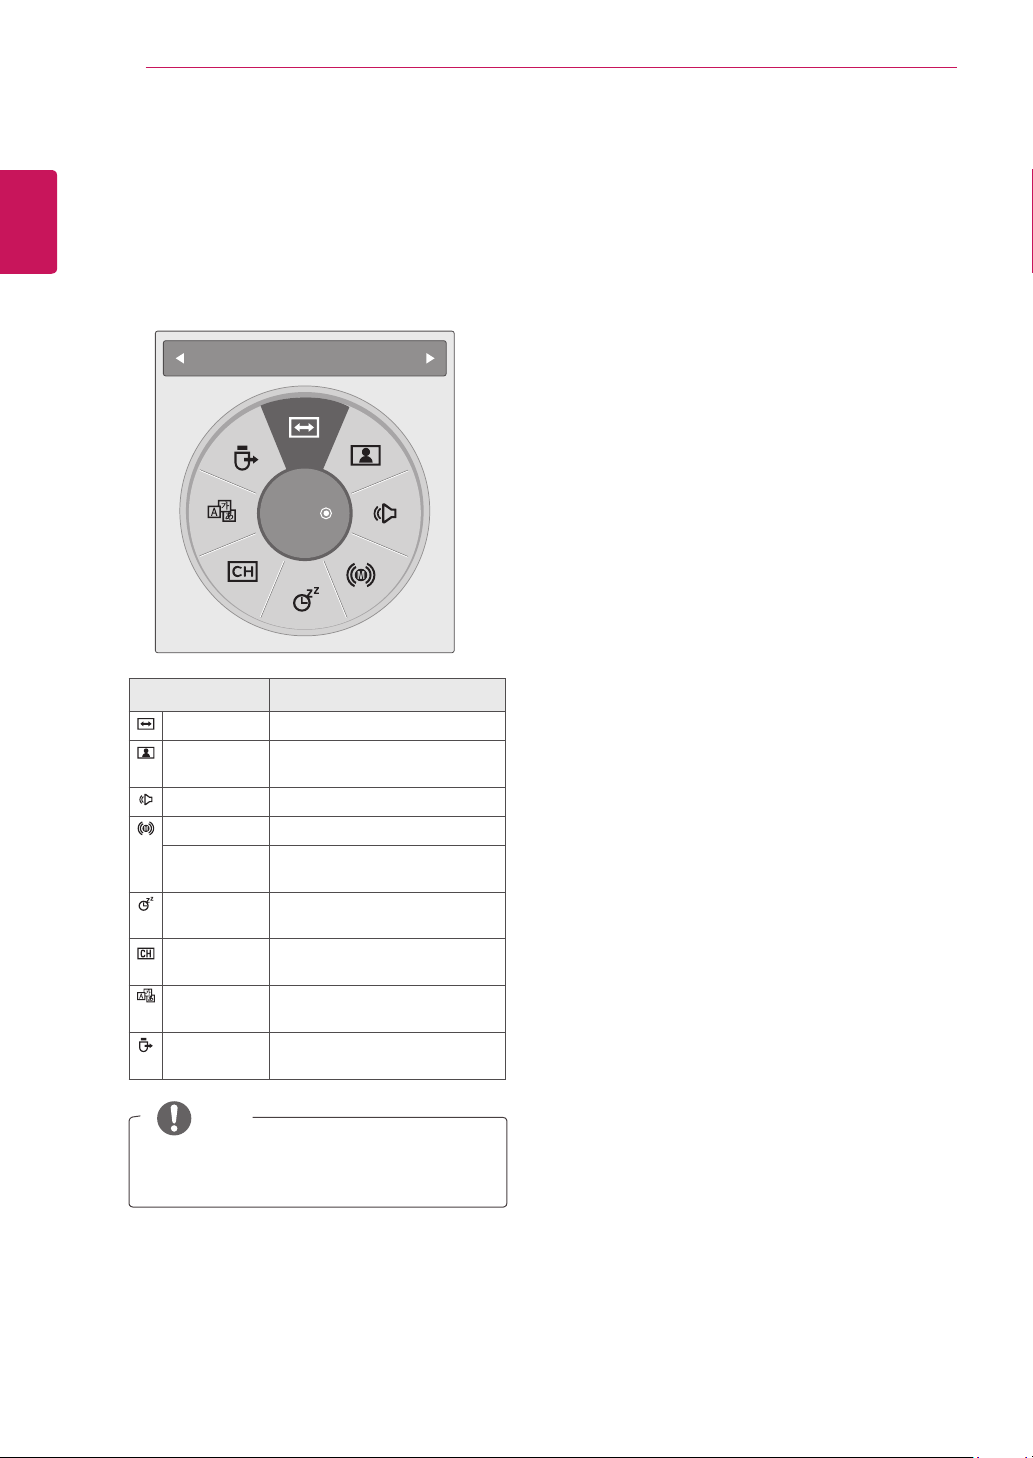
Using the Quick menu
ENGLISH
Customize the frequently using menus.
1
2
Press
Press the Navigation buttons to scroll through
Q.MENU
the following menus.
to access the quick menu.
Aspect Ratio
16:9
Menu Description
Aspect Ratio Changes the image size.
Picture
Mode
Sound Mode Changes the sound mode.
Multi Audio Selects the sound output.
SAP Changes the MTS sound
Sleep Timer Sets the length of time until
Del/Add Edits the channels to add or
Caption Activates or deactivate the
USB Device Ejects a USB device when a
Changes the image mode.
(Analog signal).
the TV to turns off
delete the channel.
subtitles.
USB device is connected.
Using the customer support
Testing the Picture / Sound
To execute picture and sound tests.
Press
1
Press the
2
Support
Press the Navigation buttons to scroll
3
or
Test
If you have any problem, press the Navigation
4
buttons to scroll to
When you are finished, press
5
When you return to the previous menu, press
BACK
Using the product or service information
To check the product or service information.
Press
1
Press the
2
Support
Press the Navigation buttons to scroll
3
Service Info..
product/Service infomation based on your
model.
When you are finished, press
4
When you return to the previous menu, press
BACK
to access the main menus.
MENU
button to scroll
Red
.
Sound Test
.
MENU
Red
.
.
.
and press
Yes
to access the main menus.
button to scroll
You can check the various
Customer
ENTER
.
EXIT
Customer
.
EXIT
Picture
.
Product/
NOTE
The available menus and options may differ
from the input source that you are using.
Press the Navigation buttons to scroll to an
3
option you want and press
When you are finished, press
4
.
EXIT
.
ENTER
Q. MENU or
Page 25

CONNECTING TO A PC
25
CONNECTING TO A PC
Your TV supports the Plug & Play* feature and
has the built-in speakers with Surround X that
reproduces sound clearly with rich bass.
* Plug & Play: This is the function that allows a PC
to use the TV without installing a driver.
NOTE
It is recommended to use the TV with the
HDMI connection for the best image quality.
If you want to use an optional external
speaker instead of the built-in speaker, set
the TV speaker feature to off
(See p.46).
HDMI connection
Transmits the digital video and audio signals from
your PC to the TV. Connect the PC and the TV
with the HDMI cable as shown in the following
illustrations. You should set PC as an input
label to connect the PC to the TV with an HDMI
connection. To add an input label, see Adding an
Input label on See p.23.
2
1
NOTE
The
OSD (On Screen Display)
on the screen as shown below.
»When turning the product on in
»When switching to
»When connecting an
signal.
Is the input connected to your PC?
Yes No
Do not show message again.
If you select
are optimised for your PC.
If you select
are optimised for the AV
set-top box, gaming device)
If you select
this message does not appear until the TV is
reset. You can change the set value in
Blue button Input Label
The values set for HDMI1/HDMI2 are saved
independently.
"Yes"
"No"
"Do not show message again"
HDMI
the size and image quality
the size and image quality
is displayed
HDMI
input.
cable with no
HDMI
device (DVD player,
.
Input
.
input.
NOTE
Use a High Speed HDMI™ Cable.
Please check the PC environment if you
cannot hear the sound in HDMI mode.
If you want to use HDMI-PC mode, you must
set the input label to PC mode.
ENGLISH
HDMI OUT
PC
Page 26

CONNECTING TO A PC
1
26
DVI to HDMI connection
ENGLISH
Transmits the digital video signal from your PC to
the TV. Connect the PC and the TV with the DVI to
HDMI cable as shown the following illustrations.
RGB connection
Transmits the analog video signal from your PC to
the TV. Connect the PC and the TV with the D-sub
15 pin cable as shown the following illustrations.
DVI OUT
2
1
AUDIO OUT
PC
NOTE
If you want to use HDMI-PC mode, you must
set the input label to PC mode.
If you do not use an optional external
speaker, connect the PC to the TV with the
supplied audio cable.
If you turn the TV on when the set becomes
cold, the screen may flicker. This is normal.
Use a shielded signal interface cable, such as
D-sub 15 pin signal cable and DVI to HDMI
cable, with a ferrite core to maintain standard
compliance for the product.
Some red, green, or blue spots may appear
on the screen. This is normal.
CAUTION
Connect the signal input
cable and tighten it
by turning the screws
clockwise.
Do not press the screen with your finger for
a long time as this may result in temporary
distortion on the screen.
Avoid displaying a fixed image on the screen
for a long period of time to prevent image
burn. Use a screensaver if possible.
RGB OUT (PC) AUDIO OUT
PC
Page 27

CONNECTING TO A PC
27
Adjusting the screen
Selecting an image mode
Display images in its optimized settings by
selecting one of the preset image modes.
Press
1
Press the Navigation buttons to scroll to
2
PICTURE
Press the Navigation buttons to scroll to
3
Picture Mode
Press the Navigation buttons to scroll to an
4
image mode you want and press
Mode Description
Vivid Adjusts the video image for the
Standard Adjusts the image for the normal
Cinema Optimizes the video image for the
Sport Optimizes the video image for high
Game Optimizes the video image for a
Expert1/2 Adjusts the detailed video image
When you are finished, press
5
When you return to the previous menu, press
BACK
to access the main menus.
MENU
and press
and press
retail environment by enhancing the
Contrast, Brightness, Color,
Sharpness
environment.
cinematic look and enjoy movies as if
you are in a movie theater.
and dynamic actions by emphasizing
primary Colors such as white, grass,
or sky blue.
fast gaming screen such as PCs or
games.
settings for video experts as well as
general viewers.
ENTER
ENTER
.
.
EXIT
.
.
ENTER
and
.
Customizing image options
Customize basic and advanced options of each
image mode for the best screen performance.
Press
1
Press the Navigation buttons to scroll to
2
PICTURE
Press the Navigation buttons to scroll to
3
Picture Mode
Press the Navigation buttons to scroll to an
4
image mode you want and press
Select and adjust following options, and then
.
5
press
Option Description
Backlight Adjusts the brightness of the
Contrast Increases or decreases the
Brightness Adjusts the base level of the
Sharpness Adjusts the level of crispness in
Color Adjusts intensity of all
Tint Adjusts the balance between
Color Temp. Set to warm to enhance hotter
Advanced
Control
Picture
Reset
to access the main menus.
MENU
and press
ENTER
ENTER
and press
ENTER
.
screen by controlling the LCD
backlight. If you decrease the
brightness level, the screen
becomes darker and the power
consumption will be reduced
without any video signal loss.
gradient of the video signal.
You may use
the bright part of the image is
saturated.
signal in the image. You may use
Brightness
the image is saturated.
the edges between the light and
dark areas of the picture. The
lower the level, the softer the
image.
and
Green
colors such as red, or set to cool
to enhance cooler colors
such as blue.
Customizes the advanced
options. See more information
about advanced options See p.45.
Restores the options to the
default setting.
.
.
.
ENTER
Contrast
when the dark part of
levels.
when
Colors
.
Red
ENGLISH
When you are finished, press
6
EXIT
.
When you return to the previous menu, press
.
BACK
Page 28
CONNECTING TO A PC
28
Customizing PC display options
ENGLISH
Customize options of each image mode for the
best image quality.
1
2
3
4
This function works in the following mode:
RGB[PC] mode.
Press
to access the main menus.
MENU
Press the Navigation buttons to scroll to
PICTURE
and press
ENTER
.
Press the Navigation buttons to scroll to
Screen(RGB-PC)
and press
ENTER
.
Select and adjust following options, and then
press
Option Description
Resolution Match the resolution of RGB mode.
Auto Config. Adjusts the screen
Position/
Size/Phase
Reset Restores the options to the default
.
ENTER
(Resolution menu is enabled only for
the following resolution with 60Hz.)
Vertical resolution : 768
1024 x 768(Default)
1280 x 768
1360 x 768
Vertical resolution : 1050
1400 x 1050
1680 x 1050(Default)
Vertical resolution : 900
1280 x 960
1440 x 900
1600 x 900(Default)
automatically. The displayed
Phase
image may be unstable for a few
seconds while the configuration is in
progress.
Adjusts the options when the
image is not clear, especially when
characters are shaky, after the auto
configuration.
settings.
Position, Size
and
Adjusting the sound
Selecting an sound mode
Play the sound in its optimized settings by
selecting one of the preset sound modes.
Press
1
Press the Navigation buttons to scroll to
2
AUDIO
Press the Navigation buttons to scroll to
3
Mode
Press the Navigation buttons to scroll to a
4
sound mode you want and press
Mode Description
Standard Selects when you want standard-
Music Selects when you listen to music.
Cinema Selects when you watch movies.
Sport Selects when you watch sports
Game Selects when you play games.
When you are finished, press
5
When you return to the previous menu, press
BACK
to access the main menus.
MENU
and press
and press
ENTER
ENTER
quality sound.
events.
.
.
.
ENTER
.
EXIT
Sound
.
When you are finished, press
5
EXIT
.
When you return to the previous menu, press
.
BACK
Page 29

Customizing sound options
Customize options of each sound mode for the
best sound quality.
CONNECTING TO A PC
29
ENGLISH
Press
1
Press the Navigation buttons to scroll to
2
AUDIO
Press the Navigation buttons to scroll to
3
Mode
Press the Navigation buttons to scroll to a
4
sound mode you want and press
Select and adjust following options, and then
5
press
Option Description
Surround X This option enhances sound depth
Treble Controls the dominant sounds in
Bass Controls the softer sounds in the
Reset Resets the sound mode to the
to access the main menus.
MENU
and press
and press
ENTER
ENTER
.
ENTER
.
and clarity by maximizing the
Surround effect.
the output. When you turn up the
treble, it will increase the output to
the higher frequency range.
output. When you turn up the bass,
it will increase the output to the
lower frequency range.
default setting.
.
ENTER
Sound
.
When you are finished, press
6
When you return to the previous menu, press
.
BACK
EXIT
.
Page 30

ENTERTAINMENT
1
2
30
ENGLISH
ENTERTAINMENT
Using integrated media features
Connecting USB storage devices
Connect USB storage devices such as a USB flash
memory, external hard drive, or MP3 player to the
TV and use multimedia features (“
See p.32).
Connect a USB flash memory or USB memory
card reader to the TV as shown on the following
illustration. The USB screen appears.
To disconnect a USB storage device,
make sure to end the connection properly to
prevent damages to the TV or files.
1
2
3
Browsing files
or
Press
Press the Navigation buttons to scroll to
Disconnect the USB storage device only when
Q.MENU
and press
Device
the message says that it is safe to remove.
to access the quick menus.
USB
.
ENTER
CAUTION
Do not turn the TV off or remove a USB
storage device while the USB storage
device is connected to the TV, as this could
result in loss of files or damage to the USB
storage device.
Back up your files saved on a USB storage
device frequently, as you may lose or
damage the files and this may be not
covered by the warranty.
Tips for using USB storage devices
Only a USB storage device is recognizable.
If the USB storage device is connected
through a USB hub, the device is not
recognizable.
A USB storage device using an automatic
recognition program may not be recognized.
A USB storage device that uses its own
driver may not be recognized.
The recognition speed of a USB storage
”
device may depend on each device.
Please do not turn off the TV or unplug
the USB device when the connected USB
storage device is working. When such
device is suddenly separated or unplugged,
the stored files or the USB storage device
may be damaged.
Do not connect a USB storage device that
has been artificially written to on the PC. The
device may cause the TV to malfunction or
fail to be played. Never forget to use only a
USB storage device that has normal music
files or image files.
Please use only a USB storage device that
was formatted as a FAT16, FAT32, NTFS
file system provided with the Windows
operating system. If a storage device has
been formatted as a different utility program
that is not supported by Windows, it may not
be recognized. Data on a USB storage device
cannot be deleted in the NTFS file system.
Please connect power to a USB storage
device that requires an external power
supply. If not, the device may not be
recognized.
Please connect a USB storage device with
the cable provided by the USB maker. If
connected with an aftermarket cable or an
excessively long cable, the device may not
be recognized.
Some USB storage devices may not be
supported or operate smoothly.
A maximum of 999 files and folders can be
recognized.
Data on a USB storage device cannot be
aligned. Up to 128 English characters can be
recognized as a file name.
Page 31

Please back up important files because
data on the USB device may be damaged.
Data management is solely the consumer's
responsibility and the manufacturer does not
cover the product bearing data damage.
If the USB is connected in Standby Mode,
the device will automatically be loaded when
the TV is turned on.
The recommended capacity is 1TB or less
for an external USB hard disk and 32GB or
less for USB memory.
Any device with more than the recommended
capacity may not work properly.
If an external USB hard disk with a “Power
Saving” function does not work, turn the
hard disk off and on again to make it work
properly.
USB storage devices below USB 2.0 are
supported, but they may not work properly
in the movie list.
When using a USB HDD via a USB extension
cable, connect it to a supported power
source.
ENTERTAINMENT
31
ENGLISH
Page 32

ENTERTAINMENT
32
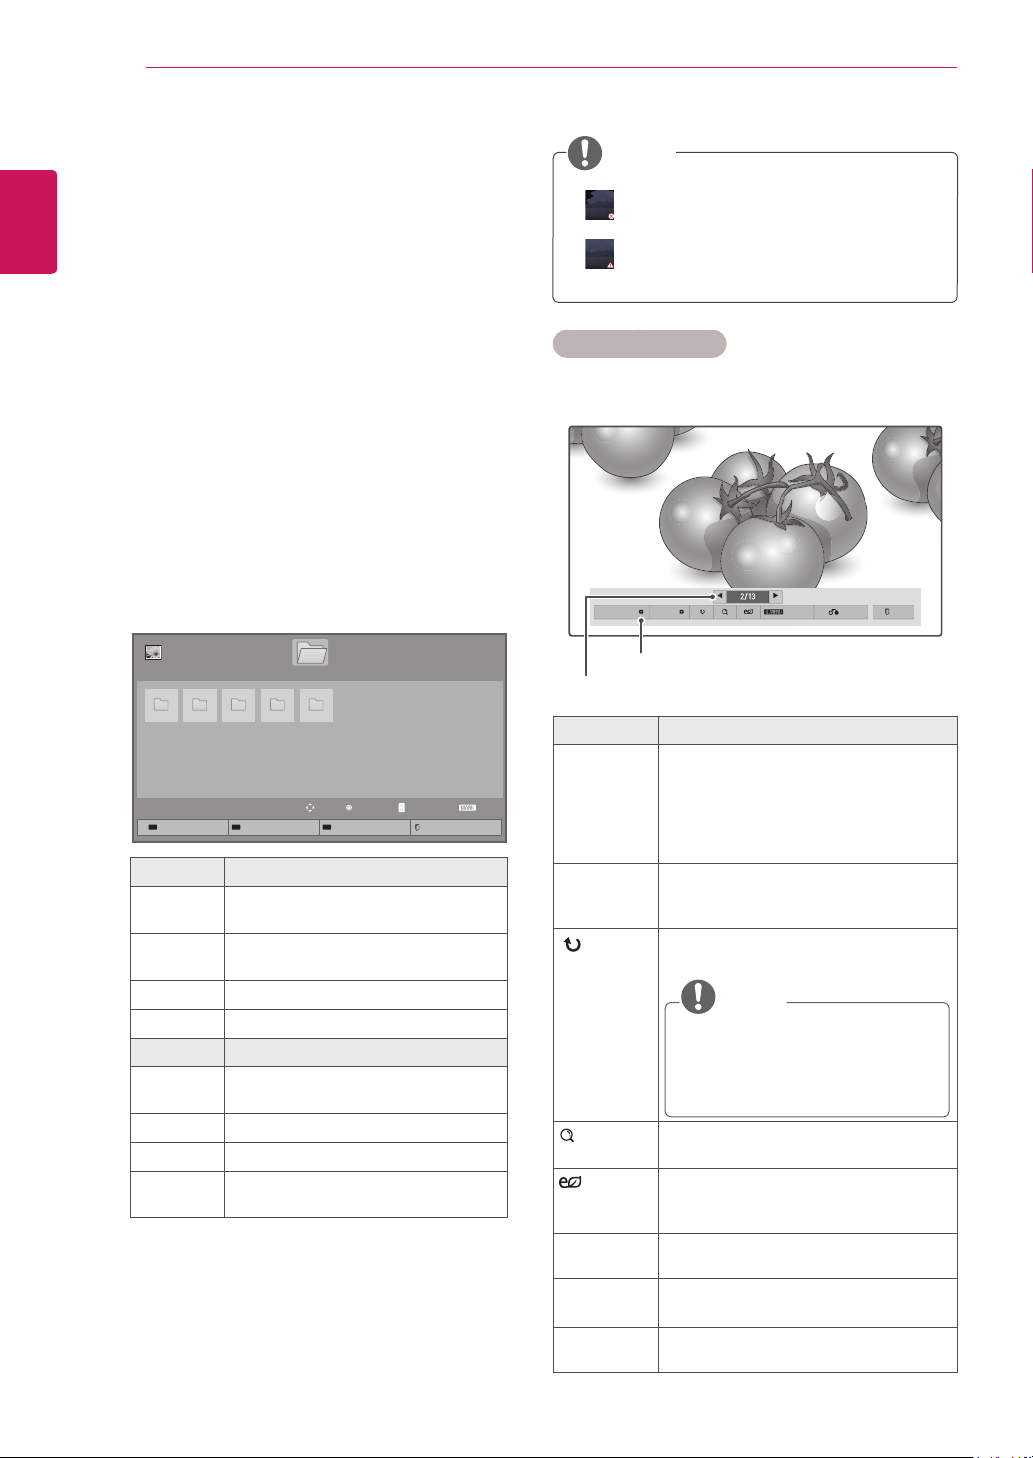
Browsing files
ENGLISH
Access the
browse files.
1
2
3
4
5
6
Movie, Photo, Music
Connect a
Press
MENU
storage device.
USB
to access the main menus.
Press the Navigation buttons to scroll to
and press
MEDIA
ENTER
Press the Navigation buttons to scroll to
List, Photo List, Music List
.
ENTER
Select
to access the connected USB
Drive1
or lists and
MY
.
Movie
or and press
storage device.
Press the Navigation buttons to Select a folder/
file you want.
Movie List
BH1
BH5
1
Drive 1
BH2 BH3
2
Page 1/1
Page 1/1
BH4
3
4
1
Music List
BH-01.mp3 BH-02.mp3 BH-03.mp3 BH-04.mp3
00:00 00:00 00:00 00:00
To Movie List
Change Numbers
NO Description
1
2
3
4
5
Moves to the upper level folder
Current page number/total number of
pages
Current page number/total number of
pages
Contents under the folder focused on
Available buttons on the remote
control
NO Description
Green
button
Yellow
button
Move to Photo List, Music List, or
Movie List
Change Numbers: Changes the
number or thumbnails displayed at a
time.
Drive 1
Move
Play
Mark Mode
CH
2
Page 1/1
Page Change
Exit
Page 1/1
Mark
3
4
5
1
To Photo List
Photo List
BH1
BH2 BH3 BH4 BH5
To Photo List
Change Numbers
Change Numbers
1
Drive 1
Move
Move
Play
Mark Mode
Mark Mode
Blue
CH
Page Change
Mark
Exit
button
5
Allows you to mark certain files.
2
Page 1/1
Page 1/1
3
4
Play
CH
Page Change
Mark
Exit
5
Page 33

ENTERTAINMENT
33
Supported file format
Type Supported file format
Video MPG, MPEG, DAT, TS, TRP, TP, VOD,
MP4, MOV, MKV, DivX, AVI, Motion
JPEG (AVI, MP4, MKV), ASF, WMV, FLV
Max bit rate of playable movie file:
20Mbps (Mega bit per second)
Bit rate of audio format: within 32 -
320kbps (MP3)
Supported subtitle format: *.smi, *.srt,
*.sub (MicroDVD, SubViewer1.0/2.0),
*.ass, *.ssa, *.txt (TMPlayer),
*.psb(PowerDivX)
Photo JPG
Available size
Baseline: 64 pixel (W) x 64 pixel (H) 15360 pixel (W) x 8640 pixel (H)
Progressive: 64 pixel (W) x 64 pixel (H) 1920 pixel (W) x 1440 pixel (H)
Music MP3
Bit rate range 32 Kbps - 320 Kbps
Sampling rate (Sampling Frequency)
MPEG1 layer 3: 32 kHz, 44.1 kHz,
48 kHz
MPEG2 layer 3: 16 kHz, 22.05 kHz,
24 kHz
MPEG2.5 layer 3: 8 kHz, 11.025 kHz,
12 kHz
* A copy-protected file will not play.
Viewing Movies
Play video files on the TV. Your TV displays all of
the video files saved in a USB storage device.
Press
1
Press the Navigation buttons to scroll to
2
MEDIA
Press the Navigation buttons to scroll to
3
and press
List
Select
4
storage device.
Press the Navigation buttons to scroll to a
5
folder you want and press
Play a movie by using the following menus/
6
buttons.
Movie List
BH1 BH2 BH3
BH5
to access the main menus.
MENU
and press
Drive1
ENTER
.
ENTER
to access the connected USB
Drive 1USB
.
ENTER
MY
Movie
.
Page 1/1
Page 1/1
BH4
ENGLISH
Move Play ExitCH Page Change
To Photo List Change Numbers Mark Mode Exit
Button Description
Navigation
button
ENTER Plays the highlighted file or enters the
CH (^, v) Moves to the previous or next page.
MARK Enters the mark mode.
Button Description
Play
Marked
Mark All Selects all files.
Unmark All Clears all of your selections.
Exit Mark
Mode
Scrolls through the files.
mark mode.
Plays the selected video.
Exits the Mark Mode.
NOTE
:Abnormal files are displayed using
this graphic.
: Non-supported files are displayed
using this graphic.
Page 34

ENTERTAINMENT
34
7
ENGLISH
Control playback by using the following
buttons.
Option Hide Exit
Button Description
Stops the playback
Plays a video
Pauses or resumes the playback
Scans backward in a file
Scans forward in a file
and
< or > Skips to specific points in a file
(ENERGY
SAVING)
Q.MENU
BACK Hides the menu on screen.
EXIT
Plays videos in slow motion
during playback. The time of a
specific point will appear on the
status bar. In some files, this
function may not work properly.
Increases or deceases the
brightness of your screen.
Shows the Option menu
To see the menu again, press
ENTER button to display.
Returns to previous menu.
Q.MENU options for movie list
1
Press
Q. MENU
.
A pop-up window will appear.
Press the Navigation buttons to scroll to movie
2
list option and press
Press the Navigation buttons to scroll to one of
3
the following options and press
Set Video Play.
Option Description
Picture
Size
Audio
Language
Subtitle
Language
Language Activated for SMI subtitles and
Code Page Subtitle font selection. When set to
Sync If the video is not synchronized
Position Moves the location of the subtitles.
Size Changes the subtitle font size.
Repeat Turn on/off repeat function of movie
Selects your desired picture format
for videos.
Full Mode
screen mode according to the
aspect ratio of video.
Original Mode
their native size.
Changes the Language Group of
the audio for video files. Files with a
single audio track cannot be selected.
The subtitles can be turned on or off.
can select the language within the
subtitle.
default, contents are displayed in the
language set in "Option - Language Menu Language."
Subtitle Language
Group
Latin1 English, Spanish,
with the captions, it can be adjusted
by 0.5 second.
playback. When turned on, the
file within the folder will be played
back repeatedly. When turned off,
if the next file name is similar to
the previous file, it can be played
sequentially.
.
ENTER
ENTER
: Files are played in full
: Files are played in
Supported
Language
Portuguese
.
Page 35

ENTERTAINMENT
35
CAUTION
When replaying a video file after stopping,
select “Yes” to restart where it previously
stopped.
If continuous series files exist within the
folder, the next file will automatically be
played. But, this excludes cases when the
Repeat function of Movie List Option is
.
See p.34
) or when set as
turned “On” (
Marked
Set Video.
Allows you to change Video presets.
(Refer to “PICTURE Settings” on See p.43)
Set Audio.
Allows you to change Audio presets.
(Refer to “AUDIO Settings” on See p.46)
Play
Movie Playing Precautions
Some user-created subtitles may not work
properly.
Some special characters are not supported
in subtitles.
HTML tags are not supported in subtitles.
Subtitles in languages other than the
supported languages are not available.
Time information in an external subtitle file
should be arranged in ascending order to be
played.
The screen may suffer temporary
interruptions (image stoppage, faster
playback, etc.) when the audio language is
changed.
A damaged video file may not play correctly,
or some player functions may not be usable.
Video files produced with some encoders
may not play correctly.
If the video and audio structure of a recorded
file is not interleaved, either the video or
audio is output.
HD videos with a maximum of 1920x1080 @
25/30P or 1280x720 @ 50/60P are supported,
depending on the frame rate.
Videos with resolutions higher than
1920x1080 @ 25/30P or 1280x720 @ 50/60P
may not work properly depending on the
frame rate.
Video files other than the specified types
and formats may not work properly.
Video files encoded with the GMC (Global
Motion Compensation) are not supported.
Only files saved in ASCII CODE are
supported in subtitles.
Only 250 Korean characters, 500 letters and
500 numbers are supported for each line of
the subtitles.
Only 10,000 sync blocks can be supported
within the subtitle file.
The max bitrate of playable movie files is
20Mbps.
We do not guarantee smooth playback of
profiles encoded level 4.1 or higher in H.264/
AVC.
DTS Audio codec is not supported.
A video file more than 30GB in file size is not
supported for playback.
Playing a video via a USB connection that
doesn’t support high speed may not work
properly.
ENGLISH
Page 36

ENTERTAINMENT
36
ENGLISH
USB storage devices below USB 2.0 are
supported, but they may not work properly
in the movie list.
The video file and the subtitle file must be
located in the same folder.
The name of the video file and the subtitle
file must be the same to view the subtitles
normally.
Video Format
DivX3.11, DivX4.12, DivX5.x, DivX6,
Xvid1.00, Xvid1.01, Xvid1.02, Xvid1.03, Xvid
1.10-beta-1/beta-2, Mpeg-1, Mpeg-2, Mpeg4, H.264/AVCXvid 1.01, Xvid 1.02, Xvid 1.03,
Xvid 1.10–beta 1, Xvid 1.10–beta 2, H.264 /
AVC
Audio Format
Dolby Digital, AAC, Mpeg, MP3, LPCM, HE-
AAC
Subtitle format
*.smi/*.srt/*.sub(MicroDVD,SubView
er1.0/2.0)/*.ass/*.ssa/*.txt(TMPlayer)/*.
psb(PowerDivX)
ts,trp,tp:
mp4
MP3, LPCM
avi:
MP3, LPCM
mkv:
MP3, LPCM
divx
MP3,LPCM
Max Resolution
1920 x 1080P @ 25 / 30P
1280 x 720P @ 50 / 60P
Dolby Digital, AAC, MPEG
: Dolby Digital, HE-AAC, AAC, MPEG,
Dolby Digital, HE-AAC, AAC, MPEG,
Dolby Digital, HE-AAC, AAC, MPEG,
: Dolby Digital,HE-AAC,AAC,MPEG,
Video Decoder
mpg, mpeg, vob:
MPEG1
dat:
ts,trp,tp:
mp4:
DivX 4.12, DivX 5.x, DivX 6, Xvid 1.00, Xvid
1.01, Xvid 1.02, Xvid 1.03, Xvid 1.10–beta 1,
Xvid 1.10-beta 2, H.264/AVC
avi:
3.11, DivX 4, DivX 5, DivX 6, Xvid 1.00, Xvid
1.01, Xvid 1.02, Xvid 1.03, Xvid 1.10–beta 1,
Xvid 1.10–beta 2, H.264/AVC
mkv:
4 SP , MPEG4 ASP
divx:
DivX 3.11, DivX 4, DivX 5, DivX 6, Xvid 1.00,
Xvid 1.01, Xvid 1.02, Xvid 1.03, Xvid 1.10–
beta 1, Xvid 1.10–beta 2, H.264 / AVC
Audio Codec
mpeg, vob:
LPCM
dat:
MPEG2, H.264 / AVC
MPEG4 SP, MPEG4 ASP, DivX 3.11,
MPEG 2, MPEG 4 SP, MPEG4 ASP, DivX
H.264 / AVC, MPEG 1, MPEG 2, MPEG
MPEG 2, MPEG 4 SP, MPEG4 ASP,
Dolby Digital, MPEG, MP3, LPCM
MPEG1, MPEG2
Dolby Digital, MPEG, MP3,
Page 37

ENTERTAINMENT
37
DivX registration code
Check and register the DivX registration code of
your TV so that you can rent or purchase the latest
movies at
or purchased DivX file, the file’s registration code
should be same with your TV’s DivX registration
code.
Press
1
Press Blue to access the
2
Press the
3
Press the Navigation button to scroll to
4
View the registration code of your TV.
5
www.divx.com/vod
MENU
Blue
Reg. Code
and press
You must register your device to
play DivX protected videos.
Registration code: xxxxxxxxxx
Register at http://vod.divx.com
to access the
button.
Close
When you are finished, press
6
. To play a rented
MY MEDIA
POP-UP
.
ENTER
ENTER
menus.
menus.
DivX
.
Deactivating the DivX feature
Deactivate all of the devices through the web
server and block devices from activating.
Delete the existing authentication information to
receive a new DivX user authentication for the
TV. Once this function is executed, a DivX user
authentication is required again to see DivX DRM
files.
Press
1
Press Blue to access the
2
Press the Navigation button to scroll to
3
Deactivation
Select
4
When you are finished, press
5
When you return to the previous menu, press
BACK
to access the
MENU
and press
to confirm.
Yes
Deregistration code:
Deregister at http://vod.divx.com
.
********
Continue with registration?
MY MEDIA
POP-UP
ENTER
CloseYes
.
EXIT
menus.
menus.
.
ENGLISH
NOTE
While you are checking the registration code,
some buttons may not work.
If you use the DivX registration code of
another device, you cannot play the rented
or purchased DivX file. Make sure to use the
DivX registration code assigned to your TV.
The video or audio files that are not
converted by the standard DivX codec may
be corrupted or not be played.
The DivX VOD code allows you to activate
up to 6 devices under one account.
Page 38
ENTERTAINMENT
38
Viewing Photos
ENGLISH
View image files saved in a USB storage device.
The displays on the screen may differ from the
model.
1
2
3
4
5
6
Press
Press the Navigation buttons to scroll to
MEDIA
Press the Navigation buttons to scroll to
and press
List
Select
to access the main menus.
MENU
and press
Drive1
ENTER
.
ENTER
to access the connected USB
MY
.
Photo
storage device.
Press the Navigation buttons to scroll to a
folder you want and press
ENTER
.
View photos by using the following menus/
buttons.
Photo List
Drive 1
BH1 BH2 BH3 BH4 BH5
Move View MarkCH Page Change
To Photo List Change Numbers Mark Mode Exit
Button Description
Navigation
button
ENTER Views the highlighted file or enters
CH (^, v) Moves to the previous or next page.
MARK Enters the mark mode.
Button Description
View
Marked
Mark All Selects all files.
Unmark All Clears all of your selections.
Exit Mark
Mode
Scrolls through the files.
the mark mode.
Views the selected photo.
Exits the Mark Mode.
Page 1/1
Page 1/1
NOTE
Abnormal files are displayed using this
graphic.
Non-supported files are displayed using
this graphic.
Using photo options
Use the following options while viewing photos.
OptionBGMSlideshow Hide
Exit
Options
Number of selected photos
Option Description
Slide show Starts or stops a slideshow with
BGM
(Background
Music)
(Rotate) Rotates photos clockwise (90°, 180°,
selected photos.
If there are no selected photos, all
photos saved in the current folder
display during a slideshow.
To set a slideshow speed, select
Turns the background music on or off.
To set the background music folder,
select
270°, 360°).
Option
.
Option
NOTE
The supported photo size is limited.
You cannot rotate a photo if the
resolution of the rotated width is
larger than the supported resolution
size.
(Zoom In)
(ENERGY
SAVING)
Option Shows the Option menu.
Views the photo by zoom in 2, 4 times
by using
Increases or decreases the brightness
of your screen.
Blue
button.
.
Hide Hides the option window.
Exit Moves to the previous menu screen.
To display the options, press
ENTER
.
Page 39

ENTERTAINMENT
39
NOTE
Option values changed in Movie List does
not affect the Photo List and Music List.
Option value changed in Photo List and
Music List are changed likewise in Photo List
and Music List.
Q.MENU options for photo list
Press
1
Press the Navigation buttons to scroll to photo
2
Q. MENU
A pop-up window will appears.
list option and press
Press the Navigation buttons to scroll to one of
3
the following options and press
.
ENTER
.
ENTER
.
Set Photo View.
Option Description
Slide Speed Selects a slideshow speed
BGM
(Background
Music)
(Fast, Medium, Slow).
Selects a music folder for the
background music.
Repeat
Random
NOTE
You cannot change the music folder
while the background music is
playing.
Set Video.
Allows you to change Video presets.
(Refer to “PICTURE Settings” on See p.43)
Set Audio.
Allows you to change Audio presets.
(Refer to “AUDIO Settings” on See p.46)
Listening to Music
Press
1
Press the Navigation buttons to scroll to
2
MEDIA
Press the Navigation buttons to scroll to
3
and press
List
Select
4
storage device.
Press the Navigation buttons to scroll to a
5
folder you want and press
Play music by using the following menus/
6
buttons.
Music List
To Movie List Change Numbers Mark Mode Exit
Button Description
Navigation
button
ENTER Plays the highlighted file or enters the
CH (^, v) Moves to the previous or next page.
MARK Enters the mark mode.
Button Description
Play
Marked
Mark All Selects all files.
Unmark All Clears all of your selections.
Exit Mark
Mode
NOTE
to access the main menus.
MENU
and press
ENTER
to access the connected USB
Drive1
BH-01.mp3 BH-02.mp3 BH-03.mp3 BH-04.mp3
00:00 00:00 00:00 00:00
Scrolls through the files.
mark mode.
Plays the selected music file.
Exits the Mark Mode.
.
ENTER
.
Drive 1
Move Play ExitCH Page Change
ENTER
.
Page 1/1
ENGLISH
MY
Music
Page 1/1
Abnormal files are displayed using this
graphic.
Non-supported files are displayed using
this graphic.
Page 40

40
7
ENGLISH
ENTERTAINMENT
Control playback by using the following
buttons.
Button Description
Stops playback
Plays a music file
Pauses or resumes playback
Skips to the next file
Skips to the previous file
Play with
Photo
(ENERGY
SAVING)
Option Shows the Option menu (See p.58).
Hide Hides the option window.
Exit Moves to the previous menu screen.
Displays photos during playback.
Increases or decreases the brightness
of your screen.
To display the options, press
ENTER
Set Audio Play.
Select Repeat or Random option.
Set Audio.
Allows you to change Audio presets.
(Refer to “AUDIO Settings” on See p.46)
NOTE
The TV will not play copy protected files.
If the TV is not in use for some time
during playback, the information box as a
screensaver will appear to prevent image
burn. To return to the Music list screen,
.
press
or
ENTER
BACK
Folder name / file name
.
Q.MENU options for music list
Press
1
Press the Navigation buttons to scroll to photo
2
Q. MENU
A pop-up window will appears.
list option and press
Press the Navigation buttons to scroll to one of
3
the following options and press
.
ENTER
.
ENTER
.
NOTE
Option values changed in Movie List does
not affect the Photo List and Music List.
Option value changed in Photo List and
Music List are changed likewise in Photo List
and Music List.
Time elapsed / Duration
Page 41

CUSTOMIZING SETTINGS
41
CUSTOMIZING SETTINGS
Accessing main menus
Press
1
Press the Navigation buttons to scroll to one of the following menus and
2
press
Press the Navigation buttons to scroll to the setting or option you want
3
and press
When you are finished, press
4
When you return to the previous menu, press
to access the main menus.
MENU
.
ENTER
.
ENTER
.
EXIT
BACK
PICTURE
Adjusts the image size,
quality, or effect.
(See p.43)
.
(See p.46)
AUDIO
Adjusts the sound quality,
effect, or volume level.
MENU
BACK
INFO
ENTER
GUIDE
ENGLISH
Q.MENU
EXIT
CHANNEL
Sets up and edit channels.
LOCK
Locks or unlocks channels
and programs.
(See p.42)
(See p.49)
CHANNEL
LOCK
OPTION
Customizes the general
settings.
PICTURE
OPTION
(See p.50)
AUDIO
INPUT
INPUT
Views the input sources
with their labels.
TIME
MY MEDIA
(See p.22)
(See p.48)
TIME
Sets the time, date or
Timer feature.
MY MEDIA
Using integrated media
features.
(See p.32)
Page 42

42
Customizing settings
ENGLISH
CHANNEL settings
CUSTOMIZING SETTINGS
Press
1
Press the Navigation buttons to scroll to
2
ENTER
Press the Navigation buttons to scroll to the setting or option
3
you want and press
- To return to the previous level, press
When you are finished, press
4
When you return to the previous menu, press
to access the main menus.
MENU
.
ENTER
.
EXIT
.
CHANNEL
.
BACK
BACK
and press
.
CHANNEL
• Auto Tuning
• Manual Tuning
• Channel Edit
• Scan Option
• System Color
Move Enter
The available Channel settings are described in the following:
Setting Description
Auto Tuning Tunes and stores all available channels through antennas or cable inputs (See p.15).
Manual Tuning Tunes and stores the channels you want manually (See p.15).
Channel Edit Adds or deletes channels (See p.16).
Scan Option Whether to search all channels or the first channel of virtual channels is switched with CH button
System Color Sets color suited the each signal.
when one or more virtual channels exist at one physical channel.
Option
Primary Channel Only scan the first channel of virtual channels.
All Channels Scan full channel.
This feature is disable in digital channel.
Page 43

CUSTOMIZING SETTINGS
43
PICTURE settings
Press
1
Press the Navigation buttons to scroll to
2
press
Press the Navigation buttons to scroll to the setting or
3
option you want and press
- To return to the previous level, press
When you are finished, press
4
When you return to the previous menu, press
BACK
to access the main menus.
MENU
.
ENTER
.
ENTER
EXIT
.
.
PICTURE
BACK
.
and
PICTURE
• Aspect Ratio : 16:9
• Picture Wizard
• Energy Saving : Off
• Smart Energy Saving : Off
• Picture Mode : Vivid
• Backlight 100
• Contrast 100
• Brightness 70
• Sharpness 50
• Color 45
• Tint 0
• Color Temp. C50
• Advanced Control
• Picture Reset
• Screen(RGB-PC)
The available Picture settings are described in the following:
Setting Description
Aspect Ratio Changes the image size to view images at its optimal size. (See p.21)
Picture Wizard Adjusts the image quality and calibrates the screen.
The customized options will be saved as
NOTE
If you use
To reset changes made by
Expert1
Picture wizard
.
, the Energy saving feature will turn off automatically.
Picture Wizard
Expert1
, operate
in the
Picture Mode
Picture Reset
.
when
Move Enter
Picture Mode
R
W
is on
ENGLISH
G
C
Energy Saving
Smart Energy
Saving
Reduces the power consumption by adjusting the screen brightness.
NOTE
When selecting Maximum, Backlight will not work.
Option
Off Select if this feature is not necessary.
Minimum/Medium/Maximum Selects the brightness level.
Screen off The screen turns off in 3 seconds.
Dims the screen backlight to reduce power consumption. By enhancing the contrast ratio, the darker
screen will look similar to the original image.
Pressing any button of the remote control and touch button (except power
button) will turn on the screen again.
NOTE
when using the Smart Energy Saving function, the screen may look saturated in the white
area of a still image.
If Energy Saving is set to Minimum, Medium or Maximum, the Smart Energy Saving function
is disabled.
Page 44

44
ENGLISH
CUSTOMIZING SETTINGS
Setting Description
Picture Mode Selects one of the preset image or customizes options in each mode for the best TV screen
Screen
(In RGB-PC
Mode Only)
performance. You are also able to customize advanced options of each mode.
The available preset picture modes vary depending on the TV .
Mode
Vivid Adjusts the video image for the retail environment by enhancing the contrast,
Standard Adjusts the image for the normal environment.
Cinema Optimizes the video image for a cinematic look to enjoy movies as if you are in a
Sport Optimizes the video image for high and dynamic actions by emphasizing primary
Game Optimizes the video image for a fast gaming screen such as PCs or games.
Expert1/2
Customizes the PC display options in RGB mode.
Option
Resolution Selects a proper resolution. See “Customizing PC display options”, page 28
Auto Config. Sets the TV to optimize the options automatically for the TV display.
Position Locates the image at the proper position.
Size Adjusts the image size.
Phase Eliminates horizontal streaking.
Reset Restores the options to the default setting.
brightness, Color, and sharpness.
movie theater.
Colors such as white, grass, or sky blue.
Adjusts the detailed video image settings for video experts as well as general viewers.
Basic image options
Setting Description
Backlight Adjusts the brightness of the screen by controlling the LCD backlight. If you decrease the
Contrast Increases or decreases the amplitude of the video signal. You may use Contrast when the
Brightness Adjusts the base level of the signal in the picture.
Sharpness Adjusts the level of crispness in the edges between the light and dark areas of the picture.
Color Adjusts intensity of all colors.
Tint Adjusts the balance between red and green levels.
Color Temp. Set to warm to enhance hotter colors such as red, or set to cool to enhance cooler colors
Advanced
Control
Picture Reset Restores the options of each mode to the factory default.
brightness level, the screen becomes darker and the power consumption will be reduced
without any video signal loss.
bright part of the picture is saturated.
The lower the level, the softer the image.
such as blue.
Customizes the advanced options.
NOTE
You cannot adjust
When the Expert 1/2 is selected, you can select
Color
and
in the RGB-PC / HDMI-PC mode.
Tint
H Sharpness, V Sharpness, Expert control
.
Page 45
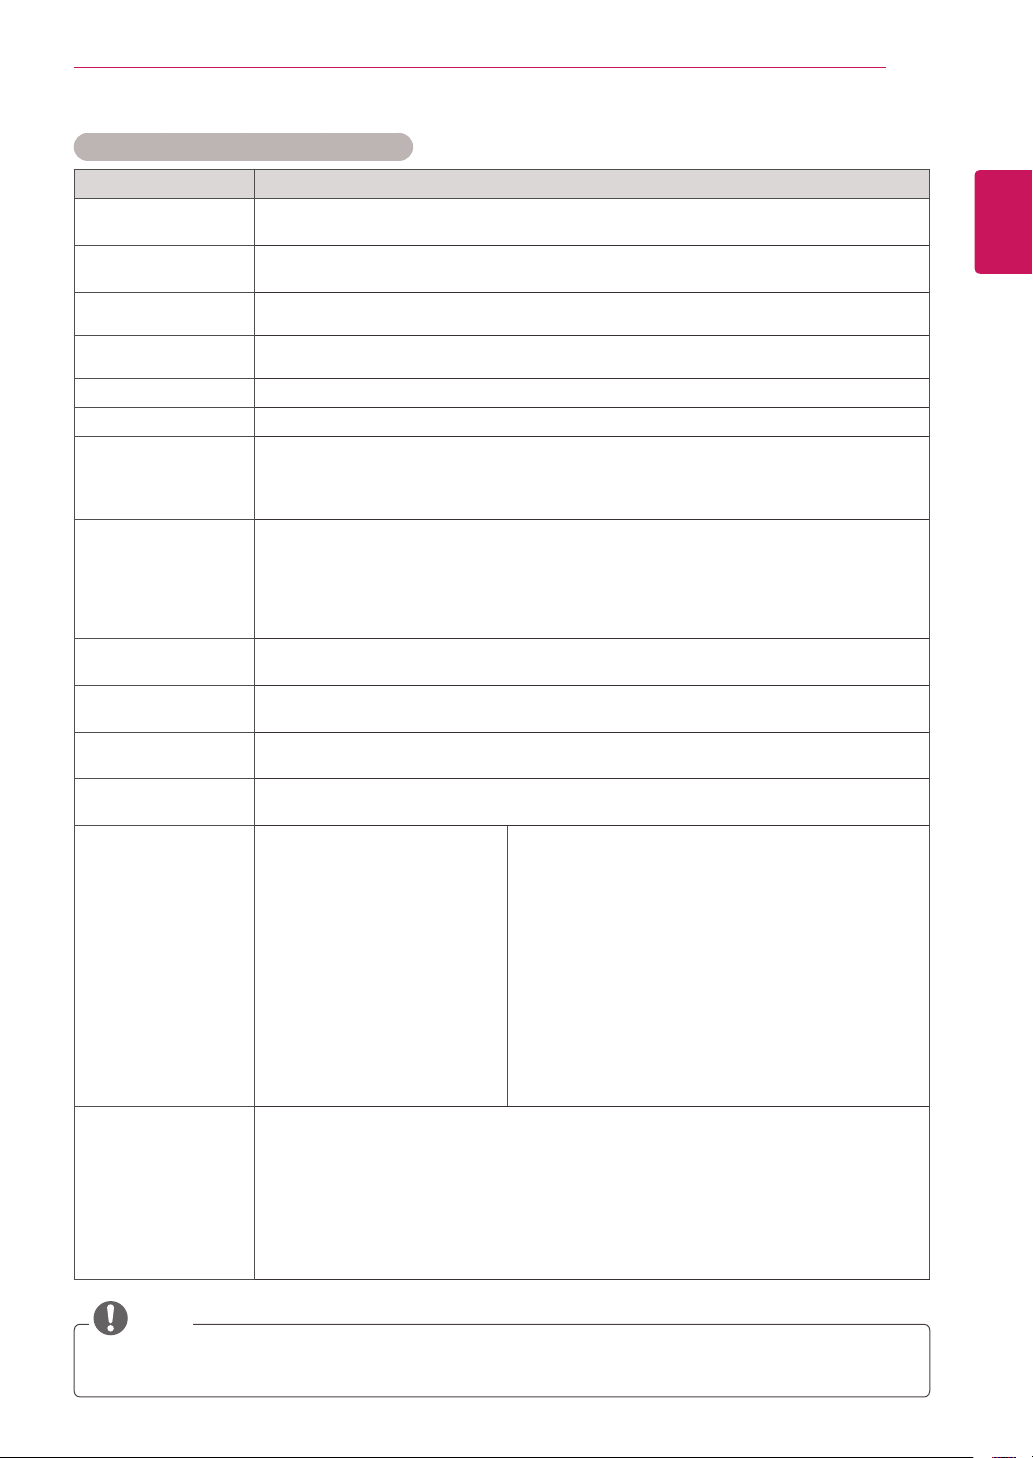
CUSTOMIZING SETTINGS
45
Advanced image / Expert control options
Setting Description
Dynamic Contrast Adjusts the contrast to keep it at the best level according to the brightness of the screen.
Dynamic Color Adjusts screen colors so that they look livelier, richer and clearer. This feature enhances hue,
Clear White Make the white area of screen brighter and more white.
Skin Color It detects the skin area of video and adjusts it to express a natural skin color.
Noise Reduction Reduces screen noise without compromising video quality.
Digital Noise Reduction Removes noise caused by compressing video.
Gamma You can adjust brightness of dark area and middle gray level area of the picture..
Black Level Sets the black level of the screen to proper level. This function is available in ATV,
Film Mode Sets to display the screen with the best image quality for the film. This feature is available in
Edge Enhancer Shows clearer and distinctive yet natural edges of the video.
Color Filter This is the function to filter the specific colors of the video.
Expert Pattern This is the pattern used for expert adjustment
Color Temperature a. Gamma : Select
Color Management
System
The picture is improved by making bright parts brighter and dark parts darker.
saturation and luminance so that red, blue and green white look more vivid.
»Low: Make the dark and middle gray level areas brighter.
»Medium: Express the original picture level.
»High: Make the dark and middle gray level area darker.
Component, and HDMI modes.
In other modes, the black level will be set to Auto, which recognizes the black level and set
»Auto: Realizing the black level of the screen and set it to High or Low automatically.
»Low: The reflection of the screen gets darker.
»High: The reflection of the screen gets brighter.
TV, Component 480i/1080i, and HDMI 1080i modes.
This function works well over Sharpness UI 60 value.
You can use the RGB filter to set color saturation and hue accurately.
This function is enabled in “Picture Mode - Expert” when you watch DTV.
Low, Medium, High
b. Method : 2 Points
»Pattern: Inner,
Outer
»Red/Green/
Blue Contrast,
Red/Green/Blue
Brightness
d. Apply to all inputs
As the tool used by the experts to make adjustments by using the test patterns, this does
not affect other colors but can be used to selectively adjust the 6 color areas (Red/Green/
Blue/Cyan/Magenta/Yellow).
Color difference may not be distinctive even when you make the adjustments for the general
video.
Adjusts Red/Green/Blue/Yellow/Cyan, Magenta.
Red/Green/Blue/Yellow/Cyan/Magenta Color: The adjustment range is -30 - +30.
Red/Green/Blue/Yellow/Cyan/Magenta Tint: The adjustment range is -30 - +30.
This feature is disable in RGB-PC and HDMI-PC mode.
c. Method : 10 Point IRE
»Pattern: Inner, Outer
»IRE (Institute of Radio Engineers) is the unit
to display the size of the video signal and
can be set among 0, 10, 20, 30 - 100. You
can adjust Red, Green or Blue according to
each setting.
»Luminance: This function displays
calculated luminance value for 2.2 gamma.
You can input luminance value you want at
100 IRE, than the target luminance value
for 2.2 gamma is displayed at every 10
steps from 10 IRE to 90 IRE.
»Red/Green/Blue: The adjustment range is
-50 - +50.
ENGLISH
NOTE
Edge Enhancer, Color Filter, Expert Pattern, Color Temperature, Color Management System are supported in the
Expert control options only.
Page 46
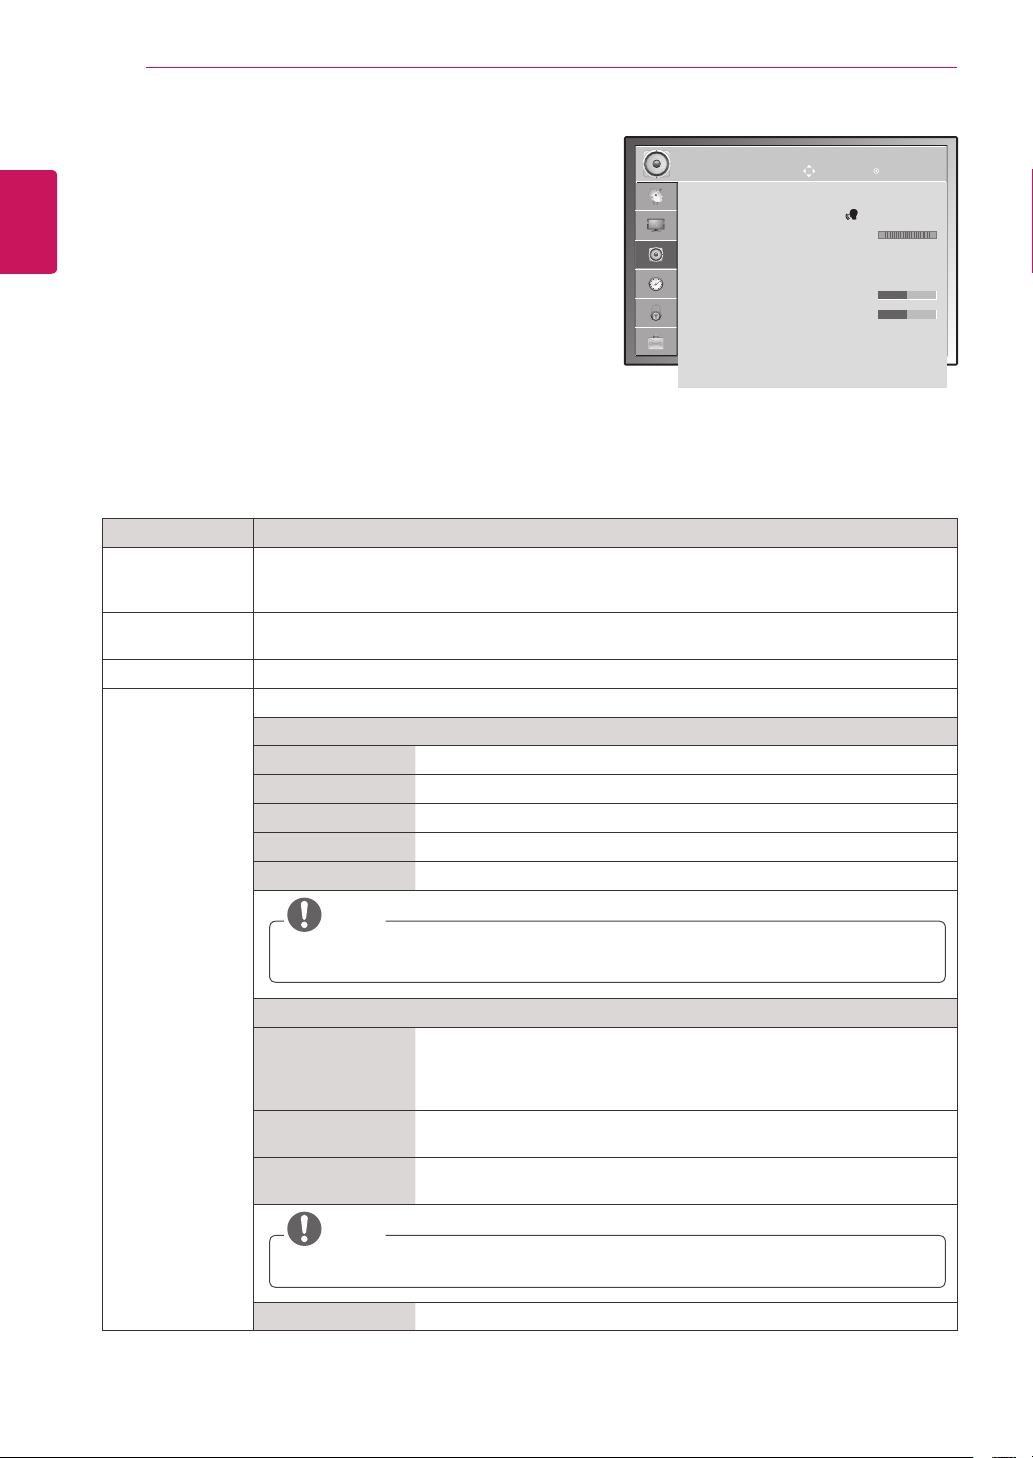
CUSTOMIZING SETTINGS
46
AUDIO settings
ENGLISH
1
2
3
4
The available Audio options are described in the following:
Press
Press the Navigation buttons to scroll to
ENTER
to access the main menus.
MENU
.
AUDIO
and press
Press the Navigation buttons to scroll to the setting or
option you want and press
- To return to the previous level, press
When you are finished, press
ENTER
EXIT
.
.
BACK
.
AUDIO
• Auto Volume : Off
• Clear Voice ll : Off 3
• Balance 0
• Sound Mode : Music
• Surround X : Off
• Treble 50
• Bass 50
• Reset
• Digital Audio Out : PCM
• TV Speaker : On
Move
Enter
L
When you return to the previous menu, press
.
BACK
Setting Description
Auto Volume Activates the Auto Volume feature to keep the volume level consistent whenever you change
Clear Voice ll Sets whether to enhance human voice clarity. You can adjust the level of clarity when you set
Balance Adjust balance between the left and right speakers according to your room environment.
Sound Mode Selects one of the preset sound modes or customizes options in each mode.
channels. The volume level may not be consistent due to different signal conditions of
broadcasting stations.
this feature on.
Mode
Standard Select when you want standard-quality sound.
Music Select when you listen to music.
Cinema Select when you watch movies.
Sport Select when you watch sports events.
Game Select when you play games.
R
NOTE
If sound quality or volume is not at the level you want, it is recommended to use a separate
home theater system or amplifier to cope with different user environments.
Option
Surround X Provides an enveloping surround sound with clear dialog and bass
Treble Controls the dominant sounds in the output. When you turn up the treble,
Bass Controls the softer sounds in the output. When you turn up the bass, it
using just two speakers. Surround X is a patented Surround technology
that solves the problem of playing 5.1 multichannel contents over two
speakers.
it will increase the output to the higher frequency range.
will increase the output to the lower frequency range.
NOTE
You cannot adjust Treble and Bass in the RGB-PC / HDMI-PC mode.
Reset Resets the sound mode to the default setting.
Page 47

CUSTOMIZING SETTINGS
Setting Description
Digital Audio Out This function is setting the Dolby digital/PCM to connect the audio outputs.
If you select “Digital Audio Out - Auto” when Dolby digital is available, SPDIF (Sony Philips Digital
InterFace) output will be Dolby Digital.
If you select “Digital Audio Out - PCM” when Dolby digital is not available, SPDIF output will be
PCM (Pulsecode modulation).
Item Audio Input Digital Audio output
Auto MPEG
DD
HE-AAC
PCM All PCM
PCM
DD
DD
47
ENGLISH
TV Speaker Turns on the internal speaker of the TV when using an external Hi-Fi system. You can use the TV
speaker as an audio output device even if there is no video input.
Page 48
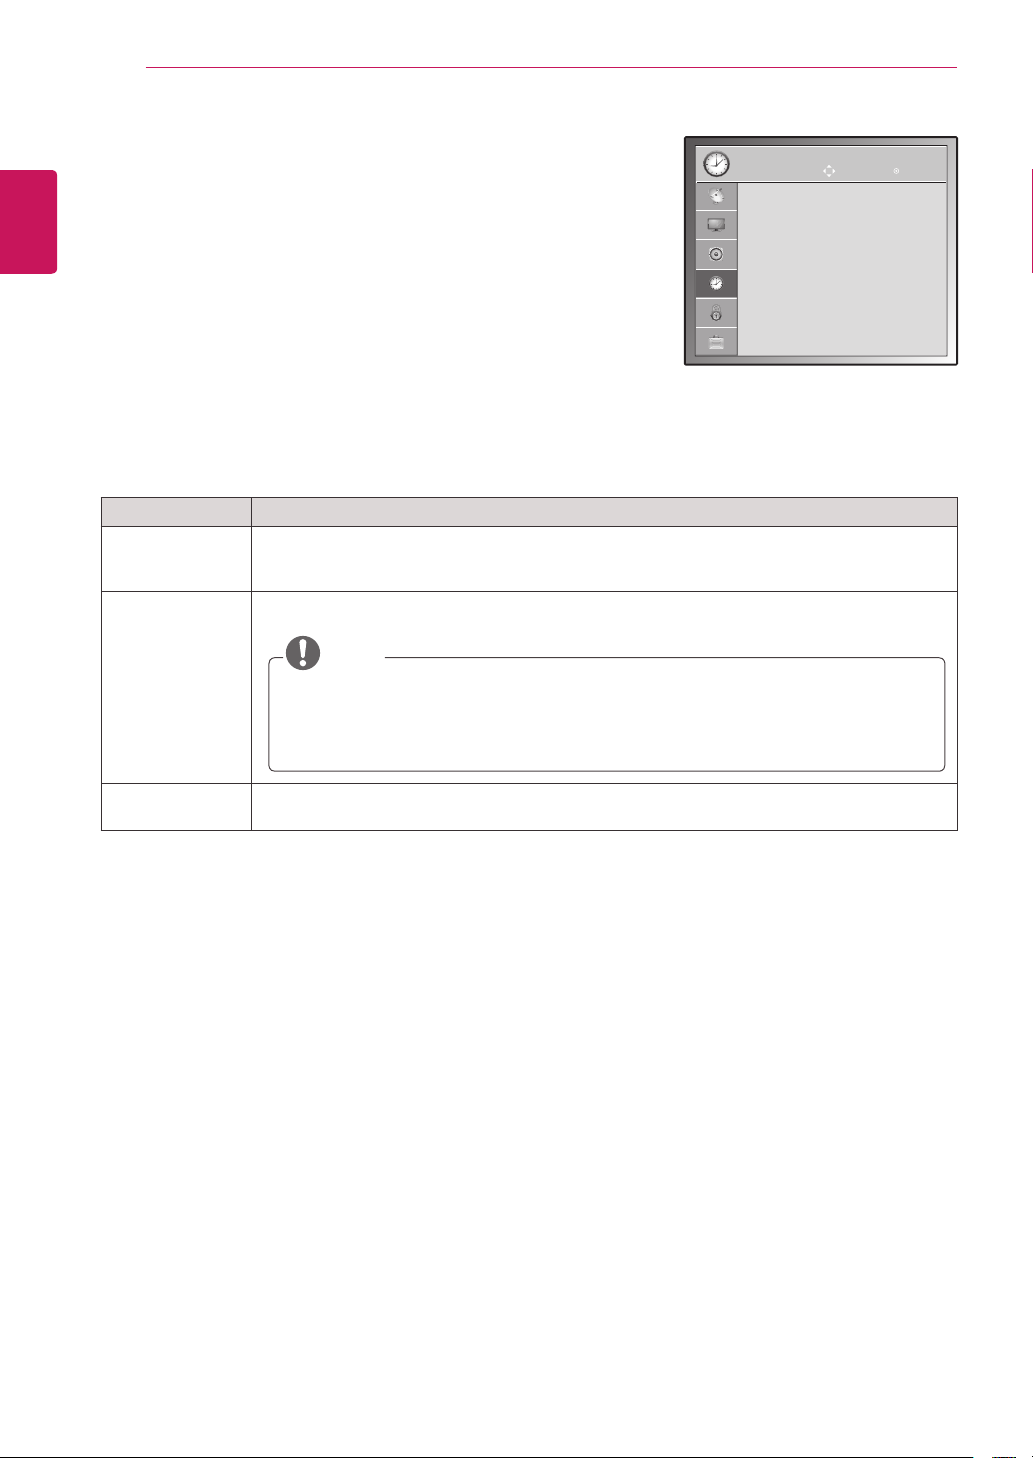
CUSTOMIZING SETTINGS
48
TIME settings
ENGLISH
1
2
3
4
The available Time settings are described in the following:
Press
Press the Navigation buttons to scroll to
to access the main menus.
MENU
TIME
and press
ENTER
.
Press the Navigation buttons to scroll to the setting or option you
want and press
- To return to the previous level, press
When you are finished, press
When you return to the previous menu, press
Setting Description
Clock Sets the time, date, time zone, and daylight-saving time feature.
Off Time/On Time
.
ENTER
.
BACK
.
EXIT
.
BACK
The time will be set automatically according to a digital channel signal which includes time
information provided by the broadcasting station. If not, set the time and date manually.
Sets the time to turn on or off the TV automatically. To use this function, you should set the
current time and date in the Clock menu.
NOTE
If you do not press any button within 2 hours after the TV turns on by the On Time
feature,the TV enters the Standby mode automatically.
If you set both Off time and On time features to the same time, the Off time feature
overrides the On time feature.
TIME
• Clock
• Off Time : Off
• On Time : Off
• Sleep Timer : Off
Move Enter
Sleep Timer Sets the length of time until the TV to turns off. When you turn the TV off and turn it on again, the
Sleep timer faature will be set to off.
Page 49

CUSTOMIZING SETTINGS
49
LOCK settings
Press
1
Press the Navigation buttons to scroll to
2
Press the Navigation buttons to scroll to the setting or option you
3
want and press
- To return to the previous level, press
When you are finished, press
4
When you return to the previous menu, press
The available Lock settings are described in the following:
Setting Description
Set Password Changes the 4-digit password. The default PIN is “0 0 0 0”.
Lock System Activates or deactivates the lock system.
Key Lock Locks or unlocks the buttons on the TV.
to access the main menus.
MENU
.
ENTER
If you forget your password, press “0-3-2-5” on the remote control.
Mode
Block Channel Blocks the channels that contain inappropriate contents for children by pressing
Rating Blocks the movies that are only broadcasted on the TV and contain inappropriate
Input Block Block the input sources.
and press
LOCK
.
BACK
.
EXIT
.
BACK
the Yellow button. The Lock icon appears in front of the blocked channels. The
channels can be selected but the screen blank and the audio is muted.
To watch a locked channel, enter the password.
contents, based on the Motion Picture Association of America (MPAA) rating.
Rating
Blocking Off General audiences . All ages admitted.
10 and above Parental guidance suggested . Some material may not be
12 and above Patents strongly cautioned . Some material may be
14 and above Restricted . Under 14 requires accompanying parent or adult
16 and above No one 16 and under admitted.
18 and above Adults only.
suitable for children.
inappropriate for children under 12.
guardian.
ENTER
.
LOCK
• Set Password
• Lock System : Off
• Key Lock : Off
Move Enter
• Block Channel
• Rating
• Input Block
ENGLISH
Page 50

CUSTOMIZING SETTINGS
50
OPTION settings
ENGLISH
1
2
3
4
The available Option settings are described in the following:
OPTION
Press
Press the Navigation buttons to scroll to
ENTER
to access the main menus.
MENU
.
OPTION
and press
Press the Navigation buttons to scroll to the setting or option
you want and press
- To return to the previous level, press
When you are finished, press
When you return to the previous menu, press
Setting Description
Language Selects a desired language.
Option
Menu Language Selects a language for the display text.
Audio Language Selects an audio language for your program. This feature operates only
Caption Sets whether to display captions and customize your option in each mode.
Mode
Analog
Digital This is only available for the digital broadcasting system.
Power Indicator Sets to turn on or off the indicator light on the TV.
Initial Setting Customizes the TV settings to suit your preference. The initial setup screen will appear
when you turn on the TV for the first time.
Setting
Language Selects a desired language.
Mode Setting Selects
ENTER
.
EXIT
CC 1-2
(Closed
captioning)
Text 1-2
.
BACK
.
.
BACK
in the DTV or CADTV mode.
Displays the audio portion of a TV program as text on the TV screen.
CC1 is the most common mode in use.
Selects Portuguese or English.
Home Use
Selects
Store Demo
Selects
Demo Mode
cancel the demo mode by pressing any buttons except the Volume and
Mute buttons.
for the home environment.
for the retail environment.
to set to show special features of the TV. You can
• Language
• Caption : Off
• Power Indicator : On
• Initial Setting
• Set ID : 1
• Mode Setting : Home Use
Move Enter
NOTE
When selecting Store Demo, Demo Mode will be activated.
Time Zone Sets the time zone and daylight saving.
Auto Tuning Scans and saves available channels automatically.
Page 51

CUSTOMIZING SETTINGS
Setting Description
Set ID Adds an ID to the connected devices. (See p.69)
Mode Setting Default selection is “Home Use”. We recommend setting the TV to “Home Use” mode for the
best picture in your home environment.
Option
Home Use Selects it for the home environment.
Store Demo Selects it for the retail environment.
Demo Mode The Demo Mode option will be enabled only when Store Demo mode is
enabled.
Sets to show special features of the TV. You can cancel the demo mode
by pressing any buttons except the Volume and Mute buttons.
51
ENGLISH
Page 52

MAKING CONNECTIONS
52
ENGLISH
MAKING CONNECTIONS
Connect various external devices to the TV and switch input modes to select an external device. For more
information about an external device’s connection, refer to the manual supplied with each device.
Available external devices are: HD receivers, DVD players, VCRs, Audio systems, USB storage devices, PC,
Camcorders or Cameras, Gaming devices, and other External devices.
Connect external devices to the TV by referring to the following table.
Connection overview
NOTE
If you record a TV program on a DVD recorder or VCR, make sure to connect the TV signal input cable
to the TV through a DVD recorder or VCR. For more information about recording, refer to the manual
supplied with the connected device.
The external device connection may differ from the model.
Connection type
HDMI (highly recommended) O - O -
Component - O - -
RGB - O - -
Optical audio - - O -
Analog audio - - - O
Digital Analog Digital Analog
Video Audio
Page 53

MAKING CONNECTIONS
Connect various external devices to the ports on the TV’s back panel.
Find an external device you want to connect to your TV shown on the following illustration.
1
Check the connection type of the external device.
2
Go to the appropriate illustration and check the connection details.
3
53
ENGLISH
HD Receiver
HDMI – See p.54
Component – See p.54
Speaker
Digital optical audio
– See p.55
Headphone
– See p.55
DVD VCR
HDMI – See p.54
Component – See p.54
Component – See p.54
USB
Memory storage
– See p.55
Memory card reader
– See p.55
PC Camcorder/Camera Gaming device
HDMI – See p.25
RGB – See p.26
HDMI – See p.54
Component – See p.54
HDMI – See p.54
Component – See p.54
NOTE
If you connect a gaming device to the TV, use the cable supplied with the gaming device.
Page 54

MAKING CONNECTIONS
1
2
HDMI OUT
1
2
54
Connecting to a Camcorder,
ENGLISH
Camera, HD receiver, DVD,
VCR player or Gaming device
Connect a Camcorder, Camera, HD receiver, DVD,
VCR player or Gaming device to the TV and select
an appropriate input mode.
HDMI connection
Transmits the digital video and audio signals from
an external device to the TV. Connect the external
device and the TV with the HDMI cable as shown
on the following illustration.
DVI to HDMI connection
Transmits the digital video signal from an external
device to the TV. Connect the external device and
the TV with the DVI-HDMI cable as shown in the
following illustration.
2
1
DVI OUT
NOTE
If you do not use an optional external
speaker, connect the PC to the TV with the
supplied audio cable.
AUDIO OUT
NOTE
Use a High Speed HDMI™ Cable.
High Speed HDMI™ Cables are tested to
carry an HD signal up to 1080p and higher.
Component connection
Transmits the analog video and audio signals from
an external device to the TV. Connect the external
device and the TV with the component cable as
shown on the following illustration. To display
images by using progressive scan, make sure to
use the component cable.
Y PBP
VIDEO AUDIO
R
L R
Page 55

MAKING CONNECTIONS
1
2
1
1
2
55
Connecting to an audio system
Use an optional external audio system instead of
the built-in speaker.
NOTE
If you use an external audio device instead
of the built-in speaker, set the TV speaker
feature to off (See p.46).
Digital optical audio connection
Transmits the digital audio signal from the TV to an
external device. Connect the external device and
the TV with the optical audio cable as shown on
the following illustration
Headphone connection
ENGLISH
Transmits the headphone signal from the TV to
an external device. Connect the external device
and the TV with the headphone as shown on the
following illustration.
OPTICAL AUDIO IN
Connecting to a USB
Connect a USB storage device such as s USB
flash memory, external hard drive, MP3 player or
a USB memory card reader to the TV and access
the USB menu to use various multimedia files.
"
Connecting USB storage devices
“
Browsing files
” on See p.32
or
" on See p.30 and
Page 56

TROUBLESHOOTING
56
ENGLISH
MAINTENANCE
Update and clean your TV regularly to keep the
best performance and to extend the product
lifespan.
Updating the TV Firmware
Download and install the latest firmware through
DTV signal to enhance or change the product
function, or add new features.
To check the current firmware version or update
the firmware,
1
2
3
Press
Press the
Support
Press the Navigation buttons to scroll to
Software Update
The current firmware version displays.
to access the main menus.
MENU
button to scroll
Red
.
and press
Customer
ENTER
.
NOTE
If you change the channel during the
firmware update through OTA, the update is
stoped.
The process resumes when you go back to
the original channel. The update continues
even when the power is switched off using
the remote control. In this case, it is normal
that the color of the power indicator may
change and a dim light may be displayed on
the screen. The system operates normally
once the update is complete.
You can check the software update status
in the Software Update menu or from the
update information displayed under the
channel banner.
When the update is complete, the TV will
4
automatically restart in 5 seconds. You may
need to reset some
menus.
AUDIO
CHANNEL, PICTURE
, or
OTA (Over-The-Air): When software update is
on, the TV will automatically check for software
updates. A pop-up window will appear on the
screen when an update is available.
NOTE
You cannot downgrade back to an older
firmware version.
The period of time for the firmware update
may be different depending on the firmware
size and DTV signal strength.
Page 57

MAINTENANCE
57
Cleaning Your TV
Clean your TV regularly to keep the best
performance and to extend the product lifespan.
CAUTION
Make sure to turn the power off and
disconnect the power cord and all other
cables first.
When the TV is left unattended and unused
for a long time, disconnect the power cord
from the wall outlet to prevent possible
damage from lightning or power surges.
Screen and frame
To remove dust, wipe the surface with a dry and
soft cloth.
To remove major dirt, wipe the surface with a soft
cloth dampened in clean water or a diluted mild
detergent. Then wipe immediately with a clean
and dry cloth.
Cabinet and stand
To remove dust, wipe the cabinet with a dry and
soft cloth.
To remove major dirt, wipe the cabinet with a
soft cloth dampened in a clean water or water
containing a small amount of mild detergent.
CAUTION
Do not spray liquid onto the surface. If water
enters the TV, it may result in fire, electric
shock, or malfunction.
Do not use any chemicals as this may
deteriorate the surface.
Power cord
Remove the accumulated dust or dirt on the
power cord regularly.
ENGLISH
CAUTION
Do not push, rub, or hit the surface with
your fingernail or a sharp object, as this may
result in scratches on the screen and image
distortions.
Do not use any chemicals, such as waxes,
benzene, alcohol, thinners, insecticides,
air fresheners, lubricants, as these may
damage the screen’s finish and cause
discolorations.
Page 58

TROUBLESHOOTING
58
ENGLISH
TROUBLESHOOTING
General
The TV does not operate normally.
Problem Resolution
The remote control doesn’t work
Power is suddenly turned off
Check to see if there is any object between the product and the
remote control causing obstruction. Ensure you are pointing the
remote control
Ensure that the batteries are installed with correct polarity ( to ,
to ).
Ensure that the correct remote operating mode is set: TV, VCR, etc.
Install new batteries.
Is the sleep timer set?
Check the power control settings. Power interrupted.
If the TV is switched on and there is no input signal, it will switch off
automatically after 15 minutes to save the power consumption.
When a broken file was played in the USB mode, the TV may turn off.
Please check the file in your usb storage.
Except the screen off mode of the energy saving menu.
Video Problems
Problem Resolution
No picture & No sound
Picture appears slowly after
switching on
No Color, poor color, or poor picture
Horizontal / vertical bars or picture
shaking
Poor reception on some channels
Lines or streaks in pictures
Check whether the product is turned on.
Try another channel. The problem may be with the broadcast.
Is the power cord inserted into wall power outlet?
Check your antenna direction and/or location.
Test the wall power outlet, plug another product’s power cord into
the outlet where the product’s power cord was plugged in.
This is normal, the image is muted during the product startup process.
Please contact your service centre, if the picture has not appeared
after five minutes.
Adjust Color in menu option.
Keep a sufficient distance between the product and the VCR.
Try another channel. The problem may be with the broadcast.
Are the video cables installed properly?
Activate any function to restore the brightness of the picture.
Check for local interference such as an electrical appliance or power
tool.
Station or cable product experiencing problems, tune to another
station.
Station signal is weak, reorient antenna to receive weaker station.
Check for sources of possible interference.
Check antenna (Change the direction of the antenna).
Page 59

Problem Resolution
No picture when connecting HDMI
Audio Problems
Problem Resolution
Picture OK & No sound
No output from one of the speakers
Unusual sound from inside the
product
No sound when connecting HDMI
or USB
TROUBLESHOOTING
59
Check that your HDMI cable is High Speed HDMI Cable.
If the HDMI cables are not High Speed HDMI Cable, flickering or no
screen display can result. Please use the High Speed HDMI Cable.
Press the
VOL(+ , -
)
button
or
VOL
(
,
)
button.
Sound muted? Press MUTE button.
Try another channel. The problem may be with the broadcast.
Are the audio cables installed properly?
Adjust Balance in menu option.
A change in ambient humidity or temperature may result in an unusual
noise when the product is turned on or off and does not indicate a
problem with the product.
Check HDMI cable is High Speed HDMI Cable.
Check USB cable over version 2.0.
Use a normal MP3 file
ENGLISH
There is a problem with PICTURE settings.
Problem Resolution
When the user changes the picture
settings, the TV automatically
converts back to the initial settings
after a certain period of time.
It means that the TV is currently set to
to Home use mode you should do the followings: From the TV Menu,
choose
you have completed switching to the
PC mode
No image is displayed.
Problem Resolution
Power is on, power indictor is blue
but the screen appears extremely
dark.
Does the ‘Invalid format’ message
appear?
Does the ‘Check signal cable’
message appear?
The power indicator is dimmed.
Adjust brightness and contrast again.
The signal from the PC (Video card) is out of the vertical or horizontal
frequency range of the product. Adjust the frequency range by
referring to the Specifications in this user’s guide.
The signal cable between PC and product is not connected. Check
the signal cable.
Press the ‘INPUT’ button in the remote control to check the input
signal.
If the product is in power saving mode, move the mouse or press any
key.
OPTION
Choose
Initial Setting
Home use
Store Demo
Choose
mode.
mode. To switch
Home use
. Now,
Page 60

60
ENGLISH
TROUBLESHOOTING
‘Unknown Product’ message appears when the product is connected.
Problem Resolution
Did you install the driver?
Install the product driver, which is provided with the product, or
download it from the web site. (http://www.lg.com)
See if the plug & play function is supported by referring to the video
card user’s guide.
After-image appears on the screen.
Problem Resolution
After-image appears when the
product is turned off.
If you use a fixed image for a long time, the pixels may be damaged
quickly. Use the screen saver function.
Screen Color is abnormal.
Problem Resolution
Screen has poor Color resoluion
(16_Colors).
Screen Color is unstable or mono
Color.
Do back spots appear on the
screen?
Set screen Color resolution to more than 24 bits (true Color) Select
control Pane Display Settings Color Table menu in Windows.
Check the connection status of the signal cable.
Several pixels (red, green, white or black Color) may appear on the
screen, which can be attributable to the unique characteristics of the
LCD panel. It is not a malfunction of the LCD.
The screen image looks abnormal.
Problem Resolution
Is the screen position wrong?
Do thin lines appear on the
background screen?
Horizontal noise appears or the
characters look blurred.
Adjust the
PICTURE
Position
Choose
menu in OSD. From the TV Menu, Choose
Screen(RGB-PC)
Adjusts
Position
.
A See if the video card resolution and frequency are supported by the
product. If the frequency is out of range, set to the recommended
resolution in the Control Panel Display Setting menu.
Adjust the
Choose
Adjust the
Choose
menu in OSD. From the TV Menu, Choose
Size
Screen(RGB-PC)
menu in OSD. From the TV Menu, Choose
Phase
Screen(RGB-PC)
Adjusts
Adjusts
.
Size
Phase
.
PICTURE
PICTURE
Page 61
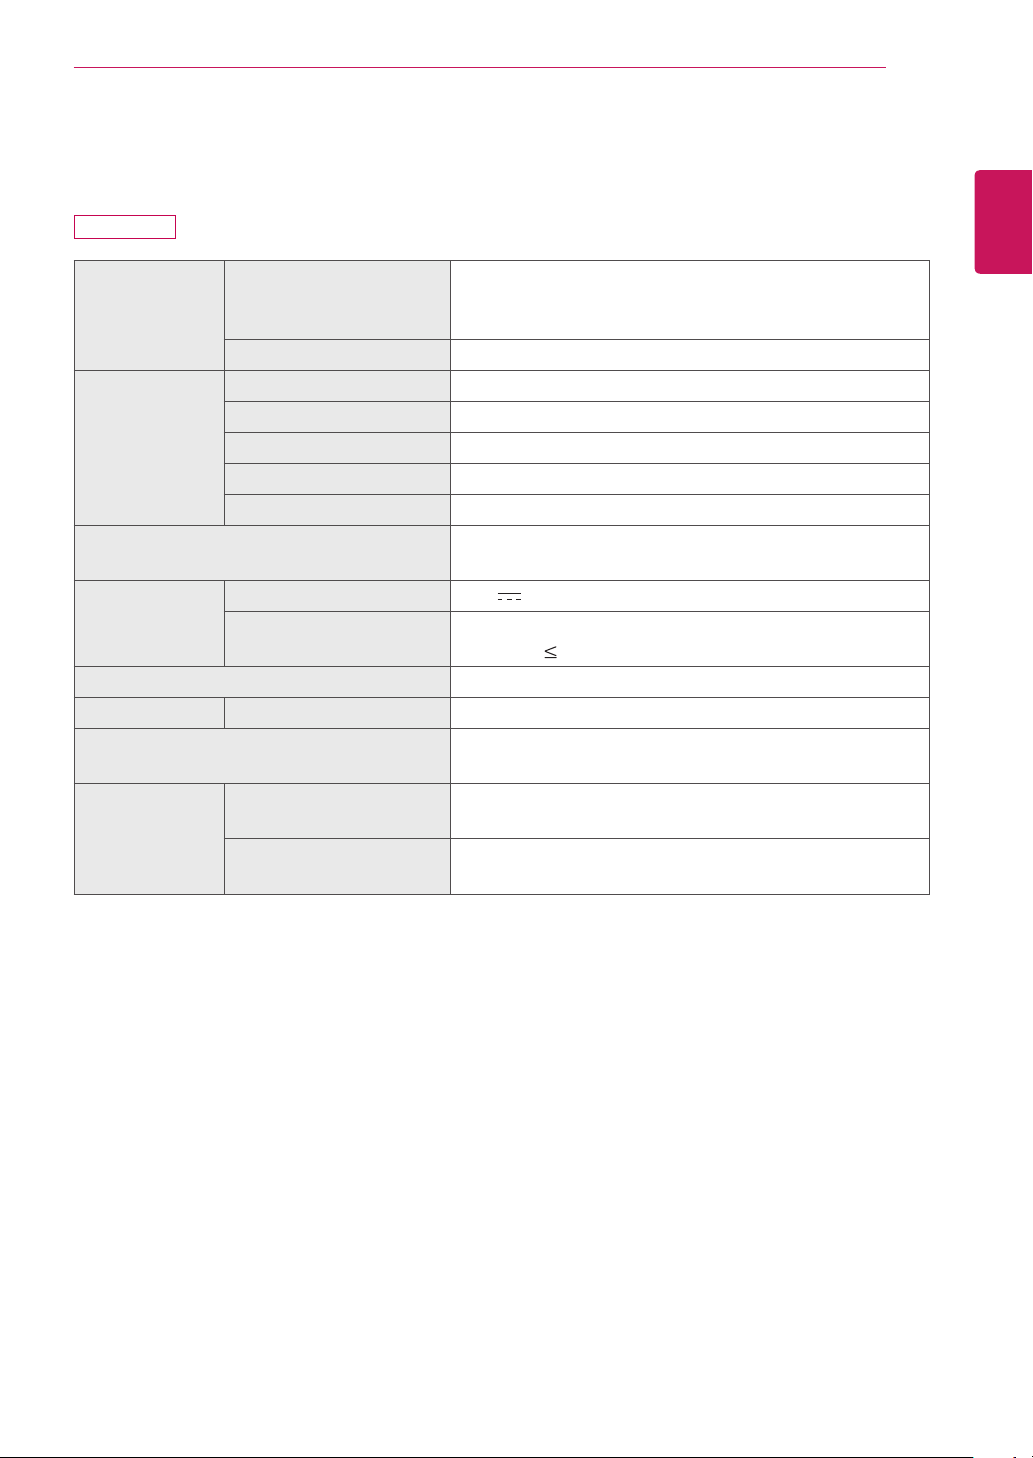
SPECIFICATIONS
61
SPECIFICATIONS
M2250D
LCD Panel Screen Type
Pixel Pitch 0.248 mm (H) x 0.248 mm (V)
Video Signal Max. Resolution 1920 × 1080 @ 60 Hz
Recommended Resolution 1920 × 1080 @ 60 Hz
Horizontal Frequency 30 kHz to 83 kHz
Vertical Frequency 56 Hz to 75 Hz
Synchronization Type
Input Connector TV, D-Sub Analog, PC Audio In, Component, HDMI*2,
Power Rated Voltage 19 V 2.2 A
Power Consumption On Mode : 35 W (typ.)
AC/DC Adapter
Tilt Tilt Range -5° to 10°
Dimensions (Width x Height x Depth)
Weight
Environmental
conditions
Operating Temperature
Operating Humidity
Storage Temperature
Storage Humidity
546.86 mm Wide (21.53 inch) TFT (Thin Film Transistor)
LCD (Liquid Crystal Display) Panel.
Visible diagonal size : 546.86 mm
Separate Sync, Digital
USB
Off Mode 0.5 W
Manufacturer: LITE-ON, Model PA-1650-68
509.1 mm x 404.2 mm x 164 mm
3.37 kg
10 °C to 35 °C
20 % to 80 %
-10 °C to 60 °C
5 % to 90 %
ENGLISH
Product specifications shown above may be changed without prior notice due to upgrade of product
functions.
Page 62

62
ENGLISH
CUSTOMIZING SETTINGS
M2350D
LCD Panel Screen Type 584.2 mm Wide (23 inch) TFT (Thin Film Transistor)
LCD (Liquid Crystal Display) Panel.
Visible diagonal size : 584.2 mm
Pixel Pitch 0.265 mm (H) x 0.265 mm (V)
Video Signal Max. Resolution
Recommended Resolution 1920 × 1080 @ 60 Hz
Horizontal Frequency
Vertical Frequency 56 Hz to 75 Hz
Synchronization Type Separate Sync, Digital
Input Connector TV, D-Sub Analog, PC Audio In, Component, HDMI*2,
Power Rated Voltage 19 V 2.4 A
Power Consumption On Mode : 40 W (typ.)
AC/DC Adapter
Tilt Tilt Range -5° to 10°
Dimensions (Width x Height x Depth)
Weight
Environmental
conditions
Operating Temperature
Operating Humidity
Storage Temperature
Storage Humidity
1920 × 1080 @ 60 Hz
30 kHz to 83 kHz
USB
Off Mode 0.5 W
Manufacturer: LITE-ON, Model PA-1650-68
546.7 mm x 423.8 mm x 180 mm
3.7 kg
10 °C to 35 °C
20 % to 80 %
-10 °C to 60 °C
5 % to 90 %
Product specifications shown above may be changed without prior notice due to upgrade of product
functions.
Page 63

SPECIFICATIONS
M2450D
LCD Panel Screen Type 609.7 mm Wide (24 inch) TFT (Thin Film Transistor)
LCD (Liquid Crystal Display) Panel.
Visible diagonal size : 609.7 mm
Pixel Pitch 0.276 mm (H) x 0.276 mm (V)
Video Signal Max. Resolution
Recommended Resolution 1920 × 1080 @ 60 Hz
Horizontal Frequency
Vertical Frequency 56 Hz to 75 Hz
Synchronization Type Separate Sync, Digital
Input Connector TV, D-Sub Analog, PC Audio In, Component, HDMI*2,
Power Rated Voltage 19 V 2.4 A
Power Consumption On Mode : 40 W (typ.)
AC/DC Adapter
Tilt Tilt Range -5° to 10°
Dimensions (Width x Height x Depth)
Weight
Environmental
conditions
Operating Temperature
Operating Humidity
Storage Temperature
Storage Humidity
1920 × 1080 @ 60 Hz
30 kHz to 83 kHz
USB
Off Mode 0.5 W
Manufacturer: LITE-ON, Model PA-1650-68
569.9 mm x 435.8 mm x 180 mm
4.43 kg
10 °C to 35 °C
20 % to 80 %
-10 °C to 60 °C
5 % to 90 %
63
ENGLISH
Product specifications shown above may be changed without prior notice due to upgrade of product
functions.
Page 64

64
ENGLISH
SPECIFICATIONS
M2550D
LCD Panel Screen Type 634.4 mm Wide (25 inch) TFT (Thin Film Transistor)
LCD (Liquid Crystal Display) Panel.
Visible diagonal size : 634.4 mm
Pixel Pitch 0.288 mm (H) x 0.288 mm (V)
Video Signal Max. Resolution
Recommended Resolution 1920 × 1080 @ 60 Hz
Horizontal Frequency
Vertical Frequency 56 Hz to 75 Hz
Synchronization Type Separate Sync, Digital
Input Connector TV, D-Sub Analog, PC Audio In, Component, HDMI*2,
Power Rated Voltage 19 V 2.8 A
Power Consumption On Mode : 50 W (typ.)
AC/DC Adapter
Tilt Tilt Range -5° to 10°
Dimensions (Width x Height x Depth)
Weight
Environmental
conditions
Operating Temperature
Operating Humidity
Storage Temperature
Storage Humidity
1920 × 1080 @ 60 Hz
30 kHz to 83 kHz
USB
Off Mode 0.5 W
Manufacturer: LITE-ON, Model PA-1650-68
594.9 mm x 451 mm x 180 mm
4.85 kg
10 °C to 35 °C
20 % to 80 %
-10 °C to 60 °C
5 % to 90 %
Product specifications shown above may be changed without prior notice due to upgrade of product
functions.
Page 65

SPECIFICATIONS
65
RGB (PC) / HDMI (PC) supported mode
Resolution
Horizontal
Frequency(kHz)
720 x 400 31.468 70.080
640 x 480 31.469 59.940
640 x 480 37.500 75.000
800 x 600 37.879 60.317
800 x 600 46.875 75.000
1024 x 768 48.363 60.004
1024 x 768 60.023 75.029
1152 x 864 67.500 75.000
1280 x 720 45.000 60.000
1280 x 800 49.702 59.810
1280 x 1024 63.981 60.020
1280 x 1024 79.976 75.025
1400 x 1050 65.317 59.978
1440 x 900 55.935 59.887
1600 x 900 60.000 60.000
1680 x 1050 64.674 59.883
1680 x 1050 65.290 59.954
1920 x 1080 67.500 60.000
Vertical
Frequency(Hz)
Component supported mode
Resolution
Horizontal
Frequency(kHz)
720 x 480 15.730 59.940
720 x 480 15.750 60.000
720 x 576 15.625 50.000
720 x 480 31.470 59.940
720 x 480 31.500 60.000
720 x 576 31.250 50.000
1280 x 720 44.960 59.940
1280 x 720 45.000 60.000
1280 x 720 37.500 50.000
1920 x 1080 33.720 59.940
1920 x 1080 33.750 60.000
1920 x 1080 28.125 50.000
1920 x 1080 56.250 50.000
1920 x 1080 67.432 59.940
1920 x 1080 67.500 60.000
Vertical
Frequency(Hz)
Component port connecting informatio
ENGLISH
HDMI (DTV) supported mode
Resolution
Horizontal
Frequency(kHz)
720 x 480 31.469
31.500
720 x 576 31.250 50.000
1280 x 720 37.500 50.000
1280 x 720 44.960
45.000
1920 x 1080 33.720
33.750
1920 x 1080 28.125 50.000
1920 x 1080 27.000 24.000
1920 x 1080 33.750 30.000
1920 x 1080 56.250 50.000
1920 x 1080 67.430
67.500
Vertical
Frequency(Hz)
59.940
60.000
59.940
60.000
59.940
60.000
59.940
60.000
Component ports on the
TV
Video output ports
on DVD player
Y P
Y P
P
B
P
B
Y B-Y R-Y
Y Cb Cr
Y Pb Pr
R
R
Page 66

SPECIFICATIONS
66
ENGLISH
NOTE
Avoid keeping a fixed image on the set’s screen for prolonged periods of time. The fixed image may
become permanently imprinted on the screen. Use a screen saver when possible.
There may be interference relating to resolution, vertical pattern, contrast or brightness in PC mode.
Change the PC mode to another resolution or change the refresh rate to another rate or adjust the
brightness and contrast on the menu until the picture is clear. If the refresh rate of the PC graphic
card can not be changed, change the PC graphic card or consult the manufacturer of the PC graphic
card.
The synchronization input waveform for Horizontal and Vertical frequencies are separate.
Connect the signal cable from the TV output port of the PC to the RGB (PC) port of the TV or the
signal cable from the HDMI output port of the PC to the HDMI/DVI IN port on the TV.
Connect the audio cable from the PC to the Audio input on the TV.
If using a sound card, adjust PC sound as required.
If the graphic card on the PC does not output analogue and digital RGB simultaneously, connect only
one of either RGB or HDMI/DVI IN to display the PC output on the TV.
If the graphic card on the PC does output analogue and digital RGB simultaneously, set the TV to
either RGB or HDMI. (The other mode is set to Plug and Play automatically by the TV.)
DOS mode may not work depending on the video card if you use an HDMI to DVI cable.
If you use too long an RGB-PC cable that is too long, there may be interference on the screen. We
recommend using under 5 m of cable. This provides the best picture quality.
Page 67

IR CODES
67
IR CODES
This feature is not available for all models.
Code
(Hexa)
08
45 Q.MENU
43 Menu
0B INPUT
10 - 19 Number Key 0-9
4C - (Dash)/LIST
1A Q.VIEW
9 MUTE
2 VOL +
3 VOL 0 CH ^
1 CH v
1E FAV/MARK
40 ^
41 v
7 <
6 >
44 Enter( )
28 BACK
79 RATIO
95 Energy Saving ( )
50 TV/PC
AA INFO
Function Note
(POWER)
Remote control Button
(Power On/Off)
Remote control Button
Remote control Button
Remote control Button
Remote control Button
Remote control Button
Remote control Button
Remote control Button
Remote control Button
Remote control Button
Remote control Button
Remote control Button
Remote control Button
Remote control Button
Remote control Button
Remote control Button
Remote control Button
Remote control Button
Remote control Button
Remote control Button
Remote control Button
Remote control Button
Remote control Button
Code
(Hexa)
99 Auto Config.
72 RED
71 GREEN
63 YELLOW
61 BLUE
B1
B0
BA
8E
8F
AB GUIDE Remote control Button
5B EXIT Remote control Button
D6 TV Discrete IR Code
C4 POWER ON Discrete IR Code
C5 POWER OFF Discrete IR Code
BF COMPONENT1 Discrete IR Code
D5 RGB-PC Discrete IR Code
CE HDMI1 Discrete IR Code
CC HDMI2 Discrete IR Code
76 Ratio 4:3 Discrete IR Code
77 Ratio 16:9 Discrete IR Code
AF Ratio Zoom Discrete IR Code
Function Note
Remote control Button
Remote control Button
Remote control Button
Remote control Button
Remote control Button
Remote control Button
Remote control Button
Remote control Button
Remote control Button
Remote control Button
(TV Input Selection)
(Only Power On)
(Only Power Off)
(Component1 Input
Selection)
(RGB-PC Input Selection)
(HDMI1 Input Selection)
(HDMI2 Input Selection)
(Only 4:3 Mode)
(Only 16:9 Mode)
(Only Zoom Mode)
ENGLISH
Page 68
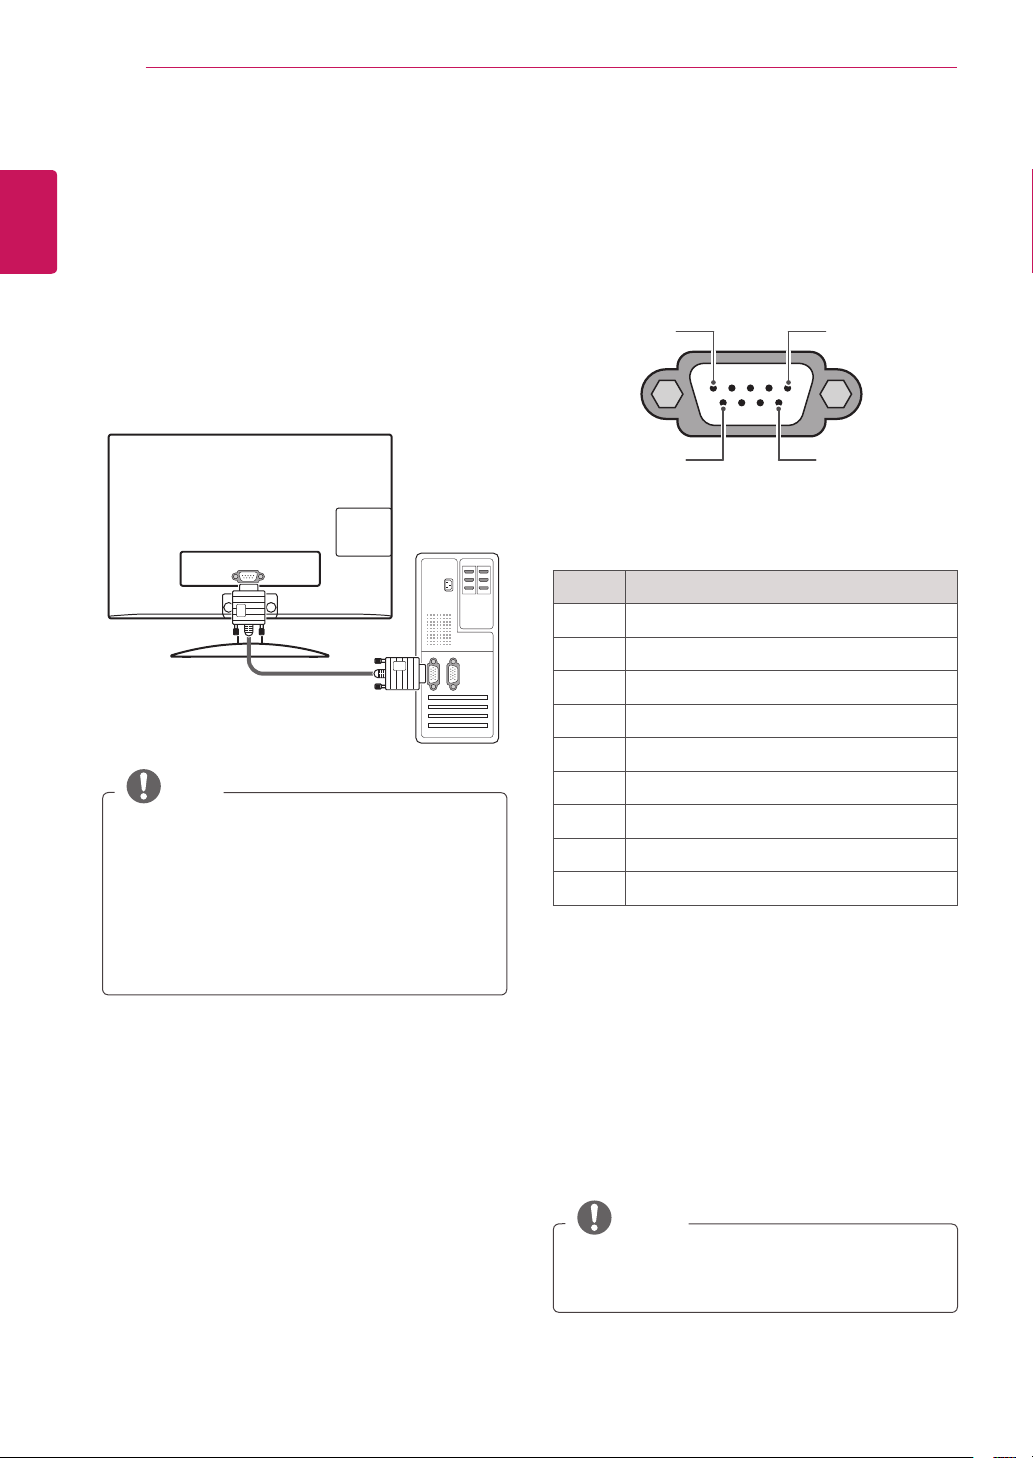
EXTERNAL CONTROL DEVICE SETUP
68
ENGLISH
EXTERNAL CONTROL DEVICE SETUP
RS-232C Setup
Connect the RS-232C (serial port) input jack to
an external control device (such as a computer or
an A/V control system) to control the product’s
functions externally.
Connect the serial port of the control device to the
RS-232C jack on the product back panel.
RS-232C IN
(CONTROL & SERVICE)
NOTE
RS-232C on this unit is intended to be used
with third party RS-232C control hardware and
software. The instructions below are provided
to help with programming software or to test
functionality using telenet software. RS-232C
connection cables are not supplied with the
product.
Type of connector; D-Sub 9-Pin Male
1 5
6 9
RS-232C IN
(CONTROL & SERVICE)
No. Pin name
1 No connection
2 RXD (Receive data)
3 TXD (Transmit data)
4 DTR (DTE side ready)
5 GND
6 DSR (DCE side ready)
7 RTS (Ready to send)
8 CTS (Clear to send)
9 No Connection
Communication Parameters
Baud rate: 9600 bps (UART)
Data length: 8 bits
Parity: None
Stop bit: 1 bit
Communication code: ASCII code
Use a crossed (reverse) cable.
NOTE
This product has command echo back in
the RS-232C Command.
Page 69

EXTERNAL CONTROL DEVICE SETUP
69
RS-232C configurations
7-Wire Configuration
(Serial female-female NULL modem cable)
PC TV
RXD 2 3 TXD
TXD 3 2 RXD
GND 5 5 GND
DTR 4 6 DSR
DSR 6 4 DTR
RTS 7 8 CTS
CTS 8 7 RTS
D-Sub 9 D-Sub 9
3-Wire Configurations(Not standard)
PC TV
RXD 2 3 TXD
TXD 3 2 RXD
GND 5 5 GND
DTR 4 6 DSR
DSR 6 4 DTR
RTS 7 8 CTS
CTS 8 7 RTS
D-Sub 9 D-Sub 9
Set ID
Set ID number. "
Press
1
Press the Navigation buttons to scroll to
2
OPTION
Press the Navigation buttons to scroll to
3
and press
Scroll left or right to select a set ID number and
4
select
When you are finished, press
5
Real Data Mapping
OPTION
Menu Language : English
Audio Language : English
Input Label
Key Lock : Off
Caption : Off
Set ID : 1
Power Indacator : On
Demo Mode : Off
Initial Setting : Home Use
to access the main menus.
MENU
and press
ENTER
. The adjustment range is 1-99.
Close
Move Enter
ENTER
.
"
.
Set ID
.
EXIT
When you return to the previous menu, press
.
BACK
* REAL DATA MAPPING
1 : Step 0
:
A : Step 10 (Set ID 10)
:
F : Step 15 (Set ID 15)
10 : Step 16 (Set ID 16)
:
63 : Step 99 (Set ID 99)
64 : Step 100
Tint
Step 0 : R50
:
Step 49 : R1
Step 50 : 0
Step 51 : G1
:
Step 100 : G50
Balance
Step 0 : L50
:
Step 49 : L1
Step 50 : 0
Step 51 : R1
:
Step 100 : R50
ENGLISH
Colour Temperature
Step 0 : W50
:
Step 49 : W1
Step 50 : 0
Step 51 : C1
:
Step 100 : C50
Page 70

EXTERNAL CONTROL DEVICE SETUP
70
ENGLISH
Command reference list
COMMAND1 COMMAND2
01. Power k a 00 to 01
02. Input Select x b See p.72
03. Aspect Ratio k c See p.72
04. Screen Mute k d 00 to 01
05. Volume Mute k e 00 to 01
06. Volume Control k f 00 to 64
07. Contrast k g 00 to 64
08. Brightness k h 00 to 64
09. Color k i 00 to 64
10. Tint k j 00 to 64
11. Sharpness k k 00 to 64
12. OSD Select k l 00 to 01
13. Remote Control Lock Mode k m 00 to 01
14. Treble
15. Bass k s 00 to 64
16. Balance k t 00 to 64
17. Color Temperature x u 00 to 64
18. Energy Saving j q 00 to 05
19. Auto Configuration j u 01
20. Channel Add/Del m b 00 to 01
21. Key m c Key Code
22. Backlight m g 00 to 64
k r 00 to 64
DATA
(Hexadecimal)
23. Channel Tuning
COMMAND 1 COMMAND 2
m a physical channel major high
DATA02
(Hexadecimal)
major low minor high minor low attribute
DATA03
(Hexadecimal)
DATA00
(Hexadecimal)
DATA04
(Hexadecimal)
DATA01
(Hexadecimal)
DATA05
(Hexadecimal)
Page 71

EXTERNAL CONTROL DEVICE SETUP
Transmission / Receiving protocol
Transmission
[Command1][Command2][ ][Set ID][ ][Data][Cr]
[ Command 1 ] : First command to control the TV.(j, k, m or x)
[ Command 2 ] : Second command to control the TV.
[ Set ID ] : You can adjust the set ID to choose desired TV ID number in Setup menu. Adjustment range
is 1 to 99. When selecting Set ID ‘0’, every connected the TV is controlled. Set ID is indicated as
decimal (1 to 99) on menu and as Hexa decimal (0x0 to 0x63) on transmission /receiving protocol.
[ DATA ] : To transmit the command data. Transmit the ‘FF’ data to read status of command.
[ Cr ] : Carriage Return ASCII code ‘0x0D’
[ ] : ASCII code ‘space (0x20)’
* In this model, TV will not send the status during the standby mode.
OK Acknowledgement
[Command2][ ][Set ID][ ][OK][Data][x]
The TV transmits ACK (acknowledgement) based on this format when receiving normal data. At this time,
if the data is data read mode, it indicates present status data. If the data is data write mode, it returns the
data of the PC computer.
* In this model, TV will not send the status during the standby mode.
* Data Format
[ Command 2 ] : Use as command.
[ Set ID ] : Use the small character, if set ID is 10, it will send the ‘0’, ‘a’.
[ DATA ] : Use the small character, if data is 0 x ab, it will send the ‘a’, ‘b’.
[ OK ] : Use the large character.
71
ENGLISH
Error Acknowledgement
[Command2][ ][Set ID][ ][NG][Data][x]
The TV transmits ACK (acknowledgement) based on this format when receiving abnormal data from nonviable functions or communication errors.
Data1: Illegal Code
Data2: Not supported function
Data3: Wait more time
* In this model, TV will not send the status during the standby mode.
* Data Format
[ Command 2 ] : Use as command.
[ Set ID ] : Use the small character, if set ID is 10, it will send the ‘0’, ‘a’.
[ DATA ] : Use the small character, if data is 0 x ab, it will send the ‘a’, ‘b’.
[ NG ] : Use the large character
Page 72

EXTERNAL CONTROL DEVICE SETUP
72
01. Power (Command: k a)
ENGLISH
02. Input Select (Command: x b)
03. Aspect Ratio (Command: k c)
To control Power On/Off of the TV.
Transmission
[k][a][ ][Set ID][ ][Data][Cr]
Data 00: Power Off Data 01: Power On
Acknowledgement
[a][ ][Set ID][ ][OK/NG][Data][x]
* In a like manner, if other functions transmit ‘FF’
data based on this format, Acknowledgement data
feedback presents status about each function.
* Note: In this model, TV will send the Acknowledge
after power on processing completion.
There might be a time delay between command
and acknowledge.
To select input source for TV.
Transmission
[x][b][ ][Set ID][ ][Data][Cr]
Data 00: DTV (Antenna)
Data 10: Analog (Antenna)
Data 11: Analog (Cable)
Data 40: Component
Data 60: RGB-PC
Data 90: HDMI1
Data 91: HDMI2
Acknowledgement
[b][ ][Set ID][ ][OK/NG][Data][x]
To adjust the screen format.
Transmission
[k][c][ ][Set ID][ ][Data][Cr]
Data 01: 4:3
Data 02: 16:9
Data 04: Zoom
Data 05: Zoom 2
Data 06: Set by program
Data 09: Just scan
Data 10: Cinema Zoom1
:
Data 1F: Cinema Zoom16
Acknowledgement
[c][ ][Set ID][ ][OK/NG][Data][x]
04. Screen Mute (Command: k d)
To select screen mute on/off.
Transmission
[k][d][ ][Set ID][ ][Data][Cr]
Data 00: Screen mute off (Picture on),
Video-out Mute off
Data 01: Screen mute on (Picture off)
Data 10: Video-out Mute on
Acknowledgement
[d][ ][Set ID][ ][OK/NG][Data][x]
* In case of Video-out Mute on only, TV will display
On Screen Display (OSD). But, in case of screen
mute on, TV will not display On Screen Display
(OSD).
05. Volume Mute (Command: k e)
To control volume mute on/off.
You can also adjust mute using the MUTE button on
remote control.
Transmission
[k][e][ ][Set ID][ ][Data][Cr]
Data 00: Volume mute on (Volume off)
Data 01: Volume mute off (Volume on)
Acknowledgement
[e][ ][Set ID][ ][OK/NG][Data][x]
06. Volume Control (Command: k f)
To adjust volume.
You can also adjust volume with the volume buttons
on remote control.
Transmission
[k][f][ ][Set ID][ ][Data][Cr]
Data Min: 00 to Max: 64
(*transmit by Hexadecimal code)
*Refer to ‘Real data mapping’. See p.69
Acknowledgement
[g][ ][Set ID][ ][OK/NG][Data][x]
07. Contrast (Command: k g)
To adjust screen contrast.
You can also adjust contrast in the PICTURE menu..
Transmission
[k][g][ ][Set ID][ ][Data][Cr]
Data Min: 00 to Max: 64
(*transmit by Hexadecimal code)
*Refer to ‘Real data mapping’. See p.69
Acknowledgement
[g][ ][Set ID][ ][OK/NG][Data][x]
Page 73

EXTERNAL CONTROL DEVICE SETUP
73
08. Brightness (Command: k h)
To adjust screen brightness.
You can also adjust brightness in the PICTURE
menu.
Transmission
[k][h][ ][Set ID][ ][Data][Cr]
Data Min: 00 to Max: 64
(*transmit by Hexadecimal code)
*Refer to ‘Real data mapping’. See p.69
Acknowledgement
[h][ ][Set ID][ ][OK/NG][Data][x]
09. Color (Command: k i)
To adjust screen color.
You can also adjust color in the PICTURE menu.
Transmission
[k][i][ ][Set ID][ ][Data][Cr]
Data Min: 00 to Max: 64
(*transmit by Hexadecimal code)
*Refer to ‘Real data mapping’. See p.69
Acknowledgement
[i][ ][Set ID][ ][OK/NG][Data][x]
12. OSD Select (Command: k l)
To select OSD (On Screen Display) on/off.
Transmission
[k][l][ ][Set ID][ ][Data][Cr]
Data 00: OSD off
Data 01: OSD on
Acknowledgement
[l][ ][Set ID][ ][OK/NG][Data][x]
13. Remote Control Lock Mode (Command: k m)
To lock the remote control and the front panel
controls on the TV.
Transmission
[k][m][ ][Set ID][ ][Data][Cr]
Data 00: Lock off
Data 01: Lock on
Acknowledgement
[m][ ][Set ID][ ][OK/NG][Data][x]
If you’re not using the remote control and front panel
controls on the TV, use this mode. When main
power is on/off, remote control lock is released.
If Key Lock is on in the standby mode, TV will not
turn on by POWER button of remote control and on
the TV.
ENGLISH
10. Tint (Command: k j)
To adjust screen tint.
You can also adjust tint in the PICTURE menu.
Transmission
[k][j][ ][Set ID][ ][Data][Cr]
Data Red: 00 to Green: 64
(*transmit by Hexadecimal code)
*Refer to ‘Real data mapping’. See p.69
Acknowledgement
[ j ][ ][Set ID][ ][OK/NG][Data][x]
11. Sharpness (Command: k k)
To adjust screen sharpness.
You can also adjust sharpness in the PICTURE menu.
Transmission
[k][k][ ][Set ID][ ][Data][Cr]
Data Min: 00 to Max: 64
(*transmit by Hexadecimal code)
*Refer to ‘Real data mapping’. See p.69
Acknowledgement
[k][ ][Set ID][ ][OK/NG][Data][x]
14. Treble (Command: k r)
To adjust treble.
You can also adjust treble in the AUDIO menu.
Transmission
[k][s][ ][Set ID][ ][Data][Cr]
Data Min: 00 to Max: 64
(*transmit by Hexadecimal code)
*Refer to ‘Real data mapping’. See p.69
Acknowledgement
[r][ ][Set ID][ ][OK/NG][Data][x]
15. Bass (Command: k s)
To adjust bass.
You can also adjust bass in the AUDIO menu.
Transmission
[k][s][ ][Set ID][ ][Data][Cr]
Data Min: 00 to Max: 64
(*transmit by Hexadecimal code)
*Refer to ‘Real data mapping’. See p.69
Acknowledgement
[s][ ][Set ID][ ][OK/NG][Data][x]
Page 74

EXTERNAL CONTROL DEVICE SETUP
74
16. Balance (Command: k t)
ENGLISH
17. Color Temperature (Command: x u)
To adjust balance.
You can also adjust balance in the AUDIO menu.
Transmission
[k][t][ ][Set ID][ ][Data][Cr]
Data Min: 00 to Max: 64
(*transmit by Hexadecimal code)
*Refer to ‘Real data mapping’. See p.69
Acknowledgement
[t][ ][Set ID][ ][OK/NG][Data][x]
To adjust color temperature.
You can also adjust color temperature in the
PICTURE menu.
Transmission
[x][u][ ][Set ID][ ][Data][Cr]
Data Min: 00 to Max: 64
(*transmit by Hexadecimal code)
*Refer to ‘Real data mapping’. See p.69
Acknowledgement
[u][ ][Set ID][ ][OK/NG][Data][x]
20. Channel Add/Del (Command: m b)
To add and delete the channels.
Transmission
[m][b][ ][Set ID][ ][Data][Cr]
Data 00: Channel Delete
Data 01: Channel Add
Acknowledgement
[b][ ][Set ID][ ][OK/NG][Data][x]
21. Key (Command: m c)
To send IR remote control code.
Transmission
[m][c][ ][Set ID][ ][Data][Cr]
* Data Key cod -See p.67
Acknowledgement
c][ ][Set ID][ ][OK/NG][Data][x]
When TV is in the standby mode, TV will turn on by
POWER button of remote control only.
18. Energy Saving (Command: j q)
To control the energy saving function.
Transmission
[ j ][q][ ][Set ID][ ][Data][Cr]
Data 00: Energy saving - off
Data 01: Energy saving - Minimum
Data 02: Energy saving - Medium
Data 03: Energy saving - Maximum
Data 05: Energy saving - Screen off
Acknowledgement
[q][ ][Set ID][ ][OK/NG][Data][x]
19. Auto Configuration (Command: j u)
To adjust picture position and minimize image
shaking automatically. Auto configuration only works
in RGB-PC mode.
Transmission
[ j ][u][ ][Set ID][ ][Data][Cr]
Data 01: To set
Acknowledgement
[u][ ][Set ID][ ][OK/NG][Data][x]
22. Backlight (Command: m g)
To adjust screen backlight.
Transmission
[m][g][ ][Set ID][ ][Data][Cr]
Data Min: 00 to Max: 64
(*transmit by Hexadecimal code)
*Refer to ‘Real data mapping’. See p.69
Acknowledgement
[g][ ][Set ID][ ][OK/NG][Data][x]
Page 75

EXTERNAL CONTROL DEVICE SETUP
23. Channel Tuning (Command: m a)
To tune channel to following physical/major/minor number.
Transmission
[m][a][ ][Set ID][ ][Data00][ ][Data01] [ ][Data02][ ] [Data03][ ][Data04][ ][Data05][Cr]
Digital channels have a Physical, Major, and Minor channel number. The Physical number is the actual digital channel
number, the Major is the number that the channel should be mapped to, and the Minor is the subchannel.
Since the ATSC tuner automatically maps the channel to the Major number, the Physical number is not required
when sending a command.
Data 00: Physical Channel Number
Analog air: 01 to 69, Analog cable: 01 to 135
DTV air: 01 to 69
Data 01 & 02: Major Channel Number
Data 01: High byte
Data 02: Low byte
Two bytes are available for the Major and Minor, normally only the second byte is used.
Data 03 & 04: Minor Channel Number
Not needed for NTSC.
Data05 :
7 Main/Sub Picture 6 Two/One
Part Channel
0 Main 0 Two 0 Use x 0 0 0 0 NTSC Air
1 Sub 1 One 1 No Use x 0 0 0 1 NTSC Cable
5 Using Physical
Channel
4
Reserved
x 0 0 1 0 ATSC Air
x 0 0 1 1 ATSC Cable_std
x 0 1 0 0 ATSC Cable_hrc
x 0 1 0 1 ATSC Cable_irc
x 0 1 1 0 ATSC cable_auto
x 0 1 1 1 Reserved
x x x x x ...
x 1 1 1 1 Reserved
3 2 1 0 Step
75
ENGLISH
The table above lists the binary code that must be converted to hexadecimal before sending. For example, the binary
code to tune the sub source to an NTSC cable channel is “1000 0001”, which translates to “81” in hex.
* 7th bit: for which source do you want to change the channel.
* 6th bit: use a two part or one part channel. Most cases just use 0 since it’s ignored when using NTSC.
* 5th bit: use 0 with NTSC since it can only use the physical channel number. Normally use 1 for ATSC since most
times it doesn’t matter what the physical number is
* 4th bit: set to 0.
* 3-0 bits: choose signal type.
* Tune Command Examples:
1. Tune to the analog (NTSC) cable channel 35.
Data 00 = Physical of 35 = 23
Data 01 & 02 = No Major = 00 00
Data 03 & 04 = No Minor = 00 00
Data 05 = 0000 0001 in binary = 01
Total = ma 00 23 00 00 00 00 01
2. Tune to the digital (ATSC) local channel 30-3.
Data 00 = Don’t know Physical = 00
Data 01 & 02 = Major is 30 = 00 1E
Data 03 & 04 = Minor is 3 = 00 03
Data 05 = 0010 0010 in binary = 22
Total = ma 00 00 00 1E 00 03 22
Acknowledgement
[a][ ][Set ID][ ][OK][Data00] [Data01] [Data02][Data03][Data04][x][a][ ][Set ID][ ][NG][Data00][x]
Page 76

76
LICENSES
ENGLISH
LICENSES
Supported licenses may differ by model. For more information of the licenses, visit www.lg.com.
Manufactured under license from Dolby Laboratories. “Dolby “and the
double-D symbol are trademarks of Dolby Laboratories.
HDMI, the HDMI logo and High-Definition Multimedia Interface are
trademarks or registered trademarks of HDMI Licensing LLC.
ABOUT DIVX VIDEO: DivX® is a digital video format created by DivX, LLC, a
subsidiary of Rovi Corporation. This is an official DivX Certified® device that
plays DivX video. Visit divx.com for more information and software tools to
convert your files into DivX videos.
ABOUT DIVX VIDEO-ON-DEMAND: This DivX Certified® device must be
registered in order to play purchased DivX Video-on-Demand (VOD) movies.
To obtain your registration code, locate the DivX VOD section in your device
setup menu. Go to vod.divx.com for more information on how to complete
your registration.
DivX Certified® to play DivX® video up to HD 1080p, including premium
content.
DivX®, DivX Certified® and associated logos are trademarks of Rovi
Corporation or its subsidiaries and are used under license.
Covered by one or more of the following U.S. patents: 7,295,673; 7,460,668;
7,515,710; 7,519,274
Page 77

Page 78

Make sure to read the Safety Precautions before
using the product.
Keep the Owner’s Manual (CD) in an accessible
place for future reference.
The model and serial number of the TV is
located on the back and one side of the TV.
Record it below should you ever need service.
MODEL
SERIAL
 Loading...