

Page 1

USER GUIDE
LM-Q910UM
ENGLISH
FRANÇAIS
Copyright ©2018 LG Electronics Inc. All rights reserved.
MFL71380001 (1.0)
www.lg.com
Page 2

ENGLISH
About this user guide
Thank you for choosing this LG product. Please carefully read this user
guide before using the device for the first time to ensure safe and proper
use.
• Always use genuine LG accessories. The supplied items are designed
only for this device and may not be compatible with other devices.
• Descriptions are based on the device default settings.
• Default apps on the device are subject to updates, and support for
these apps may be withdrawn without prior notice. If you have any
questions about an app provided with the device, please contact an
LG Service Centre. For user-installed apps, please contact the relevant
service provider.
• Modifying the device’s operating system or installing software from
unofficial sources may damage the device and lead to data corruption
or data loss. Such actions will violate your LG licence agreement and
void your warranty.
• Some content and illustrations may differ from your device, depending
on the area, service provider, software version, or OS version, and are
subject to change without prior notice.
• Software, audio, wallpaper, images, and other media supplied with
your device are licensed for limited use. If you extract and use these
materials for commercial or other purposes, you may be infringing
copyright laws. As a user, you are fully responsible for the illegal use of
media.
• Additional charges may incur for data services, such as messaging,
uploading, downloading, auto-syncing and location services. To void
additional charges, select a data plan suitable to your needs. Contact
your service provider to obtain additional details.
1
Page 3

Instructional notices
WARNING: Situations that could cause injury to the user and third parties.
CAUTION: Situations that may cause minor injury or damage to the device.
NOTE: Notices or additional information.
2About this user guide
Page 4

Table of contents
01
Custom-designed
Features
6 Video recording features
9 Sound quality and effects
features
10 Google Assistant
11 Fingerprint recognition
14 Notes on Water Resistant
Properties
02
Basic Functions
18 Product components and
accessories
19 Parts overview
22 Turning the power on or off
23 Installing the SIM card and
memory card
25 Removing the memory card
25 Battery
27 Touch screen
30 Home screen
36 Screen lock
37 Taking screenshots
38 Copy and Paste
38 Do not disturb
03
Useful Apps
40 Installing and uninstalling apps
41 App Shortcuts
42 Phone
46 Messaging
47 Camera
51 Photos
54 Contacts
56 Clock
57 E-mail
58 FM Radio
59 Google apps
3
Page 5

04
Settings
63 Settings
63 Network & Internet
68 Connected devices
72 Apps & notifications
73 Battery
74 Display
75 Sound
76 Storage
76 Security & location
77 Accounts
77 Accessibility
79 Google
79 System
05
Appendix
84 Language Settings
84 Phone software update
86 Anti-Theft Guide
87 Open Source Software Notice
Information
87 Regulatory information(FCC/IC
ID number, etc.)
88 Trademarks
89 Laser safety statement
90 More information
91 FAQ
06
For Your Safety
07
Safety Guidelines
120 LIMITED WARRANTY
STATEMENT
4Table of contents
Page 6

01
Custom-designed Features
Page 7

Video recording features
Steady recording
You can use the Steady recording feature to minimize motion blur while
recording a video.
and swipe up on the Home screen, then tap Steady
Tap
recording.
• See
Starting the camera
• This feature is available only in specific modes.
Google Lens
You can get more information or take action on items around you using
Google Lens, like landmarks, posters, restaurant menus, animals, flowers,
or barcodes, directly in your device.
For example, when you use Google Lens on a:
• Business card: You can save the phone number or address to a contact.
• Book: You can get reviews and other details about it.
• Landmark or building: You can get more details about it.
• Painting in a museum: You can get details about it.
• Plant or animal: You can learn more about it.
• Flyer or event billboard: You can add that event to your calendar.
• Google Lens is available only when your device is connected to the
internet. If you use mobile data, you may be charged for data usage,
depending on your pricing plan.
for details.
Custom-designed Features 6
Page 8

Use Google Lens
Tap and swipe up on the Home screen, then tap Google Lens.
1
Point your camera at an item.
2
To get details or take action:
3
• Tap the item on your screen.
• To select text: Tap a word, then tap it again and drag the blue dots.
Tap Speak. Ask a question or say a command, like:
• What is this?
• Call this
• Add this to Google Keep
Custom-designed Features 7
Page 9

AI CAM
Portrait Sunset Flower
You can effectively take photos or record videos since the camera
recognizes the object when taking a photo or recording a video.
Tap and swipe up on the Home screen.
1
Tap AI CAM.
2
When the object is recognized, the best effect for the scene is applied.
3
• To apply other effects, tap the scene icon.
• Portrait, pets, foods, sunrise, sunset, scenery, city view, flowers, etc,
total 8 categories can be recognized automatically.
• The result of the scene recognition may differ depending on the
illumination or the location of the subject while taking photos. Keywords
do not appear on the actual photos or videos.
• This feature is available only when the front and rear cameras are in the
Auto mode.
Custom-designed Features 8
Page 10

Sound quality and effects features
DTS:X 3D Surround
You can play a song or video in three-dimensional, immersive and vivid
sound. Connect to an earphone or other external audio devices to use this
feature.
Tap and swipe up on the Home screen.
1
Tap Settings Sound Sound quality and effects DTS:X 3D
2
Surround, then tap
Adjusting the sound direction
You can adjust the sound direction as desired.
Tap and swipe up on the Home screen.
1
Tap Settings Sound Sound quality and effects DTS:X 3D
2
Surround.
Select sound direction.
3
to activate this feature.
Custom-designed Features 9
Page 11

Google Assistant
Google Assistant overview
You can launch or use desired apps with your voice.
• To use this feature, first connect to the network and sign in to your
Google Account.
• This feature may not work properly or voice recognition accuracy may
decrease in areas where Wi-Fi or mobile network signal strength is
weak.
Launching Google Assistant
Press and hold from the Home screen to launch Google Assistant.
1
Tap GET STARTED.
2
Follow the on-screen instructions and say “Ok Google”.
3
• The device saves your voice data for recognition.
• When a similar voice or your recorded voice is used, the screen may be
unlocked.
• You need to unlock the device by using the specified method after
failing to unlock the device with voice recognition. See
lock
for details.
Setting a screen
Custom-designed Features 10
Page 12

Launching Google Assistant with your voice
Say “Ok Google” when the screen is turned off or locked.
1
Say a command or question when “Hi, how can I help?” appears on
2
the screen.
Launching Google Assistant from the Home
screen
Touch and hold on the Home screen.
1
Say a command or question when “Hi, how can I help?” appears on
2
the screen.
• Voice recognition accuracy may decrease if you speak with an unclear
voice or in a noisy place. When you use the voice recognition feature,
increase its accuracy by speaking with a clear voice in a quiet place.
Fingerprint recognition
Fingerprint recognition overview
You must register your fingerprint on your device first before using the
fingerprint recognition function.
You can use the fingerprint recognition function in the following cases:
• To unlock the screen.
• Confirm a purchase by signing in to an app or identifying yourself with
your fingerprint.
• Your fingerprint can be used by the device for user identification. Very
similar fingerprints from different users may be recognized by the
fingerprint sensor as the same fingerprint.
• If the device cannot detect your fingerprint, or you forgot the value
specified for registration, visit the nearest LG Customer Service Centre
with your device and ID card.
Custom-designed Features 11
Page 13

Precautions for fingerprint recognition
Fingerprint recognition accuracy may decrease due to a number of
reasons. To maximize the recognition accuracy, check the following before
using the device.
• Ensure that the fingerprint sensor is not damaged by a metallic object,
such as coin or key.
• When water, dust or other foreign substance is on the fingerprint
sensor or your finger, the fingerprint registration or recognition may
not work. Clean and dry your finger before having the fingerprint
recognized.
• A fingerprint may not be recognized properly if the surface of your
finger has a scar or is not smooth due to being soaked in water.
• If you bend your finger or use the fingertip only, your fingerprint may
not be recognized. Make sure that your finger covers the entire surface
of the fingerprint sensor.
• Scan only one finger for each registration. Scanning more than one
finger may affect fingerprint registration and recognition.
• The device may generate static electricity if the surrounding air is
dry. If the surrounding air is dry, avoid scanning fingerprints, or touch
a metallic object such as coin or key before scanning fingerprints to
remove static electricity.
Registering fingerprints
You can register and save your fingerprint on the device to use fingerprint
identification.
Tap and swipe up on the Home screen.
1
Tap Settings Security & location Fingerprint.
2
• A lock screen must be set in order to be able to use this feature.
• If the screen lock is not active, configure the lock screen by following the
on-screen instructions. See
Setting a screen lock
for details.
Custom-designed Features 12
Page 14

Locate the fingerprint sensor on the back of the device and gently put
3
your finger on it to register the fingerprint.
• Gently press the fingerprint sensor so that the sensor can recognize
your fingerprint.
• Ensure that your fingertip covers the entire surface of the sensor.
Follow the on-screen instructions.
4
• Repeat scanning the fingerprint by moving your finger little by little
until the fingerprint registers.
When the fingerprint registration is done, tap Done.
5
• Tap Add fingerprint to register another fingerprint. If you register
only one fingerprint and the corresponding finger is not in a good
condition, the fingerprint recognition may not work well. As the
preventive measure against this kind of situation, register multiple
fingerprints.
Managing fingerprints
You can edit or delete registered fingerprints.
Tap and swipe up on the Home screen.
1
Tap Settings Security & location Fingerprint.
2
Unlock according to the specified lock method.
3
From the fingerprint list, tap a fingerprint to rename it. To delete it, tap
4
.
Custom-designed Features 13
Page 15

Notes on Water Resistant Properties
This product is water and dust resistant in compliance with the Ingress
Protection rating IP68.
Your product has undergone testing in a controlled environment and is
proven to be water and dust resistant in certain circumstances (meets
the requirements of classification IP68 as described by the international
standard IEC 60529 - Degrees of Protection provided by Enclosures [IP
Code]; test conditions: 15-35 ºC, 86-106kPa, 1.5meter, for 30minutes).
Do not expose the device in conditions that are different from the test
conditions. Results may vary in actual use.
WARNING
Despite a rating of IP68, your device is not impervious to conditions not
tested in LG’s controlled environment. Please note that any damages that
occur due to such causes changes the colour of the LDI (Liquid Damage
Indicator). If the colour of LDI located inside the product changes, the
product is to be considered ineligible for any free-of-charge repair services
provided under the product’s limited warranty.
Avoid exposing the product to environments with excessive dust or
moisture. Do not use the product in the following environments.
Do not immerse the product in any liquid chemicals (soap, etc.)
other than water.
Do not immerse the product in salt water, including seawater.
Do not immerse the product in a hot spring.
Do not swim with this product.
Custom-designed Features 14
Page 16

Do not place the product directly on sand (such as at a beach) or
mud.
Do not immerse your product in water deeper than approximately
1.5 meters.
Do not immerse your product in water for longer than 30 minutes.
• If your product becomes wet be sure to wipe the microphone, speaker,
and stereo jack with a dry cloth before use.
• Should your product or your hands become wet, dry them before
handling the product.
• Do not use the product in places where it may be sprayed with high
pressure water (e.g. near a faucet or shower head) or submerge it in
water for extended periods of time, as the product is not designed to
withstand high water pressure.
• This product is not resistant to shock. Do not drop the product or
subject it to shock. Doing so might damage or deform the main unit,
causing water leakage.
• The product’s water and dust resistant features may be damaged by
dropping or receiving an impact.
• If the product gets wet, use a clean, soft cloth to dry it thoroughly.
• The touch screen and other features may not work properly if the
device is used while wet.
• Your product is water resistant only when the SIM/Memory card tray is
properly inserted into the product.
• Do not open or close the SIM/Memory card tray while the product is
wet or immersed in water. Exposing the open tray to water or moisture
may damage the product.
• The SIM/Memory card tray contains rubber [packing] to help prevent
dust, water, or moisture from entering the product. Do not damage the
rubber [packing] as this may allow dust, water, or moisture to enter
your product and cause damage.
Custom-designed Features 15
Page 17

• Failure to follow the provided instructions may invalidate your device’s
limited warranty.
• If the device is wet, the LDI located inside the device changes in colour.
In this case, the device is ineligible for any free-of-charge repair services
provided under the device’s limited warranty.
• Despite a rating of IP68, your device is not completely impervious to
water in any situation.
Custom-designed Features 16
Page 18

02
Basic Functions
Page 19

Product components and accessories
The following items are included with your device.
• Device
• USB cable
• Charger
• The items described above may be optional.
• The items supplied with the device and any available accessories may
vary depending on the area and service provider.
• Always use genuine LG Electronics accessories. Using accessories made
by other manufacturers may affect your device's call performance or
cause malfunctions. This may not be covered by LG's repair service.
• Some of the device parts are made of tempered glass. If you drop your
device on a hard surface or subject it to severe impact, the tempered
glass may be damaged. If this happens, stop using your device
immediately and contact an LG Customer Service Centre.
• If any of these basic items are missing, contact the dealer from which
you purchased your device.
• To purchase additional items, contact an LG Customer Service Centre.
• Some items in the product box are subject to change without notice.
• The appearance and specifications of your device are subject to change
without notice.
• Device specifications may vary depending on the area or service provider.
• Remove the protective film from the Fingerprint sensor before use of
the fingerprint recognition feature.
• Quick Start Guide
• Ejection pin
Basic Functions 18
Page 20

Parts overview
LED lamp
Microphone
Proximity/Ambient light
Volume keys (+/-)
Google Assistant key
Stereo headset jack
Fingerprint sensor
sensor
Flash
Speaker Microphone
Earpiece
Front camera lens
Power/Lock key
Touch screen
Charger/USB cable port
SIM/Memory card tray
Rear camera lens
Laser detection auto-focus
NFC area
Do NOT attempt to remove the back cover.
This device has a non-removable battery. Do not attempt to remove the
back cover. Doing so may severely damage the battery and device, which
could cause overheating, fire, and injury.
Basic Functions 19
Page 21

• Proximity/Ambient light sensor
- Proximity sensor: During a call, the proximity sensor turns off the
screen and disables touch functionality when the device is in close
proximity to the human body. It turns the screen back on and enables
touch functionality when the device is outside a specific range.
- Ambient light sensor: The ambient light sensor analyzes the ambient
light intensity when the auto-brightness control mode is turned on.
• Laser detection auto-focus
- Detect the distance from the camera to your subject for automatic
focusing.
- Quickly focus on closer or farther objects when you use the rear
camera to take photos.
• Volume keys
- Adjust the volume for ringtones, calls or notifications.
- While using the Camera, gently press a Volume key to take a photo.
To take continuous photos, press and hold the Volume key.
• Power/Lock key
- Briefly press the key when you want to turn the screen on or off.
- Press and hold the key when you want to select a power control
option.
• Google Assistant key
- Your device has the Google Assistant built-in. Find answers and get
things done while on-the-go. To get started, just tap the Google
Assistant key on the side of the phone. Press and hold the key to
quickly talk to your Assistant. Double tap to open Google Lens.
- Activate Google assistant. See the
Google Assistant
for details.
Basic Functions 20
Page 22

• Fingerprint sensor
Do not cover the microphone.Microphone
Good example Bad example
- Turn on the fingerprint recognition feature to simplify the process
of unlocking the screen. See
Fingerprint recognition overview
for
details.
• Some functions may be restricted for access, depending on the device
specifications.
• The rear of the device includes a built-in NFC antenna. Be cautious when
handling the device to avoid damaging or covering the NFC antenna.
• Do not put heavy objects on the device or sit on it. Failure to do so may
damage the touch screen.
• Screen-protective film or accessories may interfere with the proximity
sensor.
• If your device is wet or is being used in a humid place, the touch screen
or buttons may not function properly.
Hold the device correctly as shown below. If you cover the microphone
hole with a hand, finger, or protective case while using the device, you may
sound unclear during a call.
Basic Functions 21
Page 23

Turning the power on or off
Turning the power on
When the power is turned off, press and hold the Power/Lock key.
• When the device is turned on for the first time, initial configuration
takes place. The first booting time for the smart phone may be longer
than usual.
Turning the power off
Press and hold the Power/Lock key, then select Power off.
Restarting the device
When the device is not working properly or does not respond, restart it by
following the instructions below.
Press and hold the Power/Lock key and the Volume Down (-) key at
1
the same time until the power is turned off.
When the device is restarted, release the key.
2
Power control options
Press and hold the Power/Lock key, then select an option.
• Power off: Turn the device off.
• Restart: Restart the device.
• Screenshot: You can take screenshots of the current screen you are
viewing.
Basic Functions 22
Page 24

Installing the SIM card and
Memory card
memory card
Insert the SIM card from your mobile service provider and the separately
purchased memory card into the device.
• In order for the water-resistant and dust-resistant features to work
effectively, the card tray must be inserted correctly.
Insert the ejection pin into the hole in the card tray and then pull out
1
the card tray from the device.
Place the SIM card or memory card on the card tray and then insert
2
the card tray into the device in the direction of the arrow.
(optional-sold separately)
SIM card
Basic Functions 23
Page 25

• This device supports only Nano SIM cards.
Nano Micro Standard
• For problem-free performance, it is recommended to use the phone
with the correct type of SIM card. Always use a factory-made SIM card
supplied by the service provider.
• Do not lose your SIM card. LG is not responsible for damage and other
issues caused by loss or transfer of a SIM card.
• Be careful not to damage the SIM card when you insert or remove it.
• When you insert the SIM card or memory card, place it on the card tray
correctly.
• When you insert the card tray back into the device, insert it horizontally
in the direction of arrow as shown in the figure. Make sure that the card
placed on the card tray does not move out of its position.
• Insert the SIM card with the gold-coloured contacts facing downwards.
• Be sure to insert the SIM card into the device by following the
instructions in the user manual.
• If you insert or remove the card tray from the device, be careful not to
let water or other liquids enter into the card tray. If a wet card tray or
card is inserted into the device, your device may get damaged.
• Memory card is an optional item.
• Frequent writing and erasing of data may shorten the memory card
lifespan.
• Some memory cards may not be fully compatible with the device. If you
use an incompatible card, it may damage the device or the memory card,
or corrupt the data stored in it.
Basic Functions 24
Page 26
Removing the memory card
Unmount the memory card before removing it for safety.
Tap and swipe up on the Home screen.
1
Tap Settings Storage .
2
Insert the ejection pin into the hole in the card tray and then pull out
3
the card tray from the device.
Remove the memory card from the card tray.
4
Insert the card tray back into the slot.
5
• Do not remove the memory card while the device is transferring or
accessing information. This may cause data to be lost or corrupted, or
may damage the memory card or the device. LG is not responsible for
losses that result from the abuse or improper use of memory cards,
including the loss of data.
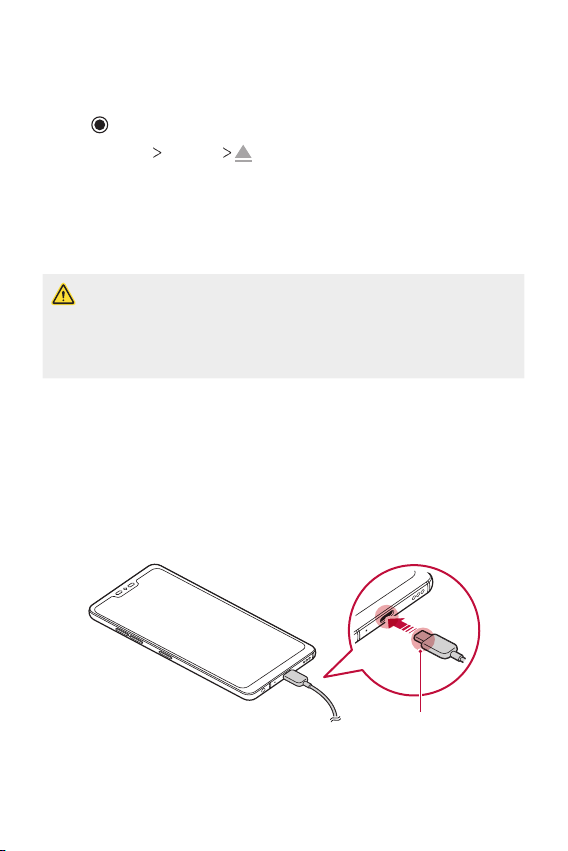
Battery
Charging the battery
Before using the device, fully charge the battery.
Charge the device with the USB Type-C cable.
Charging cable terminal
Basic Functions 25
Page 27

• Do not use the external terminal, charging cable or gender for the
device in presence of moisture. This may cause fire, electric shock,
injury, or device malfunction. If there is moisture, stop using the device
immediately and remove the moisture completely.
• Make sure to use the USB cable provided with your device.
• Make sure to use an LG-approved charger and charging cable. Charging
the battery with a third-party charger may cause the battery to explode
or may damage the device.
• Your device has an internal rechargeable battery. For your safety, do not
remove the embedded battery.
• Using the device when it is charging may cause electric shock. To use the
device, stop charging it.
• Remove the charger from the power socket after the device is fully
charged. This prevents unnecessary power consumption.
• A charging adapter that supports fast charging is included with the
product.
• Do not use third party chargers with your device as they may not
support fast charging and may cause damage to your device.
• Another way to charge the battery is by connecting a USB cable
between the device and a desktop or laptop computer. This may take a
longer time than plugging the adapter to a wall outlet.
• Do not charge the battery by using a USB hub that is unable to maintain
the rated voltage. Charging may fail or unintentionally stop.
Precautions when using the device
• Make sure to use the USB cable provided; do not use third party USB
cables or chargers with your device. The LG limited warranty does not
cover the use of third party accessories.
• Failure to follow the instructions in this guide and improper use may
damage the device.
Basic Functions 26
Page 28

Using the battery efficiently
Battery lifespan may decrease if you keep many apps and functions
running simultaneously and continuously.
Cancel background operations to increase battery life.
To minimize battery consumption, follow these tips:
• Turn off the Bluetooth® or Wi-Fi network function when not using
them.
• Set the screen timeout to as short a time as possible.
• Minimize the screen brightness.
• Set a screen lock when the device is not used.
• Check the battery level while using any downloaded apps.
Touch screen
You can familiarize yourself with how to control your device by using
touch screen gestures.
Tapping
Lightly tap with your fingertip to select or run an app or option.
Basic Functions 27
Page 29

Touching and holding
Touch and hold for several seconds to display a menu with available
options.
Double-tapping
Tap twice quickly to zoom in or out on a web page or map.
Dragging
Touch and hold an item, such as an app or widget, then move your finger
to another location in a controlled motion. You can use this gesture to
move an item.
Basic Functions 28
Page 30

Swiping
Touch the screen with your finger and move it quickly without pausing.
You can use this gesture to scroll through a list, a web page, photos,
screens, and more.
Pinching and spreading
Pinch two fingers to zoom out such as on a photo or map. To zoom in,
spread your fingers apart.
• Do not expose the touch screen to excessive physical shock. You might
damage the touch sensor.
Basic Functions 29
Page 31

• A touch screen failure may occur if you use the device near a magnetic,
metallic or conductive material.
• If you use the device under bright lights, such as direct sunlight, the
screen may not be visible, depending on your position. Use the device
in a shady location or a location with an ambient light that is not too
bright and bright enough to read books.
• Do not press the screen with excessive force.
• Gently tap with your fingertip on the option you want.
• Touch control may not work properly if you tap while wearing a glove or
by using the tip of your fingernail.
• Touch control may not work properly if the screen is moist or wet.
• The touch screen may not function properly if a screen-protective film
or accessory purchased from a third party store is attached to the
device.
• Displaying a static image for extended periods of time may result in
after-images or screen burn-in. Turn off the screen or avoid displaying
the same image for a long time when you do not use the device.
Home screen
Home screen overview
The Home screen is the starting point for accessing various functions
and apps on your device. Tap
screen.
You can manage all apps on the App page. Tap
Home screen to view all installed apps.
on any screen to directly go to the Home
and swipe up on the
Basic Functions 30
Page 32

Home screen layout
Status bar
You can view all apps and organize widgets and folders on the Home
screen.
Quick access area
Home touch buttons
• The Home screen may differ depending on the manufacturer policy, user
settings, software version or service provider.
Google Search widget
• Status bar: View status icons, the time and the battery level.
• Google Search widget: Type or speak to pull open Google Search.
• Quick access area: Fix main apps at the bottom of the screen so that
they can be accessed from any Home screen canvas.
Basic Functions 31
Page 33

• Home touch buttons
: Return to the previous screen. Close the keypad or pop-up
windows.
: Tap to go to the Home screen. To launch Google search, touch
and hold.
: Tap to view a list of recently used apps or run an app from the
list.
Status icons
When there is a notification for an unread message, calendar event or
alarm, the status bar displays the corresponding notification icon. Check
your device’s status by viewing notification icons displayed on the status
bar.
No signal
/
Data is being transmitted over the network
Alarm is set
Vibrate mode is on
Battery level
Airplane mode is on
Missed calls
Wi-Fi is connected
Mute mode is on
Hotspot is on
Basic Functions 32
Page 34

• Some of these icons may appear differently or may not appear at all,
depending on the device's status. Refer to the icons according to the
actual environment and area in which you are using the device and your
service provider.
• Displayed icons may vary, depending on the area or service provider.
Notifications panel
You can open the notifications panel by dragging the status bar
downward on the main screen.
• To open the quick access icons list, drag the notifications panel
downwards.
• To rearrange, add, or remove icons, tap
• If you touch and hold the icon, the settings screen for the
corresponding function appears.
to boost the screen brightness to the maximum of 1,000 nits
• Tap
.
• You can use the notifications panel even on the lock screen. Drag the
notifications panel while the screen is locked to quickly access the
desired features.
Basic Functions 33
Page 35

Switching the screen orientation
You can set the screen orientation to automatically switch according to
the device’s physical orientation.
On the notification panel, tap and activate Auto-rotate from the quick
access icon list.
You can also go to Settings
rotate screen.
Display Advanced and activate Auto-
Basic Functions 34
Page 36

Editing the Home screen
On the Home screen, touch and hold on an empty space, then select the
desired action from below.
• To add a widget to the Home screen, touch and hold on a blank area of
the Home screen, then select Widgets.
• To change wallpapers, touch and hold on a blank area of the Home
screen, then select Wallpapers.
You can also go to Settings
• To configure the Home screen settings, touch and hold on a blank area
of the Home screen, then select Home settings.
Display Advanced Wallpaper.
Moving apps on the App page
On the App page, touch and hold an app, then drag it to another location.
• To keep frequently used apps at the bottom of the Home screen, touch
and hold an app, then drag it to the quick access area at the bottom.
• To remove an icon from the quick access area, drag the icon to the
Home screen.
Basic Functions 35
Page 37

Using folders from the Home screen
Creating folders
On the Home screen, touch and hold an app, then drag it over another
app.
• A new folder is created and the apps are added to the folder.
Editing folders
On the Home screen, tap a folder and do one of the following actions.
• To edit the folder name tap Unnamed Folder.
• To add apps, touch and hold an app, then drag it over the folder and
release it.
• To remove an app from the folder, touch the app and drag it to outside
the folder. If the removed app is the only one app that existed in the
folder, the folder is removed automatically.
Screen lock
Screen lock overview
Your device’s screen turns off and locks itself if you press the Power/Lock
key. This also happens after the device is left idle for a specified period of
time.
If you press the Power/Lock key when a screen lock is not set, the Home
screen appears immediately.
To ensure security and prevent unwanted access to your device, set a
screen lock.
• A screen lock prevents unnecessary touch input on the device screen
and reduces battery consumption. We recommend that you activate the
screen lock while not using the device.
Basic Functions 36
Page 38

Setting a screen lock
There are several options available for configuring the screen lock settings.
Tap and swipe up on the Home screen.
1
Tap Settings Security & location Screen lock and then select the
2
method you prefer.
Customize the following settings:
3
• None: Deactivate the screen lock function.
• Swipe: Swipe on the screen to unlock the screen.
• Pattern: Draw a pattern to unlock the screen.
• PIN: Enter a numeric password to unlock the screen.
• Password: Enter an alphanumeric password to unlock the screen.
• If you incorrectly attempt to unlock the device 5 times, the screen is
blocked for 30 seconds.
Taking screenshots
You can take screenshots of the current screen you are viewing.
Via a shortcut
Press and hold the Power/Lock key and the Volume Down (-) key at the
same time for at least two seconds.
Or
Press and hold the Power/Lock key, then tap Screenshot.
• Screenshots can be viewed from the Screenshots folder in the
Photos.
Basic Functions 37
Page 39
Copy and Paste
You can cut or copy text from an app, and then paste the text into the
same app. Or, you can run other apps and paste the text into them.
Touch and hold around the text you want to copy or cut.
1
Drag / to specify the area to copy or cut.
2
Select either Cut or Copy.
3
• Cut or copied text is automatically added to the clipboard.
Touch and hold the text input window, then select Paste.
4
• If there is no item that has been copied or cut, the Paste option will not
appear.
Do not disturb
To turn off some or all sounds, swipe the status bar down with your
fingers and tap Do not disturb.
Basic Functions 38
Page 40

03
Useful Apps
Page 41

Installing and uninstalling apps
Installing apps
Access an app store to search and download apps.
• You can use Play Store or the app store provided by your service
provider.
• Some app stores may require you to create an account and sign in.
• Some apps may charge fees.
• If you use mobile data, you may be charged for data usage, depending
on your pricing plan.
Uninstalling apps
Uninstall apps
To remove an app from a home screen page, touch and hold the app, then
drag it to Remove. The app isn’t removed from your phone, just the home
screen.
To remove an app from your phone, touch and hold the app, then drag it
to Uninstall.
To disable an app or force it to stop running, go to Settings
notifications, then select the app.
Uninstalling apps from the app store
To uninstall an app, access the app store from which you download the
app and uninstall it.
Apps &
Useful Apps 40
Page 42

Installing and uninstalling apps during the
setup
When you turn on the device for the first time, you can download
recommended apps.
You can skip to the next step without installation.
App Shortcuts
On the Home screen, touch and hold an app icon such as Call, Message,
Camera and Settings to display a quick access menu. Use apps more easily
through App Shortcuts.
• This feature is available only on some apps.
Useful Apps 41
Page 43

Phone
Calls
Dial contacts, speed dial numbers, recent calls, or numbers, and search, all
from one app.
Find it:
• To call a contact or recent call, tap it.
• To open the dialpad, tap
Phone.
. Enter a number, then tap to call it.
See recent calls.
Useful Apps 42
Open the dialpad to dial a
number.
See all your contacts.
Page 44

Tips & tricks
• During a call: Your touchscreen goes dark to avoid accidental touches.
To wake it up, move it away from your face or press the Power/Lock
key.
• Multi-task: While you’re on a call, tap Home
and look up a phone number, address, or open other apps. To reopen
the call screen, swipe the status bar down and tap On-going call.
• Contacts: To search your contacts, tap
• Favourite contact: Have someone you call all the time? Touch and hold
an empty spot on the home screen, tap Widgets, then touch and hold
the Direct dial widget. Drag it to your home screen, then select the
contact. Tap the widget to dial the person.
• Voicemail:
To hear it, tap
appears in the status bar when you have new voicemail.
Phone , then touch and hold 1.
to hide the call screen
.
Make calls
When you make a call, you have options:
Phone to see your recent calls, groups, and frequently-called
• Tap
contacts. Select a contact or number to call it.
• To dial a number, tap
• To enter the international dialing code (+), touch and hold 0. To add a
pause or wait after numbers, tap Menu
, enter a number, then tap to call it.
.
Useful Apps 43
Page 45

Answer & end calls
• Answer a call: When your phone is locked, swipe up.
• When the phone is unlocked, tap ANSWER.
• Ignore a call: When your phone is locked, swipe
• When the phone is unlocked, tap DECLINE.
You can also press a volume button to silence the ringer.
• Respond with a text: When your phone is locked,
message to immediately send it.
• End a call: Tap
• During a call: Tap
the call screen, tap Home
and tap On-going call.
• When you hold your phone to your ear, the touchscreen goes dark to
avoid accidental touches. When you move the phone away from your
ear, the screen lights up again.
• Don’t use covers or screen protectors (even clear ones) that cover the
proximity sensor above the touchscreen.
.
Mute on the call screen to mute the call. To hide
. To reopen it, swipe the status bar down
down.
. Select a
Recent calls
View your calls (with newest first), and then call, text, or store them:
Find it:
• To return a call, tap
• To send a text message, store the number, or other options, tap the
• To remove an entry from the call log, tap the name or number, then tap
• To clear the list, tap Menu
Phone .
caller’s picture.
Call details
call history.
next to the caller’s name or number.
.
Call history, then tap Menu Clear
Useful Apps 44
Page 46

3-way calls
During a call, you can start another call, switch between them, or join
them in a 3-way call:
• To answer a second call, swipe
• The first call goes on hold if you answer the second call. To switch
between calls, tap
• To dial a second call, tap
The first call goes on hold when you tap
second call answers, tap
.
up.
, enter a number, then tap to call it.
. To join the calls after the
.
Your phone number
Find it: Go to Settings System About phone SIM status Phone
number on SIM.
Emergency calls
• Your service provider programs one or more emergency phone numbers
you can call under any circumstances, even when your phone is locked.
Emergency numbers vary by country. Your pre-programmed emergency
number(s) may not work in all locations, and sometimes an emergency
call cannot be placed due to network, environmental, or interference
issues.
Tap Phone (if your phone is locked, drag up to unlock it, then tap
1
EMERGENCY).
Enter the emergency number.
2
Tap to call the emergency number.
3
Useful Apps 45
Page 47

Messaging
Sending a message
You can create and send messages to your contacts using the Messaging
app.
• Sending messages abroad may incur additional charges. Consult with
your service provider for more information.
Tap .
1
Tap .
2
Specify a recipient and create a message.
3
• To use multimedia options, tap
• To access optional menu items, tap
Tap to send the message.
4
Reading a message
You can view exchanged messages organized by contact.
Tap .
1
Select a contact from the message list.
2
Configuring messaging settings
You can change messaging settings to suit your preferences.
Tap .
1
Tap Settings from the message list.
2
.
.
Useful Apps 46
Page 48

Camera
Starting the camera
You can take a photo or record a video to cherish all of your memorable
moments.
Tap and swipe up on the Home screen.
1
Tap .
2
• Before taking a photo or recording a video, wipe the camera lens with a
soft cloth.
• Be careful not to stain the camera lens with your fingers or other
foreign substance.
• Images included in this user guide may be different from the actual
device.
• Photos and videos can be viewed or edited from the Photos. See
overview
for details.
Turn the flash on
or off.
Switch between
front and rear
cameras.
Apply a film filter
effect.
Select a camera
mode.
Change the
camera options.
Photos
Start the Gallery.
Take photos.
Record videos.
Taking a photo
Select a camera mode and tap the subject to focus the camera on.
1
Tap to take a photo.
2
• You can also press the Volume Down (-) or Volume Up (+) key to
take a photo.
Useful Apps 47
Page 49

Recording a video
Select a camera mode and tap the subject to focus the camera on.
1
Tap .
2
• To take a photo while recording a video, tap
• To pause the video recording, tap
.
tap
• While recording a video, you may spread or pinch two fingers to
zoom in or out.
• While recording a video, you may tap the desired area to adjust the
brightness.
Tap to end the video recording.
3
• To check the aspect ratio before recording a video, press and hold .
. To resume the video recording,
.
Customizing the camera options
You can customize a variety of camera options to suit your preferences.
on the screen.
Tap
• Available options vary depending on the selected camera (front or rear
camera) and the selected camera mode.
• : Take a photo in FullVision (18.9:9 aspect ratio).
: Select values for aspect ratio and size for taking photos.
•
: Select values for resolution and size for recording videos.
•
: Set the timer to automatically take photos or record videos after a
•
specified period of time.
Take brighter, sharper photos in low illuminance. (When
Super Bright
Camera
the Super Bright Camera is selected, it automatically
turns on or off depending on the surrounding light
conditions.)
Useful Apps 48
Page 50

Obtain photos in vivid colours and get compensated
HDR
Steady recording Minimize motion blur while recording a video.
Tag locations Save the image with GPS location data.
Cheese shutter Take photos with voice commands.
Grid
Storage
Help Provide Help for each camera menu.
effects even when they are taken against the light.
These functions are provided by the high dynamic range
(HDR) technology equipped in the camera.
Display guide grids so that you can take photos or
record videos based on the horizontal and vertical
reference lines.
Select if you want to store the pictures and videos
in the Internal storage or SD card. (Available when a
memory card is inserted.)
Various camera modes
Google Lens
You can get more information or take action on items around you using
Google Lens, like landmarks, posters, restaurant menus, animals, flowers,
or barcodes, directly in the device.
Burst shot
You can take continuous shots of photos to create moving pictures.
In the Auto mode, touch and hold
• Continuous shots are taken at a fast speed while
• You can take up to 30 photos in a row.
• This feature is available only in specific modes.
.
is held down.
Useful Apps 49
Page 51

Other useful features in the Camera app
Auto-Exposure/Auto-Focus lock
You can fix the current exposure level and focus position by touching and
holding the screen in the Auto mode. To turn off the feature, tap a blank
area on the screen.
• This feature is available only in specific modes.
Switching between cameras
You can switch between the front and rear cameras to suit your
environment.
On the camera screen, tap
between the front and rear cameras.
or drag the screen in any direction to switch
Useful Apps 50
Page 52

Zoom in or out
You can use zoom in or out on the camera screen while taking a photo or
recording a video.
• On the camera screen, pinch or spread two fingers to zoom in or out,
then use the displayed +/- slide bar.
• You can also drag the
button up or down.
Photos
Photos overview
You can view and manage photos and videos saved on your device.
Tap and swipe up on the Home screen.
1
Tap .
2
• Saved photos and videos are displayed by folder.
Tap a folder and select a file.
3
• View the selected file in full-screen mode.
• While viewing a photo, swipe left or right to view the previous or
next photo.
• While viewing a video, swipe left or right to view the previous or
next video.
• You can view the photos or videos organized by year, month or date
in the Photos tab.
• To view photos by location at which the photo was taken, tap
Tag locations, then tap . The photos are automatically
grouped by location under the Places of the Photos app.
• Some file formats may not be supported, depending on the installed
software.
• Some files may not be opened due to encoding.
• Files that exceed the size limit may cause an error.
Useful Apps 51
Page 53

Viewing photos
Access additional
Access additional
Back to the
previous screen.
options.
Add to or remove
from your
favourites.
Share images.
Edit images.
• To display the menu items, gently tap the screen. To hide the menu
items, tap the screen again.
Editing photos
While viewing a photo, tap .
1
Use a variety of effects and tools to edit the photo.
2
Tap Save to save changes.
3
• The changes are overwritten to the original file.
Playing a video
Back to the
previous screen.
Pause or play the
video.
Share the video.
Edit the video.
Delete images.
Google Lens
preview.
options.
Add to or remove
from your
favourites.
Delete videos.
Useful Apps 52
Page 54
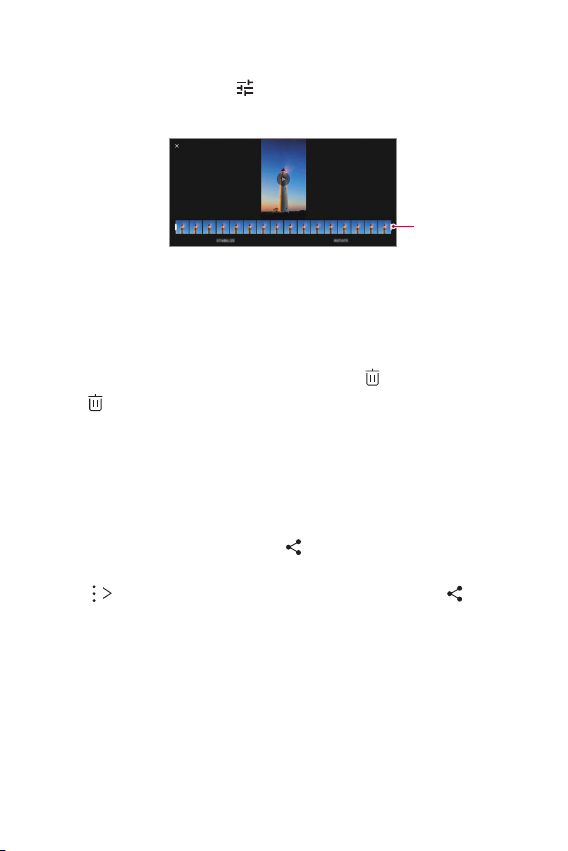
Editing videos
While viewing a video, tap .
1
Use a variety of effects and edit tools to edit the video.
2
Adjust the video
duration.
Tap Save to save changes.
3
Deleting files
You can delete files by using one of the following options:
• Touch and hold a file from the file list, then tap
from the file list and delete the desired files.
• Tap
• Deleted files are automatically moved to Bin and they can be restored
to the Gallery within 60 days.
.
Sharing files
You can share files by using one of the following options:
• While viewing a photo / video, tap
method you want.
Select from the file list to select files, and then tap to share
• Tap
them using the method you want.
to share the file by using the
Useful Apps 53
Page 55

Contacts
Contacts overview
You can save and manage contacts.
Tap and swipe up on the Home screen.
1
Tap Contacts.
2
Adding contacts
Adding new contacts
On the contact list screen, tap .
1
Enter contact details and tap .
2
Importing contacts
You can import contacts from another storage device.
On the contact list screen, tap Settings Import.
1
Select the source and target locations of the contact you want to
2
import.
Select the contacts and tap .
3
Searching for contacts
You can search for contacts by using one of the following options:
from the top of the contacts list and then enter the contact
• Tap
information or phone number.
• Scroll the contact list up or down.
• From the index of the contact list screen, tap the initial letter of a
contact.
• Tap from the top of the contacts list and then enter the contact
information or phone number to display all search details from call logs,
contacts and groups.
Useful Apps 54
Page 56

Contacts list
Editing contacts
On the contact list screen, select a contact.
1
On the contact detail screen, tap and edit details.
2
Tap to save changes.
3
Deleting contacts
You can delete contacts by using one of the following options:
• On the contact list screen, touch and hold a contact you want to
delete, then tap
Select on the contact list screen.
• Tap
• Deleted contacts may not be restored.
Adding favourites
You can register frequently used contacts as favourites.
On the contact list screen, select a contact.
1
On the contact detail screen, tap .
2
.
Useful Apps 55
Page 57

Clock
Alarm
You can set an alarm to trigger it at a specified time.
Tap and swipe up on the Home screen.
1
Tap Clock ALARM.
2
Tap to add a new alarm.
3
Configure the alarm settings and tap OK.
4
• If you select a previously set alarm, you can edit the alarm.
World clock
You can view the current time in cities around the world.
Tap and swipe up on the Home screen.
1
Tap Clock CLOCK.
2
Tap and add a city.
3
Timer
You can set the timer to trigger an alarm after a specified period of time.
Tap and swipe up on the Home screen.
1
Tap Clock TIMER.
2
Set the time and tap .
3
Stopwatch
You can use the stopwatch to record a lap time.
Tap and swipe up on the Home screen.
1
Tap Clock STOPWATCH.
2
Useful Apps 56
Page 58

Tap to initiate the stopwatch.
3
• To record a lap time, tap LAP.
Tap to suspend the stopwatch.
4
• To resume the stopwatch, tap
• To clear all the records and restart the stopwatch, tap RESET.
.
Send and receive email from all of your personal accounts (even if they’re
not Gmail accounts). You can manage your accounts in Gmail and easily
switch between them.
Tap and swipe up on the Home screen.
1
Tap Gmail
2
Search mail.
Touch and hold to choose
multiple messages, then
select an option at the top.
Swipe left or right to
archive a message.
Compose a new email.
Useful Apps 57
Page 59

• Add Gmail accounts: The first time you turned on your phone, you
probably set up or logged in to your Google account—that sets up the
Gmail app for one account.
To add more Google accounts, go to Settings
Add account
• In the Gmail app, tap Settings Add account.
• Add email accounts: The Gmail app manages all of your email
accounts. To add other personal email accounts to the Gmail app, go
to Settings
server work email accounts, tap
enter details from your IT administrator.
• Change account settings: To change the settings for a Gmail or email
account, Gmail
• Delete accounts: Go to Settings
account name. Tap REMOVE ACCOUNT.
Google.
Accounts Add account. For Microsoft® Exchange
Add account Exchange, and
Settings, then tap the account name.
Accounts Google, then tap the
Accounts, then tap
FM Radio
You can listen to FM radio. Your phone has the Frequency Modulation
(FM) broadcast receiver functionality for reception without data usage.
The phone will perform an auto tuning for the radio channels with highest
intensity.
Tap and swipe up on the Home screen.
1
Tap FM Radio.
2
• To use this app, first connect earphones to the device. The earphones
function as the radio antenna.
• This function may not be supported depending on the area.
Useful Apps 58
Page 60

Google apps
You can use Google apps by setting a Google account. The Google account
registration window appears automatically when you use a Google app for
the first time. If you do not have a Google account, create one from your
device. For details on how to use an app, see the Help in the app.
• Some apps may not work depending on the area or service provider.
Calendar
The Calendar app allows you to track your schedule of events (that you
created), organized by Day, 3-day, Week or Month.
Chrome
A fast, simple, and secure web browser, built for the modern web.
Docs
Docs is a collaborative, word-processing tool that powers productivity. Use
Docs to create, edit and work together in real-time.
Drive
Drive is a file storage and sharing app that makes it easy to find, share and
collaborate on work projects from anywhere, instantly.
Duo
Make simple, high quality video calls to your friends and family on Android
phones and iPhones.
Gmail
Gmail is an easy to use mail app that keeps your messages safe, makes
your inbox smarter, and helps you stay organized.
Useful Apps 59
Page 61

Google
The Google app keeps you in the know about the things you care about.
Find quick answers, explore your interests, and get a feed of stories and
updates on topics that matter to you.
Maps
Going somewhere? Go with Maps, the app you can rely on for real-time
GPS navigation, traffic, transit, and details about millions of places, such as
reviews and popular times.
Photos
Home for all your photos and videos, automatically organized so you can
share and save what matters.
Google Play™
Google Play is a digital content experience from Google where you can
find and enjoy your favourite music, movies, TV shows, books, magazines,
and Android apps and games.
• Download apps: Go to Play Store.
Sheets
Sheets is a collaborative spreadsheet processing tool that powers
productivity. Use Sheets to import, organize and analyze information
together in real-time.
Slides
Google Slides is a collaborative presentation creation tool that powers
productivity. Use Slides to organize information, present results, and make
decisions together in real-time.
YouTube
Watch your favourite channels, listen to music you love, and upload videos
to share with people around the world.
Useful Apps 60
Page 62

Google Assistant
Your device has the Google Assistant built-in. Find answers and get things
done while on-the-go. To get started, just tap the Google Assistant key
on the side of the phone or touch and hold the home button of the phone.
• The Google Assistant is not available in certain languages and countries.
Useful Apps 61
Page 63

04
Settings
Page 64

Settings
You can customize the device settings in accordance with your
preferences.
Tap and swipe up on the Home screen.
1
Tap Settings.
2
• Tap and enter a keyword in the search box to access a setting item.
Network & Internet
Wi-Fi
You can connect to nearby devices over a Wi-Fi network.
Connecting to a Wi-Fi network
On the settings screen, tap Network & Internet Wi-Fi.
1
Tap to activate it.
2
• Available Wi-Fi networks appear automatically.
Select a network.
3
• You may need to enter the network's Wi-Fi password.
• The device skips this process for previously accessed Wi-Fi
networks. If you do not want to automatically connect to a certain
Wi-Fi network, tap the network and then tap FORGET.
Settings 63
Page 65

Mobile networks
You can customize the mobile networks settings.
On the settings screen, tap Network & Internet Mobile network.
1
Customize the following settings:
2
• Mobile data: You can turn mobile data on and off. You can also
manage mobile data usage.
• Data roaming: Browse the web, use emails, multimedia messages and
other data services overseas.
• App data usage: You can track the amount of data your phone
uploads and downloads.
• Enhanced 4G LTE Mode: Use LTE services to improve voice and other
communications (recommended).
• Network mode: Select a network type.
• Carrier video calling: Allows you to set the carrier’s video service.
• Select automatically: Search for network operators and connect
automatically to a network.
• Access point names: View or change the access point for using mobile
data services. To change the access point, select a choice from the
access point list.
Data usage
You can track the amount of data your phone uploads and downloads.
Your phone shows a data usage graph. Below the graph, apps are listed
from highest to least data usage. Apps that use a lot of data might also
use a lot of battery power.
Some apps transfer data in the background when you’re not viewing
them—to stop an app from doing this, tap it and then turn off Background
data.
• Usage information is provided to help you manage your phone. This may
not match the amounts charged by your service provider, as they’re not
measured in the same way.
Settings 64
Page 66

Hotspot & tethering
Wi-Fi hotspot
You can set the device as a wireless router so that other devices can
connect to the Internet by using your device’s mobile data.
On the settings screen, tap Network & Internet Hotspot &
1
tethering
Enter Hotspot name and password.
2
Turn on Wi-Fi on the other device, and select the name of the device
3
network on the Wi-Fi list.
Enter the network password.
4
Wi-Fi hotspot and then tap to activate it.
• This option uses mobile data and may incur data usage fees, depending
on your pricing plan. Consult with your service provider for more
information.
• More information is available at this web site:
http://www.android.com/tether#wifi
Settings 65
Page 67

USB tethering
You can connect the device to another device via USB and share mobile
data.
Connect your device and other devices via USB cable.
1
On the settings screen, tap Network & Internet Hotspot &
2
tethering
USB tethering and then tap to activate it.
• This option uses mobile data and may incur data usage fees, depending
on your pricing plan. Consult with your service provider for more
information.
• When connecting to a computer, download the USB driver from
www.lg.com
• You cannot send or receive files between your device and a computer
while USB tethering is turned on. Turn off USB tethering to send or
receive files.
• Operating systems that support tethering are Window XP or higher, or
Linux.
and install it on the computer.
Settings 66
Page 68

Bluetooth tethering
A Bluetooth-connected device can connect to the Internet by using your
device’s mobile data.
On the settings screen, tap Network & Internet Hotspot &
1
tethering
Turn on Bluetooth on both devices and pair them.
2
Bluetooth tethering and then tap to activate it.
• This option uses mobile data and may incur data usage fees, depending
on your pricing plan. Consult with your service provider for more
information.
• More information is available at this web site:
http://www.android.com/tether#Bluetooth_tethering
Aeroplane mode
You can turn off the call and mobile data functions. When this mode is
on, functions that do not involve data, such as games and music playback,
remain available.
• On the settings screen, tap Network & Internet
Aeroplane mode.
VPN
You can connect to a safe virtual network, such as an intranet. You can
also manage connected virtual private networks.
Adding VPN
On the settings screen, tap Network & Internet VPN.
1
Tap .
2
• This feature is available only when the screen lock is activated. If the
screen lock is deactivated, a notification screen appears. Tap Set lock
from the notification screen to activate the screen lock. See
screen lock
Enter VPN details and tap SAVE.
3
for details.
Setting a
Settings 67
Page 69

Configuring VPN settings
Tap a VPN from the VPNS list.
1
Enter the VPN user account details and tap CONNECT.
2
• To save the account details, select the Save account information
checkbox.
Connected devices
Bluetooth
You can connect your device to nearby devices that support Bluetooth to
exchange data with them. Connect your device to a Bluetooth headset
and a keyboard. This makes it easier to control the device.
Pairing with another device
On the settings screen, tap Connected devices Connection
1
preferences
Tap to activate it.
2
Tap Pair new device and select a device from the list.
3
• Available devices appear automatically.
• Only devices set as visible are displayed on the list.
Follow the on-screen instructions to perform authentication.
4
• This step is skipped for previously accessed devices.
Bluetooth.
Settings 68
Page 70

Sending data via Bluetooth
Select a file.
1
• You can send multimedia files or contacts.
Tap Bluetooth.
2
Select a target device for the file.
3
• The file is sent as soon as the target device accepts it.
• File sharing processes may differ, depending on the file.
NFC
You can use the device as a transportation card or credit card. You can also
share data with the other device.
On the settings screen, tap Connected devices Connection
1
preferences
Tap to activate it.
2
• Touch the back of the device to other device that supports NFC to
allow sharing data.
• NFC antenna may be located differently depending on the device type.
See
Parts overview
NFC.
for details about the NFC antenna area.
Android Beam
You can share files by touching the back of the device to other device. You
can also share files including music, videos or contacts and open a web
page or launch an app from the other device.
On the settings screen, tap Connected devices Connection
1
preferences
Tap to activate it.
2
Select a file.
3
Tap Android Beam.
4
Android Beam.
Settings 69
Page 71

Touch the back of the device to other device.
5
• NFC antenna may be located differently depending on the device type.
Cast
If you have a Chromecast, or other device that can cast, you can show
your phone’s screen and audio on a TV.
Cast your screen
On the settings screen, tap Connected devices Connection
1
preferences
On the list, tap the device where you want to show your screen.
2
Cast.
Stop casting your screen
Swipe down from the top of your device’s screen.
1
On the Cast notification, tap Disconnect.
2
Printing
You can connect your device to a Bluetooth printer and print photos or
documents saved on the device.
On the settings screen, tap Connected devices Connection
1
preferences
• If the desired printer is not in the list, install the printer driver from the
Printing.
app store.
Tap Default print service and then tap to activate it.
2
Select a printer from the printer list screen.
3
• To add a printer, tap Add service.
• If you do not have a Google Account, tap ADD ACCOUNT to create an
account.
Settings 70
Page 72

Received files
Received contents via Bluetooth are displayed.
Chormebook
You can use the device after linked to Chromebook.
USB
To load music, pictures, videos, documents, or other files from your
computer, connect your phone to your computer with a USB cable.
To change the type of USB connection (if necessary),
On the settings screen, tap Connected devices USB.
1
Or, swipe the status bar down and tap Android System for other USB
option.
Customize the settings.
2
• Make sure to connect the phone to a high power USB port. Typically,
these are located directly on your computer.
• The first time you use a USB connection, your computer may indicate
that drivers are being installed.
Settings 71
Page 73

Apps & notifications
You can check a list of installed apps, and configure the settings for
notifications, app permissions, and more.
On the settings screen, tap Apps & notifications.
1
Customize the settings.
2
• Notifications: Depending what notifications you want, you can
change settings for certain apps.
• Default apps: You can check and configure the default apps.
• App permissions: You can check and set the permissions for the
apps using Your location, Microphone and Camera.
• Emergency alerts: You can change your emergency alert settings.
For example, for AMBER alerts and threat notifications.
• Special app access: You can change the permissions that apps can
access in the main Settings app on your device at any time. Keep in
mind turning off permissions may cause apps on your device to lose
functionality.
Settings 72
Page 74

Battery
You can see how much charge you have left, and about how long until a
full charge.
On the settings screen, tap Battery.
1
Customize the following settings:
2
• Battery saver: Reduce battery consumption by cutting down some
device settings, such as the display brightness, speed and vibration
intensity.
• Adaptive Battery: If you keep adaptive battery on, apps that you
use less often will run less while you’re not using them. Your phone
can learn how you use your apps over time. This can help save
battery in ways that work best for you.
• Battery percentage: Display the remaining battery level as a
percentage on the status bar.
• Gaming: You can configure settings for graphics and battery saving
feature.
Settings 73
Page 75

Display
You can customize detailed settings for each screen type.
On the settings screen, tap Display and customize the following settings:
• Brightness level: Use the slide bar to change the device’s screen
brightness.
• Brightness boost timeout: Select the brightness boost timeout to
adjust screen brightness according to ambient light intensity.
• Night Light: It tints your screen amber. This makes it easier to look
at your screen or read in dim light, and may help you fall asleep more
easily.
• Adaptive brightness: Setting brightness to a high level decreases your
phone’s battery life. To maximize battery life, optimize brightness level
for the available light.
• Wallpaper: Select a screen wallpaper for your device.
• Sleep: Automatically turn off the screen when the device is left idle for
a specified period of time.
• Auto-rotate screen: Automatically rotate the screen according to the
device’s orientation.
• Font size: Change the font size.
• Display size: Set the items on the screen to a size easy for you to see.
Some items may change position.
• Screen saver: Display a screen saver when the device is connected to
the holder or charger. Select a screen saver type to display.
• Ambient display: You can configure the display settings like show time,
notification icons, and etc.
• Device theme: Use a lighter or darker Colour scheme on some screens,
like your volume slider.
Settings 74
Page 76

Sound
You can customize sound, vibrate and notification settings.
On the settings screen, tap Sound and customize the following settings:
• Media Volume: Adjust the Media sound volume.
• Call Volume: Adjust the Call sound volume.
• Ring Volume: Adjust the Ring sound volume.
• Alarm Volume: Adjust the Alarm sound volume.
• Also vibrate for calls: Set the device to vibrate and play a ringtone
simultaneously.
• Do not disturb: Set the time, range and app type to receive
notification messages. Receive notification messages only on particular
days of the week.
• Sound quality and effects: Use the function to set the sound quality
and effects while playing a song or video.
• Shortcut to prevent ringing: You can set shortcut key options to
prevent ringing.
• Phone ringtone: Select a ringtone for incoming calls. Add or delete
ringtones.
• Default notification sound: Select a notification ringtone. Set music
saved on the device as a notification ringtone.
• Default alarm sound: Select a alarm ringtone. Set music saved on the
device as a alarm ringtone.
• Dial pad tones: Use the function to adjust the dial pad tone.
• Screen-locking sounds: Use the function to adjust the screen locking
sounds.
• Charging sounds: Use the function to adjust the charging sounds.
• Touch sounds: Use the function to adjust the touch sounds.
• Touch vibration: Set the device to vibrate when you tap certain items
on the screen.
Settings 75
Page 77

Storage
You can view and manage internal storage on the device or storage space
of the memory card.
On the settings screen, tap Storage.
1
Customize the following settings:
2
• Internal storage: View the total storage space and free space in the
device’s internal storage. View a list of apps in use and the storage
capacity for each app.
• SD card: View the total storage space and free space in the
memory card. This option appears only when a memory card is
inserted. To unmount the memory card, tap
.
Security & location
You can customize lock screen and security settings.
• Google Play Protect: Scans your device daily for potentially harmful
apps.
• Find My Device: Remotely track the device location. You can also
protect your data securely if you lost your device.
• Security update: Check for software update and configure automatic
installation settings.
• Screen lock: Select the desired screen lock method. See
lock
for details.
• Lock screen preferences: Change the information displayed on the
locked screen.
• Fingerprints: Use your fingerprint to unlock the screen or content. See
Fingerprint recognition overview
• Smart Lock: Allows you to set trusted devices, places, voice, and/or on-
body detection that will allow your phone to remain unlocked.
• Location: You can customize how your location information is used by
particular apps.
for details.
Setting a screen
Settings 76
Page 78

• Show passwords: Allows you to display characters briefly as you type.
• Device admin apps: Allows privileges to restrict the control or use of
the device to particular apps.
• SIM card lock: Lock or unlock the USIM card, or change the password
(PIN).
• Encryption & credentials: Encryption protects the accounts, settings,
apps, and files on your phone, so that people cannot access them
if your phone is stolen. Configure the settings for encryption and
credentials.
• Trust agents: View and use trust agents installed on the device.
• Screen pinning: Fix the app screen so that only the currently active
app can be used.
Accounts
You can add users to share your device and register a cloud account.
On the settings screen, tap Accounts.
1
Customize the settings.
2
Accessibility
You can manage accessibility plug-ins installed on your device.
On the settings screen, tap Accessibility.
1
Customize the following settings:
2
• Volume key shortcut: You can use the volume key shortcut to turn
on TalkBack or another accessibility tool quickly.
• Screen readers
spoken feedback.
• Screen readers
or actions via voice.
Select-to-Speak: Allows you to tap items to hear
TalkBack: Set the device to notify screen status
Settings 77
Page 79

• Screen readers Text-to-speech output: Change the settings for
text-to-speech features used when Voice Assistant is activated,
such as languages, speed, and more.
• Display
• Display
Font size: Change the font size.
Display size: Set the items on the screen to a size easy
for you to see. Some items may change position.
• Display
Magnification: Triple tap the screen for full screen
magnification, or triple tap and hold to temporarily magnify.
• Display
• Display
Colour correction: Adjust the display colour.
Colour inversion: Increase the display colour contrast for
people with low vision.
• Display
• Display
Large mouse cursor: Magnify the mouse cursor.
Remove animations: Allows you to set the animation
display.
• Interaction controls
Accessibility Menu: The Accessibility Menu
is a large on-screen menu to control your Android device. You can
control gestures, hardware buttons, navigation, and more.
• Interaction controls
Switch Access: Create key combinations to
control your device.
• Interaction controls
Dwell timing: If you use a mouse, you can
set the cursor to take action automatically when the cursor stops
moving for a certain amount of time. This feature can be helpful for
users with motor impairments.
• Interaction controls
Power button ends call: When this setting
is enabled, you can simply press your device’s power button to end a
call. This setting can make it faster and easier to hang up.
• Interaction controls
Auto-rotate screen: Automatically rotate
the screen according to the device’s orientation.
• Interaction controls
Touch & hold delay: This setting adjusts the
amount of time before your touch on the screen becomes a touch
and hold.
• Interaction controls
Vibration: You can turn on vibration for
ringing, notifications, and touch.
Settings 78
Page 80

• Audio & on-screen text Mono audio: Mono output combines
stereo sound into one signal that is played through all earphone
speakers. Use this if you have a hearing impairment or if a single
earbud is more convenient.
• Audio & on-screen text
when playing videos for the hearing impaired.
• Emperimental
easier to read on your device. This feature fixes the text colour as
either black or white, depending on the original text colour.
High-contrast text: High contrast makes text
Captions: Turn on the subtitle service
You can use Google settings to manage your Google apps and account
settings.
On the settings screen, tap Google.
System
About phone
You can view information about your device, such as the name, status,
software details and legal information.
On the settings screen, tap System
Languages & input
You can customize language and keyboard settings for your device.
On the settings screen, tap System Languages & input.
1
Customize the following settings:
2
• Languages: Select a language to apply for the device.
• Virtual keyboard: Allows you to customize the Gboard, Google
voice typing settings.
About phone and view information.
Settings 79
Page 81

• Physical keyboard: Select to use the physical keyboard, or check
keyboard shortcut keys.
• Spell checker: Allows you to set various options for the Google
Spell Checker.
• Auto-fill service: Enable this option to enter your information
saved in your account such as password, address, or credit card
number with a single tap. You can also disable this option, use
Google Autocomplete, or add a new service account.
• Personal dictionary: Add a word in the user dictionary using the
Add (+) button.
• Pointer speed: Adjust the pointer speed of a mouse or trackpad.
• Text-to-speech output: Configure the settings for text-to-speech
output.
Gestures
You can interact with your device using gestures. You can turn some
gestures on and off.
Turn gestures on or off
On the settings screen, tap System Gestures.
1
Customize the settings.
2
Date & time
You can customize date and time settings for your device.
On the settings screen, tap System Date & time.
1
Customize the settings.
2
Settings 80
Page 82

Backup
Your Google account data is backed up online. If you reset or replace your
phone, just log in to your Google account to restore the contacts, events,
and other details you synced with the account.
On the settings screen, tap System Backup.
1
Customize the following settings:
2
• Back up to Google Drive: Change Google drive backup settings.
You can also check the backup account currently used, or add a new
backup account.
Reset options
You can reset the device including network and app settings.
On the settings screen, tap System Reset options.
1
Customize the following settings:
2
• Reset Wi-Fi, mobile & Bluetooth: Reset Wi-Fi, Bluetooth and
other network settings.
• Reset app preferences: Reset the settings for an app. The data
saved in the app will not be deleted.
• Erase all data (factory reset): Reset all settings for the device and
delete data.
• Restarting and resetting your device deletes all data on it. Enter your
device name, Google Account and other initial information again.
Multiple users
Users and the guest profile can do most of the same things as the device’s
owner, but each profile has its own storage space. Files, messages, and
apps aren’t shared between users, the guest profile, or the device’s owner.
On the settings screen, tap System Multiple users.
1
Customize the settings.
2
Settings 81
Page 83

System update
From time to time, updates may become available for your phone. You can
download and apply updates through the Settings menu.
On the settings screen, tap System
System update.
Regulatory & safety
You can view regulatory marks and related information on your device.
On the settings screen, tap System
Regulatory labels.
Settings 82
Page 84

05
Appendix
Page 85

Language Settings
Select a language to use on your device.
Tap and swipe up on the Home screen.
1
Tap Settings System Languages & input Languages, and select
2
a language.
Phone software update
LG Mobile phone software update from the
Internet
For more information about using this function, please visit
http://www.lg.com/common/index.jsp
This feature allows you to conveniently update the firmware on your
phone to a newer version from the Internet without needing to visit a
service centre. This feature will only be available if and when LG makes a
newer firmware version available for your device.
Because the mobile phone firmware update requires the user’s full
attention for the duration of the update process, please make sure
you check all instructions and notes that appear at each step before
proceeding. Please note that removing the USB cable during the upgrade
may seriously damage your mobile phone.
• LG reserves the right to make firmware updates available only for
selected models at its own discretion and does not guarantee the
availability of the newer version of the firmware for all handset models.
, select your country and language.
Appendix 84
Page 86

LG Mobile Phone software update via Overthe-Air (OTA)
This feature allows you to conveniently update your phone’s software to
a newer version via OTA, without connecting a USB cable. This feature will
only be available if and when LG makes a newer firmware version available
for your device.
To perform the phone software update, System
Check for update.
• Your personal data from internal phone storage—including information
about your Google Account and any other accounts, your system/
application data and settings, any downloaded applications and your
DRM licence—might be lost in the process of updating your phone’s
software. Therefore, LG recommends that you backup your personal
data before updating your phone’s software. LG does not take
responsibility for any loss of personal data.
• This feature depends on the area or service provider.
System update
Appendix 85
Page 87

Anti-Theft Guide
Set up your device to prevent other people from using it if it's been reset
to factory settings without your permission. For example, if your device is
lost, stolen, or wiped, only someone with your Google Account or screen
lock information can use the device.
All you need to make sure your device is protected is:
• Set a screen lock: If your device is lost or stolen but you have a screen
lock set, the device can't be erased using the Settings menu unless
your screen is unlocked.
• Add your Google Account on your device: If your device is wiped but
you have your Google Account on it, the device can't finish the setup
process until your Google Account information is entered again.
After your device is protected, you'll need to either unlock your screen or
enter your Google Account password if you need to do a factory reset.
This ensures that you or someone you trust is doing the reset.
• Do not forget your Google Account and password you had added to
your device prior to performing a factory reset. If you can't provide the
account information during the setup process, you won't be able to use
the device at all after performing the factory reset.
Appendix 86
Page 88

Open Source Software Notice Information
To obtain the source code under GPL, LGPL, MPL, and other open
source licences, that is contained in this product, please visit
http://opensource.lge.com
In addition to the source code, all referred licence terms, warranty
disclaimers and copyright notices are available for download.
LG Electronics will also provide open source code to you on CD-ROM
for a charge covering the cost of performing such distribution (such
as the cost of media, shipping, and handling) upon email request to
opensource@lge.com
This offer is valid for a period of three years after our last shipment of this
product. This offer is valid to anyone in receipt of this information.
.
.
Regulatory information(FCC/IC ID number, etc.)
For regulatory details, go to Settings System Regulatory labels.
Appendix 87
Page 89

Trademarks
• For DTS patents, see
license from DTS Licensing Limited. DTS, the Symbol, & DTS and the
Symbol together, DTS:X, and the DTS:X logo are registered trademarks
or trademarks of DTS, Inc. in the United States and/or other countries.
© DTS, Inc. All Rights Reserved.
• Copyright ©2018 LG Electronics, Inc. All rights reserved. LG and the LG
logo are registered trademarks of LG Group and its related entities.
• Google, Google Map, Gmail, YouTube, Google Duo, Google Play, Android,
Chrome, Google Photos, Google Play Protect, Google Calendar, Google
Docs, Google Drive, Google Sheets and other related marks and logos
are trademarks of Google LLC.
®
• Bluetooth
• Wi-Fi
Alliance.
• All other trademarks and copyrights are the property of their
respective owners.
is a registered trademark of Bluetooth SIG, Inc. worldwide.
®
and the Wi-Fi logo are registered trademarks of the Wi-Fi
http://patents.dts.com
. Manufactured under
Appendix 88
Page 90

Laser safety statement
CDRH Compliance
THIS PRODUCT COMPLIES WITH APPLICABLE REQUIREMENT OF THE
DHHS PERFORMANCE STANDARD FOR LASER PRODUCT, 21 CFR
SUBCHAPTER J.
Caution!
This product employs a Laser system. To ensure proper use of this
product, please read this owner’s manual carefully and retain for future
reference. Should the unit require maintenance, contact an authorized
service centre.
Use of controls, adjustments, or the performance of procedures other
than those specified herein may result in hazardous radiation exposure.
To prevent direct exposure to laser beam, do not try to open the enclosure
or make direct contact with the laser.
Appendix 89
Page 91

More information
Tempered glass parts
Tempered glass parts of this device are not permanent and they may wear
out over time.
• If you drop your device on a hard surface or subject it to severe impact,
the tempered glass may be damaged.
If this happens, stop using your device immediately and contact an LG
Customer Service Centre.
• You can purchase protective cases to protect your device from damage
on the market.
Note that these protective cases are not covered under the warranty
service provided by LG Electronics and safety is not guaranteed.
Aspect ratio
This device uses a 19.5:9 aspect ratio.
• Some downloaded apps may not support the 19.5:9 aspect ratio.
• In this case, select the most optimal screen ratio for the app or consult
the app provider for more information.
Appendix 90
Page 92

FAQ
This chapter lists some problems you might encounter when using your
device. Some problems require you to call your service provider, but most
are easy to fix yourself.
SIM card error
Make sure the SIM card is correctly inserted.
No network connection or dropped network
Signal is weak. Move to a window or an open area.
You are outside the carrier network area. Move and check the network.
Calls are not available
New network not authorized.
Make sure you have not set call barring for the incoming number.
Make sure you have not set call barring for the number you are dialling.
Device cannot be turned on
When the battery is completely discharged, your device will not turn on.
Fully charge the battery before turning on the device.
Charging error
Make sure device is charging at a normal temperature.
Check the charger and its connection to the device.
Use only in-box accessories which are authorized by LG.
Appendix 91
Page 93

The battery depletes faster than when first purchased
When you expose the device or the battery to very cold or hot
temperatures, the battery life may be reduced.
Battery consumption will increase when you use certain features or apps,
such as GPS, games or the Internet.
The battery is consumable and the battery life will get shorter over time.
Error messages appear when launching the camera
Charge the battery.
Free some memory by transferring files to a computer or deleting files
from your device.
Restart the device.
If you are still having trouble with the camera app after trying these tips,
contact an LG Electronics Service Centre.
The photo quality is poor
The quality of your photos may vary, depending on the surroundings and
the photography techniques you use.
If you take photos and videos, standard angle quality is better than wideangle.
If you take photos in dark areas, at night or indoors, image noise may
occur or images may be out of focus.
If you have any problems, reset the options.
Appendix 92
Page 94

The touch screen responds slowly or incorrectly
If you attach a screen protector or optional accessories to the touch
screen, the touch screen may not function properly.
If you are wearing gloves, if your hands are not clean while touching the
touch screen or if you tap the screen with sharp objects or your fingertips,
the touch screen may malfunction.
The touch screen may malfunction in humid conditions or when exposed
to water.
Restart your device to clear any temporary software bugs.
If the touch screen is scratched or damaged, visit an LG Electronics Service
Centre.
Hangs or freezes
Restart the device
• If your device freezes or hangs, you may need to close apps or turn the
device off and then on again.
Perform a boot-up
• A soft reset may be used to reset the device if the screen freezes, or
the buttons, touch screen or device are no longer responding.
• To perform a soft reset of your device, simply press and hold the
Volume Down and Power keys until the device restarts.
Reset the device
• If the methods above do not solve your problem, perform a factory
data reset.
• On the settings screen, tap System
(factory reset).
- This method resets all settings for the device and deletes data.
Before performing the factory data reset, remember to make backup copies of all important data stored in the device.
- If you registered a Google Account to the device, you must sign in to
the same Google Account after resetting the device.
Reset options Erase all data
Appendix 93
Page 95

Bluetooth device is not located
Make sure the Bluetooth wireless feature is activated on your device.
Make sure the Bluetooth wireless feature is activated on the device you
wish to connect to.
Make sure your device and the other Bluetooth device are within the
maximum Bluetooth range (10 m).
If the tips above do not solve your problem, contact an LG Electronics
Service Centre.
A connection is not established when you connect the
device to a computer
Make sure the USB cable you are using is compatible with your device.
Make sure you have the proper driver installed and updated on your
computer.
Downloaded application causes a lot of errors
Application has problems.
Remove and reinstall the application.
Appendix 94
Page 96

06
For Your Safety
Page 97

Important Information
This user guide contains important information on the use and operation of this
phone. Please read all the information carefully for optimal performance and to
prevent any damage to or misuse of the phone. Any changes or modifications not
expressly approved in this user guide could void your warranty for this equipment.
Before You Start
Safety Instructions
• To reduce the possibility of electric shock, do not expose your phone to
high humidity areas, such as the bathroom, swimming pool, etc.
Always store your phone away from heat. Never store your phone in settings
that may expose it to temperatures less than 32°F (0°C) or greater than 95°F
(35°C), such as outside during extreme weather conditions or in your car on a hot
day. Exposure to excessive cold or heat will result in malfunction, damage and/or
catastrophic failure.
Be careful when using your phone near other electronic devices. RF emissions
from your mobile phone may affect nearby in adequately shielded electronic
equipment. You should consult with manufacturers of any personal medical devices
such as pacemakers and hearing aides to determine if they are susceptible to
interference from your mobile phone. Turn off your phone in a medical facility or
at a gas station. Never place your phone in a microwave oven as this will cause the
battery to explode.
For Your Safety 96
Page 98

Safety Information
Read these simple guidelines. Breaking the rules may be dangerous or illegal.
Further detailed information is given in this user guide.
• Never place your phone in a microwave oven as it will cause the battery to
explode.
• Your phone contains an internal battery. Do not dispose of your battery by fire
or with hazardous or flammable materials.
• Make sure that no sharpedged items come into contact with the battery. There
is a risk of this causing a fire.
• Be careful that children do not swallow any parts such as rubber plugs
(earphone, connection parts of the phone, etc.). This could cause asphyxiation
or suffocation.
• Unplug the power cord and charger during lightning storms to avoid electric
shock or fire.
• When riding in a car, do not leave your phone or set up the hands-free kit near
to the air bag. If wireless equipment is improperly installed and the air bag is
activated, you may be seriously injured.
• Do not use a hand-held phone while driving.
• Do not use the phone in areas where its use is prohibited. (For example: aircraft).
• Do not expose the battery charger or adapter to direct sunlight or use it in
places with high humidity, such as a bathroom.
• Never store your phone in temperatures less than -4°F (-20°C) or greater than
122°F (50°C).
• Do not use harsh chemicals (such as alcohol, benzene, thinners, etc.) or
detergents to clean your phone. There is a risk of this causing a fire.
• Do not drop, strike, or shake your phone severely. Such actions may harm the
internal circuit boards of the phone.
For Your Safety 97
Page 99

• Do not use your phone in high explosive areas as the phone may generate
sparks.
• Do not damage the power cord by bending, twisting, pulling, or heating.
• Do not use the plug if it is loose as it may cause a fire or electric shock.
• Do not place any heavy items on the power cord. Do not allow the power cord
to be crimped as it may cause fire or electric shock.
• Do not handle the phone with wet hands while it is being charged. It may cause
an electric shock or seriously damage your phone.
• Do not disassemble the phone.
• Do not place or answer calls while charging the phone as it may short-circuit
the phone and/or cause electric shock or fire.
• Only use the batteries, antennas, and chargers provided by LG. The warranty will
not be applied to products provided by other suppliers.
• Only authorized personnel should service the phone and its accessories. Faulty
installation or service may result in accidents and consequently invalidate the
warranty.
• Do not hold or let the antenna come in contact with your body during a call.
• An emergency call can be made only within a service area. For an emergency
call, make sure that you are within a service area and that the phone is turned
on.
• Use accessories, such as earphones and headsets, with caution. Ensure that
cables are tucked away safely and do not touch the antenna unnecessarily.
• A mobile device requires proper air circulation in order to dissipate heat. Direct
skin contact and inadequate circulation of air flow to the device may cause the
device to overheat. The device must be at least 1.0 cm from between the user’s
body.
• Prevent dust of any other foreign substances from getting into the Charger/
USB cable port. It may cause heat or fire.
For Your Safety 98
Page 100

FCC RF Exposure Information
• Read this information before operating the phone.
In August 1996, the Federal Communications Commission (FCC) of the United
States, with its action in Report and Order FCC 96-326, adopted an updated safety
standard for human exposure to radio frequency (RF) electromagnetic energy
emitted by FCC regulated transmitters. Those guidelines are consistent with the
safety standard previously set by both U.S. and international standards bodies.
The design of this phone complies with the FCC guidelines and these international
standards.
Body-worn Operation
This device was tested for typical body-worn operations with the back of the phone
kept 1 cm (0.39 inches) between the user’s body and the back of the phone. To
comply with FCC/ISEDC RF exposure requirements, a minimum separation distance
of 1 cm (0.39 inches) must be maintained between the user’s body and the back
of the phone. Any belt-clips, holsters, and similar accessories containing metallic
components may not be used. Body-worn accessories that cannot maintain 1 cm
(0.39 inches) separation distance between the user’s body and the back of the
phone, and have not been tested for typical bodyworn operations may not comply
with FCC/ISEDC RF exposure limits and should be avoided.
FCC Part 15 Class B Compliance
This device complies with part 15 of FCC rules and ISEDC
licence-exempt RSS standard(s).
Operation is subject to the following two conditions:
(1) this device may not cause interference, and
(2) this device must accept any interference, including interference that may cause
undesired operation of the device.
For Your Safety 99
 Loading...