

LG LM-Q720AM Operation Manual

USER GUIDE
LM-Q720AM
ENGLISH
Copyright ©2019 LG Electronics Inc. All rights reserved.
MFL71521501 (1.0) www.lg.com

About this user guide
Thank you for choosing this LG product. Please carefully read this user
guide before using the device for the first time to ensure safe and proper
use.
• Always use genuine LG accessories. The supplied items are designed
only for this device and may not be compatible with other devices.
• Descriptions are based on the device default settings.
• Default apps on the device are subject to updates, and support for
these apps may be withdrawn without prior notice. If you have any
questions about an app provided with the device, please contact an
LG Service Center. For user-installed apps, please contact the relevant
service provider.
• Modifying the device’s operating system or installing software from
unofficial sources may damage the device and lead to data corruption
or data loss. Such actions will violate your LG license agreement and
void your warranty.
• Some content and illustrations may differ from your device, depending
on the area, service provider, software version, or OS version, and are
subject to change without prior notice.
• Software, audio, wallpaper, images, and other media supplied with
your device are licensed for limited use. If you extract and use these
materials for commercial or other purposes, you may be infringing
copyright laws. As a user, you are fully responsible for the illegal use of
media.
• Additional charges may incur for data services, such as messaging,
uploading, downloading, auto-syncing and location services. To avoid
additional charges, select a data plan suitable to your needs. Contact
your service provider to obtain additional details.
• Failure to follow the instructions in this guide and improper use may
damage the device.
1
Instructional notices
WARNING: Situations that could cause injury to the user and third
CAUTION: Situations that may cause minor injury or damage to the
NOTE: Notices or additional information.
parties.
device.
2About this user guide

Table of contents
01
Custom-designed
Features
6 Using the Stylus Pen
7 Camera features
10 Sound quality and effects
10 Google Assistant
12 Fingerprint recognition
15 Face Recognition
19 Multi-tasking feature
02
Basic Functions
22 Product components and
accessories
Parts overview
23
27 Turning the power on or off
28 Installing the SIM card
31 Inserting the memory card
32 Removing the memory card
32 Battery
34 Touch screen
37 Home screen
47 Screen lock
52 Memory card encryption
53 Taking screenshots
54 Entering text
61 Content sharing
63 Do not disturb
03
Useful Apps
65 Installing and uninstalling apps
66 App trash
67 App Shortcuts
68 Phone
71 Messaging
72 Camera
83 Gallery
89 Chrome
89 QuickMemo+
92 Google apps
94 Contacts
96 Clock
3

97 Calendar
98 Music
99 Calculator
99 Game Launcher
99 Email
100 Audio Recorder
100 File Manager
100 Smart cleaning
101 LG Mobile Switch
101 LG SmartWorld
04
Settings
103 Settings
103 Network
114 Sound
116 Display
117 General
05
Appendix
130 LG Language Settings
130 LG Bridge
131 Phone software update
133 Anti-Theft Guide
134 Open Source Software Notice
Information
Regulatory information
134
(FCC ID number, etc.)
Trademarks
135
137 FAQ
06
For Your Safety
07
Limited Warranty – USA
4Table of contents

01
Custom-designed
Features
Using the Stylus Pen
You can create a memo using the stylus. With the Pen Pop feature, you
can quickly access Memo apps when you pull the stylus pen out.
• : Hides/displays the Pen Pop options. Touch and hold the icon to
delete or move it.
: Opens the Pop Memo feature to allow you to write a memo.
•
• : Opens Coloring book. Select a desired drawing and color it using
various coloring tools.
: Opens Draw chat to allow you to draw and share with others.
•
When you start drawing, it automatically records. Tap to save your
drawing. Then, tap to share it. The drawing chat file will be saved as
a GIF in Gallery.
: Opens QuickMemo+. For further information, see
•
: Add a shortcut to the app of your choice up to 5 apps. Touch and
•
hold a shortcut app to edit the shortcuts and rearrange them.
QuickMemo+
.
Custom-designed Features 6
Camera features
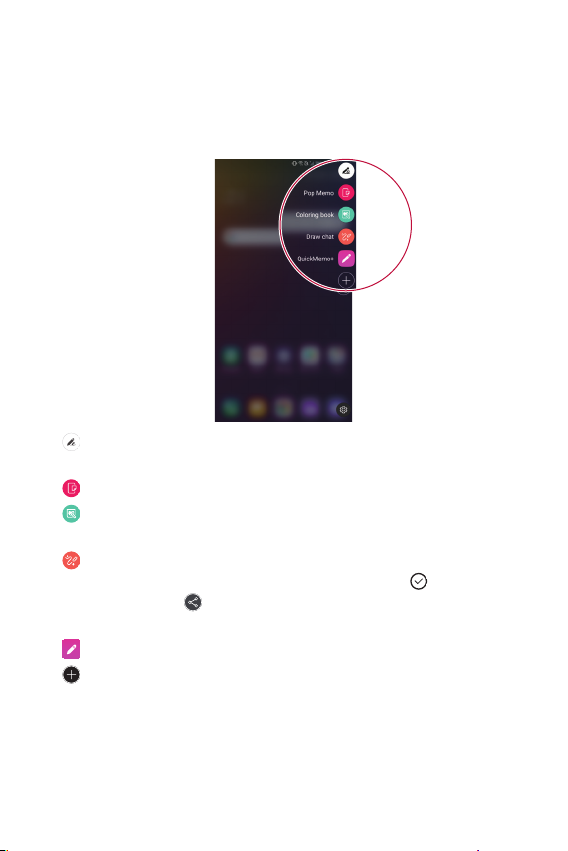
Portrait
You can take a sharp portrait by applying the camera lens blur effect.
Tap , switch to the front camera, then tap Portrait.
1
When Portrait is available appears on the screen, tap to take a
2
photo.
• To adjust blur strength, drag the slide bar up, down, left or right
(depending on the orientation of the phone).
• This feature is not available if the surroundings are too dark.
• After applying this feature, touch and hold the the desired position on
the preview screen to automatically apply the exposure value and focus.
In this case, the Portrait feature and blur strength stay the same.
Custom-designed Features 7
AI CAM
You can use the AI Cam feature to automatically recognize the object
when taking a photo or recording a video for an optimal quality.
Tap , then tap AI CAM.
1
When the object is recognized, the best effect for the scene is applied.
2
• To apply other effects, tap the scene icon.
• A wide range of categories, such as portrait, animals, food, sunrise,
sunset, landscape, sky, beach, babies, flowers and text, can be
recognized automatically.
• The result of the scene recognition may differ depending on the
illumination or the location of the subject while taking photos. Keywords
do not appear on the actual photos or videos.
Google Lens
You can get more information or take desired actions on items around
you using Google Lens, like landmarks, posters, restaurant menus, animals,
flowers, or barcodes, directly in the Camera app.
For example, when you use Google Lens on a:
• Business card: You can save the phone number or address to a
contact.
• Book: You can get reviews and other details about it.
• Landmark or building: You can get more details about it.
• Painting in a museum: You can get details about it.
• Plant or animal: You can learn more about it.
• Flyer or event billboard: You can add that event to your calendar.
• Google Lens is available only when your device is connected to the
internet. If you use mobile data, you may be charged for data usage,
depending on your pricing plan.
Custom-designed Features 8
Use Google Lens
Tap , and tap Google Lens.
1
Point your camera at an item.
2
To get details or take action:
3
• Tap the item on your screen.
• To select text: Tap a word, and select a desired option. If the result is
not shown, tap it again and drag the blue dots, if needed, and take
desired actions. Tap Speak.
Flash Jump-Cut
You can create a GIF by taking photos at three second interval.
Tap , then tap MODE Flash Jump-Cut .
1
Tap to set the number of cuts you want to take.
2
Tap to take photos.
3
Steady recording
You can use the Steady recording feature to minimize motion blur while
recording a video.
, then tap Steady recording.
Tap
• See
Starting the camera
• This feature is available only in specific modes.
for details.
Custom-designed Features 9
Sound quality and effects
DTS:X 3D Surround
You can play a song or video in three-dimensional, immersive and vivid
sound. To use this feature, connect earphones, speaker or other external
audio devices to your device.
Settings Sound Sound quality and effects, then tap DTS:X
Tap
3D Surround
Adjusting the sound direction
You can adjust the sound direction as desired.
Tap Settings Sound Sound quality and effects DTS:X 3D
1
Surround.
Select the desired sound direction.
2
to activate this feature.
Google Assistant
Google Assistant overview
Your device has the built-in Google Assistant feature. Find answers and
get things done while on-the-go. To get started, just press the Google
Assistant key on the side of the device or touch and hold
• To use this feature, first connect to the network and sign in to your
Google Account.
.
Sign in
Touch and hold from the Home screen to launch Google Assistant
1
or
Press the Google Assistant key on the left side of the device.
Tap GET STARTED.
2
Custom-designed Features 10
Follow the on-screen instructions and say “Ok Google”.
3
• The device saves your voice data for recognition.
Select whether to use the voice recognition unlock feature.
4
• When this feature is activated, you can unlock the screen by saying
“Ok Google” while the screen is turned off or unlocked.
• This feature may be more vulnerable to security than the other screen
locks, such as Knock Code, Pattern, PIN, and Password.
When a similar voice or your recorded voice is used, the screen may be
unlocked.
• To use this feature, tap
security
Secure lock settings Smart Lock, and then use the
screen lock method you set to unlock the device. Tap Voice Match,
then tap Unlock with Voice Match
unlock method again. Note that Swipe is excluded.
• You need to unlock the device by using the specified method if you fail
to unlock the device with voice recognition. See
for details.
Tap Save.
5
Settings General Lock screen &
, then enter the currently used
Setting a screen lock
Launching Google Assistant
Touch and hold on the Home screen.
1
or
Press the Google Assistant key on the left side of the device.
or
Say “Ok Google” when the screen is turned off or locked.
Say a command or question when you see on the bottom of the
2
screen.
• Voice recognition accuracy may decrease if you speak with an unclear
voice or in a noisy place. When you use the voice recognition feature,
increase its accuracy by speaking with a clear voice in a quiet place.
Custom-designed Features 11
Fingerprint recognition
Fingerprint recognition overview
You must register your fingerprint on your device first before using the
fingerprint recognition function.
You can use the fingerprint recognition function in the following cases:
• To unlock the screen.
• To view locked contents in Gallery or QuickMemo+.
• Confirm a purchase by signing in to an app or identifying yourself with
your fingerprint.
• Your fingerprint can be used by the device for user identification. Very
similar fingerprints from different users may be recognized by the
fingerprint sensor as the same fingerprint. To ensure security, set the
screen lock using a pattern, PIN or Password.
Precautions for fingerprint recognition
Fingerprint recognition accuracy may decrease due to a number of
reasons. To maximize the recognition accuracy, check the following before
using the device.
• Ensure that the fingerprint sensor is not damaged by a metallic object,
such as coin or key.
• When water, dust or other foreign substance is on the fingerprint
sensor or your finger, the fingerprint registration or recognition may
not work. Clean and dry your finger before using the fingerprint sensor.
• A fingerprint may not be recognized properly if the surface of your
finger has a scar or is not smooth due to being soaked in water.
• If you bend your finger or use the fingertip only, your fingerprint may
not be recognized. Make sure that your finger covers the entire surface
of the fingerprint sensor.
Custom-designed Features 12
• Scan only one finger for each registration. Scanning more than one
finger may affect fingerprint registration and recognition.
• The device may generate static electricity if the surrounding air is dry.
If the surrounding air is dry, avoid scanning fingerprints, or touch a
metallic object, such as coin or key, to remove static electricity before
scanning fingerprints.
Registering fingerprints
You can register and save your fingerprint on the device to use fingerprint
identification.
Tap Settings General Lock screen & security Fingerprints.
1
• This feature is available when the screen lock is set.
- Lock the device with a pattern, PIN or password.
• If the screen lock is not set, configure the lock screen by following the
on-screen instructions. See
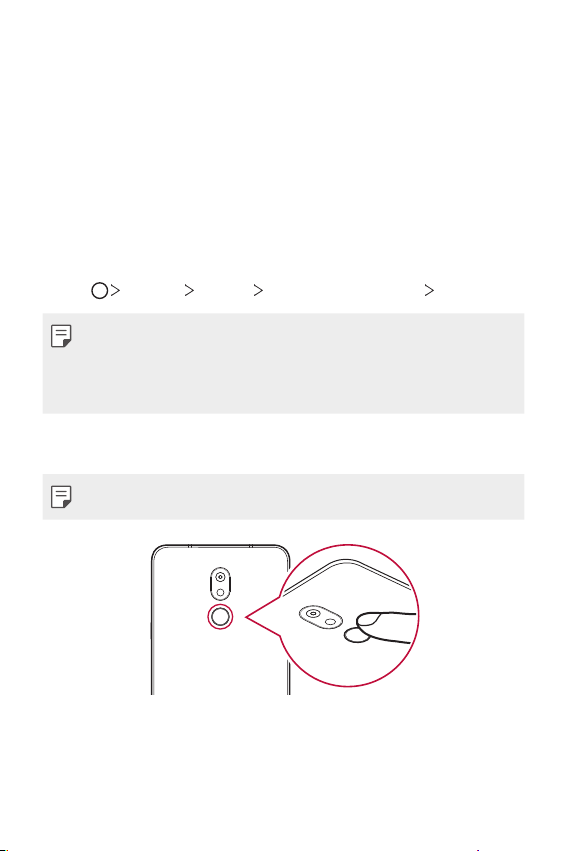
Locate the fingerprint sensor on the back of the device and gently put
2
your finger on it to register the fingerprint.
• Ensure that your fingertip covers the entire surface of the sensor.
Setting a screen lock
for details.
Custom-designed Features 13
Follow the on-screen instructions.
3
• Repeat scanning the fingerprint by moving your finger little by little
until the fingerprint registers.
When the fingerprint registration is done, tap OK.
4
• Tap ADD MORE to register another fingerprint. If you register
only one fingerprint and the corresponding finger is not in a good
condition, the fingerprint recognition may not work well. As the
preventive measure against this kind of situation, register multiple
fingerprints.
Managing fingerprints
You can edit or delete registered fingerprints.
Tap Settings General Lock screen & security Fingerprints.
1
Unlock according to the specified lock method.
2
From the fingerprint list, tap a fingerprint to rename it. To delete it, tap
3
.
Unlocking the screen with a fingerprint
You can unlock the screen or view the locked content by using your
fingerprint.
Tap Settings General Lock screen & security Fingerprints.
1
Unlock according to the specified lock method.
2
On the fingerprint settings screen, activate the desired function:
3
• Screen lock: Unlock the screen with a fingerprint.
• Content lock: Access contents you have locked in Gallery and
QuickMemo+ with a fingerprint.
Custom-designed Features 14

Face Recognition
Face recognition overview
You can unlock the screen by using face recognition.
• For stronger security, it is advisable to use Pattern, PIN, or Password.
• Unless Advanced face recognition option is applied, a similar face or
photo of your face may unlock your device. See
recognition
• The recognized facial data is securely stored in your device.
• If the device cannot detect your face, or you forgot the screen lock set
for your device, visit the nearest LG Customer Service Center with your
device and ID card.
• To save power, the face recognition feature will not work when the
battery level is below 5%.
for details.
Precautions for face recognition
Face recognition accuracy may decrease in the following cases. To increase
its accuracy, check the following before using the device.
• When your face is covered with a hat, eyeglasses, or mask, or your face
is significantly different due to heavy makeup or beard.
• When there are fingerprints or foreign substances on the front of the
camera lens, or your device cannot detect your face due to excessively
bright or dark conditions.
Enhancing the face
Custom-designed Features 15
Registering facial data
Before using the face recognition feature, register your facial data on your
device.
Tap Settings General Lock screen & security Face
1
Recognition.
• To use this feature, the screen lock must be set with a Pattern, PIN, or
Password.
• When the screen lock is not set, register the data by following the
on-screen instructions. See
Raise your device in the front of your eyes.
2
Register your face by following the on-screen instructions.
3
• Register your face in a room that is not too bright or dark.
• Position your entire face inside the guideline on the screen, and then
adjust it by slowly moving up, down, left, or right.
When the face registration is done, tap OK.
4
Setting a screen lock
for details.
Unlocking the screen with your face
You can unlock the screen with your face instead of a Pattern, PIN, or
Password.
Tap Settings General Lock screen & security Select
1
screen lock.
Unlock the screen according to the specified method.
2
Tap Allow face recognition to unlock the screen with your face.
3
Custom-designed Features 16

Improving the face recognition
You can add facial data in various conditions to improve face recognition.
Tap Settings General Lock screen & security Face
1
Recognition.
Unlock the screen according to the specified method.
2
Select Improve face recognition.
3
Register your face by following on-screen instructions.
4
When the face registration is done, tap OK.
5
Deleting facial data
You can delete the registered facial data and register it again if the face
recognition does not work properly.
Tap Settings General Lock screen & security Face
1
Recognition.
Unlock the screen according to the specified method.
2
Select Delete face to delete the facial data.
3
Unlocking the screen with your face when the screen
is turned off
With the screen turned off, raise the device in front of your face to unlock
the screen.
To deactivate this feature, follow the instruction below.
Tap Settings General Lock screen & security Face
1
Recognition.
Unlock the screen according to the specified method.
2
Tap Allow when screen is off to deactivate the feature.
3
• The face recognition feature is available only when the screen is
locked.
Custom-designed Features 17
Swiping to unlock after face recognized
After your device recognizes your face, you must swipe the screen to
unlock.
Tap Settings General Lock screen & security Face
1
Recognition.
Unlock the screen according to the specified method.
2
Tap Swipe to unlock after face recognized to activate the
3
feature.
Enhancing the face recognition
You can prevent your device from being unlocked by photos, images, or
videos.
Tap Settings General Lock screen & security Face
1
Recognition.
Unlock the screen according to the specified method.
2
Tap Advanced face recognition to activate the feature.
3
• Face recognition speed may decrease when you activate this feature.
Custom-designed Features 18
Multi-tasking feature
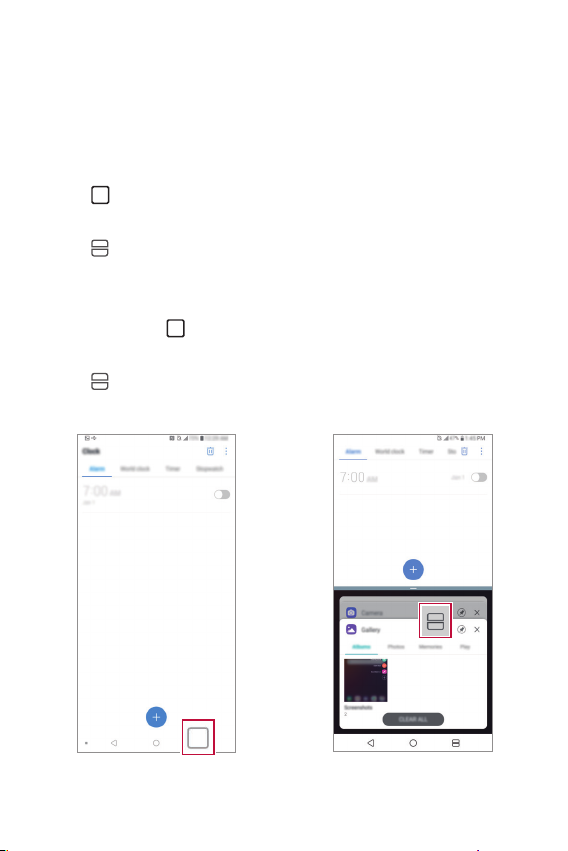
Multi-Window
You can use two apps at the same time by separating the screen into
multiple windows.
Tap from the Home touch buttons.
1
• Recently-used apps appear.
Tap at the top of the desired app to use the Multi-Window feature.
2
• The selected app appears at the top half of the screen.
You can also access this feature by doing the following:
Touch and hold while using an app.
1
• Recently-used apps appear on the split screen.
Tap at the top of the desired app to use the Multi-Window feature.
2
• The selected app appears at the bottom of the screen.
Custom-designed Features 19
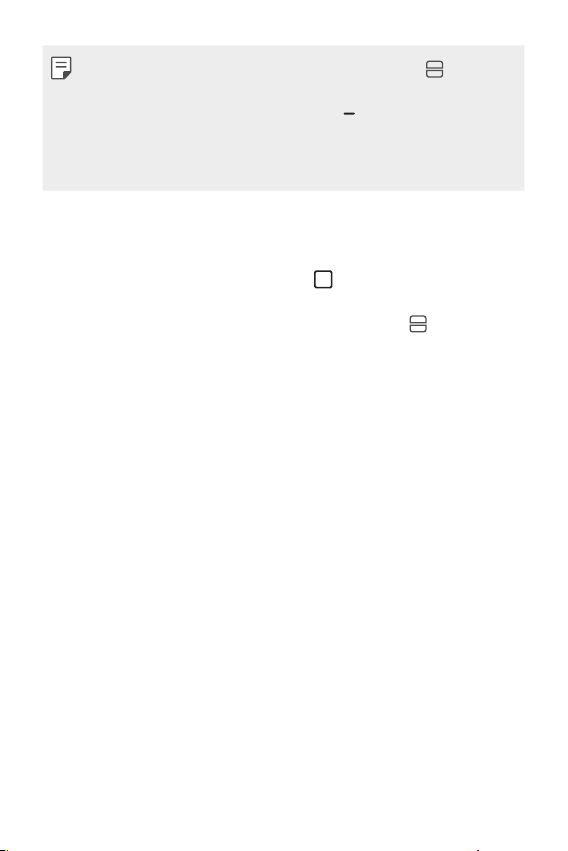
• To deactivate the Multi-Window feature, touch and hold on the
Home touch button.
• To adjust the size of the split screen, drag
screen.
• The Multi-Window feature is not supported by some LG apps and apps
downloaded from the Play Store.
at the center of the
Overview screen
The Overview screen provides a preview of your recently-used apps.
To view the list of recently-used apps, tap
• Touch and hold an app and drag it to the top of the screen to start the
app with the Multi-Window feature. You can also tap
each app preview.
on the Home touch buttons.
at the top of
Custom-designed Features 20

02
Basic Functions
Product components and
accessories
The following items are included with your device.
• Device
• USB cable
• Charger
• The items supplied with the device and any available accessories may
vary depending on the area and service provider.
• Do not use unapproved USB cables or chargers with your device. The
LG limited warranty does not cover damage caused by the use of third
party accessories.
• Some of the device parts are made of tempered glass. If you drop your
device on a hard surface or subject it to severe impact, the tempered
glass may be damaged. If this happens, stop using your device
immediately and contact an LG Customer Service Center.
• If any of these basic items are missing, contact the dealer from which
you purchased your device.
• To purchase additional basic items, contact an LG Customer Service
Center.
• To purchase optional items, contact an LG Customer Service Center for
available dealers.
• Some items in the product box are subject to change without notice.
• The appearance and specifications of your device are subject to change
without notice.
• Device specifications may vary depending on the area or service provider.
• Be sure to use authentic accessories provided by LG Electronics. Using
third-party accessories may damage the device or cause malfunctions.
• Remove the protective film from the Fingerprint sensor before using the
fingerprint recognition feature.
• Quick Start Guide
• Ejection pin
Basic Functions 22
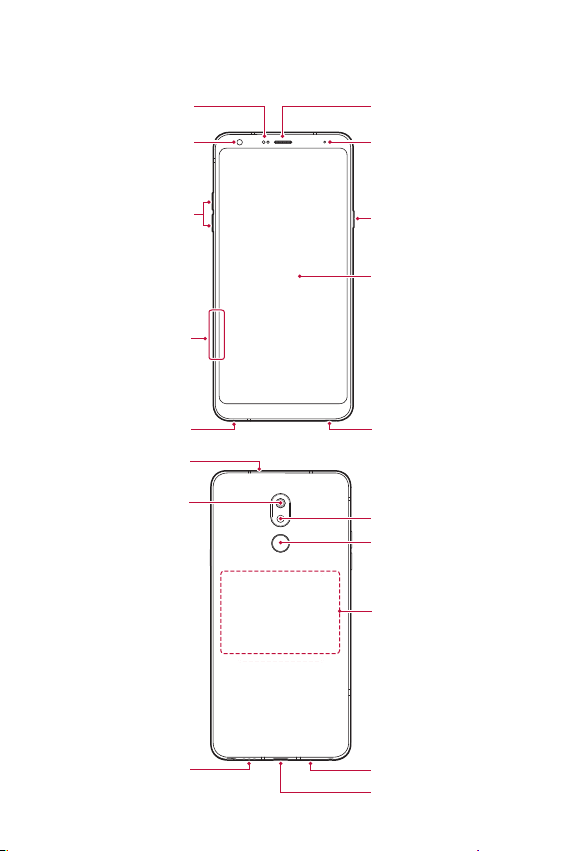
Parts overview
Microphone
Proximity/Ambient light
Front camera lens Notification LED
Volume keys (+/-)
Nano-SIM/Memory card
Stereo headset jack
Rear camera lens
sensor
tray
Earpiece
Power/Lock key
Touch screen
Stylus Pen
Flash
Fingerprint sensor
NFC area
Speaker Microphone
Charger/USB cable port
Basic Functions 23

Do NOT attempt to remove the back cover.
This device has a non-removable battery. Do not attempt to remove the
back cover. Doing so may severely damage the battery and device, which
could cause overheating, fire, and injury.
• Press and hold the volume down key and Power/Lock key at the same
time for a second to take a screenshot.
• Proximity/Ambient light sensor
- Proximity sensor: During a call, the proximity sensor turns off the
screen and disables touch functionality when the device is in close
proximity to the human body. It turns the screen back on and enables
touch functionality when the device is outside a specific range.
- Ambient light sensor: The ambient light sensor analyzes the ambient
light intensity when the auto-brightness control mode is turned on.
• Volume keys
- Adjust the volume for ringtones, calls or notifications.
- While using the Camera, gently press a Volume key to take a photo.
To take continuous photos, press and hold the Volume key.
- Press the Volume Down key twice to launch the Camera app when
the screen is locked or turned off. Press the Volume Up key twice to
launch Capture+.
• Power/Lock key
- Briefly press the key when you want to turn the screen on or off.
- Press and hold the key when you want to select a power control
option.
• Fingerprint sensor
- Turn on the fingerprint recognition feature to simplify the process
of unlocking the screen. See
Fingerprint recognition overview
details.
for
Basic Functions 24
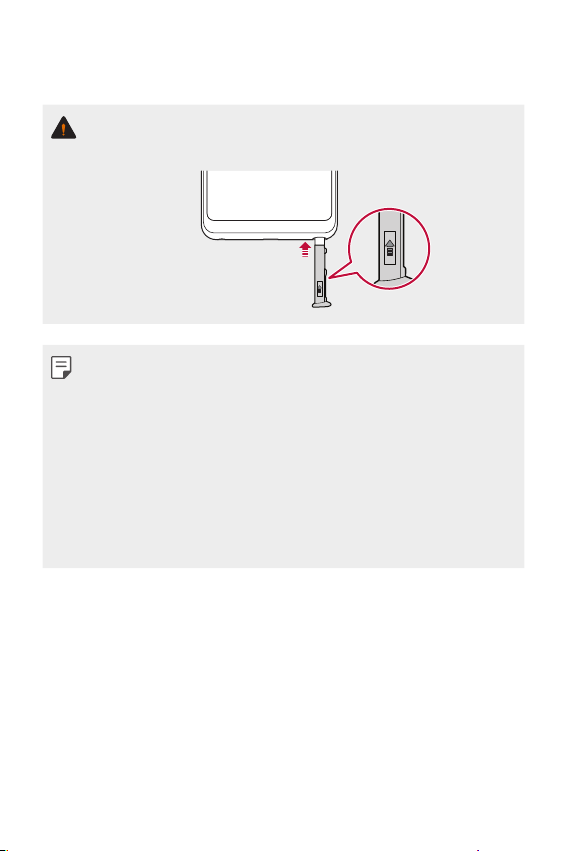
• Stylus pen
- Operate the device with the stylus pen included, or your finger.
• Please insert the pen into the device, aligning the arrow mark on the
stylus pen upwards with the device facing up.
• Some functions may be restricted for access, depending on the device
specifications.
• The rear of the device includes a built-in NFC antenna. Be cautious when
handling the device to avoid damaging or covering the NFC antenna.
• Do not put heavy objects on the device or sit on it. Doing so may
damage the touch screen.
• Screen-protective film or accessories may interfere with the proximity
sensor.
• If your device is wet or is being used in a humid place, the touch screen
or buttons may not function properly.
Basic Functions 25
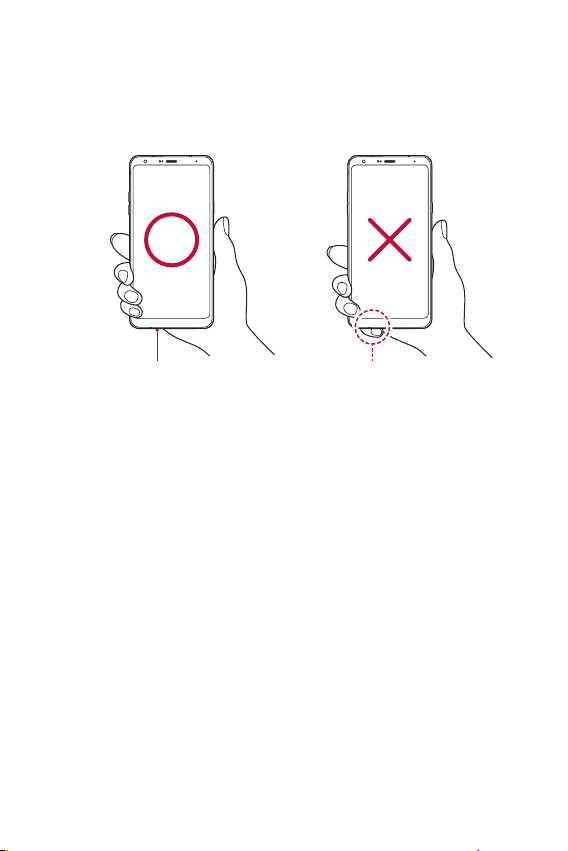
Hold the device correctly as shown below. If you cover the microphone
Good example
Bad example
hole with a hand, finger, or protective case while using the device, you may
sound unclear during a call.
Do not cover the microphone.Microphone
Basic Functions 26

Turning the power on or off
Turning the power on
When the power is turned off, press and hold the Power/Lock key.
• When the device is turned on for the first time, initial configuration
takes place. The first booting time for the smart phone may be longer
than usual.
Turning the power off
Press and hold the Power/Lock key, then select Power off.
Restarting the device
When the device is not working properly or does not respond, restart it by
following the instructions below.
Press and hold the Power/Lock key and the Volume Down key at the
1
same time until the power is turned off.
When the device restarts, release the key.
2
Power control options
Press and hold the Power/Lock key, then select an option.
• Power off: Turn the device off.
• Restart: Restart the device.
• Turn on Airplane mode: Block telecommunication-related functions,
including making phone calls, messaging and browsing the Internet.
Other functions remain available.
Basic Functions 27
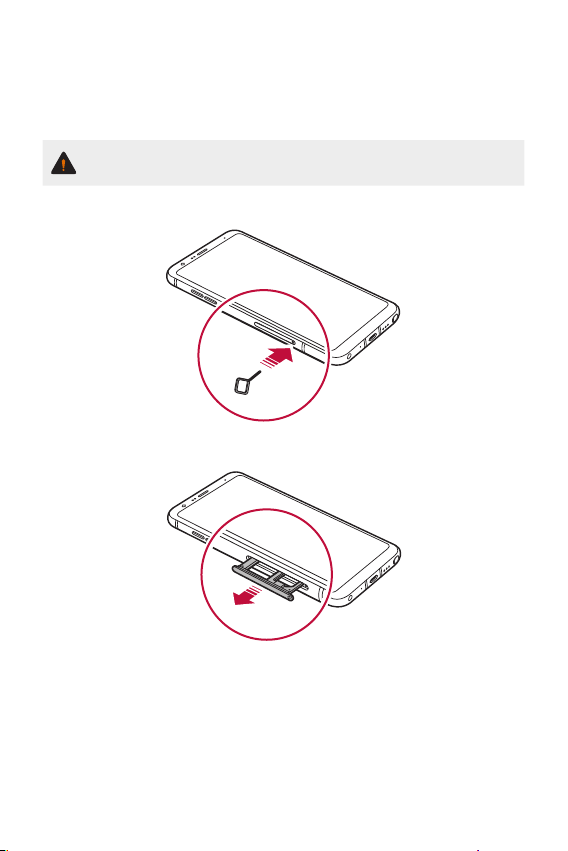
Installing the SIM card
Insert the SIM card provided by your mobile service provider to start using
your device.
• Be careful with the ejection pin since it has a sharp edge.
Insert the ejection pin into the hole on the card tray.
1
Pull out the card tray.
2
Basic Functions 28
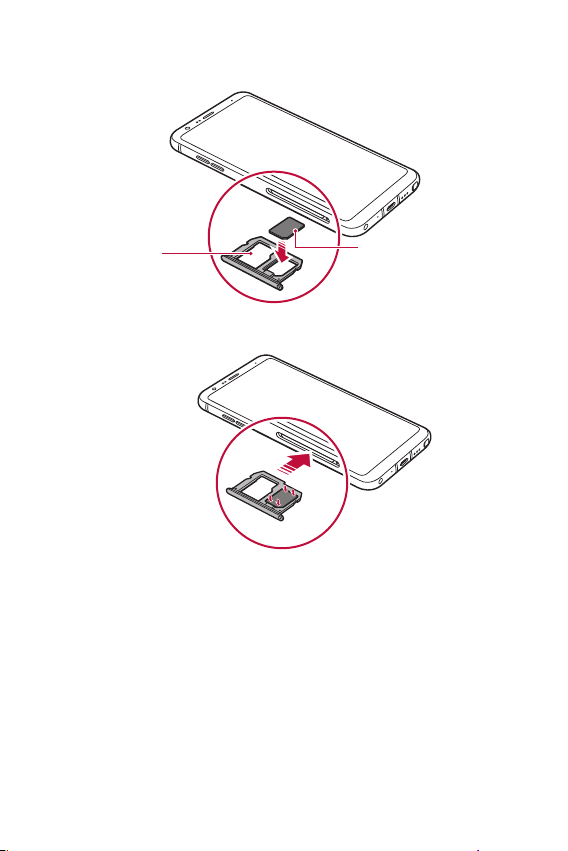
Put the SIM card on the card tray with the gold-colored contacts
3
facing downwards.
Memory card
(optional-sold
separately)
Insert the card tray back into the slot.
4
Basic Functions 29
SIM card
 Loading...