

Page 1
LG Electronics Monterrey, México S.A. de C.V.
PART NUMBER: MFL33029609 DATE: January 11th, 2013
DESCRIPTION: OWNER’S MANUAL Part No. MFL33029609
MODEL DESCRIPTION:
Product: Project:
Gas Range
Brand: Customer:
PRINTING SPECIFICATION:
1. Trim Size (mm): 4. Printing Method:
2. Printing Color: 5. Bindery Type:
182 (W), 257 (H) Off Set
Black
3. Paper Type: 6. Language:
- Cover: 7. Number of Pages:
- Content: 8. Number of Sheets:
Revolucion (Wood-Free Paper)
Revolucion (Wood-Free Paper)
NOTES:
1. The part should not contain prohibited substances (Pb, Cd, Hg, Cr+6, PBB, PBDE) and should comply
with standard LG (61)-A-9101.
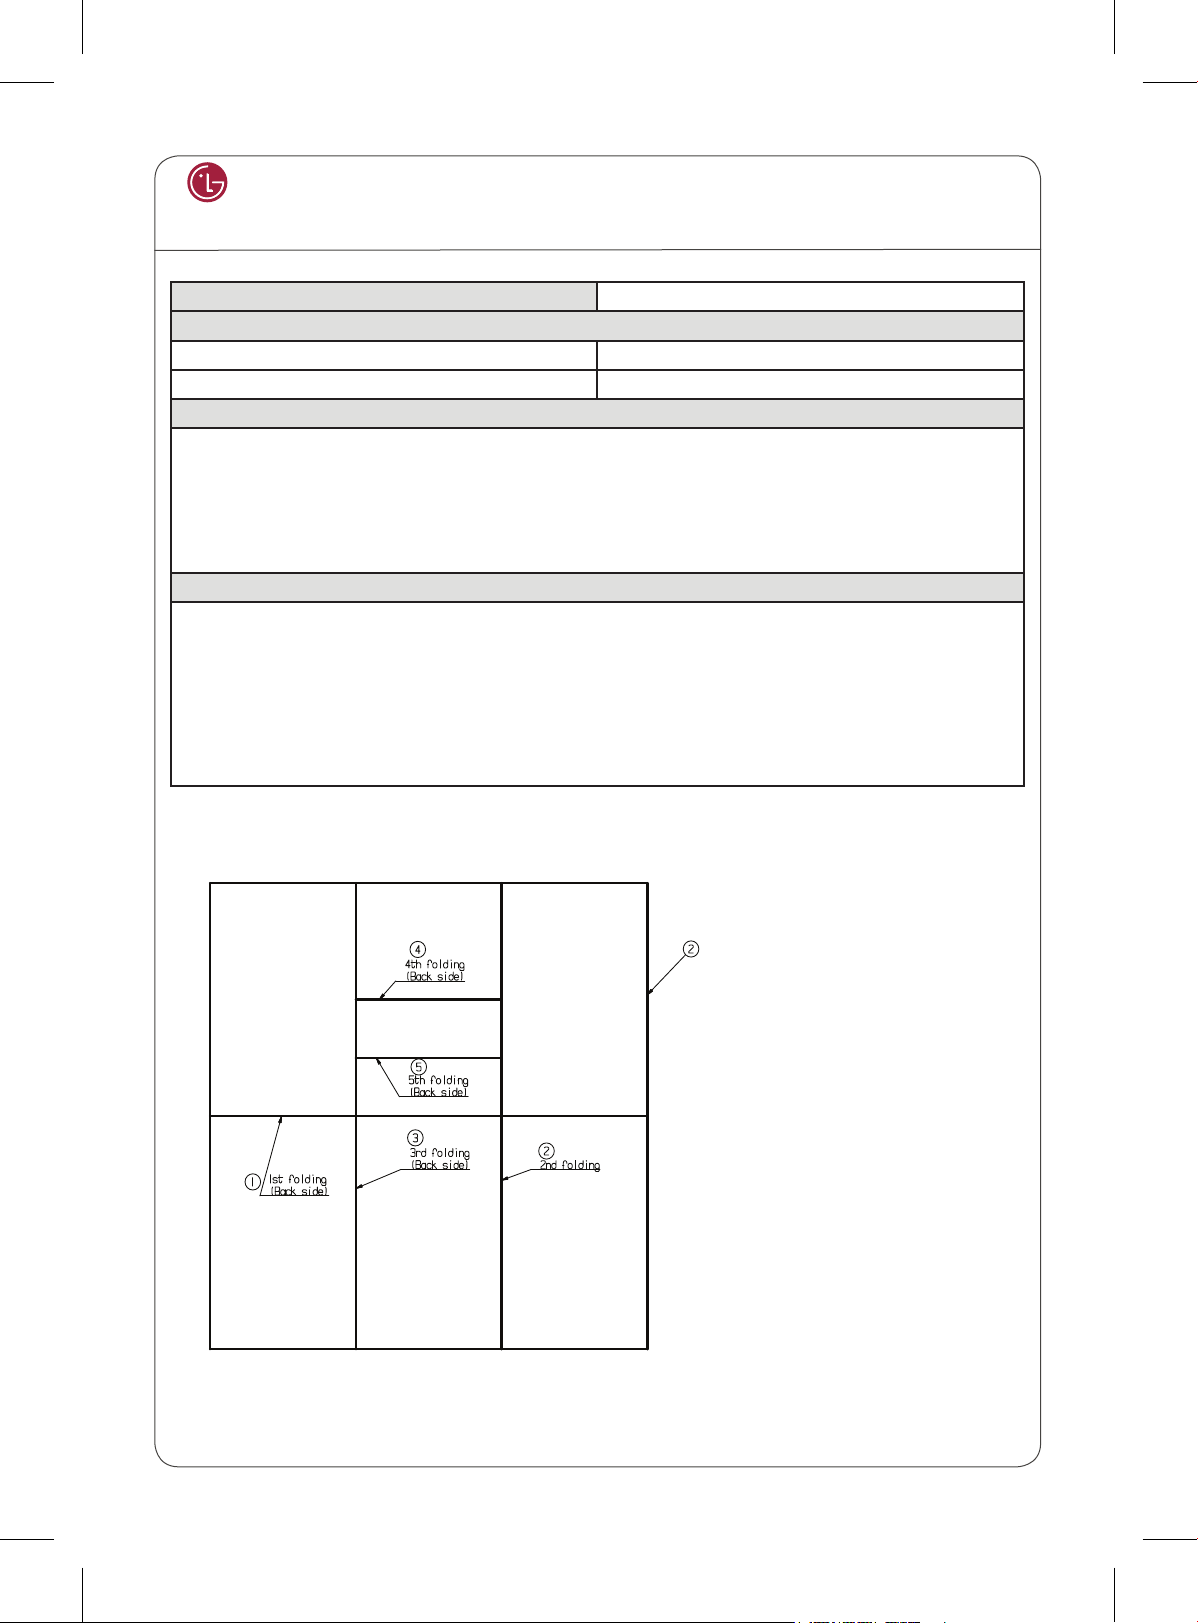
Folding procedure must be according to the order that shows below and it should be seen front
2.
(Printing side of P/N), 1 -> 2 -> 3 -> 4 -> 5.
The specification must be the same according to First Parts Approval (FPA).
Quality must not be modified.
NIKE BEST
LGEUS LG
Saddle Stitch
English & Spanish
92
46
FOLDING PROCEDURE ONLY FOR TECHNICAL CARDS
Page 2

ENGLISH
ESPAÑOL
OWNER’S MANUAL
GAS DOUBLE OVEN
RANGE
Please read this guide thoroughly before operating
and keep it handy for reference at all times.
LDG3017ST
MFL33029609
www.lg.com
Page 3

2
TABLE OF CONTENTS
TABLE OF CONTENTS
3 PRODUCT FEATURES
4 IMPORTANT SAFETY INSTRUCTIONS
10 BEFORE USE
10 Accessories
11 Components
12 HOW TO USE
12 How to use Gas Surface Burners
12 - Before Use
13 - Gas Burners
13 - Using the Gas Surface Burners
14 - Top-of-Range Cookware
15 - Using the Griddle
16 How to Use the Oven
16 - Before Use
18 - Using the Control Panel
20 Operation Instructions
20 - Convection auto conversion
20 - Temperature
20 - Language
20 - Preheating Alarm light
21 - Oven light
21 - Beeper volume
21 - Fahrenheit or Celsius
21 - Clock
22 - Timer
22 - Lockout
23 Removing and Replacing the Oven Racks
24 BAKE (Upper & Lower Oven)
25 Preheating and Pan Placement
25 SPEED BROIL (Upper Oven)
29 TIMED COOK (Upper & Lower Oven)
29 DELAYED TIMED COOK (Upper & Lower Oven)
30 How to use convection for the lower oven
30 - CONVECTION BAKE FOR THE LOWER OVEN
31 - CONVECTION ROAST FOR THE LOWER OVEN
32 Special Features
32 - KIDS MEAL (Upper Oven)
32 - WARM (Upper & Lower Oven)
33 - PROOF (Lower Oven)
33 - FAVORITE (Lower Oven)
33 - SABBATH (Upper & Lower Oven)
35 CARE AND CLEANING
35 Gas Surface Burner
35 - Removing and Replacing the Gas Surface
Burner
35 - Burner Heads/Caps
36 - Burner Grates
37 - Cooktop Surface
37 - Stainless Steel Surfaces
37 - Oven Air Vents
37 - Control Panel
37 - Front Manifold Panel and Knobs
38 - Oven Door
38 - Removing and Replacing the Doors
40 Inside of the Oven
40 - SELF CLEAN (Upper & Lower Oven)
42 - Changing the Oven Light
42 - Broiler Pan and Grid (Sold separately)
42 - Oven Racks
43 BEFORE REQUESTING SERVICE
45 WARRANTY
Page 4
PRODUCT FEATURES
3
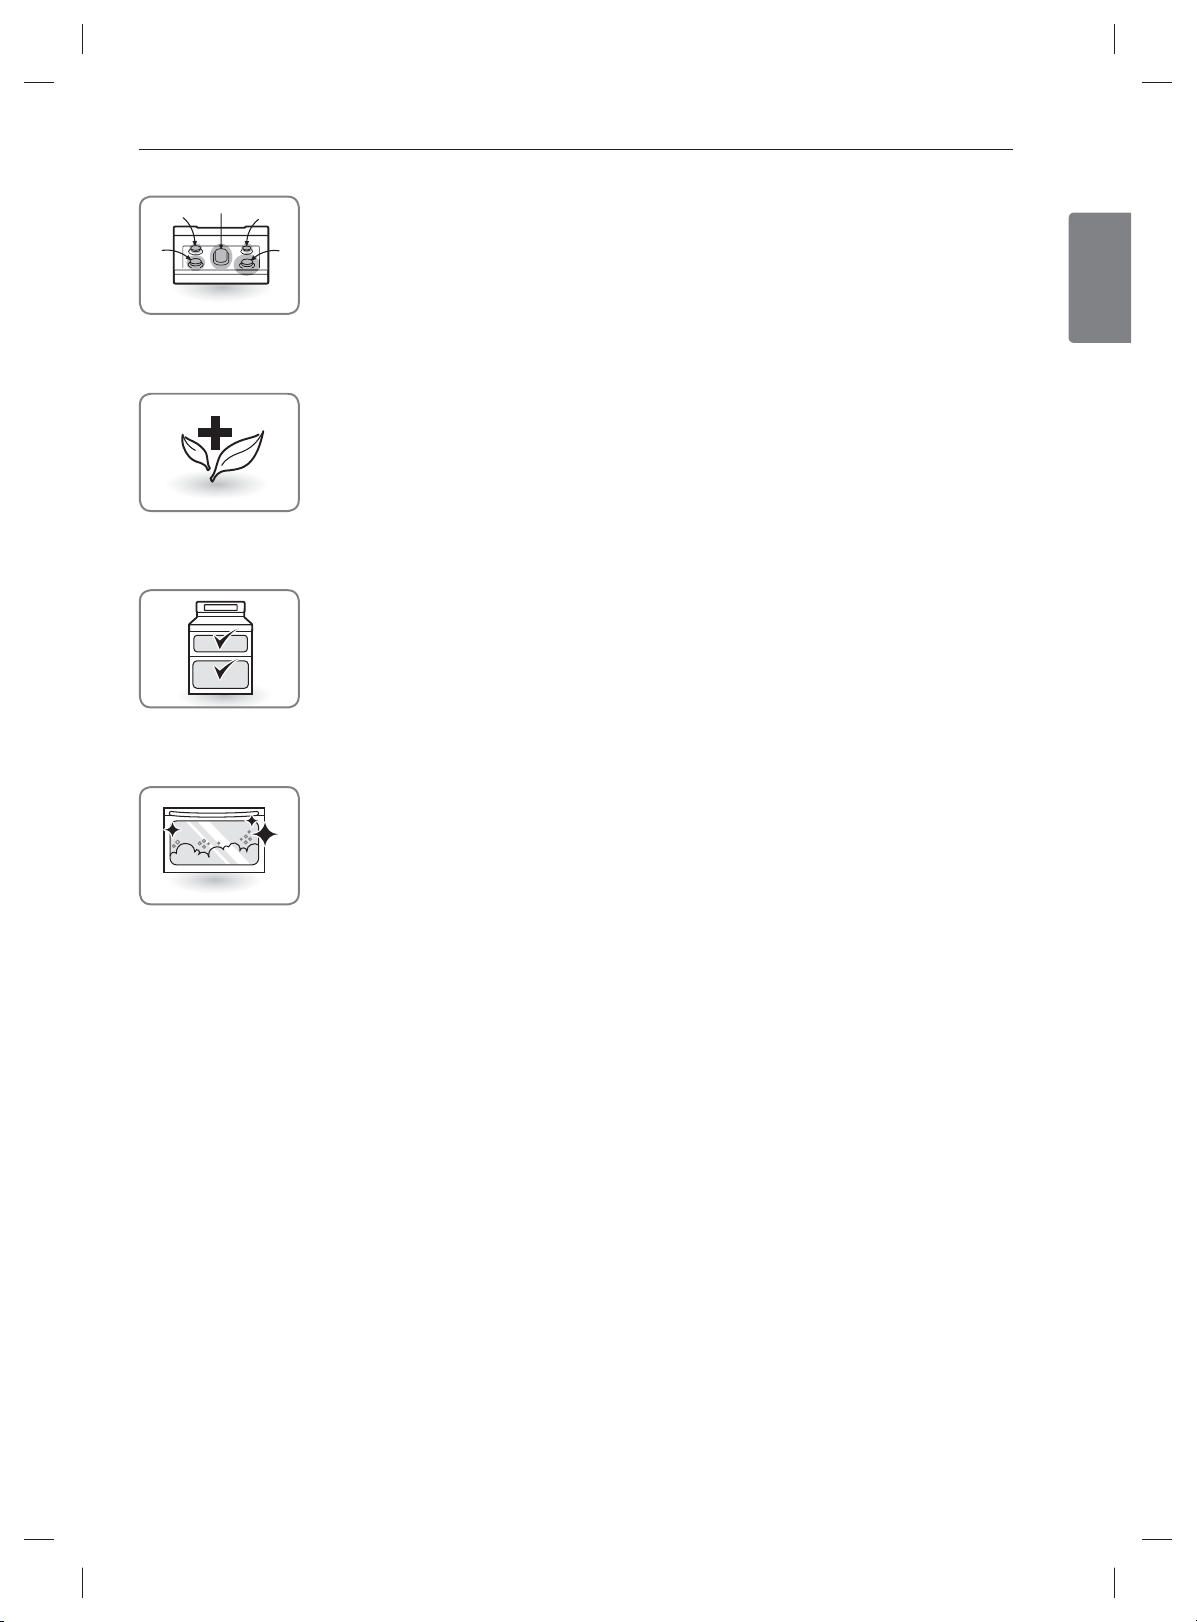
MULTIPLE GAS BURNER SIZES
Choose a burner to fit the size of your cookware.
Cooking multiple items at once is possible by using different burners at the same time.
SAFE AND CONVENIENT GAS RANGE
Provides safety and convenience for cooking.
Superboil (17000 BTU) can quickly bring a pot of water to a boil.
UPPER OVEN / LOWER OVEN
Separate upper and lower ovens.
Choose to use either oven, or both, depending on the size of your food.
ENGLISH
SELF CLEAN
Good for easy cleaning.
Page 5
4
IMPORTANT SAFETY INSTRUCTIONS
IMPORTANT SAFETY INSTRUCTIONS
Always comply with the following precautions to avoid dangerous situations and to ensure the peak performance of your product.
WARNING
Indicates a hazardous situation which, if not avoided, could result in death or serious injury.
CAUTION
Indicates a hazardous situation which, if not avoided, could result in minor or moderate injury.
WHAT TO DO IF YOU SMELL GAS
1. Open windows.
2.
DO NOT
3.
DO NOT
4.
DO NOT
5. Immediately call your gas supplier from a neighbor’s phone. Follow the gas supplier’s
instructions.
6. If you cannot reach your gas supplier, call the fire department.
try to light any appliance.
touch any electrical switch.
use any phone in your building.
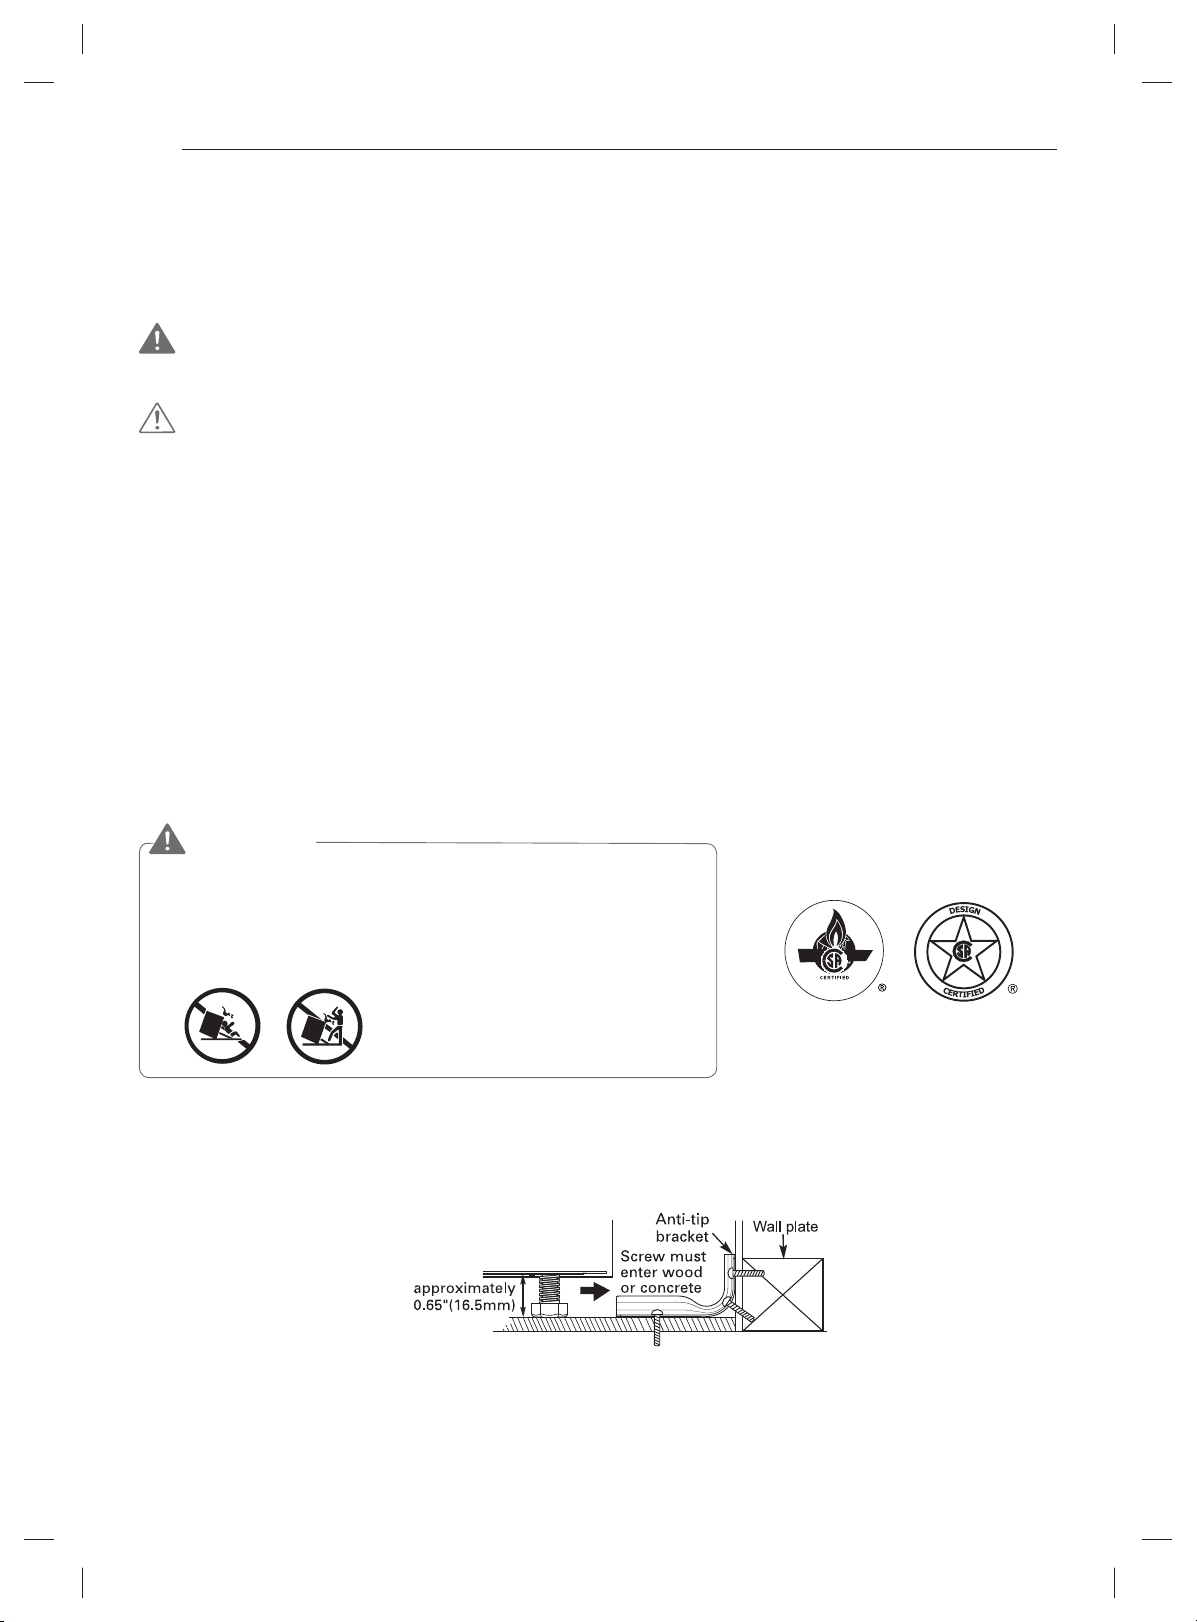
ANTI-TIP DEVICE
WARNING
•
ALL RANGES CAN TIP
•
INJURY TO PERSONS COULD RESULT
•
INSTALL ANTI-TIP DEVICES PACKED WITH RANGE
•
SEE INSTALLATION INSTRUCTIONS
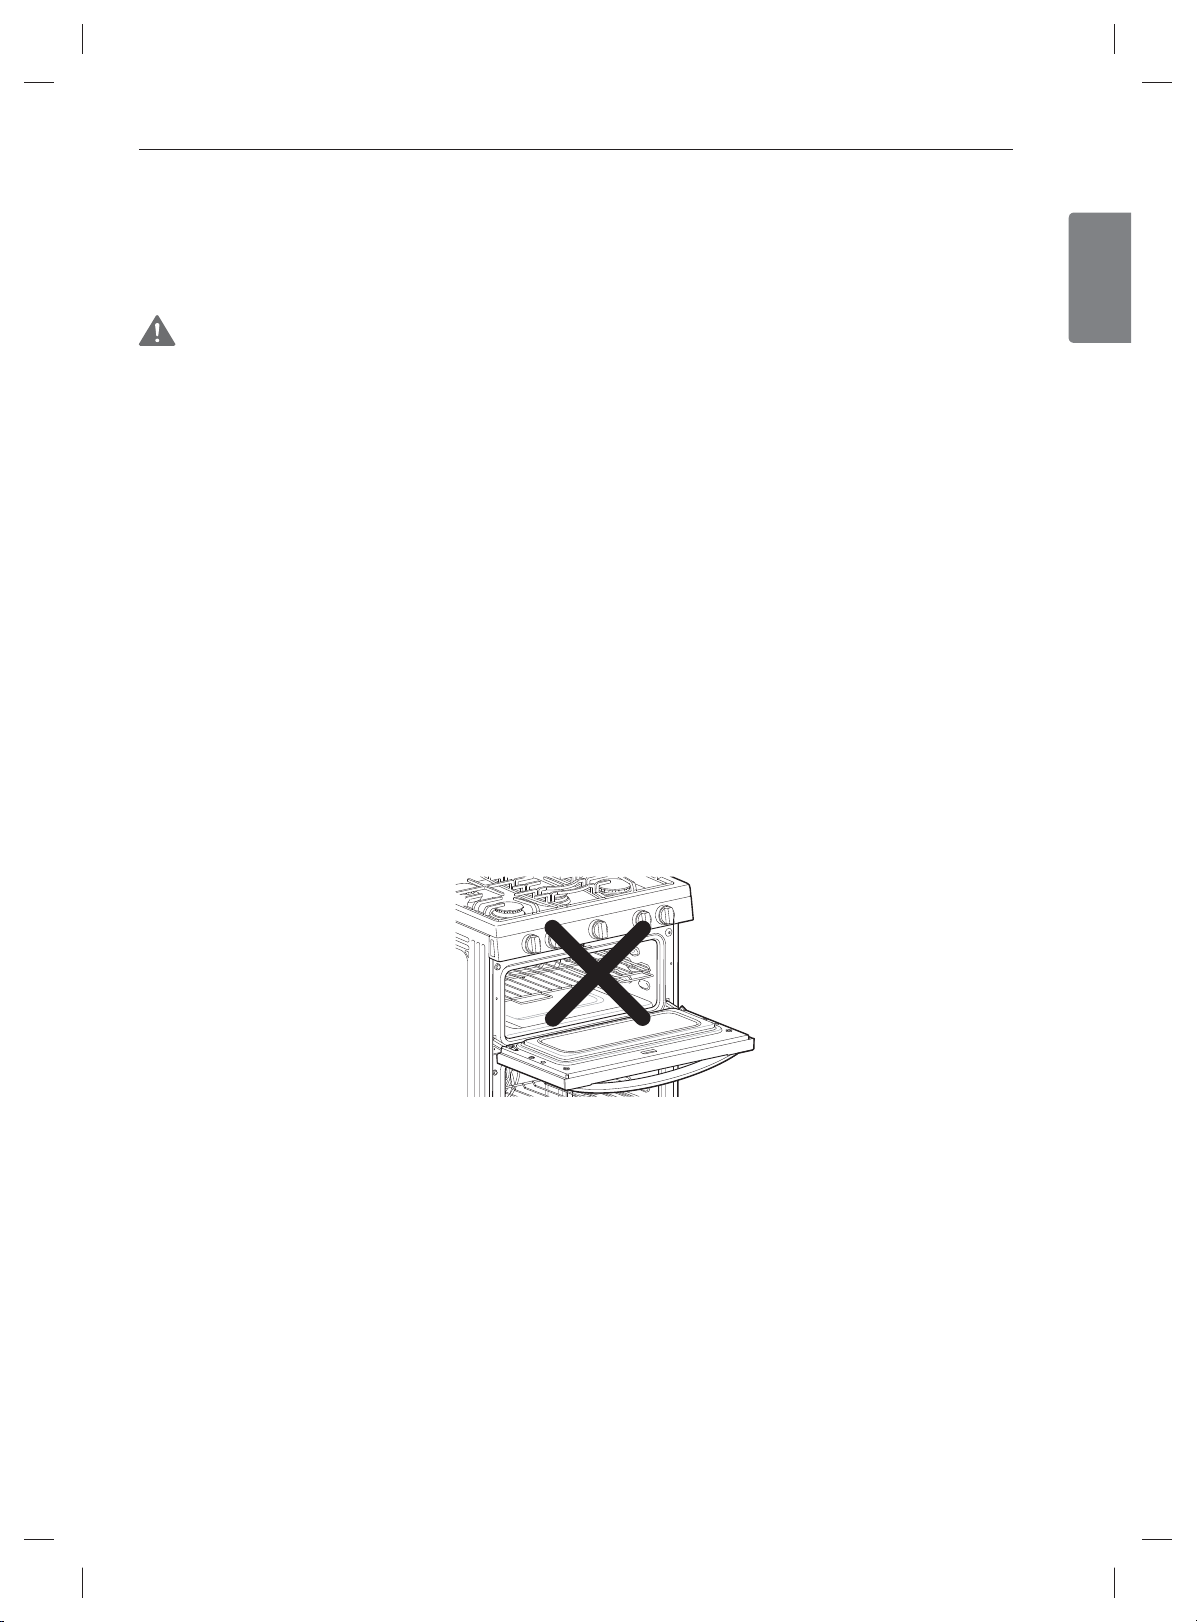
DO NOT step or sit on the door. Install the Anti-Tip Bracket packed with this range.
- The range could be tipped and injury might result from spilled hot liquid, food, or the range itself.
- If the range is pulled away from the wall for cleaning, service, or any other reason, ensure that the Anti-Tip Device is properly
reengaged when the range is pushed back against the wall.
To reduce the risk of the range tipping over, the range must be secured by properly installing the anti-tip devices.
To check that the anti-tip bracket is properly installed: Remove any items on the cooktop. Grasp the top rear edge of the range
back guard and carefully attempt to tilt it forward. Verify that the ant-itip devices are engaged.
Remove the warming or storage drawers and visually inspect that the rear leveling leg is fully inserted into the anti-tip bracket.
Refer to the installation manual for proper anti-tip bracket installatio
Page 6
IMPORTANT SAFETY INSTRUCTIONS
5
IMPORTANT SAFETY NOTICE
Enforcement Act requires the Governor of California to publish a list of substances known to the state to cause birth defects or
other reproductive harm, and requires businesses to warn customers of potential exposure to such substances.
Gas appliances can cause minor exposure to four of these substances, namely benzene, carbon monoxide, formaldehyde and
soot, caused primarily by the imperfect combustion of natural or LP gas.
Correctly adjusted burners, indicated by a bluish rather than a yellow flame, will minimize imperfect combustion. Exposure to
these substances can be minimized by opening windows or using a ventilation fan or hood.
SAFETY PRECAUTIONS
Have the installer show you the location of the range gas shut-off valve and how to shut it off if necessary.
Make sure your range is properly installed and grounded by a qualified installer, according to the installation instructions.
Any adjustment and service should be performed only by qualified gas range installers or service technicians.
Plug your range into a 120-volt grounded outlet only. Do not remove the round grounding prong from the plug. If in doubt
about the grounding of the home electrical system, it is your personal responsibility and obligation to have an ungrounded
outlet replaced with a properly grounded, three-prong outlet in accordance with the National Electrical Code. Do not use an
extension cord with this range.
DO NOT
fire hazard or electrical shock. Failure to follow this warning can cause serious injury, fire or death.
To prevent poor air circulation, place the range out of kitchen traffic path and out of drafty locations.
DO NOT
vices should be referred to a qualified technician.
Make sure that all packaging materials are removed from the range before operating it to prevent fire or smoke damage
should the packaging material ignite.
Make sure your range is properly adjusted by a qualified service technician or installer for the type of gas (natural or LP) that
is to be used. Your range can be converted for use with either type of gas. See the installation instructions.
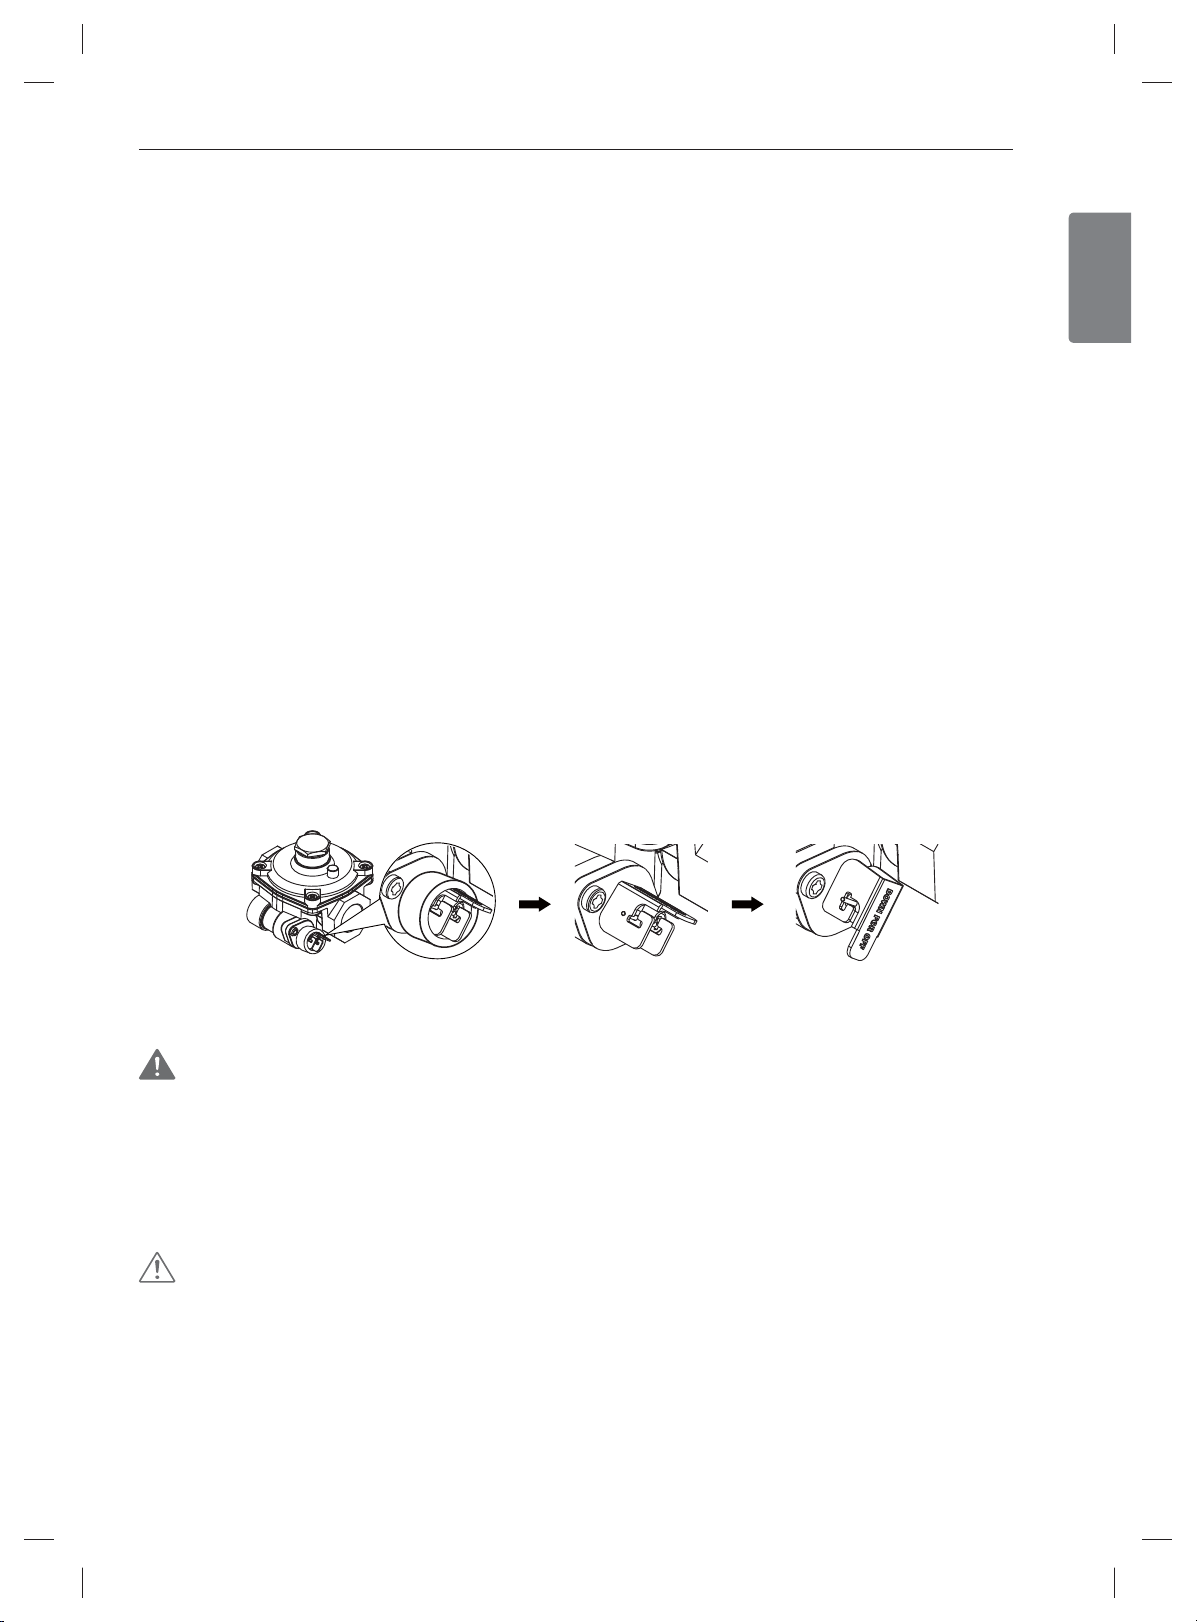
In an emergency situation or if you want to shut off the gas supply, remove the packing rubber from the regulator in the backside,
use an adapter plug, an extension cord, or remove the grounding prong from the electrical power cord to prevent
attempt to repair or replace any part of your range unless it is specifically mentioned in this manual. All other ser-
and then close the regulator’s valve by positioning the lever as shown in the figure below.
ENGLISH
Lever’s open position Lever’s open position
(without packing lever)
WARNING
These adjustments must be done by a qualified service technician according to the manufacturer’s instructions and all codes and
requirements of the authority having jurisdiction. Failure to follow these instructions could result in serious injury or property damage. The qualified agency performing these adjustments assumes responsibility for the conversion.
After using your range for a long time, high floor temperatures may result and many floor coverings will not withstand this
kind of use.
install the range over vinyl tile or linoleum that cannot withstand such type of use. Never install it directly over inte-
NEVER
rior kitchen carpeting.
CAUTION
Items of interest to children should not be placed in cabinets above a range or on the backsplash of a range—children climbing on
the range to reach items could be seriously injured.
DO NOT
DO NOT
even tip it over, causing severe personal injury.
leave children alone or unattended where a range is hot or in operation. They could be seriously burned.
let anyone climb, stand or hang on the oven door, warming drawer or cooktop. They could damage the range and
Lever’s close position
Page 7
6
IMPORTANT SAFETY INSTRUCTIONS
WARNING
This product contains chemicals known to the State of California to cause cancer.
WARNING
use your range as a space heater to heat or warm the room. Doing so may result in carbon monoxide poisoning and over-
NEVER
heating of the oven.
wear loose fitting or hanging garments while using the appliance. Be careful when reaching for items placed in cabinets
NEVER
over the range. Flammable materials could be ignited if brought in contact with flame or hot oven surfaces and may cause severe
burns.
Let the burner grates and other surfaces cool before touching them.
Large scratches or impacts to glass doors can lead to broken or shattered glass.
Stepping, leaning or sitting on the doors or drawers of this range can result in serious injuries and also cause damage to the range.
Gas leaks may occur in our system and result in a dangerous situation. Gas leaks may not be detected by smell alone. Gas sup-
Leak testing of the appliance shall be conducted according to the manufacturer’s instructions.
To prevent staining or discoloration, clean appliance after each use.
place flammable materials in the oven or near the cooktop.
DO NOT
place or use combustible materials such as gasoline or other flammable vapors and liquids in the vicinity of this or any
DO NOT
other appliance.
allow cooking grease or other flammable materials in or near the range.
DO NOT
use water on grease fires. Never touch a flaming pan. Turn the controls off. Smother a flaming pan on a surface burner
DO NOT
by covering the pan completely with a well-fitting lid, cookie sheet or flat tray. Use a multi-purpose dry chemical or foam-type fire
extinguisher.
A grease fire can be put out by covering it with baking soda or, if available, by using a multi-purpose dry chemical or foam-type fire
extinguisher.
Flame in the upper oven or lower oven can be smothered completely by closing the oven door and turning the control to off or by
using a multi-purpose dry chemical or foam-type fire extinguisher.
use the oven or the drawer for storage.
DO NOT
block the vents (air holes) of the range. They provide the air inlet and outlet that are necessary for the range to operate
NEVER
properly with correct combustion. Air openings are located at the rear of the cooktop, at the top and bottom of the oven door, and
at the bottom of the range.
cover any slots, holes or passages in the oven bottom or cover an entire rack with materials such as aluminum foil. Doing
NEVER
so blocks air flow through the oven and may cause carbon monoxide poisoning. Aluminum foil linings may also trap heat, causing
a fire hazard.
obstruct the flow of combustion and ventilation air by blocking the oven vent or air intakes. Doing so restricts air to the
NEVER
burner and may result in carbon monoxide poisoning.
Do not allow children to climb or play around the range. The weight of a child on an open door may cause the range to tip, resulting in serious burns or other injury.
pliers recommend you to purchase and install a UL approved gas detector. Install and use in accordance with the gas detector
manufacturer’s instructions.
use commercial oven cleaners on the oven finish or around any part of the oven. They will damage the finish of parts.
DO NOT
attempt to open or close the door or operate the oven until the door is properly installed.
DO NOT
place fingers between the hinge and front oven frame. Hinge arms are spring mounted. If accidentally hit, the hinge will
NEVER
slam shut against the oven frame and could injure your fingers.
Wash hands after handing.
CAUTION
To prevent damage to the oven door, do not attempt to open the door when Lock is displayed.
Disconnect electrical supply before servicing the appliance.
This product should not be installed below ventilation type hood systems that directs air in a downward direction.
use the oven for storing food or cookware.
DO NOT
place excessive weight or stand on an open door. This could cause the range to tip over, break the door, or injure the
DO NOT
user.
use delayed baking for highly perishable foods such as dairy products, pork, poultry, or seafood.
DO NOT
WARNING
use appliance door as a step stool or seat, as this may result in possible tipping of the appliance and serious injuries.
NEVER
Doing so may cause ignition and combustion problems with the gas burners resulting in personal injury and may affect the cooking performance of the unit.
Page 8
IMPORTANT SAFETY INSTRUCTIONS
7
SURFACE BURNERS
WARNING
Even if the top burner flame goes out, gas is still flowing to the burner until the knob is turned to the “OFF” position. If you
smell gas, immediately open a window and ventilate the area for five minutes prior to using the burner. Do not leave the
burners “ON” unattended.
Use proper pan size - DO NOT
large enough to cover burner grates. To avoid spillovers, make sure the cookware is large enough to contain the food properly. This will both save cleaning time and prevent hazardous accumulations of food, since heavy spattering or spillovers left
on the range can ignite. Use pans with handles that can be easily grasped and remain cool.
CAUTION
Be sure that all surface controls are set in the "OFF" position prior to supplying gas to the range.
leave the surface burners unattended at high flame settings. Boilovers may cause smoke and greasy spillovers that
NEVER
may catch on fire.
Always turn the knobs to the “LITE” position when igniting the top burners and make sure the burners have ignited.
Control the top burner flame size so it does not extend beyond the edge of the cookware. Excessive flame is hazardous.
Only use dry pot holders—moist or damp pot holders on hot surfaces may result in burns from steam. Do not let pot hold-
ers come near open flames when lifting cookware. Do not use towels or other bulky cloth items. Use a pot holder.
Using glass cookware—make sure the cookware is designed for top-of-range cooking.
To prevent burns from ignition of flammable materials and spillage, turn cookware handles toward the side or back of the
range without extending over adjacent burners.
leave any items on the cooktop. The hot air from the vent may ignite flammable items and will increase pressure in
NEVER
closed containers, which may cause them to burst.
Carefully watch foods being fried at a high flame setting.
Always heat fat slowly, and watch as it heats.
If frying combinations of oils and fats, stir together before heating.
Use a deep fat thermometer if possible to prevent overheating fat beyond the smoking point.
Use the least possible amount of fat for effective shallow or deep-fat frying. Filling the pan with too much fat can cause
spillovers when food is added.
DO NOT
DO NOT
the wok. This ring acts as a heat trap, which may damage the burner grate and burner head. It may also cause the burner
to work improperly. This may cause carbon monoxide levels which are higher than what is allowed by current standards,
resulting in a health hazard.
Foods for frying should be as dry as possible. Frost or moisture on foods can cause hot fat to bubble up and spillover the
sides of the pan.
NEVER
DO NOT
Keep all plastics away from the surface burners.
To prevent burns, always be sure that the controls for all burners are in the “OFF” position and all grates are cool before
attempting to remove them.
If you smell gas, turn off the gas to the range and call a qualified service technician. Never use an open flame to locate a
leak.
Always turn the knobs to the “OFF” position before removing cookware.
DO NOT
If the range is located near a window, do not hang long curtains that could blow over the surface burners and catch on fire.
cook foods directly on an open flame on the cooktop.
use a wok on the surface burners if the wok has a round metal ring that is placed over the burner grate to support
try to move a pan of hot fat, especially a deep fat fryer. Wait until the fat is cool.
place plastic items on the cooktop—they may melt if left too close to the vent.
lift the cooktop. Lifting the cooktop can cause damage and improper operation of the range.
use pans that are unstable or that can be easily tipped. Select cookware with flat bottoms
ENGLISH
Page 9
8
IMPORTANT SAFETY INSTRUCTIONS
BROILER
Always use a broiler pan and a grid for excess fat and grease drainage. This will help to reduce splatter, smoke, and flare-ups.
The igniter for the infrared ceramic broil burner on the ceiling of the oven will glow orange periodically during normal broil operation.
WARNING
When using your broiler, the temperature inside the oven will be extremely high. Take caution to avoid possible burns by:
• Keeping the door closed when broiling (refer to Broil section of the manual)
• Always wear oven mitts when inserting or removing food items
CAUTION
The infrared ceramic broiler will generate intense heat and will sear foods faster compared to regular bar type broilers. This broil
system is designed to be operated under consumer-use conditions only. To avoid overheating and damaging the oven, do not
use this broiler continuously for more than 45 minutes at a time.
Do not attempt to spray the broiler and its igniter with any type of cleaners or try to scrub it. This will damage the broiler system.
The ceramic plates of your broiler do not need to be manually cleaned. Any grease or splatter on the ceramic from cooking and
baking will burn clean by simply turning on your broiler for about 10 minutes.
COOK MEAT AND POULTRY THOROUGHLY
To protect against foodborne illnesses, cook meat and poultry thoroughly. The USDA has indicated the following as safe minimum internal temperatures for consumption:
Ground beef, veal, pork, or lamb: 160 °F
Poultry: 165 °F
Beef, veal, pork, or lamb: 145 °F
Fish/seafood: 145°F
SELF CLEANING OVEN
Make sure to wipe off excess spillage before operating the self clean function.
CAUTION
DO NOT
DO NOT
around any part of the oven. Residue from oven cleaners will damage the inside of the oven when the self clean cycle is
used.
Remove oven racks and other items from both upper and lower ovens before starting the self clean cycle.
Only clean the parts listed in this manual.
DO NOT
move the gasket.
If the self cleaning mode malfunctions, turn the range off and disconnect the power supply. Have it serviced by a qualified
technician.
It is normal for parts of the oven to become hot during a self clean cycle.
Avoid touching the door, window or oven vent area during a clean cycle.
leave food, cooking utensils, racks, etc. in the oven during the self clean cycle.
use oven cleaners. No commercial oven cleaner or oven liner protective coating of any kind should be used in or
clean the door gasket. The door gasket is necessary for a good seal. Care should be taken not to rub, damage or
Page 10
IMPORTANT SAFETY INSTRUCTIONS
9
OVEN
When opening the door of a hot oven, stand away from the range. The hot air and steam that escape can cause burns to hands,
face and eyes.
WARNING
block any slots, holes or passages in the oven bottom or cover an entire rack with materials such as
NEVER
aluminum foil. Doing so blocks air flow through the oven and may cause carbon monoxide poisoning. Aluminum foil linings may
also trap heat, causing a fire hazard.
DO NOT
DO NOT
cause damage to the range.
DO NOT
Keep the oven free from grease buildup.
Insert the oven racks in the desired position while the oven is cool.
To prevent burns when removing food, slide racks out until the stop engages, then remove food items.
This may also protect you from getting burnt from touching hot surfaces of the door or oven walls.
When placing or removing a griddle, always wear oven mitts.
When using cooking or roasting bags in the oven, follow the manufacturer’s directions.
Use only glass cookware that is recommended for use in gas ovens.
Always remove the broiler pan from the range after you finish broiling. Grease left in the pan can catch fire if oven is used
without removing the grease from the broiler pan.
If meat is too close to the flame while broiling, the fat may ignite. Trim excess fat to prevent excessive flare-ups.
Make sure the broiler pan is in place correctly to minimize the possibility of grease fires.
If you should have a grease fire in the broiler pan, press the “UPPER CLEAR/OFF” or “LOWER CLEAR/OFF” key, and keep
the oven door closed to contain fire until it burns out.
For safety and better cooking performance, always bake and broil with the oven door closed.
Open door baking or broiling can cause damage to the knobs or valves.
DO NOT
heat food in closed containers. Pressure inside the container could increase and burst, causing an injury.
use aluminum foil anywhere in the oven except as described in this manual. Doing so could create a fire hazard or
use the oven for storage. Items stored in the oven can catch on fire.
leave the oven door open during cooking or cool down.
ENGLISH
READ ALL INSTRUCTIONS BEFORE USING THE APPLIANCE.
SAVE THESE INSTRUCTIONS
Page 11

10
BEFORE USE
BEFORE USE
Accessories
Make sure that all parts are included after purchasing this product.
Gas double oven range
Racks
(2)
Owner’s manual Installation manual
Cooktop nozzles (5) Oven nozzles (4) Installation guide
Anti-tip Screws (6) Anchors (6)
Template
Offset rack
(1)
LP nozzle conversion kit
Anti-tip kit
Griddle plate
(1)
Sold Separately
Broiler pan Grid
NOTE
Contact LG Customer Service if any accessories are missing.
For your safety and extended product life, only use authorized components.
The manufacturer is not responsible for product malfunction or accidents caused by the use of separately purchased,
unauthorized components or parts.
The images in this guide may be different from the actual components and accessories, and are subject to change by the
manufacturer without prior notice for product improvement purposes.
Page 12
BEFORE USE
11
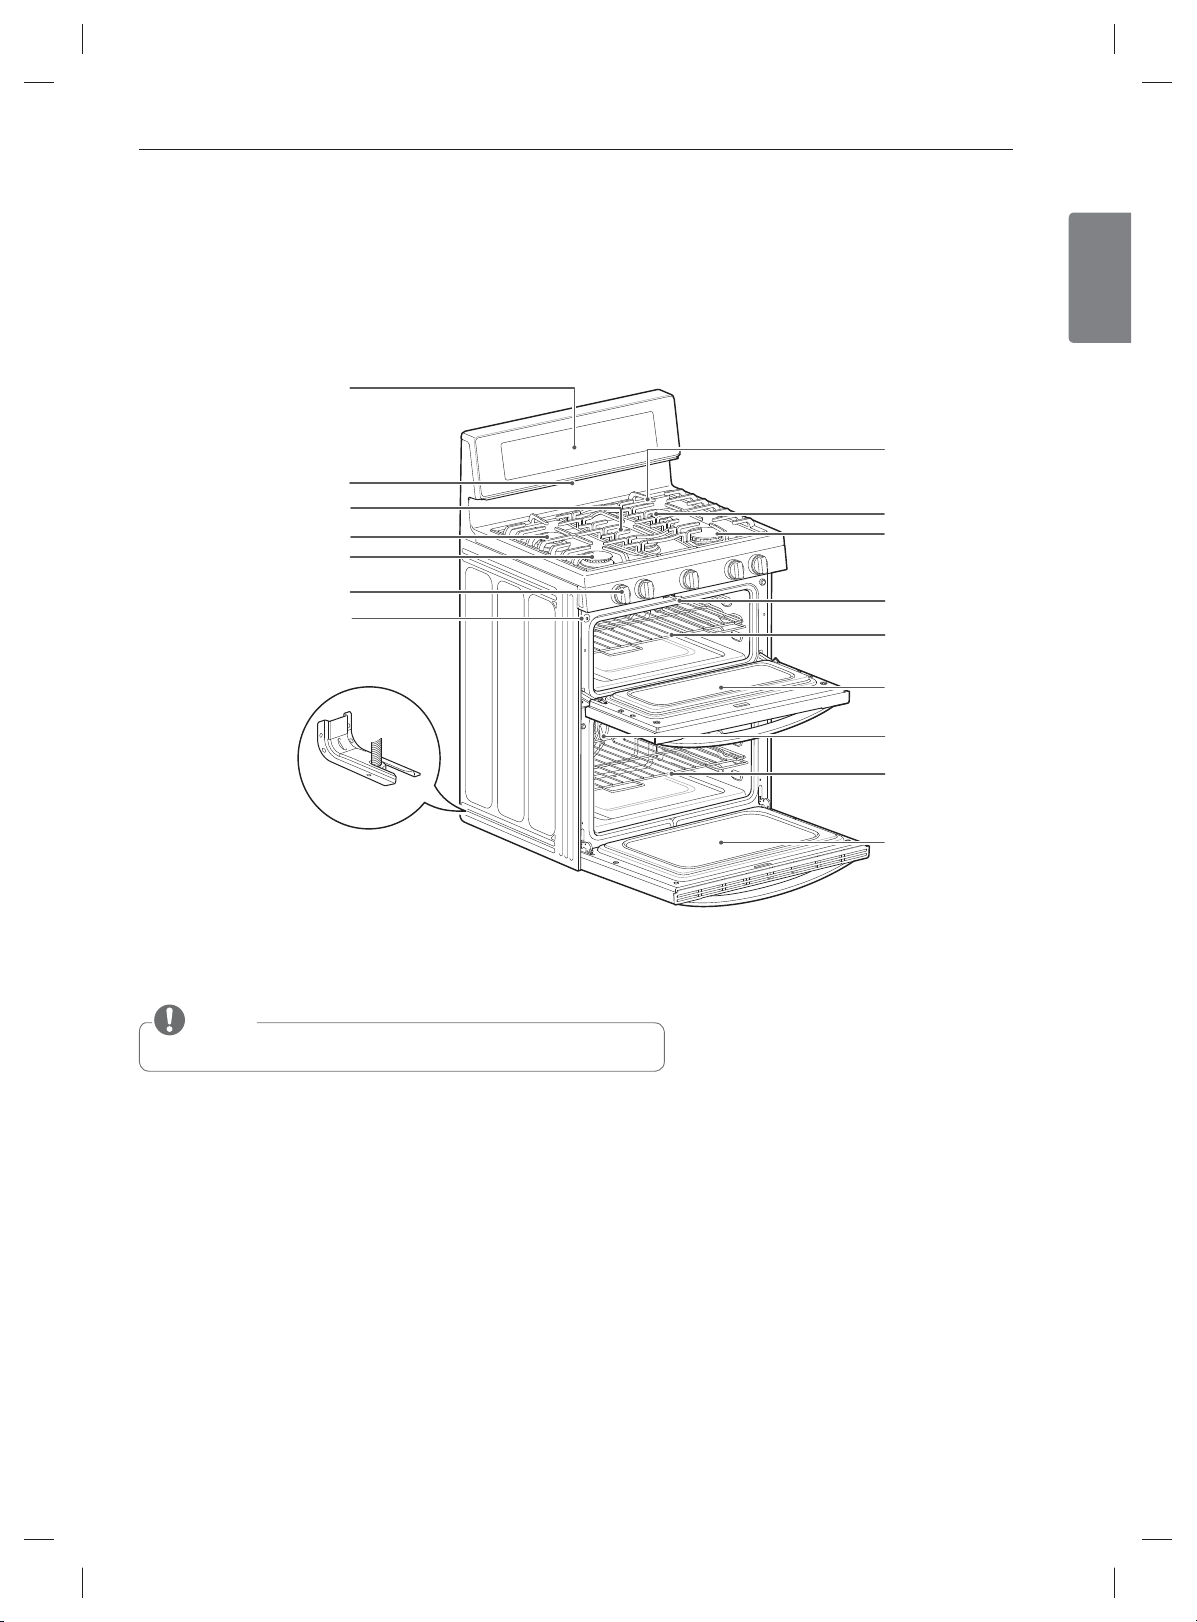
Components
Make sure to understand the names and function of each part.
* Throughout this manual, the features and appearance may vary depending on your model.
Control panel
Medium burner
Automatic oven light switch
Oven vent
Oval burner
Large burner
Knobs (5)
Anti-tip bracket
ENGLISH
Grates
Small burner
Extra large burner
Self clean latch
Rack
Upper oven door
Convection fan
Rack
NOTE
The model and serial tag is located behind the control panel.
Lower oven door
Page 13
12
HOW TO USE
HOW TO USE
Gas Surface Burners
Before use
Read all instructions before using.
Make sure that all burners are properly placed.
Make sure that all grates are properly placed before using the burner.
CAUTION
DO NOT
grate. The finish on the grate may chip without cookware to absorb the heat.
operate the burner for an extended period of time without cookware on the
Make sure that the burners and grates are cooled down before touching
them and also before placing any other object like a pot holder or a cleaning
cloth, etc.
Touching grates before cooling down may cause burns.
CAUTION
WHAT TO DO IF YOU SMELL GAS
1. Open windows.
2.
DO NOT
3.
DO NOT
4.
DO NOT
5. Immediately call your gas supplier from a neighbor’s phone.
Follow the gas supplier’s instructions.
6. If you cannot reach your gas supplier, call the fire department.
Electric spark igniters from the burners cause the clicking noise. All the spark igniters on the cooktop
will activate when igniting just one burner.
try to light any appliance.
touch any electrical switch.
use any phone in your building.
NOTE
Page 14
HOW TO USE
13
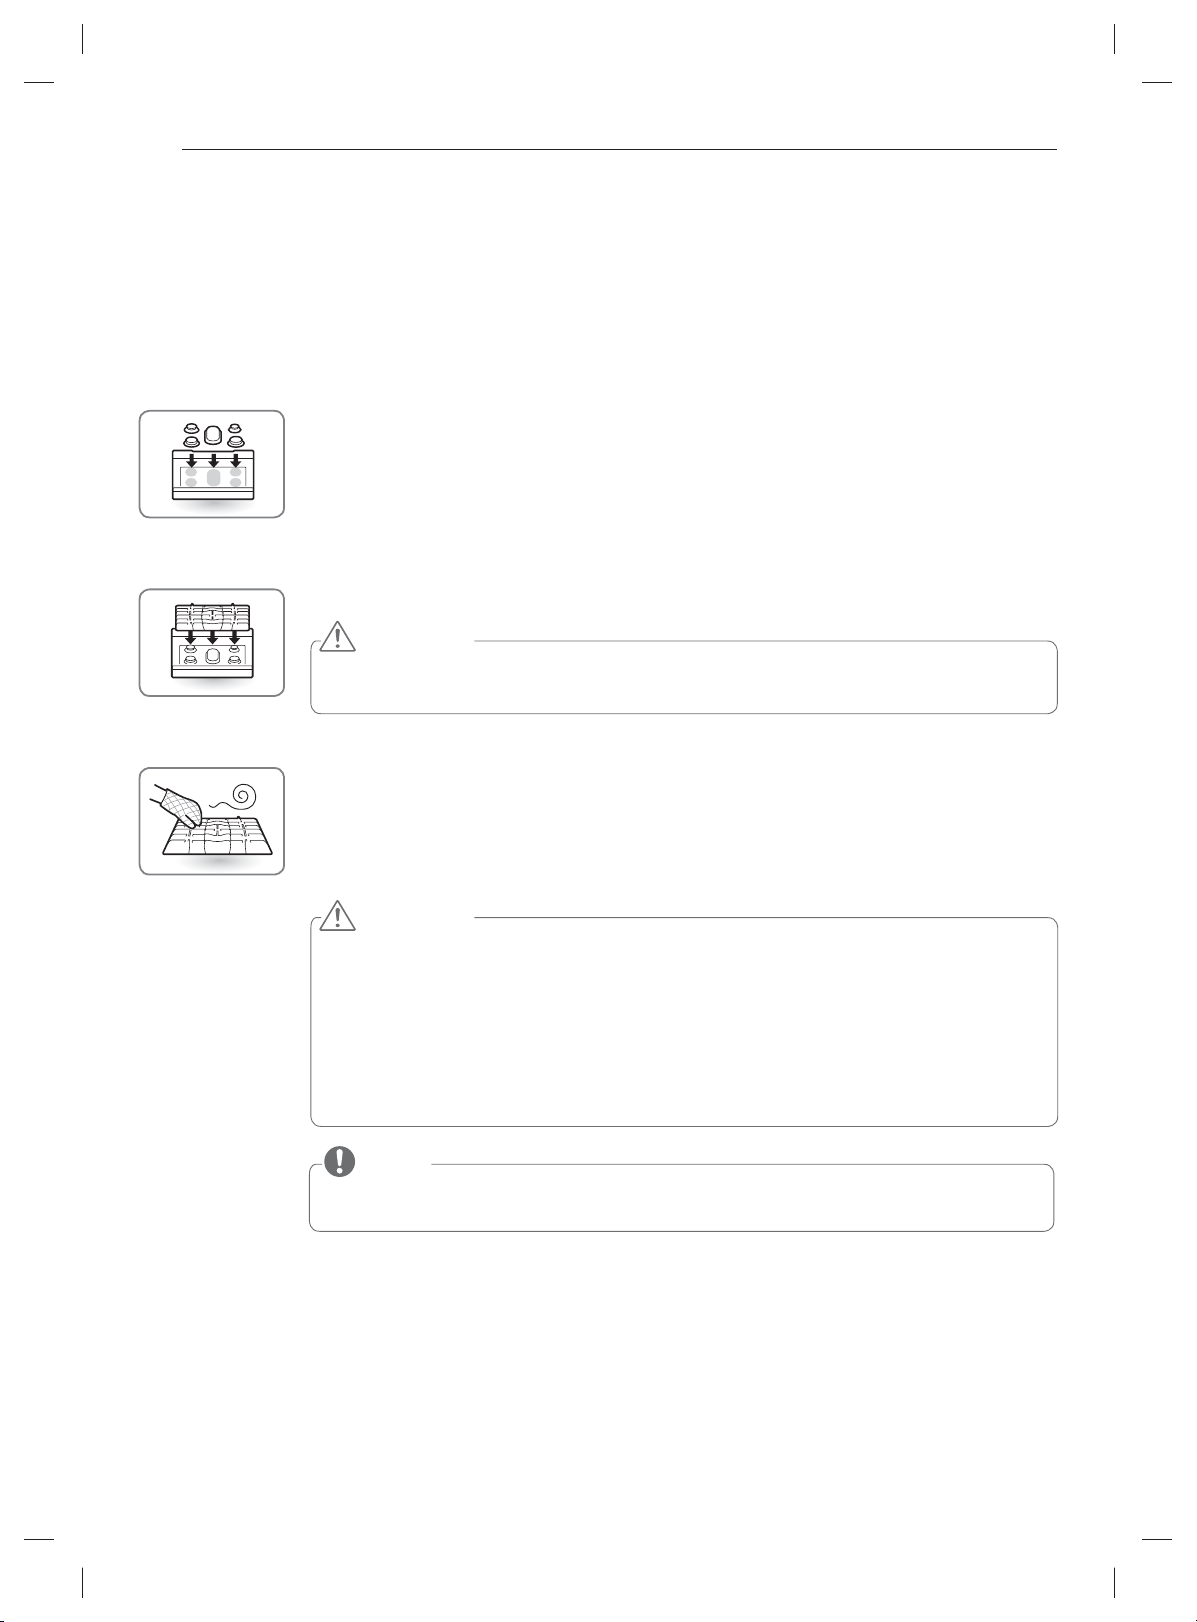
Gas burners
Your gas range cooktop has five sealed gas burners.
These can be assembled and separated. Follow the guide
below.
2
1
Medium and Large Burner
1
The medium and large burners are the primary burners
for most cooking. These general purpose burners can be
turned down from “v” to “w” to suit a wide range of
cooking needs.
Oval burner
2
The oval burner (center) is for use with a griddle or oval
pots.
3
Using the gas surface burners
Be sure that all of the surface burners are placed in the
1
correct positions.
Put the cookware on the burner. (Example: pot, frying
2
pan, etc.)
Push and turn the control knob to the “u” position.
3
ENGLISH
4
You will hear a clicking noise from the electric spark
ignition system.
Turn the control knob to control the flame size.
4
Small Burner
3
The smallest burner is used for delicate foods such as
sauces or foods that require low heat for a long cooking
time.
4
Extra large burner
The extra large burner is the maximum output burner. Like
the other four burners, it can be turned down from “
“w” for a wide range of cooking applications. This burner
is also designed to quickly bring large amounts of liquid to
a boil. It can be used with cookware 10 inches or larger in
diameter.
v
” to
Selecting the Flame Size
Watch the flame, not the knob, as you reduce heat. When
fast heating is desired, the flame size on a gas burner should
match the cookware that you are using.
CAUTION
DO NOT
burner while another burner is on. When turning a burner
to “u”, all the burners spark. An electric shock may result, which could cause you to knock over hot cookware.
attempt to disassemble or clean around any
CAUTION
let the flames extend up the sides of the cook-
NEVER
ware.
Page 15
14
HOW TO USE
In Case of Power Failure:
In case of a power failure, you can light the gas surface burners on your range with a match.
Surface burners in use when an electrical power failure
occurs will continue to operate normally.
Hold a lit match to the burner, then push in the control
1
knob.
Turn the control knob to the "Lo” position.
2
CAUTION
Use extreme caution when lighting burners with a match.
It can cause burn and damage.
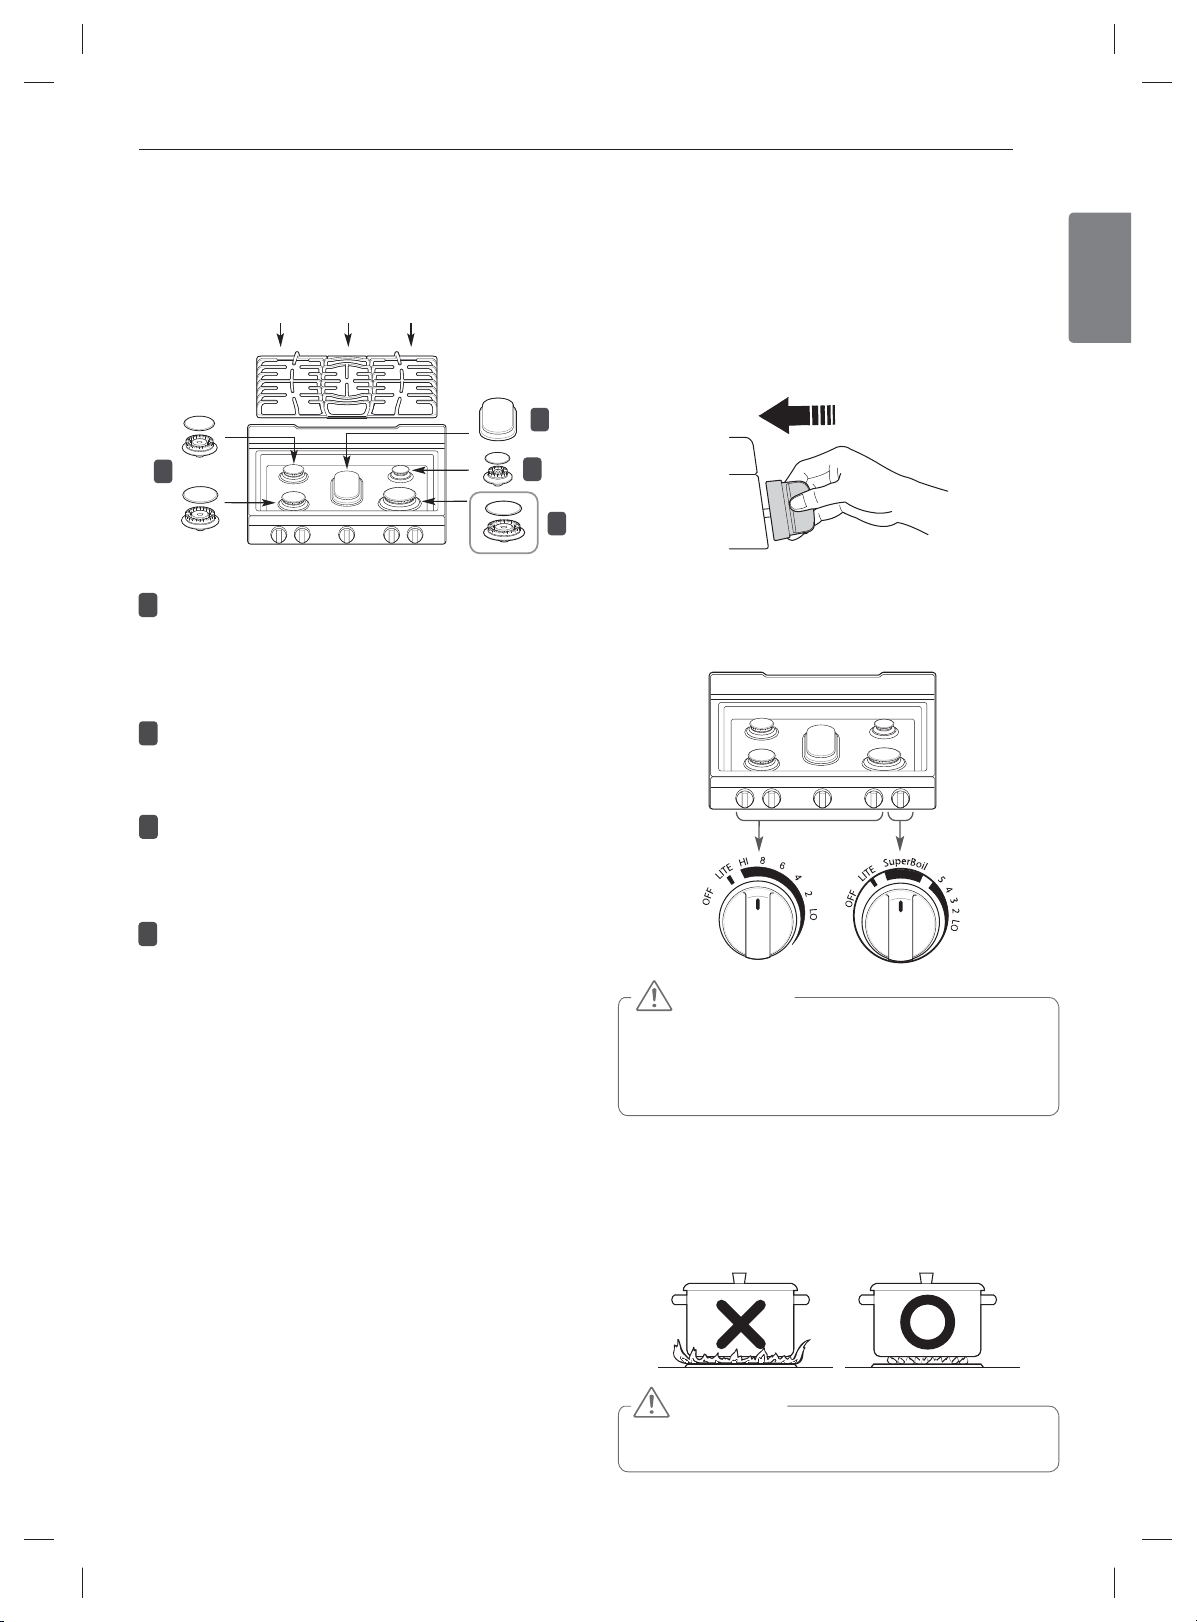
Top-of-range cookware
Aluminum
Cast-Iron
Medium-weight cookware is
recommended because it heats
quickly and evenly. Most foods
brown evenly in an aluminum
skillet. Use saucepans with tight
fitting lids when cooking with
minimum amounts of water.
If heated slowly, most skillets will
give satisfactory results.
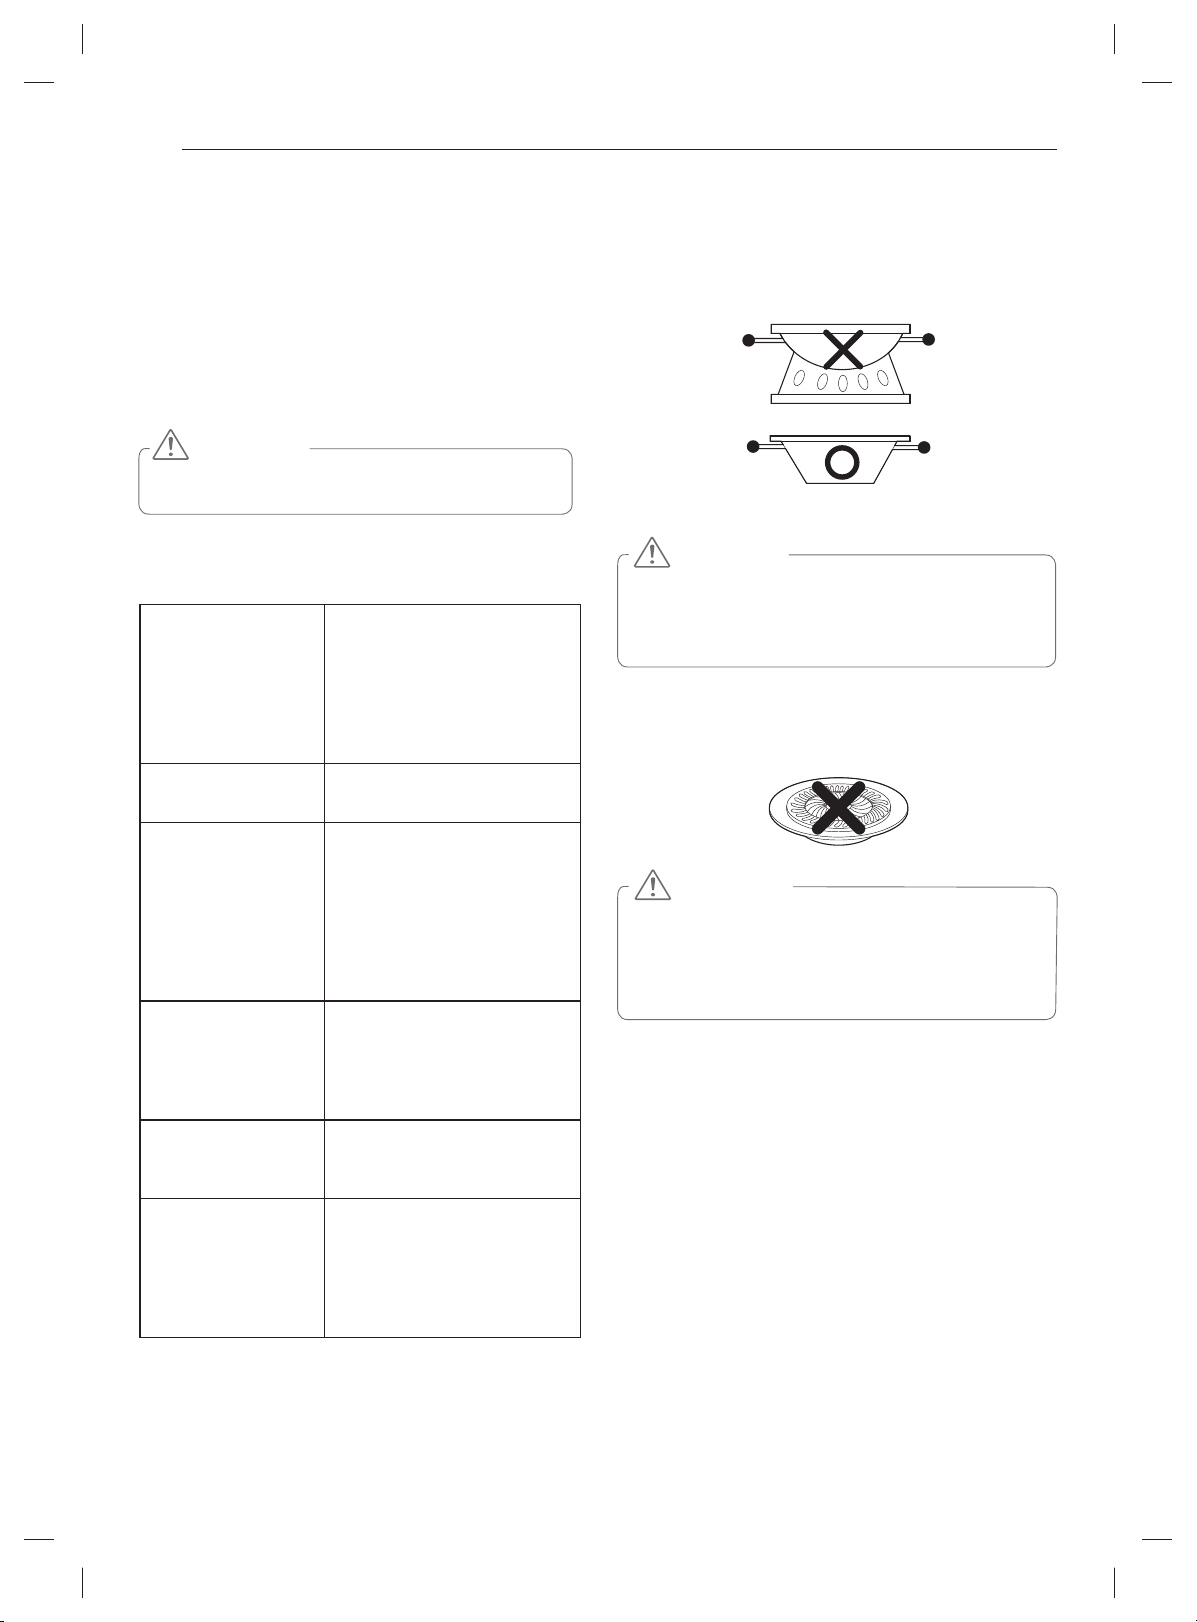
Using a Wok:
If using a wok, it is recommended that you use a 14-inch or
smaller flat-bottomed wok. Make sure that the wok bottom
sits flat on the grate.
Use a flat-bottomed wok.
CAUTION
DO NOT
burner or grate may cause the burner to work improperly, resulting in carbon monoxide levels above allowable
standards. This can be hazardous to your health.
use a wok support ring. Placing the ring over the
Using Stove-top Grills:
Do not place stove-top grills on the burner.
Stainless Steel
Enamelware
Glass
Heatproof Glass
Ceramic
This metal alone has poor
heating properties and is usually
combined with copper, aluminum
or other metals for improved heat
distribution. Combination metal
skillets work satisfactorily if they
are used with medium heat as the
manufacturer recommends.
Under some conditions, the
enamel of this cookware may melt.
Follow cookware manufacturer’s
recommendations for cooking
methods.
There are two types of glass
cookware - those for oven use only
and those for top-of-range cooking.
Can be used for either surface or
oven cooking. It conducts heat
very slowly and cools very slowly.
Check cookware manufacturer’s
directions to be sure it can be used
on gas ranges.
CAUTION
DO NOT
Using a stove top grill on the surface burner will cause
incomplete combustion and can result in exposure to
carbon monoxide levels above allowable current standards. This can be hazardous to your health.
use stove top grills on your surface burners.
Page 16
HOW TO USE
15
Using the Griddle
Your non-stick coated griddle provides an extra-large cooking
surface for meats, pancakes or other food usually prepared in
a frying pan or skillet.
NOTE
It is normal for the griddle to become discolored over
time.
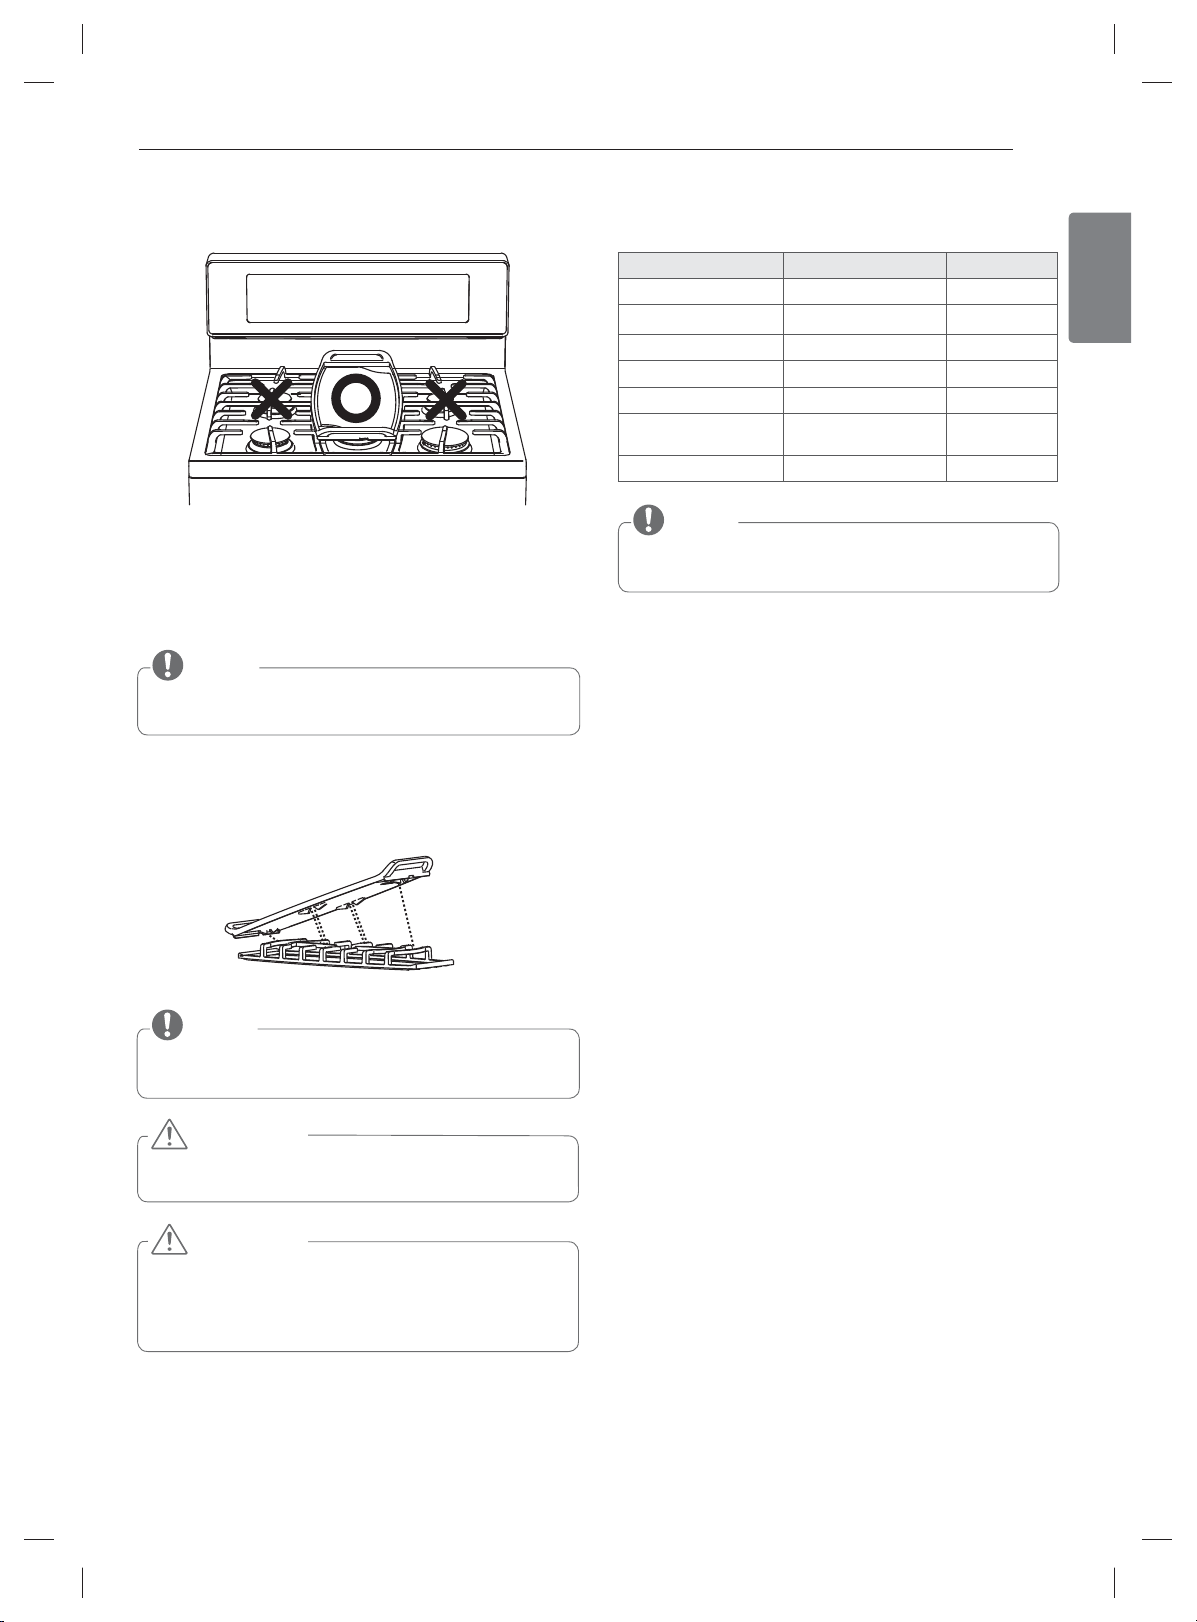
The griddle can only be used
How to Place the Griddle:
with the center burner. The griddle must be properly placed
on the center grate, as shown in the below illustration.
Preheat the griddle according to the guide below and
adjust for the desired setting.
Type of Food Preheat Conditions Cook Setting
Warming Tortillas none 5 (MED)
Pancakes HI 3 min. HI
Hamburgers HI 5 min. HI
Fried Eggs HI 5 min. HI
Bacon HI 3 min. HI
Breakfast Sausage
Links
Hot Sandwiches HI 4 min. HI
NOTE
Griddle settings may need to be adjusted if the griddle
is used for an extended time.
HI 5 min. HI
IMPORTANT NOTES:
• Avoid cooking extremely greasy foods, grease spill over can
occur.
• The griddle can become hot when surrounding burners are
in use.
• DO NOT overheat the griddle. This can damage the non
stick coating.
• DO NOT use metal utensils that can damage the griddle surface. Do not use the griddle as a cutting board.
• DO NOT place or store items on the griddle.
ENGLISH
Front
NOTE
DO NOT
griddle.
DO NOT
grates, surfaces and griddle plate are completely cooled.
The griddle plate on the cooktop may become very hot
when using the cooktop, oven or broiler systems.
Always use oven mitts when placing or removing the
griddle plate.
remove the center grate when using the
CAUTION
remove the griddle plate until the cooktop
CAUTION
Page 17
16
HOW TO USE
How to Use the Oven
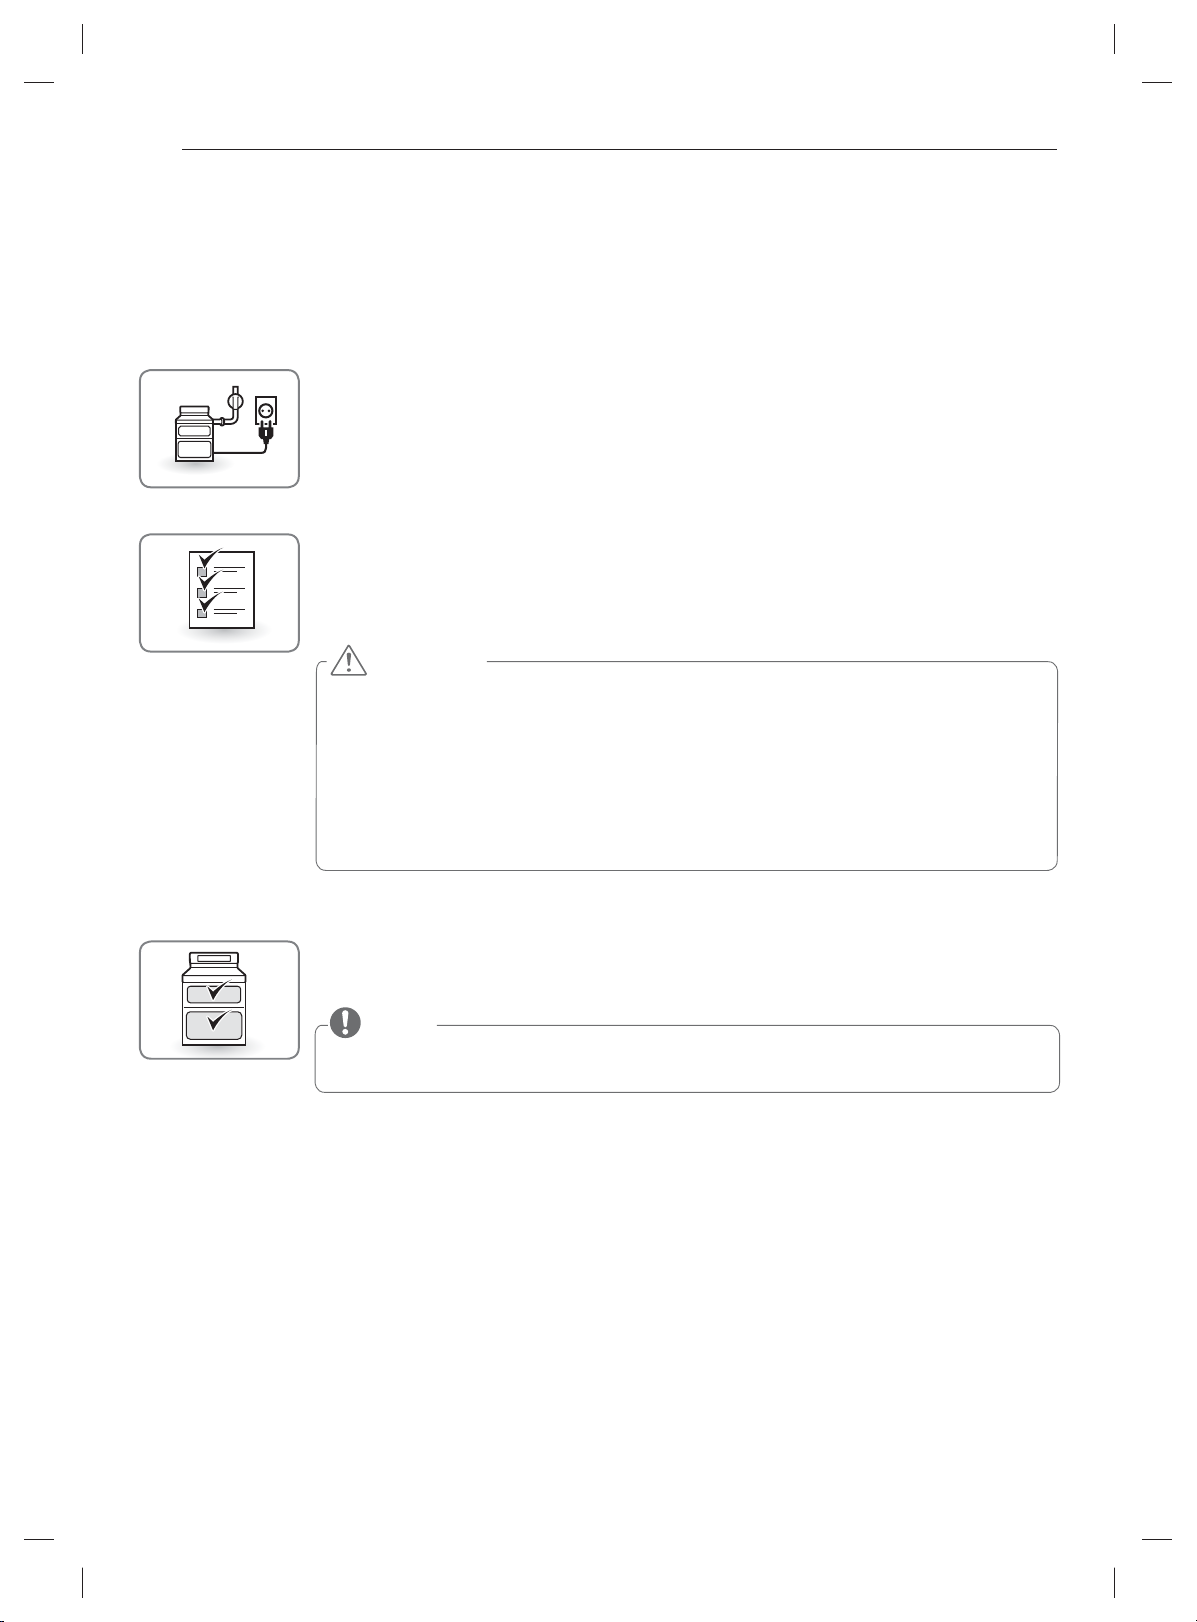
Before use
Read all instructions before using.
Make sure the electrical power cord and the gas valve are properly
connected.
Check it for safety.
Check the correct use of the range depending on the type of food you will
cook.
Make sure you know how to use the oven (temperature setting, time setting and recipe) for
best results.
CAUTION
WHAT TO DO IF YOU SMELL GAS
1. Open windows.
2.
DO NOT
3.
DO NOT
4.
DO NOT
5. Immediately call your gas supplier from a neighbor’s phone.
Follow the gas supplier’s instructions.
6. If you cannot reach your gas supplier, call the fire department.
try to light any appliance.
touch any electrical switch.
use any phone in your building.
Choose the upper or lower oven for proper cooking.
Use the upper oven to cook a small amount of food.
NOTE
When using an oven thermometer in the oven cavity, temperatures may differ from the actual set oven
temperature with all mode.
Page 18
HOW TO USE
17
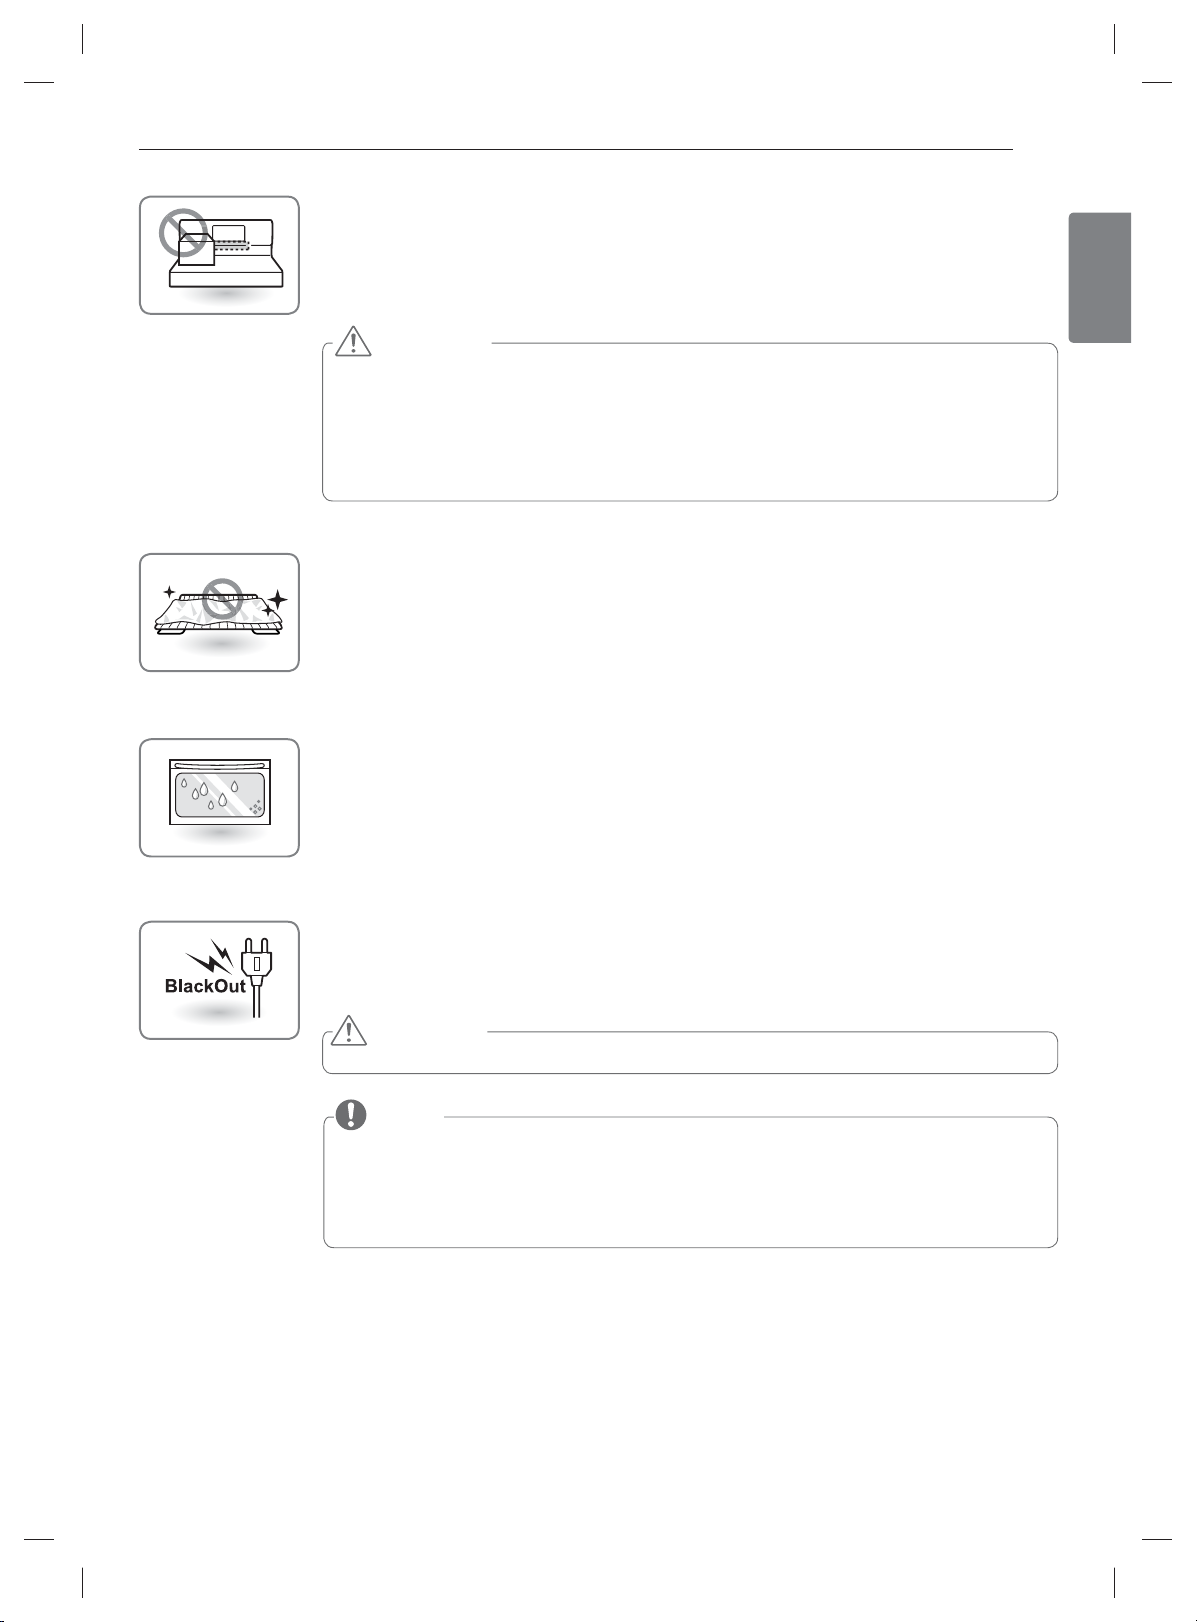
Do not block, touch or place items around the oven vent during
cooking.
Your oven is vented through ducts at the center above the burner grate. Do not block the oven vent
when cooking to allow for proper air flow. Do not touch vent openings or nearby surfaces during the
use of any cooking operation.
CAUTION
DO NOT
close to the vent.
DO NOT
crease, which may cause them to burst.
Metal items will become very hot if they are left on the cooktop, and could cause burns.
Handles of pots and pans on the cooktop may become hot if left too close to the vent.
place plastic or flammable items on the cooktop—they may melt or ignite if left too
place closed containers on the cooktop. The pressure in closed containers may in-
Do not cover rack or bottom with aluminum foil.
As your oven heats up, the temperature increase of the air in the oven
may cause water drops to occur on the door glass.
These water drops are harmless and will evaporate as the oven continues to heat up.
ENGLISH
In case of power failure, do not use the oven.
The oven and broiler can not be used during a power outage. If the oven is in use when a power failure
occurs, the oven burner shuts off and cannot be re-lit until power is restored. Once power is restored,
you will need to reset the oven (or broil function).
CAUTION
DO NOT
PF(Power Failure) / Flashing time
Depending on the model of your range, the display will either show “PF” or a flashing clock. This
means that the product has just been plugged in, or that it has experienced a power interruption.
To clear the “PF” message, press the “Clear/Off” key on the oven controls. If your oven displays a
flashing clock, then press the “Clock” key and reset the time, or press any key to stop flashing.
attempt to operate the electric ignition during an electrical power failure.
NOTE
Page 19
18
HOW TO USE
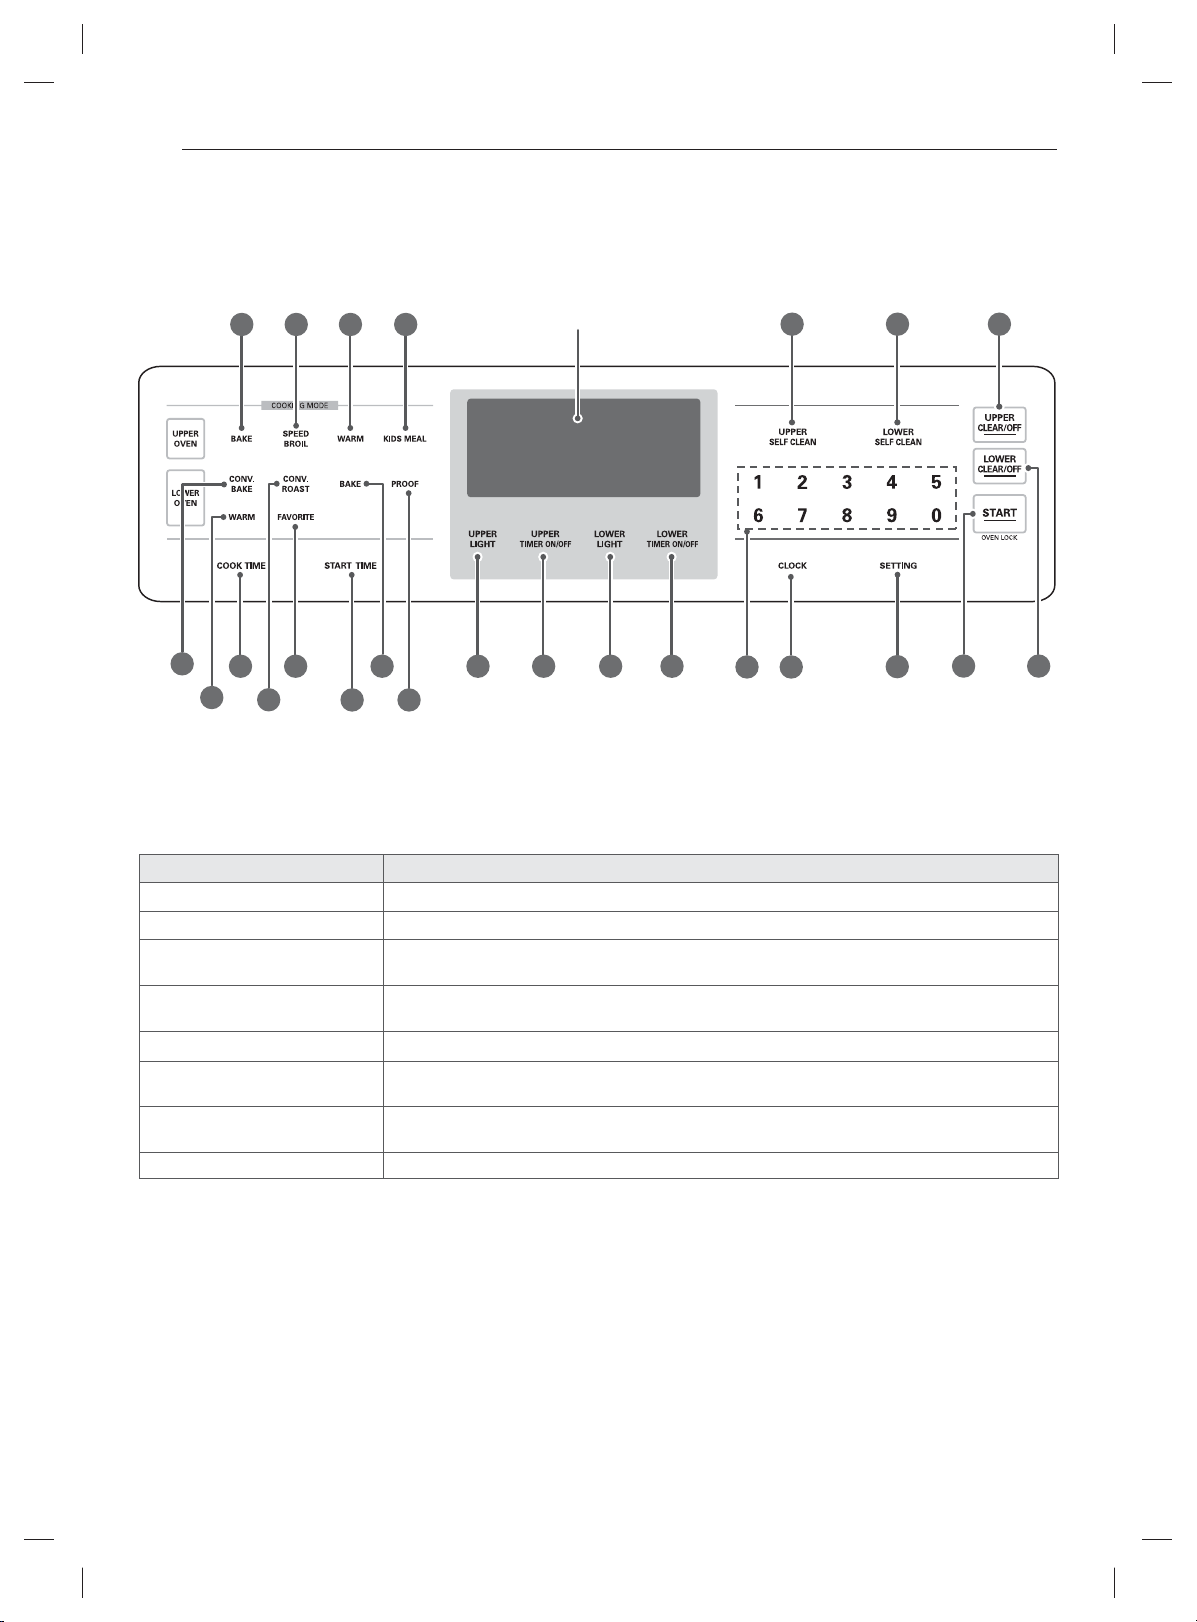
Using the Control Panel
6
Display
15
16
21
32
1 3 42
9
13
10
11
12
5192014
Upper Oven:
Name Description
BAKE Traditional bake function. Refer to “BAKE” in the How To Use section.
1
SPEED BROIL Infrared broil function. Refer to “SPEED BROIL” in the How To Use section.
2
WARM
3
KIDS MEAL
4
UPPER LIGHT Turns on/off the upper oven light.
5
UPPER TIMER ON/OFF
6
UPPER SELF CLEAN
7
UPPER CLEAR/OFF Stops cooking or cancels the setting in the UPPER OVEN.
8
Warms food in the oven.
Refer to “WARM” in the How To Use section.
Use it cook KIDS MEAL such as frozen pizza and chicken nuggets.
Refer to "KIDS MEAL" in the How To Use section.
Sets, starts or cancels the timer function of the UPPER OVEN.
Refer to “How to use the timer” in the How To Use section.
Cleans the inside of the UPPER OVEN automatically.
Refer to “SELF CLEAN” in the How To Use section.
22
24
87 17
18
Page 20
HOW TO USE
19
Using the Control Panel (continued)
Lower Oven:
Name Description
CONV.BAKE
9
CONV.ROAST
-
BAKE Traditional bake function. Refer to “BAKE” in the How To Use section.
q
PROOF To proof bread dough. Refer to “PROOF” in the How To Use section.
w
WARM
e
FAVORITE Use it to store 3 favorite types of food. Refer to "WARM" in the How To Use section.
r
LOWER LIGHT Turns on/off the lower oven light.
t
LOWER TIMER ON/OFF
y
LOWER SELF CLEAN Cleans the inside of the LOWER OVEN automatically.
u
LOWER CLEAR/OFF Stops cooking or cancels the setting in the LOWER OVEN.
i
To use the Convection Baking function, Refer to "CONVECTION BAKE" in the How To Use
section.
To use the Convection Roast function, Refer to "CONVECTION ROAST" in the How To Use
section.
Warms food in the oven.
Refer to “WARM” in the How To Use section.
Sets, starts or cancels the timer function of the LOWER OVEN.
Refer to “How to use the timer” in the How To Use section.
ENGLISH
Common Functions:
Name Description
COOK TIME Sets the cooktime length. It is automatically turned off if the desired cook time is reached.
o
START TIME Sets the desired cooking start time. The oven automatically starts cooking at the set time.
p
CLOCK
a
SETTING Sets various functions.
s
NUMBER KEY Use to set the time, timer, temperature and all times.
d
START (CONTROL LOCK)
f
Sets the time of the day.
Refer to “How to set the clock” in the Operating Instructions section.
Starts all functions except for the timer. To activate OVEN LOCK, press and hold for three
seconds.
Page 21
20
HOW TO USE
Operating Instructions
The setting value can be changed by pressing the “ ”
key.
The items are different from each model. Refer to “Setting
item chart”
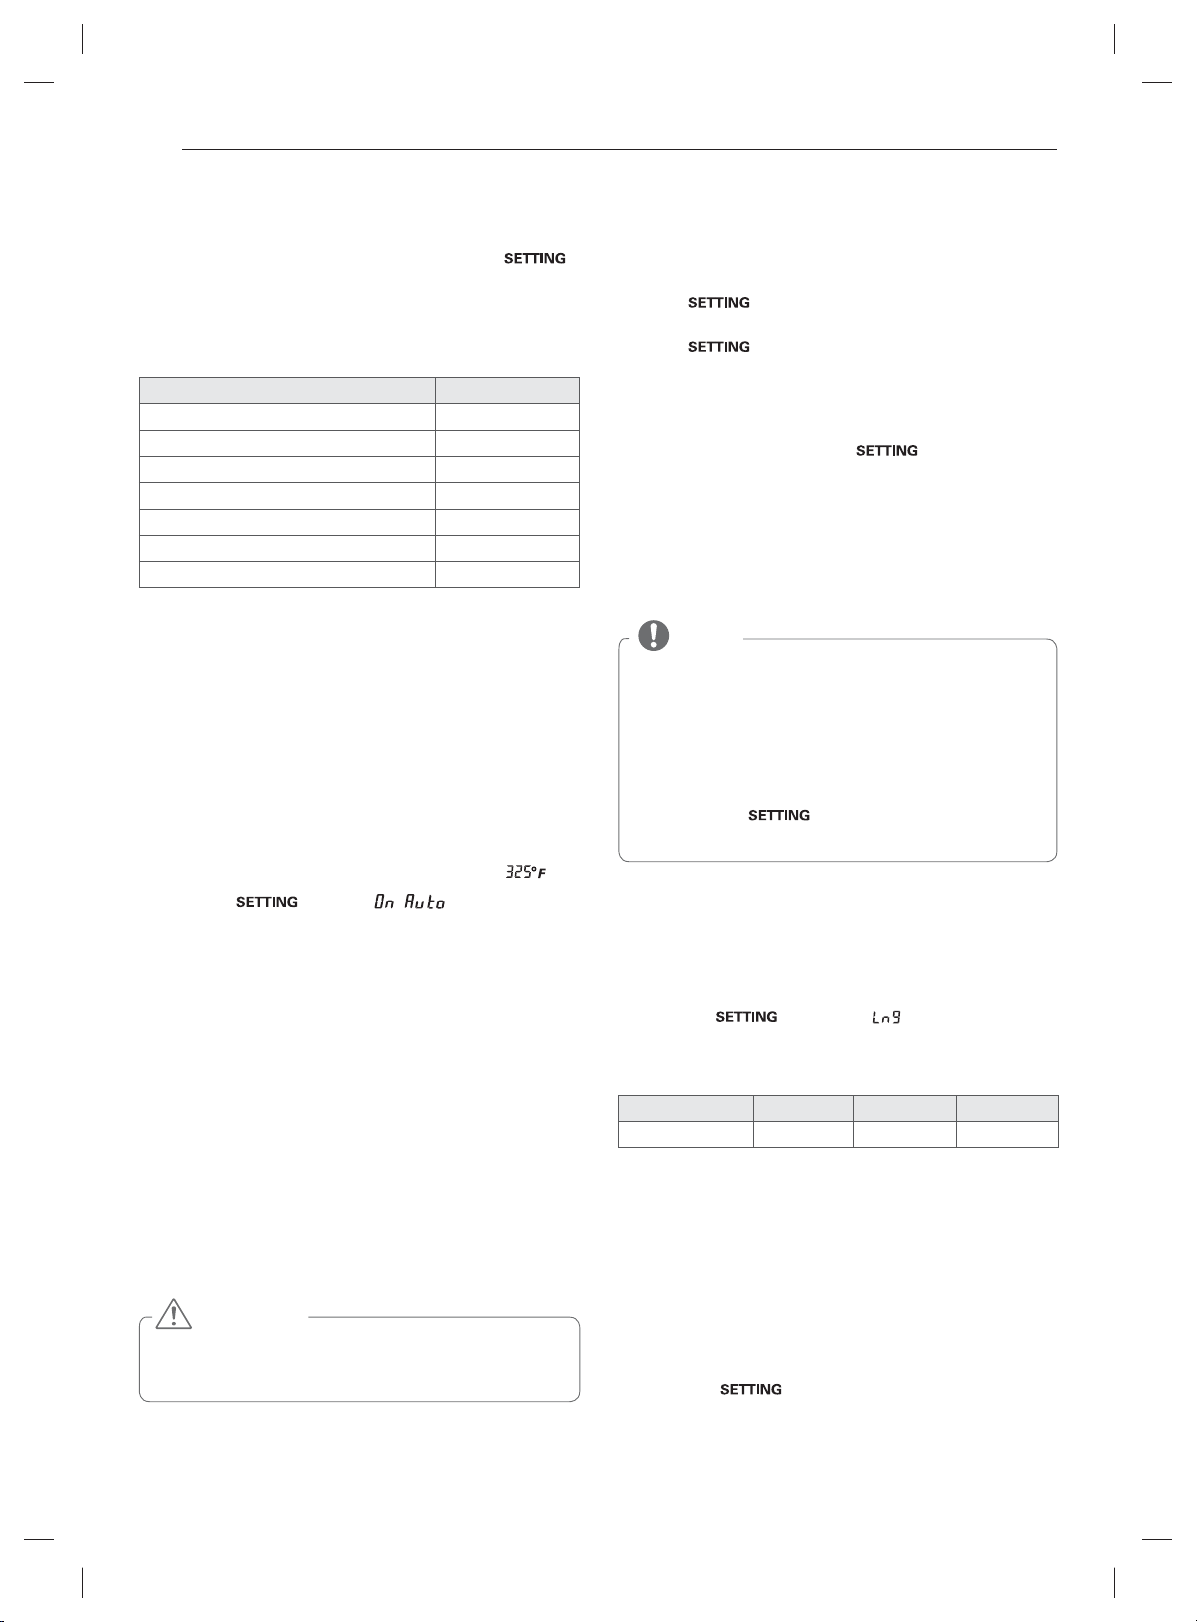
SETTING ITEM CHART
Operating Instruction LDG3017ST
Convection Auto Conversion Once
Temperature Setting (Lower oven) Twice
Temperature Setting (Upper oven) Three times
Language Four times
Preheating Alarm light On/off Five times
Beeper Volume Six times
Fahrenheit or Celsius Seven times
How to set the convection auto
conversion function for the lower
oven
When using convection bake and roast, the convection auto
conversion feature will automatically convert entered regular
baking temperatures to convection baking temperatures.
This feature is activated so that the display will show the
actual converted temperature. For example, if you enter a
regular recipe temperature of 350°F and touch the q key,
the display will show the converted temperature of .
Press the key once. will appear in the
1
display.
Press 1 for auto conversion On, or press 2 for auto conver-
2
sion Off.
Press the q Key to accept the change.
3
Determine which oven you would like to adjust (upper or
1
lower).
Press key 2 times for the lower oven, e will
2
appear in the display.
Press key 3 times for the upper oven, f will
will appear in the display.
Using the number keys, enter the amount of degrees that
3
you wish to adjust the oven up or down. To adjust the
temperature down, press the key after keying in
the numbers.
To adjust the oven temperature up 15 degrees, press
To Adjust the oven temperature
5, X
Press the q key to accept the change.
4
NOTE
This adjustment will not affect the broiling or the Self
Clean temperatures. The adjustment will be retained in
memory after a power failure. The oven temperature
can be increased (+) or decreased (-) as much as 35°F or
19°C.
To decrease or increase temperature during cooking
1. Using the number keys, enter the new temperature.
2. Press the key once.
3. Press the q key to accept the choice.
Example:
15 degrees, press 1,
down
How to select language
The default language of the oven's display is English. It can
be changed to Spanish or French.
Press the key 4 times. (Language) will
1
display.
1, 5
.
How to adjust the temperature
settings:
You may find that your new oven cooks differently than the
one it replaced. Use your new oven for a few weeks to become more familiar with it before changing the temperature
settings. After familiarizing yourself with the new oven, and
you still think that it is too hot or too cold, you can adjust the
thermostat yourself.
CAUTION
DO NOT
grocery stores, to check the temperature setting of your
oven. These thermometers may vary 20–40 degrees.
use thermometers, such as those found in
Press the number key to select language.
2
Languages English Spanish French
Number key 1 2 3
Press the q key to accept the change.
3
How to Set Preheating Alarm Light On/
Off
When the oven reaches its set-temperature, the preheating
alarm ligth will flash until the oven door is opened. You can
activate or deactivate the preheating alarm light.
Press the key 5 times. s will display.
1
Press the number 1 key to select On, or press 2 to select
2
Off.
Press the q key to accept the change.
3
Page 22
HOW TO USE
21
How to turn the interior oven light on/
off:
The interior oven light automatically turns on when the oven
door is opened. Press the M or the Q key to turn the
oven lights on or off.
How to Adjust the Beeper Volume:
Press the key 6 times. j will display.
1
Select 1 for loud, 2 for normal, 3 for low and 4 for mute.
2
Press the q key to accept the change.
3
How to select Fahrenheit or Celsius
The oven temperature settings can either be set to
Fahrenheit or Celsius. The oven defaults to Fahrenheit unless
changed by the user.
Press the key 7 times. i will display
1
Press the number 1 key to select Fahrenheit, or press 2 to
2
select Celsius.
Press the q key to accept the change.
3
.
How to Set the Clock Time:
The clock must be set to the correct time of the day in order
to the automatic oven timing functions work properly.
Press the
1
Press the number keys to select the desired time.
2
Example
Press the q key to accept the change.
3
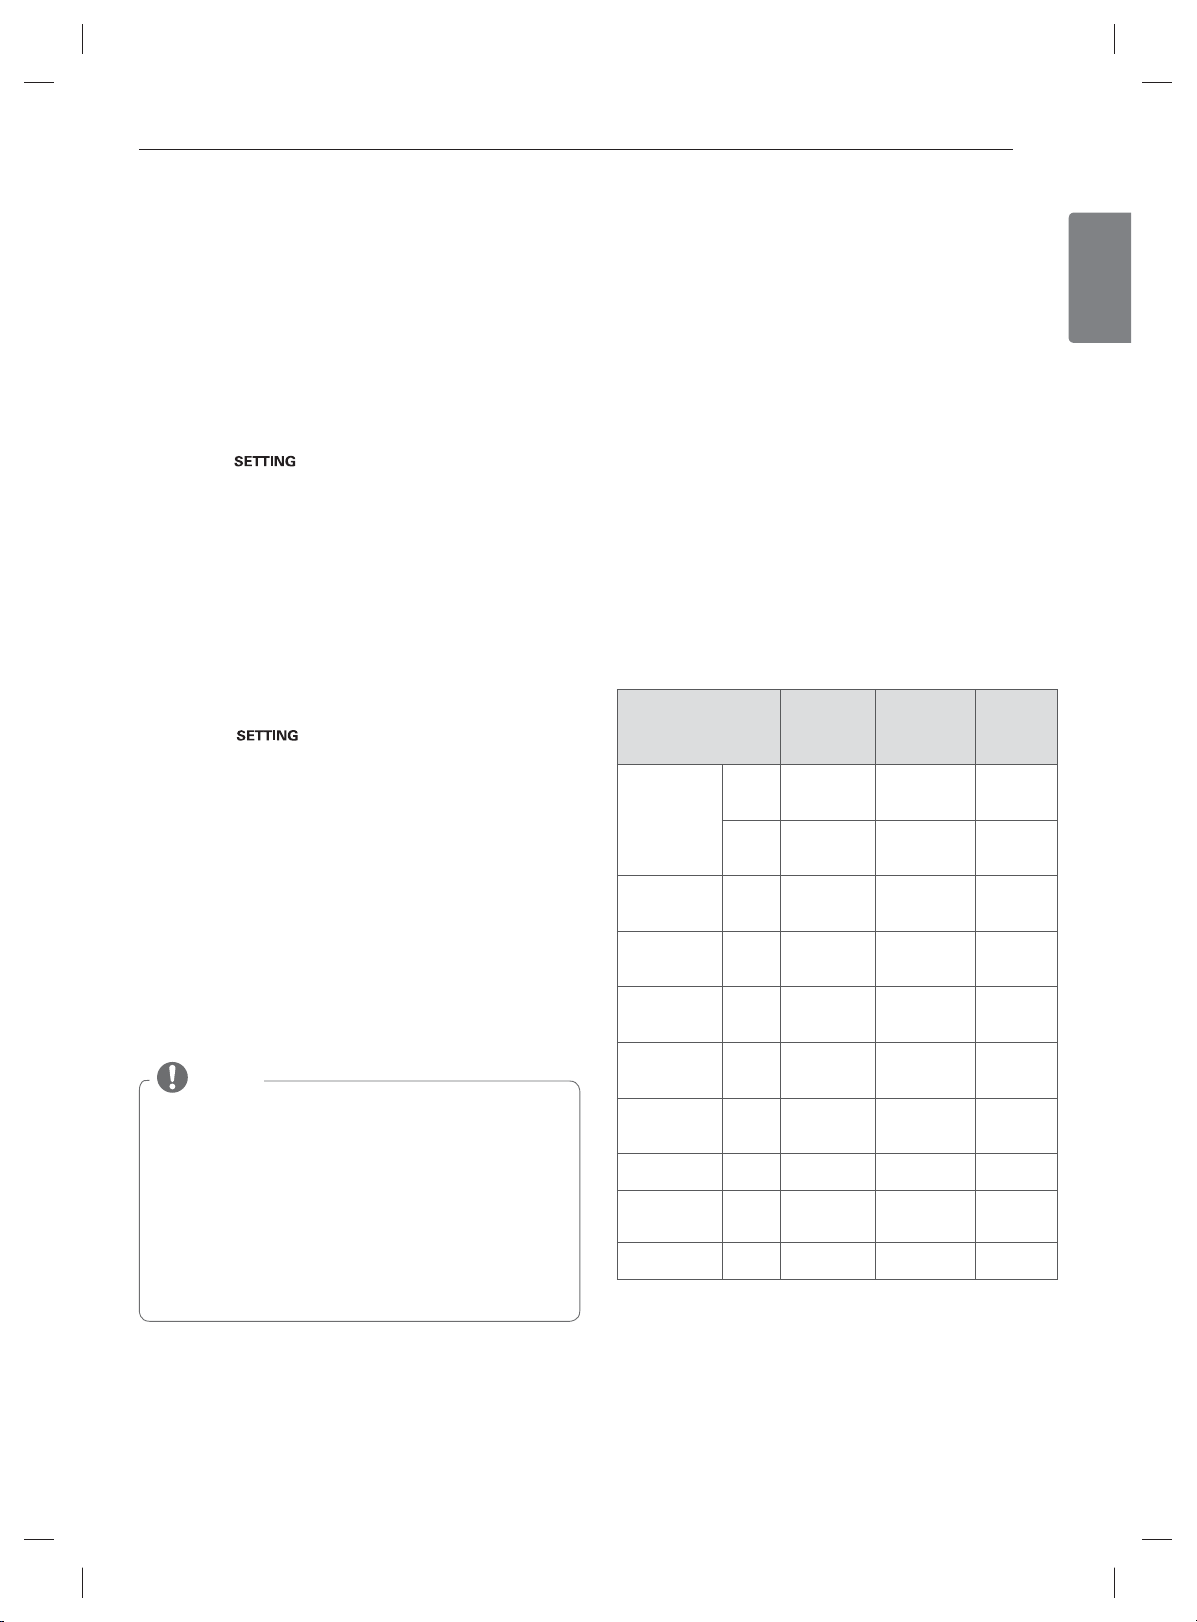
Minimum & Maximum default settings:
All of the features listed have a minimum and a maximum
time or temperature setting that may be entered into the
control. An entry acceptance beep will sound each time a
control key is pressed.
An entry error tone (two short tones) will sound if the entry of
the temperature or time is below the minimum or above the
maximum setting for the feature.
CLOCK
U
key once.
: To set
FEATURE MIN.
t
in that order.
12 Hr.
24 Hr.
, press the number keys 1, 2, 3 and 4
TEMP. /
TIME
1:00 Hr. /
Min.
0:00 Hr. /
Min.
MAX.
TEMP. /
TIME
11:59 Hr. /
Min.
23:59 Hr. /
Min.
DEFAULT
ENGLISH
How to Set the Clock (12 or 24 hour):
Hold the
1
Press 1 for 12 hour clock, or press 2 for 24 hour clock.
2
Press the q key.
3
The time of the day cannot be changed during a timed
baking or Self Clean cycle.
To check the time of the day when the display is show-
ing other information, simply press the
If the number keys are not pressed within 30 seconds
after you press the
original setting. If this happens, press the
and reenter the time of the day.
If the display time is blinking, you may have
experienced a power failure. Reset the time.
U
NOTE
button for 3 seconds.
U
key, the display reverts to the
U
U
key.
key
COOK TIME
/TIMER
CONV. BAKE
CONV.
ROAST
SPEED
BROIL
BAKE
PROOF
WARM
SELF CLEAN
0:01 Min.
300°F/
149°C
300°F/
149°C
Lo 250°F/
121°C
170°F /
77°C
2 Hr. 4 Hr. 3 Hr.
11:59 Hr. /
Min.
550°F /
288°C
550°F /
288°C
Hi 500°F/
260°C
550°F /
288°C
170°F/77°C,
3 hours
325°F/
163°C
325°F/
163°C
High
350°F/
177°C
12 Hr.
3 Hr
Page 23
22
HOW TO USE
How to Use the Timer
The upper or lower TIMER ON/OFF serves as an extra timer
in the kitchen that will sound when the set time has run out.
It does not start or stop cooking.
The upper or lower TIMER ON/OFF feature can be used during any of the other oven control functions. The upper and
lower TIMER can be operated independently of each other.
To set minutes and seconds:
1
Press the
To set hours and minutes:
Press the
Use the number keys to set the timer.
2
For Example, to set 5 minutes:
a) Press
g will appear in the display.
b) Press
To start the timer, press
3
The time will count down and show in the display.
To cancel the timer before the set time has elapsed, press
P
would like to cancel).
P
or
P
or
P
5
in the number key.
h
will appear in the display.
T
or
T
or
(depending on which oven timer you
T
T
P
key once.
key twice.
key twice.
T
or
key once.
How to Use the Oven Lockout Feature
The oven lockout feature automatically locks the oven door
and prevents most oven controls from being turned on. It
does not disable the clock, timer or the interior oven light.
Press and hold the q key for three seconds.
1
Lock A melody will sound, will appear & m
will flicker in the display. Once the oven door is locked the
oven lockout indicator will stop flashing and will remain
on.
To deactivate the lockout feature, press and hold the q
2
key for three seconds. will be displayed and m
will flash until it is completely unlocked.
NOTE
If the lockout feature is activated with either of the
doors open, the doors will not close completely until
the Lockout feature is deactivated.
NOTE
P
If
return to the time of day.
When the time is up, k will appear on the display and
4
a tone will sound. The tone will sound every 15 seconds
P
until
or
or
T
is not pressed, the timer will
T
is pressed.
NOTE
If the remaining time is not in the display, recall the
remaining time by pressing the
P
or
T
.
Page 24
HOW TO USE
23
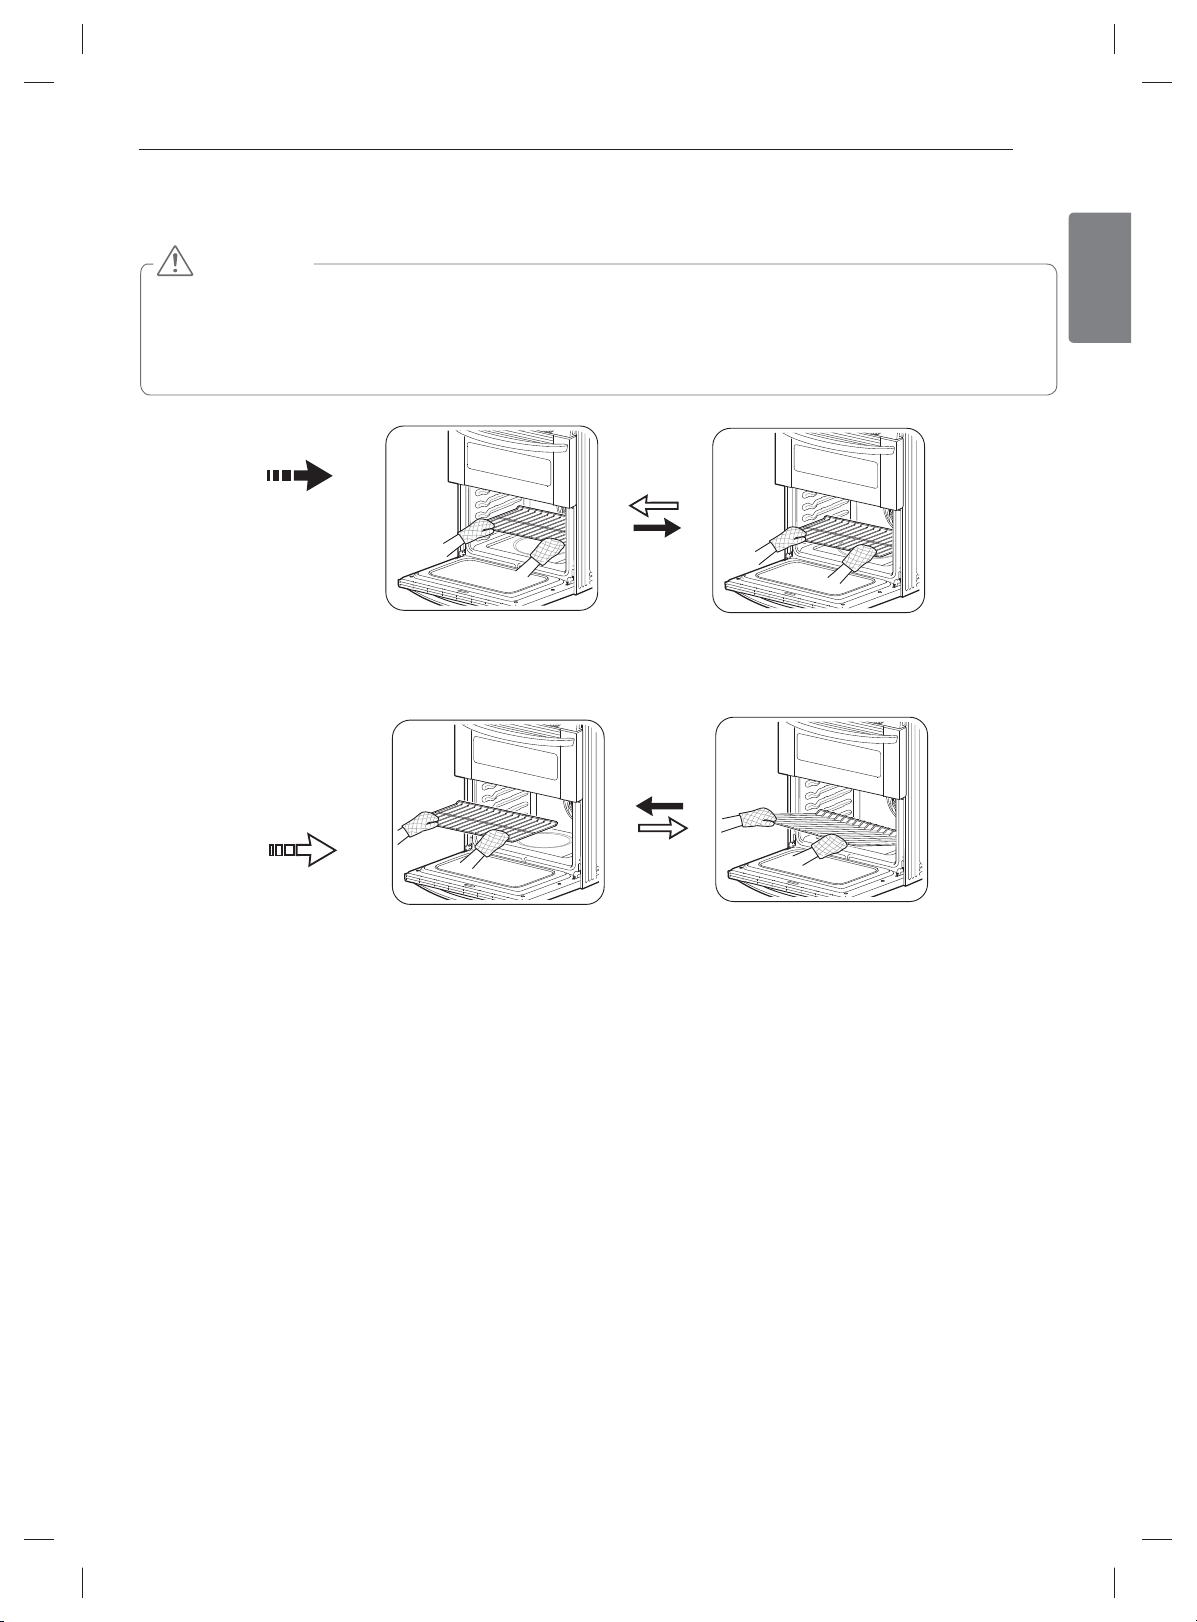
Removing and Replacing the Oven Racks
CAUTION
Replace the oven rack before turning the oven on to prevent burns.
When removing the oven racks, grab at the handles and pull out. Always wear oven mitts to prevent burns.
Only arrange oven racks when the oven is cool.
cover the rack with aluminum foil, or any other material, or place anything on the bottom of the oven.
DO NOT
Doing so will result in poor baking and may damage the oven bottom.
Remove
ENGLISH
Replace
To Remove Racks
While wearing oven mitts, grasp the oven rack.
1
Pull the rack straight out until it stops.
2
Lift up the front of the rack.
3
Pull out the rack.
4
*You can also adjust the racks position before using the oven.
To Replace Racks
While wearing oven mitts, place the end of the rack on the
1
support.
Tilt the front end of the rack up.
2
Push the rack in.
3
Check that the rack is properly in place.
4
Page 25
24
HOW TO USE
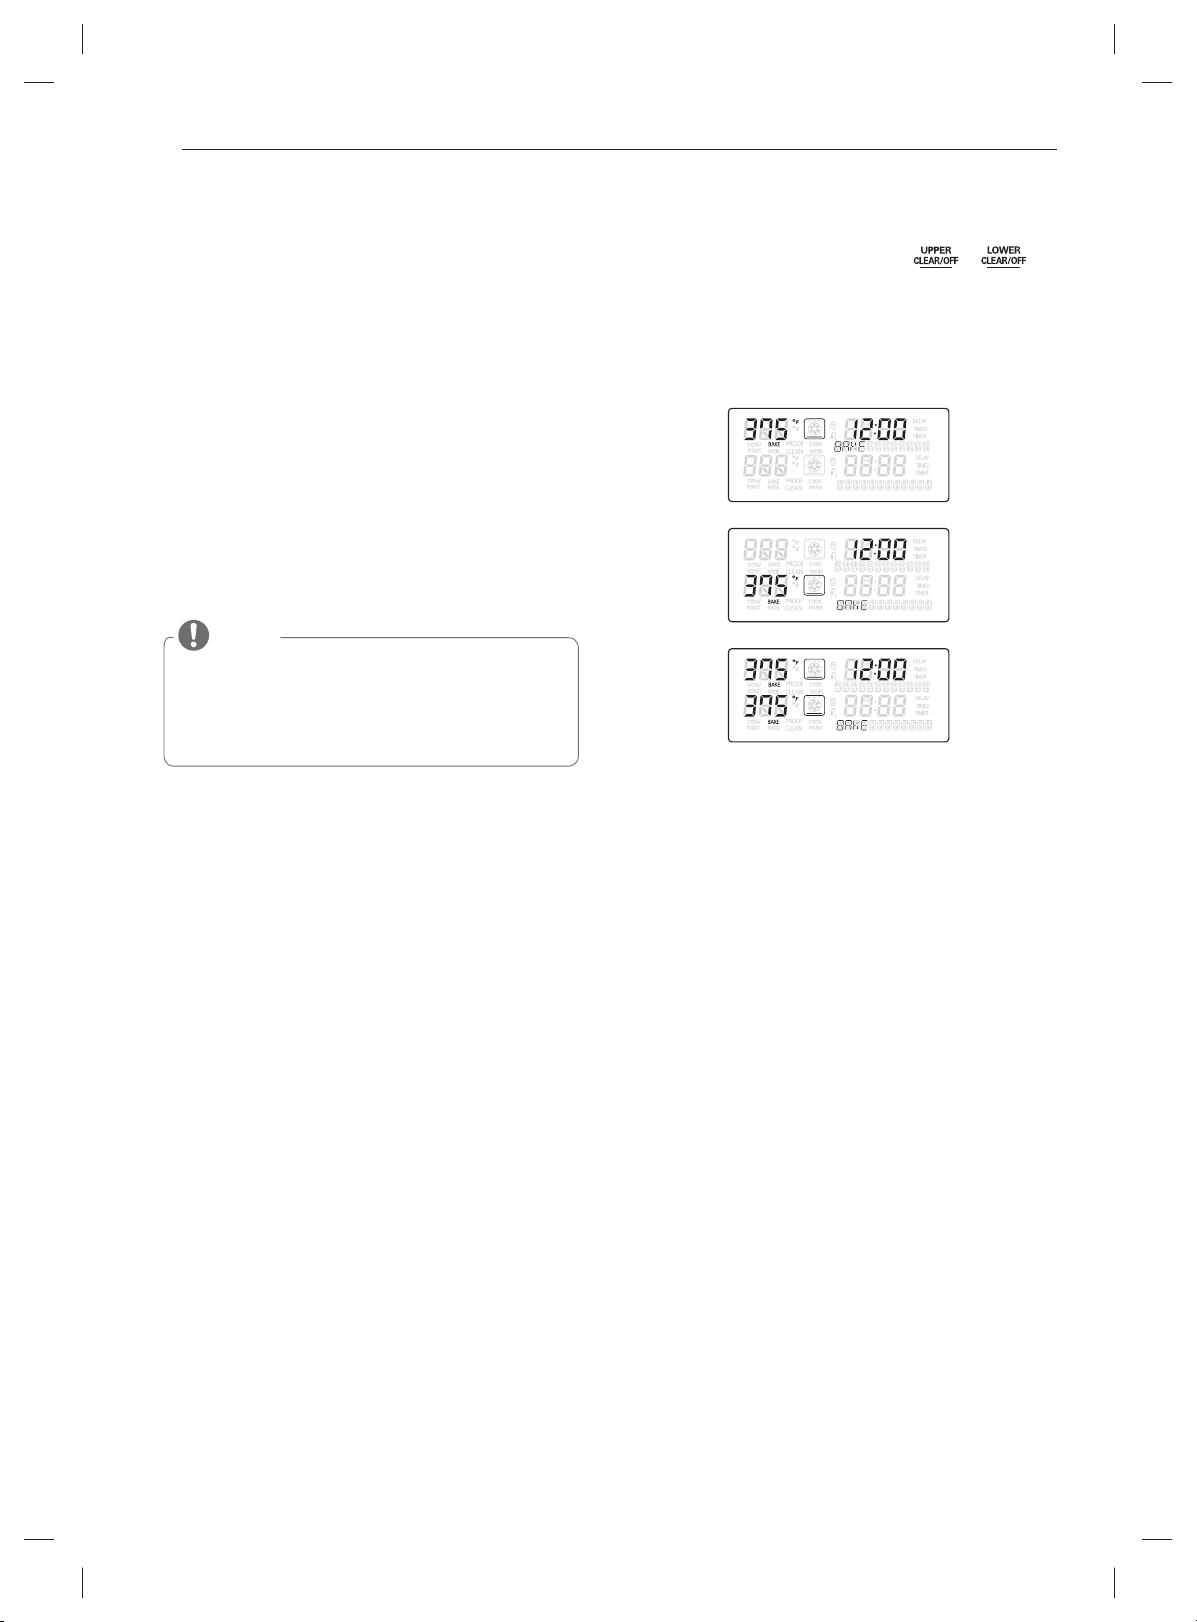
BAKE (Upper & Lower Oven)
A
is used to prepare foods such as pastries, breads, casseroles and roasts. The oven can be programmed to bake at any
temperature from 170°F (77°C) to 550°F (288°C). The default
temperature is 350°F (177°C).
To set the oven to BAKE (example to 375°F):
Press the upper or lower oven A key.
1
Set the oven temperature using the number keys
2
(ex: press 3, 7, 5).
Press the q key.
3
As the oven preheats, the temperature is displayed and
rises in 5 degree increments. Once the oven reaches the
desired temperature, a tone will sound and the oven light
will blink on and off.
When cooking is complete, press the or
4
key.
Remove the food from the oven.
5
BAKE mode display (Example)
Upper oven only
NOTE
Preheating is necessary for better cooking results.
Place the food in the oven after
preheating.
You may also change the temperature while cook-
ing by following steps 1-3.
Lower oven only
Upper & Lower oven at the same time
Page 26
HOW TO USE
25
Preheating and Pan Placement
To preheat, set the oven at the required recipe tempera-
ture. Wait until the oven reaches its set temperature
before placing the food in the oven. Preheating is necessary for satisfactory results when baking cakes, cookies,
pastries and breads.
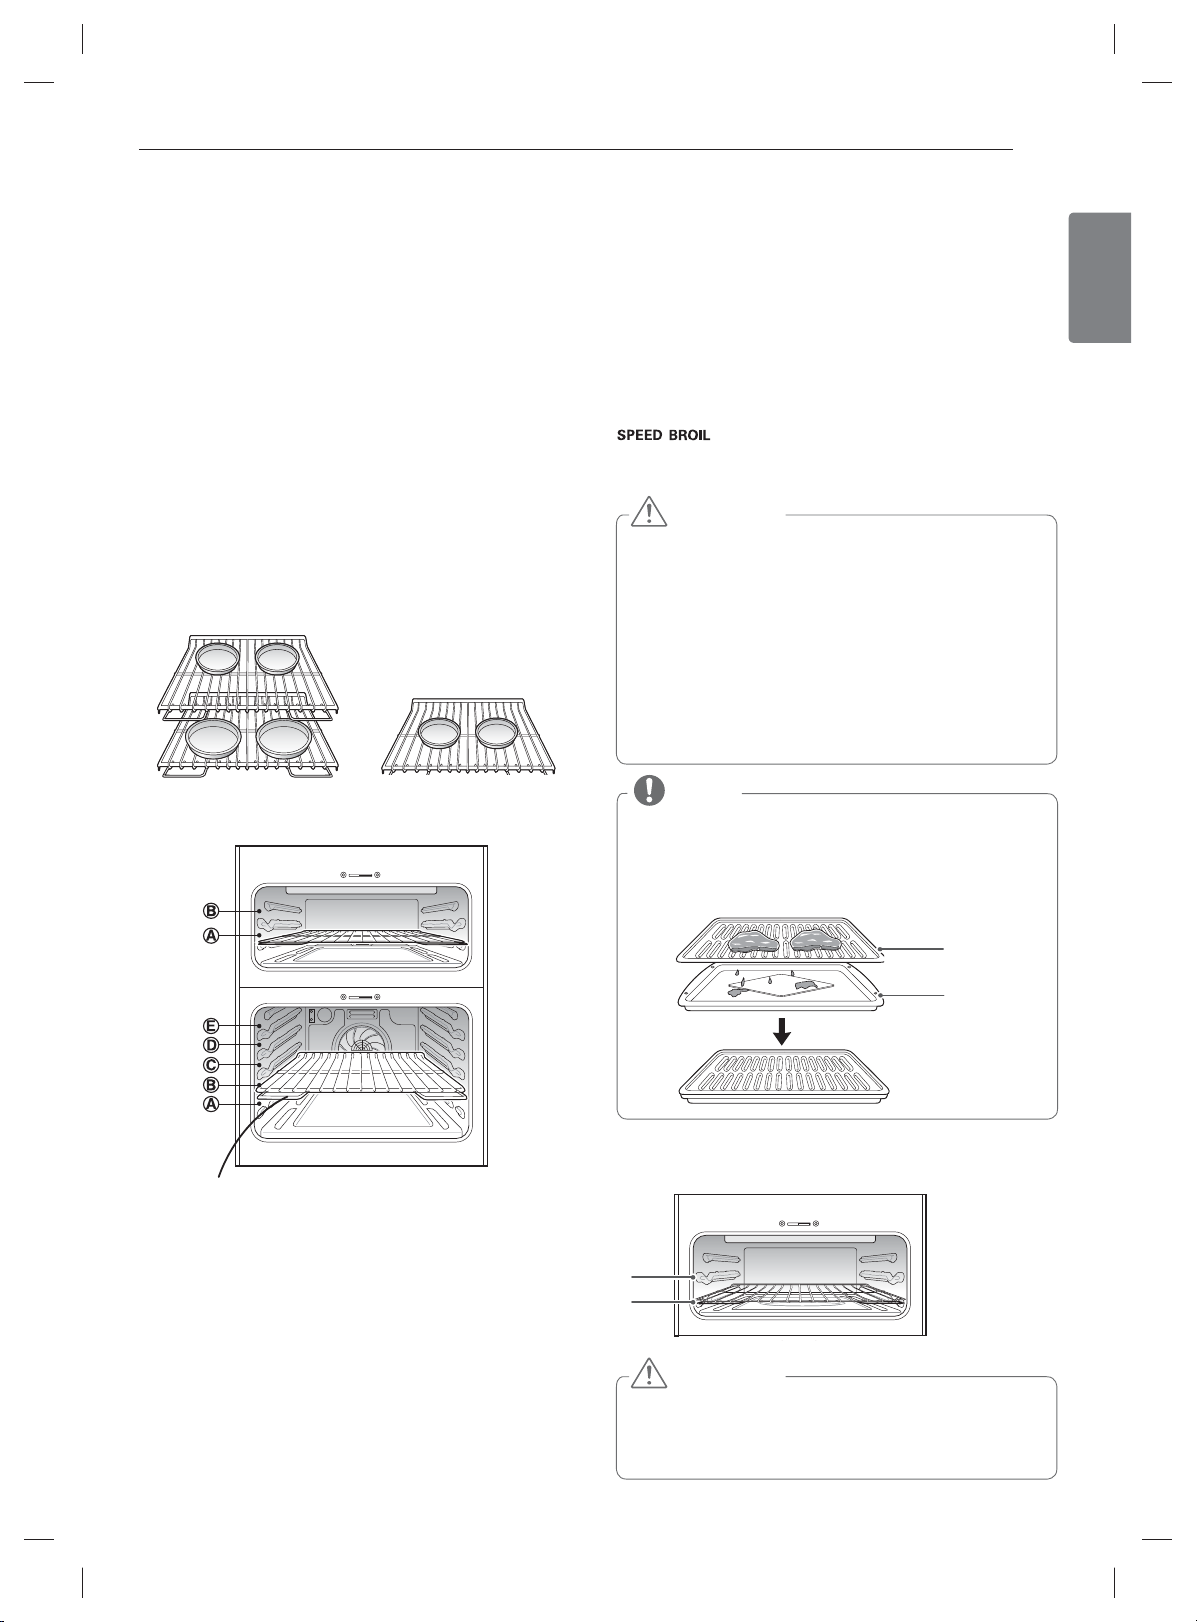
For best baking results, pans should be centered on the
racks. If baking with more than one pan, place the pans
so that each one has at least 1” to 1
around them.
If cooking on multiple racks in the lower oven, place the
oven racks in position C(a rack) and E(a rack). Place the
cookware as shown in Fig.1.
If cooking on a single rack in the upper oven, place the
oven rack in the position A and in the lower oven, place
the oven rack in the position D. Place the cookware as
shown in the Fig.2.
In the upper oven it is recommended to bake with the
standard rack in the position A.
1
/2” of air space
SPEED BROIL (Upper Oven)
Your LG gas double oven range uses an infrared (IR) ceramic
broil system. Unlike a standard broil system, the IR ceramic
broiler works by converting the heat of the flame into infrared
energy. This system provides an intense heat that can sear
foods quickly with excellent results.
Benefits of the infrared ceramic broil.
- Intense searing heat seals in juices and flavors.
- Broils foods quickly.
Your oven is designed for closed door broiling.
gas burner. The broil function works best when broiling, tender cuts of meat, poultry or fish.
DO NOT
a grease fire.
DO NOT
foil. Doing so will cause a fire.
Always use
grease drainage. This will help to reduce splatter,
smoke, and flare-ups.
NEVER
and at room temperature. If your broiler pan is damaged, warped, or has heavy permanent soiling, you
should consider replacing it to reduce the amount of
smoke you experience during broiling.
uses an intense heat radiation from the upper
CAUTION
use a broiler pan without a grid. Oil can cause
cover the grid and broiler pan with aluminum
a broiler pan and grid for excess fat and
use a broiler pan that is not thoroughly cleaned
ENGLISH
Figure 1 Figure 2
Rack
NOTE
Remove the pan from the oven to cool down for easy
cleaning.
For best results, use a pan designed for broiling, as
shown below. The broiler pan will catch grease spill
and the grid will help prevent grease splatters.
Grid
Broiler Pan
For best results, broiling should only be done with the offset
rack in position 'A' in the upper oven.
*A: The position
where you use
B
A
the offset rack.
CAUTION
Take care when sliding the offset rack in and out.
It lays lower in the cavity and passes closer to hot
surfaces that can cause burns. Always wear oven mitts
when handling racks.
Page 27
26
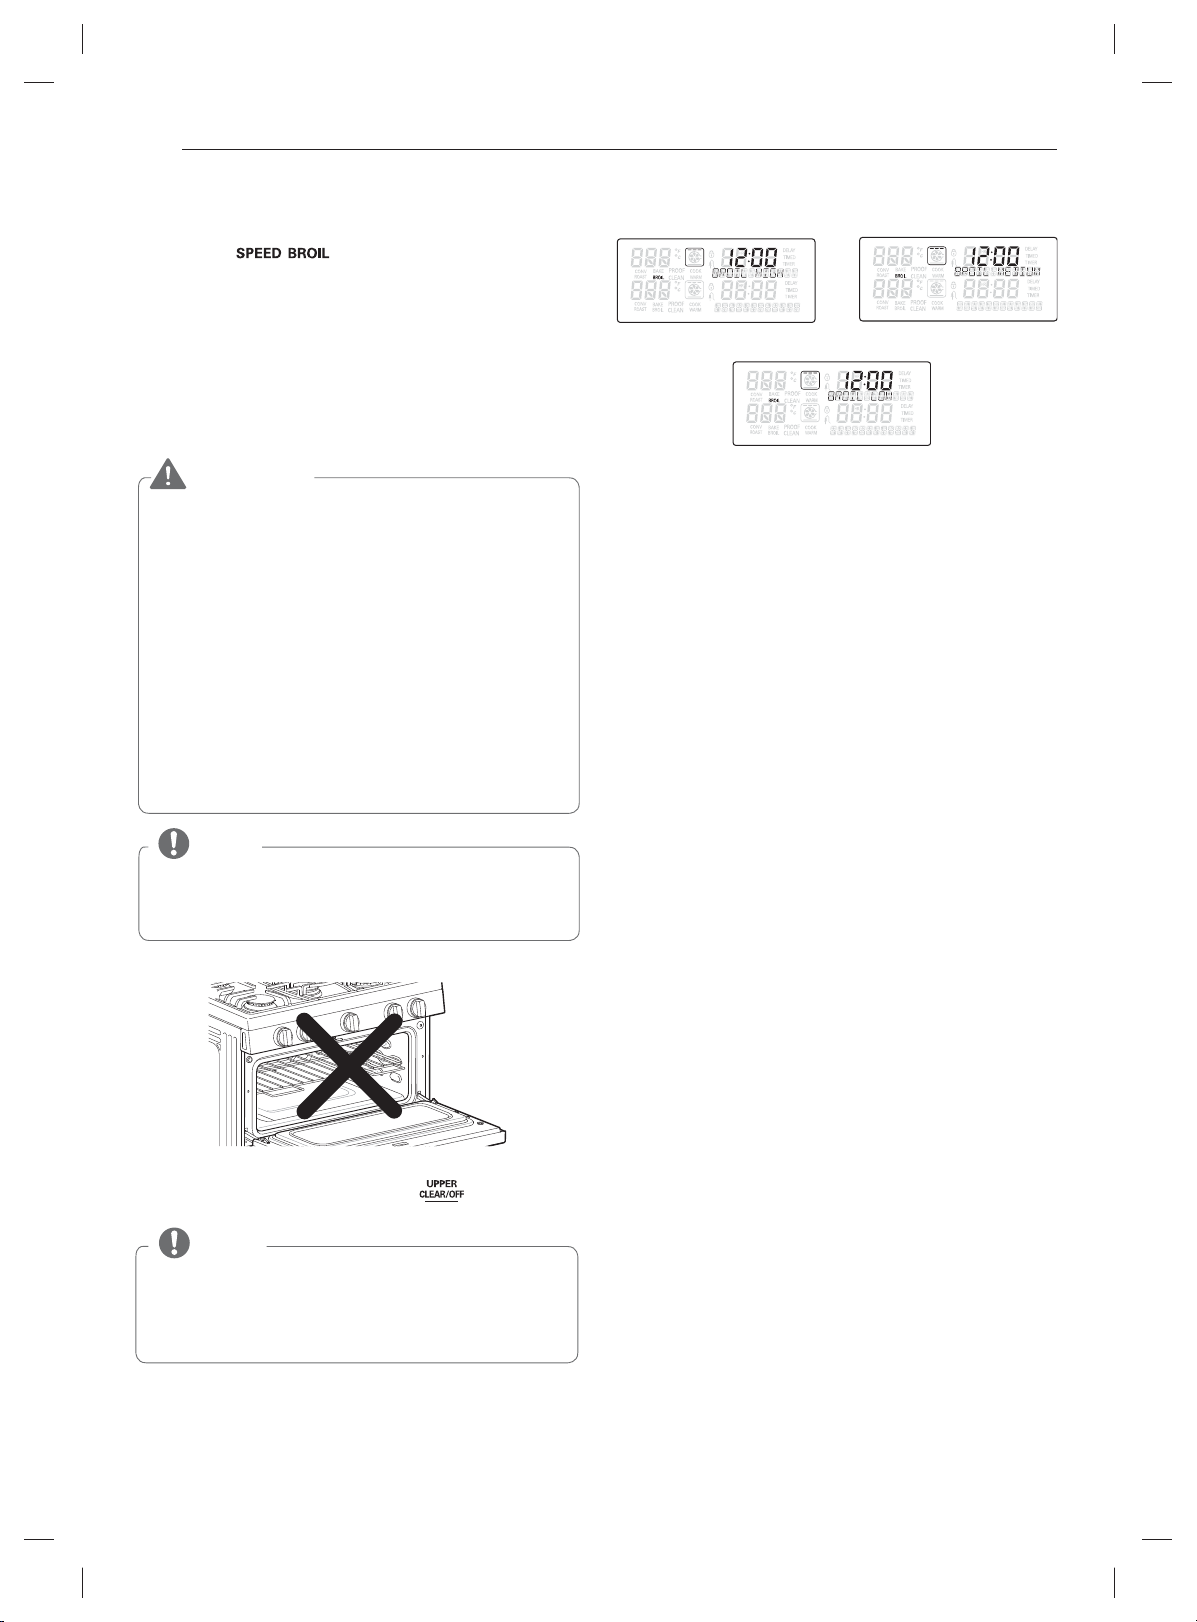
HOW TO USE
To set the upper oven to BROIL
Press the key once for high, twice for me-
1
dium, and three times for low.
Press the q key.
2
Allow the broiler to preheat for 3 minutes.
3
Place food in the upper oven.
4
Close the oven door. The oven door must be closed
5
during broiling.
WARNING
When using your broiler, the temperature inside the oven
will be extremely hot. Take caution to avoid possible
burns by:
Keeping the door closed when broiling
Always wear oven mitts when inserting/removing food
items
Improper use of the broiler may result in excessive
smoke or a grease fire. Improper use conditions include, but are not limited to:
- Broiling on rack position B.
- Setting the broiler at higher power level than
recommended.
- Using dirty/greasy broiler pans.
- Broiling beyond recommended cooking times.
NOTE
If the oven door remains open for more than 15 seconds
during broiling, the burner will shut off. The broil burner
will automatically restart once the door is closed.
When broiling is finished, press the key.
6
NOTE
During any Broil function, it is normal for the broiler to
cycle on and off. The igniter for the infrared ceramic broil
burner on the ceiling of the oven will glow orange periodically during normal broil operation.
BROIL mode display (example)
High temperature Medium temperature
Low temperature
• High: Use High for steaks, burgers and fish for which you want
to achieve deep flavorful searing.
• Medium: Use Medium for thicker pieces of meat that you want
cooked Medium-Well or Well Done. Also use the medium broil
setting for skin-on fish.
• Low: The Low setting is most effective for melting cheese on
items such as Nachos.
Because of the intense heat associated with this infrared broiler,
you may experience more smoke than you may be accustomed
to compared to a conventional broiler. This smoke is a natural by
product of searing and should not cause you to worry. If you are
experiencing more smoke than you are comfortable with, use the
following tips to reduce the amount of smoke in your oven.
For any broiling on High or Medium settings, use a broiler
1.
pan only. Do not use sautee pans or regular baking sheets for
safety reasons.
NEVER use a broiler pan that is not thoroughly cleaned and at
2.
room temperature at the beginning of cooking.
If your broiler pan is damaged, warped, or has heavy permanent
soiling, you should consider replacing it to reduce the amount
of smoke you experience during broiling.
ALWAYS run your cooktop ventilation system or vent hood
3.
during broiling.
Keep the interior of your oven as clean as possible. Leftover
4.
debris from prior meals can burn or catch fire.
Avoid fatty marinades and sugary glazes, both of these will
5.
increase the amount of smoke you experience. If you would
like to use a glaze, apply it at the very end of cooking.
If you are experiencing significant smoke with any food item,
6.
consider:
a. Lowering the broiler to the next lowest setting.
b. Using the High broil setting to achieve the level of searing
you desire, and then either switch to a lower broil setting, or
switch to the BAKE function.
As a rule, fattier cuts of meat and fish will produce more
7.
smoke than leaner items.
Adhere to the recommended Broil settings and cooking guide-
8.
lines in the chart on the following page whenever possible.
Page 28
HOW TO USE
27
BROILING CHART
Cut
Tenderloin/Filet
NY Strip Steak/Strip-
loin
Ribeye/Delmonico
Bone-In Steaks
Skirt Steak 1/2"-3/4"
Flank Steak 1"
Flank Steak 1 1/2"
Hamburgers 3/4" thick
Size/
Thickness
1 1/2"
3/4" - 1"
1 1/2"
3/4" - 1"
1 1/2"
3/4" - 1"
1 1/2"
ENGLISH
Doneness
Medium Rare High 5:00 3:00
1"
2"
Medium High 5:00 4:00
Medium Well High 6:00 4:00
Well Done High 6:00 5:00
Medium Rare High 6:00 4:00
Medium High 7:00 4:00
Medium Well High 7:00 5:00
Well Done High 7:00 6:00
Medium Rare High 7:00 5:00
Medium High 8:00 6:00
Medium Well Medium 8:00 10:00
Well Done Medium 10:00 12:00
Medium Rare High 5:00 3:00
Medium High 5:00 4:00
Medium Well High 6:00 4:00
Well Done High 6:00 5:00
Medium Rare High 6:00 5:00
Medium High 7:00 6:00
Medium Well Medium 8:00 10:00
Well Done Medium 8:00 12:00
Medium Rare High 5:00 3:00
Medium High 5:00 4:00
Medium Well High 6:00 4:00
Well Done High 6:00 5:00
Medium Rare High 6:00 5:00
Medium High 7:00 6:00
Medium Well Medium 8:00 10:00
Well Done Medium 8:00 12:00
Medium Rare High 5:00 4:00
Medium High 6:00 5:00
Medium Well High 7:00 6:00
Well Done High 8:00 7:00
Medium Rare High 8:00 8:00
Medium High 10:00 8:00
Medium Well Medium 10:00 12:00
Well Done Medium 10:00 15:00
Medium Rare High 4:00 3:00
Medium High 5:00 3:00
Medium Well High 5:00 4:00
Well Done High 6:00 4:00
Medium Rare High 7:00 5:00
Medium High 8:00 6:00
Medium Well High 8:00 8:00
Well Done High 9:00 9:00
Medium Rare High 8:00 6:00
Medium High 8:00 8:00
Medium Well High 9:00 9:00
Well Done High 10:00 10:00
Medium Rare High 5:00 3:00
Medium High 5:00 4:00
Medium Well High 6:00 4:00
Well Done High 6:00 5:00
Broiler
Setting
Time
Side 1 Side 2
Comments
• Steaks and chops should always be
allowed to rest for 5 minutes before
you cut into them and begin eating.
This allows the heat to distribute
evenly through the food and creates
a more tender and juicy result.
• For very thick pieces of meat, consider removing them from the fridge
30 minutes prior to cooking. This
will help them cook more quickly,
more evenly, and will produce less
smoke. Please note that cooking
times will likely be shorter than the
times indicated in this above chart.
• For bone-in steaks or chops that
have been “Frenched” (a portion of
meat removed from the bone), wrap
the exposed sections of bone in foil
to reduce burning.
Page 29

28
HOW TO USE
BROILING CHART
Cut
Bone-in Chops
Salmon portion/
steak, skin-on
Salmon portion/
steak, skin-off
Halibut portion, skin-
off
Shrimp, skin on
Shrimp, skin off
Lobster tail
Pork Chop 1" Well done High 6:00 5:00
Pork Tenderloin
Sausage 1/4/lb., 1.5" Well done High 6:00 4:00
Ham slices 1/2" thick Well done High 5:00 4:00
Breast, boneless,
skinless
Asparagus spears 1/2" thick Well done High 4:00 3:00
Summer squash,
zucchini
Toast 4 pieces Browning, well High 1:00 1:00
English muffin 2 split Browning, well High 2:00
Size/
Thickness
6 - 8 oz.,
2 bone
3/4" - 1" Well done Medium 6:00 4:00
1 1/2" Well done Medium 8:00
3/4" - 1" Well done Medium 6:00 4:00
1 1/2" Well done Medium 6:00 6:00
3/4" - 1" Well done Medium 6:00 5:00
1 1/2" Well done Medium 7:00 6:00
<10/lb. Well done High 4:00 3:00
10-20/lb. Well done High 3:00 3:00
21-30/lb. Well done High 3:00 2:00
<10/lb. Well done High 4:00 2:00
10-20/lb. Well done High 3:00 2:00
21-30/lb. Well done High 3:00 1:00
1/3/lb. Well done High 6:00 Do not
12-16 oz.,
1.5"
1/2" - 3/4" Well done High 6:00 4:00
1/2" strips Browning, well High 7:00
Doneness
Medium High 7:00 6:00
Well done High 9:00 8:00
Broiler
Setting
Time
Side 1 Side 2
(Flesh
side)
turn over
4:00
(Skin
side)
Comments
• When broiling skin-on fish, always
use the Medium broil setting and
always broil the skin side last.
• Seafood is best consumed immediately after cooking. Allowing
seafood to rest after cooking can
cause the food to dry out.
• It is a good idea to rub a thin coating of oil on the surface of the broiling pan before cooking to reduce
sticking, especially with fish and
seafood. You can also use a light
coating of non-stick pan spray.
• Toss your vegetables lightly in oil
before cooking to improve browning.
This chart is only for reference. Adjust cook time according to your preference.
NOTE
Broiling times may be affected by the size, weight, thickness, starting temperature and your preference of doneness.
•
This guide is based on meats at refrigerated temperatures.
NOTE
The USDA advises that consuming raw or undercooked fish, meat, or poultry can increase your risk of foodborne illness.
The USDA has indicated the following as safe minimum internal temperatures for consumption:
• Ground beef, veal, pork, or lamb: 160 °F
• Poultry: 165 °F
• Beef, veal, pork, or lamb: 145 °F
• Fish/seafood: 145°F
Page 30

HOW TO USE
29
TIMED COOK
(Upper & Lower Oven)
The TIMED COOK feature allows you to set the oven to cook
for a specific length of time. This feature can only be used
while baking.
To set TIMED COOK
(example: to BAKE at 300°F for 30 minutes):
o
Press the upper or lower A key.
1
the display.
Use the number keys to set the temperature
2
(ex. press 3, 0, 0).
Press q to begin preheating.
3
Once the oven has preheated to 300°, press the
4
o
o
key.
Set the desired baking time (ex. press 3, 0).
5
The baking time can be set for any amount of time between 1 minute and 11 hours and 59 minutes.
Press the q key and the display will show the cooking
6
time countdown.
The oven will continue to cook for the set amount of time
and then turn off automatically. When the cooking time has
elapsed:
k
The cook end indicator tone will sound every 60
seconds until the or key is pressed.
When WARM is set, the warming function is acti-
vated after cooking for the time set.
will appear in the display.
NOTE
To set the WARM function to engage at the end
of the timed cook cycle, repeat steps 1-5 and then
press the
display. (Refer to "WARM" in the How to Use section
for more information on warming.)
To cancel the TIMED COOK function, press
or
and the time of day will show in the display.
C
key. WARM will appear in the
key at any time.
q
will appear in
DELAYED TIMED COOK
(Upper & Lower Oven)
The automatic timer of the DELAYED TIMED COOK will turn
the oven ON and OFF at the time you select. This feature can
only be used for baking.
To set the oven for Delayed Start
(example: to BAKE at 300°F for 30 minutes and start
operating the bake mode at 4:30pm):
Be sure that the clock is set to the correct time of the day.
1
Arrange the interior oven rack(s) and place the food in the
2
oven.
o
Press the b key.
3
Use the number keys to set the oven temperature
4
(ex. press 3, 0, 0).
Press the key.
5
Set the desired baking time (ex. press 3, 0).
6
The baking time can be set for any amount of time from 1
minute to 11 hours and 59 minutes.
Press the key.
7
Set the desired start time (ex. press 4, 3, 0).
8
Press the q key. At the set time, a short beep will
9
sound and the oven will begin baking.
NOTE
To cancel the DELAYED TIMED COOK function, press
or key at any time.
If you would like to change the cooking time, repeat
steps 5-6 and press
The oven will continue to cook for the set amount of time
and then turn off automatically. When the cooking time has
elapsed:
k
and the time of day will show in the display.
The cook end indicator tone will sound every 60 sec-
onds until the
When WARM is set, the warming function is activated
after cooking for the time set.
q
will appear on the display.
q
.
or key is pressed.
ENGLISH
To change the cook time while operating the oven:
(example: to change the cook time from 30 minutes to 1
hour 30 minutes):
Press the key.
1
NOTE
If operating both the upper & lower oven at the same
time, press the
for the lower oven and twice for the upper oven.
Use the number keys to change the baking time
2
(ex. press
Press q to accept the change.
3
1, 3, 0
).
key once to set the cook time
NOTE
If your oven clock is set as a 12 hour clock, you can delay
the cook time for 12 hours. If your oven clock is set as a
24 hour clock, you can delay the cook time for 24 hours.
CAUTION
Use the automatic timer when cooking cured or frozen
meats and most fruits and vegetables. Foods that can
easily spoil, such as milk, eggs, fish, meat or poultry,
should be chilled in the refrigerator. Even when chilled,
they should not stand in the oven for more than 1 hour
before cooking begins, and should be removed promptly
when cooking is completed.
Eating spoiled food can result in sickness from food
poisoning.
Page 31

30
HOW TO USE
How to use convection for the lower
oven
Convection system uses a fan to circulate the oven’s heat
evenly within the oven.
This improved heat distribution allows for even cooking and
excellent results.
CONVECTION BAKE FOR THE
LOWER OVEN
Convection baking allows for even cooking and excellent
results when using multiple racks at the same time. It could
also shorten cooking time.
Benefits of CONVECTION BAKE
1
1) Even bake results using multiple racks.
2) Faster cooking time.
NOTE
When cooking using the convection cycle, the oven
temperature is automatically reduced by 25°F. The display
will show the changed temperature.
This feature is called”AUTO CONVERSION”.
Your range comes with this feature “ENABLED”.
To DISABLE the auto conversion feature, see “How to set
convection auto conversion function” in Operating Instructions section.
NOTE
You will hear a fan while cooking with convection. The fan
will stop when the door is open, but the heat will not turn
off. The fan will not start until the preheat temperature is
reached.
3) Press the
4) Once the oven reaches the desired temperature, a tone
q
key.The display will show
the converted temperature starting at 100°F. As the oven
preheats, the display will show increasing temperatures
in 5 degree increments.
will sound and the oven light will blink on and off. The
display will show the auto converted oven temperature
,
CONV, BAKE
and .
CONV, BAKE
and
NOTE
To cancel CONVECTION BAKE, touch the Z key
at any time.
Display of the CONVECTION BAKE mode (Example)
To set oven to CONVECTION BAKE (example to 375°F)
2
1) Press the key. The display will blink .
2) Set the oven temperature (Touch
3, 7, 5
).
Lower oven only
Upper & Lower oven at the same time
Page 32

Cookware for convection cooking
3
Check to see if your cookware leaves room for air circula-
tion in the oven before using your convection oven. If you
are baking with several pans, leave space between them.
Also, be sure the pans do not touch each other or the walls
of the oven.
1) Paper and Plastic
You can use heat-resistant paper and plastic containers
that are recommended for use in regular ovens in convection ovens.
2) Metal and Glass
Any type of cookware will work in your convection oven.
However, metal pans heat the fastest and are recommended for convection baking.
• Darkened or matte-finished pans will bake faster than
shiny pans.
• Glass or ceramic pans cook more slowly.
When baking cookies, use a flat cookie sheet instead of a
pan with low sides to get the best results
For recipes like oven-baked chicken, use a pan with low
sides. Hot air cannot circulate well around food in a pan
with high sides.
NOTE
Cookies and biscuits should be baked on pans with no
sides or very low sides to allow heated air to circulate
around the food. Food baked on pans with a dark finish will cook faster.
Foods cooked on a single oven rack will generally
cook faster and more evenly with convection bake.
Multiple oven rack cooking may slightly increase cook
times for some foods, but the overall result is time
saved. Breads and pastries brown more evenly.
When cooking foods on multiple racks use the con-
vection mode.
The convection fan stops during convection bake
cycle to allow for more even heating. This is normal.
Use the recommended size pan in recipe.
Some frozen foods have been developed to use
commercial convection ovens. For best results in
this oven, preheat the oven and use the temperature
recommended in the recipe.
If a food manufacturer gives specific convection bak-
ing package instructions, program the AUTO CON-
VERSION temperature so that the preheated oven
temperature reads the same as the temperature on
the package instructions.
HOW TO USE
31
CONVECTION ROAST FOR THE
LOWER OVEN
CONVECTION ROAST feature is designed to give optimum
roasting performance. CONVECTION ROAST feature
combines cooking with the convection fan to roast meats
and poultry. The heated air circulates around the food from all
sides, sealing in juices and flavors.
Foods are crispy brown on the outside while staying moist
on the inside.
To set the lower oven to CONVECTION ROAST (example
1
to 375°F).
1) Press key. Display will show .
2) Set the oven temperature
NOTE
When cooking using a convection cycle the oven
temperature is automatically reduced by 25°F, and
then the display will show the changed temperature.
This feature is called”AUTO CONVERSION”.
Your range comes with this feature “ENABLED”.
To DISABLE the auto conversion feature, see “How to
set convection auto conversion function” in Operating
Instructions section.
3) Press the q key. Display will show
the changing temperature starting at 100°F. As the oven
preheats, the display will show increasing temperatures
by 5 degree increments.
4) Once the oven reaches the desired temperature, a tone
will sound and the oven light will flash on and off. The
display will show the auto converted oven temperature
,
CONV, ROAST
5) Place food in oven.
NOTE
Touch Z key to cancel CONVECTION ROAST func-
tion at any time.
Display of the CONVECTION ROAST mode (Example)
(Touch 3, 7, 5).
and .
Lower oven only
CONV, ROAST
and
ENGLISH
Upper & Lower oven at the same time
Page 33

32
HOW TO USE
Special Features
KIDS MEAL (Upper Oven)
This function will preheat the upper oven to optimal temperature for cooking regular crust pizza, rising crust pizza, fresh
pizza, chicken nuggets, french fries, or hamburger patties.
To set the oven KIDS MEAL:
Press key in upper oven.
1
Continue pressing to select ,
2
Press the q key. PREHEATING will appear on the dis-
3
play.
Once the oven is preheated, place the food in the oven
4
and set the cooking time according to package direction.
Display Screen (example):
, will appear in display.
; ; ; ; or
.
WARM (Upper & Lower Oven)
This function will maintain an oven temperature of 170°F. The
function will keep cooked food warm for serving up
WARM
to 3 hours after cooking has finished. The Warm function may
be used without any other cooking operations or can be used
after cooking has finished using TIMED BAKE or DELAYED
TIMED BAKE.
NOTE
The
Do not use it to cool food down.
When the lower oven is above 475°F, the
tion of the upper oven cannot be used. w will appear
on the display.
To set the WARM function:
Press the
1
Press the q key.
2
Display Screen (example):
function is intended to keep food warm.
WARM
C
key of the upper and/or lower oven
WARM
func-
NOTE
• Preheating is necessary for better cooking results.
Place the food in the oven after preheating.
- Use an offset rack for kids meal cooking.
KIDS MEAL Chart
Food
Frozen pizza,
Regular crust
Frozen pizza, Rising
crust
Fresh pizza 12” B Follow pack-
Chicken nuggets 1-4 servings
French fries 1-4 servings
Hamburger patties
This chart is for reference only.
Recommend-
ed
Size
12” B Follow pack-
12” B Follow pack-
(3.5oz per 1
serving)
(3.5oz per 1
serving)
4-12 patties,
1/2” thick
Shelf
Recommended
Posi-
tion
B Follow pack-
B Follow pack-
A Follow pack-
Time
(minutes)
age instructed
times.
age instructed
times.
age instructed
times.
age instructed
times.
age instructed
times.
age instructed
times.
Upper oven only
Lower oven only
Upper & Lower oven at the same time
To set the warm function after Timed Cooking:
Set either TIMED COOK or DELAYED TIMED COOK (refer
1
to "TIMED COOK" or "DELAYED TIMED COOK" in the
How to Use section).
Press the q key.
2
Press the
3
The Warm mode is set to turn on automatically after completing the timed cooking or delayed cooking time.
To cancel the
If
functions, all cooking settings will be canceled.
C
key.
NOTE
function, press the or
WARM
key at any time.
or is pressed prior to the delay
Page 34

HOW TO USE
33
PROOF (Lower Oven)
This feature maintains a warm oven for rising yeast leavened
products before baking.
To set the PROOF function:
Use rack B or C for proofing.
1
Press the
2
Press the q key.
3
Display Screen (example):
When proofing is finished, press the Z key.
4
To avoid lowering the oven temperature and length-
ening proofing time, do not open the oven door unnecessarily. Check bread products early to avoid overproofing.
Do not use the proofing mode for warming food or
keeping food hot. The proofing oven temperature is not
hot enough to hold foods at safe temperatures. Use the
WARM feature to keep food warm.
Proofing will not operate when the oven is above 125°F.
w
J
key.
Lower oven only
Upper & Lower oven at the same time
NOTE
will show in the display.
FAVORITE (Lower Oven)
This feature may store and recall up to 3 different settings.
The favorite setting feature may be used with COOK TIME
feature. This feature will not work with any other function
including START TIME feature.
To set FAVORITE
1
1) Place the food in the oven.
2) Press
Category how
Bread Press FAVORITE
Meat Press FAVORITE
Chicken Press FAVORITE
3) Press the number keys to set the desired oven
4) Press q key. The preheat indicator tones will sound 3
Only the temperature you selected will be stored, not
If the oven temperature is changed, the changed
The stored temperature is retained after a power
Default temperature will appear in display and
will blink.
to
select
temperature. This temperature will be stored and be
recalled next use.
times when the oven reaches the programmed
temperature.
NOTE
the cooking time.
temperature will be stored.
failure.
key to select the food.
Touch favorite
key once.
key twice.
key 3 times.
COOK
Default
temp.
(May be
changed)
375°F BAKE
325°F Convection
350°F Convection
Operating
feature
Roast
Roast
ENGLISH
Page 35

34
HOW TO USE
SABBATH (Upper & Lower Oven)
The SABBATH mode is typically used on the Jewish Sabbath
and Holidays. When the SABBATH mode is activated, the
oven does not turn off until the SABBATH mode is deactivated. In SABBATH mode, all function keys, except for the
and keys, are inactive. z will appear in oven
display.
NOTE
IF the oven light is turned ON and the SABBATH mode
is active, the oven light will remain ON until the SABBATH mode is turned OFF. If the oven light needs to be
OFF, be sure to turn the oven light OFF before activating the SABBATH mode.
SABBATH mode can only be used while baking (BAKE
mode) in either the top, bottom, or both ovens.
You can use TIMED COOK in another oven while either
the upper oven or lower oven is activated.
Refer to “TIMED COOK” in the Using Oven section.
To set the SABBATH mode:
Press the A key.
1
Using the number keys, enter the desired temperature.
2
Press the q key.
3
Press and hold the
4
Display Screen (example):
Upper & Lower oven at the same time
X
key for three seconds.
Upper oven only
Lower oven only
NOTE
To cancel the BAKE function, press the or
key at any time.
To cancel the SABBATH mode, press and hold the
X
key for three seconds.
To change the temperature while in SABBATH mode
(no tones sound & no display change):
Press the upper or lower oven's A key.
1
Using the number keys, set the desired temperature.
2
Press the q key.
3
NOTE
There is a 15 second delay before the unit will recog-
nize the temperature change.
Page 36

CARE AND CLEANING
35
CARE AND CLEANING
Gas Surface Burner
CAUTION
DO NOT
To prevent burns, wait until the cooktop has cooled down before touching any of its parts.
Removing and Replacing the Gas Surface Burner
Grates and burner caps/heads can be removed for care and cleaning.
clean this appliance with bleach.
Medium burner
head and cap
Large burner
head and cap
Center grate Side grate Side grate
Oval burner
head and cap
ENGLISH
Small burner
head and cap
Extra large burner
head and cap
Burner cap is properly set.
Burner cap is NOT
properly set.
Burner Heads/Caps
For even and unhampered flame, the slits in the burner heads
must be kept clean at all times.The burner heads and (the oval
burner head) & Cap assembly can be lifted off.
Wash the burner caps in hot soapy water and rinse with
clean water.
Any spills on or around an electrode must be carefully
cleaned.
To remove burnt-on food, soak the burner heads in a
solution of mild liquid detergent and hot water for 20–30
minutes. For stubborn stains, use a toothbrush.
The burners will not operate properly if the burner ports
or electrodes are clogged or dirty.
Burner caps and heads should be cleaned routinely,
especially after bad spillovers.
Burners will not light if the cap is removed.
General burner
After Cleaning the Burner Heads/Caps
Shake out any excess water and then let them dry thoroughly.
Replace the burner heads and caps over the electrodes on
the cooktop, in the correct locations according to their size.
Make sure the hole in the burner head is positioned over the
electrode.
CAUTION
DO NOT
could damage them.
DO NOT
the burners.
hit the electrodes with anything hard. Doing so
use steel wool or scouring powders to clean
Page 37

36
CARE AND CLEANING
Burner Grates
The range consists of three separate professional-style grates. For maximum stability, these grates should only be used when in
their proper position. The two side grates can be interchanged from left to right and front to back. The center grate can be
interchanged from front to back.
NOTE
Do not operate a burner for an extended period of time without cookware on the grate. The finish on the grate may chip without cookware to absorb the heat.
Cleaning the Burner Grates
Do not lift the grates out until they have cooled.
Grates should be washed regularly and after spillovers.
Wash the grates in hot, soapy water and rinse with
clean water.
The grates are dishwasher safe.
After cleaning the grates, let them dry completely and
securely position them over the burners.
CAUTION
DO NOT
mode.
put the grate in the oven during self cleaning
Page 38

CARE AND CLEANING
37
Cooktop Surface
To avoid burns, do not clean the cooktop surface until it has
cooled. Foods with high acid or sugar content could cause a
dull spot if allowed to set. Wash and rinse when the surface
has cooled. For other spills such as oil/grease spattering, etc.,
wash with soap and water when the surface has cooled. Then
rinse and polish with a dry cloth.
NOTE
Do not lift the cooktop surface. Lifting the cooktop
surface can lead to damage and improper operation of the
range.
Stainless Steel Surfaces
To inquire about purchasing stainless steel appliance cleaner
or polish, or to find the location of a dealer nearest you,
please call our toll-free customer service number:
1-800-243-0000
NOTE
Do not use a steel wool pad; it will scratch the surface.
To clean the stainless steel surface, use warm sudsy
water or a stainless steel cleaner or polish.
Always wipe in the direction of the metal surface finish.
or visit our website at:
us.lgservice.com
Control Panel
To prevent activating the control panel during cleaning, unplug
the range. Clean up splatters with a damp cloth using a glass
cleaner. Remove heavier soil with warm, soapy water. Do not
use abrasives of any kind.
Front manifold panel and knobs
It is best to clean the manifold panel after each use of the
oven. For cleaning, use a damp cloth and mild soapy water or
a 50/50 solution of vinegar and water. For rinsing, use clean
water and polish dry with a soft cloth.
NOTE
Do not use abrasive cleansers, strong liquid cleaners,
plastic scouring pads or oven cleaners on the manifold
panel. Doing so will damage the finish.
Do not try to bend the knobs by pulling them up or
down or by hanging a towel or other objects on them.
This can damage the gas valve shaft.
The control knobs may be removed for easy cleaning.
To clean the knobs, make sure that they are in the “OFF”
position and pull them straight off the stems.
To replace the knobs, make sure the knob has the “OFF”
position centered at the top, and slide the knob directly
onto the stem.
ENGLISH
Oven air vents
Air openings are located at the rear of the cooktop, at the top
and bottom of the oven door, and at the bottom of the range.
NOTE
Do not block the vents and air openings of the range.
They provide the air inlet and outlet that are necessary for
the range to operate properly with correct combustion.
NOTE
To prevent scratching, do not use abrasive cleaners on any
of these materials.
Page 39

38
CARE AND CLEANING
Oven Door
Do not hand clean
the oven door gasket
Hand clean the door
Do not hand clean the
oven door gasket
Hand clean the door
Use soapy water to thoroughly clean the oven door.
Rinse well.
You may use a glass cleaner on the outside glass of the
oven door.
door vents.
DO NOT
abrasive cleaning materials on the outside of the oven
door.
DO NOT
gasket is made of a woven material that is essential for
a good seal. Care should be taken not to rub, damage,
or remove this gasket.
DO NOT
DO NOT
use oven cleaners, cleaning powders, or harsh
clean the oven door gasket. The oven door
immerse the door in water.
spray water or glass cleaner on the
Removing the Upper Oven Door
Fully open the door. Lift up the hinge locks toward the
1
oven frame until they stop.
Close the door to approximately 30 degrees.
2
Press down the release buttons on each hinge on both
3
sides of the door.
Push
NOTE
Do not use cleaners or harsh abrasive cleaning materials
on the outside of the oven door. Doing so can cause
damage.
Removing and replacing the doors
Do not close the oven door until all of the oven racks are completely in place.
CAUTION
Be careful when removing and lifting the door.
DO NOT
DO NOT
object.
Scratching, hitting, jarring or stressing the glass may
weaken its structure, causing an increased risk of breakage at a later time.
lift the door by the handle.
hit the glass with pots, pans, or any other
about 30°
Lift up the door until it is clear off the hinge.
4
Page 40

CARE AND CLEANING
39
Replacing the Upper Oven Door
Be sure that the hinges are lined up at a 30 degree
1
position.
Slide the door back into the hinges until you hear a solid
2
click and the release buttons have engaged.
approximately 30°
Removing the Lower Oven Door
Fully open the door. Lift up the hinge locks toward the
1
oven frame until they stop.
Close the door to the removal position (approximately five
2
degrees).
ENGLISH
Fully open the door. Push the hinge locks down onto the
3
hinge.
Close the oven door.
4
Lift the door up and out until the hinge arm is clear off of
3
the slot. Put the door on the floor.
Hinge arm
Bottom
edge of slot
Indentation
Page 41

40
CARE AND CLEANING
Replacing the Lower Oven Door
Firmly grasp both sides of the door at the top and close
1
the door to the removal position (approximately five
degrees).
Seat the indentation of the hinge arm into the bottom
2
edge of the hinge slot.
Hinge arm
Bottom
edge of slot
Indentation
Open the door to its full extension. Push the hinge locks
3
down against the front frame of the oven cavity to the
locked position. Close the oven door.
Inside of the Oven
Cleaning Guide
Soil Level Cycle Setting
Lightly Soiled Oven Cavity
Moderately Soiled Oven Cavity
Heavily Soiled Oven Cavity
2 Hour Self Clean
3 Hour Self Clean
4 Hour Self Clean
SELF CLEAN (Upper & Lower Oven)
The SELF CLEAN cycle uses above normal cooking temperatures to clean the oven cavity. You may see some smoke and
smell an odor the first few times the oven is cleaned. This is
normal and will lessen in time. Smoke may also occur if the
oven is heavily soiled. During self clean, the kitchen should
be well ventilated to minimize the odors from cleaning. The
upper and lower oven SELF CLEAN cannot be operated simultaneously.
CAUTION
DO NOT leave small children unattended near the appli-
During the self cleaning cycle, the outside of the
ance.
range can become very hot to the touch.
If you have a pet bird, move it to another well-ventilated
Some birds are extremely sensitive to the fumes
room.
given off during the self cleaning cycle of any range.
DO NOT wrap the oven walls, racks, bottom or any
other part of the range with aluminum foil or any other
material.
duce poor baking results, and cause permanent damage
to the interior of the oven (aluminum foil will melt to the
interior surface of the oven).
DO NOT force the door open.
to the automatic door locking system. Use care when
opening the oven door after the Self Cleaning cycle.
Stand to the side of the oven when opening the door to
allow hot air or steam to escape. The oven may still be
very hot.
Never touch the broil element.
not cooled completely. The broiler is self cleaning and
touching it can damage the broiler.
Doing so will destroy the heat distribution, pro-
This can cause damage
It can cause burns if it is
(p. 40)
(p. 40)
(p. 40)
NOTE
If the door will not fully open, the indentation is not
seated correctly in the bottom edge of the slot.
Page 42

CARE AND CLEANING
41
Before Starting SELF CLEAN
Do not hand clean the
oven door gasket
Hand clean the door
Remove the oven racks, broiler pan, broiler grid, all
cookware, aluminum foil or any other material from the
oven.
The kitchen should be well ventilated to minimize the
odors from cleaning.
If running a self clean in one of the ovens, the other
oven can not be used.
Wipe any heavy spillovers on the bottom of the oven.
Make sure that the oven light bulb cover is in place and
the oven light is off.
The oven light cannot be turned on during a self clean
cycle. The oven light cannot be turned on until the oven
temperature has cooled below 500˚F (260˚C) after a self
clean cycle is complete.
Fine lines may appear in the porcelain because it went
through heating and cooling. This is normal and will not
affect performance.
NOTE
Clean the frame of the oven and door with hot soapy
water. Rinse well.
Do not clean the oven door gasket. The oven door
gasket is made of a woven material that is essential
for a good seal. Care should be taken not to rub, dam-
age, or remove this gasket.
Do not open the oven door until the self clean cycle is
complete.
The oven door can become extremely hot. Do not
touch the oven door until it has cooled down.
You may see some smoke and smell an odor the first
few times the oven is cleaned. This is normal.
As the oven heats, you may hear sounds of metal
parts expanding and contracting. This is normal.
A self clean cycle cannot be started if the Oven Lock-
out feature is active.
To Set Self Clean
Press or key.
1
The oven defaults to the recommended three hour self
clean for a moderately soiled oven. Press twice for a four
hour self clean and three times for a two hour self clean.
Press the q key.
2
Once the self clean is set, the oven door will lock automatically and m will display. You will not be able to open the oven
door until the oven is cooled. The lock will release automatically when the oven has cooled.
CAUTION
DO NOT
The oven door will remained locked until the oven temperature has cooled. Forcing the door open will damage
the door.
To Set Self Clean with a Delayed Start
force the oven door open when m is displayed.
(example: set for 3:00 AM/PM)
Press or key.
1
The oven defaults to the recommended three hour self
clean for a moderately soiled oven. Press twice for a two
hour self clean and three times for a four hour self clean.
Press the key.
2
Use the keypad to enter in the time of day that you would
3
like the oven to start the Self Clean cycle (ex.
NOTE
The Delayed Self Clean start time can only be set 11 hours
and 59 minutes ahead. To set for 12- 24 hours in advance,
see “How to change hour mode on clock.”
Press the q key
4
Once the self clean is set, the oven door will lock automatically and m will display. You will not be able to open the oven
door until the oven is cooled. The lock will release automatically when the oven has cooled.
NOTE
It may become necessary to cancel or interrupt a self
clean cycle due to excessive smoke or fire in the oven.
To Cancel the Self Clean function, press the or
key.
3, 0, 0
).
ENGLISH
After Self Clean
You may notice some white ash in the oven. Wipe it off
with a damp cloth after the oven cools.
If the oven is not clean after one clean cycle, repeat the
clean cycle.
If the oven racks were left in the oven and do not
slide smoothly after a clean cycle, wipe racks and rack
supports with a small amount of vegetable oil to make
them glide easier.
Page 43

42
CARE AND CLEANING
Changing the Oven Light
The oven light is a standard 40-watt appliance bulb. It will
turn on when the oven door is open. When the oven door is
closed, press the
To replace the oven light
Unplug the range or disconnect power.
1
Turn the glass bulb cover in the back of the oven counter-
2
clockwise to remove.
Turn the bulb counterclockwise to remove from socket.
3
Insert the new bulb and turn it clockwise.
4
Insert the glass bulb cover and turn it clockwise.
5
Plug in the range or reconnect the power.
6
WARNING
Make sure that the oven and bulb are cool.
DISCONNECT the electrical power to the range at the
main fuse or circuit breaker panel. Failure to do so can
result in severe personal injury, death, or electrical
shock.
M
or Q key to turn the light on or off.
Wash and rinse the broiler pan and grid in hot water with
3
a soap-filled or plastic scouring pad. If food has burnt on,
sprinkle the grid with cleaner (while hot) and cover it with
wet paper towels or a dishcloth. Soaking the pan will remove burnt-on foods. Both the broiler pan and grid may be
cleaned with a commercial oven cleaner. Both the broile
pan and grid can also be cleaned in a dishwasher.
Oven racks
Remove the oven racks before operating the self clean cycle.
Food spilled into the tracks could cause the racks to be-
1
come stuck. Clean with a mild, abrasive cleaner.
Rinse with clean water and dry.
2
NOTE
If the racks are cleaned using the self clean cycle (not
recommended), the color will turn slightly blue and the finish will become dull. After the self clean cycle is complete,
and the oven has cooled, rub the sides of the racks with
wax paper or a cloth containing a small amount of oil. This
will make the racks glide easier into the rack tracks.
Broiler Pan and Grid (sold separately)
NOTE
Remove the broiler pan and grid from the oven before
operating the self clean cycle.
After broiling, remove the broiler pan from the oven. Re-
1
move the grid from the pan.
Carefully pour out the grease from the pan into a proper
2
container.
Page 44

BEFORE REQUESTING SERVICE
43
BEFORE REQUESTING SERVICE
Symptoms and Questions Possible Cause/Solution
Top burners do not light or do not burn evenly. Make sure that the electrical plug is inserted into a live, properly
grounded outlet.
Remove the burners and clean them. Check the electrode area
for burnt-on food or grease. See “Burner caps/burner head cleaning” in the Care and Cleaning section.
Make sure that the burner parts are installed correctly.
See “Burner caps/heads cleaning” in the Care and Cleaning section.
Burner flames are very large or yellow. If the range is connected to LP gas, contact the technician who
installed your range or made the conversion.
Surface burners light but the oven does not. Make sure that the oven gas shut-off valve, located behind the
range, is fully open.
Food does not bake or roast properly. Incorrect oven control settings. See “Using control panel” in the
How to Use section.
Incorrect rack position. See “Replace and remove Oven rack” or
“Shelf position Baking time” in the How To Use section.
Incorrect cookware is being used. See “Roast” or “Bake” in the
How To Use Section.
Oven thermostat needs adjustment.
See “How to adjust the temperature” in the Operating Instructions section.
The Clock is not set correctly. See “How to set the clock and the
timer” in the Operating Instructions section.
Aluminum foil used improperly in the oven. See “Using the
oven.”
Food does not broil properly in the oven. Incorrect oven control settings. See “Using control panel” in the
How to Use section.
The oven door is not closed. See “Using the oven” in the How to
Use section.
Aluminum foil used on the broiling pan and grid is not fitted prop-
erly.
Oven temperature is too hot or too cold. The oven thermostat needs adjustment. See “How to adjust the
temperature” in the Operating Instructions section.
Clock and timer does not work. Make sure the electrical plug is inserted into a live, properly
grounded outlet. Replace the fuse or reset the circuit breaker.
Improper oven control settings. See “How to set the clock and
the timer” in the Operating Instructions section.
Oven light does not work. The light bulb is loose or defective. Tighten or replace the bulb.
The plug on the range is not completely inserted in the electrical
outlet. Make sure the electrical plug is inserted into a live, properly grounded outlet.
Self clean is not working. The oven temperature is too high to set a self clean operation.
Allow the range to cool down to room temperature and reset the
controls.
Improper oven control settings. See “SELF CLEAN” in the Care
and Self Cleaning section.
“Crackling” or “popping” sound. This is the sound of the metal heating up and cooling down during
both the cooking and cleaning functions. This is normal.
ENGLISH
Page 45

44
BEFORE REQUESTING SERVICE
Symptoms and Questions Possible Cause/Solution
Too much smoke during the self clean cycle. Too much soil in the oven. Open the windows to get rid of the
smoke from the room. Press the
m
light goes off before trying to open the oven door. Wipe up the
excess soil and reset the clean cycle.
The oven door does not open after a self clean cycle. The oven temperature is too high. Wait up to one hour to cool
down.
The oven door is not clean after a self clean cycle. Incorrect oven control settings. See “SELF CLEAN” in the Care
and Cleaning section.
The oven was heavily soiled. Clean up heavy spills before begin-
ning the self clean cycle. Heavily soiled ovens may need either a
longer self clean or two self clean cycles.
“CLOSE DOOR TO CONTINUE BROILING” or “DOOR
OPENED” appears in the display.
"DOOR LOCKED" message appears when you want to cook. The oven door is locked because the temperature inside of the
Oven control beeps and displays an F error code.
The oven racks were cleaned in a self clean cycle. Apply a small amount of vegetable oil to a paper towel and wipe
Clock is flashing. Power outage or surge. Reset the clock. If the oven was in use, you
“Burning” or “oily” odor emitting from the vent. This is normal in a new oven. To speed the process, set a self clean
Strong odor. An odor from the insulation around the inside of the oven is normal
Fan noise The convection fan may turn on and off automatically.
Convection fan not working. The preheating temperature has not been reached. The Fan will
Burners are not lighting properly after cleaning the cooktop
surface.
When lighting just one burner, clicking noise is heard from
all the burners.
PF(Power Failure) displayed
/ Display Time is flashing
Close the oven door.
oven is too high. Press the
Press the
Check the main gas shut-off valve or the oven gas shut-off valve
and call for service.
Remove the power from the range for five minutes and then
reconnect the power. If the function error code repeats, call for
service.
the edges of the oven racks. Do not use lubricant sprays.
must reset it by pressing the
and any cooking function.
cycle for a minimum of three hours. See “SELF CLEAN” in the
Care and Cleaning section.
for the first few times the oven is used.
This is normal.
start automatically once the preheating temperature is reached.
Make sure that the burner heads and caps are completely dry and
properly positioned.
This is normal. Electric spark igniters from the burners cause the
clicking noise. All the spark igniters on the cooktop will activate
when igniting just one burner.
Depending on the model of your range, the display will either show
“PF” or a flashing clock. This means that the product has just been
plugged in, or that it has experienced a power interruption. To clear
the “PF” message, press the “Clear/Off” key on the oven controls.
If your oven displays a flashing clock, then press the “Clock” key
and reset the time, or press any key to stop flashing.
or key and wait for one hour.
or key. Wait until the
or key.
or key. Reset the clock
Page 46

WARRANTY
45
WARRANTY
LG Electronics Inc. will repair or replace your product, at LG’s option, if it proves to be defective in material or workmanship under normal use, during the warranty period set forth below, effective from the date of original consumer purchase of the product.
This limited warranty is good only to the original purchaser of the product and effective only when used in U.S.A.
WARRANTY PERIOD HOW SERVICE IS HANDLED
One Year
From the date of the
original purchase.
THIS WARRANTY IS IN LIEU OF ANY OTHER WARRANTIES, EXPRESS OR IMPLIED, INCLUDING WITHOUT LIMITATION, ANY
WARRANTY OF MERCHANTABILITY OR FITNESS FOR A PARTICULAR PURPOSE. TO THE EXTENT ANY IMPLIED WARRANTY
IS REQUIRED BY LAW, IT IS LIMITED IN DURATION TO THE EXPRESS WARRANTY PERIOD ABOVE. LG WILL NOT BE LIABLE FOR ANY CONSEQUENTIAL, INDIRECT, OR INCIDENTAL DAMAGES OF ANY KIND, INCLUDING LOST REVENUES OR
PROFITS, IN CONNECTION WITH THE PRODUCT. SOME STATES DO NOT ALLOW LIMITATION ON HOW LONG AN IMPLIED
WARRANTY LASTS OR THE EXCLUSION OF INCIDENTAL OR CONSEQUENTIAL DAMAGES, SO THE ABOVE LIMITATIONS OR
EXCLUSIONS MAY NOT APPLY TO YOU.
THIS LIMITED WARRANTY DOES NOT APPLY TO:
Service calls to correct the installation of your appliance, to instruct you how to use your appliance, to replace house fuses or
1.
correct house wiring, or to replace owner-accessible light bulbs.
Repairs when your appliance is used in other than normal, single-family household use.
2.
Pickup and delivery. Your appliance is designed to be repairable in the home.
3.
Damage resulting from accident, alteration, misuse, abuse, fire, flood, improper installation, acts of God, or use of products not
4.
approved by LG Corporation.
Repairs to parts or systems resulting from unauthorized modifications made to the appliance.
5.
Replacement parts or repair labour costs for units operated outside the united states.
6.
Any labour costs during the limited warranty period.
7.
Any part
year warranty
to replace the defective part.
of the oven that fails due to a defect in materials or workmanship. During this
, LG will also provide,
free of charge
, all labour and in-home service
full one-
ENGLISH
This warranty is extended to the original purchaser for products purchased for home use within the U.S.A. In Alaska, the warranty
excludes the cost of shipping or service calls to your home.
Some states do not allow the exclusion or limitation of incidental or consequential damages, so this exclusion or limitation may
not apply to you. This warranty gives you specific legal rights, and you may also have other rights which vary from state to state.
To know what your legal rights are, consult your local or state consumer affairs or your state’s Attorney General.
CUSTOMER ASSISTANCE INFORMATION:
To Prove Warranty Coverage Retain your Sales Receipt to prove date of purchase.
A copy of your Sales Receipt must be submitted at the time warranty
service is provided.
To Obtain the Nearest Authorized Service Center
or Sales Dealer, or to Obtain Product, Customer, or
Service Assistance
Call 1-800-243-0000
choose the appropriate prompt from the menu; or visit our website at:
http://us.lgservice.com.
(Phone answered 24 hours - 365 days a year) and
Page 47

MEMO
Page 48

ESPAÑOL
MANUAL DE PROPIETARIO
ESTUFA DE GAS CON
HORNO DOBLE
Lea detenidamente estas instrucciones antes utilizar y
guárdelas como referencia para el futuro.
LDG3017ST
P/No.: MFL33029609
www.lg.com
Page 49

2
IndIce de contenIdos
INDICE DE CONTENIDOS
3 CARACTERÍSTICAS DEL PRODUCTO
4 INSTRUCCIONES DE SEGURIDAD
IMPORTANTES
10 ANTES DE USAR
10 Accesorios
11 Componentes
12 CÓMO USAR
12 Cómo usar las hornillas a gas de la superficie
12 - Antes de usar
13 - Hornillas a gas
13 - Uso de las hornillas a gas de la superficie
14 - Utensilios ubicados sobre la estufa
15 - Usando la parrilla
16 Cómo usar el horno
16 - Antes de usar
18 - Cómo usar el panel de control
20 Instrucciones de funcionamiento
20 - Auto conversión de convección
20 - Temperatura
20 - Idioma
20 - Luz de alarma de precalentado
21 - La luz del horno
21 - Volumen del bíper
21 - Fahrenheit o Celsius
21 - Reloj
22 - Temporizador
22 - De bloqueo
23 Cómo extraer y volver a colocar los estantes del
horno
24 HORNEAR (Horno superior e inferior)
25 Precalentamiento y ubicación de las bandejas
25 ASADO RÁPIDO (Horno superior)
29 COCCIÓN CON TEMPORIZADOR
(Horno superior e inferior)
29 COCCIÓN CON TEMPORIZADOR
RETARDADO (Horno superior e inferior)
30 Como usar la convección del horno inferior
30 - HORNEADO POR CONVECCIÓN
31 - ASADO POR CONVECCIÓN
32 Características especiales
32 - MENU PARA NIÑOS (Horno superior)
32 - CALENTAR (Horno superior e inferior)
33 - LEVAR (Para el horno inferior)
33 - FAVORITOS (Para el horno inferior)
34 - SABBAT (Horno superior e inferior)
35 CUIDADO Y LIMPIEZA
35 Hornilla a gas de la superficie
35 - Cómo extraer y volver a colocar las hornillas a
gas de la superficie
35 - Cómo limpiar los cabezales/tapas de las
hornillas
36 - Parrillas de las hornillas
37 - Superficie de la estufa
37 - Superficies de acero inoxidable
37 - Conductos de ventilación del horno
37 - Panel de control
37 - Panel frontal y perillas
38 - Puerta del horno
38 - Cómo extraer y volver a colocar las puertas
40 Como limpiar el Interior del horno
40 - AUTO LIMPIEZA (Horno superior e inferior)
42 - Cómo cambiar la luz del horno
42 - Bandeja y rejilla para asar
separado)
42 - Bandejas del horno
(Se vende por
43 ANTES DE SOLICITAR SERVICIO
TÉCNICO
45 GARANTÍA
Page 50

CARACTERÍSTICAS DEL PRODUCTO
DIVERSOS TAMAÑOS DE HORNILLAS A GAS
Elija la hornilla que mejor se adapte al tamaño de su batería de cocina.
Es posible utilizar varias hornillas a la vez para cocinar distintas cosas al mismo tiempo.
ESTUFA A GAS SEGURA, CONVENIENTE.
Proporciona seguridad y conveniencia para cocinar.
Su sistema Superboil ("super hervido") (de 17000 BTU) puede rápidamente hacer hervir una
olla de agua.
HORNO SUPERIOR / HORNO INFERIOR
Hornos superior e inferior separados.
Puede elegir utilizar un horno o ambos, dependiendo del tamaño de su comida.
3
ESPAÑOL
SISTEMA DE AUTO LIMPIEZA (SELF CLEAN)
Excelente para la limpieza fácil del aparato.
Page 51

4
INSTRUCCIONES DE SEGURIDAD IMPORTANTES
INSTRUCCIONES DE SEGURIDAD IMPORTANTES
Cumpla siempre con lo indicado en las siguientes señales de avisos de seguridad para evitar situaciones peligrosas y para asegurarse de obtener el máximo rendimiento de su producto.
ADVERTENCIA
Indica una situación peligrosa que puede resultar en lesiones graves o aún la muerte si no es evitada.
PRECAUCIÓN
Indica una situación peligrosa que, de no ser evitada, puede resultar en lesiones menores a moderadas.
QUÉ HACER SI HUELE GAS
1. Abra las ventanas.
2.
intente encender ningún aparato.
NO
3.
toque ningún interruptor eléctrico.
NO
4.
utilice ningún teléfono de su edificio.
NO
5. Comuníquese de inmediato con su proveedor de gas desde el teléfono de un vecino.
Siga las instrucciones del proveedor de gas.
6. Si no puede comunicarse con su proveedor de gas, contáctese con el departamento de bomberos.
DISPOSITIVO ANTI-VUELCO
ADVERTENCIA
•
TODAS LAS ESTUFAS PUEDEN VOLCARSE
•
PUEDE OCASIONAR LESIONES A LAS PERSONAS
•
INSTALE LOS DISPOSITIVOS ANTI-VUELCO QUE SE
ENCUEN TRAN EN EL ENVOLTORIO JUNTO A LA ESTUFA
•
LEA LAS INSTRUCCIONES DE INSTALACIÓN
NO se pare ni se siente en la puerta. Instale el Soporte Anti-Vuelco que se encuentra en el envoltorio junto a la estufa.
- Si la estufa llegara a volcarse, podría provocarle lesiones al caerse líquidos o comidas calientes, o la estufa en sí misma.
- En caso de tener que separar la estufa de la pared por motivos de limpieza, mantenimiento, o por cualquier otra razón,
asegúrese de reajustar el dispositivo Anti-Vuelco cuando la estufa vuelva a colocarse contra la pared.
Aproximadamente
0,65" (16,5 mm.)
Soporte
anti-vuelco
Los tornillos
deben penetrar
la madera o el
concreto
Placa de
pared
Para reducir el riesgo de que la estufa se vuelque hacia adelante, ésta debe asegurarse instalando de manera apropiada los
dispositivos anti-vuelco.
Para verificar que el soporte anti-vuelco está correctamente instalado: Quite cualquier elemento ubicado sobre la estufa.
Agarre la punta superior trasera de la estufa e intente inclinarla hacia adelante con cuidado. Verifique que los dispositivos antivuelco estén bien fijados.
Extraiga los cajones calentadores o de almacenamiento y observe que la pata de nivelación trasera esté completamente
insertada en el soporte anti-vuelco.
Consulte el manual de instalación para aprender cómo instalar correctamente el soporte anti-vuelco.
Page 52

INSTRUCCIONES DE SEGURIDAD IMPORTANTES
5
AVISO IMPORTANTE DE SEGURIDAD
La Ley de Cumplimiento dispone que el Gobernador de California debe publicar una lista de sustancias conocidas por el Estado que
pueden ocasionar defectos de nacimiento u otros daños reproductivos; asimismo, requiere que se advierta a los clientes los efectos
de la exposición a tales sustancias. Los aparatos a gas pueden ocasionar una exposición menor a cuatro de estas sustancias, a saber,
benceno, monóxido de carbono, formaldehído y hollín, causadas principalmente por la combustión imperfecta de gas natural o gas LP.
Las hornillas correctamente ajustadas minimizan la combustión imperfecta. El ajuste correcto de las hornallas lo indica su llama más
bien azulada que amarilla. La exposición a las mencionadas sustancias puede minimizarse abriendo ventanas o utilizando un extractor de
aire o campana de ventilación.
ESPAÑOL
PRECAUCIONES DE SEGURIDAD
Solicite al instalador que le muestre dónde está ubicada la válvula de cierre de gas de la estufa y cómo cerrarla en caso
de ser necesario.
Asegúrese de que su estufa sea correctamente instalada y conectada a tierra por un instalador autorizado, de conformidad con las
instrucciones de instalación. Cualquier mantenimiento y servicio debe ser efectuado solamente por instaladores de estufas de gas
o técnicos de servicio autorizados.
Conecte su estufa únicamente a tomacorrientes de 120 volts. No remueva las patas circulares de conexión a tierra del enchufe.
En caso de tener alguna duda acerca de la puesta a tierra del sistema eléctrico de su hogar, es su obligación y res- ponsabilidad
personal reemplazar el tomacorriente sin conexión a tierra por un tomacorriente de tres patas correctamente conectado a tierra,
de conformidad con el Código Eléctrico Nacional. No conecte la estufa a ningún cable de extensión.
utilice enchufes adaptadores, cables de extensión, ni remueva las patas de conexión a tierra del cable de corriente eléctrica, a
NO
fin de prevenir peligros de incendio o descargas eléctricas. No seguir esta advertencia puede ocasionar lesiones serias, incendios
o aún la muerte.
Para prevenir una circulación pobre de aire, coloque el aparato lejos del lugar de tránsito de la cocina y fuera de lugares donde
circulen corrientes de aire.
intente reparar o reemplazar ninguna pieza del aparato a menos que así lo indique específicamente este manual. Todos los
NO
servicios a realizar en la estufa deben ser efectuados por un técnico autorizado.
Asegúrese de que todos los materiales de empaque sean removidos de la estufa antes de ponerla en funcionamiento, a fin de
evitar que el material de empaque se incendie y provoque daños por humo o incendio.
Asegúrese de que su estufa ha sido correctamente ajustada por un técnico de servicio o instalador autorizado para el tipo de gas a
ser utilizado (gas natural o gas LP). Su estufa es apta para ser utilizada con cualquiera de los dos tipos de gas. Consulte las instrucciones de instalación.
En una situación de emergencia o si usted quiere cerrar la válvula de suministro de gas, retire el empaque de gaucho del regulador
en la parte de atrás, y luego cierre la válvula de regulador posicionando la pequeña palanca tal como se muestra en la figura de
abajo.
Posición abierta
de la palanca
ADVERTENCIA
Estos ajustes deben ser efectuados por un técnico de servicio autorizado de conformidad con las instrucciones del fabricante
y con todos los códigos y requisitos de la autoridad competente. No seguir estas instrucciones podría ocasionar serias lesiones o daños
al producto. La agencia autorizada que se encargue de realizar estos ajustes asumirá la responsabilidad resultante de los mismos.
Luego de utilizar el aparato por un tiempo considerable, el piso donde el mismo se encuentra apoyado puede alcanzar altas tem-
peraturas. Debe tener en cuenta que muchos recubrimientos de piso no son aptos para resistir este nivel de calor.
Los artículos de interés para los niños no deben ubicarse en armarios que se encuentren encima de la estufa ni en la pared sobre la que
se encuentra la misma. Si un niño se trepa a la estufa para alcanzar los objetos de su interés podría resultar seriamente herido.
instale la estufa sobre pisos de vinilo o linóleo, ya que éstos no son resistentes a su nivel de calor. Nunca instale el
NUNCA
aparato directamente sobre alfombras de cocina.
PRECAUCIÓN
deje a los niños solos o sin supervisión cuando la estufa esté caliente o en funcionamiento. Podrían sufrir serias quema- duras.
NO
permita que nadie se trepe, pare o cuelgue de la puerta del horno, cajón calentador o cocina. Esto podría dañar la estufa y aún
NO
volcarla hacia adelante, causando lesiones personales severas.
Posición abierta de la
palanca (sin empaque)
Posición cerrada
de la palanca
Page 53

6
INSTRUCCIONES DE SEGURIDAD IMPORTANTES
ADVERTENCIA
Este producto contiene quimicos conocidos por el Estado de California de causar cáncer.
manipular.
ADVERTENCIA
Se puede extinguir un incendio producido por grasas cubriéndolo con bicarbonato, o utilizando un químico seco multiuso o
Si hay llamas en el horno superior o en el horno inferior, éstas pueden apagarse completamente cerrando la tapa del horno
Espere a que las rejillas, hornillas y otras superficies se enfríen antes de tocarlas.
Los fuertes rayones o impactos en las puertas de vidrio pueden ocasionar que el vidrio se rompa o se quiebre.
Si pisa, se apoya o se sienta en las puertas o cajones calentadores de la estufa, podrá resultar seriamente herido y podrá
Las fugas de gas en el aparato pueden generar una grave situación. Las fugas de gas pueden no ser detectadas sólo por el
El control de fugas de gas del aparato debe ser realizado de conformidad con las instrucciones del fabricante.
Para prevenir manchas o decoloraciones, limpie el aparato luego de cada uso.
utilice el artefacto para calentar o aclimatar la habitación. Hacerlo podría causar la intoxicación por monóxido de
NUNCA
carbono y el sobrecalentamiento del horno.
use ropa suelta o prendas colgantes mientras utiliza el artefacto. Tenga cuidado cuando deba alcanzar objetos que
NUNCA
se encuentren ubicados en alacenas encima de la estufa. Materiales inflamables podrían incendiarse si entran en contacto
con alguna llama o con las superficies calientes del horno, pudiendo causar quemaduras severas.
coloque materiales inflamables dentro del horno o cerca de la estufa.
NO
coloque ni utilice materiales combustibles, como ser gasolina u otros vapores y líquidos inflamables, en las inmediacio-
NO
nes de este o cualquier otro aparato.
permita cocinar grasas u otros materiales inflamables en o cerca de la estufa.
NO
use agua en caso de incendio producido por grasas. Nunca intente tocar una sartén en llamas. Apague todos los con-
NO
troles. Extinga las llamas de la sartén en la hornilla de la superficie cubriendo completamente la sartén con una tapa, bandeja para hornear o una bandeja chata. Utilice un químico seco multiuso o un extinguidor de incendio tipo espuma.
extinguidor de incendio tipo espuma.
y girando la perilla a la posición de apagado, o bien utilizando un químico seco multiuso o extinguidor de incendios tipo
espuma.
utilice el horno o el cajón calentador como lugar de almacenamiento.
NO
obstruya las ventilaciones (orificios de aire) de la estufa. Éstas permiten la entrada y salida de aire necesarias para
NUNCA
que la estufa funcione apropiadamente, con la combustión correcta. Las aperturas de aire están ubicadas en la parte trasera
de la estufa, en la parte superior y en la parte inferior de la puerta del horno, y en la parte inferior de la estufa.
cubra ninguna ranura, orificio o conducto ubicado al pie del horno. Tampoco cubra ningún estante con materiales
NUNCA
tales como papel de aluminio. Hacerlo obstruiría la salida de aire a través del horno, lo que podría ocasionar la intoxicación
por monóxido de carbono. Los revestimientos en papel de aluminio también pueden retener el calor, ocasionando un peligro de incendio.
bloquee la ventilación del horno o las tomas de entrada de aire, porque obstruiría de esta forma el flujo de com-
NUNCA
bustión y la ventilación de aire. Esto limitaría la circulación de aire a la hornilla y podría provocar la intoxicación por monóxido
de carbono.
también dañar el artefacto. No permita que los niños se trepen o jueguen alrededor de la estufa. El peso de un niño sobre
una puerta abierta del aparato puede provocar que el mismo se vuelque hacia adelante, provocándole serias quemaduras u
otras heridas.
olor. Los proveedores de gas recomiendan comprar e instalar un detector de gas aprobado por UL. Instale y utilice el detector de gas de acuerdo a las instrucciones de su fabricante.
utilice limpiadores comerciales de horno en los acabados del horno ni alrededor de ninguna parte del horno. Estos lim-
NO
piadores dañan el acabado de las piezas del horno.
intente abrir o cerrar la puerta del horno, ni poner en funcionamiento el mismo, hasta que la puerta haya sido correcta-
NO
mente instalada.
coloque sus dedos entre la bisagra y el marco frontal del horno. Los brazos de las bisagras son a resorte. Si los
NUNCA
golpea por accidente, la bisagra se cerrará de golpe contra el marco del horno y podría lastimarle los dedos.
Lávese las manos después de
PRECAUCIÓN
utilice el horno para almacenar comida ni baterías de cocina.
NO
Para evitar dañar la puerta del horno, no intente abrirla cuando la señal
apoye peso excesivo ni se pare sobre una puerta abierta. Esto podría provocar que la estufa se vuelque hacia adelante,
NO
que la puerta se rompa o que el usuario resulte herido.
utilice la opción de horneado retardado para comidas altamente perecederas, tales como productos diarios, carne de
NO
cerdo, aves, o mariscos.
ADVERTENCIA
Desconecte el suministro eléctrico antes de realizar cualquier mantenimiento o revisión al aparato.
Este producto no debe ser instalado debajo de sistemas de ventilación tipo campana que direccionen el aire hacia abajo.
use la puerta del artefacto como escalerilla o asiento, ya que esto puede causar que el aparato se vuelque hacia
NUNCA
adelante, provocándole serias heridas.
Esto podría causar problemas de combustión en las hornillas a gas e incluso incendios, ocasionando lesiones personales y
afectando el rendimiento funcional de la unidad.
está encendida.
Lock
Page 54

INSTRUCCIONES DE SEGURIDAD IMPORTANTES
HORNILLAS DE LA SUPERFICIE
ADVERTENCIA
Aunque la llama de la hornilla se apague, el gas continúa saliendo hasta que la perilla se gire a la posición "OFF" (APAGADO).
Si huele gas, abra una ventana de inmediato y ventile el lugar por cinco minutos antes de utilizar la hornilla. No desatienda
las hornillas cuando éstas se encuentren en posición "ON" (ENCENDIDO).
Utilice tamaños apropiados de cacerolas - NO
terías con fondos planos lo suficientemente amplias para cubrir las parrillas de las hornillas. Para evitar derrames, asegúrese
de que las baterías sean lo suficientemente amplias para contener la comida adecuadamente. Esto ahorrará tiempo de limpieza como así también evitará acumulaciones peligrosas de comida, ya que la comida salpicada o derramada en las parrillas de las hornillas puede incendiarse. Use cacerolas con asas que puedan agarrarse fácilmente y conservarse frías.
PRECAUCIÓN
Asegúrese de que todos los controles de la superficie estén en la posición "OFF" (APAGADO) antes de abrir la llave de
suministro de gas de la estufa.
Gire siempre las perillas a la posición "LITE" (ENC) para encender las hornillas superiores y asegúrese de que éstas se hayan
Verifique que el tamaño de la llama que sale de la hornilla no exceda los bordes de la batería. La llama excesiva es pelig-
Utilice únicamente agarraderas secas - las agarraderas húmedas o mojadas en superficies calientes pueden provocar que-
Si utiliza baterías de vidrio, asegúrese de que las mismas estén diseñadas para cocinar sobre la estufa.
A fin de prevenir quemaduras por el fuego ocasionado por materiales inflamables o por derrames, gire las asas de las bat-
Vigile cuidadosamente la comida que se está friendo a fuego alto.
Caliente grasas siempre a fuego lento, y vigílelas mientras se calientan.
Si va a freír combinaciones de aceites y grasas, revuelva bien la mezcla antes de comenzar a calentarla.
De ser posible, utilice un termómetro profundo para grasas para prevenir el sobrecalentamiento de la grasa por encima del
Use la mínima cantidad posible de grasa para freír. Llenar la sartén con demasiada grasa puede provocar derrames cuando
Las comidas a freír deben estar lo más secas posibles. La humedad o escarcha en la comida puede provocar que la grasa
Mantenga todos los plásticos alejados de las hornillas de la superficie.
A fin de evitar quemaduras, asegúrese siempre de que las perillas de las hornillas estén en posición "OFF" (APAGADO) y de
Si huele gas, cierre la llave de gas de la cocina y llame a un técnico de servicio autorizado. Nunca use una llama abierta para
Gire siempre las perillas a la posición de “
Si la estufa se encuentra ubicada cerca de una ventana, no cuelgue cortinas largas porque podrían volar sobre las hornillas
desatienda las hornillas de la superficie cuando estén encendidas con llama alta. Los desbordes pueden provocar
NUNCA
humo y derrames de grasa que pueden incendiarse.
encendido correctamente.
rosa.
maduras por el vapor. Asegúrese de que las asas de las baterías no estén cerca de las llamas abiertas de la estufa cuando
vaya a sacar la batería del fuego. No utilice toallas ni ningún otro producto de tela voluminoso. Utilice siempre agarraderas.
erías hacia un costado o hacia la parte trasera de la estufa; no las ponga sobre las hornillas adyacentes.
deje ningún elemento sobre la estufa. El aire caliente proveniente del conducto de ventilación puede encender los
NUNCA
elementos inflamables y aumentar la presión en contenedores cerrados, lo que puede provocar que éstos estallen.
punto de vaporización.
se agrega la comida.
cocine las alimentos directamente sobre llama abierta en las hornillas de la superficie.
NO
utilice un wok sobre las hornillas de la superficie si éste tiene un anillo de metal redondo que deba ser colocado sobre
NO
la parrilla de la hornilla para soportar el wok. Este anillo actúa como un concentrador de calor que puede dañar la parrilla de
la hornilla y/ el cabezal de la hornilla. También puede provocar el mal funcionamiento de la hornilla. Asimismo, puede provocar niveles de monóxido de carbono superiores a los permitidos por las normativas vigentes, resultando en un peligro para
la salud.
caliente bulla y se desborde de la sartén.
intente mover una sartén con grasa caliente, especialmente una freidora. Espere hasta que la grasa se enfríe.
NUNCA
coloque elementos plásticos sobre la estufa - éstos se pueden derretir si se dejan demasiado cerca del conducto de
NO
ventilación.
que las parrilla estén frías antes de intentar tocarlas.
localizar una fuga de gas.
intente levantar la estufa. Hacerlo podría dañar la cocina y provocar el mal funcionamiento de la estufa.
NO
de la estufa y prenderse fuego.
utilice cacerolas inestables o que puedan volcarse fácilmente. Seleccione ba-
” (APAGADO) antes de sacar cualquier batería del fuego.
OFF
7
ESPAÑOL
Page 55

8
INSTRUCCIONES DE SEGURIDAD IMPORTANTES
ASADOR
Siempre use una cacerola de asado y una parrilla para drenar el exceso de grasa y cebo, esto ayudará a reducir salpicaduras,
humo y llamaradas. El encendedor del asador cerámico infrarrojo que se encuentra localizado en la parte superior del interior del
horno brillará anaranjado periódicamente durante la operación normal del asador.
ADVERTENCIA
Cuando use el asador, la temperatura dentro del horno será muy alta. Tome precaución para evitar posibles quemaduras mediante las siguientes prácticas:
• Mantenga la puerta cerrada (Refiérase a la sección Asado del manual).
• Siempre use guantes para hornear cuando inserte o retire los alimentos.
PRECAUCIÓN
El asador cerámico infrarrojo generará un calor intenso que dorara la comida más rápido que un asador regular de tipo tubo. Utilice el sistema de asado solamente bajo las condiciones para el cual fue diseñado para el consumidor.
No intente rociar el asador y el encendedor del asador con ningún tipo de limpiador ni tallarlo. Esto último dañará el sistema de
asado.
Las placas cerámicas del asador no necesitan ser limpiadas manualmente. Cualquier residuo de grasa o salpicadura en la placa
cerámica provocada por el cocinado u horneado, se quemará y por lo tanto se limpiará tan solo encendiendo el asador por aproximadamente 10 minutos.
COCINE COMPLETAMENTE LA CARNE Y EL POLLO
Para protegerse de intoxicaciones, cocine la carne roja y pollería totalmente. El Departamento de Agricultura de los Estados
Unidos por sus siglas en Ingles (USDA) ha indicado las siguientes temperaturas internas mínimas para el consumo seguro de los
alimentos.
Carne de res, ternera, puerco o cordero, molida: 160° F
Aves: 165 °F
Bistec de res, ternera, puerco o cordero: 145 °F
Pescados y Mariscos: 145°F
AUTOLIMPIEZA DEL HORNO
Asegúrese de quitar los derrames en exceso antes de iniciar la función de auto limpieza.
PRECAUCIÓN
deje comida, utensilios de cocina, estantes, etcétera, dentro del horno durante el ciclo de auto limpieza.
NO
utilice limpiadores de horno. No debe utilizarse ningún limpiador comercial de horno ni revestimiento de protección de
NO
horno de ningún tipo dentro ni alrededor de ninguna parte del horno. Los residuos producidos por los limpiadores de horno
dañan la parte interior del horno cuando se está utilizando el ciclo de auto limpieza.
Extraiga los estantes del horno y cualquier otro elemento de los hornos superior e inferior antes de iniciar el ciclo de auto
limpieza.
Sólo limpie las piezas enumeradas en este manual.
limpie la junta de la puerta. La junta de la puerta resulta necesaria para lograr un buen sellado. Tenga cuidado de no
NO
frotar, dañar o mover la junta.
Si el modo de auto limpieza funciona mal, apague la estufa y desconecte el suministro de energía. Haga revisar el aparato
por un técnico de servicio autorizado.
Es normal que las piezas del horno se calienten durante el ciclo de auto limpieza.
Evite tocar la puerta, ventana o área de ventilación del horno durante el ciclo de limpieza.
Page 56

INSTRUCCIONES DE SEGURIDAD IMPORTANTES
HORNO
Cuando abra la puerta de un horno caliente, aléjese lo más posible del aparato. El aire caliente y el vapor que salen del aparato
podrían provocar quemaduras en sus manos, cara y/u ojos.
ADVERTENCIA
obstruya ninguna ranura, orificio o conducto ubicado en la parte inferior del horno. Tampoco cubra ningún estante con
NUNCA
materiales tales como papel de aluminio. Hacerlo obstruiría la circulación de aire a través del horno y podría ocasionar la intoxicación por monóxido de carbono. Los revestimientos en papel de aluminio también pueden retener el calor, provocando un
peligro de incendio.
caliente comida en empaques cerrados. La presión generada dentro del empaque puede aumentar y reventar, ocasio-
NO
nando lesiones.
use papel de aluminio en cualquier parte del horno, salvo en las partes que se indican en el presente manual. Hacerlo
NO
podría ocasionar un peligro de incendio o bien dañar la estufa.
utilice el horno como lugar de almacenamiento. Los elementos almacenados en el horno pueden prenderse fuego.
NO
Mantenga el horno libre de acumulación de grasas.
Coloque los estantes del horno en la posición deseada cuando el horno esté frío.
A fin de prevenir quemaduras al sacar la comida del horno, deslice los estantes hacia afuera hasta que hagan tope. Luego,
extraiga la comida. Esto también puede ayudarle a evitar quemarse por tocar las superficies calientes de la puerta o las
paredes del horno.
Utilice siempre guantes de cocina cada vez que ponga o saque una bandeja/rejilla del horno.
Siga las instrucciones del fabricante al utilizar bolsas para asar o para cocinar en el horno.
Utilice baterías de vidrio solamente cuando éstas sean aptas para ser utilizadas en hornos a gas.
Extraiga siempre la asadera de la estufa luego de que termine de asar. La grasa que se deja en la asadera puede prenderse
fuego si se utiliza el horno sin haberla extraído.
Si la carne está demasiado cerca de la llama cuando se está asando, la grasa puede incendiarse. Reduzca el exceso de
grasa para evitar destellos/fuego excesivo.
Asegúrese de que la asadera está ubicada correctamente en su lugar para minimizar la posibilidad de incendios provocados
por grasas.
En caso de que haya fuego en la asadera provocado por grasas, presione la tecla "UPPER CLEAR/OFF" o "LOWER CLEAR/
OFF", y mantenga la puerta del horno cerrada para contener el fuego hasta que éste se apague.
Por razones de seguridad y para lograr un óptimo rendimiento en la cocción, siempre hornee y ase sus comidas con la
puerta del horno cerrada.
Hornear o asar la comida con la puerta abierta puede dañar las perillas o las válvulas del aparato.
deje la puerta del horno abierta mientras esté cocinando o enfriando el horno.
NO
9
ESPAÑOL
LEA TODAS LAS INSTRUCCIONES ANTES DE UTILIZAR EL APARATO.
CONSERVE ESTAS INSTRUCCIONES
Page 57

10
ANTES DE USAR
ANTES DE USAR
Accesorios
Asegúrese de que todas las piezas estén incluidas antes de comprar el producto.
Estufa a gas de doble horno
Estantes
(2)
Manual del propietario Manual de instalación
Espreas superiores (5) Boquillas del horno (4) Guía de instalación
Ménsula anti-vuelco Tornillos (6) Anclajes (6)
Plantilla
Se vende por separado
Estante de compensación
(1)
Equipo de conversión para boquilla LP
Equipo anti-vuelco
Parrilla
(1)
Asadera Rejilla
NOTA
Comuníquese con el Centro de Atención al Cliente de LG en caso de que falte algún accesorio.
Por su seguridad y para lograr una óptima durabilidad del producto, utilice únicamente componentes autorizados.
El fabricante no será responsable por el mal funcionamiento del producto o por accidentes causados por el uso de compo-
nentes o piezas no autorizadas, compradas por separado.
Las imágenes incluidas en esta guía pueden diferir de los componentes y accesorios reales, y pueden ser sujetas a modifi-
caciones por parte del fabricante a los fines de mejora del producto sin necesidad de previo aviso.
Page 58

ANTES DE USAR
11
Componentes
Asegúrese de entender los nombres y función de cada pieza.
* A lo largo de este manual, las características y apariencia del producto pueden variar dependiendo de su modelo.
Panel de control
Ventilación del horno
Hornilla ovalada
Hornilla mediana
Hornilla grande
Perillas (5)
Interruptor de luz
auto-mático del horno
Parrillas
Hornilla pequeña
Hornilla extra grande
Pestillo para autolimpieza
Estante
Puerta de horno superior
Estante
Soporte Anti-
vuelco
Puerta de horno inferior
ESPAÑOL
NOTA
El modelo y la etiqueta seriada están localizados detrás del panel de control.
Page 59

12
CÓMO USAR
CÓMO USAR
Cómo usar las hornillas a gas de la superficie
Antes de usar
Lea todas las instrucciones antes de usar el producto.
Asegúrese de que todas las hornillas estén correctamente colocadas.
Asegúrese de que todas las parrillas están correctamente ubicadas antes
de encender las hornillas.
PRECAUCIÓN
encienda la hornillas por un largo período de tiempo sin que haya ninguna batería sobre la rejilla.
NO
El acabado de la parrillas puede saltarse si no hay ninguna batería que absorba el calor.
Asegúrese de que las hornillas y parrillas se hayan enfriado antes de
apoyar su mano, agarradera, repasador u otro material sobre las mismas.
Tocar las parrillas antes de que se hayan enfriado puede provocar quemaduras.
PRECAUCIÓN
QUÉ HACER SI HUELE GAS
1. Abra las ventanas.
2. NO intente encender ningún aparato.
toque ningún interruptor eléctrico.
3.
NO
4.
use ningún teléfono dentro de su edificio.
NO
5. Comuníquese de inmediato con su proveedor de gas desde el teléfono de un vecino.
Siga las instrucciones del proveedor de gas.
6. Si no puede comunicarse con su proveedor de gas, contacte al departamento de bomberos.
NOTA
El encendido de chispa electrónica de los quemadores causa un sonido de tipo clic.
Todos los encendidos de chispa en la estufa se activaran al encender un solo quemador.
Page 60

CÓMO USAR
13
Hornillas a Gas
La cocina de su estufa tiene cinco hornillas selladas a gas.
Estas pueden ser ensambladas y separadas. Siga la guía a
continuación.
2
1
Hornilla mediana y grande
1
Las hornillas medianas y grandes son las hornillas principalmente utilizadas para la mayoría de comidas. Estas
hornillas pueden llevarse de nivel "HI" (ALTO) a “LO”
(BAJO) para acomodarse al amplio rango de necesidades
culinarias.
Hornilla ovalada
2
La hornilla ovalada (centro) es para usarse con la parrilla y
ollas ovaladas.
Hornilla pequeña
3
La hornilla más pequeña es utilizada para comidas delicadas, como ser salsas o comidas que requieren poco calor
por un tiempo prolongado de cocción.
Hornilla extra grande
4
La hornilla extra grande es la hornilla de mayor potencia.
Al igual que las otras cuatro hornillas, puede llevarse de
nivel "HI" a "LO" para satisfacer el amplio rango de necesidades culinarias. Esta hornilla también está diseñada para
hervir rápidamente grandes cantidades de líquido. Puede
ser utilizada para baterías de 10 pulgadas de diámetro o
más.
3
Uso de las hornillas a gas de la superficie
Asegúrese de que todas las hornillas de la superficie
1
estén ubicadas en la posición correcta.
Ponga la batería sobre la hornilla. (Por ejemplo: una olla,
2
sartén, etc.).
Empuje y gire la perilla de control a la posición “
3
LITE
”.
ESPAÑOL
4
Escuchará un sonido tipo chasquido proveniente del
sistema de encendido de chispa eléctrica.
Gire la perilla de control para controlar la intensidad de la
4
llama.
PRECAUCIÓN
intente desensamblar o limpiar alrededor de ninguna
NO
hornilla mientras otra hornilla está encendida. Cuando
gire una hornilla a la posición “
chispearán. Puede producirse una descarga eléctrica que
puede volcar una batería caliente.
”, todas las hornillas
LITE
Cómo seleccionar el tamaño de llama
Observe la llama y no la perilla cuando reduzca la intensidad
del fuego. Cuando desee un calentamiento rápido, el tamaño
de la llama que sale de la hornilla debe coincidir con el de la
batería en uso.
PRECAUCIÓN
deje que las llamas se extiendan más allá de
NUNCA
los bordes de la batería.
Page 61

14
CÓMO USAR
En caso de falla en la energía
eléctrica:
En caso de que haya una falla en la energía eléctrica, puede
encender las hornillas superiores con un fósforo. Las hornillas
superiores que se encuentren en uso al producirse una falla
en la energía eléctrica continuarán funcionando con normalidad.
Acerque un fósforo a la hornilla. Luego, presione la perilla
1
de control.
Gire la perilla de control a la posición de“Lo”.
2
PRECAUCIÓN
Tenga extrema precaución al encender las hornillas
con fósforos. Puede quemarse y lastimarse.
Utensilios ubicados sobre la estufa
Aluminio
Hierro fundido
Acero inoxidable
Hierro esmaltado
Vidrio
Cerámica y vidrio a
prueba de calor
Se recomienda el uso de baterías
de peso mediano porque se
calientan de forma rápida y
uniforme. La mayoría de alimentos
se doran de manera uniforme en
una sartén de aluminio. Utilice
cacerolas con tapas de ajuste
hermético cuando deba cocinar
con pequeñas cantidades de agua.
Si se calientan a fuego lento,
la mayoría de sartenes darán
resultados satisfactorios.
Este metal por sí solo tiene pobres
propiedades de calentamiento,
por lo que usualmente viene
combinado con cobre, aluminio
u otros metales para lograr una
mejor distribución del calor. Las
sartenes de metales combinados
dan resultados satisfactorios si
se utilizan a fuego medio, como
recomienda el fabricante.
Bajo algunas condiciones, el
esmaltado de estas baterías
puede derretirse. Siga las
recomendaciones del fabricante de
la batería respecto a los métodos
de cocción.
Existen dos tipos de baterías de
vidrio: aquellas aptas sólo para
horno, y aquellas para utensilios
ubicados sobre la estufa.
Se puede utilizar para cocinar tanto
en la superficie como en el horno.
Conduce el calor muy lentamente
y se enfría muy lentamente.
Consulte las instrucciones del
fabricante de la batería para
asegurarse de que puede utilizarse
en estufas a gas.
Uso de wok:
Si usa un wok, se recomienda que utilice un wok de base
plana de 14 pulgadas como máximo. Asegúrese de que la
base del wok se asiente firmemente en la rejilla.
Utilice woks de base plana.
PRECAUCIÓN
use ningún aro de soporte para woks. Colocar el aro
NO
sobre la hornilla o parrilla podría causar que la hornilla
funcione de manera incorrecta, generando niveles de
monóxido de carbono superiores a los permitidos. Esto
puede resultar peligroso para su salud.
Uso de gratinadores de cocina:
No coloque gratinadores de cocina sobre las hornillas.
PRECAUCIÓN
utilice gratinadores de cocina en las hornillas de la
NO
superficie. Si utiliza un gratinador de cocina sobre las hornillas de la superficie, ocasionará una combustión incompleta, lo que provocará la exposición a niveles de monóxido
de carbono superiores a los permitidos por las normativas
vigentes. Esto puede resultar peligroso para su salud.
Page 62

Usando la parrilla
CÓMO USAR
Precaliente la parrilla según la siguiente guía y ajuste la
potencia que desee.
15
Su rejilla con capa antiadherente proporciona una superficie
extra-grande de cocción para carnes, panqueques u otros alimentos que se preparan habitualmente en una sartén normal
o plana.
NOTA
Es normal que la parrilla se descolore con el tiempo.
La parrilla sólo puede usarse en
Cómo colocar la parrilla:
el quemador central. La parrilla debe ser colocada apropiadamente en la parrilla de la hornilla central, como se muestra en
la figura de abajo.
Frontal
Tipo de alimento Condiciones de
precalentamiento
Tortillas calientes sin precalentar 5 (MED)
Panqueques HI 3 min. HI
Hamburguesas HI 5 min. HI
Huevos fritos HI 5 min. HI
Bacon HI 3 min. HI
Salchichas de
desayuno
Sándwiches calientes HI 4 min. HI
NOTA
La potencia de la parrilla podría precisar ajuste si se
usa durante períodos prolongados.
HI 5 min. HI
Ajuste de
cocción
NOTAS IMPORTANTES:
• Evite cocinar alimentos con un excesivo contenido en grasas; podrían producirse derrames de grasa.
• La parrilla puede calentarse al usar los quemadores aledaños.
• NO caliente la parrilla en exceso. Hacerlo puede dañar el
recubrimiento antideslizante.
• NO use utensilios metálicos que podrían dañar la superficie
de la parrilla. No use la plancha como tabla de cortar.
• NO coloque ni almacene objetos sobre la parrilla.
ESPAÑOL
NOTA
retire la rejilla central al usar la parrilla.
NO
PRECAUCIÓN
retire la plancha de la parrilla hasta que las rejillas, su-
NO
perficies de la estufa y la propia parrilla se hayan enfriado
por completo.
PRECAUCIÓN
La plancha de la parrilla puede calentarse mucho al usar la
estufa, el horno o los sistemas de asado.
Use siempre guantes para horno al colocar o retirar la plancha de la parrilla.
Page 63

16
CÓMO USAR
CÓMO USAR EL HORNO
Antes de usar
Lea todas las instrucciones antes de usar.
Asegúrese de que el cable de alimentación eléctrica y la válvula de gas
estén correctamente conectados.
Verifíquelo por cuestiones de seguridad.
Verifi que cómo utilizar de manera correcta la estufa, dependiendo del tipo
de comida a cocinar.
Asegúrese de que sabe cómo utilizar el horno (configuración de temperatura, tiempo de cocción y
receta) para lograr los mejores resultados.
PRECAUCIÓN
QUÉ HACER SI HUELE GAS
1. Abra las ventanas.
2. NO intente encender ningún artefacto.
3. NO toque ningún interruptor eléctrico.
4. NO use ningún teléfono dentro de su edificio.
5. Comuníquese de inmediato con su proveedor de gas desde el teléfono de un vecino.
Siga las instrucciones del proveedor de gas.
6. Si no puede comunicarse con su proveedor de gas, contacte al departamento de bomberos.
Elija el horno superior o el horno inferior para una cocción adecuada.
Use el horno superior para cocinar pequeñas cantidades de comida.
NOTA
Cuando se utiliza un termómetro de horno en la cavidad del horno, temperaturas pueden diferir de
la temperatura real del horno en cualquier modo.
Page 64

CÓMO USAR
No obstruya, toque o coloque objetos alrededor del conducto de ventilación del horno cuando el mismo esté encendido.
Su horno es ventilado a través de conductos ubicados en el centro, encima de la parrilla de la hornilla.
No obstruya la ventilación del horno cuando éste se encuentre en funcionamiento; de lo contrario, no
permitirá la circulación correcta de aire. No toque las aperturas de ventilación o las superficies de alrededor durante su uso.
PRECAUCIÓN
coloque elementos plásticos o inflamables sobre la cocina; estos pueden derretirse o pren-
NO
derse fuego si se dejan muy cerca de la ventilación.
coloque empaques cerrados sobre la cocina. Puede hacer aumentar la presión de los em-
NO
paques cerrados y provocar que revienten.
Los objetos de metal que se dejen sobre la cocina se pondrán muy calientes, pudiendo provocar
quemaduras.
Las asas de las ollas y cacerolas que se encuentren en la cocina pueden sobrecalentarse si se
dejan demasiado cerca del conducto de ventilación.
No cubra ningún estante o base con papel aluminio.
17
ESPAÑOL
A medida que su horno se caliente, el aumento de temperatura del aire
producido dentro del horno puede generar que se produzcan gotas de
agua en la puerta de vidrio del horno.
Estas gotas de agua no son peligrosas y se evaporarán a medida que el horno continúe con el proceso
de calentamiento.
En caso de falla en la energía eléctrica, no utilice el horno.
El horno y la asadera no pueden utilizarse durante un corte de energía. Si el horno se encuentra en uso
al producirse el corte de energía, el quemador del horno se apagará y no podrá ser re-encendido hasta
que se restablezca la energía. Una vez que vuelva la energía eléctrica, deberá reiniciar el horno (o la
función de asa).
PRECAUCIÓN
intente utilizar el encendido eléctrico durante una falla de energía eléctrica.
NO
NOTA
PF(Falla de Poder) / Reloj Parpadeando
Dependiendo del modelo de su estufa, la pantalla mostrará "PF“ o un reloj parpadeando. Esto
significa que el electrodoméstico ha sido conectado, o que ha experimentado una interrupción
en la alimentación. Para borrar el mensaje "PF", presione la tecla "Clear / Off" en los controles del
horno. Si su horno muestra un reloj parpadeando, presione la tecla “Clock” y reinicie el tiempo, o
presione cualquier tecla para que deje de parpadear.
Page 65

18
CÓMO USAR
Cómo usar el panel de control
1 3 42
9
13
10
11
12
5192014
Pantalla
6
15
16
21
32
22
Horno superior:
Nombre Descripción
BAKE Función tradicional de hornear. Consulte “HORNEAR” en la sección "Cómo usar".
1
SPEED BROIL Función Infrarrojo de asar. Consulte “ASADO RÁPIDO” en la sección "Cómo usar".
2
WARM
3
KIDS MEAL
4
UPPER LIGHT Enciende/ apaga la luz del horno superior.
5
UPPER SELF CLEAN
6
UPPER TIMER ON/OFF
7
UPPER CLEAR/OFF Deja de cocinar o cancela los ajustes realizados en el HORNO SUPERIOR.
8
Calienta la comida en el horno.
Consulte “CALENTAR” en la sección "Cómo usar".
Úsese para cocinar alimentos para niños como pizza congelada y nuggets de pollo.
Vea la sección [MENU PARA NIÑOS] en la sección "Cómo usar".
Limpia el interior del HORNO SUPERIOR automáticamente.
Consulte “AUTO LIMPIEZA” en la sección "Cómo usar".
Configura, inicia o cancela la función del temporizador del HORNO SUPERIOR.
Consulte “Cómo usar el temporizador” en la sección "Cómo usar".
24
87 17
18
Page 66

Cómo usar el panel de control
Horno inferior:
Nombre Descripción
CONV. BAKE
9
CONV. ROAST
-
BAKE Función tradicional de hornear. Consulte “HORNEAR” en la sección "Cómo usar".
q
PROOF Función para levar masa para pan. Consulte “LEVAR” en la sección "Cómo usar".
w
WARM
e
FAVORITE
r
LOWER LIGHT Enciende/ apaga la luz del horno inferior.
t
LOWER SELF CLEAN Limpia el interior del HORNO INFERIOR automáticamente.
y
LOWER TIMER ON/OFF
u
LOWER CLEAR/OFF Deja de cocinar o cancela los ajustes realizados en el HORNO INFERIOR.
i
Para usar la función de horneado por convección, vea "HORNEADO POR CONVECCIÓN" en la
sección de "Cómo usar".
Para usar la función de asado por convección, vea "ASADO POR CONVECCIÓN" en la sección de
"Cómo usar".
Calienta la comida en el horno.
Consulte la función “CALENTAR” en la sección "Cómo usar".
Use esta opción para almacenar tres tipos favoritos de configuraciones del horno.
Refiérase a “FAVORITOS” en la sección "Cómo usar".
Configura, inicia o cancel la función de temporizador del HORNO INFERIOR.
Consulte “Cómo usar el temporizador” en la sección "Cómo usar".
CÓMO USAR
19
ESPAÑOL
Funciones comunes
Nombre Descripción
COOK TIME
o
START TIME
p
CLOCK
a
SETTING Configura funciones varias.
s
NUMBER KEY
d
START (CONTROL LOCK)
f
Configura el tiempo de cocción. El horno se apaga automáticamente cuando alcanza el tiempo
de cocción establecido.
Configura la hora de inicio de cocción. El horno se encenderá automáticamente a la hora de inicio
fijada.
Configura la hora del día.
Consulte “Cómo configurar el reloj” en la sección "Instrucciones de funcionamiento".
Teclas numéricas que se utilizan para configurar la hora, el temporizador, la temperatura y tiempos de cocción.
Inicia todas las funciones a excepción del temporizador. Para activar OVEN LOCK (Bloquear
horno), presiónela y manténgala presionada por tres segundos.
Page 67

20
CÓMO USAR
Instrucciones de Funcionamiento
El valor de ajuste puede ser cambiado mediante la tecla
“
Los ajustes varían dependiendo de cada modelo. Refiérase a la
“Tabla de ajustes”.
”
TABLA DE AJUSTES
Instrucción de operación LDG3017ST
Auto conversión de convección Una sola vez
Fijar temperatura (horno inferior) Dos veces
Fijar temperatura (horno superior) Tres veces
Idioma Cuatro veces
Luz de alarma de precalentado “On/
Off”
Volumen de la bocina Seis veces
Fahrenheit o Celsius Siete veces
Cinco veces
Como fijar la función de auto conversión
de convección del horno inferior
Cuando use el horneado o el asado por convección, la característica de funcionamiento de auto conversión, convertirá automáticamente las temperaturas regulares a temperaturas de convección. Esta característica de funcionamiento es activada para
que la pantalla muestre la temperatura actual auto convertida.
Por ejemplo, si se introduce una temperatura regular de alguna
receta de 350°F y se presiona el botón q , la pantalla mostrará
la temperatura convertida de .
Presione la tecla una sola vez. aparecerá
1
en la pantalla.
Presione 1 para activar la auto conversión o presione 2 para
2
desactivarla.
Presione el botón q para aceptar el cambio.
3
Cómo configurar los ajustes de
temperatura:
Es posible que su nuevo horno cocine de manera diferente
a su horno anterior. Utilice el nuevo horno durante algunas
semanas para familiarizarse con el mismo antes de modificar
cual-quier ajuste de temperatura. Una vez que se haya familiarizado con el nuevo horno, si aún considera que éste está
demasiado caliente o demasiado frio, puede ajustar usted
mismo su termostato.
PRECAUCIÓN
use termómetros, como aquellos que se venden en
NO
almacenes, para verificar el ajuste de temperatura del
horno. Estos termómetros pueden variar entre 20 y 40
grados.
Determine qué horno desea ajustar (el horno superior o el
1
horno inferior).
Presione la tecla 2 veces para el horno inferior,
2
e
aparecerá en la pantalla.
Presione la tecla
f
aparecerá en la pantalla.
Con la teclas numéricas, ingrese la cantidad de grados en los
3
que desea ajustar el horno. Para bajar la temperatura, presione la tecla
Por ejemplo:
Para ajustar la temperatura del horno en 15 grados
presione 1, 5.
Para ajustar la temperatura del horno en 15 grados
presione 1, 5,
Presione la tecla q para aceptar el cambio.
4
NOTA
Este ajuste no afectará las temperaturas de las funcio-
nes de Asar ni de Auto-limpieza. El ajuste será conservado en la memoria del horno en caso de producirse
una falla en la energía eléctrica. La temperatura del
horno puede ser aumentada (+) o disminuida (-) en
hasta 35°F o 19°C, respectivamente.
Para aumentar o disminuir la temperatura mientras el
horno está en funcionamiento
1. Usando las teclas numéricas, ingrese la nueva temperatura.
2. Presione la tecla
3. Presione la tecla q para aceptar el cambio.
3 veces para el horno superior,
luego de ingresar los números.
:
una vez.
,
más
menos
,
Cómo seleccionar el idioma
El idioma predeterminado de la pantalla del horno es el Ingles.
Este puede ser cambiado a español o francés.
Presione la tecla cuatro veces. (Language)
1
aparecerá en la pantalla.
Presione la tecla numérica para seleccionar el idioma.
2
Idioma Ingles Español Francés
Tecla numérica 1 2 3
Presione la tecla
3
q
para aceptar el cambio.
Cómo configurar el encendido/ apagado
de la luz de alarma de precalentamiento:
Cuando el horno alcance la temperatura fijada, la luz de precalentamiento se encenderá hasta que la puerta del horno se abra.
Usted podrá activar o desactivar la luz de alarma de precalentamiento de la siguiente manera:
Presione la tecla 5 veces.
1
talla.
Presione la tecla numérica 1 para seleccionar encender o
2
presione 2 para seleccionar apagado. (encender/ apagar).
Presione la tecla q para aceptar el cambio.
3
s
aparecerá en la pan-
Page 68

CÓMO USAR
21
Cómo encender/apagar la luz interior del
horno:
La luz interior del horno se prende automáticamente cada vez
que se abre la puerta del horno.
Presione la tecla
del horno.
M
o Q para encender y apagar las luces
Cómo ajustar el volumen del bíper:
Presione la tecla 6 veces.
1
pantalla.
Seleccione 1 para alto, 2 para normal, 3 para bajo y 4 para
2
desactivar el sonido.
Presione la tecla q para aceptar el cambio.
3
j
aparecerá en la
Cómo seleccionar Grados Fahrenheit
o Celsius:
Las temperatura del horno puede configurarse en grados
Fahrenheit o Celsius. El ajuste predeterminado de fábrica es
en grados Fahrenheit. Éste puede ser cambiado por el usuario.
Presione la tecla 7 veces. i aparecerá en la
1
pantalla.
Presione la tecla numérica 1 para seleccionar Fahrenheit o
2
presione dos para seleccionar Celsius.
Presione la tecla q para aceptar el cambio.
3
Cómo ajustar el reloj (12 ó 24 horas):
Mantenga presionado el botón
1
Presione 1 para activar el reloj de 12 horas o presione 2
2
para activar el reloj de 24 horas.
Presione el botón q.
3
U
durante 3 segundos.
Cómo ajustar el reloj:
El reloj debe ajustarse con la hora correcta del día para que
las funciones de temporización del horno funcionen correctamente.
12
Hrs.
24
Hrs.
U
una vez.
/ HORA
MÍN.
1:00 Hrs. /
Min.
0:00 Hrs. /
Min.
0:01 Min.
300°F/
149°C
300°F/
149°C
t
, presione las teclas
TEMP. /
HORA MÁX.
11:59 Hrs. /
Min.
23:59 Hrs. /
Min.
11:59 Hrs. /
Min.
550°F /
288°C
550°F /
288°C
PREDET.
325°F/
163°C
325°F/
163°C
Presione la tecla
1
Presione la teclas numéricas para seleccionar la hora de-
2
seada.
: Para ajustar la hora en
Ejemplo
numéricas 1, 2, 3 y 4 en ese orden.
Presione la tecla q para aceptar el cambio.
3
Ajustes predeterminados mínimos y máximos:
Todas las características enumeradas tienen ajustes de
temperatura y de hora mínimos y máximos que pueden ser
ingresados en el control. Sonará un bip de aceptación cada
vez que se presione una tecla de control.
Sonará un tono de error (dos tonos cortos) si se ingresa un
valor de temperatura u hora por debajo del ajuste mínimo o
por encima del ajuste máximo de la característica.
CARACTERÍSTICA TEMP.
RELOJ
TIEMPO DE
COCCIÓN /
TEMPORIZA-
DOR
HORNEADO
POR
CONVECCIÓN
ASADO POR
CONVECCIÓN
ESPAÑOL
NOTA
La hora del día no puede ser modificada cuando el ciclo
de auto limpieza o de horneado por temporizador estén
en funcionamiento.
Para verificar la hora del día cuando la pantalla muestre
U
U
, la
otra información, simplemente presione la tecla
Si no se presiona ninguna tecla numérica dentro de los
30 segundos de haber presionado la tecla
pantalla volverá al ajuste original. Si esto sucede, presione la tecla
Si la hora se muestra en pantalla de manera intermi-
tente, puede haberse producido una falla de energía
eléctrica. Reinicie la hora.
U
y reingrese la hora.
ASADO
RÁPIDO
PARA
HORNEAR
.
LEVAR
CALENTAR
AUTO
LIMPIEZA
Bajo 250°F/
121°C
170°F /
77°C
2 Hr. 4 Hr. 3 Hrs.
Alto 500°F/
260°C
550°F /
288°C
170°F/77°C,
3 hours
Alto
350°F/
177°C
12 Hrs.
3 Hrs.
Page 69

22
CÓMO USAR
Cómo usar el temporizador:
TIMER ON/OFF
El
DO) superior o inferior sirve como un temporizador extra de
la cocina que sonará cuando el tiempo establecido se haya
completado. No comienza ni detiene la cocción.
La característica
utilizada durante cualquiera de las funciones de control del
horno. Los temporizadores superior e inferior funcionan de
manera independiente uno de otro.
Para fijar los minutos y segundos:
1
Presione la tecla
Para fijar las horas y los minutos:
Presione la tecla
Utilice las teclas numéricas para ajustar el temporizador.
2
Por ejemplo, para ajustarlo en 5 minutos:
a) Presione la tecla
g
aparecerá en la pantalla.
b) Presione la tecla numérica
h
aparecerá en la pantalla.
Para iniciar el temporizador, presione la tecla
3
T
tiempo programado en cuenta regresiva.
(TEMPORIZADOR ENCENDIDO/ APAGA-
TIMER ON/OFF
P
P
P
una vez. Se visualizará en la pantalla el correr del
superior o inferior puede ser
T
o
T
o
o
T
5
.
una vez.
dos veces.
dos veces.
P
o
Cómo utilizar la característica de bloqueo del horno:
La característica de bloqueo del horno automáticamente
bloquea la puerta del horno y no permite que la mayoría de
controles del horno puedan encenderse. No deshabilita el
reloj, temporizador ni la luz interior del horno.
Presione y mantenga presionada la tecla q por tres
1
segundos.
Sonará un tono, aparecerá y m parpadeará
en la pantalla. Una vez que la puerta del horno este bloqueada, el indicador de bloqueo del horno dejará de
parpadear y permanecerá.
2 Para desactivar la característica de bloqueo, presione y
mantenga presionada la tecla
aparecerá y m parpadeará hasta que la puerta
este completamente desactivada.
NOTA
Si la característica de bloqueo es activada por la apertura de cualquiera de las puertas, éstas últimas no
cerraran completamente hasta que la característica de
bloqueo sea desactivada.
q
por tres segundos.
Para cancelar el temporizador antes de que haya transcur-
T
P
, el temporiza-
rido el tiempo programado, presione
(dependiendo de qué temporizador - del horno superior o
inferior- desea cancelar).
NOTA
Si no se presiona
dor volverá a la hora del día.
Cuando haya transcurrido el tiempo programado, k apa-
4
recerá en la pantalla y sonará un tono. Este tono sonará
cada 15 segundos hasta que se presione la tecla
T
o
Si el tiempo restante no aparece en la pantalla, presione
la tecla
.
NOTA
P
P
T
o
o
para visualizarlo.
T
o
P
Page 70

CÓMO USAR
Cómo extraer y volver a colocar los estantes del horno
PRECAUCIÓN
Coloque el estante en el horno antes de encender el horno para evitar quemaduras.
Cuando desee remover el estante del horno, sujételo de las asas y jale. Siempre use guantes de cocina para prevenir que-
maduras.
cubra el estante con papel de aluminio ni con ningún otro material; tampoco coloque ningún elemento en la parte infe-
NO
rior del horno. Hacerlo podría provocar un mal funcionamiento del horno o podría dañar la parte inferior del horno.
Acomode los estantes del horno sólo cuando el horno esté frío.
Extraiga
23
ESPAÑOL
Coloque
Para extraer los estantes del horno:
Con sus guantes para hornear, agarre el estante del horno.
1
Tire el estante hacia afuera hasta que haga tope.
2
Levante la parte frontal del estante.
3
Tire el estante hacia afuera.
4
*También puede ajustar la posición de los estantes antes
de utilizar el horno.
Para volver a colocar los estantes del
horno:
Coloque la parte trasera del estante en el soporte. Use
1
guantes/guantes de cocina para horno.
Incline el extremo frontal del estante hacia arriba.
2
Empuje el estante hacia adentro.
3
Verifique que el estante esté correctamente ubicado en
4
su lugar.
Page 71

24
CÓMO USAR
HORNEAR
(Horno Superior e Inferior)
La función de HORNEADO se utiliza para preparar platillos
tales como pasteles, panes, guisados y comidas asadas. Se
puede programar el horno para que hornee a cualquier temperatura, desde 170°F (77°C) a 550°F (288°C). La temperatura
predeterminada es de 350°F (177°C).
Para configurar la función de HORNEADO
(por ejemplo, a 375°F):
Presione la tecla A del horno superior o inferior.
1
Ingrese la temperatura del horno utilizando las teclas nu-
2
méricas (por ej., presione
Presione la tecla q.
3
Mientras el horno se precalienta, la temperatura se visualizará en pantalla e irá aumentando en intervalos de 5
grados. Una vez que el horno alcance la temperatura
deseada, sonará un tono y la luz del horno comenzará a
parpadear.
NOTA
El precalentamiento es necesario para lograr mejo-
res resultados de cocción. Coloque la comida en el
horno luego de haberlo precalentado.
También puede cambiar la temperatura mientras
esté cocinando, siguiendo los pasos 1 a 3.
3, 7, 5
).
Cuando la cocción se haya completado, presione la tecla
4
o .
Saque la comida del horno.
5
Visualización en pantalla del modo HORNEAR (Ejemplo):
Horno superior únicamente
Horno inferior únicamente
Horno inferior únicamente
Hornos superior e inferior al mismo tiempo
Page 72

CÓMO USAR
25
Precalentamiento y ubicación de
las bandejas
Para precalentar, ajuste la temperatura del horno a la
indicada en la receta. Espere hasta que el horno alcance
la temperatura ingresada antes de poner la comida en
el horno. El precalentamiento es necesario para obtener
resultados satisfactorios al hornear pasteles, galletas,
tartas y panes.
Para obtener los mejores resultados en el horneado, las
bandejas deben centrarse en los estantes. Si hornea con
más de una bandeja, coloque las bandejas de manera tal
que cada una tenga como mínimo 1” a 1 1/2” de espacio a su alrededor.
Si debe utilizar varios estantes en el horno inferior,
coloque los estantes en la posición C(un estante) y E(un
estante). Coloque las bandejas tal como se muestra en
la Figura 1.
Si cocina en un solo estante dentro del horno superior,
coloque el estante en la posición A y en el horno inferior
colóquelo en la posición D. Coloque sus recipientes para
cocinar justo como se muestra en la Fig. 2.
En el horno superior se recomienda hornear con un
estante estándar en la posición A.
ASADO RÁPIDO (Horno superior)
Su estufa de gas LG de doble horno usa un sistema de asado
cerámico e infrarrojo (IR por sus siglas en ingles). A diferencia de un
sistema de asado estándar, el asador cerámico IR trabaja convirtiendo el calor de la flama en energía infrarroja. Este sistema provee
un intenso calor que puede dorar los alimentos rápidamente con
excelente resultados.
Beneficios de asador cerámico e infrarrojo.
- Intenso calor que dora y encierra los jugos y sabores.
- Asa los alimentos rápidamente.
Su horno está diseñado para asar a puerta cerrada. La función
niente de la hornilla de gas superior. Esta función trabaja mejor
cuando se asan cortes finos y tiernos (de 1” o menos) de carne,
aves o pescado.
NO
la grasa se incendie.
NO
provocará que se prenda fuego.
Siempre use
el exceso de grasa y cebo, esto ayudará a reducir salpicaduras, humo y llamaradas.
Nunca
limpia y a temperatura ambiente. Si la cacerola esta dañada,
deformada, o permanentemente muy sucia, debe de considerar reemplazarla para reducir la cantidad de humo durante el
asado.
(ASAR) utiliza una intensa radiación de calor prove-
PRECAUCIÓN
utilice asaderas sin rejilla. El aceite puede ocasio-nar que
cubra la rejilla ni la asadera con papel de aluminio.Hacerlo
una cacerola de asado y una parrilla para drenar
utilice una cacerola para asar si no esta totalmente
ESPAÑOL
Figura 1 Figura 2
Rack
stante
E
NOTA
Extraiga la asadera del horno para que se enfríe y así permitir la
limpieza fácil.
Para obtener los mejores resultados, utilice una bandeja diseñada
para asar, como se muestra abajo. La asadera retiene los derrames de grasa y la rejilla ayuda a prevenir que la grasa salpique.
Rejilla
Asadera
Para mejores resultados, use el modo asado con el estante de
compensación en la posición ‘A’ en el horno superior.
*A: Posición
donde se utiliza
B
A
el estante de compensación
PRECAUCIÓN
Tenga cuidado cuando deslice hacia adentro o hacia afuera
el estante de compensación, ya que como pasa cerca de la
parte inferior de la cavidad, las superficies calientes pueden
causar quemaduras. Siempre use guantes de cocina cuando
mueva los estantes del horno.
Page 73

26
CÓMO USAR
superior:
Presione la tecla una sola vez para alto, dos
1
veces para medio y tres veces para bajo.
Presione la tecla q.
2
Permita que el horno para asar se precaliente durante 3
3
minutos.
Coloque la comida en el horno superior.
4
Cierre la puerta del horno. La puerta del horno debe per-
5
manecer cerrada durante el proceso de asado.
ADVERTENCIA
Cuando use el asador, la temperatura dentro del horno
será muy alta. Tome precaución para evitar posibles
quemaduras mediante las siguientes prácticas:
Mantenga la puerta cerrada (Refiérase a la sección
Asado del manual).
Siempre use guantes para hornear cuando inserte o
retire los alimentos.
Un uso inapropiado del asador puede provocar humo
excesivo y fuego causado por la grasa. Condiciones
impropias de uso incluyen, pero no estan limitadas a:
- Asar con la parrilla en la posición B.
- Seleccionar una potencia del asador mayor a la
recomendada.
- Usar una bandeja para asar sucia y/o grasosa.
- Asar por mas tiempo del recomendado.
NOTA
Si la puerta del horno permanece abierta por más de
15 segundos durante la función de Asar, la hornilla se
apagará. La hornilla se volverá a encender automáticamente una vez que la puerta haya sido cerrada.
Cuando haya finalizado de asar, presione la tecla .
6
NOTA
Puede producirse algo de humo durante el proceso de
asado. Esto es normal. El encendedor del asador cerámico
infrarrojo que se encuentra localizado en la parte superior
del interior del horno brillará anaranjado periódicamente
durante la operación normal del asador.
Visualización en pantalla del modo ASAR (Ejemplo)Para configurar la función de ASAR en el horno
Alto temperatura Medio temperature
Bajo temperatura
• Alto: Use el ajuste ‘Alto’, para bistec, hamburguesas y
pescados que usted quiera logren un dorado profundo lleno de
sabor.
• Medio: Use el ajuste ‘Medio’ para cortes gruesos de carne
que usted quiera logren un término tres cuartos o bien cocido.
También use el ajuste medio de asado para pescado con todo
y piel.
• Bajo: El ajuste ‘Bajo’ es más efectivo para derretir queso en
alimentos como nachos.
Debido a que un intenso calor esta asociado con el asador infrarrojo, quizás experimente que exista más humo que a lo que esta
acostumbrado comparado con un asador convencional. Este
humo es naturalmente provocado por el dorado y no debe de
generarle preocupación alguna. Si experimenta más humo del
cual esta acostumbrado que exista, sírvase de los siguientes tips
para reducir la cantidad de humo en su horno:
. Para cualquier asado en sus ajustes alto o bajo, use una
1
cacerola de asado solamente. No saltee cacerolas u hojas de
horneado regulares por cuestiones de seguridad.
. NUNCA use una cacerola de asado que no este totalmente
2
limpia y a temperatura ambiente al principio del cocinado.
Si la cacerola esta dañada, deformada, o permanentemente
muy sucia, debe de considerar reemplazarla para reducir la
cantidad de humo durante el asado.
. SIEMPRE utilice el sistema de ventilación de su cocina o cam-
3
pana de ventilación durante el asado.
. Mantenga siempre el interior de su horno lo más limpio que
4
pueda. Los residuos de alimentos anteriores pueden causar
quemaduras o generar fuego.
. Evite marinadas grasosas o glaseados azucarados, ambos pu-
5
eden hacer que la cantidad de humo que exista se incremente.
Si quisiera utilizar un glaseado, aplíquelo al final del cocinado.
. Si experimenta que existe mucho humo con cualquier tipo de
6
alimento, considere:
a. Baje el nivel de asado al ajuste anterior.
b. Use el ajuste ‘Alto’ para lograr el nivel de dorado que usted
desea, posteriormente cambie al nivel anterior o encienda la
función BAKE.
. Como una regla, los cortes grasosos de carne y pescado pro-
7
ducirán más humo que los cortes magros.
. Adhiérase a los ajustes recomendados de asado y a los
8
lineamientos de cocinado en la tabla que se encuentra en la
siguiente página, siempre que sea necesario.
Page 74

TABLA PARA LA FUNCIÓN DE ASAR
CÓMO USAR
27
Corte
Lomo/Filete
Corte New York/Cor-
tes angostos
Ribeye/Delmonico
Cortes con hueso
Arrachera 1/2"-3/4"
Fajitas 1"
Fajitas 1 1/2"
Hamburguesa 3/4" thick
Tamaño/
Grosor
1"
1 1/2"
2"
3/4" - 1"
1 1/2"
3/4" - 1"
1 1/2"
3/4" - 1"
1 1/2"
Termino
Medio rojo Alto 5:00 3:00
Medio Alto 5:00 4:00
Tres cuartos Alto 6:00 4:00
Bien cocido Alto 6:00 5:00
Medio rojo Alto 6:00 4:00
Medio Alto 7:00 4:00
Tres cuartos Alto 7:00 5:00
Bien cocido Alto 7:00 6:00
Medio rojo Alto 7:00 5:00
Medio Alto 8:00 6:00
Tres cuartos Medio 8:00 10:00
Bien cocido Medio 10:00 12:00
Medio rojo Alto 5:00 3:00
Medio Alto 5:00 4:00
Tres cuartos Alto 6:00 4:00
Bien cocido Alto 6:00 5:00
Medio rojo Alto 6:00 5:00
Medio Alto 7:00 6:00
Tres cuartos Medio 8:00 10:00
Bien cocido Medio 8:00 12:00
Medio rojo Alto 5:00 3:00
Medio Alto 5:00 4:00
Tres cuartos Alto 6:00 4:00
Bien cocido Alto 6:00 5:00
Medio rojo Alto 6:00 5:00
Medio Alto 7:00 6:00
Tres cuartos Medio 8:00 10:00
Bien cocido Medio 8:00 12:00
Medio rojo Alto 5:00 4:00
Medio Alto 6:00 5:00
Tres cuartos Alto 7:00 6:00
Bien cocido Alto 8:00 7:00
Medio rojo Alto 8:00 8:00
Medio Alto 10:00 8:00
Tres cuartos Medio 10:00 12:00
Bien cocido Medio 10:00 15:00
Medio rojo Alto 4:00 3:00
Medio Alto 5:00 3:00
Tres cuartos Alto 5:00 4:00
Bien cocido Alto 6:00 4:00
Medio rojo Alto 7:00 5:00
Medio Alto 8:00 6:00
Tres cuartos Alto 8:00 8:00
Bien cocido Alto 9:00 9:00
Medio rojo Alto 8:00 6:00
Medio Alto 8:00 8:00
Tres cuartos Alto 9:00 9:00
Bien cocido Alto 10:00 10:00
Medio rojo Alto 5:00 3:00
Medio Alto 5:00 4:00
Tres cuartos Alto 6:00 4:00
Bien cocido Alto 6:00 5:00
Ajuste del
asador
Tiempo
Lado 1 Lado 2
Comentarios
ESPAÑOL
• A los bistecs y chuletas siempre
se les debe de dejar reposar por
5 minutos antes de cortarlos y ser
comidos. Esto permite que el calor
se distribuya uniformemente en el
alimento y cree un resultado más
suave y jugoso.
• Para las piezas de carne gruesas,
considere retirarlas del refrigerador 30 minutos antes de cocinarlas. Esto ayuda a que se cocinen
más rápido de manera uniforme,
además producirá menos humo. Por
favor advierta que los tiempos de
cocinado probablemente serán más
cortos que los tiempos indicados en
la tabla de arriba.
• Para los bistecs o chuletas a las
cuales se les haya “Afrancesado”
(removido una porción de carne del
hueso), cubra las secciones expuestas del hueso con papel especial,
por ejemplo papel aluminio para
reducir quemaduras.
Page 75

28
CÓMO USAR
TABLA PARA LA FUNCIÓN DE ASAR
Corte
Chuleta con hueso
Porción de salmón/
filete, con piel
Porción de salmón/
filete, sin piel
Porción de halibut,
sin piel
Camarón, con piel
Camarón, sin piel
Cola de langosta
Chuleta de puerco 1" Bien cocido Alto 6:00 5:00
Lomo de puerco
Salchicha 1/4/lb., 1.5" Bien cocido Alto 6:00 4:00
Rodajas de jamón 1/2" thick Bien cocido Alto 5:00 4:00
Pechuga, sin hueso,
sin piel
Esparragos 1/2" thick Bien cocido Alto 4:00 3:00 • Sacuda las verduras ligeramente
Calabacitas
Tostado 4 pieces Bien dorado Alto 1:00 1:00
Mantecada inglesa 2 split Bien dorado Alto 2:00
Tamaño/
Grosor
6 - 8 oz.,
2 bone
3/4" - 1" Bien cocido Medio 6:00 4:00
1 1/2" Bien cocido Medio 8:00
3/4" - 1" Bien cocido Medio 6:00 4:00
1 1/2" Bien cocido Medio 6:00 6:00
3/4" - 1" Bien cocido Medio 6:00 5:00
1 1/2" Bien cocido Medio 7:00 6:00
<10/lb. Bien cocido Alto 4:00 3:00
10-20/lb. Bien cocido Alto 3:00 3:00
21-30/lb. Bien cocido Alto 3:00 2:00
<10/lb. Bien cocido Alto 4:00 2:00
10-20/lb. Bien cocido Alto 3:00 2:00
21-30/lb. Bien cocido Alto 3:00 1:00
1/3/lb. Bien cocido Alto 6:00 Bien
12-16 oz.,
1.5"
1/2" - 3/4" Bien cocido Alto 6:00 4:00
1/2" strips Bien dorado Alto 7:00
Termino
Medio Alto 7:00 6:00 • Cuando ase pescado con piel,
Bien cocido Alto 9:00 8:00
Ajuste del
asador
Tiempo
Lado 1 Lado 2
4:00
(Lado de
la carne)
(Lado de
la carne)
dorado
Comentarios
siempre use el ajuste medio del
asador y siempre ase el lado de la
piel al final.
• Se recomienda que los pescados y
mariscos se consuman inmediatamente después de ser cocinados.
Dejar que los pescados y mariscos
reposen después de ser cocinados
puede causar que estos alimentos
se sequen.
• Es una buena idea esparcir una
capa delgada de aceite sobre la
superficie de la cacerola para asar
para reducir la adherencia de la
comida al utensilio de cocina,
especialmente con los pescados y
mariscos. También puede usar una
delgada capa de aceite para cocinar
en spray.
en aceite antes de cocinarlas para
mejorar el acabado dorado.
Esta tabla es solamente de referencia. Ajuste el tiempo de cocción de acuerdo con su preferencia.
NOTA
Los tiempos de asado pueden variar por el tamaño, peso y/o grosor de la comida a asar, temperatura de inicio y preferencias
•
personales de cocción. Esta guía se basa en carnes a temperaturas refrigeradas.
NOTA
Para protegerse de intoxicaciones, cocine la carne roja y pollería totalmente. El Departamento de Agricultura de los Estados
Unidos por sus siglas en Ingles (USDA) ha indicado las siguientes temperaturas internas mínimas para el consumo seguro de
los alimentos.
• Carne de res, ternera, puerco o cordero, molida: 160° F.
• Pollería: 165 °F.
• Bistec de res, ternera, puerco o cordero: 145 °F.
• Pescados y Mariscos: 145°F.
Page 76

CÓMO USAR
29
COCCIÓN CON TEMPORIZADOR
(Horno superior e inferior)
La función de COCCIÓN CON TEMPORIZADOR le permite
programar el horno para cocinar durante un período de tiempo
específico. Esta función solo puede utilizarse mientras se
hornea.
Para configurar la COCCIÓN CON TEMPORIZADOR
(ejemplo: para HORNEAR a 300°F durante 30 minutos):
o
Presione la tecla A superior o inferior.
1
en la pantalla.
Utilice las teclas numéricas para establecer la temperatura
2
(por ej., presione
Presione q para comenzar el precalentado.
3
Una vez que el horno se haya precalentado a 300°,
4
presione la tecla
Programe el tiempo de horneado deseado (ej. presione
5
3, 0
). El tiempo de horneado puede programarse para
cualquier cantidad de tiempo, entre 1 minuto y 11 horas y
59 minutos.
Presione la tecla q y la pantalla mostrará la cuenta
6
regresiva del tiempo de cocinado.
NOTA
Para hacer que la función CALENTAR encienda al final
del ciclo de cocinado, repita los pasos 1 a 5, y luego
presione la tecla
. (Consulte "CALENTAR" en la sección "Cómo usar" para
mayor información acerca de cómo calentar.)
Para cancelar la función COCCIÓN CON
TEMPORIZADOR, presione las teclas
en cualquier momento.
El horno continuará cocinando durante el tiempo programado
y luego se apagará automáticamente. Cuando haya finalizado
el tiempo de cocción:
k
y la hora del día aparecerán en la pantalla.
El tono que indica el final de la cocción sonará cada 60
segundos hasta que se presione la tecla
Cuando se programa la función CALENTAR, la misma se
activará luego de haberse completado la cocción por el
tiempo programado.
3, 0, 0
C
).
.
.
WARM
o
o
aparecerá en la pantalla.
aparecerá en la pantalla
Para cambiar el tiempo de cocción mientras el horno
está encendido
cocción de 30 minutos a 1 hora y 30 minutos):
Presione la tecla .
1
NOTA
Si ambos hornos superior e inferior están funcionando al
mismo tiempo, presione la tecla una vez para
fijar el tiempo de cocción para el horno inferior y dos veces
para el horno superior.
Utilice las teclas numéricas para cambiar el tiempo de
2
horneado (por ej. presione
Presione q para aceptar el cambio.
3
(por ejemplo, para cambiar el tiempo de
1, 3, 0
).
q
o
aparecerá
o .
COCCIÓN CON TEMPORIZADOR
RETARDADO (Horno superior
e inferior)
El temporizador automático de COCCIÓN CON
TEMPORIZADOR RETARDADO hará que el horno se
ENCIENDA y se APAGUE a la hora que usted seleccione. Esta
función solo puede utilizarse mientras se hornea.
Para configurar el horno para Inicio Retardado
(ejemplo: para HORNEAR a 300°F durante 30 minutos y que
el modo horneado comience a las 4:30 pm):
Asegúrese de que el reloj tenga la hora correcta.
1
Acomode la(s) bandeja(s) interiores del horno y coloque la
2
comida en el horno.
o
Presione la tecla b.
3
Utilice las teclas numéricas para establecer la temperatura
4
del horno (por ej. presione
Presione la tecla .
5
Programe el tiempo de horneado (por. ej. presione 3, 0).
6
El tiempo de horneado puede programarse por cualquier
cantidad de tiempo, entre 1 minuto y 11 horas y 59
minutos.
Presione la tecla W.
7
Programe el tiempo de inicio (por ej. presione 4, 3, 0).
8
Presione la tecla q. A la hora programada, sonará un bip
9
corto y el horno comenzará a hornear.
NOTA
Para cancelar la función COCCIÓN CON
TEMPORIZADOR RETARDADO, presione las teclas
o en cualquier momento.
Si desea cambiar el tiempo de cocción, repita los
pasos 5 a 6 y presione
El horno continuará cocinando durante el tiempo programado y
luego se apagará automáticamente. Cuando haya finalizado el
tiempo de cocción:
k
y la hora del día aparecerán en la pantalla.
El tono que indica el final de la cocción sonará cada 60
segundos hasta que se presione la tecla
Cuando se programe la función CALENTAR, la misma se
activará luego de haberse completado la cocción por el
tiempo programado.
NOTA
Si el reloj de su horno está configurado como un reloj de
12 horas, puede rertardar el tiempo de cocción por 12
horas. Si el reloj de su horno está configurado como un
reloj de 24 horas, puede rertardar el tiempo de cocción
por 24 horas.
PRECAUCIÓN
Utilice el temporizador automático cuando cocine carnes
curadas o congeladas y la mayoría de frutas y vegetales.
Los alimentos que pueden echarse a perder fácilmente
como leche, huevo, pescado, carne o aves deben
enfriarse en el refrigerador. Incluso fríos, no deben
dejarse en el horno más de 1 hora antes de la cocción, y
deben retirarse apenas termina la cocción.
Comer alimentos echados a perder puede causar
intoxicación por comida en mal estado.
q
aparecerá en la pantalla.
3, 0, 0
).
q
.
o .
ESPAÑOL
Page 77

30
CÓMO USAR
Como usar la convección del horno
inferior
El sistema de convección utiliza un ventilador para hacer circular el calor del horno.
Esto resulta en una mejora en la distribución del calor permitiendo un cocinado parejo y por lo tanto excelentes resultados.
HORNEADO POR CONVECCIÓN
El horneado por convección permite un cocinado parejo y
por lo tanto excelentes resultados incluso usando múltiples
bandejas al mismo tiempo. Puede también disminuir el tiempo
de cocinado operando el modo CONVECCIÓN HORNEADO
entre 300°F(150°C) ~ 550°F(285°C).
NOTA
Cuando cocine con un ciclo de convección, la temperatura
del horno será automáticamente reducida en 25°F posteriormente la pantalla mostrara la temperatura cambiada.
Esta característica de funcionamiento es llamada AUTO
CONVERSIÓN. Su estufa viene con esta característica de
funcionamiento habilitada.
Para deshabilitar la característica de auto conversión, vea
“Cómo activar la función de auto conversión del modo de
convección“ en la sección de “Instrucciones de funcionamiento”.
NOTA
Escuchará un ventilador mientras cocine con convección.
El ventilador parará cuando la puerta se abra, pero el calor
permanecerá encendido. El ventilador no comenzará a funcionar hasta que el horno haya alcanzado la temperatura de
precalentado.
Beneficios del modo CONVECCIÓN HORNEADO
1
1) Horneado parejo usando múltiples bandejas.
2) Tiempo de cocinado más rapido.
Para accionar el modo CONVECCIÓN HORNEADO
2
(ejemplo a 375°F).
1) Presione la tecla
2) Introduzca la temperatura del horno (Presione
. La pantalla parpadeará .
3, 7, 5
3) Presione el botón
y la temperatura convertida empezando en 100°F.
Conforme el horno se vaya precalentando, la pantalla
mostrara incrementos de temperatura de 5 grados.
4) Una vez que el horno alcance la temperatura deseada, un
tono sonará y la luz del horno parpadeará continuamente.
La pantalla mostrará la temperatura del horno auto convertida
NOTA
Para cancelar el modo CONVECCIÓN HORNEADO,
presione la tecla
Pantalla en el modo CONVECCIÓN HORNEADO
(ejemplo).
).
q. La pantalla mostrara
,
CONV, BAKE
Horno inferior solamente.
y .
Z
en cualquier momento.
CONV, BAKE
Horno inferior y superior al mismo tiempo.
Page 78

Utensilios de cocina para el cocinado por convección.
3
Antes de usar el horno por convección, verifique sus utensi-
lios de cocina dejen espacio para que el aire circule dentro
del horno. Si va a hornear con varios utensilios de cocina
deje espacio entre estos. También, asegúrese de que no
haya contacto entre las cacerolas para hornear y/o entre
estas con las paredes del horno.
1) Papel y plástico.
Se pueden utilizar papel resistente al calor y/o contene-
dores de plástico recomendados para su uso en hornos
regulares y/o hornos de convección.
2) Metal y vidrio.
Cualquier tipo de utensilio de cocina funcionará en su
horno equipado con la función de convección. Sin embargo, las cacerolas para hornear de metal calientan más
rápido y son recomendadas para su uso en hornos de
convección.
• Las cacerolas que sean oscuras o con acabados en
mate hornearan más rápido que las cacerolas de acabados brillosos.
• Las cacerolas para hornear de vidrio o de materiales
cerámicos cocinarán más despacio.
Cuando hornee galletas, use hojas planas de metal en lugar
de cacerolas con lados cortos para obtener mejores resultados.
Para recetas como pollo al horno, use cacerolas para
hornear con lados cortos. El aire caliente no podrá circular
libremente alrededor de la comida si se utiliza una cacerola
con lados largos.
NOTA
Las galletas y bizcochos deben de ser horneados
en hojas planas de metal o en cacerolas de metal de
lados muy cortos. La comida cocinada en cacerolas
con acabados oscuros se cocinará más rápido.
Al usar la función de horneado por convección la
comida cocinada en una sola bandeja generalmente
se cocinará más rápido y de forma pareja.
El uso de múltiples bandejas puede incrementar
ligeramente los tiempos de cocinado de algunas comidas pero generalmente el resultado final es el ahorro
de tiempo.
Cuando cocine alimentos en múltiples estantes utilice
el modo de cocción por convección.
Es normal que el ventilador se pare durante el ciclo
de convección, esto permite que el calor se distribuya
uniformemente.
Utilice cacerolas de tamaños recomendados en las
recetas.
Algunas comidas congeladas han sido echas para ser
cocinadas en hornos comerciales de convección. Para
mejores resultados, precaliente el horno y utilice la
temperatura recomendada en la receta del empaque.
Si algún fabricante de comida otorga instrucciones
de cocinado por convección especificas, programe la
temperatura de auto conversión para que la temperatura de precalentamiento del horno sea la misma que
la de la temperatura en las instrucciones del empaque.
CÓMO USAR
ASADO POR CONVECCIÓN
El modo de convección asado esta diseñado para otorgar un
óptimo desempeño al asar. La función CONVECCIÓN ASADO
combina el cocinado con el ventilador de convección para asar
carnes. El aire precalentado circula alrededor de las comida
desde todos los lados del horno, envolviendo mejor los jugos
y sabores. Los alimentos llegan a ser tostados y crujientes en
el exterior y jugosos en el interior.
Para accionar el horno inferior en modo CONVECCIÓN
1
ASADO (ejemplo a 375°F).
1) Presione el botón . La pantalla desplegará .
2) Fije la temperatura del horno
NOTA
Cuando cocine con un ciclo de convección, la temperatura
del horno será automáticamente reducida en 25°F posteriormente la pantalla mostrara la temperatura cambiada.
Esta característica de funcionamiento es llamada AUTO
CONVERSIÓN. Su estufa viene con esta característica de
funcionamiento habilitada. Para deshabilitar la característica de auto conversión, vea “Cómo activar la función de
auto conversión del modo de convección en la sección de
“Instrucciones de funcionamiento”.
3) Presione la tecla q. La pantalla mostrara
y la temperatura convertida empezando en 100°F. Conforme el horno se vaya precalentando, la pantalla mostrara incrementos de temperatura de 5 grados.
4) Una vez que el horno alcanza la temperatura deseada,
un tono sonará y la luz de horno parpadeará continuamente. La pantalla mostrará la temperatura del horno
auto convertida
5) Ponga la comida dentro del horno.
NOTA
Para cancelar el modo CONVECCOIÓN ASADO, pre-
sione la tecla
Pantalla en el modo CONVECCIÓN ASADO (ejemplo).
Horno inferior y superior al mismo tiempo.
,
Z
en cualquier momento.
Horno inferior solamente.
(presione 3, 7, 5).
CONV, ROAST
y .
CONV, ROAST
31
ESPAÑOL
Page 79

32
CÓMO USAR
Características especiales
MENU PARA NIÑOS (Horno superior)
Esta función precalentará el horno superior a la temperatura
óptima para cocinar pizza de pan regular, pizza de pan esponjoso,
pizza fresca, nuggets de pollo, papas a la francesa o carne para
hamburguesa.
Para fijar el horno en MENU PARA NIÑOS:
Presione el botón del horno superior.
1
, aparecerá en la pantalla.
Continúe presionando , para seleccionar
2
; ; ; ;
o .
Presione la tecla q. PREHEATING aparecerá en la
3
pantalla.
Una vez que el horno se haya precalentado. Coloque los
4
alimentos dentro del éste y fije el tiempo de cocinado de
acuerdo a las instrucciones escritas en el empaque.
Visualización en pantalla (ejemplo):
CALENTAR (Horno superior e inferior)
Esta función mantendrá la temperatura del horno en 170°F (77°C).
La función
servirla hasta 3 horas luego de que haya finalizado la cocción.
La función Calentar puede utilizarse sin otras operaciones
de cocción o puede utilizarse luego de que la cocción haya
finalizado utilizando HORNEAR CON TEMPORIZADOR u
HORNEAR CON TEMPORIZADOR RETARDADO.
CALENTAR
NOTA
La función
comida caliente. No la utilice para enfriar la comida.
Cuando la temperatura del horno inferior esté por
encima de los 475°F (246°C), la función
horno superior no podrá utilizarse.
pantalla.
Para programar la función CALENTAR:
Presione la tecla
1
Presione la tecla q.
2
Visualización en pantalla (ejemplo):
mantendrá la comida cocida caliente para
CALENTAR
tiene el propósito de mantener la
CALENTAR
w
aparecerá en la
C
del horno superior y/o inferior.
del
NOTA
• El precalentamiento es necesario para lograr mejores
resultados de cocción. Coloque la comida en el horno
luego de haberlo precalentado.
- Utilice el estante de compensación para cocinar
comida para niños.
TABLA DEL MENU PARA NIÑOS
Comida
Pizza congelada
con
masa normal
Pizza congelada
con
masa elevada
Pizza fría 12” B,
Nuggets de pollo 1-4 porciones
Papas fritas 1-4 porciones
Carnes de hamburguesa
Esta tabla es solo para referencia.
Tamaño
recomendado
12” B,
12” B,
(3.5oz por
porción)
(3.5oz por
porción)
4-12 carnes de
hamburguesa
de ½” de grosor
Posición
del
estante
Desfase
Desfase
Desfase
B,
Desfase
B,
Desfase
A,
Desfase
Tiempo
recomendado
(minutos)
Utilice los tiempos que viene
en el empaque.
Utilice los
tiempos que
viene en el
empaque.
Utilice los tiempos que viene
en el empaque.
Utilice los tiempos que viene
en el empaque.
Utilice los tiempos que viene
en el empaque.
Utilice los tiempos que viene
en el empaque.
Horno superior únicamente
Horno superior e inferior al mismo tiempo
Horno inferior únicamente
Para programar la función CALENTAR luego de la
Cocción con temporizador:
Configure la COCCIÓN CON TEMPORIZADOR O COCCIÓN
1
CON TEMPORIZADOR RETARDADO (consulte "COCCIÓN
CON TEMPORIZADOR" o "COCCIÓN CON TEMPORIZADOR
RETARDADO" en la sección "Cómo usar").
Presione la tecla q.
2
Presione la tecla
3
El modo Calentar se encenderá automáticamente luego
de haberse completado la cocción por temporizador o la
cocción con temporizador retardado.
NOTA
Para cancelar la función
o en cualquier momento.
Si presiona
función de retardo, todos los ajustes programados de
cocción se cancelarán.
C
.
CALENTAR
o antes de que se inicie la
, presione las teclas
Page 80

CÓMO USAR
33
LEVAR (Para el horno inferior)
Esta característica mantiene el horno caliente para que los
productos con levadura leven antes de hornearlos.
Para programar la función LEVAR:
Utilice la bandeja B o C para levar.
1
Presione la tecla
2
Presione la tecla q.
3
Visualización en pantalla (ejemplo):
Horno superior e inferior al mismo tiempo
Cuando el levado haya finalizado, presione la tecla
4
J
.
Horno inferior únicamente
Z
FAVORITOS (Horno inferior)
Mediante esta función se llegan a grabar y recordar hasta tres
diferentes ajustes.
La función de ajuste de FAVORITO puede llegar a usarse con
la función TIEMPO DE COCINADO. Esta función no funcionará con alguna otra función incluyendo la función TIEMPO
DE INICIO.
Para fijar la función FAVORITOS
1
1) Ponga la comida en el horno.
2) Presione el botón
de comida.
La temperatura predeterminada aparecerá en la pantalla
y COOK parpadeará.
Categoría
de
selección
Pan Presione FAVOR-
Carne Presione FAVOR-
.
Pollo Presione FAVOR-
Presione
Favoritos
ITE una sola vez.
ITE dos veces.
ITE tres veces.
para seleccionar la categoría
Temperatura
predeterminada (puede
cambiar)
375°F Horneado
325°F Convección
350°F Convección
ESPAÑOL
Falla de
operación
asado
asado
NOTA
Para evitar que la temperatura del horno baje y el
tiempo de levado sea mayor, no abra la puerta del
horno innecesariamente. Controle los productos
panificados para evitar que leven en exceso.
No utilice el modo de levado para calentar comida o
mantenerla caliente. La temperatura de levado del
horno no es suficiente para mantener comidas a
temperaturas seguras. Use la función CALENTAR para
mantener la comida caliente.
El levado no funcionará cuando el horno esté por
encima de los125°F.
w
se mostrará en la pantalla.
3) Presione los botones numéricos para fijar la temperatura del horno deseada. Esta temperatura será grabada
y recordada la siguiente vez.
4) Presione el botón
sonará tres veces cuando el horno haya alcanzado la
temperatura programada.
NOTA
Solamente la temperatura seleccionada será grabada y
no el tiempo de cocinado.
Si la temperatura del horno es cambiada, está será
grabada.
La temperatura grabada no se borra si ocurre una falla
en la corriente eléctrica.
q
. El tono de precalentamiento
Page 81

34
CÓMO USAR
SABBAT (Horno superior e inferior)
El modo SABBAT es típicamente utilizado en las vacaciones
o el Sabbat Judío. Cuando el modo SABBAT esté activado, el
horno no se apagará hasta que se desactive el modo SABBAT.
En el modo SABBAT, todas las teclas de función, excepto por
las teclas
pantalla del horno.
NOTA
SI la luz del horno está ENCENDIDA y el modo SABBAT
se encuentra activado, la luz del horno permanecerá
ENCENDIDA hasta que el modo SABBAT se APAGUE.
Si necesita que la luz del horno esté APAGADA,
asegúrese de APAGAR la luz del horno antes de activar
el modo SABBAT.
El modo SABBAT solo puede utilizarse mientras se
hornea (modo HORNEAR) ya sea en el horno superior,
inferior, o en ambos.
Puede utilizar la opción COCCIÓN CON
TEMPORIZADOR en el otro horno mientras el horno
superior o inferior está activado.
Consulte “COCCIÓN CON TEMPORIZADOR” en la
sección "Cómo usar el horno".
y , están inactivas. z aparecerá en la
Para configurar el modo SABBAT:
Presione la tecla A.
1
Utilizando las teclas numéricas, ingrese la temperatura
2
deseada.
Presione la tecla q.
3
Presione y mantenga presionada la tecla
4
tres segundos.
X
Visualización en pantalla (ejemplo):
Horno superior únicamente
Horno inferior únicamente
durante
Horno superior e inferior al mismo tiempo
NOTA
Para cancelar la función HORNEAR, presione las teclas
o en cualquier momento.
Para cancelar el modo SABBAT, presione y mantenga
presionada la tecla
X
Para cambiar la temperatura mientras se encuentra
en modo SABBAT (
Presione la tecla A del horno superior o inferior.
1
Usando las teclas numéricas, ingrese la temperatura
2
deseada.
Presione la tecla q.
3
NOTA
Habrá una demora de 15 segundos antes de que la
unidad reconozca el cambio de temperatura.
sin sonidos ni cambios en pantalla):
por 3 segundos.
Page 82

CUIDADO Y LIMPIEZA
CUIDADO Y LIMPIEZA
Hornilla a gas de la superficie
PRECAUCIÓN
limpie este artefacto con blanqueadores.
NO
Para prevenir quemaduras, espere hasta que la cocina se haya enfriado antes de tocar cualquiera de sus partes.
Cómo extraer y volver a colocar las hornillas a gas de la superficie
Las parrillas y tapas/cabezales de las hornillas pueden extraerse para limpiarlos.
35
ESPAÑOL
Parrilla central Parrilla lateral
Cabezal y tapa de
hornilla mediana
Cabezal y tapa
de hornilla grande
La tapa de la hornilla está
colocada correctamente.
La tapa de la hornilla NO
está colocada
correctamente.
Cómo limpiar los cabezales/tapas de
las hornillas
Para lograr una llama pareja y completa, las hendiduras de
los cabezales de las hornillas deben estar siempre limpias.
Los cabezales de las hornillas y la tapa de la hornalla pueden
levantarse.
• Lave las tapas de las hornillas con agua caliente y jabón, y
enjuague con agua limpia.
• Cualquier derrame sobre o alrededor de un electrodo debe
limpiarse cuidadosamente.
• Para quitar comida quemada, sumerja las hornillas en una
solución de detergente suave y agua caliente durante 2030 minutos. Para manchas resistentes, use un cepillo de
dientes.
• Las hornillas no funcionarán adecuadamente si los puertos o
electrodos de las hornillas están tapados o sucios.
• Las tapas y cabezales de las hornillas deben limpiarse con
frecuencia, especialmente luego de producirse derrames.
• Las hornillas no encenderán si no tienen la tapa puesta.
Parrilla lateral
Cabezal y tapa de
hornilla ovalada
Cabezal y tapa
de hornilla
pequeña
Cabezal y tapa de
hornilla extra grande
Hornilla general
Luego de limpiar los cabezales/tapas
de las hornillas
Quite cualquier exceso de agua y luego deje que se sequen
bien. Vuelva a colocar los cabezales y tapas de las hornillas
sobre los electrodos de la cocina, en las ubicaciones correctas
de acuerdo a su tamaño. Asegúrese de que el agujero del
cabezal de la hornilla se encuentra ubicado sobre el electrodo.
PRECAUCIÓN
golpee los electrodos. Hacerlo podría dañarlos.
NO
utilice esponjas de acero o polvos limpiadores para
NO
limpiar las hornillas.
Page 83

36
CUIDADO Y LIMPIEZA
Parrillas de las hornillas
La estufa contiene tres parrillas separadas de estilo profesional. Para logar su máxima estabilidad, estas parrillas solo deben ser
utilizadas cuando estén en la posición correcta. Las dos parrillas laterales pueden intercambiarse de izquierda a derecha y del frente
hacia atrás. La parrilla central puede intercambiarse del frente hacia atrás.
Parrilla lateral Parrilla central Parrilla lateral
NOTA
No deje encendida ninguna hornilla durante un largo período de tiempo sin que haya ninguna batería de cocina sobre la parrilla.
El acabado de la parrilla puede saltarse sin no hay ninguna batería que absorba el calor.
Cómo limpiar las parrillas de las
hornillas
No levante las parrilas hasta que se hayan enfriado.
Las parrilas deben limpiarse con regularidad, y luego de
producirse derrames.
Lave las parrilas con agua caliente y jabón, y enjuague
con agua limpia.
Las parrilas son aptas para lavavajillas.
Luego de limpiar las parrilas, deje que se sequen
completamente; luego, colóquelas en su posición
correcta sobre las hornillas.
PRECAUCIÓN
coloque ninguna parrila en el horno durante el modo
NO
de auto-limpieza.
Page 84

CUIDADO Y LIMPIEZA
37
Superficie de la estufa
Para evitar quemaduras, no limpie la superficie de la estufa
hasta que se haya enfriado. Los alimentos con alto contenido
ácido o los alimentos con alto contenido de azúcar pueden
manchar la superficie si se dejan reposar en ésta. Lave y
enjuague los alimentos derramados apenas la superficie se
haya enfriado. Para otros derrames tales como salpicaduras
de grasa y/o aceite, etc., lave con agua y jabón cuando la
superficie se haya enfriado. Luego, enjuague y lustre con un
trapo seco.
NOTA
No levante la superficie de la esufa. Levantar ésta puede
ocasionar daños o el funcionamiento inadecuado de la
estufa.
Superficies de acero inoxidable
Para consultar dónde comprar lustradores o limpiadores para
artefactos de acero inoxidable, o para localizar un distribuidor
cerca suyo, sírvase comunicarse a nuestra línea gratuita de
atención al cliente:
en:
us.lgservice.com
NOTA
No utilice esponjas de acero; rayarán la superficie.
Para limpiar la superficie de acero inoxidable, utilice
agua con abundante jabón, o un limpiador o lustrador
de acero inoxidable.
Limpie siempre en la dirección del acabado de la
superficie metálica.
1-800-243-0000,
o visite nuestro sitio web
Panel de control
Para evitar que se active el panel de control durante la
limpieza, desenchufe el artefacto. Limpie las salpicaduras con
un trapo húmedo y limpiador de vidrios. Quite la suciedad más
profunda con agua tibia y jabón. No utilice abrasivos de ningún
tipo.
Panel frontal y perillas
Lo más aconsejable es limpiar el panel frontal luego de cada
uso del horno. Para limpiarlo, utilice un trapo húmedo con
agua tibia y jabón, o una solución de 50% vinagre y 50% agua.
Para enjuagar, use agua limpia y seque con un trapo suave.
NOTA
No utilice limpiadores abrasivos, limpiadores líquidos
fuertes, esponjas plásticas o limpiadores para hornos en
el panel frontal. Si lo hace, dañará su acabado.
No intente doblar las perillas tirando de ellas hacia arriba
o hacia abajo, o colgando repasadores u otros objetos
de ellas. Esto puede dañar el mango de la válvula de
gas.
Las perillas de control pueden quitarse para una fácil
limpieza.
Para limpiar las perillas, asegúrese de que se encuentren
en la posición de "OFF" (APAGADO) y tire de ellas para
extraerlas.
Para volver a colocarlas, asegúrese de que la perilla esté
en la posición "OFF" (APAGADO) centrada hacia arriba, y
deslice la perilla directamente sobre el vástago.
ESPAÑOL
Conductos de ventilación del horno
Los orificios de ventilación se encuentran en la parte trasera
de la estufa, en la parte superior e inferior de la puerta del
horno, y en la parte inferior de la estufa.
NOTA
No obstruya los conductos y orificios de ventilación
del aparato. Éstos permiten la entrada y salida de aire
necesarias para que el aparato funcione apropiadamente,
con la combustión correcta.
NOTA
Para prevenir rayaduras, no utilice limpiadores abrasivos
en ninguno de estos materiales.
Page 85

38
CUIDADO Y LIMPIEZA
Puerta del horno
No limpie a mano la junta
de la puerta del horno
Limpie a mano
la puerta
No limpie a mano la
junta de la puerta del
horno
Limpie a mano
la puerta
Utilice agua y jabón para limpiar la puerta del horno en
profundidad. Enjuague bien. NO sumerja la puerta en
agua.
Puede utilizar un limpiador para vidrios sobre el vidrio
externo de la puerta del horno. NO rocíe agua o
limpiador de vidrios sobre las ventilaciones de la puerta.
utilice limpiadores para horno, polvos limpiadores
NO
o materiales de limpieza abrasivos para limpiar la parte
exterior de la puerta del horno.
limpie la junta de la puerta del horno. La junta de la
NO
puerta del horno está hecha de un material entretejido
que es esencial para que quede bien sellada. Debe
tenerse cuidado de no refregar, dañar o quitar esta
junta.
Cómo extraer la puerta del horno
superior
Abra la puerta por completo. Levante los seguros de la
1
bisagra hacia el marco del horno hasta que hagan tope.
Cierre la puerta a aproximadamente 30 grados.
2
Presione los botones para liberar cada bisagra a ambos
3
lados de la puerta.
Presione
NOTA
No utilice limpiadores o materiales de limpieza abrasivos
sobre la parte exterior de la puerta del horno. Si lo hace,
puede dañarla.
Cómo extraer y volver a colocar las
puertas
No cierre la puerta del horno hasta que todas los estantes del
horno estén en su lugar.
PRECAUCIÓN
Tenga cuidado al quitar y levantar la puerta.
levante la puerta de la manija.
NO
golpee el vidrio con ollas, sartenes u otros objetos.
NO
Rayar, golpear o presionar el vidrio puede debilitar su
estructura, causando un mayor riesgo de rotura en un
futuro.
aproximadamente
30°
Levante la puerta hasta que se salga de la bisagra.
4
Page 86

CUIDADO Y LIMPIEZA
39
Cómo volver a colocar la puerta del
horno superior
Asegúrese de que las bisagras estén alineadas a una
1
posición de 30 grados.
Deslice la puerta hacia las bisagras hasta que escuche
2
un sonido de encastre y que los botones de liberación se
hayan ajustado.
Cómo quitar la puerta del horno inferior
Abra la puerta por completo. Levante los seguros de la
1
bisagra hacia el marco del horno hasta que hagan tope.
Cierre la puerta hasta la posición correcta para extraerla
2
(aproximadamente a cinco grados).
ESPAÑOL
aproximadamente 30°
Abra la puerta por completo. Presione los seguros de la
3
bisagra contra la misma.
Cierre la puerta del horno.
4
Levante la puerta y sáquela hasta que el brazo de la
3
bisagra salga de la guía. Coloque la puerta sobre el piso.
Brazo de
la bisagra
Borde inferior
de la guía
Hendidura
Page 87

40
CUIDADO Y LIMPIEZA
Cómo volver a colocar la puerta del
horno inferior
Tome firmemente ambos lados de la puerta por la parte
1
superior y cierre la puerta hasta la posición correcta para
extraerla (aproximadamente a cinco grados).
Coloque la hendidura del brazo de la bisagra en el borde
2
inferior de la guía de la bisagra
Brazo de la
bisagra
Borde inferior
de la guía
Hendidura
Abra la puerta por completo. Presione los seguros de la
3
bisagra contra el marco frontal de la cavidad del horno
hasta la posición de cerrado. Cierre la puerta del horno.
NOTA
Si la puerta no se abre por completo, significa que la
hendidura no está correctamente colocada en el borde
inferior de la guía.
Cómo limpiar el interior del horno
Guía de limpieza
Nivel de suciedad Configuración de ciclo
Cavidad del horno ligeramente
sucia
Cavidad del horno
moderadamente sucia
Cavidad del horno muy sucia
Auto limpieza de 2 horas
(p. 40)
Auto limpieza de 3 horas
(p. 40)
Auto limpieza de 4 horas
(p. 40)
AUTO LIMPIEZA
(Horno superior e inferior)
El ciclo de AUTO LIMPIEZA utiliza temperaturas más
elevadas que las de cocción para limpiar la cavidad del horno.
Es posible que vea algo de humo y sienta olor durante los
primeros minutos de la limpieza. Esto es normal y disminuirá
a lo largo del proceso. También puede aparecer humo si el
horno está muy sucio. Durante la auto-limpieza, el lugar de la
cocina debe estar bien ventilado para minimizar los olores de
la limpieza. La AUTO LIMPIEZA del horno superior e inferior
no puede funcionar de manera simultánea.
PRECAUCIÓN
NO deje a los niños pequeños sin supervisión cerca
del aparato.
exterior del aparato puede estar muy caliente al tacto.
Si tiene un pájaro como mascota, muévalo a otro cuarto
bien ventilado.
sensibles a los vapores que se generan durante el ciclo
de auto limpieza de cualquier estufa.
NO cubra las paredes del horno, bandejas, parte
inferior, ni ninguna otra parte con papel de aluminio ni
con ningún otro material.
del calor, producirá malos resultados al hornear, y
causará un daño permanente al interior del horno (el
papel de aluminio se derretirá y se pegará a la superficie
interior del horno).
NO fuerce la apertura del horno.
el sistema de cierre automático de la puerta. Tenga
cuidado al abrir la puerta del horno luego del ciclo de
auto limpieza. Párese a un costado del horno al abrir
la puerta para permitir que el aire caliente o el vapor
salgan. El horno puede todavía estar muy caliente.
Nunca toque el elemento asador.
quemaduras si no se ha enfriando completamente. El
asador se limpia por si solo, el hecho de tocarlo puede
causar daños en el este.
Durante el ciclo de auto limpieza, la parte
Algunos pájaros son extremadamente
Hacerlo afectará la distribución
Esto puede dañar
Este puede causar
Page 88

CUIDADO Y LIMPIEZA
41
Antes de comenzar la AUTO LIMPIEZA
No limpie a mano la
junta de la puerta del
horno
Limpie a mano la
puerta
Quite las bandejas del horno, asadera, rejilla para asar,
elementos de cocina, papel de aluminio y cualquier otro
material del horno.
La cocina deberá estar bien ventilada para minimizar los
olores provenientes de la limpieza.
Si ejecuta la auto limpieza en uno de los hornos, el otro
horno no podrá utilizarse.
Limpie cualquier derrame excesivo en la parte inferior
del horno.
Asegúrese de que la cubierta de la lámpara de luz
del horno se encuentra en su lugar y que la luz esté
apagada.
La luz del horno no puede encenderse durante un ciclo
de auto limpieza. La luz del horno no puede encenderse
hasta que la temperatura del horno se haya enfriado a
menos de 500˚F (260˚C) luego de que finalice el ciclo de
auto limpieza.
Podrán aparecer líneas delgadas en la porcelana ya que
pasó por un proceso de calentado y enfriado. Esto es
normal y no afectará el rendimiento.
NOTA
Limpie el marco del horno y la puerta con agua caliente
y jabón. Enjuague bien.
No limpie la junta de la puerta del horno. La junta de la
puerta del horno está hecha de un material entretejido
que es esencial para que quede bien sellada. Debe
tenerse cuidado de no refregar, dañar o quitar esta
junta.
No abra la puerta del horno hasta que el ciclo de auto
limpieza haya terminado.
La puerta del horno puede estar extremadamente
caliente. No toque la puerta del horno hasta que se
haya enfriado.
Es posible que vea algo de humo y sienta olor durante
los primeros minutos de la limpieza. Esto es normal.
A medida que el horno se calienta, es posible que
escuche sonidos de partes de metal que se expanden y
contraen. Esto es normal.
No podrá iniciarse el ciclo de auto limpieza si la función
de Bloqueo del horno se encuentra activa.
Para programar la auto limpieza
Presione la tecla o .
1
l horno utiliza por defecto la auto limpieza recomendada
E
de tres horas para un horno moderadamente sucio.
Presione dos veces para hacer una auto limpieza de cuatro
horas y tres veces para una auto limpieza de dos horas.
Presione la tecla q.
2
Una vez que se haya programado la auto limpieza, la
puerta del horno se bloqueará automáticamente y se
mostrará m en la pantalla. No se podrá abrir la puerta del
horno hasta que el horno se haya enfriado. El bloqueo
se liberará automáticamente cuando el horno se haya
enfriado.
PRECAUCIÓN
fuerce la puerta del horno para abrirla cuando se
NO
muestre
hasta que baje la temperatura. Si fuerza la puerta para
abrirla, ésta se dañará.
m
. La puerta del horno permanecerá bloqueada
.
Para programar la Auto limpieza con
Inicio retardado
(ejemplo: programar para las 3:00 AM/PM)
Presione la tecla o .
1
El horno utiliza por defecto la auto limpieza recomendada
de tres horas para un horno moderadamente sucio.
Presione dos veces para hacer una auto limpieza de dos
horas y tres veces para hacer una auto limpieza de cuatro
horas.
Presione la tecla W.
2
Utilice el teclado numérico para ingresar la hora del día
3
en la que desea que el horno comience el ciclo de auto
limpieza (por ej.
NOTA
El tiempo de inicio de la auto limpieza con inicio retardado
solo puede programarse 11 horas y 59 minutos por
adelantado. Para programarla 12 a 24 horas por adelantado,
consulte “Cómo cambiar el modo horario del reloj.
Presione la tecla
4
Una vez que se haya programado la auto limpieza, la
puerta del horno se bloqueará automáticamente y se
mostrará m en la pantalla. No podrá abrir la puerta del
horno hasta que el horno se haya enfriado. El bloqueo
se liberará automáticamente cuando el horno se haya
enfriado.
NOTA
Puede ser necesario cancelar o interrumpir un ciclo de
auto limpieza debido a humo excesivo o fuego en el horno.
Para cancelar la función de Auto limpieza, presione la tecla
o .
3, 0, 0
q
).
ESPAÑOL
Luego de la Auto limpieza
Puede notar algo de ceniza blanca en el horno. Límpiela
con un trapo húmedo luego de que se enfríe el horno.
Si el horno no quedó limpio luego de un ciclo de
limpieza, repita el ciclo.
Si los estantes del horno quedaron en el interior y no se
deslizan suavemente luego del ciclo de limpieza, aplique
a los estantes y a sus soportes un poco de aceite
vegetal para que se deslicen con mayor facilidad.
Page 89

42
CUIDADO Y LIMPIEZA
Cómo cambiar la luz del horno
La luz del horno es una bombilla estándar para artefactos
de 40 vatios (watts). Se encenderá cuando la puerta del
horno esté abierta. Cuando la puerta del horno esté cerrada,
presione la tecla
Para reemplazar la luz del horno:
Desenchufe el artefacto o desconecte la energía eléctrica.
1
Gire la cubierta de vidrio de la bombilla en la parte trasera
2
del horno en sentido contrario a las agujas del reloj para
extraerla.
Gire la bombilla en sentido contrario a las agujas del reloj
3
para extraerla del porta lámpara.
M
o Q para prender o apagar la luz.
Lave y enjuague la bandeja y la rejilla para asar con agua
3
caliente con una esponja con jabón o con una esponja
plástica. Si la comida se ha quemado, rocíe la rejilla con un
limpiador (mientras esté caliente) y cúbrala con toallas de
papel húmedas o repasador húmedo. Si pone la bandeja
en remojo, la comida quemada se quitará. Tanto la bandeja
como la rejilla de asar pueden limpiarse con limpiadores
comerciales para hornos. Tanto la bandeja como la rejilla
de asar son aptas para lavarse en lavavajillas.
Bandejas del horno
Quite las bandejas del horno antes de iniciar el ciclo de auto
limpieza.
La comida derramada sobre las bandejas puede causar
1
que las mismas se atoren. Limpie con un limpiador
abrasivo suave.
Enjuague con agua limpia y seque.
2
Inserte una nueva bombilla y gírela en sentido de las
4
agujas del reloj.
Inserte la cubierta de vidrio de la bombilla y gírela en
5
sentido de las agujas del reloj.
Enchufe el artefacto o reconecte la energía eléctrica.
6
ADVERTENCIA
Asegúrese de que el horno y la bombillas estén fríos.
DESCONECTE la energía eléctrica del artefacto en el
fusible principal o en el panel de corte de circuitos. Si no
lo hace, podría sufrir lesiones personales graves, o aún
la muerte o la electrocución.
Cómo limpiar la bandeja y la rejilla para
asar (Se vende por separado)
Rejilla
Bandeja
NOTA
Extraiga la bandeja y la rejilla de asar del horno antes de
iniciar el ciclo de auto limpieza.
NOTA
Si las bandejas se limpian usando el ciclo de auto limpieza
(no recomendado), el color se tornará levemente azulado
y el acabado se opacará. Luego de que termine el ciclo
de auto limpieza, y el horno se haya enfriado, friegue los
costados de las bandejas con papel de cera o con un trapo
con una pequeña cantidad de aceite. Esto hará que las
bandejas se deslicen más fácilmente por las guías.
Luego de asar, quite la bandeja de asar del horno. Quite la
1
rejilla de la bandeja.
Vierta cuidadosamente la grasa de la bandeja a un
2
contenedor adecuado.
Page 90

ANTES DE SOLICITAR SERVICIO TÉCNICO
ANTES DE SOLICITAR SERVICIO TÉCNICO
Síntomas y preguntas Posible causa/ solución
Las hornillas superiores no encienden o no prenden de
manera pareja.
La llama de la hornilla es muy grande o amarilla. Si el artefacto está conectado con gas LP, contáctese con el
Las hornillas de la superficie prenden pero el horno no. Asegúrese de que la válvula de cierre de gas del horno, ubicada
La comida no se hornea o asa adecuadamente. Configuración incorrecta del control del horno. Consulte "Cómo
La comida no se asa correctamente en el horno. Configuración incorrecta de los controles del horno. Consulte
La temperatura del horno está demasiado caliente o
demasiado fría.
El reloj y el temporizador no funcionan. Asegúrese de que el enchufe eléctrico está correctamente
La luz del horno no funciona. La bombilla está floja o rota. Ajústela o reemplácela.
La función de auto limpieza no funciona. La temperatura del horno es demasiado elevada para iniciar la
Asegúrese de que el enchufe eléctrico está correctamente
conectado a un tomacorriente con conexión a tierra.
Extraiga las hornillas y límpielas. Verifique que no haya comida
quemada o grasa en el área de los electrodos. Consulte “Cómo
limpiar los cabezales/tapas de las hornillas” en la sección
"Cuidado y limpieza".
Asegúrese que las partes de la hornilla están instaladas
correctamente. Consulte “Cómo limpiar los cabezales/tapas de
las hornillas” en la sección "Cuidado y limpieza".
técnico que haya instalado el artefacto o que haya hecho la
conversión del tipo de gas.
detrás del artefacto, se encuentre totalmente abierta.
usar el panel de control" en la sección "Cómo usar".
Posición incorrecta de la bandeja. Consulte "Cómo extraer y
volver a colocar la bandeja del horno" o "Posición del estante" en
la sección "Cómo usar".
La batería de cocina utilizada es inapropiada. Consulte "Asar" u
"Hornear" en la sección "Cómo usar".
El termostato del horno necesita ajustarse. Consulte “Cómo
ajustar la temperatura” en la sección "Instrucciones de
funcionamiento".
El reloj no está configurado correctamente. Consulte "Cómo
ajustar el reloj y el temporizador" en la sección "Instrucciones de
funcionamiento".
Se ha utilizado inapropiadamente papel de aluminio en el horno.
Consulte "Cómo usar el horno".
"Cómo usar el panel de control" en la sección "Cómo usar".
La puerta del horno no está cerrada. Consulte "Cómo usar el
horno" en la sección "Cómo usar".
Se usó papel de aluminio en la bandeja de asar y la rejilla para
asar no queda bien colocada.
El termostato del horno necesita ajustarse. Consulte “Cómo ajustar
la temperatura” en la sección "Instrucciones de funcionamiento".
conectado a un tomacorriente con conexión a tierra. Reemplace
el fusible o restablezca el interruptor del circuito.
Configuración inadecuada de los control del horno. Consulte
"Cómo ajustar el reloj y el temporizador" en la sección
"Instrucciones de Funcionamiento".
El enchufe del artefacto no está completamente conectado al
tomacorriente eléctrico. Asegúrese de que el enchufe eléctrico
esté correctamente conectado a un tomacorriente con conexión
a tierra.
función de auto limpieza. Espere a que el artefacto se enfríe
hasta la temperatura ambiente y reinicie los controles.
Configuración inadecuada de los controles del horno. Consulte
"AUTO LIMPIEZA" en la sección "Cuidado y limpieza".
43
ESPAÑOL
Page 91

44
ANTES DE SOLICITAR SERVICIO TÉCNICO
Síntomas y preguntas Posible causa/ solución
Sonido de “chisporroteo” o “estallido”. Es el sonido del metal calentándose y enfriándose tanto durante
las funciones de cocción como de limpieza. Esto es normal.
Demasiado humo durante el ciclo de auto limpieza. Demasiada suciedad en el horno. Abra las ventanas para
deshacerse del humo del ambiente. Presione la tecla
. Espere hasta que la luz m se apague antes de intentar abrir
la puerta del horno. Limpie la suciedad en exceso y reinicie el ciclo
de limpieza.
La puerta del horno no abre luego de un ciclo de auto
limpieza.
La puerta del horno no quedó limpia luego del ciclo de auto
limpieza.
"CLOSE DOOR TO CONTINUE BROILING" (CIERRE LA
PUERTA PARA CONTINUAR ASANDO) o "DOOR OPENED"
(PUERTA ABIERTA) aparece en la pantalla.
El mensaje "DOOR LOCKED" (PUERTA BLOQUEADA)
aparece cuando desea cocinar.
El control del horno emite un sonido y muestra un código
de error "F".
Las bandejas del horno se limpiaron en un ciclo de auto
limpieza.
El reloj parpadea. Se ha producido un corte o aumento en la energía eléctrica.
Emana olor a “quemado” o a “aceite” de la ventilación. Esto es normal en un horno nuevo. Para acelerar el proceso,
Hay olor fuerte. El olor del aislamiento alrededor del interior del horno es normal en
Ruido del ventilador. El ventilador de convención puede llegar a encenderse y apagarse
El ventilador de convección no esta funcionando. El horno no ha alcanzado la temperatura de precalentado. El ven-
La chispa de los quemadores no enciende apropiadamente
después de limpiar la superficie de la estufa.
Al encender un solo quemador, un sonido de tipo clic se
escucha desde todos los quemadores.
PF(Power Failure) señal
/ Visualización de la hora parpadea
La temperatura del horno es demasiado elevada. Espere hasta una
hora a que se enfríe.
Configuración incorrecta de los controles del horno. Consulte
"AUTO LIMPIEZA" en la sección "Cuidado y Limpieza".
El horno estaba muy sucio. Limpie los derrames grandes antes
de iniciar el ciclo de auto limpieza. Los hornos muy sucios
pueden necesitar una auto limpieza más larga o dos ciclos de
auto limpieza.
Cierre la puerta del horno.
La puerta del horno está bloqueada porque la temperatura interior
del horno es demasiado elevada. Presione la tecla
Presione la tecla
Controle el cierre de la válvula principal del gas o la válvula de
cierre del gas del horno y solicite servicio técnico.
Desenchufe el aparato durante cinco minutos y luego vuelva a
enchufarlo. Si vuelve a aparecer el código de error de función,
solicite servicio técnico.
Aplique una pequeña cantidad de aceite vegetal en una toalla de
papel y pásela por los bordes de las bandejas del horno. No use
lubricantes en aerosol.
Reinicie el reloj. Si el horno estaba en uso, debe reiniciarlo
presionando la tecla
función de cocción.
programe un ciclo de auto limpieza de un mínimo de tres horas.
Consulte "AUTO LIMPIEZA" en la sección "Cuidado y limpieza".
los primeros días de uso.
automáticamente. Esto es normal.
tilador comenzará a funcionar automáticamente una vez que el
horno alcance la temperatura de precalentado.
Asegúrese de que las cabezas y tapas de las hornillas estén completamente secas y debidamente colocadas.
Esto es normal. El encendido de chispa electrónica de los quema-
dores causa un sonido de tipo clic.
Todos los encendidos de chispa en la estufa se activaran al encender un solo quemador.
Dependiendo del modelo de su estufa, la pantalla mostrará "PF“
o un reloj parpadeando. Esto significa que el electrodoméstico ha
sido conectado, o que ha experimentado una interrupción en la
alimentación. Para borrar el mensaje "PF", presione la tecla "Clear /
Off" en los controles del horno. Si su horno muestra un reloj parpadeando, presione la tecla “Clock” y reinicie el tiempo, o presione
cualquier tecla para que deje de parpadear.
o y espere una hora.
o . Reinicie el reloj y cualquier
o
o .
Page 92

GARANTÍA
45
GARANTÍA
LG Electronics Inc. reparará o reemplazará su producto, a elección de LG, si sus materiales o mano de obra son defectuosos bajo
uso normal, durante el período de garantía establecido a continuación, el que entrará en vigencia a partir de la fecha de compra
del producto por parte del consumidor original. Esta garantía limitada solo es válida para el comprador original del producto y
tendrá vigencia solo cuando se lo utilice dentro de los EE.UU.
PERÍODO DE GARANTÍA COMO SE PROVEE EL SERVICIO
ESPAÑOL
Un año
Desde la fecha de compra
original.
Cualquier parte
de obra. Durante este
sin cargo
del horno que falle debido a defectos en los materiales o mano
período de garantía de un año
, LG también brindará,
, todos los servicios en el hogar y de mano de obra necesarios para
reemplazar la parte defectuosa.
ESTA GARANTÍA REEMPLAZA CUALQUIER OTRA GARANTÍA EXPRESA O IMPLÍCITA, INCLUYENDO CUALQUIER GARANTÍA
DE COMERCIALIZACIÓN O IDONEIDAD PARA UN PROPÓSITO DETERMINADO. HASTA EL LÍMITE QUE SE REQUIERE
POR LEY A CUALQUIER GARANTÍA IMPLÍCITA, ESTA GARANTÍA ESTÁ LIMITADA EN SU DURACIÓN AL PERÍODO DE
GARANTÍA EXPRESA INDICADO MÁS ARRIBA. LG NO SERÁ RESPONSABLE POR NINGÚN DAÑO RESULTANTE, INDIRECTO,
O INCIDENTAL DE NINGÚN TIPO, INCLUYENDO LA PÉRDIDA DE INGRESOS O GANANCIAS, EN RELACIÓN CON ESTE
PRODUCTO. ALGUNOS ESTADOS NO PERMITEN LIMITACIONES EN LA DURACIÓN DE UNA GARANTÍA IMPLÍCITA O
LA EXCLUSIÓN DE DAÑOS INCIDENTALES O RESULTANTES, POR LO TANTO DICHAS LIMITACIONES O EXCLUSIONES
PUEDEN NO APLICARSE EN SU CASO.
ESTA GARANTÍA LIMITADA NO SE APLICA A:
Llamadas al servicio técnico para corregir la instalación de su artefacto, para brindarle instrucciones acerca de cómo usarlo,
1.
para reemplazar fusibles o cableado en su hogar, o para reemplazar bombillas a las que puede acceder el dueño.
Reparaciones cuando su artefacto se haya utilizado con un destino que no sea el normal de una casa de familia.
2.
Recolección y entrega. Su artefacto está diseñado para poder repararse dentro del hogar.
3.
Los daños resultantes de accidentes, alteraciones, mal uso, abusos, incendio, inundación, instalación inadecuada, actos de la
4.
naturaleza o uso de productos no aprobados por LG Corporation.
Reparaciones de partes o sistemas que resulten de modificaciones no autorizadas hechas al artefacto.
5.
Reemplazo de partes o costos de mano de obra para unidades que se utilicen fuera de los Estados Unidos.
6.
Cualquier costo de mano de obra durante el período de garantía limitada.
7.
Esta garantía se extiende al comprador original para productos comprados para uso en el hogar dentro de los EE.UU. En Alaska,
esta garantía excluye el costo del envío o visitas del servicio técnico a su hogar.
Algunos estados no permiten la exclusión o limitación de daños incidentales o resultantes, por lo tanto dichas limitaciones o
exclusiones pueden no aplicarse a usted. Esta garantía le confiere derechos legales específicos, y usted puede también tener
otros derechos que varían de estado a estado. Para conocer cuáles son sus derechos legales, consulte con su oficina local o
estatal de asuntos del consumidor o con el Procurador General de su estado.
INFORMACIÓN DE ASISTENCIA AL CLIENTE:
Para probar su cobertura de garantía Conserve la factura de venta del producto para probar la fecha en
que lo compró.
Deberá presentar la factura de venta en caso de recibir servicio
técnico en garantía.
Para ubicar el centro de servicio técnico o distribuidor
de ventas autorizado más cercano, o bien para obtener
asistencia por el uso del producto, asistencia al cliente,
o servicio técnico.
Comuníquese al 1-800-243-0000
días del año) y elija la opción deseada del menú; o visite nuestro
sitio web en:
http://us.lgservice.com.
(disponible las 24 horas, los 365
Page 93

LG Customer Information Center
For inquires or comments, visit www.lg.com or call;
1-800-243-0000
1-888-865-3026
1-888-542-2623
Register your product Online!
www.lg.com
USA, Consumer User
USA, Commercial User
CANADA
 Loading...