


KP260KP260 User Guide
www.lgmobile.com MMBB0301319 (1.0) KP260KP260
ENGLISH
BAHASA MELAYU
简体中文

Bluetooth QD ID B014198
KP260 User Guide
- ENGLISH

Contents
Introduction 6
For your safety 7
Guidelines for safe and
efficient use 8
KP260 features 13
Parts of the phone
Display Information 17
On-Screen Icons
Installation 19
Installing the SIM card and the
handset battery
Charging the Battery 21
Disconnecting the charger 22
Turning Handset ON/OFF
Contents
2
General functions 23
Making a Call
Answering a Call 24
In-call menu 25
During a Call
Conference Calls 26
Menu Tree 28
Games & Apps 30
Games
Applications
Network profiles

Call history 31
All calls
Missed calls
Dialled calls
Received calls
Call duration 32
Call costs
Data information
Organizer 33
Calendar
Memo
To d o
Multimedia 34
MP3 player
Camera 35
Video camera 37
FM Radio
Voice recorder 38
Messaging 39
New message
Inbox
Bluetooth box 40
Drafts
Outbox
Sent 41
Listen to voicemail
Info messages
Templates 42
Message settings 43
Contents
3

Contents
My stuff 46
Images
Sounds
Videos
Others 47
External memory
Profiles 48
Contacts 49
Search
New contact
Speed dial
Groups 50
Copy all
Delete all
Settings
Information
Contents
4
Tools 51
Alarm clock
Calculator
Stopwatch
Unit converter
World clock 52
SIM services
WAP 53
Home
Yahoo! 54
Bookmarks
Enter address
History
Saved pages
Settings
Information 55

Connectivity 56
Bluetooth
Network
USB connection 57
Settings 58
Date & Time
Languages
Display
Shortcut 59
Call
Security 60
Flight mode 62
Power save
Reset
Memory status
Accessories 63
Technical data 64
Contents
5
Introduction
Congratulations on your purchase
of the advanced and compact
KP260 mobile phone, designed to
operate with the latest digital mobile
communication technology.
Introduction
6
This user’s guide contains
important information on
the use and operation of
this phone. Please read all
the information carefully for
optimal performance and
to prevent any damage or
misuse of the phone. Any
changes or modifications not
expressly approved in this
user’s guide could void your
warranty for this equipment.

For your safety
Warning!
• Mobile Phones must be switched off
at all times in aircrafts.
• Do not hold the phone in your hand
while driving.
• Do not use your phone near petrol
stations, fuel depots, chemical plants
or blasting operations.
• For your safety, use ONLY specified
ORIGINAL batteries and chargers.
• Do not handle the phone with wet
hands while it is being charged.
It may cause an electric shock or
seriously damage your phone.
• Keep the phone in a safe place out
of small children’s reach. It includes
small parts which, if detached, may
cause a choking hazard.
• Not to charge a handset near
flammable material as the handset
can get hot and smoulder the
material, hence possible house fire.
Caution!
• Switch off the phone in any area
where required by special regulations.
For example, do not use your phone
in hospitals or it may affect sensitive
medical equipment.
• Emergency calls may not be available
under all mobile networks. Therefore,
you should never depend solely on
your mobile phone for emergency
calls.
• Only use ORIGINAL accessories to
avoid damage to your phone.
• All radio transmitters carry risks of
interference with electronics in close
proximity. Minor interference may
affect TVs, radios, PCs, etc.
• Batteries should be disposed off in
accordance with relevant legislation.
• Do not dismantle the phone or
battery.
• Risk of explosion if battery is replaced
by an incorrect type.
For your safety
7

Guidelines for safe and efficient use
Please read these simple guidelines.
Not following these guidelines may
be dangerous or illegal. Further
detailed information is given in this
manual.
Exposure to radio
frequency energy
Radio wave exposure and Specific
Absorption Rate (SAR) information
This mobile phone model KP260
has been designed to comply with
applicable safety requirements
Guidelines for safe and efficient use
for exposure to radio waves. This
requirement is based on scientific
guidelines that include safety
margins designed to assure the
safety of all persons, regardless of
age and health.
] The radio wave exposure
guidelines employ a unit of
measurement known as the
Specific Absorption Rate, or SAR.
Tests for SAR are conducted using
standardised methods with the
phone transmitting at its highest
certified power level in all used
frequency bands.
8
] While there may be differences
between the SAR levels of various
LG phone models, they are all
designed to meet the relevant
guidelines for exposure to radio
waves.
] The SAR limit recommended by
the International Commission on
Non-Ionizing Radiation Protection
(ICNIRP) is 2 W/kg averaged over
ten (10) gram of tissue.
] The highest SAR value for this
model phone tested by DASY4 for
use at the ear is 0.524 W/kg (10g)
and when worn on the body is
0.269 W/kg W/kg (10g).
] SAR data information for
residents in countries/regions
that have adopted the SAR limit
recommended by the Institute of
Electrical and Electronics Engineers
(IEEE), which is 1.6 W/kg averaged
over one (1) gram of tissue (for
example USA, Canada, Australia
and Taiwan).

Product care and
maintenance
Warning!
Only use batteries, chargers and
accessories approved for use with this
particular phone model. The use of
any other types may invalidate any
approval or warranty applying to the
phone, and may be dangerous.
] Do not disassemble this unit. Take
it to a qualified service technician
when repair work is required.
] Keep away from electrical
appliances such as a TVs, radios or
personal computers.
] The unit should be kept away from
heat sources such as radiators or
cookers.
] Never place your phone in a
microwave oven as it will cause
battery to explode.
] Do not drop.
] Do not subject this unit to
mechanical vibration or shock.
] The coating of the phone may be
damaged if covered with wrap or
vinyl wrapper.
] Do not use harsh chemicals (such
as alcohol, benzene, thinners, etc.)
or detergents to clean your phone.
There is a risk of this causing a fire.
] Do not subject this unit to
excessive smoke or dust.
] Do not keep the phone next to
credit cards or transport tickets; it
can affect the information on the
magnetic strips.
] Do not tap the screen with a
sharp object as it may damage the
phone.
] Do not expose the phone to liquid
or moisture.
] Use accessories, such as earphones
and headsets, with caution. Ensure
that cables are tucked away safely
and do not touch the antenna
unnecessarily.
] Please remove the data cable
before powering on the handset.
Guidelines for safe and efficient use
9

Guidelines for safe and efficient use
Electronic devices
All mobile phones may get
interference, which could affect
performance.
] Do not use your mobile phone
near medical equipment
without requesting permission.
Avoid placing the phone over
pacemakers (i.e. in your breast
pocket.)
] Some hearing aids might be
disturbed by mobile phones.
] Minor interference may affect TVs,
Guidelines for safe and efficient use
radios, PCs, etc.
Road safety
Check the laws and regulations on
the use of mobile phones in the
areas when you drive.
] Do not use a hand-held phone
while driving.
] Give full attention to driving.
] Use a hands-free kit, if available.
10
] Pull off the road and park before
making or answering a call if
driving conditions so require.
] RF energy may affect some
electronic systems in your motor
vehicle such as a car stereo or
safety equipment.
] If your vehicle is equipped with
an air bag, do not obstruct
it with installed or portable
wireless equipment. It can cause
serious injury due to improper
performance.
If you are listening to music whilst
out and about, please ensure that
the volume is at a reasonable
level so that you are aware of your
surroundings. This is particularly
imperative when attempting to cross
the street.

Avoid damage to your
hearing
Damage to your hearing can occur
if you are exposed to loud sound for
long period of time. We therefore
recommend that you do not turn on
or off the handset close to your ear.
We also recommend that music and
call volumes are set to a reasonable
level.
Blasting area
Do not use the phone where blasting
is in progress. Observe restrictions,
and follow any regulations or rules.
Potentially explosive
atmospheres
] Do not use the phone at a
refueIling point. Don’t use near fuel
or chemicals.
] Do not transport or store
flammable gas, liquid, or explosives
in the compartment of your
vehicle, which contains your
mobile phone and accessories.
In aircraft
Wireless devices can cause
interference in aircraft.
] Turn off your mobile phone before
boarding any aircraft.
] Do not use it on the ground
without crew permission.
Children
Keep the phone in a safe place out
of small children’s reach. It includes
small parts which if detached may
cause a choking hazard.
Emergency calls
Emergency calls may not be
available under all mobile networks.
Therefore, you should never depend
solely on your mobile phone for
emergency calls. Check with your
local service provider.
Guidelines for safe and efficient use
11

Guidelines for safe and efficient use
Battery information and
care
] You need not completely discharge
the battery before recharging.
Unlike other battery systems,
there is no memory effect that
could compromise the battery’s
performance.
] Use only LG batteries and chargers.
LG chargers are designed to
maximize the battery life.
] Do not disassemble or short-circuit
the battery pack.
Guidelines for safe and efficient use
] Keep the metal contacts of the
battery pack clean.
] Replace the battery when it
no longer provides acceptable
performance. The battery pack may
be recharged hundreds of times
until it needs replacing.
] Recharge the battery if it has
not been used for a long time to
maximize usability.
12
] Do not expose the battery charger
to direct sunlight or use it in high
humidity, such as the bathroom.
] Do not leave the battery in hot or
cold places, this may deteriorate
the battery performance.
] Risk of explosion: If battery is
replaced by an incorrect type.
] Dispose of used batteries according
to the manufacturer’s instructions.
] If you need to replace the battery,
take it to the nearest authorized
LG Electronics service point or
dealer for assistance.
] Always unplug the charger from
the wall socket after the phone is
fully charged to save unnecessary
power consumption of the charger.
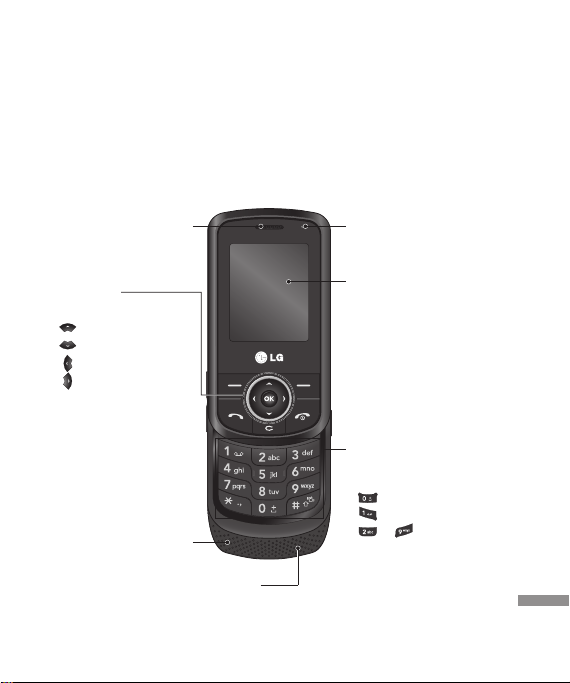
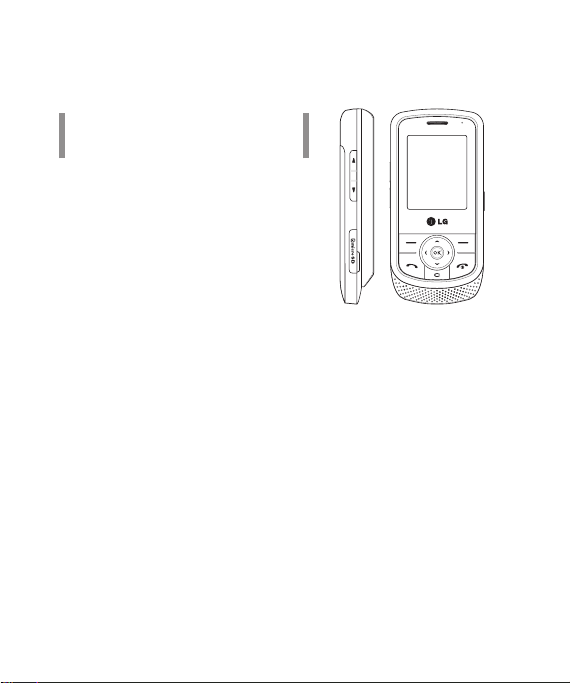
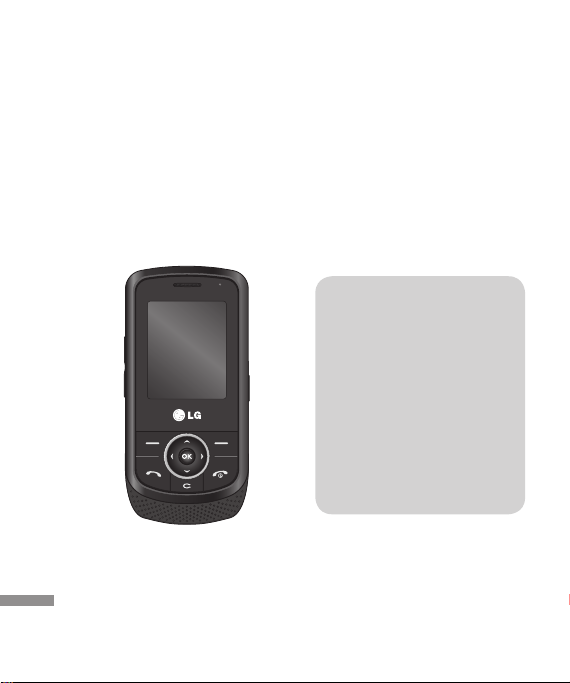
Parts of the phone
Front view
KP260 features
Earpiece
Navigation key
] In standby mode:
Brie y: Message
Brie y: Phonebook
Brie y: List of Pro les
Brie y: Favorites
] In menu: scroll up & down
Microphone
Speaker
Microphone for
speakerphone mode
LCD
] Top: Signal strength, battery
level and various functions
] Bottom: Soft key indications
Alpha numeric keys
] In standby mode: Input
numbers to dial Hold down
- International calls
- Emergency call
to - Speed dials
] In editing mode: Enter
numbers & characters
KP260 features
13
KP260 features
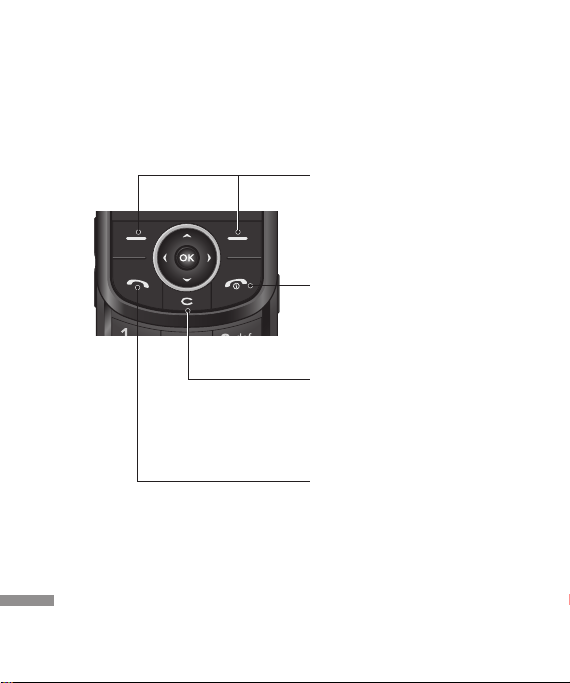
Left soft key/Right soft key
These keys performs the function indicated in
the bottom of the display.
End key
] Switch on/o (hold down)
] End or reject a call.
Clear key
Deletes a character with each press. Hold the
key down to clear all input. Use this key to go
back to a previous screen.
14
KP260 features
Send key
] Dial a phone number and answer a call.
] In standby mode: Shows recently dialed,
received and missed call list.
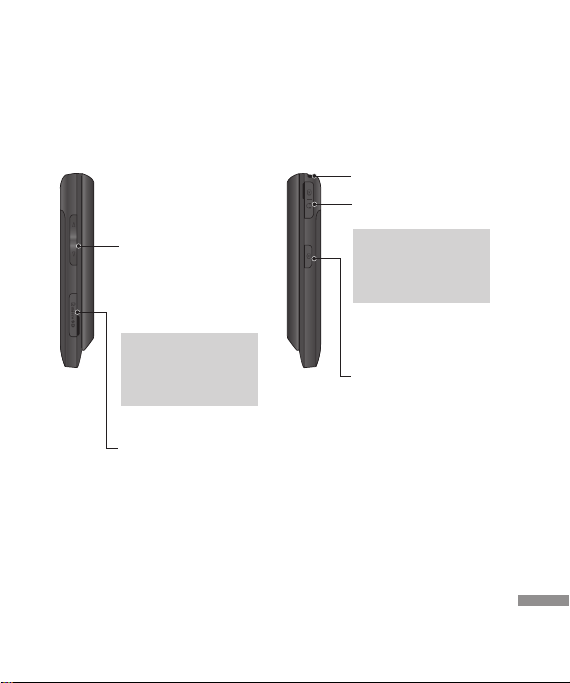
Left side view Right side view
Holes for a carrying strap
Battery Charging Connector/
Cable connector and Ear jack
Side keys
] In standby mode (opened):
Volume of key tone.
] During a call: increase/
decrease the volume of the
earpiece.
Note
] Removing the battery from
the phone when the power
is on may cause the phone
to malfunction.
MicroSD card
Note
] Please ensure phone is
powered on and be in idle
mode before connecting the
USB cable.
Side camera key
(Slide opened)
Long press - Photo camera
activation
KP260 features
15
KP260 features
Rear view
Push the button in, to
release the battery.
Camera lens
KP260 features
16
Battery latch
Battery
Battery Terminals
SIM Card Socket
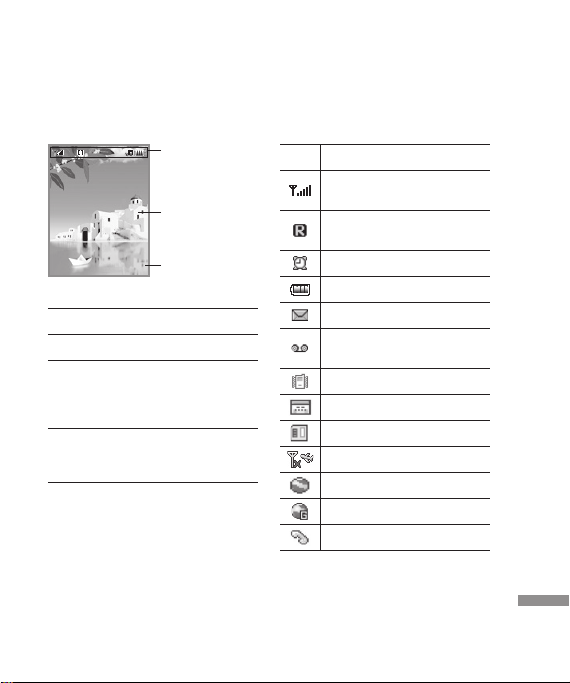
Display Information
Icon area
Text and graphic
area
Menu ContactsMenu Contacts
Area Description
First line Displays various icons.
Middle
lines
Last line Shows the functions
The screen displays several icons.
These are described below.
Soft key indications
Display messages,
instructions and any
information that you enter,
such as number to dialled.
currently assigned to the
two soft keys.
On-Screen Icons
Icon Description
Tells you the strength of the
network signal.
Shows that you are using a
roaming service.
The alarm has been set and is on.
Tells you the status of the battery.
You have received a text message.
You have received a voice
message.
Vibrate only menu in Pro les.
Schedule
External memory
Flight mode
WAP Connection
GPRS available
Calling
KP260 features
17
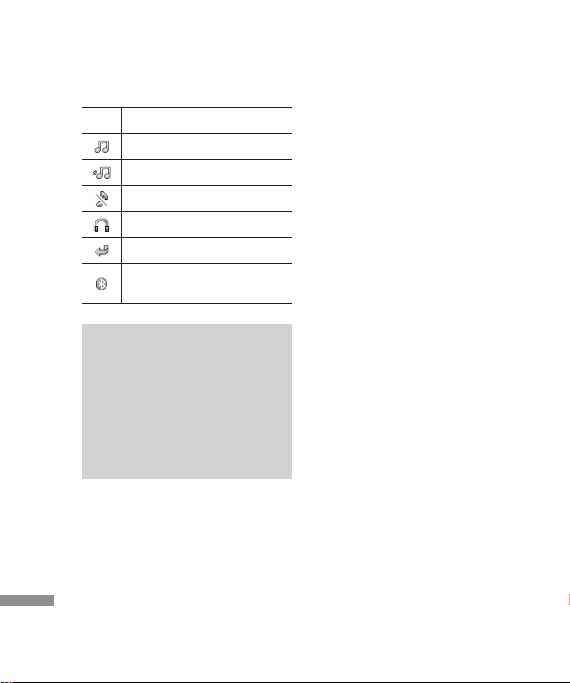
KP260 features
Icon Description
General menu in Pro les.
Outdoor menu in Pro les.
Silent menu in Pro les.
Headset menu in Pro les.
You can divert a call.
You have activated Bluetooth
connectivity.
* The quality of the conversation may
change depending on network coverage.
When the signal strength is below 2 bars,
you may experience muting, call drop
and poor audio. Please refer to this signal
as an indicator for your calls. When there
are no bars, that means that there is no
network coverage: in this case, you won’t
be able to access the network for any
service (call, messages and so on).
KP260 features
18
Installation
Installing the SIM card
and the handset battery
Make sure the power is off before
you remove the battery.
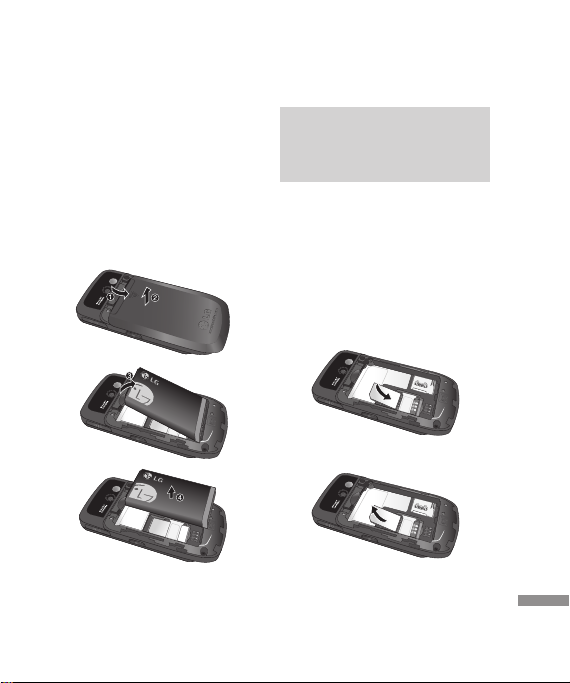
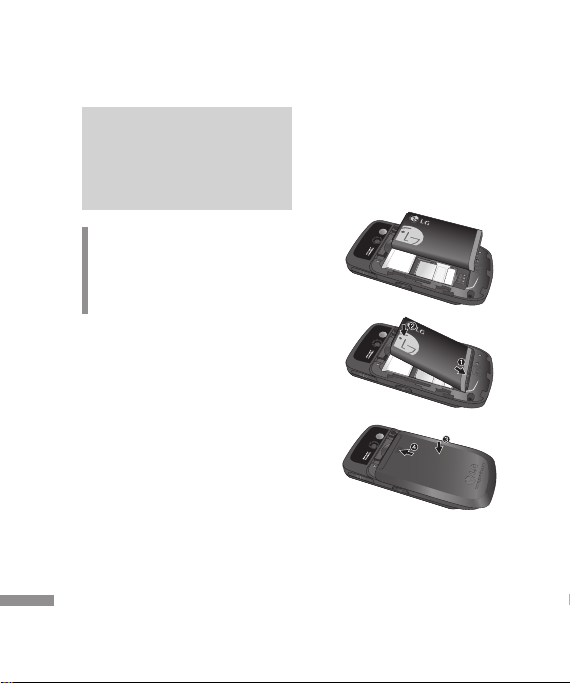
1. Remove the battery.
Slide down the battery cover and
pull out the battery.
Note
] Removing the battery from the phone
when the power is on may cause the
phone to malfunction.
2. Install the SIM card.
Insert and slide the SIM card into the
SIM card holder. Make sure that the
SIM card is inserted properly and
that the gold contact area on the
card is facing downwards. To remove
the SIM card, press down lightly and
pull it in the reverse direction.
To insert the SIM card
To remove the SIM card
Installation
19
Installation
Note
] The metal contact of the SIM card
can be easily damaged by scratches.
Pay special attention to the SIM card
while handling. Follow the instructions
supplied with the SIM card.
Warning!
• Do not replace or remove the SIM
card while your phone is being used
or turns on, or data on the SIM card
might be damaged.
Installation
20
3. Install the battery.
Insert the battery onto the back of
the phone, and push the battery
cover upwards until it snaps back
into place.
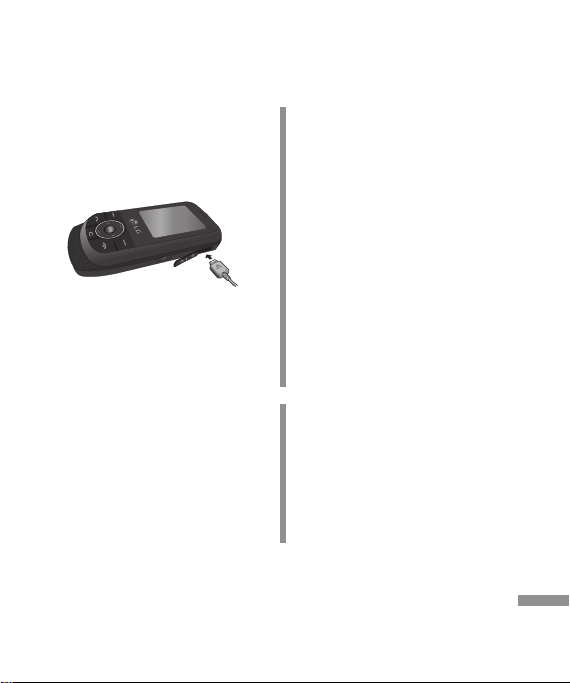
Charging the Battery
Before connecting the travel adapter
to the phone you must first install
the battery.
1. Ensure the battery is fully charged
before using the phone for the
first time.
2. With the arrow facing you as
shown in the diagram push the
plug on the travel adapter into the
socket on the side of the phone
until it clicks into place.
3. Connect the other end of the
travel adapter to the main socket.
Use only the charger included in
the box.
4. The moving bars of battery
icon will stop after charging is
complete.
Caution!
• If the battery is completely
discharged, the charging display will
appear on the LCD approximately 1
to 1.5 minutes after connecting TA.
• Do not force the connector as this
may damage the phone and/or the
travel adapter.
• Inser t the battery pack charger
vertically to wall power outlet.
• If you use the battery pack charger
out of your own country, use an
attachment plug adaptor for the
proper configuration.
• Do not remove your battery or the
SIM card while charging.
Warning!
• Unplug the power cord and charger
during lightning storms to avoid
electric shock or fire.
• Make sure that no sharp- edged items
such as animal teeth or nails, come
into contact with the battery. There is
a risk of this causing a fire.
Installation
21
Installation
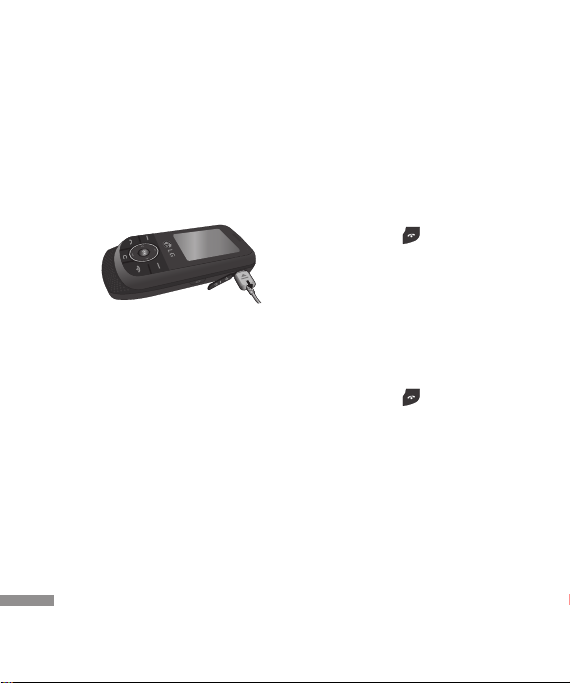
Disconnecting the
charger
Disconnect the charger from the
phone by pulling the connector, not
the cord.
Installation
22
Turning Handset ON/
OFF
Turning your Handset On
Ensure that your USIM card is in your
handset and the battery is charged.
Press and hold
comes on. Enter the USIM PIN code
that was supplied with your USIM
card if the PIN code request is set
to On.
After a few seconds you will be
registered on the network.
Turning your Handset Off
Press and hold until the power
goes off. There may be a few seconds
delay while the handset powers
down. Do not turn the handset on
again during this time.
until the power

General functions
Making a Call
1. Make sure your phone is powered
On.
2. Enter a phone number including
the area code. To edit a number
on the display screen, simply press
the
key to erase one digit
at a time.
] Press and hold the key to
erase the entire number.
3. Press the key to call.
4. When you want to finish, press the
key.
Making a Call by Send Key
1. Press the key, and the most
recent incoming, outgoing and
missed phone numbers will be
displayed.
2. Select the desired number by
using the navigation key.
3. Press the
key.
Making International Calls
1. Press and hold the key for
the international prefix. The +
character can be replaced with the
international access code.
2. Enter the country code, area code,
and the phone number.
3. Press the
key.
Ending a Call
When you have finished a call, press
the
key.
Making a Call From the
Contact list
You can store names and phone
numbers dialed frequently in the SIM
card as well as the phone memory.
You can dial a number by simply
looking up a name in the contact list.
General functions
23

General functions
Adjusting the Volume
During a call, if you want to adjust
the earpiece volume, use the side
keys of the phone.
In idle mode, you can adjust the key
volume using the side keys.
Answering a Call
When you receive a call, the phone
rings and the flashing phone icon
appears on the screen. If the caller
can be identified, the caller’s phone
number (or name if stored in your
Address Book) is displayed.
1. Slide up and press the
or the left soft key to answer an
incoming call. If the Any Key menu
option (Menu #.5.4.2) has been
set, any key press will answer a call
except for the
General functions
soft key.
2. End the call by closing the phone
or pressing the
24
key
key or the right
key.
Note
] You can answer a call while using the
Address Book or other menu features.
In case phone is connected with PC via
USB cable, call and messages are not
available.

In-call menu
Your phone provides a number
of control functions that you can
use during a call. To access these
functions during a call, press the left
soft key
[Options].
During a Call
The menu displayed on the handset
screen during a call is different than
the default main menu displayed
when in idle screen, and the options
are described below.
Making a Second Call
(Network Dependent)
You can search and dial the number
from Address Book to make a second
call.
Swapping Between Two Calls
To switch between two calls, press
key or the left soft key, and then
select Swap Call.
Answering an Incoming Call
To answer an incoming call when
the handset is ringing, simply press
the
key. The handset is also
able to warn you of an incoming
call while you are already on a call.
A tone sounds in the earpiece, and
the display will show that a second
call is waiting.
This feature, known as Call waiting,
is only available if your network
supports it. For details of how to
activate and deactivate it see Call
waiting (Menu #.5.6).
If Call Waiting is On, you can put
the first call on hold and answer the
second, by pressing the left soft
key
.
Rejecting an Incoming Call
You can reject an incoming call
without answering by simply
pressing the
During a call, you can reject an
incoming call by pressing the
key.
key.
In-call menu
25

In-call menu
Conference Calls
The conference service provides
you with the ability to have a
simultaneous conversation with
more than one caller, if your network
service provider supports this
feature. A conference call can only
be set up when you have one active
call and one call on hold, both calls
having been answered.
Once a conference call is set up,
calls may be added, disconnected or
separated (that is, removed from the
conference call but still connected to
you) by the person who set up the
conference call. These options are
all available from the In-Call menu.
The maximum callers in a conference
call are five. Once started, you are
in control of the conference call,
and only you can add calls to the
conference call.
In-call menu
26
Making a Second Call
You can make a second call while
currently in call. Enter the second
number and press the
When the second call is connected,
the first call is automatically placed
on hold. You can swap between calls,
by pressing the
key.
key.
Setting Up a Conference Call
To set up a conference call, place one
call on hold and while the active call
is on, press the left soft key and then
select the Join menu of Conference
call.
Activate the Conference Call
on Hold
To activate a conference call on hold,
press the
the left soft key [Options] and select
Join all/Hold all calls. Other users on
hold will stay connected. To return to
conference call mode, press the left
soft key
Conference call.
key. Alternatively press
[Options] followed by

Adding Calls to the
Conference Call
To add a call to an existing
conference call, press the left soft
key, and then select the Join menu
of Conference call.
Private Call in a Conference
Call
To have a private call with one caller
from a conference call, display the
number of the caller you wish to talk
to on the screen, then press the left
soft key. Select the Private menu of
Conference call to put all the other
callers on hold.
Ending a Conference Call
Currently displayed caller from a
conference call can be disconnected
by pressing the
key.
In-call menu
27
Menu Tree
The menu in this phone can be displayed in 2 ways. One is by grid type
and secondly by list view type. Please note that menu number options are
different in each view.
The default setting on the phone is set to show the menu in grid type, so
therefore all the menu number selections throughout the manual are shown
according to that setting.
The following illustration shows the available menu structure and indicates
the:
] Number assigned to each menu option.
] Page where you can find the feature description.
You can go to the desired menu using the left soft key [Menu], navigation
keys and the [OK] key. And you can also take a shortcut by pressing the
corresponding number key of desired menu after pressing the left soft key
[Menu].
Menu Tree
28
1. Games & Apps
1.1 Games
1.2 Applications
1.3 Network profiles
2. Call history
2.1 All calls
2.2 Missed calls
2.3 Dialled calls
2.4 Received calls
2.5 Call duration
2.6 Call costs
2.7 Data information
3. Organiser
3.1 Calendar
3.2 Memo
3.3 To do
4. Multimedia
4.1 MP3 player
4.2 Camera
4.3 Video camera
4.4 FM Radio
4.5 Voice recorder
5. Messaging
5.1 New message
5.2 Inbox
5.3 Bluetooth box
5.4 Drafts
5.5 Outbox
5.6 Sent
5.7 Listen to voicemail
5.8 Info messages
5.9 Templates
5.0 Message settings

6. My stuff
6.1 Images
6.2 Sounds
6.3 Videos
6.4 Others
6.5 External memory
7. Profiles
7.1 General
7.2 Silent
7.3 Vibrate only
7.4 Outdoor
7.5 Headset
8. Contacts
8.1 Search
8.2 New contact
8.3 Speed dial
8.4 Groups
8.5 Copy all
8.6 Delete all
8.7 Settings
8.8 Information
9. Tools
9.1 Alarm clock
9.2 Calculator
9.3 Stopwatch
9.4 Unit converter
9.5 World clock
9.6 SIM services
*. WAP
*.1 Home
*.2 Yahoo!
*.3 Bookmarks
*.4 Enter address
*.5 History
*.6 Saved pages
*.7 Settings
*.8 Information
0. Connectivity
0.1 Bluetooth
0.2 Network
0.3 USB connection
#. Settings
#.1 Date & Time
#.2 Languages
#.3 Display
#.4 Shortcut
#.5 Call
#.6 Security
#.7 Flight mode
#.8 Power save
#.9 Reset
#.0 Memory status
Menu Tree
29

Games & Apps
Games
Your KP260 comes with preloaded
games to keep you amused when
you have time to spare. If you choose
to download any additional games
or applications they will be saved
into this folder.
Applications
You can manage the Java
applications installed in your phone
by using the Applications menu.
You can also delete downloaded
applications.
Network profiles
To download a game, you can set
the value to connect to the network
using Network profile.
Games & Apps
30
Menu 1.1
Menu 1.2
Menu 1.3

Call history
You can check the record of missed,
received, and dialed calls only if the
network supports the Calling Line
Identification (CLI) within the service
area.
The number and name (if available)
are displayed together with the date
and time at which the call was made.
You can also view the number of
times you have called.
All calls
Menu 2.1
You can view all lists of outgoing,
missed and incoming calls.
Missed calls
Menu 2.2
This option lets you view the last 50
unanswered calls. You can also:
] View the number if available and
call it, or save it in the Address Book
] Enter a new name for the number
and save in the Address Book
] Send a message by this number
] Delete the call from the list
Dialled calls
Menu 2.3
This option lets you view the last 50
outgoing calls (called or attempted).
You can also:
] View the number if available and
call it or save it in the Address Book
] Enter new name for the number
and save in the Address Book
] Send a message by this number
] Delete the call from the list
Received calls
Menu 2.4
This option lets you view the last 50
incoming calls. You can also:
] View the number if available and
call it or save it in the Address Book
] Enter new name for the number
and save both in the Address Book
] Send a message by this number
] Delete the call from the list
Call history
31

Call history
Call duration
Allows you to view the duration of
your incoming and outgoing calls.
You can also reset the call timers.
The following timers are available:
] Last call: Length of the last call.
] All calls: Total length of all calls
made and incoming calls since the
timer was last reset.
] Dialed calls: Length of the
outgoing calls.
] Received calls: Length of the
incoming calls.
Call costs
Allows you to check the cost of your
Last call and All calls.
To check Cost settings, you should
check the following menus.
] Set credit: This network service
allows you to limit the cost of your
Call history
calls by selected charging units.
If you select Read, the number of
remaining unit is shown. If you
select Change, you can change
your change limit.
32
Menu 2.5
Menu 2.6
] Set tariff: You can set the currency
type and the unit price. Contact
your service providers to obtain
charging unit prices. To select the
currency or unit in this menu, you
need the PIN2 code.
] Auto display: This network service
allows you to see automatically the
cost of your last calls. If set to On,
you can see the last cost when the
call is released.
Data information
You can check the amount of
data transferred over the network
through the GPRS information
option.
In addition, you can also view how
much time you were Online.
Menu 2.7

Organizer
Calendar
When you enter this menu a
calendar will show up. On top of the
screen there are sections for date.
Whenever you change the date, the
calendar will be updated according
to the date. And square cursor will
be used to locate the certain day. If
you see marked date in the calendar,
it means that there is a schedule
on that day. This function helps to
remind you of your schedule and
memo.
To change the day, month, and year.
Key Description
, Yea r ly
, Monthly
, Weekly
,
Daily
In the scheduler mode, press left soft
key
[Options].
Menu 3.1
Memo
1. Select the Memo by pressing the
left soft key
2. If the entry is empty, press the left
soft key
3. Input the memo and then press
left soft key
[Save].
Note
] If you want to change the text input
mode, press the
[New].
To do
You can view and create To do notes.
1. Select the To do by pressing the
left soft key
2. If the note is not created yet, press
the left soft key [New].
3. Input the to do and then press
the left soft key [Options] >
[Save].
Menu 3.2
[OK].
[Options] >
in order.
Menu 3.3
[OK].
Organizer
33

Multimedia
You can enjoy your multimedia
function such as camera, voice
recorder, MP3 for your fun and
convenience.
Note
] When the status of the batter y indicates
low, you may not use Camera or
Multimedia function.
] While using Multimedia function, the
status of the battery is changeable.
MP3 player
The KP260 has an integrated MP3
player built-in.
You can enjoy listening to MP3
music files on your phone using
a compatible headset or via the
internal loudspeaker.
Multimedia
34
Menu 4.1
Note
] Because of the small dimension of the
speaker, in some cases the audio could
be distorted, especially at maximum
volume and when there are lots of bass
sounds. Therefore, we recommend
you to use the stereo headset in order
to appreciate the high quality of your
music.
You can transfer MP3 files from a
compatible PC to the memory in
your phone using the Mass Storage.
When you connect the phone to a
PC using the USB cable, and then
you can show removable disk
through windows explorer. After you
copy songs in removable disk, you
should execute safe remove from
your system.

Note
] You should copy MP3 to Sounds/MP3
folder. If you copy another folder, you
can't see MP3 les.
] The PC should run Windows 98 SE,
Windows ME, Windows 2000,
Windows XP operating system.
] Music is copyright protected in
international treaties and national
copyright laws. It may be necessary
to obtain permission or a license to
reproduce or copy music. In some
countries national law prohibits private
copying of copyrighted material. Please
check the national legislation of the
applicable country concerning the use
of such material.
Camera
Menu 4.2
Using the camera module built in
your phone, you can take pictures of
people. Additionally, you can send
photos to other people and select
photos as wallpaper.
Note
] When using the camera, power
consumption increases. If this icon
appears on the wallpaper,
indicating low battery, recharge the
battery before use.
Shutter sound or video recording
sound is omitted even when setting
mode, including silent mode
.
Multimedia
35

Multimedia
• To take a picture
Hold down the camera button.
- To take clear pictures, press the
camera
button while holding the
camera without any movement.
- Appropriately adjust distance to the
object that you want take a picture
of (more than 50 cm).
- Handle carefully since the camera
is vunerable to shock and use a soft
cloth when cleaning the camera
lens.
- Do not disassemble or modify the
camera as this may lead to fire or
malfunctioning.
1. Hold down the
in standby
mode.
2. Focus on the subject to capture
the image, and then press the
/ key.
Note
Multimedia
] You can adjust the brightness by using
, .
the
36
To change the below functions, press
the left soft key
] Resolution: Allows you to set the
[Options].
image size. (1280x960), (640x480)
and (320x240).
] Quality: Allows you to set the
image quality from Normal, Fine
and Super fine.
] Self timer: Allows you to select
the delay time (Off, 3 seconds,
5 seconds, 10 seconds).
Then the phone takes a photo after
the specified time.
] View option: Allows you choose
Full image or Full screen.
] Save to: You can set the space after
taking a picture. (External/Phone)
] Multi shot: Allows to take
multishot photos successively.
] Effects: 4 settings are available.
] White balance: Allows you to
change the settings according to
the environment.

] Shutter tone: You can set the
sound when taking a picture.
] Reset settings: Allows you to reset
the settings.
Video camera
Menu 4.3
1. Select Video camera menu.
2. Video camera settings menu is the
same with Photo camera settings,
except following items:
To change the below function, press
the left soft key
] Video mode: Allows you to set to
[Options].
send a video file through MMS or
General.
FM Radio
Menu 4.4
You can search radio stations and
enjoy listening to the radio.
Note
] To improve the radio reception, extend
the headset cord which functions as the
FM antenna.
1. Press the corresponding number
key of a channel to store the
currently selected radio station.
2. After presetting radio channels,
you can listen to other channel
by pressing the corresponding
number key (short press).
3. You can access the following
option menus by pressing the left
soft key
] Edit channels: You can adjust
[Options].
frequency and change the radio
station in the selected channel. You
can change the frequency 0.1 MHz
at a time with Left/Right navigation
keys and number keys.
] Auto scan: If you select "Auto Scan
Now?" On, automatically set the
radio channel.
And When "Save channel pop-up?"
message will be popped up, if you
select Yes, the selected frequency
will be stored.
] Reset channels: You can delete all
channels you saved.
] Listen via speaker/Headset: Yo u
can listen to the radio via speaker.
Multimedia
37

Multimedia
Voice recorder
You can record voice memo.
Record
1. Press OK to start recording. Once
recording is started, the message
Recording and the counter is
displayed.
2. If you want to finish recording,
press right soft key [Stop].
Album
You can view the Sounds folder
which lists all sound files saved in
the memory.
Multimedia
38
Menu 4.5

Messaging
New message
This menu includes functions related
to SMS (Short Message Service),
MMS (Multimedia Message Service),
voice mail, as well as the network’s
service messages.
Menu 5.1
Message
You can write and edit text message,
checking the number of message
pages.
1. Enter the New message menu by
pressing the left soft key
2. If you want to write a new
message, select Message.
3. To make text input easier, use T9.
4. Press [Options] to attach the
followings.
Options
] Send to: Sends text messages.
1. Enter numbers of recipients.
2. Press
key to add more
recipients.
[OK].
3. You can add phone numbers from
the address book.
4. Press the
press send after entering numbers.
If the message sent is failed ,it will
be saved in the outbox folder.
[Options] and then
Bluetooth message
To send/receive the message via
Bluetooth, you should switch on the
Bluetooth.
Inbox
You will be alerted when you have
received messages. They will be
stored in Inbox. You can save SMS up
to 110 (SMS: 100, Delivery report: 10).
If the phone shows ‘No space for SIM
message’, you have to delete only
SIM messages from Inbox.
If the phone displays ‘No space
for new message’, you can make
space of each repository as deleting
messages, media and applications.
Menu 5.2
Messaging
39

Messaging
] View : You can view the received
messages.
] Delete: You can delete the current
message.
] Reply: You can reply to the sender.
] Forward: You can forward the
selected message to another party.
] Return call: You can call back to
the sender.
] Save number: Choose the contact
type (New contact or Update
contact).
] Information: You can view
information about received
messages; Sender’s address,
Subject (only for Multimedia
message), Message date & time,
Message type, Message size.
] New message: By selecting
this menu, you can write a new
message.
] Multi delete: After selecting the
Messaging
messages you want to remove, you
can delete the selected messages.
40
] Delete all read: You can delete all
messages read.
] Delete all: You can delete all
messages.
Bluetooth box
Menu 5.3
All messages you receive via
Bluetooth are placed into your
Bluetooth box. Here you can read,
reply to and forward your messages.
Drafts
Menu 5.4
Using this menu, you can preset
multimedia messages that you use
most frequently. This menu shows
the preset multimedia message list.
Outbox
Menu 5.5
This menu allows to view the
message which is about to send or is
failed to send.
After sending the message
successfully, the message will be
moved to sent box.

Sent
This menu allows you to view the
messages which are already sent.
You can check the time and the
contents of message.
Menu 5.6
Listen to voicemail
Menu 5.7
Once this menu has been selected,
simply press the left soft key
[OK] to Listen to voicemail. You
can also hold down the
standby mode to Listen to voicemail.
Note
] When you receive a voice mail, your
phone displays the icon and you
hear an alert. Please check with your
network provider for details of their
service in order to con gure the
handset correctly.
key in
Info messages
(Dependent to network and subscription)
Info service messages are text
messages delivered by the network
to GSM. They provide general
information such as weather reports,
traffic news, taxis, pharmacies, and
stock prices.
Each type of info message has the
number; therefore, you can contact
service provider as long as you have
input the certain number for the
information.
When you have received an info
service message, you can see the
popup message to show you that
you have received a message or
the info service message is directly
displayed.
Menu 5.8
Messaging
41

Messaging
Templates
Text templates
] View : You can see multimedia
templates.
] Edit: Use this to write a new
message or edit the selected
template message from the text
template list.
] Send via
- Message: Use this to send the
selected template message by
message.
- Bluetooth message: This menu
allows you to send the message
via Bluetooth.
] Delete: Deletes the template.
] New template: Use this to create
new template.
] Delete all: Allows you to delete all
multimedia messages.
Messaging
42
Menu 5.9
Multimedia templates
After saving new template, you can
use the following options.
] View : You can see text templates.
] Edit: Use this to write a new
message or edit the selected
template message from the text
template list.
] Send: Use this to send the selected
template message.
] Delete: Deletes the template.
] New template: Use this to create
new template.
] Delete all: Allows you to delete all
multimedia messages.

Message settings
Menu 5.0
Text message
] Message type:
Text, Voice, Fax, Paging, X.400,
Email, ERMES.
] Validity period: This network
service allows you to set how long
your messages will be stored at the
message centre.
] Delivery report: If you set to
On, you can check whether your
message is sent successfully.
] Reply via same service center:
When a message is sent, it allows
the recipients to reply and charge
the cost of the reply to your
telephone bill.
] Message center number: If you
want to send the text message,
you can receive the address of SMS
centre through this menu.
] Character encoding: Choose how
the characters in your messages are
encoded, this impacts the size of
your message and therefore data
charges.
] Send long text as: Choose to send
as Multiple text message or as
Multimedia message.
Multimedia message
] Slide duration: Displays the
duration of each page when
viewing the message.
] Delivery time: Deliver your
message at a specific time.
] Priority: You can set the priority of
the message you choose.
] Validity period: This network
service allows you to set how long
your text messages will be stored
at the message centre.
] Delivery report: If you set to
On, you can check whether your
message is sent successfully.
Messaging
43

Messaging
] Read report: You can receive the
report whether the receiver read
the message or not.
] Auto download: If you select On,
you receive multimedia messages
automatically. If you select Off, you
receive only notification message
in the inbox and then you can
check this notification. If you select
Home network only, you receive
multimedia messages depends on
Home network.
] Network profiles: If you select
multimedia message server,
you can set URL for multimedia
message server.
] Permitted Message Types
Personal: Personal message.
Advertisement: Commercial
message.
Information: Necessary
information.
Messaging
44
Voicemail number
You can receive voicemail if your
network service provider supports
this feature. When a new voicemail is
arrived, the symbol will be displayed
on the screen. Please check with
your network service provider for
details of their service in order to
configure the phone accordingly.
Service message
You can set the option whether you
will receive the message or not.
Info message
] Receive
On: If you select this menu, your
phone will receive Info service
messages.
Off: If you select this menu, your
phone will not receive Info service
messages any more.

] Alert
On: Your phone will beep when
you have received Info service
message numbers.
Off: Your phone will not beep even
though you have received info
service messages.
] Languages
You can select the language you
want by pressing OK key. Then, the
info service message will be shown
in the language that you selected.
Messaging
45

My stuff
Images
Shows the list of JPG files at My stuff/
Images in Multimedia memory.
] View : You can see the JPG file when
pressing OK key or selecting View
menu of Option menus.
] Set as
- Wallpaper: Currently selected
image can be set as a wallpaper.
- Picture ID: Currently selected
image can be set as a Picture ID.
] File info: Show the file information
such as name, size, date, time and
type.
] Slide show: You can view a slide
show of the files you stored.
] New folder: You can create a new
folder.
] Sort by: You can arrange the files
as a date, type and name.
] List view/List with detail view/
Grid view: Allows you to set the
My stuff
view type.
46
Menu 6.1
Sounds
Menu 6.2
Displays the list of MP3, MIDI, AAC,
AMR, MMF files at My stuff/Music in
Multimedia memory.
] Play: You can play the MP3 file
when pressing OK key or selecting
Play menu of Option menu.
] Set as: Currently selected sound
can be set as a Ringtone/Ringtone
ID.
] Sort by: You can arrange the files
as a type and name.
Videos
Menu 6.3
Show the list of 3GP, 3G2 files at My
stuff/Videos in Multimedia memory.
Supported only .3gp files, that are
encoded with MPEG4 and h.263
video-codecs and AMR audiocodecs.
] Play: You can play the video file
when pressing OK key or selecting
Play menu of Option menu.
] Send via: Send the selected file
to another device via Multimedia
message or Bluetooth.

Note
] You may send les via Bluetooth only if
they are stored in phone memory, not
on memory card.
To send le from external memory,
please, rstly copy it to internal phone
memory.
Note
] You may send les via Bluetooth only if
they are stored in phone memory, not
on memory card.
To send le from external memory,
please, rstly copy it to internal phone
memory.
Warning!
• You can't use the following characters,
\ / : * ? < > |
] New folder: You can create a new
folder.
] Multi delete: You can remove a
number of files you selected.
] Delete all: Delete all files in the list.
] Sort by: You can arrange the files
as a type and name.
Others
Show the list of files in My media/
Others in the Multimedia memory.
Menu 6.4
External memory
Menu 6.5
If you’ve inserted a memory card it
will be displayed as a folder within
My stuff. Your external memory
folder will be divided into further
folders: Images, Sounds, Videos and
Others.
Each folder will contain all the files
of that type which are saved to
your memory card rather than your
handset.
My stuff
47

Profiles
In Profiles, you can adjust and
customise the phone tones for
different events, environments, or
caller groups.
There are five preset profiles:
General, Silent, Vibrate only,
Outdoor and Headset.
Some profiles (General, outdoor,
headset) can be personalized. Press
the left soft key [Menu] and select
Profiles using up/down navigation
keys.
Profiles
48

Contacts
Search
1. Select Search by pressing the left
soft key
2. Enter the name that you want to
search.
Note
] Instant searching is available by
inputting the initial letter of the name.
3. If you want to edit, delete, copy an
entry, or to add the voice to one,
select left soft key
[OK].
New contact
You can add phonebook entry by
using this function.
SIM card memory capacity depends
on the cellular service provider.
The number of character is SIM
dependent feature.
Note
] Maximum stored name and number
length depends on SIM-card type.
Menu 8.1
[Options].
Menu 8.2
1. Select New contact by press left
soft key
2. Input a name.
3. Press , then you can input a
number.
4. You can set a group for the entry
by pressing
5. You can set a ringtone and a photo
for the entry by press left soft key
Speed dial
You can assign any of the keys
to
can call directly by pressing this key.
1. Open the contacts first by pressing
the right soft key
in standby mode.
2. Scroll to Speed dial, then press the
left soft key
3. If you want to add speed dial,
select <Empty> by pressing the
left soft key
you can search the name in
contacts.
[OK].
, .
[Options].
Menu 8.3
with a Name list entry. You
[Contacts]
[OK].
[Assign]. Then,
Contacts
49

Contacts
4. After assigning the number as
speed dial, you can change and
delete the entry. You can also
make a call or send a message by
this number.
Groups
You can list up to the members per
each group. There are 7 groups you
can make lists to.
Copy all
You can copy entries from SIM card
memory to Phone memory and vice
versa.
Delete all
You can delete all entries from SIM
or Phone.
Settings
1. Press the right soft [Contacts]
Contacts
in standby mode.
2. Scroll to Settings, then press the
left soft key
50
[OK].
Menu 8.4
Menu 8.5
Menu 8.6
Menu 8.7
Information
] Service dial number
Use this function to access a
particular list of services provided
by your network operator
(if supported by the SIM card).
] Own number (SIM dependent)
You can save and check your own
number in SIM card.
] My business card
This option allows you to create
your own business card featuring
name and a mobile phone number.
To create a new business card,
press the left soft key
and enter the information into the
fields.
If you want to edit, delete or to
send a business card, select left
soft key
[Options].
Menu 8.8
[New]

Tools
Alarm clock
You can set the alarm clock to go on
at a specified time.
Calculator
This contains the standard
functions such as +, -, x, / Addition,
Subtraction, Multiplication, and
Division.
Furthermore, you can use the various
function of calculator such as +/-, sin,
cos, tan, log, ln, exp, sqrt.
1. Input the numbers by pressing
numeric keys.
2. Use a navigation key to select a
sign for calculation.
3. Then input the numbers.
4. Press
5. To input the decimal number,
6. To end Calculator, press the right
key to view the result.
press key.
soft key [Back].
Menu 9.1
Menu 9.2
Stopwatch
1. Press [Start] to take time and
record the lap time by pressing
[Lap].
2. Press [Stop] to ascertain the record
of lap time.
3. Press [Reset] to default condition.
Unit converter
This converts any measurement into
a unit you want. There are 7 types
that can be converted into units:
Currency, Area, Length, Weight,
Temperature, Volume and Velocity.
1. You can select one of unit types by
pressing
2. Select the unit you want to
convert by pressing
It is impossible to input “-” symbol
in unit converter.
[OK] key.
Menu 9.3
Menu 9.4
, .
Tools
51

Tools
World clock
You can view clocks of the worlds
major cities.
1. Select the city belonged to the
time zone by pressing
key.
2. You can set the current time to the
city time you select by pressing
the left soft key [OK].
SIM services
This feature depends on SIM and the
network services.
In case the SIM card supports SAT
(i.e. SIM Application Toolkit) services,
this menu will be the operator specific
service name stored on the SIM card.
Tools
52
Menu 9.5
,
Menu 9.6

WAP
You can access various WAP (Wireless
Application Protocol) services such
as banking, news, weather reports
and flight information. These services
are specially designed for mobile
phones and they are maintained by
WAP service providers.
Check the availability of WAP
services, pricing and tariffs with
your network operator and/or the
service provider whose service you
wish to use.
Service providers will also give you
instructions on how to use their
services.
Once connected, the homepage
is displayed. The content depends
on the service provider. To exit the
browser at any time, press the
key. The phone will return to the idle
screen.
Using the phone keys
When surfing the Internet, the
phone keys function differently to
phone mode.
Key Description
Scrolls each line of
,
the content area
Returns to the
previous page
Select options and
confirm actions
Home
Connects to a homepage. The
homepage will be the site which
is defined in the activated profile.
It will be defined by the service
provider if you have not defined it in
the activated profile.
Menu *.1
WAP
53

WAP
Yahoo!
To access Yahoo! services, touch
Menu and select WAP then
Yahoo! oneSearch.
Note
] You may be unable to access Yahoo! in
some countries. This is dependent on
Network Services.
Bookmarks
This menu allows you to store the
URL of favourite web pages for easy
access at a later time.
To create a bookmark.
1. Press the left soft key
[Options].
2. Select Add new and press the
OK key.
3. After entering the desired URL and
title, press the OK key.
After selecting a desired bookmark,
the following options are available.
WAP
54
Menu *.2
Menu *.3
Enter address
You can connect directly to the site
you want. After entering a specific
URL, press the OK key.
History
This menu shows the recently
browsed pages.
Saved pages
The phone can save the page on
display as an offline file.
Settings
You can set the profile, cache and
security related to internet service.
Menu *.4
Menu *.5
Menu *.6
Menu *.7
Network profile
A profile is the network information
used to connect to the Internet.
There are default profiles for some
operators, stored in phone memory.
It’s impossible to rename default
profiles.

Cache
The information or services you have
accessed are saved in the cache
memory of the phone.
Note
] A cache is a bu er memory, which is
used to save data temporarily.
Security certificates
You can see the list of personal
certificates that have been stored in
your phone.
Show image
You can select to display image or
not during WAP browsing.
JavaScript
Select whether to turn JavaScript
On or Off.
Information
This menu shows you about the
version of WAP.
Menu *.8
WAP
55

Connectivity
Bluetooth
Bluetooth enables compatible
mobile devices, peripherals and
computers that are in close proximity
to communicate directly with each
other without wires.
This handset supports built-in
Bluetooth connectivity, which makes
it possible to connect them with
compatible Bluetooth headsets,
computer applications and so on.
Note
] Always use genuine LG accessories.
] Failure to do this may invalidate your
warranty.
] Accessories may be di erent in di erent
regions; please check with our regional
service company or agent for further
inquires.
Connectivity
56
Menu 0.1
Network
You can select a network which will
be registered either automatically or
manually.
Menu 0.2
Network selection
Usually, the network selection is set
to Automatic.
] Automatic: If you select Automatic
mode, the phone will automatically
search for and select a network
for you. Once you have selected
Automatic , the phone will be set to
Automatic even though the power
is off and on.
] Manual: The phone will find the
list of available networks and show
you them. Then you can select
the network which you want to
use if this network has a roaming
agreement with your home
network operator.
The phone lets you select another
network if the phone fails to access
the selected network.

] Preferred: You can set a list of
preferred networks and the phone
attempts to register with first,
before attempting to register to
any other networks. This list is set
from the phone’s predefined list of
known networks.
GPRS attach
You can set GPRS service depending
on various situations.
USB connection
You can choose one mode of Data
service and USB Mass storage.
] Mass storage
You can connect your phone to
your PC, as a USB storage device,
using the cable in three ways.
1. Connect the phone to the PC
when the idle (or Top menu)
screen is displayed.
2. Connect the phone while it is
performing an operation or menu
function, and then move to the
idle (or Top menu) screen.
Menu 0.3
3. Connect the phone while it is
performing an operation or menu
function, and then select the USB
Mass Storage menu.
When you have finished using the
phone memory, click Exit and take
the following steps.
1. Click on the notification area.
[Unplug or Eject Hardware]
2. Select USB mass Storage Device,
click on Stop.
The following message will
appear: The USB Mass storage
device can now be safely removed
from the system.
3. Then remove the cable.
Connectivity
57

Settings
Date & Time
You can set functions relating to the
date and time.
Languages
You can change the language for
the display texts in your phone. This
change will also affect the Language
Input mode.
Display
Wallpaper
You can select the background
pictures in standby mode.
Backlight timer
You can set the light-up duration of
the display.
Brightness
You can set the brightness of LCD:
Settings
100%, 80%, 60%, 40%
58
Menu #.1
Menu #.2
Menu #.3
Home screen shortcut
Selecting On displays the
functionalities of 4 Navigation keys
and Menu key as pictures on the
middle of the idle window.
Menu style
Your phone provides you with Grid
and Wheel menu themes. Set the
menu style by scrolling and pressing
the left soft key
[OK].
Standby text
If you select On, you can edit the text
which is displayed in standby mode.
Network name
If this function is activated, network
name will be displayed on LCD.

Shortcut
This option allows you to add your
own favourites to the list already
provided. Once you create your own
menu, you can access the desired
function quickly in the idle screen by
pressing the right navigation key.
Note
] Radio menu is already provided in your
own favourites.
Call
You can set the menu relevant to a
call by pressing
Setting menu.
Menu #.4
Menu #.5
[Select] in the
Call divert
The Call divert service allows you to
divert incoming voice calls, fax calls,
and data calls to another number.
For details, contact your service
provider.
Call barring
The Call barring service prevents
your phone from making or
receiving certain category of calls.
This function requires the call
barring password. You can view the
following submenus.
Fixed dial number
(SIM dependent)
You can restrict your outgoing calls
to selected phone numbers. The
numbers are protected by your PIN2
code.
Answer mode
] Any key
If you select this menu, you can
receive a call by pressing any key
except
] Send key only
If you select this menu, you can
receive a call by only pressing
[Send] key.
[End]/ keys.
Settings
59

Settings
Send my number
(network and subscription dependent)
] Set by network
If you select this, you can send
your phone number depending on
two line service such as line 1 or
line 2.
Call waiting
(network dependent)
] Activate
If you select Activate, you can
accept a waiting (receiving) call.
] Cancel
If you select Cancel, you cannot
recognize the waiting (receiving)
call.
] View status
Shows the status of Call waiting.
Minute minder
If you select On, you can check the
Settings
call duration by a beep sound given
every minute during a call.
60
Auto redial
] On
When this function is activated,
the phone will automatically try
to redial in the case of failure to
connect a call.
] Off
Your phone will not make any
attempts to redial when the
original call has not connected.
Send DTMF tones
You can send touch tones during
an active call to control your voice
mailbox or other automated phone
services.
Security
Menu #.6
PIN code request
In this menu, you can set the phone
to ask for the PIN code of your SIM
card when the phone is switched on.
If this function is activated, you’ll be
requested to enter the PIN code.

1. Select PIN code request in the
security settings menu, and then
press
2. Set On/Off.
3. If you want to change the setting,
you need to enter PIN code when
you switch on the phone.
4. If you enter wrong PIN code more
than 3 times, the phone will lock
out. If the PIN is blocked, you will
need to key in PUK code.
5. You can enter your PUK code up
to 10 times. If you put wrong PUK
code more than 10 times, you
can not unlock your phone. You
will need to contact your service
provider.
[OK].
Auto key lock
This menu allows to set the time of
Auto key lock.
Phone lock
You can use a security code to avoid
unauthorised use of the phone.
Whenever you switch on the phone,
the phone will request security
code if you set phone lock to When
switch on.
If you set phone lock to When SIM
changed, your phone will request
security code only when you change
your SIM card.
Anti Theft Mobile Tracker
When the handset is stolen, handset
sends the SMS to the numbers
configured by real owner. User has
to configure the ATMT settings with
Name, primary number, secondary
number etc. Default ATMT code is
“0000”.
ATMT SMS will contain information
about the stolen phone IMEI, current
location & number of the person
who is using that handset.
Settings
61

Settings
Change codes
PIN is an abbreviation of Personal
Identification Number to prevent use
by unauthorised person.
You can change the access codes:
Security code, PIN2 code.
1. If you want to change the Security
code/PIN2 code input your
original code, and then press
[OK].
2. Input new Security code/
PIN2 code and verify them.
Flight mode
This allows you to use only the
phone’s features that do not require
the use of the wireless network
when you are in an airplane or in
places where the wireless network is
prevented.
If you set the flight mode on, the
icon will be displayed on the screen
instead of the network signal icon.
Settings
62
Menu #.7
Power save
If you set On, you can save the
power when you don’t use the
phone.
Reset
You can initialize all factory defaults.
You need Security code to activate
this function.
Memory status
You can check free space and
memory usage of phone, sim card
and external memory (if inserted).
Menu #.8
Menu #.9
Menu #.0

Accessories
There are various accessories for your mobile phone. You can select these
options according to your personal communication requirements.
Standard Battery
Travel Adapter
This charger
allows you to
charge the
battery while
away from
home or your
office.
Hands free ear microphone
Note
] Always use genuine LG accessories.
] Failure to do this may invalidate your
warranty.
] Accessories may be di erent in di erent
regions; please check with our regional
service company or agent for further
inquires.
Accessories
63

Technical data
General
Product name: KP260
System: GSM 900 / DCS 1800 /
PCS 1900
Phone usage
temperature limit
Normal: 55 °C
When charging: 45 °C
Technical data
64

Declaration of Comformity
Suppliers Details
Name
LG Electronics Inc
Address
LG Twin Tower 20,Yeouido-dong, Yeongdeungpo-gu Seoul, Korea 150-721
Product Details
Product Name
E-GSM 900 / DCS 1800 / PCS 1900 Tri Band Terminal Equipment
Model Name
KP260, KP260c
Trade Name
LG
Applicable Standards Details
R&TTE Directive 1999/5/EC
EN 301 489-01 v1.6.1 / EN 301 489-07 v1.3.1 / EN 301 489-17 v1.2.1
EN 60950-1 : 2001
EN 50360/EN 50361 : 2001
EN 301 511 V9.0.2
EN 300 328 V1.6.1
Supplementary Information
The conformity to above standards is verifi ed by the following Notifi ed Body (BABT)
BABT, Balfour House, Churchfi eld Road, Walton-on-Thames, Surrey, KT12 2TD, United Kingdom
Notifi ed Body Identifi cation Number : 0168
Declaration
I hereby declare under our sole responsibility
that the product mentioned above to which this
declaration relates complies with the above
mentioned standards and Directives
European Standard Center
LG Electronics Logistics and Services B.V.
Veluwezoom 15, 1327 AE Almere, The Netherlands
Tel : +31 - 36- 547 – 8940, Fax : +31 – 36 – 547 - 8794
e-mail : jacob@lge.com
Name Issued Date
Seung Hyoun, Ji / Director
Signature of representative
June 26, 2008


Panduan
Pengguna KP260
- BAHASA MELAYU

Kandungan
Pengenalan 6
Untuk keselamatan anda 7
Garis panduan untuk
penggunaan yang
selamat dan cekap 8
Ciri KP260 14
Bahagian-bahagian telefon
Memaparkan Maklumat 18
Ikon Pada-Skrin
Pemasangan 20
Memasang kad SIM dan bateri
telefon bimbit
Mengecas Bateri 22
Memutuskan sambungan
pengecas 23
Menghidupkan/Mematikan
Telefon Bimbit
Kandungan
2
Fungsi umum 24
Membuat Panggilan
Menjawab Panggilan 25
Menu Panggilan masuk 26
Semasa Panggilan
Panggilan Persidangan 27
Pokok Menu 30
Permainan & Aplikasi 32
Permainan
Java
Profil Rangkaian

Daftar Panggilan 33
Semua panggilan
Panggilan Tidak Dijawab
Panggilan Didail
Panggilan diterima 34
Jangkamasa panggilan
Kos panggilan
Maklumat GPRS 35
Penjadualan 36
Kalendar
Memo
Tug as
Multimedia 37
Pemain MP3
Kamera 38
Kamera video 40
Radio FM
Perakam Suara 41
Mesej 42
Mesej baru
Peti masuk
Peti Bluetooth 43
Draf
Peti keluar
Dihantar 44
Dengar mel suara
Mesej info
Templat 45
Tetapan
Kandungan
3

Kandungan
Barang Saya 48
Imej
Bunyi
Video
Lain-lain 49
Memori luaran
Profil 50
Kenalan 51
Cari
Tambah baru
Dail cepat 52
Kumpulan Pemanggil
Salin semua
Padam semua
Tetapan
Informasi 53
Kandungan
4
Alat 54
Jam Loceng
Kalkulator
Jam Randik
Pengubah Unit
Waktu Dunia 55
Perkhidmatan SIM
Internet 56
Rumah
Yahoo! 57
Penanda Buku
Masukkan Alamat
Sejarah
Laman disimpan
Tetapan
Informasi 58

Kesambungan 59
Bluetooth
Rangkaian
Sambungan USB 60
Tetapan 61
Tarikh & Masa
Bahasa
Papara n
Kunci pintas 62
Panggilan
Sekuriti 64
Mod penerbangan 65
Jimat tenaga 66
Reset
Status memori
Aksesori 67
Data teknikal 68
Kandungan
5

Pengenalan
Tahniah di atas pembelian anda iaitu
telefon selular KP260 yang canggih
dan padat yang direka bentuk
untuk beroperasi dengan teknologi
komunikasi mudah alih digital yang
terkini.
Pengenalan
6
Panduan pengguna ini
mengandungi maklumat
penting berkenaan
penggunaan dan operasi
telefon ini. Sila baca semua
maklumat dengan teliti untuk
prestasi optimum dan untuk
mencegah sebarang kerosakan
atau penyalah gunaan telefon
ini. Sebarang perubahan atau
pengubahsuaian yang tidak
diluluskan dengan nyata
dalam panduan pengguna
ini dan boleh membatalkan
jaminan bagi peralatan ini.

Untuk keselamatan anda
Amaran!
• Telefon Mudah alih mesti dimatikan
pada sepanjang masa di dalam
kapal terbang.
• Jangan pegang telefon semasa
memandu.
• Jangan gunakan telefon
berhampiran dengan stesen petrol,
depot bahan bakar, loji kimia atau
operasi letupan.
• Demi keselamatan anda, gunakan
HANYA bateri dan pengecas ASAL.
• Jangan kendalikan telefon anda
dengan tangan yang basah
apabila ia sedang dicas. Ia mungkin
menyebabkan kejutan elektrik atau
kerosakan serius kepada telefon
anda.
• Simpan telefon di tempat yang
selamat jauh dari capaian kanakkanak kecil. Ia termasuk bahagian
kecil yang boleh menyebabkan
bahaya tercekik jika ia ditanggalkan.
• Jangan mengecas telefon bimbit
berhampiran dengan bahan mudah
bakar kerana telefon bimbit boleh
menjadi panas dan membarakan
bahan tersebut, dan seterusnya
menyebabkan kebakaran rumah.
Awas!
• Matikan telefon dalam sebarang
kawasan yang mana anda
memerlukan peraturan khas.
Contohnya, jangan gunakan
telefon dalam hospital kerana ia
menjejaskan peralatan perubatan
sensitif.
• Panggilan kecemasan mungkin tidak
tersedia di bawah semua rangkaian
mudah alih. Oleh itu, anda tidak
sepatutnya bergantung pada telefon
mudah alih anda untuk panggilan
kecemasan.
• Hanya gunakan aksesori ASAL untuk
mengelakkan kerosakan kepada
telefon anda.
• Semua penghantar radio membawa
risiko gangguan dengan elektronik
yang berdekatan. Gangguan yang
sedikit boleh menjejas TV, radio, PC,
dan sebagainya.
• Bateri perlu dilupuskan mengikut
undang-undang relevan.
• Jangan buka telefon atau bateri.
• Risiko meletup jika bateri diganti
dengan jenis yang salah.
Untuk keselamatan anda
7

Garis panduan untuk penggunaan
yang selamat dan cekap
Sila baca garis panduan yang mudah
ini. Tidak mengikut garis panduan
ini mungkin merbahaya atau tidak
sah. Maklumat terperinci lanjut diberi
dalam manual ini.
Garis panduan untuk penggunaan yang selamat dan cekap
Pendedahan kepada
tenaga frekuensi radio
Maklumat pendedahan gelombang
radio dan Kadar penyerapan
Khusus (SAR)
Telefon mudah alih model KP260
ini telah direka untuk mematuhi
keperluan keselamatan yang
dikuatkuasakan bagi pendedahan
terhadap gelombang radio. Keperluan
ini adalah berdasarkan garis
panduan saintifik yang termasuk
margin keselamatan yang bertujuan
memastikan keselamatan bagi semua
orang, tidak kira umur atau tahap
kesihatan.
8
] Garis panduan bagi pendedahan
kepada gelombang radio
menggunakan unit ukuran yang
disebut sebagai Kadar Penyerapan
Khusus, atau SAR. Ujian bagi
SAR dijalankan menggunakan
kaedah yang dipiawaikan dengan
pemindahan telefon pada aras kuasa
yang diperakui dalam semua jalur
frekuensi yang digunakan.
] Walaupun terdapat perbezaan
antara tahap SAR pelbagai model
telefon LG, ia semua direka bentuk
untuk memenuhi garis panduan
relevan bagi pendedahan kepada
gelombang radio.
] Had SAR yang disyorkan oleh
Suruhanjaya mengenai Perlindungan
Sinaran Bukan-Ion (Commission on
Non-Ionizing Radiation Protection)
(ICNIRP) antarabangsa, iaitu 2W/kg
dipuratakan ke atas sepuluh (10)
gram tisu.
] Nilai SAR yang tertinggi untuk
telefon model ini yang diuji oleh
DASY4 untuk penggunaan pada
telinga ialah 0.524 W/kg (10g) dan
apabila dipakai pada badan ialah
0.269 W/kg (10g).

] Maklumat SAR bagi penduduk
di negara/kawasan yang telah
mengambil had SAR yang disyorkan
oleh Institut Jurutera Elektrik dan
Elektronik (Institute of Electrical and
Electronics Engineers) (IEEE), iaitu
1.6 W/kg dipuratakan ke atas satu
(1) gram tisu (misalnya Amerika
Syarikat, Kanada, Australia dan
Taiwan).
Penjagaan dan
penyelenggaraan
produk
Amaran!
Gunakan hanya bateri, pengecas
dan aksesori yang diluluskan untuk
penggunaan khusus bagi model
telefon ini. Penggunaan sebarang jenis
lain boleh mentak sahkan sebarang
kelulusan atau waranti yang berkaitan
dengan telefon ini, dan mungkin
merbahaya.
] Jangan buka bahagian-bahagian
unit ini. Bawanya ke juruteknik
perkhidmatan yang kelayakan
apabila kerja pembaikan diperlukan.
] Jauhkan daripada perkakas elektrik
seperti TV, radio, dan komputer
peribadi.
] Unit ini hendaklah dijauhkan
daripada sumber haba seperti
radiator atau dapur.
] Jangan sekali-kali letakkan telefon
anda di dalam ketuhar gelombang
mikro kerana ia akan menyebabkan
bateri meletup.
] Jangan jatuhkan.
] Jangan biarkan unit ini didedahkan
pada getaran atau kejutan
mekanikal.
] Salutan telefon mungkin rosak jika
ia dibalut dengan pembalut atau
pembalut vinil.
] Jangan gunakan bahan kimia yang
tajam (seperti alkohol, benzena,
pencair, dsb.) atau detergen
untuk membersihkan telefon
anda. Terdapat risiko ini akan
menyebabkan kebakaran.
] Jangan dedahkan unit ini kepada
asap atau habuk yang berlebihan.
Garis panduan untuk penggunaan yang selamat dan cekap
9

Garis panduan untuk penggunaan yang
selamat dan cekap
] Jangan simpan telefon di sebelah
kad kredit atau tiket pengangkutan;
ia boleh menjejaskan maklumat
pada jalur magnetik.
] Jangan ketik skrin dengan objek
yang tajam kerana ia boleh
Garis panduan untuk penggunaan yang selamat dan cekap
merosakkan telefon.
] Jangan dedahkan telefon kepada
cecair atau kelembapan.
] Gunakan aksesori, seperti fon
telinga dan alat dengar, dengan
berhati-hati. Pastikan bahawa
kabelnya disemat dengan selamat
dan tidak menyentuh antena tanpa
diperlukan.
] Sila keluarkan kabel data sebelum
menghidupkan telefon bimbit.
Peranti elektronik
Semua telefon mudah alih mungkin
mendapat gangguan, yang boleh
menjejaskan prestasi.
10
] Jangan gunakan telefon mudah alih
anda berhampiran kelengkapan
perubatan tanpa meminta
kebenaran. Elakkan daripada
meletakkan telefon di atas perentak
jantung, (iaitu di dalam saku dada
anda.)
] Sesetengah alat bantuan
pendengaran mungkin diganggu
oleh telefon mudah alih.
] Gangguan yang sedikit boleh
menjejas TV, radio, PC, dan
sebagainya.
Keselamatan di jalan
raya
Periksa undang-undang dan
peraturan mengenai penggunaan
telefon bimbit di kawasan-kawasan
tempat anda memandu.
] Jangan gunakan telefon pegang
tangan semasa memandu.
] Beri perhatian penuh kepada
pemanduan anda.

] Gunakan kit bebas tangan, jika
tersedia.
] Keluar dari jalan raya dan letak
kereta sebelum membuat atau
menjawab panggilan jika keadaan
pemanduan memerlukan anda
berbuat demikian.
] Tenaga RF boleh menjejas
sesetengah sistem elektronik
di dalam kenderaan bermotor
anda seperti stereo kereta atau
kelengkapan keselamatan.
] Apabila kenderaan anda dilengkapi
beg udara, jangan halangnya
dengan kelengkapan wayarles yang
dipasang atau yang mudah alih. Ini
boleh menyebabkan kecederaan
serius jika tidak berfungsi dengan
betul.
Jika anda mendengar muzik ketika
bergerak dan berjalan, sila pastikan
bahawa kelantangannya adalah pada
paras yang berpatutan agar anda
sedar akan keadaan di sekeliling anda.
Ini amat penting terutamanya semasa
melintas jalan.
Elakkan kerosakan
kepada pendengaran
anda
Kerosakan kepada pendengaran
anda boleh berlaku jika anda
terdedah kepada bunyi yang kuat
untuk tempoh yang lama. Oleh itu
kami menyarankan agar anda tidak
menghidupkan atau mematikan
telefon terlalu hampir dengan telinga
anda. Kami juga menyarankan
bahawa kelantangan muzik dan
panggilan ditetapkan pada paras
yang berpatutan.
Kawasan letupan
Jangan gunakan telefon di mana
peletupan sedang dijalankan. Ikut
sekatan-sekatan, dan patuhi sebarang
undang-undang atau peraturan.
Garis panduan untuk penggunaan yang selamat dan cekap
11

Garis panduan untuk penggunaan yang
selamat dan cekap
Suasana berpotensi
letupan
] Jangan gunakan telefon di tempat
pengisian minyak. Jangan gunakan
berhampiran bahan bakar atau
Garis panduan untuk penggunaan yang selamat dan cekap
bahan kimia.
] Jangan angkut atau simpan gas,
cecair atau bahan letupan mudah
terbakar di dalam petak simpanan
kenderaan anda, yang mengandungi
telefon bimbit anda dan aksesoriaksesorinya.
Dalam kapal terbang
Peranti wayarles boleh menyebabkan
gangguan di dalam pesawat.
] Matikan telefon bimbit anda
sebelum menaiki sebarang pesawat.
] Jangan gunakan ia di lapangan
terbang tanpa izin daripada
kakitangan.
12
Kanak-kanak
Simpan telefon di tempat yang
selamat jauh dari capaian kanakkanak kecil. Ia termasuk bahagian
kecil yang boleh menyebabkan
bahaya tercekik jika ia ditanggalkan.
Panggilan kecemasan
Panggilan kecemasan mungkin tidak
tersedia di bawah semua rangkaian
mudah alih. Oleh itu, anda tidak
sepatutnya bergantung pada telefon
mudah alih anda untuk panggilan
kecemasan. Semak dengan pembekal
khidmat tempatan anda.
Maklumat dan
penjagaan bateri
] Anda tidak perlu menyahcaskan
bateri anda sepenuhnya sebelum
mengecas semula. Tidak seperti
sistem bateri lain, tiada kesan
memori yang boleh menjejaskan
prestasi bateri.

] Gunakan hanya bateri dan pengecas
LG. Pengecas LG direka bentuk
untuk memaksimumkan hayat
bateri.
] Jangan buka atau litar pintaskan
pek bateri.
] Pastikan sentuhan logam pada
bateri sentiasa bersih.
] Gantikan bateri apabila ia tidak
lagi memberi prestasi yang boleh
diterima. Pek bateri mungkin dicas
beratus-ratus kali sehingga ia perlu
digantikan.
] Cas semula bateri jika ia tidak
digunakan buat tempoh masa
yang lama untuk memaksimumkan
kebolehgunaan.
] Jangan dedahkan pengecas bateri
kepada cahaya matahari langsung
atau gunakannya pada kelembapan
yang tinggi, seperti di bilik air.
] Jangan biarkan bateri di tempat
yang panas atau sejuk, ini mungkin
menjejaskan prestasi bateri.
] Risiko letupan: Jika bateri digantikan
dengan jenis yang tidak tepat.
] Lupuskan bateri yang telah
digunakan mengikut arahan
pengilang.
] Jika anda perlu menggantikan
bateri, bawanya ke pusat
perkhidmatan Elektronik LG atau
penjual untuk mendapatkan
bantuan.
] Sentiasa tanggalkan pengecas dari
soket dinding selepas telefon dicas
sepenuhnya untuk menjimatkan
kuasa pengecas daripada
penggunaan yang tidak diperlukan.
Garis panduan untuk penggunaan yang selamat dan cekap
13

Ciri KP260
Bahagian-bahagian telefon
Pandangan depan
Kekunci navigasi
] Dalam mod siap sedia:
] Dalam menu: tatal ke atas &
ke bawah
Ciri KP260
14
Alat cuping telinga
Secara ringkas: Mesej
Secara ringkas: Cari
Secara ringkas: Senarai
Pro l
Secara ringkas:
Kegemaran
Mikrofon
Speaker
Mikrofon mod speaker
LCD
] Atas: Kekuatan isyarat, paras
bateri dan pelbagai fungsi
] Bawah: Penunjuk kekunci
lembut
Kekunci abjad angka
] Dalam mod siap sedia:
Masukkan nombor untuk
didail, Tekan ke bawah
- Panggilan
antarabangsa
- Panggilan kecemasan
s ehingga -
Dail cepat
] Dalam mod mengedit:
Masukkan nombor dan aksara

Kekunci lembut kiri/Kekunci lembut kanan
Kekunci ini melaksanakan fungsi yang
ditunjukkan di bahagian bawah paparan.
Kekunci tamat
] Menghidupkan/mematikan
(tekan dan tahan).
] Menamatkan atau menolak panggilan.
Kekunci kosongkan
Memadam aksara dengan setiap tekanan. Tekan
dan tahan kekunci ini untuk memadam semua
input. Gunakan kekunci ini untuk kembali ke
skrin sebelumnya.
Kekunci hantar
] Dail nombor telefon dan jawab panggilan.
] Dalam mod siap sedia: Menunjukkan senarai
panggilan terbaru didail, diterima dan tidak
dijawab.
Ciri KP260
15

Ciri KP260
Paparan sebelah kiri Pandangan sebelah kanan
Kekunci sisi
] Dalam mod siap sedia
(terbuka): Kelantangan nada
kekunci.
] Semasa panggilan:
meningkat/menurunkan
kelantangan cuping telinga.
Nota
] Mengeluarkan bateri dari telefon
apabila kuasa dihidupkan
mungkin menyebabkan telefon
rosak.
Kad MicroSD
Ciri KP260
16
Lubang untuk tali pemegang
telefon
Penyambung Pengecasan
Batrei/Penyambung kabel dan
Bicu telinga
Nota
] Sila pastikan telefon dihidupkan
dan berada dalam mod melahu
sebelum menyambungkan
kabel USB.
Kekunci kamera sisi
(Gelangsar dibuka)
Tekan lama – Pengaktifan
kamera foto

Pandangan belakang
Selak bateri
Tolak butang ke dalam
untuk melepaskan bateri.
Kanta kamera
Soket Kad SIM
Bateri
Terminal Bateri
Ciri KP260
17

Ciri KP260
Memaparkan Maklumat
Menu KenalanMenu Kenalan
Kawasan Perihalan
Garis
pertama
Garisan
tengah
Garisan
akhir
Ciri KP260
Skrin memaparkan beberapa ikon. Ia
disenaraikan di bawah.
18
Memaparkan pelbagai ikon.
Mesej, arahan dan sebarang
maklumat paparan yang
anda masukkan seperti
nombor yang ingin didail.
Menunjukkan fungsi
sekarang ini diperuntukkan
pada dua kekunci lembut.
Kawasan ikon
Kawasan teks dan
gra k
Penunjuk-penunjuk
kekunci lembut
Ikon Pada-Skrin
Ikon Perihalan
Memberitahu anda kekuatan isyarat
rangkaian.
Menunjukkan bahawa anda
menggunakan perkhidmatan
merayau.
Penggera telah ditetapkan dan
dihidupkan.
Memberitahu anda status bateri.
Anda telah menerima mesej teks.
Anda telah menerima mesej suara.
Dalam pro l getaran
Jadual
Memori luaran
Mod penerbangan
Internet connection
GPRS available
Memanggil

Ikon Perihalan
Dalam pro l umum
Dalam pro l luar bangunan
Dalam pro l senyap
Dalam pro l alat dengar
Anda boleh mengalihkan
panggilan.
Anda telahg mengaktifkan
kesambungan Bluetooth.
* Mutu perbualan mungkin berubah
bergantung pada liputan rangkaian.
Apabila kekuatan isyarat adalah di bawah
2 bar, anda mungkin mengalami kebisuan,
panggilan yang terputus dan audio yang
lemah. Sila rujuk kepada isyarat ini sebagai
penunjuk untuk panggilan anda. Apabila
tiada bar, ia bermaksud tiada liputan
rangkaian: jika ia berlaku, anda tidak dapat
mengakses rangkaian untuk sebarang
perkhidmatan (panggilan, mesej dab
sebagainya).
Ciri KP260
19

Pemasangan
Memasang kad SIM dan
bateri telefon bimbit
Pastikan kuasa dimatikan sebelum
anda mengeluarkan bateri.
1. Keluarkan bateri.
Luncurkan penutup bateri ke bawah
dan tarik keluar bateri.
Pemasangan
20
Nota
] Mengeluarkan bateri dari telefon
apabila kuasa dihidupkan mungkin
menyebabkan telefon rosak.
2. Pasang kad SIM
Masukkan dan luncurkan kad SIM
ke dalam pemegang kad SIM.
Pastikan bahawa kad SIM dimasukkan
dengan betul dan kawasan sesentuh
keemasan pada kad menghadap ke
bawah. Untuk keluarkan kad SIM,
tekan ke bawah dengan perlahan dan
tarik ke arah bertentangan.
Untuk memasukkan kad SIM
Untuk mengeluarkan kad SIM

Nota
] Sesentuh logam pada kad SIM akan
mudah rosak jika tercalar. Tumpukan
perhatian khusus semasa mengendalikan
kad SIM. Ikut arahan yang dibekalkan
dengan kad SIM.
Amaran!
• Jangan ganti atau keluarkan kad SIM
semasa telefon anda digunakan atau
hidup, jika tidak data pada kad SIM
mungkin akan rosak.
3. Pasang bateri.
Masukkan bateri pada bahagain
belakang telefon dan tolak penutup
bateri ke atas sehingga ia berdetap
kembali ke tempatnya.
Pemasangan
21

Pemasangan
Mengecas Bateri
Sebelum menyambung penyesuai
kembara pada telefon, anda mesti
memasang baterinya dahulu.
1. Pastikan bateri dicas sepenuhnya
sebelum menggunakan telefon
buat pertama kali.
2. Dengan anak panah mengadap
anda seperti yang ditunjukkan
dalam rajah, tekan plag pada
penyesuai perjalanan ke dalam
soket pada sisi telefon sehingga ia
berdetap di tempatnya.
3. Sambungkan penghujung
penyesuai perjalanan yang satu lagi
Pemasangan
ke soket utama. Hanya gunakan
pengecas yang disertakan di dalam
kotaknya.
4. Bar bergerak ikon bateri akan
berhentikan selepas pengecasan
selesai.
22
Awas!
• Jika bateri benar-benar telah
dinyahcas, paparan pengecasan
akan muncul pada LCD kirakira 1 hingga 1.5 minit selepas
menyambungkan TA.
• Jangan memaksa penyambung
kerana mungkin merosakkan telefon
dan/atau penyesuai kembara.
• Masukkan pengecas pek bateri
secara menegak pada alur keluar
kuasa dinding.
• Jika anda menggunakan pengecas
pek bateri luar dari negara
anda, gunakan penyesuai plag
penyambung untuk tatarajah yang
sewajarnya.
• Jangan keluarkan bateri atau kad
SIM semasa mengecas.
Amaran!
• Cabut palam kord kuasa dan
pengecas semasa kilat untuk elakkan
kejutan elektrik atau kebakaran.
• Pastikan tiada item berbucu tajam
seperti kuku atau gigi haiwan,
bersentuhan dengan bateri. Terdapat
risiko ini akan menyebabkan
kebakaran.

Memutuskan
sambungan pengecas
Tanggalkan pengecas dari telefon
dengan menarik penyambungnya,
bukan kord.
Menghidupkan/
Mematikan Telefon
Bimbit
Menghidupkan Telefon Bimbit
Anda
Pastikan bahawa kad USIM anda
berada dalam telefon anda dan
bateri dicaskan. Tekan dan tahan
sehingga kuasa dihidupkan.
Masukkan kod PIN USIM yang
dibekalkan bersama dengan kad
USIM anda jika permintaan kod PIN
ditetapkan kepada Hidup.
Anda akan didaftarkan pada
rangkaian selepas beberapa saat.
Mematikan Telefon Bimbit
anda
Tekan dan tahan sehingga kuasa
dimatikan. Mungkin terdapat sedikit
kelewatan semasa kuasa telefon
sedang dimatikan. Jangan hidupkan
telefon semula pada masa ini.
Pemasangan
23

Fungsi umum
Membuat Panggilan
1. Pastikan telefon anda dihidupkan.
2. Masukkan nombor telefon termasuk
kod kawasan. Untuk mengedit
nombor pada skrin paparan, tekan
kekunci
satu digit pada satu masa.
] Tekan dan tahan kekunci
untuk memadam seluruh nombor.
3. Tekan kekunci untuk
memanggil.
4. Apabila anda ingin menamatkan
panggilan, tekan kekunci
Membuat panggilan dengan
Kekunci Hantar
1. Tekan kekunci dan nombor
telefon panggilan masuk, keluar
dan tidak dijawab akan dipaparkan.
2. Pilih nombor yang dikehendaki
dengan menggunakan kekunci
Fungsi umum
navigasi.
3. Tekan kekunci
24
untuk memadam
Membuat Panggilan
Antarabangsa
1. Tekan dan tahan kekunci
untuk nombor awalan
antarabangsa. Aksara + boleh
digantikan dengan kod akses
antarabangsa.
2. Masukkan kod negara, kod kawasan
dan nombor telefon.
3. Tekan kekunci
.
Menamatkan Panggilan
Apabila anda menamtkan panggilan,
.
tekan kekunci
.
Membuat Panggilan Dari
senarai Kenalan
Anda boleh menyimpan nama dan
nombor telefon yang kerap didail
dalam kad SIM dan juga memori
telefon.
Anda boleh mendail nombor hanya
.
dengan mencari nama dalam senarai
kenalan.

Melaraskan Kelantangan
Semasa panggilan, jika anda mahu
melaraskan kelantangan alat cuping
telinga, gunakan kekunci sisi telefon.
Dalam mod melahu, anda boleh
melaraskan kelantangan kekunci
dengan menggunakan kekunci sisi.
Menjawab Panggilan
Apabila anda menerima panggilan,
nada telefon dan ikon telefon yang
berkelip akan muncul pada skrin.
Jika pemanggil boleh dikenal pasti,
nombor telefon pemanggil (atau
nama jika disimpan dalam Buku
Alamat anda) akan dipaparkan.
1. Luncur ke atas dan tekan kekunci
atau kekunci lembut kiri untuk
menjawab panggilan masuk. Jika
pilihan menu Sebarang Kekunci
(Menu #.5.4.2) telah ditetapkan,
tekanan pada sebarang kekunci
akan menjawab panggilan kecuali
bagi keunci
lembut kanan.
atau kekunci
2. Tamatkan panggilan dengan
menutup telefon atau menekan
kekunci
Nota
] Anda boleh menjawab panggilan
sambil menggunakan Buku Telefon
atau ciri menu yang lain. Jika telefon
disambungkan dengan PC melalui kabel
USB, panggilan dan mesej tidak tersedia.
.
Fungsi umum
25

Menu Panggilan masuk
Telefon anda menyediakan beberapa
fungsi kawalan yang anda boleh
gunakan semasa membuat panggilan.
Untuk mengakses fungsi ini semasa
panggilan, tekan kekunci lembut kiri
[Pilihan].
Semasa Panggilan
Menu dipaparkan pada skrin
telefon mudah alih semasa dalam
panggilan adalah berlainan daripada
menu utama lalai yang dipaparkan
semasa skrin melahu, dan pilihannya
dihuraikan di bawah.
Membuat Panggilan Kedua
(Bergantung pada Rangkaian)
Anda boleh mencari dan mendail
Menu Panggilan masuk
nombor dari Buku Alamat untuk
membuat panggilan kedua.
26
Bertukar-tukar Antara Dua
Panggilan
Untuk bertukar antara dua panggilan,
tekan kekunci
dan kemudian pilih Tukar Panggilan.
kekunci lembut kiri
Menjawab Panggilan Masuk
Untuk menjawab panggilan masuk
apabila telefon bimbit berbunyi,
tekan kekunci
boleh memberi amaran kepada anda
mengenai panggilan masuk semasa
anda sedang dalam panggilan.
Satu nada berbunyi di dalam
cuping telinga, dan paparan akan
menunjukkan bahawa panggilan
kedua sedang menunggu.
Ciri ini, yang dipanggil Call Waiting
(Panggilan Menunggu), hanya
boleh didapati jika rangkaian anda
menyokongnya. Untuk maklumat
lanjut bagaimana untuk mengaktif
dan nyahaktifkankannya, lihat
Panggilan menunggu (Menu #.5.6).
. Alat dengar juga

Jika Panggilan Menunggu
Dihidupkan, anda boleh meletak
panggilan pertama menunggu dan
menjawab panggilan kedua dengan
menekan kekunci lembut
kiri
.
Menolak Panggilan Masuk
Anda boleh menolak panggilan
masuk tanpa menjawab dengan
menekan kekunci
Semasa panggilan, anda boleh
menolak panggilan masuk dengan
menekan kekunci
.
.
Panggilan Persidangan
Perkhidmatan persidangan
menyediakan anda dengan
keupayaan untuk mengadakan
perbualan serentak dengan lebih dari
seorang pemanggil, jika operator
rangkaian anda menyokong ciri
ini. Panggilan persidangan hanya
boleh disediakan apabila anda
mempunyai satu panggilan aktif dan
satu panggilan ditunda, kedua-dua
panggilan telah dijawab.
Sebaik saja panggilan persidangan
disediakan, panggilan boleh
ditambah, diputuskan sambungan
atau dipisahkan (iaitu, dikeluarkan
daripada panggilan persidangan
tetapi masih bersambung kepada
anda) oleh orang yang menyediakan
panggilan persidangan. Pilihan
ini semuanya tersedia dari menu
Panggilan masuk. Pemanggil
maksimum dalam panggilan
persidangan adalah lima. Sebaik saja
dimulakan, anda dapat mengawal
panggilan persidangan dan hanya
anda boleh menambah panggilan ke
panggilan persidangan.
Menu Panggilan masuk
27

Menu Panggilan masuk
Membuat Panggilan Kedua
Anda boleh membuat panggilan
kedua semasa dalam panggilan.
Masukkan nombor kedua dan tekan
kekunci
Apabila panggilan kedua
disambungkan, panggilan pertama
ditunda secara automatik. Anda boleh
menukar antara panggilan dengan
menekan kekunci
.
Menetapkan Panggilan
Persidangan
Untuk menyediakan panggilan
persidangan, tundakan satu
panggilan dan semasa panggilan aktif
hidup, tekan kekunci lembut kiri dan
kemudian pilih menu Sertai daripada
Menu Panggilan masuk
panggilan Persidangan.
28
Aktifkan Panggilan
Persidangan Sedang Ditunda
Untuk mengaktifkan panggilan
persidangan sedang menunggu,
tekan kekunci
tekan kekunci lembut kiri [Opsyen]
dan pilih Sertai semua/Tunda semua
panggilan. Pengguna lain yang
ditunda akan tetap bersambung.
.
Untuk kembali ke mod panggilan
persidangan, tekan kekunci lembut
kiri
Panggilan persidangan.
. Secara alternatif
[Pilihan] diikuti oleh
Menambah Panggilan ke
Panggilan Persidangan
Untuk menambah panggilan ke
panggilan persidangan sedia ada,
tekan kekunci lembut kiri, dan
kemudian pilih menu Sertai daripada
Panggilan Persidangan.

Panggilan Peribadi dalam
Panggilan Persidangan
Untuk membuat panggilan peribadi
dengan seorang pemanggil
persidangan, paparkan nombor
pemanggil yang anda hendak
bercakap pada skrin, kemudian
tekan kekunci lembut kiri. Pilih
menu Peribadi daripada Panggilan
Persidangan untuk menundakan
semua pemanggil lain.
Menamatkan Panggilan
Persidangan
Pemanggil terkini daripada panggilan
persidangan yang dipaparkan boleh
diputuskan sambungan dengan
menekan kekunci
.
Menu Panggilan masuk
29

Pokok Menu
Menu di dalam telefon ini boleh dipaparkan dengan 2 cara. Satu melalui jenis
grid dan kedua melalui jenis senarai pameran. Ambil perhatian bahawa menu
pilihan nombor adalah berbeza dalam setiap paparan.
Tetapan lalai pada telefon ditetapkan untuk menunjukkan menu dalam
jenis Grid, oleh itu semua menu pemilihan nombor melalui manual adalah
ditunjukkan berdasarkan tetapan tersebut.
Ilustrasi berikut menunjukkan struktur menu yang tersedia dan menunjukkan:
] Nombor yang diberikan kepada setiap pilihan menu.
] Halaman tempat anda boleh mencari huraian ciri.
Anda boleh pergi ke menu yang dikehendaki dengan menggunakan kekunci
lembut kiri [Menu], kekunci navigasi dan kekunci [OK]. Dan anda boleh juga
membuat pintasan dengan menekan kekunci nombor yang bersamaan dengan
menu yang dikehendaki selepas menekan kekunci lembut kiri [Menu].
1. Permainan & Aplikasi
1.1 Permainan
1.2 Java
1.3 Profil Rangkaian
2. Daftar Panggilan
2.1 Semua panggilan
Pokok Menu
2.2 Panggilan Tidak
2.3 Panggilan Didail
2.4 Panggilan diterima
2.5 Jangkamasa panggilan
2.6 Kos panggilan
2.7 Maklumat GPRS
30
Dijawab
3. Penjadualan
3.1 Kalendar
3.2 Memo
3.3 Tugas
4. Multimedia
4.1 Pemain MP3
4.2 Kamera
4.3 Kamera video
4.4 Radio FM
4.5 Perakam Suara
5. Mesej
5.1 Mesej baru
5.2 Peti masuk
5.3 Peti Bluetooth
5.4 Draf
5.5 Peti keluar
5.6 Dihantar
5.7 Dengar mel suara
5.8 Mesej info
5.9 Templat
5.0 Tetapan

6. Barang Saya
6.1 Imej
6.2 Bunyi
6.3 Video
6.4 Lain-lain
6.5 Memori luaran
7. Profil
7.1 Umum
7.2 Senyap
7.3 Getar Sahaja
7.4 Luar
7.5 Alat dengar
8. Kenalan
8.1 Cari
8.2 Tambah baru
8.3 Dail cepat
8.4 Kumpulan Pemanggil
8.5 Salin semua
8.6 Padam semua
8.7 Tetapan
8.8 Informasi
9. Alat
9.1 Jam Loceng
9.2 Kalkulator
9.3 Jam Randik
9.4 Pengubah Unit
9.5 Waktu Dunia
9.6 Perkhidmatan SIM
*. Internet
*.1 Rumah
*.2 Yahoo!
*.3 Penanda Buku
*.4 Masukkan Alamat
*.5 Sejarah
*.6 Laman disimpan
*.7 Tetapan
*.8 Informasi
0. Kesambungan
0.1 Bluetooth
0.2 Rangkaian
0.3 Sambungan USB
#. Tetapan
#.1 Tarikh & Masa
#.2 Bahasa
#.3 Paparan
#.4 Kunci pintas
#.5 Panggilan
#.6 Sekuriti
#.7 Mod penerbangan
#.8 Jimat tenaga
#.9 Reset
#.0 Status memori
Pokok Menu
31

Permainan & Aplikasi
Permainan Menu 1.1
KP260 anda didatangi dengan
permainan yang dipramuatkan untuk
menggembirakan anda apabila
mempunyai masa terluang. Jika anda
pilih untuk muat turun sebarang
permainan atau aplikasi tambahan, ia
akan disimpan ke dalam folder ini.
Java Menu 1.2
Anda boleh menguruskan aplikasi
Java yang dipasang dalam telefon
anda dengan menggunakan menu
Aplikasi. Anda juga boleh memadam
Java yang dimuat turun.
Profil Rangkaian Menu 1.3
Untuk memuat turun permainan,
Permainan & Aplikasi
anda boleh menetapkan nilai untuk
menyambung ke rangkaian dengan
menggunakan profil Rangkaian.
32
 Loading...