

Page 1

U S E R G U I D EGM210
- English
Some of contents in this manual may differ from your phone
depending on the software of the phone or your service provider.
Page 2

Part 15.21 statement
" Change or Modifications that are not expressly approved by the manufacturer could void
the user's authority to operate the equipment. “
Part 15.105 statement
This equipment has been tested and found to comply with the limits for a class B digital
device, pursuant to Part 15 of the FCC Rules.
These limits are designed to provide reasonable protection against harmful interference in
a residential installation. This equipment generates uses and can radiate radio frequency
energy and, if not installed and used in accordance with the instructions, may cause harmful
interference to radio communications. However, there is no guarantee that interference will
not occur in a particular installation. if this equipment does cause harmful interference or
television reception, which can be determined by turning the equipment off and on, the user
is encouraged to try to correct the interference by one or more of the following measures:
- Reorient or relocate the receiving antenna.
- Increase the separation between the equipment and receiver.
- Connect the equipment into an outlet on a circuit different from that to
which the receiver is connected.
- Consult the dealer or an experienced radio/TV technician for help.
Page 3

Part 15 Class B Compliance
This device and its accessories comply with part15 of FCC rules.
Operation is subject to the following two conditions:
(1) This device & its accessories may not cause harmful interference.
(2) This device & its accessories must accept any interference received,
including interference that may cause undesired operation.
Body-worn Operation
This device has been tested for typical body-worn operations
with the distance of 0.79inches (2.0cm) from the user’s body.
To comply with FCC RF exposure requirements, a minimum separation distance
of 0.79inches(2.0cm) must be maintained from the user's body.
Additionally, Belt clips, holsters & other body-worn accessories may not contain
metallic components.
Page 4

GM210 features
Parts of the phone
1. Earpiece
2. Main LCD
3. Send key
v
Dials a phone number and
answers a call.
v
In standby mode:
history of calls.
4. Alpha numeric keys
v
In standby mode:
Input numbers to dial
Hold down
– International calls
– Activate Voice mail centre
menu
to – Speed dials
v
In editing mode:
Enter numbers & characters
5. Clear key
v
Clears a character with each
press. Hold the key down to clear
all input.
6. End key
v
switch on/off (hold down)
v
End or reject a call.
Shows the
GM210 feat ur es
13
Page 5

GM210 features
GM210 feat ur es
14
1. Navigation key
v
In standby mode:
Briefly:
Album.
Briefly:
menu.
Briefly:
Menu
Briefly:
Menu
v
In menu:
Scroll up & down
Go to Images
Go to contacts
Go to Profiles
Go to MP3 Player
2. Soft keys
(Left soft key / Right soft key)
v
These keys perform the function
Indicated in the bottom of the
display.
3. Conrm key / OK key
v
Selects menu options and
confirms actions.
Page 6

1.
Headset/Charger/USB cable
connector
Note
Please ensure the phone is powered
on , external memory card is
inserted and in idle mode before
connecting the USB cable for Mass
Storage.
2. Lock/Unlock key
3. Camera key
4. Side keys
v
In standby mode (opened):
Keypad tones volume adjustment
v
In standby mode (closed):
Show Date & Time by turns
v
During a call:
Earpiece volume
adjustment
v
During playing MP3 music:
Audio volume adjustment
5. Micro SD memory card socket
GM210 feat ur es
15
Page 7

GM210 features
GM210 feat ur es
16
Page 8

Display Information
Icon area
Text and
graphic area
Soft key
indications
Area Description
First line Displays various icons.
Middle lines Displays messages,
instructions and any
information that you
enter, such as number
to be dialled.
Last line Shows the functions
currently assigned to
the two soft keys.
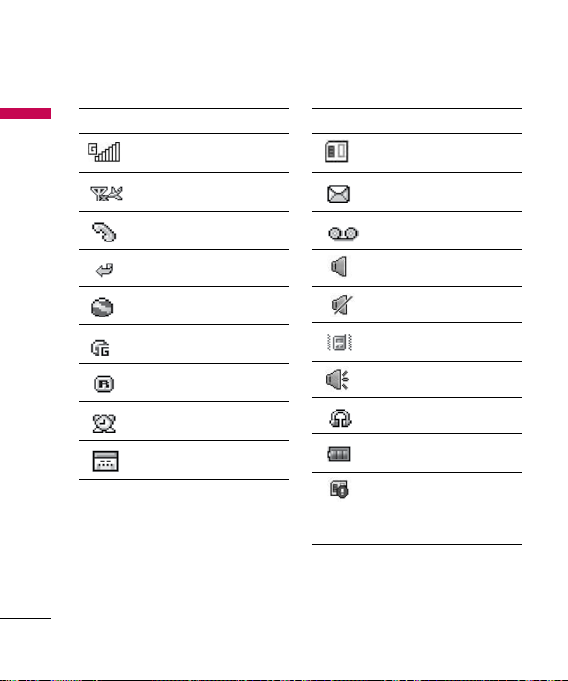
On-Screen Icons
The screen displays several icons.
There are described below.
Icon
Description
Indicates the strength of
the network signal.*
Note
* The quality of the conversation
may change depending on
network coverage. When the
signal strength is below 2 bars,
you may experience muting, call
drop and bad audio.
Please take the network bars as
indicator for your calls. When
there are no bars, that means that
there is no network coverage: in
this case, you won’t be able to
access the network for any service
(call, messages and so on).
GM210 feat ur es
17
Page 9
GM210 features
Icon Description
GM210 feat ur es
18
Indicates that GPRS
service is available.
Indicates that flight mode
has been activated.
Indicates that a call is in
progress.
All calls are diverted.
Indicates that the phone
is accessing the Browser.
Indicates that you are
using GPRS.
Shows that you are using
a roaming service.
The alarm has been set
and is on.
Indicates that you have a
schedule.
Icon Description
Indicates that external
memory is installed.
You have received a
message.
You have received a voice
mail.
General menu in profile.
Silent menu in profile.
Vibrate only menu in
profile.
Outdoor menu in profile.
Headset menu in profile.
Tells you the status of the
battery.
Indicates that external
memory is unformatted
or is unsupported by
phone.
Page 10

Getting started
Inserting the SIM
card and the handset
battery
Make sure the power is off before you
remove the battery.
1. Remove the battery cover.
Press the battery release latch and
slide the battery cover toward the
bottom of the phone. And remove
the battery cover.
Note
Removing the battery from the
phone when the power is on may
cause the phone to malfunction.
2. Remove the battery.
Hold the top edge of the battery
and lift the battery from the battery
compartment.
3. Inserting the SIM card.
Inserting the SIM card into the
holder. Slide the SIM card into the
SIM card holder. Make sure that
the SIM card is inserted properly
and that the gold contact area on
the card is facing downwards. To
remove the SIM card, press down
lightly and pull it in the reverse
direction.
Inserting
the SIM card
Remove the SIM card
Getting star ted
19
Page 11

Getting started
Caution!
Getting star ted
The metal contact of the SIM card
can be easily damaged by scratches.
Pay special attention to the SIM card
while handling.
Follow the instructions supplied with
the SIM card.
4. Inserting the battery.
Inserting the bottom of the battery
first into the bottom edge of the
battery compartment. Push down
the top of the battery until it snaps
into space.
5. Replace the battery cover.
Lay the battery cover in place of
the phone and slide it until the
latch clicks.
Charging the Battery
To connect the mains adapter to the
phone, you must have installed the
battery.
1. With the battery in position in the
phone, connect the lead from the
travel adapter to the socket on the
left side of the phone. Check that
the arrow on the lead connector
is facing towards the front of the
phone.
20
Page 12

2. Connect the other end of the mains
adapter to the mains socket. Use
only the included packing charger.
3. The moving bars of battery icon will
stop after charging is complete.
Caution!
• Do not force the connector as this
may damage the phone and/or the
travel adapter.
• Installing the battery pack charger
vertically to wall power outlet.
• If you use the battery pack charger
out of your own country, use an
attachment plug adapter for the
proper configuration.
• Do not remove your battery or the
SIM card while charging.
WARNING!
• Unplug the power cord and charger
during lightning storms to avoid
electric shock or fire.
• Make sure that no sharp-edged items
such as animal teeth, nails, come into
contact with the battery. There is a
risk of this causing a fire.
• Do not place or answer calls while
charging the phone as it may shortcircuit the phone and/or cause electric
shock or fire.
Disconnecting the
adapter
1. When charging is finished, the
moving bars of the battery icon
stop and ‘Battery Full unplug the
charger’ is displayed on the screen.
2. Unplug the adapter from the power
outlet. Disconnect the adapter from
the phone by pressing the tabs on
both sides of the connector and
pull the connector out.
Getting star ted
21
Page 13

Getting started
Note
Getting star ted
v
Ensure the battery is fully charged
before using the phone for the
first time.
v
Do not remove the battery or SIM
card while charging.
v
In the case the battery is not
properly charged, please turn the
phone off and on using the power
key, then recharge the battery.
After detaching and reattaching
the battery, please recharge the
battery.
How to use a microSD
memory card
<microSD memory card>
22
< How to installing a microSD
memory card>
1. Turn the phone off. Inserting or
removing the memory card when
the phone is on may damage the
files stored in the memory card.
2. Open the slot protection.
3. Installing the memory card into
the slot. The gold contacts must be
kept on the back of the microSD
memory card. If the memory card
doesn’t go into the slot easily, you
may be trying to installing it in
the wrong way or there could be a
foreign object in the slot.
Page 14

4. Close the slot protection.
5. To remove the memory card,
turn the phone off. Open the slot
protection and carefully extract the
memory card.
Note
v
Avoid using the memory card
when the battery is low.
v
When writing to the card, wait for
the operation to complete before
removing the card.
v
The card is designed to fit easily
into the system one way only.
Note
v
Do not bend the card or force it
into the slot.
v
Do not install any memory
cards other than those made by
microSD.
v
If the microSD has been formatted
using FAT32, format the microSD
using FAT16 again.
v
After you insert microSD card into
your phone, please check the
icon area on your screen.
v
If the memory error icon is
displayed, your memory card is
not formated or is unsuppported
by the phone.
v
In this case, you have to try to
format your memory card.
v
If the memory error icon is still
displayed on icon area , please
contact service center.
For more information on the microSD,
please refer to the memory card
instruction manual.
Getting star ted
23
Page 15

Getting started
Memory card formatting
Getting star ted
Before you start to use the memory
card you have to format it. After you
insert the memory card, select
o
Settings o Memory status
External memory
OK key.
This operation should only be done
when you insert the memory card
for the first time. During formatting
various folders will be created for
different data types.
, then press the
Turning your handset on
Ensure that your SIM card is in your
handset and the battery is charged.
Press and hold the end key until the
power comes on. Enter the SIM PIN
code that was supplied with your SIM
card if the PIN code request is set to
On. After a few seconds you will be
registered on the network.
24
Menu
o
Turning your handset o
Press and hold the end key until the
power goes off. There may be a few
seconds delay while the handset
powers down. Do not turn the
handset on again during this time.
Access Codes
You can use the access codes
described in this section to avoid
unauthorized use of your phone. The
access codes (except PUK and PUK2
codes) can be changed by using
Change codes feature of Settings
menu.
PIN code (4 to 8 digits)
The PIN (Personal Identification
Number) code protects your SIM card
against unauthorized use. The PIN
code is usually supplied with the SIM
card. When the PIN code request is
set to Enable, your phone will request
the PIN code every time the phone
is switched on. When the PIN code
request is set to Disable, your phone
Page 16

connects to the network directly
without the PIN code.
PIN2 code (4 to 8 digits)
The PIN2 code, supplied with some
SIM cards, is required to access
functions such as advice of
costs and Fixed dial number
These functions are only available
if supported by your SIM card.
Check with your network for further
information.
Call
.
PUK code (4 to 8 digits)
The PUK (PIN Unblocking Key) code
is required to change a blocked PIN
code. The PUK code may be supplied
with the SIM card. If not, contact your
network operator for the code. If
you lose the code, also contact your
network operator.
PUK2 code (4 to 8 digits)
The PUK2 code, supplied with some
SIM cards, is required to change a
blocked PIN2 code. If you lose the
code, also contact your network
operator.
Security code (4 to 8 digits)
The security code protects the
unauthorized use of your phone. The
default security code is set to ‘0000’
and the security code is required
to delete all phone entries and to
activate the Reset settings menu.
Also, the security code is required
to enable or disable the phone lock
function to prevent unauthorized
use of the phone. The security code
default setting can be modified from
the Security menu.
Getting star ted
25
Page 17

General Functions
Making and
General Fu nc ti on s
answering calls
Making a call
1. Make sure your phone is powered
on.
2. Enter a phone number including
the area code.
v
Press and hold the key to erase
the entire number.
3. Press the
4. To end the call, press the key.
key to make the call.
Making a call from the call
history list
1. In standby mode, press the key,
and the latest incoming, outgoing
and missed phone numbers will be
displayed.
2. Select the desired number by using
the up/down navigation key.
3. Press the
key.
26
Making an international call
1. Press and hold the key for
the international prefix. The ‘+’
character automatically selects the
international access code.
2. Enter the country code, area code,
and the phone number.
3. Press the
key.
Ending a call
When you have finished your call,
press the key.
Making a call from the
Contacts
You can save the names and phone
numbers dialled frequently in the SIM
card as well as the phone memory
known as the contacts list. You can
dial a number by simply looking up
the desired name in the contacts.
Page 18
Answering a call
When you receive a call, the phone
rings and the flashing phone icon
appears on the screen. If the caller
can be identified, the caller’s phone
number (or name if saved in the
contacts) is displayed.
1. To answer an incoming call, open
the phone when Flip open has been
set as the answer mode. You can
change the answer mode what you
want by using the Answer mode
feature.
Note
If the
Any key
answer mode, any key press will
answer a call except for the key
or the right soft key.
has been set as the
v
To reject an incoming call when flip
is closed, press and hold side down
key on the left side of the phone
without opening the flip.
v
You can answer a call while using
the Contacts or other menu
features.
2. To end the call, close the flip or
press the key.(If you are using
Headset, call continues even after
closing the flip)
Signal strength
You can check the strength of your
signal by the signal indicator ( )
on the LCD screen of your phone.
Signal strength can vary, particularly
inside buildings. Moving near to a
window may improve reception.
General Fu nc ti on s
27
 Loading...