

LG GM200 Owner’s Manual [in]
www.lgmobile.com P/N : MMBB0334401 (1.0)
E N G L I S H
HINDI
GM200
Some of the contents in this manual
may differ from your phone
depending on the software of the
phone or your service provider.

Bluetooth QD ID B015111
GM200 User Guide
This guide will help you understand your
new mobile phone. It will provide you with
useful explanations of features on your
phone.
Some of the contents in this manual may
differ from your phone depending on the
software of the phone or your service
provider.
-
English
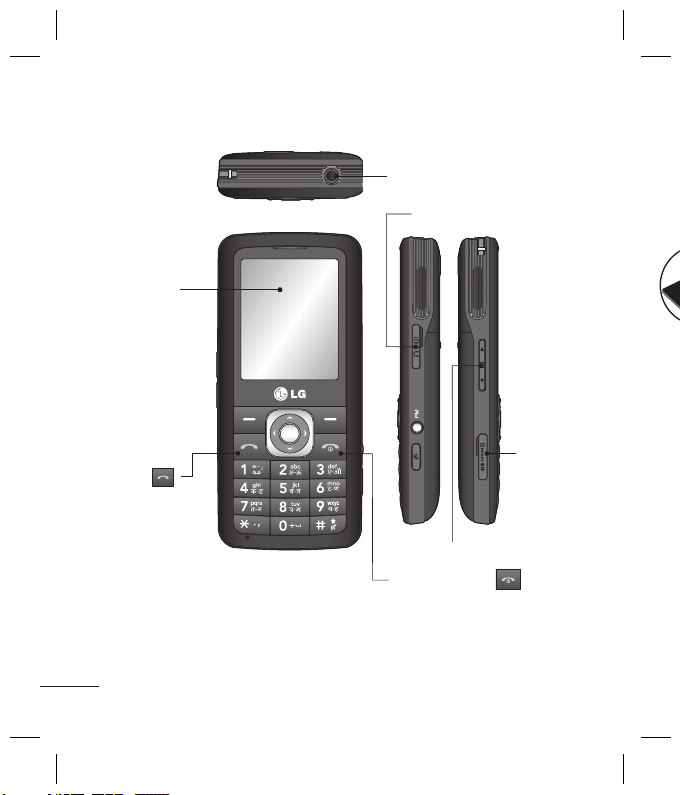
Getting to know your phone
a
e
e
m
s
o
w
Main screen
Call key
Dials a phone
number and
answers
incoming calls.
Handsfree connector
Charger, cable slot
Memory
card slot
Volume key
End/Power key
Ends or rejects a call.
Turns the phone on/off.
Returns to the standby screen
when you use the menu.
Inst
Lift t
area
To r
Not
For
Pres
Cho
WAR
not
2
y
t
en
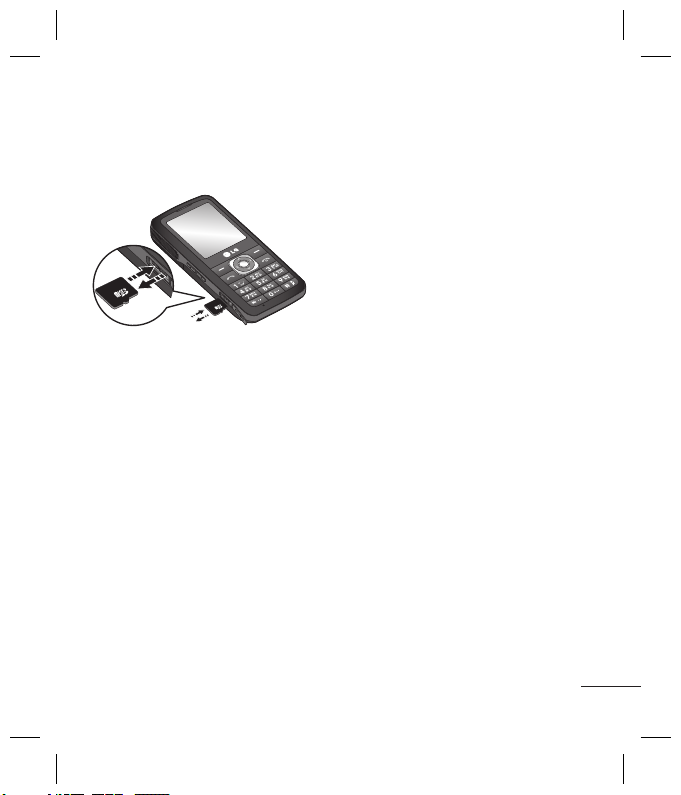
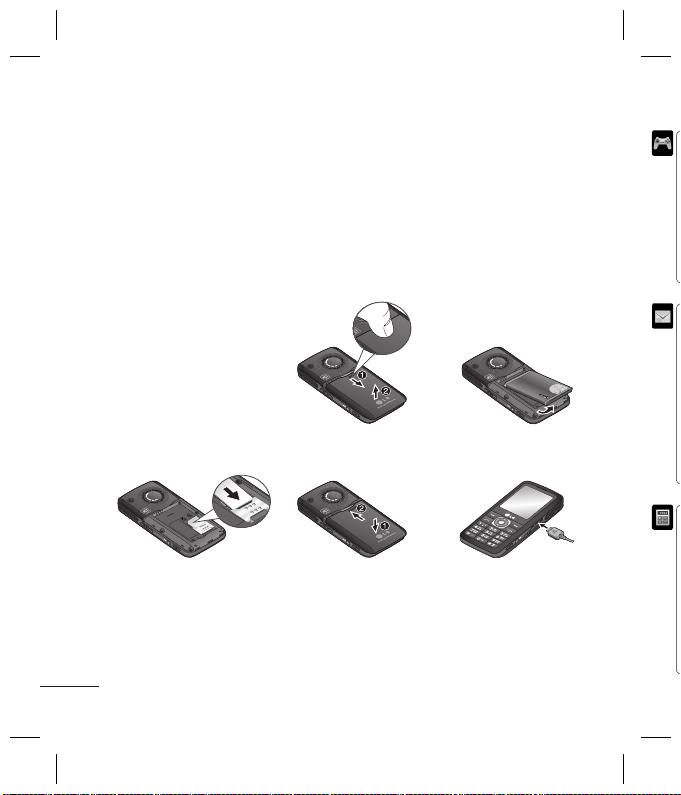
Installing a memory card
Lift the memory card cover and insert a micro SD card with the golden contact
area facing downwards. Close the memory card cover so that it clicks shut.
To remove the memory card, gently push it as shown in the diagram.
Note: A memory card is an optional accessory.
Formatting the memory card
Press Menu and select Settings.
Choose Memory status, select External memory and press Format.
WARNING: When you format your memory card, all the content will be wiped. If you do
not want to lose the data on your memory card, back it up rst.
3
e
Installing the SIM Card and Charging the Battery
Installing the SIM Card
When you subscribe to a cellular network, you are provided with a plug-in SIM card
loaded with your subscription details, such as your PIN, any optional services available
and many others.
Important! ›
The plug-in SIM card and its contacts can be easily damaged by scratches
or bending, so be careful when handling, inserting or removing the card.
Keep all SIM cards out of the reach of small children.
M
Illustrations
1 Open battery cover
2 Remove the battery
3 Insert your SIM
4 Close the battery cover
5 Charge your battery
345
WARNING: Do not remove the battery when the phone is switched on, as this may
damage the phone.
4
12
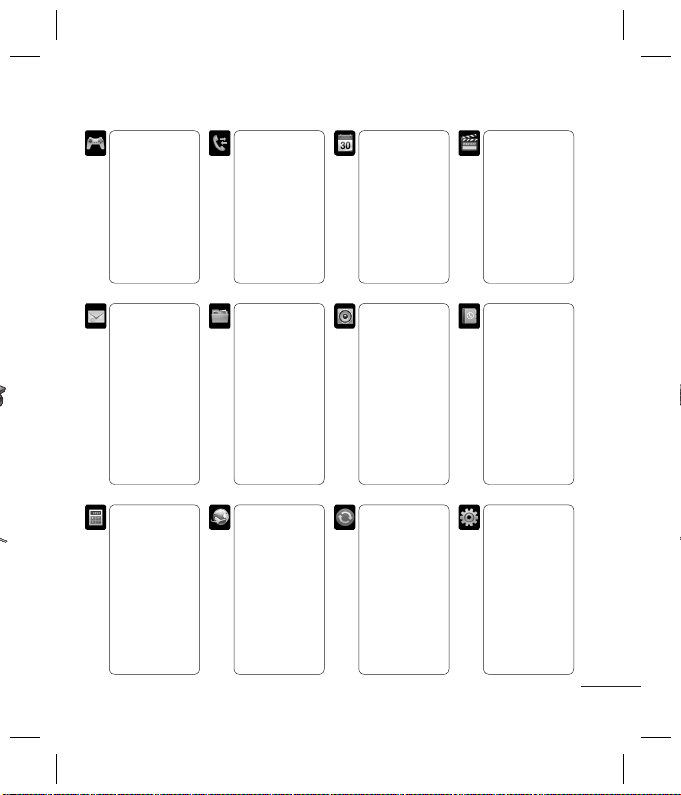
Menu map
ble
hes
rd.
Games & Apps
1 Games
2 Applications
3 Network
pro le
Messaging
1 New message
2 Inbox
3 Email box
4 Drafts
5 Outbox
6 Sent
7 Listen to
voicemail
8 Info message
9 Templates
0 Settings
Tools
1 Alarm clock
2 Calculator
3 Stopwatch
4 Unit converter
5 World clock
6 SIM services
Call history
1 All calls
2 Missed calls
3 Dialled calls
4 Received calls
5 Call duration
6 Call costs
7 Data
information
My stu
1 Images
2 Sounds
3 Videos
4 Others
5 External
memory
Browser
1 Home
Google Search
2
3 NDTV Active
4 Bookmarks
5 Enter address
6 History
7 Saved pages
8 Settings
9 Information
Organiser
1 Calendar
2 Memo
3 To do
Pro les
1 General
2 Silent
3 Vibrate only
4 Outdoor
5 Headset
Connectivity
1 Bluetooth
2 Network
3 USB
connection
Multimedia
1 MP3 player
2 Camera
3 Video camera
4 FM radio
5 Voice recorder
6 Ringtone
creator
Contacts
1 Search
2 New contact
3 Speed dials
4 Groups
5 Copy all
6 Delete all
7 Settings
8 Information
Settings
1 Date & Time
2 Languages
3 Display
4 Shortcut
5 Call
6 Security
7 Flight mode
8 Power save
9 Reset
0 Memory status
5

Calls
s
n
u
u
w
l
v
w
n
t
n
n
r
r
s
t
e
a
e
o
h
Making a call
1
Key in the number using the keypad.
To delete a digit press
Clear.
2
Press
3
To end the call, press .
TIP! To enter + when making an
international call, press and hold 0.
Making a call from your contacts
1
Select Contacts from the Standby
screen.
2
Using the keypad, enter the first
letter of the contact you want to call.
For example, for Office, Press 6 three
times to select the first character, “O”
3
Select Call or press to initiate
the call.
Answering and rejecting a call
When your phone rings, press Accept
or press
To mute your phone while it is ringing,
simply select Silent. This is useful if you
have forgotten to change your profile
to Silent for
a meeting.
Press
incoming call.
6
to initiate the call.
to answer the call.
or select Reject to reject the
TIP! You can change the settings on your
phone to answer your calls in di erent
ways. Press Menu, select Settings, and
choose Call. Select Answer mode and
choose from Any key, or Send key only.
Speed dialling
You can assign a speed dial number to
a contact you call frequently.
Viewing your Call history
You can check the record of missed,
received, and dialled calls only if the
network supports the Calling Line
Identification (CLI) within the service
area.
Changing the call settings
You can set the menu relevant to a
call. Press Menu, select Settings and
choose Call.
• Call divert - Choose whether to divert
your calls.
• Call barring – Select when you would
like calls to be barred.
• Fixed dial number – Choose a list of
numbers that can be called from your
phone. You’ll need your PUK2 code
from your operator. Only numbers
included in the fixed dial list can be
called from your phone.
• An
ans
sen
• Se
yo
yo
net
• Cal
ha
net
• Mi
ton
• Au
• Se
Co
Sea
1
Se
sc
2
U
le
3
To
th
n
Add
1
Pr
c
2
C
co

our
d
c
o
t
d
ly.
r to
,
e
e
d
ivert
uld
t of
our
e
s
e
• Answer mode - Choose whether to
answer the phone using any key or
send key only.
• Send my number - Choose whether
your number will be displayed when
you call someone. (Depends on your
network provider.)
• Call waiting - Be alerted when you
have a call waiting. (Depends on your
network provider.)
• Minute minder - Select On to hear a
tone every minute during a call.
• Auto redial - Choose On or Off.
• Send DTMF tones - Choose On or Off.
Contacts
Searching for a contact
1
Select Contacts from the standby
screen, and choose Search.
2
Using the keypad enter the first
letter of the contact you want to call.
3
To scroll through the contacts and
their different numbers use the
navigation arrows.
Adding a new contact
1
Press Contacts and choose New
contact.
2
Choose whether to store your new
contact on your Phone or SIM card.
3
Enter all the information you have in
the fields provided and select Save.
Adding a contact to a group
You can save your contacts into
groups, for example, keeping your
work colleagues and family separate.
There are a number of groups
including Family, Friends, Colleague,
VIP, Group1, Group2 and Group3
already set up on the phone.
Adding a picture to a contact
You can change the appearance of
your contacts in your address book to
include a picture.
1
In the standby screen, select
Contacts and choose Settings.
2
Select View options and choose With
picture.
3
Then return to the address book and
select the contact you want to add a
picture to.
4
Choose Options and select Edit.
5
Scroll down to the Picture section.
Choose Option and choose Save,
No picture, Images or New image. If
you choose Image, you can choose
an image that is saved in your phone
memory. If you choose New image,
your camera view finder will open
7

p
h
d
t
e
e
c
e
n
e
c
g
w
a
e
r
o
n
p
a
t
so you can take a picture of your
contact.
6
Select Save.
Messaging
Your GM200 includes functions related
to SMS (Short Message Service), MMS
(Multimedia Message Service) and
E-mail, as well as the network’s service
messages.
Sending a message
1
Press Menu, select Messaging, and
choose New message.
2
Choose Message to send an SMS or
MMS.
3
A new message editor will open. The
message editor combines SMS and
MMS into one intuitive and easy to
switch between mode. The default
setting of the message editor is SMS
mode.
4 Enter your message using either
the T9 predictive mode or Abc
manual mode.
5
Select Options and choose Insert to
add an Image, Sound, Video, Symbol,
Text template, Emoticon, Name &
Number, New slide, Subject, or More
(Contact/ My business card/Schedule/
Memo/To do).
8
6 Press the centre key.
7 Enter the phone number or press
Options
and select
Recent list
list. You can add multiple contacts.
8 Select
Send
Contacts
to open your contacts
.
or
Setting up your email
You can stay in touch on the move
using email on your GM200. It’s quick
and simple to set up a POP3 or IMAP4
email account.
1
Press Menu, select Messaging, and
choose Settings.
2
Select E-mail then E-mail account.
3
Select New then set the E-mail
account.
Sending an email using your new
account
To send/receive an email, you should
set up an email account.
1
Select Menu, select Messaging and
choose New message.
2
Choose E-mail and a new email will
open.
3
Write a subject then press Option
and choose Write email and press
OK.
4
Enter your message.
5
To
O
, t
Vi
ca
O
m
6
Pr
re
an
co
7
Pr
se
Ent
You
usin
follo
avail
mod
mod
Not
text i
in ad
T9 p
T9 p
dicti
writi
you
key
wan

ss
ts
cts.
ick
P4
nd
nt.
w
ld
nd
n
s
5
To add an attachment, select
Options and select Attachments
, then press New: Image, Sound,
Video, More( Contact, My business
card, or Schedule, Memo, To do),
Others or contents of External
memory.
6
Press Send to and enter the
recipient’s address or press Options
and select Contacts to open your
contacts list.
7
Press Send and your email will be
sent.
Entering text
You can enter alphanumeric characters
using the phone’s keypad. The
following text input methods are
available in the phone: T9 predictive
mode, ABC manual mode and 123
mode.
Note: Some elds may allow only one
text input mode (e.g. telephone number
ill
in address book elds).
T9 predictive mode
T9 predictive mode uses a built-in
dictionary to recognise words you’re
writing based on the key sequences
you press. Simply press the number
key associated with the letter you
want to enter, and the dictionary will
recognise the word once all the letters
are entered.
ABC manual mode
This mode allows you to enter letters
by pressing the key labeled with the
required letter once, twice, three or
four times until the letter is displayed.
123 mode
Type numbers using one keystroke per
number. You can also add numbers
while remaining in letter modes by
pressing and holding the desired key.
Message folders
Press Menu, select Messaging. The
folder structure used on your GM200 is
fairly selfexplanatory.
Inbox
- All the messages you receive are
placed into your Inbox.
Email box - Contains all your email
messages.
Drafts - If you don’t have time to finish
writing a message, you can save what
you have done so far here.
Outbox
- This is a temporary storage
folder while messages are being sent.
Sent
- All the messages you send are
placed into your Sent folder.
9
Listen to voicemail - You can access
o
n
h
o
e
e
d
o
h
o
e
e
n
u
u
e
your voicemail box (if provided by your
network).
Info message - All info messages and
updates received from your operator.
Templates - A list of useful messages,
already written for a quick reply.
Multimedia
MP3 player
Your GM200 has a built-in MP3 player so
you can play all your favourite music.
Playing a song
1
Press Menu and select Multimedia,
then choose MP3 player.
2
Choose All songs then select the
song you want to play.
3
Select
4
5
6
Creating a playlist
You can create your own playlists by
choosing a selection of songs from the
All songs folder.
to pause the song.
Select
Select
song.
Select Back to stop the music and
return to the MP3 player menu.
to skip to the next song.
to skip to the previous
1
Press Menu and select Multimedia.
2
Choose MP3 player, then select My
.
playlist
3
Press Options and select New
, enter the playlist name and
playlist
Save.
press
4
The All songs folder will show.
Select all of the songs that you
would like to include in your playlist
by scrolling to them and selecting
.
5
Select Done to store the playlist.
Setting Dolby effect or LG Equalizer
You can set up Dolby effect or LG
Equalizer.
1
Press Menu and select Multimedia,
then choose
2
Choose Settings, then select Audio
effect
3
Select Dolby effect or LG
MP3 player.
.
Equalizer.
Camera
Taking a quick photo
1
Select Menu, and select
Multimedia. Select Camera to
open the viewfinder.
2
H
le
p
3
P
th
4
Pr
Vi
Sho
1
In
se
2
C
3
P
su
4
Pr
5
R
co
wi
6
Se
FM
Usi
Your
feat
favo
mov
10

dia.
l
My
and
list
g
.
izer
dia,
dio
2
Holding the phone and, point the
lens towards the subject of the
photo.
3
Position the phone so you can see
the subject of your photo.
4
Press Center key to take a photo.
Video camera
Shooting a quick video
1
In standby screen, select Menu and
Multimedia.
select
2
Choose Video camera.
3
Point the camera lens towards the
subject of the video.
4
Press
5
Rec will appear in the bottom left
6
to start recording.
corner of the viewfinder and a timer
will show the length of your video.
Select Stop to stop recording.
FM radio
Using the FM radio
Your LG GM200 has an FM radio
feature so you can tune into your
favourite stations and listen on the
move.
Listening to the radio
1
Press Menu and select Multimedia,
then choose FM radio.
2
Select the channel number of the
station you would like to listen to.
Recording the Radio
1
Press center key during listening to
the Radio.
2
The recording time is displayed on
your phone. If you want to stop the
recording, press
done, the recorded contents will be
saved in My stuff as mp3 file.
3
When the recording is done, select
. If recording is
Option and then choose from
Delete, Set as,or Album.
Note: If you stay in an area with bad radio
reception, you may nd di culty in
listening to the Radio.
So, we recommend you insert Ear-mic
into Handsfree connector in order to
listen to the Radio and keep the good
radio reception.
Voice recorder
Use your Voice recorder to record
voice memos or other sounds.
11

Ringtone creator
i
f
g
n
e
h
c
g
c
.
c
i
c
t
n
c
r
n
o
t
1
Press Menu and select Multimedia,
then choose
2
Select the music what you would
like to use in music lists, and then
select
3
Press center key.
4
Select Cut when you want to start
recoding music to use as a Ringtone
while playing music.
5
Select Cut when you want to stop
recording music.
6
Once you have finished recording,
select option and choose from Save,
Play or Reset. If you choose Reset
the selected file is removed from
your phone.
Ringtone creator.
OK.
My stuff
You can store any multimedia files
into your phone’s memory so that
you have easy access to all of your
images, sounds, videos, others and
games. You can also save your files to a
memory card. The advantage of using
a memory card is that you can free up
space on your phone’s memory. All your
multimedia files will be saved in My
stuff. Press Menu then select My stuff
to open a list of folders.
12
Images
Images contains a folder of default
images on your phone, images
downloaded by you, and images taken
on your phone’s camera.
Sounds
The Sounds folder contains the Default
sounds, your voice recordings, and
sound files downloaded by you. From
here you can manage, send, or set
sounds as ringtones.
Videos
The Videos folder shows the list of
downloaded videos and videos you
have recorded on your phone.
Others
From the Others menu, you can view
the files that are not saved in the
Images, Sounds or Videos folder.
External memory
If you’ve inserted a memory card, it
will be displayed as a folder within
My stuff.
Games and Apps
Your GM200 comes with preloaded
games to keep you amused when you
have time to spare. If you choose to
download any additional games or
appl
this
Or
Usi
Whe
app
on t
the
navi
Add
You
here
Add
You
Sett
You
off a
Usi
The
arith
subt
divis
Usi
This
func

f
ken
ault
m
w
ou
applications they will be saved into
this folder.
Organizer / Tools
Using the calendar
When you enter this menu, a calendar
appears. A square cursor is located
on the current date. You can move
the cursor to another date using the
navigation keys.
Adding a memo
You can register your own memos
here.
Adding an item to your to do list
You can view, edit and add tasks to do.
Setting your alarm
You can set up to 5 alarm clocks to go
off at a specified time.
Using your calculator
The calculator provides the basic
arithmetic functions: addition,
subtraction, multiplication and
division.
Using the stopwatch
This option allows you to use the
function of a stopwatch.
Converting a unit
This converts many measurements
into a unit you want.
Adding a city to your world clock
You can add a required city to the list
of world clock. You can also check
the current time of Greenwich Mean
Time (GMT) and major cities around
the world.
SIM services
This feature depends on SIM and the
network services. In case the SIM card
supports SAT (i.e. SIM Application
Toolkit) services, this menu will be the
operator specific service name stored
on the SIM card.
Browser
Accessing the browser
You can launch the wap browser and
access the homepage of the activated
profile on browser settings. You can
also manually enter an URL address
and access the associated wap page.
1
Press Menu and select Browser
2
To access the browser homepage
directly, select Home. Alternately,
select Enter address and type in
your desired URL.
.
13
 Loading...