

LG GC-131SLQ Owner’s Manual

ENGLISH
REFRIGERATOR
Please read this guide thoroughly before operating
and keep it handy for reference at all times.
P/NO.:MFL38422699
www.lg.com

CONTENTS
INSTALLATION ........................................................... 2
FEATURE CHART ...................................................... 3
OPERATION ............................................................... 4
Starting
Temperature Control
Ice Making
Defrosting
SUGGESTIONS ON FOOD STORAGE ..................... 5
CLEANING ................................................................. 6
GENERAL INFORMATION ........................................ 6
IMPORTANT WARNINGS .......................................... 7
REPOSITIONING THE DOOR HINGE (Option) ......... 8
BEFORE CALLING FOR SERVICE . 10
SPECIFICATIONS ...................................................... 11
..........................
1

THIS REFRIGERATOR IS MANUFACTURED WITH GREAT CARE, AND UTILIZES THE
LATEST IN TECHNOLOGY.
WE ARE CONFIDENT THAT YOU WILL BE FULLY SATISFIED WITH IT'S PERFORMANCE
AND RELIABILITY.
BEFORE YOU START YOUR REFRIGERATOR, PLEASE READ THIS BOOKLET CAREFULLY.
IT PROVIDES EXACT INSTRUCTIONS FOR INSTALLATION, OPERATION AND
MAINTENANCE, AND ALSO SUPPLIES SOME USEFUL HINTS.
INSTALLATION
1. Select a good location.
Place your refrigerator where it is easy to use.
2. Avoid placing the unit near heat sources, direct
sunlight or moisture.
3. To ensure proper air circulation around the
fridge-freezer, please maintain sufficient space
on both the sides as well as top and maintain
at least 2 inches (5 cm) from the rear wall.
4. To avoid vibrations, the unit must be level.
If required, adjust the leveling screw to
compensate for unevenness of the floor.
The front should be slightly higher than the rear
to aid in door closing.
Leveling screw can be turned easily by tipping
the cabinet slightly.
Turn the leveling screw clockwise to raise the
unit, counterclockwise to lower it.
5. Clean your refrigerator thoroughly and wipe off
all dust accumulated during shipping.
6. Install accessories such as ice tray, shelf, etc.,
in their proper places.They are packed together
to prevent possible damage during shipment.
7. Connect the power supply cord (or plug) to the
outlet. Don't double up with other appliances on
the same outlet.
8. Prior to use, leave your refrigerator on for 2 or 3
hours.
Check the flow of cold air on the evaporator to
ensure proper cooling.
Your refrigerator is now ready for use.
9. When you put in a power cord, please refer to
the label situated on the back plate in order to
classify the rating.
10. This appliance is intended to be used in household
and similar applications such as staff kitchen areas
in shops, offices and other working environments;
farm houses and by clients in hotels, motels and
other residential type environments; bed and
breakfast type environments; catering and similar
non-retail applications.
2
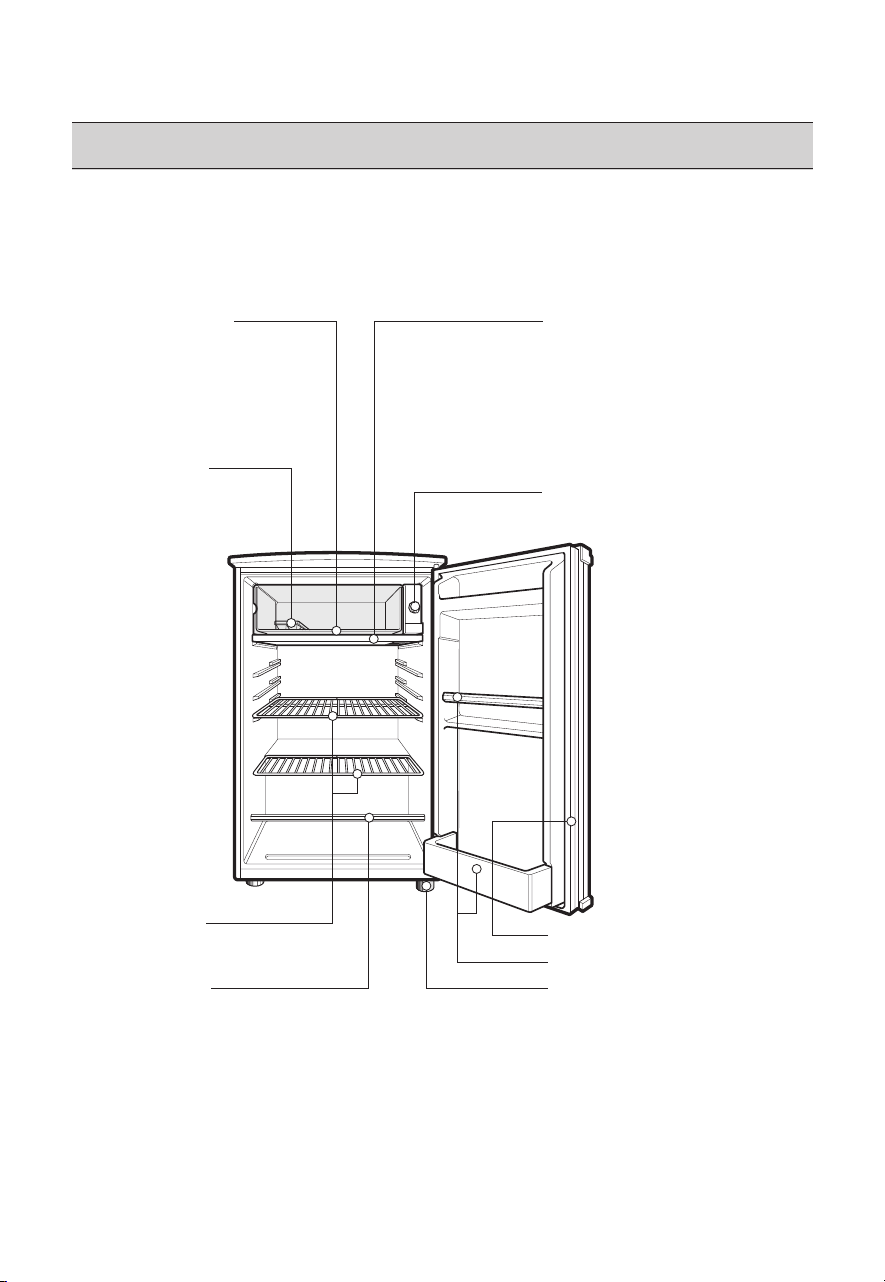
FEATURE CHART
Evaporator
Ice Tray
Drip Tray or Chiller
Tray(Optional)
: Drip Tray ; Collects Water that
drips off the evaporator when
defrosting.
: Chiller Tray ; 0°C Zone.
It can be used as a drip tray
when defrosting.
Thermostat Dial
For controlling the temperature
in the refrigerator.
Shelves
P.V.C Bar
For fruits and vegetables.
Magnetic Door Seal
Door Rack
Leveling Screw
3
 Loading...