

LG Disney mobile DM-L200 User Manual

USER
MANUAL
P/N:MMBB0202701 (1.1)
G
Project2 6/29/06 2:54 PM Page 1

LG Electronics MobileComm Inc.
201 James Record Road Huntsville, AL 35824
Tel. 1-800-793-8896 Fax. 1-800-448-4026
www.lgeser vice.com
DO NOT RETURN YOUR PRODUCT TO THE ABOVE ADDRESS. Please call
or write for the location of the LGIC authorized service center nearest
you and for the procedures for obtaining warranty claims.
Project2 6/29/06 2:54 PM Page 2

1
CONTENTS
TABLE OF
Safety Precautions
5
Welcome
8
Important Information 8
FCC Part 15 Class B Compliance 8
Technical Details 9
FCC RF Exposure Information 11
Bodily Contact During Operation 11
Vehicle-Mounted External Antenna 11
Caution 11
Phone Overview
12
Key Functions 13
Menus Overview
15
Getting Started
16
The Battery 16
Installing the Battery 16
Removing the Battery 16
Charging the Battery 17
Battery Charge Level 17
Turning the Phone On and Off 17
Turning the Phone On 17
Turning the Phone Off 18
Signal Strength 18
Screen Icons 19
Making Calls 20
Correcting Dialing Mistakes 20
Redialing Calls 20
Receiving Calls 20
Quick Access to Convenient Features
21
Mute Function 21
Volume Quick Adjustment 21
Call Waiting 21
Caller ID 21
Speed Dialing 22
Entering Information
23
Tex t Input 23
Text Input Modes 23
Text Input Examples 24
DM-L200_LGManual_1.1.qxd 9/18/06 5:03 PM Page 1

CONTENTS
TABLE OF
2
Contacts in Your Phone’s Memory
27
Contacts Entries 27
The Basics of Storing Contacts Entries 27
Options to Customize Your Contacts 28
Editing Contacts Entries 30
Deleting 33
Phone Numbers with Pauses 34
Searching Your Phone’s Memory 35
Using Phone Menus
37
Menu Access 37
Contacts 38
Access and Options 38
1. Find/Add Entry 38
2. Groups 39
3. Speed Dial 39
4. Voice Dial 39
5. Services 40
Messaging 41
Access and Options 41
1. Call History 42
1. Recent 42
2. Missed 42
3. Received 43
4. Dialed 43
5. Delete Call History 43
2. Voicemail 44
3. Create Message 44
1. Text Message 44
2. Pix Message 45
4. Inbox 46
1. Text Message 46
2. Pix Message 47
5. Outbox 47
1. Text Message 47
2. Pix Message 48
DM-L200_LGManual_1.1.qxd 9/18/06 5:03 PM Page 2

CONTENTS
TABLE OF
3
6. Drafts 48
1. Text Message 48
2. Pix Message 48
Family Center
TM
49
Accessing Family Center
TM
51
Family Locator
TM
Service 51
Family Monitor
TM
Service 54
Family Alert!
TM
Service 57
Call Control Feature 61
Entertainment 62
1. Ringtones 63
2. Images 65
3. Theme It 67
4. Games 69
5. Disney Zone 70
6. Applications 71
7. We b 73
To ol bo x 76
Access and Options 76
1. My Profile 76
2. Camera 76
1. Take Pix 76
2. Pix Gallery 78
3. Camcorder 79
1. Record Video 79
2. Video Gallery 79
4. Voice Recorder 80
1. Record Voice 80
2. Voice Gallery 80
5. Tools 81
1. Bluetooth
® 81
2. Calendar 82
3. Alarm Clock 83
4. Notepad 84
5. EZ Tip Calculator 85
6. Calculator 85
DM-L200_LGManual_1.1.qxd 9/18/06 5:03 PM Page 3

CONTENTS
TABLE OF
4
7. World Clock 86
6. Settings 86
1. Display 86
2. Volume 88
3. Roaming 89
4. Messaging 90
5. Bluetooth 92
6. Security 93
7. Setup / Others 95
8. Phone Info 98
Safety
10 0
TIA Safety Information 100
Exposure to Radio Frequency Signal 100
Antenna Care 101
Phone Operation 101
Tips on Efficient Operation 101
Driving 101
Electronic Devices 101
Pacemakers 102
Hearing Aids 102
Other Medical Devices 102
Health Care Facilities 103
Vehicles 103
Posted Facilities 103
Aircraft 103
Blasting Areas 103
Potentially Explosive Atmosphere 103
For Vehicles Equipped with an Airbag 104
Safety Information 105
Charger and Adapter Safety 105
Battery Information and Care 105
Explosion, Shock and Fire Hazards 106
General Notice 106
FDA Consumer Update 108
Consumer Information on SAR 116
Warranty Information 118
Manufacturer’s Warranty 118
DM-L200_LGManual_1.1.qxd 9/18/06 5:03 PM Page 4
5
Please follow these simple guidelines. Breaking these rules
may be dangerous or illegal. Further detailed information is
given in this user guide.
WARNING! Violation of the instructions may
cause serious injury or death.
1. Never use an unapproved battery since
this could damage the phone and/or
battery and could cause the battery to
explode.
2. Never place your phone in a microwave
oven as it will cause the battery to
explode.
3. Do not dispose of your battery by fire or
with hazardous or flammable materials.
4. Make sure that no sharp-edged items (such
as an animal’s teeth or nails) come into
contact with the battery. There is a risk of
this causing a fire.
5. Store the battery out of reach of children.
6. Small parts are a choking hazard. Always
exercise caution around small children.
Some of contents in this user guide may be
different from your phone depending on the
software of the phone or your service provider.
Features and specifications might be subject to
change without prior notice.
PRECAUTIONS
SAFETY
DM-L200_LGManual_1.1.qxd 9/18/06 5:03 PM Page 5

6
1. Unplug the power cord and charger during
lightning storms to avoid electric shock or fire.
2. When in a car, do not leave your phone or set up
the hands-free kit near the air bag. If wireless
equipment is improperly installed and the air
bag is activated, you could be seriously injured.
3. Do not use a handheld phone while driving.
4. Do not use the phone in areas where its use is
prohibited (i.e.: aircraft, hospital).
5. Do not expose the battery charger or adapter to
direct sunlight or use it in places with high
humidity, such as a bathroom.
6. Never store your phone in temperatures less
than 5°F (-15°C) or greater than 122°F (50°C).
7. Do not use harsh chemicals (i.e.: alcohol,
benzene, thinners, etc.) or detergents to clean
your phone. This may cause a fire.
8. Do not drop, strike, or shake your phone
severely. Such actions may harm the internal
circuit boards of the phone.
9. Do not use your phone in high explosive areas.
10. Do not damage the power cord by bending,
twisting, pulling or heating. Do not use the
Battery Charger if it is loose as it may cause a
fire or electric shock.
PRECAUTIONS
SAFETY
DM-L200_LGManual_1.1.qxd 9/18/06 5:03 PM Page 6
7
1. Do not place any heavy items on the power cord.
Do not allow the power cord to be crimped as it
may cause fire or electric shock.
2. Do not handle the phone with wet hands while it is
being charged. It may cause an electric shock or
seriously damage your phone.
3. Do not disassemble the phone.
4. Do not place or answer calls while charging the
phone as it may short-circuit the phone and/or
cause electric shock or fire.
5. Only use the batteries, antennas and chargers
provided by LG. The warranty will not be applied to
products provided by other suppliers.
6. Only authorized personnel should service the
phone and its accessories. Faulty installation or
service may result in accidents or invalidate the
warranty.
7. Do not hold or let the antenna come in contact
with your body during a call.
8. An emergency call can be made only within a
service area. For an emergency call, make sure
that you are within a service area and that the
phone is turned on.
DM-L200_LGManual_1.1.qxd 9/18/06 5:03 PM Page 7

8
Congratulations for choosing the advanced and compact
DM-L200 cellular phone, designed to operate with the latest
digital mobile communication technology, Code Division
Multiple Access (CDMA). Along with the many advanced
features of the CDMA system, such as greatly enhanced
voice clarity, this phone offers:
1. Large, easy-to-read, 9-line backlight LCD with status
icons.
2. Paging, messaging, voicemail and caller ID.
3. 21-key keypad.
4. Menu-driven interface with prompts for easy operation
and configuration.
5. Any key answer, auto answer, auto retry, one-touch dial
and speed dialing with 99 memory locations.
Important Information
This user’s guide provides important information on the use
and operation of your phone. Please read all the information
carefully prior to using the phone for the best performance
and to prevent any damage to or misuse of the phone. Any
unapproved changes or modifications will void your
warranty.
FCC Part 15 Class B Compliance
This device and its accessories comply with part 15 of FCC
rules. Operation is subject to the following two conditions:
(1) This device and its accessories may not cause harmful
interference, and (2) this device and its accessories must
accept any interference received, including interference that
causes undesired operation.
WELCOME
DM-L200_LGManual_1.1.qxd 9/18/06 5:03 PM Page 8

9
Technical Details
The DM-L200 is an all-digital phone that operates on both Code
Division Multiple Access (CDMA) frequencies: cellular services at
800 MHz and Personal Communication Services (PCS) at 1.9 GHz.
Also, the DM-L200 works on Advanced Mobile Phone Service
(AMPS). We call it a tri-mode phone.
CDMA technology uses a feature called DSSS (Direct Sequence
Spread Spectrum) that enables the phone to keep communication
from being crossed and to use one frequency channel by multiple
users in the same specific area. This results in a 10-fold capacity
increase when compared with analog mode. In addition, features
such as soft/softer handoff, hard handoff, and dynamic RF power
control technologies combine to reduce call interruptions.
DM-L200_LGManual_1.1.qxd 9/18/06 5:03 PM Page 9
WELCOME
10
The Cellular and PCS CDMA networks consist of MSO (Mobile
Switching Office), BSC (Base Station Controller), BTS (Base
Station Transmission System) and MS (Mobile Station). The
following table lists some major CDMA standards.
* TSB -74: Protocol between an IS-95A system and ANSI
J-STD-008
1xRTT system receives twice as many subscribers in the
wireless section as IS-95. High-speed data transmission is
also possible.
CDMA Standard
Basic Air
Interface
TIA/EIA-95A
TSB-74
ANSI J-STD-008
TIA/EIA-IS2000
ANSI TIA/EIA 553A
CDMA Dual-Mode Air Interface
14.4kbps radio link protocol and
inter-band operations
IS-95 adapted for PCS frequency
band CDMA2000 1xRTT Air Interface
Advanced Mobile Phone Service
MAS-BS
PCSC-RS
Intersystem operations
Non-signaling data comm.
Cellular base station
Cellular mobile station
PCS personal station
PCS base station
Speech CODEC
TIA/EIA/IS-634
TIA/EIA/IS/651
TIA/EIA/IS-41-C
TIA/EIA/IS-124
TIA/EIA/IS-97
TIA/EIA/IS-98
ANSI J-STD-018
ANSI J-STD-019
TIA/EIA/IS-125
TIA/EIA/IS-96-B
TIA/EIA/IS-99
TIA/EIA/IS-637
TIA/EIA/IS-657
IS-801
TIA/EIA/IS-707-A
Speech CODEC
Async Data and Fax
Short message service
Packet Data
Position Determination Service
(gpsOne)
High Speed Packet Data
Network
Service
Performance
Designator
Description
DM-L200_LGManual_1.1.qxd 9/18/06 5:03 PM Page 10
FCC RF Exposure Information
WARNING! Read this information before operating
the phone.
In August 1996, the Federal Communications Commission (FCC) of the United States, with
its action in Report and Order FCC 96-326, adopted an updated safety standard for human
exposure to Radio Frequency (RF) electromagnetic energy emitted by FCC-regulated
transmitters. Those guidelines are consistent with the safety standard previously set by
both U.S. and international standards bodies.
The design of this phone complies with the FCC guidelines and these international
standards.
Bodily Contact During Operation
This device was tested for typical use with the back of the phone kept 3/4 inches (2 cm)
from the body. To comply with FCC RF exposure requirements, a minimum separation
distance of 3/4 inches (2 cm) must be maintained between the user’s body and the back
of the phone, including the antenna, whether extended or retracted. Third-party belt-clips,
holsters and similar accessories containing metallic components should not be used.
Avoid the use of accessories that cannot maintain 3/4 inches (2 cm) distance between
the user’s body and the back of the phone and have not been tested for compliance with
FCC RF exposure limits.
Vehicle-Mounted External Antenna
(Optional, if available.)
A minimum separation distance of 8 inches (20 cm) must be maintained between
the user / bystander and the vehicle-mounted external antenna to satisfy FCC RF
exposure requirements. For more information about RF exposure, visit the FCC
website at www.fcc.gov.
CAUTION!
Use only the supplied and approved antenna. Use of
unauthorized antennas or modifications could impair call quality,
damage the phone, void your warranty and/or result in violation of FCC
regulations.Do not use the phone with a damaged antenna. If a
damaged antenna comes into contact with the skin a minor burn may
result. Contact your local dealer for a replacement antenna.
11
DM-L200_LGManual_1.1.qxd 9/18/06 5:03 PM Page 11
12
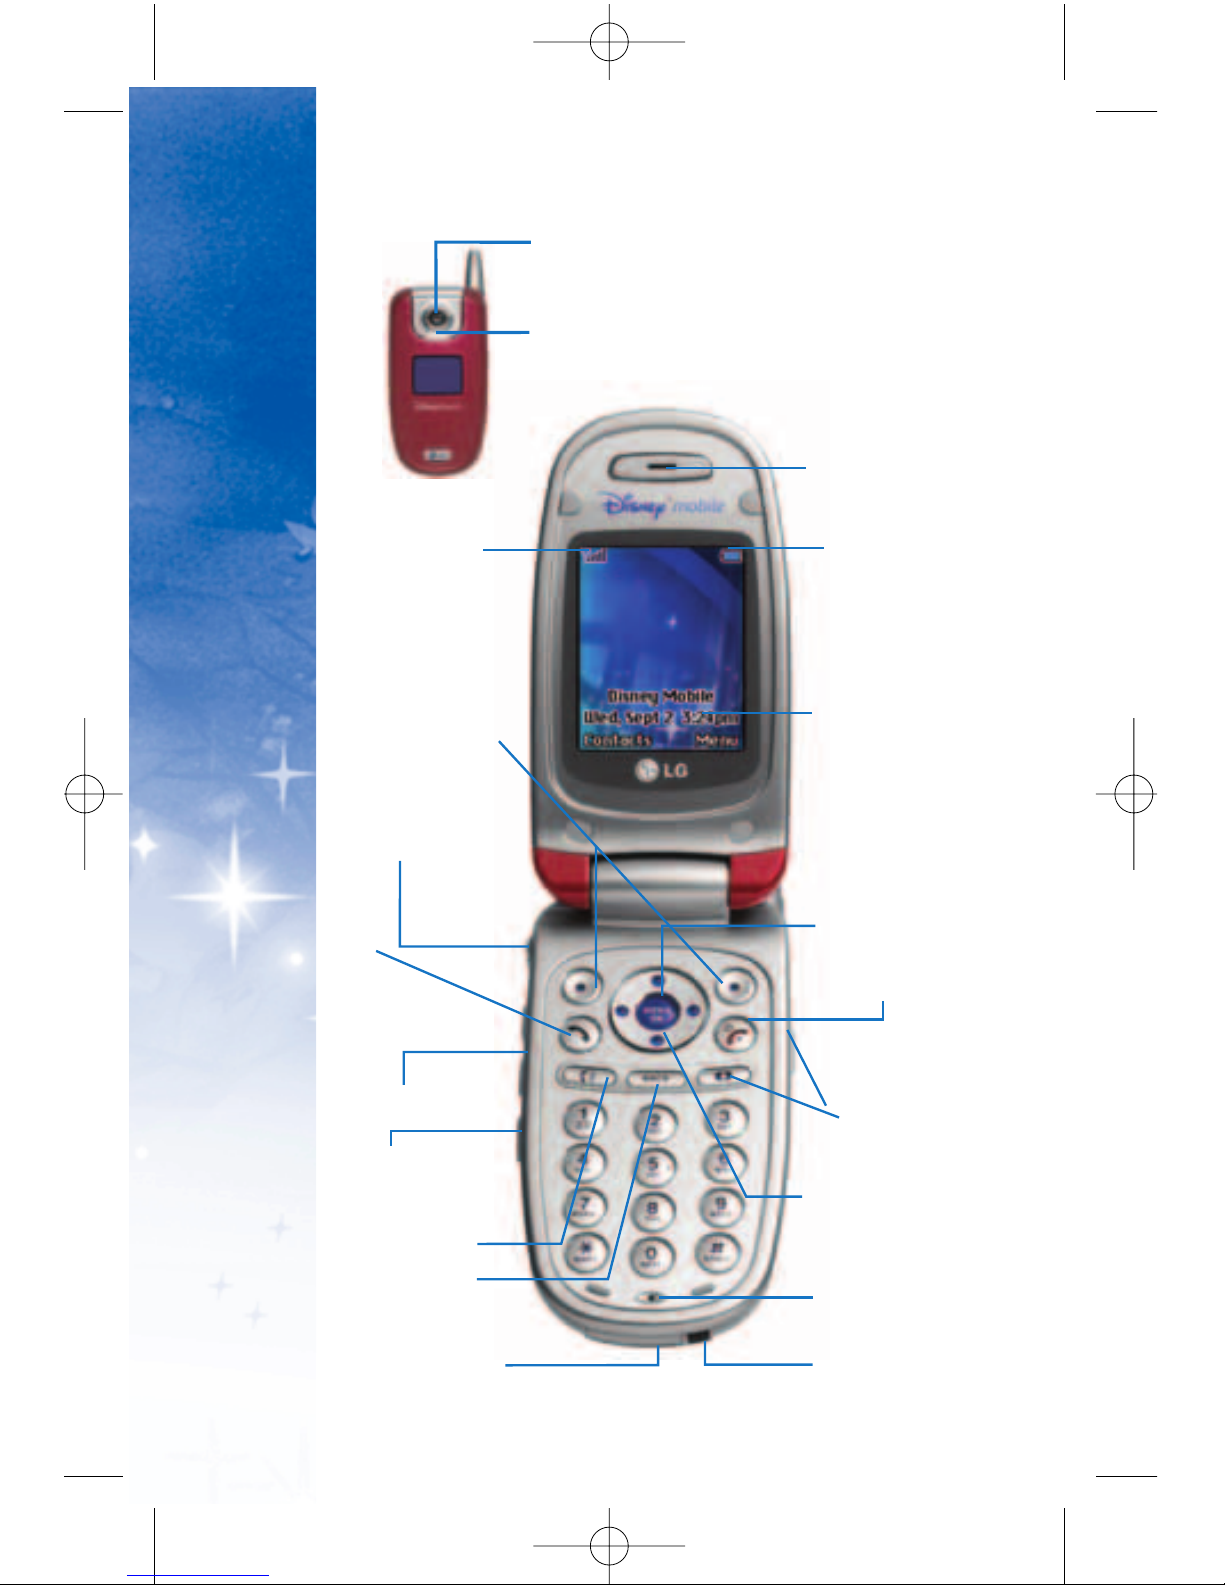
Soft Key Buttons
Tal k
End (Power)
Navigation Key
Menu/OK
Voice Services
Key
Accessory Jack
Microphone
Charger Jack
Headset Jack
Back (Clear)
Volume Control
Display Screen
Earpiece
Signal
Strength
Indicator
Battery
Strength
Indicator
Speaker Key
Camera Key
Digital Camera
Flash
OVERVIEW
PHONE
DM-L200_LGManual_1.1.qxd 9/18/06 5:03 PM Page 12
13
KKeeyy FF uunn ccttiioonn ss
SSiiggnnaall SStt rree nnggtt hh II nnddii cc aattoorr
represents the signal strength by
displaying bars. The more bars displayed, the better the signal
strength.
SSoo ff tt KK eeyy BB uutt ttoo nn ss
let you select softkey actions or menu items
corresponding to the bottom left and right lines on the display
screen.
HH eeaa ddss eett JJaa cc kk
allows you to plug in an optional headset for
convenient, hands-free conversations.
CAUTION! Inserting an accessory into the incorrect
jack may damage the phone.
TT aallkk
allows you to place or receive calls, answer Call Waiting, or
activate Voice Dial.
VVooll uummee CCoonn ttrroo ll
allows you to adjust the ringer volume in standby
mode (with the phone open) or adjust the voice volume during a
call. The volume key can also be used to scroll up or down to
navigate through the different menu options. To mute the ringer
during an incoming call, press the volume key up or down.
VVooii cc ee SS eerr vvii cceess KK eeyy
for quick access to voice dials. Also press
and hold during standby mode or during a conversation to record
a voice memo.
SSppeeaakk eerr KK eeyy
enables your phone’s built-in speaker, allowing you
to hear other callers.
BBaacckk (( CClleeaarr ))
deletes characters from the display in text entry
mode. When in a menu, press the Back key to return to the previous
menu. This key also allows you to return to the previous screen.
AAcc cceess ss oorryy JJ aacckk
allows you to connect optional accessories, such
as a USB cable. CAUTION! Inserting an accessory into the incorrect
jack may damage the phone.
DDiigg ii tta
all CCaammeerr aa
This is the lens for the integrated digital camera.
FFll aass hh
allows you to take pictures indoors or at night. It also
functions as a Message Waiting Indicator.
DM-L200_LGManual_1.1.qxd 9/18/06 5:03 PM Page 13

CC hhaarrggeerr JJ aacckk
connects the phone to the battery charger.
MM ii ccrroopphhoonn ee
allows the other caller to hear you clearly when
you are speaking to them.
NN aavv iigg aa ttii oonn KK eeyy
scrolls through the phone’s menu options
and acts as a shortcut key from standby mode.
UUpp
= Entertainment
DDoowwnn
= Menu
RRii gghh tt
= Messaging
LLeeff tt
= Family Center
CC aammeerr aa KK ee yy
In standby mode, allows you to access the
Pictures menu with the press of a button. Press and hold to
automatically launch the Camera.
EE nndd ((PPooww eerr ))
ends a call. Press and hold this key for two
seconds to turn your phone on or off. While in the main
menu, it returns the phone to standby mode and cancels
your input. When you receive an incoming call, press the
volume key to silence the ringer.
MM eenn uu//OO KK
selects the highlighted choice when navigating
through a menu.
DDiiss ppll aayy SS ccrr eeeenn
displays all the information needed to
operate your phone, such as the call status, the Contacts list,
the date and time, the signal and battery strength, etc.
BBaatt ttee rryy SS ttrr ee nn ggtt hh IInnddiiccaattoorr
represents the amount of
remaining battery charge currently available in your phone.
When all bars are displayed in the battery icon, the phone’s
battery is fully charged. When no bars are displayed, the
phone’s battery is completely discharged.
EE aarr ppiiee cc ee
lets you hear the caller and automated prompts.
OVERVIEW
PHONE
14
DM-L200_LGManual_1.1.qxd 9/18/06 5:03 PM Page 14
15
MMeennuuss OOvveerrvviieeww
11.. CCoonnttaaccttss
1. Find/Add Entry
2. Groups
3. Speed Dial
4. Voice Dial
5. Services
1. Guest Services
2. Dir Assistance
3. Road Assistance
4. Check Usage
22.. MMeessssaaggiinngg
1. Call History
1. Recent
2. Missed
3. Received
4. Dialed
5. Delete Call History
2. Voicemail
1. Call Voicemail
3. Create Message
1. Text
2. Pix
4. Inbox
1. Text
2. Pix
5. Outbox
1. Text
2. Pix
6. Drafts
1. Text
2. Pix
33.. FFaammiillyy CCeenntteerr
TM
1. Family Locator
TM
2. Family Monitor
TM
3. Family Alert!
TM
4. Call Control
5. Shop Family
6. View Info
44.. EEnntteerrttaaiinnmmeenntt
1. Ringtones
2. Images
3. Theme It
4. Games
5. Disney Zone
TM
6. Applications
7. W e b
55.. TToooollbbooxx
1. My Profile
2. Camera
1. Take Pix
2. Pix Gallery
3. Camcorder
1. Record Video
2. Video Gallery
4. Voice Recorder
1. Record Voice
2. Voice Gallery
5. Tools
1. Bluetooth
2. Calendar
3. Alarm Clock
4. Notepad
5. Ez Tip Calculator
6. Calculator
7. World Clock
6. Settings
1. Display
2. Volume
3. Roaming
4. Messaging
5. Bluetooth
6. Security
7. Setup/Others
8. Phone Info
DM-L200_LGManual_1.1.qxd 9/18/06 5:03 PM Page 15

TT hhee BBaa tttt ee rryy
The phone comes with a rechargeable battery. Keep the
battery charged while not in use in order to maximize talk
and standby time. The battery charge level is shown at the
top of the LCD screen.
IInnssttaalllliinngg tthhee BBaatttteerryy
To install, insert the battery into the opening on the back
of the phone and gently press down until the latch snaps
into place.
RReemmoovviinngg tthhee BBaatttteerryy
1. Make sure the power is off so that you don’t lose any
stored numbers or messages.
2. Press the battery release latch up and remove the battery
from the phone at a 45-degree angle.
16
NOTE: It is important to fully charge the battery
before initial use of the phone.
STARTED
GETTING
DM-L200_LGManual_1.1.qxd 9/18/06 5:03 PM Page 16
CChhaarrggiinngg tthhee BBaatttteerryy
To use the charger provided with your phone, plug the end of the
adapter into the phone's charger port and the other end into an
electrical outlet. The charge time varies depending upon the
battery level. The maximum charge time for a fully discharged
battery is 3 hours.
WARNING! Use only the charger provided with the phone.
Using any charger other than the one included with the
DM-L200 may damage your phone or battery.
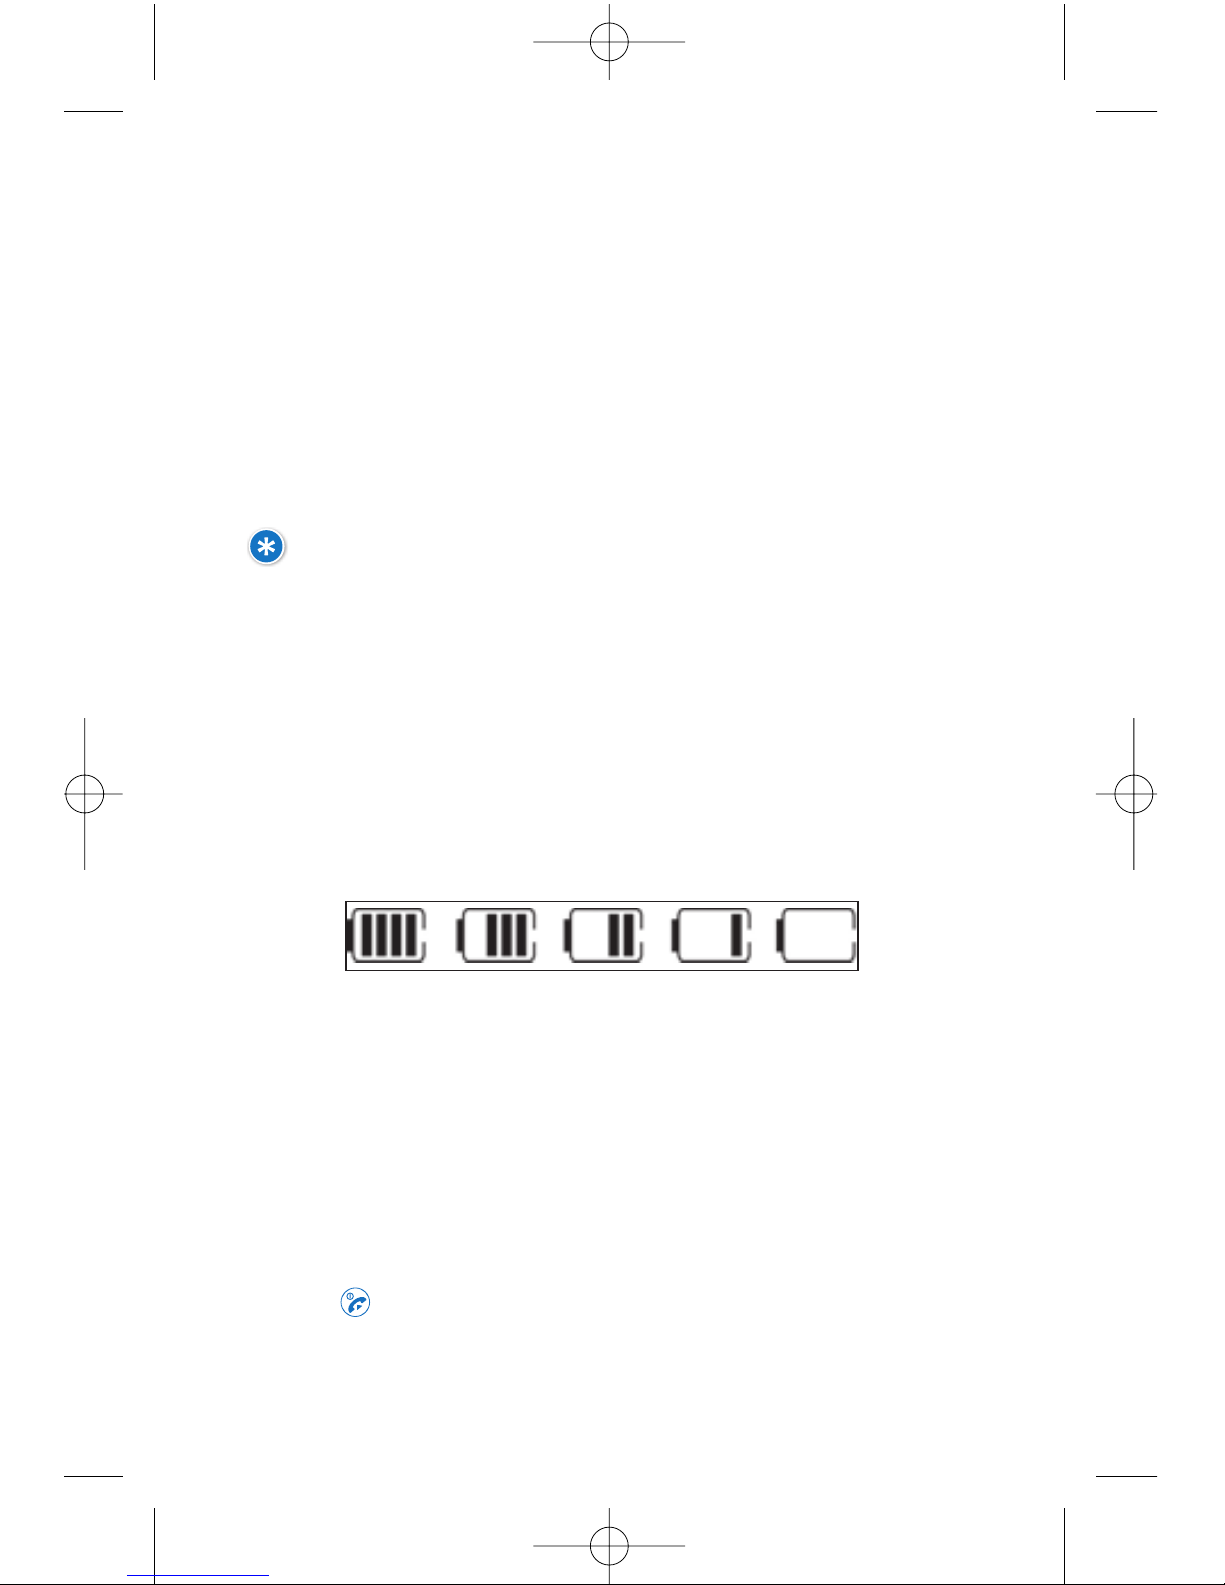
BBaatttteerryy CChhaarrggee LLeevveell
The battery charge level is shown at the top right of the LCD screen.
When the battery charge level becomes low, the low battery sensor
alerts you in three ways: sounding an audible tone, blinking the
battery icon, and displaying LOW BATTERY WARNING! If the battery
charge level becomes exceedingly low, the phone automatically
switches off and any function in progress is not saved.
TT uurr nniinngg tthh ee PPhhoonnee OO nn aann dd OOffff
TTuurrnniinngg tthhee PPhhoonnee OOnn
1. Install a charged battery or connect the phone to an external
power source such as a cigarette lighter charger or hands-free
car kit.
2. Press for a few seconds until the LCD screen lights up.
17
Fully Charged
Fully Discharged
DM-L200_LGManual_1.1.qxd 9/18/06 5:03 PM Page 17
STARTED
GETTING
18
TTuurrnniinngg tthhee PPhhoonnee OOffff
1. Press and hold until the display turns off.
SSiiggnnaall SSttrreennggtthh
Call quality depends on the signal strength in your area. The
signal strength is indicated on the screen as the number of
bars next to the signal strength icon: The more bars, the
better the signal strength. If the signal quality is poor, move
to an open area. If you are in a building, the reception may
be better near a window.
NOTE: Like any other radio device, avoid any
unnecessary contact with the antenna while your
phone is on.
DM-L200_LGManual_1.1.qxd 9/18/06 5:03 PM Page 18
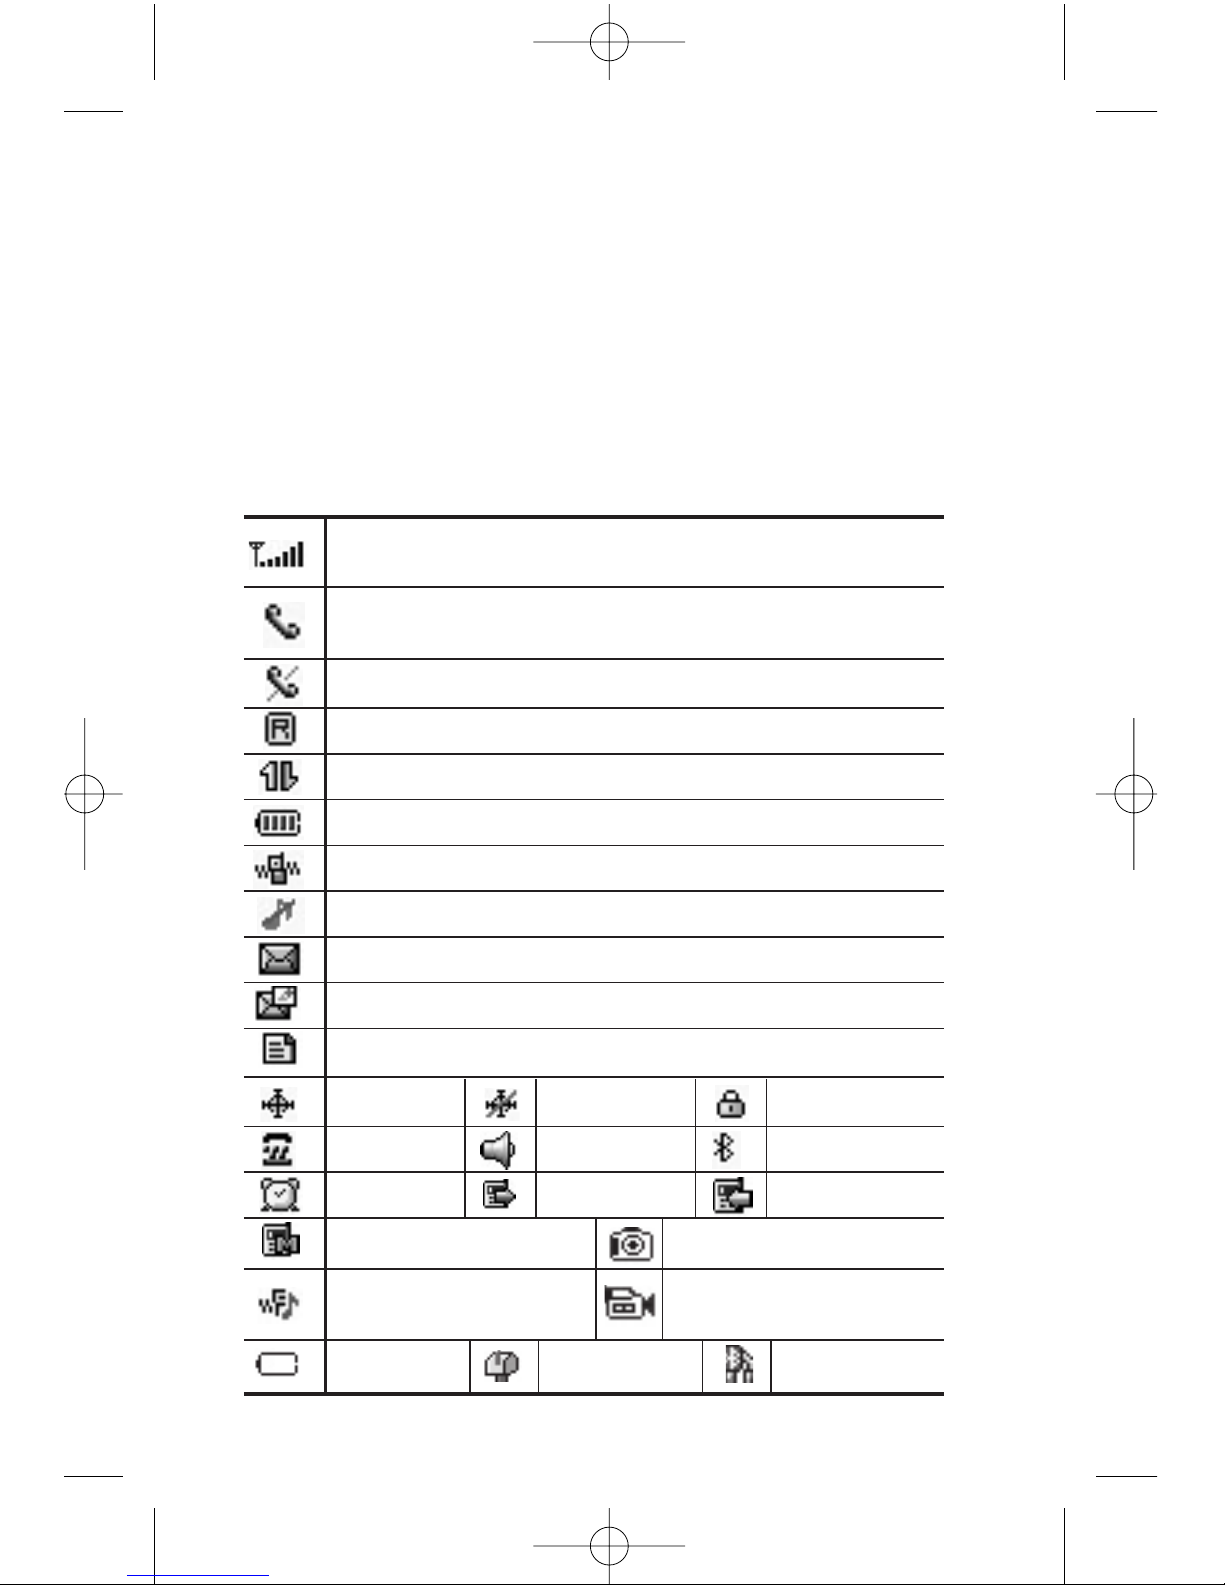
SSccrreeeenn II cc oonn ss
When the phone is powered on, the top line of the LCD screen
displays icons indicating the status of the phone.
To see the icons below, go to Menu->Toolbox->Settings->Phone
Info-> Icon Glossary.
Signal Strength Indicator. The strength of the signal received
by the phone is indicated by the number of bars displayed.
Roaming Indicator. The phone is outside of the home service area.
Indicates your Disney connection is active (data is being transferred).
Camera or Picture is activated
Battery Indicator. Indicates battery charge level.
Indicates ringtone volume is set to vibrate.
In Use Indicator. A call is in progress. No icon indicates
the phone is in standby mode.
No Service Indicator. The phone is not receiving a system signal.
Indicates you have voicemail messages.
Indicates you have new pix messages
Speaker On.
Dialed Calls.
Received Calls.
Alarm.
Missed Calls.
Location On. Location Off.
Bluetooth
TTY mode.
Low Battery
New Messages
Indicates Ringtone Off/Silent: All mode is set.
Indicates ringtone and
vibrate mode is set.
Camcorder or Video
is activated
Indicates you have new text messages.
SSL.
19
Audio Via Bluetooth
DM-L200_LGManual_1.1.qxd 9/18/06 5:03 PM Page 19
MM aakk ii nngg CCaall ll ss
1. Make sure the phone is turned on. If not, press for
about 3 seconds.
2. Enter the phone number (include the area code if needed).
3. Press .
lf the phone is locked, enter the lock code.
CCaallll FFaaiilleedd
indicates the call did not go through.
4. Press to end the call.
CC oo rrrr ee cc ttiinn gg DD ii aall ii nngg MMiisstt aakk eess
If you make a mistake while dialing a number, press
once to delete the last digit entered or hold down for at
least 2 seconds to delete all digits.
RRee ddiiaall ii nngg CC aall llss
Press twice to redial the last number. The last 50
numbers dialed are stored in the call history list and can be
accessed for redial by pressing and using the down
navigation key until you reach the desired number and
pressing again.
RRee cc eeii vv ii nngg CCaall ll ss
When the phone rings or vibrates, press to answer.
Press to end the call.
NOTE: If you press or (the side keys) while the
phone is ringing, the ringing or vibration is muted for
that call.
STARTED
GETTING
20
DM-L200_LGManual_1.1.qxd 9/18/06 5:03 PM Page 20

CONVENIENT FEATURES
QUICK ACCESS TO
MM uutt ee FFuunncc ttiioonn
The Mute function prevents the other party from hearing your
voice, but allows you to hear the other party.
MMuuttee QQuuiicckk AAccttiivvaattiioonn
Select Mute during a call.
MMuuttee QQuuiicckk CCaanncceellllaattiioonn
Select Unmute again.
VVooll uummee QQ uuiicckk AAddjjuusstt mmee nn tt
Use the side keys to adjust the earpiece and master
volumes. The upper key increases the volume and the lower
key decreases the volume.
NOTE: Earpiece volume can be adjusted during a call.
Ringtone volume can be adjusted when phone is idle.
CC aall ll WWaaiitt ii nngg
Your cellular service may offer call waiting. While a call is in
progress, two beeps indicate another incoming call. When call
waiting is enabled, you may put the active call on hold while you
answer the other incoming call. Check with your cellular service
provider for information about this function.
To Use Call Waiting:
1. Press to receive a waiting call.
2. Press again to switch between calls.
CC aall ll eerr II DD
Caller ID displays the number of the person calling when your
phone rings. If the caller’s identity is stored in Contacts, the
name appears on the screen. Check with your service provider
to ensure they offer this feature.
21
DM-L200_LGManual_1.1.qxd 9/18/06 5:03 PM Page 21

CONVENIENT FEATURES
QUICK ACCESS TO
22
SSppeeeedd DDii aalliinn gg
Speed Dialing is a co
nvenient feature that allows you to make phone
calls quickly and easily with a few keystrokes. Your phone recalls the
number from your Contacts, displays it briefly and then dials it. Speed
Dial number 1 is for Voicemail.
DDiiaalliinngg SSiinnggllee DDiiggiitt SSppeeeedd DDiiaallss ((ffrroomm 11 ttoo 99))
Press and hold the Speed Dial number.
OR
Enter the Speed Dial number and press .
DDiiaalliinngg DDoouubbllee DDiiggiitt SSppeeeedd DDiiaallss ((ffrroomm 1100 ttoo 9999))
Press the first digit and then press and hold the key of the last
digit.
OR
Enter the first and second digits and press .
DM-L200_LGManual_1.1.qxd 9/18/06 5:03 PM Page 22

TT eexx tt II nnppuutt
You can input and edit your Banner, Notepad, Schedule,
Contacts and Messages.
KKeeyy FFuunncc ttiioonnss
RRiigghh tt SSoofftt KKeeyy
: Press to scroll access the following text
input modes:
Abc / T9Word / 123 / Symbols / Smileys
SShhiifftt
: Press to change case.
Word text: Word -> WORD -> word
Abc text: Abc -> ABC -> abc
NNeexxtt
: In Word mode, press to display other matching words.
SSppaaccee
: Press to complete a word and insert a space.
CClleeaarr
: Press to delete a single space or character. Hold to
delete words.
PPuunncc ttuuaattiioonn
: In Word mode, press to insert punctuation
in a word and complete a sentence.
TTeexxtt IInnppuutt M
Mooddeess
There are five modes for entering text, numbers, special
characters and punctuation. In a text entry field, pressing
Left Soft Key displays a pop-up list of text modes.
11.. WWoorrdd MMooddee
- Use to type text using one keystroke per
letter. The phone translates keystrokes into common words
by using the letters on each key and a compressed database.
22.. AAbbcc ((MMuullttii--ttaapp)) MMooddee --
Use to add words to the Word
database.
33.. 112233 ((NNuummbbeerrss)) MMooddee --
Use to type numbers using one
keystroke per number.
INFORMATION
ENTERING
23
DM-L200_LGManual_1.1.qxd 9/18/06 5:03 PM Page 23

INFORMATION
ENTERING
24
44.. SSyymmbboollss MMooddee --
Use to insert special characters or
punctuation. There are 35 special characters.
55.. CChhaannggiinngg LLeetttteerr CCaassee --
Using Word and Abc text input
modes, you can set the capitalization. Press to reach
the following:
IInniittiiaall CCaapp ((WWoorrdd // AA bbcc))
- Only the first letter is capitalized
and subsequent letters are lower case.
CCaappss LLoocckk ((WWoorrdd // AA bbcc))
- All letters are capitalized.
LL
oowweerr CCaassee ((WWoorrdd // AAbbcc))
- All letters are in lower case.
Text Input Examples
Display the text modes and select a text mode:
1. In a text entry field, press Right Soft Key to display text
modes.
2. Press to highlight the text input mode you want
to use.
3. Press to select the highlighted text input mode.
UUssiinngg AAbbcc ((MMuullttii--ttaapp)) TTeexxtt IInnppuutt
1. Press
RRiigghh tt SSoofftt KKeeyy
to change to Abc mode.
2. Press to change to ABC Caps Lock.
3. Press .
LG is displayed.
UUssiinngg 112233 ((NNuummbbe
err ss)) TTeexx tt IInnppuutt
1. Press Right Soft Key to change to 123 mode.
DM-L200_LGManual_1.1.qxd 9/18/06 5:03 PM Page 24
25
2. Press .
5551212 is displayed.
UUssiinngg SSyymmbbooll TTeexx tt IInnppuutt
1. Press Right Soft Key to change to Symbols mode.
2. Press Right Soft Key
NNeexxtt
to view the next 12 symbols or Left
Soft Key
PPrreevv
to view the previous 11 symbols.
3. Use to highlight the special character you want to insert and
press to select it.
UUssiinngg WWoorrdd MMooddee TTeexx tt IInnppuutt
To type the message “Call the office” follow these steps:
1. Press Right Soft Key to change to Word mode.
2. Press .
3. Press to complete the word and add a space.
4. Press
Call the office is displayed.
UUssiinngg tthhee NN eexxtt KKeeyy
After you have finished entering a word, if the word displayed is not
the one you want, press to display additional choices of words
from the database.
1. Press .
Good is displayed.
2. Press .
The display gives you additional choices such as: Home, Gone,
Hood, etc.
DM-L200_LGManual_1.1.qxd 9/18/06 5:03 PM Page 25

INFORMATION
ENTERING
26
AAddddiinngg WWoorrddss ttoo tthhee WWoorrdd DDaattaabbaassee
If a word is not in the Word database, add it using Abc
(Multi-tap) mode text entry.
1. Press Right Soft Key to change to Abc (Multi-tap) mode.
2. Press .
Bop is displayed.
3. Press Right Soft Key to change to Word mode to add the
word Bop to the Word database.
4. Press to erase the existing word.
5. Press .
Bop is displayed.
6. Press .
Cos is displayed.
DM-L200_LGManual_1.1.qxd 9/18/06 5:03 PM Page 26

CONTACTS
IN YOUR PHONE’S MEMORY
27
CCoonnttaaccttss EEnnttrriieess
This allows you to have easy access to your most frequently
dialed phone numbers. You may store up to 500 entries with
up to 4 phone numbers each. Each phone number may be up
to 48 digits.
TThhee BBaassiiccss ooff SSttoorriinngg CCoonnttaaccttss EEnnttrriieess
1.From Idle Screen, enter the phone number you want to save
(up to 48 digits).
2.Use to select
SSaavvee
, then press .
3.Use to select
NNaammee EEnn ttrryy
, then press .
SSeelleecctt::
NNeeww EEnnttrryy //
EExxiissttiinngg EEnnttrryy
4.Enter a name for the phone number (up to 32 characters),
then press .
5.To Set a Speed Dial, highlight the number press Right Soft
Key
OOppttiioonnss
and select
SSeett SSppeeeedd DDiiaall..
NOTE: Use Existing Entry to add another phone number
to a contact already stored in memory.
NOTE: To skip name entry, press to go to the
next step.
NOTE: Press Left Soft Key
DDoonnee
to save the Contact
entry or press to return to the Main Menu Screen
without saving.
DM-L200_LGManual_1.1.qxd 9/18/06 5:04 PM Page 27
CONTACTS
IN YOUR PHONE’S MEMORY
28
6.Enter a Speed Dial digit (e.g., 2). Use the keypad, then
press or use to highlight the Speed Dial location,
then press twice.
7. To Set a Voice Dial, highlight the number, press Right Soft
Key
OOppttiioonnss
, and select
SSeett VVooiiccee DDiiaall
.
8. Scroll to
OOKK
and press .
9. Record your voice dial after the prompt. (Your recording
will play back.)
OOppttiioonnss ttoo CCuussttoommiizzee YYoouurr CCoonnttaaccttss
Once the basic phone number and name information is stored
in your
CC oonnttaaccttss
, you can edit and customize each entry.
HHooww ttoo AAcccceessss tthhe
e EEddiitt EEnn ttrryy ssccrreeeenn::
1. Press Left Soft Key Contacts from the Idle screen, and go
to
FFiinndd//AAdddd EEnnttrryy
.
2. Use to highlight the contact entry you want to edit,
then press .
3. Use
to
scroll to
EEddiitt EEnnttrryy
and press .
4. Use to highlight the information you want to
customize, then press .
AAddddiinngg oorr CChhaannggiinngg tthhee GGrroouupp
Allows you to manage your Contacts entries by organizing
them into groups.
1. Access the Edit Entry screen.
2. Use to highlight
NNoo GGrroouupp
, then press .
DM-L200_LGManual_1.1.qxd 9/18/06 5:04 PM Page 28
 Loading...