LG CV3011WG4A User manual [pt]

website :http://biz.lgservice.com

e-mail : http://LGEservice.com/techsup.html

WASHING MACHINE SERVICE MANUAL

CAUTION

READ THIS MANUAL CAREFULLY TO DIAGNOSE PROBLEMS

CORRECTLY BEFORE OFFERING SERVICE.

BEFORE SERVICING THE WASHING MACHINE, UNPLUG THE POWER CORD TO AVOID THE RISK OF AN ELECTRIC SHOCK.

WHEN SERVICING INTERNAL PARTS ,

USE ONLY SERVICE PARTS SUPPLIED FROM LG.

AFTER SERVICING THE ELECTRIC WIRE, INSURE THAT INSULATION

TAPE IS APPLIED TO PREVENT AN ELECTRICAL SHORT.

MODEL :

F*V3*GP(0~9)


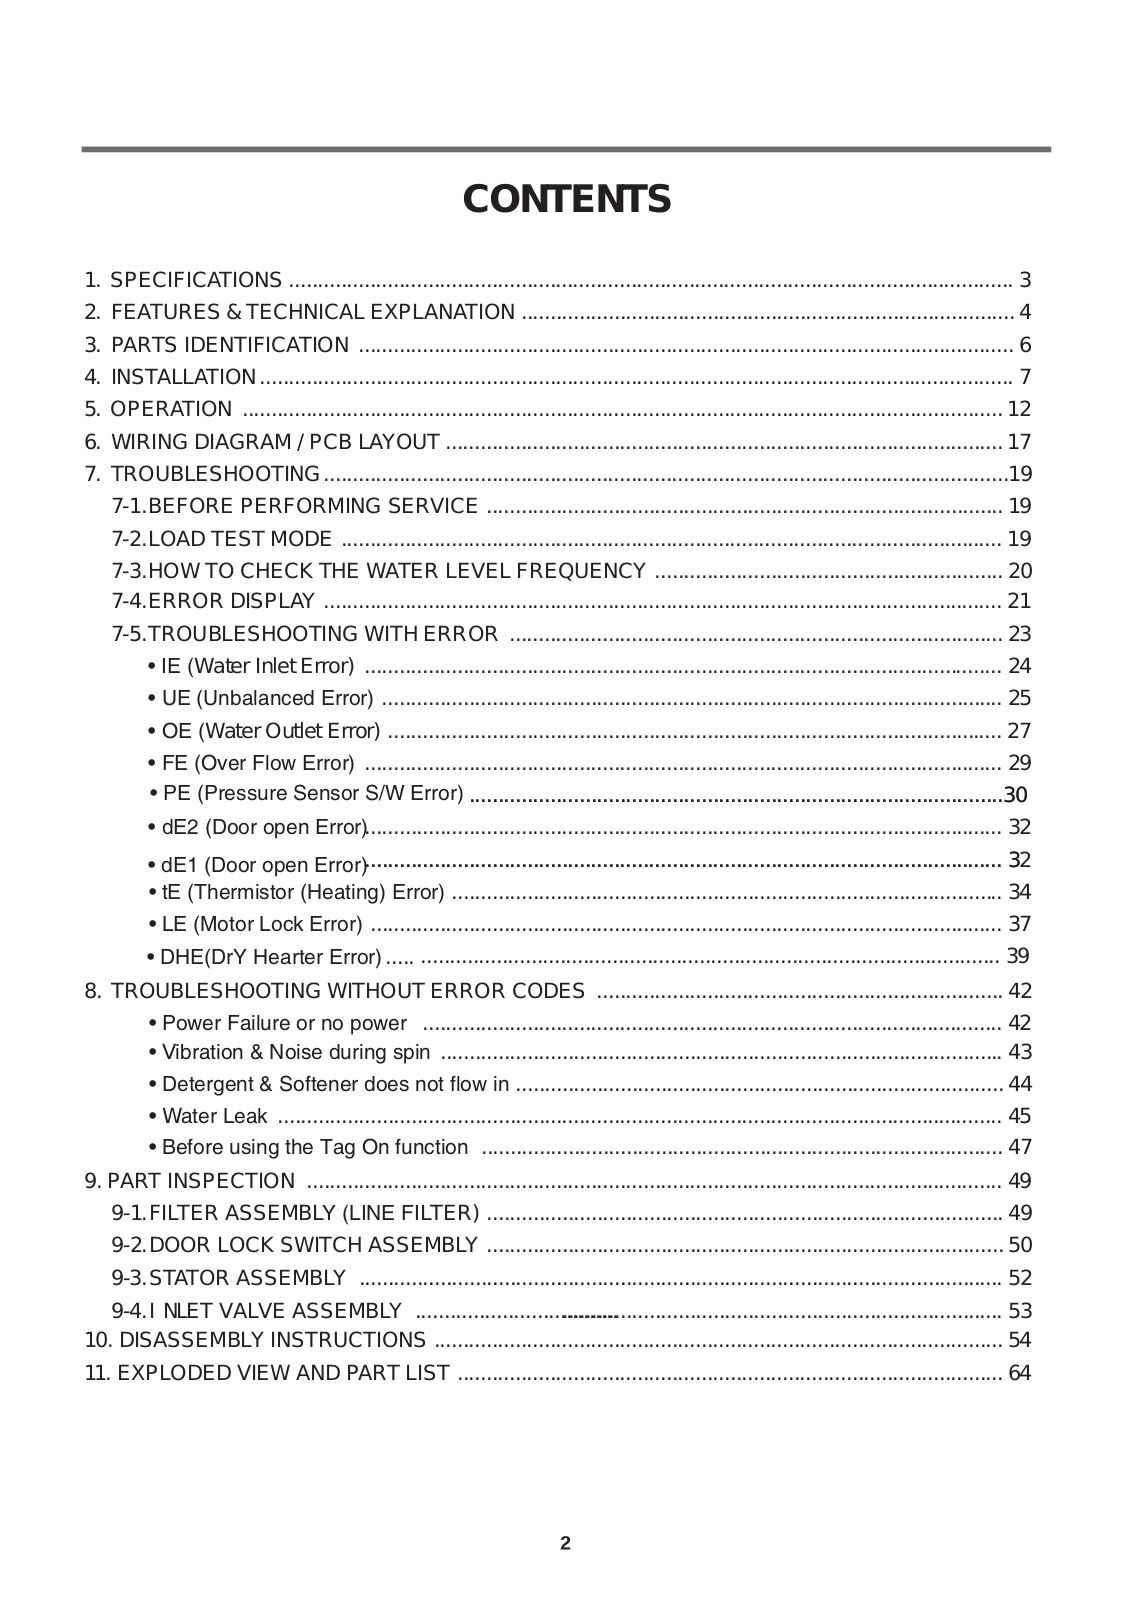
CONTENTS


1.

SPECIFICATIONS .............................................................................................................................

3

2.

FEATURES & TECHNICAL EXPLANATION .....................................................................................

4

3.

PARTS IDENTIFICATION .................................................................................................................

6

4.

INSTALLATION ..................................................................................................................................

7

5.

OPERATION ...................................................................................................................................

12

6.

WIRING DIAGRAM / PCB LAYOUT ................................................................................................

17

7.

TROUBLESHOOTING......................................................................................................................

19


7-1.BEFORE PERFORMING SERVICE .........................................................................................

19


7-2.LOAD TEST MODE ..................................................................................................................

19


7-3.HOW TO CHECK THE WATER LEVEL FREQUENCY ............................................................

20


7-4.ERROR DISPLAY .....................................................................................................................

21


7-5.TROUBLESHOOTING WITH ERROR .....................................................................................

23


• IE (Water Inlet Error) ..............................................................................................................

24


• UE (Unbalanced Error) ...........................................................................................................

25


• OE (Water Outlet Error) ..........................................................................................................

27


• FE (Over Flow Error) ..............................................................................................................

29


• PE (Pressure Sensor S/W Error) ............................................................................................

30


• dE2 (Door open Error)..............................................................................................................

32


..............................................................................................................

32


• dE1 (Door open Error)


• tE (Thermistor (Heating) Error) ...............................................................................................

34


• LE (Motor Lock Error) .............................................................................................................

37


• DHE(DrY Hearter Error) ..... ....................................................................................................

39

8.

TROUBLESHOOTING WITHOUT ERROR CODES ......................................................................

42


• Power Failure or no power ....................................................................................................

42


• Vibration & Noise during spin .................................................................................................

43


• Detergent & Softener does not flow in ....................................................................................

44


• Water Leak .............................................................................................................................

45


• Before using the Tag On function ..........................................................................................

47

9. PART INSPECTION ........................................................................................................................

49


9-1.FILTER ASSEMBLY (LINE FILTER) .........................................................................................

49


9-2.DOOR LOCK SWITCH ASSEMBLY .........................................................................................

50


9-3.STATOR ASSEMBLY ...............................................................................................................

52


9-4.I NLET VALVE ASSEMBLY .....................................................................................................

53

10. DISASSEMBLY INSTRUCTIONS ..................................................................................................

54

11. EXPLODED VIEW AND PART LIST ..............................................................................................

64

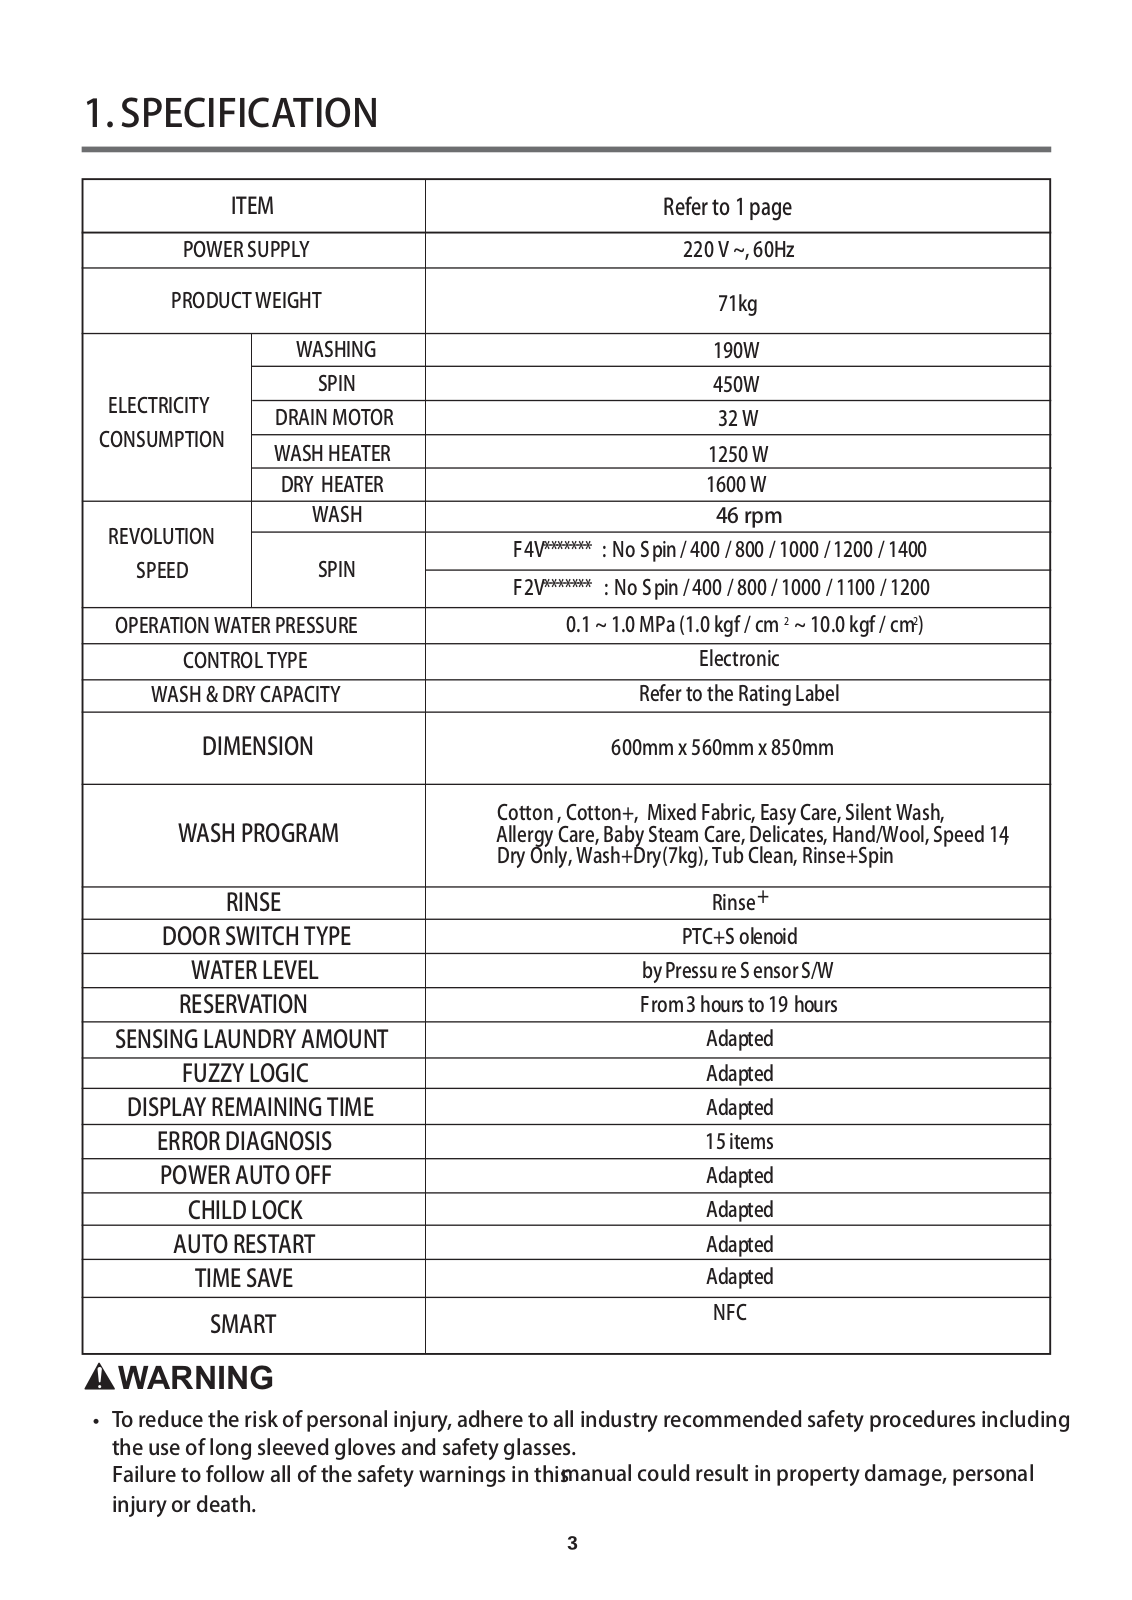
1. SPECIFICATION


ITEM


Refer to 1 page


POWER SUPPLY


220 V ~, 60Hz


PRODUCT WEIGHT


71kg


WASHING


190W

ELECTRICITY


SPIN


450W


DRAIN MOTOR


32 W

CONSUMPTION


WASH HEATER


1250 W


DRY HEATER


1600 W


REVOLUTION


WASH


46 rpm


SPIN

F4V*******

: No Spin / 400 / 800 / 1000 / 1200 / 1400

SPEED


F2V*******

: No Spin / 400 / 800 / 1000 / 1100 / 1200


OPERATION WATER PRESSURE

0.1 ~ 1.0 MPa (1.0 kgf / cm 2 ~ 10.0 kgf / cm2)


CONTROL TYPE


Electronic


WASH & DRY CAPACITY


Refer to the Rating Label


DIMENSION


600mm x 560mm x 850mm


WASH PROGRAM

Cotton , Cotton+, Mixed Fabric, Easy Care, Silent Wash,

Allergy Care, Baby Steam Care, Delicates, Hand/Wool, Speed 14,


Dry Only, Wash+Dry(7kg), Tub Clean, Rinse+Spin


RINSE


Rinse+

DOOR SWITCH TYPE


PTC+S olenoid

WATER LEVEL


byPressure SensorS/W

RESERVATION


From 3 hours to 19 hours

SENSING LAUNDRY AMOUNT


Adapted


FUZZY LOGIC


Adapted

DISPLAY REMAINING TIME


Adapted

ERROR DIAGNOSIS


15 items

POWER AUTO OFF


Adapted

CHILD LOCK


Adapted

AUTO RESTART


Adapted

TIME SAVE


Adapted


SMART


NFC


WARNING

To reduce the risk of personal injury, adhere to all industry recommended safety procedures including the use of long sleeved gloves and safety glasses.

Failure to follow all of the safety warnings in thismanual could result in property damage, personal injury or death.

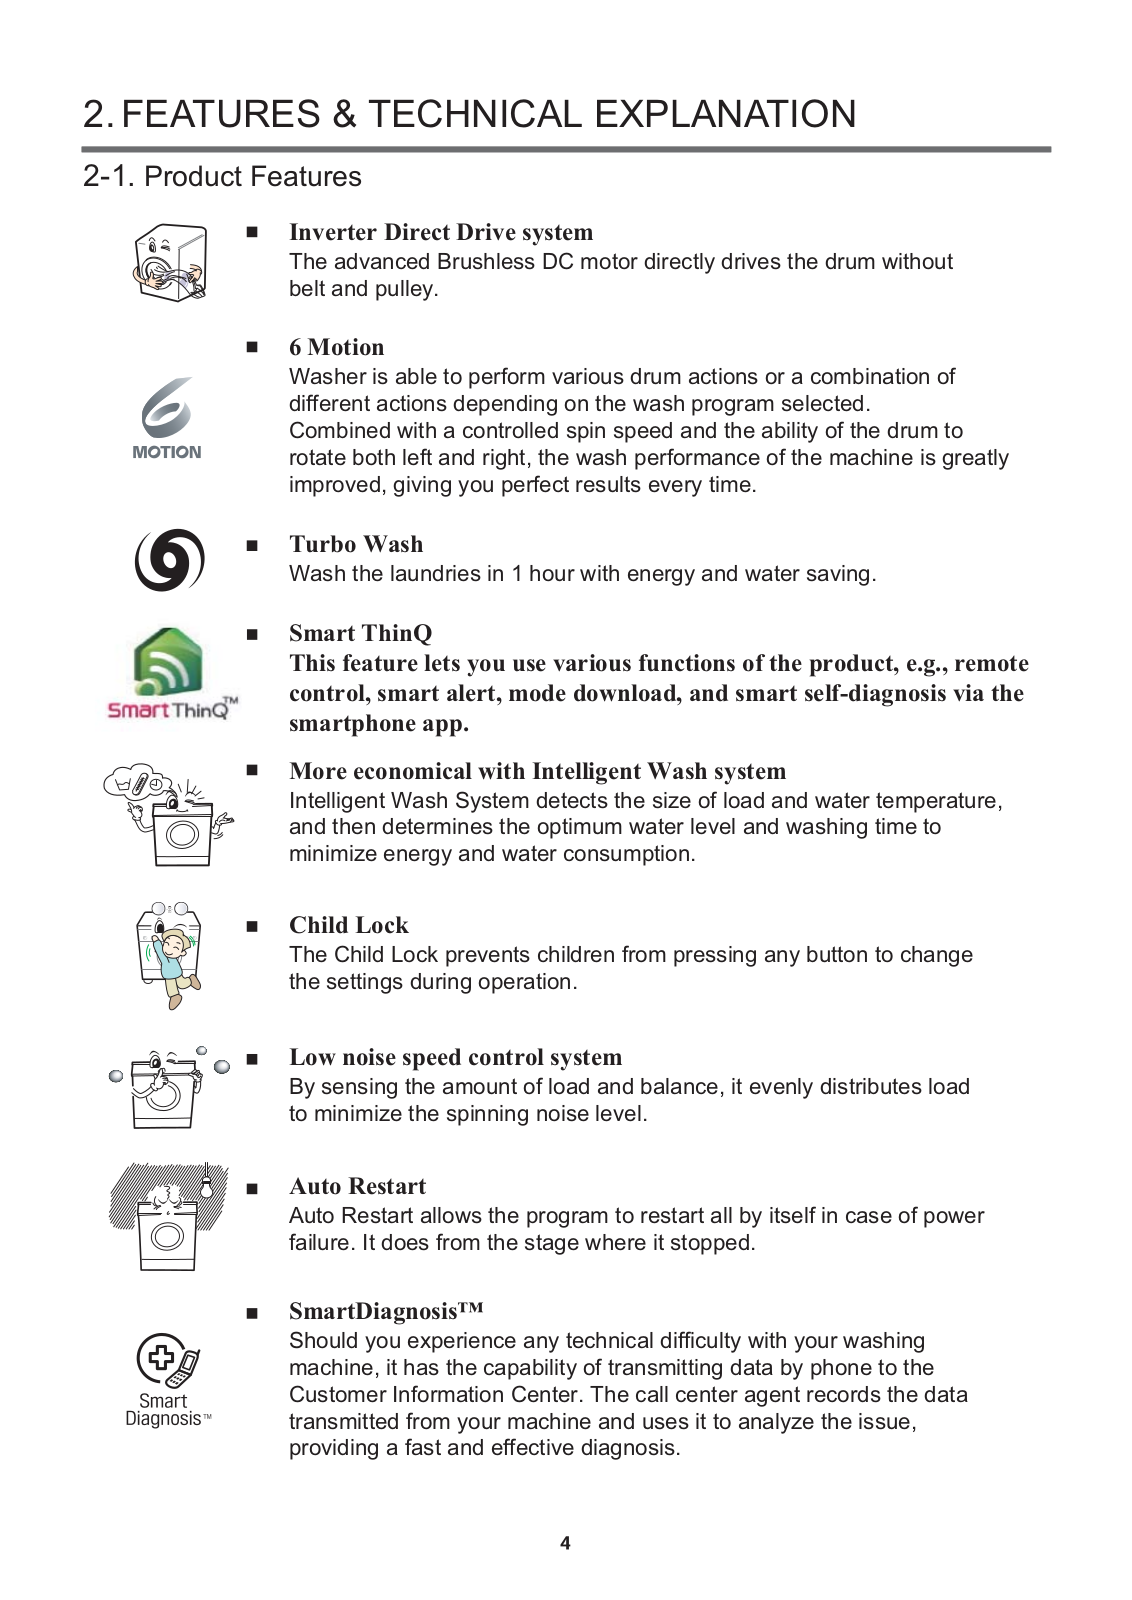
Inverter Direct Drive system

! " # $% & '$( '! & )'

*$" +$$(

6 Motion

1 ' *$+-& ! ' & ' " &*'" ' "- '--" ' " + " '", " ) + , &$

&*'" )' "$$+'" + " *'$' (- &

* $ -" ', . ) +-& "- & '" ' ,$( '&+ ! . ,'!'", ( +- $! ( '&

Turbo Wash

1 $" ' '" )' " ,( " ) !'",

Smart ThinQ

This feature lets you use various functions of the product, e.g., remote control, smart alert, mode download, and smart self-diagnosis via the smartphone app.

More economical with Intelligent Wash system

"$$', " 1 ( & '/- $" ) &+ .

" " &'" + '& & )$!$" ) '", '& &'"'&'/ " ,( " ) " &+ ' "

Child Lock


'$0 + ! " '$"-& + '", "( * " ",


'", '", + ' "

Low noise speed control system

#( " '", & "- $" *$" . ' ! "$( ' '*$

&'"'&'/ +'""'", " '$!$

Auto Restart

$$) + , &$$*( '$-'"-+ ) -'$ -& , ) ' ++

SmartDiagnosis™

$( 2+ ' " "( "'$'--'$( )' ( ) '", & '" . ' + *'$' (-" &' '", *( + "

& "-& ' " " $$" , "

" &'-& ( & '" " ' "$(/ ' . + !' '",-"--'! ' ," '

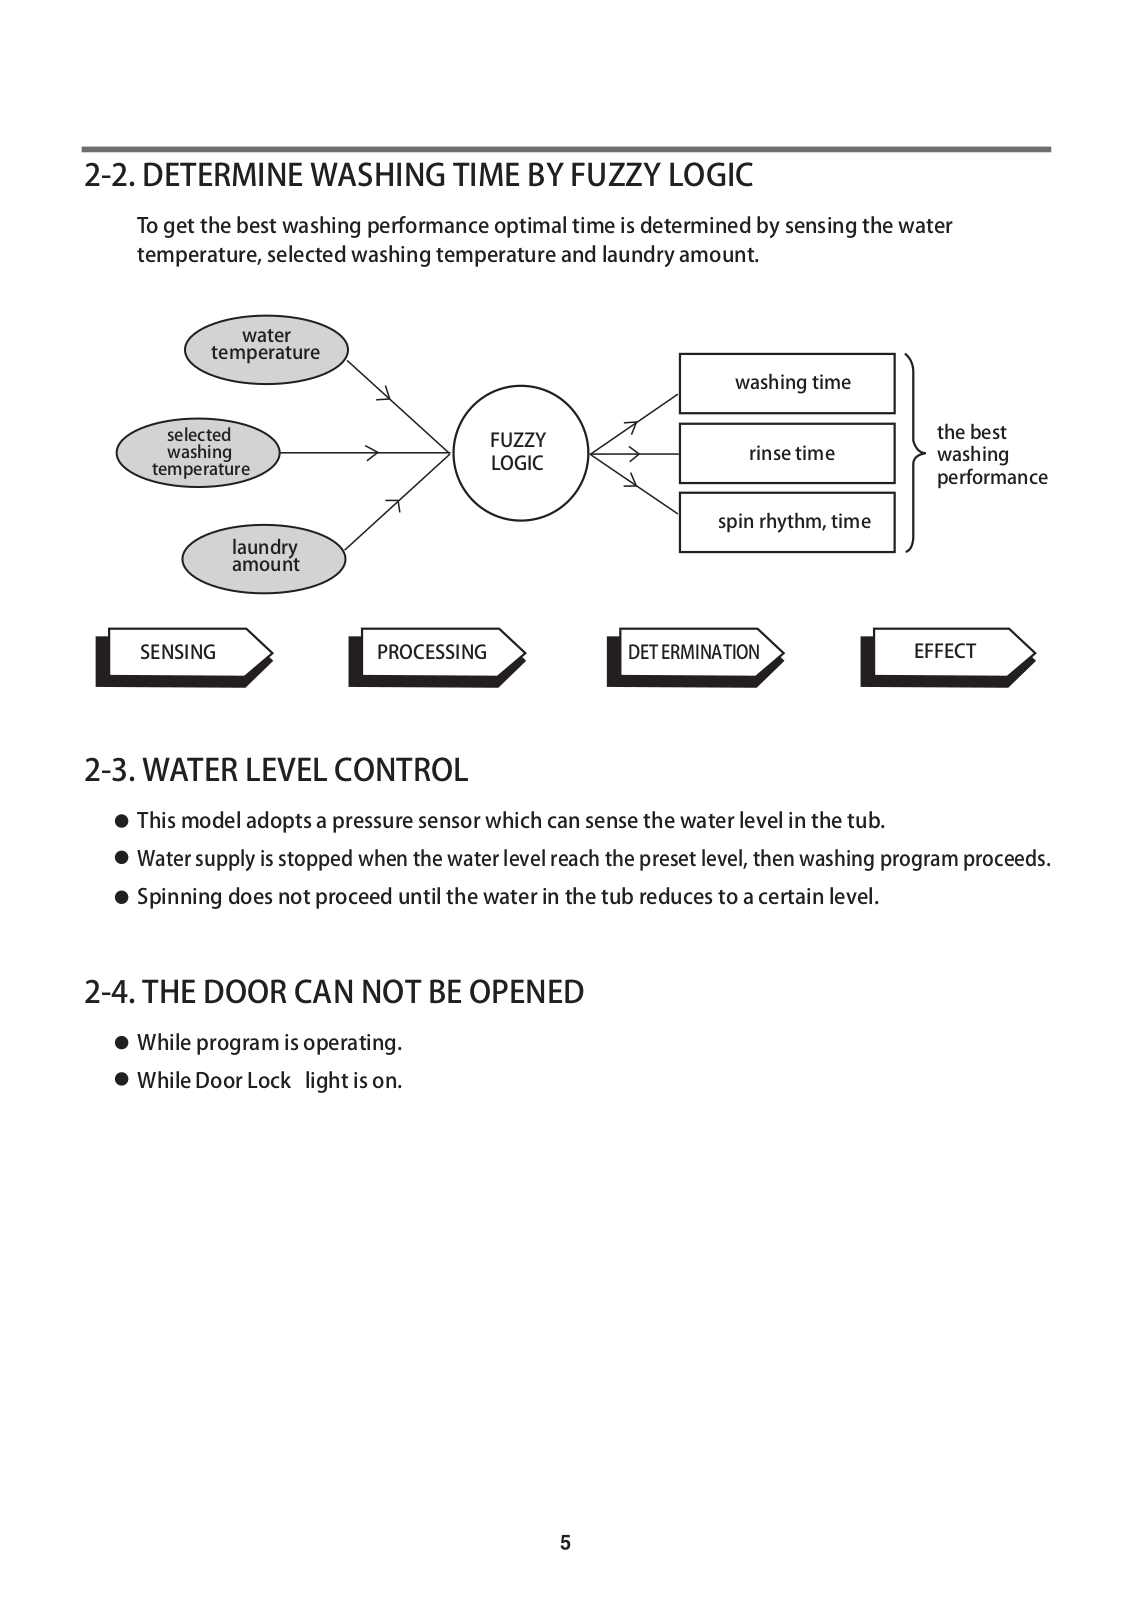
2-2. DETERMINE WASHING TIME BY FUZZY LOGIC

To get the best washing performance optimal time is determined by sensing the water temperature, selected washing temperature and laundry amount.

water


temperature


washing time


selected


FUZZY


the best

washing


rinse time

washing


LOGIC

temperature


performance


spin rhythm, time


laundry


amount


SENSING

PROCESSING


DETERMINATION

EFFECT

2-3. WATER LEVEL CONTROL

This model adopts a pressure sensor which can sense the water level in the tub.

Watersupplyisstoppedwhenthewaterlevelreachthepresetlevel,thenwashingprogramproceeds.

Spinning does not proceed until the water in the tub reduces toa certain level.

2-4. THE DOOR CAN NOT BE OPENED

While program is operating.

WhileDoor Lock light is on.

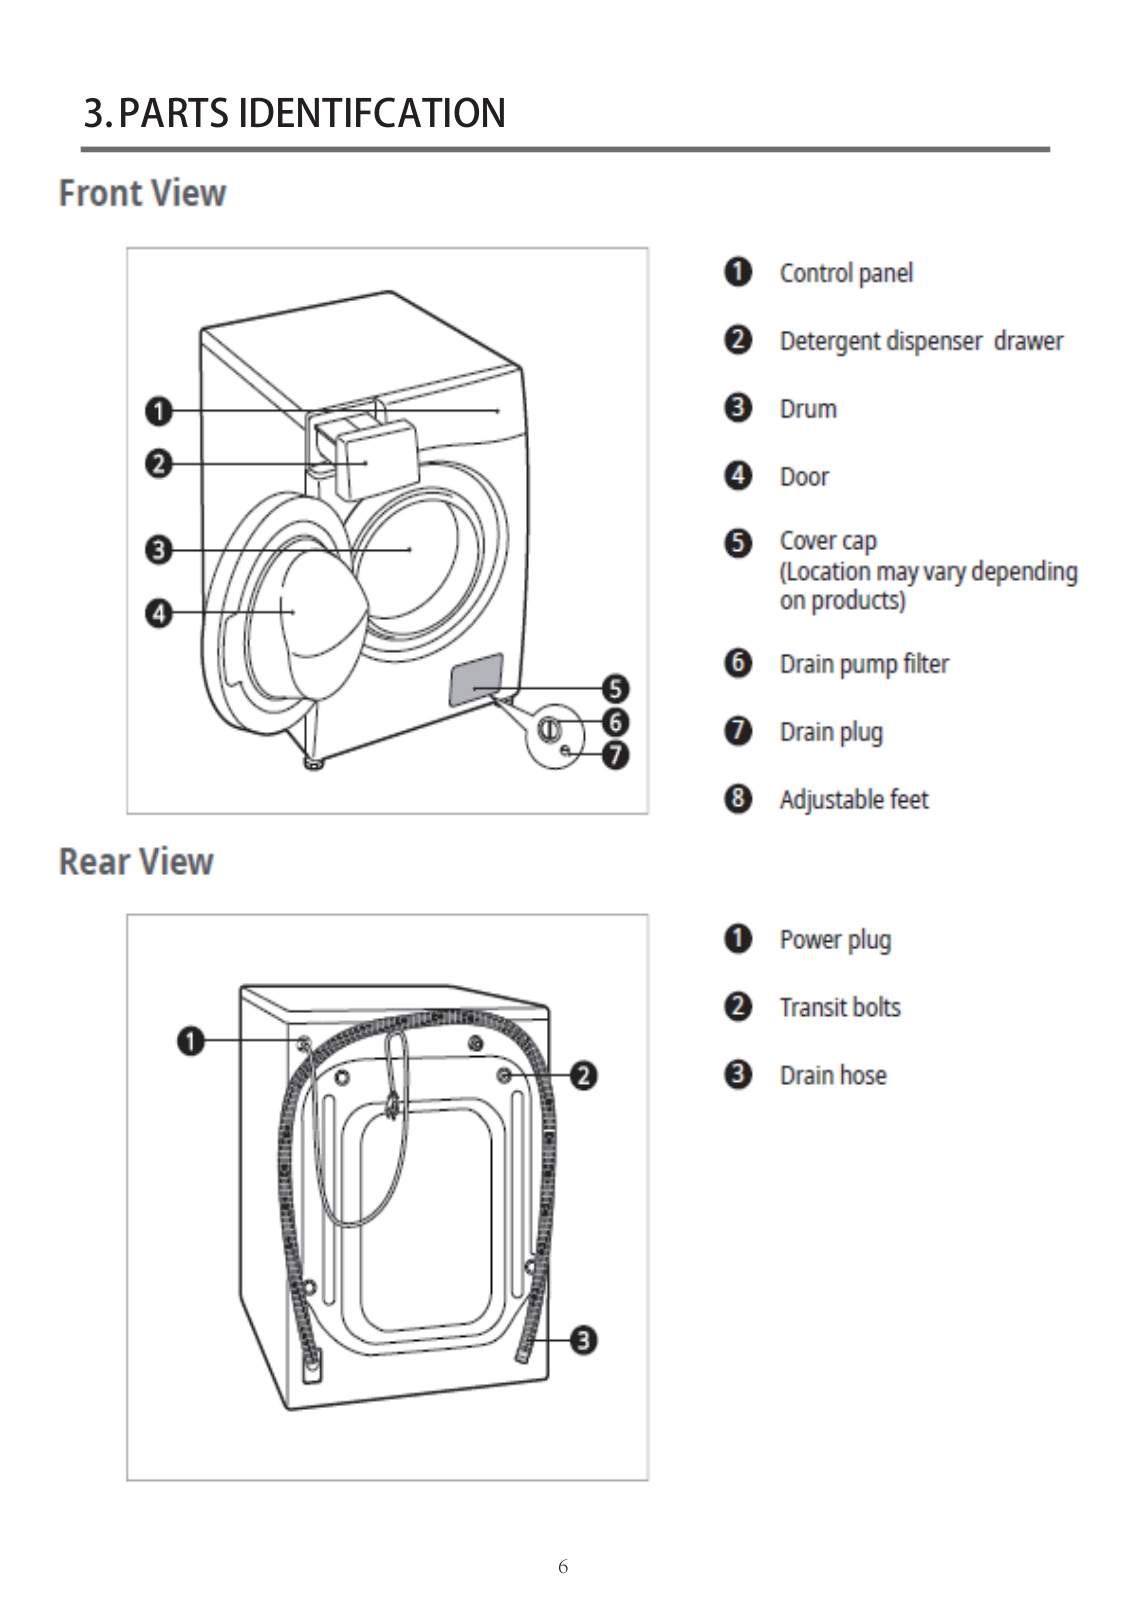
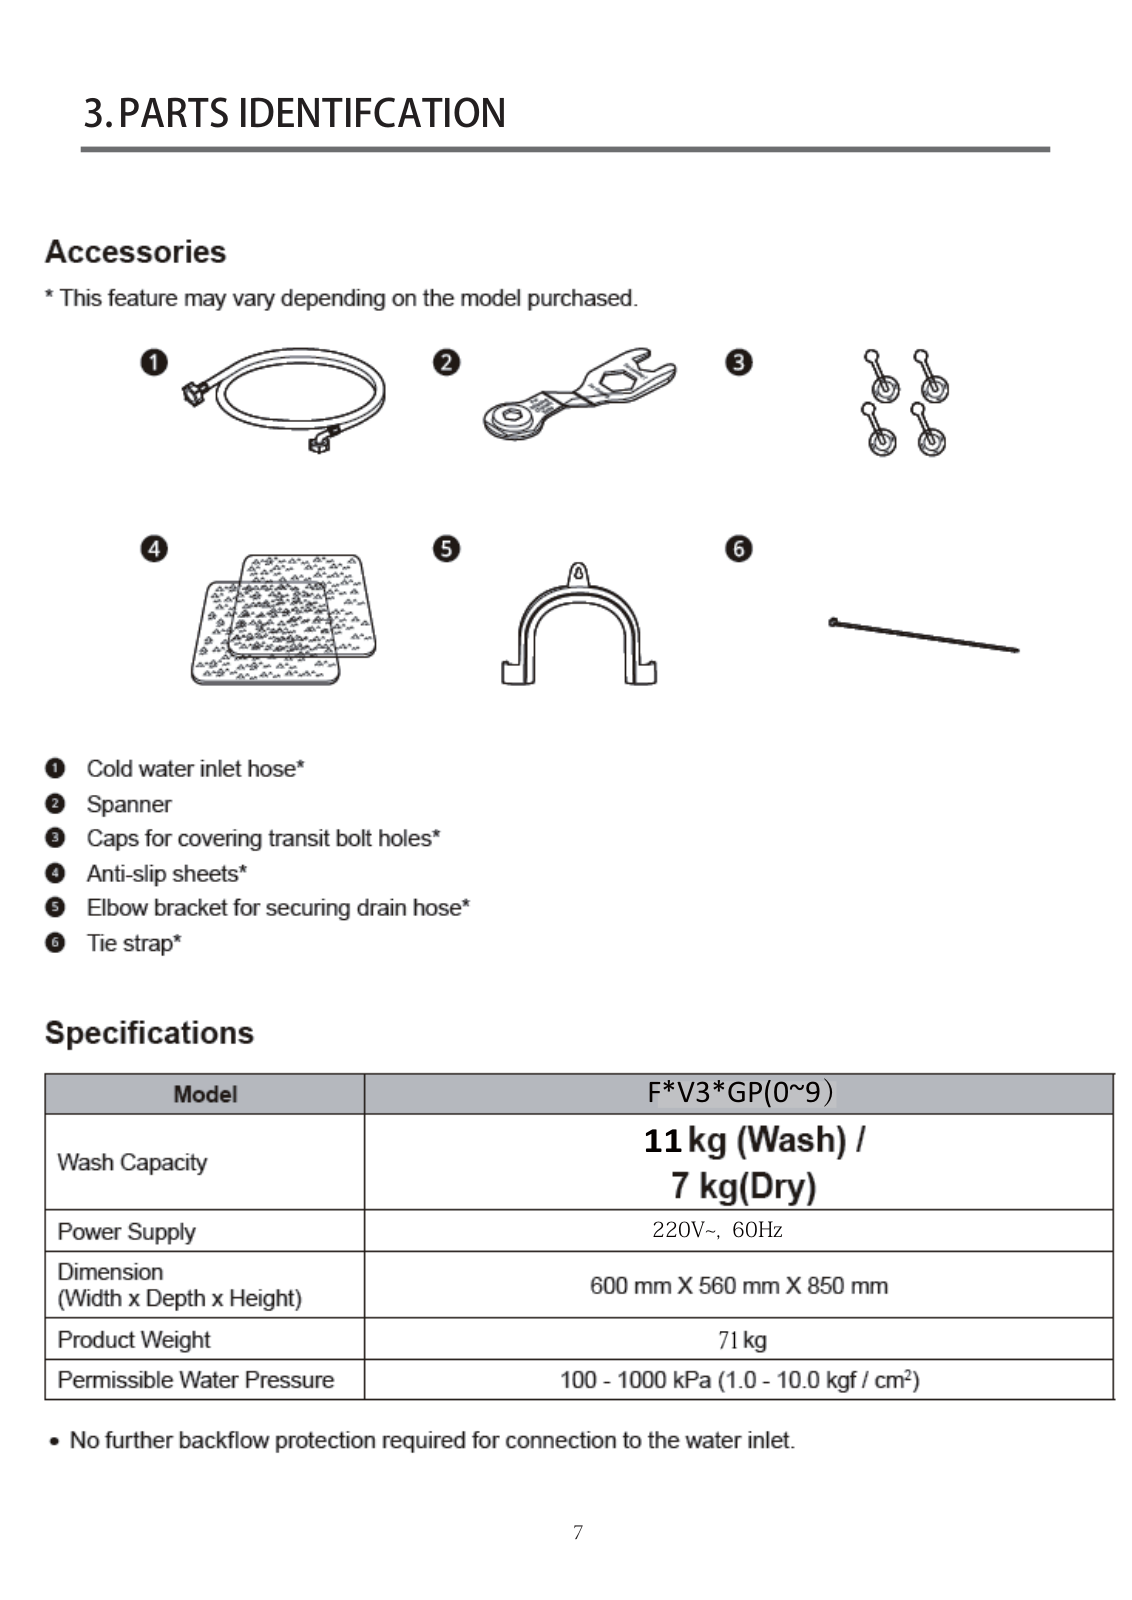
3.PARTS IDENTIFCATION

6

3.PARTS IDENTIFCATION

F*V3*GP(0~9

11

220V~, 60Hz

7

3

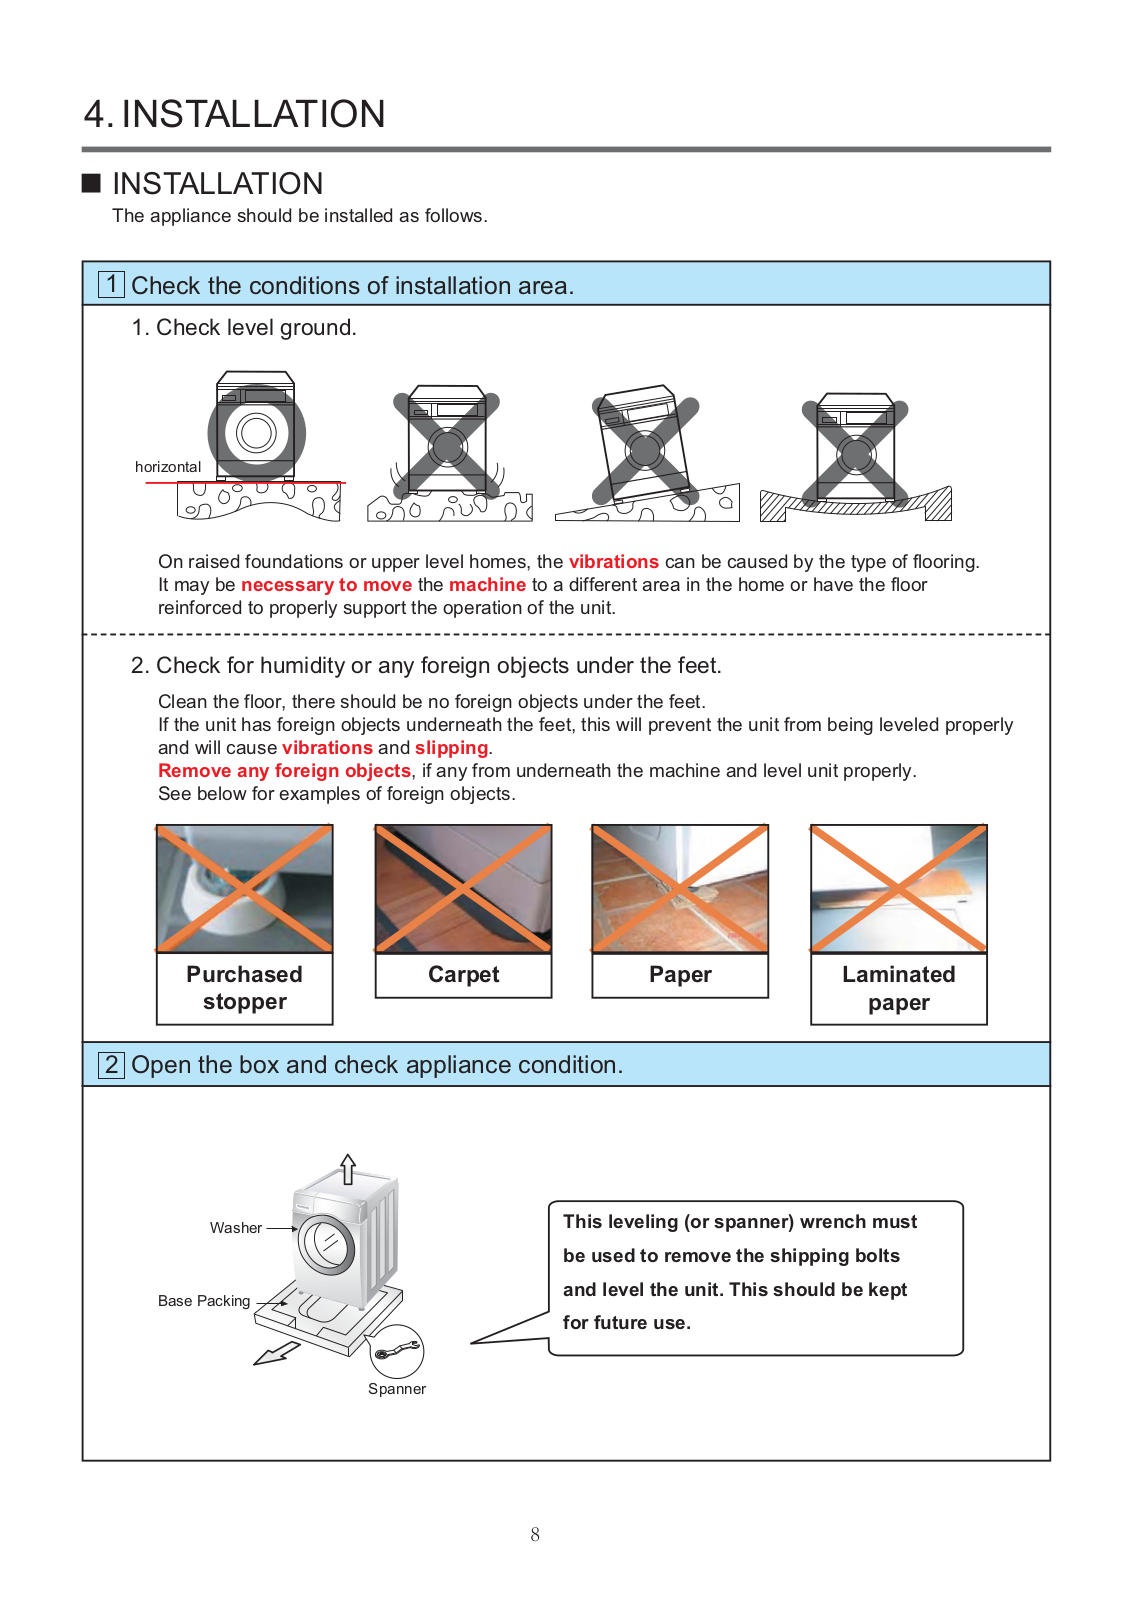
++$' " $* '"$$ - $$)

0 " ' ' "-'"$$' "

0$!$, "

'/ "$

" '-" ' " ++$!$ & . vibrations " * *( (+- -$'",

& ( *necessary to move machine '--" '" & ! -$

'"-+ +$( ++ + ' "- "'

0- &' ' ( "(-'," *4 " -

$" -$. $* "-'," *4 " -

- "' -'," *4 " " -. ' )'$$+ ! " "'-& * '",$!$+ +$( " )'$$ vibrations " slipping

Remove any foreign objects. '-"(-& " " & '" "$!$"' + +$(

*$)-2 &+$ - -'," *4


Purchased


Carpet


Paper


Laminated

stopper


paper


+ " * 2 " 0 ++$' " " ' ' "

1

# 0'",

This leveling (or spanner) wrench must be used to remove the shipping bolts and level the unit. This should be kept for future use.

+ ""

8

LG CV3011WG4A User manual

1.

2.

3.

1.

2.

3.


9

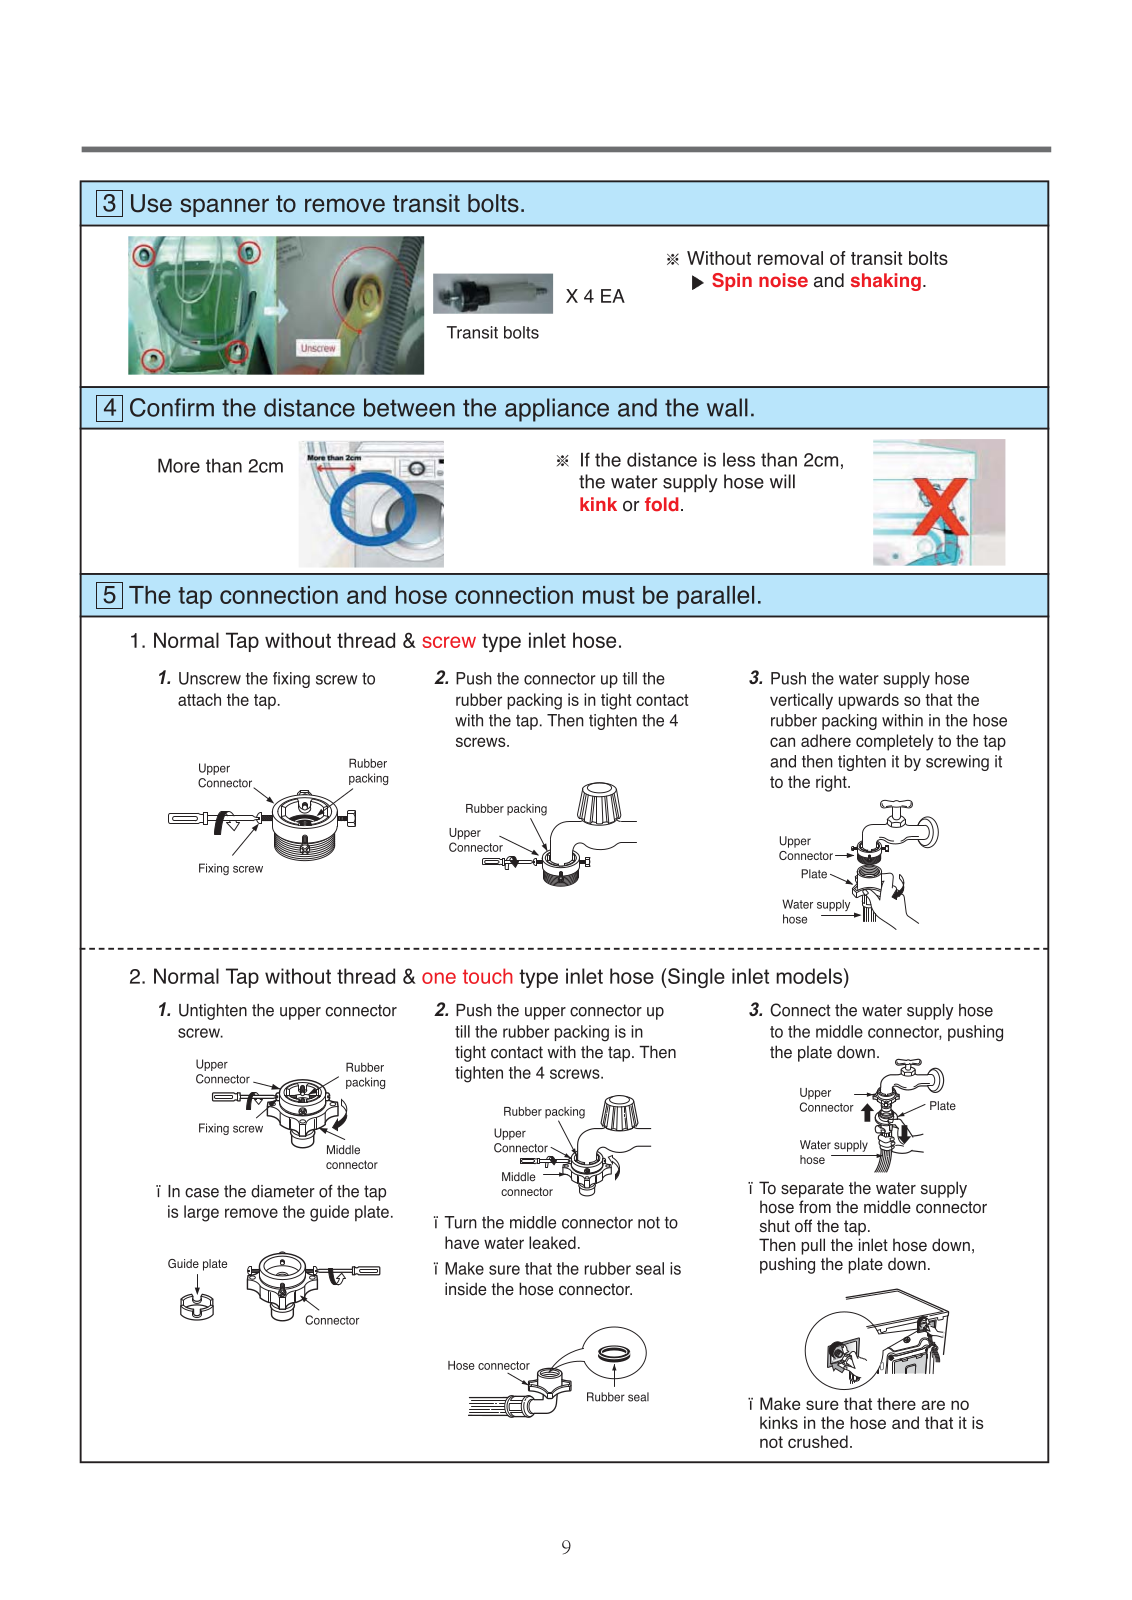
5 "" % '"


- '" ' " '"$$+ +$(. "' )'$$" '" + +$(


'$$) ) * 0-$) '" "' ) ' "


-)" 7 "$ -+ + '" '"$$' "


$ $* &'",-&

& 8 '" )

' '" '


" ( *


* 99 &


'"


* 3: &


'

7 2 99 &


<![if ! IE]>

<![endif]>& 2 99 &

+

&'" 59 &

* 9: &

<![if ! IE]>

<![endif]>&'" 59 &

7 2 99 &


&'" 59 &


" ' (+-'" '"$$' ". $* &'",-& " +'+

' " & + '" " '" "'


+ )-*$ !'" , )" & '"


"$' '-3 *-""'", " ($


' )'$$ $+$'&'"-&

& '"


-($' "-'", ' . ' )'$$" $+ '

6 "" + ) +$,


"" + ) +$, )$$ $


! ' "" '", !$ $' !' .


' & ( * - -'


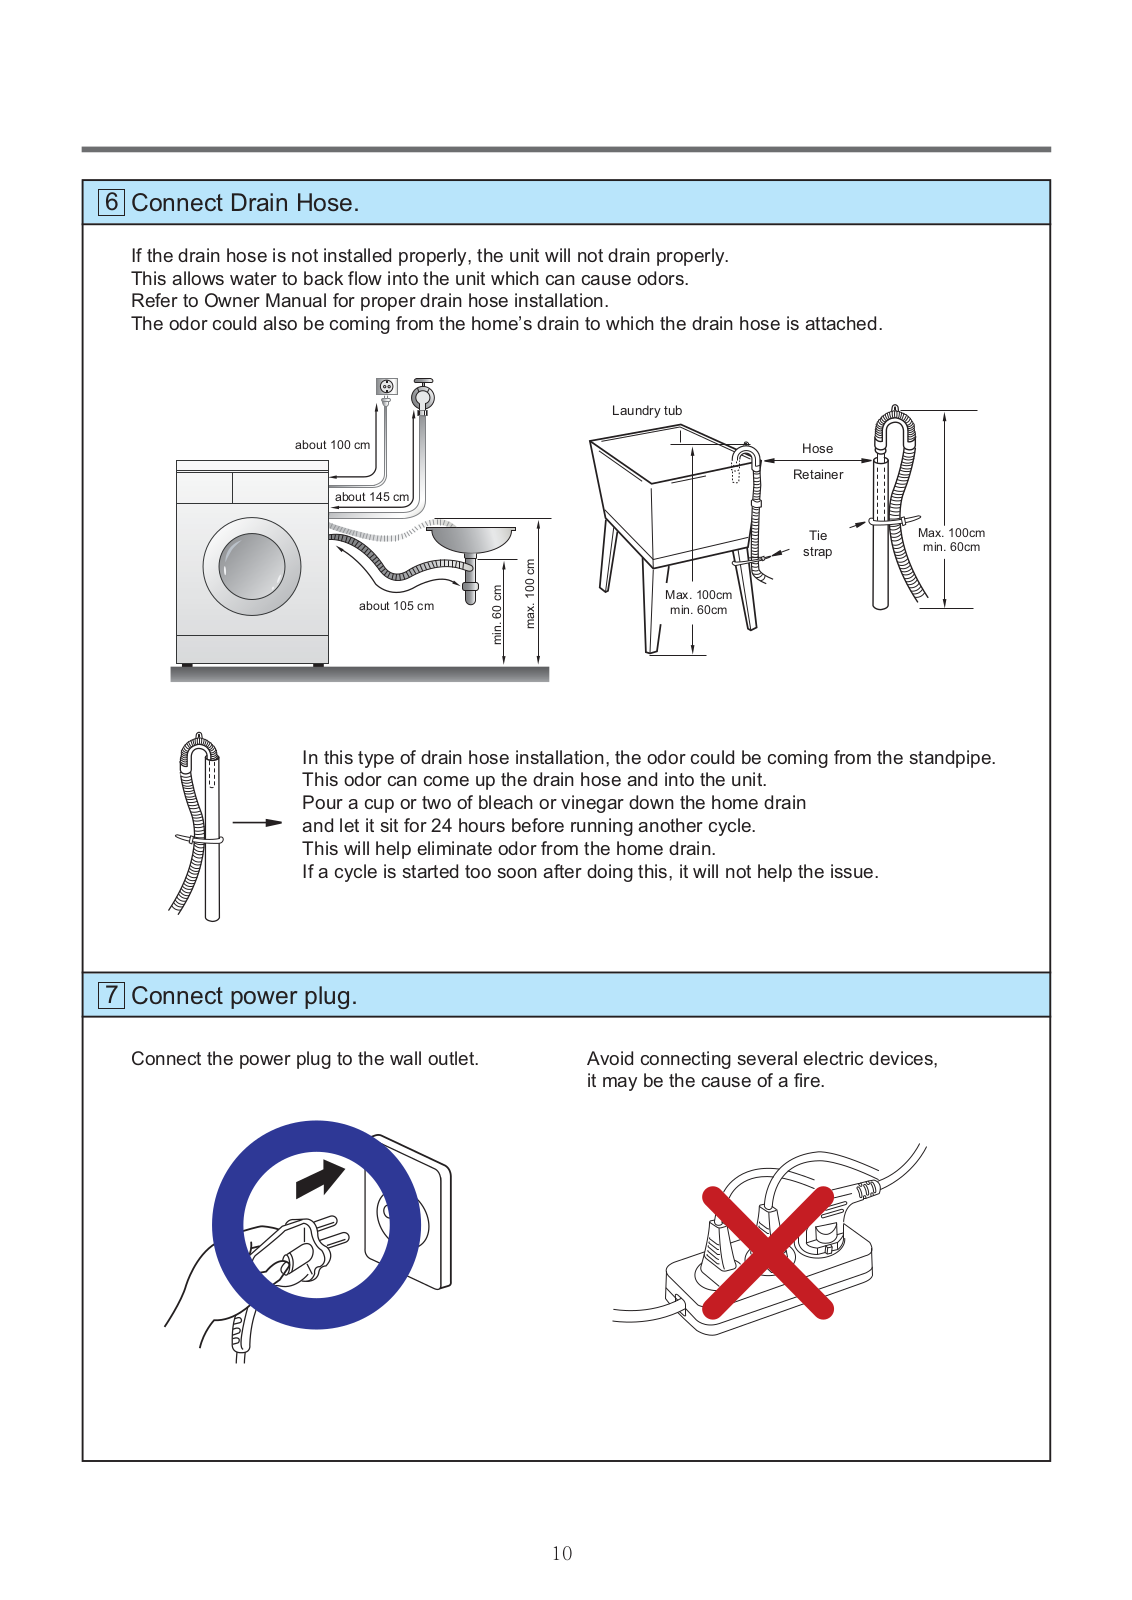
10


> 0 '/ "$' ( )' $!$;< , =


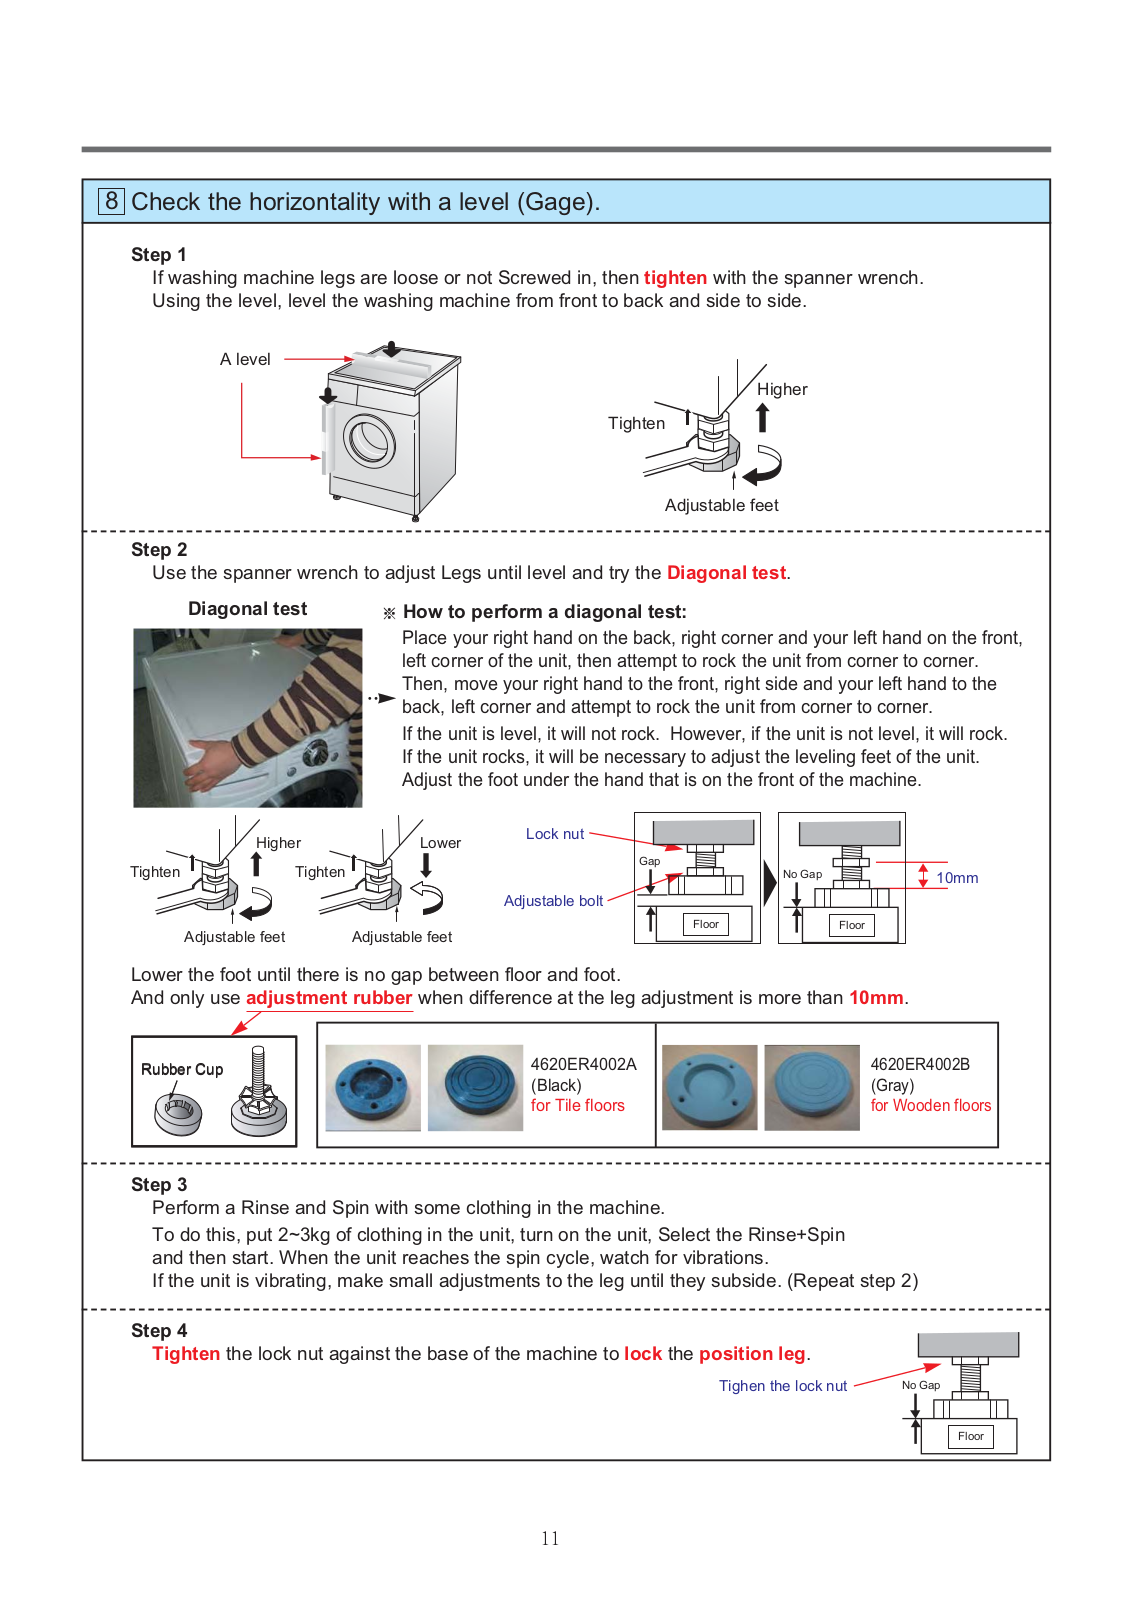
Step 1


-) '", & '"$,$" ) '". "tighten )' + "" ) "

'", $!$.$!$ ) '", & '"-&-" * 0 " ' '


$!$


',


',

"


4 *$ -


Step 2


+ "" ) " 4 , " '$ $!$" ( Diagonal test


Diagonal test

How to perform a diagonal test:


$( ', " " * 0. ', " " ($ -

" " -" .


$ -"- "' . " &+ 0 "'-& " "


". & ! ( ', " -" . ', ' " ($ - "


* 0.$ -" " &+ 0 "'-& " "


- "' '$!$. ' )'$$" 0 ) ! . '-

"' ' "$!$. ' )'$$0


- "' 0 . ' )'$$* " ( 4 $!$'",- - "'


4 -" " ' " -"- & '"


',

)

0 "


', "

', "


< +

< +

9&&


4 *$*$


4 *$ -

4 *$ -


$

$


) -" '$ ' " , + * ) "-$"-


" "$(adjustment rubber ) " '--" $, 4 & " ' & "10mm

** +


35 9 399


35 9 399 #


;#$0=


;< (=


-'$ -$


-1 "-$

Step 3


-& '" " +'" )' &$ '", '" & '"


' . + ?@0,- $ '", '" "' . " " "' .$ '" A +'"


" " 1 "

"' +'" ($. )

-!'* ' "


- "' ' !'* '",. & 0 &$$4 & " $, " '$ ( * ' ; + + =

Step 4


Tighten

$0 " , '" *-

& '"lock position leg


', "

$0 "

< +


$


11


B + ' "


1

+ ' "

2

+ ) * "

3

D


-


* "


)

'",


C

""

+ ) +$,


C "- $+ , &


$


C "" '"$


6


0

) '",

5

0 & ' ! "

4

0 ) ++$(

C


&+ " 7 '


'" * " '&$"$( "

C

0 '- &

C

0 '-) ' ++$' ,


+ " &+ )'$$*

$0)' " "$0)'


, " ' + "


' +$(

, 9


7


0

'" " +'"

8

" + )--" + "

9

1 & !$


-" ' "


C " + )--" " + ) "


C $ +'" +&


C


* "


C


0

+'" " '"


-" ' "


C " + )--" " + ) "


C -E ' " '", 0.


C ' "- $' 0 &'" '-


' "$0'",

& ! & '"'", ) *(


+$$'", +


12


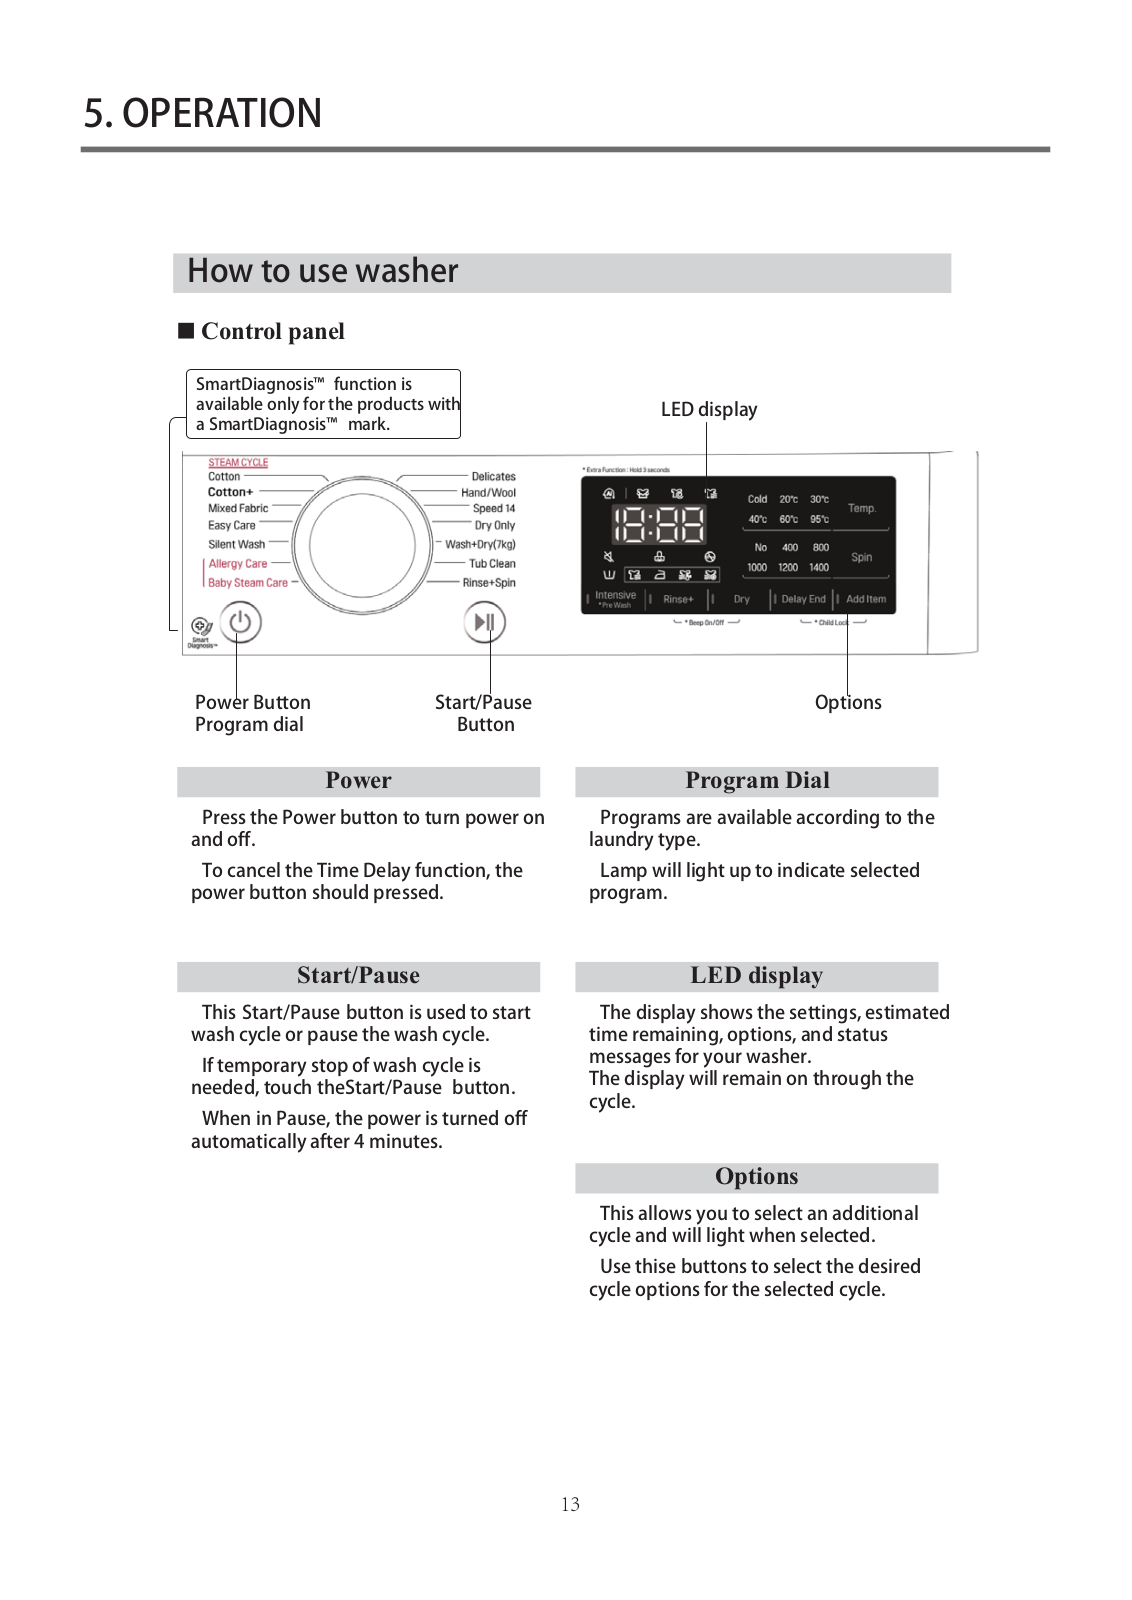
5. OPERATION

How to use washer

Control panel

SmartDiagnosis™ function is


available only for the products with


LED display

a SmartDiagnosis™ mark.


Power

Button

Start/Pause

Options

Program dial

Button


Power


Program Dial

Press the Power button to turn power on

Programs are available according to the

and off.

laundry type.

To cancel the Time Delay function, the

Lamp will light up to indicate selected

power button should pressed.

program.

Start/Pause

This Start/Pause button is used to start wash cycle or pause the wash cycle.

If temporary stop of wash cycle is needed, touch theStart/Pause button.

When in Pause, the power is turned off automatically after 4 minutes.

LED display

The display shows the settings, estimated time remaining, options, and status messages for your washer.

The display will remain on through the cycle.

Options

This allows you to select an additional cycle and will light when selected.

Use thise buttons to select the desired cycle options for the selected cycle.

13

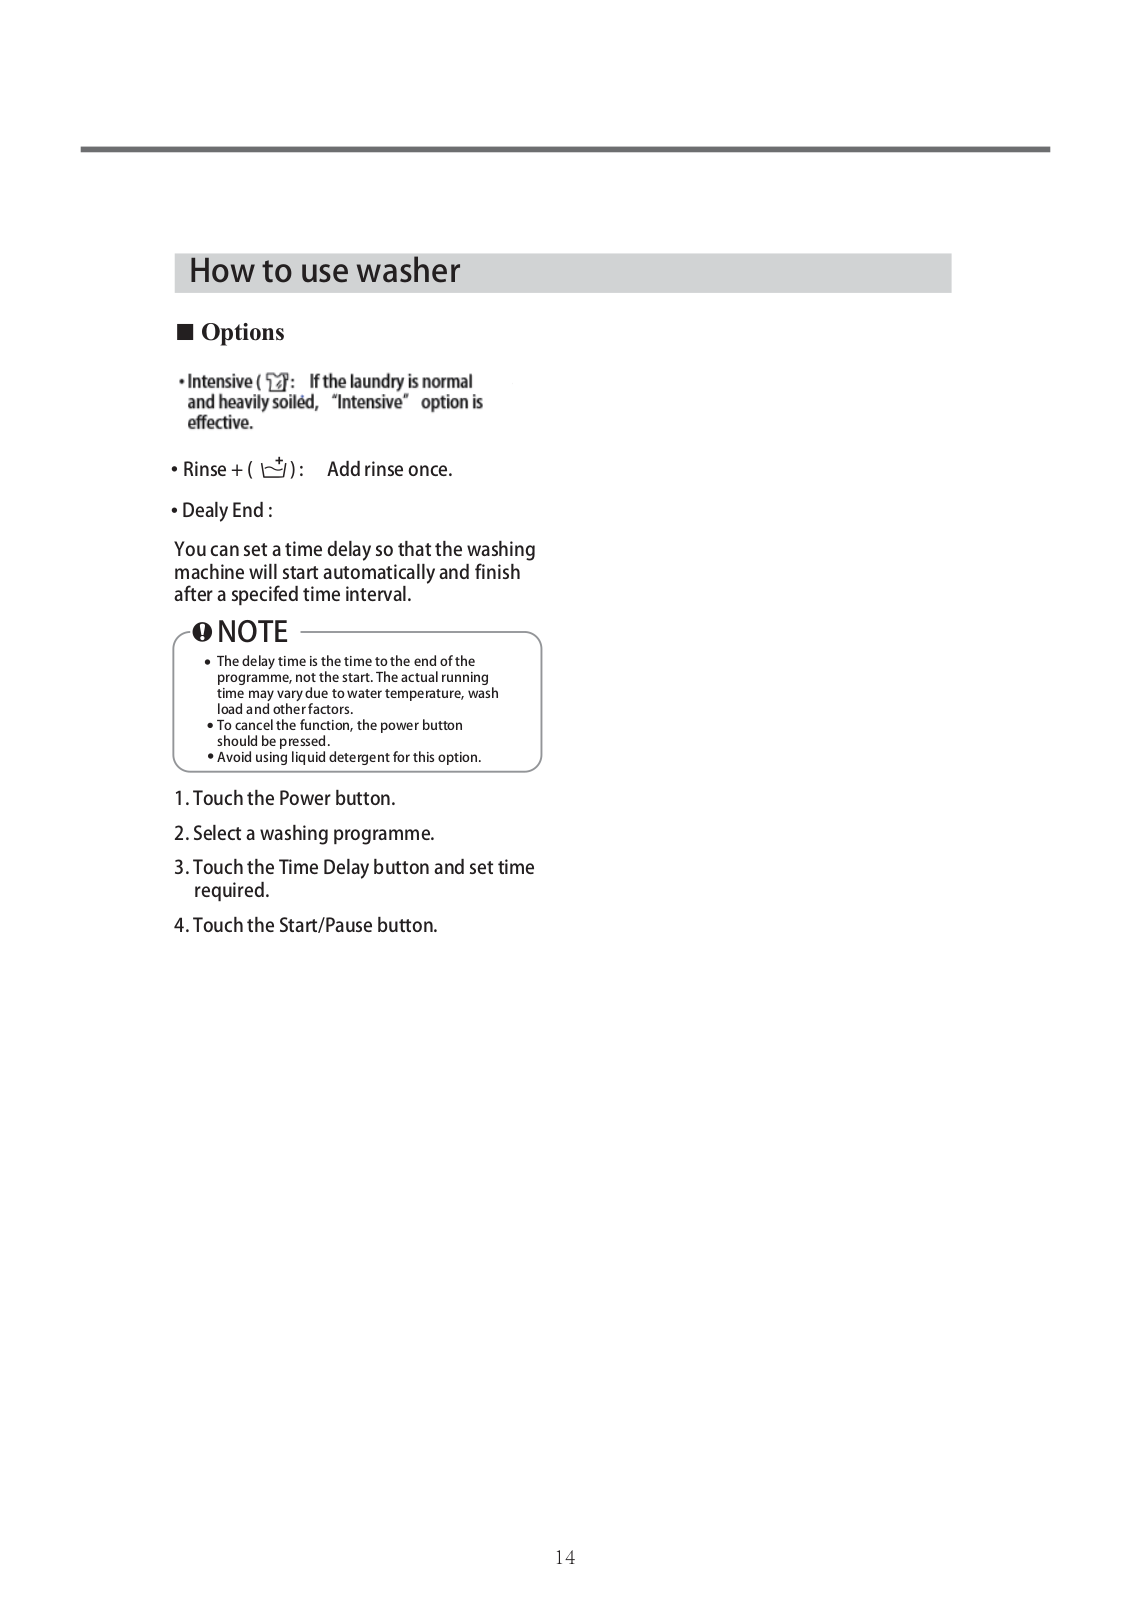
How to use washer

Options

Rinse+( ): Addrinseonce.

DealyEnd:

Youcansetatimedelaysothatthewashing machinewillstartautomaticallyand finish afteraspecifedtimeinterval.

NOTE

The delay time is the time to the end of the programme, not the start. The actual running time may vary due to water temperature, wash load and other factors.

To cancel the function, the power button should be pressed.

Avoid using liquid detergent for this option.

1.TouchthePowerbutton.

2.Selectawashingprogramme.

3.TouchtheTimeDelaybuttonandsettime required.

4.TouchtheStart/Pausebutton.

14

How to use washer


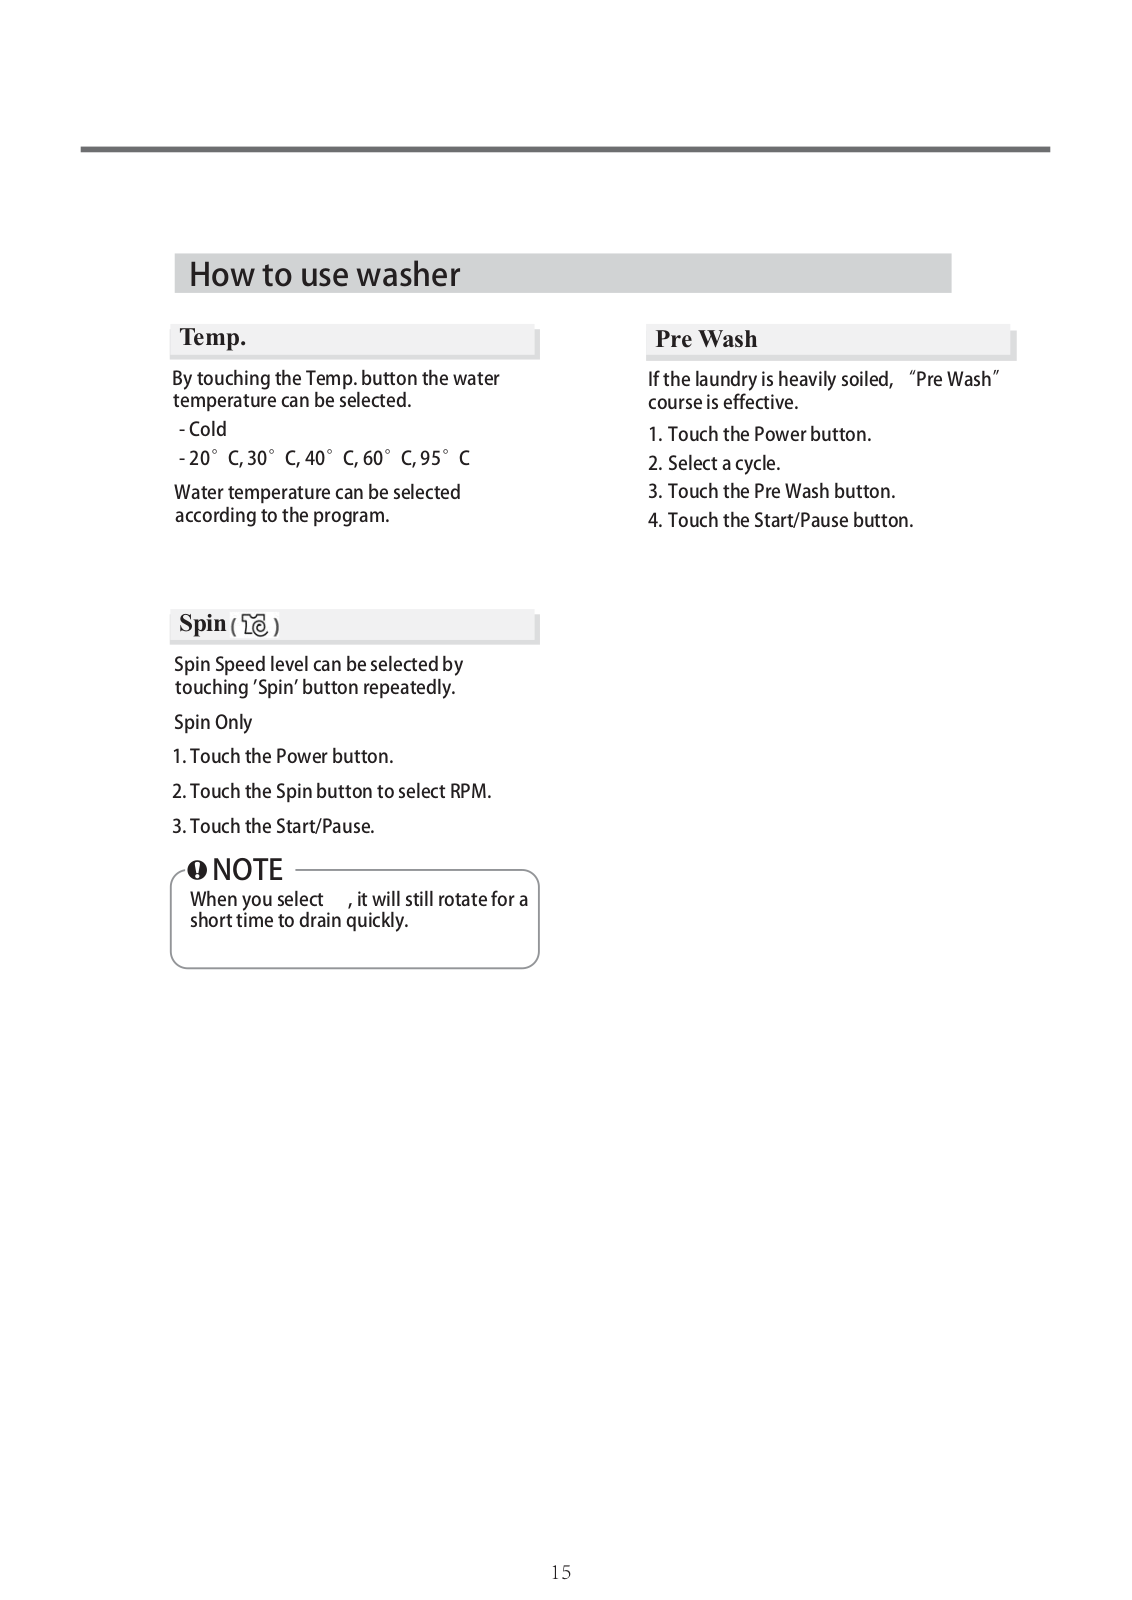
Temp.


Pre Wash


BytouchingtheTemp.buttonthewater

Ifthelaundryisheavilysoiled,“PreWash”


temperaturecanbeselected.

courseiseffective.


-Cold

1.

TouchthePowerbutton.


-20°C,30°C,40°C,60°C,95°C

2.

Selectacycle.


Watertemperaturecanbeselected

3.

TouchthePreWashbutton.


accordingtotheprogram.

4.

TouchtheStart/Pausebutton.

Spin

SpinSpeedlevelcanbeselectedby

touching'Spin'buttonrepeatedly.

SpinOnly

1.TouchthePowerbutton.

2.TouchtheSpinbuttontoselectRPM.

3.TouchtheStart/Pause.

NOTE

Whenyouselect ,itwillstillrotatefora shorttimetodrainquickly.

15

How to use washer

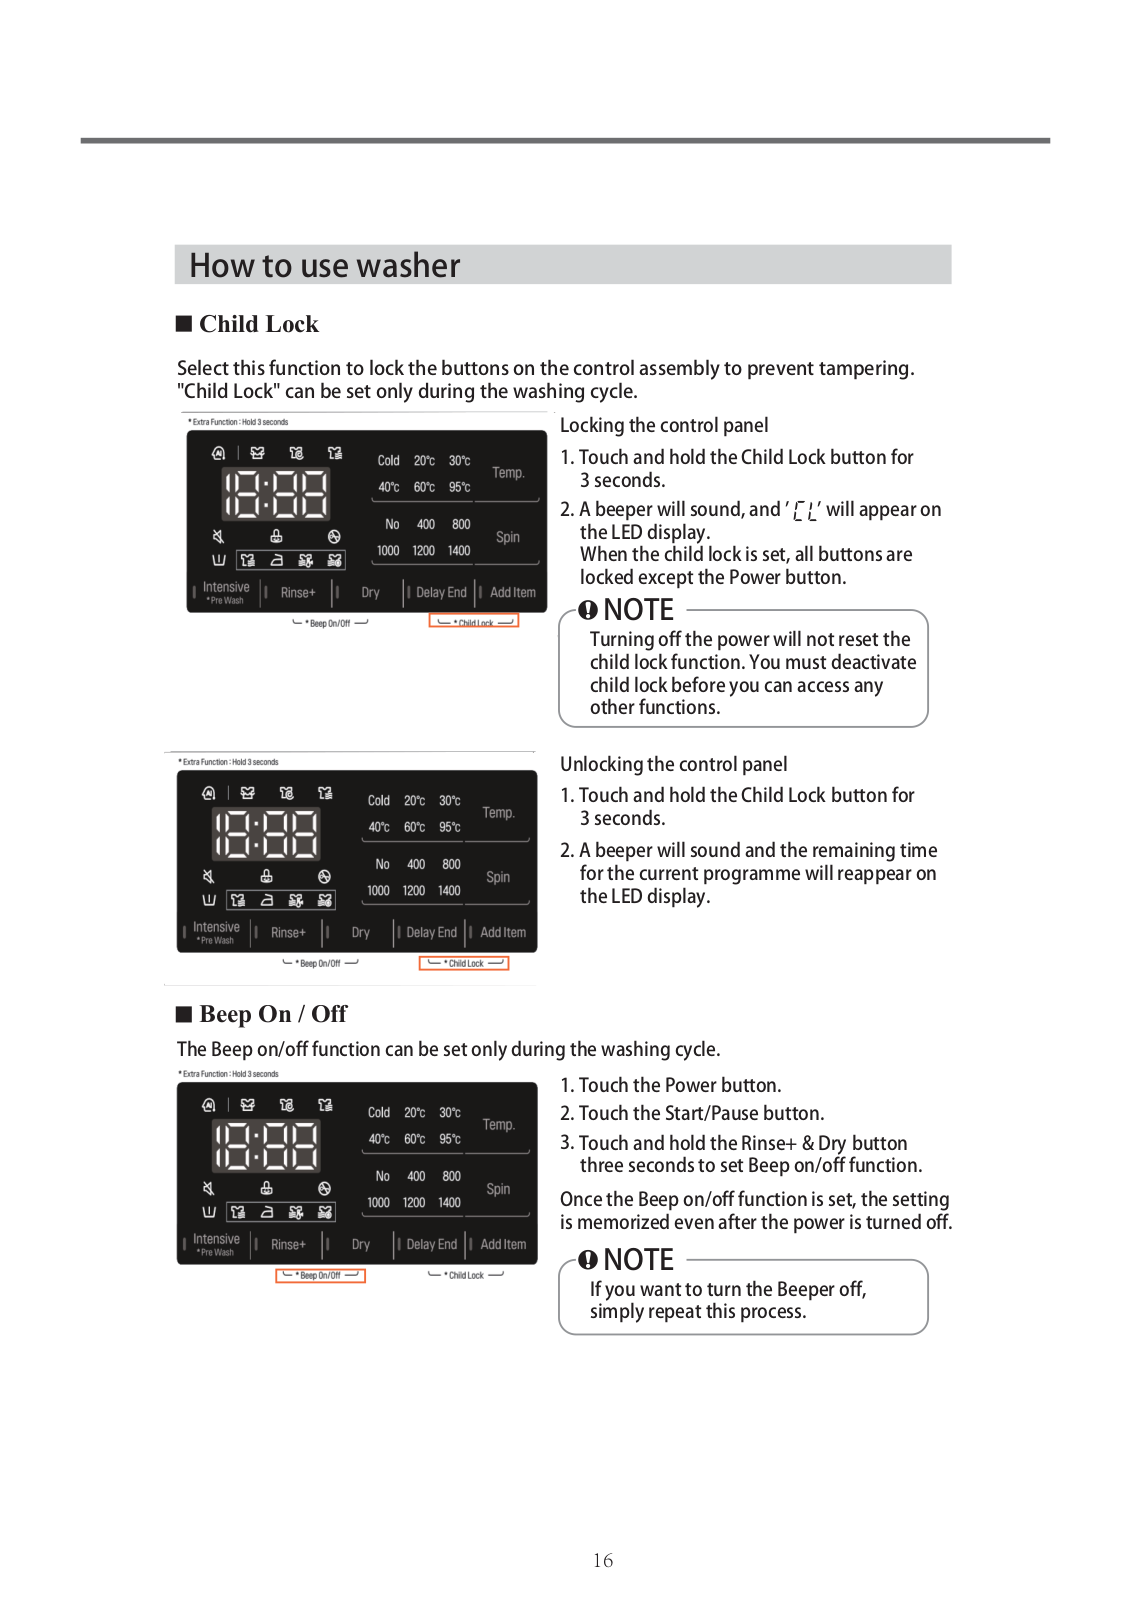
Child Lock

Select this function to lock the buttons on the control assembly to prevent tampering. "Child Lock" can be set only during the washing cycle.

Lockingthecontrolpanel

1.TouchandholdtheChildLockbuttonfor

3seconds.

2.Abeeperwillsound,and''willappearon theLEDdisplay.

Whenthechildlockisset,allbuttonsare lockedexceptthePowerbutton.

NOTE

Turningoffthepowerwillnotresetthe childlockfunction.Youmustdeactivate childlockbeforeyoucanaccessany otherfunctions.

Unlockingthecontrolpanel

1.TouchandholdtheChildLock buttonfor

3seconds.

2.Abeeperwillsoundandtheremainingtime forthecurrentprogrammewillreappearon theLEDdisplay.

Beep On / Off

TheBeepon/offfunctioncanbesetonlyduringthewashingcycle.

1.TouchthePowerbutton.

2.TouchtheStart/Pausebutton.

3.TouchandholdtheRinse+&Dry button threesecondstosetBeepon/offfunction.

OncetheBeepon/offfunctionisset,thesetting ismemorizedevenafterthepoweristurnedoff.

NOTE

IfyouwanttoturntheBeeperoff, simplyrepeatthisprocess.

16

How to use washer

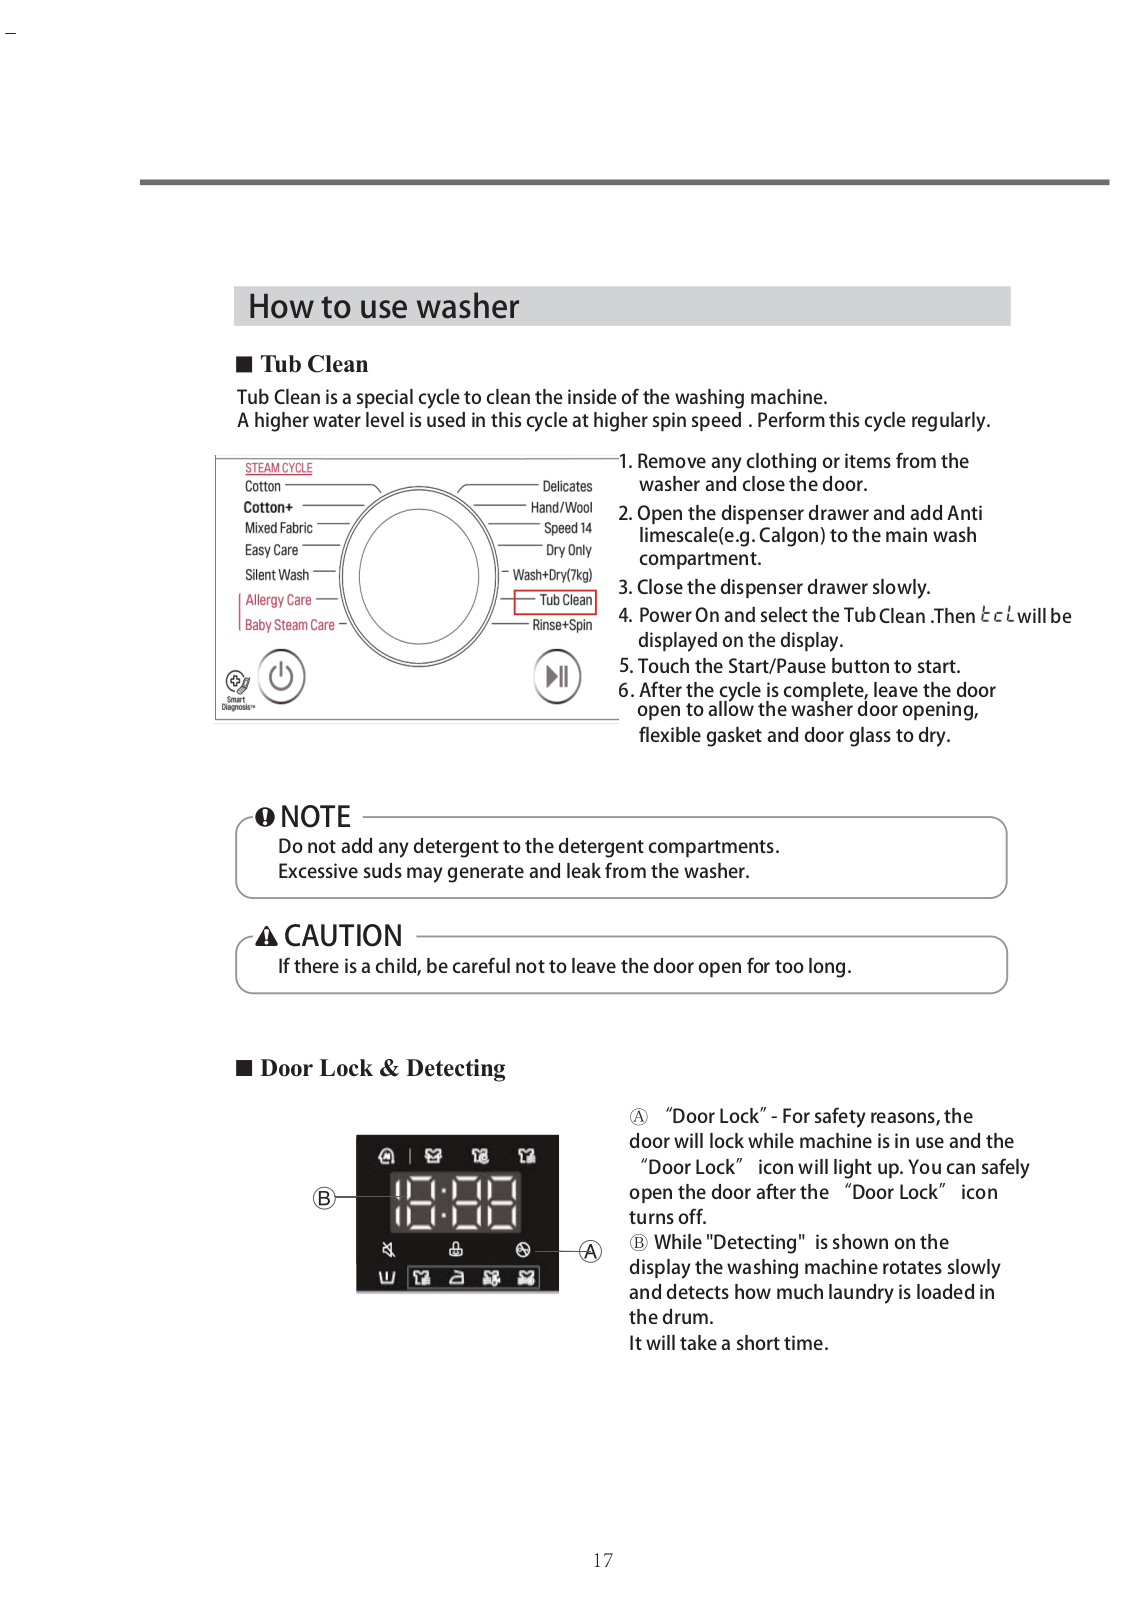
Tub Clean

TubCleanisaspecialcycletocleantheinsideofthewashing machine.

Ahigherwaterlevelisusedinthiscycleathigherspinspeed .Performthiscycleregularly.

1.Remove any clothing or items from the washer and close the door.

2.Open the dispenser drawer and add Anti limescale(e.g. Calgon) to the main wash compartment.

3.Close the dispenser drawer slowly.

4.PowerOnandselecttheTubClean.Thenwillbe displayedonthedisplay.

5.Touch the Start/Pause button to start.

6.After the cycle is complete, leave the door open to allow the washer door opening,

flexible gasket and door glass to dry.

NOTE

Do not add any detergent to the detergent compartments.

Excessive suds may generate and leak from the washer.

CAUTION

If there is a child, be careful not to leave the door open for too long.

Door Lock & Detecting

“Door Lock”- For safety reasons, the door will lock while machine is in use and the “Door Lock” icon will light up. You can safely open the door after the “Door Lock” icon turns off.

While"Detecting" is shown on the display the washing machine rotates slowly and detects how much laundry is loaded in the drum.

It will take a short time.

17

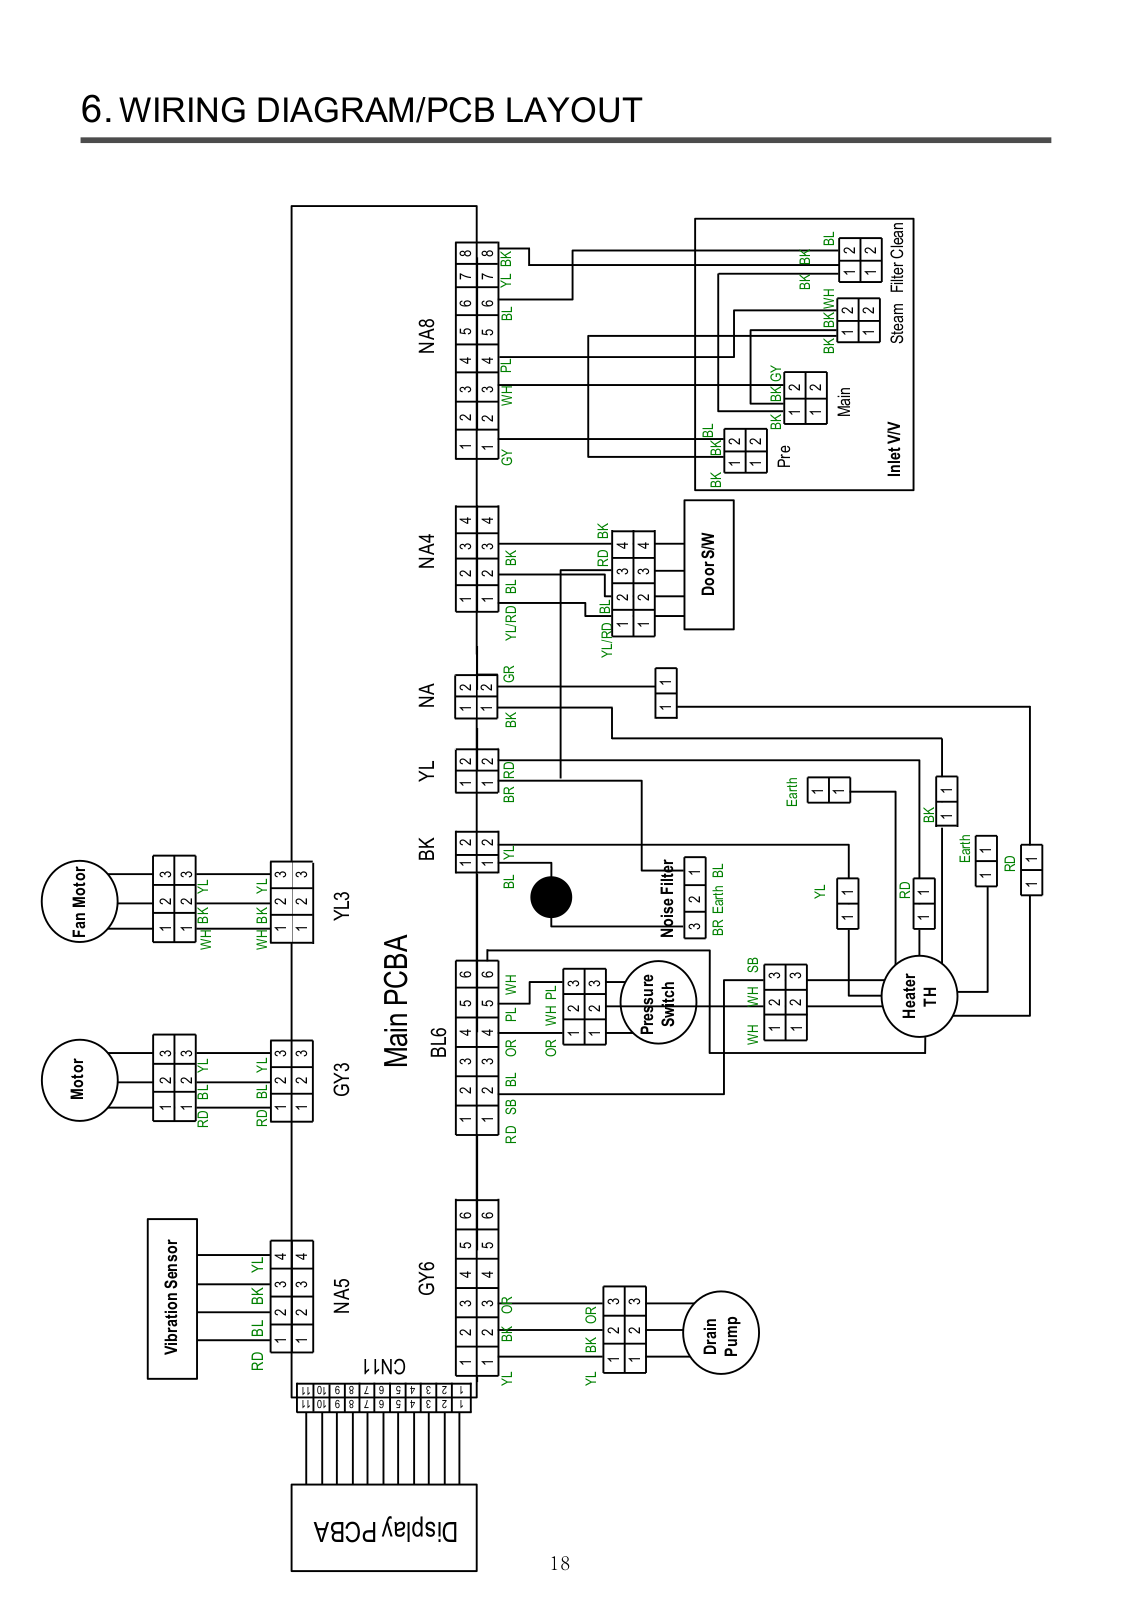
Motor

Fan Motor


Vibration Sensor


1

2


3


1

2

3


1

2


3


1

2

3


RD

BL

YL


WH BK

YL


RD

BL


BK

YL


RD

BL

YL


WH BK

YL


1


2

3

4


1

2


3


1

2

3


<![if ! IE]>

<![endif]>11 11


1


2

3

4


1

2


3


1

2

3


<![if ! IE]>

<![endif]>PCBADisplay


<![if ! IE]>

<![endif]>8765432 9 10 8765432 9 10 CN11


NA5


GY3


YL3


GY6


Main PCBA


BK

YL

NA


NA4


NA8


BL6


1


2


3

4

5

6


1

2

3

5

6


1

2

1

2

1

2


1

2

3

4


1

2

3

4

5

6

7

8


<![if ! IE]>

<![endif]>1 1


4


1


2


3

4

5

6


1

2

3


4

5

6


1

2

1

2

1

2


1

2

3

4


1

2

3

4

5

6

7

8


YL


BK

OR


RD

SB

BL

OR


PL

WH


BL

YL

BR RD

BK

GR

YL/RD

BL

BK


GY


WH

PL


BL

YL BK

<![if ! IE]>

<![endif]>18


OR

WH PL


YL


BK

OR


1

2

3


1

2

3


YL/RD

BL

RD

BK


1


2


3


1


2

3

4


1


2


3


Pressure


1


2

3

4


Noise Filter


1

1


Switch


Drain


3

2

1


Door S/W


BL


BR Earth

BL


BK

BK


Pump


WH

WH SB


1

2


1

2


1

2

3


Earth


Pre

BK

BK GY


1

2

3


1

2


BK

BK


YL


1


1

2


BK

BK WH

BL


1

1


1


Main


1

2

1

2


Inlet V/V


1

2

1

2


Heater


RD


Steam

Filter Clean


TH

1

1


BK

1


1


Earth


1

1

RD

1

1

<![if ! IE]>

<![endif]>LAYOUT DIAGRAM/PCB WIRING .6

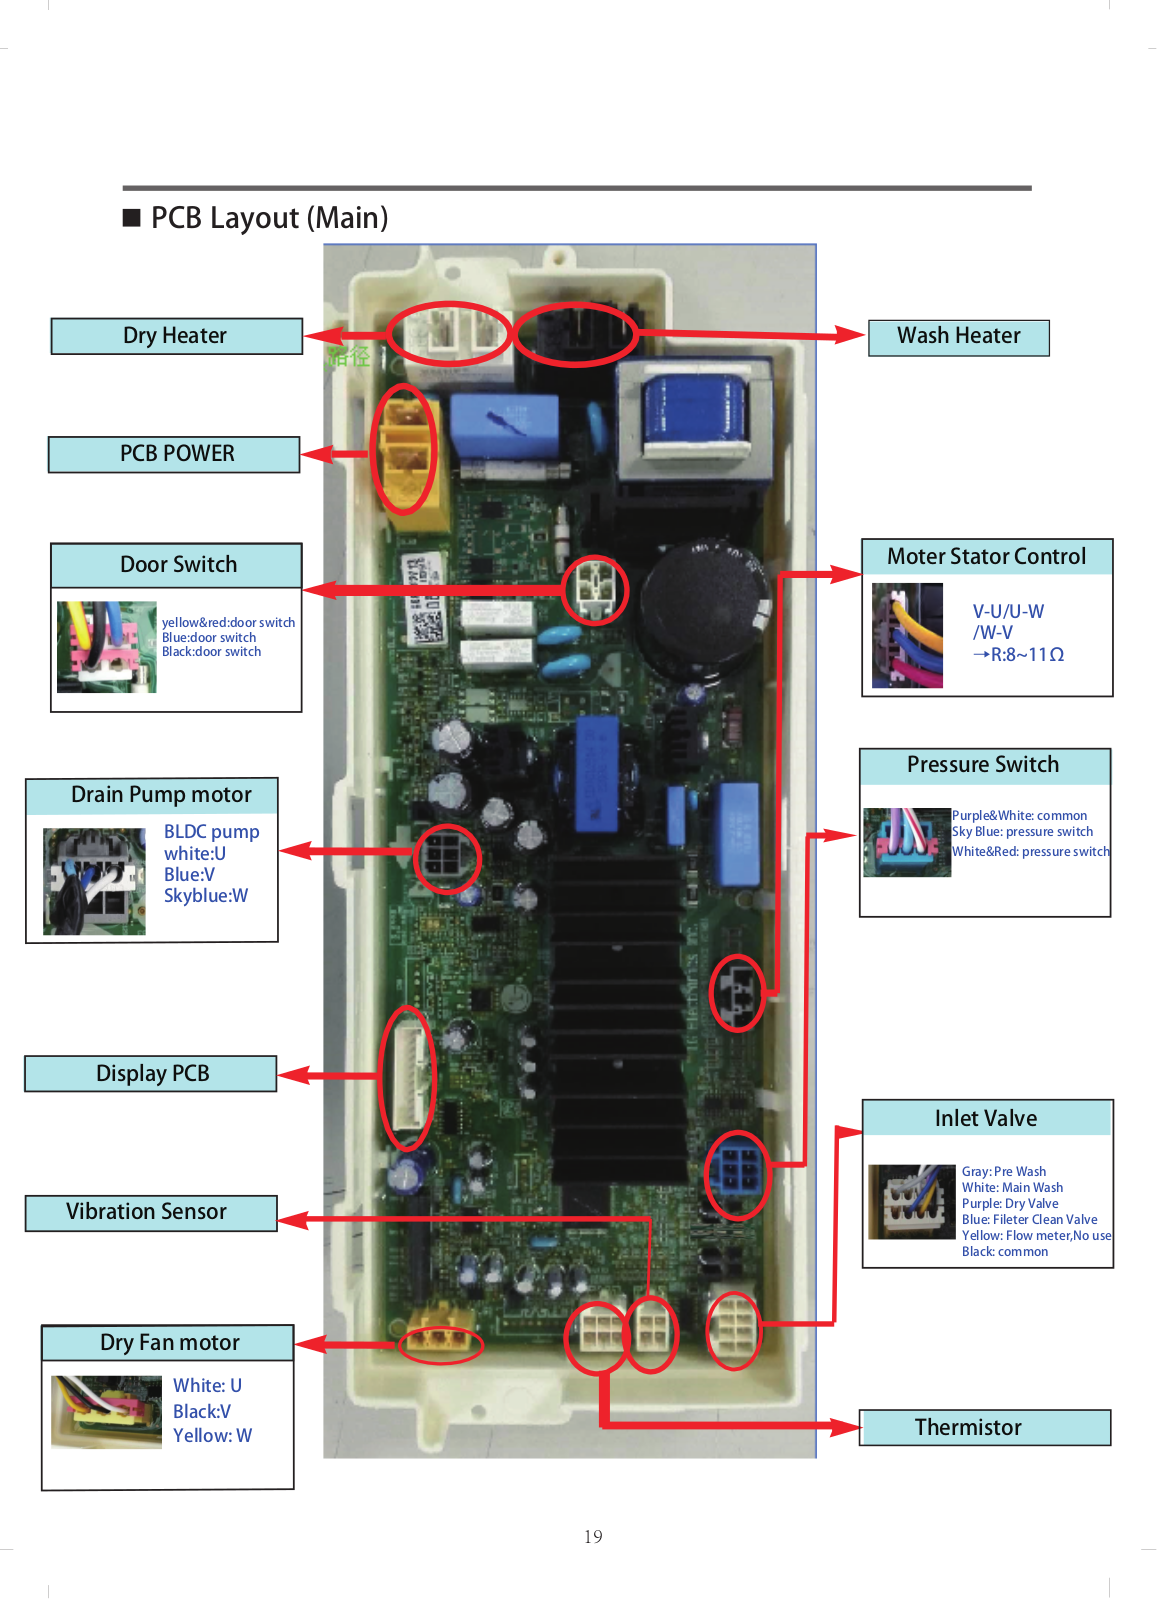
PCB Layout (Main)

Dry Heater

PCB POWER

Door Switch

yellow&red:door switch Blue:door switch Black:door switch

Drain Pump motor

BLDC pump white:U Blue:V Skyblue:W

Display PCB

Vibration Sensor

Dry Fan motor

White: U

Black:V

Yellow: W

Wash Heater

Moter Stator Control

V-U/U-W

/W-V →R:8~11Ω

Pressure Switch

Purple&White: common

Sky Blue: pressure switch

White&Red: pressure switch

Inlet Valve

Gray: Pre Wash

White: Main Wash

Purple: Dry Valve

Blue: Fileter Clean Valve

Yellow: Flow meter,No use

Black: common

Thermistor

19

7.TROUBLESHOOTING

7-1. CHECK BEFORE SERVICE

1

Before servicing ask the customer what the trouble is.

2

Check the adjustments. (Power supply :220V-, Removal of transitbolts etc..)

3

Check the troubles referring to the troubleshooting.

4

Decide service steps referring to disassembly instructions.

5

Then, service and repair.

6

Afterservicing,operatetheappliancetoseewhetheritworksOKorNOT.

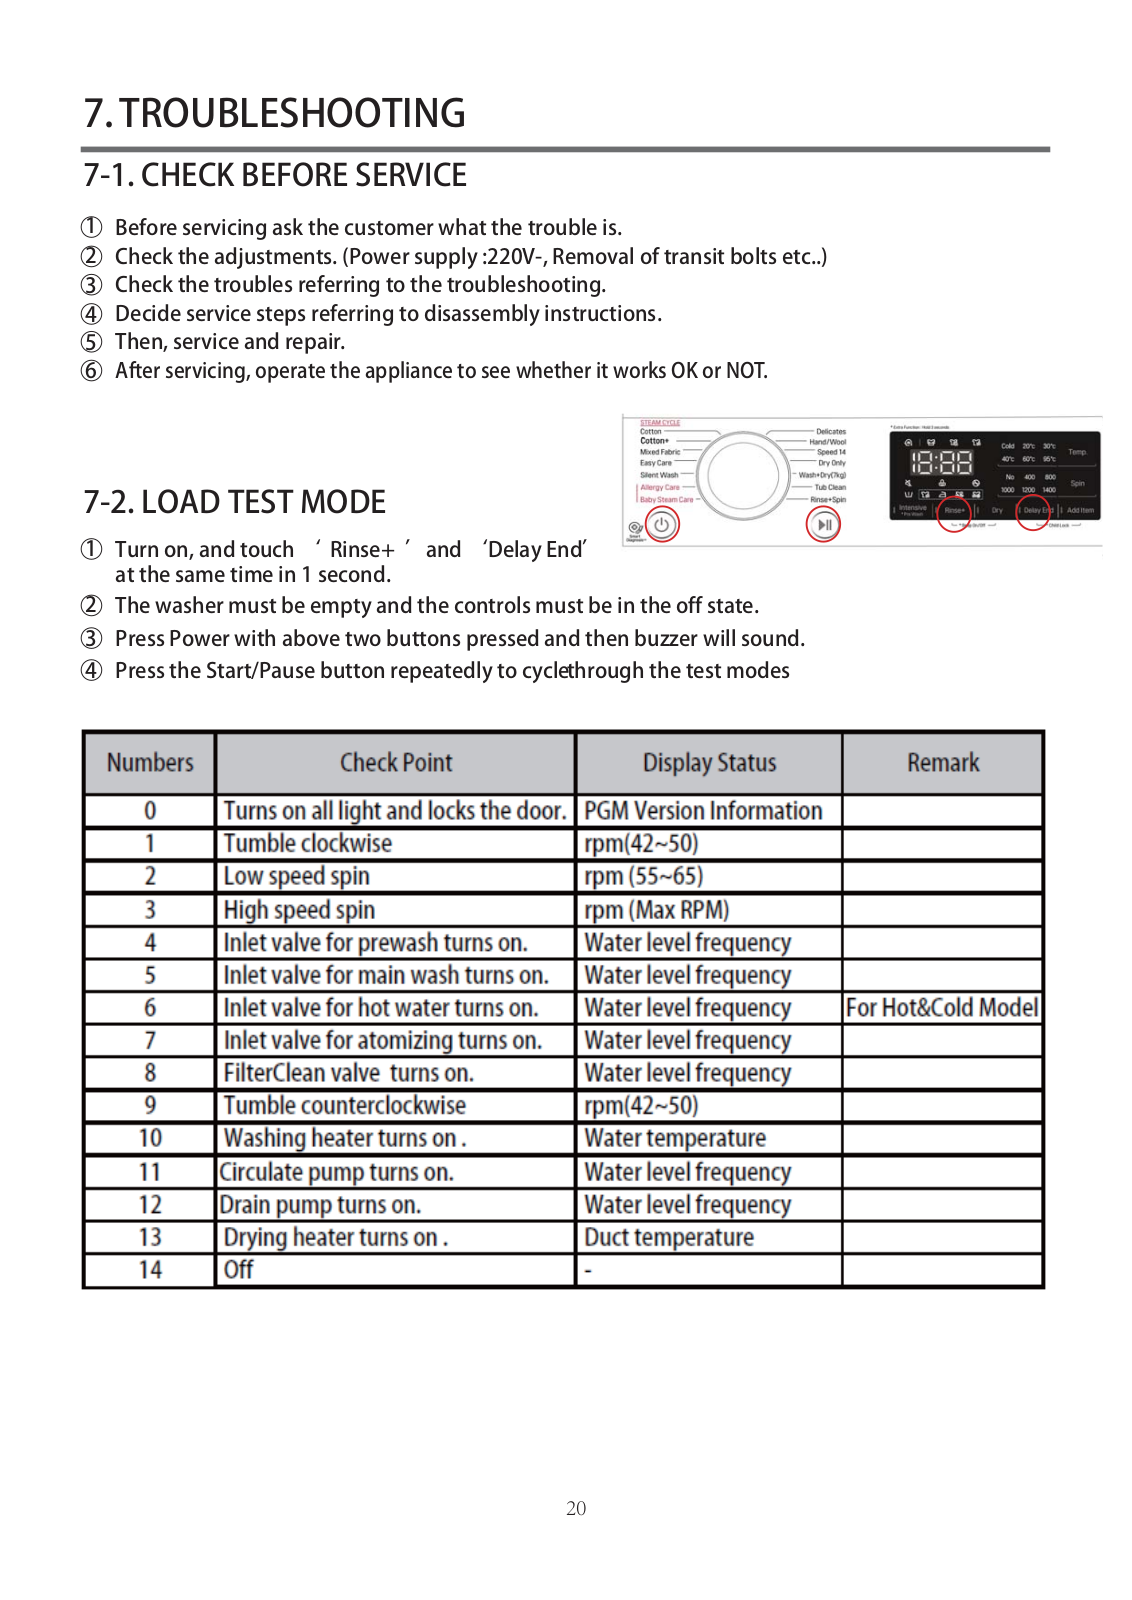
7-2. LOAD TEST MODE

1Turn on, and touch ‘ Rinse+ ’and ‘Delay End’ at the same time in 1 second.

2 The washer must be empty and the controls must be in the off state.

3 Press Power with above two buttons pressed and then buzzer will sound.

4 Press the Start/Pause button repeatedly to cyclethrough the test modes

20

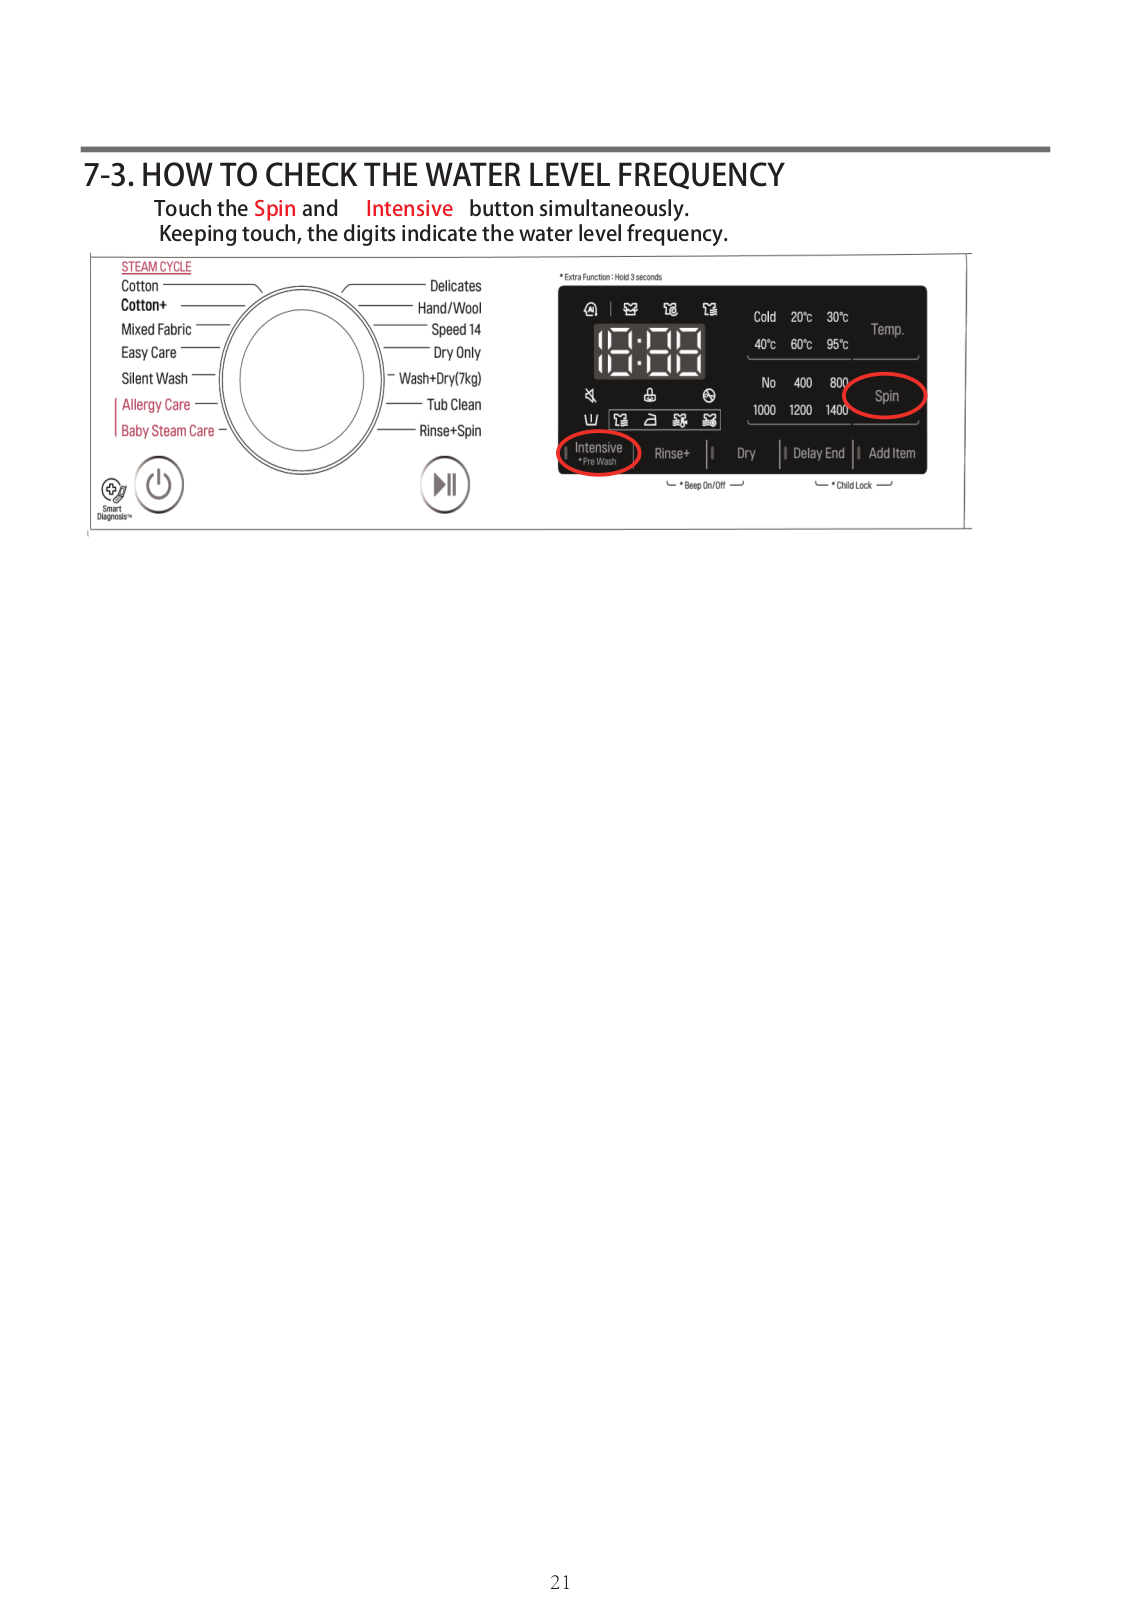
7-3. HOW TO CHECK THE WATER LEVEL FREQUENCY

Touch the Spin and Intensive button simultaneously. Keeping touch, the digits indicate the water level frequency.

21

Loading...
+ 47 hidden pages