

Page 1
Page 2

Copyright © 2007 LG Electronics, Inc. ALL RIGHTS RESERVED.
All materials used herein, including but not limited to trademarks, service marks, and all other
commercially valuable rights, properties and products are owned by and proprietary to LG Electronics,
Inc. and may not be reproduced, republished, redistributed or disseminated, either in whole or in part,
without the express written permission of LGElectronics, Inc.
All other marks are proprietary to their respective owners. Features and specifications are subject to
change without prior notice.
Page 3

LIMITED WARRANTY STATEMENT
1. WHAT THIS WARRANTY COVERS :
LG offers you a limited warranty that the
enclosed subscriber unit and its enclosed
accessories will be free from defects in
material and workmanship, according to the
following terms and conditions:
1. The limited warranty for the product extends
for TWELVE (12) MONTHS beginning on the
date of purchase of the product with valid
proof of purchase, or absent valid proof of
purchase, FIFTEEN (15) MONTHS from date
of manufacture as determined by the unit’s
manufacture date code.
2. The limited warranty extends only to the
original purchaser of the product and is not
assignable or transferable to any subsequent
purchaser/end user.
3. This warranty is good only to the original
purchaser of the product during the warranty
period as long as it is in the U.S, including
Alaska, Hawaii, U.S. Territories and Canada.
4. The external housing and cosmetic parts
shall be free of defects at the time of
shipment and, therefore, shall not be covered
under these limited warranty terms.
5. Upon request from LG, the consumer must
provide information to reasonably prove the
date of purchase.
6. The customer shall bear the cost of shipping
the product to the Customer Service
Department of LG. LG shall bear the cost of
shipping the product back to the consumer
after the completion of service under this
limited warranty.
2. WHAT THIS WARRANTY DOES
NOT COVER :
1. Defects or damages resulting from use of
the product in other than its normal and
customary manner.
2. Defects or damages from abnormal use,
abnormal conditions, improper storage,
exposure to moisture or dampness,
unauthorized modifications, unauthorized
connections, unauthorized repair, misuse,
neglect, abuse, accident, alteration,
improper installation, or other acts which
are not the fault of LG, including damage
caused by shipping, blown fuses, spills of
food or liquid.
3. Breakage or damage to antennas unless
caused directly by defects in material or
workmanship.
4. That the Customer Service Department at
LG was not notified by consumer of the
alleged defect or malfunction of the
product during the applicable limited
warranty period.
5. Products which have had the serial
number removed or made illegible.
6. This limited warranty is in lieu of all other
warranties, express or implied either in
fact or by operations of law, statutory or
otherwise, including, but not limited to any
implied warranty of marketability or fitness
for a particular use.
7. Damage resulting from use of non-LG
approved accessories.
Page 4

8. All plastic surfaces and all other externally
exposed parts that are scratched or
damaged due to normal customer use.
9. Products operated outside published
maximum ratings.
10. Products used or obtained in a rental
program.
11. Consumables (such as fuses).
3. WHAT LG WILL DO:
LG will, at its sole option, either repair,
replace or refund the purchase price of
any unit that does not conform to this
limited warranty. LG may choose at its
option to use functionally equivalent
reconditioned, refurbished or new units or
parts or any units. In addition, LG will not
re-install or back-up any data,
applications or software that you have
added to your phone. It is therefore
recommended that you back-up any such
data or information prior to sending the
unit to LG to avoid the permanent loss of
such information.
4. STATE LAW RIGHTS :
No other express warranty is applicable
to this product. THE DURATION OF ANY
IMPLIED WARRANTIES, INCLUDING THE
IMPLIED WARRANTY OF
MARKETABILITY, IS LIMITED TO THE
DURATION OF THE EXPRESS WARRANTY
HEREIN. LG INFOCOMM INC. SHALL NOT
BE LIABLE FOR THE LOSS OF THE USE OF
THE PRODUCT, INCONVENIENCE, LOSS
OR ANY OTHER DAMAGES, DIRECT OR
CONSEQUENTIAL, ARISING OUT OF THE
USE OF, OR INABILITY TO USE, THIS
PRODUCT OR FOR ANY BREACH OF ANY
EXPRESS OR IMPLIED WARRANTY,
INCLUDING THE IMPLIED WARRANTY OF
MARKETABILITY APPLICABLE TO THIS
PRODUCT.
Some states do not allow the exclusive of
limitation of incidental or consequential
damages or limitations on how long an
implied warranty lasts; so these limitations
or exclusions may not apply to you. This
warranty gives you specific legal rights
and you may also have other rights which
vary from state to state.
5. HOW TO GET WARRANTY SERVICE :
To obtain warranty service, please call or
fax to the following telephone numbers
from anywhere in the continental United
States:
Tel. 1-800-793-8896 or Fax. 1-800-448-4026
Or visit www.lgeservice.com.
Correspondence may also be mailed to:
LG Electronics MobileComm U.S.A., Inc.
201 James Record Road Huntsville, AL
35824
DO NOT RETURN YOUR PRODUCT TO THE
ABOVE
ADDRESS. Please call or write for the
location of the LG authorized service
center nearest you and for the
procedures for obtaining warranty claims.
Page 5

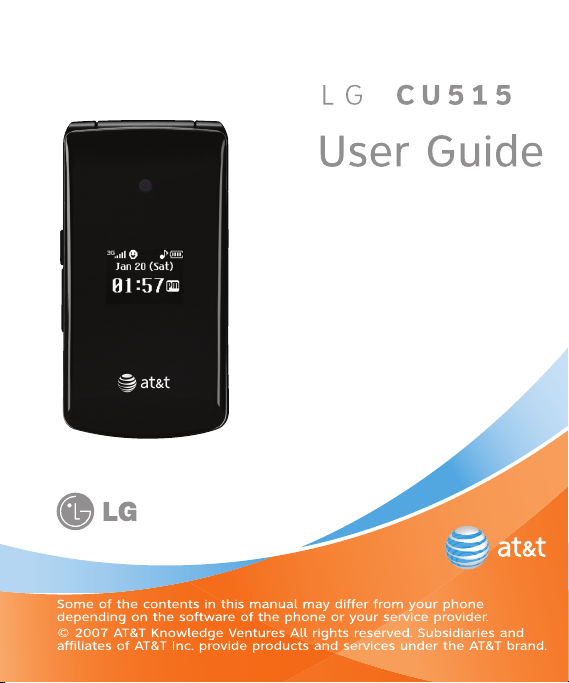
CU515
User Guide
Page 6

Table of Contents
For Your Safety . . . . . . . . . . . . . . . . . . . . . . . 5
Your Phone . . . . . . . . . . . . . . . . . . . . . . . . . 10
Phone Components . . . . . . . . . . . . . . . . . . . . . . . . 10
Your Phone’s Features . . . . . . . . . . . . . . . . . . . . . . 11
Display Information . . . . . . . . . . . . . . . . . . . . . . . . 13
Getting Started . . . . . . . . . . . . . . . . . . . . . . 16
Installing the SmartChip . . . . . . . . . . . . . . . . . . . . 16
Charging the Battery . . . . . . . . . . . . . . . . . . . . . . . 17
Memory card slot . . . . . . . . . . . . . . . . . . . . . . . . . . 18
Inserting the memory card . . . . . . . . . . . . . . . . . . 18
Removing the memory card . . . . . . . . . . . . . . . . . 18
Turning Your Phone On and Off . . . . . . . . . . . . . . 19
Access Codes . . . . . . . . . . . . . . . . . . . . . . . . . . . . . 19
Barring Password . . . . . . . . . . . . . . . . . . . . . . . . . 19
General Functions . . . . . . . . . . . . . . . . . . . 20
Making a Call . . . . . . . . . . . . . . . . . . . . . . . . . . . . . 20
Making a Call by Send Key . . . . . . . . . . . . . . . . . . . . 20
Making International Calls . . . . . . . . . . . . . . . . . . . . 20
Ending a Call . . . . . . . . . . . . . . . . . . . . . . . . . . . . . . . 20
Making a Call From the Contacts . . . . . . . . . . . . . . . 20
Adjusting the Volume . . . . . . . . . . . . . . . . . . . . . . 21
Answering a Call . . . . . . . . . . . . . . . . . . . . . . . . . . 21
Vibrate Mode (Quick) . . . . . . . . . . . . . . . . . . . . . . . . . 21
Signal Strength . . . . . . . . . . . . . . . . . . . . . . . . . . . . . . 21
Entering Text . . . . . . . . . . . . . . . . . . . . . . . . . . . . . . .21
Selecting Functions and Options . . . . . .25
2
In-Call Menu . . . . . . . . . . . . . . . . . . . . . . . .26
During a Call . . . . . . . . . . . . . . . . . . . . . . . . . . . . . . .26
Making a Second Call . . . . . . . . . . . . . . . . . . . . . . . . 26
Swapping Between Two Calls . . . . . . . . . . . . . . . . . . 26
Answering an Incoming Call . . . . . . . . . . . . . . . . . . . 26
Rejecting an Incoming Call . . . . . . . . . . . . . . . . . . . . 26
Muting the Microphone . . . . . . . . . . . . . . . . . . . . . . . 26
Using the Speakerphone . . . . . . . . . . . . . . . . . . . . . . 27
Conference Calls . . . . . . . . . . . . . . . . . . . . . . . . . . .27
Making a Second Call . . . . . . . . . . . . . . . . . . . . . . . . 27
Setting Up a Conference Call . . . . . . . . . . . . . . . . . . 27
Activate the Conference Call on Hold . . . . . . . . . . . . 27
Adding Calls to the Conference Call . . . . . . . . . . . . . 28
Private Call in a Conference Call . . . . . . . . . . . . . . . . 28
Ending a Conference Call . . . . . . . . . . . . . . . . . . . . . . 28
Video Share Calling . . . . . . . . . . . . . . . . . . . . . . . .28
Making and Answering a Video Share Call . . . . . . . 28
Making a Video Share Call in Camera &
Recording mode . . . . . . . . . . . . . . . . . . . . . . . . . . . . . 31
Menu Tree . . . . . . . . . . . . . . . . . . . . . . . . . .32
Push to Talk (PTT) . . . . . . . . . . . . . . . . . . . 36
PTT Contacts . . . . . . . . . . . . . . . . . . . . . . . . . . . . . . 40
Add Contact . . . . . . . . . . . . . . . . . . . . . . . . . . . . . . . 42
Add Group . . . . . . . . . . . . . . . . . . . . . . . . . . . . . . . . . 42
PTT Settings . . . . . . . . . . . . . . . . . . . . . . . . . . . . . . . 42
Pending Invitations . . . . . . . . . . . . . . . . . . . . . . . . 43
Page 7

Messaging . . . . . . . . . . . . . . . . . . . . . . . . . .45
New Message . . . . . . . . . . . . . . . . . . . . . . . . . . . . . 45
Inbox . . . . . . . . . . . . . . . . . . . . . . . . . . . . . . . . . . . . . 47
IM . . . . . . . . . . . . . . . . . . . . . . . . . . . . . . . . . . . . . . . . 48
Mobile Email . . . . . . . . . . . . . . . . . . . . . . . . . . . . . . 52
Drafts . . . . . . . . . . . . . . . . . . . . . . . . . . . . . . . . . . . . . 52
Outbox . . . . . . . . . . . . . . . . . . . . . . . . . . . . . . . . . . . . 53
Sent . . . . . . . . . . . . . . . . . . . . . . . . . . . . . . . . . . . . . . 53
Voicemail . . . . . . . . . . . . . . . . . . . . . . . . . . . . . . . . . 54
Templates . . . . . . . . . . . . . . . . . . . . . . . . . . . . . . . . . 54
Text Templates . . . . . . . . . . . . . . . . . . . . . . . . . . . . . . 54
Multimedia Templates . . . . . . . . . . . . . . . . . . . . . . . . 54
Signature . . . . . . . . . . . . . . . . . . . . . . . . . . . . . . . . . . 55
Message Settings . . . . . . . . . . . . . . . . . . . . . . . . . .55
Text Message . . . . . . . . . . . . . . . . . . . . . . . . . . . . . . . 55
Multimedia Message . . . . . . . . . . . . . . . . . . . . . . . . . 55
Voicemail . . . . . . . . . . . . . . . . . . . . . . . . . . . . . . . . . . 56
Service Messages . . . . . . . . . . . . . . . . . . . . . . . . . . . 56
Recent Calls . . . . . . . . . . . . . . . . . . . . . . . . .57
Missed Calls . . . . . . . . . . . . . . . . . . . . . . . . . . . . . . 57
Dialed Calls . . . . . . . . . . . . . . . . . . . . . . . . . . . . . . . 57
Received Calls . . . . . . . . . . . . . . . . . . . . . . . . . . . . 57
All Calls . . . . . . . . . . . . . . . . . . . . . . . . . . . . . . . . . . 57
Call Duration . . . . . . . . . . . . . . . . . . . . . . . . . . . . . . 57
Data Counter . . . . . . . . . . . . . . . . . . . . . . . . . . . . . . 58
MEdia Net . . . . . . . . . . . . . . . . . . . . . . . . . . .59
MEdia Net Home . . . . . . . . . . . . . . . . . . . . . . . . . . . 59
Bookmarks . . . . . . . . . . . . . . . . . . . . . . . . . . . . . . . . 59
Saved Pages . . . . . . . . . . . . . . . . . . . . . . . . . . . . . . 60
Enter URL . . . . . . . . . . . . . . . . . . . . . . . . . . . . . . . . . 60
Recent Pages . . . . . . . . . . . . . . . . . . . . . . . . . . . . . . 60
Security . . . . . . . . . . . . . . . . . . . . . . . . . . . . . . . . . . . 60
Browser Settings . . . . . . . . . . . . . . . . . . . . . . . . . . 60
Accounts . . . . . . . . . . . . . . . . . . . . . . . . . . . . . . . . . . .60
Primary Storage . . . . . . . . . . . . . . . . . . . . . . . . . . . . . 61
Cache Settings . . . . . . . . . . . . . . . . . . . . . . . . . . . . . . 61
Cookie Settings . . . . . . . . . . . . . . . . . . . . . . . . . . . . . 62
Character Encoding . . . . . . . . . . . . . . . . . . . . . . . . . . .62
Scrolling Control . . . . . . . . . . . . . . . . . . . . . . . . . . . . . 62
Show Image . . . . . . . . . . . . . . . . . . . . . . . . . . . . . . . . 62
AuthWallet . . . . . . . . . . . . . . . . . . . . . . . . . . . . . . . . . 62
AT&T Mall . . . . . . . . . . . . . . . . . . . . . . . . . .63
Shop Tones . . . . . . . . . . . . . . . . . . . . . . . . . . . . . . . . 63
Shop Games . . . . . . . . . . . . . . . . . . . . . . . . . . . . . . . 63
Shop Graphics . . . . . . . . . . . . . . . . . . . . . . . . . . . . . 63
Shop Multimedia . . . . . . . . . . . . . . . . . . . . . . . . . . 63
Shop Applications . . . . . . . . . . . . . . . . . . . . . . . . . 63
MEdia Net Home . . . . . . . . . . . . . . . . . . . . . . . . . . . 63
Cellular Video . . . . . . . . . . . . . . . . . . . . . . . 64
My Stuff . . . . . . . . . . . . . . . . . . . . . . . . . . . . .65
Games . . . . . . . . . . . . . . . . . . . . . . . . . . . . . . . . . . . . 65
Applications . . . . . . . . . . . . . . . . . . . . . . . . . . . . . . . 65
AT&T Music . . . . . . . . . . . . . . . . . . . . . . . . . . . . . . . 65
Music Player . . . . . . . . . . . . . . . . . . . . . . . . . . . . . . . . 65
Shop Music . . . . . . . . . . . . . . . . . . . . . . . . . . . . . . . . . 72
MusicID . . . . . . . . . . . . . . . . . . . . . . . . . . . . . . . . . . . . 72
3
Page 8

XM Radio . . . . . . . . . . . . . . . . . . . . . . . . . . . . . . . . . . 73
Music Videos . . . . . . . . . . . . . . . . . . . . . . . . . . . . . . . 73
The Buzz . . . . . . . . . . . . . . . . . . . . . . . . . . . . . . . . . . . 73
Community . . . . . . . . . . . . . . . . . . . . . . . . . . . . . . . . . 73
Music Apps . . . . . . . . . . . . . . . . . . . . . . . . . . . . . . . . . 73
Audio & Ringtones . . . . . . . . . . . . . . . . . . . . . . . . .74
Graphics . . . . . . . . . . . . . . . . . . . . . . . . . . . . . . . . . . 74
Video . . . . . . . . . . . . . . . . . . . . . . . . . . . . . . . . . . . . . 74
Tools . . . . . . . . . . . . . . . . . . . . . . . . . . . . . . . . . . . . . 74
Alarm Clock . . . . . . . . . . . . . . . . . . . . . . . . . . . . . . . . 74
Calendar . . . . . . . . . . . . . . . . . . . . . . . . . . . . . . . . . . . 75
Notepad . . . . . . . . . . . . . . . . . . . . . . . . . . . . . . . . . . . 75
Calculator . . . . . . . . . . . . . . . . . . . . . . . . . . . . . . . . . . 75
Tip Calculator . . . . . . . . . . . . . . . . . . . . . . . . . . . . . . . 76
World Clock . . . . . . . . . . . . . . . . . . . . . . . . . . . . . . . . 76
Tasks . . . . . . . . . . . . . . . . . . . . . . . . . . . . . . . . . . . . . . 76
Stop Watch . . . . . . . . . . . . . . . . . . . . . . . . . . . . . . . . . 76
Unit Converter . . . . . . . . . . . . . . . . . . . . . . . . . . . . . . 77
Date Finder . . . . . . . . . . . . . . . . . . . . . . . . . . . . . . . . . 77
D-Day Counter . . . . . . . . . . . . . . . . . . . . . . . . . . . . . . 77
Camera & Recordings . . . . . . . . . . . . . . . . . . . . . . .77
Take Photo . . . . . . . . . . . . . . . . . . . . . . . . . . . . . . . . . 77
Record Video . . . . . . . . . . . . . . . . . . . . . . . . . . . . . . . 79
Record Voice . . . . . . . . . . . . . . . . . . . . . . . . . . . . . . . . 80
Other Files . . . . . . . . . . . . . . . . . . . . . . . . . . . . . . . . 80
Memory Card . . . . . . . . . . . . . . . . . . . . . . . . . . . . . . 80
Address Book . . . . . . . . . . . . . . . . . . . . . . .81
Contact List . . . . . . . . . . . . . . . . . . . . . . . . . . . . . . . .81
New Contact . . . . . . . . . . . . . . . . . . . . . . . . . . . . . . 81
4
Caller Groups . . . . . . . . . . . . . . . . . . . . . . . . . . . . . . 81
Speed Dial List . . . . . . . . . . . . . . . . . . . . . . . . . . . . 81
Copy All Contacts . . . . . . . . . . . . . . . . . . . . . . . . . . 81
Delete All Contacts . . . . . . . . . . . . . . . . . . . . . . . . 82
Service Dial Numbers . . . . . . . . . . . . . . . . . . . . . . 82
My Business Card . . . . . . . . . . . . . . . . . . . . . . . . . 82
View Options . . . . . . . . . . . . . . . . . . . . . . . . . . . . . . 82
My Numbers . . . . . . . . . . . . . . . . . . . . . . . . . . . . . . 82
Settings . . . . . . . . . . . . . . . . . . . . . . . . . . . . .83
Audio & Ringtones . . . . . . . . . . . . . . . . . . . . . . . . . 83
Display . . . . . . . . . . . . . . . . . . . . . . . . . . . . . . . . . . . 84
Bluetooth . . . . . . . . . . . . . . . . . . . . . . . . . . . . . . . . . 84
Date & Time . . . . . . . . . . . . . . . . . . . . . . . . . . . . . . . 86
Call . . . . . . . . . . . . . . . . . . . . . . . . . . . . . . . . . . . . . . . 87
Security . . . . . . . . . . . . . . . . . . . . . . . . . . . . . . . . . . . 91
Connection . . . . . . . . . . . . . . . . . . . . . . . . . . . . . . . . 92
Flight Mode . . . . . . . . . . . . . . . . . . . . . . . . . . . . . . . 93
Software Update . . . . . . . . . . . . . . . . . . . . . . . . . . . 93
Check Memory . . . . . . . . . . . . . . . . . . . . . . . . . . . . 94
Handset Information . . . . . . . . . . . . . . . . . . . . . . . 94
Reset Settings . . . . . . . . . . . . . . . . . . . . . . . . . . . . . 94
Q&A . . . . . . . . . . . . . . . . . . . . . . . . . . . . . . . . 96
Accessories . . . . . . . . . . . . . . . . . . . . . . . . 98
Safety Guidelines . . . . . . . . . . . . . . . . . . 100
Glossary . . . . . . . . . . . . . . . . . . . . . . . . . . . 118
Index . . . . . . . . . . . . . . . . . . . . . . . . . . . . . . 120
Page 9

For Your Safety
Important Information
This user guide contains important information
on the use and operation of this phone. Please
read all the information carefully for optimal
performance and to prevent any damage to or
misuse of the phone. Any changes or
modifications not expressly approved in this
user guide could void your warranty for this
equipment.
Before You Start
Safety Instructions
WARNING! To reduce the possibility of
electric shock, do not expose your phone to
high humidity areas, such as the bathroom,
swimming pool, etc.
Always store your phone away from heat.
Never store your phone in settings that may
expose it to temperatures less than 32°F or
greater than 104°F, such as outside during
extreme weather conditions or in your car on a
hot day. Exposure to excessive cold or heat will
result in malfunction, damage and/or
catastrophic failure.
Be careful when using your phone near
other electronic devices. RF emissions from
your mobile phone may affect nearby in
adequately shielded electronic equipment. You
should consult with manufacturers of any
personal medical devices such as pacemakers
and hearing aides to determine if they are
susceptible to interference from your mobile
phone. Turn off your phone in a medical facility
or at a gas station. Never place your phone in a
microwave oven as this will cause the battery
to explode.
IMPORTANT! Please read the TIA SAFETY
INFORMATION on page 92 before using your
phone.
Safety Information
Read these simple guidelines. Breaking the
rules may be dangerous or illegal. Further
detailed information is given in this user guide.
] Never use an unapproved battery since this
could damage the phone and/or battery and
could cause the battery to explode.
] Never place your phone in a microwave oven
as it will cause the battery to explode.
] Do not dispose of your battery by fire or with
hazardous or flammable materials.
5
Page 10

For Your Safety
] Make sure that no sharp-edged items come
into contact with the battery. There is a risk
of this causing a fire.
] Store the battery in a place out of reach of
children.
] Be careful that children do not swallow any
parts such as rubber plugs (earphone,
connection parts of the phone, etc.). This
could cause asphyxiation or suffocation.
] Unplug the power cord and charger during
lightning storms to avoid electric shock or
fire.
] When riding in a car, do not leave your
phone or set up the hands-free kit near to
the air bag. If wireless equipment is
improperly installed and the air bag is
activated, you may be seriously injured.
] Do not use a hand-held phone while driving.
] Do not use the phone in areas where its use
is prohibited. (For example: aircraft).
] Do not expose the battery charger or adapter
to direct sunlight or use it in places with high
humidity, such as a bathroom.
] Never store your phone in temperatures less
than- 4°F or greater than 122°F.
6
] Do not use harsh chemicals(such as alcohol,
benzene, thinners, etc.) or detergents to
clean your phone. There is a risk of this
causing a fire.
] Do not drop, strike, or shake your phone
severely. Such actions may harm the internal
circuit boards of the phone.
] Do not use your phone in high explosive
areas as the phone may generate sparks.
] Do not damage the power cord by bending,
twisting, pulling, or heating. Do not use the
plug if it is loose as it may cause a fire or
electric shock.
] Do not place any heavy items on the power
cord. Do not allow the power cord to be
crimped as it may cause fire or electric
shock.
] Do not handle the phone with wet hands
while it is being charged. It may cause an
electric shock or seriously damage your
phone.
] Do not disassemble the phone.
] Do not place or answer calls while charging
the phone as it may short-circuit the phone
and/or cause electric shock or fire.
Page 11

For Your Safety
] Only use the batteries, antennas, and
chargers provided by LG. The warranty will
not be applied to products provided by other
suppliers.
] Only authorized personnel should service the
phone and its accessories. Faulty installation
or service may result in accidents and
consequently invalidate the warranty.
] Do not hold or let the antenna come in
contact with your body during a call.
] An emergency call can be made only within
a service area. For an emergency call, make
sure that you are within a service area and
that the phone is turned on.
] Use accessories, such as earphones and
headsets, with caution. Ensure that cables
are tucked away safely and do not touch the
antenna unnecessarily.
Memory card information and
care
] Always insert/ remove the memory card
while the handset power is off. If you
remove it while the power is on, it may be
damaged.
] If a damage cannot be fixed, format the
memory card.
] The memory card cannot be used for
recording copyright- protected data.
] Do not write forcefully on the memo area.
] Carry and store the memory card in its case.
] Do not allow the memory card to get wet.
] Do not leave the memory card in extremely
hot location.
] Do not disassemble or modify the memory
card.
FCC RF Exposure Information
WARNING! Read this information before
operating the phone.
In August 1996, the Federal Communications
Commission (FCC) of the United States, with its
action in Report and Order FCC 96-326,
adopted an updated safety standard for human
exposure to radio frequency (RF)
electromagnetic energy emitted by FCC
regulated transmitters. Those guidelines are
consistent with the safety standard previously
set by both U.S. and international standards
bodies.
The design of this phone complies with the
FCC guidelines and these international
standards.
7
Page 12

For Your Safety
CAUTION
Use only the supplied and approved antenna.
Use of unauthorized antennas or modifications
could impair call quality, damage the phone,
void your warranty and/or result in violation of
FCC regulations. Do not use the phone with a
damaged antenna. If a damaged antenna
comes into contact with skin, a minor burn may
result. Contact your local dealer for a
replacement antenna.
Body-worn Operation
This device was tested for typical body-worn
operations with the back of the phone kept 0.6
inches (1.5cm) between the user’s body and the
back of the phone. To comply with FCC RF
exposure requirements, a minimum separation
distance of 0.6 inches(1.5cm) must be
maintained between the user s body and the
back of the phone. Third-party belt-clips,
holsters, and similar accessories containing
metallic components should not be used. Bodyworn accessories that cannot maintain 0.6
inches(1.5cm) separation distance between the
user's body and the back of the phone, and
have not been tested for typical body-worn
operations may not comply with FCC RF
exposure limits and should be avoided.
8
Vehicle Mounted External
Antenna (optional, if available)
A minimum separation distance of 8 inches
(20cm) must be maintained between the
user/bystander and the vehicle mounted
external antenna to satisfy FCC RF exposure
requirements. For more information about RF
exposure, visit the FCC website at www.fcc.gov
FCC Part 15 Class B Compliance
This device and its accessories comply with
part 15 of FCC rules. Operation is subject to the
following two conditions: (1) This device and
its accessories may not cause harmful
interference, and (2) this device and its
accessories must accept any interference
received, including interference that may cause
undesired operation.
Cautions for Battery
] Do not disassemble.
] Do not short-circuit.
] Do not expose to high temperature: 60°C
(140°F).]
] Do not incinerate.
Page 13

For Your Safety
Battery Disposal
] Please dispose of your battery properly or
bring to your local wireless carrier for
recycling.
] Do not dispose in fire or with hazardous or
flammable materials.
Adapter (Charger) Cautions
] Using the wrong battery charger could
damage your phone and void your warranty.
] The adapter or battery charger is intended
for indoor use only.
Do not expose the adapter or battery charger
to direct sunlight or use it in places with high
humidity, such as the bathroom.
Avoid damage to your hearing
] Damage to your hearing can occur if you are
exposed to loud sound for long periods of
time. We therefore recommend that you do
not turn on or off the handset close to your
ear. We also recommend that music and call
volumes are set to a reasonable level.
] If you are listening to music whilst out and
about, please ensure that the volume is at a
reasonable level so that you are aware of
your surroundings. This is particularly
imperative when attempting to cross the
street.
9
Page 14
Your Phone
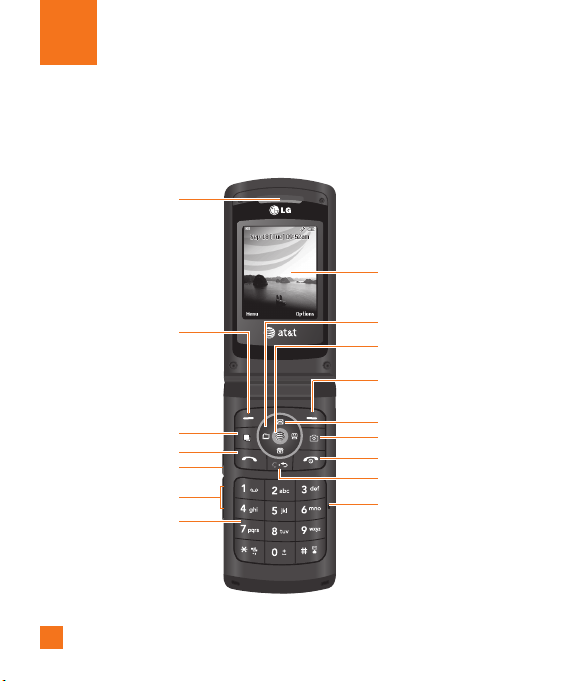
Phone Components
1. Earpiece
8. Display screen
3. Task menu key
5. Push-To-Talk keys
7. Alphanumeric keys
10
2. Left soft key
4. Send key
6. Volume keys
9. Navigation key
10. OK key
11. Right soft key
12. Message key
13. Camera key
14. End /Power key
15. Clear key
16. Microphone
Page 15

Your Phone
Your Phone’s Features
1. Earpiece
2,11. Left soft key/Right soft key: Each of
these keys perform the functions indicated by
the text on the display immediately above
them.
3. Task menu key: Multitask simultaneously
with voice and data - browse the web, make
calls, play games, send and receive
messages, and listen to MP3s. All at once.
4. Send key: You can dial a phone number and
answer incoming calls. Press this key in
standby mode to quickly access the most
recent incoming, outgoing and missed calls.
5. Push-To-Talk keys: Use for quick access to
the PTT function.
• Pressing and releasing this key while idle
displays your PTT contacts.
• Pressing and holding this key while idle
displays your PTT history.
• Pressing and holding this key while in a
PTT call allows you to speak to the other
call participants.
6. Volume keys: These keys are used to
control the volume of ringtone in standby
mode and speaker volume during a call.
7. Alphanumeric keys: These keys are used
to dial a number in standby mode and to
enter number or characters in edit mode.
8. Display screen: Displays phone status
icons, menu items, web information, pictures
and more in full color.
9. Navigation key: Use for quick access to
phone functions.
10. OK key: Short press will launch the WAP
browser. Allows you to select and confirm
menu options.
12. Message key: Use to retrieve or send text
messages.
13. Camera key: Press this key to use the
camera feature. Directly goes to the
camera mode.
14. End/Power key: Allows you to power the
phone on or off, end calls, or return to
Standby Mode.
15. Clear key: Allows you to delete the
characters entered or return you to the
previous screen.
16. Microphone: Can be muted during a call
for privacy.
11
Page 16
Your Phone
Speaker key
You can use the speakerphone during a call
by pressing the or [speakerphone]
key located on the top of the phone. The
loudspeaker is automatically deactivated
when you end the call.
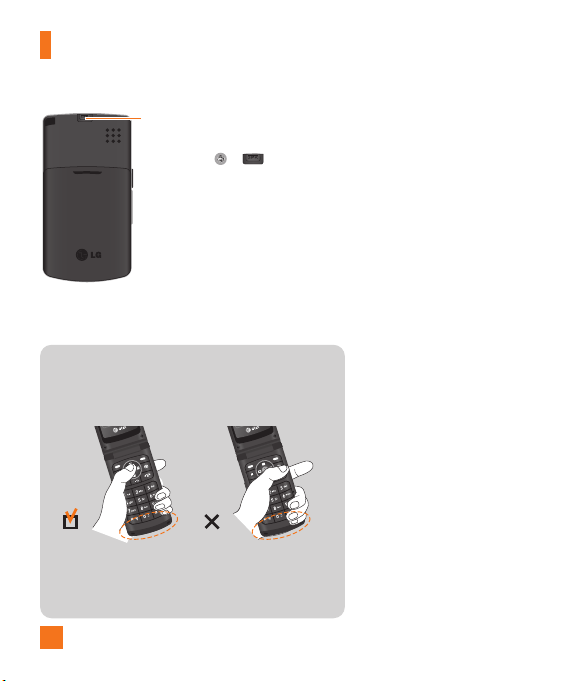
Advice to the customer
In order to allow better antenna sensitivity LG suggests that
you hold the handset as depicted in the figure below.
please do not cover the antenna area with your hand during
a call and using a bluetooth connection. It may degrade
speech quality.
12
Page 17
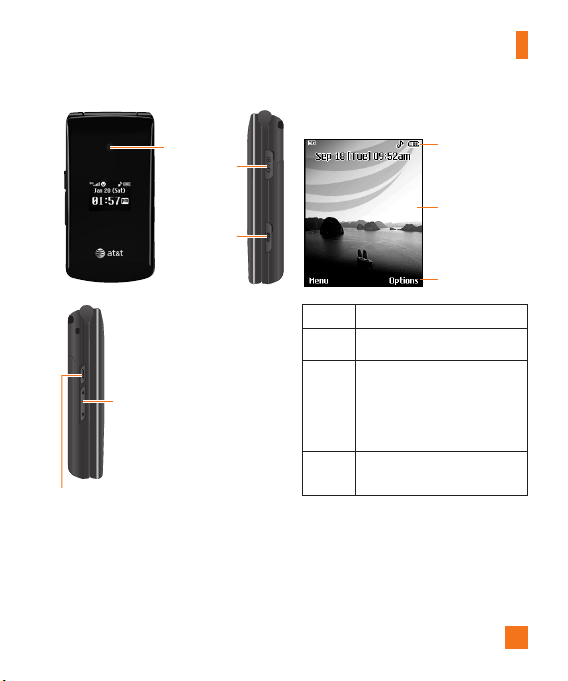
Camera
Headset jack
Removable
memory port
Side keys
• Control the volume of ringtone
in standby mode
• Speaker volume during a call
PTT key - Use for quick access to the PTT function.
• Pressing and releasing this key while idle displays
your PTT contacts.
• Pressing and holding this key while idle displays
your PTT history.
• Pressing and holding this key while in a PTT call
allows you to speak to the other call participants.
Your Phone
Display Information
Icon area
Text and graphic
area
Soft key indications
Area Description
First line Displays various icons.
Display messages, instructions
Middle
and any information that you
lines
enter, such as number to be
dialed.
Shows the functions currently
Last line
assigned to the two soft keys.
13
Page 18
Your Phone
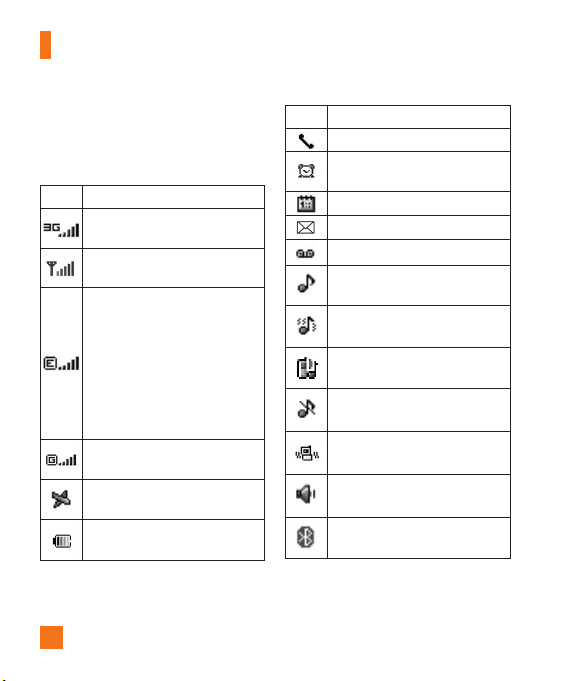
On-Screen Icons
The table below describes various display
indicators or icons that appear on the phone’s
display screen.
Icon
Description
Indicates the strength of the 3G
network signal.
Indicates the strength of the network
signal.
Indicates that GPRS service is
available.Indicates that the EDGE
service is available. Connection to the
EDGE service allows you to transfer
data at a speed of 200Kb/s(depending
on network availability). Check with
your operator for network coverage
and service availability.
Indicates that GPRS service is
available.
Indicates that Flight mode has been
activated.
Indicates the status of the battery
charge.
Icon Description
Indicates that a call is in progress.
Indicates that the alarm has been set
and is on.
Indicates the Schedule function.
Indicates the receipt of a message.
Indicates the receipt of a Voicemail.
Indicates that Ring has been set for
alert.
Indicates that Ring after vibration has
been ser for alert.
Indicates that Ring and vibration has
been set for alert.
Indicates that Silent has been set for
alert.
Indicates that Vibration has been set
for alert.
Indicates that the speakerphone has
been activated.
Indicates that the Bluetooth®function
has been activated.
* The Bluetooth®word mark and logos are owned by the Bluetooth SIG, Inc. and any use of such
marks by LG Electronics is under license. Other trademarks and trade names are those of their
respective owners. Bluetooth QD ID B013133
14
Page 19
Your Phone
Icon Description
Indicates that the data is being
transmitted using a Bluetooth
connection.
Indicates that the connection to a
headset with Bluetooth has been
activated.
Indicates that the connection to a
hands-free with Bluetooth has been
activated.
Indicates that the connection to a
stereo Bluetooth device has been
activated.
Indicates that the connection to a
hand-free & stereo with Bluetooth
has been activated.
Indicates that the Multitasking
function has been activated.
Indicates that the TTY has been set
and is on.
Indicates that the connection to a
headset with Bluetooth has been
activated.
Indicates that the phone is accessing
the WAP or data service.
Icon Description
Indicates that the status of PTT is
Available .
Indicates that the status of PTT is
Unavailable.
Indicates that the status of PTT is Do
Not Disturb.
Indicates a PTT Message is waiting in
the PTT Menu.
15
Page 20
Getting Started
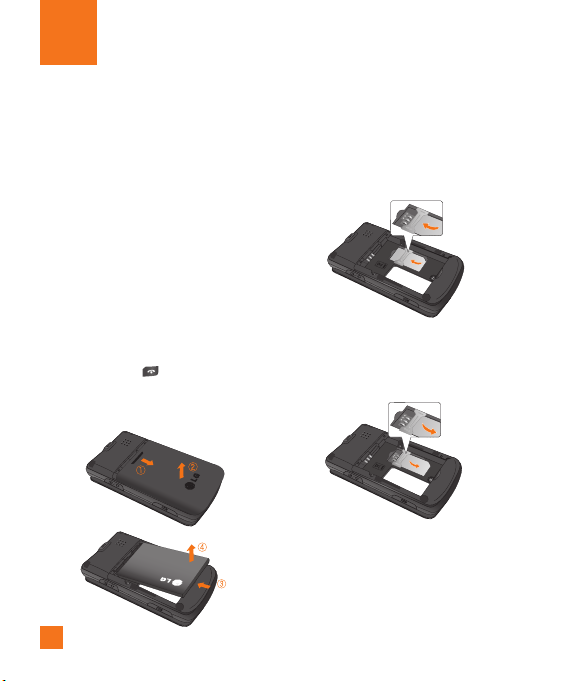
Installing the SmartChip
When you subscribe to a cellular network, you
are provided with a plug-in SmartChip loaded
with your subscription details, such as your
PIN, any optional services available and many
others.
n Important!
The plug-in SmartChip and its contacts can be
easily damaged by scratches or bending, so be
careful when handling, inserting or removing the
card. Keep all SmartChips out of the reach of
small children.
1. If necessary, switch off the phone by
holding down the [END] key until the
power-off image appears.
2. Remove the battery. To do so:
16
3. Slide the SmartChip into the SmartChip
socket so that it locks the card into place.
Make sure that the notched corner is at the
top left and the gold contacts of the card
face into the phone.
n Note
When you need to remove the SmartChip, slide
it, as shown, and take it out of the socket.
4. To insert the battery, align the golden
contacts of the battery with the
corresponding connectors on the battery
compartment. Press down on the opposite
end of the battery until it snaps into place.
Page 21
Getting Started
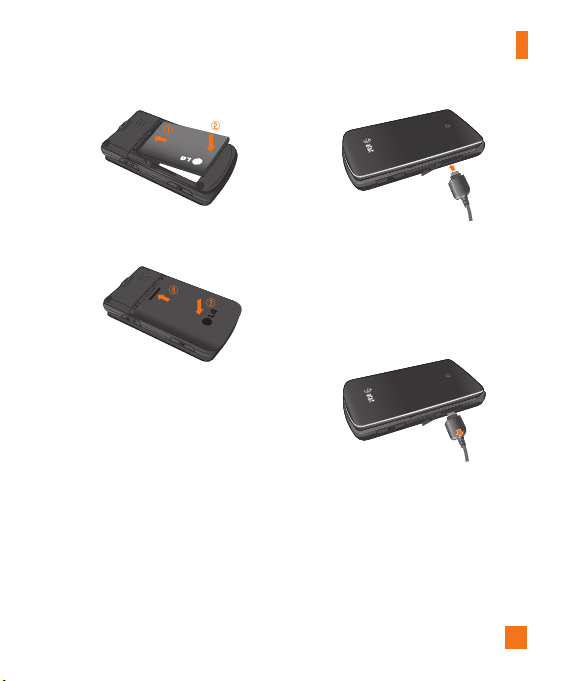
5. Attach back cover by sliding it up into
position until it clicks.
Charging the Battery
Use of unauthorized accessories could damage
your phone and void your warranty.
To use the travel charger provided with your
phone:
1. With the battery in position in the phone,
connect the lead from the travel charger to
the bottom of the phone. Check that the
arrow on the lead connector is facing
towards the front of the phone.
2. Connect the travel charger to a standard AC
wall outlet. Only use the travel charger that
comes with the package.
n Warning
The travel charger must be unplugged before you
remove the battery, otherwise, the phone could
be damaged.
3. When a phone has been charged fully,
disconnect the travel charger from the
phone by pulling the connector out.
n Note
] If your phone is powered on while charging,
you’ll see the bars on the battery indicator icon
cycle.
When the battery is fully charged, the bars on
the battery indicator icon will flash on and off.
17
Page 22
Getting Started
] If the sufficient power is not supplied on USB
Port, recharging through USB would not work
properly. This matter would be caused by the
problems on PC or USB Hub, so we suggest
you to contact producers.
If the battery fails to charge completely:
] After turning the phone on and off, please
attempt to recharge the battery.
] After detaching and reattaching the battery,
please attempt to recharge the battery.
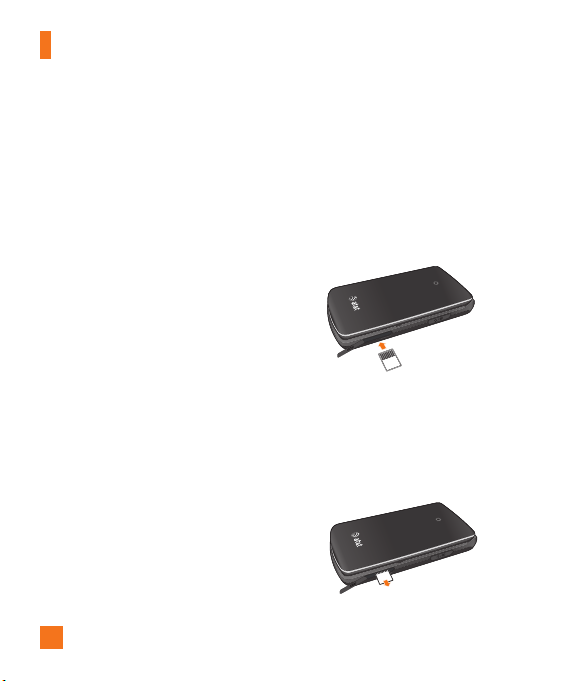
Memory card slot
The CU515 supports the microSD memory card.
The memory card can be inserted into the side
of the CU515 device. You can use this card to
save data files such as MP3 songs.
n Note
Always insert/remove the memory card with the
handset power off.
The gold connectors must be face up and
inserted first into the TransFlash memory card
slot.
Use only memory cards that have been approved
by the manufacturer. Some memory cards might
not be compliant with the handset.
18
Inserting the memory card
Insert the memory card into the slot until the
memory card is fully inserted into the slot, as
shown in the figure below:
n Note
The gold connectors must be face up and
inserted first into the memory card slot.
Removing the memory card
1. Push the memory card down into the slot
with the tip of your finger.
2. Carefully pull the memory card out of slot.
Page 23

Getting Started
Turning Your Phone On and
Off
1. Hold down the [END] key until the
phone switches on.
2. If the phone asks for a PIN, enter the PIN
and press the key.
The phone searches for your network and after
finding it goes to the idle screen as illustrated
below. From the idle screen, you can make or
receive a call.
n Note
The display language is preset to Automatic at
the factory. To change the language, use the
Languages menu option (Menu 9.2.6).
3. When you wish to switch the phone off,
hold down the [END] key until the
power-off image displays.
Access Codes
You can use the access codes described in this
section to avoid unauthorized use of your
phone. The access codes can be changed by
using the Change Codes feature (Menu
9.6.4).
Security code (4 digits)
The security code protects the unauthorized
use of your phone. The default security code is
set to ‘0000’ and the security code is required
to delete all phone entries and to activate the
Restore Factory Settings menu. The security
code default setting can be modified from the
Security Settings menu.
Barring Password
The barring password function is required
when you use the Call Barring function.
The password is obtained from the service
provider when you subscribe to this function.
19
Page 24

General Functions
Making a Call
1. Make sure your phone is powered on.
2. Enter a phone number including the area
code. To edit a number on the display
screen, simply press the key to erase
one digit at a time.
] Press and hold the key to erase the
entire number.
3. Press the [SEND] key to call the
number.
4. When finished, press the [END] key.
Making a Call by Send Key
1. Press the [SEND] key, and the most
recent incoming, outgoing and missed
phone numbers will be displayed.
2. Select the desired number by using the
navigation key.
3. Press the [SEND] key.
20
Making International Calls
1. Press and hold the key and the
international access character ‘+’ will
appear.
2. Enter the country code, area code, and the
phone number.
3. Press the [SEND] key.
Ending a Call
When you have finished a call, press the
[END] key.
Making a Call From the Contacts
You can store names and phone numbers
dialed frequently in the SmartChip as well as
in the phone memory known as the Contacts.
You can dial a number by simply selecting a
name in the contacts and pressing the
[SEND] key.
Page 25

General Functions
Adjusting the Volume
During a call, if you want to adjust the
earpiece volume, use the side keys of the
phone.
In idle mode, you can adjust the ring volume
using the side keys.
Answering a Call
When you receive a call, the phone rings and
the flashing phone icon appears on the screen.
If the caller can be identified, the caller’s phone
number (or name if stored in your Address
Book) is displayed.
1. Open the Flip and press the [SEND] key
or the left soft key to answer an incoming
call. If Any Key has been set as the answer
mode (Menu 9.5.4), any key press will
answer a call except for the [END] key
or the right soft key.
n Note
] To reject an incoming call, press and hold the
side keys on the left side of the phone.
] If Open Flip has been set as the Answer
Mode (Menu 9.5.4), you do not need to press
any key. You can answer the call simply by
opening the flip.
2. End the call by closing the phone or
pressing the [END] key.
n Notice
You can answer a call while using the Address
Book or other menu features.
Vibrate Mode (Quick)
Vibrate Mode can be activated by pressing and
holding down the [Star] key.
Signal Strength
If you are inside a building, being near a
window may give you better reception. You can
see the strength of your signal by the signal
indicator on your phone’s display screen.
Entering Text
You can enter alphanumeric characters by
using the phone’s keypad. For example, storing
names in the Address Book, writing a
message, or creating scheduling events in the
calendar all require entering text.
The following text input methods are available
on the phone.
21
Page 26

General Functions
T9 Mode
This mode allows you to enter words with only
one keystroke per letter. Each key on the
keypad has more than one letter. The T9 mode
automatically compares your keystrokes with
an internal linguistic dictionary to determine
the correct word, thus requiring far fewer
keystrokes than the traditional ABC mode.
ABC Mode
This mode allows you to enter letters by
pressing the key labeled with the required
letter once, twice, three or four times until the
letter is displayed.
123 Mode (Numbers Mode)
Type numbers using one keystroke per number.
To change to 123 mode in a text entry field,
press key until 123 mode is displayed.
A long press changes the mode to 123.
Symbolic Mode
This mode allows you to enter special
characters.
n Note
You can select a different T9 language from the
menu option. The default setting on the phone is
T9 disabled mode.
22
Changing the Text Input Mode
Change the text input mode by pressing .
You can check the current text input mode in
the upper right corner of the screen.
Using the T9 Mode
The T9 predictive text input mode allows you
to enter words easily with a minimum number
of key presses. As you press each key, the
phone begins to display the characters that it
thinks you are typing based on a built-in
dictionary. As new letters are added, the word
changes to reflect the most likely candidate
from the dictionary.
1. When you are in the T9 predictive text input
mode, start entering a word by pressing
keys to . Press one key per letter.
] The word changes as letters are typed -
ignore what’s on the screen until the
word is typed completely.
] If the word is still incorrect after typing
completely, press the [Star] key
once or more to cycle through the other
word options.
] If the desired word is missing from the
word choices list, add it by using the ABC
mode.
Page 27
General Functions
2. Enter the whole word before editing or
deleting any keystrokes.
3. Complete each word with a space by
pressing the key or the right navigation
key.
To delete letters, press . Press and hold
down to erase the letters continuously.
n Notice
To exit the text input mode without saving your
input, press the [END] key.
Using the ABC Mode
Use the keypad keys to enter your text.
1. Press the key labeled with the required
letter:
] Once for the first letter
] Twice for the second letter
] And so on
2. To insert a space, press the key once.
To delete letters, press the key. Press
and hold down the key to erase the
letters continuously.
n Note
Refer to the table below for more information on
the characters available using the keys.
Characters in the Order Display
Key
Upper Case Lower Case
1 . , ' @ ? ! - : / 1 . , ' @ ? ! - : / 1
2 A B C 2 a b c 2
3 D E F 3 d e f 3
4 G H I 4 g h i 4
5 J K L 5 j k l 5
6 M N O 6 m n o 6
7 P Q R S 7 p q r s 7
8 T U V 8 t u v 8
9 W X Y Z 9 w x y z 9
0
Space Key,
0 (Long press)
Space Key,
0 (Long press)
Using the 123 (Numbers) Mode
The 123 Mode enables you to enter numbers in
a text message (a telephone number, for
example) more quickly.
Press the keys corresponding to the required
digits before manually switching back to the
appropriate text entry mode.
23
Page 28

General Functions
Using the Symbol Mode
The Symbol Mode enables you to enter various
symbols or special characters.
To enter a symbol, press the [Star] key.
Use the navigation keys to select the desired
symbol and press the [OK] key.
T9 dictionary
The T9 dictionary is a feature that allows the
user to add any unique or personal words to
the T9 standard language database. The T9
dictionary function can be selected from the
Text Entry Settings sub menu under the Options
soft key menu. Within the T9 dictionary
function, the user can add, modify, delete or
reset personal words.
24
Page 29
Selecting Functions and Options
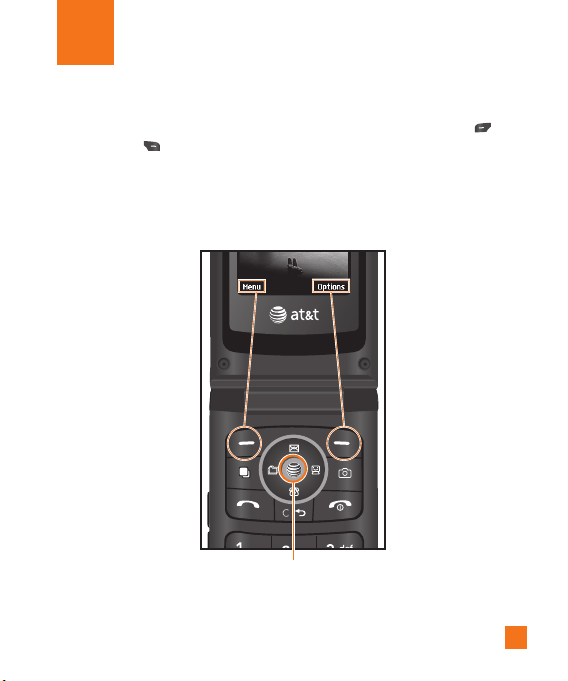
Your phone offers a set of functions that allow you to customize the phone. These functions are
arranged in menus and sub-menus, accessed via the two soft keys marked the left soft key
and the right soft key. Each menu and sub-menu allows you to view and alter the settings of a
particular function.
Soft key functions vary depending on the mode of the phone. The label on the bottom of the
display screen immediately above the soft keys indicates the current function.
Press the left soft key to
access the available Menu.
A short press will launch the WAP browser.
Press the right soft key to
access the available
Options.
A short press allows you to select and
confirm menu options.
25
Page 30

In-Call Menu
Your phone provides a number of control
functions that you can use during a call. To
access these functions during a call, press the
right soft key [Options].
During a Call
The menu displayed on the handset screen
during a call is different from the default main
menu displayed when in idle screen, and the
options are described below.
Making a Second Call
You can select a number you wish to dial from
the Address Book to make a second call. Press
the right soft key then select Contacts.
Swapping Between Two Calls
By using three methods, you can switch
between two calls.
1. Press the [send] key.
2. Press the left/right navigation key.
3. Press the right soft key and then select "
Swap Calls".
26
Answering an Incoming Call
To answer an incoming call when the handset
is ringing, simply press the [SEND] key.
The handset is also able to warn you of an
incoming call while you are already on a call. A
tone sounds in the earpiece, and the display
will show that a second call is waiting. This
feature, known as Call Waiting, is only
available if your network supports it.
If Call Waiting is on, you can put the first call
on hold and answer the second call, by
pressing the [SEND] key.
Rejecting an Incoming Call
You can reject an incoming call without
answering by simply pressing the [END]
key.
During a call, you can reject an incoming call
by pressing the [END] key.
Muting the Microphone
You can mute the microphone during a call by
pressing the left soft key [Mute]. The handset
can be unmuted by pressing the left soft key
[Unmute]. When the handset is muted, the
caller cannot hear you, but you can still hear
the caller.
Page 31

In-Call Menu
Using the Speakerphone
You can use the integrated Speakerphone
during a call by pressing the key. The
loudspeaker is automatically deactivated when
you end the call.
n Warning
Due to higher volume levels, don’t place the
phone near your ear while the speakerphone is
enabled.
Conference Calls
The conference service provides you with the
ability to have a simultaneous conversation
with more than one caller. The conference call
feature can be used only if your network
service provider supports this feature.
A conference call can only be set up when you
have one call active and one call on hold,
meaning both calls must have been answered.
Once a conference call is set up, calls may be
added, disconnected or separated (that is,
removed from the conference call but still
connected to you) by the person who set up
the conference call. These options are all
available from the In-Call menu. The maximum
number of callers in a conference call is five.
Once started, you are in control of the
conference call, and only you can add calls to
the conference call.
Making a Second Call
You can make a second call while currently on
a call simply by entering the second number
and pressing the [SEND] key. When the
second call is connected, the first call is
automatically placed on hold. You can swap
between calls, by pressing the [SEND]
key.
Setting Up a Conference Call
To set up a conference call, place one call on
hold, conference in the second active call by
pressing the right soft key and select the Join
Calls sub menu option from the Conference
Call menu.
Activate the Conference Call on
Hold
To activate a conference call on hold, press the
[SEND] key.
27
Page 32

In-Call Menu
Adding Calls to the Conference
Call
To add a call to an existing conference call,
press the right soft key, and then select the
Join Calls sub menu from the Conference Call
option.
Private Call in a Conference Call
To have a private call with one caller from a
conference call, press the right soft key and
select the Private Menu from the Conference
Call option. When the numbers of the callers
are displayed, select the one you wish to speak
in private.
Ending a Conference Call
Currently active conference call can be
disconnected by pressing the [END] key.
Video Share Calling
Making and Answering a Video
Share Call
You can make and answer a Video Share Call
with other 3G video phones. The other party
must have a 3G Video-Share capable phone
and be in a video service 3G coverage area.
28
n Note
Before you start a Video Share Call you must
check the following:
• Phone must be in a AT&T 3G service area.
• Phone needs the presence of ‘GLOBE’ (you can
see the on the left hand of the icon bar on
the screen.)
• Select the service via the Video Share menu
(see Menu 9.5.8).
To use Video Share follow these steps:
1. Make a phone call by dialing the number,
selecting the number from your contact list
or selecting the number from the list of calls
you have made or received.
2. Once the connection has been established,
after a few seconds the ‘Video Share Ready’
prompt will be displayed on the screen
provided the other party is also Video Share
enabled and in a 3G coverage area. Then,
you are ready to begin sharing your video
with the other party (or have video shared
with you). (If you set Initial Notification to On
from the Video Share (Menu 9.5.8), a
notification pop-up window will be
displayed. Select Yes and you will be
connected directly to live Video Share
Calling).
Page 33

3. To send video to the other party, simply
press the camera button OR the right soft
key [Options] - [Video Share] and select
a Video Share type (Live or Recorded).
Simply, press the Camera button and the live
Video Share Call will start.
In-Call Menu
n Note
The Speakerphone will be automatically
activated when a Video Share session begins,
unless a hands-free (Bluetooth or wired head set)
is connected.
- Live: You can share a real-time video stream
with the other party while having a
conversation.
- Recorded: You can share a pre-recorded video
clip with the other party while having a
conversation.
(Note that you can share only H.263 QCIF sized
video files)
4. If the other party accepts your request, a
video share session begins.
(It takes several seconds for the other party
to accept your invitation and start the Video
Share Call.)
During the Video Share session with the other
party, you can select a menu item using the
navigation keys by pressing the left soft key
.
- Stop: stops video sharing and proceeds
with voice call only.
- Brightness: adjusts the brightness of
the screen.
- Mute/Unmute: mute/unmute the
microphone.
- Spk. Off/Spk. On: when Spk. On is
selected, you can have a conversation using
the speakerphone. When Spk Off is selected,
you can have a conversation using the
headset.
You can record a current video clip via Options
menu, and the recorded video will be saved in
[My stuff] – [Video].
29
Page 34

In-Call Menu
5. Select the STOP menu item to stop sending
video, or press the End key [End Call] to
finish the call, or turn off the handset.
n Note
1. A Video Share Call will be terminated in the
following cases:
• When trying to make a conference call /
second call during a call.
• When holding or being held in a Video Share
call.
• When the voice call is disconnected.
• When moving out of a AT&T 3G service area.
• When the network connection is poor.
2. A Video Share Call will be unavailable in the
following cases (“Video Share Ready”
message will be greyed out).
• When trying to make a conference call /
second call during a Video Share Call.
• When holding or being held in a call.
• When moving out of a AT&T 3G service area.
“To receive a Video Share session:”
1. If you receive a Video Share request during a
call, select [Accept] to accept the
request. If you don’t want to accept the
request, press [Decline]. When you're a
recipient of a Video Share session, the
following menu items are available:
30
- Stop: stops video sharing and proceeds
with voice call only.
- Landscape: displays the incoming video
stream in landscape mode.
- Mute/Unmute: mute/unmute the
microphone.
- Spk. Off/Spk. On: when Spk. On is
selected, you can have a conversation using
the speakerphone. When Spk. Off is selected,
you can have a conversation using the
headset.
n Note
• The speakerphone will be automatically turned
on when a Video Share Call begins, and
automatically back to the previous mode when
a Video Share Call ends.
• If a hands-free or a Bluetooth headset is
connected, then the speakerphone menu will
be deactivated.
Page 35

In-Call Menu
Making a Video Share Call in
Camera & Recording mode
When you are in Camera & Recording mode,
you can easily make a Video Share Call to a
person in your Contact List.
1. Press the right soft key [Options] in
Take Photo/Record Video mode and select
[Video Share]. (This menu item is displayed
only in 3G coverage. If it is unavailable, you
will not be able to select from this menu
item.)
2. This screen provides you with three options
to make a Video Share Call:
a. Enter a number directly.
b. Select a number from the list of recent
video sharers (last five numbers).
c. Select a number from the contact list.
n Note
• If the other party is not available for a Video
Share Call, then the call will remain as a
normal voice call.
Saving your Video Share
You can save your Video Share session if you
are the sender. There will be a prompt asking if
you would like to save or discard the video at
the end of the Video Share session. If you
choose to save the video, it will be saved in
the "My Stuff," folder in your phone.
31
Page 36

Menu Tree
The following illustration shows the available menu structure and indicates the:
] Number assigned to each menu option.
] Page where you can find the feature description.
1. Push to Talk (PTT) (see page 36)
1.1 PTT Contacts
1.2 Add Contact
1.3 Add Group
1.4 PTT Settings
1.5 Pending Invitations
2. Messaging (continued)
2.0 Message Settings
2.0.1 Text Message
2.0.2 Multimedia Message
2.0.3 Voicemail
2.0.4 Service Messages
2. Messaging (see page 45)
2.1 New Message
2.2 Inbox
2.3 IM
2.4 Mobile Email
2.5 Drafts
2.6 Outbox
2.7 Sent
2.8 Voicemail
2.9 Templates
2.9.1 Text Templates
2.9.2 Multimedia Templates
2.9.3 Signature
32
3. Recent Calls (see page 57)
3.1 Missed Calls
3.2 Dialed Calls
3.3 Received Calls
3.4 All Calls
3.5 Call Duration
3.6 Data Counter
Page 37

Menu Tree
4. MEdia Net (see page 59)
4.1 MEdia Net Home
4.2 Bookmarks
4.3 Saved Pages
4.4 Enter URL
4.5 Recent Pages
4.6 Security
4.7 Browser Settings
4.7.1 Accounts
4.7.2 Primary Storage
4.7.3 Cache Settings
4.7.4 Cookie Settings
4.7.5 Character Encoding
4.7.6 Scrolling Control
4.7.7 Show Image
4.7.8 AuthWallet
5. AT&T Mall (see page 63)
5.1 Shop Tones
5.2 Shop Games
5.3 Shop Graphics
5.4 Shop Multimedia
5.5 Shop Applications
5.6 MEdia Net Home
6. Cellular Video (see page 64)
7. My Stuff (see page 65)
7.1 Games
7.2 Applications
7.3 AT&T Music
7.4 Audio & Ringtones
7.5 Graphics
7.6 Video
7.7 Tools
7.7.1 Alarm Clock
7.7.2 Calendar
7.7.3 Notepad
7.7.4 Calculator
7.7.5 Tip Calculator
7.7.6 World Clock
7.7.7 Tasks
7.7.8 Stop Watch
7.7.9 Unit Converter
7.7.0 Date Finder
7.7.* D-Day Counter
7.8 Camera & Recordings
7.8.1 Take Photo
7.8.2 Record Video
7.8.3 Record Voice
7.9 Other Files
7.0 Memory Card
33
Page 38

Menu Tree
8. Address Book (see page 81)
8.1 Contact List
8.2 New Contact
8.3 Caller Groups
8.4 Speed Dial List
8.5 Copy All Contacts
8.6 Delete All Contacts
8.7 Service Dial Numbers
8.8 My Business Card
8.9 View Options
8.0 My Numbers
34
9. Settings (see page 83)
9.1 Audio & Ringtones
9.1.1 Shop Tones
9.1.2 Ringtones
9.1.3 Volume
9.1.4 Message Alert Tones
9.1.5 Alert Type
9.1.6 Key Tones
9.1.7 Increasing Ringtone
9.1.8 Power On/Off Tones
9.2 Display
9.2.1 Shop Graphics
9.2.2 Wallpapers
9.2.3 Backlight Timer
9.2.4 Brightness
9.2.5 Menu Styles
9.2.6 Languages
9.2.7 Dialing Fonts
9.2.8 Clocks & Calendar
9.2.9 Color Schemes
9.3 Bluetooth
9.3.1 Turn On/Off
9.3.2 Search New Device
9.3.3 Paired Devices
9.3.4 Settings
Page 39

Menu Tree
9. Settings (continued)
9.4 Date & Time
9.4.1 Set Date
9.4.2 Date Format
9.4.3 Set Time
9.4.4 Time Format
9.4.5 Auto Update
9.5 Call
9.5.1 Call Forwarding
9.5.2 Send My Number
9.5.3 Auto Redial
9.5.4 Answer Mode
9.5.5 Minute Minder
9.5.6 Call Waiting
9.5.7 Call Reject
9.5.8 Video Share
9.5.9 Send DTMF Tones
9.5.0 TTY
9.5.* Hearing Aid
9.6 Security
9.6.1 Lock Handset
9.6.2 PIN Code Request
9.6.3 Fixed Dial Number
9.6.4 Change Codes
9.6.5 PTT Key Lock
9. Settings (continued)
9.7 Connection
9.7.1 Network Profiles
9.7.2 USB Connection Mode
9.8 Flight Mode
9.9 Software Update
9.0 Check Memory
9.0.1 Common
9.0.2 Reserved
9.0.3 SmartChip
9.0.4 Memory Card
9.* Handset Information
9.# Reset Settings
9.#.1 Clear Memory
9.#.2 Reset Default
35
Page 40

Push to Talk (PTT)
Welcome to PTT
Push to Talk (PTT) from AT&T lets you see
whether your family, friends, and co-workers
are available to talk before you call. You can
reach them individually or all at once via a
group call, all in an instant. Read on to hear
about all of the features AT&T Push to Talk has
to offer.
Initialize your PTT Service
Begin initializing your PTT service by pressing
the PTT Key (black button on left side of phone)
or by entering Push to Talk(1) from the Main
Menu.
You will then register your name and, once
initialization completes, begin adding your
family, friends, and co-workers who are also
AT&T PTT subscribers.
PTT Tips
PTT is a great way of communicating instantly
with the people who are important to you.
Here are a few tips to help you.
1. Make sure you are holding the PTT Key
down while you talk.
2. Make sure you don't start talking until
AFTER you hear the tone.
36
3. Note the location of the speakerphone and
microphone to make sure you aren't covering
either with your grip.
4. PTT calls can be easily started with the flip
closed. During a PTT call with the flip open
and speaker OFF, the call will be terminated
when the flip is closed. When the speaker is
ON, closing the flip will not terminate the
call.
5. Turn the volume up high to more clearly hear
your PTT calls.
Icon Descriptions
] My Availability: Your availability icon
appears next to the signal indicator on your
idle screen. This icon indicates the
availability others will see for you when you
are listed in their PTT Contacts.
Available
This will be your availability state once
you initialize service and it will not
change unless you change it as noted
below.
Page 41

Push to Talk (PTT)
Unavailable
This becomes your availability state if
you power off your phone, turn PTT Off,
or if the system detects you have moved
out of coverage.
Do Not Disturb
This becomes your availability state if
you change My Availability (Menu 1.4.1)
to Do Not Disturb. In this state you may
place PTT calls but will not receive a PTT
call.
PTT Message
This icon appears in place of your
availability status notifying you that a
PTT message is waiting. To access these
messages go to Push to Talk (1) on the
Main Menu. The message will either
immediately display or may be found
under Pending Invitations (5).
] PTT Contact Availability: This section
covers the icons which will appear next to
individuals and groups in your PTT Contacts
list indicating their availability.
• INDIVIDUALS:
Available
This contact is available to talk.
Unavailable
This contact has turned PTT Off, powered
down their phone, or moved out of
coverage.
Do Not Disturb
This contact is not receiving PTT calls.
Silent/Vibrate
This contact is available to receive PTT
calls. However they will be given the
option to accept or reject your PTT call.
Invitation in Progress
You are waiting for this contact to accept
your invitation.
• GROUPS:
Available
At least one member of the group is
available to talk.
Unavailable
Every member has powered down their
phone, turned PTT Off, or moved out of
coverage.
37
Page 42

Push to Talk (PTT)
Do Not Disturb
None of the members of the group can
be contacted.
Silent/Vibrate
All members of the group are available
to receive a PTT call but each will be
given the option to accept or reject your
call.
Invitation in Progress
You have sent an invitation to join a
group and none of the members have yet
accepted. Once one member accepts this
status will change and calls will
complete to all members who have
accepted and are available.
PTT Calls
A PTT call can only be made to individuals or
groups you have established in your PTT
Contacts. See PTT Contacts for instructions to
set up individuals/groups.
Making a PTT Call
1. Push and quickly release the PTT Key to
access your contact list. To access frequently
called numbers, Push and hold the PTT Key
to access your PTT Call History.
38
2. Select the individual or group you want to
call. Make sure an available icon is
displayed next to the name.
n Note
Calls can not be placed to Quick Group or
Dynamic Group in your PTT Call History.
3. Press and hold the PTT Key to activate the
call. A tone will immediately play indicating
you have the floor and may begin speaking.
4. Release the PTT Key when you are done
speaking.
Receiving a PTT Call
1. For the best experience your ringer should be
set to the highest possible volume.
2. If your status is Available you will hear a PTT
Call tone and then the caller's voice.
3. If your status is Vibrate All your phone will
vibrate and then you must accept or reject
the call. If set to Silent their will be no call
notification tone.
a. Accepting the call then plays the callers
voice over the earpiece.
b. Rejecting the call terminates the call. PTT
calls are not forwarded to voicemail.
Page 43

Push to Talk (PTT)
Convert to Cellular
During a PTT call the call originator may
convert the call over to a cellular call.
1. Call originator selects Options and then
selects Convert to Cellular. The originator no
longer has to press the PTT key to be heard.
2. Other participants on the call will remain in
a PTT call until they press the PTT Key.
Call Waiting
• While on a PTT call you will be notified of
incoming PTT calls. Accepting the incoming
PTT call suspends the first call. Rejecting
the incoming PTT call terminates it.
• While on a PTT call you will be notified of
incoming cellular calls. Accepting the
incoming cellular call suspends the PTT
call. Rejecting the incoming cellular call
forwards it to voicemail.
• While on a cellular call you will be notified
of incoming PTT calls. Accepting the
incoming PTT call suspends the cellular
call. Rejecting the incoming PTT call
terminates it.
How a PTT call works
When you make a PTT call, you can instantly
speak to other AT&T PTT subscribers. During a
PTT call only one person can speak at a time.
You can tell whether it is your turn to speak by
listening for the following tones:
PTT Floor Held tone
This tone plays when you press and hold the
PTT Key. It indicates you have the floor and
your speech will be heard by the other call
participants.
PTT Floor Release tone
When you let go of the PTT Key you will hear
this tone as will the other participants on the
call. All of your speech prior to this tone has
been heard by other participants. Others on the
call are now aware that the floor is open and
they have an opportunity to speak by pressing
their PTT Key.
Error tone
If you attempt to speak by pressing your PTT
Key and someone else still has the floor you
will hear this tone.
39
Page 44

Push to Talk (PTT)
The PTT Key
The black key on the left hand side of the
phone is your PTT Key.
• Pressing and releasing this key while idle
displays your PTT contacts.
• Pressing and holding this key while idle
displays your PTT history.
• Pressing and holding this key while in a
PTT call allows you to speak to the other
call participants.
To make a call press and release your PTT key
to display your contacts. Select the person or
group you wish to connect with and Press and
Hold the PTT Key.
n Note
Customers should not initiate or participate in a
PTT call while driving. The current version of our
PTT product requires you to press the button
while talking. For this reason we advise against
using PTT while driving, including with a car kit
or personal handsfree kit.
40
PTT Contacts
Menu 1.1
When accessing your PTT Contacts, Options
displays on your Right Soft Key. Options may
change depending on whether an individual or
a group was highlighted when you selected
Options.
• INDIVIDUALS:
] Quick Group Call: This option allows you
to make a group call without pre-establishing
it in your PTT Contacts. After selecting this
menu item from PTT Contacts, Options, a list
of available individuals will present. Select
those you wish to include in your call (up to
7). Then press the PTT Key to begin your
Quick Group call.
] Call Me Alert: This option allows you to
send a message to an individual in your PTT
Contacts whose status is Available,
Silent/Vibrate, or Do Not Disturb. First select
the individual, select Options, and then
select Call Me Alert. A message will display
on their idle screen "Please Call" and your
name. They can simply press their PTT Key to
call you back.
] Voice Message: This option allows you to
leave a voicemail instantly. For a message to
a contact, simply highlight the contact on
Page 45

Push to Talk (PTT)
your PTT Contacts, select Options, and select
Voice Message. Pushing the PTT Key begins
the recording. Releasing the PTT Key ends
the recording and deposits your message.
] Add Contact: This option allows you to
send an invitation to the contact that the
user has selected. After the person accepts
the invitation, he or she will be listed as an
available PTT contact.
] Add Group: This option allows you to create
a new PTT group.
] Rename: You can edit the name of the
individual.
] Delete: You can delete the individual.
] Copy to Address Book: This option allows
you to copy the name and number to your
Address Book.
] New Message: You can send a new text or
multimedia message to selected member.
• GROUPS:
] View Members: This option displays all
members of a group along with their
Availability.
] Dynamic Call: It is similar to Quick Group
Call however the participants you select from
are only those participants in the group.
] Voice Message: This option allows you to
leave a voicemail to a group in your PTT
Contacts or select members from the group.
Select the members of Voice Message and
press Ok once. Select the group to receive
the message. Pushing the PTT Key begins
the recording. Releasing the PTT Key ends
the recording and deposits your message.
] Add Group: This option allows you to create
a new PTT group.
] Leave Group: If you have joined a group
originated by another this option allows you
to leave the group but the group remains
intact for all other participants.
] Add Member: This option displays only
when you have highlighted a group which
you have originated. After adding any
additional members, a notification is sent to
the other group participants of the new
group members.
] Remove Member: This option displays only
when you have highlighted a group which
you have originated. After removing a
member a notification is sent to the
individual.
] Delete Group: Deleting a group which you
originated deletes the group from PTT
Contacts for all participants.
41
Page 46

Push to Talk (PTT)
] Rename: If you have joined a group
originated by another this option allows you
to edit the name of the group.
] New Message: You can send a new text
message to all members of the selected
group.
Add Contact
1. Select Add Contact in the PTT menu.
2. Enter the contact's name and phone number
and then select [OK]. An invitation to join
your PTT Contacts will be sent.
3. The availability icon will be Invitation in
Progress until the individual accepts.
4. Once accepted they are part of your PTT
Contacts and you are part of theirs.
Add Group
Setting up a PTT group is a great way to
quickly call a group of people you routinely
need to reach. A group can be made up of
individuals in your PTT Contacts or other AT&T
PTT subscribers you don't necessarily want to
add to your PTT Contacts.
1. After selecting Add Group you will be asked
to name your group.
Menu 1.2
Menu 1.3
42
2. Next step is to choose members. Choosing
Select In Contacts lets you chose from your
PTT Contacts. Choosing New Contact lets
you add someone not in your PTT Contacts.
a. If you want to add both types of contacts
then you will need to select one option
and save the group.
b. Then using Add Member in the PTT
Contacts Options menu you can add the
remaining members.
3. Once you have saved your group invitations
will be sent to each contact for their
acceptance. The Invitation in Progress icon
will display next to the group until one
member accepts. Availability will then
update each time a person accepts.
4. When a participant accepts your invitation
the group is now in their PTT Contacts and
they may also place calls to the group.
5. Maximum members in a group is 30, 29
participants and yourself. You may have up
to 30 groups in your PTT Contacts.
PTT Settings
] My Availability: This option allows you to
change your Availability status between Do
Not Disturb and Available.
Menu 1.4
Page 47

Push to Talk (PTT)
] Contact Alerts: This feature allows you to
be alerted when the availability status of a
contact changes from Unavailable or Do Not
Disturb to Available or Silent/Vibrate.
1. Once Contact Alerts is selected a list of
individuals from PTT Contacts will display.
Select those individuals for whom you want
to receive alerts for availability changes.
2. Once selected you will receive alerts for
availability changes until you de-select them.
3. An alert consists of a tone as well as a PTT
message when you access the PTT Menu.
] Set Your Name: When you initialized
service you set a name for yourself. This
name is presented in Contact Invitations.
Changing your name will not impact
invitations already sent but will be reflected
in future invitations.
] Auto Accept Invites: If you do not want to
pre-screen all additions to your PTT Contacts
you can use this menu item to automatically
accept your invitations.
• Enable All automatically accepts all
invitations.
• Contact Only automatically accepts
individual invitations.
• Group Only automatically accepts group
invitations.
• Disable All allows you to pre-screen all
invitations.
] PTT is On/PTT is Off: This menu item
allows you to turn your PTT Service off or
turn it on.
Pending Invitations
This menu item only displays if you have
invitations which have been waiting for your
review. Selecting this menu item displays a list
of invitations pending. Invitations not disposed
of within 7 days will expire.
Menu 1.5
Public Group Service vs
Corporate Group Service
The PTT Service which is described above is
called Public Group Service. General users like
you can add/delete contact that you want to
PTT and create Group. Whereas, PTT service
that is controlled by one administrator in a
corporate environment in order to control a
person or group to PTT is called Corporate
Group Service.
Administrator can handle centralized corporate
contact management via the Push to Talk
43
Page 48

Push to Talk (PTT)
Corporate Administrator website. Contact your
business sales representative, or
www.cingular.com/ptt for more information.
The followings are different functions from
Public Group Service.
Adding a Individual Member (notification
when done by the administrator)
• Assume this message appears on the
handset of the person who has had an
individual contact pushed to his/her
phone.
• User Message: <Contact Name> has
joined Your Contact List
Adding a Group Member (notification
when done by the administrator)
• Assume this message appears on the
handset of the person who has had a
group contact pushed to his/her phone.
• User Message: <Contact Name> has
joined <Group Name>
Deleting an Individual Member (by user)
• This function is not supported. Please
contact your Corporate Administrator.
Deleting a Group Member (by user)
• This function is not supported. Please
contact your Corporate Administrator.
44
Deleting an Individual Member
(notification, when done by the
administrator)
• Assume this message appears on the
handset of the person who has had an
individual contact deleted from his/her
phone by the administrator.
• User Message: < Contact Name > has
deleted you from their PTT Contacts.
Deleting a Group Member (notification,
when done by the administrator)
• Assume this message appears on the
handset of the person who has had a
group member deleted from his/her phone
by the administrator.
• User Message: <Group member> was
deleted from <Group name>.
Deleting a Group (notification, when done
by the administrator)
• Assume this message appears on the
handset of the person who has had a
group member deleted from his/her phone
by the administrator.
• User Message : <Group Name> has been
deleted from your PTT Contacts.
Page 49

Messaging
This menu includes functions related to SMS
(Short Message Service), MMS (Multimedia
Message Service), voice mail, as well as the
network’s service messages.
New Message
n Note
If you select a graphic or an audio file while
writing a multimedia message, the file loading
time will take about 5 seconds. You will not be
able to activate any key during the file loading
time. When the file loading is complete, you will
be able to write a multimedia message.
Editing a message
The following options are available for Editing
a Message. (Press the left soft key [Insert])
] Symbol: You can insert symbols ranging
from sentence notes to emoticons. Select
the one you want by navigating the left/right
soft keys [Previous/Next].
] Graphic: You can select a graphic image by
using the left/right navigation keys. You can
preview the selected picture by pressing the
left soft key [View].
] Audio: You can insert various ringtones.
Menu 2.1
n Note
vCard, vCalendar, vNote and vTask are created by
Address Book, Calendar, Notepad and Tasks
respectively. Go to the Tools and Address Book
sections for more detailed information.
Video: You can insert a video clip by using
]
the center key [Insert].
] New Photo: You can insert a new image
taken from the camera by pressing
[Capture]. The following camera options are
available when you press [Options]:
• Resolution: The resolution of the image
can be captured in 1280*960/640*480/
320*240/160*120.
• Quality: The quality of the captured image
can be Super Fine/Fine/Normal.
• Primary Storage: You can assign the
primary storage to Handset or Memory
Card.
• View Full Screen: Extends the photo
screen to full.
• Self Timer: Camera timer can be set to
Off/ 3 Seconds/5 Seconds/10 Seconds.
• Advanced Settings: Set the White
Balance as Auto/Daylight/
Incandescent/Cloudy/Fluorescent/
45
Page 50

Messaging
Night mode. Color Effects includes
options such as Color/ Sepia/
Mono/Negative. Shutter Tones can be
set to Tone 1/ Tone 2/ Tone 3/ Off.
• Default Settings: Allows you to set to the
default settings.
] New Audio: You can record a new audio by
pressing the center key [Record]. After
recording a new audio, you can cancel it by
pressing the right key [Cancel]. To control the
new audio menu, choose [Options] by
pressing the right key. Under [Options],
choose one of following
• Quality: Set the audio’s quality to Fine,
Normal or Economy.
• Primary Storage: You can assign the
primary storage to Handset or Memory
Card.
] New Video: You can record new video by
pressing the center key [Record].
] Subject: Type a subject into the message.
] Others: Allows you to insert vCard,
vCalendar, vNote or vTask.
] Template
- Text: You can easily insert the frequently
used sentences in the text message.
46
- Multimedia: The preset multimedia
templates are available.
- Signature: Input your own signature
created in (Menu 2.9.3). For further details,
see page 55.
] Contact: You can browse one of your
contacts and insert it.
] Slide: You can insert a slide and place it to
Insert Slide Before or Insert Slide After.
Using Options
Press right soft key [Options].
• Preview: Shows the created multimedia
message before sending it. (Only for
Multimedia Message)
• View Attachment: Shows he attached
multimedia files. (Only for Multimedia
Message)
• Save to Drafts: Saves the selected
message to draft.
• Remove: Removes the selected
multimedia or vObject. (Only for
Multimedia Message)
• Select Slide: If the message has more
than one slide, you can select and move to
the desired slide. (Only for Multimedia
Message)
Page 51

Messaging
• Set Slide: Sets the Duration, Text color
and background color of the selected slide.
(Only for Multimedia Message)
• Settings (Only for Multimedia Message)
- Priority: You can set the priority of the
message you choose.
- Validity Period: This network service
allows you to set how long your
multimedia messages will be stored at
the message center.
- Delivery Receipt: If it is set to On in
this menu, you can check whether your
message is sent successfully.
- Request Read Receipt: This menu
allows you to determine whether to
request a read confirmation mail to a
recipient.
• Text Entry Mode: Sets the text input
mode. For more details, refer to Entering
Text (page 21).
• Text Entry Settings: Text Entry Languages
allows you to set the text entry language
to English, Spanish or French. T9 Next
Word Prediction is available when it is set
to On. Use T9 Dictionary to add words or
delete/reset/modify words.
• Cancel: Allows you to exit the text input
mode without saving your input message.
Sending a Message
After completing a message using the
Insert/Options, select Send To to send a
message.
• Enter the recipient(s) as To, Cc and Bcc. You
can use the Contacts option to choose a
recipient.
• Press the right soft key [Options].
You can insert symbols, refer to recent
messages, recent calls and caller groups to set
as a recipient, and edit your message. For the
Save to Drafts, Text Entry Mode, Text Entry
Settings and Cancel options, see the
descriptions above.
Inbox
You will be alerted when you receive a
message. They will be stored in the Inbox. In
the Inbox, you can identify each message by
icons. If you are notified that you have received
a multimedia message, you can download the
whole multimedia message by selecting it in
the Receive menu.
Menu 2.2
47
Page 52

Messaging
The following [Options] are available in the
Inbox list.
] Save Contact Info: You can save the
sender's phone number in the Contact List.
] Delete: You can delete the current message.
] Forward: You can forward the selected
message to another party.
] Reply All: Allows you to reply to all
recipients on the selected message (Only for
Multimedia messages).
] Information: You can view information
about received messages; Message type,
Subject, Sender's address, Message date &
time, Priority, Message size, Attached Files
(Only for Multimedia messages).
] Multi Delete: Deletes a number of
messages you have selected from the folder.
] Delete All Read Messages: You can
delete all read messages.
] Delete All: You can delete all messages.
IM
Menu 2.3
The Instant Messaging feature can only be
used with the support of the network operator
or communities such as AIM, Windows Live
48
and Y! Messenger. For Instant Messaging
users, a valid User ID and Password will be
required in order to login and exchange
messages as well as checking the online
status.
1. Through the Main Menu.
2. Through the IM hotkey (the right navigation
key). Short pressing the hotkey will bring up
the available IM clients. The menu items
below might not appear since not all IM
communities support the various options.
Also the menu strings may appear differently
based on the selected IM communities. The
keywords such as User ID, Login and Contact
will be used as general terms in IM menus
according to the currently selected
communities such as AIM, Windows Live
and Y! Messenger.
Offline Menu
Sign On
This allows users to login by filling in the User
ID and Password.
n Note
Once the User ID and Password are saved, you
will not be required to type them in again during
Login process. This feature is optional.
Page 53

Messaging
Saved Conversations
This is where a user can view saved
conversations.
Settings
] Set Sound: Allows you to set on/off an alert
for the Contact when they have activity on
their session.
] Default Provider: Allows you to set the
default IM community to login.
] Auto Sign In: You may set the automatic IM
Login process by choosing between the
’When Power On’ or ’When IM Start’
options.
] Network: You may check your IM Network
Profiles or Server Address information.
IM Information
This indicates the Instant Messaging Client
Information such as Client Name and Version
Number.
Online Menu /
1 to 1 conversation
After a successful Login, a list of contacts with
Screen Names will appear on screen.
Depending on the cursor location in the
contacts, the following menu options will be
available.
When cursor is located on a
Conversations List
n Note
The Conversations List contains both the active
contact where a conversation has taken place as
well as an unknown contact.
Note
n
When you select the left/right navigation key or
the Confirm key on the Conversation List, it offers
the ability to view or hide conversations.
Send to Others: This offers the ability to
]
send a message to an unknown contact.
When selected, a User ID must be typed in
prior to starting an IM session or
conversation.
] Saved Conversations: You may view or
delete the stored conversation session.
] Search: This allows you to search for the
contact by Email address or name.
] Settings
• My Status: Allows you to set your status
to Available, Busy or Invisible.
49
Page 54

Messaging
• Set Sound: Allows you to set an alert for
the Contact when they have activity on
their session.
• Auto Sign On: You may Login to an IM
client automatically with the ‘When Power
On’ or ‘When IM Start’ options.
] Log Out: This begins the Logout process.
When cursor is located on a
Conversation
] End Conversation: This closes the selected
conversation. If an unknown contact was
selected, that contact is deleted.
] Block/Unblock Contact: This allows you
to block/unblock the selected Conversations
Contact.
] View Information: This allows you to view
the User ID and Status Text information.
] Search: This allows you to search for the
contact by Email address or name.
] Settings: Please refer to the previous
Settings Menu.
] Log Out: This begins the Logout process.
50
When cursor is located on a
Contact List
] Add Contact: This adds a new contact to
the selected contacts’ list; in the meantime
this searches for the contact on the basis of
E-mail Address, First Name, or Last Name.
] Refresh List: This refreshes the present
information on the contacts within the
contacts.
] Send to Others: This offers the ability to
send a message to an unknown contact.
When selected, the User ID must be typed in
prior to starting an IM session or
conversation.
] Saved Conversations: This is where a user
can view saved conversations.
] Search: This allows you to search for the
contact by Email address or name.
] Settings: Please refer to the previous
Settings Menu.
] Log Out: This begins the Logout process.
When cursor is located on a
Contact
] Add Contact: This adds a new contact to
the selected contacts list; in the meantime
Page 55

Messaging
this searches for the contact on the basis of
E-mail Address, First Name, or Last Name.
] Delete Contact: This deletes the selected
Contact.
] Block/Unblock Contact: This allows or
blocks conversation with the selected
Contact.
] Refresh Contact: This refreshes the present
information on the selected contact.
] View Information: This allows you to view
information. It provides User ID, Status Text.
] Search: This allows you to search for the
contact by Email address or name.
] Settings: Please refer to the previous
Settings Menu.
] Log Out: This begins the Logout process.
Menu options available in the
Conversation screen
] Back To List: This brings the screen back to
the contacts.
] Insert: You can insert Symbol, Template and
emoticons in the conversation screen.
] Block/Unblock Contact: This allows or
blocks conversation with the selected
Contact.
] Save Conversation: Stores the currently
active conversation.
] End Conversation: This ends the active
conversation and clears the conversation
buffer.
] Settings: Please refer to the previous
Settings Menu.
] Text Entry Mode: Sets the text input mode
such as abc, Abc, ABC, T9 abc, T9 Abc, T9
ABC and 123.
] Text Entry Mode Settings: This selects the
T9 predictive mode Language.
n Note
•
In the conversation window, you can use the
up/down navigation key for scrolling through
the conversation.
•
Maximum number of characters supported by a
message is 800 characters for receiving and
127 characters for sending.
•
The present information might not update in
real time so the “Refresh List”/“Refresh
Contact” option can be used for the most up to
date status.
51
Page 56

Messaging
Mobile Email
Mobile Email allows you to access your Yahoo!
Mail, AOL Mail, AIM Mail, Windows Live Mail,
AT&T Yahoo!, BellSouth Mail and Other
providers accounts on your phone. So, now you
can quickly and easily check your email while
you’re away from your computer.
To Set Up Mobile Email
] Open Mobile Email: Slide out the keyboard,
highlight Mobile Email and press OK.
] Select an Email Provider: Use the
navigation key to highlight the email provider
you wish to use and press OK.
] Log In
1. Highlight the ID entry field, press down on
the navigation key, and then type in your
existing email ID.
2. Scroll down and highlight the Password
field, press down on the navigation key,
and enter your password. Quick Tip: Your
password is case sensitive. Press the
on the keypad to change to lower case or
upper case.
3. To save your password scroll down to
Remember Me and press down on the
navigation key to check the box.
Menu 2.4
52
4. Select Sign In.
] Opening an Email: Just scroll down and
highlight the email subject line you want to
open and press down on the navigation key.
Once the email opens, just select Options to
reply, forward, or delete.
] Deleting an Email: Just scroll down to the
email you want to delete, press Options,
then Delete.
For additional details, visit www.att.com/email
Drafts
You can view the messages saved as a draft.
The draft messages are listed with the date
and time of when the messages were saved.
The following [Options] are available.
] Information: Allows you to view the
information on the message.
] Multi Delete: Allows you to delete multiple
messages you select from the folder.
] Delete All: Deletes all messages in the
folder.
Menu 2.5
Page 57

Messaging
Outbox
Outbox is a temporary storage place for
messages waiting to be sent.
When you press the [SEND] key, you can
make a call to the number of the recipient
number of the selected message.
If the message is not
sent from the Outbox,
you will receive a
sound alert along
with a Message
Sending Fail notice
on the screen.
Another attempt will
be made to send the failed message and after
two unsuccessful attempts, the message will
no longer be sent automatically order to send
the message that has failed, you must press
Resend from the Options menu.
After the maximum number of Send attempts
has been reached the Send function has failed.
If you were trying to send a text message,
open the message and check that the Sending
options are correct.
When the message Send has failed, the
following [Options] are available.
Menu 2.6
] Delete: Deletes the selected message
which has failed.
] Edit: Allows you to edit the selected
message.
] Error Status: Allows you to see the error
status of the failed message (Only for
Multimedia message).
] Information: Allows you to view the
information on the message.
] Delete All: Deletes all messages in the
folder.
Sent
This is where you can view the lists and
contents of sent messages and also verify if
transmission was successful.
The following [Options] are available.
] Delete: Deletes the selected message from
the Sent list.
] Information: Allows you to view information
on the message.
] Delete All: Deletes all messages in the
folder.
Menu 2.7
53
Page 58

Messaging
Voicemail
This menu provides you with a quick way of
accessing your voice mailbox (if provided by
your network).
Before using this feature, you must enter the
voice server number obtained from your service
provider.
This may already be available; to check the
voicemail, press and hold the key.
When new voicemail is received, the symbol
will be displayed on the screen.
n Note
Please check with your network service provider
for details of their service in order to configure
the handset accordingly.
Templates
Text Templates
There are 6 predefined messages in the list.
You can view and edit the template messages
or create new messages.
The following [Options] are available.
] Send: Allows you to send the selected
template via Message.
(Menu 2.9.1)
Menu 2.8
Menu 2.9
54
] Delete: Allows you to delete the selected
template message.
] Edit: Allows you to write a new message or
edit the selected template message.
] Delete All: Deletes all messages in the
folder.
Multimedia Templates
1. You can add new multimedia templates by
pressing the left soft key [New].
2. The following choices are available under
Options.
] Preview: You can preview multimedia
messages you have created.
] Remove: Removes the selected multimedia
or vObject.
] Text Entry Mode: Sets the text input mode
as abc, Abc, ABC, T9 abc, T9 Abc, T9 ABC
and 123.
] Text Entry Settings: Text Entry
Languages allows you to set the text entry
language to English, Spanish or French. T9
Next Word Prediction is available when it
is set to On. Use T9 Dictionary to add
words or delete/reset/modify words.
] Cancel: Allows you to exit the text input
mode without saving your message.
(Menu 2.9.2)
Page 59

Messaging
Signature
This feature allows you to create your Text
signature. You can use symbols, text templates
and contacts as part of the signature.
Message Settings
Text Message
]
] Email Gateway: You can send the text
] Message Subject: You can enter the SMS
] Insert Signature: You can insert your own
Multimedia Message
]
] Message Subject: You can enter the MMS
(Menu 2.9.3)
Menu 2.0
(Menu 2.0.1)
Message Center Number: If you want to
send a text message, you can get the
address of the SMS center by using this
menu.
message to an Email Address via this
gateway.
Subject from this menu.
signature (Menu 2.9.3) that you created.
(Menu 2.0.2)
Priority: You can set the priority of the
message you choose.
Subject when this menu is on.
] Validity Period: This network service
allows you to set how long your multimedia
messages will be stored at the message
center.
] Send Delivery Receipt: Allows you to send
a delivery confirmation mail for a Multimedia
Message.
] Send Read Receipt: Allows you to send a
message read confirmation mail for a
Multimedia Message.
] Download Options
- Download Without Ask: Allows
Multimedia Message to be downloaded
automatically.
- Ask Always: You can download a
multimedia message manually.
- Discard: Used when user reject to
download Multimedia Message.
] Message Center: The details for the
Multimedia gateway are pre-loaded onto
your handset and should not be changed.
55
Page 60

Messaging
Voicemail
This menu allows you to set the voicemail
center number if this feature is supported by
the network service provider. Please check with
your network service provider for details of
their service in order to configure the handset
accordingly.
Service Messages
You can set the Service option to determine
whether you will receive service messages or
not.
(Menu 2.0.3)
(Menu 2.0.4)
56
Page 61

Recent Calls
You can check the record of missed, received,
and dialed calls only if the network supports
Calling Line Identification (CLI) within the
service area.
The number and name (if available) are
displayed together with the date and time of
the call. You can also view call times.
Missed Calls
• View the number, if available, and call it or
save it in the Address Book.
• Enter a new name for the number and save
both in the Address Book.
• Send a message using this number.
• Delete the call from the list.
Dialed Calls
• View the number, if available, and call it or
save it in the Address Book.
• Enter a new name for the number and save
both in the Address Book.
• Send a message using this number.
• Delete the call from the list.
Menu 3.1
Menu 3.2
Received Calls
• View the number, if available, and call it or
save it in the Address Book.
• Enter a new name for the number and save
both in the Address Book.
• Send a message using this number.
• Delete the call from the list.
All Calls
Allows you to view all of missed, received, and
dialed call records.
Call Duration
This allows you to view the duration of incoming
and outgoing calls. You can also reset the call
times. The following timers are available:
Menu 3.3
Menu 3.4
Menu 3.5
Last Call
Length of the last call.
Received Call
Length of the incoming calls.
Dialed Calls
Length of outgoing calls.
57
Page 62

Recent Calls
All Calls
Total length of all calls made and incoming
calls received since the timer was last reset.
Data Counter
You can check the Sent, Received or All data
volumes and Reset all.
58
Menu 3.6
Page 63

MEdia Net
This menu shows how to access the Internet
by launching the WAP browser.
MEdia Net is one of the services provided by
AT&T and it gives you access to all the cool
things you can do with your wireless phone.
n Note
Check the availability of WAP services, pricing
and tariffs with your network operator and/or the
service provider whose service you wish to use.
Service providers will also give you instructions
on how to use their services.
Please contact your service provider to open an
Internet account.
To launch the browser in standby mode, press
and hold down the key.
Once connected, the homepage is displayed.
The content depends on the service provider.
To exit the browser at any time, press the
key. The idle screen is displayed.
Menus for the Browser
You can surf the Internet using either the
phone keys or the WAP Browser menu.
Using the Navigation Keys
When surfing the Internet, the keys function
differently from phone mode.
Key Description
up/down navigation
key
Scroll each line of
the content area
Using the WAP Browser Menu
There are various menus available when
surfing the Internet.
MEdia Net Home
This connects to the homepage which is
defined in the activated account. The default
account connects to AT&T’s homepage.
Bookmarks
This function allows you to store and edit
frequently accessed sites. The following
[Options] are available.
n Note
Your phone may have some pre-installed
bookmarks for sites not affiliated with LG. LG
does not warrant or endorse these sites. If you
choose to access them, you should take the
same precautions for security or content as you
would with any site.
View: Display the bookmark title and URL.
]
Menu 4.1
Menu 4.2
59
Page 64

MEdia Net
] Connect: Connect to the selected bookmark
site.
] New: Add a new bookmark manually.
] Edit: Modify the existing bookmark item.
] Delete: Allows you to erase the selected
bookmark.
] Send URL: Allows the bookmark information
to be sent via SMS to another person.
] Delete All: Allows you to erase all
bookmarks.
n Note
Pre-installed bookmarks cannot be deleted or
edited by users.
In order to change the text input mode for symbol
input, please refer to the General Functions
section.
Saved Pages
This saves the page on display as an off-line
file. A maximum of 20 pages can be saved.
Enter URL
Input the URL manually to connect to the
Internet site.
Menu 4.3
Menu 4.4
60
Recent Pages
You can manage the list of the Internet pages
you visited.
Security
A list of the available certificates is shown.
] Certificates: You can see the list of
certificates and view them in detail.
] Clear Session: Removes the secure
session.
Browser Settings
Accounts
This includes the network information used to
connect the browser to the Internet.
Select the desired account by pressing the soft
key, which is labeled as “Activate”. This will
activate the account that will be used for
future connection.
MEdia Net is the predefined account that is set
as default.
] Activate: Select the account among the list
(Menu 4.7.1)
of accounts, so it can be used for future
connection.
Menu 4.5
Menu 4.6
Menu 4.7
Page 65

MEdia Net
] View: Allows you to see the specific
account information.
] Edit: Allows you to change the account
information.
] Delete: Allows you to delete the account.
] New: Allows you to create a maximum of 20
new accounts.
n Note
You cannot edit and delete pre-installed
accounts.
In order to create a new account, please fill in
the network information.
1. Account Name: Name associated with
new account.
2. Homepage: Homepage URL.
3. Connection Mode: Select from TCP with
Proxy, TCP without Proxy, UDP(CO), UDP(CL).
4. Proxy Address: Proxy server address.
5. Proxy Port Number: Proxy server’s port
number.
6. Security: Select the secure or non-secure
mode.
7. Time Out: Values between 10 to 600
seconds.
8. Network Profile: You can choose one from
the network profiles. Note you can create a
new network profile by selecting the list
option on the center key.
n Note
1. The account information will be available from
your operator.
2. Creating or editing an account requires care.
The browser cannot connect to the Internet if
the account information is not correct.
Primary Storage
(Menu 4.7.2)
You can assign the primary storage to
Handset or Memory Card.
Cache Settings
(Menu 4.7.3)
The web pages you have accessed are stored
in the memory of the phone.
] Clear Cache: Remove all cached data in the
memory.
] Allow Cache: Set a value to determine
whether a connection attempt is made
through the cache or not.
n Note
A cache is a buffer memory, which is used to
store data temporarily, especially when it is
online.
61
Page 66

MEdia Net
Cookie Settings
The information or services you have accessed
are stored in the cookie.
] Delete Cookies: Remove all cookies.
] Allow Cookies: Set a value to determine
whether a connection attempt is made
through the cookie or not.
Character Encoding
Select a character set from the following list:
1 Automatic 2 English(ASCII)
3 English(ISO) 4 English(LATIN)
5 Unicode(UCS2 BE) 6 Unicode(UCS2 LE)
7 Unicode(UCS2 Auto) 8 Unicode(UTF-16 BE)
9 Unicode(UTF-16 LE) 0 Unicode(UTF-16 Auto)
* Unicode(UTF-8)
Scrolling Control
This allows you to determine the scroll speed
and select from 1 Line, 2 Lines or 3 Lines.
Show Image
This allows you to view pictures when
browsing.
(Menu 4.7.4)
(Menu 4.7.5)
(Menu 4.7.6)
(Menu 4.7.7)
62
AuthWallet
If set to On, the user’s personal information
such as ID and Password used to access the
Internet site will be saved automatically for
future use.
Online menu
Once you are connected to the Internet, the
following menu options are available:
] Back: Moves to the previous page.
] Forward: Moves to the next page.
] Refresh: Loads the current page again.
] Home: Moves to the initial homepage.
] Enter URL: Connects to the specific URL
after editing.
] Recent Pages: You can manage the list of
the Internet pages you visited.
] Bookmarks: You can add or save the
current page to Bookmark or view the list
saved under Bookmark.
] Settings: You can set browser related
options such as Clear cache, Clear cookies,
etc.
(Menu 4.7.8)
Page 67

AT&T Mall
Shop Tones
This menu option connects to AT&T’s ringtone
download site.
n Note
Additional charges may incur when downloading
ringtones. Contact your service provider for
further information.
Shop Games
This menu option connects to AT&T’s game
download site. This allows users to download
the various games by connecting to the
Internet.
n Note
Additional charges may incur when downloading
games. Contact your service provider for further
information.
Shop Graphics
This menu option connects to AT&T’s graphic
download site.
n Note
Additional charges may incur when downloading
graphics. Contact your service provider for further
information.
Menu 5.1
Menu 5.2
Menu 5.3
Shop Multimedia
This allows you to connect to AT&T's
multimedia download site.
n Note
Additional charges may incur when downloading
multimedia contents. Contact your service
provider for further information.
Shop Applications
This menu option connects to AT&T’s
application download site. This allows users to
download the various applications by
connecting to the Internet.
n Note
Additional charges may incur when downloading
applications. Contact your service provider for
further information.
MEdia Net Home
This connects to the homepage. The homepage
is the site which is defined in the activated
account.
Menu 5.4
Menu 5.5
Menu 5.6
63
Page 68

Cellular Video
Cellular Video (CV) brings you quick, ondemand access to crystal clear news, sports,
weather and entertainment video clips. Catch
up on TV’s hottest shows, funniest comedians,
biggest headlines and latest sports scores. You
can even personalize your homepage for quick
access to your favorites. In addition, the CV
service automatically streams localized
weather information to your personalized
“News & Weather” page each and every day.
To access CV:
1. From standby mode, press the Left Soft Key
to access the Menu.
2. Scroll to and select CV (option 6).
3. Select a category and play a clip.
64
Page 69

My Stuff
Games
Java is a technology developed by Sun
Microsystems. Similar to the way you would
download the Java Applet using the standard
Netscape or MS Internet Explorer browsers,
Java MIDIet can be downloaded using a WAP
enabled phone. Depending on the service
provider, Java based programs such as Java
games can be downloaded and run on a phone.
Once downloaded, the Java program can be
viewed within the Games menu where you can
select, execute or delete. Java program files
saved in the phone or memory card are in .JAD
and .JAR formats.
n Note
The JAR file is a compressed format of the Java
program and the JAD file is a description file that
includes all detailed information. From the
network, prior to download, you can view all
detailed file descriptions from the JAD file.
Warning
n
Only J2ME (Java 2 Micro Edition) based
programs will run in a phone environment.
J2SE (Java 2 Standard Edition) based programs
will only run in a PC environment.
Menu 7.1
Shop Games: This menu option connects to
]
AT&T’s game download site.
] Games List: You can see the default and
downloaded games in the list.
Applications
This menu displays the list of Java programs
downloaded using WAP. All previous
downloaded programs can be selected,
deleted, or viewed in detail within the
Application menu.
] Shop Applications: This menu option
connects to AT&T’s application download
site.
] Applications List: You can see the
downloaded applications in the list.
AT&T Music
Music Player
All Songs: You can view the entire playlist
]
in the internal/external memory.
] Playlists: You can create your own playlists
by choosing songs from the All Songs menu
list.
(Menu 7.3.1)
Menu 7.2
Menu 7.3
65
Page 70

My Stuff
] Artists: Shows the list of artists of all the
songs in internal/external memory, and
shows the song of chosen artist.
] Albums: Shows the list of albums of all the
songs in internal/external memory, and
shows the song of chosen album.
] Genres: Shows the list of genres of all the
songs in internal/external memory, and
shows the song of chosen genre.
n Note
Copyrights of music files may be protected by
copyright and intellectual property laws.
Therefore, it may be required to obtain necessary
permissions or licenses before you can reproduce
or copy the materials. In some countries,
national law prohibits copying of copyrighted
materials for personal archive as well. Prior to
downloading or copying the files, please ensure
that you adhere to the applicable laws and
laws of corresponding countries or regions
regarding the Terms of Use of materials.
66
Playing Music
To listen to music that you have transferred
to your phone, follow these quick easy steps:
Playing Music with the Flip Open
1. Press the Menu 7->3, select Music
Player (1), then All Songs (1) or
Playlists (2). Select a song or playlist.
2. Press to play/pause. Press up or
down on the Navigation Key to change
the volume, and left or right to go to the
previous or next song.
3. Press the Left Soft Key for Minimize to
access other phone functionality while
music is playing.
4. Press the key to browse for a song or
playlist again.
Adding Music To Your Handset
Before You Get Started
To transfer music from your PC to your device,
you will need the following:
• Windows Media Player 10 or above
• Music on your PC in one of these formats:
MP3, .AAC, AAC+ or WMA
Page 71

My Stuff
• A MicroSD card (supports up to 4GB cards)
• USB data cable
*microSD card and USB data cable sold
separately; go to att.com/wireless
n Note
Music stores may require other software to be
downloaded and separately installed or see User
Guide for use of Windows Explorer to drop and
drag tracks from you computer to phone.
Warning
n
Do not disconnect phone while the transfer is in
progress.
Note
n
Not compatible with iTunes and/or iTunes files.
Drag and Drop Music Using CU515 As A
Mass Storage Device
1. Insert a MicroSD memory card.
2. Power on the phone.
3. Connect the device to a PC using a CU515
USB data cable.
4. A bubble may appear, "Found New Hardware
LG USB Modem".
5. Access My Computer on the PC.
6. The phone's memory card will be listed under
"Devices with Removable Storage" in the
same location as an optical drive.
n Note
The PC will automatically assign a drive letter.
7. File explore in a new window for desired
music files.
8. Drag and drop the desired music content
from the PC window to the "Storage Card"
window.
9. Disconnect the device from the cable.
10. Access the Music Player on the phone.
n Note
Sideloading is not supported via Bluetooth.
Note
n
If the target computer does not detect the newly
connected handset as Mess Storage, please
follow steps 11 - 16.
11. When the Idle screen displays, press the
Menu soft key.
12. Select Settings and press the Select soft key
or the [OK] key.
13. Select Connection and press the Select soft
key or the [OK] key.
67
Page 72

My Stuff
14. Use the Up or Down Navigation key to
highlight Select USB Connection Mode and
press the Select soft key or the [OK] key.
15. Use the Up or Down Navigation key to
highlight Mass Storage and press the Select
soft key or the [OK] key.
16. Reconnect the device to a PC.
Adding Music to your Handset
Music files can be added to your handset by
using one or more of the following methods:
• Download music and ringtones over the AT&T
network directly to your device by using the
shopping for music feature.
• From your existing digital media collection
thru Windows Media Player
®
.
• From music stores through the applicable
music client.
Transferring Music from the Digital Music
Stores
In order to download music from the computer
to your phone, handset, a microSD card and
USB data cable are required. These items are
sold separately; go to att.com/wireless
1. Using your computer, open your preferred
WMDRM PC music management client.
68
2. Download the selected song to your library.
3. Insert the microSD card into the handset.
4. Use the USB adapter cable to connect the
handset to the target PC. When you try to
connect handset on your PC, the handset
displays “Connecting as Music Sync...”
5. Once the USB connection has been
established, the handset displays " Connected
as Music Sync Mode. Do not disconnect
during transfer. " and the computer screen
then shows the CU515 device. If the detection
occurs, skip to step 11.
n Note
If the target computer does not detect the newly
connected handset or provide an MTP Player
dialog window on the PC screen, please follow
steps 6 - 10.
6. When the Idle screen displays, press the
Menu soft key.
7. Select Settings and press the Select soft key
or the [OK] key.
8. Select Connection and press the Select soft
key or the [OK] key.
9. Use the Up or Down Navigation key to
highlight Select USB Connection Mode and
press the Select soft key or the [OK] key.
Page 73

My Stuff
10. Use the Up or Down Navigation key to
highlight Music Sync and press the Select
soft key or the [OK] key.
11. Highlight the song you wish to download to
the handset.
12. Using your right mouse button, click on the
highlighted song and select Transfer Track(s)
to Portable Device from the drop-down
menu. This step begins the download
process.
Transferring Music using Windows Media
Player
A USB cable, microSD card, and a current
version of the Windows Media Player are
required for this procedure.
1. Open Windows Media Player on your
computer (version 10.0 or higher).
2. Use the USB adapter cable to connect the
handset to the target PC. When you try to
connect handset on your PC, the handset
displays “Connecting as Music Sync...”
3. Once the USB connection has been
established, the handset displays " Connected
as Music Sync Mode. Do not disconnect
during transfer. " and the computer screen
then shows the CU515 device.
n Note
If the target computer does not detect the newly
connected handset or provide an MTP Player
dialog window on the PC screen, please follow
steps 6 - 10 from the previous "Transferring
Music from the Digital Music Stores" on page.
4. From within the Windows Media Player
application, click on the Sync tab. Previously
downloaded songs are then listed on the left
side of the application.
5. Choose the destination location for the media
files. The CU515 Music Sync Player appears
in a drop-down list on the right side of the
screen.
n Note
If there are no items present in the playlist, click
the Edit Playlist button and begin adding the
music files from among the various media
categories.
6. Click on the checkmark boxes (to the left of
the song entry) to select the song you want
to synchronize to your handset.
7. Click the Start Sync button at the upper right
corner of the application to download the
selected songs to your handset. A
“synchronization in progress” message
appears on the application. Do not unplug
69
Page 74

My Stuff
the handset during this process. Once
complete, a Music folder appears below the
CU515 Music Sync Player on the right of the
Sync tab.
8. It is now safe to unplug the USB connector
from the handset.
Importing a Playlist from a 3rd Party
Application
1. Open Windows Media Player on your
computer (version 10.0 or higher).
2. Use the USB adapter cable to connect the
handset to the target PC. When you try to
connect handset on your PC, the handset
displays “Connecting as Music Sync...”.
3. Once the USB connection has been
established, the handset displays " Connected
as Music Sync Mode. Do not disconnect
during transfer. " and the computer screen
then shows the CU515 device.
n Note
If the target computer does not detect the newly
connected handset or provide an MTP Player
dialog window on the PC screen, please follow
steps 6 - 10 from the previous "Transferring
Music from the Digital Music Stores" .
4. From within the Windows Media Player
application, click on the Library tab.
70
5. From the left side of the Library tab, click on
All Music. The right side of the page is then
populated with all of the songs which the
player has previously found.
6. Right click on the song entry and select, Add
to.. > Additional Playlists.
7. From the Add to Playlist dialog, click the New
button and type in a unique playlist name.
8. Click OK when you are done entering the new
playlist name. The new Windows Media
playlist is then displayed within the My
Playlist section of the Library tab (left side).
9. Drag and drop the newly created playlist from
the My Playlist section to the phone Music
Sync Player listed just above it. The phone
Music Sync Player appears on the left side of
the screen.
n Note
If there are no items present in the playlist, click
the Edit Playlist button and begin adding the
music files from among the various media
categories.
10. It is now safe to unplug the USB connector
from the handset.
Page 75

My Stuff
n Note
1. If you connect your handset with a Specific USB
Hub on your PC, the above music sync service
will not work. So we recommend a direct USB
Connection on your PC rather than HUB.
2. Once you connect your mobile phone to the
PC, the phone's screen will display the
"Connecting as Music Sync..." message. If the
message does not change to "Connected as
Music Sync Mode. Do not disconnect during
transfer.", check if your PC is running Windows
XP and Windows Media Player 10 or later. If
your PC is running Windows XP and Windows
Media Player 9, please download WMP10 or
WMP11 by visiting Microsoft site. If your PC is
running XP and WMP10 or later but
"Connecting as Music Sync..." message does
not disappear from the screen after you have
tried to establish connection three to four
times, perform one of the following methods
and try again.
Be aware that all of the existing data will be
erased on microSD card if you use the below
process.
A. Follow those steps: settings->reset settings-
>Clear Memory->memory card.
B. Format external memory using Mass
Storage.
C. Remove external memory from the phone,
and insert external memory to the phone
and format.
3. If you have connected your handset to PC, and
trying to send file using Music sync, but the
function is not working properly, please check
the below lists.
A. Check whether the file length you are
transmitting is not too long.
B. Check whether license of the file you are
transmitting is not expired.
C. Check whether the file you are transmitting
is the correct format for your phone (MP3,
WMA, AAC).
If you have checked the above three lists, and
still the file is not transmitted, please try the
actions on 2.
4. If you transfer files as shown below, the
transferred files will not show in a third party
application or in Windows Media Player.
A. Transmitted a file using Mass Storage, but
not using Music sync function.
B. Transmitted a file by directly inserting
external memory on PC.
5. When you have transferred files with Music
Sync feature and you want to delete them
from your phone, you should connect the
phone to your PC again with Music Sync to
delete them. Even if you have deleted files
transferred with Music Sync feature as shown
below, delete them again with Music Sync.
Otherwise you will not be able to transfer files
identical to the deleted files again.
71
Page 76

My Stuff
A. Deleted a file using Mass Storage, but not
using Music sync function.
B. Deleted a file by directly inserting external
memory on PC.
C. Deleted a file using delete function on the
phone.
Shop Music
(Menu 7.3.2)
Selecting Shop Music from the AT&T Music
sub menu launches the browser to a music
landing page from which you can purchase
music from 3rd party stores and personalization
content from AT&T. Some sites are data
intensive (i.e. previews via streaming) so the
user should have an unlimited MEdia bundle
like the MEdia Max 200.
n Note
Additional charges may incur when downloading
ringtone.
Contact your service provider for further
information.
72
MusicID
(Menu 7.3.3)
MusicID is an application which uses the
onboard microphone to analyze a song sample
and then compare it to a remote database of
songs. Once the application completes the
analysis of the song sample, it then provides
you with the name of the song, artist and
album art as well as opportunities to buy
related content.
] ID song!: Allows you to find out information
of unknown music by sending the sound of
the unknown music to the web. If the web
identifies the song, it returns with relevant
information of the song.
] manage IDs: Once a song has been
identified through the MusicID, you can see
the list of songs in this folder.
] help me out: Information for how to use this
java application.
] exit: Ends the application and exits.
Page 77

My Stuff
XM Radio
Selecting XM Radio from the AT&T Music sub
menu launches a preinstalled java application.
The application allows the user to listen to
dozens of channels of digital radio on your
mobile phone. Get unlimited access to
commercial-free music, the latest Hip Hop,
R&B, Rock, Jazz, Country anywhere you go.
Warning: This product will use a large amount
of data and you are responsible for all data
charges incurred. AT&T strongly recommends
that you subscribe to a MEdia Max data bundle
IN ADDITION to this purchase. Call AT&T at
611 to sign up for the MEdia Max package if
needed.
Music Videos
Selecting Music Videos from the AT&T Music
sub menu launches a browser which takes you
directly into the Music Video section of Cellular
Video. From this menu, you will have access to
music videos from the latest artist as well as
programming from AT&T, MTV,VHI, and CMT
among others. Simply click on a video and
begin watching!
(Menu 7.3.4)
(Menu 7.3.5)
n Note
Additional charges may incur when downloading
music video contents.
Contact your service provider for further information.
The Buzz
Selecting The Buzz from the AT&T Music sub
menu launches a preinstalled java application
(e.g. Billboard). The application allows the user
to obtain relevant music industry news and
information including charts, news, and concert
locations.
Community
Selecting Community from the AT&T Music sub
menu launches the browser to either one or
more of the hot user communities. The
application allows the user to interact with
their friends and the community as well as
review artist fan sites.
Music Apps
Selecting Music Apps from the AT&T Music
sub menu launches the browser to an area
where the user can purchase music related
applications for download.
(Menu 7.3.6)
(Menu 7.3.7)
(Menu 7.3.8)
73
Page 78

My Stuff
Audio & Ringtones
] Shop Tones: This menu option connects to
AT&T’s ringtone download site.
] Record Voice: You can record your own
audio by pressing the center key [OK].
] Files: You can view the audio files in the
list.
Graphics
] Shop Graphics: This menu option connects
to AT&T’s graphic download site.
n Note
Additional charges may be incurred when
downloading graphics. Contact your service
provider for further information.
Take Photo: You can take your own photo
]
by pressing the center key [OK].
] Make Animated GIF: You can make an
animation file with the selected images in
the list.
] Files: You can view the graphic files in the list.
Menu 7.4
Menu 7.5
74
Video
] Record Video: You can record your own
video by pressing the center key [OK].
] Files: You can view the video files in the list.
n Note
DRM (Digital Rights Management) Contents
Copyright protected contents.
DRM sometimes restricts some functions, such
as send, and edit. The indicates content
controlled by DRM protection.
Tools
Alarm Clock
The alarm function allows you to set up
multiple separate alarms. You can also set the
time, repetition interval and alarm sound.
Select your desired alarm setting to configure
from the alarm list. If there is no alarm setting,
press the left soft key [New] to add a new
alarm.
] Time: Select the desired set time mode
using the navigation key. Input your desired
alarm time by specifying the hour and
minute. If the time is in 12 hour clock format,
you have to select either am’ or pm’ using
the center soft key.
(Menu 7.7.1)
Menu 7.6
Menu 7.7
Page 79

My Stuff
] Repeat: Select the desired repeat mode
using the navigation key.
] Alarm Tone: Select the alarm sound to use
for the alarm using the key.
] Memo: Input alarm name.
Calendar
(Menu 7.7.2)
When you enter this menu a calendar will be
displayed. The square cursor is used to locate
a particular day. The bottom bar on the
calendar indicates schedule(s) for that day. This
function helps to remind you of the schedule.
The phone will sound an alarm tone if it has
been set for a specific schedule item.
Key Description
up/down navigation key Weekly
left/right navigation key Daily
key/ key
key/ key
Annually
Monthly
The following [Options] are available:
] Search: Allows you to search the saved
schedule(s) by pressing the character keys.
] Delete: Allows you to delete the selected
schedule.
] Send via: Sends the selected schedule by
Message or Bluetooth.
] Set Holiday: Allows you to set your
personal holiday for the selected date.
] View All: Allows you to view all saved
schedules.
] Go to Date: Allows you to jump to a specific
date.
] Delete Schedules: Deletes the defined
schedules such as Old Schedules or All
Schedules.
Notepad
(Menu 7.7.3)
You can create up to a maximum of 30 memos.
1. Select a memo pad you want to edit.
2. Press the left soft key [New] to create a new
memo.
3. Input the memo and press the center key
[Save] to save.
Calculator
(Menu 7.7.4)
The calculator function allows you to add, subtract,
multiply and divide. You can input numbers using
the number keys, and input operators using the up,
down, left, and right navigation keys.
You can input a decimal point by pressing the
[Star] key.
75
Page 80

My Stuff
Whenever you press the key, characters
are sequentially deleted in reverse order.
Tip Calculator
This feature allows you to quickly and easily
calculate the tip amount based on the total bill
as well as the split of the total bill based on
the number of people.
World Clock
The World clock function provides time
information on major cities worldwide.
1. You can select a desired city as a base using
the left soft key [Map].
2. You can view the time of desired city using
the right soft key [Options] - [Change City].
Tasks
This feature allows you to save and manage a task.
1. To add a new To do item, select the left soft
key [New] in the Task enquiry screen.
2. Input due date, notes, priority and status for
the new Task.
3. Press the left soft key [Save] to save the
Task item.
The following [Options] are available in the
Task list.
(Menu 7.7.5)
(Menu 7.7.6)
(Menu 7.7.7)
76
] Status: Allows you to change the status of
the selected task as In Progress or
Completed.
] Delete: Deletes the selected task.
] Send Via: Enables the selected task to be
sent via Message and Bluetooth.
] Edit: Allows you to edit a saved task.
] View Calendar: The calendar pop-up
window is displayed.
] Delete Tasks: Deletes All Completed, All
Past Tasks or All Tasks.
Stop Watch
This menu allows you to record the elapsed
time of an event. The duration of an individual
lap time (up to 20 times) and the total time can
be displayed.
] New Time
1. To start timing, press the center key
[Start]. The running time is displayed as
HH.MM.SS.hh (hours, minutes, seconds,
hundredths of a second).
2. During the timing, you can record an
individual lap time by pressing the right
soft key [Lap]. Up to 20 lap times can be
recorded.
(Menu 7.7.8)
Page 81

My Stuff
3. You can stop or restart timing by pressing
the key.
4. To reset the stop watch, press the left soft
key [Reset].
] Saved Times: You can see the saved
recorded times which are in the lap time list
of the New Time option.
Unit Converter
This function converts any measurement into a
unit you want.
There are 6 types of units that can be
converted: Area, Length, Weight, Temperature,
Volume, and Velocity.
n Note
You can input a decimal number by pressing the
[Star] key.
Date Finder
The date finder shows the start date, the
target date and the number of remaining days.
D-Day Counter
1. To add a new D-Day Counter item, select the
left soft key [New].
2. Input the Date and notes when you add an item.
3. Press the left soft key [Save] to save the item.
(Menu 7.7.9)
(Menu 7.7.0)
(Menu 7.7.*)
] Edit: You can edit the selected item.
] Delete: You can delete the selected item.
] Show at Idle Screen: You can see the
Remaining days for this item (D-Day) on the
Idle screen top right corner.
] Delete All: Deletes all saved items.
Camera & Recordings
Take Photo
Using the camera module built into your phone,
you can take pictures of people or events while
on the move. Additionally, you can send photos
to other people in a picture message. The right
soft key [Options] will bring up the following
options.
] Change to Video Mode: Go to the video
application, enables you to record a video
clip.
] Video Share: You can make a Video Share
Call. For more details, refer to ‘Video Share
Calling’ (page 28).
] Resolution: Sets the image size to
1280*960 (default), 640*480, 320*240 or
160*120. The selected image size appears
on the capture screen.
(Menu 7.8.1)
Menu 7.8
77
Page 82

My Stuff
] Quality: You can select the desired quality of
photo by selecting either Super Fine, Fine or
Normal mode by using the navigation keys.
] Primary Storage: You can assign the
primary storage to Handset or Memory Card.
] View Full Screen/Image: Allows you to
view the subject in full screen or full image.
n Note
When user takes a picture as Full Image,
wallpaper will be shown as full image, while it
will display as Full screen after setting the
wallpaper on it if user takes a picture using Full
screen mode.
Multishot: This feature enables the amount
]
of continuous frames that can be taken at
one time. The number of frames is
determined by the image size setting.
] Self Timer: Determines the camera timer.
] Advanced Settings
- White Balance: This adjusts the Light
Effect level and you can select from the
following options: Auto / Daylight /
Incandescent / Cloudy / Fluorescent / Night
mode
78
- Color Effects: Allows you to apply special
effects to the picture. Press the left or right
navigation key to find the tone you want to
use from the following options: Color,
Sepia, Mono and Negative.
- Shutter Tones: Allows you to select a
sound when you press the shutter. Tone 1 /
Tone 2 / Tone 3 /Off
] Default Settings: This restores the default
camera settings (Size, Brightness, Zoom,
etc.).
n Note
In Take Photo mode, you can adjust the zoom
scale by using the up/down navigation keys. The
maximum zoom scale depends on the resolution
as follows.
Resolution Zoom scale
1280*960 Level 1
640*480 Level 1~Level 20
320*240 Level 1~Level 20
160*120 Level 1~Level 20
In Take Photo mode, you can adjust the
brightness by using the left/right navigation key.
Page 83

My Stuff
Gallery
Capture
Options
Gallery
Capture
Options
n Note
• Zooming: You can zoom in/out using the
up/down navigation keys except
1280*960(default phone setting).
• Brightness: You can adjust the brightness
level of the screen using the left/right
navigation keys and there are 9 level of
setting.
Brightness
Gallery
Capture
Zooming
Options
[Internal Display]
Gallery
Capture
Options
[Internal Display]
Record Video
(Menu 7.8.2)
You can record a video clip in this menu by
pressing the Camera key. Before starting to
record, press the right soft key [Options] to set
the following values. Select the desired value
and press the key to confirm.
] Change to Photo Mode: Go to the camera
application which enables you to take a still
picture.
] Video Share: You can make a Video Share
Call. For more details, refer to ‘Video Share
Calling’ (page 28).
] Video Record Mode: Sets the recording
mode to either MMS Video Mode, Video
Share Mode or General Mode.
] Quality: Determines the quality of a video
clip.
] Primary Storage: You can assign the
primary storage to Handset or Memory
Card.
] White Balance: This adjusts the light effect
level and you can select from the following
options: Auto / Daylight / Incandescent /
Cloudy / Fluorescent/ Night mode.
] Color Effects: Allows you to apply special
effects to the video clip. Press the Left/Right
79
Page 84

My Stuff
Navigation Keys to find the tone you want to
want to use from the following options:
Color, Sepia, Mono and Negative.
] Default Settings: This restores the default
camera settings (Size, Brightness, Zoom,
etc.).
n Note
In Video Record mode, you can adjust the zoom
scale by using the up/down navigation keys. The
maximum zoom scale depends on the resolution
as follows.
Resolution Zoom scale
176*144 Level 1~Level 20
In Record Video mode, you can adjust the
brightness by using the left/right navigation keys.
Record Voice
(Menu 7.8.3)
You can record an audio clip in this menu. The
recorded audio file is saved automatically in
the Audio & Ringtones menu (Menu 7.4).
The right soft key [Options] will bring up the
following options.
] Record Mode: Sets the recording mode to
either MMS or General.
] Quality: Determines the quality of an audio clip.
80
] Primary Storage: You can set the primary
storage of the recorded audio to the Handset
or the memory Card.
Other Files
Menu 7.9
When you receive files of an undefined format
(such as .vcs, .vcf, etc.) via E-mail, the files are
saved in this folder.
The following [Options] are available.
] Delete: You can delete the selected file.
] Rename: You can edit the name of the
selected file.
] New Folder: You can create a new folder.
] Sort By: You can sort the folders by name,
date and type.
] Delete All: You can delete all files.
] Multi Delete: You can delete several files
at once.
] Information: You can view information
about the selected folder.
Memory Card
Menu 7.0
This function shows the status of the external
microSD card memory.
Page 85

Address Book
Contact List
This menu allows you to save and manage
contact address information. The Contacts’
functions allow you to add a new address or
search saved contact addresses by name.
New Contact
This menu allows you to add a new contact
address. You can enter contact address
information including name, phone numbers,
email addresses, group information items,
memos, ring tones, and image (photograph).
You have to select the Handset or the
SmartChip memory using the left and right
navigation keys.
Caller Groups
This menu allows you to manage group
information. By default, there are 4 groups:
family, friends, colleagues and school. You can
also configure a ring tone for a group so that
the group ring tone sounds when a call from a
specific contact address within that group
arrives and there is no ring tone configured for
the specific contact address.
Menu 8.1
Menu 8.2
Menu 8.3
Speed Dial List
This menu allows you to configure the speed
dial numbers. You can select a number from 2
to 9 as a speed dial. You can configure speed
dial numbers for any of the 8 numbers for a
specific contact address so that a contact
address may have multiple speed dial
numbers.
Copy All Contacts
This menu allows you to copy all of the
information from your SmartChip, e.g. name,
handset number, etc., to your handset. If a
name is duplicated during the copying
operation, the information is also duplicated.
] SmartChip to Handset: You can copy the
entry from the SmartChip card to the phone
memory.
] Handset to SmartChip: You can copy the
entry from the handset memory to the
SmartChip card (not all the data will be
copied).
Menu 8.4
Menu 8.5
81
Page 86

Address Book
Delete All Contacts
You can delete all entries in the SmartChip
and the Handset.
Press the [END] key to return to standby
mode.
Service Dial Numbers
You can view the list of Service Dialing
Numbers (SDN) assigned by your network
provider. Such numbers could include the
emergency, directory assistance and voice mail
numbers.
1. Select the Service dial number option.
2. The names of the available services will be
shown.
3. Use the up/down navigation keys to select a
service. Press the [SEND] key.
My Business Card
This option allows you to make your own name
card. Key in the Name, Mobile number, Office
number, Fax number and E-mail address.
Menu 8.6
Menu 8.7
Menu 8.8
82
View Options
You can select different options by which to
display names in your address book: Handset &
Smartchip, Handset Only or Smartchip Only.
My Numbers
This displays your phone numbers stored in the
SmartChip.
Menu 8.9
Menu 8.0
Page 87

Settings
Audio & Ringtones
There can be 4 sound modes: General, Vibrate
All, Silent and Ear Mic. General, Vibrate, and
All Silent modes can be changed from the
Volume menu under Ring tone. In addition,
pressing and holding the [Star] key on idle
screen mode can swap Normal and Manner
mode. Ear Mic is available when respective
instruments are attached.
Shop Tones
Connects to AT&T Ring tone Shops.
Ringtones
Shows and plays ring tones. These can be
downloaded ring tones from Ring tone shops.
Volume
This menu controls Ringtone, Key Tone, Call
and Multimedia volume. It is available on Ring
tone volume level 1~7.
Message Alert Tones
Allows you to select an alert tone which is
played when a message is received. You can
select any one from 10 message alert tones.
n Note
Full length music tracks cannot be set as ringtones.
(Menu 9.1.1)
(Menu 9.1.2)
(Menu 9.1.3)
Menu 9.1
(Menu 9.1.4)
Alert Type
Ringtones: Supports 3 ring alert types. Ring,
]
Ring and Vibration, and Ring after Vibration.
] Message Alert Tones: Supports 6 message
alert types. Ring Once, Ring Every 2 Min,
Ring Every 15 Min, Ring & Vibrate, Vibrate,
Silent.
] Other Alert Tones: You can elect to turn
Other Alert Tones Ring or Silent.
Key Tones
This menu option allows you to select a tone
that the phone sounds when a key is pressed.
You can select an option from Beep and
Voice.
Increasing Ringtone
Allows you to select an Increasing Ringtone
type which is played when a incoming call. You
can elect to turn this On or Off.
Power On/Off Tones
Allows you to select a Power On/Off tone. You
can elect to turn them to be On or Off.
(Menu 9.1.5)
(Menu 9.1.6)
(Menu 9.1.7)
(Menu 9.1.8)
83
Page 88

Settings
Display
Shop Graphics
Connects to AT&T’s graphic download site.
Wallpapers
You can select the background picture in
standby mode.
Backlight Timer
Use this to select whether or not the phone
uses the backlight.
Brightness
You can set the brightness of display
screen(Internal LCD and External LCD).
Menu Styles
You can configure the menu style to Icon style
or List style.
Languages
You can change the language for the display
text on your phone. This change will also affect
the Language Input mode.
Dialing Fonts
You can configure the font size and color of the
numbers which appear in the home screen
(Menu 9.2.1)
(Menu 9.2.2)
(Menu 9.2.3)
(Menu 9.2.4)
(Menu 9.2.5)
(Menu 9.2.6)
(Menu 9.2.7)
Menu 9.2
84
when you make a call.
Clocks & Calendar
This feature allows you to select the internal
LCD clock or Calendar display on the standby
screen.
Color Schemes
You can change the color of the menu, soft key
area, title bar area, and cursor by changing the
Color Schemes.
You can select the Color Schemes from
Orange, Metal, and Sky.
Bluetooth
Your phone has built-in Bluetooth wireless
technology, which makes it possible for you to
connect your phone wirelessly to other
Bluetooth devices such as a hands free device,
PC, PDA, a remote screen, or other phones.
Only one of the devices registered in your
phone can be connected at a time. (To make a
connection to the same type of device or
change Bluetooth preferences, disconnect the
existing device first.)
You can have a conversation via a cordless
Bluetooth hands-free phone or browse the
(Menu 9.2.8)
(Menu 9.2.9)
Menu 9.3
Page 89

Settings
Internet, wirelessly connected via a mobile
phone.
You can also exchange, for example, business
cards, calendar items and pictures.
MobiTV or XMRadio is supported through Only
Stereo Bluetooth.
Bluetooth A2DP Music Playing is available in
the Music Player Menu.
Hands-free profile
This icon appears when the hands-free
profile is used between the hands-free
device and the phone. This allows you to
call using a Bluetooth connection.
A2DP profile
This icon appears when the A2DP profile
is used between the stereo headset device
and the phone. This allows you to listen to
an audio clip. A2DP is the Advanced
Audio Distribution Profile, which provides
support for streaming either mono or
stereo audio using Bluetooth.
Hand-free +A2DP profile
This icon appears when both profiles of
the hands-free and the A2DP are used
between the compatible device and the
phone. This allows you to call and listen to
an audio clip using a Bluetooth
connection.
For using each device, see a manual that
comes with the device.
n Note
We recommend that your phone and the
Bluetooth device you are communicating with be
no more than 10 meters apart. The connection
may be improved if there are no solid objects in
between your phone and the other Bluetooth
device.
Turn On/Off
This menu sets the Bluetooth on or off using
the navigation key.
Search New Device
This function allows you to search and add
new device at once.
Paired Devices
This function allows you to view the list of all
devices that are paired with your phone at
once.
To add a new device, press the left soft key
[New]
(Menu 9.3.1)
(Menu 9.3.2)
(Menu 9.3.3)
85
Page 90

Settings
1. Select the [New] key to search the device
that can be connected and which is within
range.
2. If you want to stop searching, press the right
soft key [Cancel].
3. All of the devices found are displayed in the
pop-up menu.
Select the desired device by pressing the OK
key, and entering the password.
Settings
(Menu 9.3.4)
This menu allows you to configure the profile
for a Bluetooth.
] My Device Visibility
1. Selecting the Visible option exposes your
phone to other Bluetooth devices.
2. Selecting Hidden shows your phone only
to already paired devices.
] My Device Name: Allows you to change
the handset's name that can be seen by
other Bluetooth devices.
] Supported Services: Shows you all
services that CU515 supports.
] My Address: You can check your Bluetooth
address. You cannot change the default
setting.
86
] Primary Storage: You can assign the
primary storage to Handset Memory or
Memory Card.
Date & Time
Set Date
This allows you to enter the day, month and
year. You can change the date format via the
Date Format menu option.
Date Format
MM/DD/YYYY(month/day/year)
DD/MM/YYYY(day/month/year)
YYYY/MM/DD(year/month/day)
Set Time
This allows you to enter the current time. You
can choose the time format via the Time
Format menu option.
Time Format
12 Hours/24 Hours
Auto Update
Select On to set the phone to automatically
update the time and date according to the
current local time zone.
(Menu 9.4.1)
(Menu 9.4.2)
(Menu 9.4.3)
(Menu 9.4.4)
(Menu 9.4.5)
Menu 9.4
Page 91

Settings
Call
Call Forwarding
When this network service is activated, you
can direct your incoming calls to another
number, for example, to your voice mailbox
number. For details, contact your service
provider. Select one of the divert options, for
example, select If busy to divert voice calls
when your number is busy or when you reject
incoming calls.
The following options are available:
] All Voice Calls: Diverts voice calls
unconditionally.
] If Busy: Diverts voice calls when the phone
is in use.
] If No Answer: Diverts voice calls which you
do not answer.
] If Out of Reach: Diverts voice calls when
the phone is switched off or out of coverage.
] All Data Calls: Diverts to a number with a
PC connection unconditionally.
] All Fax Calls: Diverts to a number with a
fax connection unconditionally.
(Menu 9.5.1)
Menu 9.5
Send My Number
This network service allows you to set your
phone number to be displayed On or hidden
Off from the person you are calling. You can
select Set by Network if you prefer to have
different settings for different service
providers.
Auto Redial
Select On, your phone redials the number
you're trying to call up to 10 times after you
hear a quick, engaged signal. Press [END]
to stop the call attempts.
This feature attempts to redial numbers that
are engaged due to the wireless network. It
does not redial numbers to an engaged party.
n Note
There will be no alert indicating the call has been
connected.
You must stay on the line to hear when the call is
connected.
(Menu 9.5.2)
(Menu 9.5.3)
87
Page 92

Settings
Answer Mode
This allows you to determine how to answer
the phone.
] Any Key: You can answer an incoming call
by pressing any key, except the [END]
key.
] Send Key Only: You can only answer an
incoming call by pressing the [SEND]
key.
] Flip Open: When the phone rings, you can
answer a call simply by opening the flip.
Minute Minder
This option allows you to specify whether the
phone will beep every minute during an
outgoing call to keep you informed of the
length of the call.
Call Waiting
The network will notify you of a new incoming
call while you have a call in progress. Select
Activate to request the network to activate
call waiting, Deactivate to request the
network to deactivate call waiting, or View
Status, to check if the function is active or
not.
(Menu 9.5.4)
(Menu 9.5.5)
(Menu 9.5.6)
88
Call Reject
This menu allows you to enable or disable call
reject for all numbers or a specific number.
] Call Reject On/Off: This feature allows you
to reject or not the incoming calls
unconditionally by disconnecting. When the
Reject All Calls option is set, all incoming
calls are routed directly to Voicemail.
] Call Reject List: Configures conditional call
reject mode. Press the left soft key [New] to
add the phone number to be rejected to the
list. When you add a number to the list, you
can add the number by entering it directly or
by searching for the number in the Contact
List.
Video Share
Initial Notification
]
- On: If the Video Share Call service is
available and a voice call has been made,
a pop-up window will be shown on the
screen to ask whether to make a Video
Share Call or not.
- Off: No notification window is displayed
after the phone determines whether or not
the Video Share call service is available.
(Menu 9.5.7)
(Menu 9.5.8)
Page 93

] Auto Record
- On: Automatically starts recording Video
Share call images. You can view the
recorded videos on [My Stuff] – [Video].
- Off: Does not automatically start recording
video share call images.
] Service
- On: This option activates the Video Share
Call service.
- Off: If this option is selected, the Video
Share Call service will be unavailable even
in a 3G service area. (If the service is Off,
you will have to set it to On and restart the
phone in order to reactivate the Video
Share Call service).
Send DTMF Tones
You can send the DTMF (dual tone multifrequency) tones of the number on the display
during a call.
This option is helpful for entering a password
or account number when you call an
automated system, like a banking service.
(Menu 9.5.9)
Settings
89
Page 94

Settings
Menu User Feature
For hearing- /
TTY Full
speech- impaired
TTY+TALK For hearing-impaired can talk
TTY+HEAR For speech-impaired audible
TTY Off For regular users
TTY
(Menu 9.5.0)
Transmission/
Receiving Mode
text message transmission,
text message reception
voice transmission,
text message reception
text message transmission,
voice reception
voice transmission,
voice reception
Allows you to attach a TTY device enabling you
to communicate with parties also using a TTY
device.
A phone with TTY support is able to translate
typed characters to voice. Voice can also be
translated into characters and then displayed
on the TTY.
TTY mode (Tele Type writer)
TTY modes are as follows :
1. TTY Full:
- Users who cannot talk and hear send and
receive a text message through TTY
equipment.
90
When making communications
with a normal terminal
operator required
operator required
operator required
2. TTY Talk:
- Users who can talk but cannot hear receive a
text message and send voice messages
through TTY equipment.
3. TTY Hear:
- Users who can hear but cannot talk send a
text message and receive voice messages
through TTY equipment.
4. TTY Off:
- Normal users send and receive without TTY
equipment.
Connecting TTY Equipment and a
Terminal
1. Connect a TTY cable the TTY connection on
the terminal. (the TTY connection location is
the same as a hands-free ear socket)
Page 95

Settings
2. Enter the phone menu and set up the desired
TTY mode. (For a TTY mode, see below)
3. After setting a TTY mode, check the LCD
screen of the phone for the TTY icon.
4. Connect the TTY equipment to the power
source and turn it on.
5. Make a phone connection to the desired
number.
6. When a connection is made, use the TTY
equipment to type in and send a text
message or send a voice message.
7. The voice or text message from the receiver
end appears on the TTY equipment display.
Hearing Aid
If you select On, users having hearing aid with
T-Coil will have better quality of sound. This TCoil mode will remain On for all calls.
Security
Various codes and passwords are used to
protect the features and settings of your
phone. They are described in the following
sections.
(Menu 9.5.*)
Menu 9.6
Lock Handset
You can use a security code to avoid
unauthorized use of the phone.
If you set phone lock to When Power On, the
phone will request a security code whenever
you switch the phone on. If you set the phone
lock to When SmartChip Changed, your phone
will request a security code only when you
change your SmartChip. If you set the phone
lock to Immediately, your phone will lock
immediately.
PIN Code Request
When the PIN code request feature is set to
‘On’, you must enter your PIN each time you
switch the phone on. Consequently, any person
who does not have your PIN cannot use your
phone without your approval.
n Note
Before setting the PIN code request feature to
Off, you must enter your PIN
The following [Options] are available:
] On: You must enter the PIN each time the
phone is switched on.
] Off: The phone connects directly to the
network when you switch it on.
(Menu 9.6.1)
(Menu 9.6.2)
91
Page 96

Settings
Fixed Dial Number
This allows you to restrict your outgoing calls
to selected phone numbers, if this function is
supported by your SmartChip. The PIN2 code is
required.
] FDN On/Off
- On: You can only call phone numbers
stored in the Address Book. You must enter
your PIN2.
- Off: You can call any number.
] FDN List
n Note
Not all SmartChips have a PIN2. If your
SmartChip does not, this menu option is not
displayed.
Change Codes
The Change codes feature allows you to
change your current password to a new one.
You must enter the current password before
you can specify a new one.
You can change the access codes for: Security
Code, PIN1, PIN2
n Note
PIN: Personal Identification Number.
(Menu 9.6.3)
(Menu 9.6.4)
92
PTT Key Lock
This function is used to prevent a PTT call from
being made accidentally with a press of the
PTT key when is in your pocket or bag while it
is being unused.
] On: When you are logged in to the PTT
function, the message "Please press PTT key
again" is displayed if you press the PTT key.
Press the PTT key again within two (2)
seconds to display the PTT contact list and
make a call to a desired opposite.
] Off: If you are logged in to the PTT function,
you can use contact list and PTT call using
the PTT key.
n Note
The PTT Key Lock works when your phone's flip
is closed.
Connection
Network Profiles
This menu shows the Network Profile. You can
register, delete and edit by using the Options
Menu. However, you cannot delete or edit
default configurations provided by AT&T.
(Menu 9.6.5)
Menu 9.7
(Menu 9.7.1)
Page 97

Settings
USB Connection Mode
You can transfer files from a compatible PC to
the memory in your phone using the Mass
Storage. When you connect the phone to a PC
using the USB cable, this will be displayed as a
removable disk through Windows Explorer.
Flight Mode
This allows you to use only the phone’s
features that do not require the use of the
wireless network when you are in an airplane
or in places where the wireless network is
prevented.
If you set the flight mode on, the icon will
be displayed on the screen instead of the
network signal icon.
] On: You cannot make (or receive) any calls,
including emergency calls, or use other
features that require network coverage
] Off: You can deactivate the flight mode and
restart your handset to access the network.
(Menu 9.7.2)
Menu 9.8
Software Update
This menu is used to resume a postponed
software update. If new software exists, the
AT&T server notifies devices using a WAP push
message. Before updating new software after
downloading it from the AT&T server, users
will whether they would like to postpone the
operation. Reminder times can be set to 30
minutes, 1 hour, and 4 hours. When the time is
up, users are prompted again or users can
resume the postponed operation using this
menu at any time.
Menu 9.9
93
Page 98

Settings
Check Memory
Common
This function shows the status of the user
memory of the handset.
Reserved
This function shows the status of the reserved
memory for the user (Text Message, Contact
List, Calendar, Tasks, Memo).
SmartChip
This function shows the status of the
SmartChip card user memory.
Memory Card
If your phone has a multimedia memory card in
the card slot, you can save images, sounds,
and videos on the memory card. You can check
the current status of the external memory card
in the Memory status menu.
(Menu 9.0.1)
(Menu 9.0.2)
(Menu 9.0.3)
(Menu 9.0.4)
Handset Information
This menu is used to view My Numbers,
Manufacturer and Model Name information
etc.
Menu 9.0
Menu 9.*
94
Reset Settings
This function allows you to restore factory
settings. To do this, you need the security code.
Clear Memory
Deletes downloaded/user created contents
(e.g.: images, videos) from Handset content
and the External Memory card.
] Handset Contents: Deletes all
downloaded/user created Images, Videos &
Sounds from the Handset Memory.
] Handset Personal Info.: Restores Personal
Information stored in the handset memory
(e.g.: address book, messages, tasks, alarm,
Calendar schedules) to default values.
] Memory Card: Deletes all contents from
the External Memory Card.
WARNING! Be careful when you insert Micro
SD Card that is 2GB or under 2GB of memory
on CU515: When you activate, Menu->
9.Settings -> #Reset Settings -> 1 Clear
Memory -> 3 Memory Card
It could be limited with the number of files
under root directory of Memory Card, since the
Micro SD card is formatted by FAT16 that is
inserted on the phone.
(Menu 9.#.1)
Menu 9.#
Page 99

Therefore, you should create a folder under
root directory and use that folder when you
send/copy a file.
Reset Default
Restores the settings (e.g.: Audio, Display,
Language, Date & Time, Bluetooth Settings)
stored in the handset memory to default
values.
(Menu 9.#.2)
Settings
95
Page 100

Q&A
Please check to see if any problems you have encountered with the phone are described in this
section before taking the phone in for a service or calling a service engineer.
Q How do I view the list of outgoing calls,
incoming calls and missed calls?
A Press the [SEND] key.
Q How do I view all numbers stored in the
memory?
A Press the down navigation key.
Q Why is the connection inconsistent or not
audible in certain areas?
A When the frequency environment is unstable
in a certain area, connection may be
inconsistent and not audible. Relocate to
another area and try again.
Q Why is the connection not consistent or
abruptly disconnects even when
established?
A When frequency is unstable or weak or if
there are too many users, connection may be
cut off even after it was established. Please
try again later or attempt after relocating to
other areas.
96
Q Why does the LCD not turn on?
A Remove the battery and turn on the power
after placing it back in. If there is no change,
fully charge the battery and try again.
Q Why is there an echo when a connection is
made with certain telephones in a certain
area?
A This is called the ‘Echo Phenomenon’, which
occurs if the connection volume is too high
or caused by special properties (semielectronic telephone exchange) of the
equipment on the other end.
Q Why does the phone heat up?
A The phone may get hot when there is a very
long call duration or when games are played
or even when surfing the Internet for a long
time. This has no effect upon the life of the
product or performance.
 Loading...