

Page 1
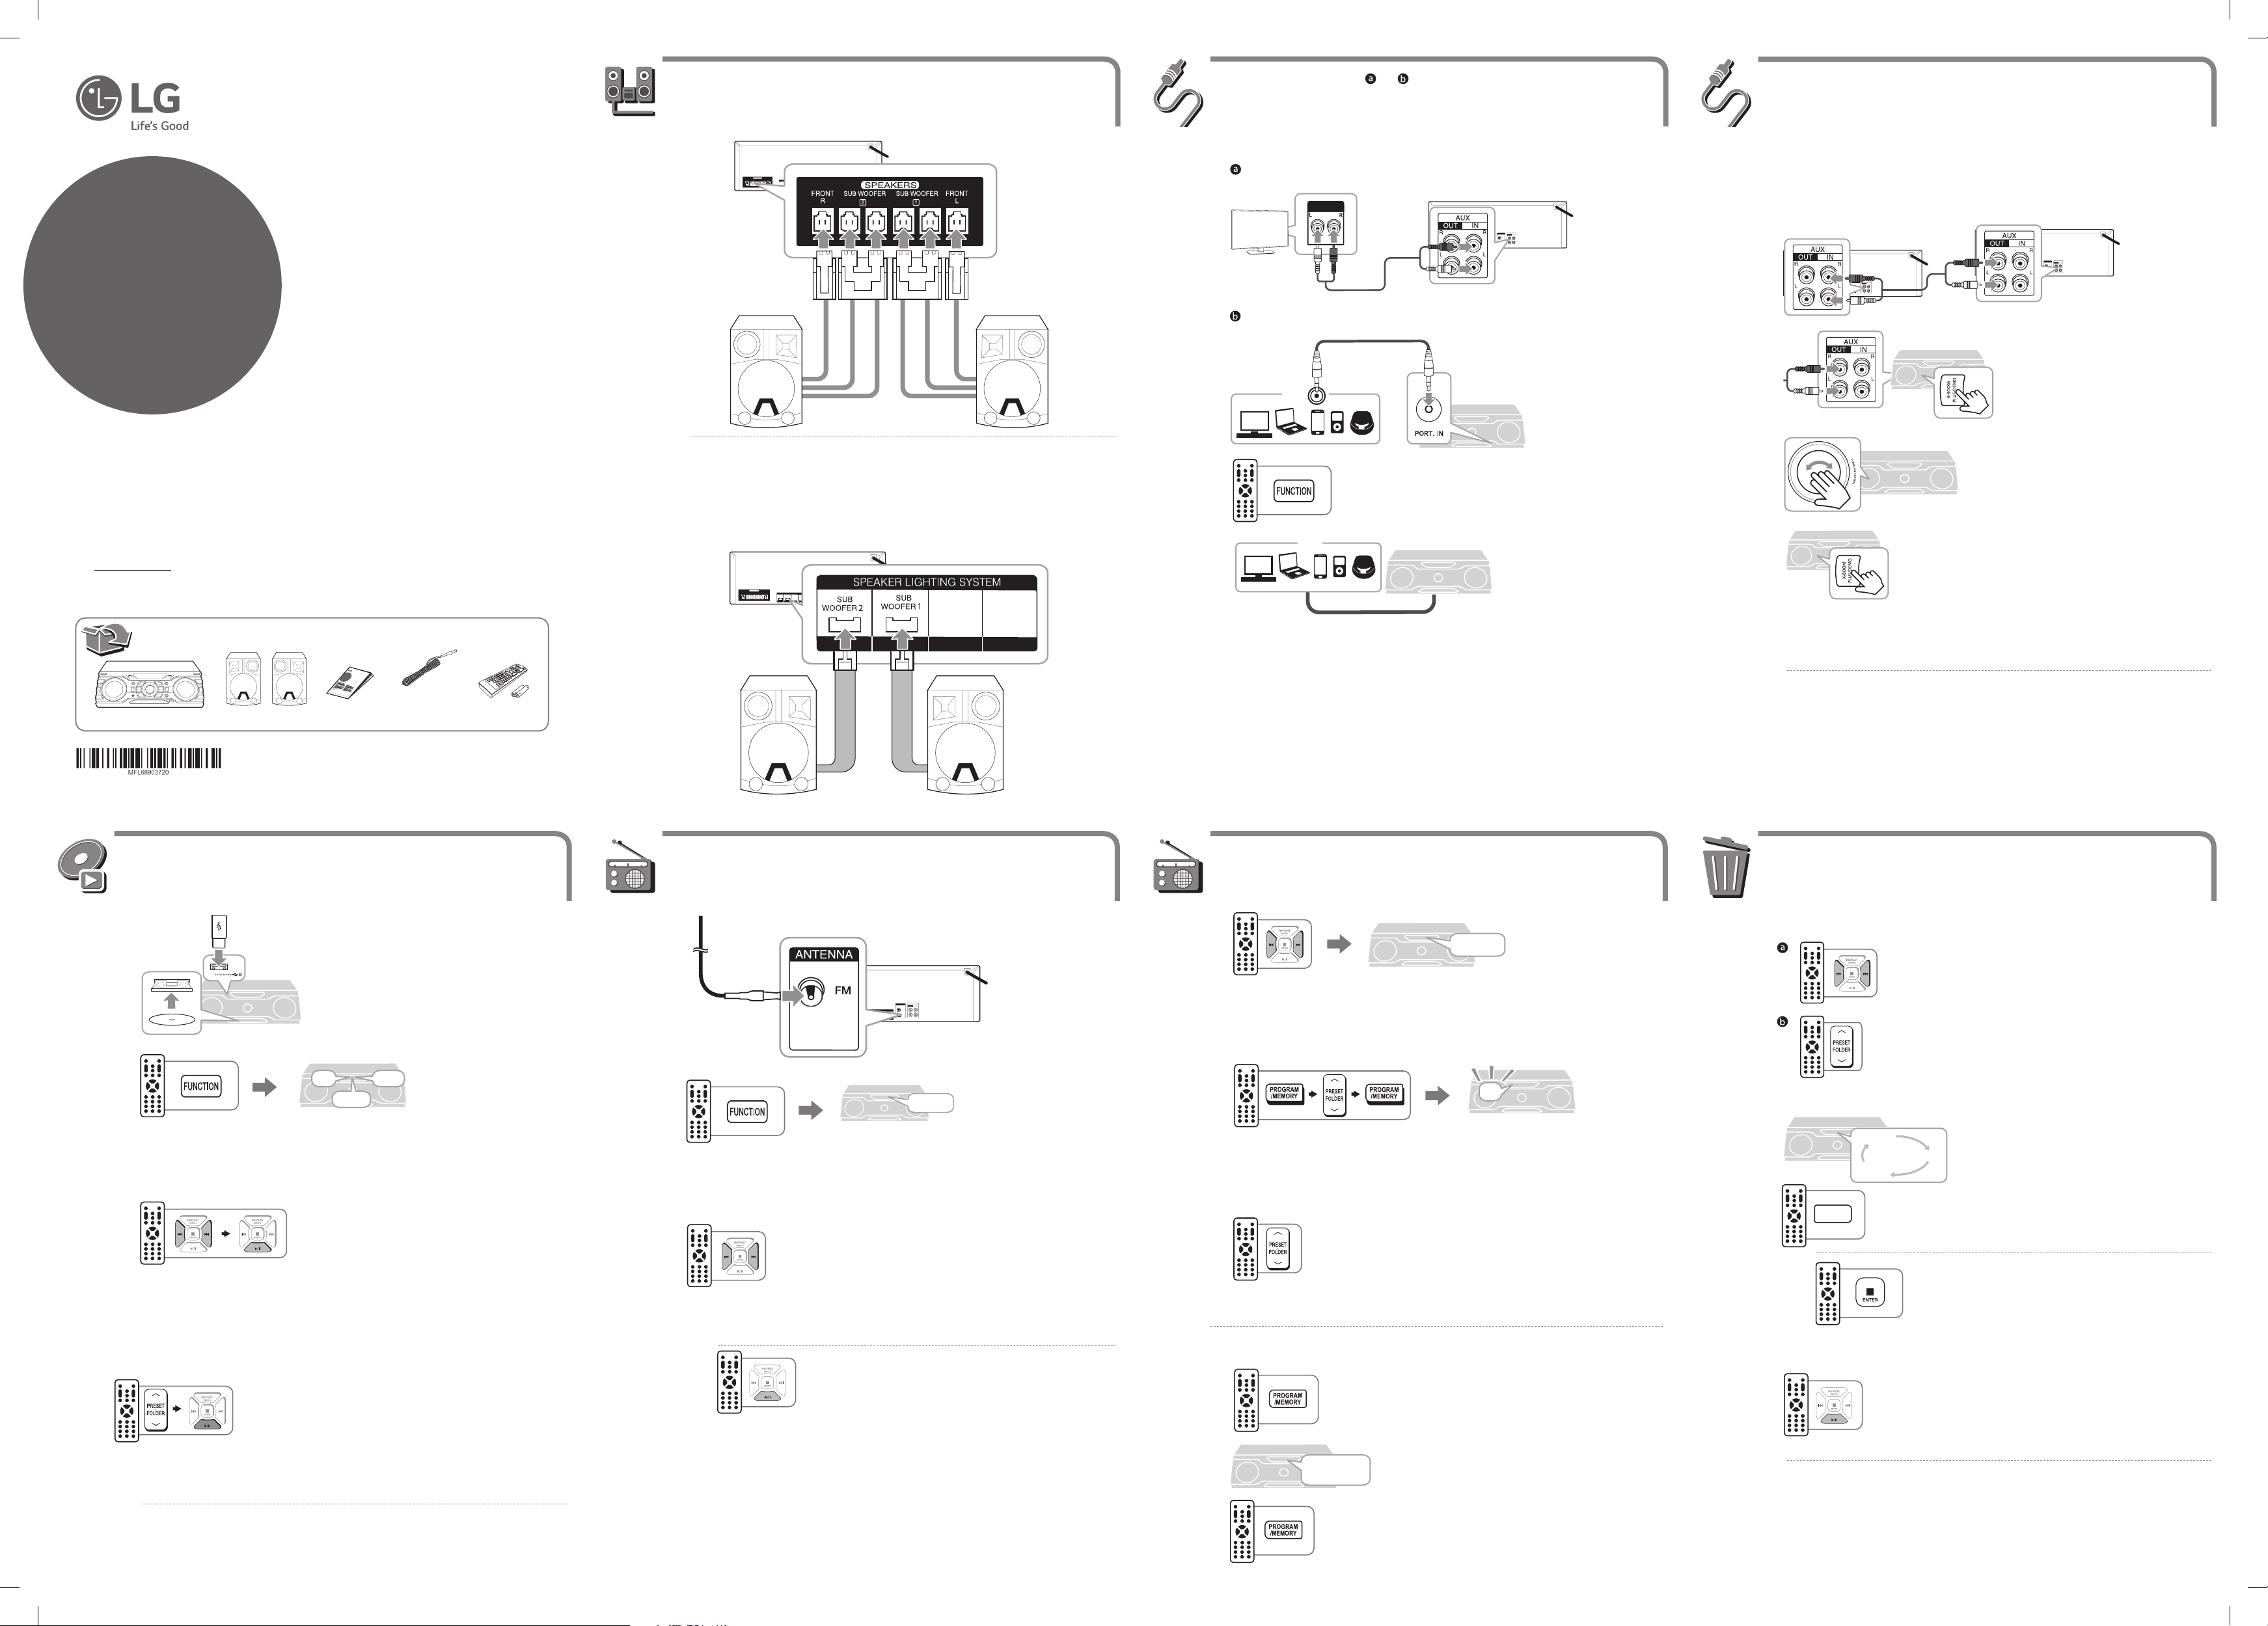
Speaker Connection
Using External Device ( or )
X-BOOM PLUS
Mini Hi-Fi
System
Model : CM9750
Make sure to connect the speaker plugs into their corresponding colored speaker connectors.
,
Connection for SPEAKER LIGHTING
a
b
AUX IN Connection
AUDIO OUT
PORT. IN Connection
<
Select AUX or PORTABLE.
You can connect two units to play music together.
a
b
c
Press X-BOOM PLUS/DEMO.
Rotate SCRATCH & CONTROL to adjust Delay setting.
ENGLISH | SIMPLE MANUAL (1 of 2)
To view the instructions of advanced features,
visit http://www.lg.com and then download Owner’s
Manual. Some of the content in this manual may differ
from your unit.
Disc & Data Playback
Antena FM
www.lg.com
Radio Operation
c
Play the music on the connected external device.
z
Presetting Radio Station
d
This function is available on CD, USB 1, USB 2, BT, PORTABLE Function.
,
Press X-BOOM PLUS/DEMO to save the Delay setting.
Deleting File
a
b
Select CD, USB 1 or USB 2.
c
USB 2CD
USB 1
Press C / V to select a desired song and press d/M to play.
a
b
c
Select FM.
FM 87.50
Tune the desired frequency. (Press and hold for auto tuning. Press for Manual tuning.)
a
Select the station to preset.
b
Select the preset number and store the station.
c
Select preset station to listen to.
FM 87.50
01
a
b
,
Select the le you want to delete in stop mode.
Select the folder you want to delete.
Select to delete the le, folder or format the USB.
DEL FILE
DEL DIR
FORMAT
DELETE
Cancel the selection.
Folder Searching
,
Press PRESETFOLDER W/S to select a folder and press d/M to play the rst le of
the selected folder.
Empty folders are not searched.
,
CM9750-FB.DKENHLK_MFL68903720_Sim_1.indd 1 2015-02-24 1:47:45
Select STEREO or MONO on FM Function.
To delete all the saved station
a
b
ERASEALL
Press and hold PROGRAM/MEMORY.
Press PROGRAM/MEMORY when ‘ERASEALL’ blinks to conrm.
c
Perform the selection.
This function is supported only in stop status. (USB only)
,
Page 2
Music Flow Bluetooth
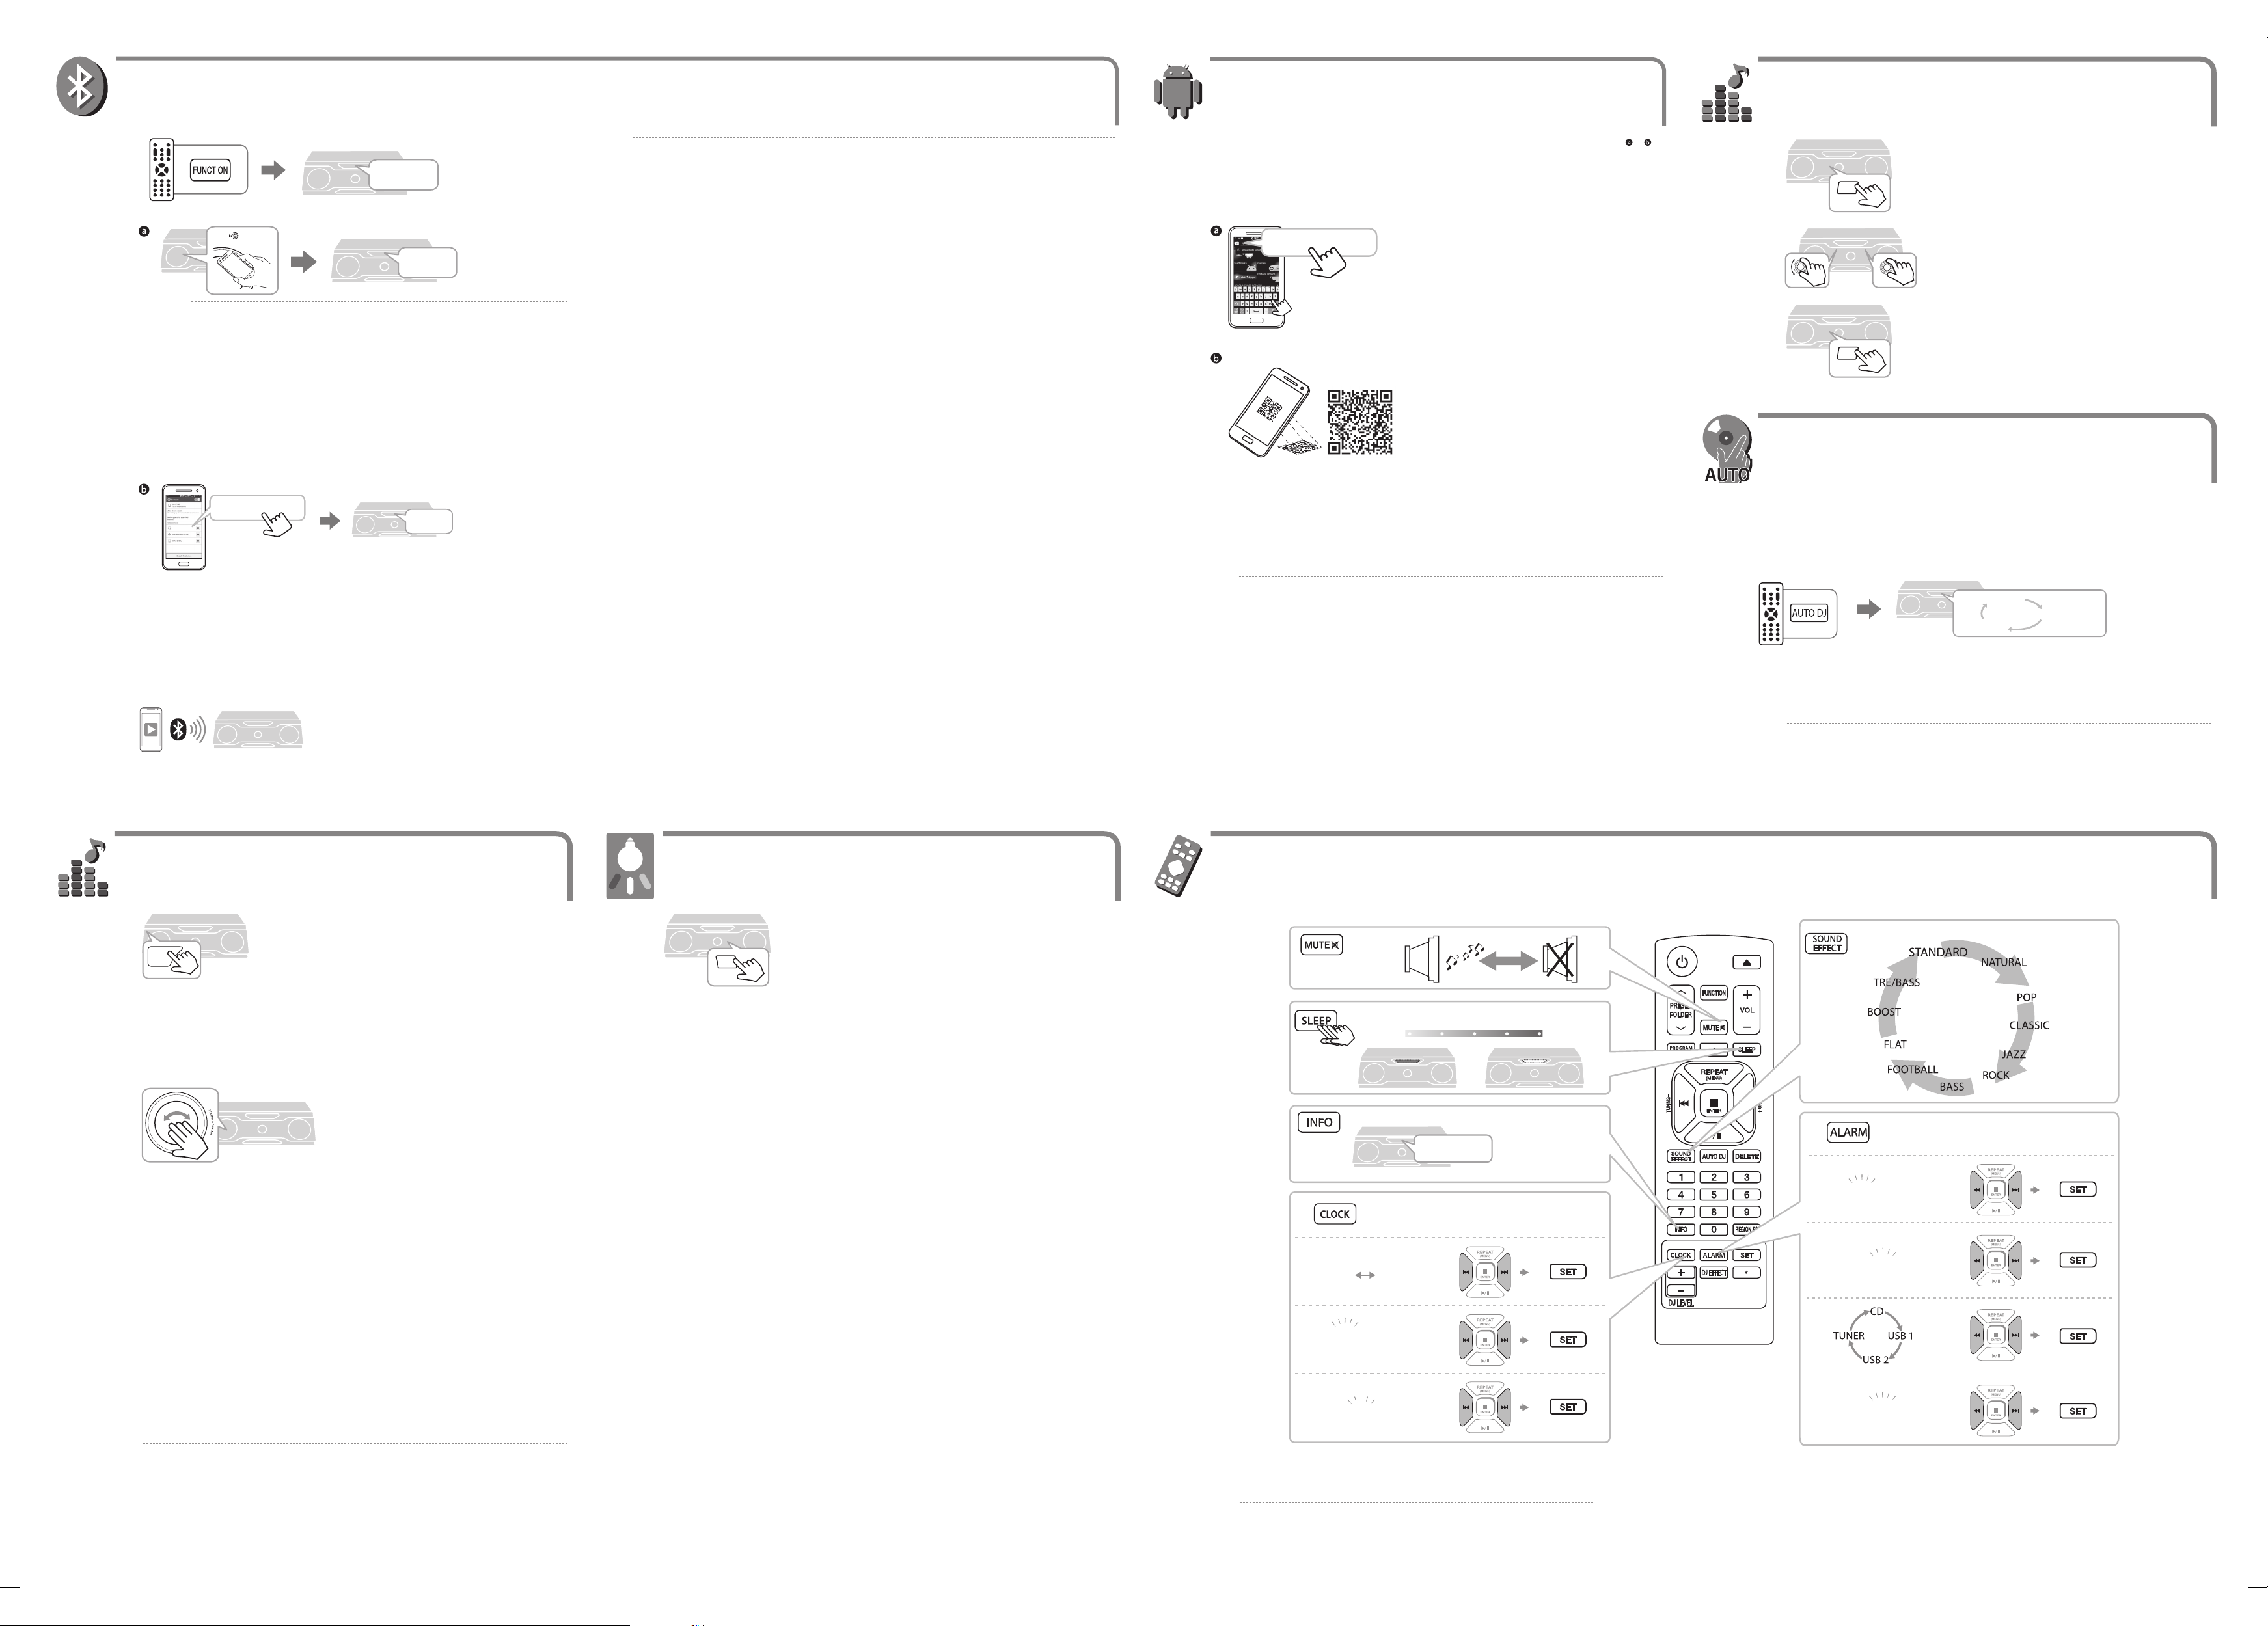
Using BLUETOOTH®
Using Music Flow Bluetooth App
USER EQ
a
b
Select BT.
BT READY
PAIRED
• If NFC connection does not work well, try again after checking the location of NFC tag in your
,
phone.
• Android O/S : Ver 4.1.2 (or later)
LG CM9750 (XX)
LG CM9750 (XX)
PAIRED
yWhen this unit is successfully connected with your Bluetooth device, “PAIRED” will be appear on the display window. The display
,
will change to the Bluetooth device’s name soon after.
yIf the device name isn’t available on the unit, “_” will be displayed.
yEven when this unit is connected to 3 Bluetooth devices in the Bluetooth mode, you can play and control music by using only
one of the connected devices.
yThe multi pairing connection is only supported on Android or iOS devices. (Multi pairing connection may not be supported
depending on the connected device specications.)
yA removable/detachable Bluetooth device (Ex : Dongle etc.) doesn’t support multi pairing.
yEven when this unit is connected with multiple Bluetooth devices, only one device which is playing will keep the Bluetooth
connection, even if you change the function of the other devices.
To use this unit more comfortably, install “Music Flow Bluetooth” on your
Search for “Music Flow Bluetooth” on the Google Play Store.
Music Flow Bluetooth
Scan QR code.
Bluetooth
devices. Select a way of installation ( or ).
a
USER EQ
b
BASS
c
USER EQ
Press USER EQ.
Rotate BASS or TREBLE to adjust the sound level.
TREBLE
Save the setting.
AUTO DJ
Auto DJ blends the end of one song into the beginning of another for seamless playback.
Set on the Bluetooth and select “LG CM9750 (XX)” on your Bluetooth device.
,
c
DJ EFFECT
a
DJ EFFECT
Enter the PIN code (0000) as needed.
Press DJ EFFECT to select a desired DJ eect (FLANGER, PHASER, CHORUS, DELAY,
DJ OFF).
Play music on your Bluetooth device.
LIGHTING
LIGHTING
• Android O/S : Ver 4.0.3 (or later)
,
• Refer to the guide from the
Additional Feature
“Music Flow Bluetooth”
App on your smart device.
AUTO DJ RANDOM
AUTO DJ OFF
Select a desired AUTO DJ mode.
Only AUTO DJ SEQUENTIAL is selected when played programmed list.
,
AUTO DJ SEQUENTIAL
b
Rotate SCRATCH & CONTROL to adjust the eect level.
Press LIGHTING. The mode changes each time you press :
OFF → VOLCANO → POLICE → THUNDER → PSYCHE → CAOS (CHAOS) → OFF
a
b
AM 12:00
c
d
10:20
10:20
0:00
180150
FILE-XXX_001
120
. . .
10
OFF
a
b
10:20
c
10:20
d
e
VOL 3
You can adjust DJ EFFECT sound gage level between 0 to 15. The initial level is 7.
,
Alarm function works only after clock is set.
,
CM9750-FB.DKENHLK_MFL68903720_Sim_1.indd 2 2015-02-24 1:47:49
Page 3

Programmed Playback
USB Copying
Mini Hi-Fi
System
Model : CM9750
You can make a playlist of your favourite tracks/les from a disc or USB device using programmed Playback .
This function is supported only on stop status.
,
To make Programmed Playback list
a
b
c
Select CD, USB 1 or USB 2.
Press
PROGRAM/MEMORY
Press C / V to select a track/le and press PROGRAM/MEMORY.
Repeat this step to store more les.
.
To enjoy Programmed Playback
a
b
,
To delete Programmed Playback List
a
Press PROGRAM/MEMORY in stop mode.
Play the Programmed Playback list.
Press Z ENTER twice to exit from Programmed Playback mode.
Press PROGRAM/MEMORY in stop status.
a
Connect USB devices to USB ports and select USB 1.
b
USB REC
Press Z ENTER to stop recording.
,
Press USB REC to start recording. Audio les in USB 1 are copied to USB 2.
USB 1
ENGLISH | SIMPLE MANUAL (2 of 2)
To view the instructions of advanced features,
visit http://www.lg.com and then download Owner’s
Manual. Some of the content in this manual may differ
from your unit.
USB Recording
www.lg.com
d
yTo delete all of the Programmed Playback list, remove the CD or USB device from the unit.
,
yA playlist of up to 20 tracks/les can be entered for each media.
Enjoy the music on the Programmed Playback list.
b
c
DELETE
Press to select a track/le to delete.
Delete selected song.
,
Status Recording
Playback
Programmed playback Programmed track(s)/le(s)
Full stop
One track/le
All track(s)/le(s)
Auto Power On
a
Connect a USB device and select the function (CD, AUX, PORTABLE, Tuner) to record.
b
USB REC
Press USB REC to start recording. Press Z ENTER to stop recording.
• A le is recorded by about 512 Mbyte when you record for a long term.
,
• When you stop recording during playback, the le that has recorded at that time will be stored.(Execpt MP3/WMA
le)
• Recording is not supported in BT or LG TV mode.
• Volume level will be changed between MIN to 30 during recording. (Only CD function)
• Press d/M to pause the recording. (Only Tuner, AUX, PORTABLE)
• It’ll be stored as follows. * The other source : AUX and the like.
AUDIO CD MP3/WMA TUNER The other source*
To select bitrate and recording speed
You can select bitrate and recording speed before recording.
a
USB REC
b
c
Press and hold USB REC for 3 seconds.
Press C / V to select a bitrate and press USB REC.
USB REC
Press C / V to select a recording speed and press USB REC. (Only CD
function)
USB REC
HELLO
This unit automatically turns on by an input source : LG TV or Bluetooth
If you have already paired with this unit, automatically this unit can turn on by an input source when this unit is turned o.
,
Status Recording (Only CD function)
Playback
Programmed playback Programmed track(s)/le(s)
Full stop
CM9750-FB.DKENHLK_MFL68903721_Sim_2.indd 1 2015-02-24 1:48:32
One track/le
All track(s)/le(s)
Auto Function Change
This unit recognizes input signals such as Bluetooth and LG TV and then changes suitable function automatically.
Page 4

LG Sound Sync
How to ax the Ferrite Core
Additional Information
LG Sound Sync enables you to control some functions of this unit by a remote control of your LG TV.
Controllable functions are volume up/down and mute. Make sure that your TV has LG Sound Sync logo as shown above.
a
LG TV
Select LG TV function.
b
TV Speaker
External Speaker
LG Sound Sync (Optical)
LG Sound Sync (Wireless)
PAIRED
LG TV
Set up the sound output of your TV : TV setting menu
[ [Sound] [ [TV Sound output] [ [LG Sound Sync
(Wireless)]
Ferrite core may not be provided depending on each nation’s regulations.
Pull the stopper [a] of the ferrite core to open.
a
Wind the power cord around the ferrite core twice (Once for 110 V cord).
b
Wind the SPEAKERS cables around the ferrite core once. Wind the SPEAKER LIGHTING cables around the ferrite core
once.
Close the ferrite core until it clicks.
c
Music File Requirement
Sampling frequency
Bit rate
Maximum les Data CD : 999 / USB : 2 000
Maximum folders Data CD : 99 / USB : 200
File extensions
CD-ROM le format ISO9660+JOLIET
USB Flash Drive Devices that support USB2.0 or USB1.1.
Bluetooth Codec SBC
• The USB function of this unit does not support all USB devices.
,
• Using NTFS le system is not supported. (Only FAT(16/ 32) le system is supported.)
• External HDD, Card readers, Locked devices, or hard type USB devices are not supported.
• The DTS is not supported. In case of DTS audio format, audio is not output.
yMP3 : 32 - 48 kHz
yWMA : 32 - 48 kHz
yMP3 : 32 - 320 kb/s
yWMA : 40 - 192 kb/s
y“.mp3”
y“.wma”
• For specic information of operating, refer to the instruction manual of your TV.
,
• If the connection fails, check the conditions of this unit and your TV : power, function.
• The amount of time to turn o this unit is dierent depending on your TV.
Specication
ENGLISH
Power Requirements Refer to the main label on the unit.
Power Consumption
Bus Power Supply (USB) 5 V 0 500 mA
Amplier Total Output 3 000 W
Design and specications are subject to change without notice.
How to disconnect the wireless network connection or the wireless device
Turn o the unit by pressing the power button for more than 5 seconds.
POWER: This unit operates on a mains supply of 200-240V~, 50/60Hz. Wiring: This unit is supplied with a BS 1363 approved
main plug. When replacing the fuse, always use of the same rating approved to BS 1362. Never use this plug with the fuse
cover omitted. To obtain a replacement fuse cover contact your dealer. If the type of plug supplied is not suitable for the
mains sockets in your home, then the plug should be removed and a suitable type tted. Please refer to the wiring instructions below: Warning: A mains plug removed from the mains lead of this unit must be destroyed. A mains plug with bared
wires is hazardous if inserted in a mains socket. Do not connect either wire to the earth pin, marked with the letter E or with
the earth symbol 6 or coloured green or green and yellow. If any other plug is tted, use same rating of fuse in the plug.
Important: The wires in this mains lead are coloured in accordance with the following codes: - BLUE: NEUTRAL, BROWN:
LIVE - As the colours of the wires in the mains lead of this unit may not correspond with the coloured marking identifying
the terminals in your plug, proceed as follows: The wire which is coloured blue must be connected to the terminal which is
marked with the letter N or coloured black. The wire which is coloured brown must be connected to the terminal which is
marked with the letter L or coloured red.
Refer to the main label on the unit.
Networked standby : 0,4 W
(If all network ports are activated.)
Safety Information
CAUTION
RISK OF ELECTRIC SHOCK
DO NOT OPEN
CAUTION: TO REDUCE THE RISK OF ELECTRIC SHOCK DO NOT
REMOVE COVER (OR BACK) NO USER-SERVICEABLE PARTS INSIDE
REFER SERVICING TO QUALIFIED SERVICE PERSONNEL.
This lightning ash with arrowhead
symbol within an equilateral triangle
is intended to alert the user to the
presence of uninsulated dangerous
voltage within the product’s enclosure
that may be of sucient magnitude
to constitute a risk of electric shock to
persons.
The exclamation point within an
equilateral triangle is intended to
alert the user to the presence of
important operating and maintenance
(servicing) instructions in the literature
accompanying the product.
WARNING: TO PREVENT FIRE OR ELECTRIC SHOCK HAZARD, DO
NOT EXPOSE THIS PRODUCT TO RAIN OR MOISTURE.
CAUTION: The apparatus shall not be exposed to water (dripping
or splashing) and no objects lled with liquids, such as vases, shall
be placed on the apparatus.
WARNING: Do not install this equipment in a conned space such
as a book case or similar unit.
CAUTION: Do not use high voltage products around this product.
(ex. Electrical swatter) This product may malfunction due to
electrical shock.
CAUTION: Do not block any ventilation openings. Install in
accordance with the manufacturer’s instructions.
Slots and openings in the cabinet are provided for ventilation and
to ensure reliable operation of the product and to protect it from
over heating. The openings shall be never be blocked by placing
the product on a bed, sofa, rug or other similar surface. This product
shall not be placed in a built-in installation such as a bookcase or
rack unless proper ventilation is provided or the manufacturer’s
instruction has been adhered to.
CAUTION: This product employs a Laser System.To ensure proper
use of this product, please read this owner’s manual carefully and
retain it for future reference. Shall the unit require maintenance,
contact an authorized service center.
Use of controls, adjustments or the performance of procedures
other than those specied herein may result in hazardous radiation
exposure. To prevent direct exposure to laser beam, do not try to
open the enclosure.
CAUTION concerning the Power Cord
The Power Plug is the disconnecting device. In case of an
emergency, the Power Plug must remain readily accessible.
This device is equipped with a portable battery or accumulator.
Safety way to remove the battery or the battery from the
equipment: Remove the old battery or battery pack, follow the
steps in reverse order than the assembly. To prevent contamination
of the environment and bring on possible threat to human
and animal health, the old battery or the battery put it in the
appropriate container at designated collection points. Do not
dispose of batteries or battery together with other waste. It is
recommended that you use local, free reimbursement systems
batteries and accumulators. The battery shall not be exposed to
excessive heat such as sunshine, re or the like.
CM9750-FB.DKENHLK_MFL68903721_Sim_2.indd 2 2015-02-24 1:48:34
 Loading...