
LG CF3DAJS Users manual

G

Order Number

: GETEC-C1-11-235

FCC Part 15 subpart B

Test Report Number

: GETEC-E3-11-119

Page 1 / 1


APPENDIX G

: USER’S MANUAL

EUT Type: LCOS PROJECTOR

FCC ID.: BEJCF3DAJS

OWNER'S MANUAL

LCOS PROJECTOR

Please read this manual carefully before operating

your set and retain it for future reference.

CF3DA

www.lg.com

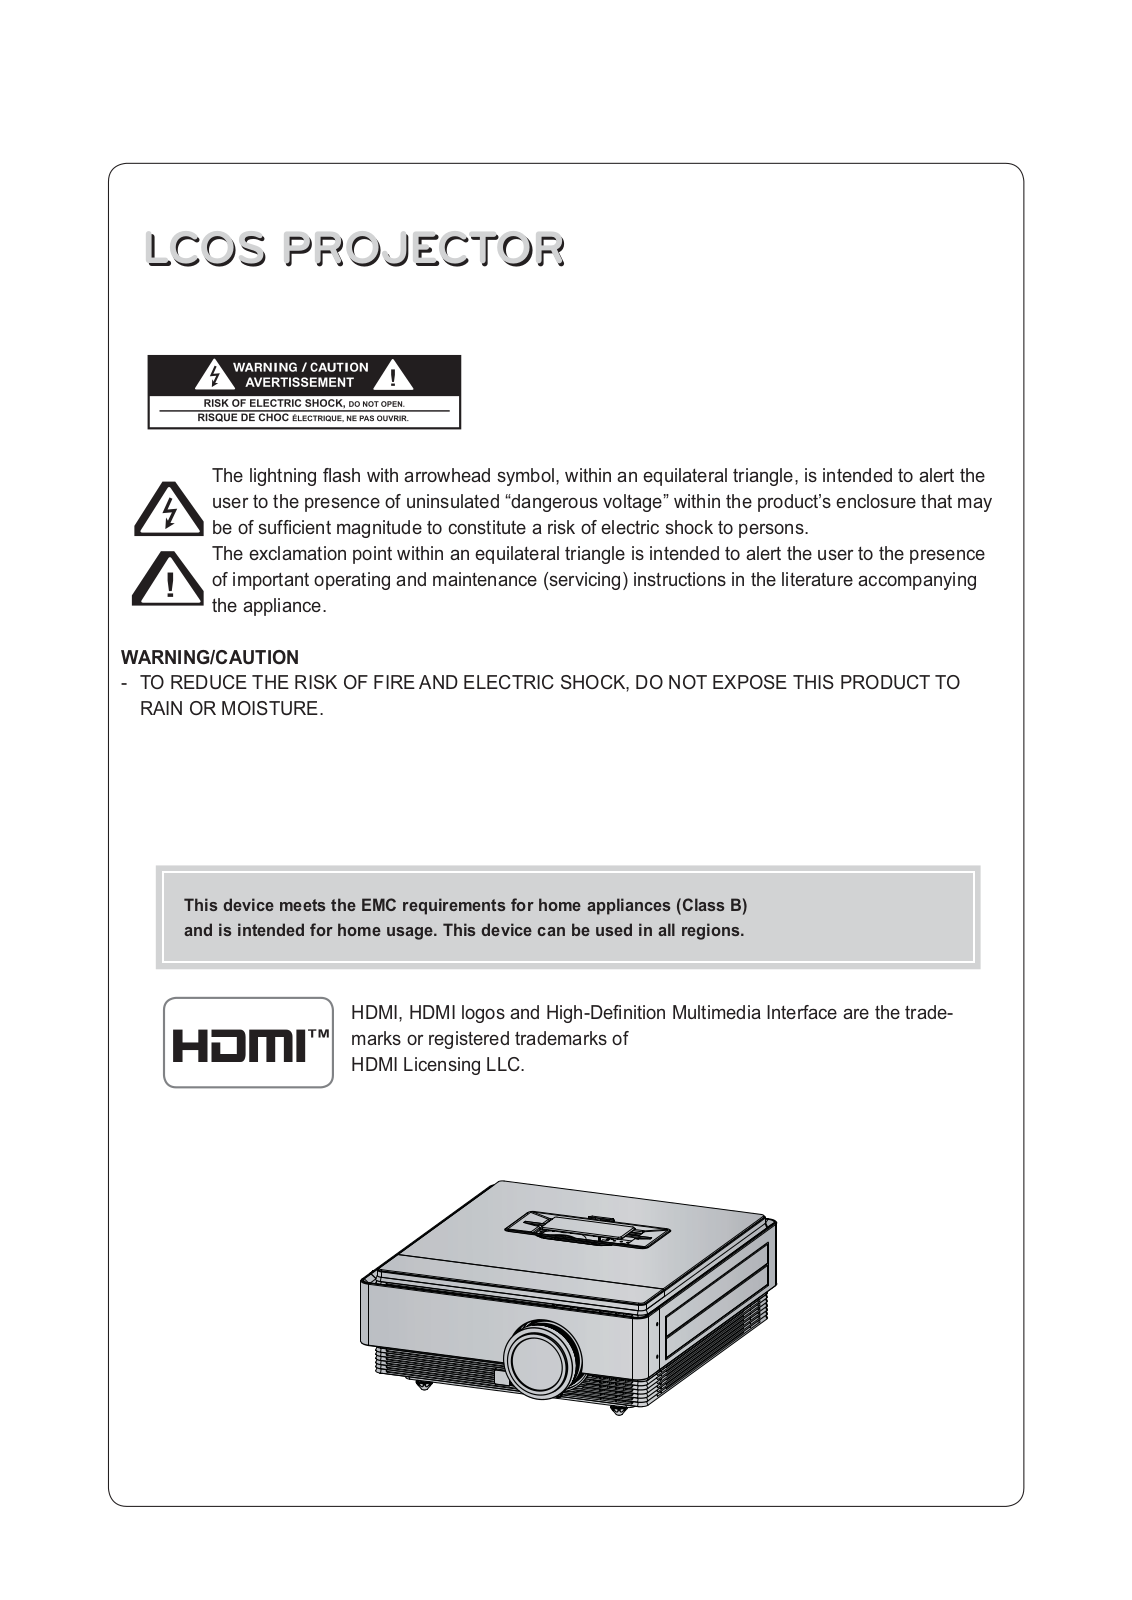
LCOS PROJECTOR


! "

#


$ %

& ' $ (

!


" $


) $

#

$

$ $* & + $!$$

WARNING/CAUTION

, ./ 0 / / . 12 ,3 3 ./ 45 / / . 1 , 2 , 5, /67,1/ 1 7., 0 ,

.4 5 ,. , 1 0./

This device meets the EMC requirements for home appliances (Class B)

and is intended for home usage. This device can be used in all regions.

-

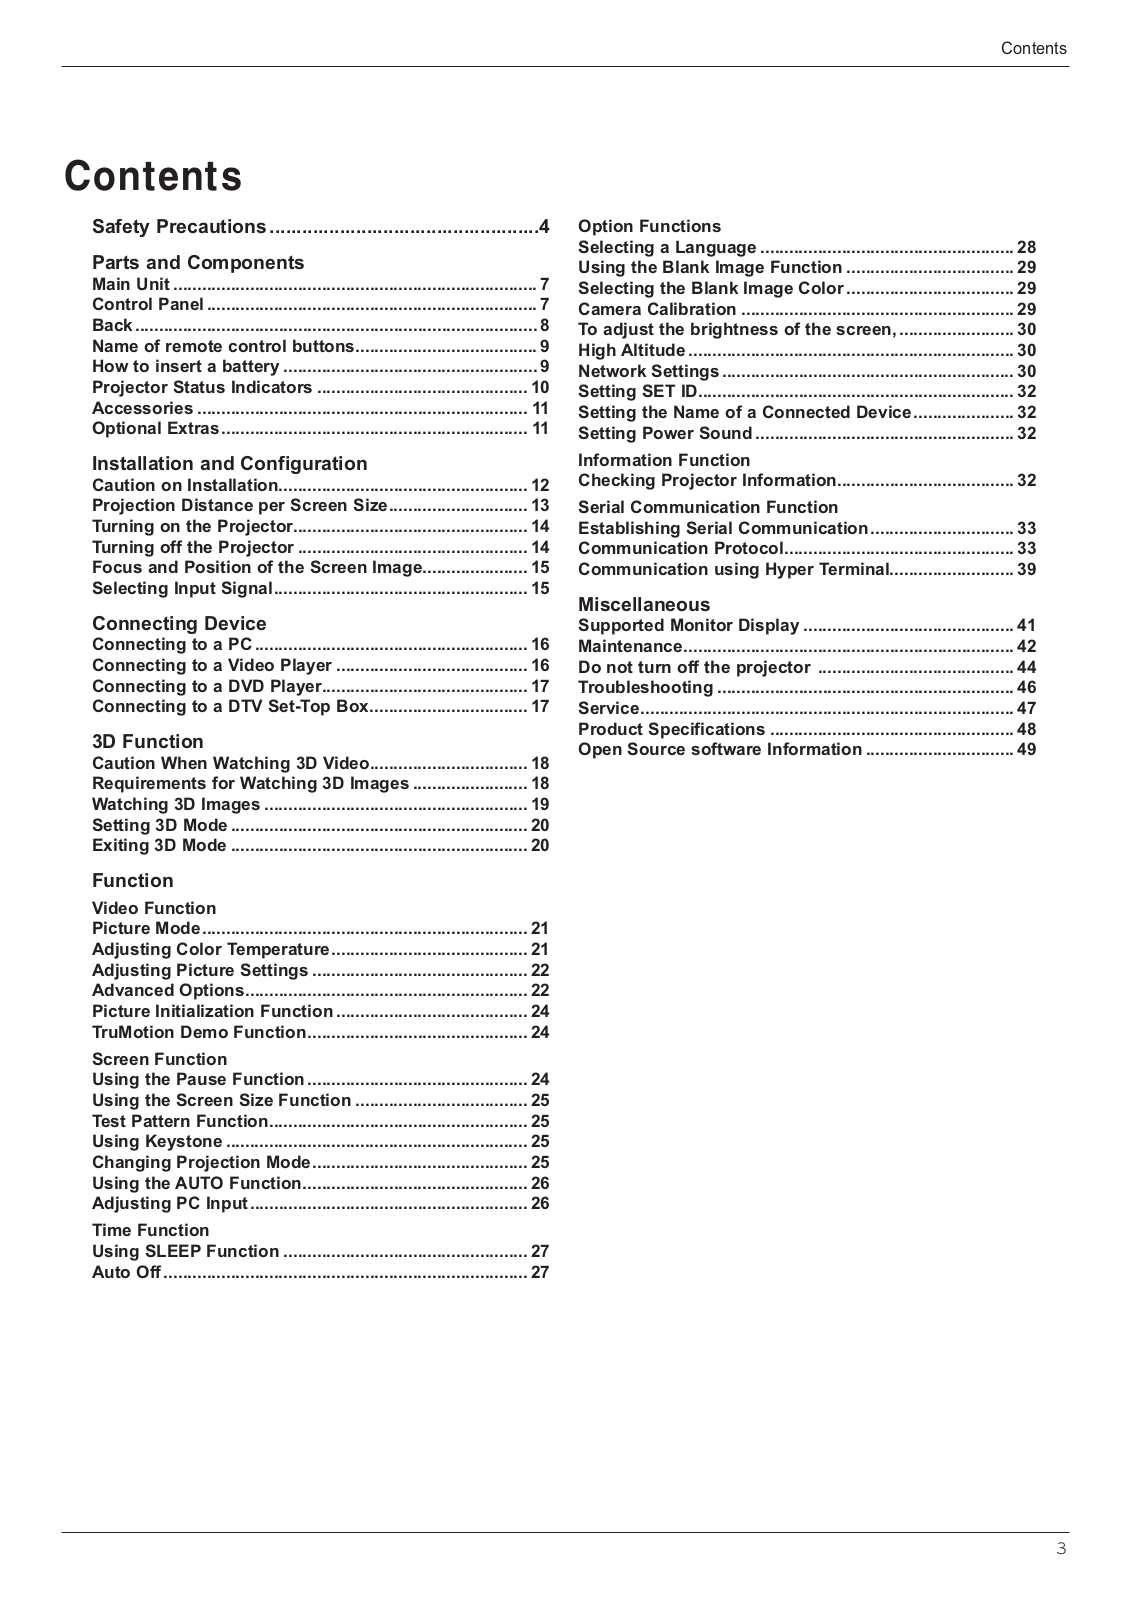
Frqwhqwv


Safety Precautions..................................................

4

Parts and Components


Main Unit ............................................................................

7

Control Panel.....................................................................

7

Back....................................................................................

8

Name of remote control buttons......................................

9

How to insert a battery .....................................................

9

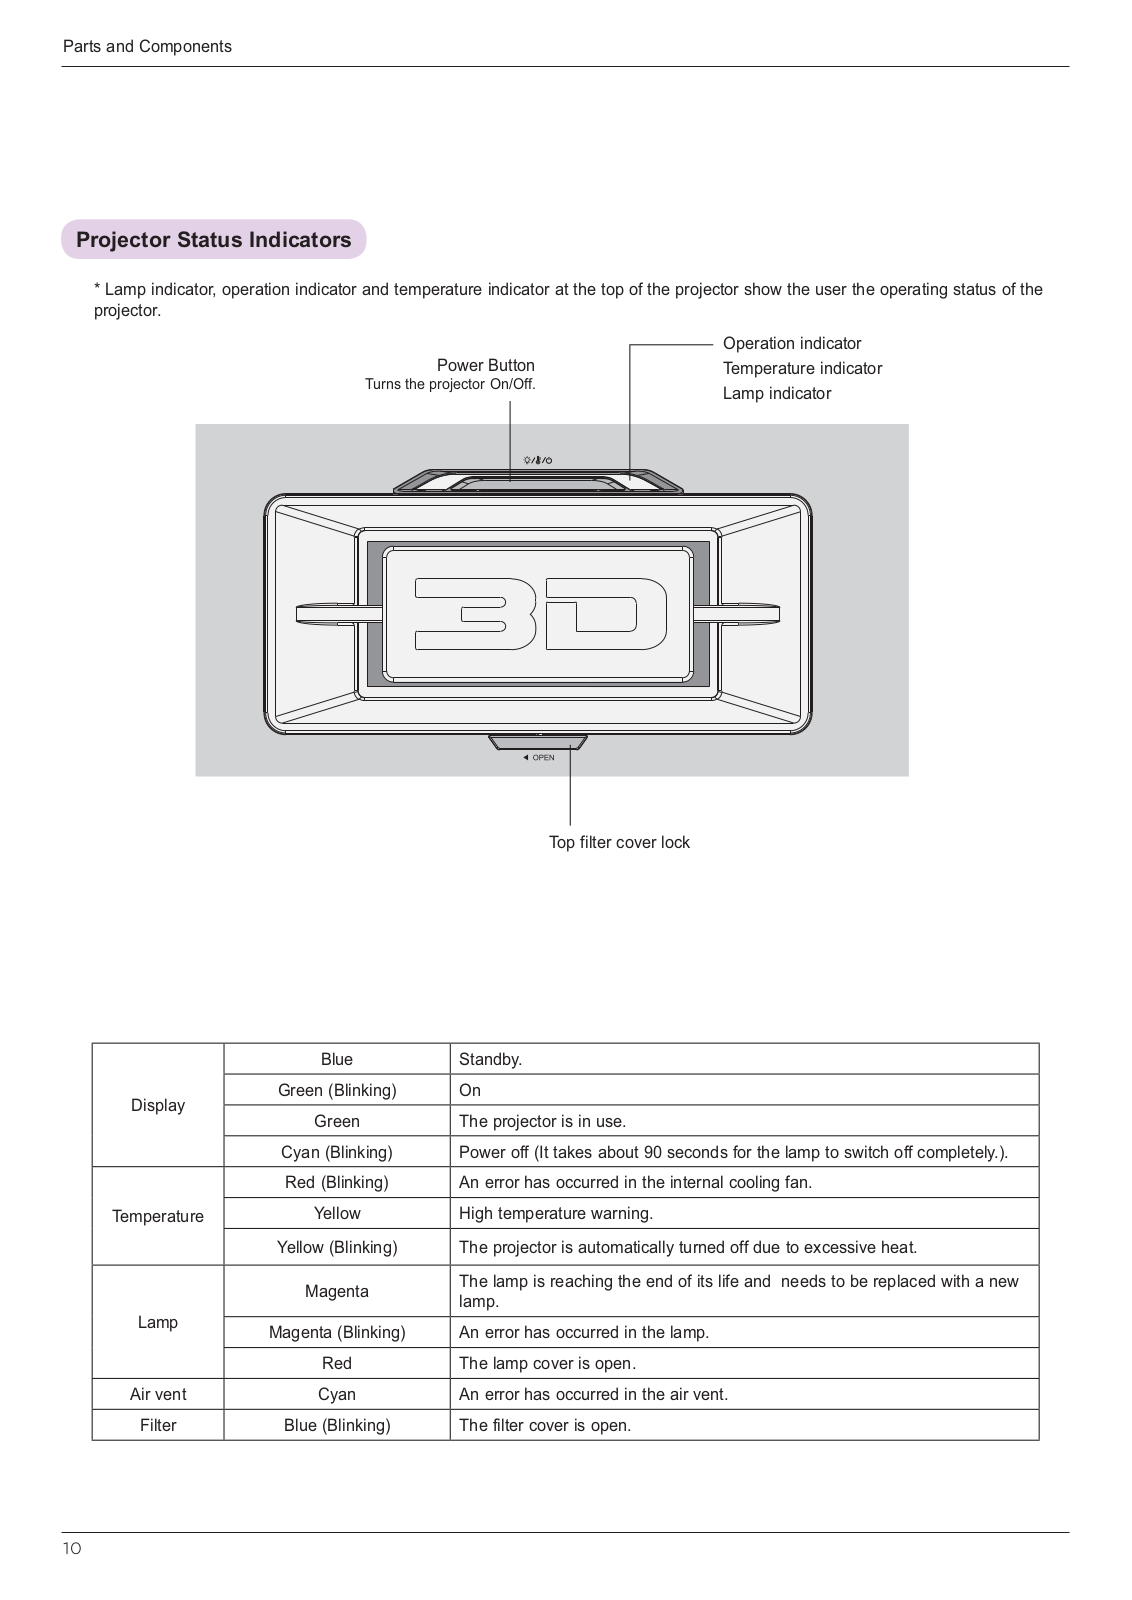
Projector Status Indicators ............................................

10

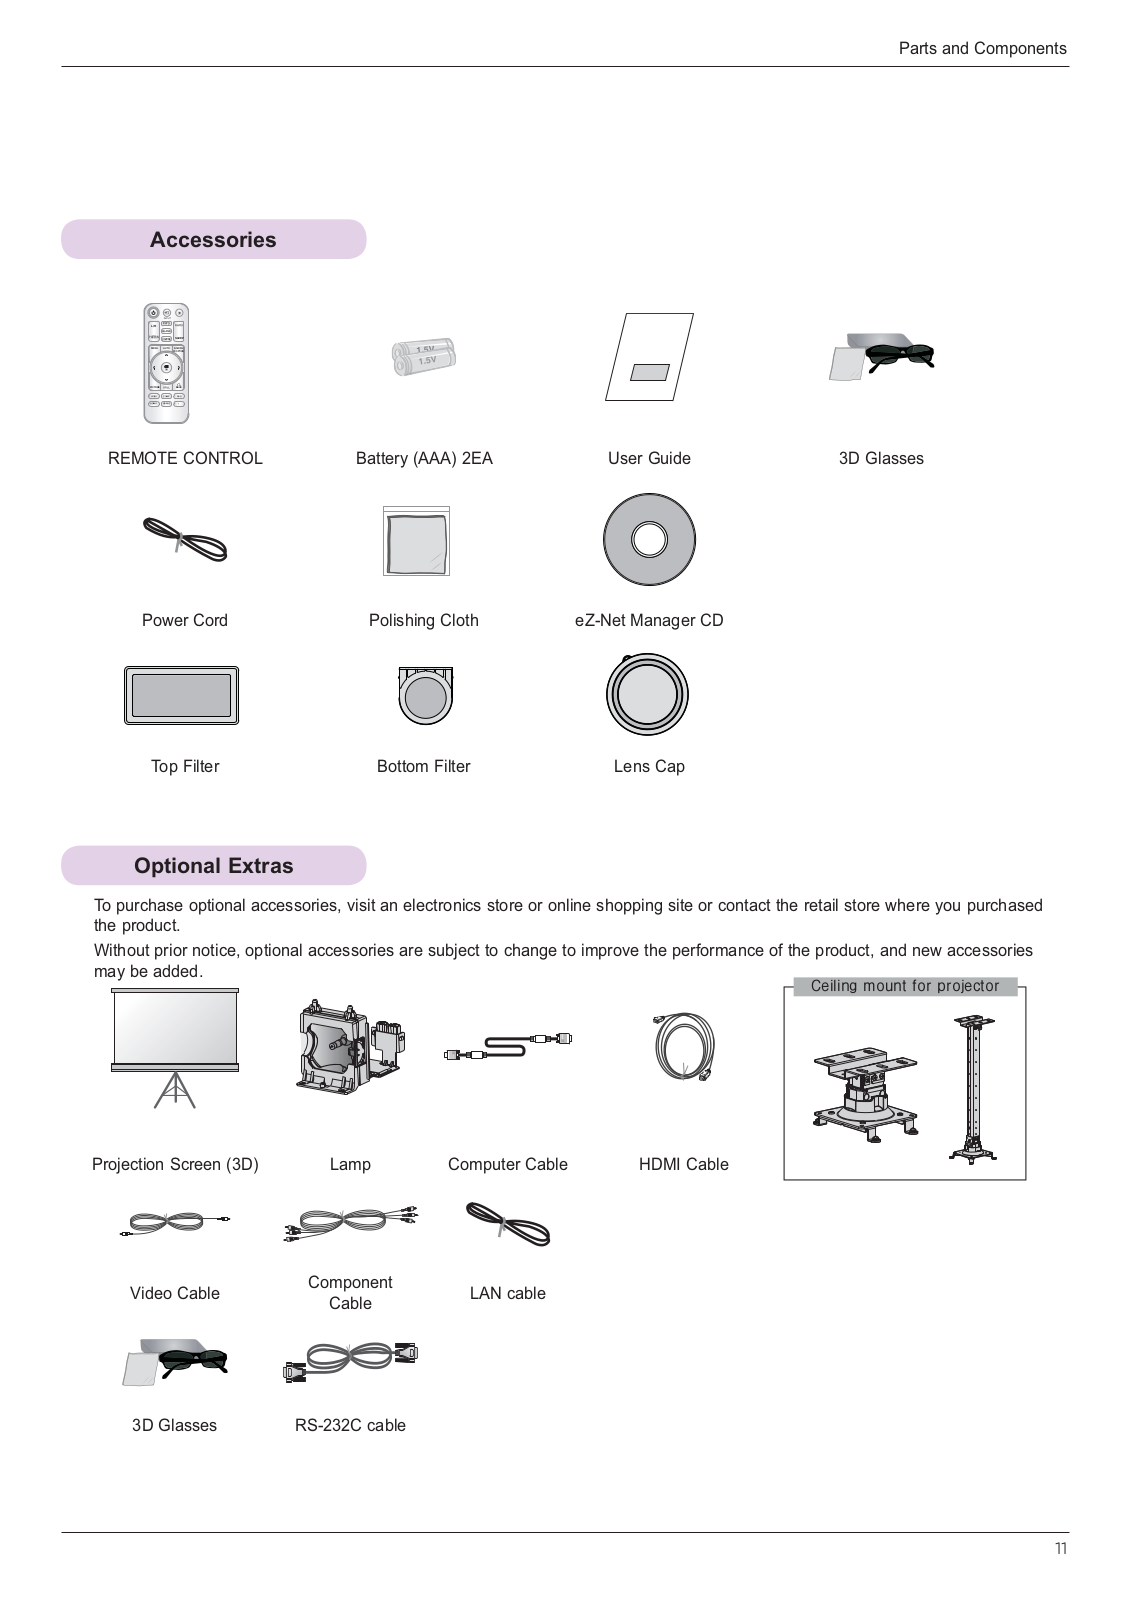
Accessories .....................................................................

11

Optional Extras................................................................

11

Installation and Configuration


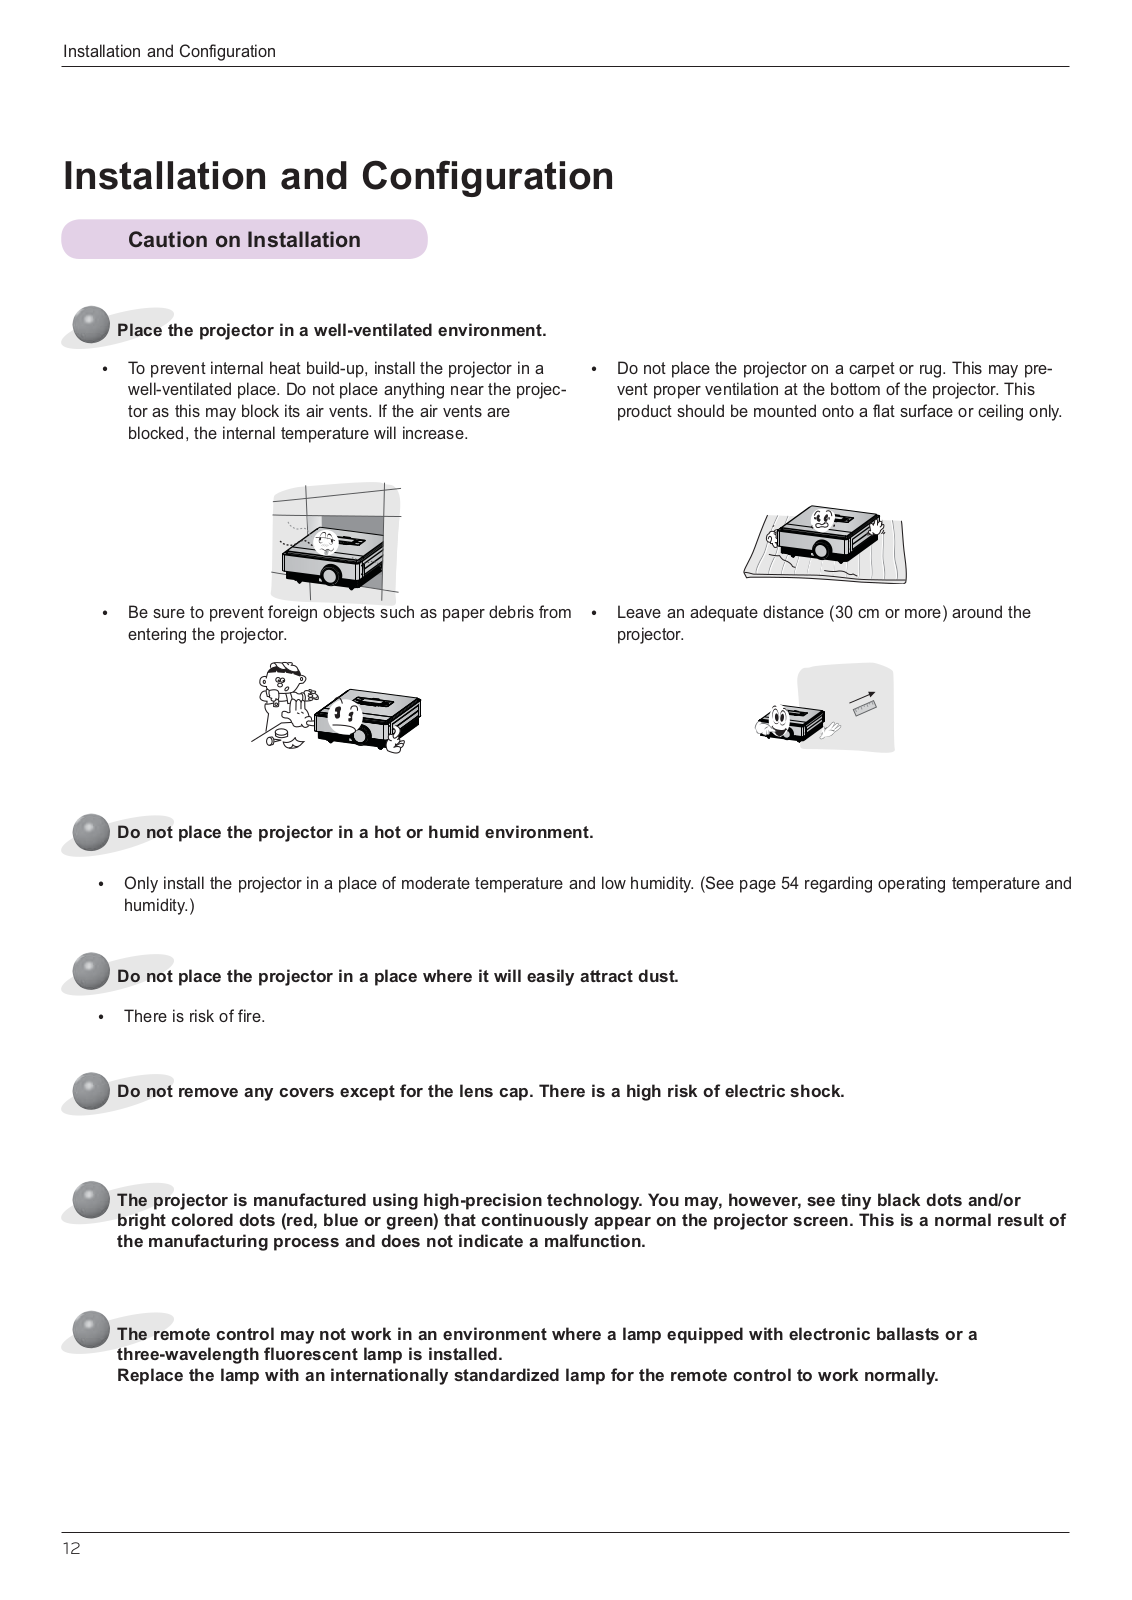
Caution on Installation....................................................

12

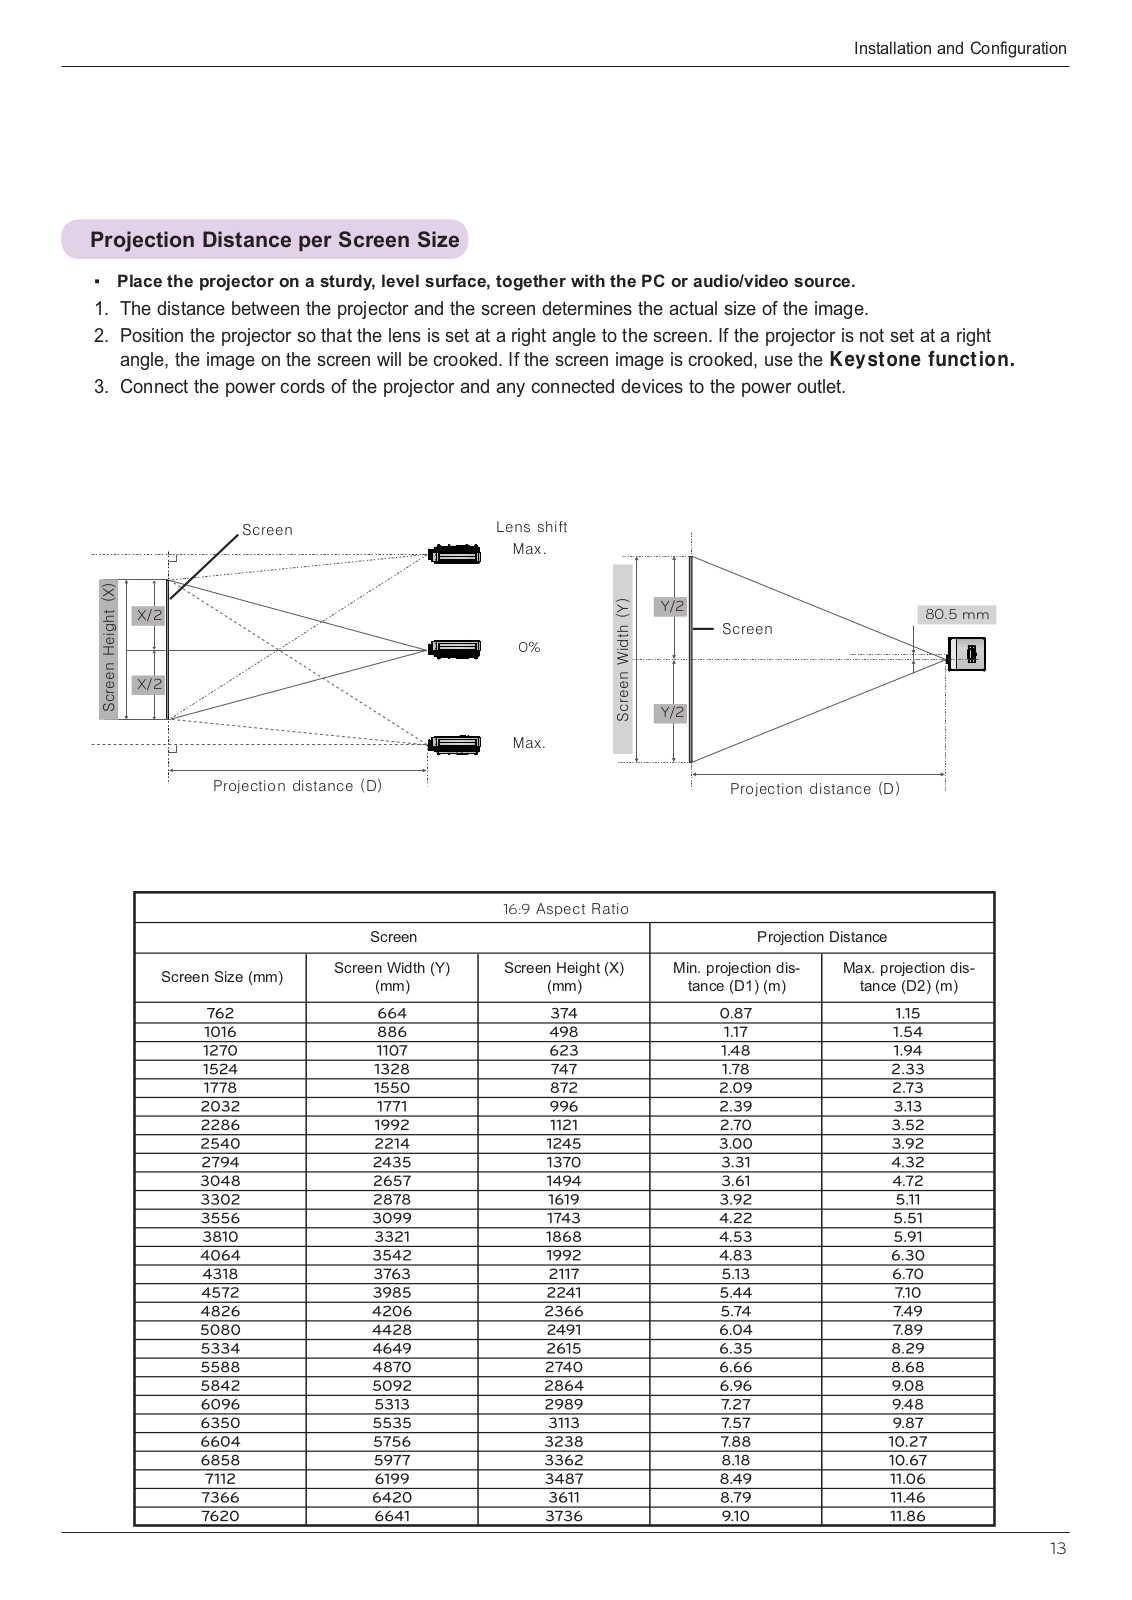
Projection Distance per Screen Size.............................

13

Turning on the Projector.................................................

14

Turning off the Projector ................................................

14

Focus and Position of the Screen Image......................

15

Selecting Input Signal.....................................................

15

Connecting Device


Connecting to a PC.........................................................

16

Connecting to a Video Player ........................................

16

Connecting to a DVD Player...........................................

17

Connecting to a DTV Set-Top Box.................................

17

3D Function


Caution When Watching 3D Video.................................

18

Requirements for Watching 3D Images ........................

18

Watching 3D Images .......................................................

19

Setting 3D Mode ..............................................................

20

Exiting 3D Mode ..............................................................

20

Function


Video Function


Picture Mode....................................................................

21

Adjusting Color Temperature.........................................

21

Adjusting Picture Settings .............................................

22

Advanced Options...........................................................

22

Picture Initialization Function ........................................

24

TruMotion Demo Function..............................................

24

Screen Function


Using the Pause Function..............................................

24

Using the Screen Size Function ....................................

25

Test Pattern Function......................................................

25

Using Keystone ...............................................................

25

Changing Projection Mode.............................................

25

Using the AUTO Function...............................................

26

Adjusting PC Input..........................................................

26

Time Function


Using SLEEP Function ...................................................

27

Auto Off............................................................................

27

Option Functions


Selecting a Language .....................................................

28

Using the Blank Image Function ...................................

29

Selecting the Blank Image Color ...................................

29

Camera Calibration .........................................................

29

To adjust the brightness of the screen,........................ 30

High Altitude ....................................................................

30

Network Settings.............................................................

30

Setting SET ID..................................................................

32

Setting the Name of a Connected Device.....................

32

Setting Power Sound ......................................................

32

Information Function


Checking Projector Information.....................................

32

Serial Communication Function


Establishing Serial Communication..............................

33

Communication Protocol................................................

33

Communication using Hyper Terminal..........................

39

Miscellaneous


Supported Monitor Display ............................................

41

Maintenance.....................................................................

42

Do not turn off the projector .........................................

44

Troubleshooting ..............................................................

46

Service..............................................................................

47

Product Specifications ...................................................

48

Open Source software Information ...............................

49

3

1 ! 7

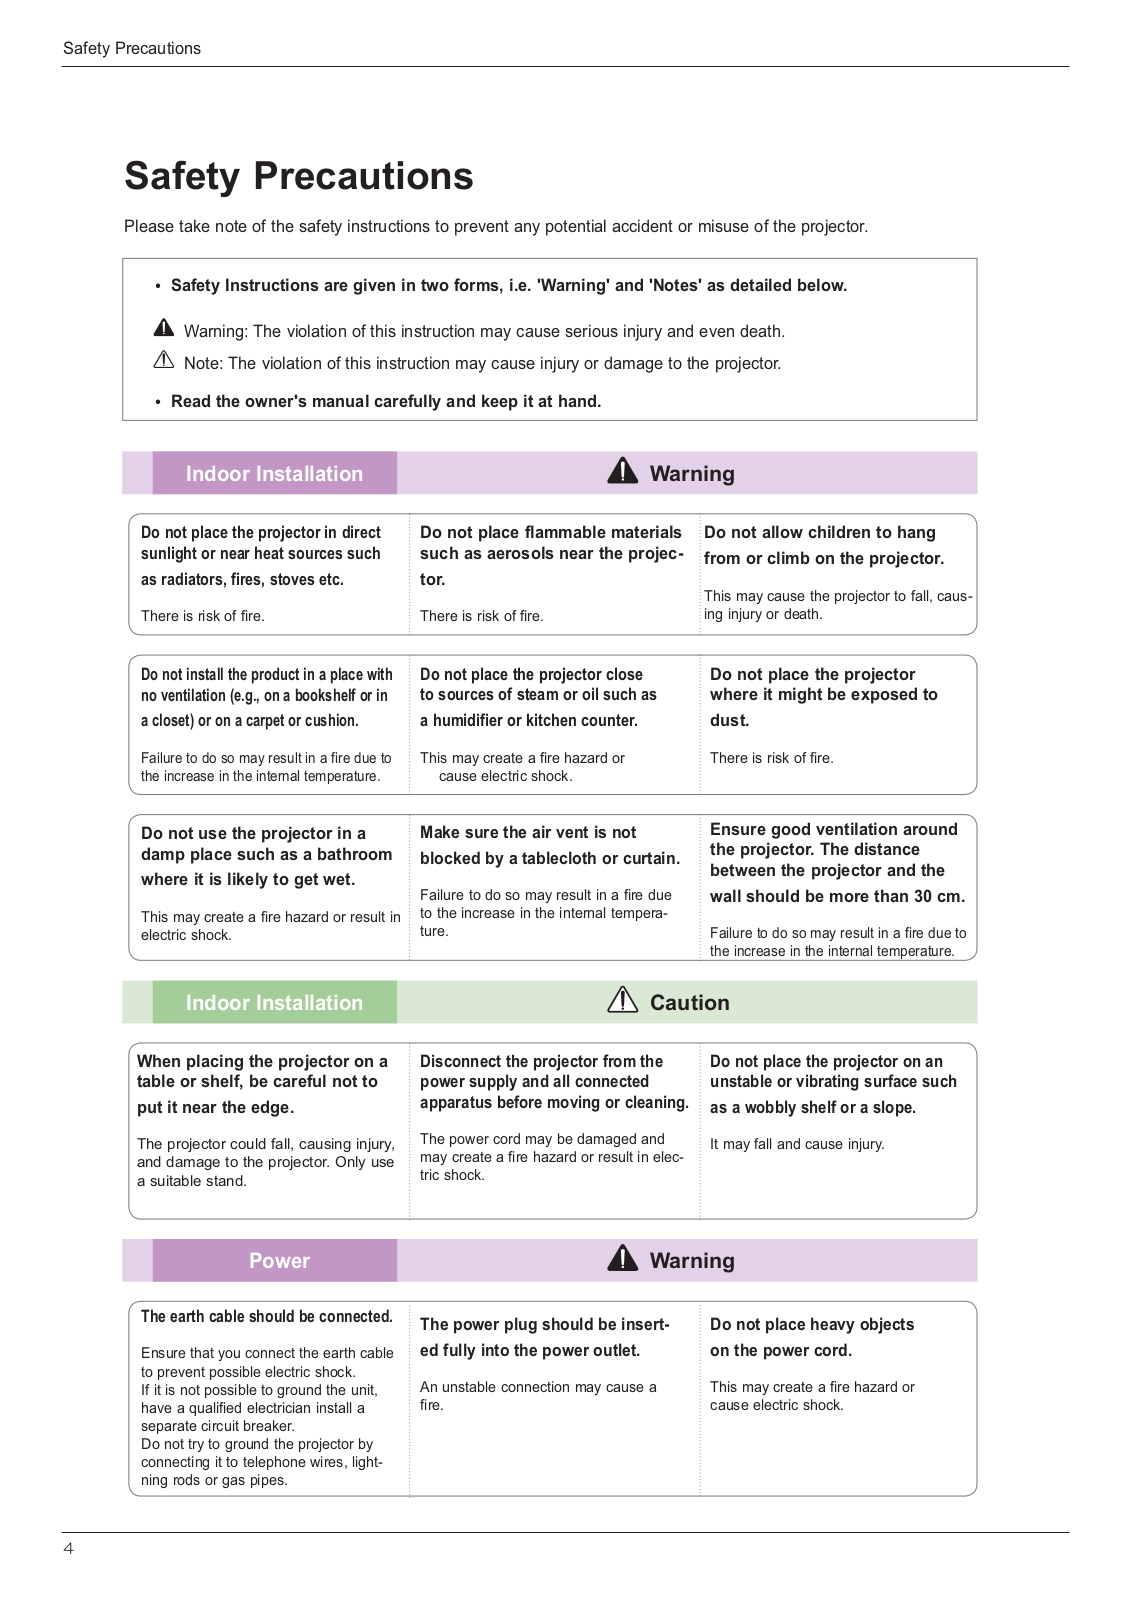
Safety Precautions

7 ! $& !$ $ 8

#Safety Instructions are given in two forms, i.e. 'Warning' and 'Notes' as detailed below.

9 : & ! 8 ! &

#5 : & ! 8 ! $ 8

#Read the owner's manual carefully and keep it at hand.


Indoor Installation

Warning


Do not place the projector in direct sunlight or near heat sources such

as radiators, fires, stoves etc.

Do not install the product in a place with no ventilation (e.g., on a bookshelf or in

a closet) or on a carpet or cushion.

Do not place flammable materials such as aerosols near the projec-

tor.

Do not place the projector close to sources of steam or oil such as

a humidifier or kitchen counter.

Do not allow children to hang

from or climb on the projector.

!$ 8 - 8 !

Do not place the projector where it might be exposed to

dust.

3 !

! ;


$


Do not use the projector in a damp place such as a bathroom

where it is likely to get wet.

! ;

Make sure the air vent is not

blocked by a tablecloth or curtain.

3 !$ -

Ensure good ventilation around the projector. The distance between the projector and the

wall should be more than 30 cm.

3 !$


Indoor Installation

Caution


When placing the projector on a table or shelf, be careful not to

put it near the edge.

$ 8 8 !$ 8 , ! "

Disconnect the projector from the power supply and all connected apparatus before moving or cleaning.

$ ! " ! ; -

Do not place the projector on an unstable or vibrating surface such

as a wobbly shelf or a slope.

! 8 !


Power

Warning


The earth cable should be connected.

/ ! "$&$ "$ " & #$"! $ 8 "!

$ -$ $

The power plug should be insert-

Do not place heavy objects

ed fully into the power outlet.

on the power cord.

4 " !

! ;


4

1 ! 7


Power

Warning


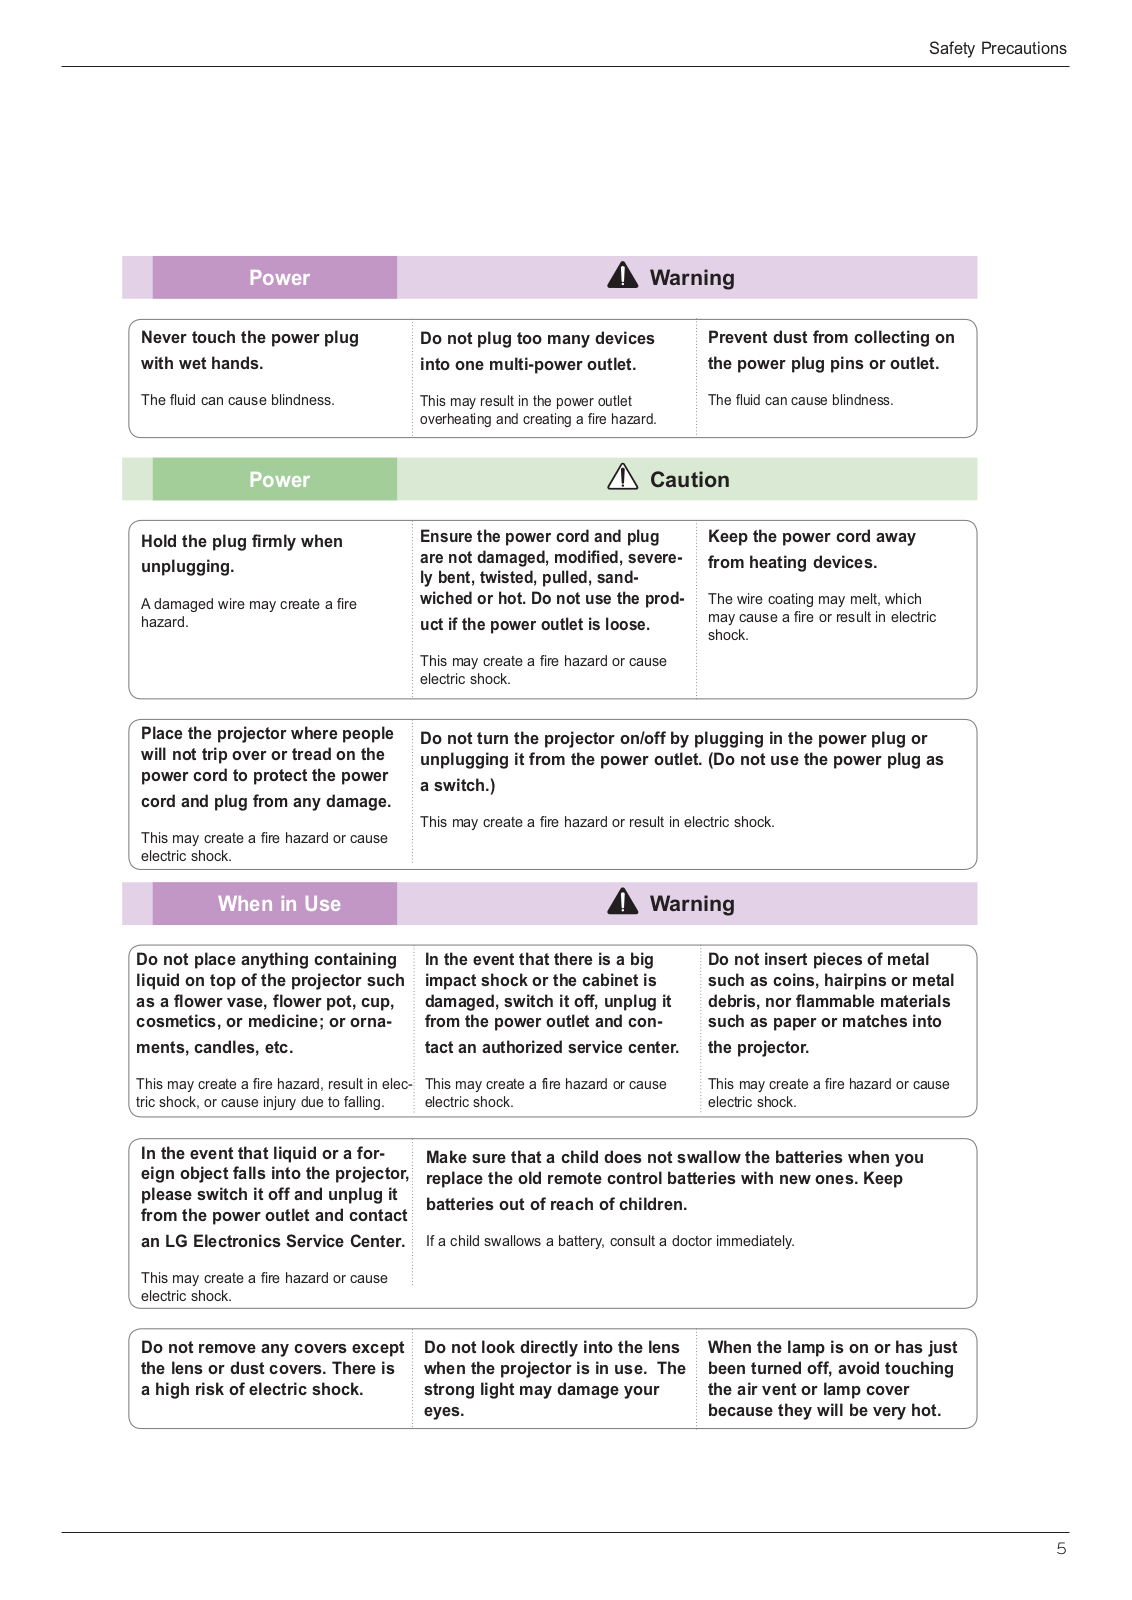
Never touch the power plug

with wet hands.

"

Power

Hold the plug firmly when

unplugging.

4 ! ;

Do not plug too many devices

Prevent dust from collecting on

into one multi-power outlet.

the power plug pins or outlet.

!$

"

& ;


Caution

Ensure the power cord and plug are not damaged, modified, severely bent, twisted, pulled, sandwiched or hot. Do not use the prod-

uct if the power outlet is loose.

! ;

Keep the power cord away

from heating devices.

! !

Place the projector where people will not trip over or tread on the power cord to protect the power

cord and plug from any damage.

! ;

When in Use

Do not turn the projector on/off by plugging in the power plug or unplugging it from the power outlet. (Do not use the power plug as

a switch.)

! ;

Warning

Do not place anything containing

In the event that there is a big

liquid on top of the projector such

impact shock or the cabinet is

as a flower vase, flower pot, cup,

damaged, switch it off, unplug it

cosmetics, or medicine; or orna-

from the power outlet and con-

ments, candles, etc.

tact an authorized service center.

! ;-

! ;

8 !


Do not insert pieces of metal such as coins, hairpins or metal debris, nor flammable materials such as paper or matches into

the projector.

! ;

In the event that liquid or a foreign object falls into the projector, please switch it off and unplug it from the power outlet and contact

an LG Electronics Service Center.

! ;

Make sure that a child does not swallow the batteries when you replace the old remote control batteries with new ones. Keep

batteries out of reach of children.

" ! !

Do not remove any covers except the lens or dust covers. There is a high risk of electric shock.

Do not look directly into the lens when the projector is in use. The strong light may damage your eyes.

When the lamp is on or has just been turned off, avoid touching the air vent or lamp cover because they will be very hot.

5

1 ! 7


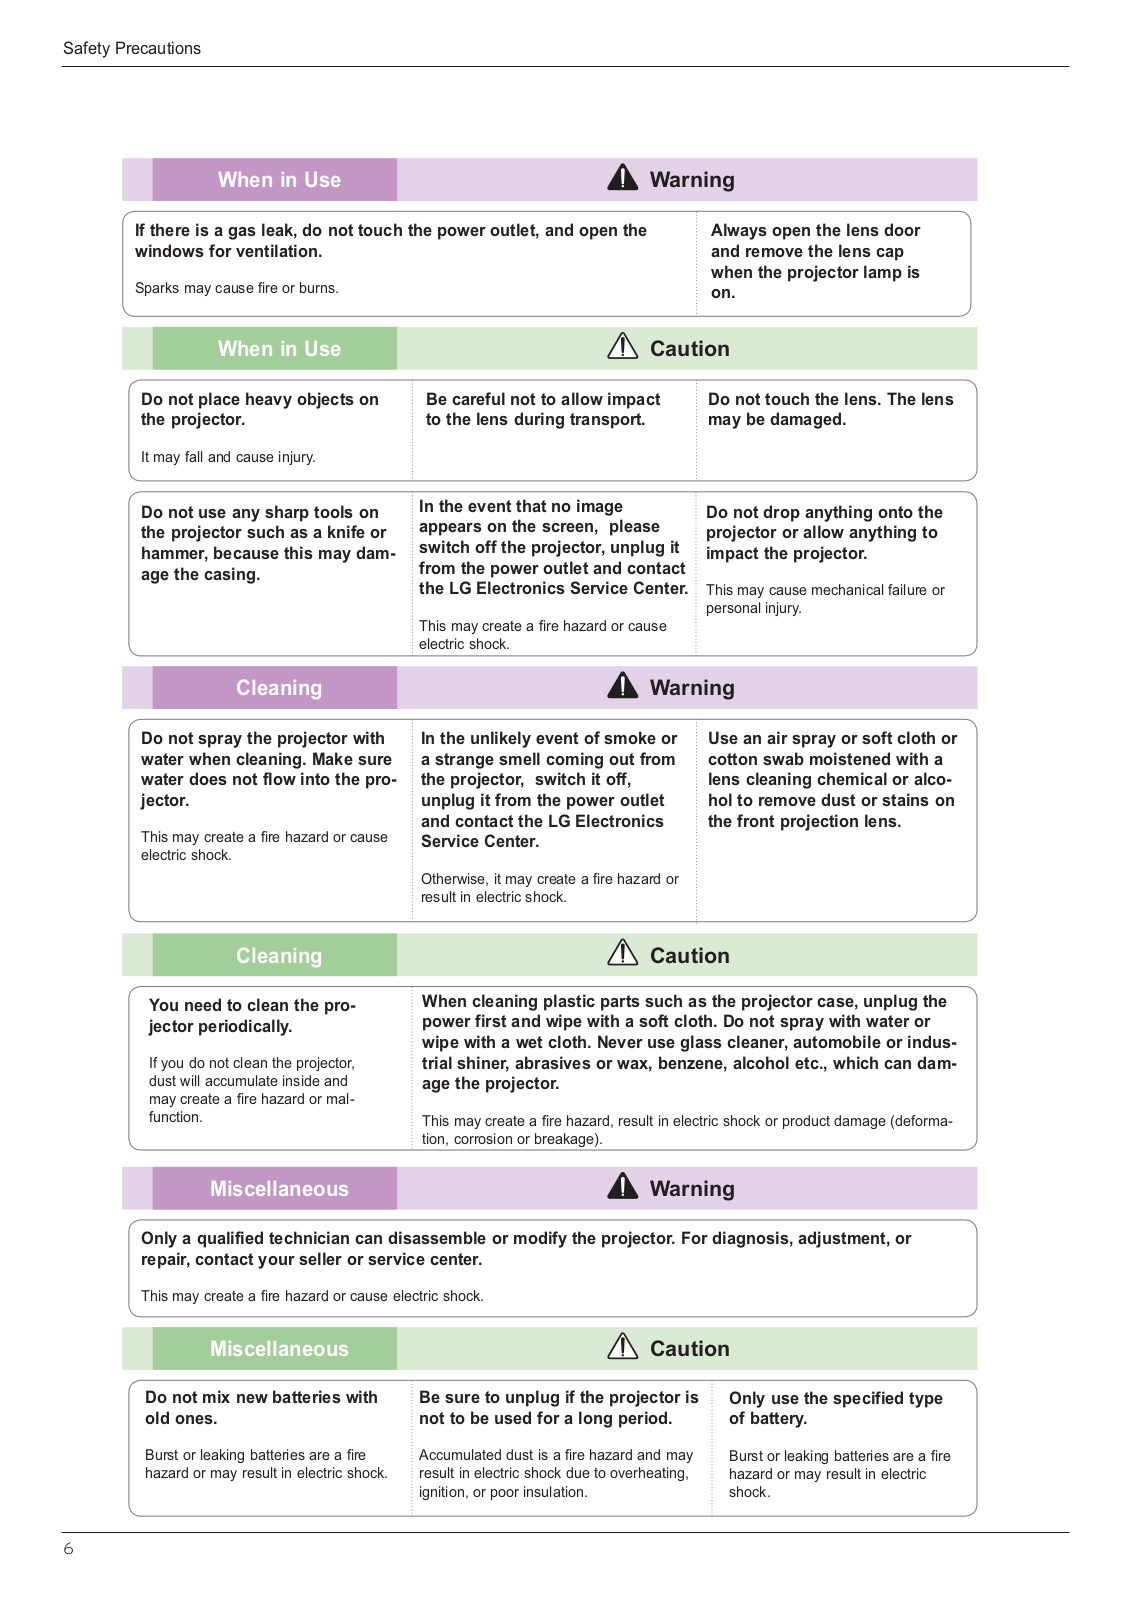
When in Use

Warning


If there is a gas leak, do not touch the power outlet, and open the windows for ventilation.

1$! "

Always open the lens door and remove the lens cap when the projector lamp is on.


When in Use

Caution


Do not place heavy objects on the projector.

! 8 !

Do not use any sharp tools on the projector such as a knife or hammer, because this may damage the casing.

Cleaning

Do not spray the projector with water when cleaning. Make sure water does not flow into the projector.

! ;

Be careful not to allow impact to the lens during transport.

In the event that no image appears on the screen, please switch off the projector, unplug it from the power outlet and contact the LG Electronics Service Center.

! ;

Do not touch the lens. The lens may be damaged.

Do not drop anything onto the projector or allow anything to impact the projector.

! $ 8 !

Warning

In the unlikely event of smoke or a strange smell coming out from the projector, switch it off, unplug it from the power outlet and contact the LG Electronics Service Center.

, ! ;

Use an air spray or soft cloth or cotton swab moistened with a lens cleaning chemical or alcohol to remove dust or stains on the front projection lens.


Cleaning

Caution


You need to clean the projector periodically.

! $ 8 ! ; -

When cleaning plastic parts such as the projector case, unplug the power first and wipe with a soft cloth. Do not spray with water or wipe with a wet cloth. Never use glass cleaner, automobile or industrial shiner, abrasives or wax, benzene, alcohol etc., which can damage the projector.

! ; $ * -" +


Miscellaneous

Warning


Only a qualified technician can disassemble or modify the projector. For diagnosis, adjustment, or repair, contact your seller or service center.

! ;


Miscellaneous

Caution


Do not mix new batteries with old ones.

Be sure to unplug if the projector is not to be used for a long period.

Only use the specified type of battery.

< "

4 ; !

< "

; !

&

; !


$


6

7 $

Parts and Components

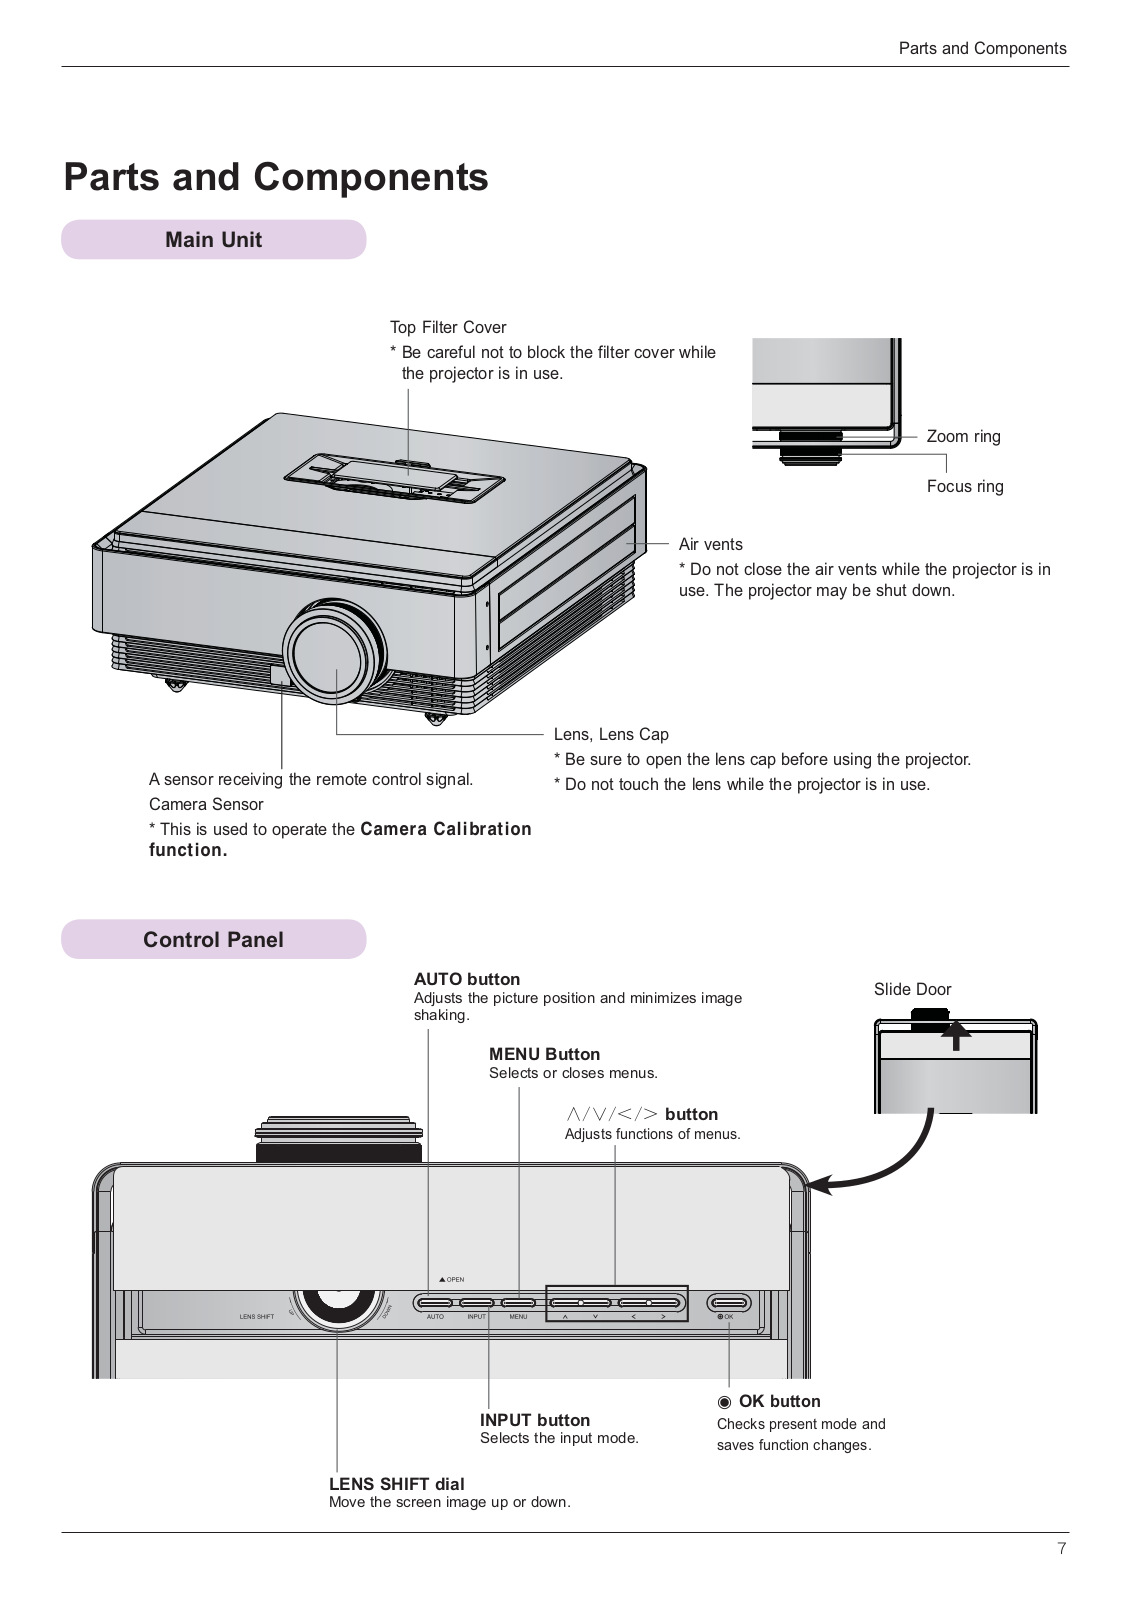
Main Unit

$3 &

= < " &$ 8

>

3

4 &

= & $ 8$ 8 ! "

$

= < $ $" $ 8

4 &

= $ 8

1

= $ Fdphud#Fdoleudwlrq# ixqfwlrq1

Control Panel

AUTO button

1


4 8$ $ ;


MENU Button

1


button


4 8


INPUT button


OK button


$


1$


&


LENS SHIFT dial

&$

7

LG CF3DAJS Users manual

7 $


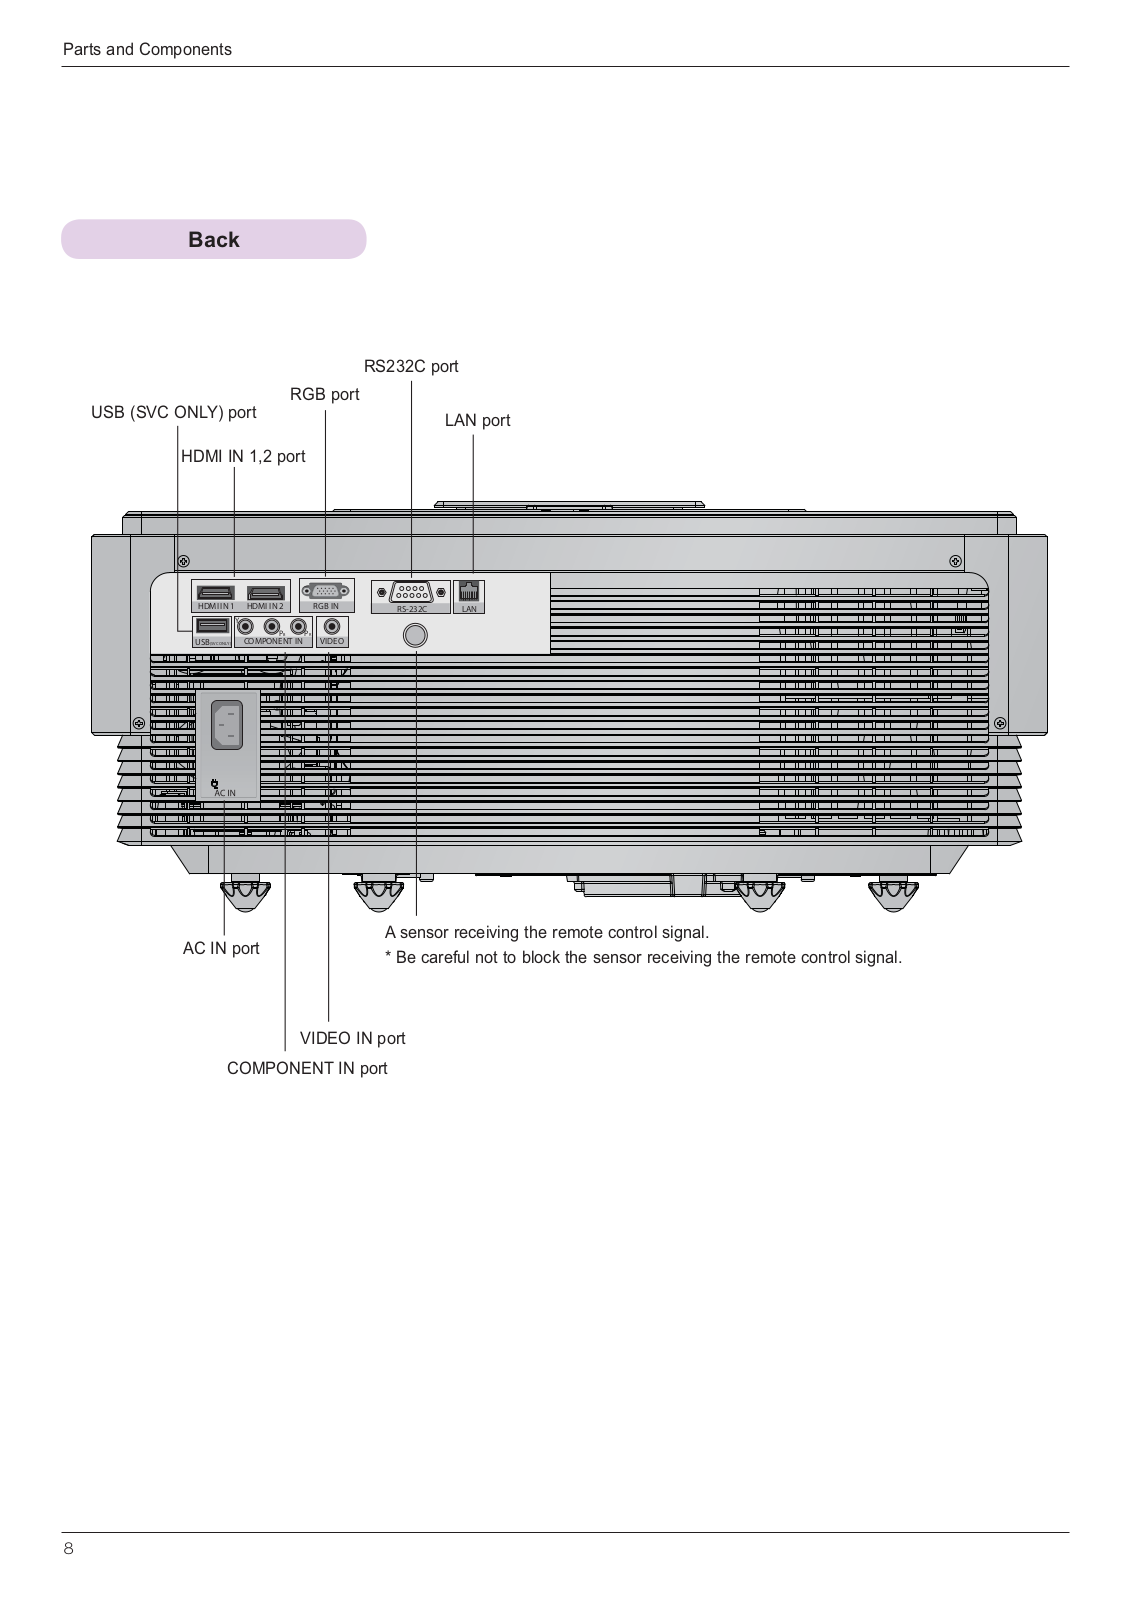
Back


.1BDB$


01< *1? ,5 @+$

.C<$


45$


5 A B$


HDMI IN 1

HDMI IN 2


RGB IN

RS-232C

LAN


Y


USB(SVC ONLY)

PB

PR

VIDEO


COMPONENT IN


4 5$


4

&


= < " &


? /, 5$


, 7,5/5 5$


8

7 $

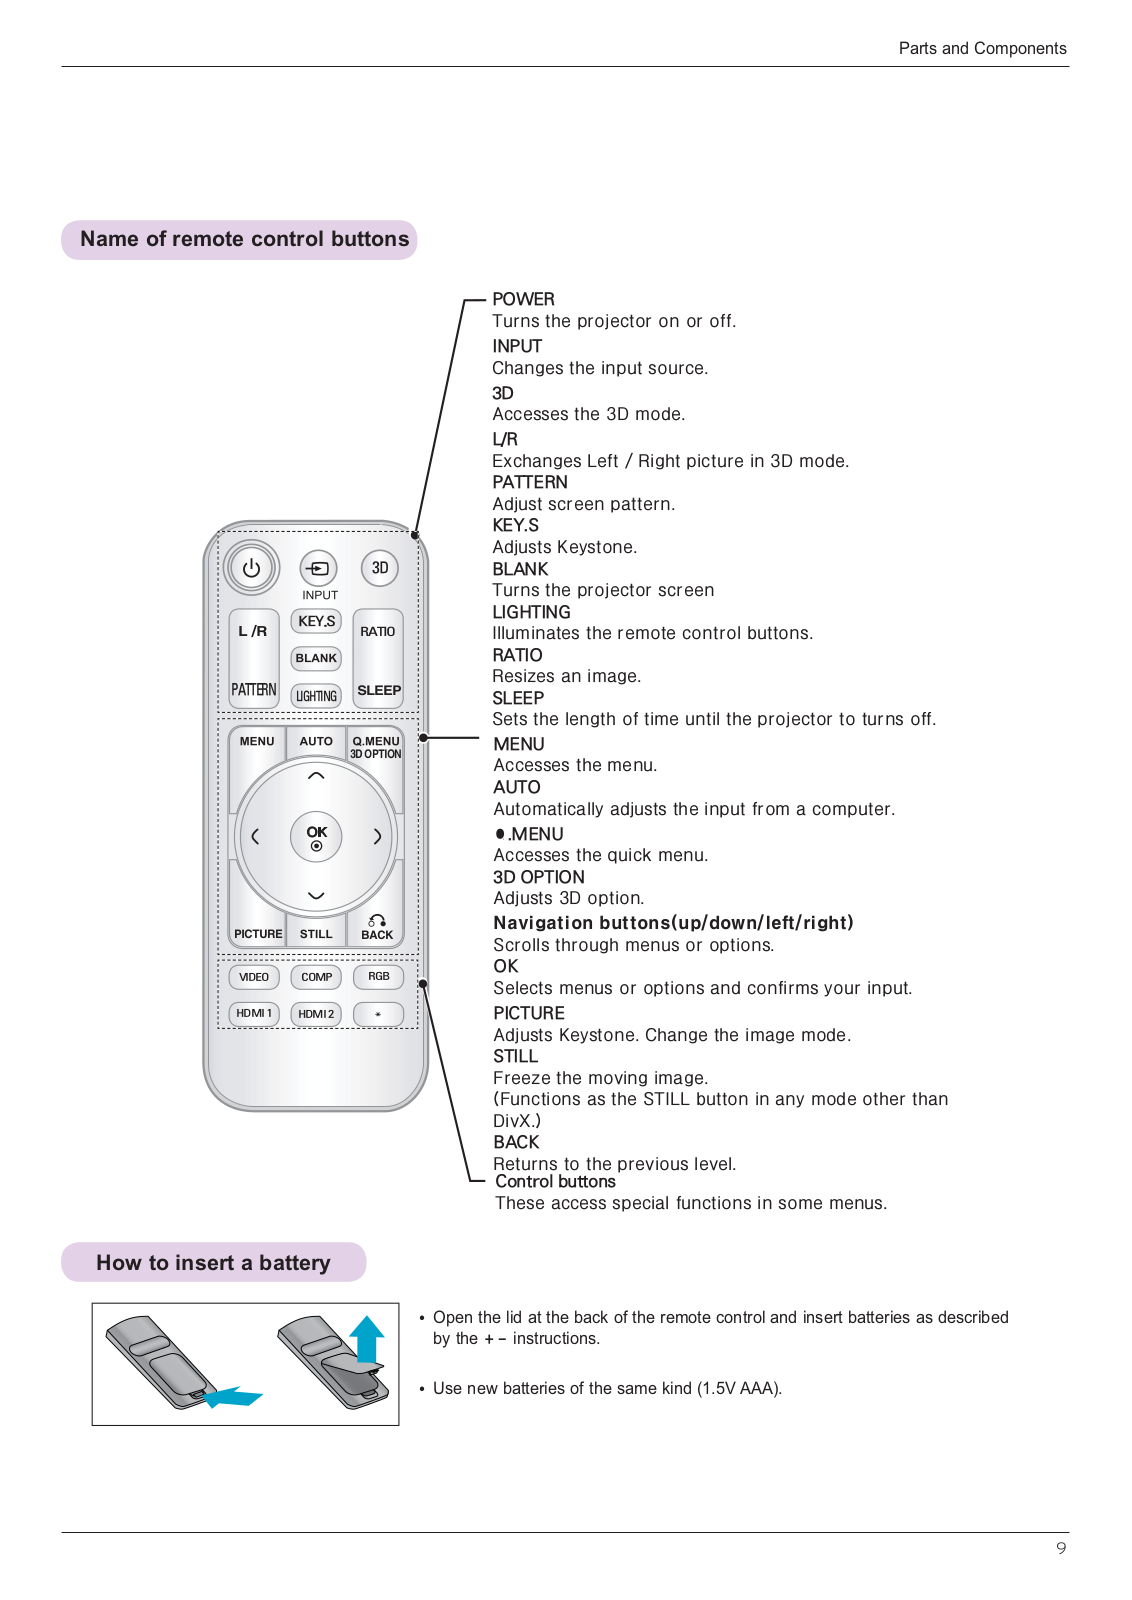
Name of remote control buttons


POWER


Wxuqv#wkh#surmhfwru#rq#ru#rii1


INPUT


Fkdqjhv#wkh#lqsxw#vrxufh1


3D


Dffhvvhv#wkh#6G#prgh1


L/R


H{fkdqjhv#Ohiw#2#Uljkw#slfwxuh#lq#6G#prgh1


PATTERN


Dgmxvw#vfuhhq#sdwwhuq1


KEY.S


Dgmxvwv#Nh|vwrqh1


3D

BLANK


Wxuqv#wkh#surmhfwru#vfuhhq


LIGHTING


.(<6


Looxplqdwhv#wkh#uhprwh#frqwuro#exwwrqv1

O#2U


5$7,2


RATIO


VOHHS

Uhvl}hv#dq#lpdjh1

3$77(51

/,*+7,1*

SLEEP


Vhwv#wkh#ohqjwk#ri#wlph#xqwlo#wkh#surmhfwru#wr#wxuqv#rii1


6G#RSWLRQ

MENU


Dffhvvhv#wkh#phqx1


AUTO


Dxwrpdwlfdoo|#dgmxvwv#wkh#lqsxw#iurp#d#frpsxwhu1


Q.MENU


Dffhvvhv#wkh#txlfn#phqx1


3D OPTION


Dgmxvwv#6G#rswlrq1

SLFWXUH


EDFN

Qdyljdwlrq#exwwrqv+xs2grzq2ohiw2uljkw,


Vfuroov#wkurxjk#phqxv#ru#rswlrqv1


OK

9,'(2

&203

5*%

Vhohfwv#phqxv#ru#rswlrqv#dqg#frqilupv#|rxu#lqsxw1


+'0,

+'0,


PICTURE


Dgmxvwv#Nh|vwrqh1#Fkdqjh#wkh#lpdjh#prgh1


STILL


Iuhh}h#wkh#prylqj#lpdjh1


+Ixqfwlrqv#dv#wkh#VWLOO#exwwrq#lq#dq|#prgh#rwkhu#wkdq#


Gly[1,


BACK


Uhwxuqv#wr#wkh#suhylrxv#ohyho1


Control buttons


Wkhvh#dffhvv#vshfldo#ixqfwlrqv#lq#vrph#phqxv1

How to insert a battery

,$" " "

"!


0

"

*A E? 444+

9

7 $

Projector Status Indicators

=$ $ $ $ $ 8 $ $ 8

7<

$ 8 , H,

,$ $$

$ &


<

1 "!


$!

C *< +

On


C

$ 8


! *< +

7

* " FG $

$! +


. *< +

4


$

@

$


@ *< +

$ 8 ! ) &


$

"$


$


$


*< +

4 $


Red

$ & $


4 &

!

4

&


3

< *< +

& $


10

7 $

Accessories


3D


.(<6


O#2U


5$7,2

3$77(51

/,*+7,1* VOHHS


6G#RSWLRQ

SLFWXUH


EDFN

9,'(2

&203

5*%

+'0,

+'0,


./ , / ,5 ., < ! *444+ B/4 0 C D C


7


7

> 5


$3

< 3

$

Optional Extras

$ $ & $$ ! $$

9 $ $ "8 $ &$ $ ! "

Fhlolqj#prxqw#iru#surmhfwru

7 8 1 *D +

$

$"

"


? "

$

45 "

"


D C .1 BDB "

11

Installation and Configuration

Caution on Installation

Place the projector in a well-ventilated environment.


$& "$ $ 8


$ $ 8 $ !$ -

&$ $!$ 8-

&$ $&

" $ 8


! " & &

$

"

!

"

$


< $&

"8$ $"

& # *DG +

$ 8


$ 8

Do not place the projector in a hot or humid environment.

, !$ 8 $ $ ! *1$EJ $ $ ! +

Do not place the projector in a place where it will easily attract dust.

Do not remove any covers except for the lens cap. There is a high risk of electric shock.

The projector is manufactured using high-precision technology. You may, however, see tiny black dots and/or bright colored dots (red, blue or green) that continuously appear on the projector screen. This is a normal result of the manufacturing process and does not indicate a malfunction.

The remote control may not work in an environment where a lamp equipped with electronic ballasts or a three-wavelength fluorescent lamp is installed.

Replace the lamp with an internationally standardized lamp for the remote control to work normally.

12

Projection Distance per Screen Size

KPlace the projector on a sturdy, level surface, together with the PC or audio/video source.

A " $ 8 ;

B 7 $ 8 $ 8" Nh|vwrqh#ixqfwlrq1

D $ $ 8 ! & $


Vfuhhq

Ohqv#vkliw

Vfuhhq#Khljkw#+[,


Pd{1

X/2


0%


X/2


Pd{1


Surmhfwlrq#glvwdqfh#+G,


Vfuhhq#Zlgwk#+\,

Y/2

80.5 mm

Vfuhhq

Y/2

Surmhfwlrq#glvwdqfh#+G,

16:9 Dvshfw#Udwlr


1


7 8


1 1 ; * +

1 9 *@+

1 *6+

$ 8 -


)$ 8 -


* +

* +

* A+ * +


* B+ * +


13

Loading...
+ 30 hidden pages