

LG ARX5 Owner’s Manual
OWNER’S MANUAL
Audio/Video
Receiver
Please read this manual carefully before operating your set and
retain it for future reference.
Some of the content in this manual may differ from your unit.
MODEL
ARX5 (ARX5, S63S6-S, S75T1-W)
www.lg.com
Copyright © 2018 LG Electronics Inc. All Rights Reserved.
MFL68962877
ENGLISH FRANÇAIS PORTUGUÊS
LHR627-FE.DGHALLK_ENG_MFL68962877.indd 1 2018-05-09 10:56:50
Getting Started
2
Getting Started
1
Safety information
CAUTION
RISK OF ELECTRIC SHOCK
CAUTION: TO REDUCE THE RISK OF ELECTRIC
SHOCK DO NOT REMOVE COVER (OR BACK)
NO USER-SERVICEABLE PARTS INSIDE REFER
SERVICING TO QUALIFIED SERVICE PERSONNEL.
WARNING: TO PREVENT FIRE OR ELECTRIC SHOCK
HAZARD, DO NOT EXPOSE THIS PRODUCT TO RAIN
OR MOISTURE.
WARNING: Do not install this equipment in a
conned space such as a book case or similar unit.
CAUTION: The apparatus should not be exposed to
water (dripping or splashing) and no objects lled
with liquids, such as vases, should be placed on the
apparatus.
CAUTION: Do not use high voltage products around
this product. (ex. Electrical swatter) This product may
malfunction due to electrical shock.
DO NOT OPEN
This lightning ash with arrowhead
symbol within an equilateral
triangle is intended to alert the
user to the presence of uninsulated
dangerous voltage within the
product’s enclosure that may be of
sufcient magnitude to constitute
a risk of electric shock to persons.
The exclamation point within an
equilateral triangle is intended
to alert the user to the presence
of important operating and
maintenance (servicing)
instructions in the literature
accompanying the product.
CAUTION: Do not block any ventilation openings.
Install in accordance with the manufacturer’s
instructions.
Slots and openings in the cabinet are provided
for ventilation and to ensure reliable operation of
the product and to protect it from over heating.
The openings shall be never be blocked by placing
the product on a bed, sofa, rug or other similar
surface. This product should not be placed in a builtin installation such as a bookcase or rack unless
proper ventilation is provided or the manufacturer’s
instruction has been adhered to.
CAUTION concerning the Power Cord
The Power Plug is the disconnecting device. In case
of an emergency, the Power Plug must remain readily
accessible.
Check the specication page of this owner’s manual
to be certain of the current requirements.
Do not overload wall outlets. Overloaded wall outlets,
loose or damaged wall outlets, extension cords, frayed
power cords, or damaged or cracked wire insulation
are dangerous. Any of these conditions could result
in electric shock or re. Periodically examine the
cord of your device, and if its appearance indicates
damage or deterioration, unplug it, discontinue use of
the device, and have the cord replaced with an exact
replacement part by an authorized service center.
Protect the power cord from physical or mechanical
abuse, such as being twisted, kinked, pinched, closed
in a door, or walked upon. Pay particular attention to
plugs, wall outlets, and the point where the cord exits
the device.
NOTICE: For safety marking information including
product identication and supply ratings, please refer
to the main label on the bottom or the other surface
of the product.
LHR627-FE.DGHALLK_ENG_MFL68962877.indd 2 2018-05-09 10:56:51
Getting Started
Getting Started
1
This device is equipped with a portable battery or
accumulator.
How to Safely remove the batteries or the
battery pack from the equipment: To Remove the
old batteries or battery pack, follow the assembly
steps in reverse order. To prevent contamination of
the environment and bring on possible threat to
human and/or animal health, the old batteries or the
battery pack must be put in an appropriate container
at designated collection points. Do not dispose
of batteries or battery pack together with other
waste. It is recommended that you use local, free
reimbursement systems batteries or battery packs,
(may not be available in your area). The batteries or
the battery pack should not be exposed to excessive
heat such as sunshine, re or the like.
CAUTION: No naked ame sources, such as lighted
candles, should be placed on the apparatus.
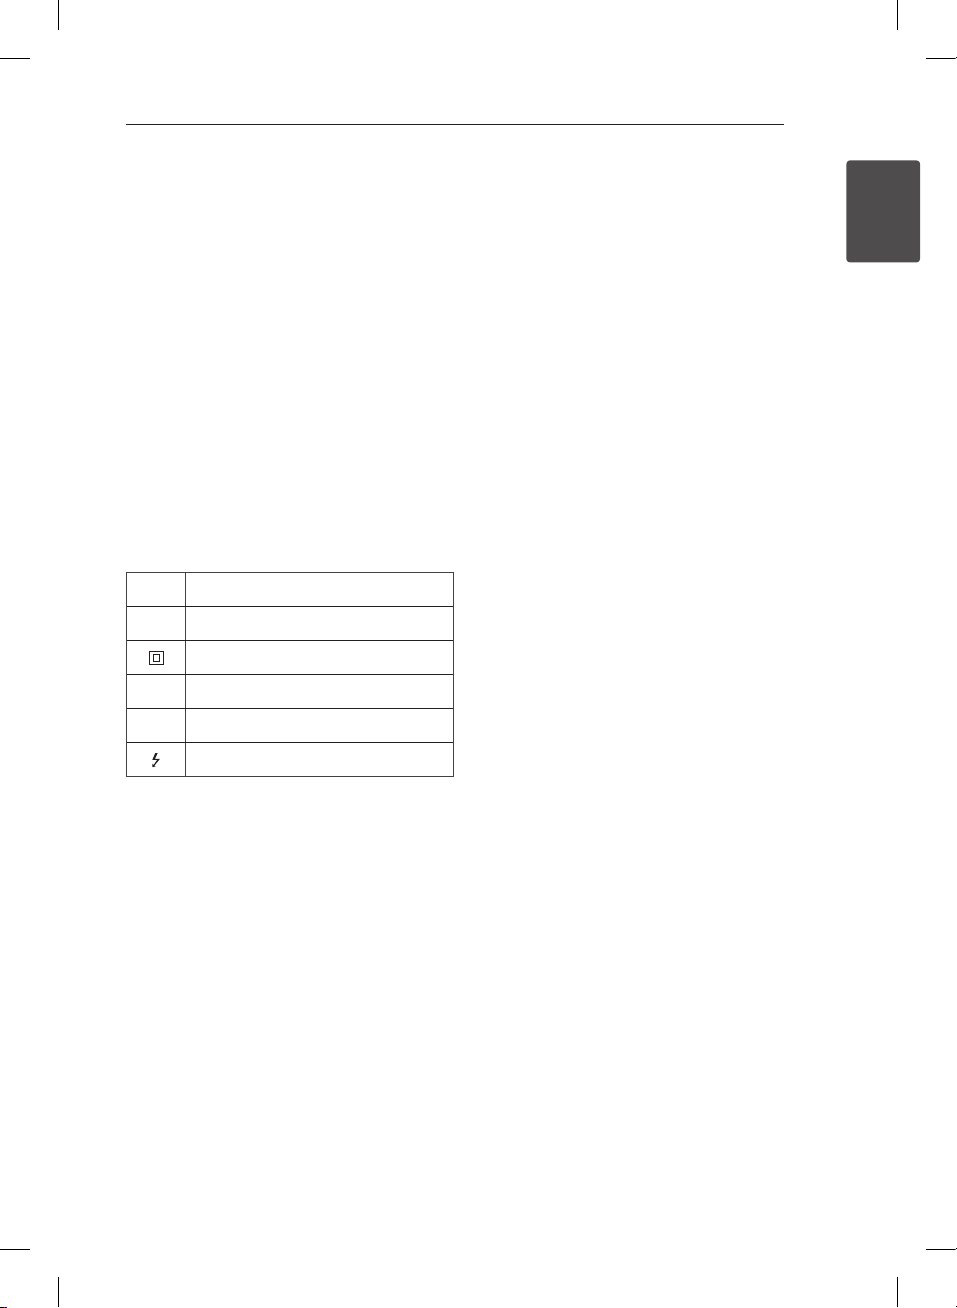
Symbols
Refers to alternating current(AC).
~
Refers to direct current(DC).
0
Refers to class II equipment.
3
Refers to stand-by.
1
Refers to “ON” (power).
!
Refers to dangerous voltage.
LHR627-FE.DGHALLK_ENG_MFL68962877.indd 3 2018-05-09 10:56:51

Table of Contents
4
Table of Contents
1 Getting Started
2 Safety information
6 Unique features
6 Accessories
6 Introduction
6 – Symbols Used in this Manual
7 – Required cables
8 Remote control
10 Front panel
11 Rear panel
2 Connecting
12 Spekaer installation
13 Before connecting
13 Positioning the system
14 Attaching the speakers to the unit
15 Connecting TV with other devices
15 – Using an HDMI cable
17 – Using a composite video cable
18 Connecting audio devices
19 Connecting other devices
20 Connecting the antenna
20 Connecting portable devices
3 System Setting
21 Settings and adjustments using the SETUP
menu
21 – SETUP configuration
21 – TESTTONE menu
22 – LEVEL menu
22 – DISTANCE menu
23 – A/V SYNC menu (Adjusting the audio delay)
23 – DOLBY DRC menu
23 – RESET menu
4 Operating
24 Selecting the input source
24 – By using the knob on the unit
24 – By using the remote control
25 USB Operation
25 – Basic Operations
25 – Selecting a folder and
an MP3/WMA file
26 – Deleting an MP3/WMA file
26 – Playing repeatedly or randomly
26 – To activate the mute function
27 – Playable file Requirement
27 – Playback effect
30 Enjoying various sound mode
30 – Setting the USER EQ
31 – LG Sound Sync
32 Using a BLUETOOTH® wireless technology
32 – Listening to music stored on the Bluetooth
devices
34 – Using the Music Flow Bluetooth App
35 – Activate Bluetooth with “Music Flow
Bluetooth” App
36 Radio Operations
36 – Listening to FM radio
36 – Improving poor FM reception
36 – Presetting the Radio Stations
36 – Deleting all the saved stations
LHR627-FE.DGHALLK_ENG_MFL68962877.indd 4 2018-05-09 10:56:51

Table of Contents
1
2
3
4
5
6
5
37 Other Operations
37 – Dimmer
37 – Using the Sleep Timer
37 – Displaying file and input source
37 – Auto power down
37 – AUTO POWER On/Off
38 Advanced Operations
38 – Recording to USB
5 Troubleshooting
39 Troubleshooting
6 Appendix
40 Controlling a TV with the Supplied Remote
Control
40 – Setting up the remote to control your TV
41 Trademarks and licenses
41 Maintenance
41 – Handling the unit
42 Specifications
LHR627-FE.DGHALLK_ENG_MFL68962877.indd 5 2018-05-09 10:56:51
Getting Started
6
Getting Started
1
Unique features
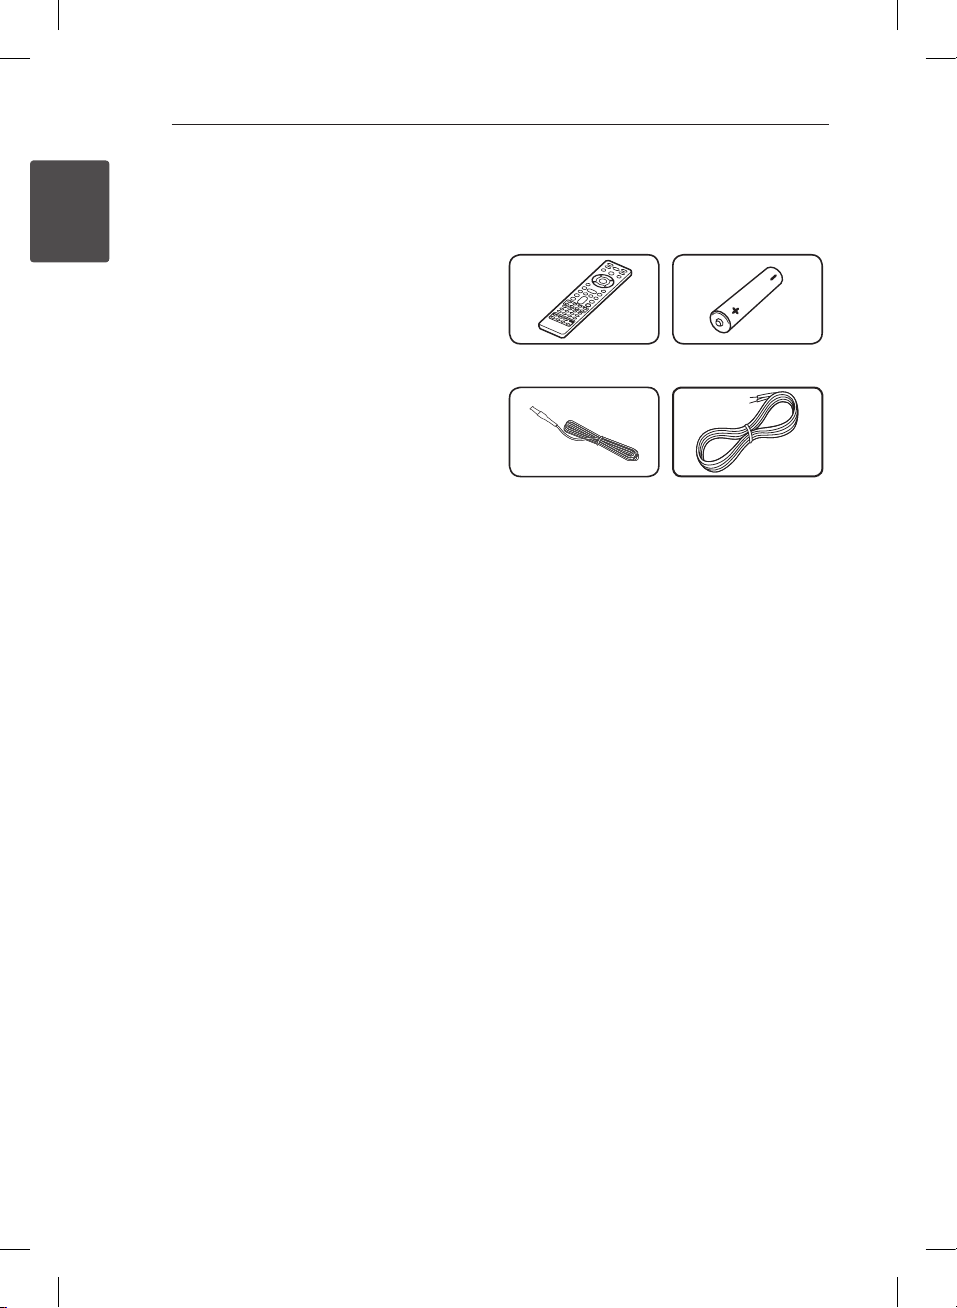
Accessories
Please check and identify the supplied accessories.
Bluetooth®
Listens to music stored on your Bluetooth device.
Portable In
Listens to music from your portable device. (MP3,
Notebook, etc.)
Remote control (1) Battery (1)
Playback effects
Listens to music various sound and playback effects.
USB Direct Recording
Records music to your USB device. (analog sources
only.)
Music Flow Bluetooth
Music Flow Bluetooth is an App designed to let you
take control of some of LG’s latest Audio devices.
Refer to the page 34-35.
LG Sound Sync
Controls volume level of this unit by the remote
control of your LG TV that is compatible with LG
Sound Sync.
FM antenna (1) Speaker cables (4)
Introduction
Symbols Used in this Manual
Note
,
Indicates special notes and operating features.
Caution
>
Indicates cautions for preventing possible damages
from abuse.
LHR627-FE.DGHALLK_ENG_MFL68962877.indd 6 2018-05-09 10:56:52
Getting Started
Getting Started
1
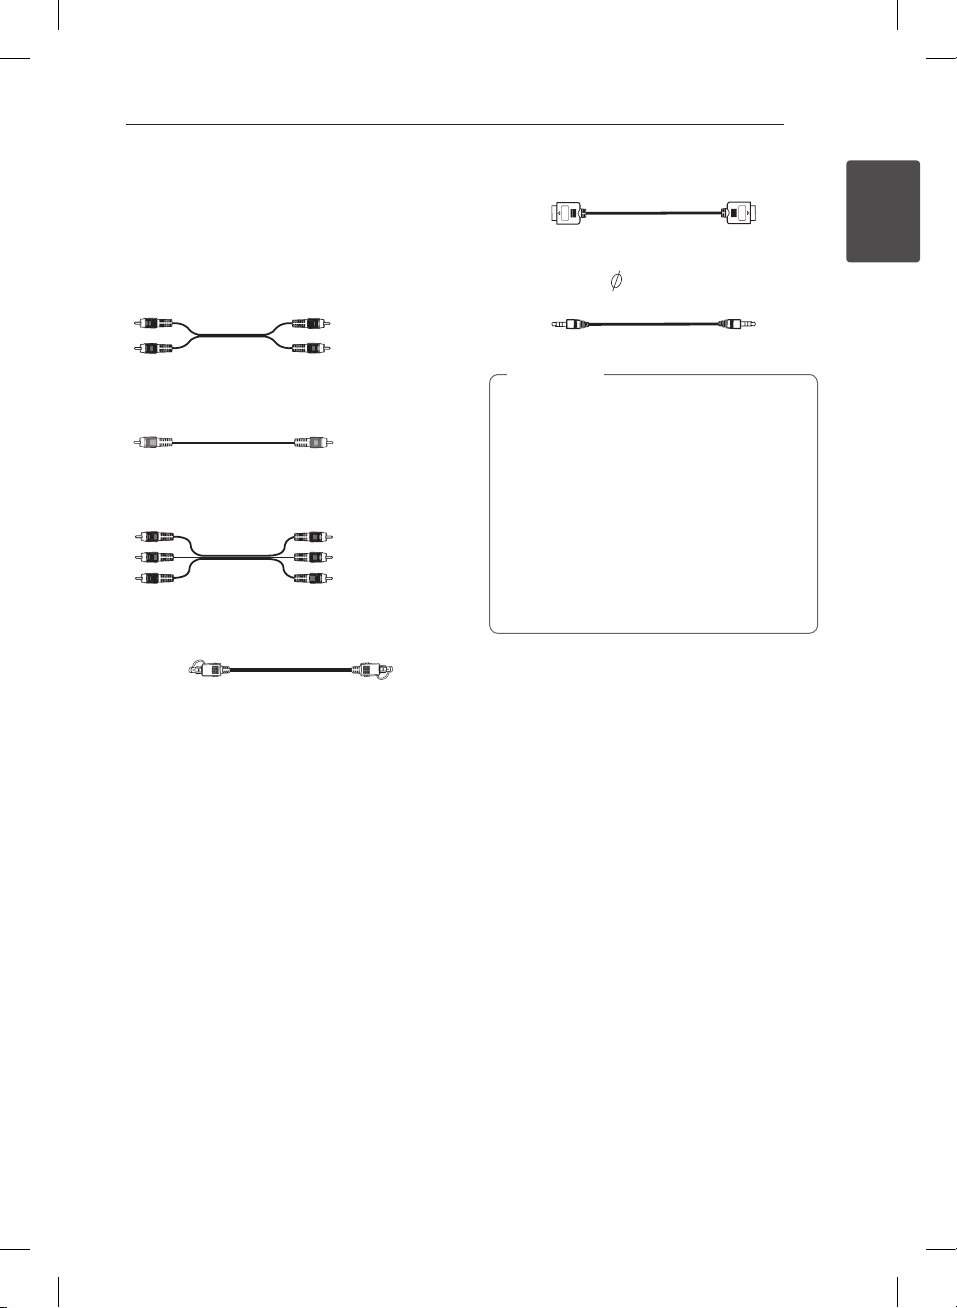
Required cables
The hookup diagrams on the subsequent pages
assume the use of the following connection cables.
You must purchase the connection cables separately
if necessary.
yAnalog audio cable
White (L)
Red (R)
yComposite video cable
Yellow
yAnalog audio/Composite video cable
Yellow (Video)
White (L/audio)
Red (R/audio)
yOptical digital audio cable
yHDMI cable
Portable cable (
y
Note
,
yTurn off the power to all components before
making any connections.
yWhen connecting an audio/video cable, be
sure to match the color-coded pins to the
appropriate jacks on the components:
yellow (video) to yellow; white (left, audio) to
white; and red (right, audio) to red.
yWhen connecting optical digital cables, insert
the cable plugs straight in until they click into
place.
yDo not bend or tie optical digital audio cables.
3.5 mm Stereo plug)
7
LHR627-FE.DGHALLK_ENG_MFL68962877.indd 7 2018-05-09 10:56:54
Getting Started
8
Getting Started
1
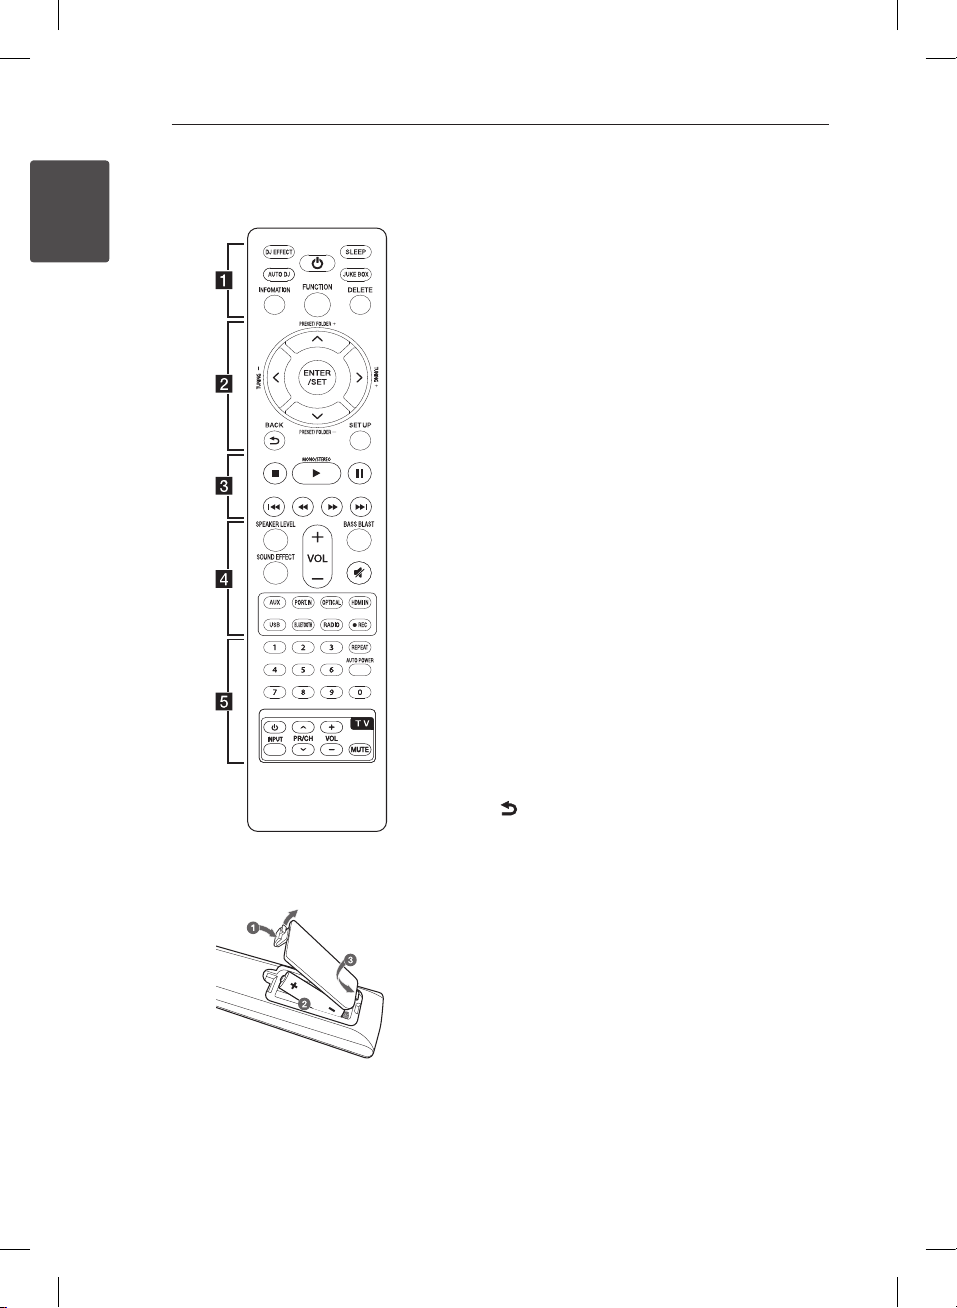
Remote control
• • • • • • • • • • • • • •a • • • • • • • • • • • • •
DJ EFFECT : Selects a desired DJ EFFECT. (Refer to
page 28.)
: Switches the unit ON or OFF.
1
SLEEP : Sets dimmer or the system to turn off
automatically at a specied time.
AUTO DJ : Selects the AUTO DJ mode. (For more
information refer to the page 28.)
JUKE BOX :
- Selects JUKE BOX mode.
- Makes your favorites list.
INFORMATION :
- Displays the information of a le or an input
source.
- Sees the name of connected all Bluetooth device
in Bluetooth mode.
FUNCTION : Selects the function and the input
source.
DELETE :
- Deletes MP3/WMA les or folders.
- Deletes a song on JUKE BOX list.
• • • • • • • • • • • • • •b • • • • • • • • • • • • •
ENTER/SET : Acknowledges menu selection.
PRESET/FOLDER (-/+) :
- Selects a preset stations.
- Searches a folder on USB device.
TUNING (-/+) : Tunes in the desired radio station.
W/S/A/D
option in the menu.
BACK : Moves backwards in the menu or exits the
setup menu.
SETUP : Displays or exits the [SETUP] menu.
(up/ down/ left/ right): Selects an
Replacement of battery
AAA(R03)
Remove the battery cover on the rear of the Remote
Control, and insert the battery with 4 and 5
matched correctly.
LHR627-FE.DGHALLK_ENG_MFL68962877.indd 8 2018-05-09 10:56:54

Getting Started
Getting Started
1
• • • • • • • • • • • • • •c • • • • • • • • • • • • •
: Stops playback.
Z
MONO/STEREO :
d
- Starts playback.
- Selects MONO/STEREO in FM mode.
: Pauses playback.
M
C/V
c/v
• • • • • • • • • • • • • •d • • • • • • • • • • • • •
SPEAKER LEVEL : Sets the sound level of desired
speaker.
VOL (-/+) : Adjusts speaker volume.
BASS BLAST : Selects the BASS BLAST sound mode
directly.
SOUND EFFECT : Selects a sound effect mode.
again to restore the sound.
INPUT buttons : Selects the input source you want to
use. (For more information refer to the page 24.)
- AUX : Selects the input source connected to AUX
- PORT.IN : Selects the input source connected to
- OPTICAL : Selects the input source connected to
- HDMI IN : Selects the input source connected to
- USB : Selects the input source connected to USB
- BLUETOOTH : Selects Bluetooth function.
- RADIO : Selects the FM tuner.
X
: Goes to the next or previous le.
: Searches backward or forward.
: Turns off the sound temporarily. Press the button
IN 1/2(L/R) jack.
PORT.IN jack.
OPTICAL IN jack.
HDMI IN 1/2/3 jack.
port.
REC : USB direct recording. (Refer to the page 38.)
• • • • • • • • • • • • • •e • • • • • • • • • • • • •
0 to 9 numerical buttons :
- Selects numbered options in a menu.
- Selects numbered tracks, les, or preset number.
REPEAT : Listens to your les repeatedly or randomly.
AUTO POWER : Turns on or off AUTO POWER
function. (Refer to the page 37.)
TV Control Buttons : Refer to the page 40.
9
LHR627-FE.DGHALLK_ENG_MFL68962877.indd 9 2018-05-09 10:56:55
Getting Started
10
Getting Started
1
Front panel
a
b
c
d
e
f
g
l
(STANDBY/ON)
a 1/!
Switches the unit ON or OFF.
BASS BLAST
b
Selects the BASS BLAST sound mode directly.
Remote sensor
c
Display window
d
Shows the current status of the unit.
DJ EFFECT
e
Selects DJ effect. (For more information refer to
the page 28.)
USER EQ
f
Sets the USER EQ mode (BASS, MIDDLE and
TREBLE). (For more information refer to the page
30.)
ENTER
- Acknowledges menu selection.
- Enters USER EQ/ Conrms USER EQ setting.
(For more information refer to the page 30.)
PLAY/PAUSE
- Starts playback.
- Pauses playback, press it again to exit pauses
status.
- Selects BASS, MIDDLE or TREBLE while in
"USER EQ" mode by pressing PLAY/PAUSE
repeatedly.(For more information refer to the
page 30.)
STOP
Stops playback.
k
j
USB port (5 V 0 500 mA)
g
Connects an USB device to USB port.
MASTER VOLUME
h
Adjusts the speaker volume.
CONTROL
i
- Control the DJ EFFECT and DJ PRO.
- Adjust USER EQ sound level. (For more
information refer to the page 30.)
DJ PRO
j
Selects DJ PRO effect. (For more information
refer to the page 27.)
SOUND EFFECT
k
Selects Sound effect.
INPUT SELECTION
l
Selects input source.
hi
LHR627-FE.DGHALLK_ENG_MFL68962877.indd 10 2018-05-09 10:56:55
Getting Started
Getting Started
1
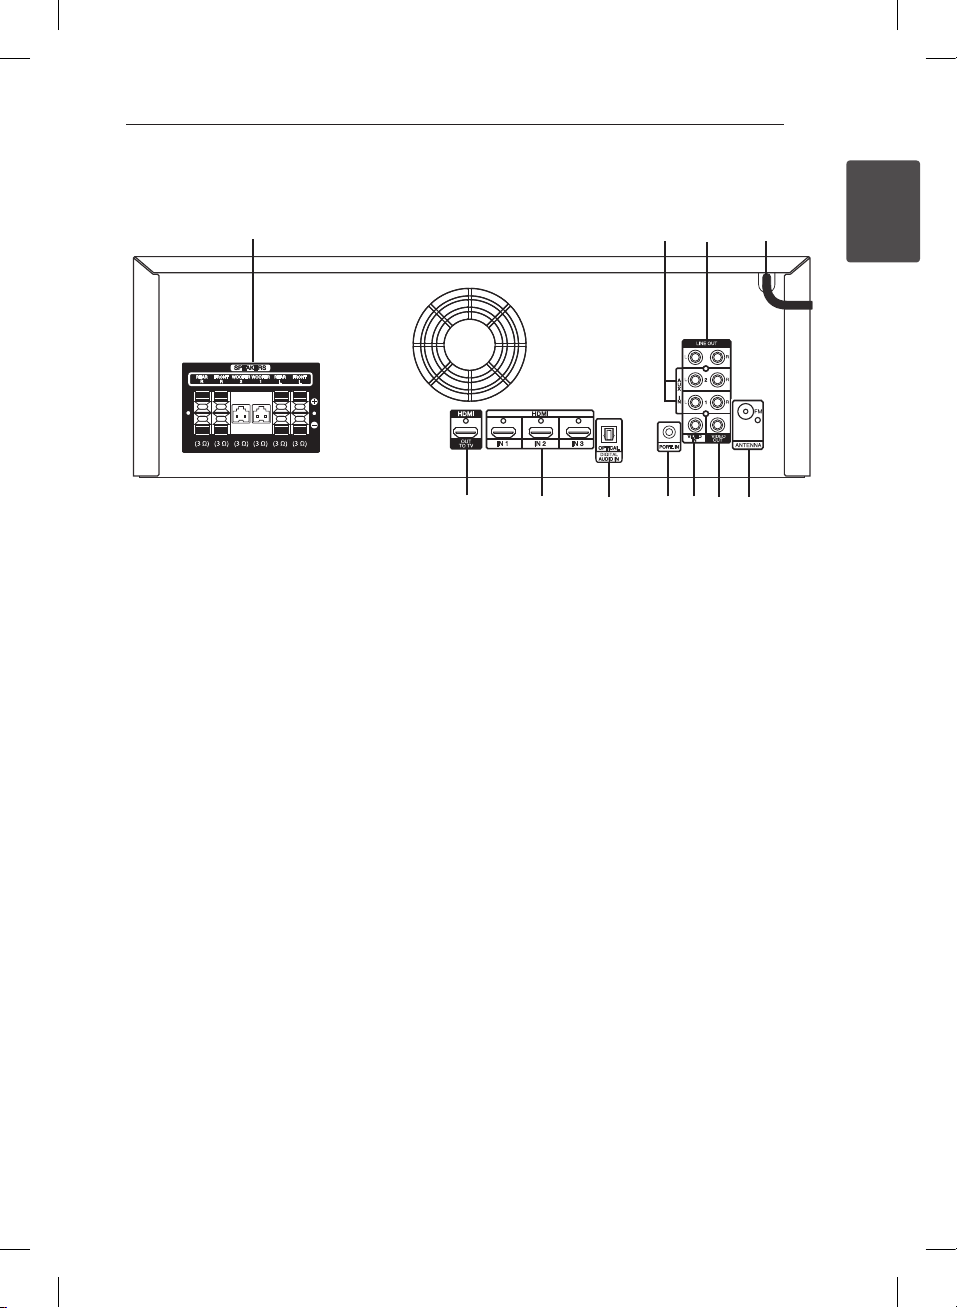
Rear panel
11
a
SPEAKERS
a
Connects the speaker cables.
AUX IN 1/2 (L/R)
b
Connects to external source with 2 channel audio
outputs.
LINE OUT (L/R)
c
Connects the components with 2 channel audio
inputs.
Power cord
d
ANTENNA
e
FM – Connects the FM wired antenna.
VIDEO OUT
f
Connects the components with analog video
input jacks.
VIDEO IN
g
Connects the components with analog video
output jacks.
PORT. IN
h
Connects a portable device (MP3 player, etc) to
PORT. IN jack.
b
c
jk
DIGITAL AUDIO IN
i
OPTICAL
Connects other components with an optical
digital audio output.
HDMI IN 1/2/3
j
Connects the component with HDMI output.
HDMI OUT TO TV
k
Connects to TV with HDMI inputs.
i
gh
f
d
e
LHR627-FE.DGHALLK_ENG_MFL68962877.indd 11 2018-05-09 10:56:55
Connecting
12
Connecting
2
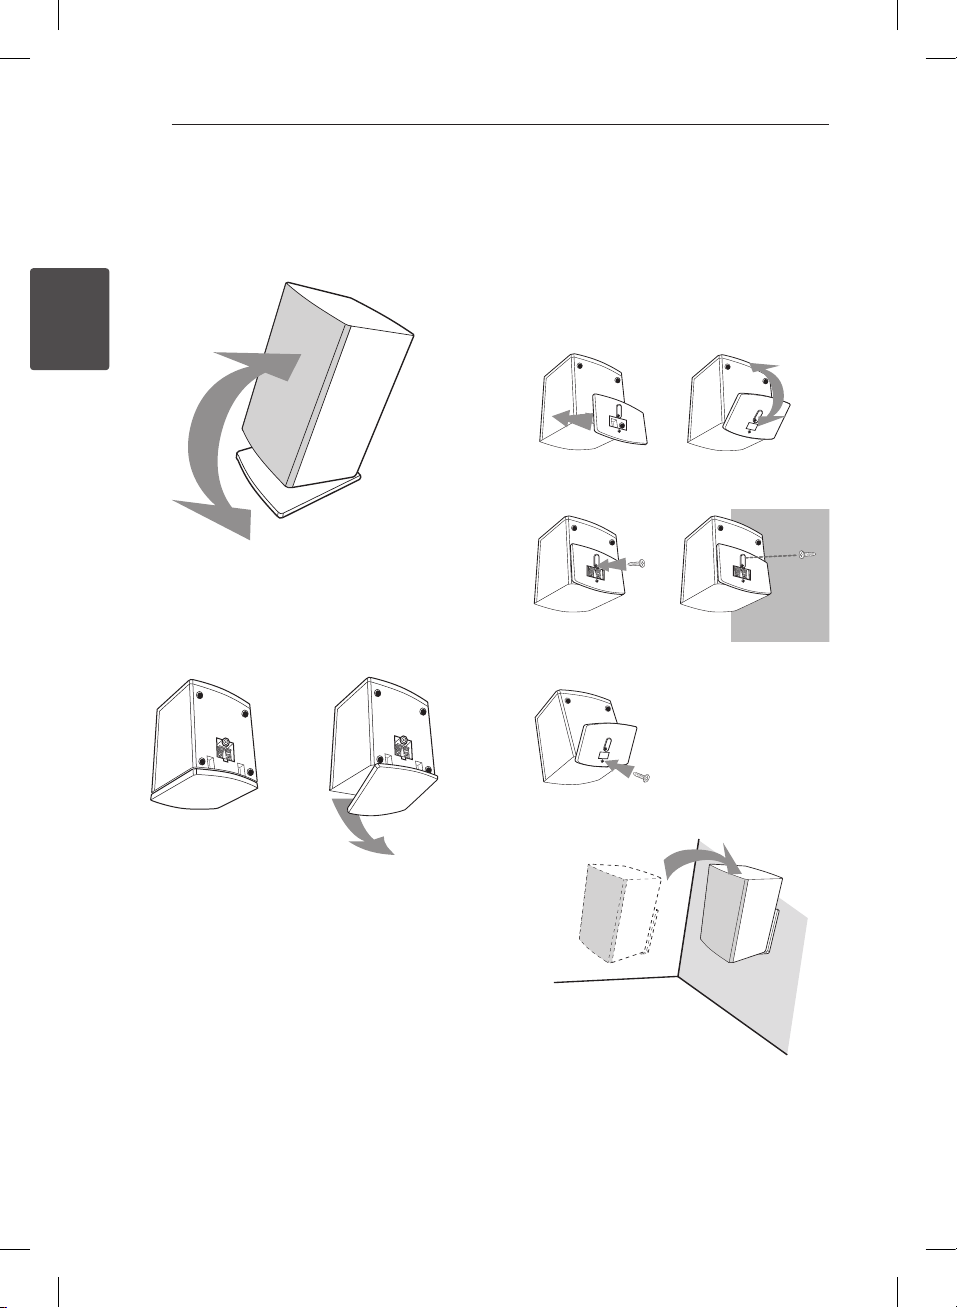
Spekaer installation
A. Stand type
You can adjust angle of speaker.
B. Wall type (Mounting the speakers to a Wall)
1. Separate the stand from the speaker.
2. Attach the stand to the speaker as shown below.
3. You can adjust angle of speaker.
4. Fix the stand to the speaker by rotating the
screw.
5. Drive 1 screw in the wall for the speaker and then
hook the speaker over there.
ySeparates stand
Separate the stand from the speaker as shown
below.
2
4
3
5
LHR627-FE.DGHALLK_ENG_MFL68962877.indd 12 2018-05-09 10:56:55
Connecting
Connecting
2
Before connecting
Please make sure to disconnect the AC power cord
before making any connection between the unit and
any other device.
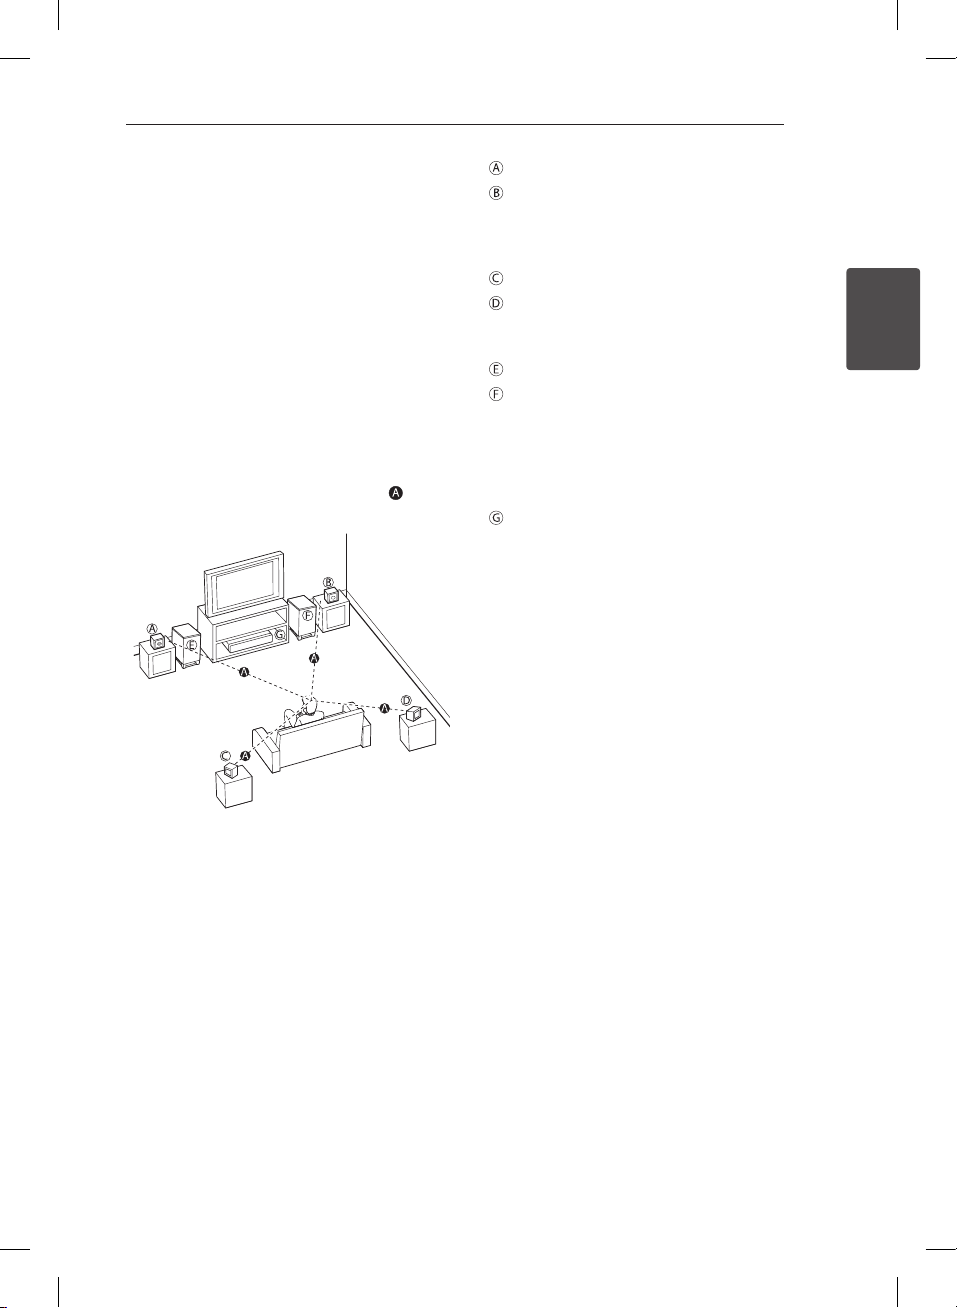
Positioning the system
The following illustration shows an example of
positioning the system. Note that the illustrations
in these instructions differ from the actual unit for
explanation purposes.
For the best possible surround sound, all the speakers
other than the subwoofer should be placed at the
same distance from the listening position (
).
13
Front speaker (L)
Front speaker (R)
Place the front speakers to the sides of the monitor
or screen and as ush with the screen surface as
possible.
Rear speaker (L)
Rear speaker (R)
Place these speakers behind your listening position,
facing slightly inwards.
Subwoofer (1)
Subwoofer (2)
The position of the subwoofer is not so critical,
because low bass sounds are not highly directional.
But it is better to place the subwoofer near the front
speakers. Turn it slightly toward the center of the
room to reduce the wall reections.
Unit
LHR627-FE.DGHALLK_ENG_MFL68962877.indd 13 2018-05-09 10:56:57
Connecting
14
Connecting
2
Attaching the speakers
to the unit
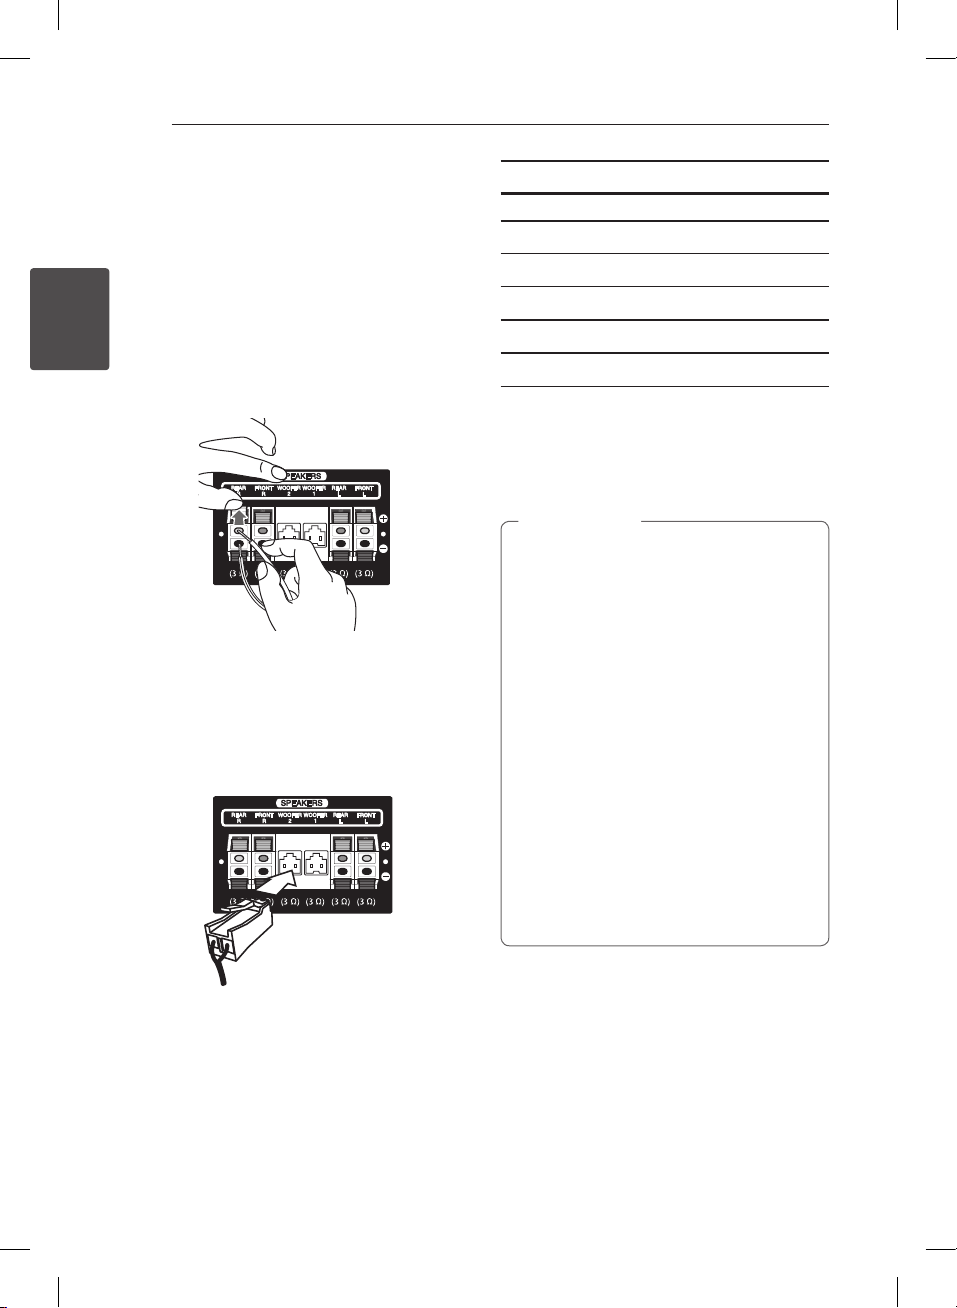
1. Connect the wires to the unit.
Match each wire’s colored band to the same
colored connection terminal on the rear of the
unit. To connect the cable to the unit, press
each plastic finger pad to open the connection
terminal. Insert the wire and release the finger
pad.
Connect the black stripe of each wire to the
black nger pad and the other end to the colored
nger pad.
Connect a woofer cord to the unit. When
connecting a woofer cord to the unit, insert the
connector until it clicks.
Color Speaker Position
Grey REAR R Rear right
Blue REAR L Rear left
Orange WOOFER 1 Any front position
Orange WOOFER 2 Any front position
Red FRONT R Front right
White FRONT L Front left
To connect the cable to the speakers, press each
plastic nger pad to open the connection terminals
on the base of each speaker. Insert the wire and
release the nger pad.
Caution
>
yCheck the volume level before playing music
to prevent inrm, child, and pregnant women
from being shocked by the sudden and loud
sound from the unit.
yDo not use the unit in a limited space. It may
damage a person’s hearing. It is recommended
to use it in a wide space.
yBe careful to make sure children not to put
their hands or any objects into the opening
speaker duct hole.
yThe speakers contain magnet parts, so color
irregularity may occur on the TV screen or PC
monitor screen. Please use the speakers far
away from either TV screen or PC monitor.
yUse the speaker supplied with this unit
only. Using any other speaker may cause
malfunction.
yBefore using the subwoofer, remove the
protective vinyl.
2. Connect the wires to the speakers.
Connect the other end of each wire to the correct
speaker according to the color coding:
LHR627-FE.DGHALLK_ENG_MFL68962877.indd 14 2018-05-09 10:56:57
 Loading...