

Page 1
OWNER’S MANUAL
AIR CONDITIONER
Please read this manual carefully before operating
your set and retain it for future reference.
P/NO : MFL67870214
www.lg.com
TYPE :
Hydro Kit (For Medium Temperature)
ITALIANO ESPAÑOL
FRANÇAIS
DEUTSCH
ΕΛΛΗΝΙΚΆ
ČEŠTINA
NEDERLANDS
POLSKI
LIMBA ROMÂNĂ
ENGLISH
PORTUGUESE
MAGYAR
БЪЛГАРСKN
SRPSKI
HRVATSKI
SVENDKA
NORSK SUOMI
DANSK
Page 2
2 Hydro Kit
Hydro Kit Ownerʼs Manual
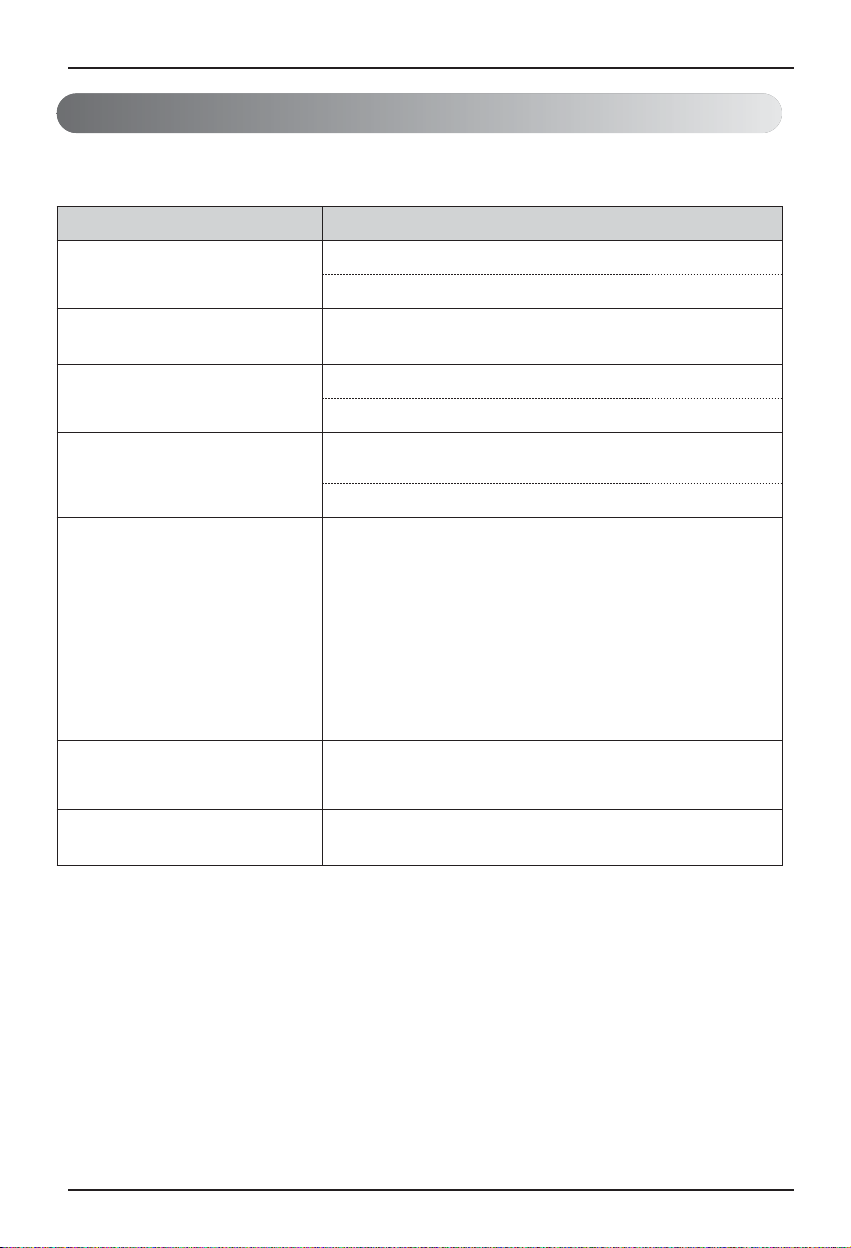
TABLE OF CONTENTS
FOR YOUR RECORDS
Write the model and serial numbers here:
Model #
Serial #
You can find them on a label on the side of each
unit.
Installer's Name
Purchased Date
n
Staple your receipt to this page in the event you
need it to prove date of purchase or for warranty
issues.
READ THIS MANUAL
Inside you will find many helpful hints on how to use and
maintain your
Hydro Kit
properly. Just a little preventive
care on your part can save you a great deal of time and
money over the life of your product.
You'll find many answers to common problems in the
chart of troubleshooting tips. If you review our chart of
Troubleshooting Tips first, you may not need to call for
service at all.
PRECAUTION
• Contact the authorized service technician for repair or
maintenance of this unit.
• Contact the installer for installation of this unit.
•
Hydro Kit
is not intended for use by young children or
invalids without supervision.
• Young children should be supervised to ensure that
they do not play with
Hydro Kit
.
• When the power cable is to be replaced, replacement
work must be performed by authorized personnel
only using only genuine replacement parts.
• Installation work must be performed in accordance
with the National Electric Code by qualified and
authorized personnel only.
Safety Precautions .............................3
Product Introduction ..........................6
Owner's Instruction ............................8
Using Thermostat .............................21
Maintenance and Service.................24
Page 3
Safety Precaution
Ownerʼs Manual 3
Hydro Kit
ENGLISH
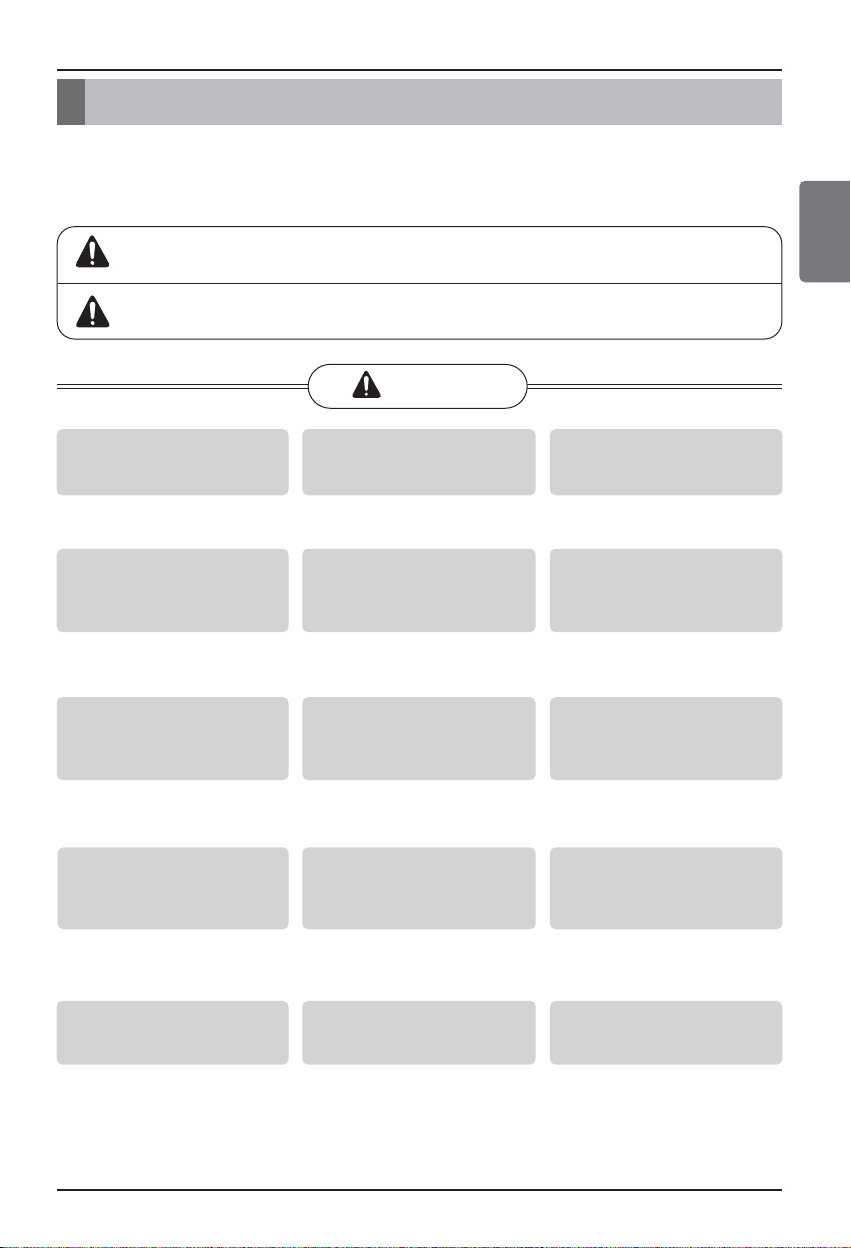
Safety Precautions
To prevent injury to the user or other people and property damage, the following instructions must be
followed.
n Incorrect operation due to ignoring instruction will cause harm or damage. The seriousness is
classified by the following indications.
WARNING
CAUTION
This symbol indicates the possibility of death or serious injury.
This symbol indicates the possibility of injury or damage.
WARNING
Always ground the product.
•
There is a risk of electric shock.
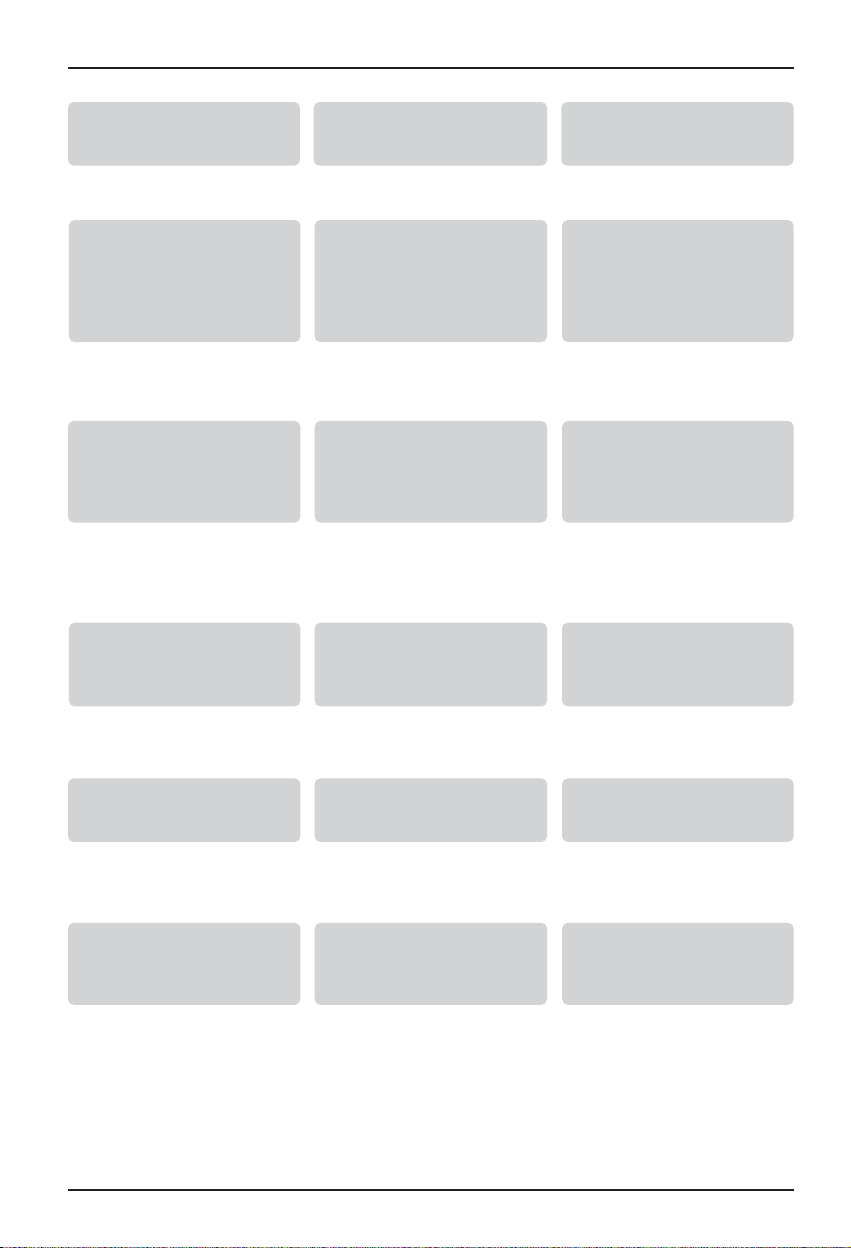
Do not use a defective or underrated
circuit breaker. Use this appliance on a
dedicated circuit.
•
There is risk of fire or electric shock.
Do not use a multi outlet. Always use
this appliance on a dedicated circuit and
breaker.
•
It can cause electric shock or fire.
For electrical work, contact the dealer, seller,
a qualified electrician, or an Authorized
Service Center. Do not disassemble or repair
the product by yourself.
•
There is risk of fire or electric shock.
Always ground the product as per the
wiring diagram. Do not connect the
ground wire to gas or water pipes
lightening rod or telephone ground wire.
•
There is risk of fire or electric shock.
Install the panel and the cover of control
box securely.
•
There is risk of fire or electric shock
due to dust , water etc.
Use the correctly rated breaker or
fuse.
•
There is risk of fire or electric shock.
Do not modify or extend the power
cable. If the power cable or cord has
scratches or skin peeled off or
deteriorated then it must be replaced.
•
There is risk of fire or electric shock.
For installation, removal or
reinstallation , always contact the
dealer or an Authorized Service
Center.
•
There is risk of fire, electric shock,
explosion, or injury.
Do not install the product on a
defective installation stand. Be sure
that the installation area does not
deteriorate with age.
•
It may cause product to fall.
Never install the outdoor unit on a
moving base or a place from where it
can fall down.
•
The falling outdoor unit can cause
damage or injury or even death of a
person.
When the product is soaked (flooded or
submerged) in water , contact an
Authorized Service Center for repair
before using it again.
•
There is risk of fire or electric shock.
Be sure to check the refrigerant to
be used. Please read the label on the
product.
•
Incorrect refrigerant can prevent the
normal operation of the unit.
Don't use a power cord, a plug or a
loose socket which is damaged.
•
Otherwise it may cause a fire or
electrical shock.
Do not touch , operate, or repair the
product with wet hands.
• T
here is risk of electric shock or fire.
Page 4
Indoor/outdoor wiring connections must
be secured tightly and the cable should
be routed properly so that there is no
force pulling the cable from the
connection terminals.
•
Improper or loose connections can
cause heat generation or fire.
Safely dispose off the packing materials.
Like screws, nails, batteries, broken
things etc after installation or service
and then tear away and throw away the
plastic packaging bags.
•
Children may play with them and
cause injury.
Make sure to check that the power
device is not dirty, loose or broken and
then Turn on the power.
•
Dirty, loose or broken power device
can cause electric shock or fire.
Do not use the product in a tightly
closed space for a long time. Perform
ventilation regularly.
•
Oxygen deficiency could occur and
hence harm your health.
Do not open the front cover or grille of the
product during operation. (Do not touch the
electrostatic filter, if the unit is so equipped.)
•
There is risk of physical injury, electric
shock, or product failure.
If strange sounds, smell or smoke comes
from product, immediately turn the breaker
off or disconnect the power supply cable.
•
There is risk of electric shock or fire.
Ventilate the product room from time
to time when operating it together with
a stove, or heating element etc.
• Oxygen deficiency can occur and hence
harm your health.
Turn the main power off when
cleaning or repairing the product.
•
There is risk of electric shock.
Take care to ensure that nobody
especially kids could step on or fall
onto the outdoor unit.
• This could result in personal injury and
product damage.
Take care to ensure that power cable
could not be pulled out or damaged
during operation.
•
There is risk of fire or electric shock.
Do not place ANYTHING on the power
cable.
•
There is risk of fire or electric shock.
When flammable gas leaks, turn off the
gas and open a window for ventilation
before turning the product on.
•
Do not use the telephone or turn switches
on or off. There is risk of explosion or fire.
In outdoor unit the step-up capacitor
supplies high voltage electricity to the
electrical components. Be sure to
discharge the capacitor completely
before conducting the repair work.
•
An charged capacitor can cause
electrical shock.
When installing the unit, use the
installation kit provided with the product.
•
Otherwise the unit may fall and cause
severe injury.
Be sure to use only those parts which
are listed in the service parts list. Never
attempt to modify the equipment.
•
The use of inappropriate parts can
cause an electrical shock, excessive
heat generation or fire.
4 Hydro Kit
Safety Precaution
Do not place a heater or other heating
appliances near the power cable.
•
There is risk of fire and electric shock.
Do not allow water to run into electric
parts. Install the unit away from water
sources.
•
There is risk of fire, failure of the
product, or electric shock.
Do not store or use or even allow
flammable gas or combustibles near the
product.
•
There is risk of fire
.
Page 5
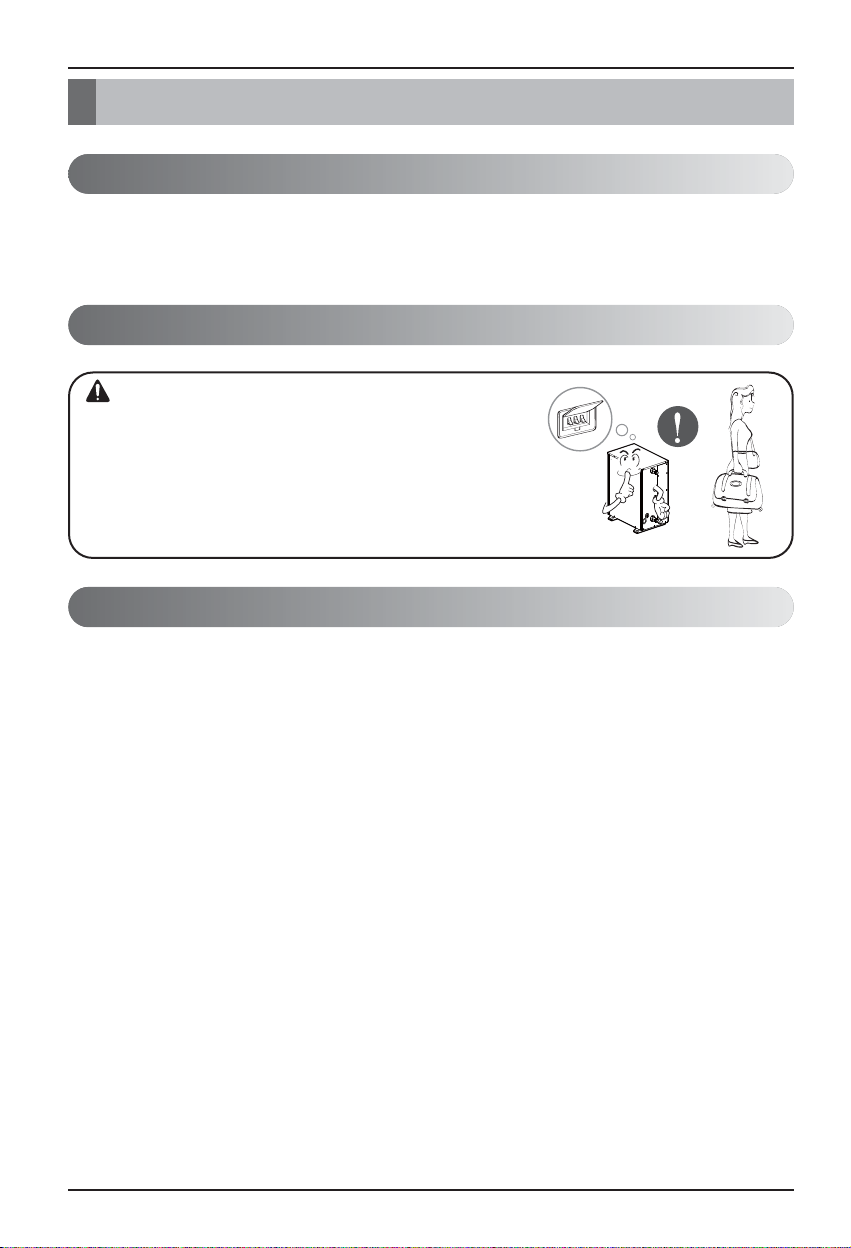
CAUTION
Two or more people must lift and
transport the product.
•
Avoid personal injury.
Do not install the product where it will be
exposed to sea wind (salt spray) directly.
•
It may cause corrosion on the product.
Keep level even when installing the
product.
•
To avoid vibration or noise.
Do not install the product where the
noise or hot air from the outdoor unit
could damage or disturb the
neighborhoods.
•
It may cause a problem for your
neighbors and hence dispute.
Always check for gas (refrigerant)
leakage after installation or repair of
product.
•
Low refrigerant levels may cause failure
of product.
Do not use the product for special
purposes, such as preserving foods,
works of art, etc. It is a consumer Hydro
Kit, not a precision refrigeration system.
•
There is risk of damage or loss of
property.
Do not block the inlet or outlet of air
flow.
•
It may cause product failure.
Use a soft cloth to clean. Do not use
harsh detergents, solvents or splashing
water etc .
•
There is risk of fire, electric shock, or
damage to the plastic parts of the
product.
Do not step on or put anyting on the
product. (outdoor units)
•
There is risk of personal injury and failure
of product.
Do not insert hands or other objects
through the air inlet or outlet while
the product is operating.
•
There are sharp and moving parts that
could cause personal injury.
Be cautious when unpacking and
installing the product.
•
Sharp edges could cause injury.
If the refrigerant gas leaks during the
repair, do not touch the leakaing
refrigerant gas.
•
The refrigernat gas can cause frostbite
(cold burn)
Do not tilt the unit when removing or
uninstalling it.
•
The condensed water inside can spill.
If the refrigerant gas leaks during
the installation, ventilate the area
immediately.
•
Otherwise it can be harmfull for your
health.
Dismantling the unit, treatment of the
refrigerant oil and eventual parts
should be done in accordance with
local and national standards.
Do not expose your skin or kids or
plants to the cool or hot air draft.
•
This could harm to your health.
Use a firm stool or ladder when
cleaning, maintaining or repairing the
product at an height.
•
Be careful and avoid personal injury.
Ownerʼs Manual 5
Hydro Kit
Safety Precaution
ENGLISH
Page 6
Product Introduction
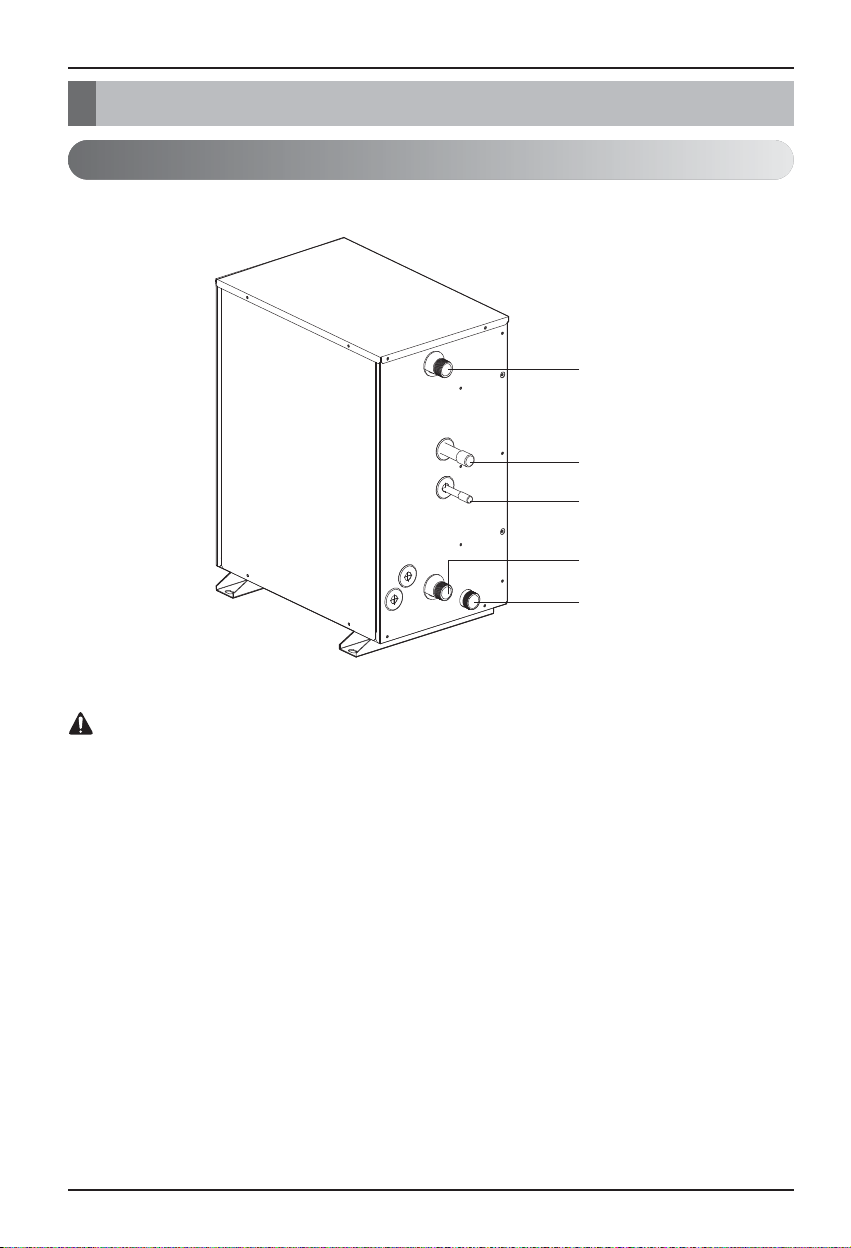
Product Introduction
Typical Installation Scene
Use of power supply separate power for the indoor unit. (Do not connect and use from the
power terminal of the outdoor unit.)
CAUTION
6 Hydro Kit
Water Out
Gas side
Liquid side
Water In
Drain
Page 7
h Grey painted functions may not be operated and displayed.
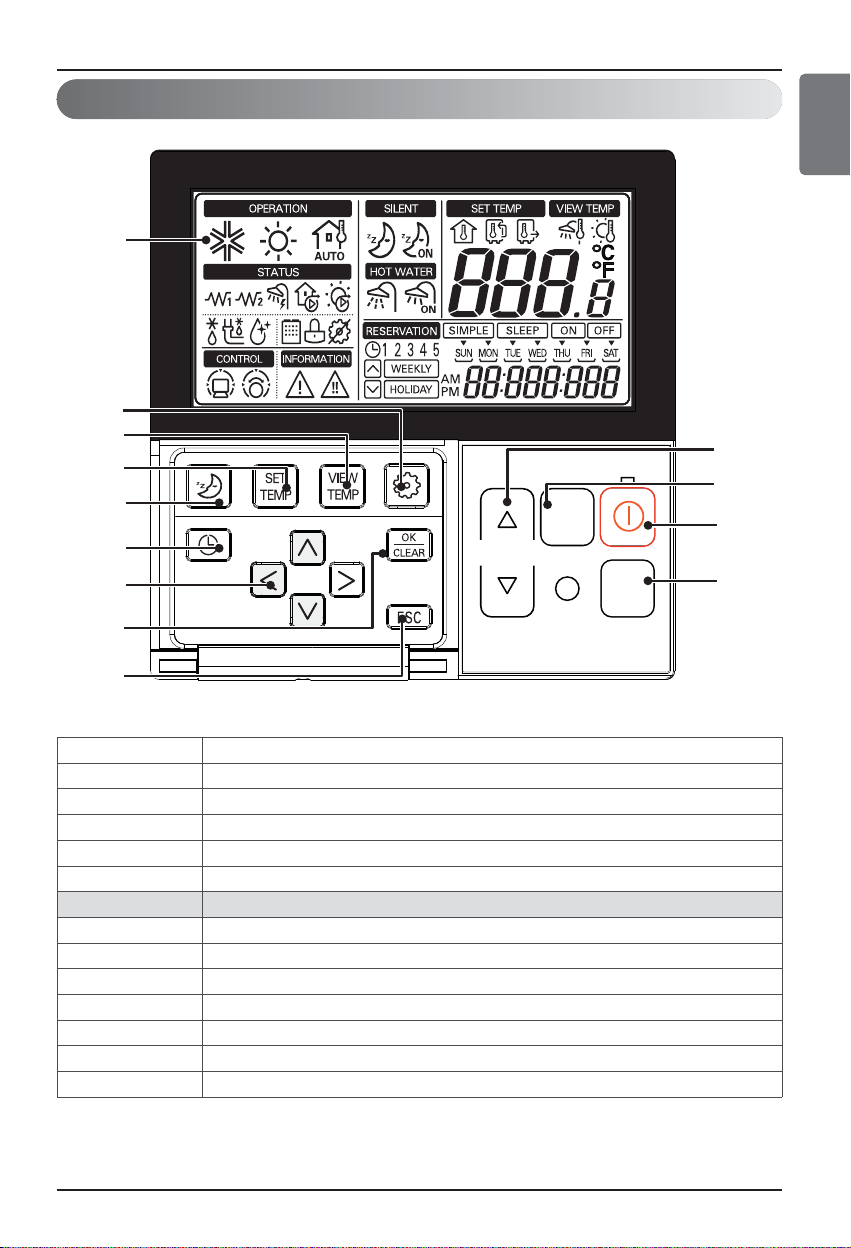
Remote Controller
ZDWHU
WHPS
RSHU
KHDWLQJ
PRGH
Ownerʼs Manual 7
Hydro Kit
Product Introduction
ENGLISH
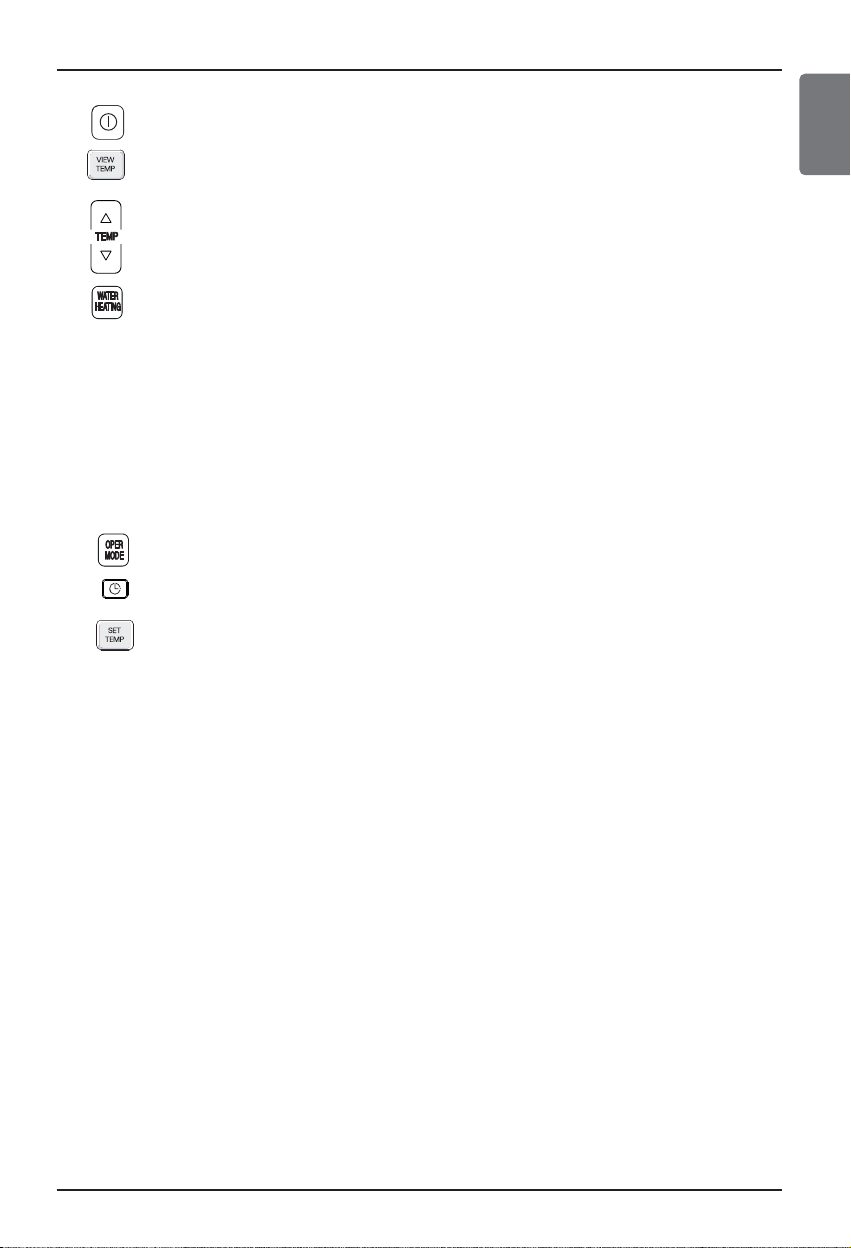
No Name
1 Display
2 Change Temperature Button
3 Water Heating Enable / Disable Button
4 Power Button
5 Operation Mode Selection Button
6 Silent Mode On / Off Button
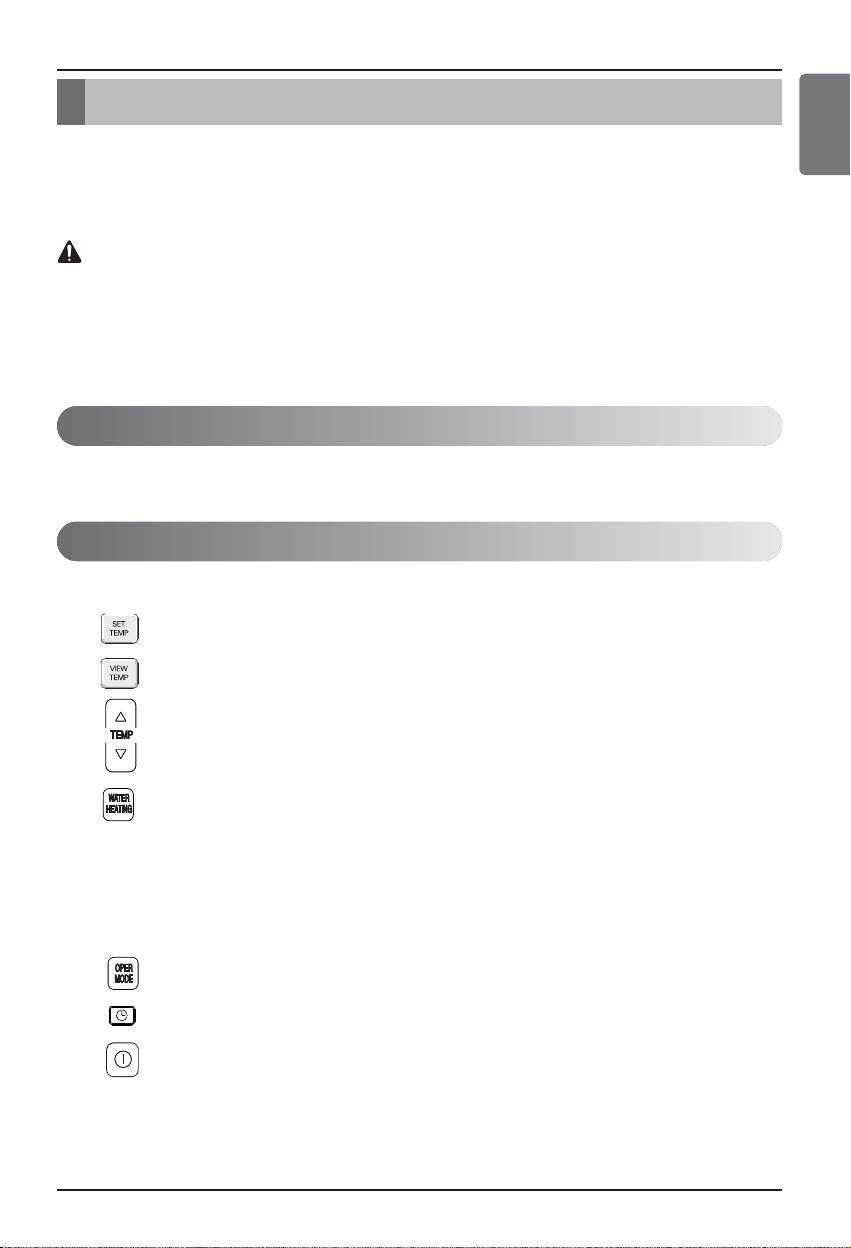
7 Temperature Setting Mode Button
8 Temperature View Mode Button
9 Function Setting Button
10 Programming Button
11 Direction Button (Up, Down, Left, Right)
12 Set / Clear button
13 ESC Button
ڸ
ۀ
ڿ
ھ
ڽ
ہ
ۂ
WHPS
ZDWHU
KHDWLQJ
RSHU
PRGH
ڹ
ں
ڻ
ڼ
ۃ
ۄ
Page 8
8 Hydro Kit
Owner's instruction
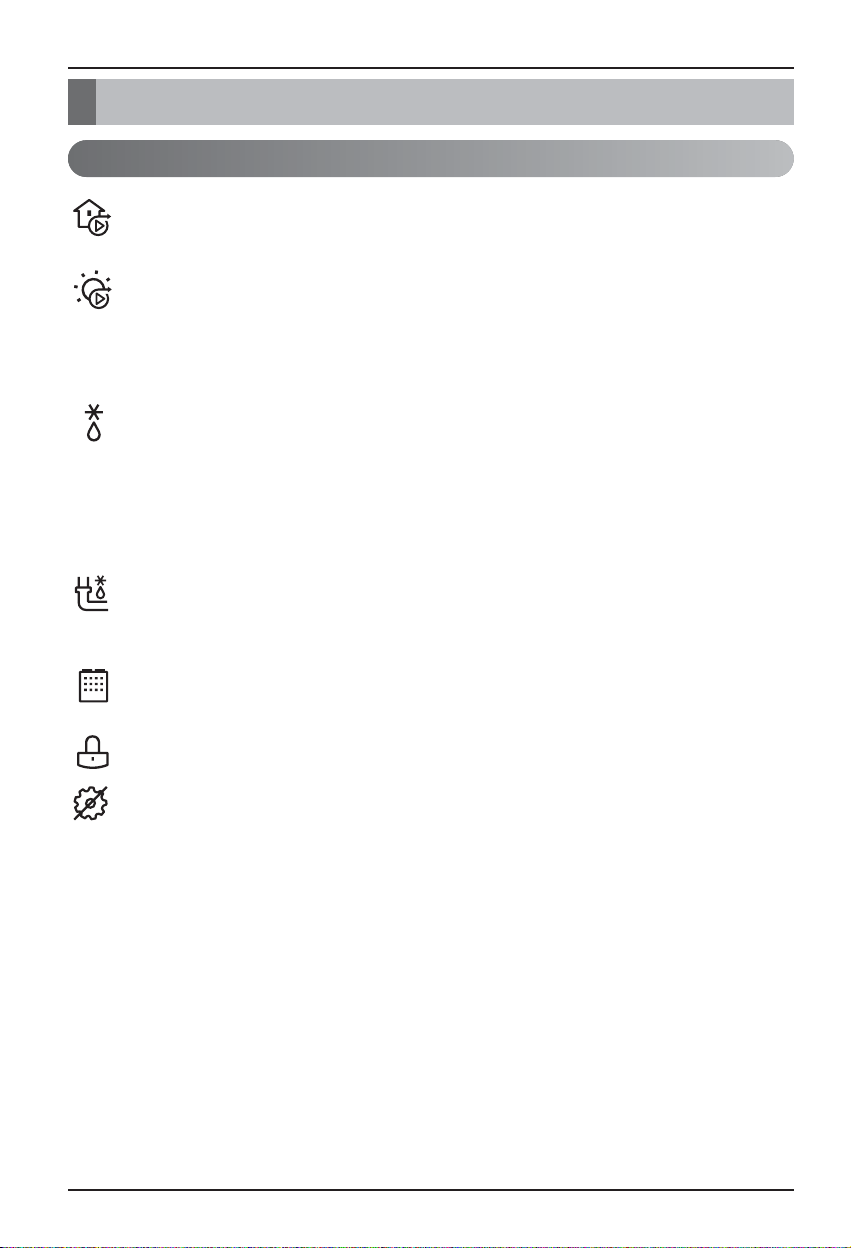
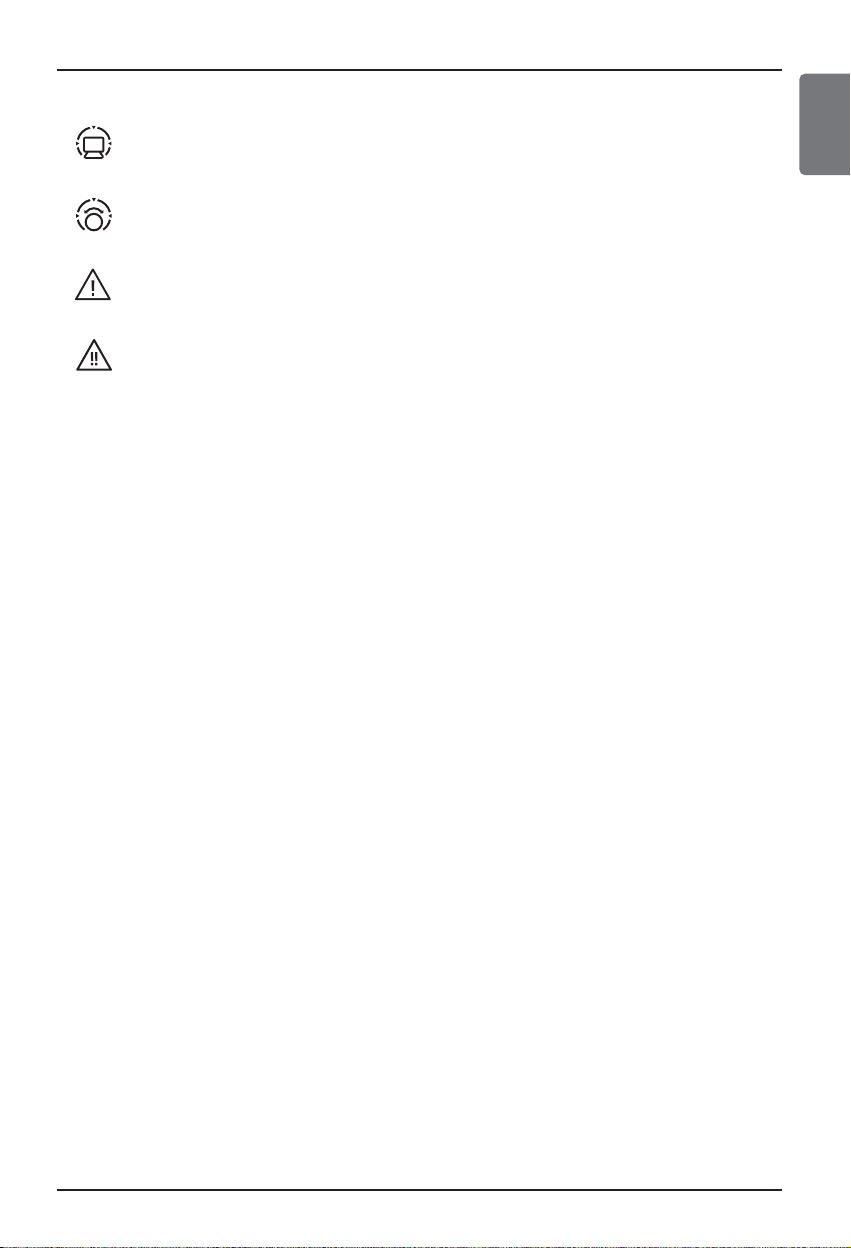
WATER PUMP
This icon indicates that the water pump is active.
AUXILIARY SOLAR THERMAL PUMP
This icon indicates that auxiliary solar thermal pump is active.
NOTE : As installation of auxiliary solar thermal pump is not compulsory but
recommendatory according to field condition, this icon can be seen although no auxiliary
solar thermal pump is installed.
DEFROSTING
This icon indicates that the defrost mode is active.
In space heating operation or sanitary water tank heating operation, freezing of the
outdoor heat exchanger may be occur due to low outdoor temperature and humidity. If
this risk occurs, the product goes into defrost operation. It reverses the cycle and takes
heat from the indoor system to prevent freezing of the outdoor system. This mode is
automatically operating.
MAINTAIN LOWEST TEMPERATURE
The purpose of this mode is maintaining the temperature to prevent damage by freezing of
water pipe.
OUTDOOR
This icon indicates that the outdoor unit is active.
CHILD LOCK
NO FUNCTION
Monitoring Information
Owner's Instruction
Page 9
Owner's instruction
CENTRAL CONTROLLER
This icon indicates that the product is controlled by the central controller.
THERMOSTAT
This icon indicates connection with thermostat.
SLIGHT TROUBLE
This icon indicates that slight trouble occurs.
HEAVY TROUBLE
This icon indicates that heavy trouble occurs.
Ownerʼs Manual 9
Hydro Kit
ENGLISH
Page 10

10 Hydro Kit
Selecting Target Temperature
j Note
: Increase 1°C or 2°F per one time pressing
: Decrease 1°C or 2°F per one time pressing
• We can change the temperature range of each mode on installation setting mode. Please refer
to Function Code 11 to 15.
• Room Temperature setting is available when Remote Room Air Sensor (sold separately) is
installed. Please refer to Function Code 03.
• Sanitary Water Tank temperature setting is available when Sanitary Water Tank is installed.
Owner's instruction
Mode Change
Turn on the product and select operation mode.
Operation Mode
• Cooling Operation - The product yields cool water to use in under floor cooling or FCU cooling.
• Heating Operation - The product yields hot water to use in under floor heating or FCU heating.
• Weather dependent Heating Operation - In this mode, heating setpoint is automatically determined
by pre-defined temperature profile.
1
Press Power Button to turn on the product.
2
Press OPER MODE Button to select each operation mode.
Cooling operation Heating operation Weather dependent
operation
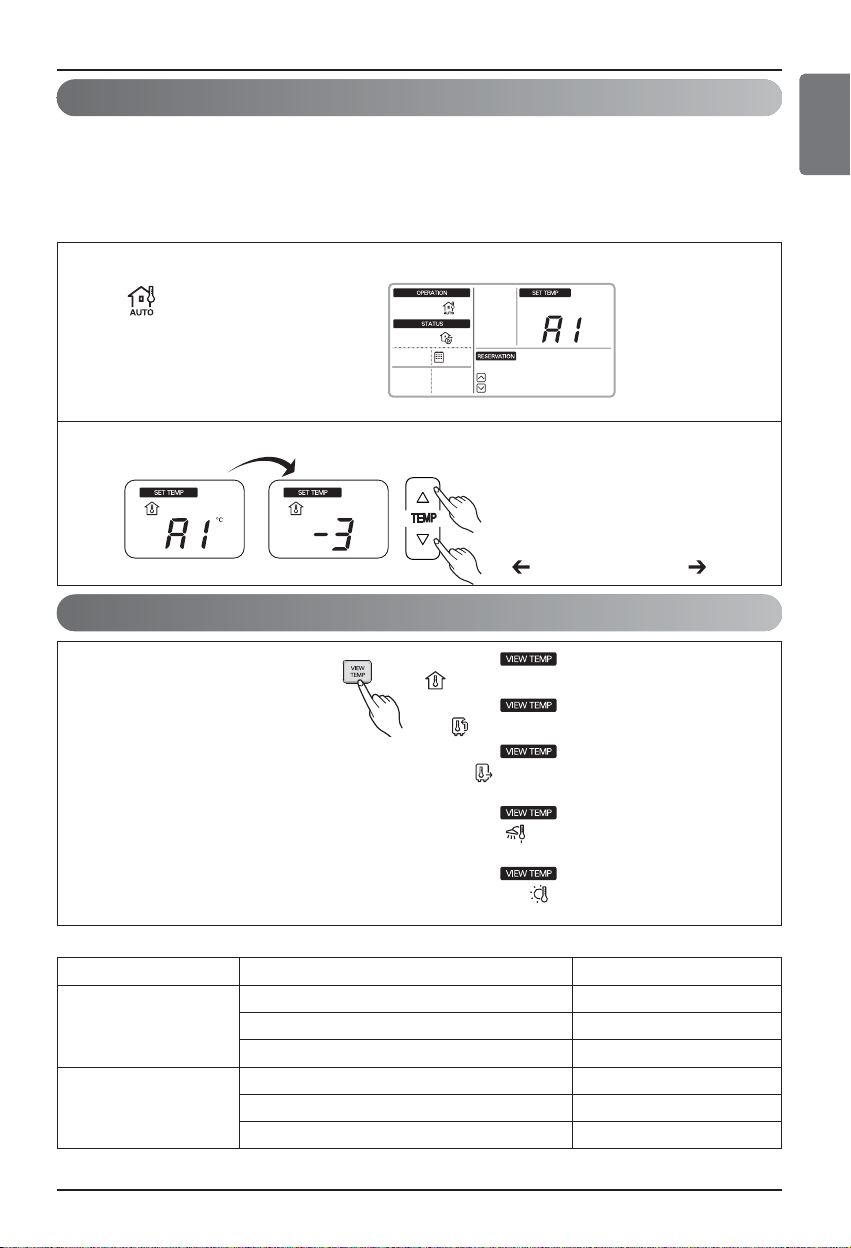
1
Press SET TEMP Button to select each operation mode.
2
Adjust desired temperature by pressing Change Temperature buttons on each mode.
Room temperature Leaving Water
temperature
Sanitary Water Tank
temperature
To raise the Temperature
To lower the Temperature
Page 11
Owner's instruction
Weather-dependent Operation
This mode is only applied to heating.
In order to save energy and to give highest comfort, setting temperature will follow outside
temperature. If outdoor temperature decreases, heating capacity for the house will increase
automatically in order to keep same room temperature. All parameters will be set by installer during
start-up procedure and will be adapted to the site characteristic.
Ownerʼs Manual 11
Hydro Kit
ENGLISH
1
Press OPER MODE Button to select Weather-dependent operation mode.
2
Adjust the desired temperature level by pressing Change Temperature buttons.
1
Press repeatedly View
Temperature Button to select
each Temperature.
(Whenever press View
Temperature button, the room
temperature will be displayed
during 5 seconds.)
View Temperature
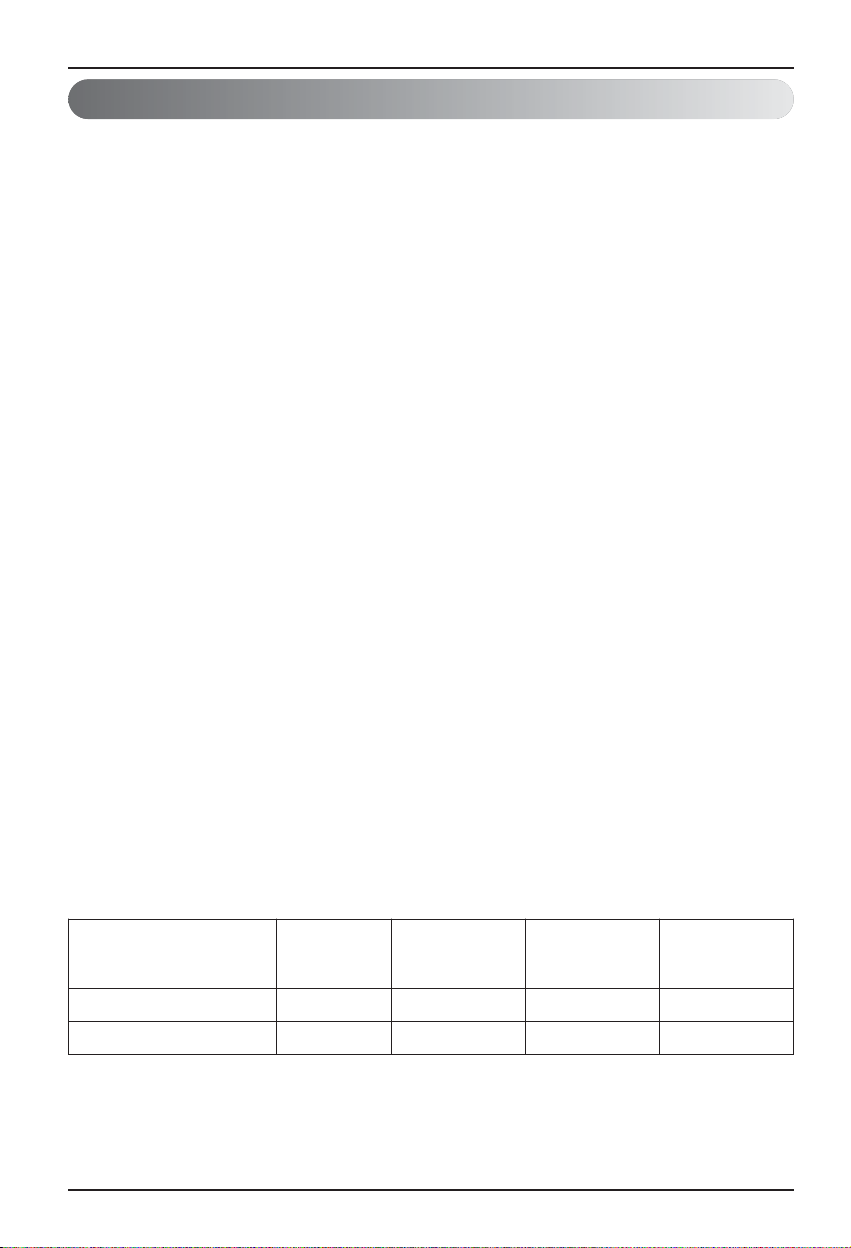
Temperature Temperature Range Displayed as
below 11°C(51°F) Lo
Air 11°C(51°F) ~ 39°C(102°F) actual temperature
above 39°C(102°F) Hi
below 0°C(32°F) [*below 40°C(104°F) ] Lo
Water
0°C(32°F) ~ 92°C(197°F) [*40°C(104°F) ~ 120°C(248°F) ]
actual temperature
above 92°C(197°F) [*above 120°C(248°F) ]
Hi
[* : Solar Thermal Temperature]
: Weather Dependent
operation icon
Ex)
Decreasing temperature profile by 3°C
(based on room air temperature)
<Temperature adjust step (unit : °C)>
-5, -4, -3, -2, -1, 0, 1, 2, 3, 4, 5
: View Room Temperature
: View Inlet Temperature
: View Outlet Temperature
:
View Sanitary Water Temperature
(ONLY displayed when sanitary
water heating mode)
:
View Solar Thermal Temperature
(ONLY displayed when sanitary
water heating mode)
Hot
Cold
Page 12
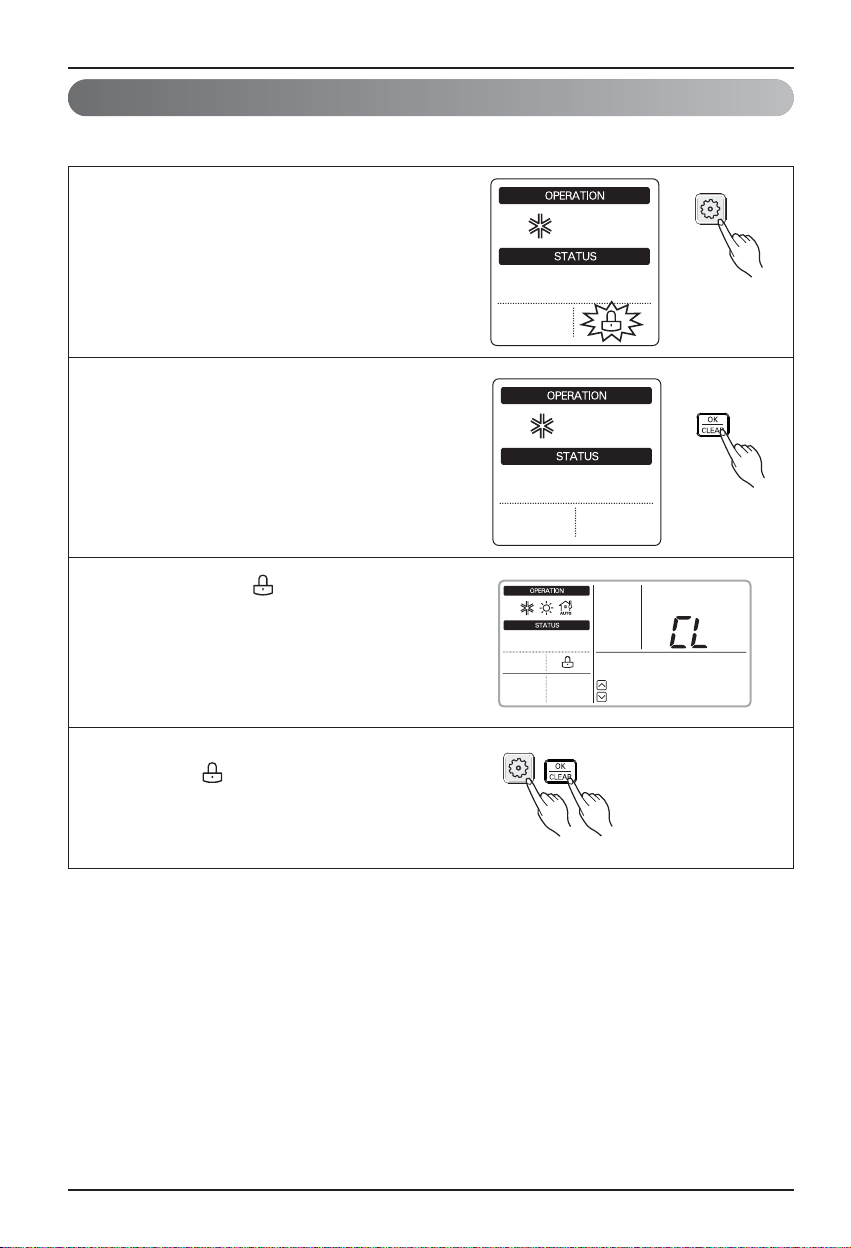
This function is to prevent children or other people from using controller.
Child Lock
12 Hydro Kit
Owner's instruction
1
Press Function Setting Button to enter
user setting mode. (The segment will be flashed)
2
Press set/clear button to finish the selection.
The segment will disappear.
4
To release this setting, press function Setting
button until icon flashes and then enter
setting/clear button.
3
During Child Lock, icon and 'CL' will be
displayed during 3 seconds whenever entering
any kind of buttons except for view temperature
button and setting/clear button.
Page 13
Owner's instruction
Ownerʼs Manual 13
Hydro Kit
ENGLISH
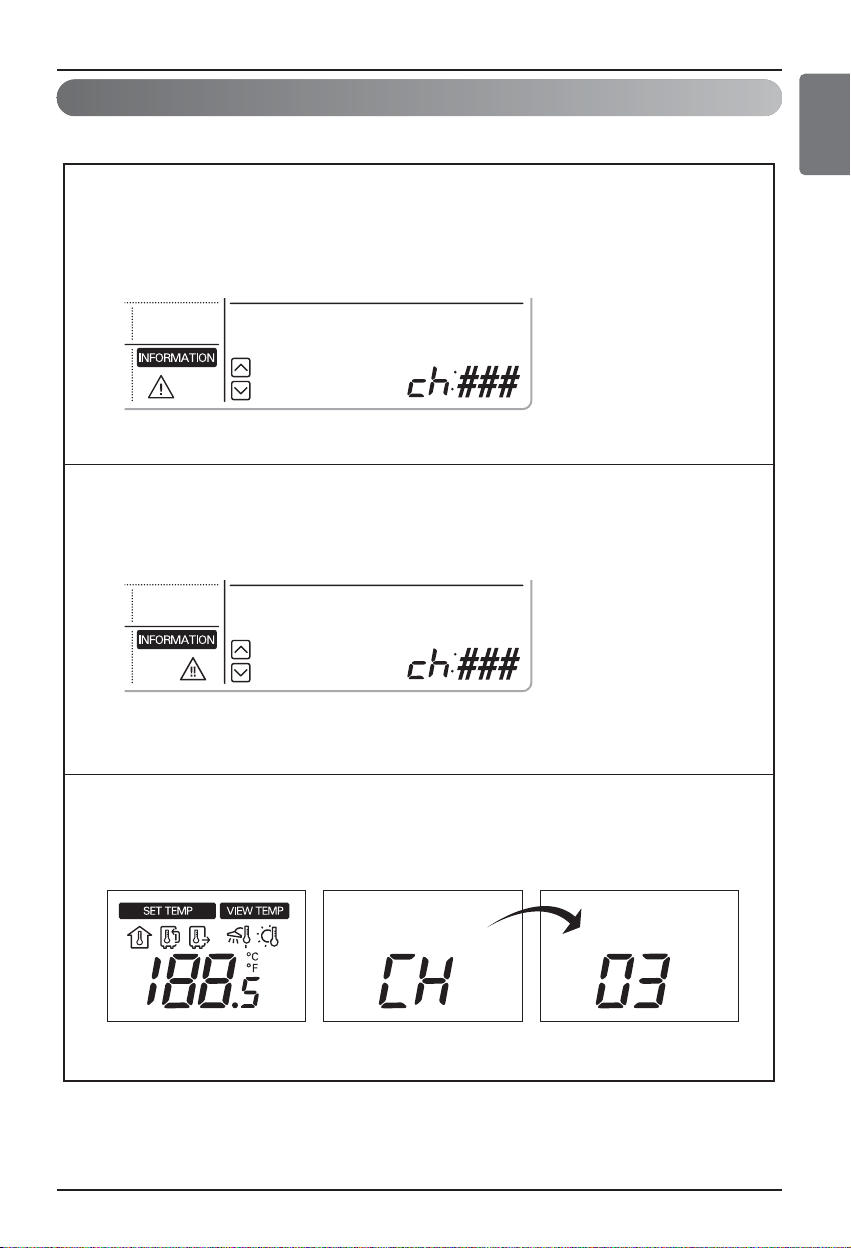
When the error is occurs on indoor unit, the error code will be displayed on remote controller.
Slight trouble
A problem is found inside the indoor unit. In most case, this trouble is concerned with
sensor problems. In this case, Hydro Kit can operate in an emergency mode
(only Heating operation).
Heavy trouble
A problem is found inside the outdoor unit.
Critical error
On critical error, the product will stop unconditionally.
At this time, CH' and error code No. keep display by turns.
Error code display
<Display>
<Display>
<Display>
Page 14
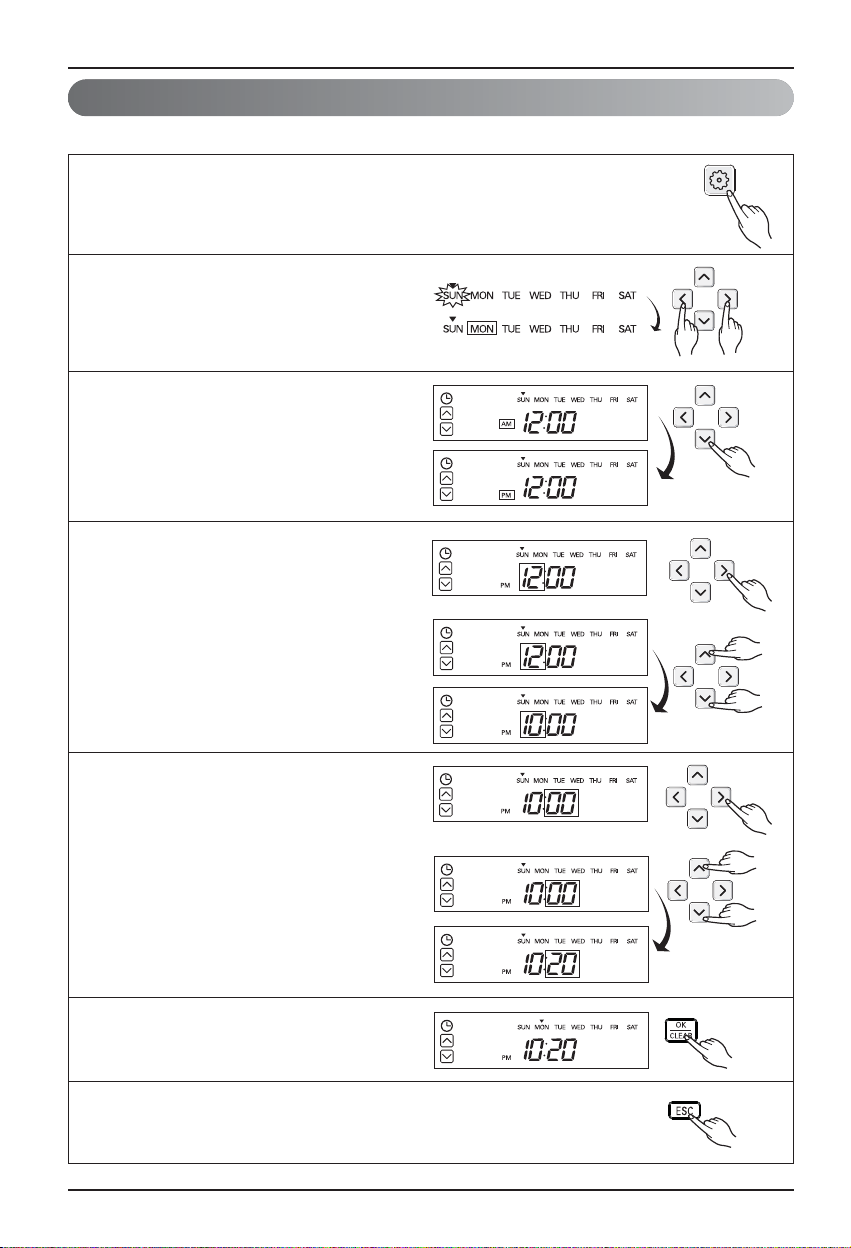
You can set current time.
Setting Current Time
1
Keep pressing programming button twice successively to enter setting
current time mode.
2
Press left, right button to adjust the
current day.
3
Press down button to move to AM/PM
part and adjust it. (The AM/PM segment
will be flashed)
4
Press right button to move to "Hour"
part. (the "Hour" segment will be
flashed)
6
Press right button to move to "Minute"
part. (the "Minute" segment will be
flashed)
7
Press up, down button to adjust the
Minute.
8
If you finish the setting, press set/clear
button.
9
Press exit button to exit or system will automatically release without any
input 25 seconds.
5
Press up, down button to adjust the
Hour.
Owner's instruction
14 Hydro Kit
Page 15
Owner's instruction
Ownerʼs Manual 15
Hydro Kit
ENGLISH
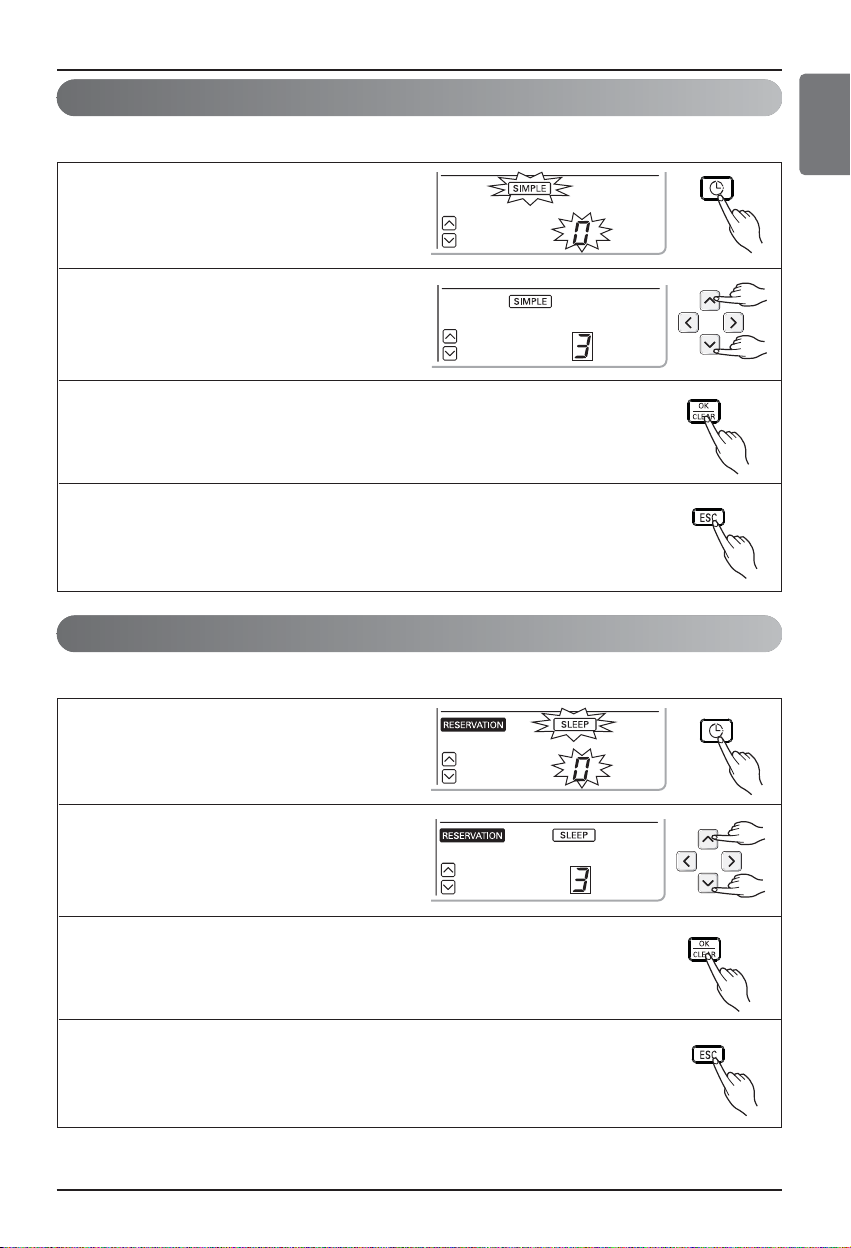
Programming : Setting Simple Reservation
You can easily turn-on reservation.(ONLY enable when unit is stand-by.)
1
Press programming button to enter the
Programming mode. (the segment will be
flashed)
2
Press up, down button to adjust the
reservation time.
3
If you finish the setting, press setting/cancel button to complete
programming
4
Press exit button to exit or system will automatically release without any
input after 25 seconds.
1
Press programming button to enter the
Programming mode. Press Programming
button repeatedly to select [sleep
reservation]. (the segment flashing)
2
Press up, down button to adjust the
reservation time.
3
If you finish the setting, press setting/cancel button to complete
programming.
4
Press exit button to exit or system will automatically release without any
input after 25 seconds.
Programming : Setting Sleep Reservation
You can easily turn-off(sleep) reservation.(ONLY enable when unit is operating.)
Page 16
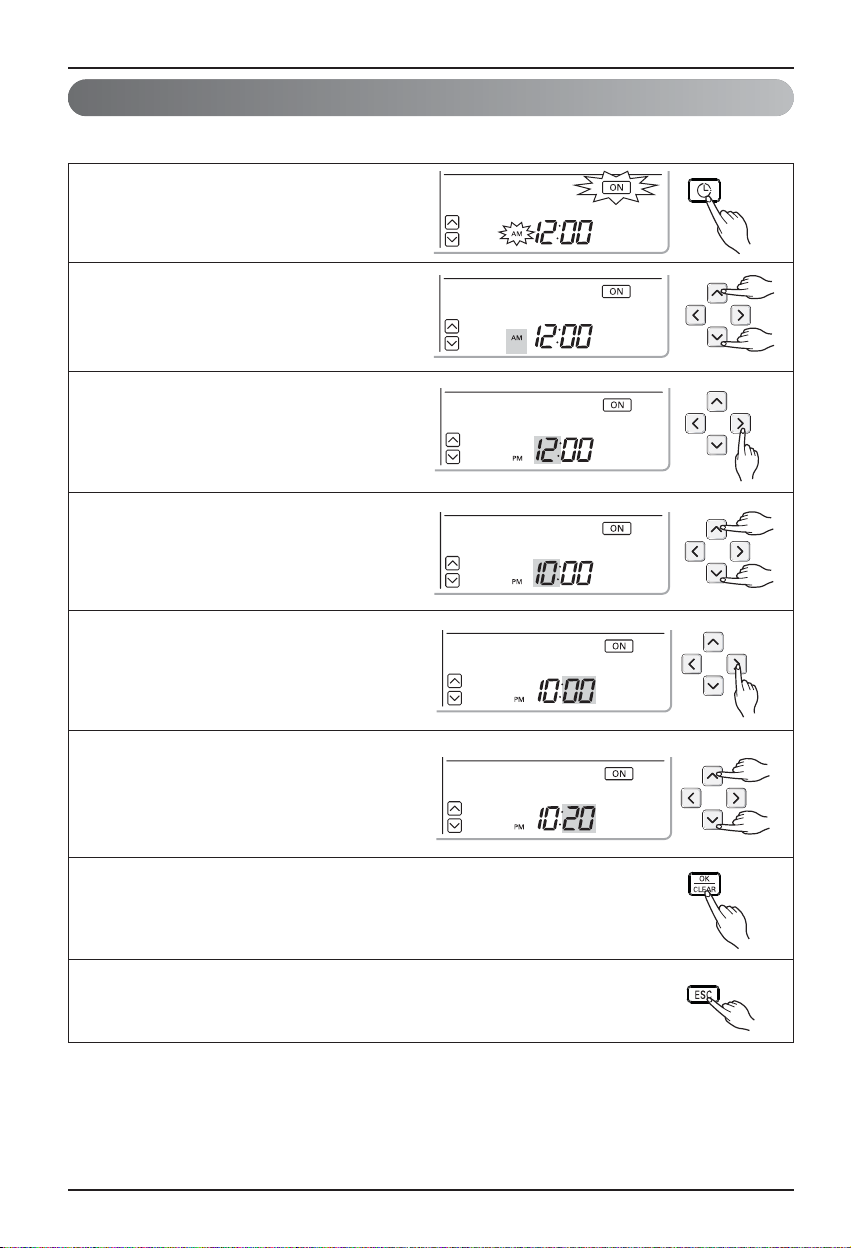
Programming : Setting ON Reservation
This function is able to turn-on after a setting time.
1
Press programming button to enter the
Programming mode. Press Programming
button repeatedly to select [on reservation].
(the segment flashing)
2
Press up, down button to adjust AM/PM.
3
Press right button to move to "Hour"
part. (the "Hour" segment will be
flashed)
4
Press up, down button to adjust the
Hour.
6
Press up, down button to adjust the
Minute.
7
If you finish the setting, press setting/cancel button to complete
programming.
8
Press exit button to exit or system will automatically release
without any input after 25 seconds.
5
Press right button to move "Minute" part.
(the "Minute" segment will be flashed)
Owner's instruction
16 Hydro Kit
Page 17
Owner's instruction
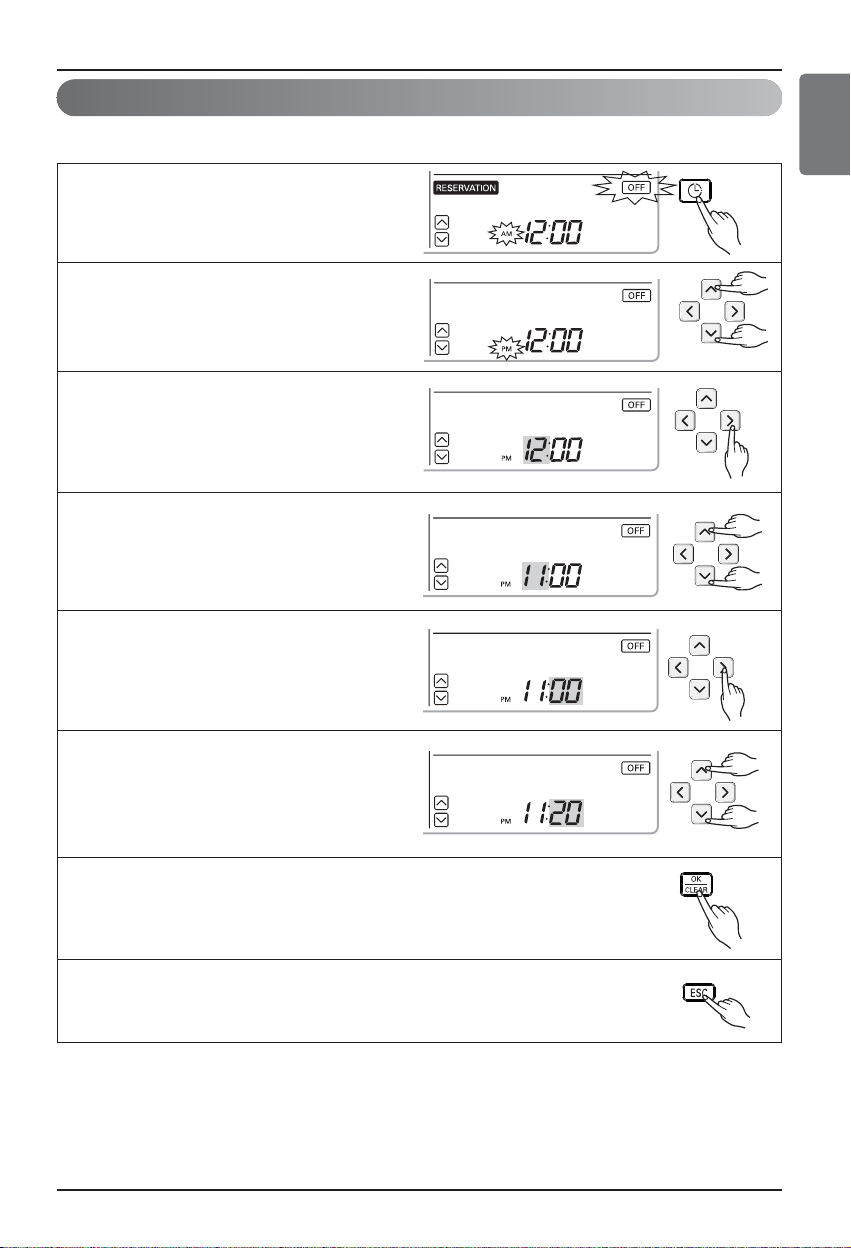
Programming : Setting OFF Reservation
This function is able to turn-off after a setting time.
1
Press programming button to enter the
Programming mode. Press Programming
button repeatedly to select [off reservation].
(the segment flashing)
2
Press up, down button to adjust AM/PM.
3
Press right button to move to "Hour"
part. (the "Hour" segment will be
flashed)
4
Press up, down button to adjust the
Hour.
6
Press up, down button to adjust the
Minute.
7
If you finish the setting, press setting/cancel button to complete
programming.
8
Press exit button to exit or system will automatically release
without any input after 25 seconds.
5
Press right button to move to "Minute"
part. (the "Minute" segment will be
flashed)
Ownerʼs Manual 17
Hydro Kit
ENGLISH
Page 18
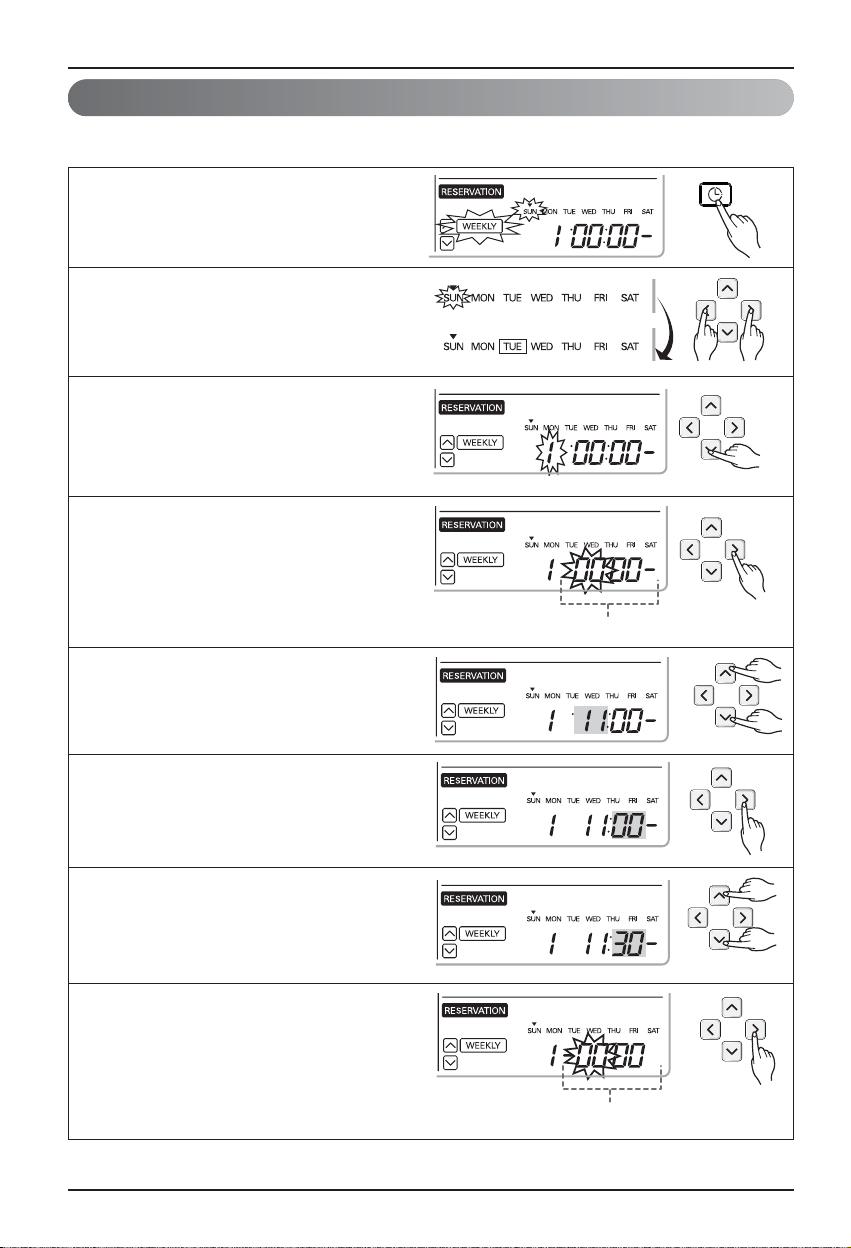
Programming : Weekly Reservation
The weekly reservation is active after setting current time.
1
Press programming button to enter the
Programming mode. Press Programming
button repeatedly to select [Weekly
reservation]. (the segment flashing)
2
Press left, right button to adjust the
current day.
3
Press up, down button to adjust the
action number.
4
Press right button to move to "Hour"
part on ON Time section.
(The "Hour" segment will be flashed)
6
Press right button to move to "Minute"
part on Start Time section.
(The "Minute" segment will be flashed)
7
Press up, down button to adjust the
Minute on Start Time section.
8
Press right button to move to "Hour" part
on OFF Time section.
(The "Hour" segment will be flashed)
5
Press up, down button to adjust the
Hour on Start Time section.
Start Time Section
Off Time Section
Owner's instruction
18 Hydro Kit
Page 19
Owner's instruction
Action
Start Time
From
To
Off Time
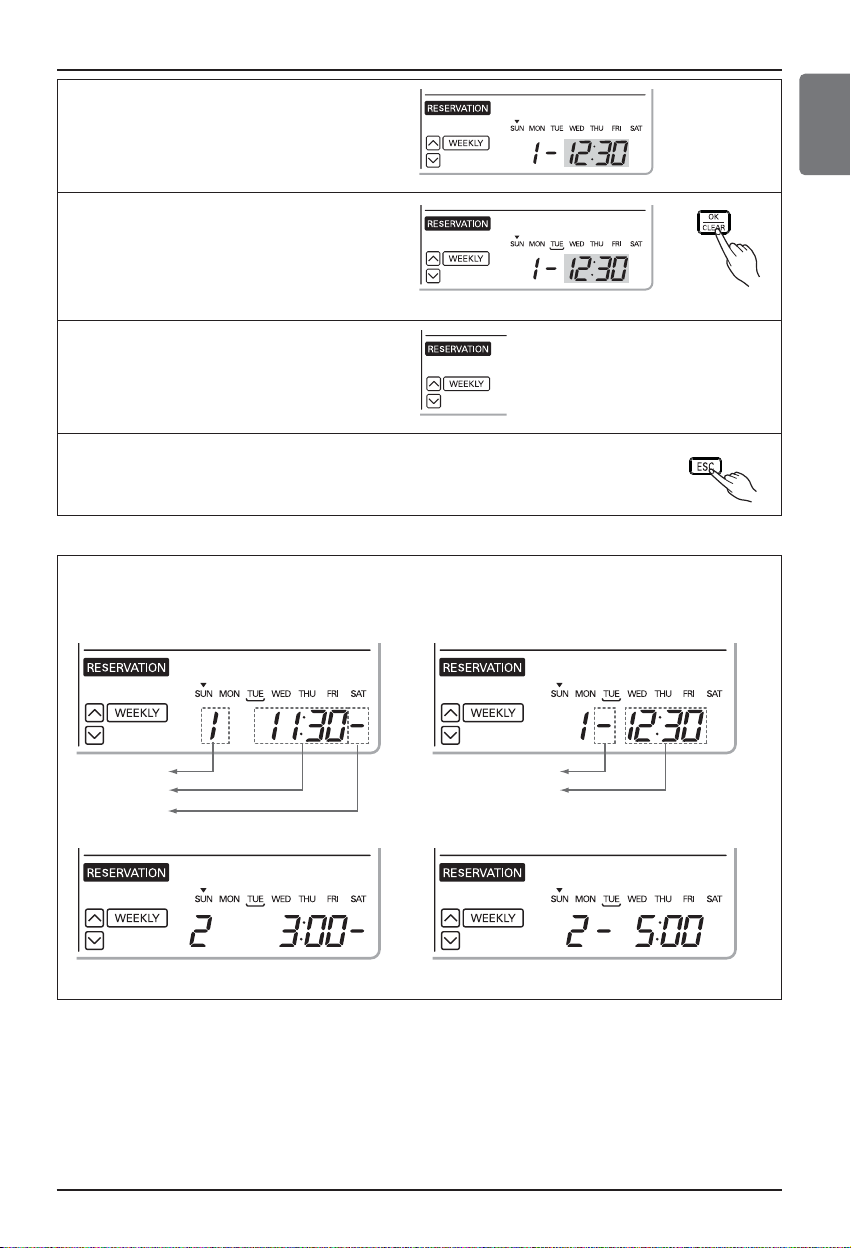
9
Please refer to the process from No.5 to
No.7 for setting OFF Time. It is the same
method.
10
If you finish the setting, press
setting/cancel button to complete
programming. The under bar
segment will be created, when
finished.
11
Please refer to the process from
No.2 to No.10 for setting other day
weekly program. It is the same
method.
12
Press exit button to exit or system will automatically
release without any input after 25 seconds.
Ownerʼs Manual 19
Hydro Kit
ENGLISH
<Note>
Description of weekly reservation
<Start Time Section> <Off Time Section>
<Start Time Section> <Off Time Section>
h Two actions per weekday can be programmed, in total 14 actions
Page 20
20 Hydro Kit
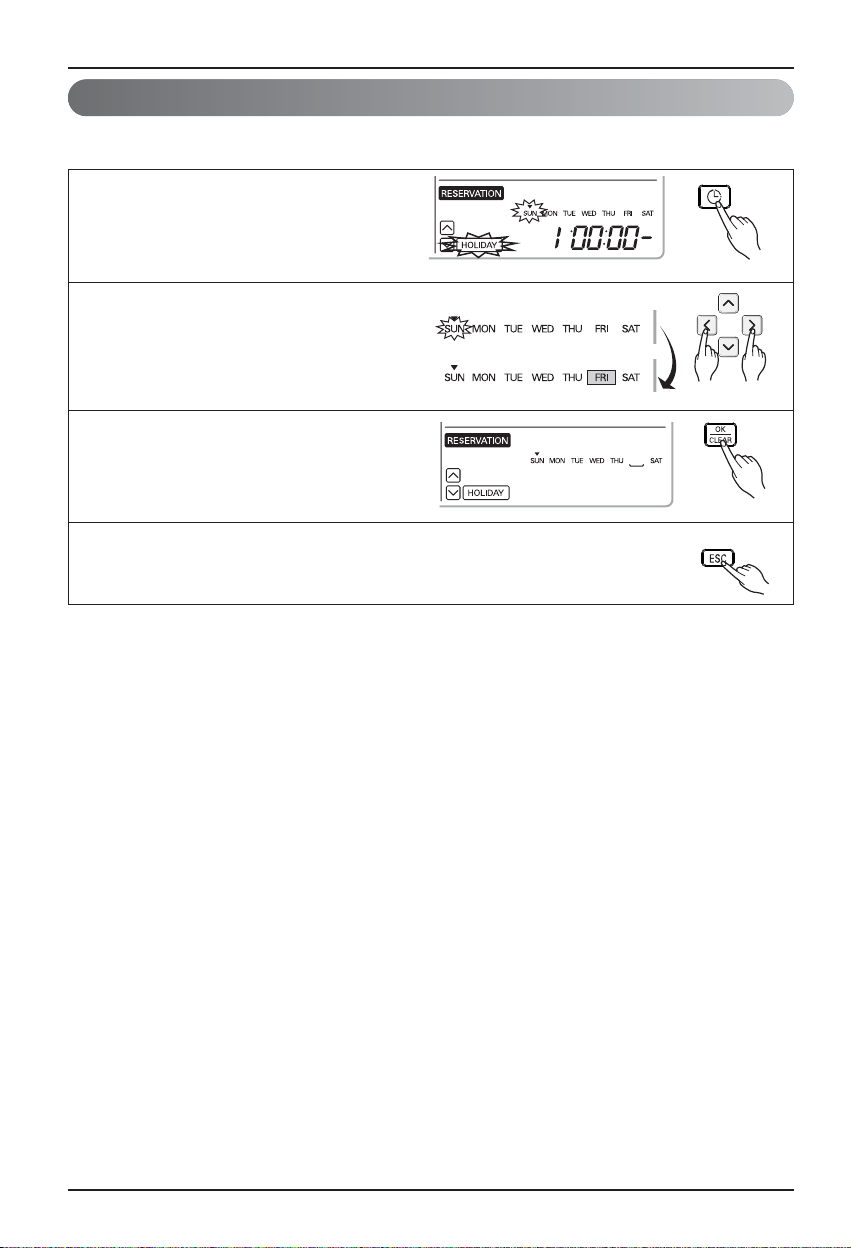
Programming : Holiday Reservation
This function is to automatically stop the machine working on some days.
1
Press programming button to enter the
Programming mode. Press Programming
button repeatedly to select [Holiday
reservation]. (the segment flashing)
2
Press left, right button to adjust the
holiday.
3
When you press set/clear button after
finishing the selection, the day selected
will disappear.
4
Press exit button to exit or system will automatically release without any input
after 25 seconds.
Owner's instruction
Page 21
Ownerʼs Manual 21
Hydro Kit
Using Thermostat
Using Thermostat
1. Some electro-mechanical type thermostat has internal delay time to protect compressor.
In that case, mode change can takes time more than user's expectation. Please read
thermostat manual carefully if the product does not response quickly.
2.
Setting temperature range by thermostat can be different with that of the product. The heating or
cooling set temperature should be chosen within the setting temperature range of the product.
CAUTION
The term "thermostat", which is widely used in this chapter, is a kind of 3rd party accessory.
LG Electronics does not supply thermostat. but it can be supplied by 3rd party manufacturers.
Room thermostat can be used for easy and convenience control. To utilize thermostat more
efficiently and correctly, this chapter presents information about using thermostat.
How to use Thermostat
Operating Thermostat with Remote Controller
To find how to turn on and off, how to set target temperature, how to change operating mode, etc,
please refer to thermostat operating manual provided by thermostat manufacturer.
• Following features are permitted when thermostat is installed :
• SET TEMP button
• VIEW TEMP button
• Temperature adjust button (*)
• Sanitary water heating Enable / Disable
(*) : The product does not turn on / off according to the setting temperature at the remote
controller. It turns on / off according to the thermostat signal.
• Following features are NOT permitted when thermostat is installed :
• Operating mode (cooling/ heating/ weather-dependent) selection
• Time scheduling
• Operation On / Off
ENGLISH
Page 22
Using Thermostat
Emergency Operation
• Definition of terms
- Trouble : a problem which can stop system operation, and can be resumed temporally under
limited operation without certificated professional's assist.
- Error : problem which can stop system operation, and can be resumed ONLY after certificated
professional's check.
- Emergency mode : temporary heating operation while system met Trouble.
• Objective of introducing 'Trouble'
- Not like airconditioning product, hydro kit is generally operated in whole winter season without
any system stopping.
- If system found some problem, which is not critical to system operating for yielding heating
energy, the system can temporarily continue in emergency mode operation with end user's
decision.
• Classified Trouble
- Trouble is classified into two levels according to the seriousness of the problem : Slight Trouble
and Heavy trouble
- Slight Trouble : a problem is found inside the indoor unit. In most case, this trouble is concerned
with sensor problems. The outdoor unit is operating under emergency mode operation condition
which is configured by DIP switch No. 4 of the indoor unit PCB.
- Heavy trouble : a problem is found inside the outdoor unit.
- Option Trouble : a problem is found for option operation such as water tank heating. In this
trouble, the troubled option is assumed as if It does not cause in the Product.
• Emergency operation level
- When system met trouble, it stops operation and waits for userʼs decision : Calling service center
or starting emergency operation.
- To start emergency operation, user simply pushes ON / OFF button once more.
- Two different levels are prepared for emergency operation : High temperature cycle and low
temperature cycle.
- In emergency operation mode, user can not adjust target temperature.
22 Hydro Kit
DIP
Switch
Target
Leaving Water
Temperature
Target
Room Air
Temperature
Target
Sanitary Water
Temperature
High temperature cycle OFF 50℃(122℉) 24℃(75℉) 50℃(122℉)
Low temperature cycle ON 30℃(86℉) 19℃(66℉) 50℃(122℉)
Page 23
Using Thermostat
• Following features are permitted in emergency operation :
- Operation On/Off
- VIEW TEMP button(*)
- Temperature adjust button (*)
- Sanitary water heating Enable / Disable
(*) : Temperature measured by failed sensor is displayed as ʻ- -ʼ.
The product does not turn on / off according to the setting temperature at the remote controller.
It turns on / off according to the thermostat signal.
• Following features are NOT permitted in emergency operation :
- Operating mode (cooling/ heating/ weather-dependent) selection
- Time scheduling
- SET TEMP button
• Duplicated trouble : Option trouble with Slight or Heavy trouble
- If option trouble occurs with slight (or heavy) trouble at the same time, the system puts higher
priority to slight (or heavy) trouble and operates as if slight (or heavy) trouble is occurred.
- Therefore, sometimes sanitary water heating can be impossible in emergency operation mode.
When sanitary water is not warming up while emergency operation, please check if sanitary water
sensor and related wiring are all Ok.
• Emergency operation is not automatically restarted after main electricity power is reset.
- In normal condition, the product operating information is restored and automatically restarted
after main electricity power is reset.
- But in emergency operation, automatic re-start is prohibited to protect the product.
- Therefore, user must restart the product after power reset when emergency operation has been
running.
Ownerʼs Manual 23
Hydro Kit
ENGLISH
Page 24
Maintenance and Service
Maintenance and Service
Maintenance activities
In order to ensure optimal availability of the unit, a number of checks and inspections on the unit and
the field wiring have to be carried out at regular intervals, preferably yearly. This maintenance should
be carried out by your local agreed technician.
Call the service immediately in the following situations
1. Anything abnormal such as burning smell, loud noise etc. happen. Stop the unit and turn the
breaker off. Never try to repair by yourself or restart the system in such cases.
2. Main power cord is too hot or damaged.
3. Error code is generated by self diagnosis.
4. Water leaks from indoor unit.
5. Any switch, breaker (safety, earth) or fuse fails to work properly
User must carry routine checkup & cleaning to avoid unitʼs poor performance.
In case of special situation, the job must be carried out by the only service person.
When the unit is not going....
• If the product is not used for long time, we strongly
recommend NOT TO SWITCH OFF THE POWER
SUPPLY to the product.
• If power is not supplied, some special product-protecting
actions (such as water pump anti-locking) will not
performed.
CAUTION
24 Hydro Kit
Page 25
Maintenance and Service
Ownerʼs Manual 25
Hydro Kit
ENGLISH
Operational instructions
n Do not disconnect the power supply of Hydro Kit during the operation.
Stop the Hydro Kit followed by outdoor unit and then only remove the power supply.
If you remove the power supply of the Hydro Kit in the mid of operation, it will leads to damage of
the product by freezing and bursting of Plate type Heat Exchanger.
n Do not remove the power supply even at the occurrence of “CH14” Error.
As the error is due to the shortage of water flow, please eliminate any sludge and scales inside the
water tubes to ensure free water pumping, remove foreign particles(dust, sand, trash, rusted
pieces) from the water tubes along with cleaning the strainer.
After cleaning the strainer, to remove the error message (not displayed), turn off the outdoor unit
followed by Hydro Kit and then disconnect power supply of Hydro Kit. And then connect power
supply and restart the unit for the normal operation.
The service will be charged if the system failure is due to strainer blockage.
Strainer cleaning period: Once in every 3 months and whenever CH14 error occurs.
n If the system stopped and displaying any error message(CH ???) please follow below procedure.
Do not remove the power supply of the Hydro Kit. Contact L.G service centre.
n Do not change the water pipes randomly. When changing the water pipes there is a possibility of
foreign material entry and bubble formation as well. This leads to freezing of Plate type heat
exchanger of Hydro Kit.
When it is essential to change the water pipes, proceed only after separating the pipes from Hydro
Kit. The inner side of the new pipes must be washed thoroughly to remove the foreign materials
and then connect the pipes with the Hydro Kit.
WARNING
WARNING
Page 26
26 Hydro Kit
Maintenance and Service
Troubleshooting Tips! Save time and money!
Check the following points before requesting repairs or service.... If the malfunction persist, please
contact your dealer.
Case Explanation
Hydro Kit does not operate.
• Have you made a mistake in timer operation?
• Has the fuse blown or has the circuit breaker been tripped?
The room has a peculiar odor.
• Check that this is not a damp smell exuded by the walls, carpet,
furniture or cloth items in the room.
Hydro Kit does not operate for
about 3 minutes when restart.
• This is the protector of the mechanism.
• Wait about three minutes and operation will begin.
Does not cool or heat effectively.
• The room may have been very hot when the Hydro Kit was first
turned on. Allow time for it to cool down.
• Has the setting temperature been set incorrectly?
The unit operation is noisy.
• Refrigerant flow sound
- While the system is being started or stopping, sound from the
refrigerant flow may be heard.
• Sound for the indoor unit heat exchanger
- During the cooling operation, a sound may be heard from the
indoor unit heat exchanger due to water freezing or melting.
• Water noise
- During starting or stopping of the unit, noise can appear in
water piping
• During defrost
- Noise can appear in unit due to defrosting of water.
Steam is raised in outdoor unit.
• Steam from outdoor heat exchanger
- During defrosting operation, ice on the outdoor heat exchanger
is melted, resulting in making steam.
Remote controller display is faint,
or no display at all.
• Has the circuit breaker been tripped?
Page 27

MANUALE DI ISTRUZIONI
CLIMATIZZATORE
Leggere con attenzione questo manuale prima di usare l’unità e
conservare per uso futuro.
www.lg.com
TYPE :
Hydro Kit (Per media temperatura)
ITALIANO
Page 28

2 Hydro Kit
Manuale dellʼutente del
Hydro Kit
SOMMARIO
DATI DA RICORDARE
Annotare qui il numero di serie e il modello:
No. modello
No. di serie
I numeri sono riportati sull'etichetta a lato di ogni
unità.
Nome dell'installatore
Data acquisto
n
Spillare la ricevuta su questa pagina qualora
fosse necessaria per provare la data di
acquisto o per motivi di garanzia.
LEGGERE IL MANUALE
In questo manuale troverete molti consigli utili su come
usare e manutenere il
Hydro Kit
in modo corretto.
Una piccola attenzione da parte vostra vi permetterà di
risparmiare molto tempo e denaro durante l'utilizzo del
prodotto.
Nella tabella di riferimento per la risoluzione dei problemi
troverete molte risposte ai problemi più comuni.
Consultando la tabella Risoluzione dei problemi potrebbe
non essere necessario contattare il servizio di assistenza.
AVVERTENZE
• Contattare un tecnico dell'assistenza autorizzato per
la riparazione o la manutenzione dellʼunità.
• Contattare lʼinstallatore per eseguire lʼinstallazione
dellʼunità.
• Il
Hydro Kit
non è previsto per l'uso da parte di
bambini o persone invalide senza una supervisione.
• I vostri figli devono essere controllati per verificare
che non giochino con il
Hydro Kit
.
• Quando il cavo di alimentazione deve essere
sostituito, il lavoro di sostituzione deve essere
eseguito solo da personale autorizzato usando solo
parti di sostituzione originali.
• Il servizio d'installazione deve essere eseguito in
conformità agli standard elettrici nazionali ed
esclusivamente da personale autorizzato.
Precauzioni di sicurezza
..............3
Introduzione al prodotto
..............6
Istruzioni per il proprietario
........8
Uso del termostato
.......................21
Manutenzione e assistenza
........24
Page 29
Precauzioni di sicurezza
Manuale dell'utente del 3
Hydro Kit
ITALIANO
Precauzioni di sicurezza
Per evitare infortuni all'utente o a terzi e danni alla proprietà, attenersi alle seguenti istruzioni.
n
Lʼuso errato causato dalla mancata osservanza delle istruzioni può causare danni o lesioni.
Lʼimportanza è classificata in base alle seguenti indicazioni.
AVVISO
ATTENZIONE
Questo simbolo indica la possibilità di decesso o di grave infortunio.
Questo simbolo indica il rischio di lesioni alla persona o di
danni alla proprietà.
AVVISO
Il prodotto deve essere sempre
provvisto di messa a terra.
•
Vi è il rischio di scosse elettriche.
Non utilizzare interruttori automatici difettosi
o di potenza inferiore. Usare questo
apparecchio con un circuito dedicato ad esso.
•
Vi è il rischio di scosse elettriche o
incendio.
Non usare una presa multipla. Usare sempre questa
apparecchiatura con un circuito di alimentazione
dedicato e interruttore automatico.
•
Si può provocare scossa elettrica o
incendio.
Per i collegamenti elettrici, rivolgersi al
rivenditore, a un elettricista qualificato o a un
centro di assistenza autorizzato. Non smontare
o tentare di riparare il prodotto da soli.
•
Vi è il rischio di scosse elettriche o
incendio.
Prevedere sempre la messa a terra per il prodotto secondo
quanto indicato nello schema elettrico. Non collegare il
filo della messa a terra a tubi di gas o dellʼacqua, al
parafulmine, o ai fili della messa a terra del telefono.
•
Vi è il rischio di scosse elettriche o
incendio.
Installare il pannello e il coperchio della
scatola di controllo in modo sicuro.
•
Vi è il rischio di scosse elettriche o incendio
dovuti a polvere, acqua, e così via.
Utilizzare fusibili o interruttori
automatici di giusta tensione.
•
Vi è il rischio di scosse elettriche o
incendio.
Non modificare o prolungare il cavo di
alimentazione. Se il cavo di alimentazione
presenta righe o la guaina esterna rotta o
deteriorata, essa deve essere sostituita.
•
Vi è il rischio di scosse elettriche o
incendio.
Per l'installazione, la rimozione e la
reinstallazione, contattare sempre il
venditore o un centro di assistenza
autorizzato.
•
C'è il rischio di scossa elettrica o
incendio, esplosione o lesioni.
Non installare il prodotto su supporti
di installazione difettosi. Accertarsi
che lʼarea di installazione non sia
soggetta a deterioramento nel tempo.
•
In caso contrario, il prodotto potrebbe
cadere.
Non installare lʼunità esterna su una
base rimovibile o in posizioni in cui
possa cadere.
•
La caduta dell'unità esterna può
causare danni o infortuni, e in alcuni
casi anche la morte.
In caso di allagamento del prodotto con acqua
(riempimento di acqua o sommerso in acqua),
rivolgersi a un centro di assistenza autorizzato per
la riparazione prima di utilizzare ancora il prodotto.
•
Vi è il rischio di scosse elettriche o
incendio.
Controllare il refrigerante utilizzato.
Leggere attentamente l'etichetta del
prodotto.
•
Il refrigerante non adatto può impedire
il normale funzionamento dell'unità.
Non utilizzare cavi di alimentazione,
spine o prese danneggiate.
•
In caso contrario, si potrebbero
verificare incendi o scosse elettriche.
Non toccare, utilizzare o riparare il
prodotto con le mani bagnate.
• Vi è il rischio di scosse elettriche o
incendio.
Page 30
I collegamenti delle unità interna ed
esterna devono essere saldamente
fissati e il cavo deve essere disposto in
modo corretto, in modo che non si
verifichino pressioni o torsioni del cavo
prodotte dai terminali di collegamento.
•
Collegamenti non corretti o lenti
possono causare la generazione di
calore o un incendio.
Smaltire in modo sicuro i materiali
dʼimballaggio. Gli oggetti come viti,
chiodi, batterie, parti rotte ecc., dopo
l'installazione o la manutenzione devono
essere eliminati e eliminare anche i
sacchi di imballaggio di plastica.
•
I bambini potrebbero giocarci e
incorrere in lesioni.
Verificare che il dispositivo di
alimentazione non sia sporco, allentato
o rotto e quindi attivare l'alimentazione.
•
Il dispositivo di alimentazione sporco,
allentato o rotto può provocare
scossa elettrica o incendio.
Non utilizzare il prodotto in ambienti
completamente chiusi per periodi
prolungati. Ventilare regolarmente
l'area.
•
Può verificarsi una deficienza di ossigeno
e quindi un pericolo per la salute.
Non aprire il coperchio anteriore o la griglia
del prodotto durante il suo funzionamento.
(Non toccare il filtro elettrostatico, se lʼunità
è equipaggiata con esso.)
•
C'è il rischio di lesioni fisiche, scossa
elettrica o guasto del prodotto.
Se si sentono strani rumori, odori o il fumo
esce dal prodotto, spegnere
immediatamente l'interruttore automatico o
disconnettere il cavo di alimentazione.
•
Vi è il rischio di scosse elettriche o
incendio.
Di tanto in tanto, aerare la stanza
quando il prodotto è utilizzato insieme a
fornelli, stufe, elementi riscaldanti, ecc.
• Può verificarsi una deficienza di ossigeno
e quindi un pericolo per la salute.
Disinserire l'alimentazione principale
quando si pulisce o si ripara il
prodotto.
•
Vi è il rischio di scosse elettriche.
Assicurarsi che nessuno possa
inciampare o cadere sull'unità esterna.
• Ciò potrebbe provocare lesioni personali e
danni al prodotto.
Avere cura di non tirare o danneggiare
il cavo di alimentazione durante il
funzionamento.
•
Vi è il rischio di scosse elettriche o
incendio.
Non appoggiare NULLA sul cavo di
alimentazione.
•
Vi è il rischio di scosse elettriche o
incendio.
Quando si hanno perdite di gas
infiammabile, chiudere il gas e aprire
una finestra per la ventilazione prima di
accendere l'interruttore del prodotto.
•
Non utilizzare il telefono o accendere o
spegnere interruttori. Vi è il rischio di
esplosioni o incendi.
Nell'unità esterna, il condensatore
moltiplicatore fornisce elettricità ad alta
tensione ai componenti elettrici. Prima di
procedere con la riparazione, assicurarsi che
il condensatore sia completamente scarico.
•
Un condensatore carico può causare
scosse elettriche.
Quando si installa l'unità, utilizzare il kit
di installazione fornito con il prodotto.
•
In caso contrario, l'unità potrebbe
cadere e causare infortuni seri.
Accertare di usare solo quelle parti che
sono elencate nella lista di pezzi di
ricambio. Non provare a modificare
l'apparecchio.
•
L'uso di parti non appropriate può
causare scosse elettriche,
un'eccessiva generazione di calore e
anche un incendio.
Precauzioni di sicurezza
4 Hydro Kit
Non posizionare stufe o altre
apparecchiature di riscaldamento
vicino al cavo di alimentazione.
•
Vi è il rischio di scosse elettriche e
incendio.
Evitare lʼingresso di acqua nelle parti
elettriche. Installare il prodotto lontano
da sorgenti d'acqua.
• Vi è il rischio di scosse elettriche, incendio o
guasti al prodotto.
Non conservare, utilizzare o avvicinare
gas infiammabili o combustibili in
prossimità del prodotto.
•
Vi è il rischio di un incendio.
Page 31

ATTENZIONE
Il prodotto va sollevato e trasportato da
almeno due persone.
•
Evitare lesioni personali.
Non installare il prodotto in luoghi
esposti direttamente al vento di mare
(spruzzi di sale).
• Ciò può provocare corrosione del prodotto.
Mantenere il prodotto in piano durante
l'installazione.
•
Per evitare vibrazioni o rumore.
Non installare il prodotto in modo che il
rumore o lʼaria calda provenienti
dallʼunità esterna possano causare
danni o disturbare i vicini.
•
Ciò potrebbe causare problemi o liti
con i vicini.
Controllare sempre che non vi siano
perdite del gas (refrigerante)
successivamente all'installazione o
riparazione del prodotto.
•
Livelli di refrigerante insufficienti possono
provocare guasti al prodotto.
Non utilizzare lʼapparecchio per scopi specifici
come conservare alimenti, opere dʼarte ecc. Il
Kit Hydro è un prodotto di consumo, non un
sistema di refrigerazione di precisione.
•
C'è il rischio di danni o perdita di
proprietà.
Non bloccare lʼingresso o lʼuscita
del flusso dʼaria.
•
In caso contrario, si potrebbero verificare
guasti al prodotto.
Utilizzare un panno soffice per la pulizia.
Non utilizzare detergenti aggressivi,
solventi o spruzzi d'acqua e così via.
•
Vi è il rischio di scosse elettriche,
incendio o danni alle parti in plastica del
prodotto.
Non calpestare o mettere oggetti sul
prodotto (unità esterne)
• Vi è il rischio di infortuni alle persone e
guasti al prodotto.
Non introdurre le mani o altri oggetti
nella bocca di ingresso o uscita
dellʼaria mentre l'unità è in funzione.
•
Ci sono componenti taglienti o in
movimento che possono provocare
lesioni personali.
Disimballare e installare il prodotto con
attenzione.
•
I bordi taglienti possono causare
infortuni.
In caso di perdite di gas refrigerante
durante la riparazione, non toccare il
gas refrigerante fuoriuscito.
•
Il gas refrigerante può provocare ustioni
(bruciatura da freddo).
Non inclinare l'unità quando la si
rimuove o la si disinstalla.
•
L'acqua condensata al suo interno
potrebbe fuoriuscire.
In caso di perdite di gas refrigerante
durante lʼinstallazione, aerare
immediatamente l'ambiente.
• Altrimenti esso può essere pericoloso per la
vostra salute.
Lo smontaggio dell'unità e il trattamento
dell'olio refrigerante e di eventuali parti
sono operazioni da eseguirsi in conformità
con le normative standard locali e nazionali.
Non esporre direttamente la pelle, i
bambini o piante al flusso di aria fredda
o calda.
•
Ciò potrebbe causare danni alla
salute.
Utilizzare una scala salda per pulire, riparare
o eseguire operazioni di manutenzione al
prodotto quando questo è installato in alto.
•
Fare attenzione a non procurarsi
lesioni personali.
Precauzioni di sicurezza
Manuale dell'utente del 5
Hydro Kit
ITALIANO
Page 32

Introduzione al prodotto
Introduzione al prodotto
Situzione di installazione tipica
Usare un'alimentazione elettrica separata per l'unità interna.
(Non collegare né usare il terminale di alimentazione dell'unità esterna).
ATTENZIONE
6 Hydro Kit
Uscita acqua
Lato gas
Lato liquidi
Ingresso acqua
Drenaggio
Page 33

h Le funzioni indicate in colore grigio possono non essere attive e visualizzate.
Controllore remoto
ZDWHU
WHPS
RSHU
KHDWLQJ
PRGH
Introduzione al prodotto
Manuale dell'utente del 7
Hydro Kit
ITALIANO
No Nome
1 Display
2 Pulsante di variazione temperatura
3 Pulsante di attivazione/disattivazione riscaldamento acqua
4 Pulsante di accensione
5 Pulsante scelta modalità di funzionamento
6 Pulsante modalità silenziosa On/Off
7 Pulsante modalità impostazione temperatura
8 Pulsante modalità visualizzazione temperatura
9 Pulsante di impostazione delle funzioni
10 Pulsante di programmazione
11 Tasto direzionale (Su, Giù, Sinistra, Destra)
12 Pulsante Imposta/cancella
13 Pulsante ESC
ڸ
ۀ
ڿ
ھ
ڽ
ہ
ۂ
WHPS
ZDWHU
KHDWLQJ
RSHU
PRGH
ڹ
ں
ڻ
ڼ
ۃ
ۄ
Page 34

8 Hydro Kit
Istruzioni per l'utente
POMPA DELL'ACQUA
Questa icona indica che la pompa dell'acqua è attiva.
POMPA DI CALORE IMPIANTO SOLARE AUSILIARIO
Questa icona indica che la pompa di calore dell'impianto solare ausiliario è attiva.
NOTA : Dato che l'installazione di una pompa termica per impianto solare ausiliario non è
obbligatoria ma raccomandata in relazione alla condizione in campo, questa icona
può apparire sebbene non sia installata alcuna pompa termica per impianto solare.
BRINAMENTO
Questa icona indica che è attivato il modo di sbrinamento.
Nell'utilizzo di riscaldamento dell'ambiente o nell'utilizzo per serbatoio acqua sanitaria, il
congelamento dello scambiatore di calore esterno può verificarsi a causa della bassa
temperatura esterna e dell'umidità. Se si presenta questo rischio, il prodotto deve essere
sbrinato. Esso inverte il ciclo e preleva calore dal sistema interno per evitare il congelamento
del sistema esterno. Questo modo è attivato automaticamente.
MANTENERE LA TEMPERATURA PIU' BASSA
Lo scopo di questo modo è di mantenere la temperatura corretta per evitare danni per
congelamento della tubazione dell'acqua.
ESTERNO
Questa icona indica che l'unità esterna è attivata.
CLOCCO BAMBINI
NESSUNA FUNZIONE
Informazioni di monitoraggio
Istruzioni per l'utente
Page 35

Istruzioni per l'utente
CONTROLLORE CENTRALE
Questa icona indica che il prodotto è controllato dal controllore centrale.
TERMOSTATO
Questa icona indica il collegamento con il termostato.
GUASTO LIMITATO
Questa icona indica che si verifica un piccolo guasto.
GUASTO GRAVE
Questa icona indica che si verifica un guasto importante.
Manuale dell'utente del 9
Hydro Kit
ITALIANO
Page 36

10 Hydro Kit
Selezione di temperatura desiderata
j Nota
: Ogni pressione incrementa la temperatura di 1°C o 2°F
: Ogni pressione riduce la temperatura di 1°C o 2°F
• E' possibile cambiare il campo della temperatura di ciascun modo nel modo di impostazione
dell'installazione. Vedere codice funzione 11-15.
• L'impostazione della temperatura ambiente è disponibile quando è installato il sensore aria
ambiente remoto (fornito separatamente). Vedere codice funzione 03.
• La impostazione di temperatura serbatoio acqua sanitaria è disponibile quando è installato il
serbatoio acqua sanitaria.
Istruzioni per l'utente
Cambio modalità
Accendere il prodotto e selezionare il modo di funzionamento.
Modo operativo
• Operazione di raffreddamento - Il prodotto fornisce acqua fredda da usare nel raffreddamento sotto
pavimento o raffreddamento della unità FCU.
• Operazione di riscaldamento - Il prodotto fornisce acqua calda da usare nel riscaldamento o sotto
pavimento o riscaldamento unità FCU.
• Utilizzo di riscaldamento dipendente dal tempo atmosferico - In questo modo, il punto di regolazione
del riscaldamento è determinato automaticamente dall'andamento di temperatura predefinito.
1
Premere tasto di alimentazione per accendere il prodotto.
2
Premere tasto OPER MODE (modo funzionamento) per selezionare ciascun modo di funzionamento.
Raffreddamento Riscaldamento Utilizzo dipendente dal
tempo atmosferico
1
Premere tasto SET TEMP (impostaz. temper.) per selezione ciascun modo di utilizzo.
2
Regolare temperatura desiderata premendo i tasti di cambio di temperatura in ciascun modo.
Temperatura ambiente Temperatura acqua in
uscita
Temperatura serbatoio
acqua sanitaria
Per aumentare la temperatura
Per ridurre la temperatura
Page 37

Istruzioni per l'utente
Utilizzo dipendente dal tempo atmosferico
Questo modo è applicato solo per funzione di riscaldamento. Per il risparmio di energia e per
ottenere un maggior comfort, la regolazione della temperatura dipende dalla temperatura esterna.
Se la temperatura esterna si riduce, la capacità di riscaldamento dei locali si ridurrà automaticamente
per mantenere la stessa temperatura ambiente. Tutti i parametri verranno impostati dall'installatore
durante la procedura di avviamento e verranno adattati alla caratteristica della località geografica.
Manuale dell'utente del 11
Hydro Kit
ITALIANO
1
Premere tasto OPER MODE (modo operativo) per selezionare il modo di funzionamento
dipendente dal tempo atmosferico.
2
Regolare il valore di temperatura desiderato premendo i tasti di modifica temperatura.
1
Premere più volte il tasto di
visione di temperatura per
selezionare ciascuna
temperatura.
(Quando si preme il tasto di
visione temperatura, la
temperatura ambiente verrà
visualizzata per 5 secondi.)
Visionare la temperatura
Temperatura Campo temperature Visualizzato come
Inferiore a 11℃(51℉) Lo
Aria 11℃(51℉) ~ 39℃(102℉) Temperatura attuale
Superiore a 39℃(102℉) Hi
Inferiore 0℃(32℉) [* Inferiore 40℃(104℉) ]
Lo
Acqua
0℃(32℉) ~ 92℃(197℉) [*40℃(104℉) ~ 120℃(248℉) ]
Temperatura attuale
Superiore a 92℃(197℉) [*Superiore a 120℃(248℉) ]
Hi
(* : Temperatura imp. solare)
: Icona di funzionamento
dipendente dal tempo
atmosferico
Es.) Andamento di temperatura in
riduzione di 3°C (in base alla
temperatura aria ambiente)
<Fare regolazione di temperatura (unità : °C)>
-5, -4, -3, -2, -1, 0, 1, 2, 3, 4, 5
:
Visualizza temperatura ambiente
:
Visualizza temperatura ingresso aria
:
Visualizza temperatura uscita aria
:
Visualizza temperatura acqua sanitaria
(E' visualizzata SOLO quando si è nel
modo di riscaldamento acqua sanitaria)
:
Visualizza temperatura riscaldamento con
impianto solare (E' visualizzata SOLO quando si
è nel modo di riscaldamento acqua sanitaria)
Caldo
Freddo
Page 38

Questa funzione serve per evitare che i bambini o altre persone usino il controllore.
Sicurezza bambini
12 Hydro Kit
Istruzioni per l'utente
1
Premere il tasto impostazione funzioni per
entrare nel modo di impostazione utente.
(Il segmento lampeggerà)
2
Premere tasto imposta/cancella per terminare
la selezione. Il segmento scomparirà.
4
Per avviare questa impostazione, premere il
tasto Setting delle funzioni fino a quando
lampeggia l'icona e quindi attivare il tasto
setting/clear (impostazione / cancella)
3
Durante il blocco bambini, l'icona e 'CL'
verranno visualizzati per 3 secondi quando si
attiva qualsiasi tipo di tasto eccetto il tasto di
visione di temperatura e il tasto di
impostazione/cancellazione (setting/clear).
Page 39

Istruzioni per l'utente
Manuale dell'utente del 13
Hydro Kit
ITALIANO
Quando si verifica l'errore nell'unità interna, il codice di errore verrà visualizzato sul controllore remoto.
Guasto limitato
Si è verificato un guasto entro l'unità interna. Nella maggior parte dei casi, il guasto
riguarda i sensori. In questo caso il kit Hydro può funzionare in un modo di emergenza
(solo funzionamento di riscaldamento).
Guasto grave
Si verifica un guasto nell'unità esterna.
Errore critico
In caso di errore critico, il prodotto si ferma in modo senza condizione.
In questo istante, il simbolo CH' e il No. di codice di errore sono attivati sul display.
Visualizzazione di codice di errore
<Display>
<Display>
<Display>
Page 40

Potete impostare l'ora effettiva.
Ora attuale di impostazione
1
Mantenere la pressione sul tasto di programmazione per due volte in
successione per immettere il modo dellʼorario di impostazione attuale
2
Premere tasto sinistro e destro per
regolare il giorno attuale.
3
Premere tasto verso il basso per
passare alla parte AM/PM
(mattino/pomer.) e regolarlo.
(Il segmento AM/PM lampeggerà)
4
Premere tasto destro per passare alla
parte "Hour" (ora). (Il segmento "Hour"
lampeggerà)
6
Premere tasto destro per passare alla
parte "Minuti". (Il segmento "Minute"
lampeggerà)
7
Premere tasto verso il basso, verso
l'alto per regolare i minuti.
8
Se avete terminato la impostazione,
premere tasto set/clear
(imposta/cancella).
9
Premere tasto exit per uscire o il sistema verrà attivato automaticamente
senza alcuna modifica dopo 25 secondi.
5
Premere tasto verso il basso, verso
l'alto per regolare l'ora.
Istruzioni per l'utente
14 Hydro Kit
Page 41

Istruzioni per l'utente
Manuale dell'utente del 15
Hydro Kit
ITALIANO
Programmazione: Impostazione pianificazione semplice
Potete facilmente attivare la pianificazione. (permessa SOLO quando l'unità è in stand-by.)
1
Premere il tasto di programmazione per
entrare nel modo di programmazione. (il
segmento lameggerà)
2
Premete tasto verso l'alto e verso il basso
per regolare il tempo di pianificazione.
3
Se terminate l'impostazione, premete il tasto impostazione/cancellazione
per completare la programmazione.
4
Premete il tasto exit per uscire o il sistema si spegnerà automaticamente
senza alcuna immissione dati dopo 25 secondi.
1
Premere il tasto di programmazione per
entrare nel modo di programmazione.
Premere il tasto Programming
(programmazione) più volte per selezionare
[prenotazione in fase di attesa]
(il segmento lampeggia)
2
Premere tasto verso l'alto e verso il basso
per regolare il tempo di pianificazione.
3
Se terminate l'impostazione, premete il tasto impostazione/cancellazione
per completare la programmazione.
4
Premere il tasto exit per uscire o il sistema si spegnerà automaticamente
senza alcuna immissione dati dopo 25 secondi.
Programmazione: Impostazione pianificazione di disattivazione
Potete facilmente disattivare la disinserzione (fase attesa).(Ammessa SOLO quando l'unità è in funzione).
Page 42

Programmazione: Impostazione pianificazione ON (inserita)
Questa funzione permette l'accensione dopo il tempo di impostazione.
1
Questa funzione permette l'accensione dopo il
tempo di impostazione. Premere il tasto di
programmazione per entrare nel modo di
programmazione. Premere il tasto
Programming più volte per selezionare
[prenotazione attivata] (pianificazione inserita).
2
Premere tasto verso l'alto e verso il
basso per regolare AM/PM.
3
Premere il tasto destro per passare alla
parte "Hour" (ora). (Il segmento "Hour"
lampeggerà)
4
Premere tasto verso l'alto e verso il
basso per regolare l'ora.
6
Premere tasto verso l'alto e verso il
basso per regolare i minuti.
7
Se terminate l'impostazione, premete il tasto
impostazione/cancellazione per completare la programmazione.
8
Premere il tasto exit per uscire o il sistema si spegnerà
automaticamente senza alcuna immissione dati dopo 25
secondi
5
Premere il tasto destro per passare alla
parte "Minute". (il segmento "Minute"
lampeggerà)
Istruzioni per l'utente
16 Hydro Kit
Page 43

Istruzioni per l'utente
Programmazione: Impostazione pianificazione esclusa (OFF)
Questa funzione permette lo spegnimento dopo il tempo di impostazione.
1
Premere il tasto di programmazione per
entrare nel modo di programmazione.
Premere tasto Programming più volte per
selezionare [prenotazione esclusa] (il
segmento lamppeggerà).
2
Premere tasto verso l'alto e verso il
basso per regolare AM/PM.
3
Premere il tasto destro per passare alla
parte "Hour". (il segmento "Hour"
lampeggerà)
4
Premere tasto verso l'alto e verso il
basso per regolare l'ora.
6
Premere tasto verso l'alto e verso il
basso per regolare i minuti.
7
Se terminate l'impostazione, premete il tasto
impostazione/cancellazione per completare la
programmazione.
8
Premere il tasto exit per uscire o il sistema si spegnerà
automaticamente senza alcuna immissione dati dopo 25 secondi
5
Premere il tasto destro per passare alla
parte "Minuti". (il segmento "Minute"
lampeggerà)
Manuale dell'utente del 17
Hydro Kit
ITALIANO
Page 44

Programmazione: Impostazione settimanale
La impostazione settimanale è attiva dopo avere impostato lʼora corrente.
1
Premere il pulsante di programmazione per accedere alla
modalità di programmazione. Ripetere lʼazionamento del
pulsante per selezionare [impostazione settimanale].
(il segmento lampeggia)
2
Premere il pulsante Sinistra o Destra
per impostare il giorno corrente.
3
Premere il pulsante Su o Giù per
regolare i minuti di azione.
4
Premere il pulsante Destra per
accedere alla parte "Ora" nella sezione
Ora ON. (Il segmento “Ora” inizierà a
lampeggiare)
6
Premere il pulsante Destra per
accedere alla parte "Minuti" nella
sezione Ora inizio. (Il segmento “Minuti”
inizierà a lampeggiare)
7
Premere il pulsante Su, Giù per regolare i
minuti nella sezione Ora inizio.
8
Premere il pulsante Destra per accedere
alla parte "Ora" nella sezione Ora OFF.
(Il segmento “Ora” inizierà a lampeggiare)
5
Premere il pulsante Su, Giù per regolare
lʼora nella sezione Ora inizio.
Sezione ora di avvio
Sezione ora di spegnimento
Istruzioni per l'utente
18 Hydro Kit
Page 45

Istruzioni per l'utente
Azione
Ora di avvio
Da
A
Ora di spegnimento
9
Vedere il processo da No. 5 a No. 7 per
impostare il tempo di esclusione (OFF).
E' lo stesso metodo.
10
Se terminate l'impostazione, premete il
tasto
impostazione/cancellazione per
completare la programmazione.
Il segmento a barra inferiore verrà
generato quando si è terminata la
programmazione.
11
Vedere il processo da No. 2 a No. 10
per impostare un altro programma
settimanale-giornaliero.
E' lo stesso metodo.
12
Premere il tasto exit per uscire o il sistema si spegnerà
automaticamente senza alcuna immissione dati dopo 25 secondi.
Manuale dell'utente del 19
Hydro Kit
ITALIANO
<Nota>
Descrizione della pianificazione settimanale
<Sezione ora avvio > < Sezione ora arresto >
<Sezione ora avvio> < Sezione ora arresto >
h Possono essere programmate due azioni per giorno della settimana, in totale 14 azioni.
Page 46

20 Hydro Kit
Programmazione: Pianificazione vacanze
Questa funzione serve per arrestare automaticamente il funzionamento della macchina in alcuni
giorni.
1
Premete il tasto di programmazione per
entrare nel modo di programmazione.
Premere tasto Programming più volte per
selezionare [prenotazione per ferie]. (il
segmento lampeggerà)
2
Premere tasto sinistro, destro per
regolare le date della vacanza.
3
Quando si preme il tasto set/clear dopo
aver terminato la selezione, il giorno
selezionato scomparirà.
4
Premere il tasto exit per uscire o il sistema si spegnerà automaticamente
senza alcuna immissione dati dopo 25 secondi.
Istruzioni per l'utente
Page 47

Uso del termostato
Uso del termostato
1. Alcuni termostati di tipo elettromeccanico dispongono di un tempo di ritardo interno per
proteggere il compressore. In tal caso, il cambio modalità può impiegare un tempo superiore
alle aspettative dellʼutilizzatore. Leggere con attenzione il manuale del termostato se il
prodotto non risponde in modo rapido.
2.
Lʼimpostazione dellʼintervallo di temperatura da parte del termostato può essere differente rispetto
a quella eseguita con il prodotto. La temperatura di riscaldamento o raffreddamento deve essere
scelta allʼinterno dellʼintervallo di temperatura del prodotto.
ATTENZIONE
Il termine "termostato", che è ampiamente usato in questo capitolo, è un tipo di accessorio di terze
parti. La LG Electronics non fornisce il termostato, ma esso può essere fornito da fabbricanti di terze
parti. Il termostato ambiente può essere usato facilmente e con controllo economico.
Per utilizzare il termostato con maggiore efficienza e correttezza, questo capitolo indica le
informazioni sul suo utilizzo.
Come usare il termostato
Uso del termostato con controllore remoto
Per avere notizie su accensione e spegnimento, come impostare la temperatura valuta, come
modificare il modo di funzionamento, ecc., vedere il manuale di impostazione del termostato fornito
dal fabbricante dello stesso.
• Le caratteristiche seguenti sono ammesse quando il termostato è stato installato :
• Pulsante SET TEMP
• Pulsante VIEW TEMP
• Pulsante di regolazione della temperatura (*)
• Attiva/Disattiva riscaldamento dellʼacqua sanitaria
(*) : Il prodotto non si accende o spegne (on / off) a seconda della impostazione di temperatura
nel controllore remoto. Si accende o si spegne in base al segnale del termostato.
• Le caratteristiche seguenti NON sono ammesse quando il termostato è stato installato:
• Selezione della modalità operativa (raffreddamento/ riscaldamento/ in funzione delle
condizioni atmosferiche)
• Pianificazione ora
• Funzionamento On / Off
Manuale dell'utente del 21
Hydro Kit
ITALIANO
Page 48

Uso del termostato
Funzionamento di emergenza
• Definizione dei termini
- Guasto: un guasto che può interrompere il funzionamento del sistema e può essere ripristinato
temporaneamente in modo limitato senza lʼassistenza di personale qualificato.
- Errore: guasto che può interrompere il funzionamento del sistema e può essere ripristinato
SOLTANTO con lʼassistenza di personale qualificato.
- Modalità emergenza: funzionamento temporaneo di riscaldamento mentre il sistema ha un
guasto.
• Obiettivo di introduzione di un 'guastoì
- Diversamente dall'unità di condizionamento aria, il kit Hydro funziona generalmente per tutta la
stagione invernale senza alcun arresto del sistema.
- Se nel sistema si verificano guasto, non critici per il funzionamento per fornire lʼenergia di
riscaldamento, il sistema può temporaneamente continuare il funzionamento in emergenza a
seguito della decisione dellʼutilizzatore.
• Guasto classificato
- Il guasto è classificato in due livelli a seconda della serietà del problema : guasto limitato e
guasto grave.
- Guasto limitato: nellʼunità interna si è verificato un guasto. Nella maggior parte dei casi, il guasto
riguarda i sensori. Lʼunità esterna funziona in condizioni di uso di emergenza che è configurata
con il microinterruttore N. 4 del PCB dellʼunità interna.
- Guasto grave: nellʼunità esterna si è verificato un guasto.
- Guasto su unʼopzione: si è verificato un guasto per il funzionamento di unʼopzione come il
riscaldamento del serbatoio dellʼacqua. In questo guasto, l'opzione di guasto è supposta come se
essa non provocasse l'arresto del prodotto.
• Livello di funzionamento di emergenza
- Quando il sistema ha un guasto, esso arresta il funzionamento e attende la decisione dell'utente :
Chiamare il centro di assistenza o avviare il funzionamento di emergenza. Contattare il centro di
assistenza o iniziare un'operazione di emergenza.
- Per avviare il funzionamento di emergenza, l'utente semplicemente preme il tasto ON / OFF
ancora una volta.
- Per il funzionamento di emergenza sono preparate due diversi livelli: Ciclo ad alta temperatura e
ciclo a bassa temperatura.
- In modalità di funzionamento di emergenza, lʼutilizzatore non può regolare la temperatura
desiderata.
22 Hydro Kit
Microinterruttore
Temperatura
desiderata
dellʼacqua in uscita
Temperatura
desiderata
dellʼaria ambiente
Temperatura
desiderata
dellʼacqua sanitaria
Ciclo ad alta temperatura OFF 50℃(122℉) 24℃(75℉) 50℃(122℉)
Ciclo a bassa temperatura ON 30℃(86℉) 19℃(66℉) 50℃(122℉)
Page 49

Uso del termostato
• Le caratteristiche seguenti sono ammesse nel funzionamento di emergenza :
- Funzionamento On / Off
- Pulsante VIEW TEMP (*)
- Pulsante di regolazione della temperatura (*)
- Attiva/Disattiva riscaldamento dellʼacqua sanitaria
(*) : La temperatura misurata dal sensore guasto è indicata con ʻ- -ʻ.
Il prodotto non si accende/non si spegne a seconda della temperatura regolata sul controllore remoto.
Si accende o si spegne in base al segnale del termostato.
• Le caratteristiche seguenti NON sono ammesse nel funzionamento di emergenza :
- Selezione della modalità operativa (raffreddamento/ riscaldamento/ in funzione delle
condizioni atmosferiche)
- Pianificazione ora
- Pulsante SET TEMP
• Guasto duplicato: Guasto su unʼopzione con guasto lieve o grave
- Se l'opzione di guasto si verifica con guasto limitato (o grave) contemporaneamente, il sistema
impone la priorità massima al guasto limitato (o grave) e funziona come se si fosse verificato un
guasto limitato (o grave).
- Pertanto, talvolta il riscaldamento dell'acqua sanitaria può essere impossibile nel modo di
funzionamento di emergenza. Quando lʼacqua sanitaria non si riscalda in funzionamento di
emergenza, controllare se il sensore dellʼacqua sanitaria e i relativi cablaggi siano tutti corretti.
• Il funzionamento di emergenza non viene riavviato automaticamente dopo il ripristino
dellʼalimentazione elettrica.
- Nelle condizioni normali, le informazioni sul funzionamento del prodotto vengono ripristinate e
riavviate automaticamente al ripristino dellʼalimentazione elettrica.
- Tuttavia in condizioni di emergenza, il riavvio automatico non è consentito per proteggere il
prodotto.
- Di conseguenza, lʼutilizzatore deve riavviare il prodotto dopo il ripristino dellʼalimentazione
quando è stato eseguito un funzionamento di emergenza.
Manuale dell'utente del 23
Hydro Kit
ITALIANO
Page 50

Manutenzione e assistenza
Manutenzione e assistenza
Attività di manutenzione
Per assicurare una disponibilità ottimale dell'unità, si deve eseguire un certo numero di controlli e
ispezioni sull'unità e sul cablaggio in campo ad intervalli regolari, preferibilmente ogni anno.
Questa manutenzione dovrebbe essere eseguita da vostro tecnico accreditato locale.
Contattare immediatamente l'assistenza nei casi seguenti
1. Si verifica qualcosa di anomalo, come odore di bruciato, forte rumore, e così via.
Spegnere l'unità ed escludere l'interruttore. In questi casi, non tentare di riparare da soli o
riavviare il sistema.
2. Il cavo di alimentazione è troppo caldo o danneggiato.
3. La diagnostica automatica genera un codice di errore.
4. L'acqua esce dall'unità interna.
5. Selettore, interruttore (di sicurezza o di massa) o fusibile non funzionano più.
L'utente deve eseguire controlli periodici e pulizia per evitare che le prestazioni si riducano.
In caso di una situazione speciale, il lavoro deve essere eseguito dal solo tecnico di
manutenzione.
Quando l'unità non è usata....
• Se il prodotto non viene utilizzato per molto tempo, si consiglia
vivamente di NON INTERROMPERE LʼALIMENTAZIONE
ELETTRICA al prodotto.
• Se lʼalimentazione viene interrotta, non verranno eseguite
alcune speciali azioni per la protezione del prodotto (come
l'antibloccaggio della pompa dellʼacqua).
ATTENZIONE
24 Hydro Kit
Page 51

Manutenzione e assistenza
Manuale dell'utente del 25
Hydro Kit
ITALIANO
Istruzioni operative
n Non staccare l'alimentatore di Hydro Kit durante il funzionamento.
Arrestare Hydro Kit e successivamente l'unità esterna e solo allora rimuovere l'alimentatore.
Se si rimuove l'alimentatore da Hydro Kit durante il funzionamento, il prodotto potrebbe riportare
danni causati dal congelamento o dallo scoppio dello scambiatore di calore a lastra.
n Non rimuovere l'alimentatore nemmeno in presenza dell'errore "CH14".
Poiché l'errore è dovuto alla scarsità del flusso dell'acqua, suggeriamo di eliminare la melma e le
scaglie all'interno dei tubi per garantire un pompaggio adeguato dell'acqua, di rimuovere particelle
estranee (polvere, sabbia, rifiuti, pezzi arrugginiti) dai tubi e di pulire il filtro.
Dopo aver pulito il filtro, per rimuovere il messaggio d'errore (non visualizzato), spegnere l'unità
esterna e successivamente Hydro Kit, quindi staccare l'alimentatore di Hydro Kit. Quindi
connettere l'alimentatore e riavviare l'unità per il normale funzionamento.
Il servizio sarà addebitato se l'interruzione del sistema è dovuta al blocco del filtro.
Periodo di pulizia del filtro: Una volta ogni 3 mesi e tutte le volte che si verifica l'errore CH14.
n Se il sistema si ferma e viene visualizzato un messaggio d'errore (CH ???) seguire la procedura
indicata.
Non rimuovere l'alimentatore di Hydro Kit. Contattare il centro di assistenza di L.G.
n Non sostituire a caso i tubi dell'acqua. Quando si sostituiscono i tubi dell'acqua esiste la possibilità
che entrino dei materiali estranei e si verifichi la formazione di bolle. Ciò porta al congelamento
dello scambiatore di calore a lastra di Hydro Kit.
Quando è essenziale sostituire i tubi dell'acqua, procedere solo dopo aver separato i tubi da
Hydro Kit. La parte interna dei nuovi tubi deve essere lavata con attenzione per rimuovere i
materiali esterni, quindi i tubi vanno connessi a Hydro Kit.
AVVISO
AVVISO
Page 52

26 Hydro Kit
Consigli per la ricerca e riparazione dei guasti! Rispamiate tempo e denaro!
Controllare quanto segue prima di richiedere una riparazione o assistenza...
Se il malfunzionamento persiste, contattare il proprio fornitore.
Case Spiegazione
Il Kit Hydro non funziona.
• Possibile di errore di utilizzo del timer.
• Possibile scatto dellʼinterruttore automatico o rottura di un
fusibile?
L'ambiente ha uno strano odore.
• Verificare che lʼodore di umidità non provenga da pareti, tappeti,
mobili o abiti presenti nella stanza.
Il Kit Hydro non funziona per circa
3 minuti quando lo si riavvia.
• Protezione del meccanismo.
• Attendere circa 3 minuti perché il condizionatore si avvii.
Non raffredda o non riscalda
efficacemente.
• L'ambiente può essere molto caldo quando il Kit Hydro è stato
acceso per primo. Attendere il tempo necessario per il
raffreddamento.
• La temperatura di impostazione è stata fatta in modo non
corretto?
Il funzionamento dell'unità è
rumoroso.
• Rumore del flusso del refrigerante
- Quando il sistema viene avviato o arrestato, il rumore del
passaggio del refrigerante può essere rilevato.
• E' generato un suono dallo scambiatore di calore dell'unità
interna.
- Durante l'operazione di raffreddamento, un suono può essere
sentito dallo scambiatore di calore dell'unità interna a causa del
congelamento o della fusione dell'acqua.
• Rumore di scorrimento di acqua
- Durante l'avvio o l'arresto dell'unità, si può verificare un rumore
nella tubazione dell'acqua
• Durante lo sbrinamento
- Il rumore può apparire nell'unità a causa dello sbrinamento
dell'acqua.
La quantità di vapore aumenta
nell'unità esterna.
• Vapore generato da scambiatore di calore esterno
- Durante l'operazione di sbrinamento, il ghiaccio sullo
scambiatore di calore esterno viene fuso, provocando la
generazione di vapore.
Il display del controllore remoto è
debole o non indica nessun dato.
• L'interruttore automatico è scattato?
Manutenzione e assistenza
Page 53

MANUAL DEL PROPIETARIO
AIRE ACONDICIONADO
Por favor lea este manual detenidamente antes de
utilizar su equipo y guárdelo para consultas futuras.
www.lg.com
TIPO :
Hydro Kit (Para Intermedio Temperatura)
ESPAÑOL
Page 54

2 Hydro Kit
Manual del propietario del Hidro Kit
ÍNDICE
PARA SU REGISTRO
Escriba el número de serie y de modelo aquí:
Nº de modelo
Nº de serie
Puede encontrarlos en la etiqueta situada en el lateral
de cada unidad.
Nombre del instalador
Fecha de compra
n
Grape el recibo a esta página por si necesita probar la
fecha de compra o para cuestiones relacionadas con la
garantía.
LEA ESTE MANUAL
Dentro encontrará muchos consejos útiles sobre cómo utilizar
y mantener su Hidro Kit adecuadamente.
Con tan sólo un poco de cuidado preventivo por su parte,
podrá ahorrar una gran cantidad de dinero durante la vida útil
de la unidad.
Encontrará respuestas a problemas comunes en el cuadro de
sugerencias de solución de problemas. Si consulta en primer
lugar nuestro cuadro de Sugerencias de solución de
problemas, puede que no necesite llamar al servicio técnico.
PRECAUCIÓN
• Póngase en contacto con el servicio técnico autorizado para
reparaciones o mantenimiento de esta unidad.
• Póngase en contacto con un instalador para instalar la
unidad.
• El Hidro Kit no deberá ser utilizado por niños o personas
discapacitadas sin supervisión.
• Supervise a los niños cuando estén cerca del Hidro Kit para
que no jueguen con él.
• Si fuera necesario sustituir el cable de alimentación, el
trabajo deberá realizarlo personal autorizado y sólo se
usarán recambios originales.
• El trabajo de instalación debe realizarse de acuerdo con los
estándares nacionales de cableado y solamente lo llevará a
cabo personal autorizado.
Precauciones de seguridad ..............3
Presentación del producto ................6
Instrucciones para el propietario .....8
Utilización del termostato ...............21
Mantenimiento y reparación............24
Page 55

Manual del propietario del 3
Hydro Kit
Precauciones de seguridad
ESPAÑOL
Precauciones de seguridad
Para evitar lesiones al usuario u otras personas y daños materiales, deben seguirse las siguientes
instrucciones.
n
El funcionamiento incorrecto causado por hacer caso omiso de estas instrucciones provocará daños
personales o materiales. La gravedad se clasifica de acuerdo con las indicaciones siguientes.
Este símbolo indica la posibilidad de muerte o lesiones graves.
Este símbolo indica la posibilidad de lesiones o daños materiales.
Conecte el aparato a una toma de
tierra.
• Existe riesgo de descarga eléctrica.
No utilice un disyuntor defectuoso o
con una capacidad nominal inferior a
la necesaria. Utilice este dispositivo
con un disyuntor dedicado.
• Existe riesgo de incendio o de descarga
eléctrica.
No utilice una salida múltiple. Utilice
este dispositivo con un disyuntor
dedicado.
• No hacerlo podría causar descargas
eléctricas o un incendio.
Para los trabajos eléctricos, póngase
en contacto con el distribuidor, el
vendedor, un electricista cualificado o
un centro autorizado de servicio
técnico. No desmonte ni repare la
unidad usted mismo.
• Existe riesgo de incendio o de descarga
eléctrica.
Conecte la unidad siempre a una
toma de tierra como muestra el
esquema de cableado. No conecte la
toma de tierra a tuberías de gas o
agua, a un pararrayos o a un cable de
toma de tierra de teléfono.
• Existe riesgo de incendio o de descarga
eléctrica.
Instale el panel y la cubierta de la caja
de control de forma segura.
• Existe riesgo de incendio o de descarga
eléctrica debido al polvo, agua, etc…
Utilice un disyuntor o un fusible con
la clasificación adecuada.
• Existe riesgo de incendio o de descarga
eléctrica.
No modifique ni alargue el cable de
alimentación. Si el cable de
alimentación tiene arañazos, se ha
dañado el aislante o está deteriorado,
deberá sustituirlo.
• Existe riesgo de incendio o de descarga
eléctrica
Para la instalación, retirada o
reinstalación, póngase en contacto
con el distribuidor o con un centro de
servicio técnico autorizado.
• Existe riesgo de incendio, descarga
eléctrica, explosión o daños personales.
No instale la unidad en una base de
instalación defectuosa. Asegúrese de
que el área de instalación no se
deteriora con el tiempo.
• Podría hacer que la unidad se caiga.
No instale la unidad exterior en una
base móvil o en un lugar desde donde
pueda caerse.
• La caída de la unidad exterior puede
causar daños materiales o personales,
incluso la muerte.
Si la unidad se moja (por inmersión o
inundación), póngase en contacto con
un centro de servicio técnico para
repararlo antes de usarlo de nuevo.
• Existe riesgo de incendio o de descarga
eléctrica.
Asegúrese de comprobar el uso del
refrigerante. Lea la etiqueta de la
unidad.
• Un refrigerante incorrecto puede impedir
el funcionamiento normal de la unidad.
No use un cable de alimentación o
enchufe dañados, o una toma de
corriente floja.
• De hacerlo, podría provocar una
descarga eléctrica o un incendio.
No toque, utilice o repare la unidad
con las manos mojadas.
• Existe riesgo de incendio o de descarga
eléctrica.
Page 56

Las conexiones de cableado de
interior/exterior deben fijarse
fuertemente y el cable debe
disponerse correctamente para que
no haya fuerzas que tiren de él en los
terminales de conexión.
• Unas conexiones inadecuadas o flojas
pueden generar calor o hasta un
incendio.
Deshágase de forma segura de los
materiales de embalaje. Así como de los
tornillos, clavos, baterías, elementos rotos,
etc. que hayan quedado tras la instalación o
reparación y, a continuación, deshágase de
las bolsas de plástico del embalaje.
• Los niños podrían jugar con ellos y
hacerse daño.
Asegúrese de comprobar que el
enchufe de alimentación no está
sucio, flojo o roto y, a continuación,
encienda él aparato.
• Un enchufe sucio, flojo o roto puede
causar descargas eléctricas o incendios.
No utilice la unidad en un lugar muy
cerrado durante un largo periodo de
tiempo. Ventile regularmente.
•
Podría ocasionarse una deficiencia de
oxígeno y ello dañaría su salud.
No abra la rejilla frontal de la unidad
mientras esté en funcionamiento. (No toque
el filtro electrostático en caso de que la
unidad disponga de uno.)
•
Existe riesgo de lesiones, descargas
eléctricas o averías en la unidad.
Si salen de la unidad sonidos, olores o
humos extraños, haga saltar
inmediatamente el disyuntor o desconecte
el cable de alimentación.
•
Existe riesgo de descarga eléctrica o
de incendio.
Ventile periódicamente la sala donde
se encuentra la unidad si la utiliza
junto con una estufa u otro
electrodoméstico calefactor, etc.
• Podría ocasionarse una deficiencia de
oxígeno y ello dañaría su salud.
Apague el suministro eléctrico
principal cuando vaya a limpiar o
reparar la unidad.
•
Existe riesgo de descarga eléctrica.
Asegúrese de que nadie, en especial
los niños, pueda pisar o tropezar con
la unidad exterior.
• Podría causar lesiones o daños en la
unidad.
Asegúrese de que el cable no pueda
desenchufarse de un tirón ni resultar
dañado durante el funcionamiento.
•
Existe riesgo de incendio o descarga
eléctrica.
No coloque NINGÚN OBJETO sobre el
cable de alimentación.
•
Existe riesgo de incendio o descarga
eléctrica.
En caso de fugas de gas inflamable,
cierre la válvula del gas y abra las
ventanas para ventilar la habitación
antes de encender la unidad.
•
No utilice el teléfono ni encienda o
apague interruptores. Existe riesgo de
explosión o incendio.
En la unidad exterior, el condensador
de aumento proporciona electricidad
de alto voltaje a los componentes
eléctricos. Asegúrese de descargar el
condensador completamente antes de
realizar algún trabajo de reparación.
• Un condensador cargado puede causar
descargas eléctricas.
Al instalar la unidad, use el kit de
instalación proporcionado con el
producto.
• En caso contrario la unidad podría caerse
y causar lesiones graves.
Asegúrese de usar solamente los
componentes de la lista de
componentes svc. No intente nunca
modificar el equipo.
• Usar componentes inadecuados puede
causar descargas eléctricas, generar un
calor excesivo o un incendio.
4 Hydro Kit
Precauciones de seguridad
No coloque un calefactor u otros
electrodomésticos de calefacción
cerca del cable de alimentación.
• Existe riesgo de incendio o de descarga
eléctrica.
Evite que entre agua en las partes
eléctricas. Instale la unidad alejada de
cualquier fuente de agua.
• Existe riesgo de incendio, de averías en
la unidad o de descarga eléctrica.
No guarde, use o permita siquiera que
haya gas inflamable o combustibles
cerca de la unidad.
• Existe riesgo de incendio.
Page 57

Manual del propietario del 5
Hydro Kit
Para mover y transportar la unidad
son necesarias dos personas.
• Evitará daños personales.
No instale la unidad en un lugar
donde pueda estar expuesta al viento
marino (viento salado) directamente.
• Podría causar corrosión en la unidad.
Mantenga el equipo nivelado mientras
lo instala.
• Para evitar vibraciones o ruidos.
No instale la unidad donde el ruido o el
aire caliente de la unidad exterior
puedan dañar o molestar a los
vecinos.
• Podría suponer un problema para sus
vecinos y, por lo tanto, una situación
incómoda para todos.
Compruebe que no haya fugas de gas
(refrigerante) tras instalar o reparar la
unidad.
• Unos niveles bajos de refrigerante
podrían causar averías en la unidad.
No utilice la unidad para fines
especiales, como conservar comida,
obras de arte, etc. Se trata de un
aparato Hidro Kit de consumo, no un
sistema de refrigeración de precisión.
• Existe riesgo de daños o pérdidas de la
propiedad.
No bloquee la entrada o la salida del
caudal de aire.
• Podría causar averías en la unidad.
Utilice un paño suave para limpiarlo.
No use detergentes agresivos,
disolventes ni lo salpique de agua.
• Existe riesgo de incendio, descargas
eléctricas o daños en las partes de
plástico de la unidad.
No se suba ni coloque nada sobre la
unidad. (Unidades externas)
• Existe riesgo de daños personales y de
avería de la unidad.
No introduzca las manos ni ningún
otro objeto por la entrada o la salida
de aire mientras la unidad esté
funcionando.
• Existen partes afiladas y móviles que
podrían provocar lesiones.
Tenga cuidado al desembalar e
instalar la unidad.
• Los bordes afilados podrían provocar
lesiones.
Si hay una fuga de gas refrigerante
durante una reparación, no lo toque.
• El gas refrigerante podría causar
quemaduras por frío.
No incline la unidad al retirarla o
desinstalarla.
• El agua condensada del interior podría
derramarse.
Si el gas refrigerante se escapa
durante la instalación, ventile el área
inmediatamente.
• De lo contrario, puede ser perjudicial para
su salud.
El desmontaje de la unidad y el
tratamiento del aceite refrigerante y
componentes deben realizarse según
los estándares locales y nacionales.
No se exponga usted, un niño o una
planta a la corriente de aire frío o
caliente.
• Podría dañar su salud.
Utilice una banqueta estable o una
escalera para la limpieza, el
mantenimiento o la reparación de la
unidad cuando se encuentre a cierta
altura.
• Tenga cuidado para evitar daños
personales.
ESPAÑOL
Precauciones de seguridad
Page 58

Presentación del producto
Presentación del producto
Escena de instalación típica
Use un suministro eléctrico independiente para la unidad interior.
(No conecte y utilice la terminal de alimentación de la unidad exterior.)
6 Hydro Kit
Salida de agua
Lado del gas
Lado del líquido
Entrada de agua
Desagüe
Page 59

Manual del propietario del 7
Hydro Kit
h Es posible que las funciones marcadas en gris no puedan utilizarse o mostrarse en la pantalla.
Mando a distancia
ZDWHU
WHPS
RSHU
KHDWLQJ
PRGH
ESPAÑOL
Presentación del producto
Nº Nombre
1 Pantalla de visualización
2 Botón de cambio de temperatura
3 Botón de activación/desactivación de calefacción de agua
4 Botón de encendido/apagado
5 Botón de selección de modo de funcionamiento
6 Botón de activación/desactivación del modo Silencio
7 Botón de modo de configuración de temperatura
8 Botón de modo de vista de temperatura
9 Botón de configuración de función
10 Botón de programación
11 Botón de dirección (Arriba, Abajo, Izquierda, Derecha)
12 Botón Selección/Borrar
13 Botón ESC
ڸ
ۀ
ڿ
ھ
ڽ
ہ
ۂ
WHPS
ZDWHU
KHDWLQJ
RSHU
PRGH
ڹ
ں
ڻ
ڼ
ۃ
ۄ
Page 60

8 Hydro Kit
Instrucciones para el propietario
BOMBA DE AGUA
Este icono indica que la bomba de agua está activa.
BOMBA TERMAL SOLAR AUXILIAR
Este icono indica que la bomba termal solar auxiliar está activa.
NOTA : Puesto que la instalación de una bomba térmica solar auxiliar no es obligatoria,
aunque sí aconsejable según las condiciones de campo, este icono puede verse aunque no
haya ninguna bomba térmica solar auxiliar instalada.
DESCONGELACIÓN
Este icono indica que el modo de descongelado está activado.
Durante el funcionamiento de la calefacción de espacio o del calentamiento del tanque de
agua sanitaria, podría darse la congelación del intercambiador de calor exterior debido a la
baja temperatura exterior y a la humedad. Si ocurre esto, la unidad entrará en modo de
descongelado. Invierte el ciclo y toma el calor del sistema interior para evitar que se congele
el sistema exterior. Este modo se activa automáticamente.
MANTENER LA TEMPERATURA AL MÍNIMO
El objetivo de este modo es mantener la temperatura para evitar daños por congelación en
la tubería de agua.
EXTERIOR
Este icono indica que la unidad exterior está activa.
BLOQUEO PARA NIÑOS
SIN FUNCIÓN
Información de supervisión
Instrucciones para el propietario
Page 61

Manual del propietario del 9
Hydro Kit
Instrucciones para el propietario
CONTROL CENTRAL
Este icono indica que el producto está siendo controlador por el controlador central.
TERMOSTATO
Este icono indica conexión con el termostato.
PROBLEMA LEVE
Este icono indica que existe un problema leve.
PROBLEMA GRAVE
Este icono indica que existe un problema grave.
ESPAÑOL
Page 62

10 Hydro Kit
Selección de la temperatura objetivo
h Nota
: Aumenta 1 °C o 2 °F cada vez que se pulsa
: Disminuye 1 °C o 2 °F cada vez que se pulsa
• Podemos cambiar el rango de temperatura de cada modo en el modo de configuración de instalación.
Consulte los Códigos de Función 11 a 15.
• La configuración Room Temperature (Temperatura de la estancia) está disponible cuando se ha instalado
un sensor remoto de aire de la estancia (vendido por separado). Consulte el Código de Función 03.
• La configuración de temperatura del depósito de agua sanitaria esta disponible cuando tras la instalación
del depósito de agua sanitaria.
Instrucciones para el propietario
Cambio de modo
Encienda la unidad y seleccione el modo de operación.
Modo de funcionamiento
• Función de refrigeración - El producto produce agua fría para utilizar en una refrigeración subterránea o
refrigeración FCU.
• Función de calefacción - El producto produce agua caliente para utilizar en calefacción subterránea o FCU.
• Función de calefacción sujeta al clima - En este modo, la temperatura de la calefacción está determinada
automáticamente por el perfil de temperatura predefinida
1
Pulse el botón de encendido/apagado para encender la unidad.
2
Pulse el botón OPER MODE (MODO DE OPERACIÓN) para seleccionar una función.
Función de
refrigeración
Función de
calefacción
Función sujeta al clima
1
Pulse el botón SET TEMP (CONFIG. TEMP.) para seleccionar una función.
2
Ajuste a la temperatura que desee pulsando los botones Change Temperature (Cambiar
temperatura) en cada modo.
Temperatura de la
estancia
Temperatura de agua de
salida
Temperatura de depósito
de agua sanitaria
Para subir la temperatura
Para bajar la temperatura
Page 63

Manual del propietario del 11
Hydro Kit
Instrucciones para el propietario
Función sujeta al clima
Este modo sólo se aplica a la calefacción.
Para ahorrar energía y ofrecer el mayor confort, la configuración de la temperatura dependerá de la
temperatura exterior. Si se reduce la temperatura exterior, la capacidad de calefacción de la casa aumentará
automáticamente para mantener la misma temperatura en la estancia. Todos los parámetros serán
configurados por el instalador durante el procedimiento de inicio y se adaptará a las características del lugar.
ESPAÑOL
1
Pulse el botón OPER MODE (MODO DE OPERACIÓN) para seleccionar el modo Weatherdependent operation (Función sujeta al clima).
2
Ajuste el nivel de temperatura que desee pulsando los botones Change Temperature
(Cambiar temperatura).
1
Pulse varias veces el botón de
Ver temperatura hasta
seleccionar la temperatura
deseada. (Cada vez que pulse
el botón View Temperature (Ver
temperatura), la temperatura de
la estancia se mostrará durante
5 segundos.)
Ver temperatura
(* : Temperature termal solar)
: Icono de operación
Función sujeta al
clima
Ex)
Ej) Disminución del perfil de temperatura
en 3°C (basado en la temperatura
ambiente del aire de la estancia)
<Ajustes de temperatura (unidad: °C)>
-5, -4, -3, -2, -1, 0, 1, 2, 3, 4, 5
: Ver temperatura de la estancia
: Ver temperatura de entrada
: Ver temperatura de salida
:
Ver temperatura del agua sanitaria
(SÓLO se muestra cuando se encuentre en
el modo de calefacción de agua sanitaria)
:
Ver Temperatura termal solar (SÓLO se
muestra cuando se encuentre en el modo
de calefacción de agua sanitaria)
Calor ‘
‘
Frío
Temperatura Rango de temperatura
Se muestra como
Aire
bajo 11°C(51°F)
Baja
11°C(51°F) ~ 39°C(102°F)
Temperatura real
sobre 39°C(102°F)
Alta
Agua
bajo 0°C(32°F) [* bajo 40°C(104°F) ]
Baja
0°C(32°F) ~ 92°C(197°F) [*40°C(104°F) ~ 120°C(248°F) ]
Temperatura real
sobre 92°C(197°F) [* sobre 120°C(248°F) ]
Alta
Page 64

Esta función es para evitar que los niños u otras personas usen el controlador.
Seguro para niños
12 Hydro Kit
Instrucciones para el propietario
1
Pulse el Botón Function Setting (Configuración de
funciones) para entrar en el modo de configuración
de usuario. (El segmento desaparecerá.)
2
Pulse el botón set/clear (seleccionar/borrar) para
terminar la selección. (El segmento
desaparecerá.)
4
Para liberar esta configuración, pulse el botón
“Function Setting” (Configuración de funciones)
hasta que parpadee el icono y, a
continuación, pulse el botón “setting/clear”
(seleccionar/borrar).
3
Mientras está activado el Seguro para niños, el
icono y “CL” se mostrarán durante 3 segundos
cada vez que pulse cualquier botón, excepto el de
“view temperature” (Ver temperatura) y el botón
setting/clear (selección/borrar).
Page 65

Manual del propietario del 13
Hydro Kit
Instrucciones para el propietario
ESPAÑOL
Si se produce un error en la unidad interior, el código de error se mostrará en el mando a distancia.
Problema leve
Se ha encontrado un problema en la unidad interior.
En la mayoría de los casos, este problema está relacionado con problemas del sensor.
En este caso, el Hydro Kit puede funcionar en un modo de emergencia (sólo para
funcionamiento de Calefacción).
Problema grave
Se ha encontrado un problema en la unidad de exterior.
Error crítico
Cuando ocurra un error crítico, el producto se detendrá irremediablemente.
En este momento, se mostrará alternativamente “CH” y el nº del código de error.
Visualización de código de error
<Pantalla>
<Pantalla>
<Pantalla>
Page 66

Puede configurar la hora actual.
Configuración de la hora actual
1
Siga pulsando el botón de programación dos veces sucesivamente
hasta introducir el modo tiempo actual.
2
Pulse el botón derecha o izquierda para
ajustar el día actual.
3
Pulse el botón abajo para moverse a la
parte AM/PM y ajustarla. (El segmento
AM/PM comenzará a parpadear)
4
Pulse el botón derecha para moverse a
la parte "Hour" (Hora). (El segmento
“Hour” (Hora) comenzará a parpadear)
6
Pulse el botón derecha para moverse a la
parte "Minute" (Minuto). (El segmento
[Minute] (Minuto) comenzará a parpadear)
7
Pulse arriba o abajo para ajustar los
minutos.
8
Cuando complete la configuración,
pulse el botón set/clear
(Seleccionar/borrar).
9
Pulse el botón [Exit] (Salir) para salir o el sistema saldrá automáticamente
tras 25 segundos desde la última entrada.
5
Pulse arriba o abajo para ajustar la
hora.
Instrucciones para el propietario
14 Hydro Kit
Page 67

Instrucciones para el propietario
ESPAÑOL
Programación: Configuración de una reserva sencilla
Puede accionar fácilmente la opción de reserva. (Sólo disponible cuando la unidad está en modo espera).
1
Pulse el botón de programación para entrar
en el modo [Programming] (Programación).
(El segmento comenzará a parpadear)
2
Pulse arriba o abajo para ajustar la hora de
reserva.
3
Cuando complete la configuración, pulse el botón [Setting/Cancel]
(Config./Cancelar) para completar la programación.
4
Pulse el botón [Exit] (Salir) para salir o el sistema saldrá automáticamente
tras 25 segundos desde la última entrada.
1
Pulse el botón de programación para entrar en el
modo [Programming] (Programación). Pulse el
botón de Programación repetidamente para
seleccionar [sleep reservation] (Reserva en
hibernación) (el segmento parpadeará)
2
Pulse arriba o abajo para ajustar la hora de
reserva.
3
Cuando complete la configuración, pulse el botón [Setting/Cancel] (Config./Cancelar)
para completar la programación.
4
Pulse el botón [Exit] (Salir) para salir o el sistema saldrá automáticamente
tras 25 segundos desde la última entrada.
Programación: Configuración de hibernación de reserva
Puede apagar fácilmente la opción de reserva (hibernar).
(Sólo disponible cuando la unidad está en modo espera).
Page 68

Programación: Configuración de activación de reserva
Esta función puede activar la función tras un tiempo seleccionado.
1
Pulse el botón de programación para entrar en el
modo [Programming] (Programación). Pulse el
botón de Programación repetidamente para
seleccionar [on reservation] (Reserva activada).
(El segmento parpadeará).
2
Pulse arriba o abajo para ajustar
AM/PM.
3
Pulse el botón derecha para moverse a
la parte "Hour" (Hora). (El segmento
“Hour” (Hora) comenzará a parpadear)
4
Pulse arriba o abajo para ajustar la
hora.
6
Pulse arriba o abajo para ajustar los
minutos.
7
Cuando complete la configuración, pulse el botón
[Setting/Cancel] (Config./Cancelar) para completar la
programación.
8
Pulse el botón [Exit] (Salir) para salir o el sistema saldrá
automáticamente tras 25 segundos desde la última entrada.
5
Pulse el botón derecha para moverse a
la parte "Minute" (Minuto). (El segmento
[Minute] (Minuto) comenzará a
parpadear)
Instrucciones para el propietario
16 Hydro Kit
Page 69

Manual del propietario del 17
Hydro Kit
Instrucciones para el propietario
Programación: Configuración de desactivación de reserva
Esta función puede desactivar la función tras un tiempo seleccionado.
1
Pulse el botón de programación para entrar en
el modo [Programming] (Programación). Pulse
el botón de Programación repetidamente para
seleccionar [off reservation] (Reserva
desactivada). (el segmento parpadeará)
2
Pulse arriba o abajo para ajustar
AM/PM.
3
Pulse el botón derecha para moverse a
la parte "Hour" (Hora). (El segmento
“Hour” (Hora) comenzará a parpadear)
4
Pulse arriba o abajo para ajustar la
hora.
6
Pulse arriba o abajo para ajustar los
minutos.
7
Cuando complete la configuración, pulse el botón
[Setting/Cancel] (Config./Cancelar) para completar la
programación.
8
Pulse el botón [Exit] (Salir) para salir o el sistema saldrá
automáticamente tras 25 segundos desde la última entrada.
5
Pulse el botón derecho para navegar hasta
la parte de “Minute” (Minuto). (El segmento
[Minute] (Minuto) comenzará a parpadear)
ESPAÑOL
Page 70

Programación: reserva semanal
La reserva semanal se activará una vez configurada la hora
1
Pulse el botón de programación para entrar en
el modo [Programming] (Programación). Pulse
el botón de Programación repetidamente para
seleccionar [Weekly reservation] (Reserva
semanal). (El segmento parpadeará).
2
Pulse el botón derecha o izquierda para
ajustar el día actual.
3
Pulse arriba o abajo para ajustar el
número de acción.
4
Pulse el botón derecha para desplazarse
hasta [Hour] (Hora) en la sección [ON
Time] (Tiempo activado). (El segmento
“Hour” (Hora) comenzará a parpadear)
6
Pulse el botón derecha para desplazarse
hasta [Minute] (Minuto) en la sección [Start
Time] (Hora de inicio). (El segmento [Minute]
(Minuto) comenzará a parpadear)
7
Pulse el botón arriba o abajo para ajustar el
valor de [Minute] (Minuto) en la sección
[Start Time] (Hora de inicio).
8
Pulse el botón derecha para desplazarse
hasta [Hour] (Hora) en la sección [OFF
Time] (Tiempo desactivado). (El segmento
“Hour” (Hora) comenzará a parpadear)
5
Pulse el botón arriba o abajo para ajustar
el valor de [Hour] (Hora) en la sección
[Start Time] (Hora de inicio).
Sección Hora de inicio
Sección tiempo desactivado
Instrucciones para el propietario
18 Hydro Kit
Page 71

Manual del propietario del 19
Hydro Kit
Instrucciones para el propietario
Acción
Hora de inicio
Desde
Hasta
Hora de apagado
9
Para configurar la desactivación del Tiempo,
consulte el proceso desde el Nº5 al Nº7.
Es el mismo método.
10
Cuando complete la configuración,
pulse el botón [Setting/Cancel]
(Config./Cancelar) para completar la
programación. Al terminar, se creará el
segmento bajo la barra.
11
Consulte el proceso desde el Nº2 al
Nº10 para configurar un programa
para un día de la semana diferente.
Es el mismo método.
12
Pulse el botón [Exit] (Salir) para salir o el sistema saldrá automáticamente tras
25 segundos desde la última entrada.
ESPAÑOL
<Nota>
Descripción de la reserva semanal
<Sección de hora de inicio> <Sección de hora de apagado>
<Sección de hora de inicio> <Sección de hora de apagado>
h Se pueden programar dos acciones por día de la semana, un total de 14 acciones
Page 72

20 Hydro Kit
Programación: reserva de vacaciones
Esta función detendrá automáticamente la unidad para que no funcione durante algunos días.
1
Pulse el botón de programación para
entrar en el modo [Programming]
(Programación). Pulse el botón de
Programación repetidamente para
seleccionar [Holiday reservation] (Reserva
de vacaciones). (el segmento parpadeará)
2
Pulse el botón derecha o izquierda para
ajustar el día de vacaciones.
3
Cuando pulse el botón set/clear
(seleccionar/borrar) tras completar la
selección, el día seleccionado
desaparecerá.
4
Pulse el botón [Exit] (Salir) para salir o el sistema saldrá automáticamente tras
25 segundos desde la última entrada.
Instrucciones para el propietario
Page 73

Manual del propietario del 21
Hydro Kit
Uso del termostato
Uso del termostato
1. Algunos termostatos de tipo electro-mecánico tienen un tiempo de demora interno para proteger
el compresor. En este caso, los cambios de modo pueden tardar más de lo que esperaría el
usuario. Lea con cuidado el manual del termostato si el producto no responde rápidamente.
2. El rango de configuración de temperatura por el termostato puede ser diferente del de la unidad.
La temperatura de calefacción o refrigeración debe elegirse dentro del rango de temperatura de la
unidad.
El término "termostato", usado ampliamente en este capítulo, es un accesorio de terceros.
LG Electronics no proporciona el termostato y debe obtenerse de otros fabricantes.
Puede usarse un termostato de sala para facilitar y hacer más cómodo el control.
Para utilizar el termostato de forma más efectiva y correcta, este capítulo presenta información acerca de
cómo usarlo.
Cómo utilizar el termostato
Funcionamiento el termostato con mando a distancia
Para conocer cómo activarlo o desactivarlo, cómo configurar la temperatura objetivo, cómo cambiar el
modo de funcionamiento, etc. consulte el manual de funcionamiento incluido por el fabricante del
termostato.
• Las funciones siguientes están disponibles cuando se instala un termostato:
• Botón SET TEMP (CONFIG. TEMP.)
• Botón VIEW TEMP (VER TEMP.)
• Botón de ajuste de temperatura (*)
• Calefacción de agua sanitaria Habilitada/Deshabilitada
(*) : El producto no se enciende/apaga de acuerdo con el ajuste de temperatura en el mando a
distancia. Se enciende o apaga según la señal del termostato.
• Las siguientes funciones NO están permitidas cuando se ha instalado un termostato:
• Selección del modo de operación (refrigeración / calefacción / sujeto al clima)
• Planificación de tiempo
• Encendido/Apagado
ESPAÑOL
Page 74

Uso del termostato
Uso del termostato
• Uso del termostato
- Problema: un problema que puede detener el funcionamiento del sistema, aunque éste puede
reanudarse temporalmente con un funcionamiento limitado sin ayuda de un profesional
certificado.
- Error: un problema que puede detener el funcionamiento del sistema y que SÓLO podrá
reanudarse tras la comprobación por parte de un profesional certificado.
- Modo de emergencia: operación de calefacción temporal mientras el sistema encuentra algún
problema.
• Objetivo de presentar los 'Problemas'
- A diferencia de un aparato de aire acondicionado, el Hidro kit suele funcionar durante toda la
temporada de invierno sin que el sistema se pare.
- Si el sistema encuentra algún problema que no es crítico para seguir produciendo energía de
calefacción, el sistema continuará funcionando temporalmente en el modo de emergencia con la
decisión del usuario final.
• Problema clasificado
- Los problemas se clasifican en dos niveles según la gravedad del problema: Problemas leves y
Problemas graves.
- Problema leve: Se ha encontrado un problema en la unidad interior. En la mayoría de los casos,
este problema está relacionado con problemas del sensor. La unidad exterior está funcionando
en el modo de emergencia configurada con el interruptor DIP Nº4 del PCB de la unidad interior.
- Problema grave: Se ha encontrado un problema en la unidad exterior.
- Problema en las opciones: Se ha encontrado un problema en una opción de funcionamiento,
como la calefacción del depósito. En este caso, la opción que provoca el problema se asume
como si no se causara en el Producto. (CHECK ENGLISH)
• Nivel de operación de emergencia
- Si el sistema se encuentra con un problema, detendrá el funcionamiento y esperará a la decisión
del usuario: Llamar a un centro de servicio técnico, o iniciar el funcionamiento de emergencia.
- Para iniciar el funcionamiento de emergencia, simplemente pulse el botón ON / OFF
(ENCENDIDO/APAGADO) una vez más.
- Hay preparados dos niveles diferentes para un funcionamiento de emergencia: Ciclo de alta
temperatura y ciclo de baja temperatura.
- En el modo de funcionamiento de emergencia, el usuario no puede ajustar la temperatura
objetivo.
22 Hydro Kit
Interruptor DIP
Temperatura
objetivo de agua
de salida
Temperatura
objetivo de aire de
estancia
Temperatura
objetivo de agua
sanitaria
Ciclo de alta temperatura Desactivado 50℃(122℉) 24℃(75℉) 50℃(122℉)
Ciclo de baja temperatura Activado 30℃(86℉) 19℃(66℉) 50℃(122℉)
Page 75

Manual del propietario del 23
Hydro Kit
Uso del termostato
• Las siguientes funciones están permitidas en el modo de funcionamiento de emergencia:
- Encendido/Apagado
- Botón VIEW TEMP (VER TEMP.)
- Botón de ajuste de temperatura (*)
- Calefacción de agua sanitaria Habilitada/Deshabilitada
(*): Cuando el sensor está estropeado y mide la temperatura, la muestra así: '- -'.
El producto no se enciende/apaga de acuerdo con el ajuste de temperatura en el mando a distancia.
Se enciende o apaga según la señal del termostato.
• Las funciones siguientes NO están disponibles durante el funcionamiento de emergencia
- Selección del modo de funcionamiento (refrigeración / calefacción / sujeto al clima)
- Planificación de tiempo
- Botón SET TEMP (CONFIG. TEMP.)
• Problema duplicado: Problema de funcionamiento combinado con un problema leve o grave
- Si ocurre un problema de funcionamiento combinado con un problema leve (o grave), el sistema
asignará una mayor prioridad al problema leve (o grave) y funcionará como si hubiera ocurrido
un problema leve (o grave).
- Por lo tanto, en algunas ocasiones calentar el agua sanitaria puede ser imposible en el modo de
funcionamiento de emergencia.Cuando el agua sanitaria no se está calentando en el modo de
funcionamiento de emergencia, por favor, compruebe si el sensor de agua sanitaria y el
cableado relacionado están bien.
• El funcionamiento de emergencia no se reinicia automáticamente tras reiniciar la
alimentación eléctrica principal.
- En situaciones normales, la información de funcionamiento del producto se restaurará y se
reiniciará automáticamente tras restablecer el suministro eléctrico.
- Pero en el funcionamiento de emergencia, el reinicio automático queda prohibido para proteger
la unidad.
- Por lo tanto, el usuario deberá reiniciar la unidad tras restaurar el suministro cuando se haya
ejecutado un funcionamiento de emergencia.
ESPAÑOL
Page 76

Mantenimiento y reparación
Mantenimiento y reparación
Actividades de mantenimiento
Para asegurar la disponibilidad óptima de la unidad, deben llevarse a cabo una serie de
comprobaciones e inspecciones en la unidad y el cableado de la instalación regularmente,
preferiblemente una vez al año.
Este mantenimiento debe llevarse a cabo por un técnico cualificado de su localidad.
Llame al servicio técnico inmediatamente en las siguientes situaciones
1. Cualquier situación anormal, como olor a quemado, un ruido alto, etc.
Detenga la unidad y active el disyuntor.
Nunca intente reparar el equipo usted mismo o reiniciar el equipo en estos casos.
2. El cable de alimentación está demasiado caliente o dañado.
3. El autodiagnóstico genera un código de error.
4. Hay una fuga de agua en la unidad interior.
5. Cualquier interruptor, disyuntor (de seguridad, de tierra) o fusible falla o no funciona
correctamente
El usuario debe llevar a cabo una comprobación y una limpieza rutinarias para evitar un mal
rendimiento de la unidad.
En caso de que se dé una situación especial, el trabajo debe ser llevado a cabo solamente
por personal de mantenimiento.
Cuando la unidad no vaya a …
• Si el producto no se utiliza durante un largo periodo de tiempo,
le recomendamos encarecidamente NO DESCONECTAR DEL
SUMINISTRO ELÉCTRICO la unidad.
• Si no se suministra alimentación, no se realizarán algunas
acciones especiales de protección de la unidad (como la
función antibloqueo de la bomba de agua).
24 Hydro Kit
Page 77

Manual del propietario del 25
Hydro Kit
Mantenimiento y reparación
ESPAÑOL
Instrucciones de funcionamiento
n No desconecte el suministro de energía de Hydro Kit durante el funcionamiento.
Detenga el Hydro Kit seguido de la unidad exterior y, a continuación retire solamente el suministro
de energía.
Si retira el suministro de energía del Hydro Kit durante su funcionamiento, esto producirá daños del
producto por congelación y explosión del intercambiador de calor de Placas.
n No retire el suministro de energía incluso si se produce un Error “CH14”.
Como el error es debido a la escasez del flujo de agua, por favor elimine cualquier residuo y
suciedad de dentro de los tubos de agua para asegurar el libre bombeo de agua, elimine las
partículas extrañas (polvo, arena, basura, piezas oxidadas) de los tubos de agua y realice una
limpieza del filtro.
Después de limpiar el filtro, para eliminar el mensaje de error (no mostrado), apague la unidad
exterior seguida del Hydro Kit y, a continuación desconecte el suministro de energía del Hydro Kit.
Y a continuación, conecte el suministro de energía y reinicie la unidad para su normal
funcionamiento.
El servicio se cobrará si el fallo del sistema se debe a la obstrucción del filtro.
Regularidad para la limpieza del filtro: Una vez cada 3 meses y siempre que se produzca un error
CH14.
n Si el sistema se detiene y no muestra ningún mensaje de error (CH???) por favor siga el siguiente
procedimiento.
No retire el suministro de energía del Hydro Kit. Contacte al centro de servicio L.G.
n No cambie las tuberías de agua de forma aleatoria. Al cambiar las tuberías de agua existe la
posibilidad de que entre material extraño y también de que se formen burbujas. Esto conduce a la
congelación del intercambiador de calor de placas del Hydro Kit.
Cuando es esencial cambiar las tuberías de agua, se debe realizar únicamente después de
separar los tubos del Hydro Kit. El lado interior de los nuevos tubos se debe lavar a fondo para
eliminar los materiales extraños y, a continuación conectar los tubos con el Kit de Hydro.
Page 78

26 Hydro Kit
Consejos de resolución de problemas: ahorre tiempo y dinero
Haga las comprobaciones siguientes antes de llamar al servicio técnico para reparaciones o
mantenimiento. Si el fallo de funcionamiento persiste, póngase en contacto con su distribuidor.
Situación Explicación
Hidro Kit no funciona.
• ¿Se ha cometido algún error en la utilización del programador?
• ¿Se ha fundido el fusible o se ha activado el disyuntor?
La habitación tiene un olor
extraño.
• Compruebe que la pared, las alfombras, los muebles u otros
tejidos de la estancia no huelen a húmedo.
Hidro Kit no funciona durante
unos 3 minutos al reiniciarlo.
• Es un sistema de protección del mecanismo.
• Espere unos tres minutos y el funcionamiento volverá a
comenzar.
No enfría o calienta de forma
eficaz.
• La estancia estaba ya muy caliente cuando el se encendió por
primera vez el Hidro Kit. Deje que la habitación se enfríe.
• ¿Se ha configurado correctamente la temperatura?
La unidad tiene un
funcionamiento ruidoso.
• El flujo de refrigerante hace ruidos
- Al iniciar o detener el sistema, puede oírse el sonido del flujo
de refrigerante.
• Sonido del intercambiador de calor de la unidad interior
- Durante la operación de refrigeración, puede escucharse un
sonido en el intercambiador de calor de la unidad interior
debido a que el agua se ha congelado o se está derritiendo.
• Ruido de agua
- Durante el encendido o apagado de la unidad, puede oírse
ruido en las tuberías de agua
• Durante el descongelado
- Puede aparecer ruido en la unidad debido al descongelado del
agua.
Sale vapor de la unidad de
exterior.
• Vapor del intercambiador de calor exterior
- Durante la operación de descongelado, el hielo del
intercambiador de calor exterior se derrite, causando vapor.
La imagen en pantalla de
visualización es débil, o no se
muestra nada en absoluto.
• ¿Se ha activado el disyuntor?
Mantenimiento y reparación
Page 79

MANUEL D’UTILISATION
CLIMATISEUR
Veuillez lire attentivement ce manuel avant d’utiliser
votre appareil, et le conserver pour toute consultation ultérieure.
www.lg.com
TYPE :
Hydro Kit (Pour Température Moyen)
FRANÇAIS
Page 80

2 Hydro Kit
Manuel de lʼutilisateur Hydro Kit
TABLE DES MATIÈRES
INFORMATIONS À CONSERVER
Inscrivez le numéro de modèle et de série :
Modèle
N° de série
Ils sont mentionnés sur lʼétiquette apposée sur la face
latérale de l'appareil.
Nom du revendeur
Date dʼachat
n Agrafez votre facture à cette page afin de la retrouver
facilement si vous devez, le cas échéant, prouver la date
d'achat ou vous prévaloir de la garantie.
LISEZ CE MODE D'EMPLOI
Vous y trouverez des conseils utiles sur la manière dʼutiliser et
dʼentretenir correctement Hydro Kit.
Un minimum de mesures de précaution de votre part peut vous éviter
de perdre beaucoup de temps et dʼargent pendant la durée de vie de
votre produit.
Vous trouverez de nombreuses réponses aux problèmes fréquents
dans le tableau des conseils de dépannage. La consultation de notre
tableau Conseils de dépannage peut vous éviter de faire appel à nos
services.
PRÉCAUTIONS D'USAGE
• Pour toute réparation ou entretien de cet appareil, contactez le
service technique agréé.
• Pour toute installation de cet appareil, contactez l'installateur
agréé.
• Hydro Kit nʼest pas destiné à être utilisé par de jeunes enfants ou par
des personnes handicappées sans surveillance.
• Il est recommandé de surveiller les jeunes enfants pour
sʼassurer quʼils ne jouent pas avec Hydro Kit.
• Lorsque le câble dʼalimentation doit être remplacé, le
remplacement doit être réalisé exclusivement par du personnel
autorisé à lʼaide des pièces de rechange dʼorigine.
• L'installation doit être réalisée conformément aux normes
locales en vigueur et effectuée uniquement par du personnel
qualifié.
Consignes de sécurité .......................3
Présentation de lʼappareil..................6
Consignes dʼutilisation ......................8
Utilisation du thermostat ................21
Maintenance et entretien..................24
Page 81

Manuel de lʼutilisateur 3
Hydro Kit
Consignes de sécurité
FRANÇAIS
Consignes de sécurité
Afin d'éviter tout risque de blessure pour l'utilisateur ou des tiers, ainsi des dégâts matériels, respectez les consignes cidessous.
n
Toute mauvaise utilisation suite au non-respect des instructions comporte des risques pour les individus et le
matériel. Les libellés ci-dessous indiquent leur niveau de gravité.
Ce symbole indique un danger de mort ou de blessure grave.
Ce signe indique un risque de blessure corporelle ou de dégât matériel.
Raccordez systématiquement
l'appareil à la terre.
• Il existe un risque dʼincendie ou
dʼélectrocution.
Évitez d'utiliser un disjoncteur
défectueux ou de capacité
insuffisante. Utilisez cet appareil sur
un circuit dédié.
• À défaut, il existe un risque d'incendie ou
de décharge électrique (électrocution).
Nʼutilisez pas de bloc dʼalimentation à
prises multiples. Branchez cet
appareil sur un circuit doté dʼun
disjoncteur dédié.
• Il peut occasionner des chocs électriques
ou des incendies.
Pour toute réparation, contactez le
concessionnaire, le revendeur, un
électricien qualifié ou un centre de
réparation agréé. Ne tentez pas de
démonter ou de réparer vous-même
l'appareil.
• À défaut, il existe un risque d'incendie ou
de décharge électrique (électrocution).
Procédez dans tous les cas à une mise
à la terre de lʼappareil conformément
au schéma de câblage. Ne reliez pas le
fil de terre à une canalisation de gaz,
une conduite dʼeau, à un paratonnerre
ou à un fil de terre téléphonique.
• À défaut, il existe un risque d'incendie ou
de décharge électrique (électrocution).
Fixez soigneusement le panneau et le
capot du boîtier de commande.
•
Sinon, vous risquez de provoquer un
incendie ou un choc électrique en raison de
la présence de poussière, dʼhumidité, etc.
Utilisez un disjoncteur ou un fusible
de puissance adéquate.
• À défaut, il existe un risque d'incendie ou
de décharge électrique (électrocution).
Ne changez pas le câble d'alimentation et
n'utilisez pas de rallonge. Si le cordon
dʼalimentation est abîmé, dénudé par endroit
ou défectueux, remplacez-le immédiatement.
• À défaut, il existe un risque d'incendie ou
de décharge électrique (électrocution).
Pour lʼinstallation, le retrait ou la
réinstallation, contactez toujours le
revendeur ou un centre de SAV agréé.
• À défaut, il existe un risque d'incendie, de
décharge électrique (électrocution),
d'explosion ou de blessure.
N'installez pas l'appareil sur un
support défectueux. Assurez-vous que
lʼemplacement choisi pour lʼinstallation
ne sʼest pas altéré au fil du temps.
• Autrement, le produit risque de tomber.
Nʼinstallez jamais lʼunité extérieure
sur une surface instable, ni dans un
endroit où elle risque de tomber.
• La chute de lʼunité extérieure peut
provoquer des dommages, des blessures
voire entraîner la mort.
Si de lʼeau pénètre dans lʼappareil,
contactez un service après-vente
agréé pour le faire réparer avant de le
réutiliser.
• À défaut, il existe un risque d'incendie ou
de décharge électrique (électrocution).
Vérifiez bien le fluide frigorigène à
utiliser (consultez lʼétiquette apposée
sur lʼappareil).
• Toute utilisation dʼun fluide frigorigène
non adapté est susceptible dʼaltérer le
bon fonctionnement de lʼunité.
Nʼutilisez pas un câble dʼalimentation
ni une fiche ou une prise desserrée
qui soient endommagés.
• Sinon, vous risquez de provoquer un
incendie ou un choc électrique.
Ne touchez pas lʼappareil et ne
lʼactionnez pas avec les mains
mouillées.
• À défaut, il existe un risque de décharge
électrique (électrocution) ou d'incendie.
Page 82

Les connexions électriques entre lʼunité
intérieure et lʼunité extérieure doivent
supporter les contraintes mécaniques et
le câble dʼalimentation doit être placé de
façon à n'exercer aucune traction sur les
bornes de connexion.
• Toute connexion inadéquate présente un
risque de surchauffe ou d'incendie.
Procédez à une mise au rebut réglementaire
des matériaux dʼemballage, tels que les vis,
les clous, les piles, les éléments cassés,
etc., après lʼinstallation ou lʼentretien de
lʼappareil. Veillez ensuite à jeter tout sac en
plastique.
• Les enfants sont susceptibles de jouer avec
ces éléments et de se blesser.
Assurez-vous que la prise du cordon
dʼalimentation nʼest ni sale ni altérée et
quʼelle est parfaitement serrée avant de
procéder au branchement.
• Toute prise sale, altérée ou desserrée
présente un risque de choc électrique ou
d'incendie.
N'utilisez pas l'appareil dans un espace
hermétiquement clos pendant une
longue période. Aérez la pièce
régulièrement.
• Sinon, un manque dʼoxygène pourrait être
observé, ce qui nuirait à votre santé.
Nʼouvrez pas la grille frontale de
lʼappareil pendant son fonctionnement
(Ne touchez pas le filtre électrostatique, si
l'appareil en est équipé).
• Il existe un risque dʼincendie, de
dysfonctionnement de l'appareil ou
d'électrocution.
En cas de bruit, dʼodeur ou de fumée
anormaux, coupez immédiatement le
disjoncteur ou débranchez le cordon
dʼalimentation.
• À défaut, il existe un risque de décharge
électrique (électrocution) ou d'incendie.
Aérez régulièrement la pièce où se
trouve lʼappareil lorsque celui-ci est
utilisé simultanément avec un
appareil de chauffage, etc.
• Sinon, un manque dʼoxygène pourrait
être observé, ce qui nuirait à votre santé.
Coupez lʼalimentation lors des
activités de nettoyage ou de
maintenance de lʼappareil.
• À défaut, il existe un risque de décharge
électrique (électrocution).
Veillez à ce que personne ne puisse
trébucher ou tomber sur lʼunité
extérieure, en particulier les enfants.
• Cela pourrait provoquer des blessures
corporelles ou endommager l'appareil.
Veillez à ce qu'il soit impossible de tirer
sur le cordon d'alimentation ou de
l'endommager pendant le
fonctionnement de l'appareil.
• À défaut, il existe un risque d'incendie ou de
décharge électrique (électrocution).
Ne placez AUCUN objet sur le câble
dʼalimentation.
• À défaut, il existe un risque d'incendie ou de
décharge électrique (électrocution).
En cas de fuite de gaz inflammable,
fermez la conduite dʼarrivée de gaz et
ouvrez une fenêtre pour aérer avant de
mettre le produit en marche.
• N'utilisez pas de téléphone et n'allumez ni
n'éteignez les interrupteurs, au risque de
provoquer une explosion ou un incendie.
Le transformateur élévateur de lʼunité
extérieure fournit un courant haute tension aux
composants électriques. Assurez-vous de
décharger complètement le condensateur avant
de procéder à une quelconque réparation.
• Un condensateur chargé peut être à lʼorigine
dʼun choc électrique.
Lors de lʼinstallation, utilisez le kit fourni
à cet effet avec lʼappareil.
• Autrement, lʼunité risque de tomber et de
provoquer de graves blessures.
Utilisez uniquement des composants
figurant dans la liste des pièces de
rechange. Nʼessayez en aucun cas de
modifier lʼéquipement.
• Toute utilisation de pièces inadéquates peut
causer un choc électrique, une surchauffe ou
un incendie.
4 Hydro Kit
Consignes de sécurité
Ne placez pas un radiateur ou dʼautres
appareils de chauffage à proximité du
câble dʼalimentation.
• À défaut, il existe un risque d'incendie ou de
décharge électrique (électrocution).
Assurez-vous que les pièces électriques
ne sont pas au contact de l'eau. Veillez
notamment à installer lʼunité loin de
toute source dʼeau.
• Il existe un risque dʼincendie, de
dysfonctionnement de l'appareil ou
d'électrocution.
Ne stockez pas et nʼutilisez pas de
combustible ou de gaz inflammable à
proximité de l'appareil.
• À défaut, il existe un risque d'incendie.
Page 83

Manuel de lʼutilisateur 5
Hydro Kit
Faites appel à deux ou plusieurs
personnes pour soulever et transporter
l'appareil.
• Attention à ne pas vous blesser.
N'exposez pas l'appareil directement à
l'action du vent marin (vent salé).
• Vous éviterez tout risque de corrosion.
L'appareil doit être installé de niveau.
• Vous éviterez ainsi toute vibration ou
nuisance sonore.
N'installez pas l'appareil dans un endroit
où le bruit ou l'air chaud émanant de
lʼunité extérieure risque de constituer une
nuisance pour le voisinage.
• Dans le cas contraire, votre installation
pourrait gêner vos voisins et être à lʼorigine
dʼun conflit avec ces derniers.
Vérifiez systématiquement l'absence de
toute fuite de fluide frigorigène après
l'installation ou après une réparation de
l'appareil.
• Si le niveau de fluide frigorigène est
insuffisant, l'appareil risque de tomber en
panne.
N'utilisez pas l'appareil à des fins
particulières comme la conservation
d'aliments, d'œuvres d'art, etc. Il sʼagit dʼun
Hydro Kit consommateur, et non dʼun
système de réfrigération de précision.
• À défaut, vous risquez dʼendommager ou
d'altérer ces biens.
Nʼobstruez pas l'entrée et la sortie du
flux dʼair.
• Au risque dʼendommager lʼappareil.
Utilisez un chiffon doux pour le
nettoyage. Nʼutilisez pas de détergents
agressifs ni de solvants ou autres
produits de ce type.
• Sinon, vous risquez de provoquer un
incendie ou un choc électrique ou
d'endommager les composants en plastique.
Ne montez pas sur l'appareil et ne posez
rien dessus. (Outdoor units)
• Vous risqueriez de vous blesser ou d'altérer
le fonctionnement de l'appareil.
Ne placez pas les mains ou un objet au
niveau de lʼentrée ou de la sortie dʼair
lorsque lʼappareil fonctionne.
• Certaines pièces acérées et amovibles
pourraient provoquer des blessures.
Déballez et installez le produit avec
prudence.
• Il comporte des arêtes vives présentant un
risque de coupure.
Si une fuite de fluide frigorigène se
produit lors de la réparation, ne le
touchez pas.
• Ce fluide peut provoquer des gelures
(brûlures froides).
Nʼinclinez pas lʼunité lorsque vous la
déplacez ou que vous la démontez.
• Lʼeau condensée quʼelle contient pourrait
sʼécouler.
Si une fuite de fluide frigorigène se
produit lors de lʼinstallation, aérez la
pièce immédiatement.
• Cela peut être nuisible pour votre santé.
Les procédures de démontage de lʼunité et
de remplacement de lʼhuile frigorigène ou
de composants du système doivent être
exécutées conformément aux normes
locales et nationales.
Nʼexposez pas votre peau, ni les enfants
ou les plantes aux courants dʼair chaud
ou froid.
• Sinon, cela risque d'être nuisible à votre
santé.
Utilisez un escabeau ou une échelle
stable pour nettoyer ou réparer lʼappareil
en hauteur.
• Faites attention à ne pas vous blesser.
FRANÇAIS
Consignes de sécurité
Page 84

Présentation de lʼappareil
Présentation de lʼappareil
Schéma illustrant une installation classique
Utilisation dʼun courant séparé de lʼalimentation électrique pour lʼunité intérieure.
(Ne pas connecter ni utiliser le terminal électrique de lʼunité extérieure.)
6 Hydro Kit
Écoulement vers l’extérieur
Côté gaz
Côté liquide
Écoulement vers l’intérieur
Écoulement
Page 85

Manuel de lʼutilisateur 7
Hydro Kit
h Les fonctions grisées ne sont pas activées ni affichées.
Programmateur à distance
ZDWHU
WHPS
RSHU
KHDWLQJ
PRGH
FRANÇAIS
Présentation de lʼappareil
N° Nom
1 Affichage
2 Bouton changement de température
3 Bouton Activation/Désactivation du chauffage dʼeau
4 Bouton Marche
5 Bouton Sélection Mode dʼOpération
6 Bouton Arrêt/Marche mode silencieux
7 Bouton Mode Réglage Température
8 Bouton Mode Afficher Température
9 Bouton Réglage Fonction
10 Bouton Programmation
11 Bouton Direction (Haut Bas, Gauche, Droite)
12 Touche Définir/Effacer (Set/Clear)
13 Bouton ECHAP
ڸ
ۀ
ڿ
ھ
ڽ
ہ
WHPS
ۂ
ۃ
ۄ
ZDWHU
KHDWLQJ
RSHU
PRGH
ڹ
ں
ڻ
ڼ
Page 86

8 Hydro Kit
Consignes dʼutilisation
POMPE HYDRAULIQUE
Ce symbole indique que la pompe hydraulique est activée.
POMPE THERMIQUE SOLAIRE AUXILIAIRE
Cette icône indique que la pompe thermique solaire auxiliaire est active.
REMARQUE : Comme lʼinstallation dʼune pompe à chaleur solaire auxiliaire nʼest pas obligatoire
mais recommandée en fonction des conditions environnementales, cette icône peut être affichée
bien quʼaucune pompe à chaleur solaire auxiliaire ne soit installée.
DÉGIVRAGE
Cette icône indique que le mode de dégivrage est actif.
Que ce soit en mode chauffage de lʼhabitation ou chauffage du réservoir dʼeau sanitaire,
lʼéchangeur de chaleur extérieur peut geler en raison de la faible température extérieure et de
lʼhumidité. Si une telle situation se produit, lʼappareil doit faire lʼobjet dʼun dégivrage. Le cycle est
alors inversé : la chaleur est récupérée auprès du système intérieur afin dʼempêcher le système
extérieur de geler. Ce mode sʼactive automatiquement.
MAINTIEN FAIBLE TEMPÉRATURE
Lʼobjectif de ce mode est de conserver la température afin d'empêcher tout dommage suite au gel
des conduites dʼeau.
EXTÉRIEUR
Cette icône indique que lʼunité extérieure est active.
VÉROUILLAGE ENFANTS
AUCUNE FONCTION
Informations sur le contrôle
Consignes dʼutilisation
Page 87

Manuel de lʼutilisateur 9
Hydro Kit
Consignes dʼutilisation
RÉGULATEUR CENTRAL
Cette icône indique que lʼappareil est contrôlé par une commande centralisée.
THERMOSTAT
Cette icône indique une connexion au thermostat.
INCIDENT MINEUR
Cette icône indique la présence dʼun léger problème.
INCIDENT MAJEUR
Cette icône indique la présence dʼun grave problème.
FRANÇAIS
Page 88

10 Hydro Kit
Sélection de la température cible
j Remarque
: Diminue de 1° C ou de 2° F par pression sur la touche
: Augmente de 1° C ou de 2° F par pression sur la touche
• Nous pouvons modifier la plage des températures de chaque mode lors de lʼinstallation du mode de
réglage. Veuillez vous référer aux codes de fonction 11 à 15.
• Lʼoption de réglage de la température ambiante est disponible si un capteur dʼair de la pièce à
distance (vendu séparément) est installé. Veuillez vous référer au code de fonction 03.
• Le réglage de la température de la citerne sanitaire est disponible lorsquʼune citerne est installée.
Consignes dʼutilisation
Changement du mode
Allumez lʼappareil et sélectionnez le mode de fonctionnement.
Mode de fonctionnement
• Activation Climatisation - Lʼappareil produit de lʼeau froide à utiliser pour la climatisation au sol ou la climatisation FCU.
• Activation Chauffage - Lʼappareil produit de lʼeau chaude à utiliser pour la climatisation au sol ou la climatisation FCU.
• Activation Chauffage selon conditions météorologiques - Ce mode permet à la température de chauffage appropriée
dʼêtre déterminée automatiquement par un profil de température prédéfini.
1
Appuyez sur la touche de mise en marche pour allumer lʼappareil.
2
Appuyez sur la touche OPER MODE pour sélectionner chaque mode de fonctionnement.
Mode Froid Mode chaud
Fonctionnement tributaire des
conditions météorologiques
1
Appuyez sur la touche SET TEMP pour sélectionner chaque mode de fonctionnement.
2
Sélectionnez la température de votre choix en appuyant sur les touches de modification de la
température sous chaque mode.
Température ambiante Température de lʼeau de
sortie
Température de la citerne
sanitaire
Pour augmenter la Température
Pour baisser la température
Page 89

Manuel de lʼutilisateur 11
Hydro Kit
Consignes dʼutilisation
Réglage du fonctionnement tributaire des conditions météorologiques
Ce modèle est disponible uniquement en mode Chaud.
Par souci dʼéconomie dʼénergie et dʼoptimisation du confort, le réglage de la température suit la même courbe que la
température extérieure. Si la température extérieure diminue, la puissance de chauffe de la maison augmente
automatiquement afin de maintenir la température ambiante constante. Tous les paramètres sont définis par lʼinstallateur
au cours de la procédure de démarrage et sont adaptés en fonction des caractéristiques du site.
FRANÇAIS
1
Appuyez sur le bouton OPER MODE pour sélectionner le mode dʼactivation selon les consitions météorologiques
2
Sélectionnez le niveau de température de votre choix en appuyant sur les touches de modification de la
température.
1
Appuyez plusieurs fois sur la
touche View Temp (afficher la
température) pour
sélectionner chaque
température. (A chaque fois
que vous appuyez sur le
bouton View Temperature
(Afficher la température), la
température ambiante
sʼaffiche pendant 5
secondes.)
Affichage de la température
(* : Température thermique solaire)
: Icône de fonctionnement
en mode tributaire des
conditions
météorologiques
Ex) Decreasing temperature profile by 3°C (based
on room air temperature)
< Valeurs pour le réglage de la température
(unité : °C)>
-5, -4, -3, -2, -1, 0, 1, 2, 3, 4, 5
: Afficher la température ambiante
: Afficher la température dʼentrée
: Afficher la température de sortie
:
Afficher la température de lʼeau sanitaire
(sʼaffiche UNIQUEMENT en mode de chauffage
de lʼeau sanitaire)
:
Afficher la telpérature thermique solaire
(sʼaffiche UNIQUEMENT en mode de
chauffage de lʼeau sanitaire)
Chaud
Froid
Température Plage des températures
Sʼaffichent à lʼécran
comme suit :
Air
au-dessous de 11°C(51°F)
Lo (faible)
11°C(51°F) ~ 39°C(102°F)
Température réelle
au-dessus de 39°C(102°F)
Hi (élevée)
Eau
Au-dessous de 0°C(32°F) [* Au-dessous de 40°C(104°F) ]
Lo (faible)
0°C(32°F) ~ 92°C(197°F) [*40°C(104°F) ~ 120°C(248°F) ]
Température réelle
Au-dessus de 92°C(197°F) [* Au-dessus de 120°C(248°F) ]
Hi (élevée)
Page 90

Cette fonction permet dʼempêcher tout enfant ou autre personne dʼutiliser la commande.
Verrouillage enfant
12 Hydro Kit
Consignes dʼutilisation
1
Appuyez sur la touche de réglage des fonctions pour
accéder au mode de réglage de lʼutilisateur (le champ
se met à clignoter).
2
Appuyez sur la touche set/clear (définir/effacer)
au terme de la sélection.
Le segment disparaîtra.
4
Pour désactiver ce réglage, appuyez sur le
bouton de réglage des fonctions jusquʼà ce que
lʼicône clignote puis appuyez sur le bouton
régler/effacer.
3
Lorsque lʼoption de verrouillage enfant est activée,
lʼcône et la mention « CL » sʼaffichent pendant
3 seconde chaque fois que vous appuyez sur
nʼimporte quelle touche, à lʼexception de celle qui
permet dʼafficher la température et de la touche
set/clear –définir/effacer).
Page 91

Manuel de lʼutilisateur 13
Hydro Kit
Consignes dʼutilisation
FRANÇAIS
Lorsque lʼerreur se produit sur lʼunité intérieure, le code dʼerreur sʼaffiche sur la télécommande.
Incident mineur
Un problème est observé au sein de lʼunité intérieure.
Dans la plupart des cas, cet incident est lié au capteur. Dans ce cas, Hydro Kit peut
fonctionner en mode urgence (uniquement en mode chauffage).
Incident important
Un problème a été identifié à lʼintérieur de lʼunité extérieure.
Erreur critique
En cas dʼerreur critique, le produit sʼarrête sans condition.
Dans ce cas, la mention « CH » et le n° du code dʼerreur sʼaffichent par intermittence.
Affichage du code erreur
<Affichage>
<Affichage>
<Affichage>
Page 92

Vous pouvez définir lʼheure actuelle.
Réglage de lʼheure actuelle
1
Continuez à appuyer le bouton de programmation deux fois de suite pour
entrer le mode réglage de lʼheure actuelle.
2
Appuyez sur la touche vers la gauche ou
vers la droite pour sélectionner le jour.
3
Appuyez sur la touche vers le bas pour
passer du champ AM (de 00h01 à 12h00) au
champ PM (de 12h01 à 23h59) et
inversement et régler lʼheure (Le champs
AM/PM va clignoter)
4
Appuyez sur le bouton droit pour passer au
champ "Heure". (Le champ "Heure" va
clignoter)
6
Appuyez sur le bouton droit pour passer au
champ "Minute". (Le champ "Minute" va
clignoter)
7
Appuyez sur le bouton haut ou bas pour
régler les Minutes.
8
A la fin du réglage, appuyez sur le
bouton set/clear (Définir/Effacer).
9
Appuyez sur le bouton exit sortie) ou le système va se déclencher sans
alimentation de 25 secondes.
5
Appuyez sur la touche vers le haut ou vers le
bas pour régler lʼheure.
Consignes dʼutilisation
14 Hydro Kit
Page 93

Manuel de lʼutilisateur 15
Hydro Kit
Consignes dʼutilisation
FRANÇAIS
Programmation : Réglage dʼune programmation simple
Vous pouvez facilement activer la programmation.(Activer UNIQUEMENT lorsque lʼunité est en stand-by.)
1
Appuyez sur la touche de programmation pour
accéder au mode de programmation. (le
segment clignote).
2
Appuyez sur la touche vers le haut ou vers le
bas pour régler lʼheure de la programmation.
3
A la fin du réglage, appuyez sur le bouton Réglage/Effacer pour terminer la
programmation.
4
Appuyez sur la touche quitter pour quitter lʼécran ou le système le fera
automatiquement après 25 secondes dʼinactivité.
1
Appuyez sur la touche de programmation pour
accéder au mode de programmation. Appuyez sur le
bouton de programmation à plusieurs reprises pour
sélectionner [sleep reservation]. (ce champ clignote).
2
Appuyez sur la touche vers le haut ou vers le bas
pour régler lʼheure de la programmation.
3
Lorsque vous avez terminé, appuyez sur la touche définir/effacer (set/clear) pour
enregistrer ou non vos réglages.
4
Appuyez sur la touche quitter pour quitter lʼécran ou le système le fera
automatiquement après 25 secondes dʼinactivité.
Programmation : Réglage dʼune programmation en mode nuit
Vous pouvez facilement désactiver la programmation (veille). (Activer UNIQUEMENT lorsque lʼunité est en
fonctionnement.)
Page 94

Programmation : Réglage de la programmation « ON »
Cette fonctionnalité génère l’activation de l’appareil au terme d’une période déterminée.
1
Appuyez sur la touche de programmation pour
accéder au mode de programmation. Appuyez sur le
bouton de programmation à plusieurs reprises pour
sélectionner [on reservation].
2
Appuyez sur la touche vers le haut ou vers le
bas pour passer du champ AM (de 00h01 à
12h00) au champ PM (de 12h01 à 23h59) et
inversement.
3
Appuyez sur le bouton droit pour passer
au champ “Heure”. (Le champ “Heure”
va clignoter)
4
Appuyez sur la touche vers le haut ou
vers le bas pour régler l’heure.
6
Appuyez sur le bouton haut ou bas pour
régler les Minutes.
7
Lorsque vous avez terminé, appuyez sur la touche
définir/effacer (set/clear) pour enregistrer ou non vos réglages.
8
Appuyez sur la touche quitter pour quitter l’écran ou le
système le fera automatiquement après 25 secondes
d’inactivité.
5
Appuyez sur le bouton droit pour passer
au champ "Minute". (Le champ "Minute"
va clignoter)
Consignes d’utilisation
16 Hydro Kit
Page 95

Manuel de l’utilisateur 17
Hydro Kit
Consignes d’utilisation
Programmation : Réglage de la programmation « OFF »
Cette fonctionnalité génère la désactivation de l’appareil au terme d’une période déterminée.
1
Appuyez sur la touche de programmation pour
accéder au mode de programmation. Appuyez sur le
bouton de programmation à plusieurs reprises pour
sélectionner [off reservation].
2
Appuyez sur la touche vers le haut ou vers le
bas pour passer du champ AM (de 00h01 à
12h00) au champ PM (de 12h01 à 23h59) et
inversement.
3
Appuyez sur le bouton droit pour passer au
champ “Heure”. (Le champ “Heure” va
clignoter)
4
Appuyez sur la touche vers le haut ou
vers le bas pour régler l’heure.
6
Appuyez sur le bouton haut ou bas pour
régler les Minutes.
7
Lorsque vous avez terminé, appuyez sur la touche
définir/effacer (set/clear) pour enregistrer ou non vos réglages.
8
Appuyez sur la touche quitter pour quitter l’écran ou le
système le fera automatiquement après 25 secondes
d’inactivité.
5
Appuyez sur le bouton à droite pour
accéder à la section « Minute ». (Le
champ "Minute" va clignoter)
FRANÇAIS
Page 96

Programmation : Programmation hebdomadaire
La programmation hebdomadaire est activée lorsque lʼheure actuelle est définie.
1
Appuyez sur la touche de programmation pour accéder
au mode de programmation. Appuyez sur le bouton de
programmation à plusieurs reprises pour sélectionner
[Weekly reservation]. (ce champ clignote).
2
Appuyez sur la touche vers la gauche ou
vers la droite pour sélectionner le jour.
3
Appuyez sur la touche vers le haut ou
vers le bas pour afficher le nombre
dʼactions.
4
Appuyez sur le bouton droit pour passer
au champ “Heure”. (Le champ “Heure”
va clignoter) (Le champ "Heure" va
clignoter)
6
Appuyez sur le bouton droit pour passer
au champ "Minute" dans la section
Début de la Période. (Le champ
"Minute" va clignoter)
7
Appuyez sur la touche vers le haut ou
vers le bas pour régler les minutes du
début de la période.
8
Appuyez sur le bouton droit pour passer
au champ "Heure" dans la section Fin de
la Période. (Le champ "Heure" va
clignoter)
5
Appuyez sur la touche vers le haut ou
vers le bas pour régler lʼheure du début
de la période.
Section « début de la période »
Section de la fin de la période
Consignes dʼutilisation
18 Hydro Kit
Page 97

Manuel de lʼutilisateur 19
Hydro Kit
Consignes dʼutilisation
Action
Heure de début
De
À
Heure de fin
9
Reportez-vous à la procédure de lʼétape n°
5 à lʼétape n° 7 pour régler le temps
dʼarrêt. La méthode est la même.
10
Lorsque vous avez terminé, appuyez
sur la touche définir/effacer (set/clear)
pour enregistrer ou non vos réglages.
Le segment under bar sera créé, une
fois lʼopération terminée.
11
Reportez-vous à la procédure de
lʼétape n° 2 à lʼétape n° 10 pour régler
un autre programme hebdomadaire. La
méthode est la même.
12
Appuyez sur la touche quitter pour quitter lʼécran ou le système le fera
automatiquement après 25 secondes dʼinactivité.
FRANÇAIS
<Remarque>
Description dʼune restriction hebdomadaire
<Section du début de la période> <Section de la fin de la période>
<Section du début de la période> <Section de la fin de la période>
h Il est possible de programmer jusquʼà deux actions par jour, soit 14 actions au total.
Page 98

20 Hydro Kit
Programmation : Programmation des jours fériés
Cette fonctionnalité permet dʼinterrompre automatiquement le fonctionnement de lʼappareil certains jours.
1
Appuyez sur la touche de programmation
pour accéder au mode de programmation.
Appuyez sur le bouton de programmation à
plusieurs reprises pour sélectionner
[Holiday reservation]. (ce champ clignote).
2
Appuyez sur le bouton gauche et droit
pour programmer les jours fériés.
3
Lorsque vous appuyez sur le bouton
régler/effacer après avoir terminé la
sélection, le jour sélectionné disparaît.
4
Appuyez sur la touche quitter pour quitter lʼécran ou le système le fera
automatiquement après 25 secondes dʼinactivité.
Consignes dʼutilisation
Page 99

Manuel de lʼutilisateur 21
Hydro Kit
Utilisation du thermostat
Utilisation du thermostat
1. Certains thermostats de type électromécanique sont dotés dʼun système de délai dʼattente pour une
meilleure protection du compresseur. Dans ce cas, toute modification du mode de fonctionnement peut
se révéler plus longue que prévue. Lisez attentivement le manuel du thermostat si lʼappareil ne répond
pas rapidement.
2. Le réglage de la plage des températures du thermostat peut être différent de celui de lʼappareil.
Les températures de chauffage et de refroidissement doivent être sélectionnées dans la plage des
températures de lʼappareil.
Le « thermostat » largement évoqué dans ce chapitre, relève des accessoires tiers.
LG Electronics ne fournit pas de thermostat mais vous pouvez utiliser des thermostats de fabricants tiers.
Le thermostat dʼambiance peut être utilisé pour un contrôle plus facile et confortable.
Ce chapitre vise à vous fournir toutes les informations utiles pour une utilisation du thermostat plus efficace
et correcte.
Utilisation du thermostat
Activation du Thermostat par commande à distance
Pour savoir comment activer/désactiver le thermostat, comment régler la température cible, comment changer de
mode de fonctionnement, etc., veuillez vous référer au manuel dʼutilisation fourni avec le thermostat.
Fonctionnalités disponibles lorsquʼun thermostat est installé :
• Touche SET TEMP (définir la température)
• Touche VIEW TEMP (afficher la température)
• Bouton de réglage de la température (*)
• Activation/désactivation du chauffage de lʼeau sanitaire
(*) : The product does not turn on / off according to the setting temperature at the remote
controller. Il sʼallume/sʼéteint sur la base du signal du thermostat.
• Fonctionnalités NON disponibles lorsquʼun thermostat est installé :
•
Sélection du mode de fonctionnement (froid/chaud/tributaire des conditions météorologiques)
• Planification horaire
• Fonctionnement On/Off
FRANÇAIS
Page 100

Utilisation du thermostat
Fonctionnement en mode urgence
• Définition des termes
- Incident : tout problème susceptible de provoquer lʼarrêt du système et de permettre son redémarrage
temporaire dans des conditions de fonctionnement limitées, sans aucune intervention dʼun technicien agréé.
- Erreur : tout problème susceptible de provoquer lʼarrêt du système et de permettre son redémarrage
UNIQUEMENT après l'intervention d'un technicien agréé.
- Mode urgence : fonctionnement du chauffage temporaire lorsquʼun incident est observé au niveau du
système.
• Intérêt de la prise en compte des « incidents »
- Contrairement à dʼautres climatiseurs, Hydro Kit fonctionne généralement tout lʼhiver sans arrêt
du système.
- Si un problème qui nʼaffecte pas de manière critique la puissance de lʼappareil à produire de lʼénergie de
chauffage, est observé, le système peut continuer à fonctionner temporairement en mode urgence, si
l'utilisateur le souhaite.
• Classification des incidents
- Les problèmes sont classés selon deux niveaux de gravité : problème léger et problème grave
- Incident mineur : un problème est observé au sein de lʼunité intérieure. Dans la plupart des cas, cet incident
est lié au capteur. Lʼunité extérieure fonctionne en mode dʼurgence (commutateur DIP n° 4 de la carte
électronique de lʼunité intérieure).
- Incident important : un problème est observé au sein de lʼunité extérieure.
- Incident affectant une option : un problème est observé au niveau du fonctionnement dʼune option, par
exemple, le chauffage du ballon d'eau. Dans ce cas dʼun problème dʼoption, lʼorigine du problème ne met pas
en cause le produit.
• Niveau de fonctionnement en cas dʼurgence
- Lorsque le système rencontre un problème, il arrête le fonctionnement et attend la décision de lʼutilisateur :
appel du centre de SAV ou enclenchement du mode urgence.
- Pour enclencher le mode urgence, lʼutilisateur appuie simplement une deuxième fois sur le bouton
marche/arrêt.
- Deux niveaux différents sont disponibles en mode urgence : Cycle de température élevée et cycle de
température basse.
- En mode urgence, l'utilisateur ne peut pas régler la température cible.
22 Hydro Kit
Commutateur
DIP
Température de
lʼeau de sortie
cible
Température
ambiante cible
Température de
lʼeau sanitaire
cible
Cycle de température élevée OFF 50℃(122℉) 24℃(75℉) 50℃(122℉)
Cycle de température basse ON 30℃(86℉) 19℃(66℉) 50℃(122℉)
 Loading...