How it Works
Log In / Sign Up
Buy Points
How it Works
FAQ
Contact Us
Questions and Suggestions
Users
LG
Loading...
#
47LW659S
5
47LW659S-ZC
47LW75
47LW7500-ZA
47LW750G-ZA
47LW750H
2
47LW750S-ZA
47LW750T-ZA
47LW750W-ZA
47LW77
47LW7700
10
47LW7700-TA
47LW7700UA
47LW7700-ZA
47LW770G-ZA
47LW770S-ZA
47LW770T-ZA
47LW770W-ZA
47LW95
47LW9500
13
47LW9500-CA
47LW9500-TA
47LW9500UA
47LW9500-ZA
2
47LW950G-ZA
2
47LW950S-ZA
2
47LW950T-ZA
2
47LW950W-ZA
2
47LW98
47LW9800
13
47LW9800-DA
47LW9800UA
3
47LW9800-ZA
47LW980G
47LW980G-ZA
47LW980S
14
47LW980S-ZA
47LW980T
47LW980T-ZA
47LW980W
4
47LW980W-ZA
47LX6
47LX6500
48
47LX6500-TD
47LX6500UB
47LX650N
7
47LX6800
2
47LX6900
47LX9
47LX9500
45
47LX9500-TA
2
47LX9500UA
2
47LX9500-ZA
2
47LX950N
4
47LX950N-ZA
2
47LX9550
47LX9800
2
47LX9800-ZA
2
47LX9900
2
47LX9900-ZA
2
47LX9 series
47LY330C
47LY330C-ZA
2
47LY331C-ZA
47LY340C
5
47LY340C-CA
47LY340C-TA
47LY340C-ZA
47LY340H
2
47LY341C-ZA
47LY345C-ZA
2
47LY3D
2
47LY3DE
2
47LY3DE-AA
2
47LY3DE Series
47LY3DF
2
47LY3RF
11
47LY3RF-MA
47LY3RF Series
47LY3RF-TB
47LY54
47LY540H
5
47LY540H-TA
47LY540H-ZA
2
47LY540S
6
47LY540S-CA
47LY540S-TA
47LY540S-ZA
47LY541H-ZA
47LY560H
3
47LY570H
3
47LY750H
4
47LY750H-ZA
2
47LY751H-ZA
47LY755H-TA
47LY760H
10
47LY760H-UA
47LY760H-ZA
3
47LY761H-ZA
47LY9
29
Loading...
Loading...
Nothing found
47LX9500
Schematic
31 pgs
3.29 Mb
0
Schematic
31 pgs
3.43 Mb
0
User Manual
2 pgs
1.92 Mb
0
User Manual
16 pgs
3.03 Mb
0
User Manual
196 pgs
16.52 Mb
0
Owner's Manual
181 pgs
72.6 Mb
0
Owner's Manual
202 pgs
12.53 Mb
0
Owner's Manual
37 pgs
9.47 Mb
0
Owner's Manual
270 pgs
23.9 Mb
0
Owner's Manual
218 pgs
96.46 Mb
0
Owner's Manual
202 pgs
89.67 Mb
0
Owner's Manual
121 pgs
41.2 Mb
0
Owner's Manual
385 pgs
9.16 Mb
0
Owner’s Manual
191 pgs
87.27 Mb
0
User Manual
196 pgs
16.2 Mb
0
User Manual
385 pgs
8.01 Mb
0
User Manual [bg]
196 pgs
16.58 Mb
0
User Manual [bs]
196 pgs
16.71 Mb
0
User Manual [da]
196 pgs
18.13 Mb
0
User Manual [de]
196 pgs
18.15 Mb
0
Owner's Manual [es]
181 pgs
72.24 Mb
0
Owner's Manual [es]
189 pgs
75.77 Mb
0
User Manual [es]
196 pgs
16.67 Mb
0
user manuals [es]
192 pgs
4.47 Mb
0
User Manual [fi]
196 pgs
18.12 Mb
0
Owner’s Manual [fr]
190 pgs
88.89 Mb
0
User Manual [fr]
196 pgs
20.98 Mb
0
User guide [he]
228 pgs
50.23 Mb
0
User manual [hr]
196 pgs
18.26 Mb
0
User Manual [hu]
196 pgs
20.39 Mb
0
User Manual [it]
196 pgs
16.77 Mb
0
User Manual [it]
196 pgs
18.07 Mb
0
User Manual [it]
197 pgs
17.29 Mb
0
instruction manual [ja]
104 pgs
20.06 Mb
0
User Manual [lv]
196 pgs
16.7 Mb
0
User Manual [nl]
196 pgs
18.14 Mb
0
User Manual [pl]
196 pgs
17.36 Mb
0
User Manual [pl]
196 pgs
16.48 Mb
0
User Manual [ru]
194 pgs
19.49 Mb
0
User Manual [sk]
196 pgs
16.6 Mb
0
User manual [sk]
196 pgs
16.61 Mb
0
User Manual [th]
48 pgs
20.87 Mb
0
User Manual [tr]
198 pgs
14.72 Mb
0
User Manual [uk]
194 pgs
18.1 Mb
0
User manual [zh]
180 pgs
74.82 Mb
0
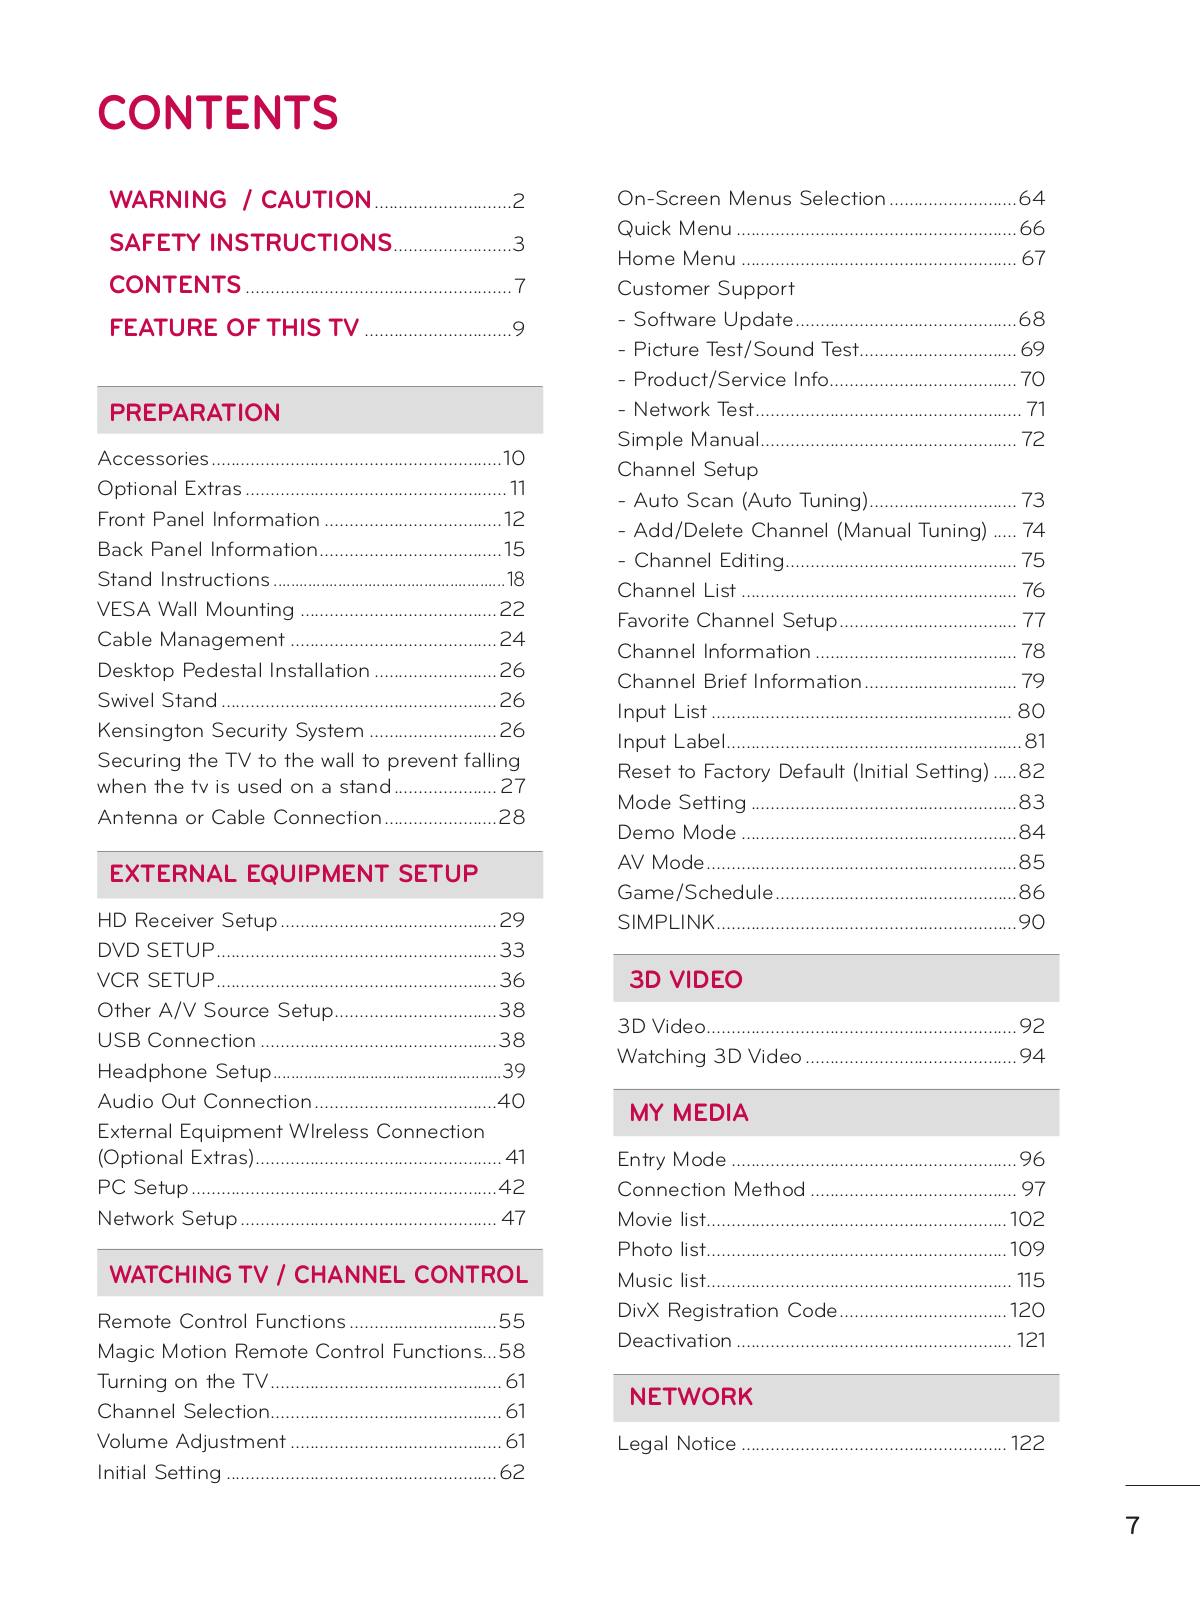
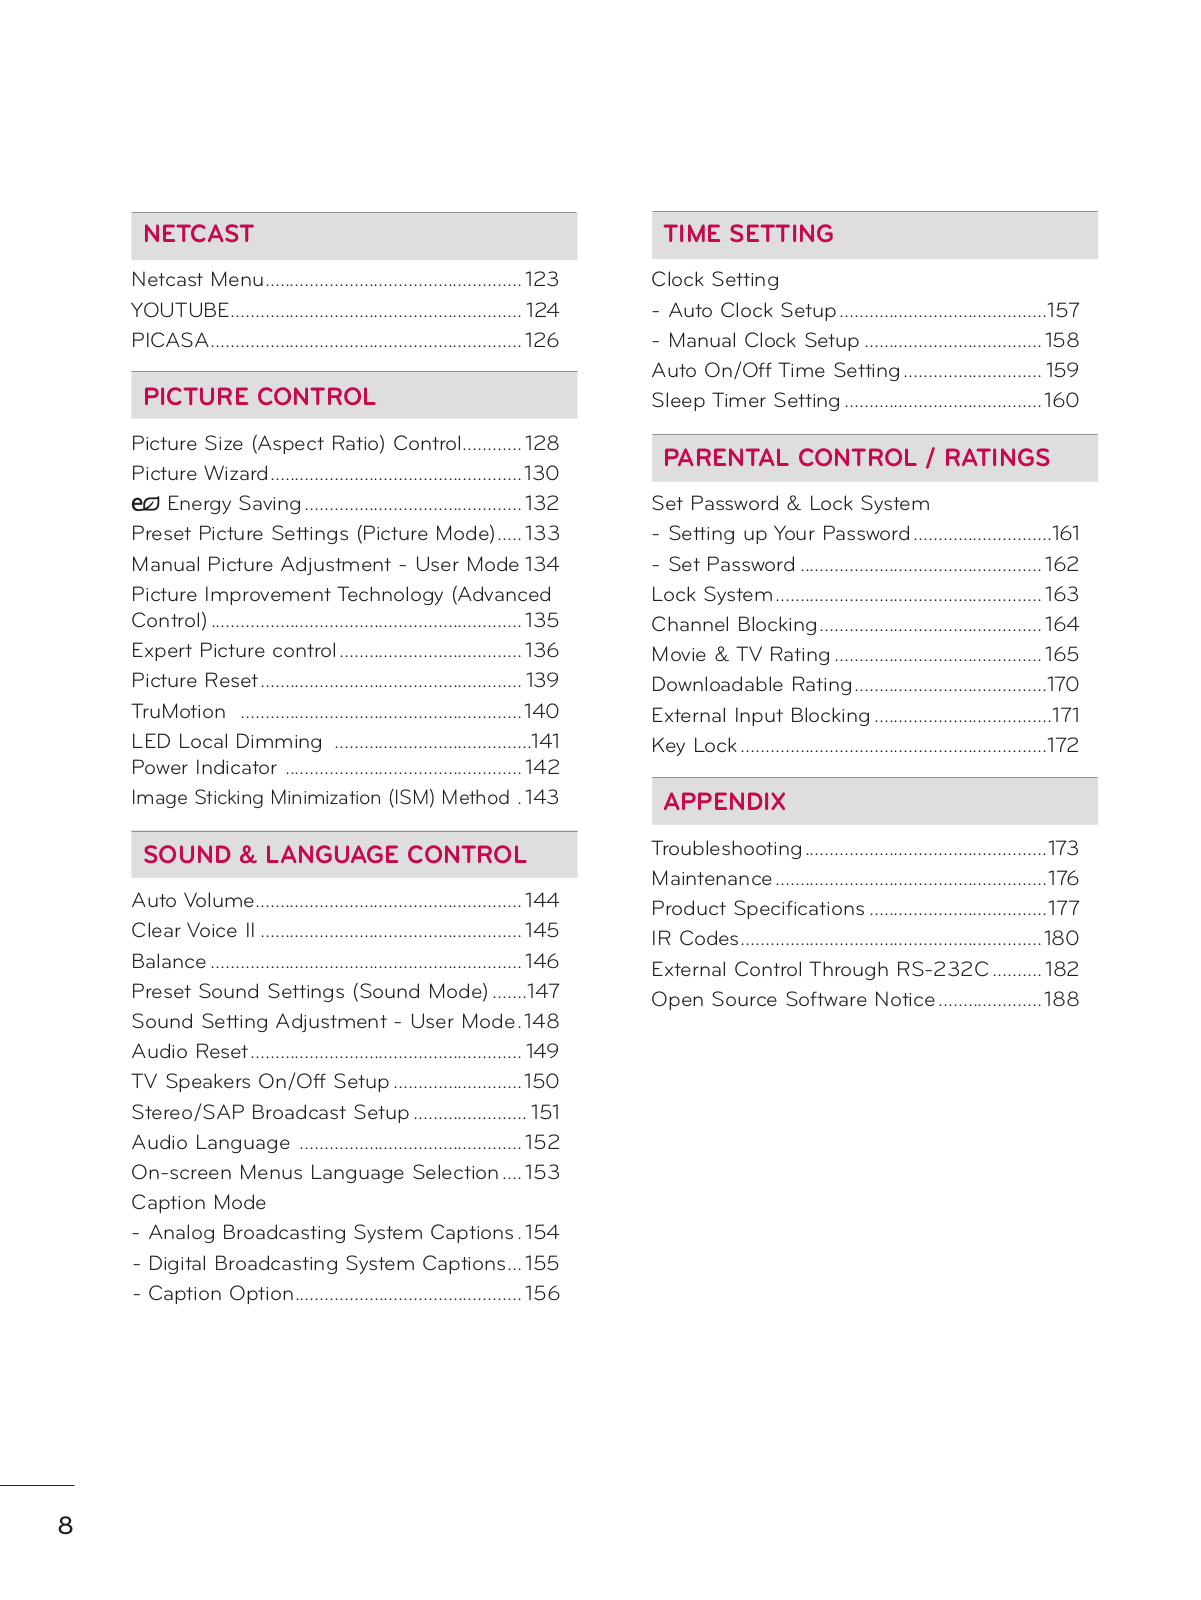
Table of contents
Loading...
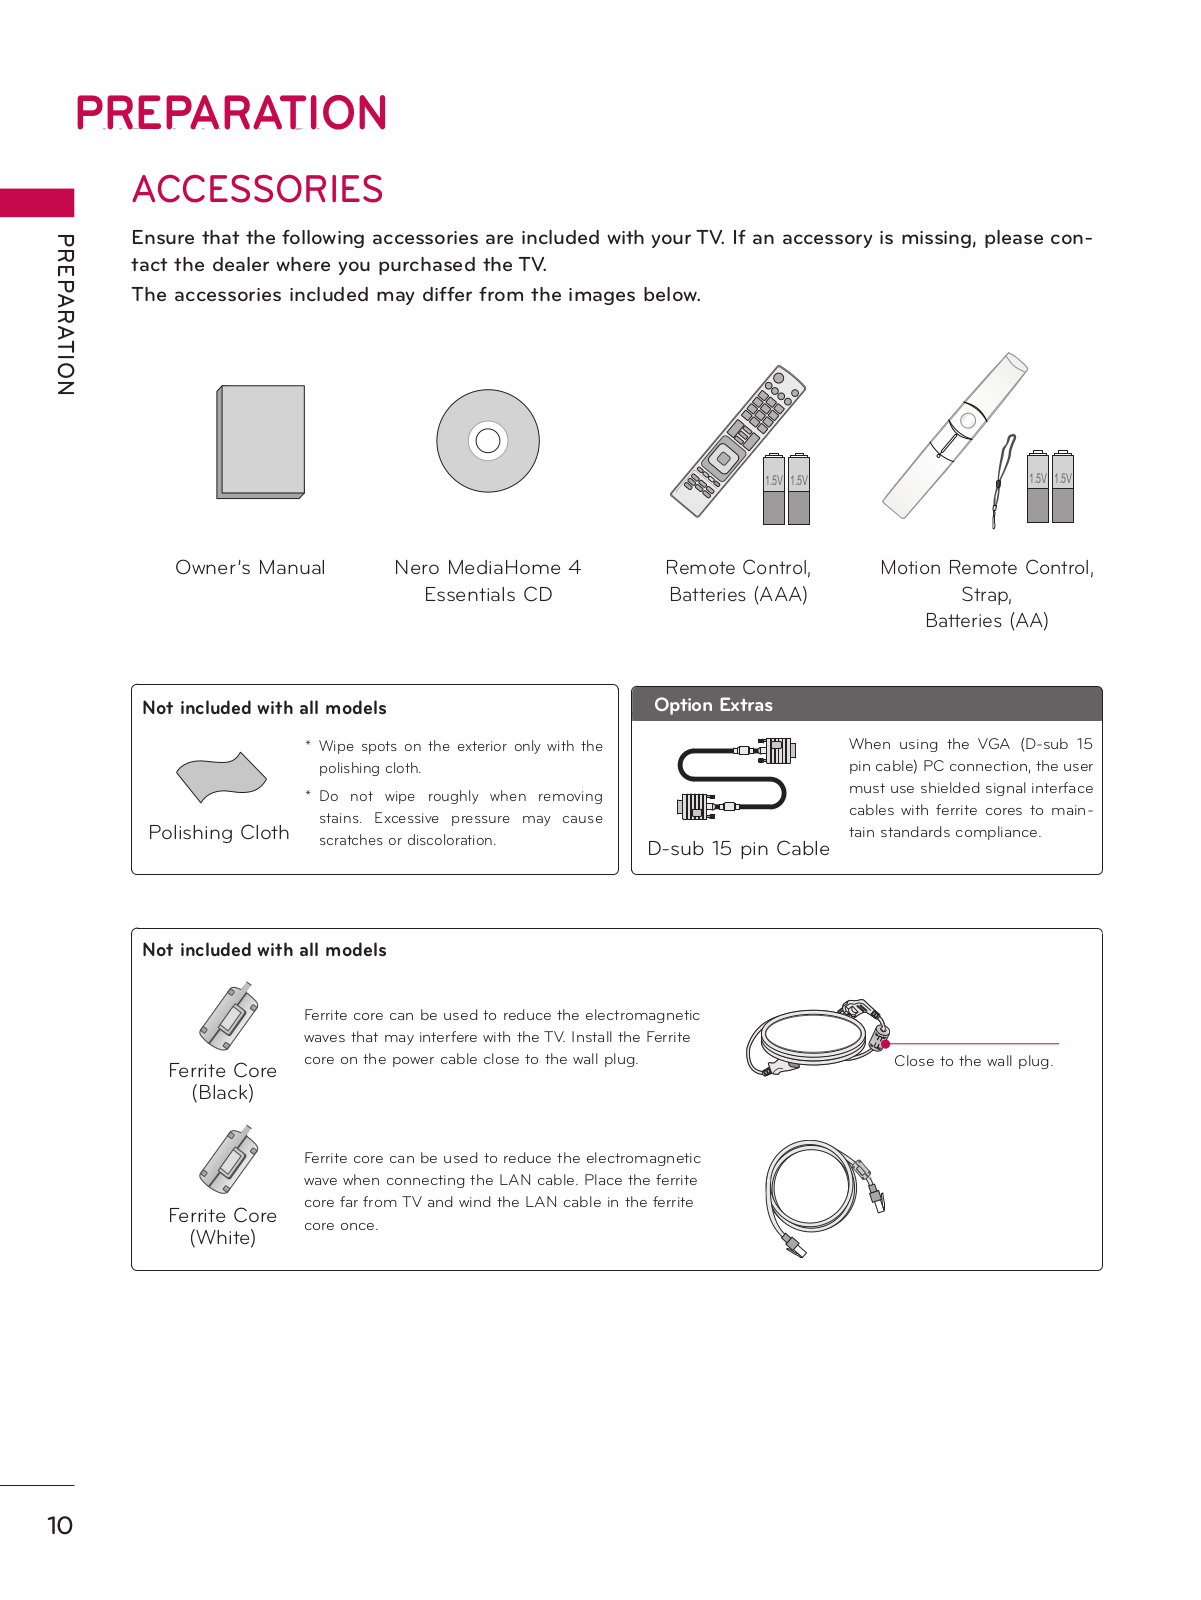
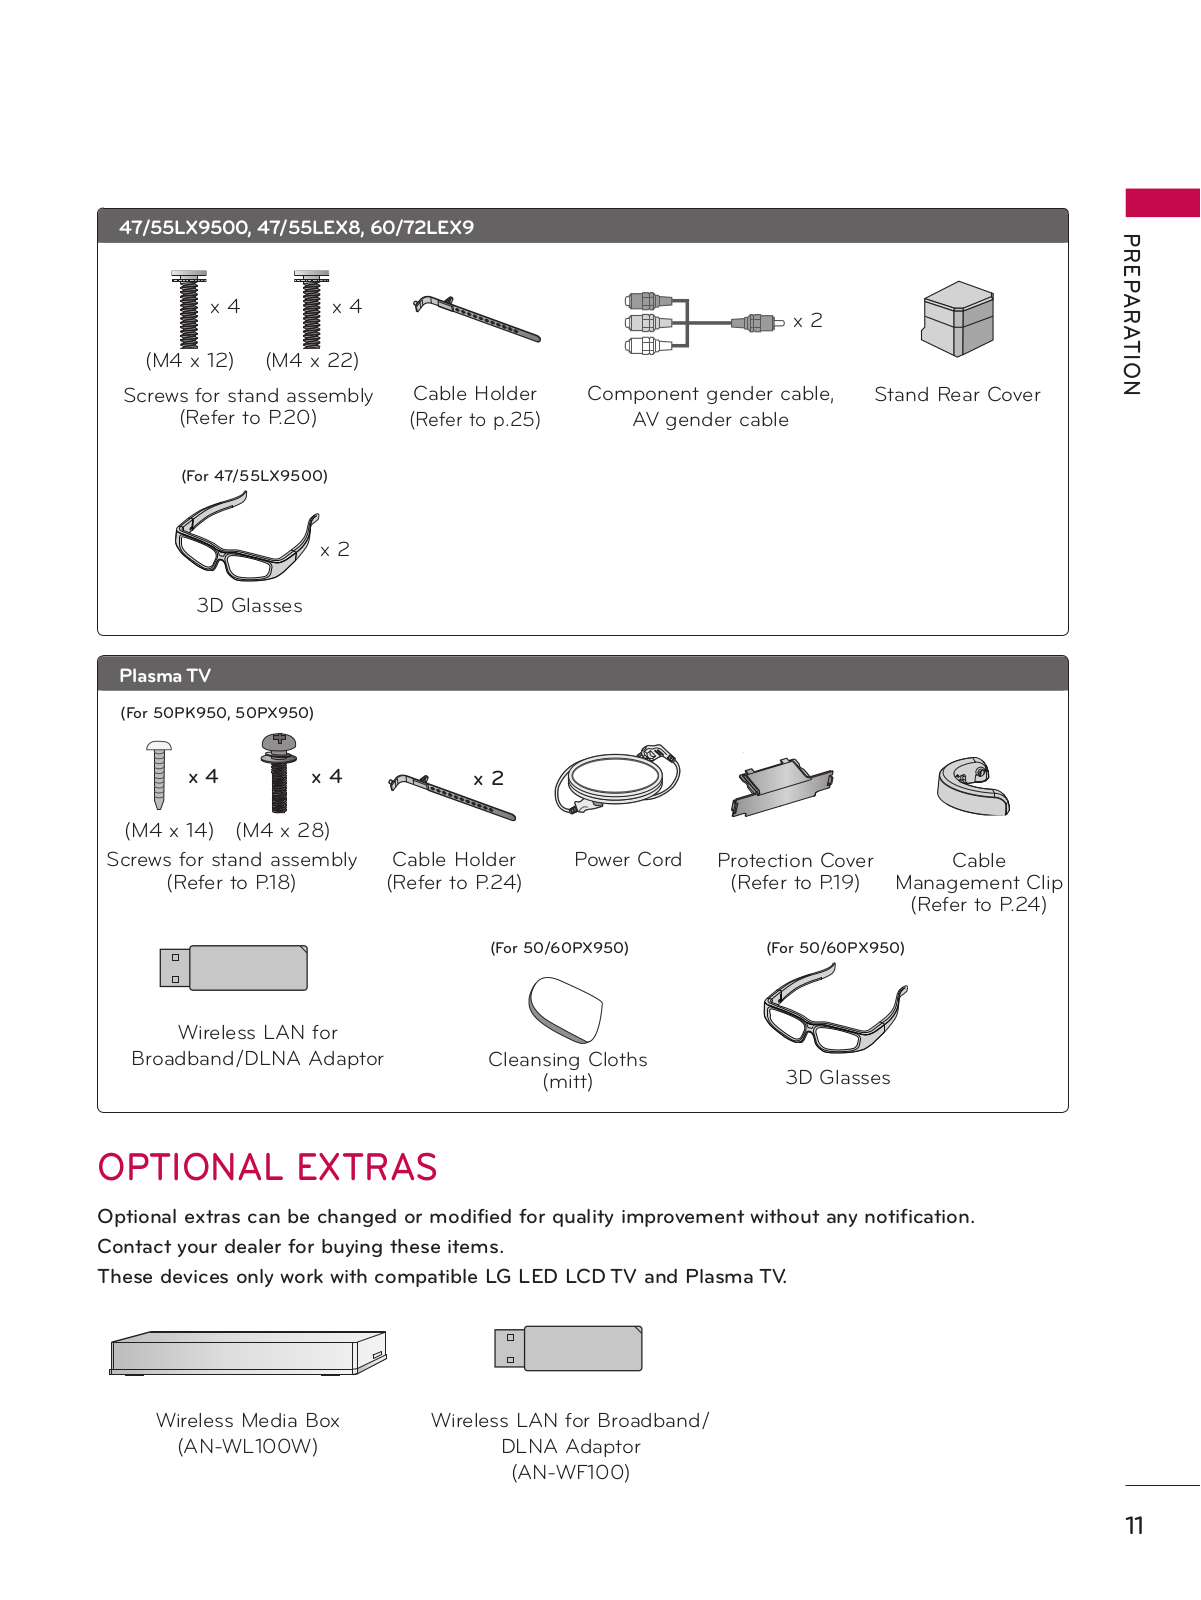
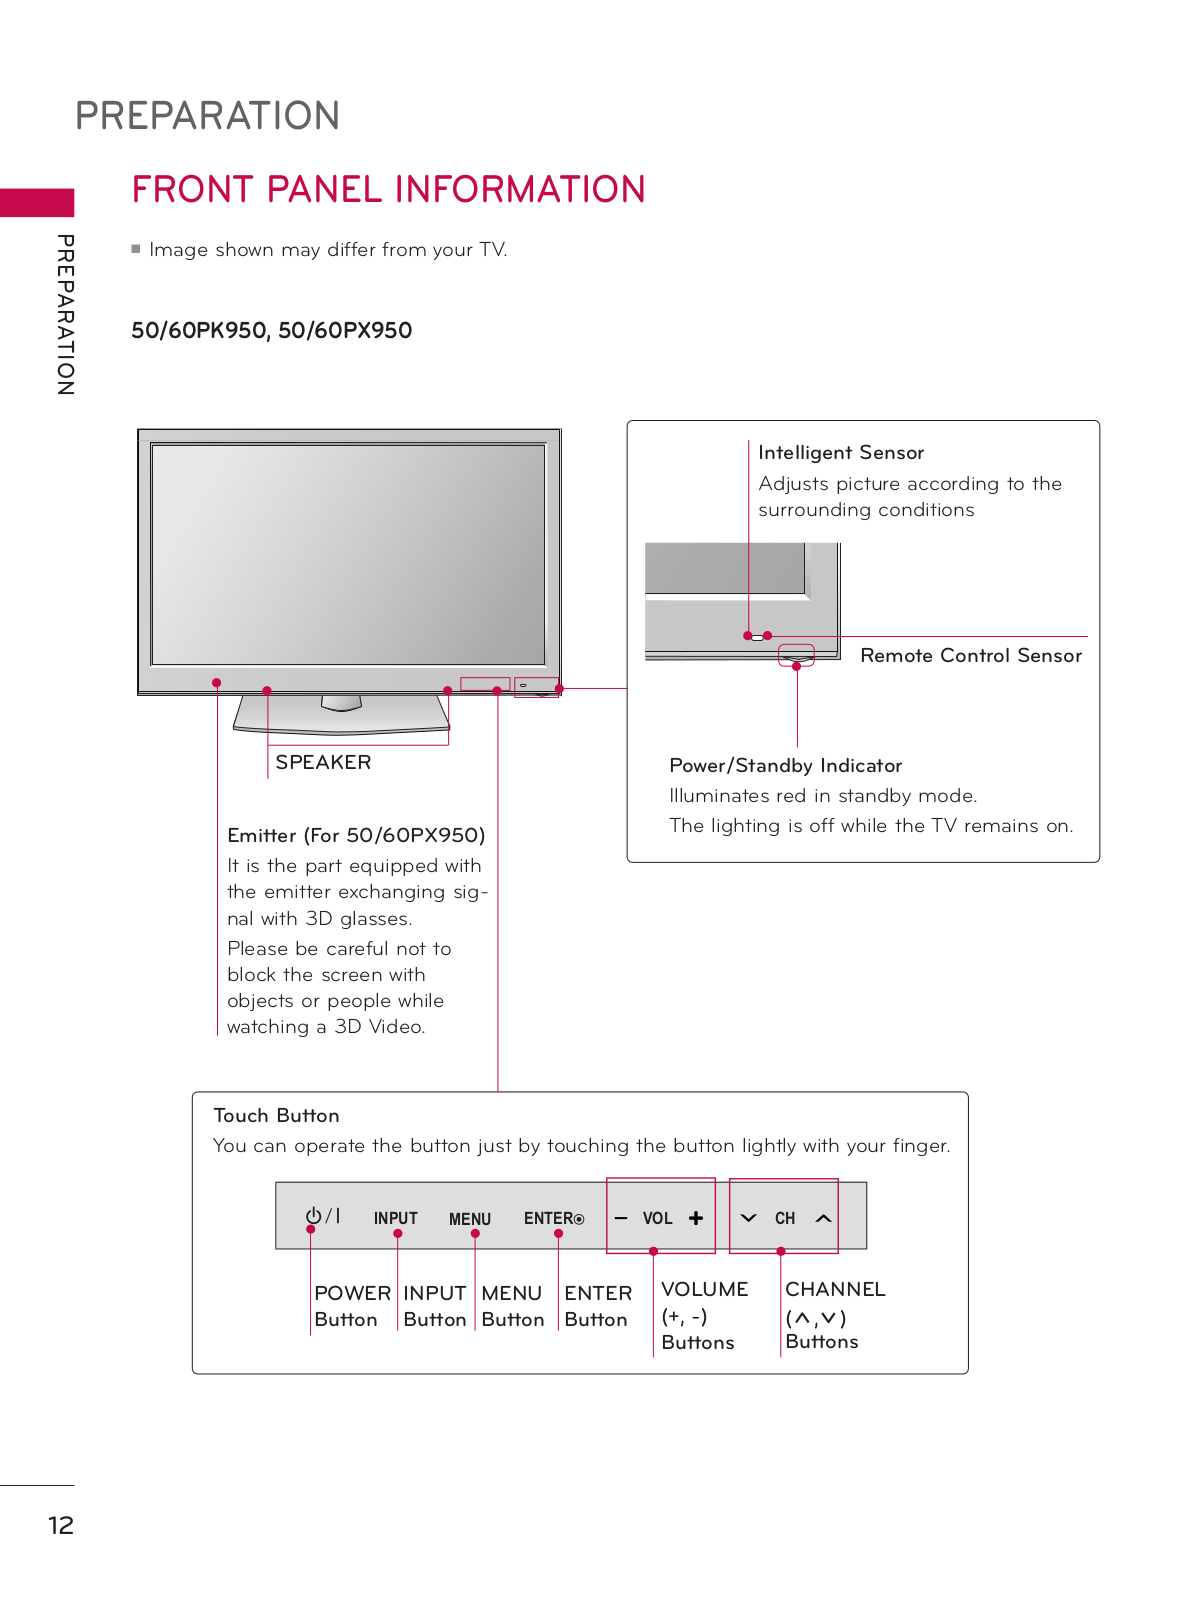
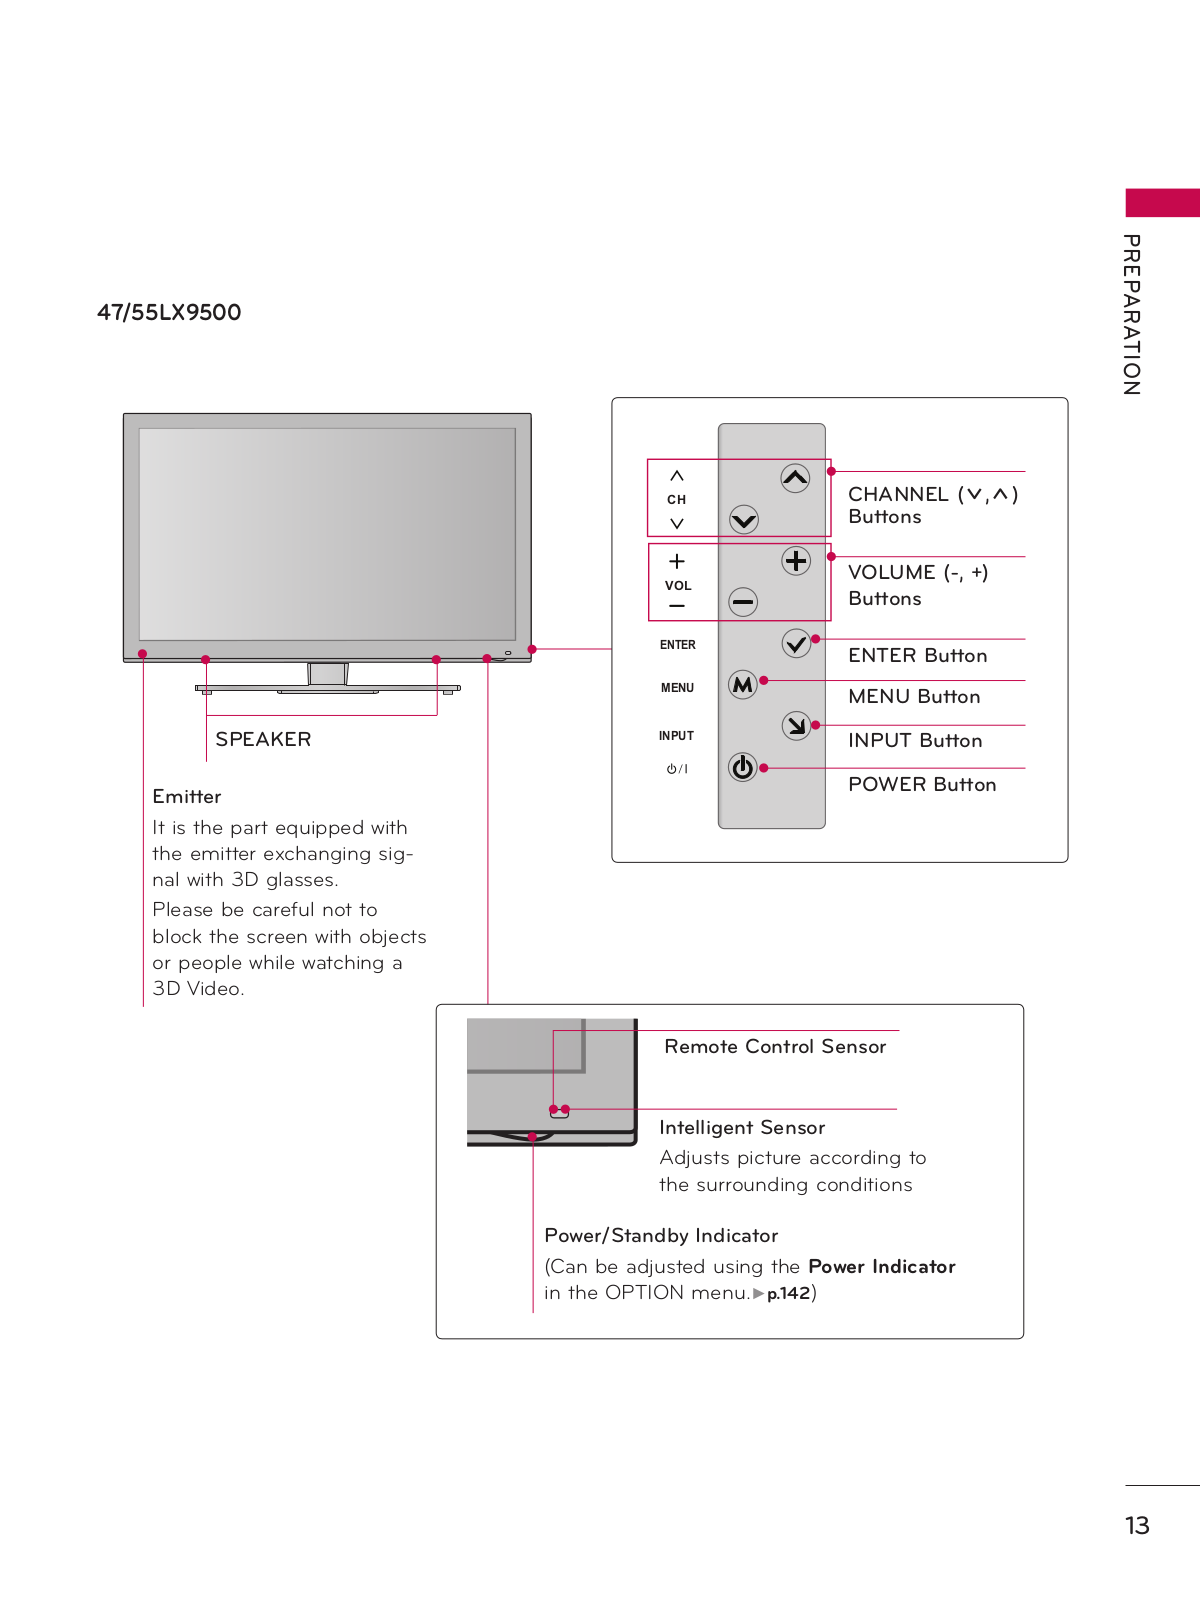
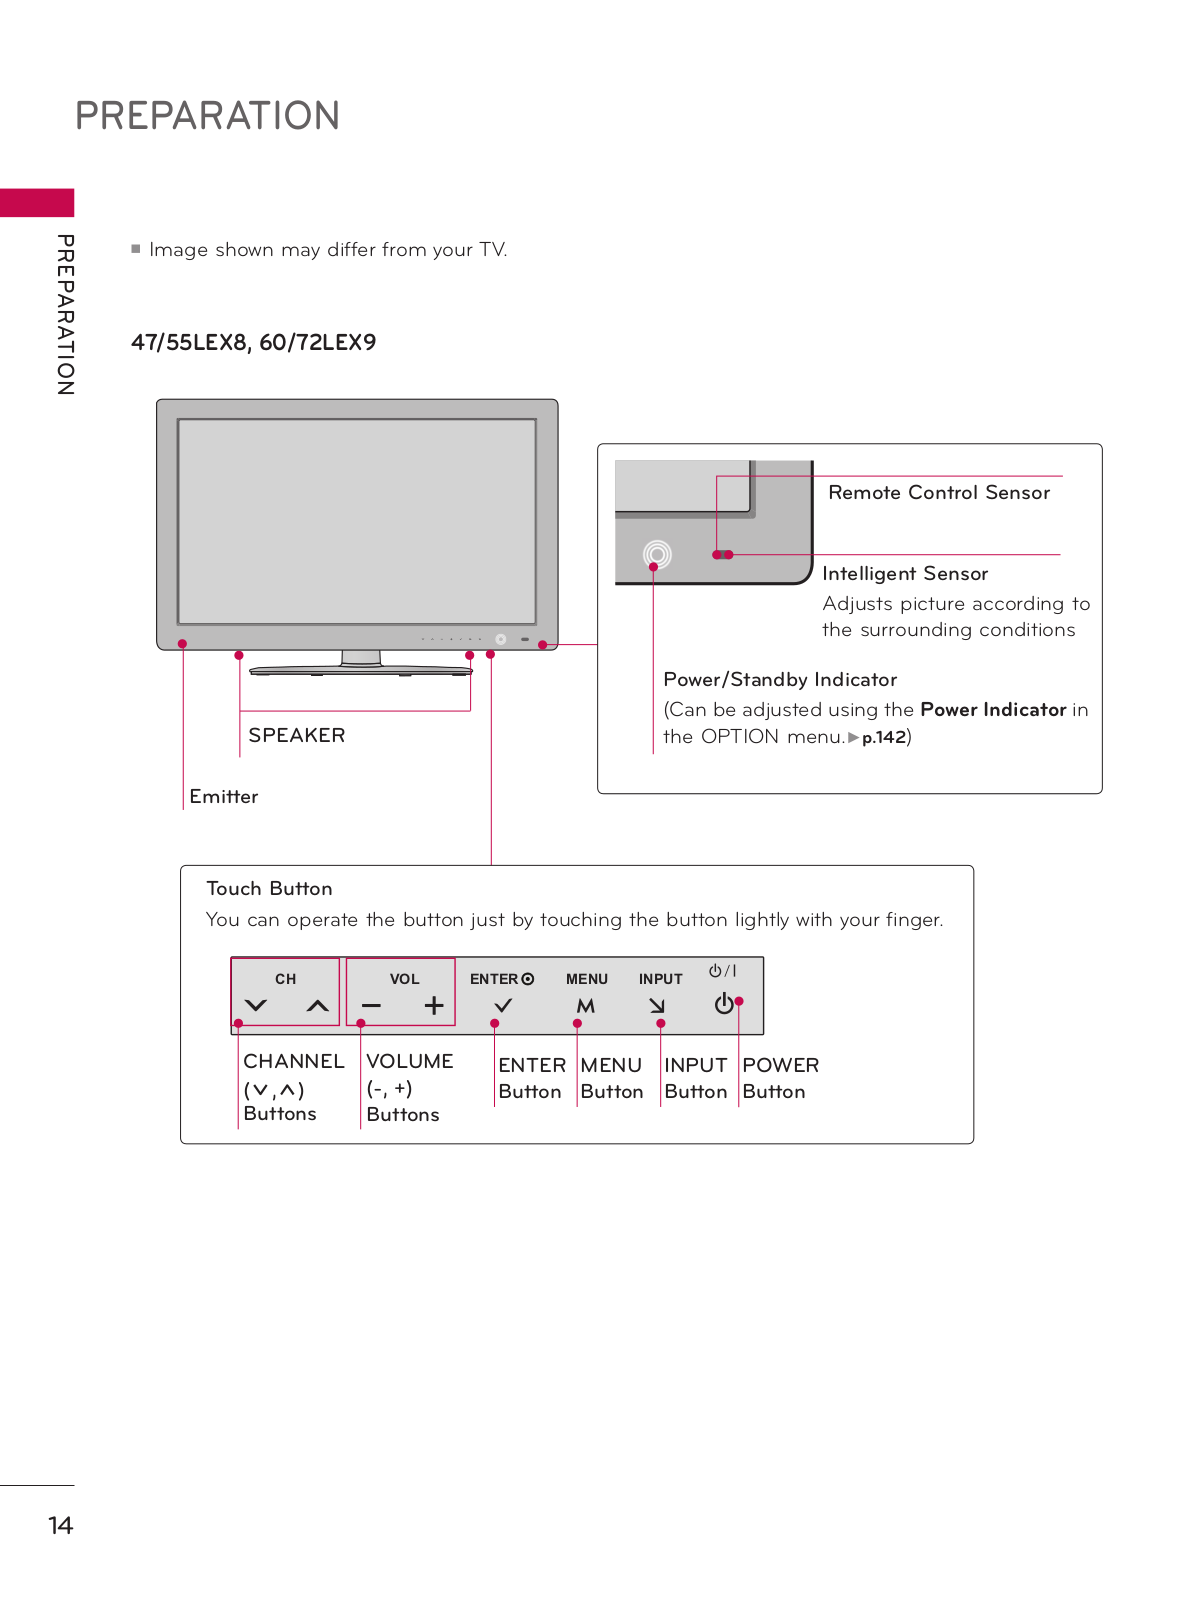
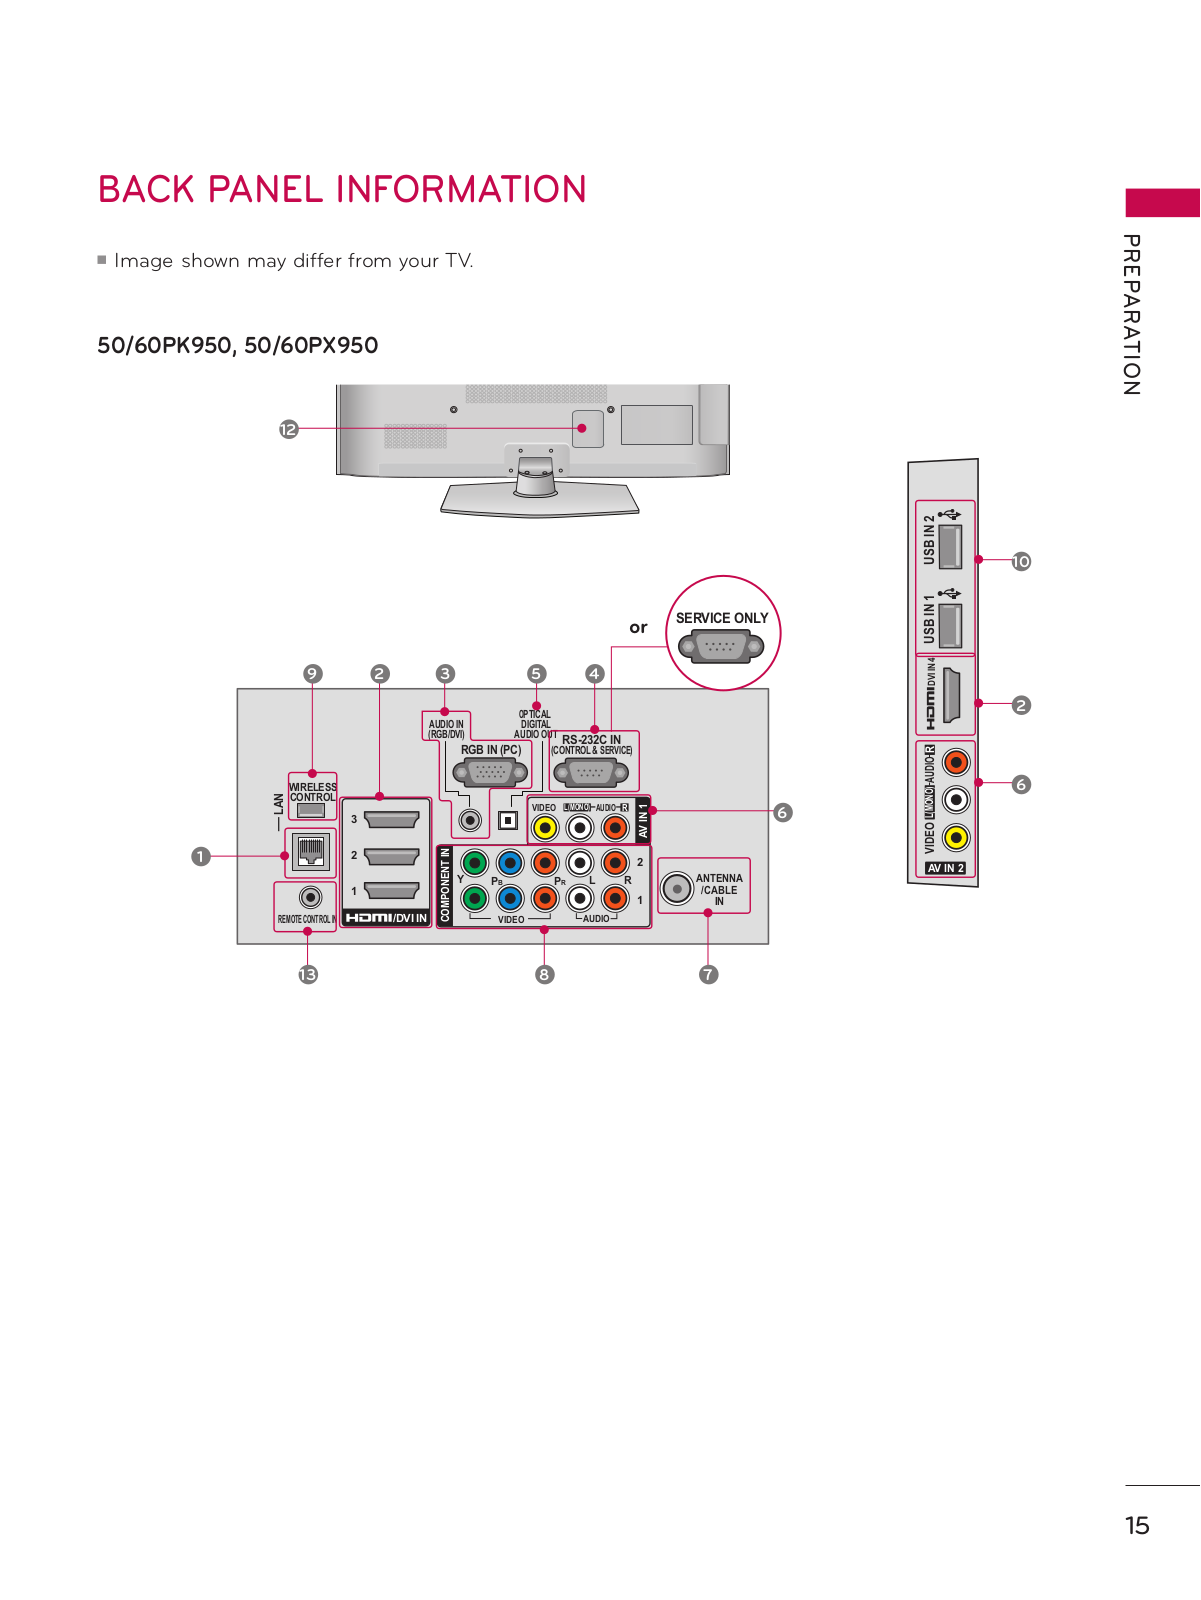
LG 47LX9500 Owner’s Manual
...
LG Owner’s Manual
Download
Specifications and Main Features
Frequently Asked Questions
User Manual
Download
Loading...
+
161
hidden pages
Unhide
You need points to download manuals.
1 point = 1 manual.
You can buy points or you can get point for every manual you upload.
Buy points
Upload your manuals
 Loading...