

LG 200LC1R User Manual

LCD TV
OWNER'S MANUAL
MODELS: 15LC1R *
20LC1R *
3itttttttsm^
m' '
■■
V'"'
♦
■
Internet Home Page : http://www.lge.com
http://www.lg.ca
ENERGYSATR is a set of power-saving
guidelines issued by the U.S.
Environmental Protection Agency(EPA).
As an ENERGY STAR
Partner LGE U. S. A.,Inc.
has determined that this
product meets the ENER
ENERGY STAR
GY STAR guidelines for
energy efficiency.
I
Please read this manual carefully before operating
your set.
Retain it for future reference.
Record model number and serial number of the set.
See the label attached on the back cover and quote
this information to your dealer
when you require service.
P/NO : 38289U0559C (0607-REV01)
Printed in Korea
Warning
Warning
WARNING:
TO REDUCE THE RISK OF ELECTRIC SHOCK DO NOT REMOVE COVER (OR BACK). NO
USER SERVICEABLE PARTS INSIDE. REFER TO QUALIFIED SEFWICE PERSONNEL
The lightning lash wih spitol, withh an equilateral Wangle, is interiJed to alert the
Leer to ttie presenre unir^ulated ‘tiangerous wbge" within te poducf s enclosure ttet nmy
A
A
NOTE TO CABLE/TV INSTALLER:
This reminder is provided to call the CATV system installer’s attention to Article 820-40 of the
National Electric Code (U.S.A.). The code provides guidelines for proper grounding and, in par
ticular, specifies that the cable ground shall be connected to the grounding system of the build
ing, as close to the point of the cable entry as practical.
be of siffcierf magnitude to o)nsiiJte a risk of eledric shock to persons.
The excbmaticn point wfthin m. equilateral Wangle is irtatoed to atert the user to tte p-esence of
impoftent opening and maintenarire (servicing) ir^'lnictions in ttie lileratue ac»omparying the
^jpliaroe.
REGULATORY INFORMATION
This equipment has been tested and found to comply with the limits for a Class B digital device,
pursuant to Part 15 of the FCC Rules. These limits are designed to provide reasonable pro
tection against harmful Interference in a residential installation. This equipment generates,
uses and can radiate radio frequency energy and, if not installed and used in accordance with
the instructions, may cause harmful interference to radio communications. However, there is
no guarantee that interference will not occur in a particular installation. If this equipment does
cause harmful interference to radio or television reception, which can be determined by turn
ing the equipment off and on, the user is encouraged to try to correct the interference by one
or more of the following measures:
- Reorient or relocate the receiving antenna.
- Increase the separation between the ^uipment and receiver.
- Connect the equipment into an outlet on a dicuit different from that to which the receiver Is connected.
- Consult the dealer or an experienced radio/TV technician for help.
Any changes or modifications not expressly approved by the party responsible for compliance
could void the user’s authority to operate the equipment.
CAUTION:
Do not attempt to modify this product in any way without written authorization from LG Electronics
Corporation. Unauthorized modification could void the user’s authority to operate this product.
U.S.A. only
COMPLIANCE:
The responsible party for this product's compliance is:
LQ Electronics U.S.A., Inc.
1000 Sylvan Avenue, Englewood Cliffs, NJ 07632
Phone: 1-800-243-0000
http://us.lge.com
Safety Instructions
Safety Instructions
WARNING :
To Reduce The Risk Of Fire Or Electric Shock, Do Not Expose This Apparatus To Rain Or Moisture.
Apparatus shall not be exposed to dripping or splashing and no objects filled wth liquids, such as vases,
shall be placed on the apparatus.
IMPORTANT SAFETY INSTRUCTIONS
A
1. Read these instructions.
2. Keep these instructions.
3. Heed all warnings.
4. Follow all Instructions.
5. Do not use this apparatus near water.
6. Clean only with a dry cloth.
8. Do not install near any heat sources such
as radiators, heat registers, stoves, or other
apparatus (including amplifiers) that pro
duce heat.
O № \ p
9. Do not defeat the safety purpose of the
polarized or grounding type plug. A polar
ized plug has two blades with one wider
than the other. A grounding type plug has
two blades and a third
wide blade or the third prong is provided for
your safety. When the provided plug does
not fit into your outlet, consult an electrician
for replacement of the obsolete outlet.
10. Protect the power cord from being walked
on or pinched particularly at plugs, conve
nience receptacles, and the point where
they exit from the apparatus.
grounding prong. The
7. Do not block any of the ventilation open
ings. Install in accordance with the manu
facturer’s instructions.
11. Only use the attachments / accessories
specified by the manufacturer.

Safety Imtmctions
Safety Instructions continued
12VUse only wth acart, stand, tripod, bracket, or
table specified by the manufacturer, or sold
with the apparatus. When a cart ¡s used, use
caution when moving the cart / apparatus
combinatbn to avoid injury from tip-over.
14
Refer all servicing to qualified service per
sonnel. Servicing is required when the
apparatus has been damaged in any way,
such as power supply cord or plug is dam
aged, liquid has been spilled or objects
have fallen into the apparatus, the appara
tus has been exposed to rain or moisture,
does not operate normally, or has been
dropped.
13. Unplug this apparatus during lightning storms
or when unused for long periods of time.
Crs
/ Note
- If the TV feels cold to the touch, there may be a small “flicker” when when it is turned on. This
is normal, there is nothing wrong with TV.
- Some minute dot defects may be visible on the screen, appearing as tiny red, green, or blue
spots. However, they have no adverse effect on the monitor's performance.
- Avoid touching the LCD screen or holding your finger(s) against it for long periods of time.
Doing so may produce some temporary distortion effects on the screen.
CAUTION concerning the Power Cord
Most appliances recommend they be placed upon a dedicated circuit; that is, a single outlet circuit
which powers only that appliance and has no additional outlets or branch circuits. Check the speci
fication page of this owner's manual to be certain.
Do not overload wall outlets. Overloaded wall outlets, loose or damaged wall outlets, extension
cords, frayed power cords, or damaged or cracked wire insulation are dangerous. Any of these con
ditions could result in electric shock or fire. Periodically examine the cord of your appliance, and if
its appearance indicates damage or deterioration, unplug it, discontinue use of the appliance, and
have the cord replaced with an exact replacement part by an authorized servicer.
Protect the power cord from physical or mechanical abuse, such as being twisted, kinked, pinched,
closed in a door, or walked upon. Pay particular attention to plugs, wall outlets, and the point where
the cord exits the appliance.
On Disposal
a. The fluorescent lamp used in this product contains a small amount of mercury.
b. Do not dispose of this product with general household waste.
Disposal of this product must be carried out in accordance to the regulations of your local authority.
V

Contents
Contents
Warnings ..............................................................2
Safety Instructions
Introduction
Controls
Connection Options
Remote Control Key Functions
Installation
Accessories
Kensington Security System(Options) .9
Installation Instruction
External Equipment Connections . .12-16
Antenna Connection
VCR Setup ............................................13
Cable TV Setup
External A/V Source Setup
DVD Setup.............................................14
DTV Setup
PC Setup
...........................................
..................................................
.................................
............................................
...............................
.............................
.....................................
..................
............................................
..............................................
3~4
..............
10
12
13
14
15
16
Operation
TV Operation Overview
Menu Language Selection .......................17
Channel Menu Options
Memorizing the Channels with EZ Sran ..18
Add/Delele Channels with Manual
Program ................................................18
Adjust frquency with Manual Program 18
Favorite Channels Setup
Picture Menu Options
EZ Video................................................20
ACC (Auto Color Control)
Manual Picture Control
Sound Menu Options
EZ Audio
...............................................
...........................
......................
.....................
.........................
17
19
20
20
21
Equalizer Adjustments
AVL (Auto Volume Leveler)
Sound Balance
Stereo/SAP Broadcasts Setup
6
7
8
9
Time Menu Options
Auto Clock Setup
Manual Clock Setup
OrVOff Timer Setup ..............................24
Sleep Timer Setup ....................................24
Auto Off .................................................24
Special Menu Options
Closed Captions
Select Mode ..........................................26
Key Lock................................................................................................26
Power indicator......................................26
Caption/Text
Captions
Lock Menu Options
Lock Menu Setup ..................................28
Screen Menu Options
Maintenance ........................32
Product Specifications ................32
Troubleshooting Checklist
..........................................
.........................................
................................................
..........................
.................
..............
..................................
.............................
....................................
.........................
..............................
30-31
21
21
22
22
23
23
25
27
27
33
After reading this manual, keep it handy for future reference.

Introduction
Introduction
Controls
0 0 'j 0 0 0 [)
Channel Buttons
Buttons
4 N .
Volume
Enter
Button
On/Off
Button
Input
Button
Menu
Button
1/
Remote Control Sensor
Power/Standby Indicator
Glows amber in Standby mode,
Glows blue when the TV Is turned on.
Connection Options
Introduction

Introduction
Remote Control Key Functions
- When using the remote control, aim it at the remote control sensor on the TV.
MUTE
Switches the sound on or off.
Returns to the TV mode.
FAV
(Refer to p.19)
NUMBER buttons
AUDIO
(Refer to p.21)
cc--------------
(Refer to p.25)
EXIT^
j ooo
1 ooo
1 ooo
\*oo&,
INPUT
Selects the remote operating
mode.
(Refer to p.26)
POWER
MTS
(Refer to p.22)
MENU
ENTER
CH A / ▼ (Channel button)
VOL ^ I ► (Volume button)
VIDEO
(Refer to p.20)
SLEEP
(Refer to p.24)
FLASHBK
Press the FLASH BK button
to return to the last channel
you were watching.
Ii’slidi 'ii; liadc'' ijs
• Open the battery compartment cover on the back side and insert
the batteries with correct polarity.
• Use two 1.5V batteries of AAA type. Don't mix used batteries with
new batteries.

Installation
Aì.ì ì -Ssì;'' r'.s
Owner’s Manual
AAA Batteries
Remote Control
4^
®1
©
0 5'T
CrOO
< i
w
%
Power Cord
Tie Holder
- Arrange the wires
with the tie Holder.
Installation
rj
Installation guide
Rack
Ki;'lsi'l!;;!;':i Si:C II ly Syslirtll
- The TV is equipped with a Kensington Security System con
nector on the back panel. Connect the Kensington Security
System cable as shown below.
- For the detailed installation and use of the Kensington
Security System, refer to the user’s guide provided with the
Kensington Security System.
For further information, contact httpV/www.kensIngtonxom,
the Internet homepage of the Kensington company.
Kensington sells security systems lor expensive electronic
equipment such as notebook PCs and LCD projectors.
NOTE
- The Kensington Security System is an optional accessory.
NOTES
a. If the TV feels cold to the touch, there may be a small ilick-
ef when when It Is turned on.
This is normal, there is nothing wrong with TV.
b. Some minute dot defects may be visible on the screen,
appearing as tiny red, green, or blue spots. However, they
have no adverse effect on the monitor’s performance.
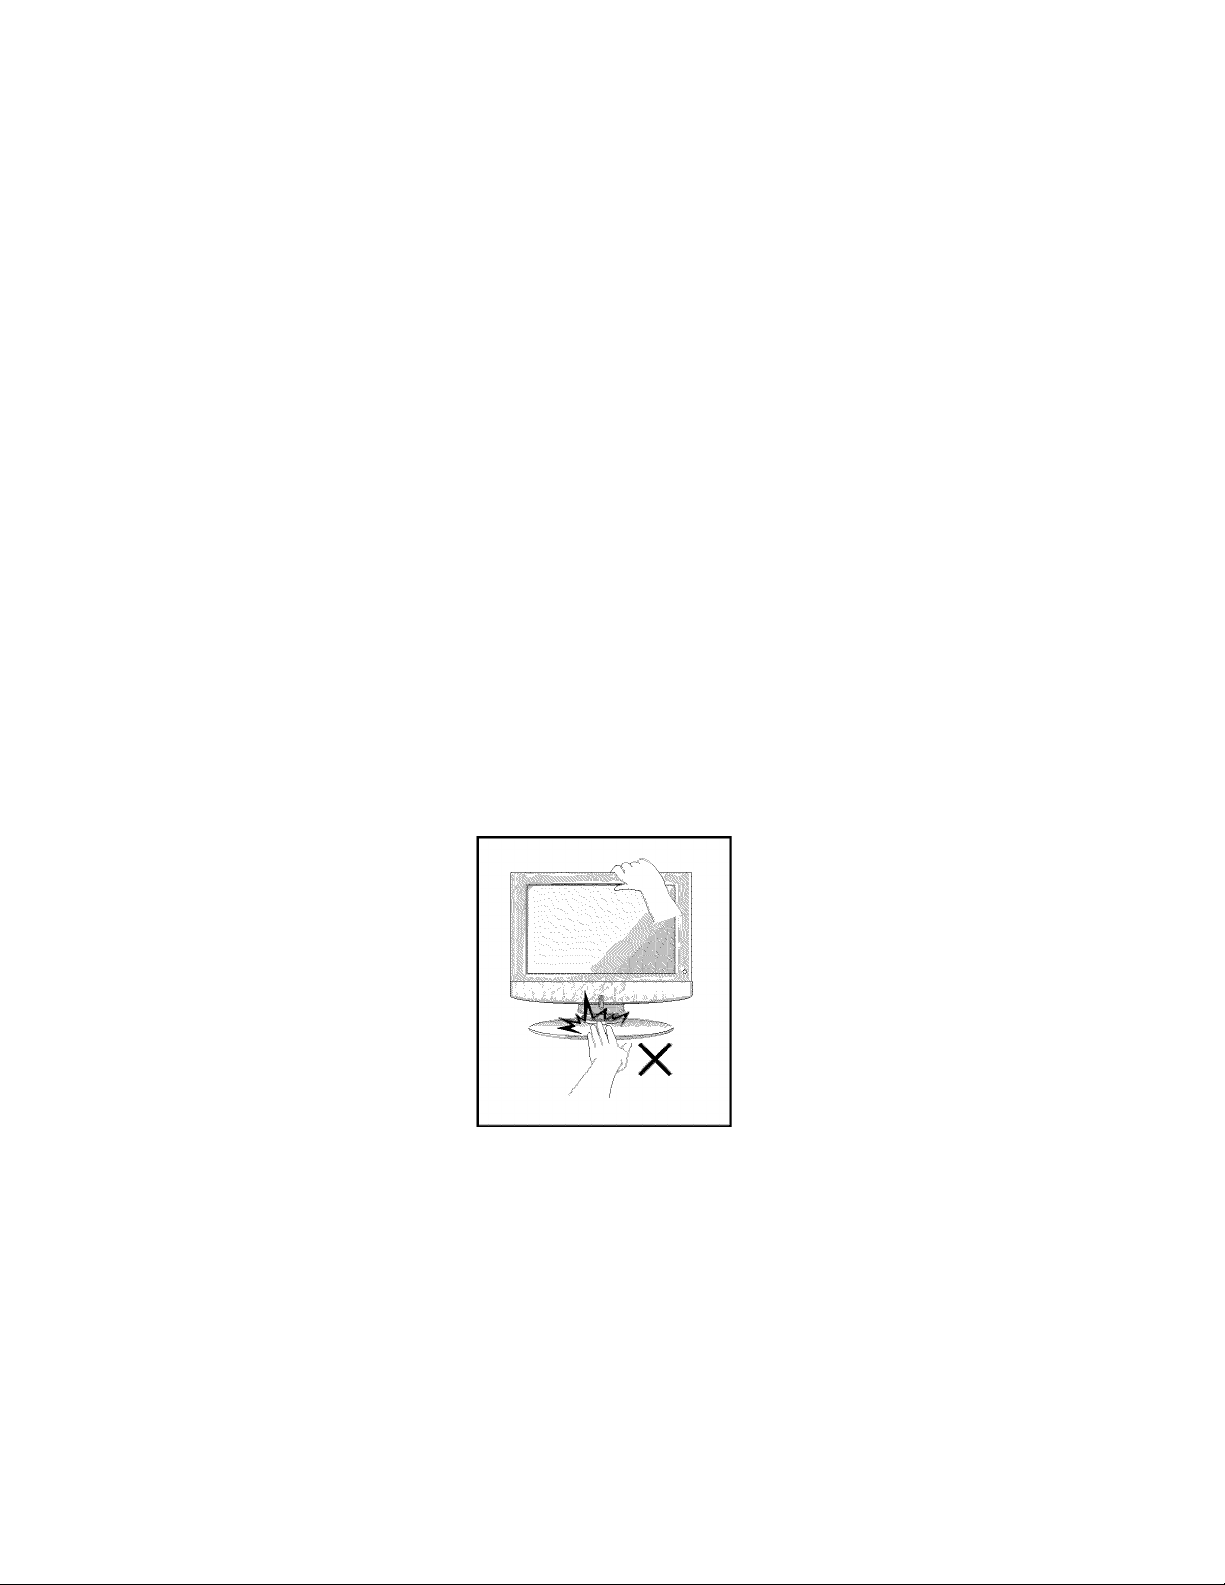
c. Avoid touching the LCD screen or holding your linger(s)
against it for long periods of time.
Doing so may produce some temporary distortion effects on
the screen.
4-Anchor 4-Screws for wall
mount rack
2-Ring spacers
(20LC1R* only)
15LC1R*
20LC1R*
Fixing screw
Installation
Installation Instruction
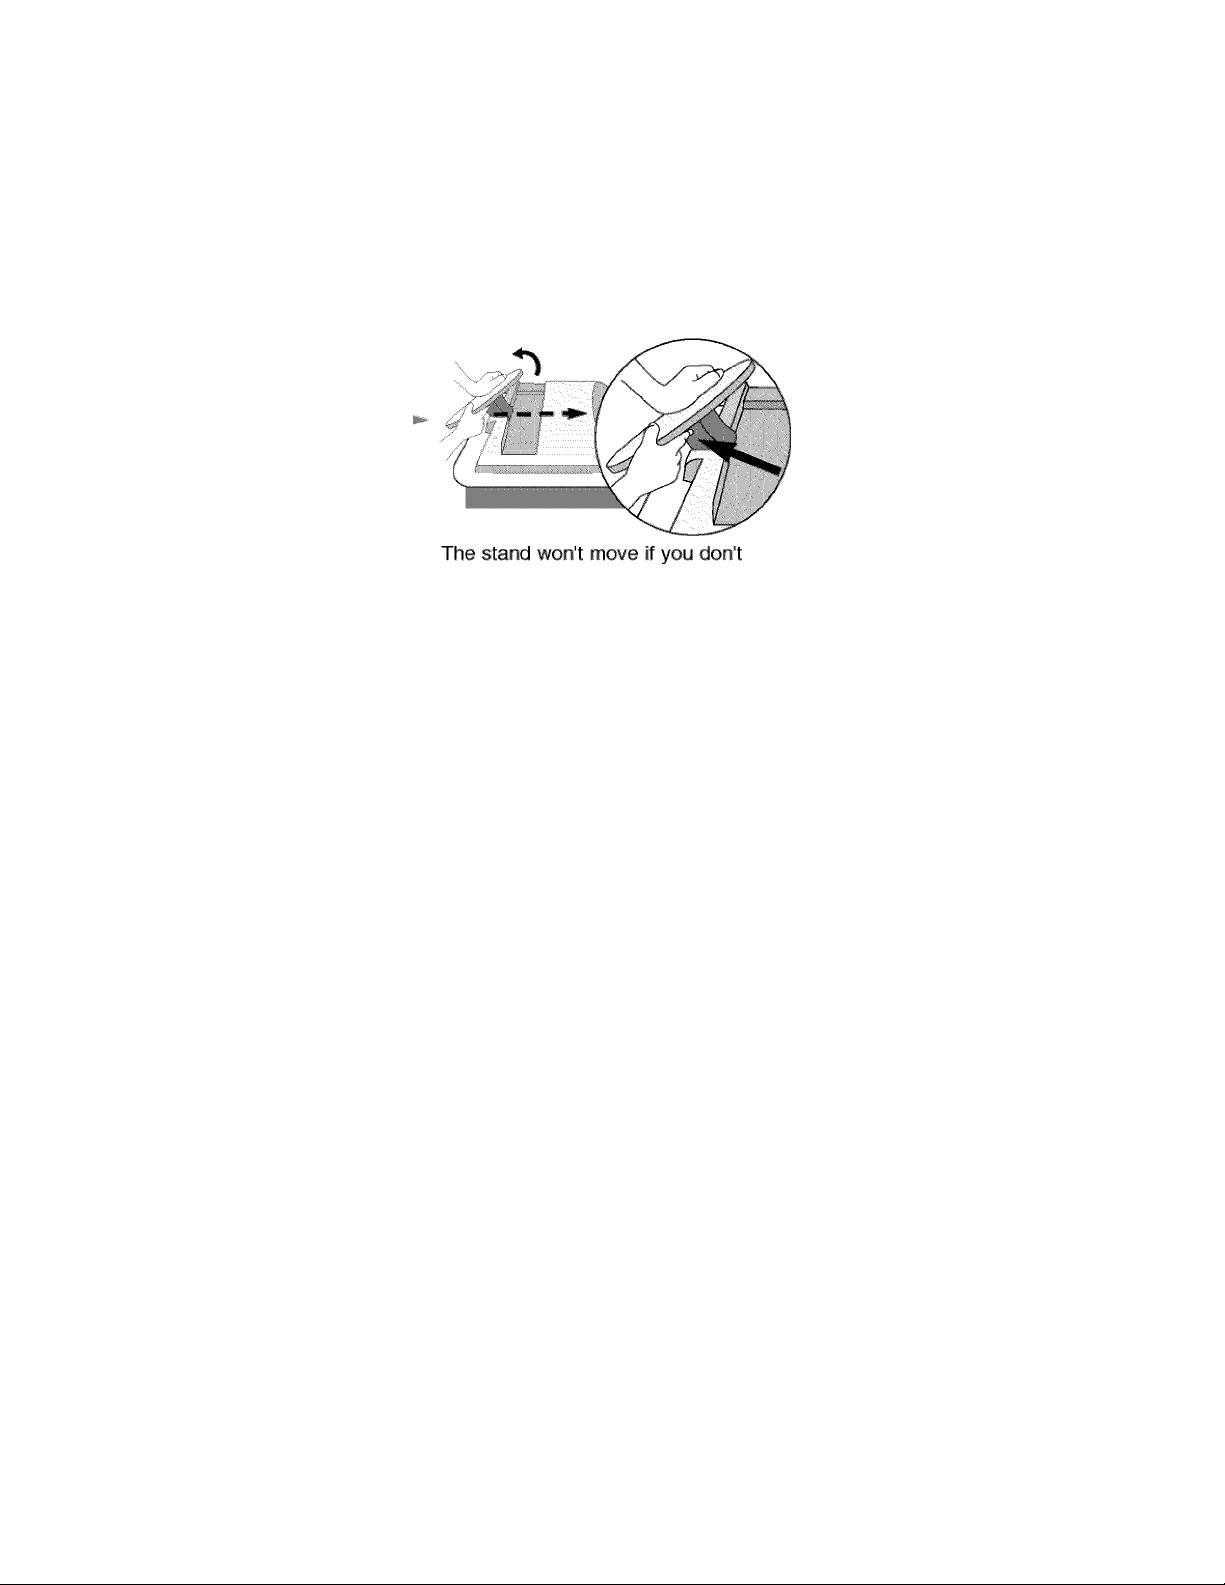
1. Place the set with its front facing downward on a cushion or soft cloth.
2. Hold down the release button inside the stand and strongly pull out the stand with your two hands.
Note: Here shown may be somewhat different from your set.
press release button.
VVa.' ■ lot!a: ii-.'^U-.l alion
20LC1R* only >
2-Ring spacers
Place the ring spacers on the set before installing the
wall mounting bracket so that the inclination of the
backside of the set can be adjusted perpendicularly.
For proper ventilation, allow a clearance of 4" on each side and from the wall. Detailed installation instruc
tions are available from your dealer, see the optional Tilt Wall Mounting Bracket Installation and Setup Guide.
l)':;-skt:.:|: i■■-:;(!í!.s|f;l If.sUillMlioi'
10
For proper ventilation, allow a clearance of 4" on each side and from
the wall.
Installation Instruction Continued
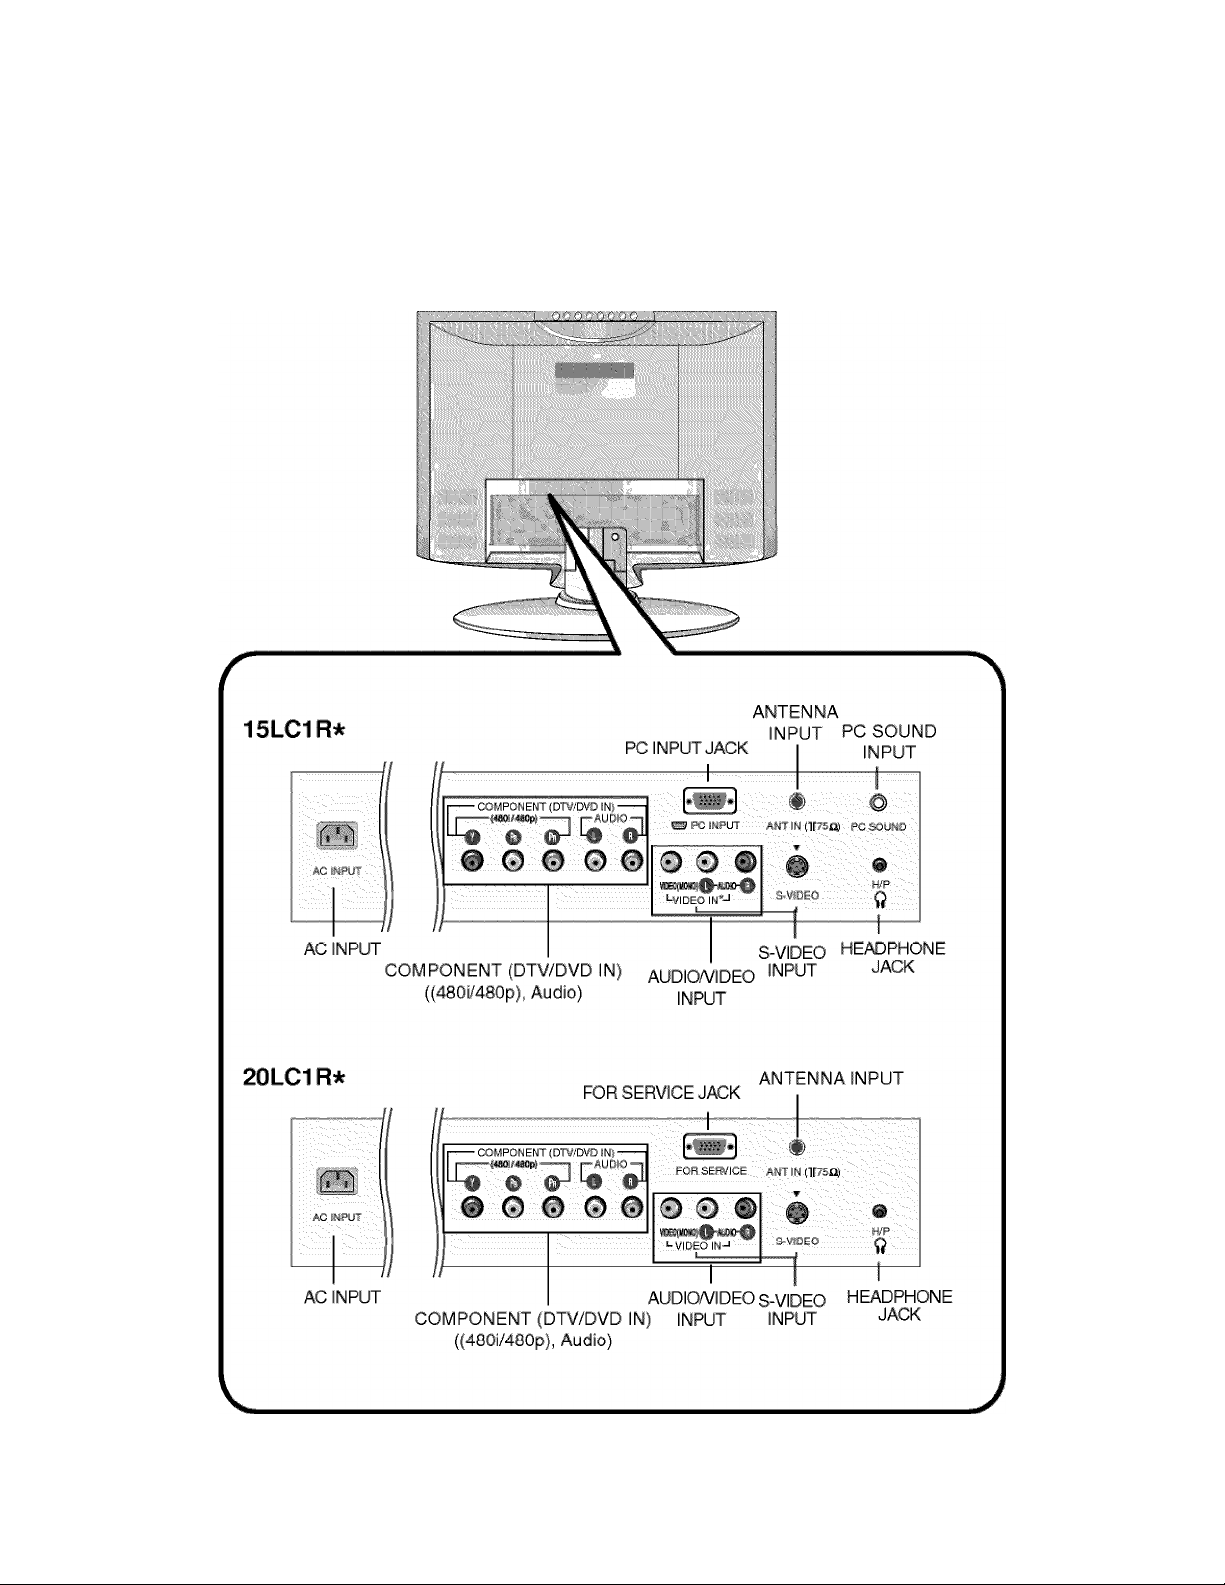
1. Connect the aerial cable to the socket marked i75 £1 on the back. For the best reception an
outdoor aerial should be used.
2. To connect an additional equipment, see the External Equipment Connections section.
3. Connect the power cord.
Note: Here shown may be somewhat different from your set.
Installation
I ':;,s li!''li'i!; y-i-" di^:.i ;-iy
Adjust the position of the panel in various ways for maximum comfort.
• Tilt range
Be careful that your hands are not
pressed down when tilting the screen.
11
 Loading...