

Page 1
LLGG 220000
LLGG 220000
Guide de L’utilisateur
User Guide
MMBB0183201(1.1)
User Guide
H
LLGG 220000
Page 2

Copyright ©2005 LG Electronics, Inc. All rights reserved.
LG and the LG logo are registered trademarks of LG Group
and its related entities. All other trademarks are the property
of their respective owners.
Page 3
IMPORTANT SAFETY PRECAUTIONS
Read these simple guidelines. Breaking the rules may be dangerous or illegal. Further detailed information is
given in this user guide.
WARNING! Violation of the instructions may cause serious injury or death.
1. Never use an unapproved battery since this could damage the phone and/or battery and could
cause the battery to explode.
2. Never place your phone in a microwave oven as it will cause the battery to explode.
3. Do not dispose of your battery by fire or with hazardous or flammable materials.
4. Make sure that no sharp-edged items such as animal’s teeth or nails, come into contact with the
battery. There is a risk of this causing a fire.
5. Store the battery out of reach of children.
6. Be careful that children do not swallow any parts as this could cause asphyxiation or suffocation.
IMPORTANT SAFETY PRECAUTIONS
1
Page 4

IMPORTANT SAFETY PRECAUTIONS
IMPORTANT SAFETY PRECAUTIONS
2
1. Unplug the power cord and charger during lightning storms to avoid electric shock or fire.
2. When in a car, do not leave your phone or set up the hands-free kit near to the air bag. If
wireless equipment is improperly installed and the air bag is activated, you may be seriously
injured.
3. Do not use a hand-held phone while driving.
4. Do not use the phone in areas where its use is prohibited. (i.e.: aircraft, hospital).
5. Do not expose the battery charger or adapter to direct sunlight or use it in places with high
humidity, such as a bathroom.
6. Never store your phone in temperatures less than -15°C or greater than 50°C
7. Do not use harsh chemicals (i.e.: alcohol, benzene, thinners, etc.) or detergents to clean your
phone. There is a risk of this causing a fire.
8. Do not drop, strike, or shake your phone severely. Such actions may harm the internal circuit
boards of the phone.
9. Do not use your phone in high explosive areas as the phone may generate sparks.
10. Do not damage the power cord by bending, twisting, pulling or heating. Do not use the
Battery Charger if it is loose as it may cause a fire or electric shock.
Page 5

1. Do not place any heavy items on the power cord. Do not allow the power cord to be crimped as
it may cause fire or electric shock.
2. Do not handle the phone with wet hands while it is being charged. It may cause an electric
shock or seriously damage your phone.
3. Do not disassemble the phone.
4. Do not place or answer calls while charging the phone as it may short-circuit the phone and/or
cause electric shock or fire.
5. Only use the batteries, antennas and chargers provided by LG. The warranty will not be applied
to products provided by other suppliers.
6. Only authorized personnel should service the phone and its accessories. Faulty installation or
service may result in accidents and consequently invalidate the warranty.
7 Do not hold or let the antenna come in contact with your body during a call.
8. An emergency call can be made only within a service area. For an emergency call, make sure that
you are within a service area and that the phone is turned on.
IMPORTANT SAFETY PRECAUTIONS
3
Page 6

CONTENTS
Some of contents in this user guide may be different from your phone depending on the software of the phone
or your service provider. Features and specifications might be subject to change without prior notice.
CONTENTS
IMPORTANT SAFETY
PRECAUTIONS 1
CONTENTS 4
Welcome 9
Important Information
FCC Part 15 Class B
Compliance
Industry Canada Compliance
Technical Details
FCC RF Exposure
Information 11
4
Phone Overview 12
Menus Overview 14
Getting Started with Your
Phone 16
The Battery
Installing the Battery
Removing the Battery
Charging the Battery
Battery Charge Level
Turning the Phone On and Off 17
Turning the Phone On
Turning the Phone Off
Signal Strength
Screen Icons 18
Making Calls 19
Correcting Dialing Mistakes
Redialing Calls
Receiving Calls
Page 7

Quick Access to
Convenient Features 20
Manner Mode
Lock Mode
Mute Function
Volume Quick Adjustment
Call Waiting 21
Caller ID
Speed Dialing
Entering and Editing
Information 22
Text Input
Text Input Examples 23
Using Abc (Multi-tap) Text Input
Using T9 Mode Text Input 24
Using the NEXT Key
Ading Words to the T9 Database
Contacts in Your Phone’s
Memory 25
Contacts Entries
The Basics of Storing Contacts Entries
Options to Customize Your Contacts 26
Editing Contacts Entries 28
CONTENTS
Deleting 30
Phone Numbers With Pauses 31
Searching Your Phone’s Memory 32
Making a Call From Your Phone’s
Memory
Using Phone Menus 34
Menu Access
Contacts
Access and Options
1. List Entries 35
2. New Entry
3. Groups 36
4. Speed Dials
5. Erase all Contacts
5
Page 8

CONTENTS
CONTENTS
Call History 37
Access and Options
1. All Calls
2. Dialed Calls
3. Received Calls 38
4. Missed Calls
5. Erase History
6. Timers
Messaging 39
Access and Options
1. Voice Mail 40
2. Text and Multimedia
1. Send New
2. Inbox 41
3. Outbox/Sent 42
4. Drafts 43
5. Saved
6. Erase Messages 44
6
7. Settings 44
8. Memory Status 45
3. Web Alert
4. E-mail
5. IM & Chat
Do More 46
Access and Options
1. Wireless Web
2. Sounds 47
2.1 Ringtones
2.2 Sound Clips
2.3 Voice Memo 48
3. Images 49
3.1 Wallpaper
3.2 Image Clips
3.3 Picture Album
3.4 Online Album
4. Games
5. Tools 50
Get New
Calculator
Alarm Clock 51
Scheduler
Notepad 52
Ez Tip Calc 53
World Clock
6. Favourites 54
6.1 Shortcode List
6.2 Web Links
7. Memory Status
Camera 55
Access and Options
1. Take Picture
2. Take Video 56
3. Picture Album 57
4. Video Album
Page 9
Settings 58
Access and Options
1. Sounds
1.1 Ringers
1.2 Keypad 59
1.3 Volume
1.4 Alerts 60
2. Display 61
2.1 Banner
2.2 Wallpaper
2.3 Main Display
2.4 Keypad light 62
2.5 Time and Date
2.6 Menu Style 63
2.7 Fonts
3. Games/Tools
3.1 Backlight Settings
3.2 Volume
3.3 Notification 64
4. Others 64
4.1 Assign Shortcut
4.2 Call Setup
4.3 Language 65
4.4 TTY Mode 66
4.5 Data Setup
5. Advanced 67
5.1 Phone Info
5.2 System 68
5.3 Security 69
6. Airplane Mode 71
CONTENTS
Safety 72
TIA Safety Information
Exposure to Radio Frequency Signal
Antenna Care
Phone Operation
Tips on Efficient Operation
Driving 73
Electronic Devices
Pacemakers
Hearing Aids 74
Other Medical Devices
Health Care Facilities
Vehicles
Posted Facilities
Aircraft
Blasting Areas
Potentially Explosive Atmosphere 75
For Vehicles Equipped with an Air Bag
7
Page 10

CONTENTS
CONTENTS
Safety Information 75
Charger and Adapter Safety
Battery Information and Care
Explosion, Shock, and Fire Hazards 76
General Notice
FDA Consumer Update 78
Consumer Information on
SAR 85
Accessories 87
Travel Charger
Battery
Vehicle Power Charger
USB Data Cable
Hands-Free Car Kit (Portable)
Headset
Holster
8
Warranty information 88
Page 11

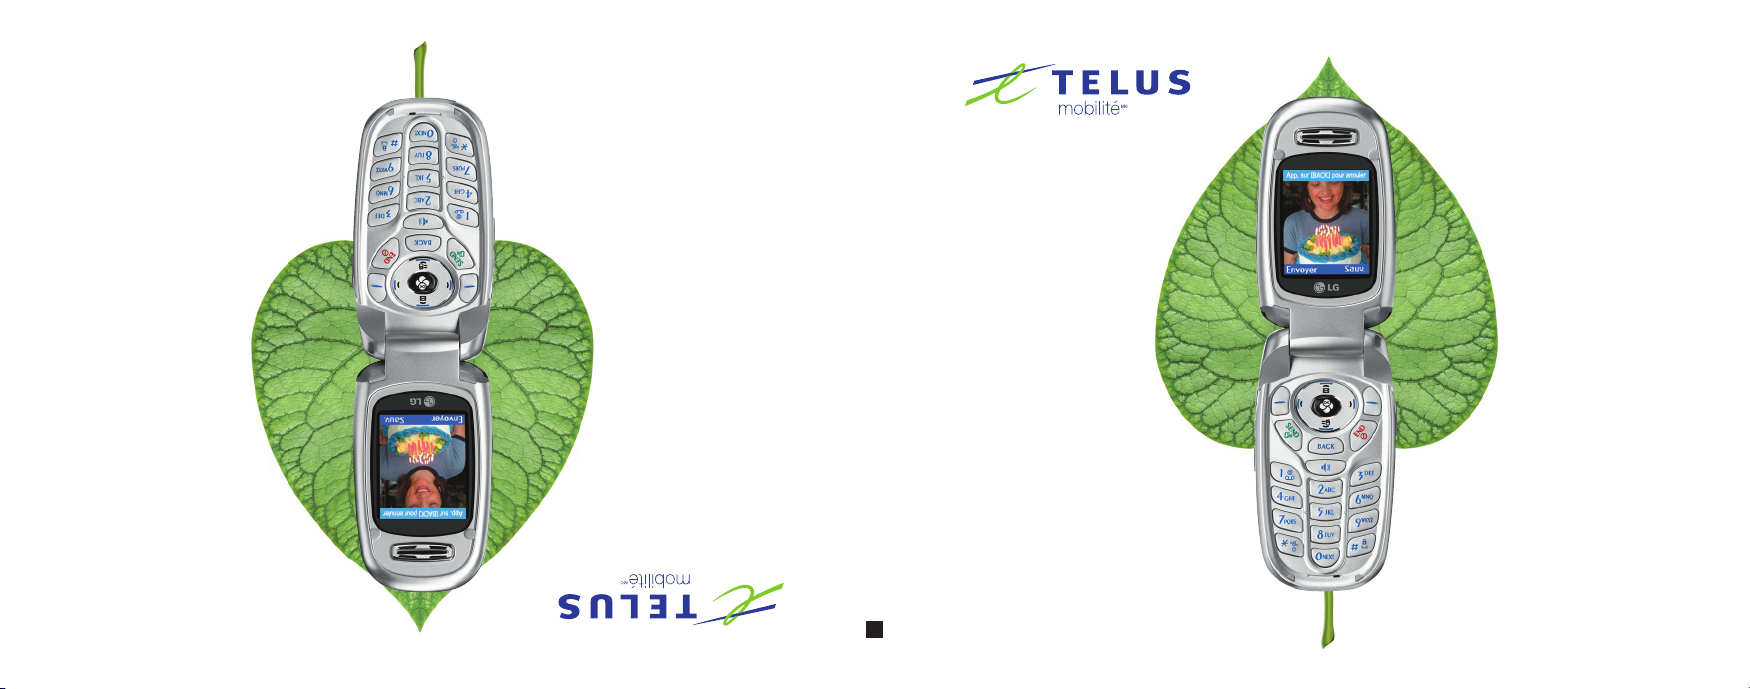
WELCOME
Congratulations for choosing the advanced and compact
LG 200 cellular phone, designed to operate with the
latest digital mobile communication technology, Code
Division Multiple Access (CDMA). Along with the many
advanced features of the CDMA system, such as greatly
enhanced voice clarity, this phone offers:
1. Large, easy-to-read, 9-line backlight LCD with status
icons.
2. Paging, messaging, Voice Mail and Caller ID.
3. 23-key keypad.
4. Menu-driven interface with prompts for easy operation
and configuration.
5. Any key answer, auto answer, auto retry, one-touch dial
and speed dialing with 99 memory locations.
6. Bilingual (English and French) capabilities.
Important Information
This user’s guide provides important information on the
use and operation of your phone. Please read all the
information carefully prior to using the phone for the
best performance and to prevent any damage to or
misuse of the phone. Any unapproved changes or
modifications will void your warranty.
FCC Part 15 Class B Compliance
This device and its accessories comply with part 15 of
FCC rules. Operation is subject to the following two
conditions: (1) This device and its accessories may not
cause harmful interference, and (2) this device and its
accessories must accept any interference received,
including interference that causes undesired operation.
Industry Canada Compliance
This phone complies with Industry Canada RSS 133.
This phone complies with the Class B limits for radio
noise emissions as set out in the interference causing
standard entitled "Digital Apparatus" ICES-003 of
Industry Canada.
Technical Details
The LG 200 is an all digital phone that operates on both
Code Division Multiple Access (CDMA) frequencies:
cellular services at 800 Mhz and Personal
Communication Services (PCS) at 1.9 Ghz. Also, the
LG 200 works on Advanced Mobile Phone Service
(AMPS). We call it a tri-mode phone. Since the phone
operates on Cellular, PCS and AMPS, the call fail rate is
WELCOME
9
Page 12
WELCOME
WELCOME
10
less than on a conventional dual-mode or
singlemode phone.
CDMA technology uses a feature called DSSS
(Direct Sequence Spread Spectrum) that enables
the phone to keep communication from being
crossed and to use one frequency channel by
multiple users in the same specific area. This
results in a 10-fold capacity increase when
compared with analog mode. In addition, features
such as soft / softer handoff, hard Handoff, and
dynamic RF power control technologies combine
to reduce call interruptions.
The Cellular and PCS CDMA networks consist of
MSO (Mobile Switching Office), BSC (Base
Station Controller), BTS (Base Station
Transmission System), and MS (Mobile Station).
The following table lists some major CDMA
standards.
* TSB -74: Protocol between an IS-95A system
and ANSI J-STD-008
1xRTT system receives twice as many subscribers
in the wireless section as IS-95. Its battery life is
twice as long as IS-95. High-speed data
transmission is also possible.
CDMA Standard
Basic Air
Interface
Network
Service
Performance
Designator Description
TIA/EIA-95A
TSB-74
ANSI J-STD-008
TIA/EIA-IS2000
ANSI TIA/EIA
553 A
TIA/EIA/IS-634
TIA/EIA/IS/651
TIA/EIA/IS-41-C
TIA/EIA/IS-124
TIA/EIA/IS-96-B
TIA/EIA/IS-99
TIA/EIA/IS-637
TIA/EIA/IS-657
IS-801
TIA/EIA/IS-707-A
TIA/EIA/IS-97
TIA/EIA/IS-98
ANSI J-STD-018
ANSI J-STD-019
TIA/EIA/IS-125
CDMA Dual-Mode Air Interface
14.4kbps radio link protocol and
inter-band operations
IS-95 adapted for PCS frequency
band CDMA2000 1xRTT Air
Interface
Advanced Mobile Phone Service
MAS-BS
PCSC-RS
Intersystem operations
Nom-signaling data comm.
Speech CODEC
Async Data and Fax
Short message service
Packet Data
Position Determination Service
(gpsOne)
High Speed Packet Data
Cellular base station
Cellular mobile station
PCS personal station
PCS base station
Speech CODEC
Page 13

FCC RF Exposure Information
WARNING! Read this information before operating
the phone.
In August 1996, the Federal Communications
Commission (FCC) of the United States, with its action in
Report and Order FCC 96-326, adopted an updated
safety standard for human exposure to Radio Frequency
(RF) electromagnetic energy emitted by FCC regulated
transmitters. Those guidelines are consistent with the
safety standard previously set by both U.S. and
international standards bodies.
The design of this phone complies with the FCC
guidelines and these international standards.
Bodily Contact During Operation
This device was tested for typical use with the back of the
phone kept 3/4 inches (2 cm) from the body. To comply
with FCC RF exposure requirements, a minimum
separation distance of 3/4 inches (2 cm) must be
maintained between the user’s body and the back of the
phone, including the antenna, whether extended or
retracted. Third-party belt-clips, holsters and similar
accessories containing metallic components should not
be used. Avoid the use of accessories that cannot
maintain 3/4 inches (2 cm) distance between the user’s
body and the back of the phone and have not been
tested for compliance with FCC RF exposure limits.
Vehicle-Mounted External Antenna
(Optional, if available.)
A minimum separation distance of 8 inches (20 cm) must
be maintained between the user / bystander and the
vehicle-mounted external antenna to satisfy FCC RF
exposure requirements. For more information about RF
exposure, visit the FCC website at www.fcc.gov.
Caution
Use only the supplied and approved antenna. Use of
unauthorized antennas or modifications could impair call
quality, damage the phone, void your warranty and/or
result in violation of FCC regulations.
Do not use the phone with a damaged antenna. If a
damaged antenna comes into contact with the skin a
minor burn may result. Contact your local dealer for a
replacement antenna.
WELCOME
11
Page 14
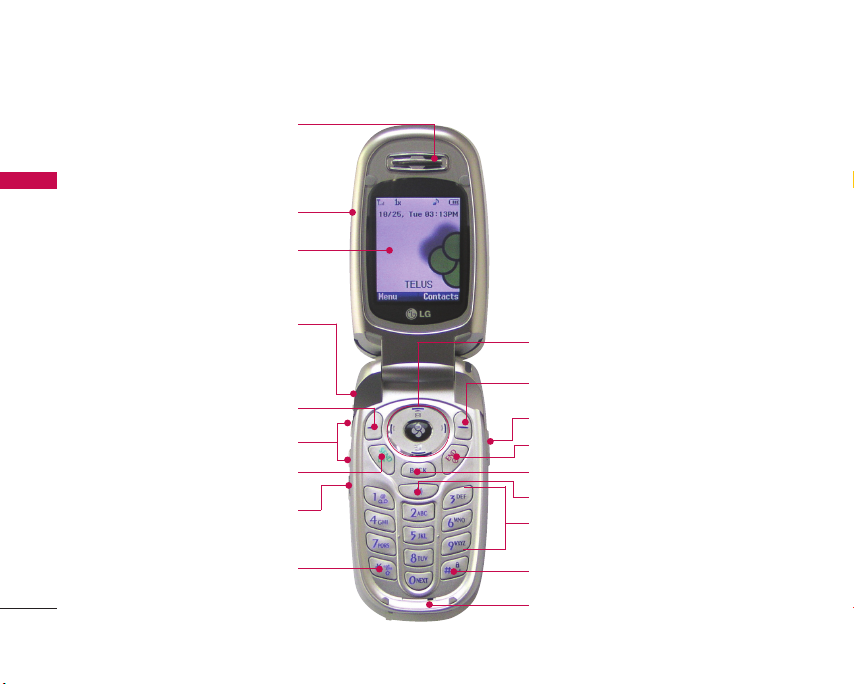
PHONE OVERVIEW
Earpiece
PHONE OVERVIEW
12
Flip
LCD Screen
Headset Jack
Left Soft Key
Side Keys
SEND Key
Voice Dial Key
Manner Mode Key
Navigation Keys
Right Soft Key
Side Camera Key
END/PWR Key
BACK Key
Speaker Key
Alphanumeric Keypad
Lock Mode Key
Microphone
Page 15

Earpiece
Open the case to answer an incoming call and
Flip
close to end the call.
LCD Screen
Displays messages and indicator icons.
Headset Jack
Left Soft Key
menu.
Side Keys
mode and the earpiece volume during a call.
SEND Key
Voice Dial Key
Manner Mode Key
standby mode press and hold for about 3
seconds).
Navigation Keys
options and acts as a shortcut key from standby
mode. (Contacts, Call History, Messasing, Tools,
Camera, Settings.)
Right Soft Key
menu.
Use to display the function Message
Use to adjust the ringer volume in standby
Use to place or answer calls.
Use for quick access to Voice Memo.
Use to set the mode (from
Scrolls through the phone’s menu
Use to select an action within a
Side Camera Key
function. (Press and hold for about 3 seconds to use
camera function.)
END Key
call. Also use to return to the main menu display
screen.
BACK Key
Press and hold to delete entire words. Press this key
once in a menu to go back one level.
Speaker Key
call.
Alphanumeric Keypad
characters and select menu items.
Lock Mode Key
lock function by pressing and holding the key
for about 3 seconds.
Use for quick access to Camera
Use to turn the power on/off and to end a
Press to delete a single space or character.
Use to turn the speaker on/off during a
Use to enter numbers and
Use in Main Menu Screen to set the
Microphone
PHONE OVERVIEW
13
Page 16
MENUS OVERVIEW
MENUS OVERVIEW
14
1. Contacts
1. List Entries
2. New Entry
3. Groups
4. Speed Dials
5. Erase all Contacts
2. Call History
1. All Calls
2. Dialed Calls
3. Received Calls
4. Missed Calls
5. Erase History
1. All Calls
2. Dialed Calls
3. Received Calls
4. Missed Calls
6. Timers
1. Last Call
2. Lifetime
3. Messaging
1. Voice Mail
2. Text/Multimedia
1. Send New
2. Inbox
3. Outbox/Sent
4. Drafts
5. Saved
6. Erase Messages
7. Settings
8. Memory Status
3. Web Alert
4. E-mail
5. IM & Chat
4. Do More
1. Wireless Web
2. Sounds
3. Images
4. Games
5. Tools
6. Favourites
7. Memory Status
Page 17

5. Camera
1. Take Picture
2. Take Video
3. Picture Album
4. Video Album
6. Settings
1. Sounds
1. Ringers
2. Keypad
3. Volume
4. Alerts
2. Display
1. Banner
2. Wallpaper
3. Main Display
4. Keypad light
5. Time and Date
6. Menu Style
7. Fonts
3. Games / Tools
1. Backlight Settings
2. Volume
3. Notification
4. Others
1. Assign Shortcut
2. Call Setup
3. Language
4. TTY Mode
5. Data Setup
5. Advanced
1. Phone Info
2. System
3. Security
6. Airplane Mode
MENUS OVERVIEW
15
Page 18

GETTING STARTED WITH YOUR PHONE
The Battery
Note
It is important to fully charge the battery before
initial use of the phone.
The phone comes with a rechargeable battery. Keep
GETTING STARTED WITH YOUR PHONE
the battery charged while not in use in order to
maximize talk and standby time. The battery charge
level is shown at the top of the LCD screen.
Installing the Battery
To install the battery, insert the battery into the
opening on the back of the phone. Put the battery
cover on the battery and push it slightly upwards.
Removing the Battery
Remove the battery by pressing the upper area, and
pulling the battery.
16
Charging the Battery
To use the charger provided with your phone:
WARNING! Use only the charger provided with the
phone. Using any charger other than the one included
with the LG 200 may damage your phone or battery.
1. Plug the end of the adapter into the phone's
charger port and the other end into an electrical
outlet.
2. The charge time varies depending upon the
battery level. The maximum charge time for a fully
discharged battery is 3.5 hours.
Battery Charge Level
The battery charge level is shown at the top right of
the LCD screen. When the battery charge level
becomes low, the low battery sensor alerts you in
three ways: sounding an audible tone, blinking the
battery icon, and displaying
WARNING!
exceedingly low, the phone automatically switches off
and any function in progress is not saved.
If the battery charge level becomes
LOW BATTERY
Page 19
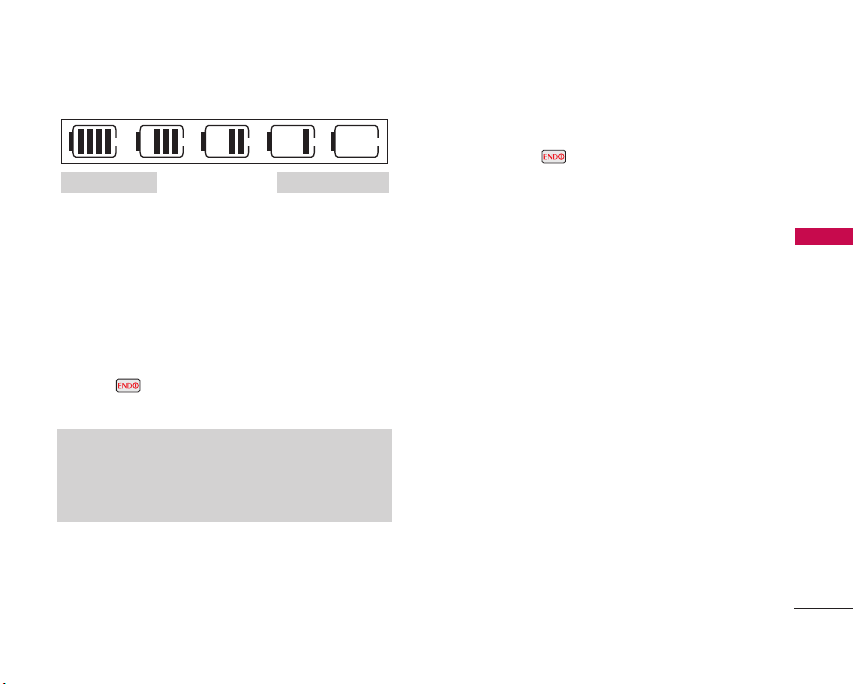
Fully DischargedFully Charged
Turning the Phone On and Off
Turning the Phone On
1. Install a charged battery or connect the phone to
an external power source such as a cigarette lighter
charger or hands-free car kit.
2. Press for a few seconds until the LCD screen
lights up.
Note
Like any other radio device, avoid any
unnecessary contact with the antenna while your
phone is on.
Turning the Phone Off
1. Press and hold until the display turns off.
Signal Strength
Call quality depends on the signal strength in your
area. The signal strength is indicated on the screen
as the number of bars next to the signal strength
icon: The more bars, the better the signal strength. If
the signal quality is poor, move to an open area. If
you are in a building, the reception may be better
near a window.
GETTING STARTED WITH YOUR PHONE
17
Page 20
GETTING STARTED WITH YOUR PHONE
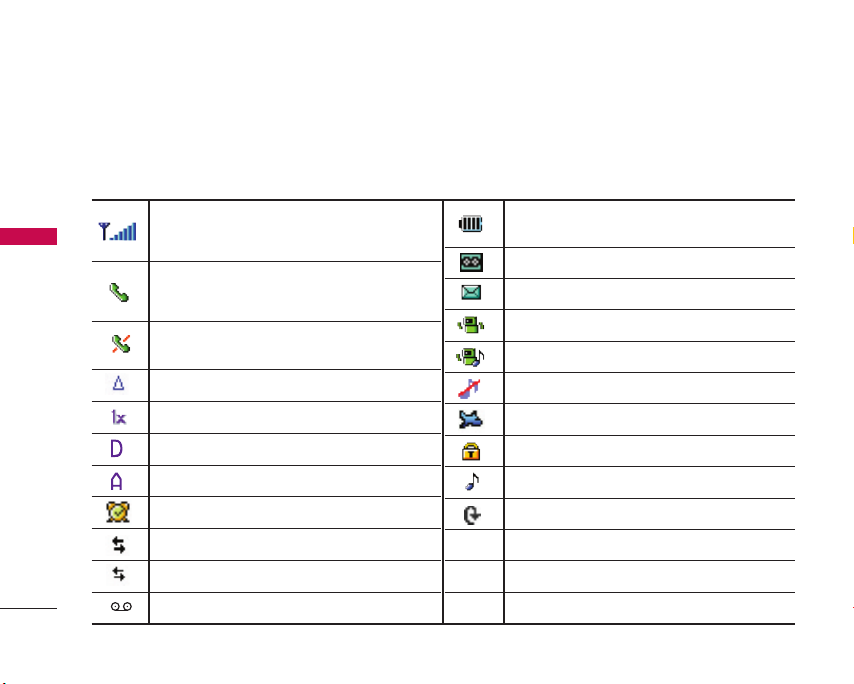
Screen Icons
When the phone is powered on, the top line of the LCD screen displays icons indicating the status of the phone.
To see the icons below, go to Menu->Settings->Advanced->Phone Info->Icon Glossary.
GETTING STARTED WITH YOUR PHONE
18
Signal strength indicator. The strength of the
signal received by the phone is indicated by the
number of bars displayed.
In Use indicator. A call is in progress.
* No icon indicates the phone is in Main Menu
Screen.
No service indicator. The phone is not
receiving a system signal.
Roaming.
IS-2000.
Digital.
Analog.
Alarm.
1X Data active.
1X Data dormant.
New voicemails.
Battery strength. Indicates battery charge level.
New msgs&voice.
New msgs.
Vibrate On.
Ringer & Vibrate.
Ringer Off / Silence All mode.
Airplane mode.
SSL.
Ringer On.
QNC Data active
Page 21
Making Calls
1. Make sure the phone is turned on. If not, press
for about 3 seconds.
2. Enter the phone number (include the area code if
needed).
3. Press .
lf the phone is locked, enter the lock code.
Call Failed
4. Press to end the call.
Correcting Dialing Mistakes
If you make a mistake while dialing a number, press
down for at least 2 seconds to delete all digits.
- indicates the call did not go through.
once to delete the last digit entered or hold
Redialing Calls
1. Press twice to redial the last number. The last
60 numbers (dialed) are stored in the call history
list and can be accessed for redial by pressing
and using the down navigation key until you
reach the desired number and pressing
again.
Receiving Calls
1. When the phone rings or vibrates, press to
answer.
Note
If you press or (the side keys) while the
phone is ringing, the ringing or vibration is muted
for that call.
2. Press to end the call.
GETTING STARTED WITH YOUR PHONE
19
Page 22
QUICK ACCESS TO CONVENIENT FEATURES
QUICK ACCESS TO CONVENIENT FEATURES
20
Manner Mode
Use Manner Mode in public places. When Manner Mode
is set, is displayed on the screen, the key tones are
silent, and the phone is set to Manner Mode.
Manner Mode Quick Activation
1. From standby mode press to Manner Mode.
Manner Mode Quick Cancellation
1. Press for manner mode cancellation.
Note
Mode changes can only be when the flip is OPEN.
Lock Mode
Use Lock Mode to prevent others from using your
phone. When Lock Mode is set, your 4-digit
password is required to use the phone.
Note
The lock code/password is the last 4 digits of your
phone number. You can change to a new password
using the Security menu.
Mute Function
The Mute function prevents the other party from hearing
your voice, but allows you to hear the other party.
Mute Quick Activation
1. Select Mute during a call.
Mute Quick Cancellation
1. Select Unmute again.
Volume Quick Adjustment
Use the side keys to adjust the earpiece and master
volumes. The upper key increases the volume and the
lower key decreases the volume.
Earpiece volume can be adjusted during a call.
Ringer volume can be adjusted when phone is idle.
Note
Key beep volume can be turned on/off through the
Sounds Menu (Menu-> Settings -> Sounds -> Keypad ->
Keypad Sound).
Page 23
Call Waiting
Your cellular service may offer call waiting. While a call is in
progress, two beeps indicate another incoming call. When call
waiting is enabled, you may put the active call on hold while
you answer the other incoming call. Check with your cellular
service provider for information about this function.
1. Press to receive a waiting call.
2. Press again to switch between calls.
Caller ID
Caller ID displays the number of the person calling when
your phone rings. If the caller’s identity is stored in
Contacts, the name appears on the screen. Check with
your service provider to ensure they offer this feature.
Speed Dialing
Speed dialing is a convenient feature that allows you to make
phone calls quickly and easily with a few keystrokes. Your
phone recalls the number from your Contacts, displays it
briefly and then dials it. Speed Dial number 1 is for Voice Mail.
Dialing Single Digit Speed Dials (from 1 to 9)
Press and hold the Speed Dial number.
OR
Enter the Speed Dial number and press .
Dialing Double Digit Speed Dials (from 10 to 99)
Press the first digit and then press and hold the key of
the last digit.
OR
Enter the first and second digits and press .
QUICK ACCESS TO CONVENIENT FEATURES
21
Page 24

ENTERING AND EDITING INFORMATION
ENTERING AND EDITING INFORMATION
22
Text Input
You can input and edit your Banner, Schedule,
Contacts and Messages.
Key Functions
Right Soft Key
following text input modes:
T9Word / Abc / 123 / Symbols / Smileys
Shift
: Press to change case.
• T9 text: T9Word > T9WORD > T9word
• Abc text: Abc > ABC > abc
Next
: In T9 mode, press to display other
matching words.
Space
space.
Clear
Hold to delete words.
Punctuation
punctuation in a word and complete a sentence.
: Press to scroll access the
: Press to complete a word and insert a
: Press to delete a single space or character.
: In T9 mode, press to insert
Text Input Modes
There are five modes for entering text, numbers,
special characters and punctuation. In a text entry
field, pressing Right Soft Key displays a pop-up
list of text modes.
T9Word (T9) Mode
Use to type text using one keystroke per letter.
The phone translates keystrokes into common words
by using the letters on each key and a compressed
database.
Abc (Multi-tap) Mode
Use to add words to the T9 database.
123 (Numbers) Mode
Use to type numbers using one keystroke per
number.
Symbols Mode
Use to insert special characters or punctuation.
Smileys Mode
Use to insert smiley graphics. There are 36 smiley
characters.
Page 25
Changing Letter Case
Using T9 and Abc text input modes you can set the
capitalization. Press to reach the following:
Initial Cap (T9Word / Abc)
Only the first letter is capitalized. and subsequent
letters are lower case.
Caps Lock (T9WORD / ABC)
All letters are capitalized.
Lower Case (T9word / abc)
All letters are in lower case.
Text Input Examples
Display the text modes and select a text mode:
1. In a text entry field, press Right Soft Key to
display text modes.
2. Press to highlight the text input mode you
want to use.
3. Press to select the highlighted text input
mode.
Using Abc (Multi-tap) Text Input
1. Press Right Soft Key to change to Abc mode.
2. Press to change to ABC Caps Lock.
3. Press .
LG
is displayed.
ENTERING AND EDITING INFORMATION
23
Page 26
ENTERING AND EDITING INFORMATION
ENTERING AND EDITING INFORMATION
24
Using T9 Mode Text Input
1. Press Right Soft Key to change to T9Word
mode.
2. Press .
3. Press to complete the word and add a space.
4. Press
.
Call the office.
Using the NEXT Key
After you have finished entering a word, if the word
displayed is not the one you want, press to
display additional choices of words from the
database.
1. Press .
Good
2. Press .
The display gives you additional choices such as:
Home, Gone, Hood
is displayed.
is displayed.
, etc.
Ading Words to the T9 Database
If a word is not in the T9 database, add it by using
Abc (Multi-tap) mode text entry.
1. Press Right Soft Key to change to Abc (Multitap) mode.
2. Press .
Bop
is displayed.
3. Press Right Soft Key to change to T9Word
mode to add the word Bop to the T9 database.
4. Press to Delete the existing word.
5. Press .
Cop
is displayed.
6. Press .
Bop
is displayed.
Page 27
CONTACTS IN YOUR PHONE’S MEMORY
Contacts Entries
This allows you to have an easy access to your most
frequently dialed phone numbers. You may store up
to 500 entries with up to 5 phone numbers each.
Each phone number may be up to 32 digits.
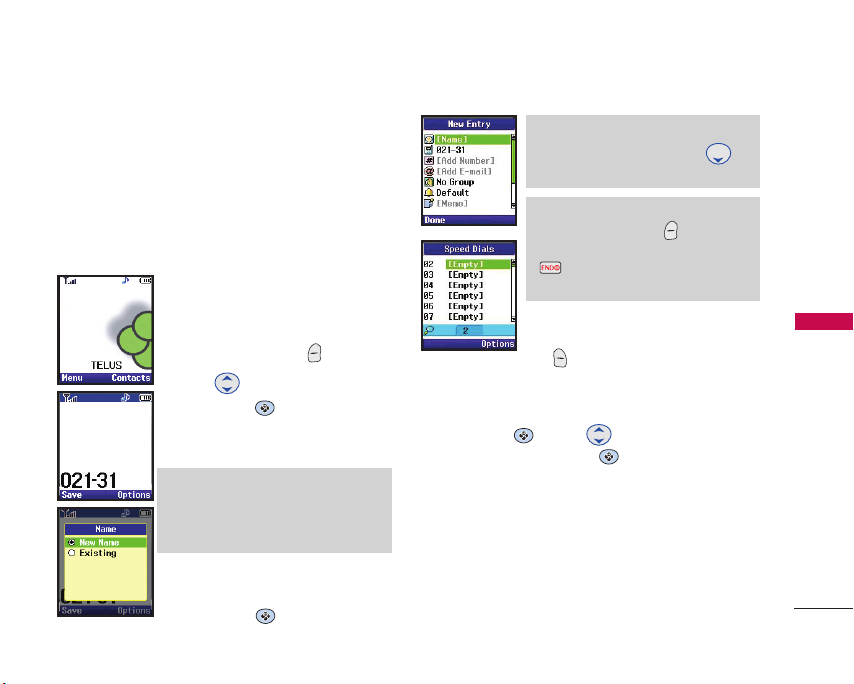
The Basics of Storing Contacts Entries
1. From Main Menu Screen, enter
the phone number you want to
save (up to 32 digits).
Save
2. Press Left Soft Key
3. Use to select Name entry,
then press .
New Name / Existing
.
Note
Use Existing to add another
phone number to a contact
already stored in memory.
4. Enter a name for the phone
number (up to 22 characters),
then press .
Note
To skip name entry, press to
go to the next step.
Note
Press Left Soft Key Done to
save the Contact entry or press
to return to the Main Menu
Screen without saving.
5. To Set a Speed Dial, highlight
the number, press Right Soft Key
Options
, and select Set
Speed Dial.
6. Enter a Speed Dial digit (e.g., 2). Use the keypad,
then press or use to highlight the Speed
Dial location, then press two times.
PHONE’S MEMORY
25
CONTACTS IN YOUR
Page 28
CONTACTS IN YOUR PHONE’S MEMORY
PHONE’S MEMORY
26
Options to Customize Your Contacts
Once the basic phone number and name information
is stored in your Contacts, you can edit and
customize each entry.
How to Access the Edit Entry screen:
1. Press Left Soft Key
and select
2. Use to highlight the contact entry you want
CONTACTS IN YOUR
to edit, then press .
3. Press Left Soft Key
4. Use to highlight the information you want to
customize, then press .
List Entries
.
Menu
Edit
, select
.
Contacts
Adding or Changing the Group
Allows you to manage your Contacts entries by
organizing them into groups.
1. Access the Edit Entry screen.
2. Use to highlight No Group, then press .
,
3. Use to select the Group, then press .
No Group / Family / Friends / Colleagues /
Business / School
4. Press Left Soft Key
Done
to save the change.
Page 29
Changing the Call Ringer
Allows you to identify who is calling, by setting
different ringers for different phone numbers in your
Contacts. It is automatically set to the default ringer
when the Contact is saved.
1. Access the Edit Entry screen.
2. Use to highlight Default, then press .
3. Use to select the Ringer Type, then press
.
Done
4. Press Left Soft Key
Adding or Changing the Memo
Allows you to enter up to 32 characters as a memo
to the Contact entry.
1. Access the Edit Entry screen.
2. Use to highlight
3. Enter text, then press .
4. Press to save the change.
to save the change.
Memo
, then press .
Adding or Changing the Picture ID
Allows the phone to display an image to identify the
caller.
1. Access the Edit Entry screen.
Default
2. Use to highlight
3. Press Right Soft Key
additional choices.
4. Use to select
, then press .
Album
5. Use to select the picture, then press Left
Soft Key
6. Press Left Soft Key
Default/Avatar/Picture
Save
.
, then press .
More
to display
Done
to save the change.
PHONE’S MEMORY
27
CONTACTS IN YOUR
Page 30
CONTACTS IN YOUR PHONE’S MEMORY
PHONE’S MEMORY
28
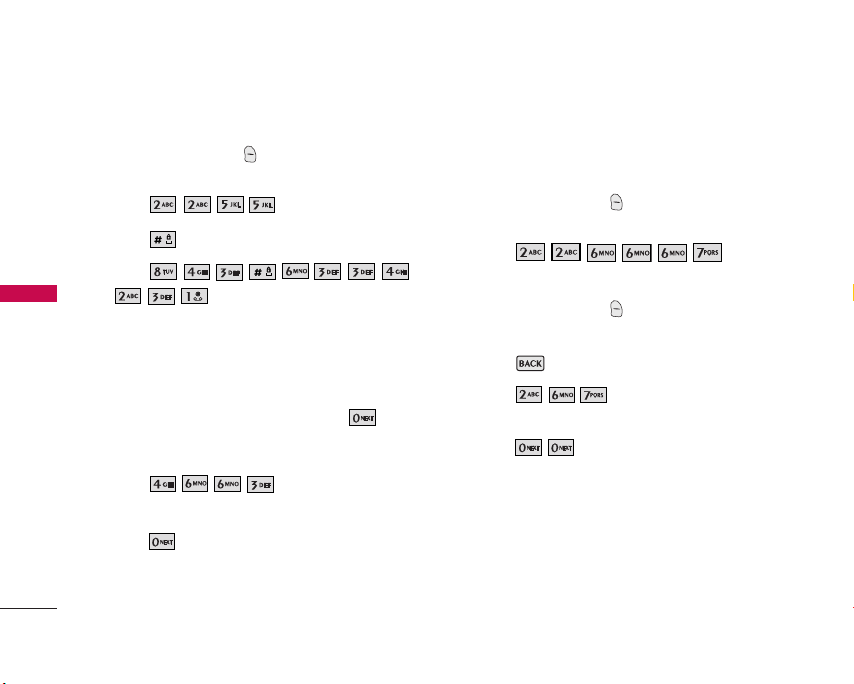
Adding Speed Dial
1. Access the Edit Entry screen.
2. Use to highlight the phone number you want
to set with a Speed Dial, then press Right Soft
Options
Key
Set Speed Dial
3. Select
4. Enter a Speed Dial digit. Use the Keypad, then
CONTACTS IN YOUR
press , or use to highlight the Speed Dial
digit, then press .
5. Press Left Soft Key
.
, then press .
Done
to save the change.
Editing Contacts Entries
Adding Another Phone Number
From the Main Menu Screen
1. From Main Menu Screen enter the phone number
you want to save (up to 32 digits).
Save
2. Left Soft Key
3. Use to highlight
4. Use to highlight the existing contact entry
and press .
5. then press Left Soft Key
A confirmation message is displayed.
.
Existing
and press .
Done
to save.
Page 31

Through Contacts
1. Access the Edit Entry screen.
2. Use to highlight
Add Number
, then press
.
3. Enter the number, then press .
4. Use to highlight a Label, then press .
Done
5. Press Left Soft Key
Default Numbers
to save.
The phone number saved when a Contact is created
is the Default Number. If more than one number is
saved in a Contact entry, another number can be
designated as the Default Number.
Changing the Default Number
1. Access the Edit Entry screen.
2. Use to highlight the phone number you want
to set as the Default Number, then press Right
Options
Soft Key
.
3. Scroll to
Set as Default #
and press .
A confirmation message is displayed.
4. Press Left Soft Key
Editing Stored Phone Numbers
Done
to save.
1. Access the Edit Entry screen.
2. Use to highlight the phone number, then
press .
3. Edit the phone number as necessary, then press
.
4. Use to confirm the Label, then press .
Done
5. Press Left Soft Key
to save.
PHONE’S MEMORY
29
CONTACTS IN YOUR
Page 32

CONTACTS IN YOUR PHONE’S MEMORY
PHONE’S MEMORY
30
Editing Stored Names
1. Access the Edit Entry screen.
2. Use to highlight the name, then press .
3. Edit the name as necessary, then press .
Done
4. Press Left Soft Key
Editing Customized Options
Edit any of the Contacts options in the same manner
CONTACTS IN YOUR
as when the Contact is created.
1. Access the Edit Entry screen.
2. Use to highlight the information you want to
customize, then press .
3. Edit the information as necessary, then press .
4. Press Left Soft Key
to save the change.
Done
to save the change.
Deleting
Deleting a Phone Number from a Contact
1. Access the Edit Entry screen.
2. Use to highlight the phone number to be
deleted.
Options
Contacts
.
.
Options
.
3. Press Right Soft Key
4. Highlight
5. Highlight
A confirmation message is displayed.
Deleting a Contact Entry
1. Press Right Soft Key
2. Use to highlight the contact entry you want
to edit, then press Right Soft Key
3. Highlight
4. Highlight
A confirmation message is displayed.
Erase Field
Erase
Erase Entry
Erase
, and press .
, and press .
, and press .
, and press .
Page 33

Deleting a Speed Dial
1. Press Left Soft Key
and select
2. Highlight the Speed Dial you want to delete, then
press Right Soft Key
3. Highlight
4. Highlight
A confirmation message is displayed.
Speed Dials
Remove
Remove
Menu
, select
.
Options
, and press .
, and press .
Contacts
.
,
Phone Numbers With Pauses
When you call automated systems such as voice mail
or credit billing numbers, you often have to enter a
series of numbers. Instead of entering these numbers
by hand, you can store the numbers in your Contacts
separated by special pause characters (P, T). There
are two different types of pauses you can use when
storing a number:
Hard Pause (P)
The phone stops dialing until you press to advance
to the next number.
2-sec Pause (T)
The phone waits 2 seconds before sending the next
string of digits.
Storing a Number with Pauses
1. Enter the number and press Right Soft Key
Options
.
2. Highlight the
. Enter the second set of numbers.
3. After you have finished entering numbers, press
Left Soft Key
4. Select
5. Add more Entry information and press Left Soft
Key
Hard Pause/2-sec Pause
Save
.
New Name/Existing
Done
, if you want to futher customize.
, then press .
, then press
PHONE’S MEMORY
31
CONTACTS IN YOUR
Page 34

CONTACTS IN YOUR PHONE’S MEMORY
PHONE’S MEMORY
32
Searching Your Phone’s Memory
The LG 200 is able to perform a dynamic search of
the contents in your phone’s memory. A dynamic
search compares entered letters or numbers against
the entries in your Contacts. A matching list is
displayed in ascending order. You can then select a
number from the list to call or edit. There are several
ways to search:
Scrolling Alphabetically
CONTACTS IN YOUR
Searching by Letter
Scrolling Through Your Contacts
1. Press Left Soft Key
and select
List Entries
2. Use to scroll through the list.
Searching by Letter
1. Press Left Soft Key
and select
List Entries
2. Enter by letter you want to search.
Menu
.
Menu
.
, select
, select
Contacts
Contacts
Making a Call From Your Phone’s Memory
Once you have stored phone numbers in your
Contacts, you can place calls to those numbers
quickly and easily.
By pressing after searching for a phone
number in Contacts or Recent Calls and
highlighting it.
Use Speed Dialing.
From Contacts
1. Press Left Soft Key
,
2. Use to select the phone number.
and select
List Entries
3. Press to place the call.
,
Menu
.
, select
Contacts
,
Page 35

From Recent Calls
1. Press Left Soft Key
Call History
2. Select
3. Use to select the type of recent call, then
press .
All Calls/ Dialed Calls/ Received Calls
Menu
.
.
/
Missed Calls
4. Use to select the phone number.
5. Press to place the call.
Speed Dialing
For a single-digit Speed Dial, press and hold the digit
or press the digit, then press . For a doubledigit Speed Dial, press the first digit and hold the
second digit or press the first and second digits, then
press .
Prepending a Stored Number
Prepend can be used if you are out of your home
system area and need to add the area code to an
existing number in your phone's memory. When a
Contacts entry or message callback number is
displayed, you can add to the beginning of the
original number. However, you cannot edit the
original number.
1. Recall a number in your Recent Calls (All Calls /
Dialed Calls / Received Calls / Missed Calls).
Options
2. Press Right Soft Key
Prepend
.
3. Enter the prepend digits to the phone number.
4. Press to place the call.
and select
PHONE’S MEMORY
33
CONTACTS IN YOUR
Page 36

USING PHONE MENUS
Menu Access
Press Left Soft Key
phone menus. There are two methods of accessing
menus and submenus:
Use the navigation key to highlight and select, or
Press the number key that corresponds to the
submenu.
For example:
1. Press Left Soft Key
USING PHONE MENUS
menu items.
Use to scroll through the list of menus.
2. Press the number key that corresponds to the
menu item you want to select.
The sub-menu list will be displayed.
3. Press the number key that corresponds to the
sub-menu you want to access.
4. Use to highlight your preferred setting, then
press to select it.
34
Menu
to have access to six
Menu
to display the six
Contacts
The Contacts menu allows you to store names,
phone numbers and other information in your
phone’s memory.
Access and Options
1. Press Left Soft Key
2. Press
3. Select a sub-menu.
1. List Entries
2. New Entry
3. Groups
4. Speed Dials
5. Erase all Contacts
Contacts
.
Menu
.
Page 37

1. List Entries
Allows you to view your Contacts list.
1. Press
2. Options from here:
,, .
Press to scroll through your Contacts
alphabetically.
Press Right Soft Key
of the following:
Search Name / Search Number / Search Speed
Dial / Search Group / Send Message / Erase
Entry
Press Left Soft Key
Number.
Options
New
to store a New
to select one
2. New Entry
Allows you to add a new number to your Contacts.
Note
Using this submenu, the number is saved as a new
Contact. To save the number into an existing
Contact, edit the Contact entry.
1. Press
2. Enter the name and press .
3. Enter the number and press .
4. Use to select the phone number type and
5. Continue saving the entry as necessary.
,, .
press .
Note
For more detailed information, see page 25.
USING PHONE MENUS
35
Page 38

USING PHONE MENUS
3. Groups
Allows you to view your grouped Contacts, add a new
group, change the name of a group, delete a group,
or send a message to everyone in the selected group.
1. Press , , .
2. Options from here.
Use to highlight a group to view, then press
.
USING PHONE MENUS
Press Left Soft Key
to the list.
Use to highlight a group, then press Right
Soft Key
group or delete the group.
Edit Group/ Erase Group
36
Add
to add a new group
Options
to change the name of the
4. Speed Dials
Allows you to view your list of Speed Dials or
designate Speed Dials for numbers entered in your
Contacts.
1. Press
2. Use to highlight the Speed Dial position,
3. Use to highlight the Contact, then press
,, .
and press .
.
A confirmation message is displayed.
5. Erase all Contacts
Allows you to erase all of your Contacts at once.
1. Press , , .
2. Enter your lock code.
Erase All
3. Press
A confirmation message is displayed.
.
Page 39

Call History
The Call History menu is a list of the last phone
numbers or Contact entries for calls you placed,
accepted, or missed. It is continually updated as new
numbers are added to the beginning of the list and
the oldest entries are removed from the bottom of
the list.
Access and Options
1. Press Left Soft Key
2. Press
Call History
3. Select a sub-menu.
1. All Calls
2. Dialed Calls
3. Received Calls
4. Missed Calls
5. Erase History
6. Timers
Menu
.
1. All Calls
Allows you to view the list of all calls; up to 20 entries.
1. Press , , .
2. Use to highlight an entry, then
Press to view the entry.
Press to place a call to the number.
Press Right Soft Key
Save/Send Message/Prepend/Erase/Erase All
.
Options
to select:
2. Dialed Calls
Allows you to view the list of outgoing calls; up to 20
entries.
1. Press , , .
2. Use to highlight an entry, then
Press to view the entry.
Press to place a call to the number.
Press Right Soft Key
Save/Send Message/Prepend/Erase/Erase All
Options
to select:
USING PHONE MENUS
37
Page 40

USING PHONE MENUS
3. Received Calls
Allows you to view the list of incoming calls; up to 20
entries.
1. Press , , .
2. Use to highlight an entry, then
Press to view the entry.
Press to place a call to the number.
Press Right Soft Key
Save/Send Message/Prepend/Erase/Erase All
USING PHONE MENUS
4. Missed Calls
Allows you to view the list of missed calls; up to 20
entries.
1. Press , , .
2. Use to highlight an entry, then
Press to view the entry.
Press to place a call to the number.
Press Right Soft Key
Save/Send Message/Prepend/Erase/Erase All
38
Options
Options
to select:
to select:
5. Erase History
Allows you to erase selected call list(s).
1. Press , , .
2. Use to highlight the list of calls to erase,
then press .
All Calls/ Dialed Calls/ Received Calls
/
Missed Calls
3. Press .
6. Timers
Allows you to view the duration of selected calls.
1. Press , , .
2. Use to highlight a call list.
Last Call/ Lifetime
Page 41

Messaging
Access and Options
1. Press Left Soft Key
2. Press
Messaging
3. Select a sub-menu.
1. Voice Mail
2. Text/Multimedia
3. Web Alert
4. E-mail
5. IM & Chat
Text messages, pages, and the voice mail box become
available as soon as the phone is powered on.
Check types of messages by pressing the message
key .
Make a call to the callback number by pressing
during an Inbox message check.
Read and edit messages saved in the outbox after
transmission and resend them.
[Menu]
.
The phone can store up to 100 inbox messages or
up to inbox 3M memory. (Outbox: 100 messages or
1M memory, Saved box: 20 messages or 500KB
memory, Drafts box: 20 messages or 500KB
.
memory) The LG 200 supports up to 150 characters
per message and messages including the limit are
supported by MMS. The information stored in the
message is determined by phone mode and service
capability. Other limits to available characters per
message may exist. Please check with your service
provider for system features and capabilities.
New Message Alert
There are three ways your phone alerts you to new
messages.
1. The phone displays a message on the screen.
2. One of eight ring types is heard, if selected.
3. The message icon ( ) is displayed on the
screen. In the case of an urgent message, the icon
will flash and Urgent message is displayed.
Note
If you receive the same message twice, your
phone deletes the older one and the new one is
stored as a Duplicate.
USING PHONE MENUS
39
Page 42

USING PHONE MENUS
1. Voice Mail
Allows you to view new voice messages recorded in
the Voicemail box. Once you exceed the storage limit,
old messages are overwritten. When you have a new
voice message, your phone will alert you.
Checking Your Voicemail Box
1. Press , , .
2. Use to highlight the options and press .
Connect Voice Mail / Clear voicemail icon
USING PHONE MENUS
40
2. Text and Multimedia
1. Send New
You can send messages from one phone to another.
1. Press , , , .
2. Enter the phone number of the recipient or the
email address for an email message.
Options
Press Right Soft Key
Select the option(s) to customize.
Send / Save As Draft / Priority / Set As Cc /
Set As Bcc / Remove Field / Cancel
3. Press .
4. Enter the subject and press .
.
Note
To send a message, press .
Page 43

5. Type your message.
Options
Press Right Soft Key
.
Select the option(s) to customize.
Send / Save As Draft / Priority /
Remove Field / Cancel
6. Use to highlight Picture and press .
Press Right Soft Key
Options
8. Select the option(s) to customize.
Preview / Send /Save As Draft /Priority
Delivery Report / Remove Field / Cancel
9. Use to highlight
Send
and press .
A sending screen is displayed.
.
/
Note
Press Left Soft Key
new picture and send it directly.
Use to select Picture Album or Image Clip.
Select Picture and press Left Soft Key
7. Use to highlight Sound and press .
Take PIX
. You can take the
Select
Note
Press Left Soft Key
new voice memo and send it directly.
Use to select Voice Memo or Sound.
Select Sound and press Left Soft Key
Record
. You can take the
Select.
2. Inbox
The phone alerts you in 3 ways when you receive a
new message:
By displaying a message notification on the
.
screen.
By sounding a beep or vibrating, if set.
By blinking . (only when you get a high priority
message)
Received text messages, picture messages, and
email lists may be searched and the contents viewed.
Received messages are displayed from newest to
oldest.
USING PHONE MENUS
41
Page 44

USING PHONE MENUS
Out of Memory Warning
If the memory is full, no more messages can be
received until enough memory space becomes
available. The message TEXT MSG 100% FULL is
displayed and new messages are not accepted.
Viewing Your Inbox
1. Press , , , .
2. Use to highlight a message and press .
3. Options from here:
USING PHONE MENUS
Left Soft Key
Right Soft Key
Reply w copy / Forward / Erase / Save
Number / Save E-mail / Save Message /
Go URL / Lock / Message Info
42
Reply
Options
3. Outbox/Sent
Up to 100 messages or 1M memory can be stored in
the Outbox. View lists and contents of sent messages
and verify whether the transmission was successful or
not.
1. Press , , , .
2. Use to highlight a message and press .
3. Options from here:
Left Soft Key
.
.
Right Soft Key
Forward / Erase / Save Number /
Resend
Options
.
.
Save Quick-Text / Save Message / Go URL /
Lock / Message Info
Page 45

4. Drafts
Displays draft messages.
1. Press , , , .
2. Use to highlight a message.
Options from here:
Press Right Soft Key
Options
Erase/ Message Info
3. Press to view the message.
5. Saved
Displays Saved messages.
1. Press , , , .
2. Use to highlight a message and press .
3. Options from here saved in Inbox:
.
Left Soft Key
Right Soft Key
Reply
Options
.
.
Reply w copy/ Forward/ Erase/ Save
Number
/
Save E-mail/ Go URL/ Lock
Message Info
/
USING PHONE MENUS
Options from here saved in Outbox :
Left Soft Key
Right Soft Key
Resend
Options
.
.
Forward/ Erase/ Save Number/ Save
Quick-Text
/
Go URL/ Lock/ Message Info
43
Page 46

USING PHONE MENUS
6. Erase Messages
Allows you to erase all text messages stored in your
Inbox, Outbox/Sent, Drafts or Saved messages. You
can also erase all messages at the same time.
1. Press , , , .
Press
in the Inbox.
Press
stored in Outbox/Sent.
USING PHONE MENUS
Press
in the Drafts.
Press
in the Saved messages.
Press
stored in the Inbox, Outbox, Drafts or Saved
messages.
2. Press
Erase All
A confirmation message is displayed.
44
Inbox
to erase all messages stored
Outbox
to erase all messages
Drafts
to erase all messages stored
Saved
to erase all messages stored
All Messages
to erase all messages
.
7. Settings
Allows you to configure 6 settings for messages.
1. Press , , , .
2. Use to highlight a setting, then press .
Save to Outbox Auto Save / Prompt /
Do not Save
Auto Delete Inbox On / Off
Quick Text 10 predefined phrases
Default Entry Mode T9Word / Alpha / Number
Auto Download On / Off
Callback # None / My Phone Number /
Message Settings Sub-Menu Descriptions
Save to Outbox
Other
Allows you to automatically save sent messages in
Outbox when transmitted.
Auto Delete Inbox
Allows you to automatically delete read messages
when you exceed the storage limit.
Page 47

Quick Text
Allows you to display, edit and add text phrases.
These text strings allow you to reduce manual text
input into messages.
Default Entry Mode
Allows you to select the default input method
including T9Word, Abc, 123.
Auto Download
Allows you to auto display the content when
receiving a message.
Callback #
Allows you to automatically send a designated
callback number when you send a message.
8. Memory Status
1. Press , , , .
3. Web Alert
Web Alert is a special link or message provided from
the carrier to inform you of special offers, bulletins
and announcements.
1. Press , , .
4. E-mail
Allows you send an E-mail.
1. Press , , .
5. IM & Chat
Allows you to send and receive instant messages at
any time. Allows you to chat with internet messenger
users.
1. Press , , .
USING PHONE MENUS
45
Page 48

USING PHONE MENUS
Do More
Your phone’s Do More menu lets you access some
of the extra features built into your phone. Your
phone permits you to store up to 2.5MB of
memory. Each item is also limited by size according
to their content-type when you download.
Access and Options
Allows you to initiate a Microbrowser session.
USING PHONE MENUS
46
1. Press Left Soft Key
2. Press
3. Select a sub-menu.
Do More
1. Wireless Web
2. Sounds
3. Images
4. Games
5. Tools
6. Favourites
7. Memory Status
.
Menu
1. Wireless Web
The Microbrowser feature allows you to view internet
content, especially designed for your mobile phone.
Access and selections within this feature are
dependent upon your service provider. For specific
information on Microbrowser access through your
phone, contact your service provider.
1. Press , , .
Overview
.
The Microbrowser allows the user to use a variety of
Internet services. Using the Microbrowser on the
phone allows you to:
Send and receive Internet e-mail.
Browse and search the World Wide Web via web
pages especially designed for wireless phone
customers.
Set bookmarks to directly access your favorite
sites.
Retrieve information, such as stock quotes and
flight schedules from the Internet.
Page 49

Quality of Browser
Browsing the web via the phone is not like using your
home computer. Site providers have selected only the
critical aspects of their site to present to wireless
phone users and have removed most graphics.
Ending the Microbrowser Session
You can end a Microbrowser session by pressing .
Navigating through the Browser
While using the Microbrowser, you will find the
following content:
Numbered options (some options may not be
numbered);
Links (embedded in content);
Text or numeric input;
Simple text.
You can act on the options or the links by using the
Soft Keys.
2. Sounds
1. Press Left Soft Key , , .
2.1 Ringtones
1. Press , , , .
2. Scroll to
Get New
will launch.)
2.2 Sound Clips
1. Press , , , .
2. Use to highlight a sound clip.
Options from here:
Press Right Soft Key
Play/ Set As/ Properties/ Erase/ Send to
online album
and press . (The browser
More
.
/
View online album
USING PHONE MENUS
47
Page 50

USING PHONE MENUS
2.3 Voice Memo
Allows you to add, listen to, and erase short verbal
reminders.
Recording a Voice Memo
To record a memo:
1. Press , , , .
Press Left Soft Key New
2.
you to start recording after the beep.)
3. Wait for the beep and then start speaking.
USING PHONE MENUS
4. To finish recording, press
To record a conversation during a phone call:
1. During a call, press Right Soft Key
2. Scroll to
3. Press Right Soft Key
Record
Stop rec
and press to end the recording
prior to the countdown completion.
48
. (The phone prompts
Left Soft Key Done
and press .
Options
Options
and scroll to
Note
Your phone can store a total of 3 minutes of
memos.
Playing a Voice Memo
To play the voice memos you have recorded:
1. Press , , , .
2. Scroll to the voice memo you wish to hear and
press .
Left Soft Key PLay
3. Press
.
Erasing Recorded Voice Memos
To erase recorded memos:
.
1. Press , , , .
2. Scroll to the voice memo you wish to erase and
press .
3. Press Right Soft Key
Erase
4. Scroll to
, and press .
.
Options
.
Page 51

5. Scroll to
Erase
, and press to confirm that
you want to erase the voice memo.
3. Images
1. Press Left Soft Key , , .
3.1 Wallpaper
1. Press , , , .
2. Scroll to
Get New
will launch.)
3.2 Image Clips
1. Press , , , .
2. Use to highlight a image clip.
Options from here:
Press Right Soft Key
View/ Set As/ Properties/ Erase/ Send to
online album
and press . (The browser
More
.
/
View online album
3.3 Picture Album
1. Press , , , .
2. Use to select
Ta k e N ew
or
View Album
3.4 Online Album
1. Press , , , . (The browser will
launch.)
4. Games
1. Press Left Soft Key , , .
2. Scroll to
Get New
will launch and take you to the Games download
menu.)
and press . (The browser
.
USING PHONE MENUS
49
Page 52

USING PHONE MENUS
5. Tools
1. Press Left Soft Key , ,
Get New
1. Press , , .
2. Scroll to
Get New
will launch and take you to the Tools download
menu.)
USING PHONE MENUS
50
and press . (The browser
Calculator
Allows you to perform simple mathematical
calculations. You can enter numbers up to the second
decimal place.
1. Press , , .
2. Scroll to
Calculator
and press .
3. Enter data.
Use keypad to enter numbers.
Use to enter decimals.
Use to enter plus/minus change.
Press Left Soft Key to clear the entry.
Press Right Soft Key to enter algebraic operators.
Use Navigation Key to enter operators.
Press to complete equation.
Note
Calculations can be made with up to 29
characters at one time (e.g., 63+78-21 would be
8 characters).
Page 53

Alarm Clock
Allows you to set one of four alarms. The current
time is displayed at the top of the screen when you
select an alarm to set. At the alarm time, Alarm 1 (or
2 or 3, as applicable) will be displayed on the LCD
screen and the alarm will sound.
1. Press , , .
2. Scroll to
3. Select the alarm you want to edit and press .
Alarm Clock
and press .
Alarm 1/ Alarm 2/Alarm 3/ Quick Alarm
4. Press .
5. Set the time for alarm and press .
6. Use to highlight Once (recurring setting)
and press .
7. Press to select one of the following and
press .
Once/ Daily/ Mon - Fri/ Weekends
8. Use to highlight Ring (ring type setting),
press .
9. Use to select one of the available alarm ring
types and press .
Save
10. Left Soft Key
.
Scheduler
Allows you to conveniently keep and access your
agenda(s). Simply store your appointments and your
phone will alert you with a reminder of your
scheduled appointments.
1. Press , , .
2. Scroll to
3. Use to highlight the scheduled day.
4. Press Left Soft Key
Scheduler
Moves cursor to the left.
Moves cursor to the right.
Moves to the previous week.
Moves to the next week.
and press .
Add
.
USING PHONE MENUS
51
Page 54

USING PHONE MENUS
5. Enter your schedule information including:
Date
Time
Content
Recurring event
When to ring the alarm reminder
Which ring alarm to sound
6. Press Left Soft Key
Note
Scheduler will not alert you during a call or during
SMS transmitting. It will sound the reminder after
USING PHONE MENUS
you exit a call.
52
Save
Notepad
Allows you to add, read, edit, and erase notes to
yourself.
To compose a note:
1. Press , , .
.
3. Press Left Soft Key
2. Scroll to
Notepad
and press .
Add
.
4. Type your note using the numeric keypad and
press .
To read a saved note:
1. From
Tools
menu, select
Notepad
.
2. Highlight a note and press .
To delete saved notes:
1. From
Tools
menu, select
Notepad
.
2. Highlight a note and press .
Erase
3. Press Right Soft Key
Erase
4. Scroll to
and press .
.
Page 55

Ez Tip Calc
Allows you to quickly and easily calculate the
amounts for a bill with the amount of the bill, the
amount of the tip, and the number of people as
variables.
1. Press , , .
2. Scroll to
3. Use your keypad and navigation key to enter the
4. If you’re splitting the check, highlight Split and
Ez Tip Calc
bill amount and desired tip percentage. (The
correct tip will be calculated instantly.)
enter the number of people in your party. (An
equal split of the bill will be calculated and
displayed.)
and press .
World Clock
Allows you to determine the current time in another
time zone or country.
1. Press , , .
2. Scroll to
3. Press Right Soft Key
World Clock
bar across the world map and display the
date/time in that location.
and press .
Cities
to move the time
Note
Press Left Soft Key
Daylight Savings Time in the selected location.
Set DST
to display
USING PHONE MENUS
53
Page 56

USING PHONE MENUS
6. Favourites
1. Press Left Soft Key , , .
6.1 Shortcode List
1. Press , , , .
2. The browser will launch.
6.2 Web Links
1. Press , , , .
USING PHONE MENUS
2. The browser will launch.
7. Memory Status
1. Press Left Soft Key , , .
54
Page 57

Camera
View, take and trade your digital pictures and video
right from your wireless phone.
Access and Options
1. Press Left Soft Key
2. Press
3. Select a sub-menu.
Camera
1. Take Picture
2. Take Video
3. Picture Album
4. Video Album
Menu
.
1. Take Picture
1. Press , , .
Note
.
Pressing the Side Camera Key from standby mode
is a hot key to Take Picture.
2. Set the brightness , zoom , flash, and
press Right Soft Key
settings.
Select the option(s) to customize.
Flash Off / On this shot / Always On
Resolution HI 640X480 / MED
White Balance Auto / Sunny / Cloudy /
Self Timer 5 sec / 10 sec
Quality Fine / Normal / Economy
Shutter Sound Shutter / Chime
Options
320X240 / LOW 160X120
Fluorescent / Tungsten
to change other
USING PHONE MENUS
55
Page 58

USING PHONE MENUS
Color Tone Normal / Antique / Mono /
Multi Shots 4 shots / 8 shots / 12 shots
Note
When the Flash is On, take the photo within 12
inches of the subject.
3. Take a picture by pressing .
4. Press Right Soft Key
USING PHONE MENUS
The picture is stored in
Using the Side Camera Key
You can use the Side Camera Key to use the sub
menu list.
1. Press the Side Camera Key for about 3
seconds to enter the Take Picture mode.
2. Take a picture by pressing Side Camera Key .
56
Sephia / Bluish / Greenish /
Reddish / Mono Negative
Save
.
Picture Album
.
2. Take Video
1. Press , , .
2. Set the brightness , zoom , and press
Right Soft Key
settings.
Select the option(s) to customize.
Flash Off / On this shot / Always On
White Balance Auto / Sunny / Cloudy /
Color Tone Normal / Antique / Mono /
Video Album
3. Press Left Soft Key or to begin recording,
and again to stop.
4. Press Left Soft Key
is stored in
Options
to change other
Fluorescent / Tungsten
Sephia / Bluish / Greenish /
Reddish / Mono Negative
Save
. The recorded video
Video Album
.
Page 59

3. Picture Album
Allows you to view pictures stored in the phone.
1. Press , , .
2. Select your desired picture with and press
Options
Right Soft Key
Set As Caller ID / Wallpaper
Take New Picture
Send to Online Album
Erase This picture / All pictures
Slideshow
Edit Caption Rename the selected Picture
Picture Info Title / Taken / Resolution /
Expand
.
Size / Quality
4. Video Album
Allows you to view videos stored in the phone.
1. Press , , .
2. Select your desired video with and press
Options
Right Soft Key
Take New Video
Erase This video / All videos
Edit Caption Rename the selected Video
Video Info Title / Taken / Resolution /
.
Size / Quality
USING PHONE MENUS
57
Page 60

USING PHONE MENUS
Settings
The Settings menu has options to customize your
phone.
Access and Options
USING PHONE MENUS
58
1. Press Left Soft Key
2. Press
3. Select a sub-menu.
1. Sounds
2. Display
3. Games / Tools
4. Others
5. Advanced
6. Airplane Mode
Settings
1. Sounds
Options to customize various sounds emitted from
the phone.
1.1 Ringers
Menu
.
.
1.1.1 Voice Calls
Allows you to set ring tones for types of incoming calls.
1. Press
2. Select an incoming call type.
3. Use to select a ringer, then press Left Soft
1.1.2 Messages
Allows you to select the alert type for a new
message.
1. Press
2. Select
, , , , .
Caller ID / Unknown calls / Roaming
Save
Key
to save the sound.
, , , , .
Voice Mail/ Text and Multimedia
Web-Alerts/ 2-Min Reminder
.
/
Page 61

3. Use to to select a setting, then press .
1.1.3 Meeting / Silent Mode
1. Press , , , , .
2. Use to set the setting, then press to
save the change.
On / Off
2. Use to select a length, then .
Short Sends out a tone for a fixed period of
time even if you keep the key pressed.
Long Sends out a continuous tone for as long
as you keep the key pressed.
1.3 Volume
1.2 Keypad
1.2.1 Keypad Sound
1. Press , , , , .
2. Use to set the setting, then press to
save the change.
On / Off
1.2.2 DTMF Length
Allows you to set the DTMF Length and touch tone
playback speed.
1. Press
, , , , .
1.3.1 Ringer
Allows you to set master volume settings.
1. Press , , , , .
2 Use to adjust the volume, then press to
save the change.
1.3.2 Earpiece
Allows you to set earpiece volume settings.
1. Press , , , , .
2 Use to adjust the earpiece volume, then
press to save the change.
USING PHONE MENUS
59
Page 62

USING PHONE MENUS
1.3.3 Speaker
Allows you to set speaker volume settings.
1. Press , , , , .
2 Use to adjust the speaker volume, then press
to save the change.
1.3.4 Power On/Off
Allows you to set the phone to sound a tone when
the phone is powered on and off.
1. Press , , , , .
USING PHONE MENUS
2. Use to set the alert tone, then press to
save the change.
1.4 Alerts
1. Press , , , .
2. Use to set the alert setting, then press
to save the change.
On / Off
60
1.4.1 Service Change
Alerts you when service changes. Phone displays
Entering Service Area or Leaving Service Area message.
1.4.2 Minute Beep
Alerts you 10 seconds before the end of every
minute during a call.
1.4.3 Call Connect
Alerts you when the call is connected.
1.4.4 Call Lost
Alerts you when the call is disconnected.
Page 63

2. Display
Options to customize the phone's display screen.
2.1 Banner
Allows you to enter a string of up to 12 characters
which display on the LCD screen.
1. Press , , , .
2. Enter your banner text, then press .
2.2 Wallpaper
Allows you to choose the kind of background to be
displayed on the phone.
1. Press , , , .
2. Press the navigation key left or right to display
Default, Wallpaper, or Picture Album.
3. Press the navigation key up or down and press
to view the image. (Once an image is
displayed, you can use to scroll through and
view the other default images.)
Save
4. Press Left Soft Key
.
2.3 Main Display
2.3.1 Backlight
Allows you to set the duration for illuminating the
LCD backlight.
1. Press , , , , .
2. Use to select a setting, then press to
save the change.
7 seconds / 15 seconds / 30 seconds /
Always On / Always Off
2.3.2 Power Safe Mode
Allows you to set the power saver to On/Off.
1. Press , , , , .
2. Use to select On / Off, then press .
NOTE
If the Backlight Timer on Main LCD is set to
‘Always On’, settings in Power Saver menu will be
ignored.
USING PHONE MENUS
61
Page 64

USING PHONE MENUS
2.3.3 Contrast
Allows you to set the level of contrast for your LCD
screen.
1. Press , , , , .
2. Use to adjust the contrast level, then press
.
2.3.4 Theme Colors
Allows you to choose the color of the background
screen.
USING PHONE MENUS
1. Press , , , , .
2. Use to select the background color, then
press .
style 1 / style 2
62
2.4 Keypad light
Allows you to set the duration for illuminating the
phone's keypad.
1. Press , , , .
2. Use to select a setting, then press to
save the change.
8 seconds / 15 seconds / 30 seconds / Always Off
2.5 Time and Date
Allows you to choose the clock format displayed on
the LCD screen.
1. Press , , , .
2. Select a sub-menu and press .
Main Display / Sub Display
3. Select a sub-menu and press .
Main Display
Sub Display
4. Use to select a setting, then press .
: Time / Date /
Position
: Time & Date / Time Only
Page 65

2.6 Menu Style
Allows you to view the Menus as icons or in a list
format.
1. Press , , , .
2. Use to select a menu format, then press
.
Icon / List
2.7 Fonts
Allows you to set the size of the font for calling digits
and text editor.
1. Press , , , .
2. Select a sub-menu and press .
Message / Browser / Notepad
3. Use to choose a setting, then press .
Normal / Large
3. Games/Tools
3.1 Backlight Settings
Allows you to set the duration for illuminating the
backlight.
1. Press , , , .
2. Use to select a setting, then press to
save the change.
8 seconds / 15 seconds / Always on / Always off
3.2 Volume
Allows you to set volume settings.
1. Press , , , .
2 Use to adjust the volume, then press to
save the change.
USING PHONE MENUS
63
Page 66

USING PHONE MENUS
3.3 Notification
Allows you to set volume settings.
1. Press , , , .
2. Select a sub-menu and press .
Voice Mail / Text & Multimedia
Message
3. Use to set the alert setting, then press
to save the change.
On / Off
USING PHONE MENUS
64
4. Others
4.1 Assign Shortcut
Assign a shortcut to your favorite and most
frequently used function. Select it from the list, and
then access it directly by pressing in standby
mode.
1. Press , , , .
2. Read the disclaimer and press .
3. Select a menu and press .
Left Navigation / Right Navigation
4.2 Call Setup
4.2.1 Call Answer
Allows you to determine how to handle an answered
call.
1. Press , , , , .
2. Use to select a setting, then press .
Send Key / Any Key / Flip Open
Page 67

4.2.2 Auto-Answer
Allows you to select Auto-Answer on the time basis
before the phone automatically answers a call. This
feature is intended for use with hands free devices,
but is an independent feature of the phone and must
be manually turned on/off when connected or
disconnected from the device.
1. Press , , , , .
2. Use to select a setting, then press .
On / Off
4.2.3 Auto-Prepend
Allows you to add Dial 1+Number to Options in
recent calls list. If you choose Dial 1+Number in
recent calls list, Terminal displays dialing screen and
shows 1+Number on the screen regardless of calling
digits condition.
1. Press , , , , .
2. Use to select a setting, then press .
On / Off
4.2.4 Auto-Redial
Allows you to set the Auto-Redial mode to On/Off.
1. Press , , , , .
2. Use to select a setting, then press .
On / Off
4.3 Language
Allows you to set the bilingual feature according to
your preference. Choose between English and French.
1. Press , , , .
English
or
French
2. Use to select
.
, then press
USING PHONE MENUS
65
Page 68

USING PHONE MENUS
4.4 TTY Mode
Allows you to attach a TTY device enabling you to
communicate with parties also using a TTY device. A
phone with TTY support is able to translate typed
characters to voice. Voice can also be translated into
characters and then displayed on the TTY.
* TTY : Text Telephone. (or Teletypewriter for Deaf).
1. Press , , , .
2. Read the disclaimer and press .
3. Use to select a setting, then press .
USING PHONE MENUS
Enable TTY / Disable TTY
66
4.5 Data Setup
4.5.1 Data/Fax
Allows you to use your phone to transmit data and
faxes.
1. Press , , , , .
2. Use to select a setting, then press .
Off / Fax In Once / Fax In Always / Data In Once /
Data In Always
NOTE
The Data Connection Kit allows you to connect
your PC or PDA to your LG wireless phone,
freeing you from having to locate a telephone
outlet. You can send or receive an e-mail, a fax, or
access the Internet anytime, anywhere.
Page 69

4.5.2 PC Connection
Allows you to select the data port.
1. Press , , , , .
2. Use to select a setting, then press .
USB / RS-232C / Closed
5. Advanced
Options for specific system network settings.
5.1 Phone Info
The Phone Info menu provides you with specific
information pertaining to your phone model.
NOTE
When using the 1X HSPD data service via an RS232C data cable, the port speed is set to
115,200 (230,400 is not supported). When
using the 1X HSPD data service via a USB data
cable, you may get better port speed if the port
speed is set to 230,400 rather than 115,200.
5.1.1 NAM
Allows you to view your phone number.
1. Press , , , , .
USING PHONE MENUS
5.1.2 Software Version
Allows you to view the software.
1. Press , , , , .
5.1.3 Hardware Version
Allows you to view the hardware.
1. Press , , , , .
67
Page 70

USING PHONE MENUS
5.1.4 ESN
Allows you to view the ESN.
1. Press , , , , .
5.1.5 PRL
Allows you to view the PRL.
1. Press , , , , .
5.1.6 Browser Version
Allows you to view the Browser Version.
USING PHONE MENUS
1. Press , , , , .
5.1.7 Serving System
Identifies the channel number of a system that is
served and a SID Number. This information is only for
technical support.
1. Press , , , , .
68
5.1.8 Icon Glossary
Allows you to view all the icons and their meanings.
1. Press , , , , .
5.2 System
The System menu allows you to designate specific
system network settings.
5.2.1 Set Mode
Allows you to set up the phone producer’s
management environment. Leave the default setting
unless you want to alter the system selection as
instructed by your service provider.
1. Press , , , , .
2. Use to select a setting, then press .
Digital Only / Analog Only / Automatic / Home
Only
Page 71

5.2.2 Set NAM
Allows you to select the phone's NAM (Number
Assignment Module) if the phone is registered with
multiple service providers.
1. Press , , , , .
2. Use to select a NAM, then press .
NAM 1 / NAM 2
5.2.3 Call Guard
Call Guard alerts you when roaming charges apply.
1. Press , , , , .
2. Use to select a setting, then press .
On / Off
5.3 Security
All of your phone’s security settings are available
through the Security menu. You must enter your lock
code to view the Security menu.
5.3.1 Lock Phone
Keeps your phone from unauthorized use. Once the
phone is locked, it is in restricted mode until the lock
code is entered. You can receive phone calls and still
make emergency calls. You can modify the lock code
using the New Lock code within the Security menu.
1. Press , , , .
2. Enter the 4-digit password.
The lock code is commonly the last 4 digits of
your phone number.
3. Press Lock Phone.
4. Use to select a setting, then press .
Lock The phone is always locked. When
locked, you can only receive incoming
calls or make emergency calls.
Unlock The phone is never locked.
USING PHONE MENUS
69
Page 72

USING PHONE MENUS
5.3.2 Change Lock
Allows you to change to a new four-digit lock code.
1. Press , , , .
2. Enter the 4-digit password.
The lock code is commonly the last 4 digits of
your phone number.
3. Press
4. Enter a new four-digit lock code.
5. Enter the new lock code again to confirm the
USING PHONE MENUS
original entry.
Change Lock
70
5.3.3 Reset Defaults
Allows you to reset your phone to the factory default
settings.
1. Press , , , .
2. Enter the 4-digit password.
The lock code is commonly the last 4 digits of
.
your phone number.
3. Press
4. Read the screen message, then press .
5. Press
back to the factory defaults or press
to exit without changing.
Reset Defaults
Revert
.
to change your phone settings
Cancel
Page 73

6. Airplane Mode
Airplane Mode allows you to use many of your
phone’s features, such as Games, Notepad, Voice
Memos, etc., when you are in an airplane or in any
other area where making or receiving calls or data is
prohibited. When your phone is in Airplane Mode, it
cannot send or receive any calls or access online
information.
1. Press , , .
2. Read the screen message, then press .
3. Use to select a setting, then press .
On / Off
USING PHONE MENUS
71
Page 74

SAFETY
SAFETY
72
TIA Safety Information
The following is the complete TIA Safety Information
for wireless handheld phones.
Exposure to Radio Frequency Signal
Your wireless handheld portable phone is a low power
radio transmitter and receiver. When it is ON, it receives
and also sends out Radio Frequency (RF) signals.
In August, 1996, the Federal Communications
Commissions (FCC) adopted RF exposure guidelines
with safety levels for handheld wireless phones.
Those guidelines are consistent with the safety
standards previously set by both U.S. and
international standards bodies:
ANSI C95.1 (1992) *
NCRP Report 86 (1986)
ICNIRP (1996)
Santé Canada, Code de sécurité 6, 1999.
American National Standards Institute; National
Council on Radiation Protection and Measurements;
International Commission on Non-Ionizing Radiation
Protection
Those standards were based on comprehensive and
periodic evaluations of the relevant scientific
literature. For example, over 120 scientists, engineers
and physicians from universities, government health
agencies and industry reviewed the available body of
research to develop the ANSI Standard (C95.1).
The design of your phone complies with the FCC
guidelines (and those standards).
Antenna Care
Use only the supplied or an approved replacement
antenna. Unauthorized antennas, modifications or
attachments could damage the phone and may
violate FCC regulations.
Phone Operation
NORMAL POSITION: Hold the phone as you would
any other telephone with the antenna pointed up
and over your shoulder.
Tips on Efficient Operation
For your phone to operate most efficiently:
Do not touch the antenna unnecessarily when the
Page 75

phone is in use. Contact with the antenna affects call
quality and may cause the phone to operate at a
higher power level than otherwise needed.
Driving
Check the laws and regulations on the use of wireless
phones in the areas where you drive and always obey
them. Also, if using your phone while driving, please
observe the following:
Give full attention to driving -- driving safely is
your first responsibility;
Use hands-free operation, if available;
Pull off the road and park before making or
answering a call if driving conditions or the law so
require.
Electronic Devices
Most modern electronic equipment is shielded from
RF signals. However, certain electronic equipment
may not be shielded against the RF signals from your
wireless phone.
Pacemakers
The Health Industry Manufacturers Association
recommends that a minimum separation of six (6)
inches be maintained between a handheld wireless
phone and a pacemaker to avoid potential
interference with the pacemaker. These
recommendations are consistent with the
independent research by and recommendations of
Wireless Technology Research.
Persons with pacemakers:
Should ALWAYS keep the phone more than six (6)
inches from their pacemaker when the phone is
turned ON;
Should not carry the phone in a breast pocket;
Should use the ear opposite the pacemaker to
minimize the potential for interference;
Should turn the phone OFF immediately if there is
any reason to suspect that interference is taking
place.
SAFETY
73
Page 76

SAFETY
SAFETY
74
Hearing Aids
Some digital wireless phones may interfere with some
hearing aids. In the event of such interference, you
may want to consult your service provider (or call the
customer service line to discuss alternatives.)
Optional for each phone manufacturer.
Other Medical Devices
If you use any other personal medical device, consult
the manufacturer of your device to determine if it is
adequately shielded from external RF energy. Your
physician may be able to assist you in obtaining this
information.
Health Care Facilities
Turn your phone OFF in health care facilities when
any regulations posted in these areas instruct you to
do so. Hospitals or health care facilities may use
equipment that could be sensitive to external RF
energy.
Vehicles
RF signals may affect improperly installed or
inadequately shielded electronic systems in motor
vehicles. Check with the manufacturer or its
representative regarding your vehicle. You should
also consult the manufacturer of any equipment that
has been added to your vehicle.
Posted Facilities
Turn your phone OFF in any facility where posted
notices so require.
Aircraft
FCC regulations prohibit using your phone while in
the air. Switch OFF your phone before boarding an
aircraft.
Blasting Areas
To avoid interfering with blasting operations, turn
your phone OFF when in a “blasting area” or in areas
posted: “Turn off two-way radio”. Obey all signs and
instructions.
Page 77

Potentially Explosive Atmosphere
Turn your phone OFF when in any area with a
potentially explosive atmosphere and obey all signs
and instructions. Sparks in such areas could cause an
explosion or fire resulting in bodily injury or even
death.
Areas with a potentially explosive atmosphere are
often, but not always marked clearly. Potential areas
may include: fueling areas (such as gasoline stations);
below deck on boats; fuel or chemical transfer or
storage facilities; vehicles using liquefied petroleum
gas (such as propane or butane); areas where the air
contains chemicals or particles (such as grain, dust,
or metal powders); and any other area where you
would normally be advised to turn off your vehicle
engine.
For Vehicles Equipped with an Air Bag
An air bag inflates with great force. DO NOT place
objects, including either installed or portable wireless
equipment, in the area over the air bag or in the air
bag deployment area. If in-vehicle wireless equipment
is improperly installed and the air bag inflates, serious
injury could result.
Safety Information
Please read and observe the following information for
safe and proper use of your phone and to prevent
damage. Also, keep the user guide in an accessible
place at all the times after reading it.
Caution! Violation of the instructions may cause
minor or serious damage to the product.
Charger and Adapter Safety
The charger and adapter are intended for indoor
use only.
Battery Information and Care
Please dispose of your battery properly or take it
to your local wireless carrier for recycling.
The battery does not need to be fully discharged
before recharging.
Use only LG-approved chargers specific to your
phone model since they are designed to maximize
battery life.
Do not disassemble or short-circuit the battery.
Keep the battery’s metal contacts clean.
SAFETY
75
Page 78

SAFETY
SAFETY
76
Replace the battery when it no longer provides
acceptable performance. The battery can be
recharged several hundred times before
replacement.
Recharge the battery after long periods of non-use
to maximize battery life.
Battery life will vary due to usage patterns and
environmental conditions.
Use of extended backlighting, MiniBrowser, and
data connectivity kits affect battery life and
talk/standby times.
The self-protection function of the battery cuts
the power of the phone when its operation is in an
abnormal state. In this case, remove the battery
from the phone, reinstall it, and turn the phone
on.
Explosion, Shock, and Fire Hazards
Do not put your phone in a place subject to
excessive dust and keep the minimum required
distance between the power cord and heat
sources.
Unplug the power cord prior to cleaning your
phone, and clean the power plug pin when it is
dirty.
When using the power plug, ensure that it is firmly
connected. If it is not, it may cause excessive heat
or fire.
If you put your phone in a pocket or bag without
covering the receptacle of the phone (power plug
pin), metallic articles (such as a coin, paperclip or
pen) may short-circuit the phone. Always cover the
receptacle when not in use.
Do not short-circuit the battery. Metallic articles
such as a coin, paperclip or pen in your pocket or
bag may short-circuit the + and – terminals of the
battery (metal strips on the battery) upon moving.
Short-circuit of the terminal may damage the
battery and cause an explosion.
General Notice
Using a damaged battery or placing a battery in
your mouth may cause serious injury.
Page 79

Do not place items containing magnetic
components such as a credit card, phone card,
bank book or subway ticket near your phone. The
magnetism of the phone may damage the data
stored in the magnetic strip.
Talking on your phone for a long period of time
may reduce call quality due to heat generated
during use.
When the phone is not used for a long period
time, store it in a safe place with the power cord
unplugged.
Using the phone in proximity to receiving
equipment (i.e., TV or radio) may cause
interference to the phone.
Do not use the phone if the antenna is damaged.
If a damaged antenna contacts skin, it may cause a
slight burn. Please contact an LG Authorized
Service Center to replace the damaged antenna.
Do not immerse your phone in water. If this
happens, turn it off immediately and remove the
battery. If the phone does not work, take it to an
LG Authorized Service Center.
WARNING
: The power cord on this product
contains lead, a chemical known to the State of
California to cause [cancer, and] birth defects or
other reproductive harm.
.
handling
Do not paint your phone.
The data saved in your phone might be deleted
Wash hands after
due to careless use, repair of the phone or
upgrade of the software. Please backup your
important phone numbers. (Ring tones, text
messages, voice messages, pictures and videos
could also be deleted.)
The manufacturer is not liable for damage due to
the loss of data.
When you use the phone in public places, set the
ring tone to vibration so as not to disturb others.
Do not turn your phone on or off when putting it
in your ear.
SAFETY
77
Page 80

SAFETY
SAFETY
78
FDA Consumer Update
The U.S. Food and Drug
Administration’s Center for Devices and
Radiological Health Consumer Update
on Mobile Phones:
1. Do wireless phones pose a health hazard?
The available scientific evidence does not show that
any health problems are associated with using
wireless phones. There is no proof, however, that
wireless phones are absolutely safe. Wireless phones
emit low levels of Radio Frequency (RF) energy in the
microwave range while being used. They also emit
very low levels of RF when in the standby mode.
Whereas high levels of RF can produce health effects
(by heating tissue), exposure to low level RF that
does not produce heating effects causes no known
adverse health effects. Many studies of low level RF
exposures have not found any biological effects.
Some studies have suggested that some biological
effects may occur, but such findings have not been
confirmed by additional research. In some cases,
other researchers have had difficulty in reproducing
those studies or in determining the reasons for
inconsistent results.
2. What is the FDA's role concerning the safety of
wireless phones?
Under the law, the FDA does not review the safety of
radiation-emitting consumer products such as
wireless phones before they can be sold, as it does
with new drugs or medical devices. However, the
agency has authority to take action if wireless phones
are shown to emit Radio Frequency (RF) energy at a
level that is hazardous to the user. In such a case, the
FDA could require the manufacturers of wireless
phones to notify users of the health hazard and to
repair, replace or recall the phones so that the hazard
no longer exists.
Although the existing scientific data do not justify
FDA regulatory actions, the FDA has urged the
wireless phone industry to take a number of steps,
including the following:
Support needed research into possible biological
effects of RF of the type emitted by wireless phones;
Design wireless phones in a way that minimizes any
RF exposure to the user that is not necessary for
device function; and
Page 81

Cooperate in providing users of wireless phones
with the best possible information on possible
effects of wireless phone use on human health.
The FDA belongs to an interagency working group of
the federal agencies that have responsibility for
different aspects of RF safety to ensure coordinated
efforts at the federal level. The following agencies
belong to this working group:
National Institute for Occupational Safety and
Health
Environmental Protection Agency
Occupational Safety and Health Administration
National Telecommunications and Information
Administration
The National Institutes of Health participates in
some interagency working group activities, as well.
The FDA shares regulatory responsibilities for wireless
phones with the Federal Communications
Commission (FCC). All phones that are sold in the
United States must comply with FCC safety
guidelines that limit RF exposure. The FCC relies on
the FDA and other health agencies for safety
questions about wireless phones.
The FCC also regulates the base stations that the
wireless phone networks rely upon. While these base
stations operate at higher power than do the wireless
phones themselves, the RF exposures that people get
from these base stations are typically thousands of
times lower than those they can get from wireless
phones. Base stations are thus not the subject of the
safety questions discussed in this document.
3. What kinds of phones are the subject of this
update?
The term “wireless phone” refers here to handheld
wireless phones with built-in antennas, often called
“cell”, “mobile” or “PCS” phones. These types of
wireless phones can expose the user to measurable
Radio Frequency (RF) energy because of the short
distance between the phone and the user’s head.
These RF exposures are limited by FCC safety
guidelines that were developed with the advice of the
FDA and other federal health and safety agencies.
When the phone is located at greater distances from
the user, the exposure to RF is drastically lower
because a person's RF exposure decreases rapidly
with increasing distance from the source.
The so-called “cordless phones,” which have a base
SAFETY
79
Page 82

SAFETY
SAFETY
80
unit connected to the telephone wiring in a house,
typically operate at far lower power levels and thus
produce RF exposures far below the FCC safety
limits.
4. What are the results of the research done
already?
The research done thus far has produced conflicting
results, and many studies have suffered from flaws in
their research methods. Animal experiments
investigating the effects of Radio Frequency (RF)
energy exposures characteristic of wireless phones
have yielded conflicting results that often cannot be
repeated in other laboratories. A few animal studies,
however, have suggested that low levels of RF could
accelerate the development of cancer in laboratory
animals. However, many of the studies that showed
increased tumor development used animals that had
been genetically engineered or treated with
cancer-causing chemicals so as to be pre-disposed to
develop cancer in the absence of RF exposure. Other
studies exposed the animals to RF for up to 22 hours
per day. These conditions are not similar to the
conditions under which people use wireless phones,
so we don’t know with certainty what the results of
such studies mean for human health. Three large
epidemiology studies have been published since
December 2000. Between them, the studies
investigated any possible association between the
use of wireless phones and primary brain cancer,
glioma, meningioma or acoustic neuroma, tumors of
the brain or salivary gland, leukemia or other cancers.
None of the studies demonstrated the existence of
any harmful health effects from wireless phone RF
exposures. However, none of the studies can answer
questions about long-term exposures, since the
average period of phone use in these studies was
around three years.
5. What research is needed to decide whether RF
exposure from wireless phones poses a health
risk?
A combination of laboratory studies and
epidemiological studies of people actually using
wireless phones would provide some of the data that
are needed. Lifetime animal exposure studies could
be completed in a few years. However, very large
numbers of animals would be needed to provide
reliable proof of a cancer promoting effect if one
exists. Epidemiological studies can provide data that
Page 83

is directly applicable to human populations, but 10
or more years follow-up may be needed to provide
answers about some health effects, such as cancer.
This is because the interval between the time of
exposure to a cancer-causing agent and the time
tumors develop — if they do — may be many, many
years. The interpretation of epidemiological studies is
hampered by difficulties in measuring actual RF
exposure during day-to-day use of wireless phones.
Many factors affect this measurement, such as the
angle at which the phone is held, or which model of
phone is used.
6. What is the FDA doing to find out more about
the possible health effects of wireless phone RF?
The FDA is working with the U.S. National Toxicology
Program and with groups of investigators around the
world to ensure that high priority animal studies are
conducted to address important questions about the
effects of exposure to Radio Frequency (RF) energy.
The FDA has been a leading participant in the World
Health Organization International Electro Magnetic
Fields (EMF) Project since its inception in 1996. An
influential result of this work has been the
development of a detailed agenda of research needs
that has driven the establishment of new research
programs around the world. The project has also
helped develop a series of public information
documents on EMF issues.
The FDA and the Cellular Telecommunications &
Internet Association (CTIA) have a formal
Cooperative Research and Development Agreement
(CRADA) to do research on wireless phone safety.
The FDA provides the scientific oversight, obtaining
input from experts in government, industry, and
academic organizations. CTIA-funded research is
conducted through contracts with independent
investigators. The initial research will include both
laboratory studies and studies of wireless phone
users. The CRADA will also include a broad
assessment of additional research needs in the
context of the latest research developments around
the world.
SAFETY
81
Page 84

SAFETY
SAFETY
82
7. How can I find out how much Radio Frequency
energy exposure I can get by using my wireless
phone?
All phones sold in the United States must comply with
Federal Communications Commission (FCC) guidelines
that limit Radio Frequency (RF) energy exposures. The
FCC established these guidelines in consultation with
the FDA and the other federal health and safety
agencies. The FCC limit for RF exposure from wireless
telephones is set at a Specific Absorption Rate (SAR)
of 1.6 watts per kilogram (1.6 W/kg). The FCC limit is
consistent with the safety standards developed by the
Institute of Electrical and Electronic Engineering (IEEE)
and the National Council on Radiation Protection and
Measurement. The exposure limit takes into
consideration the body’s ability to remove heat from
the tissues that absorb energy from the wireless phone
and is set well below levels known to have effects.
Manufacturers of wireless phones must report the RF
exposure level for each model of phone to the FCC.
The FCC website (http://www.fcc.gov/oet/ rfsafety)
gives directions for locating the FCC identification
number on your phone so you can find your phone’s
RF exposure level in the online listing.
8. What has the FDA done to measure the Radio
Frequency energy coming from wireless phones?
The Institute of Electrical and Electronic Engineers
(IEEE) is developing a technical standard for measuring
the Radio Frequency (RF) energy exposure from
wireless phones and other wireless handsets with the
participation and leadership of FDA scientists and
engineers. The standard, “Recommended Practice for
Determining the Spatial-Peak Specific Absorption Rate
(SAR) in the Human Body Due to Wireless
Communications Devices: Experimental Techniques,”
sets forth the first consistent test methodology for
measuring the rate at which RF is deposited in the
heads of wireless phone users. The test method uses a
tissue-simulating model of the human head.
Standardized SAR test methodology is expected to
greatly improve the consistency of measurements
made at different laboratories on the same phone. SAR
is the measurement of the amount of energy absorbed
in tissue, either by the whole body or a small part of
the body. It is measured in watts/kg (or milliwatts/g) of
matter. This measurement is used to determine whether
a wireless phone complies with safety guidelines.
Page 85

9. What steps can I take to reduce my exposure to
Radio Frequency energy from my wireless
phone?
If there is a risk from these products — and at this
point we do not know that there is — it is probably
very small. But if you are concerned about avoiding
even potential risks, you can take a few simple steps
to minimize your exposure to Radio Frequency (RF)
energy. Since time is a key factor in how much
exposure a person receives, reducing the amount of
time spent using a wireless phone will reduce RF
exposure. If you must conduct extended
conversations by wireless phone every day, you could
place more distance between your body and the
source of the RF, since the exposure level drops off
dramatically with distance. For example, you could
use a headset and carry the wireless phone away
from your body or use a wireless phone connected to
a remote antenna. Again, the scientific data do not
demonstrate that wireless phones are harmful. But if
you are concerned about the RF exposure from these
products, you can use measures like those described
above to reduce your RF exposure from wireless
phone use.
10. What about children using wireless phones?
The scientific evidence does not show a danger to
users of wireless phones, including children and
teenagers. If you want to take steps to lower
exposure to Radio Frequency (RF) energy, the
measures described above would apply to children
and teenagers using wireless phones. Reducing the
time of wireless phone use and increasing the
distance between the user and the RF source will
reduce RF exposure.
Some groups sponsored by other national
governments have advised that children be
discouraged from using wireless phones at all. For
example, the government in the United Kingdom
distributed leaflets containing such a
recommendation in December 2000. They noted
that no evidence exists that using a wireless phone
causes brain tumors or other ill effects. Their
recommendation to limit wireless phone use by
children was strictly precautionary; it was not based
on scientific evidence that any health hazard exists.
SAFETY
83
Page 86

SAFETY
SAFETY
84
11. What about wireless phone interference with
medical equipment?
Radio Frequency (RF) energy from wireless phones
can interact with some electronic devices. For this
reason, the FDA helped develop a detailed test
method to measure Electro Magnetic Interference
(EMI) of implanted cardiac pacemakers and
defibrillators from wireless telephones. This test
method is now part of a standard sponsored by the
Association for the Advancement of Medical
Instrumentation (AAMI). The final draft, a joint effort
by the FDA, medical device manufacturers and many
other groups, was completed in late 2000. This
standard will allow manufacturers to ensure that
cardiac pacemakers and defibrillators are safe from
wireless phone EMI.
The FDA has tested hearing aids for interference from
handheld wireless phones and helped develop a
voluntary standard sponsored by the Institute of
Electrical and Electronic Engineers (IEEE). This
standard specifies test methods and performance
requirements for hearing aids and wireless phones so
that no interference occurs when a person uses a
“compatible” phone and a “compatible” hearing aid
at the same time. This standard was approved by the
IEEE in 2000.
The FDA continues to monitor the use of wireless
phones for possible interactions with other medical
devices. Should harmful interference be found to
occur, the FDA will conduct testing to assess the
interference and work to resolve the problem.
12. Where can I find additional information?
For additional information, please refer to the
following resources:
FDA web page on wireless phones
(http://www.fda.gov/cdrh/phones/index.html)
Federal Communications Commission (FCC) RF
Safety Program (http://www.fcc.gov/oet/rfsafety)
International Commission on Non-lonizing Radiation
Protection (http://www.icnirp.de)
World Health Organization (WHO) International EMF
Project (http://www.who.int/emf)
National Radiological Protection Board (UK)
(http://www.nrpb.org.uk/)
Page 87

Consumer Information on SAR
(Specific Absorption Rate)
This model phone meets the government's
requirements for exposure to radio waves. Your
wireless phone is a radio transmitter and receiver. It is
designed and manufactured not to exceed the
emission limits for exposure to Radio Frequency (RF)
energy set by the Federal Communications
Commission of the U.S. Government. These limits are
part of comprehensive guidelines and establish
permitted levels of RF energy for the general
population. The guidelines are based on standards
that were developed by independent scientific
organizations through periodic and thorough
evaluation of scientific studies. The standards include
a substantial safety margin designed to assure the
safety of all persons, regardless of age and health.
The exposure standard for wireless mobile phones
employs a unit of measurement known as the Specific
Absorption Rate, or SAR. The SAR limit set by the
FCC is 1.6 W/kg. Tests for SAR are conducted using
standard operating positions specified by the FCC
with the phone transmitting at its highest certified
power level in all tested frequency bands. Although
SAR is determined at the highest certified power
level, the actual SAR level of the phone while
operating can be well below the maximum value.
Because the phone is designed to operate at multiple
power levels to use only the power required to reach
the network, in general, the closer you are to a
wireless base station antenna, the lower the power
output.
Before a phone model is available for sale to the
public, it must be tested and certified to the FCC
that it does not exceed the limit established by the
government-adopted requirement for safe exposure.
The tests are performed in positions and locations
(e.g., at the ear and worn on the body) as required
by the FCC for each model.
The highest SAR value for this model phone when
tested for use at the ear is 1.23 W/kg and when
worn on the body, as described in this user guide, is
0.848W/kg (body-worn measurements differ among
phone models, depending upon available accessories
and FCC requirements). While there may be
differences between SAR levels of various phones and
at various positions, they all meet the government
requirement for safe exposure.
SAFETY
85
Page 88

SAFETY
SAFETY
86
The FCC has granted an Equipment Authorization for
this model phone with all reported SAR levels
evaluated as in compliance with the FCC RF emission
guidelines. SAR information on this model phone is
on file with the FCC and can be found under the
Display Grant section of
http://www.fcc.gov/oet/fccid after searching on FCC
ID BEJAX5000. Additional information on Specific
Absorption Rates (SAR) can be found on the Cellular
Telecommunications Industry Association (CTIA)
website at http://www.wow-com.com.
* In the United States and Canada, the SAR limit for
mobile phones used by the public is 1.6 watts/kg
(W/kg) averaged over one gram of tissue. The
standard incorporates a substantial margin of safety
to give additional protection for the public and to
account for any variations in measurements.
Page 89

ACCESSORIES
There are a variety of accessories available for your mobile phone. Consult your local dealer for availability.
Travel Charger
The battery charger, allows you to
power your phone using.
Battery
Standard battery is available.
Vehicle Power Charger
The vehicle power charger
allows you to operate the phone
and trickle charge the phone’s
battery from your vehicle. It takes
5 hours to charge a completely
discharged standard battery.
USB Data Cable
The USB data cable kit, enables
you to connect your phone to
your PC.
Hands-Free Car Kit (Portable)
The hands-free car kit enables you
to attach the phone to the power
jack in your car, providing you with
hands-free operation. It can charge
a completely discharged battery in
5 hours.
Headset
Connects to your phone,
allowing hands-free operation.
Includes earpiece, microphone,
and integrated call answer /
termination button.
(Model Headset 1000)
Holster
ACCESSORIES
87
Page 90

WARRANTY INFORMATION
WARRANTY INFORMATION
88
1. WHAT THIS WARRANTY COVERS :
LG offers you a limited warranty that the enclosed
subscriber unit and its enclosed accessories will be
free from defects in material and workmanship,
according to the following terms and conditions:
(1) The limited warranty for the product extends
for ONE (1) year beginning on the date of
purchase of the product by the original end
user.
(2) The limited warranty extends only to the
original end user of the product and is not
assignable or transferable to any subsequent
purchaser/end user.
(3) This warranty is good only to the original end
user of the product during the warranty period
as long as it is in Canada.
(4) Upon request from LG, the consumer must
provide information to reasonably prove the
date of purchase.
(5) During the applicable warranty period, LG will
repair or replace at LG’s sole option, without
charge to the original end user, any defective
component part of the phone or accessory.
(6) LG may, use rebuilt, reconditioned, or new parts
or components when repairing any product or
replace a product with a rebuilt, reconditioned
or new product.
2. WHAT THIS WARRANTY DOES NOT COVER :
(1) Defects or damages resulting from use of the
product in other than its normal and customary
manner.
(2) Defects or damages from abnormal use,
abnormal conditions, improper storage,
exposure to moisture or dampness,
unauthorized modifications, unauthorized
connections, unauthorized repair, misuse,
neglect, abuse, accident, alteration, improper
installation, or other acts which are not the
fault of LG, including damage caused by spills of
food or liquids.
(3) Breakage or damage to antennas unless caused
directly by defects in material or workmanship.
(4) If the carrier’s or manufacturer’s Customer
Service Centre was not notified by the end user
of the alleged defect or malfunction of the
product, during the warranty period.
Page 91

(5) Products which have had their serial numbers
removed or made illegible.
(6) Damage resulting from use of non-LG approved
accessories.
(7) All plastic surfaces and all other externally
exposed parts that are scratched or damaged
due to normal customer use.
(8) Products serviced by non-authorized persons or
companies.
Notes:
(1) This limited warranty is in lieu of all other
warranties, express or implied either in fact or
by operations of law, statutory or otherwise,
including, but not limited to any implied
warranty of merchantability or fitness for a
particular purpose.
(2) Shipping damage is the sole responsibility of
the shipping company.
3. EXCLUSION OF LIABILITY :
No other express warranty is applicable to this
product. THE DURATION OF ANY IMPLIED
WARRANTIES, INCLUDING THE IMPLIED
WARRANTY OF MARKETABILITY, IS LIMITED TO
THE DURATION OF THE EXPRESS WARRANTY
HEREIN. LG ELECTRONICS CANADA, INC. SHALL
NOT BE LIABLE FOR THE LOSS OF THE USE OF
THE PRODUCT, INCONVENIENCE, LOSS OR ANY
OTHER DAMAGES, DIRECT OR
CONSEQUENTIAL, ARISING OUT OF THE USE
OF, OR INABILITY TO USE, THIS PRODUCT OR
FOR ANY BREACH OF ANY EXPRESS OR IMPLIED
WARRANTY, INCLUDING THE IMPLIED
WARRANTY OF MERCHANTABILITY APPLICABLE
TO THIS PRODUCT.
4. HOW TO GET WARRANTY SERVICE :
To obtain warranty service, please call the
following telephone number from anywhere in
Canada:
LG Electronics Canada, Inc.
Tel. 1-888-542-2623
WARRANTY INFORMATION
89
Page 92

IMPORTANTES MESURES DE SÉCURITÉ
Veuillez prendre connaissance de ces directives simples. La violation des règles peut être dangereuse ou illégale.
Ce guide de l'utilisateur fournit des renseignements détaillés à ce propos.
AVERTISSEMENT! La violation des instructions pourrait entraîner des blessures graves ou la mort.
1. N’utilisez jamais une pile non approuvée; cela pourrait endommager le téléphone et faire exploser
la pile.
2. Ne placez jamais votre téléphone dans un four à micro-ondes, car cela fera exploser la pile.
3. Ne jetez pas la pile au feu ou près d'un feu, ni avec des matières dangereuses ou inflammables.
4. Pour éviter tout risque d’incendie, évitez tout contact entre la pile et des objets acérés, comme
des crocs d’animal ou des ongles.
5. Tenez la pile hors de la portée des enfants.
6. Veuillez faire attention que les enfants n’avalent aucune pièce du téléphone car ceci pourrait
causer l’asphyxie ou le suffocation.
IMPORTANTES MESURES DE SÉCURITÉ
1
Page 93

IMPORTANTES MESURES DE SÉCURITÉ
IMPORTANTES MESURES DE SÉCURITÉ
1. Débranchez le cordon d’alimentation et le chargeur pendant les orages pour éviter les chocs
électriques et les incendies.
2. En voiture, ne laissez pas votre téléphone ni l'ensemble mains libres près d’un coussin de sécurité
gonflable. Si l’équipement sans fil dans le véhicule est incorrectement installé et que le coussin de
sécurité se gonfle, cela pourrait provoquer des blessures graves.
3. N’utilisez pas un téléphone mobile en conduisant.(c.-à-d. avion, hôpital)
4. N’utilisez pas le téléphone dans les endroits où son usage est interdit (par exemple dans un avion).
5. N’exposez pas l’adaptateur ou le chargeur à la lumière directe du soleil et ne les utilisez pas dans les
endroits très humides comme les salles de bains.
6. Ne rangez jamais votre téléphone à des températures de moins de ou de plus de 50°C.
7. Pour éviter tout risque d’incendie, n’utilisez pas de produits chimiques (c.-à-d. : alcool, benzène,
solvants, etc.) ni de détergents forts pour nettoyer votre téléphone.
8. Évitez de laisser tomber le téléphone par terre, de le frapper ou de le secouer. Le choc ou les
vibrations pourraient endommager les circuits électroniques du téléphone.
9. N’utilisez pas votre appareil dans les endroits où il y a risque d’explosion car il peut produire des
étincelles.
10. N'endommagez pas le cordon en le pliant, en le tordant, en le tirant ou en l'exposant à la chaleur.
N'utilisez pas la fiche du chargeur si elle est desserrée car cela pourrait causer un incendie ou un
choc électrique.
2
Page 94

1. Ne placez pas d’objets lourds sur le cordon d’alimentation. Afin d’éviter tout risque d’incendie et
de choc électrique, veillez à ce que le cordon d’alimentation ne soit pas écrasé.
2. Ne manipulez pas votre téléphone avec des mains mouillées pendant qu’il se charge. Vous pourriez
vous électrocuter ou endommager le téléphone.
3. Ne démontez pas le téléphone.
4. Ne faites pas d’appels et ne répondez pas au téléphone pendant la charge, car cela pourrait
causer un court-circuit, un choc électrique ou un incendie.
5. Utilisez uniquement les piles, les antennes et les chargeurs fournis par LG. La garantie n’est pas
valide si vous utilisez des produits provenant d’autres fournisseurs.
6. Seul le personnel autorisé devrait faire l’entretien du téléphone et de ses accessoires. Une
installation ou une réparation incorrectes pourraient causer des accidents et ainsi rendre la
garantie nulle.
7. Pendant un appel, ne tenez pas l’antenne de l’appareil et évitez qu’elle n’entre en contact avec
votre corps.
8. Les appels d’urgence ne peuvent être faits que dans une zone de service. Si vous devez faire un
appel d’urgence, assurez-vous d’être dans une zone de service et que votre téléphone est allumé.
IMPORTANTES MESURES DE SÉCURITÉ
3
Page 95

TABLE DES MATIÈRES
Une partie de contenu de ce guide d'utilisateur peut être différent de votre téléphone selon le logiciel du
téléphone ou de votre fournisseur de service. Les dispositifs et les caractéristiques pourraient être sujets au
changement sans préavis.
TABLE DES MATIÈRES
Importantes mesures de
sécurité 1
Table des matières 4
Introduction 9
Renseignements importants
Conformité à la clause 15
classe B de la FCC
Conformité aux normes
d'Industrie Canada 10
Détails techniques
Renseignements de la FCC sur
l’exposition aux
radiofréquences (RF) 12
4
Vue d’ensemble du
téléphone 14
Référence des menus du
téléphone 16
Le démarrage du téléphone18
Utilisation de la batterie
Installation de la pile
Retrait de la pile
Chargement de la pile
Niveau de charge de la pile
Mise sous tension et hors tension
du téléphone 19
Mise sous tension du téléphone
Mise hors tension du téléphone
Puissance du signal 19
Icônes de l'écran 20
Comment faire un appel 21
Comment corriger une erreur de
composition
Comment recomposer un numéro
Comment répondre à un appel
Accès rapide aux fonctions
pratiques 22
Mode Politesse (silence)
Mode verrouillage
Fonction Muet
Réglage rapide du volume
Appel en attente 23
Page 96

Identification de l'appelant 23
Composition abrégée
Comment entrer et modifier
de l'information 24
Entrée de texte
Votre répertoire dans la
mémoire du téléphone 28
Enregistrement d'entrées dans
le répertoire
Options de personnalisation du
répertoire 29
Modification des entrées de contacts 32
Suppression 35
Numéro de téléphone contenant des
pauses 37
Comment effectuer une recherche dans
la mémoire de votre téléphone 38
Comment établir un appel à partir
d'une entrée de répertoire
Comment utiliser les menus
du téléphone 40
Accès au menu
Contacts
Accès et options
1. Liste des entrées 41
2. Nouvelle entrée
3. Groupes 42
4. Comp. abrégée
5. Effacer tout 43
TABLE DES MATIÈRES
Historique 43
Accès et options
1. Tous les appels 44
2. Appels effectués
3. Appels reçus 45
4. Appels manqués
5. Effacer historique 46
6. Durée des appels
Messagerie 47
Accès et options
1. Messagerie Vocale 48
2. Mess. Text./multimédia
1. Envoyer mess.
2. Boîte réception 50
5
Page 97

TABLE DES MATIÈRES
TABLE DES MATIÈRES
3. Boîte d’envoi/Mess. Envoyés 51
4. Ébauches
5. Mess. Sauvegardés 52
6. Effacer messages
7. Paramètres 53
8. Info de Mémoire 54
3. Avis Web
4. Courriel
5. Mi et clavarder
Plus 55
Accès et options
1. Web sans fil
2. Sons 56
2.1 Sonneries
2.2 Fichiers sonores
6
2.3 Mémo vocal 57
3. Images 58
3.1 Papier peint
3.2 Fichiers images
3.3 Album photo 59
3.4 Album en ligne
4. Jeux
5. Outils
Obtenir Nouveau
Calculatrice 60
Réveil
Calendrier 61
Bloc-notes 62
Calcul pourboire 63
Horloge universelle 64
6. Signets 64
6.1 Liste de raccourcis
6.2 Liens Internet
7. État de la mémoire
Appareil photo 65
Accès et options
1. Prendre Photo
2. Prendre Vidéo 66
3. Album de Photo 67
4. Album de Vidéo
Parametrès 68
Accès et options
1. Sons
1.1 Sonneries
Page 98

1.2 Clavier 69
1.3 Volume 70
1.4 Avis
2. Affichage 71
2.1 Banniére
2.2 Papier Peint
2.3 Écran Principal
2.4 Éclairage clavier 72
2.5 Date et heure 73
2.6 Style de menu
2.7 Police
3. Jeux/Outils 74
3.1 Paramètres rétroéclair.
3.2 Volume
3.3 Avis
4. Autres 75
4.1 Attribuer raccourci 75
4.2 Paramètres appel
4.3 Langue 76
4.4 Mode ATS 77
4.5 Paramètres données
5. Avancé 78
5.1 Information
5.2 Systéme 80
5.3 Sécurité 81
6. Mode avion 82
TABLE DES MATIÈRES
Sécurité 83
Renseignements sur la
sécurité TIA
Exposition à un signal radioélectrique
Entretien de l’antenne
Utilisation du téléphone
Conseils pour un fonctionnement
efficace 84
Conduite automobile
Appareils électroniques
Stimulateurs cardiaques
Prothèses auditives 85
Autres appareils médicaux
Établissements de soins de santé
Véhicules
Installations avec avertissements
7
Page 99

TABLE DES MATIÈRES
TABLE DES MATIÈRES
Avions 86
Zones de dynamitage
Atmosphères potentiellement explosives
Pour les véhicules équipés d’un coussin
de sécurité gonflable
Renseignements sur la
sécurité 87
Adaptateur et chargeur – Sécurité
Pile – Information et soin
Explosion, choc et incendie 88
Généralités
Informations de la FDA 90
Renseignements sur le TAS 98
8
Accessoires 100
Chargeur de batterie
Batterie
Allume-cigare de voiture
Câble USB de données
Ensemble mains libres pour
voiture (portatif)
Écouteur
Étui
Garantie Limitée 101
Page 100

INTRODUCTION
Félicitations pour votre achat du téléphone cellulaire
LG 200 compact et moderne, conçu pour
fonctionner avec la technologie de communication
numérique mobile la plus récente, accès multiple par
répartition en code (CDMA - Code Division Multiple
Access). En plus des nombreuses fonctions
perfectionnées du système CDMA, comme la clarté
vocale considérablement accrue, ce téléphone offre :
1. Un grand écran à cristaux liquides, rétroéclairé,
facile à lire 9 lignes avec des icônes d’activité.
2. Radiomessagerie, message vocal et identification
de l'appelant.
3. Un clavier à 23-touches.
4. Une interface à menus avec invites pour faciliter
l’utilisation et la configuration.
5. La prise d’appel toute touche, la réponse
automatique, la composition abrégée et à une
seule touche avec 99 adresses de mémoire.
6. Un affichage bilingue (Anglais et Français).
Renseignements importants
Ce guide d’utilisation fournit des renseignements
importants sur l’utilisation et le fonctionnement de
votre téléphone. Veuillez lire soigneusement tous les
renseignements avant d’utiliser le téléphone pour en
obtenir le meilleur rendement et pour éviter de
l’endommager ou de mal l’utiliser. Toute la
modification ou l’altération non autorisée annulera
votre garantie.
Conformité à la clause 15 classe B de la
FCC
Cet appareil et ses accessoires sont conformes à la
clause 15 des règlements de la FCC. Son
fonctionnement est soumis aux deux conditions
suivantes : (1) cet appareil et ses accessoires ne
peuvent pas provoquer de brouillage préjudiciable et
(2) cet appareil et ses accessoires doivent accepter
la réception de tout brouillage, y compris ceux qui
pourraient provoquer un fonctionnement indésirable.
INTRODUCTION
9
 Loading...