

Lexus LX450 2002, LX470 2002, LX570 2002 Owner Manual

SECTION 3 –
STARTING AND DRIVING
Starting and driving
Three–way catalytic converter 198. . . . . . . . . . . . . . . . . . . . . . . . . . . . .
Engine exhaust caution 199. . . . . . . . . . . . . . . . . . . . . . . . . . . . . . . . . . .
Before starting the engine 200. . . . . . . . . . . . . . . . . . . . . . . . . . . . . . . . .
Ignition switch with steering lock 200. . . . . . . . . . . . . . . . . . . . . . . . . . .
Parking brake 201. . . . . . . . . . . . . . . . . . . . . . . . . . . . . . . . . . . . . . . . . . .
How to start the engine 202. . . . . . . . . . . . . . . . . . . . . . . . . . . . . . . . . . .
Automatic transmission 203. . . . . . . . . . . . . . . . . . . . . . . . . . . . . . . . . . .
Four–wheel drive system 211. . . . . . . . . . . . . . . . . . . . . . . . . . . . . . . . .
Cruise control 213. . . . . . . . . . . . . . . . . . . . . . . . . . . . . . . . . . . . . . . . . . .
Active height control suspension (AHC) 216. . . . . . . . . . . . . . . . . . . . .
Adaptive variable suspension (AVS) 224. . . . . . . . . . . . . . . . . . . . . . . .
Active traction control system 225. . . . . . . . . . . . . . . . . . . . . . . . . . . . . .
Vehicle skid control system 227. . . . . . . . . . . . . . . . . . . . . . . . . . . . . . . .
Brake system 230. . . . . . . . . . . . . . . . . . . . . . . . . . . . . . . . . . . . . . . . . . .
Brake pad wear limit indicators 234. . . . . . . . . . . . . . . . . . . . . . . . . . . .
Types of tires 234. . . . . . . . . . . . . . . . . . . . . . . . . . . . . . . . . . . . . . . . . . . .
1
197
STARTING AND DRIVING
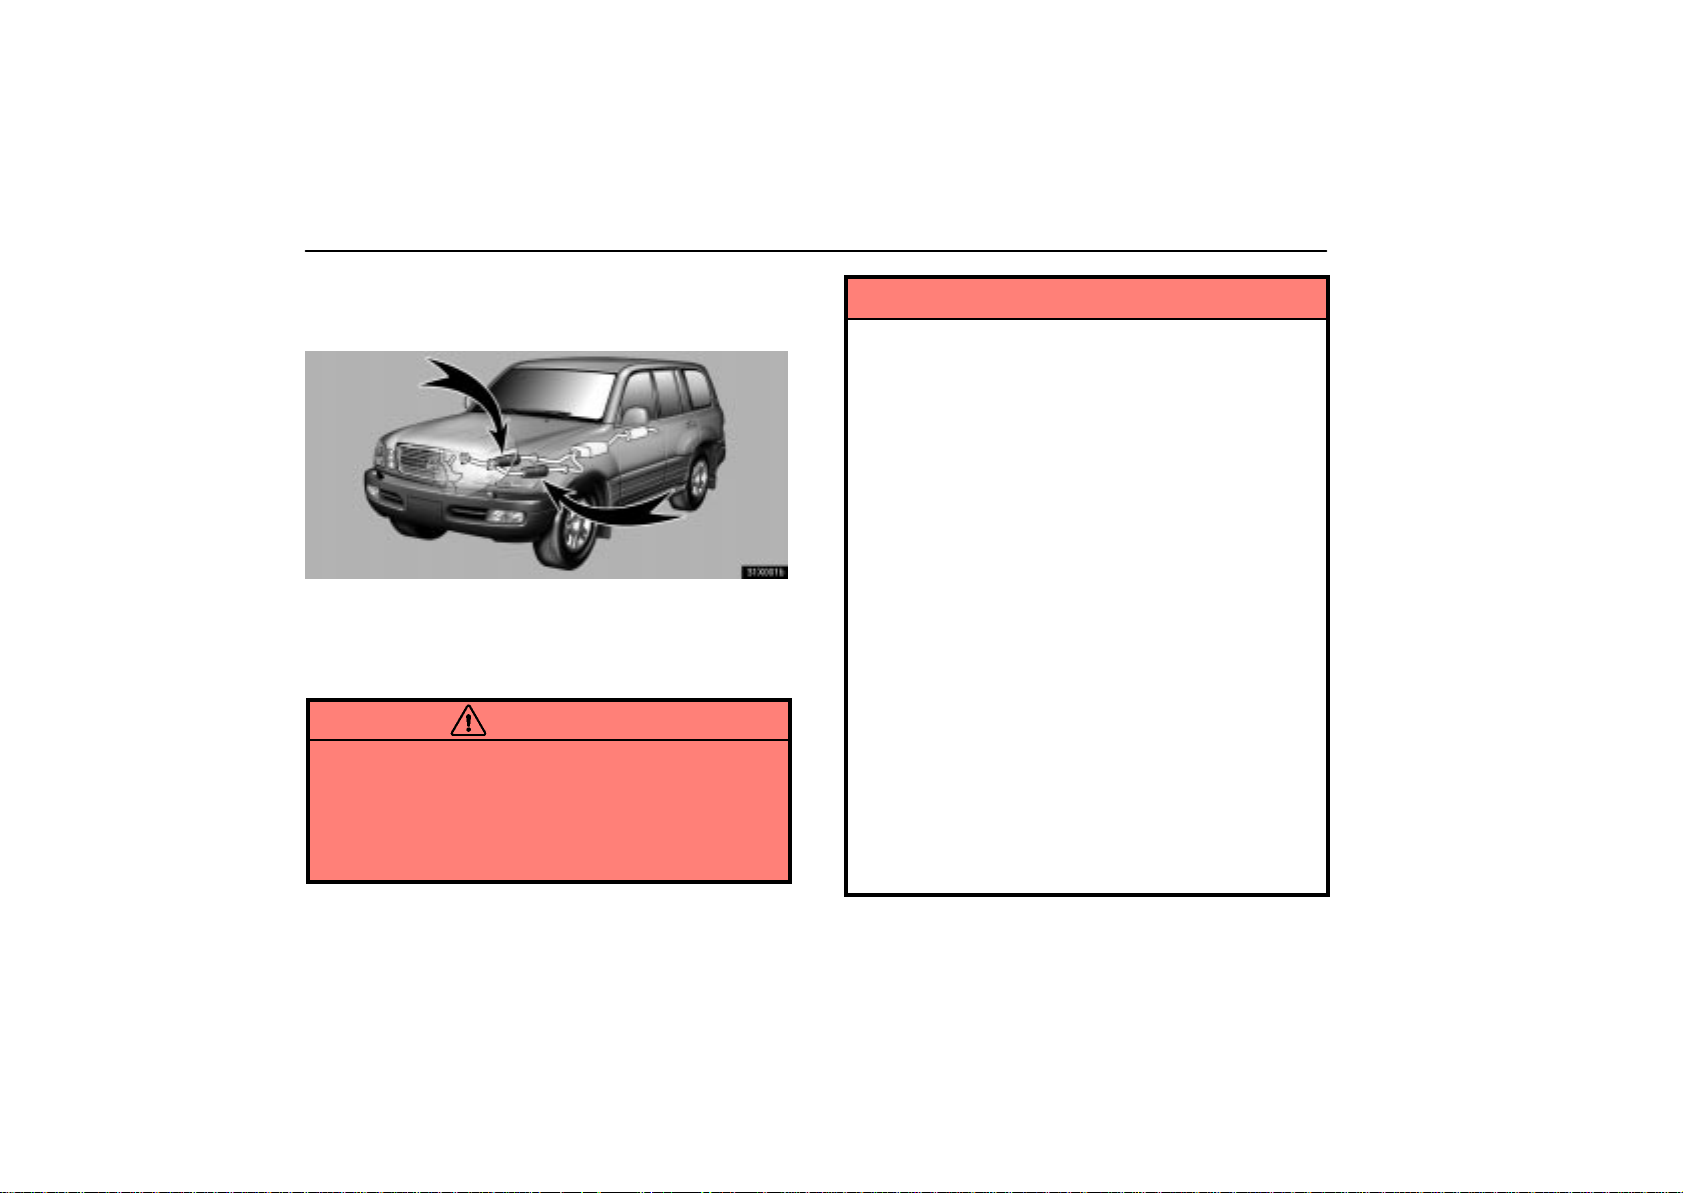
THREE–WAY CATALYTIC
CONVERTER
31X001b
Three–way catalytic converters are emission control
devices installed in the exhaust system.
It looks somewhat like a muffler, but its purpose is to reduce
pollutants in the exhaust gas.
CAUTION
Keep people and combustible materials away from
the exhaust pipe while the engine is running. The
exhaust gas is very hot.
Do not drive, idle or park your vehicle over anything
that might burn easily such as grass, leaves, paper or
rags.
NOTICE
A large amount of unburned gases flowing into the
three–way catalytic converter may cause it to overheat
and create a fire hazard. To prevent this and other
damage, observe the following precautions:
Use only unleaded gasoline.
Do not drive with an extremely low fuel level; running
out of fuel could cause the engine to misfire, creating
an excessive load on the three–way catalytic
converter.
Do not allow the engine to run at idle speed for more
than 20 minutes.
Avoid racing the engine.
Do not push–start or pull–start your vehicle.
Do not turn off the ignition while the vehicle is
moving.
Keep your engine in good running order.
Malfunctions in the engine electrical system, electric
ignition system or fuel system could cause an
extremely high three–way catalytic converter
temperature.
If the engine becomes difficult to start or stalls
frequently, take your vehicle in for a check–up as
soon as possible. Remember, your Lexus dealer
knows your vehicle and its three–way catalytic
converter system best.
198

STARTING AND DRIVING
To ensure that the three–way catalytic converter and
the entire emission control system operate properly,
your vehicle must receive the periodic inspections
required by the Lexus Maintenance Schedule. For
scheduled maintenance information, refer to the
“Owner’s Manual Supplement / Scheduled
Maintenance”.
ENGINE EXHAUST CAUTION
CAUTION
Avoid inhaling the engine exhaust. It contains
carbon monoxide, which is a colorless and odorless
gas. It can cause unconsciousness or even death.
Make sure the exhaust system has no holes or loose
connections. The system should be checked from
time to time. If you hit something, or notice a change
in the sound of the exhaust, have the system checked
immediately.
Do not run the engine in a garage or enclosed area
except for the time needed to drive the vehicle in or
out. The exhaust gases cannot escape, making this
a particularly dangerous situation.
Do not remain for a long time in a parked vehicle with
the engine running. If it is unavoidable, however, do
so only in an unconfined area and adjust the heating
or cooling system to force outside air into the vehicle.
Keep the back door closed while driving. An open or
unsealed back door may cause exhaust gases to be
drawn into the vehicle.
To allow proper operation of your vehicle’s
ventilation system, keep the inlet grilles in front of the
windshield clear of snow, leaves, or other
obstructions.
If you smell exhaust fumes in the vehicle, drive with
the windows open and the back door closed. Have
the cause immediately located and corrected.
199

STARTING AND DRIVING
BEFORE STARTING THE ENGINE
1. Check the area around the vehicle before entering it.
2. Adjust seat position, seatback angle, head restraint height
and steering wheel angle.
3. Adjust the inside and outside rear view mirrors.
4. Lock all doors.
5. Fasten seat belts.
Remember to check that the service reminder indicators
function when turning the key to ”ON”, and check the fuel
gauge to see that you have sufficient fuel.
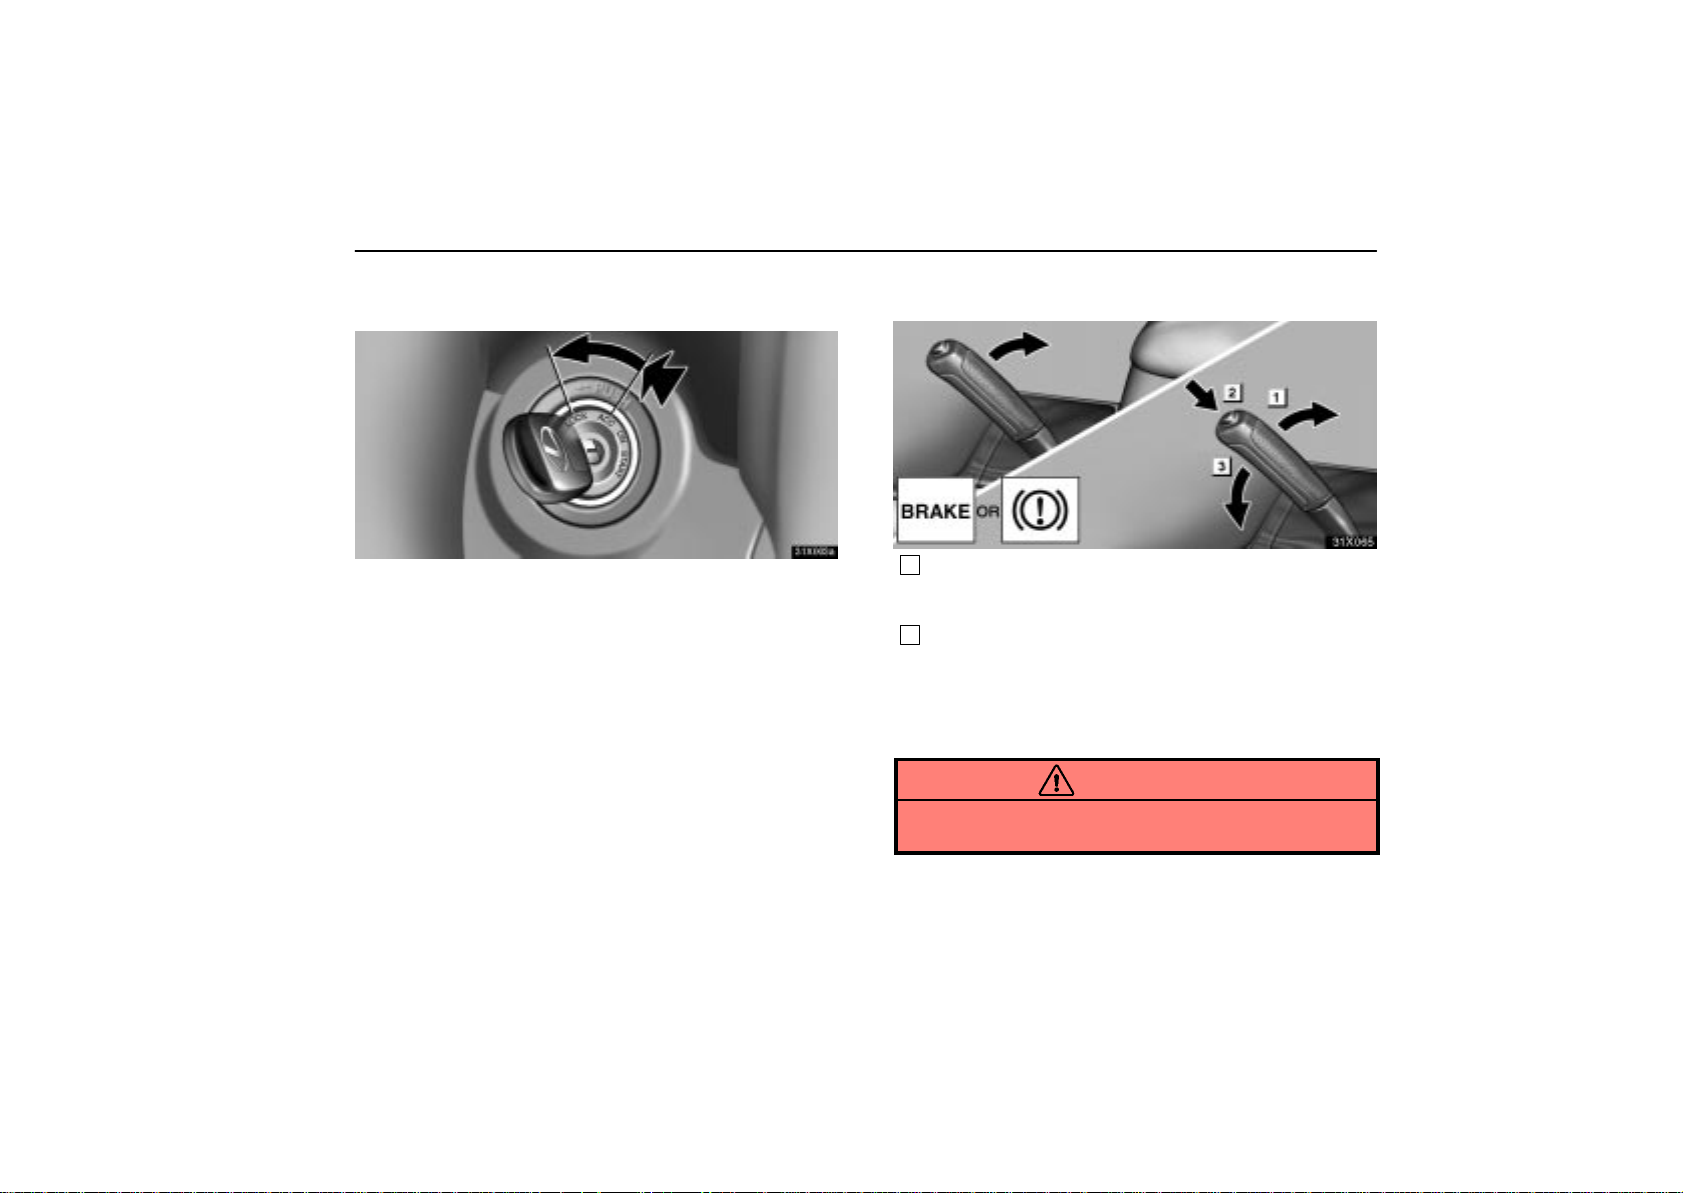
IGNITION SWITCH WITH STEERING
LOCK
31X002a
”START” – Starter motor on. The key will return to the
”ON” position when released.
For starting tips, see page 202.
”ON” – Engine on and all accessories on.
This is the normal driving position.
NOTICE
Do not leave the key in the ”ON” position if the engine
is not running. The battery will discharge and the
electronic ignition system could be damaged.
200
”ACC” – Accessories such as the radio operate, but the
engine is off.
STARTING AND DRIVING
If you leave the key in the ”ACC” or ”LOCK” position and open
the driver’s door, a buzzer will remind you to remove the key.
31X003a
”LOCK” – Engine is off and the steering wheel is locked.
The ignition key can be removed only at this position.
To turn the key from ”ACC” to the ”LOCK” position, you must
put the transmission selector lever in the ”P” position.
Once you remove the key, the engine immobiliser system is
automatically set. See ”Engine immobiliser system” on page
11.
When starting the engine, the key may seem stuck at the
”LOCK” position. To free it, first be sure the key is pushed all
the way in, and then rock the steering wheel slightly while
turning the key gently.
If, in an emergency, you must turn the engine off while the
vehicle is moving, turn the key only to ”ACC”.
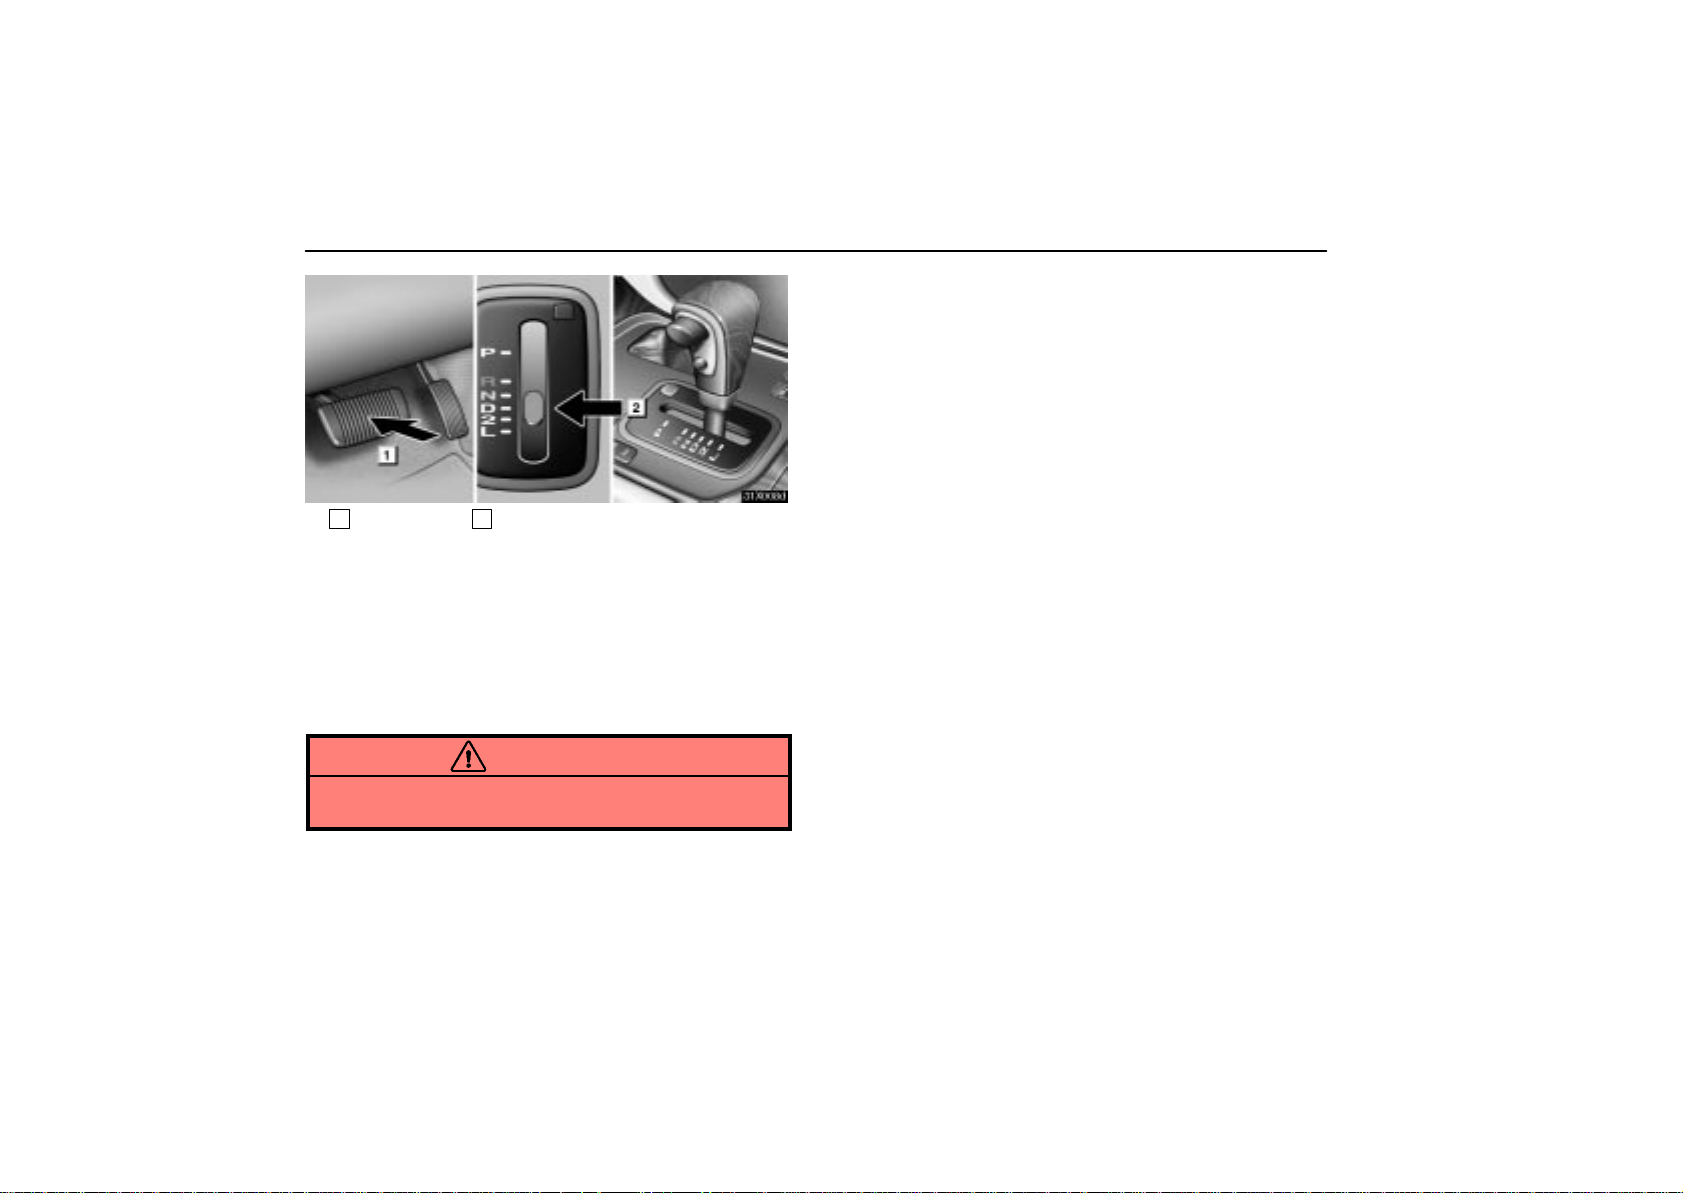
PARKING BRAKE
31X065
1
To set: Pull up the lever. For better holding power,
first depress the brake pedal and hold it while setting
the parking brake.
2
To release: Pull up the lever slightly (1), press the
lock release button (2), and lower the lever (3).
Before leaving your vehicle, firmly apply the parking brake. For
better holding power, first depress the brake pedal and hold it
while setting the parking brake.
CAUTION
Before driving, make sure the parking brake is fully
released and that the parking brake reminder light is off.
201

STARTING AND DRIVING
HOW TO START THE ENGINE
Before cranking
1. Apply the parking brake firmly.
2. Turn off unnecessary lights and accessories.
3. Put the selector lever in ”P”. If you need to restart the engine
while the vehicle is moving, put the selector lever in ”N”. A
starter safety device will prevent the starter from operating if
the selector lever is in any drive position.
4. Depress the brake pedal and hold it to the floor until driving
off.
Starting the engine
Before starting the engine, be sure to follow the instructions in
”Before cranking”.
Normal starting procedure
The multiport fuel injection system/sequential multiport fuel
injection system in your engine automatically controls the
proper air–fuel mixture for starting. You can start a cold or hot
engine as follows:
1. With your foot off the accelerator pedal, crank the engine by
turning the key to ”ST ART”. Release it when the engine starts.
2. After the engine runs for about 10 seconds, you are ready
to drive.
If the weather is below freezing, let the engine warm up for a
few minutes before driving. Do not leave the vehicle while the
engine is warming up.
If the engine stalls ...
Simply restart it , using the correct procedure given in normal
starting.
If the engine will not start
See ”If your vehicle will not start” on page 256.
NOTICE
Do not crank for more than 30 seconds at a time. This
may overheat the starter and wiring systems.
Do not race a cold engine.
If the engine becomes difficult to start or stalls
frequently, have the engine checked immediately.
202

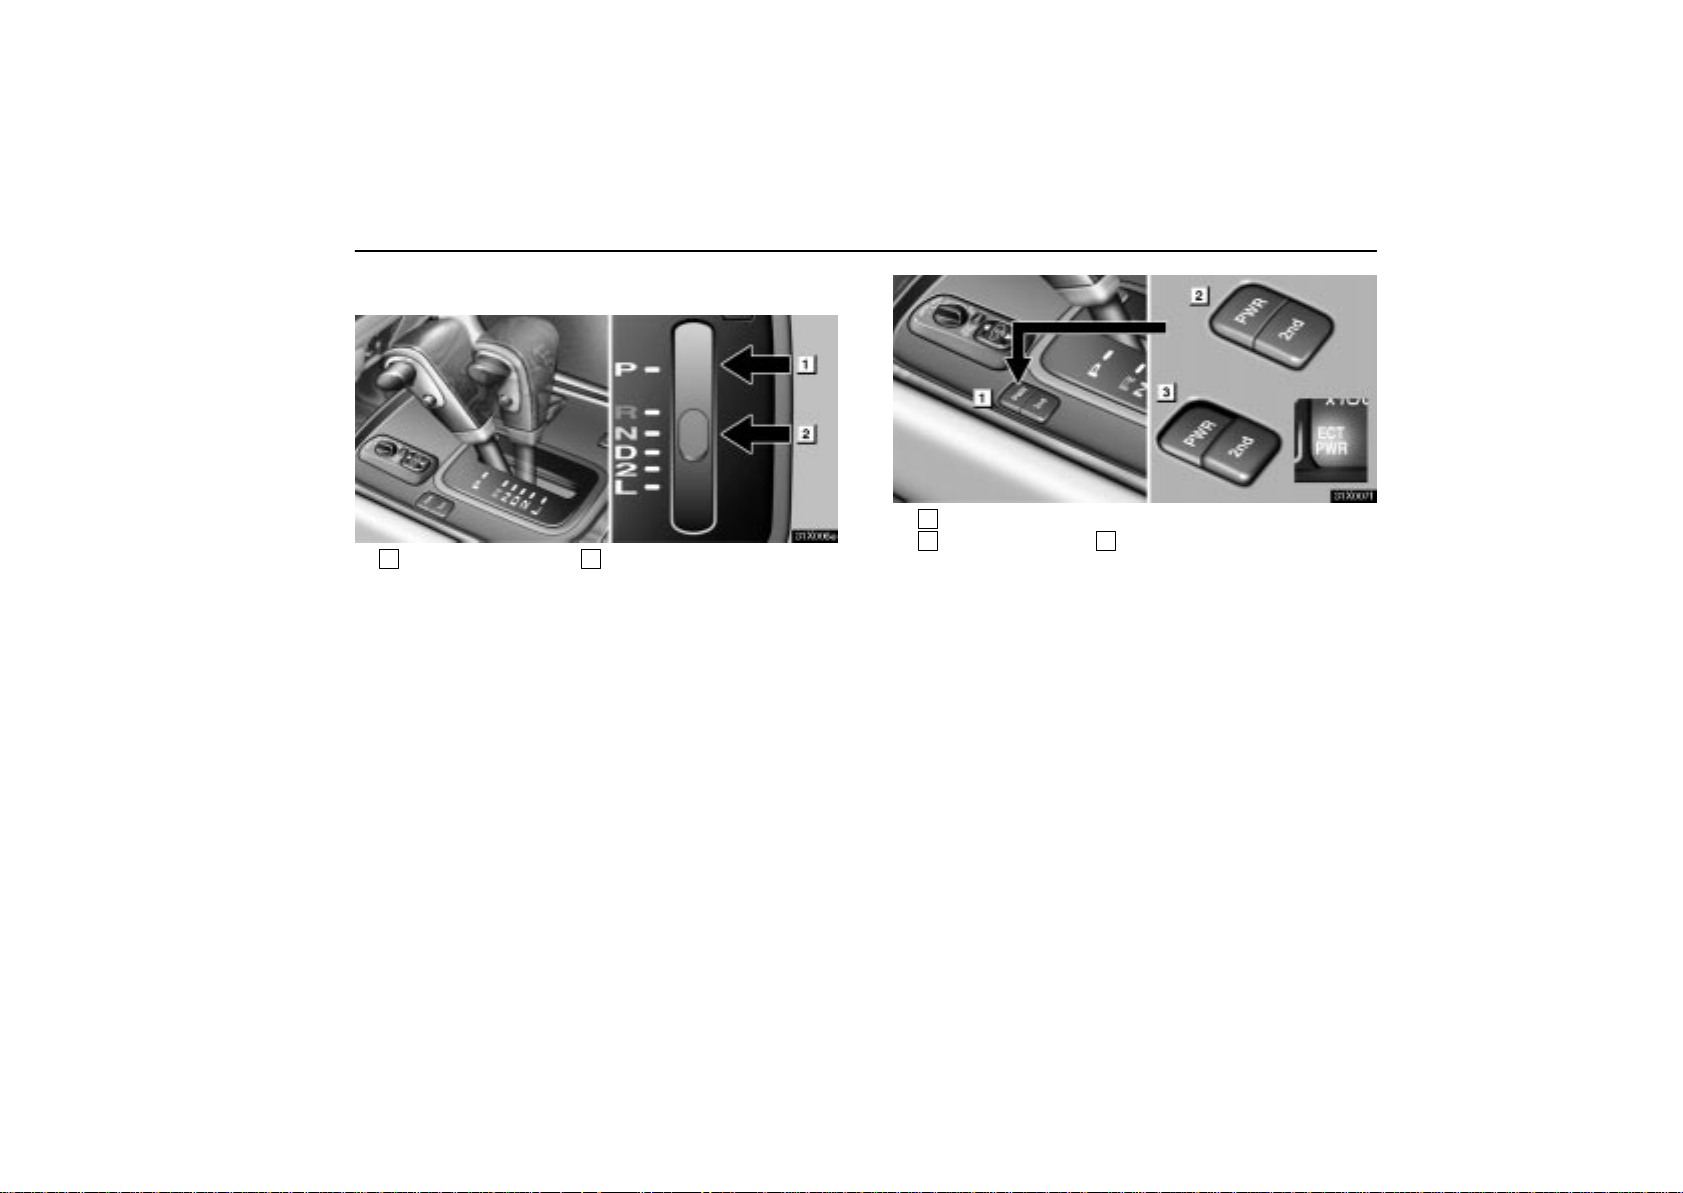
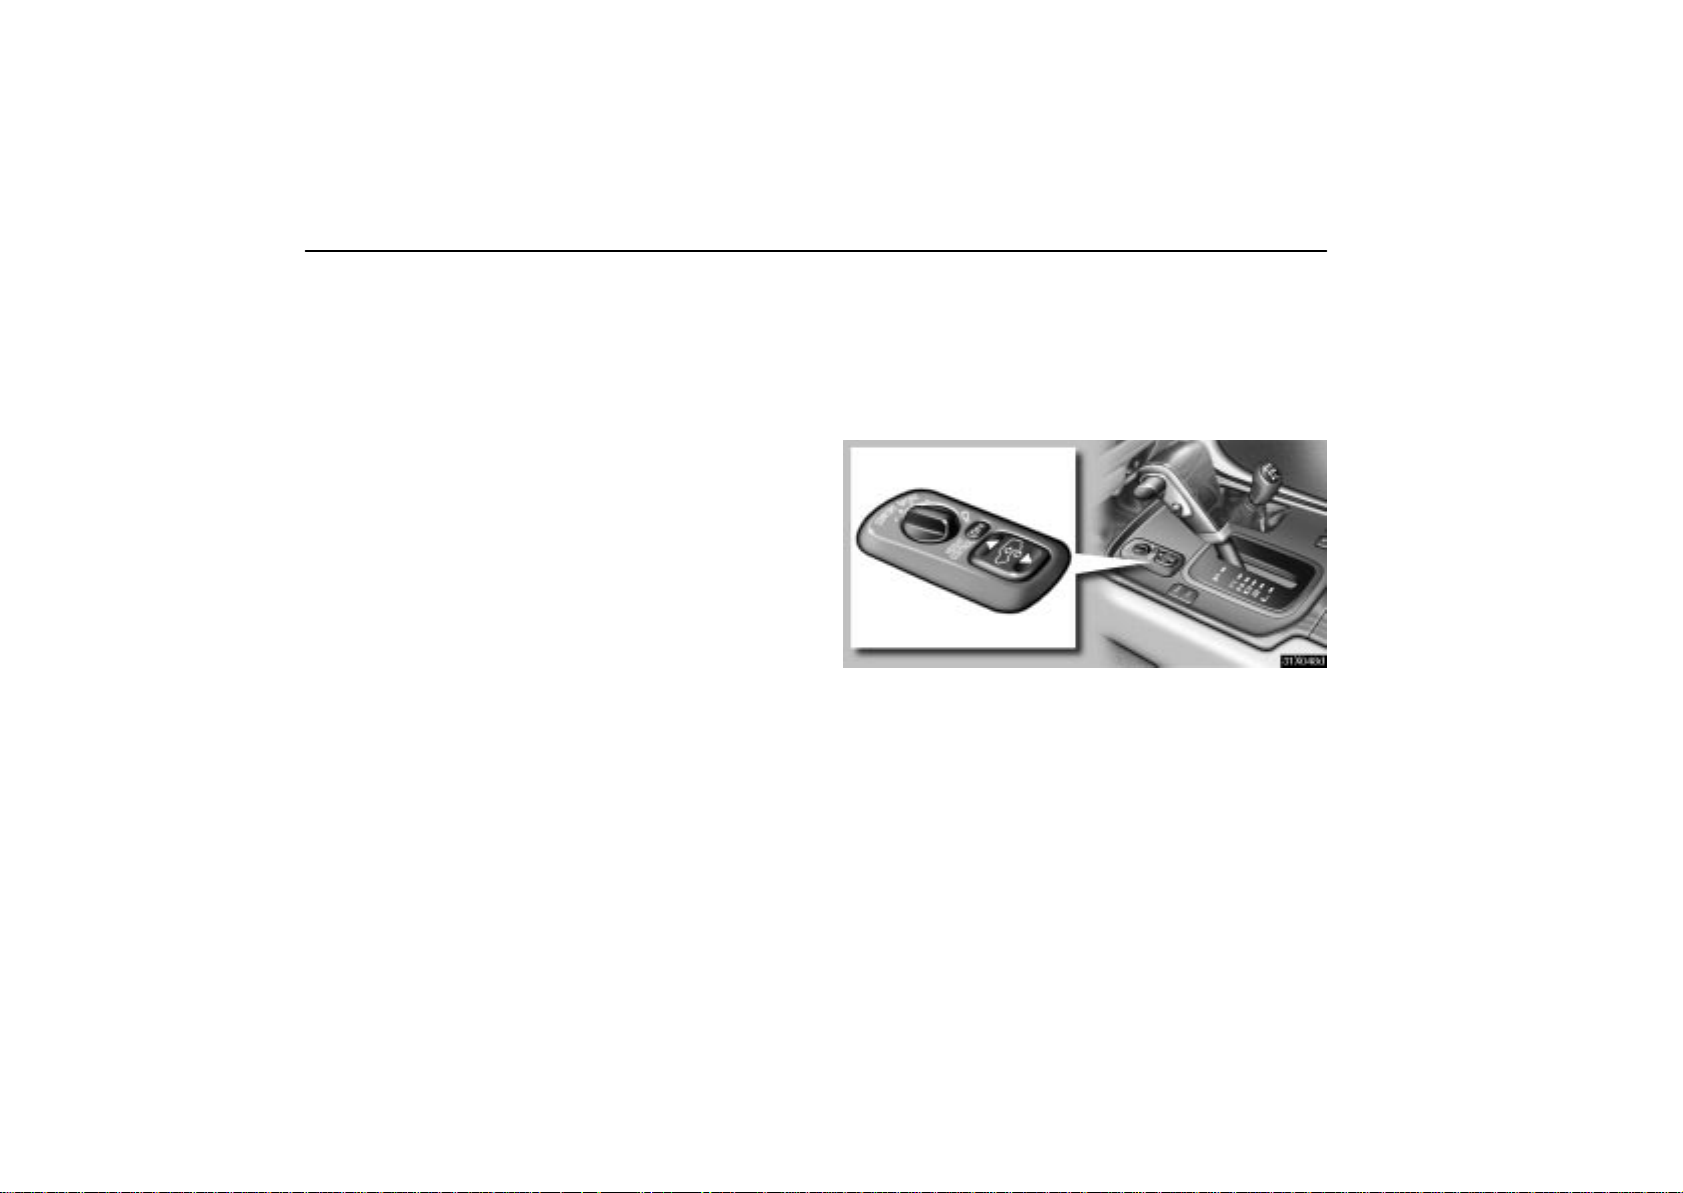
AUTOMATIC TRANSMISSION
Your automatic transmission has a shift lock system to
minimize the possibility of incorrect operation. This
means you can only shift out of ”P” position when the
brake pedal is depressed (with the ignition switch in ”ON”
position and the lock release button pressed in.) ()
31X005f
1
Lock release button
With the brake pedal depressed, shift
while holding the lock release button
in. (The ignition switch must be in the
”ON” position.)
Shift while holding the lock release
button in.
Shift normally.
STARTING AND DRIVING
2
Overdrive switch
For selecting either a three–speed or four–speed
transmission.
When the cruise control is being used even if you
downshift the transmission by turning off the overdrive
switch, engine braking will not be enabled because the
cruise control is not cancelled. For ways to decrease the
vehicle speed, see ”Cruise control” on page 213.
3
Shift position indicator
The shift position is also displayed on the instrument
cluster.
P: Parking, engine starting and key removal position
R:Reverse position
N:Neutral position
D:Normal driving (with overdrive on) position
2: Position for stronger engine braking
L: Position for maximum engine braking
4
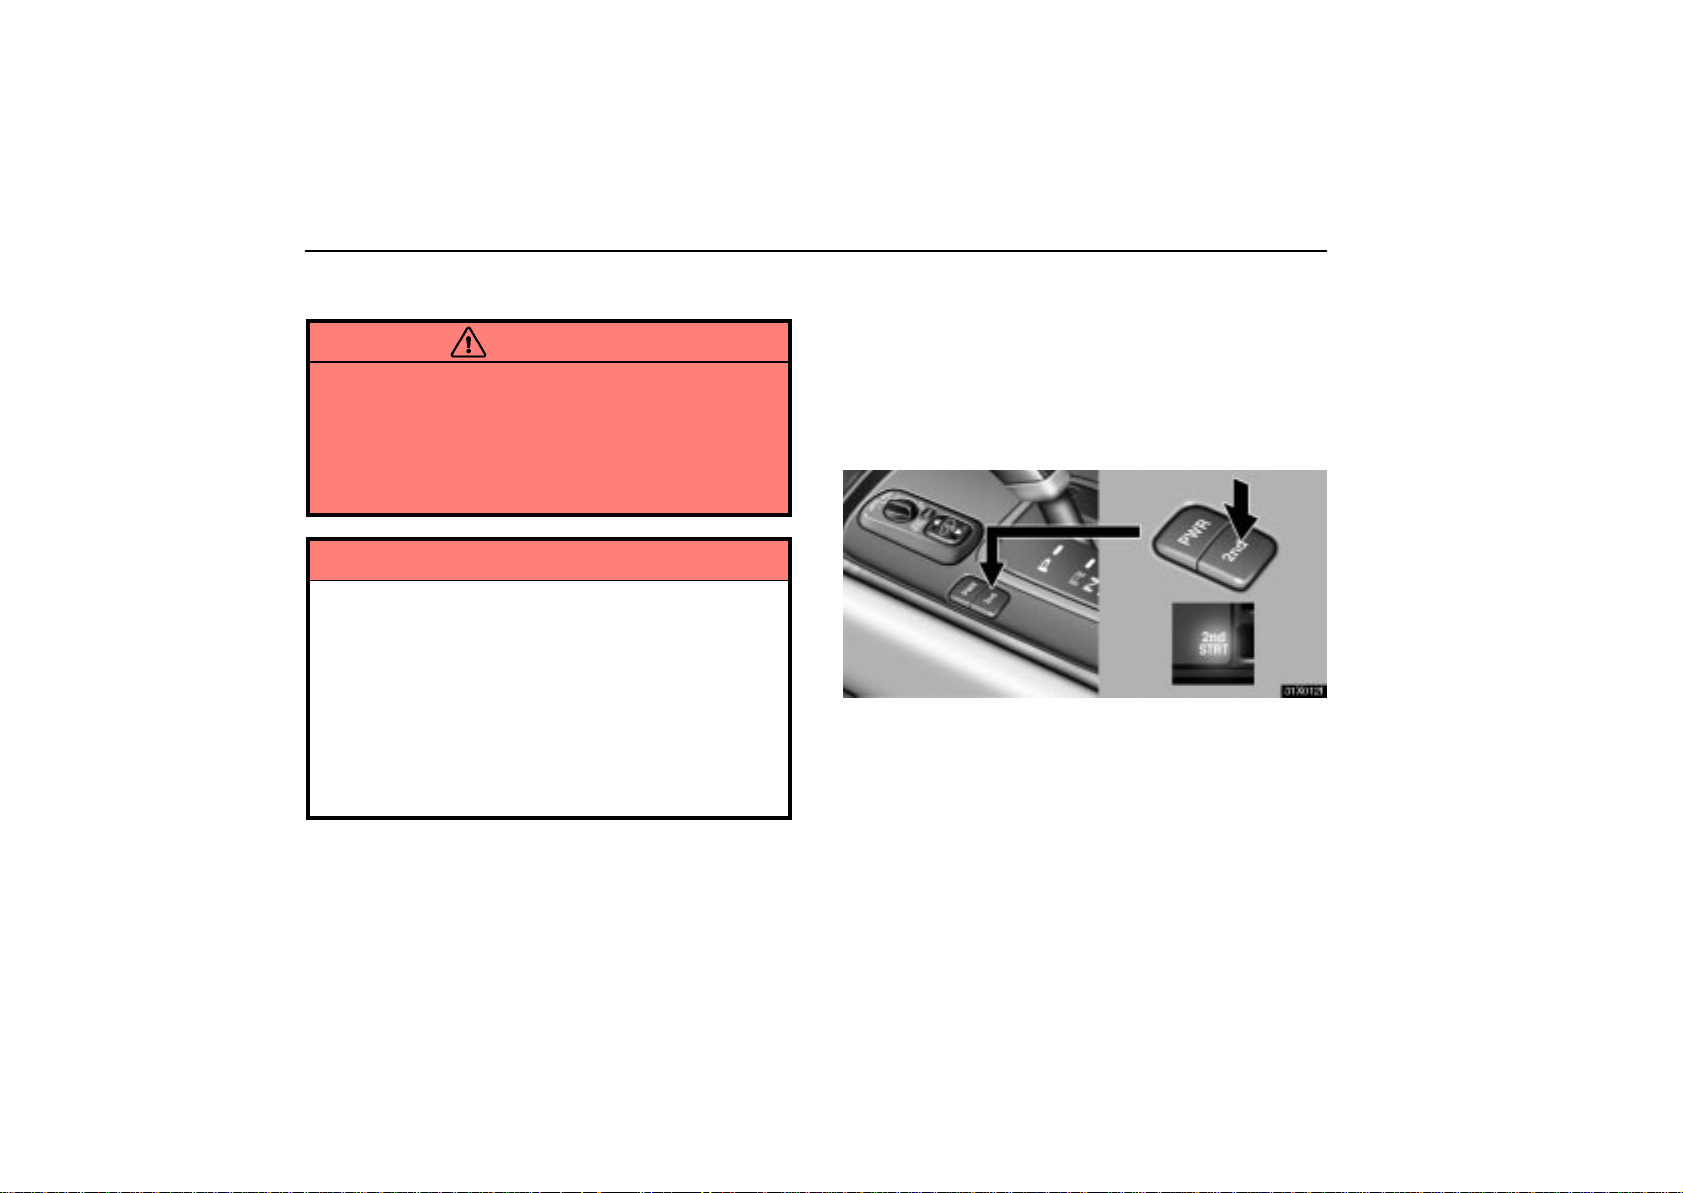
Second start mode selector switch
For selecting either second start mode or normal driving
mode.
5
Driving pattern selector switch
For selecting a driving pattern suited to existing driving
condition.
203
STARTING AND DRIVING
Correct use of the automatic transmission is explained in
the following parts.
(a) Overdrive switch
(b) Normal driving
(c) Using engine braking
(d) Using the ”2” and ”L” positions
(e) Backing up
(f) Parking
(g) Good driving practice
(h) Rocking your vehicle if stuck
(i) If you cannot shift the selector lever
(j) Driving in ”2nd STRT” (second start) mode
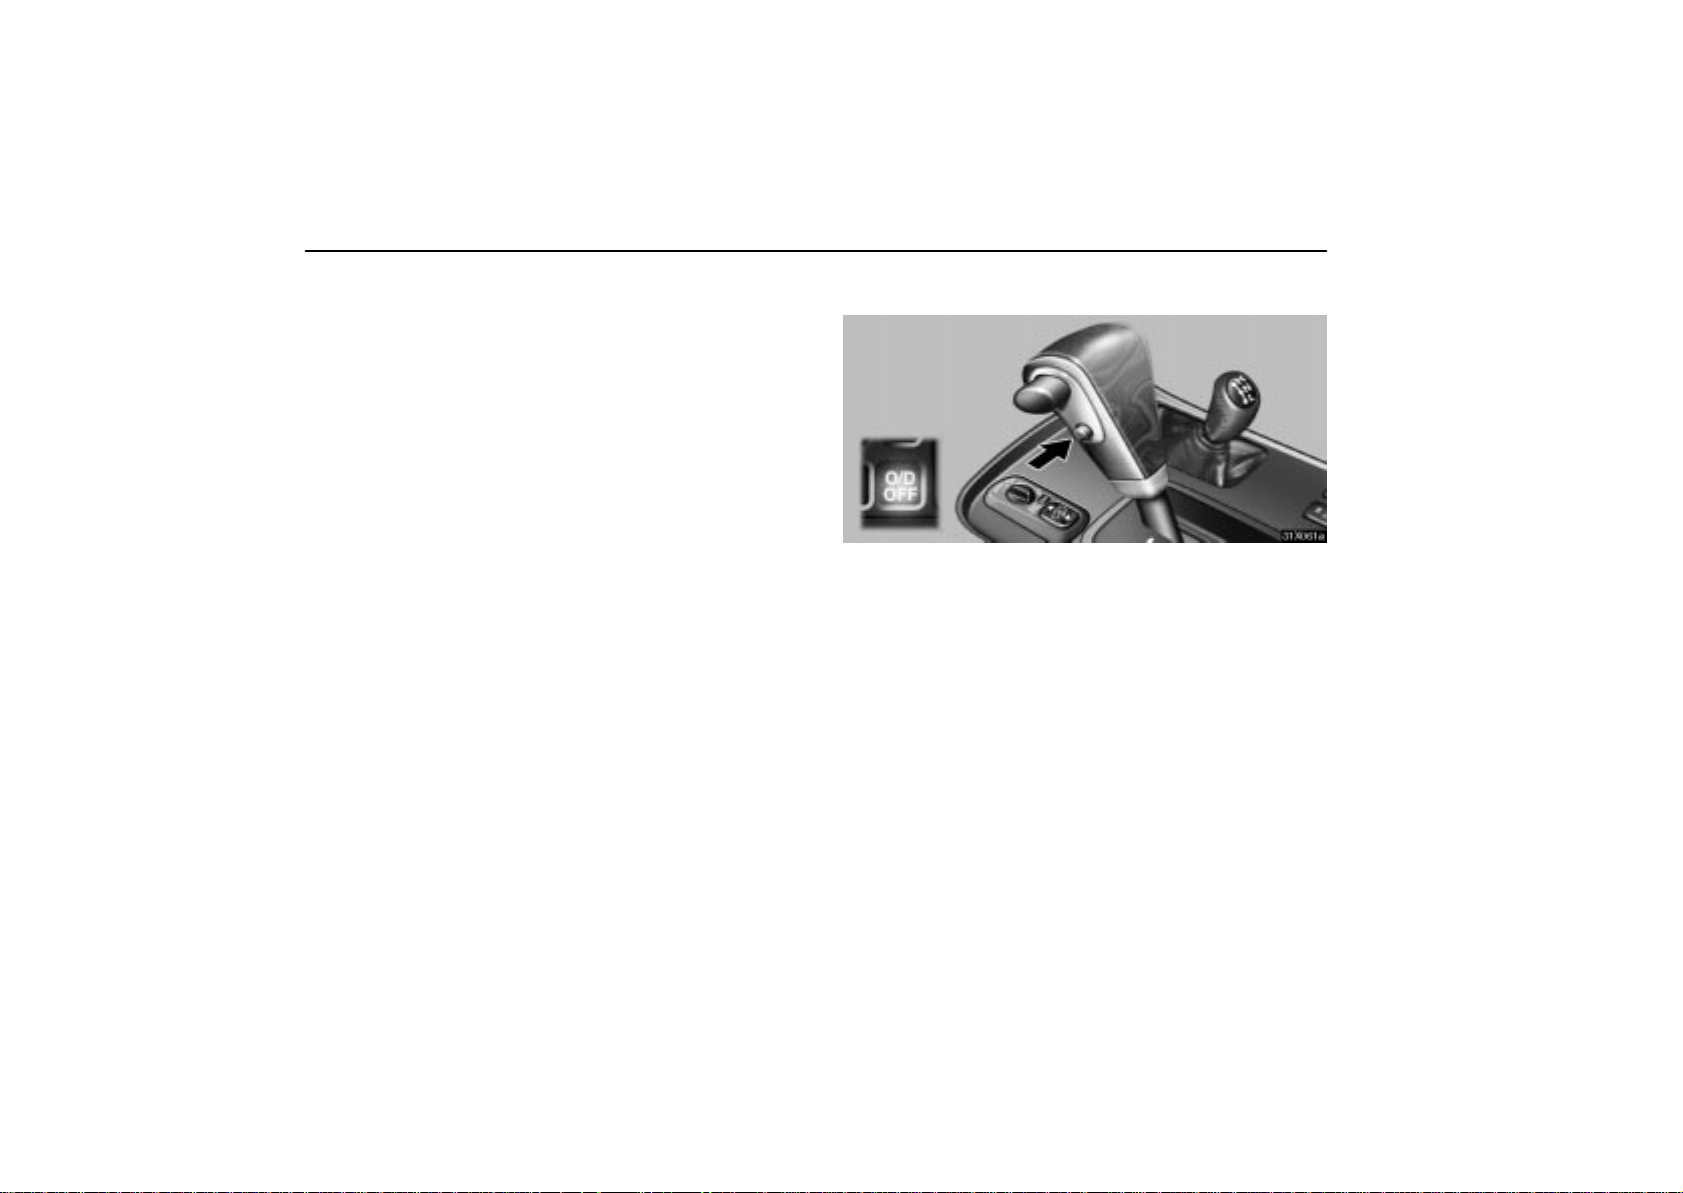
(a) Overdrive switch
31X061a
You can select either third gear (with overdrive off) or fourth
gear (with overdrive on) by pushing this switch.
To turn the overdrive off, push the switch. The “O/D OFF”
indicator light should come on. To turn the overdrive on again,
push the switch again. The “O/D OFF” indicator light should
go off.
Always drive your vehicle with the overdrive on for better fuel
economy and quieter driving.
If the engine is turned off when the overdrive is off and
restarted, the overdrive will automatically be on.
When the cruise control is being used, even if you downshift
the transmission by pushing and releasing the overdrive
switch, engine braking will not be enabled because the cruise
control is not cancelled.
For ways to decrease the vehicle speed, see “Cruise control”
on page 213.
204
(b) Normal driving
31X006e
1
”P” (Park) position 2”N” (Neutral) position
1. Start the engine as instructed in ”How to start the
engine” on page 202.
The transmission must be in ”P” or ”N”. The engine will not start
in any drive position even if the ignition key is turned to
”START”.
STARTING AND DRIVING
31X007f
1
Driving pattern selector switch
2
Normal position 3Power position
2. Set the driving pattern selector switch to the ”Normal”
position.
Your transmission has a driving pattern selector switch which
allows you to select either ”Normal” or ”Power” to suit your
driving condition. For ordinary driving, Lexus recommends
that you use the ”Normal” position to improve fuel economy.
3. For more powerful acceleration and sporty driving, use
the ”Power” position.
In the ”Power” position, the ”ECT PWR” light in the instrument
cluster is on and the transmission is shifted up at higher vehicle
speeds and shifted down more responsively than in the
”Normal” position.
205
STARTING AND DRIVING
31X008d
1
Brake pedal 2”D” (Drive) position
4. With your foot holding down the brake pedal, shift the
selector lever to ”D”.
Always use the ”D” position to improve fuel economy and quiet
driving. Only in this position, shifting into the overdrive gear is
possible. However, while the engine coolant temperature is
low, the transmission will not shift into the overdrive gear even
in the ”D” position. (See ”(c) Using engine braking” and ”(g)
Good driving practice” for exceptions.)
CAUTION
Never put your foot on the accelerator pedal while
shifting.
5. Release the parking brake and brake pedal. Depress
the accelerator pedal slowly for smooth starting.
In normal cruising, the vehicle will start in the first gear and
automatically shift to the most suitable gear for the running
conditions.
When the lever is in the “D” position, the automatic
transmission system will select the most suitable gear for the
running conditions such as hill climbing, hard towing, etc.
If you need to accelerate rapidly while driving, depress the
accelerator pedal to the full throttle position. This provides
more acceleration by automatically downshifting the
transmission to the next lower gear or beyond, depending on
the vehicle speed.
If engine braking is needed, such as in descending a long hill,
see ”(c) Using engine braking”.
206
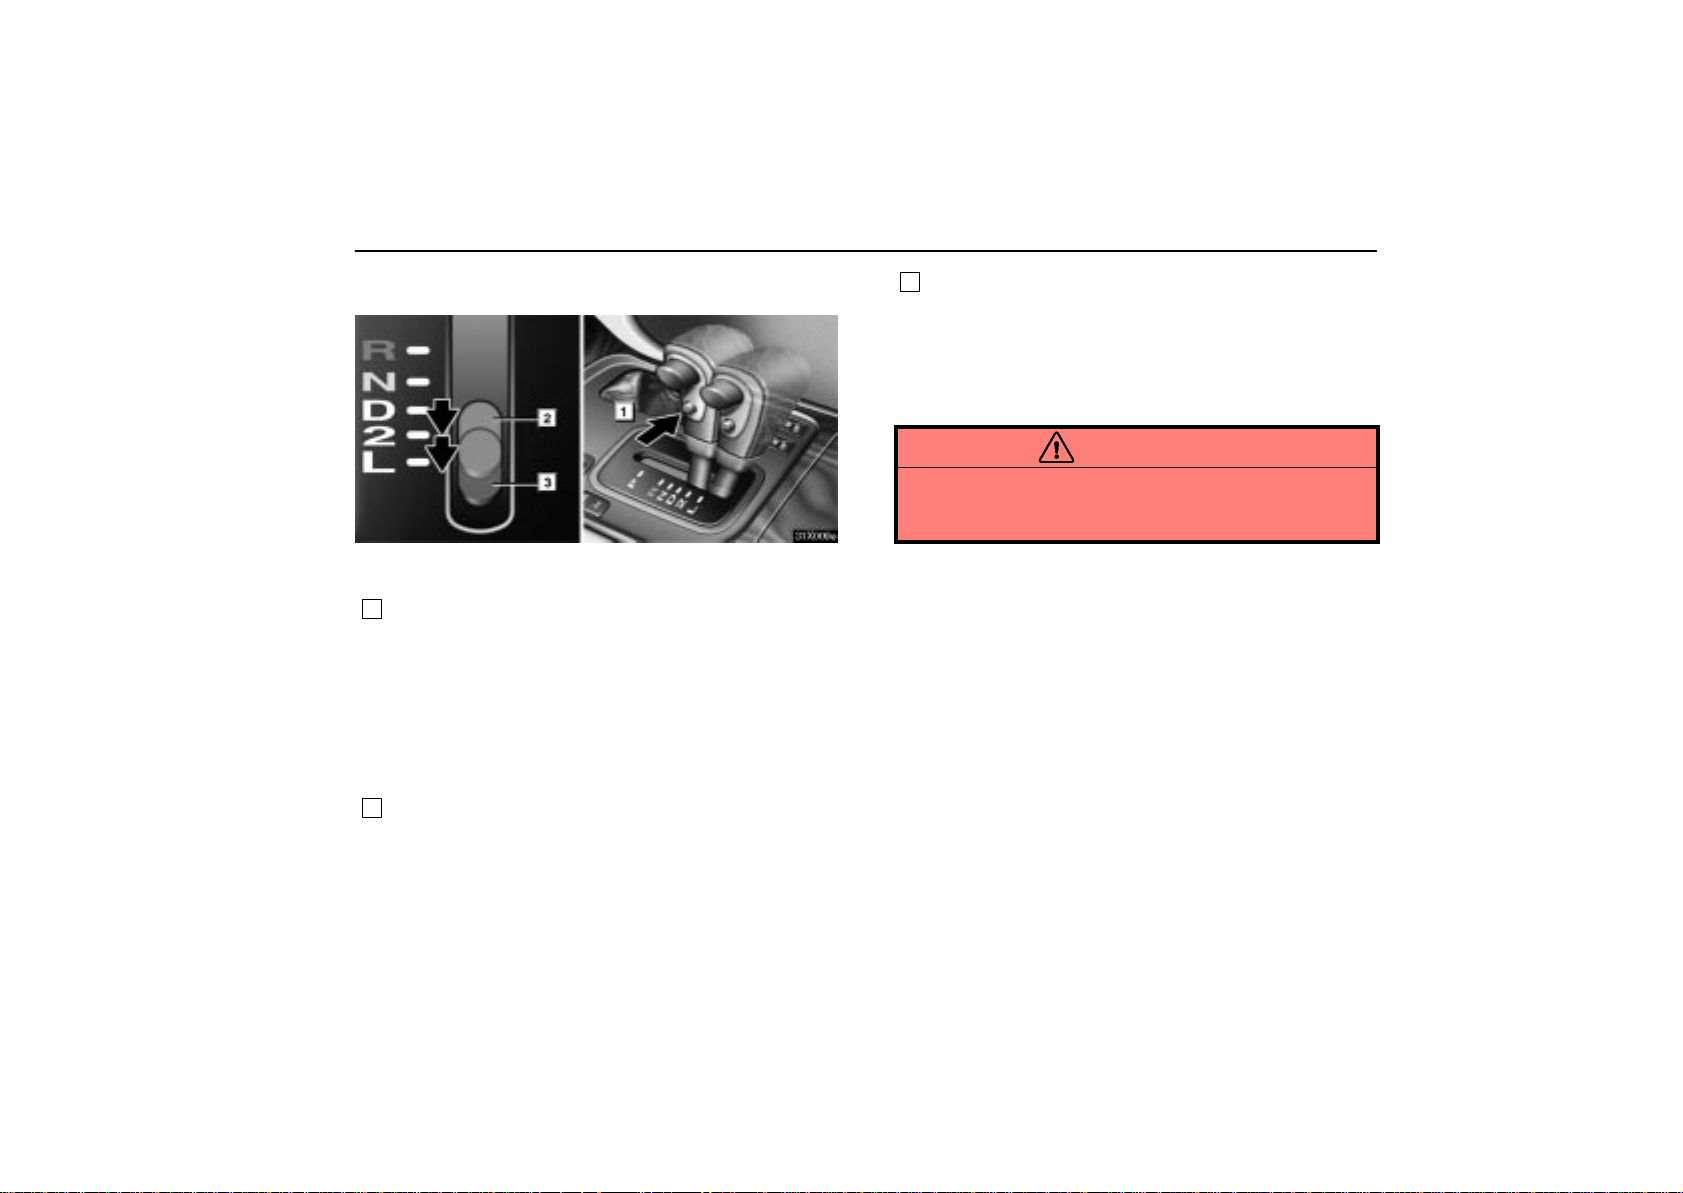
(c) Using engine braking
STARTING AND DRIVING
3
Shift into the ”L” position. The transmission will downshift
to first gear when the vehicle speed is or becomes lower
than the speed listed below and maximum engine braking
will be applied.
Transfer ”H” 57 km/h (35 mph)
”L” 12 km/h (7 mph)
31X009e
To use the braking power of the engine, downshift the
transmission in the way described below:
1
Push the overdrive switch. The ”O/D OFF” indicator light
will come on and the transmission will downshift to third
gear.
When the cruise control is being used, even if you
downshift the transmission by pushing and releasing the
overdrive switch, engine braking will not be enabled
because the cruise control is not cancelled. For ways to
decrease the vehicle speed, see ”Cruise control” on page
213.
2
Shift into the ”2” position. The transmission will downshift
to second gear when the vehicle speed is or becomes
lower than the speed listed below and stronger engine
braking will be obtained.
Transfer ”H” 112 km/h (69 mph)
”L” 39 km/h (25 mph)
CAUTION
Be careful when downshifting on a slippery surface.
The abrupt change in engine speed could cause the
vehicle to spin or skid.
(d) Using the ”2” and ”L” positions
The ”2” and ”L” positions are used for strong engine braking as
described previously.
With the selector lever in ”2” or ”L”, you can start the vehicle in
motion as with the lever in ”D”.
With the selector lever in ”2”, the vehicle will start in first gear
and automatically shift to second gear.
With the selector lever in ”L”, the transmission is engaged in
first gear.
207
STARTING AND DRIVING
NOTICE
Be careful not to over–rev the engine. Watch the
tachometer to keep engine rpm from going into the
red zone. The approximate maximum allowable
speed for each position is given below for your
reference:
Transmission Transfer
”L” ”H”
”2” 42 km/h (26 mph) 104 km/h (65 mph)
”L” 23 km/h (14 mph) 57 km/h (35 mph)
Do not continue hill climbing or hard towing for a long
time in the ”2” or ”L” position. This may cause severe
automatic transmission damage from overheating.
To prevent such damage, ”D” position should be
used in hill climbing or hard towing.
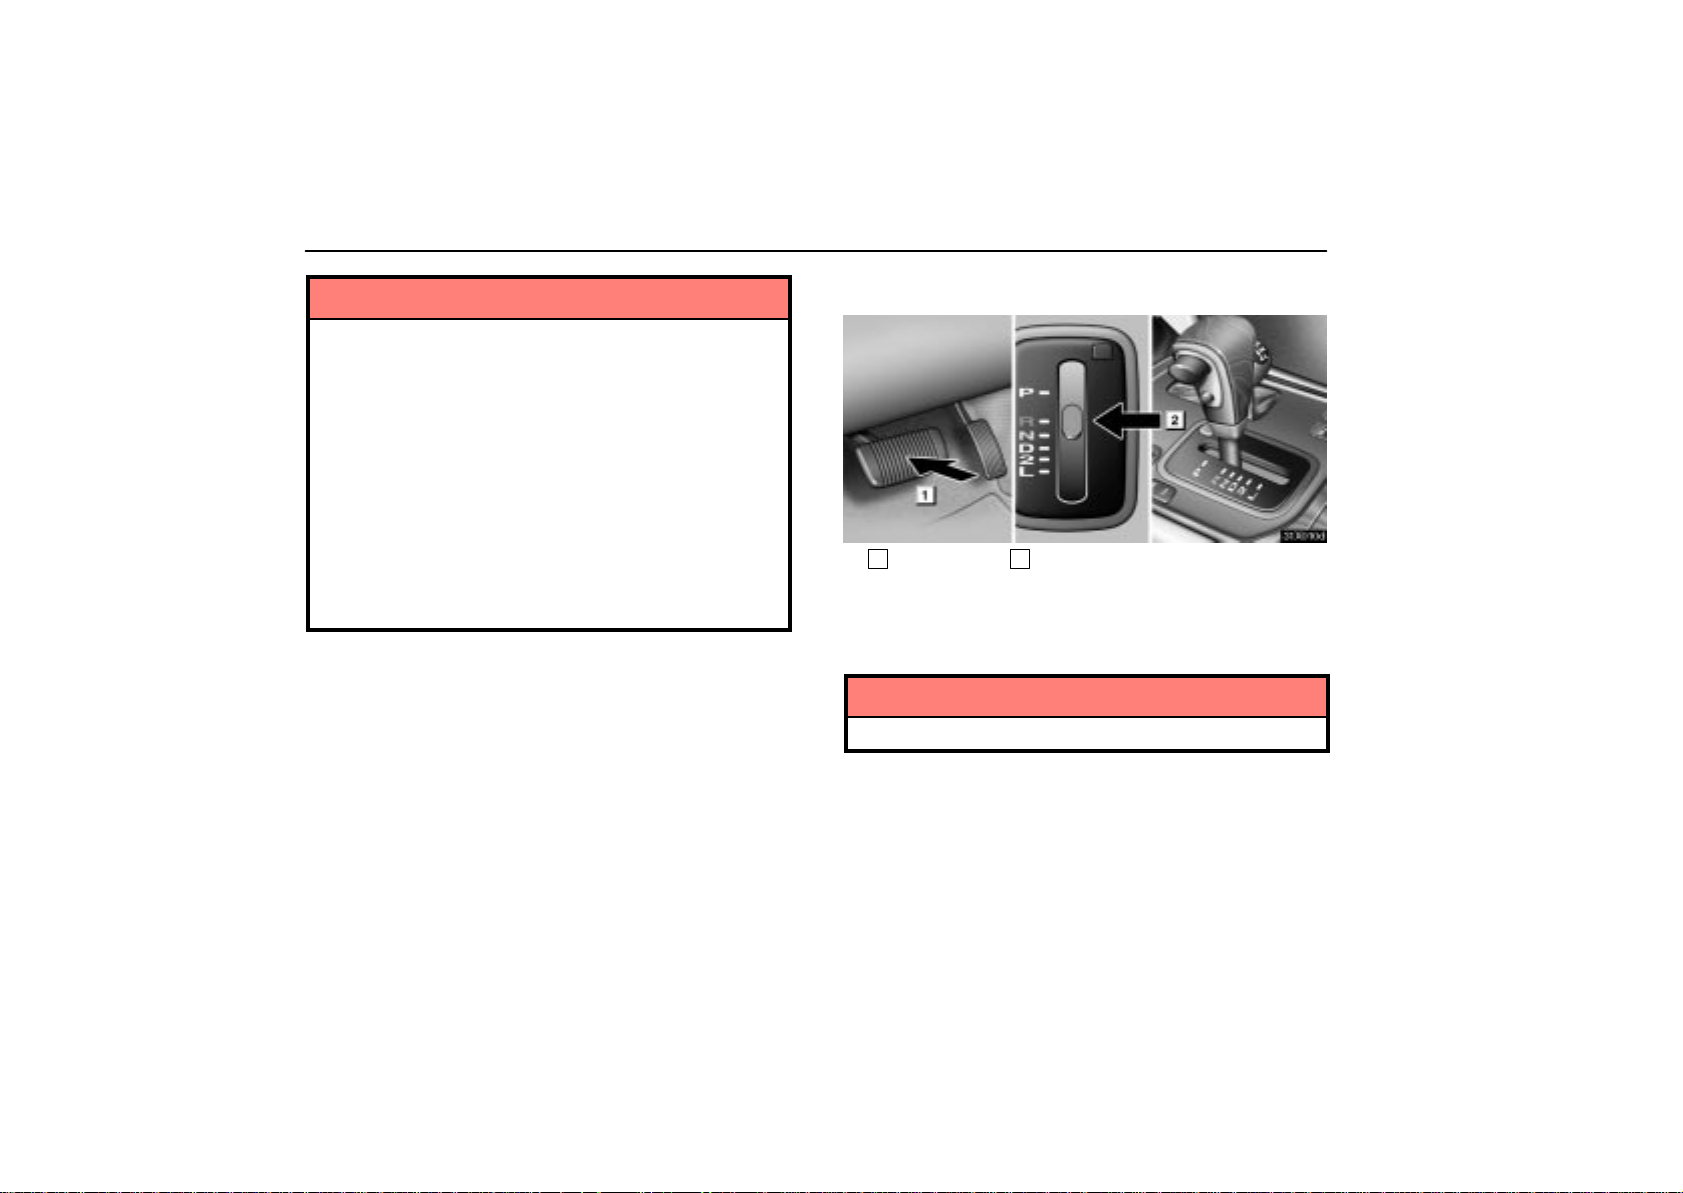
(e) Backing up
31X010d
1
Brake pedal 2”R” (Reverse) position
1. Bring the vehicle to a complete stop.
2. With the brake pedal held down with your foot, shift the
selector lever to the ”R” position.
NOTICE
Never shift into reverse while the vehicle is moving.
When you are backing up, you can adjust the outside rear view
mirror on the passenger’s side down quickly. For details, see
page 103.
208
STARTING AND DRIVING
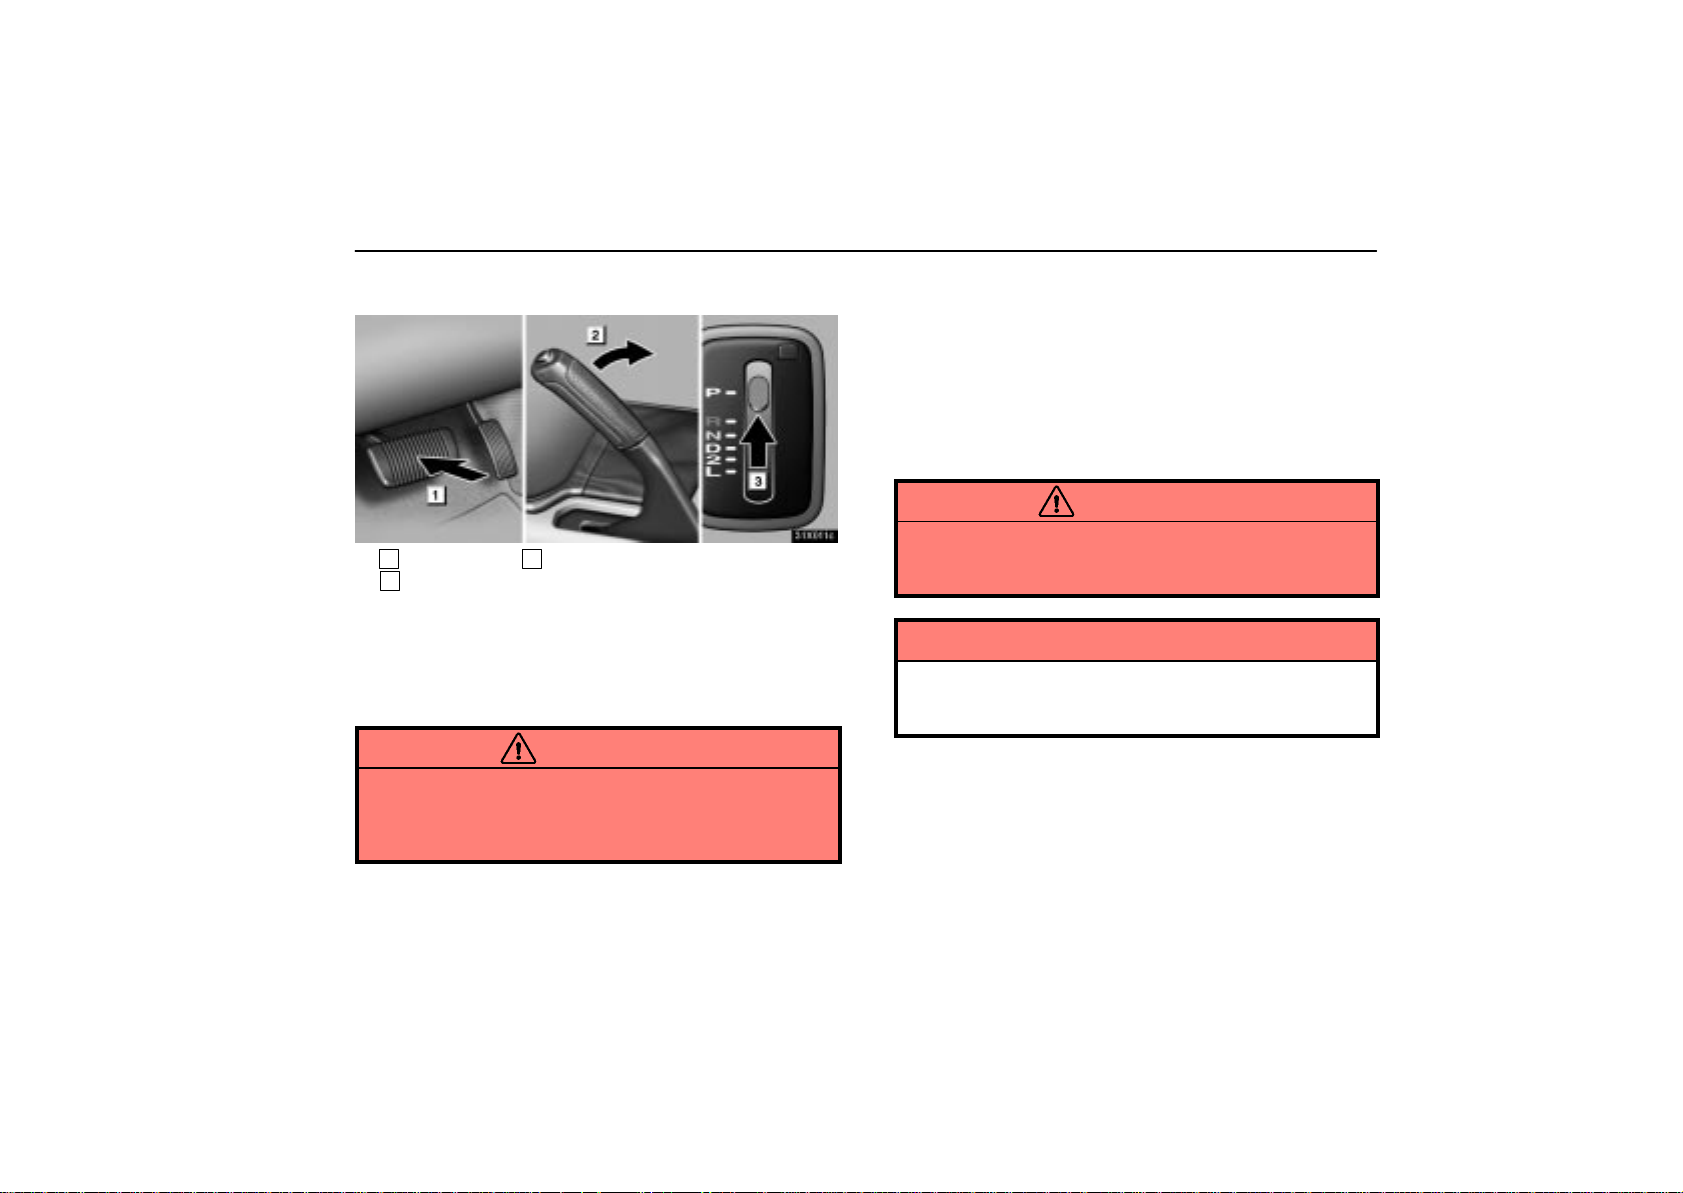
(f) Parking
31X011c
1
Brake pedal 2Parking brake lever
3
”P” (Park) position
1. Bring the vehicle to a complete stop.
2. Apply the parking brake fully.
3. With the brake pedal held down with your foot, shift the
selector lever to the ”P” position.
CAUTION
While the vehicle is moving, never attempt to move the
selector lever into ”P” under any circumstances.
Serious mechanical damage and loss of vehicle control
may result.
(g) Good driving practice
If the transmission repeatedly shifts up and down between
the third and overdrive gears when climbing a gentle slope,
turn off the overdrive switch. Be sure to turn the switch on
immediately after climbing the slope.
When towing a trailer, in order to maintain efficient engine
braking and electrical charging performance, do not use
overdrive.
CAUTION
Always keep y o u r f o o t o n t h e brake pedal while stopped
with the engine running. This prevents the vehicle from
creeping.
NOTICE
Do not hold the vehicle on an upgrade with the
accelerator pedal. This can cause the transmission to
overheat. Always u s e t h e b r a k e p ed a l o r parking brake.
209
STARTING AND DRIVING
(h) Rocking your vehicle if stuck
CAUTION
If your vehicle becomes stuck in snow, mud, sand, etc.,
then you may attempt to rock the vehicle free by moving
it forward and backward. Do not attempt this procedure
if people or objects are anywhere near the vehicle.
During the rocking operation the vehicle may suddenly
move forward or backward as it becomes un–stuck,
causing injury or damage to nearby people or objects.
NOTICE
If you rock your vehicle, observe the following
precautions to prevent damage to the transmission and
other parts.
Do not depress the accelerator pedal while shifting
the selector lever or before the transmission is
completely shifted to forward or reverse gear.
Do not race the engine and avoid spinning the
wheels.
If your vehicle remains stuck after rocking the vehicle
several times, consider other ways such as towing.
(i) If you cannot shift the selector lever
If you cannot shift the selector lever even though the brake
pedal is depressed, use the shift lock override button. For
instructions, see ”If you cannot shift automatic transmission
selector lever” on page 277.
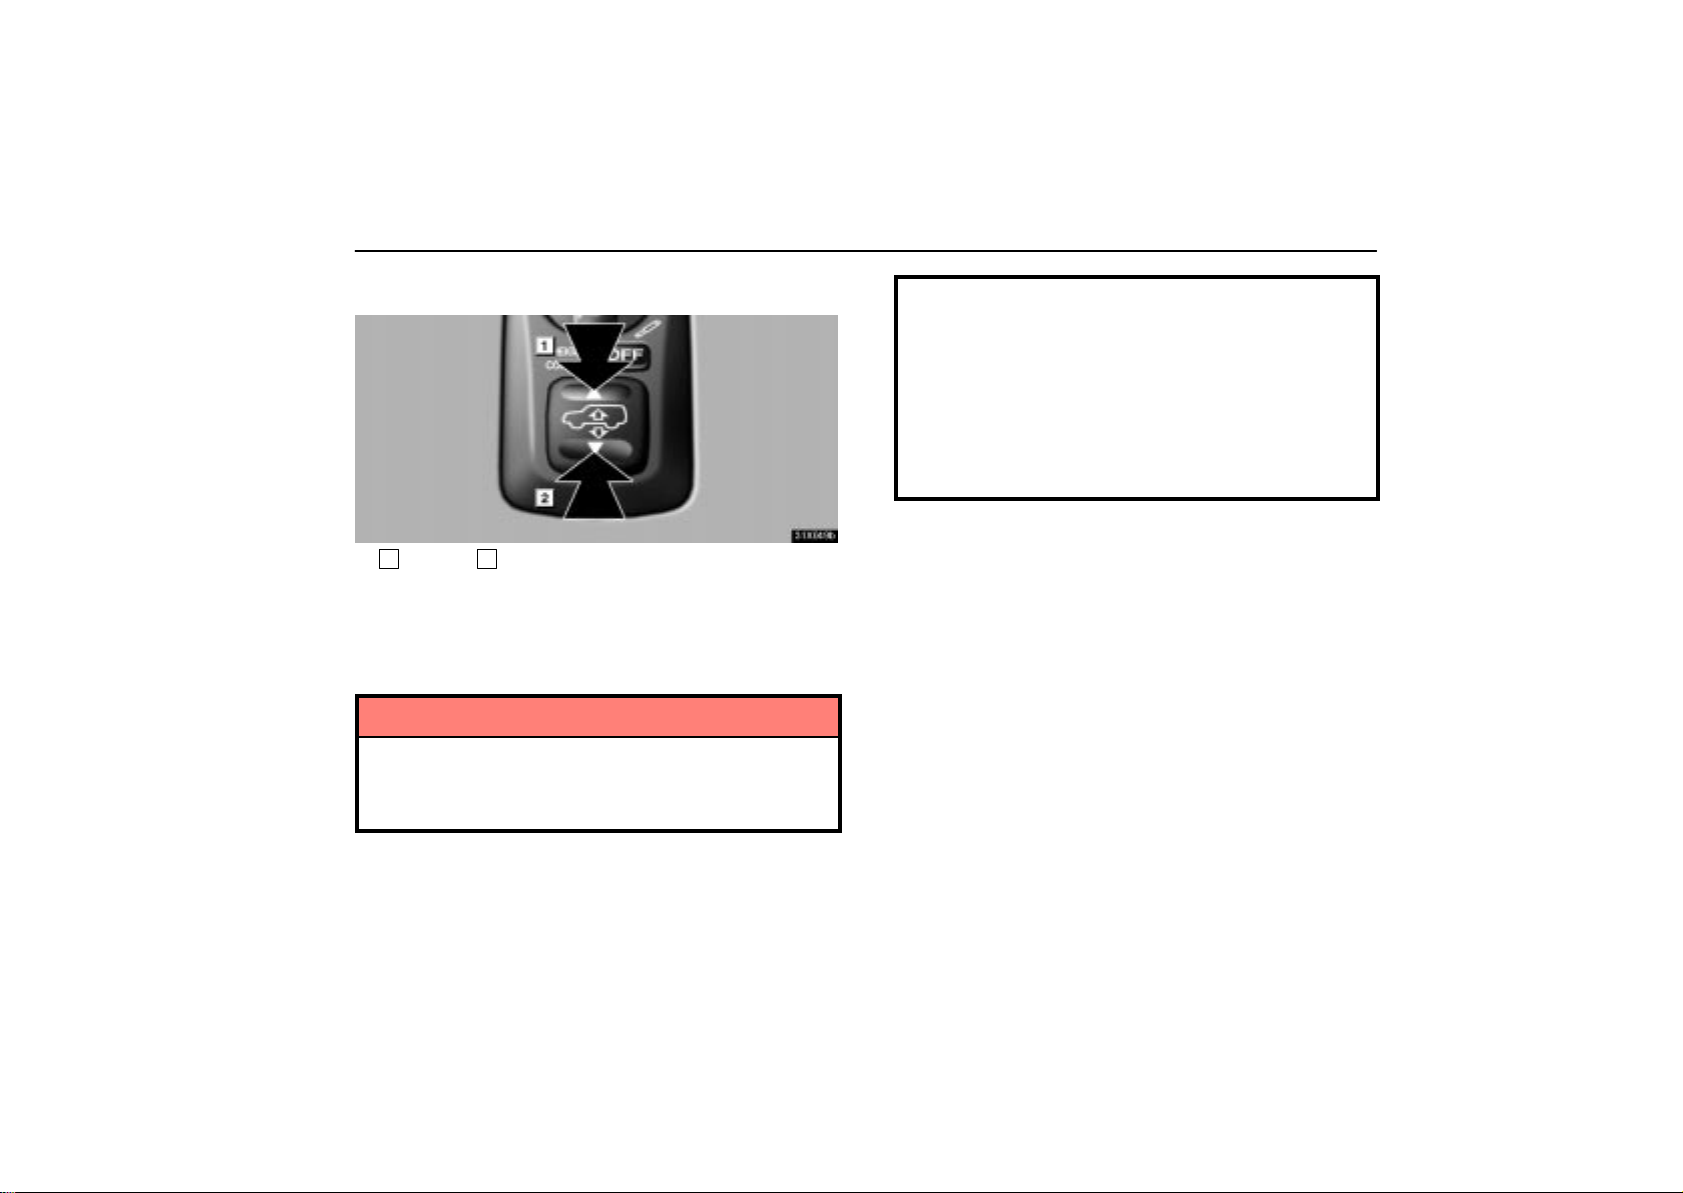
(j) Driving in ”2nd STRT” (second start)
mode
31X012f
In the ”2nd STRT” (second start) mode, the transmission
system shifts up from second gear. Use this mode when
starting your vehicle in sand, mud, ice or snow.
T o set the ”2nd STRT” mode, push the ”2nd” switch. In the ”2nd
STRT” mode, the ”2nd STRT” indicator light comes on. To
cancel the ”2nd STRT” mode, push the ”2nd” switch again.
The ”PWR” mode is automatically cancelled when you push
the ”2nd” switch.
210
STARTING AND DRIVING
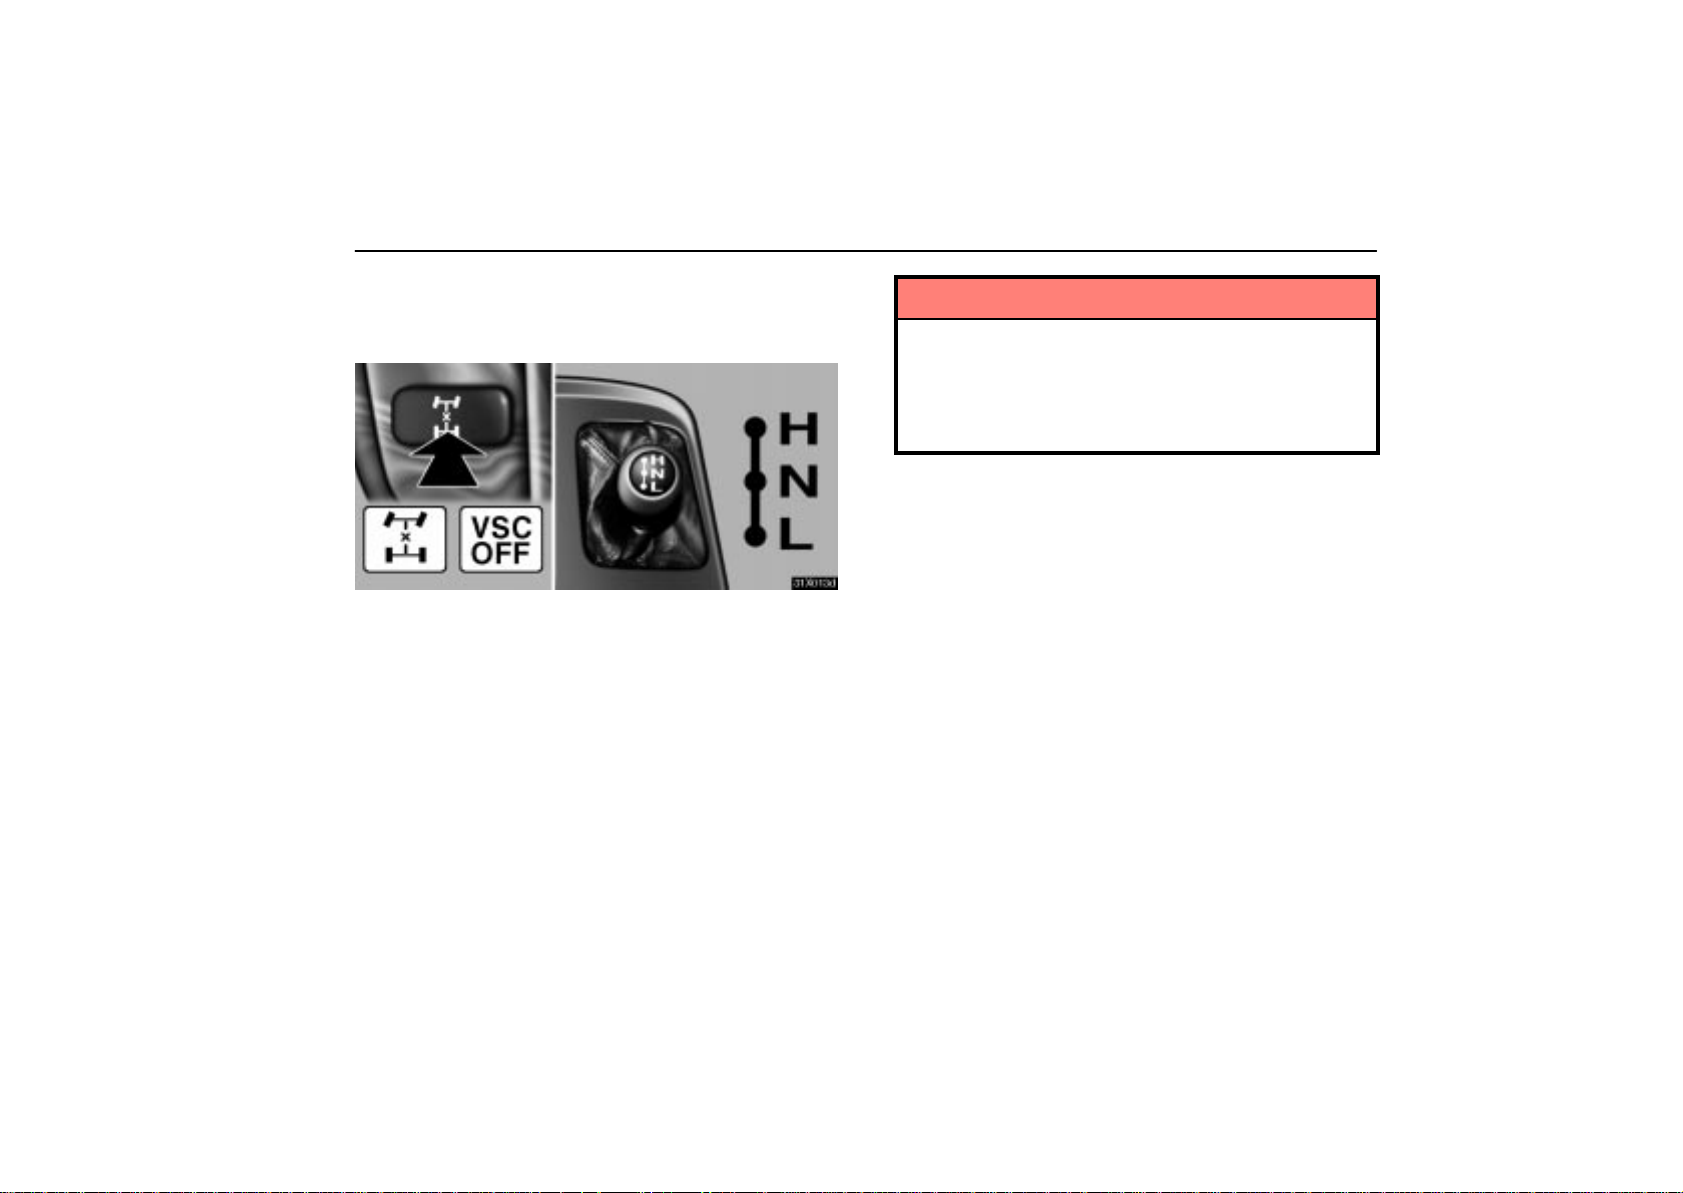
FOUR–WHEEL DRIVE SYSTEM
(a) Four–wheel drive control
31X013d
Use the four–wheel drive control lever and center
differential lock button to select the following transfer and
center differential modes.
The “H” and “L” position of the four–wheel drive control lever
provides either lock or unlock mode of the center differential
depending on the center differential lock button position.
Use the center differential lock system if your wheels get stuck
in a ditch, or when you are driving on a slippery or bumpy
surface. When the center differential is locked, the vehicle skid
control system is automatically turned off and the center
differential lock and “VSC OFF” indicator lights come on
because the function that controls engine performance
interferes with the process of freeing your wheels.
NOTICE
As soon as the center differential lock switch is turned
on, the “VSC OFF” indicator light comes on. After the
wheels are out of the ditch or off the slippery or bumpy
surface, turn the center differential lock switch off.
Make sure t h e c e nter differential lock indicator light and
vehicle skid control system off indicator light turn off.
”H” (high speed position, center differential unlocked):
Lever at ”H”, center differential lock button left out
Use this for normal driving on all types of roads, from dry
hard–surfaced roads to wet, icy or snow–covered roads. This
position gives greater economy, quietest ride, least wear and
better vehicle control.
”H” (high speed position, center differential locked):
Lever at ”H”, center differential lock button pushed in
Use this for greater traction when you experience a loss of
power, such as wheel slipping, in the center differential unlock
mode.
”N” (neutral position): Lever at ”N”
No power is delivered to the wheels. The vehicle must be
stopped.
211

STARTING AND DRIVING
”L” (low speed position, center differential unlocked):
Lever at ”L”, center differential lock button left out
Use this for maximum power and traction. Use this for climbing
or descending steep hills, off–road driving, and hard pulling in
sand or mud.
In this mode, the braking feeling that occurs when the wheels
are negotiating a sharp corner is further reduced than in the “L”
(low position, center differential locked) mode.
“L” (low speed position, center differential locked): Lever
at “L”, center differential lock button pushed in
Use this for maximum power and traction. Use this for hard
pulling in situations the vehicle cannot negotiate even in the “L”
(low speed position, center differential unlocked) mode. Also,
using this mode when driving down steep off–road inclines will
help contribute to increased vehicle stability.
The indicator light tells when the differential lock is engaged.
Note that the differential is not still locked as long as the
indicator light remains off.
If the indicator light does not go off when you push out the
center differential lock button, drive straight ahead while
accelerating or decelerating, or drive in reverse.
See ”(b) Shifting procedure” for further instructions.
Advice for driving on slippery roads in “L” (low speed
position) mode
If you shift the four–wheel drive control lever to “L”, the
automatic transmission lever to “2” when you drive in steep
off–road areas, the output of the brake can be controlled
effectively by the active traction control system, which assists
the driver to control the driving power of 4 wheels.
Use the “L” position of the automatic transmission lever for
maximum power and traction when your wheels get stuck or
when you drive down a steep incline. In the following cases,
the out put of the brake can be controlled by the active traction
control system if the engine speed is under 3,000 rpm
(normally engine speed is under 3,000 rpm when the wheels
get unstuck).
The four–wheel drive control lever in the “L” position and the
automatic transmission lever in the “L” position or the
automatic transmission lever in the “D” or “2” with the
transmission downshifting to the first gear.
The four–wheel drive control lever in the “L” position and the
automatic transmission lever in the “R” position
(As for the automatic transmission lever positions, see
“Automatic transmission” on page 203.)
212
STARTING AND DRIVING
(b) Shifting procedure
To shift between unlock and lock modes in ”H”, push the
center differential lock button.
To shift between unlock and lock modes in ”L”, push the
center differential lock button.
To shift between ”H” and ”L”, stop the vehicle, put the
transmission into ”N” and move the four–wheel drive control
lever.
CAUTION
Never move the four–wheel drive control lever if wheels
are slipping. Stop the slipping or spinning before
shifting.
NOTICE
For normal driving on dry and hard surface roads,
unlock the center differential. To prevent damage to the
center differential lock system, do not push the center
differential lock button when the vehicle is cornering or
when its wheels are spinning freely off the ground. If the
indicator light does not go off when unlocking the
center differential, drive straight ahead while
accelerating or decelerating, or drive in reverse.
CRUISE CONTROL
The cruise control allows you to cruise the vehicle at a
desired speed over about 40 km/h (25 mph) with your foot
off the accelerator pedal.
Y our cruising speed can be maintained although a slight speed
change may occur when driving up or down a gradient, within
the limits of engine performance. On steeper hills, a greater
speed change will occur so it is better to drive without the cruise
control.
When the cruise control is on, the driving pattern of the
automatic transmission is fixed in the normal position,
regardless of the position of the driving pattern selector switch.
CAUTION
To help maintain maximum control of your vehicle,
do not use the cruise control when driving in heavy
or varying traffic, or on slippery (rainy, icy or
snow–covered) or winding roads.
Avoid vehicle speed increases when driving
downhill. If the vehicle speed is too fast in relation to
the cruise control set speed, cancel the cruise
control then downshift the transmission to use
engine braking to slow down.
213
STARTING AND DRIVING
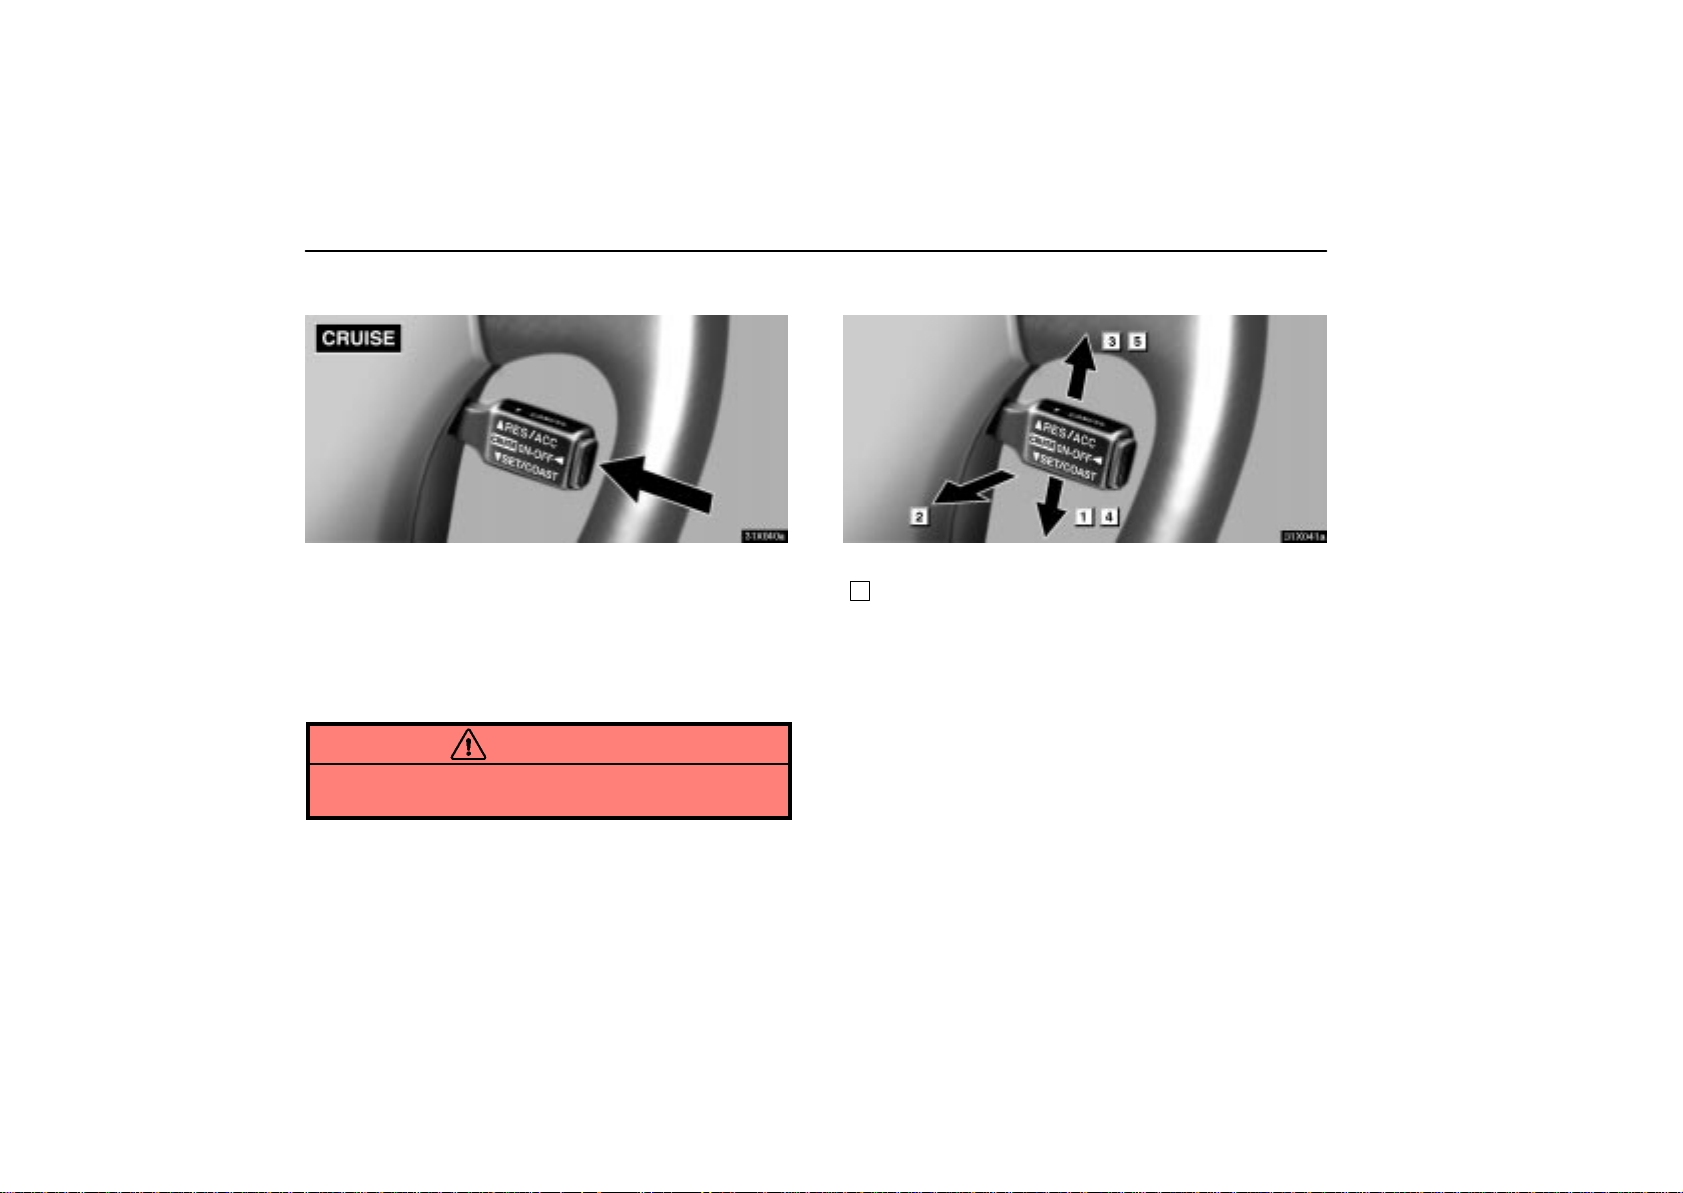
Turning on the system
31X040a
To operate the cruise control, push the main switch. This turns
the system on. The indicator light in the instrument cluster
shows that you can now set your desired cruising speed.
Another push o n t h e sw itch will turn the system completely of f.
When the ignition key is turned off, the main switch is also
automatically turned off. To use the cruise control again, push
the main switch again to turn it on.
CAUTION
To avoid accidental cruise control engagement, keep
the main switch off when not using the cruise control.
Setting operation
31X041
Each function is described below.
1
Setting at a desired speed.
The transmission must be in ”D” before you set the cruise
control speed.
Bring the vehicle to the desired speed, press the control lever
downward in the ”SET/COAST” direction and release it. This
sets the vehicle at that speed. Now you may take your foot off
the accelerator pedal. If you need acceleration – for example,
when passing – depress the accelerator pedal enough for the
vehicle to exceed the set speed. When you release the
accelerator pedal, the vehicle will return to the speed set prior
to the acceleration.
214

STARTING AND DRIVING
2
Cancelling the preset speed
You can cancel the preset speed by either of the following:
a. Pulling the control lever in the ”CANCEL” direction.
b. Depressing the brake pedal.
If the vehicle speed falls below about 40 km/h (25 mph), the
preset speed will be automatically cancelled.
If the vehicle speed drops 16 km/h (10 mph) below the preset
speed, the preset speed will also automatically be cancelled.
If the preset speed automatically cancels out for other than
these reasons, have your vehicle checked by your Lexus
dealer at the earliest opportunity.
3
Resetting to a faster speed
Press the control lever upward in the ”RES/ACC” direction and
hold it. Release the lever when the desired speed is attained.
While the lever is held upward, the vehicle will gradually gain
speed.
When the difference between the actual vehicle speed and the
set speed is less than 5 km/h (3 mph), the set speed can be
increased 1.6 km/h (1 mph) each time by pressing the control
lever upward in the ”RES/ACC” direction quickly within 0.6
seconds.
However, a quicker way to reset is to accelerate the vehicle
and then press the control lever downward in the
”SET/COAST” direction.
4
Resetting to a slower speed
Press the control lever downward in the ”SET/COAST”
direction and hold it. Release the lever when the desired
speed is attained. While the lever is held downward, the
vehicle speed will gradually decrease.
When the difference between the actual vehicle speed and the
set speed is less than 5 km/h (3 mph), the set speed can be
lowered 1.6 km/h (1 mph) each time by pressing the control
lever downward in the ”SET/COAST” direction quickly within
0.6 seconds.
However, a quicker way to reset is to depress the brake pedal
and then press the control lever downward in the
”SET/COAST” direction.
Even if you turn off the overdrive switch with the cruise control
on, engine braking will not be applied because the cruise
control is not cancelled. To decrease the vehicle speed, reset
to a slower speed with the cruise control lever or depress the
brake pedal. If you use the brake pedal, cruise control is
cancelled.
5
Resuming the preset speed
If the preset speed is cancelled by pulling the control lever or
by depressing the brake pedal, pushing the lever up in the
”RES/ACC” direction will restore the speed set prior to
cancellation. However, once the vehicle speed falls below
about 40 km/h (25 mph), the preset speed will not be resumed.
215
STARTING AND DRIVING
Cruise control failure warning
If the ”CRUISE” indicator light in the instrument cluster flashes
when using the cruise control, push the main switch to turn the
system off and then push it again to turn it on.
If any of the following conditions then occurs, there is some
trouble in the cruise control system.
The indicator light does not come on.
The indicator light flashes again.
The indicator light goes out after it comes on.
If this is the case, contact your Lexus dealer and have your
Lexus inspected.
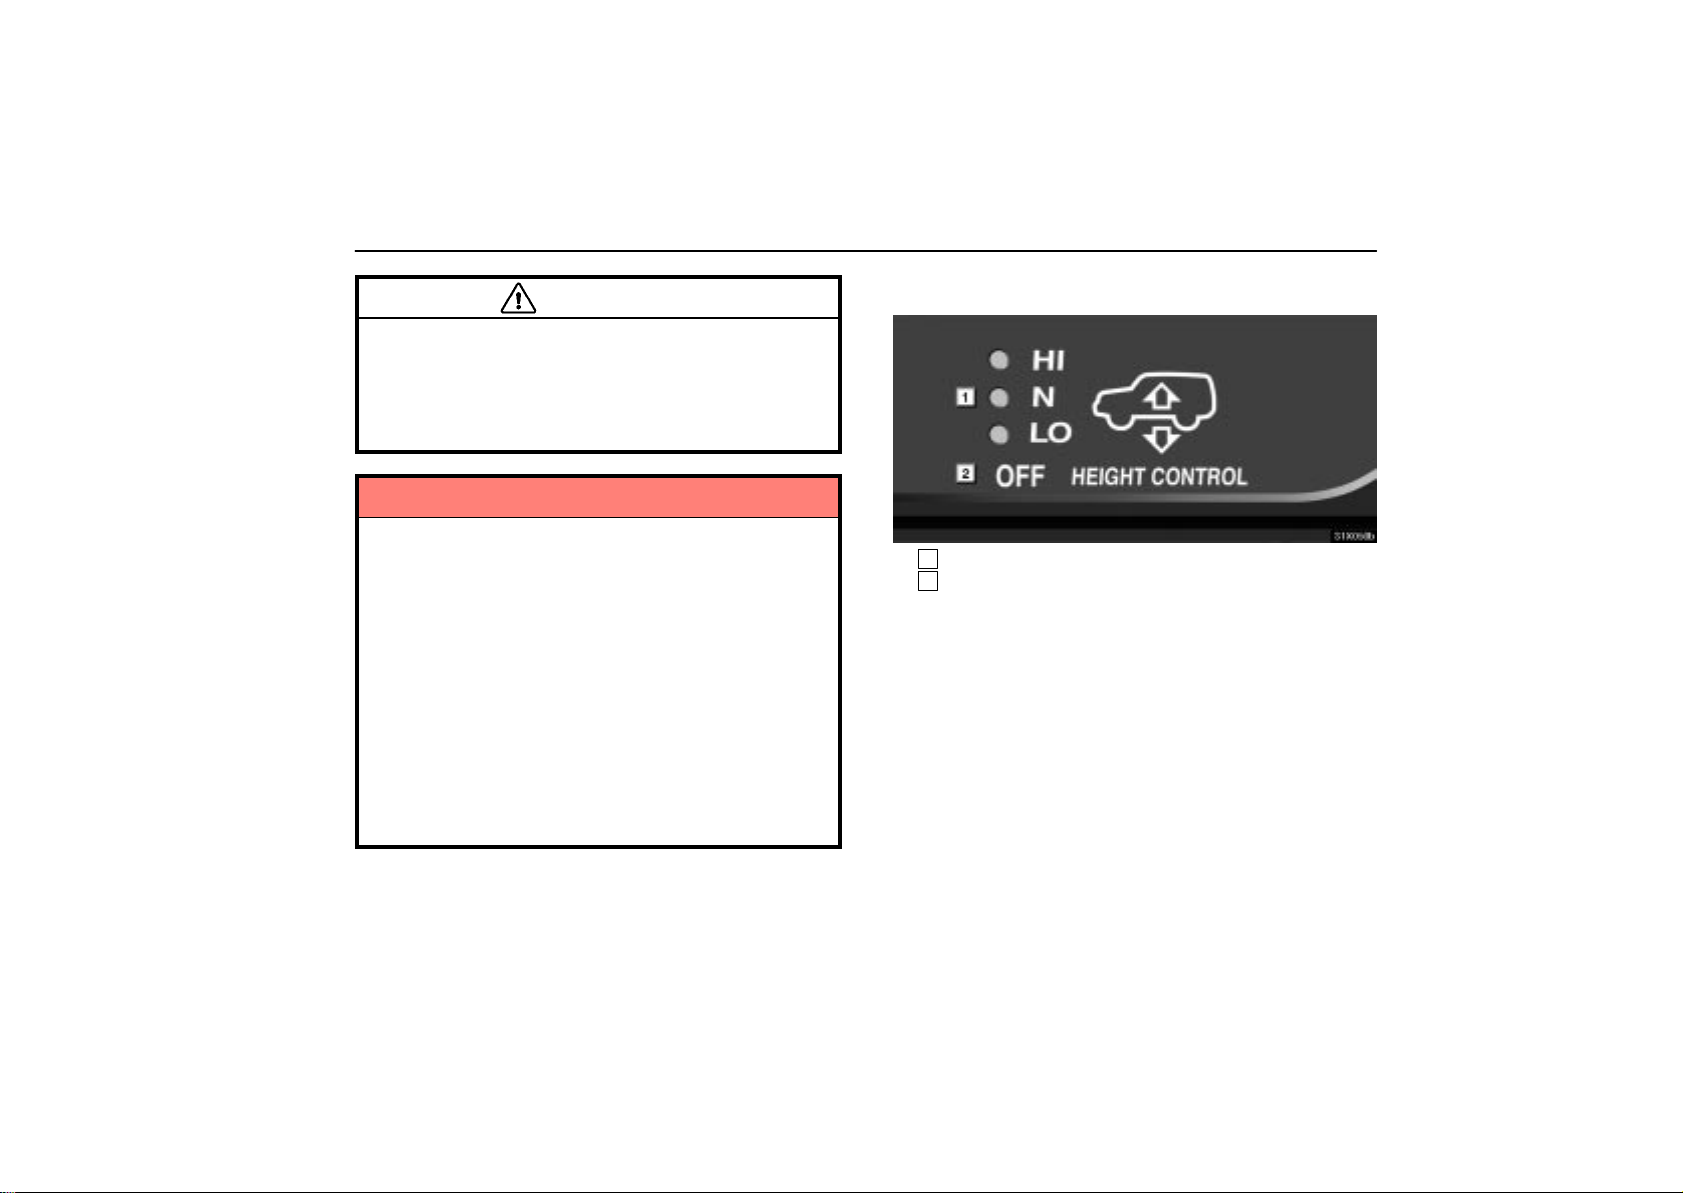
ACTIVE HEIGHT CONTROL
SUSPENSION (AHC)
This active height control suspension controls the vehicle
height depending on the vehicle driving condition. Select
your desired height among the ”HI” (high), ”N” (normal)
and ”LO” (low) modes with the height select switch.
31X048d
(a) Vehicle height modes
”HI” (high) mode
The vehicle height is about 40 mm (1.6 in.) higher at front
and about 50 mm (2.0 in.) higher at rear than the normal
mode height.
This mode is suitable when driving on bumpy roads and
through water.
This mode is available when the vehicle speed is under about
30 km/h (19 mph).
216
STARTING AND DRIVING
CAUTION
The ”HI” (high) or ”Extra high” mode should be used for
severe off–road driving condition only. Because the
vehicle’s center of gravity is higher in this setting, the
vehicle may become unstable when turning abruptly,
resulting in an unexpected accident.
When the four–wheel drive control lever is put at ”L”, this mode
may change to the extra high mode automatically in
accordance with the driving condition.
When the vehicle exceeds the specified vehicle speed, the
vehicle height changes to the following:
With the four–wheel drive control lever at ”H” and at the
vehicle speed of 30 km/h (19 mph) or over, the normal mode
is automatically selected.
With the four–wheel drive control lever at ”L” and at the
vehicle speed of 50 km/h (30 mph) or over, the vehicle
height becomes automatically about 25 mm (1.0 in.) higher
than the normal mode height. If the vehicle speed is lowered
about 20 km/h (12 mph) or less after that, the high mode
automatically resumes.
Extra high mode
This mode is automatically selected from the high mode
with the four–wheel drive control lever placed in ”L”
position depending on the vehicle driving condition.
If the vehicle becomes stuck, the vehicle height rises
automatically to the extra high mode (slightly higher or at about
70 mm (2.8 in.) higher than normal mode height).
In the following cases, the extra high mode changes to the high
mode automatically:
When your vehicle is no longer stuck.
When the four–wheel drive control lever is put in a position
other than ”L”.
When you push the height select switch on the ”” side
in the extra high mode, the normal mode is selected.
Since the extra high mode is automatically selected, you
cannot select this mode on purpose with the height select
switch.
”N” (normal) mode
The vehicle height in this mode is standard.
This mode is suitable for ordinary driving.
”LO” (low) mode
The vehicle height is about 50 mm (2.0 in.) lower at front
and about 40 mm (1.6 in.) lower at rear than the normal
mode height.
This mode allows you easy access to the vehicle (getting in
and out) and easy loading and unloading operation.
This mode is available when the vehicle is stopped. When you
start the vehicle, the normal mode is automatically selected.
217

STARTING AND DRIVING
NOTICE
The normal mode is automatically selected when the
vehicle begins to move in the low mode. So be careful
when you drive in any place where the overhead height
is limited.
(b) Automatic leveling function
Regardless of the number of occupants or the luggage
loading condition, the vehicle height is always
automatically adjusted to a fixed height in any mode.
However, the vehicle height cannot be raised if the vehicle load
exceeds the limits. (See page 219.)
(c) Vehicle height mode changing condition
To change the vehicle height, it is necessary to meet the
following 3 conditions.
The engine should be running.
All the side doors and back door should be closed.
The height control ”OFF” indicator light should go off.
When selecti n g a mode with the four–wheel drive control lever
at ”H”, there is a vehicle speed limit. Refer to the following
table.
= The mode can be selected.
= The mode cannot be selected.
Low
mode
At vehicle
stoppage
Under about 30
km/h (19 mph)
About 30 km/h
(19 mph) or over
In the following cases the active height control
suspension does not operate even if the above conditions
are all met.
The brake pedal has been depressed for longer than about
5 seconds with the vehicle stopped.
The suspension fluid temperature is lower than –30C
(–22F). If the engine is warmed up, the suspension fluid
temperature will be raised as the inside of the engine
compartment becomes warmer. Then the active height
control suspension becomes operable.
Driving on bumpy roads, which may cause the suspension
to fully elongate.
The steering wheel is operated abruptly more than 3/4 turns
with center differential lock system activated.
Normal
mode
High
mode
218
STARTING AND DRIVING
(d) Vehicle height adjustment
31X049b
1
Higher 2Lower
To change the mode, push the height select switch on
either side of ”” and ””.
The height control indicator light indicates which mode is
selected. (See page 221.)
NOTICE
If you change the vehicle height frequently, the pump
may overheat. To prevent this, the active height
control suspension should be stopped temporarily
for a minute between selections. Operate it again.
Before you lower the vehicle height with the height
select switch, check under the vehicle to make sure
that nothing to damage the vehicle or no one to be
injured is there and the underbody of the vehicle
does not touch the ground.
After unloading, the height of a vehicle equipped with
the active height control suspension becomes
slightly higher than the normal vehicle height. Take
sufficient care where the overhead height is
restricted.
The vehicle height cannot be raised if the vehicle load
exceeds the following limits:
Up to 4 occupants* plus about 300 kg (661 lb.) in the normal
mode
Up to 4 occupants* plus about 170 kg (375 lb.) in the high
mode
*About 68 kg (150 lb.) for a person
If the above load capacity is exceeded, the desired vehicle
height may not be obtained even if the height select switch is
pushed. (If the vehicle height cannot be raised in the normal
mode and the height control indicator indicates ”LO”, this is
because the vehicle is loaded too heavily. Under these
conditions, drive your vehicle with due care.)
If the vehicle height cannot be raised even after unloading,
push the height select switch on the ”” side and then on the
”” side. If this does not work, turn off the ignition once and
then turn on. Operate the select switch again.
219

STARTING AND DRIVING
Selecting the high mode:
Push the height select switch on the ”” side when the vehicle
speed is under about 30 km/h (19 mph).
To change the normal mode to high, push the switch once.
To change the low mode to high, push the switch twice. It
takes about 30 seconds until the low mode changes to the high
mode.
Selecting the normal mode:
To change the high mode to normal, push the height select
switch on the ”” side once.
To change the low mode to normal, push the height select
switch on the ”” side once.
Selecting the low mode:
Push the height select switch on the ”” side while the vehicle
is stopped.
To change the high mode to low, push the switch twice.
To change the normal mode to low, push the switch once.
NOTICE
Do not select the low mode on bumpy roads. If the
underbody of the vehicle touches the rugged road
surface, the vehicle may be damaged.
(e) Turning off the active height control
suspension
31X051b
To turn off the active height control suspension with the
vehicle stopped, push the height control switch. The
height control ”OFF” indicator light comes on and the
vehicle height is fixed in the same mode as the height
control switch is pushed.
This status is memorized in the system even after the engine
is stopped.
If you push the switch again, the height control ”OFF” indicator
light goes out and the active height control suspension is
turned on.
Even if the engine is stopped while the vehicle height is
being lowered, the operation continues for up to 12
seconds.
220
STARTING AND DRIVING
CAUTION
If you drive through deep water over about 500 mm (20
in.) in depth, put the vehicle height in the HI (High) mode
with the active height select switch and then turn off the
active height control suspension by pushing the height
control switch. Drive your vehicle at 30 km/h (19 mph)
or lower speed.
NOTICE
When jacking up or installing tire chains, be sure to
turn off the active height control suspension and
stop the engine. Otherwise, the vehicle height may
change because of the automatic leveling function,
resulting in an unexpected accident.
If your vehicle must be towed, put the vehicle height
in the normal mode and turn off the active height
control suspension. Otherwise, the vehicle height
may change because of the automatic leveling
function, resulting in an unexpected accident.
If your vehicle gets ditched, turn off the active height
control suspension with the height control switch.
Otherwise, the vehicle height may change because of
the automatic leveling function, resulting in an
unexpected accident.
(f) Height control indicator lights
31X050b
1
Height control indicator lights
2
Height control ”OFF” indicator light
When the ignition switch is turned on, all the indicator
lights come on. The indicator light showing the present
mode only remains on and all other lights go off after a few
seconds. This means the system operates correctly.
If you change the vehicle height mode, the indicator lights
change as follows:
Even after the active height control suspension is turned
off with the height control switch, if the vehicle speed
exceeds 30 km (19 mph), the active height control
automatically selects the normal mode.
221
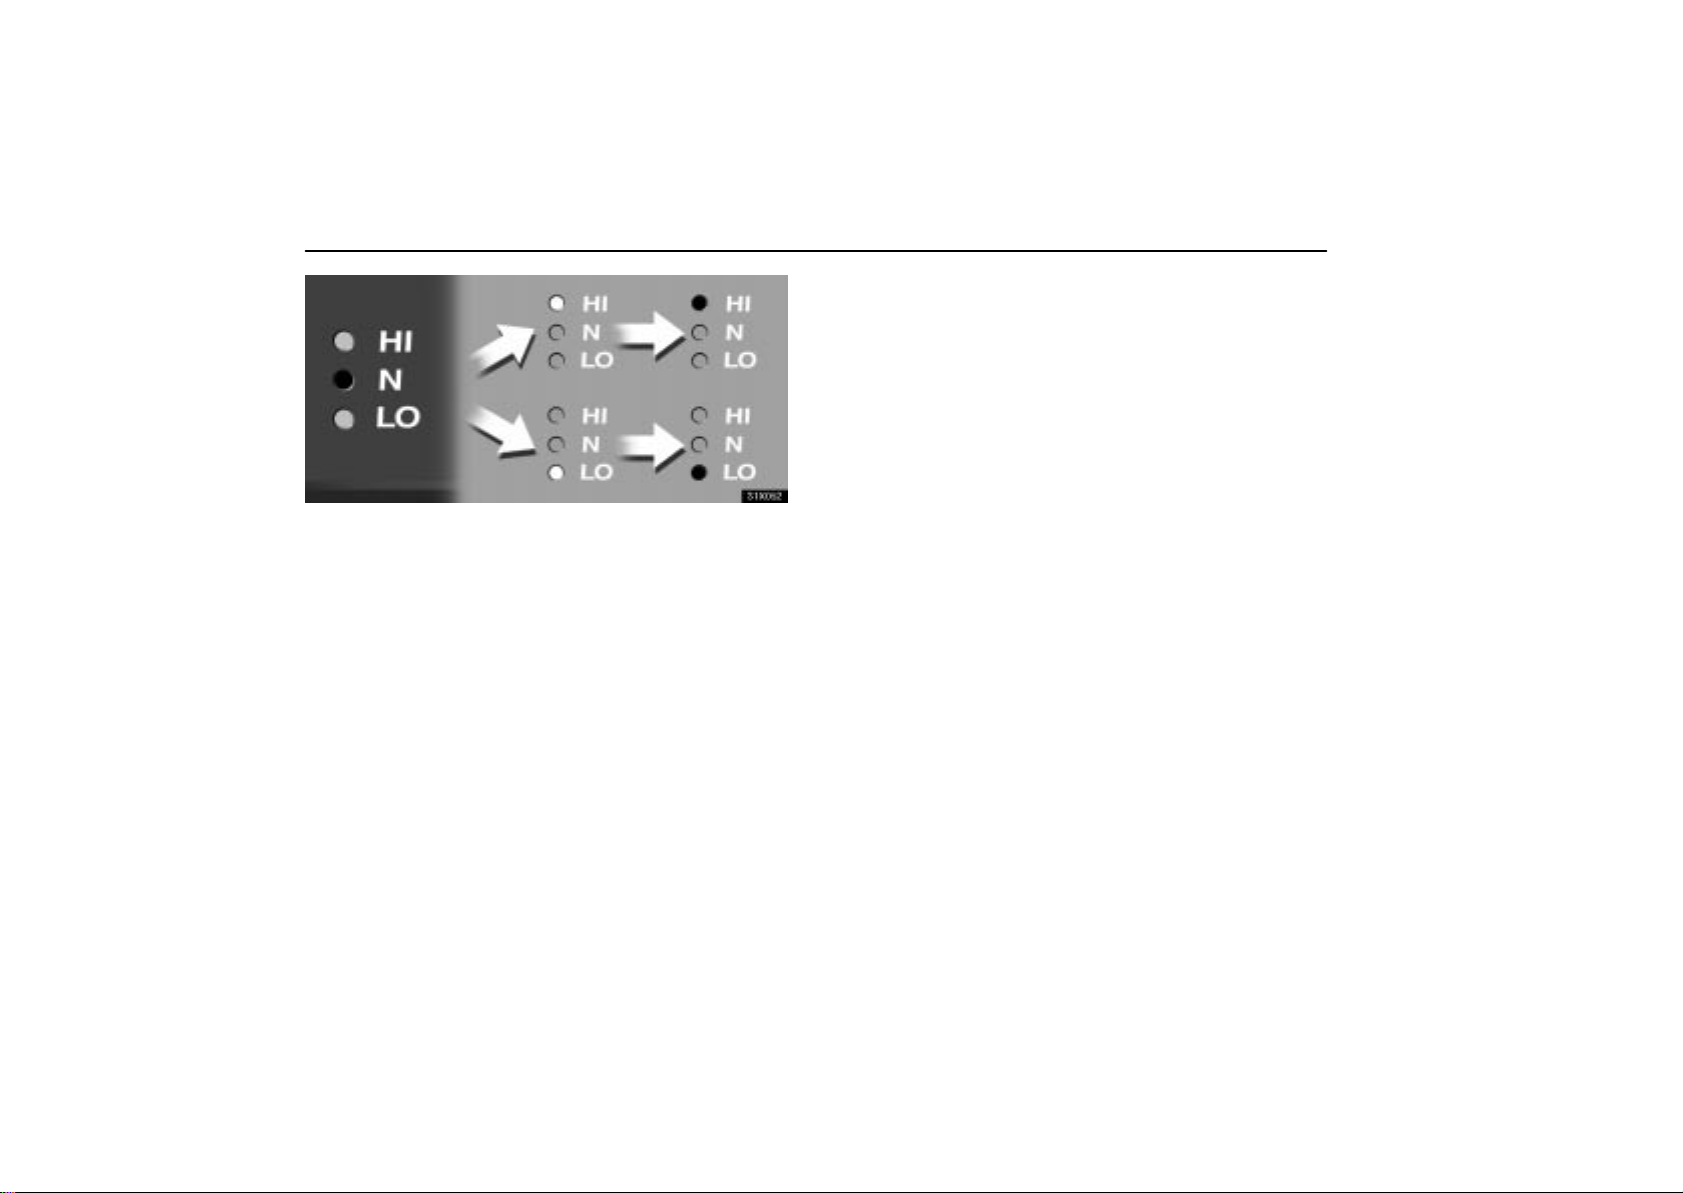
STARTING AND DRIVING
31X052
: Blinking : Illuminating
When changing the vehicle height from the normal mode
to high:
1. The ”N” (normal) mode indicator light goes off and the ”HI”
(high) mode indicator light blinks.
2. After the vehicle height control reaches the high mode, the
high mode indicator light remains on.
With the active height control suspension turned off, if
you operate the height select switch or the vehicle height
is changing depending on the vehicle speed, the vehicle
height control enters the ready mode. In this case, the
height control indicator lights change as follows:
1. The present mode indicator light comes on and at the same
time the ready mode indicator light blinks.
2. When the active height control suspension is turned on, the
present mode indicator light goes off and the ready mode
indicator light blinks. (The vehicle height changes.)
3. After the vehicle height has changed completely, the
changed mode indicator light stays on.
If the vehicle is loaded heavily, the vehicle height cannot
be raised even if the height select switch is operated. If the
underbody of the vehicle has touched the surface on
bumpy roads, the vehicle height cannot be lowered with
the height select switch. The height control indicator
lights change as follows:
1. The present mode indicator light goes off and the selected
mode indicator light blinks.
2. The selected mode indicator light goes off. (The vehicle
height does not change.) The present mode indicator light
comes on again.
Height control ”OFF” indicator light: When the ignition
switch is turned on, this light comes on. If it goes out after a few
seconds, the active height control suspension operates
correctly. If you push the height control switch, the active
height control is turned off. The height control ”OFF” indicator
light comes on.
In the following cases, there is a problem somewhere in your
active heig h t c o n t r o l s u s pension. Although there is no problem
to continue normal driving, have the active height control
suspension checked by your Lexus dealer as soon as
possible.
The height control ”OFF” indicator light does not come on
when the ignition switch is turned on.
The height control ”OFF” indicator light blinks.
222

STARTING AND DRIVING
(g) Operation in cold weather
The active height control suspension does not operate in
cold weather when the suspension fluid temperature
drops below –30C (–22F).
In this case, operating the height select switch does not
change the vehicle height. The vehicle height control enters
the ready mode and the selected height control indicator light
blinks. The active height control becomes operable if the
engine is warmed up with the suspension fluid temperature
being raised within normal operating limits. The vehicle
changes to the s e l e c t e d h e i ght when the vehicle height control
is in the ready mode.
When the suspension fluid temperature is around –30C
(–22F), the vehicle height cannot be raised even within the
available load capacity. After warming up the engine, push the
control switch on the ”” side once and then on the ”” side
to select the desired vehicle height.
It takes longer to change the vehicle height when the
suspension fluid temperature drops below –15C (5F).
(h) Parking and stopping tips
If you immediately stop the engine to park the vehicle after
off–road driving, the vehicle height is lowered slightly as the
vehicle becomes cool. When parking, make sure there is
nothing that will be in contact with the underbody of the vehicle.
When you start the engine, the vehicle returns to the previous
height.
If you park the vehicle for a long time, the vehicle height may
gradually lower . When parking for a long time, make sure there
is nothing that will come in contact with the underbody of the
vehicle. When you start the engine, the vehicle returns to the
previous height.
If you stop the engine, the vehicle height may change in
accordance with the change in the temperature. When you
start the engine, the vehicle returns to the previous height.
(i) Installing or removing heavy equipment
If you install or remove heavy equipment exceeding 15 kg (33
lb.), the front torsion bar should be adjusted. Consult your
Lexus dealer.
223
STARTING AND DRIVING
(j) Active height control failure warning
If there is a problem somewhere in the active height control
suspension, the nor m a l m o d e i s a u t o m atically selected. If this
occurs, the height control ”OFF” indicator light blinks and the
vehicle height control cannot be activated until the malfunction
is corrected.
Stop the engine and start it again. If the height control ”OFF”
indicator light goes out, the active height control suspension
returns to normal. If the height control ”OFF” indicator blinks
again, bring your vehicle to your Lexus dealer as soon as
possible and have it checked.
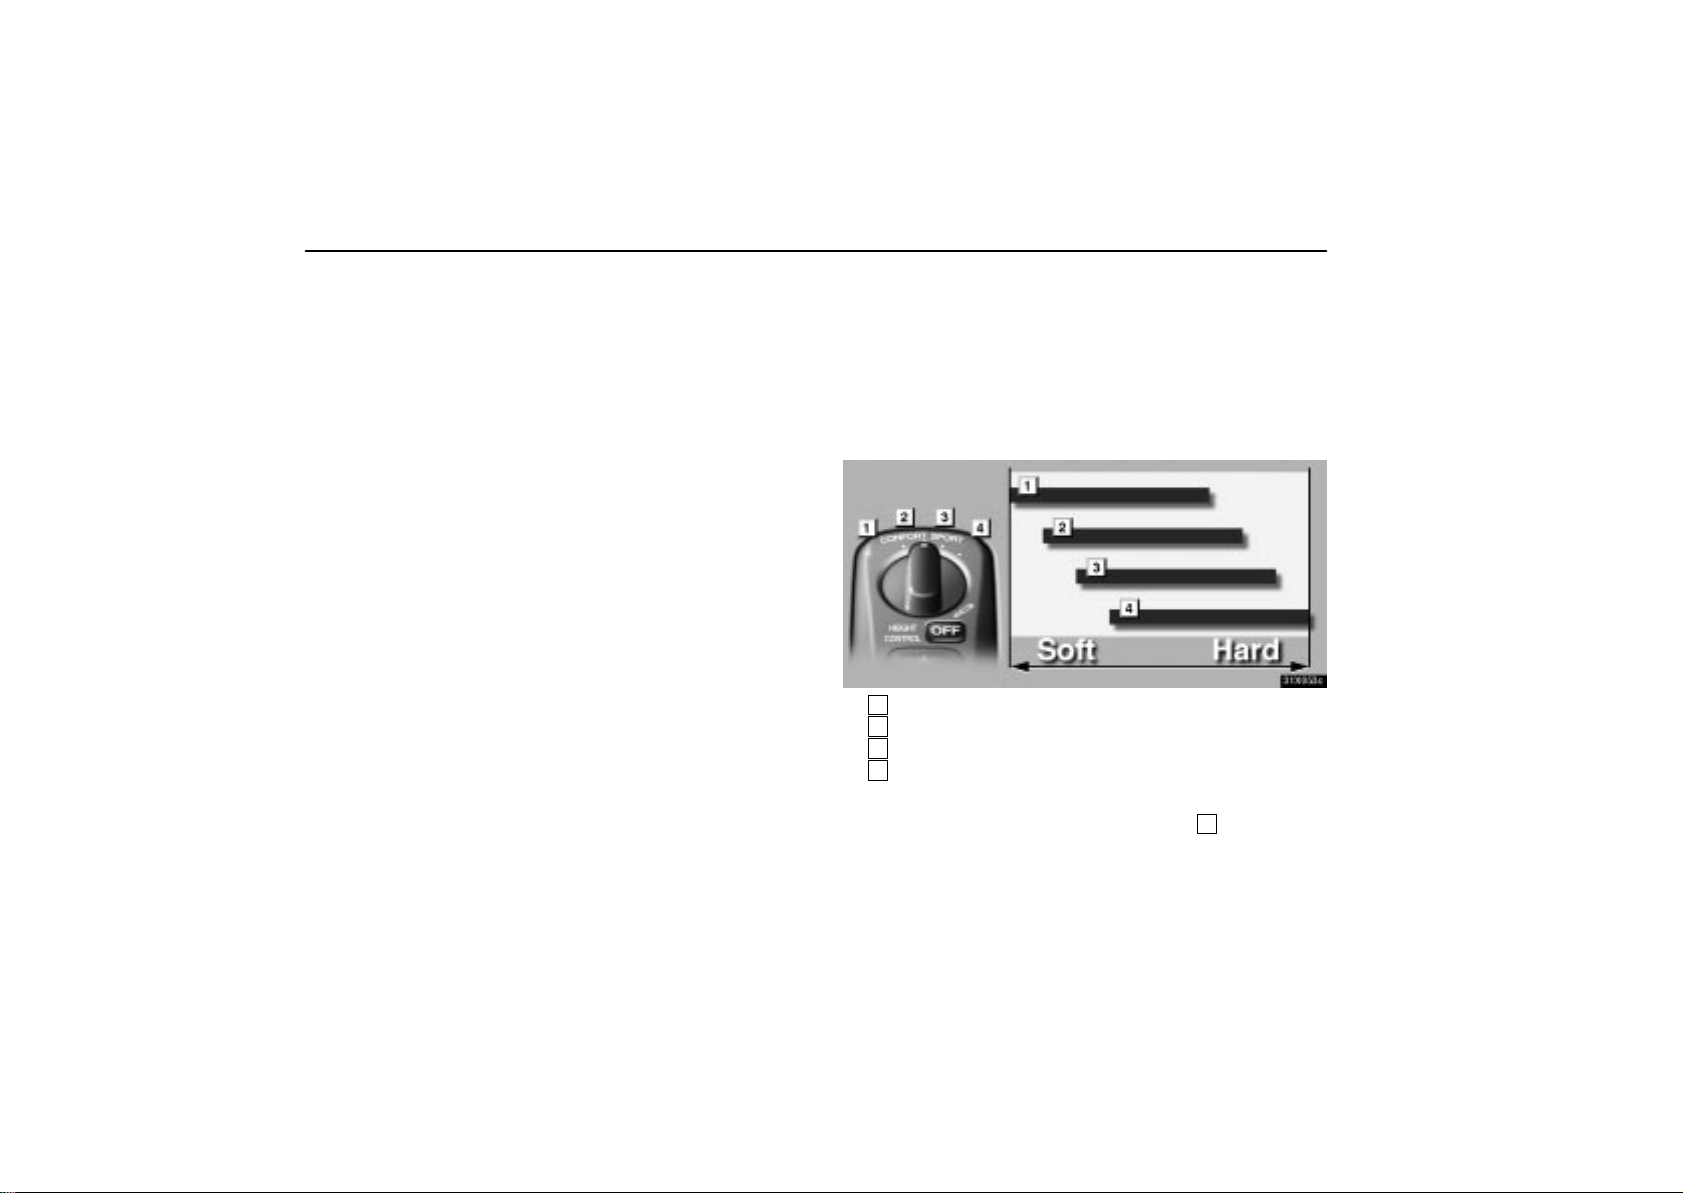
ADAPTIVE VARIABLE SUSPENSION
(AVS)
This adaptive variable suspension adjusts the damping
effect on the shock absorbers with the damping mode
select switch. Select one of the 4 modes which is suited
to the driving conditions with the damping mode select
switch to provide good riding comfort and stability.
31X053c
1
For driving on a bumpy road
2
For ordinary driving such as in the city traffic
3
For moderate high speed driving
4
For sporty type driving such as on winding
mountain roads and high speed driving
We recommend you to select the mode
driving. The damping effect will be changed automatically to
provide good riding comfort.
2
for ordinary
224
STARTING AND DRIVING
When your vehicle is loaded heavily or you are driving in an
unpaved road, the mode
provide good vehicle stability , the damping effect will be harder
than for ordinary driving mode.
With the four–wheel drive control lever at ”L”, the damping
effect suitable for off–road driving will be provided.
3
or 4 will be recommended. To
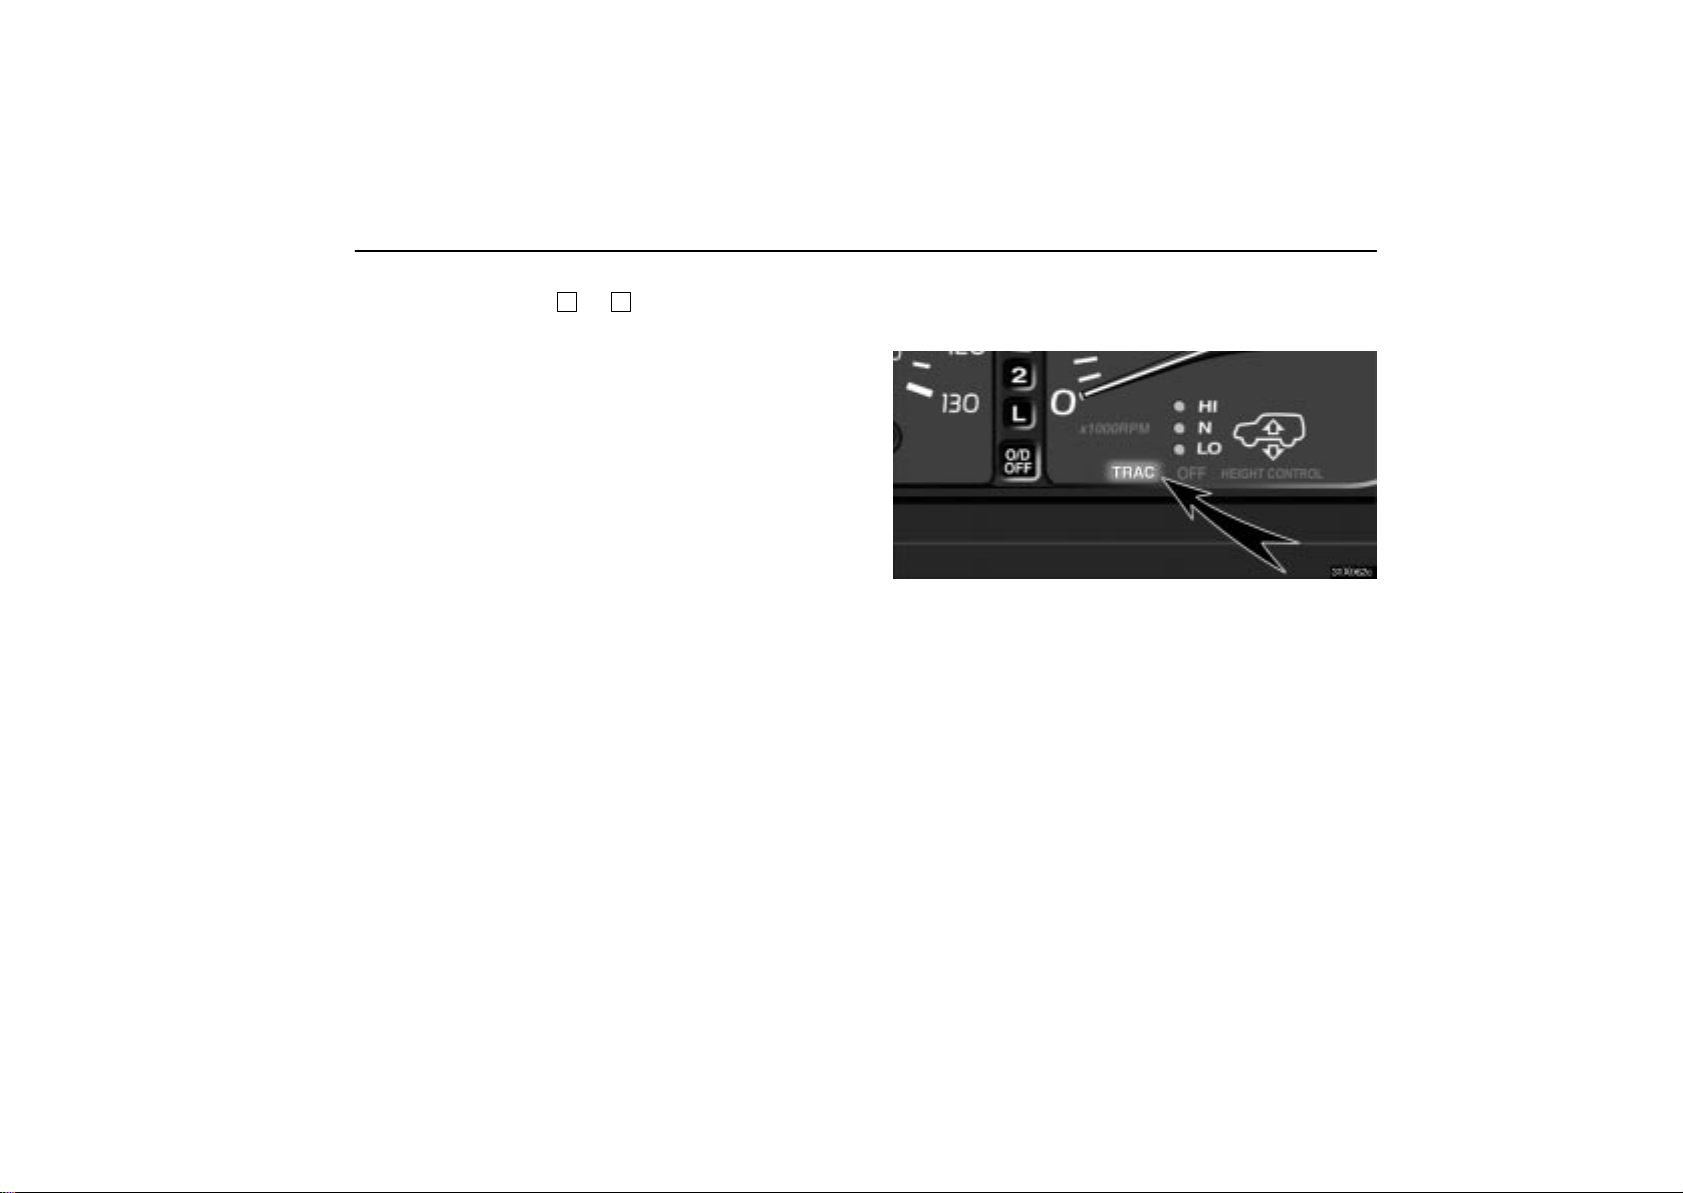
ACTIVE TRACTION CONTROL
SYSTEM
31X062c
Active traction control system indicator light
The active traction control system automatically helps
control the spinning of 4 wheels which may occur when
accelerating on slippery road surfaces, by controlling the
output of the brake and engine. Thus, the system assists
driver to control the driving power of 4 wheels. When you
turn the ignition switch on, the active traction control
system always turns on automatically, and the active
traction control indicator light will come on. The indicator
light will go off after a few seconds.
When active traction control is applied, the active traction
control system indicator light blinks.
225
STARTING AND DRIVING
You may hear a sound in the engine compartment for a few
seconds when the engine is started or just after the vehicle is
started. This means that the active traction control system is
in the self–check mode, and does not indicate malfunction.
When the active traction control system is operating, you may
feel vibration or noise of your vehicle, caused by operation of
the brakes. This indicates the system is functioning properly .
When getting the vehicle out of mud or new snow, etc., the
active traction control system will help operate to prevent the
wheels from spinning.
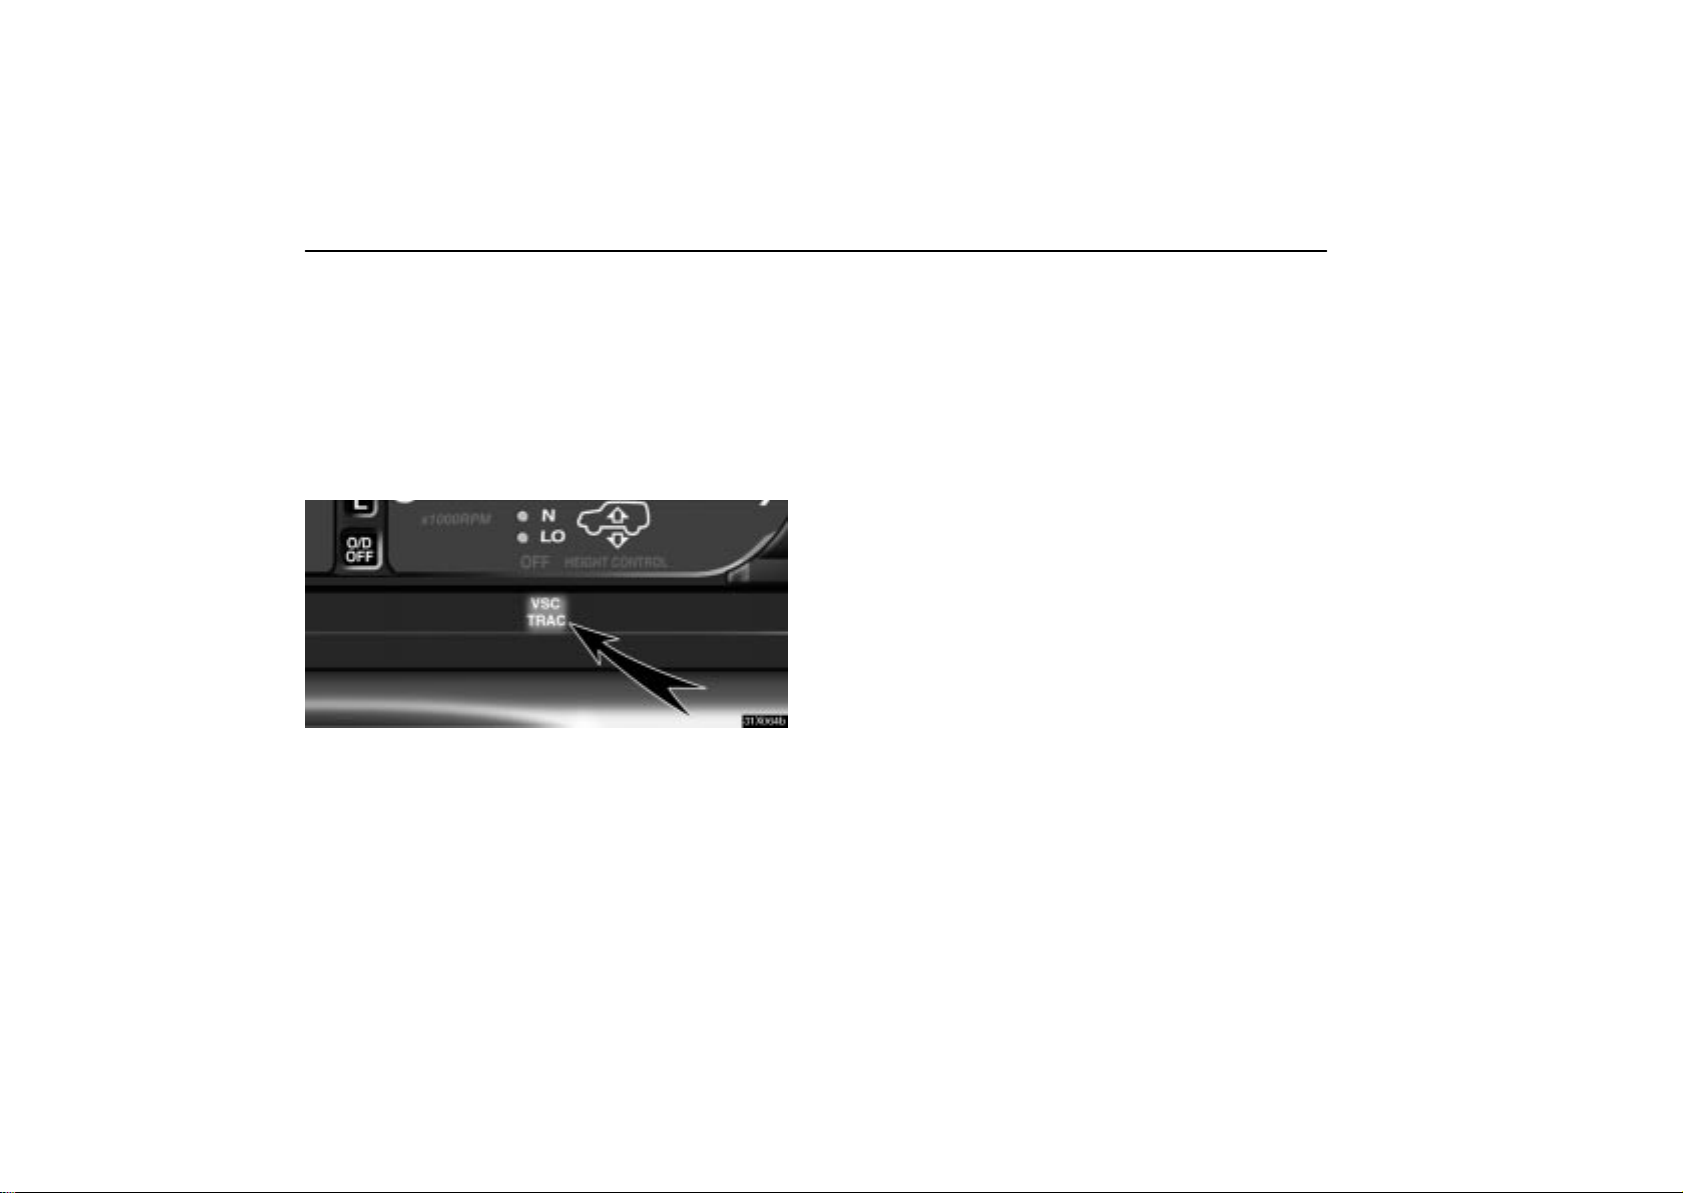
31X064b
Active traction control system failure warning
This light warns when there is a problem somewhere in the
active traction control system or vehicle skid control system.
If the “VSC/TRAC” warning light comes on, have your vehicle
checked by your Lexus dealer as soon as possible.
The brake actuator temperature increases during the active
traction control system or vehicle skid control system
operating. If the brake actuator temperature becomes too high
while the active traction control system or vehicle skid control
system is operating, a buzzer will start to sound intermittently
to indicate that the active traction control system can no longer
operate. In this case, immediately stop your vehicle at a safe
place. If the system continues to operate, the buzzer sound
changes from intermittent to continuous. (The continuous
buzzer sound will stop after about 3 seconds.) At the time the
“VSC/TRAC” warning light will come on and the active traction
control system temporarily stops operating in order to protect
the brake actuator. (Although the active traction control
system does not operate, there is no problem to continue your
driving.) The system will be automatically restored after a short
time and “VSC/TRAC” warning light goes off if the accelerator
pedal is released.
When the “ABS” warning light comes on, the active traction
control system is not operating.
The “VSC/TRAC” warning light will come on when the ignition
key is turned to “ON”, and will go off after a few seconds.
The “VSC/TRAC” warning light may stay on for 60 seconds
after the ignition key is turned to the “ON” position. It is normal
if it goes off after a few seconds.
Depressing the brake pedal repeatedly may turn on the
“VSC/TRAC” warning light. It is normal if it goes off after a few
seconds.
When the “VSC/TRAC” warning light comes on, the active
traction control system is not operating, but there is no problem
if you continue to drive.
226
 Loading...