

Lexus LX450 1996, LX470 1996, LX570 1996 Owner Manual

SECTION 6 – 4
SERVICE PROCEDURES AND
SPECIFICATIONS
Electrical components
Specifications 222
Checking battery condition 224
Battery recharging precautions 229
Checking and replacing the blade type fuses 229
Checking the cartridge type fuses 231
Checking the fusible links 232
Adding washer fluid 233
Checking the headlight aim 233
Replacing light bulbs 235
221
ELECTRICAL COMPONENTS
SPECIFICATIONS
– FUSE LOCATIONS
– FUSES
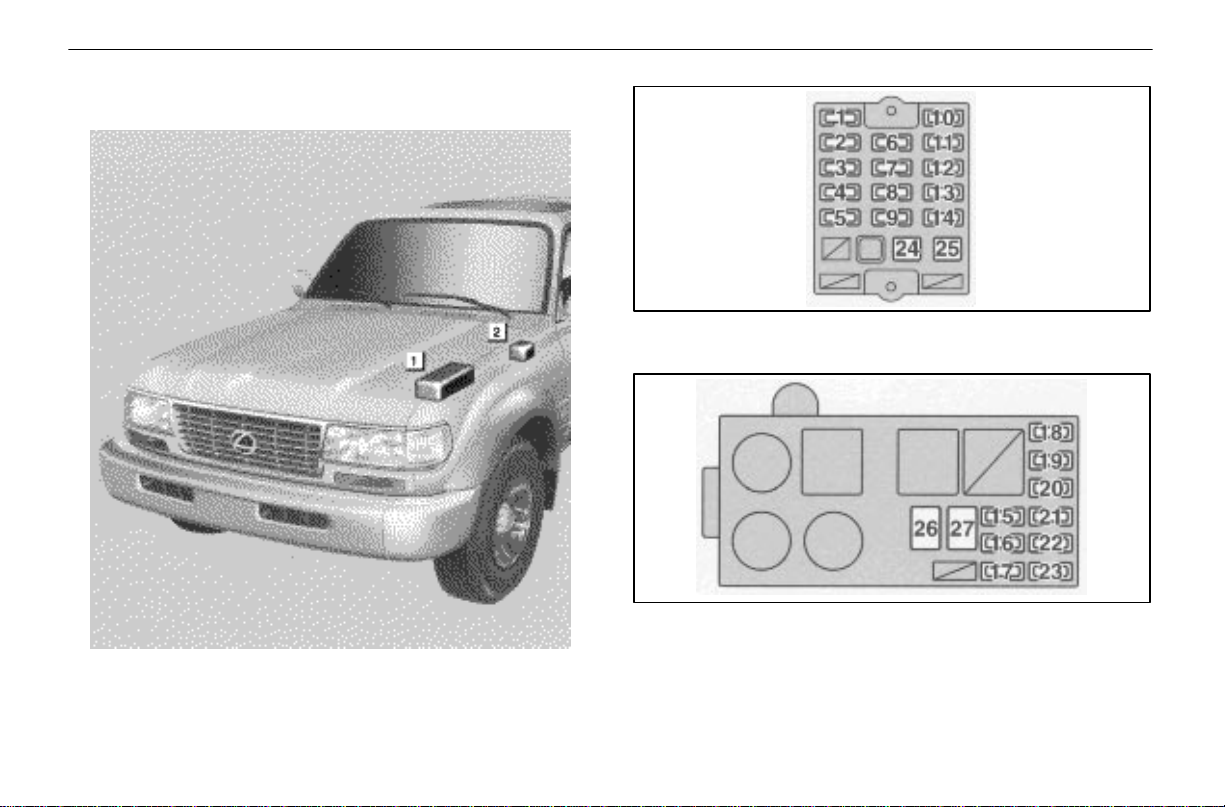
Driver’s side instrument panel
Engine compartment
222
Engine compartment
Driver’s side instrument panel

ELECTRICAL COMPONENTS
No. Fuse AMPERE CIRCUIT
Cigarette lighter,
Power rear view mirrors,
Digital clock display, Radio,
1 CIG 15
2 TAIL 15
3 OBD 15 On–board diagnosis system
4 STOP 10
5 DEFOG 20 Rear window defogger
6 WIPER 20
7 GAUGE 10
8 TURN 7.5 Turn signal lights
9 ECU–IG 15 Cruise control system
10 ECU–B 10 SRS airbag system
Cassette tape player,
Power antenna, Automatic
transmission shift lock system,
SRS airbag system
Tail lights, License plate lights,
Parking and front side marker
lights, Instrument panel lights,
Clock, Glovebox light
Stop lights, Multiport fuel
injection system/sequential
multiport fuel injection system,
Cruise control cancel device,
Automatic transmission shift
lock system
Windshield wipers and washer,
Rear window wiper and washer
Gauges and meters,
Service reminder indicators and
warning buzzers (except
discharge and open door
warning lights), Back–up lights
No. Fuse AMPERE CIRCUIT
11
12 IGN 7.5
13 A.C 10 Air conditioning system
14 DIFF 30 Differential lock system
15 CHARGE 7.5
16 EFI 15
17 CDS–FAN 20 No circuit
18
19
20 RADIO 20 Audio system
21 TEL 15 Telephone
22
REAR–
HTR
HEAD
(RH)
HEAD
(LH)
HAZ–
HORN
20 Air conditioning system
Multiport fuel injection
system/sequential multiport fuel
injection system,
Emission control system,
SRS airbag system
Charging system,
Discharge warning light
Multiport fuel injection
system/sequential multiport fuel
injection system
15 Right–hand headlights
15 Left–hand headlights
15 Emergency flashers, Horns
223
ELECTRICAL COMPONENTS
No. Fuse AMPERE CIRCUIT
Interior lights, Personal light,
Luggage compartment light,
23 DOME 10
24
25
26 AM 1 50
27 ABS 60 Anti–lock brake system
FL
HEATER
FL
POWER
40 Air conditioning system
30
Ignition switch light,
Open door warning light, Clock,
Radio, Cassette tape player,
Power antenna, Vanity lights
Power windows,
Power door lock system,
Electric moon roof
All components in “CIG”,
“WIPER”, “GAUGE”, “TURN”,
“ECU–IG”, “REAR–HTR”,
“IGN”, “DIFF” and
“FL POWER” circuits
CHECKING BATTERY CONDITION
Precautions
CAUTION
!
BATTERY PRECAUTIONS
The battery produces flammable and explosive
hydrogen gas.
Do not cause a spark by contacting the battery
terminals with tools.
Do not smoke or light a match near the battery.
The electrolyte contains poisonous and corrosive
sulfuric acid.
Avoid contact with eyes, skin or clothes.
Never inhale or swallow electrolyte.
Wear protective safety glasses when working near
the battery.
Keep children away from the battery.
EMERGENCY MEASURES
If electrolyte gets in your eyes, flush your eyes
with clean water for at least 15 minutes and get
immediate medical attention. If possible, continue
to apply water with a sponge or cloth while
traveling to the medical office.
224
ELECTRICAL COMPONENTS
If electrolyte gets on your skin, thoroughly wash
the contacted area. If you feel a pain or burn, get
medical attention immediately.
If electrolyte gets on your clothes, there is a
possibility of its soaking through to your skin, so
immediately take off the exposed clothing and
follow the procedure above, if necessary.
If you happen to swallow electrolyte, drink a large
quantity of water or milk. Follow with milk of
magnesia, beaten raw egg or vegetable oil. Then
go immediately for emergency help.
Checking battery exterior
Check the battery for corroded or loose connections,
cracks, or loose hold–down clamps.
1. If the battery is corroded, wash it off with a solution of
warm water and baking soda. Coat the terminals with grease
to prevent further corrosion.
2. If the connections are loose, tighten the clamp bolts – but
do not overtighten.
3. Tighten the hold–down clamp only enough to keep the
battery firmly in place. Overtightening may damage the
battery case.
Terminals
Hold–down clamp
225
ELECTRICAL COMPONENTS
NOTICE
Make sure the engine and all accessories are
turned off before performing maintenance.
When checking the battery, remove the ground
cable first and reinstall it last.
Be careful not to cause a short circuit with tools.
Take care no solution gets into the battery when
washing it.
Checking battery fluid
There are 2 types of batteries: maintenance type and
non–maintenance type.
A non–maintenance battery has “MAINTENANCE FREE
BATTERY” on its top. A maintenance type battery does not
have such indication.
Maintenance type battery
Check the fluid condition by the fluid level lines on the side
of the battery. Or if the battery has a hydrometer on its top,
you can also check the hydrometer.
Non–maintenance battery
Check the battery condition by the hydrometer on top of the
battery.
226

ELECTRICAL COMPONENTS
(a) Checking by the fluid level lines (Maintenance type
battery only)
The fluid (electrolyte) level must be between the upper
and lower lines.
When checking the fluid level, look at all six cells, not just one
or two.
If the level is lower than the lower line, add distilled water.
(See “Adding distilled water” on page 228.)
Upper line
Lower line
(b) Checking by the hydrometer
Check the battery condition by the hydrometer color.
Maintenance type battery
BLUE – Good condition
WHITE – Charging necessary. Have the batt ery checked
by your Lexus dealer.
RED – Add distilled water. (See “Adding distilled water”
on page 228.)
Non–maintenance type battery
BLUE – Good condition.
WHITE – Charging necessary. Have the battery checked
by your Lexus dealer.
RED – Have the battery checked by your Lexus dealer.
227
ELECTRICAL COMPONENTS
NOTICE
(For non–maintenance type battery):
Do not refill the battery with water.
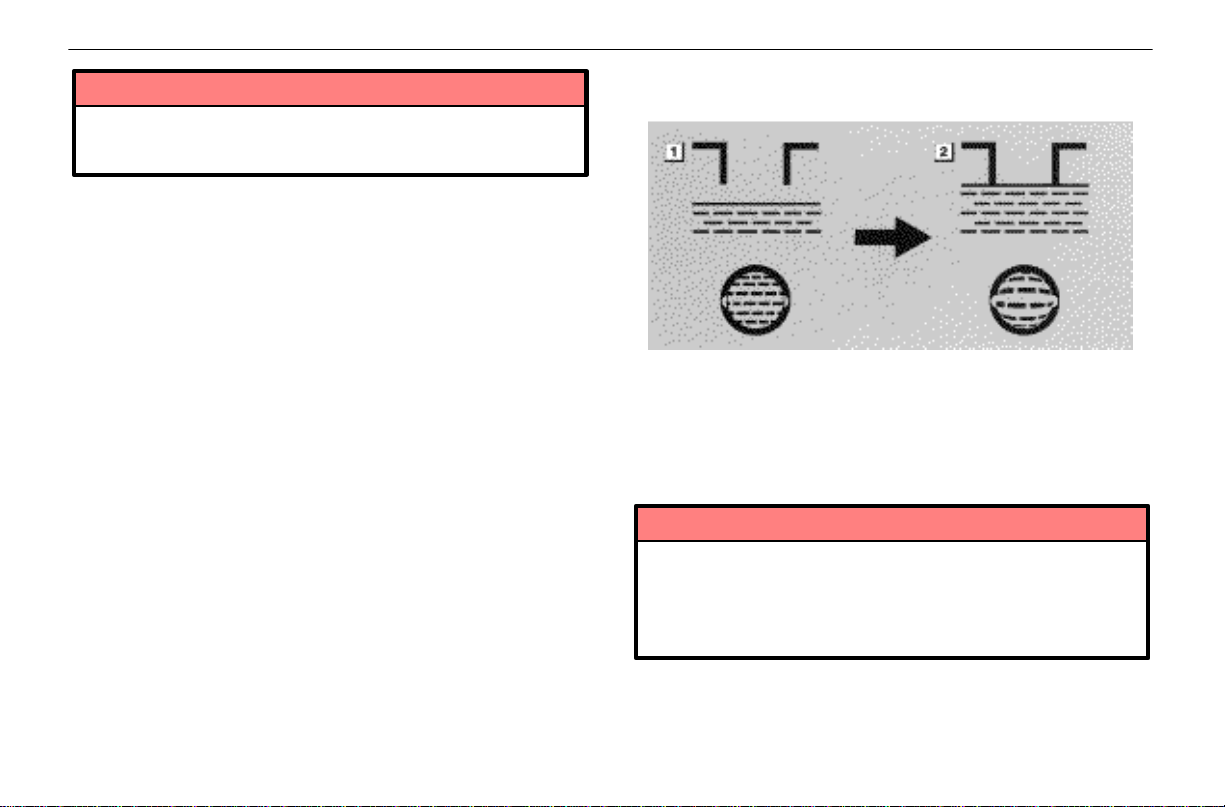
Adding distilled water
(Maintenance type battery only)
1. Remove the vent plugs.
2. Add distilled water to cells needing fluid.
If the side of the battery is covered, check the water level by
looking down directly above the cell as illustrated above.
3. Retighten the vent plugs securely.
Low
Do not overfill the cells. Excess electrolyte could
squirt out of the battery during heavy charging,
causing corrosion or damage.
Use a cover on the battery for longer life.
O.K.
NOTICE
228
ELECTRICAL COMPONENTS
BATTERY RECHARGING
PRECAUTIONS
During recharging, the battery is producing hydrogen
gas.
Therefore, before recharging:
1. Maintenance type batteries – Remove the vent plugs.
2. If recharging with the battery installed on the vehicle, be
sure to disconnect the ground cable.
3. Make sure the power switch on the recharger is off when
connecting the charger cables to the battery and when
disconnecting them.
CAUTION
!
Always charge the battery in an unconfined area.
Do not charge the battery in a garage or closed
room where there is not sufficient ventilation.
Non–maintenance batteries: Only do a slow charge
(5A or less). Charging at a quicker rate is
dangerous. The battery may explode causing
personal injuries. Maintenance type batteries: Be
sure to remove the vent plugs before recharging.
NOTICE
Never recharge the battery while the engine is
running. Also, make sure all accessories are turned
off.
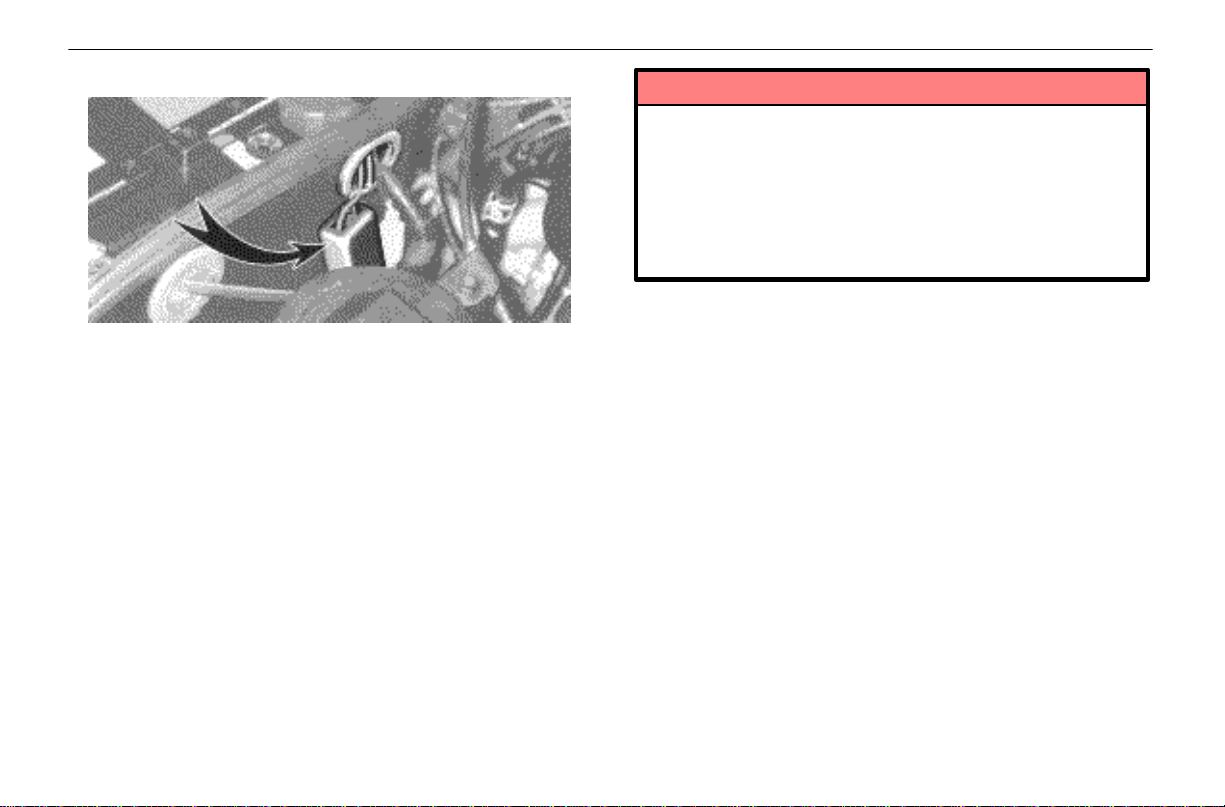
CHECKING AND REPLACING THE
BLADE TYPE FUSES
Driver’s side kick panel
Spare fuses
Engine compartment
1. Turn the ignition switch off and open the fuse box
lid.
Pull–out tool
229
ELECTRICAL COMPONENTS
Determine which fuse may be causing the problem. The lid
of the fuse box shows the name of the circuit for each fuse.
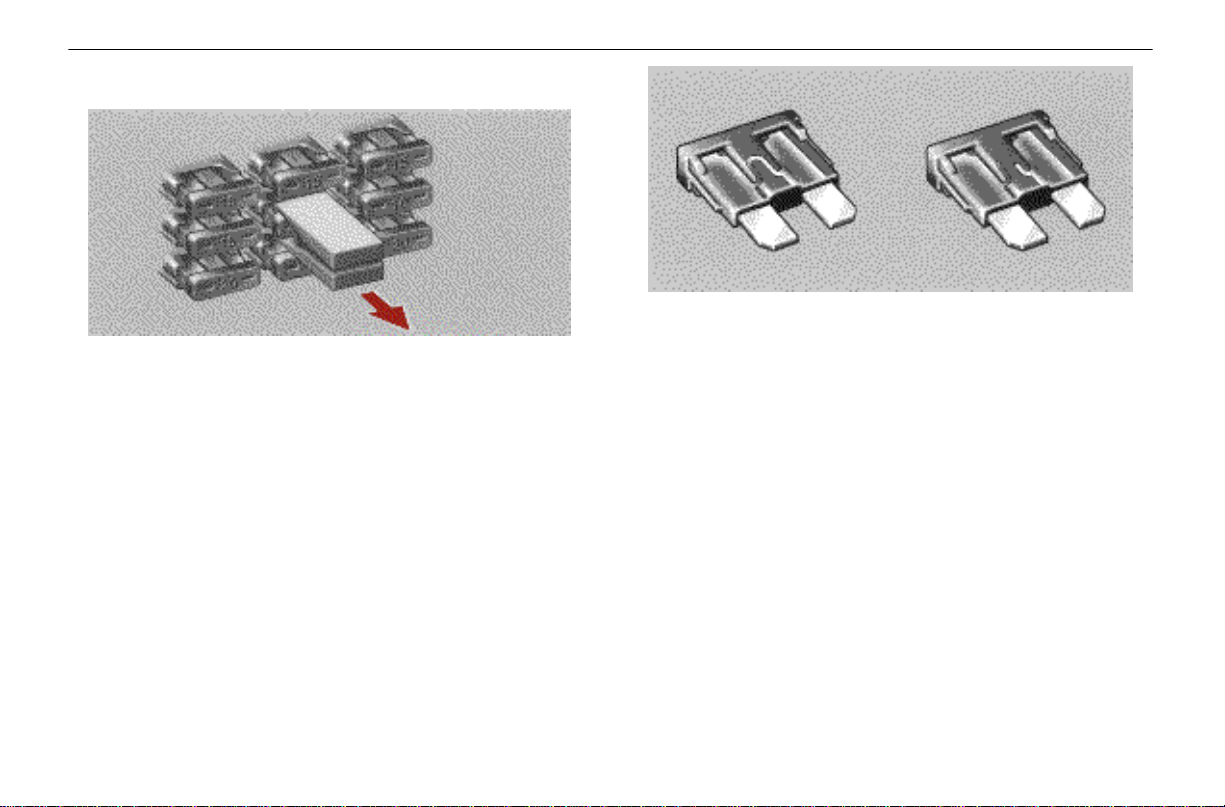
2. Make sure the inoperative component is turned off.
Pull the suspected fuse straight out with the pull–out
tool and check it. If it has blown, push a new fuse into
the clips.
a. Look carefully at the fuse. If the thin wire is broken, the
fuse has blown. If you are not sure or if it is too dark to see,
try replacing the suspected fuse with one of the same value
that you know is good.
b. Only Install a fuse with the amperage rating designated
on the fuse box lid.
Good
If you do not have a spare fuse, in an emergency you can pull
out the “CIG,” “DOME” or “A.C” fuse, which may be
dispensable for normal driving, and use it if its amperage
rating is the same.
If you cannot use one of the same amperage, use one lower
than, but as close as possible to, the amperage. If the
amperage is lower than that specified, the fuse might blow
out again but this does not indicate anything wrong. Be sure
to get the correct fuse as soon as possible and return the
substitute to its original clips.
It is a good idea to purchase a set of spare fuses and keep
them in your vehicle for emergencies.
If the new fuse immediately blows out, there is a problem
with the electrical system. Have your Lexus dealer correct
it as soon as possible.
Blown
230
ELECTRICAL COMPONENTS
CAUTION
!
Never use a fuse with a higher amperage rating, or
any other object, in place of a fuse. This may cause
extensive damage and possibly a fire.
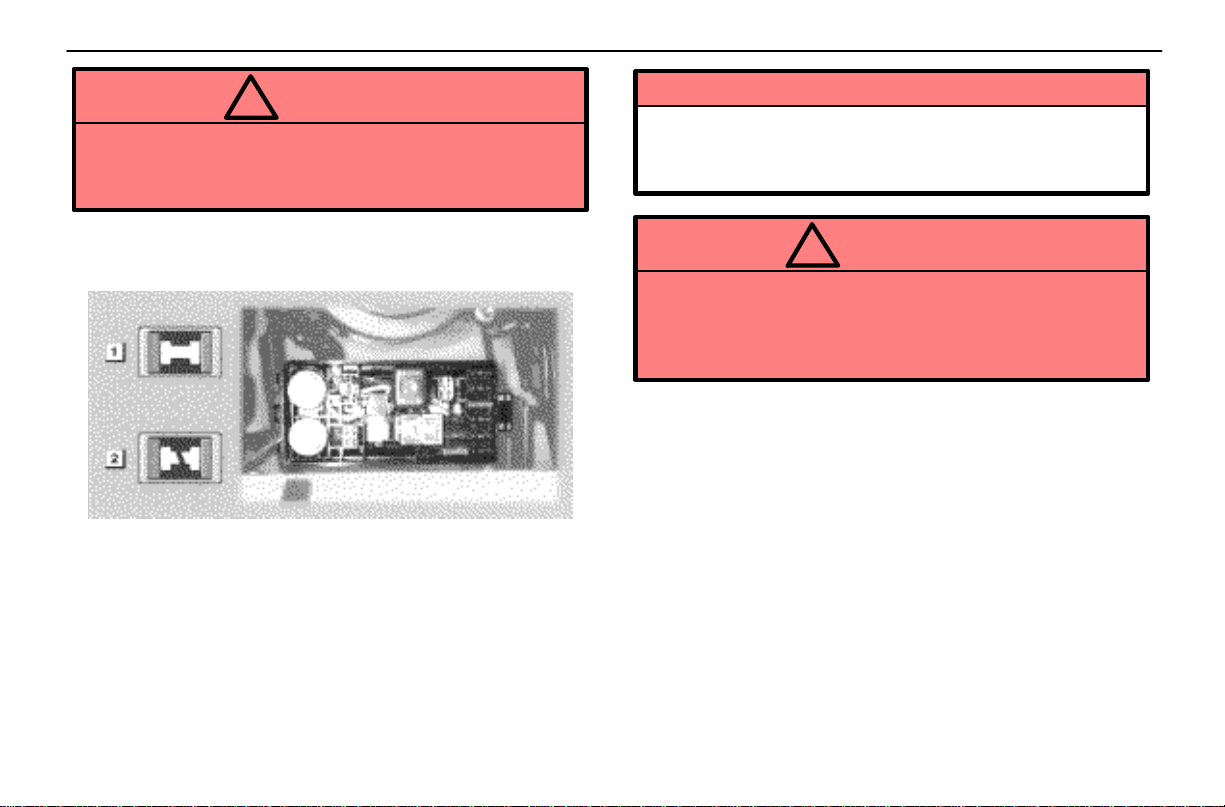
CHECKING THE CARTRIDGE TYPE
FUSES
If the headlights or other electrical components do not
work and the blade type fuses are O.K., check the
cartridge type fuses. If any of the cartridge type fuses
are blown, they must be replaced.
If there is an overload in the circuits from the battery, the
fuses are designed to blow before the entire wiring harness
is damaged.
Good
Melted
NOTICE
Before replacing the fuses, have the cause of
electrical overload determined and repaired by your
Lexus dealer.
CAUTION
!
Always use a genuine Lexus fuse or equivalent for
replacement. Never install an ordinary wire – even
for a temporary fix. This may cause extensive
damage and possibly a fire.
231
ELECTRICAL COMPONENTS
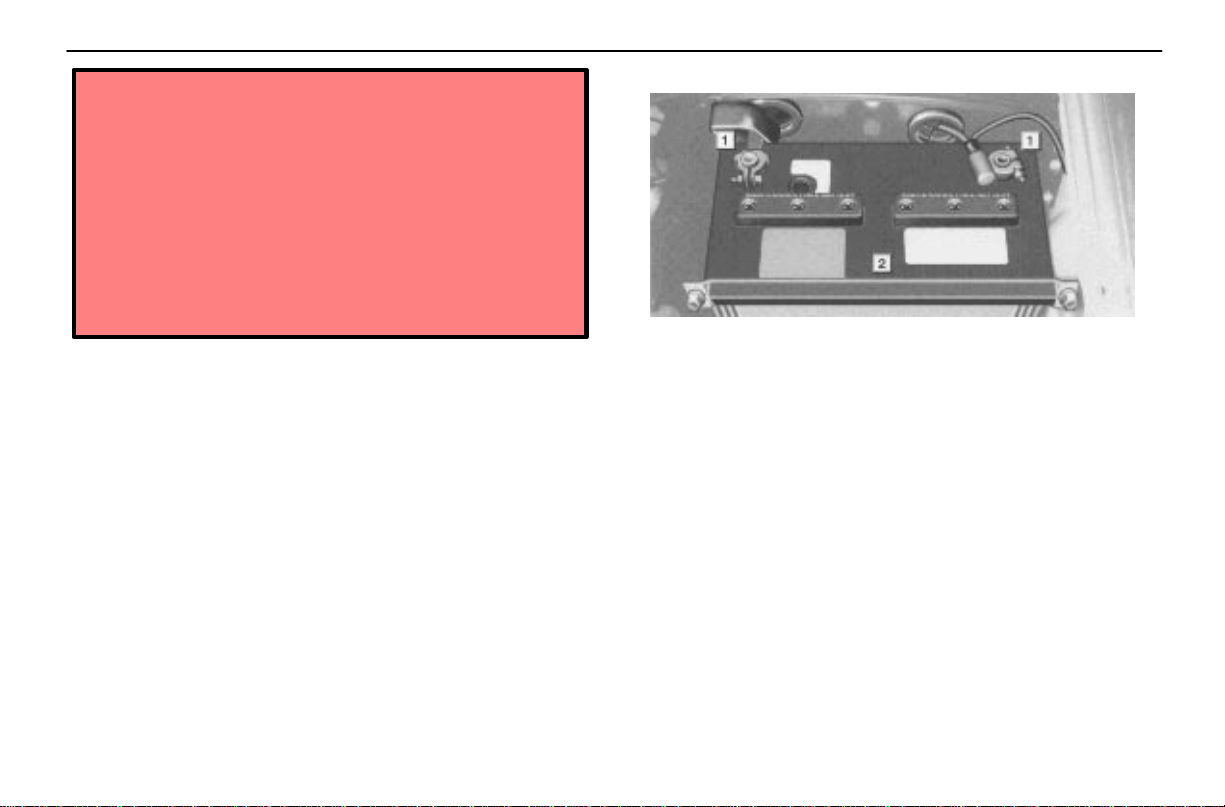
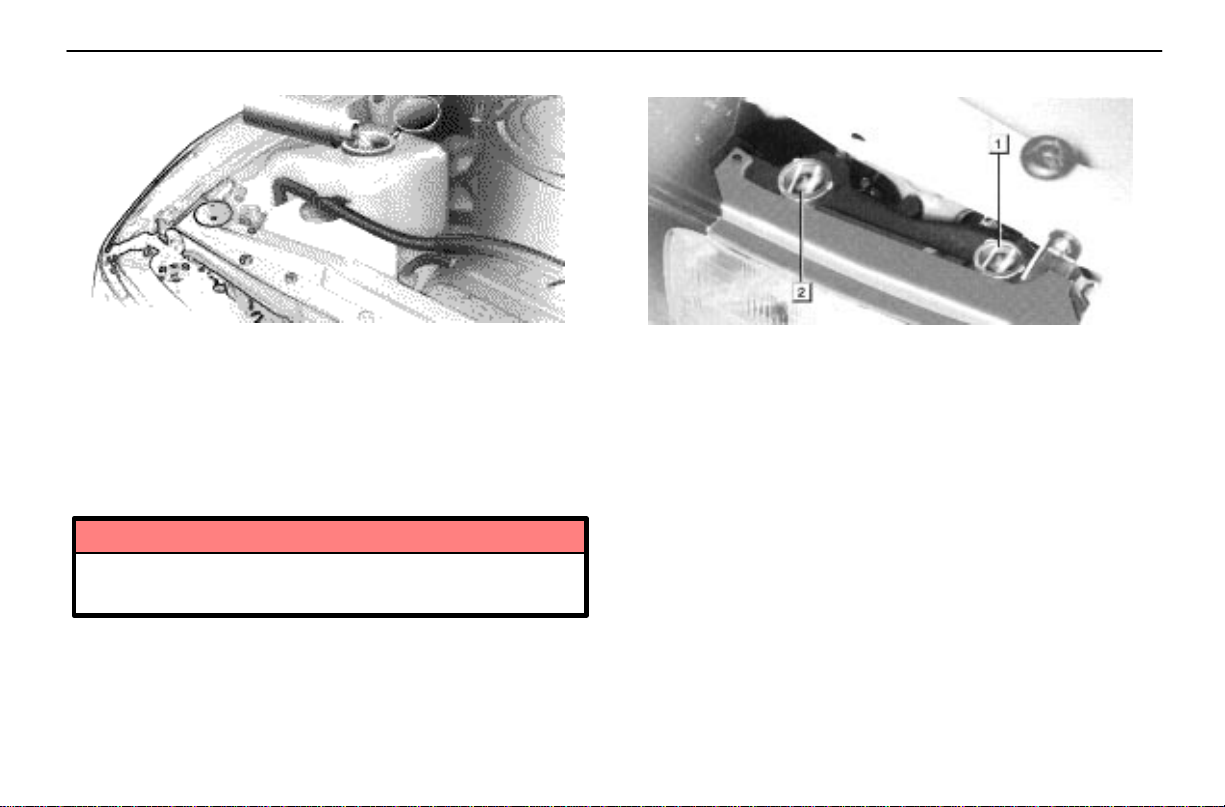
CHECKING THE FUSIBLE LINKS
Fusible links
If the headlights or other electrical components do not
work and the fuses are O.K., check the fusible links. If
any of the links is melted, it must be replaced.
If there is an overload in the circuits from the battery, the
fusible links are designed to melt before the entire wiring
harness is damaged.
NOTICE
Before replacing the fusible links, have the cause
of electrical overload determined and repaired by
your Lexus dealer.
Always use a genuine Lexus fusible link or
equivalent for replacement. Never install a wire –
even for a temporary fix. It may cause extensive
damage and possibly a fire.
232
ELECTRICAL COMPONENTS
ADDING WASHER FLUID
If any washer does not work, the washer tank may be
empty. Add washer fluid.
You may use plain water as washer fluid. However, in cold
areas where temperatures range below the freezing point,
use washer fluid containing antifreeze. This product is
available at your Lexus dealer and most auto parts stores.
Follow the manufacturer’s directions for how much to mix
with water.
NOTICE
Do not use engine antifreeze or any other substitute
because it may damage your vehicle’s paint.
CHECKING THE HEADLIGHT AIM
Before checking the headlight aim:
1. Be sure that the body around the headlight is not
deformed.
2. Park the vehicle on a level spot.
3. The driver gets into the driver’s seat and puts the vehicle
in a state readying for a driving (with a full tank).
4. Bounce the vehicle several times.
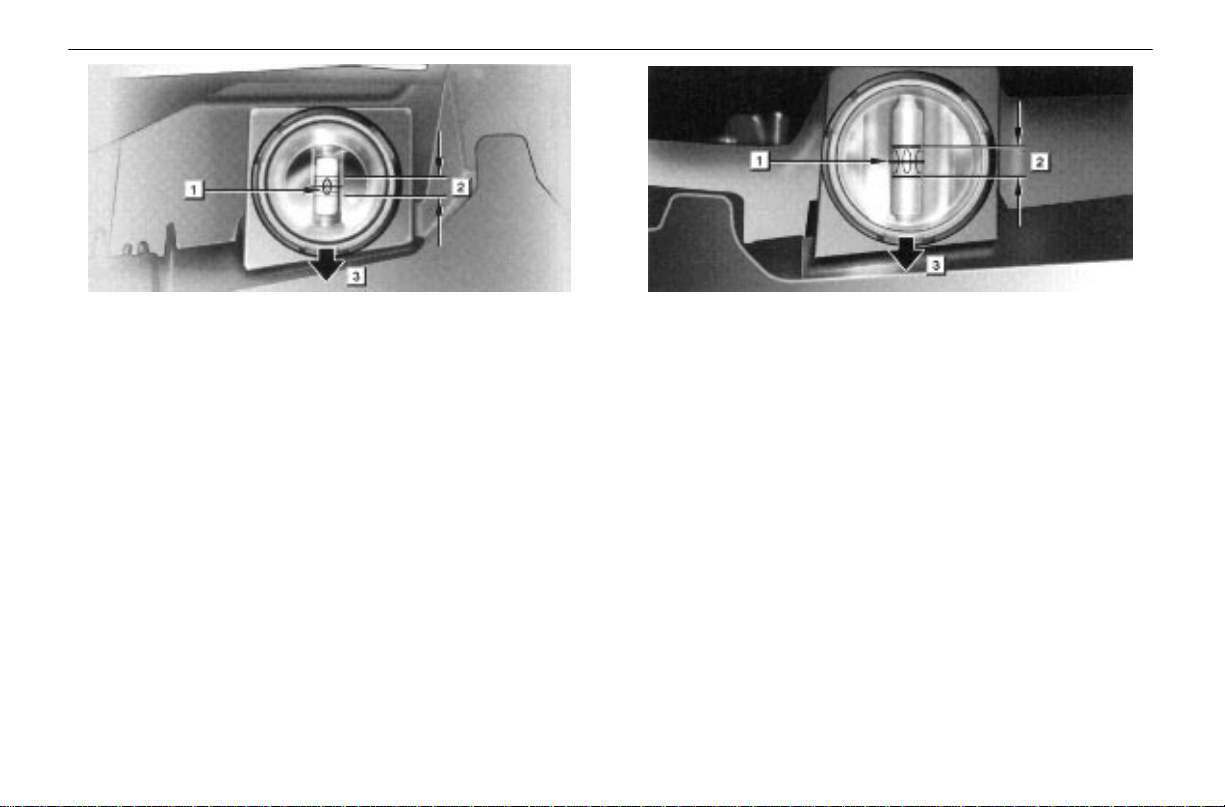
Beam angle gauge (vertical movement)
Beam angle gauge (horizontal movement)
233
ELECTRICAL COMPONENTS
Vertical movement gauge: The bubble of the gauge should
not deviate from the center of the gauge by more than two
marks to either side of the gauge.
234
Bubble
Acceptable range
Front
Horizontal movement gauge: The red mark should not
deviate by more than one mark to either side of the gauge.
If the error is over the value specified above, take the vehicle
to your Lexus dealer to adjust the headlight aim.
Mark
Acceptable range
Front
ELECTRICAL COMPONENTS
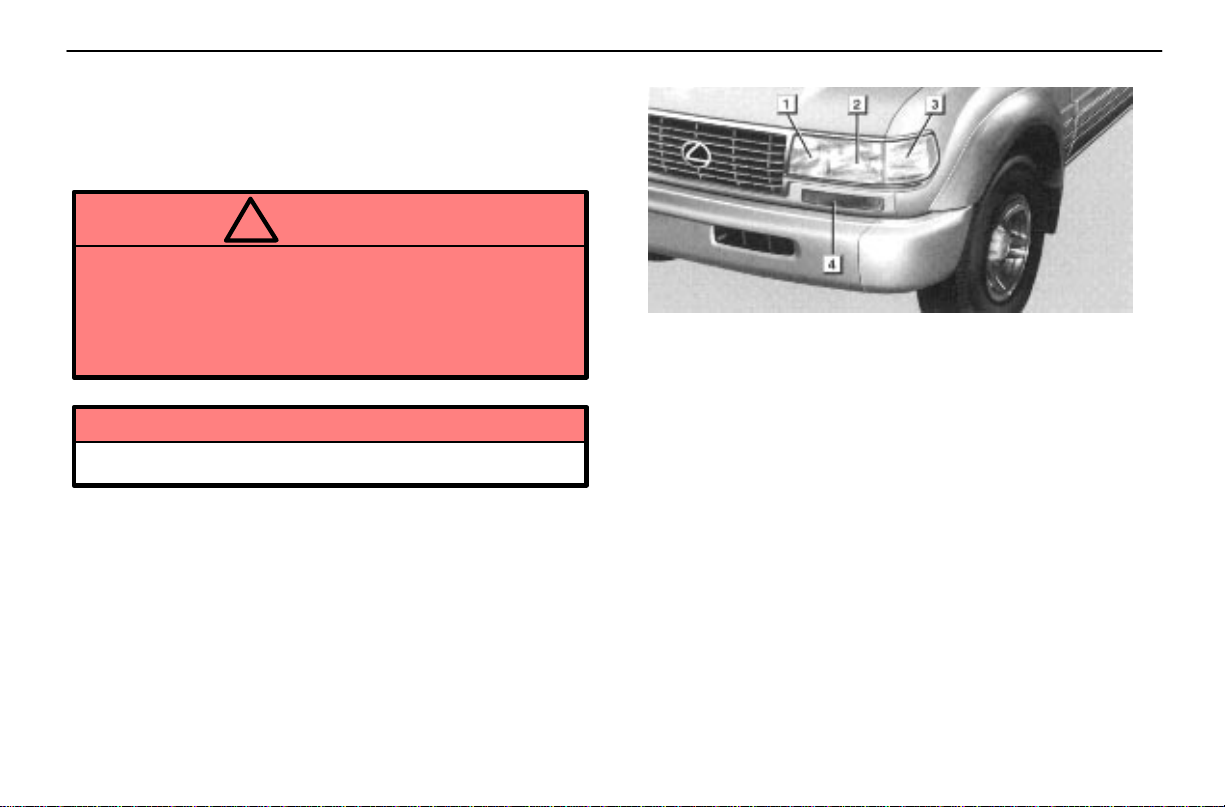
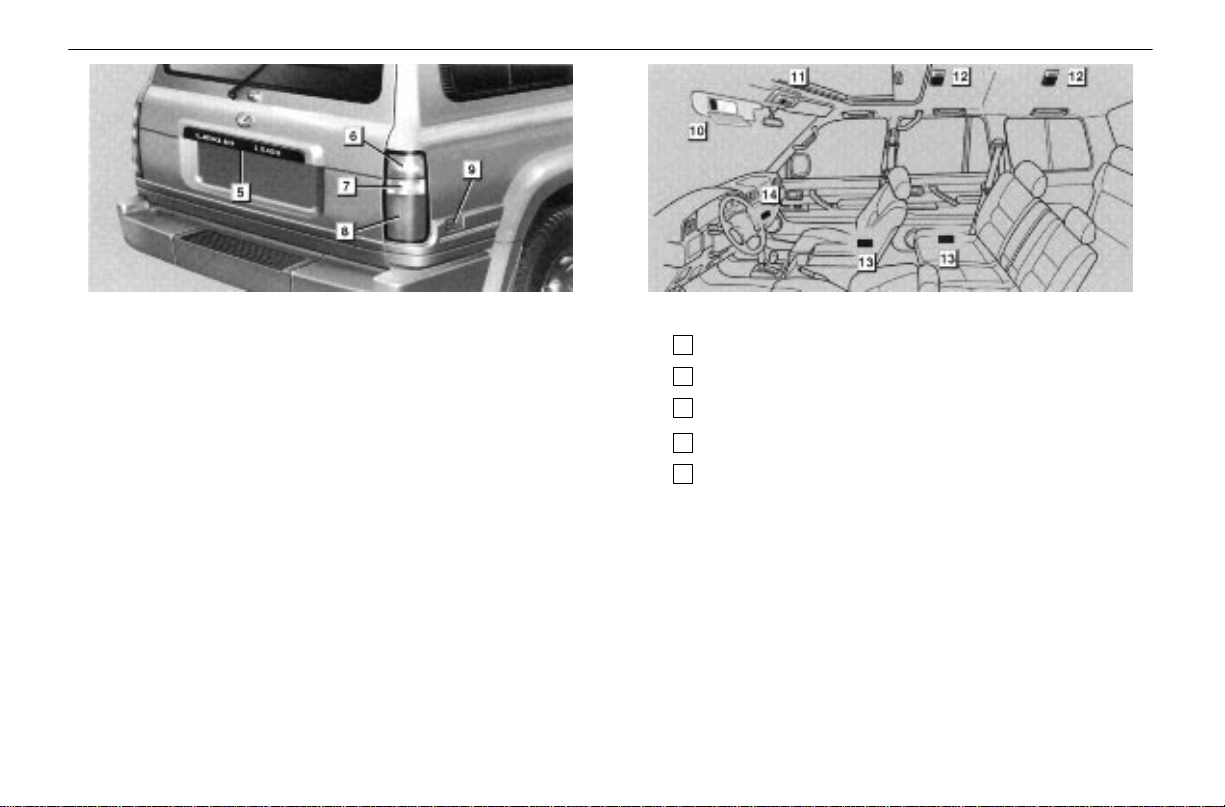
REPLACING LIGHT BULBS
The illustration on the following pages show the locations of
light bulbs. If it is necessary to replace a bulb, take your
vehicle to your Lexus dealer as soon as possible. Use bulbs
with the bulb numbers and wattage ratings given in the table.
CAUTION
!
Halogen bulbs have pressurized gas inside and
require special handling. They can burst or shatter
if scratched or dropped. Hold a bulb only by its
plastic or metal case. Do not touch the glass part of
a bulb with bare hands.
NOTICE
Only use a bulb of the listed type.
LIGHT LOCATION
Light Bulbs Bulb No. W Type
Headlights (inner) 9005 65 B
Headlights (outer) 9006 55 A
Parking and front side
marker lights
Front turn signal lights 1156 27 C
168 5 D
235
ELECTRICAL COMPONENTS
Light Bulbs Bulb No. W Type
License plate lights 168 5 D
Rear turn signal lights 1156 27 C
Back–up lights 1156 27 C
Stop and tail lights 1157 27/8 C
Rear side marker
lights
194 3.8 D
236
Light Bulbs Bulb No. W Type
10
Vanity lights – 3 E
11
Personal light – 10 C
12
Interior lights – 10 E
13
Door courtesy light – 3 D
14
Glovebox light – 1.4 D
A: HB4 halogen bulbs
B: HB3 halogen bulbs
C: Single end bulbs
D: Wedge base bulbs
E: Double end bulbs

SECTION 7
REPORTING SAFETY DEFECTS
FOR U.S. OWNERS
Reporting safety defects for U.S. owners 247
245

REPORTING SAFETY DEFECTS FOR U.S. OWNERS
REPORTING SAFETY DEFECTS
FOR U.S. OWNERS
If you believe that your vehicle has a defect which
could cause a crash or could cause injury or death,
you should immediately inform the National
Highway Traffic Safety Administration (NHTSA) in
addition to notifying Toyota Motor Sales, U.S.A.,
Inc. (Toll–free: 1–800–25–LEXUS).
If NHTSA receives similar complaints, it may open
an investigation, and if it feels that a safety defect
exists in a group of vehicles, it may order a recall
and remedy campaign. However, NHTSA cannot
become involved in individual problems between
you, your dealer, or Toyota Motor Sales, U.S.A.,
Inc.
To contact NHTSA, you may either call the Auto
Safety Hotline toll–free at 1–800–424–9393 (or
366–0123 in Washington, D.C., area) or write to:
NHTSA, U.S. Department of Transportation,
Washington, D.C. 20590. You can also obtain
other information about motor vehicle safety from
the Hotline.
246

SECTION 6 – 5
SERVICE PROCEDURES AND
SPECIFICATIONS
Body
Specifications 238
Protecting your vehicle from corrosion 239
Washing and waxing 240
Cleaning the interior 241
237

BODY
SPECIFICATIONS
– DIMENSIONS AND WEIGHT
Overall length 4820 mm (189.8 in.)
Overall width 1930 mm (76.0 in.)
Overall height 1860 mm (73.2 in.)*
1870 mm (73.6 in.)*
Wheelbase 2850 mm (112.2 in.)
Tread – Front 1595 mm (62.8 in.)
– Rear 1600 mm (63.0 in.)
Vehicle capacity weight (occupants + luggage) 524 kg (1155 lb.)
*1: Unladen vehicle plus 2 occupants *2: Unladen vehicle
– FUEL TANK
Capacity 95 L (25.1 gal., 20.9 Imp. gal.)
1
2
238

BODY
PROTECTING YOUR VEHICLE
FROM CORROSION
Proper care of your Lexus can help ensure long–term
corrosion prevention.
The most common causes of corrosion to your vehicle
are:
The accumulation of road salt, dirt and moisture in
hard–to–reach areas under the vehicle.
Chipping of paint or undercoating caused by minor
accidents or by stones and gravel.
The following conditions will cause or accelerate
corrosion of your vehicle, so it is important to keep your
vehicle, particularly the underside, as clean as possible
and to repair any damage to paint or protective coatings
as soon as possible.
The presence of road salt or dust control chemicals, salt in
the air near the sea coast, industrial air pollution.
High humidity, especially at temperatures just above
freezing point.
Certain parts of your vehicle are wet or damp for an
extended period of time, even though other parts of the
vehicle are dry.
Components of the vehicle which are prevented from
quick–drying due to lack of proper ventilation are exposed
to high temperature.
To help prevent corrosion on your Lexus, follow these
guidelines:
Keep your vehicle clean by regular washing. In addition,
observe the following points.
If you drive on salted roads in the winter or if you live near
the ocean, you should hose off the undercarriage at least
once a month to minimize corrosion.
High pressure water or steam is effective for cleaning the
vehicle’s underside and wheel housings. Pay particular
attention to these areas as it is difficult to see all the mud
and dirt. It will do more harm than good to simply wet the
mud and debris without removing them. The lower edge of
doors, rocker panels and frame members have drain holes
which should not be allowed to clog with dirt as trapped
water in these areas can cause corrosion.
Wash the underside of the vehicle thoroughly when winter
is over.
See “Washing and waxing” for more tips.
Check the condition of your vehicle’s paint and trim. If
you find any chips or scratches in the paint, touch them up
immediately to prevent corrosion from starting. If the chips
or scratches have gone through the bare metal, have a
qualified body shop make the repair.
239
BODY
Check the interior of your vehicle. Water and dirt can
accumulate under the floor mats and could cause corrosion.
Occasionally check under the mats to make sure the area is
dry. Be particularly careful when transporting chemicals,
cleansers, fertilizers, salt, etc. These should be transported
in proper containers. If a spill or leak should occur,
immediately clean and dry the area.
Use mud shields on your wheels. If you drive on salted or
gravel roads, mud shields help protect your vehicle.
Full–size shields, which come as near to the ground as
possible, are the best. We recommend that the fittings and
the area where the shields are installed be treated to resist
corrosion. Your Lexus dealer will be happy to assist in
supplying and installing the shields if they are recommended
for your area.
Do not park your vehicle in a damp, poorly ventilated
garage. If you wash your vehicle in the garage, or if you drive
it in covered with water or snow, your garage may be so
damp it will cause corrosion. Even if your garage is heated,
a wet vehicle can corrode if the ventilation is poor.
WASHING AND WAXING
Washing your Lexus by hand
Work in the shade and wait until the vehicle body is not
hot to the touch.
1. Rinse of f loose dirt with a hose. Remove any mud or road
salt from the underside of the vehicle or in the wheel wells.
2. Wash with a mild car–wash soap, mixed according to the
manufacturer’s instructions. Use a soft cotton mitt and keep
it wet by dipping it frequently into the wash water. Do not rub
hard – let the soap and water remove the dirt.
Aluminum wheels: Use only a mild soap or neutral
detergent.
Urethane bumpers and side moldings: Wash carefully.
Do not scrub with abrasive cleaners. The bumper and side
molding faces are soft.
Road tar: Remove with turpentine or cleaners that are
marked safe for painted surfaces.
NOTICE
Do not use gasoline or strong solvents, which may
be toxic or cause damage.
3. Rinse thoroughly – dried soap can cause streaking. In
hot weather you may need to rinse each section right after
you wash it.
240
BODY
4. To prevent water spots, dry the vehicle using a clean soft
cotton towel. Do not rub or press hard – you might scratch
the paint.
Automatic car wash
Your vehicle may be washed in an automatic car wash, but
remember that the paint can be scratched by some type of
brushes, unfiltered washing water, or the washing process
itself. Scratching reduces paint durability and gloss,
especially on darker colors. The manager of the car wash
should be able to advise you whether the process is safe for
the paint on your vehicle.
Waxing your Lexus
Polishing and waxing is recommended to maintain the
original beauty of your Lexus’ finish.
1. Always wash and dry the vehicle before you begin
waxing, even if you are using a combined cleaner and wax.
2. Use a good q uality polish and wax. If the finish has b ecome
extremely weathered, use a car–cleaning polish, followed by a
separate wax. Carefully follow the manufacturer’s instructions
and precautions. Be sure to polish and wax the chrome trim as
well as the paint.
3. Wax the vehicle again when water does not bead but
remains on the surface in large patches.
CLEANING THE INTERIOR
CAUTION
!
Do not wash the vehicle floor with water, or allow
water to get onto the floor when cleaning the vehicle
interior or exterior. Water may get into audio
components or other electrical components above
or under the floor carpet (or mat) and cause a
malfunction; and it may cause body corrosion.
Leather Interior
Remove dirt using a soft cloth dampened with 5% solution
of neutral detergent for wool. Then thoroughly wipe off all
traces of detergent with a clean damp cloth.
After cleaning or whenever any part of the leather gets wet,
dry with a soft clean cloth. Allow the leather to dry in a
ventilated shaded area.
241
BODY
NOTICE
If a stain should fail to come out with a neutral
detergent, apply a cleaner that does not contain an
organic solvent.
Never use organic substances such as benzine,
alcohol or gasoline, or alkaline or acid solutions
for cleaning the leather as these could cause
discoloring.
Use of a nylon brush or synthetic fiber cloth, etc.
may scratch the fine grained surface of the leather.
Mildew may develop on soiled leather upholstery.
Be especially careful to avoid oil spots. Try to keep
your upholstery always clean.
Long exposure to direct sunlight may cause the
leather surface to harden and shrink. Keep your
vehicle in a shaded area, especially in the summer.
The interior of your vehicle is apt to heat up on hot
summer days, so avoid placing on the upholstery
items made of vinyl or plastic or containing wax as
these tend to stick to leather when warm.
Improper cleaning of the leather upholstery could
result in discoloration or staining.
Synthetic Leather Areas
(Part of door panels)
The synthetic leather areas may be easily cleaned with
a mild soap or detergent and water.
First vacuum over the upholstery to remove loose dirt. Then,
using a sponge or soft cloth, apply the soap solution to the
synthetic leather. After allowing it to soak in for a few minutes
to loosen the dirt, remove the dirt and wipe off the soap with
a clean damp cloth. If all the dirt does not come off, repeat
the procedure. Commercial foaming–type cleaners are also
available which work well. Follow the manufacturer’s
instructions.
NOTICE
Do not use solvent, thinner, gasoline or window
cleaner on the interior.
242

BODY
Carpets, Windows and Seat Belts
Begin by vacuuming thoroughly to remove as much dirt as
possible. Several types of foam cleaners are available;
some are in aerosol cans and others are powders or liquids
which you mix with water to produce a foam. To shampoo the
carpets, use a sponge or brush to apply the foam. Rub in
overlapping circles. Do not apply water – the best results are
obtained by keeping the carpet as dry as possible. Read the
shampoo instructions and follow them closely.
The seat belts may be cleaned with mild soap and water
or with lukewarm water.
Use a cloth or sponge. As you are cleaning, check the belts
for excessive wear, fraying or cuts.
NOTICE
Use a good foam–type shampoo to clean the
carpets.
Do not use dye or bleach on the belts – it may
weaken them.
The windows may be cleaned with any household
window cleaner.
When cleaning the inside of the rear window, be
careful not to scratch or damage the heater wires.
Air Conditioning Control Panel, Car Audio,
Instrument Panel, Console Panel, and
Switches
Use a soft damp cloth for cleaning.
Soak a clean soft cloth in water or lukewarm water then
lightly wipe off any dirt.
NOTICE
Do not use organic substances (solvents, kerosene,
alcohol, gasoline, etc.) or alkaline or acidic
solutio ns. These chemi cals can cause discolo ring,
staining or peel in g of th e surface.
If you use cleaners or polishing agents, make sure
their ingredients do not include the substances
mentioned above.
If you use a liquid car freshener, do not spill the
liquid onto the vehicle’s interior surfaces. It may
contain the ingredients mentioned above.
Immediately clean any spill using the method
mentioned above.
If you have any questions about the cleaning of your
Lexus, your local Lexus dealer will be pleased to
answer them.
243

BODY
244
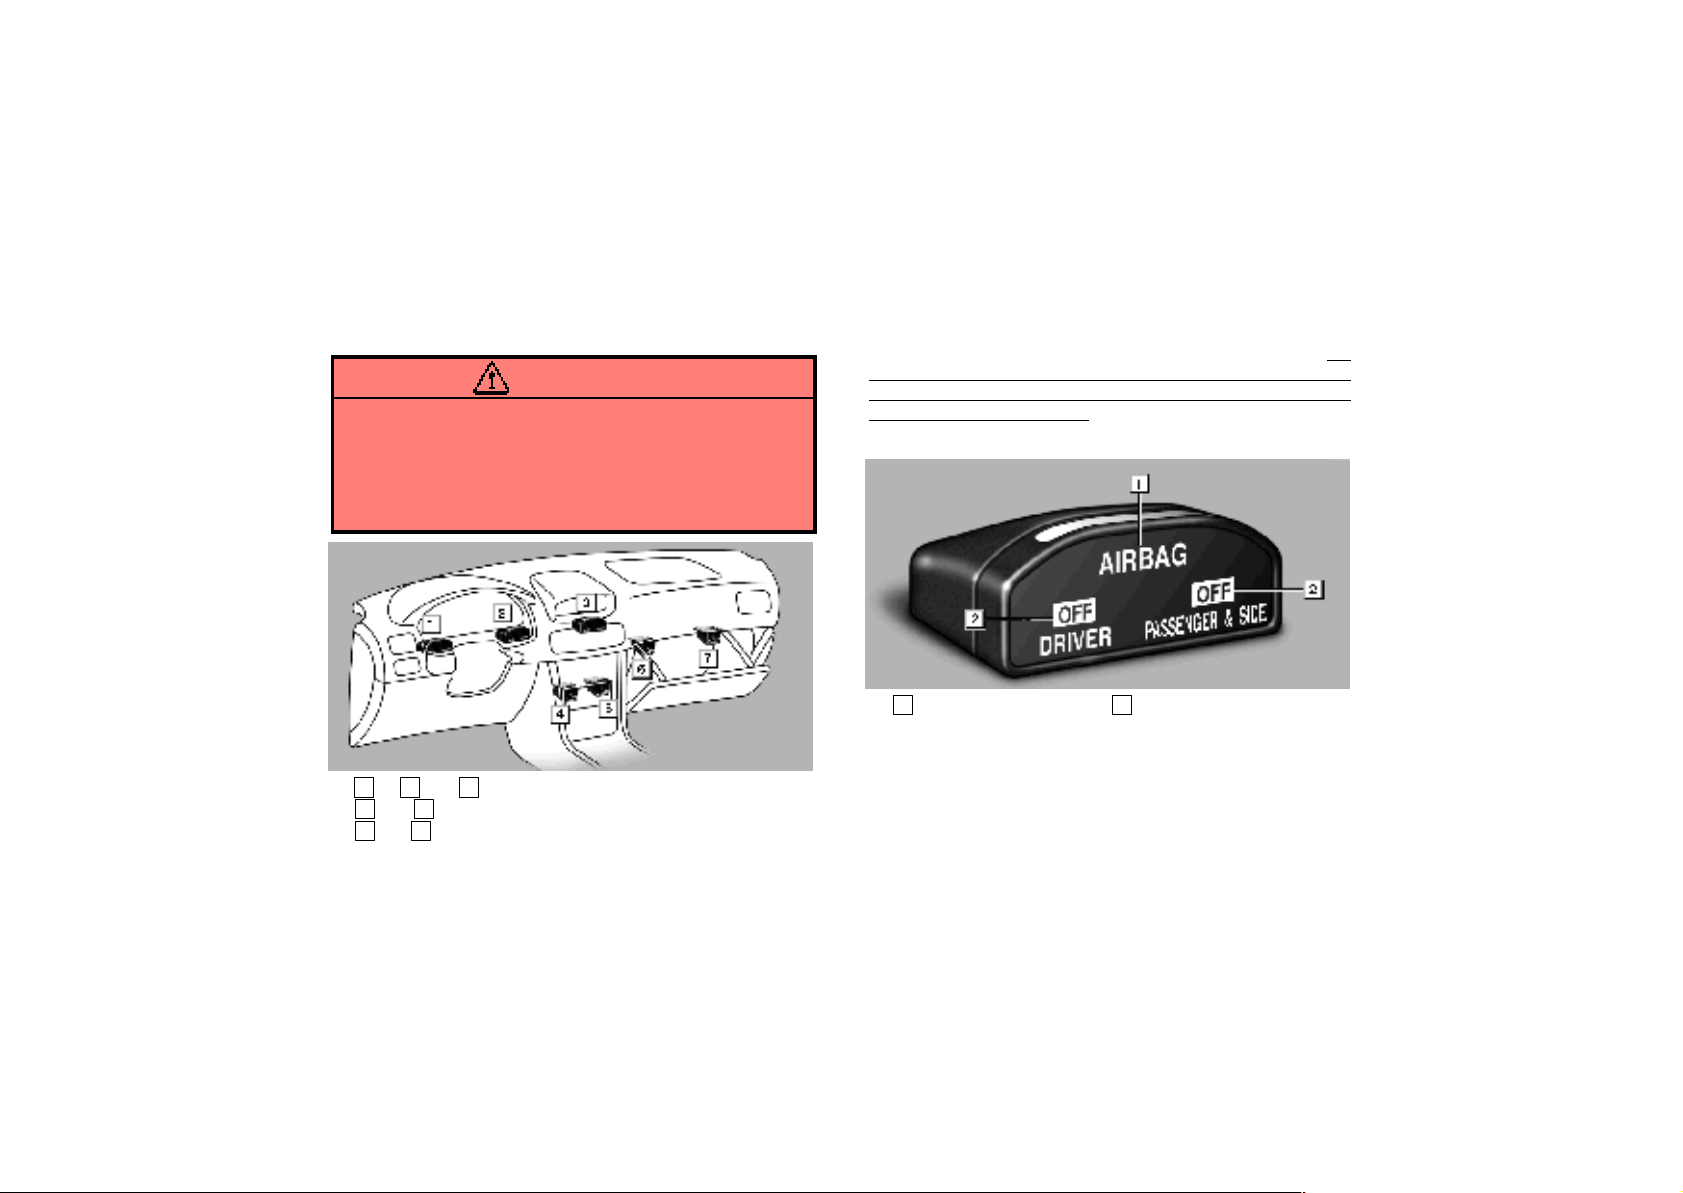
Owner’s Manual for Airbag Manual
ON–OFF Switches
CAUTION
You must review this Owner’s Manual in order to
determine whether you are permitted to operate this
vehicle with the airbag turned off. If the special
circumstances do not exist, then the airbag(s) should
be turned ON to avoid serious personal injuries to front
seat passengers.
AB1a
1
, 2 or 3OFF indicator light
4
or 6Manual ON–OFF switch for driver airbag
5
or 7Manual ON–OFF switch for passenger airbag
This vehicle has been modified to include airbag manual
ON–OFF switch(es). The switch(es) turn(s) the airbag
OFF when needed, and is located in the glove
compartment or in the console area.
”OFF” indicator(s) indicate the airbag status. They are
located on the right or left side of the instrument meter
cluster or in front of the center clock on the dashboard.
Switches are available for passenger and driver airbags. On
vehicles equipped with side airbags, a switch to turn OFF the
front passenger airbag will also simultaneously turn OFF the
side airbag on that side only. The side airbag for the driver can
not be turned off with any switch.
AB2a
1
AIRBAG warning light 2OFF indicator light
The illustration shown above is an example of the
indicators for driver, passenger and side airbags.
T o check the airbag manual ON–OFF system status, turn
the ignition switch to the ”ACCESSORY” position or the
”ON” position. The ”AIRBAG” warning light and the
”OFF” indicator light should go on for approximately 5
seconds. If the airbag manual ON–OFF switch(es) are
turned off, the ”OFF” indicator will continue to illuminate,
and if the airbag manual ON–OFF switch(es) are turned
on, the ”OFF” indicator will not illuminate.
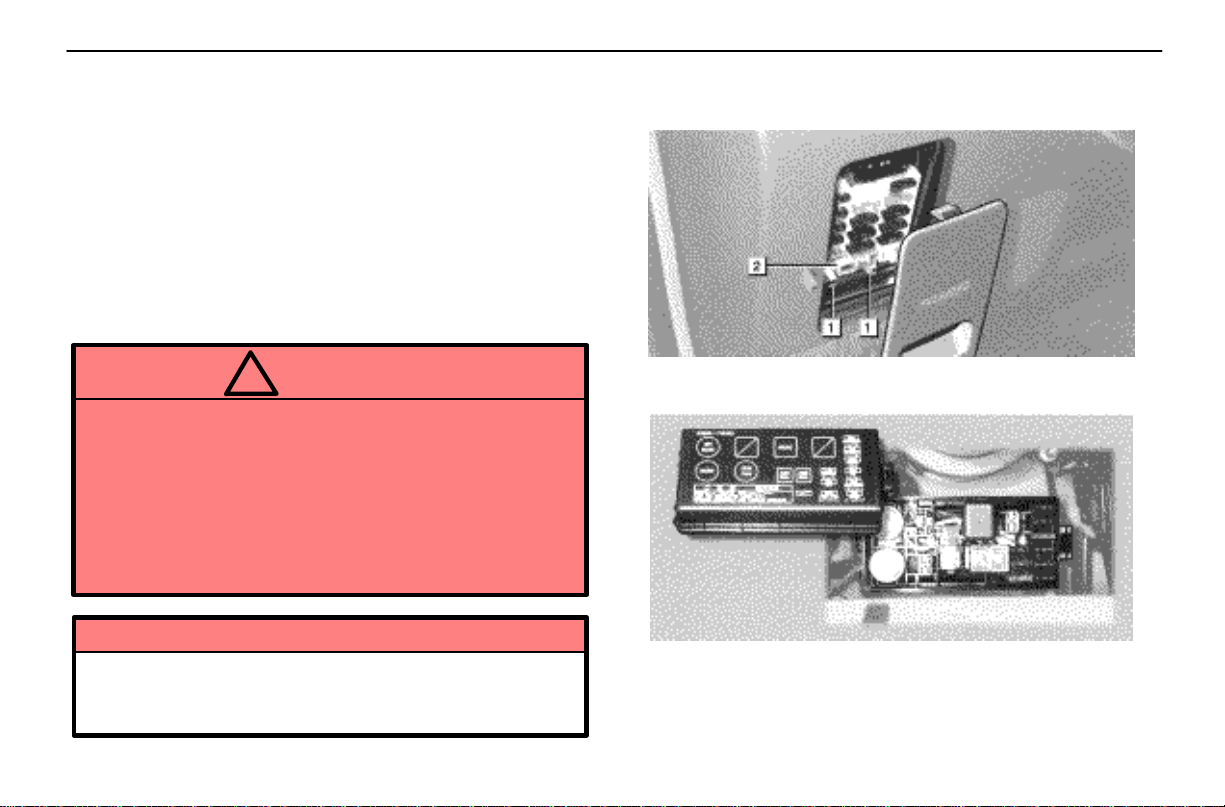
1.

AB3b
ON position
The illustration shown above is an example of the driver
airbag manual ON–OFF switch
To turn OFF an airbag, insert your ignition key into the
airbag manual ON–OFF switch located in the glove
compartment or in the console area, and turn the switch
counterclockwise to the ”OFF” position. Remove the
ignition key from the airbag manual ON–OFF switch, and
insert the key in the ignition switch and turn to the
”ACCESSORY” or ”ON” position. The ”OFF” indicator
should illuminate to let you know that the airbag is off. The
airbag will remain OFF until you turn it back on again, and
the ”OFF” indicator will stay on to remind you that the
airbag is OFF.
OFF position
CAUTION
If the airbag is turned off for a person who is not in a risk
group identified by the United States government, that
person will not have the extra protection of an airbag.
In a crash, the airbag would not be able to inflate and
help protect the person sitting there from death or
serious personal injuries. Do not turn off the airbag
unless the person sitting there is in a risk group.
To turn ON an airbag, insert your ignition key into the
airbag manual ON–OFF switch located in the glove
compartment or in the console area, and turn the switch
clockwise to the ”ON” position. Remove the ignition key
from the airbag manual ON–OFF switch, and insert the key
in the ignition switch and turn to the ”ACCESSORY” or
”ON” position. The ”OFF” indicator should NOT
illuminate to let you know that the airbag is on. The airbag
will remain ON until you turn it back off again. If the airbag
manual ON–OFF system has some failure,
Do not put an ”at risk” person in front of an airbag.
T ake your vehicle to an authorized T oyota/Lexus Dealer
to have it repaired.
2.

U.S. OWNERS: The U.S. Department of Transportation will authorize an airbag to be turned OFF ONLY FOR THE
FOLLOWING AT RISK OCCUPANTS.
CANADIAN OWNERS: The Transport Canada has set the application for an airbag to be turned OFF ONLY FOR THE
FOLLOWING AT RISK OCCUPANTS, and asks the customers to self–certificate whether they are the applicants of those
below.
DRIVER SIDE
Medical Condition. The driver has a medical condition which,
according to his or her physician:
Causes the driver airbag to pose a special risk for the driver;
and
Makes the potential harm from the driver airbag in a crash
greater than the potential harm from turning off that airbag
and allowing the driver, even if belted, to hit the steering
wheel, dashboard, or windshield in a crash.
Distance from driver airbag. Despite taking all reasonable
steps to move back from the driver airbag, the driver is not able
to maintain a 10–inch distance from the center of his or her
breastbone to the center of the driver airbag cover.
PASSENGER SIDE
Infant. I transport an infant (less than 1 year old) who must ride
in the front seat because:
My vehicle has no rear seat;
My vehicle has a rear seat too small to accommodate a rear–
facing infant seat; or
The infant has a medical condition which, according to the in-
fant’s physician, makes it necessary for the infant to ride in the
front seat so that the driver can constantly monitor the child’s
condition.
Child age 1 to 12. A child age 1 to 12 must ride in the front seat
because:
My vehicle has no rear seat;
Although children ages 1 to 12 ride in the rear seat(s) when-
ever possible, children ages 1 to 12 sometimes must ride in
the front because no space is available in the rear seat(s) of
my vehicle; or
The child has a medical condition which, according to the
child’s physician, makes it necessary for the child to ride in the
front seat so that the driver can constantly monitor the child’s
condition.
3.

DRIVER SIDE
Medical condition. A passenger has a medical condition
which, according to his or her physician:
Causes the passenger airbag to pose a special risk for the
passenger; and
Makes the potential harm from the passenger airbag in a
crash greater than the potential harm from turning off that airbag and allowing the passenger, even if belted, to hit the
dashboard, or windshield in a crash.
Y our vehicle has been designed to take advantage of the life saving and injury preventing benefits of the airbag supplemental restraint
system (SRS). Turning off the SRS can reduce the occupant protection which your vehicle safety systems can provide to you in
certain accidents and increase the likelihood of serious personal injuries. Your specific vehicle may be equipped with occupant
restraint design features such as energy absorbing belt loops, seat belt webbing clamps, seat belt webbing material, and sewing
pattern as well as the other features which were selected for your vehicle to be used together with an operational SRS. Depending
on the type of accident, the operation of these many safety features could be affected resulting in serious personal injuries when
the SRS is turned off.
U.S. OWNERS:Please contact your nearest dealer, the Toyota/Lexus toll–free Customer Assistance Number or the NHTSA at (800)
424–9393 if you have any questions concerning the use and operation of your airbag switch(es) or restraint systems.
CANADIAN OWNERS: Please contact your nearest dealer, the Toyota/Lexus toll–free Customer Assistance Number or the
Transport Canada at (800) 333–0371 if you have any questions concerning the use and operation of your airbag switch(es) or
restraint system.
PASSENGER SIDE
4.
 Loading...