

Page 1

2-1. Driving procedures
Driving the vehicle
The following procedures should be observed to ensure safe driving.
n Starting the engine (→P. 95 )
n Driving
STEP 1
STEP 2
With the brake pedal depressed, shift the shift lever to “D”.
Release the parking brake. (→P. 103)
(→P. 9 8)
STEP 3
Gradually release the brake pedal and gently push the accelerator pedal to accelerate the vehicle.
n Stopping
STEP 1
STEP 2
With the shift lever in “D”, push the brake pedal.
If necessary, set the parking brake.
When the vehicle is stopped for an extended period of time, shift the
shift lever to “P” or “N”. (
n Parking the vehicle
STEP 1
STEP 2
STEP 3
STEP 4
STEP 5
With the shift lever in “D”, push the brake pedal.
Set the parking brake. (→P. 103)
Shift the shift lever to “P”. (→P. 9 8 )
Turn the ignition key to stop the engine.
Lock the door, making sure that you have the key on your per-
son.
Starting on a steep incline
STEP 1
STEP 2
STEP 3
Firmly set the parking brake and shift the shift lever to “D”.
Gently depress the accelerator pedal.
Release the parking brake.
→P. 9 8 )
88
Page 2

2-1. Driving procedures
n Breaking in your new Lexus
To extend the life of the vehicle, the following precautions are recommended to
observe:
l For the first 200 miles (300 km):
Avoid sudden stops.
l For the first 500 miles (800 km):
Do not tow a trailer.
l For the first 1000 miles (1600 km):
• Do not drive at extremely high speeds.
• Avoid sudden acceleration.
• Do not drive continuously in the low gears.
• Do not drive at a constant speed for extended periods.
n Operating your vehicle in a foreign country
Comply with the relevant vehicle registration laws and confirm the availability of the
correct fuel. (→P. 370)
2
When driving
89
Page 3

2-1. Driving procedures
CAUTIO N
n When starting the vehicle
Always keep your foot on the brake pedal while stopped with the engine running.
This prevents the vehicle from creeping.
n When driving the vehicle
l Do not drive if you are unfamiliar with the location of the brake and accelerator
pedals to avoid depressing the wrong pedal.
Accidentally depressing the accelerator pedal instead of the brake pedal will
result in sudden acceleration that may lead to an accident that could result in
death or serious injury.
l Do not drive the vehicle over or stop the vehicle near flammable materials.
l Do not let the vehicle roll backwards while the shift lever is in a driving position, or
roll forward while the shift lever is in “R”.
Doing so may cause the engine to stall or lead to poor brake and steering performance, resulting in an accident or damage to the vehicle.
l If the smell of exhaust is noticed inside the vehicle, open the windows and check
that the back door is closed.
Large amounts of exhaust in the vehicle can cause driver drowsiness and eventually, death. Have the cause of the problem inspected immediately.
l Do not under any circumstances shift the shift lever to “P”, “R” or “N” while the
vehicle is moving.
Doing so can cause significant damage to the transmission and may result in a
loss of vehicle control.
l Do not shift the shift lever to “N” while the vehicle is moving.
Doing so may cause the engine brake not to operate properly and lead to an
accident.
l Do not turn the engine off while driving.
The power steering and brake booster systems will not operate properly if the
engine is off.
90
Page 4

2-1. Driving procedures
CAUTIO N
n When driving the vehicle
l Use engine braking (downshift) to maintain a safe speed when driving down a
steep hill.
Using the brakes continuously may cause the brakes to overheat and lose effectiveness. (→P. 99 )
l When stopped on an inclined surface, use the brake pedal and parking brake to
prevent the vehicle from rolling backward or forward and causing an accident.
l Be careful when driving on slippery surfaces, as the vehicle may spin or skid when
downshifting, rapidly accelerating, braking or turning.
l Do not adjust the position of the steering wheel, the seat, or the inside or outside
rear view mirrors while driving.
Doing so may result in a loss of vehicle control that can cause accidents that may
result in death or serious injury.
l Always check that all passengers' arms, heads or other parts of their bodies are
not outside the vehicle, as this may result in death or serious injury.
l Do not drive in excess of the speed limit. Even if the legal speed limit permits it, do
not drive over 85 mph (140 km/h) unless your vehicle has high-speed capability
tires. Driving over 85 mph (140 km/h) may result in tire failure, loss of control and
possible injury. Be sure to consult a tire dealer to determine whether the tires on
your vehicle are high-speed capability tires or not before driving at such speeds.
l If you drive through deep water over about 500 mm (20 in.) in depth, put the
vehicle height in the HI (High) mode with the active height select switch and then
turn off the active height control suspension by pushing the height control switch.
Drive your vehicle at 30 km/h (19 mph) or lower speed.
2
When driving
91
Page 5

2-1. Driving procedures
CAUTIO N
n When shifting the shift lever
Be careful not to shift the shift lever with the accelerator pedal depressed.
This may lead to unexpected rapid acceleration of the vehicle that may cause an
accident and result in death or serious injury.
n When the vehicle is stopped
l Do not race the engine.
If the vehicle is in any gear other than “P” or “N” the vehicle may accelerate suddenly and unexpectedly, and may cause an accident.
l Do not leave the vehicle with the engine running for a long time.
If such a situation cannot be avoided, park the vehicle in an open space and
check that exhaust fumes do not enter the vehicle interior.
l Always keep a foot on the brake pedal while the engine is running to prevent an
accident caused by the vehicle moving.
n When the vehicle is parked
l Do not leave glasses, cigarette lighters, spray cans, or soft drink cans in the vehi-
cle when it is in the sun.
Failure to do so may result in the following:
• Gas may leak from a cigarette lighter or spray can, and may lead to a fire.
• The temperature inside the vehicle may cause the plastic lenses and plastic
material of eye glasses to deform or crack.
• Soft drink cans may fracture, causing the contents to spray over the interior of
the vehicle, and may also cause a short circuit in the vehicle's electrical components.
l Always apply the parking brake, shift the shift lever to “P”, stop the engine and
lock the vehicle.
Do not leave the vehicle unattended while the engine is running.
l Do not touch the exhaust pipe while the engine is running or immediately after
turning the engine off.
Doing so may cause burns.
l Do not leave the engine running in an area with snow build up, or where snow is
expected to fall.
Exhaust gases may enter the vehicle and cause gas poisoning.
92
Page 6

2-1. Driving procedures
CAUTIO N
n When taking a nap in the vehicle
Always turn the engine off.
Otherwise, you may accidentally move the shift lever or press the accelerator
pedal, which could cause an accident or fire due to abnormal engine overheating.
Additionally, if the vehicle is parked in a poorly ventilated area, exhaust fumes may
enter the vehicle and cause gas poisoning.
n When braking the vehicle
l When the brakes are wet, drive more cautiously.
Braking distance increases when the brakes are wet, and may cause one side of
the vehicle to brake differently than the other side. Also the parking brake may
not securely hold the vehicle.
l If the brake assist function does not operate, do not follow other vehicles closely
and avoid downhill or sharp turns that require braking.
In this case, braking is still possible, but it will require more force on the pedal than
usual. Braking distance may also increase.
l Do not pump the brake pedal if the engine stalls.
Each push on the pedal uses up your reserved brake fluid pressure.
l The brake system consists of 2 individual hydraulic systems: if one of the systems
fails, the other will still operate. In this case, the brake pedal should be depressed
more firmly than usual and braking distance becomes longer.
Do not drive your vehicle with only a single brake system. Have your brakes fixed
immediately.
2
When driving
93
Page 7

2-1. Driving procedures
NOTICE
n While driving the vehicle
Do not use the accelerator pedal or depress accelerator and brake pedals together
to hold the vehicle on a hill.
n When parking the vehicle
Always put the shift lever in “P”. Failure to do so may cause the vehicle to move or
the vehicle may accelerate suddenly if the accelerator pedal is accidentally
depressed.
n Avoiding damage to vehicle parts
l Do not turn the steering wheel fully in either direction and hold it there for a long
time.
Doing so may damage the power steering pump.
l When driving over bumps in the road, drive as slowly as possible to avoid damag-
ing the wheels, underside of the vehicle, etc.
n If you hear a squealing or scraping noise (brake pad wear limit indicators)
Have your Lexus dealer check and replace the brake pads as soon as possible.
The rotor damage can result if the pads are not replaced when needed.
It is dangerous to drive the vehicle when the wear limits of the brake pads and/or
that of the brake discs are exceeded.
n If you get a flat tire while driving
A flat or damaged tire may cause the following situations. Hold the steering wheel
firmly and gradually press the brake pedal to slow down the vehicle.
l It may be difficult to control your vehicle.
l The vehicle will make abnormal sounds.
l The vehicle will behave abnormally.
Replace a flat tire with a new one. (→P. 3 46 )
94
Page 8
2-1. Driving procedures
Starting the engine
]
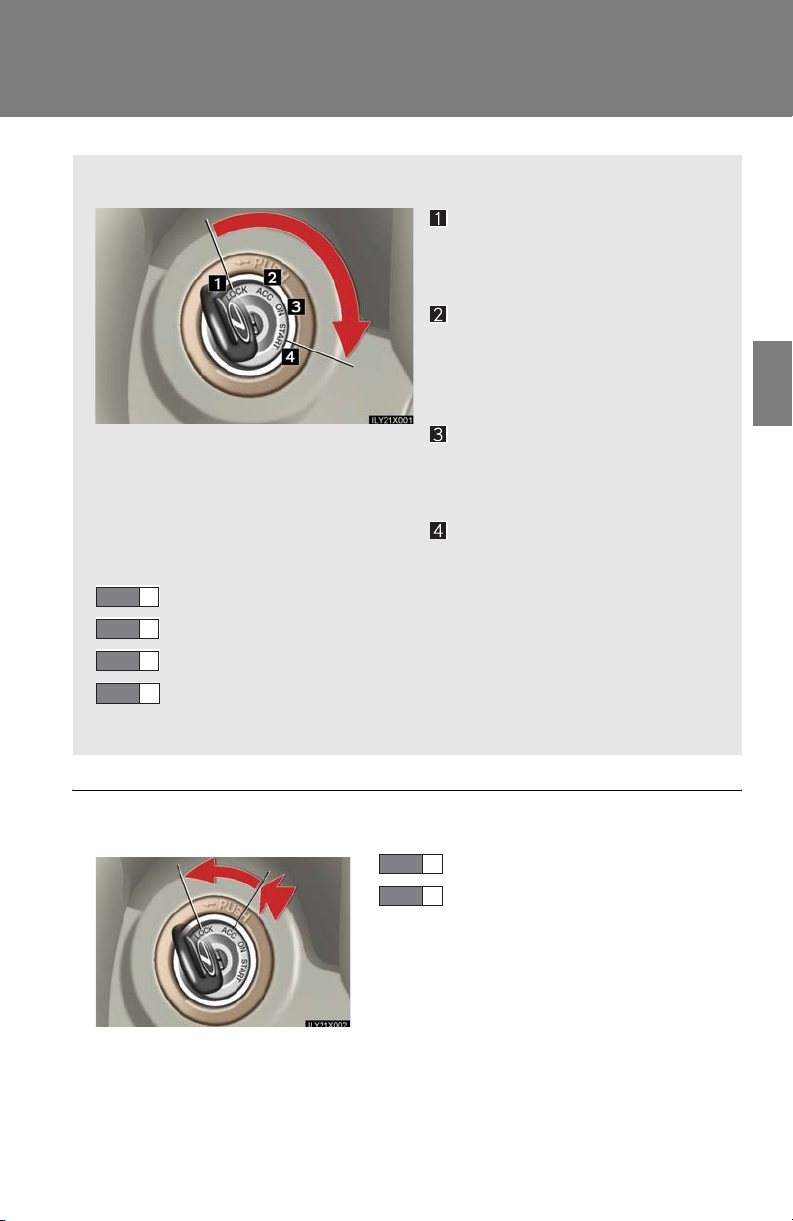
n Ignition switch
n Starting the engine
STEP 1
STEP 2
STEP 3
STEP 4
Check that the parking brake is set.
Check that the shift lever is set in “P”.
Sit in the driver’s seat and firmly depress the brake pedal.
Turn the ignition key to the “START” position and start the
engine.
LOCK:
The steering wheel is locked
and the key can be removed.
ACC:
Some electrical components
such as the audio system can be
used.
ON:
All electrical components can
be used.
START
2
When driving
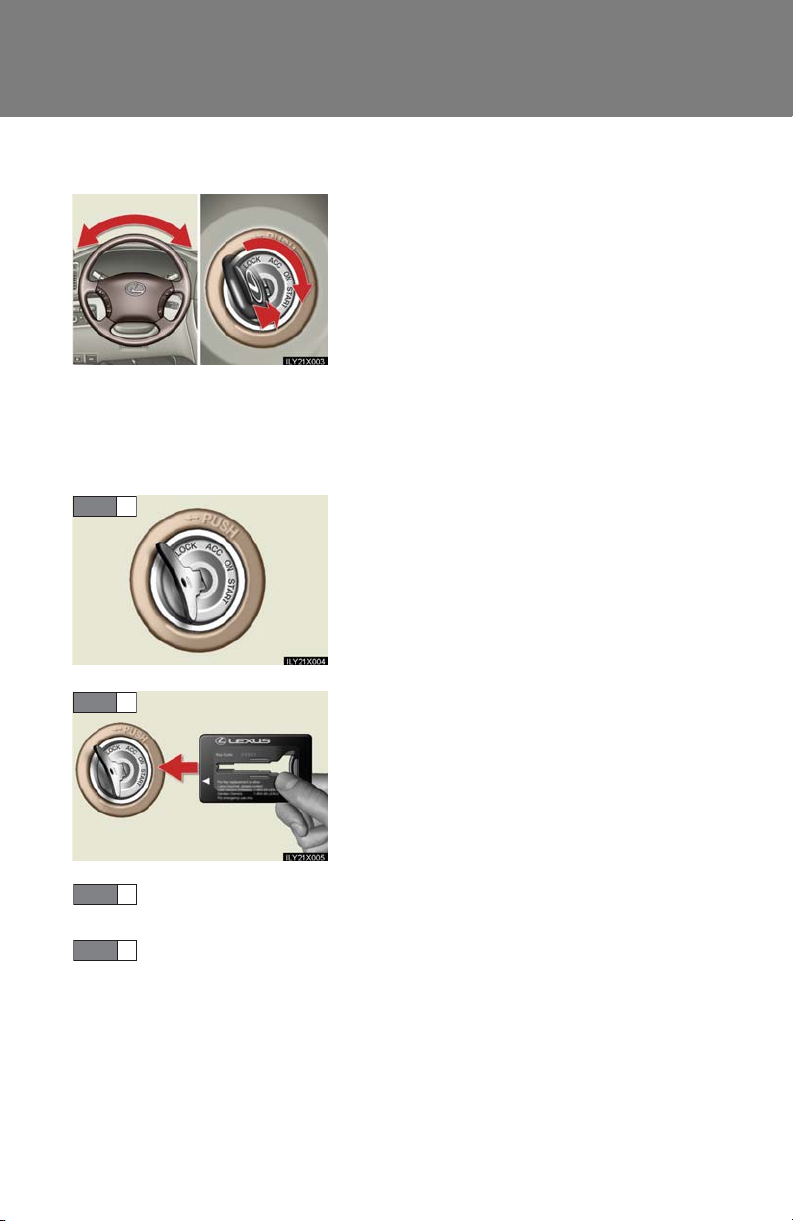
n Tu r n in g t he ke y f ro m “AC C” to “LO CK ”
STEP 1
STEP 2
Shift the shift lever to “P”.
Push in the key and turn to the
“LOCK” position.
95
Page 9
2-1. Driving procedures
T
n Steering lock release
When starting the engine, the ignition switch
may seem stuck in the “LOCK” position. To
free it, turn the ignition key while turning the
steering wheel sightly in either direction.
n If the engine does not start
The engine immobilizer system may not have been deactivated. (→P. 47 )
n Starting the engine using the flat key
STEP 1
STEP 2
STEP 3
STEP 4
Remove the flat key from its case. Insert the
key into the ignition switch.
Bring the key case close to the ignition switch
within 10 seconds as indicated by an arrow.
Put the key case away when the indicator light goes out. This means the
engine immobilizer system has turned off.
Start the engine within 60 seconds after the indicator light goes off.
96
Page 10
2-1. Driving procedures
n Cranking hold function
Once you turn the ignition key to “START” position and release it, the function continues to crank the engine in “ON” position until it starts. If the engine has not
started, the function stops after about 25 seconds. Wait a few seconds and restart
it.
n Leak detection pump
Several hours after the engine is turned off, you may hear a sound coming from
underneath the luggage compartment for several minutes. This is normal operation
and does not indicate a malfunction.
2
CAUTIO N
n When starting the engine
Always start the engine while sitting in the driver’s seat. Do not press the accelerator pedal while starting the engine under any circumstances.
Doing so may cause an accident resulting in death or serious injury.
n When driving
Do not turn the ignition switch to the “LOCK” position while driving. If, in an emergency, you must turn the engine off while the vehicle is moving, turn the key only to
the “ACC” position.
NOTICE
n To prevent battery discharge
Do not leave the ignition key in the “ACC” or “ON” position for long periods without the engine running.
n When starting the engine
l Do not race a cold engine.
l If the engine becomes difficult to start or stalls frequently, have the engine
checked immediately.
When driving
97
Page 11
2-1. Driving procedures
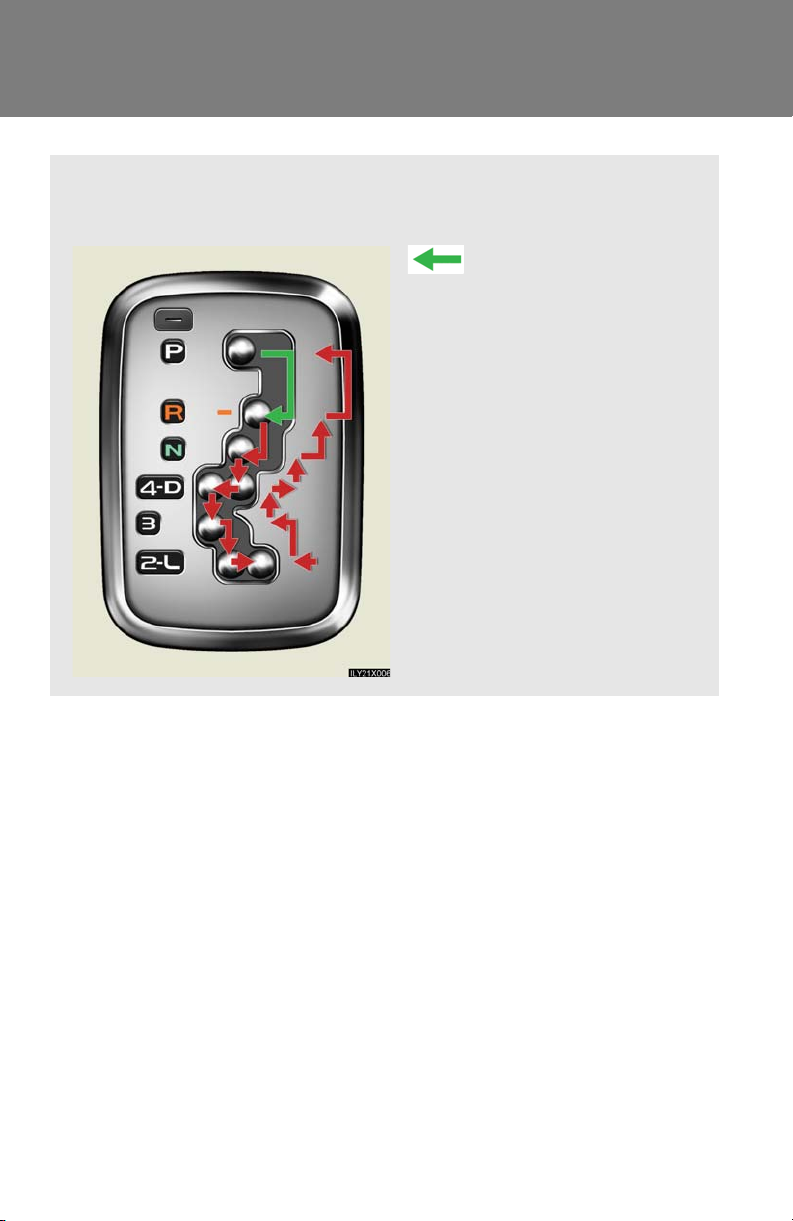
Automatic transmission
Select a shift position appropriate for the driving conditions.
n Shifting the shift lever
While the ignition key is
in the “ON” position,
depress the brake pedal
and move the shift lever.
98
Page 12

n Shift position uses
Shift position Function
P Parking the vehicle or starting the engine
R Reversing
N Neutral
2-1. Driving procedures
D Normal driving*
4 Positi on for engine bra king
3,2 Position for more powerful engine braking
L Position for maximum engine braking
*: To improve fuel consumption and reduce noises, set the shift lever in the
“D” position for normal driving.
2
When driving
99
Page 13
2-1. Driving procedures
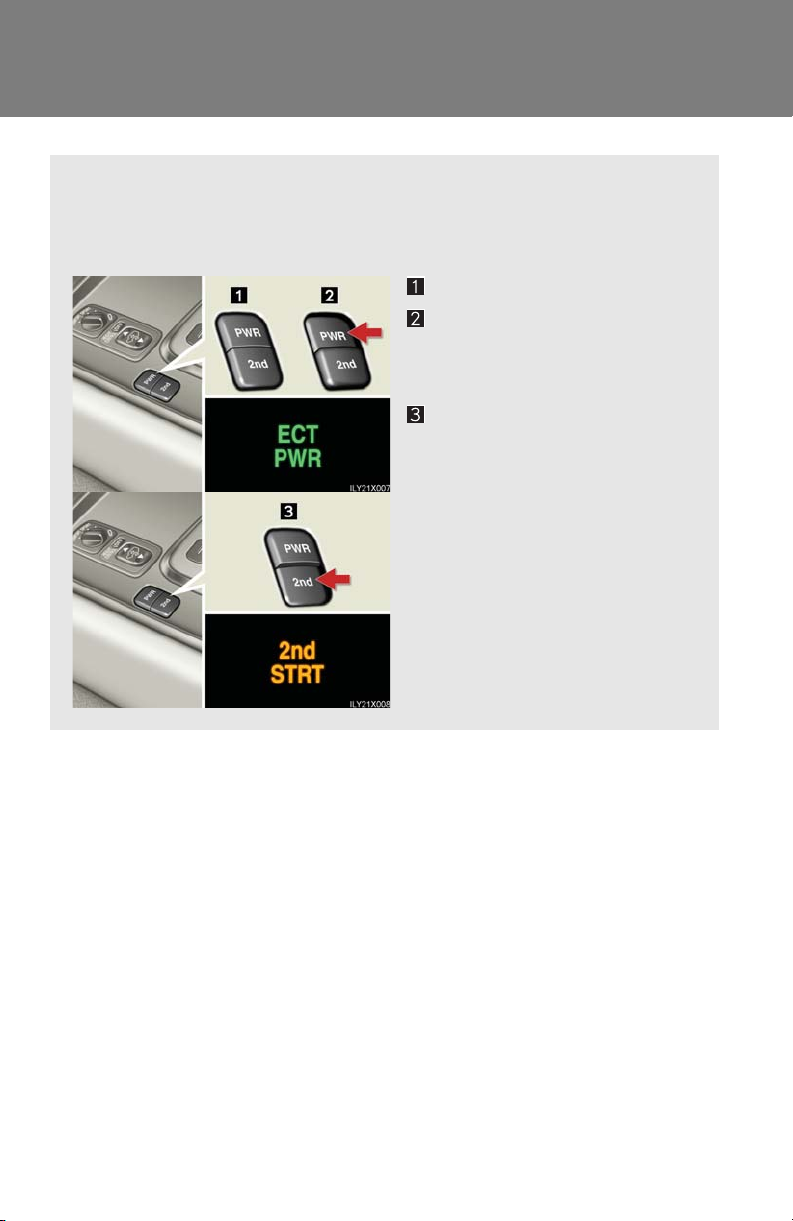
n Selecting a driving mode
The following patterns can be selected to suit current driving and
operating conditions.
Normal mode
Power m ode
For powerful acceleration and
driving in mountainous regions.
“2nd STRT” (second start)
For starting on slippery road
surfaces, such as on snow.
Press “2nd” to return to normal
mode.
100
Page 14

2-1. Driving procedures
n Downshifting restrictions
Keep the engine rpm from going into red zone. The maximum allowable speed is as
follows:
Maximum speed mph (km/h)
Downshifting
Tr a n s f e r
“L” “H”
4→3 32 (51) 80 (129)
3→2 21 (35) 54 (88)
2→1 9 (14) 22 (37)
n When driving with the cruise control system
The engine brake will not operate when downshifting from “D” to “4”. (→P. 12 0)
n “2nd STRT” mode automatic deactivation
“2nd STRT” mode is automatically deactivated if the engine is turned off after driving in “2nd STRT” mode.
n If the shift lever cannot be shifted from “P”
→P. 35 8
2
When driving
101
Page 15
2-1. Driving procedures
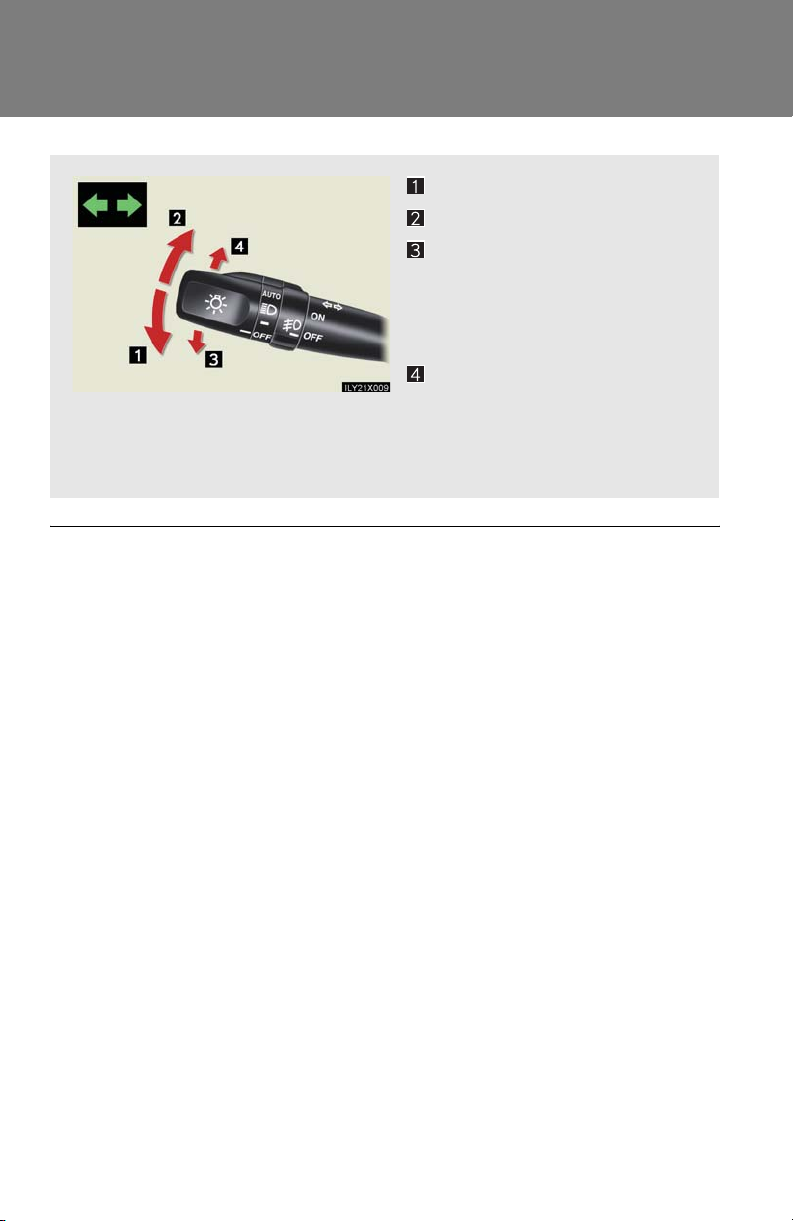
Turn signal lever
Left turn
Right turn
Move and hold the lever part-
way to signal a lane change
The left hand signal will flash
until you release the lever.
Move and hold the lever partway to signal a lane change
The right hand signal will flash
until you release the lever.
n Turn signals can be operated when
The ignition key is in the “ON” position.
n If the indicators flash faster than usual
Check that a light bulb in the front or rear turn signal lights has not burned out.
102
Page 16
2-1. Driving procedures
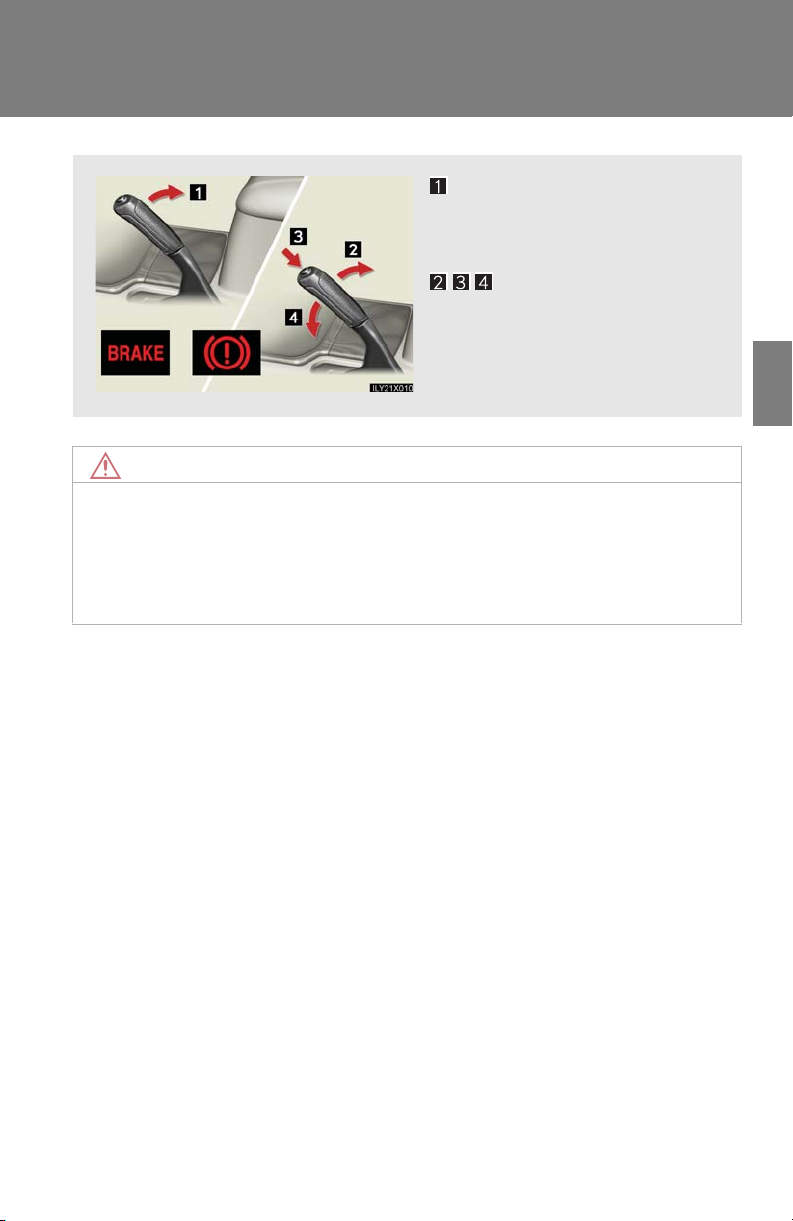
Parking brake
Sets the parking brake
Fully set the parking brake while
depressing the brake pedal.
Releases the parking
brake
U.S .A. Can ad a
NOTICE
n Before driving
Fully release the parking brake.
Driving the vehicle with the parking brake set will lead to brake components overheating, which may affect braking performance and increase brake wear.
2
When driving
103
Page 17

2-4. Using other driving systems
Cruise control
Use the cruise control to maintain a set speed without using the accelerator.
n Set the vehicle speed
STEP 1
STEP 2
n Adjusting the speed setting
Turn the “ON-OFF” button ON.
Push the button once more to
deactivate the cruise control.
Accelerate or decelerate to the
desired speed and press the
lever down to set the cruise
control speed.
Increase speed
Decrease speed
Hold the lever until the desired
speed setting is obtained.
120
Fine adjustment of the set speed
(approximately 1.0 mph [1.6 km/
h]) can be made by lightly pressing the lever up or down and
releasing it.
Page 18
2-4. Using other driving systems
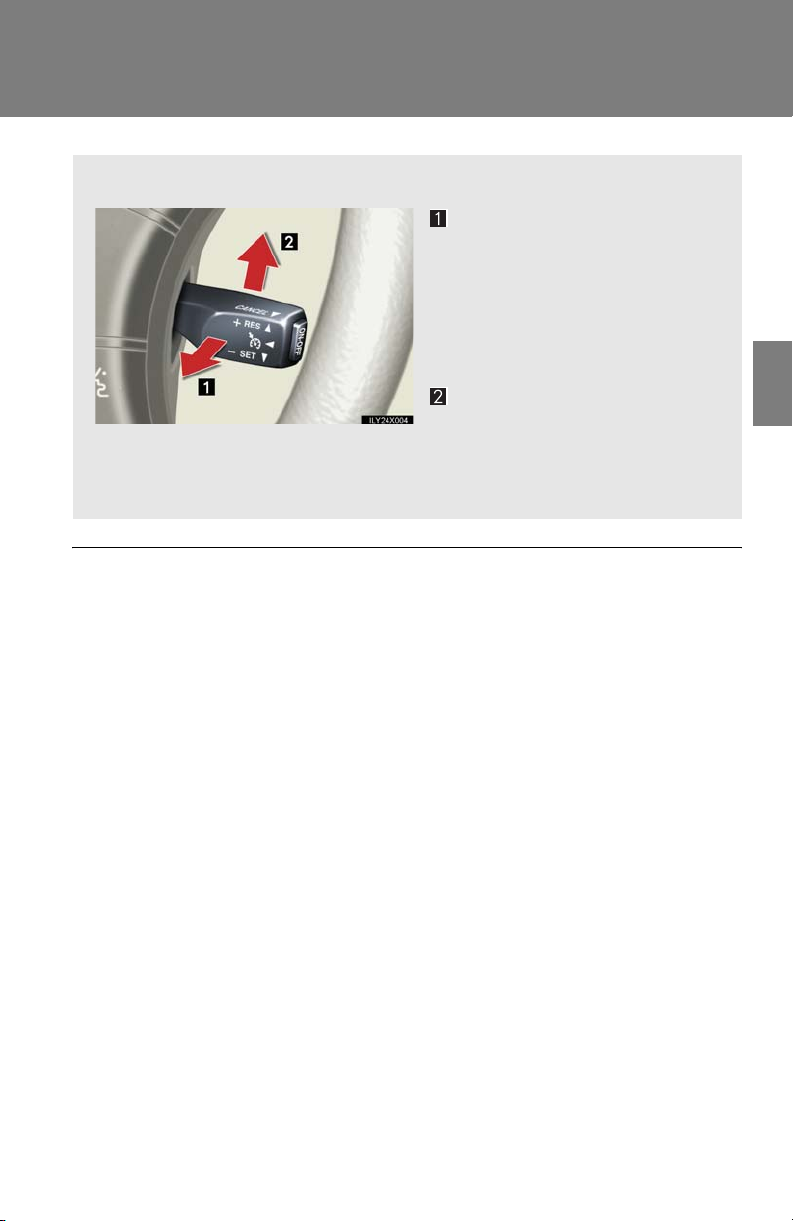
n Canceling and resuming regular acceleration
Cancel
Push the lever towards you to
cancel cruise control.
The setting is also canceled
when the brake pedal is
depressed.
Resume
2
To resume cruise control and
return to the set speed, push the
lever up.
n Cruise control can be set when
l The shift lever is in the “D” or “4”.
l Vehicle speed is between approximately 25 mph (40 km/h) and 125 mph
(200 km/h).
n Accelerating
The vehicle can be accelerated normally. After acceleration, the set speed
resumes.
n Automatic cruise control cancelation
The set speed is automatically canceled in any of the following situations.
l Actual vehicle speed falls more than 10 mph (16 km/h) below the preset vehicle
speed
l Actual vehicle speed is below 25 mph (40 km/h)
l VSC is activated
n If the cruise control indicator light flashes
Turn the “ON-OFF” button off once, and then reactivate the system.
If the cruise control speed cannot be set or if the cruise control cancels immediately
after being activated, there may be a malfunction in the cruise control system. Have
the vehicle inspected by your Lexus dealer.
When driving
121
Page 19

2-4. Using other driving systems
CAUTIO N
n To avoid operating the cruise control by mistake
Keep the “ON-OFF” button off when not in use.
n Situations unsuitable for cruise control
Do not use cruise control in any of the following situations.
Doing so may result in control of the vehicle being lost and could cause serious or
fatal accident.
l In heavy traffic
l On roads with sharp bends
l On slippery roads, such as those covered with rain, ice or snow
l On steep hills
l On winding roads
122
Page 20
2-4. Using other driving systems
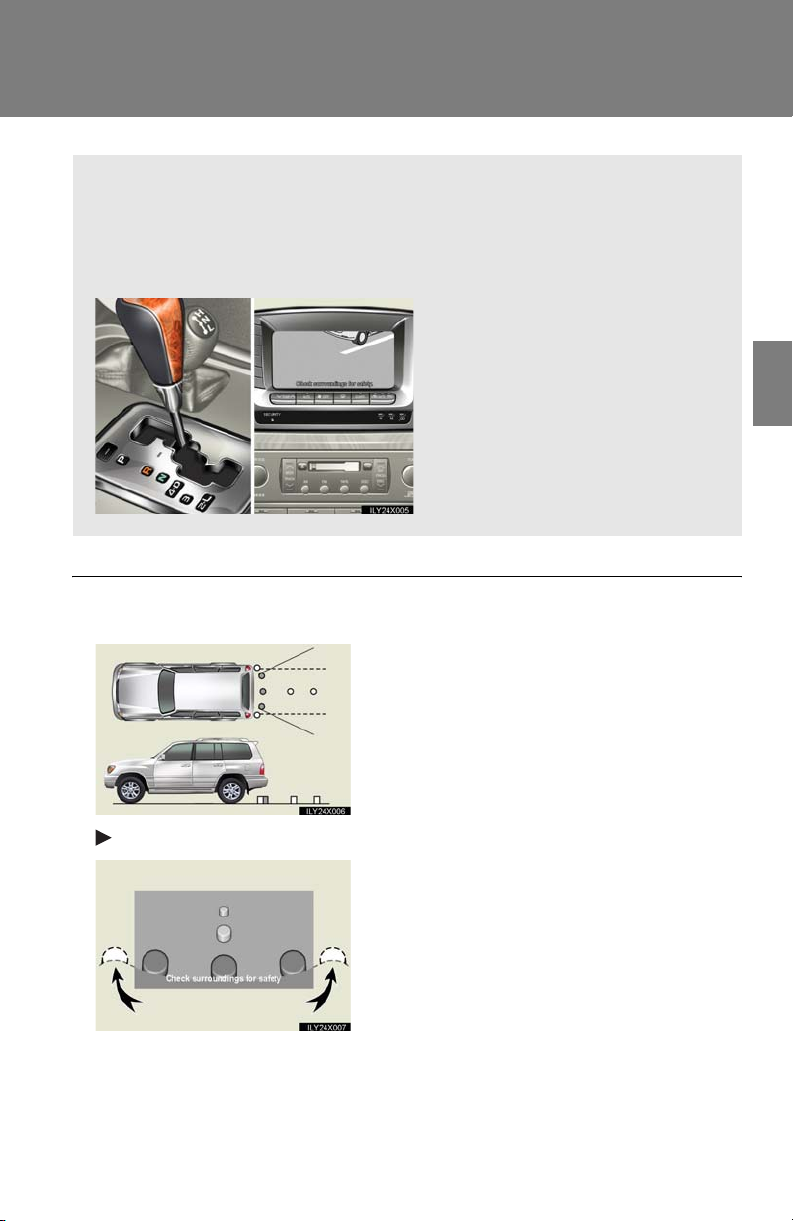
Rear view monitor system (if equipped)
The rear view monitor system assists the driver by displaying an image of
the view behind the vehicle while reversing. The image is displayed in
reverse on the screen. This allows the image to appear in the same manner
as that of the rear view mirror.
Rear view image is displayed
when the shift lever is in “R”.
n Displayed area
Corner of bumper
If you move the lever out of “R”,
the screen returns to the previous one.
The area covered by the camera is limited.
Objects which are close to either corner of
the bumper or under the bumper cannot be
seen on the screen.
The area displayed on the screen may vary
according to vehicle orientation or road conditions.
2
When driving
123
Page 21
2-4. Using other driving systems
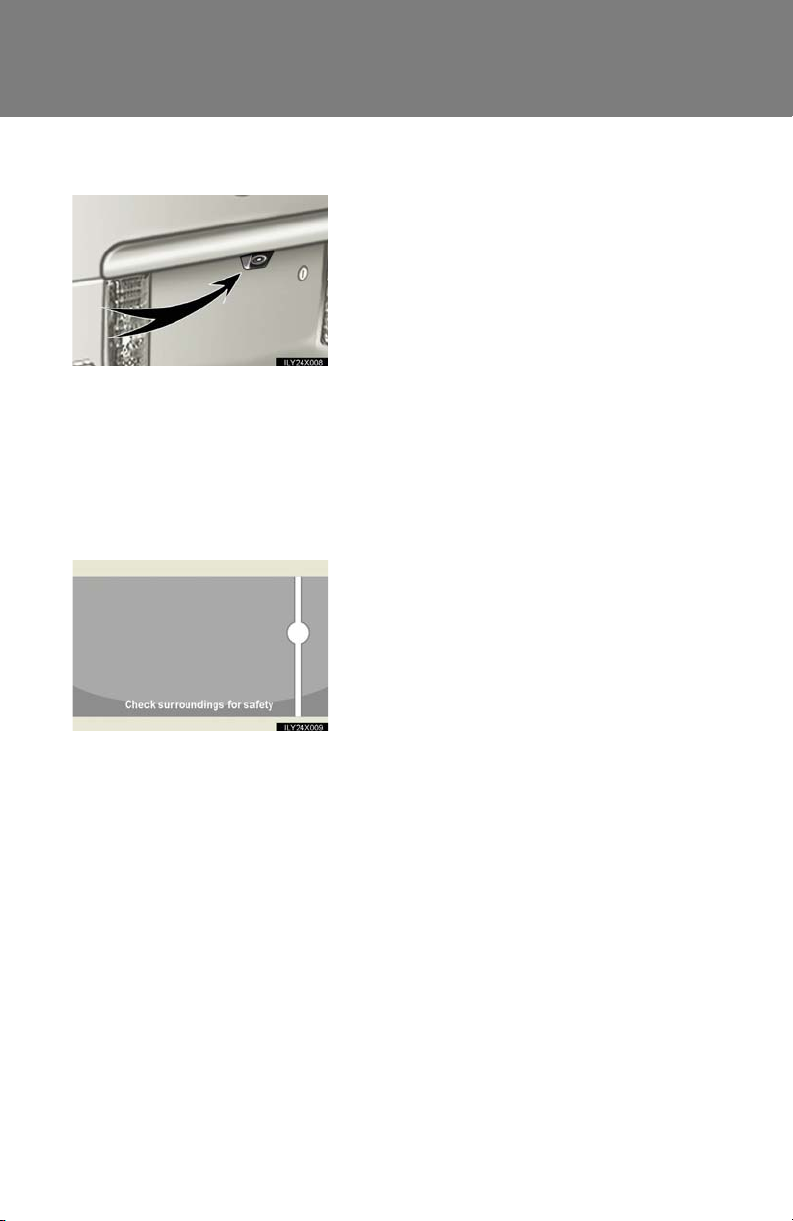
n Rear view monitor system camera
n Smear effect
In the following cases, it may be difficult to
see the images on the screen, even when the
system is functioning correctly.
• In the dark (e.g. at night).
• If the temperature near the lens is
extremely high or low.
• If water droplets get on the camera, or
when humidity is high (e.g. when it rains).
• If foreign matter (e.g. snow or mud) get
on the camera lens.
• If the sun or headlights are shining directly
into the camera lens.
If a bright light (e.g., sunlight reflected off the
vehicle body) is picked up by the camera, a
smear effect* peculiar to the camera may
occur.
*: Smear effect—A phenomenon that occurs
when a bright light (e.g., sunlight reflected
off the vehicle body) is picked up by the
camera; when transmitted by the camera,
the light source appears to have a vertical
streak above and below it.
124
Page 22

2-4. Using other driving systems
CAUTIO N
n Observe these precautions to avoid an accident that could result in death or seri-
ous injuries.
l Never depend solely on the monitor system when reversing.
l Always check visually and with the mirrors to confirm your intended path is clear.
l Depicted distances between objects and flat surfaces differ from actual dis-
tances.
l Do not use the system if the back door is open.
n Conditions which may affect the rear view monitor system
l If the back of the vehicle is hit, the camera's position and mounting angle may
change. Contact your Lexus dealer.
l Rapid temperature changes, such as when hot water is poured on the vehicle in
cold weather, may cause the system to function abnormally.
l If the camera lens is dirty, it cannot transmit a clear image. Rinse with water and
wipe with a soft cloth. If extremely dirty, wash with a mild cleanser and rinse.
l The displayed image may be darker and moving images may be slightly distorted
when the system is cold.
2
When driving
125
Page 23
2-4. Using other driving systems
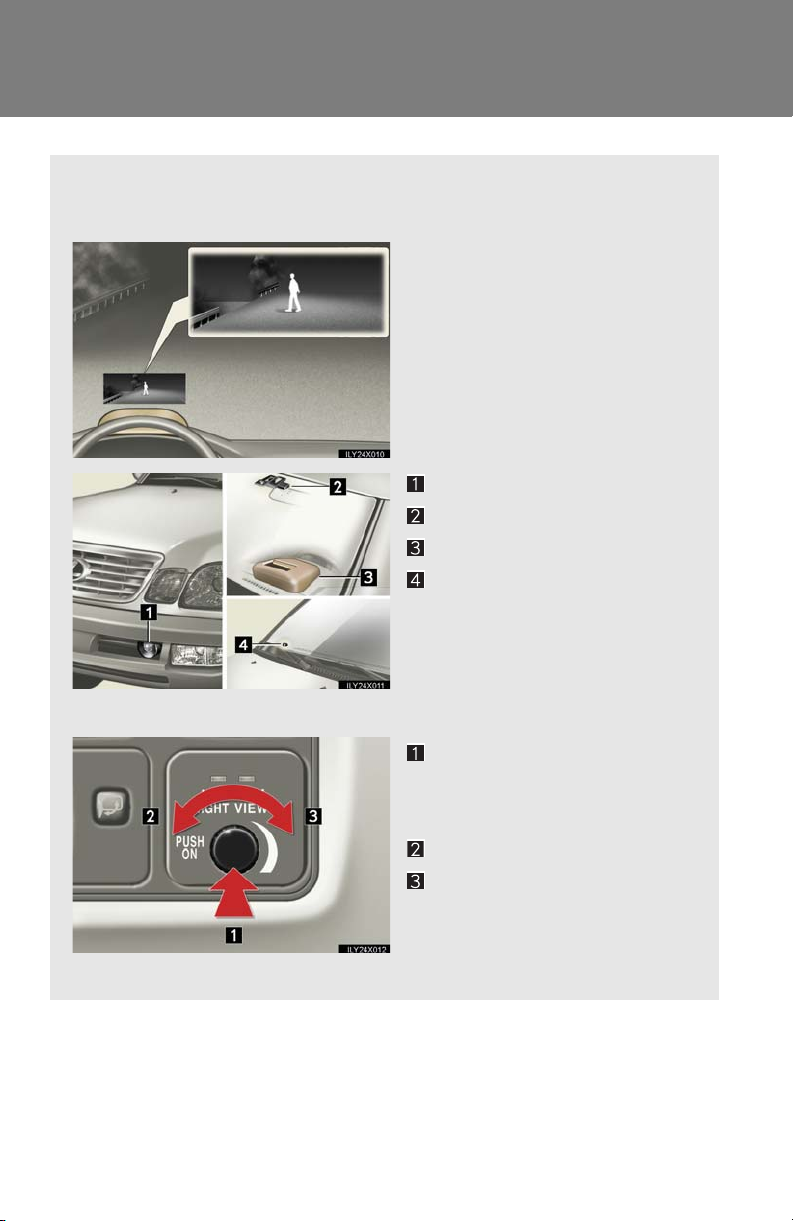
Lexus night view system (if equipped)
The Lexus night view system assists the driver by displaying a monochrome
image of the view in front of the vehicle while driving at night.
Near-infrared rays are irradiated forward and an image converted from its irradiated light is
shown on the head-up display.
The image is shown ranging
from the tip of the low beam to
the high beam.
Near-infrared floodlight
Near-infrared camera
Head-up display
Automatic light control
sensor
n Turning on the system and adjusting the brightness of the display
ON/OFF
“MAIN” indicator light comes
on when the system is on.
Darker
Brighter
If the display is too bright, you
cannot see surroundings
through the windshield clearly.
126
Page 24

2-4. Using other driving systems
n The Lexus night view system can be operated when
l The ignition key is in the “ON” position.
l It is dark outside.
l The headlights are on.
When all the above conditions are met, the head-up display shutter opens automatically and the image sent from the head-up display is shown on the windshield.
n “BEAM” indicator
l When the vehicle starts moving with the system on, the near-infrared floodlight
is irradiated and the “BEAM” indicator light comes on.
n Conditions unfavorable to correct operation
In the following conditions, the image may not be clear or the view of the road
ahead may not be shown at all.
l Driving on hills with many up and down slopes.
l Driving on road with curves.
l In severe weather conditions such as rain, fog or snow.
l Strong near-infrared light emission, such as the light coming from a vehicle run-
ning in the opposite lane, enters the near-infrared camera.
l An object or clothing of a pedestrian is made of a certain kind of material (ex.
leather).
l The windshield or the lens of the near-infrared floodlight is dirty. (Always keep
the windshield and the lens clean.)
l Double vision of image reduces clarity in some situation.
l The top of the windshield fogs up.
2
When driving
127
Page 25

2-4. Using other driving systems
CAUTIO N
n While driving
l This system should be used as a supplemental aid to help you see objects. Never
depend on this system only. Be sure to view objects with your own eyes.
l This system is designed to help you see objects better when driving in a flat area
with few curves in darkness. Use of this function in an area with many curves or
slopes or in a well-lit area could cause an accident.
n Conditions which may affect the Lexus night view system
l If the front bumper is deformed in a collision, etc., the performance of the near-
infrared floodlight will be affected. Have it repaired or replaced by your Lexus
dealer.
l If you notice the inner lens of the near-infrared camera is dirty, have it inspected
by your Lexus dealer.
l If the top of the windshield fogs up, the lens of the near-infrared camera will also
fog up, resulting in deterioration of the system performance. Defog the windshield by pushing the windshield air flow button on the air conditioning.
l If the outside temperature is low, the head-up display may darken or it may take
time to display the image with the system on.
l The automatic light control sensor may not function properly if an object is placed
on the sensor, or anything that blocks the sensor is affixed to the windshield.
n To a v oi d in j ur y
The near-infrared floodlight irradiates strong energy nut visible to the eyes. Do not
stare at the floodlight at close range for a long time.
128
Page 26

2-4. Using other driving systems
NOTICE
n To avoid damaging the head-up display
l Do not put anything in front of the head-up display shutter. It may hinder the open-
ing or closing of the shutter.
l Do not let drinks spill on the head-up display.
l If an object gets caught in the shutter and it dose not close securely, open the shut-
ter with your hand and remove the object. The shutter will function properly after
you turn the ignition off and then on.
2
When driving
129
Page 27
2-4. Using other driving systems
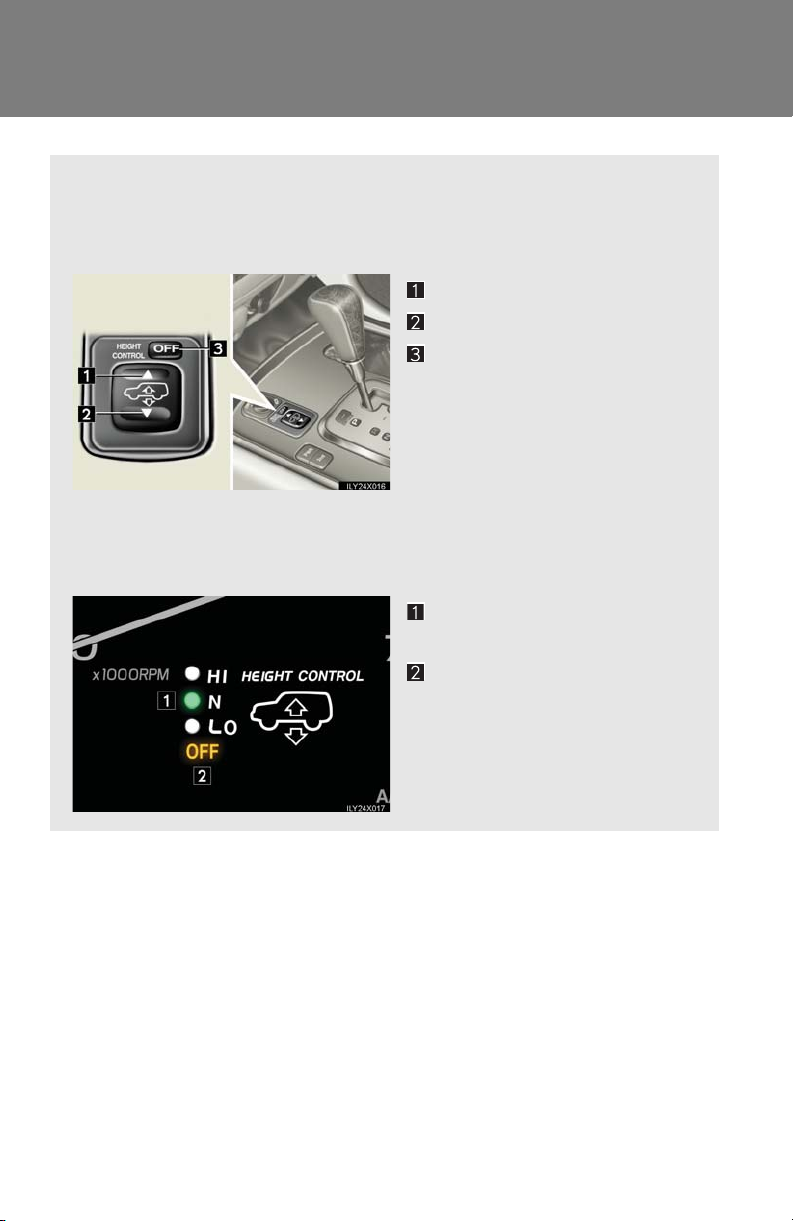
AHC (Active Height Control Suspension)
AHC adjusts the vehicle height in accordance with driving conditions.
There are 3 selectable modes, “HI” (high), “N” (normal), and “LO” (low).
n Height control switch
“s” (Up) switch
“t” (Down) switch
“OFF” switch
Push while the vehicle is
stopped. The “OFF” indicator
light will come on, and the vehicle height will be fixed in the
current mode. Push the switch
again to turn the system back
on.
n AHC indicator lights
Height control mode indicators
Height control “OFF” indicator
130
Page 28

2-4. Using other driving systems
Vehicle height modes
Press “s” to step up one height mode, and “t” to step down one height
mode. (Ex. When in the low height mode, press “s” once to switch to the
normal height mode, and twice to switch to the high height mode.)
n “HI” (high) height mode
Vehicle height is 1.6 in. (40 mm) higher at the front, and 2.0 in. (50
mm) higher at the rear than the normal mode height.
This mode is suitable when driving on bumpy roads or through water.
High height mode is only available when the vehicle speed is under 19
mph (30 km/h).
n “N” (normal) height mode
The standard vehicle height. This mode is suitable for ordinary driving.
n “LO” (low) height mode
Vehicle height is 2.0 in. (50 mm) lower at the front, and 1.6 in. (40 mm)
lower at the rear than the normal mode height.
This mode allows easy access to the vehicle.
Low height mode is only available when the vehicle is stopped. When
you start the vehicle, normal height mode is automatically selected.
2
When driving
Conditions for changing the vehicle height mode
Some modes may not be selectable depending on the vehicle speed
when the four-wheel drive control lever is in the “H” position. Refer to the
following table.
Low mode Normal mode High mode
Vehicle stopped Ye s Ye s Ye s
Under 19 mph (30 km/h) No Ye s Ye s
19 mph (30 km/h) or over No Ye s No
131
Page 29

2-4. Using other driving systems
AHC indicator lights
If you change the vehicle height mode, the indicator lights change as follows:
• The current mode indicator light will turn off, and the selected mode
indicator light will begin flashing.
• Once the change in vehicle height is complete, the selected mode
indicator light will change from flashing to continuously lit.
If you press the height control switch while AHC is off, the current mode
indicator light will turn on and the selected mode indicator light will begin
flashing while the system starts up.
Once the system has started, the current mode indicator light will turn off.
n Operating conditions
l The engine must be running.
l All side doors and the back door must be closed.
n Automatic change in vehicle height when in the high mode
l If the vehicle speed exceeds 19 mph (30 km/h) with the four-wheel drive con-
trol lever in the “H” position, normal mode is automatically selected.
l If the vehicle speed exceeds 30 mph (50 km/h) with the four-wheel drive con-
trol lever in the “L” position, the vehicle height is lowered to 1.0 in. (25 mm)
higher than the normal mode height. If the vehicle speed drops to 12 mph (20
km/h) or less, high mode is automatically resumed.
132
Page 30

2-4. Using other driving systems
n Extra high mode
If the vehicle becomes stuck, extra high mode may be automatically selected when
the vehicle height is in high mode with the four-wheel drive control lever in the “L”
position.
The vehicle height is raised to 2.8 in. (70 mm) higher than the normal mode height,
or slightly higher.
Extra high mode will change back to high mode when:
• The vehicle is no longer stuck
• The four-wheel drive control lever is shifted to a position other than “L”
l If you push “t” when in extra high mode, normal mode is selected.
l Extra high mode cannot be manually selected.
n Turning off the active height control suspension
l The system will remain off until the switch is pushed again, even if the ignition is
turned off.
l Even if AHC is turned off, the system automatically selects the normal mode if
the vehicle's speed exceeds 19 mph (30 km/h).
n Automatic leveling function
The vehicle is adjusted to a fixed height for each mode, regardless of the number of
occupants and the luggage load.
l However the vehicle cannot be raised if the vehicle load exceeds the following
limits:
• Up to 4 occupants* plus approximately 661 lb. (300 kg) in the normal mode
• Up to 4 occupants* plus approximately 375 lb. (170 kg) in the high mode
*: average weight 150 lb. (68 kg) per person
l If the vehicle height cannot be raised when in the normal mode, and “LO” is lit
on the height mode indicator, the vehicle is loaded too heavily. Take extra care
when driving in this condition.
If the vehicle height cannot be raised even after unloading the vehicle, press
“t” then “s” on the height mode select switch. If the vehicle height still cannot
be raised, turn the ignition off then on again, then try once more.
2
When driving
133
Page 31

2-4. Using other driving systems
n If the vehicle height does not change
If the vehicle is loaded too heavily, or the undercarriage has come into contact with
the road surface, the vehicle height cannot be raised/lowered. In this case, the indicator lights will change as follows:
l The current mode indicator light will turn off, and the target mode indicator light
will begin flashing.
l The target mode indicator light will turn off, and the original mode indicator light
will be lit once more. (The vehicle height does not change.)
n In the following cases AHC will not operate
l The brake pedal has been depressed for longer than 5 seconds while the vehi-
cle is stopped.
l The suspension fluid temperature is lower than -22°F (-30°C).
l Driving on bumpy roads which may cause the suspension to fully elongate.
l If the steering wheel is abruptly turned more than 3/4 of a revolution with the
center differential lock system activated.
n Cold weather operation
It may take longer for the vehicle height to change if the suspension fluid temperature drops below -5°F (-15°C).
AHC does not operate when the suspension fluid temperature drops below -22°F
(-30°C).
l In this case, the selected height mode indicator light will flash when the height
mode select switch is pressed, however the vehicle height will not change.
Once the engine has warmed the suspension fluid to within normal operating
limits, AHC will begin operating and the vehicle height will automatically
change to the selected mode.
l When the suspension fluid is around -22°F (-30°C), the vehicle height may not
be able to be raised, even if AHC is operating. In this case, push “t” then “s”
on the height mode select switch after further warming the engine to select the
desired vehicle height.
134
Page 32

2-4. Using other driving systems
n Parking and stopping tips
l If you immediately stop the engine after off-road driving, or park the vehicle for
a long time, the vehicle height may gradually lower. When parking, make sure
there is nothing under the vehicle that may come in contact with the underbody.
The vehicle will return to the set height when the engine is started.
l The vehicle height may change as the temperature changes when the engine is
stopped. The vehicle will return to the set height when the engine is started.
n Propeller shaft noise
If the vehicle height is adjusted on a slope, or with the selector lever in a position
other than “P” or “N” while the vehicle is stopped, you may hear a sound caused by
the expansion and contraction of the propeller shaft. This does not indicate a malfunction.
n Continued system operation
Even if the engine is stopped while the vehicle height is being lowered, operation
will continue for up to 12 seconds.
n Active height control failure warning
l If a malfunction occurs in the AHC system, normal mode is automatically
selected.
The height control “OFF” indicator will blink, and AHC cannot be activated until
the malfunction is corrected.
Stop the engine and start it again. If the height control “OFF” indicator light
turns off, the system is operating correctly. If the indicator light continues to
blink, have the vehicle checked at your Lexus dealer as soon as possible.
l If the height control “OFF” indicator light does not come on when the ignition
switch is turned on, there is a malfunction in the AHC system. You can continue
normal driving, however have the vehicle checked by your Lexus dealer as soon
as possible.
n Installing or removing heavy equipment
If the equipment exceeds 33 lb. (15 kg), the front torsion bar must be adjusted. See
your Lexus dealer.
2
When driving
135
Page 33

2-4. Using other driving systems
CAUTIO N
n Using the high and extra high modes
These modes should only be used for rough off-road conditions. Because the vehicle's center of gravity is higher when in these modes, the vehicle may become
unstable when turning abruptly, resulting in an accident.
n When jacking up the vehicle or installing tire chains
Turn off the AHC and stop the engine, otherwise the vehicle height may change
due to the automatic leveling function, resulting in an accident.
n When driving through water deeper than 1.6 ft. (0.5 m)
Select the “HI” (high) mode and turn off AHC. Drive at 19 mph (30 km/h) or lower.
Otherwise the vehicle height may change due to the automatic leveling function,
resulting in an accident.
n If your vehicle must be towed
Put the vehicle height in the normal mode and turn off AHC, otherwise the vehicle
height may change due to the automatic leveling function, resulting in an accident.
n If your vehicle becomes stuck in a ditch
Turn off AHC, otherwise the vehicle height may change due to the automatic leveling function, resulting in an accident.
136
Page 34

2-4. Using other driving systems
NOTICE
n To avoid damage to the vehicle
l If in the low mode, the vehicle automatically shifts to the normal mode when the
vehicle is started. Take care when overhead height is limited.
l After unloading, the vehicle height may be slightly higher than normal. Take care
when overhead height is limited.
l Before lowering the vehicle height, check that no-one is under the vehicle and
the area is free of obstructions. Also check that the underbody of the vehicle will
not touch the ground.
l Do not select the low mode when driving on bumpy roads, as the underbody of
the vehicle may contact the road surface.
n Avoid rapid changes to the vehicle height
As the pump may overheat. Leave at least a minute between selections when
changing the AHC mode.
2
When driving
137
Page 35

2-4. Using other driving systems
AVS (Adaptive Variable Suspension)
AVS controls the suspension according to the road and driving conditions.
Selecting an optimum driving mode allows good riding comfort and stability.
For driving on a bumpy road
For ordinary driving such as
in the city traffic
For moderate high speed
driving
For sporty type driving such
as on winding mountain
roads and high speed driving
n Driving mode
l Mode is suitable for ordinary driving.
l Mode or is suitable for heavy load or driving on a unpaved road.
l With the four-wheel drive control lever at “L”, the damping effect suitable for off-
road driving will be provided.
138
Page 36

2-4. Using other driving systems
Four-wheel drive system
Use the four-wheel drive control lever and center differential lock/unlock
switch to select following transfer and center differential modes.
Four-wheel drive control lever
“H” (high speed position)
Normal driving on all types of
roads.
“N” (neutral position)
No power is delivered to the
wheels.
“L” (low speed position)
Driving requiring maximum
power and traction such as
climbing or descending steep
hills off-road driving and hard
pulling in sand or mud, etc.
Center differential lock/unlock switch
2
When driving
Lock the center differential
when your vehicle’s wheels get
stuck in a ditch or when you are
driving on a slippy or bumpy
surface.
After the wheels are out of the
ditch or off the slippy or bumpy
surface, unlock the center differential.
n The four-wheel drive control lever can be operated when
l The shift lever is in the “N” position, and
l The vehicle is stopped completely.
139
Page 37

2-4. Using other driving systems
n Advice for driving on slippery roads in “L” (low speed position)
l If you shift the four-wheel drive control lever to “L” and the shift lever to “2” while
driving in steep off-road areas, the output of the brake can be controlled effectively by the active traction control system, which assists the driver to control the
driving power of 4 wheels.
l Use the “L” position of the shift lever for maximum power and traction when
your wheels get stuck or when you drive down a steep incline. In the following
cases, the output of the brake can be controlled by the active traction control
system if the engine speed is under 3,000 rpm (normally under 3,000 rpm
when the wheels get unstuck).
• The four-wheel drive control lever in the “L” position and the shift lever in the
“L” position or the shift lever in the “D”, “4”, “3” or “2” with the transmission
downshifting to first gear.
• The four-wheel drive control lever in the “L” position and the shift lever in the
“R” position.
n The center differential lock/unlock button can be operated when
l The ignition key is in the “ON” position, and
l The four-wheel drive control lever is in the “H” or “L” position.
n Locking /unlocking the center differential
l When the center differential is locked, VSC (vehicle stability control) is auto-
matically turned off. (Center differential lock and “VSC OFF” indicator light
come on.)
l When the operation is not completed, the center differential lock indicator
blinks. If the indicator light does not go off when unlocking the center differential, drive straight ahead while accelerating or decelerating, or drive in reverse.
l The center differential lock system operation is not completed within 5 seconds
while the cruise control system is set, cancel the cruise control system.
140
Page 38

2-4. Using other driving systems
CAUTIO N
n While driving
Never move the four-wheel drive control lever if the wheels are slipping. Doing so
may cause an accident resulting in death or serious injury.
NOTICE
n To prevent damage to the center differential
l For normal driving on dry and hard surface roads, unlock the center differential.
l Unlock the center differential after the wheels are out of the ditch or off the slip-
pery or bumpy surface.
l Do not push the center differential lock/unlock button when the vehicle is corner-
ing or when its wheels are spinning freely off the ground.
2
When driving
141
Page 39

2-4. Using other driving systems
Driving assist systems
To help enhance driving safety and performance, the following systems
operate automatically in response to various driving situations. Be aware,
however, that these systems are supplementary and should not be relied
upon too heavily when operating the vehicle.
n ABS (Anti-lock Brake System)
Restrains the vehicle from slipping when driving on slick road surfaces or
in the event of sudden braking.
n BA (Brake Assist)
Generates an increased level of braking force after the brake pedal is
depressed, when the system detects a panic stop situation.
n VSC (Vehicle Stability Control)
Helps the driver to control skidding when swerving suddenly or turning on
slippery road surfaces.
n TRAC (Active Traction Control)
Maintains drive power and prevents the 4 wheels from spinning when
starting the vehicle or accelerating on slippery roads.
n VGRS (Variable Gear Ratio Steering)
Adjusts the wheel turning angle in accordance with the vehicle speed and
steering wheel movement.
When the VSC system is operating
If the vehicle is in danger of slipping, the slip indicator light flashes
and buzzer sounds to indicate that
the VSC systems have been
engaged.
142
Page 40

When the TRAC system is operating
U.S.A
2-4. Using other driving systems
If the 4 wheels spin, the active traction control system indicator light
flashes to indicate that the TRAC
system have been engaged.
Canada
To disable VSC system
If the vehicle gets stuck in fresh snow or mud, VSC system may reduce
power from the engine to the wheels. You may need to turn the system off
to enable you to rock the vehicle in order to free it.
Push the center differential lock/
unlock switch to turn off VSC system.
The center differential lock and
“VSC OFF” indicator lights should
come on.
Push the switch again to turn the
system back on.
2
When driving
143
Page 41

2-4. Using other driving systems
n Sounds and vibrations caused by the ABS, BA, VSC, TRAC and VGRS systems
l A sound may be heard from the engine compartment when the engine is
started or just after the vehicle begins to move. This sound does not indicate that
a malfunction has occurred in any of these systems.
l Any of the following conditions may occur when the above systems are operat-
ing. None of these indicates that a malfunction has occurred.
• Vibrations may be felt through the vehicle body and steering.
• A motor sound may be heard after the vehicle comes to a stop.
• The brake pedal may pulsate slightly after the ABS is activated.
• The brake pedal may move down slightly after the ABS is activated.
n VGRS is disabled in the following situations
l During stopping or the steering wheel has been moved for a long time while
driving at lower speeds.
l After the engine is restarted at less than -22°F (-30°C).
l If you disconnect the battery with the steering wheel turned, the center position
of the steering wheel could be slightly and temporary changed. To initialize the
VGRS, drive for a short while.
144
Page 42

2-4. Using other driving systems
CAUTIO N
Any of the following conditions may result in an accident which could cause death or
serious injury:
n The ABS does not operate effectively when
l The limits of tire gripping performance have been exceeded.
l The vehicle hydroplanes while driving at high speed on the wet or slick road.
n Stopping distance when the ABS is operating on the wet or slick roads
The ABS is not designed to shorten the vehicle’s stopping distance. Always maintain a safe distance from the vehicle in front of you in the following situations.
l When driving on dirt, gravel or snow-covered roads
l When driving with tire chains
l When driving over bumps in the road
l When driving over roads with potholes or roads with uneven roads
n TRAC may not operate effectively when
Directional control and power may not be achievable while driving on slippery road
surfaces, even if the TRAC is operating.
Do not drive the vehicle in conditions where stability and power may be lost.
n When the VSC is activated
The slip indicator light flashes and a warning buzzer sounds. Always drive carefully.
Reckless driving may cause an accident. Exercise particular care when the indicator light flashes and a buzzer sounds.
n Replacing tires
Make sure that all tires are of the same size, brand, tread pattern and total load
capacity. In addition, make sure that the tires are inflated to the specified tire pressure level.
The ABS and VSC will not function correctly if different tires are fitted on the vehicle.
Contact your Lexus dealer for further information when replacing tires or wheels.
2
When driving
145
Page 43

2-3. Operating the lights and windshield wipers
Headlight switch
The headlights can be operated manually or automatically.
The side marker, parking,
tail, license plate and
U.S. A.
instrument panel lights
turn on.
Canada
Turning on the high beam headlights
The headlights and all
lights listed above turn
on.
The headlights and all the
lights listed above turn
on and off automatically.
(When the ignition key is
turned to the “ON” position.)
With the headlights on, push the
lever forward to turn on the high
beams.
Pull the lever back to the center
position to turn the high beams off.
Pull the lever toward you to turn
on the high beams.
112
Release to turn them off. You can
flash the high beams with the headlights on or off.
Page 44

2-3. Operating the lights and windshield wipers
n Daytime running light system
To make your vehicle more visible to other drivers, the headlights turn on automatically (at a reduced intensity) whenever the engine is started and the parking brake
is released. Daytime running lights are not designed for use at night.
n Headlight control sensor
The sensor may not function properly if an
object is placed on the sensor, or anything
that blocks the sensor is affixed to the windshield.
Doing so interferes with the sensor detecting
the level of ambient light and may cause the
automatic headlight system to malfunction.
n Automatic light off system
The headlights and tail lights turn off 30 seconds after a door is opened or closed if
the ignition key has been turned to the “ACC” or “LOCK” while the headlights are
turned on. (The lights turn off immediately if the LOCK button on the key is pressed
after all doors are locked.)
To turn the lights on again, turn the ignition key to the “ON” position, or turn the light
switch “OFF” once and then back to the or position.
n Customization
Settings (e.g. light sensor sensitivity) can be changed. (→P. 3 89 )
2
When driving
NOTICE
n To prevent battery discharge
Do not leave the lights on longer than necessary when the engine is not running.
113
Page 45

2-3. Operating the lights and windshield wipers
Fog light switch
The fog lights improve visibility in difficult driving conditions, such as in rain
or fog. They can be turned on only when the headlights are on low beam.
OFF
ON
114
Page 46

2-3. Operating the lights and windshield wipers
Windshield wipers and washer
With “AUTO” selected, the wipers will operate automatically when the
sensor detects falling rain. The system automatically adjusts wiper timing in
accordance with rain volume and vehicle speed.
Sensor sensitivity (low)
Sensor sensitivity (high)
Rain-sensing wiper operation
Low speed wiper operation
High speed wiper operation
Wash/wipe operation
n The windshield wiper and washer can be operated when
The ignition key is in the “ON” position.
n Dripping prevention wiper sweep
After washing and wiping operation several times, the wipers operate one more
time after a short delay to prevent dripping.
However, the last sweep will not happen if the vehicle is traveling above 106 mph
(170 km/h).
n Effects of vehicle speed on wiper operation
With the settings other than “AUTO” also, the time until drip prevention wiper
sweep occurs is changed depending on vehicle speed.
With “LO” selected, wiper operation will be switched from low speed to intermittent wiper operation only when the vehicle is stationary.
2
When driving
115
Page 47

2-3. Operating the lights and windshield wipers
n Rain drop sensor
The sensor judges the amount of raindrops.
n If no windshield washer fluid sprays
Check that the washer nozzles are not blocked if there is washer fluid in the windshield washer fluid reservoir.
n In extremely hot or cold weather
The system will turn off if the windshield gets extremely hot (at more than 194°F
[90°C]) or cold (at less than -22°F [-30°C]).
n Windshield wiper features
l The rear window and outside rear view mirror defoggers automatically turn on
when you operate the wipers.
n Customization
Settings (e.g. drip prevention function) can be changed. (→P. 3 89 )
CAUTIO N
n Caution regarding the use of windshield wipers in “AUTO” mode
The windshield wipers may operate unexpectedly if the sensor is touched or the
windshield is subject to vibration in “AUTO” mode. Take care that your fingers or
anything else do not become caught in the windshield wipers.
116
Page 48

2-3. Operating the lights and windshield wipers
NOTICE
n When the windshield is dry
Do not use the wipers, as they may damage the windshield.
n When there is no washer fluid spray from the nozzle
Damage to the washer fluid pump may be caused if the lever is pulled toward you
and held continually.
2
When driving
117
Page 49

2-3. Operating the lights and windshield wipers
Rear window wiper and washer
Intermittent window wiper
operation
Normal window wiper operation
Washer operation
Washer/wiper operation
n The rear window wiper and washer can be operated when
The ignition key is in the “ON” position.
n Dripping prevention wiper sweep
After washing and wiping operation several times, the wipers operate one more
time after a short delay to prevent dripping.
n Effect of vehicle and shift position on wiper operation
l With “HI” selected, wiper operation will be switched from low speed to intermit-
tent wiper operation only the vehicle is stationary.
l With “LO” or “OFF” selected, the rear window wiper sweeps once when you
shift the shift lever to “R” while windshield wipers operating or with 17 seconds
from their deactivation.
NOTICE
n When the rear window is dry
Do not use the wipers, as they may damage the rear window.
118
Page 50

2-3. Operating the lights and windshield wipers
Headlight cleaner switch (if equipped)
Washer fluid can be sprayed on the headlights.
Press the switch to clean the
headlights.
n The headlight cleaner can be operated when
When the ignition key is in the “ON” position and the headlight switch is turned
ON.
2
When driving
NOTICE
n When the washer fluid tank is empty
Do not use this function when the washer fluid tank is empty. This may cause the
washer cleaner motor to overheat.
119
Page 51

2-2. Instrument cluster
Gauges and meters
The units used on the speedometer may differ depending on the target
region.
The following gauges, meters and display illuminate when the ignition
key is turned to the “ON” position.
Voltmeter
Displays the charge state.
Speedometer
Displays the vehicle speed.
Tachometer
Displays the engine speed in revolutions per minute.
Engine oil pressure gauge
Displays the engine oil pressure.
Engine coolant temperature gauge
Displays the engine coolant temperature.
104
Page 52

2-2. Instrument cluster
Odometer
Displays the total distance the vehicle has been driven.
Trip meter
Displays the distance the vehicle has been driven since the meter was last
reset. Trip meters A and B can be used to record and display different distances independently.
Odometer / trip meter and trip meter reset knob
Switches between odometer and trip meter displays. Pushing and holding
the button will reset the trip meter when the trip meter is being displayed.
Fuel gauge
Displays the quantity of fuel remaining in the tank.
Instrument panel light control
The brightness of the instrument panel lights can be adjusted.
2
When driving
Darker
Brighter
105
Page 53

2-2. Instrument cluster
NOTICE
n To prevent damage to the engine and its components
l Do not let the indicator needle of the tachometer enter the red zone, which indi-
cates the maximum engine speed.
l The engine may be overheating if the engine coolant temperature gauge is in the
red zone (“H”). In this case, immediately stop the vehicle in a safe place. Check
the engine after it has cooled completely. (→P. 363)
n While driving
l When the voltmeter indicates more than 19 V or less than 9 V, the battery may be
malfunctioning. Have your vehicle checked at your Lexus dealer.
l When the engine oil pressure gauge does not work properly, immediately stop
the engine and contact your Lexus dealer.
106
Page 54

2-2. Instrument cluster
Indicators and warning lights
The indicator and warning lights on the instrument cluster and center
panel inform the driver of the status of the vehicle’s various systems.
Instrument cluster
The units used on the speedometer and some indicators may differ depending on the target region.
2
When driving
Center panel
107
Page 55

2-2. Instrument cluster
n Indicators
The indicators inform the driver of the operating state of the vehicle’s various systems.
Turn signal indicator
(→P. 1 02 )
Headlight high beam indicator (→P. 11 2)
Headlight indicator
(U.S.A.)
(→P. 112)
Tail light indicator
(Canada)
(→P. 112)
Cruise control indicator
(→P. 120 )
* *
Slip indicator (→P. 142 )
Roll sensing of curtain
*
shield airbags off indicator (→P. 6 5)
“PWR” mode indicator
(→P. 100)
(U.S.A.)
(Canada)
Active height control indicator (→P. 13 0)
Vehicle stability control
*
system OFF indicator
(→P. 143 )
Center differential lock
indicator (→P. 14 3)
Active traction control
*
system indicator
(→P. 143 )
Active traction control
*
system indicator
(→P. 143 )
“AIRBAG ON/OFF” indicator(→P. 67)
Automatic transmission
indicator (→P. 99)
108
Automatic transmission
second start indicator
(→P. 100)
Page 56

2-2. Instrument cluster
n Warning lights
Warning lights inform the driver of malfunctions in the indicated
vehicle’s systems. (→P. 337)
* * * * * *
(U.S.A.) (Canada) (U.S.A.) (Canada)
* * * *
2
(U.S.A.) (Canada)
* *
(U.S.A.)
*: These lights turn on when the ignition key is turned to the “ON” position
to indicate that a system check is being performed. They will turn off
after the engine is started, or after a few seconds. There may be a malfunction in a system if the lights do not come on, or if the lights do not
turn off. Have the vehicle inspected by your Lexus dealer.
CAUTIO N
n If a safety system warning light does not come on
Should a safety system light such as ABS and the SRS airbag warning lights not
come on when the ignition key is turned to the “ON” position, this could mean that
these systems are not available to help protect you in an accident, which could
result in death or serious injury. Have the vehicle inspected by your Lexus dealer
immediately if this occurs.
When driving
109
Page 57

2-2. Instrument cluster
Trip information display
The trip information display presents the driver with a variety of drivingrelated data.
Display items can be switched
by pushing the “MODE” switch.
Trip information
n Average vehicle speed
Displays the average vehicle speed since the engine
was started or the function was reset.
n Driving distance
110
The function can be reset by pushing the “RESET”
switch for longer than one second when the average
vehicle speed is displayed.
Displays the driving distance since engine was
started or the function was reset.
The function can be rest pushing the “RESET” switch for
longer than one second when the driving distance is
displayed.
Page 58

n Driving range
2-2. Instrument cluster
Displays the estimated maximum distance that can
be driven with the quantity of fuel remaining.
This distance is computed based on your average fuel
consumption. As a result, the actual distance that can be
driven may differ from that displayed.
n Average fuel consumption
Displays the average fuel consumption since the
vehicle was last refueled.
n Current fuel consumption
Displays the current rate of fuel consumption.
n Changing the unit shown on the display
STEP 1
STEP 2
STEP 3
Push and hold the “MODE” switch until the unit flashes.
Push the “RESET” switch to change the unit.
Push the “MODE” switch.
2
When driving
The unit on the outside temperature display
is also changed.
111
Page 59

When driving
2
2-1. Driving procedures ................. 88
Driving the vehicle...................... 88
Starting the engine...................... 95
Automatic transmission............. 98
Turn signal lever.......................... 102
Parking brake............................... 103
2-2. Instrument cluster................... 104
Gauges and meters .................. 104
Indicators and warning
lights.............................................. 107
Trip information display............. 110
2-3. Operating the lights and
windshield wipers .................. 112
Headlight switch........................... 112
Fog light switch.............................. 114
Windshield wipers and
washer............................................ 115
Rear window wiper and
washer........................................... 118
Headlight cleaner switch .......... 119
2-4. Using other driving
systems.................................... 120
Cruise control............................. 120
Rear view monitor system...... 123
Lexus night view system........... 126
AHC (Active Height Control
Suspension)............................... 130
AVS (Adaptive Variable
Suspension)............................... 138
Four-wheel drive system......... 139
Driving assist systems................ 142
2-5. Driving information................ 146
Off-road precautions............... 146
Cargo and luggage..................... 151
Vehicle load limits...................... 155
Winter driving tips..................... 156
Trailer towing................................ 160
Dinghy towing.............................. 170
87
Page 60

1-2. Opening, closing and locking the doors
Wireless remote control
The wireless remote control can be used to lock/unlock the vehicle and the
back door from outside the vehicle.
Locks all doors
Unlocks all doors
Opens the windows and
moon roof (push and hold)
Sounds alarm
(push and hold) (→P. 4 9)
n 2-step unlocking function
When you push the UNLOCK button, the driver's door is unlocked. Pushing the
button again within 3 seconds unlocks the other doors.
n Operation signals
Doors: A buzzer sounds and the emergency flashers flash to indicate that the doors
have been locked/unlocked. (Locked: Once; Unlocked: Twice)
Windows and moon roof: A buzzer sounds when the windows and moon roof begin
to open.
n Door lock buzzer
If a door is not fully closed, a buzzer sounds for 10 seconds if an attempt to lock the
door is made. Fully close the door to stop the buzzer, and lock the vehicle once
more.
n Security feature
If a door is not opened within approximately 30 seconds after the vehicle is
unlocked, the anti-theft system automatically locks the vehicle again.
1
Before driving
3
Page 61

1-2. Opening, closing and locking the doors
n Low battery
If the wireless remote control does not function or if it only operates very close to
the vehicle, the battery may be low. (→P. 30 9)
n Customization
Settings (e.g. 2-step unlocking function) can be changed. (→P. 389 )
n Certification for wireless remote control (for vehicles sold in the U.S.A.)
NOTE:
This device complies with Part 15 of the FCC Rules. Operation is subject to the following two conditions: (1) this device may not cause harmful interference, and (2)
this device must accept any interference received, including interference that may
cause undesired operation.
NOTICE:
This equipment has been tested and found to comply with the limits for a Class B
digital device, pursuant to Part 15 of the FCC Rules. These limits are designed to
provide reasonable protection against harmful interference in a residential installation. This equipment generates, uses and can radiate radio frequency energy and, if
not installed and used in accordance with the instructions, may cause harmful interference to radio communications. However, there is no guarantee that interference
will not occur in a particular installation. If this equipment does cause harmful interference to radio or television reception, which can be determined by turning the
equipment off and on, the user is encouraged to try to correct the interference by
one or more of the following measures:
l Reorient or relocate the receiving antenna.
l Increase the separation between the equipment and receiver.
l Connect the equipment into an outlet on a circuit different from that to which
the receiver is connected.
l Consult the dealer or an experienced radio/TV technician for help.
FCC WARNING:
Changes or modifications not expressly approved by the party responsible for
compliance could void the user's authority to operate the equipment.
n Certification for wireless remote control (for vehicles sold in Canada)
NOTE:
Operation is subject to the following two conditions: (1) this device may not cause
interference, and (2) this device must accept any interference, including interference that may cause undesired operation of the device.
4
Page 62

1-2. Opening, closing and locking the doors
Side doors
The vehicle can be locked/unlocked using a key, wireless remote control or
door lock switch.
n Key
Locks all doors
Closes the windows and
moon roof (turn and hold)
Unlock all doors
Turning the key unlocks the
driver’s door. Turning the key
again unlocks the other doors.
Opens the windows and
moon roof (turn and hold)
n Wireless remote control
→P. 3
n Door lock switch
1
Before driving
Locks all doors
Unlocks all doors
5
Page 63

1-2. Opening, closing and locking the doors
n Inside lock button
Locks the door
Unlocks the door
The front doors can be opened
by pulling the inside handles
even if the lock buttons are in
the lock position.
Locking the front doors from the outside without a key
The door cannot be locked if either of the front doors is open and the key
is in the ignition switch.
Rear door child-protector lock
The door cannot be opened from
inside the vehicle when the locks
are set.
These locks can be set to prevent
children from opening the rear
doors. Push down rear door
switches to lock the rear doors.
6
Page 64

1-2. Opening, closing and locking the doors
Automatic door locking and unlocking systems
The following functions can be set or canceled:
Function Operation
Shift position linked door
locking function
Shift position linked door
unlocking function
Speed linked door locking
function
Driver's door linked door
unlocking function
Shifting the shift lever out of “P” locks all doors.
Shifting the shift lever to “P” unlocks all doors.
All doors are locked when the vehicle speed is
approximately 12 mph (20 km/h) or higher.
All doors are unlocked when the driver's door is
opened within 10 seconds after turning the ignition key to the “LOCK” position.
n Setting and canceling the functions
To switch between setting and canceling, follow the procedure below:
STEP 1
Close all the doors and turn the ignition key to the “ON” position.
(Perform step 2 within 10 seconds.)
STEP 2
Shift the shift lever to “P” or “N”,
press and hold the driver's door
lock switch (
or ) for 5 sec-
onds then release.
1
Before driving
The shift lever and switch positions
corresponding to the desired function to be set or canceled are
shown as follows.
7
Page 65

1-2. Opening, closing and locking the doors
Function Shift lever position Switch position
Shift position linked door locking
function
“P”
Shift position linked door unlocking function
Speed linked door locking function
Driver's door linked door unlocking
“N”
function
When the setting or canceling operation is complete, all doors are locked
and then unlocked.
n Customization
Settings (e.g. unlocking function using a key) can be changed. (→P. 38 9)
CAUTIO N
n To prevent an accident
Observe the following precautions while driving the vehicle.
Failing to do so may result in a door opening and an occupant falling out, resulting in
death or serious injury.
l Always use a seat belt.
l Always lock all doors.
l Ensure that all doors are properly closed.
l Do not pull the inside handle of the front door while driving.
l Set the rear door child protector locks when children are seated in the rear seat.
8
Page 66

1-2. Opening, closing and locking the doors
Back door
The back door can be locked/unlocked using a key, wireless remote control or door lock switch.
n Key
Unlocks the door
Locks the door
Open the door
1
Before driving
n Wireless remote control
→P. 3
n Door lock switch
Locks the door
Unlocks the door
9
Page 67

1-2. Opening, closing and locking the doors
n Inside lock button
Unlocks the door
Locks the door
Open the door
Back door child-protector lock
10
The door cannot be opened from
inside the vehicle when the lock is
set.
This lock can be set to prevent children from opening the back door.
Move the lever to the LOCK position.
Page 68

1-2. Opening, closing and locking the doors
Rear step bumper
The rear step bumper is for rear
end protection and easier step-up
loading.
CAUTIO N
Observe the following precautions.
Falling to do so may result in death or serious injury.
n While driving
l Keep the back door closed.
This not only keeps personal belongings from being thrown out, but also prevents
exhaust gases from entering the vehicle.
l Do not get on the rear step bumper.
1
Before driving
NOTICE
n To prevent damage to the back door components
l Do not apply any force, paint or let any other foreign matter on the damper.
l Make sure there is nothing in the doorway before closing.
l Do not allow more than one person to get on the rear step bumper at a time.
11
Page 69

1-6. Anti-theft system
Engine immobilizer system
The vehicle's keys have built-in transponder chips that prevent the engine
from starting if the key has not been previously registered in the vehicle's
on-board computer.
The indicator light flashes after
the key has been removed from
the ignition switch to indicate
that the system is operating.
n Conditions that may cause the system to malfunction
l If the grip portion of the key is in contact with a metallic object.
l If the key is in close proximity to or touching a key to the security system (key
with a built-in transponder chip) of another vehicle.
n Certifications for the engine immobilizer system
For vehicles sold in the U.S.A.
FCC ID: MOZRI-20BTY
This device complies with Part 15 of the FCC Rules. Operation is subject to the following two conditions: (1) this device may not cause harmful interference, and (2)
this device must accept any interference received, including interference that may
cause undesired operation.
For vehicles sold in Canada
This device complies with RSS-210 of Industry Canada. Operation is subject to the
following two conditions: (1) this device may not cause interference, and (2) this
device must accept any interference, including interference that may cause undesired operation of the device.
1
Before driving
47
Page 70

1-6. Anti-theft system
CAUTIO N
n Certifications for the engine immobilizer system
Changes or modifications not expressly approved by the party responsible for
compliance could void the user’s authority to operate the equipment.
NOTICE
n For proper system operation
Do not modify, remove or disable the engine immobilizer system. If any unauthorized changes or modifications are made, the proper operation of the system cannot be guaranteed.
48
Page 71

1-6. Anti-theft system
Alarm
The system sounds the alarm and flashes the vehicle lights when an attempt
to steal the vehicle is detected.
n Triggering of the alarm
The alarm is triggered in the following situations.
1
l A locked door is unlocked or opened in any way other than using
the wireless remote door lock function or key. (The doors will lock
again automatically)
l The hood is opened while the vehicle is locked.
n Setting the alarm system
Close the doors and hood, and
lock all doors. The system will be
set automatically after 30 seconds.
The indicator light changes from
being on to flashing when the
system is set.
n Deactivating or stopping the alarm
Do one of the following to deactivate or stop the alarm.
l Unlock the doors.
l Start the engine. (The alarm will be deactivated or stopped after a
few seconds.)
Before driving
49
Page 72

1-6. Anti-theft system
n Items to check before locking the vehicle
To prevent unexpected triggering of the alarm and vehicle theft, make sure of the
following.
l Nobody is in the vehicle.
l The windows and moon roof are closed before the alarm is set.
l No valuables or other personal items are left in the vehicle.
n Triggering of the alarm
The alarm may be triggered in the following situations.
(Stopping the alarm deactivates the alarm system.)
l A person inside the vehicle opens a door or hood.
l The battery is recharged or replaced when the vehicle is locked.
n Pa nic mode
When PANIC is pushed and held, an alarm
will sound to deter any person from trying to
break into or damage your vehicle.
To stop the alarm, push any button on the
wireless remote control.
50
Page 73

1-6. Anti-theft system
Theft prevention labels (U.S.A.)
These labels are attached to the
vehicle to reduce vehicle theft
by facilitating the tracing and
recovery of parts from stolen
vehicles. Do not remove under
penalty of law.
1
Before driving
51
Page 74

1-5. Refueling
Opening the fuel tank cap
Perform the following steps to open the fuel tank cap.
n Before refueling the vehicle
Stop the engine and ensure that all the doors and windows are
closed.
n Opening the fuel tank cap
STEP 1
STEP 2
STEP 3
Pull the lever.
Turn the fuel tank cap slowly to
open.
Hang the fuel tank cap on the
back of the fuel filler door.
44
Page 75

1-5. Refueling
Closing the fuel tank cap
After refueling, turn the fuel tank
cap clockwise until you hear a
click. The cap will revolve slightly in
the opposite direction once
released.
n Fuel t ypes
Use premium unleaded gasoline. (91 Octane Rating [Research Octane Number
96] or higher)
n Fuel tank capacity
Approximately 25.4 gal. (96 L, 21.1 Imp. gal.)
1
Before driving
45
Page 76

1-5. Refueling
CAUTIO N
n Refueling the vehicle
Observe the following precautions while refueling the vehicle. Failure to do so, may
result in death or serious injury.
l Touch the vehicle or some other metal surface to discharge any static electricity.
Sparks resulting from discharging static electricity may cause the fuel vapors to
ignite.
l Always hold the grips on the fuel tank cap and turn it slowly to remove it.
A whooshing sound may be heard when the fuel tank cap is loosened. Wait until
the sound cannot be heard before fully removing the cap. In hot weather, pressurized fuel may spray out the filler neck and cause injury.
l Do not allow anyone that has not discharged static electricity from their bodies to
come close to an open fuel tank.
l Do not inhale vaporized fuel.
Fuel contains substances that are harmful if inhaled.
l Do not smoke while refueling the vehicle.
Doing so may cause the fuel to ignite and cause a fire.
l Do not return to the vehicle or touch any person or object that is statically
charged.
This may cause static electricity to build up, resulting in a possible ignition hazard.
n When replacing the fuel tank cap
Do not use anything but a genuine Lexus fuel tank cap designed for your vehicle.
Failure to do so may cause a fire or other incident which may result in death or serious injury.
NOTICE
n Refueling
Do not spill fuel during refueling.
Failing to do so may damage the vehicle, such as causing the exhaust systems to
operate abnormally or damaging fuel system components or the vehicle's painted
surface.
46
Page 77

1-4. Opening and closing the windows and moon roof
Power windows
The power windows can be opened and closed using the following
switches.
Closing
One-touch closing
*
Opening
One-touch opening
*
*: Pushing the switch in the
opposite direction will stop
window travel partway.
1
Before driving
37
Page 78

1-4. Opening and closing the windows and moon roof
Lock switch
Press the switch down to lock passenger window switches.
Use this switch to prevent children
from accidentally opening or closing a passenger window.
n The power windows can be operated when
The ignition key must be in the “ON” position.
n Linked door lock window operation
l The power windows can be opened and closed using the key. (→P. 5)
l The power windows can be opened using the wireless remote control. (→P. 3)
n Retain ed accessory power
The power windows can be operated for approximately 45 seconds even after the
ignition key is turned to the “ACC” or “LOCK” position. They cannot, however, be
operated once the driver’s or front passenger’s door is opened.
n Jam protection function
If an object becomes caught between the window and the window frame, window
travel is stopped and the window is opened slightly.
n Customization
Settings (e.g. linked door lock operation) can be changed. (→P. 3 89 )
38
Page 79

1-4. Opening and closing the windows and moon roof
CAUTIO N
n Closing the windows
Observe the following precautions.
Failing to do so may result in death or serious injury.
l Check to make sure that all passengers do not have any part of their body in a
position where it could be caught when a window is being operated.
l Do not allow children to operate the power windows.
Closing a power window on someone can cause death or serious injury.
n Jam protection function
l Never try jamming any part of your body to activate the jam protection function
intentionally.
l The jam protection function may not work if something gets caught just before
the window fully closes.
1
Before driving
39
Page 80

1-4. Opening and closing the windows and moon roof
Power quarter windows
The power quarter windows can be opened and closed using the following
switches.
Close Open
n The power quarter windows can be operated when
The ignition key must be in the “ON” position.
CAUTIO N
n Closing the quarter windows
Observe the following precautions.
Failing to do so may result in serious injury.
l Check to make sure that all passengers do not have any part of their body in a
position where it could be caught when a window is being operated.
l Do not allow children to operate the power quarter windows.
Closing a power quarter window on someone can cause serious injury.
For the right quarter window
For the left quarter window
40
Page 81

1-4. Opening and closing the windows and moon roof
Moon roof
Use the overhead switches to open, close, and tilt the moon roof up and
down.
n Opening and closing
Open
Stops just before it is opened
fully. Press the switch again to
fully open.
Close
To stop partway, press the switch
lightly.
n Tilt up and down
Tilt up
Tilt down
To stop partway, press the switch
lightly.
1
Before driving
41
Page 82

1-4. Opening and closing the windows and moon roof
n The moon roof can be operated when
The ignition key must be in the “ON” position.
n Linked door lock moon roof operation
l The moon roof can be opened and closed using the key. (→P. 5 )
l The moon roof can be opened using the wireless remote control. (→P. 3 )
n Retain ed accessory power
The moon roof can be operated for approximately 45 seconds even after the ignition key is turned to the “ACC” or “LOCK” position. It cannot, however, be operated
once the driver’s or front passenger’s door is opened.
n Jam protection function
If an object is detected between the moon roof and the frame while closing or tilting
down, travel is stopped and the moon roof opens slightly.
n Sunshade
The sunshade can be opened and closed manually. However, the sunshade will
open automatically when the moon roof is opened.
n When the battery is disconnected
The moon roof must be initialized in order to ensure proper operation.
STEP 1
Push and hold the “SLIDE” switch or “TILT” switch until the moon roof is
closed fully.
STEP 2
To ensure the initialization is complete, make sure automatic opening and
closing functions work properly.
n Customization
Settings (e.g. linked door lock operation) can be changed. (→P. 3 89 )
42
Page 83

1-4. Opening and closing the windows and moon roof
CAUTIO N
n Opening the moon roof
Observe the following precautions.
Failing to do so may cause death or serious injury.
l Do not allow any passengers to put their hands or heads outside the vehicle while
it is moving.
l Do not sit on top of the moon roof.
n Closing the moon roof
Observe the following precautions.
Failing to do so may result in death or serious injury.
l Check to make sure that all passengers do not have any part of their bodies in a
position where they could be caught when the moon roof is being operated.
l Do not allow children to operate the moon roof.
Closing the moon roof on someone can cause death or serious injury.
n Jam protection function
l Never try jamming any part of your body to activate the jam protection function
intentionally.
l The jam protection function may not work if something gets caught just before
the moon roof fully closes.
1
Before driving
43
Page 84

1-3. Adjustable components
Front seats
Seat position fore/aft control switch
Seatback angle control switch
Seat cushion (front) angle control switch
Vertical height control switch
Lumbar support control switch
12
Page 85

1-3. Adjustable components
CAUTIO N
n Reclining adjustment
Do not recline the seat more than necessary when the vehicle is in motion, to
reduce the risk of sliding under the lap belt.
If the seat is too reclined during an accident, the lap belt may slide past the hips and
apply restraint forces directly to the abdomen or your neck may contact the shoulder belt, increasing the risk of death or serious injury.
n When adjusting the front passenger’s seat from the driver’s seat
Wait until a passenger is seated or have gotten off the front passenger’s seat before
operating the switch to avoid injuring the passenger.
1
Before driving
13
Page 86

1-3. Adjustable components
Rear seats
To adjust the seatback angle, pull the seatback angle lever
Second seat
Seatback angle lever
Third seat
14
Page 87

Tumbling second seats and third seat entry
1-3. Adjustable components
For easy access to the third seat, perform and in “Tum-
STEP 1 STEP 2
bling second seats”. (→P. 1 5)
n Before tumbling second seats
Stow the seat belt buckles and
lower the head restraints to the
lowest position.
n Tumbling second seats
STEP 1
Pull the seatback angle levers and
fold the second seats down.
When returning the second seats
to their original position, lift them
up until they lock.
1
Before driving
STEP 2
Pull the lever under the seat cushion or pull the strap on the rear end
of the seat cushion and swing the
whole seat forward.
When returning the second seats
to their original position, lift them
down until they lock.
15
Page 88

1-3. Adjustable components
STEP 3
STEP 4
n Returning second seats.
Reverse the steps above.
Hook the holding strap to the
assist grip and secure the seat by
pulling its free end.
When returning the second seats
to their original position, put the
holding strap into the pocket.
Remove the seat hook covers from
the back of the seat cushion, and
install them on the seat hooks.
When returning the second seats
to their original position, remove
the seat hook covers from the floor
and install them in the back of the
seat cushion.
If you cannot raise the seatback
because of the locked seat belt,
release the lock.
16
Push in the lower front edge of
the seatback cushion to slacken
the seat belt.
Let the seat belt retract a little.
Page 89

Tumbling third seats
n Before tumbling third seats
1-3. Adjustable components
n Tumbling third seats
STEP 1
Stow the seat belts and buckles,
and lower the head restraints to
the lowest position.
Use the seat belt hangers to prevent the belts from being tangled.
Pull the seatback angle levers and
fold the third seats.
When returning the third seats to
their original position, lift them up
until they lock.
1
Before driving
17
Page 90

1-3. Adjustable components
STEP 2
STEP 3
STEP 4
While turning the lever, lift and
slide the whole seat backward.
When returning the third seats to
their original position, slide them
forward to their locked position
while lifting down with the lever,
and then completely lift them
down.
Hook the holding strap to the
assist grip and secure the seat by
pulling its free end.
When returning the third seats to
their original position, put the holding strap into the pocket.
Remove the seat hook covers from
the back of the seat cushion, and
install them on the seat hooks.
When returning the third seats to
their original position, remove the
seat hook covers from the floor and
install them in the back of the seat
cushion.
n Returning third seats.
Reverse the steps above.
18
Page 91

1-3. Adjustable components
Removing third seats
n Before removing third seats
Perform and in “Tumbling third seats”. (→P. 1 7)
STEP 1 STEP 2
n Removing third seats
STEP 1
Remove the lever cover and pull
the lock release lever. Lift up the
rear side of the seat and pull the
whole seat backward.
When returning the third seats to
their original position, put the front
side of the seat, pull the lever and
then put the rear side.
1
Before driving
STEP 2
n Returning third seats
Reverse the steps above.
Remove the seat hook covers from
the back of the seat cushion and
install them on the seat hooks.
When returning the third seats to
their original position, remove the
seat hook covers from the floor and
install them in the back of the seat
cushion.
19
Page 92

1-3. Adjustable components
CAUTIO N
n Seat adjustment
Do not recline the seat more than necessary when the vehicle is in motion, to
reduce the risk of sliding under the lap belt.
If the seat is too reclined during an accident, the lap belt may slide past the hips and
apply restraint forces directly to the abdomen or your neck may contact the shoulder belt, increasing the risk of death or serious injury.
n When tumbling the seat
l Do not sit on or place anything on the tumbled seatback while driving.
l Be sure to install the seat hook covers on the seat hooks, or you may get burned
when they become hot.
n When removing or reinstalling the seat
l Be careful not to get your hands or feet pinched in the seat.
l Be careful not to hit the removed seat against a person or drop it on yourself.
l Do not leave the removed seat loose in the vehicle.
l Do not sit on or place anything on the removed seat.
n When returning the seatback to the upright position
Observe the following precautions. Failure to do so may result in death or serious
injury.
l Press for ward and rearward on the top of the seatback and pull up the edge of
the bottom cushion.
l Check that the seat belts are not twisted or caught under the seat.
l Arrange the seat belts in the proper positions for ready use.
NOTICE
n To avoid damaging the seat and seatbelt
l The seat belts and the buckles must be stowed before you fold down the seat-
backs.
l Avoid putting heavy loads on the removed seat.
20
Page 93

1-3. Adjustable components
Driving position memory system
Your preferred driving position (the position of the driver's seat, steering
wheel and outside rear view mirrors) can be entered into the computer's
memory and recalled with the touch of a button.
Two different driving positions can be entered into memory.
1
n Entering a position to memory
Check that the shift lever is set in “P”.
STEP 1
STEP 2
Turn the ignition key to the “ON” position.
Adjust the driver’s seat, steering wheel, and outside rear view
mirrors to the desired positions.
STEP 3STEP 3
n Recalling the memorized position
Check that the shift lever is set in “P”.
STEP 1
STEP 2
Turn the ignition key to the “ON” position.
Before driving
While pushing the “SET” button,
push button “1” or “2” until the
signal beeps.
If the selected button has
already been preset, the previously recorded position will be
overwritten.
Push button “1” or “2” to recall
the desired position.
21
Page 94

1-3. Adjustable components
n Retain ed accessory power
Each memorized position (except for the steering wheel position) can be activated
within 30 seconds after the corresponding driver’s door is opened, even if the key is
removed from ignition switch.
n If any position memory button is pushed while the adjustments are being made
The operation will stop. To reactivate the system, push the desired button (“1” or “2”)
again.
n If the battery is disconnected
The memorized positions must be reset because the computer's memory is erased
when the battery is disconnected.
CAUTIO N
n Seat adjustment caution
Take care during seat adjustment that the seat does not strike the rear passenger or
squeeze your body against the steering wheel.
If this happens, you can stop the movement by pressing another seat position memory button.
22
Page 95

1-3. Adjustable components
Head restraints
Lock
release
button
n Adjusting the height of the head restraints
Make sure that the head restraints are
adjusted so that the center of the head
restraint is closest to the top of your ears.
Vertical adjustment
Push and hold the lock release
button when lowering the head
restraint.
Angle adjustment *
Removal
Pull the head restraint up while
pushing the lock release button.
*: Front seats only
1
Before driving
n Head restraints of different seats
The head restraints are specially designed for the seats on which they are installed.
CAUTIO N
n Head restraint precautions
Observe the following precautions regarding the head restraints. Failure to do so
may result in death or serious injury.
l Adjust the head restraints to the correct position at all times.
l Do not drive with the head restraints removed.
23
Page 96

1-3. Adjustable components
Seat belts
Make sure that all occupants are wearing their seat belts before driving the
vehicle.
n Correct use of the seat belts
Extend the shoulder belt so
that it comes fully over the
shoulder, but does not come
into contact with the neck or
slide off the shoulder.
Position the lap belt as low as
possible over the hips.
Adjust the position of the
seatback. Sit up straight and
well back in the seat.
Do not twist the seat belt.
n Fastening and releasing the seat belt
Front, second and third (outboard seats) seat belt
Release button
24
Fastening the belt
Push the tab into the buckle until
a clicking sound is heard.
Releasing the belt
Press the release button.
Page 97

\
Third (center seat) seat belt
1-3. Adjustable components
Release button
Fastening the belt
Push the tab into the buckle until
a clicking sound is heard.
Releasing the belt
Press the release button.
n Adjusting the height of the belt (front, second and third outboard
seat)
Release button
Move the height adjuster up and
down as needed until you hear a
click.
Push and hold the lock release
button when lowering.
n Adjusting the length of the belt (third center seat)
Remove excess length by pulling the free end of the belt.
1
Before driving
25
Page 98

1-3. Adjustable components
Seat belt pretensioners (front seats)
The pretensioner helps the seat
belt to quickly restrain the occupant by retracting the seat belt
when the vehicle is subjected to
certain types of severe frontal collision.
The pretensioner may not activate
in the event of a minor frontal
impact, a side impact or a rear
impact.
n Emergency locking retractor (ELR)
The retractor will lock the belt during a sudden stop or on impact. It may also lock if
you lean forward too quickly. A slow, easy motion will allow the belt to extend, and
you can move around fully.
n Automatic locking retractor (ALR)
When a passenger's shoulder belt is completely extended and then retracted even
slightly, the belt is locked in that position and cannot be extended. This feature is
used to hold the child restraint system (CRS) firmly. To free the belt again, fully
retract the belt and then pull the belt out once more. (→P. 75 )
26
Page 99

1-3. Adjustable components
n Pregnant women
Obtain medical advice and wear the seat belt
in the proper way. (→P. 24 )
Women who are pregnant should position
the lap belt as low as possible over the hips in
the same manner as other occupants. Extend
the shoulder belt completely over the shoulder and position the belt across the chest.
Avoid belt contact over the rounding of the
abdominal area.
If the seat belt is not worn properly, not only a
pregnant woman, but also the fetus could suffer death or serious injury as a result of sudden braking or a collision.
n People suffering illness
Obtain medical advice and wear the seat belt in the proper way. (→P. 24 )
n Child seat belt usage
The seat belts of your vehicle were principally designed for persons of adult size.
l Use a child restraint system appropriately for the child, until the child become
large enough to properly wear the vehicle's seat belt. (→P. 72 )
l When the child becomes large enough to properly wear the vehicle's seat belt,
follow the instructions on P. 24 regarding seat belt usage.
n Replacing the belt after the pretensioner has been activated
The seat belts cannot be used if a pretensioner has activated. After an accident,
have your Lexus dealer inspect the pretensioners and replace them, if necessary.
1
Before driving
27
Page 100

1-3. Adjustable components
n Seat belt extender
If your seat belts cannot be fastened securely
because they are not long enough, a personalized seat belt extender is available from
your Lexus dealer free of charge.
CAUTIO N
n Wearing a seat belt
Observe the following precautions to reduce the risk of injury in the event of sudden braking or an accident. Failing to do so may cause death or serious injury.
l Ensure that all passengers wear a seat belt.
l Always wear a seat belt properly.
l Each seat belt should be used by one person only. Do not use a seat belt for more
than one person at the same time, including children.
l Children should be seated in the rear seat and always use a seat belt and/or an
appropriate child restraint system.
l Do not recline the seat any more than necessary to achieve a proper seating
position. The seat belt is most effective when the occupants are sitting up straight
and well back in the seats.
l Do not wear the shoulder belt under your arm.
l Always wear your seat belt low and snug across your hips.
28
 Loading...