

Lexus LX450 2004, LX470 2004, LX570 2004 Owner Manual

SECTION 2 –
2
AIR CONDITIONING AND AUDIO
Audio
Audio system 210. . . . . . . . . . . . . . . . . . . . . . . . . . . . . . . . . . . . . . . . . . . . . . . . . . . . . . . . . . . . . . . . . . . . . .
For vehicles equipped with Navigation System,
please refer to the separate “Navigation System
Owner’s Manual”.
209
AUDIO
AUDIO SYSTEM
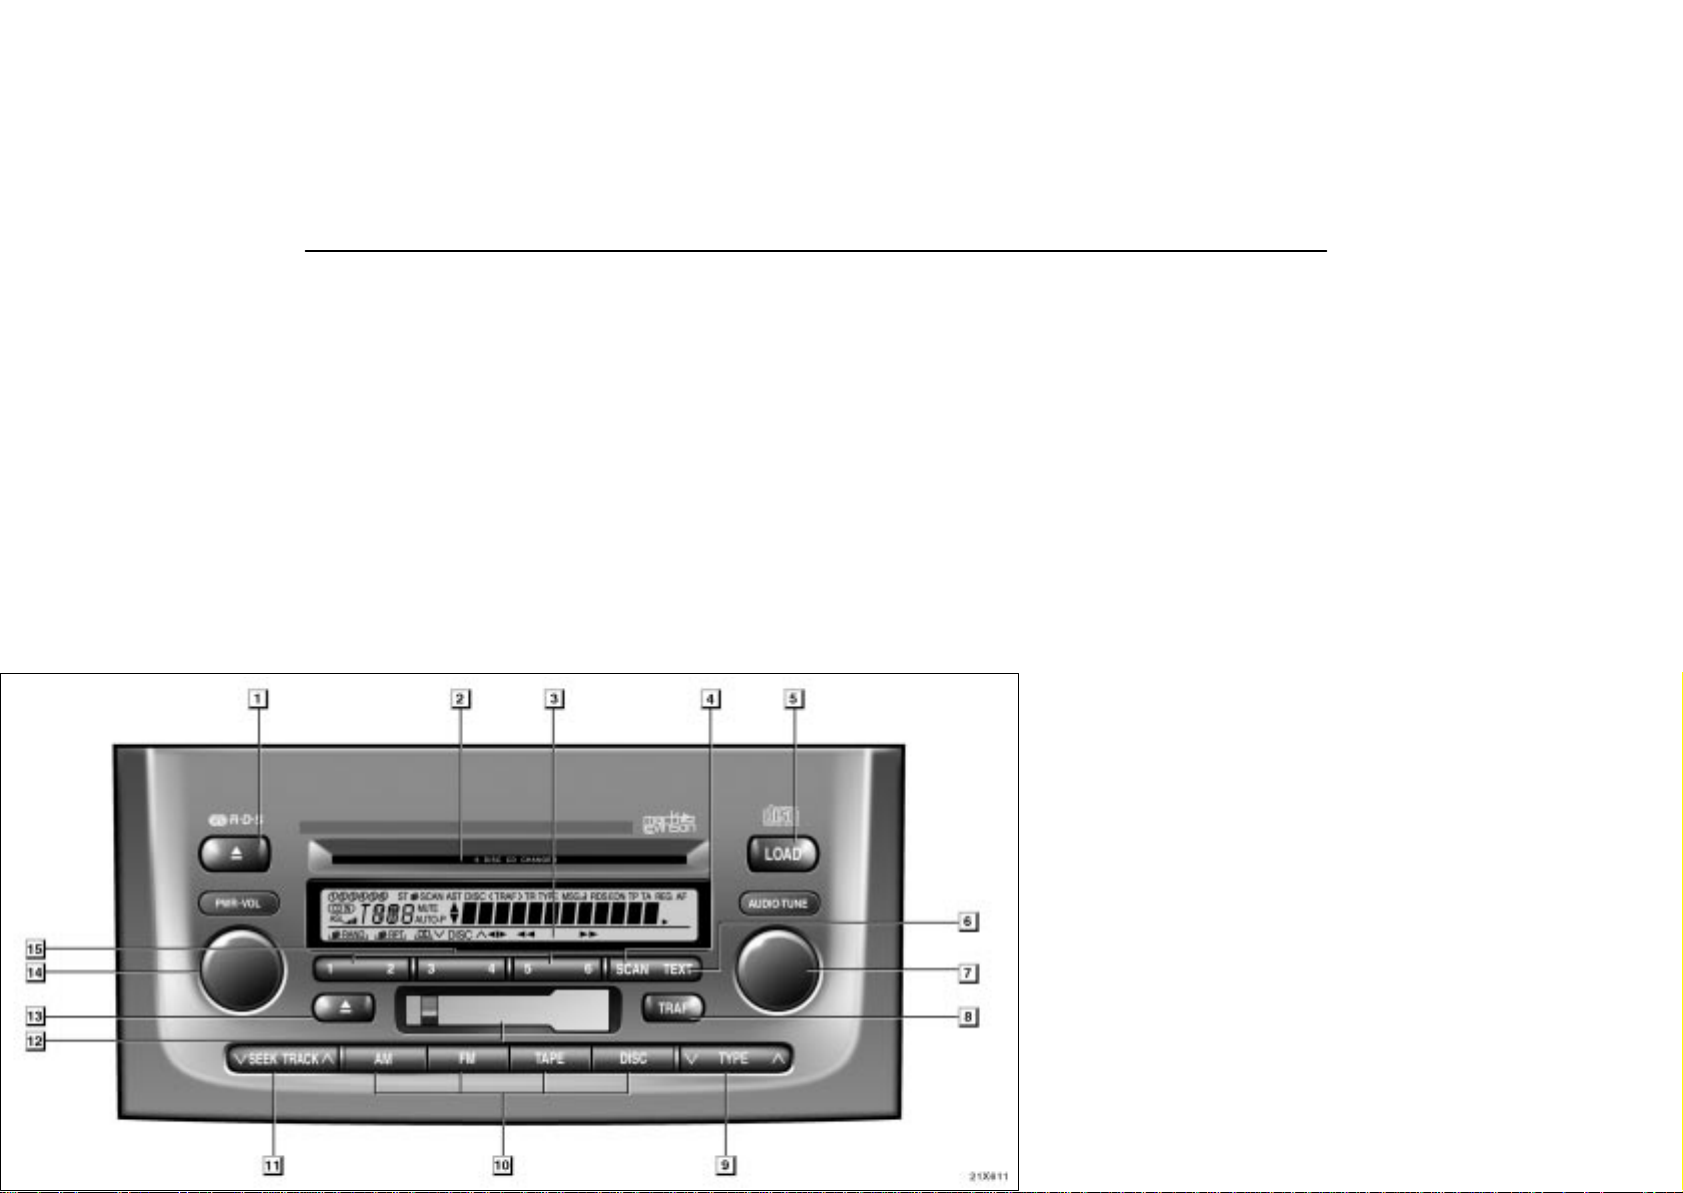
Quick reference for your audio system
You can adjust the brightness of the display. See “Instrument panel light control” on page 66 for details.
210
22X611

AUDIO
1
Stopping and ejecting a compact disc
(See page 224 for details.)
2
Compact disc slot
(See page 223 for details.)
3
Display of functions in TAPE mode
RPT: Automatic repeat
(See page 221 for details.)
DOLBY NR
:
(See page 220 for details.)
: Side change
(See page 221 for details.)
: Rewinding or Fast forwarding
: (See page 221 for details.)
3
Display of functions in CD mode
RAND:Random access
(See page 227 for details.)
RPT: Automatic repeat
(See page 226 for details.)
Disc selection
:
(See page 225 for details.)
: Reversing or Fast forwarding
: (See page 226 for details.)
4
Scan button
(See page 225 for details.)
5
Load button
(See page 223 for details.)
6
TEXT button
(See page 219 for details.)
7
AUDIO-TUNE knob
(See page 213 or for details.)
8
Traffic announcement button
(See page 219 for details.)
9
Program type button
(See page 218 for details.)
10 Mode selectors
(See page 212 for details.)
11 Radio mode: Seek tuning
(See page 216 or 217 for details.)
TAPE or CD Direct access to a desired program
mode: (See page 222 or 226 for details.)
12 Cassette tape slot
(See page 220 for details.)
13 Stopping and ejecting a cassette tape
(See page 220 for details.)
14 Turning the system on and adjusting the volume
(See page 212 for details.)
15 Function buttons
1 - 6: Station selector buttons
(See page 217 for details.)
211
AUDIO
Using your audio system: some basics
This section describes some of the basic features of the Lexus
audio system. Some information may not pertain to your
system.
Y our audio system works when the ignition key is in the “ACC”
or “ON” position.
NOTICE
To prevent the battery from being discharged, do not
leave the car audio on longer than necessary when the
engine is not running.
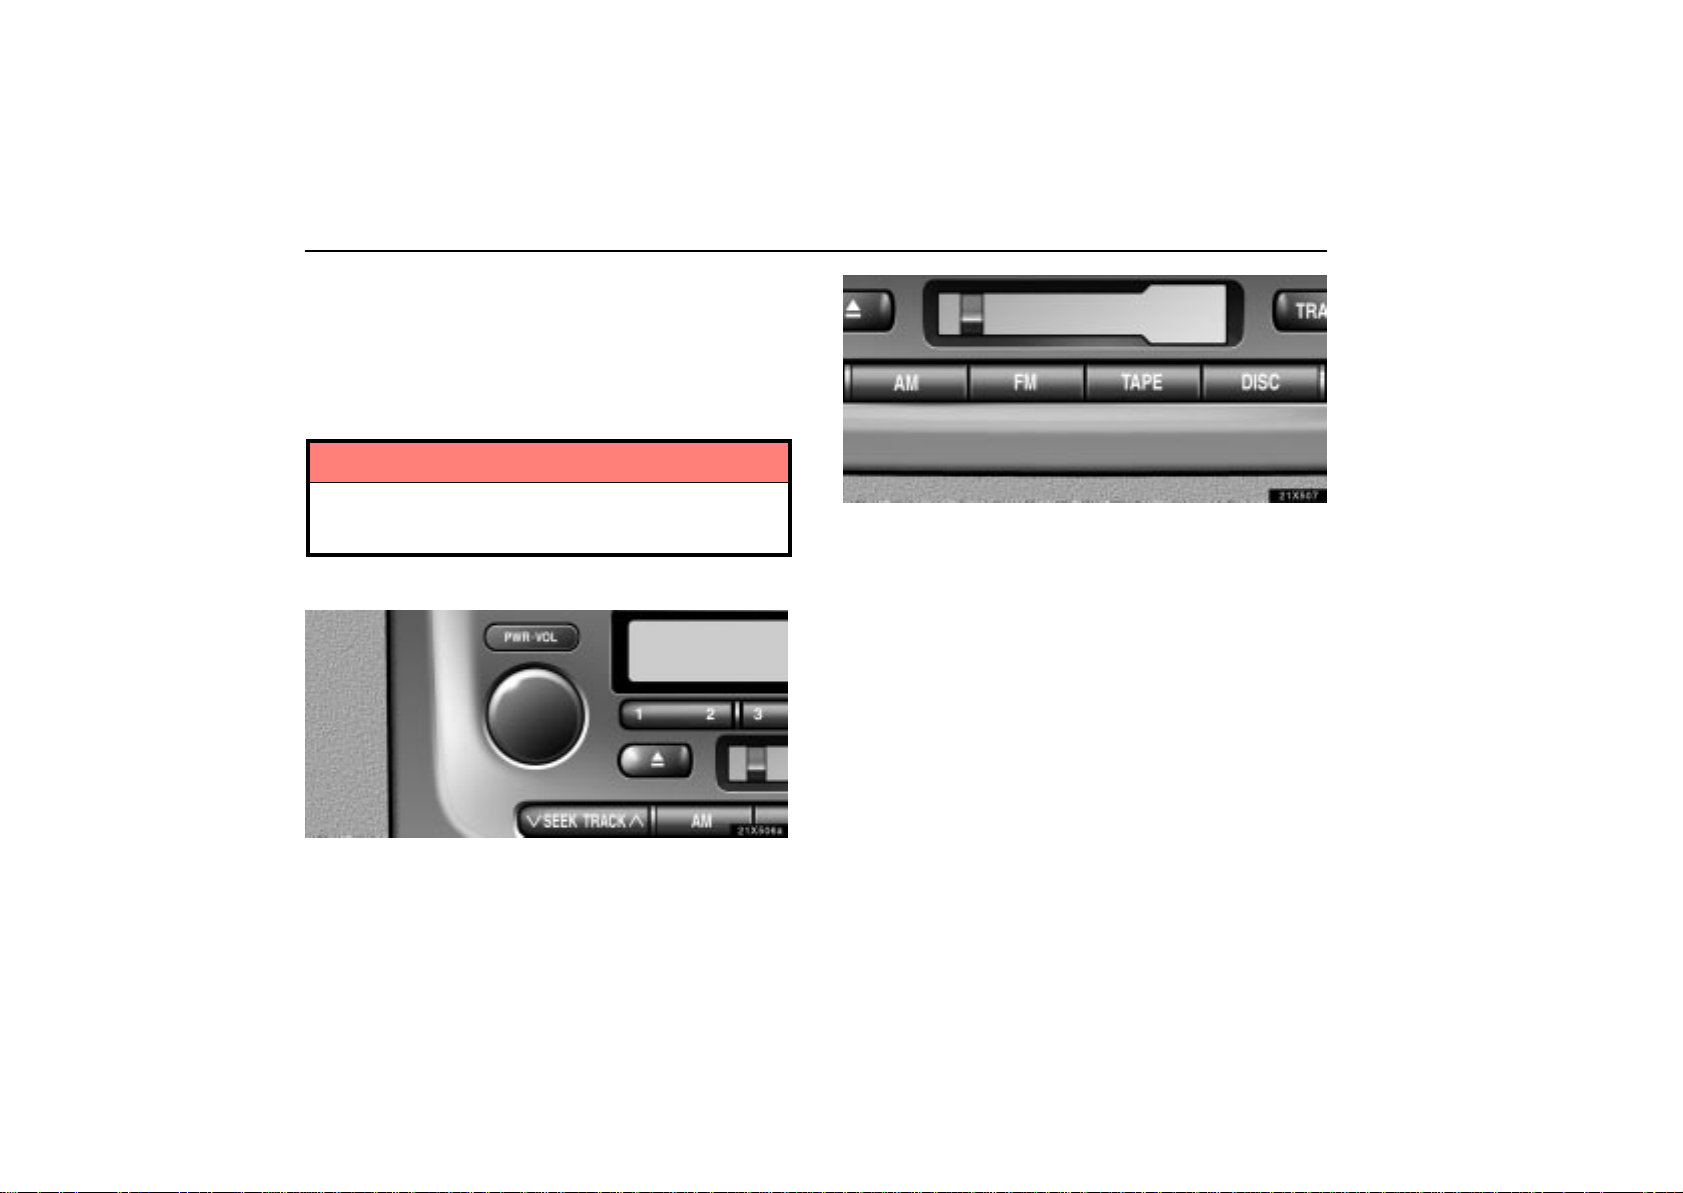
(a) Turning the system on and off
21X506a
21X507
Push “AM”, “ F M ” , “ TAPE” or “DISC” to turn on that mode.
The selected mode turns on directly.
Push these buttons if you want to switch from one mode to
another.
If the tape or disc is not set, the cassette player or compact disc
player does not turn on.
You can turn off the cassette player by ejecting the cassette
tape. If the audio system was previously off, then the entire
audio system will be turned off when you eject the cassette
tape. If another function was previously playing, it will come on
again.
Push this knob to turn the audio system on and off. T urn
this knob to adjust the volume.
The system turns on in the last mode used.
212

AUDIO
21X553
In the “T APE” or “CD” mode, the applicable functions are
shown in the lowest part of the display. Push the switch
just below to turn on each function.
(b) Tone and balance
How good an audio program sounds to you is largely
determined by the mix of the treble, mid-range, and bass
levels. In fact, different kinds of music and vocal programs
usually sound better with different mixes of treble, mid-range,
and bass.
A good balance of the left and right stereo channels and of the
front and rear sound levels is also important.
Keep in mind that if you are listening to a stereo recording or
broadcast, changing the right/left balance will increase the
volume of one group of sounds while decreasing the volume
of another.
22X612
Each time you push the “AUDIO-TUNE” knob, the display
changes as in the following. To adjust the tone and
balance or turn on or off the automatic sound levelizer,
turn the knob.
BAS: Adjusts low-pitched tones.
MID: Adjusts mid-pitched tones.
TRE: Adjusts high-pitched tones.
FAD: Adjusts the sound balance between the front and rear
speakers.
BAL: Adjusts the sound balance between the right and left
speakers.
ASL: Turns on or off the automatic sound levelizer.
Automatic sound levelizer: When the audio sound becomes
difficult to be heard due to road noise, wind noise, etc. during
driving, the system adjusts to the optimum volume and tone
quality according to the noise level. While the automatic sound
levelizer is on, “ASL” appears on the display.
213
AUDIO
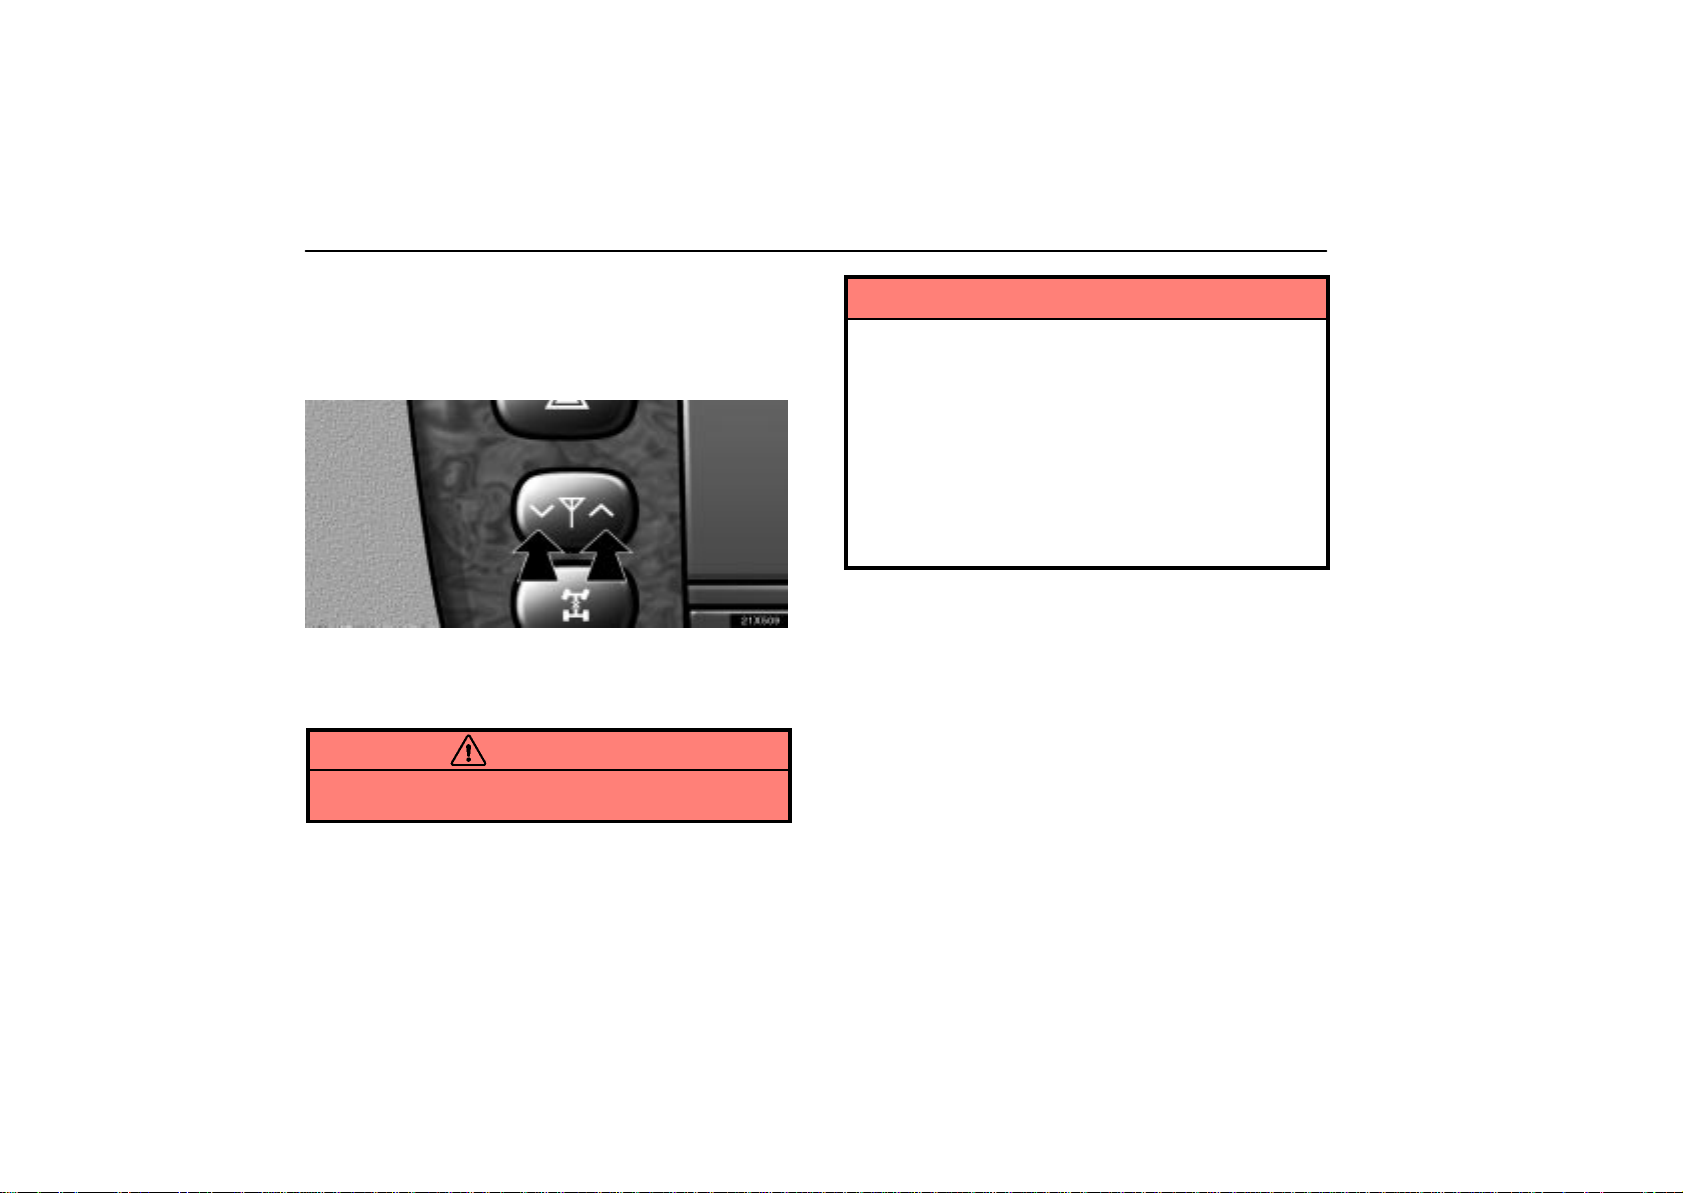
(c) Your power antenna
The antenna automatically extends when the radio is on, and
retracts when the radio mode is off. However, even if you turn
off the radio when the radio on the rear seat audio system is on,
the antenna does not retract.
21X509
To adjust the height of the antenna manually, push the
switch.
Clean the antenna mast periodically with a clean dry cloth.
CAUTION
Before extending the antenna, confirm that no one is
close enough to get injured.
NOTICE
To prevent damage to the antenna, make sure it is
retracted before driving your vehicle through an
automatic car wash.
The antenna mast has to be extended higher than 100
mm (3.94 in.) length when the audio is on. Extend the
antenna mast when the radio signal is weak.
Putting a window tint (especially, conductive or
metallic type) on the right-hand rear quarter window
may affect the reception of radio or mobile telephone.
For the installation of the window tint, consult with
your Lexus dealer.
214
AUDIO
(d) Your cassette player
When you insert a cassette, the exposed tape should be to t h e
right.
NOTICE
Do not oil any part of the cassette player, and do not
insert anything except a cassette tape into the slot.
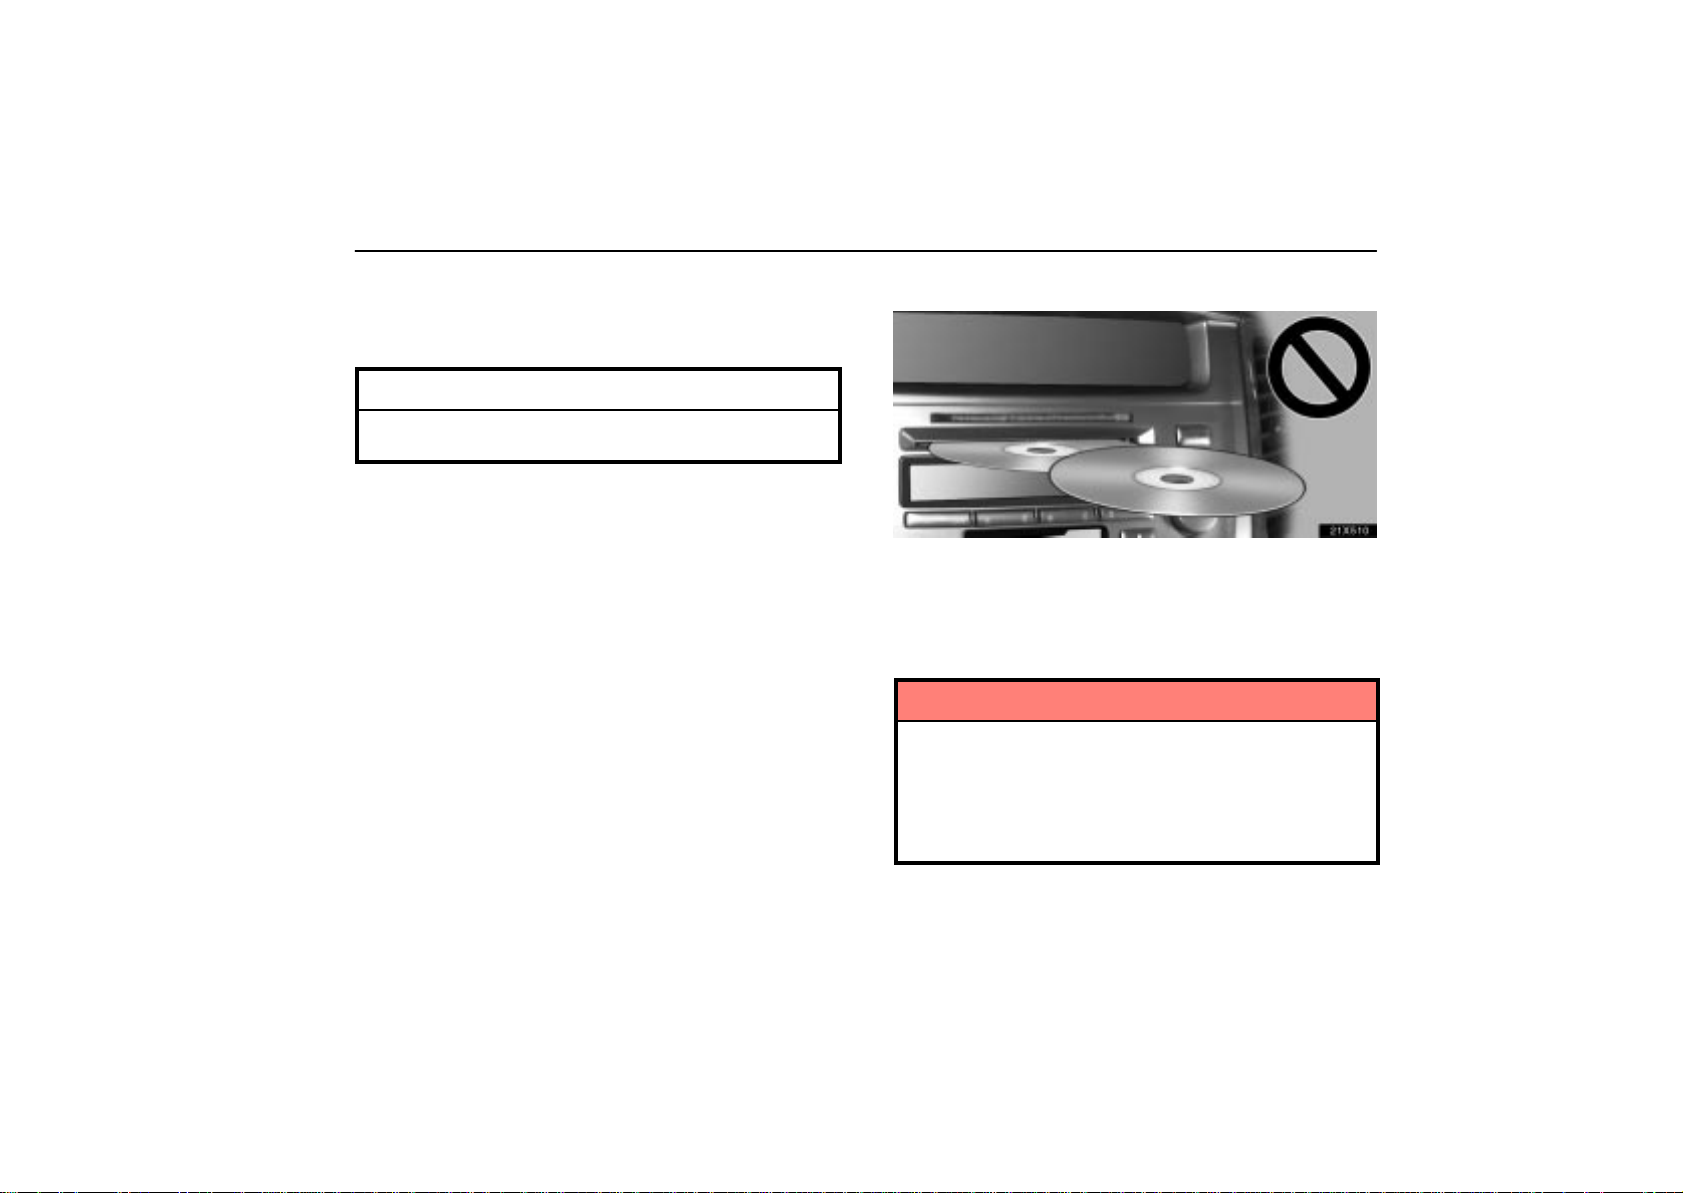
(e) Your compact disc player with changer
21X510
Your changer can store up to 6 discs and play selected discs
or continuously play all the discs set in the player.
When you set discs into the player, make sure their labels face
up. If not, the player will display “ERROR1” and the disc
number.
NOTICE
Never try to disassemble or oil any part of the
compact disc player. Do not insert anything other
than compact discs into the slot.
Do not insert a disc upon another one, or it will
damage the changer. Insert only one disc into the slot
at a time.
The player is intended for use with 12 cm (4.7 in.) discs only.
215

AUDIO
Radio operation
(a) Listening to the radio
21X511z
Push these buttons to choose either an AM or FM station.
“AM”, “FM1” or “FM2” appears on the display.
21X554
Turn this knob to the right to step up the station band or
to the left to step down.
Your radio automatically changes to stereo reception when a
stereo broadcast is received. “ST” appears on the display . If
the signal becomes weak, the radio reduces the amount of
channel separation to prevent the weak signal from creating
noise. If the signal becomes extremely weak, the radio
switches from stereo to mono reception. In this case, “ST”
disappears from the display.
216
AUDIO
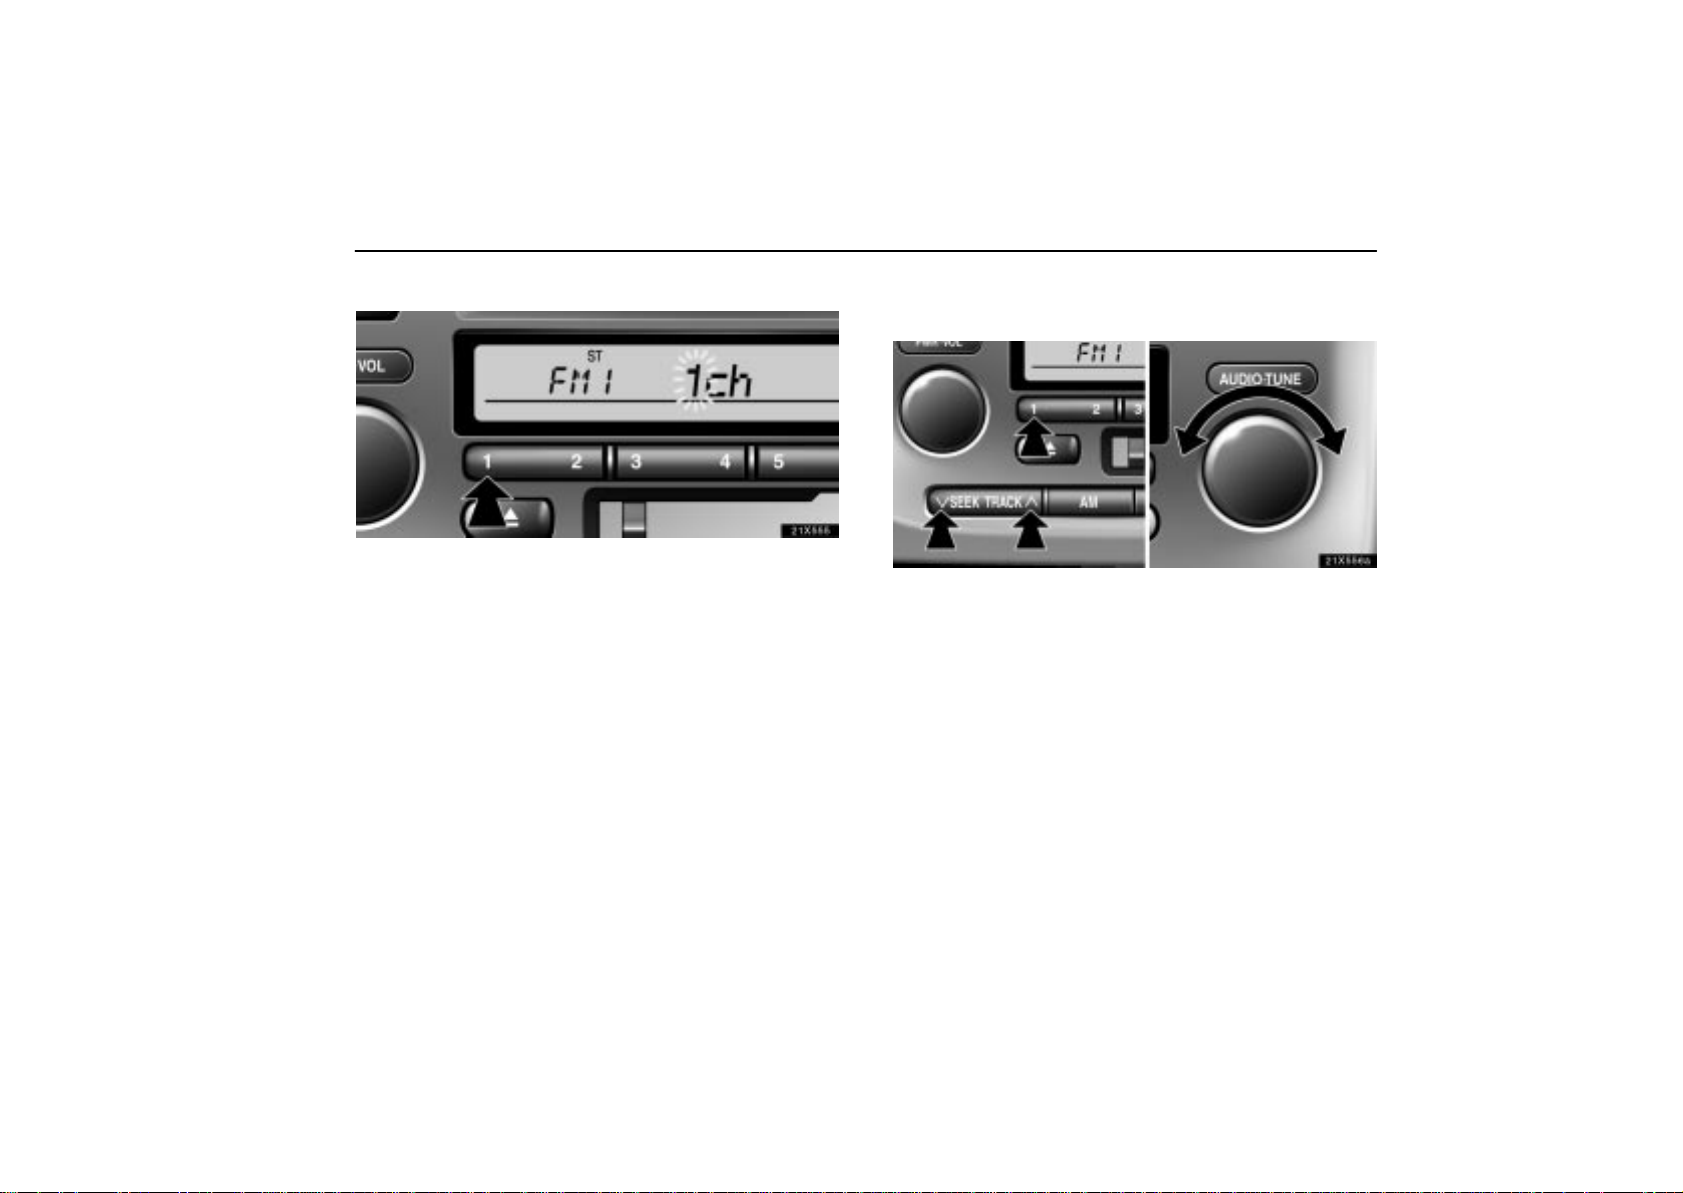
(b) Presetting a station
21X555
1. Tune in the desired station.
2. Push one of the station selector buttons ( 1-6 ) and hold
it until a beep is heard. This sets the station to the button
and the button number ( 1-6 ) appears on the display.
Each button can store one AM station and two FM stations. To
change the preset station to a different one, follow the same
procedure.
The preset station memory is cancelled when the power
source is interrupted by battery disconnection or a blown fuse.
(c) Selecting a station
Tune in the desired station using one of the following methods.
21X556a
Preset tuning: Push the button ( 1-6 ) for the station you want.
The button number ( 1-6 ) and station frequency appear on the
display.
Manual tuning: Turn the “AUDIO-TUNE” knob. The radio will
step up or down to another frequency.
Seek tuning: Push the “SEEK” button. The radio will begin
seeking up or down for a station of the nearest frequency and
will stop on reception. Each time you push the button, the
stations will be searched automatically one after another.
217
AUDIO
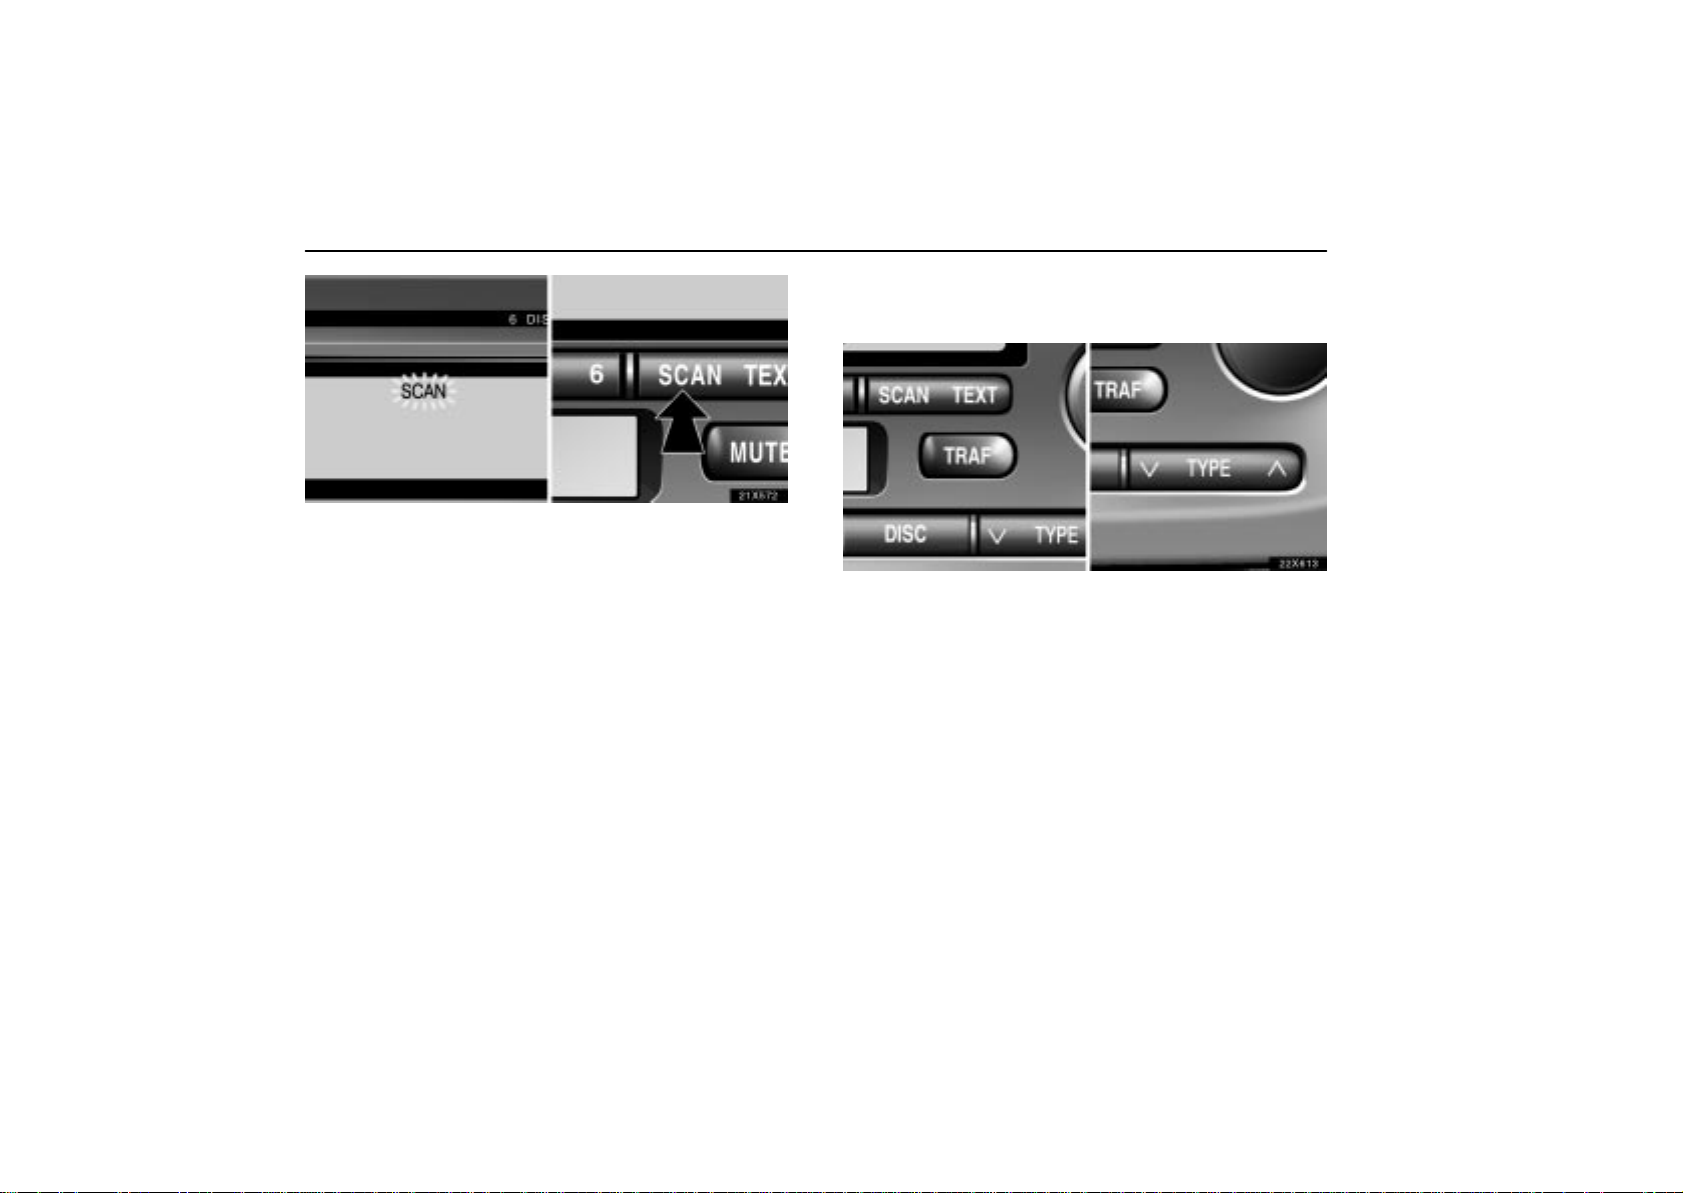
21X572
To scan all the frequencies: Push the “SCAN” button.
“SCAN” appears on the display. The radio will find the next
station up the band, stay there for a few seconds, and then
scan again. To select a station, push the “SCAN” button a
second time.
To scan the preset stations: Push the “SCAN” button until
you hear a beep. “SCAN” appears on the display. The radio
will tune in the next preset station up the band, stay there for
a few seconds, and then move to the next preset station. To
select a station, push the “SCAN” button a second time.
(d) RDS (Radio Data System)
TYPE (Program type):
22X613
When you push the “TYPE” button, the current program type
receiving from RDS station appears on the display.
If the system receives no RDS stations, “NO PTY” appears on
the display.
218
AUDIO
Each time you push the “
changes as in the following:
ROCK
EASY LIS (Easy listening)
CLS/JAZZ (Classical music and jazz)
R&B (Rhythm and Blues)
INFORM (Information)
RELIGION
MISC
ALERT (Emergency message)
Push the “SEEK TRACK” or “SCAN” button with the program
type shown on the display and the radio seeks or scans the
station in the relevant program type.
TRAF (Traffic) function: A station that regularly
broadcasts traffic information is automatically located.
When you push the “TRAF” button, “TRAF SEEK” appears on
the display and the radio will start seeking any traffic program
station.
If no traffic program station is found, “NO TRAF INFO” appears
on the display for a few seconds and the display returns to the
previous mode.
” or “ ” button, the program type
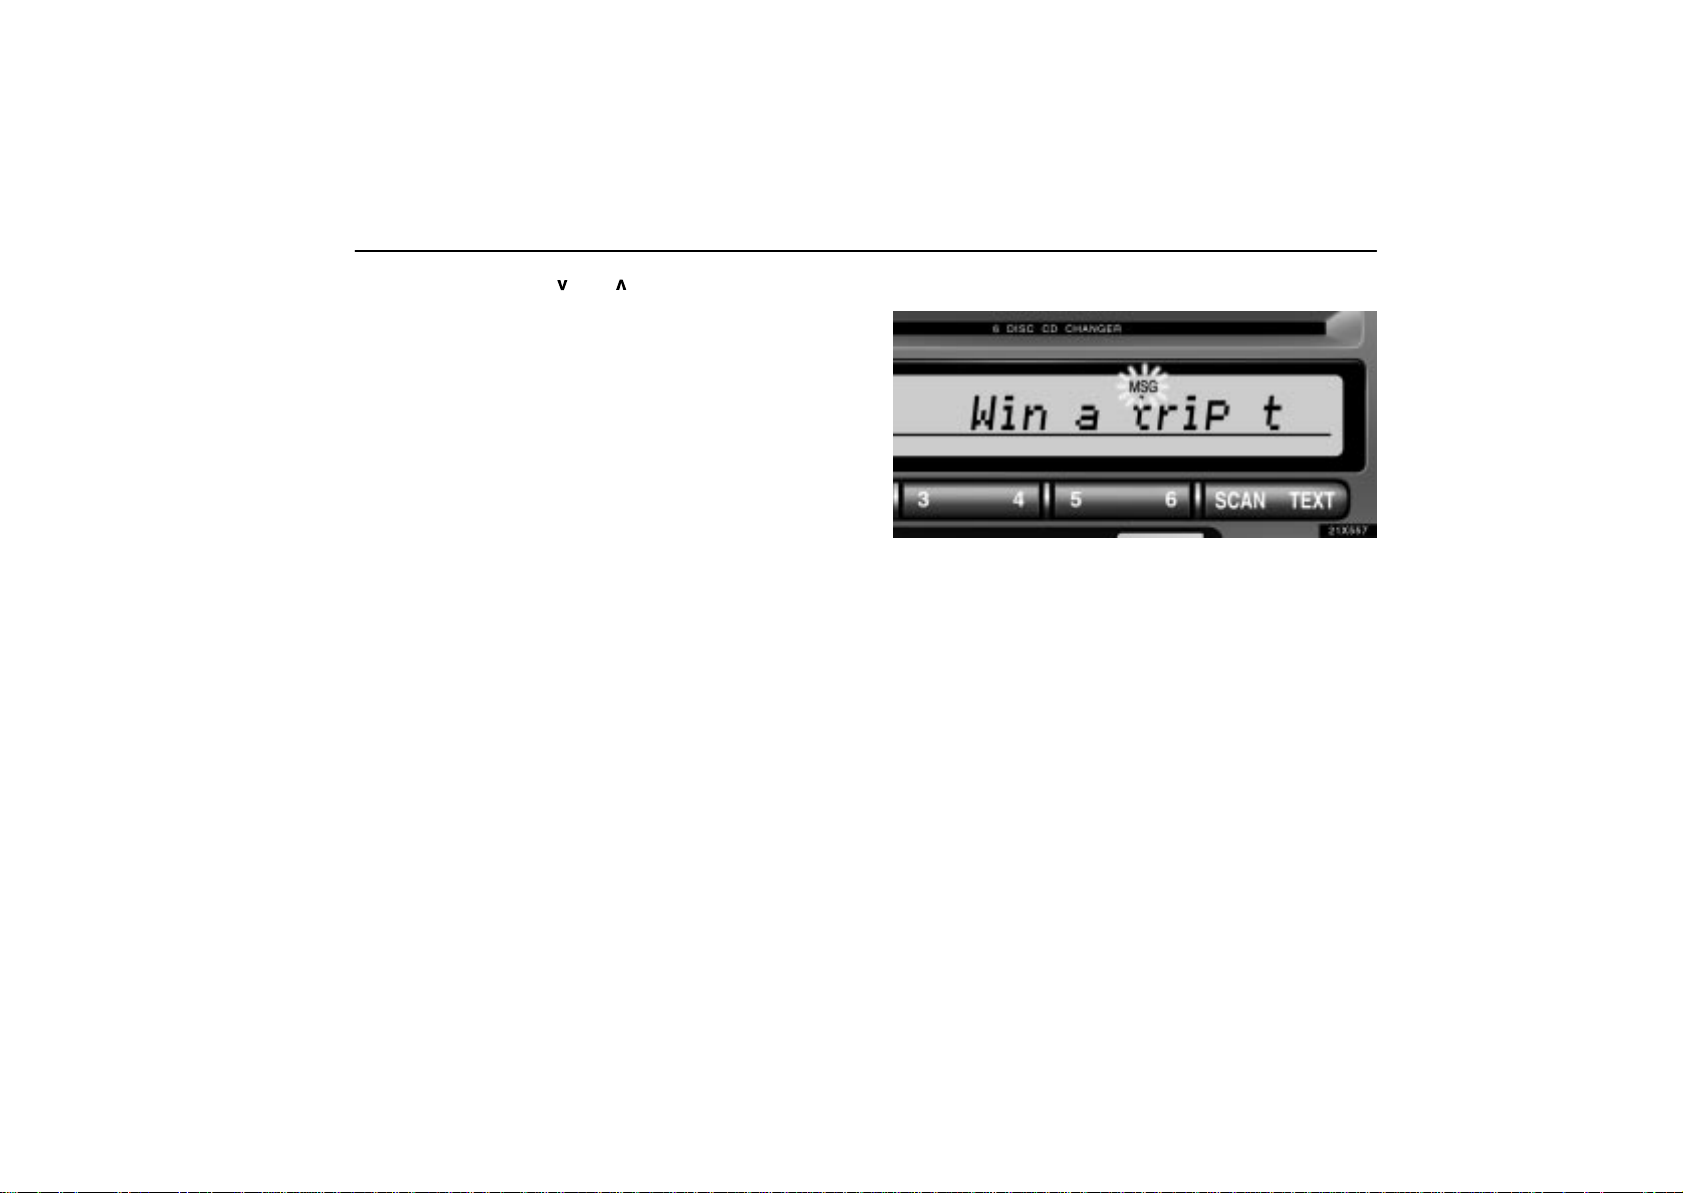
Radio text message:
21x557
If the radio receives a radio text from RDS station, “MSG”
appears on the display. Push the “TEXT” button, and a text
message is displayed.
If the entire the message is not displayed, “” will appear on
the display. To display the rest of the message, push and hold
the “TEXT” button until you hear a beep.
After the entire message has been displayed, the message will
disappear.
In case a text message is not accepted on the display, you can
push the “TEXT” button and hold it to display the rest of the
message.
When the system can show the station name, “RDS” appears
on the display. Each time you push the “TEXT” button,
indication on the display changes from the band to the station
name, a radio text in this order. After 6 seconds passes,
indication returns to the band.
219
AUDIO
Cassette tape player operation
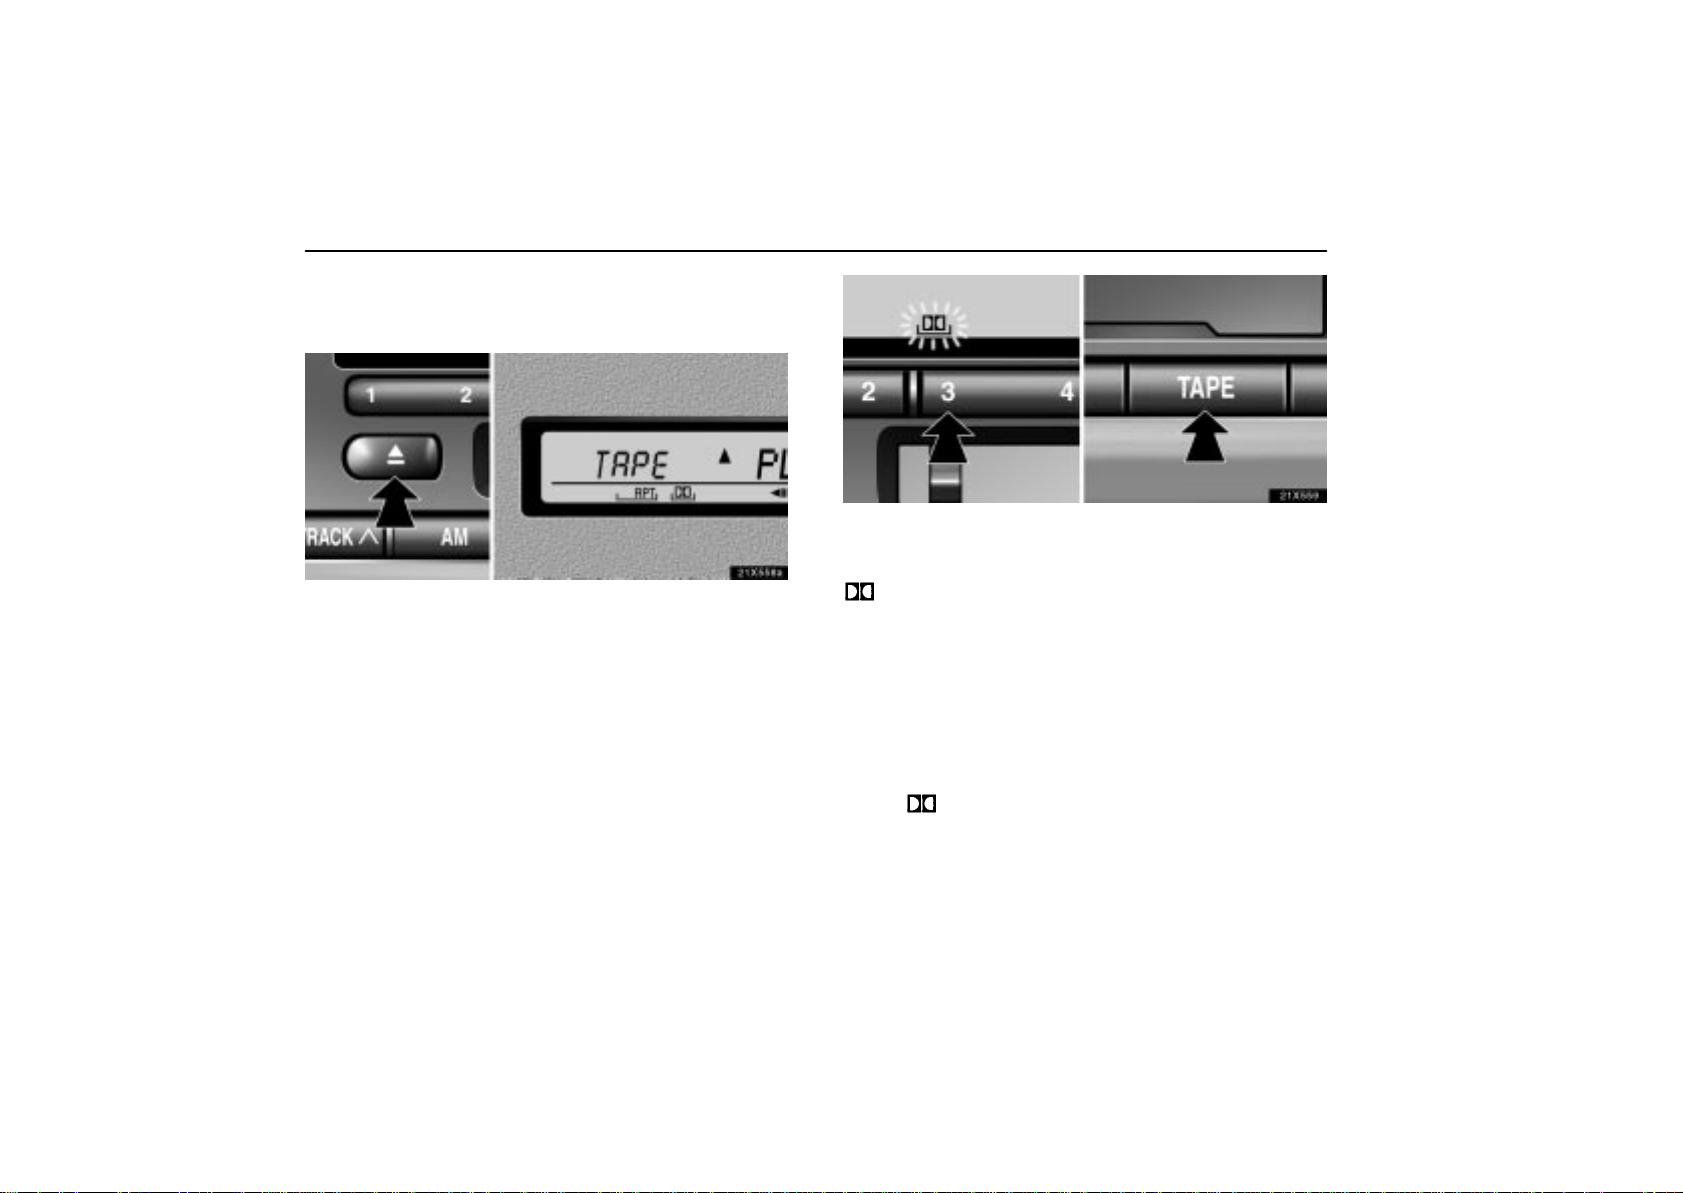
(a) Playing a cassette tape
21X558a
When you insert a cassette tape, the exposed tape should
face to the right.
The player will automatically start when you insert a cassette
tape. At this time, “TAPE” appears on the display.
To stop or eject the cassette tape, push the “EJECT” button.
Auto-reverse feature: After the cassette player reaches the
end of a tape, it automatically reverses and begins to play the
other side, regardless of whether the cassette was playing or
fast forwarding.
20X559
If a cassette is already in the slot, push the “TAPE” button.
Dolby Noise Reduction* feature: If you are listening to a
tape that was recorded with Dolby* Noise Reduction, push the
button. The display will indicate that the Dolby noise
reduction system is on.
The Dolby NR mode reduces tape noise by about 10 dB. For
best sound reproduction, play your tapes with the Dolby NR on
or off according to the mode used for recording the tape.
T o play a tape recorded without Dolby NR, push the button until
the symbol disappears from the display.
* Dolby noise reduction manufactured under license from Dolby
Laboratories Licensing Corporation. “DOLBY” and the double- D
symbol
Corporation.
are trademarks of Dolby Laboratories Licensing
220
AUDIO
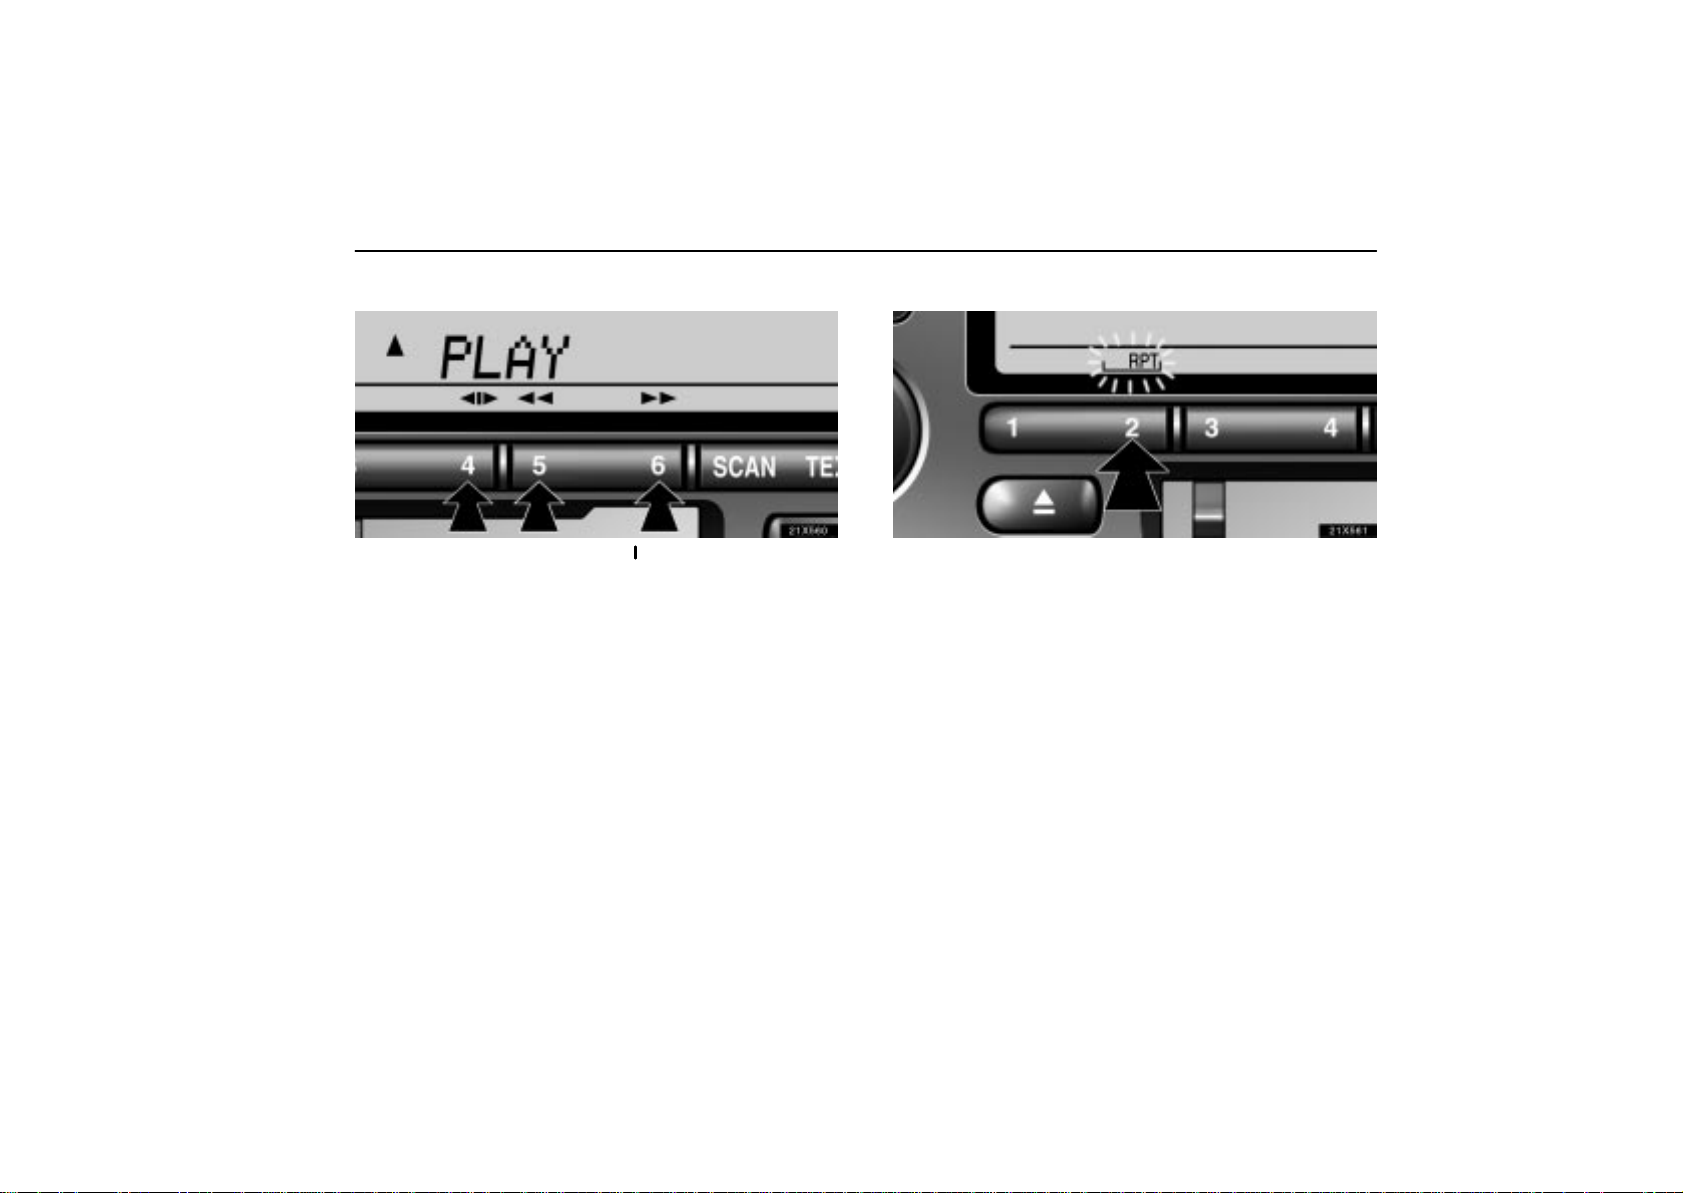
(b) Manual program selection
21X560
“Program” button: Push the “
other side of a cassette tape. The display indicates which side
is currently selected ( indicates top side, indicates bottom
side).
“Rewind” button: Push the “” button to rewind a tape.
“REW” appears on the display.
To stop rewinding, push the same button or “TAPE” button.
“Fast forward” button: Push the “” button to fast forward
a cassette tape. “FF” appears on the display.
To stop fast forwarding, push the same button or “TAPE”
button.
” button to select the
(c) Automatic program selection
21X561
“RPT” button: The repeat feature automatically replays the
current program.
Push the “RPT” button while the program is playing. When the
program ends, it will automatically be rewound and replayed.
Push the button again to turn off the repeat feature.
There must be at least 5 seconds of blank space between
programs for the repeat feature to work correctly.
221
AUDIO
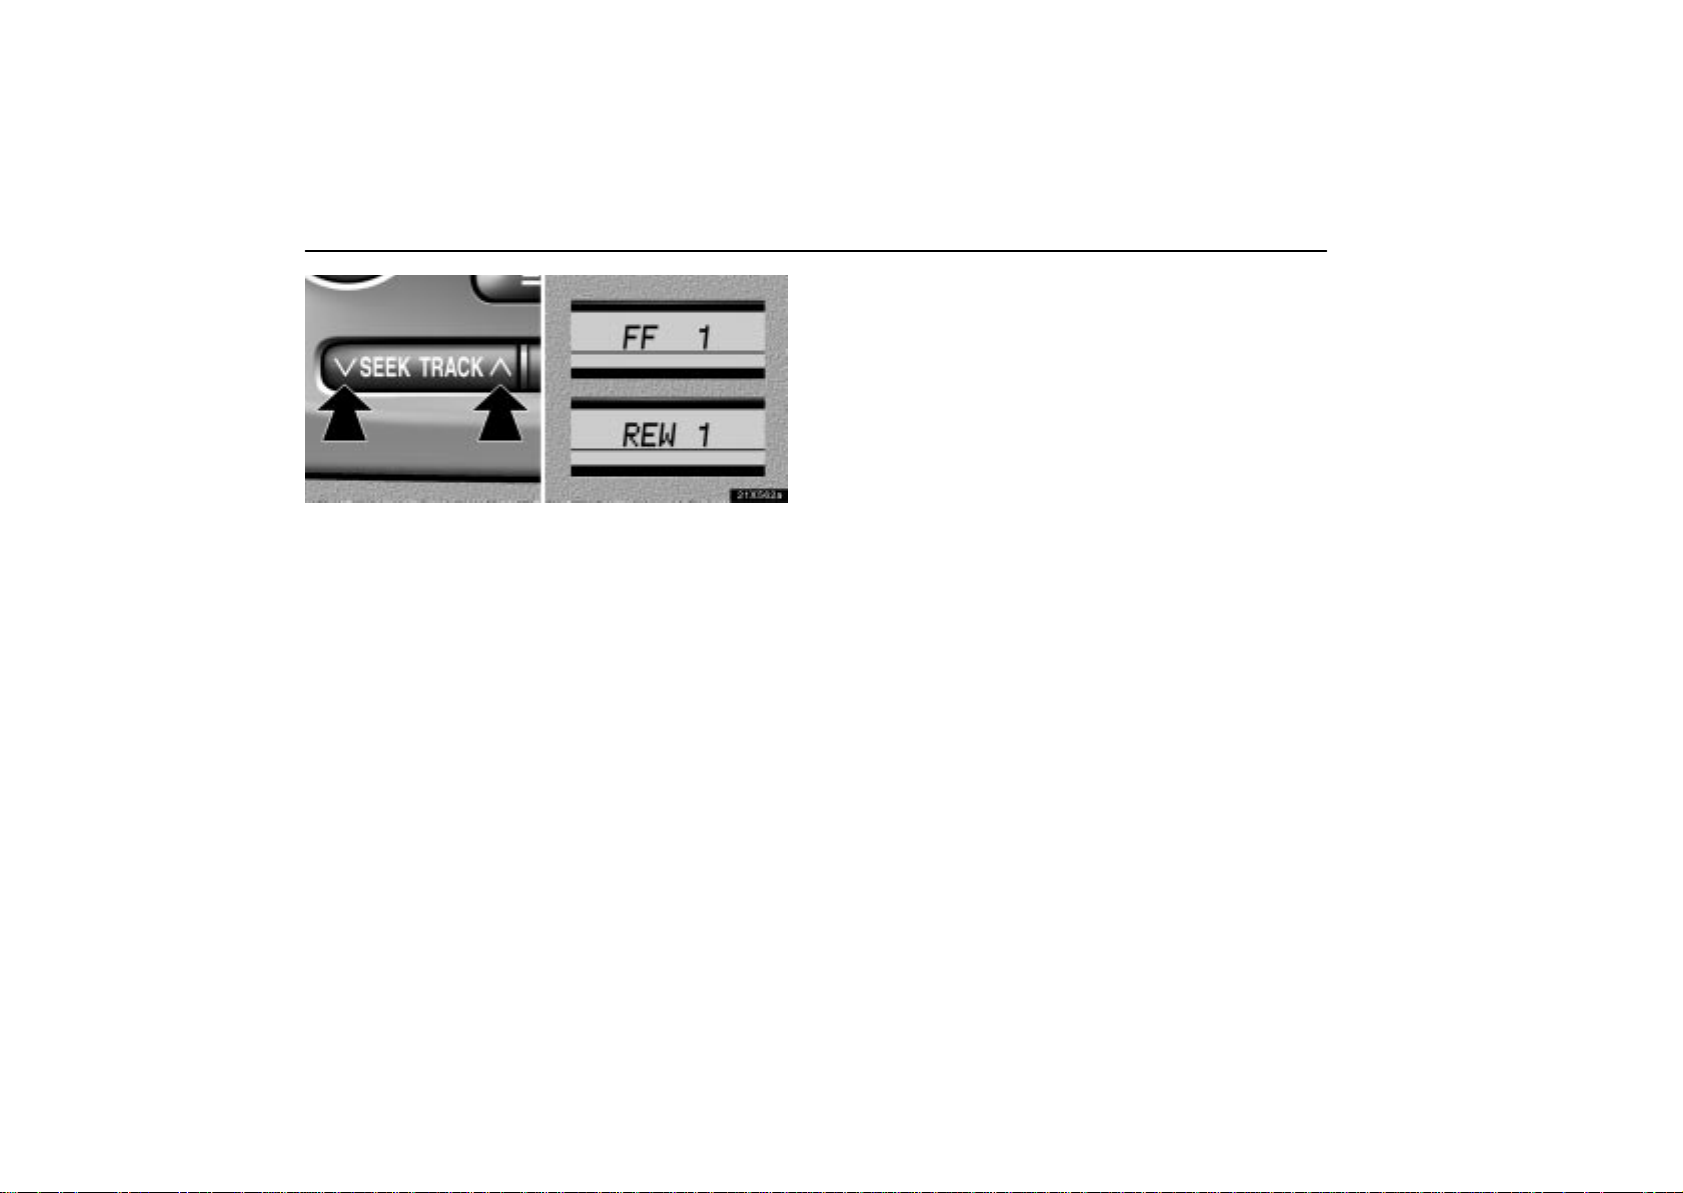
21X562a
“Automatic program selection” button: The automatic
program selection feature allows you to program your cassette
player to skip forward or backward to locate the song you want
to hear. You can skip up to nine programs at a time.
Push this bu t t o n on the r i g h t side to s k i p forward. “FF” and the
number will appear on the display. Push the button until the
number you want to skip appears on the display. After that, the
player will automatically skip forward.
When the end of the tape is reached, the player automatically
reverses sides and resumes normal play.
Push this button on the left side to skip backward. Push the
button until “REW” and the number you want to skip appear on
the display.
If you set “REW 1”, the player will rewind to the beginning
of the current program.
When counting the number of programs you want to rewind,
remember to count the current program as well. For
example, if you want to rewind to a song that is two before
the song you are listening to, push this button until “REW
3” appears on the display.
When the beginning of the tape is reached, the player
automatically resumes normal play.
There must be at least 5 seconds of blank space between
programs for this feature to work correctly.
“RPT” or “Automatic program selection” features: These
features may not work well with some spoken word, live or
classical recordings.
222
AUDIO
Compact disc player operation
(a) Inserting or ejecting compact discs
The ignition switch must be in the “ACC” or “ON” position.
Your changer can store up to 6 discs.
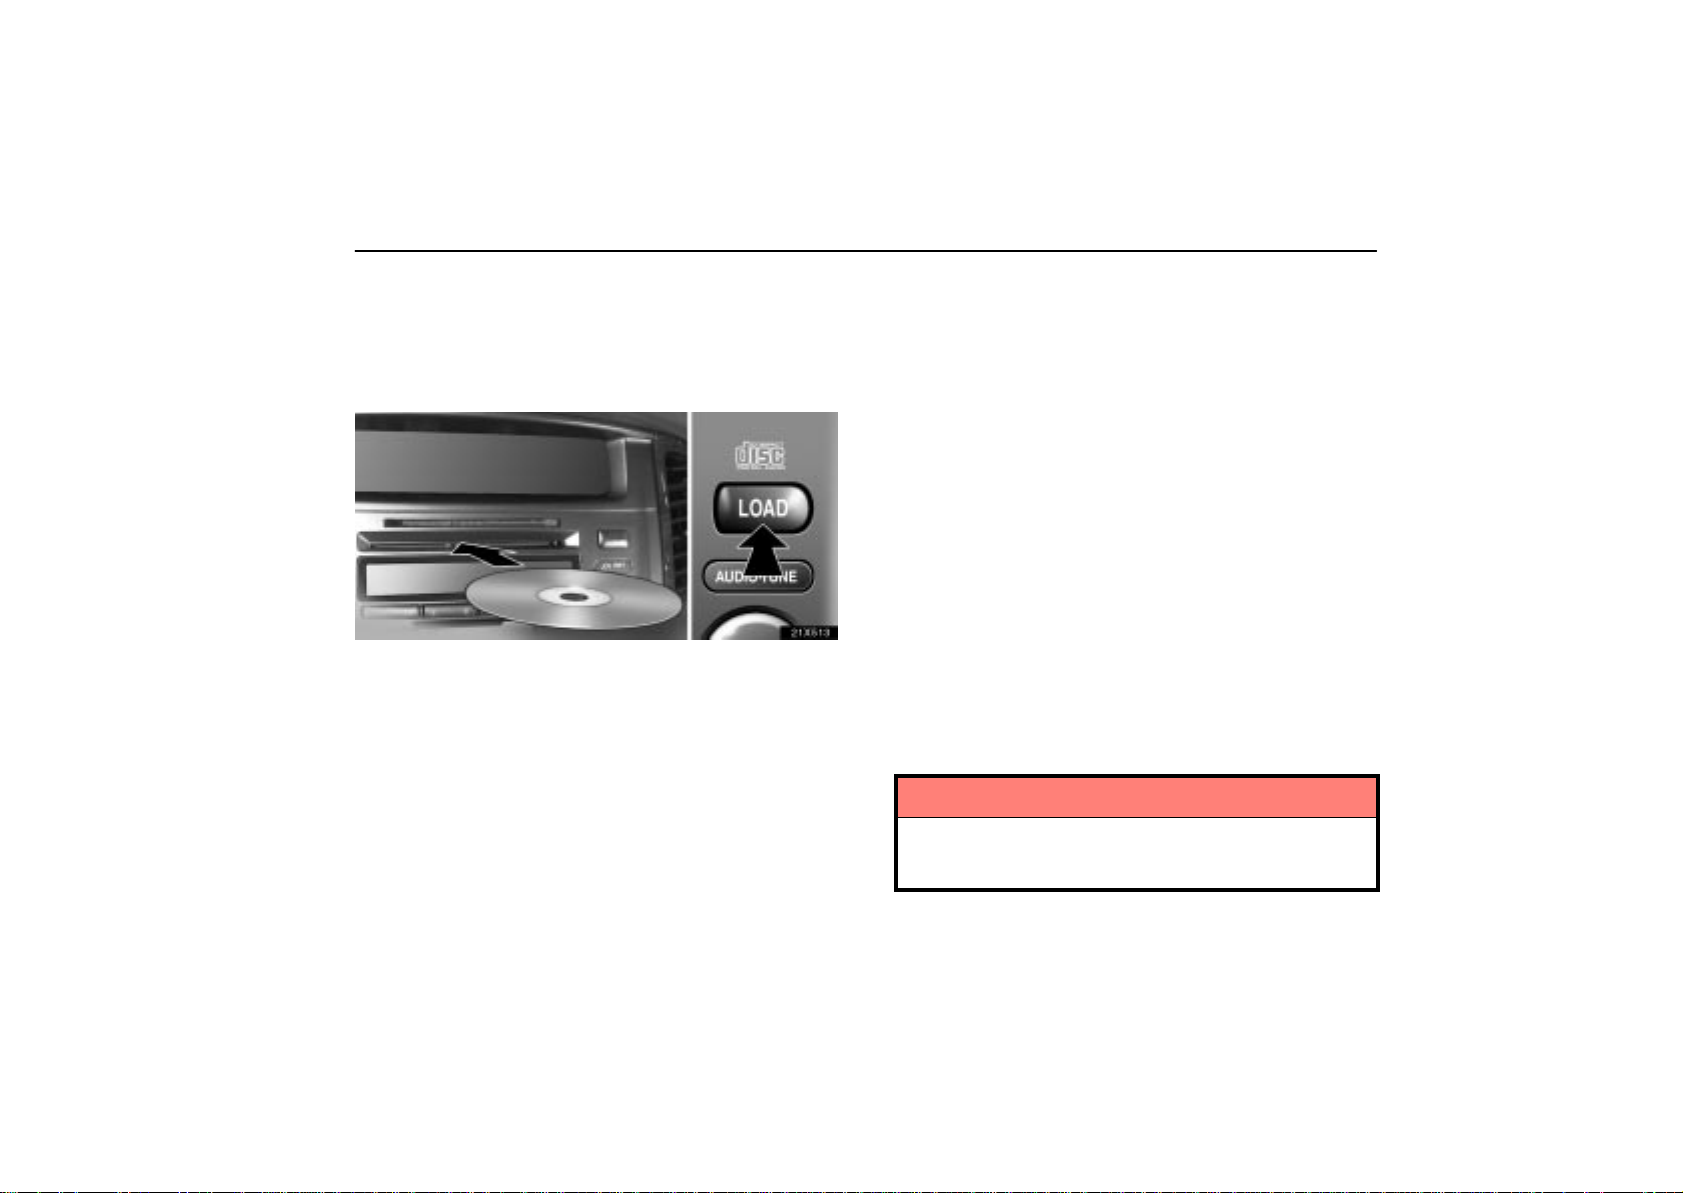
21x513
Setting a single compact disc alone:
1. Push the “LOAD” button briefly.
The umber indicators at both ends of the slot start blinking and
“WAIT” appears on the display. After the umber blinking
indicators changes to green, and the “WAIT” changes to the
“LOAD”, the CD door opens.
2. Insert only one disc while the CD door is open.
You can set a disc at the lowest empty disc number.
After insertion, the set disc is automatically loaded.
If the label faces down, the disc cannot be played. In this case,
“ERROR1” and disc number appear on the display.
If you need to insert the next disc, repeat the same procedure
to insert another disc.
Setting all the discs:
1. Push the “LOAD” button until you hear a beep.
The umber indicators at both ends of the slot start blinking and
“WAIT” appears on the display. After the umber blinking
indicators changes to green, and the “WAIT” changes to the
“LOAD”, the CD door opens.
2. Insert only one disc while the CD door is open.
The CD door closes and “WAIT” appears again.
3. Insert the next disc after the “WAIT” changes to the
“LOAD” and the CD door opens.
4. Repeat this procedure until you insert all the discs.
To cancel the operation, push the “LOAD” or “DISC” button.
If you do not insert the discs within 15 seconds after pushing
the “LOAD” button and “LOAD” is displayed, the operation will
be canceled automatically.
NOTICE
Do not insert one disc stacked on top of another one or
feed them in continuously, to prevent discs from getting
stuck in the player.
223
AUDIO
21X563
Ejecting a single disc alone:
1. Push the button under the “
display to display the disc number you want to eject.
2. Push the “EJECT” button briefly.
At this time, the display shows “EJECT” and the indicators at
both ends of the slot as well as disc number light up.
Ejecting all the discs:
Push the “EJECT” button until you hear a beep.
However, if you accidentally pushed the “EJECT” button, push
the “DISC” or “LOAD” button to insert the disc again.
Do not push in the disc which is being ejected forcibly.
” or “ ” signal on the
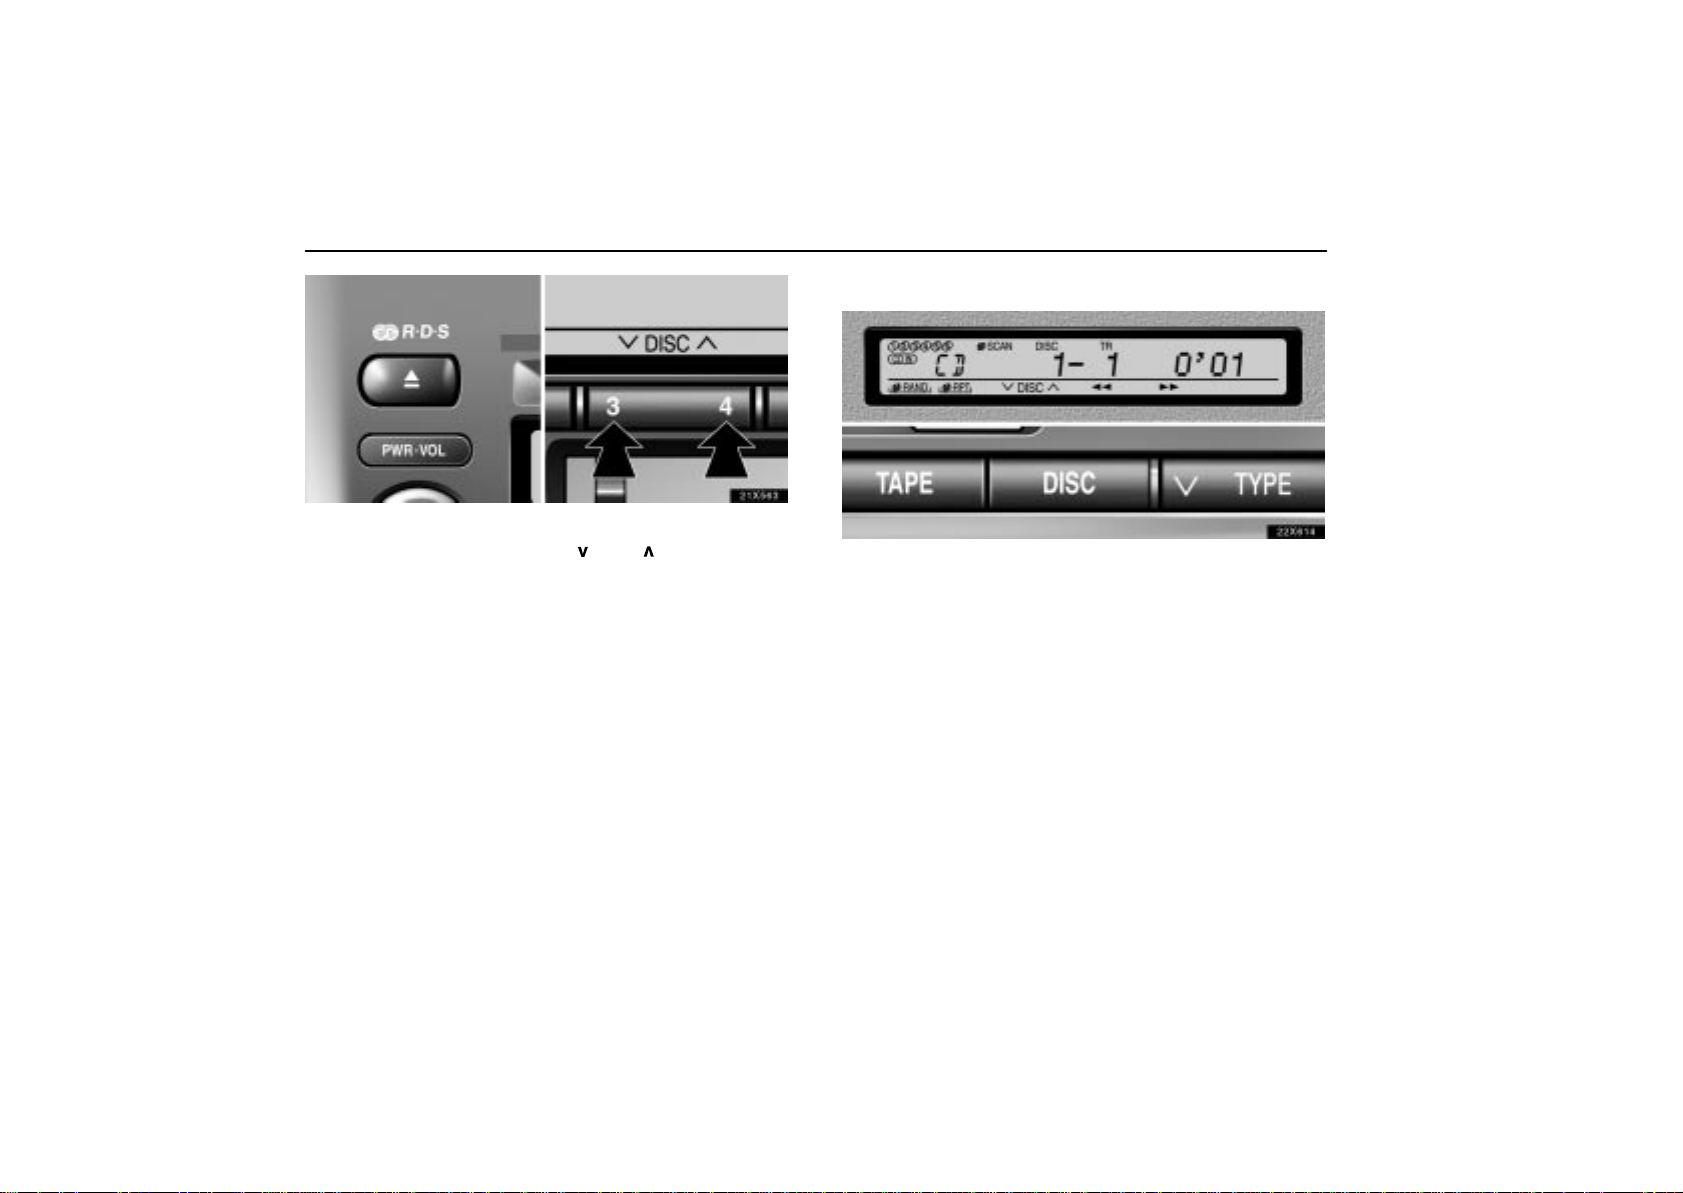
(b) Playing a compact disc
22X614
Push the “DISC” button if the discs are already loaded in
the player.
“CD” appears on the display.
The discs set in the player are played continuously, starting
with the last disc you inserted. The disc number of the disc
currently being played, the track number and the time from the
beginning of the program appear on the display.
When play of one disc ends, the first track of the following disc
starts. When play of the final disc ends, play of the first disc
starts again.
The player will skip any empty disc number.
224
AUDIO
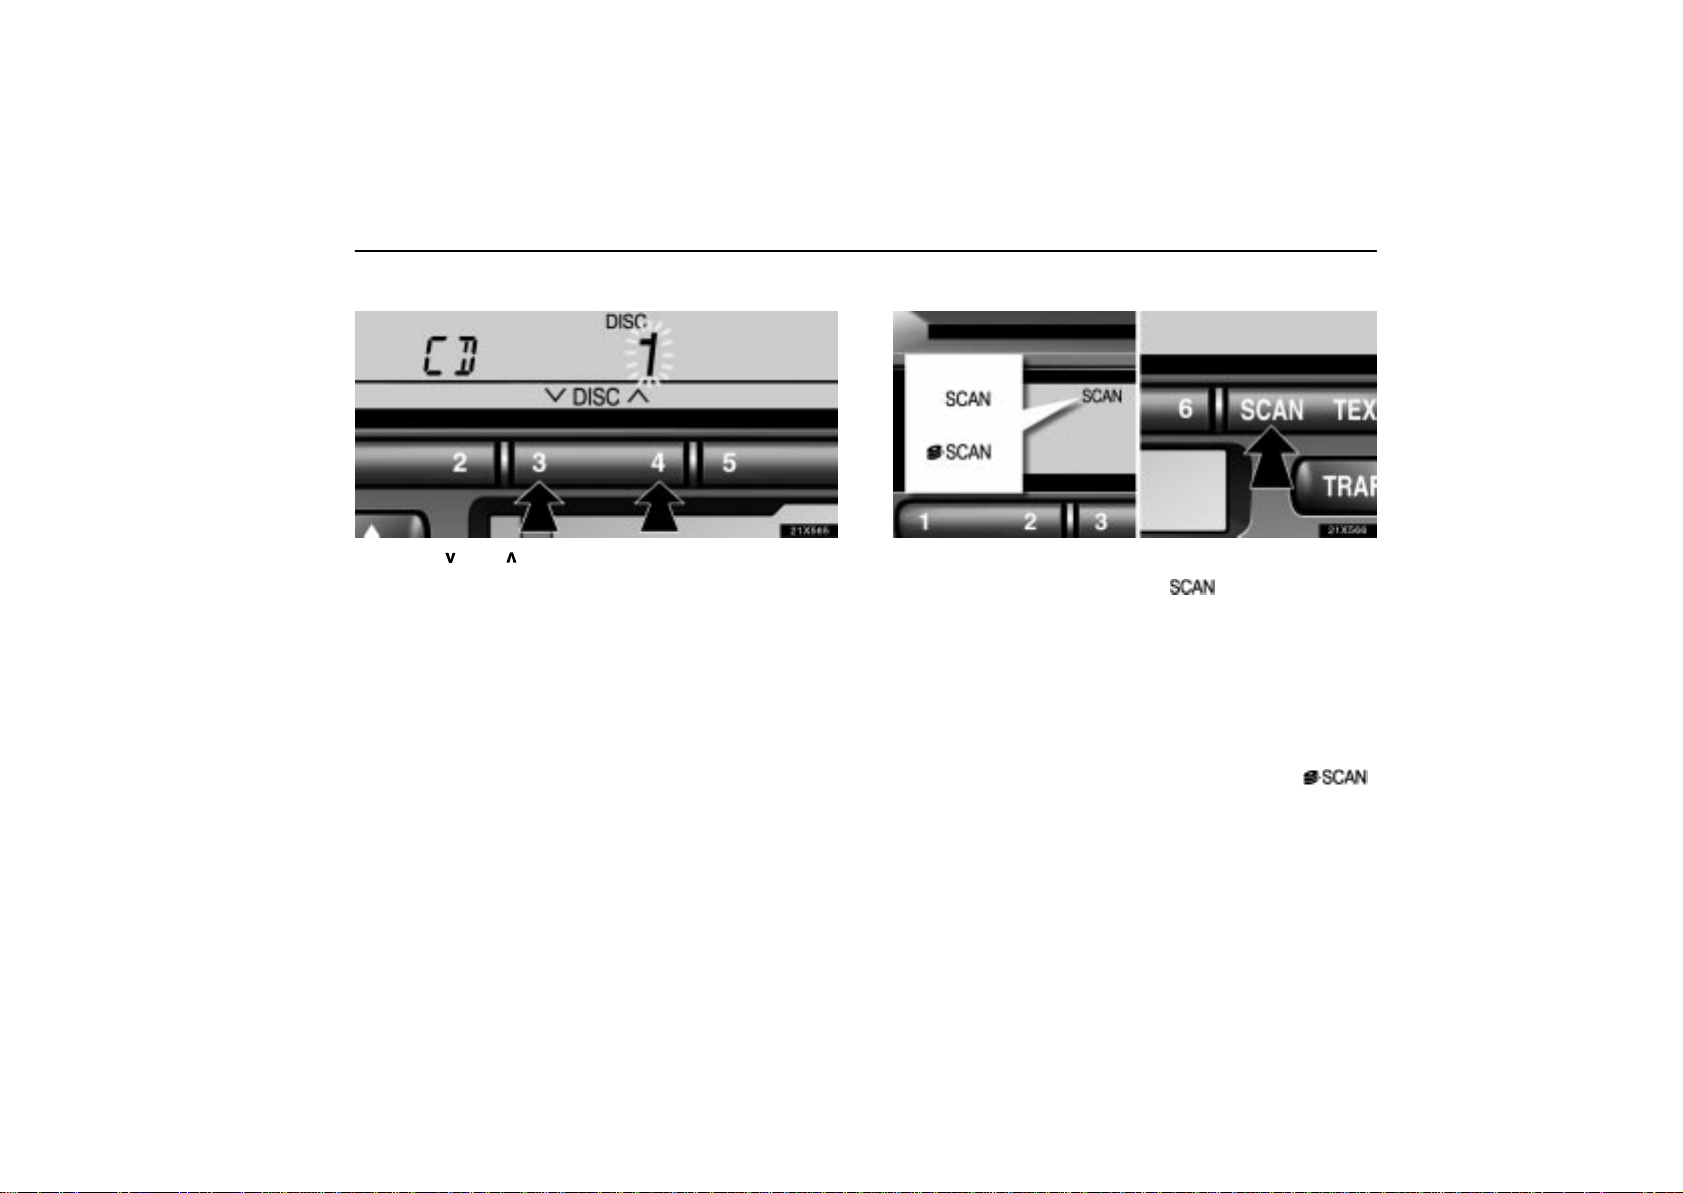
(c) Selecting a desired disc
21X565
Push the “ ” or “ ”button to select the disc number.
Push the button several times until the desired disc number
appears on the display. When you release the button, the
player will start playing the selected disc from the first track.
(d) Searching for a desired track or disc
21X566
Searching for a desired track:
Push the “SCAN” button briefly. “
display . The compact disc player will play the next track for 10
seconds, then scan again. To select a track, push the “SCAN”
button a second time. If the player reaches the end of the disc,
it will continue scanning at track 1.
After all the tracks are scanned in one pass, normal play
resumes.
Searching for a desired disc:
Push the “SCAN” button until you hear a beep. With “
on the display, the program at the beginning of each disc will
be played for 10 seconds. To continue listening to the program
of your choice, push the “SCAN” button a second time.
After all the discs in the player are scanned in one pass, the
scan function is cancelled.
” will appear on the
”
225
AUDIO
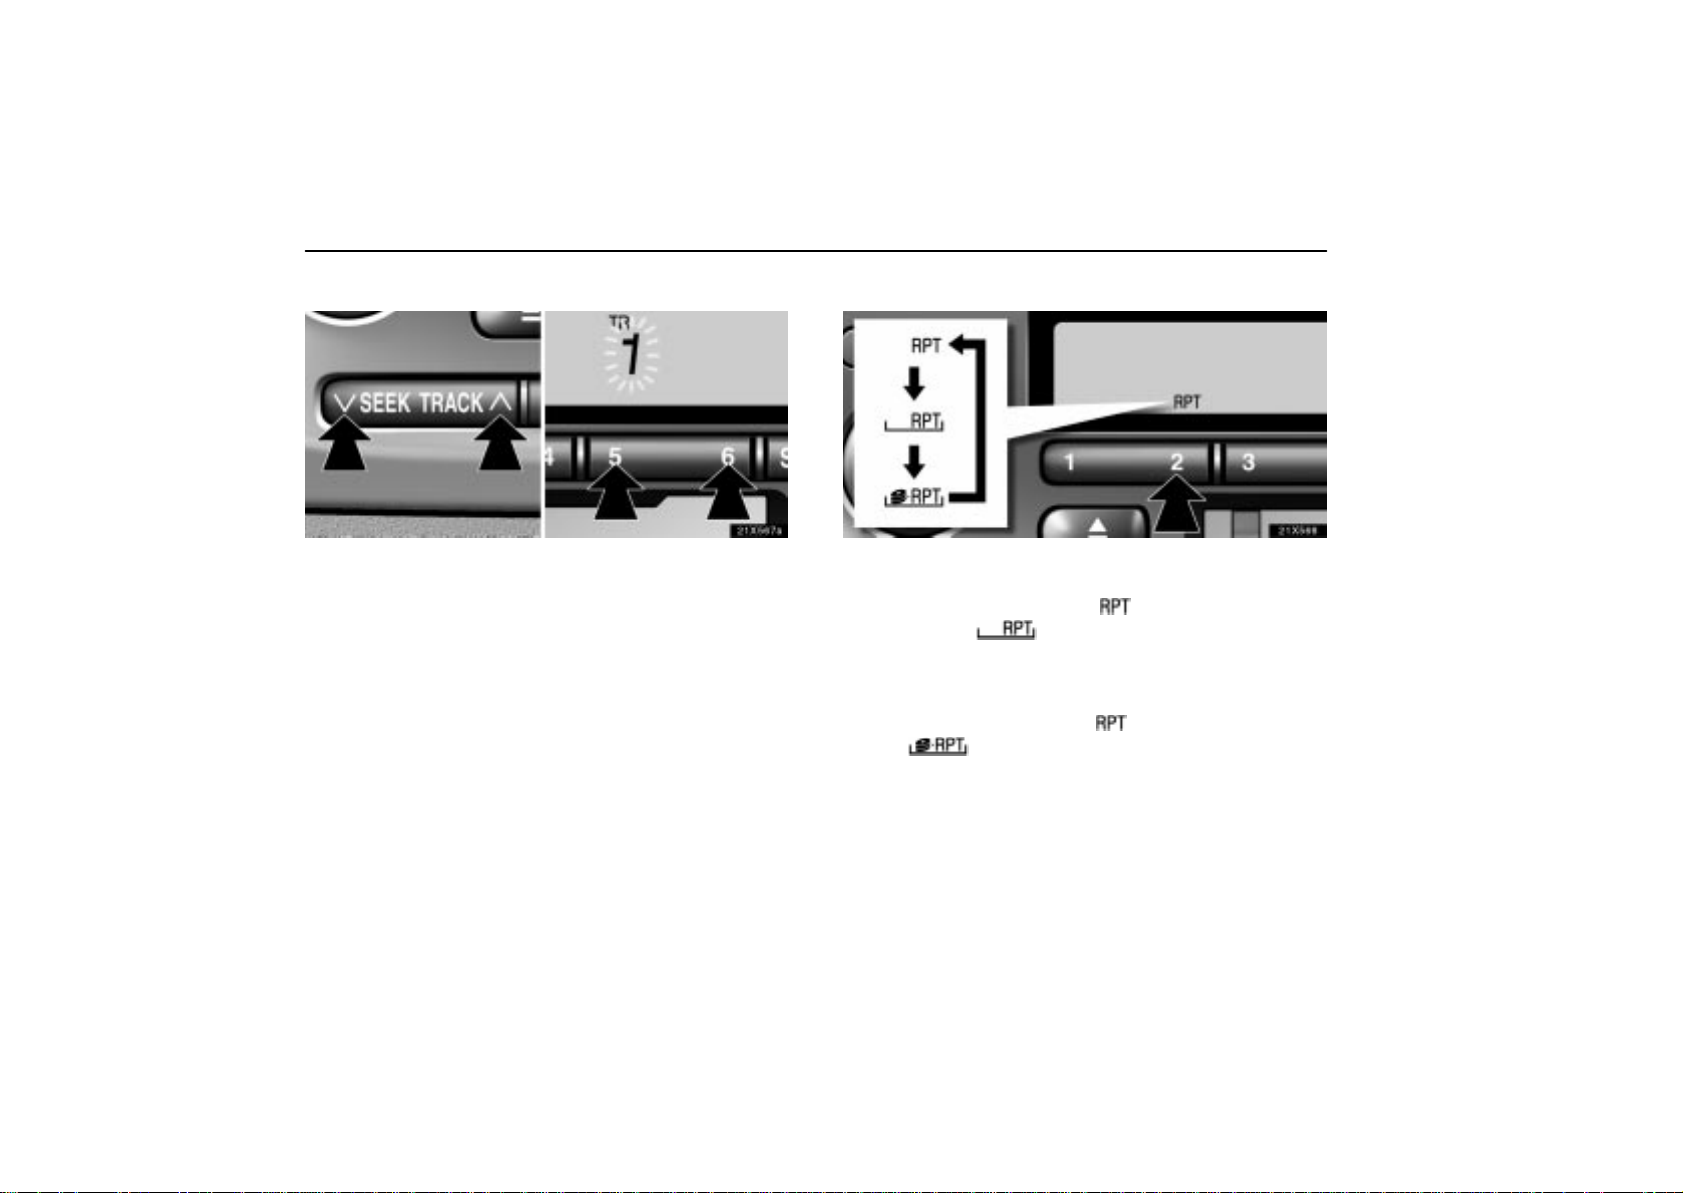
(e) Selecting a desired track
21X567a
“TRACK” button: Use for direct access to a desired track.
Push either side of the “TRACK” button several times until the
desired track number appears on the display . As you release
the button, the player will start playing the selected track from
the beginning.
“Fast forward” button.
Push the “” button and hold it to fast forward the disc.
When you release the button, the compact disc player will
resume playing from that position.
“Reverse” button.
Push the “” button and hold it to reverse the disc. When
you release the button, the compact disc player will resume
playing.
(f) Repeating a track or a disc
21X568
“RPT” button: There are 2 repeat features — you can either
replay a disc track or a whole compact disc.
Repeating a track: Push the “
track is playing. “ ” will appear on the display . When the
track ends, it will automatically be replayed. This process will
be continued until you push the button again to turn off the
repeat feature.
Repeating a disc: Push the “
beep. “ ” will appear on the display. The player will
repeat all the tracks on the disc you are listening to. When the
disc ends, the player will automatically go back to the top track
of the disc and replay. This process will be continued until you
push the button again to turn off the repeat feature.
” button briefly while the
” button until you hear a
226

AUDIO
(g) Random playing
21X569
“RAND” button: There are 2 random features — you can
either listen to the tracks on all the compact discs in the player
in random order, or only listen to the tracks on a specific
compact disc in random order.
Random playin g f o r the tracks on a disc: Push the “
button briefly. “ ” will appear on the display and play
the disc you are listening to in random order.
Random playing for all the tacks in the magazine: Push the
” button until you hear a beep. “ ” will appear
“
on the display and the player will perform all the tracks on all
the discs in the magazine in random order. To turn off the
random feature, push “
When a track is skipped or the system is inoperative, push the
button to reset.
” a second time.
(h) Compact disc text
21x586
When you push the “TEXT” button while the compact disc
with compact disc text display function (the logo “CD
TEXT” marked on the CD) is being played, the track
number, elapsed time, compact disc title and then track
”
title appear on the display.
When you push this button if the compact disc does not have
a text display function, “NO TITLE” appears on the display.
The display can show up to 12 letters at once. If the CD title
or music title is longer than 12 letters, hold down the button for
longer than 1 second. The letters after the 12th one are shown.
However, 24 letters at maximum can be shown on the display.
When you push this button for longer than 1 second or play no
operation for about 6 seconds with the letters after the 13th one
on the display, the display returns and shows the first 12 letters.
Even if the CD title or music title is longer than 24 letters, the
display can show up to 24 letters.
227
AUDIO
(i) If the player malfunctions
If the player or another unit equipped with the play er
malfunctions, your audio system will display one of the four
following error messages.
If “WAIT” appears on the display: It indicates that th e in si de
of the player unit may be too hot due to the very high ambient
temperature. Remove the disc from the player and allow the
player to cool down.
If “ERROR 1” appears on the display: It indicates that the
disc is dirty, damaged, or it was inserted upside down. Clean
the disc or insert it correctly.
If “ERROR 3” or “ERROR 4” appears on the display: It
indicates there is trouble inside the system. Eject the disc.
If the malfunction is not rectified: Take your vehicle to your
Lexus dealer.
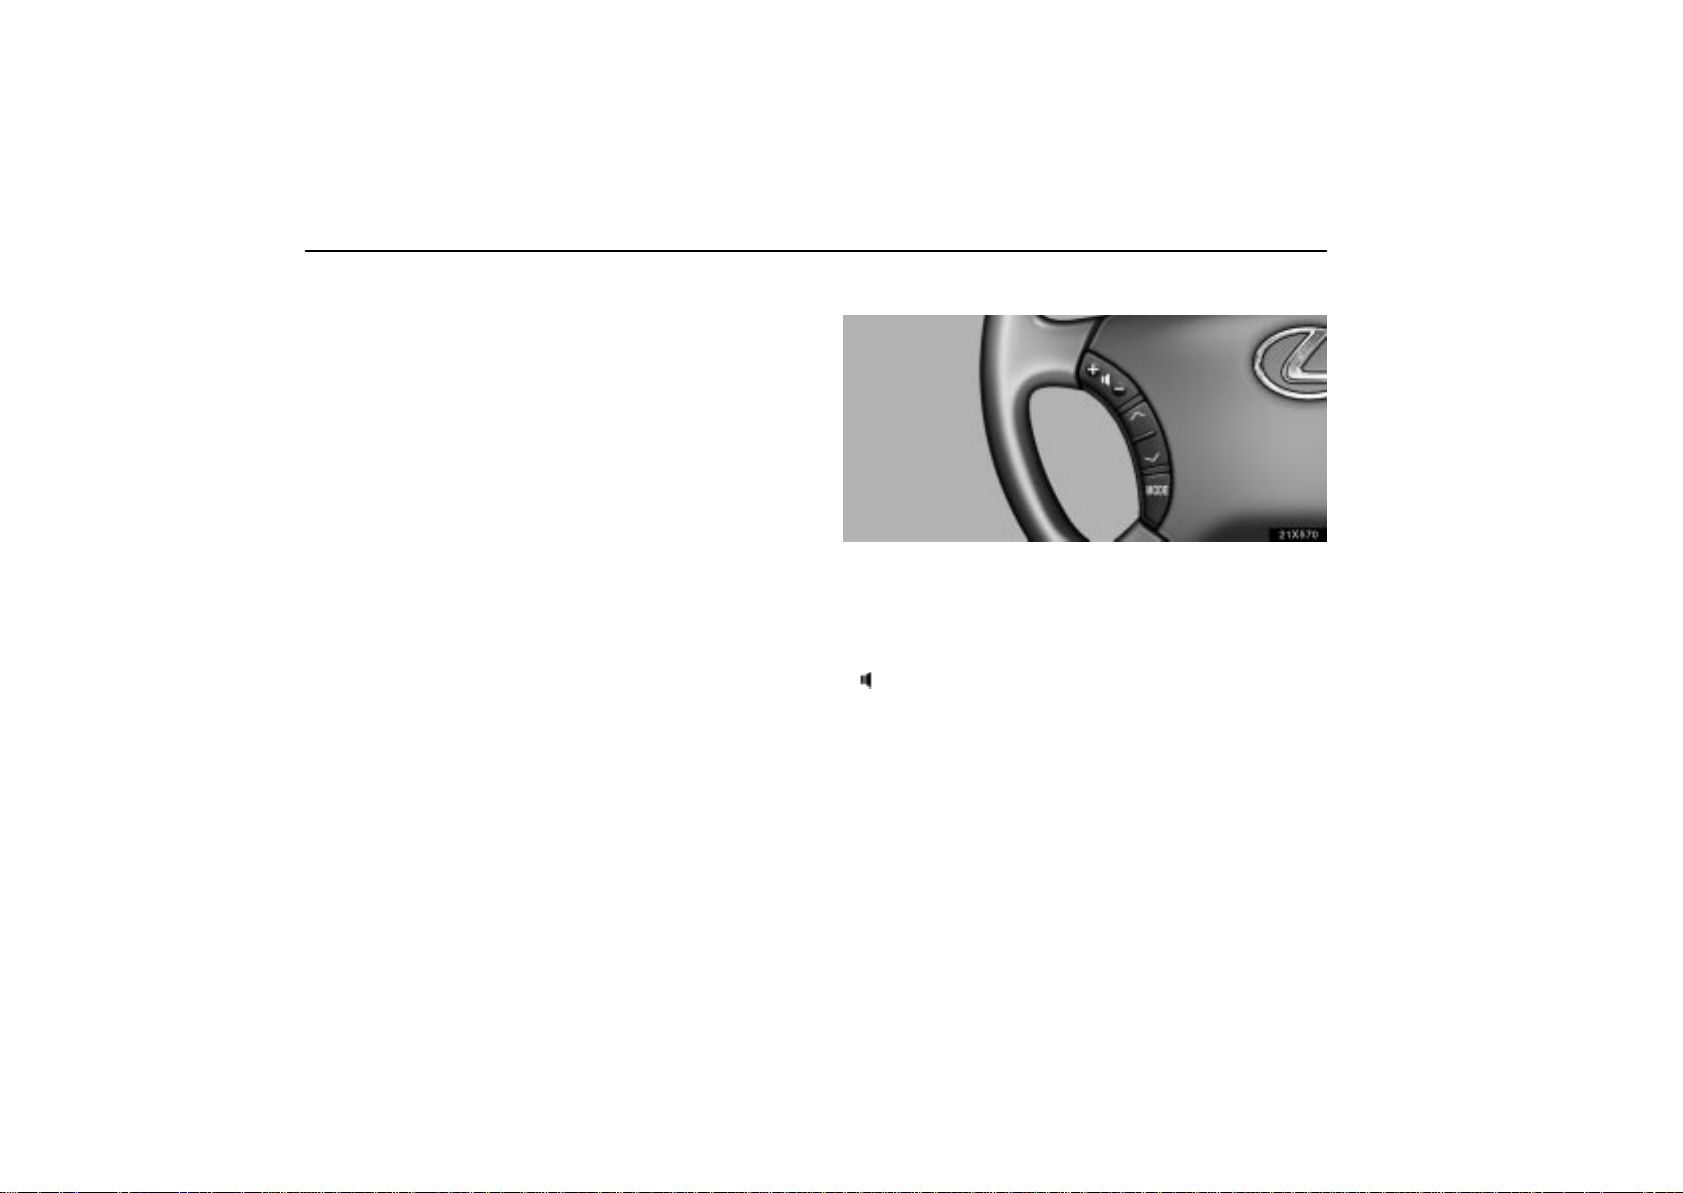
Audio remote controls (steering switches)
21x570
The switches are installed on the left side of the steering wheel.
“MODE” switch: Use this switch to change the mode. If a tape
or compact disc is not inserted, the “TAPE” or “CD” mode is
skipped. When you push the switch with the audio system
turned off, the audio system turns on.
” switches: Use these switches to adjust the volume.
“
Push “+” to increase the volume and “–” to decrease the
volume. The volume continues to increase or decrease while
the switch is being pressed.
228

AUDIO
(a) When the radio mode is selected
or
”
“
select a station.
To select a preset station, push the switch briefly. Do this
again to select the next preset station.
To seek a station, push and hold the switch until you hear
a beep. Do this again to find the next station. If you push
the switch on either side of the
seek mode, seeking will be cancelled.
To step up or down the frequency, push and hold the switch
even after you hear a beep. When you release from the
switch, the radio will begin seeking up or down for a station.
Do this again to find the next station.
(b) When the “TAPE” mode is selected
or
“
”
rewind the tape or for automatic program selection.
Push this switch until you hear a beep to fast forward or
rewind the tape. To stop fast forwarding or rewinding, push
the same side on the switch until you hear a beep.
Push this switch briefly for automatic program selection.
When automatically selecting a program, you can skip up to
9 programs at a time. For details, see page 222 for details.
switch: Push this switch for seek tuning or to
”“
or
“
”
switch: Push this switch to fast forward or
”“
during the
”“
(c) When the “CD” mode is selected
or
“
”
or disc.
Push this switch briefly to select a desired track.
To select a desired disc, push and hold this switch until the
desired number of the disc appears and you hear a beep.
switch: Use this switch to select a desired track
”“
CAUTION
Operate the switches with due care while you are
driving to avoid accidents.
229

AUDIO
Rear seat audio system
In the rear seat, you can enjoy a different mode from the
one used on the front audio system, using headphones.
21x571a
(a) Turning the system on and off
“ON/SOURCE” butto n : Use this button to turn the system o n
when the system is off. When the system is turned on, the
mode changes by pushing this button.
“OFF” button: Use this button to turn off the system.
“Volume adjusting” knob: Use this knob to adjust the
volume.
(b) When the radio mode is selected
“
on the preset button of the front audio system. Each push of
the button changes to the station with higher numbered preset
button.
“
seek tuning.
Push this button briefly. Each time you push the button, the
Push this button and hold it until you hear a beep. The radio
will begin seeking up or down for a station, and will stop on
reception. Each time you push the button, the stations will
(c) When the “TAPE” mode is selected
“
of a cassette tape.
“
forward or backward to locate the song you want to hear. For
details, see “Automatic program selection” on page 221.
” button: Push this button to select a station preset
CH
TUNE
radio will step up or down to another frequency.
be searched out one after another.
PROG
TRACK
” button: Push this button for manual tuning or
” button: Push this button to select the other side
” button: Push the left or right side to skip
230
AUDIO
(d) When the “CD” or “DVD” mode is selected
“
DISC
“
TRACK
track or push this button and hold it to fast forward or reverse.
(e) Some basics
This system cannot be used if the audio system is not turned
on.
You cannot select “AM” or “FM” mode in the rear seat if the
“FM” or “AM” mode is used on the front seats side.
If you select the same mode as the front seats side, operating
the controller will affect the mode on the front seats side.
” Use this button to search a desired disc.
” button: Use this button to search a desired
CAUTION
This system is not designed for a driver. So, the driver
should not use this system while driving.
Car audio system operating hints
NOTICE
To ensure correct audio system operations:
Be careful not to spill beverages over the audio
system.
Do not put anything other than a cassette tape or
compact discs into the cassette tape slot or compact
disc slot.
The use of a cellular phone inside or near the vehicle
may cause a noise from the speakers of the audio
system which you are listening to. However, this
does not indicate a malfunction.
231

AUDIO
Radio reception
Usually, a problem with radio reception does not mean there
is a problem with your radio - it is just the normal result of
conditions outside the vehicle.
For example, nearby buildings and terrain can interfere with
FM reception. Power lines or telephone wires can interfere
with AM signals. And of course, radio signals have a limited
range. The farther you are from a station, the weaker its signal
will be. In addition, reception conditions change constantly as
your vehicle moves.
Here are some common reception problems that probably do
not indicate a problem with your radio:
FM
Fading and drifting stations - Generally, the effective range
of FM is about 40 km (25 miles). Once outside this range, you
may notice fading and drifting, which increase with the
distance from the radio transmitter. They are often
accompanied by distortion.
Multi-path - FM signals are reflective, making it possible for
two signals to reach your antenna at the same time. If this
happens, the signals will cancel each other out, causing a
momentary flutter or loss of reception.
Static and fluttering - These occur when signals are blocked
by buildings, trees, or other large objects. Increasing the bass
level may reduce static and fluttering.
Station swapping - If the FM signal you are listening to is
interrupted or weakened, and there is another strong station
nearby on the FM band, your radio may tune in the second
station until the original signal can be picked up again.
AM
Fading - AM broadcasts are reflected by the upper
atmosphere - especially at night. These reflected signals can
interfere with those received directly from the radio station,
causing the radio station to sound alternately strong and weak.
Station interference - When a reflected signal and a signal
received directly from a radio station are very nearly the same
frequency, they can interfere with each other, making it di fficult
to hear the broadcast.
Static - AM is easily affected by external sources of electrical
noise, such as high tension power lines, lightening, or electrical
motors. This results in static.
232
AUDIO
Caring for your cassette player and tapes
For the best performance for your cassette player and tapes:
Clean the tape head and other parts regularly.
A dirty tape head or tape path can decrease sound quality
and tangle your cassette tapes. The easiest way to clean
them is by using a cleaning tape. (A wet type is
recommended.)
Use high-quality cassettes:
Low- quality cassette tapes can cause many problems,
including poor sound, inconsistent playing speed, and
constant auto- reversing. They can also get stuck or
tangled in the cassette player.
Do not use a cassette if it has been damaged or tangled or
if its label is peeling off.
Do not leave a cassette in the player if you are not listening
to it, especially if it is hot outside.
Store cassettes in their cases and out of direct sunlight.
Avoid using cassettes with a total playing time longer than
100 minutes (50 minutes per side). The tape used in these
cassettes is thin and could get stuck or tangled in the
cassette player.
Caring for your compact disc player and discs
Your compact disc player is intended for use with 12 cm (4.7
in.) discs only.
Extremely high temperature can keep your compact disc
player from working. On hot days, use air conditioning to
cool the vehicle interior before you listen to a disc.
Bumpy roads or other vibrations may make your compact
disc player skip.
If moisture gets into your compact disc player, you may not
hear any sound even though your compact disc player
appears to be working. Remove the disc from the player
and wait until it dries.
CAUTION
Compact disc players use an invisible laser beam which
could cause hazardous radiation exposure if directed
outside the unit. Be sure to operate the player correctly.
233

AUDIO
20L037
Use only compact discs marked as shown above. The
following products may not be playable on your compact
disc player.
Copy-protected CD
CD-R (CD-Recordable)
CD-RW (CD-Re-writable)
CD-ROM
234
22sv01
Special shaped discs
22sv02
Low quality discs
AUDIO
22sv03
Labeled discs
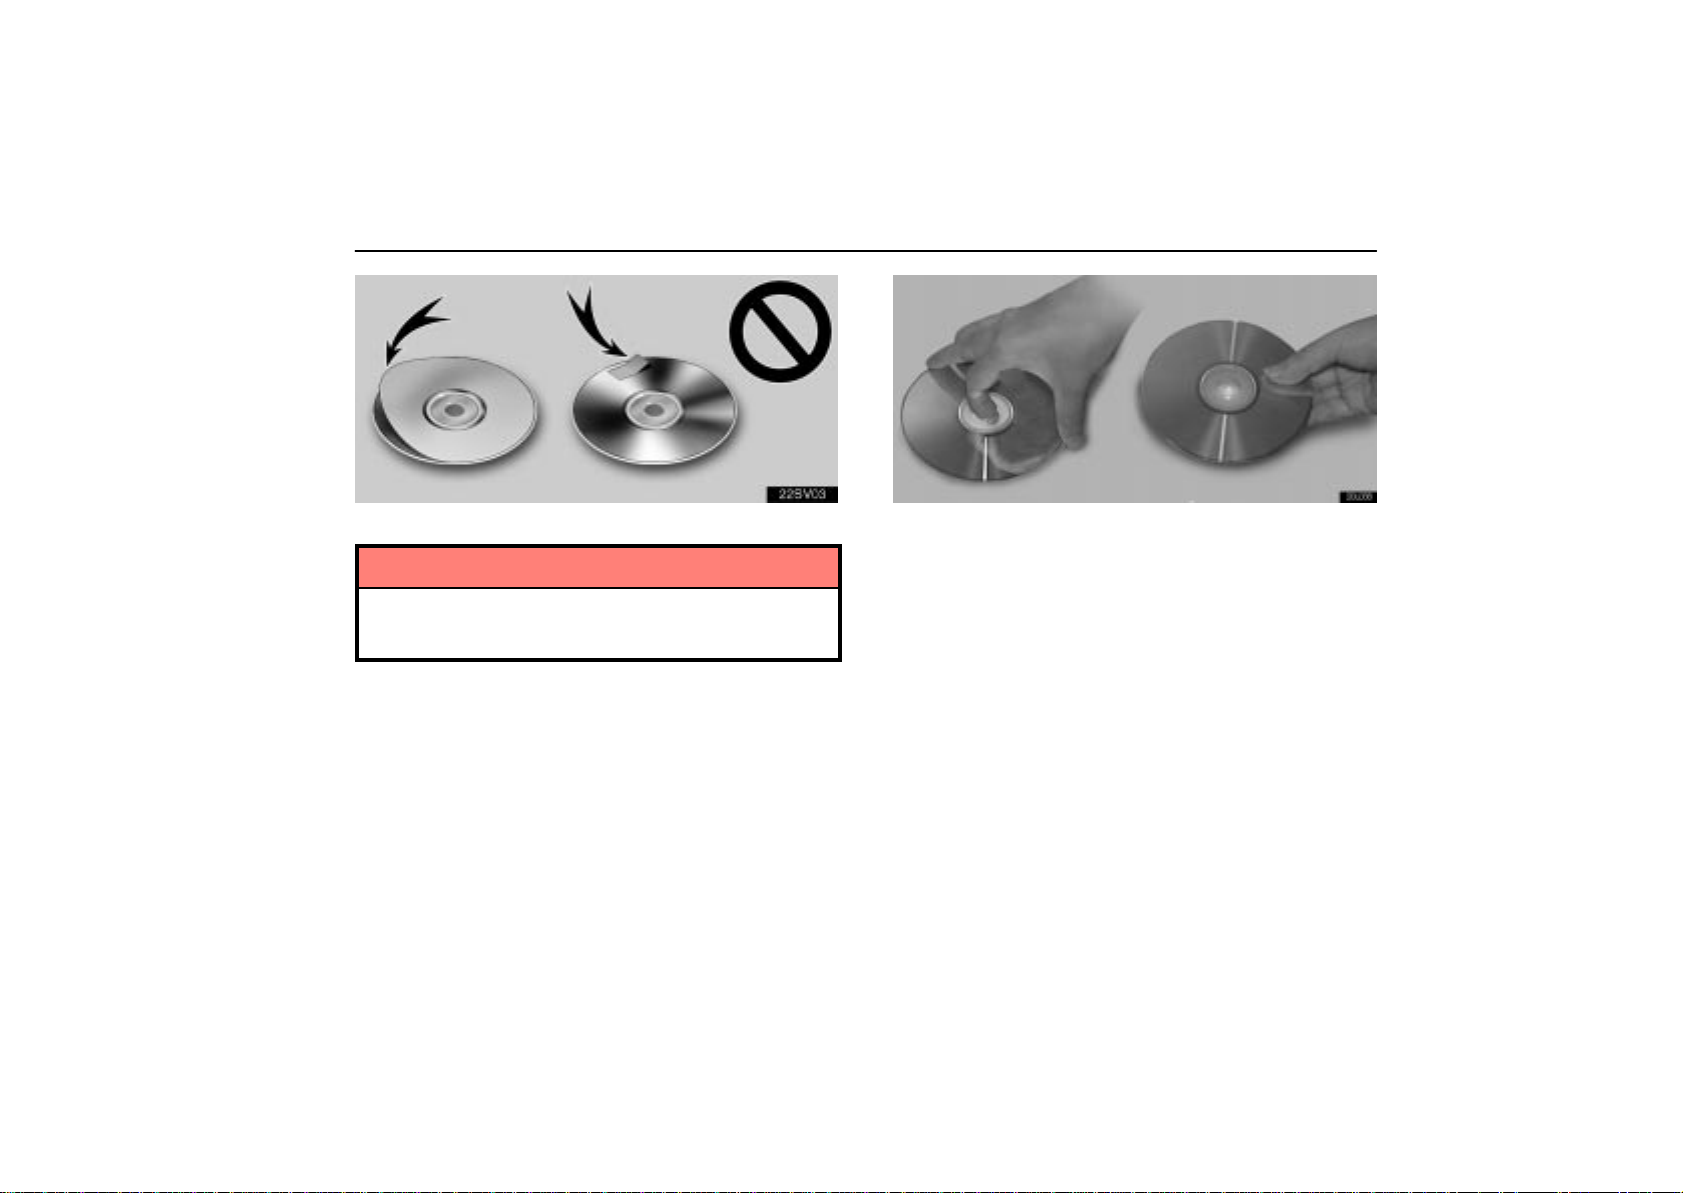
NOTICE
To prevent damage to the player or changer , do not use
special shaped, low quality or labeled discs such as
those shown in the illustrations.
20L038
Correct
Handle compact discs carefully, especially when you set
them into the magazine. Hold them on the edge and do not
bend them. Avoid getting fingerprints on them, particularly
on the shiny side.
Dirt, scrapes, warping, pin holes, or other disc damage
could cause the player to skip or to repeat a section of a
track. (To see a pin hole, hold the disc up to the light.)
Wrong
235

AUDIO
20L039
To clean a compact disc: Wipe it with a soft, lint-free cloth
that has been dampened with water. Wipe in a straight line
from the center to the edge of the disc (not in a circle). Do not
use a conventional record cleaner or anti-static device.
236

SECTION 3 –
STARTING AND DRIVING
Driving tips
Off-road vehicle precautions 284. . . . . . . . . . . . . . . . . . . . . . . . . . . . . . . . . . . . . . . . . . . . . . . . . . . . . . . . .
Break-in period 285. . . . . . . . . . . . . . . . . . . . . . . . . . . . . . . . . . . . . . . . . . . . . . . . . . . . . . . . . . . . . . . . . . . .
Operation in foreign countries 285. . . . . . . . . . . . . . . . . . . . . . . . . . . . . . . . . . . . . . . . . . . . . . . . . . . . . . . .
Tips for driving in various conditionss 286. . . . . . . . . . . . . . . . . . . . . . . . . . . . . . . . . . . . . . . . . . . . . . . . .
Off-road driving precautions 287. . . . . . . . . . . . . . . . . . . . . . . . . . . . . . . . . . . . . . . . . . . . . . . . . . . . . . . . .
Winter driving tips 289. . . . . . . . . . . . . . . . . . . . . . . . . . . . . . . . . . . . . . . . . . . . . . . . . . . . . . . . . . . . . . . . . .
Dinghy towing 291. . . . . . . . . . . . . . . . . . . . . . . . . . . . . . . . . . . . . . . . . . . . . . . . . . . . . . . . . . . . . . . . . . . . .
Trailer towing 291. . . . . . . . . . . . . . . . . . . . . . . . . . . . . . . . . . . . . . . . . . . . . . . . . . . . . . . . . . . . . . . . . . . . . .
How to save fuel and make your vehicle last longer 301. . . . . . . . . . . . . . . . . . . . . . . . . . . . . . . . . . . .
Vehicle load limits 302. . . . . . . . . . . . . . . . . . . . . . . . . . . . . . . . . . . . . . . . . . . . . . . . . . . . . . . . . . . . . . . . . .
Cargo and luggage 303. . . . . . . . . . . . . . . . . . . . . . . . . . . . . . . . . . . . . . . . . . . . . . . . . . . . . . . . . . . . . . . . .
2
283
DRIVING TIPS
OFF-ROAD VEHICLE
PRECAUTIONS
32X001c
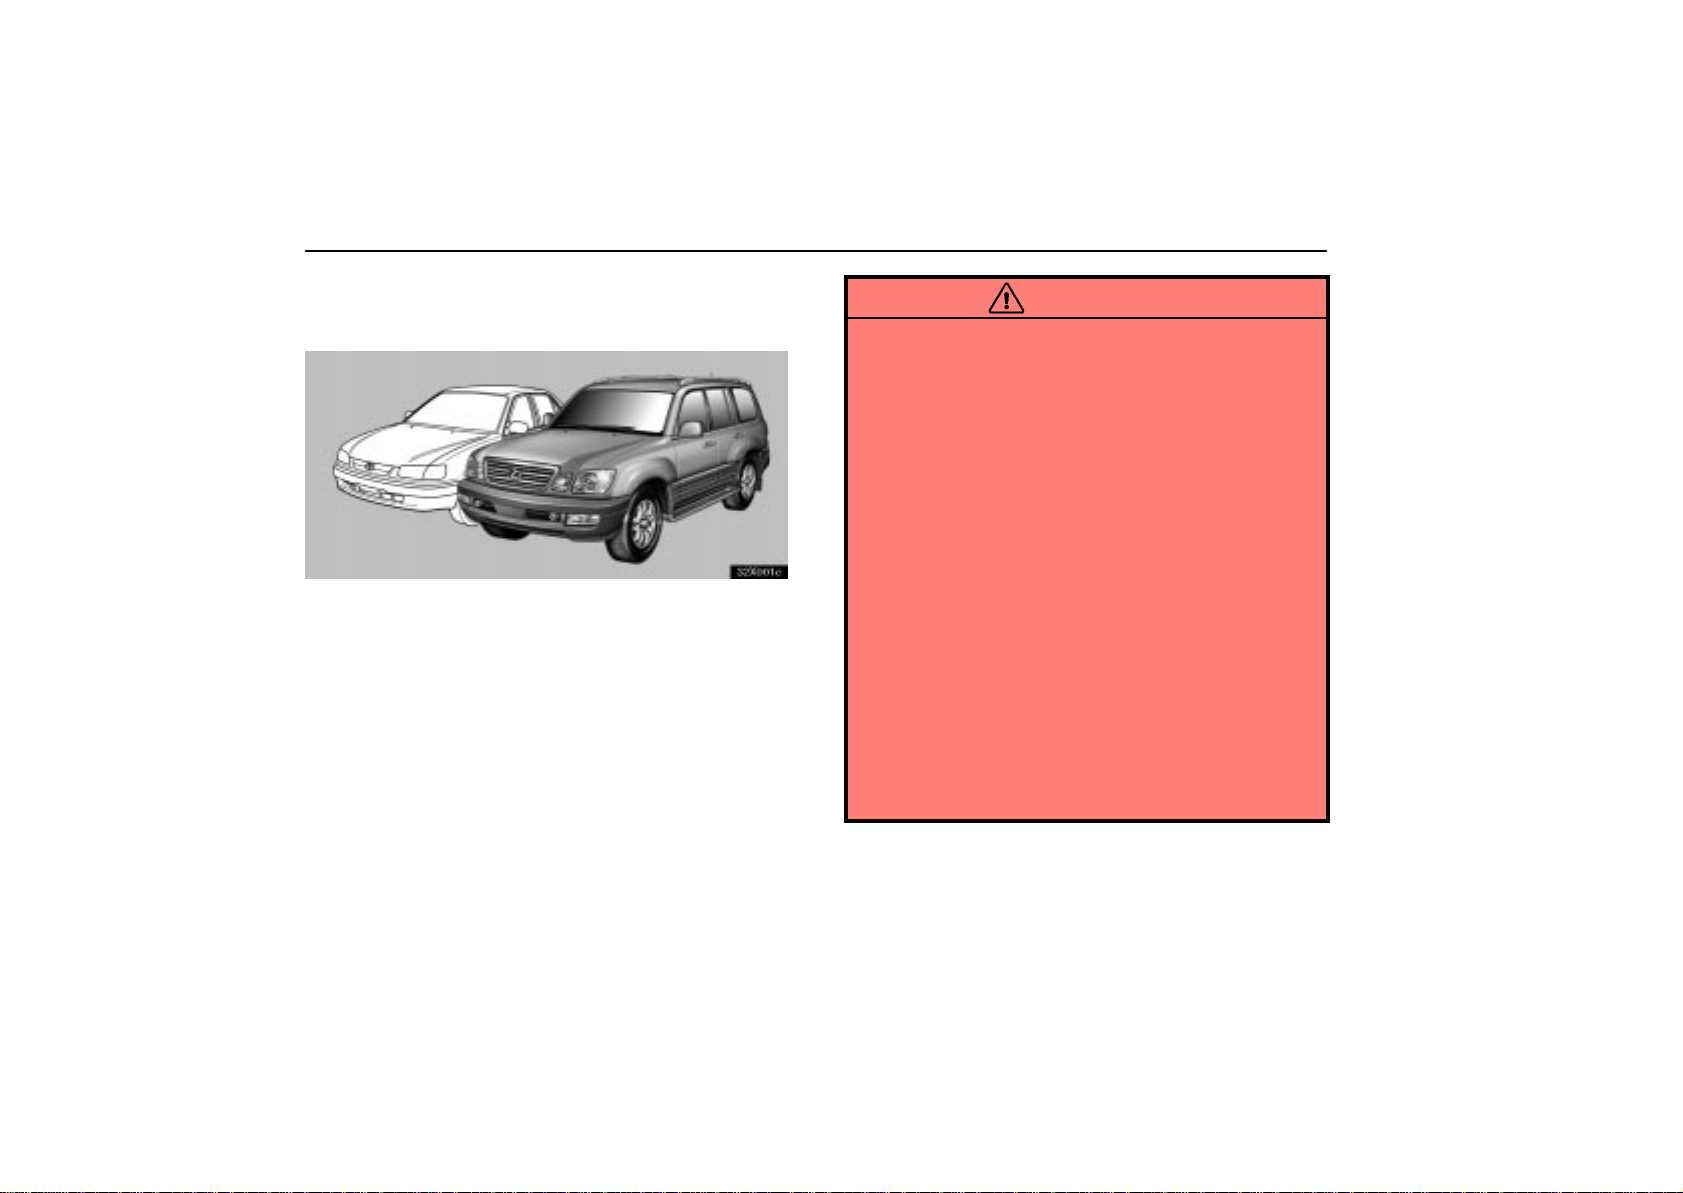
This vehicle belongs to the utility vehicle class, which has
higher ground clearance and narrower tread in relation to
the height of its center of gravity to make it capable of
performing in a wide variety of off- road applications.
Specific design characteristics give it a higher center of
gravity than ordinary passenger cars. This vehicle design
feature causes this type of vehicle to be more likely to
rollover. And, utility vehicles have a significantly higher
rollover rate than other types of vehicles. An advantage
of the higher ground clearance is a better view of the road
allowing you to anticipate problems. It is not designed for
cornering at the same speeds as ordinary passenger cars
any more than low-slung sports cars designed to perform
satisfactorily under off- road conditions. Therefore,
sharp turns at excessive speeds may cause rollover.
CAUTION
Always observe the following precautions to minimize
the risk of serious personal injury or damage to your
vehicle:
In a rollover crash, an unbelted person is
significantly more l i k e l y t o d i e t han a person wearing
a seat belt. Therefore, the driver and all passengers
should fasten their seat belts whenever the vehicle is
moving.
Avoid sharp turns or abrupt maneuvers, if at all
possible. Failure to operate this vehicle correctly
may result in loss of control or vehicle rollover
causing death or serious injury.
Loading cargo on the roof luggage carrier will make
the center of the vehicle gravity higher. Avoid high
speeds, sudden starts, sharp turns, sudden braking
or abrupt maneuvers, otherwise it may result in loss
of control or vehicle rollover due to failure to operate
this vehicle correctly.
Always slow down in gusty crosswinds. Because of
its profile and higher center of gravity, your vehicle is
more sensitive to side winds than an ordinary
passenger car. Slowing down will allow you to have
better control.
284
 Loading...