

Page 1

SECTION 6 –
SERVICE PROCEDURES AND
SPECIFICATIONS
Introduction
Vehicle identification 300. . . . . . . . . . . . . . . . . . . . . . . . . . . . . . . . . . . . . .
Engine compartment overview 301. . . . . . . . . . . . . . . . . . . . . . . . . . . . .
Do–it–yourself service precautions 302. . . . . . . . . . . . . . . . . . . . . . . . .
Parts and tools 303. . . . . . . . . . . . . . . . . . . . . . . . . . . . . . . . . . . . . . . . . .
Positioning the jack 305. . . . . . . . . . . . . . . . . . . . . . . . . . . . . . . . . . . . . .
1
2003 IS300 from Aug. ’02 Prod. (OM53439U)
299
Page 2
INTRODUCTION
VEHICLE IDENTIFICATION
SV61008
The vehicle identification number (VIN) is the legal
identifier for your vehicle. This number is on the left top
of the instrument panel and can be seen through the
windshield from outside.
This is the primary identification number for your Lexus. It is
used in registering the ownership of your vehicle.
SV63004
The vehicle identification number (VIN) is also on the
Certification Label.
SV61002
The engine number is stamped on the engine block as
shown.
300
2003 IS300 from Aug. ’02 Prod. (OM53439U)
Page 3
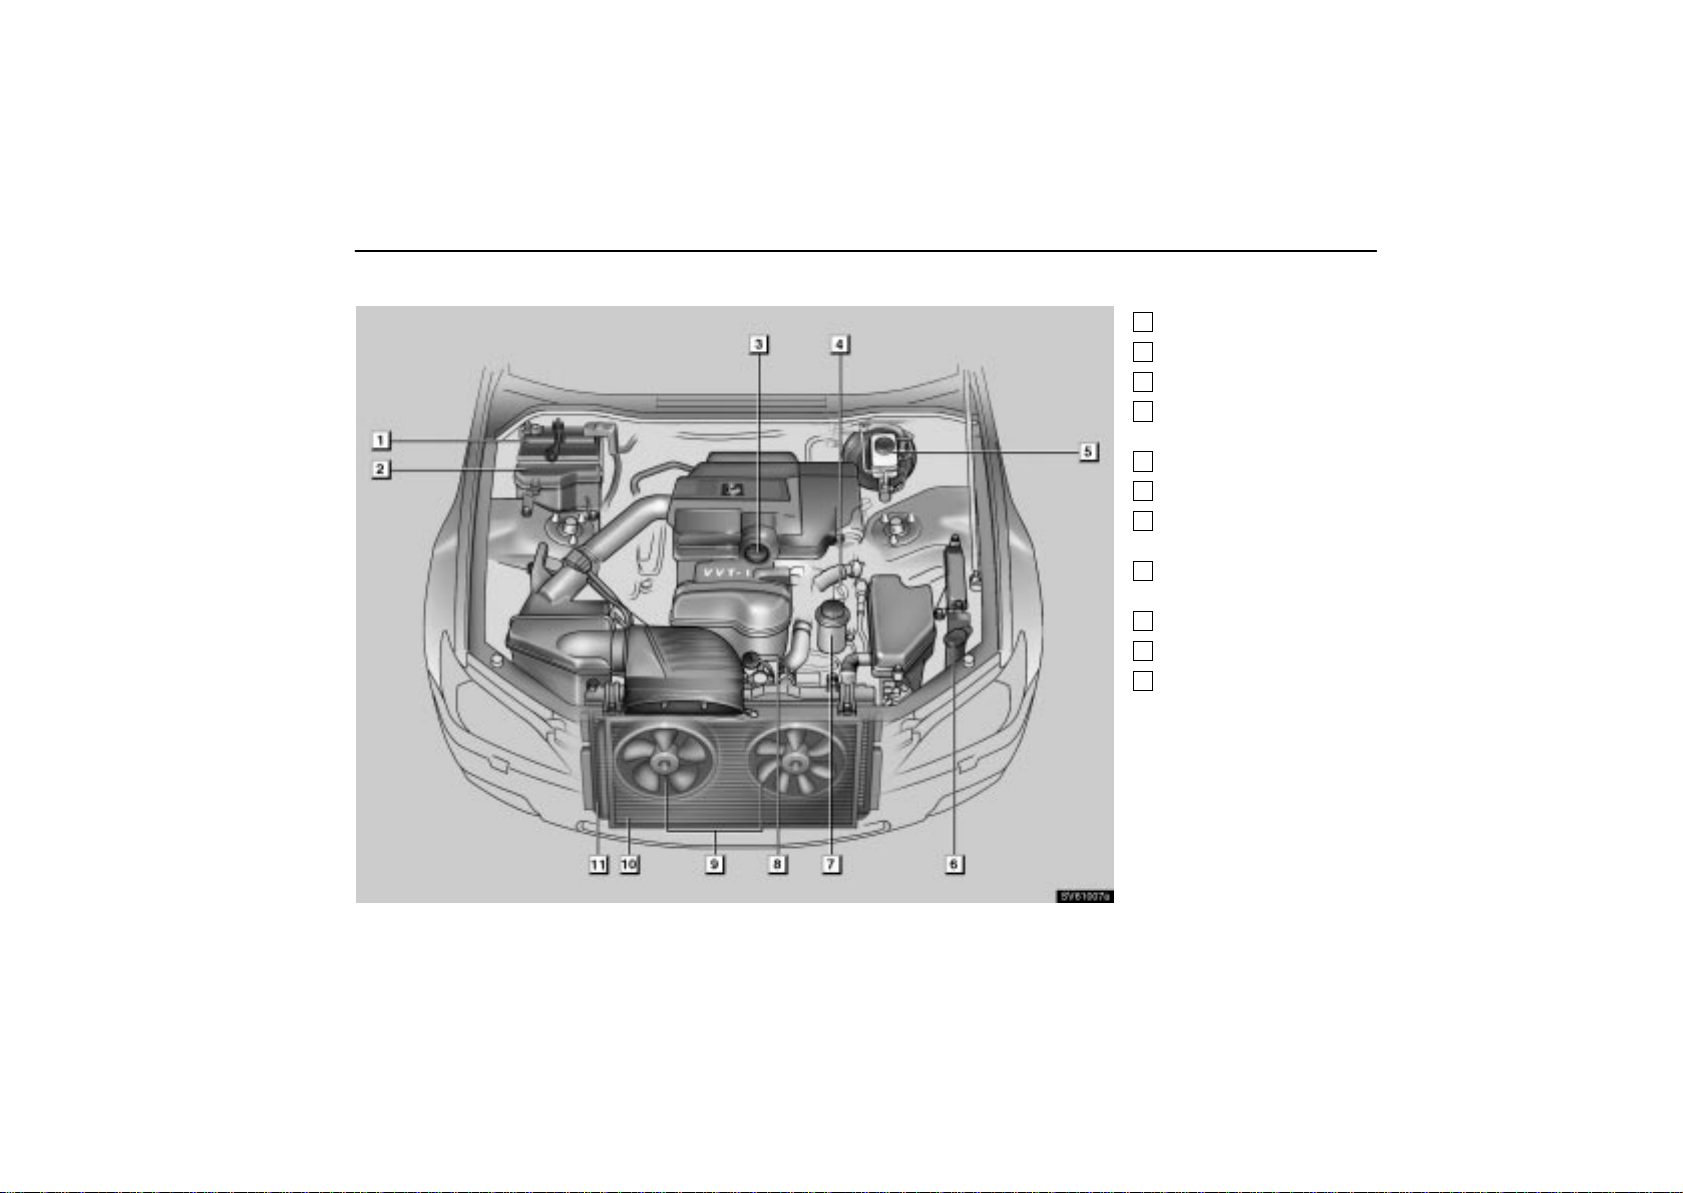
ENGINE COMPARTMENT OVERVIEW
SV61007a
INTRODUCTION
1
Battery
2
Fuse box
3
Engine oil filler cap
4
Engine oil level
dipstick
5
Brake fluid reservoir
6
Washer fluid tank
7
Power steering fluid
reservoir
8
Engine coolant
reservoir
9
Electric cooling fans
10
Condenser
11
Radiator
2003 IS300 from Aug. ’02 Prod. (OM53439U)
301
Page 4

INTRODUCTION
DO–IT–YOURSELF SERVICE
PRECAUTIONS
If you perform maintenance yourself, be sure to follow the
correct procedure given in this Section.
You should be aware that improper or incomplete servicing
may result in operating problems.
Performing do–it–yourself maintenance during the warranty
period may affect your warranty coverage. Read the separate
Lexus Warranty statement for details and suggestions.
This Section gives instructions only for those items that are
relatively easy for an owner to perform. As explained in
Section 5, there are still a number of items that must be
performed by a qualified technician with special tools.
For information on tools and parts for do–it–yourself
maintenance, see ”Parts and tools” on page 303.
Utmost care should be taken when working on your vehicle to
prevent accidental injury . Here are a few precautions that you
should be especially careful to observe:
CAUTION
When the engine is running, keep hands, clothing,
and tools away from the moving fan and engine drive
belt. (Removing rings, watches, and ties is
advisable.)
Right after driving, the engine compartment – the
engine, radiator, exhaust manifold and power
steering fluid reservoir, etc. – will be hot. So be
careful not to touch them. Oil and other fluids may
also be hot.
Do not smoke, cause sparks or allow open flames
around fuel or the battery. Their fumes are
flammable.
Do not get under your vehicle with just the body jack
supporting it. Always use automotive jack stands or
other solid supports.
Be sure the ignition is off if you work near the electric
cooling fan or radiator grille. With the ignition on, the
electric cooling fan may automatically start to run if
the air conditioning is on and/or if the coolant
temperature is high.
Use eye protection whenever you work on or under
your vehicle where you may be exposed to flying or
falling material, fluid spray, etc.
Be extremely cautious when working on the battery.
It contains poisonous and corrosive sulfuric acid.
Warning: Battery posts, terminals and related
accessories contain lead and lead compounds,
chemicals known to the State of California to cause
cancer and reproductive harm. Wash hands after
handling.
302
2003 IS300 from Aug. ’02 Prod. (OM53439U)
Page 5

INTRODUCTION
NOTICE
Remember that battery and ignition cables carry high
currents or voltages. Be careful of accidentally
causing a short circuit.
Before closing the engine hood, check to see that you
have not forgotten any tools, rags, etc.
Do not drive with the air cleaner removed, or
excessive engine wear could result. Also backfiring
could cause a fire in the engine compartment.
Do not overfill automatic transmission fluid, or the
transmission could be damaged.
Be careful not to scratch the glass surface with the
wiper frame.
PARTS AND TOOLS
Here is a list of parts and tools you will need to perform
do–it–yourself maintenance. Remember all Lexus parts are
designed in metric sizes, so your tools must be metric.
CHECKING THE ENGINE OIL LEVEL
Parts (if level is low):
”Toyota Genuine Motor Oil” or equivalent
Oil grade: API grade SL ”Energy–Conserving” or ILSAC
multigrade engine oil. For recommended oil viscosity, see
page 317.
Tools:
Rag or paper towel
Funnel (only for adding oil)
CHECKING THE ENGINE COOLANT LEVEL
Parts (if level is low):
”Toyota Genuine Long Life Coolant” or equivalent
See ”Checking the engine coolant level” on page 319 for
instructions.
Demineralized or distilled water
Tools:
Funnel (only for adding coolant)
2003 IS300 from Aug. ’02 Prod. (OM53439U)
303
Page 6

INTRODUCTION
CHECKING BRAKE FLUID
Parts (if level is low):
FMVSS No. 116 DOT 3 or SAE J1703 brake fluid
Tools:
Funnel (only for adding fluid)
CHECKING POWER STEERING FLUID
Parts (if level is low):
Automatic transmission fluid DEXRON
Tools:
Rag or paper towel
Funnel (only for adding fluid)
II or III
CHECKING BATTERY CONDITION
Tools:
Warm water
Baking soda
Grease
Conventional wrench (for terminal clamp bolts)
CHECKING AND REPLACING THE BLADE
TYPE FUSES
Parts (if replacement is necessary):
Fuse with same amperage rating as original
CHECKING THE CARTRIDGE TYPE FUSES
Parts (if replacement is necessary):
Genuine Lexus fuse or equivalent with same amperage
rating as original
ADDING WASHER FLUID
Parts:
Water
Washer fluid containing antifreeze (for winter use)
Tools:
Funnel
304
2003 IS300 from Aug. ’02 Prod. (OM53439U)
Page 7
INTRODUCTION
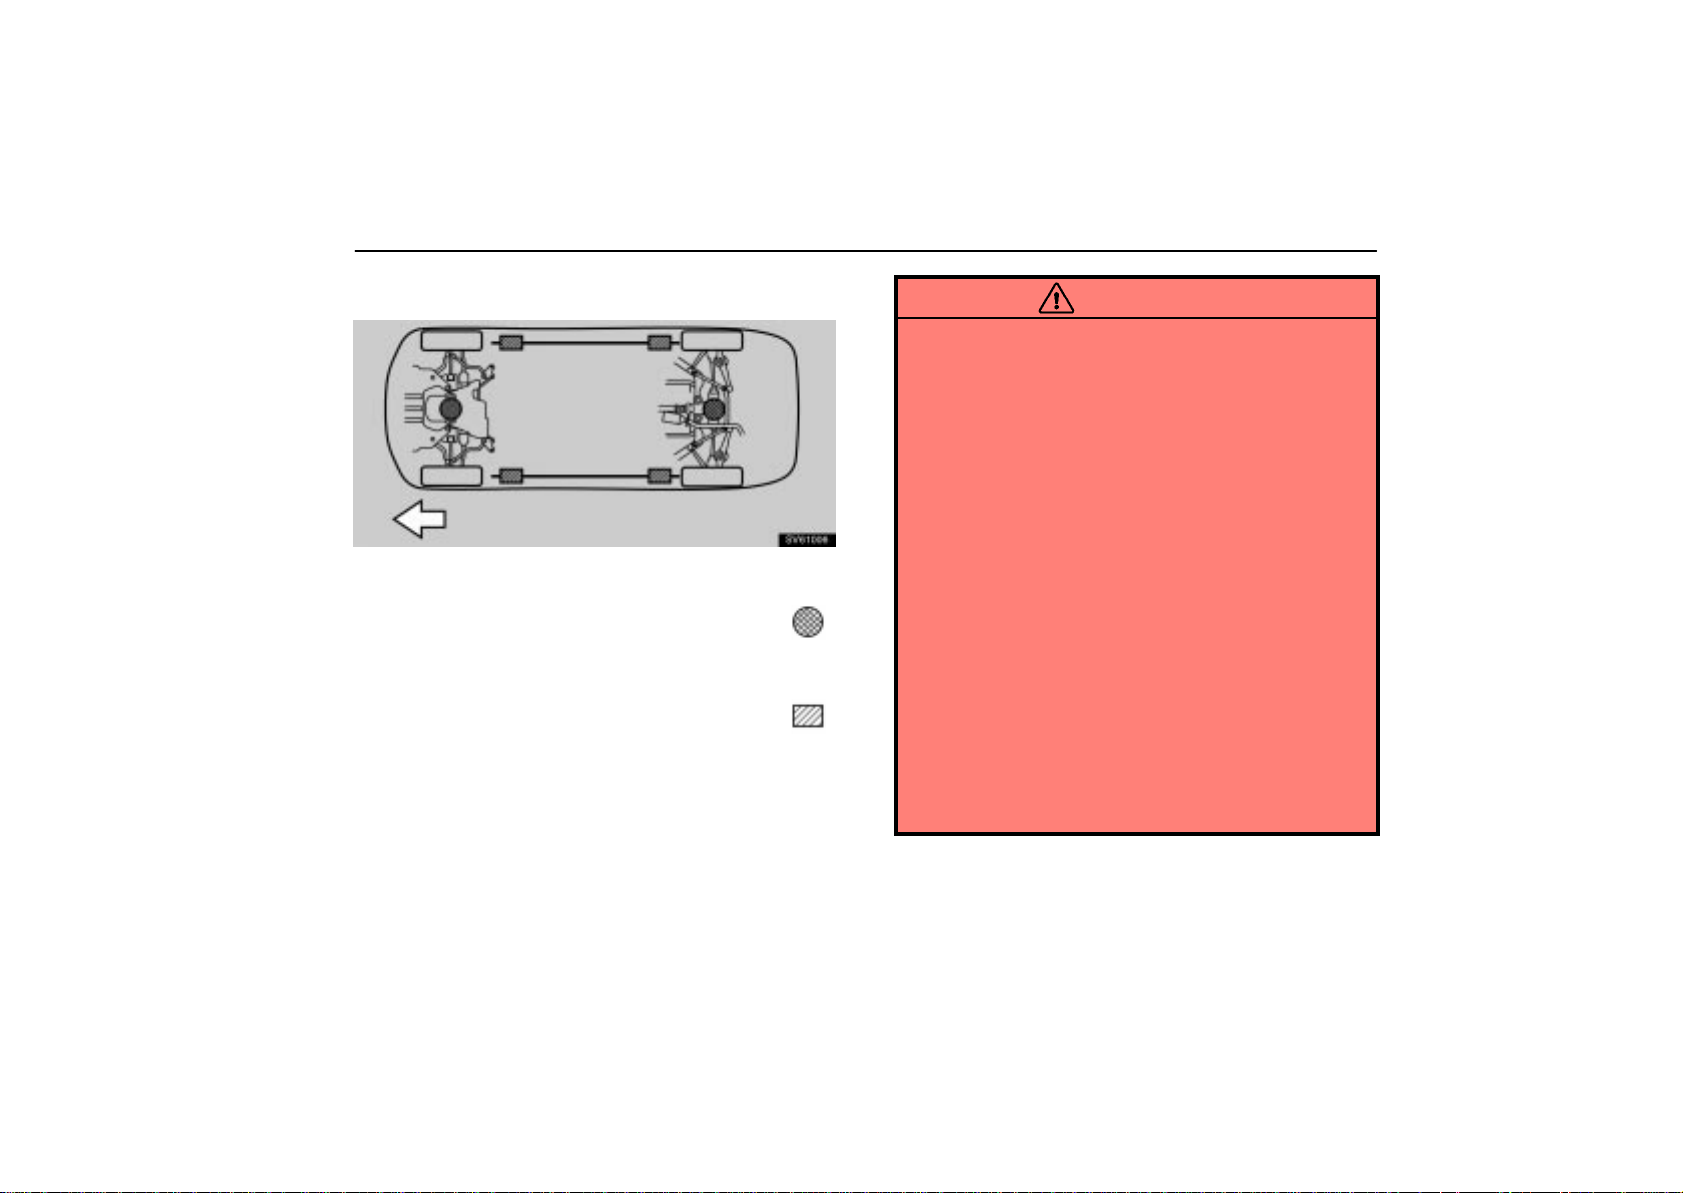
POSITIONING THE JACK
SV61006
Front of vehicle
When jacking up your vehicle with the jack, position the
jack correctly as shown in the illustration.
Jack position
Support position and Pantograph jack position . . . . .
. . . . . . . . . . . . . . . . . . . . . . . . . . . . . . . . . .
Front– Front crossmember
Rear– Rear differential
CAUTION
When jacking, be sure to observe the following to
reduce the possibility of personal injury:
Follow jacking instructions.
Do not put any part of your body under the vehicle
supported by a jack. Personal injury may occur.
Do not start or run the engine while your vehicle is
supported by the jack.
Stop the vehicle on a level firm ground, firmly set the
parking brake and put the transmission in ”P”
(automatic) or reverse (manual). Block the wheel
diagonally opposite to the one being changed if
necessary.
Make sure to set the jack properly in the jack point.
Raising the vehicle with jack improperly positioned
will damage the vehicle or may allow the vehicle to fall
off the jack and cause personal injury.
Never get under the vehicle when the vehicle is
supported by the jack alone; use vehicle support
stands.
Do not raise the vehicle with someone in the vehicle.
When raisi n g t h e v e h i c l e , d o n o t p l ace any objects on
top of or underneath the jack.
2003 IS300 from Aug. ’02 Prod. (OM53439U)
305
Page 8

INTRODUCTION
NOTICE
Make sure to place the jack correctly, or your vehicle
may be damaged.
306
2003 IS300 from Aug. ’02 Prod. (OM53439U)
Page 9

SECTION 5
MAINTENANCE
Maintenance
Maintenance requirements 292. . . . . . . . . . . . . . . . . . . . . . . . . . . . . . . .
General maintenance 293. . . . . . . . . . . . . . . . . . . . . . . . . . . . . . . . . . . . .
Does your vehicle need repairing? 296. . . . . . . . . . . . . . . . . . . . . . . . .
Emissions Inspection and Maintenance (I/M) programs 297. . . . . . . .
For scheduled maintenance information, please refer
to the ”Owner’s Manual Supplement/Scheduled
Maintenance”.
2003 IS300 from Aug. ’02 Prod. (OM53439U)
291
Page 10

MAINTENANCE
MAINTENANCE REQUIREMENTS
Your Lexus vehicle has been designed for fewer maintenance
requirements with longer service intervals to save both your
time and money . However, each regular maintenance as well
as day–to–day care is more important than ever before to
ensure smooth, trouble–free, safe, and economical driving.
It is the owner’s responsibility to make sure the specified
maintenance, including general maintenance services, is
performed. Note that both the new vehicle and emission
control system warranties specify that proper maintenance
and care must be performed. See ”Owner’s Guide”, ”Owner’s
Manual Supplement” or ”Warranty Booklet” for complete
warranty information.
General maintenance
General maintenance items are those day–to–day care
practices that are important to your vehicle for proper
operation. It is the owner’s responsibility to ensure that the
general maintenance items are performed regularly.
These checks or inspections can be done either by yourself or
your Lexus dealer.
Scheduled maintenance
The scheduled maintenance items listed in the ”Owner’s
Manual Supplement / Scheduled Maintenance” are those
required to be serviced at regular intervals.
For details of your maintenance schedule, read the ”Owner’s
Manual Supplement / Scheduled Maintenance”.
It is recommended that only genuine Lexus parts be used
for maintenance.
The owner may elect to use non–Lexus supplied parts for
replacement purposes without invalidating the emission
control system warranty. However, use of replacement
parts which are not of equivalent quality may impair the
effectiveness of the emission control systems.
You may also elect to have maintenance, replacement, or
repair of the emission control devices and system
performed by any automotive repair establishment or
individual without invalidating this warranty. See
”Owner’s Guide”, ”Owner’s Manual Supplement” or
”Warranty Booklet” for complete warranty information.
292
2003 IS300 from Aug. ’02 Prod. (OM53439U)
Page 11
MAINTENANCE
Where to go for service?
Lexus technicians are well–trained specialists and are kept up
to date with the latest service information through technical
bulletins, service tips, and in–dealership training programs.
They are well informed about the operation of all the systems
on your vehicle.
You can be confident that your Lexus dealer’s service
department performs the best job to meet the maintenance
requirements of your vehicle.
Your copy of the repair order is proof that all required
maintenance has been performed for warranty coverage. And
if any problems should arise with your vehicle while under
warranty, your Lexus dealer will promptly take care of it. Again,
be sure to keep a copy of the repair order for any service
performed on your Lexus.
What about do–it–yourself maintenance?
Many of the maintenance items are easy to do yourself, if you
have a little mechanical ability and a few basic automotive
tools. Simple instructions for how to perform them are
presented in Section 6.
If you are a skilled do–it–yourself mechanic, the Lexus service
manuals are recommended. Please be aware that
do–it–yourself maintenance can affect your warranty
coverage. See ”Owner’s Guide”, ”Owner’s Manual
Supplement” or ”Warranty Booklet” for the details.
GENERAL MAINTENANCE
Listed below are the general maintenance items that should be
performed at the intervals specified. It is recommended that
any problem you notice be brought to the attention of your
Lexus dealer or qualified service shop for their advice.
CAUTION
Make these checks only where adequate ventilation can
be obtained if you run the engine.
Vehicle exterior
Items listed below should be performed from time to time,
unless otherwise specified.
Tire pressure
Check the pressure with a gauge every two weeks, or at least
once a month and adjust as shown on the tire pressure label.
See page 331 for additional information.
Tire surface
Check the tires carefully for cuts, damage or excessive wear.
See page 335 for additional information.
Wheel nuts
When checking the tires, make sure to check the nuts for
looseness. Tighten them if necessary.
2003 IS300 from Aug. ’02 Prod. (OM53439U)
293
Page 12

MAINTENANCE
Tire rotation
Rotate the tires according to the maintenance schedule. (For
scheduled maintenance information, please refer to the
“Owner’s Manual Supplement” or “Scheduled Maintenance”.)
See page 333 for additional information.
Fluid leaks
Check underneath for leaking fuel, oil, water or other fluid after
the vehicle has been parked for a while. If you smell fuel fumes
or notice any leak, have the cause found and corrected
immediately.
Doors and engine hood
Check that all doors, including trunk lid or back door, operate
smoothly and all latches lock securely . Make sure the engine
hood secondary latch secures the hood when the primary latch
is released.
Vehicle interior
Items listed below should be checked regularly, e.g. while
performing periodic services, cleaning the vehicle, etc.
Lights
Make sure the headlight, stop lights, tail lights, turn signal
lights, and other lights are working. Check headlight aim.
Service reminder indicators and warning buzzers
Check that all service reminder indicators and warning
buzzers function properly.
Steering wheel
Check that it has the specified free play. Be alert for changes
in steering condition, such as hard steering, excessive free
play or strange noise.
Seats
Check that all front seat controls such as seat adjusters,
seatback recliner, etc. operate smoothly. Check that the head
restraints move up and down smoothly and that the locks hold
securely in any latched position. For folding–down rear
seatbacks, check that the latches lock securely.
Seat belts
Check that the seat belt system such as buckles, retractors
and anchors operate properly and smoothly. Make sure the
belt webbing is not cut, frayed, worn or damaged.
Accelerator pedal
Check the pedal for smooth operation and uneven pedal effort
or catching.
Clutch pedal
Check the pedal for smooth operation.
Brake pedal
Check the pedal for smooth operation and the proper
clearance and free play. Check the brake booster function.
Brakes
At a safe place, check that the brakes do not pull to one side
when applied.
294
2003 IS300 from Aug. ’02 Prod. (OM53439U)
Page 13

MAINTENANCE
Parking brake
Check that the lever has the proper travel and that, on a safe
incline, your vehicle is held securely with only the parking
brake applied.
Automatic transmission ”Park” mechanism
On a safe incline, check that your vehicle is held securely with
the selector lever in ”P” position and all brakes released.
Engine compartment
Items listed below should be checked from time to time,
e.g. each time when refueling.
Washer fluid
Make sure there is sufficient fluid in the tank. See page 354 for
additional information.
Engine coolant level
Make sure the coolant level is between the Upper and Lower
lines on the see–through reservoir when the engine is cold.
See page 319 for additional information.
Battery
Your Lexus has a maintenance free battery. You do not have
to add distilled water. For longer life of the battery, however,
see page 348 for additional information.
Brake fluid level
Make sure the brake fluid level is correct. See page 329 for
additional information.
Engine oil level
Check the level on the dipstick with the engine turned off and
the vehicle parked on a level spot. See page 315 for additional
information.
Power steering fluid level
Check the level on the dipstick. The level should be in the
”HOT” or ”COLD” range depending on the fluid temperature.
See page 330 for additional information.
Exhaust system
If you notice any change in the sound of the exhaust or smell
exhaust fumes, have the cause located and corrected
immediately. (See “Engine exhaust caution” on page 225 in
Section 3–1.)
2003 IS300 from Aug. ’02 Prod. (OM53439U)
295
Page 14

MAINTENANCE
DOES YOUR VEHICLE NEED
REPAIRING?
Be on the alert for changes in performance and sounds, and
visual tip–offs that indicate service is needed. Some important
clues are:
Engine missing, stumbling, or pinging
Appreciable loss of power
Strange engine noises
A fluid leak under the vehicle (however, water dripping from
the air conditioning after use is normal.)
Change in exhaust sound (This may indicate a dangerous
carbon monoxide leak. Drive with the windows open and
have the exhaust system checked immediately.)
Flat–looking tires, excessive tire squeal when cornering,
uneven tire wear
Vehicle pulls to one side when driving straight on a level
road
Strange noises related to suspension movement
Loss of brake effectiveness, spongy feeling brake pedal,
pedal almost touches floors, vehicle pulls to one side when
braking
Engine coolant temperature continually higher than normal
If you notice any of these clues, take your vehicle to your Lexus
dealer as soon as possible. It probably needs adjustment or
repair.
CAUTION
Do not continue driving with the vehicle unchecked. It
could result in serious vehicle damage and possibly
personal injury.
296
2003 IS300 from Aug. ’02 Prod. (OM53439U)
Page 15

EMISSIONS INSPECTION AND
MAINTENANCE (I/M) PROGRAMS
Some states have vehicle emission inspection programs
which include OBD (On–Board Diagnostics) checks.
The OBD system monitors the operation of the emission
control system. When the OBD system determines that a
problem exist s somewhere in the emission control system, the
malfunction indicator lamp comes on. In this case, your vehicle
may not pass the I/M test and need to be repaired. Contact
your Lexus dealer to service the vehicle.
Even if the malfunction indicator lamp does not come on, your
vehicle may not pass I/M test as readiness codes have not
been set in the OBD system.
Readiness codes are automatically set during ordinary driving.
However, when the battery is disconnected or run down, the
codes are erased. Also, depending on your driving habits, the
codes may not be completely set.
Also, if the malfunction indicator lamp had come on recently
due to temporary malfunction such as a loose fuel tank cap,
your vehicle may not pass the I/M test.
The malfunction indicator lamp will go off after taking several
driving trips, but the error code in the OBD system will not be
cleared unless about 40 trips or more are taken.
If your vehicle does not pass the I/M test as readiness codes
have not been set, contact your Lexus dealer to prepare the
vehicle for re–testing.
MAINTENANCE
2003 IS300 from Aug. ’02 Prod. (OM53439U)
297
Page 16

MAINTENANCE
298
2003 IS300 from Aug. ’02 Prod. (OM53439U)
Page 17

SECTION 3 –
STARTING AND DRIVING
Driving tips
Break–in period 258. . . . . . . . . . . . . . . . . . . . . . . . . . . . . . . . . . . . . . . . . .
Operation in foreign countries 258. . . . . . . . . . . . . . . . . . . . . . . . . . . . .
Tips for driving in various conditionss 259. . . . . . . . . . . . . . . . . . . . . . .
Winter driving tips 260. . . . . . . . . . . . . . . . . . . . . . . . . . . . . . . . . . . . . . . .
Dinghy towing 262. . . . . . . . . . . . . . . . . . . . . . . . . . . . . . . . . . . . . . . . . . .
Trailer towing 262. . . . . . . . . . . . . . . . . . . . . . . . . . . . . . . . . . . . . . . . . . . .
How to save fuel and make your vehicle last longer 263. . . . . . . . . . .
2
2003 IS300 from Aug. ’02 Prod. (OM53439U)
257
Page 18

DRIVING TIPS
BREAK–IN PERIOD
Drive gently and avoid high speeds.
Y ou need not follow a break–in schedule with your new Lexus.
But following a few simple tips for the first 1600 km (1000 miles)
can add to the future economy and long life of your vehicle:
Avoid full throttle acceleration when starting and driving.
Avoid racing the engine.
Try to avoid hard stops during the first 300 km (200 miles).
Do not drive slowly with the manual transmission in a high
gear.
Do not drive for a long time at any single speed, either fast
or slow.
OPERATION IN FOREIGN
COUNTRIES
If you plan to drive your Lexus in another country ...
First, comply with the vehicle registration laws.
Second, confirm the availability of the correct fuel (unleaded
and minimum octane rating).
258
2003 IS300 from Aug. ’02 Prod. (OM53439U)
Page 19
DRIVING TIPS
TIPS FOR DRIVING IN VARIOUS
CONDITIONS
Always slow down in gusty crosswinds. This will allow you
much better control.
Drive slowly onto curbs and, if possible, at a right angle.
Avoid driving onto high, sharp–edged objects and other
road hazards. Failure to do so can lead to severe tire
damage resulting in tire bursts.
Drive slowly when passing over bumps or travelling on a
bumpy road. Otherwise, the impact could cause severe
damage to the tires and/or wheels.
When parking on a hill, turn the front wheels until they touch
the curb so that the vehicle will not roll. Apply the parking
brake, and place the transmission in ”P” (automatic) or in
first or reverse (manual). If necessary, block the wheels.
Washing your vehicle or driving through deep water may get
the brakes wet. To see whether they are wet, check that
there is no traffic near you and then press the pedal lightly.
If you do not feel a normal braking force, the brakes are
probably wet. To dry them, drive the vehicle cautiously while
lightly pressing the brake pedal with the parking brake
applied. If they still do not work safely, pull to the side of the
road and call a Lexus dealer for assistance.
CAUTION
Before driving off, make sure the parking brake is
fully released and that the parking brake reminder
light is off.
Do not leave your vehicle unattended while the
engine is running.
Do not rest your foot on the brake pedal while driving.
It can cause dangerous overheating, needless wear,
and poor fuel economy.
To drive down a long or steep hill, reduce your speed
and downshift. Remember, if you ride the brakes
excessively, they may overheat and not work
properly. See page 235.
Be careful when accelerating, upshifting,
downshifting or braking on a slippery surface. The
abrupt change in engine speed, such as sudden
acceleration or engine braking, could cause the
vehicle to spin or skid.
Do not drive in excess of the speed limit. Even if the
legal speed limit permits it, do not drive over 140 km/h
(85 mph) unless your vehicle has high–speed
capability tires. Driving over 140 km/h (85 mph) may
result in tire failure, loss of control and possible
injury. Be sure to consult a tire dealer to determine
whether the tires on your vehicle are high–speed
capability tires or not before driving at such speeds.
2003 IS300 from Aug. ’02 Prod. (OM53439U)
259
Page 20

DRIVING TIPS
Do not continue normal driving when the brakes are
wet. If they are wet, your vehicle will require a longer
stopping distance, and it may pull to one side when
the brakes are applied. Also, the parking brake will
not hold the vehicle securely.
260
WINTER DRIVING TIPS
Make sure you have a proper freeze protection of engine
coolant.
Your coolant must contain ethylene–glycol type coolant for a
proper corrosion protection of aluminum components. Use
”Toyota Genuine Long Life Coolant” or equivalent. See
”Checking the engine coolant level” on page 319 for
instructions.
NOTICE
Do not use alcohol type antifreeze or plain water alone.
When it is extremely cold, we recommend to use 60% solution
for your Lexus, to provide protection down to about –50C
(–58F). Do not use more than 70% solution for better coolant
performance.
Check the condition of the battery and cables.
Cold temperatures reduce the capacity of any battery, so it
must be in top shape to provide enough power for winter
starting. Page 348 tells you how to visually inspect the battery.
Y our Lexus dealer and most service stations will be pleased to
check the battery charge level.
Make sure the engine oil viscosity is suitable for the cold
weather.
See page 317 for recommended viscosity. Leaving a heavy
summer oil in your vehicle during winter months may cause
harder starting. If you are not sure about which oil to use, call
your Lexus dealer – they will be pleased to help.
2003 IS300 from Aug. ’02 Prod. (OM53439U)
Page 21

DRIVING TIPS
Check the electronic ignition system for loose
connections or obvious damage.
Keep the door locks from freezing.
Squirt lock de–icer or glycerine into the locks to keep them from
freezing.
Use a washer fluid containing an antifreeze solution.
This product is available at your Lexus dealer and most auto
parts stores. Follow the manufacturer’s directions for how
much to mix with water.
NOTICE
Do not use engine antifreeze or any other substitute
because it may damage your vehicle’s paint.
Do not use your parking brake when there is a possibility
it could freeze.
When parking, put the transmission into ”P” (automatic) or into
first or reverse (manual) and block the front wheels. Do not use
the parking brake, or snow or water accumulated in and around
the parking brake mechanism may freeze the parking brake,
making it hard to release.
Keep ice and snow from accumulating under the fenders.
Ice and snow built up under your fenders can make steering
difficult. During bad winter driving, stop and check under the
fenders occasionally.
Depending on where you are driving, we recommend you
carry some emergency equipment.
Some of the things you might put in the vehicle are tire chains,
window scraper, bag of sand or salt, flares, small shovel,
jumper cables, etc.
2003 IS300 from Aug. ’02 Prod. (OM53439U)
261
Page 22
DRIVING TIPS
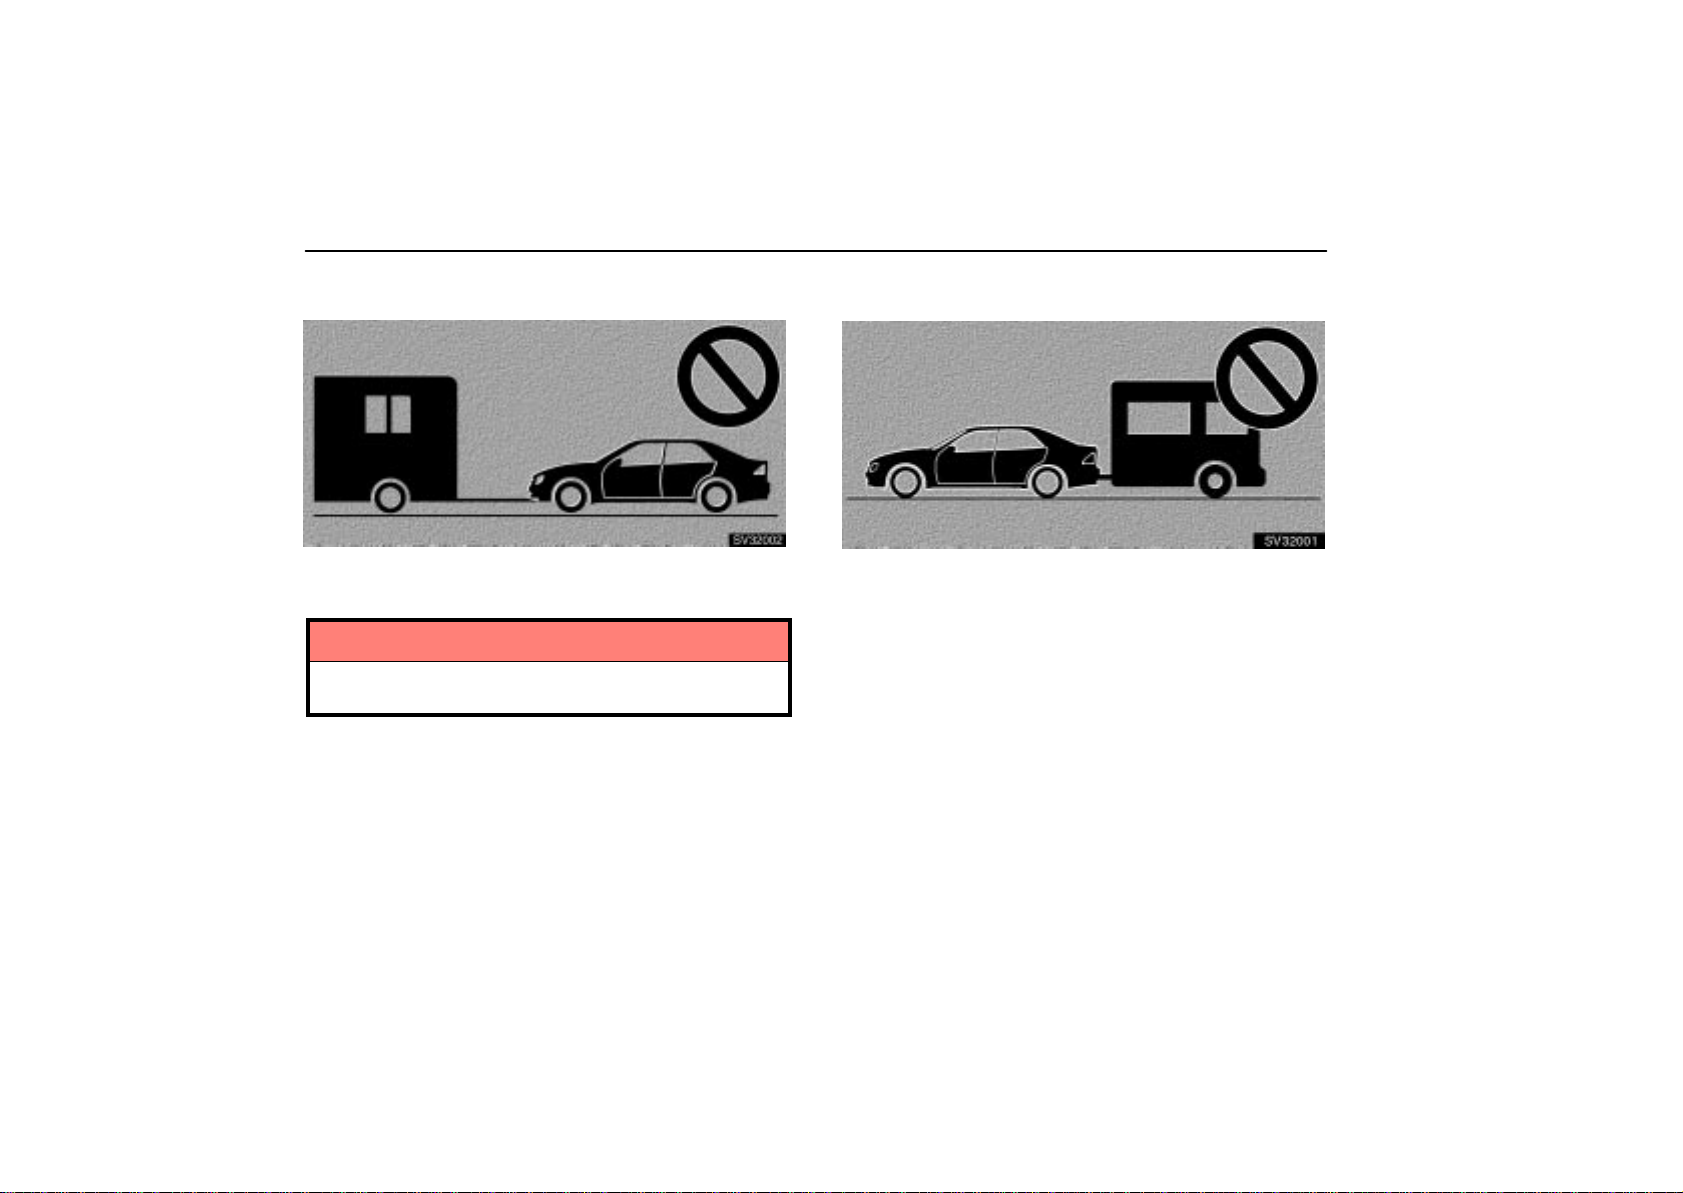
DINGHY TOWING
SV32002
Your vehicle is not designed to be dinghy towed (with four
wheels on the ground) behind a motorhome.
NOTICE
Do not tow your vehicle with four wheels on the ground.
This may cause serious damage to your vehicle.
TRAILER TOWING
SV32001
Lexus does not recommend towing a trailer with your
vehicle. It is not designed for trailer towing.
262
2003 IS300 from Aug. ’02 Prod. (OM53439U)
Page 23

DRIVING TIPS
HOW TO SAVE FUEL AND MAKE
YOUR VEHICLE LAST LONGER
Improving fuel economy is easy – just take it easy . It will help
make your vehicle last longer, too. Here are some specific tips
on how to save money on both fuel and repairs:
Keep your tires inflated at the correct pressure. Check
the pressure every two weeks, or at least once a month.
Underinflation causes tire wear and wastes fuel.
Do not carry unneeded weight in your vehicle. Excess
weight puts a heavier load on the engine, causing greater
fuel consumption.
Avoid lengthy warm–up idling. Once the engine is
running smoothly, begin driving – but gently. Remember,
however, that on cold winter days this may take a little
longer.
Accelerate slowly and smoothly . Avoid jackrabbit starts.
Avoid long engine idling. If you have a long wait and you
are not in traffic, it is better to turn off the engine and start
again later.
Avoid engine over–revving. Use a gear position suitable
for the road on which you are traveling.
Avoid continuous speeding up and slowing down.
Stop–and–go driving wastes fuel.
Avoid unnecessary stopping and braking. Maintain a
steady pace. Try to time the traffic signals so you only need
to stop as little as possible or take advantage of through
streets to avoid traffic lights. Keep a proper distance from
other vehicles to avoid sudden braking. This will also
reduce wear on your brakes.
Avoid heavy traffic or traffic jams whenever possible.
Do not rest your foot on the brake pedal. This causes
premature wear, overheating and poor fuel economy.
Maintain a moderate speed on highways. The faster you
drive, the greater the fuel consumption. By reducing your
speed, you will cut down on fuel consumption.
Keep the front wheels in proper alignment. Avoid hitting
the curb and slow down on rough roads. Improper
alignment not only causes faster tire wear but also puts an
extra load on the engine, which, in turn, wastes fuel.
Keep the bottom of your vehicle free from mud, etc.
This not only lessens weight but also helps prevent
corrosion.
2003 IS300 from Aug. ’02 Prod. (OM53439U)
263
Page 24

DRIVING TIPS
Keep your vehicle tuned–up and in top shape. A dirty air
cleaner, improper valve clearance, dirty plugs, dirty oil and
grease, brakes not adjusted, etc. all lower engine
performance and contribute to poor fuel economy. For
longer life of all parts and lower operating costs, keep all
maintenance work on schedule, and if you often drive under
severe conditions, see that your vehicle receives more
frequent maintenance. (For scheduled maintenance
information, please refer to the ”Owner’s Manual
Supplement / Scheduled Maintenance”.)
CAUTION
Never turn off the engine to coast down hills. Your
power steering and brake booster will not function
without the engine running. Also, the emission control
system operates properly only when the engine is
running.
264
2003 IS300 from Aug. ’02 Prod. (OM53439U)
Page 25

SECTION 4
IN CASE OF AN EMERGENCY
In case of an emergency
If your engine stalls while driving 266. . . . . . . . . . . . . . . . . . . . . . . . . . .
If you cannot increase the engine speed 266. . . . . . . . . . . . . . . . . . . .
If your vehicle will not start 267. . . . . . . . . . . . . . . . . . . . . . . . . . . . . . . .
If your vehicle overheats 271. . . . . . . . . . . . . . . . . . . . . . . . . . . . . . . . . .
If you have a flat tire 272. . . . . . . . . . . . . . . . . . . . . . . . . . . . . . . . . . . . . .
If your vehicle becomes stuck 283. . . . . . . . . . . . . . . . . . . . . . . . . . . . .
If your vehicle needs to be towed 284. . . . . . . . . . . . . . . . . . . . . . . . . .
If you cannot shift automatic transmission selector lever 289. . . . . . .
If you lose your keys or lock yourself out 290. . . . . . . . . . . . . . . . . . . .
2003 IS300 from Aug. ’02 Prod. (OM53439U)
265
Page 26

IN CASE OF AN EMERGENCY
IF YOUR ENGINE STALLS WHILE
DRIVING
If your engine stalls while driving . . . .
1. Reduce your speed gradually, keeping a straight line.
Move cautiously off the road to a safe place.
2. Turn on your emergency flashers.
3. Try starting the engine again.
If the engine will not start, see ”If your vehicle will not start”.
CAUTION
If the engine is not running, the power assist for the
brakes and steering will not work, so steering and
braking will be much harder than usual.
IF YOU CANNOT INCREASE THE
ENGINE SPEED
If the engine speed does not increase with the accelerator
pedal depressed down to about the middle position, there
may be a problem somewhere in your electronic throttle
control system.
At this time, if you depress the accelerator pedal more firmly
and slowly, you can drive you vehicle at low speeds. Have your
vehicle checked by your Lexus dealer as soon as possible.
Even if the a b n o r m a lity of the electronic throttle control system
is corrected during low speed driving, the system may not be
recovered until the engine is stopped and the ignition key is
turned to ”ACC” or ”LOCK” position.
CAUTION
Be especially careful to prevent erroneous pedal
operation.
266
2003 IS300 from Aug. ’02 Prod. (OM53439U)
Page 27

IN CASE OF AN EMERGENCY
IF YOUR VEHICLE WILL NOT
START
(a) Simple checks
Before making these checks, make sure you have followed the
correct starting procedure instructions in ”How to start the
engine” on page 229 and that you have sufficient fuel. Since
your vehicle is equipped with the engine immobiliser system,
also check whether the other keys will start the engine. If they
work, your key may be broken. Have the key checked at your
Lexus dealer. If none of your keys work, the system is possibly
broken. Call your Lexus dealer. See ”Keys” on page 8.
If the engine is not turning over or is turning over too
slowly –
1. Check that the battery terminals are tight and clean.
2. If the battery terminals are O.K., switch on the interior light.
3. If the light is out, dim or goes out when the starter is
cranked, the battery is discharged. You may try jump starting.
See ”(c) Jump starting” for further instruction.
If the light is O.K., but the engine still will not start, it needs
adjustment or repair. Call a Lexus dealer, Roadside
Assistance or Customer Service Assistance. (See
”Foreword”.)
NOTICE
Do not pull– or push–start the vehicle. It may damage
the vehicle or cause a collision when the engine starts.
Also the three–way catalytic converter may overheat
and become a fire hazard.
If the engine turns over at its normal speed but will not
start –
1. The engine may be flooded because of repeated cranking.
See ”(b) Starting a flooded engine” for further instructions.
2. If the engine still will not start, it needs adjustment or repair.
Call a Lexus dealer, Roadside Assistance or Customer
Service Assistance. (See ”Foreword”.)
2003 IS300 from Aug. ’02 Prod. (OM53439U)
267
Page 28
IN CASE OF AN EMERGENCY
(b) Starting a flooded engine
If the engine will not start, your engine may be flooded
because of repeated cranking.
If this happens, turn the key to ”START” with the accelerator
pedal held down. Continue this operation for 30 seconds and
then stop cranking. Then try starting the engine with your foot
off the accelerator pedal.
If the engine does not start after 30 seconds of cranking,
release the key, wait a few minutes and try again.
If the engine still will not start, it needs adjustment or repair.
Call a Lexus dealer, Roadside Assistance or Customer
Service Assistance. (See ”Foreword”.)
NOTICE
Do not crank for more than 30 seconds at a time. This
may overheat the starter and wiring systems.
(c) Jump starting
To avoid serious personal injury and damage to your
vehicle which might result from battery explosion, acid
burns, electrical burns, or damaged electronic
components, these instructions must be followed
precisely.
If you are unsure about how to follow this procedure, we
strongly recommend that you seek help from your Lexus
dealer, Roadside Assistance or Customer Service Assistance.
(See ”Foreword”.)
CAUTION
Batteries contain sulfuric acid which is poisonous
and corrosive. Wear protective safety glasses when
jump starting, and avoid spilling acid on your skin,
clothing, or vehicle.
If you should accidentally get acid on yourself or in
your eyes, remove any contaminated clothing and
flush the affected area with water immediately . Then
get immediate medical attention. If possible,
continue to apply water with a sponge or cloth while
en route to the medical office.
The gas normally produced by a battery will explode
if a flame or spark is brought near. Use only
standardized jumper cables and do not smoke or
light a match while jump starting.
268
2003 IS300 from Aug. ’02 Prod. (OM53439U)
Page 29
Warning: Battery posts, terminals and related
accessories contain lead and lead compounds,
chemicals known to the State of California to cause
cancer and reproductive harm. Wash hands after
handling.
NOTICE
The battery used for boosting must be 12 V. Do not jump
start unless you are sure that the booster battery is
correct.
IN CASE OF AN EMERGENCY
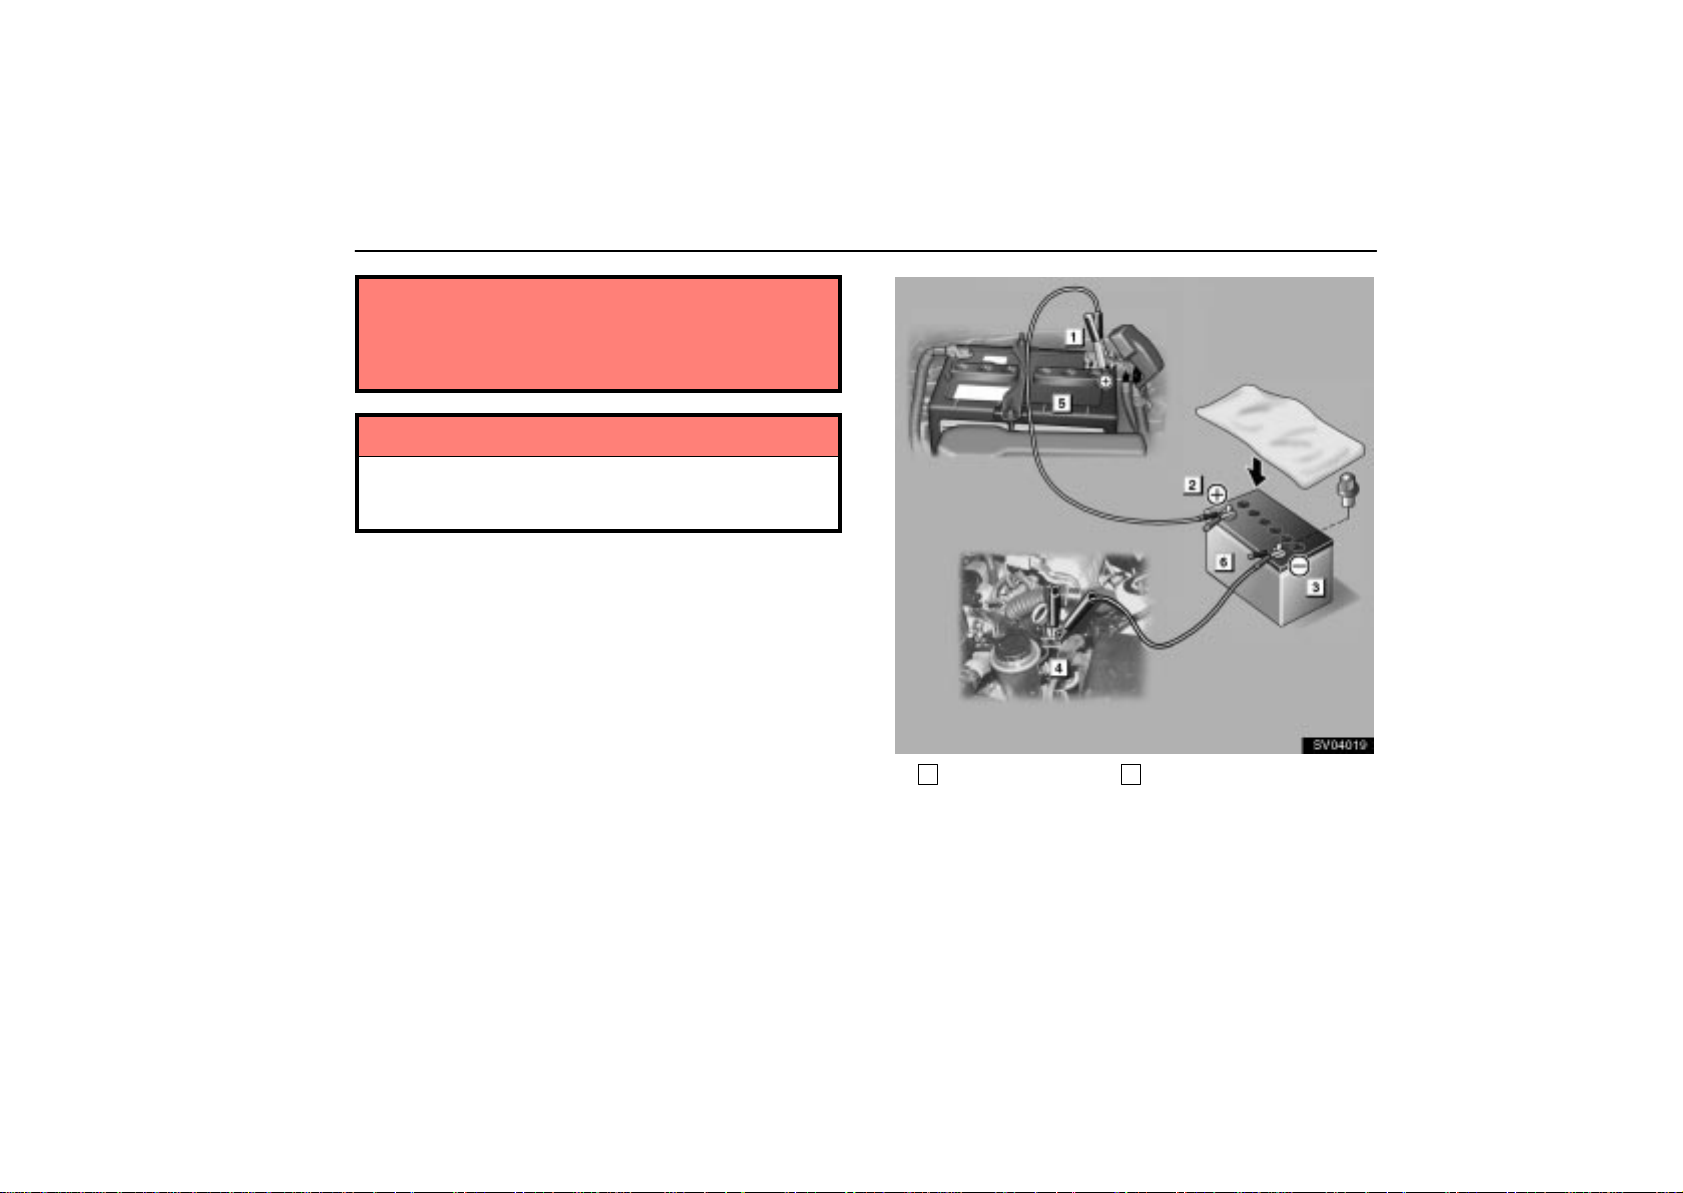
SV04019
5
Discharged battery 6Booster battery
JUMP STARTING PROCEDURE
1. If the booster battery is installed in another vehicle, make
sure the vehicles are not touching. Turn off all unnecessary
lights and accessories.
2003 IS300 from Aug. ’02 Prod. (OM53439U)
269
Page 30

IN CASE OF AN EMERGENCY
2. If required, remove all the vent plugs from the booster
battery . Lay a cloth over the open vents on the booster battery.
(This helps reduce the explosion hazard, personal injuries and
burns.)
If the booster battery is an extended maintenance interval
battery, it is not necessary to remove the vent plugs.
3. If the engine in the vehicle with the booster battery is not
running, start it and let it run for about 5 minutes. During jump
starting, run the engine at about 2000 rpm with the accelerator
pedal lightly depressed.
4. Locate positive (+) and negative (–) terminals of each
battery . C o n n ect the jumper cables in the exact order (
3 4
) shown in the illustration.
1
Connect a positive (red) jumper cable clamp to the
1 2
positive (+) terminal of the discharged battery.
2
Connect the clamp at the other end of the positive (red)
cable to the positive (+) terminal of the booster battery.
3
Connect a negative (black) cable clamp to the negative
(–) terminal of the booster battery.
4
Connect the clamp at the other end of the negative (black)
cable to a solid, stationary, unpainted metallic point (such
as shown in the illustration) away from the battery. Do not
connect it to o r near any part that moves when the engine
is cranked.
CAUTION
When making the connections, to avoid serious injury,
do not lean over the battery or accidentally let the
jumper cables or clamps touch anything except the
correct battery terminals or the ground.
5. Start your engine in the normal way . After starting, run it at
about 2000 rpm for several minutes with the accelerator pedal
lightly depressed.
6. Carefully disconnect the cables in the exact reverse order:
the negative cable and then the positive cable.
7. Carefully dispose of the battery cover cloths which may
now contain sulfuric acid.
8. If removed, replace all the battery vent plugs.
If the cause of your battery discharging is not apparent (for
example, lights left on), you should have it checked at your
Lexus dealer.
270
2003 IS300 from Aug. ’02 Prod. (OM53439U)
Page 31

IN CASE OF AN EMERGENCY
IF YOUR VEHICLE OVERHEATS
If your engine coolant temperature gauge indicates
overheating, if you experience a loss of power, or if you
hear a loud knocking or pinging noise, the engine has
probably overheated.
When the engine overheats
Pull safely off the road, stop the vehicle and turn on your
emergency flashers. Put the transmission in ”P” (automatic)
or neutral (manual) and apply the parking brake.
A: If steam is coming from your engine:
Turn off the engine. Leave the hood closed until there is no sign
of steam or coolant. Your engine could have been seriously
damaged already. Call your Lexus dealer for assistance.
CAUTION
To help avoid personal injury, keep the hood closed until
there is no steam. Escaping steam or coolant is sign of
very high pressure.
B: If no steam is coming from your engine:
Leave the engine running and turn off the air conditioning.
Check the following.
Is the cooling fan operating?
Is the coolant in the acceptable range?
Is the engine drive belt O.K.?
CAUTION
When the en g ine is running, keep hands and clothing
away from the moving fan and engine drive belt.
Do not attempt to remove the radiator cap when the
engine and radiator are hot. Serious injury could
result from scalding hot fluid and steam blown out
under pressure.
If the cooling fan is not operating or the coolant is not in the
acceptable range, turn off the engine and call your Lexus
dealer.
If both conditions are O.K., after the engine coolant
temperature has cooled to normal, continue driving your
vehicle.
If the engine coolant temperature does not cool down, or your
vehicle overheats again, have it checked as soon as possible
by your Lexus dealer.
2003 IS300 from Aug. ’02 Prod. (OM53439U)
271
Page 32

IN CASE OF AN EMERGENCY
IF YOU HAVE A FLAT TIRE
1. Reduce your speed gradually, keeping a straight line.
Move cautiously off the road to a safe place – well away from
the traffic. Avoid stopping on the center divider of a highway.
Park on a level spot with firm ground.
2. Stop the engine and turn on your emergency flashers.
3. Firmly set the parking brake and put the transmission in ”P”
(automatic) or reverse (manual).
4. Have everyone get out of the vehicle on the side away from
traffic.
5. Read the following instructions thoroughly.
CAUTION
When jacking, be sure to observe the following to
reduce the possibility of personal injury:
Follow jacking instructions.
Do not put any part of your body under a vehicle
supported by a jack. Personal injury may occur.
Do not start or run the engine while your vehicle is
supported by the jack.
Stop the vehicle on a level firm ground, firmly set the
parking brake and put the transmission in ”P”
(automatic) or reverse (manual). Block the wheel
diagonally opposite to the one being changed if
necessary.
Make sure to set the jack properly in the jack point.
Raising the vehicle with jack improperly positioned
will damage the vehicle or may allow the vehicle to fall
off the jack and cause personal injury.
Never get under the vehicle when the vehicle is
supported by the jack alone.
Use the jack only for lifting your vehicle during wheel
changing.
Do not raise the vehicle with someone in the vehicle.
When raising the vehicle, do not put an object on or
under the jack.
Raise the vehicle only high enough to remove and
change the tire.
NOTICE
Do not continue driving with a deflated tire. Driving
even a short distance can damage a tire and wheel
beyond repair.
272
2003 IS300 from Aug. ’02 Prod. (OM53439U)
Page 33

IN CASE OF AN EMERGENCY
Compact spare tire (Some models)
SV64025
The compact spare tire is designed for temporary
emergency use only.
The compact spare tire is identified by the distinctive wheel
design and color and special wording ”TEMPORARY USE
ONLY” molded into the side wall of the tire.
To keep the compact spare tire noticeable, do not hide the
wheel by a wheel cover or such.
The compact spare tire saves space in your luggage
compartment, and its lighter weight helps to improve fuel
economy and permits easier installation in case of a flat tire.
The compact spare tire can be used many times, if necessary.
It has tread life of up to 4800 km (3000 miles) depending on
road conditions and your driving habits. When tread wear
indicators appear on the tire, replace the tire. (See ”Checking
and replacing tires” on page 335.)
CAUTION
The compact spare tire was designed especially for
your Lexus. Do not use it on any other vehicle.
Do not use more than one compact spare tire at the
same time.
The pressure for the compact spare tire must be 420
Kpa (4.2 kgf/cm
Do not exceed 80 km/h (50 mph) when driving with the
compact spare tire.
The standard tire should be repaired and replaced as
soon as possible.
Avoid sudden acceleration, sudden deceleration and
sharp turns with the compact spare tire.
2
or bar, 60 psi).
NOTICE
Your ground clearance is reduced when the compact
spare tire is installed so avoid driving over obstacles
and drive slowly on rough, unpaved roads and speed
bumps. Als o , d o n ot attempt to go through an automatic
car wash as the vehicle may get caught, resulting in
damage.
2003 IS300 from Aug. ’02 Prod. (OM53439U)
273
Page 34

IN CASE OF AN EMERGENCY
Access to spare tire (SportCross)
SV41029
1. Pull up the deck board.
SV41030
2. Take off the hook at the rear of the deck board.
3. Lift up the back side of the board and secure the board
by hooking it at the top of the back door opening with the
hook at the edge of the strap.
Make sure the board is secured and does not fall down.
274
2003 IS300 from Aug. ’02 Prod. (OM53439U)
Page 35

SV41034
When closing the board, replace the hook also in its
original position as shown.
IN CASE OF AN EMERGENCY
Spare tire with turning direction indicators
(Some models)
SV41014
NOTICE
If you close the back door with the board hooked, the
hook may be damaged.
The spare tire with turning direction indicators is of a
uni–directional type and is intended for use on the
passenger side of the vehicle.
Installing the wheel on the driver side of the vehicle will not
affect tire performance. If the spare tire is used on the driver
side of the vehicle, it should be used only temporarily and then
replaced with the correct one.
275
2003 IS300 from Aug. ’02 Prod. (OM53439U)
Page 36

IN CASE OF AN EMERGENCY
CAUTION
SportCross:
The spare tire was designed especially for your
Lexus. Do not use it on any other vehicle.
Do not use more than one spare tire at the same time.
Do not exceed 80 km/h (50 mph) when driving with the
spare tire.
The standard tire should be repaired and replaced as
soon as possible.
Avoid sudden acceleration, sudden deceleration and
sharp turns with the spare tire.
Changing procedure
SV41027
1
Jack 2Jack handle 3Wrench 4 Spare tire
1. Get the jack, wrench and spare tire.
To prepare yourself for an emergency, you should familiarize
yourself with the use of the jack and each tool, and their
storage locations.
276
2003 IS300 from Aug. ’02 Prod. (OM53439U)
Page 37

IN CASE OF AN EMERGENCY
SS41005
1
Joint
2
When removing the jack, turn the joint by hand in the
”contract” direction until the jack is free.
3
When storing, turn the joint by hand in the ”expand”
direction until the jack is firmly secured to prevent it from
flying forward during a collision or sudden braking.
SV41028
To remove the spare tire:
1
Remove the tool tray
2
Loosen the bolt and remove it.
When storing the spare tire, place it with the inner side of the
wheel facing up. Then bolt the tire in place and install the tool
tray to prevent the tire from flying forward during a collision or
sudden braking.
2003 IS300 from Aug. ’02 Prod. (OM53439U)
277
Page 38

IN CASE OF AN EMERGENCY
SV41033
2. Block the wheel diagonally opposite the flat tire to keep
the vehicle from rolling when it is jacked up.
When blocking the wheel, place a wheel block in front of one
of the front wheels or behind one of the rear wheels.
278
SS41008
3. Loosen all the wheel nuts.
Always loosen the wheel nuts before raising the vehicle.
Turn the wheel nuts counterclockwise to loosen them. To get
maximum leverage, fit the wrench to the nut so that the handle
is on the right side, as shown above. Grab the wrench near the
end of the handle and pull up on the handle. Be careful that the
wrench does not slip off the nut.
Do not remove the nuts yet – just unscrew them about one–half
turn.
CAUTION
Never use oil or grease on the bolts or nuts. The nuts
may loosen and the wheels may fall off, which could
cause a serious accident.
2003 IS300 from Aug. ’02 Prod. (OM53439U)
Page 39

IN CASE OF AN EMERGENCY
SV04003
4. Position the jack at the jack points as shown.
Make sure the jack is positioned on a level and solid surface.
SV41031
5. After making sure no one is in the vehicle, raise it high
enough so that the spare tire can be installed.
Allow for the fact that you need more ground clearance when
putting on the spare tire than when removing the flat tire.
To raise the vehicle, insert the jack handle into the jack (it is a
loose fit) and turn it clockwise. As the jack touches the vehicle
and begins to lift, double–check that it is properly positioned.
CAUTION
Never get under the vehicle when the vehicle is
supported by the jack alone.
279
2003 IS300 from Aug. ’02 Prod. (OM53439U)
Page 40

IN CASE OF AN EMERGENCY
SS41011
6. Remove the wheel nuts and remove the flat tire.
Lift the flat tire straight off and put it aside.
SL41003
7. Remove the wheel ornament.
When installing the alloy wheels, at this point, remove the
wheel ornament from the flat tire and replace it on the newly
installed tire.
280
SS41012
Before putting on the wheel, remove any corrosion on the
mounting surfaces with a wire brush or such. Installation of
wheels without good metal–to–metal contact at the mounting
surface can cause wheel nuts to loosen and eventually cause
a wheel to come off while driving.
2003 IS300 from Aug. ’02 Prod. (OM53439U)
Page 41

IN CASE OF AN EMERGENCY
SS41013
8. Reinstall all the wheel nuts finger tight.
Align the holes in the wheel with the bolts. Then lift up the
wheel and get at least the top bolt started through its hole.
Wiggle the tire and press it back over the other bolts.
Reinstall the wheel nuts and tighten them as much as you can
by hand. Press the tire back and see if you can tighten them
more.
CAUTION
Never use oil or grease on the bolts or nuts. Doing so
may lead to overtightening the nuts and damaging the
bolts. The nuts may loosen and the wheels may fall off,
which could cause a serious accident. If there is oil or
grease on any bolt or nut, clean it.
SS41014
9. Lower the vehicle completely and tighten the wheel
nuts.
Turn the jack handle counterclockwise to lower the vehicle.
Use only the wheel nut wrench to tighten the nuts. Do not use
other tools or any additional leverage other than your hands,
such as a hammer, pipe or your foot. Make sure the wrench
is securely engaged over the nut.
Tighten each nut a little at a time in the order shown. Repeat
the process until all the nuts are tight.
CAUTION
When lowering the vehicle, make sure all portions of
your body and all other persons around will not be
injured as the vehicle is lowered to the ground.
As soon as possible after changing wheels, have the
wheel nuts tightened by torque wrench at 103 N·m
(10.5 kgf·m, 76 ft·lbf.).
281
2003 IS300 from Aug. ’02 Prod. (OM53439U)
Page 42

IN CASE OF AN EMERGENCY
SL41002
11.After changing the wheel, check the air pressure of the
replaced tire. Stow all the tools, jack and flat tire securely.
If the pressure of the replaced tire is low, drive slowly to the
nearest service station and fill to the correct pressure.
Do not forget to reinstall the tire valve cap as dirt and moisture
could get into the valve core and possibly cause air leakage.
If the cap is missing, put a new one on as soon as possible.
This is the same procedure for changing or rotating your tires.
10.Reinstall the wheel ornament.
Put the wheel ornament into position and then tap it firmly with
the side or heel of your hand to snap it into place.
CAUTION
Take due care in handling the ornament to avoid
unexpected personal injury.
282
CAUTION
When reinstalling a standard tire, take due care in
handling the ornament to avoid unexpected personal
injury.
Before driving, make sure all the tools, jack and flat
tire are securely in place in their storage location to
reduce the possibility of personal injury during a
collision or sudden braking.
2003 IS300 from Aug. ’02 Prod. (OM53439U)
Page 43

IN CASE OF AN EMERGENCY
IF YOUR VEHICLE BECOMES
STUCK
If your vehicle becomes stuck in snow, mud, sand, etc.,
then you may attempt to rock the vehicle free by moving
it forward and backward.
Your vehicle is equipped with the traction control system,
turn off the system to become unstuck to allow the tires
to spin enough to remove the vehicle from the
obstruction. (For details, see ”Traction control system”
on page 244 or 246.)
CAUTION
Do not attempt to rock the vehicle free by moving it
forward and backward if people or objects are anywhere
near the vehicle. During the rocking operation the
vehicle may suddenly move forward or backward as it
becomes unstuck, causing injury or damage to nearby
people or objects.
NOTICE
If you rock your vehicle, observe the following
precautions to prevent damage to the transmission and
other parts.
Do not depress the accelerator pedal while shifting
the selector lever or before the transmission is
completely shifted to forward or reverse gear.
Do not race the engine and avoid spinning the
wheels.
If your vehicle remains stuck after rocking the vehicle
several times, consider other ways such as towing.
2003 IS300 from Aug. ’02 Prod. (OM53439U)
283
Page 44

IN CASE OF AN EMERGENCY
IF YOUR VEHICLE NEEDS TO BE
TOWED
If towing is necessary, we recommend you to have it done
by your Lexus dealer or a commercial tow truck service.
In consultation with them, have your vehicle towed using
either (a) or (b).
(a) Towing with a wheel lift type truck
(b) Using a flat bed truck
(c) Never tow with a sling type truck
Only when you cannot receive a towing service from a
Lexus dealer or commercial tow truck service, tow your
vehicle carefully in accordance with the instructions
given in ”(d) Emergency towing” on page 288.
Proper equipment will help ensure that your vehicle is not
damaged while being towed. Commercial operators are
generally aware of the state/provincial and local laws
pertaining to towing.
Your vehicle can be damaged if it is towed incorrectly.
Although most operators know the correct procedure, it is
possible to make a mistake. To avoid damage to your vehicle,
make sure the following precautions are observed. If
necessary, show this page to the tow truck driver.
TOWING PRECAUTIONS:
Use a safety chain system for all towing, and abide by the
state/provincial and local laws. The wheels and axle on the
ground must be in good condition. If they are damaged, use
a towing dolly.
(a) Towing with a wheel lift type truck
From front
SS41015
MANUAL TRANSMISSION:
We recommend using a towing dolly under the rear wheels.
AUTOMATIC TRANSMISSION:
Use a towing dolly under the rear wheels.
NOTICE
Never tow a vehicle with an automatic transmission
from the front with rear wheels on the ground, as this
may cause serious damage to the transmission.
284
2003 IS300 from Aug. ’02 Prod. (OM53439U)
Page 45

IN CASE OF AN EMERGENCY
From rear
SS41016b
Place the ignition key in the ”ACC” position.
NOTICE
Do not tow with the key removed or in the ”LOCK”
position, as the steering lock mechanism is not
strong enough to hold the front wheels straight.
When lifting wheels, take care to ensure adequate
ground clearance for towing at the opposite end of
the raised vehicle. Otherwise, the bumper and/or
underbody of the towed vehicle will be damaged
during towing.
(b) Using a flat bed truck
SS41017
Tie down points
40E014
2003 IS300 from Aug. ’02 Prod. (OM53439U)
285
Page 46

IN CASE OF AN EMERGENCY
SS41018a
A
Front BRear
If your Lexus is transported by a flat bed, it should be tied
down at locations A and B as shown above.
SV04004
NOTICE
Do not use the rear emergency towing eyelets.
286
Rear emergency towing eyelets
2003 IS300 from Aug. ’02 Prod. (OM53439U)
Page 47

IN CASE OF AN EMERGENCY
Tie down angle
SV04005
If you use chains or wires to tie down your vehicle, the
angles shaded black must be at 45.
(c) Towing with a sling type truck
SS41021
NOTICE
Do not tow with a sling type truck, either from the front
or rear. This may cause body damage.
2003 IS300 from Aug. ’02 Prod. (OM53439U)
287
Page 48

IN CASE OF AN EMERGENCY
(d) Emergency towing
SV41032
If towing is necessary, we recommend you to have it done
by your Lexus dealer or a commercial tow truck service.
If towing service is not available in an emergency, your
vehicle may be temporarily towed by a cable or chain
secured to the emergency towing eyelet. Use extreme
caution when towing the vehicle.
NOTICE
Only use specified towing eyelet; otherwise your
vehicle may be damaged.
A driver must be in the vehicle to steer it and operate the
brakes.
Towing in this manner may be done only on hard–surfaced
roads for a short distance and at low speeds. Also, the wheels,
axles, drive train, steering and brakes must all be in good
condition.
CAUTION
Use extreme caution when towing the vehicle. Avoid
sudden starts or erratic driving maneuvers which would
place excessive stress on the emergency towing eyelet
and towing cable or chain. The eyelet and towing cable
or chain may break and cause serious injury or damage.
NOTICE
Use only a cable or chain specifically intended for use
in towing vehicles. Securely fasten the cable or chain
to the towing eyelet provided.
Before towing, release the parking brake and put the
transmission in neutral (manual) or ”N” (automatic). The
ignition key must be in ”ACC” (engine off) or ”ON” (engine
running).
CAUTION
If the engine is not running, the power assist for the
brakes and steering will not work so steering and
braking will be much harder than usual.
288
2003 IS300 from Aug. ’02 Prod. (OM53439U)
Page 49

IF YOU CANNOT SHIFT
AUTOMATIC TRANSMISSION
SELECTOR LEVER
SV04012
If you cannot shift the selector lever, use the shift lock
button as follows:
1
Turn the ignition key to ”LOCK” or ”ACC”. Make sure the
parking brake is applied. Pry up the cover with a
flat–bladed screwdriver or equivalent.
IN CASE OF AN EMERGENCY
SV04013
2
Insert your finger, the screwdriver or equivalent into the
hole to push down the shift lock override button. You can
shift the selector lever while pushing the button.
For your safety, keep the brake pedal depressed.
Be sure to have the system checked by your Lexus dealer as
soon as possible.
2003 IS300 from Aug. ’02 Prod. (OM53439U)
289
Page 50

IN CASE OF AN EMERGENCY
IF YOU LOSE YOUR KEYS OR
LOCK YOURSELF OUT
You can purchase a new key at your Lexus dealer if you
can give them the key number and master key.
Even if you lose only one key, contact your Lexus dealer to
make a new key . If you lose all your master keys, you cannot
make new keys; the whole engine immobiliser system must be
replaced.
See the suggestion given in ”Keys” on page 8.
You can use the wireless remote control system with the new
key. Contact your Lexus dealer for detailed information.
If your keys are locked in the vehicle and you cannot get a
duplicate, many Lexus dealers can still open the door for you,
using their special tools. If you must break a window to get in,
we suggest breaking the smallest side window because it is the
least expensive to replace. Be extremely cautious to avoid
cuts from the glass.
290
2003 IS300 from Aug. ’02 Prod. (OM53439U)
Page 51

SECTION 3 –
STARTING AND DRIVING
Starting and driving
Three–way catalytic converter 224. . . . . . . . . . . . . . . . . . . . . . . . . . . . .
Engine exhaust caution 225. . . . . . . . . . . . . . . . . . . . . . . . . . . . . . . . . . .
Before starting the engine 226. . . . . . . . . . . . . . . . . . . . . . . . . . . . . . . . .
Ignition switch with steering lock 227. . . . . . . . . . . . . . . . . . . . . . . . . . .
Parking brake 228. . . . . . . . . . . . . . . . . . . . . . . . . . . . . . . . . . . . . . . . . . .
How to start the engine 229. . . . . . . . . . . . . . . . . . . . . . . . . . . . . . . . . . .
Automatic transmission 230. . . . . . . . . . . . . . . . . . . . . . . . . . . . . . . . . . .
Manual transmission 239. . . . . . . . . . . . . . . . . . . . . . . . . . . . . . . . . . . . .
Electronic controlled transmission 240. . . . . . . . . . . . . . . . . . . . . . . . . .
Cruise control 241. . . . . . . . . . . . . . . . . . . . . . . . . . . . . . . . . . . . . . . . . . .
Traction control system 244. . . . . . . . . . . . . . . . . . . . . . . . . . . . . . . . . . .
Vehicle skid control system 247. . . . . . . . . . . . . . . . . . . . . . . . . . . . . . . .
Electronic throttle control system 249. . . . . . . . . . . . . . . . . . . . . . . . . . .
Brake system 250. . . . . . . . . . . . . . . . . . . . . . . . . . . . . . . . . . . . . . . . . . .
Brake pad wear indicators 254. . . . . . . . . . . . . . . . . . . . . . . . . . . . . . . . .
Types of tires 254. . . . . . . . . . . . . . . . . . . . . . . . . . . . . . . . . . . . . . . . . . . .
Limited –slip differential 255. . . . . . . . . . . . . . . . . . . . . . . . . . . . . . . . . . .
1
2003 IS300 from Aug. ’02 Prod. (OM53439U)
223
Page 52

STARTING AND DRIVING
THREE–WAY CATALYTIC
CONVERTER
SV31040
Three–way catalytic converters are emission control
devices installed in the exhaust system.
It looks somewhat like a muffler, but its purpose is to reduce
pollutants in the exhaust gas.
CAUTION
Keep people and combustible materials away from
the exhaust pipe while the engine is running. The
exhaust gas is very hot.
Do not drive, idle or park your vehicle over anything
that might burn easily such as grass, leaves, paper or
rags.
NOTICE
A large amount of unburned gases flowing into the
three–way catalytic converter may cause it to overheat
and create a fire hazard. To prevent this and other
damage, observe the following precautions:
Use only unleaded gasoline.
Do not drive with an extremely low fuel level; running
out of fuel could cause the engine to misfire, creating
an excessive load on the three–way catalytic
converter.
Do not allow the engine to run at idle speed for more
than 20 minutes.
Avoid racing the engine.
Do not push–start or pull–start your vehicle.
Do not turn off the ignition while the vehicle is
moving.
Keep your engine in good running order.
Malfunctions in the engine electrical system,
electronic ignition system or fuel system could cause
an extremely high three–way catalytic converter
temperature.
If the engine becomes difficult to start or stalls
frequently, take your vehicle in for a check–up as
soon as possible. Remember, your Lexus dealer
knows your vehicle and its three–way catalytic
converter system best.
224
2003 IS300 from Aug. ’02 Prod. (OM53439U)
Page 53

STARTING AND DRIVING
To ensure that the three–way catalytic converter and
the entire emission control system operate properly,
your vehicle must receive the periodic inspections
required by the Lexus Maintenance Schedule . For
scheduled maintenance information, refer to the
”Owner’s Manual Supplement/Scheduled
Maintenance ”.
ENGINE EXHAUST CAUTION
CAUTION
Avoid inhaling the engine exhaust. It contains
carbon monoxide, which is a colorless and odorless
gas. It can cause unconsciousness or even death.
Make sure the exhaust system has no holes or loose
connections. The system should be checked from
time to time. If you hit something, or notice a change
in the sound of the exhaust, have the system checked
immediately.
Do not run the engine in a garage or enclosed area
except for the time needed to drive the vehicle in or
out. The exhaust gases cannot escape, making this
a particularly dangerous situation.
Do not remain for a long time in a parked vehicle with
the engine running. If it is unavoidable, however, do
so only in an unconfined area and adjust the heating
or cooling system to force outside air into the vehicle.
Keep the trunk lid or back door closed while driving.
An open or unsealed trunk lid or back door may
cause exhaust gases to be drawn into the vehicle.
2003 IS300 from Aug. ’02 Prod. (OM53439U)
225
Page 54

STARTING AND DRIVING
To allow proper operation of your vehicle’s
ventilation system, keep the inlet grilles in front of the
windshield clear of snow, leaves, or other
obstructions.
If you smell exhaust fumes in the vehicle, drive with
the windows open and the trunk lid or back door
closed. Have the cause immediately located and
corrected.
BEFORE STARTING THE ENGINE
1. Check the area around the vehicle before entering it.
2. Adjust seat position, seatback angle, head restraint height
and steering wheel angle.
3. Adjust the inside and outside rear view mirrors.
4. Lock all doors.
5. Fasten seat belts.
Remember to check that the service reminder indicators
function when turning the key to ”ON”, and check the fuel
gauge to see that you have sufficient fuel.
226
2003 IS300 from Aug. ’02 Prod. (OM53439U)
Page 55

STARTING AND DRIVING
IGNITION SWITCH WITH STEERING
LOCK
SS31002
”START” – Starter motor on. The key will return to the
”ON” position when released.
For starting tips, see page 229.
”ON” – Engine on and all accessories on.
This is the normal driving position.
NOTICE
Do not leave the key in the ”ON” position if the engine
is not running. The battery will discharge and the
electronic ignition system could be damaged.
If you leave the key in the ”ACC” or ”LOCK” position and open
the driver’s door, a buzzer will remind you to remove the key.*
NOTE: *The volume or interval of beep sound can be
changed. Ask your Lexus dealer for details.
SS31003
”LOCK” – Engine is off and the steering wheel is locked.
The ignition key can be removed only at this position.
Manual transmission: To turn the key from ”ACC” to the
”LOCK” position, you must push in the key.
Automatic transmission: To turn the key from ”ACC” to the
”LOCK” position you must put the transmission selector lever
in the ”P” position and you must push in the key.
Once you remove the key, the engine immobiliser system is
automatically set. See ”Engine immobiliser system” on page
12.
”ACC” – Accessories such as the radio operate, but the
engine is off.
227
2003 IS300 from Aug. ’02 Prod. (OM53439U)
Page 56

STARTING AND DRIVING
When starting the engine, the key may seem stuck at the
”LOCK” position. To free it, first be sure the key is pushed all
the way in, and then rock the steering wheel slightly while
turning the key gently.
If, in an emergency, you must turn the engine off while the
vehicle is moving, turn the key only to ”ACC”.
CAUTION
For manual transmission:
Never remove the key when the vehicle is moving, as
this will lock the steering wheel and result in loss of
steering control.
PARKING BRAKE
SV31017
To set: Pull up the lever. For better holding power, first
depress the brake pedal and hold it while setting the
parking brake.
To release: Pull up the lever slightly (1) , press the lock
release button (2), and lower (3).
To remind you that the parking brake is set, the parking brake
reminder light in the instrument panel remains on until you
release the parking brake.
CAUTION
Before driving, make sure the parking brake is fully
released and that the parking brake reminder light is off.
228
2003 IS300 from Aug. ’02 Prod. (OM53439U)
Page 57

STARTING AND DRIVING
HOW TO START THE ENGINE
Before cranking
1. Apply the parking brake firmly.
2. Turn off unnecessary lights and accessories.
3. Manual transmission: Press the clutch pedal to the floor
and shift the transmission into neutral. Hold the clutch pedal
to the floor until the engine is started. A starter safety device
will prevent the starter from operating if the clutch pedal is not
fully depressed.
Automatic transmission: Put the selector lever in ”P”. If you
need to restart the engine while the vehicle is moving, put the
selector lever in ”N”. A starter safety device will prevent the
starter from operating if the selector lever is in any drive
position.
4. For automatic transmission only:Depress the brake
pedal and hold it to the floor until driving off.
Starting the engine
Before starting the engine, be sure to follow the instructions in
”Before cranking”.
Normal starting procedure
The multiport fuel injection system/sequential multiport fuel
injection system in your engine automatically controls the
proper air–fuel mixture for starting. You can start a cold or hot
engine as follows:
1. With your foot off the accelerator pedal, crank the engine by
turning the key t o ” START”. Release it when the engine starts.
2. After the engine runs for about 10 seconds, you are ready
to drive.
If the weather is below freezing, let the engine warm up for a
few minutes before driving. Do not leave the vehicle while the
engine is warming up.
If the engine stalls ...
Simply restart it , using the correct procedure given in normal
starting.
If the engine will not start
See ”If your vehicle will not start” on page 267.
NOTICE
Do not crank for more than 30 seconds at a time. This
may overheat the starter and wiring systems.
Do not race a cold engine.
If the engine becomes difficult to start or stalls
frequently, have the engine checked immediately.
2003 IS300 from Aug. ’02 Prod. (OM53439U)
229
Page 58

STARTING AND DRIVING
AUTOMATIC TRANSMISSION
Your automatic transmission has a shift lock system to
minimize the possibility of incorrect operation. This
means you can only shift out of ”P” position when the
brake pedal is depressed with the ignition switch in ”ON”
position. ()
SV31020
The shift position is displayed on the instrument
cluster.
P: Parking, engine starting and key removal position
R: Reverse position
N: Neutral position
D: Normal driving position (Shifting into overdrive
possible)
M: Position for manual shifting up or downshifting
When the cruise control is being used, even if you
downshift from ”5” to ”4”, engine braking will not be
enabled because the cruise control is not cancelled. For
the operation to decrease the vehicle speed, see page
243.
3, 2: Position for more powerful engine braking
L: Position for maximum engine braking
230
2003 IS300 from Aug. ’02 Prod. (OM53439U)
Page 59

STARTING AND DRIVING
Correct use of the automatic transmission is explained in
the following parts.
(a) Normal driving
(b) Driving in M mode
(c) Using engine braking
(d) Using the ”3”, ”2” and ”L” positions
(e) Backing up
(f) Parking
(g) Good driving practice
(h) If you cannot shift the selector lever
(i) If the ”ECT PWR” indicator light flashes
(a) Normal driving
SV31021
1
”P” (Park) position 2”N” (Neutral) position
1. Start the engine as instructed in ”How to start the
engine” on page 229.
The transmission must be in ”P” or ”N”. The engine will not start
in any drive position even if the ignition key is turned to
”START”.
2003 IS300 from Aug. ’02 Prod. (OM53439U)
231
Page 60

STARTING AND DRIVING
SS31019
1
Power position 2Normal position
3
Snow position
2. Set the driving pattern selector switch to the ”Normal”
position.
Your transmission has a driving pattern selector switch which
allows you to select ”Power”, ”Normal” or ”Snow” mode to suit
your driving condition. For ordinary driving, Lexus
recommends that you use the ”Normal” position to improve fuel
economy.
3. For more powerful acceleration and sporty driving, use
the ”Power” position.
In the ”Power” position, the ”ECT PWR” light in the instrument
cluster is on and the transmission is shifted up at higher vehicle
speeds and shifted down more responsively than in the
”Normal” position.
For ”Snow” mode, see ”Electronic Throttle Control
System” on page 249.
232
SV31022
1
Brake pedal 2”D” (Drive) position
4. With your foot holding down the brake pedal, shift the
selector lever to ”D”.
Always use the ”D” position to improve fuel economy and quiet
driving. In this position, shifting into the overdrive gear is
possible. However, while the engine coolant temperature is
low, the transmission will not shift into the overdrive gear even
in the ”D” position. (See ”(c) Using engine braking” and ”(g)
Good driving practice” for exceptions.)
CAUTION
Never put your foot on the accelerator pedal while
shifting.
2003 IS300 from Aug. ’02 Prod. (OM53439U)
Page 61

STARTING AND DRIVING
5. Release the parking brake and brake pedal. Depress
the accelerator pedal slowly for smooth starting.
In normal cruising, the vehicle will start in the first gear and
automatically shift up to the most suitable gear. On inclines,
declines or windi n g roads, etc., the vehicle shifts up and down
automatically according to the running conditions to obtain the
suitable driving power and engine braking.
When the lever is in ”3” position, the automatic transmission
system will select the most suitable gear for the running
conditions such as hill climbing, hard towing, etc.
If you need to accelerate rapidly while driving, depress the
accelerator pedal to the full throttle position. This provides
more acceleration by automatically downshifting the
transmission to the next lower gear or beyond, depending on
the vehicle speed.
If engine braking is needed, such as in descending a long hill,
see ”(b) Using engine braking”.
(b) Driving in M mode
If the change lever is shifted to M position, the shift range
position can be switched over between 5 and 2 using the
shift switc h o n the steering wheel instead of operating the
change lever. The first shift range position is on 5 when
the change lever is shifted to M position.
SV31024
1
”M” position
When the selector lever is put in the ”M” position, the M MODE
indicator is shown on the instrument cluster.
2003 IS300 from Aug. ’02 Prod. (OM53439U)
233
Page 62

STARTING AND DRIVING
SV31028
2
Downshifting on the front, Upshifting on the rear
5: Fifth range
The most suitable gear is selected automatically
between first and fifth gears according to the vehicle
speed or the running condition.
4: Fourth range
The most suitable gear is selected automatically
between first and fourth gears according to the vehicle
speed or the running condition.
3: Third range
The most suitable gear is selected automatically
between first and third gears according to the vehicle
speed or the running condition.
Slight engine braking will be obtained on a downhill
road.
Smooth running with less shifting will be obtained on an
uphill.
2: Second range
First or second gear will be selected automatically
according to the vehicle speed or the running condition.
This range is used in the case that the engine braking is
necessary.
The gear position being used is shown on the instrument
cluster.
Each time you push the switch located on the front of the
steering wheel, the transmission downshifts (from ”5”) to ”4”,
”3” and then ”2”.
When you push the switch located on the back of the steering
wheel, the transmission upshifts to ”3”, ”4” and then ”5”.
For the precautions on each position, see the description on
the next page.
234
2003 IS300 from Aug. ’02 Prod. (OM53439U)
Page 63

STARTING AND DRIVING
Warning tone sounds twice in any of the following cases:
You attempt to downshift the transmission when it is not
possible to downshift due to the high vehicle speed.
You attempt to downshift from ”2” position.
You attempt to upshift from ”5” position.
If the ”M” indicator flashes, there is a problem somewhere
in the system. In this case, it should be noted that you
cannot downshift or upshift the transmission using the
switches on the steering wheel. Consult with your Lexus
dealer as soon as possible. The transmission works
exactly in the same way as when you put the selector lever
in the ”D” position.
CAUTION
Be careful when downshifting on a slippery surface.
The abrupt change in engine speed could cause the
vehicle to spin or skid.
(c) Using engine braking
SV31023
To use the braking power of the engine, downshift the
transmission in the way described below:
1
Shift into the ”M” position, and you push the transmission
down shift switch. The transmission will downshift to
fourth gear and engine braking will be obtained. This is
effective only when you are driving in the ”D” position or
in fifth gear (”M” position).
When the cruise control is being used, even if you
downshift from ”5” to ”4”, engine braking will not be
enabled because the cruise control is not cancelled. If
you need to decrease the vehicle speed, see page 243.
2
Shift into the ”3” position. The transmission will downshift
to third gear when the vehicle speed is or becomes lower
than the speed listed below and stronger engine braking
will be obtained.
2003 IS300 from Aug. ’02 Prod. (OM53439U)
235
Page 64

STARTING AND DRIVING
3
Shift into the ”2” position. The transmission will downshift
to second gear when the vehicle speed is or becomes
lower than the speed listed below and stronger engine
braking than that of ”3” position will be obtained.
4
Shift into the ”L” position. The transmission will downshift
to first gear when the vehicle speed is or becomes lower
than the speed listed below and maximum engine braking
will be enabled.
”4” 177 km/h (110 mph)
”3” 123 km/h (76 mph)
”2” 81 km/h (51 mph)
”L” 17 km/h (11 mph)
CAUTION
Be careful when downshifting on a slippery surface.
The abrupt change in engine speed could cause the
vehicle to spin or skid.
(d) Using the ”3”, ”2” and ”L” positions
The ”3”, ”2” and ”L” positions are used for strong engine
braking as described previously.
With the selector lever in ”3”, ”2” or ”L”, you can start the vehicle
in motion as with the lever in ”D”.
With the selector lever in ”3” or ”2”, the vehicle will start in the
first gear and automatically shift to third or second gear.
With the selector lever in ”L”, the transmission is engaged in
the first gear.
NOTICE
Be careful not to over–rev the engine. Watch the
tachometer to keep engine rpm from going into the
red zone. The approximate maximum allowable
speed for each position is given below for your
reference:
”3” 124 km/h (78 mph). . . . . . . . . . . . . . . . . . .
”2” 81 km/h (51 mph). . . . . . . . . . . . . . . . . . .
”L” 52 km/h (33 mph). . . . . . . . . . . . . . . . . . .
Do not continue hill climbing or hard towing for a long
time in the ”3”, ”2” or ”L” position. This may cause
severe automatic transmission damage from
overheating. To prevent such damage, ”4” position
should be used in hill climbing or hard towing.
236
2003 IS300 from Aug. ’02 Prod. (OM53439U)
Page 65

STARTING AND DRIVING
(e) Backing up
SV31025
1
Brake pedal 2”R” (Reverse) position
1. Bring the vehicle to a complete stop.
2. With the brake pedal held down with your foot, shift the
selector lever to the ”R” position.
NOTICE
Never shift into reverse while the vehicle is moving.
(f) Parking
SV31026
1
Brake pedal 2Parking brake lever
3
”P” (Park) position
1. Bring the vehicle to a complete stop.
2. Pull the parking brake lever up fully to securely apply the
parking brake.
3. With the brake pedal held down with your foot, shift the
selector lever to the ”P” position.
CAUTION
Never attempt to move the selector lever into ”P” under
any circumstances while the vehicle is moving. Serious
mechanical damage and loss of vehicle control may
result.
2003 IS300 from Aug. ’02 Prod. (OM53439U)
237
Page 66

STARTING AND DRIVING
(g) Good driving practice
If the transmission repeatedly shifts up and down between the
fourth and overdrive gears when climbing a gentle slope, shift
the selector lever to the ”M” position and select the fourth gear
by pushing the transmission switch. Be sure to shift the
selector lever to the ”D” position after climbing the slope.
CAUTION
Always keep your foot on the brake pedal while stopped
with the engine running. This prevents the vehicle from
creeping.
NOTICE
Always use the brake pedal or the parking brake to hold
the vehicle on an upgrade. Do not attempt to hold the
vehicle using the accelerator pedal, as this can cause
the transmission to overheat.
(h) If you cannot shift the selector
If you cannot shift the selector lever even though the brake
pedal is depressed, use the shift lock override button. For
instructions, see ”If you cannot shift automatic transmission
selector lever” on page 289.
(i) If the ”ECT PWR” indicator light flashes
If the ”ECT PWR” indicator light flashes, contact your Lexus
dealer as soon as possible. There may be trouble in the
transmission system.
238
2003 IS300 from Aug. ’02 Prod. (OM53439U)
Page 67

STARTING AND DRIVING
MANUAL TRANSMISSION
SV31034
The shift pattern is the conventional pattern shown above.
Press the clutch pedal down fully while shifting, and then
release it slowly. Do not rest your foot on the pedal while
driving, because it will cause clutch trouble. And do not use the
clutch to hold the vehicle when stopped on an uphill grade –
use the parking brake.
Upshifting too soon or downshifting too late will cause lugging,
and possibly pinging. Regularly revving the engine to
maximum speed in each gear will cause excessive engine
wear and high fuel consumption.
Recommended shifting speeds
The transmission is fully synchronized and upshifting or
downshifting is easy.
For the best compromise between fuel economy and vehicle
performance, you should upshift or downshift at the following
speeds:
gear km/h (mph)
1 to 2 or 2 to 1 24 (15)
2 to 3 or 3 to 2 40 (25)
3 to 4 or 4 to 3 64 (40)
4 to 5 or 5 to 4 72 (45)
Downshift to the appropriate gear if acceleration is needed
when you are cruising below the above downshifting speeds.
Upshifting too soon or downshifting too late will cause lugging,
and possibly pinging. Regularly revving the engine to
maximum speed in each gear will cause excessive engine
wear and high fuel consumption.
Maximum allowable speeds
To get on a highway or to pass slower traffic, maximum
acceleration may be necessary. Make sure you observe the
following maximum allowable speeds in each gear:
gear km/h (mph)
1 56 (35)
2 98 (61)
3 145 (91)
NOTICE
Do not downshift if you are going faster than the maximum allowable speed for the next lower gear.
2003 IS300 from Aug. ’02 Prod. (OM53439U)
239
Page 68

STARTING AND DRIVING
Good driving practice
If it is difficult to shift into reverse, put the transmission in
neutral, release the clutch pedal momentarily, and then try
again.
When towing a trailer, in order to maintain engine braking
efficiency, do not use fifth gear.
CAUTION
Be careful when downshifting on a slippery surface.
Abrupt shifting could cause the vehicle to spin or skid.
NOTICE
Make sure the vehicle is completely stopped before
shifting into reverse.
ELECTRONIC CONTROLLED
TRANSMISSION
(Vehicle with automatic transmission only)
SV31039
1
Power position 2Normal position
The electronic controlled system has 2 modes: Normal
and Power modes.
Normal mode: For ordinary driving, Lexus recommends that
you use the normal mode to improve fuel economy.
Power mode: For more powerful acceleration and sporty
driving.
In the power mode, the ”ECT PWR” light in the instrument
cluster is on and the transmission is shifted up at higher vehicle
speeds and shifted down more responsively than in the normal
mode.
240
2003 IS300 from Aug. ’02 Prod. (OM53439U)
Page 69

STARTING AND DRIVING
CRUISE CONTROL
The cruise control allows you to cruise the vehicle at a
desired speed over 40 km/h (25 mph) with your foot off the
accelerator pedal.
Y our cruising speed can be maintained although a slight speed
change may occur when driving up or down a gradient, within
the limits of engine performance. On steeper hills, a great
speed change will occur so it is better to drive without the cruise
control.
When the cruise control is on, the driving pattern of the
automatic transmission is fixed in the normal position,
regardless of the position of the selector switch.
CAUTION
To help maintain maximum control of your vehicle,
do not use the cruise control when driving in heavy
or varying traffic, or on slippery (rainy, icy or
snow–covered) or winding roads.
Avoid vehicle speed increases when driving
downhill. If the vehicle speed is too fast in relation to
the cruise control set speed, cancel the cruise
control then downshift the transmission to use
engine braking to slow down.
Turning on the system
SV31029
To operate the cruise control, push the main switch. This turns
the system on. The indicator light in the instrument cluster
shows that you can now set your desired cruising speed.
Another push o n the switch will turn the system completely of f.
When the ignition key is turned off, the main switch is also
automatically turned off. To use the cruise control again, push
the main switch again to turn it on.
CAUTION
To avoid accidental cruise control engagement, keep
the main switch off when not using the cruise control.
2003 IS300 from Aug. ’02 Prod. (OM53439U)
241
Page 70

STARTING AND DRIVING
Setting operation
SV31030
Each function is described below.
1
Setting at a desired speed.
Automatic transmission: The transmission must be in the
”D” position or the gear position must be ”4” or ”5” in M mode
before you set the cruise control speed.
Bring the vehicle to the desired speed, press the control lever
downward in the ”SET/COAST” direction and release it. This
sets the vehicle at that speed. Now you may take your foot off
the accelerator pedal. If you need acceleration – for example,
when passing – depress the accelerator pedal enough for the
vehicle to exceed the set speed. When you release the
accelerator pedal, the vehicle will return to the speed set prior
to the acceleration.
2
Cancelling the preset speed
You can cancel the preset speed by either of the following:
a. Pulling the control lever in the ”CANCEL” direction.
b. Depressing the brake pedal.
c. Depressing the clutch pedal (manual transmission)
If the vehicle speed falls below about 40 km/h (25 mph), the
preset speed will be automatically cancelled.
If the vehicle speed drops 16 km/h (10 mph) below the preset
speed, the preset speed will also automatically be cancelled.
If the preset speed automatically cancels out for other than
these reasons, have your vehicle checked by your Lexus
dealer at the earliest opportunity.
3
Resetting to a faster speed
Press the control lever upward in the ”RES/ACC” direction and
hold it. Release the lever when the desired speed is attained.
While the lever is held upward, the vehicle will gradually gain
speed.
When the difference between the actual vehicle speed and the
set speed is less than 5 km/h (3 mph), the set speed can be
increased 1.6 km/h (1 mph) each time by pressing the control
lever upward in the ”RES/ACC” direction quickly within 0.6
seconds.
However, a quicker way to reset is to accelerate the vehicle
and then press the control lever downward in the
”SET/COAST” direction.
242
2003 IS300 from Aug. ’02 Prod. (OM53439U)
Page 71

4
Resetting to a slower speed
Press the control lever downward in the ”SET/COAST”
direction and hold it. Release the lever when the desired
speed is attained. While the lever is held downward, the
vehicle speed will gradually decrease.
When the difference between the actual vehicle speed and the
set speed is less than 5 km/h (3 mph), the set speed can be
lowered 1.6 km/h (1 mph) each time by pressing the control
lever downward in the ”SET/COAST” direction quickly within
0.6 seconds.
However, a quicker way to reset is to depress the brake pedal
and then press the control lever downward in the
”SET/COAST” direction.
Automatic transmission: Even if you downshift the
transmission from the ”D” position to ”M” with the cruise control
on, engine braking will not be applied because the cruise
control is not cancelled. To decrease the vehicle speed, reset
to a slower speed with the cruise control lever or depress the
brake pedal. If you use the brake pedal, cruise control is
cancelled.
5
Resuming the preset speed
If the preset speed is cancelled by pulling the control lever or
by depressing the brake pedal, pushing the lever up in the
”RES/ACC” direction will restore the speed set prior to
cancellation. However, once the vehicle speed falls below
about 40 km/h (25 mph), the preset speed will not be resumed.
STARTING AND DRIVING
Cruise control failure warning
If the ”CRUISE” indicator light in the instrument cluster flashes
five times and then goes out when using the cruise control, it
means that there is trouble in the cruise control system.
Contact your Lexus dealer.
2003 IS300 from Aug. ’02 Prod. (OM53439U)
243
Page 72

STARTING AND DRIVING
TRACTION CONTROL SYSTEM
(With vehicle skid control system)
The traction control system automatically help control the
spinning of the rear wheels which may occur when
accelerating on slippery road surfaces, thus assisting
driver control the driving power of the rear wheels. When
you turn the ignition switch on, the traction control
system always turns on automatically, and the slip
indicator light w ill come on. The indicator lights will go off
after a few seconds.
SV31037
Slip indicator light
Leave the system on during ordinary driving so that it can
operate when needed. When traction control is applied,
the slip indicator light blinks.
244
SV31033
You can turn off the traction control system by pushing
the ”TRAC OFF” switch. The ”TRAC OFF”
indicator/warning light will then come on. Pushing the
”TRAC OFF” switch a second time turns the system back
on and extinguishes the ”TRAC OFF” indicator/warning
light.
You may hear a sound in the engine compartment for a few
seconds when the engine is started or just after the vehicle is
started. This means that the traction control system is in the
self–check mode, and does not indicate malfunction.
When the traction control system is operating, you may feel
vibration of your vehicle, caused by operation of the brakes.
This indicates the system is functioning properly.
When getting the vehicle out of mud or new snow, etc. the
traction control system will help operate to prevent the wheels
from spinning.
If the light flashes, this indicates a malfunction in the traction
control system. Contact your Lexus dealer as soon as
possible to service the vehicle.
2003 IS300 from Aug. ’02 Prod. (OM53439U)
Page 73

STARTING AND DRIVING
Traction control system failure warning
SV31041
These lights warn that there is a problem somewhere in the
vehicle skid control system or traction control system.
The lights will come on when the ignition key is turned to ”ON”,
and will go off after a few seconds.
If the ”VSC” warning light and ”TRAC OFF” indicator/warning
light come on, the vehicle skid control system and traction
control system do not work. However, as conventional braking
operates when applied, there is no problem to continue your
driving.
If any of the following conditions occurs, this indicates a
malfunction somewhere in the parts monitored by the warning
light system. Contact your Lexus dealer as soon as possible
to service the vehicle:
The ”VSC” warning light or ”TRAC OFF” indicator/warning
light do not come on after the ignition is turned to on.
The ”VSC” warning light and ”TRAC OFF” indicator/warning
light remain on after the ignition is turned to on.
The ”VSC” warning light and “TRAC OFF” indicator/warning
light come on while driving without pushing ”TRAC OFF”
switch.
CAUTION
Under certain slippery road conditions, full traction of
the vehicle and power to the rear wheels cannot be
maintained, even though the traction control system is
in operation. Do not drive the vehicle under any speed
or maneuvering conditions which will cause the vehicle
to lose traction. In situations where the road surface is
covered with ice or snow, your vehicle should be fitted
with snow tires or tire chains. Always drive at an
appropriate and cautious pace.
2003 IS300 from Aug. ’02 Prod. (OM53439U)
245
Page 74

STARTING AND DRIVING
TRACTION CONTROL SYSTEM
(Without vehicle skid control system)
The traction control system automatically help control the
spinning of the rear wheels which may occur when
accelerating on slippery road surfaces, thus assisting
driver control the driving power of the rear wheels. When
you turn the ignition switch on, the traction control
system always turns on automatically, and the slip
indicator light w ill come on. The indicator lights will go off
after a few seconds.
SV31037
Slip indicator light
Leave the system on during ordinary driving so that it can
operate when needed. When traction control is applied,
the slip indicator light blinks.
SV31036
You can turn off the traction control system by pushing
the ”TRAC OFF” switch. The ”TRAC OFF”
indicator/warning light will then come on. Pushing the
”TRAC OFF” switch a second time turns the system back
on and extinguishes the ”TRAC OFF” indicator/warning
light.
You may hear a sound in the engine compartment for a few
seconds when the engine is started or just after the vehicle is
started. This means that the traction control system is in the
self–check mode, and does not indicate malfunction.
When the traction control system is operating, you may feel
vibration of your vehicle, caused by operation of the brakes.
This indicates the system is functioning properly.
When getting the vehicle out of mud or new snow, etc. the
traction control system will help operate to prevent the wheels
from spinning.
246
2003 IS300 from Aug. ’02 Prod. (OM53439U)
Page 75

STARTING AND DRIVING
If the light flashes, this indicates a malfunction in the traction
control system. Contact your Lexus dealer as soon as
possible to service the vehicle.
CAUTION
Under certain slippery road conditions, full traction of
the vehicle and power to the rear wheels cannot be
maintained, even though the traction control system is
in operation. Do not drive the vehicle under any speed
or maneuvering conditions which will cause the vehicle
to lose traction. In situations where the road surface is
covered with ice or snow, your vehicle should be fitted
with snow tires or tire chains. Always drive at an
appropriate and cautious pace.
VEHICLE SKID CONTROL SYSTEM
The vehicle skid control system helps provide integrated
control of the systems such as an anti–lock brake system,
brake assist system, traction control, engine control, etc.
This system automatically controls the output of the
brakes or engine to help prevent the vehicle from skidding
when cornering on a slippery road surface or abrupt
steering wheel operation occurs.
SV31037
Slip indicator light
If the vehicle is going to skid during driving, the slip indicator
light flashes and an alarm sounds intermittently.
The vehicle skid control activates when the vehicle speed is
about more than 15 km/h (9 mph).
2003 IS300 from Aug. ’02 Prod. (OM53439U)
247
Page 76

STARTING AND DRIVING
You may hear a sound in the engine compartment for a few
seconds when the engine is started or just after the vehicle is
started. This means that the vehicle skid control is in the
self–check mode and does not indicate a malfunction.
When you turn the ignition switch on, this system always turns
on.
248
Vehicle skid control system failure warning
SV31041
These lights warn that there is a problem somewhere in the
vehicle skid control system or traction control system.
The lights will come on when the ignition key is turned to ”ON”,
and will go off after a few seconds.
If the ”VSC” warning light and ”TRAC OFF” indicator/warning
light come on, the vehicle skid control system and traction
control system do not work. However, as conventional braking
operates when applied, there is no problem to continue your
driving.
If any of the following conditions occurs, this indicates a
malfunction somewhere in the parts monitored by the warning
light system. Contact your Lexus dealer as soon as possible
to service the vehicle:
The ”VSC” warning light or ”TRAC OFF” indicator/warning
light do not come on after the ignition is turned to on.
The ”VSC” warning light and ”TRAC OFF” indicator/warning
light remain on after the ignition is turned to on.
2003 IS300 from Aug. ’02 Prod. (OM53439U)
Page 77

STARTING AND DRIVING
The ”VSC” warning light and ”TRAC OFF” indicator/warning
light come on while driving without pushing ”TRAC OFF”
switch.
CAUTION
Do not rely excessively on the vehicle skid control
system. Even if the vehicle skid control system is
operating, you must always drive carefully and attentively to avoid serious injury. Reckless driving will
result in an unexpected accident. If the slip indicator
light flashes, sounding an alarm, special care should
be taken while driving.
Only use tires of specified size. The size, manufac-
turer, brand and tread pattern for all 4 tires should be
the same. If you use the tires other than specified, or
different type or size, the vehicle skid control system
may not function correctly. When replacing the tires
or wheels, contact your Lexus dealer.
ELECTRONIC THROTTLE
CONTROL SYSTEM
The electronic throttle control system always maintains
appropriate engine output in relation to the accelerator
opening in all driving conditions.
SV31038
You can select the snow mode by pushing the ”SNOW”
switch. The ”SNOW” indicator light will come on.
Snow mode: Decreases the engine output to minimize rear
wheel spinning on snowcovered or slippery roads.
To return to the normal mode, push the ”SNOW” switch again.
The ”SNOW” indicator light will go off.
When you turn the ignition switch off in the snow mode, the
mode automatically changes to the normal mode.
2003 IS300 from Aug. ’02 Prod. (OM53439U)
249
Page 78

STARTING AND DRIVING
BRAKE SYSTEM
The tandem master cylinder brake system is a hydraulic
system with two separate sub–systems. If either sub–system
should fail, the other will still work. However, the pedal will be
harder to press, and your stopping distance will be longer.
Also, the brake system warning light may come on.
CAUTION
Do not drive your vehicle with only a single brake
system. Have your brakes fixed immediately.
Brake booster
The brake booster uses engine vacuum to power–assist the
brakes. If the engine should quit while you are driving, you can
bring the vehicle to a stop with normal pedal pressure. There
is enough reserved vacuum for one or two stops but no more!
CAUTION
Do not pump the brake pedal if the engine stalls.
Each push on the pedal uses up your reserved
vacuum.
Even if the power assist is completely lost, the brakes
will still work. But you will have to push the pedal
hard, much harder than normal. And your braking
distance will be longer.
Anti–lock brake system
The anti–lock brake system is designed to automatically
help prevent lock–up of the wheels during a sudden
braking or braking on slippery road surfaces. This assists
in providing directional stability and steering
performance of the vehicle under these circumstances.
Effective way to press the ABS brake pedal: When the
anti–lock brake system function is in action, you may feel the
brake pedal pulsating and hear a noise. In this situation, to
let the anti–lock brake system work for you, just hold the
brake pedal down more firmly . Do not pump the brake in a
panic stop. This will result in reduced braking performance.
The anti–lock brake system becomes operative after the
vehicle has accelerated to a speed in excess of approximately
10 km/h (6 mph). It stops operating when the vehicle
decelerates to a speed below approximately 5 km/h (3 mph).
Depressing the brake pedal on slippery road surfaces such as
on the manhole cover, the steel plate under the construction,
joints in the bridge, etc. on a rainy day tends to activate the
anti–lock brake system.
You may hear a click or motor sound in the engine
compartment for a few seconds when the engine is started or
just after the vehicle begins to move. This means that the
anti–lock brake system is in the self–check mode, and does not
indicate a malfunction.
When the anti–lock brake system is activated, the
following conditions may occur. They do not indicate a
malfunction of the system:
250
2003 IS300 from Aug. ’02 Prod. (OM53439U)
Page 79

STARTING AND DRIVING
Y ou may hear the anti–lock brake system operating and feel
the brake pedal pulsating and the vibrations of the vehicle
body and steering wheel. You may also hear the motor
sound in the engine compartment even after the vehicle is
stopped.
At the end of the anti–lock brake system activation, the
brake pedal may move a little forward.
CAUTION
Do not overestimate the anti–lock brake system:
Although the anti–lock brake system assists in
providing vehicle control, it is still important to drive
with all due care and maintain a moderate speed and
safe distance from the vehicle in front of you, because
there are limits to the vehicle stability and effectiveness
of steering wheel operation even with the anti–lock
brake system on.
If tires grip performance exceeds its capability, or if
hydroplaning occurs during high speed driving in the
rain, the anti–lock brake system does not provide
vehicle control.
Anti–lock brake system is not designed to shorten the
stopping distance: Always drive at the moderate speed
and maintain a safe distance from the vehicle in front of
you. Compared with vehicles without an anti–lock
brake system, your vehicle may require a longer
stopping distance in the following cases:
Driving on rough, gravel or snow–covered roads.
Driving with tire chains installed.
Driving over the steps such as the joints on the road.
Driving on roads where the road surface is pitted or
has other differences in surface height.
Install all 4 tires of specified size at appropriate
pressure: The anti–lock brake system detects vehicle
speeds using t h e speed sensors for respective wheels’
turning speeds. The use of tires other than specified
may fail to detect the accurate turning speed resulting
in a longer stopping distance.
2003 IS300 from Aug. ’02 Prod. (OM53439U)
251
Page 80

STARTING AND DRIVING
”ABS” warning light
SV31014
U.S.A.
SV31031
CANADA
The light comes on when the ignition key is turned to the ”ON”
position. If the anti–lock brake system and the brake assist
work properly, the light turns off after a few seconds.
Thereafter, if either of the systems malfunctions, the light
comes on again.
When the ”ABS” warning light is on (and the brake system
warning light is off), the anti–lock brake system, the brake
assist system, the traction control system and/or the vehicle
skid control system do not operate, but the brake system still
operates conventionally.
When the ”ABS” warning light is on (and the brake system
warning light is off), the anti–lock brake system and/or the
traction control system do/does not operate so that the wheels
could lock up during a sudden braking or braking on slippery
road surfaces.
If either of the following conditions occurs, this indicates
a malfunction somewhere in the parts monitored by the
warning light system. Contact your Lexus dealer as soon
as possible to service the vehicle.
The light does not come on when the ignition key is turned
to the ”ON” position, or remains on.
The light comes on while you are driving.
A warning light turning on briefly during operation does not
indicate a problem.
252
2003 IS300 from Aug. ’02 Prod. (OM53439U)
Page 81

STARTING AND DRIVING
CAUTION
If the ”ABS” warning light remains on together with the
brake system warning light, immediately stop your
vehicle at a safe place and contact your Lexus dealer.
In this case, not only the anti–lock brake system will fail
but also the vehicle will become extremely unstable
during braking.
Drum–in–disc type parking brake system
Your vehicle has a drum–in–disc type parking brake system.
This type of brake system needs bedding–down of the brake
shoes periodically or whenever the parking brake shoes
and/or drums are replaced.
Have your Lexus dealer perform the bedding–down.
Brake assist system
When you slam the brakes on, the brake assist system
judges as an emergency stop and provides more powerful
braking for a driver who cannot hold down the brake pedal
firmly.
When you slam the brakes on, more powerful braking will be
applied. At this time, you may hear a sound in the engine
compartment and feel the vibrations of the brake pedal. This
does not indicate a malfunction.
The brake assist system becomes operative after the vehicle
has accelerated to a speed in excess of approximately 10 km/h
(6 mph). It stops operating when the vehicle decelerates to a
speed below approximately 5 km/h (3 mph).
For an explanation of this system’s warning light, see ”ABS
warning light” on page 50 and ”Vehicle skid control system
failure warning” on page 248.
2003 IS300 from Aug. ’02 Prod. (OM53439U)
253
Page 82

STARTING AND DRIVING
BRAKE PAD WEAR INDICATORS
SS31030
The brake pad wear limit indicators on your disc brakes
give a warning noise when the brake pads are worn to the
extent that replacement is required.
If you hear a squealing or scraping noise while driving, have
the brake pads checked and replaced by your nearest Lexus
dealer immediately.
Avoid continuous driving with the warning noise.
Continuous driving without replacing the brake pads will cause
expensive rotor damage and increasing brake pedal effort to
get the same stopping distance.
TYPES OF TIRES
Determine what kind of tires your vehicle is originally equipped
with.
1. Summer tires
Summer tires are high–speed capability tires best suited to
highway driving under dry conditions.
Since summ e r tires do not have the same traction performance
as snow tires, summer tires are inadequate for driving on
snow–covered or icy roads. For driving on snow–covered or
icy roads, we recommend using snow tires. If installing snow
tires, be sure to replace all four tires.
2. All season tires
All season tires are designed to provide better traction in snow
and to be adequate for driving in most winter conditions, as well
as for use all year round.
All season tires, however, do not have adequate traction
performance compared with snow tires in heavy or loose snow .
Also, all season tires fall short in acceleration and handling
performance compared with summer tires in highway driving.
254
2003 IS300 from Aug. ’02 Prod. (OM53439U)
Page 83

STARTING AND DRIVING
CAUTION
Do not mix summer and all season tires on your
vehicle as this can cause dangerous handling
characteristics, resulting in loss of control.
Do not use tires other than the manufacturer’s
designated tires, and never mix tires or wheels of the
sizes different from the originals.
LIMITED–SLIP DIFFERENTIAL
Some vehicles are equipped with a limited–slip differential. If
one rear wheel begins to spin, the limited–slip differential is
designed to aid traction by automatically transmitting driving
force to the other rear wheel. If you are not sure whether your
vehicle is equipped with one, you can ask your Lexus dealer.
CAUTION
Do not start or run the engine while your vehicle is
supported by a jack. The vehicle could be driven off the
jack and could pose a danger or result in serious injury.
NOTICE
Use only a spare tire of the same size, construction and
load capacity as the original tires on your Lexus
because damage to the limited–slip differential could
possibly occur with another tire type.
2003 IS300 from Aug. ’02 Prod. (OM53439U)
255
Page 84

STARTING AND DRIVING
256
2003 IS300 from Aug. ’02 Prod. (OM53439U)
Page 85

SECTION 2 –
AIR CONDITIONING AND AUDIO
Air conditioning
Automatic air conditioning controls 180. . . . . . . . . . . . . . . . . . . . . . . . .
1
2003 IS300 from Aug. ’02 Prod. (OM53439U)
179
Page 86

AIR CONDITIONING
AUTOMATIC AIR CONDITIONING CONTROLS
You can adjust the brightness of the display. See
”Instrument panel light control” on page 53 for details.
The automatic air conditioning automatically maintains
the set temperature.
In the automatic operation mode, the air conditioning selects
the most suitable fan speed, air flow, air intake and on–off of
the air conditioning according to the temperature.
The ignition key must be in the ”ON” position.
180
SV21019
NOTICE
To prevent the battery from being discharged, do not
leave the air conditioning on longer than necessary
when the engine is not running.
2003 IS300 from Aug. ’02 Prod. (OM53439U)
Page 87

1
Automatic air flow control position
2
Air flow control dial
3
Air intake control button
4
Temperature control dial
5
Automatic fan speed control position
6
Air conditioning on–off button
7
Fan speed control dial
AIR CONDITIONING
2003 IS300 from Aug. ’02 Prod. (OM53439U)
181
Page 88

AIR CONDITIONING
SV21006
182
Air flow selection
2003 IS300 from Aug. ’02 Prod. (OM53439U)
Page 89

AIR CONDITIONING
(a) Climate control
SETTING OPERATION – automatic control
SV21018
1. Set the air flow control dial and the fan speed control
dial to ”AUTO” positions.
An indicator light will illuminate to show that the automatic
operation mode has been selected.
Air flow quantity and switching of the diffusers are
automatically adjusted.
When one of the manual control dials is turned while operating
in automatic mode, the operation corresponding to the dial
turned is set. Other conditions continue to be adjusted
automatically.
When the fan speed control dial is turned to ”OFF”, the fan is
turned off.
If the ”A/C” button indicator flashes, there is a problem in the
air conditioning system and the air conditioning automatically
shuts off. If this happens, take your vehicle to your Lexus
dealer for service.
SV21021a
2. Turn the temperature control dial to set the desired
temperature.
The temperature control dial is used to set the desired
passenger compartment temperature. The temperature of air
delivered to the passenger compartment will be controlled
automatically according to the setting. The figures on the
panel indicate degrees Fahrenheit.
When you adjust the temperature control dial to maximum
cooling, the air intake mode will be automatically changed to
RECIRCULATED AIR.
2003 IS300 from Aug. ’02 Prod. (OM53439U)
183
Page 90

AIR CONDITIONING
SETTING OPERATION – manual control
If manual air flow selection is desired –
SV21017
The outlets from which air is delivered can be selected
manually by pushing the button. The function of each mode is
as follows:
1
Panel – Air flows mainly from the instrument panel vents.
2
Bi–level – Air flows from both the floor vents and the
instrument panel vents.
3
Floor – Air flows mainly from the floor vents.
4
Floor/Windshield – Air flows mainly from the floor vents
and windshield vents.
Set the air flow control dial to the floor/windshield position
turns on the defogging function with the purpose of
clearing the front view.
Use with the air intake control positioned in fresh.
Press the ”A/C” button for dehumidified heating or
cooling. This setting clears the front view more quickly.
5
Windshield – Air flows mainly from the windshield vents.
Set the air flow control dial to the windshield position turns
on the defogging function with the purpose of clearing the
front view.
This position allows the air intake to select FRESH
automatically. This is to clean up the front view more
quickly.
If you want to return the setting to RECIRCULATE mode,
press the air intake selector button one again.
Press ”A/C” button for dehumidified heating or cooling.
This setting clears the front view more quickly.
184
2003 IS300 from Aug. ’02 Prod. (OM53439U)
Page 91

AIR CONDITIONING
If manual fan speed control is desired –
SV21023
1
Fan speed at low 2Fan speed at high
The fan speed can be set to your desired speed by turning the
fan speed control dial. The higher the fan speed is, the more
air is delivered. Turning the dial to ”OFF” turns off the fan.
To remove exterior windshield frost, use the high speed
setting.
If manual switching of air intake is desired –
SV21024a
The air intake control button is used to switch the air intake
between the OUTSIDE AIR mode and RECIRCULATED AIR
mode.
With the but t o n in t h e OUTSIDE AIR mode, the OUTSIDE AIR
mode indicator light will come on and the system will take fresh
outside air into the vehicle.
If quick circulation of cooled air is desired, push the air intake
control button for RECIRCULATED AIR. The
RECIRCULATED AIR mode indicator light will come on.
For normal use, it is best to keep the air intake control button
set to OUTSIDE AIR mode. If recirculated air is used during
heating, the windows will fog up more easily.
When you adjust the airflow control dial and the fan speed
control dial to ”AUTO” positions in case that the room
temperature is much higher than the set temperature, the air
intake mode will be automatically changed to
RECIRCULATED AIR.
2003 IS300 from Aug. ’02 Prod. (OM53439U)
185
Page 92

AIR CONDITIONING
However, once selecting ”RECIRCULATED AIR” of the air
intake manually will make this function inoperable. In order to
make this function operable again, first select ”OUTSIDE AIR”
of the air intake, turn off the ignition switch, and start the engine
again. Then this function return to be operable.
If manual on–off of the air conditioning is desired –
Push the ”A/C” button to turn the air conditioning on and push
it again to turn the air conditioning off.
The air conditioning does not work if the outside temperature
is lowered down to around 0C (32F).
If the system is used for ventilation, heating in dry weather or
removing frost or exterior fog on the windshield, turn the air
conditioning of f once it is no longer required. This will improve
fuel economy . The air conditioning can be used for year–round
automatic temperature control including cooling and
dehumidifying operation.
If the air conditioning compressor does not operate, the
indicator of the ”A/C” button will blink. If the indicator of the
”A/C” button blinks even when the ”A/C” button is pushed
again, have the compressor checked by your nearest Lexus
dealer.
(b) Windshield defogging and defrosting
SV21016
To remove interior fog on the windshield –
1. Turn the air flow control dial to ”WINDSHIELD”.
2. Set the ”OUTSIDE AIR” mode.
To remove frost or exterior fog on the windshield –
1. Turn the temperature control dial to the maximum
temperature.
2. Turn the air flow control dial to ”WINDSHIELD”.
3. Turn the fan speed control dial to ”HI”.
4. Leave the air conditioning on–off button off.
186
2003 IS300 from Aug. ’02 Prod. (OM53439U)
Page 93

AIR CONDITIONING
CAUTION
Do not use the ”FRONT WINDSHIELD” button during
cooled air operation in extremely humid weather. The
difference between the temperature of the outside air
and that of the windshield could cause the outer surface
of the windshield to fog up blocking your vision.
(c) Air filter
The air filter may clog after long use which will reduce the air
flow. However, you can inspect the filter easily.
The air conditioning filter may clog after long use. The filter
may need to be replaced if the air flow of the air conditioner and
heater experiences extreme reductions in operating efficiency,
or if the windows become to fog up easily.
When you inspect and replace the air filter, be sure to turn of f
the fan.
SS21013
1. Remove the glove box.
Remove belongings stored in the glove box, and remove the
two pins installed on the lower part of the glove box, and
remove the glove box.
2003 IS300 from Aug. ’02 Prod. (OM53439U)
187
Page 94

AIR CONDITIONING
SV21015
2. Remove the cover and take out the air filter
If it is dirty, it should be replaced. To maintain the air
conditioning efficiency, replace the air filter according to the
maintenance schedule. (For scheduled maintenance
information, please refer to the ”Owner’s Manual Supplement
/ Scheduled Maintenance”.)
INFORMATION
The air filter should be installed properly in position.
The use of air conditioning with the air filter removed
may cause deteriorated dustproof performance and
then affect air conditioning performance.
188
(d) Operating tips
To help cool down the interior after parking in the hot sun,
drive for the first few minutes with the windows open. After
the excess heat has blown away, close the windows.
Make sure the air inlet grilles in front of the windshield are
not blocked by leaves or other obstructions.
If air flow control is not satisfactory, check the dashboard
vents. (See ”Center vents” and ”Side vents”.)
On humid days, do not blow cold air on the windshield. The
windshield could fog up because of the difference in air
temperature on the inside and outside of the windshield.
Keep the area under the front seats clear to allow air to
circulate throughout the vehicle.
On cold days, set the fan speed selector to adjust the fan
speed high for a minute to help clear the intake ducts of
snow or moisture. This can reduce the amount of fogging
on the windows.
When driving on dusty roads, close all windows. If dust
thrown up by the vehicle is still drawn into the vehicle after
closing the windows, it is recommended that the air intake
control button be left to the OUTSIDE AIR mode and the fan
speed control dial be turned to anywhere except the ”OFF”
button.
If following another vehicle on a dusty road, or driving in
windy and dusty conditions, it is recommended that the air
intake control button be temporarily pressed in to the
RECIRCULATED A I R m ode, which will close of f the outside
passage and prevent outside air and dust from entering the
vehicle interior.
2003 IS300 from Aug. ’02 Prod. (OM53439U)
Page 95

AIR CONDITIONING
Heating
For best results, set controls to:
For automatic operation –
Set the air flow control dial and the fan speed control
dial to ”AUTO” position.
Temperature – To the desired temperature
Air intake – OUTSIDE AIR
For manual operation –
Fan speed – To the desired fan speed
Temperature – Towards WARM (to the right)
Air intake – OUTSIDE AIR
Air flow – FLOOR
For quick heating, select RECIRCULATED AIR for a few
minutes. To keep the windows from fogging, select
OUTSIDE AIR after the vehicle interior has been warmed.
Push the ”A/C” button on for dehumidified heating.
Choose floor/windshield air flow to heat the vehicle interior
while defrosting or defogging the windshield.
Air conditioning
For best results, set controls to:
For automatic operation –
Set the air flow control dial and the fan speed control
dial to ”AUTO” position.
Temperature – To the desired temperature
Air intake – OUTSIDE AIR
For manual operation –
Fan speed – To the desired fan speed
Temperature – Towards COLD (to the left)
Air intake – OUTSIDE AIR
Air flow – PANEL
For quick cooling, select RECIRCULATED AIR for a few
minutes.
Ventilation
For best results, set controls to:
For automatic operation –
Set the air flow control dial and the fan speed control
dial to ”AUTO” position.
Temperature – Towards low temperature
Air intake – OUTSIDE AIR
2003 IS300 from Aug. ’02 Prod. (OM53439U)
189
Page 96

AIR CONDITIONING
For manual operation –
Fan speed – To the desired fan speed
Temperature – Towards COLD (to the left)
Air intake – OUTSIDE AIR
Air flow – PANEL
Defogging and defrosting
– The inside of the windshield
For best results, set controls to:
For automatic operation –
Temperature – Towards high temperature to heat;
low temperature to cool
Air intake – OUTSIDE AIR
AIR FLOW – WINDSHIELD
For manual operation –
Fan speed – To the desired fan speed
Temperature – Towards WARM (to the right) to heat;
COLD (to the left) to cool
Air intake – OUTSIDE AIR
Air flow – WINDSHIELD
Set the air flow control dial to the windshield or floor/windshield
position turns on the defogging function with the purpose of
clearing the front view.
When turning the air flow selector to windshield position, the
air intake selects FRESH automatically. This is to clean up the
front view more quickly.
If you want to return the setting to RECIRCULATE mode, press
the air intake selector button once again.
Press the ”A/C” button for dehumidified heating or cooling. This
setting clears the front view more quickly.
On humid days, do not blow cold air on the windshield – the
difference between the outside and inside temperatures
could make the fogging worse.
– The outside of the windshield
For best results, set controls to:
For automatic operation –
Temperature – Towards high temperature
Air intake – OUTSIDE AIR
Air flow – WINDSHIELD
190
2003 IS300 from Aug. ’02 Prod. (OM53439U)
Page 97

AIR CONDITIONING
For manual operation –
Fan speed – To the desired fan speed
Temperature – Towards WARM (to the right)
Air intake – OUTSIDE AIR
Air flow – WINDSHIELD
Set the air flow control dial to the windshield or floor/windshield
position turns on the defrosting function with the purpose of
clearing the front view.
When turning the air flow selector to windshield position, the
air intake selects FRESH automatically. This is to clean up the
front view more quickly.
If you want to return the setting to RECIRCULATE mode, press
the air intake selector button once again.
Press the ”A/C” button for dehumidified heating or cooling. This
setting clears the front view more quickly.
To heat the vehicle interior while defrosting the windshield,
choose floor/windshield air flow.
Center vents
SV21026
The center vents may be opened or closed as shown.
Side vents
SS21019
The side vents may be opened or closed as shown.
2003 IS300 from Aug. ’02 Prod. (OM53439U)
191
Page 98

AIR CONDITIONING
192
2003 IS300 from Aug. ’02 Prod. (OM53439U)
Page 99

SECTION 2 –
AIR CONDITIONING AND AUDIO
Audio
Audio system 194. . . . . . . . . . . . . . . . . . . . . . . . . . . . . . . . . . . . . . . . . . . .
2
2003 IS300 from Aug. ’02 Prod. (OM53439U)
193
Page 100

AUDIO
AUDIO SYSTEM
Quick reference for your audio system (Type A)
SV22049
194
You can adjust the brightness of the display. See ”Instrument panel light control” on page 53 for details.
2003 IS300 from Aug. ’02 Prod. (OM53439U)
 Loading...