

Page 1
4200 Series Setup
1
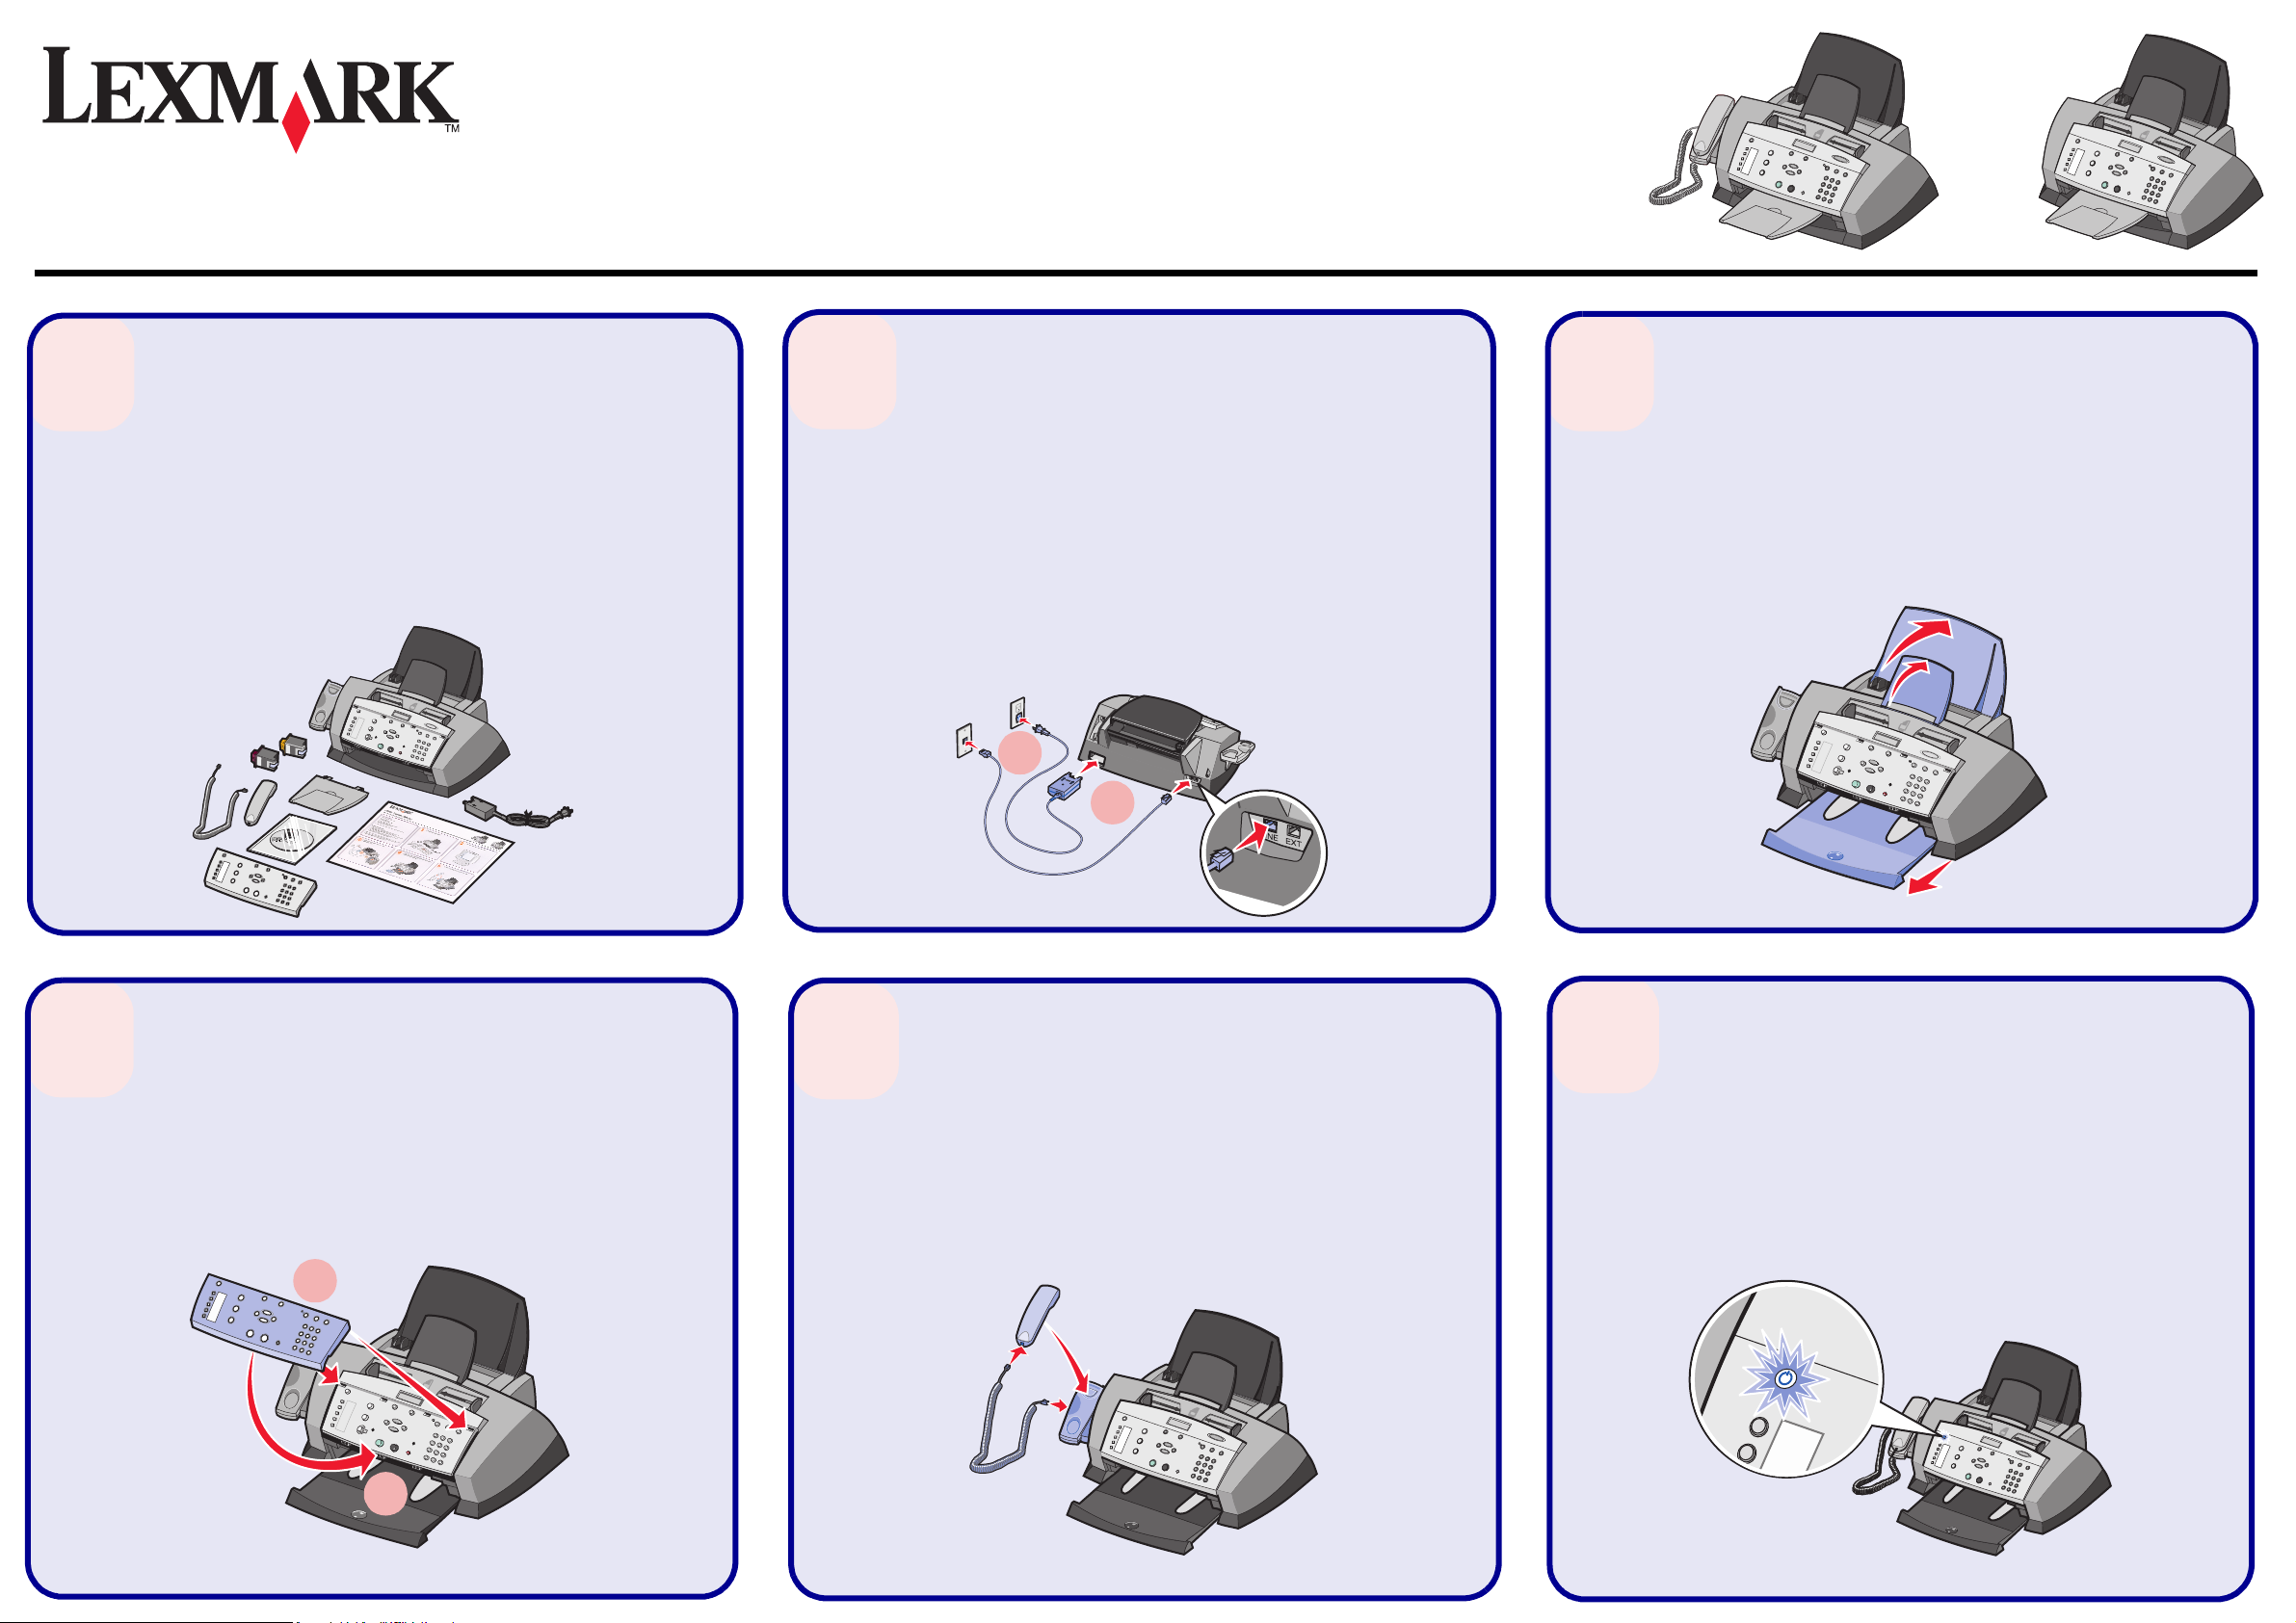
Unpack the All-In-One.
Note: Your model may not include a handset.
Desembale o All-In-One.
Nota: É possível que o modelo que adquiriu não inclua um auscultador.
Rozbalte zařízení All-In-One.
Poznámka: Váš model nemusí být vybaven sluchátkem.
ВгЬлфе фпн екфхрщфЮ ¼лб уе ¸нб брь фз ухукехбуЯб.
УзмеЯщуз: Фп дйкь убт мпнфЭлп ендЭчефбй нб мзн ресйлбмвЬней бкпхуфйкь фзлецюнпх.
Csomagolja ki a multifunkciós készüléket.
Megjegyzés: Előfordulhat, hogy az Ön által vásárolt modell nem tartalmaz telefonkagylót.
All-In-One’ı ambalajından çıkarın.
Not: Satın aldığınız modelde telefon bulunmayabilir.
2
Connect the power supply and the telephone line.
If you need to connect your All-In-One to an external device, such as an answering machine,
refer to your User’s Guide.
Ligue o transformador e a linha telefónica.
Se precisar de ligar o All-In-One a um dispositivo externo, como um atendedor de chamadas,
consulte o Manual do Utilizador.
Připojte napájecí kabel a telefonní kabel.
Pokud chcete připojit zařízení All-In-One k externímu zařízení, jako je například záznamník,
vyhledejte informace o připojení v uživatelské příručce.
УхндЭуфе фп фспцпдпфйкь кбй фз гсбммЮ фпх фзлецюнпх.
Бн иЭлефе нб ухндЭуефе фпн екфхрщфЮ ¼лб уе ¸нб ме кЬрпйб еощфесйкЮ ухукехЮ, р.ч. бхфьмбфп
фзлецщнзфЮ, бнбфсЭофе уфпн
Csatlakoztassa a tápegységet és a telefonkábelt.
Ha a multifunkciós készüléket külső eszközhöz, például üzenetrögzítőhöz szeretné
csatlakoztatni, tanulmányozza át a Használati útmutatót.
Güç kablosunu prize takın ve telefon hattı bağlantısını kurun.
All-In-One’ı telesekreter gibi harici bir aygıta bağlamanız gerekirse, Kullanıcı Kılavuzu’na
başvurun.
Пдзгь чсЮузт
.
2
1
3
Lift the paper supports and extend the paper exit tray.
Levante os suportes de papel e puxe para fora o tabuleiro de
saída do papel.
Zvedněte podpěry papíru a rozložte výstupní podavač.
Бнбузкюуфе фб уфзсЯгмбфб фпх чбсфйпэ кбй рспекфеЯнефе фз иЮкз
еоьдпх чбсфйпэ.
Emelje fel a papírtartókat, és húzza ki teljesen a papírkimeneti
tálcát.
Kağıt desteklerini kaldırın ve kağıt çıkış tepsisini dışarı çekin.
4
Add an overlay.
Aplique uma sobreposição.
Nasa8te překryvný štítek.
КпллЮуфе мйб ефйкЭфб.
Tegyen fel egy borítást.
Kaplamayı takın.
1
2
5
Attach the handset to the All-In-One, if your model includes a handset.
Ligue o auscultador ao All-In-One, se o modelo que adquiriu o incluir.
Pokud je váš model zařízení All-In-One vybaven sluchátkem, připojte sluchátko.
Бн фп мпнфЭлп убт ресйлбмвЬней бкпхуфйкь фзлецюнпх, ухндЭуфе фп уфпн екфхрщфЮ ¼лб
уе ¸нб.
Ha a készülékhez mellékelve van telefonkagyló, akkor csatlakoztassa azt a készülékhez.
Aldığınız modelde telefon varsa, telefonu All-In-One’a bağlayın.
6
Make sure the power is on.
Certifique-se de que a alimentação está ligada.
Zkontrolujte, že je zařízení napájeno elektrickým proudem.
ВевбйщиеЯфе ьфй п екфхрщфЮт еЯнбй бнбммЭнпт.
Győződjön meg róla, hogy a készülék be van kapcsolva.
Gücün açık olduğundan emin olun.
Page 2
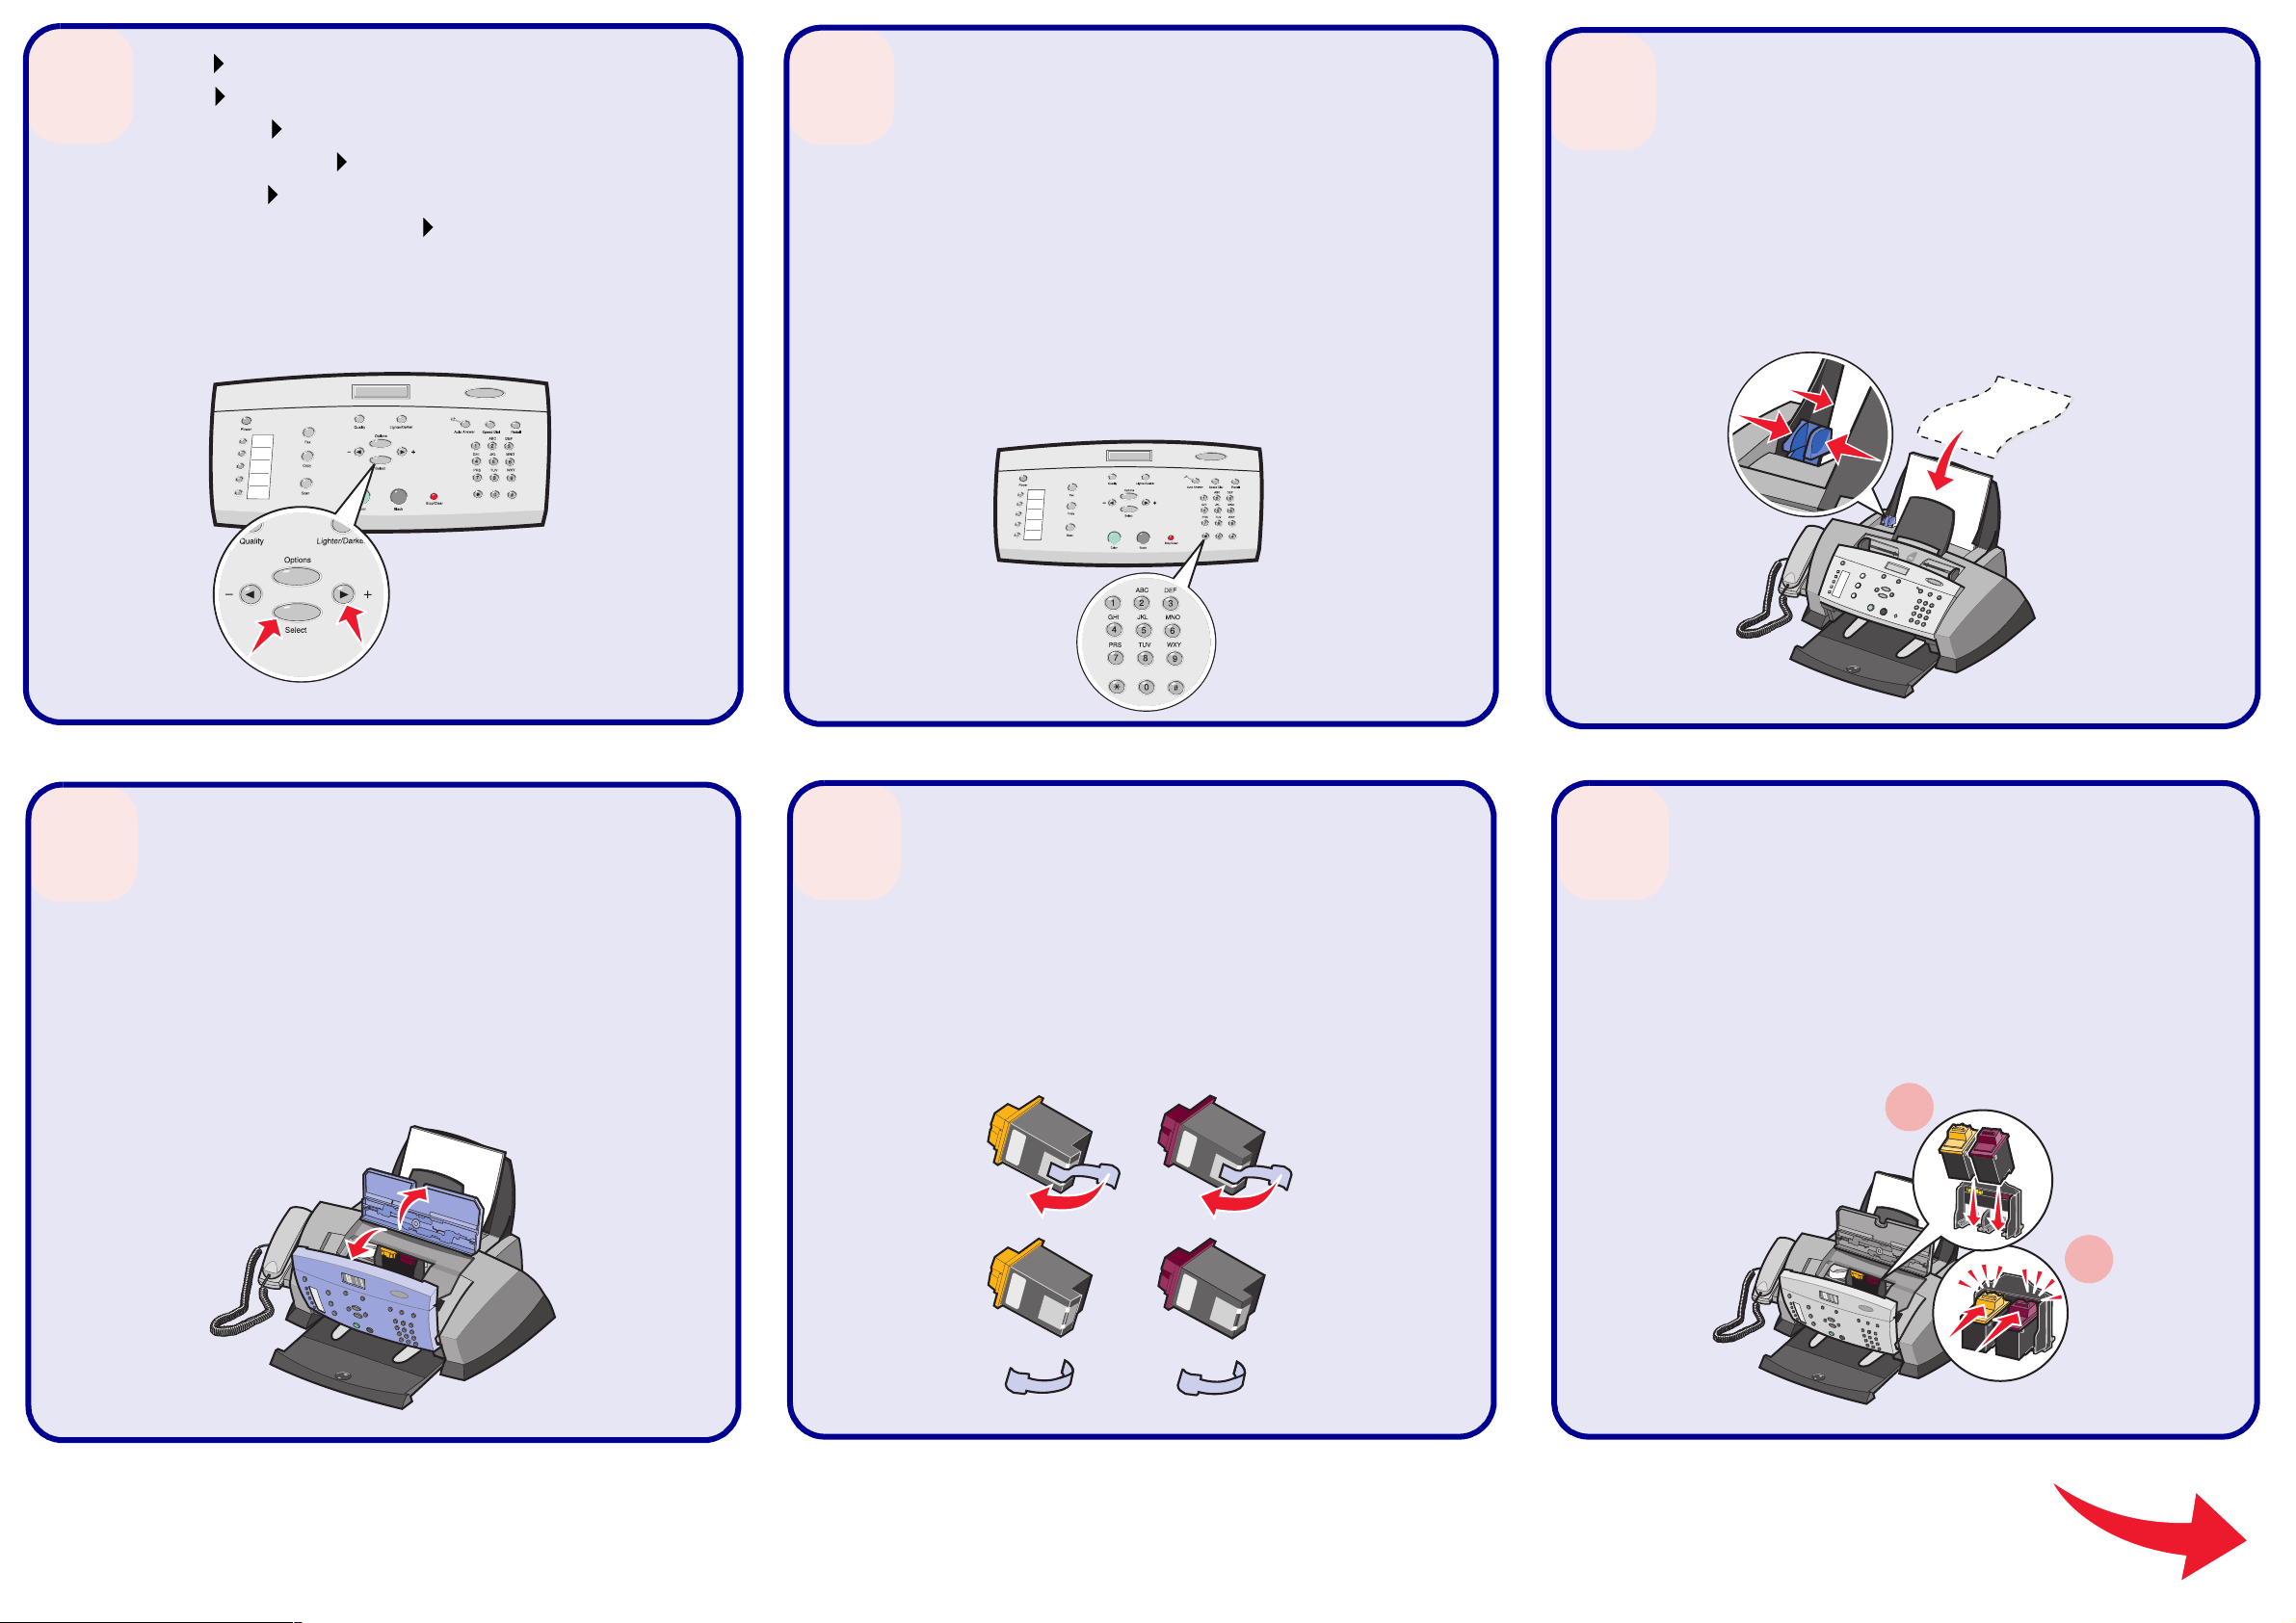
7
Press to scroll, and then press Select to enter your default language, and then your default
country.
Prima para percorrer as opções e, em seguida, prima Select (Seleccionar)
para predefinir o seu idioma e, depois, o seu país.
Pomocí tlačítka vyberte výchozí jazyka zemi/oblast a nastavení potvr8te pomocí tlačítka
Vybrat.
МефбкйнзиеЯфе ме фп кпхмрЯ кбй рбфЮуфе ЕрйлпгЮ гйб нб псЯуефе фзн рсперйлегмЭнз глюууб.
Уфз ухнЭчейб псЯуфе фзн рсперйлегмЭнз чюсб.
Nyomja meg a gombot, majd a Választás gombot, és adja meg az alapértelmezett
nyelvet és az alapértelmezett országot/területet.
Menü seçenekleri arasında ilerlemek için düğmesine basın; varsayılan dili girmek için
Select (Seç) düğmesine basın ve sonra varsayılan dili seçin.
8
Use the keypad to enter the date, format, time, name, and fax number. Press Select after each
entry.
To enter text, press the corresponding keypad number until the desired character appears.
Utilize os botões do teclado numérico para introduzir a data, a hora e o número de fax. Prima
Select (Seleccionar) após cada informação introduzida.
Para introduzir texto, prima a tecla numérica correspondente até aparecer o carácter
pretendido.
Pomocí tlačítek zadejte datum, formát, čas, jméno a číslo faxu. Po zadání každé položky
stiskněte tlačítko Vybrat.
Chcete-li zadat nějaký text, stiskněte odpovídající tlačítka tolikrát, aby se správné písmeno
zobrazilo na displeji.
ЧсзуймпрпйЮуфе фб бсйимзфйкЬ рлЮкфсб гйб нб кбфбчщсЮуефе фз н змеспмзнЯб, фз мпсцЮ, фзн
юсб, фп ьнпмб кбй фпн бсйимь фпх fax. МефЬ брь кЬие кбфбчюсзуз рпх кЬнефе, рб фЮуфе ЕрйлпгЮ.
Гйб нб кбфбчщсЮуефе кеЯменп, рбфЮуфе ербнейлзммЭнб фп бнфЯуфпйч п бсйимзфйкь рлЮкфсп мЭчсйт
ьфпх емцбнйуфеЯ п чбсбкфЮсбт рпх иЭлефе.
A billentyűzet segítségével adja meg a dátumot, a formátumot, az időt, a nevet és a
faxszámot. Nyomja meg a Választás gombot minden adat bevitele után.
Szöveget úgy írhat be, hogy a megfelelő számgomb nyomogatásával beírja a szükséges
karaktereket.
Tuş takımını kullanarak tarihi, biçimi, saati, adı ve faks numarasını girin. Her girişten sonra
Select düğmesine basın.
Metin girmek için, istediğiniz karakter görüntüleninceye kadar tuş takımında ilgili sayı
düğmesine basın.
9
Load plain paper and adjust the paper guide.
Coloque papel e ajuste a respectiva guia.
Založte běžný papír a upravte vodicí lišty.
ФпрпиефЮуфе брль чбсфЯ кбй схимЯуфе фпн пдзгь чбсфйпэ.
Tegyen be normál papírt, majd állítsa be a papírvezetőt.
Düz kağıt yükleyin ve kağıt kılavuzunu yüklediğiniz kağıda
göre ayarlayın.
10
Open the control panel and the cartridge access door.
Abra o painel de controlo e a porta de acesso aos tinteiros.
Otevřete ovládací panel a dvířka pro přístup ke kazetám.
БнпЯофе фпн рЯнбкб елЭгчпх кбй фз иэсб рсьувбузт уфйт
кбуЭфет екфэрщузт.
Nyissa fel a kezelőpanelt és a patrontartó ajtaját.
Kontrol panelini ve kartuş erişim kapağını açın.
11
Remove the sticker and tape from the print cartridges.
Retire a etiqueta e a fita adesiva dos tinteiros.
Sejměte ochrannou pásku a nálepku z tiskových kazet.
БцбйсЭуфе фп бхфпкьллзфп кбй фзн фбйнЯб брь фйт кбуЭфет
екфэрщузт.
Távolítsa el a címkét és a szalagot a nyomtatópatronokról.
Yaz ıcı kartuşlarından etiketi ve bandı çıkarın.
12
Insert the cartridges.
Insira os tinteiros.
Vložte kazety.
ФпрпиефЮуфе фйт кбуЭфет екфэрщузт.
Helyezze be a patronokat.
Kartuşları takın.
1
2
21C0076
P/N 21C0076 E.C. 3T0003
© 2004 Lexmark International, Inc. All rights reserved.
www.lexmark.com
Page 3

13
Close the cartridge access door and the control panel.
Feche a porta de acesso aos tinteiros e o painel de controlo.
Zavřete dvířka pro přístup ke kazetám a ovládací panel.
КлеЯуфе фз иэсб рсьувбузт уфйт кбуЭфет екфэрщузт кбй фпн
рЯнбкб елЭгчпх.
Zárja be a patrontartó ajtaját és a kezelőpanelt.
Kartuş erişim kapağını ve ardından kontrol panelini kapatın.
14
Press Select, and then press to scroll through the color cartridge numbers.
Press Select to verify the color cartridge you installed.
Repeat this step for the black cartridge.
Prima Select (Seleccionar) e, em seguida, para percorrer os números de tinteiros de
cores.
Prima Select (Seleccionar) para confirmar o tinteiro de cores que instalou.
Repita esta operação para o tinteiro preto.
Stiskněte tlačítko Vybrat a poté pomocí tlačítka naje8te na číslo kazety.
Stisknutím tlačítka Vybrat ověřte instalovanou barevnou kazetu.
Opakujte tento krok pro černou kazetu.
РбфЮуфе ЕрйлпгЮ кбй мефЬ рбфЮуфе гйб нб мефбкйнзиеЯфе уфз лЯуфб ме фпхт бсйимпэт фщн
кбуефюн Эгчсщмзт екфэрщузт.
РбфЮуфе ЕрйлпгЮ гйб нб ерйвевбйюуефе ьфй бхфЮ еЯнбй з кбуЭфб екфэрщузт рпх егкбфбуфЮубфе.
ЕрбнблЬвефе бхфь фп вЮмб гйб фзн кбуЭфб бурсьмбхсзт екфэрщузт.
Nyomja meg a Választás gombot, ezután a gombbal lépegethet a színes patronok
azonosítószámai között.
A behelyezett színes patron ellenőrzéséhez nyomja meg a Választás gombot.
A fekete patronra vonatkozóan ismételje meg ezeket a lépéseket.
Select düğmesine ve renkli kartuş numaralarını kaydırmak için düğmesine basın.
Tak tığınız renkli kartuşu doğrulamak için Select düğmesine basın.
Bu işlemi siyah kartuş için yineleyin.
15
Press Select to align the cartridges.
Prima Select (Seleccionar) para alinhar os tinteiros.
Stisknutím tlačítka Vybrat vyrovnejte kazety.
РбфЮуфе ЕрйлпгЮ гйб нб ехихгсбммЯуефе фйт кбуЭфет.
A patronok kalibrálásához nyomja meg a Választás gombot.
Kartuşları hizalamak için Select düğmesine basın.
16
Attach the Automatic Document Feeder (ADF) exit tray.
Instale o tabuleiro de saída do alimentador automático de
documentos (ADF).
Připojte výstupní zásobník automatického podavače
dokumentů.
УхндЭуфе фз иЮкз еоьдпх фпх Бхфьмбфпх Фспцпдьфз
ЕггсЬцщн (ADF).
Szerelje fel az automatikus lapadagoló kimeneti tálcáját.
Otomatik Belge Besleme (ADF) çıkış tepsisini takın.
If you are using your All-In-One without a computer, you are finished.
Se estiver a utilizar o dispositivo All-In-One sem um computador, chegou ao fim da instalação.
Pokud používáte zařízení All-In-One bez počítače, je instalace dokončena.
Бн чсзуймпрпйеЯфе фпн екфхрщфЮ ¼лб уе ¸нб
чщсЯт
хрплпгйуфЮ, Эчефе плпклзсюуей фз дйбдйкбуЯб.
Ha a multifunkciós készüléket nem csatlakoztatta számítógéphez, készen van.
All-In-One’ı bilgisayara bağlamadan kullanacaksanız, yapmanız gereken işlemler bitmiştir.
If you are using your All-In-One with a computer, continue with the following steps.
Se estiver a utilizar o dispositivo All-In-One com um computador, siga os passos apresentados a seguir.
Pokud používáte zařízení All-In-One s počítačem, prove8te následující kroky.
Бн чсзуймпрпйеЯфе фпн екфхрщфЮ ¼лб уе ¸нб
ìáæß ìå
хрплпгйуфЮ, ухнечЯуфе ме фб рбсбкЬфщ вЮмбфб.
Ha a multifunkciós készüléket számítógéphez csatlakoztatta, folytassa a következő lépésekkel.
All-In-One’ı bilgisayara bağlı olarak kullanacaksanız, aşağıdaki adımları izleyin.
Page 4

17
Make sure the computer is on.
Certifique-se de que o computador está ligado.
Zkontrolujte, zda je počítač zapnutý.
ВевбйщиеЯфе ьфй п хрплпгйуфЮт еЯнбй бнбммЭнпт.
Győződjön meg róla, hogy a számítógép be van kapcsolva.
Bilgisayarın açık olduğundan emin olun.
18
Connect the USB cable to the computer and to the All-In-One.
Ligue o cabo USB ao computador e ao All-In-One.
Připojte kabel USB k počítači a k zařízení All-In-One.
УхндЭуфе фп кблюдйп USB уфпн хрплпгйуфЮ кбй уфпн екфхрщфЮ ¼лб уе ¸нб.
Csatlakoztassa az USB kábelt a számítógéphez és a multifunkciós készülékhez.
USB kablosunu bilgisayara ve All-In-One’a bağlayın.
19
Important!
Click Cancel on all New Hardware screens.
Importante:
Faça clique em Cancel (Cancelar) em todos os ecrãs de hardware novo.
Důležité!
Ve všech oknech Nový hardware klepněte na tlačítko Storno.
Узмбнфйкь!
ЕрйлЭофе ¢êõñï óå
üëåò
фйт пиьнет фпх пдзгпэ егкбфЬуфбузт нЭпх хлйкпэ.
Fontos!
Az összes Új hardver képernyőn kattintson a Mégse gombra.
Önemli!
Tüm Yeni Ya zılım ekranlarında İptal düğmesini tıklatın.
20
Insert the CD. Follow the instructions on the screen to install the software.
If the CD does not automatically run:
1 Click Start Run.
2 Click Browse.
3 Select the Lexmark CD located in your CD-ROM drive, and then click OK.
4 Follow the instructions on the screen to install the software.
Introduza o CD. Siga as instruções apresentadas no ecrã para instalar o software.
Se o CD não for iniciado automaticamente:
1 Faça clique em Start (Iniciar) Run (Executar).
2 Faça clique em Browse (Procurar).
3 Seleccione o CD Lexmark CD que se encontra na unidade de CD-ROM e faça clique em OK.
4 Siga as instruções apresentadas no ecrã para instalar o software.
Vložte disk CD. Postupujte podle pokynů na obrazovce a instalujte software.
Pokud se program na disku CD nespustí automaticky:
1 Klepněte na tlačítko Start Spustit.
2 Klepněte na tlačítko Procházet.
3 Vyberte disk CD Lexmark v jednotce CD-ROM a klepněte na tlačítko OK.
4 Postupujte podle pokynů na obrazovce a instalujte software.
ФпрпиефЮуфе фп CD. Гйб нб егкбфбуфЮуефе фп лпгйумйкь, бкплпхиЮуфе фйт пдзгЯет рпх емцбнЯжпнфбй уфзн пиьнз.
Бн з лейфпхсгЯб фпх CD ден бсчЯуей бхфьмбфб:
1 РбфЮуфе ¸нбсоз ЕкфЭлеуз.
2 РбфЮуфе БнбжЮфзуз.
3 ЕрйлЭофе фп CD фзт Lexmark фп прпЯп Эчефе фпрпиефЮуей уфз мпнЬдб CD-ROM кбй кЬнфе клйк уфп OK.
4 Гйб нб егкбфбуфЮуефе фп лпгйумйкь, бкплпхиЮуфе фйт пдзгЯет рпх емцбнЯжпнфбй уфзн пиьнз.
Helyezze be a CD-lemezt. A képernyőn megjelenő utasítások szerint telepítse a szoftvert.
Ha a CD nem indul el automatikusan:
1 Kattintson a Start Futtatás parancsra.
2 Kattintson a Tallózás gombra.
3 Jelölje ki a CD-ROM-meghajtóban lévő Lexmark CD-t, majd kattintson az OK gombra.
4 A képernyőn megjelenő utasítások szerint telepítse a szoftvert.
CD’yi takın. Yazılımı yüklemek için ekrandaki yönergeleri izleyin.
CD otomatik olarak çalışmaya başlamazsa:
1 Başlat Çalıştır öğelerini tıklatın.
2 Gözat öğesini tıklatın.
3 CD-ROM sürücünüzde bulunan Lexmark CD’sini seçin ve Ta mam ’ı tıklatın.
4 Yazılımı yüklemek için ekrandaki yönergeleri izleyin.
 Loading...