

Page 1
X422 MFP
Setup Guide
January 2004
Lexmark and Lexmark with diamond design are trademarks of Lexmark
International, Inc., registered in the United States and/or other countries.
© 2004 Lexmark International, Inc.
740 West New Circle Road
Lexington, Kentucky 40550
Page 2

Page 3

English
Page 4

Edition:January 2004
The following paragraph does not apply to any country where such
provisions are inconsistent with local law: LEXMARK
INTERNATIONAL, INC., PROVIDES THIS PUBLICATION “AS IS”
WITHOUT WARRANTY OF ANY KIND , EITHER EXP RESS OR IMPLIED ,
INCLUDING, BUT NOT LIMITED TO, THE IMPLIED WARRANTIES OF
MERCHANTABILITY OR FITNESS FOR A PARTICULARPURPOSE.
Some states do not allow disclaimer of express or implied warranties in
certain transactions; therefore, this statement may not apply to you.
This publication could include technical inaccuracies or typographical
errors. Changes are periodically made to the information herein; these
changes will be incorporated in later editions. Improvements or changes
in the products or the programs described may be made at any time.
Comments about this publication may be addressed to Lexmark
International, Inc., Department F95/032-2, 740 West New Circle Road,
Lexington, Kentucky 40550, U.S.A. In the United Kingdom and Eire, send
to Lexmark International Ltd., Marketing and Services Department,
Westhorpe House, Westhorpe, Marlow Bucks SL7 3RQ. Lexmark may
use or distribute any of the information you supply in any way it believes
appropriate without incurring any obligation to you. You can purchase
additional copies of publications related to this product by calling 1-800553-9727. In the United Kingdom and Eire, call +44 (0)8704 440 044. In
other countries, contact your point of purchase.
References in this publication to products, programs, or services do not
imply that the manufacturer intends to make these available in all countries
in which it operates. Any reference to a product, program, or service is not
intended to state or imply that only that product, program, or service may
be used. Any functionally equivalent product, program, or service that
does not infringe any existing intellectual property right may be used
instead. Evaluation and verification of operation in conjunction with other
products, programs, or services, except those expressly designated by the
manufacturer, are the user’s responsibility.
Lexmark and Lexmark with diamond design are trademarks of Lexmark
International, Inc., registered in the United States and/or other countries.
PostScript® is a registered trademark of Adobe Systems Incorporated.
Other trademarks are the property of their respective owners.
© 2004 Lexmark International, Inc.
All rights reserved.
UNITED STATES GOVERNMENT RIGHTS
This software and any accompanying documentation provided under this
agreement are commercial computer software and documentation
developed exclusively at private expense.
Conventions
It may help you to recognize the caution and warning conventions used in
this document.
CAUTION: A caution identifies something that could cause you harm.
Warning: A warning identifies something that could damage your product
hardware or software.
Safety information
CAUTION: Do not use the fax feature during a lightning storm. Do not set
up this product or make any electrical or cabling connections, such as the
power cord or telephone, during a lightning storm.
• Connect the power cord to a properly grounded electrical outlet
that is near the product and easily accessible.
• Use only a 26 AWG or larger telecommunications (RJ-11) cord
when connecting this product to the public switched telephone
network.
• Refer service or repairs, other than those described in the
operating instructions, to a professional service person.
• This product is designed, tested, and approved to meet strict
global safety standards with the use of specific Lexmark
components. The safety features of some parts may not always
be obvious. Lexmark is not responsible for the use of other
replacement parts.
This product contains mercury in the lamp (<5mg Hg). Disposal of
mercury may be regulated due to environmental considerations. For
disposal or recycling information, please contact your local authorities or
the Electronic Industries Alliance: www.eiae.org.
Static sensitivity notice
This symbol identifies static-sensitive parts. Do not
touch in the areas near these symbols without first
touching the metal frame of the printer.
Page 5

Contents
Step 1: Install drivers for local printing and scanning . . . .1
Step 2: Unpack the MFP . . . . . . . . . . . . . . . . . . . . . . . . . . . .5
Step 3: Set up MFP and options . . . . . . . . . . . . . . . . . . . . . .9
Windows . . . . . . . . . . . . . . . . . . . . . . . . . . . . . . . . . . . . . . . . . .2
Macintosh . . . . . . . . . . . . . . . . . . . . . . . . . . . . . . . . . . . . . . . . .3
UNIX/Linux . . . . . . . . . . . . . . . . . . . . . . . . . . . . . . . . . . . . . . . .4
Unpacking . . . . . . . . . . . . . . . . . . . . . . . . . . . . . . . . . . . . . . . . .5
Placing the MFP . . . . . . . . . . . . . . . . . . . . . . . . . . . . . . . . . . . .6
Installing options on your MFP . . . . . . . . . . . . . . . . . . . . . . . . .9
Setting up the optional 250-sheet or 500-sheet drawer . . . . .10
Attach the scanner automatic document feeder (ADF) tray . .11
Unlock the scanner . . . . . . . . . . . . . . . . . . . . . . . . . . . . . . . . .12
Step 4: Install opt i ona l me m ory c ar ds . . . . . . . . . . . . . . . .13
Opening the side door . . . . . . . . . . . . . . . . . . . . . . . . . . . . . .13
Removing the system board access shield . . . . . . . . . . . . . .14
Installing an MFP memory card . . . . . . . . . . . . . . . . . . . . . . .15
Installing an optional flash memory or font card . . . . . . . . . . .15
Reattaching the system board access shield . . . . . . . . . . . . .17
Reattaching the side door . . . . . . . . . . . . . . . . . . . . . . . . . . . .17
Step 5: Prepare the MFP . . . . . . . . . . . . . . . . . . . . . . . . . . .19
Raising the paper rest . . . . . . . . . . . . . . . . . . . . . . . . . . . . . . .19
Attaching a control panel overlay . . . . . . . . . . . . . . . . . . . . . .20
Contents
iii
Page 6

Step 6: Install the print cartridge . . . . . . . . . . . . . . . . . . . . .21
Removing the packaging . . . . . . . . . . . . . . . . . . . . . . . . . . . .21
Preparing the print cartridge . . . . . . . . . . . . . . . . . . . . . . . . . .22
Step 7: Load media . . . . . . . . . . . . . . . . . . . . . . . . . . . . . . . 25
Changing Paper Size and Paper Type settings . . . . . . . . . . .26
Loading the trays . . . . . . . . . . . . . . . . . . . . . . . . . . . . . . . . . . 27
Loading the multipurpose feeder . . . . . . . . . . . . . . . . . . . . . .30
Loading envelopes . . . . . . . . . . . . . . . . . . . . . . . . . . . . . . . . .33
Loading the scanner automatic document feeder (ADF) . . . .34
Step 8: Attach cables . . . . . . . . . . . . . . . . . . . . . . . . . . . . .35
Attaching the telephone cord . . . . . . . . . . . . . . . . . . . . . . . . .35
Attaching a USB cable . . . . . . . . . . . . . . . . . . . . . . . . . . . . . .36
Verifying the USB queue . . . . . . . . . . . . . . . . . . . . . . . . . . . .36
Attaching a network cable . . . . . . . . . . . . . . . . . . . . . . . . . . . .37
Step 9: Power on the MFP . . . . . . . . . . . . . . . . . . . . . . . . . .39
Turn on the MFP . . . . . . . . . . . . . . . . . . . . . . . . . . . . . . . . . . .39
Step 10: Configure for TCP/IP . . . . . . . . . . . . . . . . . . . . . .41
Assigning an MFP IP address . . . . . . . . . . . . . . . . . . . . . . . .41
Verifying the IP settings . . . . . . . . . . . . . . . . . . . . . . . . . . . . .42
Using the resident Web page . . . . . . . . . . . . . . . . . . . . . . . . .42
Step 11: Verify MFP setup . . . . . . . . . . . . . . . . . . . . . . . . . .43
Printing a menu settings page . . . . . . . . . . . . . . . . . . . . . . . .43
Printing a network setup page . . . . . . . . . . . . . . . . . . . . . . . . 44
Printing a local test page . . . . . . . . . . . . . . . . . . . . . . . . . . . .44
Printing Quick Reference documentation . . . . . . . . . . . . . . . .45
Contents
iv
Page 7

Step 12: Install drivers for network printing . . . . . . . . . . .47
Windows . . . . . . . . . . . . . . . . . . . . . . . . . . . . . . . . . . . . . . . . .47
Macintosh . . . . . . . . . . . . . . . . . . . . . . . . . . . . . . . . . . . . . . . .51
UNIX/Linux . . . . . . . . . . . . . . . . . . . . . . . . . . . . . . . . . . . . . . .53
NetWare . . . . . . . . . . . . . . . . . . . . . . . . . . . . . . . . . . . . . . . . .54
Step 13: Set default copy settings . . . . . . . . . . . . . . . . . . .55
Step 14: Set up to send and receive faxes . . . . . . . . . . . .57
Configuring fax setup . . . . . . . . . . . . . . . . . . . . . . . . . . . . . . .57
Sending a fax from your MFP . . . . . . . . . . . . . . . . . . . . . . . . .58
Step 15: Set up your e-mail server . . . . . . . . . . . . . . . . . . .59
Other sources of information . . . . . . . . . . . . . . . . . . . . . . . 63
Publications CD . . . . . . . . . . . . . . . . . . . . . . . . . . . . . . . . . . .63
Drivers CD . . . . . . . . . . . . . . . . . . . . . . . . . . . . . . . . . . . . . . .64
Lexmark Web site . . . . . . . . . . . . . . . . . . . . . . . . . . . . . . . . . .64
Notices . . . . . . . . . . . . . . . . . . . . . . . . . . . . . . . . . . . . . . . . . .65
Index . . . . . . . . . . . . . . . . . . . . . . . . . . . . . . . . . . . . . . . . . . . 69
Contents
v
Page 8

Contents
vi
Page 9

Step 1: Install drivers for local
printing and scanning
For local printing and scanning, it is important that you install the
drivers for your multifunction printer (MFP) on your computer before
you install the actual hardware.
A local MFP is an MFP attached to your computer using a USB cable.
If your MFP is attached to a network instead of your computer, skip this
step and go to Step 2: “Unpack the MFP” on page 5.
Note: Use the drivers CD to
install your print and scan
drivers. Launch the CD and
follow the instructions to
install MFP software.
A print driver is software that lets your computer communicate with
your MFP. The procedure to install drivers depends on the operating
system you are using.
A scan driver is software that lets you acquire and adjust a scan.
Again, the procedure to install drivers depends on the operating
system you are using.
Select your operating system from the following table to find driver
installation instructions.
Operating system Go to page...
Windows Server 2003, Windows 2000,
Windows XP, Windows 98, and Windows Me
Note: Windows 95 and Windows NT are not
supported operating systems.
Macintosh 3
UNIX/Linux 4
* For local installation, do not attach a USB cable while your MFP and
computer are turned on. Install the drivers first.
2
Install drivers for local printing and scanning
1
Page 10

Windows Some Windows operating systems may already include a system
driver that is compatible with your MFP. This may seem automatic in
later versions of Windows. System print drivers work well for simple
printing, but they may contain less functionality than our enhanced
custom driver.
Note: Installing a custom
driver does not replace the
system driver. A separate
print object is created and
appears in the Printers
folder.
Using Windows Server
2003, Windows 2000,
Windows XP, and
Windows 98/Me
Note: Some Windows
operating systems require
that you have administrative
access to install print drivers
on your computer.
Use the drivers CD that shipped with your MFP to install the custom
print driver and obtain all of the enhanced print features and
functionality.
Drivers are also available in downloadable software packages on
Lexmark’s Web site at www.lexmark.com.
1 Insert the drivers CD into your CD-ROM drive of your computer.
If the CD does not auto launch, click Start Æ Run, and then
type D:\Setup.exe in the Run dialog box.
2 Click Install Software.
3 Click Printer and Software.
4 Click Agree to accept the license agreement.
5 Select Suggested, and then click Next.
The Suggested option is the default installation for local and
attached setup. If you need to install utilities, change settings, or
customize device drivers, select Custom, and follow the
instructi ons on your screen.
6 Select Local Attached, and then click Next.
Follow the instructions on your screen to complete installing the
drivers.
What do I do next?
Task Go to page…
After you ha v e inst alled th e driv ers on y our compute r , y ou
are ready to set up the MFP.
Install drivers for local printing and scanning
2
5
Page 11

Macintosh In order to print locally to a USB-attached MFP, you must create a
queue in Print Center (Mac OS X).
Note: Visit our Lexmark
Web site,
www.lexmark.com, for
Macintosh 8.6–9.x printing
support.
Mac OS X In order to print to an MFP, you must install a PostScript™ Printer
Description (PPD) file on your computer.
1 Insert the drivers CD into your CD-ROM drive.
2 Double-click the installer package for your MFP.
Note: A PPD file provides
detailed information about
the capabilities of an MFP to
your Macintosh computer.
Note: A PPD for your MFP
is also available in a
downloadable software
package on our Lexmark
Web s ite at
www.lexmark.com.
3 On the Authorization screen, choose Click the lock to make
changes.
4 Enter your password, and then click OK.
5 Click Continue on the Welcome screen and again after you
view the Readme file.
6 Click Continue after you view the license agreement, and then
click Agree to accept the terms of the agreement.
7 Select a Destination, and then click Continue.
8 On the Easy Install screen, click Install. All the necessary
software is installed on your computer.
9 Click Close when installation is complete.
T o v erify that your MFP is properly connected, continue with set up and
see “Verifying the USB queue” on page 36.
What do I do next?
Task Go to page…
After you ha v e inst alled th e driv ers on y our compute r , y ou
are ready to set up the MFP.
5
Install drivers for local printing and scanning
3
Page 12

UNIX/Linux Local printing is supported on many UNIX and Linux platforms, such
as Sun Solaris and Red Hat.
The Sun Solaris and Linux packages are available on the drivers CD
and on our Lexmark Web site at www.lexmark.com.
The driver package for Sun Solaris supports USB connections to Sun
Ray appliances and Sun workstations.
Visit our Lexmark Web site at www.lexmark.com for a complete list of
supported UNIX and Linux platforms.
What do I do next?
Task Go to page…
After you ha v e inst alled th e driv ers on y our compute r , y ou
are ready to set up the MFP.
5
Install drivers for local printing and scanning
4
Page 13
Step 2: Unpack the MFP
Unpacking 1 Select a location for your MFP.
CAUTION: The MFP weighs 46 lbs. (21 kg) and requires
at least two people to lift it safely. Leave the MFP in the
box until you are ready to install it. Ask someone to help
you lift the MFP.
• Leave enough room to open the
MFP trays, covers, doors, and
options. It is also important to
allow space around the MFP for
proper ventilation.
Unpack the MFP
5
Page 14
Placing the MFP
78.74 cm
(31 in.)
40.64 cm
(16 in.)
7.62 cm
(3 in.)
Warning: Allow at least 7.62 cm (3 in.) clearance on the
right side of the MFP for the cooling fan to function
properly.
• Provide the proper environment:
– A firm, level surface
– Away from the direct airflow of
air conditioners, heaters, or
ventilators
– Free of sunlight, humidity
extremes, or temperature
fluctuations
– Clean, dry, and free of dust
Unpack the MFP
6
Page 15

12
2 Remove all items from the box.
Make sure you have the following items:
(1) MFP with one installed standard
250-sheet tray
(2) Automatic Document Feeder (ADF)
tray
(3) Language overlays
(4) Installation Pointer sheet
(5) Setup Guide
(6) Quick Reference sheet
(7) Tel epho ne co rd
(8) Power cord
1
(9) Publications CD (shipped inside the
Setup Guide)
(10) Drivers CD
(11) Document Managemen t CD,
containing your scanning software.
This CD is optional and is used only
for locally-connected MFPs.
(12) One print cartridge (inside MFP)
10
11
If any items are missing or damaged,
refer to the publicationsCD for the
designated Lexmark support phone
number for your country or region.
2
3
9
8
7
6
4
5
Unpack the MFP
7
Page 16

Save the carton and packing material in
case you need to repack the MFP.
What do I do next?
Task Go to page…
After you hav e unpack ed the MFP, you are ready to set up
the MFP and install a ny op tions y ou ma y ha v e purch ased.
9
Unpack the MFP
8
Page 17
Step 3: Set up MFP and options
Installing options on your MFP You have the option of installing an extra
paper drawer on your MFP to increase
the amount of available media. To
purchase an additional drawer , contact
your sales representative.
Lexmark ABC MFP Base Model and Options
MFP
250-sheet
drawer
MFP
500-sheet
drawer
Set up MFP and options
9
Page 18
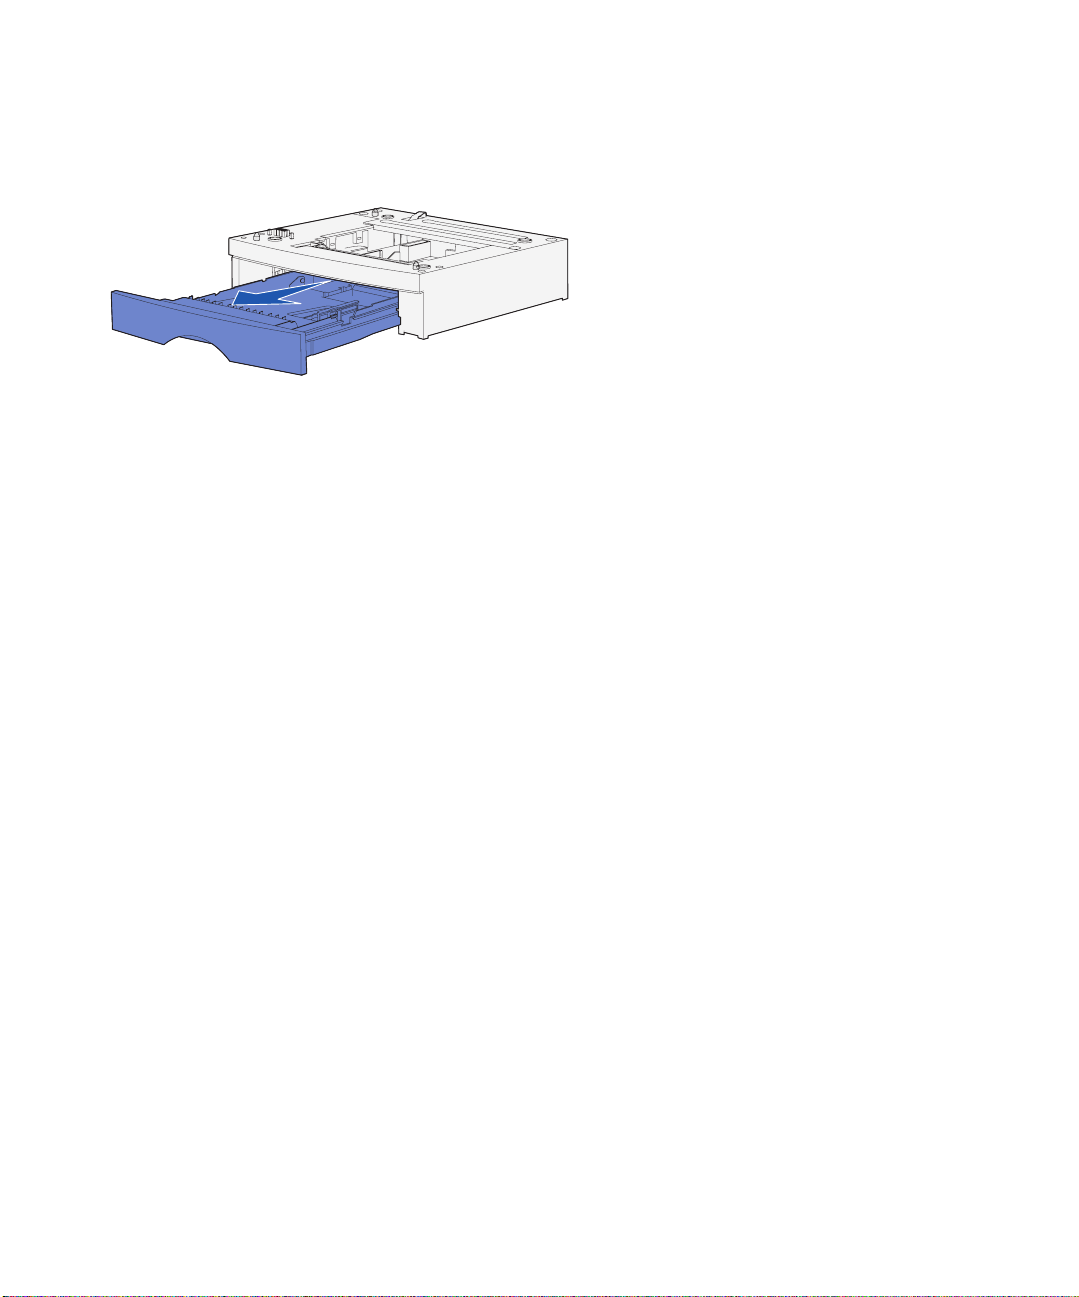
Setting up the optional 250-sheet or 500-sheet drawer
After you have installed the drivers, you
are ready to set up the optional 250sheet or 500-sheet drawer.
1 Remove the tray from the support
unit. Remove all of the packing
material and tape from both the
support unit and tray.
2 Place the support unit on top of a
firm, flat surface where you plan to
use the MFP.
3 Place the MFP on top of the
support unit.
Adding an optional dra wer f or Mac OS X user s When adding an optional drawer to an
MFP that will be used by way of USB in
Mac OS X, additional setup is required to
allow th e option al dra we r to be used as a
source when printing.
Set up MFP and options
10
1 Go to /Applications/Utilities and
launch Print Center.
2 Select the MFP from the Printer
List and choose Show Info from
the Printers menu.
3 Select Installable Options from
the pop-up menu at the top of the
Printer Info window and modify the
Trays pop-up menu to reflect the
number of trays connected to the
MFP.
4 Click Apply Changes and close
the Printer Info window.
Page 19

Attach the scanner automatic document feeder (ADF) tray
1 Remove the ADF tray from the
box.
2 Align the tabs on the tray with the
slots located on top of the scanner.
3 Push the tray down so that the
tabs slide into the slots.
Set up MFP and options
11
4 Slide the tray forward until it locks
into place.
Page 20
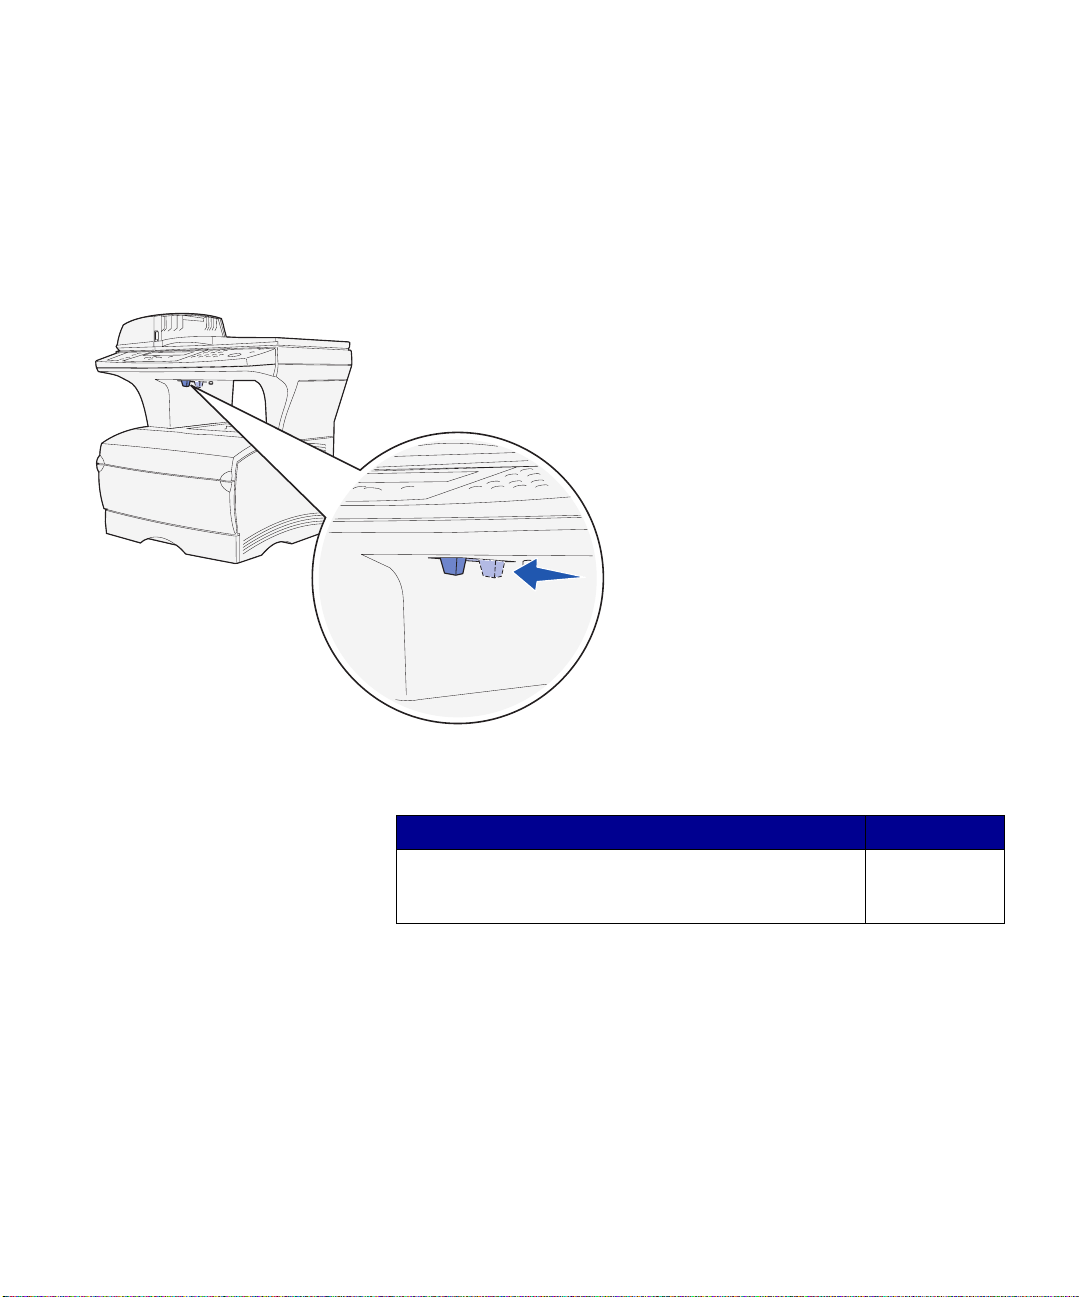
Unlock the scanner After you have finished assembling your
MFP, you must unlock the scanner.
Note: The scanner is shipped in a locked position to
prevent damage. We highly recommend that you lock the
scanner anytime you move the MFP.
To unlock the scanner:
1 Locate the scanner lock under the
left side of the scanner flatbed on
the MFP.
2 Move the locking mechanism
toward the front of the MFP.
To lock the scanner (if you move your
MFP after initial setup):
1 Make sure the scanner is in the
Ready (idle) state.
2 Turn off and unplug the scanner.
3 Move the locking mechanism
toward the back of the MFP. This
locks the scanner.
What do I do next?
Task Go to page…
After you have installed MFP opt ional drawers, attached
the ADF tray, and unlocked the scanner, you are now
ready to install optional memory cards.
Set up MFP and options
12
13
Page 21
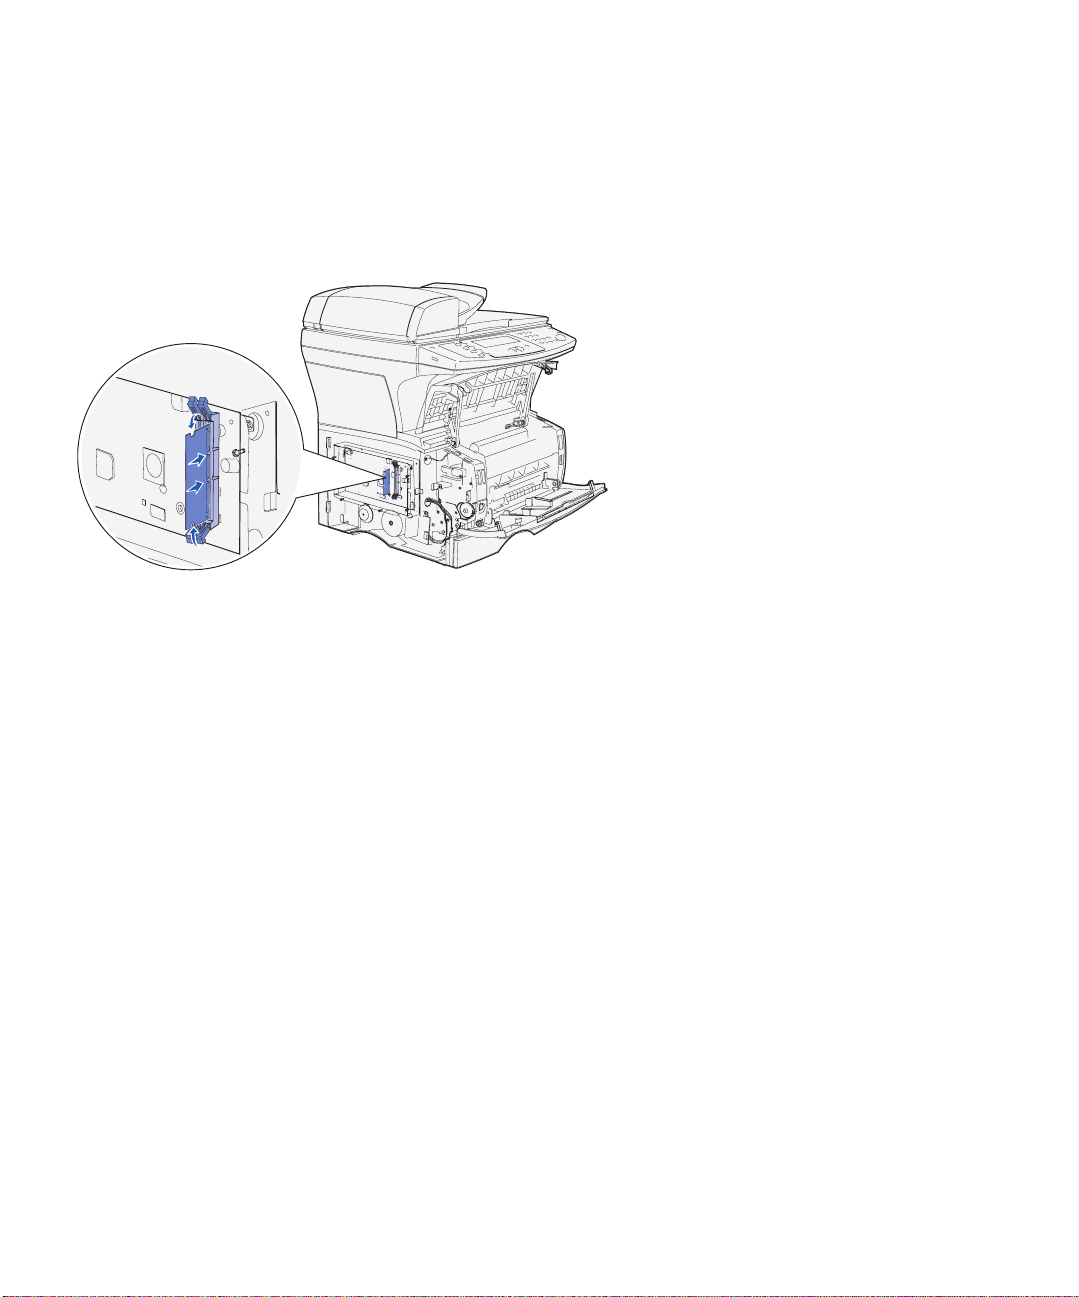
Step 4: Install optional memory
cards
CAUTION: If you are in stalli ng memo ry cards som etime
after setting up the MFP, turn the MFP off and unplug the
power cord before continuing.
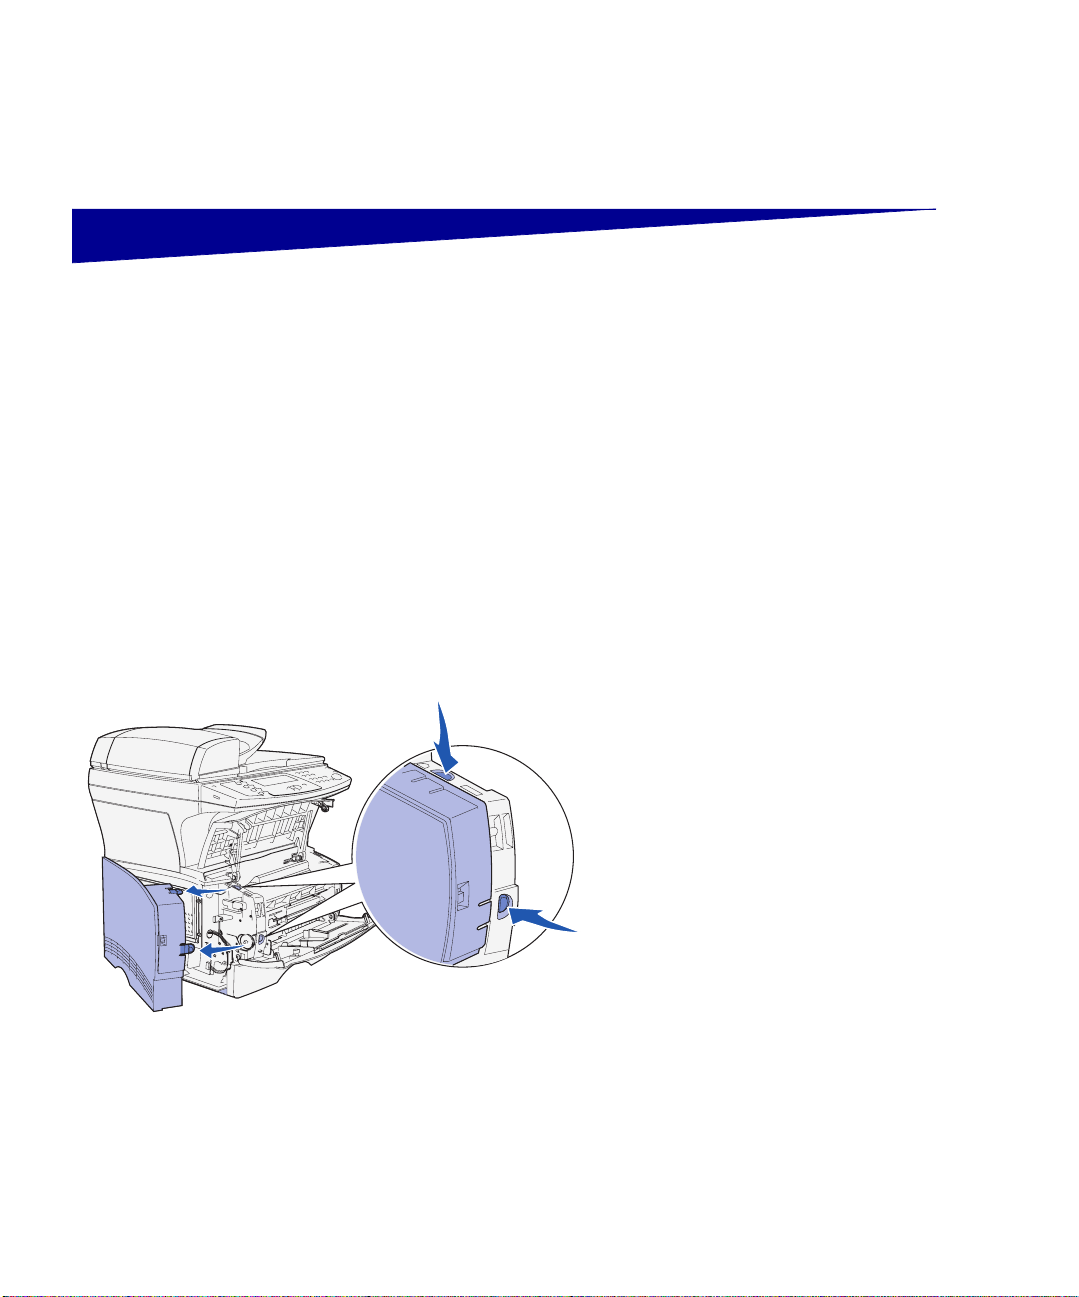
Opening the side door
You can customize your MFP memory
capacity and connectivi ty by adding
optional cards.
The instructions in this section help you
install any of the following memory cards:
– MFP memory
– Flash me mory or font cards
1 Open the front door and the
multipurpose feeder door.
2 Firmly press the two tabs
simultaneously to free them from
their slots.
3 Slide the side door off of the back
of the MFP as you swing it out to
remove it.
4 Set the door aside.
Install optional memory cards
13
Page 22
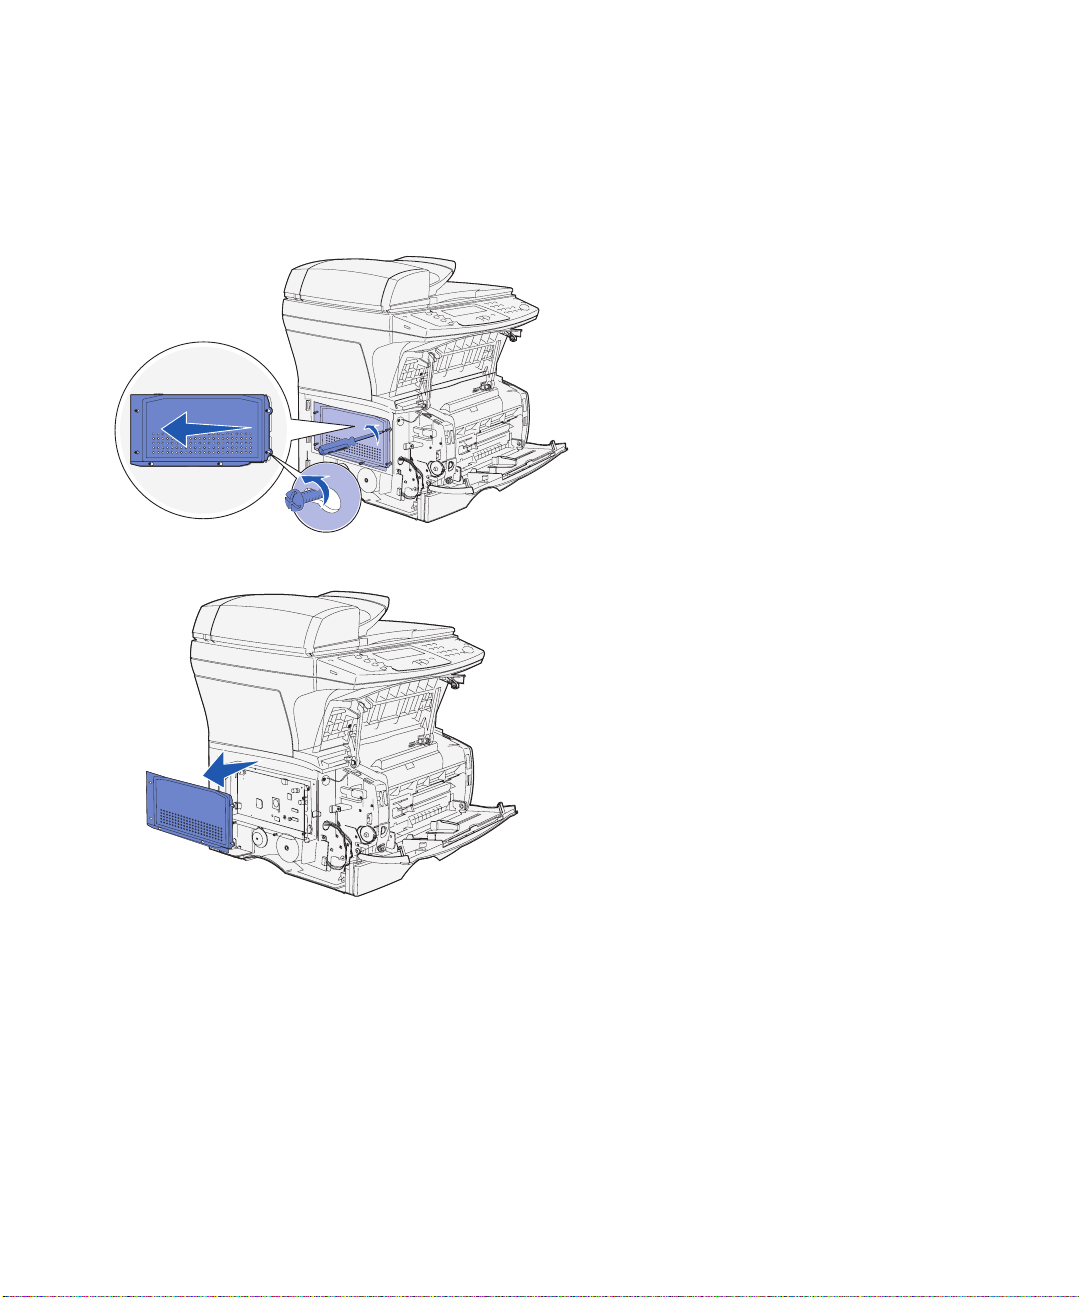
Removing the system board access shield
Note: You need a small Phillips screwdriver to remove
the system board access shield.
1 Loosen the six screws. Do not
remove them completely.
2 Slide the shield to the left until the
screws fit into the keyholes on the
shield.
3 Pull the shield straight out and set
it aside.
Install optional memory cards
14
Page 23
Installing an MFP memory card
Warning: Memory cards are easily damaged by static
electricity. Touch something metal on the MFP before you
touch a card.
Note: Some memory options offered for other Lexmark
MFPs cannot be used with your MFP. Refer to the
publications CD for memory specifications.
1 Unpack the memory card. Avoid
touching the connection points
along the edge of the card.
2 Push open the latches on both
sides of the memory connector.
3 Align the notches on the card with
the notches on the connector.
4 Push the memory card firmly into
the connector until the latches on
both ends snap int o plac e.
5 Make sure the latch fits over the
notch on the end of the card.
Installing an optional flash memory
or font card
Install optional memory cards
15
Follow the instructions in this section to
install an optional flash memory or font
card. The system board has one
connection location which can support
either one flash memory card or one font
card.
Page 24
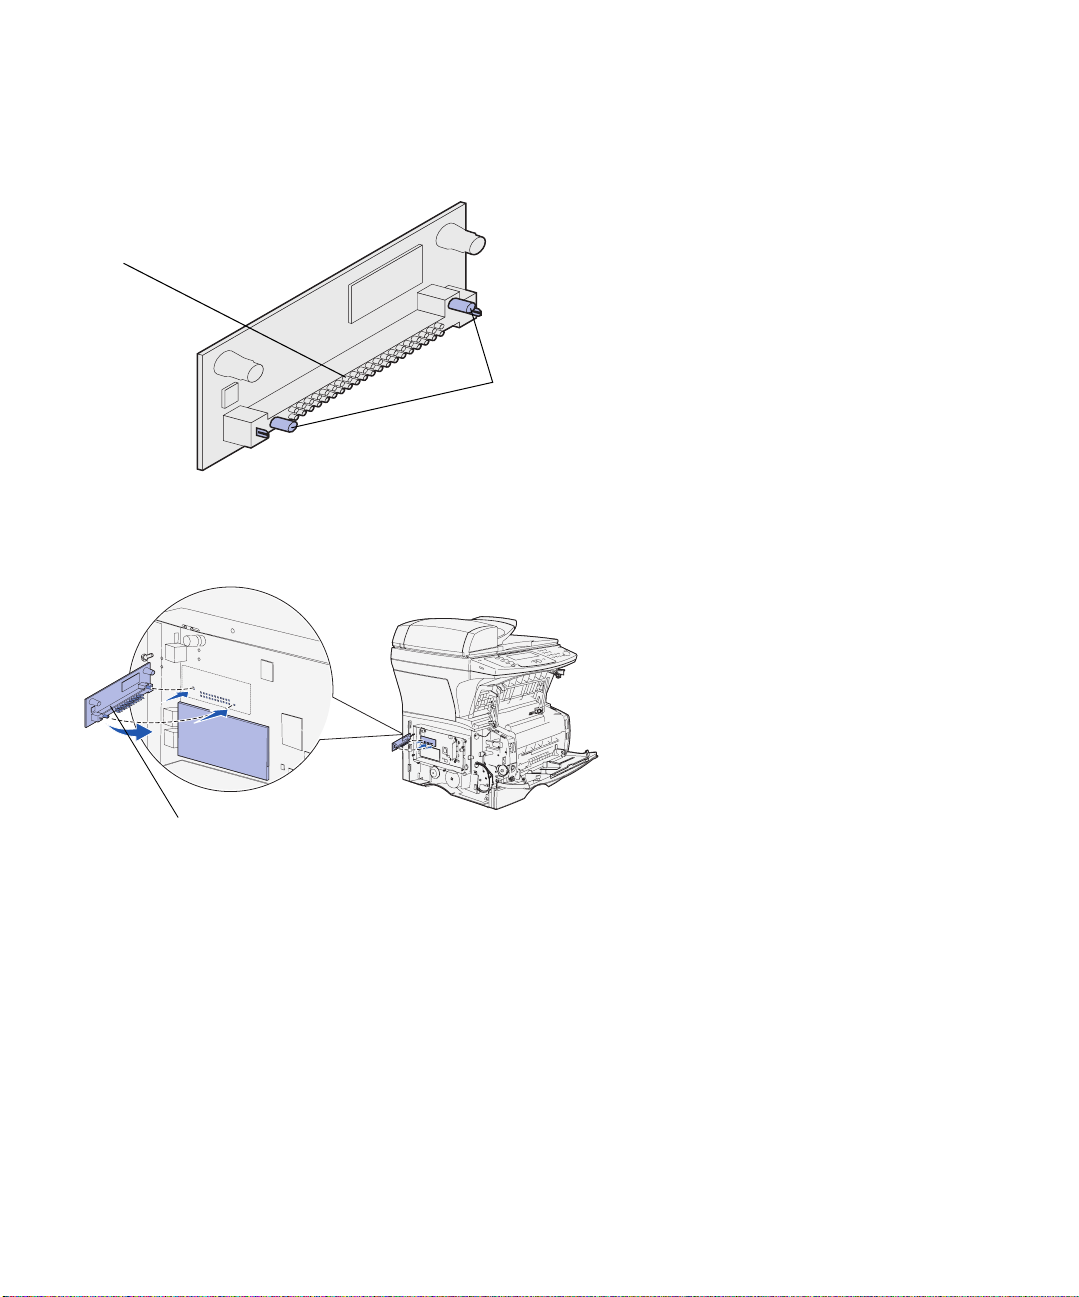
Warning: Optional flash memory and font cards are
easily damaged by static electricity. Touch something
metal on the MFP before you touch a card.
1 Unpack the flash memory or font
card.
Metal pins
Avoid touching the metal pins on
the bottom of the card. Save the
packaging.
Plastic pins
2 Holding the flash memory or font
card by its sides, align the plastic
pins on the card with the holes on
the system board.
Card
Note: Do not pivot the card into the slot. Align the pins on
the card with the system board and push the card straight
in. The row of metal pins on the card must be fully inserted
along its entire length.
Install optional memory cards
16
3 Push in until the flash memory or
font card is firmly in place.
Page 25
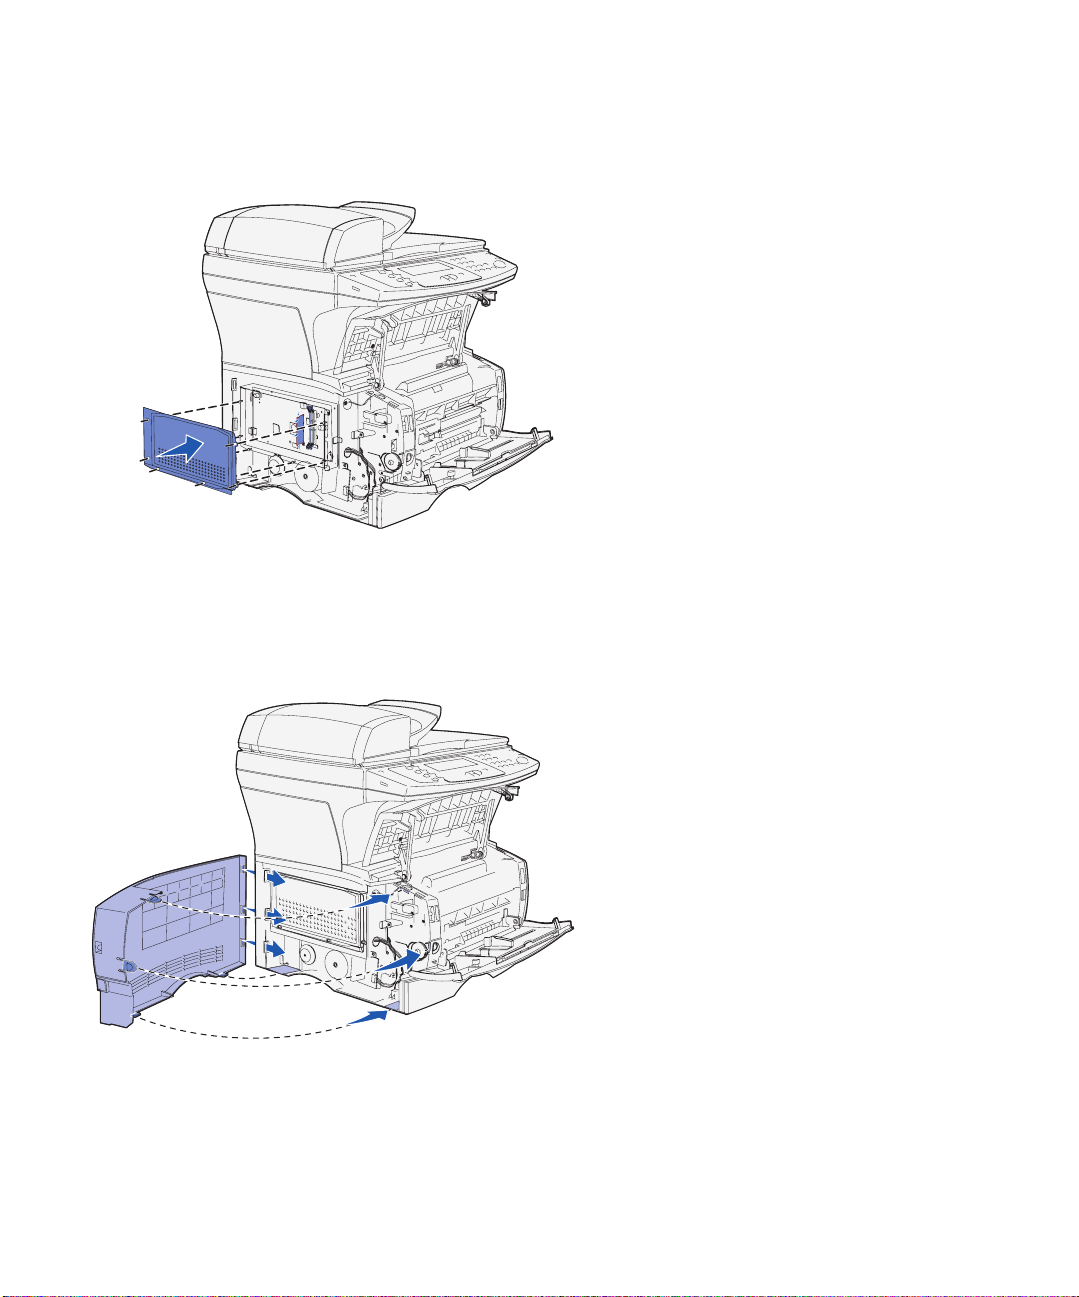
Reattaching the system board access shield
1 Align the six keyholes on the shield
with the six screws on the system
board.
2 Press the shield against the
system board, and then slide the
shield to the right.
3 Ti ghten the six screws.
Reattaching the side door
Install optional memory cards
1 Align the three rear tabs on the
side door with the corresponding
slots on the MFP.
2 Guide the tabs on the top, bottom,
and front of the door into their
corresponding slots. The top and
front tabs snap into place.
3 Close the upper front door and the
multipurpose feeder door. Make
sure both doors snap closed on
both sides.
17
Page 26

.
What do I do next?
Task Go to page…
After you have installed any optional memory cards, you
are ready to finish setting up your MFP.
19
Install optional memory cards
18
Page 27

Step 5: Prepare the MFP
Raising the paper rest The paper rest holds printed jobs at an
angle to keep them from sliding out of the
output bin. Unfold the paper rest forward
to extend it.
Prepare the MFP
19
Page 28

Attaching a control panel overlay If English is not your preferred language
and you have the MFP control panel
language overlay, attach the overlay to
your MFP control panel.
1 Remove the language panel
currently on the MFP by gently
prying up at the indentation.
2 Snap the overlay into place.
.
What do I do next?
Task Go to page…
After you have finished setti ng up the MF P, you are ready
to install the print cartridge.
Prepare the MFP
20
21
Page 29

Step 6: Install the print cartridge
Removing the packaging 1 Open the front door of the MFP.
Handle
2 Grasp the print cartridge by the
handle. Lift the cartridge out.
Handle
Install the print cartridge
21
Page 30

3 Remove the packaging from the
print cartridge.
Warning: Do not touch the photoconductor drum on the
bottom of the print cartridge.
Preparing the print cartridge 1 Hold the print cartridge by the
handle and gently shake it to
distribute the toner evenly.
Install the print cartridge
22
Page 31

2 Install the print cartri dge.
a Grasp the print cartridge by the
handle.
b Align the tabs on each side of
the print cartridge with the slots
on each side of the print
cartr i dge crad le.
c Slide the print cartridge into the
MFP until it snaps into place.
Close the front door. Make sure the door
snaps closed on both sides, or the MFP
will not function properly.
What do I do next?
Task Go to page…
After you have finished installing the print cartridge, you
are ready to load media into the MFP.
25
Install the print cartridge
23
Page 32

Install the print cartridge
24
Page 33

Step 7: Load media
Your MFP comes with one standard tray
and a multipurpose feeder (one optional
250 or 500 sheet tray is also available
separately) that combine for a total
capacity of 350, 600 or 850 sheets.
The following table lists page numbers
where you can find loading instructions
for each source.
Source Paper sizes supported Paper types supported
Capacity
(sheets)
Go to page...
Tray 1 A4, A5, JIS B5, folio, letter, legal,
Optional
250-sheet tray
Optional
500-sheet tray
Multipurpose
feeder
*For feeding other types of labels from Tray 1 and the multipurpose feeder, refer to the Card, Stock & Label Guide
available on the Lexmark Web site at www.lexmark.com/publications.
executive, statement
A4, A5, JIS B5, folio, letter, legal,
executive, statement
A4, JIS B5, folio , lett er, legal,
executive
A4, A5, JIS B5, folio, letter, legal,
executive, statement
Paper
Paper labels*
Transparencies
Paper only 250 27
Paper only 500 27
Paper
Envelopes
Transparencies
Card stock
250
100
50
100
10
20
10
27
30
Load media
25
Page 34

Changing Paper Size and Paper Type settings
If you load any print media other than
plain letter or A4 paper in tray 1, make
sure you change the Paper Type and
Paper Size settings using the Paper
Menu on the MFP control panel.
Changing the Paper Size 1 Press the administration (key)
button.
2 Choose Paper Menu, and then
press the check mark button (✓
3 Choose Paper Size, and then
press ✓
.
4 Change the Paper Size using the
arrow keys.
5 Choose Submit, and then press
✓
.
Changing the Paper Type 1 Press the administration (key)
button.
).
Load media
26
2 Choose Paper Menu, and then
press ✓
.
3 Choose Paper Type, and then
press ✓
.
4 Change the Paper Type using the
arrow keys.
5 Choose Submit, and then press
✓
.
Page 35

Loading the trays Follow these instructions to load the
standard tray and any optional tray.
1 Remove the tray.
2 Press the metal plate down.
Load media
27
Page 36

Length guide tab
Width guide tab
3 Squeeze the width guide tab and
the width guide together, and then
slide the guide all the way to the
right.
4 Squeeze the length guide tab and
the length guide together, and then
fully extend the guide.
5 Flex the sheets back and forth to
loosen them, and then fan them.
Do not fold or crease the print
media. Straighten the edges of the
stack on a level surface.
Load media
28
Page 37

Metal stop
Stack
height
indicator
Note: Overfilling the tray may cause jams. Refer to the
table on page 25 for the maximum capacity of various
print media in the tray.
6 Place the print media against the
left side of the tray, with the print
side down and facing the front of
the tray.
Do not load bent or wrinkled print
media.
7 Tuck the corner of the print media
under the metal stop.
8 Squeeze the width guide tab and
the width guide together and slide
the width guide until it lightly
touches the stack of print media.
Load media
29
9 Squeeze the length guide tab and
the length guide together, and then
slide the guide to the edge of the
print media.
Page 38

Loading the multipurpose feeder You can use the multipurpose feeder in
two ways:
• Tray—As a tray , you can load print
media in the feeder with the
intention of leaving it there.
• Manual feeder—As a manual
feeder, y ou send a print job to the
MFP while specifying the type and
size of media from your computer.
The MFP then prompts you to load
the appropriate print media before
it prints.
Use the following instructions to load the
multipurpose feeder.
1 Use the finger grips to pull the door
open.
Finger grips
Load media
30
Page 39

Note: If you are loading envelopes into the multipurpose
feeder, do not extend the tray all of the way. This may
cause envelopes to feed incorrectly.
2 Pull out the extension.
3 Unfold the extension.
4 Slide the width guide all the way to
the right.
Load media
5 Flex the sheets back and forth to
loosen them, and then fan them.
Do not fold or crease the print
media. Straighten the edges of the
stack on a level surface.
31
Page 40

Stack
height
limiter
6 Place the print media against the
left side of the multipurpose
feeder, with the print side up and
facing into the multipurpose
feeder.
7 Push the print media forward, but
do not force it.
8 Slide the width guide until it lightly
touches the stack of print media.
Note: Refer to the table on page 25 for the maximum
capacity of various print media in the multipurpose feeder.
Refer to the publications CD for
additional information on loading different
types of media such as letterhead,
transparencies, card stock, and
envelopes.
Load media
32
Page 41

Loading envelopes
1 Make sure the multipurpose
feeder is only pulled out and not
extended.
2 Place the envelopes against the
left side of the multipurpose
feeder, with the print side up and
the stamp c orner o n th e ri gh t si de.
3 Push the envelopes forward, but
do not force them.
Note: If you are loading envelopes into the multipurpose
feeder, do not extend the tray all of the way. This may
cause envelopes to feed incorrectly.
4 Slide the width guide until it lightly
touches the stack of envelopes.
Load media
33
Page 42

Loading the scanner automatic document feeder (ADF)
1 Slide the paper guides out.
2 Place the paper face up in the
scanner ADF, under the stack
height limiters, and slide the paper
guides until they lightly touch the
paper.
Note: The scanner multipurpose feeder can hold a
maximum of 50 sheets of 20 lb paper.
What do I do next?
Task Go to page…
After you have finished loading the media into the MFP,
you are read y to att ach cab les to y our MFP and compute r .
Load media
35
34
Page 43

Step 8: Attach cables
CAUTION: Do not connect
or disconnect a
communication port, a
telephone cord, or any other
connector during a ligh tni ng
storm.
Attaching the telephone cord
The MFP can be attached to a network or directly to a computer to
print locally.
If the MFP is locally attached, remember to install your drivers first
before attaching your cables. See Step 1: “Install drivers for local
printing and scanning” on page 1, if you have not already installed the
drivers.
1 Connect the MFP to the telephone jack using the telephone line.
2 Plug one end of the telephone cord into the socket at the back
of the MFP and the other end into a telephone jack.
Attach cables
35
Page 44

Attaching a
USB cable
Be sure to match the USB symbol on
the cable to the USB symbol on the
MFP.
A USB port is standard on the MFP.
Windows 98 SE, Windows Me, Windows 2000, Windows XP, and
Windows Server 2003 operating systems support USB connections.
Some UNIX, Linux, and Macintosh computers also support USB
connections. Refer to your computer operating system documentation
to see if your system supports USB.
To attach the MFP to a computer:
1 Connect the MFP to the computer using a USB cable.
A USB port requires a USB cable such as Lexmark part number
12A2405 (2 m [6.5 ft]). Be sure to match the USB symbol on the
cable to the USB symbol on the MFP.
2 Plug one end of the MFP power cord into the socket at the back
of the MFP and the other end into a properly grounded outlet.
3 Turn on your MFP.
After the MFP completes its internal tests, the Ready message
indicates that the MFP is ready to receive jobs.
If you do not see the Ready message on the display , ref er to the
publications CD for instructions on clearing the message. Click
Printing, and then click Understanding MFP messages.
4 Turn on your computer and any other peripherals.
Verifying the USB queue
Mac OS X 1 Open Print Center in the Finder. Print Center is located in the
Utilities folder (in the Applications folder).
2 Do one of the following:
If your USB-attached MFP appears in the Printer List, you can
quit Print Center. A queue has been created for your MFP.
If your USB-attached MFP does not appear in the Printer List,
make sure the USB cable is properly connected and the MFP is
Attach cables
36
Page 45

turned on. After the MFP appears in the Printer List, you can
quit Print Center.
Attaching a
You can attach your MFP to a network using standard network cables.
network cable
Ethernet A 10BaseT/100BaseTx Fast Ethernet port is standard on the MFP.
To attach the MFP to a network:
1 Make sure the MFP is turned off and unplugged.
2 Plug one end of the standard network cable into a LAN drop or
hub and the other end into the Ethernet port on the back of the
MFP. The MFP automatically adjusts for the network speed.
3 Plug one end of the MFP power cord into the socket at the back
of the MFP and the other end into a properly grounded outlet.
Use Category 5 cable with an RJ-45
connector for the standard network
port.
4 Turn on the MFP.
After the MFP completes its internal tests, the Ready message
indicates that the MFP is ready to receive jobs.
If you do not see the Ready message on the display , ref er to the
publications CD for instructions on clearing the message. Click
Printing, and then click Understanding MFP messages.
5 Turn on your computer and any other peripherals.
802.11 wireless options Your MFP can be converted to wireless networking by using an
optional 802.11 Wireless Print Adapter. This adapter is a piece of
hardware that plugs into the Ethernet port on your MFP.
If you purchased this adapter for your MFP, refer to the documentation
that shipped with the adapter for installation and configuration.
What do I do next?
Task Go to page…
After you have finished attaching cables to the MFP and
your computer, you are ready to turn on the MFP.
Attach cables
37
39
Page 46

Attach cables
38
Page 47

Step 9: Power on the MFP
Turn on the MFP You are now ready to power on the MFP.
1 Locate the power switch on the
right side of the MFP.
2 Turn it on.
What do I do next?
Task Go to page…
After you have powered on the MFP, you are ready to
verify that the MFP is properly set up.
Power on the MFP
39
43
Page 48

Power on the MFP
40
Page 49

Step 10: Configure for TCP/IP
If you have TCP/IP available on your network, we recommend that you
assign an IP address to the MFP.
Assigning an MFP
IP address
If your network is using DHCP , an IP address is automatically assigned
after you connect the network cable to the MFP.
1 Look for the address under the “TCP/IP” heading on the
network setup page you printed in “Printing a network
setup page” on page 44.
2 Go to “Verifying the IP settings” on page 42 and begin with
step 2.
If your network is not using DHCP, then you must manually assign an
IP address to the MFP.
An easy way to do this is to use the MFP control panel:
1 Press the administration button and then select Network/USB
and then TCP/IP.
2 Change the address by entering the new IP address in the
Address field using the numeric keypad. Use the arrow keys to
navigate the IP address fields.
3 Enter the appropriate address in the Netmask field using the
arrow keys to navigate.
4 Enter the appropriate address in the Gateway field using the
arrow keys to navigate.
5 When you are finished, select Submit to return the MFP to the
Ready state.
6 Reprint the network setup page to see the new configuration.
See “Printing a network setup page” on page 44.
7 Go to “Verifying the IP settings” on page 42.
Configure for TCP/IP
41
Page 50

Verifying the
IP settings
Note: On Windows
computers, click Start Æ
Programs Æ Command
prompt (or Start Æ
Programs Æ
Accessories Æ Command
prompt if using
Windows 2000 or Windows
XP).
Note: On Mac OS X, go to
/Applications/Utiliti es and
launch Network Utility. Click
the tab labeled Ping, enter
the IP address of the MFP
and click the Ping button.
Using the resident Web page
1 On the Network Setup Page, look under the “TCP/IP” heading
and make sure the IP address, netmask, and gateway are what
you expected.
2 Ping the MFP and verify that it responds. For example, at a
command prompt on a network computer, type ping followed
by the new MFP IP address:
ping 192.168.0.11
If the MFP is active on the network, you receive a reply.
Your MFP has a resident Web page, which you can access from your
browser. To access the resident Web page, type the MFP’s IP address
in the URL address field of your browser (for example,
http://192.168.236.24). If you do not know the IP address of your MFP,
you can find it on the network setup page (for help, see “Printing a
network setup page” on page 44).
Note: Many settings may
only be changed using the
resident Web page. These
settings are signified by an
asterisk (*) on the Menu
Settings page.
Some of the resident Web page features include a status window of
the MFP and details of the MFP’s configuration, such as current
memory and engine code levels. If you are an administrator, you can
also change copy settings, fax settings, e-mail settings, and so on.
What do I do next?
Task Go to page…
After you hav e con figured the MFP f or TCP/IP se tup , y o u
are ready to install network drivers.
Configure for TCP/IP
42
47
Page 51

Step 11: Verify MFP setup
The menu settings page lists the default MFP settings and all the
options you purchased or installed. If a feature or an option is not
listed, you need to check your installation. For help printing the menu
settings page, see page 43.
The network setup page provides information that is needed if you are
attaching your MFP to a network. For help printing the network setup
page, see page 44.
If you set up your MFP as a local MFP (step 1 on page 1), this is a
good time to verify that your computer and MFP are communicating
properly. For help printing a test page, see page 44.
You can also print the Quick Reference and Clearing Jams
documentation at this time, so that you can easily reference this
information when necessary. For help printing the Quick Reference
documentation, see page 45.
Printing a menu
settings page
Note: For more information
about using the MFP control
panel and changing menu
settings, refer to the
publications CD.
Print a menu settings page to review the default MFP settings and to
verify that MFP options are installed correctly.
1 Make sure the MFP is on.
2 Press the admin is tration button and then choose Print
Reports.
3 Choose Menu Settings Page, and then press ✓. The menu
settings page prints automatically.
4 Verify that the options you installed are correctly listed under
“Installed Features.”
If an option you installed is not listed, turn the MFP off, unplug
the power cord, and reinstall the option.
5 Verify the amount of memory installed is correctly listed under
“Device Information.”
Verify MFP setup
43
Page 52

6 Verify that the paper trays are configured for the sizes and types
of paper you loaded.
Printing a network
setup page
Note: Save the network
setup page after it prints. Y ou
will use it in the other steps.
Printing a local test page
If the MFP is attached to a network, print a network setup page to verify
the network connection. This page also provides important information
that helps you configure for network printing.
1 Make sure the MFP is on.
2 Press the admin is tration button and then sele ct Print
Reports.
3 Choose Network Setup Page, and then press ✓. The
network setup page prints automatically.
4 On the network setup page, confirm that Status is “Connected.”
If Status is “Not Connected,” your LAN drop may not be active
or your network cable may be malfunctioning. Consult your
network administrator for a solution, and then print another
network setup page to verify that you are connected to your
network.
If the MFP is attached directly to your computer, print a test page to
verify the MFP and computer are communicating properly.
Windows 1 From the Start menu, click Settings Æ Printers.
2 From the Printers folder, right-click the icon for your local MFP.
3 Select Properties from the sidebar menu.
4 From the General tab, click Print Test Page.
Verify MFP setup
44
Page 53

Mac OS X 1 Open any application and create something to print (TextEdit,
for example).
2 Choose Print from the File menu.
Note: If another printer is
already set up as the default
printer, then you have to
select the MFP from the
Printer pop-up menu and
then choose Print.
Printing Quick Reference documentation
Information about using the MFP and clearing jams is included on the
publications CD that shipped with your MFP documentation.
We recommend you print this information and store it in a convenient
location near the MFP.
To print the Quick Reference documentation from the publications CD:
1 Launch the publications CD.
2 Click Quick Reference.
3 Print the documents.
What do I do next?
Task Go to page…
If you have a locally-attached MFP, continue to
Step 13:“Set default copy settings”
If you have a network -attached MFP, you are ready to
configure for TCP/IP setup.
55
41
Verify MFP setup
45
Page 54

Verify MFP setup
46
Page 55

Step 12: Install drivers for
network printing
After you have assigned and verified the TCP/IP settings, you are
ready to install the MFP on each network computer.
Windows In Windows environments, network MFPs can be configured for direct
printing or shared printing. Both network printing methods require the
installation of a print driver.
Suppor ted pr int drivers
• Windows system print driver
• Lexmark custom print driver
Note: Installing a custom
driver will not replace the
system driver. A separate
print object will be created
and appear in the Printers
folder.
System drivers are built into Windows operating systems. Custom
drivers are available on the drivers CD.
Updated system and custom drivers are available on our Lexmark
Web s ite at www.lexmark.com.
For basic MFP functionality, you can install a system print driver. The
system print driver presents a consistent user interface for use with all
the MFPs on your network. However, using a cust om print driver
provides enhanced MFP features and functionality, such as print
status alerts.
Install drivers for network printing
47
Page 56

Follow the steps for your printing configuration and operating system
to configure your network MFP:
Printing configuration Operating system Go to page...
Direct
• MFP is connected directly to the netw ork using a ne tw ork cab le , such as
Ethernet.
• Print drivers are typically installed on each network computer.
Shared
• MFP is connected to one of the computers on the network using a local
cable, such as USB.
• Print drivers are installed on the computer attached to the MFP.
• During driver installation, the MFP is set up to be “shared” so that other
network computers can print to it.
Direct printing using
Windows 98/Me,
To install a custom print driver:
1 Insert the drivers CD into your CD-ROM drive.
Windows 2000,
Windows XP, and
Windows Server 2003
If the CD does not auto launch, click Start Æ Run, and then
type D:\Setup.exe in the Run dialog box.
2 Click Install Software.
MFP
3 Click Printer and Software.
4 Click Agree to accept the license agreement.
Clients
5 Select Suggested, and then click Next.
Windows 98/Me,
Windows 2000,
Windows XP, or
Windows Server 2003
Windows 98/Me,
Windows 2000,
Windows XP, or
Windows Server 2003
48
49
Note: The port may be
identified by an MFP ID/host
name or by the IP address of
the MFP. If you don’t know
the IP address, print a
network setup page and look
under the TCP/IP heading.
For help, see “Printing a
network setup page” on
page 44.
The Suggested option is the default installation for local and
network-attached setup. If you need to install utilities, change
settings, o r customize de vice driver s, select Custom, and f ollow
the instructions on your screen.
6 Select Network Attached, and then click Next.
7 Select the port you want to use.
If your port is not listed, or you prefer to use a standard TCP/IP
port, click Add.
8 Follow the instructions on your screen to complete installing the
drivers.
9 Print a test page to verify MFP installation.
Install drivers for network printing
48
Page 57

Shared printing from a
server using
Windows 98/Me,
Windows 2000,
Windows XP, and
Windows Server 2003
Server
MFP
Clients
After connecting your MFP to a Windows 98/Me, Windows 2000,
Windows XP, or Windows Server 2003 computer (which will act as a
server), follow these steps to configure your network MFP for shared
printing:
Step 1: Install a custom print driver
1 Insert the drivers CD into your CD-ROM drive.
If the CD does not auto launch, click Start Æ Run, and then
type D:\Setup.exe in the Run dialog box.
2 Click Install Software.
3 Click Printer and Software.
4 Click Agree to accept the license agreement.
5 Select Suggested, and then click Next.
6 Select Local Attached, and then click Next.
7 Follow the instructions on your screen to complete installing the
drivers.
8 Print a test page to verify MFP installation.
Note: If you are missing
files, you may be prompted
to provide the server
operating system CD.
Step 2: Share the MFP on the network
1 Click Start Æ Settings Æ Printers.
2 Select the MFP you just created.
3 Click File Æ Sharing.
4 Check the Shared check box, and then enter a name in the
Shared Name text box.
5 In the Alternate or Additional Drivers section, select the
operating systems of all the network clients that will print to the
MFP.
6 Click OK.
7 Check the following to make sure the MFP was successfully
shared.
• The print object in the Printers folder now has a shared
indicator.
Install drivers for network printing
49
Page 58

• Browse Network Neighborhood. Find the host name of the
server and look for the shared name you assigned to the
MFP.
Step 3: Install the print driver (or subset) on network
clients
Using the point and print method
Note: This method is
usually the best use of
system resources. The
server handles driver
modifications and the print
job processing. This lets
network clients return to
programs much faster.
With this method, a subset of driver information is copied from the
server to the client computer. This is just enough information to send
a print job to the MFP.
1 On the Windows desktop of the client computer, double-click
Network Neighborhood.
2 Locate the host name of the server computer, and then double-
click the host name.
3 Right-click the shared MFP name, and then click Install.
4 Wait a few minutes for the driver information to be copied from
the server computer to the client computer, and for a new MFP
object to be added to the Printers folder. The time this takes
varies, based on network traffic and other factors.
5 Close Network Neighborhood.
6 Print a test page to verify MFP installation.
Install drivers for network printing
50
Page 59

Using the peer-to-peer method
With this method, the print driver is fully installed on each client
computer. Network clients retain control of driver modifications. The
client computer handles the print job processing.
1 Click Start Æ Settings Æ Printers.
2 Click Add Printer to launch the Add Printer wizard.
3 Click Network Print Server.
4 Select the network MFP from the Shared printers list. If the MFP
is not listed, enter the path of the MFP in the text box.
The path will look similar to the following:
\\<server host name>\<shared MFP name>
Note: If this is a new MFP,
you may be prompted to
install a print driver. If no
system driver is available,
then you will need to provide
a path to available drivers.
The server host name is the name of the server computer that
identifies it to the ne t work. The shared MF P nam e is th e name
assigned during the server installation process.
5 Click OK.
6 Select whether you want this MFP to be the default for the client,
and then click Finish.
7 Print a test page to verify MFP installation.
Macintosh
Note: A PostScript Printer
Description (PPD) file
provides detailed
information about the
capabilities of an MFP to
your Macintosh computer.
Mac OS X Step 1: Install a custom PPD file
A PostScript Printer Description (PPD) file must be installed on each
computer used to print to a network MFP. In addition, the computer
must also have a print queue in Print Center (Mac OS X). A print queue
can be created either through AppleTalk or IP Printing. Follow the
instructions for your operating system to install a PPD file and create
a desktop MFP or print queue.
Follow the instructions to install a PPD file and create a print queue.
1 Insert the drivers CD.
2 Double-click the installer package for your MFP.
Install drivers for network printing
51
Page 60

3 On the Authorization screen, choose Click the lock to make
changes.
4 Enter your password, and then click OK.
5 Click Continue on the Welcome screen and again after you
view the Readme file.
Note: A PPD for your MFP
is also available in a
downloadable software
package on our Lexmark
Web s ite at
www.lexmark.com.
Note: If you don’t know
which zone or MFP to select,
look on the network setup
page under the AppleTalk
heading.
6 Click Continue after you view the license agreement, and
then click Agree to accept the terms of the agreement.
7 Select a Destination, and then click Continue.
8 On the Easy Install screen, click Install. All the necessary
software is installed on your computer.
9 Click Close when installation is complete.
Step 2: Create a print queue in Print Center
Using AppleTalk
Follow these steps to create a print queue using AppleTalk. To create
an IP print queue, see “Using IP Printing” on page 53.
1 Open Finder, click Applications, and then click Utilities.
2 Double-click Print Center.
3 Choose Add Printer from the Printer s menu.
4 Choose AppleTalk from the pop-up menu.
5 Select the Apple Talk zone from the list.
6 Select the new MFP from the list, and then click Add.
7 Verify MFP installation:
a Open Finder, click Applications, and then click TextEdit.
b Choose Print from the File menu.
c Choose Summary from the Print Panel menu.
d Do one of the following:
• If the PPD file displayed in the Summary window is
correct for your MFP, then MFP setup is complete.
• If the PPD file displayed in the Summary window is not
correct for your MFP, delete the MFP from the printer list
Install drivers for network printing
52
Page 61

in Print Center and repeat “Step 1: Install a custom PPD
file” on page 51.
Using IP Printing
Follow these steps to create a print queue using IP Printing. T o create
an AppleTalk print queue, see “Using AppleTalk” on page 52.
1 Open Finder, click Applications, and then click Utilities.
2 Double-click Print Center.
3 Choose Add Printer from the Printer s menu.
4 Choose IP Printing from the pop-up menu.
5 Enter the IP address or the MFP DNS name in the Printer’s
Address box.
6 Choose Lexmark from the Printer Model pop-up menu.
7 Select the new MFP from the list, and then click Add.
8 Verify MFP installation:
a Open Finder, click Applications, and then click TextEdit.
b Choose Print from the File menu.
c Choose Summary from the Print Panel menu.
d Do one of the following:
• If the PPD file displayed in the Summary window is
correct for your MFP, then MFP setup is complete.
• If the PPD file displayed in the Summary window is not
correct for your MFP, delete the MFP from the printer list
in Print Center and repeat “Step 1: Install a custom PPD
file” on page 51.
UNIX/Linux Your MFP supports many UNIX and Linux platforms, such as Sun
Solaris and Red Hat. Visit our Lexmark Web site at
www.lexmark.com for a complete list of supported UNIX and Linux
platforms.
Install drivers for network printing
53
Page 62

Note: The Sun Solaris and
Linux packages are available
on the drivers CD and on our
Lexmark Web site at
www.lexmark.com.
Lexmark provides a print driver package for each supported UNIX and
Linux platform.
You can download these packages from our Lexmark Web site. You
may also find the driver package you need on the drivers CD.
NetWare Your MFP supports both Novell Distributed Print Services (NDPS) and
regular queue-based NetWare environments. For the latest
information about installing a network MFP in a NetWare environment,
launch the drivers CD and click View Documentation.
What do I do next?
Task Go to page…
After you hav e insta lled ne two rk drivers , y ou are ready to
set default MFP parameters.
55
Install drivers for network printing
54
Page 63

Step 13: Set default copy
settings
To set the default copy settings for your MFP:
1 Press the administration button.
2 Select Default Menus.
3 Select Copy Settings.
4 Enter new values for Copy Settings by using the arrow keys to
navigate the fields. See the following table for possible copy
settings, select a setting, and then press ✓.
Copy settings Available setti ngs
Content Text, Text/Graphics*, Photo
Duplex Off*, Long edge, Short edge
Paper Saver Off*, 2 on 1 Port., 2 on 1 Land., 4 on 1
Print Page Borders On*, Off
Collate On*, Off
Original Size Letter, Legal, Executive, Folio,
Copy To Source Tray 1*
Darkness 1 to 9 with graphic
Number of Copies 1*–999
Overlay Confidential, Copy, Draft, Urgent, Off*,
Allow priority copies On*, Off
*Indicates the default setting when shipped.
Set default copy settings
Port., 4 on 1 Land.
Statement, A4, A5, JIS B5
Tray 2 (if installed)
MP Feeder
and Custom (if configured)
55
Page 64

What do I do next?
Task Go to page…
After you ha ve set defau lt c opy settings, you are ready to
set up to send and receive faxes.
57
Set default copy settings
56
Page 65

Step 14: Set up to send and
receive faxes
To receive faxes, your MFP just needs to be plugged in with a phone
line attached. It is automatically configured to receive faxes.
Configuring
fax setup
Entering the Station
Name
Entering the Station
Number
The T elephone Consumer Protection Act of 1991 requires all outgoing
faxes to contain specific information in a margin at the top or bottom of
each transmitted page, or on the first page of the transmission. This
required information includes:
• Station Name
• Station Number
• Time and Date
1 Press the administration button.
2 Choose Default Menus, and then press ✓).
3 Choose Fax Settings, and then press ✓.
4 Choose Station Name, and then press ✓.
5 Enter the Station Name (a personal name or company name) by
selecting letters and pres sing ✓after each letter.
6 When you are finished, choose Submit, and then press ✓. This
returns you to the Fax Settings menu.
1 Choose Station Number from the Fax Settings menu, and
then press ✓.
2 Enter your fax phone number by selecting numbers and
pressing ✓after each number.
Set up to send and receive faxes
57
Page 66

3 When you are finished, choose Submit and then press ✓. This
returns you to the Fax Settings menu. Choose Home and then
press ✓.
Entering the time and
date
Sending a fax from your MFP
Note: To enter a fax
shortcut, place the
document in the ADF or on
the flatbed and press the #
key and then the shortcut
number.
If the date and time are not correct on your MFP, follow the steps below.
1 Press the administration button.
2 Choose Default Menus, and then press ✓.
3 Scroll to the next screen using the arrow keys.
4 Choose Set Date and Time, and then press ✓.
5 Set the Year, Month, Day, Hour (24 Hour), and Minute.
6 Choose Submit, and then press ✓.
1 Place your document in either the scanner ADF or lay it on the
scanner flatbed.
2 Press Fax.
3 Enter the fax number using the numeric keypad.
4 Press Start or select Fax It on the display.
5 A Fax Confirmation page prints, telling you if you are successful.
For more information about faxing, refer to the publications CD.
What do I do next?
Task Go to page…
After you have set up the M FP to s end a nd receive faxes,
you are ready to set up the e-mail server.
Set up to send and receive faxes
58
59
Page 67

Step 15: Set up your e-mail
server
In order to use the e-mail function on your MFP, you must set up the
e-mail server first. Your e-mail server settings must be configured
using the MFP resident Web page.
To access the resident Web page:
Note: If you do not know the
IP address of your MFP, you
can find it on the network
setup page (for help, see
“Printing a network
setup page” on page 44).
1 Type the MFP’s IP address in the URL address field of your
browser (for example, http://192.168.236.24).
2 Click Configuration from the left column.
3 Click E-mail/FTP Settings from the Default Settings column.
4 Click Server Setup at the bottom of the page. Enter the settings
for your e-mail server.
Setting Type of entry Information
Primary SMTP
Gateway
Primary SMTP
Gateway Port
Secondary SMTP
Gateway
Secondary SMTP
Gateway Port
SMTP Timeout Numeric 5–30 seconds
Numeric IP address of the primary
SMTP gateway
Numeric Default:
25
Numeric IP address of the
secondary SMTP gateway
Numeric Default:
25
Default:
5 seconds
Set up your e-mail server
59
Page 68

Setting Type of entry Information
Server Requires
Authentication
Checkbo x /Text Check this opti on i f your e-
mail server requires user
authentication.
Enter your userid and
password.
Choosing E-mail
Attachment or Web Link
Note: Images must be
specified as attachmen ts or
Web Links.The two cannot
be mixed. E-mail shortcuts
will not allow a choice
between Web Link and
attachment, and any
shortcut imported will have
that setting ignored.
Reply Address Text Required. E-mails sent to
the MFP will appear to
originate from this
address.
Subject Text Optional. Subject line for
the e-mail. If a subje ct lin e
is entered on the Server
settings page, this is what
appears by default on the
control panel. You can
change the subject line at
the control panel us ing the
display keyboard.
Message Text Optional. This text is sent
in the body of each e-mail.
Images can be sent as attachments or Web Links. Attachments are
actual files that are included in the e-mail. Web Links are a path to a
directory or server where the image is located that is included in the email.
To set up a Web Li nk:
1 Type the MFP’s IP address in the URL address field of your
browser (for example, http://192.168.236.24).
2 Click Configuration from the left column.
3 Click E-mail/FTP Settings from the Default Settings column.
4 Click Server Setup at the bottom of the page.
Set up your e-mail server
60
Page 69

5 Enter your Web Li n k settings at the bottom of the page.
Setting Type of entry Additional information
Server Text This is the address of the
FTP server where the
images will be placed.
Example: mycompany.net
Login Te xt Account login name for th e
Password Text Password for the login
Path Text Complete path to the
Filename Text Base file name for the
Web link Text
FTP server.
name.
directory where the
images will be stored.
Example: /docs/scanned
files
images to be stored, date
and timestamp will be
added to base, as might
'-1' '-2' and so o n f or things
like JPEGs.
(*,:,?,<,>,|," are invalid)
Complete path to the
HTTP address or directory
where users can access
the image. The body of a
sent e-mail includes this
path plus a filena me for the
images scanned.
Example:
http://mycompany.net/
docs/scannedfiles
What do I do next?
Congratulations! You are finished with the MFP set up. If you need more
information about y our MFP, see “Other sources of i nf ormation” o n page63.
Set up your e-mail server
61
Page 70

Set up your e-mail server
62
Page 71

Other sources of information
Publications CD The publications CD provides information about loading paper,
clearing error messages, ordering and replacing supplies, and
troubleshooting. It also provides general information for
administrators.
The information on the publications CD is also available on Lexmark’s
Web s ite at www.lexmark.com/publications.
Viewing the
CD contents
Note: The publications CD
is shipped inside this
Setup Guide.
Distributing the
information
Launch the publications CD and browse the contents to see a
complete list of the available information.
The User’s Reference includes the following types of helpful
information:
• Copy, scan, and fax information
• Tips for successful printing
• Ways to improve print quality
• Information about using the MFP control panel
• Instructions for replacing supplies
• Solutions to common problems
• Methods for clearing paper jams
• Overview of MFP menus
• Explanation of MFP messages
You can give users access to the information on the publications CD in
several ways:
• Give the publications CD to a system administrator or the Help
desk.
• Copy the entire contents of the CD (or just specific topics) to a
shared network drive or intranet site.
Other sources of information
63
Page 72

• Print the information on the publications CD and store it near
the MFP for easy access.
• Send Lexmark’s MFP documentation URL to MFP users
(www.lexmark.com/publications). Users with Inte rnet access
can browse the site.
Quick Reference and
Clearing Jams
The MFP Quick Reference provides easy access to information about
how to make simple copies, send a fax, and how to use the control
panel. The Quick Reference also provides helpful information about
clearing paper jams. This information is available on the publications
CD. Store the information near the MFP for easy access.
Drivers CD The drivers CD contains all the necessary files to get your MFP up and
running. It may also contain MFP utilities, screen fonts, and additional
documentation.
Lexmark Web site Visit our Web site at www.lexmark.com for updated print and scan
drivers, utilities, and other MFP documentatio n.
Congratulations! You are now ready to use your new MFP. Save this book if you
anticipate purchasing MFP options in the future.
Other sources of information
64
Page 73

Notices
Electronic emission notices
FCC rules Part 15
This equipment has been tested and found to
comply with the limits for a Class A digital device,
pursuant to Part 15 of the FCC Rules. Operation is
subject to the following two conditions: (1) this
device may not cause harmful interference, and (2)
this device must accept any interference received,
including interference that may cause undesired
operation.
The FCC Class A limits are designed to provide
reasonable protection against harmful interference
when the equipment is operated in a commercial
environment. This equipment generates, uses, and
can radiate radio frequency energy and, if not
installed and used in accordance with the
instruction manual, may cause harmful interference
to radio communications. Operation of this
equipment in a residential area is likely to cause
harmful interference, in which case the user will be
required to correct the interference at his own
expense.
The manufacturer is not responsible for any radio
or television interference caused by using other
than recommended cables or by unauthorized
changes or modifications to this equipment.
Unauthorized changes or modifications could void
the user's authority to operate this equipment.
Note: To assure compliance with FCC regulations
on electromagnetic interference for a Class A
computing device, use a properly shielded and
grounded cable such as Lexmark part number
12A2405 for USB attach. Use of a substitute cable
not properly shielded and grounded may result in a
violation of FCC regulations.
Industry Canada compliance statement
This Class A digital apparatus meets all
requirements of the Canadian InterferenceCausing Equipment Regulatio n s.
Avis de confor mit é aux normes de l’industr ie
du Canada
Cet appareil numérique de la classe A respecte
toutes les exigences du Règlement sur le matériel
brouilleur du Canada.
European Community (EC) directives
conformity
This product is in conformity with the protecti on
requirements of EC Council directives 89/336/EEC,
73/23/EEC, and 1999/5/EC on the approximation
and harmonization of the laws of the Member
States relating to electromagnetic compatibility and
safety of electrical equipment designed for use
within certain voltage limits and on radio equipment
and telecommunications terminal equipment.
A declaration of conformity with the requirements
of the directives has been signed by the Director of
Manufacturing and Technical Support, Lexmark
International, S.A., Boigny, France.
This product satisfies the Class A limits of EN
55022 and safety requirements of EN 60950.
Notices
65
Page 74

Radio interference notice
Warning: This is a Class A product. In a domestic
environment, this product may cause radio
interference, in which case, the user may be
required to take adequate measures.
Telecommunications notices
FCC rules Part 68
This equipment complies with Part 68 of the FCC
rules and the requirements adopted by the
Administrative Council for Terminal Attachments
(ACT A). On the back of this equipment is a label that
contains, among other information, a product
identifier in the format US:AAAEQ##TXXXX. If
requested, this number must be provided to the
Telephone Company.
This equipment uses the RJ-11C Universal Service
Order Code (USOC) jack.
A plug and jack used to connect this equipment to
the premises’ wiring and telephone network must
comply with the applicable FCC Part 68 rules and
requirements adopted by the ACTA. A compliant
telephone cord and modular plug is provided with
this product. It is designed to be connected to a
compatible modular jack that is also compliant. See
“Attaching a network cable” on page 37 for more
information.
The Ringer Equivalence Number (REN) is used to
determine the number of devices that may be
connected to a telephone line. Excessive RENs on
a telephone line may result in the devices not
ringing in response to an incoming call. In most but
not all areas, the sum of RENs should not exceed
five (5.0). To be certain of the number of devices
that may be connected to a line, as determined by
the total RENs, contact your local telephone
company. For products approved after July 23,
2001, the REN for this product is part of the
product identifier that has the format
US:AAAEQ##TXXXX. The digits represented by
## are the REN without a decimal point (for
example, 03 is a REN of 0.3). For earlier products,
the REN is shown separately on the label.
If this equipment causes harm to the telephone
network, the Telephone Company will notify you in
advance that temporary discontinuance of service
may be required. But if advance notice isn't
practical, the Telephone Company will notify the
customer as soon as possible. Also, you will be
advised of your right to file a complaint with the
FCC if you believe it is necessary.
Telephone companies report that electrical surges,
typically lightning transients, are very destructive to
customer terminal equipment connected to AC
power sources. This has been identified as a major
nationwide problem. It is recommended that the
customer install an appropriate AC surge arrestor in
the AC outlet to which this device is connected. This
is to avoid damage to the equipment caused by
local lightning strikes and other electrical surges.
The telephone company may make changes in its
facilities, equipment, operations or procedures that
could affect the operation of this equipment. If this
happens, the telephone company will provide
advance notice in order for you to make necessary
modifications to maintain uninter rupted serv ic e.
If trouble is experienced with this equipment, for
repair or warranty information, launch the MFP CD,
and then clic k Contact Le xmark for a complete list
of phone numbers and Web sites. If the equipment
is causing harm to the telephone network, the
telephone company may request that you
disconnect the equipment until the problem is
resolved.
This equipment contains no user serviceable parts.
For repair and warranty information, launch the
MFP CD, and then click Contact Lexmark for a
complete list of phone numbers and Web sites.
Connection to party line service is subject to state
tariffs. Contact the state public utility commission,
Notices
66
Page 75

public service commission, or corporation
commission for information.
If your building has specially wired alarm
equipment connected to the telephone line, ensure
the installation of this equipment does not disable
your alarm equipment. If you have questions about
what will disable alarm equipment, consult your
telephone company or a qualified installer.
The Telephone Consumer Protection Act of 1991
makes it unlawful for any person to use a computer
or other electronic device, including fax machines,
to send any message unless said message clearly
contains in a margin at the top or bottom of each
transmitted page or on the first page of the
transmission, the date and time it is sent and an
identification of the business or other entity, or
other individual sending the message, and the
telephone number of the sending machine or such
business, other entity, or individual. (The telephone
number provided may not be a 900 number or any
other num ber for which charges exceed local or
long-distance transmission charges.)
See the Fax Setup section on the publications CD
in order to program this information into your fax
machine.
Notice to users of the Canadian telephone
network
power sources. This has been identified as a major
nationwide problem. It is recommended that the
customer install an appropriate AC surge arrestor in
the AC outlet to which this device is connected. This
is to avoid damage to the equipment caused by
local lightning strikes and other electrical surges.
This equipment uses CA11A telephone jacks.
Using this equipment in Germany
This equipment requires a German billing tone filter
Lexmark part number 14B5123 to be installed on
any line which receives metering pulses in
Germany. Metering pulse s may or may not be
present on analog lines in Germany. The
subscriber may request that metering pulses be
placed on the line, or can have them removed by
calling the German network provider. Normally,
metering pulses are not provided unless
specifically requested by the subscriber at the time
of installation.
Using this equipment in Switzerland
This equipment requires a Swiss billing tone filter
Lexmark part number 14B5109 to be installed on
any line which receives metering pulses in
Switzerland. The Lexmark filter must be used, as
metering pulses are present on all analog
telephone lines in Switzerland.
This product meets the applicable Industry Canada
technical specifi ca tio ns.
The Ringer Equivalence Number (REN) is an
indication of the maximum number of terminals
allowed to be connected to a telephone interface.
The terminus of an interface may consist of any
combination of devices, subject only to the
requirement that the sum of the RENs of all the
devices does not exceed five. The modem REN is
located on the rear of the equipment on the product
labeling.
Telephone companies report that electrical surges,
typically lightning transients, are very destructive to
customer terminal equipment connected to AC
Notices
67
Page 76

Notices
68
Page 77

Index
Numerics
802.11 wireless options 37
A
ADF
loading 34
adjusting
tray paper guides 28
attaching
Automatic Document Feeder (ADF) 11
cables 35
control panel overlay 20
Automatic Document Feeder (ADF)
attaching 11
C
cables
attaching 35
USB 36
CD
drivers 64
changing
paper size 26
paper type 26
configuring
e-mail server 59
control panel overlay
attaching 20
copy settings 55
D
direct printing
Windows 48, 49
drivers CD 64
E
e-mail attachment 60
e-mail server
configuring 59
envelopes
loading 33
Ethernet 37
F
fax
configuring 57
sending 58
settings 57
station name 57
time and date 58
flash memory
installing 15
flash memory card 15
font card 15
installing 15
I
installing
flash memory card 15
font card 15
local drivers 1
local UNIX/Linux drivers 4
local Windows drivers 2
MFP memory 15
MFP memory card 15
network Macintosh drivers 51
network UNIX/Linux drivers 53
network Windows drivers 47
optional drawer 10
print cartridge 21
Index
69
Page 78

IP address
setting 41
verifying 42
items
MFP 7
L
Linux 4
loading
ADF 34
envelopes 33
media 25
scanner automatic document feeder 34
trays 27
local drivers
installing 1
M
media
loading 25
memory
installing 15
memory cards
installing 15
menu settings page 43
printing 43
MFP
items 7
placement 6
turning on 39
unpack 7
MFP memory card
installing 15
N
installing 53
network Windows drivers
installing 47
O
optional drawer
installing 10
P
paper size 26
changing 26
paper size support 25
paper type 26
changing 26
paper type support 25
placement
MFP 6
print cartridge
installing 21
preparing 22
printing
network settings page 44
printing configurat ion
direct 48
shared 48
R
reattaching
side door 17
system board access shield 17
removing
system board access shield 14
resident Web page
using 42
NetWare 54
network Macintosh drivers
installing 51
network settings page
printing 44
network setup page 44
network UNIX/Linux drivers
S
Safety information ii
scanner
unlocking 12
scanner automatic document feeder
loading 34
Index
70
Page 79

sending
fax 58
shared printing
Windows 49
side door
opening 13
reattaching 17
system board access shield
reattaching 17
removing 14
T
TCP/IP 41
tray paper guides
adjusting 28
trays
loading 27
turning on
MFP 39
U
UNIX 4
UNIX/Linux
installing local drivers 4
unlocking
scanner 12
unpacking
MFP 7
USB 36
using
resident Web page 42
W
Web Link 60
Windows 3
installing local drivers 2
Index
71
Page 80

Index
72
Page 81

Page 82

Lexmark and Lexmark with diamond design are trademarks of Lexmark International, Inc.,
registered in the United States and/or other countries.
© 2004 Lexmark International, Inc.
740 West New Circle Road
Lexington, Kentucky 40550
www.lexmark.com
 Loading...