

Page 1
Lexmark™ X342
Quick Reference
Loading paper and
specialty media
Loading paper in the paper tray
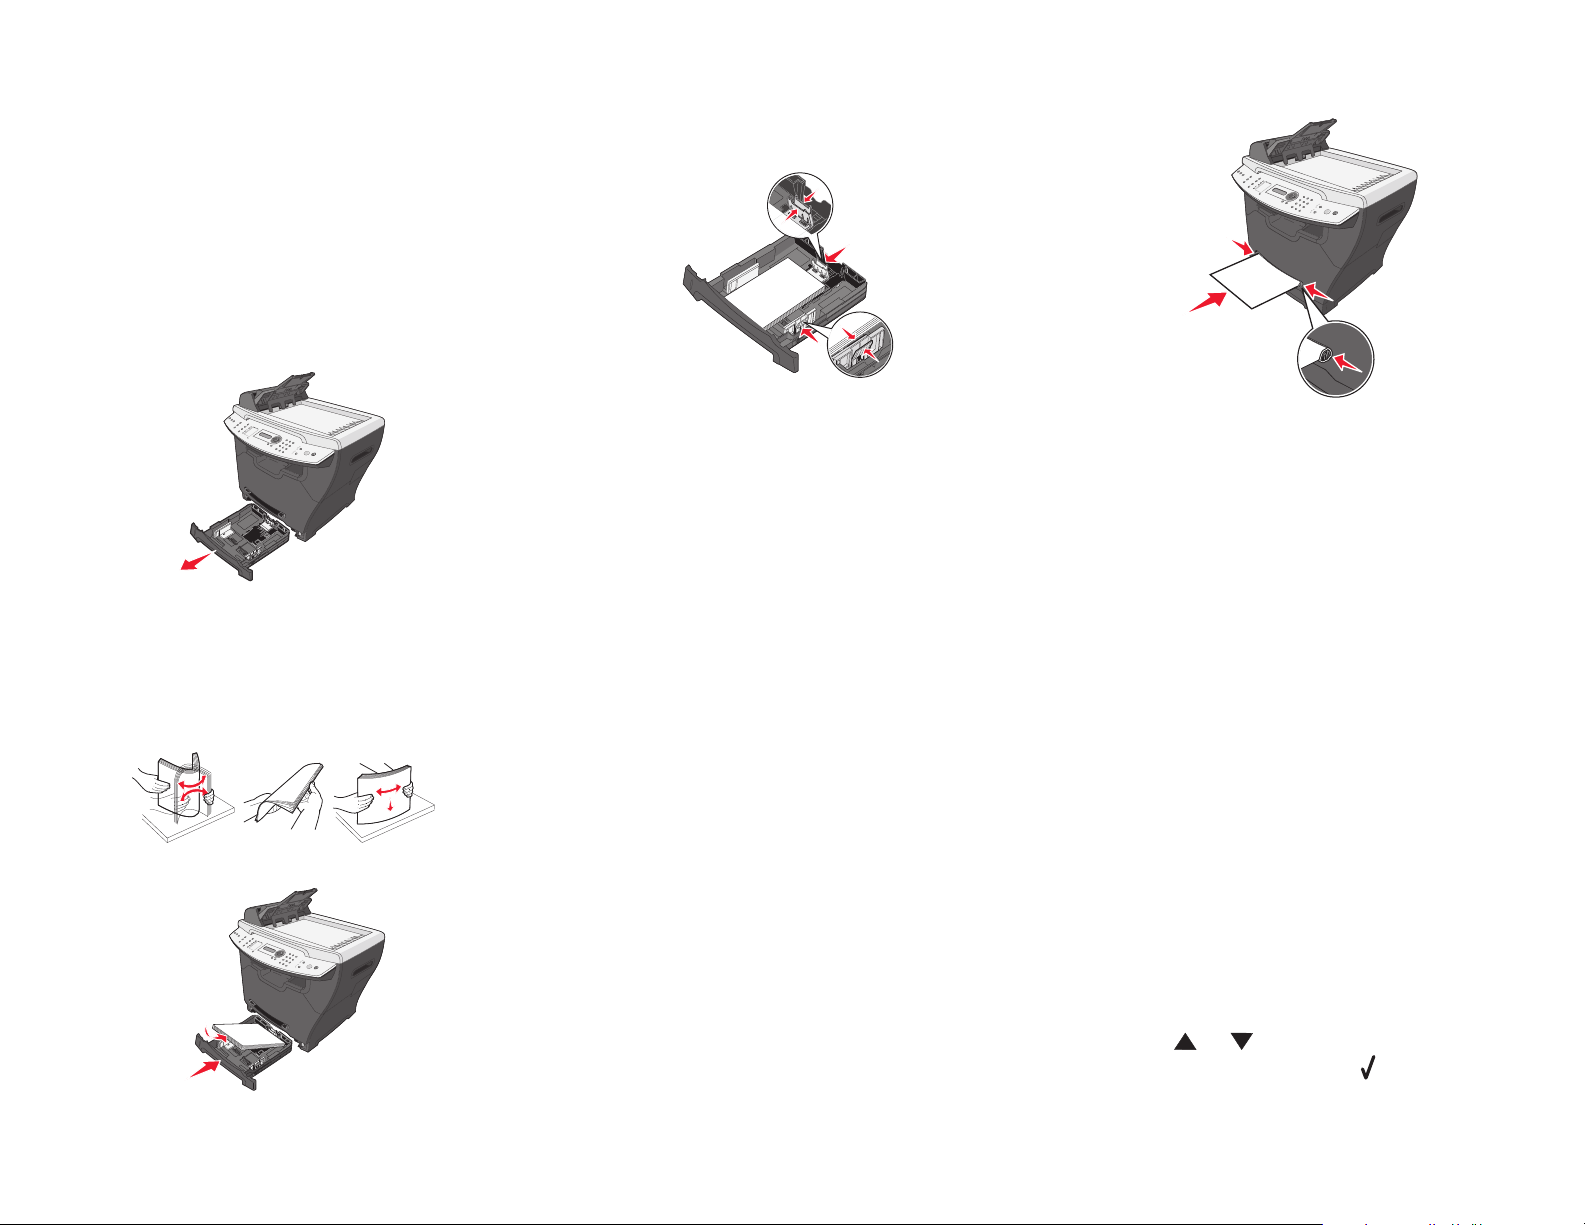
1 Remove the paper tray.
5 Make sure the paper is below the maximum fill
lines on the left inside wall of the tray.
6 Squeeze and adjust the paper guides until they
lightly touch the side of the stack of paper.
7 Close the paper tray.
The MFP automatically engages the print
media.
2 Holding the tray on a stable surface, press the
guide lock, and slide the rear guide until it locks
at the paper length you want.
3 Prepare a stack of paper for loading by flexing
or fanning it back and forth. Straighten the
edges on a level surface.
4 Load the paper with the print side facing down.
Loading paper in the manual
feeder
1 Make sure:
• You use paper designed for laser printers.
• The paper is not used or damaged.
• If you are using specialty paper, you follow the
instructions that came with it.
• You do not force paper into the MFP.
• Set the correct paper type and size in the
control panel, or using the computer.
2 Place a single sheet of paper face-up with the
leading edge first into the center of the manual
feeder, and adjust the paper guides to the paper
width.
Copying
Making a copy
1 Load the original document face-up into the
ADF or face-down on the scanner glass.
2 From the control panel, press Copy.
3 Enter the number of copies you want to print.
4 Press Start.
Copying multiple pages onto a
single sheet (Paper Saver)
The Paper Saver feature lets you copy consecutive
pages of a multiple-page document on a single sheet
of paper.
1 Load paper.
2 Load the original document face-up into the
ADF or face-down on the scanner glass.
3 From the control panel, make sure Copy mode
is selected.
4 Under Copy, press Options.
5 Press or repeatedly until Paper Saver
is selected, and then press .
Page 2

6 Press or repeatedly until the setting you
1
2
1
2
want to use is selected.
Printing
b Remove the toner cartridge using the
handle.
Note:
2-Up—Prints two copied documents on a
•
page.
• 4-Up—Prints four copied documents on a
page.
• Off—Prints one copied document on a
page.
7 Press .
8 Press Start.
9 If prompted, press 1 (for yes) if you have more
pages, or 2 (for no) if you have finished copying
the number of pages you want to print in Paper
Saver mode.
Faxing
Sending a fax
1 Make sure the MFP is on.
2 Load an original document face-up into the ADF
or face-down on the scanner glass.
Note: Do not load postcards, 4 x 6 cards,
small items, or thin media (such as
magazine clippings) into the ADF.
Place these items on the scanner
glass.
Printing a document
1 Load paper.
2 With a document open, click File Print.
3 Click Properties, Options, Setup, or
Preferences.
4 Adjust the settings.
5 Click OK.
6 Click OK or Print.
Canceling a job from the printer
control panel
If the job is formatting or already printing, press
Stop.
Maintaining the printer
Replacing the toner cartridge
1 Press the access button on the left side of the
MFP, and open the front cover.
3 Remove the toner cartridge from the packaging,
and gently shake four or five times to distribute
the toner.
4 Gently slide the toner cartridge in until it locks
into place.
5 Close the front cover.
3 From the control panel, press Fax.
4 Enter a fax number, press Speed Dial 1, 2, 3, 4,
or 5, or press Phone Book to select a number.
5 Press Start.
6 If prompted, press 1 (for yes) if you have more
pages, or 2 (for no) if you have finished
scanning the entire document.
2 To remove the toner cartridge:
a Press the button on the print cartridge
assembly.
Page 3

Replacing the photoconductor
1
2
1 Press the access button on the left side of the
MFP, and open the front cover.
2 Pull on the handle to remove the print cartridge
assembly.
Note: The toner cartridge snaps into place
when correctly installed.
7 Reinstall the print cartridge assembly.
8 Press and hold Stop for three seconds to reset
photoconductor recount.
9 Close the front cover.
Cleaning the scanner glass
1 Slightly dampen a soft, lint–free cloth or paper
towel with water.
2 Open the top cover.
Cleaning the inside of the MFP
CAUTION: The fuser area is hot. Avoid contact
with the fuser area to prevent burns.
Warning: While cleaning the inside of the
MFP, be careful not to touch the
transfer roller located under the
toner cartridge. Oil from your fingers
can affect print quality.
1 Turn the MFP off, unplug the power cord, and
then wait for the MFP to cool down.
2 Open the front cover, and pull on the handle to
remove the print cartridge assembly.
3 Place the print cartridge assembly on a flat,
clean surface.
4 To remove the toner cartridge:
a Press the button on the print cartridge
assembly.
b Remove the toner cartridge using the
handle.
5 Unpack the photoconductor kit.
6 Install the toner cartridge into the new
photoconductor.
3 Wipe the surfaces of the scanner glass and
ADF until they are clean and dry.
4 Wipe the underside of the white top cover and
white sheet until it is clean and dry.
5 Close the top cover.
Cleaning the outside of the MFP
Wipe the outside surface of the MFP with a soft,
clean, lint–free cloth. If you dampen the cloth slightly
with water, be careful not to let any water drip onto or
inside the MFP.
Warning: Do not touch the green
photoconductor drum.
3 Place the print cartridge assembly on a clean,
dry surface.
4 With a dry, lint–free cloth, wipe away any dust
and spilled toner from the print cartridge area.
5 Reinsert the print cartridge assembly, and close
the front cover.
6 Plug in the power cord and turn the MFP on.
 Loading...