

Page 1

3100 Series
All-In-One
User’s Guide
• Learning about the All-In-One
• Understanding the software
• Working with digital photos
• Printing, Scanning, Copying and Faxing
• Maintenance
• Troubleshooting
www.lexmark.com
Page 2

Edition: July 2003
The following paragraph does not apply to any country where such provisions are inconsistent
with local law: LEXMARK INTERNATIONAL, INC., PROVIDES THIS PUBLICATION “AS IS” WITHOUT
WARRANTY OF ANY KIND , EITHER EXPRESS OR IMPLIED , INCLUDING, BUT NO T LIMITED TO , THE
IMPLIED WARRANTIES OF MERCHANTABILITY OR FITNESS FOR A PAR TICULAR PURPOSE. Some
states do not allow disclaimer of express or implied warranties in certain transactions; therefore, this
statement may not apply to you.
This publication could include technical inaccuracies or typographical errors. Changes are periodically
made to the information herein; these changes will be incorporated in later editions. Improvements or
changes in the products or the programs described may be made at any time.
Comments about this publication may be addressed to Lexmark International, Inc., Department F95/032-2,
740 West New Circle Road, Lexington, Kentucky 40550, U.S.A. In the United Kingdom and Eire, send to
Lexmark International Ltd., Marketing and Services Department, Westhorpe House, Westhorpe, Marlow
Bucks SL7 3RQ. Lexmark may use or distribute any of the information you supply in any way it believes
appropriate without incurring any obligation to you. You can purchase additional copies of publications
related to this product by calling 1-800-553-9727. In the United Kingdom and Eire, call +44 (0)8704 440
044. In other countries, contact your point of purchase.
References in this publication to products, programs, or services do not imply that the manufacturer intends
to make these available in all countries in which it operates. Any ref erence to a product, program, or service
is not intended to state or imply that only that product, program, or service may be used. Any functionally
equivalent product, program, or service that does not infringe any existing intellectual property right may
be used instead. Evaluation and verification of operation in conjunction with other products, programs, or
services, except those expressly designated by the manufacturer, are the user’s responsibility.
Lexmark and Lexmark with diamond design are trademarks of Lexmark International, Inc., registered in the
United States and/or other countries.
Other trademarks are the property of their respective owners.
© 2003 Lexmark International, Inc.
All rights reserved.
UNITED STATES GOVERNMENT RIGHTS
This software and any accompanying documentation provided under this agreement are commercial
computer software and documentation developed exclusively at private expense.
Safety information
Use only the power supply provided with this product or the manufacturer’s authorized replacement pow er
supply.
Connect the power cord to an electrical outlet that is near the product and easily accessible.
Refer service or repairs, other than those described in the user documentation, to a professional service
person.
Do not use the fax feature during a lightning storm. Do not set up this product or make any electrical or
cabling connections, such as the power supply cord or telephone, during a lightning storm.
Copyright advisory
It may be illegal to copy certain materials without permission or license, including documents, images, and
currency. If you are not sure whether you have permission, seek legal advice.
ii
Page 3

Contents
Getting started ...................................................................1
Finding information ............ ... ... ... .... ... ....................................... ... . 2
Creating your first project .............................................................. 3
Learning about the All-In-One ..........................................5
Setting up the All-In-One ............................................................... 5
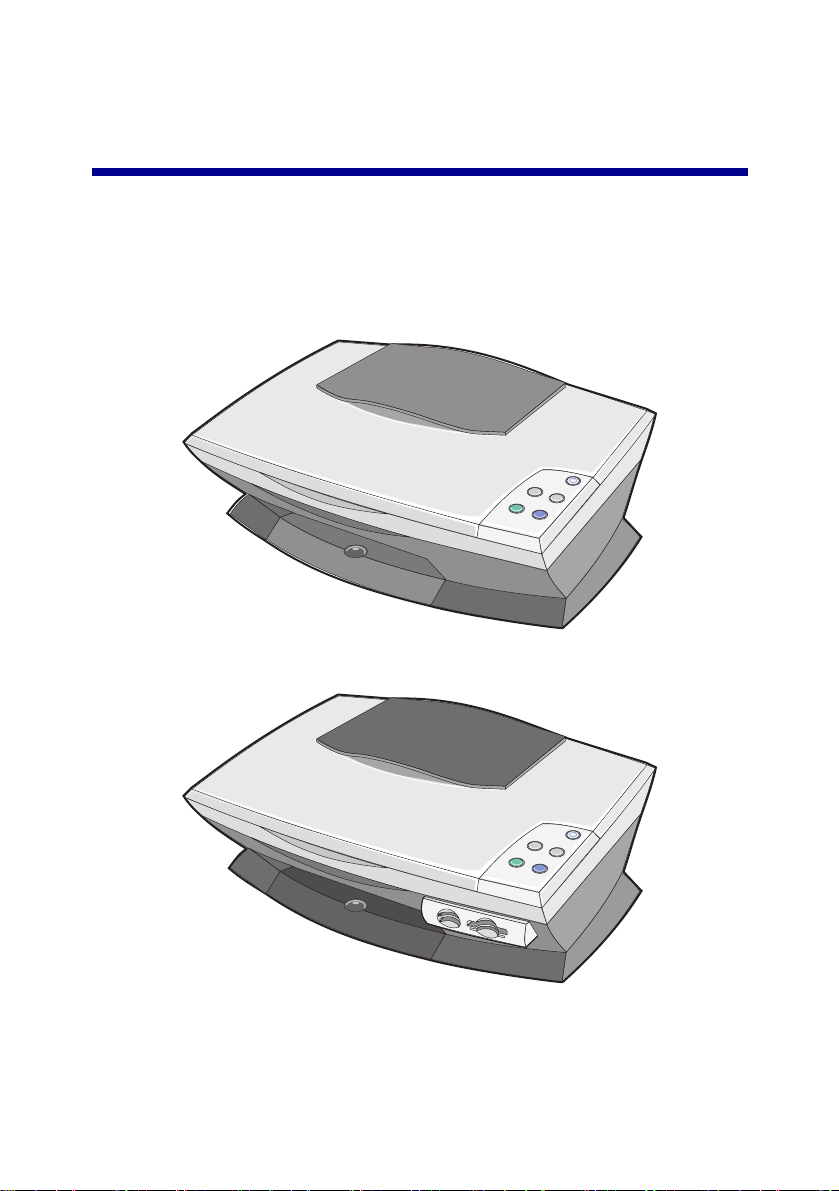
Understanding the parts of the All-In-One .................................... 5
Using the control panel ................................................................. 7
Loading paper ............................................................................... 8
Loading your document on the scanner glass ............................ 11
Inserting the digital camera memory card ................................... 11
Understanding the software ...........................................13
Using the Lexmark All-In-One Center .........................................13
Using Print Properties .................................................................17
Using the Lexmark Solution Center ............................................19
Using the Lexmark Photo Editor .................................................21
Accessing the Memory Card Manager ........................................ 22
Working with digital photos ............................................23
Using the Lexmark Memory Card Manager ................................23
Finding your photos .............. ... ... .... ... ....................................... .. 24
Printing digital photos .................................................................. 26
Printing borderless photos .......................................................... 27
Cropping photos ..........................................................................28
iii
Page 4

Editing photos ............................................................................. 29
Sharing photos ............... .... ... ... ....................................... ............29
Adding text captions under your photos ...................................... 30
Printing, Scanning, Copying and Faxing .......................31
Printing ........................... .......................................... ...................3 1
Scanning ........................ ............................................................. 34
Copying .......................... .......................................... ...................35
Faxing ......................................................................................... 36
Creating fun projects ................................................................... 37
Maintenance ..................................................................... 38
Replacing print cartridges ...........................................................38
Aligning the print cartridges ........................................................ 40
Cleaning the print cartridge nozzles ................................ ... ... ......41
Wiping the print cartridge nozzles and contacts ......................... 41
Preserving the print cartridges ........ ... ... ... .... ............................... 43
Ordering supplies ........................................................................ 43
Recycling Lexmark products ....................................................... 43
Troubleshooting ...............................................................44
Troubleshooting checklist ...........................................................44
Setup troubleshooting ..................... ... ... ... ................................... 46
Printing troubleshooting .............................................................. 48
Scanning, copying, and faxing troubleshooting .......................... 50
Photo card is not recognized by the card reader ...................... .. 52
Error messages ........ ... ....................................... ... ...................... 52
Removing and reinstalling the software ......................................53
Other help sources ...................................................................... 55
iv
Page 5
Getting started
Use this guide for the Lexmark 3100 Series.
1
Page 6
Finding information
Congratulations on the purcha se of t he Lexmark™ 3100 Series All-In-One.
Refer to When you need help with
Setup poster This document contains complete setup information.
Drivers and Utilities CDThe Drivers and Utilities CD contains drivers f or your AIO
User’s Guide This document contains information about:
Lexmark Web site • Upgrades — Software upgrade information
printer, the Lexmark All-In-One Center, the Lexmark
Solution Center, the Lexmark Photo Editor, the Lexmark
Memory Card Manager, fax software, and Optical
Character Recognition software.
• Printing digital photos
• Basic usage
• Scanning, printing, copying, and faxing
• Creative projects
• Print cartridge ordering information
• Setup troubleshooting
• General troubleshooting
• Customer Care — Contact information, order status,
warranty, and repair information
• Downloads — Drivers
• Reference — Printer documentation and product
specifications
You can access the Lexmark Web site at
http://support.lexmark.com/.
2
Page 7
Creating your first project
You can print photos from your digital camera memory card after saving
them to your computer.
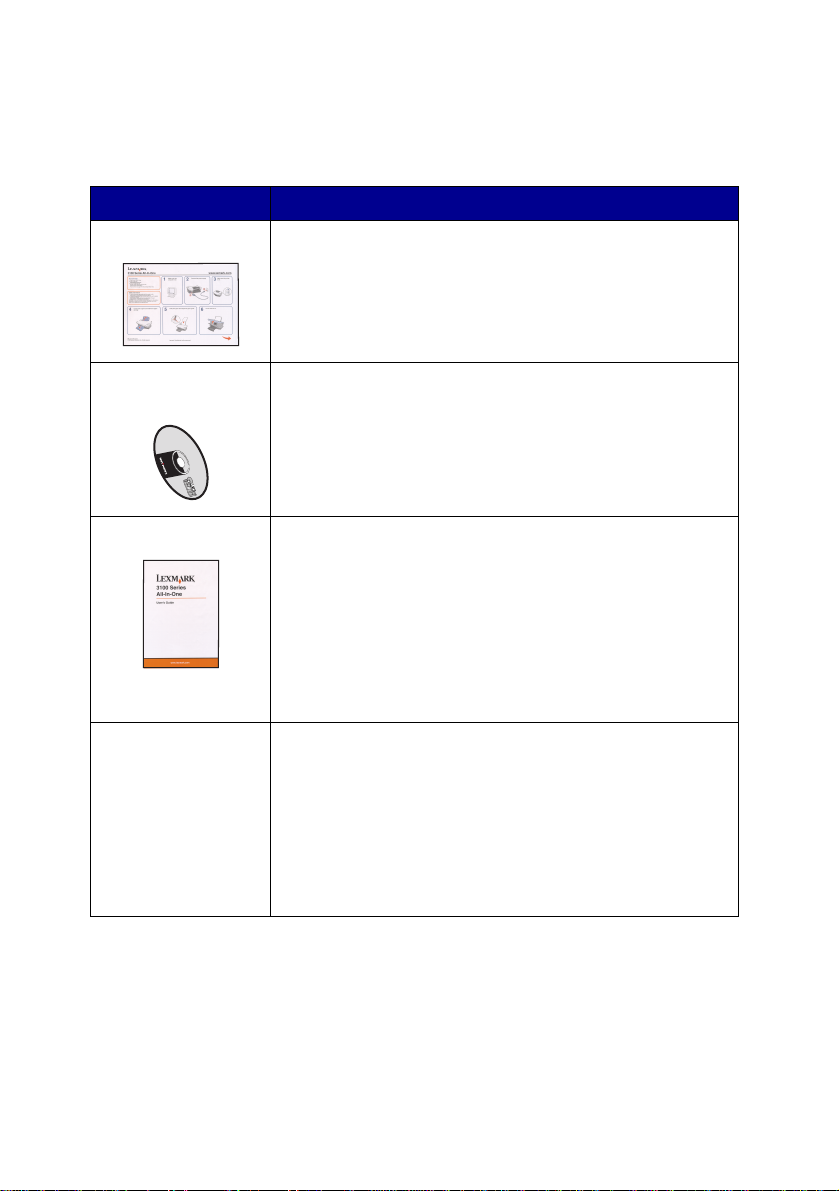
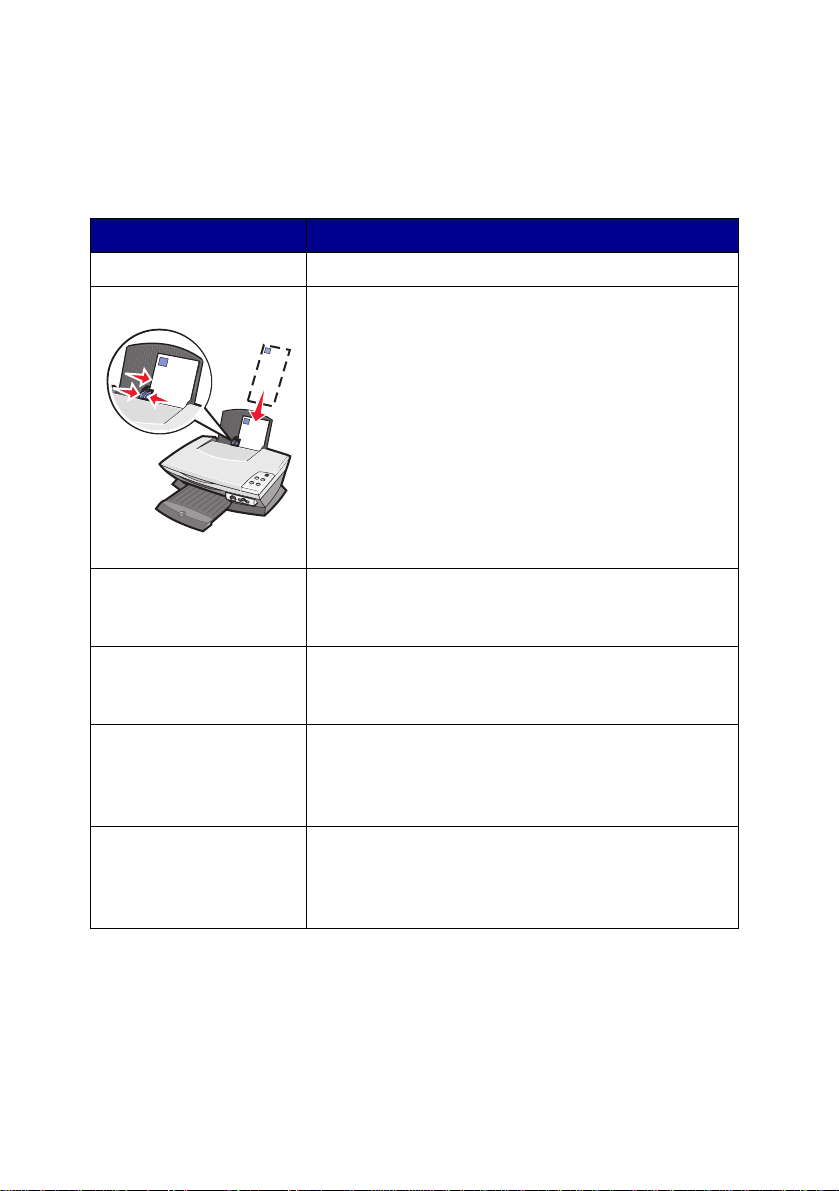
1 Load paper. For additional help, see page 8.
Letter/A4 Cards
or
2 Adjust the paper guide.
or
3 Insert your digital camera memory card into the All-In-One (see
page 11) or access your photos from a computer (see pag e 24) and
then continue with step 6.
4 Select Auto maticall y save all the ima ges in a My Pictu res f older
with today’s date on the computer screen.
3
Page 8
5 Click OK.
The All-In-One Saved Images page appears.
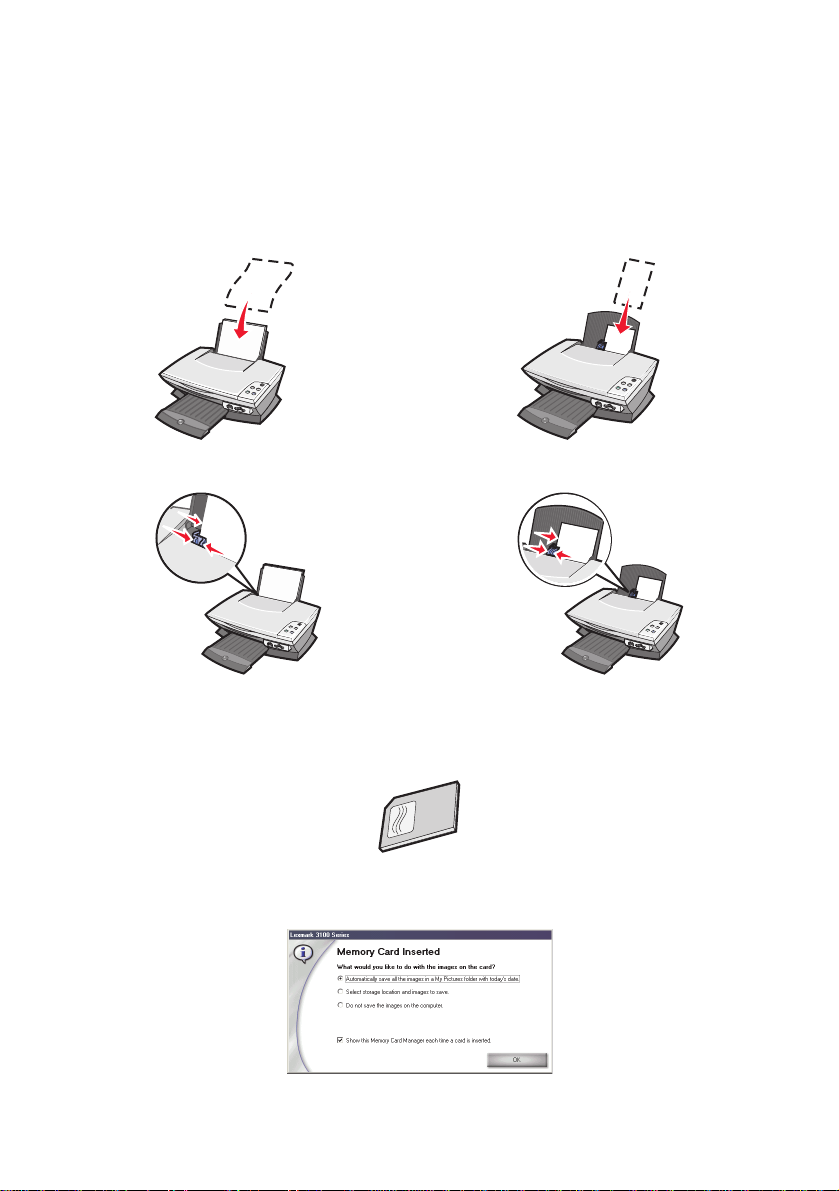
6 Select a paper size from the Create a page from saved photos
section to populate the page layouts.
7 Select a page layout from the Create a page from saved photos
section.
8 Drag the images you want to print.
9 Click Print Now.
Congratulations! You have successfully completed your first project using
the Lexmark 3100 Series All-In-One. For more projects, see scanning,
copying, printing, and faxing information on page 31. For help working with
digital photos, see page 23.
4
Page 9
Learning about the All-In-One
Setting up the All-In-One
If you have not already done so, follow the steps on the setup
documentation to complete the hardware and software installation. If
problems occur during the setup process, see “S etup troubleshooting” on
page 46.
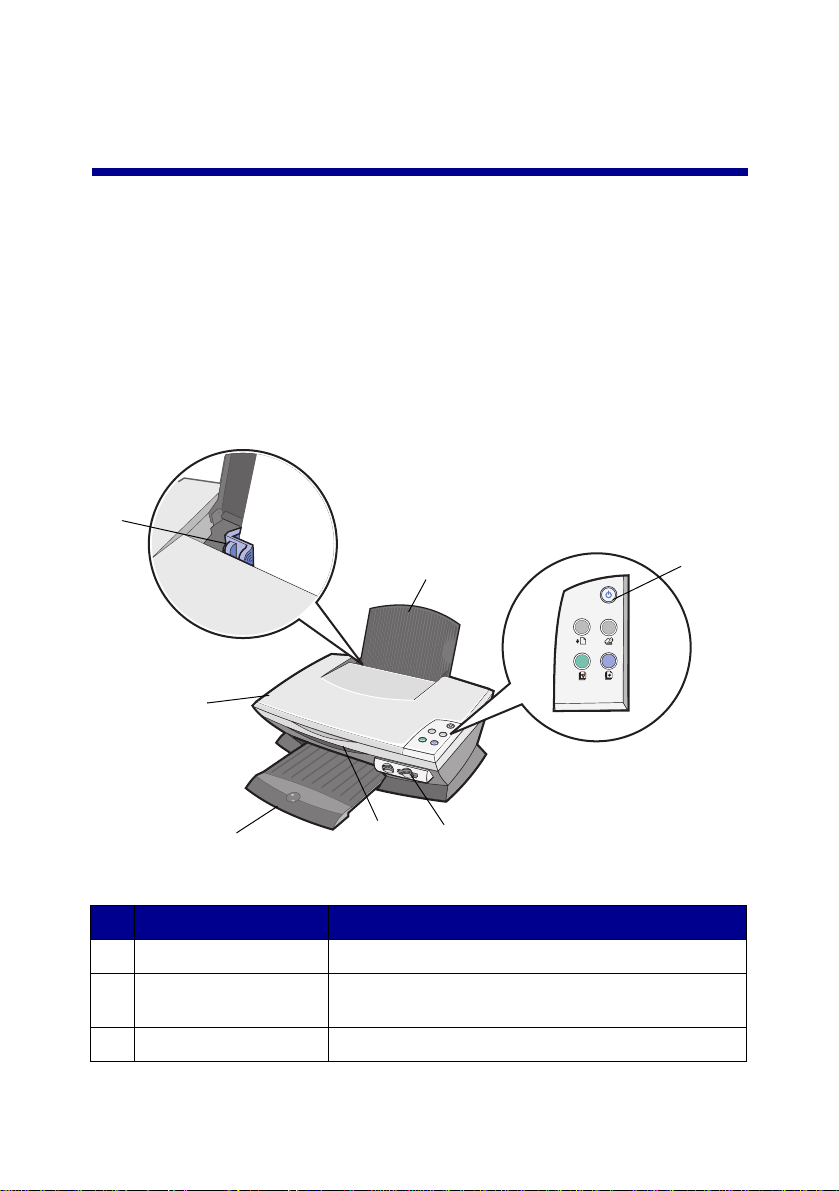
Understanding the parts of the All-In-One
7
1
6
5
# Use the To
1 Paper support Load paper into the All-In-One (AIO).
2 Control panel Operate the AIO (see page 7 for details about
3 Memory card slots Insert digital camera memory cards.
4
each of the buttons).
3 (availabl e on some models)
5
2
Page 10
# Use the To
4 Scanner unit Access the print cartridges.
5 Paper exit tray Hold paper as it exits the AIO.
The AIO paper exit tray can hold:
• 25 sheets of plain paper
• 10 sheets of labels
• 10 envelopes
• 10 cards
• 1 transparency
• 1 photo page
Note: To avoid smearing ink, remove each
transparency or photo from the paper exit tray
before the next one exits the AIO. Photos and
transparencies may require up to 15 minutes to
dry.
6 Top cover Hold the item on the scanner glass for scanning.
7 Paper guide Squeeze and slide to the left edge of the paper for
proper paper feeding.
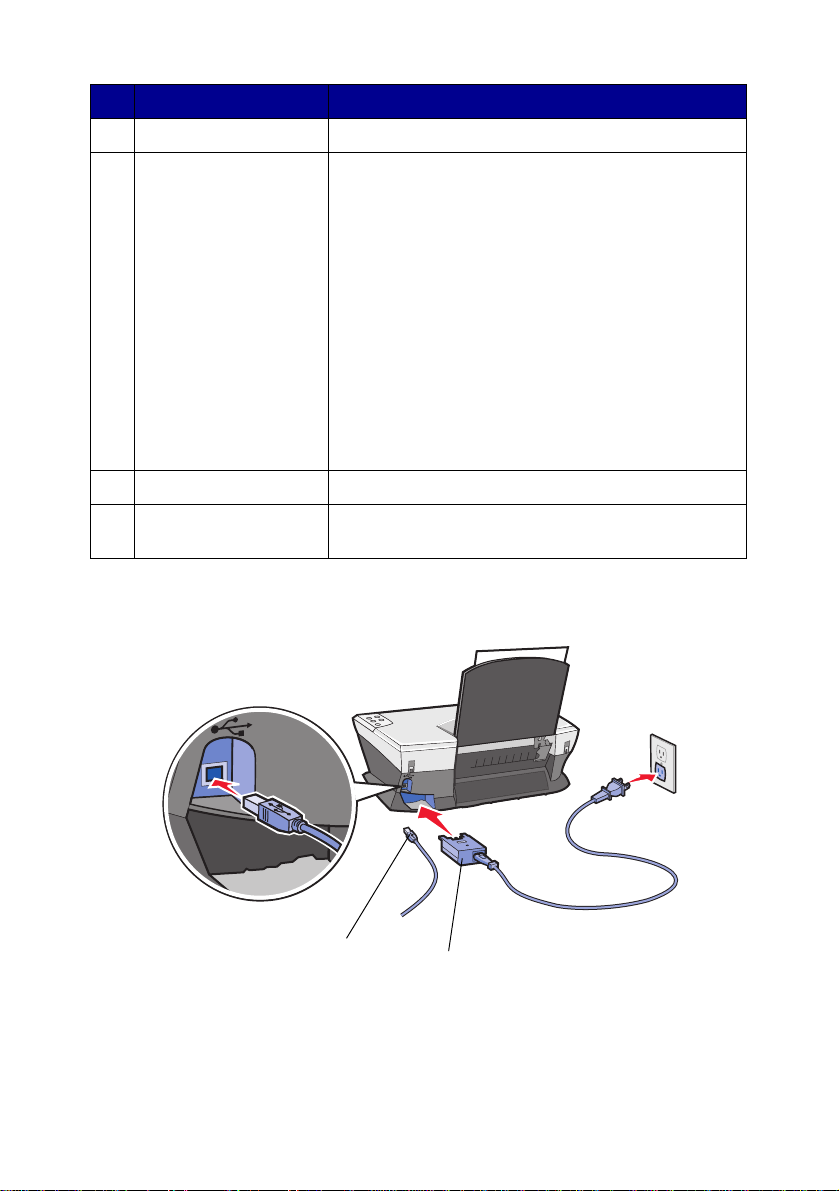
USB cable
1
Power supply
Silver, metal contacts are on the
top of the power supply.
6
2
Page 11
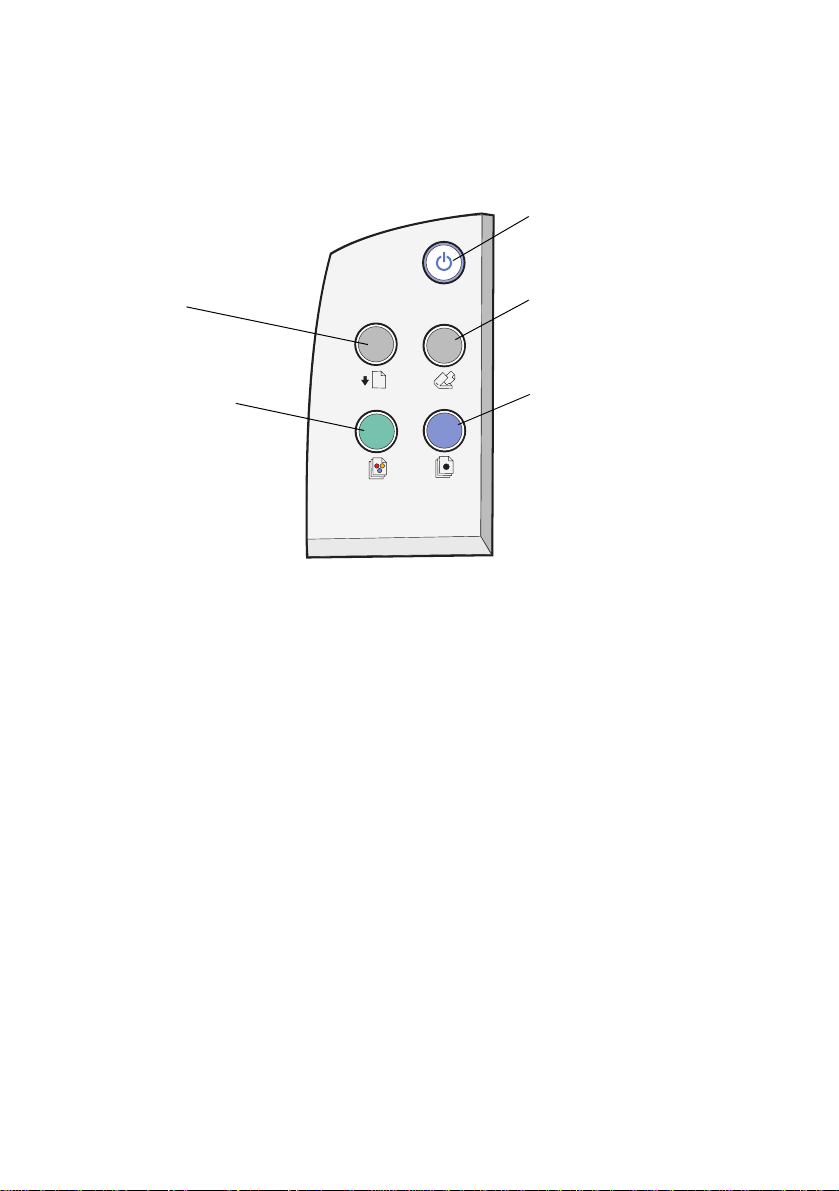
Using the control panel
The AIO has a control panel that lets you sca n and cop y with the pr ess of a
button.
Power
Press to turn on and off.
Paper Feed
Press to feed paper.
Photo/Color Copy
Press to make a color or
photo copy.
Note: Both the com pu te r and th e AIO must be turned on to
make copies.
Scan
Press to start the scanning
process and open the
All-In-One Center.
Black Copy
Press to make a black and
white copy.
7
Page 12
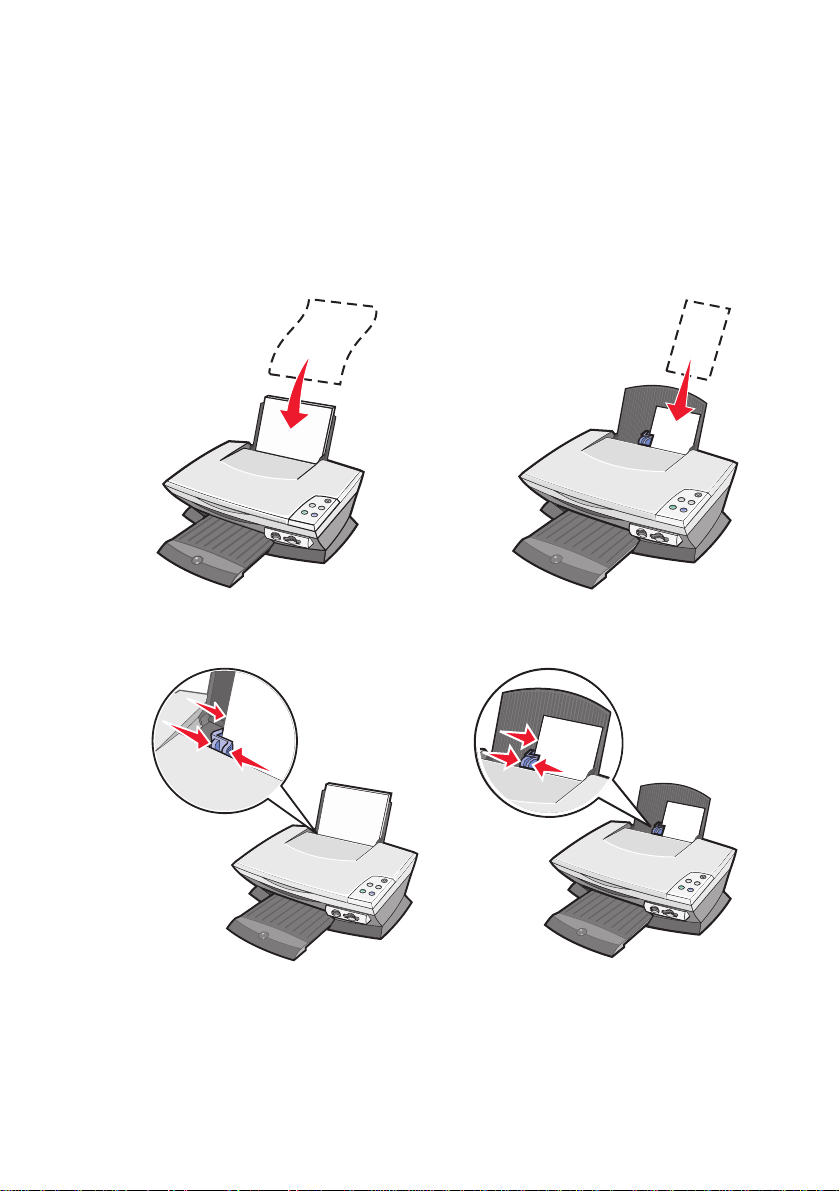
Loading paper
To load most types of paper:
1 Place the paper against the right side of the paper support with the
print side facing you and the t op of the paper feeding into the paper
support.
Letter/A4 Cards
or
2 Squeeze and slide the paper guide to the left edge of the paper.
or
Note: Do not force paper into the AIO.
8
Page 13
Before you begin printing, scanning, copying, or faxing documents, see
page 6 to determine how much the paper exit tray can hold.
Follow these guidelines when loading plain and specialty paper in the
paper support.
Load up to Make sure
100 sheets of plain paper The paper is designed for use with inkjet printers.
10 envelopes • The envelopes are loaded vertically against the
right side of the paper support.
• The stamp location is in the upper left corner.
• The envelopes are designed for use with inkjet
printers.
• You squeeze and slide the paper guide to the left
edge of the envelope.
Note: Do not load envelopes with:
• Holes, perforations, cutouts, or deep
embossing.
• Metal clasps, string ties, or metal folding bars.
• Exposed flap adhesive.
25 sheets of card stock • The card stock is designed for use with inkjet
printers.
• The thickness does not exceed 0.025 inches.
10 greeting cards, index
cards, postcards, or
photo cards
100 sheets of coated
paper
50 sheets of photo, or
glossy paper
• The cards are loaded vertically against the right
side of the paper support.
• Adjust the paper guide (see page 8).
The coated side faces you.
Note: Since photos require more drying time, we
recommend that you remove each photo as it exits
and allow it to dry to avoid ink smearing.
The glossy or coated side faces you.
Note: Since photos require more drying time, we
recommend that you remove each photo as it exits
and allow it to dry to avoid ink smearing.
Note: Make sure you select the appropriate paper size f or your
document.
9
Page 14
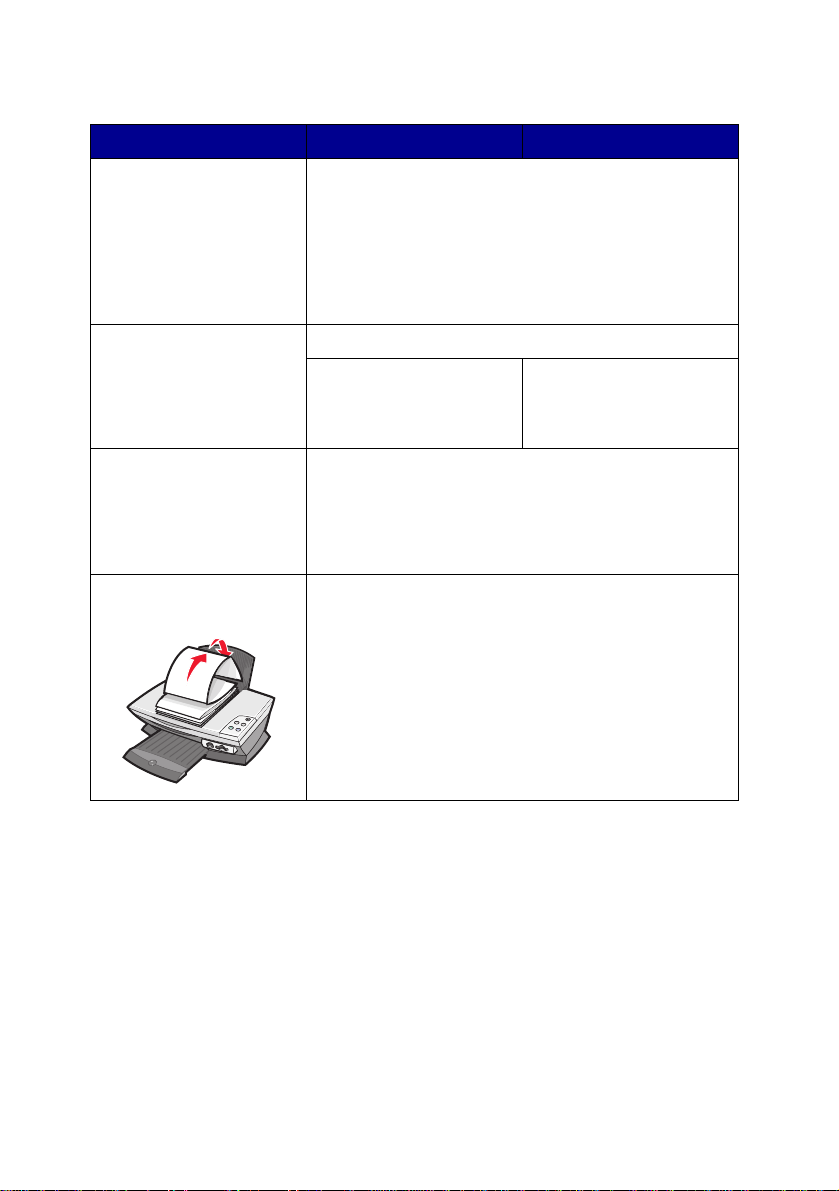
Load up to Make sure
50 transparencies • The rough side faces you.
• The transparencies are designed for use with
inkjet printers.
Note: Since transparencies require more drying
time, we recommend that you remove each
transparency as it ex it s an d al l ow it to dry to avoid
ink smearing.
100 sheets of custom
size paper
100 iron-on transfers • You follow the loading instructions on the iron-on
20 sheets of banner
paper
Your paper size fits within these dimensions.
Width
76 to 216 mm
3.0 to 8.5 in.
packaging.
• The blank side faces you.
Note: For best results, remove each iron-on transf er
as it exits.
• The banner paper is designed for use with inkjet
printers.
• You place the stack of banner paper on the top
cover, and feed in the first sheet, as shown.
• Select Letter Banner or A4 Banner in Print
Properties (see page 17).
Length
127 to 432 mm
5.0 to 17.0 in.
10
Page 15
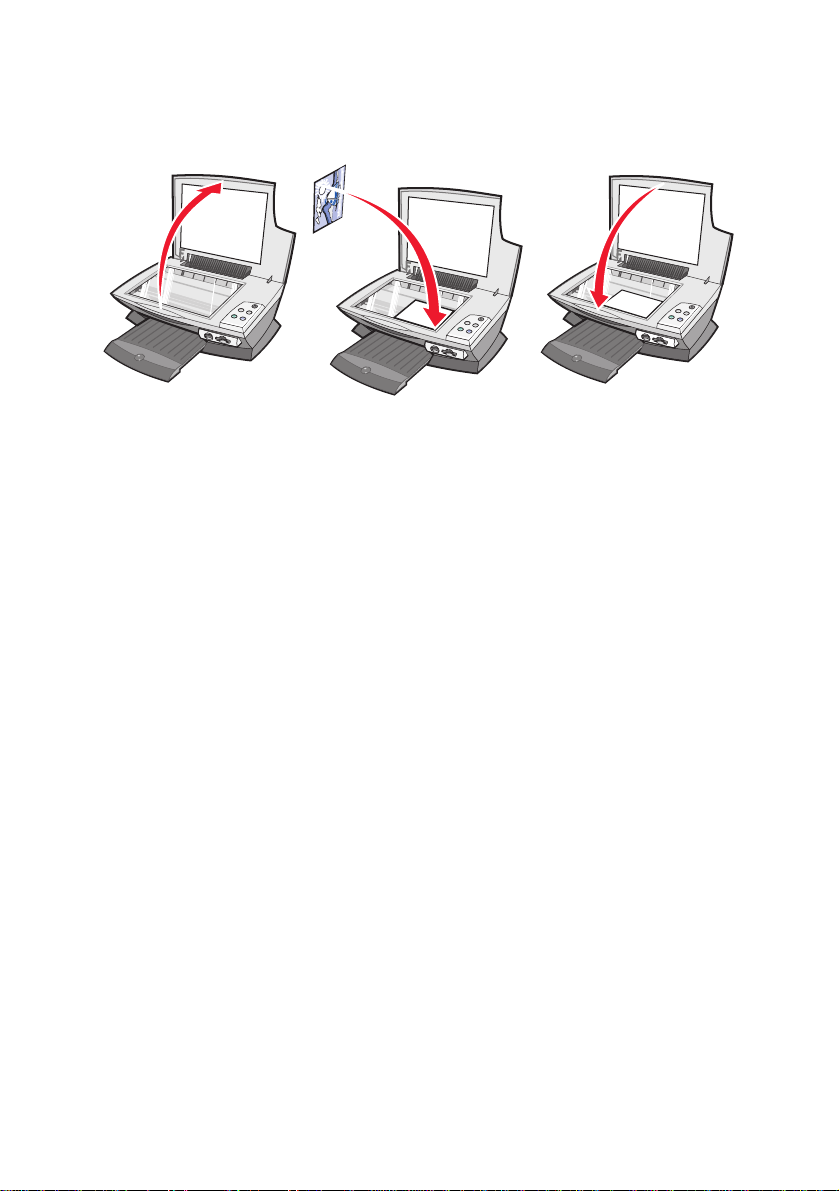
Loading your document on the scanner glass
1 Open the top cover. 2 Place the item you
want to copy face
down on the scanner
glass.
Note: Make sure the upper left corner of the front of the item
aligns with the arrow at the front corner of the scanner
glass.
3 Close the top cover to
avoid dark edges.
Inserting the digital camera memory card
Some Lexmark 3100 Series models support the following digital media:
• CompactFlash Type I and Type II • MultiMedia
• IBM Microdrive • Memory Stick
• Secure Digital • SmartMedia
Card
11
Page 16
The card reader (if available on your AIO) has four slots to accommodate
these media and a small light that blinks indicating the card is being r ead or
is transmitting data.
Note: Do not remove the digital camera memory card while
the light is on or blinking.
This illustration shows you where to insert each of the supported digital
camera memory cards.
Secure Digital,
MultiMedia Card
Memory Stick SmartMedia
CompactFlash Type I and Type II,
IBM Microdrive
Before you insert your memory card, consider the following information:
• If you are inserting a Memory Stick or SmartMedia card, make sure
the gold contact area faces up.
• If you are inserting a CompactFlash Type I or Type II, MultiMedia, or
Secure Digital card, make sure the name label faces up.
• If you are inserting a Secure Digital card, make sure the gold
contact area faces down.
Note: Your AIO recognizes one source for photos at a time.
Insert only one digital camera memory card at a time.
Note: The manufacturer name may differ from the digital
camera memory card types listed on page 11.
A small light on the memory card reader flashes and turns itself off
when the digital camera memory card is properly inserted.
The light blinks when the card is transferring data to or from the
computer.
12
Page 17

Understanding the software
The AIO software consists of five main components:
• The Lexmark 3100 Series All-In-One Center (scanning, copying,
faxing, and printing digital photos)
• Print Properties (printing)
• The Lexmark 3100 Series Solution Center (troubleshooting,
maintenance, and cartridge ordering information)
• The Lexmark Photo Editor (editing photos and graphics)
• The Lexmark Memory Card Manager (transferring digital photos on
some models)
Using the Lexmark All-In-One Center
Use the Lexmark 3100 Series All-In-One Center software to scan, copy,
and fax documents. There are four ways to open the All-In-One Center:
• Click Start Programs Lexmark 3100 Series
Lexmark All-In-One Center.
• Double-click the Lexmark 3100 Series All-In-One Center icon on
the desktop.
• Double-click the Lexmark 3100 Series All-In-One Center quick
launch icon.
• Press Scan on the control panel. For more information about using
the control panel, see page 7.
13
Page 18
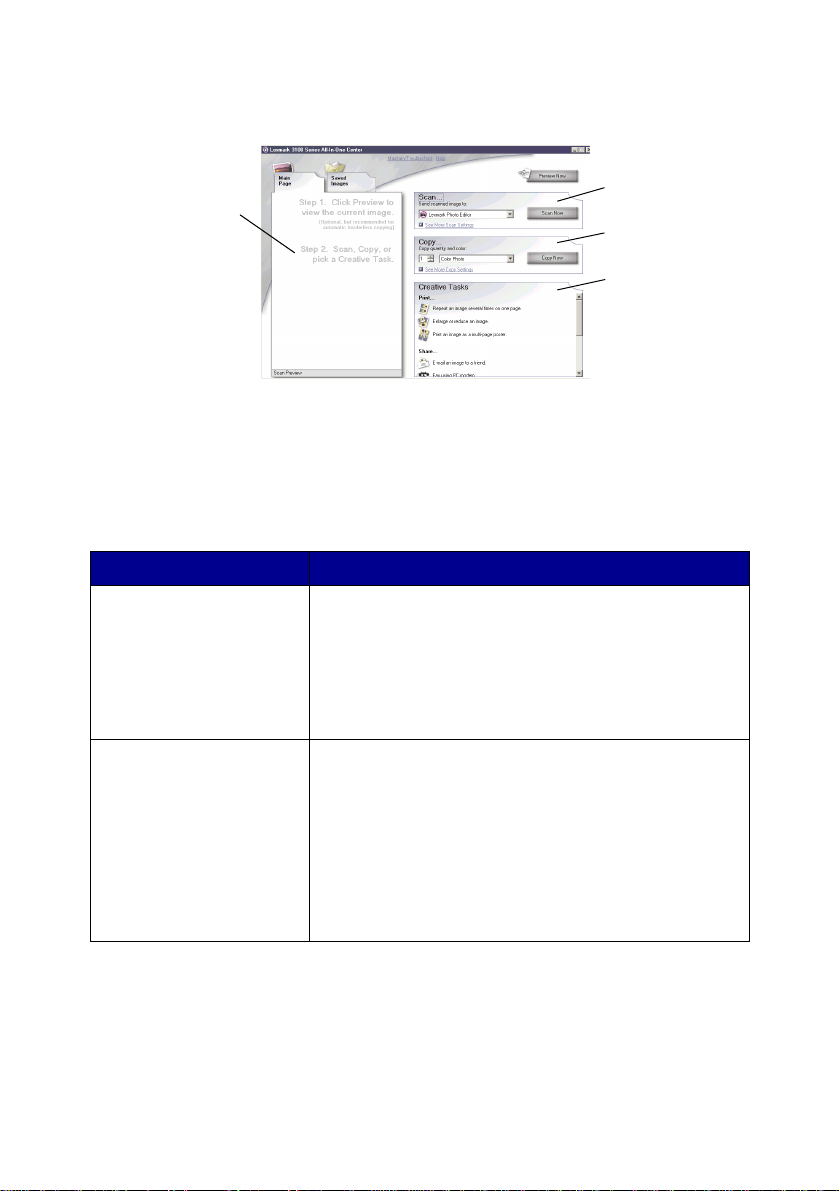
The All-In-One Main Page displays.
Scan section
Preview section
Copy section
Creative Tasks
section
The All-In-One Main Page
The All-In-One Main Page consist s of four main sections: Scan, Copy,
Creative Tasks, and Preview.
From this section You can
Scan • Select a program to send the scanned image to.
• Select a blank paper size.
• Choose what type of image is being scanned.
• Choose how the scan will be used.
Note: Click See More Scan Settings to view all
settings.
Copy • Select a blank paper size .
• Select the quantity and color of your copies.
• Select a quality setting for your copies.
• Adjust the size of the scanned area.
• Lighten or darken your copies.
• Enlarge or reduce your copies.
Note: Click See More Copy Settings to view all
settings.
14
Page 19
From this section You can
Creative Tasks Choose from a variety of creative ideas:
• Enlarge or reduce an image.
• Repeat an image several times on one page.
• Print an image as a multi-page poster.
• E-mail an image to a friend.
• Fax using PC modem.
• Save an image on your computer.
• Edit text found in a scanned document (OCR).
• Modify an image with a photo editor.
Preview section • Select a region of the preview image to scan.
• View an image of what will be printed, scanned, or
copied.
Note: For more information about the All-In-One Main Page,
click the Help link near the top of the screen.
Saved Images page
Use the Saved Images page to perform tasks with images that are saved
on the computer. The Saved Images page consists of four main sections.
From this section You can
Preview section • Show or create folders.
• Preview and select images.
• Rename, delete, or edit selected images.
Open With... Select a program to send the saved image to.
15
Page 20

From this section You can
Print a Copy... • Choose the quantity and whether to print in color.
• Select a blank paper size.
• Select a quality setting for your copies.
• Lighten or darken your copies.
• Enlarge or reduce your copies.
Note: Click See More Copy Settings to view all
settings.
Creative Tasks • Print an album page with various photo sizes.
Note: You can al so add text to photos (see page 26).
• Choose an existing layout f or your photos (see
page 26).
• Perf orm the same creative tasks av ailable from the
All-In-One Main Page Creative Tasks section.
Note: For more information about this page, click the Help link
near the top of the screen.
Maintain/Troubleshoot dialog box
To access the Maintain/Troubleshoot dialog box:
1 Open the All-In-One Center (see page 13).
2 Click the Maintain/Troubleshoot link at the top of the All-In-One
Main Page.
The Maintain/Troubleshoot page provides you with direct links to the
Lexmark Solution Center. Choose from these topics:
• Maintain or fix quality problems
• Troubleshoot All-In-One problems
• Device status and ink levels
• More printing ideas and how to’s
• Contact information
• Advanced (Skin, voice, and communication options)
• View the software version and copyright information
For more information about the Lexmark Solution Center, see page 19.
16
Page 21

Using Print Properties
Print Properties is the software that controls the AIO printing func tion . You
can change the settings in Print Properties based on the type of project
you want to create . You can open Print Properties from almost any
program:
1 With your document open, click Print.
2 In the Print dialog box, click t he Properties, Preferences, Options,
or Setup button (depending on the program or operating system).
The Print Properties screen displays.
Print Properties
tabs
Use the Quality/
Copies, Paper
Setup, and Print
Layout tabs to
select the print
settings.
I Want To menu
Select one of the
projects from the
menu to help
print photos,
banners,
envelopes,
posters, and
more.
The I Want To menu
The I W ant To menu displa ys when yo u open Print Properties. It contains a
variety of task wizards to help you select the correct print settings for your
project. Close the menu for a full view of the Print Properties dialog box.
17
Page 22

Print Properties tabs
All of the print settings are on the three main tabs of the Print Properties
software: Quality/Copies, Paper Setup, and Print Layout.
From this tab You can change these settings
Quality/Copies Quality/Speed—Select a Quality/Speed setting.
Multiple Copies—Customize how the AIO prints several
copies of a single print job, collated or uncollated.
Print Color Images in Black and White—Select this to
print color images in black and white.
Paper Type —Select the type of paper you are using or
allow the printer sensor to select the paper type for you.
Paper Setup Paper Size—Select the size of the paper you are using,
Print Layout Layout—Select the layout you want to print.
and choose if your want to print borderless.
Orientation—Select how you want the document oriented
on the printed page. You can print portrait or landscape.
Duplexing—Select this when you want to print on both
sides of the paper.
Note: For additional information about these settings,
right-click a setting on the screen, and then select the
What’s This? item.
Save Settings menu
From the Save Settings menu, you can name and save the current Print
Properties settings for future use. You can save up to five custom settings.
Options menu
Use the Options menu to make changes t o the Quality Options, Pa per
Type Sensor Options, Layout Options, and Printing Status Options
settings. For more information on these settings, open the tab dialog box
from the menu, and then click the Help button on the dialog box, if the
button is available.
18
Page 23

The Options menu also provides you with direct links to different parts of
the Lexmark Solution Center (see page 19), as well as software version
information.
Using the Lexmark Solution Center
The Lexmark 3100 Series Solution Center is a valuable information
resource. To open the Lexmark Solution Center , click Start Programs
Lexmark 3100 Series Lexmark 3100 Series Solution Center.
The Printer Status tab displays.
Printer Status
Ink Levels
The Lexmark Solution Center consists of six tabs: Printer Status, How To,
Troubleshooting, Maintenance, Contact Information, and Advanced.
From this tab You can
Printer Status (Main
dialog box)
How To Learn how to:
Troubleshooting • Learn tips about the current status.
• View the status of the AIO. For ex ample , w hile printing,
the status is “Busy Printing.”
• View the ink levels of the print cartridges.
• Scan, copy, fax, and print.
• Find and change settings.
• Use basic features.
• Print projects such as banners, photos, envelopes,
cards, iron-on transfers, and transparencies.
• Find the printable electronic guide.
• Solve AIO problems.
19
Page 24

From this tab You can
Maintenance • Install a new print cartridge.
• View shopping options for new cartridges.
• Print a test page.
• Clean to fix horizontal streaks.
• Troubleshoot othe r in k pro blems.
• Align to fix blurry edges.
• Remove Japanese postcard residue.
Contact Information • Learn how to contact Lexmark by phone, e-mail, or on
Advanced • Change the appearance of the Printing Status window
the World Wide Web.
and turn printing voice notification on or off.
• Download the latest software files.
• Change the network printing settings.
• Obtain software version information.
Note: For more information, click the Help button in the lower
right corner of the screen.
20
Page 25

Using the Lexmark Photo Editor
Use the Lexmark Photo Editor software to edit graphics. To open the
Lexmark Photo Editor, click Start Programs Lexmark 3100 Series
Lexmark Photo Editor.
The Lexmark Photo Editor displays.
Touch-up Tools
Use the touch-up tools to edit your graphic.
• Remove red eye • Crop • Paint brush
• Pencil • Text • Line
•Eye Dropper •Flood Fill •Eraser
Note: Move your pointer over the tool for a description.
21
Page 26

Accessing the Memory Card Manager
The Lexmark Memory Card Manager (available on some models) gives
you several options for transferring photos from your digital camera
memory card to your computer’s hard disk.
There are three ways to access the Lexmark Memory Card Manager:
• Insert a digital camera memory card.
• Right-click the Lexmark 3100 Series All-In-One quick launch icon
on the bottom right of your screen, and select Launch Memory
Card Manager.
• Click Start Programs Lexmark 3100 Series Memory Card
Manager.
For more information about the Memory Card Manager (see page 23).
22
Page 27

Working with digital photos
Most digital cameras use a memory card to store photos. Insert the digital
camera memory card into your AIO to access photos stored on the card.
Then, save them to your computer using the software. You can now print
your photos.
Using the Lexmark Memory Card Manager
The Lexmark Memory Card Manager (available on some models) gives
you several options for transferring photos from your digital camera
memory card to your computer’s hard disk.
For help accessing the Lexmark Memory Card Manager, see page 21.
You can:
• Automatically save all photos to a My Pictures folder with today’s
date.
• Select storage location and images to save.
• Select not to save the images on the computer.
• Choose whether to display the Lexmark Memory Card Manager
message screen each time a card is inserted.
23
Page 28

Finding your photos
From a computer
1 Open the Lexmark All-In-One Center (see page13).
2 Click the Saved Images tab.
3 Click Show Folders.
4 In the directory in the right panel, select the folder where your
photos are stored.
From a digital camera memory card
(available on some models)
1 Insert your digital camera memory card into the corresponding
memory card slot (see page 11).
Note: Insert only one digital camera memory card at a time.
Note: A small light on th e me m ory card reader flashes and
turns itself off when the digital camera memory card is
properly inserted.
The light blinks when the card is transferring data to or
from the computer.
Note: Do not remove the digital camera memory card while
the light is on or blinking.
The Memory Card Inserted dialog box appears:
24
Page 29

2 Click Select storage location and images to save.
3 Click OK.
4 Type a name for your new sub-folder.
5 Select your Save Options.
Note: Do not select After saving, erase the saved images
from the memory card unless you want to delete the
photos from the memory card permanently.
6 Click OK.
7 Type a name for your photo, if desired.
8 Click Next to save, or click Skip if you do not want to save the
photo.
9 Repeat steps 7 and 8 for each photo.
10 Click OK.
The Lexmark All-In-One Center opens with the Saved Images tab
selected. The photos stored in the sub-fo lder y ou creat ed appear in
the Preview section of the Saved Images page.
25
Page 30

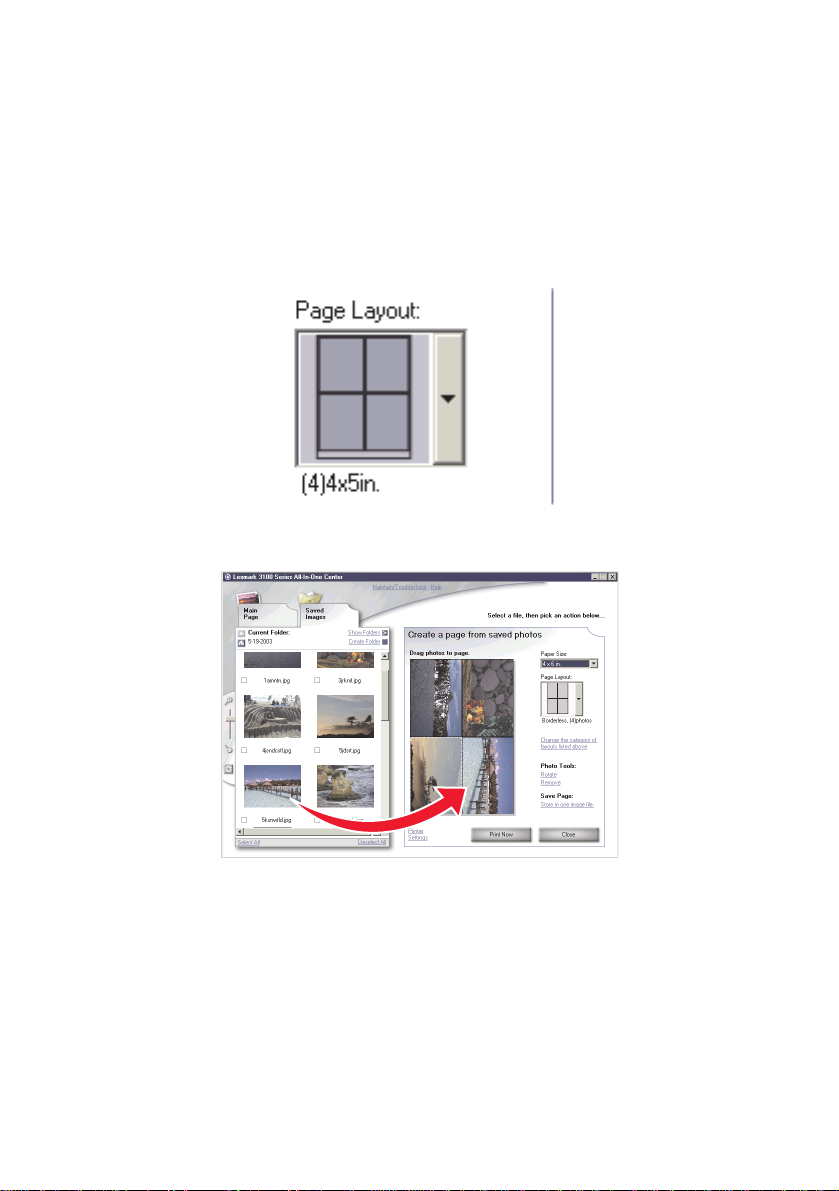
Printing digital photos
1 Choose a layout for your photos
a Open the All-In-One Center (see page 13).
b Click the Saved Images tab.
c From the Creative Tasks section, select Print an album page
with various photo sizes.
2 Select a paper size for your photos.
3 Select a page layout from the Create a page from saved photos
section.
Select a paper size.
Select a page layout.
Change the category of
layouts shown.
Print your photos.
Note: Click Change the category of layouts list ed above to
select picture package la youts, scrapbook page la youts,
borderless layouts , g reeting card layouts, or purchased
template layouts.
Note: To add text to your page layout, select a lay out with a
black box shown. Click inside the black box to add text.
A dialog box opens. Enter your text.
4 Drag your photos onto the page.
5 Click Print Now to print your photos.
Note: To prev ent smudging, remov e each photo as it e xits and
let it dry completely before stacking.
26
Page 31

Printing borderless photos
1 For best results, load photo paper into the paper support (see
page 8).
2 Open the All-In-One Center (see page 13).
3 Click the Saved Images tab.
4 From the Creative Tasks section, select Print an album page with
various photo sizes.
5 Click Change the category of layouts listed above.
6 Select Only Borderless from the Selected Lay outs dialog box.
7 Click OK.
8 Select a paper size for your photos.
9 Select a page layout from the Create a page from saved photos
section.
10 Drag your photos onto the page.
11 Click Print Now.
27
Page 32

Cropping photos
1 Double-click one of the photo thumbnails in the Preview section of
the Saved Images tab.
The photo opens in the Lexmark Photo Editor.
2 Use the arrow pointer, and draw a rectangle around the area you
want to keep.
Move y our cursor to the frame of the editing window, and then click
and drag the frame to resiz e it.
3 Click the scissors or crop tool to crop the image.
4 Save your changes.
a Click File Save As.
Note: If you click File Save, the changes you made
overwrite your original photo.
b Enter a file name and a file type, and then click Save.
c Select your Quality Options.
d Click OK.
5 Click File Print Properties or Preferences.
6 From the Paper Setup tab, select a paper size.
7 Click OK.
8 Click Print.
28
Page 33

Editing photos
1 Double-click one of the photo thumbnails in the Preview section of
the Saved Images tab.
2 The photo opens in the Lexmark Photo Editor.
Note: You can edit only one photo at a time.
3 Edit your photo with the tools available.
4 Save your changes.
a Click File Save As.
Note: If you click File Save, the changes you made
overwrite your original photo.
b Enter a file name and a file type, and then click Save.
Sharing photos
1 Open the Lexmark All-In-One Center (see page13).
2 Click the Saved Images tab.
3 From the Creative Tasks section, select E-mail an image to a
friend.
4 Select the image or images to send, and then click Attach Now.
Your computer launches your e-mail program and opens a new
message. Then, it attaches your photos to the message.
5 Click Send to e-mail your photos.
Note: Some e-mail providers only allow you to attach one
photo per e-mail.
Note: For faster sending, reduce the image dimensions before
you send them.
29
Page 34

Adding text captions under your photos
1 Open the Lexmark All-In-One Center (see page13).
2 Click the Saved Images tab.
3 From the Creative Tasks section, select Print an album page with
various photo sizes.
4 Click Change the category of layouts listed above.
5 Select Only Scrapbook Pages from the Selected Layouts dialog
box.
6 Click OK.
7 Select a paper size for your photos.
8 Select a page layout from the Create a page from saved photos
section.
9 Drag your photos onto the page.
10 Click inside the black box.
A dialog box opens.
11 Enter your text.
12 Click Print Now.
30
Page 35

Printing, Scanning, Copying and Faxing
Printing
The Print Properties I Want To menu (see page 17) provides you with
printing wizards to help you complete tasks such as printing banners,
photographs, or posters.
Note: Use a black print cartridge for printing black and white
text documents to conserve your photo print cartridge.
1 Depending on what you want to print, load the appropriate type of
paper (see page 8).
2 Make sure you select the paper size for your document (see step 8
on page 32).
3 Make sure the AIO is on.
4 Click File Print.
5 In the Print dialog box, click t he Properties, Preferences, Options,
or Setup button (depending on th e program).
The Print Properties dialog box displays.
6 If the printing task you want to perform is on the I Want To menu,
click it, and then follow the instructions on the computer screen;
otherwise, click Close at the bottom of the menu.
31
Page 36

7 From the Quality/Copies tab, select the quality, speed, paper type,
and number of copies.
Quality/Speed
settings
Paper type
setting
Copy
settings
To see details about a setting, right-click a setting on the screen,
and then select the What’s This? item.
8 From the Paper Setup tab, select the paper size and orientation.
Paper size
setting
Orientation
setting
To see details about a setting, right-click a setting on the screen,
and then select the What’s This? item.
32
Page 37

9 From the Print Layout tab, select the layout and duple xing settings
for the type of document you are printing.
Layout
setting
Duplexing
setting
To see details about a setting, right-click a setting on the screen,
and then select the What’s This? item.
10 Once you have applied all the settings you want in Print Properties,
click OK at the bottom of th e screen to return to the Print dialog bo x.
11 Click Print.
33
Page 38

Scanning
The following steps show you how to scan and save images.
1 Load your document on the scanner glass (see page 11).
2 Open the Lexmark All-In-One Center (see page13).
The All-In-One Main Page displays.
3 Click Preview Now in the upper right corner of the All-In-One Main
Page.
An image of the scanned item displays in the preview section.
4 Click and drag to select a specific area of the preview image to
scan.
5 Click See More Scan Settings to review and change the scan
settings.
6 Select your scan settings.
7 From the Send scanned image to: drop-down menu, select a
program to send the scanned ima ge to, or click the Creative Tasks
section to display a list of projects (see page 14).
Preview Now
Click to see a preview
of the image.
Preview section
See a preview of the image, and select an area to be
scanned.
34
Scan Now
Click to scan the item
on the scanner bed.
Scan settings
Adjust the settings for
the scanned item.
Page 39

8 If you are sending the scanned imag e to a software program, click
Scan Now to complete the scan. If you are using the Creative Tasks
section, follow th e instructions on the computer screen.
For a list of the Crea tiv e Tasks available from the All-In- One Main P age ,
see page 15.
Copying
To make a quick copy, press Black or Photo/Color copy on the control panel.
Note: The computer must be turned on.
To make black and white, gray, or color copies:
1 Load your document on the scanner glass (see page 11).
2 Open the Lexmark All-In-One Center (see page13).
The All-In-One Main Page displays.
3 Click Preview Now.
4 Click See More Copy Settings to re vie w and change t he copy settings.
The All-In-One Copy section expands:
Preview Now
Click to see a preview of the
image.
Copy Now
Click to copy your image.
Preview section
See a preview of the image, and select an area to be copied.
5 Select your copy settings.
Note: You may want to reduce or enlarge the image.
6 Click Copy Now.
35
Copy settings
Adjust the settings for the copy.
Page 40

Faxing
The following section gives you basic faxing information.
Note: DSL (digital subscriber line), ISDN (integrated services
digital network) and cable mod ems are not f ax modems
and are not supported.
Sending a fax
The following steps lead you through sending a fax using the computer
modem.
1 Load your document on the scanner glass (see page 11).
2 Open the Lexmark All-In-One Center (see page13).
3 Click Preview Now in the upper right corner of the All-In-One Main
Page.
4 From the Creative Tasks section, click Fax using PC modem.
5 Follow the instructions on the computer screen.
Receiving a fax
1 Click Start Programs FaxTools FaxTools. Fax Tools is
ready to receive faxes.
2 Once a fax is received, click the Fax Inbox to view or print your
faxes.
If you want to alw ays print your faxes as they come in, follow these steps:
1 From the main Fax Tools screen, click Configure.
2 Select General Configuration.
3 Select the Fax tab.
4 Click the Print incoming faxes check box, and then click OK.
36
Page 41

Creating fun projects
You can create other fun projects, such as photos, cards, envelopes,
transparencies, iron-on transfers, and more.
1 Open the Lexmark Solution Center (see page19).
2 Click How To.
3 Select a project from the list.
4 Follow the instructions on the computer screen.
37
Page 42

Maintenance
Replacing print cartridges
The Lexmark 3100 Series uses the following cartridges:
Left cartridge carrier Right cartridge carrier
19 (Color) 48 (Black)
20 (Color) 50 (Black)
25 (Color) 55 (Black)
90 (Photo)
Note: In order to print, two cartridges must be installed. Either
a black or photo cartridge may be used with the color
cartridge.
For information about ordering supplies, see Maintenance on page 20.
Removing the used cartridges
1 Make sure the AIO is on.
2 Lift the scanner unit until the scanner support keeps it open.
The print cartridge carrier m oves and stops at the loading pos ition
unless the AIO is busy.
3 Pull the top of the cartridge toward you until you hear a snap.
4 Remove the old cartridges. Store them in an air-tight container or
dispose of them (see page 43).
Note: Use the cartridge storage unit that was packaged with
your photo cartridge to store cartridges for future use.
38
Page 43

Installing the cartridges
1 If you are installing new cartridges, remove the storage unit (photo
cartridge only), sticker and transparent tape from the bottom of the
cartridges.
Warning: Do not touch or remove the gold contact areas on the
back and bottom of the cartridges.
2 Insert the color cartridge in the left carrier. Insert the black or photo
cartr i dg e in the right carrier.
Depending on the part numbers you use, the color of the cartridge
tops may vary.
Note: Purchase a black print cartridge to use with the color
cartridge for printing text documents.
3 Snap the cartridges into plac e.
4 Close the scanner unit.
Note: The scanner unit must be closed to start a print job.
Lexmark’s All-In-One warranty does not cover repair of failures or damage
caused by a refilled cartridge. We do not recommend use of refilled
cartridges. Refilling cartridges can affect print quality and may cause
damage to the All-In-One. For best results, use Lexmark supplies.
39
Page 44

Specifying cartridge settings in the printer software
Before you specify the print cartridge settings in the printer software, install
the cartridges. For help, see “Installing the cartridges” on page 39.
1 Open the Lexmark Solution Center (see page19).
2 From the Maintenance tab, click Install a new print cartridge.
3 Select the type of cartridge you installed.
Note: Specify whether the cartridge is a new cartridge or an
old cartridge (one that has been used before). If an old
cartridge is incorrectly identified as new cartridge in the
Lexmark Solution Center, ink levels may be incorrect.
4 Click OK or Next.
5 If you installed a new cartridge, continue with “Aligning the print
cartridges.”
Aligning the print cartridges
You should align your print cartridges after installing cartridges to improve
print quality.
To align the print cartridges:
1 Load plain paper (see page 8).
2 Open the Lexmark Solution Center (see page19).
3 From the Maintenance tab, click Align to fix blurry edges.
4 Click Print.
An alignment page prints automatically, aligning your print
cartridges.
40
Page 45

Cleaning the print cartridge nozzles
To improve print quality, you may need to clean the print cartridge nozzles.
Clean the nozzles when:
• Characters are not printing completely.
• White dashes appear in graphics or printed text.
• Print is smudged or too dark.
• Vertical, straight lines are not smooth.
• Colors on print jobs are faded or they differ from the colors on the
screen.
To clean the nozzles:
1 Load plain paper (see page 8).
2 Open the Lexmark Solution Center (see page19).
3 From the Maintenance tab, click Clean to fix horizontal streaks.
4 Click Print.
A nozzle page prints, forcing ink through the nozzles to clean the
clogged nozzles.
5 Print your document again to verify your print quality has improved.
If print quality has not improved, try cleaning the print cartridge
nozzles up to two more times.
If you are not satisfied with the print quality, follow the instructions
for wiping the print cartridge nozzles and contacts.
Wiping the print cartridge nozzles and contacts
If the print quality does not improve after cleaning the print cartridge
nozzles, dried ink may be on the nozzles or contacts. To wipe the print
cartridge nozzles and contacts:
1 Remove the print cartridges (see page 38).
2 Dampen a clean, lint-free cloth with water.
41
Page 46

3 Hold the damp cloth against the gold nozzle area for about three
seconds. Gently blot and wipe dry in one direction (this pre ve nts the
colors in the color cartridge from mixing).
Nozzles
4 Hold a clean, damp section of cloth against the contacts for about
three seconds. Gently blot and wipe dry in one direction.
Contacts
5 Allow the nozzles and contacts to dry completely.
6 Reinstall the print cartridges.
7 Align the print cartridges (see page 40).
8 Print your document again.
If the print quality has not improved, try cleaning the print cartridge
nozzles up to two more times.
If print quality is still unsatisfactory, replace your print cartridges
(see page 38).
42
Page 47

Preserving the print cartridges
To ensure the longest life from your print cartridges and optimum
performance from your All-In-One:
• Keep a new print cartridge in its packaging until you are ready to
install it.
• Keep your photo cartridge in the print cartridge storage unit when
not in use. A print cartridge storage unit is included with new photo
print cartridges. Use the print cartridge storage unit to store your
black cartridge when you are using the photo cartridge.
• Do not remove a print cartridge from the All-In-One except to
replace, clean, or store it in an airtight container, such as the print
cartridge storage unit. The print cartridges will not print correctly if
left exposed for an extended period of time because the ink will dry
out.
Note: Use the cartridge storage unit that was packaged with
your photo cartridge to store cartridges for future use.
Lexmark’s All-In-One warranty does not cover repair of failures or damage
caused by a refilled cartridge. Lexmark does not recommend use of refilled
cartridges. Refilling cartridges can affect print quality and may cause
damage to the All-In-One. For best results, use Lexmark supplies.
Ordering supplies
To order supplies or locate a dealer near you, visit the Le xmark W eb site at
www.lexmark.com.
Recycling Lexmark products
To return your Lexmark products to Lexmark for recycling:
1 Visit our Web site:
www.lexmark.com/recycle
2 Follow the instructions on your screen.
43
Page 48

Troubleshooting
This section helps you solve problems you may have with the AIO.
Additional troubleshooting information is available in the Lexmark Solution
Center. For help accessing the Lexmark Solution Center, see page 19.
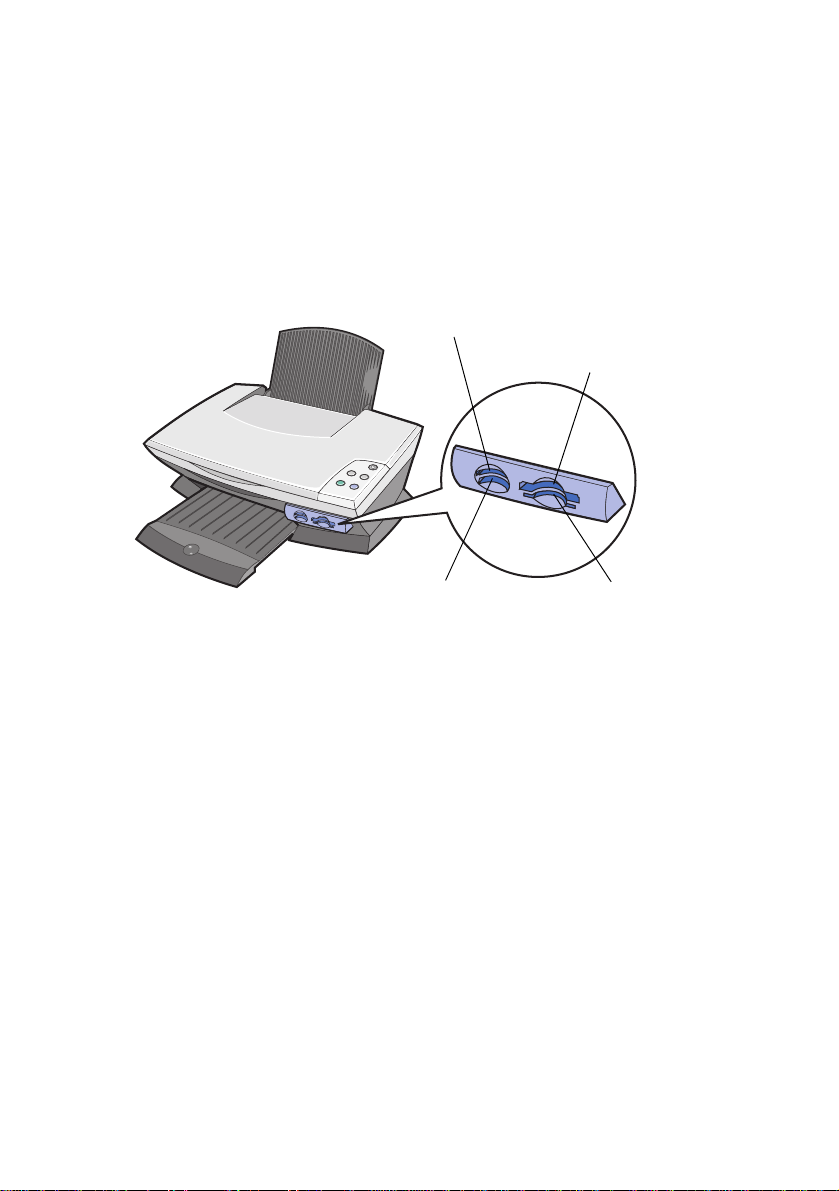
Troubleshooting checklist
Before you try to solve the problem, check the following:
Is the power supply inserted correctly (arrows up) and firmly
attached to the AIO and an electrical outlet?
Is the USB cable securely attached to the comput er and th e AIO?
Are both the computer and AIO on?
Did you remove the sticker and transparent tape from both print
cartridges? For help, refer to the setup documentation.
Are the print cartridges properly installed (see page 39)?
Is the paper loaded correctly? Make sure you do not force th e
paper into the AIO.
Did you install the AIO software correctly? For help, refer to the
setup documentation.
Is the Lexmark 3100 Series set as the default printer (see
page 54)?
Is your operating system supported?
Do you have administrator rights? You must have administrator
rights to install the software on a network.
44
Page 49

If you are still experiencing problems , see the following table to select a
topic.
Problem Go to page
Power light does not come on 46
Alignment page or test page does not print 46
When I insert the AIO software CD, nothing happens 46
AIO is not communicating with the computer 47
Installation appears incomplete 47
A blank page prints 48
AIO prints slowly 48
Print is too dark or smudged 48
V ertical lines are jagged or edges are not smooth 49
White lines appear in graphics or solid black areas 49
AIO has a paper jam 49
Scanning or using a scanned image with a software program
takes a long time or freezes the computer
Scanning was not successful 50
My program is not on the Send scanned image to list 50
50
Edge of the copy does not print 51
Copy button on the control panel does not work 51
Fax function does not work 52
Photo card is not recognized by the card reader 52
Error messages 52
Removing and reinstalling the software 53
Setting the AIO as the default printer 54
Other help sources 55
45
Page 50

Setup troubleshooting
Use this section to solve problems you may hav e during setup.
Power light does not come on
1 Make sure the power supply is correctly inserted into the AIO (see
page 6).
2 Check the power supply connections.
3 Press Power on the control panel.
Alignment page or test page does not print
1 Make sure you remove the sticker and transparent tape from both
print cartridges. For help installing print cartridges, see page 39.
2 Make sure the print cartridges are properly installed (see page 39).
3 Make sure you loaded the paper correctly and did not force the
paper into the AIO (see page 8).
4 Make sure the Lexmark 3100 Series is set as the default printer
(see page 54).
When I insert the AIO software CD, nothing happens
From the desktop, double-click the My Computer icon, and then
double-click the CD-ROM drive icon.
Windows XP users, click Start My Computer, and then double-click the
CD-ROM drive icon.
Note: If auto launch is turned off, double-click setup.exe.
46
Page 51

AIO is not communicating with the computer
1 Disconnect and reconnect both ends of th e USB cable. For help,
refer to the setup documentation.
2 Unplug the AIO from the electrical wall outlet, and then reconnect
the power supply. Press Power if your AIO did not power on. For
help, refer to the setup documentation.
3 Restart the computer. If the problem continues, remove and then
reinstall the software (see page 53).
Installation appears incomplete
The software may not be installed properly. Try the following:
1 Click Start Settings Control Panel System.
Windows XP users, click Start Control Panel Printers and
other hardware Printers and Faxes.
2 Click Properties.
3 If you are using Windows 98 or Windows Me, click the Device
Manager tab.
If you are using Windows 2000 or Windows XP, select the
Hardware tab, and then click the Device Manager button.
4 Look for the Other Devices category. If there are any Lexmark
devices shown here, highlight them and then press the Delete key.
Note: The Other Devices category displays only when
unknown devices are present. Do not delete any
Lexmark items unless they are present un der the Other
Devices category.
5 Insert the CD, and install the software again. Do not restart the
computer. For help, refer to the setup documentation.
47
Page 52

Printing troubleshooting
A blank page prints
1 Make sure you remove the sticker and transparent tape from both
print cartridges. For help installing print cartridges, see page 39.
2 Make sure the print cartridges are properly installed (see page 39).
3 Make sure you loaded the paper correctly and did not force the
paper into the AIO (see page 8).
4 Make sure the Lexmark 3100 Series is set as the default printer
(see page 54).
AIO prints slowly
1 Close all programs not in use. The memory resources may be low.
2 Make sure the Print Properties Quality/Speed setting is set on
Normal or Quick Print (see page 18).
3 Try printing a smaller file. If the memory resources are too low, you
may not be able to print larger files. Consider purchasing more
memory.
Note: Photographs typically have a larger file size. Try
lowering the scanning resolution.
Print is too dark or smudged
1 Remove the paper as it exits. Let the ink dry before handling.
2 Adjust the Quality/Speed setting in Print Properties (see page 18)
or in the All-In-One Center (see page 14).
The Better or Best Quality/Speed setting may cause smearing if
used with plain paper. Try using Normal.
3 Open the Lexmark Solution Center (see page19).
4 From the Maintenance tab, click Clean to fix horizontal streaks.
48
Page 53

Vertical lines are jag ged or edges are not smooth
1 Adjust the Quality/Speed setting in Print Properties (see page 18).
For best print quality, select Better or Best.
2 Align the print cartridges. To align the print cartridges:
a Open the Lexmark Solution Center (see page 19).
b From the Maintenance tab, click Align to fix blurry edges.
White lines appear in graphics or solid black areas
Clean the print cartridge nozzles. Going long periods without using the AIO
can cause the print cartridge nozzles to become clogged. To clean the
cartridge nozzles:
1 Open the Lexmark Solution Center (see page19).
2 From the Maintenance tab, click Clean to fix horizontal streaks.
AIO has a paper jam
1 Follow the instructions on the screen for clearing the paper jam.
2 Make sure you are using paper designed for an inkjet printer. For a
list of recommended paper types, see page9.
3 Make sure you are correctly loading the paper (see page 8).
4 Make sure the paper guide is against the left ed ge of the paper (see
page 8).
49
Page 54

Scanning, copying, and faxing troubleshooting
Scanning or using a scanned image with a software
program takes a long time or freezes the computer
Lower the scanning resolution. Scanning resolution is much different than
printing resolution and is generally set much lower . To change the scanning
resolution:
1 Open the Lexmark All-In-One Center (see page13).
2 From the Scan section, click See More Scan Settings.
3 Click Display Advanced Scan Settings.
4 From the Scan tab of Advanced Scan Settings, enter a lower scan
resolution.
Scanning was not successful
The software may not be installed properly. Follow the instructions for “AIO
is not communicating with the computer” on page 47.
My program is not on the Send scanned image to list
To add your program to the Send scanned image to program list:
1 Open the Lexmark All-In-One Center (see page13).
2 Select Search for more from the Send images to list.
3 Click Enhanced Search.
4 Select the applications you want to add from the list box, and then
click Add.
5 Click Close to save your changes.
50
Page 55

Edge of the copy does not print
Make sure:
• The original is properly oriented on th e gla ss (se e pag e 11).
• The area you want to copy is not larger than the printab le area of
the page. Apply the Fit-to-page feature.
To apply the Fit-to-page feature:
1 Open the Lexmark All-In-One Center (see page 13).
2 From the Copy section, click See More Copy Settings.
3 From the Reduce/Enlarge section, click the second butto n, and
then select Fit to page from the corresponding drop-down
menu.
4 Copy your document again.
Copy button on the control panel does not work
Make sure:
1 The computer is on. The power light must be on in order for the AIO
to work.
2 The USB cable is securely attached to the computer and the AIO.
3 You properly installed the software. For help, refer to the setup
documentation. The software must be installed for the copier to
function.
4 The Lexmark 3100 Series All-In-One quick launch icon in the lower
right of your screen is present and a red “X” is not present. If a red
“X” is present, remove and install the software again (see page 53).
Note: If the Lexmark 3100 Series quick launch icon does not
appear in the lower right of your screen, open the
All-In-One Center (see page 13).
51
Page 56

Fax function does not work
If you are having trouble sending or receiving faxes, make sure:
• The computer and the AIO are on.
• The computer is connected to a phone line. A phone connection is
required for faxing to function.
• You have a working fax modem installed on your computer.
• You have installed the fax software included on the CD.
• The fax driver you want to use is the def ault fax driver in the
All-In-One Center.
To verify your fax driver default:
1 Open the All-In-One Center (see page 13).
2 Click Advanced Scan Settings.
3 Click Fax.
Note: DSL (digital subscriber line), ISDN (integrated services
digital network) and cable mod ems are not f ax modems
and are not supported.
Photo card is not recognized by the card reader
• Remove and then reinsert the photo card.
• Unplug and then plug the USB cable in again.
Error messages
If you receive any of the following error messages, follow the instructions
that appear on your computer screen.
• Paper jam
• Cover open
• Ink Low
• Paper out
• Cartridge error
52
Page 57

Removing and reinstalling the software
If the AIO software is not functioning properly or a communications error
message displays when you try to use the AIO, you may need to remove
and then reinstall the AIO software.
1 From the desktop, click Start Programs
Lexmark 3100 Series Uninstall Lexmark 3100 Series.
2 Follow the instructions on the computer screen to remove the AIO
software.
3 Restart the computer before reinstalling the software.
4 Insert the CD and follow the instructions on the computer screen to
install the software. For help, refer to the setup documentation.
Checking your port setting
1 Click Start Settings Printers.
Windows XP users, click Start Control Panel Printers and
Other Hardware Printers and Faxes.
2 Right-click the Lexmark 3100 Series printer icon.
3 From the sidebar menu, select Properties.
4 Windows 98/Me users, click the Details tab.
Windows 2000 or Windows XP users, click the Ports tab.
5 Make sure:
• The port is set to a USB port.
• File is not set as the port.
Note: If USB port is not listed, you need to remove and then
reinstall the AIO software (see page 53).
53
Page 58

Setting the AIO as the default printer
Windows 98 and Windows Me users:
1 Click Start Settings Printers.
2 Right-click the Lexmark 3100 Series printer icon.
3 Make sure:
• Set as Default is selected.
• Pau se Print ing is not selected.
Windows 2000 users:
1 Click Start Settings Printers folder.
2 Right-click the Lexmark 3100 Series printer icon.
3 Make sure:
• Set as Default is selected.
• Pau se Print ing is not selected.
• Use Printer Offline is not selected.
Windows XP users:
1 Click Start Control Panel Printers and Other Hardware
Printers and Faxes.
2 Make sure the Lexmark 3100 Series icon:
• Is set as the default printer (indicated by a check mark). If the
Lexmark 3100 Series is not the default printer, right-click the
printer icon, and then click Set as Default.
• Does not indicate Paused. If the icon indicates that the AIO is
paused, right-click the icon, and then click Resume Printing.
• Indicates Ready. If the icon indicates Offline, right-click th e icon,
and then click Use Printer Online.
54
Page 59

Other help sources
If the preceding solutions do not solve the problem with your All-In-One:
• Refer to the Lexmark Solution Center software for more
troubleshooting information:
1 Click Start Programs Lexmark 3100 Series
Lexmark 3100 Series Solution Center.
2 Click the Troubleshooting tab on the left side of the screen.
• Visit our Web site at http://support.lexmark.com/ for help.
55
Page 60

Notices
Emissions notices
Federal Communications
Commission (FCC)
compliance information
statement
The Lexmark 3100 Series
4477-001/4478-001 has
been tested and found to
comply with the limits for a
Class B digital device,
pursuant to Part 15 of the
FCC Rules. Operation is
subject to the following two
conditions: (1) this device
may not cause harmful
interference, and (2) this
device must accept any
interference received,
including interference that
may cause undesired
operation.
The FCC Class B limits are
designed to provide
reasonable protection
against harmful interference
in a residential installation.
This equipment generates,
uses, and can radiate radio
frequency energy and, if not
installed and used in
accordance with the
instructions, may cause
harmful interference to radio
communications. However,
there is no guarantee that
interference will not occur in
a particular installation. If this
equipment does cause
harmful interference to radio
or television reception, which
can be determined by turning
the equipment off and on, the
user is encouraged to try to
correct the interference by
one or more of the following
measures:
• Reorient or relocate the
receiving antenna.
• Increase the separation
between the equipment
and receiver.
• Connect the equipment
into an outlet on a circuit
different from that to
which the receiver is
connected.
• Consult your point of
purchase or service
representative for
additional suggestions.
The manufacturer is not
responsible for any radio or
television interference
caused by using other than
recommended cables or by
unauthorized changes or
modifications to this
equipment. Unauthorized
changes or modifications
could void the user's
authority to operate this
equipment.
Note:To assure
compliance with FCC
regulations on
electromagnetic
interference for a Class B
computing device, use a
properly shielded and
grounded cable such as
Lexmark part number
1329605 for parallel attach
or 12A2405 for USB
attach. Use of a substitute
cable not properly shielded
and grounded may result in
a violation of FCC
regulations.
Any questions regarding this
compliance information
statement should be directed
to:
Director of Lexmark
Technology & Services
Lexmark International, Inc.
740 West New Circle Road
Lexington, KY 40550
(859) 232-3000
Industry Canada
compliance statement
This Class B digital
apparatus meets all
requirements of the
Canadian
Interference-Causing
Equipment Regulations.
Avis de conformité aux
normes de l’industrie du
Canada
Cet appareil numérique de la
classe B respecte toutes les
exigences du Règlement sur
le matériel brouilleur du
Canada.
European Community (EC)
directives conformity
This product is in conformity
with the protection
requirements of EC Council
directives 89/336/EEC and
73/23/EEC on the
approximation and
harmonization of the laws of
the Member States relating
to electromagnetic
compatibility and safety of
electrical equipment
designed for use within
certain voltage limits.
A declaration of conformity
with the requirements of the
directives has been signed
by the Director of
Manufacturing and T echnical
Support, Lexmark
International, S.A., Boigny,
France.
This product satisfies the
Class B limits of EN 55022
and safety requirements of
EN 60950.
56
Page 61

The United Kingdom
Telecommunications Act 1984
This apparatus is approved under
the approval number NS/G/1234/
J/100003 for the indirect
connections to the public
telecommunications systems in
the United Kingdom.
Japanese VCCI notice
ENERGY STAR
The EPA ENERGY STAR Office
Equipment program is a
partnership effort with office
equipment manufacturers to
promote the introduction of
energy-efficient products and to
reduce air pollution caused by
power generation.
Companies participating in this
program introduce products that
power down when they are not
being used. This feature will cut
the energy used by up to 50
percent. Lexmark is proud to be a
participant in this program.
As an ENERGY STAR Partner,
Lexmark International, Inc. has
determined that this product
meets the ENERGY STAR
guidelines for energy efficiency.
Noise emission levels
The following measurements
were made in accordance with
ISO 7779 and reported in
conformance with ISO 9296.
1-meter average sound
pressure, dBA
Printing 44 dBA
Page 62

Index
A
accessing photos
from a computer 24
from a memory
card 24
adding text to page
layout 26
adding text to photos 30
Advanced tab 20
AIO software 13
album page 26
aligning print
cartridges 40
All-In-One Center, see
Lexmark All-In-One
Center 13
All-In-One Main Page
Copy section 14
Creative Tasks
section 15
Preview section 15
Scan section 14
All-In-One status 19
B
banner paper
loading 10
banners, printing 17
black and white, printing
in 18
black cartridge part
number 38
Black Copy button 7
blank page prints 48
borderless photos
printing 27
both sides, printing on,
see duplexing
C
card stock
loading 9
cartridges
aligning 40
cleaning nozzles 41
part numbers 38
viewing ink levels
of 19
wiping 41
cartridges, print
aligning 40
cleaning contacts 41
cleaning nozzles 41
installing 39
part numbers 38
preserving 43
removing 38
replacing 38
choosing
layout for photos 26
cleaning, print cartridge
nozzles 41
coated paper
loading 9
color cartridge part
number 38
Contact Information
tab 20
contacts, wiping 41
control panel 7
copies 18
copy settings 14
copying 35
copyright advisory ii
Creative Tasks
All-In-One Center 15
cropping photos 28
custom size paper
loading 10
D
digital photos
All-In-One Center 13
working with 23
duplexing 18
E
edge to edge, see
borderless photos 27
editing photos 29
edition information ii
e-mail
scan to 29
envelopes
printing 9, 17
F
fax
sending 36
troubleshooting 52
faxing 36
H
hardware setup 5
How To tab 19
I
I Want To
change quality
settings 17
58
Page 63

change speed
settings 17
print a banner 17
print a photo 17
print a poster 17
print an envelope 17
print on both sides of
the paper 17
see more printing
ideas 17
I Want To menu 17
ink cartridges
viewing ink levels
of 19
ink levels
viewing 19
installing
print cartridges 39
iron-on transfers
loading 10
printing 17
L
layout
selecting 18
Lexmark All-In-One
Center
opening 13
using 13
Lexmark Photo Editor
opening 21
using 21
Lexmark Solution
Center 19
Advanced tab 20
Contact Information
tab 20
How To tab 19
Maintenance tab 20
opening 19
Printer Status tab 19
Troubleshooting
tab 19
loading
banner paper 10
card stock 9
coated paper 9
custom size paper 10
glossy paper 9
iron-on transfers 10
paper 8
photo cards 9
photo paper 9
postcards 9
transparencies 10
M
Maintain/Troubleshoot
page 16
Maintenance tab 20
margins, photos without
margins see
borderless 27
Memory Card Inserted
dialog box 24
Memory Card Manager
using 22
memory cards
inserting 11
multiple copies 18
multiple images 15
N
nozzles, print
wiping 41
O
ordering supplies 43
orientation
selecting 18
P
page layouts, selecting
borderless 26
greeting card 26
picture package 26
purchased 26
scrapbook page 26
paper
acceptable types
of 31
loading 31
Paper Feed button 7
Paper Setup tab 18
paper size
selecting 18
paper type
selecting 18
part numbers
black cartridge 38
color cartridge 38
photo cartridge 38
parts
control panel 5
memory card slots 5
paper support 5
scanner unit 6
parts of your All-In-One 5
photo cards
loading 9
photo cartridge part
number 38
photo paper
loading 9
Photo/Color Copy
button 7
photos 26
adding text 26
borderless 27
cropping 28
editing 29
finding 24
printing 17
scanning 34
sharing 29
poor quality printing 48
postcards
loading 9
posters
printing 17
Power button 7
59
Page 64

preserving print
cartridges 43
Preview Now button 34
Preview section
Preview Now
button 34
Print/Copy preview 15
Scan preview 15
print cartridges
aligning 40
cleaning nozzles 41
installing 39
part numbers 38
preserving 43
removing 38
replacing 38
viewing ink levels
of 19
wiping nozzles 41
Print Layout tab 18
print nozzles
cleaning 41
print nozzles, wiping 41
Print Properties 17
I Want To menu 17
opening 17
Options menu 18
Paper Setup tab 18
Print Layout tab 18
Quality/Copies tab 18
Save Settings
menu 18
tabs 18
printing 31
album page 26
borderless 27
digital photos 26
envelopes 9, 17
photos 17
posters 15, 17
without margins 27
printing problems 48
blank page prints 48
Printing Status window
changing appearance
of 20
Q
Quality/Copies tab 18
R
recycling Lexmark
products 43
reinstalling software 53
removing print
cartridges 38
removing software 53
repeat images 15
replacing print
cartridges 38
S
Safety information ii
Save Settings menu 18
Saved Images page
Open with...
section 15
Print a
Copy...section 16
Scan button 7
scan settings 14
scanning 34
scrapbook pages 30
settings, saving for future
use 18
setup troubleshooting 46
software
All-In-One Center 13
Memory Card
Manager 22
Photo Editor 21
Print Properties 17
reinstalling 53
removing 53
Solution Center 19
understanding 13
software setup 5
sound, see voice
notification
Status tab 19
supplies
ordering 43
T
text
adding to page
layout 26
adding to photos 30
touch-up tools
crop 21
eraser 21
eye dropper 21
flood fill 21
line 21
paint brush 21
pencil 21
remove red eye 21
text 21
transparencies
loading 10
troubleshooting
blank page prints 48
checklist 44
copying problems 50
faxing problems 50
printing problems 48
scanning problems 50
setup problems 46
Troubleshooting tab 19
U
understanding
software 13
V
voice notification
turning on or off 20
W
Web site, Lexmark 55
60
Page 65

www.lexmark.com
 Loading...