

Page 1

11
*yourPCuser guide*your
PC
user guide
224MS 0999-055-00306
Using your Reload CD
(If supplied)
If you encounter unrecoverable problems with your system, then this Reload CD will be able to set
your system back to how it was when you first switched it on.
However, before using this CD please ensure that, where possible, you have made back-up
copies of all your personal data as the hard drive will be set back to its factory settings, and all
data will be wiped.
Instructions
1. Log your system off
2. Insert the CD into the CD drive, then restart the PC/Notebook.
3. You will then be presented with a screen giving the following options:
R – Restore (start the restore process)
S – Repair Boot Sector (make the drive bootable)
D – Details (this gives information on when the reload was last run, which may be needed should
you call technical support)
C – Cancel (abort the reload process)
To proceed with the reload you should choose R – Restore,
If you realise you have not backed up your data then you can choose C – Cancel, which will allow
you to abort the reload process and you can then copy your data.
If you encounter an error message stating that the system is incapable of accepting this method
of reload, then please check the disk for dirt/scratches and repeat the process above to try again.
4. Once the Reload process is running it will take approximately 30 minutes depending on the size
of your hard drive.
5. Once the process has finished, please ensure that you remove the reload CD before restarting.
It is important you do this otherwise the reload process will begin again when you switch the
system back on. If during the reload process you encounter any problems then please telephone
the technical support telephone number.
*your
PC
user guide
*your
PC
user guide
Page 2

Other Information
Trouble Shooting
Reload CD
Help & Support
Hardware
Windows
Internet
3
*your
PC
user guide
2
*your
PC
user guide
Welcome!
This User Guide will tell you all you need to know to get
your new PC up and running quickly and easily.
Please take a few moments to read through this manual
as it also explains how to use all the different parts of the
PC and will answer the questions most commonly asked
by our customers.
Whilst every care is taken to keep this manual up-to-date, some of the
features described may not be applicable to your particular system.
If this is the case, additional printed documentation may be supplied.
Alternatively, it may be in electronic format on CD or as ‘help’ files on the
hard disk drive. For the latest information you should sign up for your free
Supanet account (UK only) and visit our web site, www.supanet.com
Getting Started in Windows! . . . . . . . . . . . . . . . . . . . . . . .4
The Mouse . . . . . . . . . . . . . . . . . . . . . . . . . . . . . . . . . . . . .4
The Intellimouse . . . . . . . . . . . . . . . . . . . . . . . . . . . . . . . .4
The Keyboard . . . . . . . . . . . . . . . . . . . . . . . . . . . . . . . . . .5
Wireless Internet Keyboard and Mouse . . . . . . . . . . . . . .6
The Windows XP Desktop . . . . . . . . . . . . . . . . . . . . . . . . .7
User Accounts . . . . . . . . . . . . . . . . . . . . . . . . . . . . . . . . . .8
Adding an account . . . . . . . . . . . . . . . . . . . . . . . . . . . . . .9
Running Programs . . . . . . . . . . . . . . . . . . . . . . . . . . . . .10
Installing Additional Software . . . . . . . . . . . . . . . . . . . . .11
Requirements . . . . . . . . . . . . . . . . . . . . . . . . . . . . . . . . .11
Windows XP Home Edition - Compatibility issues . . . . .12
Shutting Down . . . . . . . . . . . . . . . . . . . . . . . . . . . . . . . . .13
Logging Off or Changing the User: . . . . . . . . . . . . . . . . .13
Connecting to the Internet . . . . . . . . . . . . . . . . . . . . . . .14
To connect to the Internet with Supanet: . . . . . . . . . . . .14
Outlook Express . . . . . . . . . . . . . . . . . . . . . . . . . . . . . . .15
Building Your Own Website . . . . . . . . . . . . . . . . . . . . . . .16
Worldbuilder2 . . . . . . . . . . . . . . . . . . . . . . . . . . . . . . . . .16
Security on the Internet . . . . . . . . . . . . . . . . . . . . . . . . .18
Anti-virus Software: . . . . . . . . . . . . . . . . . . . . . . . . . . . .18
Anti-hacker (Firewall) Software: . . . . . . . . . . . . . . . . . .18
SPAM . . . . . . . . . . . . . . . . . . . . . . . . . . . . . . . . . . . . . . . .19
Popups . . . . . . . . . . . . . . . . . . . . . . . . . . . . . . . . . . . . . .19
Disk Drives . . . . . . . . . . . . . . . . . . . . . . . . . . . . . . . . . . .20
Removable Drives/Storage . . . . . . . . . . . . . . . . . . . . . . .20
The Hard Disk Drive . . . . . . . . . . . . . . . . . . . . . . . . . . . .21
CD-ROM Drives . . . . . . . . . . . . . . . . . . . . . . . . . . . . . . . .23
CD-Writers . . . . . . . . . . . . . . . . . . . . . . . . . . . . . . . . . . .24
DVD-ROM Drive . . . . . . . . . . . . . . . . . . . . . . . . . . . . . . . .25
DVD-+Writers . . . . . . . . . . . . . . . . . . . . . . . . . . . . . . . . .25
Game Controllers . . . . . . . . . . . . . . . . . . . . . . . . . . . . . .27
Modems . . . . . . . . . . . . . . . . . . . . . . . . . . . . . . . . . . . . . .28
Firewire (IEEE 1394) Ports . . . . . . . . . . . . . . . . . . . . . . .28
LAN Network Port (Ethernet) . . . . . . . . . . . . . . . . . . . . .28
Getting Help In Windows XP . . . . . . . . . . . . . . . . . . . . . .29
Electronic Manuals . . . . . . . . . . . . . . . . . . . . . . . . . . . . .30
The Reload CD . . . . . . . . . . . . . . . . . . . . . . . . . . . . . . . .31
When to use the Reload CD: . . . . . . . . . . . . . . . . . . . . . .31
How to use the Reload CD: . . . . . . . . . . . . . . . . . . . . . . .31
Before Using the Reload CD: . . . . . . . . . . . . . . . . . . . . .32
The System/Driver CD . . . . . . . . . . . . . . . . . . . . . . . . . .33
Troubleshooting . . . . . . . . . . . . . . . . . . . . . . . . . . . . . . .33
Troubleshooting Modems . . . . . . . . . . . . . . . . . . . . . . . .36
Useful Web sites . . . . . . . . . . . . . . . . . . . . . . . . . . . . . . .37
This Manual . . . . . . . . . . . . . . . . . . . . . . . . . . . . . . . . . . .38
Exclusions of consequential Loss . . . . . . . . . . . . . . . . . .39
Getting Started
TABLE OF CONTENTS
Page 3
5
*your
PC
user guide
4
*your
PC
user guide
Getting Started in Windows!
Windows is the interface between you and the computer. It is pre-installed onto the
computer and has an easy to use graphical display. If you have used a PC (Personal
Computer) before and are confident in using Windows XP you can just dive straight in and
explore. You can always come back to this guide later on.
If you are new to computers this chapter will give you enough information to start using
Windows and points you to some of the many places where you can find help and advice.
The Mouse
You will need to use the mouse usually along with the keyboard in all Windows applications.
Using a Mouse
You Point the mouse by moving it to an area or item on the screen, where the on-screen
pointer changes to an arrow or a hand.
You
Left Click the mouse by pressing and quickly releasing the left mouse button on an icon
on the desktop or in a menu. Usually, the colour of the icon will change to show that it has
been selected.
• You use the
left button to select an object or function.
• You use the
right button usually to bring up a menu of choices.
Sometimes you will need to Double Click with the left button on something
to make it work:
You Double Click on an item by pressing and releasing the mouse button twice in quick
succession. This action generally will ‘open’ that item.
To ‘run’ a program, or ‘open’ a file or folder, place the mouse pointer over the item and
double click. If you double click too slowly Windows may think you have performed two
normal clicks and nothing will happen.
You can adjust the speed needed for the Double Click to work if necessary, search in the
Windows Help and Support for Double Click for more information.
Sometimes you may want to move an item from one place to another; this is
called dragging and dropping:
You drag an item by pressing and holding down the left button on the item, and then
by moving the mouse, making sure not to let go of the left button.
You drop the item by releasing the left button when you have reached
the destination.
The Intellimouse
The ‘Intellimouse’ has a wheel between the two buttons.
This wheel helps you to view pages of text in a document, or
pages on the Internet that are larger than your monitor screen.
You can rotate the wheel up and down to scroll around
a window or sometimes even zoom in and out (magnify).
Depending on the application you can click the wheel
to change the direction of the scroll or to start another function.
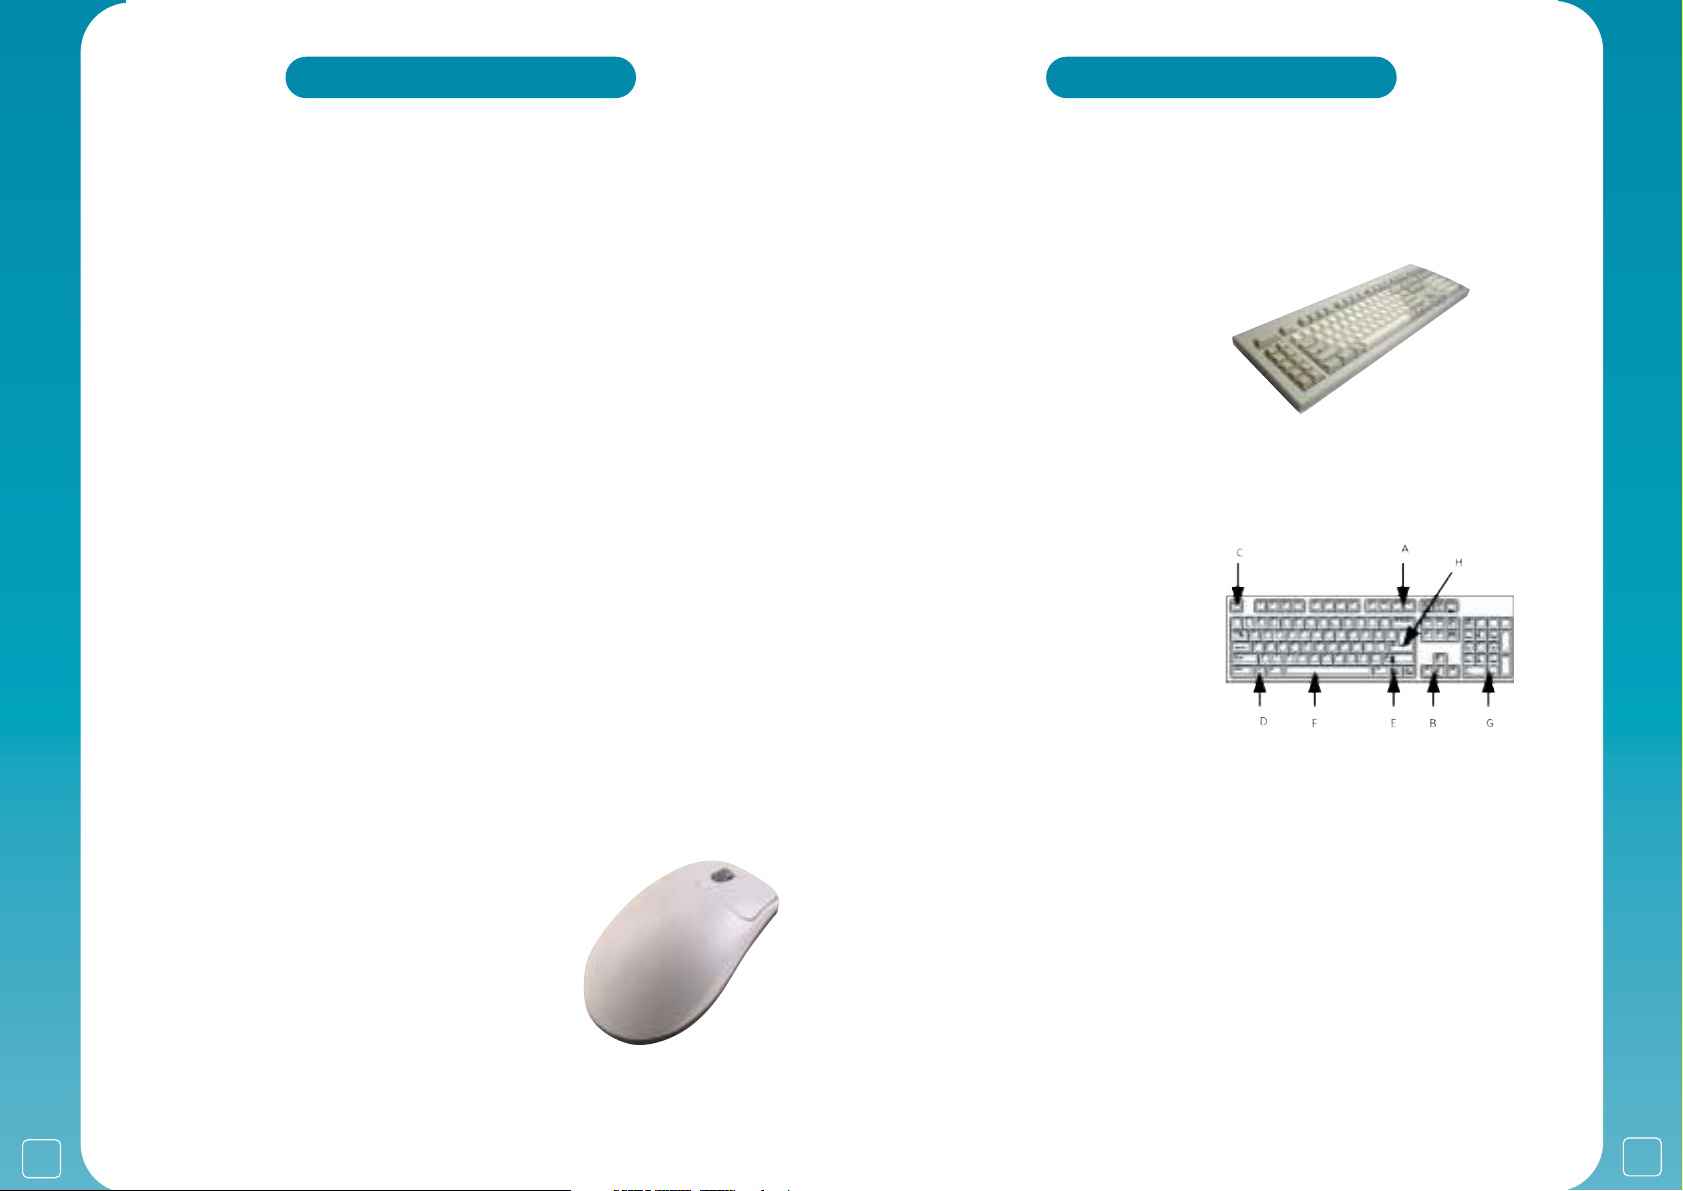
The Keyboard
The keyboard is very similar to a standard typewriter keyboard but may have some extra keys
for special functions:
You can use:
(A) The Function Keys or ‘F’ Keys:
The ‘F1’ to ‘F12’ keys along the top
of the keyboard are used as a quick way
of performing specific tasks such as
printing a document, summoning the
on-screen help menu, or saving a file.
(B) The ‘Cursor’ or ‘Arrow Keys’:
This is used for moving the cursor or highlight.
(C) The ‘Esc’ or ‘Escape’ key:
These are used to exit, or ‘escape’, from a menu or application.
(D) The ‘Windows’ key:
This is used to bring up the ‘Start’
menu on the Windows desktop.
(E) The ‘Right Click’ key:
This is used to open a menu
of additional functions.
(F) The ‘Space Bar’:
This long bar at the bottom is usually
used to create spaces between words or letters in a document.
(G) The ‘Delete’ key:
This key allows you to delete letters or words, or even whole paragraphs in a document.
(H) The ‘Carriage Return’ Key:
The ‘Return’ key can be used to create a new line when typing a document, just like a normal
typewriter. It can also be used to select ‘OK’ (Yes) whenever an application asks for input.
The Euro symbol:
On most keyboards this can be accessed by pressing the number ‘4’ key located just
underneath the ‘Function Keys’ whilst simultaneously holding down the ‘Ctrl’ key which is
located at the bottom right of the keyboard and the ‘Alt’ key which is near the ‘CTRL’ key or by
holding down ‘Alt Gr’ which is to the right of the long ‘space bar’ and pressing the number ‘4’.
Page 4
7
*your
PC
user guide
6
*your
PC
user guide
Wireless Internet Keyboard and Mouse
Some PCs are supplied with this type of keyboard
Connecting to the computer:
• Make sure the computer is turned off.
• Plug the receiver unit leads into the keyboard
and mouse ports at the back of the PC.
• Try to locate the receiver unit away from any electrical
devices, including the PC.
• Turn on the computer.
Batteries:
• Insert two AA batteries inside the battery
compartment of the keyboard.
• Insert two AAA batteries inside the battery
compartment of the mouse.
The Location of Keyboard and Mouse ID setting:
• The receiver unit ID switch is on the top of the receiver.
• The keyboard ID switch is on the underside of the keyboard.
• The mouse ID switch is on the underside of the mouse.
To initialize the keyboard and mouse:
• For best results make sure the receiver and mouse/keyboard are close together.
• Press and release the receiver unit ID switch.
• Then within five seconds press and release the
keyboard ID switch.
• Press and release the receiver unit ID switch.
• Then within five seconds press and release the
Mouse ID switch.
! Note: If either the mouse or keyboard are not working, repeat all steps from
the beginning.
Check that the batteries are correctly installed. Please replace batteries if necessary.
! NOTE: The model shown above may not be the model provided with your PC. For further
information refer to the keyboard and mouse setup guide included with your order.
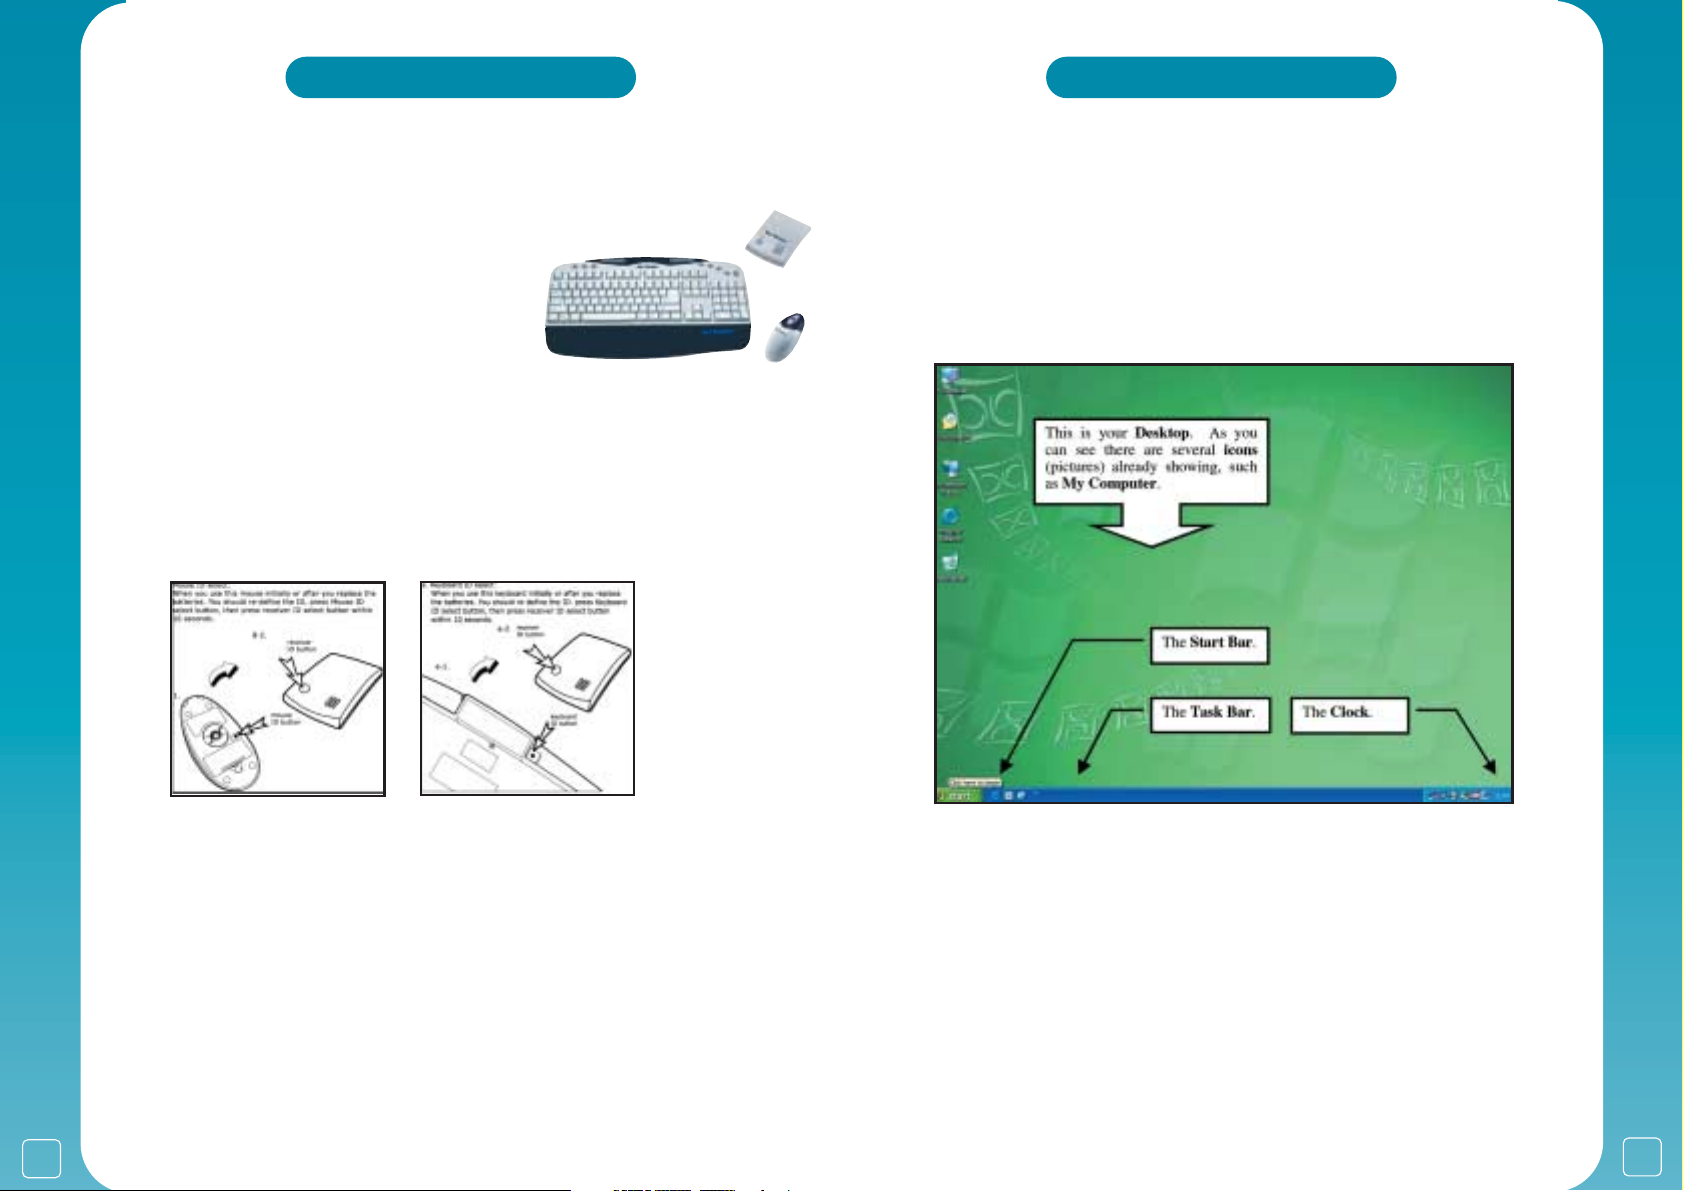
The Windows XP Desktop
After preparing Windows and setting up your Internet account, your Desktop will look
something like this.
! NOTE: To speed things up a bit, from now on, if you are not advised specifically to Double
Click with the mouse, or Right Click, then assume all Clicks are single Left Clicks, which are
performed with the Left Mouse Button.
Everything Starts from the Desktop:
With the mouse, click the ‘Start’ button to bring up a menu of programs and applications.
If you cannot see the program you want in this menu, click on ‘All Programs’ to reveal the rest
of the programs and further menus.
If you move the mouse over an icon or button on the desktop and without clicking leave the
mouse to hover a Windows Popup will give you information about what it is, these Popups are
called Screen Tips.
Page 5
9
*your
PC
user guide
8
*your
PC
user guide
User Accounts
Each user of the PC can have:
• A personal account, with a logon name and password.
• A personal folder to store their documents.
• Personalised desktop settings and appearance.
There are two types of account:
Administrator Account:
The first account setup in Windows XP has Administrator privileges.
The Administrator is usually a parent or a responsible person who is in charge of the PC.
Accounts created with administrator privileges can:
• Create, change and delete all user accounts.
• Make changes to the PC that will affect all the users of that computer.
• Install programs and have access to all files on the computer.
Limited Account:
A Limited account is best for children or occasional users of the PC.
• Users with this type of account can:
• Change their own account details only.
• Change their own desktop settings.
• View their own files or those in the shared files folder only.
Limited users may not be able to install some programs.
! NOTE: You do not have to set up multiple users if you do not want to. Without them, the PC
will start up using the logon name you supplied during initial Windows setup.
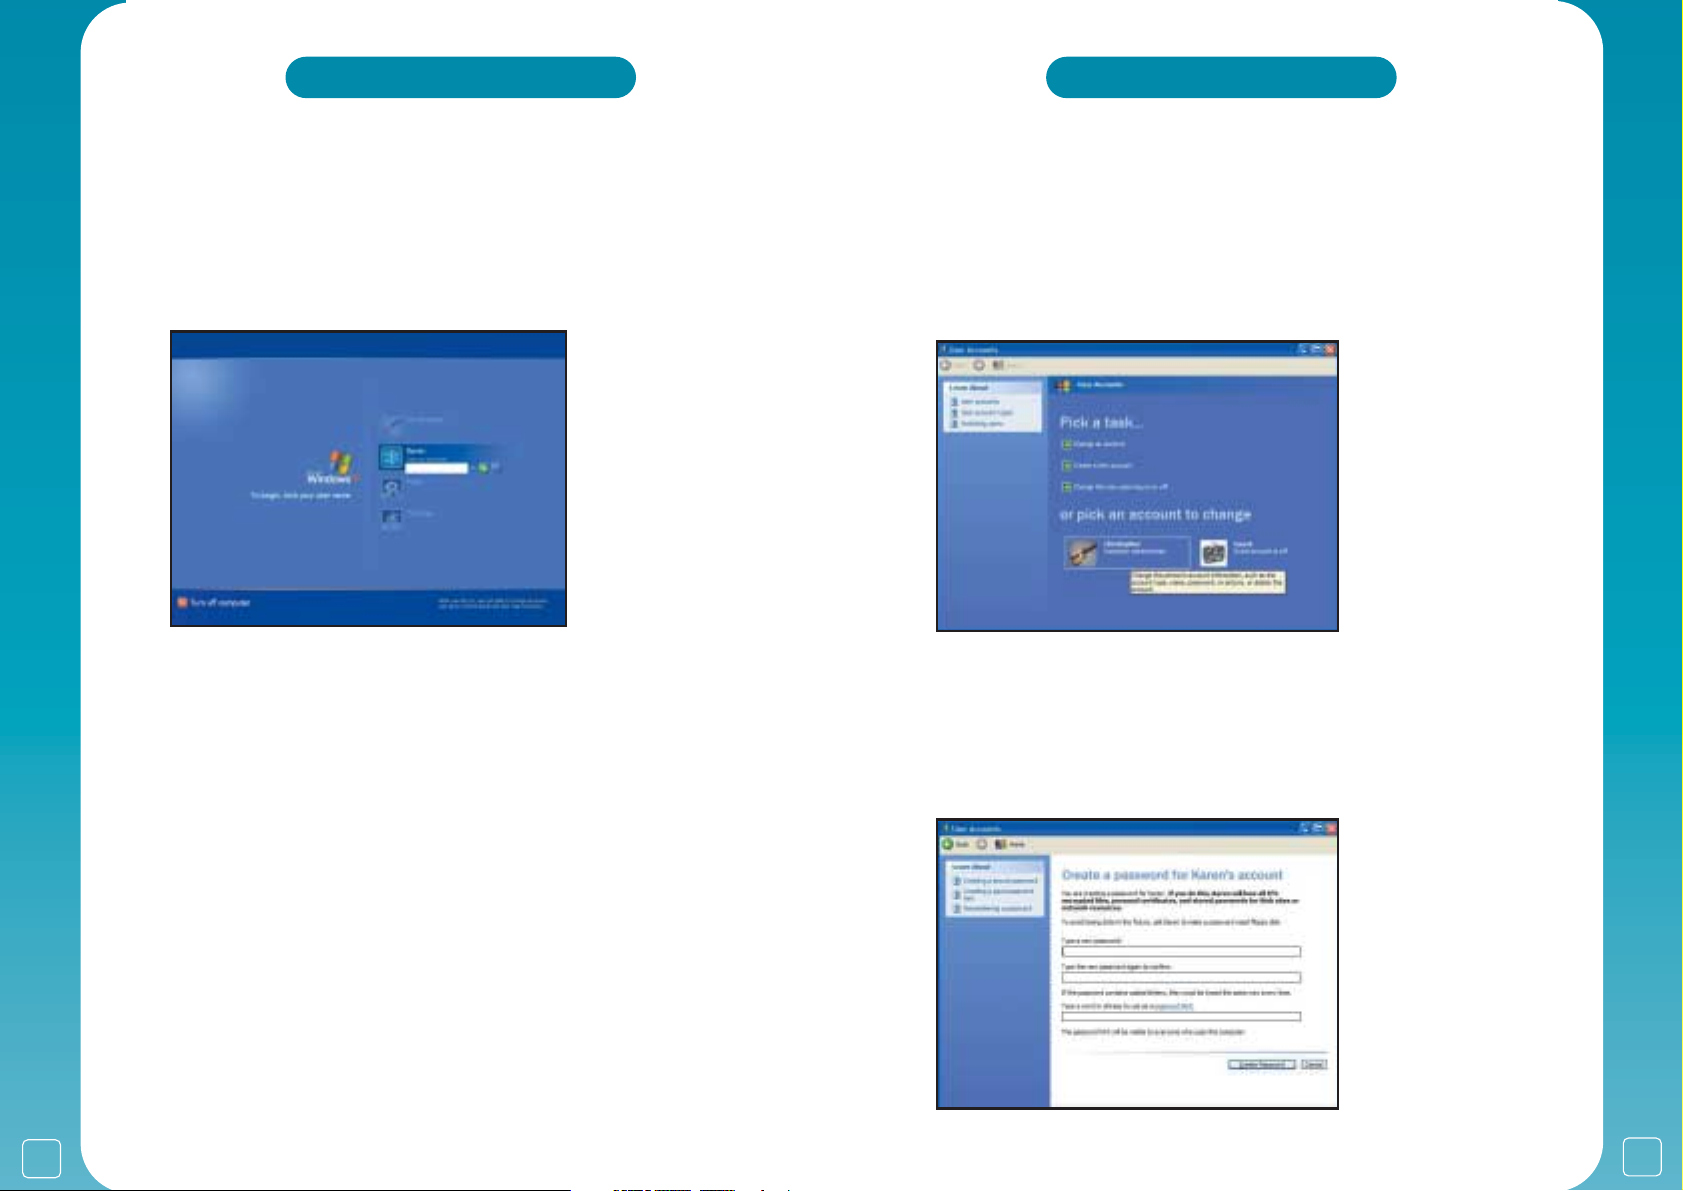
Adding an account
From the Desktop
• Choose 'Start’,’ Control Panel’ and 'User Accounts'.
• Click on 'Create a new account' and then, type in a name for the Account.
• Choose an Administrator or Limited Account.
Creating a password
If required, click on 'Create password' and follow the on-screen instructions.
! NOTE: Remember that passwords are case sensitive – the PC will see ‘password',
'PASSWORD' and 'Password' as three different words.
Page 6
11
*your
PC
user guide
10
*your
PC
user guide
Running Programs
Click ‘Start’ for the program menu.
From here you can:
• Launch Internet Explorer or Outlook Express.
• See your most recently used programs.
• Open your personal
‘My Documents’ folders.
Click on
‘All Programs’ to see the other
programs on your hard drive.
For example:
• Click on ‘Start’ to load Tour Windows XP
• Move the pointer to
‘All Programs’
• Move to ‘Accessories’
• Click on ‘Tour Windows XP’ to start the tour.
• Click on the
‘Exit’ button to stop the preview at any time.
! NOTE: Certain programs are for use on versions of Windows released prior to XP. These
programs may need to be run in Compatibility Mode to ensure correct operation.
Type ‘Compatibility Mode’ into the XP Help and Support page for further details. This can be
launched from the Start Menu, or by pressing F1.
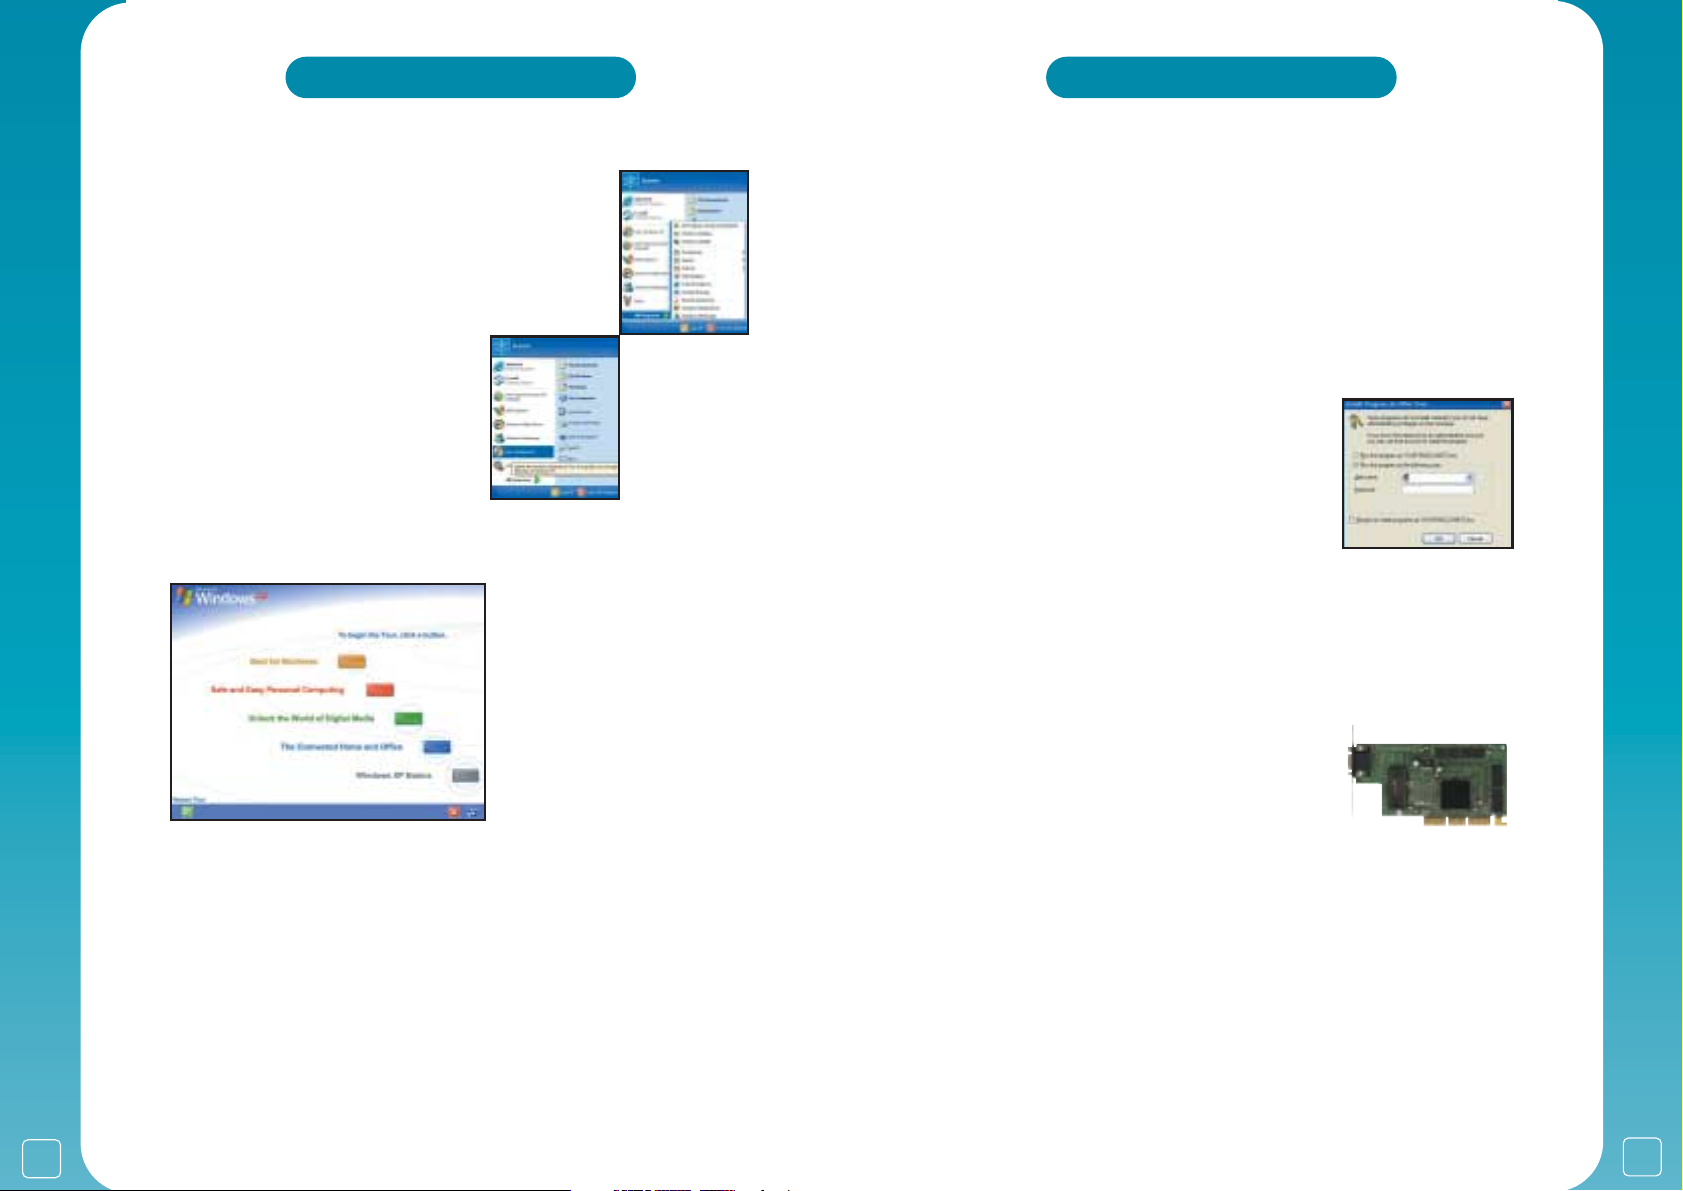
Installing Additional Software
You need to install any extra software on CD-ROM supplied or bought at a later date onto your
computer before you can use it. You should always follow the instructions supplied with the
software.
! NOTE: Only users with Administrator accounts should install software. Programs may not
install correctly from Limited accounts.
Most Windows CD-ROM disks will automatically start to play or ‘auto-play’ when you put the
disk in the drive. If the currently logged on user has only a Limited account this screen
appears. Select an account that has Administrator privileges before installing the software.
General advice on Installing Windows Applications:
• Close any Windows programs that may be running.
• Insert the CD-ROM disk containing your new software.
• Click on ‘Start’ and then ‘Control Panel’.
• Double Click on the ‘Add/Remove Programs’ icon.
• Click on the ‘Add new programs’ button.
• Choose ‘Add a program from floppy disk or CD-ROM’.
• Click ‘Next’ to install the software onto your PC.
• Click on the ‘Finish’ button to finish the installation.
Follow the instructions that appear on screen and accept the default locations the software
suggests, or follow the recommended instructions in the software manual.
! NOTE: After they have been installed most programs will create their own entries under
‘Start’ and ‘All Programs’ which you need to click on to run your new software.
Installing Games Software:
You can load and run most new and recent games in Windows but always follow the
instructions provided with the game for installation and troubleshooting advice.
Requirements
First check the system requirements of any game:
(RAM) Memory: e.g. 256MB
(CPU) Processor speed: e.g. 800Mhz
Graphics card: e.g. 32MB 3D Accelerator
Version of Windows: e.g. Windows98, Millennium, Windows XP.
Compatibility: e.g. Not Compatible with Windows NT 4.
Additional Software e.g. DirectX v8.1
Some game manufacturers supply two sets of specifications, one is the bare minimum and
the other is recommended for the game to play at its best.
Games software requires more and more power as time goes by, and at some point you may
need to upgrade your graphics card for these games to work properly, you may also need to
upgrade other components such as RAM, CPU or even Hard Drive Space to install the games.
Should you require an upgrade please contact our technical advisors using the number
supplied in your warranty pack.
Microsoft Direct X:
DirectX is pre-loaded on your PC as standard. Some older games may also be supplied with a
version of Direct X and you may be asked if you wish to load this during the installation
process. To check what version of Direct X you have on your system, Click on ‘Start’, ‘Run’ and
type in ‘dxdiag’ this will open the Direct X diagnostics tool and the version number should be
displayed on the first tab.
! IF IN DOUBT ALWAYS SAY 'NO' TO INSTALLING DIRECT X.
Page 7

13
*your
PC
user guide
12
*your
PC
user guide
Windows XP Home Edition – Compatibility issues
Windows XP is an operating system from Microsoft, and is available in two
versions:
Windows XP Home Edition - Consumer/Home orientated
Windows XP Professional Edition - Business/Corporate orientated
A major support issue with Windows XP is compatibility with older software and hardware. To
understand why there are compatibility problems with Windows XP, it is important to broadly
understand the history of Microsoft's operating systems. Historically, Microsoft operating
systems have fitted into two categories:
Consumer Group Corporate Group
Windows 95 Windows NT
Windows 98 Windows 2000
Windows ME
The Consumer group was primarily aimed at the home users and Corporate group at the
business users. Microsoft have now replaced both of these categories with the two versions of
Windows XP mentioned above.
However, the key thing to remember is that Windows XP is based on the technology used by
the corporate group of operating systems (i.e. Windows NT/2000). Although the basic
architecture of the Consumer Group and Corporate Group is the same, there are key
differences. It is these differences that have in the past required software applications and
hardware device drivers to be written separately for one or both categories of operating
system.
Therefore, in simple terms if software applications or hardware device drivers were written to
be compatible with both categories of operating system then the chances are they will be
compatible with Windows XP. If however, the software applications were written for the
Consumer Group of operating systems only then it is highly probable that they will not be
compatible with Windows XP.
On a positive note, at launch, Windows XP supported approximately 12,000 third-party devices
-- from scanners and printers to external drives and add-in cards -- nearly twice the number
supported by Windows 2000 at its launch. Windows XP also supports the vast majority of
popular software applications. More than 1,500 new applications and 4,000 existing
applications were tested. As a result of extensive testing in the United States, 90 percent of
the 1,500 most popular applications (distributed in North America) will run on Windows XP.
An additional 2,000 applications are being tested outside the United States, and initial results
show that 80 percent to 95 percent are compatible.
Shutting Down
Don’t forget to save any work you have done!
• Exit any programs you are using.
• Click on ‘Start’ and then ‘Turn Off Computer’.
• Select ‘Turn off’ to shut down the computer.
You can use the ‘Standby’ and ‘Restart’ Options by simply
clicking on them.
! NOTE: Standby is recommended for short periods of
inactivity.
! NOTE: Switching the PC off without following the
shutdown procedure should only be done in emergencies as
this can cause loss of data and software corruption.
Logging Off or Changing the User:
To end your computer session and allow someone else to use the PC without Shutting Down:
• Click ‘Start ’and ‘Log Off ’.
• Click ‘Switch User ’
or
• To end your session completely and
return to the main ‘Log In’ screen:
• Click ‘Log Off’
Page 8

15
*your
PC
user guide
14
*your
PC
user guide
Outlook Express
Using Outlook Express:
Use Outlook Express (OE) to send and
receive e-mail.
• Click ‘Start ’and then ‘E-Mail -Outlook
Express’.
The dial-up connection box will appear.
• Click on ‘Work Offline ’and then ‘Hide ’
to clear.
• Click ‘Yes’, if asked ‘Do you want to make
Outlook Express your default mail client?’
To create an email:
• Click on the ‘New Mail ’button
• Type the recipient ’s e-mail address in the box labelled "To:"
• Type in a subject for the message in the box labelled "Subject"
• Click in the main window and type your message.
To send your email:
• Click ‘Send ’and the message will be stored in the ‘Outbox ’folder.
• Click ‘Send/Receive ’when prompted click yes to go online
• Click on ‘Connect ’ when the ‘Dial Up Connection ’box appears
When the connection is established your message will be sent and a copy stored in the
‘Sent Items ’folder.
To close Outlook Express and disconnect your Internet connection:
Choose ‘File ’and ‘Exit ’and ‘Disconnect Now ’.
To read emails sent to you:
• Launch Outlook Express and then ‘Connect ’
If you have e-mails waiting they will be downloaded to the
‘Inbox’ folder.
• Click on ‘Inbox’ to see the Sender and Subject of the mail you have received.
The message is shown in preview the panel below.
Or
• Double-click on any message to see it in a separate window.
! Don’t forget to close your connection as described previously.
Creating additional e-mail addresses:
If you chose the username ‘smith’ on signing up to Supanet your email address would
be smith@supanet.com.
You can also use anything@smith.supanet.com.
‘Anything’ is known as an alias. You can use as many aliases as you want. So each member
of the family can have an e-mail address for example bill@smith.supanet.com,
betty@smith.supanet.com, and ben@smith.supanet.com and so on.
Connecting to the Internet
All our PCs come provided with the capability to sign up for a standard 56k modem Supanet
Internet
account immediately from setup. The Supanet Pay-As-You-Go and Supavalue
accounts can use any telephone provider for connection. All other accounts require a
British
Telec om (BT)
telephone line. Also, provided you have a BT line, the standard 56k connection speed
can easily be upgraded to
Broadband, which can provide up to ten times faster internet
access. This is especially useful for large file downloads including movies and entire albums
and will also provide smoother and faster on-line gaming.
Call Supanet
FREE on 0800 915 8188 for advice on which package is best for you.
To connect to the Internet with Supanet (only available in the UK):
• Follow the simple registration screen that shows whenever the PC is switched on.
• Double Click on the Supanet Internet icon on the Desktop.
The PC connects to Supanet and Internet Explorer will open the Supanet Home Page.
Internet Explorer
Internet Explorer is the most popular method of
browsing the Internet and comes already installed
on your Desktop.
From
Supanet ’s home page you can start to
explore the Internet.
Click on ‘Help’ and ‘Tutorials’ for online help
pages about:
• Finding your way around the Internet.
• Using E-mail and Newsgroups.
• How to create your own website using Supanet
WorldBuilder 2.
! If your telephone has a ‘call waiting’ facility you MUST disable this before connecting,
as it may cause your connection to drop due to interference.
Comprehensive help files are also available from the Internet Explorer Help menu.
Closing the Internet Connection:
• Close Internet Explorer by clicking on the RED X in the top right hand corner.
• Click on ‘Disconnect Now’ to close your Internet connection.
Alternatively:
• Right-click the ‘Connection Monitor’ icon next to the clock and then click ‘Disconnect‘.
Page 9

17
*your
PC
user guide
16
*your
PC
user guide
Launching Worldbuilder2
Once you have logged in to Worldbuilder2 you
will see the following section.
You can get information about the Webspace
allocated to your account.
In this section you can Launch Worldbuilder2
and start to design your website following the
step by step guide provided.
Once your website is finished and you are happy
with it, you can Publish Your Site to the Internet
so that everyone can see it.
You can also Promote your website so that it shows up on Supanet searches, and also on
International searches. There is nothing more satisfying than seeing your website show up on
an Internet search.
Building your website
Once you click on Launch, the Worldbuilder2 program will open. As you can see it is a fairly
simple menu, with full instructions in the panel on the left. The panel on the right shows your
website as it develops.
Follow the instructions on the left; at some point you may want to leave it for a while, you may
need more pictures if you are creating a photo album. At the top of the left hand panel there
is
a Quit button, pressing this will automatically save your work so that you can come back to
it at a later date. You will be able to continue where you left off.
Building Your Own Website
Once you have a Supanet Account you will be able to
create your very own web site on a subject of your
choice, from holiday snaps to an Internet Diary.
A website can be accessed by anybody on the Internet,
so if you build a Diary, all of your friends and family
can read it and find out how you are doing.
! NOTE: Make sure that no financial information is
included in your website, also try to avoid providing
information about your location and although it may
be tempting it is not a good idea to reveal your
primary email address as this could leave you
vulnerable to viruses and marketing emails (SPAM).
Worldbuilder2
To aid you in creating your website, Supanet have
provided
Worldbuilder2, which is a program that runs
across the Internet, this means that you do not install
it on your PC.
This also means that you can access the program
from anywhere that you have Internet Access.
If you have a business, and you are away and find
something you need to update on the site, dial up
Supanet on any Internet capable PC, click on My
Webspace at the top of the page, and then click on
Worldbuilder2 to login and build or administer your
website.
Login by typing your Supanet account name and
password in the fields shown and click the Login
button.
For more information on accessing your Supanet
account from other locations, please contact Supanet
Support.
Page 10

19
*your
PC
user guide
18
*your
PC
user guide
SPAM
Spam is a form of unsolicited email from marketing firms on the Internet, just like the
ordinary mail you get through your letterbox, but emails can be of an adult nature or worse.
Always try to keep your primary email safe, just for friends and family. Create an alias for use
when registering for newsletters on the Internet, as they may pass your details on to a spam
organization, contact your Internet Service Provider (ISP) e.g. Supanet for more information
about spam and ways to combat it. There are also software programs available that will filter
spam out of your email.
Supanet is dedicated to preventing spam and has active filters on its servers that hunt for
possible examples of spam. There are also websites dedicated to answering any further
questions you might have about spam. Spam offenders are placed on a blacklist that prevents
them from using their account from sending massive amounts of emails, effectively putting
them out of business.
! NOTE: Never give your account or password details to anyone, apart from a Supanet or your
own ISP advisor as this account could then be stolen and used for spamming other people.
You would then be identified as a spammer yourself, and your account would be disabled.
Popups
Popups are adverts that appear in the middle of the screen at random while you are browsing
the Internet, they can often be harmless and are a part of the website’s normal operation. But
sometimes these Popups can be of an adult
nature or contain viruses.
When in doubt about a Popup use your
Task Manager to End the Process.
On your keyboard using the left hand hold
down the
Ctrl key (bottom left of the
keyboard) and the
Alt key (just to the right
of Ctrl), now while still holding those keys
down, press (once) the
Delete key (just
above the Arrow keys).
The "Task Manager" will show up with the
Popup listed, click on it once with the
mouse and then click on
End Task, this will
shut the Popup down safely.
You can also buy software that will prevent
Popups from showing up, and some
software will even prevent the Popup from
being downloaded from the Internet, which
will help to save your download time.
Security on the Internet
VIRUS ALERT!
If you have been listening to the news in the last few months you will have seen Virus Alerts
that have even made it to the National News. Threats to your security, that even though
possibly do not attack you directly, have unwanted side effects, such as data loss, Windows
and application crashes and the inability to use the Internet. Some attacks can even steal your
personal or financial details if stored on your computer; this information can then be used to
invade your privacy or to obtain money from your bank or credit cards.
Nowadays the threat of a
Virus, Trojan, Worm or Hijack is more real than ever, just
connecting to the Internet can leave your computer open to malicious attack. Most new
computer users report an attack within a few days, and some have reported an attack within
just a few minutes of connecting to the Internet.
However there are ways to
reduce the risk of attacks, to close the stable door before the
horse bolts. Methods for reducing the risk include a mixture of common sense, caution and
specialized software. Apart from the attacks that arrive without your interaction, most attacks
arrive by downloading or clicking on something from the Internet.
Anti-virus Software:
The first step and still the most effective protection is Anti-virus software. Anti-virus
protection works on two main levels. The first involves scanning files, documents and
programs accessed on your PC or being downloaded from the Internet, for suspicious, virus
type behaviour. This level of security is provided by the Anti-virus program itself, once
installed on the PC. The second level is a list of viruses, which contains their names and what
they are likely to do. The first level uses this list to cross reference suspicious behaviour, and
help identify viruses.
Anti-virus software MUST be updated regularly, as often as possible, and if possible, every
time you connect to the Internet. Most anti-virus software will automatically check for updates
when you connect, some will need manually updating, always refer to the software
documentation for information on this. Some updates will include changes to the anti-virus
program and some will be just updates to the virus list. Program updates will nearly always
require you to turn off your PC, and restart it.
Anti-hacker (Firewall) Software:
The second step is becoming more and more important as the Internet becomes more a part
of our lives. Nowadays PCs are multimedia stations, capable of providing digital
entertainment, some of which can be found on the Internet. To access this entertainment new
ways of connecting to the Internet have been incorporated into Windows XP. This enhanced
use of the Internet can leave you open to attack, directly by hackers. This type of attack is
usually not detected by anti-virus software.
Firewall software allows the information you want to leave the PC, and only the information
you request to come down from the Internet.
Common Sense and Caution:
However the specialized software above loses some of its potency if common sense and
caution are not also utilized. For instance, no companies send requests in email for account
information, nobody will ask you for your password in an email or in a window that pops up.
Account and password information will only be requested during a process that you begin
yourself. I.e. on the Supanet website, their webmail function will ask for your account and
password, but only when you click on the EMAIL button to begin the process.
Never open or preview emails that arrive from people you do not know, and to verify that
emails from people you do know were definitely sent by them, agree a code that you can place
in the Subject Line.
Page 11

21
*your
PC
user guide
20
*your
PC
user guide
Disk Drives
Your PC stores the programs and data you use on one to four, different drives.
The number and type of drive varies depending on the PC ordered.
DRIVE CAPACITY DRIVE TYPE
A: Floppy drive
(normally 3.5") 1.44Mb
B: Additional Floppy drive (not normally fitted)
C: Hard disk drive Depends on PC ordered.
D: CD-ROM or
DVD-ROM drive 650Mb or 4.7Gb up to 17Gb
E: CD-Writer or 650Mb or 4.7Gb up to 17Gb
DVD-Writer (if fitted)
Windows XP places Hard Drives at the start of the alphabet, beginning with the letter ‘C’ so
the first drive is C: then Windows XP places Optical (CD) Drives after the Hard Drives, so with
only one Hard drive installed as C: the CD-ROM Drive would show as D: If another Hard Drive
were installed, Windows XP would set that as D: and so the CD/DVD-ROM Drive would
become E: and if another CD Drive were fitted that would become F: and so on.
Removable Drives/Storage
Windows XP has the ability to access information on drives that can be removed from the PC.
Always read the documentation for the drive for removal instructions.
Examples of storage that Windows XP can see as a removable drives are:
• Digital Cameras.
• Zip Drives.
• USB Pen Drives.
• Multimedia - Card Readers.
The Hard Disk Drive
! IMPORTANT NOTE: Avoid keeping magnetic objects near your PC and your Floppy Disk
collection. Magnetic fields destroy data stored on Floppy and Hard Disk Drives.
How much space do I have left?
• Click ‘Start’ and then’ My Computer’
• Right click on the C: drive icon.
• Choose ‘Properties’ from the menu
The pie chart shows how much of the hard disk has
been used up.
If the drive is becoming full, you can.
• Uninstall any programs you no longer use.
• Consider running the maintenance tasks listed below
Defragmenter:
Defragmenter reads and re-saves all the files on the disk in continuous blocks to allow
quicker access.
• Click >‘Start’, >‘All Programs’, >‘Accessories’, >‘System Tools’, >‘Disk Defragmenter’.
• Choose the hard drive you want to defragment.
• Click ‘Analyze’ to perform a check on the drive.
• Click the ‘Defragment’ button, if recommended, to start the process.
Depending on the size of the Hard Drive and
the amount of space used defragmentation
can take several hours to complete.
Check your progress by watching the
progress bar, which may sometimes pause
for several minutes at around 10%.
Don’t worry - just wait for the progress bar
to start moving again.
If the defragmenter program keeps starting
from the beginning again, then another
program is interfering with the process.
It is always best to run defragmenter when
no other programs are running, especially
screensavers.
Page 12

23
*your
PC
user guide
22
*your
PC
user guide
Disk Cleanup
Disk Cleanup helps you free up space on your hard drive by identifying files you can safely delete.
To start Disk Cleanup:
• Click ‘Start’, ‘All Programs’, ‘Accessories’, ‘System Tools’ and then ‘Disk Cleanup’.
Recycle bin:
You can deposit files in the Recycle Bin but still retrieve those files you may have accidentally
removed unless you ‘empty’ the bin, which removes the files completely from view.
If you need more hard disk space and to maintain your Hard Drive performance you should
regularly ‘empty the recycle bin’.
• Open the bin by double-clicking on it
• Click on ‘File’ and ‘Empty Recycle Bin’ to delete the contents permanently.
CD-ROM Drives
Understanding Disk Formats
CD-Audio: CD disc with audio tracks in the CDDA (Compact Disc Digital Audio) format, which
is the standard for recording music tracks on a compact disc.
CD-ROM: (Compact Disc Read Only Memory):
A compact disc format used to hold text, graphics and hi-fi stereo sound. An audio CD player
cannot play CD-ROMs, but CD-ROM players can play audio discs.
DVD-Audio: An audio-only storage format similar to CD-Audio that can also contain music
videos, graphics and other information.
DVD-ROM: (Digital Versatile Disc-Read Only Memory):
A read-only DVD disc used for storing data, menus, audio and video. Most DVD-ROM drives
will play DVD-Video movies, but some home DVD players cannot play DVD-ROMs.
CD-R: The most popular format for writing discs, CD-R normally holds up to 650MB of
information, but larger, less compatible discs are available up to 1GB. The discs are
inexpensive and can be used to share data with any PC equipped with a CD-ROM drive.
DVD-+R: DVD-+R is similar to CD-R in that you can write to the discs only once. But it has
much more storage capacity (up to 4.7GB of data). These discs are normally used for burning
high-quality video to be played on a DVD player.
CD-RW: Unlike the CD-R format, the CD-RW format can be written to and erased multiple
times. CD-RW drives read and write to either CD-R or CD-RW discs, but many older CD-ROM
drives cannot read CD-RWs.
DVD-+RW: Like CD-RW, DVD-+RW is a re-writable format. The drive can also create CD-RW
and CD-R discs.
DVD-Video: These are the DVD movies you buy in the store. These disks use high quality
MPEG2 video and digital surround sound.
Common CD ROM Functions:
Most CD-ROM drives have these functions in common:
• Stop/Eject Button.
• Power/Read Light.
• Manual release button/eject.
As you can see from the illustration below the CD-ROM Drive has a small round pinhole,
pushing a long pin into this hole will manually release the tray and the CD-ROM drawer will
open. This can be useful if a CD Disk ever becomes stuck in the drawer.
! Remember, never force the drawer, forcing the drawer can cause further damage to the unit.
Page 13

25
*your
PC
user guide
24
*your
PC
user guide
Operating the CD-ROM Drive:
• Open the disk tray by pressing the eject button.
• Place an audio
CD/CD-ROM disk in the centre of the tray with the printed side of the disk
(label) facing upwards.
• Close the disk tray by pressing the eject button. The drive is now ready for operation.
! NOTE: Most CD-ROM disks will ‘auto play’ i.e. start to run as soon as the disk is loaded into
the drive. Some CD-ROM Drives will not ‘auto play’, as a safety feature to help prevent
accidentally interrupting the normal operation of the system.
CD-Writers
A CD-RW drive reads and plays CDs like an ordinary CD-ROM. It also writes data to CD-R and
CD-RW disks. Data written to a CD-R disk cannot be deleted. But data can be added until the
disk is full. CD-RW disks work the same as CD-R disks, but data already on the disk can be
deleted, you can delete individual files or even clear the entire disk. Most CD-RW disks allow
this to be done hundreds of times. Some PCs come fitted with a CD-Writer drive. Our CD write
capable drives come ready to use with all the necessary software to create audio and data CDs.
! Not all CD-R and CD-RW disks are compatible with every CD Drive, as CD Drives are
constantly being updated and improved by the manufacturer. Please contact Support for
recommendations if you are having difficulty.
! Windows XP has built in support for CD writers and you can save information on CD-R and
CD-RW disks in the same way that you can copy files to a Floppy Disk or Hard Drive.
To Copy Files and Folders to a CD:
• Insert a CD-R or CD-RW into the CD-Writer drive.
• Click on the files or folders you want to copy to the CD.
• Click ‘Copy this file’ under ‘File and Folder Tasks’,
‘Copy this folder’, or ‘Copy the selected items’.
In the Copy Items dialog box click the CD-RW drive, and
then click ‘Copy’.
In My Computer, double-click the CD-RW drive. Windows
displays a temporary area where the files are held before
they are copied to the CD. Verify that the files and folders
that you intend to copy to the CD appear under ‘Files ready to be written to the CD’. Under CD
Writing Tasks, click ‘Write these files to CD’, and follow the on-screen instructions.
Alternatively you can click ‘File’ and then ‘Write these files to CD’.
Hints on writing CDs:
• If you choose not to write the files in the temporary folder to a CD, you will see a reminder
that the folder still contains files when you start the PC.
• Do not copy more files to the CD than it will hold. Standard CDs hold up to 650MB.
• Check you have enough space on your Hard Drive (C:/) to store the temporary files created
during the CD writing process. For a standard CD, Windows reserves up to 700MB of the
available free space.
• After you copy files or folders to the CD, view the CD and open the file to confirm that the
files were copied.
• Blank CD-R and CD-RW disks vary greatly in quality. Always buy blank disks from brand name
manufacturers -and never use unbranded ‘white label’ disks as they can be of poor quality.
! IMPORTANT NOTICE. CD copier software is designed to assist you in reproducing material in
which you own the copyright or have obtained permission to copy from the copyright owner.
Unless you own the copyright or have permission from the copyright owner, you may be
violating copyright law and be subject to payment of damages and other remedies. If you are
uncertain about your rights, contact your legal advisor.
DVD-ROM Drive
Some systems may have a ‘Digital Versatile Disk’ DVD-ROM drive, which at first glance looks like
a CD-ROM drive but has the DVD logo on the front panel to differentiate it from a CD-ROM drive.
A double-sided DVD-ROM disk holds up to 17Gb of information to run comprehensive
multimedia, games software, and digital quality movies.
Viewing DVD Movies:
Put your DVD movie in the drive and Windows XP will
ask you what program should play the DVD, most
systems are provided with
PowerDVD already installed
and ready to play.
Once PowerDVD starts a small
control panel will
appear with controls exactly like a standard home DVD
player. Controls like ‘PLAY’, ‘STOP’ and ‘FAST
FORWARD’.
DVD disk regions:
DVD disks and players have embedded ‘region codes’ so that, for example, DVD disks
released for ‘North America’ will not be playable in Europe.
! When buying DVD movies always make sure that they are for use in Europe - Region 2.
DVD-+Writers
A DVD-+R or DVD-+RW Drive can perform all the functions of the CD Drives listed above. It
can read and play CDs like an ordinary CD-ROM. It can also write data to DVD-R and CD-RW
disks. It can also read DVDs and can also write data to DVD-R and DVD-RW disks. As before
data written to a CD-R disk cannot be deleted. But data can be added to the disk until the disk
is full. DVD-RW disks work the same as DVD-R disks, but data already on the disk can be
deleted, you can delete individual files or even clear the entire disk. Most DVD-RW disks allow
this to be done hundreds of times. Some PCs come fitted with a DVD-+ Writer drive. Our DVD
Write capable drives come ready to use with all the necessary software to create audio, data
and DVD disks.
Hints writing DVDs:
• Avoid interruptions. Make sure there are no programs running that could periodically
interrupt your computer’s operations. Switch off programs such as screen savers, e-mail,
virus updates and fax software. Also, log off the network to prevent anyone accessing your
hard drive during burning.
• Keep files in the same place: If the files you want to burn are scattered all over your hard
drive, the burning software may have trouble finding them quickly enough to send them
smoothly to the burner. Keep all your files in the same folder or even better; reserve a
partition on your hard drive for storing disc images. Do not copy across a network.
• Create a real disc image: most burning software gives you the choice of creating a real disc
image of the files to be burned or burning them "on-the-fly". A real disc image is a single
file that contains all the files you want to burn. It’s time consuming and takes up hard disc
drive space, but it’s a safer bet when burning lots of smaller files to a recordable disc.
• Defrag often: When you save a file to your hard drive, the data is written to blank parts of
the disc. As a result, the file’s data is fragmented. When you access a file, the software has
to find all the fragments, which can slow things down. Defragmentation, or "defragging"
consolidates files into a single, contiguous space for fast access.
Page 14

27
*your
PC
user guide
26
*your
PC
user guide
• Burn slower: Record at a slower speed, which does not empty the buffer as fast as highspeed burning. This is especially important when copying many small files or copying a CD
from a CD-ROM drive that is slower than the burner drive.
• Test first: while CD-Rs are relatively inexpensive, other media formats can be expensive. It’s
a shame wasting them during unsuccessful burns. So before burning, have the software do
a test burn.
• Test last: While this has nothing to do with buffer underrun, it’s a good way of avoiding
unpleasant surprises, and it’s easy. When you’ve burned a disc, try to play it on the
intended player.
Audio CDs:
When you place a music CD in the CD drive, the
Windows Media Player (WMP) will automatically run.
It looks like a normal CD player, with buttons for controlling the tracks you listen to.
You can:
• ‘Play’, ‘pause’ and ‘stop’ a CD from playing and use the skip buttons to move between
tracks or parts of tracks.
• Play many other types of multimedia files including MP3, WAV and MID audio files and AVI,
ASF and MPEG movie files.
• Organize all the multimedia files on your PC for easier storage and retrieval.
• Listen to radio stations from all over the world and find other multimedia content quickly
and easily, when you’re connected to the Internet.
• Transfer multimedia files to your hard drive, and also to many of the latest portables and
handheld PCs.
Game Controllers
Connections:
USB game controllers plug into the USB port on the connector panel at the back of the PC. If
you have both a game pad and joystick, have only one of these devices plugged in at any one time.
Game controllers will work only with software that is designed to use these devices. With
some software (especially games) you may be asked to select the keyboard, game pad or
joystick before you can use it.
Installation:
These instructions refer to the game controllers supplied with certain PCs. If you have
purchased a different game controller you should follow the instructions that were supplied
with it.
Plug the game controller into USB port 2. We recommend that you always use this port for
the game controller. A message box saying that new hardware has been detected will appear
on-screen.
The game controller is now ready for use.
Tes ting and calibrating:
Follow the installation procedures for the game controller before installing any games.
Some games software will automatically respond to the controller being used.
However, you may need to:
• Choose the ‘Configure Game Controllers’.
• Choose the controller you wish to use from the game’s
Option Menu.
Once the game controller is installed check that it is working.
• Go to Control Panel.
• Double-click on ‘Printers and Other Hardware’.
• Double-click ‘Game Controllers’.
• Click on the controller you want to check and click
‘Properties’.
From the ‘Test’ tab check your joystick is working properly by testing the movement and all
the button functions.
To calibrate the controller for optimum performance:
Click the ‘Settings’ tab.
When you have followed the instructions for the tests, click on
‘OK’ and ‘OK’ again to return to the Control Panel.
Page 15

29
*your
PC
user guide
28
*your
PC
user guide
Modems
A modem links your PC to the telephone line so that you can access the Internet or send and
receive e-mail. Most PCs are fitted with the latest V92 56K modems.
! NOTE: Services such as ‘Call Waiting’ can interfere with the correct operation of the modem
whilst you are connected to the Internet or your e-mail. Always disable these features before
using the modem.
! NOTE: Modems damaged by thunderstorms are not covered by the warranty. Surge
protectors are available that allow the modem cable to be protected.
Physical Connection:
You use the cable supplied to connect the modem from the ‘Line’ socket at the back of the PC
to a telephone point in the home/office. Please refer to your Setup Guide for information on
connecting your modem telephone cable. If you need to use a telephone extension cable to
connect the PC to a telephone point, please ensure it is BT approved and preferably
compatible with modem data communications.
Firewire (IEEE 1394) Ports
Firewire (also called IEE 1394) allows the high-speed transfer of high levels of data in realtime between video and audio devices, and scanners at a faster rate than a USB 1 type port.
Not all PCs have built in Firewire ports; please refer to your setup guide for more information.
Firewire ports are usually located in the expansion port bays on the back of the PC.
! NOTE: On systems featuring a built-in Firewire port you should install a driver for the
peripheral device to connect with the IEEE 1394 port. For details please refer to the manual
that comes with the peripheral device.
LAN Network Port (Ethernet)
! NOTE: Some models have an optional internal 10/100 Base-T LAN port that can connect
your computer to other computers, networks or cable broadband services through a local
area network (LAN). This supports data transfer rates of between 10Mbps and 100Mbps.
The built-in LAN port provides a standard RJ-45 connector.
To connect the cable to your LAN port:
• Connect one end of the cable into the network wall outlet, your hub or ADSL router if you
have one.
• Connect the other end of the cable into the computer RJ-45 LAN port.
Getting Help In Windows XP
Windows Help and Support:
• Click ‘Start’ and then ‘Help and support’ for
a detailed list of subjects where help is
available. Help can also be obtained in
Windows by pressing the ‘F1’ key.
or
• Type a keyword or phrase in the ‘Search’
panel and Windows displays a list of
associated topics.
or
• Click ‘Index’ to see a complete list of topics
to select from.
The Tour Windows XP option in ‘All
Programs/Accessories’ will give help and
advice in using Windows, including animated
demonstrations and walkthrough guides.
Application Help:
Most Windows applications have their own
help screens via the application’s ‘Help’ menu.
You can get help by choosing a subject, viewing
an index or searching for keywords and
phrases.
Pressing the ‘F1’ key may also activate
this help feature.
Page 16

31
*your
PC
user guide
30
*your
PC
user guide
Electronic Manuals
You can view the text and graphics of a printed manual in electronic format
(PDF) via the Acrobat Reader software preloaded on your PC. The Acrobat
Reader program is also available on the System and Driver CD supplied with your
PC, if you need to re-install it. Just place your Driver CD in your CD-ROM and
click on Acrobat Reader when the menu pops up.
Double-click on any PDF file to read it.
When you buy software on CD, look through the contents of the disk for the manual.
Also the CD case may include a booklet with help or advice on installing and using the software.
! The System and Driver CD supplied with your PC, and the CDs in any included software
packs also contain relevant electronic manuals.
Feature Help:
Whenever you see the ‘?’ symbol in the top right corner of an applications window, you can:
Click on the question mark.
Then click the feature you require help on.
The Reload CD (if supplied)
Your support pack comes with a Reload CD to restore the
software on the PC to its ‘out-of-the-box’ condition.
Reload CD Features:
• It is easy to use.
• Requires no special knowledge or technical expertise and
will fix most software problems quickly.
• Saves the time and expense of returning the PC or calling
our Customer Care lines.
When to use the Reload CD:
Your PC may not work because software can conflict with other files on your PC or certain key
files may have been accidentally deleted or damaged.
The Reload CD will:
• Restore every file on your computer to how it was when you switched it on for the first time its ‘out of the box ’ state and clear any corrupt file or virus from the Hard Drive.
• Get the PC working again, if your computer has trouble with booting up problems, sound,
display, CD/DVD drives or starting applications.
How does it work?
A small area of your hard disk drive holds a copy of the Windows Operating System and all the
software pre-loaded on the PC. This area cannot be deleted or overwritten and is compressed
to take up as little space as possible. The Reload CD will remove all the preloaded software
and any personal data on the hard drive and replace it with the copy to return your PC to its ‘out
of the box ’ state.
! Warning. In the event of hard drive replacement by the end user you will not be able to run a
reload, as the hidden partition is created here at the factory.
What will not be restored?
• Any programs you installed from CD or floppy disk or downloaded from the Internet since
receiving the PC.
However you can reinstall them after using the Reload CD
• All the data files that you have created and stored on the hard drive such as word processor
documents (and templates), database files, digital camera pictures and scanned images.
If you want to keep any of these files, you must copy them to floppy disks or on to a blank CD (if
your system has a CD-writer).
How to use the Reload CD:
• If you can, copy the data files you have created onto floppy disks and/or CDs.
• Insert the Reload CD in the CD-ROM or DVD-ROM drive, with the label facing up.
• Switch the PC off with the disk still in the drive.
• Switch the PC back on again.
The PC will restart and show a new menu. This menu gives you the option to ‘R’ Restore.
Press ‘R’ on the keyboard and follow the on screen instructions.
The computer will then start the Reload process, which may take around 10 to 20 minutes.
• Once prompted, remove the Reload CD and restart the PC.
• Keep a record of the Reload code that shows at the end of the process.
Page 17

33
*your
PC
user guide
32
*your
PC
user guide
Before Using the Reload
Save your work using a common folder. Make a note of the folder and where you are saving it,
so you can copy it back after using the reload CD.
Many applications use the ‘My Documents’ folder as the default folder for saving files.
You can also print out your e-mail address book from Outlook Express.
• Click on ‘Addresses’, then ‘Print’.
• Select ‘All’ and choose a format for the list.
• Click ‘OK’.
First print out any e-mail messages in the Inbox and Outbox you need to keep, as the Reload
process will delete them
• Start Outlook Express,
• Click on the ‘Inbox’ or ‘Outbox’,
• Highlight the message you want and
• Click ‘Print’ followed by ‘OK’.
Copying files and folders to floppy disk or CD:
• Put a blank floppy disk in drive A:
• Click ‘Start’
• Select ‘All Programs’, ‘Accessories’ and ‘Windows Explorer’
NB Windows Explorer is a ‘file manager’ for all the files on your PC. It is split into two panels. In
the left panel are all the folders on the hard drive and any other drive on your system, such as
the floppy drive and the CD-ROM drive. The right hand panel shows the files that are contained
in each folder.
• Click on a folder in the left panel to see the files it contains in the right panel.
NB Some folders are marked with a small plus sign ‘+’. This indicates that the folder contains
sub-folders.
• Click on the ‘+’ to see these sub-folders displayed.
• Select any folder that contains your data files
• Click on the required filename to choose and highlight the one you wish to back-up.
NB If multiple files are required, hold down the ‘Control’ key and click on each file you need.
• When you have selected all the files let go of the ‘Control’ key.
• Right-click on any of the highlighted files and choose ‘Send To’.
• A sub-menu will display ‘3.5 Floppy (A)’ or your CDRW drive.
• Choose the relevant drive and select it.
NB A file transferring process will then begin.
Alternatively, to speed things up:
• Select the folder itself (rather than individual files in the folder) and send this to the floppy A:
drive.
NB A message may appear giving details of any files or folders that you are copying, which
already exist on the floppy disk. You can either cancel the copying of that file or overwrite the
version of the file that exists on the floppy disk.
The System/Driver CD
The System/Driver CD supplied contains drivers for a range of PCs. Drivers allow a piece of
hardware such as the graphics controller or a printer) to communicate with the rest of the PC.
If drivers are accidentally changed or deleted, the hardware they control may not work
correctly.
Depending on the PC you ordered the CD might include drivers for:
• DVD decoding
• Motherboards
• Display Cards
• Sound Cards
• Modems
• Joysticks and Game pads
• Printers
• Direct X
And
• Electronic manuals
! IMPORTANT!
The information in the electronic manuals is of an advanced nature and should not be used
unless you are comfortable with the technical aspects of Windows.
Please have this CD to hand if a support advisor is guiding you through a procedure to solve a
problem.
Troubleshooting
This section provides you with help and advice and tries to answer all of the FAQs (Frequently
Asked Questions). A few minutes spent here may save you the time and expense of contacting
our support lines.
NB You can also get on screen help in using Windows as well as many software applications
by pressing the F1 key.
My computer won’t turn on:
Please check:
• All the cables and connectors are correctly installed.
• Both the system unit and the monitor are turned on, as each has its own switch.
• The mains socket on your wall is working and turned on.
• The system unit ’s power cable is plugged in.
• Some system units also have a power switch on the back of the Computer. Check that is in
the ‘on’ position.
• The fuse in the mains power cable for your system unit.
• Always replace a fuse with one of the same rating; the mains leads of both the system unit
and the monitor should be fitted with 5A fuses.
• If a replaced fuse immediately fails again, you should not use the PC further but seek advice
from support staff.
• The power cables.
• Unplug any optional peripherals (if connected), such as printers, scanners and other USB
devices.
! NOTE: You can swap cables over to determine if there is a break or short in one of the
cables, for example the power cable for the monitor with the power cable for the system unit.
Page 18

35
*your
PC
user guide
34
*your
PC
user guide
The display is blank when I turn my PC on:
The monitor’s power indicator light is not lit.
• Check that the system unit is turned on and that the power light is lit.
NB If not, refer to ‘My computer won ’t turn on’ above.
• If the PC power light is lit, but the monitor is not, try turning the monitor off and back on
again.
NB If the monitor ’s power indicator then flashes on and off, then refer to ‘If the monitor’s
power light is lit’ below.
• Check the power cable is securely connecting the monitor to the mains socket and the
monitor signal cable is securely plugged into the PC.
• Unplug the system unit ’s power cable and plug it directly into the monitor.
NB If the monitor ’s power indicator lights up, then replace the monitor power cable.
If the monitor ’s power indicator still does not light up, then there is probably some other
problem with the monitor.
If the monitors power light is lit.
• Sit tight and wait for a moment.
NB When a monitor is turned on, it can take a minute or so before the display appears.
• Check that the brightness and other controls are correctly set. Try adjusting them to the
minimum and maximum settings allowed.
• Check that the system unit is turned on as well as the monitor.
• Double-check that the signal cable connecting the monitor to the system unit is properly
connected.
An "out of range" error message appears when powering on for the first time
in Windows XP:
• Restart the PC.
• As it starts, rapidly and repeatedly press the (F8) key or (F5) key to display the advanced
options menu.
• Select the option "Enable VGA Mode". Press ‘enter’.
• When you see ‘select operating System to start’, press ‘enter’
NB You should only have Windows XP listed there.
• Click on a popup message which will eventually appear on the bottom right of your screen
• Click on the ‘yes’ button after the "windows will try to adjust your screen resolution"
message appears and then click ‘yes’ again
My computer just beeps at me when I turn it on:
If the system unit comes on, but beeps at you continuously:
• Check if any keys on the keyboard are depressed
• In case of spillage, leave the keyboard to dry out overnight and try again the next day.
• Unplug any optional peripherals (if connected), such as printers, scanners etc.
• Unplug the Keyboard and Mouse from the PS/2 ports and shut down and restart the
machine.
NB If the beeping stops it would appear to be either a faulty keyboard or Mouse. You might try
a friend’s keyboard and mouse on your machine as a check.
I get an error message on the screen when I turn my computer on:
‘Disk boot failure’ or ‘Invalid system disk’
• Remove any floppy disks and CD-ROMs from the drives and press ‘Enter’
or
• If this doesn’t work, please seek advice from Technical Support to check the settings on
your computer.
‘CMOS Battery state low’
• Replace the CMOS battery which provides the power for the PC to maintain a small store of
vital information including the date and time.
Keyboard not detected or Mouse not detected
• Check that the mouse and the keyboard are plugged into the correct sockets at the back of
the PC.
or
• Check if they work on a friend’s computer.
The Windows logo stays on the screen and nothing else happens.
or
The PC has started but the keyboard and/or Mouse don’t work.
• Check that the mouse and keyboard cables are in the correct sockets. If not, switch off the
PC, swap the cables and switch back on.
My system won ’t let me copy a file onto a floppy disk.
• Ensure the floppy disk is formatted, not full and not write-protected.
I left my PC unattended for a few minutes and now the screen is blank.
• Move the mouse or press a key to bring back the screen, as the power management system
has put the PC in standby mode.
Which are the ‘back slash ’and ‘forward slash ’keys?
• The back slash key ‘\’ is next to the ‘Z ’key.
• The forward slash ‘/’ is on the same key as the ‘?’
When I press the ‘£’key I get the ‘#’ symbol or when I press ‘@’ I get ‘"’
• Use the ‘Regional Settings ’option in ‘Control Panel ’to select the English/British keyboard’
to change from the US settings as above.
Page 19

36
*your
PC
user guide
37
*your
PC
user guide
Troubleshooting Modems
If you experience problems whilst trying to use the modem for e-mail or accessing the
Internet there are a number of checks you can make to try to find out where the problem lies.
Check that the PC can detect the modem:
This is only an internal test and does not check the ability of the modem to send data down a
phone line.
• From the ‘Start’ button choose ‘Control Panel’.
• Click on ‘Switch to Classic View’
• Double-click on the ‘Phone and Modem’ icon.
The Modem Properties box is displayed make sure that the modem name is highlighted.
• Select the ‘Diagnostics’ tab.
• Now click on the ‘Query Modem’ button to check that your modem has been installed
correctly.
• The window above should show ‘Success’.
‘No dial tone’ message whilst trying to e-mail or connect to the Internet:
If you get this error, work through each of the following steps in turn:
• Start by checking that the modem cable is connected to a working phone socket. As a test,
plug a phone into the socket and listen for a dial tone.
• Make sure the modem cable is plugged into the socket marked LINE on the modem at the
back of the PC. Also check that it is securely plugged into the phone socket.
• Make sure no one is using the telephone line at the same time.
• Check the amount of telephony devices (modems, phones, fax machines etc) on the
telephone line.
Each such device will have a REN number and adding together the REN of each device on the
line will give a total REN value. If this value is too high (typically greater than three) there is
less chance of the modem connecting. In these cases, unplug one or more devices from the
telephone line and try connecting again. Most modems have a REN of 1 and the number of
other devices is usually printed on the underside of the device.
! NOTE: Extension cables can cause connection difficulties. If you are using an extension cable
make sure that it is BT approved and if possible approved for data communications.
If possible, try connecting without it.
! NOTE: Modems damaged by thunderstorms are not covered by the warranty. Surge
protectors are available that allow the modem cable to be protected.
Useful Web sites
TOTAL CARE SUPPORT
WWW.TOTALCARESUPPORT.COM
The following third party Websites are not under the control of the PC Manufacturer. As such,
the manufacturer does not accept any liability for the content of the sites and you visit these
sites at your own risk. Also these links are provided as a service to our customers and their
inclusion does not imply any endorsement of the site and its material.
LEXMARK
WWW.LEXMARK.CO.UK
CYBERLINK
WWW.GOCYBERLINK.COM
JENOPTIK
WWW.JENIMAGE.COM
ATI
WWW.ATI.COM
MICROSOFT
WWW.MICROSOFT.COM/UK
GSP & DK SOFTWARE
WWW.GSP.CC
INTEL
WWW.INTEL.COM
AMD
WWW.AMD.COM
KASPERSKY
WWW.KASPERSKY.COM
NORTON
WWW.NORTON.COM
MICROSTAR
WWW.MSI.COM.TW
CREATIVE LABS
WWW.EUROPE.CREATIVE.COM
GIGABYTE
WWW.TW.GIGA-BYTE.COM
SAMSUNG
WWW.SEC.SAMSUNG.CO.KR
NVIDIA
WWW.NVIDIA.COM
CHAINTECH
WWW.CHAINTECH.COM TW
ALBATRON
WWW.ALBATRON.COM TW
Page 20

39
*your
PC
user guide
38
*your
PC
user guide
This Manual
This manual is provided to you free of charge and is intended only to assist the reader in the
use of the product. The supplier in good faith provides all of the information contained in this
manual.
The supplier does not guarantee the accuracy of that information and accepts no
responsibility or liability for any loss or damage arising from the use of any information
provided or omitted.
! NOTE: You must carefully read these instructions and all other literature provided with the
product prior to operation.
Software Copyright:
Copyright and intellectual property rights in the software and user documentation are owned
by the Software Publisher or its suppliers and are protected by United Kingdom copyright laws.
The license for any software supplied with the PC is for single user use only on this system.
You cannot copy this software and distribute it to anyone else. You may not loan, rent, lease or
license this software or any copy. Under certain agreements with the relevant software
suppliers, your invoice is both proof of purchase and limited license to use the software.
The software is provided without any free training or support.
On-line help is available within most applications.
Because software is inherently complex and may not be completely free from errors, you are
advised to verify your work and to make back-up copies. It is well known for even popular
applications including Windows to crash unexpectedly.
In no event will The Software Publisher or Supplier be liable for direct, indirect, special,
incidental, cover or consequential damages arising out of the use of or inability to use the
software or user documentation, even if advised of the possibility of such damages.
Software Compatibility:
This system has been designed to run the vast majority of general PC applications. However,
like all PC suppliers, we cannot guarantee that all applications will run without system
modification or upgrade. Certain applications may need upgrades in the form of additional
memory, graphics card with further dedicated memory, faster processors, new BIOS,
motherboard, new drivers or other additional hardware.
Requirements of software change. The current generation of demanding multimedia games
or 32-bit applications will not run on PC systems which were available 2 or 3 years ago.
Likewise, we cannot guarantee that this PC system will run all current PC software or PC
software designed in the future.
Most software manufacturers will allow you to try out a demo version of the program therefore
enabling you to check its compatibility with your PC before purchasing the full software.
Hardware Compatibility:
We can provide details of hardware items, which have been tested and approved for use with this
PC system. Some hardware upgrades are designed for a particular type of PC and we cannot
guarantee that a particular hardware item or upgrade will be compatible with this PC system.
Hardware that is incompatible or incorrectly fitted may damage your PC and void the warranty.
We do offer an upgrade service using approved compatible components.
Please contact our service centre for a quotation if you wish to upgrade your PC.
Exclusions of consequential Loss
In any event, the supplier accepts no liability for any consequential loss or damage arising
from the use or failure of the product or any information provided, including, but not limited
to economic or financial loss, damage to peripheral equipment or products, loss of use,
productivity or time.
All correspondence relating to the product or this manual should be addressed to:
VMT Marketing Department, Time Technology Park, Burnley, BB12 7TG
(c) Copyright 2000 VMT Limited - All rights reserved
Neither the whole nor any part of the information contained herein, nor the products
described in this manual may be adapted or reproduced in any material form except with the
prior approval of the publisher.
IBM (r) is a registered trademark of International Business Machines Corporation.
Microsoft, MS-DOS(r) Windows is a registered trademark of Microsoft Corporation.
Published 2004.
Declaration of Conformity
This equipment conforms to:
The protection requirements of the EC DIRECTIVE 89/336/EEC on Electromagnetic
Compatibility (EMC), in accordance with the provisions of the Electromagnetic Compatibility
Regulations 1992.
The principal elements of the safety objectives of the Low Voltage Directive EC DIRECTIVE
72/23/EEC, in accordance with the Low Voltage Electrical Equipment (Safety) Regulations 1989.
The following standards have been applied:
BS EN 55022B Conducted and Radiated Emissions
BS EN 61000-3-2 Harmonic Current Emissions
BS EN 61000-4-2 Immunity to Electrostatic Discharge
BS EN 61000-4-4 Immunity to Fast Transient Burst, AC Power Lines
BS EN 60950 Electrical Safety of IT Equipment
 Loading...