

Page 1

310 Series
User’s Guide
User’s Guide
Page 2

User’s Guide
Edition: June 2004
The following paragraph does not apply to any country where such provisions are inconsistent
with local law: LEXMARK INTERNATIONAL, INC., PROVIDES THIS PUBLICATION “AS IS”
WITHOUT WARRANTY OF ANY KIND, EITHER EXPRESS OR IMPLIED, INCLUDING, BUT NOT
LIMITED TO, THE IMPLIED WARRANTIES OF MERCHANTABILITY OR FITNESS FOR A
PARTICULAR PURPOSE. Some states do not allow disclaimer of express or implied warranties in
certain transactions; therefore, this statement may not apply to you.
This publication could include technical inaccuracies or typographical errors. Changes are periodically
made to the information herein; these changes will be incorporated in later editions. Improvements or
changes in the products or the programs described may be made at any time.
Comments about this publication may be addressed to Lexmark International, Inc., Department F95/
032-2, 740 West New Circle Road, Lexington, Kentucky 40550, U.S.A. In the United Kingdom and
Eire, send to Lexmark International Ltd., Marketing and Services Department, Westhorpe House,
Westhorpe, Marlow Bucks SL7 3RQ. Lexmark may use or distribute any of the information you supply
in any way it believes appropriate without incurring any obligation to you. You can purchase additional
copies of publications related to this product by calling 1-800-553-9727. In the United Kingdom and
Eire, call +44 (0)8704 440 044. In other countries, contact your point of purchase.
References in this publication to products, programs, or services do not imply that the manufacturer
intends to make these available in all countries in which it operates. Any reference to a product,
program, or service is not intended to state or imply that only that product, program, or service may be
used. Any functionally equivalent product, program, or service that does not infringe any existing
intellectual property right may be used instead. Evaluation and verification of operation in conjunction
with other products, programs, or services, except those expressly designated by the manufacturer,
are the user’s responsibility.
Lexmark and Lexmark with diamond design are trademarks of Lexmark International, Inc., registered
in the United States and/or other countries. Photo Jetprinter is a trademark of Lexmark International,
Inc.
Other trademarks are the property of their respective owners.
© 2004 Lexmark International, Inc.
All rights reserved.
UNITED STATES GOVERNMENT RIGHTS
This software and any accompanying documentation provided under this agreement are commercial
computer software and documentation developed exclusively at private expense.
Safety information
• Use only the power supply provided with this product or the manufacturer's authorized
replacement power supply.
• Connect the power supply cord to an electrical outlet that is near the product and
easily accessible.
• Refer service or repairs, other than those described in the user documentation, to a
professional service person.
CAUTION: Do not set up this product or make any electrical or
cabling connections, such as the power supply cord or telephone,
during a lightning storm.
Conventions
Note: A note identifies something that could help you.
CAUTION: A caution identifies something that could cause you
harm.
Warning: A warning identifies something that could damage your
product hardware or software.
Page 3

Contents
Understanding your printer ..............................................7
Printer parts .................................................................................. 7
Control panel ................................................................................. 8
Loading paper ..................................................................10
Supported photo paper types ...................................................... 10
Loading the photo paper ............................................................. 10
Inserting memory cards ..................................................11
Supported memory cards ............................................................ 11
Inserting memory cards .............................................................. 12
Printing from a memory card .......................................... 13
Step 1: Load photo paper ........................................................... 13
Step 2: Insert a memory card ...................................................... 13
Step 3: View your photos ............................................................ 13
Step 4: Select a photo to print ..................................................... 13
Step 5: Customize the photo ....................................................... 14
Step 6: To select another photo, repeat steps 4 and 5. .............. 14
Step 7: Print photo(s) .................................................................. 14
Step 8: Remove the memory card .............................................. 14
3
Page 4

Printing from a digital camera ........................................15
Customizing your photo prints .......................................16
Printing an index page ................................................................ 16
Printing all photos ....................................................................... 16
Printing a photo in black and white ............................................. 17
Cropping a photo ........................................................................ 18
Adjusting the brightness .............................................................. 19
Adjusting the number of prints .................................................... 20
Viewing slide show ...................................................................... 21
Printing DPOF selection .............................................................. 21
Customizing your printer settings .................................22
Changing the blank paper size ................................................... 22
Changing the blank paper type ................................................... 22
Changing the print quality ........................................................... 23
Adjusting preview before print ..................................................... 23
Changing the control panel display language ............................. 23
Changing the power save ........................................................... 24
Clearing photo settings ............................................................... 24
Restoring factory defaults ........................................................... 25
Traveling with your printer ..............................................26
Before you travel ......................................................................... 26
Packing the printer ...................................................................... 26
Unpacking the printer .................................................................. 28
4
Page 5

Maintaining your print cartridge ..................................... 30
Checking the ink level status ...................................................... 30
Refilling the print cartridge .......................................................... 30
Ordering supplies ........................................................................ 30
Replacing the print cartridge ....................................................... 31
Aligning the print cartridge .......................................................... 34
Cleaning the print cartridge nozzles ............................................ 34
Printing a test page ..................................................................... 35
Troubleshooting ............................................................... 36
Setup troubleshooting ................................................................. 37
Print troubleshooting ................................................................... 38
Improving print quality ................................................................. 40
Jams and misfeeds troubleshooting ........................................... 43
Memory card and PictBridge troubleshooting ............................. 44
Error messages troubleshooting ................................................. 45
Finding more information ............................................... 47
Notices ..............................................................................48
Index ..................................................................................51
5
Page 6

6
Page 7
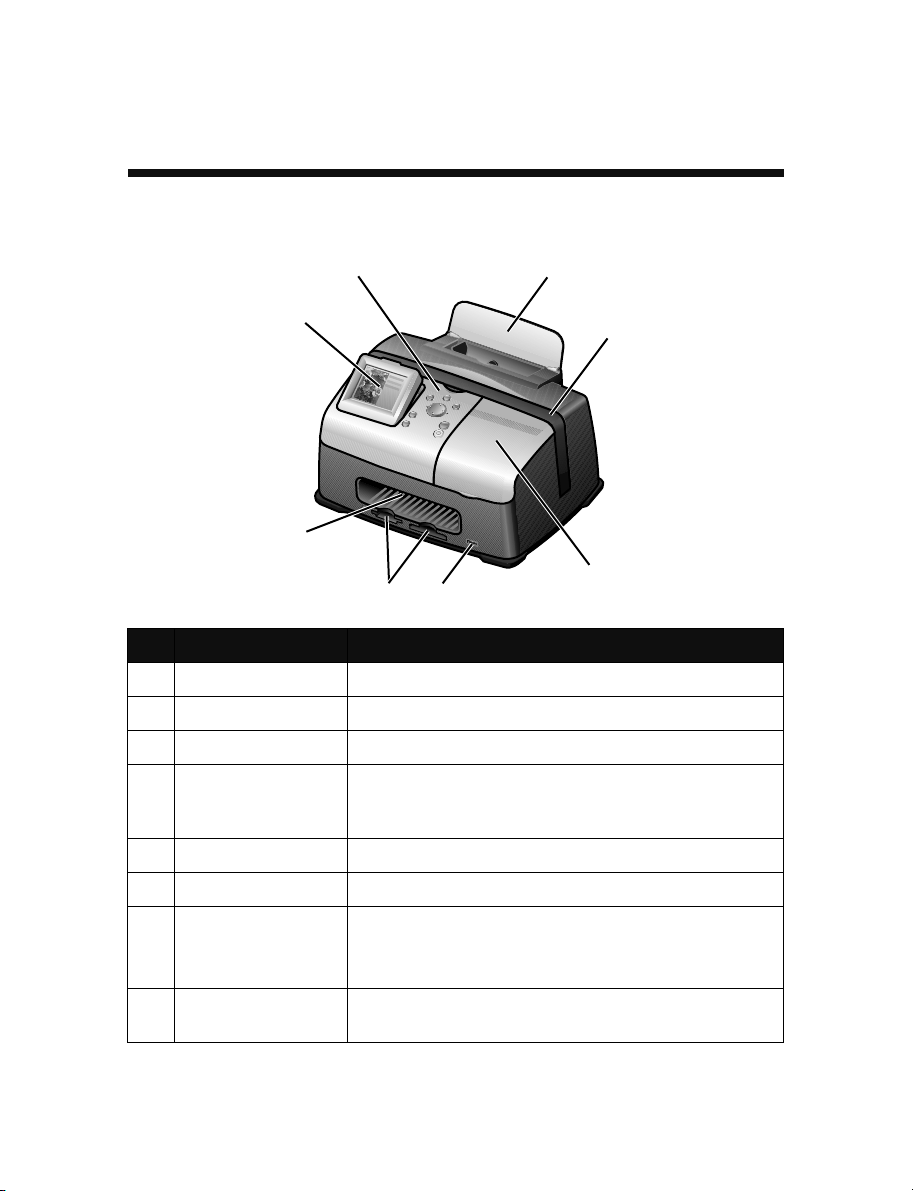
Understanding your printer
Printer parts
8
1
7
2
6
3
5
4
# Part Purpose
1 Paper support Load paper into the printer.
2 Carry handle Transporting the printer.
3 Access cover Install or replace print cartridge.
4 PictBridge port Connect a PictBridge-enabled digital camera to the
5 Memory card slots Insert memory cards.
6 Paper exit Allows paper to exit after printing is complete.
7 Control panel
display
printer. Use the controls on the camera to select and
print your photos.
Preview photos on your memory card and check the
status of the printer.
The display has 4 positions: flat, 25°, 50°, and 90°.
8 Control panel Operate the printer. For more details, see “Control
panel” on page 8
7
Page 8
1
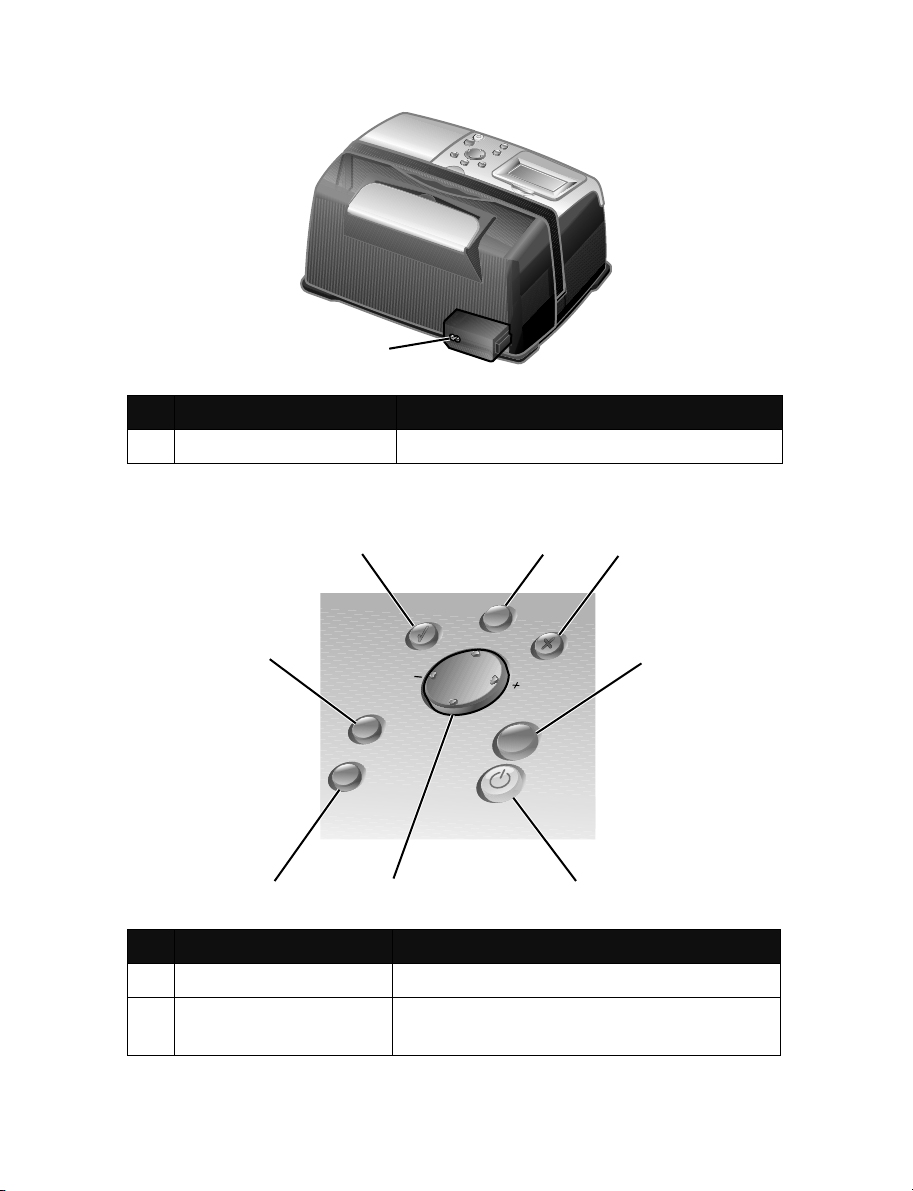
# Part Purpose
1 Power supply cord port Install the provided power supply cord.
Control panel
8
1
2
7
65
# Button Purpose
1Menu • Display the Photo menu.
2 Stop/Clear • Deselect the displayed photo for printing.
• Stop the print job.
4
3
8
Page 9
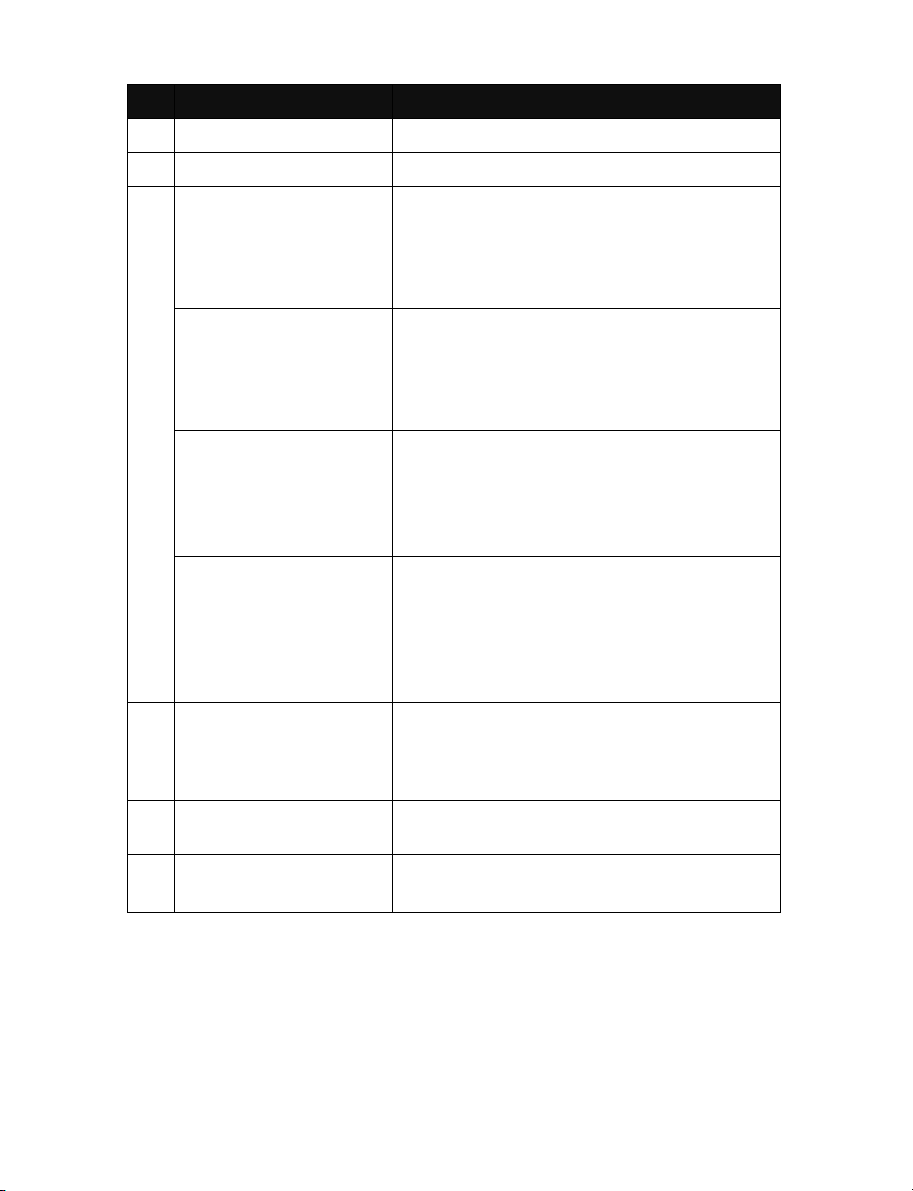
# Button Purpose
3 Start Begin printing the selected photos.
4 Power Turn the printer on and off.
5 Up arrow • Scroll through menu options.
• Change the selected area when cropping an
image.
• Skip forward through the pictures on the
memory card 10 at a time.
Down arrow • Scroll through menu options.
• Change the selected area when cropping an
image.
• Skip backward through the pictures on the
memory card 10 at a time.
Right arrow (+) • Increase the number of prints.
• Change the selected area when cropping an
image.
• Increase the value of a menu item.
• Display the next picture on a memory card.
Left arrow (-) • Decrease the number of prints.
• Change the selected area when cropping an
image.
• Decrease the value of a menu item.
• Display the previous picture on a memory
card.
6 Number of Prints • Change the number of photos you want to
7 Rotate Rotate the image on the control panel display
8 Select • Choose a menu option.
print.
• Change the size of the green crop box when
cropping an image.
90° counterclockwise for easier viewing.
• Choose a displayed photo for printing.
9
Page 10
Loading paper
Supported photo paper types
Type Size Usage
Photo/Glossy
cards
Card stock Index card: 4 x 6 inches
Note: Do not load more than 25 sheets into the paper support.
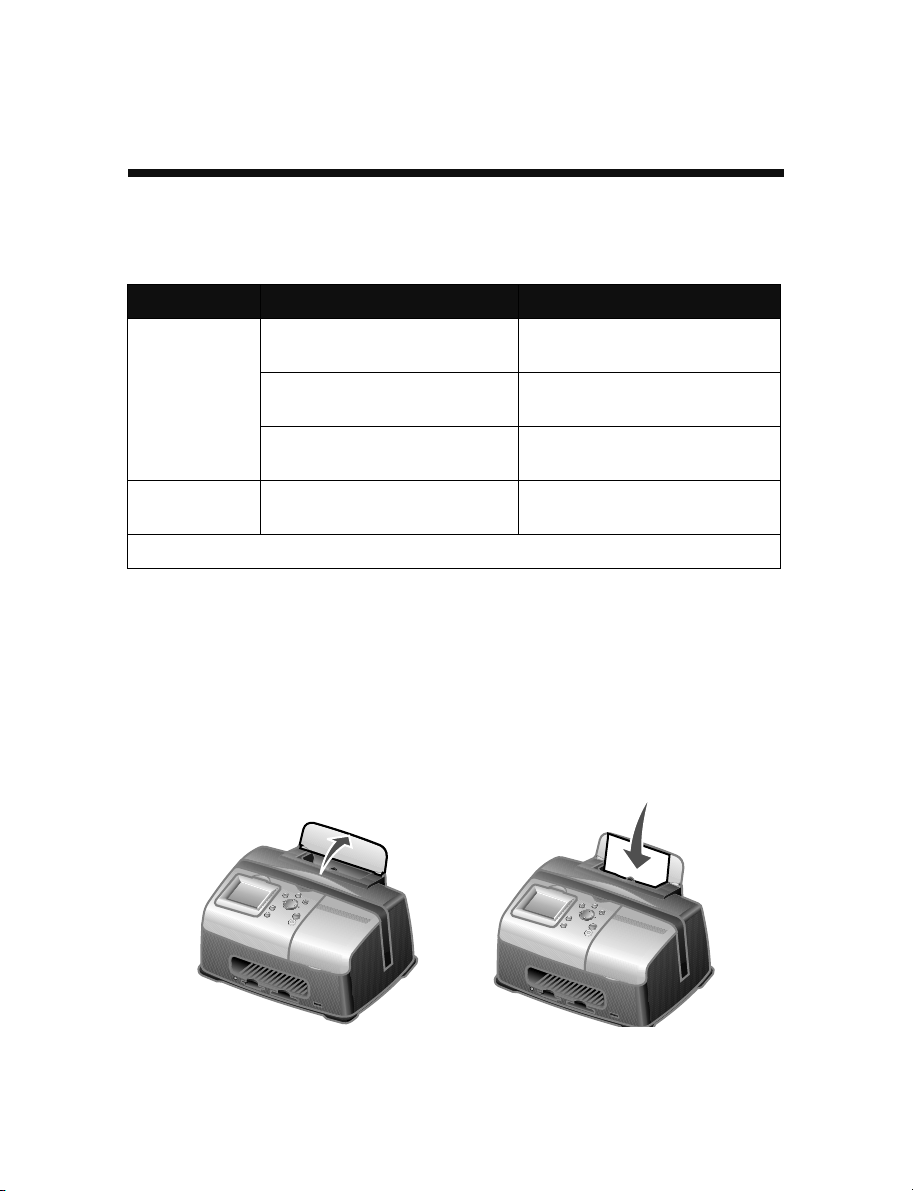
Loading the photo paper
1 Lift the paper support.
2 Load the photo paper into the paper support with the print side
facing you.
Photo paper: 4 x 6 inches
(102 x 152 mm)
Hagaki card: 3.9 x 5.8 inches
(100 x 148 mm)
A6 card: 4.1 x 5.8 inches
(105 x 148 mm)
(102 x 152 mm)
Print photos
Print photos
Print photos
Print test pages and cartridge
maintenance pages
Note: Do not force the photo paper into the printer.
10
Page 11
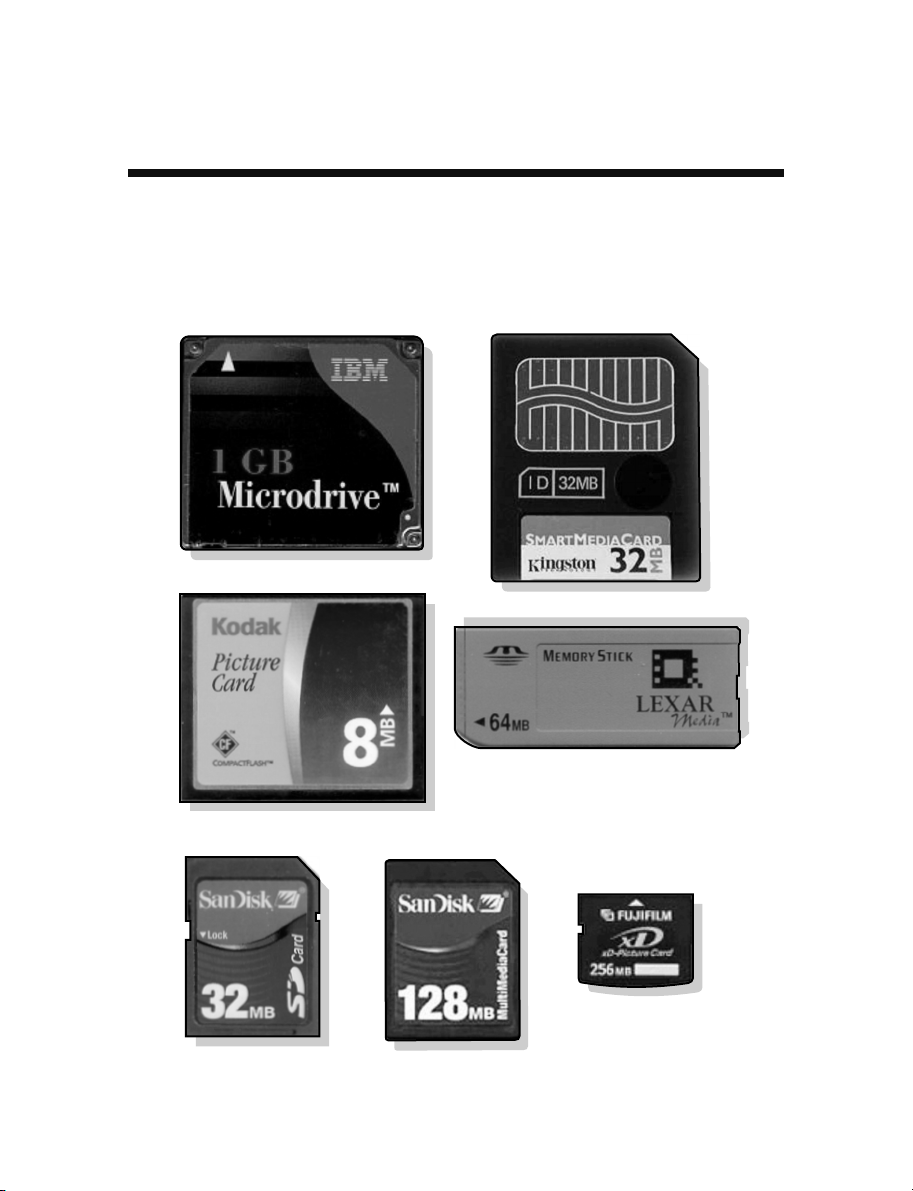
Inserting memory cards
Supported memory cards
Note: Your card manufacturer may differ from the ones
pictured.
Microdrive
SmartMedia
CompactFlash Type I and Type II
Secure Digital (SD)
MultiMedia Card
Memory Stick
Memory Stick PRO
Memory Stick Duo (with adapter)
Memory Stick PRO Duo (with adapter)
xD Picture Card
(up to 512MB)
11
Page 12
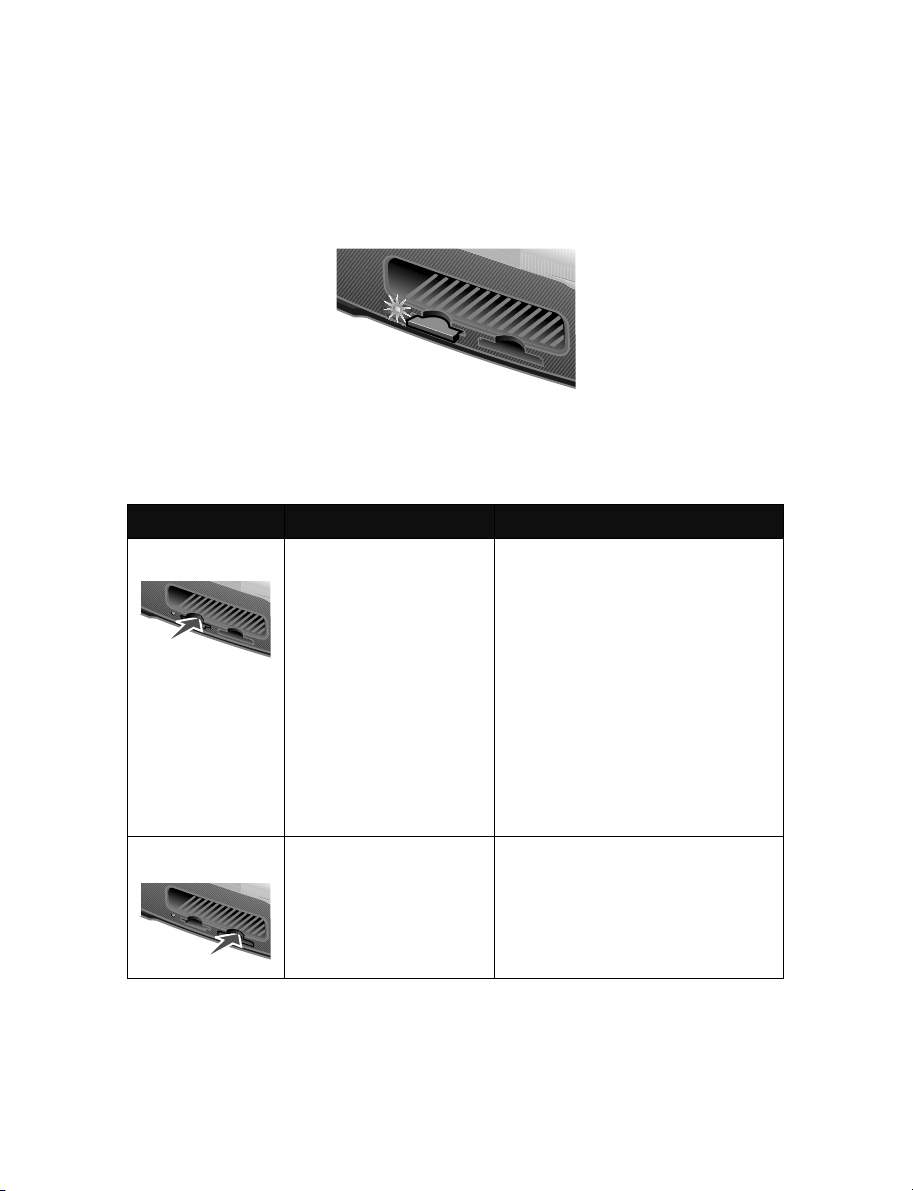
Inserting memory cards
The memory card reader has two slots to accommodate different size
memory cards. A small light turns on when a memory card is inserted. The
light blinks to indicate the memory card is being read or is transmitting
data.
Warning: Do not remove the memory card while the light is
blinking.
Slot Memory card Installation
Left slot • Secure Digital
• SmartMedia
• MultiMedia
• Memory Stick
• Memory Stick PRO
• Memory Stick Duo
(with adapter)
• Memory Stick PRO
Duo (with adapter)
• xD Picture Card.
Right slot • CompactFlash Type I
and Type II
• Microdrive
• Insert card with brand name
label face up.
Note: If you are using
SmartMedia cards, make sure the
gold contact area faces up.
Note: If you are using a Memory
Stick Duo or Memory Stick PRO
Duo card, be sure to connect it to
the adapter that came with the
card before inserting it in the slot.
• If you have an arrow on your
card, make sure it points
toward the printer.
• The name label faces up.
• If you have an arrow on your
card, make sure it points
toward the printer.
Note: Your printer recognizes only one digital media source for
photos at a time.
12
Page 13

Printing from a memory card
Step 1: Load photo paper
Note: For help loading photo paper and a list of supported
paper types, see page 10.
Step 2: Insert a memory card
Note: If you are unsure of what type of memory card you have,
see page 11.
The I Want To... menu appears.
Step 3: View your photos
1 Press the down arrow to highlight Slide Show.
2 Press Select.
Each photo will appear on the display for five seconds. To skip
ahead, press the right arrow button. To go back, press the left arrow
button.
3 Press Stop/Clear when you are ready to select the photos you want
to print.
Step 4: Select a photo to print
1 Press the right or left arrow buttons to scroll to the photo you want
to print.
Note: For easier viewing, press
the display 90° counterclockwise.
2 Press Select.
13
Rotate to rotate the image on
Page 14

Step 5: Customize the photo
You can adjust the photo settings before you print. If you want to:
• Crop the photo, see page 18.
• Adjust the brightness, see page 19.
• Change the number of prints, press Number Of Prints.
• Change the print quality, see page 23.
• Change the blank paper size, see page 22.
Step 6: To select another photo, repeat steps 4
and 5.
When you are finished selecting your photo(s), continue with step 7.
Step 7: Print photo(s)
Press Start.
If Preview before Print is on, a preview of the print job is first displayed.
Press
Start again to print the photo.
If Preview before Print is off, the photo prints immediately.
Note: To adjust the Preview setting, see page 23.
Step 8: Remove the memory card
Warning: Do not remove the memory card while the light is
blinking. The light blinks to indicate the memory card is
being read or is transmitting data.
14
Page 15
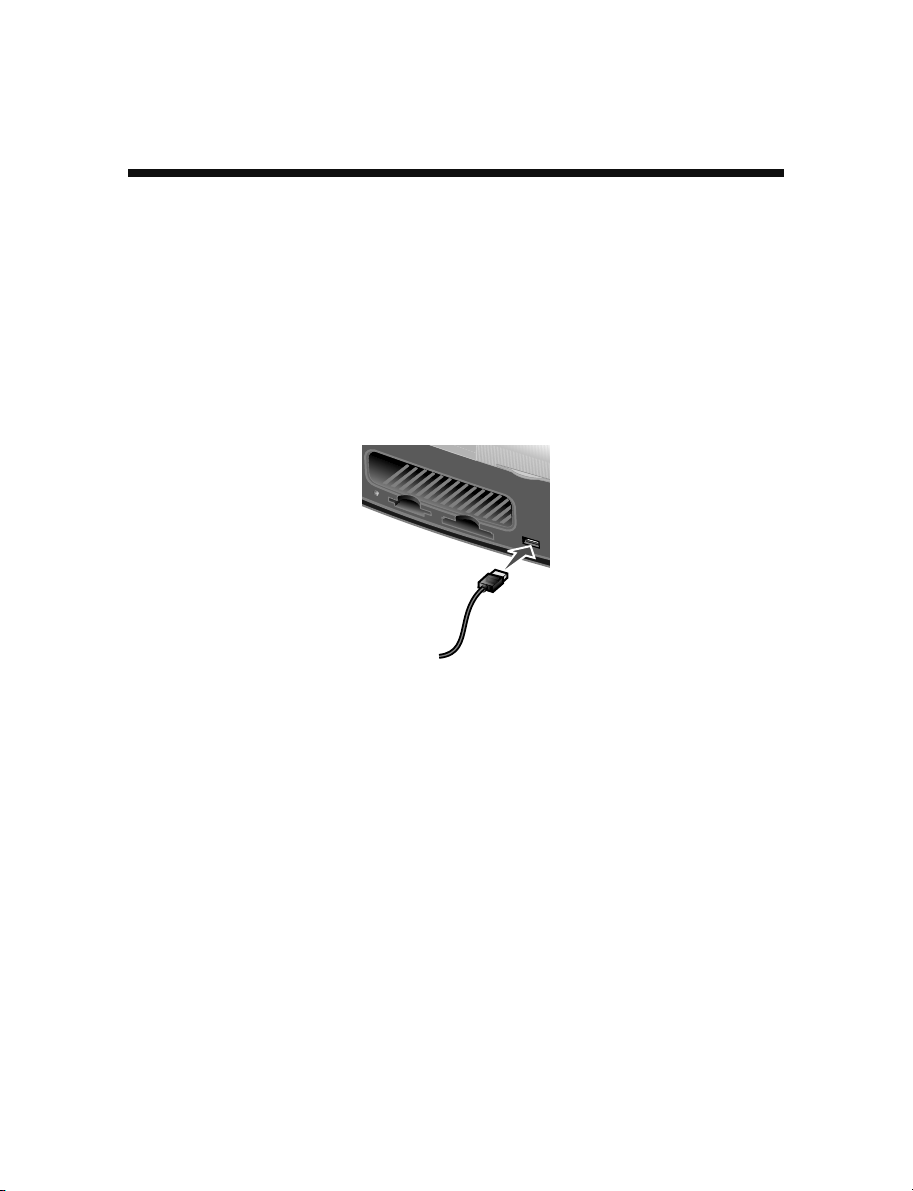
Printing from a digital camera
You can connect a PictBridge-enabled digital camera to your printer and
use the buttons on the camera to select and print your photos:
1 Insert one end of the USB cable into the camera.
Note: Use only the USB cable that came with your camera.
2 Insert the other end of the cable into the PictBridge port on the front
of the printer.
3 Refer to the instructions included with your camera for PictBridge
connection and usage information.
Note: Make sure the PictBridge-enabled digital camera is set
to the correct USB mode. Refer to the camera
documentation for more information.
15
Page 16

Customizing your photo prints
Printing an index page
1 Load photo paper.
2 Insert a memory card.
Note: If you are unsure of what type of memory card you have,
see page 11.
The I Want To... menu appears.
3 Press Menu.
The Photo menu appears.
4 Press the down arrow button until you highlight Print Index
Page.
5 Press Select.
If Preview before Print is on, a preview of the print job is first
displayed. Press
Start to print the index page.
If Preview before Print is off, the index page prints immediately.
Note: To adjust the Preview setting, see page 23.
Printing all photos
1 Load photo paper.
2 Insert a memory card.
Note: If you are unsure of what type of memory card you have,
see page 11.
The I Want To... menu appears.
16
Page 17

3 Press the down arrow button until you highlight Print All
Photos.
4 Press Select.
If Preview before Print is on, a preview of the print job is first
displayed. Press
If Preview before Print is off, the photos print immediately.
Note: To adjust the Preview setting, see page 23.
Start to print the photos.
Printing a photo in black and white
1 Load photo paper.
2 Insert a memory card.
Note: If you are unsure of what type of memory card you have,
see page 11.
The I Want To... menu appears with View Photos or Print
highlighted.
3 Press Select.
4 Press the right or left arrow buttons to scroll to the photo you want
to adjust.
5 Press Select.
6 Press Menu.
The Photo menu appears.
7 Press the down arrow button until you highlight Print Color.
8 Press the right arrow button until you highlight Black & White.
9 Press Select.
To adjust other photos, repeat steps 4–8.
10 Press Start to print the photo(s).
17
Page 18

If Preview before Print is on, a preview of the print job is first displayed.
Press
Start again to print the photo.
If Preview before Print is off, the photo prints immediately.
Note: To adjust the Preview setting, see page 23.
Cropping a photo
1 Load photo paper.
2 Insert a memory card.
Note: If you are unsure of what type of memory card you have,
see page 11.
The I Want To... menu appears with View Photos or Print
highlighted.
3 Press Select.
4 Press the right or left arrow buttons to scroll to the photo you want
to adjust.
5 Press Menu.
The Photo menu appears.
6 Press the down arrow button until you highlight Crop.
7 Press Select.
8 Adjust the green crop box over the photo.
Press the arrow buttons to move the crop box.
Press
Number Of Prints to change the size of the crop box.
9 Press Select to accept your changes.
To adjust other photos, repeat steps 4–9.
10 Press Start to print the photo(s).
If Preview before Print is on, a preview of the print job is first displayed.
Press
Start again to print the photo.
18
Page 19

If Preview before Print is off, the photo prints immediately.
Note: To adjust the Preview setting, see page 23.
Adjusting the brightness
1 Load photo paper.
2 Insert a memory card.
Note: If you are unsure of what type of memory card you have,
see page 11.
The I Want To... menu appears with View Photos or Print
highlighted.
3 Press Select.
4 Press the right or left arrow buttons to scroll to the photo you want
to adjust.
5 Press Menu.
The Photo menu appears.
6 Press the down arrow button until you highlight Brightness.
7 Press Select.
8 Press the right or left arrow buttons to adjust the brightness of the
photo.
9 Press Select to accept your changes.
To adjust other photos, repeat steps 4–9.
10 Press Start to print the photo(s).
If Preview before Print is on, a preview of the print job is first displayed.
Press
Start again to print the photo.
If Preview before Print is off, the photo prints immediately.
Note: To adjust the Preview setting, see page 23.
19
Page 20

Adjusting the number of prints
1 Load photo paper.
2 Insert a memory card.
Note: If you are unsure of what type of memory card you have,
see page 11.
The I Want To... menu appears with View Photos or Print
highlighted.
3 Press Select.
4 Press the right or left arrow buttons to scroll to the photo you want
to adjust.
5 Press Number Of Prints until you reach the desired quantity.
To adjust the number of prints of other photos, repeat steps 4 and 5.
6 Press Start to print the photo(s).
If Preview before Print is on, a preview of the print job is first displayed.
Press
Start again to print the photo.
If Preview before Print is off, the photo prints immediately.
Note: To adjust the Preview setting, see page 23.
20
Page 21

Viewing slide show
1 Insert a memory card.
Note: If you are unsure of what type of memory card you have,
see page 11.
The I Want To... menu appears.
2 Press the down arrow button until you highlight Slide Show.
3 Press Select.
4 Press Stop/Clear when you are ready to select the photos you want
to print.
Printing DPOF selection
The Digital Print Order Format (DPOF) is an option available on some
digital cameras. If you take pictures with a camera that supports DPOF,
you can specify which photos to print and the number of copies of each
photo while the memory card is still in the camera.
1 Load photo paper.
2 Insert a memory card.
Note: If you are unsure of what type of memory card you have,
see page 11.
The I Want To... menu appears.
3 Use the down arrow button to highlight Print DPOF Selection.
4 Press Select.
If Preview before Print is on, a preview of the print job is first displayed.
Press
Start to print the DPOF selections.
If Preview before Print is off, the DPOF selections print immediately.
Note: To adjust the Preview setting, see page 23.
21
Page 22

Customizing your printer settings
Adjustments made to the settings in this section will remain in effect until
you adjust the settings again or until you reset the factory default settings.
Changing the blank paper size
The factory default setting is 4x6.
1 Press Menu.
The Photo menu appears.
2 Press the down arrow button until you highlight Blank Paper
Size.
3 Press the right or left arrow buttons to scroll through the paper
sizes.
Your choices are 4x6, A6, and Hagaki.
4 Press Select to save your choice.
Changing the blank paper type
The factory default setting is Glossy.
1 Press Menu.
The Photo menu appears.
2 Press the down arrow button until you highlight Paper Type.
3 Press the right or left arrow buttons to scroll through the paper
types.
Your choices are Glossy, Plain, and Coated.
4 Press Select to save your choice.
22
Page 23

Changing the print quality
The factory default setting is Automatic.
1 Press Menu.
The Photo menu appears.
2 Press the down arrow button until you highlight Print Quality.
3 Press the right or left arrow buttons to scroll through the print quality
settings.
Your choices are Draft, Normal, and Photo.
4 Press Select to save your choice.
Adjusting preview before print
The factory default setting is On.
1 Press Menu.
The Photo menu appears.
2 Press the down arrow button until you highlight Preview before
Print.
3 Press the right or left arrow buttons to scroll through the settings.
Your choices are On and Off.
4 Press Select to save your choice.
Changing the control panel display language
The factory default setting is English.
1 Press Menu.
The Photo menu appears.
2 Press the down arrow button until you have reached the last item.
23
Page 24

3 Press the up arrow button twice.
4 Press the right or left arrow buttons to scroll through the languages.
5 Press Select to save your choice.
Changing the power save
The factory default setting is 20 Min.
1 Press Menu.
The Photo menu appears.
2 Press the down arrow button until you highlight Power Save.
3 Press the right or left arrow buttons to scroll through the settings.
Your choices are Immediately, 10 Min, 20 Min, and 30 Min.
4 Press Select to save your choice.
Clearing photo settings
This option lets you adjust when the current photo settings are cleared.
The settings that are affected are Number of Copies and Brightness. The
factory default setting is After 2 Minutes.
1 Press Menu.
The Photo menu appears.
2 Press the down arrow button until you highlight Clear Settings
When.
3 Press the right or left arrow buttons to scroll through the settings.
Your choices are Never and After 2 Minutes.
4 Press Select to save your choice.
24
Page 25

Restoring factory defaults
1 Press Menu.
The Photo menu appears.
2 Press the down arrow button until you highlight Restore
Settings.
3 Press Select.
25
Page 26
Traveling with your printer
Before you travel
When traveling with your printer, make sure you bring the following items:
• Photo paper.
• Extra print cartridge if you expect to do a lot of printing. For
compatible print cartridges, see “Ordering supplies” on page 30.
• A memory card for photos or a PictBridge-enabled camera with a
USB cable. For compatible memory cards, see “Supported memory
cards” on page 11.
Packing the printer
1 Turn the printer off.
2 Remove all photo paper from the paper support.
3 Close the paper support.
4 Remove any memory cards from the memory card slots.
26
Page 27
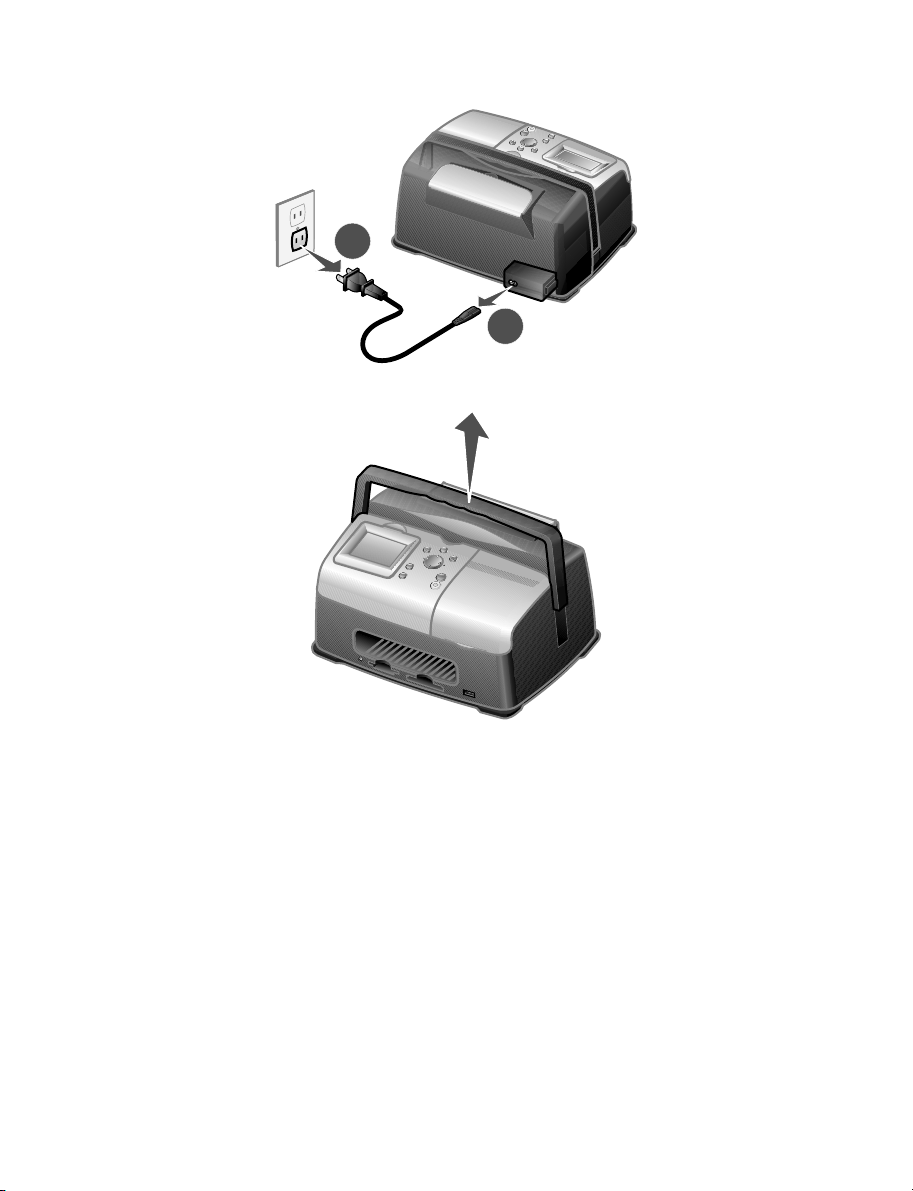
5
Disconnect the power cord.
1
6 Raise the carry handle.
2
Note: When traveling with your printer, it is not necessary to
remove the print cartridge.
Warning: Always travel with the printer in the upright position.
27
Page 28
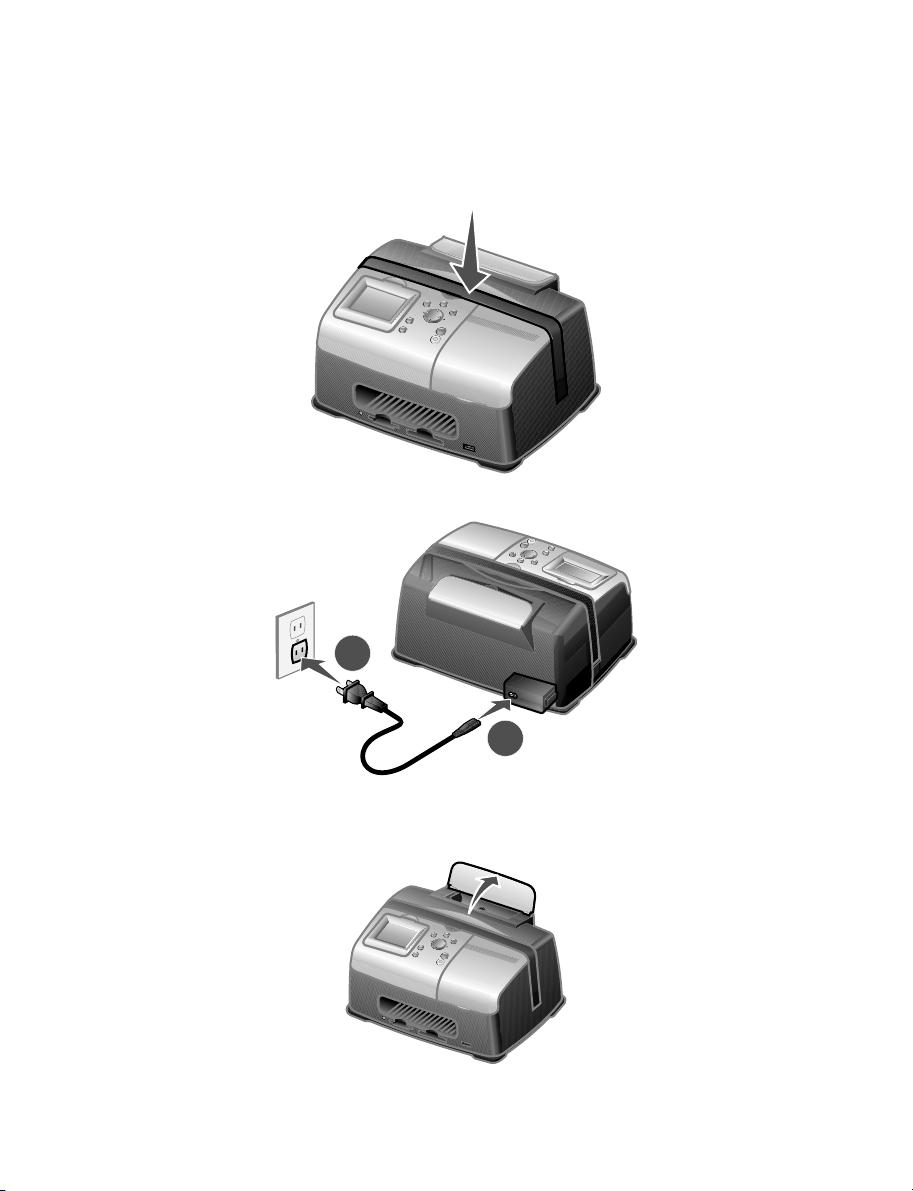
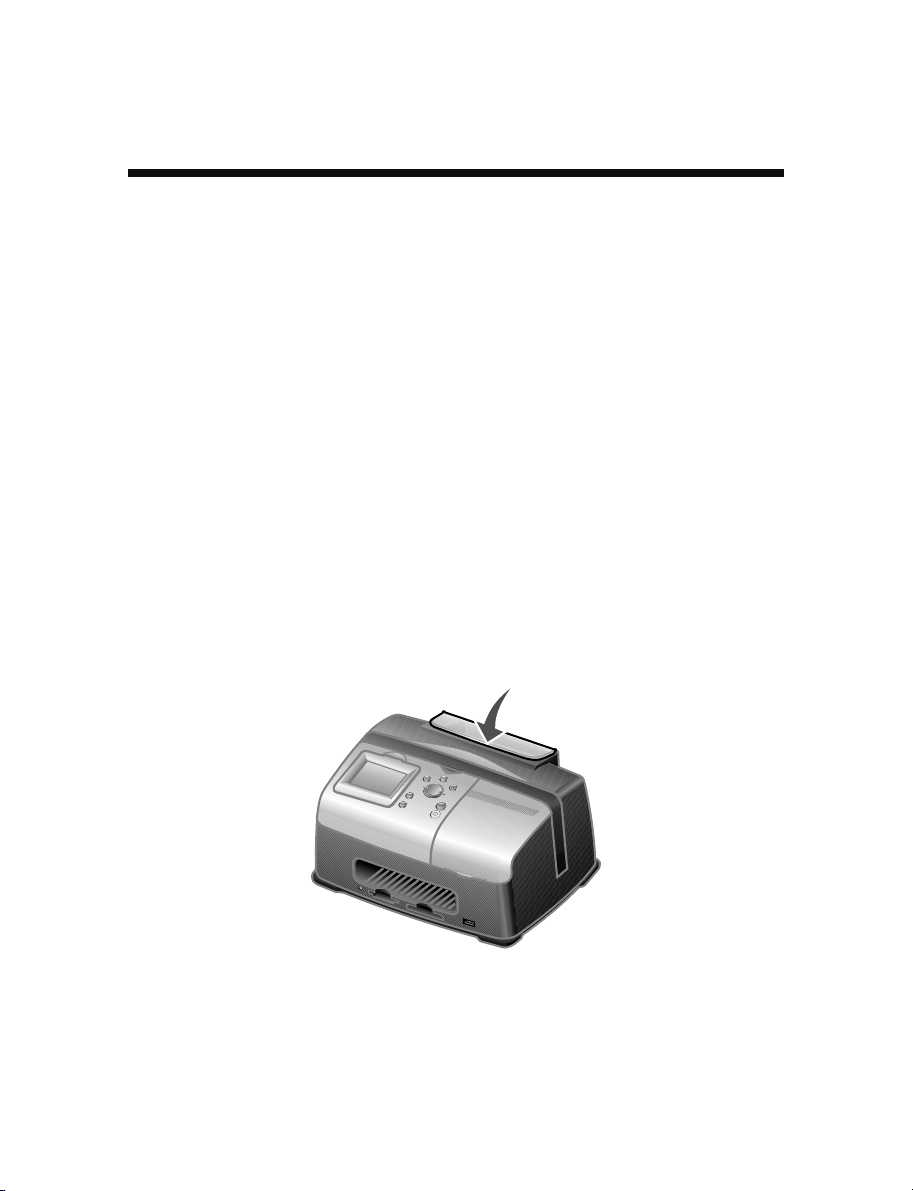
Unpacking the printer
1 Place the printer on a flat, level surface.
2 Lower the carrying handle.
3 Connect the power cord.
2
1
4 Press Power. Make sure the power light and display are on.
5 Lift the paper support.
28
Page 29

6 Load photo paper.
The printer is now ready to print your photos. Insert a memory card
containing photos or connect your PictBridge-enabled camera to the
printer.
29
Page 30

Maintaining your print cartridge
Checking the ink level status
1 Press Menu.
The Photo menu appears.
2 Press the down arrow button until you highlight Ink Levels.
3 Press Select.
Note: Press
If you need to order a new print cartridge, see “Ordering supplies” on
page 30.
Stop/Clear to return to the previous menu.
Refilling the print cartridge
Lexmark’s warranty does not cover the repair of failures or damage caused
by a refilled cartridge. We do not recommend use of a refilled cartridge.
Refilling a cartridge can affect print quality and cause damage to the
printer. Use Lexmark supplies for the best results. See “Ordering supplies”
on page 30.
Ordering supplies
To order printer supplies or to locate a dealer near you, contact the
Lexmark Web site at www.lexmark.com.
Color print cartridges
• 33 • 35
30
Page 31

Replacing the print cartridge
Removing a used print cartridge
1 If the printer is off, press the Power button.
2 Open the access cover.
3 Press down on the cartridge lever to open the cartridge lid.
31
Page 32

4
Remove the old cartridge.
Installing a print cartridge
1 If you are installing a new print cartridge, remove the sticker and
transparent tape from the bottom of the print cartridge.
1
2
Warning: Do not touch the gold contact area on the back or the
nozzles on the bottom of the cartridge.
2 Unless it is already open, press down on the cartridge lever to open
the cartridge lid.
32
Page 33

3
Insert the cartridge.
4 Snap the lid closed.
5 Close the access cover.
6 Load a blank 4x6 index card into the paper support.
7 When prompted on the display, press Select to print the cartridge
alignment page.
Note: You may discard this page after it prints.
33
Page 34

Aligning the print cartridge
1 Load a blank 4x6 index card.
2 Press Menu.
The Photo menu appears.
3 Press the down arrow button until you highlight Align
Cartridge.
4 Press Select.
Note: Discard the index card after it prints.
Cleaning the print cartridge nozzles
1 Load a blank 4x6 index card.
2 Press Menu.
The Photo menu appears.
3 Press the down arrow button until you highlight Clean
Cartridge.
34
Page 35

4
Press Select.
Note: Discard the index card after it prints.
Printing a test page
1 Load a blank 4x6 index card.
2 Press Menu.
The Photo menu appears.
3 Press the down arrow button until you highlight Print Test
Page.
4 Press Select.
Note: Discard the index card after it prints.
35
Page 36

Troubleshooting
Category Purpose
“Setup troubleshooting” on page 37 Resolves issues that occur during the
“Print troubleshooting” on page 38 Resolves issues that occur while
“Improving print quality” on page 40 Resolves issues with the print quality of
“Jams and misfeeds troubleshooting”
on page 43
“Memory card and PictBridge
troubleshooting” on page 44
“Error messages troubleshooting” on
page 45
initial printer setup.
printing.
your photos.
Resolves issues with paper jams and
misfeeds.
Resolves issues that occur while using
memory cards and PictBridge-enabled
cameras.
Resolves issues with error messages
on the display.
36
Page 37

Setup troubleshooting
Symptom Diagnosis Solution
Incorrect language
appears on the
display
The Power light is
not lit
Alignment page or
test page will not
print
Did you select the wrong
language during the initial
printer setup?
Is the power supply pushed
all the way into the printer?
Is the printer connected to a
working electrical outlet?
Is the printer on? Press the Power button. If
Do you see an error
message?
Did you remove the
transparent tape from the
bottom of the print
cartridge?
Is the print cartridge
installed properly?
Is the photo paper loaded
correctly?
See “Changing the control
panel display language” on
page 23.
1 Disconnect the power
supply cord from the wall
outlet, and then from the
printer.
2 Reconnect the power
supply cord by pushing it
all the way into the wall
outlet and the connector
on the printer.
3 Press the Power button.
1 Connect the printer to an
electrical outlet that other
electrical devices have
been using.
2 Press the Power button.
the Power light does not
come on, see “The Power
light is not lit” on page 37.
See “Error messages
troubleshooting” on page 45.
Remove the print cartridge,
check for the transparent
tape and then reinsert it.
See “Replacing the print
cartridge” on page 31.
See “Loading the photo
paper” on page 10.
37
Page 38

Print troubleshooting
Symptom Diagnosis Solution
Poor photo quality
Including:
• Blank page
• Dark print
• Faded print
• Incorrect colors
• Light and dark
bands in print
• Skewed lines
• Smudges
• Streaks
• White lines in print
Are you using the correct
print quality setting?
Did the ink completely
dry on the photo paper
before you moved it?
Is the photo paper
wrinkled?
Are the printer settings
adjusted to the correct
paper size?
Is the print cartridge
aligned properly?
Has the print cartridge
been properly
maintained?
Is the cartridge out of
ink?
Try using a different print
quality setting. For help,
see “Changing the print
quality” on page 23.
Allow the ink some time
to dry completely before
handling the print.
Use a new piece of photo
paper that is straight and
unwrinkled.
Select the correct paper
size. See “Changing the
blank paper size” on
page 22.
See “Aligning the print
cartridge” on page 34.
See “Improving print
quality” on page 40.
1 Check the status of
the ink cartridge. See
“Checking the ink level
status” on page 30.
2 If the ink level is low,
replace the ink
cartridge. See
“Replacing the print
cartridge” on page 31.
38
Page 39

Symptom Diagnosis Solution
Poor quality at the edges
of the page
Printer does not print or
respond
Slow print speed Are you using the highest
Are you using the correct
paper size with the size
you selected in the
printer?
Is the printer on? Press the Power button.
Do you see an error
message?
Is the print cartridge
installed properly?
print quality resolution?
The printer supports
three paper sizes: 4x6,
A6, and Hagaki.
1 Verify the paper size
you are using.
2 Verify the printer
setting matches your
paper size. See
“Changing the blank
paper size” on
page 22.
If the Power light does
not come on, see “The
Power light is not lit” on
page 37.
See “Error messages
troubleshooting” on
page 45.
Remove the print
cartridge, check for
transparent tape and
then reinsert. See
“Replacing the print
cartridge” on page 31.
Reduce the print quality
resolution. See
“Changing the print
quality” on page 23.
Note: Draft and Normal
print more quickly than
Best.
39
Page 40

Improving print quality
Basic solutions
If you are not satisfied with the print quality of your document, make sure
you:
• Use the appropriate paper size for your print. See “Changing the
blank paper size” on page 22.
• Select a higher print quality. See “Changing the print quality” on
page 23.
Advanced solutions
If your photo still does not have the print quality you want, follow these
steps:
1 Align the print cartridge. See page 34.
If print quality has not improved, continue to step 2.
2 Clean the print nozzles. See page 34.
If print quality has not improved, repeat step 2 up to two more times
before continuing to step 3.
3 Reinsert the print cartridge. See page 41.
If print quality has not improved, continue to step 4.
4 Wipe the print cartridge nozzles and contacts. See page 41.
If print quality has not improved, repeat step 4 up to two more times.
5 If print quality is still not satisfactory, replace the print cartridge. See
page 30.
40
Page 41

Reinserting the print cartridge
1 Remove the print cartridge. See page 31.
2 Insert the print cartridge. See page 32.
3 Print your photo again.
Wiping the print cartridge nozzles and contacts
1 Remove the print cartridge. See page 31.
2 Dampen a clean, lint-free cloth with water and place it on a level
surface.
Note: Place two pieces of paper under the cloth to avoid
getting ink on the work surface.
3 Gently hold the nozzles against the cloth for about three seconds,
and then wipe in the direction shown.
4 Gently hold the contacts against another clean section of cloth for
about three seconds, and then wipe in the direction shown.
41
Page 42

5 With another clean section of the cloth, repeat steps 3 and 4.
6 Let the nozzles and contacts dry completely.
7 Reinsert the print cartridge. See “Installing a print cartridge” on
page 32.
8 Run the clean cartridge utility. See “Cleaning the print cartridge
nozzles” on page 34.
9 Print your photo again.
42
Page 43

Jams and misfeeds troubleshooting
Symptom Diagnosis Solution
Paper jams Did the jam occur at the
Paper misfeeds, skews,
or multiple sheets feed
paper support?
Is the photo paper loaded
correctly?
Are you using photo
paper recommended for
your printer?
Are you loading more
than one page at a time?
Is the photo paper
wrinkled or damaged?
Turn the power off. Firmly
grasp the photo paper
and gently pull it from the
printer.
See “Loading the photo
paper” on page 10.
The printer supports
three photo paper sizes:
4x6, A6, and Hagaki.
Try loading a smaller
amount of photo paper
into the printer. See
page 10.
Use a new piece of photo
paper that is straight and
unwrinkled.
43
Page 44

Memory card and PictBridge troubleshooting
Symptom Diagnosis Solution
Memory card is not
recognized by the printer
Cannot print from the
digital camera
Is the memory card
damaged?
Is the memory card
inserted correctly?
Is there more than one
memory card inserted at
the same time.
Are you using a
supported memory card
type?
Do you have a
PictBridge-enabled
digital camera connected
to the printer.
Is the digital camera
PictBridge compatible?
Verify that there is no
damage to the memory
card.
Insert the memory card
correctly. See page 12.
Only one memory card
may be used at one time.
Remove the second
memory card.
For supported memory
cards, see page 11.
Disconnect the
PictBridge-enabled
digital camera from the
printer.
Remove the device and
use a PictBridge-enabled
digital camera in the
PictBridge port.
Refer to your camera
documentation to
determine if it is
PictBridge compatible.
Is the PictBridge-enabled
digital camera set to the
correct USB mode?
Is there a memory card
inserted in the printer?
Are you using the USB
cable that came with your
digital camera?
44
Refer to your camera
documentation for help
selecting the correct USB
mode.
Remove the memory
card from the printer.
You must use the USB
cable that came with your
camera.
Refer to your camera
documentation to
determine which type of
USB cable it supports.
Page 45

Error messages troubleshooting
Error Message What it indicates Solution
Ink low The print cartridge is
Paper jam There is a paper jam. 1 Clear the paper jam. See
Carrier jam The print cartridge carrier is
Paper out The printer is out of photo
Cover open The access cover was open
Cartridge
missing
running out of ink.
The Ink Low warning occurs
when your cartridge is about
25% full, 15% full, and
10% full.
stuck.
paper.
when you pressed Start.
The print cartridge is
missing or not installed
properly.
Replace the cartridge. See
page 31.
“Jams and misfeeds
troubleshooting” on
page 43.
2 Press Select to reprint
the last photo.
1 Remove all the paper
from the printer.
2 Verify that the print
cartridge is installed
properly. See
“Reinserting the print
cartridge” on page 41.
3 Press Select to reprint
the last photo.
Load more photo paper into
the printer. See page 10.
Verify that the access cover
is closed.
Printing continues
immediately.
Verify that the cartridge is
installed properly. See
“Installing a print cartridge”
on page 32.
Alignment
error
The print cartridge is not
installed properly or the
transparent tape was not
removed.
45
Verify that the cartridge is
installed properly and the
transparent tape is removed.
See “Installing a print
cartridge” on page 32.
Page 46

Error Message What it indicates Solution
Card problem The memory card was
No images The memory card has no
Card format The memory card formatting
PictBridge
port
Size warning The paper size selected
inserted incorrectly or is
damaged.
A second memory card has
been detected.
supported images.
is not supported.
The device attached to the
PictBridge port is not
supported.
The PictBridge-enabled
digital camera is not set to
the correct USB mode.
does not match the size of
the photo paper in the paper
support.
1 Verify that there is no
damage to the memory
card.
2 Insert the card correctly.
See page 12.
Only one memory card may
be used at one time.
Remove the second card.
Use a different memory card
containing photos.
Reformat the memory card
in your digital camera.
For help, see your digital
camera documentation.
1 Remove the device.
2 Use a PictBridge-enabled
digital camera in the
PictBridge port.
Refer to your digital camera
documentation for help
selecting the correct USB
mode.
Verify the printer setting
matches your blank paper
size. See page 22.
Note: An index page can
only be printed on 4 x 6
photo paper.
46
Page 47

Lexmark confidential until announced - 7/22/04
Finding more information
Resource Description
Setup sheet Instructions on how to set up your printer.
User’s Guide Information on:
• Digital photo printing
• Using the control panel
• Maintenance
• Troubleshooting
• Safety
Lexmark Web site http://support.lexmark.com/
The Web site has information on:
• Customer Care—Product registration, contact
information, order status, warranty status, and repair
information.
• Reference—Printer documentation and
specifications
• Solutions—Searchable KnowledgeBase and e-mail
support
47
Page 48

Notices
Electronic emission notices
Federal Communications Commission (FCC) compliance information statement
The Lexmark 310 Series Photo Jetprinter, Type Number 4300, has been tested and found to
comply with the limits for a Class B digital device, pursuant to Part 15 of the FCC Rules.
Operation is subject to the following two conditions: (1) this device may not cause harmful
interference, and (2) this device must accept any interference received, including interference
that may cause undesired operation.
The FCC Class B limits are designed to provide reasonable protection against harmful
interference in a residential installation. This equipment generates, uses, and can radiate radio
frequency energy and, if not installed and used in accordance with the instructions, may cause
harmful interference to radio communications. However, there is no guarantee that interference
will not occur in a particular installation. If this equipment does cause harmful interference to
radio or television reception, which can be determined by turning the equipment off and on, the
user is encouraged to try to correct the interference by one or more of the following measures:
• Reorient or relocate the receiving antenna.
• Increase the separation between the equipment and receiver.
• Connect the equipment into an outlet on a circuit different from that to which the receiver is
connected.
• Consult your point of purchase or service representative for additional suggestions.
The manufacturer is not responsible for any radio or television interference caused by using
other than recommended cables or by unauthorized changes or modifications to this
equipment. Unauthorized changes or modifications could void the user's authority to operate
this equipment.
Any questions regarding this compliance information statement should be directed to:
Director of Lexmark Technology & Services
Lexmark International, Inc.
740 West New Circle Road
Lexington, KY 40550
(859) 232-3000
Industry Canada compliance statement
This Class B digital apparatus meets all requirements of the Canadian Interference-Causing
Equipment Regulations.
Avis de conformité aux normes de l’industrie du Canada
Cet appareil numérique de la classe B respecte toutes les exigences du Règlement sur le
matériel brouilleur du Canada.
European Community (EC) directives conformity
This product is in conformity with the protection requirements of EC Council directives 89/336/
EEC and 73/23/EEC on the approximation and harmonization of the laws of the Member
States relating to electromagnetic compatibility and safety of electrical equipment designed for
use within certain voltage limits.
A declaration of conformity with the requirements of the directives has been signed by the
Director of Manufacturing and Technical Support, Lexmark International, S.A., Boigny, France.
This product satisfies the Class B limits of EN 55022 and safety requirements of EN 60950.
48
Page 49

Japanese VCCI notice
If this symbol appears on your product, the accompanying statement is applicable.
Korean MIC statement
If this symbol appears on your product, the accompanying statement is applicable.
This equipment has undergone EMC registration as a household product. It can be used in any
area, including a residential area.
The United Kingdom Telecommunications Act 1984
This apparatus is approved under the approval number NS/G/1234/J/100003 for the indirect
connections to the public telecommunications systems in the United Kingdom.
Noise emission levels
The following measurements were made in accordance with ISO 7779 and reported in
conformance with ISO 9296.
1-meter average sound pressure, dBA
Printing
44 dBA
Idling Silent
ENERGY STAR
The EPA ENERGY STAR Office Equipment program is a partnership effort with office
equipment manufacturers to promote the introduction of energy-efficient products and to
reduce air pollution caused by power generation.
Companies participating in this program introduce products that power down when they are not
being used. This feature will cut the energy used by up to 50 percent. Lexmark is proud to be
a participant in this program.
As an ENERGY STAR Partner, Lexmark International, Inc. has determined that this product
meets the ENERGY STAR guidelines for energy efficiency.
49
Page 50

Printer energy consumption
The following table documents the energy consumption characteristics of the printer.
Mode Description Power consumption
Printing Printer is generating hard copy output 10 W
Power Saver Printer is in energy saving mode 7 W
Off
The power consumption levels listed in the previous table represent time-averaged
measurements. Instantaneous power draws may be substantially higher than the average.
Printer is plugged into a wall outlet, but
switch is turned off 5.5 W
Power Saver
As part of the ENERGY STAR program, this printer is designed with an energy-saving mode
called Power Saver. The Power Saver Mode is equivalent to the EPA Sleep Mode. The Power
Saver Mode saves energy by lowering power consumption during periods of inactivity. For this
printer, the Power Saver Mode is entered immediately at the end of a print job. The Power
Saver Mode does not affect the performance of this product and therefore cannot be modified
by the user.
Off modes
This printer has an off mode which still consumes a small amount of power. To completely stop
printer power consumption, disconnect the power supply from the wall outlet.
Total energy usage
It is sometimes helpful to calculate the total printer energy usage. Since power consumption
claims are provided in power units of Watts, the power consumption should be multiplied by the
time the printer spends in each mode in order to calculate energy usage. The total printer
energy usage is the sum of each mode's energy usage.
Mercury statement
This product contains mercury in the lamp (<5mg Hg). Disposal of mercury may be regulated
due to environmental considerations. For disposal or recycling information, contact your local
authorities or the Electronic Industries Alliance: www.eiae.org.
Copyright advisory
It may be illegal to copy certain materials without permission or license, including documents,
images, and currency. If you are not sure whether you have permission, seek legal advice.
Limited Warranty Information
Lexmark International, Inc. furnishes a limited warranty that this printer or All-In-One product
will be free of defects in material and workmanship for a period of 12 months after the original
date of purchase. To view the limitations and conditions of this limited warranty, please refer to
the Statement of Limited Warranty included with this unit or set forth at http://
warranty.lexmark.com.
50
Page 51

Index
A
access cover 7
adjust printer settings 22
aligning the print
cartridge 34
arrow button 9
B
black & white photos 17
blank paper
loading 10
selecting 22
selecting type 22
size 10
type 10
brightness, adjust 19
buttons, control panel
- (left arrow) 9
+ (right arrow) 9
down arrow 9
left arrow 9
Menu 8
Number of Prints 9
Power 9
right arrow 9
Rotate 9
Select 9
Start 9
Stop/Clear 8
up arrow 9
C
cable, USB 15
cards, memory 11
cartridge, print
aligning 34
clean contacts 41
clean nozzles
automatic 34
manual 41
ink level status 30
installing 32
ordering 30
part numbers 30
refilling 30
removing 31
replacing 31
changing
area to print 18
blank paper size 22
blank paper type 22
brightness 19
language 23
number of prints 20
power save 24
preview before
print 23
print quality 23
cleaning print cartridge
nozzles
automatic 34
manual 41
clear photo settings 24
color print cartridge part
numbers 30
CompactFlash, memory
card 11
control panel 8
control panel display 7
copyright advisory 50
crop photos 16, 18
customize photos 16
customize printer
settings 22
D
darken photos 19
default settings 25
digital camera
port 7
printing from 15
USB cable 15
digital photos
from memory card 13
from
PictBridge-enabled
camera 15
display, control panel 7
down arrow button 9
DPOF 21
E
edit photos
black & white 17
brightness 19
crop 16, 18
number of prints 20
edition information 2
electronic emission
statement 48
emission statement 48
error message
Alignment error 45
Card format 46
Card problem 46
51
Page 52

Carrier jam 45
Cartridge missing 45
Cover open 45
Ink low 45
No images 46
Paper jam 45
Paper out 45
PictBridge port 46
Size warning 46
F
FCC statement 48
finding more
information 47
H
handle 7
I
I Want To... menu 16
improving print quality 40
index page, print 16
ink level status 30
inserting a memory
card 12
installing the print
cartridge 32
J
jam, paper 43
Jams and misfeeds
troubleshooting 43
L
language, changing 23
left arrow button 9
Lexmark Web site 47
lighten photos 19
loading blank paper 10
M
maintaining the print
cartridge 30
maintenance 30
memory card
inserting 12
printing from 13
removal 14
slots 7
supported types 11
troubleshooting 44
memory cards, supported
CompactFlash 11
Memory Stick 11
Memory Stick Duo 11
Memory Stick PRO 11
Memory Stick PRO
Duo 11
Microdrive 11
MultiMedia 11
Secure Digital 11
SmartMedia 11
xD Picture Card 11
Memory Stick Duo,
memory card 11
Memory Stick PRO Duo,
memory card 11
Memory Stick PRO,
memory card 11
Memory Stick, memory
card 11
Menu button 8
Microdrive, memory
card 11
Minus (-) button 9
mobility 26
MultiMedia memory
card 11
N
nozzle, print cartridge
cleaning
automatic 34
manual 41
Number of Prints
button 9
number of prints,
changing 20
O
ordering supplies 30
P
packing the printer,
travel 26
paper exit 7
paper jam 43
paper misfeeds 43
paper size, blank
selecting 22
supported 10
paper support 7
paper type, blank
selecting 22
supported 10
paper, blank
loading 10
select size 22
select type 22
supported sizes 10
supported types 10
part numbers
color print cartridge 30
parts
access cover 7
control panel 8
control panel display 7
handle 7
memory card slots 7
paper exit 7
paper support 7
PictBridge port 7
power supply port 8
photo settings
black & white 17
brightness 19
clear 24
crop 18
52
Page 53

default 25
DPOF selections 21
number of prints 20
photos
print all 16
print index page 16
select to print 13
slide show 21
PictBridge
port 7
printing 15
troubleshooting 44
USB cable 15
Plus (+) button 9
Power button 9
power save 24
power supply port 8
preview before print 23
print
alignment page 34
all photos 16
black & white
photo 17
index page 16
preview 23
selecting photo 13
test page 35
using DPOF
selections 21
using
PictBridge-enabled
digital camera 15
print cartridge
aligning 34
clean contacts 41
clean nozzles
automatic 34
manual 41
ink level status 30
installing 32
ordering 30
part numbers 30
refilling 30
removing 31
replacing 31
print from
memory card 13
PictBridge-enabled
digital camera 15
print quality
improving 40
select 23
Print troubleshooting 38
printer settings, adjust 22
Q
quality, improve print 40
R
refilling print cartridge 30
removing memory
cards 14
removing print
cartridge 31
replacing print
cartridge 31
restore default
settings 25
right arrow (+) button 9
Rotate button 9
S
safety information 2
Secure Digital, memory
card 11
Select button 9
selecting photo to
print 13
settings, photo
brightness 19
clear 24
default 25
DPOF selections 21
number of prints 20
settings, print
blank paper size 22
blank paper type 22
clear settings 24
default settings 25
language 23
power save 24
preview 23
print quality 23
Setup troubleshooting 37
slide show 21
slow print speed 39
SmartMedia, memory
card 11
Start button 9
Stop/Clear button 8
supplies, ordering 30
T
test page 35
traveling with your
printer 26
troubleshooting
alignment page will not
print 37
error message
Alignment error 45
Card format 46
Card problem 46
Carrier jam 45
Cartridge
missing 45
Cover open 45
Ink low 45
No images 46
Paper jam 45
Paper out 45
PictBridge port 46
Size warning 46
language,
incorrect 37
memory card 44
not printing 39
not responding 39
paper jam 43
paper misfeeds 43
paper sticks
together 43
53
Page 54

photo edge quality 39
PictBridge 44
poor photo quality 38
power light not lit 37
print quality
problems 38
print speed 39
slow printing 39
test page will not
print 37
U
Understanding your
printer 7
unpacking the printer,
travel 28
up arrow button 9
USB cable 15
USB, PictBridge port 15
W
Web site, Lexmark 47
wiping print cartridge
contacts 41
nozzles 41
X
xD Picture Card, memory
card 11
54
Page 55

310 Series
Benutzerhandbuch
Benutzerhandbuch
Page 56

Benutzerhandbuch
Ausgabe: Juni 2004
Der folgende Abschnitt hat für alle jene Länder keine Gültigkeit, deren Gesetze mit dessen
Bestimmungen unvereinbar sind. LEXMARK INTERNATIONAL, INC., ÜBERNIMMT FÜR DIESE
PUBLIKATION KEINERLEI GARANTIE, WEDER AUSDRÜCKLICH NOCH IMPLIZIT,
EINSCHLIESSLICH (JEDOCH NICHT DARAUF BESCHRÄNKT) DER IMPLIZITEN GARANTIE
HINSICHTLICH DER HANDELSÜBLICHEN QUALITÄT ODER DER EIGNUNG FÜR EINEN
BESTIMMTEN ZWECK. In einigen Staaten ist der Ausschluss von ausdrücklichen oder
stillschweigenden Garantien bei bestimmten Rechtsgeschäften nicht zulässig. Deshalb hat diese
Aussage für Sie möglicherweise keine Gültigkeit.
Diese Publikation kann technische Ungenauigkeiten oder Tippfehler enthalten. Die vorliegenden
Informationen ändern sich von Zeit zu Zeit. Diese Änderungen werden in spätere Ausgaben
aufgenommen. Verbesserungen oder Änderungen an den beschriebenen Produkten oder
Programmen können jederzeit vorgenommen werden.
Anmerkungen zu dieser Publikation senden Sie an die folgende Adresse: Lexmark International, Inc.
Department F95/032-2, 740 West New Circle Road, Lexington, Kentucky 40550, USA. In
Großbritannien und Irland: Lexmark International Ltd., Marketing and Services Department,
Westhorpe House, Westhorpe, Marlow Bucks SL7 3RQ. Lexmark ist dazu berechtigt, die von Ihnen
gelieferten Informationen auf jede gewünschte Art und Weise zu nutzen oder weiterzugeben, ohne
damit Ihnen gegenüber eine Verpflichtung einzugehen. Wählen Sie in den USA die Telefonnummer
1-800-553-9727, um zusätzliche Exemplare der Publikationen für dieses Produkt zu bestellen. In
Großbritannien oder Irland wählen Sie +44 (0)8704 440 044. In den übrigen Ländern wenden Sie sich
bitte an Ihren Händler.
Die Erwähnung von Produkten, Programmen oder Services in dieser Publikation bedeutet nicht, dass
der Hersteller diese in allen Ländern anbieten möchte, in denen er aktiv ist. Jeglicher Verweis auf
Produkte, Programme oder Services soll nicht bedeuten, dass ausschließlich diese Produkte,
Programme oder Services eingesetzt werden können. Alle funktional äquivalenten Produkte,
Programme oder Services, die kein bestehendes Recht an geistigem Eigentum verletzen, dürfen
stattdessen verwendet werden. Bei Verwendung anderer Produkte, Programme und Services als den
ausdrücklich vom Hersteller empfohlenen ist der Benutzer für die Beurteilung und Prüfung der
Funktionsfähigkeit selbst zuständig.
Lexmark und Lexmark mit der roten Raute sind Marken von Lexmark International, Inc. Sie sind in den
Vereinigten Staaten und/oder in anderen Ländern registriert. Photo Jetprinter ist ein Warenzeichen
von Lexmark International, Inc.
Andere Marken sind Eigentum ihrer jeweiligen Besitzer.
© 2004 Lexmark International, Inc.
Alle Rechte vorbehalten.
UNITED STATES GOVERNMENT RIGHTS
This software and any accompanying documentation provided under this agreement are commercial
computer software and documentation developed exclusively at private expense.
Sicherheitsinformationen
• Verwenden Sie ausschließlich das diesem Produkt beiliegende Netzkabel bzw. ein
durch den Hersteller zugelassenes Ersatznetzkabel.
• Schließen Sie das Netzkabel an eine Steckdose an, die sich in der Nähe des Geräts
befindet und leicht zugänglich ist.
• Lassen Sie alle Wartungs- und Reparaturarbeiten, die nicht in der
Benutzerdokumentation beschrieben sind, ausschließlich von einem ausgebildeten
Servicemitarbeiter durchführen.
VORSICHT: Schließen Sie während eines Gewitters weder das
Gerät noch Kabel an (Netzkabel, Telefonkabel usw.).
Konventionen
Hinweis: Ein Hinweis kennzeichnet Situationen, die Ihnen helfen können.
VORSICHT: Vorsicht kennzeichnet Situationen, die Ihnen
Schaden zufügen können.
Achtung: Warnung/Achtung kennzeichnet Situationen, die
Schäden an der Produkthardware oder -software verursachen
können.
Page 57

Inhalt
Informationen zu Ihrem Drucker ............................................... 7
Bestandteile des Druckers ........................................................................7
Bedienfeld .................................................................................................8
Einlegen von Papier ................................................................. 10
Unterstützte Fotopapiersorten ................................................................10
Einlegen des Fotopapiers .......................................................................10
Einsetzen von Speicherkarten ................................................ 11
Unterstützte Speicherkarten ...................................................................11
Einsetzen von Speicherkarten ................................................................12
Drucken über eine Speicherkarte ........................................... 13
Schritt 1: Einlegen von Fotopapier ..........................................................13
Schritt 2: Einsetzen einer Speicherkarte .................................................13
Schritt 3: Anzeigen Ihrer Fotos ...............................................................13
Schritt 4: Auswählen eines Fotos für den Druckvorgang ........................13
Schritt 5: Anpassen des Fotos ................................................................14
Schritt 6: Wiederholen von Schritt 4 und 5 zur Auswahl eines
weiteren Fotos ........................................................................................14
Schritt 7: Drucken von Fotos ...................................................................14
Schritt 8: Entnehmen der Speicherkarte .................................................14
Drucken über Digitalkameras .................................................. 15
Anpassen von Fotoausdrucken .............................................. 16
Drucken einer Indexseite ........................................................................16
Drucken sämtlicher Fotos .......................................................................16
Drucken eines Fotos in Schwarzweiß .....................................................17
Beschneiden von Fotos ..........................................................................18
3
Page 58

Anpassen der Helligkeit ..........................................................................19
Anpassen der Anzahl an Ausdrucken .....................................................20
Anzeigen der Diashow ............................................................................21
Drucken der DPOF-Auswahl ................................................................... 21
Anpassen der Druckereinstellungen ...................................... 22
Ändern des Papierformats für das leere Papier ......................................22
Ändern der Papiersorte für das leere Papier ..........................................22
Ändern der Druckqualität ........................................................................23
Anpassen der Vorschau vor dem Drucken ............................................. 23
Ändern der Sprache des Bedienfeld-Displays ........................................23
Ändern der Einstellung für den Stromsparmodus ...................................24
Löschen von Fotoeinstellungen ..............................................................24
Wiederherstellen der Werkseinstellungen ..............................................25
Unterwegs mit Ihrem Drucker ................................................. 26
Vor Reiseantritt .......................................................................................26
Einpacken des Druckers .........................................................................26
Auspacken des Druckers ........................................................................28
Wartung der Tintenpatrone .....................................................30
Überprüfen des Tintenfüllstands .............................................................30
Nachfüllen der Tintenpatrone .................................................................. 30
Bestellen von Zubehör ............................................................................30
Austauschen der Tintenpatrone ..............................................................31
Ausrichten der Tintenpatrone ..................................................................34
Reinigen der Patronendüsen ..................................................................34
Drucken einer Testseite ..........................................................................35
Fehlersuche und Abhilfe .......................................................... 36
Fehlersuche und Abhilfe bei der Einrichtung ..........................................37
Fehlersuche und Abhilfe beim Drucken .................................................. 38
Verbessern der Druckqualität .................................................................40
Fehlersuche und Abhilfe bei Papierstaus und
Papierzuführungsfehlern ......................................................................... 43
4
Page 59

Fehlersuche und Abhilfe in Bezug auf die Speicherkarte
und PictBridge .........................................................................................44
Fehlersuche und Abhilfe bei Fehlermeldungen ...................................... 45
Weitere Informationen .............................................................. 47
Hinweise .................................................................................... 48
Index .......................................................................................... 51
5
Page 60

6
Page 61

Informationen zu Ihrem Drucker
Bestandteile des Druckers
8
1
7
2
6
3
5
4
# Bestandteil Zweck
1 Papierstütze Papier in den Drucker einlegen.
2 Tragegriff Drucker transportieren.
3 Abdeckung Tintenpatrone einsetzen oder austauschen.
4 PictBridge-Anschluss Hiermit kann eine PictBridge-fähige Digitalkamera an den
5 Speicherkarten-
Steckplätze
6 Papierablage Hierdurch kann das Papier nach abgeschlossenem
7 Bedienfelddisplay Hier können Fotos auf der Speicherkarte in der Vorschau
8 Bedienfeld Ermöglicht den Betrieb des Druckers. Weitere Details
Drucker angeschlossen werden. Mit den Steuerelementen
der Kamera können Fotos ausgewählt und gedruckt
werden.
Speicherkarten einsetzen.
Druckvorgang abgelegt werden.
angezeigt sowie der Status des Druckers überprüft werden.
Das Display weist 4 Positionen auf: Flach, 25°, 50° und 90°.
finden Sie unter „Bedienfeld“ auf Seite 8.
7
Page 62

1
# Bestandteil Zweck
1 Netzanschluss Hier kann der im Lieferumfang enthaltene
Netzanschluss angebracht werden.
Bedienfeld
8
1
2
7
65
# Taste Zweck
1Menü•Hiermit wird das Fotomenü eingeblendet.
2 Stopp/Löschen • Hiermit kann die Auswahl des angezeigten Fotos
für den Druckauftrag aufgehoben werden.
• Hiermit kann der Druckauftrag angehalten werden.
4
3
8
Page 63

# Taste Zweck
3 Start Hiermit kann mit dem Drucken der ausgewählten
4 Ein/Aus Hiermit kann der Drucker ein- und ausgeschaltet
5Aufwärtspfeil • Hiermit kann in den Menüoptionen geblättert
Abwärtspfeil • Hiermit kann in den Menüoptionen geblättert
Rechtspfeil (+) • Ermöglicht die Festlegung einer höheren Anzahl
Linkspfeil (-) • Ermöglicht die Festlegung einer niedrigeren
6 Anzahl der Ausdrucke • Hiermit kann die Anzahl der zu druckenden Fotos
7 Drehen Hiermit kann das Bild im Bedienfeld um 90 Grad
8 Auswahl • Hiermit kann eine Menüoption ausgewählt
Fotos begonnen werden.
werden.
werden.
• Beim Zuschnitt eines Bilds kann hiermit der
ausgewählte Bereich geändert werden.
• Hiermit kann in Zehnersprüngen vorwärts durch
die Fotos auf der Speicherkarte geblättert werden.
werden.
• Beim Zuschnitt eines Bilds kann hiermit der
ausgewählte Bereich geändert werden.
• Hiermit kann in Zehnersprüngen rückwärts durch
die Fotos auf der Speicherkarte geblättert werden.
an Ausdrucken.
• Beim Zuschnitt eines Bilds kann hiermit der
ausgewählte Bereich geändert werden.
• Hiermit kann der Wert eines Menüeintrags erhöht
werden.
• Ermöglicht die Anzeige des nächsten Bilds auf
einer Speicherkarte.
Anzahl an Ausdrucken.
• Beim Zuschnitt eines Bilds kann hiermit der
ausgewählte Bereich geändert werden.
• Hiermit kann der Wert eines Menüeintrags
verringert werden.
• Ermöglicht die Anzeige des vorherigen Bilds auf
einer Speicherkarte.
geändert werden.
• Beim Zuschnitt eines Bilds kann hiermit die Größe
des grünen Zuschnittrahmens geändert werden.
gegen den Uhrzeigersinn gedreht und so besser
angezeigt werden.
werden.
• Hiermit kann ein angezeigtes Foto für den
Druckvorgang ausgewählt werden.
9
Page 64

Einlegen von Papier
Unterstützte Fotopapiersorten
Sorte Format Verwendung
Foto-/
Glanzkarten
Karten Karteikarte: 4 x 6 Zoll
Hinweis: Es sollten nicht mehr als 25 Blatt in die Papierstütze eingelegt werden.
Einlegen des Fotopapiers
1 Heben Sie die Papierstütze an.
2 Legen Sie das Fotopapier so ein, dass die zu bedruckende Seite Ihnen
zugewandt ist.
Fotopapier: 4 x 6 Zoll
(102 x 152 mm)
Hagaki-Karte: 3,9 x 5,8 Zoll
(100 x 148 mm)
A6-Karte: 4,1 x 5,8 Zoll
(105 x 148 mm)
(102 x 152 mm)
Fotos drucken
Fotos drucken
Fotos drucken
Testseiten drucken und Seiten zur
Patronenwartung drucken
Hinweis: Drücken Sie das Fotopapier nicht mit Gewalt in den Drucker.
10
Page 65

Einsetzen von Speicherkarten
Unterstützte Speicherkarten
Hinweis: Möglicherweise ist Ihre Karte von einem anderen als den hier
aufgeführten Herstellern.
Microdrive
SmartMedia
CompactFlash Typ I und Typ II
Secure Digital (SD)
Memory Stick
Memory Stick PRO
Memory Stick Duo (mit Adapter)
Memory Stick PRO Duo (mit Adapter)
MultiMedia Card
11
xD Picture Card
(bis zu 512 MB)
Page 66

Einsetzen von Speicherkarten
Der Speicherkartenleser weist zwei Steckplätze für Speicherkarten
unterschiedlicher Größe auf. Wenn eine Speicherkarte eingesetzt ist, leuchtet ein
kleine LED auf. Die LED blinkt, wenn die Karte gelesen wird oder Daten übertragen
werden.
Achtung: Nehmen Sie die Speicherkarte nicht heraus, wenn die LED
blinkt.
Steckplatz Speicherkarte Installation
Linker Steckplatz • Secure Digital
Rechter Steckplatz • CompactFlash Typ I und
• SmartMedia
• MultiMedia
• Memory Stick
• Memory Stick PRO
• Memory Stick Duo
(mit Adapter)
• Memory Stick PRO Duo
(mit Adapter)
• xD Picture Card
Typ I I
• Microdrive
• Setzen Sie die Karte so ein, dass
die Namensbeschriftung nach oben
zeigt.
Hinweis: Wenn Sie eine SmartMediaKarte einsetzen, muss der goldene
Kontaktbereich nach oben zeigen.
Hinweis: Wenn Sie eine Memory
Stick Duo- oder Memory Stick PRO
Duo-Karte verwenden, schließen Sie
sie zunächst an den mit der Karte
gelieferten Adapter an, bevor Sie sie in
den Steckplatz einsetz.
• Falls sich auf der Karte ein Pfeil
befindet, sollte dieser in Richtung
des Druckers zeigen.
• Die Namensbeschriftung weist
nach oben.
• Falls sich auf der Karte ein Pfeil
befindet, sollte dieser in Richtung
des Druckers zeigen.
Hinweis: Ihr Drucker erkennt nur jeweils eine einzige Quelle für digitale
Medien/Fotos.
12
Page 67

Drucken über eine Speicherkarte
Schritt 1: Einlegen von Fotopapier
Hinweis: Informationen zum Einlegen von Fotopapier sowie eine Liste
der unterstützten Papiersorten finden Sie auf Seite 10.
Schritt 2: Einsetzen einer Speicherkarte
Hinweis: Wenn Sie sich nicht sicher sind, welchen Speicherkartentyp
Sie verwenden, lesen Sie auf Seite 11 nach.
Das Menü „Ich möchte...“ wird angezeigt.
Schritt 3: Anzeigen Ihrer Fotos
1 Drücken Sie auf den Abwärtspfeil, um den Eintrag Diashow zu markieren.
2 Drücken Sie die Taste Auswahl.
Jedes Fotos wird fünf Sekunden lang im Display angezeigt. Wenn Sie
vorwärts springen möchten, drücken Sie auf die Taste mit dem Rechtspfeil.
Wenn Sie zurückgehen möchten, drücken Sie auf die Taste mit dem
Linkpfeil.
3 Drücken Sie auf Stopp/Löschen, wenn Sie die zu druckenden Fotos
auswählen möchten.
Schritt 4: Auswählen eines Fotos für den
Druckvorgang
1 Blättern Sie mithilfe der nach rechts und links weisenden Pfeiltasten zu
dem Foto, das gedruckt werden soll.
Hinweis: Eine bessere Ansicht erzielen Sie, wenn Sie auf Drehen
drücken. Hiermit wird das Bild im Display um 90° gegen den
Uhrzeigersinn gedreht.
2 Drücken Sie die Taste Auswahl.
13
Page 68

Schritt 5: Anpassen des Fotos
Vor dem Drucken können die Fotoeinstellungen angepasst werden. Wenn Sie...
• das Foto beschneiden möchten, lesen Sie auf Seite 18 nach.
• die Helligkeit anpassen möchten, lesen Sie auf Seite 19 nach.
• die Anzahl der Ausdrucke ändern möchten, drücken Sie auf Anzahl der
Ausdrucke
• die Druckqualität ändern möchten, lesen Sie auf Seite 23 nach.
• das leere Papierformat ändern möchten, lesen Sie auf Seite 22 nach.
.
Schritt 6: Wiederholen von Schritt 4 und 5 zur
Auswahl eines weiteren Fotos
Wenn Sie die Auswahl der Fotos abgeschlossen haben, fahren Sie mit Schritt 7
fort.
Schritt 7: Drucken von Fotos
Drücken Sie die Taste Start.
Wenn „Vorschau vor Drucken“ aktiviert ist, wird zunächst eine Vorschau des
Druckauftrags angezeigt. Drücken Sie erneut auf Start, um das Foto zu drucken.
Wenn „Vorschau vor Drucken“ deaktiviert ist, wird das Foto sofort gedruckt.
Hinweis: Informationen zum Anpassen der Vorschaueinstellung finden
Sie auf Seite 23.
Schritt 8: Entnehmen der Speicherkarte
Achtung: Nehmen Sie die Speicherkarte nicht heraus, wenn die LED
blinkt. Die LED blinkt, wenn die Karte gelesen wird oder Daten
übertragen werden.
14
Page 69

Drucken über Digitalkameras
Sie können eine PictBridge-fähige Digitalkamera an den Drucker anschließen und
mit den Tasten auf der Kamera Fotos auswählen und drucken:
1 Schließen Sie das USB-Kabel an der Kamera an.
Hinweis: Verwenden Sie ausschließlich das zu Ihrer Kamera
gehörende USB-Kabel.
2 Schließen Sie das andere Ende des Kabels an den PictBridge-Anschluss
an der Vorderseite des Druckers an.
3 Informationen zu PictBridge-Verbindungen und ihrer Verwendung finden
Sie in der Bedienungsanleitung Ihrer Kamera.
Hinweis: Vergewissern Sie sich, dass bei der PictBridge-fähigen
Digitalkamera der richtige USB-Modus eingestellt wurde.
Weitere Informationen finden Sie in der Dokumentation für die
Kamera.
15
Page 70

Anpassen von Fotoausdrucken
Drucken einer Indexseite
1 Legen Sie Fotopapier ein.
2 Setzen Sie eine Speicherkarte ein.
Hinweis: Wenn Sie nicht sicher sind, welche Speicherkarte Sie
verwenden, ziehen Sie Seite 11 zurate.
Das Menü „Ich möchte“ wird angezeigt.
3 Drücken Sie auf Menü.
Das Menü „Foto“ wird angezeigt.
4 Drücken Sie auf den Abwärtspfeil, bis der Eintrag Indexseite drucken
ausgewählt ist.
5 Drücken Sie Auswahl.
Wenn die Funktion „Vorschau vor Drucken“ aktiviert ist, wird zuerst eine
Vorschau des Druckauftrags angezeigt. Drücken Sie auf
Indexseite zu drucken.
Wenn die Funktion „Vorschau vor Drucken“ deaktiviert ist, wird die
Indexseite sofort gedruckt.
Start, um die
Hinweis: Auf Seite 23 erfahren Sie, wie Sie die Vorschau-Einstellung
anpassen.
Drucken sämtlicher Fotos
1 Legen Sie Fotopapier ein.
2 Setzen Sie eine Speicherkarte ein.
Hinweis: Wenn Sie nicht sicher sind, welche Speicherkarte Sie
verwenden, ziehen Sie Seite 11 zurate.
Das Menü „Ich möchte...“ wird angezeigt.
16
Page 71

3 Drücken Sie auf den Abwärtspfeil, bis der Eintrag Alle Fotos drucken
ausgewählt ist.
4 Drücken Sie Auswahl.
Wenn die Funktion „Vorschau vor Drucken“ aktiviert ist, wird zuerst eine
Vorschau des Druckauftrags angezeigt. Drücken Sie auf Start, um die Fotos
zu drucken.
Wenn die Funktion „Vorschau vor Drucken“ deaktiviert ist, werden die Fotos
sofort gedruckt.
Hinweis: Auf Seite 23 erfahren Sie, wie Sie die Vorschau-Einstellung
anpassen.
Drucken eines Fotos in Schwarzweiß
1 Legen Sie Fotopapier ein.
2 Setzen Sie eine Speicherkarte ein.
Hinweis: Wenn Sie nicht sicher sind, welche Speicherkarte Sie
verwenden, ziehen Sie Seite 11 zurate.
Das Menü „Ich möchte“ wird angezeigt und der Eintrag Fotos/Ausdruck
anz. ist markiert.
3 Drücken Sie Auswahl.
4 Blättern Sie mithilfe des Rechts- oder Linkspfeils zu dem Foto, das Sie
anpassen möchten.
5 Drücken Sie Auswahl.
6 Drücken Sie auf Menü.
Das Menü „Foto“ wird angezeigt.
7 Drücken Sie auf den Abwärtspfeil, bis der Eintrag Farbdruck ausgewählt
ist.
8 Drücken Sie auf den Rechtspfeil, bis der Eintrag Schwarzweiß
ausgewählt ist.
9 Drücken Sie Auswahl.
Wenn Sie weitere Fotos anpassen möchten, wiederholen Sie dafür die
Schritte 4–8.
10 Drücken Sie auf Start, um die Fotos zu drucken.
17
Page 72

Wenn die Funktion „Vorschau vor Drucken“ aktiviert ist, wird zuerst eine Vorschau
des Druckauftrags angezeigt. Drücken Sie erneut auf
Wenn die Funktion „Vorschau vor Drucken“ deaktiviert ist, wird das Foto sofort
gedruckt.
Hinweis: Auf Seite 23 erfahren Sie, wie Sie die Vorschau-Einstellung
anpassen.
Start, um das Foto zu drucken.
Beschneiden von Fotos
1 Legen Sie Fotopapier ein.
2 Setzen Sie eine Speicherkarte ein.
Hinweis: Wenn Sie nicht sicher sind, welche Speicherkarte Sie
verwenden, ziehen Sie Seite 11 zurate.
Das Menü „Ich möchte“ wird angezeigt und der Eintrag Fotos/Ausdruck
anz. ist markiert.
3 Drücken Sie Auswahl.
4 Blättern Sie mithilfe des Rechts- oder Linkspfeils zu dem Foto, das Sie
anpassen möchten.
5 Drücken Sie auf Menü.
Das Menü „Foto“ wird angezeigt.
6 Drücken Sie auf den Abwärtspfeil, bis der Eintrag Ausschneiden
ausgewählt ist.
7 Drücken Sie Auswahl.
8 Passen Sie den grünen Zuschnittsrahmen über dem Foto an.
Drücken Sie auf die Pfeiltasten, um den Zuschnittsrahmen zu verschieben.
Drücken Sie auf
Zuschnittsrahmens zu ändern.
9 Drücken Sie auf Auswahl, um Ihre Änderungen zu übernehmen.
Wenn Sie weitere Fotos anpassen möchten, wiederholen Sie dafür die
Schritte 4-9.
10 Drücken Sie auf Start, um die Fotos zu drucken.
Wenn die Funktion „Vorschau vor Drucken“ aktiviert ist, wird zuerst eine Vorschau
des Druckauftrags angezeigt. Drücken Sie erneut auf
drucken.
Anzahl der Ausdrucke, um die Größe des
Start, um das Foto zu
18
Page 73

Wenn die Funktion „Vorschau vor Drucken“ deaktiviert ist, wird das Foto sofort
gedruckt.
Hinweis: Auf Seite 23 erfahren Sie, wie Sie die Vorschau-Einstellung
anpassen.
Anpassen der Helligkeit
1 Legen Sie Fotopapier ein.
2 Setzen Sie eine Speicherkarte ein.
Hinweis: Wenn Sie nicht sicher sind, welche Speicherkarte Sie
verwenden, ziehen Sie Seite 11 zurate.
Das Menü „Ich möchte“ wird angezeigt und der Eintrag Fotos/Ausdruck
anz. ist markiert.
3 Drücken Sie Auswahl.
4 Blättern Sie mithilfe des Rechts- oder Linkspfeils zu dem Foto, das Sie
anpassen möchten.
5 Drücken Sie auf Menü.
Das Menü „Foto“ wird angezeigt.
6 Drücken Sie auf den Abwärtspfeil, bis der Eintrag Helligkeit ausgewählt
ist.
7 Drücken Sie Auswahl.
8 Passen Sie die Helligkeit des Fotos durch Drücken Sie auf den Rechts-
oder Linkspfeil an.
9 Drücken Sie auf Auswahl, um Ihre Änderungen zu übernehmen.
Wenn Sie weitere Fotos anpassen möchten, wiederholen Sie dafür die
Schritte 4-9.
10 Drücken Sie auf Start, um die Fotos zu drucken.
Wenn die Funktion „Vorschau vor Drucken“ aktiviert ist, wird zuerst eine Vorschau
des Druckauftrags angezeigt. Drücken Sie erneut auf
drucken.
Wenn die Funktion „Vorschau vor Drucken“ deaktiviert ist, wird das Foto sofort
gedruckt.
Hinweis: Auf Seite 23 erfahren Sie, wie Sie die Vorschau-Einstellung
anpassen.
Start, um das Foto zu
19
Page 74

Anpassen der Anzahl an Ausdrucken
1 Legen Sie Fotopapier ein.
2 Setzen Sie eine Speicherkarte ein.
Hinweis: Wenn Sie nicht sicher sind, welche Speicherkarte Sie
verwenden, ziehen Sie Seite 11 zurate.
Das Menü „Ich möchte“ wird angezeigt und der Eintrag Fotos/Ausdruck
anz. ist markiert.
3 Drücken Sie Auswahl.
4 Blättern Sie mithilfe des Rechts- oder Linkspfeils zu dem Foto, das Sie
anpassen möchten.
5 Drücken Sie auf Anzahl der Ausdrucke, bis die gewünschte Menge
ausgewählt ist.
Wiederholen Sie die Schritte 4 und 5, wenn Sie die Anzahl der Ausdrucke
für weitere Fotos anpassen möchten.
6 Drücken Sie auf Start, um die Fotos zu drucken.
Wenn die Funktion „Vorschau vor Drucken“ aktiviert ist, wird zuerst eine Vorschau
des Druckauftrags angezeigt. Drücken Sie erneut auf
drucken.
Wenn die Funktion „Vorschau vor Drucken“ deaktiviert ist, wird das Foto sofort
gedruckt.
Start, um das Foto zu
Hinweis: Auf Seite 23 erfahren Sie, wie Sie die Vorschau-Einstellung
anpassen.
20
Page 75

Anzeigen der Diashow
1 Setzen Sie eine Speicherkarte ein.
Hinweis: Wenn Sie nicht sicher sind, welche Speicherkarte Sie
verwenden, ziehen Sie Seite 11 zurate.
Das Menü „Ich möchte...“ wird angezeigt.
2 Drücken Sie auf den Abwärtspfeil, bis der Eintrag Diashow ausgewählt ist.
3 Drücken Sie Auswahl.
4 Drücken Sie auf Stopp/Löschen, wenn Sie bereit sind, die zu druckenden
Fotos auszuwählen.
Drucken der DPOF-Auswahl
Digital Print Order Format (DPOF) steht bei einigen Digitalkameras als Option zur
Ver fügung. Wenn Sie Bilder mit einer Kamera aufnehmen, die DPOF unterstützt,
können Sie angeben, welche Fotos in wie vielen Abzügen gedruckt werden sollen,
während sich die Speicherkarte noch in der Kamera befindet.
1 Legen Sie Fotopapier ein.
2 Setzen Sie eine Speicherkarte ein.
Hinweis: Wenn Sie nicht sicher sind, welche Speicherkarte Sie
verwenden, ziehen Sie Seite 11 zurate.
Das Menü „Ich möchte...“ wird angezeigt.
3 Wählen Sie mithilfe des Abwärtspfeils den Eintrag DPOF-Auswahl
drucken aus.
4 Drücken Sie Auswahl.
Wenn die Funktion „Vorschau vor Drucken“ aktiviert ist, wird zuerst eine Vorschau
des Druckauftrags angezeigt. Drücken Sie auf
drucken.
Wenn die Funktion „Vorschau vor Drucken“ deaktiviert ist, werden die Dokumente
der DPOF-Auswahl sofort gedruckt.
Hinweis: Auf Seite 23 erfahren Sie, wie Sie die Vorschau-Einstellung
anpassen.
Start, um die DPOF-Auswahl zu
21
Page 76

Anpassen der Druckereinstellungen
Die in diesem Abschnitt beschriebenen Anpassungen, die an den Einstellungen
vorgenommen werden, bleiben wirksam, bis die Einstellungen erneut angepasst
werden bzw. bis Sie die Werkseinstellungen wiederherstellen.
Ändern des Papierformats für das leere Papier
Die Werkseinstellung lautet 4 x 6.
1 Drücken Sie auf Menü.
Das Menü „Foto“ wird angezeigt.
2 Drücken Sie auf den Abwärtspfeil, bis der Eintrag Papierformat
ausgewählt ist.
3 Blättern Sie mithilfe des Rechts- oder Linkspfeils in den Papierformaten.
Sie können zwischen „4 x 6“, „A6“ und „Hagaki“ wählen.
4 Drücken Sie auf die Taste Auswahl, um Ihre Auswahl zu speichern.
Ändern der Papiersorte für das leere Papier
Die Werkseinstellung lautet Glanzpapier.
1 Drücken Sie auf Menü.
Das Menü „Foto“ wird angezeigt.
2 Drücken Sie auf den Abwärtspfeil, bis der Eintrag Papiersorte
ausgewählt ist.
3 Blättern Sie mithilfe des Rechts- oder Linkspfeils in den Papiersorten.
Sie können zwischen „Glanzpapier“, „Normal“ und „Beschichtet“ wählen.
4 Drücken Sie auf die Taste Auswahl, um Ihre Auswahl zu speichern.
22
Page 77

Ändern der Druckqualität
Die Werkseinstellung lautet Automatisch.
1 Drücken Sie auf Menü.
Das Menü „Foto“ wird angezeigt.
2 Drücken Sie auf den Abwärtspfeil, bis der Eintrag Druckqualität
ausgewählt ist.
3 Blättern Sie mithilfe des Rechts- oder Linkspfeils in den Einstellungen für
die Druckqualität.
Sie können zwischen „Entwurf“, „Normal“ und „Foto“ wählen.
4 Drücken Sie auf die Taste Auswahl, um Ihre Auswahl zu speichern.
Anpassen der Vorschau vor dem Drucken
Die Werkseinstellung lautet Ein.
1 Drücken Sie auf Menü.
Das Menü „Foto“ wird angezeigt.
2 Drücken Sie auf den Abwärtspfeil, bis der Eintrag Vorschau vor
Drucken ausgewählt ist.
3 Blättern Sie mithilfe des Rechts- oder Linkspfeils in den Einstellungen.
Sie können die Einstellungen „Ein“ und „Aus“ wählen.
4 Drücken Sie auf die Taste Auswahl, um Ihre Auswahl zu speichern.
Ändern der Sprache des Bedienfeld-Displays
Die Werkseinstellung lautet English.
1 Drücken Sie auf Menü.
Das Menü „Foto“ wird angezeigt.
2 Drücken Sie auf den Abwärtspfeil, bis der letzte Eintrag angezeigt wird.
23
Page 78

3 Drücken Sie zweimal auf den Aufwärtspfeil.
4 Blättern Sie mithilfe des Rechts- oder Linkspfeils in den Sprachen.
5 Drücken Sie auf die Taste Auswahl, um Ihre Auswahl zu speichern.
Ändern der Einstellung für den Stromsparmodus
Die Werkseinstellung lautet 20 Minuten.
1 Drücken Sie auf Menü.
Das Menü „Foto“ wird angezeigt.
2 Drücken Sie auf den Abwärtspfeil, bis der Eintrag Stromsparmodus
ausgewählt ist.
3 Blättern Sie mithilfe des Rechts- oder Linkspfeils in den Einstellungen.
Es stehen folgende Optionen zur Verfügung: „Sofort“, „10 Minuten“,
„20 Minuten“ und „30 Minuten“.
4 Drücken Sie auf die Taste Auswahl, um Ihre Auswahl zu speichern.
Löschen von Fotoeinstellungen
Mithilfe dieser Option können Sie anpassen, wann die aktuellen Fotoeinstellungen
gelöscht werden. Betroffen sind die Einstellungen für die Anzahl der Kopien und die
Helligkeit. Die Werkseinstellung lautet Nach 2 Minuten.
1 Drücken Sie auf Menü.
Das Menü „Foto“ wird angezeigt.
2 Drücken Sie auf den Abwärtspfeil, bis der Eintrag Einst. löschen,
wenn ausgewählt ist.
3 Blättern Sie mithilfe des Rechts- oder Linkspfeils in den Einstellungen.
Sie können zwischen den Optionen „Nie“ und „Nach 2 Minuten“ wählen.
4 Drücken Sie auf die Taste Auswahl, um Ihre Auswahl zu speichern.
24
Page 79

Wiederherstellen der Werkseinstellungen
1 Drücken Sie auf Menü.
Das Menü „Foto“ wird angezeigt.
2 Drücken Sie auf den Abwärtspfeil, bis der Eintrag für die Wiederherstellung
der Einstellungen ausgewählt ist.
3 Drücken Sie Auswahl.
25
Page 80

Unterwegs mit Ihrem Drucker
Vor Reiseantritt
Auf Reisen sollten Sie stets folgendes Zubehör für Ihren Drucker mitführen:
• Fotopapier.
• Zusätzliche Tintenpatrone, wenn Sie mit hohem Druckvolumen rechnen.
Eine Liste kompatibler Tintenpatronen finden Sie unter „Bestellen von
Zubehör“ auf Seite 30.
• Eine Speicherkarte für Fotos oder eine PictBridge-fähige Kamera mit
einem USB-Kabel. Eine Liste kompatibler Speicherkarten finden Sie unter
„Unterstützte Speicherkarten“ auf Seite 11.
Einpacken des Druckers
1 Schalten Sie den Drucker aus.
2 Nehmen Sie das gesamte Fotopapier aus der Papierstütze.
3 Klappen Sie die Papierstütze ein.
4 Entnehmen Sie sämtliche Speicherkarten aus den dafür vorgesehenen
Speicherplätzen.
26
Page 81

5 Ziehen Sie das Netzkabel ab.
1
6 Ziehen Sie den Tragegriff heraus.
2
Hinweis: Wenn Sie Ihren Drucker auf Reisen mitnehmen, ist es nicht
erforderlich, die Tintenpatrone herauszunehmen.
Achtung: Achten Sie auf Reisen stets darauf, dass sich der Drucker in
aufrechter Position befindet.
27
Page 82

Auspacken des Druckers
1 Stellen Sie den Drucker auf eine flache und ebene Oberfläche.
2 Drücken Sie den Tragegriff nach unten.
3 Stecken Sie das Netzkabel ein.
2
1
4 Drücken Sie auf die Taste Ein/Aus. Vergewissern Sie sich, dass die
Netz-LED und das Display aktiv sind.
5 Heben Sie die Papierstütze an.
28
Page 83

6 Legen Sie Fotopapier ein.
Nun können Sie Ihre Fotos drucken. Setzen Sie eine Speicherkarte mit Fotos ein
oder schließen Sie Ihre PictBridge-fähige Kamera an den Drucker an.
29
Page 84

Wartung der Tintenpatrone
Überprüfen des Tintenfüllstands
1 Drücken Sie auf Menü.
Das Menü „Foto“ wird angezeigt.
2 Drücken auf den Abwärtspfeil, bis der Eintrag Tintenfüllstände
ausgewählt ist.
3 Drücken Sie Auswahl.
Hinweis: Drücken Sie auf
zurückzukehren.
Informationen zum Bestellen einer neuen Tintenpatrone erhalten Sie unter
„Bestellen von Zubehör“ auf Seite 30.
Stopp/Löschen, um zum vorherigen Menü
Nachfüllen der Tintenpatrone
Die Lexmark Garantie erstreckt sich nicht auf die Reparatur von Fehlern oder
Schäden, die durch eine nachgefüllte Patrone entstanden sind. Lexmark rät daher
von der Verwendung einer nachgefüllten Patrone ab. Durch das Nachfüllen von
Patronen kann die Druckqualität negativ beeinflusst werden, außerdem sind
Schäden am Drucker möglich. Um optimale Ergebnisse zu erzielen, sollten Sie
Lexmark Zubehör verwenden. Siehe „Bestellen von Zubehör“ auf Seite 30.
Bestellen von Zubehör
Zum Bestellen von Zubehör für das Gerät oder zum Suchen nach einen Händler in
Ihrer Nähe besuchen Sie die Lexmark Website unter www.lexmark.com.
Farbtintenpatronen
• 33 • 35
30
Page 85

Austauschen der Tintenpatrone
Entfernen einer benutzten Tintenpatrone
1 Wenn der Drucker ausgeschaltet ist, drücken Sie auf die Taste Ein/Aus.
2 Öffnen Sie die Zugangsklappe.
3 Drücken Sie den Patronenhebel nach unten, um die Patronenabdeckung
zu öffnen.
31
Page 86

4 Entfernen Sie die alte Patrone.
Einsetzen einer Tintenpatrone
1
Vor dem Einsetzen einer neuen Patrone müssen Sie den Aufkleber und das
durchsichtige Klebeband an der Unterseite der Tintenpatrone entfernen.
1
2
Achtung: Sie sollten keinesfalls den goldfarbenen Kontaktbereich an der
Rückseite oder die Düsen an der Unterseite der Patrone
berühren.
2 Sofern Sie nicht bereits geöffnet ist, drücken Sie den Patronenhebel nach
unten, um die Patronenabdeckung zu öffnen.
32
Page 87

3 Setzen Sie die Patrone ein.
4 Lassen Sie die Abdeckungen beim Schließen einrasten.
5 Schließen Sie die Zugangsklappe.
6 Legen Sie eine Karteikarte im Format 4 x 6 in die Papierstütze ein.
7 Drücken Sie auf Auswahl, wenn Sie durch eine Meldung auf dem Dislplay
dazu aufgefordert werden, um die Patronenausrichtunsseite zu drucken.
Hinweis: Nach dem Drucken können Sie diese Seite entsorgen.
33
Page 88

Ausrichten der Tintenpatrone
1 Legen Sie eine leere Karteikarte im Format 4 x 6 ein.
2 Drücken Sie auf Menü.
Das Menü „Foto“ wird angezeigt.
3 Drücken auf den Abwärtspfeil, bis der Eintrag Patronen ausrichten
ausgewählt ist.
4 Drücken Sie auf Auswahl.
Hinweis: Entsorgen Sie die Karteikarte, nachdem Sie gedruckt wurde.
Reinigen der Patronendüsen
1 Legen Sie eine leere Karteikarte im Format 4 x 6 ein.
2 Drücken Sie auf Menü.
Das Menü „Foto“ wird angezeigt.
3 Drücken auf den Abwärtspfeil, bis der Eintrag Patronen reinigen
ausgewählt ist.
34
Page 89

4 Drücken Sie auf Auswahl.
Hinweis: Entsorgen Sie die Karteikarte, nachdem Sie gedruckt wurde.
Drucken einer Testseite
1 Legen Sie eine leere Karteikarte im Format 4 x 6 ein.
2 Drücken Sie auf Menü.
Das Menü „Foto“ wird angezeigt.
3 Drücken auf den Abwärtspfeil, bis der Eintrag Testseite drucken
ausgewählt ist.
4 Drücken Sie auf Auswahl.
Hinweis: Entsorgen Sie die Karteikarte, nachdem Sie gedruckt wurde.
35
Page 90

Fehlersuche und Abhilfe
Kategorie Zweck
„Fehlersuche und Abhilfe bei der
Einrichtung“ auf Seite 37
„Fehlersuche und Abhilfe beim Drucken“ auf
Seite 38
„Verbessern der Druckqualität“ auf Seite 40 Behebung von Problemen mit der
„Fehlersuche und Abhilfe bei Papierstaus
und Papierzuführungsfehlern“ auf Seite 43
„Fehlersuche und Abhilfe in Bezug auf die
Speicherkarte und PictBridge“ auf Seite 44
„Fehlersuche und Abhilfe bei
Fehlermeldungen“ auf Seite 45
Behebung von Problemen, die bei der
Ersteinrichtung des Druckers auftreten.
Behebung von Problemen, die beim
Drucken auftreten.
Druckqualität von Fotos.
Behebung von Problemen aufgrund von
Papierstaus und Papiereinzugsfehlern.
Behebung von Problemen, die bei der
Verwendung von Speicherkarten und
PictBridge-fähigen Kameras auftreten.
Behebung von Problemen im
Zusammenhang mit Fehlermeldungen auf
dem Display.
36
Page 91

Fehlersuche und Abhilfe bei der Einrichtung
Symptom Diagnose Lösung
Auf dem Display wird
nicht die richtige
Sprache angezeigt.
Die Netz-LED
leuchtet nicht
Die
Ausrichtungsseite
oder Testseite wird
nicht gedruckt.
Haben Sie bei der
Ersteinrichtung des Druckers
die falsche Sprache
ausgewählt?
Ist das Netzkabel fest mit dem
Drucker verbunden?
Ist der Drucker an eine
funktionstüchtige elektrische
Steckdose angeschlossen?
Ist der Drucker eingeschaltet? Drücken Sie die Ein-/Aus-Taste.
Wird eine Fehlermeldung
angezeigt?
Haben Sie das durchsichtige
Klebeband von der Unterseite
der Tintenpatrone entfernt?
Ist die Tintenpatrone
vorschriftsmäßig eingesetzt?
Ist das Fotopapier richtig
eingelegt?
Siehe „Ändern der Sprache des
Bedienfeld-Displays“ auf
Seite 23.
1 Ziehen Sie das Netzkabel
aus der Wandsteckdose und
dann vom Drucker ab.
2 Schließen Sie das Netzkabel
erneut an, indem Sie es ganz
in die Wandsteckdose und in
den Druckeranschluss
drücken.
3 Drücken Sie die Ein-/Aus-
Ta st e .
1 Schließen Sie den Drucker
an eine elektrische
Steckdose an, die auch von
anderen elektrischen
Geräten verwendet wurde.
2 Drücken Sie die Ein-/Aus-
Ta st e .
Falls die Netz-LED nicht
leuchtet, erhalten Sie unter „Die
Netz-LED leuchtet nicht“ auf
Seite 37 weitere Informationen.
Siehe „Fehlersuche und Abhilfe
bei Fehlermeldungen“ auf
Seite 45.
Nehmen Sie die Tintenpatrone
heraus, überprüfen Sie, ob das
durchsichtige Klebeband
entfernt wurde, und setzen Sie
die Tintenpatrone wieder ein.
Siehe „Austauschen der
Tintenpatrone“ auf Seite 31.
Siehe „Einlegen des
Fotopapiers“ auf Seite 10.
37
Page 92

Fehlersuche und Abhilfe beim Drucken
Symptom Diagnose Lösung
Schlechte Fotoqualität
Beispiele:
• Leere Seite
• Dunkler Ausdruck
• Blasser Ausdruck
• Falsche Farben
• Helle und dunkle
Streifen im Ausdruck
• Verzerrte Linien
• Verschmieren
• Streifen
• Weiße Linien im
Ausdruck
Verwenden Sie die richtige
Einstellung für die
Druckqualität?
Haben Sie die Tinte auf dem
Fotopapier vor dem
Herausnehmen lange genug
trocknen lassen?
Ist das Fotopapier
zerknittert?
Sind die
Druckereinstellungen an das
richtige Papierformat
angepasst?
Ist die Tintenpatrone
vorschriftsmäßig
ausgerichtet?
Wurde die Tintenpatrone
ordnungsgemäß gewartet?
Weist die Patrone einen
niedrigen Tintenfüllstand
auf?
Aktivieren Sie eine andere
Einstellung für die
Druckqualität. Weitere
Hinweise finden Sie unter
„Ändern der Druckqualität“
auf Seite 23.
Warten Sie einige Zeit, bis
die Tinte vollständig
getrocknet ist, bevor Sie den
Ausdruck aus der Ablage
nehmen.
Verwenden Sie ein neues
glattes Blatt Fotopapier, das
nicht zerknittert ist.
Wählen Sie das richtige
Papierformat aus. Siehe
„Ändern des Papierformats
für das leere Papier“ auf
Seite 22.
Siehe „Ausrichten der
Tintenpatrone“ auf Seite 34.
Siehe „Verbessern der
Druckqualität“ auf Seite 40.
1 Überprüfen des Status
des Tintenfüllstands.
Siehe „Überprüfen des
Tintenfüllstands“ auf
Seite 30.
2 Tauschen Sie die
Patronen aus, falls der
Tintenfüllstand niedrig ist.
Siehe „Austauschen der
Tintenpatrone“ auf
Seite 31.
38
Page 93

Symptom Diagnose Lösung
Schlechte Qualität an den
Seitenrändern
Der Drucker druckt oder
reagiert nicht
Geringe
Druckgeschwindigkeit
Verwenden Sie das richtige
Papierformat, das wiederum
mit dem im Drucker
ausgewählten Format
übereinstimmt?
Ist der Drucker
eingeschaltet?
Wird eine Fehlermeldung
angezeigt?
Ist die Tintenpatrone
vorschriftsmäßig
eingesetzt?
Verwenden Sie die
Auflösung für eine
höchstmögliche
Druckqualität?
Der Drucker unterstützt drei
Papierformate: 4 x 6, A6 und
Hagaki.
1 Überprüfen Sie, welches
Papierformat Sie
verwenden.
2 Stellen Sie sicher, dass
die Einstellung im
Drucker mit dem
verwendeten
Papierformat
übereinstimmt. Siehe
„Ändern des
Papierformats für das
leere Papier“ auf
Seite 22.
Drücken Sie die Ein-/AusTaste. Falls die Netz-LED
nicht leuchtet, erhalten Sie
unter „Die Netz-LED
leuchtet nicht“ auf Seite 37
weitere Informationen.
Siehe „Fehlersuche und
Abhilfe bei
Fehlermeldungen“ auf
Seite 45.
Nehmen Sie die
Tintenpatrone heraus,
stellen Sie sicher, dass das
durchsichtige Klebeband
entfernt wurde, und setzen
Sie die Tintenpatrone wieder
ein. Siehe „Austauschen der
Tintenpatrone“ auf Seite 31.
Reduzieren Sie die
Auflösung der
höchstmöglichen
Druckqualität. Siehe
„Ändern der Druckqualität“
auf Seite 23.
Hinweis: Mit den Optionen
„Entwurf“ und „Normal“
können Sie schneller
drucken als mit „Beste“.
39
Page 94

Verbessern der Druckqualität
Einfache Lösungen
Gehen Sie wie folgt vor, wenn Sie mit der Druckqualität des Ausdrucks nicht
zufrieden sind:
• Verwenden Sie das zu Ihrem Druckvorhaben passende Papierformat.
Siehe „Ändern des Papierformats für das leere Papier“ auf Seite 22.
• Wählen Sie eine höhere Druckqualität aus. Siehe „Ändern der
Druckqualität“ auf Seite 23.
Erweiterte Lösungsmöglichkeiten
Wenn das Foto trotzdem nicht die Druckqualität aufweist, die Sie erwarten, gehen
Sie folgendermaßen vor:
1 Richten Sie die Tintenpatronen aus. Siehe Seite 34.
Wenn die Druckqualität nicht besser geworden ist, fahren Sie mit Schritt 2
fort.
2 Reinigen Sie die Druckdüsen. Siehe Seite 34.
Wenn sich die Druckqualität nicht verbessert, wiederholen Sie Schritt 2 bis
zu zwei Mal, bevor Sie zu Schritt 3 übergehen.
3 Setzen Sie die Tintenpatrone wieder ein. Siehe Seite 41.
Wenn die Druckqualität nicht besser geworden ist, fahren Sie mit Schritt 4
fort.
4 Wischen Sie die Düsen und Kontakte der Tintenpatronen ab. Siehe
Seite 41.
Hat sich die Druckqualität nicht verbessert, wiederholen Sie Schritt 4 bis zu
zwei Mal.
5 Wenn die Druckqualität trotzdem nicht zufrieden stellend ist, tauschen Sie
die Tintenpatronen aus. Siehe Seite 30.
40
Page 95

Wiedereinsetzen der Tintenpatrone
1 Nehmen Sie die Tintenpatrone heraus. Siehe Seite 31.
2 Setzen Sie die Tintenpatrone ein. Siehe Seite 32.
3 Drucken Sie das Foto erneut.
Reinigen der Patronendüsen und -kontakte
1 Nehmen Sie die Tintenpatrone heraus. Siehe Seite 31.
2 Feuchten Sie ein fusselfreies Tuch leicht mit Wasser an und legen Sie es
auf eine glatte Oberfläche.
Hinweis: Legen Sie zwei Blätter Papier unter das Tuch, um zu
verhindern, dass Tinte auf die Arbeitsoberfläche gelangt.
3 Drücken Sie die Düsen für ungefähr drei Sekunden behutsam gegen das
Tuch und wischen Sie sie anschließend in der gezeigten Richtung ab.
4 Drücken Sie die Kontakte für ungefähr drei Sekunden behutsam gegen
einen anderen sauberen Bereich des Tuches und wischen Sie sie
anschließend in der angegebenen Richtung ab.
41
Page 96

5 Wiederholen Sie mit einem anderen, sauberen Teil des Tuchs die Schritte 3
bis 4.
6 Lassen Sie die Düsen und Kontakte vollständig trocknen.
7 Setzen Sie die Tintenpatrone wieder ein. Siehe „Einsetzen einer
Tintenpatrone“ auf Seite 32.
8 Führen Sie das Dienstprogramm zur Reinigung der Patronen aus. Siehe
„Reinigen der Patronendüsen“ auf Seite 34.
9 Drucken Sie das Foto erneut.
42
Page 97

Fehlersuche und Abhilfe bei Papierstaus und
Papierzuführungsfehlern
Symptom Diagnose Lösung
Papierstaus Ist der Papierstau in der
Papier wird nicht richtig oder
schief eingezogen oder es
werden mehrere Blätter
eingezogen
Papierstütze aufgetreten?
Ist das Fotopapier richtig
eingelegt?
Wird das verwendete
Fotopapier für den Drucker
empfohlen?
Legen Sie mehrere Seiten
gleichzeitig ein?
Ist das Fotopapier zerknittert
oder beschädigt?
Schalten Sie den Drucker
aus. Greifen Sie das
Fotopapier und ziehen Sie
es vorsichtig aus dem
Drucker.
Siehe „Einlegen des
Fotopapiers“ auf Seite 10.
Der Drucker unterstützt drei
Fotopapierformate: 4 x 6, A6
und Hagaki.
Versuchen Sie, weniger
Fotopapier in den Drucker
einzulegen. Siehe Seite 10.
Verwenden Sie ein neues
glattes Blatt Fotopapier, das
nicht zerknittert ist.
43
Page 98

Fehlersuche und Abhilfe in Bezug auf die
Speicherkarte und PictBridge
Symptom Diagnose Lösung
Speicherkarte wird nicht
vom Drucker erkannt.
Drucken von der
Digitalkamera nicht möglich.
Ist die Speicherkarte
beschädigt?
Wurde die Speicherkarte
ordnungsgemäß eingesetzt?
Wurden mehrere
Speicherkarten gleichzeitig
eingesetzt?
Verwenden Sie einen
unterstützten
Speicherkartentyp?
Haben Sie eine
PictBridge-fähige
Digitalkamera an den
Drucker angeschlossen?
Ist die Digitalkamera
PictBridge-kompatibel?
Ist der richtige USB-Modus
für die PictBridge-fähige
Digitalkamera eingestellt?
Wurde eine Speicherkarte in
den Drucker eingelegt?
Verwenden Sie das
USB-Kabel, das im
Lieferumfang der
Digitalkamera enthalten
war?
Stellen Sie sicher, dass die
Speicherkarte nicht
beschädigt ist.
Setzen Sie die Speicherkarte
ordnungsgemäß ein. Siehe
Seite 12.
Es kann immer nur eine
Speicherkarte verwendet
werden.
Entfernen Sie die zweite
Speicherkarte.
Informationen zu den
verwendeten Speicherkarten
erhalten Sie auf Seite 11.
Trennen Sie die
PictBridge-fähige
Digitalkamera vom Drucker.
Entfernen Sie das Gerät und
verwenden Sie eine
PictBridge-fähige Kamera
am PictBridge-Anschluss.
In der Dokumentation zu
Ihrer Kamera erfahren Sie,
ob die Kamera PictBridgekompatibel ist.
Ziehen Sie hinsichtlich der
Auswahl des richtigen
USB-Modus die
Dokumentation Ihrer Kamera
zurate.
Nehmen Sie die
Speicherkarte aus dem
Drucker.
Verwenden Sie
ausschließlich das im
Lieferumfang Ihrer Kamera
enthaltene USB-Kabel.
Ziehen Sie die
Dokumentation Ihrer Kamera
zurate, um zu erfahren,
welchen USB-Kabeltyp die
Kamera unterstützt.
44
Page 99

Fehlersuche und Abhilfe bei Fehlermeldungen
Fehlermeldung Aussage Lösung
Wenig Tinte Die Tintenpatrone enthält nur
Papierstau Ist ein Papierstau aufgetreten? 1 Beheben Sie den Papierstau.
Druckschlitten
blockiert
Kein Papier Es befindet sich kein Fotopapier
Abdeckung offen Die Zugangsklappe war zu dem
Patrone fehlt Die Tintenpatrone wurde gar
Ausrichtungsfehler
noch sehr wenig Tinte.
Die Warnung „Wenig Tinte“ wird
ausgegeben, wenn die Patrone
noch zu ca. 25 %, 15 % und
10 % voll ist.
Der Druckschlitten ist zum
Stillstand gekommen.
mehr im Drucker.
Zeitpunkt, zu dem Sie auf Start
gedrückt haben, geöffnet.
nicht oder nicht ordnungsgemäß
eingesetzt.
Die Tintenpatrone wurde nicht
richtig eingesetzt oder das
transparente Band wurde nicht
entfernt.
Tauschen Sie die Patrone aus.
Siehe Seite 31.
Siehe „Fehlersuche und
Abhilfe bei Papierstaus und
Papierzuführungsfehlern“ auf
Seite 43.
2 Drücken Sie die Taste
Auswahl, um das letzte Foto
erneut zu drucken.
1 Nehmen Sie sämtliches
Papier aus dem Drucker.
2 Stellen Sie sicher, dass die
Tintenpatrone richtig
eingesetzt wurde. Siehe
„Wiedereinsetzen der
Tintenpatrone“ auf Seite 41.
3 Drücken Sie die Taste
Auswahl, um das letzte Foto
erneut zu drucken.
Legen Sie mehr Fotopapier in
den Drucker ein. Siehe
Seite 10.
Stellen Sie sicher, dass die
Zugangsklappe geschlossen ist.
Der Druckvorgang wird sofort
fortgesetzt.
Stellen Sie sicher, dass die
Patrone richtig eingesetzt
wurde. Siehe „Einsetzen einer
Tintenpatrone“ auf Seite 32.
Stellen Sie sicher, dass die
Patrone richtig eingesetzt und
das transparente Band entfernt
wurde.
Siehe „Einsetzen einer
Tintenpatrone“ auf Seite 32.
45
Page 100

Fehlermeldung Aussage Lösung
Problem mit der
Karte
Keine Bilder Auf der Speicherkarte befinden
Format der Karte Das Format der Speicherkarte
PictBridgeAnschluss
Größenwarnung Das ausgewählte Papierformat
Die Speicherkarte wurde nicht
ordnungsgemäß eingesetzt
oder ist beschädigt.
Es wurde eine zweite
Speicherkarte festgestellt.
sich keine unterstützten Bilder.
wird nicht unterstützt.
Das an den PictBridgeAnschluss angeschlossene
Gerät wird nicht unterstützt.
An der PictBridge-fähigen
Digitalkamera wurde nicht der
richtige USB-Modus eingestellt.
stimmt nicht mit dem Format
des in die Papierstütze
eingelegten Fotopapiers
überein.
1 Stellen Sie sicher, dass die
Speicherkarte nicht
beschädigt ist.
2 Setzen Sie die Karte
ordnungsgemäß ein. Siehe
Seite 12.
Es kann immer nur eine
Speicherkarte verwendet
werden.
Entfernen Sie die zweite Karte.
Verwenden Sie eine andere
Speicherkarte, auf der sich
Fotos befinden.
Formatieren Sie die
Speicherkarte in Ihrer
Digitalkamera.
Hilfe hierzu finden Sie in der
Dokumentation zu Ihrer
Digitalkamera.
1 Entfernen Sie das Gerät.
2 Verwenden Sie am
PictBridge-Anschluss eine
PictBridge-fähige Kamera.
Ziehen Sie hinsichtlich der
Auswahl des richtigen
USB-Modus die Dokumentation
Ihrer Digitalkamera zurate.
Stellen Sie sicher, dass die
Einstellung im Drucker mit dem
verwendeten Papierformat
übereinstimmt. Siehe Seite 22.
Hinweis: Eine Indexseite kann
nur auf Fotopapier im Format
4 x 6 gedruckt werden.
46
 Loading...