

Page 1
Color quality guide
Page 1 of 34
Color quality guide
The Color quality guide helps users understand how operations available on the printer can be used to adjust and
customize color output.
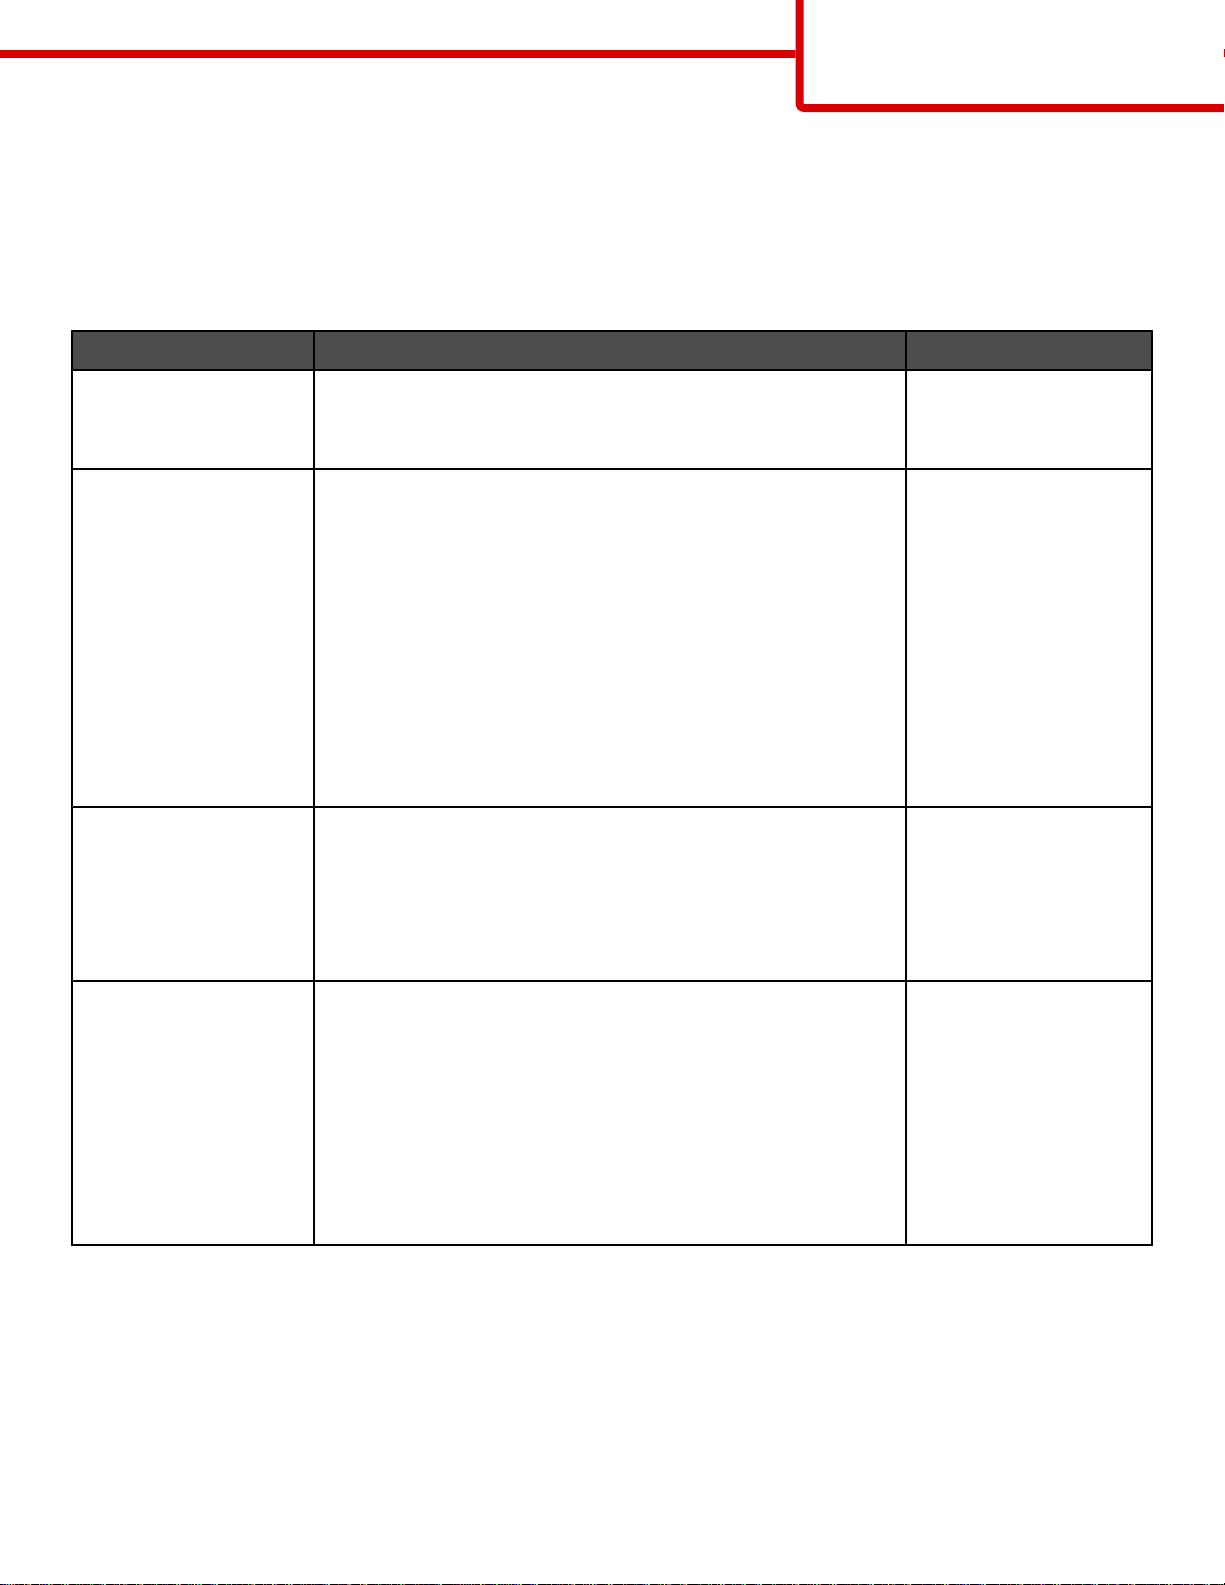
Quality menu
Menu item Description Settings
Print Mode Specifies whether images are printed in monochrome grayscale
or in color
Note: Color is the default setting.
Color Correction Adjusts the color output on the printed page
Notes:
• Due to the differences in additive and subtractive colors,
certain colors that appear on computer monitors are
impossible to duplicate on the printed page.
• Auto is the default setting. Auto applies different color
conversion tables to each object on the printed page. It
looks at how the color for each object is defined.
• Off turns off color correction.
• Manual allows customization of the color tables using the
settings available under the Manual Color menu.
Print Resolution Specifies the printed output resolution
Notes:
• 4800 CQ is the default setting.
• 1200 dpi provides the highest resolution output. This setting
increases gloss.
Color
Black Only
Auto
Off
Manual
1200 dpi
4800 CQ
Toner Darkness Lightens or darkens the printed output
Notes:
• 4 is the default setting.
• Selecting a smaller number can help conserve toner.
• If Print Mode is set to Black Only, a setting of 5 increases
toner density and darkness to all print jobs.
• If Print Mode is set to Color, a setting of 5 is the same as a
setting of 4.
1–5
Page 2

Color quality guide
Page 2 of 34
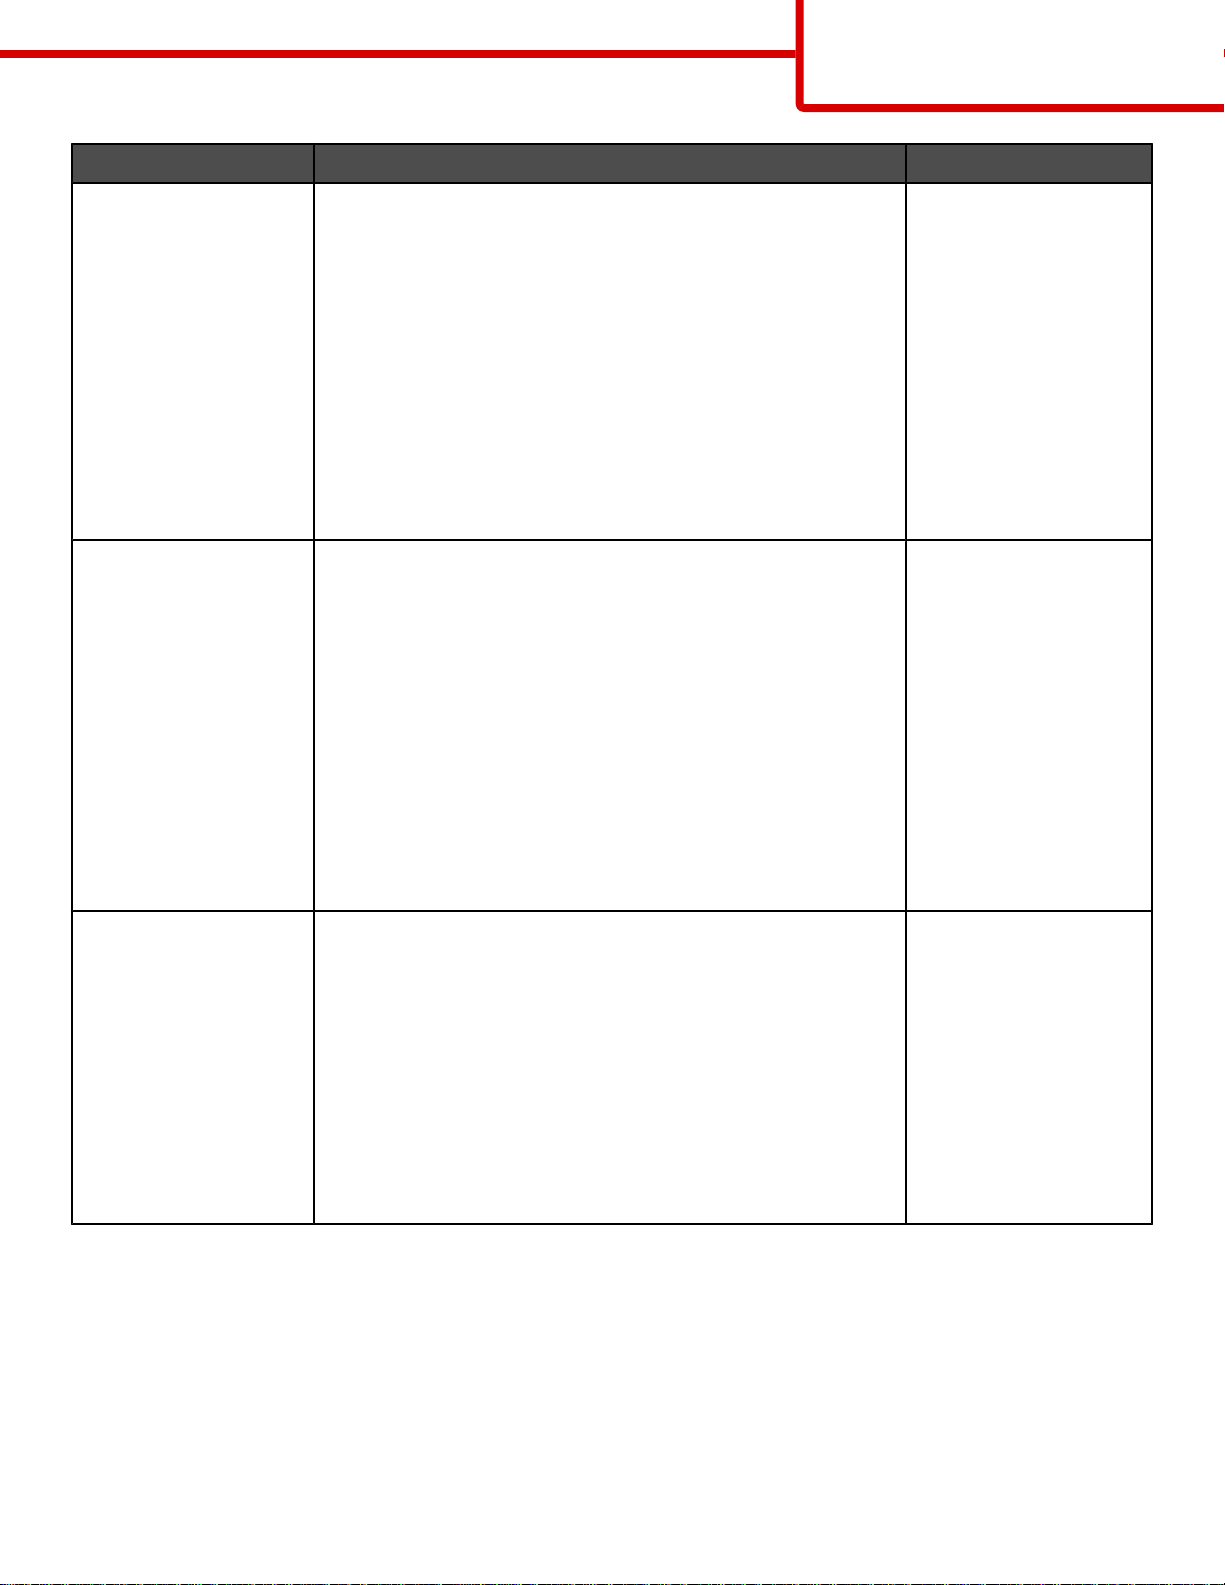
Menu item Description Settings
Enhance Fine Lines Enables a print mode preferable for files such as architectural
drawings, maps, electrical circuit diagrams, and flow charts
Notes:
• To set Enhance Fine Lines from the software program with
a document open (applicable to Windows users), click
File Print, and then click Properties, Preferences,
Options, or Setup.
• To set Enhance Fine Lines using the Embedded Web
Server, type the network printer IP address in a browser
window.
Color Saver Reduces the amount of toner used for graphics and images.
The amount of toner used for text is not reduced.
Notes:
• Off is the default setting.
• On overrides Toner Darkness settings.
• Color Saver is not supported in PPDS, and only partially
supported by the PCL emulation printer software.
RGB Brightness Adjusts brightness in color outputs
Notes:
On
Off
On
Off
-6 to 6
• 0 is the default setting.
• -6 is the maximum decrease. 6 is the maximum increase.
• This does not affect files where CMYK color specifications
are being used.
RGB Contrast Adjusts contrast in color outputs
Notes:
• 0 is the default setting.
• This does not affect files where CMYK color specifications
are being used.
RGB Saturation Adjusts saturation in color outputs
Notes:
• 0 is the default setting.
• This does not affect files where CMYK color specifications
are being used.
Color Balance
• Cyan
• Magenta
Adjusts color in printed output by increasing or decrea sing the
amount of toner being used for each color
Note: 0 is the default setting.
• Yellow
• Black
• Reset Defaults
0 to 5
0 to 5
-5 to 5
Page 3
Color quality guide
Page 3 of 34
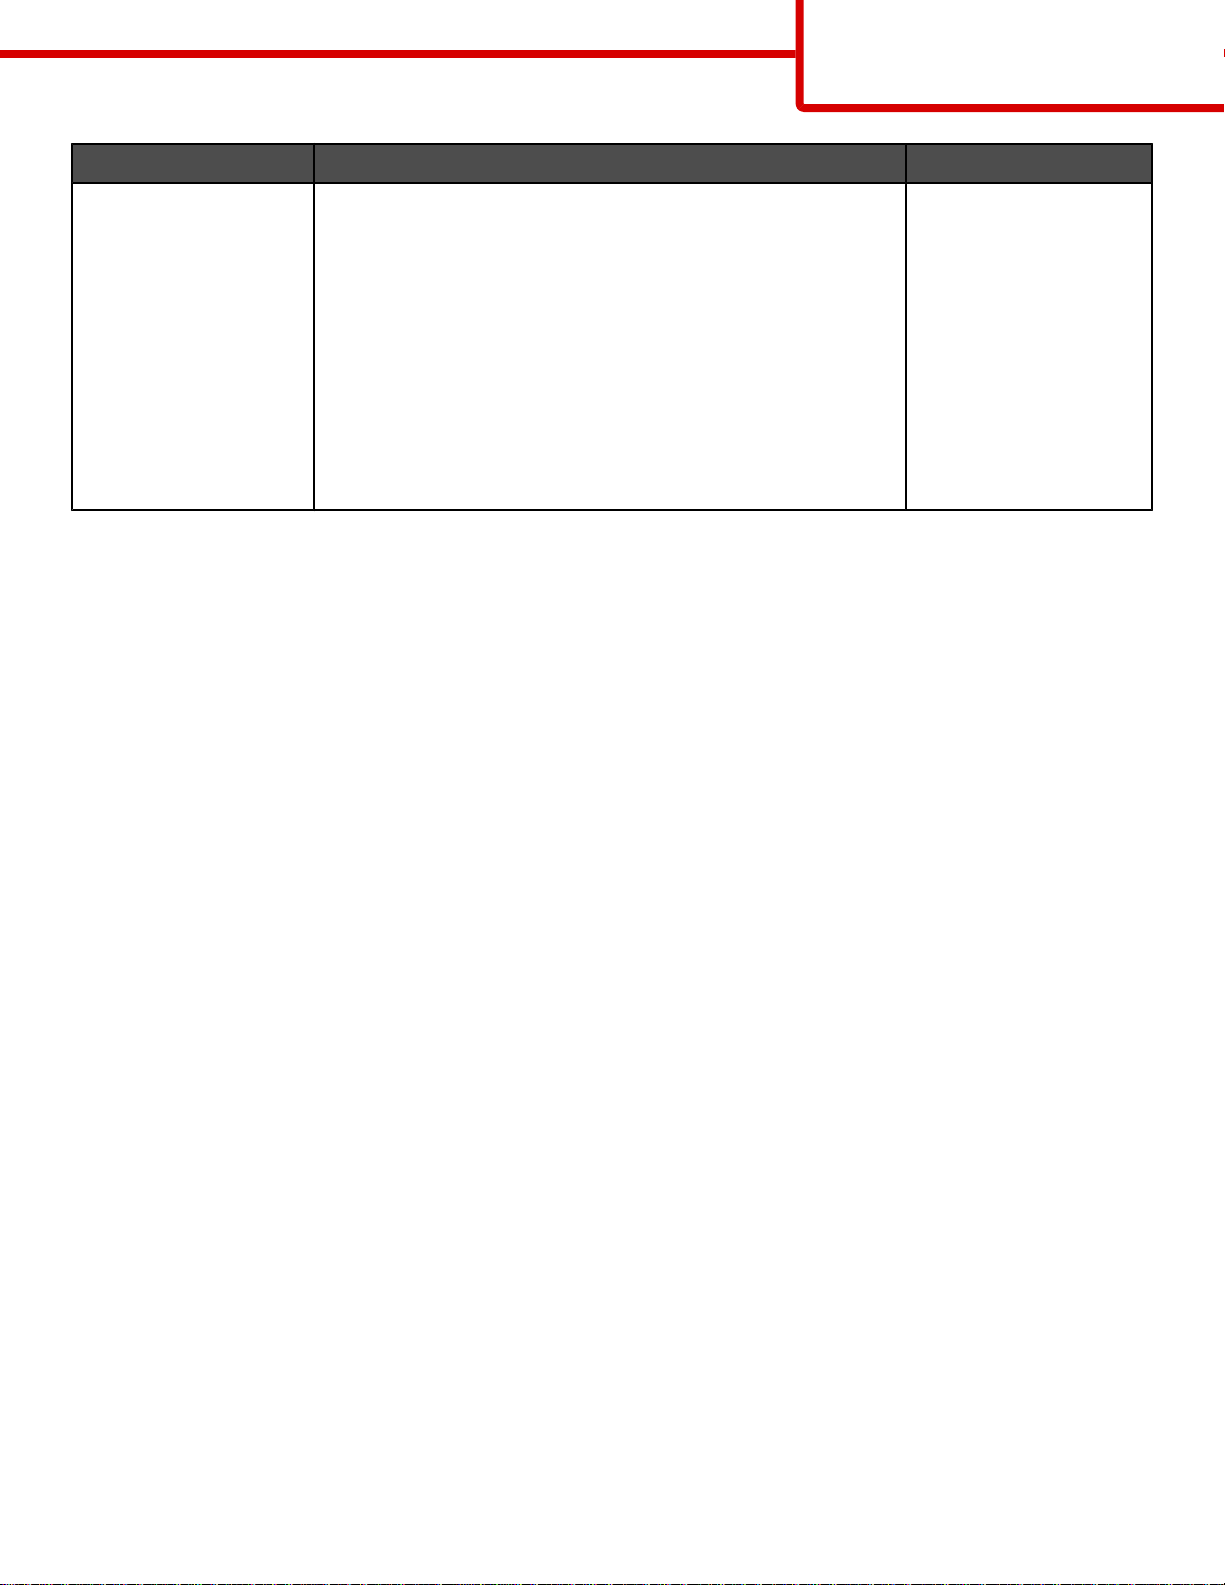
Menu item Description Settings
Color Samples Prints sample pages for each of the RGB and CMYK color
conversion tables used in the printer
Notes:
• Selecting any setting prints the sample.
• Color samples consist of a series of colored boxes along
with the RGB or CMYK combination that creates the color
observed. These pages can be used to help decide which
combinations to use to get the desired printed output.
• The easiest way to access a complete list of these pages is
by using the Embedded Web Server, a series of resident
pages located in network printers. Type the IP address of
the printer in a browser window to see these pages.
Manual Color
• RGB Image
• RGB Text
• RGB Graphics
Customizes the RGB color conversions
Notes:
• sRGB Display is the default setting. This applies a color
conversion table that tries to produce output that matches
the colors displayed on a computer monitor.
• Vivid applies a color conversion table that produces
brighter, more saturated colors.
• Display—True Black applies a color conversion table that
uses only black toner for neutral gray colors.
• sRGB Vivid applies a color table that increases saturation.
This is preferred for business graphics and text.
• Off turns off color conversion.
sRGB Display
sRGB Vivid
Display—True Black
Vivid
Off—RGB
US CMYK
Euro CMYK
Vivid CMYK
Off—CMYK
Vivid
sRGB Display
Display—True Black
sRGB Vivid
Off
Manual Color
• CMYK Image
• CMYK Text
• CMYK Graphics
Customizes the CMYK color conversions
Notes:
• US CMYK is the default setting. This applies a color
conversion table that tries to produce output that matches
SWOP color output.
• Euro CMYK applies a color conversion table that tries to
produce output that matches EuroScale color output.
• Vivid CMYK increases color saturation for the US CMYK
color conversion table.
• Off turns off color conversion.
US CMYK
Euro CMYK
Vivid CMYK
Off
Page 4
Color quality guide
Page 4 of 34
Menu item Description Settings
Color Adjust Initiates a recalibration of color conversion tables and allows the
printer to make adjustments for color variations in output
Notes:
None
• Calibrating starts when this menu is selected.
Calibrating appears on the display until the process is
finished.
• Color variations in output sometimes result from
changeable conditions such as room temperature and
humidity. Color adjustments are made on printer
algorithms. Color alignment is also recalibrated in this
process.
Frequently Asked Questions (FAQ) about color printing
What is RGB color?
Red, green, and blue light can be added together in various amounts to produ ce a large range of colors observed
in nature. For example, red and green can be combined to create yellow. Televisions and computer monitors create
colors in this manner. RGB color is a method of describing colors by indicating the amount of red, green, or blue
needed to produce a certain color.
What is CMYK color?
Cyan, magenta, yellow, and black inks or toners can be printed in various amounts to produce a large range of colors
observed in nature. For example, cyan and yellow can be combined to create green. Printing presses, inkjet printers,
and color laser printers create colors in this manner. CMYK color is a method of describing colors by indicating the
amount of cyan, magenta, yellow, and black needed to reproduce a particular color.
How is color specified in a document to be printed?
Software programs typically specify document color using RGB or CMYK color comb inations. Additionally, they
commonly let users modify the color of each objec t in a document. For more information, see the software program
Help section.
How does the printer know what color to print?
When a user prints a document, information describing the type and color of each object is sent to the printer. The
color information is passed through color conversion tables that translate the color into appropriate amounts of cyan,
magenta, yellow, and black toner needed to produce the desired color. The object type information lets different
color conversion tables be used for different types of objects. For example, it is possible to apply one type of color
conversion table to text while applying a different color conversion table to photographic images.
Should I use PostScript or PCL emulation printer software? What settings should I use for the best color?
The PostScript driver is strongly recommended for best color quality. The default settings in the PostScript driver
provide preferred color quality for the majority of printouts.
Why doesn't the printed color match the color I see on the computer screen?
The color conversion tables used in Auto Color Correction mode generally approximate the colors of a sta ndard
computer monitor. However, because of technology differences that exist between printers and monitors, there are
many colors that can also be affected by monitor variations and lighting co nditio ns. For recommendatio ns on how
the printer color sample pages may be useful in solving certain color-matching problems, see the question, “How
can I match a particular color (such as a color in a corporate logo)?”
Page 5

Color quality guide
Page 5 of 34
The printed page appears tinted. Can I slightly adjust the color?
Sometimes a user may consider printed pages to appear tinted (for example, everything printed seems to be too
red). This can be caused by environmental conditions, paper type, lighting conditions, or user preference. In these
instances, adjusting the Color Balance setting may be used to create more preferable color. Color Balance provides
the user with the ability to make subtle adjustments to the amount of toner being used in each color plane. Selecting
positive (or negative) values for cyan, magenta, yellow, and black under the Color Balance menu will slightly increase
(or decrease) the amount of toner used for the chosen color. For example, if a user believes the overall printed page
to be too red, then decreasing both magenta and yellow could potentially improve color preferences.
For information about adjusting the Color Balance setting, see the Menus and Messages Guide on the Software and
Documentation CD.
My color transparencies seem dark when being projected. Is there anything I can do to improve the color?
This problem most commonly occurs when projecting transparencies with reflective overhead projectors. To obtain
the highest projected color quality, transmissive overhead projectors are recommended. If a reflective projector must
be used, then adjusting the Toner Darkness setting to 1, 2, or 3 will lighten the transparency. For more information,
see the Menus and Messages Guide on the Software and Documentation CD.
Make sure to print on the recommended type of color transparencies. For more information ab out the paper and
media specifications, see the User's Guide on the Software and Documentation CD.
What is manual color correction?
The color conversion tables applied to each object when using the default Auto Color Correction setting generate
preferred color for the majority of documents. Occasionally, a user may want to apply a different color table mapping.
This customization is accomplished using the Manual Color menu and the Manual Color Correction setting.
Manual Color Correction applies to RGB and CMYK color conversion table mappings as defined in the Manual Color
menu.
Users may select any of the different color conversion tables for RGB or CMYK:
Color conversion table Settings
RGB
• sRGB Display
• Display—True Black
• sRGB Vivid
• Vivid
• Off
CMYK
• US CMYK
• Euro CMYK
• Vivid CMYK
• Off
Note: The Manual Color Correction setting is not useful if the software program does not specify colors with RGB
or CMYK combinations. It is also not effective in situations where the software program or the computer operating
system controls the adjustment of colors.
How can I match a particular color (such as a corporate logo)?
Occasionally, users have a need for the printed color of a particular object to closely match a specific color. For
example, a user may need to match the color of a corporate logo. While instances can occur in which the printer
cannot exactly reproduce the desired color, users should be able to identify adequate color matches for the majority
of cases.
Page 6
Color quality guide
Page 6 of 34
The Color Samples menu item can provide useful information in helping solve this particular type of color-matching
problem. The nine Color Samples values correspond to color conve rsion tables in the printer. Selecting any of the
Color Samples values generates a multiple-page printout consisting of hundre ds of colored boxes. Either a CMYK
or RGB combination is located on each box, depending on the table selected. The observe d color of each box is
obtained by passing the CMYK or RGB combination labeled on the box through the selected color conversion table.
The user can examine the color samples pages and identify the box whose color is the closest to the desired color.
The color combination labeled on the box can then be used for modifying the color of the object in a software program.
For instructions, see the software program Help. Manual Color Correction may be necessary to utilize the selected
color conversion table for the particular object.
Selecting which Color Samples pages to use for a particular color-matching problem depends on the Color Correction
setting being used (Auto, Off, or Manual), the type of object being printed (text, graphics, or images), and how the
color of the object is specified in the software pro gram (RGB or CMYK combinations). When the printer Color
Correction setting is set to Off, the color is based on the print job information; no color conversion is implemented.
Note: The Color Samples pages are not useful if the software program does not specify colors with RGB or CMYK
combinations. Additionally, certain situations exist where the software pr ogram or the computer operating system
adjusts the RGB or CMYK combinations specified in the program through color management. The resulting printed
color may not be an exact match of the Color Samples pages.
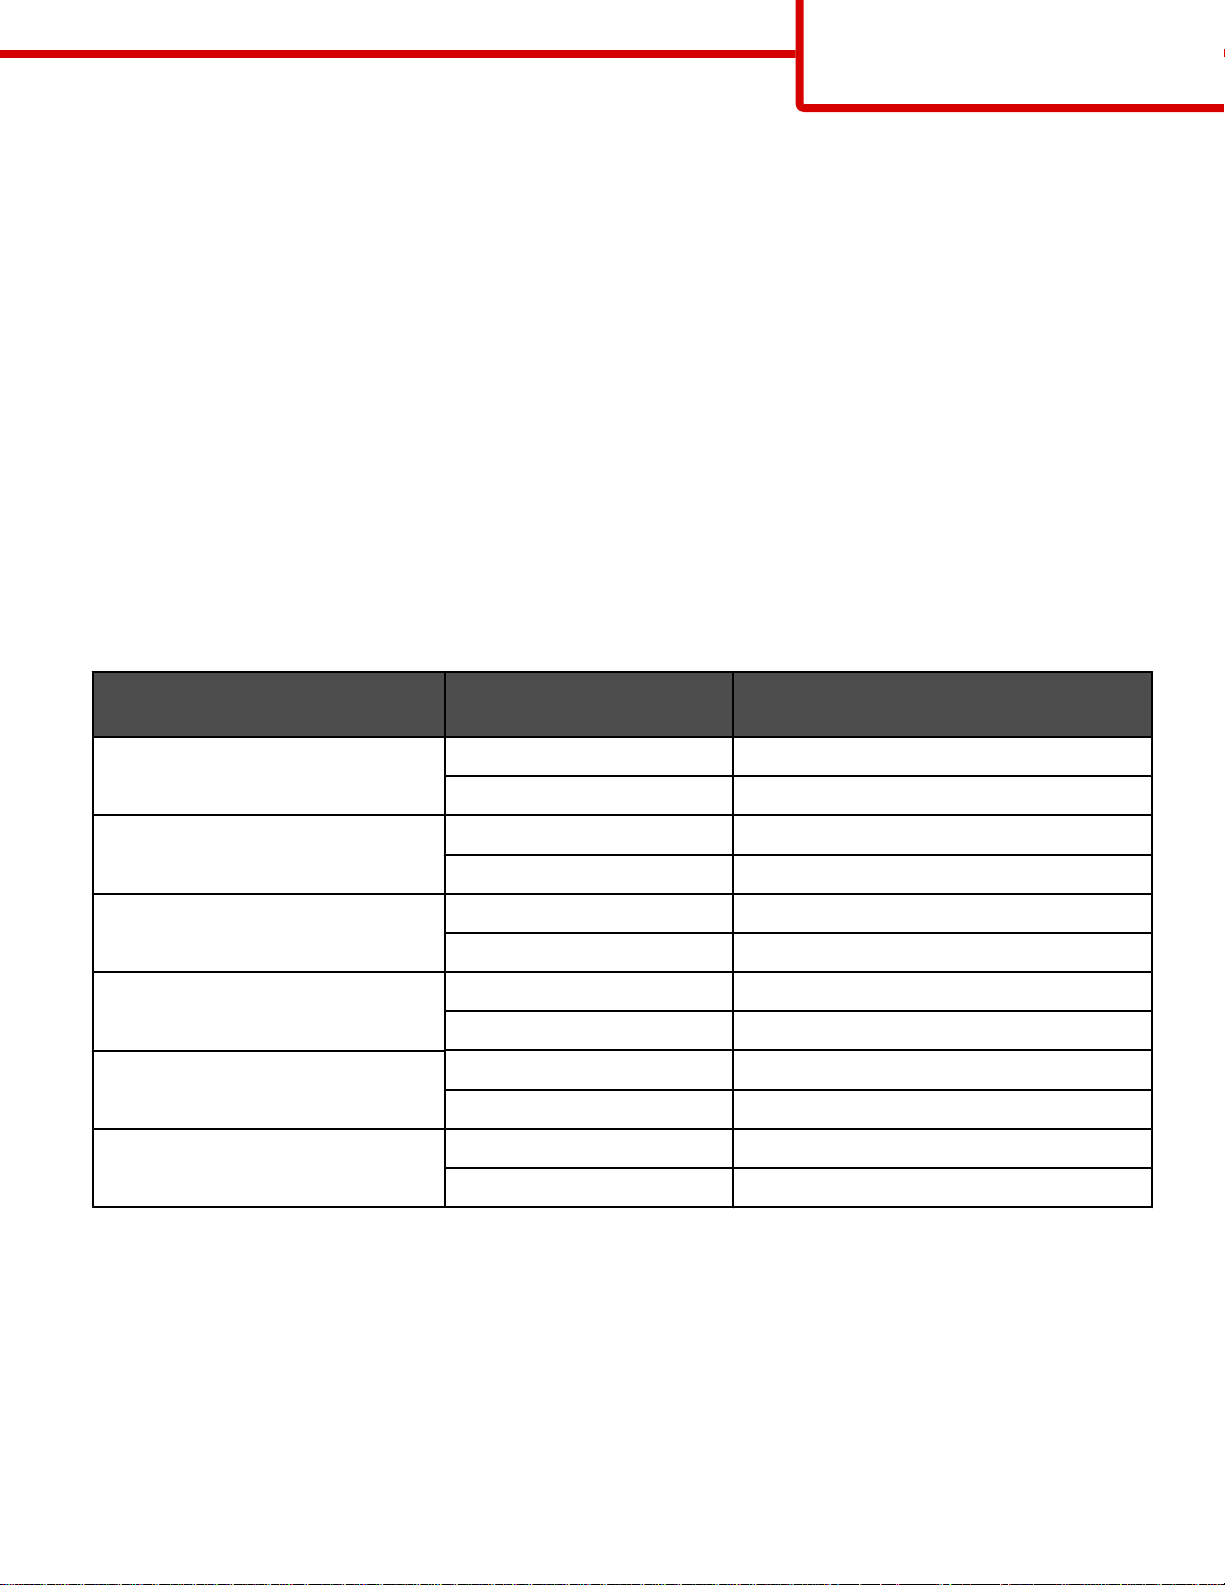
The following table can help identify which Color Sample pages to use for color matching.
Color specification and object to
be printed
RGB—Text Auto SRGB Vivid
RGB—Graphic Auto SRGB Vivid
RGB—Image Auto SRGB Display
CMYK—Text Auto US CMYK or Euro CMYK
CMYK—Graphic Auto US CMYK
CMYK—Image Auto US CMYK
Color Correction setting Sample pages to use
Manual Manual Color RGB Text Setting
Manual Manual Color RGB Graphic Setting
Manual Manual Color RGB Image Setting
Manual Manual Color CMYK Text Setting
Manual Manual Color CMYK Graphic Setting
Manual Manual Color CMYK Image Setting
What are Detailed Color Samples and how do I access them?
This topic applies only to network printers. These pages requir e the use of the Embedded Web Server. The
Embedded Web Server is a series of resident pages stored in the network printer firmware. To access these pages,
browse to the IP address of the network printer. Click Configuration Menu, and then click Detailed Color
Samples.
For more information about using the Embedded Web Server, see the User's Guide on the Software and
Documentation CD.
Page 7

Color quality guide
Page 7 of 34
Detailed Color Samples are pages similar to the default pages of color samples accessible from the Quality menu
using the control panel. The default color samples available using this method have an increment value of 10% for
red, green, and blue. If the user finds a value on this page that is close, but would like to scan more colors in a nearby
area, the user can use the Detailed Color Samples to select the desired color values and a more specific increment.
This provides a way to print multiple pages of colore d boxes that surround a specific color of interest.
There are nine conversion tables available with the following three options:
• Print—Prints the default pages
• Detailed—Lets you enter individual red, green, and blue values and a specific increment of color
• Reset—Lets you clear the existing information and enter new values
The process can be duplicated for Cyan (C), Magenta (M), Yellow (Y), and Black (K) color conversion tables, to o.
Collectively, these values are known as CMYK color. The default increment is 10% for Black and 20% each for Cyan,
Magenta, and Yellow.
Page 8
)
)
Print quality guide
Page 8 of 34
Print quality guide
Many print quality problems can be solved by replacing a supply or maintenance item that is approaching the end o f
its intended life. Check the control panel for a message about a printer supply.
Use the following table to find solutions to print quality problems:
Isolating print quality problems
To help isolate print quality problems, print the print quality test pages:
1 Turn the printer off.
2 From the control panel, press and hold and while turning the printer on.
3 Release both buttons when Performing Self Test appears.
The printer performs its power-on sequence, and then Config Menu appears.
4 Press until Prt Quality Pgs appears, and then press .
The pages are formatted. Printing Quality Test Pages appears, and then the pages print. The message
remains on the control panel until all the pages print.
5 After the print quality test pages print, press until Exit Config Menu appears, and then press .
The information in the following topics may help you solve print quality problems. If these suggestions still do not correct
the problem, call for customer service. You may have a printer part that requires adjustment or replacement.
Repeating defects
Example Cause Solution
If marks occur repeatedly only in one color and
multiple times down a page, a toner cartridge or
photoconductor may be defective.
If marks occur down the page repeatedly in all
colors, the fuser may be defective.
Replace the toner cartridge if the defects occur
every:
• 33.5 mm (1.32 in.)
• 35.7 mm (1.41 in.)
Replace the photoconductor if the defects occur
every:
• 28.3 mm (1.11 in.)
• 72.4 mm (2.85 in.)
Replace the fuser if the defects occur every
116.2 mm (4.58 in.).
Page 9
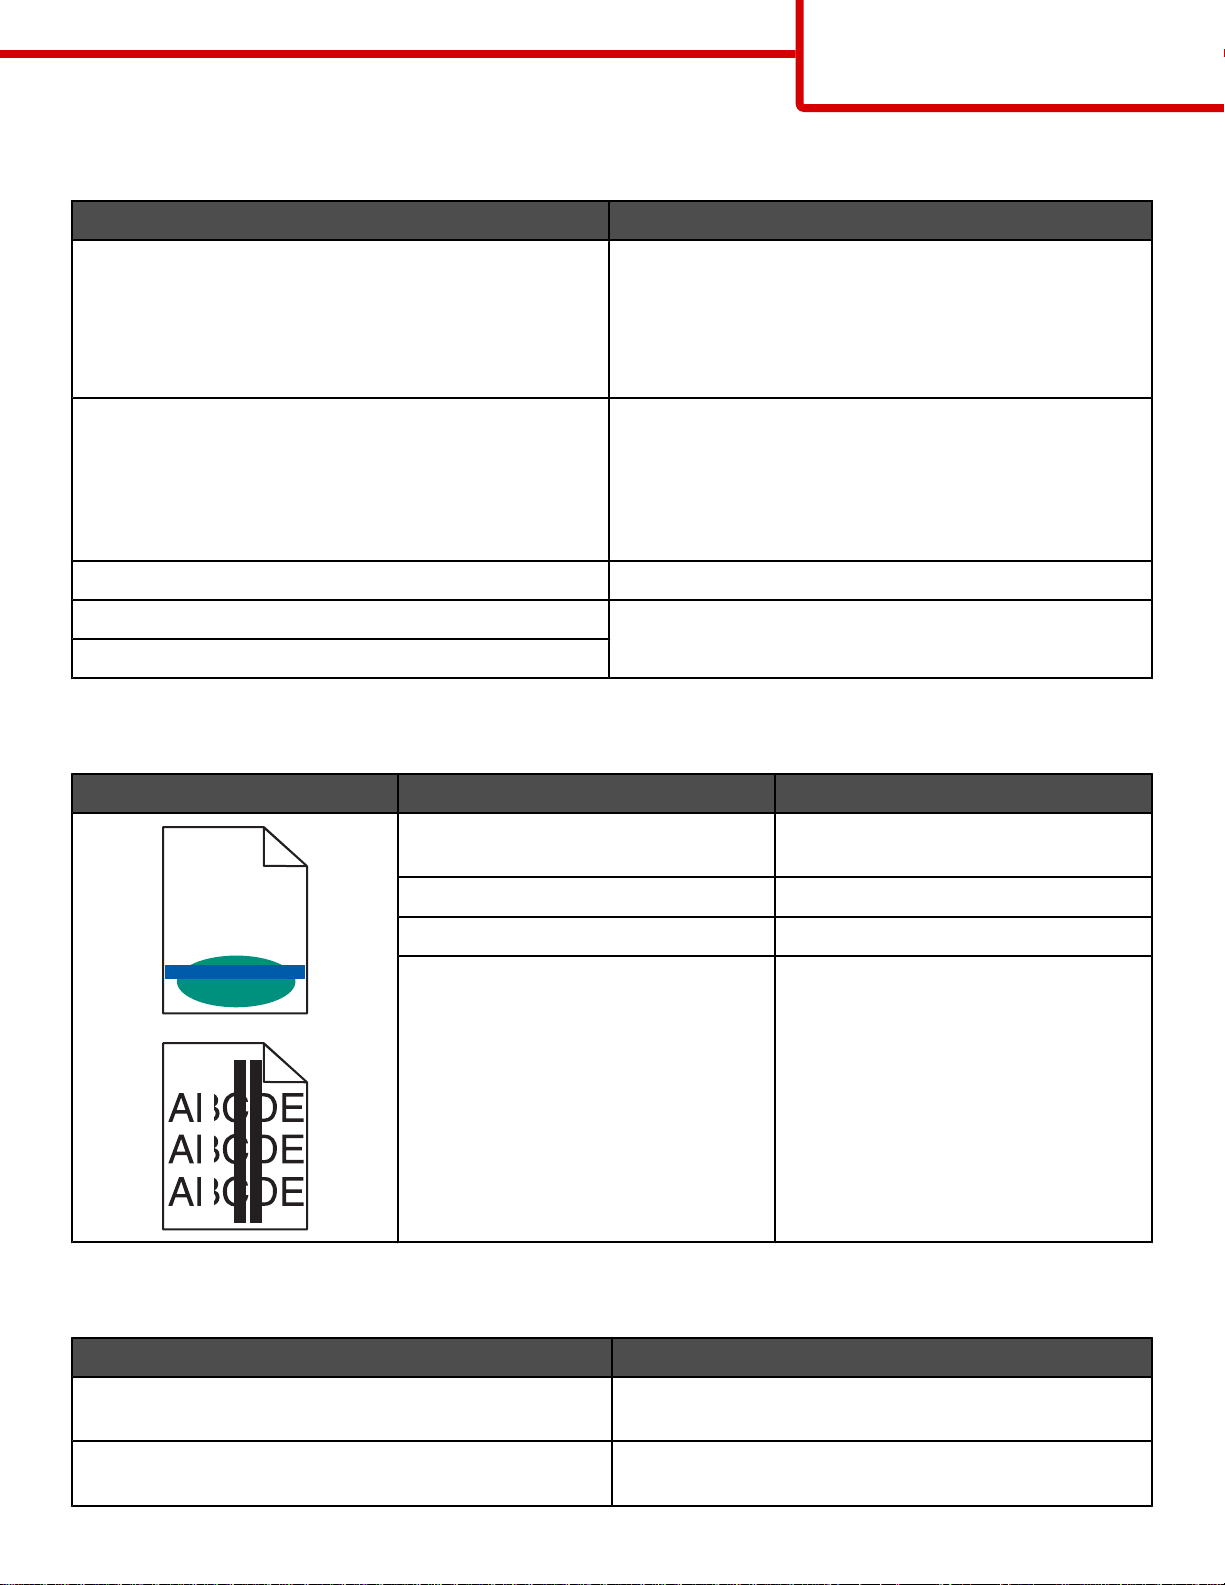
Color misregistration
Example Cause Solution
Print quality guide
Page 9 of 34
Color has shifted outside of the
appropriate area or has been
superimposed over another color
ABCDEABCDE
ABCDE
ABCDE
Adjusting the color alignment
1 Make sure the printer is turned off.
2 From the control panel, press and hold and while turning the printer on.
3 Release both buttons when Performing Self Test appears.
The printer performs its power-on sequence, and then Config Menu appears.
area.
• Adjust the color alignment. For
more information, see “Adjusting
the color alignment” on
page 9.
• Remove and reinstall the
photoconductors. For more
information about installing
supplies, see the User's Guide on
the Software and Documentation
CD.
Note: If you have not resolved the
issue, adjust the color alignment
again.
4 Press until Color Alignment appears, and then press .
5 Press again to print the alignment page.
6 Press until Set A appears, and then press .
7 From the printed sheet, find the straightest of the 20 lines beside the letter A.
8 Press or until that number is displayed, and then press .
Submitting Selection appears.
9 Repeat steps 6 through 8 to align sets A through L.
10 Press .
11 Press until Exit Config Menu appears, and then press .
Resetting the Printer appears briefly, followed by a clock, and then Ready appears.
Page 10

Streaked horizontal lines
) )
Example Cause Solution
Print quality guide
Page 10 of 34
ABCDE
ABCDE
A toner cartridge is defective,
empty, or worn.
Fuser is defective or worn. Replace the fuser.
Photoconductors may be
defective.
Replace the toner cartridge.
Replace the photoconductor units.
ABCDE
Print irregularities
Example Cause Solution
ABCDE
ABCDE
ABCDE
Media has absorbed moisture due to
high humidity.
The media being used does not meet
the printer specifications.
A toner cartridge is low or may be
almost empty.
Load media from a fresh package into
the paper tray.
Make sure the Paper Type and Paper
Weight settings match the type of
media you are using.
Avoid textured media with rough
finishes.
Replace the toner cartridge.
Fuser is worn or defective. Replace the fuser.
Print is too dark
Cause Solution
Toner Darkness setting is too dark, RGB Brightness
setting is too dark, or RGB Contrast setting is too high.
Toner cartridge is defective. Replace the toner cartridge.
Select a different Toner Darkness setting, RGB
Brightness setting, or RGB Contrast setting from Print
Properties before sending the job to print.
Note: This solution applies to Windows users only.
Page 11
Print is too light
Cause Solution
Print quality guide
Page 11 of 34
Toner Darkness setting is too light, RGB Brightness
setting is too bright, or RGB Contrast setting is incorrect.
• Select a different Toner Darkness setting, RGB
Brightness setting, or RGB Contrast setting from Print
Properties before sending the job to print.
Note: This solution applies to Windows users only.
• Adjust the color quality settings in the Quality menu.
The media being used does not meet the printer
specifications.
• Load media from a new package.
• Avoid textured media with rough finishes.
• Make sure the media you load in the trays is not damp.
• Make sure the Paper Type and Paper Weight settings
match the type of media you are using.
Color Saver is On. Turn Color Saver off.
Toner is low. Replace the toner cartridge.
Toner cartridge is defective or worn.
Light colored line, white line, or incorrectly colored line
Example Cause Solution
Toner cartridge is defective. Replace the color cartridge causing the
line.
ABCDE
ABCDE
Photoconductors are defective. Replace the photoconductor units.
Transfer belt is defective. Replace the transfer belt.
Printhead lenses are dirty. Clean the printhead lenses.
Transparency print quality is poor
Cause Solution
You are using transparencies that do not meet the printer
specifications.
Paper Type setting for the tray you are using is set to
something other than Transparency.
Use only transparencies recommended by the printer
manufacturer.
Make sure the Paper Type setting is set to Transparency.
Page 12

Uneven print density
Example Cause Solution
Toner cartridge is defective. Replace the toner cartridge.
Print quality guide
Page 12 of 34
Photoconductor is worn or
ABCDE
A
BCDE
A
BCDE
defective.
Gray background
Example Cause Solution
Toner darkness setting is too dark. Select a different toner darkness setting in the Print Properties
before sending the job to print.
ABCDE
ABCDE
ABCDE
Streaked vertical lines
Replace the photoconductor.
Example Cause Solution
ABCDE
ABCDE
Toner is smeared before f using t o the
media.
Toner cartridge is defective. Replace the toner cartridge causing
Transfer belt is defective. Replace the transfer belt.
If media is stiff, try feeding from
another tray.
the streaks.
ABCDE
Toner fog or background shading appears on the page
Cause Solution
Toner cartridge is worn or defective. Reinstall or replace the cartridge.
Transfer belt is worn or defective. Replace the transfer belt.
Photoconductor is worn or defective. Replace the photoconductor.
Fuser is worn or defective. Replace the fuser.
Toner is in the paper path. Call for customer service.
Page 13

Ghost images
Example Cause Solution
Print quality guide
Page 13 of 34
The photoconductors are not functioning
properly.
Toner is low. Replace the toner cartridge.
Clipped images
Cause Solution
Guides in the selected tray are set
for a different media size than
what is loaded in the tray.
There could be an incorrect page
size selected in the driver or
program.
Move the guides in the tray to the
proper positions for the size
loaded.
• Specify the correct page size
in the driver or program.
• Set the Paper Size to match
the media in the tray.
• Make sure the Paper Type setting is
correct for the media you are using.
• Replace the photoconductors.
Incorrect margins
Cause Solution
Guides in the selected tray are set for a differe nt paper
size than what is loaded in the tray.
Auto size sensing is set to Off, but you loaded a
different size paper in a tray. For example, you inserted
A4-size paper into the selected tray but did not set the
Paper Size to A4.
Move the guides in the tray to the proper positions for the
size loaded.
• Set the Paper Size to match the media in the tray.
• Specify the correct page size in Print Properties or the
program.
Skewed print
Cause Solution
Guides in the selected tray are not in the correct position
for the media size loaded in the tray.
The media being used does not meet the printer
specifications.
Move the guides in the tray to the proper positions for the
size loaded.
Make sure you are using media that meets the printer
specifications.
Page 14

Blank pages
Cause Solution
Print quality guide
Page 14 of 34
Toner is low.
• Remove the toner cartridge from the printer. Shake the
cartridge back and forth several times, and then reinstall it.
• Install a new toner cartridge.
Toner cartridge is defective or empty. Replace the toner cartridge.
Solid color pages
Cause Solution
Photoconductor is installed incorrectly. Remove and then reinstall the photoconductor.
Photoconductor is defective. Replace the photoconductor.
Printer requires servicing. Call for customer service.
Paper curl
Cause Solution
Paper Type and Paper Weight settings are not
appropriate for the type of paper or specialty media you
are using.
Change the Paper Type and Paper Weight settings to
match the paper or specialty media loaded in the printer.
Paper has been stored in a high humidity environment.
• Load paper from a fresh package.
• Store paper in its original wrapper until you use it.
Toner specks
Cause Solution
Toner cartridges are worn or defective. Replace the defective or worn toner cartridges.
Toner is in the media path. Call for customer service.
Toner rubs off
Cause Solution
Specialty media is being used. Make sure the correct Media Type is selected.
The Paper Weight setting in the Paper Menu is wrong for
the type of media being used.
The fuser is worn or defective. Replace the fuser.
Change the Paper Weight from Normal to Heavy. If
necessary, change Paper Texture from Normal to Rough.
Page 15

Printing guide
Page 15 of 34
Printing guide
Get the most from the printer by properly loading the trays and setting the types and sizes for media.
Loading the standard tray
The printer has two trays to select from: the standard tray (Tray 1), also known as the 250-sheet tray, and the optional
550-sheet tray (Tray 2). Load the paper or specialty media used for the majority of print jobs in Tray 1. Proper paper
loading prevents jams and facilitates trouble-free printing.
Do not remove trays while a job prints or while Busy blinks on the display. Doing so may cause a jam.
1 Grasp the handle and pull the tray out. Remove the tray completely.
2 Squeeze the width guide tabs together as shown, and move the width guide to the side of the tray.
3 Squeeze the length guide tabs together as shown, and slide the length guide to the correct position for the size of
paper being loaded. Notice the size indicators in the window in the bottom of the tray. Use these indicators to help
position the guide. Notice t he load lines on the width guide tab: they indicate the maximum height for loading paper.
Page 16

Printing guide
Page 16 of 34
Load lines
1
Length indicator
2
4 Flex the sheets back and forth to loosen them, and then fan them. Do not fold or crease the paper. Straighten the
edges on a level surface.
5 Load the paper stack with the recommended print side faceup. Load the stack toward the back of the tray as shown.
When loading preprinted letterhead, place the header toward the front of the tray.
6 Squeeze the width guide tabs, and slide the width guide to lightly touch the side of the stack.
Page 17

Printing guide
Page 17 of 34
7 Align the tray, and insert it.
8 If a different type of paper was loaded than the type previously loaded in the tray, change the Paper Type setting
for the tray from the control panel. For more information, see “Setting the paper size and type” on page 17.
Setting the paper size and type
Note: Trays with matching paper size and paper type settings are automatically linked by the printer. When a linked
tray runs out of paper, the printer draws from another tray.
To change the paper size and type settings:
1 Make sure the printer is on and Ready appears.
2 From the control panel, press .
3 Press until Paper Menu appears, and then press .
4 Press until Paper Size/Type appears, and then press .
5 Press until the correct tray appears, and then press .
6 Press until appears next to the correct size, and then press .
7 Press or to scroll through the list of possible paper types. Highlight the correct type, and then press .
Submitting Selection appears. The printer returns to the Paper Menu.
8 Press twice to return to the Ready state.
Page 18

Supplies guide
Page 18 of 34
Supplies guide
When a toner low message appears such as Cyan Toner Low, you should order a new toner cartridge.
You may be able to print a limited number of pages when the message first appears, but it is best to have the new
cartridge available when the current one runs out.
Note: Shake your new print cartridge gently before installing it into the printer to maximize its yield.
The following table lists the part numbers for ordering supply items.
Part number list
Part name Part number For printer(s)
Cyan Extra High Yield Return
Program Toner Cartridge
Magenta Extra High Yield Return
Program Toner Cartridge
Yellow Extra High Yield Return
Program Toner Cartridge
Cyan Extra High Yield Toner
Cartridge
Magenta Extra High Yield Toner
Cartridge
Yellow Extra High Yield Toner
Cartridge
Cyan High Yield Return Program
Toner Cartridge
Magenta High Yield Return Program
Toner Cartridge
Yellow High Yield Return Program
Toner Cartridge
Black High Yield Return Program
Toner Cartridge
C5340CX C534
C5340MX C534
C5340YX C534
C5342CX C534
C5342MX C534
C5342YX C534
C5240CH C532, C534
C5240MH C532, C534
C5240YH C532, C5 34
C5240KH C534
Cyan High Yield Toner Cartridge C5242CH C532, C534
Magenta High Yield Toner Cartridge C5242MH C532, C534
Yellow High Yield Toner Cartridge C5242YH C532, C5 34
Black High Yield Toner Cartridge C5242KH C534
Cyan Return Program Toner
Cartridge
Magenta Return Program Toner
Cartridge
Yellow Return Program Toner
Cartridge
C5220CS C530, C532, C534
C5220MS C530, C532, C534
C5220YS C530, C532, C534
Page 19

Supplies guide
Part name Part number For printer(s)
Page 19 of 34
Black Return Program Toner
Cartridge
Cyan Return Program Toner
Cartridge
Magenta Return Program Toner
Cartridge
Yellow Return Program Toner
Cartridge
Black Return Program Toner
Cartridge
Cyan Toner Cartridge C5222CS C530, C532, C534
Magenta Toner Cartridge C5222MS C530, C532, C534
Yellow Toner Cartridge C5222YS C530, C532, C534
Black Toner Cartridge C5222KS C530, C532, C534
Cyan Toner Cartridge C5202CS C530
Magenta Toner Cartridge C5202MS C530
Yellow Toner Cartridge C5202YS C530
C5220KS C530, C532, C534
C5200CS C530
C5200MS C530
C5200YS C530
C5200KS C530
Black Toner Cartridge C5202KS C530
Photoconductor Unit C53030X C530, C532, C534
Photoconductor Unit, Multi-Pack C53034X C530, C532, C534
Fuser (100V/50–60Hz) 40X3571 C530, C532, C534
Fuser (120V/50–60Hz) [low voltage] 40X3569 C530, C532, C534
Fuser (220–240V/50–60Hz) [high
voltage]
Transfer Belt 40X3572 C530, C532, C534
Waste Toner Box C52025X C530, C532, C534
40X3570 C530, C532, C534
Ordering a fuser or a transfer belt
When Fuser Life Warning or Transfer Belt Life Warning appears, you need to order a replacement fuser
or transfer belt.
When Replace Fuser or Replace Transfer Belt appears, you need to install the new replacement part. For
installation information, see the documentation that came with the fuser or transfer belt.
Part number Part name
40X3572 Transfer belt
40X3569 (120V/50–60Hz)
40X3570 (220–240V/50–60Hz)
40X3571 (100V/50–60Hz)
Fuser
Page 20

Supplies guide
Page 20 of 34
Ordering photoconductors
When Black PC Unit Life Warning or Cyan PC Unit Life Warning, Magenta PC Unit Life
Warning, or Yellow PC Unit Life Warning appears, you need to order replacement photoconductor(s).
Part number Pa rt name
C53030X Photoconductor Unit
C53034X Photoconductor Unit, Multi-Pack
Page 21

Media guide
Page 21 of 34
Media guide
The printer supports the following paper and other specialty media sizes. Select custom sizes up to the maximum
specified for the Universal setting.
Supported paper sizes
—supported
X—unsupported
Paper size Dimensions Standard 250-sheet
tray (Tray 1)
Letter
Legal
JIS B5
A4
Executive
A5
Folio
Statement
Universal*
215.9 x 279.4 mm
(8.5 x 11 in.)
215.9 x 355.6 mm
(8.5 x 14 in.)
182 x 257 mm
(7.17 x 10.1 in.)
210 x 297 mm
(8.27 x 11.7 in.)
184.2 x 266.7 mm
(7.25 x 10.5 in.)
148 x 210 mm
(5.83 x 8.27 in.)
216 x 330 mm
(8.5 x 13 in.)
139.7 x 215.9 mm
(5.5 x 8.5 in.)
148 x 210 mm to
215.9 x 355.6 mm
(5.83 x 8.27 in. to
8.5 x 14 in.)
X X
Optional 550-sheet
tray (Tray 2)
Multipurpose feeder
or manual feeder
X
76.2 x 123.8 mm
(3 x 4.88 in.) to
215.9 x 355.6 mm
(8.5 x 14 in.)
76.2 x 152.4 mm
(3 x 6 in.) to
215.9 x 355.6 mm
(8.5 x 14 in.)
*This size setting formats the page or envelope for 215.9 x 355.6 mm (8.5 x 14 in.) for the 250-sheet tray unless the
size is specified by the program.
Measurements apply to simplex (one-sided) printing only. For dup lex (two-sided) printing, the minimum size is
139.7 x 210 mm (5.50 x 8.27 in.).
X X
(Multipurpose feeder)
X X
(Manual feeder)
Page 22

Media guide
Page 22 of 34
Paper size Dimensions Standard 250-sheet
tray (Tray 1)
7 3/4 Envelope
(Monarch)
Commercial 9
Envelope
Commercial 10
Envelope
International DL
Envelope
International C5
Envelope
International B5
Envelope
Other Envelope*
*This size setting formats the page or envelope for 215.9 x 355.6 mm (8.5 x 14 in.) for the 250-sheet tray unless the
size is specified by the program.
Measurements apply to simplex (one-sided) printing only. For dup lex (two-sided) printing, the minimum size is
139.7 x 210 mm (5.50 x 8.27 in.).
98.4 x 190.5 mm
(3.875 x 7.5 in.)
98.4 x 225.4 mm
(3.875 x 8.9 in.)
104.8 x 241.3 mm
(4.12 x 9.5 in.)
110 x 220 mm
(4.33 x 8.66 in.)
162 x 229 mm
(6.38 x 9.01 in.)
176 x 250 mm
(6.93 x 9.84 in.)
104.8 x 210 mm to
215.9 x 355.6 mm
(4.125 x 8.27 in. to
8.5 x 14 in.)
X X
X X
X X
X X
X X
X X
X X
Optional 550-sheet
tray (Tray 2)
Multipurpose feeder
or manual feeder
Storing media
Use these media storage guidelines to help avoid jams and uneven print quality:
• For best results, store media where the temperature is 21°C (70°F) and the relative humidity is 40%.
• Store media in cartons when possible, on a pallet or shelf, rather than on the floor.
• Store individual packages of media on a flat surface.
• Do not store anything on top of individual media packages.
Avoiding jams
The following hints can help you avoid jams:
• Use only recommended media.
For more information, see the Card Stock & Label Guide available on the Lexmark Web site at
www.lexmark.com/publications.
• For detailed information about purchasing large quantities of customized media, see the Card Stock & Label
Guide.
• Do not load too much media. Make sure the stack height does not exceed the indicated maximum height.
• Do not load wrinkled, creased, damp, or curled media.
• Flex, fan, and straighten media before loading it.
• Do not use media that has been cut or trimmed by hand.
• Do not mix media sizes, weights, or types in the same stack.
• Store the media in an appropriate environment.
Page 23

Media guide
Page 23 of 34
• Do not remove trays while the printer is printing. Wait for Load tray <x> or Ready to appear before removing
a tray.
• Do not load the manual feeder while the printer is printing. Wait for Load manual feeder with <x> to appear.
• Push all trays in firmly after loading media.
• Make sure the guides in the trays are properly positioned and are not pressing too tightly a gainst the paper.
• Make sure all media sizes and media types are set correctly in the control panel menu.
• Make sure all printer cables are attached correctly. For more information, see the setup docu mentation.
Note: If a jam occurs, clear the entire media path. For information on the media path, see the User's Guide.
Page 24

Print defects guide
Page 24 of 34
Print defects guide
Repeating defects measurements
Match a set of repeating defects on a print job to the marks on one of the vertical lines. The line that best matches the
defects on the print job indicates which particular part is causing the defect.
Change the photoconductor unit for the color
that shows this defect.
72.4 mm
(2.85 inches)
28.3 mm
(1.11 inches)
Change the toner cartridge for the color that
shows this defect.
35.7 mm
(1.41 inches)
33.5 mm
(1.32 inches)
Change the fuser.
116.2 mm
(4.58 inches)
Page 25

MENU
BACK
STOP
MENU
BACK
STOP
Menu map
Page 25 of 34
Menu map
Menus list
A number of menus are available to make it easy for you to change printer settings. This diagram shows the items
available under each menu.
Note: Some menu items may not be available based on the printer model or the options installed.
Supplies Menu Paper Menu Reports Settings
Replace Supply
Cyan Cartridge
Magenta Cartridge
Yellow Cartridge
Black Cartridge
Cyan PC Unit
Magenta PC Unit
Yellow PC Unit
Black PC Unit
Default Source
Paper Size/Type
Configure MP
Substitute Size
Paper Texture
Paper Weight
Paper Loading
Custom Types
Universal Setup
Menu Settings Page
Device Statistics
Network Setup Page
Network <x> Setup Page
Wireless <x> Setup Page
Profiles List
NetWare Setup Page
Print Fonts
Print Directory
Fuser
Transfer Belt
Security Network/Ports Help
Max Invalid PIN
Job Expiration
TCP/IP
IPv6
Wireless
Standard Network
Network <x>
Standard USB
USB <x>
NetWare
AppleTalk
LexLink
Color Quality
Print Quality
Printing Guide
Supplies Guide
Media Guide
Print Defects
Menu Map
Information Guide
Connection Guide
Moving Guide
USB Direct
Setup Menu
Finishing Menu
Quality Menu
Utilities Menu
PDF Menu
PostScript Menu
PCL Emul Menu
HTML Menu
Image Menu
Understanding the control panel
7
9
6
5
8
1
7
6
X
123
789
654
#0
5
4
3
2
1
X
2
34
Page 26

Menu map
Page 26 of 34
Control panel item Description
1 Display The display shows messages and pictures that communicate the status of the
printer.
2 Select
3 Navigation buttons
4 Indicator light Indicates the printer status:
Pressing initiates action on a menu item.
Press or to scroll through menu lists.
Press
or to scroll through values or text that rolls to another screen.
• Off—The power is off.
• Blinking green—The printer is warming up, processing data , or printing.
• Solid green—The printer is on, but idle.
• Solid red—Operator intervention is needed.
5 Stop Stops all printer activity
A list of options is offered once Stopped appears on the display.
6 Menu Opens the menu index
Note: These menus are only available when the printer is in the Ready state.
7 Back Returns the display to the previous screen
8 USB direct port Insert a USB flash drive to send data to the printer.
9 Numeric keypad Consists of the numbers 0–9, a backspace button, and a pound button
Page 27

Information guide
Page 27 of 34
Information guide
Help pages
Help pages are a series of PDFs stored in the printer. They contain helpful information about using the printer and
performing printing tasks.
English, French, German, and Spanish translations are stored in the printer. Other transla tion s a re available on the
Software and Documentation CD.
Menu item Description
Color quality guide Provides information about adjusting and customizing color printing
Print quality guide Provides information about solving print quality issues
Printing guide Provides information about loading paper and other speciality media
Supplies guide Provides part numbers for ordering supplies
Media guide Provides a list of the paper sizes supported in trays, drawers, and feeders
Print defects guide Provides help in determining the printer part causing a repetitive defect
Menu map Provides a list of the control panel menus and settings
Information guide Provides help in locating additional information
Connection guide Provides information about connecting the printer locally (USB) or to a network
Moving guide Provides instructions for safely moving the printer
Setup sheet
The Setup sheet packaged with the printer provides information about setting u p the printer.
Software and Documentation CD
The Software and Documentation CD packaged with the printer includes a User's Guide and a Menus and Messages
Guide.
The User's Guide provides information about loading paper, ordering supplies, troubleshoo ting, and clearing jams.
The Menus and Messages Guide provides information about changing the printer settings for each availab le menu
item. It also includes a list of printer status and error messages.
Additional language support
The User's Guide, Setup sheet, Menus and Messages Guide, and Help pages are also available in other languages
on the Software and Documentation CD.
Page 28

Connectivity guide
Page 28 of 34
Connectivity guide
Windows instructions for a locally attached printer
Note: When installing a locally attached printer, if the operating system is not supported by the Software and
Documentation CD, the Add Printer Wizard must be used.
Updates for the printer software may be available on the Lexmark Web site at www.lexmark.com.
What is local printing?
Local printing is printing to a locally attached printer (a printer that is connected directly to your computer with a USB
cable). When setting up this type of printer, you should install the printer software before connecting the USB cable.
For more information, see the setup documentation packaged with the printer.
The Software and Documentation CD can be used to install the necessary printer software on most Windows operating
systems.
Installing software using the CD
Using the Software and Documentation CD, you can in stall printer software for the following operating systems:
• Windows Server 2003 and Windows Server 2003 x64
• Windows XP and Windows XP x64 bit Edition
• Windows 2000
• Windows NT 4.0
• Windows Me
• Windows 98 Second Edition
1 Insert the Software and Documentation CD.
If the install screen does not appear, click Start Run, and then type D:\setup.exe, where D is the letter of your
CD-ROM drive.
2 Select Install Printer and Software.
3 Select Suggested, and then click Next.
4 Select Local Attach, and then click Next. The printer software is copied to your computer.
5 Connect the USB or parallel cable, and then turn on the printer.
The Plug and Play screen appears and a printer object is created in the Printers folder.
Installing software using the Add Printer Wizard
You can install printer software for the following operating systems:
• Windows 95 (USB not supported)
• Windows 98 First Edition
1 Insert the Software and Documentation CD.
If the CD automatically starts, click Exit.
2 Click Start Settings Printers, and then click Add Printer to start the Add Printer Wizard.
3 When prompted, select to install a local printer, and then click Have Disk.
Page 29

Connectivity guide
Page 29 of 34
4 Specify the location of the printer software. The path should be similar to D:\Drivers\Print\Win_9xMe\, where D
is the letter of your CD-ROM drive.
5 Click OK.
Windows instructions for network attached printers
What is network printing?
In Windows environments, network printers can be configured for direct printing or shared printing. Both network
printing methods require the installation of printer software and the creation of a network port.
Printing method Example
IP printing
• Printer is connected directly to the network using a network cable, such as an
Ethernet cable.
• Printer software is typically installed on each network computer.
Shared printing
• Printer is connected to one of the computers on the network using a local cable,
such as a USB or parallel cable.
• Printer software is installed on the computer attached to the printer.
• During software installation, the printer is set up to be “shared” so that other
network computers can print to it.
Installing software for direct IP printing
1 Insert the Software and Documentation CD.
If the install screen does not appear, click Start Run, and then type D:\setup.exe, where D is the letter of your
CD-ROM drive.
2 Select Install Printer and Software.
3 Select Suggested, and then click Next.
Note: Select Custom instead of Suggested to select the components you want to install.
4 Select Network Attach, and then click Next. The printer software is copied to your computer.
5 Select the printer model you are installing.
The printer is automatically discovered on the network, an IP address is automatically assigned, and a network
printer object is created in the Printers folder.
6 From the list of discovered printers, select the one you want to print to.
Note: If the printer does not appear in the list, click Add Port, and then follow the instructions on the screen.
7 Click Finish to complete the installation.
8 Click Done to exit the installer.
Page 30

Connectivity guide
Page 30 of 34
Installing software for shared printing
Setting up shared printing requires several steps and should be done in the following order:
1 Install the printer software on the computer atta ch ed to the printer.
a Insert the Software and Documentation CD.
If the install screen does not appear, click Start Run, and then type D:\setup.exe, where D is the letter of
your CD-ROM drive.
b Select Install Printer and Software.
c Select Suggested, and then click Next.
d Select Local Attach, and then click Next. The printer software is copied to your computer.
e Connect the USB or parallel cable, and then turn on the prin ter. The Plug and Play screen appears, and a
printer object is created in the Printers folder.
2 Share the printer on the network.
a Open the printers folder of your operating system.
b Select the printer object.
c From Print Properties, click the option to share the printer. This requires assigning a shared name to the printer.
d Click OK. If files are missing, you may be prompted for your operating system CD.
e Check the following to make sure the printer was successfully shared:
• The printer object in the Printers folder now has a shared indicator. For example, a hand may appear under
the printer object.
• Search Network Neighborhood or My Network Places. Find the name of the host computer, and look for
the shared name assigned to the printer.
3 Connect other network computers to the printers.
• Using the peer-to-peer method
a Open the printers folder for your operating system.
b Click Add Printer to start the Add Printer Wizard.
c Select to install a network printer.
d Enter the printer name or URL if you are on the Internet or an intranet, and then click Next. If the printer
name or URL is unknown, leave the text box empty, and then click Next.
e From the Shared printers list, select the network printer. If the printer is not listed, enter the path of the
printer in the text box. The path looks similar to the following: \\[server host name]\[shared printer name].
The server host name is the name of the server computer that identifies it to the network. The shared
printer name is the name assigned during the installation process.
f Click OK.
g When the installation is complete, print a test page.
h Repeat steps a through g on every network computer you want to enable to print to the shared printer.
• Using the point-and-print method
Note: For more information, see the Lexmark Web site at www.lexmark.com. Look for a Knowledgebase
article about 64-bit support.
This method may be the best use of system resources. The computer attached to the printer handles
processing for all print jobs, including those routed from other network computers. This lets other network
Page 31

Connectivity guide
Page 31 of 34
computers return to applications much faster. With this method, only a subset of printer software is installed
on each network computer.
a From the network computer you want to enable to print to the shared printer, do uble-click Network
Neighborhood or My Network Places on the desktop.
b Locate the host name of the computer attached to the printer, and double-click the host name.
c Right-click the shared printer name, and select the option to install the printer on the network computer.
Wait a few minutes for the proc ess to complete. The amou nt of time it takes v aries based on netw ork traffic
and other factors.
d Close Network Neighborhood or My Network Places.
e Print a test page.
f Repeat steps a through e on every network computer you want to enable to print to the shared printer.
Mac instructions for a locally-attached printer
Before installing printer software
A locally-attached printer is a printer connected to a computer using a USB cable. When setting up thi s type of printer ,
install the printer software before connecting the USB cable. For more information, see the setup documentation.
The Software and Documentation CD can be used to install the necessary printer software.
Note: A PPD for the printer is also available in a downloadable software package on the Lexmark Web site at
www.lexmark.com.
Creating a queue in the Print Center or Printer Setup Utility
For local printing, you need to create a print queue:
1 Install a PostScript Printer Description (PPD) file on the computer. A PPD file provides detailed information to the
Mac computer about the capabilities of the printer.
a Insert the Software and Documentation CD.
b Double-click the installer package for the printer.
c From the Welcome screen, click Continue, and then click Continue again after viewing the Readme file.
d Click Continue after viewing the license agreement, and then click Agree to accept the terms of the agreement.
e Select a Destination, and then click Continue.
f From the Easy Install screen, click Install.
g Enter the user password, and then click Okay. All the necessary software is installed on the computer.
h Click Close when installation is complete.
2 Open the Finder, click Applications, and then click Utilities.
3 Double-click Print Center or Printer Setup Utility.
4 Verify the print queue was created:
• If the USB-attached printer appears in the Printer list, quit the Print Center or Printer Setup Utility.
• If the USB-attached printer does not appear in the Printer list, make sure the USB cable is properly connected
and the printer is turned on. After the printer appears in the Printer list, quit the Print Center or Printer Setup
Utility.
Page 32

Connectivity guide
Page 32 of 34
Mac instructions for network-attached printers
Installing software for network printing
To print to a network printer, each Macintosh user must install a custom PostScript Printer Description (PPD) file and
create a print queue in the Print Center or Printer Setup Utility.
1 Install a PPD file on the computer.
a Insert the Software and Documentation CD.
b Double-click the installer package for the printer.
c From the Welcome screen, click Continue, and then click Continue again after viewing the Readme file.
d Click Continue after viewing the license agreement, and then click Agree to accept the terms of the agreement.
e Select a Destination, and then click Continue.
f From the Easy Install screen, click Install.
g Enter the user password, and then click OK. All the necessary software is installed on the computer.
h Click Close when installation is complete.
2 Create a print queue in the Print Center or Printer Setup Utility.
• Using AppleTalk printing
a Open the Finder, click Applications, and then click Utilities.
b Double-click Print Center or Print Setup Utility.
c From the Printer Menu, choose Add Printer.
d From the pop-up menu, choose AppleTalk.
e From the list, select the AppleTalk zone.
For information about which zone or printer to select, see the network setup page under the AppleTalk
heading. For information about printing a network setup page, see the User's Guide.
f From the list, select the new printer, and then click Add.
• Using IP printing
a Open the Finder, click Applications, and then click Utilities.
b Double-click Print Center or Print Setup Utility.
c From the Printer Menu, choose Add Printer.
d From the pop-up menu, choose IP Printing.
e Enter the IP address or the printer DNS name in the Printer Address box.
The TCP/IP address can be found on the network setup page. For information about printing a netwo rk
setup page, see the User's Guide.
f From the printer model pop-up menu, choose your printer.
g From the list, select the new printer, and then click Add.
Installing other software for Macintosh
The following Macintosh utilities can be found on the Mac partition of the Software and Documentation CD:
• Printer File Loader
• Printer Status
• Auto Updater
• Printer Settings
The Software and Utilities documentation is copied to the Macintosh hard disk during the printer installation process.
Page 33

Moving the printer
Page 33 of 34
Moving the printer
Before moving the printer
CAUTION: The printer weighs 25.40 kg (56 lb); therefore, it requires at least two people to lift it safely. Us e the
handholds on the sides of the printer to lift it, and make sure your fingers are not under the printer when you set it
down.
Follow these guidelines to avoid personal injury or printer damage:
• Always use at least two people to lift the printer.
• Always turn off the printer using the power switch before moving it.
• Disconnect all cords and cables from the printer before moving it.
• Remove all printer options before moving the printer.
Warning: Damage to the printer caused by improper moving is not covered by th e printer warranty.
Setting the printer up in a new location
When the printer is set up, allow clearance around it as shown.
101.6 mm
1
(4.0 in.)
2
3
609.6 mm
(24.0 in.)
101.6 mm
(4.0 in.)
Page 34

Moving the printer
Page 34 of 34
152.4 mm
4
(6.0 in.)
304.8 mm
5
(12.0 in.)
Moving the printer to another location
The printer and options can be safely moved to another location by following these precautions:
• Remove all printer options before moving the printer.
• Any cart used to move the printer must have a surface able to support the full footprint of the printer. Any cart used
to move the options must have a surface ab le to support the dimensions of the options.
• Keep the printer in an upright position.
• Avoid severe jarring movements.
Shipping the printer
When shipping the printer, use the original packaging or call the place of purchase for a relocation kit.
 Loading...