

Page 1
C520, C522, and C524
Menus and Messages Guide
June 2005
Lexmark and Lexmark with diamond design are trademarks of Lexmark International, Inc.,
registered in the United States and/or other countries.
© 2005 Lexmark International, Inc.
All rights reserved.
740 West New Circle Road
Lexington, Kentucky 40550
www.lexmark.com
Page 2
Edition: June 2005
The following paragraph does not apply to any country where such provisions are inconsistent with local law: LEXMARK
INTERNATIONAL, INC., PROVIDES THIS PUBLICATION “AS IS” WITHOUT WARRANTY OF ANY KIND, EITHER EXPRESS OR
IMPLIED, INCLUDING, BUT NOT LIMITED T O, THE IMPLIED W ARRANTIES OF MERCHANT ABILITY OR FITNESS FOR A P AR TICULAR
PURPOSE. Some states do not allow disclaimer of express or implied warranties in certain transactions; therefore, this statement may not
apply to you.
This publication could include technical inaccuracies or typographical errors. Changes are periodically made to the information herein; these
changes will be incorporated in later editions. Improvements or changes in the products or the programs described may be made at any time.
Comments about this publication may be addressed to Lexmark International, Inc., Department F95/032-2, 740 West New Circle Road,
Lexington, Kentucky 40550, U.S.A. In the United Kingdom and Eire, send to Lexmark International Ltd., Marketing and Services
Department, Westhorpe House, Westhorpe, Marlow Bucks SL7 3RQ. Lexmark may use or distribute any of the information you supply in
any way it believes appropriate without incurring any obligation to you. You can purchase additional copies of publications related to this
product by calling 1-800-553-9727. In the United Kingdom and Eire, call +44 (0)8704 440 044. In other countries, contact your point of
purchase.
References in this publication to products, programs, or services do not imply that the manufacturer intends to make these available in all
countries in which it operates. Any reference to a product, program, or service is not intended to state or imply that only that product,
program, or service may be used. Any functionally equivalent product, program, or service that does not infringe any existing intellectual
property right may be used instead. Evaluation and verification of operation in conjunction with other products, programs, or services, except
those expressly designated by the manufacturer, are the user’s responsibility.
Lexmark and Lexmark with diamond design, MarkNet, and MarkVision are trademarks of Lexmark International, Inc., registered in the
United States and/or other countries.
®
is a registered trademark of the Hewlett-Packard Company.
PCL
PostScript
The following terms are trademarks or registered trademarks of these companies:
Albertus The Monotype Corporation plc ITC Lubalin Graph International Typeface Corporation
Antique Olive Monsieur Marcel OLIVE ITC Mona Lisa International Typeface Corporation
®
is a registered trademark of Adobe Systems Incorporated.
Apple-Chancery Apple Computer, Inc. ITC Zapf Chancery International Ty peface Corporation
Arial The Monotype Corporation plc Joanna The Monotype Corporation plc
Based on Times New Roman under
license from The Monotype
Corporation plc, is a product of Agfa
CG Times
Corporation Marigold Arthur Baker
Chicago Apple Computer, Inc. Monaco Apple Computer, Inc.
Linotype-Hell AG and/or its
Clarendon
subsidiaries Ne w York Apple Computer, Inc.
Eurostile Nebiolo Oxford Arthur Baker
Linotype-Hell AG and/or its
Geneva Apple Computer, Inc. Palatino
subsidiaries
Linotype-Hell AG and/or its
GillSans The Monotype Corporation plc Stempel Garamond
subsidiaries
Linotype-Hell AG and/or its
Helvetica
subsidiaries Taffy Agfa Corporation
Hoefler Jonathan Hoefler Type Foundry Times New Roman The Monotype Corporation plc
ITC Avant Garde
Gothic International T y peface Corporation Univers
Linotype-Hell AG and/or its
subsidiaries
ITC Bookman International Typeface Corporation
Other trademarks are the property of their respective owners.
© 2005 Lexmark International, Inc.
All rights reserved.
UNITED STATES GOVERNMENT RIGHTS
This software and any accompanying documentation provided under this agreement are commercial computer software and
documentation developed exclusively at private expense.
Page 3

Contents
Contents
Chapter 1: Using printer menus ........................................................................................ 4
Understanding the printer operator panel ........................................................................................................5
Menu Groups ...................................................................................................................................................7
Supplies Menu ..........................................................................................................................................7
Paper Menu ......................................................... ........................................ ..... ...... ..................................9
Reports ...................................................................................................................................................14
Settings ...................................................................................................................................................16
Security ...................................................................................................................................................32
Network/Ports .........................................................................................................................................33
Help ........................................................................................................................................................42
Chapter 2: Understanding printer messages ................................................................. 43
3
Page 4
1
Using printer menus
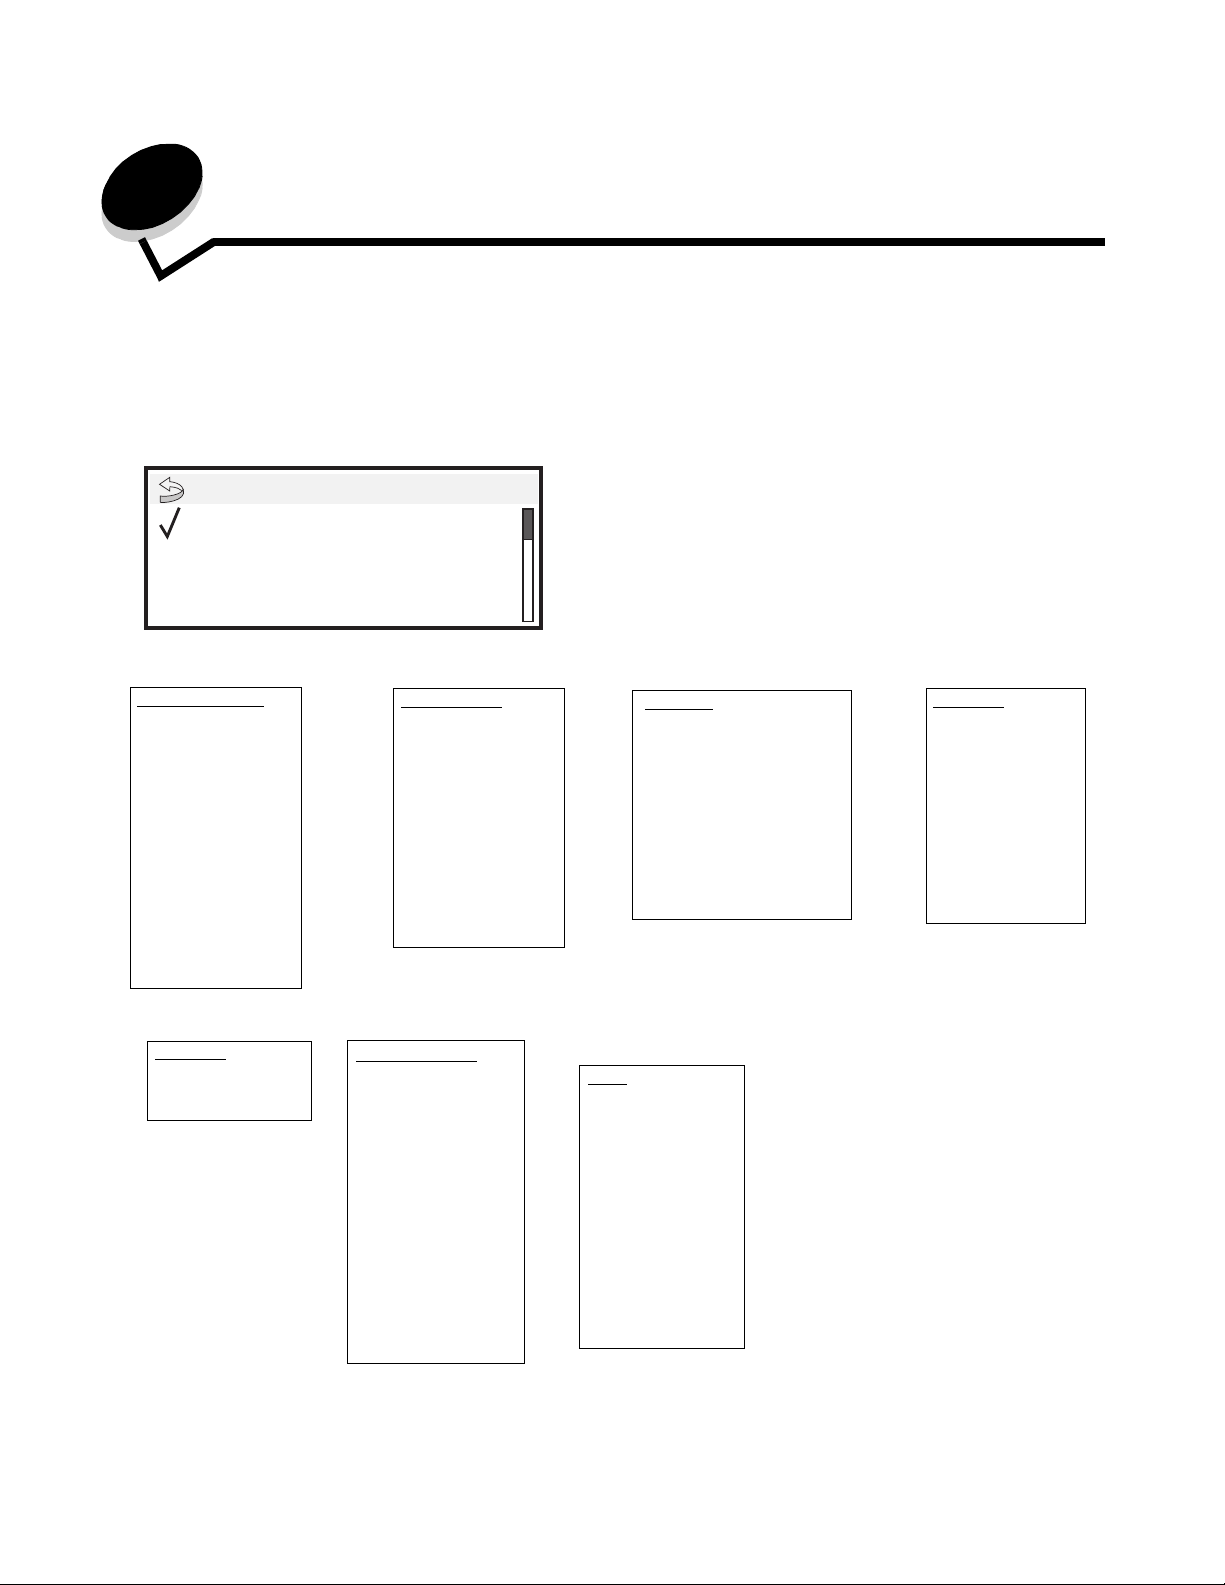
A number of menus are available to make it easy to change printer settings. The diagram shows the menu index on the
operator panel wh ic h lis ts t he m en us and me n u ite ms a vailable und er ea ch m enu. The menu items in eac h m en u and their
values are described in more detail later in this chapter.
Note: Some menu items and values are displayed only if a specific option is installed on the printer. Other
menu items may only be effective for a particular printer language.
Menu
Supplies
Paper Menu
Reports
.
Supplies Menu
Replace Supply
Cyan Cartridge
Magenta Cartridge
Yellow Cartridge
Black Cartridge
Cyan PC Unit
Magenta PC Unit
Yellow PC Unit
Black PC Unit
Fuser
Transfer Belt
Waste Toner Box
Paper Menu
Default Source
Paper Size/Type
Configure MP
Substitute Size
Paper Texture
Paper Weight
Paper Loading
Custom Types
Universal Setup
Reports
Menu Settings Page
Device Statistics
Network Setup Page
Network <x> Setup Page
Profiles List
NetWare Setup Page
Print Fonts
Print Directory
Settings
Setup Menu
Finishing Menu
Quality Menu
Utilities Menu
PDF Menu
PostScript Menu
PCL Emul Menu
HTML Menu
Image Menu
Security
Max Invalid PIN
Job Expiration
Network/Ports
TCP/IP
IPv6
Standard Network
Network [x]
Standard USB
USB [x]
Parallel
Parallel [x]
Serial
Serial [x]
NetWare
AppleTalk
LexLink
Help
Print All
Color Quality
Print Quality
Printing Guide
Supplies Guide
Media Guide
Print Defects
Menu Map
Information Guide
Connection Guide
Moving Guide
Using printer menus
4
Page 5
Using printer menus
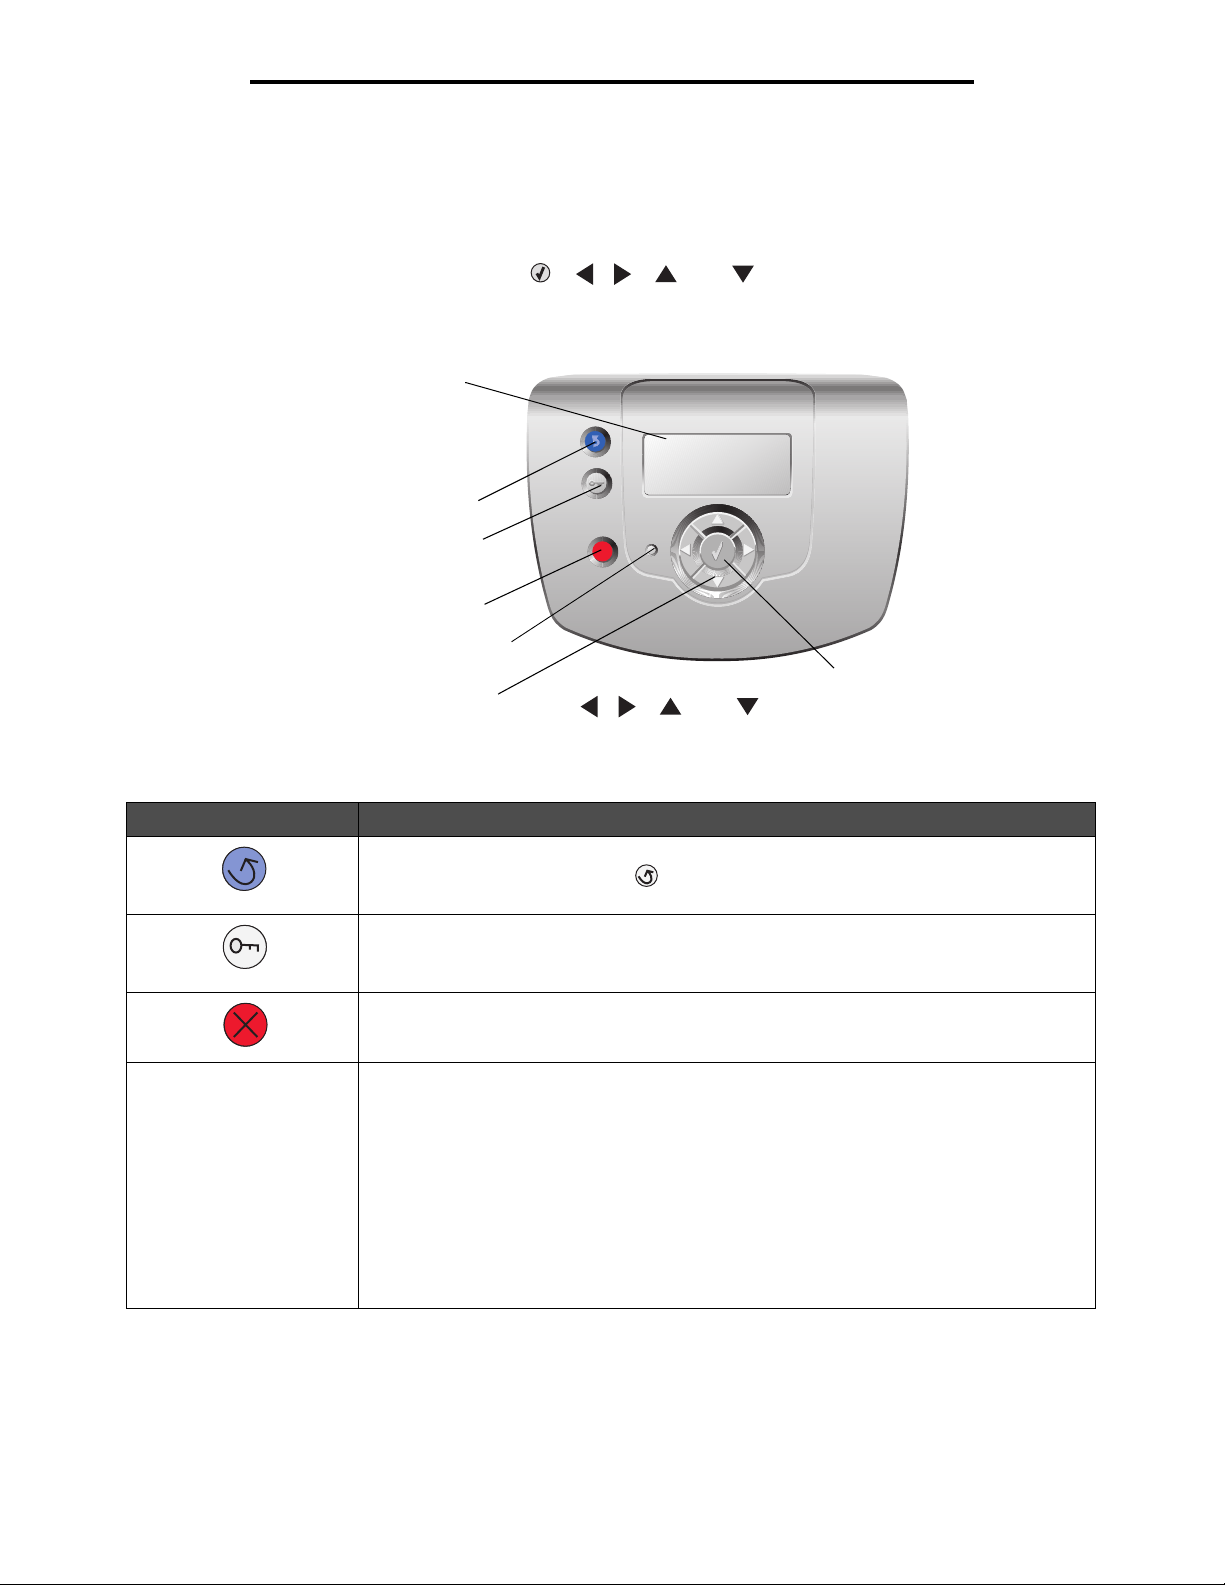
Understanding the printer operator panel
The printer operator panel consists of these items:
• A 4-line, grayscale display that can show both graphics and text
• Eight buttons: Back, Menu, Stop, Select ( ), , , , and
• Indicator light
Display
BACK
Back
Menu
Stop
Indicator light
Navigation button s , , , and
The use of the buttons and the layout of the operator panel are described in the following table.
Operator panel item Function
Back To return to the previous screen.
Note: This button is only active if appears on the top left of the screen. Changes made
on a screen are not applied if the Back button is pressed.
Menu To open the menu index.
Note: The printer must be in the Ready state to access the menu index. A message
indicating the menus are unavailable appears if the printer is not ready.
Stop To stop or suspend all printer activit y. After pressing Stop, the message Stopping appears .
When the printer has stopped, the status line on the display shows Stopped, and a list of
options appears.
MENU
STOP
X
Select
Indicator light The two-toned light emitting diode called the indicator light on the operator panel give s
information about the status of the printer using the colors red and green.
Status Indicates
Off Printer power is off.
Blinking green Printer is warming up, processing data, or printing a job.
Solid green Printer is on, but idle.
Solid red Operator intervention is required.
Understanding the printer operator panel
5
Page 6

Operator panel item Function
Using printer menus
Navigation buttons
Display
Status / Supplies
View Supplies
Ready
Tray 1 low
Tell me more scr e en
Some held jobs were not
restored.
Show me screen
The Up and Down buttons are used to move up and down in lists.
When navigating through a list using the Up or Down button, the cursor
moves one line at a time.
The Left and Right buttons are used to move within a screen, such as
moving from one value to another. They are also used to scroll through text
that does not fit on the screen.
The Select button is used to initiate action on a menu item or value. Press
Select when the cursor is next to the menu item or value needed.
The display shows messages and graphics which describe the current state of the printer
and indicates possible printer problems requiring resolution.
The top line of the display is the header line. If applicable, it contains the graphic indicating
the Back button can be used. It also displays the current status and the Supplies
(Warnings) status. If multiple warnings are present, each warning is separated by a
comma.
The other three lines of the display are the body of the screen which shows printer status,
supplies messages, Show me screens, and allows for the selection of menus, menu items,
and values.
1. Remove tray;
remove print media
Understanding the printer operator panel
6
Page 7
Using printer menus
Menu Groups
Note: An asterisk (*) next to a value indicates the default setting. Not all values are available on all printer
models.
Supplies Menu
The Supplies Men u on ly ha s true v al ues for the Replace Supply menu item. The ot her me nu i tems are vi e w-onl y stat us tha t
are seen from the Supplies Men u or through Vie w Supp lies . If accessed throu gh View Supplies , each men u item is f ollo wed
by a colon (:) on the operator panel display.
Menu item Purpose Values
Replace Supply To select the supply item just
replaced. A supply counter must be
manually reset when a
photoconductor unit is replaced.
Cyan Cartridge To view the status of the cyan toner
cartridge.
Magenta Cartridge To view the status of the magenta
toner cartridge.
Cyan PC Unit Once a v alu e is c hosen, th e Su pply
Magenta PC Unit
Yellow PC Unit
Black PC Unit
Low Replace indicates end-of-l if e f or the
Invalid
Replace
Missing or Defective
OK
Uncalibrated
Unsupported
Low Replace indicates end-of-l if e f or the
Invalid
Replace
Missing or Defective
OK
Uncalibrated
Replaced Selection screen
appears.
Select Yes from the Supply
Replaced Selection screen to reset
the supply counter.
Select No or press to exit the
Replace Supply menu item.
item is near and print quality
problems may occur.
item is near and print quality
problems may occur.
Yellow Cartridge To view the status of the yellow toner
cartridge.
Menu Groups
Unsupported
Low Replace indicates end-of-l if e f or the
Invalid
Replace
Missing or Defective
OK
Uncalibrated
Unsupported
item is near and print quality
problems may occur.
7
Page 8
Using printer menus
Menu item Purpose Values
Black Cartridge To view the status of the black toner
cartridge.
Cyan PC Unit To view the status of the cyan
photoconductor unit.
Magenta PC Unit To view the status of the magenta
photoconductor unit.
Yellow PC Unit To view the status of the yellow
photoconductor unit.
Low Replace indicates end-of-l if e f or the
Invalid
Replace
Missing or Defective
OK
Uncalibrated
Unsupported
Life Warning
Replace
Missing
OK
Life Warning
Replace
Missing
OK
Life Warning
Replace
Missing
item is near and print quality
problems may occur.
OK
Black PC Unit To view the status of the black
photoconductor unit.
Fuser To view the status of the fuser. Life Warning
Transfer Belt To view the status of the transfer belt. Life Warning
Waste Toner Box To view the status of the waste toner
box.
Life Warning
Replace
Missing
OK
Replace
Missing
OK
Replace
Missing
OK
Near Full
Replace
Missing
OK
Menu Groups
8
Page 9

Using printer menus
Paper Menu
Use the Paper Menu to define settings relating to media.
Default Source
Use this menu item to define the default media source.
Menu item Purpose Values
Default Source Identifies the default media source. Tray <x> If the same size and type of media are
MP Feeder
Manual Paper
Manual Env
in two sources (a nd th e Paper Size and
Paper Type menu items are correctly
set), the sources are automatically
linked. When one source is empty,
media automatical ly fee ds from the ne xt
linked source.
Tray 1 is the factory default setting.
Note: The MP Feeder value, which
stands for the multipurpose feeder, is
shown only when Co nfigure MP is set to
Cassette. See Configure MP for more
information.
Menu Groups
9
Page 10

Using printer menus
Paper Size/Type
Note: Only installed media sources are displayed.
These menu items ar e used to set t he size and type of m edia loa ded into a so urce , such as a tray, the multipurpose feeder ,
or the manual feed slot. Setting the si z e and type is a two-step proc ess. In the first men u ite m, Size appears in bold letters.
After selecting the media size, the screen changes, and Type appears in bold letters. Then, select the media type.
Menu item Purpose Values
Tray <x>
Size/Type
Tray <x>
Size/Type
Identifies the default size for each
source.
Note: For trays with automatic size
sensing, only the value detected by
the hardware appears.
Identifies the type of media installed in
each source.
Note: If a user-defined name is
available, it appears instead of
Custom Type <x>. If two or more
custom types share the same name,
the name only appears once in the
Pap er Type list.
*A4 (non-US)
A5
JIS B5
*Letter (US)
Legal
Executive
Folio
Universal
*Plain Paper
Card Stock
Transparency
Glossy
Labels
Bond
Letterhead
Preprinted
Colored Paper
Custom Type <x>
If the same size and type of media is
in two sources (and the Paper Size
and Paper Type menu items are
correctly set), the sources are
automatically linked. When one
source is empty, media automatical ly
feeds from the next linked source.
Use this menu item to:
• Optimize print quality for the
specified media.
• Select sources through the
software application by selecting
type and size.
• Automatically link sources.
Any sources containing the same
type and size of media are
automatically linked by the printer if
the Paper Size and the Paper Type
are set to the correct values.
MP Feeder
Size/Type
Identifies the s ize o f media installe d in
the multipurpose feeder.
*A4 (non-US)
A5
JIS B5
*Letter (US)
Legal
Executive
Folio
Statement
Universal
7 3/4 Envelope
9 Envelope
10 Envelope
DL Envelope
B5 Envelope
C5 Envelope
Other Envelope
The multipurpose feeder is only
display ed on the op erator panel when
Configure MP is set to Cassette .
Note: See Configure MP for more
information.
Menu Groups
10
Page 11
Using printer menus
Menu item Purpose Values
MP Feeder
Size/Type
Manual Paper
Size/Type
Manual Paper
Size/Type
Identifies the type of media installed in
the multipurpose feeder.
Note: If a user-defined name is
available, it appears instead of
Custom Type <x>. If two or more
custom types share the same name,
the name only appears once in the
Paper Type value list.
Identifies the media size being
manually loaded.
Identifi es the media type being
manually loaded.
*Plain Paper
Card Stock
Transparency
Glossy
Labels
Bond
Envelope
Letterhead
Preprinted
Colored Paper
Custom Type <x>
*A4 (non-US)
A5
JIS B5
*Letter (US)
Legal
Executive
Folio
Statement
Universal
*Plain Paper
Card Stock
Transparency
Glossy
Labels
Bond
Letterhead
Preprinted
Colored Paper
Custom Type <x>
The multipurpose feeder is only
display ed on the op erator panel when
Configure MP is set to Cassette .
Note: See Configure MP for more
information.
Manual Envelope
Size/Type
Manual Envelope
Size/Type
Identifies the envelope size being
manually loaded.
Identifies the envelope type being
manually loaded.
Menu Groups
7 3/4 Envelope
9 Envelope
*10 Envelope (US)
*DL Envelope (non-US)
B5 Envelope
C5 Envelope
Other Envelope
*Envelope
Custom Type <x>
11
Page 12
Using printer menus
Configure MP
This menu item is use d to configure the multi purpose feed er as another source or m anual f eede r . If the m ultipurpose f eeder
is linked with another tray, the printer can select media from the multipurpose feeder before selecting media from another
tray.
Menu item Purpose Values
Configure MP Determines when the printer selects
media loaded in the multipu rpose
feeder.
*Cassette
Manual
Substitute Size
This menu item is u sed to dete rmine whethe r the printer can s ubstitute anot her paper siz e i f the reques ted pa per si ze is not
currently installed in a ny of the printer sources. If, for example , Substitute Size i s set to Letter/A4, and only le tter si z e p aper
is installed in the printer when a request is received to print on A4 paper, the printer substitutes letter for A4 and prints the
job instead of displaying a change paper request.
Menu item Purpose Values
Substitute Size Substitutes the specified size if the
requested size is not loaded.
Off
Statement/A5
Letter/A4
*All Listed
• The Off value indicates no size
substitutions are allowed.
• The Al l Listed v alue i ndicates that
all available substitutions are
allowed.
Paper Texture
These menu items a re used to set the media texture for ea ch of th e def ined medi a types . Th is allo ws th e printer to op timiz e
the print quality for the specified media.
Menu item Purpose Values
Plain Texture Identifies the texture of the media
Transparency
Texture
Glossy Texture
Labels Texture
Bond Texture
Envelope Texture
Letterhead Texture
Preprinted Texture
Colored Texture
Card Stock Te xture Identifies the tex ture of the card stoc k
Custom <x>
Texture
loaded in a specific source.
loaded in a specific source.
Identifies the texture of the custom
media loaded in a specific source.
Smooth
*Normal
Rough
Smooth
*Normal
Rough
Smooth
*Normal
Rough
Note: The default for Bond Texture
is Rough.
Shown if Card Stock is supported in
the specified source.
Shown if the custom type is
supported in the specified source.
Menu Groups
12
Page 13
Using printer menus
Paper Weight
These menu items ar e us ed to set the paper weight for each of the defined m edi a ty pes. This allows the printe r to op tim ize
the print quality for the media weight.
Menu item Purpose Values
Plain Weight Identifies the relative weight of the
Transparency
Weight
Glossy Weight
Labels Weight
Bond Weight
Envelope Weight
Letterhead Weight
Preprinted Weight
Colored Weight
Card Stock Identifies the relative weight of the
Custom <x> Weight Identifies the relative weight of the
media loaded in a specific source,
and ensures the toner adheres
properly to the printed page.
card stock loaded in a specific
source.
custom paper loaded in a specific
source.
Light
*Normal
Heavy
Light
*Normal
Heavy
Light
*Normal
Heavy
Shown if Card Stock is supported in
the specified source.
Shown if the custom type is
supported in the specified source .
Paper Loading
These menu items are used to set the loading orientation for each media type. A source is loaded with preprinted media,
and then the printer can be notifi ed that the media is loaded for duplex (t wo -si ded) printing. Use the applicatio n so ftware to
indicate simplex (one-sided) printing. When simplex printing is selected, the printer automatically inserts blank pages to
print the simplex job correctly.
Menu item Purpose Values
Glossy Loading Properly handles preprinted paper
Bond Loading
Letterhead Loading
Preprinted Loading
Colored Loading
Custom <x>
Loading
whether the job is a duplexed or a
simplexed job.
Properly handles preprinted custom
paper whether the job is a duplexed
or a simplexed job.
Duplex
*Off
Duplex
*Off
Menu Groups
13
Shown if the custom type is
supported in the specified source.
Page 14
Using printer menus
Custom Types
This menu item is used t o de fine a n ame for each custom paper type. Assign na mes u sing a utilit y suc h as M arkVision™ or
from the operator panel.
Menu item Purpose Values
Custom Type <x> Specifies th e typ e of m edia asso ciate d
with each Cu stom Type av ailab le i n the
Paper Type menu.
*Paper
Card Stock
Transparency
Glossy
Labels
Envelope
The custom type media must be
supported in the designate d sou rce
in order to assign a user-defined
name.
Once the name is assigned, the
name (truncated to 16 characters)
is displayed instead of Custom
Type <x>.
Universal Setup
These menu items ar e us ed to specify the height an d wid th of the Universa l Paper Size. By specifying the height and width
for Universal Paper Size, the printer uses the Universal setting exactly like other paper sizes, including support for duplex
and n-up. For more information on n-up, see Multipage Print.
Menu item Purpose Values
Units of Measure Determines the unit of measure
used to enter the Universal Heig ht
and Width.
Portrait Width Sets the portrait width of the
universal media.
Note: If the value set exceeds the
maximum width, the printer uses the
maximum value allowed in inches or
millimeters.
Portrait Height Sets the portrait height of the
universal media.
Note: If the value set exceeds the
maximum height, the printer uses
the maximum value allowed in
inches or millimeters.
Inches
Millimeters
3 inches to
14.17 inches in 0.01
inch increments
76 mm to 360 mm in
1 mm increments
3 inches to
14.17 inches in 0.01
inch increments
76 mm to 360 in
1 mm increments
Inches is the US default and
Millimeters is the international default.
Shows either inches or millimeters
from Units of Measure setting;
8.5 inches is the US default, and
216 mm is the international default.
Shows either inches or millimeters
from Units of Measure setting;
14 inches is the US default, and
356 millimeters is the international
default.
Feed Direction Specifies the feed direction of the
Universal Paper Size.
*Short Edge
Long Edge
Reports
Menu Settings Page
This menu ite m prints a menu settings page.
Menu item Purpose Values
Menu Settings
Page
Prints information relating to the
default printer settings and verifies
that printer options are installed
correctly.
Menu Groups
After selecting this item, the pag e prints a nd the printer re turns
to Ready .
14
Long Edge is only shown if the longest
edge is shorter than the maximum
physical width that the printer tray can
accommodate.
Page 15
Using printer menus
Device Statis tic s
This menu item displays the printer statistics.
Menu item Purpose Values
Device Statistics Prints information relating to the
printer st atistics.
After selecting this i tem, the pa ge prints and the printer returns
to Ready.
Network Setup Page
This menu item prints a network setup page.
Menu item Purpose Values
Network Setup
Page
Network <x>
Setup Page
appears if
additional
network options
are installed.
Prints information relating to
network settings and verifies the
network connection.
Note: This page also provides
information that aids in configuring
for network printing.
After selecting this item , the page prints a nd the printer re turns
to Ready.
Profiles List
This menu item prints a list of profiles stored in this printer.
Menu item Purpose Values
Profiles List Prints a list of profiles stored in the
printer.
After selecting this i tem, the pa ge prints and the printer returns
to Ready.
NetWare Setup Page
This menu item prints information relating to the MarkNet™ N8000 Series internal print server.
Menu item Purpose Values
NetWare Setup
Page
Prints information relating to the
MarkNet N8000 Series in ternal print
server and the network settings
defined by the Network <x> Setup
menu item in the Network Menu.
After selecting this i tem, the pa ge prints and the printer returns
to Ready.
Print Fonts
This menu item prints a list of the fonts stored in the printer.
Menu item Purpose Values
Print Fonts Prints a sample of all the fonts
available for the selected printer
language.
PCL Fonts Prints a sample of all printer fonts
available for PCL emulation.
PostScript Fonts Prints a sample of all printer fonts
available for PostScript emulation.
Menu Groups
15
Page 16

Using printer menus
Print Directory
This menu item prints the directory listing. The directory listing is a list of the resources that are stored on a formatted
optional flash memory card or hard disk.
Menu item Purpose Values
Print Directory Prints a list of the resources that are
stored on the optional flash me mory
card or hard disk.
Note: Print Directory is available
only when either a nondefective
flash or disk is installed and
formatted, and Job Buffer Size is not
set to 100%.
After selecting this i tem, the pa ge prints and the printer returns
to Ready.
Settings
Setup Menu
Use these menu items to configure a variety of printer features.
Menu item Purpose Values
Display
Language
Determines the language o f t he text
displayed on the operator panel.
English Note: All values may not be available.
Français
Deutsch
Italiano
Español
Dansk
Norsk
Nederlands
Svenska
Português
Suomi
Russian
Polski
Hungarian
Turkish
Czech
Simplified Chinese
Traditional Chinese
Korean
Japanese
Menu Groups
16
Page 17
Using printer menus
Menu item Purpose Values
Power Saver Specifies the amount of time (in
minutes) the printer wa its afte r a job
is printed before it goes into a
reduced power state.
Disabled This value does not appear unless
Energy Conserv e is s et to Of f . See th e
User’s Guide for more information.
1...240 Specifies the amount of time after a
print job before the printer goes into
Power Saver mode. (The printer may
not support the entire range of values.)
The factory default Power Saver
setting depends on the printer model.
Print the menu settings page to
determine the current Power Saver
setting. When the printer is in Power
Saver mode, it is still ready to receive
print jobs.
Select 1 to put the printer in Power
Saver mode one minute after it
finishes a print job. This uses much
less energy, but requires more warmup time for the printer. Select 1 if the
printer shares an electrical circuit with
room lighting and flickering lights are
noticed.
Select a high value if the printer is in
constant use. Under most
circumstances, this keeps the printer
ready to print with minimum warm-up
time. Select a value between 1 and
240 minutes if wanting a balance
between energy cons um pti on and a
shorter warm-up period.
Alarms Controls whether the printer sounds
an alarm when the printer requires
operator intervention.
Timeouts Specifies the amount of time (in
seconds) the printer waits to return
to the home screen, receive an endof-job message, or receive
additional bytes of data from the
computer.
Note: Wait Timeout is onl y a va ilab le
when using PostScript emulation.
This menu value has no effect on
PCL emulation print jobs.
Alarm Control:
Off
*Single
Continuous
Cartridge Alarm:
Off
*Single
Continuous
Screen Timeout:
15–300
(*30)
Print Timeout:
Disabled
1–255
(*90)
Wait Timeout:
Disabled
15...65535 (*40)
Off—Printer does not sound an alarm.
Single—Printer sounds three quick
beeps.
Continuous—Printer repeats three
beeps every 10 seconds.
Disabled—Disables Screen Timeout.
15–300—Specifies the amoun t of time
the printer waits bef ore returning to th e
home screen.
Disabled—Disables Print Timeout.
1–25—Specifies the amount of time
the printer waits for an en d-of-job
message before canceling the
remainder of the print job.
Note: When the timer expires, any
partially formatted page still in the
printer is printed, and other inpu t ports
are examined to see if data exists.
Disabled—Disables Wait Timeout.
15...65535—Specifies the amount of
time the printer waits for additional
data before it cancels the job.
Menu Groups
17
Page 18

Using printer menus
Menu item Purpose Values
Print Recovery Specifies whether the printer
continues from certain offline
situations, reprints jammed pages,
or waits until the entire page is
processed and ready to be printed.
Auto Continue:
*Disabled
5–255
Jam Recovery:
On
Off
*Auto
Page Protect:
*Off
On
Lets the printer automatica lly co nti n ue
from certain offline situations when not
resolved within the sp eci fie d time
period.
5–255—Specifies the amount of time
in seconds that the printer waits.
Specifie s whether the printer reprints
jammed pages.
On—Printer reprints jammed pages.
Off—Printer does not reprint jammed
pages.
Auto—Printer reprints a jammed pag e
unless the memory required to hold
the page is needed for other printer
tasks.
Successfully prints a page that may
otherwise generate Complex Page
errors.
Off—Prints a partial page of data if
memory is insufficient to process the
entire page.
On—Ensures that an entire page is
processed before it prints.
Note: If, after selecting On, the page
still cannot print, reduce the size and
number of fonts on the page, or
increase t he installed printer memory.
Note: For most print jobs, On is not
needed. When On is sele cted, printing
may be slower.
Printer Language Specifies the default printer
language used to comm unicate data
from the computer to the printer.
Note: Setting a printer language as
the default does not prevent a
software application from sending
print jobs that use the other
language.
Print Area Modifies the logical and physical
printable area.
Download Target Specifies the storage location for
downloaded r esources.
Storing downloaded resources in
flash memory or on a hard disk is
permanent storage rather than the
temporary storage that RAM
provides. The resources remain in
the flash memory or on the hard
disk even wh en th e printer is turned
off.
PCL Emulation
*PS Emulation
*Normal
Whole Page
*RAM All downloaded resources are
Flash All downloaded resources are
Disk All downloaded resources are
PCL emulation—Uses a PCL
interpreter for incoming host
communications.
PostScript emulation—Uses a PS
interpreter for incoming host
communications.
Note: The Whole Page setting only
affects pages printed using PCL 5
interpreter. This setting has no effect
on pages printed using the PCL XL or
PostScript in terpreters. If attempting to
print any data in the non-printab le area
defined by Normal Print Area, the
printer clips the image at th e boundary
defined by the Normal defined
printable area.
automatically stor ed in printer me mory
(RAM).
automatically stored in flash memory.
automatically stored on the hard disk.
Menu Groups
18
Page 19

Using printer menus
Menu item Purpose Values
Job Accounting Specifies to store or not store
statistical information about the
most recent print jobs on the hard
disk. The statistics include whether
the job printed with or without
errors, the print time , the jo b siz e (in
bytes), the requested media size
and type, the total n umber of printed
pages, and the number of copies
requested.
Note: Job Accounting is only
displayed when a hard disk is
installed, is neither defective nor
Read/Write or Write protected, and
Job Buffer Size is not set to 100%.
Resource Save Specifies what the printer does with
downloaded resources, such as
fonts and macro s sto r ed in RAM , if
the printer receives a job that
requires more memory than is
available.
Factory Defaults Returns printer settings to the
factory default values.
*Off Printer does not store job statistics on
disk.
On Printer stores j ob statisti cs f or the most
recent print jobs.
*Off Printer retains downloaded resources
only until memory is needed. It then
deletes those resources asso ciated
with the inactive printer language.
On Printer retains all downloaded
resources for all printer languages
during language changes and printer
resets. If the printer runs out of
memory, 38 Memory Full appears.
*Do Not Restore User-defined settings remai n.
Restore • All menu items are returned to the
factory de fault values except:
– Display Language.
– All settings in the Parallel Menu,
Serial Menu, Network Menu, and
USB Menu.
• All downloaded resources (fonts,
macros, and symbol sets) in printer
memory (RAM) are deleted.
(Resources residing in flash
memory or on the hard disk are
unaffected.)
Finishing Menu
Use these menu items to define how the printer delivers the printed output.
Menu item Purpose Values
Duplex Sets duplex (two-sided) printing as
the default for all print jobs.
Note: Select Duplex from the
printer driver to duplex only specific
jobs.
On Pr ints on both sides of the paper.
*Off Prints on one side of the paper.
Menu Groups
19
Page 20

Using printer menus
Menu item Purpose Values
Duplex Bind Defines the way dupl ex ed page s are
bound, and how the printing on the
back of the sheet (even-numbered
pages) is oriented in relation to the
printing on the front (odd-numbered
pages).
*Long Edge
Assumes bindi ng along the long edge of the page (left ed ge f or
portrait orientation and top edge for landscape orientation).
The following illustration shows long-edge binding for portrait
and landscape pages:
Binding
Back of
sheet
Portrait
Short Edge
Assumes binding along the short edge of the page (top edge
for portrait orientatio n a nd l eft e dg e for landscape orie nta tion ).
The following illustration shows short-edge binding for portrait
and landscape pages:
Back of
sheet
Front of
next sheet
Binding
Binding
Back of sheet
Front of next
sheet
Landscape
Binding
Copies Sets the number of copies needed
for the printer default value.
Note: Set the number of copies
required for a specific job from the
printer driver.
Blank Pages Specifies whether to include
application-generated blank pages
as part of the printed output.
Back of
sheet
Front of
next sheet
Landscape
Portrait
1...999 (*1) Values selected from the printer driver
always override values selected from
the operator panel.
*Do Not Print Does not print application-generated
blank pages as part of the job.
Print Prints application-generated blank
pages as part of the job.
Front of
next sheet
Menu Groups
20
Page 21

Using printer menus
Menu item Purpose Values
Collation Keeps the pages of a print job
Separator Sheets Inserts blank separator sheets
Separator
Source
Multipage Print Prints multiple-page images on one
stacked in sequence when printing
multiple copies of the job.
between jobs, between multiple
copies of a job, or between each
page of a job.
Specifies the source that holds
separator sheets.
side of a sheet of pa per. This is also
called n-up or Paper Saver.
On Prints entire job the number of times
specified by the Copies menu item.
For example, if Copies is set to 2, and
three pages are sent to print, the
printer prints page 1, page 2, page 3,
page 1, page 2, page 3.
*Off Prints each page of a job the number
of times specified by the Copies menu
item. For e x ample, if Copi es is s et to 2,
and three pages are sent to print, the
printer prints page 1, page 1, page 2,
page 2, page 3, page 3.
*None Does not insert separator sheets.
Between Copies Inserts a blank sheet between each
copy of a job . If C ollation is Off , a b lank
page is inserted between each set of
printed pages (all page 1’s, all page
2’s, and so on). If Collation is On, a
blank page is inserted between each
collated copy of the job.
Between Jobs Inserts a blank sheet between jobs.
Between Pages Inserts a blank sheet between each
page of a job. This is useful when
printing transparencies or wanting to
insert blank pages in a document for
notes.
Tray <x> (*Tray 1) Selects separator sheets from the
specified tray.
MP Feeder Selects separator sheets from the
multipurpose feeder.
Note: Configure MP must be set to
Cassette.
*Off Prints 1 page image per side.
2 Up P rints 2 page images per si de.
3 Up P rints 3 page images per si de.
4 Up P rints 4 page images per si de.
6 Up P rints 6 page images per si de.
9 Up P rints 9 page images per si de.
12 Up Prints 12 page images per side.
16 Up Prints 16 page images per side.
Menu Groups
21
Page 22

Using printer menus
Menu item Purpose Values
Multipage Order Determines the positioning of
multiple page images when using
Multipage Print.
The positioning depends on the
number of images and whether the
images are portrait or landscape in
orientation.
For exa mp le, if selecting 4-Up m ul tip age print ing and p ortrait orienta tion , the results differ de pe ndi ng
on the Multipage Order value selected.
Horizontal
Order
21
43
Multipage View Determines the orientation of a
multiple-page sheet.
*Horizontal
Vertical
Rev Horizontal
Rev Vertical
Vertical
Order
31
42
*Auto Lets the printer choose between
Long Edge Sets the long edge of the medi a as the
Reverse
Horizontal Order
12
34
portrait and landscape orientation.
top of the page (landscape).
Reverse
Vertical Order
13
24
Short Edge Sets the short edge of the media as
Multipage Border Prints a border around each page
image when using Multipage Print.
*None Does not print a border around each
Solid Prints a solid line border around each
Quality Menu
Use these menu items to change settings that affect print quality and save toner.
Menu item Purpose Values
Print Mode To determine whether images are
printed in a monochrome grayscale
or in color.
*Color
Black Only
the top of the page (portrait).
page image.
page image.
Menu Groups
22
Page 23

Using printer menus
Menu item Purpose Values
Color Correction To adjust the printed color to better
match the colors of other output
devices or standard color systems.
Due to the differences between
additive and subtractive colors,
certain colors that appear on the
monitor are impossible to duplicate
on the printer.
Print Resolution To select printed output resolution. 1200 dpi Provides the highest resolution output
Toner Darkness To lighten or darken printed output,
or conserve toner.
*Auto Applies different color conversion
tables to each object on the printed
page, depending on the type of object
and how the col or for each object is
specified.
Off No color correction is implemented.
Manual Allows customization of the color
conversion tables applied to each
object on the printed page, depending
on the type of object and ho w the color
for each object is specified.
Customization is performed using the
selections available under the Manual
Color menu item.
which generates preferable output for
certain images and graphics. This
setting also provides increased gloss.
*4800 CQ Default setting.
1 Greatest reduction in toner
consumption.
2 Further reduction in toner
consumption.
3 Reduction in toner consumption.
4 Default setting.
5 If Print Mode is Black Only, a setting of
Color Saver To conserve toner in graphics and
RGB Brightness To assist in making brightness,
RGB Contrast *0, 1, 2, 3, 4, 5 5 i s maximum increase.
RGB Saturation *0, 1, 2, 3, 4, 5 5 is maximum incr ease.
images yet maintain high quality
text. The amount of toner used to
print graphics and images is
reduced; however, text is printed
with default toner us age. If sel ected,
this setting overrides Toner
Darkness settings. Color Saver is
not supported in PPDS, and partially
supported by the PCL emulation
driver.
contrast, and saturati on adjustments
to color output.
These functions do not affect files
where CMYK color specifications
are being used. See Frequently
asked questions (FAQ) about
color printing in the User’s Guide
on the publications CD for more
information on color specifications.
On
*Off
-6, -5, -4, -3, -2, -1,
*0, 1, 2, 3, 4, 5, 6
5 increases toner density a nd
darkness to all print jobs. If Print Mode
is Color, a setting of 5 is the same as
4.
-6 is maximum decrease.
6 is maximum increase.
Menu Groups
23
Page 24

Using printer menus
Menu item Purpose Values
Color Balance To provide users with the ability to
make subtle color adjustments to
printed output by increasing or
decreasing the amount of toner
being used for each color plane
individually.
Color Samples To assist use rs in s electi ng col ors to
be printed. Users can print color
samples pages for each of the RGB
and CMYK color conv ersion tables
used in the printer.
The color samples pages consist of
a series of colored boxes along wi th
the RGB or CMYK combination that
creates the color observed for each
particular box. These pages can be
useful in helping us ers decide w hich
RGB or CMYK combinations to use
in their software applications to
create the desired printed color
output.
The printer Embedded Web Server
(EWS) interface, which is only
available on network models, offers
users more flexibility. It lets users
access the printing of Deta iled Color
Samples.
Press to print the chosen color
sample.
Cyan -5, -4, -3, -2, -1, *0, 1, 2, 3, 4, 5
Magenta
Yellow
Black
Reset Defaults Sets values for Cyan, M agenta, Yellow ,
sRGB Display Prints RGB samples using
sRGB Vivid Prints RGB samples using sRGB Vivid
Display—True Black Prints RGB samples using
Vivid Prints RGB samples using Vivid color
Off—RGB Color conversion is implemented.
US CMYK Prints CMYK samples using US CMYK
Euro CMYK Prints CMYK samples using
Vivid CMYK Prints CMYK samples using
Off—CMYK No color conversion is implemented.
-5 is maximum decrease.
5 is maximum increase.
and Black to 0 (zero).
sRGB Display color conversion tables.
color conversion tables.
Display—True Black color conversion
tables.
conversion tables.
color conversion tables.
Euro CMYK color conversion tables.
Vivid CMYK color conversion tables.
Menu Groups
24
Page 25

Using printer menus
Menu item Purpose Values
Manual Color To let users customize the RGB or
CMYK color conversions applied to
each object on the printed page.
Color conversion of the data
specified using RGB combinations
can be customized based on object
type (text, graphics, or image).
Color Adjust Initiates a recalibration of printer
color conversion tables. This allows
the printer to make adjustments for
color variations in output that might
result from changeable conditions
such as room temperature and
humidity. Color adjustments are
based on printer internal al gorithms.
Color alignment is recalibrated also.
RGB Image Vivid: Applies a color con v ers ion tab le
RGB Text Vivid
RGB Graphics
CMYK Image
CMYK Text
CMYK Graphics
None Press to start this automatic
that produces brighter, m ore s aturated
colors.
*sRGB Display: Applies a color
convers ion tab le to produ ce output that
approxim ates the colors dis playe d on a
computer monitor.
Display — True Black: Applies color
convers ion tab le to produ ce output that
approxim ates the colors dis playe d on a
computer monitor while using only
black toner for neutral gray colors.
sRGB Vivid: Increases color
saturation for the sRGB Display color
conversion table. Preferred for
business graphics and text.
Off: No color conversion is
implemented.
sRGB Display
Display - True Black
*sRGB Vivid
Off
*US CMYK (country/region-specific
factory default values): Applies a color
conversion table to approximate
SWOP color output.
*Euro CMYK (country/region-specific
factory default values): Applies color
conversion table to approximate
EuroScale color output.
Vivid CMYK: Increases color
saturation for the US CMYK color
conversion table.
Off: No color conversion is
implemented.
adjustment. Calibrating appears on
the printer operator panel during this
process.
Enhance Fine
Lines
A selection to enable a print mode
preferab le for ce rtain files containing
fine line detail, such as ar ch ite ctu ra l
drawings, maps, electronic circuit
diagrams, and flow charts.
Enhance Fine Lines is not a menu
item. This setting is only available on
the PCL emulation driver or
PostScript driver or on the printer
Embedded Web Server.
Menu Groups
On In the driver, enable the check box.
*Off In the driver, disable the check box.
25
Page 26

Using printer menus
Utilities Menu
Use these menu items to change printer settings, remove jobs, set up printer hardware, and troubleshoot printer problems.
Menu item Purpose Values
Factory Defaults Returns printer settings to the
Remove Held
Jobs
Format Flash Formats the flash memory.
Defragment
Flash
factory default values.
Removes confidential and held jobs
from the printer hard disk.
Warning: Do not turn off the printer
while the flash is formatting.
Note: This menu item is only
displayed if a nondefective optional
flash memory card is in stalled and is
not write or read/write password
protected.
Retrieves lost storage area from
resources that were deleted from
flash memory.
Warning: Do not turn off the printer
while the flash is defragmenting.
Note: This menu item is only
displayed if a nondefective optional
flash memory card is in stalled and is
not write or read/write password
protected.
*Do Not Restore User-defined settings remain.
Restore Now All menu items are returned to the
Confidential
Held
Not Restored
All
Yes Deletes any data stored in flash
No Cancels the request to f ormat th e flash
Yes Transfers all resources stored in flash
No Cancels the request to defrag ment th e
factory default values except:
• Display Language.
• All settin gs in the Parallel Menu,
Serial Menu, Network Menu, and
USB Menu.
• Resourc es residing in flash memory
or on the hard disk.
Note: All downloaded resources
(fonts, macros, and symbol sets) in
printer memory (RAM) are deleted.
Selecting a v al ue on ly affects jobs that
are resident in the printer. Bookmarks,
jobs on USB flash memory devices,
and other types of held jobs are not
affected.
memory and prepares the flash
memory to receive new resources.
memory and leaves current resources
stored in flash memory.
memory to printer memory and then
reformats the optional flash memory.
When the format operation is
complete, the resources are loaded
back into flash memory.
flash memory.
Format Disk Formats the printer hard disk.
Warning: Do not turn off the printer
while the hard disk is formatting.
Note: This menu item is only
displayed if a nondefective optional
hard disk is install ed and is not write
or read/write password protected.
Job Acct Stat Prints a listing of all job statistics
stored on the hard dis k , or c lea rs a ll
statistics on the disk.
Note: This menu item is only
displayed if a nondefective optional
hard disk is install ed and is not write
or read/write password protected.
Yes Deletes any data stored on the hard
disk and prepares the devic e to
receive new resources.
No Cancels the request to format the hard
disk and leaves current resources
stored on the disk.
Print Prints all statistics available for the
most recent print jobs.
Clear Deletes all accumulated job statistics
from the hard disk.
Menu Groups
26
Page 27

Using printer menus
Menu item Purpose Values
Hex Trace Helps isolate the source of a print
Coverage
Estimator
LCD Contrast Adjusts the contrast of the operator
job problem.
Provides an estimate of the percent
coverage of cyan, magenta, yellow,
and black on a page. The estimate
is printed on a separator page.
panel display.
Activate With Hex Trace selected, all data sent
*Off Percent coverage is not printed.
On Prints the estimated percentage of
1 - 10 (*5) A higher value makes the display
PDF Menu
Use these menu items to change printer settings that affect PDF jobs.
Menu item Purpose Values
Scale to Fit Scales page content to fit the
selected media size.
Yes
*No
to the printer is printed in he xa dec im al
and character representation. Control
codes are not executed.
Note: To exit Hex Trace, turn the
printer off, or reset the printer:
1 Press .
2 Press until Reset
printer appears, and then press
.
coverage for each color on the page.
appear lighter; a lower value makes
the display appear darker.
Yes—Scales the page to fit the
selected media.
No—Does not scale the page ; printed
text or graphics are cropped if larger
than the selected media.
Annotations Specifies whether to print
annotations in the PDF.
*Do Not Print
Print
Do Not Print—Does not print PDF
annotations.
Print—Prints PDF annotations.
PostScript Menu
Use these menu items to change printer settings that affect jobs using the PostScript printer language.
Menu item Purpose Values
Print PS Error Prints a page defining the Po stScript
emulation error when an error
occurs.
Font Priority Establishes the font search order.
Note: Font Priority is only displayed
when a formatted flash or hard disk
is installed, is neither defective nor
Read/Write or Write protected, and
Job Buffer Size is not set to 100%.
On Prints an error message before it
discards the job.
*Off Discards the print job without printing
an error message.
*Resident Printer searches printer memory for
the requested font before searching
the flash memory or hard disk.
Flash/Disk Printer searches the hard disk and
flash memory for the requested font
before searching printer memory.
Menu Groups
27
Page 28

Using printer menus
Menu item Purpose Values
Image
Smoothing
Enhances the contrast and
sharpness of low-resolution
bitmapped images (such as images
downloaded from the World Wide
Web) and smooths their color
transitions.
Note: Image Smoothing has no
effect on images that are 300 dpi or
higher resolution.
On Enhances lo w res oluti on im ages , su ch
as graphics with a resolution of 72 dpi.
*Off Uses default resolution when printing
all images.
PCL Emul Menu
Use these menu items to change printer settings that affect jobs using the PCL emulation printer language.
Menu item Purpose Values
Font Source Determines the set of fonts
displayed in the Font Name menu
item.
*Resident Displays all fonts resident in printer
RAM when the p rinter ships from the
factory.
Disk Displays all fonts stored on the
printer hard disk.
Flash Displays all fonts stored in flash
memory.
Download Displays all fonts downloaded to
printer RAM.
All Displays all fonts available to the
printer from all sources.
Font Name Identifies a specific font from the
specified font source.
Symbol Set Determines the symbol set for a
specified font name.
*R0 Courier The font name and font ID f or all
*10U PC-8 (US)
(country/region-
specific factory default
values)
*12U PC-850 (non-US)
(country/region-
specific factory default
values)
fonts in the selected font source are
displayed. The font source
abbreviation is R for resident, F for
flash, K for disk, and D for download.
A symbol set is a set of alphabetic
and numeric char acters, punctuati on,
and special symbols used when
printing with a selected font. Symbol
sets support the different
requirements for languages or
specific applications, such as math
symbols for scien tifi c text. Only the
symbol sets supported for the
selected font name are displayed.
Menu Groups
28
Page 29

Using printer menus
Menu item Purpose Values
PCL Emulation
Settings
Changes the point size for scalable
typographic fonts.
Specifies the font pitch for scalable
monospaced fonts.
Determines how text and graphics
are oriented on the page.
Determines the number of li nes t hat
print on each page.
Sets the width of the logical pa ge f or
A4 size paper.
Point Size:
1.00–1008.00 (*12)
Pitch:
0.08–100.00 (*10)
Orientation:
*Portrait
Landscape
Lines per Page:
1–255
*60 (US)
*64 (non-US)
A4 Width:
*198 mm
203 mm
Point size refers to the height of the
characters in the font. One point
equals approximately 1/72 of an
inch. Point sizes from 1 to 1008 in
increments of 0.25 points can be
selected.
Note: Point Size is only displ a y ed f o r
typographic fonts.
Pitch refers to the number of fixedspace characters in a horiz onta l inch
of type. A pitch from 0.08 to 100
characters per inch (cpi) in
increments of 0.01 cpi can be
selected. For nonscalable
monospaced fonts, the pitch is
displayed but cannot be changed.
Note: Pitch is only displayed for
fixed, or monospaced, fonts.
Portrait prints text and graphics
parallel to the short edge of the
paper.
Landscape prints text and graphics
parallel to the l ong edge of the paper.
The printer sets the amou nt of s pace
between each line (vertical line
spacing) based on the Lines per
Page, Paper Size, and Orientation
menu items. Select the correct Paper
Size and Orientation before changin g
Lines per Page.
Note: The 203 mm setting makes
the logical page wide e nou gh to p rint
eighty 10-pitch characters.
Specifies whether the printer
automatically performs a carriage
return after a line feed control
command.
Specifies whether the printer
automatically performs a line feed
after a carriage return control
command.
Auto CR after LF:
On
*Off
Auto LF after CR:
On
*Off
Menu Groups
29
Off—Printer does not perform a
carriage return after a line feed
control command.
On—Printer performs a carriage
return after a line feed control
command.
Off—Printer does not perform a line
feed after a carriage return control
command.
On—Printer performs a line feed
after a carriage return control
command.
Page 30

Using printer menus
Menu item Purpose Values
Tray Renumber Configures the printer to work with
printer drivers or applications that
use different s ource assignments for
the sources: trays, multipurpose
feeder, and the manual feed slot.
Note: See the Technical Reference
for more information about
assigning source numbers.
Assign MP Feeder:
*Off
None
0–199
Assign Tray [x]:
*Off
None
0–199
Assign Manual Paper:
*Off
None
0–199
Assign Man Env:
*Off
None
0–199
View Factory Def Displays the factory default value
Off—Printer uses factory default
source assignments.
None—Source ignores the Select
Paper Feed command.
0–199—Select a numeric value to
assign a custom value to a source.
Off—Printer uses factory default
source assignments.
None—Source ignores the Select
Paper Feed command.
0–199—Select a numeric value to
assign a custom value to a source.
Off—Printer uses factory default
source assignments.
None—Source ignores the Select
Paper Feed command.
0–199—Select a numeric value to
assign a custom value to a source.
Off—Printer uses factory default
source assignments.
None—Source ignores the Select
Paper Feed command.
0–199—Select a numeric value to
assign a custom value to a source.
assigned to each source.
Restore Defaults:
Yes
No
Select Yes to return all source
assignments to factory default
values.
Menu Groups
30
Page 31

Using printer menus
HTML Menu
These menu items are used to change the printer HTML settings.
Menu item Purpose Values
Font Name Sets the default font for HTML
documents.
Note: Times will be used in HTML
documents that do not specify a
font.
Font Size Sets the default font size for HTML
documents.
Scale Scales the default font for HTML
documents.
Orientation Sets the page orientation for HTML
documents.
Margin Size Sets the page margin for HTML
documents.
Albertus MT
Antique Olive
Apple Chancery
Arial MT
Avant Garde
Bodoni
Bookman
Chicago
Clarendon
Cooper Black
Copperplate
Coronet
Courier
Eurostile
Garamond
Geneva
Gill Sans
Goudy
Helvetica
Hoefler Text
1 pt–255 pt (*12 pt) Select point sizes from 1 to 255 points
1%–400% (*100%) Select scale sizes from 1 to 400% in
*Portrait
Landscape
8 mm–255 mm
(*19 mm)
Intl CG Times
Intl Courier
Intl Univers
Joanna MT
Letter Gothic
Lubalin Graph
Marigold
MonaLisa Recut
Monaco
New CenturySbk
New York
Optima
Oxford
Palatino
StempelGaramnd
Taffy
Times
TimesNewRoman
Univers
Zapf Chancery
in 1 point increments.
1% increments.
Portrait—Prints text and graphics
parallel to the short edge of the paper.
Landscape—Prints text and graphics
parallel to the long edge of the paper.
Set the margin from 8 to 255 mm in
1 mm increments.
Backgrounds Specifies whether to print
backgrounds in HTML documents.
Do Not Print
*Print
Do Not Print—Does not print HTML
backgrounds.
Print—Prints HTML backgrounds.
Image Menu
These menu items are used to change the size or orientation of a printed image, or to invert a printed image.
Menu item Purpose Values
Auto Fit Selects optimal paper size, scaling,
and orientation.
Invert Inverts bi-tonal monochrome
images.
*On
Off
On
*Off
Menu Groups
31
Note: When set to On, this setting
overrides the scaling setting and can
override the orientation setti ng for
some images.
Note: Does not apply to GIF or JPEG.
Page 32

Using printer menus
Menu item Purpose Values
Scaling Scales the image to fit media size. Anchor Top Left
*Best Fit
Anchor Center
Fit Height / Width
Fit Height
Fit Width
Orientation Sets the image orientation. *Portrait
Landscape
Rev Portrait
Rev Landscape
Note: When the Auto Fit setting is set
to On, Scaling is automatically set to
Best Fit.
Portrait—Prints text and graphics
parallel to the short edge of the paper.
Landscape—Prints text and graphics
parallel to the long edge of the paper.
Security
These menu items are used to set security levels on individual print jobs requiring a PIN and securing an installed hard
disk.
Menu item Purpose Values
Max Invalid PIN Limits the number of times an inv alid
pin number can be entered.
*Off
2
3
4
5
6
7
8
9
10
• This menu item only appears if an
optional hard disk is installed.
• The printer counts the number of
times in a row an invalid pin for a
user name is entered.
• Once the limit is reached, the jobs
for that user name based on this
PIN are deleted.
Job Expiration Limits the amount of time a
confidential job stays in the printer
before it is deleted.
*Off
1 hour
4 hours
24 hours
1 week
Menu Groups
32
Page 33

Using printer menus
Network/Ports
TCP/IP
This menu item is used to view and change the Transmission Control Protocol/Internet Protocol settings.
Note: This menu item is not displayed for non-network models.
Menu item Purpose Values
TCP/IP Sets the network option to
TCP/IP (Transmission Control
Protocol/Internet Protocol)
Note: This menu item is not
displayed for non-network
models.
Activate *On
View Hostname View only
Address 4 field IP address
Netmask
Gateway
Enable DHCP *On
Enable RARP
Enable BOOTP
AutoIP
Enable FTP/TFTP
HTTP Server Enabled
WINS Server Address 4 field IP address
DNS Server Address
IPv6
Use this menu item to view or change Internet Protocol Version 6 settings.
Off
Off
Note: This menu item is not displayed for non-network models.
Menu item Purpose Values
IPv6 Sets the network to IPv6 (Internet
Protocol Version 6).
Enable IPv6 *On
View Hostname View only
View Address
View Router Address
Enable DHCPv6 *On
Menu Groups
33
Off
Off
Page 34

Using printer menus
Standard Network and Network <x>
Use these menu items to change printer settings affecting jobs sent to the printer through a network port (either Standard
Network or Network <x>).
Menu item Purpose Values
PCL
SmartSwitch
PS SmartSwitch Configures the printer so it
NPA Mode Specifies whether the printer
Network Buffer Configures the size of the network
Configures the printer so it
automatically switches to
PCL emulation when a print job
received through the network port
requires it, regardless of the default
printer language.
automatically switches to
PostScript emulation when a print
job received through the network
port requires it, regardless of the
default printer language.
performs the special processing
required for bidirectional
communication, following the
conventions defined in the Network
Printing Alliance (NPA) Protocol.
Note: Changing this menu item
automatically resets the printer.
input buffer.
Note: Changing the Network Buffer
menu item automatically resets the
printer.
*On Printer examines data on the network
Off Printer does not exami ne the i ncoming
*On Printer examines data on the network
Off Printer does not exami ne the i ncoming
Off Printer does not perform NPA
*Auto Printer examines the data to
*Auto Printer automatically calculates the
3K to maximum
size allowed
(1K increments)
interface and selects PCL emulation if
the data indicates that is the required
printer language.
data. The printer uses Po stSc ript
emulation to process the job if PS
SmartSwitch is On, or uses the default
printer language specified in the
Setup Menu if PS SmartSwitch is Off.
interface connection and selects
PostScriptemulation if the data
indicates that is the required printer
language.
data. The printer uses PCL emulation
to process the job if PCL SmartSwitch
is On, or uses the default printer
language specifie d in the Setup Menu
if PCL SmartSwitch is Off.
processing.
determine the format and then
processes it appropriately.
Network Buffer size (recommended
setting).
User specifies the Network Buffer size.
The maximum size depends on the
amount of memory in the printer, the
size of the other link buffers, and
whether Resource Save is set to On or
Off. To maximize the range for the
Network Buffer si z e, disable or reduce
the size of the p arallel, serial, and USB
buffers.
Job Buffering Temporarily stores jobs on the
printer hard disk before printing.
Note: Changing this menu item
automatically resets the printer.
*Off Does not buffer jobs to the hard disk.
On Buffers print jobs to the hard disk.
Auto Buffers print jobs only if the printer is
busy processing data from another
input port.
Menu Groups
34
Page 35

Using printer menus
Menu item Purpose Values
Mac Binary PS Configures the printer to process
Macintosh binary PostScript print
jobs.
On Printer processes raw binary
PostScript print jobs from computers
using the Macintosh operating system.
Note: This setting often causes
Windows print jobs to fail.
Off Printer filters PostScript print jobs
using standard protocol.
*Auto Printer proces ses print jobs from
computers using either Win do w s or
Macintosh operating systems.
Standard USB and USB <x>
Use these menu items to change printer settings affecting a Universal Serial Bus (USB) port (USB <x>).
Menu item Purpose Values
PCL
SmartSwitch
Configures the printer so it
automatically switches to
PCL emulation when a print job
received through the USB port
requires it, regardless of the default
printer language.
*On Printer examines the data on the USB
port and selects PCL emulation if the
data indicates that is the required
printer language.
Off Printer does not e xamin e the incom ing
data. The printer uses
PostScript emulation to process the
job if PS SmartSwitch is On, or uses
the default printer language specified
in the Setup Menu if PS SmartSwitch
is Off.
PS SmartSwitch Configures the printer so it
automatically switches to
PostScript emulation when a print
job received through the USB port
requires it, regardless of the default
printer language.
NPA Mode Specifies whether the printer
performs the special processing
required for bidirectional
communication, following the
conventions defined in the Network
Printing Alliance (NPA) Protocol.
Note: Changing this menu item
automatically resets the printer.
*On Printer examines data on the USB
interface and selects
PostScript emulation if the data
indicates that is the required printer
language.
Off Printer does not e xamin e the incom ing
data. The printer uses PCLemulation
to process the job if PCL SmartSwitch
is On, or uses the default printer
language specified in the Setup Menu
if PCL SmartSwitch is Off.
On Printer performs NPA processing. If
data is not in NPA format, it is rejected
as bad data.
Off Printer does not perform NPA
processing.
*Auto Printer examines the data to determine
the format and then processes it
appropriately.
Menu Groups
35
Page 36

Using printer menus
Menu item Purpose Values
USB Buffer Configures the size of the USB input
buffer.
Note: Changing the USB Buffer
menu item automatically resets the
printer.
Job Buffering Temporarily stores jobs on the
printer hard disk before printing.
Note: Changing the Job Buffering
menu item automatically resets the
printer.
Mac Binary PS Configures the printer to process
Macintosh binary PostScript print
jobs.
Disabled Job buffering is disabled. Any jobs
*Auto Printer automatically calculates the
3K to maximum size
allowed
(1K increm ents)
*Off Does not buffer print jobs to the hard
On Buffers print jobs to the hard disk.
Auto Buffers print jobs only if the printer is
On Printer filters PostScript print jobs
Off Printer processes raw binary
*Auto Printer processes print jobs from
already buffered on the disk are
printed before normal processing of
incoming jobs resumes.
USB Buffer size (recommended
setting).
The user specifies the USB Buffer
size. The maximum size depends on
the amount of memory in the printer,
the size of the other link buffers, and
whether Resource Save is set to On or
Off. To maximize the rang e for the USB
Buffer size, disable or reduce the size
of the parallel, serial, and network
buffers.
disk.
busy processing data from another
input port.
using standard protocol.
PostScript print jobs from computers
using the Macintosh operating system.
Note: This setting often causes
Windows print jobs to fail.
computers using either Windows or
Macintosh operatin g system s.
ENA Address Sets the USB port ENA Address. 4 field IP address Shown only if an ENA is attached
ENA Netmask Sets the USB port ENA Netmask.
ENA Gateway Sets the USB port ENA Gateway.
through the USB port.
Parallel and Parallel <x>
Use these men u ite ms to c ha nge printe r s etti ng s affecting jobs sent to the printer through a pa rallel port (either Std Parallel
or Parallel <x>).
Menu item Purpose Values
PCL
SmartSwitch
Configures the printer so it
automatically switches to
PCL emulation when a print job
received throu gh the par a llel port
requires it, regardless of the default
printer language.
Menu Groups
*On Printer examines data on the par al le l
interface and selects PCL emulation if
the data indicates that is the required
printer language.
Off Printer does not examine the in coming
data. The printer uses PostScript
emulation to process the j ob if PS
SmartSwitch is On, or uses the default
printer language specified in the
Setup Menu if PS SmartSwitch is Off.
36
Page 37

Using printer menus
Menu item Purpose Values
PS SmartSwitch Configures the printer so it
automatically switches to PostScript
emulation when a print job received
through the parallel port requires it,
regardless of the default printer
language.
NPA Mode Specifies whether the printer
performs the special proces si ng
required for bidirectional
communication, following the
conventions defined in the Network
Printing Alliance (NPA) Protocol.
Note: Changing this menu item
automatically resets the printer.
Parallel Buffer Configures the size of the parallel
input buffer.
Note: Changing this menu item
automatically resets the printer.
*On Printer examines data on the par al le l
Off Printer does not examine the in coming
On Printer performs NPA processing. If
Off Printer does not perform NPA
*Auto Printer examine s data, de termines the
Disabled Disables job buffering. Any jobs
*Auto Printer automatically calculates the
3K to maximum
size allowed
(1K increments)
interface and selects PostScript
emulation if the data indicates that is
the required printer language.
data. The printer uses PCL emulation
to process the job if PCL SmartSwitch
is On, or uses the default printer
language specif ied in the Setup Menu
if PCL SmartSwitch is Off.
data is not in NPA format, it is rejected
as bad data.
processing.
format, and then processes it
appropriately.
already buffered on the disk are
printed before normal processing of
incoming jobs resumes.
Parallel Buffer size (recommended
setting).
The user specifies the Parallel Buffer
size. The maximum size depends on
the amount of memory in the printer,
the size of the other link buffers, and
whether Resource Sa ve is set to On or
Off. To maximize the range for the
Parallel Buffer size, disable or reduce
the size of the serial and USB buffers.
Job Buffering Temporarily stores jobs on the
printer hard disk before printing.
Note: Changing this menu item
automatically resets the printer.
Advanced Status Enables bidirectional
communication through the parallel
port.
Protocol Specifies the parallel interface
protocol.
*Off Does not buffer print jobs to the hard
disk.
On Buffers print jobs to the hard disk.
Auto Buffers print jobs only if the printer is
busy processing data from another
input port.
Off Disables parallel port negotiation.
*On Enables bidirectional communication
through the parallel interface.
Standard May resolve some parallel interface
problems.
*Fastbytes Provides compatibility with most
existing parallel interface
implementations (recommended
setting).
Menu Groups
37
Page 38

Using printer menus
Menu item Purpose Values
Honor Init Determines whether the printer
honors hardware initialization
requests from the computer. The
computer requests initialization by
activating the INIT signal on the
parallel interface. Many personal
computers activate the INIT signal
each time the comp uter is turned on
and off.
Parallel Mode 2 Determines whether the parallel
port data is sampled on the leading
or trailing edge of strobe.
Mac Binary PS Configures the printer to process
Macintosh binary PostScript print
jobs.
Serial and Serial <x>
*Off Printer does not honor hardware
initialization requests from the
computer.
On Printer honors hardware initialization
requests from the computer.
*On Samples parallel port data on the
leading edge of strobe.
Off Samples parallel port data on the
trailing edge of strobe.
On Printer processes raw binary
PostScript print jobs from computers
using the Macintosh operating system.
Note: This setting often causes
Windows pr int jobs to fail.
Off Printer filters PostScript print jobs
using standard protocol.
*Auto Printer processes print jobs from
computers using either Windows or
Macintosh operatin g sys te ms.
Use these menu items to change printer settings affecting jobs sent to the printer through an optional serial port.
Menu item Purpose Values
PCL
SmartSwitch
PS SmartSwitch Configures the printer so it
Configures the printer so it
automatically switches to PCL
emulation when a print job received
through the serial port requires it,
regardless of the default printer
language.
automatically s witche s to P ostScript
emulation when a print job received
through the serial port requires it,
regardless of the default printer
language.
*On
Off
*On
Off
On—The printer examines the data at
the serial interface and selects PCL
emulation if the data indicates that is
the required printer language.
Off—The printer does not e xamine th e
incoming data. The printer uses
PostScript emulation to process the
job if PS SmartSwitch is On, or uses
the default printer language specified
in the Setup Menu if PS SmartSwitch
is Off.
On—The printer examines the data at
the serial interface and selects
PostScript emulation if the data
indicates that is the required printer
language.
Off—The printer does not e xamine th e
incoming data. The printer uses PCL
emulation to process the job if PCL
SmartSwitch is On, or uses the default
printer language specified in the
Setup Menu if PCL SmartSwitch is Off.
Menu Groups
38
Page 39

Using printer menus
Menu item Purpose Values
NPA Mode Specifies whether the printer
performs the special processing
required for bidirectional
communication, following the
conventions defined in the Network
Printing Alliance (NPA) Protocol.
Note: Changing this menu item
automatically resets the printer.
Serial Buffer Configures the size of the serial
input buffer.
Note: Changing the Serial Buffer
menu item automatically resets the
printer.
Job Buffering Temporarily stores jobs on the
printer hard disk before printing.
Note: Changing the Job Buffering
menu item automatically resets the
printer.
On Printer performs NPA processing. If
Off Printer does not perform NPA
*Auto Printer examines the data to
Disabled Disables job buffering. Any jobs
*Auto Printer automatically calculates the
3K to maximum
size allowed
(1K increments)
*Off Does not buffer print jobs to the hard
On Buffers print jobs to the hard disk.
Auto Buffers print jobs only if the printer is
data is not in NPA format, it is rejected
as bad data.
processing.
determine the format and then
processes it appropriately.
already buff e red on the disk are
printed before normal processing of
incoming jobs resumes.
Serial Buffer size (recommended
setting).
User specifies the Serial Buffer size.
The maximum size depends on the
amount of memory in the printer, the
size of the other link buffers, and
whether Resource Save is set to On or
Off. To maximize the range for the
Serial Buffer size, dis able or reduce
the size of the parallel and USB
buffers.
disk.
busy processing data from another
input port.
Serial Protocol Selects the hardware and software
handshaking values for the serial
interface.
Robust XON Deter mines whether the printer
communicates availability to the
computer.
This menu item only applies to the
serial port if Serial Protocol is set to
XON/XOFF.
*DTR Hardware handshaking.
DTR/DSR Hardware handshaking.
XON/XOFF Software handshaking.
XON/XOFF/DTR Combined hardware and software
handshaking.
XONXOFF/DTRDSR Combined hardware and software
handshaking.
*Off Printer waits to receive data from the
computer.
On Printer sends a continuous stream of
XONs to the host computer to indicat e
that the serial port is ready to receive
more data.
Menu Groups
39
Page 40

Using printer menus
Menu item Purpose Values
Baud Specifies the rate at which data can
be received through the serial port.
Note: 138200, 172800, 230400,
and 345600 baud rates are
displayed in the Standard Serial
menu. These values are not
displayed in the Serial Option 1,
Serial Option 2, or Serial Option 3
menus.
Data Bits Specifies the number of data bits
that are sent in each transmission
frame.
Parity Sets the parity for serial input and
output data frames.
1200
2400
4800
*9600
19200
38400
57600
115200
138200
172800
230400
345600
7
*8
Even
Odd
*None
Ignore
Honor DSR Determines whether the printer
uses the Data Set Ready (DSR)
signal. DSR is one of the
handshaking signals for most serial
interface cabl es.
The serial interface uses DSR to
distinguish data sent by the
computer from data created by
electrical noise in the serial cable.
This electrical noise can cause stray
characters to print. Select On to
prevent stray characters from
printing.
*Off All data received by the serial port is
On Only data received while the DSR
NetWare
Use these menu items to view or change the printer NetWare settings.
Menu item Purpose Values
View Login
Name
View Print Mode Displays the assigned NetWare
View Network
Number
Displays the assigned NetWare
login name.
print mode.
Displays the assigned NetWare
number.
Selecting View Login Name displays the NetWare name on
the operator panel.
Selecting View Print Mode displays the NetWare print mode
on the operator panel.
Selecting View Network Number displays the NetWare
network number on the operator panel.
treated as valid data.
signal is high is treated as valid.
Menu Groups
40
Page 41

Using printer menus
Menu item Purpose Values
Activate Activates or deactivates the
NetWare feature.
Ethernet 802.2 Sets the Ethernet 802.2 value On or
Off.
Ethernet 802.3 Sets the Ethernet 802.3 value On or
Off.
Ethernet Type II Sets the Ethernet Type II value On
or Off.
Ethernet SNAP Sets the Ethernet SNAP value On
or Off.
Packet Burst Sets the Packet Burst value On or
Off.
NSQ/GSQ Mode Sets the NSQ/GSQ Mode value On
or Off.
Off
*On
*On
Off
*On
Off
*On
Off
*On
Off
On
*Off
On
*Off
AppleTalk
Use these menu items to view or change the printer AppleTalk settings.
Menu item Purpose Values
View Name Displays the assigned AppleTalk
name.
Selecting View Name displays the AppleTalk name on the
operator panel.
Off—Deactivates the NetWare
feature.
On—Activates the NetWare feature.
View Address Displays the assigned AppleTalk
address.
Activate Activates or deactivates the
AppleTalk feature.
*Set Zone Provides a list of zones from
network.
Selecting View Address displays the AppleTalk address on
the operator panel.
Off
*On
The default is default zone for the network. If no default zone
exists on the network, the * is the default.
LexLink
Use these menu items to view the LexLink name or change the LexLink activation.
Menu item Purpose Values
View Nickname Displays the assigned LexLink
nickname.
Activate Activates or deacti vates the Le xLink
feature.
Selecting View Nickname displays the LexLink nickname on
the operato r panel.
*On
Off
Off—Deactivates the AppleTalk
feature.
On—Activates the AppleTa lk feature.
On—Activates the LexLink feature .
Off—Deactivates the LexLink feature.
Menu Groups
41
Page 42

Using printer menus
Help
These menu items are used to print some or all of the resident Help menu pages. These pages contain information about
printer connectivity, print quality, paper tips, and supplies.
Note: If the operator panel is set to a language other than English, French, German, or Spanish, the
document prints in English.
The Help menu pages can be printed in the following languages from the publications CD.
English Spanish Swedish Polish
French Danish Portuguese Korean
German Norwegian Finnish Traditional Chinese
Italian Dutch Russian Simplified Chinese
Menu item Purpose Values
Print All Prints all Help menu topics. After selecting this item, the Help menu pages print, and the
Color Quality Prints the Color Quality topic. After selecting this item, the Help menu topic prints, and the
Print Quality Prints the Print Quality topic.
Printing Guide Prints the Printing Guide topic.
Supplies Guide Prints the Supplies Guide topic.
Media Guide Prints the Media Guide topic.
Print Defects Prints the Print Defects sheet.
Menu Map Prints the Menu Map topic.
Information
Guide
Connection
Guide
Moving Guide Prints the Moving Guide help
Prints the Information Guide
topic.
Prints the Connection Guide
topic.
menu topic .
printer returns to Ready.
printer returns to Ready.
Menu Groups
42
Page 43

2
Understanding printer messages
The printer operator panel displays messages describing the current state of the printer and indicates possible printer
problems requ iring interv ention . Thi s topic pr o vide s a list of a ll print er messag es , e xp lains what the y m ean, an d tells ho w to
clear the messages.
The following table lists the messages in alphanumerical order.
Message Action
Activating Menu Changes Wait for the message to clear.
Busy Wait for the message to clear, or cancel the print job.
Calibrating Wait for the message to clear.
Cancel not available Wait for the message to clear.
Canceling Wait for the message to clear.
Change <src> to <Custom Type Name> • Press until Continue appears, and then press if the
Change <src> to <Custom String>
Change <src> to <size>
Change <src> to <type> <size>
media was changed.
• Press until Use current appears, and then press to
print on media currently in the printer.
• Cancel the current job.
• Access the printer Show me.
Clearing job accounting statistics Wait fo r the message to clear.
Close lower door. Close upper door. Close the upper and lower doors to clear the message.
Copies Enter the desired number of copies.
Defragmenting Flash
DO NOT POWER OFF
Delete • Press until Continue appears, and then press to de le te
Delete all • Press until Continue appears, and then press to de le te
Delete all confidential jobs • Press until Continue appears, and then press to delete
Deleting Wait for the message to clear.
Disabling DLEs Wait for the message to clear.
Disabling Menus Wait for the message to clear.
Warning: Do not turn the printer off while this message is displayed.
Wait for the message to clear.
the specified job.
• Press to cancel the operation.
all confidential jobs.
• Press to cancel the operation.
all held jobs.
• Press to cancel the operation.
Note: While the menus are disabled, printer settings from the operator
panel cannot be changed.
Understanding printer messages
43
Page 44

Understanding printer messages
Message Action
Disk corrupted The printer has attempted a disk recovery process, and cannot repair
Disk Recovery x/5 yyy%
DO NOT POWER OFF
Enabling Menus Wait for the message to clear.
Encrypting Disk yyy%
DO NOT POWER OFF
Enter PIN Enter the PIN specified in the driver when the confidential job was sent
Enter PIN to lock Enter the correct PIN number to lock the operator panel and prevent
Flushing buffer Wait for the message to clear.
Formatting Disk yyy%
DO NOT POWER OFF
Formatting Flash
DO NOT POWER OFF
Insert Tray <x> Insert the specified tray.
the disk.
Reformat appears. Press to reformat the disk and delete all
files currently stored on the disk.
Warning: Do not turn the printer off while this message is displayed.
The printer is attempting to recover the hard disk. Disk recovery takes
place in five phas es; the oper ator pan el displa ys the percent com plete of
the current phase.
Wait for the message to clear.
Warning: Do not turn the printer off while this message is displayed.
The printer is encrypting the hard disk. The percent complete is
displayed.
Wait for the message to clear.
to the printer.
menu changes.
Warning: Do not turn the printer off while this message is displayed.
The printer is formatting the hard disk. The percent complete is
displayed.
Wait for the message to clear.
Warning: Do not turn the printer off while this message is displayed.
Wait for the message to clear.
Internal System Error
Reload Bookmarks
Internal System Error, Reload
Security Certificates
Invalid Network Code Download valid code to the MarkNet N8000 Series internal print server.
Invalid Engine Code Download valid engine code to the printer.
Invalid PIN Enter the correct PIN.
Load Manual feeder with
<Custom Type Name>
Load Manual feeder with
<Custom String>
Load Manual feeder with <size>
Load Manual feeder with
<size> <type>
• Reload the Bookmarks.
• Press until Continue appears, and then press to clear
the message and continue printing.
• Reload the Security Certificates.
• Press until Continue appears, and then press to clear
the message and continue printing.
Note: Network code may be downloaded while this mes sa ge is
displayed.
Note: Engine code may be dow nl oa ded w hi le thi s me ss age is displa yed.
• Load the specified media in the manual feed slot or multipurpose
feeder.
• Press until Continue appears, and then pr ess to ignore
the manual f eed re quest and print on med ia alread y instal led in one of
the sources.
If the printer finds a tray that ha s m ed ia of t he correct type and si z e, it
feeds media from that tray. If the printer cannot find a tray with the
correct media type and siz e, it prints on whatever media i s insta lled in
the default source.
• Cancel the current job.
Understanding printer messages
44
Page 45

Understanding printer messages
Message Action
Load <src> with <Custom Type Name> • Load the source with the correct type and size media.
Load <src> with <Custom String>
Load <src> with <size>
Load <src> with <type> <size>
Menus are Disabled The printer menus are dis abled. The printer sett ing s can not be changed
Network A network interface is the active communication link.
Network <x>
No held jobs Wait for the message to clear.
No jobs found Note: The four-digit personal identification number (PIN) entered is not
No jobs to cancel Wait for the message to clear.
Parallel A parallel interface is the active communication link.
Parallel <x>
• Cancel the current job.
from the operator panel.
Note: It is possible to cancel a job , print a c onfide ntial jo b, or print a held
job.
Contact your system support person.
associated with any confidential print job.
• Press until Try again appears , and the n press to enter
another PIN.
• Press until Cancel appears, and then press to exit the
Enter PIN screen.
Power Saver • Send a job to print.
Printer locked, enter PIN to unlock The operator panel is locked.
Printing Wait for the message to clear.
Programming Disk
DO NOT POWER OFF
Programming Flash
DO NOT POWER OFF
Programming System Code
DO NOT POWER OFF
Ready Send a job t o print.
Remote Management Active
DO NOT POWER OFF
• Press to warm the printer to normal operating temperature and
display the Ready message.
Enter the correct PIN number to unlock it.
Warning: Do not turn the printer off while this message is displayed.
Wait for the message to clear.
Warning: Do not turn the printer off while this message is displayed.
Wait for the message to clear.
Warning: Do not turn the printer off while this message is displayed.
Wait for the message to clear and the printer to reset.
The printer settings are being configured, and the printer was taken
offline to ensure it is not currently printing and processing jobs.
Warning: Do not turn the printer off while this message is displayed.
Wait for the message to clear.
Understanding printer messages
45
Page 46

Understanding printer messages
Message Action
Remove all color supplies The printer is set to Black Only mode in the CONFIG MENU in the Print
Remove paper from standard output
bin
Resetting Fuser Count Wait for the message to clear.
Resetting the Printer Wait for the message to clear.
Restore Held Jobs? • Press until Continue appears, and then press to restore
Restoring Factory Defaults Wait for the message to clear.
Restoring Held Job(s) x/y • Wait for the message to clear.
Serial <x> A serial interface is the active communication link.
Mode menu item.
• Remove all color toner cartridges and color photoconductor units.
• Press until Continue appears, and then press to clear
the message and print in Black Only mode.
• Cancel the current job.
• See the User’s Guide for more information.
Remove the media from the standard bin.
all Print and Hold jobs on the hard disk.
• Press until Do not restore appears, and then press
to delete Print and Hold jobs.
Note: When factory default settings are restored:
• All downloaded resources (fonts, macros, symbol sets) in the printer
memory are deleted.
• All menu settings return to the factory default setting except:
– The Display Language setting in the “Setup” Menu.
– All settings in the “Parallel” Menu, “Serial” Menu, “Network” Menu ,
“Infrared” Menu, “LocalTalk” Menu, “USB” Menu, and “Fax” Menu.
• Press until Quit restoring appears, and then press to
delete unrestored Print and Hold jobs.
Note: x represents the number of the job being restored, and y
represen ts the total number of jobs to be restored.
Setup Required Remove the packing material from the printer. Make sure all supplies,
Some held jobs were lost • Press until Continue appears, and then press to clear
Standard Bin Full Remove the stack of media from the bin to clear the message.
Submitting selection Wait for the message to clear.
Tray <x> Empty Load media in the tray to clear the message.
Tray <x> Low Add media to the tray to clear the message.
Tray <x> Missing Insert the tray.
USB The printer is processing data through the specified USB port.
USB <x>
View supplies Displays the current level of all printer supplies.
the fuser, the transfer belt, and the trays are installed correctly.
the message and continue printing.
The printer frees memory by deleting the oldest held job and
continues deleting held jobs until there is enough printer memory to
process th e job.
• Cancel the current job.
Understanding printer messages
46
Page 47

Understanding printer messages
Message Action
Waiting The printer has receiv ed a pa ge of dat a to print, b u t is w aiting f or an End
1565 Emul Error Load Emul Option The printer automatically clears the message in 30 seconds, and then
31 Missing or defective <color>
cartridge
32 Replace unsupported <color>
cartridge
34 Incorrect media • Load the appropriate media in the selected source.
34 Short Paper • Press until Continue appears, and then press to clear
of Job command, a Form Feed command, or additional data.
• Press to print the contents of the buffer.
• Cancel the current job.
disables the download emulator on the firmware card.
Download the co rrect down load em ulator v ersion from the Le xmark W eb
site.
Remove the specified toner cartridge, and then place it in the correct
position.
Remove the toner cartridge, and install a supported one.
• Press until Continue appears, and then press to clear
the message and print the job using a different paper source.
the message and continue printing.
The printer does not automatically reprint the page that promp ted the
message.
• Check tray length and width guides to ensure media is properly fitted.
• Make sure the print job is requesting the correct size of media.
• Adjust the Paper Size setting for the size media being used.
If MP Feeder Size is set to Universal, make sure the media is large
enough for the formatted data.
• Cancel the current job.
35 Insufficient memory to support
Resource Save feature
37 Insufficient memory to collate
job
37 Insufficient memory for Flash
Memory Defragment operation
37 Insufficient memory, some held
jobs were deleted
37 Insufficient memory, some held
jobs were lost
38 Memory Full • Press until Continue appears, and then press to clear
• Press until Continue appears, and then press to disa ble
Resource Save and continue printing.
• To enable Resource Save after receiving this message:
– Make sure the link buffers are set to Auto, then exit the menus to
activate the link buffer changes.
– When Ready is displayed, enable Resource Save.
• Install additional memory.
• Press until Continue appears, and then press to print
the portion of the job already store d and b egin c ollat ing the rest o f the
job.
• Cancel the current job.
• Press until Continue appears, and then press to stop
the defragment operation and continue printing.
• Delete fonts, macros, and other data in printer memory.
• Instal l additional printer memory.
The printer deleted some held jobs in order to process current jobs.
Press until Continue appears, and then press to clear th e
message.
The printer was unable to restore some or all of the confidential or held
jobs on the hard disk.
Press until Continue appears, and then press to clear th e
message.
the message and continue printing.
The job may not print correctly.
• Cancel the current job.
• Instal l additional printer memory.
Understanding printer messages
47
Page 48

Understanding printer messages
Message Action
39 Page is too complex to print • Press until Continue appears, and then press to clear
50 PPDS font error • Press until Continue appears, and then press to clear
51 Defective flash detected Press until Continue appears, and then press to clear the
52 Not enough free space in flash
memory for resources
53 Unformatted flash detected Press until Continue appears, and then press to clear the
54 Serial option <x> error • Make sure the serial link is set up correctly, and the appropriate cable
the message and continue printing.
The job may not print correctly.
• Cancel the current job.
• Instal l additional printer memory.
the message and continue printing.
The job may not print correctly.
• Cancel the current job.
message and continue printing.
Install different flash memory before downloading any resources to
flash.
• Press until Continue appears, and then press to clear
the message and continue printing.
Downloaded fonts and macros not previously stored in flash memory
are deleted.
• Delete fonts, macros, and other data stored on the flash memory.
• Install a larger capacity flash memory card.
message and continue printing.
Format the flash memory before storing any resources on it. If the
error message remains, the flash memory may be defective and
require replacing.
is in use.
• Make sure the serial interface parameters (protoc ol, bau d, pa rity, and
data bits) are set correctly on the printer and host computer.
• Press until Continue appears, and then press to clear
the message and continue printing.
The job may not print correctly.
• Turn the printer off and then on to reset the printer.
54 Network <x> software error • Press until Continue appears, and then press to clear
54 Standard network software error
55 Unsupported option in slot <x> 1 Turn the printer off.
56 Parallel port <x> disabled • Press until Continue appears, and then press to clear
56 Standard parallel port disabled
56 Serial port <x> disabled • Press until Continue appears, and then press to clear
the message and continue printing.
The job may not print correctly.
• Program new firmware for the network interface.
• Reset the printer.
2 Unplug the power cord from the wall outlet.
3 Remove the unsupported option.
4 Connect the power cord to a properly grounded outlet.
5 Turn the printer on.
the message.
The printer discards any data received through the parallel port.
• Make sure the Parallel Buffer menu item is not set to Disabled.
the message.
The printer discards any data received through the serial port.
• Make sure the Serial Buffer menu item is not set to Disabled.
Understanding printer messages
48
Page 49

Understanding printer messages
Message Action
56 Standard USB port disabled • Press until Continue appears, and then press to clear
58 Too many flash options installed 1 Turn off and unplug the printer.
58 Too many trays attached 1 Turn off and unplug the printer.
61 Remove defective disk • Press until Continue appears, and then press to clear
62 Disk full • Press until Continue appears, and then press to clear
63 Unformatted disk • Press until Continue appears, and then press to clear
the message.
The printer discards any data received through the USB port.
• Make sure the USB Buffer menu item is not set to Disabled.
2 Remove the excess flash memory.
3 Plug in the printer, and turn it on.
2 Remove the additional drawers.
3 Plug in the printer, and turn it on.
the message and continue printing.
• Install a different hard disk before performing any operations that
require a hard disk.
the message and continue processing.
Any information not previously stored on the hard disk is deleted.
• Delete fonts, macros, and other data stored on the hard disk.
• Install a larger hard disk.
the message and continue printing.
• Format the disk.
If the error message remains, the hard disk may be defective and
require replacing.
64 Unsupported disk format • Press until Continue appears, and then press to clear
80 Fuser life warning • Press until Continue appears, and then press to clear
80 Replace fuser Replace the fuser using the instruction sheet that comes with the
82 Waste toner box nearly full • Press until Continue appears, and then press to clear
82 Replace waste toner box Replace t he waste toner box using the ins tructio n s he et th at comes with
82 Waste toner box missing Insert the waste toner box.
83 Transfer belt missing Insert the transfer belt.
83 Transfer belt life warning • Press until Continue appears, and then press to clear
the message and continue printing.
• Format the disk.
If the error message remains, the hard disk may be defective and
require replacing.
the message and continue printing.
• Order a replacement fuser. When print quality is reduced, install the
new fuser using the ins truction sheet that co mes with the repl acement
fuser.
replacement fuser.
the message and continue printing.
• Order a replacement was te toner box immedia tely.
the replacement waste tone r box.
the message and continue printing.
• Order a replacement transfer belt. When print quality is reduced,
install the new tr ansfe r belt using the in struction sheet tha t comes with
the replacement transfer belt.
Understanding printer messages
49
Page 50

Understanding printer messages
Message Action
83 Replace transfer belt Replace the transfer belt using the instruction sheet that comes with the
84 <color> PC Unit life warning • Press until Ignore appea rs, and then press to clear the
84 Replace <color> PC Unit Replace the specified photoconductor unit using the instruction sheet
84 <color> PC Unit missing Insert the specified photoconductor unit.
87 Fuser missing Insert the fuser.
88 <color> Cartridge low • Replace the specified toner cartridge.
88 Replace <color> cartridge • Replace the specified toner cartridge.
200.yy Paper jam
201.yy Paper jam
202.yy Paper jam
203.yy Paper jam
230.yy Paper jam
241.yy Paper jam
242.yy Paper jam
250.yy Paper jam
900–999 Service <message> 1 Turn the printer off.
replacement transfer belt. Reset the printer internal counter for the
transfer belt.
message and continue printing.
• Order the specified photoconductor unit. When print quality is
reduced, install the new specified photoconductor unit using the
instruction sheet that come s with the replacement specified
photoconductor unit.
that comes with the replacement photoconductor unit.
• Press until Continue appears, and then press to clear
the message and continue printing.
• Press until Continue appears, and then press to clear
the message and continue printing.
1 Clear the paper path.
2 After clearing the paper path, press to resume printing.
2 Unplug the power cord from the wall outlet.
3 Check all cable connections.
4 Connect the power cord to a properly grounded outlet.
5 Turn the printer back on.
If the service message recurs, call for service, and report the message
number and description of the problem.
Understanding printer messages
50
Page 51

Index
Numerics
1565 Emul Error Load Emul Option 47
200.yy Paper jam 50
201.yy Paper jam 50
202.yy Paper jam 50
203.yy Paper jam 50
230.yy Paper jam 50
241.yy Paper jam 50
242.yy Paper jam 50
250.yy Paper jam 50
31 Missing or defective <color> cartridge 47
32 Replace unsupported <color> cartridge 47
34 Incorrect media 47
34 Short Paper 47
35 Insufficient memory to support Resource Save
feature 47
37 Insufficient memory for Flash Memory Defragment
operation 47
37 Insufficient memory to collate job 47
37 Insufficient memory, some held jobs were deleted 47
37 Insufficient memory, some held jobs were lost 47
38 Memory Full 47
39 Page is too complex to print 48
50 PPDS font error 48
51 Defective flash detected 48
52 Not enough free space in flash memory for
resources 48
53 Unformatted flash detected 48
54 Network <x> software error 48
54 Serial option <x> error 48
54 Standard network softw are error 48
55 Unsupported option in slot <x> 48
56 Parallel port <x> disabled 48
56 Serial port <x> disabled 48
56 Standard parallel port disabled 48
56 Standard USB port disabled 49
58 Too many flash options installed 49
58 Too many trays attached 49
61 Remove defective disk 49
62 Disk full 49
63 Unformatted disk 49
64 Unsupported disk format 49
80 Fuser life warning 49
80 Replace fuser 49
82 Replace waste toner box 49
82 Waste toner box missing 49
82 Waste toner box nearly full 49
83 Replace transfer belt 50
83 Transfer belt life warning 49
83 Transfer belt missing 49
84 <color> PC Unit life warning 50
84 <color> PC Unit missing 50
84 Replace <color> PC Unit 50
87 Fuser missing 50
88 <color> Cartridge low 50
88 Replace <color> cartridge 50
900–999 Service <message> 50
A
accounting statistics 26
Activate
AppleTalk 41
LexLink 41
NetWare 41
Activating Menu Changes 43
adjust color 25
Advanced S tatus, parallel 37
Alarms 17
Alarm Control 17
Cartridge Alarm 17
Annotations 27
AppleTalk 41
Auto Fit 31
automatic size sensing 10
B
Back button 5
Backgrounds, HTML 31
Baud 40
Blank Pages 20
Busy 43
button
Back 5
Menu 5
Select 6
Stop 5
button, navigation 6
C
Calibrating 43
Cancel not available 43
Canceling 43
Change <src> to <Custom String> 43
Change <src> to <Custom Type Name> 43
Change <sr c> to <size> 43
Change <src> to <type> <size> 43
51
Page 52

Index
Clearing job accounting statistics 43
Close lower door. Close upper door. 43
Collation 21
collation, enabling 21
Color Adjust 25
Color Balance 24
Color Correction 23
Color Quality, Help 42
Color Samples 24
Color Saver 23
Configure MP 12
Connection Guide , Hel p 42
Copies 43
Copies, specifying numbe r 20
Coverage Estimator 27
Custom Types 14
D
Data Bits 40
Default Source 9
defaults, factory 19
Defragment Flash 26
Defragmenting Flash DO NOT POWER OFF 43
Delete 43
Delete all 43
Delete all confidential jobs 43
Deleting 43
Device Statistics 15
diagram, menu 4
directory printing 16
Disabling DLEs 43
Disabling Menus 43
Disk corrupted 44
disk format 26
Disk Recovery x/5 yyy% DO NOT POWER OFF 44
display 6
Display Language 16
Download Target 18
Duplex 19
Duplex Bind 20
duplex binding 20
duplex enabling 19
E
emulation settings
PCL 29
ENA Address, USB 36
ENA Gateway, USB 36
ENA Netmask, USB 36
Enabling Menus 44
Encrypting Disk yyy% DO NOT POWER OFF 44
Enhance Fine Lines 25
Enter PIN 44
Enter PIN to lock 44
Ethernet 802.2, NetWare 41
Ethernet 802.3, NetWare 41
Ethernet SNAP, NetWare 41
Ethernet Type II, NetWare 41
F
Factory Defaults 19, 26
Feed Direction 14
Finishing Menu 19
flash defragmenting 26
flash formatting 26
Flushing buffer 44
Font Name, HTML 31
Font Name, PCL 28
Font Priority 27
Font Size, HTML 31
Font Source, PCL 28
fonts, printing 15
Format Disk 26
Format Flash 26
Formatting Disk yyy% DO NOT POWER OFF 44
Formatting Flash DO NOT POWER OFF 44
H
held jobs, removal 26
Help
Color Quality 42
Connection Guide 42
Information Guide 42
Media Guide 42
Menu Map 42
Moving Guide 42
Print All 42
Print Defects 42
Print Quality 42
Printing Guide 42
Supplies Guide 42
Help menu pages 42
Hex Trace 27
Honor DSR 40
Honor Init, parallel 38
HTML
backgrounds 31
font name 31
font size 31
margin size 31
orientation 31
scaling 31
HTML Menu 31
I
Image Menu 31
image orientation 32
image scaling 32
Image Smoothing 28
indicator light 5
Information Guide, Help 42
Insert Tray <x> 44
52
Page 53

Index
Internal System Error Reload Bookmarks 44
Internal System Error, Reload Security Certificates 44
Invalid Engine Code 44
Invalid Network Code 44
Invalid PIN 44
Invert 31
IPv6 33
J
Job Accounting 19
job accounting statistics 26
Job Acct Stat 26
Job Buffering
network 34
parallel 37
serial 39
USB 36
Job Expiration 32
L
language, display 16
language, printer 18
LCD Contrast 27
LexLink 41
light, indicator 5
Load <src> with < Custom String> 45
Load <src> with < type> <size> 45
Load <src> with <Custom Type Name> 45
Load <src> with <size> 45
Load Manual feeder with <Custom String> 44
Load Manual feeder with <Custom Type Name> 44
Load Manual feeder with <size> 44
Load Manual feeder with <size> <type> 44
loading paper 13
M
Mac Binary PS
network 35
parallel 38
USB 36
Manual Color 25
Manual Envelope Size 11
Manual Envelope Type 11
Manual Paper Size 11
Manual Paper Type 11
Margin Size, HTML 31
Max Invalid PIN 32
Media Guide, Help 42
Menu button 5
menu diagram 4
Menu Map, Help 42
Menu Settings Page 14
Menus are Disabled 45
Moving Guide, Help 42
MP Feeder Size 10
MP Feeder Type 11
Multipage Border 22
Multipage Order 22
Multipage Print 21
Multipage View 22
N
Navigation buttons 6
NetWare 40
NetWare Setup Page 15
Network 45
Network <x> 34, 45
Network Buffer 34
Network Ports 33
Network Setup Page 15
No held jobs 45
No jobs found 45
No jobs to cancel 45
NPA Mode
network 34
parallel 37
serial 39
USB 35
NSQ/GSQ mode, NetWare 41
O
operator panel 5
Orientation 32
Orientation, HTML 31
P
Packet Burst, NetWare 41
panel, operator 5
Paper Loading 13
Paper Menu 9
Paper Size 10
Paper Texture 12
Paper Type 10
paper type, custom 14
Paper Weight 13
Parallel 36, 45
Parallel <x> 36, 45
Parallel Buffer 37
Parallel Mode 2 38
Parity 40
PCL Emulation Settings 29
A4 Width 29
Auto CR after LF 29
Auto LF after CR 29
Lines per Page 29
Orientation 29
Pitch 29
Point Size 29
PCL font name 28
PCL font source 28
PCL Menu 28
53
Page 54

Index
PCL SmartSwitch
network 34
parallel 36
serial 38
USB 35
PCL symbol set 28
PCL tray renumber 30
PDF Menu 27
Portrait Height 14
Portrait Width 14
PostScript Menu 27
Power Saver 17, 45
Print All, Help 42
Print Area 18
Print Defects, Help 42
Print Directory 16
Print Fonts 15
Print Mode 22
Print PS Error 27
Print Quality, Help 42
Print Recovery 18
Auto Continue 18
Jam Recovery 18
Page Protect 18
Print Resolution 23
Printer Language 18
Printer locked, enter PIN to unlock 45
Printing 45
printing annotations 27
Printing Guide, Help 42
Profiles List 15
Programming Disk DO NOT POWER OFF 45
Programming Flash DO NOT POWER OFF 45
Programming System Code DO NOT POWER OFF 45
Protocol, parallel 37
PS SmartSwitch
network 34
parallel 37
serial 38
USB 35
Q
Quality Menu 22
R
Ready 45
Remote Management Active DO NOT POWER OFF 45
Remove all color supplies 46
Remove Held Jobs 26
Remove paper from standard output bin 4 6
Reports 14
Resetting Fuser Count 46
Resetting the Printer 46
Resource Save 19
Restore Held Jobs? 46
restoring defaults 19
Restoring Factory Defaults 46
Restoring Held Job(s) x/y 46
RGB Brightness 23
RGB Contrast 23
RGB Saturation 23
Robust XON 39
S
samples, color 24
saving power 17
Scale to Fit 27
Scale, HTML 31
Scaling 32
Security 32
Select button 6
Separator Sheets 21
Separator Source 21
Serial 38
Serial <x> 38, 46
Serial Buffer 39
Serial Protocol 39
Set Zone, AppleTalk 41
Settings 16
Setup Menu 16
Setup Page, NetWare 15
Setup Required 46
Some held jobs were lost 46
Standard Bin Full 46
Standard Network 34
Standard USB 35
statistics 19
statistics, job accounting 26
Stop button 5
Submitting selection 46
Substitute Size 12
Supplies Guide, Help 42
Supplies Menu 7
Black Cartridge 8
Black PC Unit 8
Cyan Cartridge 7
Cyan PC Unit 8
Fuser 8
Magenta Cartridge 7
Magenta PC Unit 8
Replace Supply 7
Transfer Belt 8
Waste Toner Box 8
Yellow Cartridge 7
Yellow PC Unit 8
Symbol Set, PCL 28
T
TCP/IP 33
textured paper 12
Timeouts 17
Print Timeout 17
54
Page 55

Timeouts (continued)
Screen Timeout 17
Wait Timeout 17
Toner Darkness 23
Tray <x> Empty 46
Tray <x> Low 46
Tray <x> Missing 46
Tray <x> Size 10
Tray <x> Type 10
Tray Renumber
Assign Man Env 30
Assign Manual Paper 30
Assign MP Feeder 3 0
Restore Defaults 30
View Factory Def 30
Tray Renumber, PCL 30
U
Units of Measure 14
Universal Paper Size 14
Universal Setup 14
USB 46
USB <x> 35, 46
USB Buffer 36
Utilities Menu 26
Index
V
View Address, AppleTalk 41
View Login Name, NetWare 40
View Name, AppleTalk 41
View Network Number, NetWare 40
View Nickname, LexLink 41
View Print Mode, NetWare 40
View supplies 46
W
Waiting 47
X
Tray Renumber
Assign Tray 30
55
 Loading...