

Lexmark BDX5495HSN3 - X5495 All In One Printer User Manual

5400 Series All-In-One
User's Guide
July 2006 www.lexmark.com
Lexmark and Lexmark with diamond design are trademarks of Lexmark International, Inc., registered in the United States and/or other countries.
All other trademarks are the property of their respective owners.
© 2006 Lexmark International, Inc.
All rights reserved.
740 West New Circle Road
Lexington, Kentucky 40550

Important Safety Information
Use only the power supply and power supply cord provided with this product or the manufacturer's authorized replacement power supply and power supply
cord.
Connect the power supply cord to a properly grounded electrical outlet that is near the product and easily accessible.
To reduce the risk of fire, use only a 26 AWG or larger telecommunications (RJ-11) cord when connecting this product to the public switched telephone
network.
Refer service or repairs, other than those described in the user documentation, to a professional service person.
This product is designed, tested, and approved to meet strict global safety standards with the use of specific Lexmark components. The safety features of
some parts may not always be obvious. Lexmark is not responsible for the use of other replacement parts.
CAUTIONS—When using this product, basic safety precautions should always be followed to reduce the risk of fire, electric shock,
and injury to persons, including the following:
Do not place or use this product near water or wet locations.
Do not set up or use this product or make any electrical or cabling connections, such as the power cord or telephone, during a lightning storm.
If a telephone is connected to this product, do not use the telephone to report a gas leak in the vicinity of the leak.
SAVE THESE INSTRUCTIONS.
Use care when you replace a lithium battery.
CAUTION: There is a danger of explosion if a lithium battery is incorrectly replaced. Replace it only with the same or equivalent type of lithium battery.
Do not recharge, disassemble, or incinerate a lithium battery. Discard used batteries according to the manufacturer's instructions and local regulations.

Contents
Finding information about the printer.................................................................................9
Setting up the printer..........................................................................................................12
Checking the box contents........................................................................................................................12
Installing another language control panel..................................................................................................13
Getting the printer ready to fax..................................................................................................................13
Choosing a fax connection ................................................................................................................................. 13
Using an RJ11 adapter ....................................................................................................................................... 14
Connecting directly to a telephone wall jack....................................................................................................... 16
Connecting to a telephone.................................................................................................................................. 17
Connecting to an answering machine................................................................................................................. 18
Connecting to a computer with a modem ........................................................................................................... 19
Learning about the printer..................................................................................................22
Understanding the parts of the printer.......................................................................................................22
Using the control panel buttons and menus..............................................................................................23
Using the control panel....................................................................................................................................... 23
Using the Copy menu ......................................................................................................................................... 26
Using the Scan menu ......................................................................................................................................... 27
Using the Fax menu............................................................................................................................................ 28
Using the Photo Card menu ............................................................................................................................... 29
Saving settings ................................................................................................................................................... 31
Learning about the software..............................................................................................33
Using the printer software..........................................................................................................................33
Using the Imaging Studio...........................................................................................................................33
Using the All-In-One Center.......................................................................................................................35
Opening the All-In-One Center ........................................................................................................................... 35
Using the Scanning & Copying tab..................................................................................................................... 35
Using the Saved Images tab............................................................................................................................... 36
Using the Maintain/Troubleshoot link.................................................................................................................. 37
Using the Solution Center..........................................................................................................................37
Using Print Properties................................................................................................................................38
Opening Print Properties .................................................................................................................................... 38
Using the Save Settings menu ........................................................................................................................... 39
Using the I Want To menu.................................................................................................................................. 39
Using the Options menu ..................................................................................................................................... 39
Using the Print Properties tabs ........................................................................................................................... 39
Using the Photo Editor...............................................................................................................................40
Using the Toolbar......................................................................................................................................41
Using Fast Pics..........................................................................................................................................42
Using the Fax Setup Utility........................................................................................................................42
3

Loading paper and original documents............................................................................43
Loading paper............................................................................................................................................43
Loading various paper types......................................................................................................................43
Loading original documents into the Automatic Document Feeder...........................................................46
Loading original documents on the scanner glass.....................................................................................48
Printing.................................................................................................................................49
Printing a document...................................................................................................................................49
Printing a Web page..................................................................................................................................49
Printing photos or images from a Web page.............................................................................................50
Printing collated copies..............................................................................................................................50
Printing the last page first (reverse page order)........................................................................................51
Printing transparencies..............................................................................................................................51
Printing envelopes.....................................................................................................................................51
Printing cards.............................................................................................................................................51
Printing multiple pages on one sheet.........................................................................................................52
Working with photos...........................................................................................................53
Retrieving and managing photos...............................................................................................................53
Inserting a memory card ..................................................................................................................................... 53
Inserting a flash drive.......................................................................................................................................... 54
Transferring photos from a memory device to a computer using Fast Pics........................................................ 55
Transferring photos from a memory device to the computer using the control panel......................................... 55
Transferring photos from a memory card to a flash drive ................................................................................... 55
Printing photos using the control panel......................................................................................................56
Printing photos stored on a memory device using the proof sheet..................................................................... 56
Printing all photos ............................................................................................................................................... 57
Printing photos by date range............................................................................................................................. 57
Printing photos using color effects...................................................................................................................... 58
Printing photos from a digital camera using DPOF............................................................................................. 58
Using a PictBridge-enabled digital camera to control printing photos ................................................................ 59
Printing photos using the computer...........................................................................................................59
Printing photos stored on a memory device using Fast Pics .............................................................................. 59
Printing photos stored on the computer using the Imaging Studio ..................................................................... 60
Creating and printing a scrapbook or album page.............................................................................................. 60
Adding text captions to a photo page ................................................................................................................. 60
Copying................................................................................................................................62
Making a copy............................................................................................................................................62
Copying photos..........................................................................................................................................62
Collating copies.........................................................................................................................................63
Repeating an image on one page..............................................................................................................63
Enlarging or reducing an image.................................................................................................................64
4

Scanning..............................................................................................................................65
Scanning a document................................................................................................................................65
Customizing scan settings using the computer.........................................................................................65
Scanning documents or images for e-mailing............................................................................................66
Scanning text for editing............................................................................................................................67
Scanning images for editing......................................................................................................................67
Scanning clear images from magazines or newspapers...........................................................................67
Scanning to a computer over a network....................................................................................................68
Faxing...................................................................................................................................69
Sending a fax.............................................................................................................................................70
Entering a fax number ........................................................................................................................................ 70
Sending a fax using the control panel................................................................................................................. 70
Sending a fax using the computer ...................................................................................................................... 71
Sending a broadcast fax at a scheduled time..................................................................................................... 71
Sending a fax while listening to a call (On Hook Dial) ........................................................................................ 72
Receiving a fax..........................................................................................................................................72
Receiving a fax automatically ............................................................................................................................. 72
Receiving a fax with an answering machine....................................................................................................... 72
Receiving a fax manually.................................................................................................................................... 73
Using Caller ID.................................................................................................................................................... 73
Forwarding faxes.......................................................................................................................................73
Printing fax activity reports.........................................................................................................................74
Setting up Speed Dial numbers.................................................................................................................74
Using the Phone Book...............................................................................................................................75
Customizing dial settings...........................................................................................................................76
Setting up a dialing prefix ................................................................................................................................... 76
Setting the distinctive ring................................................................................................................................... 76
Setting the number of rings before receiving a fax automatically ....................................................................... 77
Setting up to fax while behind a PBX.................................................................................................................. 77
Customizing fax settings............................................................................................................................78
Customizing settings using the Fax Setup Utility................................................................................................ 78
Setting up a fax header....................................................................................................................................... 79
Setting up a fax footer......................................................................................................................................... 80
Blocking unwanted changes to fax settings........................................................................................................ 81
Blocking junk faxes ............................................................................................................................................. 82
Networking the printer........................................................................................................84
Installing network printers..........................................................................................................................84
Direct IP printing ................................................................................................................................................. 84
Shared printing ................................................................................................................................................... 84
Tips for installing a network printer............................................................................................................85
Assigning an IP address ..................................................................................................................................... 85
Finding your MAC address ................................................................................................................................. 85
Configuring a network printer manually .............................................................................................................. 85
5

Finding a printer/print server located on remote subnets ................................................................................... 86
Network troubleshooting tips .............................................................................................................................. 86
Maintaining the printer........................................................................................................87
Changing print cartridges...........................................................................................................................87
Removing a used print cartridge......................................................................................................................... 87
Installing print cartridges..................................................................................................................................... 87
Achieving better print quality......................................................................................................................89
Improving print quality......................................................................................................................................... 89
Aligning print cartridges ...................................................................................................................................... 89
Cleaning the print cartridge nozzles ................................................................................................................... 89
Wiping the print cartridge nozzles and contacts ................................................................................................. 90
Preserving the print cartridges...................................................................................................................91
Cleaning the scanner glass.......................................................................................................................91
Ordering supplies.......................................................................................................................................91
Using genuine Lexmark print cartridges....................................................................................................92
Refilling a print cartridge............................................................................................................................92
Recycling Lexmark products......................................................................................................................92
Troubleshooting..................................................................................................................93
Setup troubleshooting................................................................................................................................93
Incorrect language appears on the display......................................................................................................... 93
Power button is not lit ......................................................................................................................................... 94
Software does not install..................................................................................................................................... 94
Page does not print............................................................................................................................................. 95
Cannot print from digital camera using PictBridge.............................................................................................. 96
Print troubleshooting..................................................................................................................................96
Improving print quality......................................................................................................................................... 96
Poor text and graphic quality .............................................................................................................................. 97
Poor quality at the edges of the page ................................................................................................................. 98
Print speed is slow.............................................................................................................................................. 98
Partial document or photo prints......................................................................................................................... 98
Photo smudges................................................................................................................................................... 98
Copy troubleshooting.................................................................................................................................98
Copier does not respond .................................................................................................................................... 99
Scanner unit does not close ............................................................................................................................... 99
Poor copy quality ................................................................................................................................................ 99
Partial document or photo copies ..................................................................................................................... 100
Scan troubleshooting...............................................................................................................................100
Scanner does not respond................................................................................................................................ 100
Scan was not successful .................................................................................................................................. 100
Scanning takes too long or freezes the computer ............................................................................................ 101
Poor scanned image quality ............................................................................................................................. 101
Partial document or photo scans ...................................................................................................................... 101
6

Cannot scan to an application .......................................................................................................................... 101
Cannot scan to a computer over a network ...................................................................................................... 102
Fax troubleshooting.................................................................................................................................102
Cannot send or receive a fax............................................................................................................................ 102
Can send but not receive faxes ........................................................................................................................ 103
Can receive but not send faxes ........................................................................................................................ 104
Printer receives a blank fax .............................................................................................................................. 105
Received fax has poor print quality................................................................................................................... 105
Caller ID information is not displayed ............................................................................................................... 106
Network troubleshooting..........................................................................................................................106
The printer to be configured does not appear in the list of printers found on your network.............................. 106
Cannot print to the network printer ................................................................................................................... 107
Network name does not appear in the list ........................................................................................................ 107
Jams and misfeeds troubleshooting........................................................................................................107
Paper jams........................................................................................................................................................ 108
Paper or specialty media misfeeds................................................................................................................... 108
Printer does not feed paper, envelopes, or specialty media............................................................................. 109
Banner paper jams ........................................................................................................................................... 109
Memory card troubleshooting..................................................................................................................109
Memory card cannot be inserted ...................................................................................................................... 109
Nothing happens when memory card is inserted.............................................................................................. 110
Error messages.......................................................................................................................................110
Settings are not saved.............................................................................................................................117
Resetting to factory default settings.........................................................................................................117
Removing and reinstalling the software...................................................................................................117
Notices...............................................................................................................................118
Power consumption.................................................................................................................................122
Index...................................................................................................................................123
7

8

Finding information about the printer
Setup sheet
Description Where to find
The Setup sheet gives you instructions for setting up
hardware and software.
You can find this document in the printer box or on the Lexmark
Web site at www.lexmark.com.
Getting Started or Setup Solutions booklet
Description Where to find
The Getting Started booklet gives you instructions for
setting up hardware and software (on Windows operating
systems) and some basic instructions for using the printer.
Note: If your printer supports Macintosh operating
systems, see the Mac Help:
You can find this document in the printer box or on the
Lexmark Web site at www.lexmark.com.
1 From the Finder desktop, double-click the Lexmark
5400 Series folder.
2 Double-click the printer Help icon.
The Setup Solutions booklet tells you how to solve printer
setup problems.
Note: These documents do not ship with all printers. If you
did not receive a Getting Started booklet or a Setup
Solutions booklet, see the User's Guide instead.
User's Guide
Description Where to find
The User's Guide gives you instructions for using the printer
and other information such as:
• Using the software (on Windows operating systems)
• Loading paper
• Printing
• Working with photos
• Scanning (if supported by your printer)
• Making copies (if supported by your printer)
• Faxing (if supported by your printer)
• Maintaining the printer
• Connecting the printer to a network (if supported by your
printer)
• Troubleshooting problems with printing, copying,
scanning, faxing, paper jams, and misfeeds
Note: If your printer supports Macintosh operating systems,
see the Mac Help:
1 From the Finder desktop, double-click the Lexmark
5400 Series folder.
2 Double-click the printer Help icon.
When you install the printer software, the User's Guide will
be installed.
1 Click Start Programs or All Programs
Lexmark 5400 Series.
2 Click User's Guide.
If the link to the User's Guide is not on your desktop, follow
these instructions:
1 Insert the CD.
The installation screen appears.
Note: If necessary, click Start Run, and then type
D:\setup, where D is the letter of your CD-ROM drive.
2 Click View User's Guide (including Setup
Troubleshooting).
3 Click Yes.
An icon of the User's Guide appears on your desktop,
and the User's Guide appears on the screen.
You can also find this document on the Lexmark Web site
at www.lexmark.com.
9

Help
Description Where to find
The Help gives you instructions for using the software, if your
printer connects to a computer.
While in any Lexmark software program, click Help, Tips
Help, or Help Help Topics.
Lexmark Solution Center
Description Where to find
The Lexmark Solution Center software is included on your
CD. It installs with the other software, if your printer
connects to a computer.
To access the Lexmark Solution Center:
1 Click Start Programs or All Programs Lexmark
5400 Series.
2 Select Lexmark Solution Center.
Customer support
Description Where to find (North America) Where to find (rest of world)
Telephone support
Call us at
• US: 1-800-332-4120
Monday–Friday (8:00 AM–11:00 PM EST)
Saturday (Noon–6:00 PM EST)
• Canada: 1-800-539-6275
Monday–Friday (9:00 AM–9:00 PM EST)
Saturday (Noon–6:00 PM EST)
Telephone numbers and support hours vary by
country or region.
Visit our Web site at www.lexmark.com.
Select a country or region, and then select the
Customer Support link.
Note: For additional information about
contacting Lexmark, see the printed warranty
that shipped with your printer.
• Mexico: 001-888-377-0063
Monday–Friday (8:00 AM–8:00 PM EST)
Note: Support numbers and times may change
without notice. For the most recent phone
numbers available, see the printed warranty
statement that shipped with your printer.
E-mail support
For e-mail support, visit our Web site:
www.lexmark.com.
1 Click CUSTOMER SUPPORT.
2 Click Technical Support.
3 Select your printer family.
4 Select your printer model.
5 From the Support Tools section, click e-Mail
Support.
6 Complete the form, and then click Submit
Request.
10
E-mail support varies by country or region, and
may not be available in some instances.
Visit our Web site at www.lexmark.com.
Select a country or region, and then select the
Customer Support link.
Note: For additional information about
contacting Lexmark, see the printed warranty
that shipped with your printer.

Limited Warranty
Description Where to find (US) Where to find (rest of world)
Limited Warranty Information
Lexmark International, Inc. furnishes
a limited warranty that this printer will
be free of defects in materials and
workmanship for a period of 12
months after the original date of
purchase.
To view the limitations and conditions of this
limited warranty, see the Statement of
Limited Warranty included with this printer,
or set forth at www.lexmark.com.
1 Click CUSTOMER SUPPORT.
2 Click Warranty Information.
3 From the Statement of Limited Warranty
section, click Inkjet & All-In-One
Printers.
Warranty information varies by
country or region. See the printed
warranty that shipped with your
printer.
4 Scroll through the Web page to view the
warranty.
Record the following information (located on the store receipt and the back of the printer), and have it ready when you
contact us so that we may serve you faster:
• Machine Type number
• Serial number
• Date purchased
• Store where purchased
11
Setting up the printer
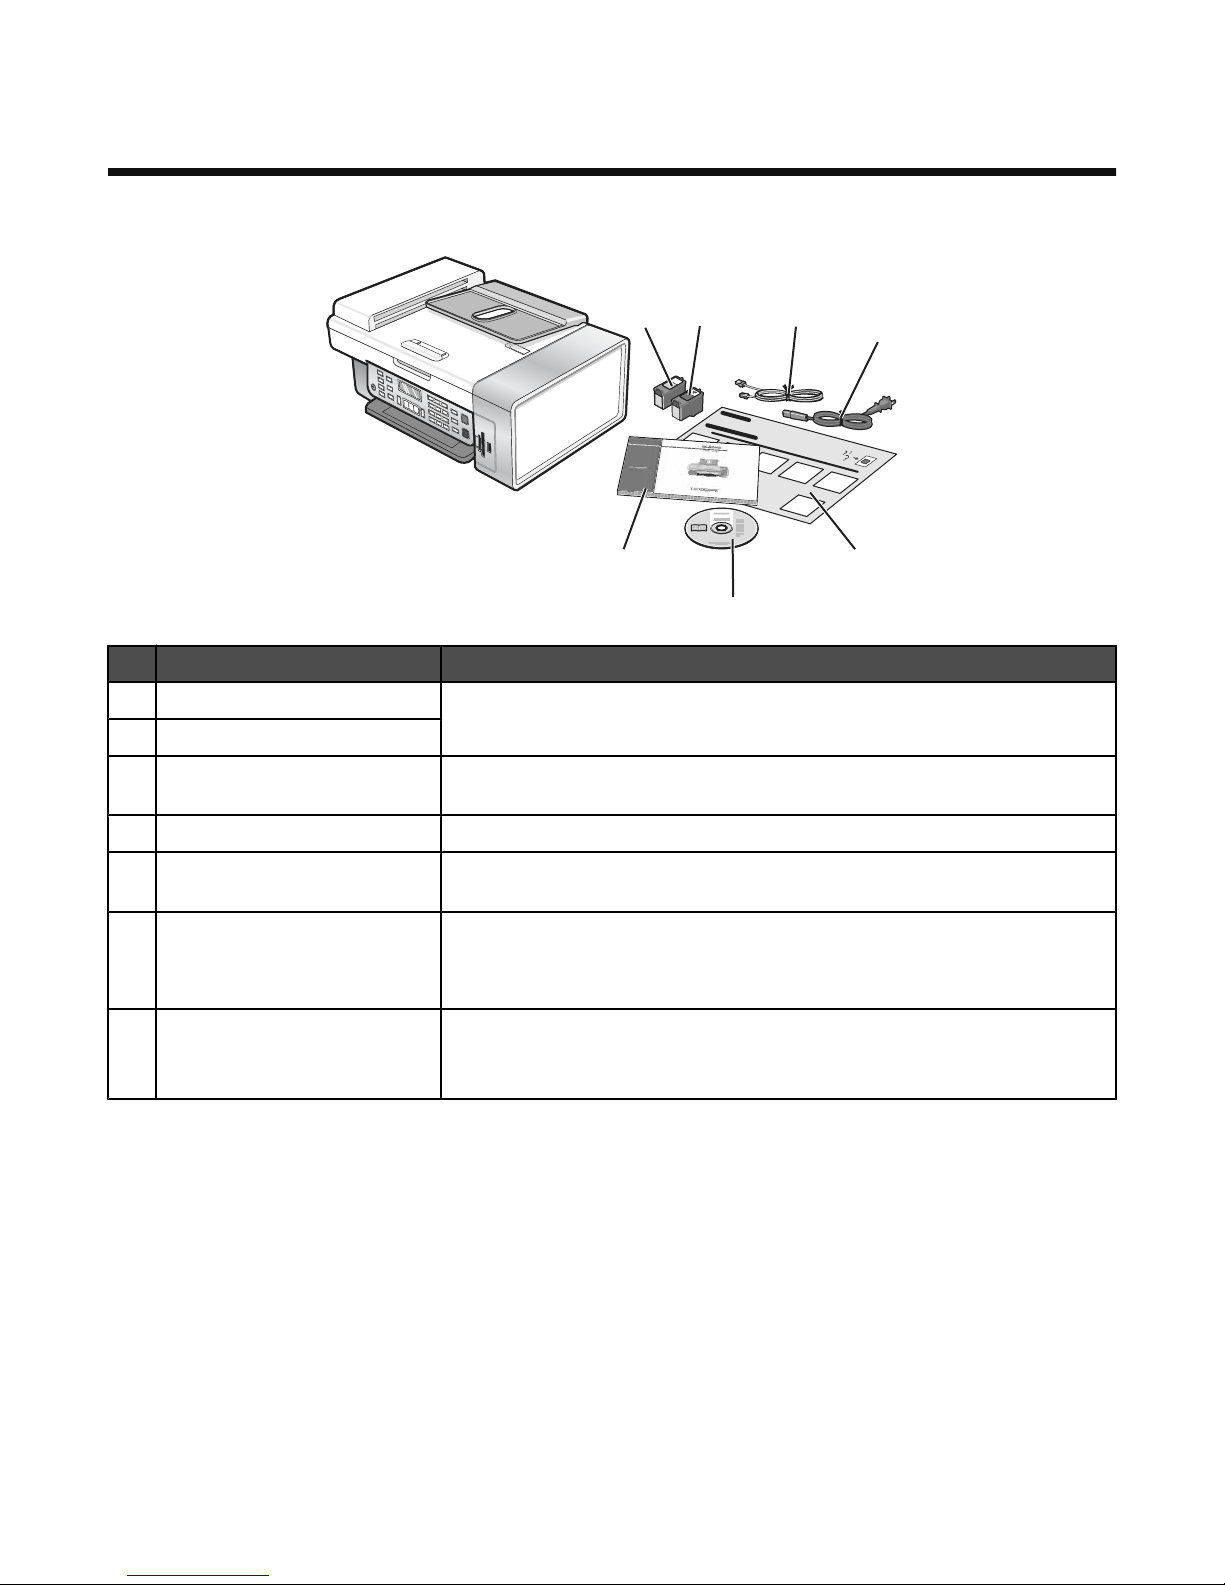
Checking the box contents
2
1
3
4
7
5
6
Name Description
Black print cartridge Cartridges to be installed into the printer.
1
Color print cartridge
2
Telephone cord Use for faxing. For more information about connecting this cord, see “Choosing
3
Power cord Attaches to the power supply port located at the back of the printer.
4
Setup sheet Instructions on setting up printer hardware and software, and information on
5
Note: Cartridge combinations vary depending on the product purchased.
a fax connection” on page 13.
setup troubleshooting.
Installation software CD
6
User's Guide or Setup Solutions Printed booklet that serves as a guide.
7
• Installation software for the printer
• Help
• User's Guide in electronic format
Note: The User's Guide can be found on the installation software CD that
shipped with the printer.
12
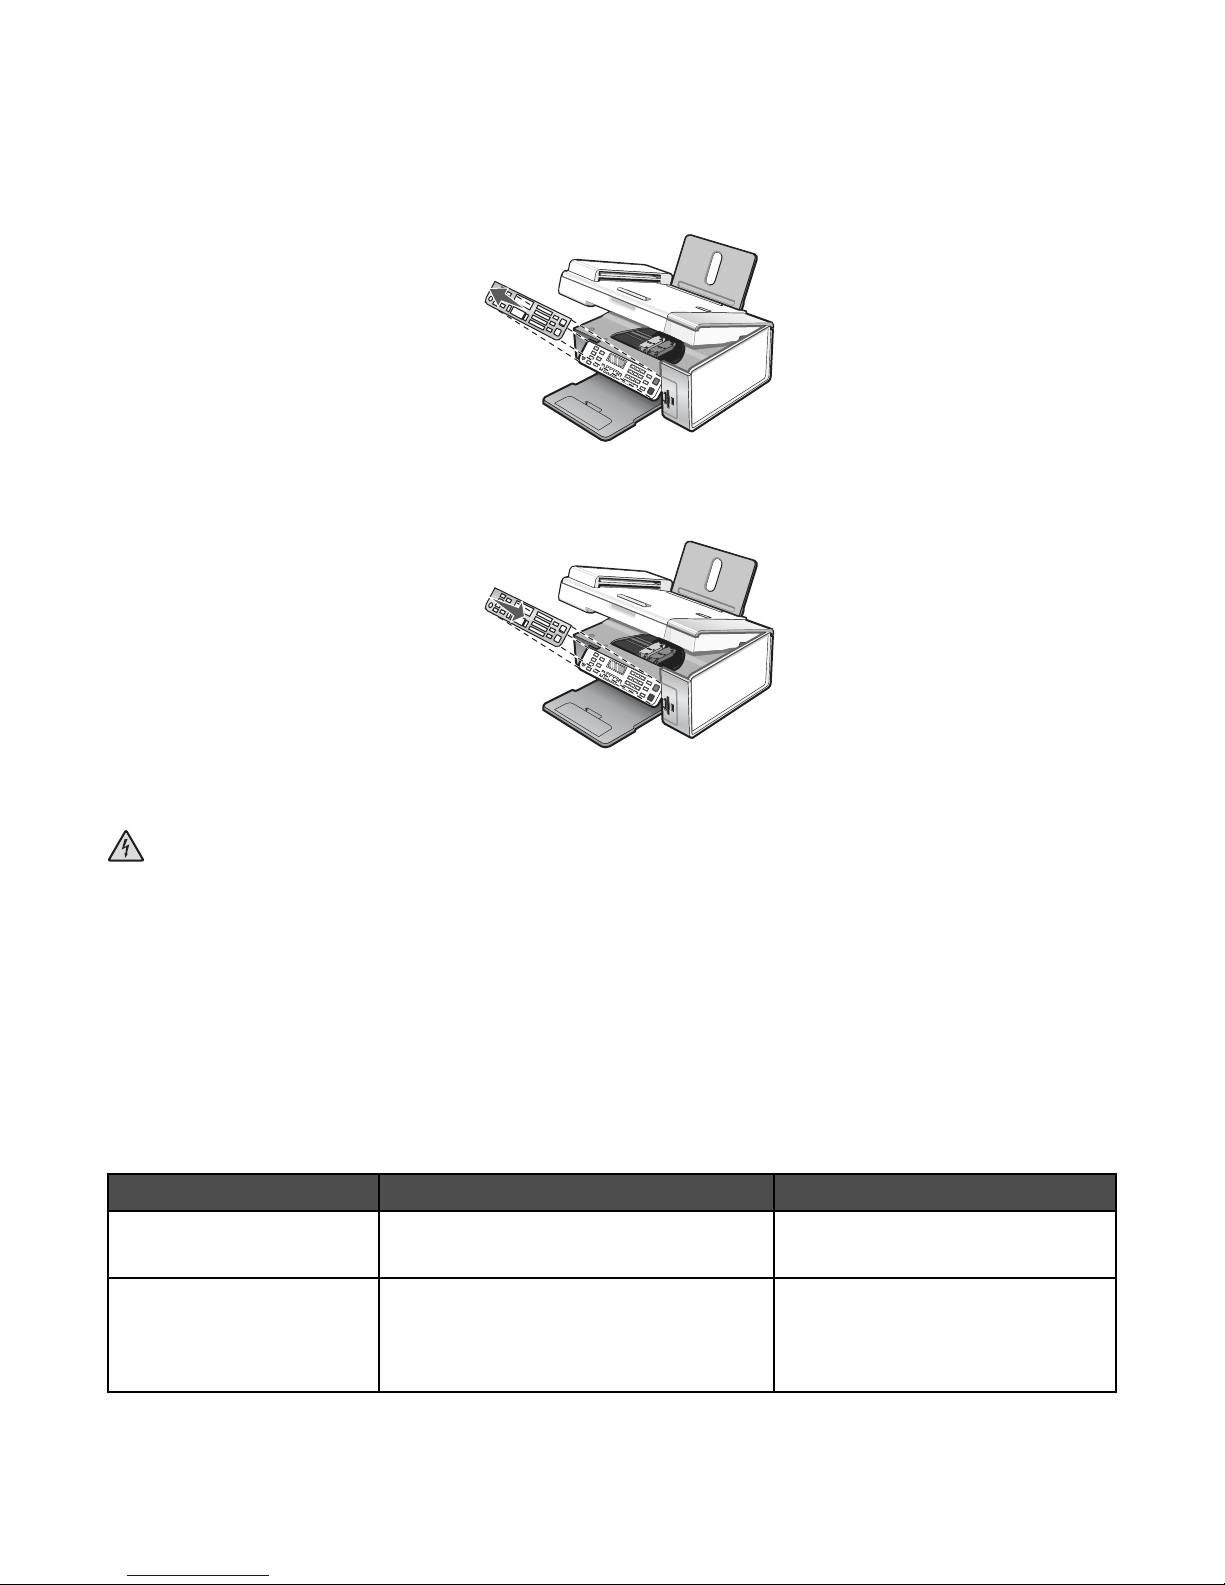
Installing another language control panel
These instructions apply only if you received one or more additional language control panels with the printer.
1 Lift and remove the control panel (if one is installed).
2 Choose the correct control panel for your language.
3 Align the clips on the control panel with the holes on the printer, and then press down.
Getting the printer ready to fax
CAUTION: Do not use the fax feature during a lightning storm. Do not set up this product or make any electrical or
cabling connections, such as the power supply cord or telephone, during a lightning storm.
Choosing a fax connection
You can connect the printer with equipment such as a telephone, an answering machine, or a computer modem. If problems
occur, see “Setup troubleshooting” on page 93.
Note: The printer is an analog device that works best when directly connected to the wall jack. Other devices (such as a
telephone or answering machine) can be successfully attached to pass through the printer, as described in the setup steps.
If you want a digital connection such as ISDN, DSL, or ADSL, a third-party device (such as a DSL filter) is required.
You do not need to attach the printer to a computer, but you do need to connect it to a telephone line to send and receive
faxes.
You can connect the printer to other equipment. See the following table to determine the best way to set up the printer.
Equipment Benefits See this section
• The printer
• A telephone cord
• The printer
• A telephone
• Two telephone cords
Send and receive faxes without using a
computer.
• Use the fax line as a normal telephone
line.
• Send and receive faxes without using a
computer.
“Connecting directly to a telephone wall
jack” on page 16
“Connecting to a telephone” on
page 17
13

Equipment Benefits See this section
• The printer
• A telephone
Receive both incoming voice messages and
faxes.
“Connecting to an answering machine”
on page 18
• An answering machine
• Three telephone cords
• The printer
• A telephone
Send faxes using the computer or the printer. “Connecting to a computer with a
modem” on page 19
• A computer modem
• Three telephone cords
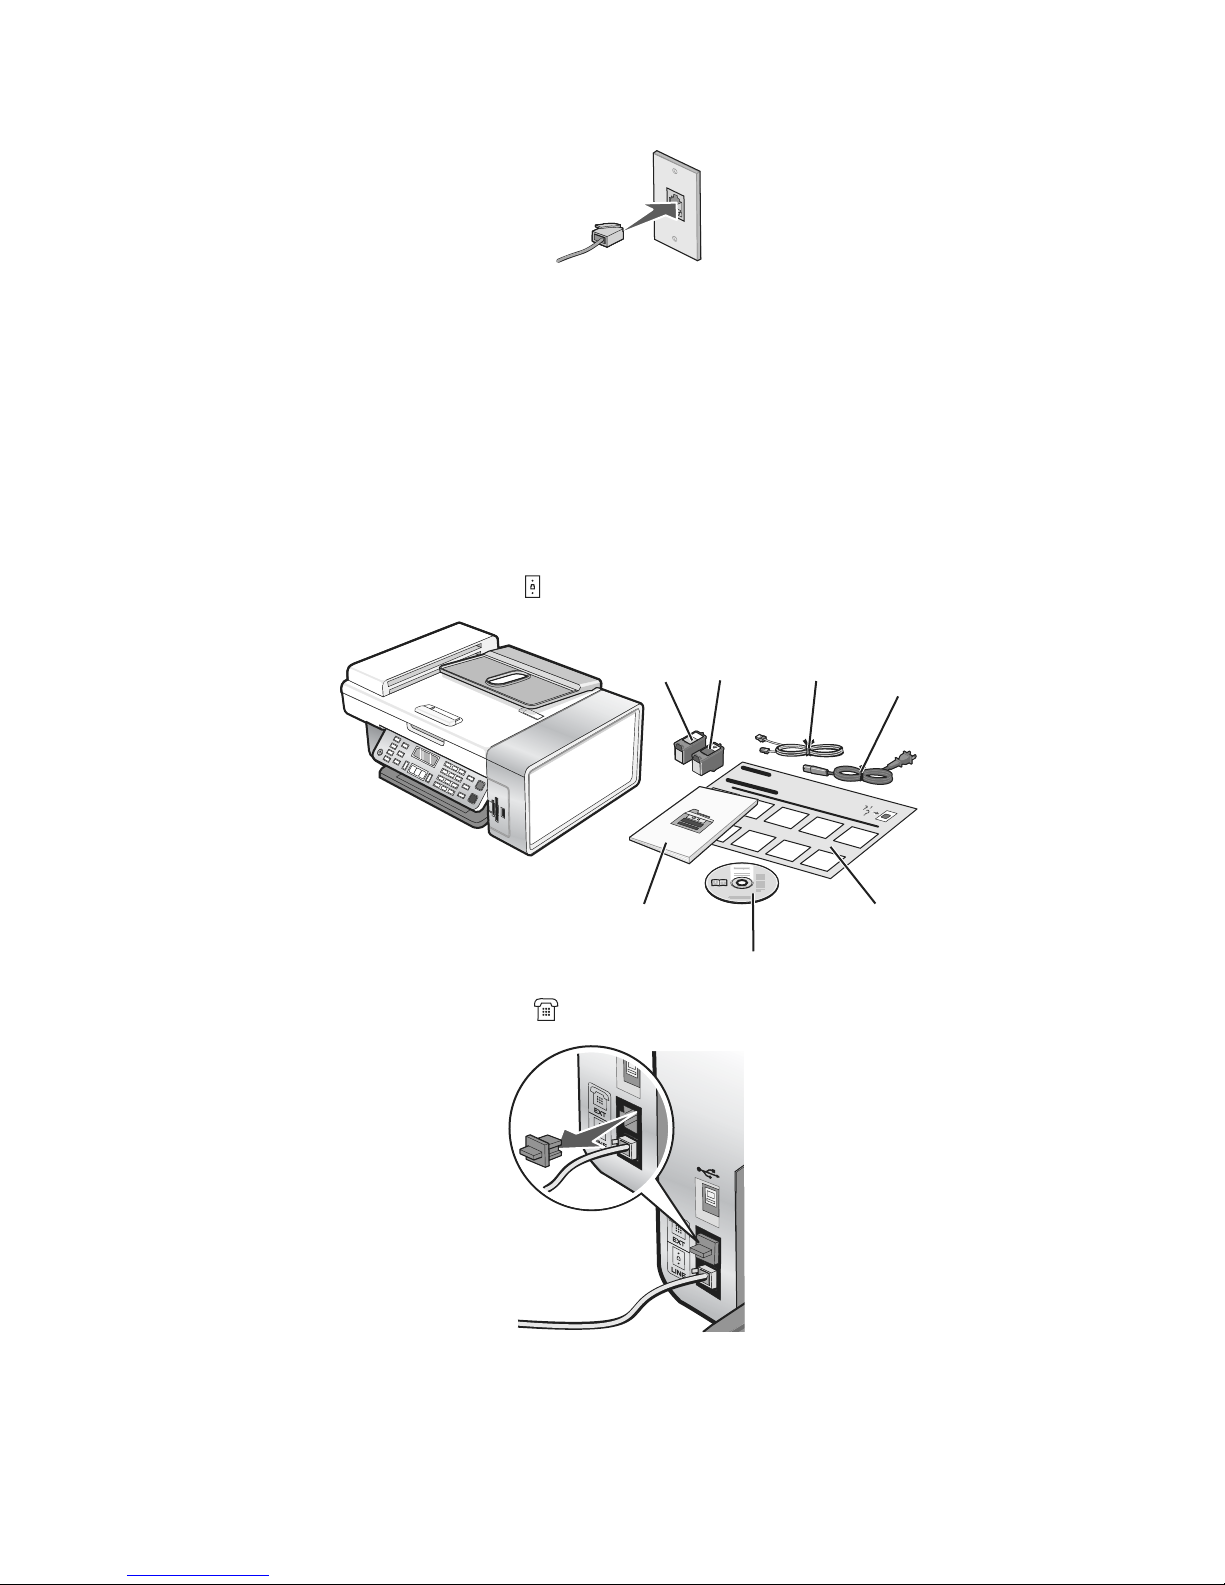
Using an RJ11 adapter
Country/region
• United Kingdom
• Ireland
• Finland
• Norway
• Denmark
To connect your printer to an answering machine, telephone, or other telecommunications equipment, use the telephone
line adapter included in the box with the printer.
1 Connect the adapter to the telephone line that came with the printer.
• Italy
• Sweden
• Netherlands
• France
• Portugal
Note: The UK adapter is shown. Your adapter may look different, but it will fit the telephone outlet used in your location.
2 Connect the telephone line of your chosen telecommunications equipment to the left outlet of the adapter.
14
If your telecommunications equipment uses a US-style (RJ11) telephone line, follow these steps to connect the equipment:
1 Remove the plug from the EXT port on the back of the printer.
Note: Once this plug is removed, any country- or region-specific equipment you connect to the printer by the adapter,
as shown, will not function properly.
2 Connect your telecommunications equipment directly to the EXT port on the back of the printer.
Country/region
• Saudi Arabia
• United Arab Emirates
• Egypt
• Bulgaria
• Czech Republic
• Belgium
• Australia
• South Africa
• Israel
• Hungary
• Poland
• Romania
• Russia
• Slovenia
• Spain
• Turkey
• Greece
To connect a telephone, an answering machine, or other telecommunications equipment to the printer:
1 Remove the plug from the back of the printer.
15

2 Connect your telecommunications equipment directly to the EXT port on the back of the printer.
Note: Once this plug is removed, any country- or region-specific equipment that you connect to the printer by the adapter,
as shown, will not function properly.
Country/region
• Germany
• Austria
• Switzerland
There is a plug installed in the EXT port of the printer. This plug is necessary for the proper functioning of the printer.
Note: Do not remove the plug. If you remove it, other telecommunications devices in your home (such as telephones or
answering machines) may not work.
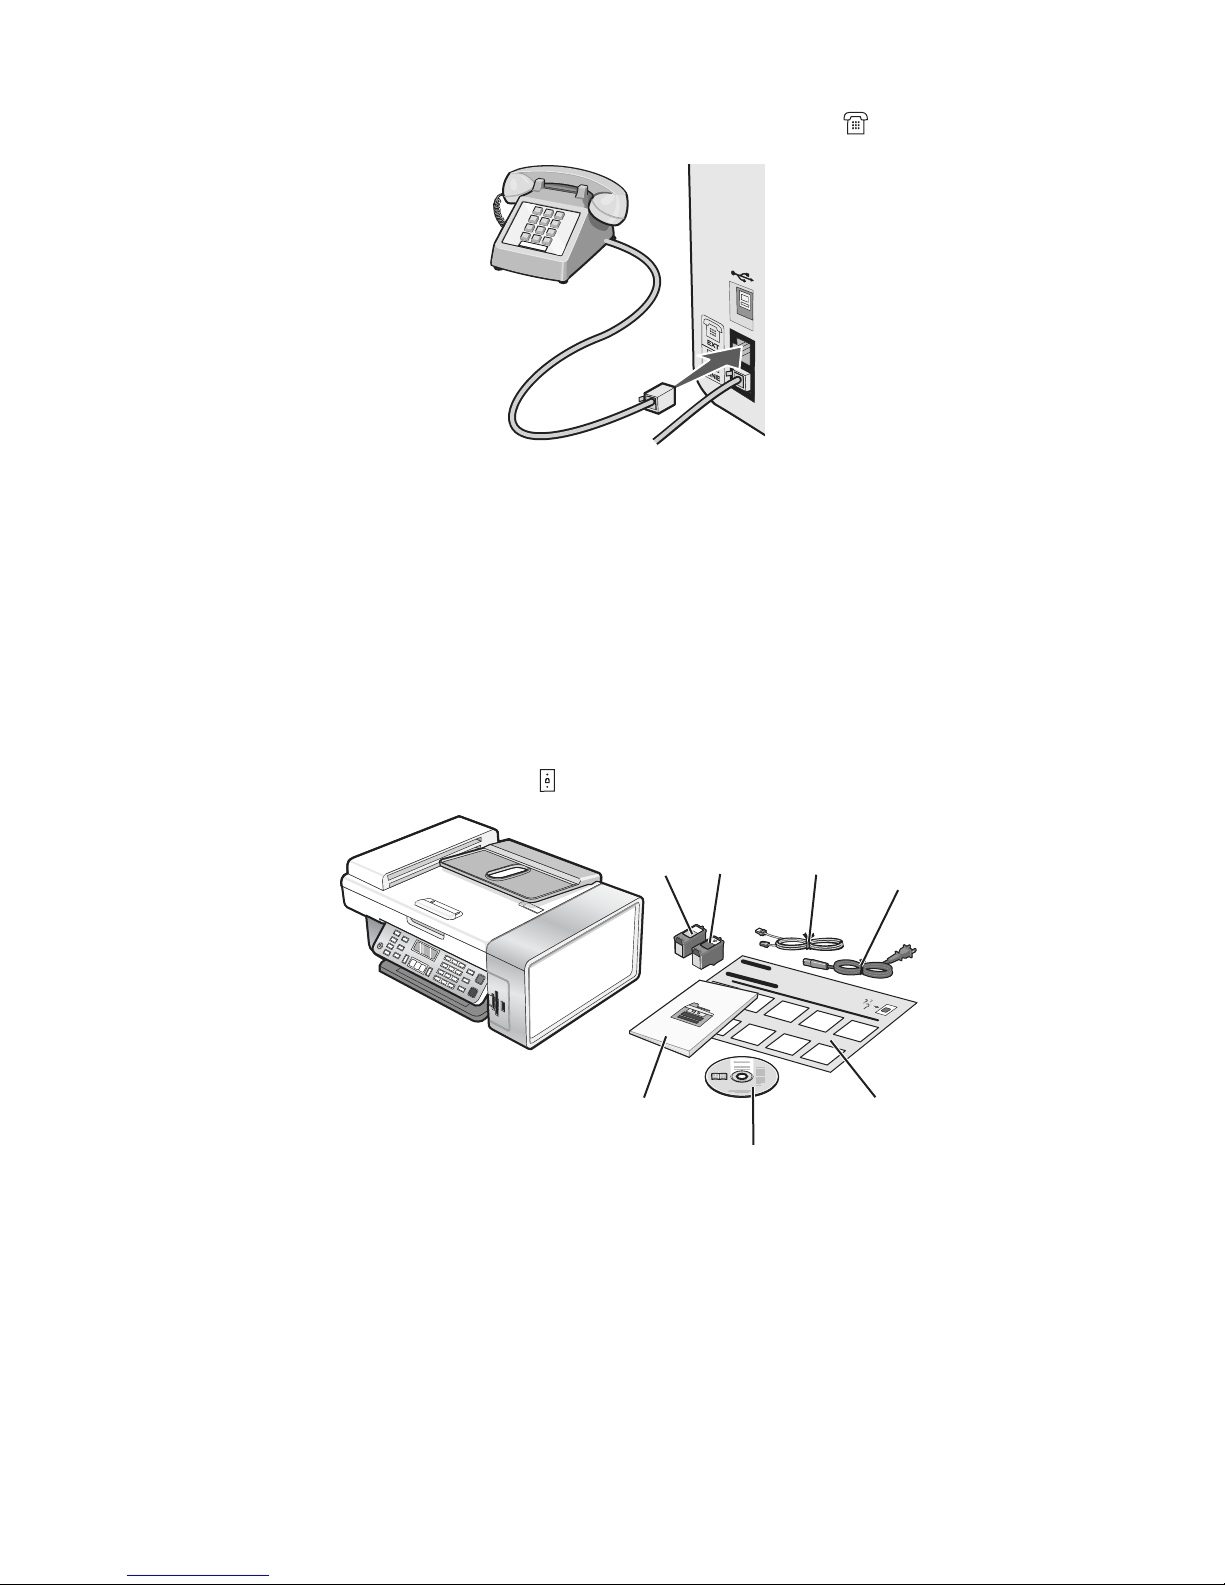
Connecting directly to a telephone wall jack
Connect the printer directly to a telephone wall jack to make copies or to send and receive faxes without using a computer.
1 Make sure you have a telephone cord and a telephone wall jack.
2 Connect one end of the telephone cord into the LINE port of the printer.
16
3 Connect the other end of the telephone cord into an active telephone wall jack.
Connecting to a telephone
Connect a telephone to the printer to use the fax line as a normal telephone line. Then set up the printer wherever your
telephone is located to make copies or to send and receive faxes without using a computer.
Note: Setup steps may vary depending on your country or region. For more information on connecting the printer to
telecommunications equipment, see “Using an RJ11 adapter” on page 14.
1 Make sure you have the following:
• A telephone
• Two telephone cords
• A telephone wall jack
2 Connect one telephone cord to the LINE port of the printer, and then plug it into an active telephone wall jack.
1
7
3 Remove the protective plug from the EXT port of the printer.
2
3
4
5
6
17
4 Connect the other telephone cord to a telephone, and then plug it into the EXT port of the printer.
Connecting to an answering machine
Connect an answering machine to the printer to receive both incoming voice messages and faxes.
Note: Setup steps may vary depending on your country or region. For more information on connecting the printer to
telecommunications equipment, see “Using an RJ11 adapter” on page 14.
1 Make sure you have the following:
• A telephone
• An answering machine
• Three telephone cords
• A telephone wall jack
2 Connect one telephone cord into the LINE port of the printer, and then plug it into an active telephone wall jack.
2
1
3
4
7
5
6
18
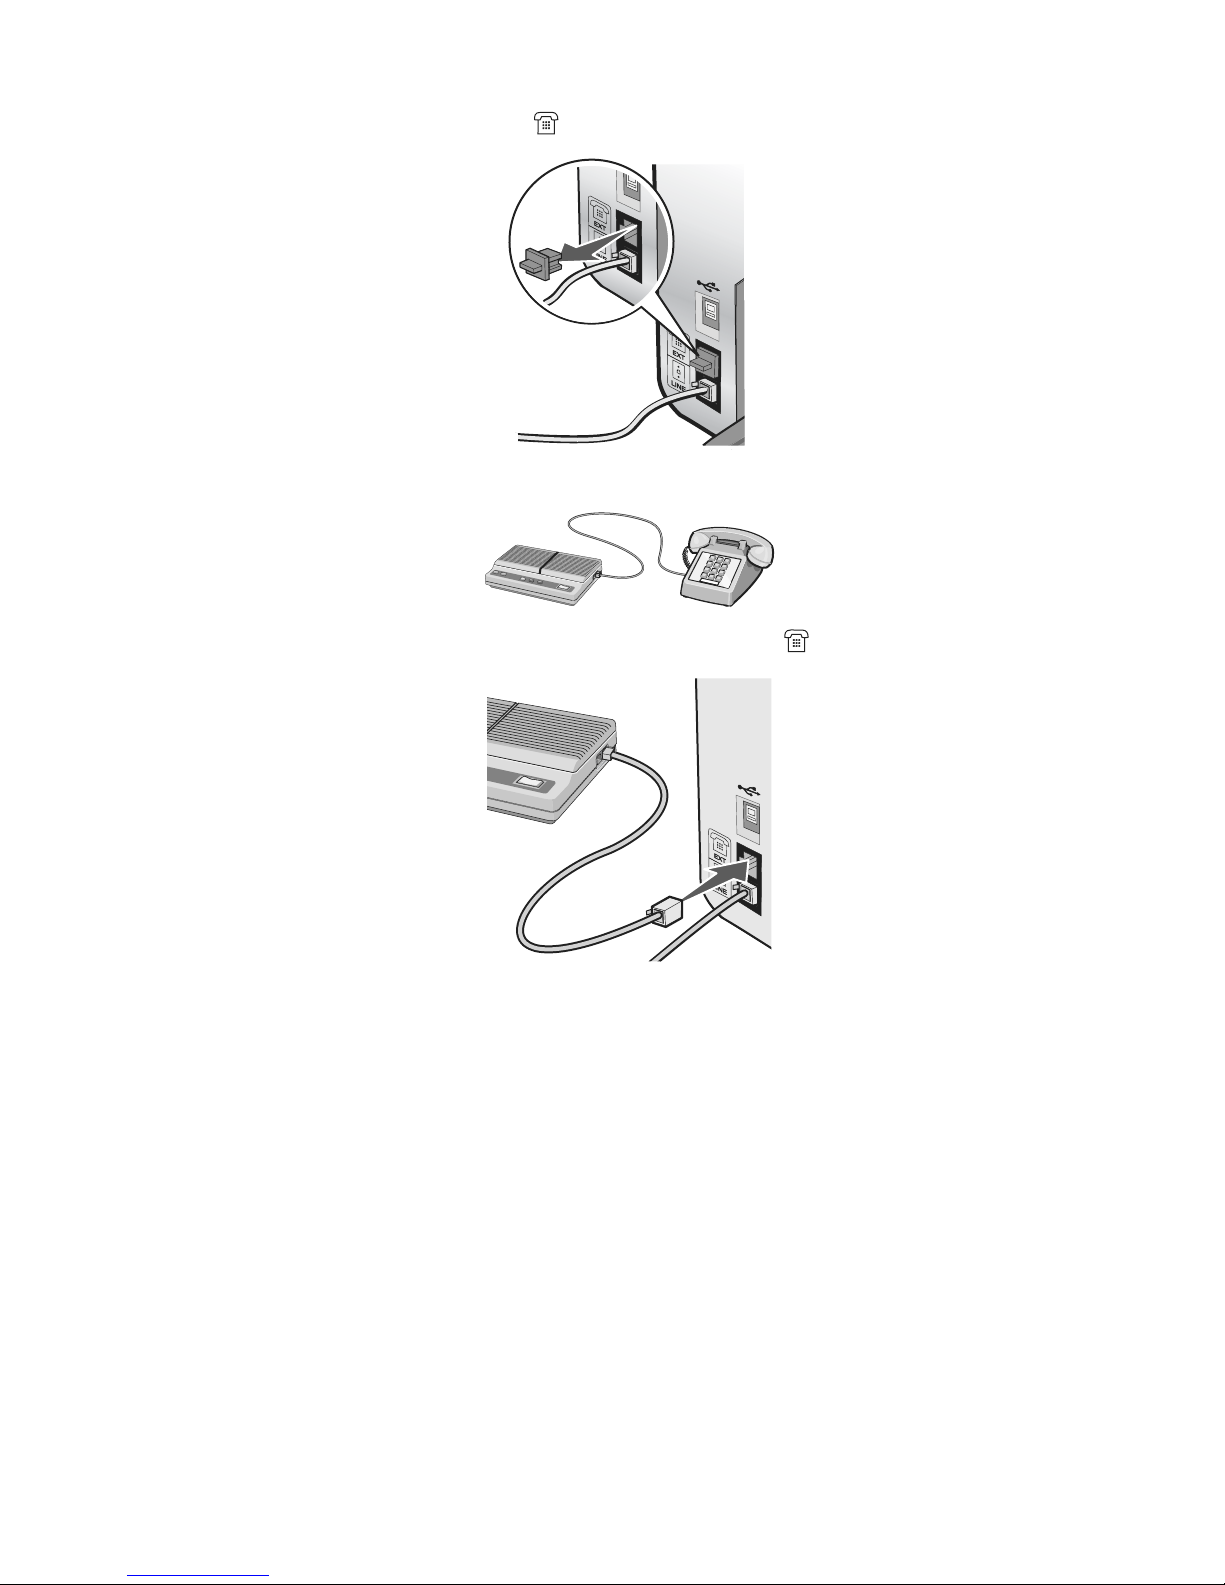
3 Remove the protective plug from the EXT port of the printer.
4 Connect a second telephone cord from the telephone to the answering machine.
5 Connect a third telephone cord from the answering machine to the EXT port of the printer.
Connecting to a computer with a modem
Connect the printer to a computer with a modem to send faxes from the software application.
Note: Setup steps may vary depending on your country or region. For more information on connecting the printer to
telecommunications equipment, see “Using an RJ11 adapter” on page 14.
1 Make sure you have the following:
• A telephone
• A computer with a modem
• Three telephone cords
• A telephone wall jack
19

2 Connect a telephone cord into the LINE port of the printer, and then plug it into an active telephone wall jack.
1
7
3 Remove the protective plug from the EXT port of the printer.
2
3
4
5
6
4 Connect a second telephone cord from the telephone to the computer modem.
20

5 Connect a third telephone cord from the computer modem to the EXT port of the printer.
21
Learning about the printer
Understanding the parts of the printer
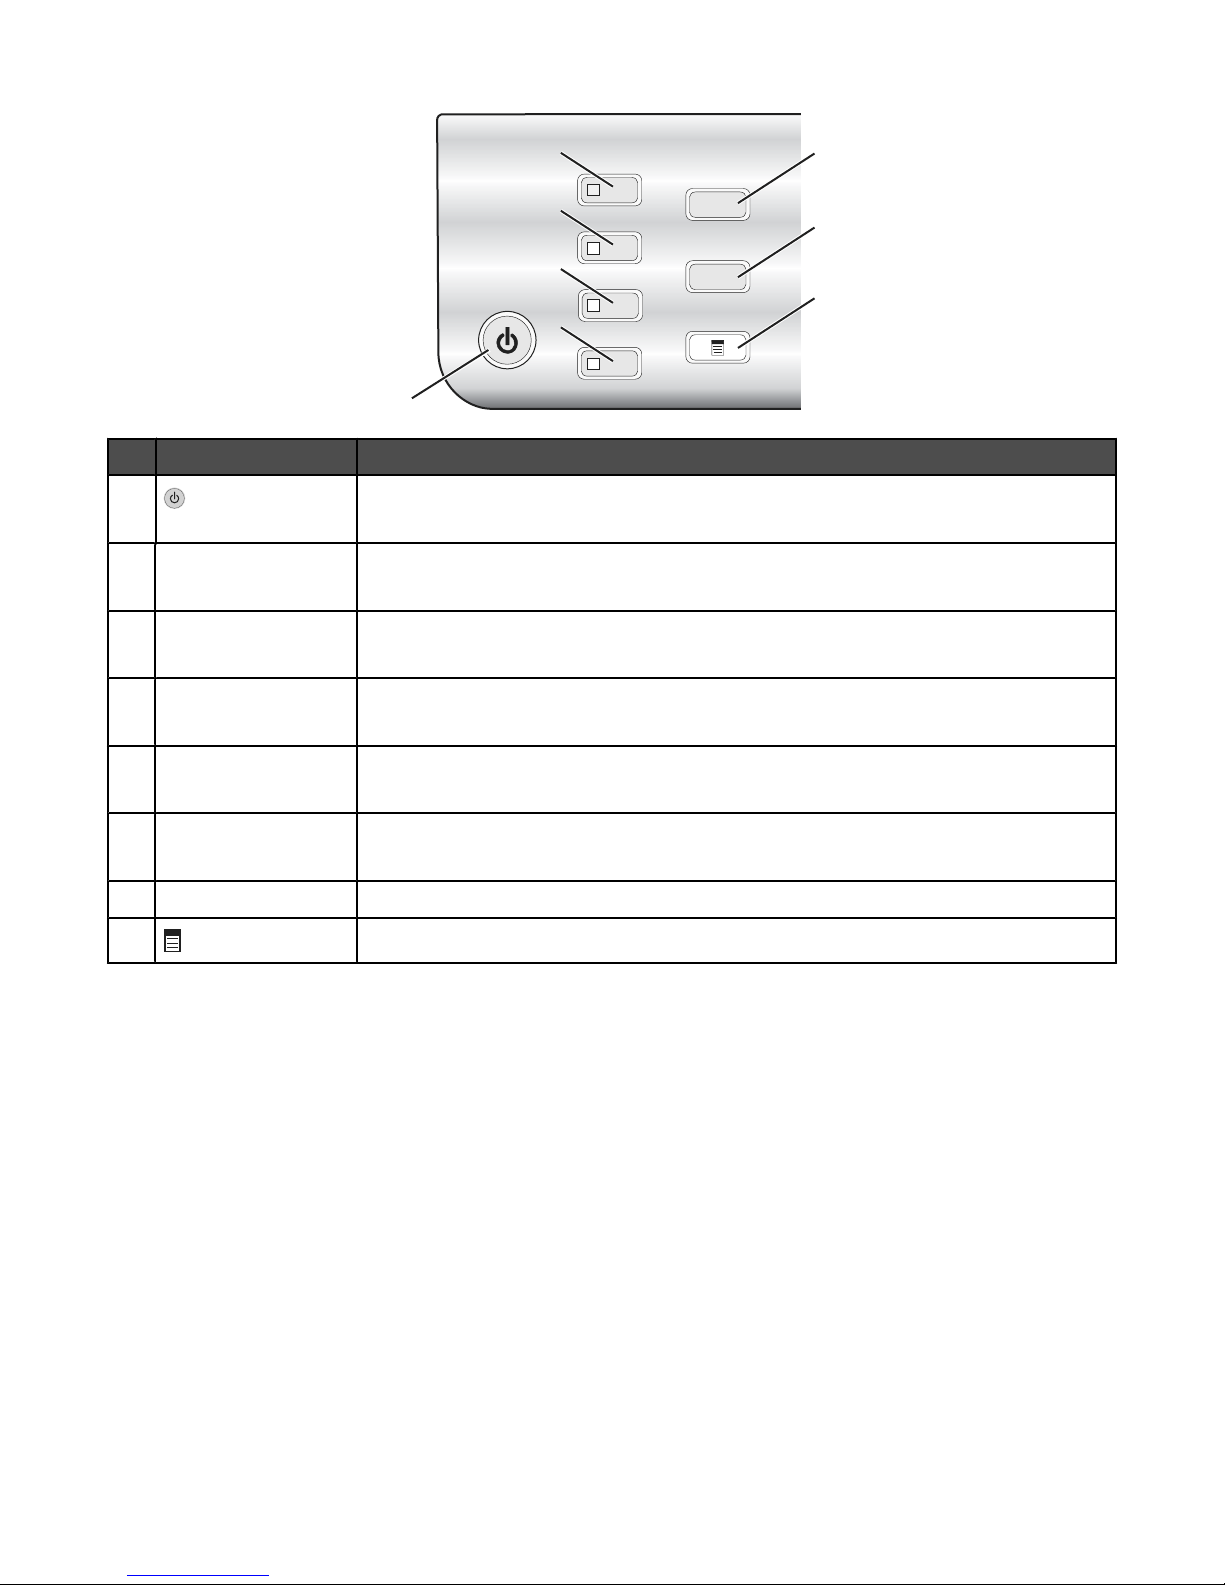
10
9
8
1
11
7
6
5
4
Use the To
Paper support Load paper.
1
Automatic Document Feeder (ADF) paper stop
2
2
3
12
• Stop paper as it exits the ADF.
• Support A4 and legal-size paper as it exits.
PictBridge port Connect a PictBridge-enabled digital camera or a flash
3
drive to the printer.
Memory card slots Insert a memory card.
4
Control panel Operate the printer.
5
For more information, see “Using the control panel” on
page 23.
Paper exit tray Hold paper as it exits.
6
Automatic Document Feeder (ADF) paper guide Keep paper straight when feeding into the ADF.
7
Automatic Document Feeder (ADF) Scan, copy, or fax multiple-page letter, legal, and A4 size
8
documents.
Automatic Document Feeder (ADF) tray Load original documents in the ADF. Recommended for
9
scanning, copying, or faxing multiple-page documents.
Note: Do not load postcards, photos, small items, or thin
media (such as magazine clippings) into the ADF. Place
these items on the scanner glass.
Paper guide Keep paper straight when feeding.
10
Top cover Access the scanner glass.
11
Scanner glass Copy, scan, fax, or remove an item.
12
22
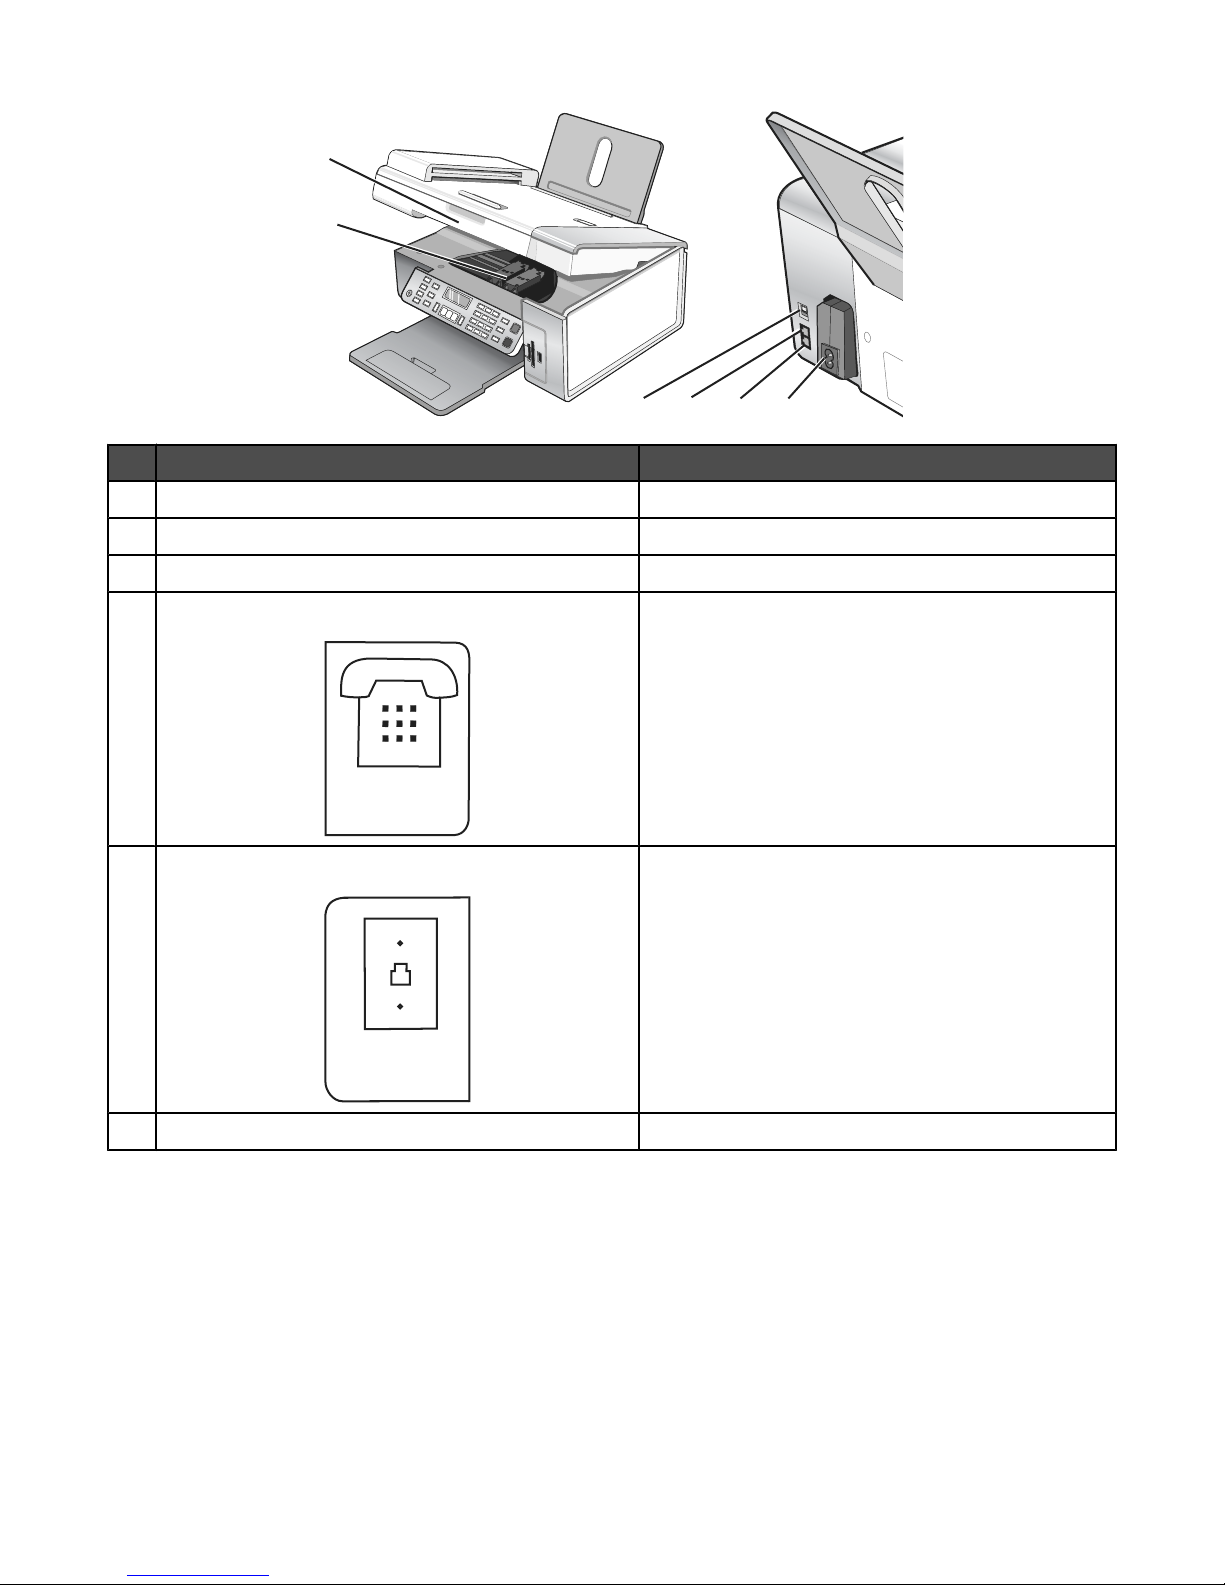
1
EXT
LINE
2
3
4
Use the To
Scanner unit Access the print cartridges.
1
Print cartridge carrier Install, replace, or remove a print cartridge.
2
USB port Connect the printer to a computer using a USB cable.
3
6
5
EXT port
4
LINE port
5
Power supply with port Connect the printer to a power source.
6
Connect additional devices, such as a data/fax modem,
telephone, or answering machine to the printer.
Note: Remove the plug to access the port.
Connect the printer to an active telephone line to send
and receive faxes. The printer must be connected to this
telephone line to receive incoming fax calls.
Note: Do not connect additional devices to the LINE
port, and do not connect a DSL (digital subscriber line),
ISDN (integrated services digital network), or cable
modem to the printer.
Using the control panel buttons and menus
Using the control panel
The display shows:
• Printer status
• Messages
• Menus
23
2
6
3
4
5
1
Press To
1
• Turn the printer on and off.
• Stop the print, copy, scan, or fax process.
Copy Mode Access the copy default screen and make copies.
2
Note: The mode is selected when the button light is on.
Scan Mode Access the scan default screen and scan documents.
3
Note: The mode is selected when the button light is on.
Fax Mode Access the fax default screen and send faxes.
4
Note: The mode is selected when the button light is on.
Photo Card Access the photo default screen and print photos.
5
Note: The mode is selected when the button light is on.
7
8
Resize
6
• In Copy mode: Change the size of a copy.
• In Photo Card mode: Change the size of a photo.
Lighter / Darker Adjust the brightness of a copy, fax, or photo.
7
8
Display the Copy, Scan, Fax, or Photo Card menu, depending on which mode is selected.
24
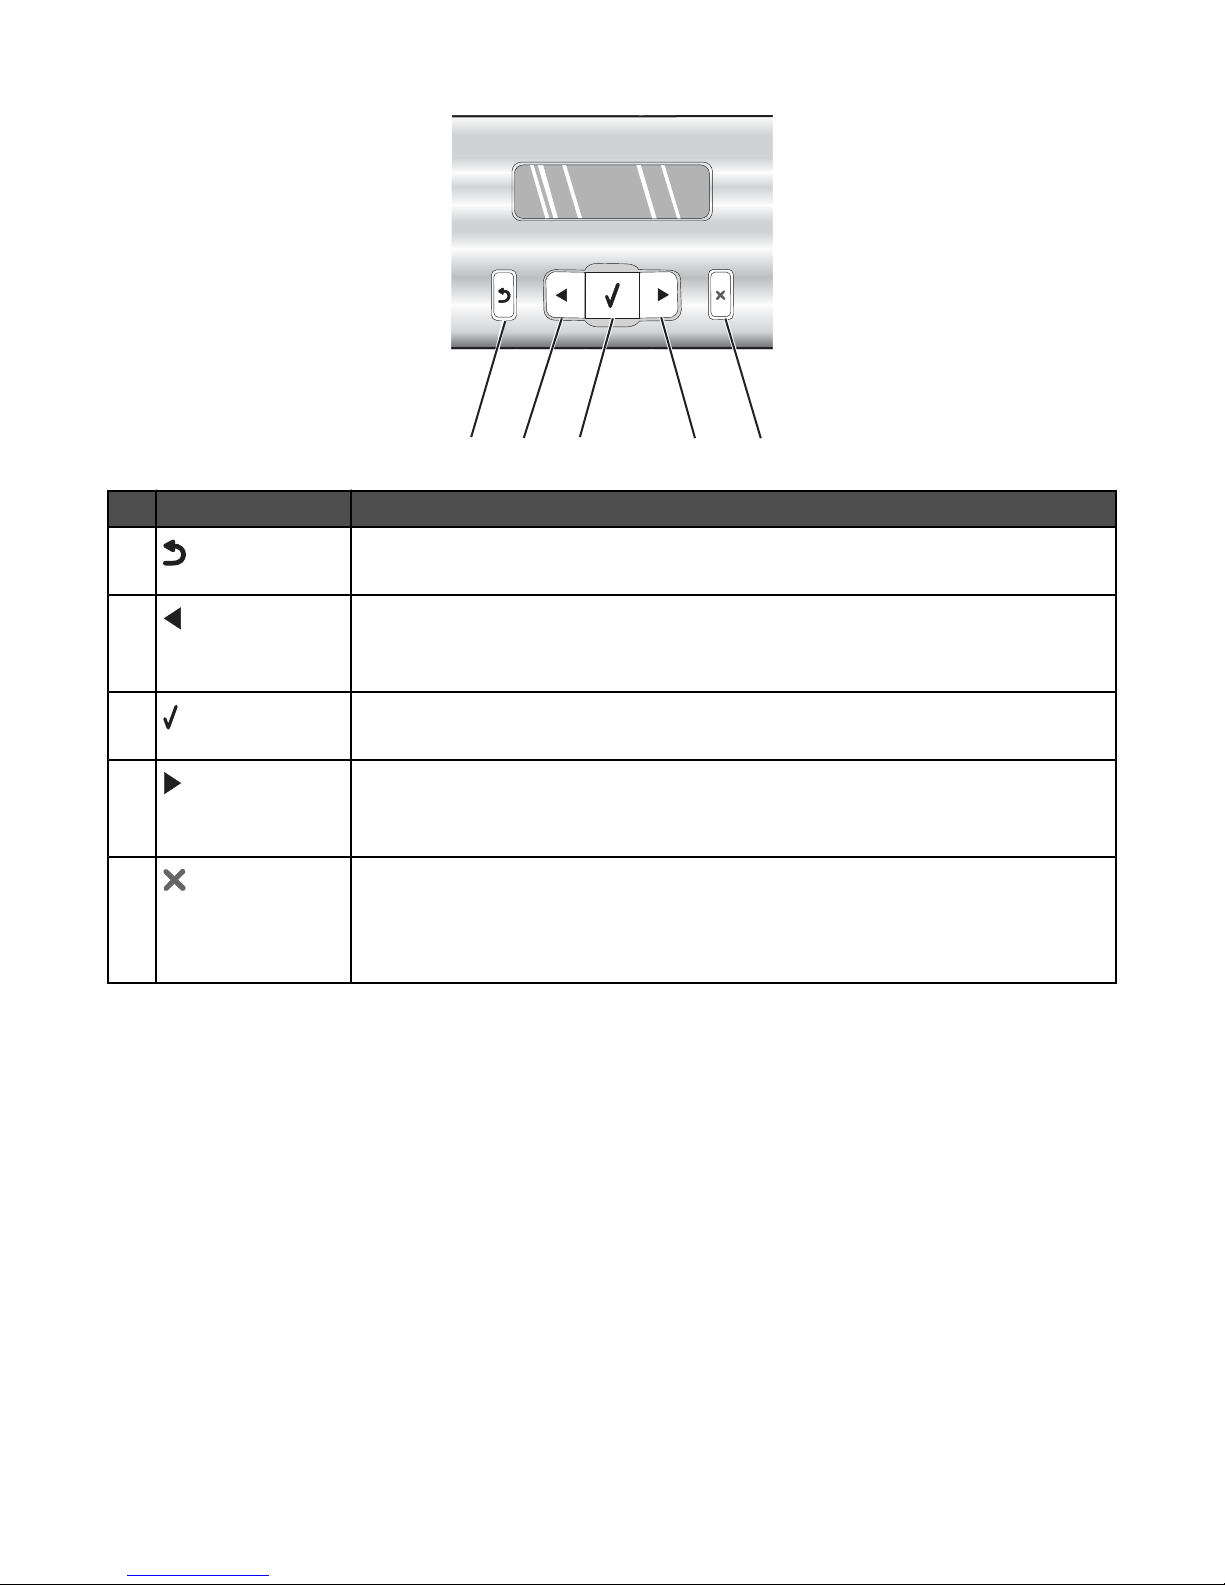
Press To
2
1
3
4
5
1
• Return to the previous screen.
• Delete a letter or number.
2
• Decrease a number.
• Delete a letter or number.
• Scroll through menus, submenus, or settings on the display.
3
• Select a menu or submenu item that appears on the display.
• Feed or eject paper.
4
• Increase a number.
• Enter a space between letters or numbers.
• Scroll through menus, submenus, or settings on the display.
5
• Cancel a print, copy, scan, or fax job in progress.
• Clear a fax number or end a fax transmission and return to the fax default screen.
• Exit a menu or submenu, and return to the default copy, scan, fax, or photo card screen.
• Clear current settings or error messages, and return to default settings.
25
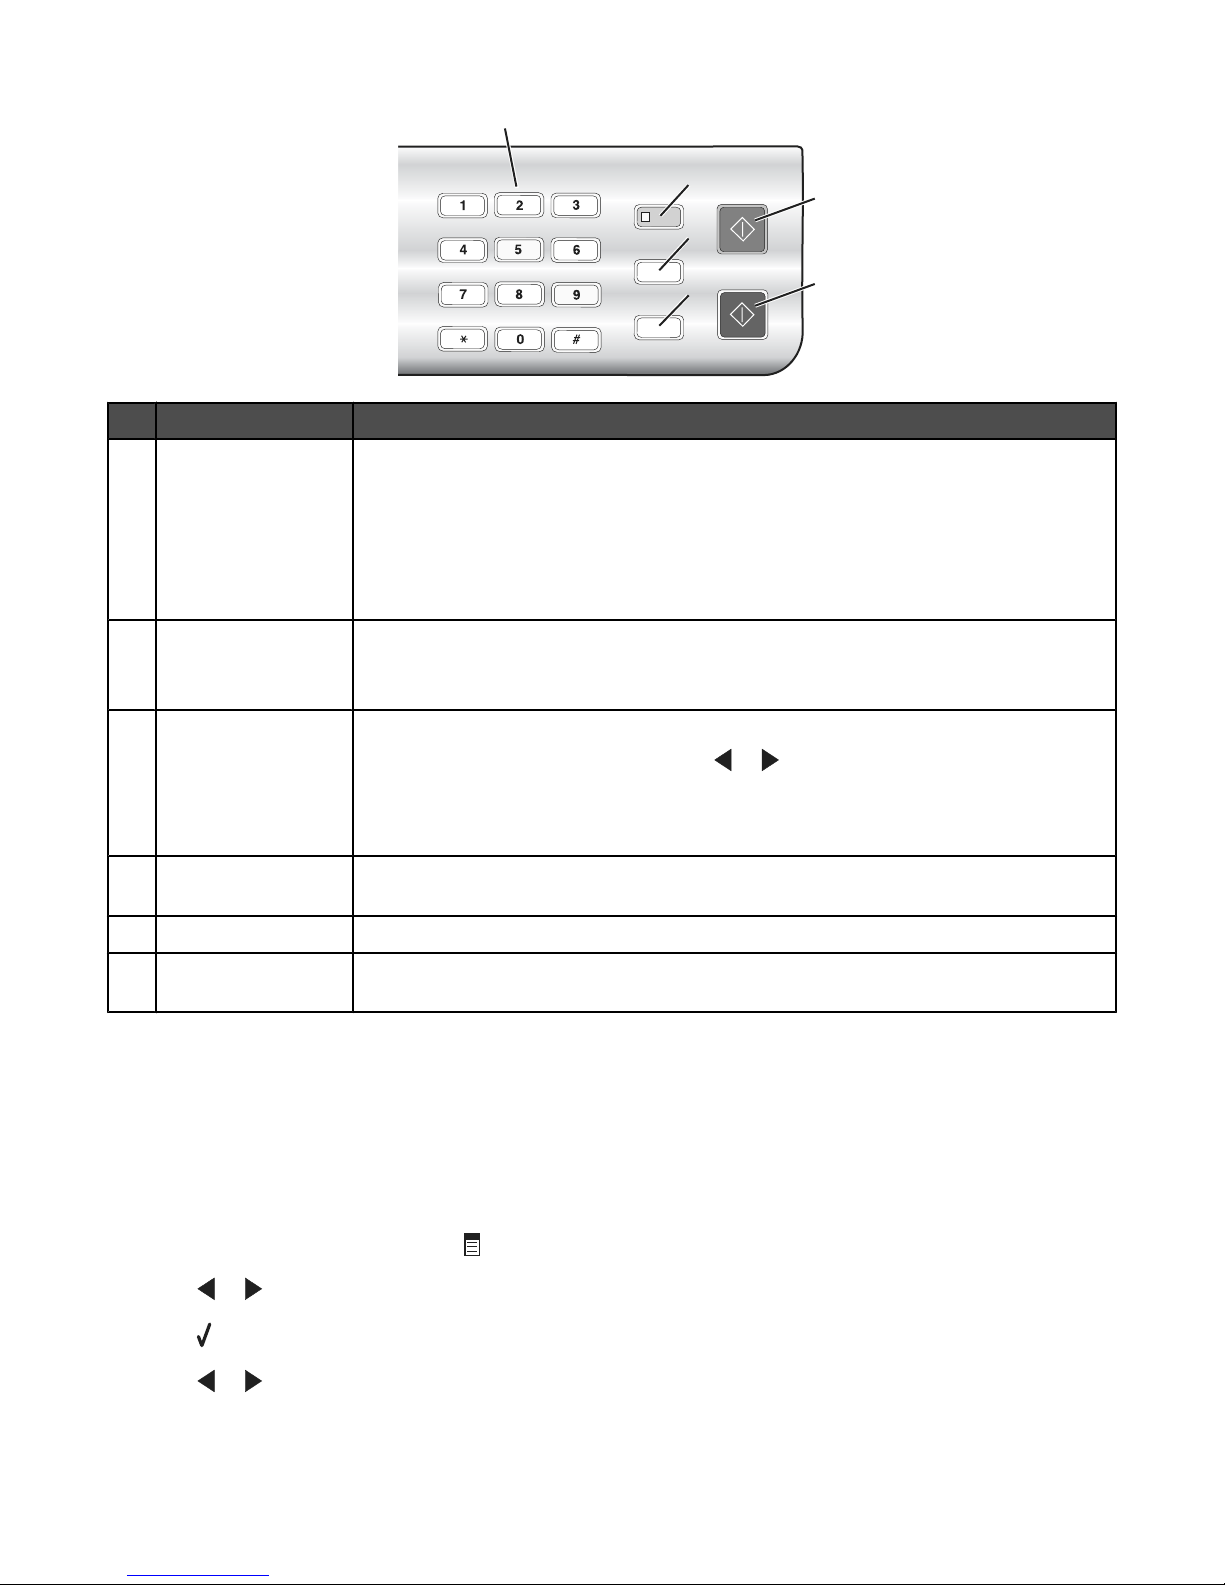
1
2
5
3
6
Press To
A keypad number or
1
symbol
4
In Copy mode or Photo Card mode: Enter the number of copies or prints you want to make.
In Fax mode:
• Enter fax numbers.
• Navigate an automated answering system.
• Select letters when creating a Speed Dial list.
• Type numbers to enter or edit the date and time shown on the display.
Auto Answer Set the printer to answer all incoming calls when the button light is on.
2
Note: For information on setting the number of rings before the printer will answer incoming
calls, see “Receiving a fax automatically” on page 72.
Pause / Redial In Fax mode:
3
• Display the last number dialed. Press or to view the last five numbers dialed.
• Insert a three-second pause in the number to be dialed to wait for an outside line or get
through an automated answering system. Enter a pause only when you have already
begun entering the number.
Phone Book Access any of the programmed Speed Dial numbers (1–89) or Group Dial numbers (90–
4
99).
Start Color Start a color copy, scan, fax, or photo print job, depending on which mode is selected.
5
Start Black Start a black-and-white copy, scan, fax, or photo print job, depending on which mode is
6
selected.
Using the Copy menu
To access and navigate the Copy menu:
1 From the control panel, press Copy Mode.
The copy default screen appears.
2 If you do not want to change a setting, press Start Color or Start Black.
3 If you want to change a setting, press
4 Press or repeatedly until the menu item you want appears.
5 Press .
.
6 Press or repeatedly until the submenu item you want or the setting you want appears.
26
7 Press .
Note: Pressing
selects a setting. An * appears next to the selected setting.
8 To go into additional submenus and settings, repeat step 6 and step 7 as needed.
9 If needed, press repeatedly to return to the previous menus and make other setting selections.
10 Press Start Color or Start Black.
Use this To
Copies
Resize
1
1
Specify how many copies to print.
• Specify the percentage for enlarging or reducing the original copy.
• Specify a specific copy size.
• Create a multiple-page poster.
Lighter / Darker
1
Quality
1
Paper Size Specify the size of the paper loaded.
Paper Type Specify the type of paper loaded.
Repeat Image
1
Collate Print one or more copies in the correct order.
1
N-Up
Original Size
Original Type
1
1
Adjust the brightness of a copy.
Adjust the quality of a copy.
Choose how many copies of an image to print on a page.
Choose how many pages to print on a page.
Specify the size of the original document.
Specify the type of the original document.
Tools
• Maintenance
– View ink levels.
– Clean cartridges.
– Align cartridges.
– Print a test page.
• Device Setup—Customize printer setup settings.
• Defaults—Customize printer settings.
1
Temporary setting. For information on saving temporary and other settings, see “Saving settings” on page 31.
Using the Scan menu
To access and navigate the Scan menu:
1 From the control panel, press Scan Mode.
The scan default screen appears.
2 Press or repeatedly until the scan destination you want appears.
3 If you do not want to change a setting, press Start Color or Start Black.
4 If you want to change a setting, press
5 Press or repeatedly until the menu item you want appears.
.
27
6 Press .
7 Press or repeatedly until the submenu item you want or the setting you want appears.
8 Press .
Note: Pressing
selects a setting. An * appears next to the selected setting.
9 To go into additional submenus and settings, repeat step 7 and step 8 as needed.
10 If needed, press repeatedly to return to the previous menus and make other setting selections.
11 Press Start Color or Start Black.
Use this To
1
Quality
Original Size
Tools
1
Adjust the quality of a scan.
Specify the size of the original document.
• Maintenance
– View ink levels.
– Clean cartridges.
– Align cartridges.
– Print a test page.
• Device Setup—Customize printer setup settings.
• Defaults—Customize printer settings.
1
Temporary setting. For information on saving temporary and other settings, see “Saving settings”
on page 31.
Using the Fax menu
To access and navigate the Fax menu:
1 From the control panel, press Fax Mode.
The fax default screen appears.
2 If you do not want to change a setting, enter the fax number and press Start Color or Start Black.
3 If you want to change a setting, press
4 Press or repeatedly until the menu item you want appears.
5 Press .
6 Press or repeatedly until the submenu item you want or the setting you want appears.
7 Press .
Note: Pressing
selects a setting. An * appears next to the selected setting.
8 To go into additional submenus and settings, repeat step 6 and step 7 as needed.
9 If needed, press repeatedly to return to the previous menus and make other setting selections.
10 Press Start Color or Start Black.
.
28
Use this To
1
Quality
Phone Book Add, edit, and print names and fax numbers of individuals or groups.
On Hook Dial Dial a telephone number while listening to the call through a speaker on
Delay Fax Enter a specific time to send a fax.
Auto Answer Answer all incoming phone calls.
Lighter / Darker
1
Adjust the quality of a fax you are sending.
the printer. This is useful when you must navigate an automated answering
system before sending your fax.
Note: Make sure the date and time are entered correctly before setting a
specific time to send a fax.
Adjust the brightness of a fax you are sending.
Fax Setup
• Print fax history or transmission status reports.
• Customize settings for receiving a fax.
• Select fax printing options.
• Customize settings for sending a fax.
• Block faxes from the numbers you specify.
Tools
• Maintenance
– View ink levels.
– Clean cartridges.
– Align cartridges.
– Print a test page.
• Device Setup—Customize printer setup settings.
• Defaults—Customize printer settings.
1
Temporary setting. For information on saving temporary and other settings, see “Saving settings” on page 31.
Using the Photo Card menu
1 If necessary, press Photo Card, or insert a memory card or a flash drive into the printer. For more information, see
“Inserting a memory card” on page 53 or “Inserting a flash drive” on page 54.
2 Press or repeatedly until the menu item you want appears.
3 Press .
4 Press or repeatedly until the submenu item you want or the setting you want appears.
5 Press .
Note: Pressing
selects a setting. An * appears next to the selected setting.
6 To go into additional submenus and settings, repeat step 4 and step 5 as needed.
7 If needed, press repeatedly to return to the previous menus and make other setting selections.
8 Press Start Color or Start Black.
29
Menu item Action
Proof Sheet Print and then scan a proof sheet:
• for all photos on the memory card
• for the most recent 20 photos
• by date
For more information, see “Printing photos stored on a memory device using the
proof sheet” on page 56.
Print Photos Print photos directly from a memory card or flash drive.
Save Photos
• Save photos stored on a memory card or flash drive to the computer.
• Copy photos from a memory card to a flash drive.
Photo Effects
Paper Size1
Photo Size1
1
Layout
1
Quality
Paper Type1
Tools
1
2
2
2
Apply red-eye reduction, color effects, or automatic image enhancement to your
photos.
Specify the size of the paper loaded.
Specify the size photo you want.
Center one photo on a page, or specify the number of photos to print on a page.
Adjust the quality of printed photos.
Specify the type of paper loaded.
• Maintenance
– View ink levels.
– Clean cartridges.
– Align cartridges.
– Print a test page.
• Device Setup—Customize printer setup settings.
• Defaults—Reset printer settings to factory defaults.
1
Setting will return to factory default setting when a memory card or flash drive is removed.
2
Setting must be saved individually. For more information, see Note below table.
Note: To save Paper Size, Paper Type, or Photo Size settings:
1 Press
.
2 Press or repeatedly until Tools appears.
3 Press .
4 Press or repeatedly until Defaults appears.
5 Press .
6 Press or repeatedly until the setting type you want appears.
7 Press .
8 Press or repeatedly until the setting you want appears.
9 Press .
30
 Loading...