

Page 1
Français
INTRODUCTION
In édit ! W inni e l’O urs o n, le héros chér i des enf a nts , déb oule dan s sa voit u re
ra dioc omma ndée ! C e jou et a été conç u en pen s ant aux jeun es e n fan t s : pris e
en ma in f acil e, d esi g n a t tra y ant et fo n cti o ns amu s ant e s. Fan t ast i que ! La
ra dioc omma nde pr end la f o rme d’ un po t d e m iel ! Re gard ez les ph are s
s’ allu mer comm e su r un e vr aie voit ure !
GUIDE DE PRISE EN MAIN
RC CAR
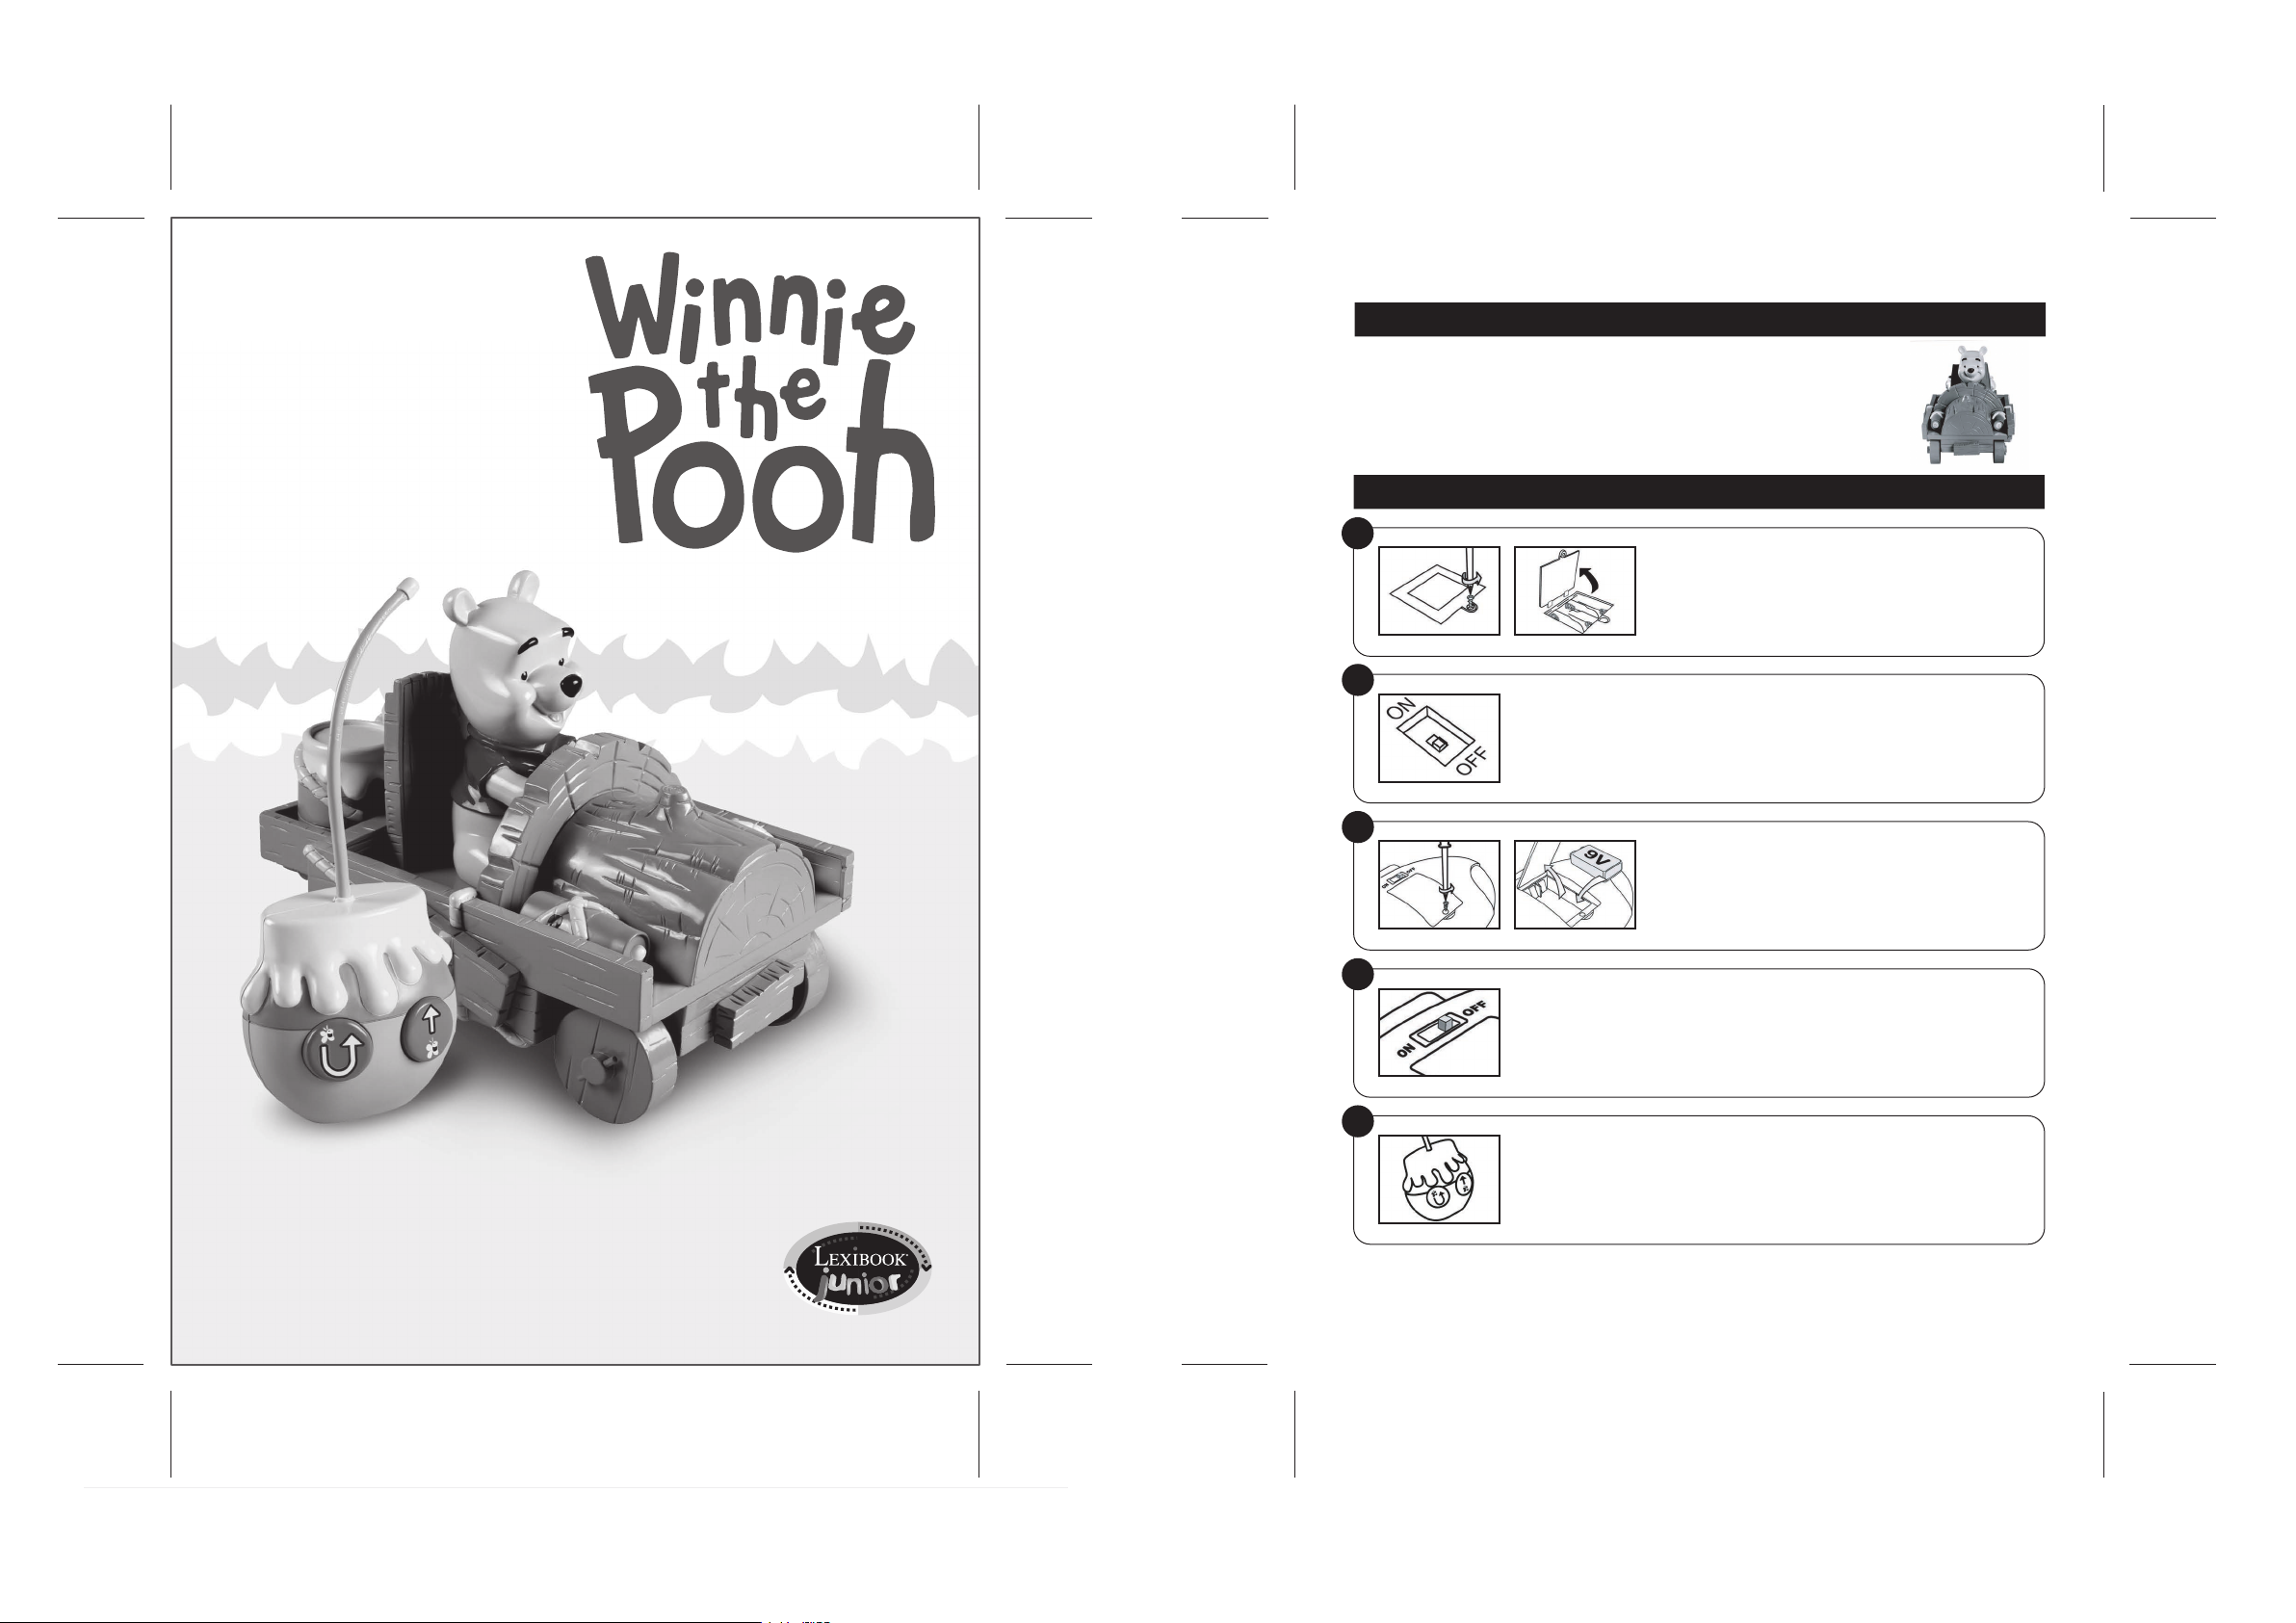
1
As sure z v o us q ue la v oitu re r adi o com m and é e n e so it
pa s en mar c he. Ouv r ez l e co mpar time nt à pil e s si tué
so us la vo i tur e à l ’aid e d ’un t o urn e vis . I nsér ez 4 pil e s
de t ype LR 6 ou AA (no n f our n ies ) e t refe rmez l a port e
du com part imen t. R esse rrez la vis.
2
Me ttez la vo i tur e ra dioc omma ndée en ma r che en pla çant le sél ecte ur
ON /OFF sit ué s ous la v oitu re e n po siti on O N.
3
As sure z vou s que la radi o com m and e ne soit pas en
ma rche . Ouv r ez le comp arti ment à pile s sit u é der rièr e
la rad i oco m man d e à l’a i de d’un tour n evi s . Insére z 1
pi le d e 9 V (n on fou rnie ) e t refer mez la po rte du
co mpar time nt. Ress erre z la vis .
4
Me ttez la ra dioc omma nde en mar che en pla çant le bo uton ON / OFF si t ué
de rriè re l a ra dioc omma nde en p osit ion ON.
Français
English
Español
Português
Italiano
Deutsch
Nederlands
Ελληνικά
INSTRUCTION MANUAL
GUIDE DE L’UTILISATEUR
IT050
5
Pour jou er, tenez la radiocommande ave c vos deux mains et ap pu ye z sur les
touches avec vos pouces. Appuyez s ur la t ou ch e de dr oi te pour avancer et
appuyer celle de gauche pour re cu le r vers la droite. Quand votre enfant a
terminé d e jouer avec sa voiture radiocommandée Wi nn ie l'Ourson, veuillez
éteindre la voiture et sa radiocommande afin de préserver l’énergie des piles.
1
Page 2
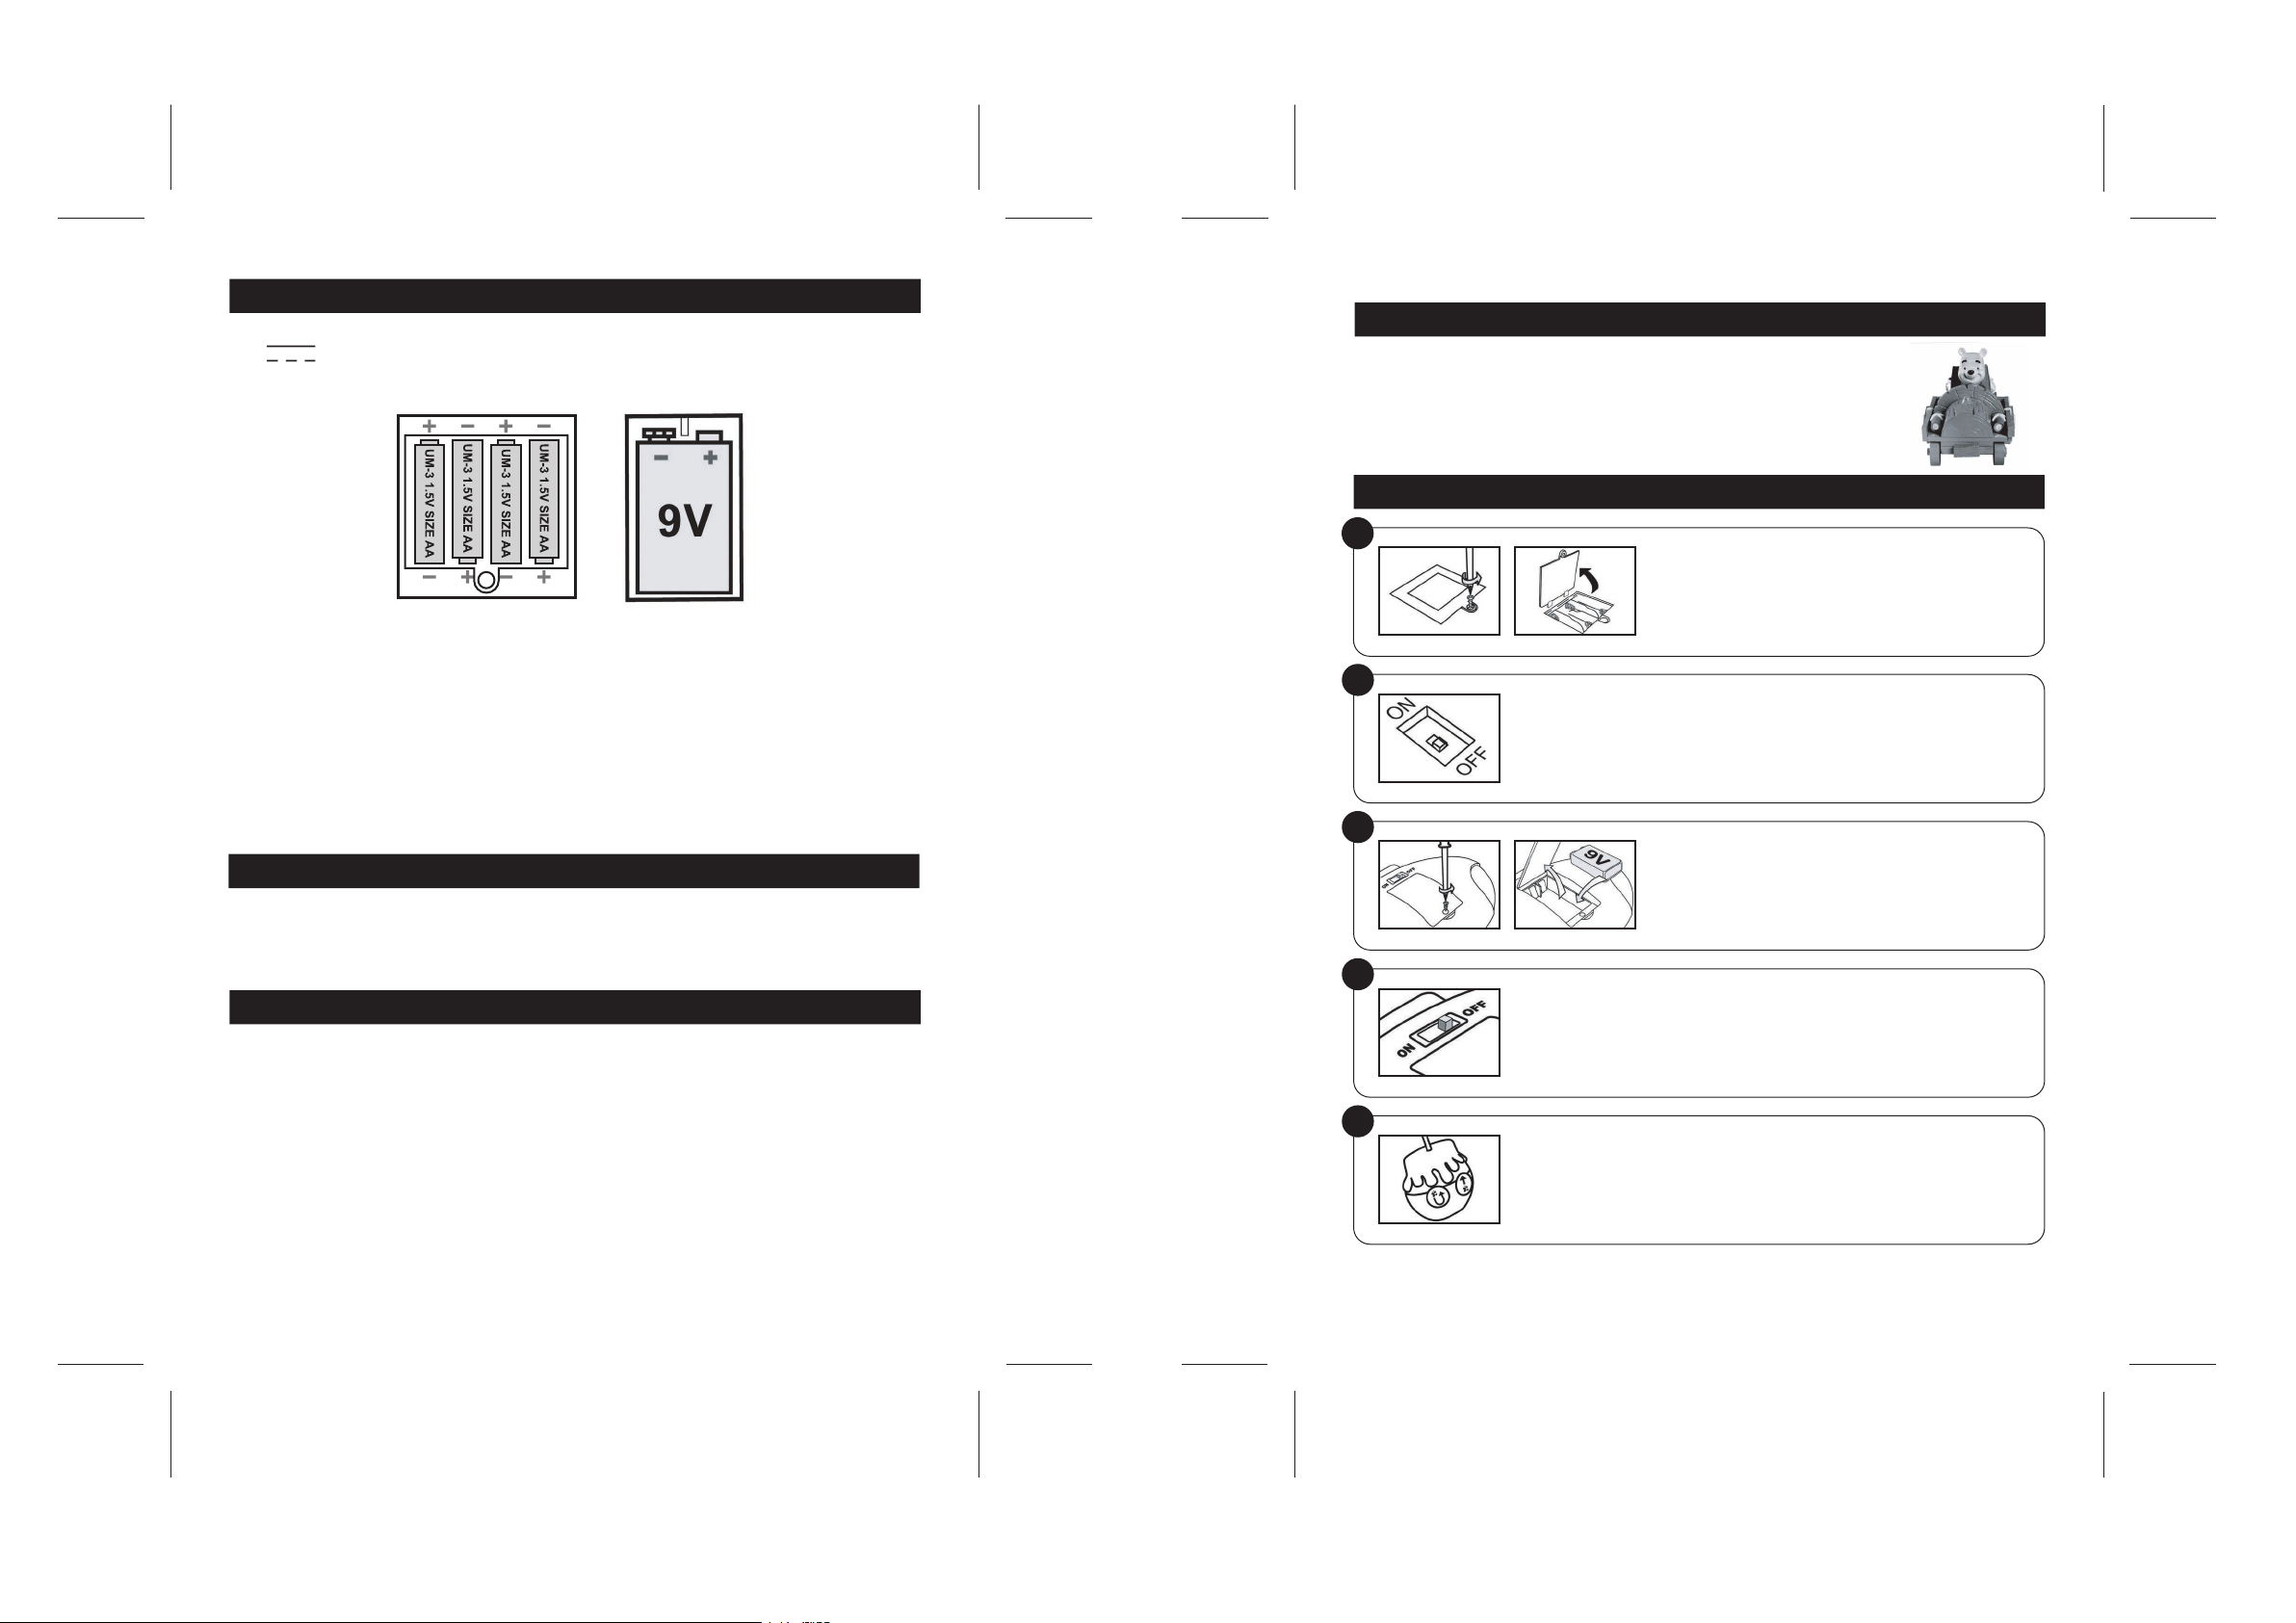
ALIMENTATION
La vo iture ra d i ocomm and é e de W i n n ie l ' O u rson f o nction n e avec 4 piles al c aline s L R 6 ou AA de
1. 5 V d’une c a p a cité d e 2 . 25 Ah e t 1 pile d e 9 V typ e 6 L R61 (t o u t e s non i n c l uses).
Pour installer le s piles,veuillez vous référer aux instructions données au x étapes 1 et 3 du guide
de prise en main.
English
INTRODUCTION
Fa ntas tic! Wi n nie th e Po oh, chi l dre n ’s bel oved be a r, r i din g on a rem o te cont rol
ca r! Thi s toy was co nce i ved wi th you n g chil dren in mind : si m ple op erat ion,
at trac tive d esig n and fun feat ures . Wow ! T he re m ote con tro l take s the sha pe
of a h oney pot ! Wat c h t h e c a r ’s head ligh ts f lash jus t li ke r eal cars do !
START-UP GUIDE
Ne pas ut ili s er de pil e s rec harg eabl es. Ne pas rech a rge r les piles non re cha r gea b les . Ret i rer les
ac cumu late urs du je u a van t d e l es rec h arg e r. N e char ger les a c cum u lat e urs qu e s ous la s u rve i lla n ce
d' un a dult e. N e pa s mél ange r di ffé r ent s ty p es d e pi les o u a c cum u lat e urs , ou des p ile s et accu mula
te urs n e ufs e t usa g és. C e jeu d oit ê t re alime nté d e s pil es spé cifi ées u n iqu e men t . Les p ile s et
ac cumu late urs d oive nt êt r e mis en pl a ce en resp ecta nt la p olar ité. Les p i les e t acc umul ateu rs us a gés
do iven t ê tre enl evés du jo uet. L e s b orn e s d 'un e p i le ou d'u n a c cum u lat e ur ne doi v ent pa s ê t re mis e s
en c our t -ci r cui t . Ne pas jete r les pil es au feu. Ret irer l es pil es en c as de non util isat ion pro lon g ée.
Veu i lle z co n ser v er l ’em b all a ge d e c e je u ca r il con t ien t d’ i mpo r tan t es i nfo r mat i ons .
ATTENTION : s i le pr od ui t présente un mauvais fonctionnement o u subit d es décharges électrostatiques,
éteindre puis al lu me r le produit à l'aide du b ou to n MARCHE/ARRET. Si le p ro du it ne fonctionne to uj ou rs
pas correctement, enlever puis remettre les piles.
ENTRETIEN
Pour nettoyer l e jeu, utilisez uniquement un c hi ffon doux légèrement imbibé d’eau, à l’exclusion de t ou t
produit détergent. N’exposez pas le jeu à la lumière di re ct e du soleil ni à toute autre source d e chaleur.
Ne le mouillez pa s. Ne le d ém on te z pas, ne le la is se z tomber. Retirez les pi le s si le produit ne va pas ê tr e
utilisé pendant une longue période.
GARANTIE
NOTE : veuillez garder ce mode d’emploi, il contient d’importantes informations.
Ce produit est couvert par notre garantie de 2 ans.
Pour toute mise en œu vr e de la garantie ou de se rv ic e après vente, vous devez vous adresser à votre
revendeur muni de votre preuve d’achat. Notre garantie couvre les vices de matériel ou de montage
imputables au con st ru ct eu r à l’ex cl us io n de toute détérioration provenant du non-respect de la notice
d’utilisation ou de toute intervention intempestive sur l’article (telle que dém on ta ge , e xp os it io n à la
chaleur ou à l’humidité …). Il e st recommandé d e conserver l ’e mb al la ge pour t ou te référence ul té ri eu re .
Dans u n souci constant d’amélioration, no us pouvons être amenés à modifier les c ou le ur s et les détails
du produit présenté su r l’em ba ll ag e. Ne convient pas à u n enfa nt de moins de 36 mois car co nt ie nt de
petits éléments détachables susceptibles d’être avalés.
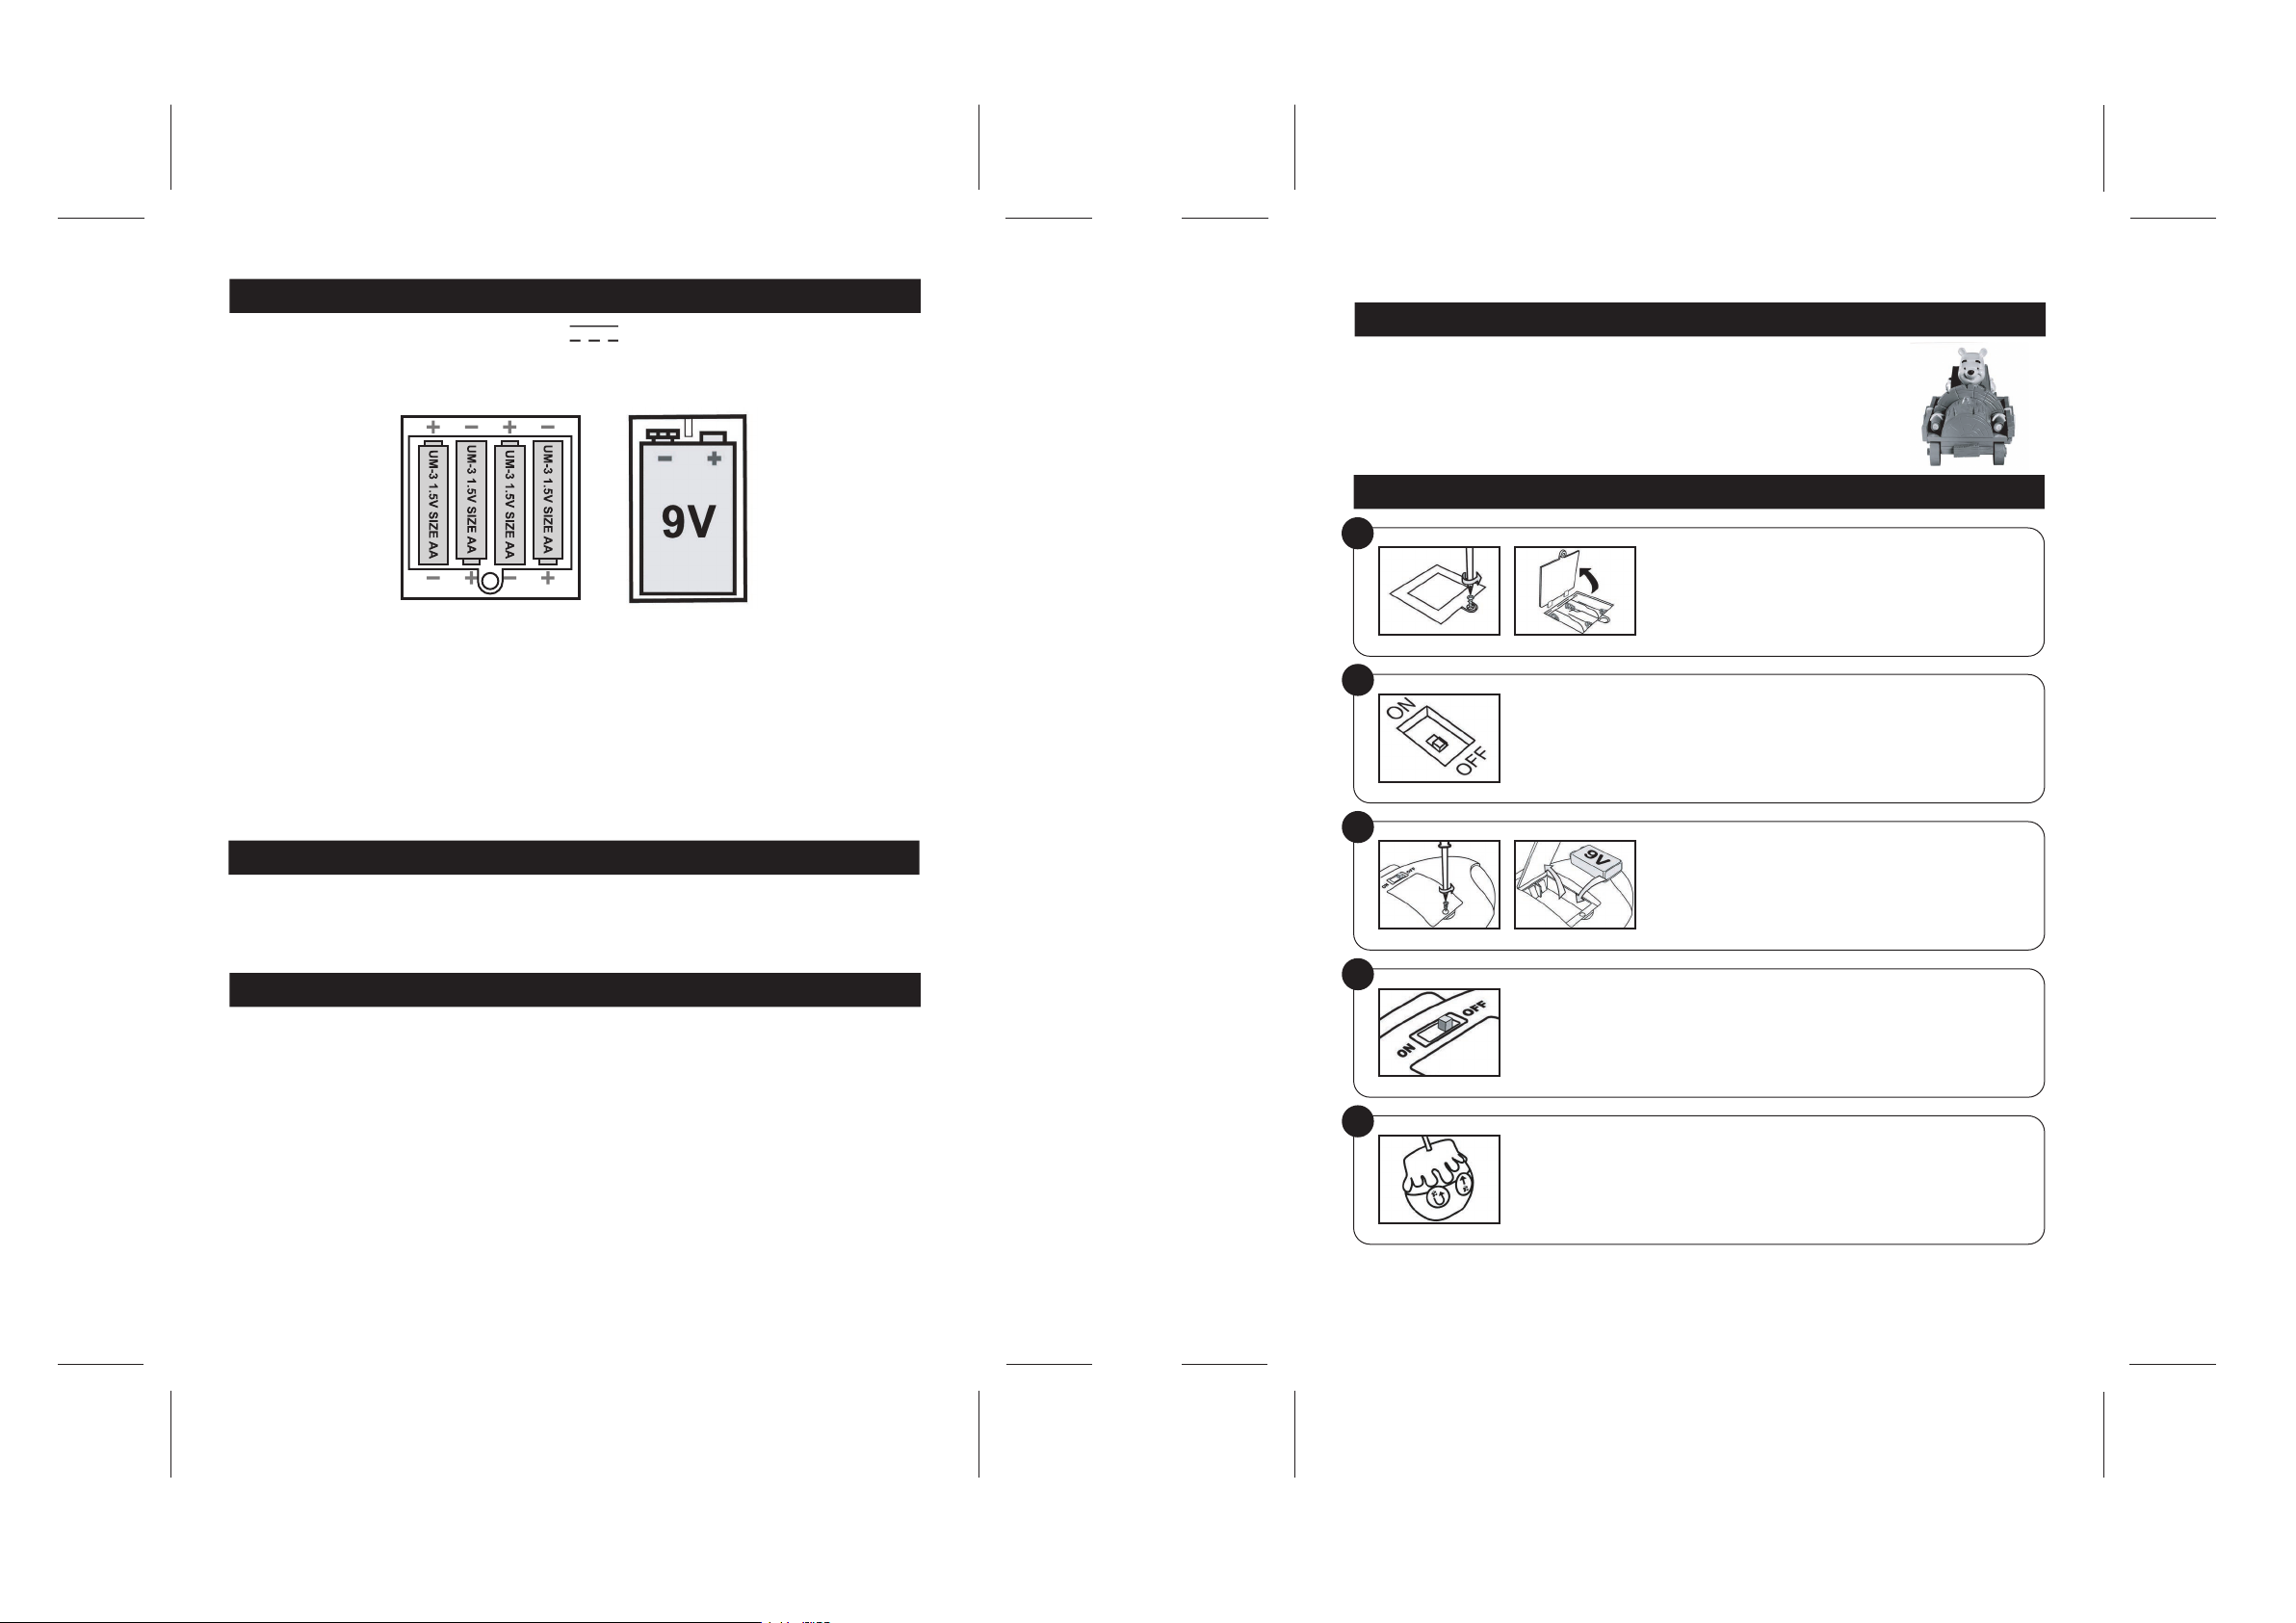
1
Ma ke sure th e remo t e cont r ol car is no t turn e d on.
Op en th e batt ery com par t men t l oca t ed at the bott om
si de o f the RC c a r us ing a scr e wdr i ver. I nser t 4 x AA
ba tter ies (not inc lude d) an d cl ose bac k th e bat tery
do or. Tigh ten the scre w.
-
2
Turn the r emot e c ont r ol car on usi ng the ON/ OFF swi tch loc ated at the
bo ttom sid e of the car.
3
Ma ke su r e th e remo te co n tro l is not t urn e d on . Open
th e batte ry comp a rtm e nt loc a ted at the ba c k of the
re mote cont rol u s ing a scre wdri ver. Inser t 1 x 9 V
ba tter y (no t inc lude d) an d clo se ba c k th e bat t ery
do or. Tigh ten the scre w.
4
Turn the rem ote con t rol on usin g t h e O N/OF F sw itch lo c ate d at the ba c k
of the rem ote.
5
To play, hold the remote control with both hands and use your thumbs to
press the keys. Press the right key to go forward and the left key to go
backwards towards the r ig ht . Remember to turn t he RC car and its r em ot e
control off when you are finished playing to preserve battery power.
Réf érence: IT050
© 2005 LE XIBOOK®
32
Page 3
POWER SUPPLY
Winnie the Pooh RC c ar w or ks with 4 alkaline 1.5V 2. 25 Ah batteries type LR6 or A A and 1 x 9 V
battery type 6LR61 (all not included).
To install the batteries, please follow the instructions given in steps 1 & 3 of the start-up guide.
Español
INTRODUCCIÓN
iF antá stic o! iW inni e the P ooh , el oso más q ueri do po r los n iños , mon tand o en
un coche de cont rol re moto ! Este jugue te se ha co nce b ido pe nsa n do en lo s
ni ños: fu ncio nami ento se ncil lo, dis eño atr acti vo, y d ive r tid a s f unci ones .
iE stup endo ! i El cont rol tie n e f orm a d e ta rro de mie l! i Mir a c o mo luc e n l os faro s
co mo l os c oche s de ver dad!
GUÍA DE PUESTA A PUNTO
Do not use re ch ar ge ab le batteries. Non-rechargeable batteries ar e not to be re ch ar ge d. Rechargeable
batteries are to be removed from the toy before being char ge d. Rechargeable batteries are on ly to be
charged under adult supervision. Different types of batt er ie s or new and used bat te ri es are not to be
mixed. Only batteries of the same o r equivalent type as recommended a re to be us ed . Batteries are to be
inserted with the c or re ct polarity. Exhausted batteries are to be removed from th e toy. The s up pl y
terminals are not to be short circuited. Do not throw batteries in to a fire. Remove t he batteries if y ou are
not going to us e the game for a long period of ti me . Please retain the p ac ka gi ng for future re fe re nc e since
it contains important information.
WARN IN G : i f the unit malfunctions or receives an electrostatic sh oc k, switch the unit off and on again
using the ON/OFF button. If this proves to be ineffective, remove the batteries and insert them again.
MAINTENANCE
To clean the game, use o nl y a soft cloth moistened with w at er ; do not use any detergent pr od uc t. Do not
expose the game to direct sunlight or to any othe r source of heat. Do not get the game wet. Do not
dismantle or drop the game.
Remove the batteries if the toy is not going to be used for an extended period of time.
WARRANTY
NOTE : please keep this instruction manual, it contains important information.
This product is covered by our 2-year warranty.
For any claim under the warranty or after sale s er vi ce , please contact yo ur distributor and present a v al id
proof of purc ha se . Our warranty covers any manufacturing material and workmanship defect, with the
exception of any deterioration arising fro m the non-observance of the instruction manual or fro m any
careless action implemented o n this it em (such as dismantling, exposition to heat an d humidity, etc.). In
a bi d to keep improving o ur se rv ic es , we could implement mo di fi ca ti on on the colours and th e details of
the pr od uc t shown on t he packaging. Not suitable fo r children under 36 months old, as it contains small
detachable elements which could be swallowed.
Ref erence: IT050
© 2005 LE XIBOOK®
1
Asegúrate de que el coche de control remoto esté
apagado. Abre el compartimento de las pilas situado en
la parte i nf er io r del c oche, utilizando un de sa to rn il la dor.
Coloca 4 pilas de 1,5 V, de tipo AA (no incl ui da s) , y
cierra de nuevo la tapa del comp ar ti me nt o. Aprieta el
tornillo.
2
En cien de el co che ponie ndo en la pos i ció n ‘on’ el in t err u pto r ON/O FF
si tuad o en la part e in feri or.
3
Asegúrate de que el mando de c on tr ol rem ot o es té
apagado. Ab re el compartimento de la s pilas situado en
la parte trasera del mando, utilizando un desatorn illador.
Coloca 1 pila de 9 V (no incluida) y cierra de nu ev o la
tapa del compartimento. Aprieta el tornillo.
4
En cien de el ma ndo de cont rol re moto poni e ndo en la pos ició n ‘ON’ el
in terr upto r ON /OFF sit uado en la p arte tra sera .
5
Para jugar, s uj et a el mando de control re mo to con las do s manos y usa los
dedos pu lg ar es pa ra pulsar las teclas. Pulsa la te cl a derecha para ir hacia
delante, y la t ec la i zq ui er da p ar a ir hacia atrás hacia la derecha. Recuerda
apagar el mando de control remoto cuando termines de jugar.
54
Page 4

ALIMENTACIÓN
El coche de radio control Winnie the Pooh funciona co n 4 pilas al ca li na s de 1,5 V 2,25 Ah, de tipo
LR6 o AA, y una de 9 V de tipo 6LR61 (no se incluye ninguna pila).
Para colocar las pilas, sigue l as instrucciones que se dan en los pasos 1 y 3 de la guía d e puesta
a punto.
Português
INTRODUÇÃO
Fa ntás tico ! O Win n ie the Poo h , o urs o qu e to das as cri a nça s ad o ram , a
co nduz ir um c a rro t e lec o man d ado ! E ste b rinq uedo f oi cri ado a p e nsa r n as
cr ianç as: fácil de u tili zar, bo nito e dive rtid o. Mu i to eng raça do! O t e lec o man d o
te m a f orma d e u m p ote de me l! Os far óis do ca rro ac e nde m t al como o s c arro s
ve rdad eiro s!
GUIA PARA INICIAR
No util ice p ilas r eca r gab l es. N o in t ent e reca rgar las p ilas n o re c arg a ble s . Re t ire l a bat ería del
ju guet e a ntes de re carg arla . L a r e car g a d e l a b ate r ía deb e l l eva r se a c abo baj o l a s uper visi ón de u n
ad ulto . No me z cle p ilas o b ate r ías d e dist into t ipo. Tamp o co me zcle p ilas o b ate r ías u sada s con p i las
o bate rías nue v as. Est e ju e go d ebe ser alim enta do ú n ica m ent e co n las pil a s e s pec í fic a s. L as p ilas
y las ba t erí a s d ebe n in stal arse re spet ando cu i dad o sam e nte la pol arid ad. Las pi l as y b ater ías gas ta
da s d eben re tira rse del ju guet e l o a nte s p o sib l e. No cor t oci r cui t e l os ter m ina l es de las pi l as o d e las
ba terí as. No arr o je las pil as ni las bate rías al fu e go. Si pre vé que el jugu ete no va a utili zars e
du rant e u n p eri o do lar go de tie m po, re tire la s p ila s . L a caja de berá d e s e r guar dada y a q u e cont iene
in form ació n.
ATENCIÓN: si
enciéndala de nuevo utilizando las teclas ON/OFF. Si esto no es efectivo, quite y vuelva a poner las pilas
y/o realice el proceso Reset.
el aparato no func io na bien o recibe una descarga electrostática, apague la unidad y
MANTENIMIENTO
Para limpiar el juguete, utilice úni ca me nt e un paño suave hu me de ci do en agua. No u ti li ce ningún
producto detergente. No exponga el juguete a la acción directa de los rayos del sol ni a ni ng un a otra
fuente de ca lo r. No mojar e l juguete. No desmonte o de je caer el j ug ue te .R et ir e las pilas del juguete s i no
va utilizarlo durante largos periodos de tiempo.
GARANTÍA
NOTA: Conserve este ma nu al de instrucciones ya qu e contiene informaciones de importancia. Este
producto está cubierto por nuestra garantía de 2 años.
Para cualquier re cl am ac ió n b aj o l a garantía o petición de servicio post venta deberá dirigirse a su re ve nd
edor y p re se nt ar su comprobante d e compra. Nuestra g ar an tí a cubre los d ef ec to s de material o montaje
que sean imputables al fabricante, con la excepción de todo aquel deterioro que sea consecuencia de la
no observación de las ind ic ac io ne s indicadas en el manual de instrucciones o de tod a intervención
improcedente so br e este aparato (como po r ejemplo el desmontaje, exp os ic ió n al calor o a la
humedad…).
Se recomienda conservar el emb al aj e para cualquier referencia fut ur a. En nuestro constante afán de
superación, podemos proceder a la modificación de los co lo re s y detalles de l prod uc to mostrado en el
embalaje. Este juguete no está r ec om en da do para n iñ os menores de 36 meses, ya que contiene piezas
que podrían desprenderse y tragarse.
Ref erencia : IT050
© 2 005 LEX IBOOK®
1
Ce rtif ique -se que o car r o tel e com a nda d o não e s tá
li gado . Abr a o co mpar time nto d as pi l has , que s e
en cont ra na part e in fer i or do carr o te lec o man d ado ,
co m um a c h ave de f end a s. C olo q ue 4 pi lhas AA ( n ão
in cluí das) e vo l te a fech ar a t amp a d o c omp a rti m ent o
da s pi lhas . Ap erte o p araf uso.
-
2
Li gue o ca r ro tel ecom anda do atr avés d o b otão o n/of f (lig ar/d esli gar) q ue
se enc ontr a na par te i nfer ior do c arro .
3
Certifique-se que o telecomando não está ligado. Abra
o compartimento das pilhas que se encontra na par te
traseira do telecomando, utilizando uma chave de
fendas. Coloque 1 pi lh a de 9V (não incluída) e volte a
fechar a tampa do compartimento das pilhas. Aperte o
parafuso.
4
-
Li gue o te l eco m and o atrav és do b otã o o n /of f ( liga r/de slig ar) qu e se
en cont ra n a pa rte tras eira des te.
5
Para u ti li za r o brinquedo, segure o t el ec om an do co m as duas mãos e com
os dedos p ol eg ar es prima os botões. Prima o botão direito para avançar e o
botão esquerdo para f az er marcha-atrás par a a dir ei ta . Lembre-se de
desligar o carro telecomandado e o telecomando qu an do deixar de os
utilizar, pa ra p re se rv ar a e ne rg ia d as p il ha s.
76
Page 5

ENERGIA
O carro telecomandado do Winnie the Pooh funciona com 4 pilhas alcalinas de 1,5V 2.25 Ah do
tipo LR6 ou AA e 1 p il ha d e 9v d o ti po 6 LR 61 ( ne nh um a de st as s e en co nt ra i nc lu íd a) .
Para colocar as pilhas, por favor siga as instruções apresentadas no passo 1 e 3 do guia para
iniciar.
Não utilize pilhas recarregáveis. Não recarregue pilhas não recarregáveis. As pilhas recarregáveis
deverão se r r et ir ad as do brinquedo antes de serem recarregadas (se removíveis); as p il ha s r ec ar re gá ve is
só deverão s er recarregadas sob a supervisão de um adulto (se re mo ví ve is ); não misture d if er en te s tipos
de pi lh as o u pilhas novas com pilhas usadas; s ó de ve rá utilizar pilhas do mesmo tipo ou e qu iv al en te s às
pilhas recomendadas; as pilhas deverão ser colocadas com a polaridade correcta; as pil ha s gastas
deverão ser retiradas do brinquedo; os ter mi na is eléctricos não deverão se r col oc ad os em curto circuito.Não atire as pilhas para o fogo . Ret ir e as pilhas em cas o de uma não utilização prolongada.
Guardar a embalagem porque contem informação importante.
AVISO : se o ap ar el ho nã o funcionar ou receber qualquer choque electrostático, desligue o ap ar el ho e
ligue-o de novo utilizando o botão ON/OFF. Se i st o nã o re su lt ar, r et ir e as b at er ia s e fa ça R es et .
Italiano
INTRODUZIONE
Fantastico! Winnie Pooh , l’o rs et to amat o da tutti i bambini, guid a una macc hi na
telecomandata! Qu es to giocattolo è s ta to concepito con un occhio di riguardo p er i
più piccoli: facilità di utilizzo, design attraente e funzioni divertenti. Il telecomando
ha la fo rm a di un v as et to di miele! Guarda i fa na li che lampeggiano, proprio come
le macchine vere!
GUIDA INTRODUTTIVA
1
As sicu rars i che l’au to te leco mand ata s ia sp enta .
Ap rire lo sco m par t o ba tte r ie s itu a to n ell a pa rte
in feri ore de ll’a uto se rven dosi di un cac ciav ite.
In seri re 4 bat teri e AA ( non inc l use ) e r ich i ude r e lo
sp orte llo dell o sc ompa rto batt erie . Se rrar e la vit e.
2
Ac cend ere l ’ aut o t ele c oma n dat a s erv e ndo s i del l’in terr utto re ON/ OFF
si tuat o ne lla part e in feri ore dell ’aut o st essa .
MANUTENÇÃO
Para limpar o jogo, utilize apenas um pano suave lig ei ra me nt e hu me de ci do e sem qualquer tipo de
detergente. Não exponha o jogo à luz directa do sol nem a qualquer outra fonte de calor.
Não m ol he a unidade. Não desmonte nem deixe ca ir a unidade. Retire as pilhas caso o p ro du to não seja
utilizado durante um longo período de tempo.
GARANTIA
NOTA : P or favor gu ar de este manual, pois contém informações importantes. Este produto está coberto
pela nossa garantia de 2 anos.
Para a utilização da garantia ou do serviço pós-venda, deverá dirigir-se ao seu revendedor, levando
consigo o ta lã o da co mp ra . A nossa garantia cobre d ef ei to s de ma te ri al ou de montagem da responsabili
dade do fabricante, excluindo qu al qu er deterioração proveniente do nã o cumprimento do modo de u ti li za
ção ou de qualquer intervenção inoportuna sobre a unidade (como a desmontagem, ex po si çã o ao calor
ou à humidade…).
Recomenda-se que guarde a caixa pa ra um a futura referência. Na procura de uma constante melhoria,
poderemos modificar as cores ou características do p ro du to apresentadas na caixa. Não ac on se lh ad o a
crianças com menos de 36 meses de idade, devido às pequenas peças desmontáveis, susceptíveis de
serem engolidas.
Ref erência : IT050
© 2 005 LEX IBOOK®
3
Assicurarsi che il te le co ma nd o sia spento. Aprire l o
scomparto batterie s it ua to nel la parte posteriore d el
telecomando se rv en do si di un cacciavite. Inserire 1
batteria da 9 V (non inclusa) e richiudere lo spor te ll o
dello scomparto batterie. Serrare la vite.
4
Ac cend ere i l te leco mand o se rven dosi del l ’in t err u tto r e ON /OFF sit u ato
-
-
su lla part e po ster iore del tel ecom ando ste sso.
5
Per gio ca re , reggere il telecomando con entrambe le mani e servirsi dei
pollici per premere i tast i. Premere il tas to destro per avanzare e quello
sinistro per ret ro ce de re verso destra. Ricordarsi di spegnere l’auto e il
telecomando quando non si gioca per limitare il consumo della batteria.
98
Page 6

ALIMENTAZIONE
L’au to telecomandata di Winnie Pooh funziona con 4 batterie alcaline LR 6 o AA da 1,5V 2,25 Ah e
1 batteria 6LR61 da 9v (non incluse).
Per installare le batterie, seguire le istruzioni contenute nelle fasi 1 & 3 della guida introduttiva.
Non usare batterie ricaricabili. Le batterie non ricaricabili non d ev on o ess er e ricaricate; le batterie
ricaricabili devo no ess er e rimosse dal giocattolo prima di essere ricaricate (se rim ov ib il i) ; le batterie
ricaricabili devono essere caricate solo sott o la supervisione di un adulto (se rimovibili); non bisogna
mischiare tipi diversi di batterie o batterie nuove e usate; devono essere usate solo le batterie consigliate,
dello st es so tipo o di tipo equivalente; le batterie devono es se re inserite con la polarità corretta; le batterie
esaurite devono essere rimosse dal giocattolo; i terminali di alimentazione non devono essere cortocircuitati. Conservare la confezione per futuro riferimento poiché contiene informazioni importanti.
ATTENZIONE : S e il prodotto presenta un d if et to nel funzionamento o subisce de ll e sc ar ic he elettrostat
iche, spegnere e accendere il prodotto util iz za nt o il tast o ON/OFF. Se il prodotto non funziona ancora
correttamente, togliere e rimettere le pile o effettuare la procedura RESET.
Deutsch
EINLEITUNG
Fa ntas tisc h! Wi nnie the P o oh, d er L i ebl i ngs b är der Ki nder, f ährt a uf e i nem
ferngesteuerten Auto! Dieses Spielzeug wurde speziell für Kleinkinder entwickelt:
Ei nfac h Be d ien u ng, attr akti ves D esi g n un d lu s tig e Fun ktio nen. Ein f ach supe r !
Di e F erns teue rung hat die For m e ines Hon igto pfs! Die Fro ntli chte r d es Auto s
le ucht en g enau wie bei ech ten Auto s!
ERSTE SCHRITTE
1
Verg ew is se rn Sie sich, dass die Fernsteuerung nicht
eingeschaltet is t. Öffnen Sie das Batteriefach an der
Unterseite des Fahrzeugs mit einem Schraubenzieher.
Legen Sie 4 x AA Batterien (nicht beiliegend) ein und
schließen Sie das Batteriefach. Ziehen Sie die
Schraube an.
2
-
Sc halt en S ie d as f ern g est e uer t e A u to m it d em E in- und Aus scha lter ein ,
de r un ter dem Fahr zeug ang ebra cht ist.
MANUTENZIONE
Per pulire il giocattolo, servirsi unicamente di un panno morbido leggermente inumidito con acqua,
evitando qualsiasi prodotto detergente. Non esp or re il giocattolo alla luce dir et ta del sole né ad altr e
sorgenti di calore. N on b ag na re . No n sm on ta re i l gi oc at to lo e non lasciarlo cadere. Estrarre le batterie in
caso di mancato utilizzo per un lungo periodo di tempo.
GARANZIA
NOTA : conservare il presente libretto d’i st ru zi on i in quanto contiene informazioni impo rt an ti . Questo
prodotto è coperto dalla nostra garanzia di 2 anni.
Per servirsi della garanzia o del servizio di assistenza post vendita, rivolgersi al negoziante muniti di
prova d’acquisto. La nostra garanzia copre i vizi di materiale o d i mont ag gi o imputabili al costruttore a
esclusione di qualsiasi deterioramento causato dal mancato rispetto delle istruzioni d’uso o di qualsiasi
intervento inadeguato sul prodotto (smontaggio, esposizione al calore o all’umidità…).
Si raccomanda di conservare la confezione per qualsiasi riferimento futuro. Nel nostro impegno costante
volto al miglioramento dei nostri prod ot ti , è possibile che i co lo ri e i dettagli dei prodotti illustrati sulla
confezione differiscano dal prodotto effe tt iv o. No n adatto a bambini di età inferiore a 36 mesi in quanto
contiene piccole parti mobili che potrebbero essere ingoiate.
Rif eriment o: IT05 0
© 2 005 LEX IBOOK®
3
Ver g ewi s ser n S ie sic h, da s s die F erns teue rung n ich t
ei nges chal tet ist . Öff nen S ie da s Batt erie fach a n der
Rückseite des Fahrzeugs mit einem Schr au be nz ie he r.
Le gen S ie 1 x 9 V Ba tter ie (n icht b eil i ege n d) ein und
sc hlie ßen S i e das B att e rie f ach . Zieh en Si e die
Sc hrau be a n.
4
Sc halt en Si e das fern gest euer te Au to mi t dem Ein- und A ussc halt er an
de r Rü ckse ite des Fahr zeug s ei n.
5
Halten Sie die Fernbedienung fest in beiden Händen und drücken Sie die
Taste n mit den Daumen. Mit der rechten Taste fährt das Fah rz eu g na ch
vorne und mit der linken Taste re ch ts nach hint en . Verge wi ss er n Sie si ch ,
dass S ie da s ferngesteuerte Fahrzeug auschalten, wenn Sie es ni ch t mehr
benutzen. Auf diese Weise sparen Sie Batterieleistung ein.
1110
Page 7

STROMVERSORGUNG
Das ferngesteuerte Winnie the Pooh Auto arbeitet mit 4 Alkaline 1 ,5 V 2,25 Ah Batterien vom Typ
LR6 oder AA s ow ie 1 x 9 V B at te ri e Typ 6 LR 61 ( ni ch t be il ie ge nd ).
Fü r die Insta llat ion de r Bat teri en bef olg e n Sie bitte die SC HRIT TE 1 & 2 im Abs chni tt Erste
Sc hrit te.
Verw en de n Sie keine wiederaufladbaren Batterien. Versuchen S ie nicht normale B at te ri en wieder
aufzuladen. Nehmen Sie die Batterien aus dem aus dem Gerät bev or Sie sie aufladen. Die Batterien
sollten nur unte r Aufsicht Erwa ch se ne r aufgeladen werden. Verw en de n Sie nic ht verschieden Batteri
etypen zusammen ode r neu e mit alten Batterien. Das Spie l dar f nur mit den genannten Batterietypen
betrieben wer de n. Bat te ri en müs se n mit der richtigen Polarität eingesetzt werden. L ee re Bat te ri en
müssen entfernt we rd en . Schl ie ss en Sie die Versorgungsanschlüsse ni ch t kurz . Verwenden Sie nur die
angegebenen Ba tt er ie n. Werfen Sie Batterien nicht ins Fe ue r. Nehmen Sie die Ba tt er ie n heraus, wenn das
Spielzeug fü r längere Zeit ni ch t benutzt wird. D ie Verpackung muss aufbewahrt werden, da sie wi ch ti ge
Informationen enthält.
HINWEIS : sollte das Gerät nicht mehr richtig funktionieren o de r ein Elektrostatischer Stromschlag
bekommen haben, schalten Sie das Gerät Aus un wieder Ein mit dem ON/OFF Knopf. Sollte dieses nicht
helfen, nehmen Sie die Batterien raus, und/oder machen Sie eine RESET.
FLEGE UND WARTUNG
Verw en de n Sie zur Reinigung des Spielzeugs nur ein we ic he s, leicht angefeuchtetes Tu ch un d niemals
Reinigungsmittel. S et ze n Si e das Spielzeug nicht direkter Sonnenbestrahlung od er a nd er en Hitzequellen
aus. Bringen Sie es auf keinen Fall mit Nässe in Berührung.
Nehmen Sie es nicht auseinander un d lassen Si e es ni ch t fallen. Entnehmen Sie die Batterien, falls das
Spielzeug über einen längeren Zeitraum hinweg nicht in Gebrauch ist.
Nederlands
INLEIDING
Fantastisch! Win ni e the Poeh, he t lievelingsbeertje van al le kinderen, rijdend in een
afstandsbestuurde wagen! D it speelgoed werd o nt wo rp en denkend aan jonge
kinderen: eenvoudige werking, aa nt re kk el ij k o nt we rp en le uk e k ar ak te ri st ie ke n.
Zeer gek! De honingpot-afstandsbediening heeft de vo rm van ee n honi ng po t! Zie
hoe de koplampen van de wagen flikkeren net zoals bij echte wagens!
OPSTARTHANDLEIDING
1
Zorg ervoor dat de afstandsbestuurde wagen is
uitgeschakeld. Open het batterijvak aan de onderkant van
de RC-wagen door middel van een schroevendraaier.
Steek er 4 x AA batterijen (niet bijgeleverd) in en sluit
-
opnieuw de batterijdeur. Draai de schroef vast.
2
Zet de a fs ta nd sb es tu ur de wagen aa n door middel van de aa n/ ui t schakelaar
aan de onderkant de wagen.
3
Zorg ervoor dat de afstandsbediening i s uitgeschakeld.
Open het batterijvak aan de achterkant van de afstands
bediening door middel van een schroevendraaier. St ee k
er 1 x 9V batterij (ni et bi jg el ev er d) in en sl ui t o pn ie uw de
batterijdeur. Dr aa i de s ch ro ef v as t.
-
GARANTIE
Anmerkung : bitte bewahren Sie diese Bedienungsanleitung auf, da sie wichtige Hin we is e enthält. Dieses
Produkt hat 2 Jahre Garantie.
Für je de In an sp ru ch na hm e der Garantie oder des Kundendienstes, kontaktieren Sie bi tt e I hr en Einzelhän
dler unter Vorlage der Einkaufsquittung. Unsere Garantie de ck t Ma te ri al sc hä de n oder Installationsfehler,
die auf den Hersteller zurückzuführen sind. Nicht eingeschlossen sind Schäden, die durch Missachtung
der Bedienungsanleitung oder auf unsachgemäße Behandlung (wie z. B. unbefugtes Öffnen, Aussetzen
von Hitze ode r F eu ch ti gk ei t, us w.) zurückzuführen sind. Wir empfehlen, die Verpackung für sp ät er e
Konsultationen aufzubewahren.
Bedingt durch unser ständiges Bemühen nach Verbesserung, kann das Produkt möglicherweise in Farben
und Details von d er Verpackungsabbildung abweichen. Nicht f ür Kinder unter 36 Mo na te n geeignet, da es
kleine, abnehmbare Einzelteile enthält, die verschluckt werden könnten.
Ref erenznu mmer: I T050
© 2 005 LEX IBOOK®
4
Ze t de af s tan d sbe d ien i ng aa n d oor m i dde l van de a an/u it sch akel aar a a n
-
de ach terk ant van de a fsta ndsb edie ning .
5
Om te spelen, hou je de afstandsbediening met beide handen vast en gebruik
je jouw duimen om op de toetsen te drukken. Druk op de rechtertoets om
vooruit te rijd en en op de linkertoets om achteruit te rijden. Denk eraan de
RC-wagen en de afstandsbediening uit te zetten als je klaar bent met spelen
om zodoende de batterij te sparen.
1312
Page 8

STROOMTOEVOER
De Winnie the Poeh RC-wagen werkt me t 4 alkaline batterijen van 1,5V 2, 25 A h, type LR6 of AA
en 1 x 9V batterij van het type 6LR61 (geen van deze zijn bijgeleverd).
Om de b atte rije n in te st eken , ge l iev e de r ich t lij n en te volg en a ange duid in s t app e n 1 & 3 va n
de ops tart hand leid ing.
Geen oplaadbare batterijen gebruiken. Probeer nooit gewone (niet oplaadbare) batterijen te herladen.
Haal de accu’s uit het spel , alvorens ze op te lade n. De accu’s alleen opladen in het bijzijn van een
volwassene. Gebruik geen b at te ri je n of accu’s van een verschillend type, dan wel nieuwe en oude door
elkaar. Dit spel mag alleen worden gebruikt met deze specifieke b at te ri je n. Plaats de ba tt er ij en en accu’s
met de polen in de juiste richting. Le ge batterijen en accu’s moeten uit het sp ee lg oe d worden ge ha al d.
Voor ko m kortsluiting met de zijkanten van de batterijen en de accu’s. Gooi g ee n batterijen in open v uu r.
Verw ij de r de batterijen wa nn ee r het speelgoed vo or langere tijd niet wo rd t gebruikt. Voor ve rd er e referen
tie deze gebruiksaanwijzing bewaren, daar het belangrijke informatie bevat.
WAAR SC HU WI NG : I nd ie n het toestel slecht we rk t o f een electrische schok ond er ga at , s ch ak el het toestel
uit en terug aa n door mi dd el van de AAN/UIT/-toets. Indien dit het probleem niet verhelpt, verwijder de
batterijen en/of voer een Reset procedure uit.
Ελληνικά
ΕΙΣΑΓΩΓΗ
Φανταστικό! Ο Γουίνι ο Πουφ, ο αγαπημένος αρκούδος των παιδιών, τώρα ... καβαλάρης σε
ένα τηλεκατευθυνόμενο αυτοκίνητο! Το παιχνίδι αυτό σχεδιάστηκε, έχοντας κατά νου τα
μικρά παιδιά: απλή λειτουργία, ελκυστικό ντιζάιν και διασκεδαστικά χαρακτηριστικά. Τί
πλάκα! Το τηλεχειριστήριο έχει το σχήμα του βάζου μελιού! Κοιτάξτε πώς αναβοσβήνουν οι
προβολείς του αυτοκινήτου, ακριβώς όπως και στα πραγματικά αυτοκίνητα!
ΟΔΗΓΟΣ ΓΙΑ ΝΑ ΞΕΚΙΝΗΣΕΤΕ
1
Βεβαιωθείτε ότι το τηλεχειριστήριο δεν είναι ενεργοποιημένο.
Ανοίξτε το διαμέρισμα της μπαταρίας που βρίσκεται στην κάτω
πλευρά του τηλεχειριστηρίου, χρησιμοποιώντας ένα κατσαβίδι.
Εισάγετε τις μπαταρίες 4 x AA (δεν περιλαμβάνονται) και
ξανακλείστε το πορτάκι για τις μπαταρίες. Συσφίξτε τη βίδα.
-
2
Ενεργοποιήστε το τηλεχειριστήριο, χρησιμοποιώντας το διακόπτη ενεργό/ανενεργό
(on/off) στο κάτω μέρος του αυτοκινήτου.
ONDERHOUD
Om het speelgoed te reinigen, gebruik je alleen een zachte, licht vochtige doek. Alle detergenten zijn
verboden. Stel het spel ni et bl oo t aan direct zonlicht of ee nd er we lk e hittebron. Maak he t spel niet na t.
Haal het niet uit elkaar en laat het niet vallen.
Indien je het spel voor langere tijd niet gebruikt, haal de batterijen eruit.
GARANTIE
OPMERKING: gel ie ve deze handleiding te bewaren aan ge zi en het belangrijke informatie bevat. Het
product is gedekt door onze 2 jaar garantie.
Voor alle herstellingen ti jd en s de garantie of na ve rk oo ps di en st , moet je je ri ch te n tot de verkoper m et een
aankoopbewijs. Onze ga ra nt ie geldt voor a l het materiaal e n de montage van de fa br ik an t, exclusief alle
schade veroorzaakt door het niet repsecteren van onze gebruiksaanwijzing ( zoals uit elkaar halen,
blootstellen aa n hitte of vochtigheid….). Wi j ra de n aan de verpakking t e bewaren voor enige referentie i n
de toekomst.
In onze poging vo or constante ve rb et er in g, is het mogelijk dat kl eu re n en details van dit pr od uc t lichtjes
verschillen van dez e op de verpakking. Niet geschikt voor kinderen onder 36 maanden daar er kleine
losse onderdeeltjes aanwezig zijn.
Ref erentie : IT05 0
© 2 005 LEX IBOOK®
3
Βεβαιωθείτε ότι το τηλεχειριστήριο δεν είναι ενεργοποιημένο.
Ανοίξτε το διαμέρισμα της μπαταρίας που βρίσκεται στην κάτω
πλευρά του τηλεχειριστηρίου, χρησιμοποιώντας ένα κατσαβίδι.
Εισάγετε τη μπαταρία 1 x 9 V (δεν περιλαμβάνεται) και
ξανακλείστε το πορτάκι για τις μπαταρίες. Συσφίξτε τη βίδα.
4
Ενεργοποιήστε το τηλεχειριστήριο, χρησιμοποιώντας το διακόπτη ενεργό/ανενεργό
(on/off) στο κάτω μέρος του τηλεχειριστηρίου.
5
Για να παίξετε, κρατήστε το τηλεχειριστήριο και με τα δύο σας χέρια και
χρησιμοποιήστε τους αντίχειρές σας, για να πατήσετε τα πλήκτρα. Πατήστε το δεξί
πλήκτρο για να κινηθείτε προς τα μπροστά και το αριστερό για να κινηθείτε δεξιά,
προς τα πίσω. Θυμηθείτε να απενεργοποιήσετε το τηλεκατευθυνόμενο αυτοκίνητο,
όταν έχετε τελειώσει με το παιχνίδι έτσι, ώστε να διατηρήσετε την ισχύ της μπαταρίας
.
1514
Page 9

Π ΑΡΟΧΗ ΙΣΧΥΟΣ
Το τηλεκατευθυνόμενο αυτοκίνητο του Γουίνι του Πουφ λειτουργεί με 2 αλκαλικές μπαταρίες των 1,5V 2,25 Ah,
τύπου LR6 ή AA, και μία μπαταρία 1 x 9v, τύπου 6LR61 (δεν παρέχονται όλες).
Για να εγκαταστήσετε τις μπαταρίες, παρακαλούμε να ακολουθήσετε τις οδηγίες που δίνονται στα βήματα 1
& 3 του οδηγού έναρξης.
Οι μη επαναφορτιζόμενες μπαταρίες δεν πρέπει να επαναφορτίζονται. Οι επαναφορτιζόμενες μπαταρίες πρέπει να
αφαιρούνται από το παιχνίδι πριν φορτιστούν (αν είναι αφαιρούμενες). Οι επαναφορτιζόμενες μπαταρίες πρέπει να
φορτίζονται μόνο κάτω από την επίβλεψη ενήλικου ατόμου (αν είναι αφαιρούμενες). Δεν πρέπει να μπαίνουν μαζί
μπαταρίες διαφορετικού τύπου ή νέες με χρησιμοποιημένες. Πρέπει να χρησιμοποιούνται μόνο μπαταρίες του ίδιου ή
ισοδύναμου τύπου με αυτόν που συνιστάται. Οι μπαταρίες πρέπει να μπαίνουν με τη σωστή πολικότητα. Οι μπαταρίες
που έχουν εξαντληθεί πρέπει να αφαιρούνται από το παιχνίδι. Οι ακροδέκτες της τροφοδοσίας δεν πρέπει να
βραχυκυκλώνονται. Παρακαλούμε φυλάξτε τη συσκευασία γιατί περιέχει πληροφορίες που μπορούν να χρειαστούν
στο μέλλον. Η τροφοδοσία αυτού του παιχνιδιού πρέπει να γίνεται μόνο τις καθορισμένες μπαταρίες.
ΠΡΟΕΙΔΟΠΟΙΗΣΗ : Αν η συσκευή δεν λειτουργεί καλά ή δεχτεί στατικό ηλεκτρισμό, σβήστε τη συσκευή και ανάψτε
την πάλι, χρησιμοποιώντας το κουμπί ON/OFF. Αν αυτό δεν έχει αποτέλεσμα, βγάλτε τη μπαταρία και/ή κάντε
επαναφορά με το Reset.
Y ΝΤΗΡΗΣΗ
Για να καθαρίσετε το παιχνίδι, χρησιμοποιήσετε μόνο ένα μαλακό πανί ελαφρά μουσκεμένο σε νερό. Μη
χρησιμοποιήσετε κανένα απορρυπαντικό. Μην εκθέτετε το παιχνίδι στο φως του ήλιου ή σε οποιαδήποτε άλλη πηγή
θερμότητας. Μην αφήσετε το το παιχνίδι να βραχεί. Μην αποσυναρμολογήσετε ή αφήσετε να πέσει κάτω το παιχνίδι.
Βγάζετε τις μπαταρίες αν το προϊόν δεν πρόκειται να χρησιμοποιηθεί για μεγάλο χρονικό διάστημα.
Ε ΓΓΥΗΣΗ
ΣΗΜΕΙΩΣΗ : Παρακαλούμε φυλάξτε αυτό το εγχειρίδιο οδηγιών γιατί περιέχει σημαντικές πληροφορίες. Αυτό το
προϊόν καλύπτεται με 2ετή εγγύηση.
Για οποιαδήποτε απαίτηση που προβλέπεται στην εγγύηση ή στην τεχνική υποστήριξη, παρακαλούμε επικοινωνήστε
με τον διανομέα, παρουσιάζοντας μια έγκυρη απόδειξη αγοράς. Η εγγύησή μας καλύπτει οποιοδήποτε ελάττωμα ως
προς τα κατασκευαστικά υλικά και την τεχνική αρτιότητα, με εξαίρεση οποιαδήποτε φθορά που προκύπτει από τη μη
τήρηση των οδηγιών του εγχειριδίου ή οποιαδήποτε απρόσεκτη ενέργεια απέναντι σε αυτό το προϊόν (όπως
αποσυναρμολόγηση, έκθεση σε ζεστό ή υγρό μέρος, κλπ.). Συνιστάται να φυλάξετε τη συσκευασία για οποιεσδήποτε
περαιτέρω πληροφορίες.
Στην προσπάθειά μας της συνεχούς βελτίωσης των υπηρεσιών μας, πιθανώς να κάνουμε αλλαγές στα χρώματα και
τις λεπτομέρειες του προϊόντος που φαίνονται στη συσκευασία.
Το προϊόν αυτό δεν είναι κατάλληλο για παιδιά κάτω των 36 μηνών, επειδή περιέχει μικρά αφαιρούμενα κομμάτια που
τα μικρά παιδιά θα μπορούσαν να καταπιούν.
Κωδικός αναφοράς: IT050
© 2005 LEXIBOOK
Français
DECLARATION DE CONFORMITE
Par la présente,
the Pooh RC car (IT050) est conforme aux exigences
essentielles et aux autres dispositions pertinentes de la
directive 1999/5/CE.
Informations sur la protection de
l'environnement
Tout appareil électrique usé est une matière
recyclable et ne devrait pas faire partie des
ordures ménagères! Nous vous demandons de
bien vouloir nous soutenir en contribuant
activement au ménagement des ressources et
à la protection de l'environnement en déposant
cet appareil dans sites de collecte (si
existants).
English
DECLARATION OF CONFORMITY
Hereby,
RC car (IT050) is in compliance with the essential
requirements and other relevant provisions of Directive
1999/5/EC.
Environmental Protection
Unwanted electrical appliances can be
recycled and should not be discarded along
with regular household waste! Please actively
support the conservation of resources and help
protect the environment by returning this
appliance to a collection centre (if available).
Español
DECLARACIÓN DE CONFORMIDAD
Por medio de la presente
Winnie the Pooh RC car (IT050) cumple con los requisitos
esenciales y cualesquiera otras disposiciones aplicables o
exigibles de la Directiva 1999/5/CE.
Advertencia para la protección del medio
ambiente
iLos aparatos eléctricos desechados son
reciclables y no deben ser eliminados en la
basura doméstica! Por ello pedimos que nos
ayude a contribuir activamente en el ahorro de
recursos y en la protección del medio
ambiente entregando este aparato en los
centros de colección (si existen).
Português
DECALAÇÃO DE CONFORMIDADE
Lexibook® S.A. declara que este Winnie the Pooh RC car
(IT050) está conforme com os requisitos essenciais e outras
disposições da Directiva 1999/5/CE.
Indicações para a protecção do meio
ambiente
Aparelhos eléctricos antigos são materiais que
não pertencem ao lixo doméstico! Por isso
pedimos para que nos apoie, contribuindo
activamente na poupança de recursos e na
protecção do ambiente ao entregar este
aparelho nos pontos de recolha, caso existam.
Lexibook® S.A. déclare que l'appareil Winnie
Lexibook® S.A. declares that this Winnie the Pooh
Lexibook® S.A. declara que el
Italiano
DIC HIARAZI ONE DI CONFORM ITÀ
Con la pre sente L exibook
Win nie t he Pooh R C car ( IT050 ) è con fo rme a i
req uisiti essenzi ali ed alle al tre dis posizio ni pert inenti
sta bilite dalla d irettiv a 1999/ 5/CE.
Avvertenze per la tutela dell’ambiente
Gli apparecchi elettrici vecchi sono materiali
pregiati, non rientrano nei normali rifiuti
domestici! Preghiamo quindi i gentili clienti di
contribuire alla salvaguardia dell’ambiente e
delle risorse e di consegnare il presente
apparecchio ai centri di raccolta competenti,
qualora siano presenti sul territorio.
Deutsch
KON FORMITÄ TSERKLÄ RUNG
Hie rmit er klärt L exibook
die ser/die se/dies es Wi nn ie th e Pooh RC car (I T050) i n
Übereinstimmung mi t d en gru ndl egenden Anforderungen
und den an deren r elevant en Vorsc hriften der Ri chtlini e
199 9/5/EG befinde t". (BM Wi)
Hinweise zum Umweltschutz
Alt-Elektrogeräte sind Wertstoffe, sie gehören
daher nicht in den Hausmüll! Wir möchten Sie
daher bitten, uns mit Ihrem aktiven Beitrag bei
der Ressourcenschonung und beim
Umweltschutz zu unterstützen und dieses
Gerät bei den (falls vorhanden) eingerichteten
Rücknahmestellen abzugeben.
Nederlands
CON FORMITE ITSVERK LARING
Hie rbij ve rklaart Lexibo ok
the Pooh R C car ( IT050) in over eenstem ming is met
de essenti ële eis en en d e ander e relev ante be palinge n
van richtl ijn 199 9/5/EG
Richtlijnen voor milieubescherming
Gebruikte elektronische apparaten horen niet
thuis in het huisafval !
Wij vragen u daarom een bijdrage aan de
bescherming van ons milieu te leveren en dit
apparaat op de voorziene verzamelplaatsen af
te geven.
Ελληνι κά
ΔΗΛ ΩΣ Η ΣΥΜ ΜΟ ΡΦΩΣΗ Σ
ΜΕ ΤΗ Ν ΠΑΡ ΟΥΣ Α L exibo ok
Win ni e t he P ooh R C car ( IT 050 ) ΣΥ ΜΜΟ ΡΦ ΩΝ ΕΤΑΙ
ΠΡΟ Σ ΤΙΣ ΟΥΣΙ ΩΔ ΕΙΣ Α ΠΑ ΙΤΗΣΕ ΙΣ ΚΑΙ ΤΙ Σ ΛΟΙ ΠΕΣ
ΣΧΕ ΤΙ ΚΕΣ Δ ΙΑΤΑΞ ΕΙ Σ Τ ΗΣ ΟΔ ΗΓ ΙΑΣ 1 99 9/5/Ε Κ
Υποδείξεις για την προστασία του
περιβάλλοντος
Οι παλιές ηλεκτρικές συσκευές είναι πολύτιµα
υλικά και συνεπώς δεν έχουν θέση στα οικιακά
απορρίµµατα! Θα θέλαµε λοιπόν να σας
παρακαλέσουµε να µας υποστηρίξετε συµ
βάλλοντας ενεργά στην προστασία των
πρώτων υλών και του περιβάλλοντος
παραδίδοντας τη συσκευή αυτή στις υπηρεσίες
ανακύκλωσης - εφόσον υπάρχουν.
®
S. A. dich iara ch e quest o
®
S. A., das s sich
®
S. A. dat het toe stel Wi nnie
®
S. A. ΔΗΛΩ ΝΕ Ι ΟΤΙ
1716
Page 10

Contactez-nous / Contact us
LEXIBOOK S.A
2, avenue de Scandinavie
91953 Courtaboeuf Cedex France
Assistante technique : 0892 23 27 26 (0,34€ TTC/Min)
LEXIBOOK UK ltd
Unit 10 Petersfield Industrial Estate
Bedford Road, Petersfield
Hampshire, GU32 3QA, United Kingdom
Freephone helpline: 0808 100 3015
LEXIBOOK Electronica Lda
Quinta dos Loios
Praceta José Domingos dos Santos, 6B-8A
2835-343 Lavradio-Barreiro Portugal
Apoio Técnico : 212 039 600
LEXIBOOK Ibérica S.L
C/ de las Hileras 4, 4° 15
28013 Madrid Spain
Tél : +3491-548-89-32
LEXIBOOK Italia S.r.l
Via Eustachi, 45
20129 Milano Italia
Tel. : +39 02 20 40 49 59
©Disney, based on the "Winie the Pooh' works",
by A.A Milne and E.H. Shepard.
www.disney.com
www.lexibookjunior.com
© 2005 LEXIBOOK®
Designed in Europe – Made in China
Conçu en Europe – Fabriqué en Chine
1177
Ref : IT050IM0195
18
 Loading...