

Lenovo ThinkStation SCSI Hard Disk Drive, ThinkStation Serial Attached SCSI Hard Disk Drive User guide [ja]
Page 1

ThinkStation Serial Attached
SCSI Hard Disk Drive
User's Guid e
Page 2

First Edition (December 2007)
© Copyright Lenovo 2007.
Portions © Copyright International Business Machines Corporation 2005.
All rights reserved.
LENOVO products, data, computer software, and services have been developed
exclusively at private expense and are sold to governmental entities as commercial items
as defined by 48 C.F.R. 2.101 with limited and restricted rights to use, reproduction and
disclosure.
LIMITED AND RESTRICTED RIGHTS NOTICE: If products, data, computer software, or
services are delivered pursuant a General Services Administration ″GSA″ contract, use,
reproduction, or disclosure is subject to restrictions set forth in Contract No.
GS-35F-05925.
Page 3

Contents
Safety information . . . . . . . . . . . . . . . . . . . .v
General safety guidelines . . . . . . . . . . . . . . . . . vii
Service . . . . . . . . . . . . . . . . . . . . . . . . vii
Power cords and power adapters . . . . . . . . . . . . . . . vii
Extension cords and related devices . . . . . . . . . . . . . . viii
Plugs and outlets . . . . . . . . . . . . . . . . . . . . viii
Batteries . . . . . . . . . . . . . . . . . . . . . . .ix
Heat and product ventilation . . . . . . . . . . . . . . . .ix
Chapter 1. About the ThinkStation Serial Attached SCSI (SAS) hard disk
drive . . . . . . . . . . . . . . . . . . . . . . . .1
Product description . . . . . . . . . . . . . . . . . . . .1
Installation planning . . . . . . . . . . . . . . . . . . . .2
Installation requirements . . . . . . . . . . . . . . . . .2
Partition planning . . . . . . . . . . . . . . . . . . .4
Installing the drive . . . . . . . . . . . . . . . . . . . .4
Step 1. Opening your computer . . . . . . . . . . . . . . .4
Step 2. Unpacking the drive . . . . . . . . . . . . . . . .4
Step 3. Mounting the drive in the bay . . . . . . . . . . . . .5
Step 4. Attaching the cables to the drive . . . . . . . . . . . .6
Step 5. Completing the installation of the drive . . . . . . . . . .7
Preparing the drive for use . . . . . . . . . . . . . . . . .7
Partitioning and formatting your drive . . . . . . . . . . . . .8
Chapter 2. Troubleshooting . . . . . . . . . . . . . . . . 113
Appendix A. PCIe-to-SAS host bus adapter quick installation
instructions . . . . . . . . . . . . . . . . . . . . 115
Appendix B. Service and Support . . . . . . . . . . . . . 117
Registering your option . . . . . . . . . . . . . . . . . 117
Online technical support . . . . . . . . . . . . . . . . . 117
Telephone technical support . . . . . . . . . . . . . . . . 117
Appendix C. Lenovo Limited Warranty . . . . . . . . . . . 119
Warranty information . . . . . . . . . . . . . . . . . . 123
Suplemento de Garantía para Méjico . . . . . . . . . . . . . 125
Appendix D. Lenovo Limited Warranty - Customer Notice . . . . . 127
Appendix E. Notices . . . . . . . . . . . . . . . . . . 137
© Lenovo 2007. Portions © IBM Corp. 2005. iii
Page 4

Recycling information . . . . . . . . . . . . . . . . . . .138
Trademarks . . . . . . . . . . . . . . . . . . . . . .139
Appendix F. Electronic emission notices . . . . . . . . . . . .141
Appendix G. Important information for the European Directive
2002/96/EC . . . . . . . . . . . . . . . . . . . . .143
Appendix H. China RoHS . . . . . . . . . . . . . . . . .151
iv ThinkStation Serial Attached SCSI Hard Disk Drive User's Guide
Page 5

Safety information
Before installing this product, read the Safety Information.
Antes de instalar este produto, leia as Informações de Segurança.
Pred instalací tohoto produktu si prectete prírucku bezpecnostních instrukcí.
Læs sikkerhedsforskrifterne, før du installerer dette produkt.
Ennen kuin asennat tämän tuotteen, lue turvaohjeet kohdasta Safety
Information.
Avant d’installer ce produit, lisez les consignes de sécurité.
Vor der Installation dieses Produkts die Sicherheitshinweise lesen.
Prima di installare questo prodotto, leggere le Informazioni sulla Sicurezza.
Lees voordat u dit product installeert eerst de veiligheidsvoorschriften.
Les sikkerhetsinformasjonen (Safety Information) før du installerer dette
produktet.
© Lenovo 2007. Portions © IBM Corp. 2005. v
Page 6
Antes de instalar este produto, leia as Informações sobre Segurança.
Antes de instalar este producto lea la información de seguridad.
Läs säkerhetsinformationen innan du installerar den här produkten.
vi ThinkStation Serial Attached SCSI Hard Disk Drive User's Guide
Page 7

General safety guidelines
Always observe the following precautions to reduce the risk of injury and
property damage.
Service
Do not attempt to service a product yourself unless instructed to do so by the
Customer Support Center. Use only a service provider who is approved to
repair your particular product.
Note: Some parts can be upgraded or replaced by the customer. These parts
are referred to as Customer Replaceable Units, or CRUs. Lenovo expressly
identifies CRUs as such, and provides documentation with instructions when it
is appropriate for customers to replace those parts. Yo u must closely follow all
instructions when performing such replacements. Always make sure that the
power is turned off and that the product is unplugged from any power source
before you attempt the replacement. If you have any questions or concerns,
contact the Customer Support Center.
Power cords and power adapters
Use only the power cords and power adapters supplied by the product
manufacturer.
Never wrap a power cord around the power adapter or other object. Doing so
can stress the cord in ways that can cause the cord to fray, crack or crimp. This
can present a safety hazard.
Always route power cords so that they will not be walked on, tripped over, or
pinched by objects.
Protect the cord and power adapters from liquids. For instance, do not leave
your cord or power adapter near sinks, tubs, toilets, or on floors that are
cleaned with liquid cleansers. Liquids can cause a short circuit, particularly if
the cord or power adapter has been stressed by misuse. Liquids can also cause
gradual corrosion of the power cord terminals and/or the connector terminals
on the adapter which can eventually result in overheating.
Always connect power cords and signal cables in the correct order and ensure
that all power cord connectors are securely and completely plugged into
receptacles.
© Lenovo 2007. Portions © IBM Corp. 2005. vii
Page 8

Do not use any power adapter that shows corrosion at the ac input pins
and/or shows signs of overheating (such as deformed plastic) at the ac input
or anywhere on the power adapter.
Do not use any power cords where the electrical contacts on either end show
signs of corrosion or overheating or where the power cord appears to have
been damaged in any way.
Extension cords and related devices
Ensure that extension cords, surge protectors, uninterruptible power supplies,
and power strips that you use are rated to handle the electrical requirements of
the product. Never overload these devices. If power strips are used, the load
should not exceed the power strip input rating. Consult an electrician for more
information if you have questions about power loads, power requirements, and
input ratings.
Plugs and outlets
If a receptacle (power outlet) that you intend to use with your computer
equipment appears to be damaged or corroded, do not use the outlet until it is
replaced by a qualified electrician.
Do not bend or modify the plug. If the plug is damaged, contact the
manufacturer to obtain a replacement.
Some products are equipped with a three-pronged plug. This plug fits only
into a grounded electrical outlet. This is a safety feature. Do not defeat this
safety feature by trying to insert it into a non-grounded outlet. If you cannot
insert the plug into the outlet, contact an electrician for an approved outlet
adapter or to replace the outlet with one that enables this safety feature. Never
overload an electrical outlet. The overall system load should not exceed 80
percent of the branch circuit rating. Consult an electrician for more information
if you have questions about power loads and branch circuit ratings.
Be sure that the power outlet you are using is properly wired, easily accessible,
and located close to the equipment. Do not fully extend power cords in a way
that will stress the cords.
Connect and disconnect the equipment from the electrical outlet carefully.
viii ThinkStation Serial Attached SCSI Hard Disk Drive User's Guide
Page 9

Batteries
All personal computers manufactured by Lenovo contain a non-rechargeable
coin cell battery to provide power to the system clock. In addition many
mobile products such as notebook PCs utilize a rechargeable battery pack to
provide system power when in portable mode. Batteries supplied by Lenovo
for use with your product have been tested for compatibility and should only
be replaced with Lenovo approved parts.
Never attempt to open or service any battery. Do not crush, puncture, or
incinerate batteries or short circuit the metal contacts. Do not expose the
battery to water or other liquids. Only recharge the battery pack strictly
according to instructions included in the product documentation.
Battery abuse or mishandling can cause the battery to overheat, which can
cause gasses or flame to “vent” from the battery pack or coin cell. If your
battery is damaged, or if you notice any discharge from your battery or the
buildup of foreign materials on the battery leads, stop using the battery and
obtain a replacement from the battery manufacturer.
Batteries can degrade when they are left unused for long periods of time. For
some rechargeable batteries (particularly Lithium Ion batteries), leaving a
battery unused in a discharged state could increase the risk of a battery short
circuit, which could shorten the life of the battery and can also pose a safety
hazard. Do not let rechargeable Lithium-Ion batteries completely discharge or
store these batteries in a discharged state.
Heat and product ventilation
Computers, AC adapters, and many accessories can generate heat when turned
on and when batteries are charging. Always follow these basic precautions:
v Do not leave your computer, AC adapter, or accessories in contact with your
lap or any part of your body for an extended period when the products are
functioning or when the battery is charging. Your computer, AC adapter, and
many accessories produce some heat during normal operation. Extended
contact with the body could cause discomfort or, potentially, a skin burn.
v Do not charge the battery or operate your computer, AC adapter, or
accessories near flammable materials or in explosive environments.
v Ventilation slots, fans, and heat sinks are provided with the product for
safety, comfort, and reliable operation. These features might inadvertently
become blocked by placing the product on a bed, sofa, carpet, or other
flexible surface. Never block, cover, or disable these features.
General safety guidelines ix
Page 10

x ThinkStation Serial Attached SCSI Hard Disk Drive User's Guide
Page 11
Chapter 1. About the ThinkStation Serial Attached SCSI (SAS) hard disk drive
This section provides information on the ThinkStation® Serial Attached SCSI
(SAS) hard disk drive.
Product description
The SAS hard disk drive can only be installed in computers with at least one
of the following configurations:
v a SAS-compatible backplane with bays designed to accommodate SAS hard
disk drives
v a PCI Express (PCIe)-to-SAS host bus adapter
SAS hard disk drive connects to a SAS-compatible interface which
The
supports SAS hard disk drives in a single drive per cable configuration. There
are no jumper settings required for master or slave settings.
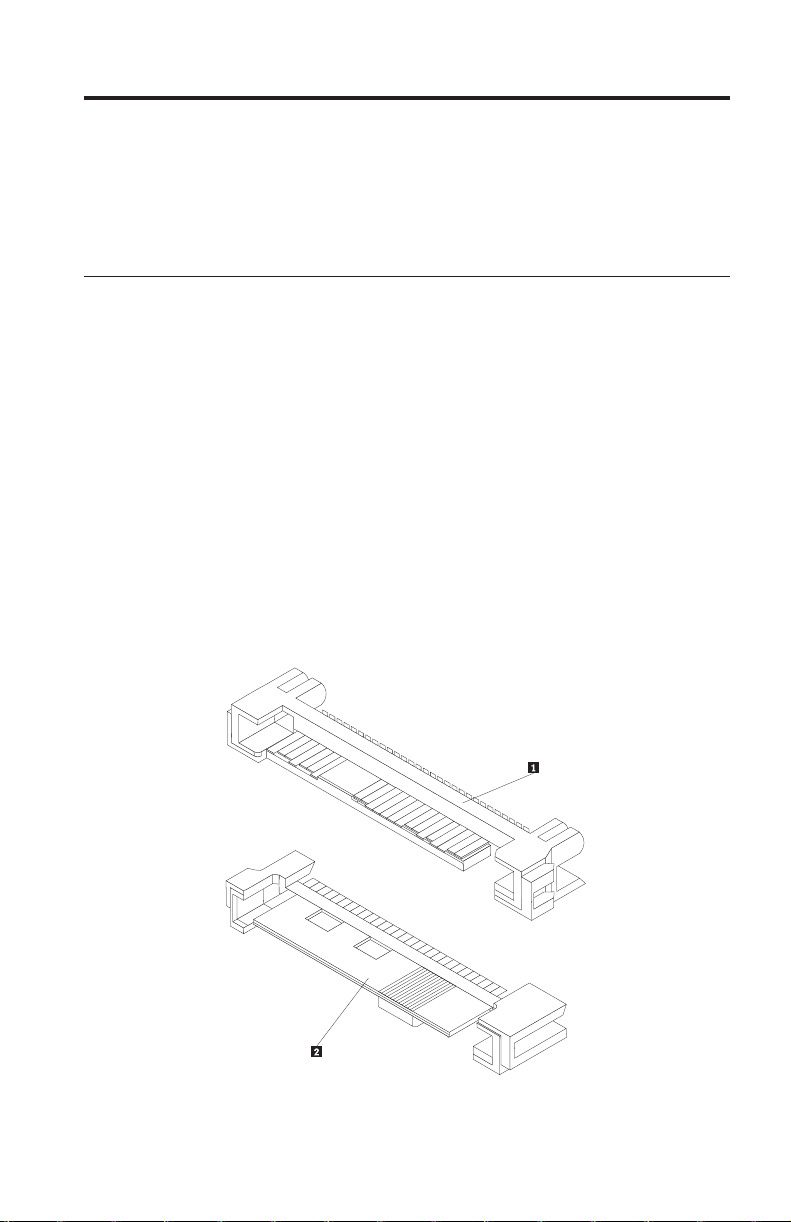
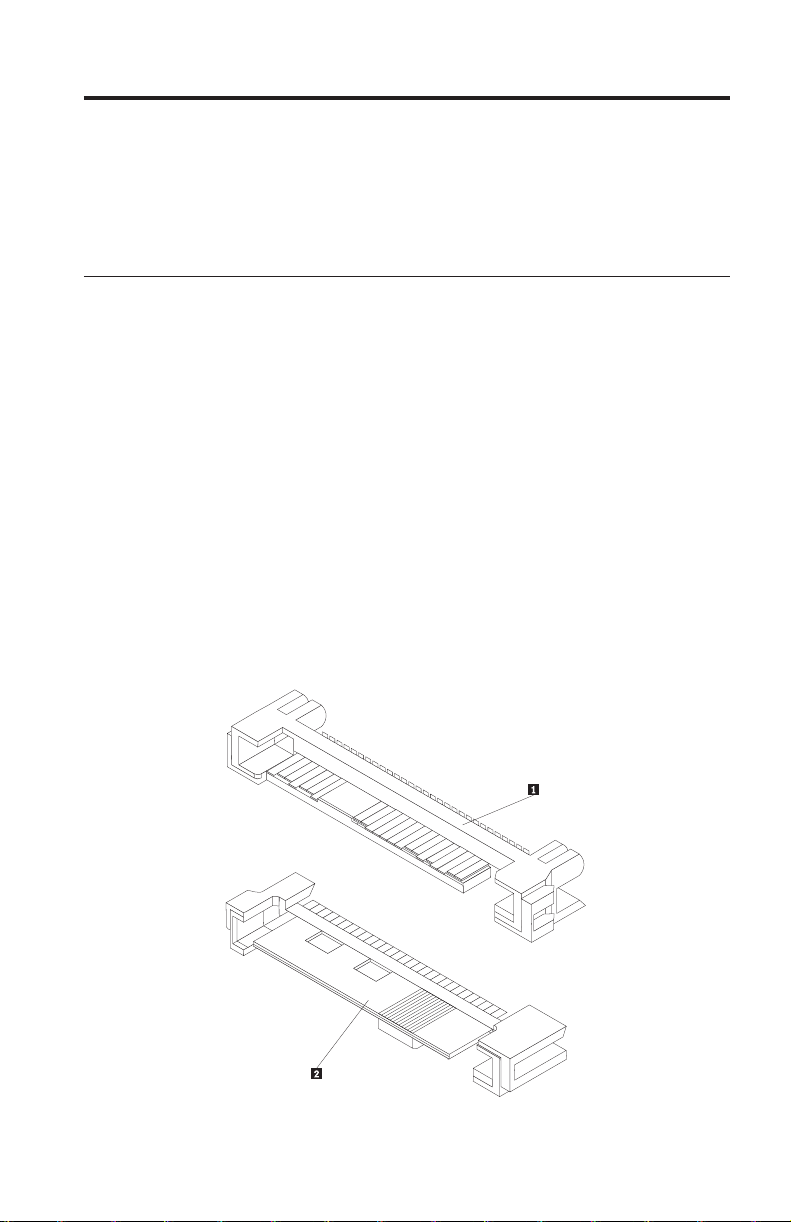
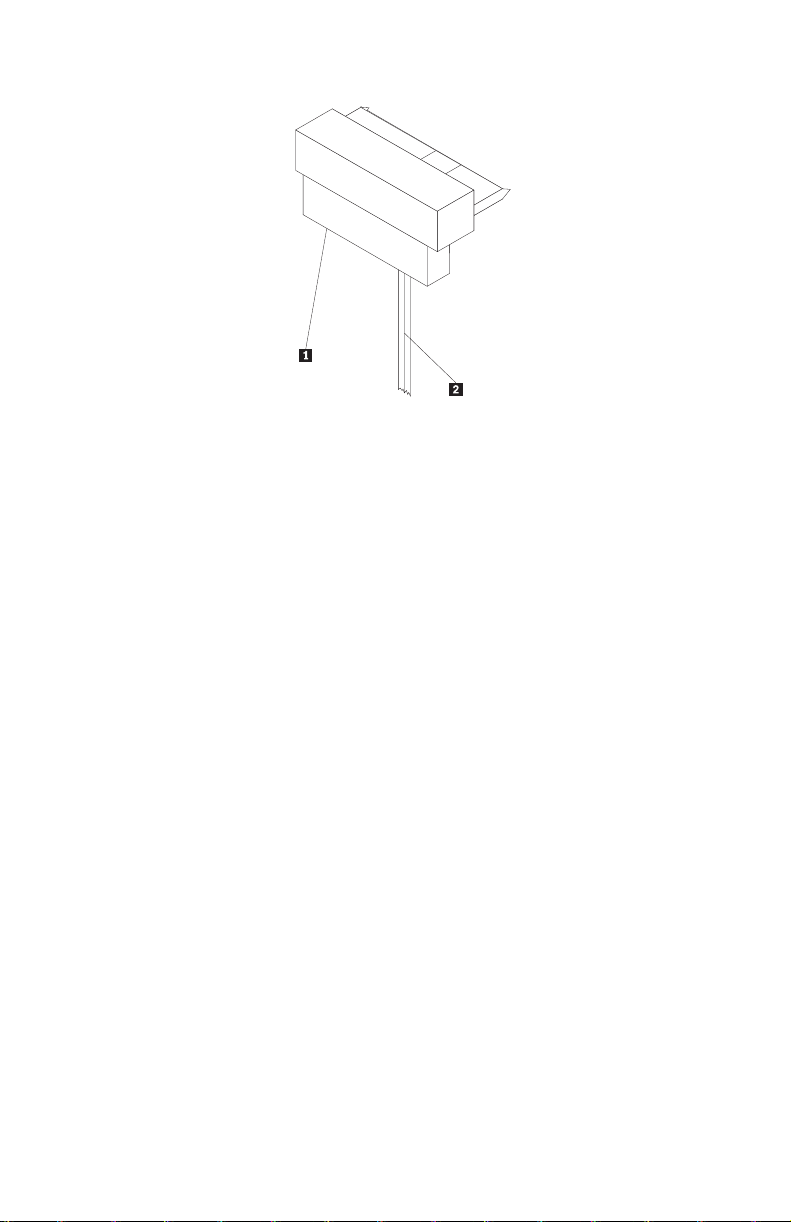
The SAS hard disk drive uses 29-pin SAS interface connectors. The top surface
1 and the bottom surface 2 of the connector are displayed in the diagram
below. The cables included in the option package enable you to connect the
power port and the signal port of the SAS hard disk drive as Serial ATA
(S ATA) hard disk drives.
© Lenovo 2007. Portions © IBM Corp. 2005. 1
Page 12

Your hard disk drive can be configured in one of the following ways:
v As single drive
– Be installed as the only hard disk drive in a computer
– Replace a hard disk drive
As one of multiple drives to operate with other installed hard disk drives
v
Notes:
1. SAS hard disk drives can not operate with SATA hard disk drives.
2. Make sure that all the other hard disk drives in your computer are SAS
hard disk drives.
The SAS and SATA drives can not operate together as they have different
spinning speeds, which cause the two drives to place different rotational
vibration forces on the chassis. If a SATA drive of 7200 RPM and a SAS
drive of 15000 RPM are installed in the same chassis, the two different
forces on the chassis could cause performance degradation and
additional acoustic noise.
addition to this User’s Guide, your option package contains:
In
v Serial Attached SCSI hard disk drive
v Drive handling flyer
v Safety information manual
v Two SAS cables
Contact
your place of purchase if parts are missing or damaged. Be sure to
retain your proof of purchase. It may be required to receive warranty service.
Installation planning
This section contains detailed information to help you plan your SAS hard disk
drive installation.
Installation requirements
To install the SAS hard disk drive, you must have:
v Documentation
The documentation that came with your computer and operating system.
v SAS compatible port
Your computer must have a SAS compatible port on system board or a
PCIe-to-SAS host bus adapter. If you are not sure about your port, see the
documentation that came with your computer. Generally, the ThinkStation
D10 series computer systems have SAS compatible ports on the system
board. The ThinkStation S10 series computer systems need a PCIe-to-SAS
host bus adapter to support SAS hard disk drives.
2 ThinkStation Serial Attached SCSI Hard Disk Drive User's Guide
Page 13
For PCIe-to-SAS host bus adapter installation instructions, see Appendix A,
“PCIe-to-SAS host bus adapter quick installation instructions,” on page 115 or
refer to the documentation that comes with your PCIe-to-SAS host bus
adapter.
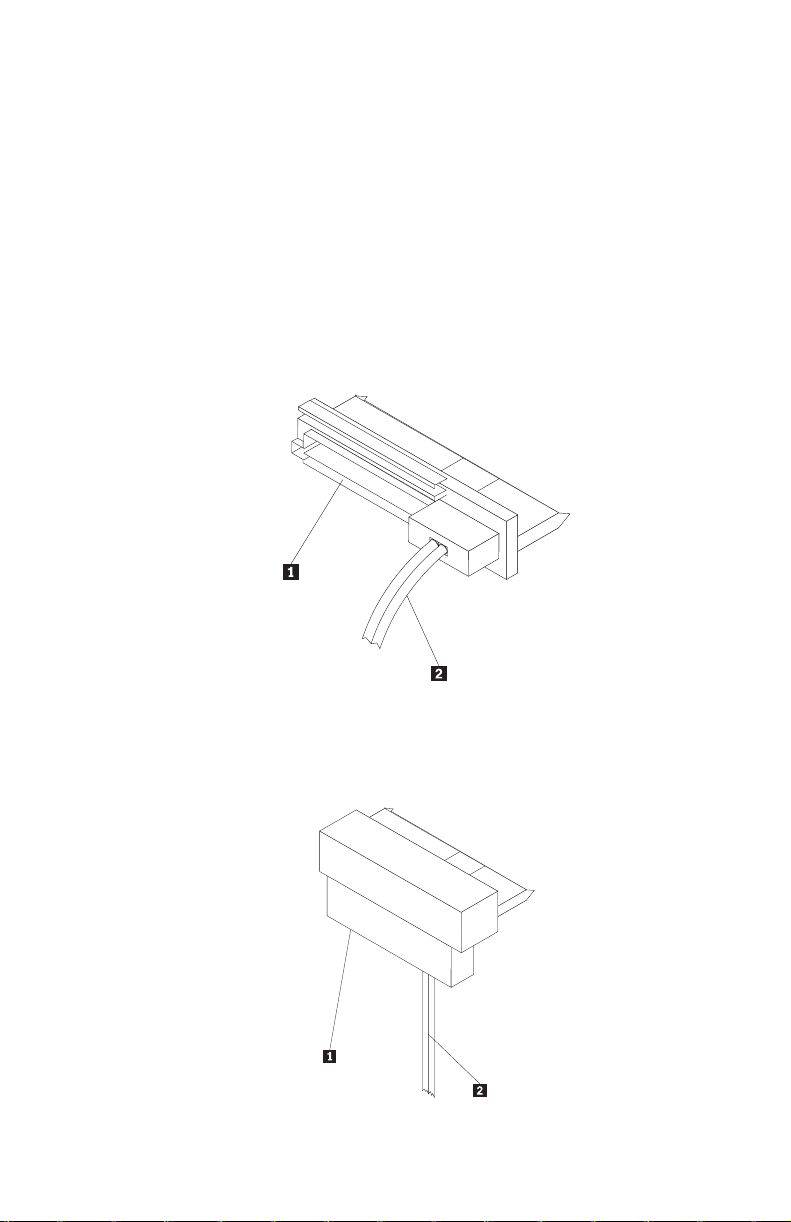
v SAS hard disk drive cable
You will be required to use one of the following 29-pin SAS connecting
cables included in your option package to connect the SAS hard disk drive
to the power and signal ports:
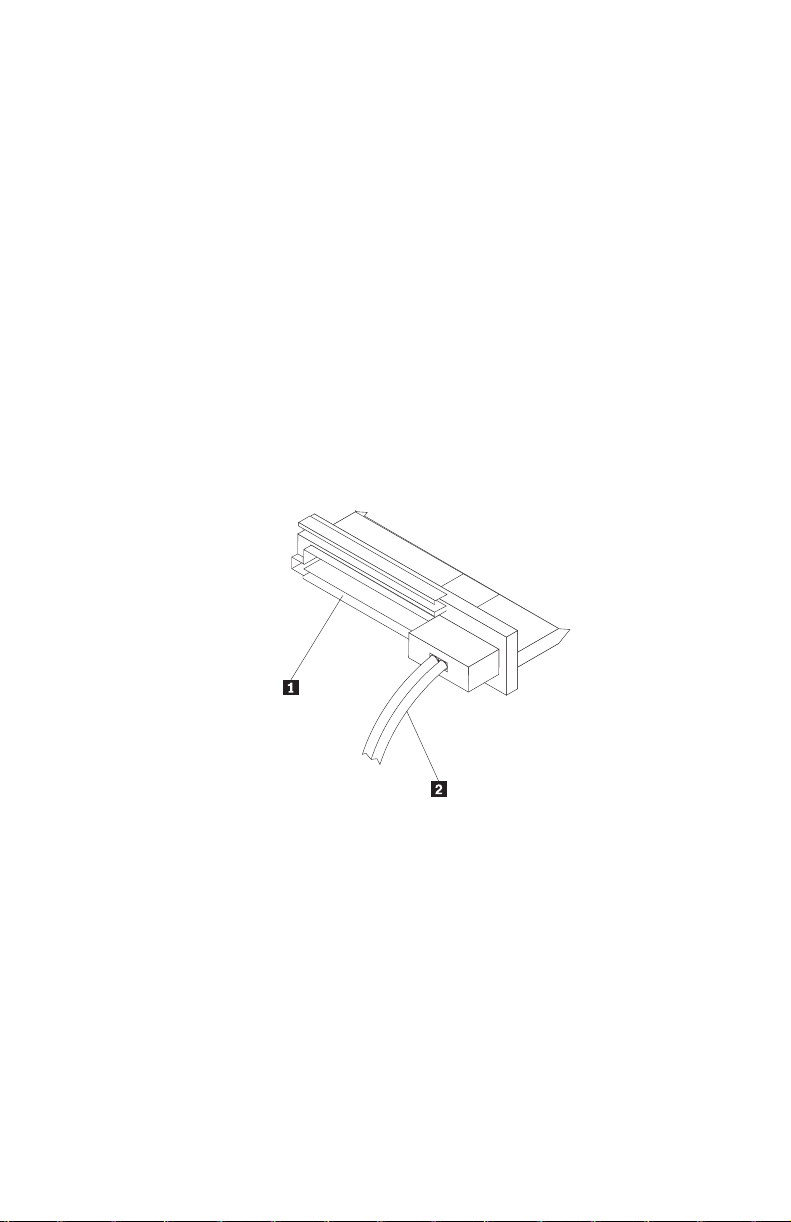
– Straight connecting cable
The straight cable is for the ThinkStation D10 series computer systems.
The power port 1 and the signal cable 2 are displayed in the diagram
below.
– Right angle connecting cable
The right angle connecting cable is for the ThinkStation S10 series
computer systems. The power port 1 and the signal cable 2 are
displayed in the diagram below.
Chapter 1. About the ThinkStation Serial Attached SCSI (SAS) hard disk drive 3
Page 14

Partition planning
The two kinds of file systems used by the Microsoft® operating system are
NTFS and FAT32. Microsoft Windows® XP can support both of these file
systems, but Microsoft Windows Vista® can only support NTFS.
Note: NTFS is recommended to be used to partition any new drives.
To determine which file system you are using, do the following:
1. Right-click an exiting drive under My Computer.
2. Select Properties. The file system will be displayed in the General tab.
For more information on partitioning your drive, see “Partitioning and
formatting your drive” on page 8.
Installing the drive
You must install your new drive in the computer before using your operating
system to partition and format your new drive.
The instructions in this section are general guidelines that apply to most
computers. For specific information on installing a hard disk drive in your
computer, see the documentation that came with your computer.
Step 1. Opening your computer
Before opening your computer, complete the following steps:
1. Turn off the computer.
2. Unplug the power cable from the power outlet of your computer and all
other attached devices and cables.
is now safe to open your computer. For specific information about opening
It
your computer, see the documentation that came with your computer.
Step 2. Unpacking the drive
Use the following procedure to unpack and handle the drive. To prevent
damage and static-electricity discharge, keep handling to a minimum.
1. Do not open the antistatic bag until you are ready to install the drive. Static
electricity can damage the drive and other computer components.
2. Touch the inner conductive surface of the antistatic bag containing the
drive and your hand to an unpainted metal surface on the computer for
two seconds. This drains static electricity from the bag and from your body.
3. Before handling the drive, ground yourself by touching an unpainted
surface on the computer. Ground yourself again after leaving and returning
to your work area.
4 ThinkStation Serial Attached SCSI Hard Disk Drive User's Guide
Page 15
4. Always handle the drive by its edges. Do not touch any exposed printed
circuitry, components, or connector pins.
5. While installing the drive, avoid all unnecessary handling. Rough handling
can damage the heads, rotating disks, and bearings inside the drive
housing.
6. If you must put the drive down, place the antistatic bag on a flat, padded
surface and place the drive on the bag with the component side facing up.
If you want to install the drive in a 5.25-inch bay, you will need to
Note:
purchase a universal bay conversion kit which is available at many local
computer supply stores.
Step 3. Mounting the drive in the bay
You can mount the drive horizontally or vertically based on the location of the
bay in your chassis. The ThinkStation D10 and S10 series computer systems
provide plastic brackets for you to mount your hard disk drives. Alternatively,
you can mount your hard disk drive using screws in a bay without a bracket.
The screws should be commercially available at your local computer retailer.
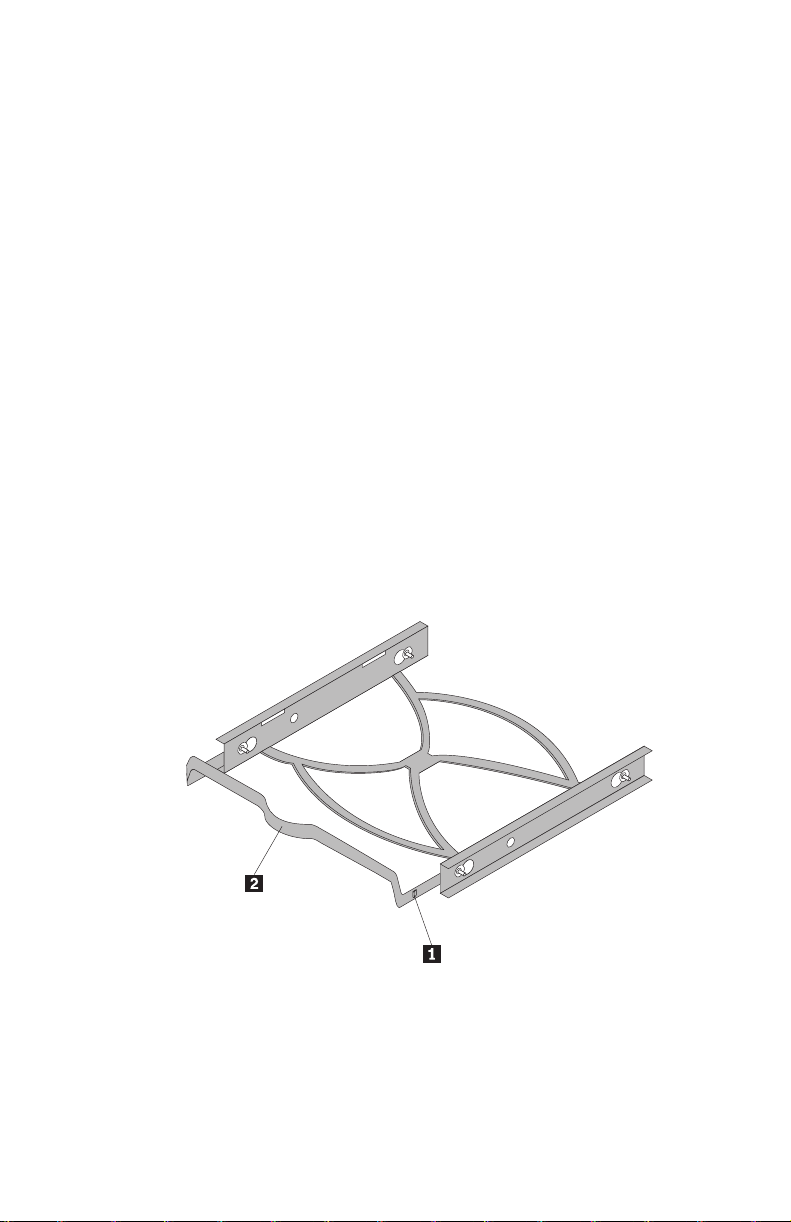
To mount the drive using the bracket:
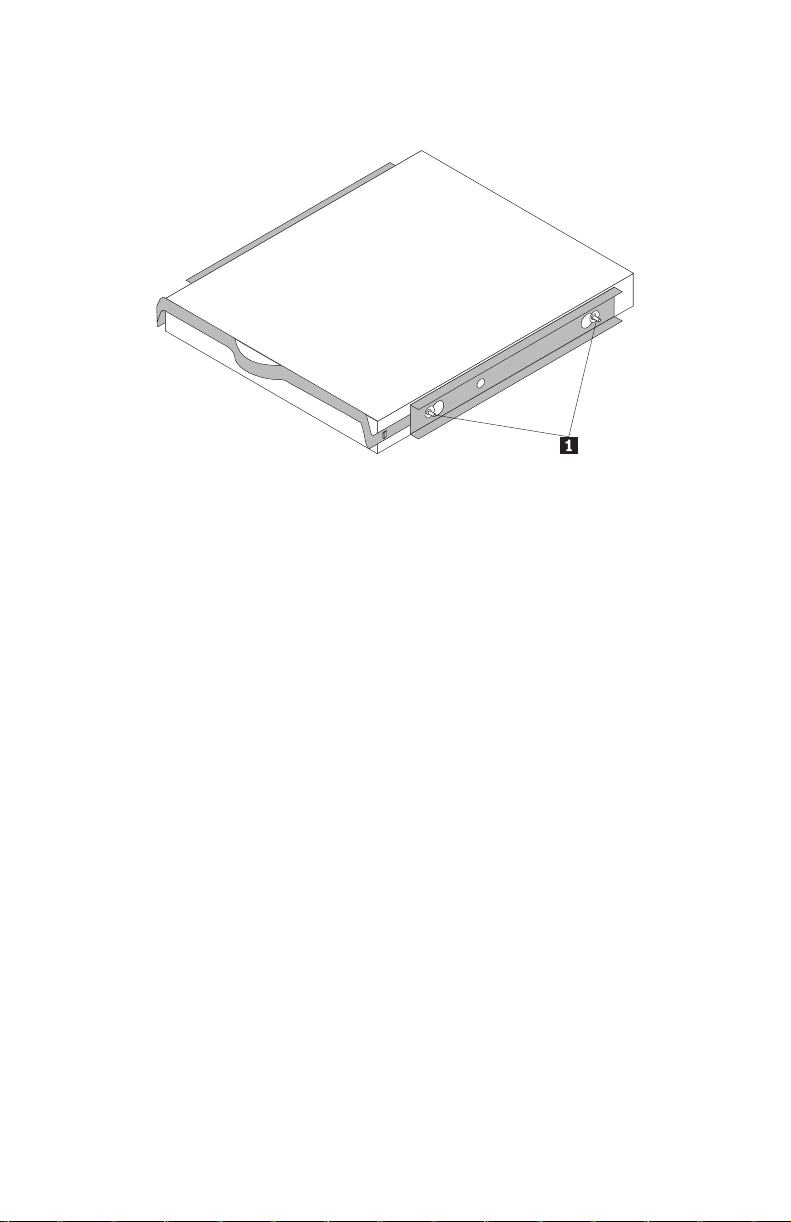
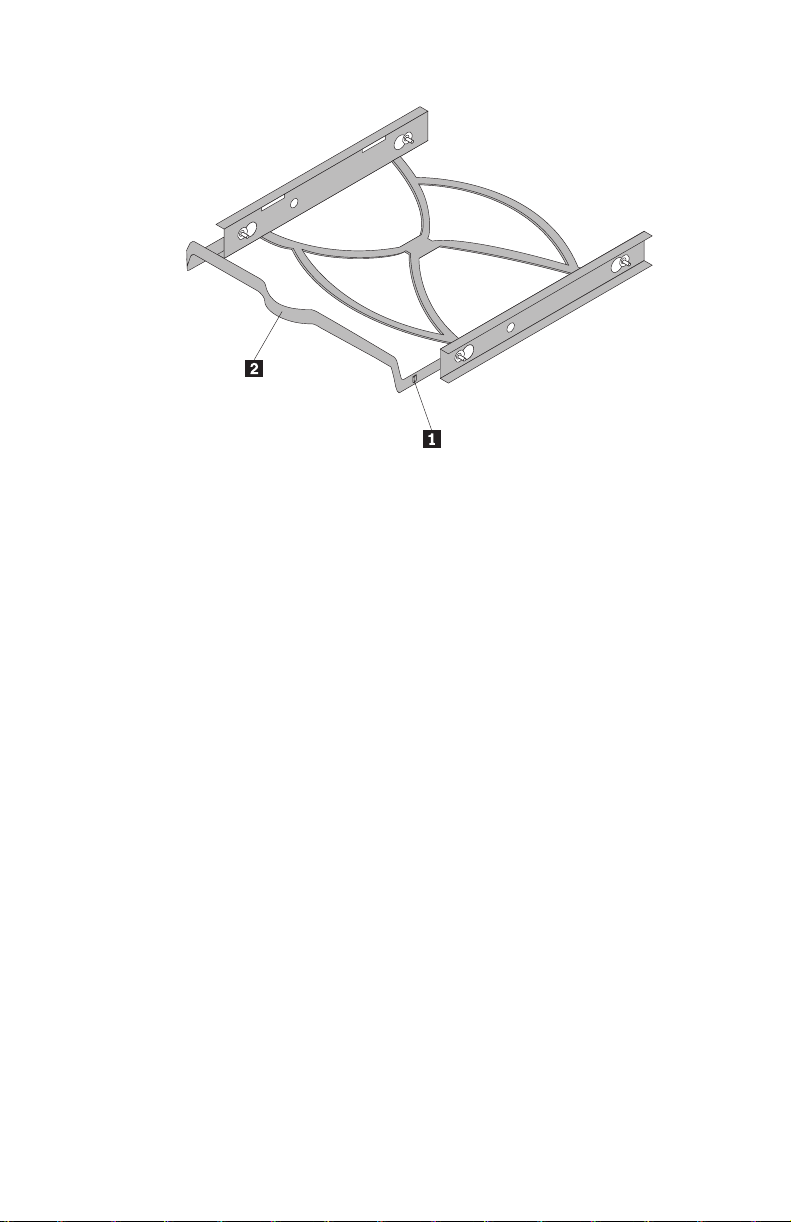
1. Pull the bracket out of the bay by pressing the snaps (1) and pulling the
handle (2).
Chapter 1. About the ThinkStation Serial Attached SCSI (SAS) hard disk drive 5
Page 16
2. Install the drive to the bracket, and make sure the four mounting pins (1)
have already been aligned in the drive screw holes and secured tightly.
3. If you are adding your new drive to a system with an existing hard disk
drive, position the new drive adjacent to and in the same direction of the
existing hard disk drive so that you will not have to twist the interface
cable when you connect the drive.
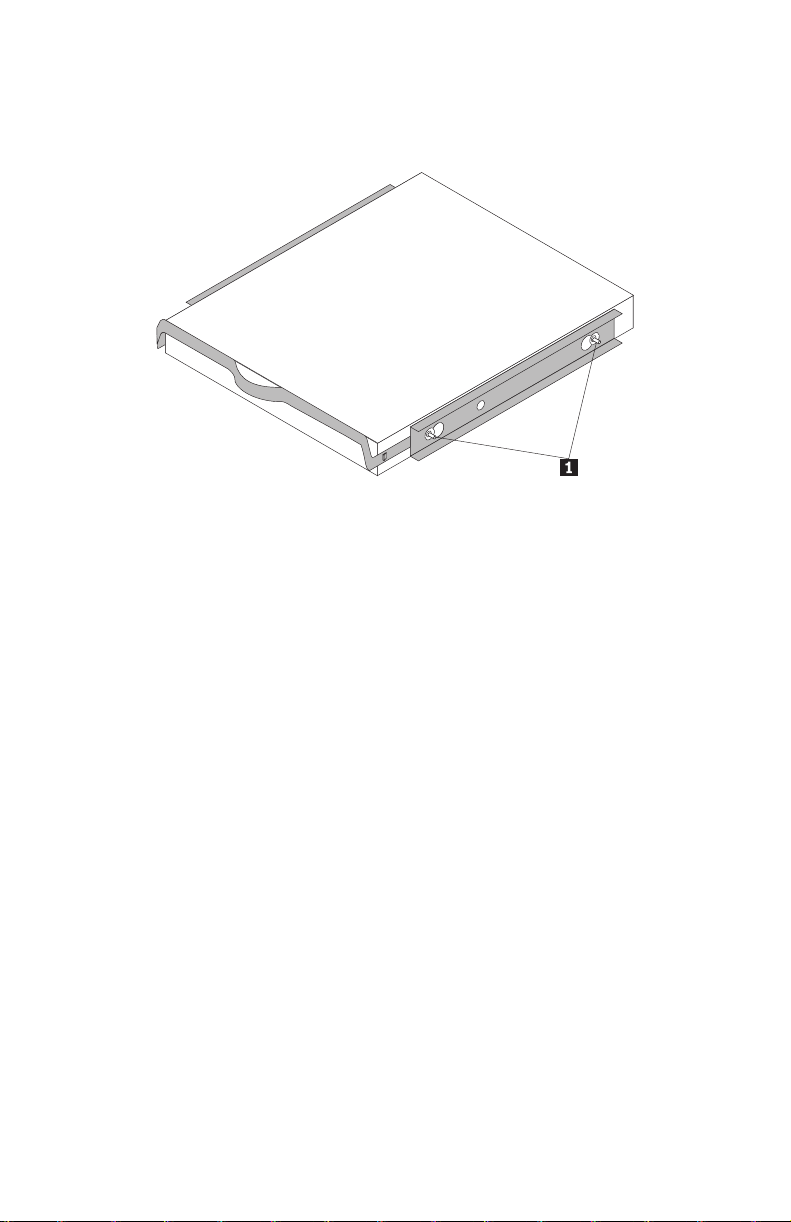
4. Slide the drive with bracket into the bay until the two snaps of the bracket
are locked in the bay.
To mount the drive using screws:
1. Slide the drive into the bay.
2. If you will add your new drive to a system with an existing drive, position
the new drive adjacent to and oriented in the same direction as the existing
hard drive so that you will not have to twist the interface cable when you
connect the drive.
3. Align the drive-bay screw holes with the threaded holes in the drive
housing or expansion brackets.
4. Hand thread the screws to lightly secure the drive in the bay. For some
installations, it might be necessary to use the screw holes on the bottom
(circuit board side) of the drive.
5. Check the drive alignment and tighten the screws. Do not over tighten.
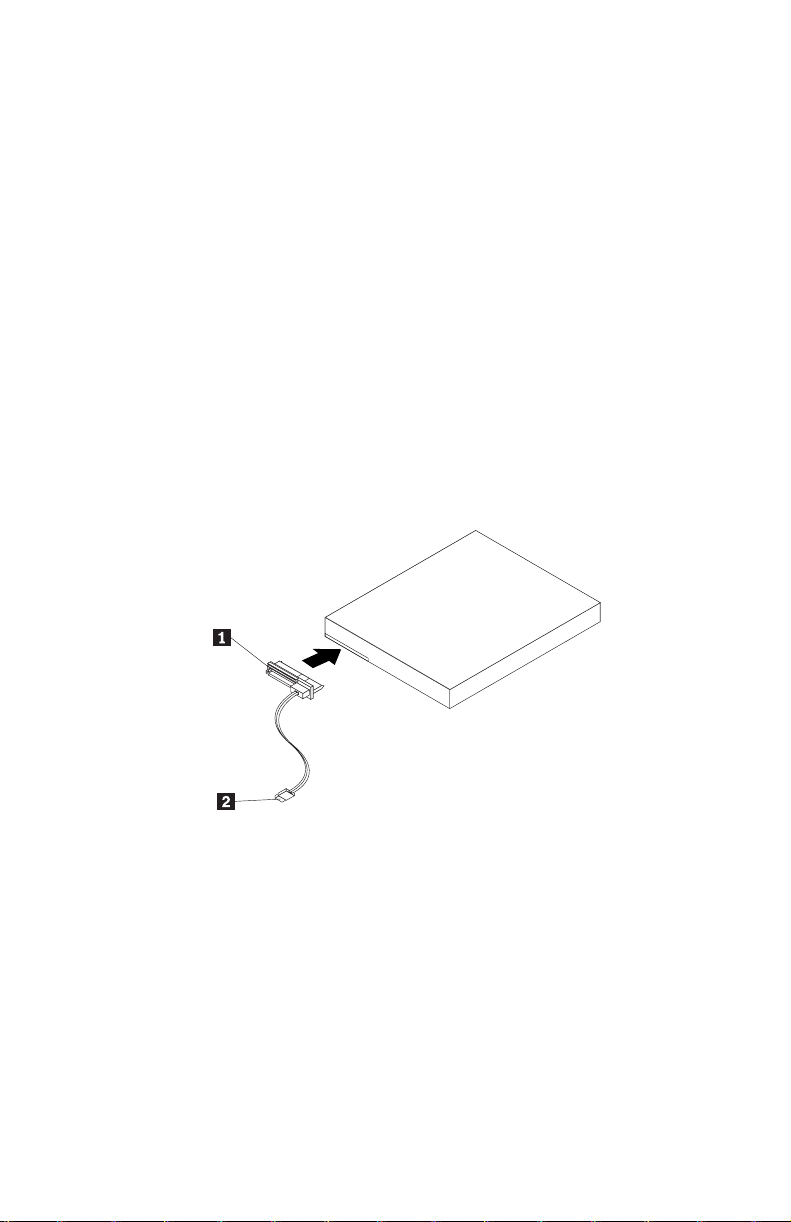
Step 4. Attaching the cables to the drive
Use the following procedure to attach the cables.
1. Select the right 29-pin cable for your computer (straight cable for the
ThinkStation D10 series computer systems and right angle cable for the
ThinkStation S10 series computer systems).
2. Attach the 29-pin cable to your SAS hard disk drive interface connector.
6 ThinkStation Serial Attached SCSI Hard Disk Drive User's Guide
Page 17
3. Attach the other end (7 pin signal port 2) to the SAS compatible port. For
the ThinkStation D10 series computer systems, the five blue SATA/SAS
ports on the system board can support SAS hard disk drive. For the
ThinkStation S10 series computer systems, you need a PCIe-to-SAS host bus
adapter. If you are not sure about your port or computer model, see the
documentation that came with your computer.
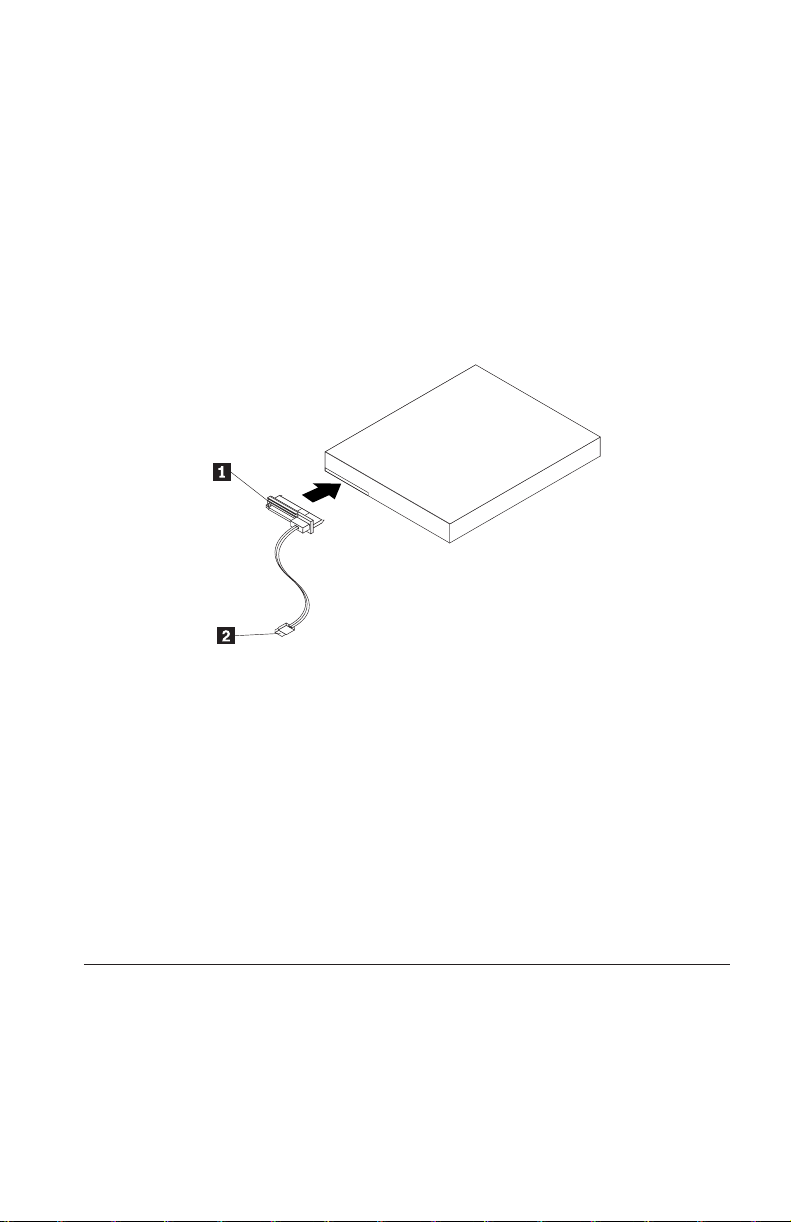
4. Find an unused 15-pin SATA power connector coming from the computer
power supply and attach it to the power port 1 on the connecting cable.
The power connector is keyed so that it attaches one way only. Do not force
it. If the connector does not attach using reasonable pressure, recheck the
orientation of the cable connector to the drive connector and try again.
Step 5. Completing the installation of the drive
To complete the installation of the drive:
1. Verify that the hard disk drive is securely mounted and the cables are
firmly attached.
2. Verify that the cables do not interfere with the computer cover and do not
block the power supply fan blades or air flow paths.
3. Replace the computer cover.
4. Reconnect all devices. Make sure that the keyboard, mouse, and monitor
cables are firmly connected.
5. Reconnect all AC power cords.
Preparing the drive for use
When you restart your computer, the configuration setup information screen
displays because you changed the hardware in your computer. Some
computers require you to make configuration choices the first time you restart
after installing a new device. If the screen does not display, see your computer
documentation for information about how to access it. For most computers,
Chapter 1. About the ThinkStation Serial Attached SCSI (SAS) hard disk drive 7
Page 18

you can see the configuration information during computer startup by pressing
F1 when the configuration graphic displays in the upper right corner of your
screen.
Check your configuration setup information for one of the following:
v If the configuration setup program reports the size of your new drive as
what you expected, save your changes, close the configuration program, and
continue with “Partitioning and formatting your drive” on page 8.
v If your computer seems to stop responding or if it does not restart
successfully, go to Chapter 2, “Troubleshooting,” on page 113.
Partitioning and formatting your drive
If you are adding your drive to a computer that has Windows XP or Windows
Vista installed on an existing drive, follow the instructions below to partition
and format your new SAS drive.
Note: Under Windows XP, a minimum of Service Pack 1a (SP1a) is required
for the hard disk drive to access capacities greater than 137 GB.
1. Turn on your computer.
2. Click Start.
3. Right-click My Computer.
4. Click Manage. The Computer Management window opens.
5. From the left side menu, click Disk Management.
6. Click the new drive located in the lower right side of the screen.
7. From the menu bar, click Action > All Tasks > New Partition.
8. The New Partition window opens. Follow the on-screen instructions to
partition the drive.
9. After clicking Finish in the on-screen instructions, the format will begin.
If you are installing the drive in a computer that has no hard disk
Note:
drive, follow the instructions below to partition and format the new hard disk
drive for Windows XP or Windows Vista operating system using NTFS:
1. Insert the first Windows XP or Windows Vista installation diskette (Setup
Disk #1) in the diskette drive or insert the Windows XP or Windows Vista
installation CD or DVD into your CD-ROM or DVD-ROM drive.
2. Restart your computer.
3. Use the instructions in the Windows XP or Windows Vista user’s guide to
partition and format your drive.
8 ThinkStation Serial Attached SCSI Hard Disk Drive User's Guide
Page 19
Capítulo 1. Sobre a Unidade de Disco Rígido SAS
(Serial Attached SCSI) ThinkStation
Esta seção fornece informações sobre a unidade de disco rígido SAS (Serial
Attached SCSI) ThinkStation®.
Descrição do Produto
A unidade de disco rígido SAS só pode ser instalada em computadores com
pelo menos uma das seguintes configurações:
v Um painel traseiro compatível com SAS com compartimentos desenvolvidos
para acomodar unidades de disco rígido SAS
v Um adaptador de barramento de host PCIe (PCI Express)-para-SAS
unidade de disco rígido SAS se conecta a uma interface compatível com SAS
A
que suporta unidades de disco rígido SAS em uma única unidade por
configuração de cabo. Não há configurações de jumper necessárias para
configurações principais ou secundárias.
A unidade de disco rígido SAS utiliza conectores de interface SAS de 29 pinos.
A superfície superior 1 e a superfície inferior 2 do conector são exibidas no
diagrama a seguir. Os cabos inclusos no pacote de opções permitem a conexão
da porta de alimentação e da porta de sinal da unidade de disco rígido SAS
como unidades de disco rígido SATA (Serial ATA).
© Lenovo 2007. Partes © IBM Corp. 2005. 9
Page 20

Sua unidade de disco rígido pode ser configurada de uma das seguintes
maneiras:
v Como uma unidade única
– Ser instalada como a única unidade de disco rígido em um computador
– Para substituir uma unidade de disco rígido
Como uma de várias unidades para operar com outras unidades de disco
v
rígido instaladas
Notas:
1. As unidades de disco rígido SAS não podem operar com unidades de
disco rígido SATA.
2. Certifique-se de que todas as outras unidades de disco rígido do
computador sejam SAS.
As unidades SAS e SATA não podem operar juntas, pois possuem
velocidades giratórias diferentes, o que faz as duas unidades aplicarem
forças de vibração rotacional diferentes no chassis. Se uma unidade SATA
de 7200 RPM e uma unidade SAS de 15000 RPM estiverem instaladas no
mesmo chassis, as duas forças diferentes no chassis podem causar
degradação do desempenho e ruído adicional.
deste Guia do Usuário, o pacote de opções contém:
Além
v Unidade de disco rígido Serial Attached SCSI
v Alça de manipulação da unidade
v Manual de informações sobre segurança
v Dois cabos SAS
em contato com o local de compra se as peças estiverem faltando ou com
Entre
defeito. Certifique-se de guardar o seu comprovante de compra. Ele pode ser
exigido para o recebimento do serviço de garantia.
Planejamento da Instalação
Esta seção contém informações detalhadas para ajudá-lo a planejar a instalação
da sua unidade de disco rígido SAS.
Requisitos de Instalação
Para instalar a unidade de disco rígido SAS, você deve ter:
v Documentação
A documentação que veio com o seu computador e sistema operacional.
v Porta Compatível com SAS
Seu computador deve ter uma porta compatível com SAS na placa-mãe ou
um adaptador de barramento de host PCIe para SAS. Se você não tem
certeza sobre a sua porta, consulte a documentação fornecida com o
10 ThinkStation Serial Attached SCSI Hard Disk Drive User's Guide
Page 21
computador. Geralmente, os sistemas de computador ThinkStation D10
series possuem portas compatíveis com SAS na placa-mãe. Os sistemas de
computador ThinkStation S10 series necessitam de um adaptador de
barramento de host PCI para SAS para suportar unidades de disco rígido
SAS.
Para obter instruções de instalação do adaptador de barramento de host
PCIe para SAS, consulte Apêndice A, “PCIe-to-SAS host bus adapter quick
installation instructions”, na página 115 ou a documentação fornecida com o
adaptador de barramento de host PCIe para SAS.
v Cabo da Unidade de Disco Rígido SAS
Será necessário utilizar um dos seguintes cabos de conexão SAS de 29 pinos
inclusos no pacote de opções para conexão da unidade de disco rígido SAS
nas portas de alimentação e de sinal:
– Cabo de Conexão Linear
O cabo linear é para os sistemas de computador ThinkStation D10 series.
A porta de alimentação 1 e o cabo de sinal 2 são exibidos no
diagrama a seguir.
– Cabo de Conexão de Ângulo Direito
O cabo de conexão de ângulo direito é para os sistemas de computador
ThinkStation S10 series. A porta de alimentação 1 e o cabo de sinal 2
são exibidos no diagrama a seguir.
Capítulo 1. Sobre a Unidade de Disco Rígido SAS (Serial Attached SCSI) ThinkStation 11
Page 22
12 ThinkStation Serial Attached SCSI Hard Disk Drive User's Guide
Page 23

Planejamento de Partição
Os dois tipos de sistemas de arquivos utilizados pelo sistema operacional
Microsoft® são o NTFS e o FAT32. O Microsoft Windows® XP pode suportar
esses dois sistemas de arquivo, mas o Microsoft Windows Vista® pode suportar
apenas NTFS.
Nota: O NTFS é recomendado para ser utilizado para particionar quaisquer
unidades novas.
Para determinar qual sistema de arquivo está sendo utilizado, faça o seguinte:
1. Clique com o botão direito do mouse em uma unidade de saída em Meu
computador.
2. Selecione Propriedades. O sistema de arquivos será exibido na guia Geral.
Para obter mais informações sobre a partição da unidade, consulte
“Particionando e Formatando a Unidade” na página 18.
Instalando a Unidade
Você deve instalar sua nova unidade no computador antes de utilizar o sistema
operacional para particioná-la e formatá-la.
As instruções desta seção são diretrizes gerais que se aplicam à maioria dos
computadores. Para obter informações específicas sobre a instalação de uma
unidade de disco rígido no seu computador, consulte a documentação que veio
com ele.
Etapa 1. Abrindo o Computador
Antes de abrir seu computador, conclua as seguintes etapas:
1. Desligue o computador.
2. Desconecte o cabo de alimentação da tomada de energia do seu
computador e de todos os dispositivos e cabos conectados.
é seguro abrir o computador. Para obter informações específicas sobre a
Agora
abertura do computador, consulte a documentação fornecida com o
computador.
Etapa 2. Desempacotando a Unidade
Utilize o procedimento a seguir para desempacotar e manusear a unidade.
Para evitar danos e descarga de eletricidade estática, manuseie o mínimo
possível.
1. Não abra a embalagem antiestática até que esteja pronto para instalar a
unidade. A eletricidade estática pode danificar a unidade e outros
componentes do computador.
Capítulo 1. Sobre a Unidade de Disco Rígido SAS (Serial Attached SCSI) ThinkStation 13
Page 24

2. Toque a superfície condutora interna da bolsa antiestática que contém a
unidade e uma superfície de metal do computador que não seja pintada
por dois segundos. Isso faz com que a eletricidade estática da embalagem e
de seu corpo seja drenada.
3. Antes de manusear a unidade, faça o seu aterramento tocando na superfície
sem tinta do computador. Faça o seu aterramento novamente depois de sair
e voltar para sua área de trabalho.
4. Sempre manuseie a unidade pelas bordas. Não toque qualquer circuito de
impressão exposto, componentes ou pinos conectores.
5. Ao instalar a unidade, evite todo o manuseio desnecessário. O manuseio
descuidado pode danificar os cabeçotes, os discos de rotação e os mancais
dentro do compartimento da unidade.
6. Se você precisar rebaixar a unidade, coloque a bolsa antiestática sobre uma
superfície plana e revestida e coloque a unidade na bolsa com o lado do
componente voltado para cima.
Se desejar instalar a unidade em um compartimento de 5,25 polegadas,
Nota:
será necessário adquirir um kit de conversão de compartimento universal que
está disponível em muitas lojas de fornecimento de computadores locais.
Etapa 3. Montando a Unidade no Compartimento
É possível montar a unidade na horizontal ou na vertical com base no local do
compartimento em seu chassi. Os sistemas de computador ThinkStation D10 e
S10 series fornecem hastes plásticas para montagem das unidades de disco
rígido. Alternativamente, é possível montar sua unidade de disco rígido
utilizando parafusos em um compartimento sem uma haste. Os parafusos
devem estar disponíveis para compra no revendedor local de computador.
Para Montar a Unidade Utilizando a Haste:
1. Tire a haste do compartimento, pressionando os botões (1) e puxando a
alça (2).
14 ThinkStation Serial Attached SCSI Hard Disk Drive User's Guide
Page 25
Capítulo 1. Sobre a Unidade de Disco Rígido SAS (Serial Attached SCSI) ThinkStation 15
Page 26
2. Instale a unidade na haste e certifique-se de que os quatro pinos de
montagem (1) estejam alinhados nos orifícios do parafuso da unidade e
apertados com segurança.
3. Se estiver incluindo sua nova unidade em um sistema com uma unidade de
disco rígido existente, coloque a nova unidade adjacente e na mesma
direção da unidade de disco rígido existente para não haver necessidade de
girar o cabo da interface ao conectar a unidade.
4. Deslize a unidade com a haste para dentro do compartimento até que os
dois botões da haste estejam travadas no compartimento.
Para Montar a Unidade Utilizando Parafusos:
1. Deslize a unidade para dentro do compartimento.
2. Se você for incluir a sua nova unidade em um sistema com uma unidade
existente, coloque a nova unidade adjacente e na mesma direção da
unidade de disco rígido existente para não haver necessidade de girar o
cabo de interface ao conectar a unidade.
3. Alinhe os orifícios dos parafusos do compartimento de unidade com os
orifícios encadeados no invólucro da unidade ou suportes de expansão.
4. Aperte os parafusos para segurarem levemente a unidade no
compartimento. Em algumas instalações, pode ser necessário utilizar os
orifícios dos parafusos na parte inferior (lado da placa de circuito) da
unidade.
5. Verifique o alinhamento da unidade e aperte os parafusos. Não aperte
excessivamente.
Etapa 4. Conectando os Cabos à Unidade
Utilize os procedimentos a seguir para conectar os cabos.
16 ThinkStation Serial Attached SCSI Hard Disk Drive User's Guide
Page 27
1. Selecione o cabo direito de 29 pinos para o seu computador (cabo linear
para os sistemas de computador ThinkStation D10 series e cabo de ângulo
direito dos sistemas de computador ThinkStation S10 series).
2. Conecte o cabo de 29 pinos ao conector de interface da unidade de disco
rígido SAS.
3. Conecte a outra extremidade (porta de sinal de 7 pinos 2) à porta
compatível com SAS. Para os sistemas de computador ThinkStation D10
series, as cinco portas azuis SATA/SAS na placa-mãe podem suportar
unidade de disco rígido SAS. Para os sistemas de computador ThinkStation
S10 series, é necessário um adaptador de barramento de host PCIe para
SAS. Se você não tem certeza sobre a porta ou modelo do computador,
consulte a documentação fornecida com o computador.
4. Localize um conector de alimentação SATA de 15 pinos que não seja usado
e que venha da fonte de alimentação do computador e conecte-o à porta de
alimentação 1 no cabo de conexão. O conector de alimentação é como
uma chave, só pode ser conectado de uma maneira. Não force. Se o
conector não conectar com uma pressão razoável, verifique novamente a
orientação do conector de cabo ao conector de unidade e tente novamente.
Etapa 5. Concluindo a Instalação da Unidade
Para concluir a instalação da unidade:
1. Verifique se a unidade de disco rígido está firmemente montada e se os
cabos estão firmemente conectados.
2. Verifique se os cabos não interferem na tampa do computador e não
bloqueiam as lâminas do ventilador da fonte de alimentação ou os
caminhos do fluxo de ar.
3. Recoloque a tampa do computador.
4. Reconecte todos os dispositivos. Certifique-se de que o teclado, o mouse e
os cabos do monitor estão firmemente conectados.
5. Reconecte todos os cabos de alimentação AC.
Capítulo 1. Sobre a Unidade de Disco Rígido SAS (Serial Attached SCSI) ThinkStation 17
Page 28

Preparando a Unidade para Utilização
Ao iniciar seu computador novamente, a tela de informações de instalação de
configuração é exibida porque você alterou o hardware no seu computador.
Alguns computadores requerem que você faça opções de configuração na
primeira vez que você inicia novamente após a instalação de um novo
dispositivo. Se a tela não for exibida, consulte a documentação do seu
computador para obter informações sobre como acessá-la. Na maioria dos
computadores, é possível visualizar informações de configuração durante a
inicialização do computador pressionando F1 quando o gráfico de configuração
for exibido no canto superior direito de sua tela.
Verifique as informações de instalação de configuração para um dos
procedimentos a seguir:
v Se o programa de instalação de configuração relatar o tamanho da sua nova
unidade como esperado, salve suas alterações, feche o programa de
configuração e continue com “Particionando e Formatando a Unidade” na
página 18.
v Se o computador parar de responder ou não iniciar novamente com êxito, vá
para o Capítulo 2, “Troubleshooting”, na página 113.
Particionando e Formatando a Unidade
Se estiver incluindo sua unidade em um computador que possui o Windows
XP ou Windows Vista instalado em uma unidade existente, siga as instruções
abaixo para particionar e formatar sua nova unidade SAS.
Nota: No Windows XP, é necessário um mínimo de SP1a (Service Pack 1a)
para a unidade de disco rígido para acessar capacidades acima de 137 GB.
1. Ligue o computador.
2. Clique em Iniciar.
3. Clique com o botão direito em Meu computador.
4. Clique em Gerenciar. A janela Gerenciamento do Computador é aberta.
5. No menu do lado esquerdo, clique em Gerenciamento de Disco.
6. Clique na nova unidade localizada no lado inferior direito da tela.
7. Na barra de menus, clique em Ação > Todas as Tarefas > Nova Partição.
8. A janela Nova Partição é aberta. Siga as instruções na tela para particionar
a unidade.
9. Depois de clicar em Concluir nas instruções na tela; a formatação será
iniciada.
Se você estiver instalando a unidade em um computador que não
Nota:
possui unidade de disco rígido, siga as instruções a seguir para particionar e
18 ThinkStation Serial Attached SCSI Hard Disk Drive User's Guide
Page 29

formatar a nova unidade de disco rígido para os sistemas operacionais
Windows XP ou Windows Vista utilizando o NTFS:
1. Insira o primeiro disquete de instalação do Windows XP ou Windows Vista
(Disco de Configuração #1) na unidade de disquete ou insira o CD ou DVD
de instalação do Windows XP ou Windows Vista na unidade de CD-ROM
ou DVD-ROM.
2. Reinicie o computador.
3. Utilize as instruções do guia do usuário do Windows XP ou Windows Vista
para particionar e formatar sua unidade.
Capítulo 1. Sobre a Unidade de Disco Rígido SAS (Serial Attached SCSI) ThinkStation 19
Page 30

Chapitre 1. A propos de l’unité de disque dur SAS
(Serial Attached SCSI) pour ThinkStation
La présente section propose des informations concernant l’unité de disque dur
SAS (Serial Attached SCSI) pour ThinkStation.
Description du produit
L’unité de disque dur SAS ne peut être installée que sur des ordinateurs
équipés d’au moins un des éléments de configuration suivants :
v un circuit électronique compatible avec la technologie, équipé de baies
conçues pour loger des unités de disque dur SAS
v un adaptateur de bus hôte PCIe-vers-SAS
de disque dur SAS se connecte à une interface compatible avec la
L’unité
technologie qui prend en charge les unités de disque dur SAS dans une seule
unité par configuration de câble. Le cavalier ne nécessite aucun paramétrage
particulier pour les configurations maître ou esclave.
L’unité de disque dur SAS utilise des connecteurs d’interface SAS à 29 broches.
La surface supérieure 1 et la surface inférieure 2 du connecteur sont
illustrées dans le schéma ci-après. Les câbles fournis en option vous permettent
de connecter la prise d’alimentation et le port d’interface de l’unité de disque
dur SAS en tant qu’unités de disque dur SATA (Serial ATA).
20 ThinkStation Serial Attached SCSI Hard Disk Drive User's Guide
Page 31

Votre unité de disque dur peut être configurée de l’une des façons suivantes :
v en monounité
– en tant qu’unité de disque dur unique sur un ordinateur
– en remplacement d’une unité de disque dur
en tant qu’une unité parmi d’autres unités de disque dur installées
v
Remarques
:
1. Les unités de disque dur SAS ne peuvent pas fonctionner avec des unités
de disque dur SATA.
2. Vérifiez que toutes les autres unités de disque dur de votre ordinateur
correspondent à des unités de disque dur SAS.
Les unités SAS et SATA ne peuvent pas fonctionner ensemble car leur
vitesse de rotation est différente et les deux unités exercent différentes
forces de vibration liées à la rotation sur le boîtier. Si une unité SATA de
7200 tours par minute et une unité SAS de 15000 tours par minute sont
installées sur le même boîtier, les deux différentes forces exercées sur le
boîtier risquent de nuire aux performances et d’être plus bruyants.
le présent guide d’utilisation, votre option est livrée avec les éléments
Outre
suivants :
v Unité de disque dur SAS (Serial Attached SCSI)
v Manuel expliquant comment manipuler l’unité
v Manuel relatif aux consignes de sécurité
v Deux câbles SAS
contact avec votre revendeur si des éléments manquent ou sont
Prenez
endommagés. Conservez votre preuve d’achat ; elle peut vous être demandée
pour appliquer la garantie.
Planification de l’installation
La présente section contient des informations détaillées destinées à vous aider
à planifier l’installation de votre unité de disque dur SAS.
Eléments requis pour l’installation
Pour installer l’unité de disque dur SAS, vous devez disposer des éléments
suivants :
v Documentation
Il s’agit de la documentation qui accompagne votre ordinateur et votre
système d’exploitation.
v Port compatible avec la technologie SAS
Votre ordinateur doit être équipé d’un port compatible avec la technologie
SAS sur la carte mère ou d’un adaptateur de bus hôte PCIe-vers-SAS. Si
Chapitre 1. A propos de l’unité de disque dur SAS (Serial Attached SCSI) pour ThinkStation 21
Page 32

vous avez des doutes sur la nature de votre port, reportez-vous à la
documentation qui accompagne votre ordinateur. Généralement, les systèmes
informatiques ThinkStation D10 Series sont équipés de ports compatibles
avec la technologie SAS sur la carte mère. Les systèmes informatiques
ThinkStation S10 Series ont besoin d’un adaptateur de bus hôte
PCIe-vers-SAS pour prendre en charge des unités de disque dur SAS.
Pour obtenir des instructions d’installation de l’adaptateur de bus hôte
PCIe-vers-SAS, consultez Annexe A, «PCIe-to-SAS host bus adapter quick
installation instructions», à la page 115 ou la documentation accompagnant
l’adaptateur de bus hôte PCIe-vers-SAS.
v Câble d’unité de disque dur SAS
Vous devrez utiliser un des câbles de connexion à 29 broches suivants, livrés
avec l’option, pour connecter l’unité de disque dur SAS à la prise
d’alimentation et au port d’interface :
– Câble de connexion droit
Le câble de connexion droit est conçu pour les systèmes informatiques
ThinkStation D10 Series. La prise d’alimentation 1 et le cordon
d’interface 2 sont affichés dans le schéma ci-après.
– Câble de connexion à angle droit
Le câble à angle droit est conçu pour les systèmes informatiques
ThinkStation S10 Series. La prise d’alimentation 1 et le cordon
d’interface 2 sont affichés dans le schéma ci-dessous.
22 ThinkStation Serial Attached SCSI Hard Disk Drive User's Guide
Page 33

Planification du partitionnement
Les deux types de systèmes de fichiers utilisés par le système d’exploitation
Microsoft sont NTFS et FAT32. Microsoft Windows XP prend en charge ces
deux systèmes de fichier, mais Microsoft Windows Vista ne prend en charge
que NTFS.
Remarque : Il est recommandé d’utiliser NTFS pour partitionner n’importe
quels lecteurs.
Pour déterminer le fichier système que vous utilisez, procédez comme suit :
1. Cliquez avec le bouton droit de la souris sur une unité de sortie sous Poste
de travail.
2. Sélectionnez Propriétés. Le système de fichiers sera affiché dans l’onglet
Général.
Pour plus d’informations sur le partitionnement de votre unité, voir
«Partitionnement et formatage de l’unité», à la page 28.
Installation de l’unité
Vous devez installer votre nouvelle unité avant d’utiliser avant de la formater
et partitionner à l’aide du système d’exploitation.
Les instructions fournies dans cette section sont générales et conviennent à la
plupart des ordinateurs. Des informations spécifiques concernant l’installation
d’une unité de disque dur sur votre ordinateur figurent dans la documentation
accompagnant ce dernier.
Chapitre 1. A propos de l’unité de disque dur SAS (Serial Attached SCSI) pour ThinkStation 23
Page 34

Etape 1. Ouverture de l’ordinateur
Avant d’ouvrir l’ordinateur, procédez comme suit :
1. Mettez l’ordinateur hors tension.
2. Débranchez le câble d’alimentation de la prise d’alimentation de votre
ordinateur ainsi que tous les autres périphériques et câbles.
peut être dangereux d’ouvrir votre ordinateur. Des informations spécifiques
Il
concernant l’ouverture de l’ordinateur figurent dans la documentation fournie
avec ce dernier.
Etape 2. Déballage de l’unité
Procédez comme indiqué ci-après pour déballer et manipuler l’unité. Afin
d’éviter tout dommage et des décharges d’électricité statique, manipulez au
minimum les éléments.
1. N’ouvrez pas la pochette antistatique tant que vous n’êtes pas prêt à
installer l’unité. L’électricité statique peut endommager l’unité et les autres
composants de l’ordinateur.
2. Mettez la pochette antistatique et votre main en contact avec une surface
métallique non peinte pendant au moins deux secondes. (Cette opération
élimine l’électricité statique de la pochette et de votre corps.)
3. Avant de manipuler l’unité, touchez une surface non peinte de l’ordinateur
afin de vous décharger de l’électricité statique. Recommencez cette
opération en quittant et en retournant à votre espace de travail.
4. Tenez toujours l’unité par les côtés. Evitez de toucher ses circuits imprimés,
ses composants ou les broches du connecteur.
5. Lors de l’installation de l’unité, évitez toute manipulation inutile. Toute
mauvaise manipulation peut endommager les têtes, les disques rotatifs et
les roulements dans le logement de l’unité.
6. Si vous devez poser l’unité, posez-la par dessus la pochette antistatique, sur
une surface plane et souple, par exemple un magazine
Remarque
: Si vous souhaitez installer l’unité dans une baie de 5,25 pouces,
vous devez vous procurer un kit de conversion de baie universel disponible
auprès d’un grand nombre de distributeurs locaux.
Etape 3. Montage de l’unité dans la baie
Vous pouvez monter l’unité horizontalement ou verticalement selon
l’emplacement de la baie dans votre boîtier. Les systèmes informatiques
ThinkStation D10 Series et S10 Series sont équipés de crochets en plastique
facilitant le montage de vos unités de disque dur. Vous pouvez également
monter votre unité de disque dur à l’aide de vis dans une baie sans crochet.
Ces vis doivent être disponibles à la vente dans le magasin de matériel
informatique le plus près de chez vous.
24 ThinkStation Serial Attached SCSI Hard Disk Drive User's Guide
Page 35

Pour monter l’unité en utilisant les crochets :
1. Tirez le crochet hors de la baie en appuyant sur les ergots (1) et en tirant
sur la poignée (2).
2. Installez l’unité sur le crochet et vérifiez que les quatre goujons de montage
(1) sont alignés dans les trous de vissage et bien serrés.
3. Si vous ajoutez votre nouvelle unité sur un système déjà doté d’une unité
de disque dur, assurez-vous que la nouvelle unité est positionnée de façon
adjacente à l’unité existante et orientée dans le même sens, afin de ne pas
avoir à tordre le câble d’interface lors de la connexion de l’unité.
4. Faites glisser l’unité avec les crochets dans la baie jusqu’à ce que les deux
ergots du crochet soient verrouillés dans la baie.
Pour monter l’unité avec des vis :
1. Faites glisser l’unité dans la baie.
Chapitre 1. A propos de l’unité de disque dur SAS (Serial Attached SCSI) pour ThinkStation 25
Page 36

2. Si vous prévoyez d’ajouter votre nouvelle unité sur un système déjà doté
d’une unité de disque dur, assurez-vous que la nouvelle unité est
positionnée de façon adjacente à l’unité existante et orientée dans le même
sens, afin de ne pas avoir à tordre le câble d’interface lors de la connexion
de l’unité.
3. Alignez les orifices de vissage de la baie sur les orifices taraudés du boîtier
de l’unité ou des pattes de fixation.
4. Serrez légèrement les vis pour assurer leur position. Sur certaines
installations, il est parfois nécessaire d’utiliser les orifices de vissage situés à
l’arrière (côté carte à circuits) de l’unité.
5. Vérifiez que l’alignement est correct, puis serrez les vis, mais ne serrez pas
trop fort.
Etape 4. Connexion des câbles à l’unité
Procédez comme indiqué ci-après pour connecter les câbles.
1. Sélectionnez le bon câble à 29 broches (câble droit pour les systèmes
informatiques ThinkStation D10 Series et câble à angle droit pour les
systèmes ThinkStation S10 Series).
2. Attachez le câble à 29 broches à votre connecteur d’interface d’unité de
disque dur SAS.
3. Attachez l’autre extrémité (port d’interface à 7 broches 2) au port
compatible avec la technologie SAS. Pour les systèmes informatiques
ThinkStation D10 Series, les cinq ports SATA/SAS bleus de la carte mère
acceptent les unités de disque dur SAS. Pour les systèmes informatiques
ThinkStation S10 Series, vous avez besoin d’un adaptateur de bus hôte
PCIe-vers-SAS. Si vous avez des doutes sur la nature de votre port ou le
modèle de votre ordinateur, reportez-vous à la documentation qui
accompagne votre ordinateur.
4. Repérez un connecteur d’alimentation SATA à 15 broches inutilisé et relié
au boîtier d’alimentation de l’ordinateur et branchez-le sur la prise
d’alimentation 1 du câble d’alimentation. Le connecteur d’alimentation ne
peut être branché que dans un seul sens. Ne le branchez pas de force. Si
vous ne parvenez pas à brancher le connecteur d’une simple pression,
vérifiez le sens d’insertion du connecteur de câble sur l’unité, puis
renouvelez l’opération.
26 ThinkStation Serial Attached SCSI Hard Disk Drive User's Guide
Page 37

Etape 5. Fin de l’installation matérielle
Procédez comme suit :
1. Vérifiez que l’unité de disque dur est correctement montée et que les câbles
sont fermement connectés.
2. Vérifiez que les câbles ne sont pas gênés par le boîtier de l’ordinateur et
qu’ils ne bloquent pas les pales du ventilateur du bloc d’alimentation ni la
circulation de l’air.
3. Remettez en place le boîtier de l’ordinateur.
4. Reconnectez toutes les unités. Assurez-vous que les cordons du clavier, de
la souris et du moniteur sont fermement connectés.
5. Reconnectez tous les cordon d’alimentation secteur.
Préparation de l’unité en vue de son utilisation
Lors du redémarrage de l’ordinateur, l’écran contenant les informations
d’installation et de configuration s’affiche car vous avez modifié des éléments
matériels sur votre ordinateur. Certains systèmes vous invitent à sélectionner
des options de configuration au premier redémarrage après l’installation d’une
nouvelle unité. Si cet écran ne s’affiche pas, recherchez dans la documentation
de votre ordinateur la procédure permettant d’y accéder. Sur la plupart des
ordinateurs, l’accès aux informations de configuration lors du démarrage de
l’ordinateur s’effectue en appuyant sur la touche F1 lorsque le graphique de
configuration s’affiche dans l’angle supérieur droit de l’écran.
Vérifiez vos informations de configuration dans les cas suivants :
v Si le programme de configuration indique une taille correcte pour votre
nouvelle unité, sauvegardez vos modifications, fermez le programme de
configuration, et passez à l’étape «Partitionnement et formatage de l’unité»,
à la page 28.
Chapitre 1. A propos de l’unité de disque dur SAS (Serial Attached SCSI) pour ThinkStation 27
Page 38

v Si votre ordinateur semble ne plus répondre ou s’il ne redémarre pas, passez
au Chapitre 2, «Troubleshooting», à la page 113 .
Partitionnement et formatage de l’unité
Si vous ajoutez votre unité sur un ordinateur où Windows XP ou Windows
Vista est installé sur une unité existante, suivez les instructions ci-après pour
partitionner et formater votre nouvelle unité SAS.
Remarque : Sous Windows XP, vous devez avoir installé au moins le Service
Pack 1a (SP1a) pour que l’unité de disque dur accède à des capacités
supérieures à 137 Go.
1. Mettez l’ordinateur sous tension.
2. Cliquez sur Démarrer.
3. Cliquez à l’aide du bouton droit de la souris sur Poste de travail.
4. Cliquez sur Gérer. La fenêtre Gestion de l’ordinateur s’ouvre.
5. Dans le menu de gauche, cliquez sur Gestion des disques.
6. Cliquez sur la nouvelle unité située dans l’angle inférieur droit de l’écran.
7. Dans la barre de menus, cliquez sur Action > Toutes les tâches > Nouvelle
partition.
8. La fenêtre Nouvelle partition s’affiche. Suivez les instructions affichées à
l’écran pour partitionner l’unité.
9. Le formatage commence lorsque vous cliquez sur Terminer dans les
instructions affichées à l’écran.
Remarque
: Si vous installez l’unité sur un ordinateur qui ne comporte
aucune unité de disque dur, suivez les instructions ci-après afin de partitionner
et de formater la nouvelle unité de disque dur pour le système Windows XP
ou Windows Vista au moyen du système de fichiers NTFS :
1. Introduisez la première disquette d’installation Windows XP ou Windows
Vista (Disquette n° 1 d’installation) dans l’unité de disquette ou le CD
d’installation de Windows XP ou Windows Vista dans l’unité de CD-ROM
ou de DVD.
2. Redémarrez votre ordinateur.
3. Suivez les instructions fournies dans le guide d’utilisation de Windows XP
ou Windows Vista pour partitionner et formater votre unité.
28 ThinkStation Serial Attached SCSI Hard Disk Drive User's Guide
Page 39

Kapitel 1. Informationen zum ThinkStation-SAS-Festplattenlaufwerk
In diesem Abschnitt finden Sie Informationen zum ThinkStation®-SAS-Festplattenlaufwerk
Produktbeschreibung
Das SAS-Festplattenlaufwerk kann nur in Computern mit mindestens einer der
folgenden Konfigurationen installiert werden:
v einer SAS-kompatiblen Rückwandplatine mit Positionen, die für SAS-
Festplattenlaufwerke
v einem PCI-Express-(PCIe)-zu-SAS-Hostbusadapter
SAS-Festplattenlaufwerk wird an eine SAS-kompatible Schnittstelle ange-
Das
schlossen,
Kabelkonfiguration unterstützt. Es sind keine Brückeneinstellungen für die
Konfiguration als Master oder Slave erforderlich.
Das SAS-Festplattenlaufwerk verwendet 29-polige SAS-Schnittstellenanschlüsse.
folgenden Abbildung dargestellt. Die im Zusatzpaket enthaltenen Kabel ermöglichen
Festplattenlaufwerks
(SAS - Serial Attached SCSI).
geeignet sind.
die SAS-Festplattenlaufwerke in einem einzigen Laufwerk über
Die Oberseite 1 und die Unterseite 2 des Anschlusses sind in der
das Verbinden des Netzanschlusses und des Signalanschlusses des SAS-
als SATA-Festplattenlaufwerk (Serial ATA).
© Lenovo 2007. In Teilen © IBM Corp. 2005. 29
Page 40

Das Festplattenlaufwerk kann wie folgt konfiguriert werden:
v Installation als einziges Laufwerk
– Als einziges Festplattenlaufwerk des Computers
– Als Ersatz für ein Festplattenlaufwerk
Als eines von mehreren Laufwerken zum gemeinsamen Betrieb mit anderen
v
installierten Festplattenlaufwerken
Anmerkungen:
1. SAS-Festplattenlaufwerke können nicht gemeinsam mit SATA-Festplattenlaufwerken
verwendet werden.
2. Stellen Sie sicher, dass es sich bei allen übrigen im Computer installierten
Festplattenlaufwerken um SAS-Festplattenlaufwerke handelt.
SAS- und SATA-Laufwerke können nicht gemeinsam verwendet werden,
da sie unterschiedliche Drehgeschwindigkeiten aufweisen. Die Laufwerke
setzen das Gehäuse daher unterschiedlichen Rotationsschwingungen aus.
Werden ein SATA-Laufwerk mit 7.200 Umdrehungen pro Minute und ein
SAS-Laufwerk mit 15.000 Umdrehungen pro Minute im gleichen Gehäuse installiert, führen die unterschiedlichen Schwingungen möglicherweise zu Leistungseinbußen und zu einem erhöhten Geräuschpegel.
diesem Benutzerhandbuch enthält das Zusatzpaket Folgendes:
Neben
v SATA-Festplattenlaufwerk
v Broschüre zum Umgang mit dem Laufwerk
v Handbuch mit Sicherheitsinformationen
v Zwei SAS-Kabel
Wenden
kaufsstelle.
Sie sich bei fehlenden oder beschädigten Teilen an die zuständige Ve r -
Bewahren Sie den Kaufnachweis sorgfältig auf. Möglicherweise
müssen Sie ihn vorlegen, um Gewährleistungsservice in Anspruch nehmen zu
können.
Planung der Installation
Dieser Abschnitt enthält detaillierte Informationen zur Planung der Installation
des SAS-Festplattenlaufwerks.
Installationsvoraussetzungen
Zur Installation des SAS-Festplattenlaufwerks ist Folgendes erforderlich:
v Dokumentation
Die mit dem Computer und dem Betriebssystem gelieferte Dokumentation.
30 ThinkStation-SAS-Festplattenlaufwerk User's Guide
Page 41

v SAS-kompatibler Anschluss
Ihr Computer muss über einen SAS-kompatiblen Anschluss auf der Systemplatine
oder über einen PCIe-zu-SAS-Hostbusadapter verfügen. Wenn Sie
nicht wissen, ob diese Voraussetzung erfüllt ist, schlagen Sie in der Dokumentation
Computersysteme
zum Computer nach. Normalerweise verfügen ThinkStation-
der Serie D10 über SAS-kompatible Anschlüsse auf der
Systemplatine. ThinkStation-Computersysteme der Serie S10 benötigen für
die Unterstützung von SAS-Festplattenlaufwerken einen PCIe-zu-SAS-Hostbusadapter.
Installationsanweisungen für PCIe-zu-SAS-Hostbusadapter finden Sie im
Anhang mit den Anweisungen zur Schnellinstallation eines PCIe-zu-SASHostbusadapters
busadapter.
oder in der Dokumentation zu Ihrem PCIe-zu-SAS-Host-
v SAS-Festplattenlaufwerkkabel
Sie müssen eines der folgenden im Zusatzpaket enthaltenen 29-poligen SASVerbindungskabel
verwenden, um das SAS-Festplattenlaufwerk mit dem
Netzteil- und dem Signalanschluss zu verbinden:
– 1:1-Verbindungskabel
Das 1:1-Kabel ist für ThinkStation-Computersysteme der Serie D10 vorgesehen.
Das Netzanschlusskabel 1 und das Signalkabel 2 sind in der
folgenden Abbildung dargestellt.
Kapitel 1. Informationen zum ThinkStation-SAS-Festplattenlaufwerk 31
Page 42

– Winkelverbindungskabel
Das Winkelverbindungskabel ist für ThinkStation-Computersysteme der
Serie S10 vorgesehen. Das Netzanschlusskabel 1 und das Signalkabel
2 sind in der folgenden Abbildung dargestellt.
Partitionsplanung
Das Microsoft®-Betriebssystem verwendet die Dateisysteme NTFS und FAT32.
Microsoft Windows® XP unterstützt beide Dateisysteme, Microsoft Windows
Vista® unterstützt nur NTFS.
Anmerkung: Für die Partitionierung von neuen Laufwerken wird NTFS emp-
fohlen.
Gehen Sie wie folgt vor, um festzustellen, welches Dateisystem Sie verwenden:
1. Klicken Sie mit der rechten Maustaste unter Arbeitsplatz auf ein vorhandenes
Laufwerk.
2. Wählen Sie Eigenschaften aus. Das Dateisystem wird auf der Registerkarte
Allgemein angezeigt.
Weitere Informationen zum Partitionieren des Laufwerks sind im Abschnitt
„Laufwerk partitionieren und formatieren” auf Seite 38 enthalten.
32 ThinkStation-SAS-Festplattenlaufwerk User's Guide
Page 43

Laufwerk installieren
Sie müssen das neue Laufwerk im Computer installieren, bevor Sie das
Betriebssystem zum Partitionieren und Formatieren des neuen Laufwerks
verwenden können.
Bei den Anweisungen in diesem Abschnitt handelt es sich um allgemeine
Richtlinien, die für die meisten Computer gelten. Informationen zur Installation
eines Festplattenlaufwerks in einem bestimmten Computer finden Sie in der
Dokumentation zum Computer.
Schritt 1. Computer öffnen
Gehen Sie wie folgt vor, bevor Sie den Computer öffnen.
1. Schalten Sie den Computer aus.
2. Ziehen Sie das Netzkabel aus dem Netzanschluss des Computers, und zie-
hen
Sie dann alle übrigen angeschlossenen Einheiten und Kabel ab.
können den Computer nun gefahrlos öffnen. Genauere Informationen zum
Sie
Öffnen des Computers finden Sie in der Dokumentation zum Computer.
Schritt 2. Laufwerk auspacken
Halten Sie sich beim Auspacken und beim Umgang mit dem Laufwerk an die
folgenden Richtlinien. Berühren Sie das Laufwerk möglichst wenig, um Beschädigungen
1. Öffnen Sie die antistatische Schutzhülle erst unmittelbar vor der Installation
2. Halten Sie die innere leitende Oberfläche der antistatischen Schutzhülle, in
3. Erden Sie sich, indem Sie eine unlackierte Oberfläche des Computers
4. Fassen Sie das Laufwerk immer an den Rändern an. Berühren Sie keine
5. Vermeiden Sie bei der Installation des Laufwerks ein unnötiges Berühren
und statische Entladungen zu vermeiden.
des Laufwerks. Durch statische Aufladung können das Laufwerk und
andere Komponenten des Computers beschädigt werden.
der sich das Laufwerk befindet, und Ihre Hand zwei Sekunden lang gegen
eine unlackierte Metalloberfläche des Computers. Dadurch wird statische
Aufladung von der Schutzhülle und von Ihrem Körper abgeleitet.
berühren, bevor Sie das Laufwerk anfassen. Erden Sie sich erneut, nachdem
Sie das Laufwerk ausgepackt haben und zu Ihrem Arbeitsbereich zurückgekehrt
sind.
offen liegende Schaltlogik, Komponenten oder Kontaktstifte.
des Laufwerks. Durch einen falschen Umgang mit dem Laufwerk können
die Köpfe, die rotierenden Scheiben und die Lager im Laufwerkgehäuse
beschädigt werden.
Kapitel 1. Informationen zum ThinkStation-SAS-Festplattenlaufwerk 33
Page 44

6. Wenn Sie das Laufwerk absetzen müssen, legen Sie die antistatische Schutzhülle
auf einer ebenen, weichen Fläche und das Laufwerk mit der Kompo-
nentenseite nach oben auf der Schutzhülle ab.
Anmerkung:
gen
Sie einen universellen Umbausatz für Laufwerkpositionen. Diesen Umbau-
Zur Installation des Laufwerks in einer 5,25-Zoll-Position benöti-
satz erhalten Sie normalerweise in Ihrem örtlichen Computerfachgeschäft.
Schritt 3. Laufwerk in die Position einsetzen
Sie können das Laufwerk horizontal oder vertikal einsetzen, je nach Lage der
Position in Ihrem Gehäuse. ThinkStation-Computersysteme der Serien D10
und S10 verfügen über Kunststoffhalterungen, mit denen Sie die Festplattenlaufwerke
auch mit Hilfe von Schrauben in einer Position ohne Halterung installieren.
Die Schrauben erhalten Sie normalerweise in Ihrem örtlichen Computerfachgeschäft.
Gehen Sie wie folgt vor, um das Laufwerk mit Hilfe der Halterung zu installieren:
1. Ziehen Sie die Halterung aus der Position, indem Sie auf die Laschen (1)
installieren können. Alternativ können Sie das Festplattenlaufwerk
drücken und dann am Griff ziehen (2).
34 ThinkStation-SAS-Festplattenlaufwerk User's Guide
Page 45

2. Installieren Sie das Laufwerk in der Halterung. Stellen Sie dabei sicher, dass
die vier Befestigungsstifte (1) bereits an den Bohrlöchern im Laufwerk
ausgerichtet und sicher befestigt wurden.
3. Wenn Sie das neue Laufwerk in einem System installieren, in dem sich
bereits ein Festplattenlaufwerk befindet, müssen Sie darauf achten, dass Sie
das neue Laufwerk neben dem bereits vorhandenen und in derselben Ausrichtung
einsetzen, damit Sie das Schnittstellenkabel nicht biegen müssen,
um das Laufwerk anzuschließen.
4. Schieben Sie das Laufwerk mit der Halterung in die Position, bis die beiden
Laschen der Halterung in die Position einrasten.
Gehen Sie wie folgt vor, um das Laufwerk mit Hilfe von Schrauben zu
installieren:
1. Schieben Sie das Laufwerk in die Position.
2. Wenn Sie das neue Laufwerk in einem System installieren, in dem sich
bereits ein Festplattenlaufwerk befindet, müssen Sie darauf achten, dass Sie
das neue Laufwerk neben dem bereits vorhandenen und in derselben Ausrichtung
einsetzen, damit Sie das Schnittstellenkabel nicht biegen müssen,
um das Laufwerk anzuschließen.
3. Richten Sie die Schraublöcher an der Laufwerkposition mit den Gewindebohrungen
im Laufwerkgehäuse oder in den Erweiterungshalterungen aus.
4. Drehen Sie die Schrauben per Hand ein, um das Laufwerk lose in der Posi-
tion
zu sichern. Bei einigen Installationen müssen Sie die Schraublöcher an
der Unterseite (d. h. die Seite mit der Schaltkarte) des Laufwerks verwenden.
5. Überprüfen Sie die Ausrichtung des Laufwerks, und ziehen Sie die Schrauben
an. Ziehen Sie sie nicht zu fest an.
Kapitel 1. Informationen zum ThinkStation-SAS-Festplattenlaufwerk 35
Page 46

Schritt 4. Kabel an das Laufwerk anschließen
Schließen Sie die Kabel wie folgt an:
1. Wählen Sie das rechte 29-polige Kabel für Ihren Computer aus (1:1-Kabel
für ThinkStation-Computersysteme der Serie D10 und Winkelkabel für
ThinkStation-Computersysteme der Serie S10).
2. Schließen Sie das 29-polige Kabel an den Schnittstellenanschluss des SASFestplattenlaufwerks
3. Schließen Sie das andere Ende (7-poliger Signalanschluss 2) an den SASkompatiblen
Anschluss an. Bei ThinkStation-Computersystemen der Serie
D10 unterstützen die fünf blauen SATA-/SAS-Anschlüssse auf der Systemplatine
SAS-Festplattenlaufwerke. Für ThinkStation-Computersysteme der
Serie S10 ist ein PCIe-zu-SAS-Hostbusadapter erforderlich. Wenn Sie nicht
wissen, über welchen Anschluss oder welches Computermodell Sie verfügen,
schlagen Sie in der Dokumentation zum Computer nach.
4. Schließen Sie einen freien 15-poligen SATA-Netzteilanschluss der Stromver-
sorgung
kabel
des Computers an den Netzteilanschluss (1) am Verbindungs-
an. Der Netzteilanschluss ist mit einer Führung versehen, so dass er
nur auf eine Weise verbunden werden kann. Stellen Sie die Verbindung
nicht gewaltsam her. Wenn die Verbindung nicht mit leichtem Druck hergestellt
werden kann, überprüfen Sie erneut, ob der Kabelanschluss richtig am
Laufwerkanschluss ausgerichtet ist, und versuchen Sie erneut, die Verbindung
herzustellen.
an.
36 ThinkStation-SAS-Festplattenlaufwerk User's Guide
Page 47

Schritt 5. Installation des Laufwerks abschließen
Schließen Sie die Installation des Laufwerks wie folgt ab:
1. Stellen Sie sicher, dass das Festplattenlaufwerk ordnungsgemäß eingesetzt
wurde und dass die Kabel fest angeschlossen sind.
2. Stellen Sie sicher, dass die Kabel nicht die Computerabdeckung oder die
Lüfterflügel des Netzteils blockieren bzw. die Luftzirkulation beeinträchtigen.
3. Bringen Sie die Computerabdeckung wieder an.
4. Schließen Sie alle Einheiten wieder an. Stellen Sie sicher, dass die Kabel für
Tastatur, Maus und Bildschirm fest angeschlossen sind.
5. Schließen Sie alle Wechselstrom-Netzkabel wieder an.
Laufwerk für Verwendung vorbereiten
Beim erneuten Starten des Computers erscheint die Anzeige mit den Konfigurationsdaten, weil die Hardware des Computers geändert wurde. Bei einigen
Computern ist es beim ersten Neustart nach dem Installieren einer neuen Einheit
erforderlich, Konfigurationsoptionen auszuwählen. Wenn die Anzeige
nicht automatisch erscheint, schlagen Sie in der Dokumentation zum Computer
nach, wie Sie auf die Anzeige zugreifen können. Bei den meisten Computern
können Sie die Konfigurationsdaten während des Systemstarts anzeigen, indem
Sie die Taste F1 drücken, wenn die Konfigurationsgrafik oben rechts angezeigt
wird.
Überprüfen Sie die Konfigurationsdaten auf Folgendes:
v Wenn die Kapazität des neuen Laufwerks vom Konfigurationsprogramm
wie erwartet angegeben wird, sichern Sie die Änderungen, schließen das
Konfigurationsprogramm und fahren mit dem Abschnitt „Laufwerk partitionieren
und formatieren” auf Seite 38 fort.
v Wenn der Computer nicht mehr reagiert oder nicht erneut gestartet werden
kann, fahren Sie mit dem Kapitel zur Fehlerbehebung fort.
Kapitel 1. Informationen zum ThinkStation-SAS-Festplattenlaufwerk 37
Page 48

Laufwerk partitionieren und formatieren
Wenn Sie das Laufwerk in einem Computer installieren, in dem sich bereits ein
Laufwerk mit Windows XP oder mit Windows Vista befindet, befolgen Sie die
folgenden Anweisungen zum Partitionieren und Formatieren des neuen SASLaufwerks.
Anmerkung: Unter Windows XP ist mindestens Service-Pack 1a (SP1a) erfor-
derlich,
zugreifen kann.
1. Schalten Sie den Computer ein.
2. Klicken Sie auf Start.
3. Klicken Sie mit der rechten Maustaste auf Arbeitsplatz.
4. Klicken Sie auf Verwalten. Das Fenster ″Computerverwaltung″ wird geöff-
net.
5. Klicken Sie im linken Seitenmenü auf Datenträgerverwaltung.
6. Klicken Sie auf das neue Laufwerk unten rechts in der Anzeige.
7. Klicken Sie in der Menüleiste auf Vorgang > Alle Tasks > Neue Partition.
8. Das Fenster ″Neue Partition″ wird geöffnet. Befolgen Sie die angezeigten
Anweisungen zum Partitionieren des Laufwerks.
9. Nachdem Sie auf Fertig stellen geklickt haben, wird der Formatierungsvorgang
damit das Festplattenlaufwerk auf Kapazitäten von über 137 GB
gestartet.
Anmerkung:
laufwerk
Wenn Sie das Laufwerk in einem Computer ohne Festplatten-
installieren, führen Sie zum Partitionieren und Formatieren des neuen
Festplattenlaufwerks für Windows XP oder Windows Vista mit NTFS die folgenden
Schritte aus:
1. Legen Sie die erste Installationsdiskette für Windows XP oder Windows
Vista (Setup Disk #1) in das Diskettenlaufwerk ein, oder legen Sie die Installations-CD
ROM-
oder -DVD für Windows XP oder Windows Vista in das CD-
oder DVD-ROM-Laufwerk ein.
2. Starten Sie den Computer erneut.
3. Partitionieren und formatieren Sie das Laufwerk anhand der Anweisungen
im Benutzerhandbuch für Windows XP bzw. Windows Vista.
38 ThinkStation-SAS-Festplattenlaufwerk User's Guide
Page 49

Capitolo 1. Informazioni sull’unità disco fisso
ThinkStation Serial Attached SCSI (SAS
In questa sezioni vengono fornite informazioni sull’unità disco fisso
ThinkStation® Serial Attached SCSI (SAS).
Descrizione del prodotto
L’unità disco fisso SAS può essere installata solo sui computer con almeno una
delle seguenti configurazioni:
v un bakplane compatibile con SAS con alloggiamenti progettati per sistemare
le unità disco fisso SAS
v un PCI Express (PCIe)-nell’-adattatore host bus SAS
disco fisso SAS si collega a un’interfaccia compatibile con SAS che
L’unità
supporta le unità disco fisso SAS in una singola unità per al configurazione per
cavo. Non sono richieste impostazioni dei cavallotti per le impostazioni master
o slave.
L’unità disco fisso SAS utilizza i connettori dell’interfaccia SAS a 29 perni. La
superficie superiore 1 e la superficie inferiore 2 del connettore sono
visualizzate nel diagramma in basso. I cavi inclusi nel pacchetto opzionale
consentono di collegare la porta di alimentazione e la porta del segnale
dell’unità disco fisso SAS come le unità disco fisso seriali ATA (SATA).
© Lenovo 2007. Portions © IBM Corp. 2005. 39
Page 50

40 Guida utente dell’unità disco fisso ThinkStation Serial Attached SCSI
Page 51

L’unità disco fisso può essere configurata in uno dei seguenti modi:
v Una singola unità
– Deve essere installata come unità disco fisso unica in un computer
– Sostituire l’unità disco fisso
Come una delle numerose unità da utilizzare con le altre unità disco fisso
v
installate
Note:
1. Le unità disco fisso SAS possono non funzionare con le unità disco fisso
SATA.
2. Accertarsi che tutte le altre unità disco fisso nel computer siano unità
disco fisso SAS.
Le unità SAS e SATA non possono funzionare insieme perché hanno
diverse velocità di accelerazione, che comportano alle unità il
posizionamento di diverse forze di vibrazioni rotazionali sullo chassis. Se
l’unità SATA di 7200 RPM e l’unità SAS di 15000 RPM vengono installate
sullo stesso chassis, le due diverse forze sullo chassis possono produrre
danni meccanici e rumori acustici aggiuntivi.
alla guida utente, il pacchetto opzionale contiene:
Oltre
v L’unità disco fisso SCSI collegata in serie SCSI
v Volantino per la gestione dell’unità
v Manuale relativo alle informazioni sulla sicurezza
v Due cavi SAS
un componente manca o è danneggiato, contattare il punto vendita.
Se
Conservare la ricevuta d’acquisto. È possibile che venga richiesta per
l’assistenza tecnica.
Pianificazione dell’installazione
In questa sezione contiene informazioni dettagliate per pianificare
l’installazione dell’unità disco fisso SAS.
Requisiti di installazione
Per installare l’unità disco fisso SAS, è necessario avere:
v Documentazione
La documentazione fornita con il computer e il sistema operativo.
v Porta compatibile con SAS
Il computer deve avere una porta compatibile SAS sulla scheda di sistema o
un adattatore host bus PCIe-a-SAS. Se non si è sicuri dell’esistenza della
porta, fare riferimento alla documentazione fornita con l’elaboratore. In
genere, i sistemi del computer della serie ThinkStation D10 hanno le porte
Capitolo 1. Informazioni sull’unità disco fisso ThinkStation Serial Attached SCSI (SAS 41
Page 52

SAS compatibili sulla scheda di sistema. I sistemi del computer della serie
ThinkStation S10 necessitano un adattatore host bus PCIe-a-SAS per
supportare le unità disco fisso SAS.
Per istruzioni sull’installazione dell’adattatore bus host PCIe-a-SAS, vedere
Appendice A, “Istruzioni sull’installazione rapida dell’adattatore bus host
PCI-a-SAS”, a pagina 115 o fare riferimento alla documentazione fornita con
l’adattatore host bus PCIe-a-SAS.
v Cavo dell’unità disco fisso SAS
Sarà necessario utilizzare uno dei seguenti cavi di collegamento a 29 perni
SAS inclusi nel pacchetto opzionale per collegare l’unità disco fisso SAS alle
porte di alimentazione e segnale:
– Cavo di collegamento diritto
Il cavo diritto è per i sistemi di computer della serie ThinkStation D10. La
porta di alimentazione 1 e il cavo di segnale 2 sono visualizzati nello
schema in basso.
– Cavo di collegamento angolare destro
Il cavo di collegamento angolare destro è adatto per i sistemi di computer
ThinkStation della serie S10. La porta di alimentazione 1 e il cavo di
segnale 2 sono visualizzati nello schema in basso.
42 Guida utente dell’unità disco fisso ThinkStation Serial Attached SCSI
Page 53

Capitolo 1. Informazioni sull’unità disco fisso ThinkStation Serial Attached SCSI (SAS 43
Page 54

Pianificazione della partizione
Due tipi di file system utilizzati dal sistema operativo Microsoft® sono NTFS e
FAT32. Microsoft Windows® XP può supportare entrambi questi file system, ma
Microsoft Windows Vista® può supportare solo NTFS.
Nota: NTFS è consigliato per essere utilizzato per la partizione delle nuove
unità.
Per stabilire il file system che si sta utilizzando, procedere nel seguente modo:
1. Fare clic con il pulsante destro sull’unità esistente in Risorse del computer.
2. Selezionare Proprietà. Il file system verrà visualizzato nella scheda
Generale.
Per ulteriori informazioni sulla partizione dell’unità, vedere “Creazione di
partizioni e formattazione dell’unità” a pagina 49 .
Installazione dell’unità
Installare la nuova unità nel computer prima di utilizzare il sistema operativo
per la partizione e la formattazione della nuova unità.
Le istruzioni riportate in questa sezione sono indicazioni valide per la maggior
parte degli elaboratori. Per informazioni più specifiche sull’installazione
dell’unità disco fisso, fare riferimento alla documentazione fornita con
l’elaboratore.
Passo 1. Apertura dell’elaboratore
Prima di aprire l’elaboratore, completare i seguenti passi:
1. Spegnere l’elaboratore.
2. Scollegare il cavo di alimentazione dalla presa di alimentazione del
computer e di tutte le altre unità e cavi collegati.
adesso possibile aprire l’elaboratore. Per informazioni più specifiche
È
sull’apertura dell’elaboratore, fare riferimento alla documentazione fornita con
l’elaboratore.
Passo 2. Disimballaggio dell’unità
Per disimballare l’unità, effettuare la procedura riportata di seguito. Per evitare
di danneggiare l’unità, non fare eccessivi spostamenti.
1. Non aprire l’unità in un imballo antistatico fino a quando è pronto
l’installazione dell’unità. L’elettricità statica può danneggiare l’unità ed altri
componenti dell’elaboratore.
44 Guida utente dell’unità disco fisso ThinkStation Serial Attached SCSI
Page 55

2. Prima di aprire l’involucro di protezione statica contenente l’unità poggiare
l’involucro su una superficie di metallo non dipinta per almeno due
secondi. In questo modo, si riduce l’elettricità statica presente nell’involucro
di protezione e nel proprio corpo.
3. Prima di maneggiare l’unità, toccare una superficie non dipinta
sull’elaboratore. Quindi lasciare la presa e ritornare all’area di lavoro.
4. Afferrare sempre l’unità dalle estremità. Non toccare i circuiti esterni, i
componenti o i piedini del connettore.
5. Durante l’installazione dell’unità, non fare eccessivi movimenti. I
movimenti bruschi potrebbero danneggiare le testine e i dischi di rotazione
all’interno dell’alloggiamento dell’unità.
6. Per poggiare l’unità, posizionare l’imballo antistatico su una superficie
piana e posizionare l’unità sull’imballo.
Se si desidera installare l’unità in un alloggiamentoda 5,25 pollici, sarà
Nota:
necessario acquistare un kit di conversione disponibile presso i principali
rivenditori.
Passo 3. Fissaggio dell’unità nel vano
È possibile fissare l’unità orizzontalmente o verticalmente nella posizione
dell’unità di chassis. ThinkStation D10 e i sistemi del computer della serie S10
forniscono staffe di plastica per il montaggio delle unità a disco fisso. In
alternativa, è possibile montare l’unità disco fisso con le viti in un supporto
senza staffa. Le viti devono essere disponibili in commercio presso il
rivenditore di computer locale.
Per montare l’unità utilizzando la staffa:
1. Estrarre la staffa dall’alloggiamento premendo i ganci (1) ed estraendo
l’handle (2).
Capitolo 1. Informazioni sull’unità disco fisso ThinkStation Serial Attached SCSI (SAS 45
Page 56

46 Guida utente dell’unità disco fisso ThinkStation Serial Attached SCSI
Page 57

2. Installare l’unità e accertarsi che i quattro perni di montaggio (1) siano
stati allineati nei fori della vite dell’unità e fissati correttamente.
3. Se si aggiunge la nuova unità su un sistema che contiene già un’altra unità,
verificare che la nuova unità venga posizionata nella stessa direzione di
quella esistente in modo da non dover torcere il cavo di interfaccia per
collegare entrambe l’unità.
4. Far scorrere l’unità con la staffa nell’alloggiamento fino a che i perni della
staffa sono bloccati nell’alloggiamento.
Per montare l’unità con le viti:
1. Far scorrere l’unità nel vano.
2. Se si aggiunge la nuova unità su un sistema che contiene già un’altra unità,
verificare che la nuova unità venga posizionata nella stessa direzione di
quella esistente in modo da non dover torcere il cavo di interfaccia per
collegare entrambe l’unità.
3. Allineare i fori delle viti tra il vano e l’unità con i fori filettati del supporto
di fissaggio o dell’alloggiamento dell’unità.
4. Fissare le viti manualmente per installare l’unità nel vano. Per alcune
installazioni vengono utilizzati i fori delle viti nella parte inferiore
dell’unità (lato della scheda di circuito).
5. Controllare l’allineamento dell’unità e stringere le viti. Non serrare
eccessivamente.
Passo 4. Collegamento dei cavi all’unità
Per collegare i cavi, completare la seguente procedura.
1. Selezionare il cavo destro a 29 prese per il computer (cavo diritto per i
sistemi di computer della serie ThinkStation D10 e cavo angolare destro per
i sistemi di computer della serie ThinkStation S10).
Capitolo 1. Informazioni sull’unità disco fisso ThinkStation Serial Attached SCSI (SAS 47
Page 58

2. Collegare il cavo a 29 prese al connettore di interfaccia dell’unità disco fisso
SAS.
3. Collegare l’altra estremità (porta di segnale a 7 perni 2) alla porta
compatibile con SAS. Per i sistemi di computer della serie ThinkStation
D10, le cinque porte blu SATA/SAS sulla scheda di sistema possono
supportare l’unità disco fisso SAS. Per i sistemi di computer ThinkStation
serie S10, è necessario un adattatore bus host PCIe-a-SAS. Se non si è sicuri
dell’esistenza della porta o del modello di computer, fare riferimento alla
documentazione fornita con l’elaboratore.
4. Ricercare un connettore di alimentazione SATA non utilizzo
dell’alimentazione del computer e collegarlo alla porta di alimentazione
(1) sul cavo di collegamento. Il connettore di alimentazione è protetto in
modo da collegarlo in una sola direzione. Non forzarlo. Se il connettore
non viene inserito con la giusta pressione, rimuoverlo e tentare di nuovo.
Passo 5. Completamento dell’installazione dell’unità
Per completare l’installazione dell’unità:
1. Verificare che il disco fisso sia stato montato correttamente e i cavi collegati
saldamente.
2. Accertarsi che i cavi non intralcino il coperchio dell’elaboratore e che non
blocchino la ventola dell’alimentatore o il canale del flusso d’aria.
3. Riposizionare il coperchio dell’elaboratore.
4. Ricollegare tutte le periferiche. Controllare che i cavi della tastiera, del
mouse e del monitor siano collegati saldamente.
5. Ricollegare tutti i cavi di alimentazione CA.
48 Guida utente dell’unità disco fisso ThinkStation Serial Attached SCSI
Page 59

Preparazione dell’unità
Quando si riavvia l’elaboratore, viene visualizzata una finestra contenente le
informazioni sulle impostazioni di configurazione, poiché è stato modificato
l’hardware dell’elaboratore. Su alcuni elaboratori, è necessario scegliere le
impostazioni di configurazione la prima volta che viene riavviato l’elaboratore
dopo l’installazione di una nuova unità. Se questa finestra non viene
visualizzata, consultare la documentazione per informazioni su come accedervi.
Per la maggior parte dei computer, è possibile visualizzare le informazioni di
configurazione durante l’avvio del computer premendo F1 quando viene
visualizzata la finestra grafica di configurazione nell’angolo superiore destro
della schermata.
Controllare le impostazioni di configurazione in uno dei seguenti casi:
v Se il programma di configurazione riporta la dimensione corretta della
nuova unità, salvare le modifiche, chiudere il programma di configurazione
e passare al “Creazione di partizioni e formattazione dell’unità” a pagina 49 .
v Se l’elaboratore non risponde o non riparte correttamente, consultare il
Capitolo 2, “Risoluzione dei problemi”, a pagina 113.
Creazione di partizioni e formattazione dell’unità
Se si aggiunge un’unità ad un elaboratore con il sistema operativo Windows
XP o Windows Vista installato su un’unità esistente, seguire le istruzioni
riportate di seguito per creare una partizione e formattare la nuova unità SAS.
Nota: In Windows XP, è necessario minimo un Service Pack 1a (SP1a) per
l’unità disco fisso per accedere alle funzioni con capacità superiori ai 137 GB.
1. Accendere il computer.
2. Fare clic su Avvio/Start.
3. Fare clic con -il pulsante destro del mouse su Risorse del computer.
4. Fare clic su Gestione. Viene aperta la finestra Gestione computer.
5. Dal menu laterale sinistro, fare clic su Gestione disco.
6. Fare clic sulla nuova unità presente nella parte laterale destra inferiore della
schermata.
7. Dalla barra dei menu, fare clic su Azione > Tutte le attività > Nuova
partizione.
8. Viene visualizzata la finestra Nuova partizione. Seguire le -istruzioni
presenti sulla schermata per effettuare la partizione dell’unità.
9. Dopo aver selezionato Fine nelle istruzioni presenti sulla schermata, inizia
la formattazione.
Capitolo 1. Informazioni sull’unità disco fisso ThinkStation Serial Attached SCSI (SAS 49
Page 60

Nota: Se si installa l’unità su un elaboratore che non contiene altre unità disco
fisso, seguire le istruzioni riportate di seguito per creare una partizione e
formattare la nuova unità disco fisso per il sistema operativo Windows XP o
Windows Vista tramite NTFS:
1. Inserire il primo minidisco di installazione per Windows XP o Windows
Vista (Disco di installazione #1) nell’apposito unità o inserire il CD o D VD di
installazione di Windows XP o Windows nell’apposita unità.
2. Riavviare il computer.
3. Seguire le istruzioni della guida utente di Windows XP o Windows Vista
per effettuare la partizione e la formattazione dell’unità.
50 Guida utente dell’unità disco fisso ThinkStation Serial Attached SCSI
Page 61

Capítulo 1. Acerca de la unidad de disco duro
ThinkStation Serial Attached SCSI (SAS)
Esta sección proporciona información acerca de la unidad de disco duro
ThinkStation® Serial Attached SCSI (SAS).
Descripción del producto
La unidad de disco duro SAS sólo se puede instalar en sistemas con una de las
siguientes configuraciones, como mínimo:
v un placa posterior compatible con SAS con bahías diseñadas para alojar
unidades de disco duro SAS
v un adaptador de tarjeta PCI Express (PCIe) a bus de host SAS
unidad de disco duro SAS se conecta a una interfaz compatible con SAS
La
que admite dichas unidades en una unidad individual mediante una
configuración por cable. No hacen falta valores de puente para los valores
maestro o esclavo.
La unidad de disco duro SAS utiliza conectores para la interfaz SAS de 29
clavijas. La superficie de la parte superior 1 y la de la parte inferior 2 del
conector se muestran en el diagrama siguiente. Los cables que se incluyen en el
paquete de la opción permiten que se conecte al puerto de alimentación y al
puerto de señal de la unidad de disco duro SAS como unidades de disco duro
Serial ATA (SATA).
© Lenovo 2007. Partes del © IBM Corp. 2005. 51
Page 62

La unidad de disco duro se puede configurar de una de estas formas:
v Como una unidad individual
– Instalarse como la única unidad de disco duro del sistema
– Para sustituir una unidad de disco duro
Para que una de las diversas unidades funcione con otras unidades de disco
v
duro instaladas
Notas:
1. Para que las unidades de disco duro SAS no funcionen con unidades de
disco duro SATA.
2. Asegúrese de que todas las unidades de disco duro de su sistema son
SAS.
Las unidades SAS y SATA no pueden funcionar juntas puesto que tienen
velocidades de rotación distintas que pueden hacer que dos unidades
produzcan vibraciones de rotación distintas en el chasis. Si se instala una
unidad SATA de 7200 RPM y una unidad de 15000 RPM en el mismo
chasis, las diferencia de fuerzas podría causar daños mecánicos y de otro
tipo, así como sonidos extraños.
Además
de esta guía del usuario, el paquete de esta opción contiene:
v Unidad de disco duro SCSI serie
v Folleto de manipulación de unidades
v Manual de información de seguridad
v Dos cables SAS
Póngase
en contacto con el establecimiento de compra si faltara algún elemento
o si estuviera estropeado. No olvide conservar el comprobante de compra.
Puede que el servicio de garantía se lo solicite para prestarle ayuda.
Planificación de la instalación
Este apartado contiene información detallada para ayudarle a planificar la
instalación de la unidad de disco duro SAS.
Requisitos de la instalación
Para instalar la unidad de disco duro SAS, debe disponer de lo siguiente:
v Documentación
La documentación que se suministra con el sistema y el sistema operativo.
v Un puerto compatible SAS
Su sistema debe contar con un puerto compatible con SAS en la placa de
sistema o un adaptador de bus de host, de PCIe a SAS. Si no está seguro del
puerto, consulte la documentación que se suministra con el sistema.
Generalmente, los sistemas ThinkStation serie D10 disponen de puertos
52 ThinkStation Serial Attached SCSI Hard Disk Drive User's Guide
Page 63

compatibles con SAS en la placa del sistema. Los sistemas ThinkStation serie
S10 necesitan un adaptador de bus de host, de PCIe a SAS para ser
compatibles con las unidades de disco duro SAS.
Para obtener las instrucciones de instalación del adaptador de bus de host,
de PCIe a SAS, consulte el Apéndice A, “PCIe-to-SAS host bus adapter quick
installation instructions”, en la página 115 o la documentación que se
suministra con el adaptador.
v Cable de la unidad de disco duro SAS
Tendrá que utilizar uno de los siguientes cables de conexión SAS de 29
patillas, que se incluyen en el paquete de la opción, para conectar la unidad
de disco duro SAS a los puertos de alimentación y de señal:
– Cable de conexión directo
El cable directo es para los sistemas ThinkStation serie D10. El puerto de
alimentación 1 y el cable de señal 2 se muestran en el diagrama
siguiente.
– Cable de conexión del ángulo derecho
El cable de conexión del ángulo derecho es para los sistemas ThinkStation
serie S10. El puerto de alimentación 1 y el cable de señal 2 se
muestran en el diagrama siguiente.
Capítulo 1. Acerca de la unidad de disco duro ThinkStation Serial Attached SCSI (SAS) 53
Page 64

54 ThinkStation Serial Attached SCSI Hard Disk Drive User's Guide
Page 65

Planificación de la partición
Los dos tipos de sistemas de archivo utilizados por el sistema operativo de
Microsoft® son NTFS y FAT32. Microsoft Windows® XP puede dar soporte a
estos dos tipos de archivo, pero Microsoft Windows Vista® sólo admite NTFS.
Nota: Se recomienda utilizar el tipo NTFS para particionar cualquier unidad
nueva.
Para determinar el tipo de archivo que está utilizando, haga lo siguiente:
1. Pulse con el botón derecho del ratón sobre alguna unidad de salida de Mi
PC.
2. Seleccione Propiedades. El sistema de archivos se mostrará en el separador
General.
Para más información acerca de cómo partir la unidad, consulte el apartado
“Partición y formateo de la unidad” en la página 60.
Instalación de la unidad
Antes de utilizar el sistema operativo para particionar y dar formato a la
nueva unidad instale la nueva unidad en el sistema.
Las instrucciones de este apartado son directrices generales que sirven para la
mayoría de los sistemas. Si desea obtener información específica acerca de
cómo instalar una unidad de disco duro en el sistema, consulte la
documentación que se suministra junto con el sistema.
Paso 1. Cómo abrir el sistema
Antes de abrir el sistema, lleve a cabo estos pasos:
1. Apague el sistema.
2. Desconecte el cable de alimentación de la toma de corriente del sistema, así
como el resto de dispositivos y cables que estén conectados.
podrá abrir el sistema con toda seguridad. Si desea obtener información
Ahora
específica acerca de cómo abrir el sistema, consulte la documentación que se
suministra junto con el sistema.
Paso 2. Cómo desempaquetar la unidad
Emplee el procedimiento siguiente para desempaquetar y manipular la unidad.
Para evitar daños y descargas de electricidad estática, procure manipular la
unidad lo mínimo posible.
1. No abra la funda antiestática hasta el momento de instalar la unidad. La
electricidad estática puede dañar la unidad y otros componentes del
sistema.
Capítulo 1. Acerca de la unidad de disco duro ThinkStation Serial Attached SCSI (SAS) 55
Page 66

2. Ponga en contacto la superficie conductora, interna, de la funda antiestática
que contiene la unidad y su mano, con una superficie del sistema, metálica
y sin pintar, durante dos segundos. Esta acción elimina la electricidad
estática de la funda y de su cuerpo.
3. Antes de manipular la unidad, elimine la electricidad estática que pudiera
tener tocando una superficie sin pintar, del sistema. Vuelva a repetir la
operación cada vez que se marche y vuelva al área de trabajo.
4. Tome siempre la unidad por los extremos. No toque ningún sistema de
circuitos impreso, ningún componente ni patillas conectoras que puedan
quedar al descubierto.
5. Al instalar la unidad, evite toda manipulación innecesaria. Una
manipulación inadecuada podría dañar los cabezales, discos giratorios y
cojinetes de rodamiento del interior del alojamiento de la unidad.
6. Si tiene que colocar la unidad hacia abajo, coloque la funda antiestática
sobre una superficie lisa y blanda, y deje la unidad sobre la funda con el
lado de los componentes hacia abajo.
Si desea instalar la unidad en una bahía de 5,25 pulgadas, tendrá que
Nota:
adquirir un kit de conversión universal, disponible en muchas tiendas de
suministros informáticos.
Paso 3. Cómo montar la unidad en la bahía
Puede montar la unidad horizontalmente o verticalmente, según la ubicación
de la bahía en el chasis. Los sistemas ThinkStation serie D10 y S10, disponen
de delimitadores de plástico para el montaje de las unidades de disco duro.
Como alternativa, también puede montar la unidad de disco duro utilizando
tornillos en una bahía que no tenga delimitador. Estos tornillos suelen
comercializarse en las tiendas de informática.
Para montar la unidad utilizando el delimitador:
1. Tire del delimitador para extraerlo de la bahía presionando las dos
fijaciones (1) y tire del descriptor de contexto 2).
56 ThinkStation Serial Attached SCSI Hard Disk Drive User's Guide
Page 67

Capítulo 1. Acerca de la unidad de disco duro ThinkStation Serial Attached SCSI (SAS) 57
Page 68

2. Fije la unidad al delimitador y asegúrese de que las cuatro patillas de
montaje (1) hayan quedado alineadas y firmemente aseguradas en los
orificios de la unidad.
3. Si va a añadir la unidad nueva a un sistema que ya tiene una unidad de
disco duro, coloque la nueva de forma que se encuentre en una posición
adyacente y en la misma dirección que la unidad de disco duro existente
para no tener que enroscar el cable al conectar la unidad.
4. Deslice la unidad con el delimitador en la bahía hasta que las fijaciones del
delimitador estén bloqueadas en la bahía.
Para montar la unidad con tornillos: :
1. Deslice la unidad hacia la bahía.
2. Si va añadir la unidad en un sistema que ya tiene una unidad de disco
duro, coloque la nueva de forma que se encuentre en una posición
adyacente y en la misma dirección que la unidad de disco duro para no
tener que enroscar el cable al conectar la unidad.
3. Alinee los orificios para tornillos de la bahía de la unidad con los orificios
de rosca del alojamiento de la unidad o de los componentes de sujeción de
expansión.
4. Atornille los tornillos con la mano para fijar un poco la unidad en la bahía.
Para determinadas instalaciones, puede que tenga que utilizar los orificios
de tornillo de la parte inferior (en la parte de la placa del circuito) de la
unidad.
5. Compruebe la alineación de la unidad y apriete bien los tornillos. No lo
apriete en exceso.
Paso 4. Cómo conectar los cables a la unidad
Emplee el procedimiento siguiente para conectar los cables.
58 ThinkStation Serial Attached SCSI Hard Disk Drive User's Guide
Page 69

1. Seleccione el cable derecho de 29 patillas para el sistema (cable directo para
los sistemas ThinkStation serie D10 y cable de ángulo derecho para los
sistemas ThinkStation serie S10).
2. Conecte el cable de 29 patillas al conector de la interfaz de la unidad de
disco duro SAS.
3. Conecte el otro extremo (puerto de señal de 7 patillas) 2) al puerto
compatible con SAS. Los sistemas ThinkStation serie D10 disponen de cinco
puertos SATA/SAS azules en la placa del sistema que admite la unidad de
disco duro SAS. Para los sistemas ThinkStation serie S10 se necesita un
adaptador de bus de host, de PCIe a SAS. Si no está seguro del puerto o
del modelo de sistema que tiene, consulte la documentación que se
suministra con el sistema.
4. Busque un conector de alimentación de 15 patillas SATA que no se utilice
en la fuente de alimentación del sistema y conéctelo al cable del puerto de
alimentación 1. El conector de alimentación sólo se conecta de una forma.
No lo fuerce. Si el conector no se conecta ejerciendo una presión razonable,
vuelva a comprobar la orientación del conector del cable con el conector de
la unidad e inténtelo de nuevo.
Paso 5. Cómo llevar a cabo la instalación de la unidad
Para llevar a cabo la instalación de la unidad:
1. Verifique que la unidad de disco duro esté montada correctamente y que
los cables estén bien conectados.
2. Verifique que los cables no interfieran con la cubierta del sistema y que no
bloqueen las paletas del ventilador ni las salidas de aire.
3. Vuelva a colocar la cubierta del sistema.
4. Conecte de nuevo todos los dispositivos. Asegúrese de que los cables del
teclado, ratón y monitor estén bien conectados.
5. Vuelva a conectar todos los cables de alimentación CA.
Capítulo 1. Acerca de la unidad de disco duro ThinkStation Serial Attached SCSI (SAS) 59
Page 70

Preparación de la unidad para su uso
Cuando reinicie el sistema, aparecerá la pantalla de información de
configuración porque habrá cambiado el hardware del sistema. Algunos
sistemas necesitan que el usuario realice ciertas elecciones de configuración la
primera vez que reinicia el sistema tras instalar un dispositivo nuevo. Si no
aparece la pantalla, consulte la documentación del sistema donde encontrará
información acerca de cómo acceder a la misma. Para la mayoría de los
sistemas, puede ver la información de configuración durante el arranque del
sistema si pulsa F1 cuando aparece el gráfico de configuración en la esquina
superior derecha de la pantalla.
Compruebe la información de configuración en uno de estos sentidos:
v Si el programa de configuración informa del tamaño de la unidad nueva y
es lo que esperaba, guarde los cambios, cierre el programa de configuración
y prosiga con el apartado “Partición y formateo de la unidad” en la página
60.
v Si el sistema parece dejar de responder o si no se reinicia satisfactoriamente,
vaya al Capítulo 2, “Troubleshooting”, en la página 113.
Partición y formateo de la unidad
Si va a añadir la unidad a un sistema que tiene instalado Windows XP o
Windows Vista en una unidad existente, siga las instrucciones que figuran a
continuación para partir y formatear la nueva unidad compatible con SAS.
Nota: En Windows XP, es necesario tener instalado, como mínimo, Service
Pack 1a (SP1a) para que la unidad de disco duro pueda acceder a los recursos
de más de 137 GB.
1. Encienda el sistema.
2. Pulse Inicio.
3. Pulse con el botón derecho del ratón sobre Mi PC.
4. Pulse en Administrar. Se abrirá la ventana de gestión del sistema.
5. En el menú de la izquierda, pulse Administración de discos.
6. Pulse en la nueva unidad que se encuentra en la parte inferior derecha de
la pantalla.
7. En la barra de menú, pulse en Acción > Todas las tareas > Nueva
partición.
8. Se abrirá la ventana de la nueva partición. Siga las instrucciones de la
pantalla para particionar la unidad.
9. Tras pulsar Finalizar en la pantalla de instrucciones , comenzará el
formateo.
60 ThinkStation Serial Attached SCSI Hard Disk Drive User's Guide
Page 71

Nota: Si va a instalar la unidad en un sistema que no tenga ninguna unidad
de disco duro, siga las instrucciones que figuran a continuación para partir y
formatear la nueva unidad para el sistema operativo Windows XP o Windows
Vista con NTFS:
1. Inserte el primer disquete de instalación Windows XP o Windows Vista
(Disco de configuración número 1) en la unidad de disco o inserte el CD o
DVD de instalación de Windows XP o Windows Vista en la unidad de
CD-ROM o DVD-ROM.
2. Reinicie el sistema.
3. Utilice las instrucciones de la guía Windows XP o Windows Vista para
partir y formatear la unidad.
Capítulo 1. Acerca de la unidad de disco duro ThinkStation Serial Attached SCSI (SAS) 61
Page 72

Kapitola 1. Jednotka pevného disku ThinkStation SAS
(Serial Attached SCSI)
Tato část obsahuje informace o jednotce pevného disku ThinkStation® SAS (Serial
Attached SCSI).
Popis produktu
Jednotku pevného disku SAS lze instalovat do počítačů s alespoň jednou z následujících
konfigurací:
v základní deska kompatibilní s SAS s pozicemi pro jednotky pevného disku SAS
v adaptér PCIe-na-SAS (PCI Express na hostitelskou sběrnici SAS)
Jednotka
kabelem pro jednu jednotku. Není potřeba nastavovat propojky pro hlavní a vedlejší
disk.
Jednotka pevného disku SAS používá 29poziční konektory SAS. Horní 1 a spodní 2
strana konektoru jsou ukázány na obrázku. Dodané kabely umožňují připojit napájecí
a datové konektory jednotky pevného disku SAS jako diskovou jednotku SATA (Serial
ATA).
pevného disku SAS se připojuje k rozhraní kompatibilnímu s SAS jedním
62 Jednotka pevného disku ThinkStation Serial Attached SCSI Uživatelská příručka
Page 73

Jednotku pevného disku lze instalovat těmito způsoby:
v jediná jednotka
– instalovaná jako jediná jednotka pevného disku v počítači
– náhrada jednotky pevného disku
Jedna z více jednotek spolupracující s dalšími instalovanými jednotkami pevného
v
disku.
Poznámky:
1. Jednotky pevného disku SAS nefungují spolu s jednotkami pevného disku SATA.
2. Ujistěte se, že všechny ostatní diskové jednotky v počítači jsou jednotky pevného
disku SAS.
Jednotky SAS a SATA nemohou být provozovány společně, protože mají různé
rychlosti otáčení, čímž by na skříň působily z jednotek různé vibrační síly
působené rotací. Jsou-li jednotka SATA se 7200 otáčkami za minutu a jednotka
SAS s 15000 otáčkami za minutu instalovány ve stejné skříni, mohou dvě různé
síly působící na skříň způsobit snížení výkonu a zvýšení hluku.
této uživatelské příručky se v dodávce nachází:
Kromě
v jednotka pevného disku SAS (Serial Attached SCSI)
v pokyny pro zacházení s jednotkou
v příručka s bezpečnostními instrukcemi
v dva kabely SAS
některá z uvedených položek chybí nebo je poškozena, obraťte se na svého
Pokud
dodavatele. Uschovejte si doklad o koupi. Můžete ho potřebovat pro získání záručního
servisu.
Příprava instalace
Tato část obsahuje podrobné informace, které vám pomohou s přípravou instalace
jednotky pevného disku SAS.
Požadavky pro instalaci
Chcete-li instalovat jednotku pevného disku SAS, musíte mít:
v Dokumentaci
Dokumentaci dodanou s vaším počítačem a operačním systémem.
v Konektor kompatibilní s SAS
Váš počítač musí mít konektor SAS na základní desce nebo adaptér PCIe-na-SAS.
Nejste-li si jisti konektorem SAS, podívejte se dokumentace k vašemu počítači.
Obvykle mají počítače ThinkStation D10 konektor SAS na základní desce. Počítače
ThinkStation S10 pro podporu jednotek SAS potřebují adaptér PCIe-na-SAS.
Kapitola 1. Jednotka pevného disku ThinkStation SAS (Serial Attached SCSI) 63
Page 74

Návod k instalaci adaptéru PCIe-na-SAS naleznete v části Dodatek A, “PCIe-to-SAS
host bus adapter quick installation instructions”, na stránce 115 nebo v dokumentaci
dodané s adaptérem PCIe-na-SAS.
v Kabel jednotky pevného disku SAS
Pro připojení jednotky pevného disku SAS k napájecímu a datovému konektoru je
potřeba jeden z dodaných 29pozičních kabelů SAS:
– Rovný kabel
Rovný kabel slouží pro počítače ThinkStation D10. Napájecí konektor 1
a datový kabel 2 jsou ukázány na obrázku.
– Zahnutý kabel
Zahnutý kabel slouží pro počítače ThinkStation S10. Napájecí konektor 1
a datový kabel 2 jsou ukázány na obrázku.
64 Jednotka pevného disku ThinkStation Serial Attached SCSI Uživatelská příručka
Page 75

Příprava diskových oblastí
Dva druhy systémů souborů používaných operačním systémem Microsoft® jsou NTFS
a FAT32. Microsoft Windows® XP podporuje oba tyto systémy, ale Microsoft Windows
Vista® podporuje pouze NTFS.
Poznámka: NTFS se doporučuje pro všechny nové jednotky.
Který systém souborů používáte, zjistíte takto:
1. Klepněte pravým tlačítkem na existující jednotku v okně Tento počítač.
2. Použijte Vlastnosti. Na kartě Obecné se zobrazí systém souborů.
Další informace o diskových oblastech naleznete v části “Rozdělení disku na oblasti
a jeho formátování” na stránce 69.
Instalace jednotky
Novou jednotku musíte instalovat na počítač před použitím operačního systému pro
rozdělení a formátování disku.
Pokyny v této části jsou obecné pokyny, které platí pro většinu počítačů. Pokyny pro
instalaci jednotky pevného disku na váš počítač naleznete v jeho dokumentaci.
Krok 1. Otevření počítače
Před otevřením počítače proveďte tyto kroky:
1. Vypněte počítač.
2. Odpojte napájecí kabely počítače a všech připojených zařízení.
je bezpečné počítač otevřít. Postup otevření vašeho počítače naleznete v jeho
Nyní
dokumentaci.
Krok 2. Vybalení jednotky
Jednotku vybalte a zacházejte s ní podle těchto pokynů. Chcete-li zabránit poškození
jednotky nábojem statické elektřiny, omezte manipulaci s ní na minimum.
1. Neotvírejte antistatický obal, dokud nebudete připraveni jednotku instalovat. Statická
elektřina může poškodit jednotku a jiné části počítače.
2. Dotkněte se na dvě vteřiny vnitřním vodivým povrchem antistatického obalu
jednotky a rukou nelakované kovové plochy počítače. Tím vybijete náboj statické
elektřiny z obalu a ze svého těla.
3. Před manipulací s jednotkou se uzemněte dotykem nelakované kovové plochy
počítače. Po opuštění pracovní oblasti a návratu do ní se znovu uzemněte.
4. Jednotku vždy berte za okraje. Nedotýkejte se odkrytých tištěných obvodů, součástek
a kolíků konektorů.
Kapitola 1. Jednotka pevného disku ThinkStation SAS (Serial Attached SCSI) 65
Page 76

5. Při instalaci jednotky s ní zbytečně nemanipulujte. Hrubé zacházení může poškodit
hlavy, rotující disky a ložiska uvnitř jednotky.
6. Musíte-li jednotku odložit, umístěte antistatický obal na rovný měkký povrch
a jednotku položte na obal stranou se součástkami nahoru.
Poznámka:
Chcete-li umístit jednotku do 5,25palcové pozice, musíte si obstarat redukci
v některém z místních obchodů s počítači.
Krok 3. Montáž jednotky do pozice
Jednotku lze umístit vodorovně nebo svisle podle umístění pozice v počítači. Počítače
ThinkStation D10 a S10 mají umělohmotné rámečky pro montáž jednotek pevných
disků. Také je možné instalovat diskovou jednotku do pozice bez rámečku pomocí
šroubů. Šrouby lze zakoupit v některém z místních obchodů s počítači.
Montáž jednotky pomocí rámečku:
1. Vytáhněte rámeček z pozice po stisknutí zarážek (1) tahem za držadlo (2).
66 Jednotka pevného disku ThinkStation Serial Attached SCSI Uživatelská příručka
Page 77

2. Vložte jednotku do rámečku. Ujistěte se, že jsou čtyři montážní čepy (1) umístěny
v otvorech pro šrouby na jednotce a dotaženy.
3. Přidáváte-li novou jednotku do systému s existující jednotkou pevného disku,
orientujte novou jednotku shodně s existující, aby nedošlo k překroucení kabelu
rozhraní při připojování jednotky.
4. Zasuňte jednotku v rámečku do pozice, dokud nezapadnou obě zarážky rámečku.
Montáž jednotky pomocí šroubů:
1. Zasuňte jednotku do pozice.
2. Přidáváte-li novou jednotku do systému s existující jednotkou pevného disku,
orientujte novou jednotku shodně s existující, aby nedošlo k překroucení kabelu
rozhraní při připojování jednotky.
3. Srovnejte otvory pro šrouby pozice s otvory pro šrouby v jednotce.
4. Zašroubujte šrouby rukou, aby byla jednotka zajištěna v pozici. V některých
případech je nutné použít otvory pro šrouby ve spodní části (části s elekronikou)
jednotky.
5. Zkontrolujte zarovnání jednotky a utáhněte šrouby. Nedotahujte šrouby příliš silně.
Krok 4. Připojení kabelů k jednotce
Kabely připojíte k jednotce takto:
1. Vyberte odpovídající 29poziční kabel pro váš počítač (rovný kabel pro počítače
ThinkStation D10 a zahnutý pro ThinkStation S10).
2. Připojte 29poziční kabel ke konektoru jednotky pevného disku SAS.
3. Připojte druhý konec (7poziční datový konektor 2) ke konektoru SAS. Na
počítačích ThinkStation D10 podporuje jednotky pevného disku SAS pět modrých
konektorů SATA/SAS na základní desce. Počítače ThinkStation S10 potřebují
adaptér PCIe-na-SAS. Nejste-li si jisti konektorem či modelem počítače, podívejte se
dokumentace k vašemu počítači.
Kapitola 1. Jednotka pevného disku ThinkStation SAS (Serial Attached SCSI) 67
Page 78

4. Nalezněte nepoužitý 15poziční napájecí konektor SATA od zdroje napájení počítače
a připojte ho ke konektoru napájení 1 na kabelu. Konektor napájení má výstupky,
takže lze připojit jen jedním směrem. Nepřipojujte ho nadměrnou silou. Nejde-li
konektor připojit přiměřeným tlakem, zkontrolujte je-li správně orientován vzhledem
ke konektoru na jednotce a zkuste ho připojit znovu.
Krok 5. Dokončení instalace jednotky
Instalaci jednotky dokončíte takto:
1. Ověřte, že je jednotka správně umístěna a kabely správně připojeny.
2. Ověřte, že kabely nepřekáží krytu počítače, že neblokují lopatky větráku a že nebrání
proudění vzduchu.
3. Nasaďte kryt počítače.
4. Připojte všechna zařízení. Ověřte, že kabely klávesnice, myši a monitoru jsou
správně připojeny.
5. Připojte všechny napájecí šňůry.
Příprava jednotky na použití
Po spuštění počítače se zobrazí obrazovka konfiguračního programu, protože došlo ke
změně hardwaru počítače. Některé počítače vyžadují, abyste při prvním spuštění po
přidání nového zařízení provedli změnu nastavení. Pokud se obrazovka konfiguračního
programu nezobrazí, naleznete v dokumentaci počítače postup pro spuštění
konfiguračního programu. U většiny počítačů se údaje o nastavení zobrazí po stisknutí
klávesy F1 během spouštění počítače po zobrazení konfigurační grafiky v pravém
horním rohu obrazovky.
V údajích o nastavení ověřte následující:
v Pokud konfigurační program nahlásí správnou velikost nové jednotky, uložte změny,
ukončete konfigurační program a pokračujte podle části “Rozdělení disku na oblasti
a jeho formátování” na stránce 69.
68 Jednotka pevného disku ThinkStation Serial Attached SCSI Uživatelská příručka
Page 79

v Pokud počítač nereaguje nebo se nespustí správně, pokračujte podle části Kapitola 2,
“Troubleshooting”, na stránce 113.
Rozdělení disku na oblasti a jeho formátování
Přidáváte-li jednotku do počítače se systémem Windows XP nebo Windows Vista
instalovaným na existující jednotce, rozdělte novou jednotku SAS na oblasti a formátujte
ji podle následujících pokynů.
Poznámka: Ve Windows XP je potřeba instalovat minimálně aktualizaci Service Pack
1a (SP1a), aby byl přístupný prostor nad 137 GB.
1. Zapněte počítač.
2. Klepněte na Start.
3. Klepněte pravým tlačítkem na Tento počítač.
4. Klepněte na tlačítko Spravovat. Otevře se okno správy počítače.
5. Na levé straně nabídky klepněte na tlačítko Správa disků.
6. Klepněte na nový disk umístěný v pravém dolním rohu okna.
7. V nabídce klepněte na tlačítko Akce > Všechny úlohy > Nový oddíl.
8. Otevře se okno Nový oddíl. Jednotku rozdělte na oblasti podle pokynů na obrazovce.
9. Po klepnutí na tlačítko Dokončit se zahájí formátování jednotky.
Poznámka:
Přidáváte-li jednotku do počítače bez diskové jednotky, rozdělte novou
diskovou jednotku na oblasti a formátujte ji systémem souborů NTFS na systému
Windows XP nebo Windows Vista takto:
1. Vložte první instalační disketu systému Windows XP nebo Windows Vista (Setup
Disk #1) do diskové jednotky nebo vložte instalační CD či DVD systému Windows
XP nebo Windows Vista do jednotky CD-ROM či DVD-ROM.
2. Restartujte počítač.
3. Jednotku rozdělte na oblasti a formátujte ji podle pokynů v uživatelské příručce
systému Windows XP nebo Windows Vista.
Kapitola 1. Jednotka pevného disku ThinkStation SAS (Serial Attached SCSI) 69
Page 80

Kapitola 1. O jednotke pevného disku ThinkStation
Serial Attached SCSI (SAS)
V tejto časti nájdete informácie o jednotke pevného disku ThinkStation® Serial Attached
SCSI (SAS).
Popis produktu
Jednotku pevného disku SAS môžete nainštalovať len do počítačov, ktoré obsahujú:
v základnú dosku, kompatibilnú so SAS, obsahujúcu pozície pre jednotky pevných
diskov SAS
v hostiteľský adaptér zbernice PCI Express (PCIe)-to-SAS
Jednotku
ktoré podporuje pevné disky SAS v konfigurácii jeden disk na kábel. Na konfiguráciu
režimu Master alebo Slave nie sú vyžadované žiadne nastavenia mostíkov.
Jednotka pevného disku SAS používa 29-pinové konektory rozhrania SAS. Vrchná časť
1 a spodná časť 2 tohto konektora je zobrazená na obrázku. Káble, obsiahnuté v
balení tejto voľby, vám umožňujú pripojiť napájací a signálny port jednotky pevného
disku SAS ako u jednotky Serial ATA (SATA).
pevného disku SAS môžete pripojiť len k rozhraniu kompatibilnému so SAS,
70 ThinkStation Serial Attached SCSI Hard Disk Drive User's Guide
Page 81

Disk môže byť nakonfigurovaný:
v Ako jediná jednotka
– Ako jediná jednotka pevného disku v počítači
– Na nahradenie inej jednotky pevného disku
Ako jeden z viacerých diskov, spolupracujúci s inými nainštalovanými jednotkami
v
pevných diskov
Poznámky:
1. Jednotky pevných diskov SAS nemôžu byť používané súčasne s pevnými diskami
SATA.
2. Uistite sa, že všetky ostatné pevné disky vo vašom počítači sú pevné disky SAS.
Pevné disky SAS a SATA nemôžu pracovať súčasne, pretože majú odlišné
rýchlosti točenia disku, kvôli čomu tieto jednotky pôsobia rozličnými rotačnými
vibračnými silami na šasi. Ak je v tej istej šasi nainštalovaná jednotka SATA,
ktorá točí disk rýchlosťou 7200 RPM, a jednotka SAS, ktorá točí disk rýchlosťou
15000 RPM, odlišné sily pôsobiace na šasi môžu spôsobiť mechanické poškodenia
a hluk.
tejto užívateľskej príručky, balenie produktu obsahuje:
Okrem
v Jednotku pevného disku SAS
v Leták s informáciami o zaobchádzaní s jednotkou
v Príručku s bezpečnostnými informáciami
v Dva káble SAS
prípade, že niektoré súčasti chýbajú alebo sú poškodené, kontaktujte miesto nákupu.
V
Nezabudnite si vziať doklad o kúpe. Môžete ho potrebovať pri záručnom servise.
Plánovanie inštalácie
V tejto časti nájdete podrobné informácie, ktoré vám uľahčia plánovanie inštalácie
jednotky pevného disku SAS.
Požiadavky na inštaláciu
Na inštaláciu pevného disku SAS musíte mať:
v Dokumentáciu
Dokumentáciu pre váš počítač a operačný systém.
v Port kompatibilný so SAS
Váš počítač musí mať port kompatibilný so SAS na systémovej doske alebo hostiteľský
adaptér PCIe-to-SAS. Ak ste si nie istý, či váš počítač obsahuje potrebný port, pozrite
si dokumentáciu k vášmu počítaču. Vo všeobecnosti, počítačové systémy radu
ThinkStation D10 obsahujú porty kompatibilné so SAS na systémovej doske. V
počítačových systémoch radu ThinkStation S10 musíte použiť hostiteľský adaptér
PCIe-to-SAS.
Kapitola 1. O jednotke pevného disku ThinkStation Serial Attached SCSI (SAS) 71
Page 82

Pokyny na inštaláciu hostiteľského adaptéra PCIe-to-SAS nájdete v časti Príloha A,
“PCIe-to-SAS host bus adapter quick installation instructions”, na strane 115 a v
dokumentácii k vášmu adaptéru PCIe-to-SAS.
v Kábel jednotky pevného disku SAS
Na pripojenie jednotky pevného disku SAS k napájaciemu a signálnemu portu budete
potrebovať nasledujúce 29-pinové pripájacie káble SAS, ktoré sú súčasťou balenia
produktu:
– Priamy pripájací kábel
Priamy kábel je vhodný na použitie v počítačových systémoch radu ThinkStation
D10. Napájací port 1 a signálny kábel 2 sú zobrazené na obrázku.
– Pravouhlý kábel
Pravouhlý pripájací kábel je vhodný na použitie v počítačových systémoch radu
ThinkStation S10. Napájací port 1 a signálny kábel 2 sú zobrazené na obrázku.
72 ThinkStation Serial Attached SCSI Hard Disk Drive User's Guide
Page 83

Plánovanie delenia
Operačné systémy Microsoft® používajú dva typy súborových systémov: NTFS a FAT32.
Operačný systém Microsoft Windows® XP podporuje oba tieto súborové systémy, ale
systém Microsoft Windows Vista® podporuje iba NTFS.
Poznámka: Pri delení nových diskov vám odporúčame použiť súborový systém NTFS.
Ak chcete zistiť, aký súborový systém používate, postupujte takto:
1. Kliknite pravým tlačidlom na existujúcu jednotku v okne My Computer.
2. Vyberte Properties. Používaný súborový systém nájdete v záložke General.
Viac informácií o delení diskov na oddiely nájdete v časti “Delenie a formátovanie disku”
na strane 77.
Inštalácia jednotky
Vašu novú jednotku musíte pred rozdelením a formátovaním pomocou operačného
systému nainštalovať do vášho počítača.
Inštrukcie uvedené v tejto časti sú všeobecným návodom, ktorý vyhovuje väčšine
počítačov. Špecifické informácie o inštalácii pevného disku do počítača nájdete v
dokumentácii počítača.
Krok 1. Otvorenie počítača
Pred jeho otvorením vykonajte nasledujúce kroky:
1. Vypnite počítač.
2. Odpojte napájací kábel a všetky pripojené zariadenia a káble z vášho počítača.
je bezpečné otvoriť počítač. Špecifické informácie o otváraní počítača nájdete v
Teraz
dokumentácii, ktorá je súčasťou vášho počítača.
Krok 2. Vybalenie jednotky
Pri vybaľovaní a manipulácii s diskom postupujte podľa nasledujúcich pokynov.
Manipuláciu obmedzte na minimálnu možnú mieru, kvôli hroziacemu riziku poškodenia
a kvôli riziku výboja statickej elektriny.
1. Antistatický obal jednotky neotvárajte pokiaľ nie ste pripravený jednotku
nainštalovať. Statická elektrina môže zničiť disk aj ďalšie komponenty počítača.
2. Dotknite sa vnútorného vodivého povrchu antistatického obalu obsahujúceho disk a
na dve sekundy položte ruku na nezafarbenú kovovú časť počítača. Toto odvedie
statickú elektrinu z obalu aj z vášho tela.
3. Pred manipuláciou s diskom sa uzemnite dotykom nezafarbeného povrchu počítača.
Ak opustíte svoje pracovisko, po návrate sa uzemnite znova.
Kapitola 1. O jednotke pevného disku ThinkStation Serial Attached SCSI (SAS) 73
Page 84

4. Disk chytajte vždy len za okraj. Nedotýkajte sa plošných spojov, komponentov alebo
pinov konektorov.
5. Počas inštalácie jednotky sa vyvarujte zbytočnej manipulácie. Nešetrné
zaobchádzanie môže poškodiť hlavy disku, rotujúce disky a ložiská v jednotke
pevného disku.
6. Ak musíte disk odložiť, umiestnite antistatický obal na rovnú podložku a položte na
tento obal disk stranou s komponentmi smerom nahor.
Poznámka:
Ak chcete jednotku nainštalovať do pozície s veľkosťou 5,25″, musíte použiť
univerzálnu konverznú sadu, ktorú môžete zakúpiť u väčšiny predajcov s počítačovými
komponentmi.
Krok 3. Upevnenie jednotky v pozícii
Jednotku môžete upevniť v horizontálnej i vertikálnej polohe, v závislosti od umiestnenia
pozície v šasi. Počítačové systémy radu ThinkStation D10 a S10 sú dodávané s
plastovými držiakmi na upevnenie jednotiek pevných diskov. Prípadne môžete jednotku
pevného disku pripevniť pomocou skrutiek do pozícií bez držiaku. Skrutky môžete
zakúpiť u vášho predajcu počítačových komponentov.
Pripevnenie jednotky pomocou držiaku:
1. Vytiahnite držiak z pozície stlačením úchytiek (1) a vytiahnutím rúčky(2).
74 ThinkStation Serial Attached SCSI Hard Disk Drive User's Guide
Page 85

2. Vložte jednotku do držiaka a uistite sa, že štyri upevňovacie zarážky (1) sú
zarovnané s dierami pre skrutky a sú pevne prichytené.
3. Ak novú jednotku inštalujete do systému, v ktorom je už nainštalovaná iná jednotka
pevného disku, novú jednotku umiestnite pri existujúcej jednotke v tom istom smere,
aby ste pri pripájaní jednotky nemuseli prekrútiť kábel rozhrania.
4. Zasuňte jednotku v držiaku do pozície, kým sa úchytky nezaistia v pozícii.
Pripevnenie jednotky pomocou skrutiek:
1. Jednotku zasuňte do pozície.
2. Ak novú jednotku inštalujete do systému, v ktorom je už nainštalovaná iná jednotka
pevného disku, novú jednotku umiestnite pri existujúcej jednotke v tom istom smere,
aby ste pri pripájaní jednotky nemuseli prekrútiť kábel rozhrania.
3. Zarovnajte otvory pre skrutky v pozícii s otvormi pre skrutky jednotky disku alebo
expanznej konzoly.
4. Rukou pritiahnite skrutky tak, aby zľahka upevnili disk v pozícii. Pri niektorých
inštaláciách budete možno musieť použiť otvory pre skrutky v spodnej časti (strana
dosky plošných spojov) jednotky.
5. Skontrolujte zarovnanie disku a skrutky dotiahnite. Nezaťahujte ich však prisilno.
Krok 4. Pripojenie káblov k jednotke
Pri pripájaní káblov postupujte podľa nasledujúceho návodu.
1. Vyberte 29-pinový kábel vhodný pre váš počítač (priamy pre počítačové systémy
radu ThinkStation D10 a pravouhlý pre počítačové systémy radu ThinkStation S10).
2. Pripojte 29-pinový kábel do konektora rozhrania jednotky SAS.
3. Druhý koniec kábla (7-pinový signálny port 2) pripojte k portu SAS. V
počítačových systémoch radu ThinkStation D10 podporuje jednotky SAS päť
modrých portov SATA/SAS na systémovej doske. V počítačových systémoch radu
Kapitola 1. O jednotke pevného disku ThinkStation Serial Attached SCSI (SAS) 75
Page 86

ThinkStation S10 musíte použiť hostiteľský adaptér PCIe-to-SAS. Ak ste si nie istý
ohľadne modelu vášho počítača a portov, ktoré obsahuje, pozrite si dokumentáciu k
vášmu počítaču.
4. Nájdite voľný 15-pinový napájací konektor SATA zo zdroja napájania a pripojte ho k
napájaciemu portu 1 na pripájacom kábli. Napájací konektor je možné zapojiť len
jedným spôsobom. Nezapájajte ho nasilu. Ak konektor nezapadne použitím
primeranej sily, skontrolujte orientáciu konektora kábla a skúste znova.
Krok 5. Dokončenie inštalácie jednotky
Pri dokončení inštalácie disku postupujte podľa nasledujúceho návodu:
1. Skontrolujte, či je disk bezpečne pripevnený a káble sú pevne pripojené.
2. Skontrolujte, či káble neprekážajú krytu počítača a či neblokujú ventilátor
napájacieho zdroja alebo prúdenie vzduchu.
3. Vráťte kryt počítača na svoje miesto.
4. Pripojte späť všetky zariadenia. Uistite sa, že klávesnica, myš a káble monitora sú
pevne pripojené.
5. Pripojte všetky elektrické napájacie káble.
Príprava disku na používanie
Pretože ste zmenili hardvér počítača, po reštarte sa zobrazí informatívna obrazovka
nastavenia konfigurácie. Niektoré počítače vyžadujú, aby ste vykonali voľby konfigurácie
hneď po prvom reštarte po inštalácii nového zariadenia. Ak sa táto obrazovka neobjaví,
pozrite sa do dokumentácie vášho počítača, ako ju sprístupniť. Na väčšine počítačov
môžete nájsť konfiguračné informácie pri spustení počítača stlačením klávesu F1 po
zobrazení obrazovky konfigurácie v pravom hornom rohu obrazovky.
V informáciách o nastavení konfigurácie skontrolujte nasledujúce:
76 ThinkStation Serial Attached SCSI Hard Disk Drive User's Guide
Page 87

v Či program nastavenia konfigurácie indikuje očakávanú veľkosť vášho nového disku.
Uložte zmeny, ukončite konfiguračný program a pokračujte časťou “Delenie a
formátovanie disku” na strane 77.
v Ak počítač nereaguje alebo ak reštart neprebehol úspešne, prejdite na Kapitola 2,
“Troubleshooting”, na strane 113.
Delenie a formátovanie disku
Ak pridávate váš disk do počítača, na ktorom je už na inom disku nainštalovaný operačný
systém Windows XP alebo Windows Vista, postupujte podľa nasledujúcich pokynov na
rozdelenie a formátovanie vašej novej jednotky SAS.
Poznámka: V systéme Windows XP je vyžadovaný minimálne balík opráv 1a (SP1a),
aby mohol pevný disk využívať kapacitu vyššiu než 137 GB.
1. Zapnite počítač.
2. Kliknite na Start.
3. Kliknite pravým tlačidlom myši na My Computer.
4. Kliknite na Manage. Otvorí sa okno Computer Management.
5. V ponuke vľavo vyberte Disk Management.
6. Vyberte novú jednotku umiestnenú v okne vpravo dolu.
7. V ponukovej lište kliknite na Action > All Tasks > New Partition.
8. Otvorí sa okno New Partition. Postupujte podľa zobrazovaných pokynov a rozdeľte
disk na oddiely.
9. Po kliknutí na tlačidlo Finish sa spustí formátovanie disku.
Poznámka:
Ak jednotku inštalujete do počítača, v ktorom nie je iná jednotka pevného
disku, postupujte podľa nasledujúcich pokynov na rozdelenie a formátovanie nového
pevného disku na súborový systém NTFS pre operačné systémy Windows XP a Windows
Vista:
1. Do disketovej mechaniky vložte prvú inštalačnú disketu Windows XP alebo
Windows Vista (Setup Disk #1) alebo do jednotky CD-ROM/DVD-ROM vložte
inštalačné CD/DVD systému Windows XP alebo Windows Vista.
2. Reštartujte počítač.
3. Na rozdelenie a formátovanie vášho disku postupujte podľa pokynov v užívateľskej
príručke Windows XP alebo Windows Vista.
Kapitola 1. O jednotke pevného disku ThinkStation Serial Attached SCSI (SAS) 77
Page 88

Bölüm 1. ThinkStation Serial Attached SCSI (SAS) sabit
disk sürücüsü hakkında
Bu bölümde, ThinkStation® Serial Attached SCSI (SAS) sabit disk sürücüsü hakkında
bilgi verilir.
Ürün Tanımı
SAS sabit disk sürücüsü yalnızca en azından aşağıdaki yapılandırmalara sahip
bilgisayarlara kurulabilir:
v SAS sabit disk sürücülerini barındırmak üzere tasarlanmış bölmeleri bulunan SAS
uyumlu bir arka yüz
v PCI Express’den (PCIe) SAS’a bir anasistem veriyolu bağdaştırıcısı
sabit disk sürücüsü, SAS sabit disk sürücülerini kablo yapılandırması başına tek bir
SAS
sürücü yapılandırmasında destekleyen SAS uyumlu bir arabirime bağlanır. Ana ya da
ikincil ayarlar için gerekli atlatma kablosu ayarları yoktur.
SAS sabit disk sürücüsü 29 iğneli SAS arabirim bağlaçlarını kullanır. Bağlacın üst yüzeyi
1 ve alt yüzeyi 2 aşağıdaki şemada gösterilir. Aksam paketindeki kablolar SAS sabit
disk sürücüsünün güç kapısını ve sinyal kapısını Serial ATA (SATA) sabit disk sürücüleri
olarak bağlamanıza olanak tanır.
78 ThinkStation Serial Attached SCSI Hard Disk Drive User's Guide
Page 89

Bölüm 1. ThinkStation Serial Attached SCSI (SAS) sabit disk sürücüsü hakkında 79
Page 90

Sabit disk sürücünüz aşağıdaki yöntemlerden biri kullanılarak yapılandırılabilir:
v Tek sürücü olarak
– Bir bilgisayardaki tek sabit disk sürücüsü olarak kurulacak şekilde
– Bir sabit disk sürücüsünün yerine geçecek şekilde
Birkaç sürücüden biri, kurulu olan diğer sabit disk sürücüleriyle birlikte çalışacak
v
şekilde
Notlar:
1. SAS sabit disk sürücüleri SATA sabit disk sürücüleriyle birlikte çalışamaz.
2. Bilgisayarınızdaki diğer tüm sabit disk sürücülerinin SAS sabit disk sürüsü
olduğundan emin olun.
SAS ve SATA sürücülerinin dönme hızları farklı olduğu ve bu da gövdeye farklı
dönüş titreşimi güçleri uyguladığı için bu sürücüler bir arada çalışamaz. 7200
devir/dakika hızındaki bir SATA ile 15000 devir/dakika hızındaki bir SAS
sürücüsü aynı gövdeye takılırsa, gövdeye uyguladıkları iki farklı güç başarımı
düşürebilir ve fazladan gürültü çıkarabilir.
Kullanıcı Kılavuzu’na ek olarak aksam paketinizde aşağıdakiler yer alır:
Bu
v Serial Attached SCSI sabit disk sürücüsü
v Sürücü kullanım kitapçığı
v Güvenlik bilgileri elkitabı
v İki adet SAS kablosu
eksik ya da zarar görmüş ise, ürünü satın aldığınız yere başvurun. Satın alma
Parçalar
belgenizi sakladığınızdan emin olun. Garanti hizmeti almak için bu belge gerekli olabilir.
Kuruluşun Planlanması
Bu bölümde SAS sabit disk sürücünüzün kuruluş işlemini planlamanıza yardımcı olacak
ayrıntılı bilgiler yer alır.
Kuruluş Gereksinimleri
SAS sabit disk sürücüsünün kurulması için aşağıdakiler gereklidir:
v Belgeler
Bilgisayarınız ve işletim sisteminizle birlikte gönderilen belgeler.
v SAS uyumlu kapı
Bilgisayarınızın sistem kartında SAS uyumlu bir kapı ya da bir PCIe’den SAS’a
anasistem veriyolu bağdaştırıcısı bulunmalıdır. SAS kapınız olup olmadığından emin
değilseniz, bilgisayarınızla birlikte gönderilen belgelere bakın. Genelde, ThinkStation
D10 serisi bilgisayar sistemlerinin sistem kartında SAS uyumlu kapılar vardır.
ThinkStation S10 serisi bilgisayar sistemlerinin SAS sabit disk sürücülerini
desteklemesi için bir PCIe’den SAS’a anasistem veriyolu bağdaştırıcısı
kullanılmalıdır.
80 ThinkStation Serial Attached SCSI Hard Disk Drive User's Guide
Page 91

PCIe’den SAS’a anasistem veriyolu bağdaştırıcısı yönergeleri için, Ek A,
“PCIe-to-SAS host bus adapter quick installation instructions”, sayfa 115 başlıklı
konuya ya da PCIe’den SAS’a anasistem veriyolu bağdaştırıcınızla birlikte gönderilen
belgelere bakın.
v SAS sabit disk sürücüsü kablosu
SAS sabit disk sürücüsünü güç ve sinyal kapılarına bağlamak için aksam paketinizle
birlikte gönderilen aşağıdaki 29 iğneli SAS bağlantı kablolarından birini kullanmanız
gerekecektir:
– Düz bağlantı kablosu
Düz kablo ThinkStation D10 serisi bilgisayar sistemleri içindir. Güç kapısı 1 ve
sinyal kablosu 2 aşağıdaki şemada gösterilir.
– Dik açılı bağlantı kablosu
Dik açılı bağlantı kablosu ThinkStation S10 serisi bilgisayar sistemleri içindir. Güç
kapısı 1 ve sinyal kablosu 2 aşağıdaki şemada gösterilir.
Bölüm 1. ThinkStation Serial Attached SCSI (SAS) sabit disk sürücüsü hakkında 81
Page 92

82 ThinkStation Serial Attached SCSI Hard Disk Drive User's Guide
Page 93

Bölümlemenin Planlanması
Microsoft® işletim sisteminde kullanılan iki tip dosya sistemi NTFS ve FAT32’dir.
Microsoft Windows® XP bu dosya sistemlerinin her ikisini de destekleyebilir ancak
Microsoft Windows Vista® yalnızca NTFS’yi destekler.
Not: Herhangi bir yeni sürücüyü bölümlemek için NTFS’nin kullanılması önerilir.
Hangi dosya sistemini kullandığınızı saptamak için, aşağıdakileri yapın:
1. My Computer (Bilgisayarım) öğesi altındaki bir sürücüyü sağ tıklatın.
2. Properties (Özellikler) öğesini seçin. Dosya sistemi General (Genel) etiketi altında
görüntülenir.
Sürücünüzün bölümlenmesine ilişkin ek bilgi için bkz. “Sürücünüzün Bölümlenmesi ve
Biçimlendirilmesi” sayfa 87.
Sürücünün Kurulması
Yeni sürücünüzü bölümlemek ve biçimlendirmek için işletim sisteminizi kullanmadan
önce yeni sürücünüzü bilgisayara kurmanız gerekir.
Bu bölümdeki yönergeler birçok bilgisayar için kullanılabilir olan genel kılavuzlardır.
Bilgisayarınıza sabit disk sürücüsü takılmasına ilişkin bilgiler için bilgisayarınızla birlikte
gönderilen belgelere bakın.
Adım 1. Bilgisayarınızın açılması
Bilgisayarınızı açmadan önce aşağıdaki adımları tamamlayın:
1. Bilgisayarı kapatın.
2. Güç kablosunu bilgisayarınızın güç prizinden çıkarın ve diğer tüm bağlı aygıtları ve
kabloları çıkarın.
bilgisayarınızı açabilirsiniz. Bilgisayarınızın açılmasına ilişkin bilgiler için
Şimdi
bilgisayarınızla birlikte gönderilen belgelere bakın.
Adım 2. Sürücünün paketinin açılması
Sürücüyü paketinden çıkarmak ve tutmak için aşağıdaki yordamı kullanın: Sürücünün
zarar görmesini ve statik elektrik boşalmasını önlemek için sürücüye olabildiğince az
dokunun.
1. Sürücüyü kurmak için hazır olana kadar antistatik ambalajı açmayın. Statik elektrik
sürücüye ve diğer bilgisayar bileşenlerine zarar verebilir.
2. Sürücünün bulunduğu antistatik ambalajın iç kısmındaki iletken yüzeye dokunun ve
elinizi bilgisayarın üzerindeki boyasız metal yüzeye iki saniye dokundurun. Bu işlem
ambalajdaki ve vücudunuzdaki statik elektriği boşaltır.
Bölüm 1. ThinkStation Serial Attached SCSI (SAS) sabit disk sürücüsü hakkında 83
Page 94

3. Sürücüye dokunmadan önce bilgisayarın üzerindeki boyasız bir yüzeye dokunarak
üzerinizdeki elektriği boşaltın. Çalışma alanınıza dönmeden önce üzerinizdeki
elektriği tekrar boşaltın.
4. Her zaman sürücüyü kenarlarından tutun. Açıkta bulunan baskılı devre düzeneğine,
bileşenlere ya da bağlaç iğnelerine dokunmayın.
5. Sürücüyü takarken, gerekmediği sürece sürücüye dokunmamaya çalışın. Sürücünün
dikkatsiz bir şekilde tutulması sürücü gövdesindeki kafalara, döner disklere ve
rulmanlara zarar verebilir.
6. Sürücüyü yere koymak zorundaysanız, antistatik ambalajı düz ve korumalı bir zemine
koyun ve sürücüyü, bileşenlerin bulunduğu yüzü yukarı bakacak şekilde ambalajın
üzerine yerleştirin.
Sürücüyü 5.25 inçlik bir bölmeye takmak istiyorsanız, çevrenizdeki bir çok
Not:
bilgisayar malzemeleri satan dükkanda bulabileceğiniz evrensel bir dönüştürme takımı
satın almanız gerekir.
Adım 3. Sürücünün bölmeye takılması
Bölmenin gövdenizdeki yerine bağlı olarak, sürücüyü yatay ya da dikey olarak
takabilirsiniz. ThinkStation D10 ve S10 serisi bilgisayar sistemleriyle birlikte sabit disk
sürücülerinizi monte edebilmeniz için plastik montaj blokları sağlanır. Ya da, sabit disk
sürücünüzü bölme içine, montaj bloğu kullanmadan vidalarla da monte edebilirsiniz.
Vidaları çevrenizdeki bilgisayar malzemeleri satan bir mağazadan satın alabilirsiniz.
Sürücüyü montaj bloğu kullanarak bölmeye takmak için aşağıdaki işlemleri yapın::
1. Tırnaklara (1) bastırıp tutamacı çekerek (2) montaj bloğunu bölmenin dışına
çıkarın.
84 ThinkStation Serial Attached SCSI Hard Disk Drive User's Guide
Page 95

2. Sürücüyü montaj bloğuna takın ve dört montaj iğnesinin de (1) zaten sürücünün
vida delikleriyle hizalandığından ve güvenli bir şekilde sıkıldığından emin olun.
3. Yeni sürücünüzü sabit disk sürücüsü olan bir sisteme ekliyorsanız, yeni sürücüyü,
varolan sabit disk sürücüsüne bitişik ve bununla aynı yönde yerleştirin. Böylece
sürücüleri bağlamak için arabirim kablosunu bükmenize gerek kalmaz.
4. Sürücüyü, bloğun iki tırnağı bölmenin içinde yerlerine oturuncaya kadar montaj
bloğu ile birlikte bölmenin içine kaydırın.
Sürücüyü vida kullanarak bölmeye takmak için aşağıdaki işlemleri yapın::
1. Sürücüyü sürücü bölmesine kaydırarak yerleştirin.
2. Yeni sürücünüzü, sürücüsü olan bir sisteme ekliyorsanız, yeni sürücüyü, var olan
sabit sürücünün yanına ve eski sürücüyle aynı yönde yerleştirin. Böylece sürücüleri
bağlamak için arabirim kablosunu bükmenize gerek kalmaz.
3. Sürücü bölmesindeki vida deliklerini, sürücü kasasındaki ya da genişletme
bloklarındaki vida dişli deliklerle aynı hizaya getirin.
4. Sürücüyü bölmeye gevşek bir şekilde sabitlemek için vidaları elinizle takın. Bazı
kuruluşlarda, sürücünün altındaki (devre kartının olduğu taraf) vida deliklerini
kullanmak gerekebilir.
5. Sürücünün hizalanmasını denetleyin ve vidaları sıkıştırın. Vidaları çok fazla
sıkmayın.
Adım 4. Kabloların sürücüye takılması
Kabloları takmak için aşağıdaki yordamı kullanın.
1. Bilgisayarınıza uygun 29 iğneli kabloyu seçin (ThinkStation D10 serisi bilgisayar
sistemleri için düz kablo ve ThinkStation S10 serisi bilgisayar sistemleri için dik açılı
kablo).
2. 29 iğneli kabloyu SAS sabit disk sürücüsü arabirim bağlacına takın.
3. Kablonun diğer ucunu (7 iğneli sinyal kapısını 2) SAS uyumlu kapıya takın.
ThinkStation D10 serisi bilgisayar sistemlerinde, sistem kartındaki beş adet mavi
Bölüm 1. ThinkStation Serial Attached SCSI (SAS) sabit disk sürücüsü hakkında 85
Page 96

renkte SATA/SAS kapısı SAS sabit disk sürücülerini destekler. ThinkStation S10
serisi bilgisayar sistemlerinde, PCIe’dan SAS’a bir anasistem veriyolu
bağdaştırıcısına gerek duyarsınız. Kapınızdan ya da bilgisayar modelinizden emin
değilseniz, bilgisayarınızla birlikte gönderilen belgelere bakın.
4. Bilgisayarın güç kaynağından gelen, kullanılmamış bir 15 iğneli SATA güç bağlacı
bulun ve bunu bağlantı kablosunun üzerindeki güç kapısına 1 takın. Güç bağlacı
yalnızca bir yöne takılabilmesi için kilitlidir. Çok fazla zorlamayın. Bağlaç yeterli
düzeyde güç kullanılarak takılmıyorsa, kablo bağlacının sürücüye olan yönünü
yeniden denetleyin ve tekrar deneyin.
Adım 5. Sürücünün kuruluşunun tamamlanması
Sürücünün kuruluş işlemini tamamlamak için aşağıdakileri yapın:
1. Sabit disk sürücüsünün güvenli bir şekilde monte edildiğinden ve kabloların sıkıca
takıldığından emin olun.
2. Kabloların bilgisayar kapağını ve herhangi bir güç kaynağı fan kanadını ya da hava
akışı yolunu engellemediğinden emin olun.
3. Bilgisayar kapağını yerine takın.
4. Tüm aygıtları yeniden takın. Klavye, fare ve görüntü birimi kablolarının sıkıca
takıldığından emin olun.
5. Tüm AC gücü kablolarını yeniden takın.
Sürücünün Kullanıma Hazırlanması
Bilgisayarınızı yeniden başlattığınızda, bilgisayarınızdaki bir donanımı değiştirdiğiniz
için yapılandırma ayarları bilgi ekranı görüntülenir. Bazı bilgisayarlar, yeni bir aygıt
kurulduktan sonra bilgisayar ilk kez yeniden başlatıldığında yapılandırma seçimleri
yapmanızı gerektirir. Ekran görüntülenmezse, ekrana nasıl erişileceğini öğrenmek için
bilgisayarınızın belgelerine bakın. Birçok bilgisayarda, yapılandırma bilgilerini, başlatma
işlemi sırasında, ekranınızın sağ üst köşesinde yapılandırma grafiği görüntülendiğinde F1
tuşuna basarak görebilirsiniz.
86 ThinkStation Serial Attached SCSI Hard Disk Drive User's Guide
Page 97

Yapılandırma ayarları bilgilerinizi aşağıdakilerden biri için denetleyin:
v Yapılandırma ayarları programı yeni sürücünüzün büyüklüğünü beklediğiniz gibi
bildirirse, değişikliklerinizi kaydedin, yapılandırma programını kapatın ve
Sürücünüzün Bölümlenmesi ve Biçimlendirilmesi (sayfa 87) başlıklı bölüme geçin.
v Bilgisayarınız yanıt vermeyi kesmiş gibi görünürse ya da başarıyla yeniden
başlatılmazsa, Bölüm 2, “Troubleshooting” (sayfa 113) başlıklı bölüme geçin.
Sürücünüzün Bölümlenmesi ve Biçimlendirilmesi
Sürücünüzü, var olan bir sürücüde Windows XP ya da Windows Vista sisteminin kurulu
olduğu bir bilgisayara ekliyorsanız, yeni SAS sürücünüzü bölümlemek ve
biçimlendirmek için aşağıdaki yönergeleri kullanın.
Not: Windows XP işletim sisteminde, sabit disk sürücüsünün 137 GB’den büyük
kapasitelere ulaşabilmesi için en azından Service Pack 1a (SP1a) kurulmalıdır.
1. Bilgisayarınızı açın.
2. Start (Başlat) öğesini tıklatın.
3. My Computer (Bilgisayarım) öğesini sağ tıklatın.
4. Manage (Yönet) öğesini tıklatın. Computer Management (Bilgisayar Yönetimi)
penceresi açılır.
5. Sol taraftaki menüden, Disk Management (Disk Yönetimi) öğesini tıklatın.
6. Ekranın alt sağ kısmında yer alan yeni sürücüyü tıklatın.
7. Menü çubuğunda, Action (Eylem) > All Tasks (Tüm Görevler) > New Partition
(Yeni Bölüm) seçeneklerini tıklatın.
8. New Partition (Yeni Bölüm) penceresi açılır. Sürücüyü bölümlemek için ekran
üzerindeki yönergeleri izleyin.
9. Ekran üzerindeki yönergelerde Finish (Son) düğmesi tıklatıldıktan sonra
biçimlendirme işlemi başlar.
Sürücüyü, sabit disk sürücüsü bulunmayan bir bilgisayara takıyorsanız, yeni sabit
Not:
disk sürücüsünü, NTFS dosyalarının kullanıldığı Windows XP ya da Windows Vista
işletim sisteminde bölümlemek ve biçimlendirmek için aşağıdaki yönergeleri kullanın:
1. İlk Windows XP ya da Windows Vista kuruluş disketini (Setup Disk #1) disket
sürücüsüne takın ya da Windows XP ya da Windows Vista kuruluş CD’sini ya da
DVD’sini CD-ROM ya da DVD-ROM sürücünüze takın.
2. Bilgisayarınızı yeniden başlatın.
3. Sürücünüzü bölümlemek ve biçimlendirmek için Windows XP ya da Windows Vista
kullanıcı kılavuzundaki yönergeleri kullanın.
Bölüm 1. ThinkStation Serial Attached SCSI (SAS) sabit disk sürücüsü hakkında 87
Page 98

Z 1 B XZ ThinkStation SAS 2L}/w
>?Va)KPX ThinkStation®SAS 2L}/wDE"#
z7hv
SAS 2L}/wv\20ZAY_PTB3ndCDFczP#
v JCZ SAS 2L}/w"xPP\D SAS If]We
v PCI Express(PCIe)-SASwz\_Jdw
SAS 2L}/wT?ygB,S;v}/wDdC==,S='V SAS 2L}/
wD SAS If]S
SAS 2L}/w9C 29 }E SAS SZ,Sw#B<T>K,SwD%?fe 1
MW?fe 2#!~|Py|,DgB\9zT,S SATA 2L}/wD==,
,S SAS 2L}/wDg4KZMEEKZ#
Z#whCMShC<;h*x_hC#
88 ThinkStation Serial Attached SCSI Hard Disk Drive User's Guide
Page 99

zIT4TB3V=(4dC2L}/w:
v w*%}/w
– w*FczPvPD2L}/w20
– f;3v2L}/w
v w*`v}/w.;,kd{Q20D2L}/w;pKP
":
;I
1. SAS 2L}/w
2. 7#zFczPyPDd{2L}/w<G SAS 2L}/w#
IZ SAS M SATA }/wD}*YH;,,a<B=v}/wTz\D}
*q4&;,,rK=_;I,1KP#g{,;vz\O20K;v*Y
7200 */VSD SATA }/wM;v*Y* 15000 */VSD SAS }/
*
w,b=vTz\)SD;,&MI\<BT\K/0nbkt#
}K>6C'8O7b,!~|P9P:
v SAS 2L}/w
v }/wYwe3
v 2+E"Va
v =u SAS gB
{"V?~1Yrp5,kk:r&*5#kqX#t:u>$#ZS\#^~
g
q1I\aC=#
k SATA 2L}/w;pKP#
20f.
>?V|,ozzf. SAS 2L}/w20Dj8E"#
20*s
*20 SAS 2L}/w,zXk_8:
v D5
FczMYw53f=DD5#
v SAS If]KZ
zDFczXk_P;v PCIe - SAS wz\_Jdw,rweOXk_P;v
SAS If]KZ#g{zTzTKZ;G\e~,kNDFczf=DD5
#ivB,ThinkStation D10 5PFcz53Dwe<x SAS If]KZ#
ThinkStation S10 5PDFcz53h* PCIe - SAS wz\_Jdw4'V SAS
2L}/w#
*q! PCIe - SAS wz\_JdwD208>E",kNDZ 115 3D=< A,
:PCIe-to-SAS host bus adapter quick installation instructions;r PCIe - SAS w
z\_Jdwf=DD5#
v SAS 2L}/wgB
Chapter 1. About the ThinkStation Serial Attached SCSI (SAS) hard disk drive 989
#(
Page 100

zh*9C!~|Py|,DTB3;y 29 }E SAS ,SgB,+ SAS 2
L}/w,S=g4MEEKZ:
– 1=,SgB
1=gBICZ ThinkStation D10 5PDFcz53#B<T>Kg4KZ
1 MEEgB 2#
– 1G,SgB
1G,SgBICZ ThinkStation S10 5PDFcz53#B<T>Kg4K
Z 1 MEEgB 2#
90 ThinkStation Serial Attached SCSI Hard Disk Drive User's Guide
 Loading...