

Page 1

ThinkCentreM600
UserGuide
MachineTypes:10G8,10G9,10GA,10GB,10GC,10GD,10GE,
10GF,10KG,10KH,10KJ,and10KK
Page 2

Note:Beforeusingthisinformationandtheproductitsupports,besuretoreadandunderstandthe“Read
thisfirst:Importantsafetyinformation”onpageiii
andAppendixE“Notices”onpage113.
SixthEdition(June2017)
©CopyrightLenovo2015,2017.
LIMITEDANDRESTRICTEDRIGHTSNOTICE:IfdataorsoftwareisdeliveredpursuanttoaGeneralServices
Administration“GSA”contract,use,reproduction,ordisclosureissubjecttorestrictionssetforthinContractNo.
GS-35F-05925.
Page 3

Contents
Readthisfirst:Importantsafety
information..............iii
Beforeusingthismanual............iii
Serviceandupgrades.............iii
Staticelectricityprevention...........iv
Powercordsandpoweradapters........iv
Japanesepowercordandpoweradapter
description...............v
Extensioncordsandrelateddevices.......v
Plugsandoutlets...............v
Externaldevices...............v
Heatandproductventilation..........v
Operatingenvironment............vi
Lasercompliancestatement..........vi
Powersupplystatement...........vii
Cleaningandmaintenance..........vii
Chapter1.Productoverview......1
Hardwarelocations..............1
Frontview................1
Rearview................3
Computercomponents..........5
Partsonthesystemboard.........7
Machinetypeandmodellabel........8
Features..................8
Specifications...............11
Programs.................11
Accessingaprogramonthecomputer...11
Installingaprogramthatisreadytobe
installed...............12
AnintroductiontoLenovoprograms....12
Chapter2.Usingyourcomputer...15
Registeringthecomputer..........15
Settingthecomputervolume.........15
AddinganicontotheWindowsnotificationarea.15
Usingadisc................16
Guidelinesaboutusingtheopticaldrive...16
Handlingandstoringadisc........16
Playingandremovingadisc.......16
Recordingadisc............17
Connectingtoanetwork...........17
ConnectingtoanEthernetLAN......17
ConnectingtoawirelessLAN.......18
ConnectingtoaBluetooth-enableddevice..18
I/Obox..................18
AbouttheI/Obox............18
UsingtheI/Obox............19
Externalbatterybox............19
Batterysafetyinformation........19
Usingtheexternalbatterykit.......20
Chapter3.Y ouandyourcomputer..23
Arrangingyourworkspace..........23
Glareandlighting............23
Aircirculation.............23
Electricaloutletlocationsandcablelengths.23
Comfort...............23
Accessibilityinformation...........24
Cleaningthecomputer...........27
Maintenance...............27
Basicmaintenancetips.........27
Goodmaintenancepractices.......27
Keepingthecomputercurrent.......28
Movingthecomputer............29
Chapter4.Security..........31
Lockingthecomputer............31
Lockingthecomputercover.......31
AttachingaKensington-stylecablelock...33
Viewingandchangingsecuritysettingsinthe
SetupUtilityprogram............33
Preventingunauthorizedaccesstothecomputer.33
Usingfingerprintauthentication........34
Usingandunderstandingfirewalls.......34
Protectingdataagainstviruses........34
ComputraceAgentsoftwareembeddedin
firmware.................35
TrustedPlatformModule(TPM)........35
Chapter5.Advancedconfiguration..37
UsingtheSetupUtilityprogram........37
StartingtheSetupUtilityprogram.....37
Enablingordisablingadevice.......37
EnablingordisablingtheAutomaticPowerOn
features...............37
EnablingordisablingtheErPLPScompliance
mode................38
EnablingordisablingtheConfiguration
ChangeDetectionfeature........38
Usingthecoverpresenceswitch......39
UsingBIOSpasswords.........39
Selectingastartupdevice........40
ExitingtheSetupUtilityprogram......41
UpdatingtheBIOS.............41
©CopyrightLenovo2015,2017
i
Page 4

Chapter6.Troubleshooting,
diagnostics,andrecovery......43
Basicprocedureforresolvingcomputer
problems.................43
Troubleshooting..............43
Startupproblems............43
Audioproblems............44
CDproblems.............45
DVDproblems.............45
Intermittentproblems..........46
Storagedriveproblems.........46
Networkingproblems..........47
Performanceproblems..........49
Serialconnectorcannotbeaccessed....50
USBdeviceproblems..........50
Softwareanddriverproblems.......51
Diagnostics................51
LenovoSolutionCenter.........51
Recoveryinformation............51
RecoveryinformationforWindows7....52
RecoveryinformationforWindows10....53
Chapter7.Installingorreplacing
hardware...............55
Handlingstatic-sensitivedevices.......55
Installingorreplacinghardware........55
Installingexternaloptions........55
Replacingthepoweradapter.......56
Replacingtheverticalstand........57
ReplacingtheVESAmountbracket.....59
Replacingtheexternalopticaldrive(for10G8,
10G9,10GA,10GB,10GC,10GD,10GE,and
10GF)................61
ReplacingtheI/Obox(for10G8,10G9,10GA,
10GB,10GC,10GD,10GE,and10GF)...67
Replacingtheexternalbatterybox(for10G8,
10G9,10GA,10GB,10GC,10GD,10GE,and
10GF)................70
Replacingthepoweradapterbracket....74
Removingthecomputercover.......76
Replacingthesystemfan(for10G8,10G9,
10GA,10GB,10GC,10GD,10GE,and
10GF)................78
Replacingtheheatsink.........80
Replacingthememorymodule......82
Replacingtheinternalspeaker.......84
Replacingthestoragedrive........86
Replacingthecoin-cellbattery......91
ReplacingtheWi-Ficard.........92
Completingthepartsreplacement.....94
Chapter8.Gettinginformation,help,
andservice..............97
Informationresources............97
Accessingtheuserguideinvarious
languages...............97
Windowshelpsystem..........97
Safetyandwarranty...........97
LenovoWebsite............97
LenovoSupportWebsite.........98
Frequentlyaskedquestions........98
Helpandservice..............98
Callingforservice............98
Usingotherservices..........99
Purchasingadditionalservices......99
AppendixA.Regulatory
information.............101
Exportclassificationnotice..........101
Electronicemissionsnotices.........101
FederalCommunicationsCommission
DeclarationofConformity........101
Eurasiancompliancemark..........103
Brazilaudionotice.............103
Mexicowireless-radiocomplianceinformation..103
Additionalregulatoryinformation.......103
AppendixB.WEEEandrecycling
information.............105
ImportantWEEEinformation.........105
RecyclinginformationforJapan........105
RecyclinginformationforBrazil........106
BatteryrecyclinginformationforTaiwan.....106
BatteryrecyclinginformationfortheEuropean
Union..................107
AppendixC.RestrictionofHazardous
Substances(RoHS)Directive....109
EuropeanUnionRoHS...........109
ChinaRoHS................109
TurkishRoHS...............109
UkraineRoHS...............110
IndiaRoHS................110
TaiwanRoHS...............110
AppendixD.ENERGYST ARmodel
information.............111
AppendixE.Notices.........113
Trademarks................114
iiThinkCentreM600UserGuide
Page 5
Readthisfirst:Importantsafetyinformation
CAUTION:
Beforeusingthecomputer,besuretoreadandunderstandalltherelatedsafetyinformationforthis
product.RefertothesafetyinformationinthissectionandintheSafetyandWarrantyGuidethatyou
receivedwiththisproduct.Readingandunderstandingallthesafetyinformationreducestheriskof
personalinjuryanddamagetoyourproduct.IfyounolongerhaveacopyoftheSafetyandWarranty
Guide,youcanobtainaPortableDocumentFormat(PDF)versionfromtheLenovo
siteathttp://www.lenovo.com/UserManuals.
Beforeusingthismanual
CAUTION:
Beforeusingthismanual,besuretoreadandunderstandalltherelatedsafetyinformationforthis
product.RefertotheinformationinthissectionandthesafetyinformationintheSafetyandWarranty
Guidethatyoureceivedwiththisproduct.Readingandunderstandingthissafetyinformationreduces
theriskofpersonalinjuryanddamagetoyourproduct.
®
SupportWeb
IfyounolongerhaveacopyoftheSafetyandWarrantyGuide,youcanobtainaPortableDocumentFormat
(PDF)versionfromtheLenovo
®
SupportWebsiteathttp://www.lenovo.com/UserManuals.
Serviceandupgrades
DonotattempttoserviceaproductyourselfunlessinstructedtodosobytheCustomerSupportCenteror
yourdocumentation.OnlyuseaServiceProviderwhoisapprovedtorepairyourparticularproduct.
Note:Somecomputerpartscanbeupgradedorreplacedbythecustomer.Upgradestypicallyare
referredtoasoptions.ReplacementpartsapprovedforcustomerinstallationarereferredtoasCustomer
ReplaceableUnits,orCRUs.Lenovoprovidesdocumentationwithinstructionswhenitisappropriatefor
customerstoinstalloptionsorreplaceCRUs.Youmustcloselyfollowallinstructionswheninstallingor
replacingparts.TheOffstateofapowerindicatordoesnotnecessarilymeanthatvoltagelevelsinsidea
productarezero.Beforeyouremovethecoversfromaproductequippedwithapowercord,alwaysensure
thatthepoweristurnedoffandthattheproductisunpluggedfromanypowersource.Ifyouhaveany
questionsorconcerns,contacttheCustomerSupportCenter.
Althoughtherearenomovingpartsinthecomputerafterthepowercordhasbeendisconnected,the
followingwarningsarerequiredforyoursafety.
CAUTION:
Hazardousmovingparts.Keepfingersandotherbodypartsaway.
CAUTION:
©CopyrightLenovo2015,2017
iii
Page 6

Beforeyouopenthecomputercover,turnoffthecomputerandwaitseveralminutesuntilthe
computeriscool.
Staticelectricityprevention
Staticelectricity,althoughharmlesstoyou,canseriouslydamagecomputercomponentsandoptions.
Improperhandlingofstatic-sensitivepartscancausedamagetothepart.Whenyouunpackanoption
orCRU,donotopenthestatic-protectivepackagecontainingthepartuntiltheinstructionsdirectyou
toinstallit.
WhenyouhandleoptionsorCRUs,orperformanyworkinsidethecomputer,takethefollowingprecautions
toavoidstatic-electricitydamage:
•Limityourmovement.Movementcancausestaticelectricitytobuilduparoundyou.
•Alwayshandlecomponentscarefully.Handleadapters,memorymodules,andothercircuitboardsbythe
edges.Nevertouchexposedcircuitry.
•Preventothersfromtouchingcomponents.
•Whenyouinstallastatic-sensitiveoptionorCRU,touchthestatic-protectivepackagecontainingthe
parttoametalexpansion-slotcoverorotherunpaintedmetalsurfaceonthecomputerforatleasttwo
seconds.Thisreducesstaticelectricityinthepackageandyourbody.
•Whenpossible,removethestatic-sensitivepartfromthestatic-protectivepackagingandinstallthepart
withoutsettingitdown.Whenthisisnotpossible,placethestatic-protectivepackagingonasmooth,
levelsurfaceandplacethepartonit.
•Donotplacethepartonthecomputercoverorothermetalsurface.
Powercordsandpoweradapters
Useonlythepowercordsandpoweradapterssuppliedbytheproductmanufacturer.Donotusetheac
powercordforotherdevices.
Thepowercordsshallbesafetyapproved.ForGermany,itshallbeH03VV-F,3G,0.75mm
connectedtothepoweradapter),H05VV-F,3G,0.75mm
supplyassembly),orbetter.Forothercountries,thesuitabletypesshallbeusedaccordingly.
Neverwrapapowercordaroundapoweradapterorotherobject.Doingsocanstressthecordinwaysthat
cancausethecordtofray,crack,orcrimp.Thiscanpresentasafetyhazard.
Alwaysroutepowercordssothattheywillnotbewalkedon,trippedover,orpinchedbyobjects.
Protectpowercordandpoweradaptersfromliquids.Forinstance,donotleaveyourpowercordorpower
adapternearsinks,tubs,toilets,oronfloorsthatarecleanedwithliquidcleansers.Liquidscancausea
shortcircuit,particularlyifthepowercordorpoweradapterhasbeenstressedbymisuse.Liquidsalsocan
causegradualcorrosionofpowercordterminalsand/ortheconnectorterminalsonapoweradapter,
whichcaneventuallyresultinoverheating.
Ensurethatallpowercordconnectorsaresecurelyandcompletelypluggedintoreceptacles.
Donotuseanypoweradapterthatshowscorrosionattheacinputpinsorshowssignsofoverheating(such
asdeformedplastic)attheacinputoranywhereonthepoweradapter.
2
(thepowercordconnectedtotheinternalpower
2
(thepowercord
Donotuseanypowercordswheretheelectricalcontactsoneitherendshowsignsofcorrosionor
overheatingorwherethepowercordappearstohavebeendamagedinanyway.
ivThinkCentreM600UserGuide
Page 7

Japanesepowercordandpoweradapterdescription
Extensioncordsandrelateddevices
Ensurethatextensioncords,surgeprotectors,uninterruptiblepowersupplies,andpowerstripsthatyouuse
areratedtohandletheelectricalrequirementsoftheproduct.Neveroverloadthesedevices.Ifpowerstrips
areused,theloadshouldnotexceedthepowerstripinputrating.Consultanelectricianformoreinformation
ifyouhavequestionsaboutpowerloads,powerrequirements,andinputratings.
Plugsandoutlets
Ifareceptacle(poweroutlet)thatyouintendtousewiththecomputerequipmentappearstobedamagedor
corroded,donotusetheoutletuntilitisreplacedbyaqualifiedelectrician.
Donotbendormodifytheplug.Iftheplugisdamaged,contactthemanufacturertoobtainareplacement.
Donotshareanelectricaloutletwithotherhomeorcommercialappliancesthatdrawlargeamountsof
electricity;otherwise,unstablevoltagemightdamagethecomputer,data,orconnecteddevices.
Someproductsareequippedwithathree-prongedplug.Thisplugfitsonlyintoagroundedelectricaloutlet.
Thisisasafetyfeature.Donotdefeatthissafetyfeaturebytryingtoinsertitintoanon-groundedoutlet.If
youcannotinserttheplugintotheoutlet,contactanelectricianforanapprovedoutletadapterortoreplace
theoutletwithonethatenablesthissafetyfeature.Neveroverloadanelectricaloutlet.Theoverallsystem
loadshouldnotexceed80percentofthebranchcircuitrating.Consultanelectricianformoreinformation
ifyouhavequestionsaboutpowerloadsandbranchcircuitratings.
Besurethatthepoweroutletyouareusingisproperlywired,easilyaccessible,andlocatedclosetothe
equipment.Donotfullyextendpowercordsinawaythatwillstressthecords.
Besurethatthepoweroutletprovidesthecorrectvoltageandcurrentfortheproductyouareinstalling.
Carefullyconnectanddisconnecttheequipmentfromtheelectricaloutlet.
Externaldevices
DonotconnectordisconnectanyexternaldevicecablesotherthanUniversalSerialBus(USB)cableswhile
thecomputerpowerison;otherwise,youmightdamagethecomputer.T oavoidpossibledamageto
connecteddevices,waitatleastfivesecondsafterthecomputerisshutdowntodisconnectexternaldevices.
Heatandproductventilation
Computers,poweradapters,andmanyaccessoriescangenerateheatwhenturnedonandwhenbatteries
arecharging.Alwaysfollowthesebasicprecautions:
•Donotleavethecomputer,poweradapter,oraccessoriesincontactwithyourlaporanypartofyour
bodyforanextendedperiodwhentheproductsarefunctioningorwhenthebatteryischarging.The
computer,poweradapter,andmanyaccessoriesproducesomeheatduringnormaloperation.Extended
contactwiththebodycouldcausediscomfortor,potentially,askinburn.
©CopyrightLenovo2015,2017
v
Page 8

•Donotchargethebatteryoroperatethecomputer,poweradapter,oraccessoriesnearflammable
materialsorinexplosiveenvironments.
•Ventilationslots,fans,andheatsinksareprovidedwiththeproductforsafety,comfort,andreliable
operation.Thesefeaturesmightinadvertentlybecomeblockedbyplacingtheproductonabed,sofa,
carpet,orotherflexiblesurface.Neverblock,cover,ordisablethesefeatures.
Inspectyourdesktopcomputerfordustaccumulationatleastonceeverythreemonths.Beforeinspecting
thecomputer,turnoffthepowerandunplugthecomputer'spowercordfromtheelectricaloutlet;then
removeanydustfromventsandperforationsinthebezel.Ifyounoticeexternaldustaccumulation,then
examineandremovedustfromtheinsideofthecomputerincludingheatsinkinletfins,powersupplyvents,
andfans.Alwaysturnoffandunplugthecomputerbeforeopeningthecover.Ifpossible,avoidoperatingthe
computerwithintwofeetofhigh-trafficareas.Ifyoumustoperatethecomputerinornearahigh-traffic
area,inspectand,ifnecessary,cleanthecomputermorefrequently.
Foryoursafetyandtomaintainoptimumcomputerperformance,alwaysfollowthesebasicprecautions
withyourdesktopcomputer:
•Keepthecoverclosedwheneverthecomputerispluggedin.
•Regularlyinspecttheoutsideofthecomputerfordustaccumulation.
•Removedustfromventsandanyperforationsinthebezel.Morefrequentcleaningsmightberequiredfor
computersindustyorhigh-trafficareas.
•Donotrestrictorblockanyventilationopenings.
•Donotstoreoroperatethecomputerinsidefurniture,asthismightincreasetheriskofoverheating.
•Airflowtemperaturesintothecomputershouldnotexceed35°C(95°F).
•Donotinstallairfiltrationdevices.Theymayinterferewithpropercooling.
Operatingenvironment
Theoptimalenvironmentinwhichtousethecomputeris10°C–35°C(50°F–95°F)withhumidityranging
between35%and80%.Ifthecomputerisstoredortransportedintemperatureslessthan10°C(50°F),allow
thecoldcomputertoriseslowlytoanoptimaloperatingtemperatureof10°C–35°C(50°F–95°F)beforeuse.
Thisprocesscouldtaketwohoursinextremeconditions.Failuretoallowthecomputertorisetoanoptimal
operatingtemperaturebeforeusecouldresultinirreparabledamagetothecomputer.
Ifpossible,placethecomputerinawell-ventilatedanddryareawithoutdirectexposuretosunshine.
Keepelectricalappliancessuchasanelectricfan,radio,high-poweredspeakers,airconditioner,and
microwaveovenawayfromthecomputerbecausethestrongmagneticfieldsgeneratedbytheseappliances
candamagethemonitoranddataonthestoragedrive.
Donotplaceanybeveragesontopoforbesidethecomputerorotherconnecteddevices.Ifliquidisspilled
onorinthecomputeroraconnecteddevice,ashortcircuitorotherdamagemightoccur.
Donoteatorsmokeoveryourkeyboard.Particlesthatfallintoyourkeyboardcancausedamage.
Lasercompliancestatement
CAUTION:
Whenlaserproducts(suchasCD-ROMs,DVDdrives,fiberopticdevices,ortransmitters)are
installed,notethefollowing:
viThinkCentreM600UserGuide
Page 9
•Donotremovethecovers.Removingthecoversofthelaserproductcouldresultinexposureto
hazardouslaserradiation.Therearenoserviceablepartsinsidethedevice.
•Useofcontrolsoradjustmentsorperformanceofproceduresotherthanthosespecifiedherein
mightresultinhazardousradiationexposure.
DANGER
SomelaserproductscontainanembeddedClass3AorClass3Blaserdiode.Notethefollowing:
Laserradiationwhenopen.Donotstareintothebeam,donotviewdirectlywithoptical
instruments,andavoiddirectexposuretothebeam.
Powersupplystatement
Neverremovethecoveronapowersupplyoranypartthathasthefollowinglabelattached.
Hazardousvoltage,current,andenergylevelsarepresentinsideanycomponentthathasthislabelattached.
Therearenoserviceablepartsinsidethesecomponents.Ifyoususpectaproblemwithoneoftheseparts,
contactaservicetechnician.
Cleaningandmaintenance
Keepthecomputerandworkspaceclean.Shutdownthecomputerandthendisconnectthepower
cordbeforecleaningthecomputer.Donotsprayanyliquiddetergentdirectlyonthecomputeroruse
anydetergentcontainingflammablematerialtocleanthecomputer.Spraythedetergentonasoftcloth
andthenwipethecomputersurfaces.
©CopyrightLenovo2015,2017
vii
Page 10

viiiThinkCentreM600UserGuide
Page 11
Chapter1.Productoverview
Thischapterprovidesinformationaboutthefollowingtopics:
•“Hardwarelocations”onpage1
•“Features”onpage8
•“Specifications”onpage11
•“Programs”onpage11
Hardwarelocations
Thissectionprovidesinformationaboutthelocationsofthecomputerhardware.
Note:Thecomputerhardwaremightlookslightlydifferentfromtheillustrations.
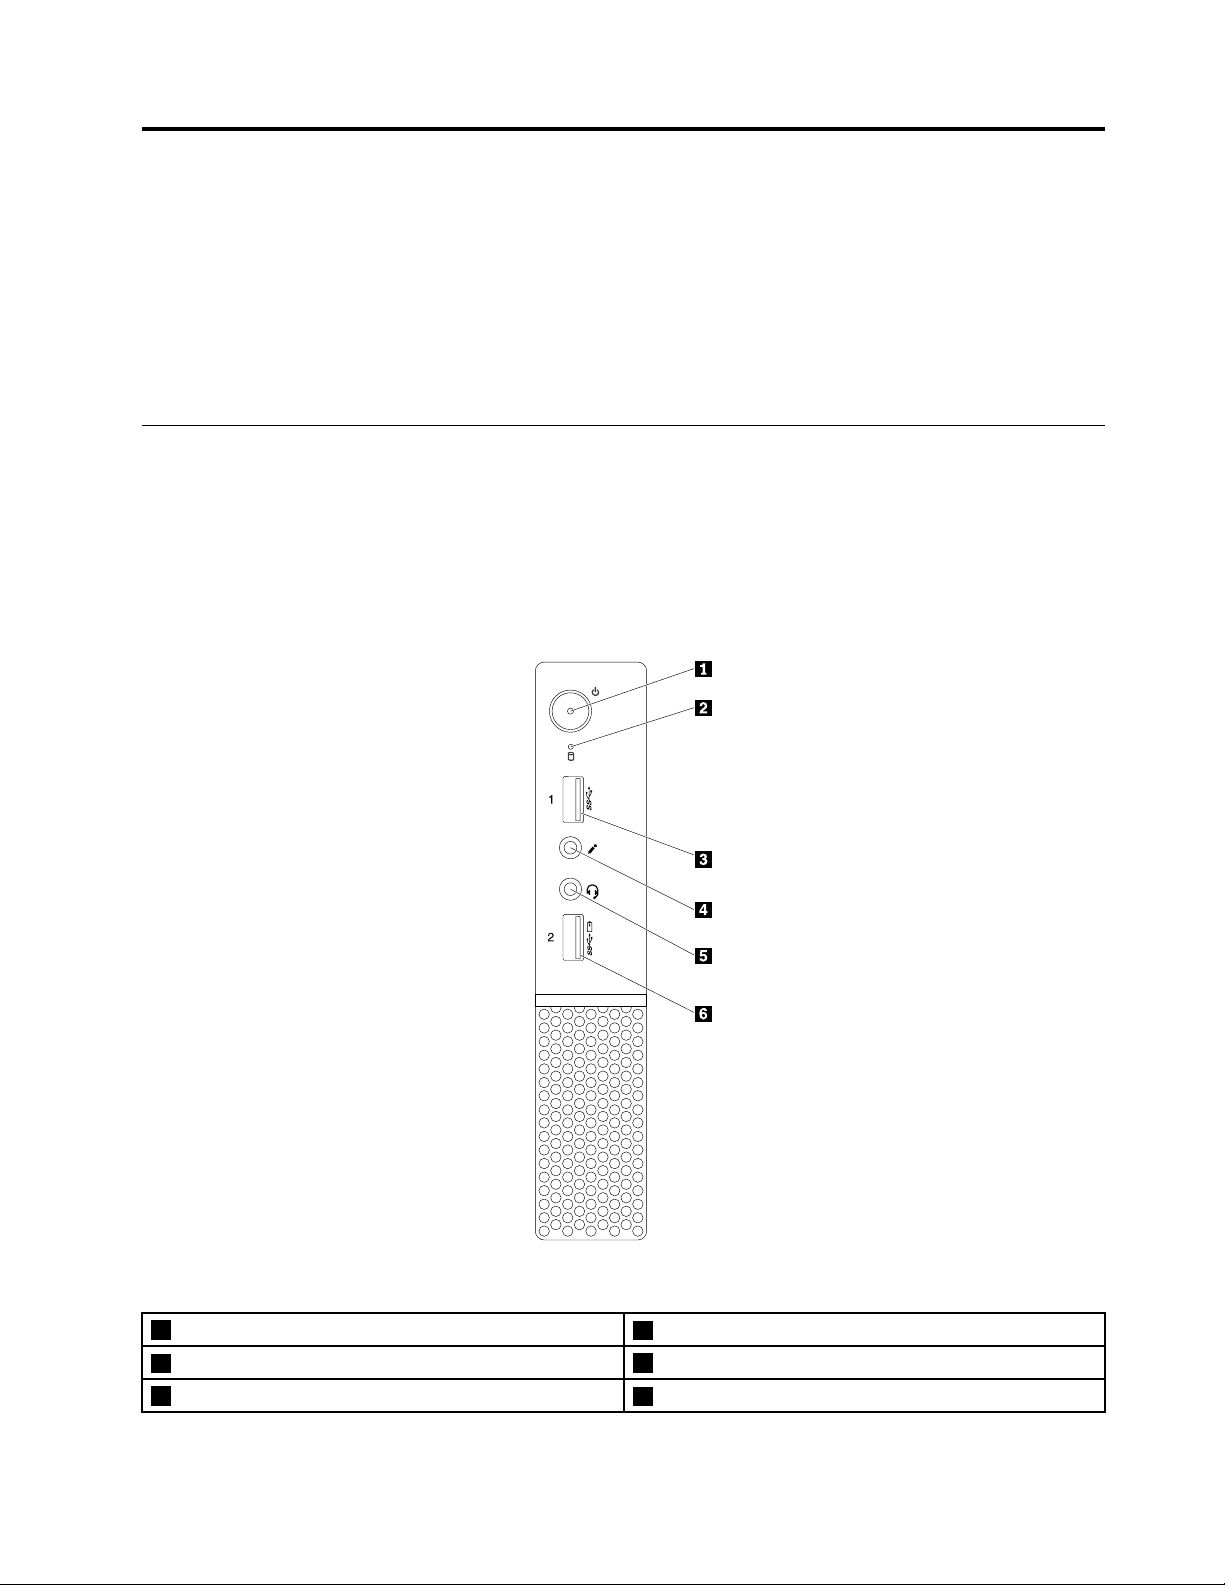
Frontview
Figure1.Frontview
1Powerbutton
3USB3.0connector
5Headsetconnector
©CopyrightLenovo2015,2017
2Storagedriveactivityindicator
4Microphoneconnector
6AlwaysOnUSB3.0connector
1
Page 12

•AlwaysOnUSB3.0connector
UsedtoconnectadevicethatrequiresaUSB2.0orUSB3.0connection,suchasakeyboard,amouse,
ascanner,aprinter,orapersonaldigitalassistant(PDA).Withthepoweradapterconnected,youcan
chargetheautomaticallydetecteddeviceevenwhenthecomputerisinhibernationmodeorturnedoff.If
theAlwaysOnUSBconnectorfunctionisnotenabled,openthePowerManagerprogramandenablethe
function.T oopenthePowerManagerprogram,see“Accessingaprogramonthecomputer”onpage11
ToenabletheAlwaysOnUSBconnector,refertothehelpsystemofthePowerManagerprogram.
•Headsetconnector
Usedtoconnectaheadsetorheadphonestoyourcomputer.
•Microphoneconnector
Usedtoconnectamicrophonetoyourcomputer.Youcanusethemicrophonetorecordaudiooruse
speech-recognitionsoftware.
•Powerbutton
Usedtoturnonyourcomputer.Youalsocanusethepowerbuttontoturnoffyourcomputeronlywhen
youcannotuseanyMicrosoft
®
Windows
®
shutdownproceduretoturnoffyourcomputer.
•Storagedriveactivityindicator
Whentheindicatorison,thestoragedrivesareinuse.
•USB3.0connector
UsedtoconnectadevicethatrequiresaUSB2.0orUSB3.0connection,suchasakeyboard,amouse,a
scanner,aprinter,oraPDA.
.
2ThinkCentreM600UserGuide
Page 13
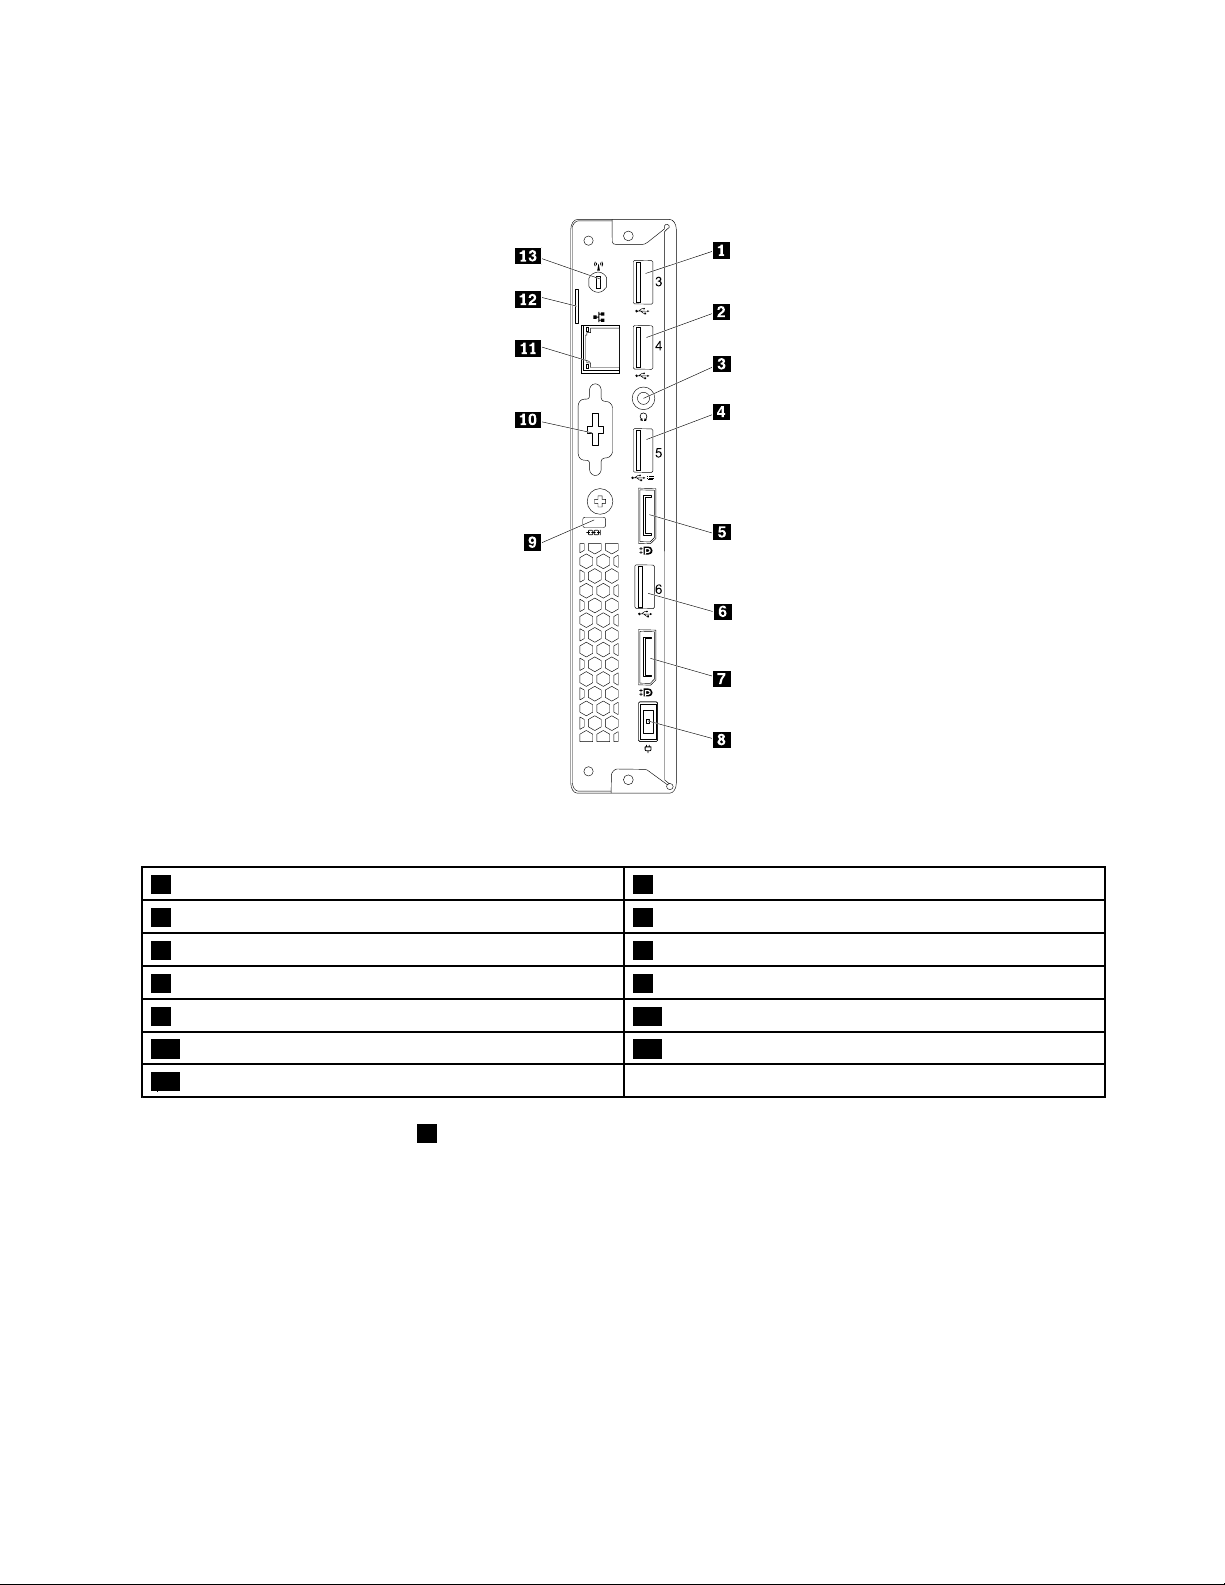
Rearview
Figure2.Rearview
1USB3.0connector2USB2.0connector
3Headphoneconnector
5DisplayPort
7DisplayPortconnector8Poweradapterconnector
9Security-lockslot10Optionalconnector(availableonsomemodels)
11Ethernetconnector12Padlockloop
13Wi-Fiantennaslot
®
connector
4USB2.0connector
6USB3.0connector
Note:TheUSB2.0connector4supportsthesmartpoweronfeaturethatenablesyoutoturnonthe
computerorwakeitupfromS4hibernationmodebypressingAlt+Ponthekeyboard.Youcanenableor
disablethesmartpoweronfeaturefromtheSetupUtilityprogram.Fordetailedinformation,see“Enablingor
disablingadevice”onpage37
.
•Poweradapterconnector
Usedtoconnectthepoweradaptertoyourcomputerforpowersupply.
•DisplayPortconnector
Usedtoconnectahigh-performancemonitor,adirect-drivemonitor,orotherdevicesthatusea
DisplayPortconnector.
Chapter1.Productoverview3
Page 14

•Ethernetconnector
UsedtoconnectanEthernetcableforalocalareanetwork(LAN).
Note:TooperatethecomputerwithinFederalCommunicationsCommission(FCC)ClassBlimits,usea
Category5eorbetterEthernetcable.
•Headphoneconnector
Usedtoconnectheadphonestoyourcomputer.
•Optionalconnector
Optionalconnector,dependingonyourcomputermodel.
•Padlockloop
Forinformation,see“Lockingthecomputercover”onpage31
.
•Security-lockslot
Forinformation,see“AttachingaKensington-stylecablelock”onpage33.
•USB2.0connector
UsedtoconnectadevicethatrequiresaUSB2.0connection,suchasakeyboard,amouse,ascanner,a
printer,orapersonaldigitalassistant(PDA).
•USB3.0connector
UsedtoconnectadevicethatrequiresaUSB2.0orUSB3.0connection,suchasakeyboard,amouse,a
scanner,aprinter,oraPDA.
•Wi-Fiantennaslot
UsedtoinstalltherearWi-Fiantennacableconnectorthatisavailableonlyonsomemodels.Therear
Wi-FiantennaisinstalledontherearWi-Fiantennacableconnector.
4ThinkCentreM600UserGuide
Page 15
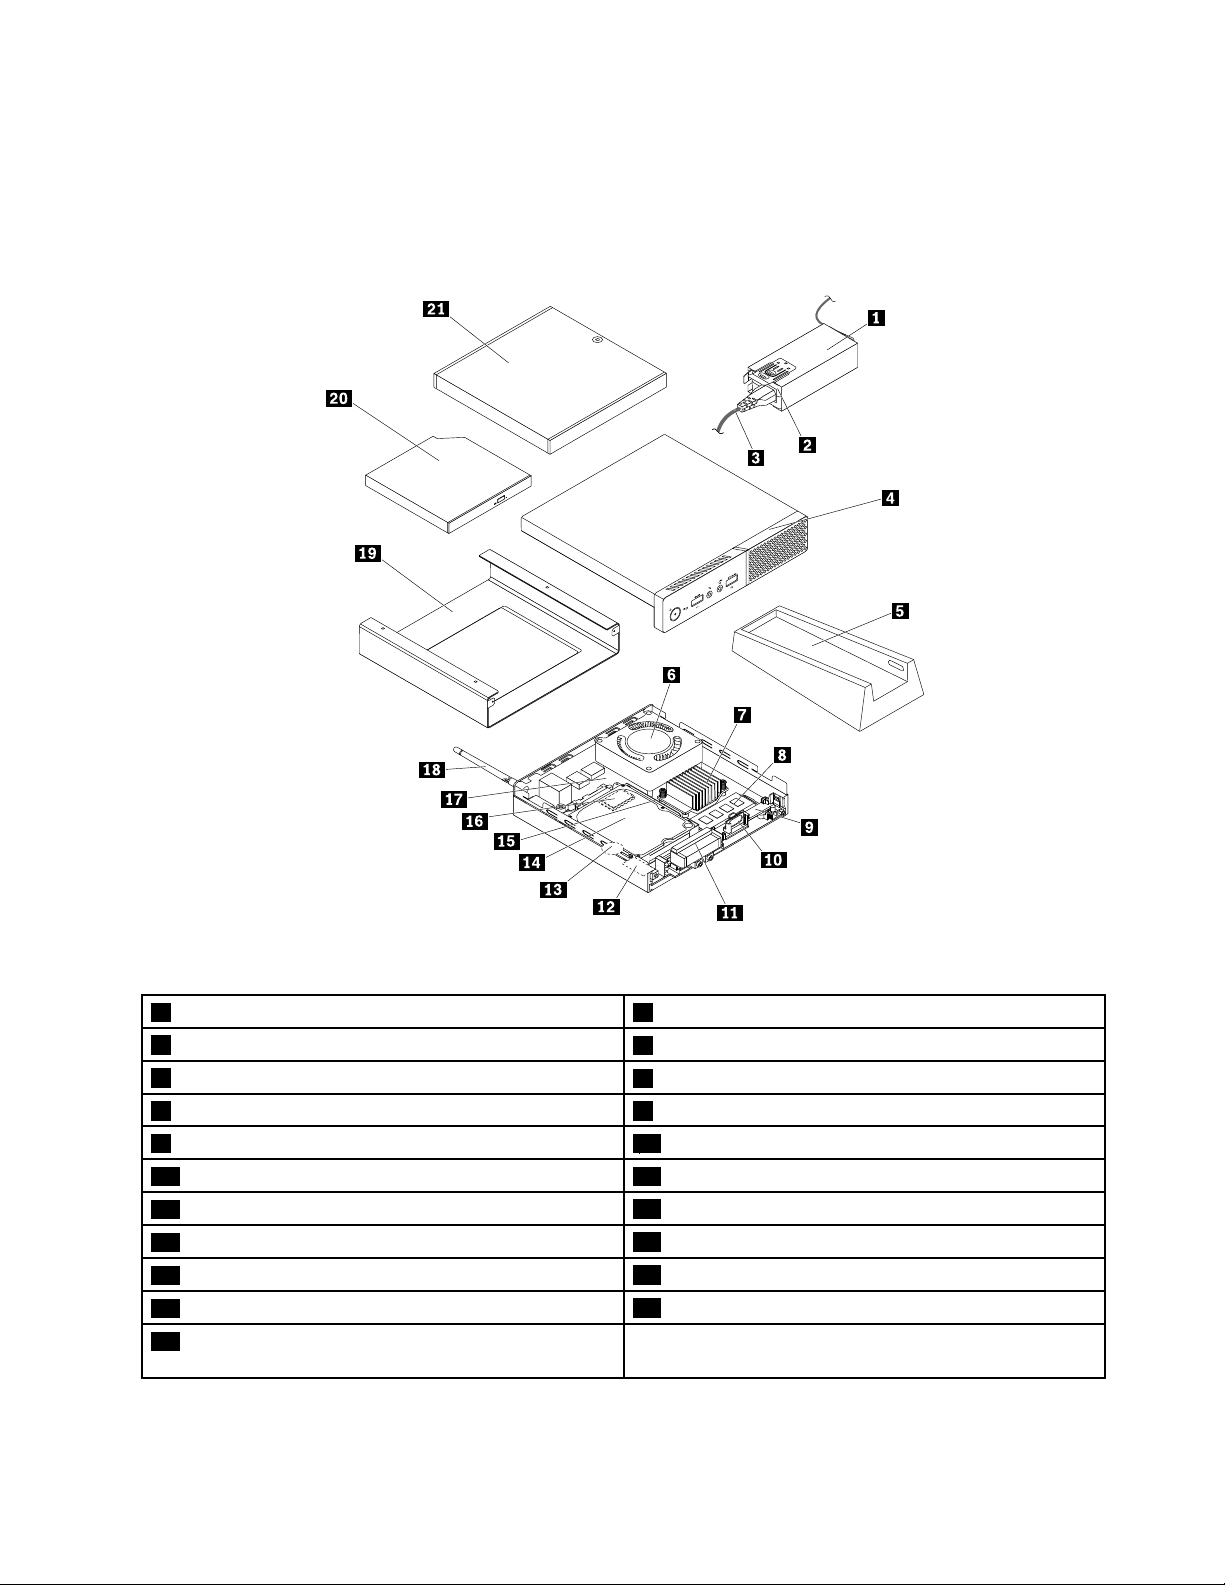
Computercomponents
Note:Dependingonyourcomputermodel,someofthefollowingcomponentsmightnotbeavailable.
For10G8,10G9,10GA,10GB,10GC,10GD,10GE,and10GF
Figure3.Computercomponents
1Poweradapterbracket2Poweradapter
3Powercord
5Verticalstand
7Heatsink8Memorymodule
9Internalspeakerholder10Internalspeaker
11FrontWi-Fiantenna12Wi-Ficard
13Coin-cellbattery
15Storagedrivebracket
17Systemboard
19VESA
21Externalbox(externalbatterybox,externaloptical
®
mountbracket
4Computercover
6Systemfan
142.5-inchstoragedrive
16M.2storagedrive
18RearWi-Fiantenna
20Externalopticaldrive
drivebox,orI/Obox)
Chapter1.Productoverview5
Page 16
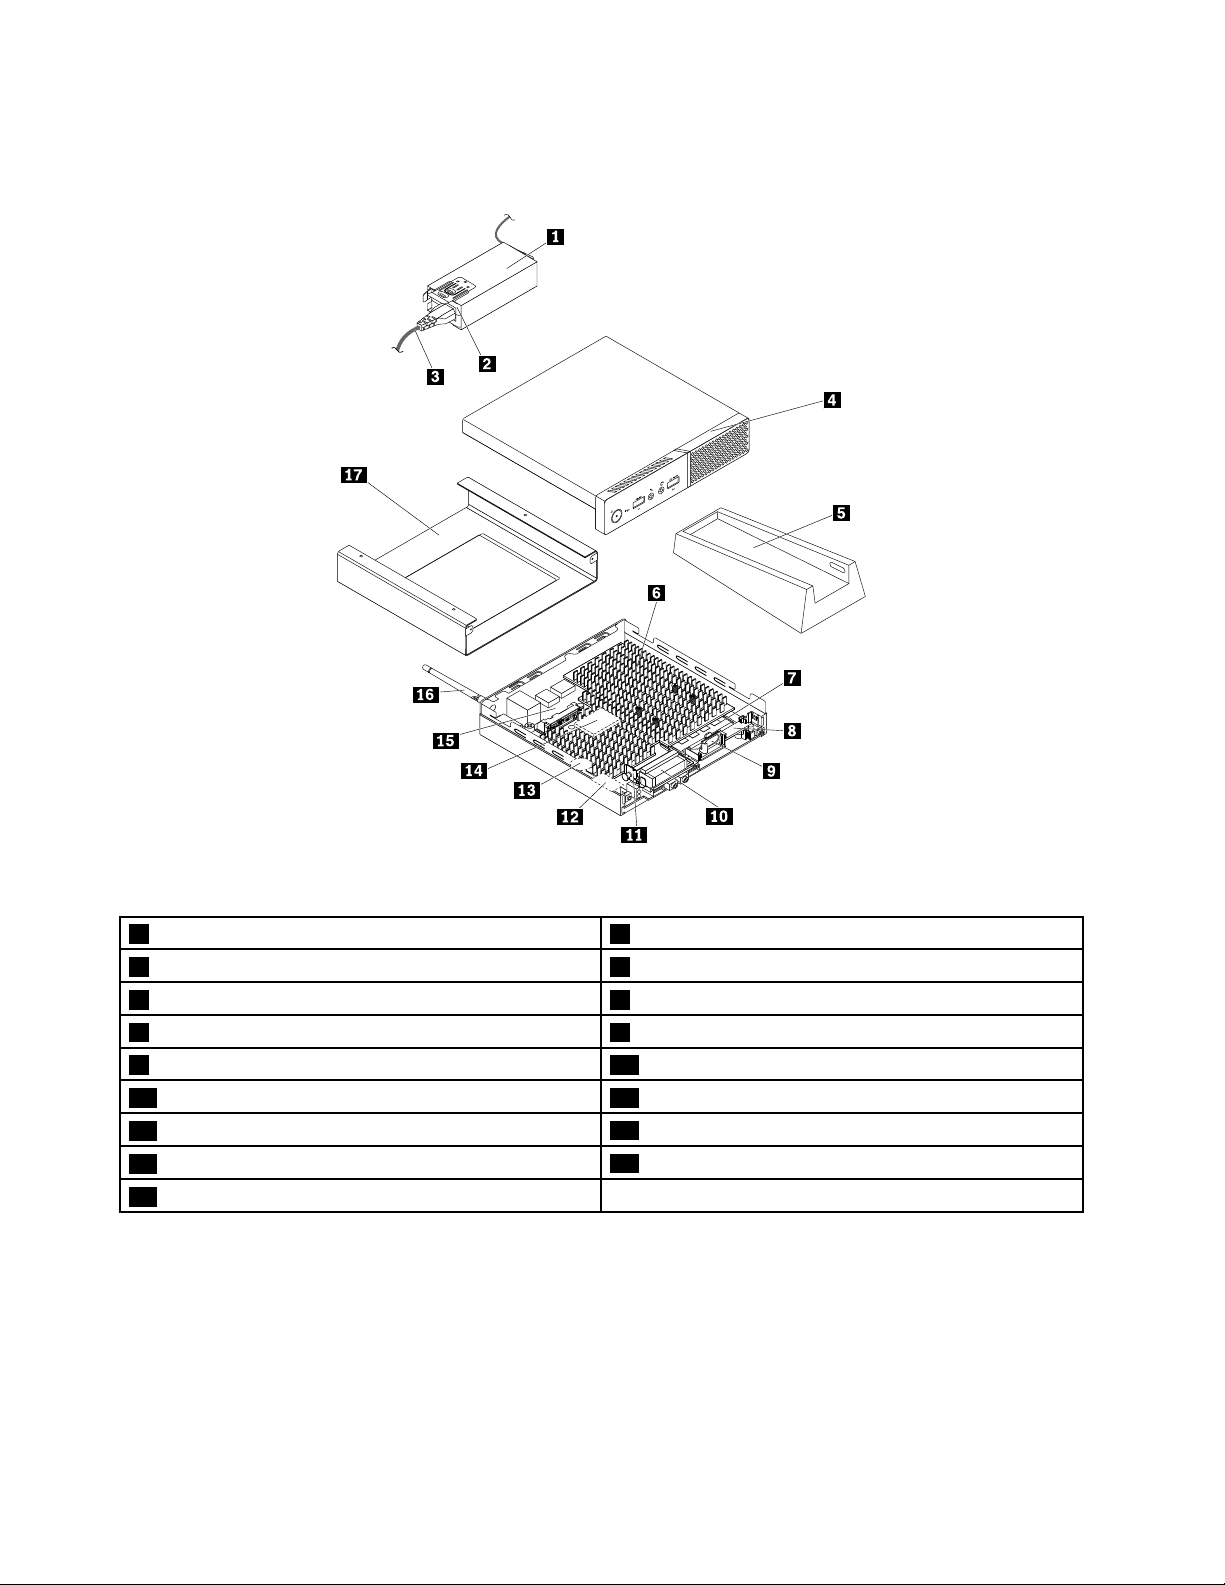
For10KG,10KH,10KJ,and10KK
Figure4.Computercomponents
1Poweradapterbracket2Poweradapter
3Powercord
5Verticalstand6Heatsink
7Memorymodule8Internalspeakerholder
9Internalspeaker10FrontWi-Fiantenna
11Antennabracket12Wi-Ficard
13Coin-cellbattery
15Systemboard
17VESAmountbracket
4Computercover
14M.2storagedrivie
16RearWi-Fiantenna
6ThinkCentreM600UserGuide
Page 17
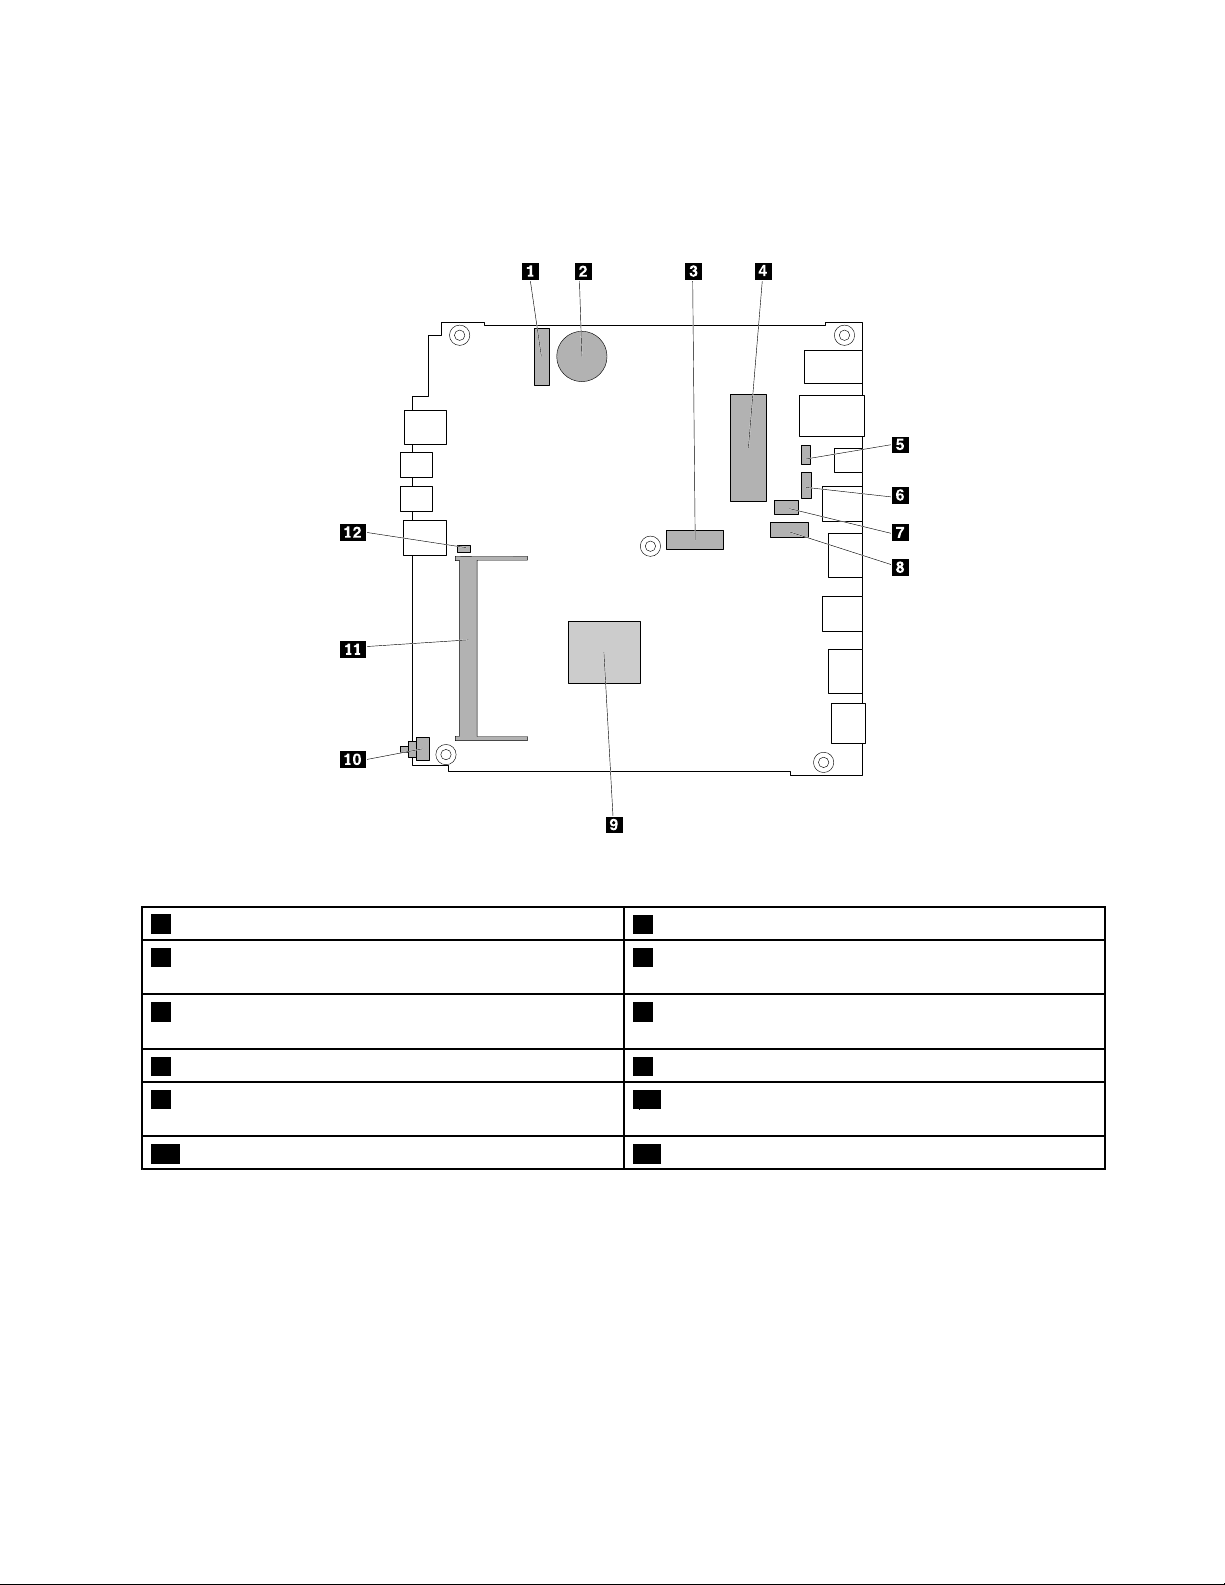
Partsonthesystemboard
Note:Forthepartsthataredisplayedonthefollowingfigurebutnotintroducedinthefollowingtable,see
“Frontview”onpage1and“Rearview”onpage3.
Figure5.Partsonthesystemboard
1M.2Wi-Ficardslot
3M.2storagedriveslot(for10KG,10KH,10KJ,and
10KK)
5Systemfanconnector(for10G8,10G9,10GA,10GB,
2Coin-cellbattery
4SATA3.0storagedriveconnector(for10G8,10G9,
10GA,10GB,10GC,10GD,10GE,and10GF)
6OptionalUSB2.0connector
10GC,10GD,10GE,and10GF)
7Optionalserialconnector8Optionaldisplayconnector
9Microprocessor
10Coverpresenceswitchconnector(Intrusionswitch
connector)
11Memoryslot12Internalspeakerconnector
Chapter1.Productoverview7
Page 18
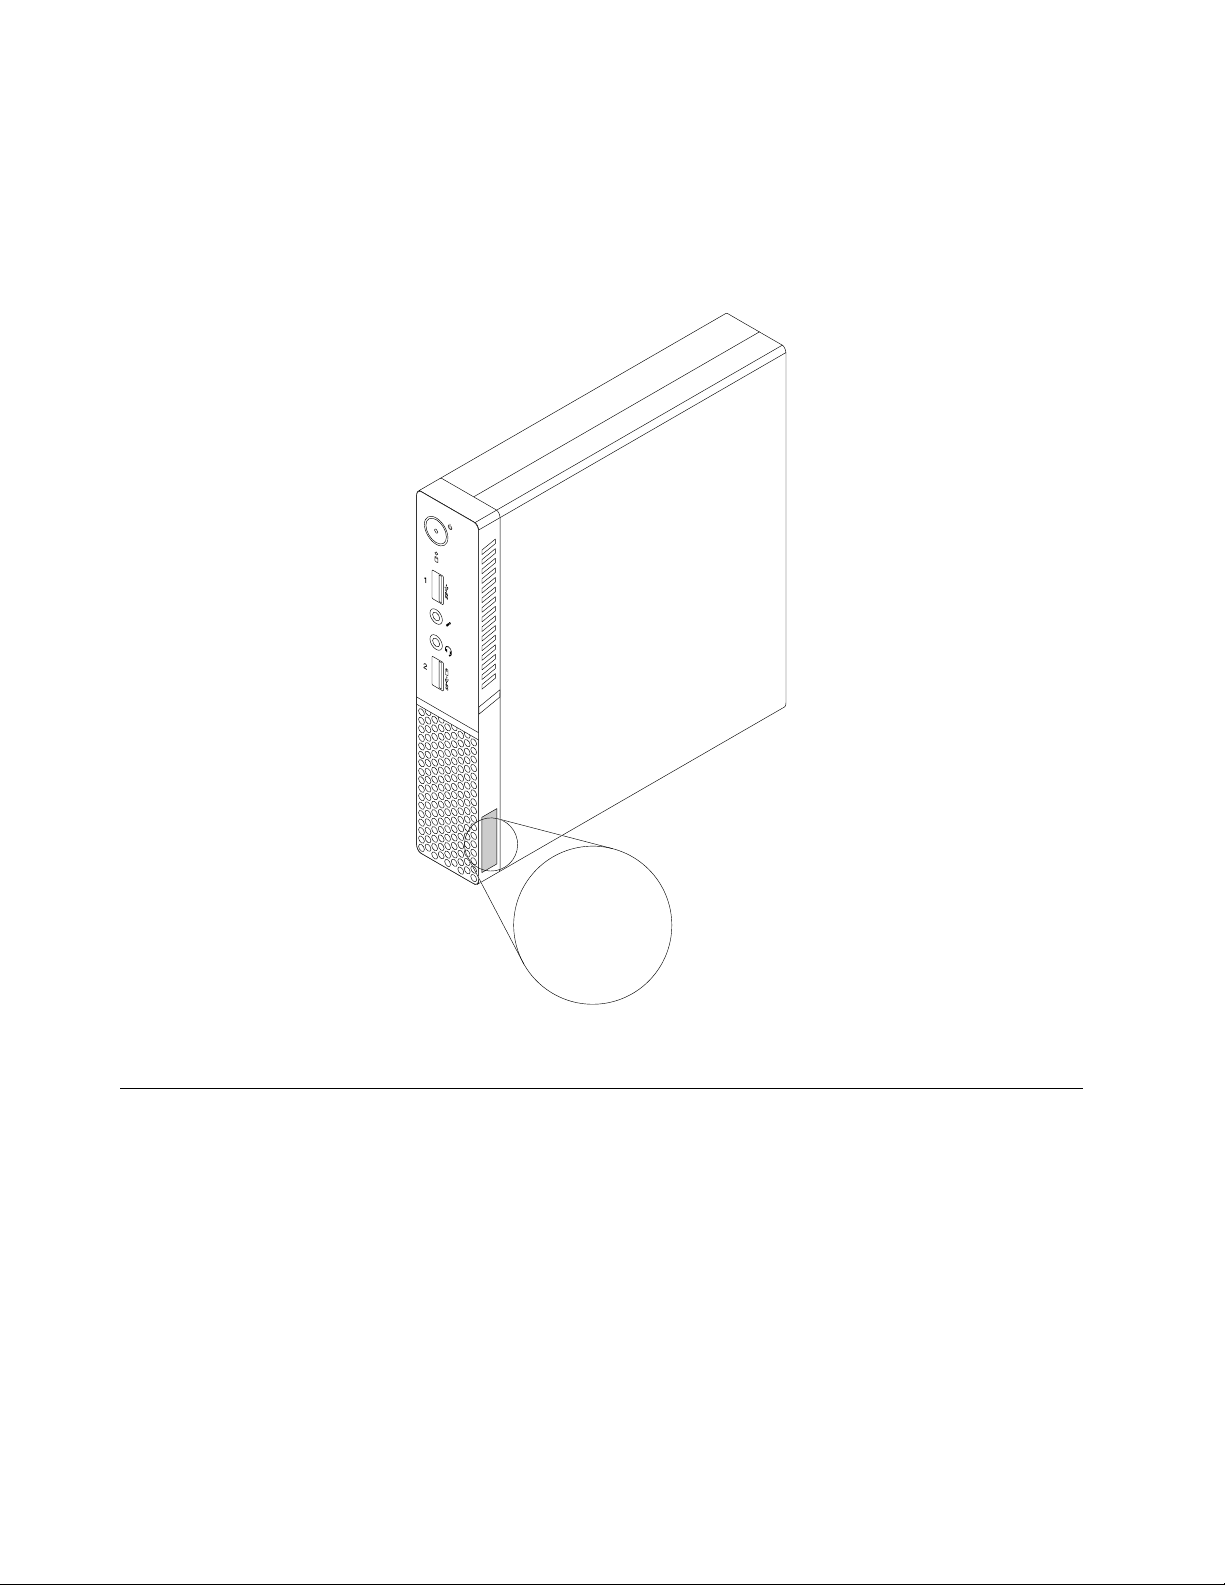
Machinetypeandmodellabel
MT-M XXXX-XXXXXX
S/N XXXXXXXX
Themachinetypeandmodellabelidentifiesyourcomputer.WhenyoucontactLenovoforhelp,themachine
typeandmodelinformationhelpssupporttechnicianstoidentifyyourcomputerandprovidefasterservice.
Themachinetypeandmodellabelisattachedonthesideofyourcomputerasshown.
Figure6.Machinetypeandmodellabel
Features
Thecomputerfeaturesintroducedinthissectionapplytovariousmodels.
Informationaboutyourcomputer
•Toviewbasicinformation(suchasmicroprocessorandmemoryinformation)aboutyourcomputer,
dothefollowing:
1.ClicktheStartbuttontoopentheStartmenu.
2.DependingonyourWindowsversion,dooneofthefollowing:
–ForWindows7:Right-clickComputer,andthenclickProperties.
–ForWindows10:ClickSettings➙System➙About.
8ThinkCentreM600UserGuide
Page 19

Note:Thememoryshownintheoperatingsystemmightbeinconsistentwiththenominalmemoryofthe
memorymodule(s)thatareinstalledinyourcomputer.
•Toviewdetailedinformationaboutthedevices(suchastheopticaldriveandnetworkadapters)onyour
computer,dothefollowing:
1.DependingonyourWindowsversion,dooneofthefollowing:
–ForWindows7:ClicktheStartbuttontoopentheStartmenu.Right-clickComputer,andthen
clickProperties.
–ForWindows10:Right-clicktheStartbuttontoopentheStartcontextmenu.
2.ClickDeviceManager.T ypetheadministratorpasswordorprovideconfirmationifprompted.
Preinstalledoperatingsystem
YourcomputerispreinstalledwithWindows7orWindows10operatingsystem.Additionaloperating
systemsmightbeidentifiedbyLenovoascompatiblewithyourcomputer.Todetermineifanoperating
systemhasbeencertifiedortestedforcompatibility,checktheWebsiteoftheoperatingsystemprovider.
Note:Dependingonyourcomputermodel,theinformationaboutWindowsoperatingsystemsmightnotbe
applicabletoyourcomputer.
Powersupply
Yourcomputercomeswitha65-wattpoweradapter.
Storagedrives
Yourcomputersupportsuptoonestoragedrive(harddiskdrives,hybriddrives,orsolid-statedrives).
Toviewtheamountofstoragedrivespace,dothefollowing:
1.DependingonyourWindowsversion,dooneofthefollowing:
•ForWindows7:ClicktheStartbuttontoopentheStartmenu.Right-clickComputer,andthenclick
Manage.
•ForWindows10:Right-clicktheStartbuttontoopentheStartcontextmenu.
2.ClickDiskManagement.
Videofeatures
Theintegratedgraphicscardsupportsthefollowingdisplayconnectorsonyourcomputer:
•DisplayPortconnectors
Audiofeatures
Theintegratedaudiocardsupportsthefollowingaudioconnectorsanddevicesonyourcomputer:
•Headphoneconnector
•Headsetconnector
•Internalspeaker
•Microphoneconnector
Input/Output(I/O)features
•Audioconnectors(headphoneconnector,headsetconnector,andmicrophoneconnector)
•DisplayPortconnectors
•Ethernetconnector
•USBconnectors
Chapter1.Productoverview9
Page 20

Expansion
•Externalopticaldrivebox(availableonsomemodels)
•Storagedrivebay
•Memoryslot
Networkfeatures
•EthernetLAN
TheintegratednetworkinterfacecardsupportstheEthernetconnectoronyourcomputer.
•WirelessLAN(availableonsomemodels)
•Bluetooth(availableonsomemodels)
Securityfeatures
Formoreinformation,seeChapter4“Security”onpage31.
Systemmanagementfeatures
•Abilitytostorepower-onself-test(POST)hardwaretestresults
•DesktopManagementInterface(DMI)
DesktopManagementInterfaceprovidesacommonpathforuserstoaccessinformationaboutall
aspectsofacomputer.Theinformationincludesprocessortype,installationdate,connectedprintersand
otherperipherals,powersources,maintenancehistory,andsoon.
•ErPLPScompliancemode
Theenergy-relatedproductsdirective(ErP)lowestpowerstate(LPS)compliancemodereducesthe
consumptionofelectricitywhenyourcomputerisinsleeporoffmode.Formoreinformation,see
“EnablingordisablingtheErPLPScompliancemode”onpage38
.
•PrebootExecutionEnvironment(PXE)
PrebootExecutionEnvironmentenablescomputerstostartthroughanetworkinterfaceindependentof
datastoragedrives(suchasharddiskdrives)orinstalledoperatingsystems.
•SystemManagement(SM)BasicInput/OutputSystem(BIOS)andSMsoftware
TheSMBIOSspecificationdefinesdatastructuresandaccessmethodsthatcanbeusedtoread
managementdatastoredintheBIOSofacomputer.
•WakeonLAN
WakeonLANisanEthernetcomputernetworkingstandardthatallowsacomputertobeturnedon
orwokenupbyanetworkmessage.Themessageusuallyissentbyaprogramrunningonanother
computeronthesameLAN.
•WakeonRing
WakeonRing,sometimesreferredtoasWakeonModem,isaspecificationthatallowssupported
computersanddevicestoresumefromsleeporhibernationmode.
•WindowsManagementInstrumentation(WMI)
WindowsManagementInstrumentationisasetofextensionstotheWindowsDriverModel.Itprovidesan
operatingsysteminterfacethroughwhichinstrumentedcomponentsprovideinformationandnotification.
10ThinkCentreM600UserGuide
Page 21

Specifications
Thissectionliststhephysicalspecificationsforyourcomputer.
Dimensions
Width:35mm(1.4inches)
Height:179mm(7.0inches)
Depth:182mm(7.2inches)
Weight
Maximumconfigurationasshipped:1.3kg(2.9lb)
Environment
•Airtemperature:
Operating:From10°C(50°F)to35°C(95°F)
Storageinoriginalshippingpackage:From-40°C(-40°F)to60°C(140°F)
Storagewithoutpackage:From-10°C(14°F)to60°C(140°F)
•Humidity:
Operating:20%–80%(non-condensing)
Storage:20%–90%(non-condensing)
•Altitude:
Operating:From-15.2m(-50ft)to3048m(10000ft)
Storage:From-15.2m(-50ft)to10668m(35000ft)
Electricalinput
Inputvoltage:From100Vacto240Vac
Inputfrequency:50/60Hz
Programs
Thissectionprovidesinformationabouttheprogramsonthecomputer.
Accessingaprogramonthecomputer
Toaccessaprogramonthecomputer,dooneofthefollowing:
•FromWindowsSearch:
1.DependingonyourWindowsversion,dooneofthefollowing:
–ForWindows7:ClicktheStartbuttontoopentheStartmenu,andthentypetheprogramname
intothesearchbox.
–ForWindows10:T ypetheprogramnameintothesearchboxnexttotheStartbutton.
2.Inthesearchresults,clickthenameofthedesiredprogramtolaunchtheprogram.
•FromtheStartmenuorControlPanel:
1.ClicktheStartbuttontoopentheStartmenu.
2.DependingonyourWindowsversion,dooneofthefollowing:
–ForWindows7:ClickAllProgramstodisplaytheprogramlist.Fromthelistorafolderinthelist,
clickthenameofthedesiredprogramtolaunchtheprogram.
Chapter1.Productoverview11
Page 22

–ForWindows10:Fromtheprogramlistorafolderinthelist,clickthenameofthedesiredprogram
tolaunchtheprogram.
3.IftheprogramnameisnotdisplayedontheStartmenu,dooneofthefollowing:
–ForWindows7:ClickControlPanelontheStartmenu.
–ForWindows10:ClicktheStartbuttontoopentheStartmenu,andthenclickWindowsSystem
➙ControlPanel.
4.ViewControlPanelusinglargeiconsorsmallicons,andthenclickthenameofthedesiredprogram
tolaunchtheprogram.
Installingaprogramthatisreadytobeinstalled
Note:ForWindows7,dependingonthecomputermodel,someoftheLenovoprogramsmightbereadyto
beinstalled,soyouneedtoinstallthemmanually.Then,youcanaccessandusetheseprograms.
Toinstallaprogramthatisreadytobeinstalled,dothefollowing:
1.OpentheLenovoThinkVantage
page11.
2.ViewtheprogramiconsusingTiles.
3.Followtheinstructionsundergreyed-outiconstolocatetheiconforthedesiredprogram.Then,
double-clicktheicontoinstalltheprogram.
®
Toolsprogram.See“Accessingaprogramonthecomputer”on
AnintroductiontoLenovoprograms
ThissectionprovidesinformationaboutthemajorLenovoprogramsavailableonyouroperatingsystem.
Note:Dependingonyourcomputermodel,someofthefollowingprogramsmightnotbeavailable.
•ForWindows7only:
–CreateRecoveryMedia
TheCreateRecoveryMediaprogramenablesyoutorestoreonlytheCdriveortheentirestorage
drivetothefactory-defaultsettings.
–FingerprintManagerProorThinkVantageFingerprintSoftware
TheFingerprintManagerProorThinkVantageFingerprintSoftwareprogramenablesyoutousea
fingerprintreader.Theintegratedfingerprintreaderprovidedonsomekeyboardsenablesyoutoenroll
yourfingerprintandassociateitwithyourpower-onpassword,harddiskpassword,andWindows
password.Asaresult,fingerprintauthenticationcanreplacepasswordsandenablesimpleandsecure
useraccess.
–LenovoBluetoothLock
TheLenovoBluetoothLockprogramenablesyoutouseaBluetoothdevice(suchasyoursmartphone)
asaproximity-basedunitforlockingorunlockingyourcomputerautomatically.Bydetectingthe
distancebetweenyourcomputerandthepredefinedBluetoothdevicethatyouarecarrying,theLenovo
BluetoothLockprogramautomaticallylocksyourcomputerwhenyouwalkawayandunlocksyour
computerwhenyoucomeback.Thisisasimplewaytoprotectyourcomputeragainstunauthorized
accessincasethatyouforgettolockyourcomputer.
–LenovoPowerENGAGE
TheLenovoPowerENGAGEprogramenablesyoutoregisteryourcomputerwithLenovo.
–PasswordManager
ThePasswordManagerprogramautomaticallycapturesandfillsinauthenticationinformationfor
WindowsprogramsandWebsites.
12ThinkCentreM600UserGuide
Page 23

–PowerManager
ThePowerManagerprogramprovidesconvenient,flexible,andcompletepowermanagementfor
yourcomputer.Itenablesyoutoadjustyourcomputerpowersettingstoachievethebestbalance
betweenperformanceandpowersaving.
–RescueandRecovery
®
TheRescueandRecoveryprogramisaone-buttonrecoveryandrestoresolution.Itincludesaset
ofself-recoverytoolstohelpyoudiagnosecomputerproblems,gethelp,andrecoverfromsystem
crashes,evenifyoucannotstarttheWindowsoperatingsystem.
–SystemUpdate
TheSystemUpdateprogramprovidesregularaccesstothesystemupdatesforyourcomputer,such
asdevicedriverupdates,softwareupdates,andBIOSupdates.Theprogramgathersinformationfrom
theLenovoHelpCenteraboutnewupdatesforyourcomputer,thensortsanddisplaystheupdatesfor
downloadandinstallation.Y ouhavecompletecontrolofwhichupdatestodownloadandinstall.
•ForWindows10only:
–LenovoCompanion
Yourcomputer’sbestfeaturesandcapabilitiesshouldbeeasytoaccessandunderstand.WithLenovo
Companion,theyare.UseLenovoCompaniontodothefollowing:
–Optimizeyourcomputer’sperformance,monitoryourcomputer’shealth,andmanageupdates.
–Accessyouruserguide,checkwarrantystatus,andviewaccessoriescustomizedforyourcomputer.
–Readhow-toarticles,exploreLenovoforums,andstayup-to-dateontechnologynewswitharticles
andblogsfromtrustedsources.
LenovoCompanionisfilledwithexclusiveLenovocontenttohelpyoulearnmoreaboutwhatyou
candowithyourcomputer.
–LenovoID
TheLenovoIDprogramenablesyoutocreateyourLenovoIDandaccessallsupportedLenovo
programsandwebportalswithsinglesign-on.
•ForWindows7andWindows10:
–LenovoDeviceExperienceorLenovoPCExperience
TheLenovoDeviceExperienceorLenovoPCExperienceprogramhelpsyouworkmoreeasilyand
securely.TheprogramprovideseasyaccesstoLenovoThinkVantageToolsorLenovoT ools,important
settingsandinformationaboutyourcomputer,theLenovoSupportWebsite,andsoon.
–LenovoSolutionCenter
TheLenovoSolutionCenterprogramenablesyoutotroubleshootandresolvecomputerproblems.It
combinesdiagnostictests,systeminformationcollection,securitystatus,andsupportinformation,
alongwithhintsandtipsformaximumsystemperformance.
Chapter1.Productoverview13
Page 24

14ThinkCentreM600UserGuide
Page 25

Chapter2.Usingyourcomputer
Thischaptercontainsthefollowingtopics:
•“Registeringthecomputer”onpage15
•“Settingthecomputervolume”onpage15
•“AddinganicontotheWindowsnotificationarea”onpage15
•“Usingadisc”onpage16
•“Connectingtoanetwork”onpage17
•“I/Obox”onpage18
•“Externalbatterybox”onpage19
Registeringthecomputer
WhenyouregisterthecomputerwithLenovo,youenterrequiredinformationintoaLenovodatabase.The
informationenablesLenovotocontactyouwhenthereisarecallorothersevereproblemandprovide
quickerservicewhenyoucallLenovoforhelp.Inaddition,somelocationsofferextendedprivilegesand
servicestoregisteredusers.
ToregisterthecomputerwithLenovo,ensurethatthecomputerisconnectedtotheInternet.Then,goto
http://www.lenovo.com/registerandfollowtheinstructionsonthescreen.
Settingthecomputervolume
Tosetthecomputervolume,dothefollowing:
1.ClickthevolumeiconintheWindowsnotificationareaonthetaskbar.
Note:IfthevolumeiconisnotdisplayedintheWindowsnotificationarea,addtheicontothe
notificationarea.See“AddinganicontotheWindowsnotificationarea”onpage15
2.Followtheinstructionsonthescreentoadjustthevolume.Clickthespeakericontomutetheaudio.
.
AddinganicontotheWindowsnotificationarea
ToaddanicontotheWindowsnotificationarea,dothefollowing:
1.Clickthearrownexttothenotificationareatoviewhiddenicons.Then,clickthedesirediconand
dragittothenotificationarea.
2.Iftheiconisnotdisplayed,turnontheicon.
a.ClicktheStartbuttontoopentheStartmenu.
b.DependingonyourWindowsversion,dooneofthefollowing:
•ForWindows7:ClickControlPanel.ViewControlPanelusinglargeiconsorsmallicons,and
thenclickNotificationAreaIcons➙T urnsystemiconsonoroff.
•ForWindows10:ClickSettings➙Personalization➙Taskbar➙Turnsystemiconsonoroff.
c.Turnonthedesiredicon.
3.IftheiconisstillnotdisplayedintheWindowsnotificationarea,repeatstep1.
©CopyrightLenovo2015,2017
15
Page 26

Usingadisc
Thissectionprovidesinformationaboutusingadiscandtheopticaldrive.
Guidelinesaboutusingtheopticaldrive
Whenusingtheopticaldrive,followtheseguidelines:
•Donotplacethecomputerinalocationwherethedriveisexposedtoanyofthefollowingconditions:
–Hightemperature
–Highhumidity
–Excessivedust
–Excessivevibrationorsuddenshock
–Aninclinedsurface
–Directsunlight
•Donotinsertanyobjectotherthanadiscintothedrive.
•Donotinsertdamageddiscsintothedrive.Warped,scratched,ordirtydiscscandamagethedrive.
•Beforemovingthecomputer,removethediscfromthedrive.
Handlingandstoringadisc
Whenhandlingandstoringadisc,followtheseguidelines:
•Holdthediscbyitsedges.Donottouchthesurfaceofthesidethatisnotlabeled.
•Toremovedustorfingerprints,wipethediscwithaclean,softclothfromthecentertotheoutside.Wiping
thediscinacirculardirectionmightcauselossofdata.
•Donotwriteorstickpaperonthedisc.
•Donotscratchormarkthedisc.
•Donotplaceorstorethediscindirectsunlight.
•Donotusebenzene,thinners,orothercleanerstocleanthedisc.
•Donotdroporbendthedisc.
Playingandremovingadisc
Toplayadisc,dothefollowing:
1.Withthecomputeron,presstheeject/closebuttononthefrontoftheopticaldrive.Thetrayslides
outofthedrive.
2.Insertadiscintothetray.Someopticaldrivehasasnaphubinthecenterofthetray.Ifyourdrivehasa
snaphub,supportthetraywithonehandandthenpushcenterofthediscuntilitsnapsintoplace.
3.Presstheeject/closebuttonagainorgentlypushthetrayforwardtoclosethetray.Thediscplayer
programstartsautomatically.Formoreinformation,refertothehelpsystemofthediscplayerprogram.
Toremoveadiscfromtheopticaldrive,dothefollowing:
1.Withthecomputeron,presstheeject/closebuttononthefrontoftheopticaldrive.Thetrayslides
outofthedrive.
2.Carefullyremovethediscfromthetray.
3.Presstheeject/closebuttonagainorgentlypushthetrayforwardtoclosethetray.
16ThinkCentreM600UserGuide
Page 27

Note:Ifthetraydoesnotslideoutofthedrivewhenyoupresstheeject/closebutton,turnoffthecomputer.
Then,insertastraightenedpaperclipintotheemergency-ejectholeadjacenttotheeject/closebutton.
Usetheemergencyejectonlyinanemergency.
Recordingadisc
Ifyouropticaldrivesupportsrecording,youcanrecordadisc.
RecordingadiscusingWindowstools
TorecordadiscusingWindowstools,dooneofthefollowing:
•BurnadiscusingtheAutoPlaywindow.
1.Ensurethatthediscisplayedautomatically.
a.ClicktheStartbuttontoopentheStartmenu.
b.DependingonyourWindowsversion,dooneofthefollowing:
–ForWindows7:ClickControlPanel.ViewControlPanelusinglargeiconsorsmallicons,
andthenclickAutoPlay.
–ForWindows10:ClickSettings➙Devices➙AutoPlay.
c.SelectorturnonUseAutoPlayforallmediaanddevices.
2.Insertarecordablediscintotheopticaldrivethatsupportsrecording.TheAutoPlaywindowopens.
3.Followtheinstructionsonthescreen.
•BurnadiscusingWindowsMedia
1.Insertarecordablediscintotheopticaldrivethatsupportsrecording.
2.OpenWindowsMediaPlayer.See“Accessingaprogramonthecomputer”onpage11.
3.Followtheinstructionsonthescreen.
•BurnadiscfromanISOfile.
1.Insertarecordablediscintotheopticaldrivethatsupportsrecording.
2.Double-clicktheISOfile.
3.Followtheinstructionsonthescreen.
®
Player.
Recordingadiscusingpreinstalledprograms
Torecordadiscusingpreinstalledprograms,dothefollowing:
1.Insertarecordablediscintotheopticaldrivethatsupportsrecording.
2.OpenthePowerDVDCreate,PowerProducer,orPower2Goprogram.See“Accessingaprogramon
thecomputer”onpage11.
3.Followtheinstructionsonthescreen.
Connectingtoanetwork
Thissectionprovidesinformationaboutconnectingtoanetwork.Ifyoucannotconnectthecomputertoa
network,see“Networkingproblems”onpage47.
ConnectingtoanEthernetLAN
YoucanconnectthecomputertoanEthernetLANbyconnectinganEthernetcabletotheEthernetconnector.
Chapter2.Usingyourcomputer17
Page 28

DANGER
Toavoidtheriskofelectricalshock,donotconnectthetelephonecabletotheEthernetconnector.
ConnectingtoawirelessLAN
YoucanconnectthecomputertoawirelessLANwithouttheuseofanEthernetcablebutbymeansof
radiowavesonly.
Note:ThewirelessLANfeatureisoptional.
Toestablishawireless-LANconnection,dothefollowing:
1.EnsurethatawirelessLANisavailableandthewirelessLANfeatureonthecomputerisworking.
2.Clickthewireless-network-connection-statusiconintheWindowsnotificationareatodisplayavailable
wirelessnetworks.
Note:Ifthewireless-network-connection-statusiconisnotdisplayedintheWindowsnotificationarea,
addtheicontothenotificationarea.See“AddinganicontotheWindowsnotificationarea”onpage15
3.ClickawirelessLAN,andthenclickConnecttoconnectthecomputertoit.Providerequired
informationifneeded.
ConnectingtoaBluetooth-enableddevice
Bluetoothisashort-rangewirelesscommunicationstechnology.UseBluetoothtoestablishawireless
connectionbetweenthecomputerandanotherBluetooth-enableddevicewithinadistanceofabout10
m(32.8ft).
.
Note:TheBluetoothfeatureisoptional.
ToconnecttoaBluetooth-enableddevice,dothefollowing:
1.EnsurethattheBluetoothfeatureonthecomputerisworkingandtheBluetooth-enableddeviceis
locatedwithinadistanceofabout10m(32.8ft)fromthecomputer.
2.ClicktheBluetoothiconintheWindowsnotificationareaonthetaskbar.
Note:IftheBluetoothiconisnotdisplayedintheWindowsnotificationarea,addtheicontothe
notificationarea.See“AddinganicontotheWindowsnotificationarea”onpage15.
3.DependingonyourWindowsversion,dooneofthefollowing:
•ForWindows7:ClickAddaDeviceandfollowtheinstructionsonthescreen..
•ForWindows10:ClickAddaBluetoothDeviceandfollowtheinstructionsonthescreen.
I/Obox
Thissectionprovidesthefollowinginformation:
•“AbouttheI/Obox”onpage18
•“UsingtheI/Obox”onpage19
Note:ForinformationaboutreplacingtheI/Obox,referto“ReplacingtheI/Obox(for10G8,10G9,10GA,
10GB,10GC,10GD,10GE,and10GF)”onpage67.
AbouttheI/Obox
TheI/Oboxprovidesthefollowingconnectors:
18ThinkCentreM600UserGuide
Page 29

•ForconnectingtotheThinkCentre®tinypersonalcomputer
OneUSB3.0connector
•Forconnectingtoexternaldevices
FourUSB2.0connectors(twoonthefrontandtwoontherear)
TwoUSB3.0connectors
Oneserialport
Dimensions
Width:24mm(0.9inches)
Height:183mm(7.2inches)
Depth:184mm(7.2inches)
UsingtheI/Obox
WhenyouusetheI/OboxwiththeThinkCentretinycomputer,notethefollowing:
•TheI/Oboxsupportsamaximumcurrentratingof5A.Itisrecommendedthatyouconnectlow-current
devicestotheI/Oboxandconnecthigh-currentdevicesdirectlytotheThinkCentretinycomputerto
ensurethebestperformanceofthedevices.
•TheUSB2.0connectorsandUSB3.0connectorsontheI/Oboxeachprovides500mAand900mA
current,respectively.Whenyouconnectahigh-currentstoragedrivetoonlyoneUSBconnector,the
systemmightnotrecognizethedevice.YoucanconnectthestoragedrivetotwoUSBconnectors
ontheI/Obox.
•Theserialportdoesnotsupporthotswapping.Donotconnectadevicetotheconnectororremovea
devicefromtheconnectorwhilethesystemisrunning.
•TheconnectorsontheI/Oboxcannotbeenabledordisabledindividually.T oenableordisableanyofthe
connectorsontheI/Obox,enableordisabletheUSBconnectors3and4ontherearofthecomputer.
•TheI/OboxenablesyoutowakeupthecomputerfromS3standbymodethroughoperationsondevices
connectedtotheI/Oboxconnectors.
Externalbatterybox
Thissectionprovidesthefollowinginformation:
•“Batterysafetyinformation”onpage19
•“Usingtheexternalbatterykit”onpage20
Note:Forinformationaboutreplacingtheexternalbatterybox,referto“Replacingtheexternalbatterybox
(for10G8,10G9,10GA,10GB,10GC,10GD,10GE,and10GF)”onpage70.
Batterysafetyinformation
http://www.lenovo.com/safety
Chapter2.Usingyourcomputer19
Page 30

Safetyinformation
DANGER
Thereisadangerofexplosioniftherechargeablebatterypackisincorrectlyreplaced.Thebattery
packcontainsasmallamountofharmfulsubstances.
Toavoidpossibleinjury:
•ReplaceonlywithabatteryofthetyperecommendedbyLenovo.
•Keepthebatterypackawayfromfire.
•Donotexposeittowaterorrain.
•Donotattempttodisassembleit.
•Donotshort-circuitit.
•Keepitawayfromchildren.
Note:(JEITAguidance):Batteriesareexpendableproducts.Whenafullychargedbatteryno
longerprovidessufficientruntime,itshouldbereplaced.Batteriesusedlongerthanthewarranty
periodmaybegoodcandidatesforreplacement.Batteryreplacementsunderwarrantymustbe
validatedbyLenovousingLenovosystemdiagnosticsinstalledonthecomputer,oravailablefor
downloadatwww.lenovo.com/thinkvantagetoolboxandeitherwww.lenovo.com/powermanager_xpor
www.lenovo.com/powermanager_vista_win7.Batterylifeisaffectedbyseveralfactorssuchasrecharge
cyclecount,temperature,systemusage,screenbrightness,applications,andothercustomerpreferences.
Note:Lenovobatteriesareshippedpartiallychargedtomaximizeshelflife.Tomaximizethelongevityof
yourbattery,youshouldfullychargeitafterreceivingit.Batteriesshouldalsoberechargedatleasttwicea
year.Ifthebatteryisstoredwithalowchargeforextendedperiodsoftime,thebatterymaybecome
unusableandmightbedisabled.BatteriessuppliedbyLenovoforusewithyourproducthavebeentested
forcompatibilityandshouldonlybereplacedwithapprovedparts.
AbatterypackotherthantheonespecifiedbyLenovo,oradisassembledormodifiedbatterypackis
notcoveredbythewarranty.
LenovodoesnotsupportbatteriesthatarenotgenuineLenovo-madeorauthorized.Lenovosystemsmay
continuetoboot,butmaynotchargeunauthorizedbatteries.
Warning:Lenovohasnoresponsibilityfortheperformanceorsafetyofunauthorizedbatteries,andprovides
nowarrantiesforfailuresordamagearisingoutoftheiruse.
Usingtheexternalbatterykit
Prerequisites
•TheexternalbatterykitisconnectedtoaLenovo-specifiedpoweradapterwiththefollowingelectrical
parameters:
Input:100-240Vac
Output:20Vdc,3.25A
•Theexternalbatterykitisusedandstoredinthefollowingenvironmenttemperature:
10°Cto40°C(50°Fto104°F)
20ThinkCentreM600UserGuide
Page 31

Connectorsandindicatorsontheexternalbatterybox
Figure7.Externalbatterykit
1Indicator1(green)
2Indicator2(red)
3dc-outconnector
4acpowerconnector
5dc-to-dccable
Tousetheexternalbattery,dothefollowing:
1.Turnoffyourcomputer.
2.Usethedc-to-dccabletoconnectthedc-outconnectorontheexternalbatteryboxandtheacpower
connectoronthecomputer.
3.Connectthepoweradaptertotheacpowerconnectorontheexternalbatterybox.
Note:Aftertheexternalbatteryboxisproperlyconnectedtothecomputerandthepoweradapter,the
externalbatteryservesasabackuppowersupplytoensurethatthecomputerentershibernationmode
whenthepoweradapterisremovedorapoweroutageoccurs.
Thetwoindicatorsontheexternalbatteryboxindicatethestatusoftheexternalbattery.
IndicatorstatusExternalbatterystatus
Greenindicatorflashes
Greenindicatoralwayson
Redindicatorflashes
Redindicatoralwayson
Lessthan20%powerremaining
poweradapterconnected
Batteryusagereaches500times(maximumguaranteed)
Batteryfailingorincorrectlyinstalled
Additionalinstructions
•Inthecaseofanacpowerfailure,ifthecomputerisconnectedtoasufficientlychargedexternalbattery,
thecomputerwillturntobepoweredbytheexternalbatteryandenterhibernationstate.Afterthe
computerentershibernationstate,thecomputerwillnotrespondwhenyoupressthepowerbutton.
•Whentheacpowersupplyisrestored,thecomputerwillbepoweredonwhenyoupressthepowerbutton.
•Inthecaseofanacpowerfailure,ifthecomputerisinhibernationstate,wakeupthecomputerbeforethe
greenindicatorontheexternalbatteryboxstartstoflash.Ifthepowersupplyisrestoredbeforethegreen
indicatorstartstoflash,youdononeedtowakeupthecomputer.
•Inthecaseofanacpowerfailureafterthecomputerhascrashed,databackupwillnotwork.
Chapter2.Usingyourcomputer21
Page 32

22ThinkCentreM600UserGuide
Page 33

Chapter3.Youandyourcomputer
Thischaptercontainsthefollowingtopics:
•“Arrangingyourworkspace”onpage23
•“Accessibilityinformation”onpage24
•“Cleaningthecomputer”onpage27
•“Maintenance”onpage27
•“Movingthecomputer”onpage29
Arrangingyourworkspace
Arrangeyourworkspacetosuityourneedsandthekindofworkyoudo.Thissectionprovidesinformation
aboutthefactorsthataffectthewayyouarrangeyourworkspace.
Glareandlighting
Positionthemonitortominimizeglareandreflectionsfromoverheadlights,windows,andotherlightsources.
Reflectedlightfromshinysurfacescancauseannoyingreflectionsonyourscreen.Whenpossible,place
themonitoratrightanglestowindowsandotherlightsources.Ifnecessary,reduceoverheadlighting
byturningofflightsorusinglowerwattagebulbs.Ifyouinstallthemonitornearawindow,usecurtains
orblindstoblockthesunlight.Y oucanadjustthebrightnessandcontrastcontrolsonthemonitorasthe
roomlightingchangesthroughouttheday.
Whereitisimpossibletoavoidreflectionsortoadjustthelighting,anantiglarefilterplacedoverthescreen
mightbehelpful.However,thesefiltersmightaffecttheclarityoftheimageonthescreen;trythemonlyafter
youhaveexhaustedothermethodsofreducingglare.
Aircirculation
Thecomputerproducesheat.Thecomputerhasafanthatpullsinfreshairandforcesouthotairthrough
theairvents.Blockingtheairventscancauseoverheating,whichmightresultinamalfunctionordamage.
Positionthecomputersothatnothingblockstheairvents;usually,51mm(2inches)ofairspaceissufficient.
Ensurethattheventedairisnotblowingonpeople.
Electricaloutletlocationsandcablelengths
Thefollowingfactorsmightdeterminethefinalplacementofthecomputer:
•Locationsofelectricaloutlets
•Lengthofpowercordsorpoweradapters
•Lengthofthecablesthatareconnectedtootherdevices
Formoreinformationaboutpowercordsorpoweradapters,see“Powercordsandpoweradapters”on
pageiv
.
Comfort
Althoughnosingleworkingpositionisidealforeveryone,hereareafewguidelinestohelpyoufindaposition
thatsuitsyoubest.Thefollowingfiguresetsanexampleforyourreference.
©CopyrightLenovo2015,2017
23
Page 34

•Screenposition:Keepthescreenatacomfortableviewingdistance,usually51-61cm(20-24inches).
Then,adjustthescreensothatthetopofthescreenisatorslightlybeloweyelevelandyoucanviewit
withouttwistingyourbody.
•Chairposition:Useachairthatgivesyougoodbacksupportandseatheightadjustment.Usechair
adjustmentstobestsuityourdesiredposture.
•Headposition:Keepyourheadandneckinacomfortableandneutral(verticalorupright)position.
•Armandhandpositions:Keepyourforearms,wrists,andhandsinarelaxedandneutral(horizontal)
position.T ypewithasofttouchwithoutpoundingthekeys.
•Legposition:Keepyourthighsparalleltothefloorandyourfeetflatonthefloororonafootrest.
Makeminormodificationsinyourworkingposturetodetertheonsetofdiscomfortcausedbylongperiodsof
workinginthesameposition.Frequent,shortbreaksfromyourworkalsohelptopreventminordiscomfort
associatedwithyourworkingposture.
Accessibilityinformation
Lenovoiscommittedtoprovidinguserswhohavehearing,vision,andmobilitylimitationswithgreater
accesstoinformationandtechnology.Thissectionprovidesinformationaboutthewaystheseuserscanget
themostoutoftheircomputerexperience.Youalsocangetthemostup-to-dateaccessibilityinformation
fromthefollowingWebsite:
http://www.lenovo.com/accessibility
Keyboardshortcuts
Thefollowingtablecontainskeyboardshortcutsthatcanhelpmakethecomputereasiertouse.
Note:Dependingonyourkeyboard,someofthefollowingkeyboardshortcutsmightnotbeavailable.
KeyboardshortcutFunction
Windowslogokey+U
RightShiftforeightseconds
ShiftfivetimesTurnonorturnoffStickyKeys
NumLockforfivesecondsTurnonorturnoffToggleKeys
LeftAlt+LeftShift+NumLock
LeftAlt+LeftShift+PrtScn(orPrtSc)TurnonorturnoffHighContrast
OpenEaseofAccessCenter
TurnonorturnoffFilterKeys
TurnonorturnoffMouseKeys
Formoreinformation,gotohttp://windows.microsoft.com/,andthenperformasearchusinganyofthe
followingkeywords:keyboardshortcuts,keycombinations,shortcutkeys.
24ThinkCentreM600UserGuide
Page 35

EaseofAccessCenter
EaseofAccessCenterontheWindowsoperatingsystemenablesuserstoconfiguretheircomputersto
suittheirphysicalandcognitiveneeds.
TouseEaseofAccessCenter,dothefollowing:
1.ClicktheStartbuttontoopentheStartmenu.
2.DependingonyourWindowsversion,dooneofthefollowing:
•ForWindows7:ClickControlPanel.ViewControlPanelusinglargeiconsorsmallicons,and
thenclickEaseofAccessCenter.
•ForWindows10:ClickSettings➙EaseofAccess.
3.Choosetheappropriatetoolbyfollowingtheinstructionsonthescreen.
EaseofAccessCentermainlyincludesthefollowingtools:
•Magnifier
Magnifierisausefulutilitythatenlargestheentirescreenorpartofthescreensothatyoucansee
theitemsbetter.
•Narrator
Narratorisascreenreaderthatreadsaloudwhatisdisplayedonthescreenanddescribeseventssuchas
errormessages.
•On-ScreenKeyboard
Ifyouprefertotypeorenterdataintothecomputerusingamouse,joystick,orotherpointingdevice
insteadofaphysicalkeyboard,youcanuseOn-ScreenKeyboard.On-ScreenKeyboarddisplaysavisual
keyboardwithallthestandardkeys.
•HighContrast
HighContrastisafeaturethatheightensthecolorcontrastofsometextandimagesonyourscreen.Asa
result,thoseitemsaremoredistinctandeasiertoidentify.
•Personalizedkeyboard
Adjustkeyboardsettingstomakeyourkeyboardeasiertouse.Forexample,youcanuseyourkeyboard
tocontrolthepointerandtypecertainkeycombinationseasier.
•Personalizedmouse
Adjustmousesettingstomakeyourmouseeasiertouse.Forexample,youcanchangethepointer
appearanceandmakeiteasiertomanagewindowswiththemouse.
SpeechRecognition
SpeechRecognitionenablesyoutocontrolthecomputerbyvoice.
Usingonlyyourvoice,youcanstartprograms,openmenus,clickobjectsonthescreen,dictatetextinto
documents,andwriteandsende-mails.Everythingyoudowiththekeyboardandmousecanbedonewith
onlyyourvoice.
TouseSpeechRecognition,dothefollowing:
1.DependingonyourWindowsversion,dooneofthefollowing:
•ForWindows7:ClickControlPanelontheStartmenu.
•ForWindows10:ClicktheStartbuttontoopentheStartmenu,andthenclickWindowsSystem➙
ControlPanel.
2.ViewControlPanelusinglargeiconsorsmallicons,andthenclickSpeechRecognition.
Chapter3.Youandyourcomputer25
Page 36

3.Followtheinstructionsonthescreen.
Screen-readertechnologies
Screen-readertechnologiesareprimarilyfocusedonsoftwareprograminterfaces,helpinformationsystems,
andvariousonlinedocuments.Foradditionalinformationaboutscreenreaders,seethefollowing:
•UsingPDFswithscreenreaders:
http://www.adobe.com/accessibility.html?promoid=DJGVE
•UsingtheJAWSscreenreader:
http://www.freedomscientific.com/jaws-hq.asp
•UsingtheNVDAscreenreader:
http://www.nvaccess.org/
Screenresolution
Youcanmakethetextandimagesonyourscreeneasiertoreadbyadjustingthescreenresolutionofthe
computer.
Toadjustthescreenresolution,dothefollowing:
1.Right-clickablankareaonthedesktop.
2.DependingonyourWindowsversion,dooneofthefollowing:
•ForWindows7:ClickScreenresolution.
•ForWindows10:ClickDisplaysettings.
3.Followtheinstructionsonthescreen.
Note:Settingtheresolutiontoolowmightpreventsomeitemsfromfittingonthescreen.
Customizableitemsize
Youcanmaketheitemsonyourscreeneasiertoreadbychangingtheitemsize.
•Tochangetheitemsizetemporarily,usetheMagnifiertoolinEaseofAccessCenter.See“Easeof
AccessCenter”onpage25.
•Tochangetheitemsizepermanently,dothefollowing:
–Changethesizeofalltheitemsonyourscreen.
1.Right-clickablankareaonthedesktop.
2.DependingonyourWindowsversion,dooneofthefollowing:
–ForWindows7:ClickScreenresolution➙Maketextandotheritemslargerorsmaller.
–ForWindows10:ClickDisplaysettings.
3.Changetheitemsizebyfollowingtheinstructionsonthescreen.
–ChangethesizeoftheitemsonaWebpage.
PressandholdCtrl,andthenpresstheplus-signkey(+)toenlargeortheminus-signkey(-)to
reducethetextsize.
–Changethesizeoftheitemsonthedesktoporawindow.
Note:Thisfunctionmightnotworkonsomewindows.
Ifyourmousehasawheel,pressandholdCtrl,andthenscrollthewheeltochangetheitemsize.
Industry-standardconnectors
Thecomputerprovidesindustry-standardconnectorsthatenableyoutoconnectassistivedevices.
26ThinkCentreM600UserGuide
Page 37

TTY/TDDconversionmodem
Thecomputersupportstheuseofatexttelephone(TTY)orthetelecommunicationsdeviceforthedeaf(TDD)
conversionmodem.ThemodemmustbeconnectedbetweenthecomputerandaTTY/TDDtelephone.
Then,youcantypeamessageonthecomputerandsendittothetelephone.
Documentationinaccessibleformats
Lenovoprovideselectronicdocumentationinaccessibleformats,suchasproperlytaggedPDFfilesor
HyperTextMarkupLanguage(HTML)files.Lenovoelectronicdocumentationisdevelopedtoensure
thatvisuallyimpaireduserscanreadthedocumentationthroughascreenreader.Eachimageinthe
documentationalsoincludesadequatealternativetextsothatvisuallyimpaireduserscanunderstandthe
imagewhentheyuseascreenreader.
Cleaningthecomputer
CAUTION:
Removeanymediafromthedrivesandturnoffallconnecteddevicesandthecomputer .Then,
disconnectallpowercordsfromelectricaloutletsanddisconnectallcablesthatareconnected
tothecomputer.
Itisagoodpracticetocleanthecomputerperiodicallytoprotectthesurfacesandensuretrouble-free
operation.Useonlymildcleaningsolutionsandadampclothtocleanthepaintedsurfacesofthecomputer.
Dustbuildupcompoundsproblemsassociatedwithglare,soremembertocleanthescreenperiodically.
Wipethescreensurfacegentlywithasoft,drycloth,orblowonthescreentoremovegritandotherloose
particles.Dependingonthetypeofthescreen,moistenasoft,lint-freeclothwithanLCDcleanerorliquid
glasscleanerandthenwipethescreensurface.
Maintenance
Withappropriatecareandmaintenance,thecomputerwillserveyoureliably.Thissectionprovides
informationaboutmaintainingthecomputersothatitcankeepworkingintoporder.
Basicmaintenancetips
Herearesomebasicpointsaboutkeepingthecomputerfunctioningproperly:
•Keepthecomputerinaclean,dryenvironment.Ensurethatthecomputerrestsonaflat,steadysurface.
•Donotcoveranyofairvents.Theseairventsprovideairflowtokeepthecomputerfromoverheating.
•Keepfoodanddrinksawayfromallpartsofthecomputer.Foodparticlesandspillsmightmakethe
keyboardandmousestickandunusable.
•Donotgetthepowerswitchesorothercontrolswet.Moisturecandamagethesepartsandcausean
electricalhazard.
•Alwaysdisconnectapowercordbygraspingthepluginsteadofthecord.
Goodmaintenancepractices
Byperformingafewgoodmaintenancepractices,youcanmaintaingoodcomputerperformance,protect
yourdata,andbepreparedincaseofacomputerfailure.
•Keepthecomputersoftware,devicedrivers,andoperatingsystemup-to-date.See“Keepingthe
computercurrent”onpage28
•Emptyyourrecyclebinonaregularbasis.
•CleanoutyourInbox,SentItems,andDeletedItemsfoldersinyoure-mailapplicationonaregularbasis.
.
Chapter3.Youandyourcomputer27
Page 38

•Cleanupfilesandfreeupstoragedrivespaceandmemoryspaceoccasionallytopreventperformance
problems.See“Performanceproblems”onpage49
•Keepalogbook.Entriesmightincludemajorsoftwareorhardwarechanges,device-driverupdates,
intermittentproblemsandwhatyoudidtoresolvethem,andotherissuesyoumighthaveexperienced.
Thecauseofaproblemmightbechangeinhardware,changeinsoftware,oranyotheractionsthatmight
havetakenplace.AlogbookcanhelpyouoraLenovotechniciandeterminethecauseofaproblem.
•Backupyourdataonthestoragedriveregularly.Youcanrestorethestoragedrivefromabackup.
Tobackupyourdata,dooneofthefollowing:
–ForWindows7:OpentheRescueandRecoveryprogram.See“Accessingaprogramonthecomputer”
onpage11
–ForWindows10:Right-clicktheStartbuttontoopentheStartcontextmenu,andthenclickControl
Panel.ViewControlPanelusinglargeiconsorsmallicons,andthenclickFileHistory.Followthe
instructionsonthescreen.
•Createarecoverymediumasearlyaspossible.Youcanusetherecoverymediumtorecoveryour
operatingsystemevenifWindowsfailstostartup.
Tocreatearecoverymedium,dooneofthefollowing:
–ForWindows7:OpentheCreateRecoveryMediaprogram.See“Accessingaprogramonthe
computer”onpage11
systemoftheprogram.
–ForWindows10:Right-clicktheStartbuttontoopentheStartcontextmenu,andthenclickControl
Panel.ViewControlPanelusinglargeiconsorsmallicons,andthenclickRecovery.Followthe
instructionsonthescreen.
•ForWindows7,createarescuemediumasearlyaspossible.Y oucanusetherescuemediumto
recoverfromfailuresthatpreventyoufromgainingaccesstotheRescueandRecoveryworkspace
onyourstoragedrive.
Tocreatearescuemedium,opentheRescueandRecoveryprogram.See“Accessingaprogramonthe
computer”onpage11
oftheprogram.
.Formoreinformationaboutbackingupyourdata,refertothehelpsystemoftheprogram.
.Formoreinformationaboutcreatingarecoverymedium,refertothehelp
.Formoreinformationaboutcreatingarescuemedium,refertothehelpsystem
.
Keepingthecomputercurrent
Inmostcases,itisagoodpracticetohavethemostup-to-dateoperatingsystemupdatepatches,software
programs,anddevicedrivers.Thissectionprovidesinformationabouthowtogetthelatestupdatesforthe
computer.
Gettingthelatestdevicedrivers
Attention:Reinstallingdevicedriverswillchangethecurrentconfigurationofthecomputer.
Togetthelatestdevicedriversforthecomputer,dooneofthefollowing:
•Downloadthedevicedriversthatarepreinstalledonthecomputer.Gotohttp://www.lenovo.com/drivers.
•UsetheLenovoprogramorWindowsUpdate.See“Gettingthelatestsystemupdates”onpage28.
Note:ThedevicedriversprovidedbyWindowsUpdatemightnotbetestedbyLenovo.Itisrecommended
thatyougetdevicedriversfromLenovo.
Gettingthelatestsystemupdates
Togetthelatestsystemupdatesforthecomputer,ensurethatthecomputerisconnectedtotheInternet
anddooneofthefollowing:
•UseoneofthefollowingLenovoprogramstogetthesystemupdates:
28ThinkCentreM600UserGuide
Page 39

–ForWindows7:UsetheSystemUpdateprogram.
–ForWindows10:UsetheLenovoCompanionprogram.
ToopentheSystemUpdateorLenovoCompanionprogram,see“Accessingaprogramonthecomputer”
onpage11.Formoreinformationaboutusingtheprogram,refertothehelpsystemoftheprogram.
•UseWindowsUpdatetogetthesystemupdates.
1.ClicktheStartbuttontoopentheStartmenu.
2.DependingonyourWindowsversion,dooneofthefollowing:
–ForWindows7:ClickControlPanel.ViewControlPanelusinglargeiconsorsmallicons,and
thenclickWindowsUpdate.
–ForWindows10:ClickSettings➙Update&security➙WindowsUpdate.
3.Followtheinstructionsonthescreen.
Movingthecomputer
Beforemovingthecomputer,takethefollowingprecautions:
1.Backupyourdataonthestoragedrive.See“Goodmaintenancepractices”onpage27.
2.Removeanymediafromthedrivesandturnoffallconnecteddevicesandthecomputer.Then,
disconnectallpowercordsfromelectricaloutletsanddisconnectallcablesthatareconnectedtothe
computer.
3.Ifyousavedtheoriginalshippingcartonsandpackingmaterials,usethemtopacktheunits.Ifyouare
usingdifferentcartons,cushiontheunitstoavoiddamage.
Movingthecomputertoanothercountryorregion
Whenyoumovethecomputertoanothercountryorregion,youmusttakelocalelectricalstandardsinto
consideration.Ifthelocalelectricaloutletstyleisdifferentfromthetypeyouarecurrentlyusing,contactthe
LenovoCustomerSupportCentertopurchaseeitheranelectricalplugadapteroranewpowercord.Fora
listofLenovoSupportphonenumbers,gotohttp://www.lenovo.com/support/phone.Ifyoucannotfindthe
supporttelephonenumberforyourcountryorregion,contactyourLenovoreseller.
Chapter3.Youandyourcomputer29
Page 40

30ThinkCentreM600UserGuide
Page 41

Chapter4.Security
Thischaptercontainsthefollowingtopics:
•“Lockingthecomputer”onpage31
•“ViewingandchangingsecuritysettingsintheSetupUtilityprogram”onpage33
•“Preventingunauthorizedaccesstothecomputer”onpage33
•“Usingfingerprintauthentication”onpage34
•“Usingthecoverpresenceswitch”onpage39
•“Usingandunderstandingfirewalls”onpage34
•“Protectingdataagainstviruses”onpage34
•“ComputraceAgentsoftwareembeddedinfirmware”onpage35
•“TrustedPlatformModule(TPM)”onpage35
Lockingthecomputer
Thissectionprovidesinformationaboutlockingthecomputerwiththelockingdevicestokeepthecomputer
safe.
Lockingthecomputercover
Lockingthecomputercoverhelpspreventunauthorizedpeoplefromgainingaccesstotheinsideofyour
computer.Yourcomputercomeswithapadlockloopsothatthecomputercovercannotberemoved
whenapadlockisinstalled.
©CopyrightLenovo2015,2017
31
Page 42

Figure8.Installingapadlock
32ThinkCentreM600UserGuide
Page 43

AttachingaKensington-stylecablelock
YoucanuseaKensington-stylecablelocktosecureyourcomputertoadesk,table,orothernon-permanent
fixture.Thecablelockconnectstothesecurity-lockslotattherearofyourcomputer.Dependingonthetype
selected,thecablelockcanbeoperatedwithakeyorcombination.Thecablelockalsolocksthebuttons
usedtoopenthecomputercover.Thisisthesametypeoflockusedwithmanynotebookcomputers.You
canordersuchacablelockdirectlyfromLenovobysearchingforKensingtonat:
http://www.lenovo.com/support
Figure9.Kensington-stylecablelock
ViewingandchangingsecuritysettingsintheSetupUtilityprogram
ToviewandchangesecuritysettingsintheSetupUtilityprogram,dothefollowing:
1.StarttheSetupUtilityprogram.See“StartingtheSetupUtilityprogram”onpage37.
2.SelectSecurity.
3.Followtheinstructionsontherightsideofthescreentoviewandchangesecuritysettings.Y oucan
referto“UsingtheSetupUtilityprogram”onpage37togetbasicinformationaboutsomemajor
securitysettings.
4.ExittheSetupUtilityprogram.See“ExitingtheSetupUtilityprogram”onpage41.
Preventingunauthorizedaccesstothecomputer
YoucanuseBIOSpasswordsandWindowsaccountstopreventunauthorizedaccesstothecomputerand
data.
•TouseBIOSpasswords,see“UsingBIOSpasswords”onpage39.
•TouseWindowsaccounts,dothefollowing:
1.ClicktheStartbuttontoopentheStartmenu.
Chapter4.Security33
Page 44

2.DependingonyourWindowsversion,dooneofthefollowing:
–ForWindows7:ClickControlPanel➙UserAccounts.
–ForWindows10:ClickSettings➙Accounts.
3.Followtheinstructionsonthescreen.
Usingfingerprintauthentication
Ifyourkeyboardhasafingerprintreader,youcanusefingerprintauthenticationtoreplacepasswordsfor
simpleandsecureuseraccess.T ousefingerprintauthentication,firstenrollyourfingerprintsandassociate
themwithyourpasswords(suchasthepower-onpassword,harddiskpassword,andWindowspassword).
Usethefingerprintreaderandthefingerprintprogramtocompletethisprocedure.
Tousefingerprintauthentication,dooneofthefollowing:
•ForWindows7:OpentheFingerprintManagerProorThinkVantageFingerprintSoftwareprogram
providedbyLenovo.See“Accessingaprogramonthecomputer”onpage11
aboutusingtheprogram,refertothehelpsystemoftheprogram.
•ForWindows10:ClicktheStartbuttontoopentheStartmenu,andthenclickSettings➙Accounts➙
Sign-inoptions.Followtheinstructionsonthescreen.
Tousethefingerprintreader,refertothedocumentationshippedwiththefingerprintkeyboardorlocatedon
theLenovoSupportWebsiteathttp://www.lenovo.com/support/keyboards.
.Formoreinformation
Usingandunderstandingfirewalls
Afirewallcanbehardware,software,oracombinationofbothdependingonthelevelofsecurityrequired.
Firewallsworkonasetofrulestodeterminewhichinboundandoutboundconnectionsareauthorized.Ifthe
computerispreinstalledwithafirewallprogram,ithelpsprotectagainstcomputerInternetsecuritythreats,
unauthorizedaccess,intrusions,andInternetattacks.Italsoprotectsyourprivacy.Formoreinformation
abouthowtousethefirewallprogram,refertothehelpsystemofyourfirewallprogram.
TouseWindowsFirewall,dothefollowing
1.DependingonyourWindowsversion,dooneofthefollowing:
•ForWindows7:ClickControlPanelontheStartmenu.
•ForWindows10:ClicktheStartbuttontoopentheStartmenu,andthenclickWindowsSystem➙
ControlPanel.
2.ViewControlPanelusinglargeiconsorsmallicons,andthenclickWindowsFirewall.
3.Followtheinstructionsonthescreen.
Protectingdataagainstviruses
Thecomputerispreinstalledwithanantivirusprogramtohelpyouguardagainst,detect,andeliminate
viruses.
Lenovoprovidesafullversionofantivirussoftwareonthecomputerwithafree30-daysubscription.After30
days,youmustrenewthelicensetocontinuereceivingtheantivirussoftwareupdates.
Note:Virusdefinitionfilesmustbekeptup-to-datetoguardagainstnewviruses.
Formoreinformationabouthowtouseyourantivirussoftware,refertothehelpsystemofyourantivirus
software.
34ThinkCentreM600UserGuide
Page 45

ComputraceAgentsoftwareembeddedinfirmware
TheComputraceAgentsoftwareisanITassetmanagementandcomputertheftrecoverysolution.The
softwaredetectsifchangeshavebeenmadeonthecomputer,suchashardware,software,orthecomputer
call-inlocation.YoumighthavetopurchaseasubscriptiontoactivatetheComputraceAgentsoftware.
TrustedPlatformModule(TPM)
TPMisasecurecryptoprocessorthatcanstorecryptographickeysthatprotectinformationstoredinthe
computer.
Chapter4.Security35
Page 46

36ThinkCentreM600UserGuide
Page 47

Chapter5.Advancedconfiguration
Thischaptercontainsthefollowingtopics:
•“UsingtheSetupUtilityprogram”onpage37
•“UpdatingtheBIOS”onpage41
UsingtheSetupUtilityprogram
TheSetupUtilityprogramisusedtoviewandchangetheconfigurationsettingsofthecomputer.This
sectionprovidesinformationaboutonlythemajorconfigurationsettingsavailableintheprogram.
Note:TheoperatingsystemsettingsmightoverrideanysimilarsettingsintheSetupUtilityprogram.
StartingtheSetupUtilityprogram
TostarttheSetupUtilityprogram,dothefollowing:
1.Turnonorrestartthecomputer.
2.BeforeWindowsstartsup,repeatedlypressandreleasetheF1keyuntiltheSetupUtilityprogram
opens.IfaBIOSpasswordhasbeenset,theSetupUtilityprogramwillnotopenuntilyouenterthe
correctpassword.Formoreinformation,see“UsingBIOSpasswords”onpage39
Note:Forsomekeyboards,youmightneedtopressFn+F1toopentheSetupUtilityprogram.
.
Toviewandchangetheconfigurationsettings,followtheinstructionsontherightsideofthescreen.The
keysusedtoperformvarioustasksaredisplayedatthebottomofthescreen.
Enablingordisablingadevice
Thissectionprovidesinformationabouthowtoenableordisableuseraccesstohardwaredevices(such
asUSBconnectorsorstoragedrives).
Toenableordisableadevice,dothefollowing:
1.StarttheSetupUtilityprogram.See“StartingtheSetupUtilityprogram”onpage37.
2.SelectDevices.
3.SelectthedeviceyouwanttoenableordisableandpressEnter.
4.SelectthedesiredsettingandpressEnter.
5.ExittheSetupUtilityprogram.See“ExitingtheSetupUtilityprogram”onpage41.
EnablingordisablingtheAutomaticPowerOnfeatures
IfyouenabletheAutomaticPowerOnfeatures,thecomputerwillstartupautomatically.
ToenableordisabletheAutomaticPowerOnfeatures,dothefollowing:
1.StarttheSetupUtilityprogram.See“StartingtheSetupUtilityprogram”onpage37.
2.SelectPower➙AutomaticPowerOnandpressEnter.
3.SelectthefeatureyouwanttoenableordisableandpressEnter.
4.SelectthedesiredsettingandpressEnter.
5.ExittheSetupUtilityprogram.See“ExitingtheSetupUtilityprogram”onpage41.
©CopyrightLenovo2015,2017
37
Page 48

EnablingordisablingtheErPLPScompliancemode
Lenovocomputersmeettheeco-designrequirementsoftheErPLot3regulation.Formoreinformation,go
to:
http://www.lenovo.com/ecodeclaration
YoucanenabletheErPLPScompliancemodeintheSetupUtilityprogramtoreducetheconsumptionof
electricitywhenthecomputerisofforinsleepmode.
ToenableordisabletheErPLPScompliancemode,dothefollowing:
1.StarttheSetupUtilityprogram.See“StartingtheSetupUtilityprogram”onpage37.
2.SelectPower➙EnhancedPowerSavingModeandpressEnter.
3.DependingonwhetheryouselectEnabledorDisabled,dooneofthefollowing:
•IfyouselectEnabled,pressEnter.Then,disabletheWakeonLANfeature.See“Enablingor
disablingtheAutomaticPowerOnfeatures”onpage37.
•IfyouselectDisabled,pressEnter.Then,gotothenextstep.
4.ExittheSetupUtilityprogram.See“ExitingtheSetupUtilityprogram”onpage41.
WhentheErPLPScompliancemodeisenabled,youcanwakeupthecomputerbydoingoneofthe
following:
•Pressthepowerbutton.
•EnabletheWakeUponAlarmfeaturetomakethecomputerwakeupatasettime.See“Enablingor
disablingtheAutomaticPowerOnfeatures”onpage37.
•EnabletheAfterPowerLossfeaturetomakethecomputerwakeupwhenthepowersupplyresumesafter
asuddenlossofelectricity.
1.StarttheSetupUtilityprogram.See“StartingtheSetupUtilityprogram”onpage37.
2.SelectPower➙AfterPowerLossandpressEnter.
3.SelectPowerOnandpressEnter.
4.ExittheSetupUtilityprogram.See“ExitingtheSetupUtilityprogram”onpage41.
IntheWindows10operatingsystems,youalsoneedtodisabletheFastStartupfunctiontomeettheoff
moderequirementofErPcompliance.
TodisabletheFastStartupfunction,dothefollowing:
1.ClicktheStartbuttontoopentheStartmenu,andthenclickWindowsSystem➙ControlPanel.
2.SelectAllControlPanelItems➙PowerOptions.
3.SelectChoosewhatthepowerbuttonsdofromthepop-updialogbox.
4.SelecttheChangesettingsthatarecurrentlyunavailableoption,andcleartheTurnonfaststartup
optionfromtheShutdownsettingslist.
EnablingordisablingtheConfigurationChangeDetectionfeature
IfyouenabletheConfigurationChangeDetectionfeature,whenthePOSTdetectstheconfigurationchanges
ofsomehardwaredevices(suchasstoragedrivesormemorymodules),anerrormessagewillbedisplayed
whenyouturnonthecomputer.
ToenableordisabletheConfigurationChangeDetectionfeature,dothefollowing:
1.StarttheSetupUtilityprogram.See“StartingtheSetupUtilityprogram”onpage37.
2.SelectSecurity➙ConfigurationChangeDetectionandpressEnter.
38ThinkCentreM600UserGuide
Page 49

3.SelectthedesiredsettingandpressEnter.
4.ExittheSetupUtilityprogram.See“ExitingtheSetupUtilityprogram”onpage41.
Tobypasstheerrormessageandlogintotheoperatingsystem,dooneofthefollowing:
•PresstheF2key.
Note:Forsomekeyboards,youmightneedtopressFn+F2tobypasstheerrormessage.
•StartandthenexittheSetupUtilityprogram.See“StartingtheSetupUtilityprogram”onpage37
“ExitingtheSetupUtilityprogram”onpage41.
Usingthecoverpresenceswitch
Thecoverpresenceswitchpreventsthecomputerfromloggingintotheoperatingsystemwhenthe
computercoverisnotproperlyinstalledorclosed.
Toenablethecover-presence-switchconnectoronthesystemboard,dothefollowing:
1.StarttheSetupUtilityprogram.See“StartingtheSetupUtilityprogram”onpage37.
2.SelectSecurity➙ChassisIntrusionDetectionandpressEnter.
3.SelectEnabledandpressEnter.
4.ExittheSetupUtilityprogram.See“ExitingtheSetupUtilityprogram”onpage41.
Whenthecover-presence-switchconnectoronthesystemboardisenabled,ifthecoverpresenceswitch
detectsthatthecomputercoverisnotcorrectlyinstalledorclosed,anerrormessagewillbedisplayedwhen
youturnonthecomputer.Tobypasstheerrormessageandlogintotheoperatingsystem,dothefollowing:
1.Properlyinstallorclosethecomputercover.
2.StartandthenexittheSetupUtilityprogram.See“StartingtheSetupUtilityprogram”onpage37and
“ExitingtheSetupUtilityprogram”onpage41.
and
UsingBIOSpasswords
ByusingtheSetupUtilityprogram,youcansetpasswordstopreventunauthorizedaccesstothecomputer
anddata.
Youdonothavetosetanypasswordstousethecomputer.However,usingpasswordsimprovescomputer
security.Ifyoudecidetosetanypasswords,readthefollowingtopics.
SetupUtilityprogrampasswordtypes
Thefollowingtypesofpasswordsareavailable:
•Power-onpassword
Whenapower-onpasswordisset,youarepromptedtoenteravalidpasswordeachtimethecomputeris
turnedon.Thecomputercannotbeuseduntilthevalidpasswordisentered.
•Administratorpassword
Settinganadministratorpassworddetersunauthorizedusersfromchangingconfigurationsettings.Ifyou
areresponsibleformaintainingtheconfigurationsettingsofseveralcomputers,youmightwanttoset
anadministratorpassword.
Whenanadministratorpasswordisset,youarepromptedtoenteravalidpasswordeachtimeyou
trytoaccesstheSetupUtilityprogram.TheSetupUtilityprogramcannotbeaccesseduntilavalid
passwordisentered.
Ifboththepower-onpasswordandadministratorpasswordareset,youcanentereitherpassword.
However,youmustuseyouradministratorpasswordtochangeanyconfigurationsettings.
Chapter5.Advancedconfiguration39
Page 50

•Harddiskpassword
Settingaharddiskpasswordpreventsunauthorizedaccesstothedataonthestoragedrive.Whena
harddiskpasswordisset,youarepromptedtoenteravalidpasswordeachtimeyoutrytoaccess
thestoragedrive.
Notes:
–Afteryousetaharddiskpassword,yourdataonthestoragedriveisprotectedevenifthestoragedrive
isremovedfromonecomputerandinstalledinanother.
–Iftheharddiskpasswordisforgotten,thereisnowaytoresetthepasswordorrecoverdatafrom
thestoragedrive.
Passwordconsiderations
Apasswordcanbeanycombinationofupto64alphabeticandnumericcharacters.Forsecurityreasons,it
isrecommendedtouseastrongpasswordthatcannotbeeasilycompromised.
Note:TheSetupUtilityprogrampasswordsarenotcasesensitive.
Tosetastrongpassword,considerthefollowingguidelines:
•Haveatleasteightcharactersinlength
•Containatleastonealphabeticcharacterandonenumericcharacter
•Notbeyournameoryourusername
•Notbeacommonwordoracommonname
•Besignificantlydifferentfromyourpreviouspasswords
Setting,changing,anddeletingapassword
Toset,change,ordeleteapassword,dothefollowing:
1.StarttheSetupUtilityprogram.See“StartingtheSetupUtilityprogram”onpage37.
2.SelectSecurity.
3.Dependingonthepasswordtype,selectSetPower-OnPassword,SetAdministratorPassword,or
HardDiskPasswordandpressEnter.
4.Followtheinstructionsontherightsideofthescreentoset,change,ordeleteapassword.
Note:Apasswordcanbeanycombinationofupto64alphabeticandnumericcharacters.Formore
information,see“Passwordconsiderations”onpage40
5.ExittheSetupUtilityprogram.See“ExitingtheSetupUtilityprogram”onpage41.
.
Selectingastartupdevice
Ifthecomputerdoesnotstartupfromadeviceasexpected,youcanchoosetochangethestartupdevice
sequencepermanentlyorselectatemporarystartupdevice.
Changingthestartupdevicesequencepermanently
Tochangethestartupdevicesequencepermanently,dothefollowing:
1.Dependingonthetypeofthestoragedevice,dooneofthefollowing:
•Ifthestoragedeviceisinternal,gotostep2.
•Ifthestoragedeviceisadisc,ensurethatthecomputerisonorturnonthecomputer.Then,insert
thediscintotheopticaldrive.
•Ifthestoragedeviceisanexternaldeviceotherthanadisc,connectthestoragedevicetothe
computer.
40ThinkCentreM600UserGuide
Page 51

2.StarttheSetupUtilityprogram.See“StartingtheSetupUtilityprogram”onpage37.
3.SelectStartup.
4.Followtheinstructionsontherightsideofthescreentochangethestartupdevicesequence.
5.ExittheSetupUtilityprogram.See“ExitingtheSetupUtilityprogram”onpage41.
Selectingatemporarystartupdevice
Note:Notalldiscsandstoragedrivesarebootable.
Toselectatemporarystartupdevice,dothefollowing:
1.Dependingonthetypeofthestoragedevice,dooneofthefollowing:
•Ifthestoragedeviceisinternal,gotostep2.
•Ifthestoragedeviceisadisc,ensurethatthecomputerisonorturnonthecomputer.Then,insert
thediscintotheopticaldrive.
•Ifthestoragedeviceisanexternaldeviceotherthanadisc,connectthestoragedevicetothe
computer.
2.Turnonorrestartthecomputer.BeforeWindowsstartsup,repeatedlypressandreleasetheF12key
untilStartupDeviceMenuisdisplayed.
Note:Forsomekeyboards,youmightneedtopressFn+F12todisplayStartupDeviceMenu.
3.SelectthedesiredstoragedeviceandpressEnter.Thecomputerwillstartupfromthedeviceyouselect.
Ifyouwanttoselectapermanentstartupdevice,selectEnterSetuponStartupDeviceMenuandpress
EntertostarttheSetupUtilityprogram.Formoreinformationabouthowtoselectapermanentstartup
device,see“Changingthestartupdevicesequencepermanently”onpage40
.
ExitingtheSetupUtilityprogram
ToexittheSetupUtilityprogram,dooneofthefollowing:
•Ifyouwanttosavethenewsettings,presstheF10key.Then,selectYesinthewindowdisplayed
andpressEnter.
Note:Forsomekeyboards,youmightneedtopressFn+F10toexittheSetupUtilityprogram.
•Ifyoudonotwanttosavethenewsettings,selectExit➙DiscardChangesandExitandpressEnter.
Then,selectYesinthewindowdisplayedandpressEnter.
UpdatingtheBIOS
Whenyouinstallanewprogram,hardwaredevice,ordevicedriver,youmightbeinformedtoupdate
theBIOS.YoucanupdatetheBIOSfromyouroperatingsystemoraflashupdatedisc(supportedonly
onsomemodels).
ToupdatetheBIOS,dothefollowing:
1.Gotohttp://www.lenovo.com/drivers.
2.DownloadtheflashBIOSupdatedriverfortheoperatingsystemversionortheISOimageversion(used
tocreateaflashupdatedisc).Then,downloadtheinstallationinstructionsfortheflashBIOSupdate
driveryoudownload.
3.PrinttheinstallationinstructionsyoudownloadandfollowtheinstructionstoupdatetheBIOS.
Note:IfyouwanttoupdatetheBIOSfromaflashupdatedisc,theinstallationinstructionsmightnotprovide
theinformationabouthowtorecordtheupdatedisc.See“Usingadisc”onpage16
.
Chapter5.Advancedconfiguration41
Page 52

42ThinkCentreM600UserGuide
Page 53

Chapter6.Troubleshooting,diagnostics,andrecovery
Thischapterprovidessolutionstoresolvethecomputerproblems.Followthestepsinthebasicprocedure
forresolvingcomputerproblems,whichhelpsyoumakegooduseofthetroubleshooting,diagnostics,
andrecoveryinformation.
•“Basicprocedureforresolvingcomputerproblems”onpage43
•“Troubleshooting”onpage43
•“Diagnostics”onpage51
•“Recoveryinformation”onpage51
Basicprocedureforresolvingcomputerproblems
Itisrecommendedthatyouusethefollowingproceduretoresolvecomputerproblemsyouareexperiencing:
1.Ensurethat:
a.Thecablesforallconnecteddevicesareconnectedcorrectlyandsecurely.
b.Allconnecteddevicesthatrequireacpowerareconnectedtoproperlygrounded,functioning
electricaloutlets.
c.AllconnecteddevicesareenabledintheBIOSsettingsofthecomputer.See“Enablingordisabling
adevice”onpage37
Iftheseactionsdonotresolveyourproblem,continuewiththenextstep.
2.Useanantivirusprogramtoseeifthecomputerhasbeeninfectedbyavirus.Iftheprogramdetects
avirus,removethevirus.Iftheantivirusprogramdoesnotresolveyourproblem,continuewiththe
nextstep.
3.Goto“T roubleshooting”onpage43andfollowtheinstructionsforthetypeofproblemyouare
experiencing.Ifthesetroubleshootinginstructionsdonotresolveyourproblem,continuewiththe
nextstep.
4.Runthediagnosticprogram.See“Diagnostics”onpage51.Ifthediagnosticprogramdoesnotresolve
yourproblem,continuewiththenextstep.
5.Recoveryouroperatingsystem.See“Recoveryinformation”onpage51.
6.Ifnoneoftheseactionssolveyourproblem,contacttheLenovoCustomerSupportCenter.Foralistof
LenovoSupportphonenumbers,gotohttp://www.lenovo.com/support/phone.Formoreinformation
abouthelp,service,andtechnicalassistance,seeChapter8“Gettinginformation,help,andservice”
onpage97.
.
Troubleshooting
Attention:Donotopenthecomputerorattemptanyrepairbeforereadingandunderstanding“Readthis
first:Importantsafetyinformation”inthisdocument.
Usethetroubleshootinginformationtofindsolutionstoproblemsthathavedefinitesymptoms.
Startupproblems
Thissectionprovidessolutionstostartup-relatedproblems.
Thecomputerdoesnotstartupwhenyoupressthepowerbutton
Solutions:Ensurethat:
•Thepowercordiscorrectlyconnectedtotherearofthecomputerandtoaworkingelectricaloutlet.
©CopyrightLenovo2015,2017
43
Page 54

•Ifthecomputerhasasecondarypowerswitchontherearofthecomputer,ensurethatitisswitchedon.
•Thepowerindicatoronthefrontofthecomputerison.
•Thecomputervoltagematchesthevoltageavailableattheelectricaloutletforyourcountryorregion.
Theoperatingsystemfailstostartup
Solution:Ensurethatthestartupsequenceincludesthedevicewheretheoperatingsystemresides.Usually,
theoperatingsystemisonthestoragedrive.Formoreinformation,see“Changingthestartupdevice
sequencepermanently”onpage40.
Thecomputerbeepsmultipletimesbeforetheoperatingsystemstartsup
Solution:Ensurethatnokeysarestuck.
Audioproblems
Thissectionprovidessolutionstoaudio-relatedproblems.
NoaudioinWindows
Solutions:
•IfyouareusingpoweredexternalspeakersthathaveanOn/Offcontrol,ensurethat:
–TheOn/OffcontrolissettotheOnposition.
–Thespeakerpowercableisconnectedtoaproperlygrounded,functionalacelectricaloutlet.
•Ifyourexternalspeakershaveavolumecontrol,ensurethatthevolumeisnotsettoolow.
•ClickthevolumeiconintheWindowsnotificationareaonthetaskbar.Ensurethatthemutespeakers
settingsarenotselectedandnoneofthevolumesettingsissettoolow.
Note:IfthevolumeiconisnotdisplayedintheWindowsnotificationarea,addtheicontothenotification
area.See“AddinganicontotheWindowsnotificationarea”onpage15.
•Somemodelshaveafrontaudiopanelyoucanusetoadjustvolume.Ifyouhaveafrontaudiopanel,
ensurethatthevolumeisnotsettoolow.
•Ensurethatyourexternalspeakers(andheadphones,ifused)areconnectedtothecorrectaudio
connectoronthecomputer.Mostspeakercablesarecolor-codedtomatchtheconnector.
Note:Whenexternal-speakerorheadphonecablesareconnectedtotheaudioconnector,theinternal
speaker,ifpresent,isdisabled.Inmostcases,ifanaudioadapterisinstalledinoneoftheexpansion
slots,theaudiofunctionbuiltintothesystemboardisdisabled.Therefore,youmustusetheaudio
connectorsontheaudioadapter.
•EnsurethattheprogramyouarerunningisdesignedforuseintheMicrosoftWindowsoperatingsystem.
IftheprogramisdesignedtoruninDOS,theprogramdoesnotusetheWindowssoundfeature.The
programmustbeconfiguredtouseSoundBlasterProorSoundBlasteremulation.
•Ensurethattheaudiodevicedriversarecorrectlyinstalled.
Soundcomesonlyfromoneexternalspeaker
Solutions:
•Ensurethatthespeakercableisinsertedcompletelyintotheconnectoronthecomputer.
•Ensurethatthecablethatconnectstheleftspeakertotherightspeakerissecurelyconnected.
•DependingonyourWindowsversion,dooneofthefollowing:
–ForWindows7:ClickthevolumeiconintheWindowsnotificationareaonthetaskbar.Then,click
thespeakericonontopofthevolumecontrol.
44ThinkCentreM600UserGuide
Page 55

–ForWindows10:Right-clickthevolumeiconintheWindowsnotificationareaonthetaskbar.Then,
clickOpenVolumeMixerandselectthedesiredspeaker.
Note:IfthevolumeiconisnotdisplayedintheWindowsnotificationarea,addtheicontothenotification
area.See“AddinganicontotheWindowsnotificationarea”onpage15
Then,clicktheLevelstabandensurethattheBalancesettingsaresetcorrectly.
.
CDproblems
ThissectionprovidessolutionstoCD-relatedproblems.
ACDorDVDdoesnotwork
Solutions:
•IfyouhavemultipleCDorDVDdrivesinstalled(oracombinationofCDandDVDdrives),tryinsertingthe
discintotheotherdrive.Insomecases,onlyoneofthedrivesisconnectedtotheaudiosubsystem.
•Ensurethatthediscisinsertedcorrectly,withitslabelup.
•Ensurethatthediscyouareusingisclean.Toremovedustorfingerprints,wipethedisccleanwithasoft
clothfromthecentertotheoutside.Wipingadiscinacircularmotionmightcauselossofdata.
•Ensurethatthediscyouareusingisnotscratchedordamaged.Tryinsertinganotherdiscthatyou
knowisgood.Ifyoucannotreadfromaknown-gooddisc,youmighthaveaproblemwithyouroptical
driveorthecablingtoyouropticaldrive.Ensurethatthepowercableandsignalcablearesecurely
connectedtothedrive.
Unabletouseabootablerecoverymedium,suchastheProductRecoveryCD,to
startthecomputer
Solution:EnsurethattheCDorDVDdriveisinthestartupsequencebeforethestoragedrive.Referto
“Selectingatemporarystartupdevice”onpage41
sequence.Notethatonsomemodelsthestartupsequenceispermanentlysetandcannotbechanged.
forinformationonviewingandchangingthestartup
DVDproblems
ThissectionprovidessolutionstoDVD-relatedproblems.
BlackscreeninsteadofDVDvideo
Solutions:
•RestarttheDVDplayerprogram.
•Tryalowerscreenresolutionorcolordepth.
•Closeanyopenfiles,andthenrestartthecomputer.
DVDmoviedoesnotplay
Solutions:
•Ensurethatthediscsurfaceiscleanandnotscratched.
•Checkthediscorpackageforregionalcoding.Y oumightneedtopurchaseadiscwithcodingforthe
regionwhereyouareusingthecomputer.
NoaudioorintermittentaudiowhileplayingaDVDmovie
Solutions:
•Checkthevolumecontrolsettingsonthecomputerandonyourspeakers.
•Ensurethatthediscsurfaceiscleanandnotscratched.
Chapter6.T roubleshooting,diagnostics,andrecovery45
Page 56

•Checkallcableconnectionstoandfromthespeakers.
•UsetheDVDmenuforthevideotoselectadifferentaudiotrack.
Playbackissloworchoppy
Solutions:
•Disableanybackgroundprograms,suchasAntiVirusorDesktopThemes.
•Ensurethatvideoresolutionissettolessthan1152x864pixels.
Invaliddiscornodiscfoundmessage
Solutions:
•EnsurethataDVDdiscisinthedrivewiththeshinysideofthediscfacingdown.
•Ensurethatvideoresolutionissettolessthan1152x864pixels.
•OncomputersthathaveaCD-ROMorCD-RWdriveinadditiontoaDVD-ROMdrive,ensurethatthe
DVDdiscisinthedrivelabeled“DVD”.
Intermittentproblems
Someproblemsoccuronlyoccasionallyandaredifficulttorepeat.
Solutions:
•Ensurethatallcablesandcordsaresecurelyconnectedtothecomputerandconnecteddevices.
•Ensurethatwhenthecomputerison,thefangrillisnotblocked(thereisairflowaroundthegrill),andthe
fansareworking.Ifairflowisblockedorthefansarenotworking,thecomputermightoverheat.
•IfSmallComputerSystemInterface(SCSI)devicesareinstalled,ensurethatthelastexternaldevicein
eachSCSIchainisterminatedcorrectly.Formoreinformation,seeyourSCSIdocumentation.
Storagedriveproblems
Selectyoursymptomfromthefollowinglist:
•“SomeorallstoragedrivesmissingfromtheSetupUtilityprogram”onpage46
•“"NoOperatingSystemFound"messageorthesystemnotstartingupfromthecorrectstoragedrive”
onpage46
SomeorallstoragedrivesmissingfromtheSetupUtilityprogram
Symptom:SomeorallstoragedrivesmissingfromtheSetupUtilityprogram
Solutions:
•Ensurethatallstoragedrivesignalcablesandpowercablesareconnectedcorrectly.
•Ensurethatthecomputerisconfiguredcorrectlytosupportthestoragedrives.
–IfthecomputerisinstalledwithfiveSATAstoragedrives,ensurethattheSATAstoragedrive
enablementmodule(onetofivestoragedrives)isinstalled.
–IfthecomputerisinstalledwithSASstoragedrives,ensurethattheSASstoragedriveenablement
module(onetofivestoragedrives)ortheLSIMegaRAIDSASadapterisinstalled.
"NoOperatingSystemFound"messageorthesystemnotstartingupfromthe
correctstoragedrive
Symptom:"NoOperatingSystemFound"messageorthesystemnotstartingupfromthecorrectstorage
drive
46ThinkCentreM600UserGuide
Page 57

Solutions:
•Ensurethatallstoragedrivesignalcablesandpowercablesareconnectedcorrectly.
•EnsurethatthestoragedrivethecomputerstartsupfromislistedasthefirststartupdeviceintheSetup
Utilityprogram.Referto“Changingthestartupdevicesequencepermanently”onpage40
Note:Inrarecases,thestoragedrivewiththeoperatingsystemmightgetcorruptedordamaged.Insuch
cases,youmightneedtoreplacethestoragedrive.
.
Networkingproblems
Thissectionprovidessolutionstonetworking-relatedproblems.
EthernetLANproblems
MycomputercannotbeconnectedtoanEthernetLAN
Solutions:
•ConnectthecablefromtheEthernetconnectortotheRJ45connectorofthehub.
•EnabletheEthernetLANfeatureintheSetupUtilityprogram.See“StartingtheSetupUtilityprogram”on
page37
•EnabletheEthernetLANadapter.
•UpdateorreinstalltheEthernetLANdriver.See“Keepingthecomputercurrent”onpage28.
•Installallnetworkingsoftwarethatisnecessaryforyournetworkenvironment.CheckwithyourLAN
administratorforthenecessarynetworkingsoftware.
•Setthesameduplexfortheswitchportandtheadapter.Ifyouconfiguredtheadapterforfullduplex,
ensurethattheswitchportisalsoconfiguredforfullduplex.Settingthewrongduplexmodemight
degradeperformance,causedataloss,orresultinlostconnections.
.Then,followtheinstructionsonthescreen.
1.DependingonyourWindowsversion,dooneofthefollowing:
–ForWindows7:ClickControlPanelontheStartmenu.
–ForWindows10:ClicktheStartbuttontoopentheStartmenu,andthenclickWindowsSystem
➙ControlPanel.
2.ViewControlPanelusinglargeiconsorsmallicons,andthenclickNetworkandSharingCenter➙
Changeadaptersettings.
3.Right-clicktheEthernetLANadaptericonandclickEnable.
MycomputerisaGigabitEthernetmodelandIuseaspeedof1000Mbps,buttheconnectionfails
orerrorsoccur
Solution:ConnectthenetworkcabletotheEthernetconnectorusingCategory5wiringanda100BASE-T
hub/switch(not100BASE-X).
MycomputerisaGigabitEthernetmodel,butitcannotbeconnectedtothenetworkat1000Mbps,
butatonly100Mbps
Solutions:
•Tryanothercable.
•Setthelinkpartnertoauto-negotiate.
•Settheswitchtobe802.3ab-compliant(gigabitovercopper).
Chapter6.T roubleshooting,diagnostics,andrecovery47
Page 58

TheWakeOnLANfeaturedoesnotwork
Solution:EnabletheWakeOnLAN(WOL)featureintheSetupUtilityprogram.See“StartingtheSetupUtility
program”onpage37.Then,followtheinstructionsonthescreen.
WirelessLANproblem
Note:ThewirelessLANfeatureisoptional.
ThewirelessLANfeaturedoesnotwork
Solutions:
•EnablethewirelessLANfeatureintheSetupUtilityprogram.See“StartingtheSetupUtilityprogram”on
page37.Then,followtheinstructionsonthescreen.
•ForWindows10,enablethewirelessLANfeatureinWindowsSettings.ClicktheStartbuttontoopenthe
Startmenu,andthenclickSettings➙Network&Internet➙Wi-Fi.T urnontheWi-Fifeature.
•EnablethewirelessLANadapter.
1.DependingonyourWindowsversion,dooneofthefollowing:
–ForWindows7:ClickControlPanelontheStartmenu.
–ForWindows10:ClicktheStartbuttontoopentheStartmenu,andthenclickWindowsSystem
➙ControlPanel.
2.ViewControlPanelusinglargeiconsorsmallicons,andthenclickNetworkandSharingCenter➙
Changeadaptersettings.
3.Right-clickthewirelessLANadaptericonandclickEnable.
•UpdateorreinstallthewirelessLANdriver.See“Keepingthecomputercurrent”onpage28.
Bluetoothproblems
Note:TheBluetoothfeatureisoptional.
TheBluetoothfeaturedoesnotwork
Solutions:
•EnabletheBluetoothfeatureintheSetupUtilityprogram.See“StartingtheSetupUtilityprogram”on
page37
•TurnontheBluetoothradios.
•EnabletheBluetoothadapter.
.Then,followtheinstructionsonthescreen.
1.DependingonyourWindowsversion,dooneofthefollowing:
–ForWindows7:ClicktheStartbuttontoopentheStartmenu.Right-clickComputer,andthen
clickProperties.
–ForWindows10:Right-clicktheStartbuttontoopentheStartcontextmenu.
2.ClickDeviceManager.T ypetheadministratorpasswordorprovideconfirmationifprompted.
3.Right-clickthedesiredBluetoothradiosunderBluetoothorBluetoothRadios,andthendoone
ofthefollowing:
–ForWindows7:ClickEnable.
–ForWindows10:ClickEnabledevice.
1.DependingonyourWindowsversion,dooneofthefollowing:
–ForWindows7:ClickControlPanelontheStartmenu.
–ForWindows10:ClicktheStartbuttontoopentheStartmenu,andthenclickWindowsSystem
➙ControlPanel.
48ThinkCentreM600UserGuide
Page 59

2.ViewControlPanelusinglargeiconsorsmallicons,andthenclickNetworkandSharingCenter➙
Changeadaptersettings.
3.Right-clicktheBluetoothadaptericonandclickEnable.
•UpdateorreinstalltheBluetoothdriver.See“Keepingthecomputercurrent”onpage28.
SounddoesnotcomefromtheBluetoothheadsetorheadphones
Solution:SettheBluetoothheadsetorheadphonesasthedefaultdevice.
1.Exittheapplicationthatusesthesounddevice(forexample,WindowsMediaPlayer).
2.Right-clickthevolumeiconintheWindowsnotificationareaonthetaskbar.
Note:IfthevolumeiconisnotdisplayedintheWindowsnotificationarea,addtheicontothe
notificationarea.See“AddinganicontotheWindowsnotificationarea”onpage15
3.ClickPlaybackdevices.
4.IfyouareusingtheHeadsetprofile,selectBluetoothHands-freeAudio,andthenclickSetDefault.If
youareusingtheAVprofile,selectStereoAudio,andthenclickSetDefault.
5.ClickOK.
.
Performanceproblems
Thissectionprovidessolutionstoperformance-relatedproblemsofthecomputer.
Excessivenumberoffragmentedfiles
Solution:UsetheWindowsdiskdefragmentationordiskoptimizationfeaturetocleanupthefiles.
Note:Dependingonthevolumeofthestoragedrivesandamountofdatastoredonthestoragedrives,the
disk-defragmentationprocessmighttakeuptoseveralhours.
1.Closeanyopenprogramsandwindows.
2.ClicktheStartbuttontoopentheStartmenu.
3.DependingonyourWindowsversion,dooneofthefollowing:
•ForWindows7:ClickComputer.
•ForWindows10:ClickWindowsSystem➙FileExplorer➙ThisPC.
4.Right-clickyourCdriveandthenclickProperties.
5.ClicktheT oolstab.
6.DependingonyourWindowsversion,dooneofthefollowing:
•ForWindows7:ClickDefragmentnow.
•ForWindows10:ClickOptimize.Selectthedesireddrive,andthenclickOptimize.
7.Followtheinstructionsonthescreen.
Insufficientfreestoragedrivespace
Solutions:Freeupstoragedrivespace.
•CleanoutyourInbox,SentItems,andDeletedItemsfoldersfromyoure-mailapplication.
•CleanupyourCdrive.
1.ClicktheStartbuttontoopentheStartmenu.
2.DependingonyourWindowsversion,dooneofthefollowing:
–ForWindows7:ClickComputer.
–ForWindows10:ClickWindowsSystem➙FileExplorer➙ThisPC.
3.Right-clickyourCdriveandthenclickProperties.
Chapter6.T roubleshooting,diagnostics,andrecovery49
Page 60

4.Checktheamountoffreespace,andthenclickDiskCleanup.
5.Alistofunnecessaryfilecategoriesisdisplayed.Selecteachfilecategoryyouwanttodelete,
andthenclickOK.
•TurnsomeWindowsfeaturesofforremovesomeunnecessaryprograms.
1.DependingonyourWindowsversion,dooneofthefollowing:
–ForWindows7:ClickControlPanelontheStartmenu.
–ForWindows10:ClicktheStartbuttontoopentheStartmenu,andthenclickWindowsSystem
➙ControlPanel.
2.ViewControlPanelusinglargeiconsorsmallicons,andthenclickProgramsandFeatures.
3.Dooneofthefollowing:
–ToturnsomeWindowsfeaturesoff,clickTurnWindowsfeaturesonoroff.Followthe
instructionsonthescreen.
–Toremovesomeunnecessaryprograms,selecttheprogramyouwanttoremove,andthenclick
Uninstall/ChangeorUninstall.
Insufficientfreememoryspace
Solutions:
•Right-clickablankareaonthetaskbarandopenT askManager.Then,endsometasksyouarenot
performing.
•Installadditionalmemorymodules.Topurchasememorymodules,goto
http://www.lenovo.com.
Serialconnectorcannotbeaccessed
Solutions:
•Connecttheserialcabletotheserialconnectoronthecomputerandtotheserialdevice.Iftheserial
devicehasitsownpowercord,connectthepowercordtoagroundedelectricaloutlet.
•Turnontheserialdeviceandkeepthedeviceonline.
•Installanyapplicationprogramssuppliedwiththeserialdevice.Refertothedocumentationthatcomes
withtheserialdeviceformoreinformation.
•Ifyouaddedoneserial-connectoradapter,installtheadaptercorrectly.
USBdeviceproblems
ThissectionprovidessolutionstoUSBdevice-relatedproblems.
MyUSBdevicecannotbeaccessed
Solutions:
•ConnecttheUSBcablefromtheUSBconnectortotheUSBdevice.IftheUSBdevicehasitsownpower
cord,connectthepowercordtoagroundedelectricaloutlet.
•TurnontheUSBdeviceandkeepthedeviceonline.
•InstallanydevicedriversorapplicationprogramssuppliedwiththeUSBdevice.Refertothe
documentationthatcomeswiththeUSBdeviceformoreinformation.
•DetachandreconnecttheUSBconnectortoresettheUSBdevice.
IcannotinstalltheWindows7operatingsystemusinganexternalUSBdevice
Solution:Gotohttp://www.lenovo.com/supporttodownloadandinstallUSBdrivers.
50ThinkCentreM600UserGuide
Page 61

Softwareanddriverproblems
Thissectionprovidessolutionstosoftware-anddriver-relatedproblems.
Forsomeprograms,datescannotbesortedincorrectorder
Solution:Someprogramsdevelopedbeforetheyear2000useonlythelasttwodigitsofayeartosortdates,
assumingthefirsttwodigitsare19.Consequently,datescannotbesortedincorrectordernowadays.
Checkwithyoursoftwaremanufacturertoseeifanyupdatesareavailable.Manysoftwaremanufacturers
makeupdatesavailablefromtheWorldWideWeb.
Someapplicationprogramsdonotworkasexpected
Solutions:
1.Checkwhethertheproblemiscausedbyanapplicationprogram.
a.Ensurethatthesoftwareiscompatiblewiththecomputer.Refertotheinformationsuppliedwith
thesoftwareformoreinformation.
b.Verifythatothersoftwareworkscorrectlyonthecomputer.
c.Verifythatthesoftwareyouareusingworksonanothercomputer.
2.Iftheproblemiscausedbyanapplicationprogram:
•Refertotheprinteddocumentationthatcomeswiththeprogramorthehelpsystemoftheprogram.
•Updatetheprogram.See“Keepingthecomputercurrent”onpage28
•Uninstalltheprogramandthenreinstallit.Todownloadaprogramthatispreinstalledonthe
computer,gotohttp://www.lenovo.com/supportandfollowtheinstructionsonthescreen.
.
Adevicedoesnotworknormallyduetodevicedriverproblems
Solution:Updatethedevicedriver.See“Keepingthecomputercurrent”onpage28.
Diagnostics
Note:IfyouareusingaWindowsoperatingsystemotherthanWindows7orWindows10,goto
http://www.lenovo.com/diagsforthediagnosticsinformationforthecomputer.
Thediagnosticprogramisusedtotesthardwarecomponentsofthecomputer.Thediagnosticprogramalso
canreportoperating-system-controlledsettingsthatinterferewiththecorrectoperationofthecomputer.
LenovoSolutionCenter
TheLenovoSolutionCenterprogramisthediagnosticprogrampreinstalledonthecomputer.Theprogram
enablesyoutotroubleshootandresolvecomputerproblems.Itcombinesdiagnostictests,system
informationcollection,securitystatus,andsupportinformation,alongwithhintsandtipsformaximum
systemperformance.
ToopentheLenovoSolutionCenterprogram,see“Accessingaprogramonthecomputer”onpage11
moreinformationaboutusingtheprogram,refertothehelpsystemoftheprogram.
IfyouareunabletoisolateandrepairtheproblemyourselfafterrunningLenovoSolutionCenter,save
andprintthelogfilescreatedbytheprogram.Y oumightneedthelogfileswhenyouspeaktoaLenovo
technicalsupportrepresentative.
.For
Recoveryinformation
Thissectionprovidesinstructionsabouthowtorecoveryouroperatingsystem.
Chapter6.T roubleshooting,diagnostics,andrecovery51
Page 62

Note:Ifadevicedoesnotworknormallyafterrecoveringtheoperatingsystem,updatethedevicedriver.
See“Keepingthecomputercurrent”onpage28.
RecoveryinformationforWindows7
TorecoveryourWindows7operatingsystem,usethefollowingsolutions:
•UseWindowsrecoverysolutions.
–UseSystemRestoretorestoresystemfilesandsettingstoanearlierpoint.
1.ClicktheStartbuttontoopentheStartmenu.
2.ClickControlPanel.ViewControlPanelusinglargeiconsorsmallicons,andthenclickRecovery
➙OpenSystemRestore.
3.Followtheinstructionsonthescreen.
–UsetheWindowsrecoveryenvironmentbydoingoneofthefollowing:
–Afterseveralconsecutivefailedbootattempts,theWindowsrecoveryenvironmentmightstart
automatically.Followtheinstructionsonthescreentochoosetheappropriaterecoverysolution.
–Turnonorrestartthecomputer.Then,repeatedlypressandreleasetheF8keyuntiltheAdvanced
BootOptionswindowopens.SelectRepairYourComputer,pressEnter,andfollowtheinstructions
onthescreentochoosetheappropriaterecoverysolution.
Note:Forsomekeyboards,youmightneedtopressFn+F8toopentheAdvancedBootOptions
window.
•UsetheRescueandRecoveryprogramtorestorethestoragedrivefromabackup,orrestoretheC
drivetothefactory-defaultsettings.
Notes:
–Dependingonthecomputermodel,theRescueandRecoveryprogrammightnotbepreinstalled.You
needtoinstalleditmanuallyearlier.
–IfyouusetheRescueandRecoveryprogramtorestorethestoragedrivefromabackup,ensurethat
youbackedupyourdataearlierwiththeprogram.
TousetheRescueandRecoveryprogram,dooneofthefollowing:
–OpentheRescueandRecoveryprogram.See“Accessingaprogramonthecomputer”onpage11
Formoreinformationaboutusingtheprogram,refertothehelpsystemoftheprogram.
–OpentheRescueandRecoveryworkspace.
1.Turnoffthecomputer.PressandholdtheEnterkeyandthenturnonthecomputer.Releasethe
EnterkeywhenStartupInterruptMenuisdisplayed.Then,pressF11toopentheRescueand
Recoveryworkspace.
2.IftheRescueandRecoveryworkspacefailstoopen,usetherescuemediumyoucreatedearlierto
resolvetheproblem.Selecttherescuemediumasthestartupdevice.See“Selectingatemporary
startupdevice”onpage41.Whentherescuemediumstarts,theRescueandRecoveryworkspace
opens.Followtheinstructionsonthescreen.
•UsetherecoverymediumyoucreatedearlierwiththeCreateRecoveryMediaprogramtorestoreonly
theCdriveortheentirestoragedrivetothefactory-defaultsettings.
Note:Tocreatearecoverymedium,see“Goodmaintenancepractices”onpage27.
1.Selecttherecoverymediumasthestartupdevice.See“Selectingatemporarystartupdevice”
onpage41.
2.Followtheinstructionsonthescreentochoosetheappropriaterecoverysolution.
.
52ThinkCentreM600UserGuide
Page 63

•UsetherecoverydiscsetprovidedbyLenovotorestoretheentirestoragedrivetothefactory-default
settings.
–Ifthecomputercomeswiththerecoverydiscset,followtheinstructionsshippedwiththediscset.
–Ifthecomputerdoesnotcomewiththerecoverydiscset,contacttheLenovoCustomerSupport
Centertoorderarecoverydiscset.See“Callingforservice”onpage98
.
RecoveryinformationforWindows10
TorecoveryourWindows10operatingsystem,usethefollowingsolutions:
•UseWindowsrecoverysolutions.
–UserecoverysolutionsinWindowsSettings.
1.ClicktheStartbuttontoopentheStartmenu.
2.ClickSettings➙Update&security➙Recovery.
3.Choosetheappropriaterecoverysolutionbyfollowingtheinstructionsonthescreen.
–UseSystemRestoretorestoresystemfilesandsettingstoanearlierpoint.
1.ClicktheStartbuttontoopentheStartmenu,andthenclickWindowsSystem➙ControlPanel.
2.ViewControlPanelusinglargeiconsorsmallicons,andthenclickRecovery➙OpenSystem
Restore.
3.Followtheinstructionsonthescreen.
–UsetheFileHistorytooltorestoreyourfilesfromabackup.
Note:IfyouusetheFileHistorytooltorestoreyourfilesfromabackup,ensurethatyoubackedup
yourdataearlierwiththetool.
1.ClicktheStartbuttontoopentheStartmenu,andthenclickWindowsSystem➙ControlPanel.
2.ViewControlPanelusinglargeiconsorsmallicons,andthenclickFileHistory➙Restore
personalfiles.
3.Followtheinstructionsonthescreen.
–UsetheWindowsrecoveryenvironmentbydoingoneofthefollowing:
–Afterseveralconsecutivefailedbootattempts,theWindowsrecoveryenvironmentmightstart
automatically.Followtheinstructionsonthescreentochoosetheappropriaterecoverysolution.
–SelecttherecoverymediumyoucreatedearlierwiththeWindowstoolasthestartupdevice.See
“Selectingatemporarystartupdevice”onpage41.Then,followtheinstructionsonthescreen
tochoosetheappropriaterecoverysolution.
Note:Tocreatearecoverymedium,see“Goodmaintenancepractices”onpage27.
•UsetherecoveryUSBkeyprovidedbyLenovotorestoretheentirestoragedrivetothefactory-default
settings.
–IfthecomputercomeswiththerecoveryUSBkey,followtheinstructionsshippedwiththeUSBkey.
–IfthecomputerdoesnotcomewiththerecoveryUSBkey,contacttheLenovoCustomerSupport
CentertoorderarecoveryUSBkey.See“Callingforservice”onpage98
.
Chapter6.T roubleshooting,diagnostics,andrecovery53
Page 64

54ThinkCentreM600UserGuide
Page 65

Chapter7.Installingorreplacinghardware
Thischaptercontainsthefollowingtopics:
•“Handlingstatic-sensitivedevices”onpage55
•“Installingorreplacinghardware”onpage55
Handlingstatic-sensitivedevices
Donotopenthestatic-protectivepackagecontainingthenewpartuntilthedefectiveparthasbeenremoved
andyouarereadytoinstallthenewpart.Staticelectricity,althoughharmlesstoyou,canseriouslydamage
computercomponentsandparts.
Whenyouhandlepartsandothercomputercomponents,taketheseprecautionstoavoidstatic-electricity
damage:
•Limityourmovement.Movementcancausestaticelectricitytobuilduparoundyou.
•Alwayshandlepartsandothercomputercomponentscarefully.HandlePCI/PCI-Expresscards,memory
modules,systemboards,andmicroprocessorsbytheedges.Nevertouchanyexposedcircuitry.
•Preventothersfromtouchingthepartsandothercomputercomponents.
•Touchthestatic-protectivepackagecontainingtheparttoametalexpansion-slotcoverorother
unpaintedmetalsurfaceonthecomputerforatleasttwoseconds.Thisreducesstaticelectricityfrom
thepackageandyourbodybeforeyouinstallorreplaceanewpart.
•Whenpossible,removethenewpartfromthestatic-protectivepackage,andinstallitdirectlyinthe
computerwithoutsettingthepartdown.Whenthisisnotpossible,placethestatic-protectivepackage
thatthepartcameinonasmooth,levelsurfaceandplacethepartonthepackage.
•Donotplacethepartonthecomputercoverorothermetalsurface.
Installingorreplacinghardware
Thissectionprovidesinstructionsonhowtoinstallorreplacehardwareforthecomputer.Y oucanexpand
thecapabilitiesofthecomputerandmaintainthecomputerbyinstallingorreplacinghardware.
Attention:Donotopenthecomputerorattemptanyrepairbeforereadingandunderstandingthe“Read
thisfirst:Importantsafetyinformation”onpageiii
Notes:
•Someofthehardwarepartsinthissectionareoptional.
•UsecomputerpartsprovidedonlybyLenovo.
•Wheninstallingorreplacinganoption,usetheappropriateinstructionsinthissectionalongwiththe
instructionsthatcomewiththeoption.
•Inmostareasoftheworld,LenovorequiresthereturnofthedefectiveCRU.Informationaboutthiswill
comewiththeCRUorwillcomeafewdaysaftertheCRUarrives.
.
Installingexternaloptions
Youcanconnectexternaloptionstothecomputer,suchasexternalspeakers,aprinter,orascanner.For
someexternaloptions,youmustinstalladditionalsoftwareinadditiontomakingthephysicalconnection.
Wheninstallinganexternaloption,see“Hardwarelocations”onpage1toidentifytherequiredconnector.
©CopyrightLenovo2015,2017
55
Page 66

Usetheinstructionsshippedwiththeoptiontohelpyoumaketheconnectionandinstallanysoftware
ordevicedriversthatarerequiredfortheoption.
Replacingthepoweradapter
Attention:Donotopenyourcomputerorattemptanyrepairbeforereadingandunderstandingthe“Read
thisfirst:Importantsafetyinformation”onpageiii.
Toreplacethepoweradapter,dothefollowing:
1.Removeallmediafromthedrivesandturnoffallattacheddevicesandthecomputer.Then,disconnect
allpowercordsfromelectricaloutletsanddisconnectallcablesthatareconnectedtothecomputer.
2.Ifthepoweradapterbracketisavailable,removethepoweradapterbracket.See“Replacingthe
poweradapterbracket”onpage74.
3.Disconnectthepoweradapterfromthecomputer.
Figure10.Removingthepoweradapter
56ThinkCentreM600UserGuide
Page 67

4.Connectthenewpoweradaptertothepoweradapterconnectorattherearofyourcomputerand
aworkableelectricaloutlet.
Figure11.Installingthepoweradapter
5.Ifthepoweradapterbracketisavailable,installthepoweradapterbracket.See“Replacingthepower
adapterbracket”onpage74.
Replacingtheverticalstand
Attention:Donotopenyourcomputerorattemptanyrepairbeforereadingandunderstandingthe“Read
thisfirst:Importantsafetyinformation”onpageiii.
Notes:
•Theverticalstandcomesintwosizes,asmallersizeforcomputerswithnoexternalboxinstalled,anda
largersizeforcomputerswithanexternalopticaldriveboxinstalled.Refertothefigurethatmatchesthe
sizeofyourverticalstandwhenreadingthissection.
Chapter7.Installingorreplacinghardware57
Page 68

•IfyourcomputercomeswithaVESAmountbracket,andyouareinstallingthesmallerverticalstand,
ensurethatyouremovetheVESAmountbracketbeforeyouinstalltheverticalstand.ToremovetheVESA
mountbracket,see“ReplacingtheVESAmountbracket”onpage59
.
Toreplacetheverticalstand,dothefollowing:
1.Removeallmediafromthedrivesandturnoffallattacheddevicesandthecomputer.Then,disconnect
allpowercordsfromelectricaloutletsanddisconnectallcablesthatareconnectedtothecomputer.
2.Liftthecomputertoremoveitfromtheverticalstand.
Figure12.Removingthecomputerfromtheverticalstand
58ThinkCentreM600UserGuide
Page 69

3.Aligntherearofthecomputerwiththerearofthenewverticalstandandpositionthecomputeron
theverticalstandasshown.
Figure13.Installingtheverticalstand
ReplacingtheVESAmountbracket
Attention:Donotopenyourcomputerorattemptanyrepairbeforereadingandunderstandingthe“Read
thisfirst:Importantsafetyinformation”onpageiii.
Note:IfyourcomputercomeswithaVESAmountbracket,donotinstalladustshield.
ToreplacetheVESAmountbracket,dothefollowing:
1.Removeallmediafromthedrivesandturnoffallattacheddevicesandthecomputer.Then,disconnect
allpowercordsfromelectricaloutletsanddisconnectallcablesthatareconnectedtothecomputer.
2.Ifthepoweradapterbracketisavailable,removethepoweradapterbracket.See“Replacingthe
poweradapterbracket”onpage74.
Chapter7.Installingorreplacinghardware59
Page 70

3.RemovethetwoscrewsthatsecuretheVESAmountbrackettothecomputer.
Figure14.RemovingtheVESAmountbracketscrews
4.SlidethecomputerfromthefrontoftheVESAmountbrackettoremovetheVESAmountbracket
fromthecomputer.
Figure15.RemovingtheVESAmountbracket
60ThinkCentreM600UserGuide
Page 71

5.SlidethecomputerintothenewVESAmountbracket.
Figure16.InstallingtheVESAmountbracket
6.InstallthetwoscrewstosecuretheVESAmountbrackettothecomputer.
Figure17.InstallingtheVESAmountbracketscrews
7.Ifthepoweradapterbracketisavailable,installthepoweradapterbracket.See“Replacingthepower
adapterbracket”onpage74.
Replacingtheexternalopticaldrive(for10G8,10G9,10GA,10GB,10GC, 10GD,10GE,and10GF)
Attention:Donotopenyourcomputerorattemptanyrepairbeforereadingandunderstandingthe“Read
thisfirst:Importantsafetyinformation”onpageiii
Toreplacetheexternalopticaldrive,dothefollowing:
1.Removeallmediafromthedrivesandturnoffallattacheddevicesandthecomputer.Then,disconnect
allpowercordsfromelectricaloutletsanddisconnectallcablesthatareconnectedtothecomputer.
.
Chapter7.Installingorreplacinghardware61
Page 72

2.DisconnecttheexternalopticaldriveadapterfromtheUSBconnectorsontheexternalopticaldrive
andthecomputer.
3.RemovethescrewthatsecurestheexternalopticaldriveboxontheVESAmountbracketandthenslide
theexternalopticaldriveboxasshowntoremoveitfromtheVESAmountbracket.
Figure18.Removingtheexternalopticaldrivebox
62ThinkCentreM600UserGuide
Page 73

4.Removethescrewthatsecurestheexternalopticaldriveintheexternalopticaldrivebox.Usethe
screwdrivertoslidetheexternalopticaldriveforwardandthenremovetheexternalopticaldrivefrom
theexternalopticaldrivebox.
Figure19.Removingtheexternalopticaldrivefromtheexternalopticaldrivebox
5.Removethetwoscrewsthatsecuretheexternalopticaldrivemetalplateandthenremovethemetal
platefromtheexternalopticaldrive.
Figure20.Removingtheexternalopticaldrivemetalplate
Chapter7.Installingorreplacinghardware63
Page 74

6.Alignthetwoscrewholesintheexternalopticaldrivemetalplatewiththecorrespondingholesin
thenewexternalopticaldriveandtheninstallthetwoscrewstosecurethemetalplateonthenew
externalopticaldrive.
Figure21.Installingtheexternalopticaldrivemetalplate
7.Slidethenewexternalopticaldriveintotheexternalopticaldriveboxuntilitsnapsintoposition.
Figure22.Installingtheexternalopticaldriveintotheexternalopticaldrivebox
64ThinkCentreM600UserGuide
Page 75

8.Installthescrewtosecuretheexternalopticaldriveintheexternalopticaldrivebox.
Figure23.Installingtheexternalopticaldrivescrew
Chapter7.Installingorreplacinghardware65
Page 76

9.AlignthetwoscrewholesintheexternalopticaldriveboxwiththetwoscrewsontheVESAmount
bracketandthenslidetheexternalopticaldriveboxasshowntoinstallitontheVESAmountbracket.
Figure24.Installingtheexternalopticaldrivebox
66ThinkCentreM600UserGuide
Page 77

10.InstallthescrewtosecuretheexternalopticaldriveboxontheVESAmountbracket.
Figure25.Installingtheexternalopticaldriveboxscrew
11.ConnecttheexternalopticaldriveadaptertotheUSBconnectorsontheexternalopticaldriveandthe
computer.See“Rearview”onpage3.
ReplacingtheI/Obox(for10G8,10G9,10GA,10GB,10GC,10GD,10GE, and10GF)
Attention:Donotopenyourcomputerorattemptanyrepairbeforereadingandunderstandingthe“Read
thisfirst:Importantsafetyinformation”onpageiii.
ToreplacetheI/Obox,dothefollowing:
1.Removeallmediafromthedrivesandturnoffallattacheddevicesandthecomputer.Then,disconnect
allpowercordsfromelectricaloutletsanddisconnectallcablesthatareconnectedtothecomputer.
2.DisconnecttheI/OboxcablefromtheUSBconnectorsonthecomputer.
Chapter7.Installingorreplacinghardware67
Page 78

3.RemovethescrewthatsecurestheI/OboxontheVESAmountbracketandthenslidetheI/Oboxas
showntoremoveitfromtheVESAmountbracket.
Figure26.RemovingtheI/Obox
68ThinkCentreM600UserGuide
Page 79

4.AlignthetwoscrewholesinthenewI/OboxwiththetwoscrewsontheVESAmountbracketandthen
slidetheI/OboxasshowntoinstallitontheVESAmountbracket.
Figure27.InstallingtheI/Obox
Chapter7.Installingorreplacinghardware69
Page 80

5.InstallthescrewtosecuretheI/OboxontheVESAmountbracket.
Figure28.InstallingtheI/Oboxscrew
6.ConnecttheI/OboxcabletotheUSBconnectorsonthecomputer.See“Rearview”onpage3.
Replacingtheexternalbatterybox(for10G8,10G9,10GA,10GB,10GC, 10GD,10GE,and10GF)
Attention:Donotopenyourcomputerorattemptanyrepairbeforereadingandunderstandingthe“Read
thisfirst:Importantsafetyinformation”onpageiii
Toreplacetheexternalbatterybox,dothefollowing:
1.Removeallmediafromthedrivesandturnoffallattacheddevicesandthecomputer.Then,disconnect
allpowercordsfromelectricaloutletsanddisconnectallcablesthatareconnectedtothecomputer.
2.DisconnecttheexternalbatteryboxcablefromtheUSBconnectoronthecomputer.
.
70ThinkCentreM600UserGuide
Page 81

3.RemovethescrewthatsecurestheexternalbatteryboxontheVESAmountbracketandthenslidethe
externalbatteryboxasshowntoremoveitfromtheVESAmountbracket.
Figure29.Removingtheexternalbatterybox
4.Slidethereleasebuttonontheexternalbatteryboxasshownanduseascrewdrivertoslidethebattery
forwardatthesametime.Then,removethebatteryfromtheexternalbatterybox.
Figure30.Removingthebatteryfromtheexternalbatterybox
Chapter7.Installingorreplacinghardware71
Page 82

5.Slidethenewbatteryintotheexternalbatteryboxuntilitsnapsintoposition.
Figure31.Installingthebatteryintotheexternalbatterybox
72ThinkCentreM600UserGuide
Page 83

6.AlignthetwoscrewholesintheexternalbatteryboxwiththetwoscrewsontheVESAmountbracket
andthenslidetheexternalbatteryboxasshowntoinstallitontheVESAmountbracket.
Figure32.Installingtheexternalbatterybox
Chapter7.Installingorreplacinghardware73
Page 84

7.InstallthescrewtosecuretheexternalbatteryboxontheVESAmountbracket.
Figure33.Installingtheexternalbatteryboxscrew
8.ConnecttheexternalbatteryboxcabletoaUSBconnectoronthecomputer.See“Rearview”onpage3.
Replacingthepoweradapterbracket
Attention:Donotopenyourcomputerorattemptanyrepairbeforereadingandunderstandingthe“Read
thisfirst:Importantsafetyinformation”onpageiii.
Note:ThepoweradapterbracketisinstalledontheVideoElectronicsStandardsAssociation(VESA)mount
bracket.
Toreplacethepoweradapterbracket,dothefollowing:
1.Removeallmediafromthedrivesandturnoffallattacheddevicesandthecomputer.Then,disconnect
allpowercordsfromelectricaloutletsanddisconnectallcablesthatareconnectedtothecomputer.
74ThinkCentreM600UserGuide
Page 85

2.Pullthetab1andthenslidethepoweradapterbracketasshowntoremoveitfromtheVESAmount
bracket.
Figure34.Removingthepoweradapterbracket
3.Removethepoweradapterfromthepoweradapterbracket.
4.Slidethepoweradapterintothenewpoweradapterbracket.Ensurethatthepoweradapterissecured
bythebracket.
5.AlignthetwotabsonthepoweradapterbracketwiththeslotsintheVESAmountbracket.Then,slide
thepoweradapterbracketasshowntoinstallitontheVESAmountbracket.
Figure35.Installingthepoweradapterbracket
Chapter7.Installingorreplacinghardware75
Page 86

Removingthecomputercover
Attention:Donotopenyourcomputerorattemptanyrepairbeforereadingandunderstandingthe“Read
thisfirst:Importantsafetyinformation”onpageiii.
CAUTION:
Beforeyouopenthecomputercover,turnoffthecomputerandwaitseveralminutesuntilthe
computeriscool.
Toremovethecomputercover,dothefollowing:
1.Removeanymediafromthedrivesandturnoffallconnecteddevicesandthecomputer.Then,
disconnectallpowercordsfromelectricaloutletsanddisconnectallcablesthatareconnectedtothe
computer.
2.Holdthesidesofyourcomputerandgentlylayitdownsothatthecomputercoverisfacingup.
3.Unlockanylockingdevicethatsecuresthecomputercover.
4.Ifyourcomputercomeswithadustshield,removethedustshieldbypullingitoutwardsfromthe
computercover.
Figure36.Removingthedustshield
76ThinkCentreM600UserGuide
Page 87

5.Removethescrewthatsecuresthecomputercover.
Figure37.Removingthecomputercoverscrew
Chapter7.Installingorreplacinghardware77
Page 88

6.Slidethecomputercovertothefrontofthecomputerasmallamount.Then,liftthecomputercoverto
removeitfromthecomputer.
Figure38.Removingthecomputercover
Figure39.Removingthecomputercover
Replacingthesystemfan(for10G8,10G9,10GA,10GB,10GC,10GD, 10GE,and10GF)
Attention:Donotopenyourcomputerorattemptanyrepairbeforereadingandunderstandingthe“Read
thisfirst:Importantsafetyinformation”onpageiii.
Toreplacethefrontfan,dothefollowing:
1.Removeanymediafromthedrivesandturnoffallconnecteddevicesandthecomputer.Then,
disconnectallpowercordsfromelectricaloutletsanddisconnectallcablesthatareconnectedtothe
computer.
78ThinkCentreM600UserGuide
Page 89

2.Removethecomputercover.See“Removingthecomputercover”onpage76.
3.Disconnectthesystemfancablefromthesystemfanconnectoronthesystemboard.See“Partson
thesystemboard”onpage7.
4.Removethefourscrewsthatsecurethesystemfan,andthenremovethesystemfanasshown.
Figure40.Removingthesystemfan
5.Positionthenewsystemfanasshown,andalignthefourscrewholesinthesystemfanwiththe
correspondingmountingstudsonthesystemboard.Then,installthefourscrewstosecurethesystem
fantothechassis.
Figure41.Installingthesystemfan
Chapter7.Installingorreplacinghardware79
Page 90

6.Connectthecableofthenewsystemfantothesystemfanconnectoronthesystemboard.See
“Partsonthesystemboard”onpage7.
Whattodonext:
•Toworkwithanotherpieceofhardware,gototheappropriatesection.
•Tocompletetheinstallationorreplacement,goto“Completingthepartsreplacement”onpage94
Replacingtheheatsink
Attention:Donotopenyourcomputerorattemptanyrepairbeforereadingandunderstandingthe“Read
thisfirst:Importantsafetyinformation”onpageiii.
CAUTION:
Theheatsinkandfanassemblymightbeveryhot.Beforeyouopenthecomputercover,turnoffthe
computerandwaitseveralminutesuntilthecomputeriscool.
For10G8,10G9,10GA,10GB,10GC,10GD,10GE,and10GF
Toreplacetheheatsink,dothefollowing:
1.Removeanymediafromthedrivesandturnoffallconnecteddevicesandthecomputer.Then,
disconnectallpowercordsfromelectricaloutletsanddisconnectallcablesthatareconnectedtothe
computer.
2.Removethecomputercover.See“Removingthecomputercover”onpage76.
.
80ThinkCentreM600UserGuide
Page 91

3.Partiallyremovescrew1,fullyremovescrew2,andthenfullyremovescrew1.Then,liftthefailing
heatsinkoffthesystemboard.
Notes:
•Carefullyremovethetwoscrewsfromthesystemboardtoavoidanypossibledamagetothesystem
board.Thetwoscrewscannotberemovedfromtheheatsink.
•Donottouchthethermalgreasewhilehandlingtheheatsink.
Figure42.Removingtheheatsink
4.Positionthenewheatsinkonthesystemboardsothatthetwoscrewsalignwiththecorresponding
mountingstudsonthesystemboard.Ensurethatthenotchededgeoftheheatsinkfacestoward
thesystemfan.
5.Partiallytightenscrew1,thenfullytightenscrew2,andthenfullytightenscrew1.Donotover-tighten
thescrews.
Whattodonext:
•Toworkwithanotherpieceofhardware,gototheappropriatesection.
•Tocompletetheinstallationorreplacement,goto“Completingthepartsreplacement”onpage94.
For10KG,10KH,10KJ,and10KK
Toreplacetheheatsink,dothefollowing:
1.Removeanymediafromthedrivesandturnoffallconnecteddevicesandthecomputer.Then,
disconnectallpowercordsfromelectricaloutletsanddisconnectallcablesthatareconnectedtothe
computer.
2.Removethecomputercover.See“Removingthecomputercover”onpage76.
Chapter7.Installingorreplacinghardware81
Page 92

3.Removethescrews1and2,andthenloosenthefourscrewsthatsecuretheheatsinktothesystem
boardinthefollowingsequence:
a.Partiallyremovescrew3,fullyremovescrew4,andthenfullyremovescrew3.
b.Partiallyremovescrew5,fullyremovescrew6,andthenfullyremovescrew5.
Note:Carefullyremovethefourscrews3to6fromthesystemboardtoavoidanypossibledamageto
thesystemboard.Thefourscrewscannotberemovedfromtheheatsink.
Figure43.Removingtheheatsink
4.Liftthefailingheatsinkoffthesystemboard.
Notes:
•Youmighthavetogentlytwisttheheatsinktofreeitfromthemicroprocessor.
•Donottouchthethermalgreasewhilehandlingtheheatsink.
5.Positionthenewheatsinkonthesystemboardsothatthefourscrews3to6alignwiththe
correspondingmountingstudsonthesystemboard.
6.Tightenthefourscrews3to6tosecurethenewheatsinkinthefollowingsequence.Donot
over-tightenthescrews.
a.Partiallytightenscrew3,fullytightenscrew4,andthenfullytightenscrew3.
b.Partiallytightenscrew5,fullytightenscrew6,andthenfullytightenscrew5.
7.Installthescrews1and2.
Whattodonext:
•Toworkwithanotherpieceofhardware,gototheappropriatesection.
•Tocompletetheinstallationorreplacement,goto“Completingthepartsreplacement”onpage94
Replacingthememorymodule
Attention:Donotopenyourcomputerorattemptanyrepairbeforereadingandunderstandingthe“Read
thisfirst:Importantsafetyinformation”onpageiii
.
.
Toreplacethememorymodule,dothefollowing:
82ThinkCentreM600UserGuide
Page 93

1.Removeanymediafromthedrivesandturnoffallconnecteddevicesandthecomputer.Then,
disconnectallpowercordsfromelectricaloutletsanddisconnectallcablesthatareconnectedtothe
computer.
2.Removethecomputercover.See“Removingthecomputercover”onpage76.
3.Locatethememorymodule.See“Computercomponents”onpage5.
4.Removeanypartsthatmightpreventyouraccesstothememorymodule.Dependingonyourcomputer
model,youmightneedtoremovetheheatsink.See“Replacingtheheatsink”onpage80
.
5.Opentheretainingclipsandgentlypullthememorymoduleoutofthememoryslot.
Figure44.Removingthememorymodule
6.Insertthenotchedend2ofthenewmemorymoduleintotheslot1.Pressthememorymodule
firmlyandpivotthememorymoduleuntilitsnapsintoplace.Makesurethatthememorymoduleis
securedintheslotanddoesnotmoveeasily.
Figure45.Installingthememorymodule
7.Reinstalltheheatsinkifyouhaveremovedit.See“Replacingtheheatsink”onpage80.
Whattodonext:
•Toworkwithanotherpieceofhardware,gototheappropriatesection.
•Tocompletetheinstallationorreplacement,goto“Completingthepartsreplacement”onpage94.
Chapter7.Installingorreplacinghardware83
Page 94

Replacingtheinternalspeaker
Attention:Donotopenyourcomputerorattemptanyrepairbeforereadingandunderstandingthe“Read
thisfirst:Importantsafetyinformation”onpageiii.
Toreplacetheinternalspeaker,dothefollowing:
1.Removeanymediafromthedrivesandturnoffallconnecteddevicesandthecomputer.Then,
disconnectallpowercordsfromelectricaloutletsanddisconnectallcablesthatareconnectedtothe
computer.
2.Removethecomputercover.See“Removingthecomputercover”onpage76.
3.Disconnecttheinternalspeakercablefromtheinternalspeakerconnectoronthesystemboard.See
“Partsonthesystemboard”onpage7.
4.Pressthetab1thatsecurestheinternalspeakerasshown,andthenlifttheinternalspeakeroutof
theinternalspeakerholder.
Figure46.Removingtheinternalspeaker(for10G8,10G9,10GA,10GB,10GC,10GD,10GE,and10GF)
Figure47.Removingtheinternalspeaker(for10KG,10KH,10KJ,and10KK)
84ThinkCentreM600UserGuide
Page 95

5.Insertthenewinternalspeakerintotheinternalspeakerholderuntilthenewinternalspeakersnapsinto
positionandissecuredbythetab1.
Figure48.Installingtheinternalspeaker(for10G8,10G9,10GA,10GB,10GC,10GD,10GE,and10GF)
Figure49.Installingtheinternalspeaker(for10KG,10KH,10KJ,and10KK)
6.Securethecableofthenewinternalspeakerintheretainingcliponthesideoftheinternalspeaker
holderasshown.
Chapter7.Installingorreplacinghardware85
Page 96

Figure50.Securingtheinternalspeakercable(for10G8,10G9,10GA,10GB,10GC,10GD,10GE,and10GF)
Figure51.Securingtheinternalspeakercable(for10KG,10KH,10KJ,and10KK)
7.Connectthecableofthenewinternalspeakertotheinternalspeakerconnectoronthesystemboard.
See“Partsonthesystemboard”onpage7.
Whattodonext:
•Toworkwithanotherpieceofhardware,gototheappropriatesection.
•Tocompletetheinstallationorreplacement,goto“Completingthepartsreplacement”onpage94
Replacingthestoragedrive
Attention:Donotopenyourcomputerorattemptanyrepairbeforereadingandunderstandingthe“Read
thisfirst:Importantsafetyinformation”onpageiii
Toreplacethestoragedrive,refertooneofthefollowingtopics:
86ThinkCentreM600UserGuide
.
.
Page 97

•“Replacingthe2.5-inchstoragedrive(for10G8,10G9,10GA,10GB,10GC,10GD,10GE,and10GF)”
onpage87
•“ReplacingtheM.2storagedrive”onpage89
Replacingthe2.5-inchstoragedrive(for10G8,10G9,10GA,10GB,10GC,10GD,
10GE,and10GF)
Toreplacethe2.5-inchstoragedrive,dothefollowing:
1.Removeanymediafromthedrivesandturnoffallconnecteddevicesandthecomputer.Then,
disconnectallpowercordsfromelectricaloutletsanddisconnectallcablesthatareconnectedtothe
computer.
2.Removethecomputercover.See“Removingthecomputercover”onpage76.
3.IfyourcomputercomeswithafrontWi-Fiantenna,disconnectthefrontWi-Fiantennacablefromthe
Wi-Ficard.
4.Removethescrewthatsecuresthestoragedrivebracket.Slidethestoragedrivebracketasshown,and
thenliftthestoragedrivebrackettoremoveitfromthecomputer.
Figure52.Removingthestoragedrivebracket
5.Slidethe2.5-inchstoragedriveasshown,andthenliftthe2.5-inchstoragedrivetoremoveitfromthe
storagedrivebracket.
Figure53.Removingthe2.5-inchstoragedrive
Chapter7.Installingorreplacinghardware87
Page 98

6.Positionthenew2.5-inchstoragedriveonthestoragedrivebracketsothatthefourscrews1onthe
2.5-inchstoragedrivealignwiththecorrespondingslotsinthestoragedrivebracket.Slidethe2.5-inch
storagedriveintopositionasshown.
Figure54.Installingthe2.5-inchstoragedrive
7.Positionthestoragedrivebracketonthesystemboardsothatthethreeslotsonthestoragedrive
bracketalignwiththecorrespondingstandoffsonthesystemboard.Slidethestoragedrivebracket
asshown,untilthescrewholeinthestoragedrivebracketalignswiththecorrespondingmounting
studonthesystemboard,andthe2.5-inchstoragedriveisinstalledontheSATA3.0connector
onthesystemboard.
Figure55.Installingthestoragedrivebracket
88ThinkCentreM600UserGuide
Page 99

8.Installthescrewtosecurethestoragedrivebrackettothesystemboard.
Figure56.Installingthestoragedrivebracketscrew
9.IfyouhavedisconnectedthefrontWi-Fiantennacable,reconnectittotheWi-Ficard.
Whattodonext:
•Toworkwithanotherpieceofhardware,gototheappropriatesection.
•Tocompletetheinstallationorreplacement,goto“Completingthepartsreplacement”onpage94.
ReplacingtheM.2storagedrive
Note:TheM.2storagedrivemightcomeintwosizes,asmallersizeasshownontheleftsideandalarger
sizeontherightsideasshowninthefiguresinthissection.RefertothefigurethatmatchesyourM.2
storagedrivewhenreadingthissection.IfyourcomputercomeswiththesmallerM.2storagedrive,youwill
notbeabletoreplaceitwithalargerM.2storagedrive.
ToreplacetheM.2storagedrive,dothefollowing:
1.Removeanymediafromthedrivesandturnoffallconnecteddevicesandthecomputer.Then,
disconnectallpowercordsfromelectricaloutletsanddisconnectallcablesthatareconnectedtothe
computer.
2.Removethecomputercover.See“Removingthecomputercover”onpage76.
3.LocatetheM.2storagedrive.See“Computercomponents”onpage5.
4.RemoveanypartsthatmightpreventyouraccesstotheM.2storagedrive.Dependingonyour
computermodel,youmightneedtoremovetheheatsinkorthestoragedrivebracket.See“Replacing
theheatsink”onpage80or“Replacingthe2.5-inchstoragedrive(for10G8,10G9,10GA,10GB,10GC,
10GD,10GE,and10GF)”onpage87
.
Chapter7.Installingorreplacinghardware89
Page 100

5.PullouttheplasticfastenerthatsecurestheM.2storagedrivesothattheM.2storagedrivepopsup.
Figure57.RemovingtheM.2storagedrivescrew
6.PulltheM.2storagedriveoutoftheM.2storagedriveslot.
Figure58.RemovingtheM.2storagedrive
7.InsertthenewM.2storagedriveintotheM.2storagedriveslot.Ensurethatthesidewiththecircuit
boardisfacingdown.Then,pivottheM.2storagedrivedownwardsothatthefastenernotchontheM.2
storagedrivealignswiththeplasticmountingstudonthesystemboard.
Figure59.InstallingtheM.2storagedrive
90ThinkCentreM600UserGuide
 Loading...