

Lenovo Serial Hard Drive Bay Adapter, ThinkPad User Manual

Serial Hard Drive Bay Adapter
User’ s Gui de

Note: Before using this information and the product it supports, read the information
in Appendix A, “Service and Support,” on page A-1, and Appendix B, “Warranty
information,” on page B-1
First Edition (September 2005)
© Copyright Lenovo 2005.
Portions © Copyright International Business Machines Corporation 2003.
All rights reserved.
U.S. GOVERNMENT USERS – RESTRICTED RIGHTS: Our products and/or services are
provided with RESTRICTED RIGHTS. Use, duplication or disclosure by the Government
is subject to the GSA ADP Schedule contract with Lenovo Group Limited, if any, or the
standard terms of this commercial license, or if the agency is unable to accept this
Program under these terms, then we provide this Program under the provisions set forth
in Commercial Computer Software–Restricted Rights at FAR 52.227-19, when applicable,
or under Rights in Data-General, FAR 52.227.14 (Alternate III).

Contents
About this book . . . . . . . . . . . . . . . . . . . . .v
Registering your option . . . . . . . . . . . . . . . . . .v
Installation . . . . . . . . . . . . . . . . . . . . . . 1-1
Handling the drive . . . . . . . . . . . . . . . . . . . 1-1
Installing a new hard disk drive into the adapter . . . . . . . . . 1-2
Installing the ThinkPad system hard disk drive into the adapter . . . . 1-3
Appendix A. Service and Support . . . . . . . . . . . . . . A-1
Online technical support . . . . . . . . . . . . . . . . . A-1
Telephone technical support . . . . . . . . . . . . . . . . A-1
Appendix B. Warranty information . . . . . . . . . . . . . B-1
Worldwide telephone list . . . . . . . . . . . . . . . . . B-15
Guarantee supplement for Mexico . . . . . . . . . . . . . . B-19
Appendix C. Notices . . . . . . . . . . . . . . . . . . C-1
Trademarks . . . . . . . . . . . . . . . . . . . . . . C-2
Electronic emission notices . . . . . . . . . . . . . . . . . C-2
Federal Communications Commission (FCC) Declaration of Conformity C-2
© Copyright Lenovo 2005. © Portions Copyright IBM Corp. 2003. iii

iv Serial Hard Drive Bay Adapter User’s Guide

About this book
The ThinkPad
®
Serial Hard Drive Bay Adapter can only be installed into an
Ultrabay
™
that is compatible with serial (SATA) hard drives.
Your option package contains this user’s guide and the adapter.
If any of the items listed above are missing or damaged, contact your place of
purchase. Be sure to retain your proof of purchase; it might be required to
receive warranty service.
Registering your option
Thank you for purchasing this Lenovo
™
product. Please take a few moments
to register your product and provide us with information that will help
Lenovo to better serve you in the future. Your feedback is valuable to us in
developing products and services that are important to you, as well as in
developing better ways to communicate with you. Register your option on the
following We b site:
http://www.lenovo.com/register
Lenovo will send you information and updates on your registered product
unless you indicate on the Web site questionnaire that you do not want to
receive further information.
© Copyright Lenovo 2005. © Portions Copyright IBM Corp. 2003. v

vi Serial Hard Drive Bay Adapter User’s Guide

Installation
This section provides information on installing a supported hard disk drive
into your Ultrabay media bay using the ThinkPad Serial Hard Drive Bay
Adapter.
Note: The adapter supports only the 2.5-in. ThinkPad Serial ATA Hard Disk
Drive. It does not support ThinkCentre
®
hard disk drives, Lenovo China
hard disk drives or hard disk drives from other companies.
Handling the drive
To protect the hard disk drive during installation, observe the following
precautions:
v Keep the drive in its static-protective bag until you are ready to install the
drive in your ThinkPad computer. If you must put the drive down, place the
static-protective bag on a flat, padded surface, and place the drive on the
bag with the component side facing up.
v Handle the drive with care. Dropping or jarring the drive can damage the
components inside the drive housing.
v Limit your movement. Movement can cause static electricity buildup.
v Do not subject the drive to physical shocks.
v Handle the drive by the edges.
v Do not touch any exposed components on the drive.
v Do not apply pressure to the cover of the drive.
Attention
The drive is very sensitive. Incorrect handling can cause damage and
permanent loss of data on the hard disk.
© Copyright Lenovo 2005. © Portions Copyright IBM Corp. 2003. 1-1
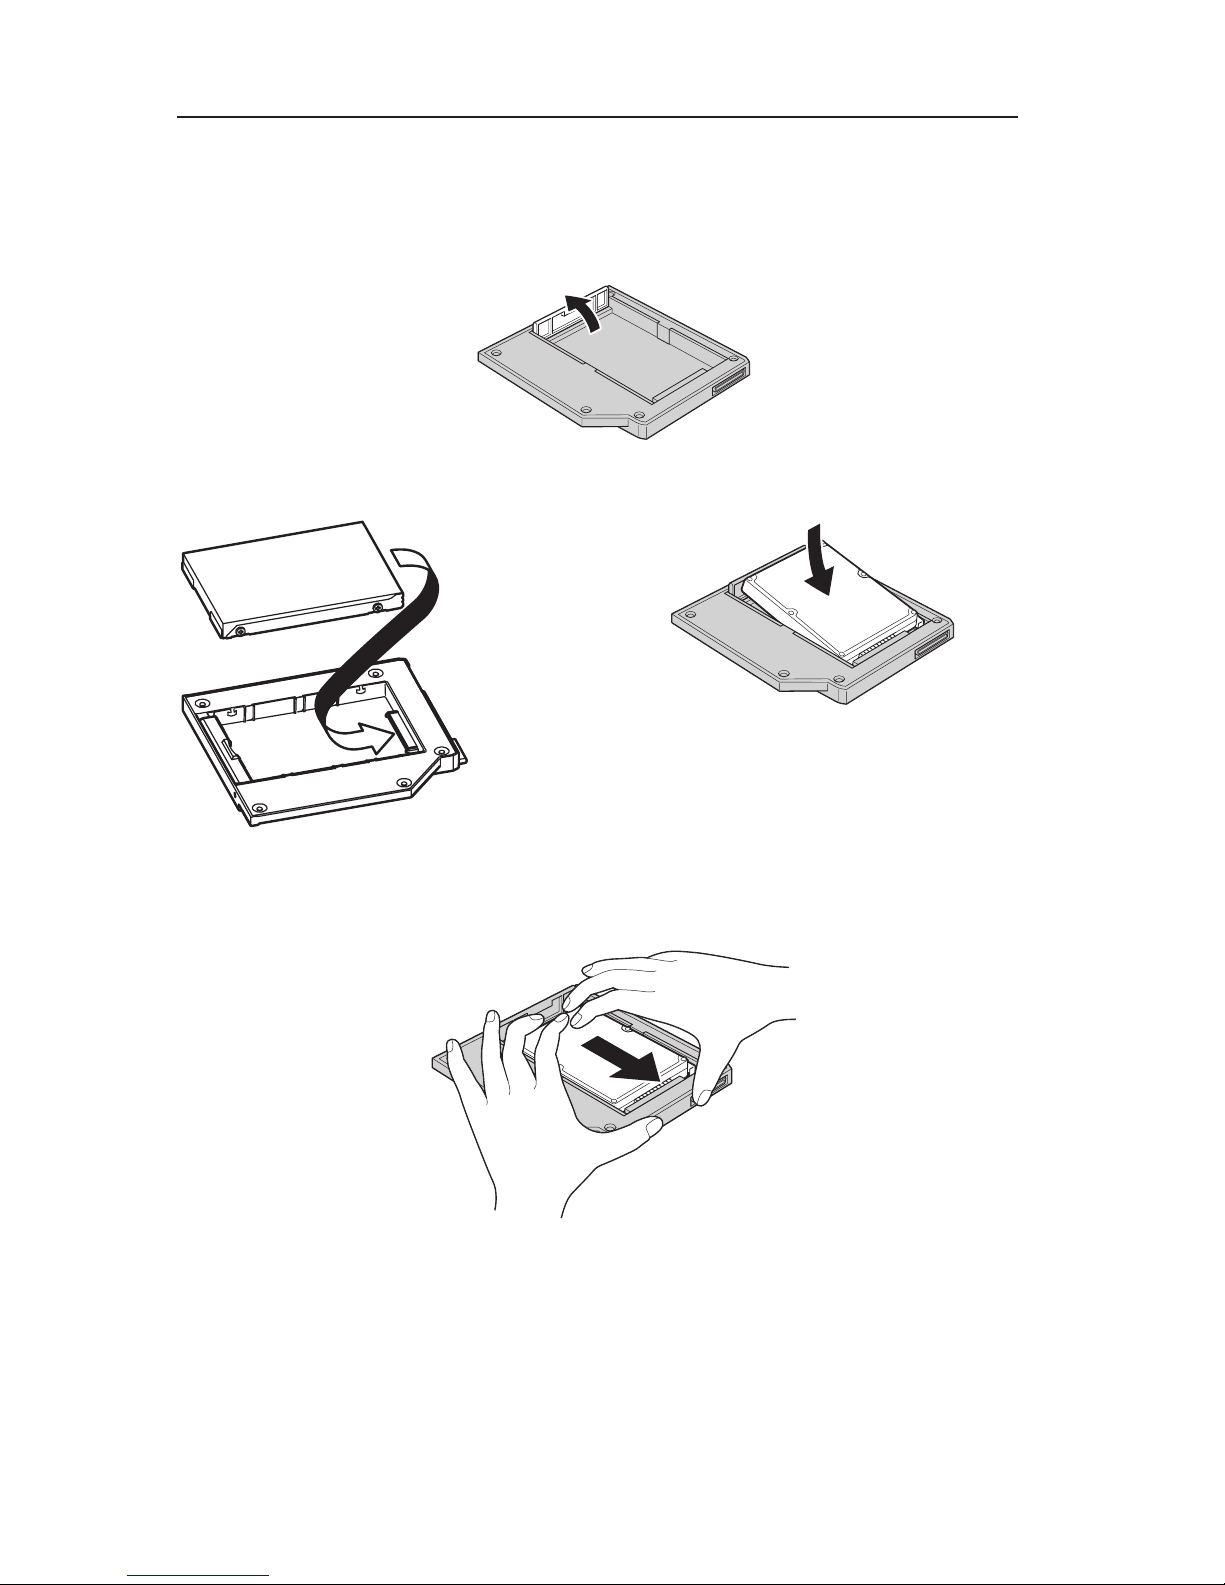
Installing a new hard disk drive into the adapter
To install a new hard disk drive into the adapter, complete the following
procedure:
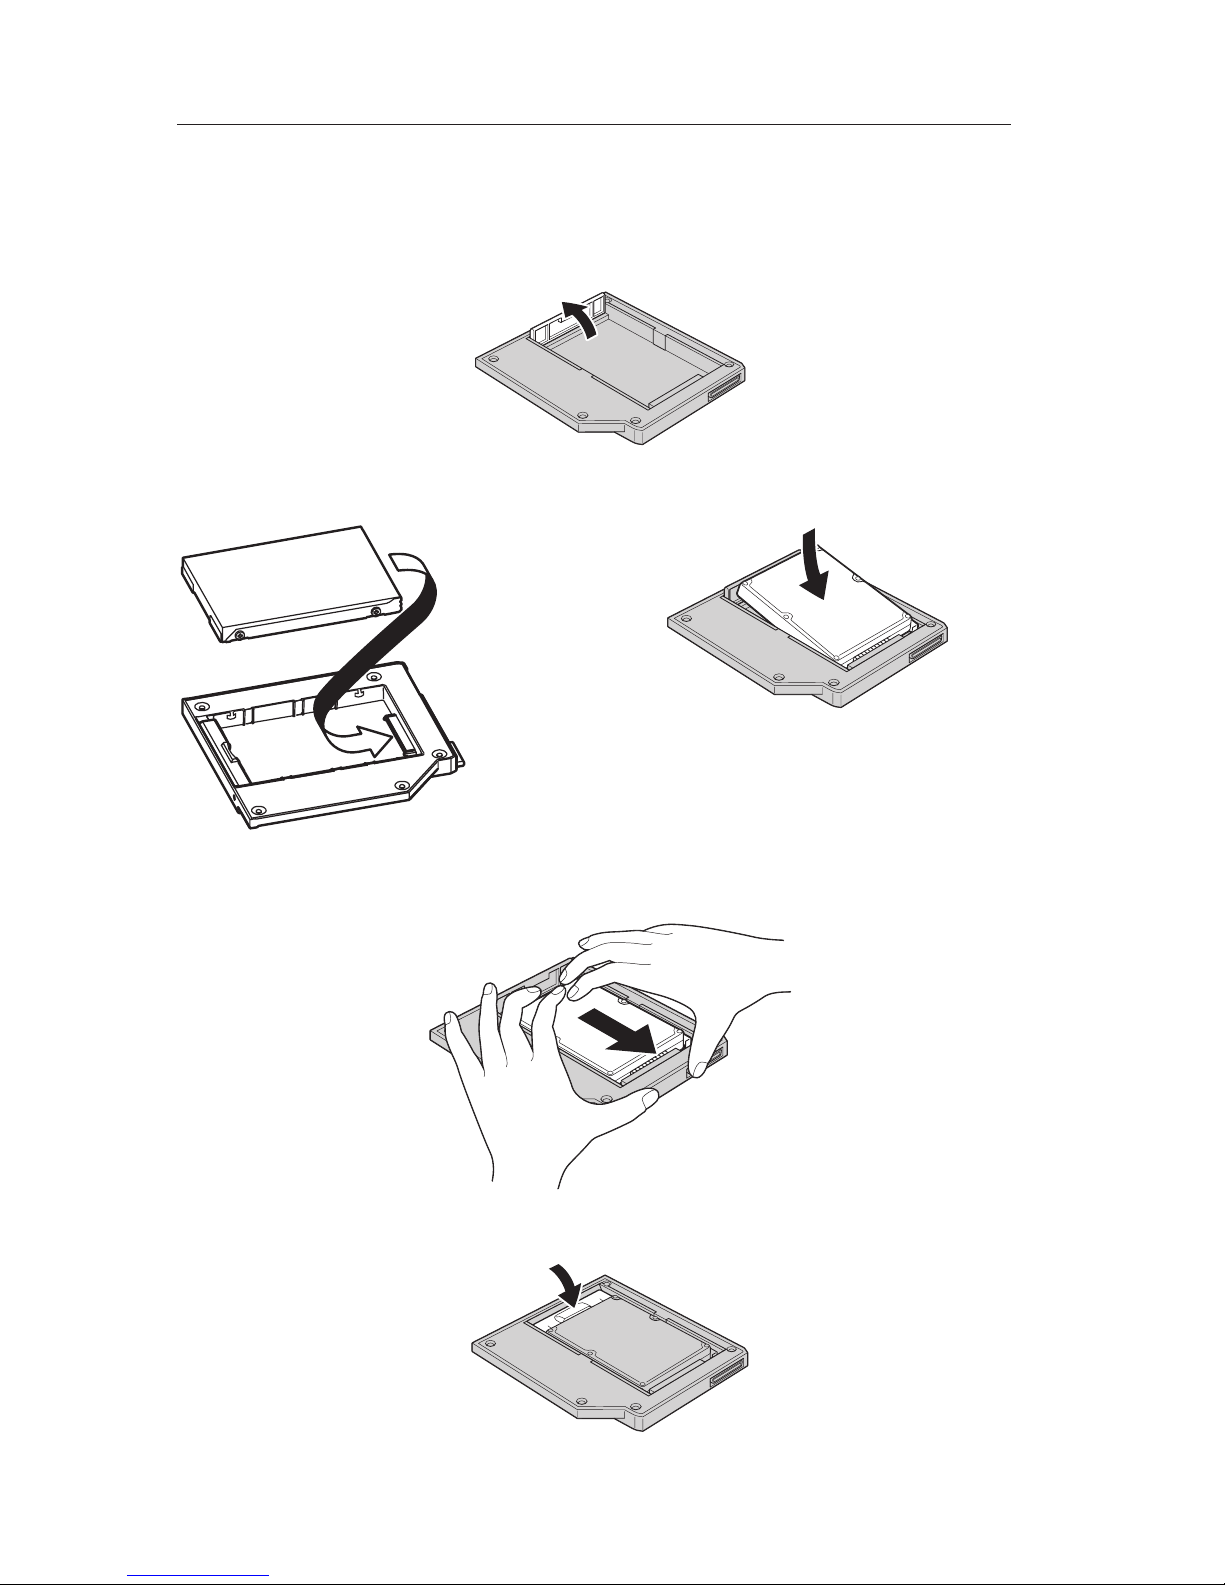
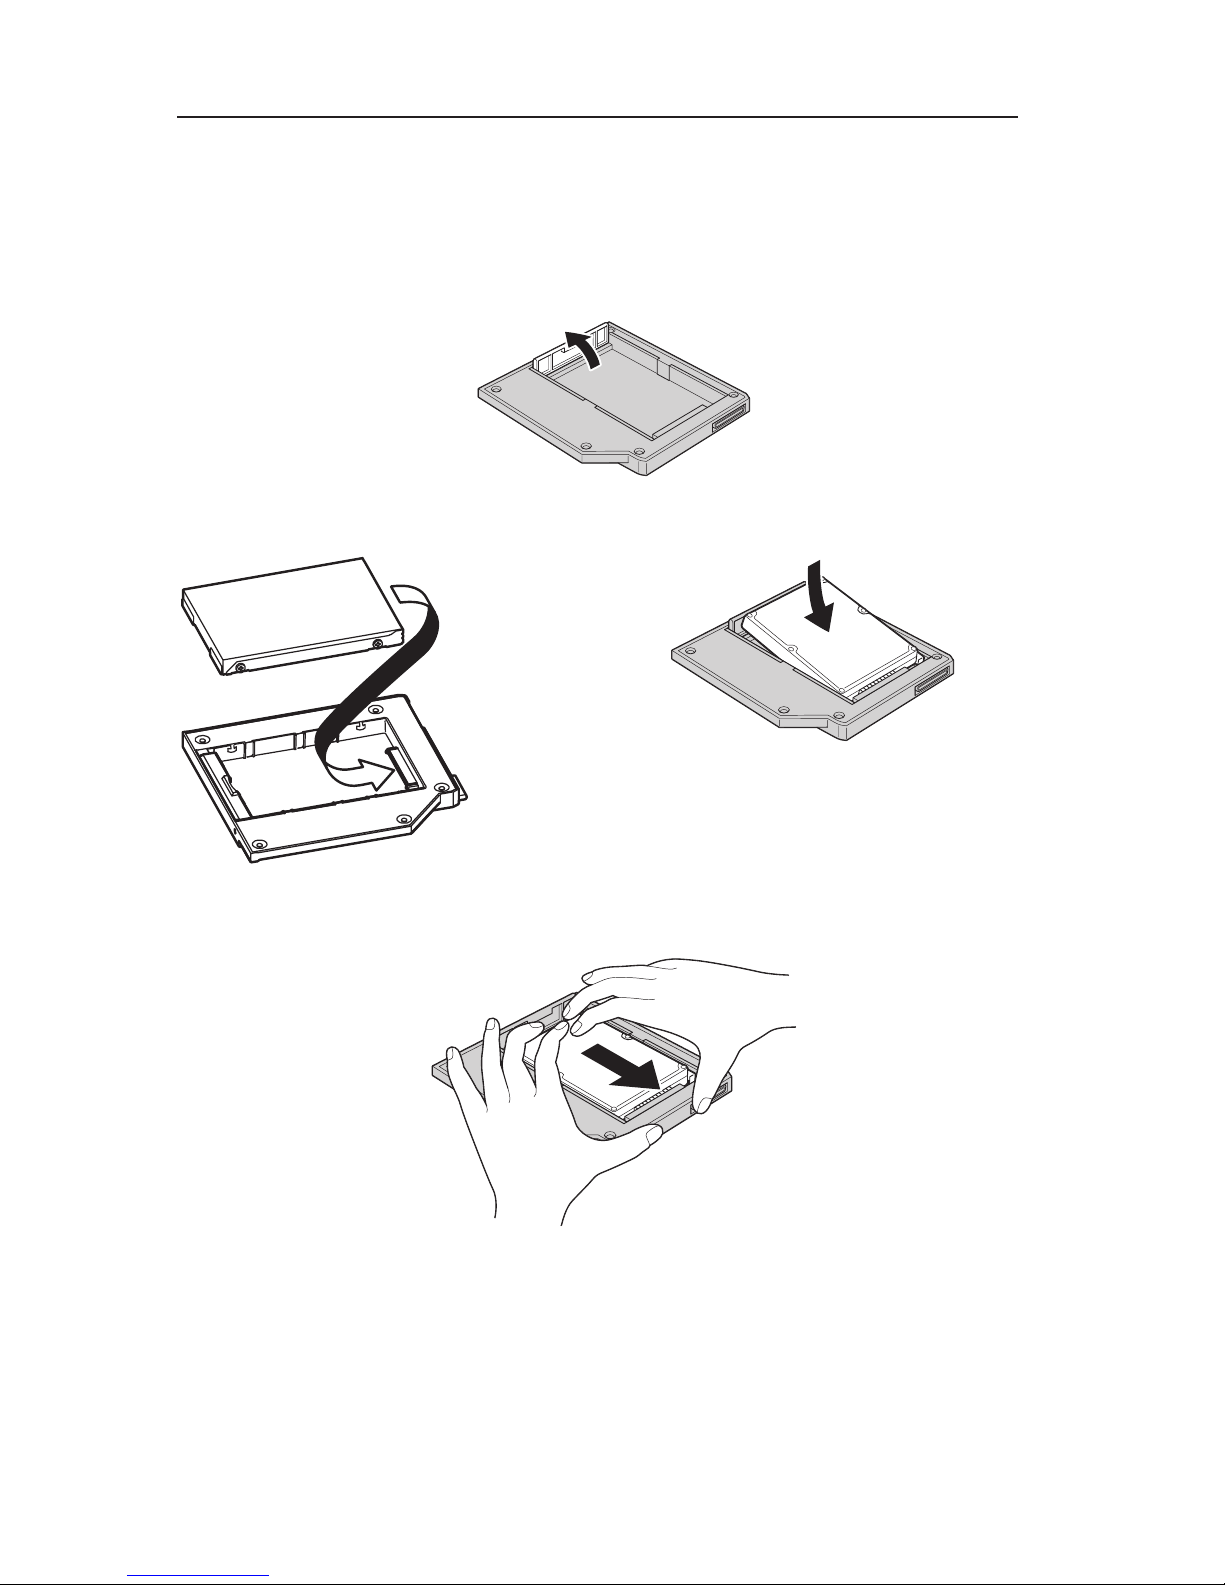
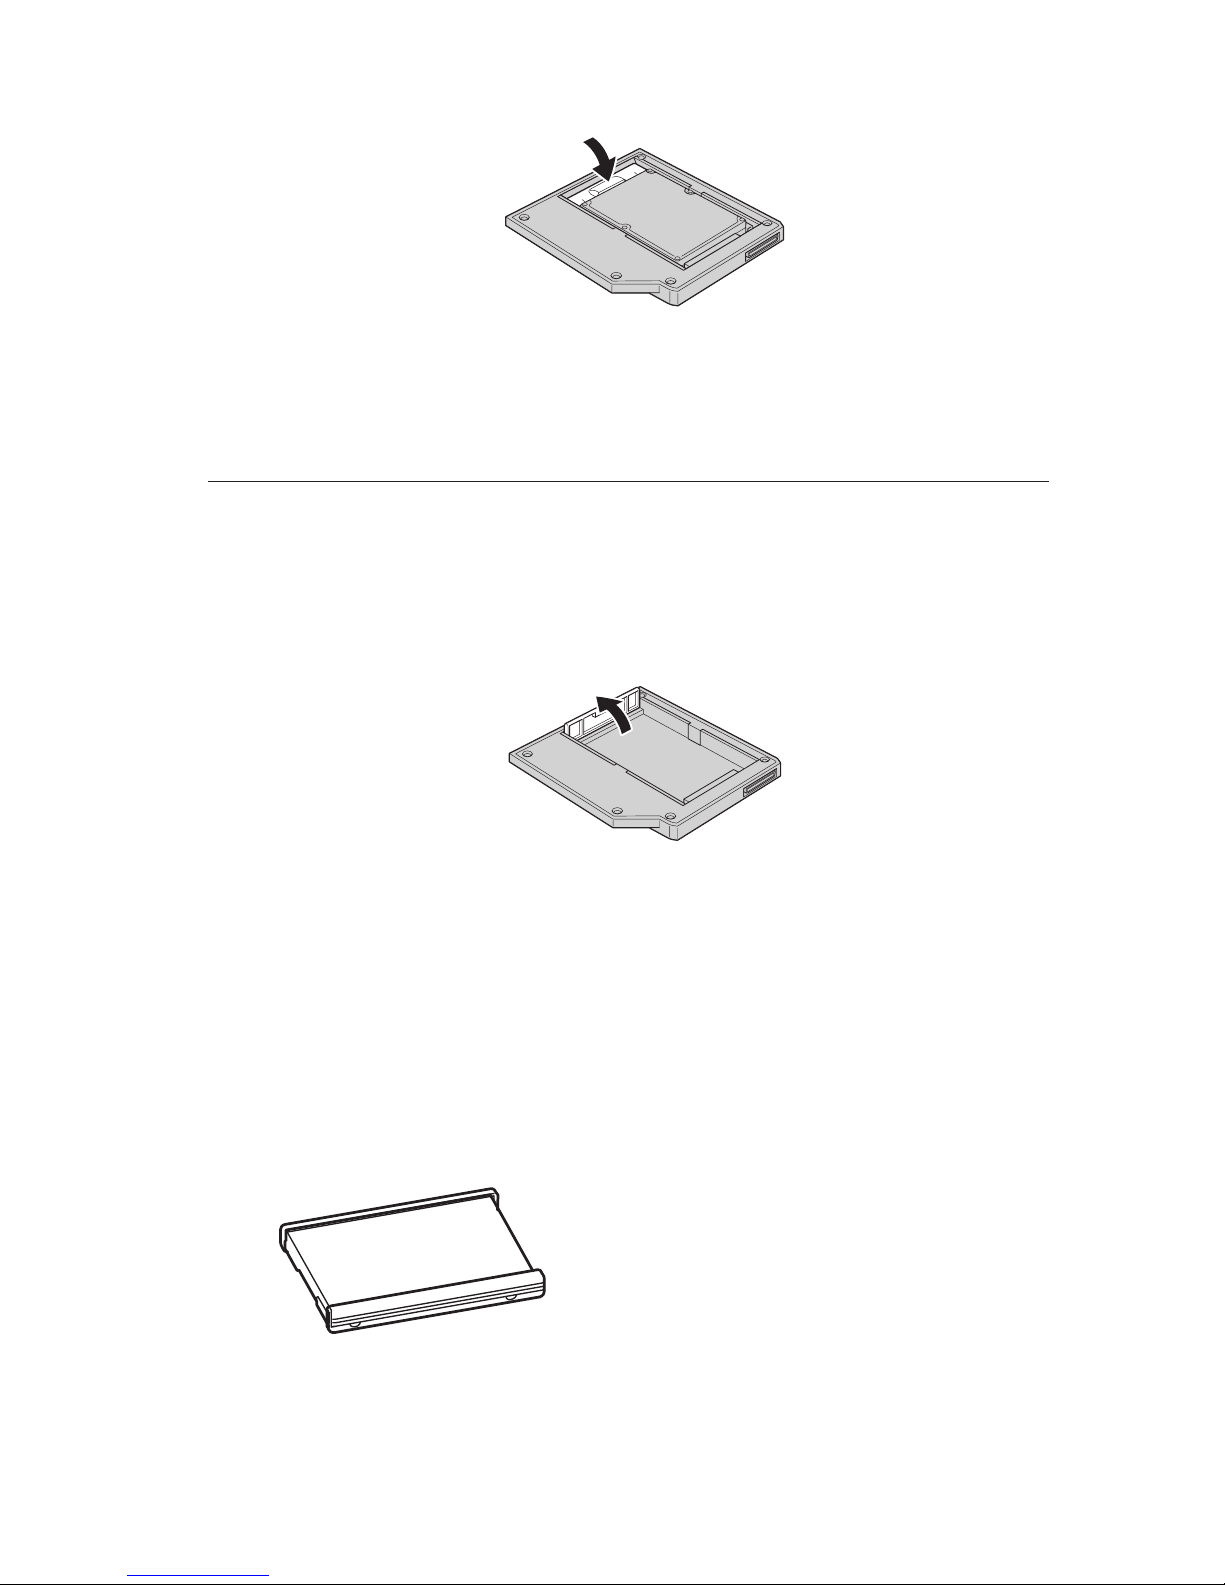
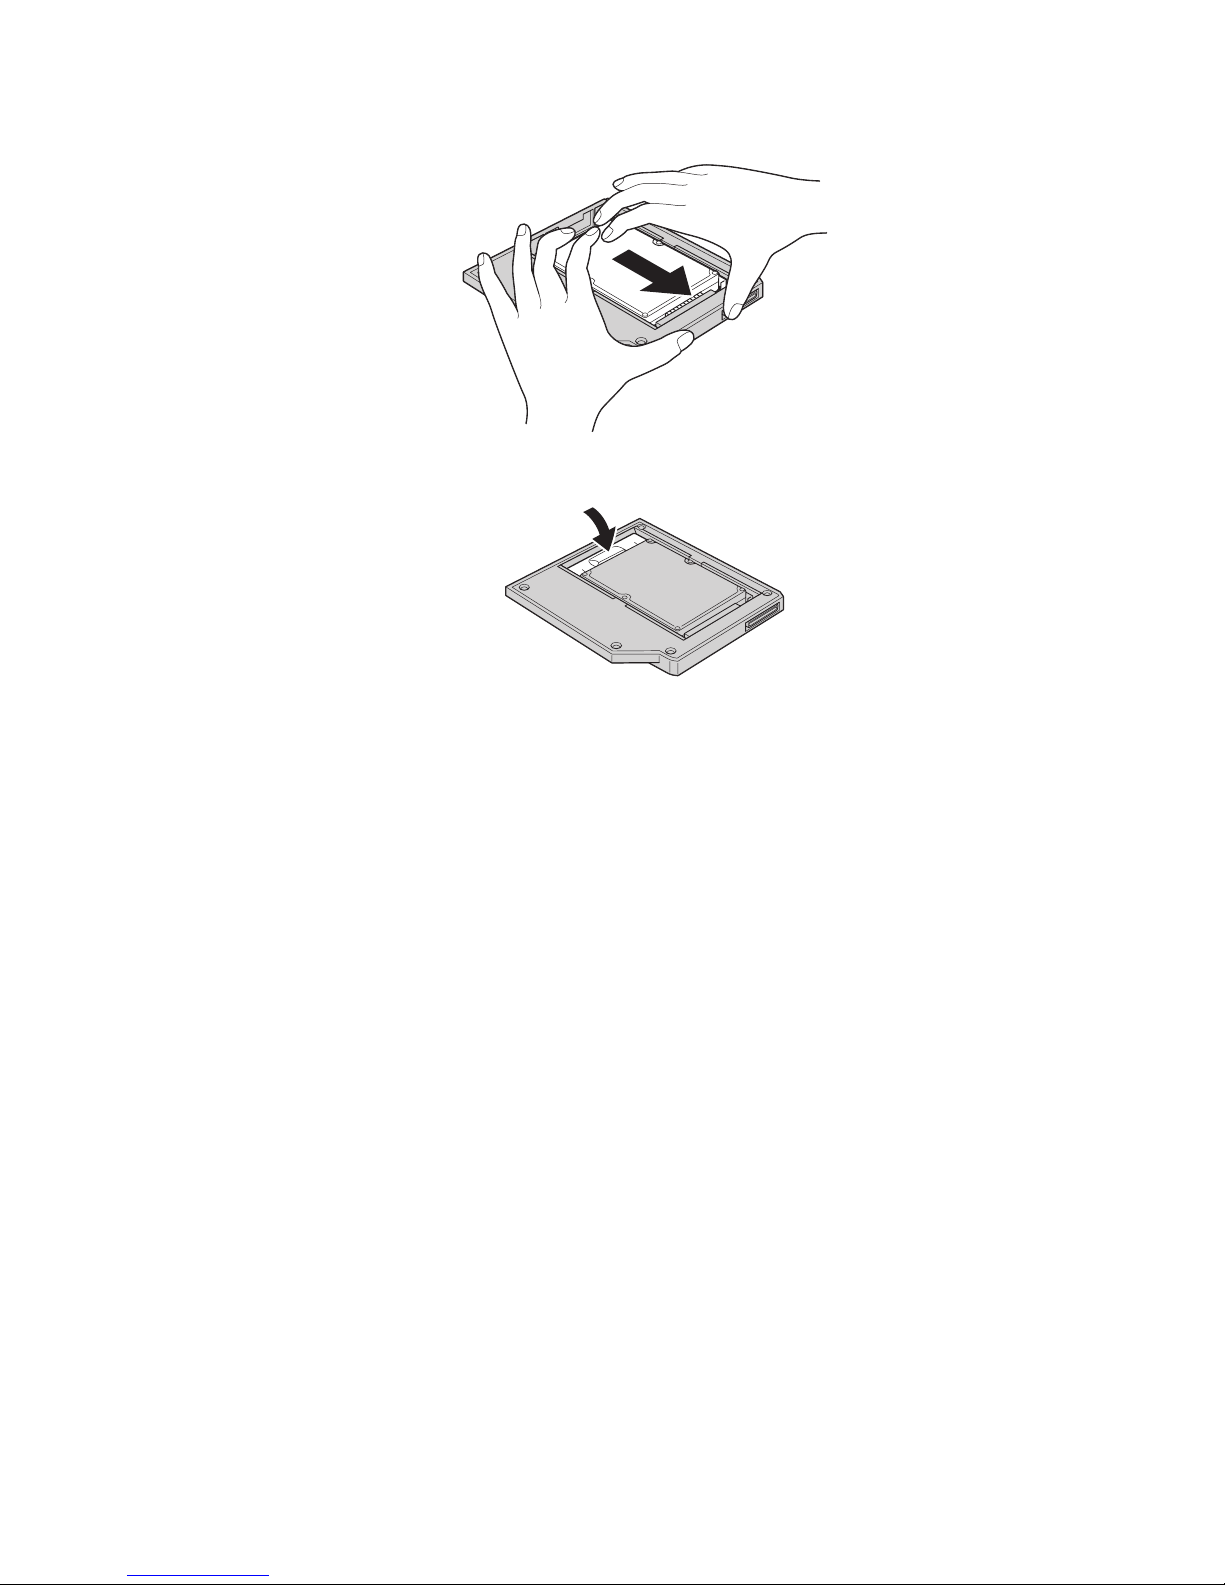
1. Lift the adapter retaining latch.
2. Insert the drive into the adapter at an angle.
3. Slide the drive into the connector until it locks into place.
4. Lower the adapter retaining latch until it snaps closed.
1-2 Serial Hard Drive Bay Adapter User’s Guide

5. Insert the adapter into the drive media bay.
Note:
For information on the drive media bay, refer to your system
documentation.
Installing the ThinkPad system hard disk drive into the
adapter
To install a ThinkPad system hard disk drive into the adapter, complete the
following procedure:
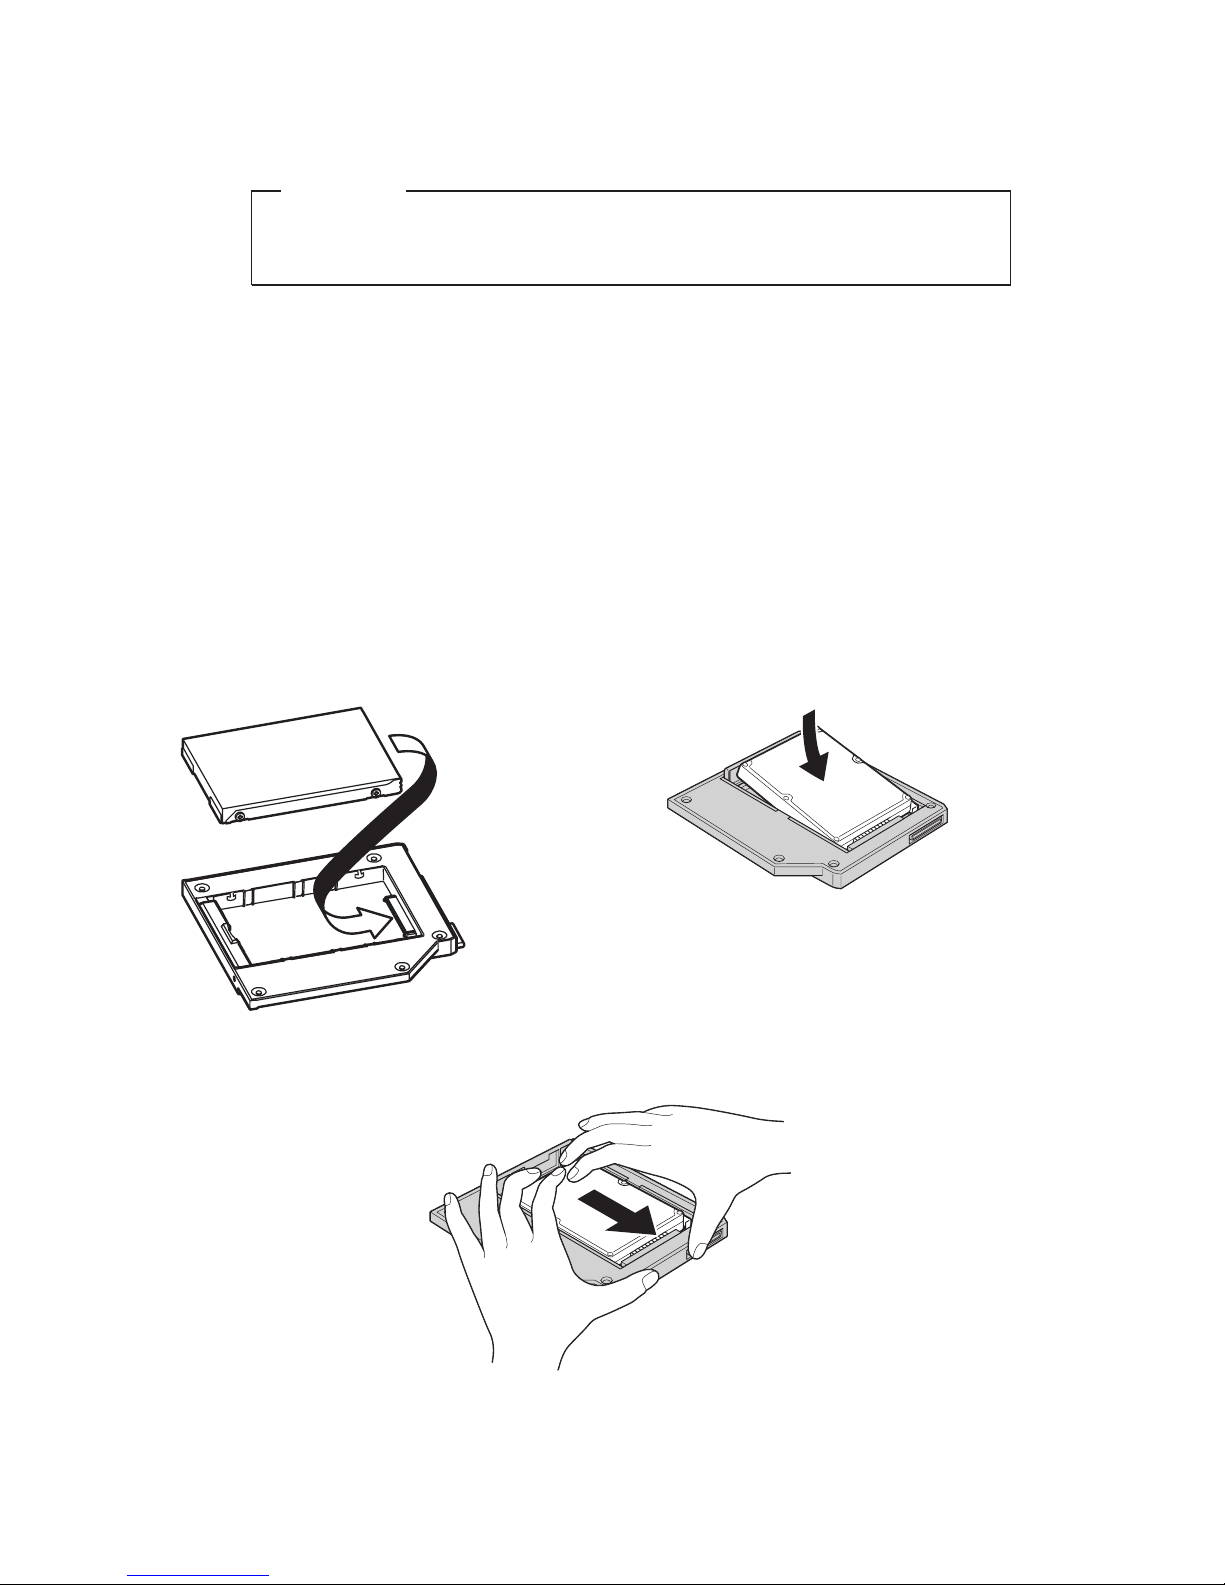
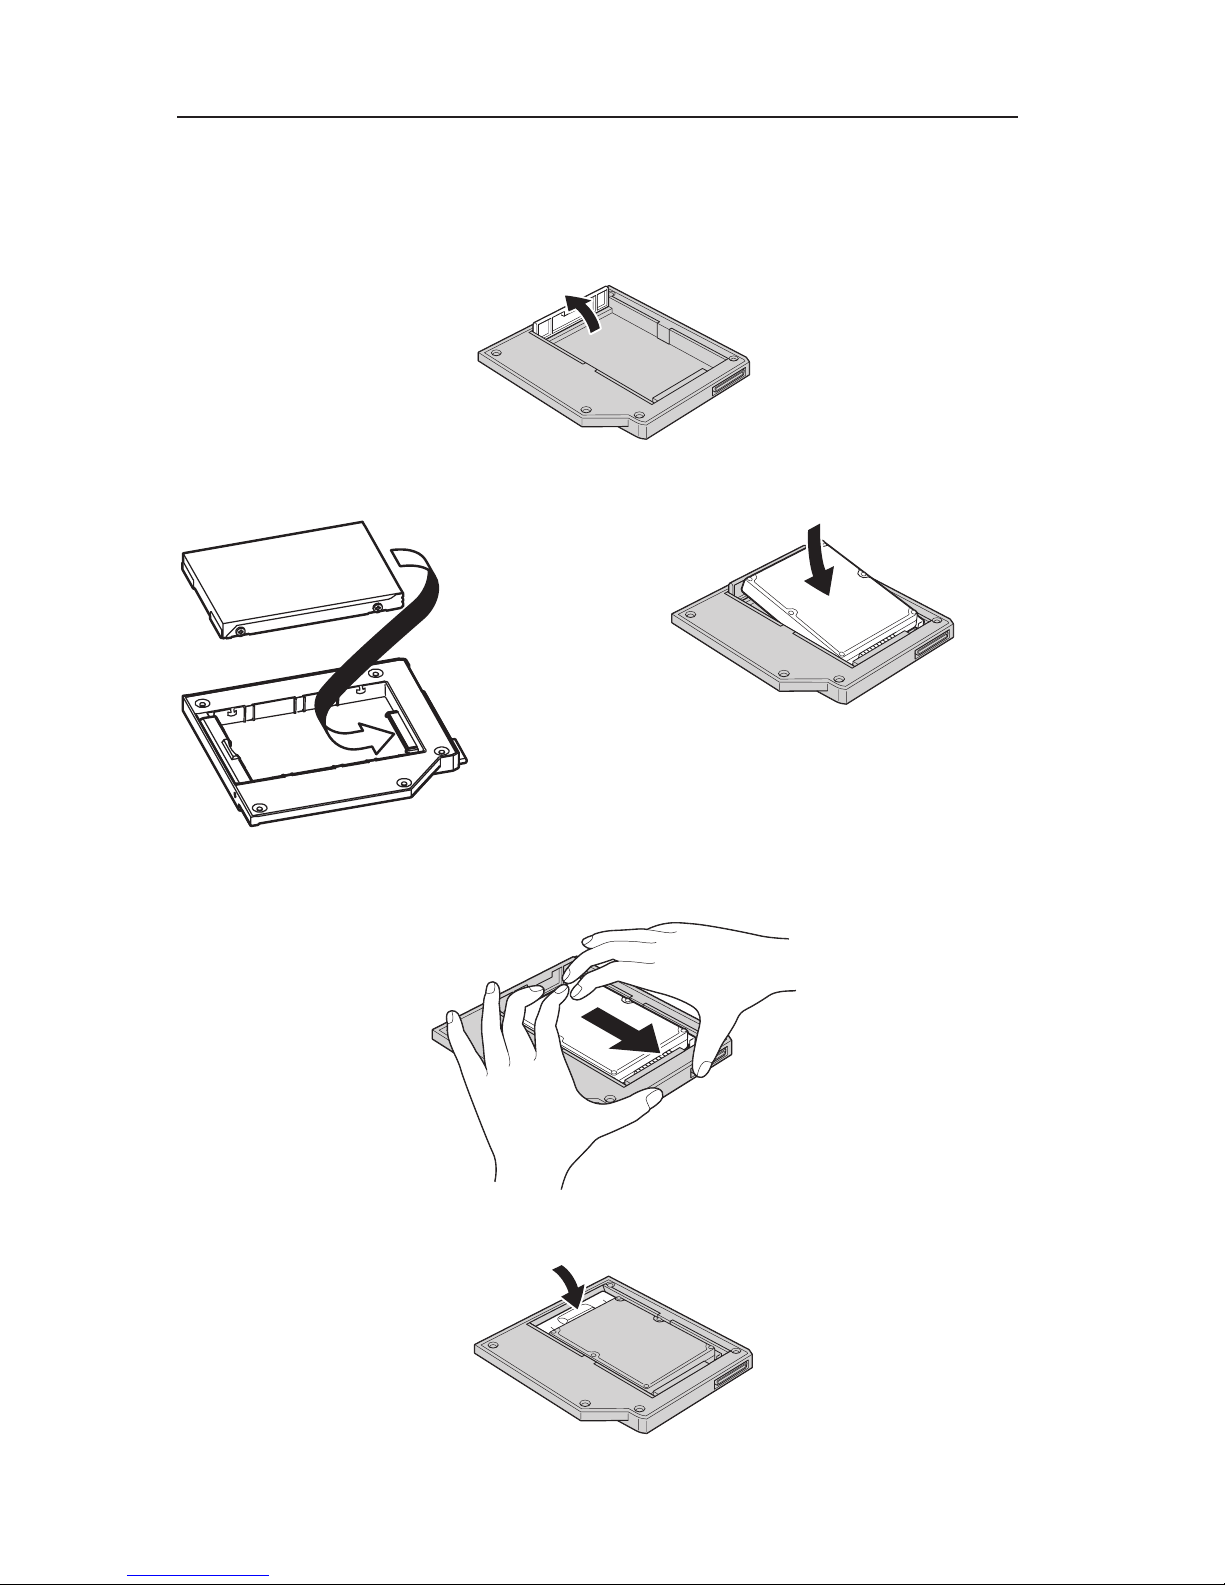
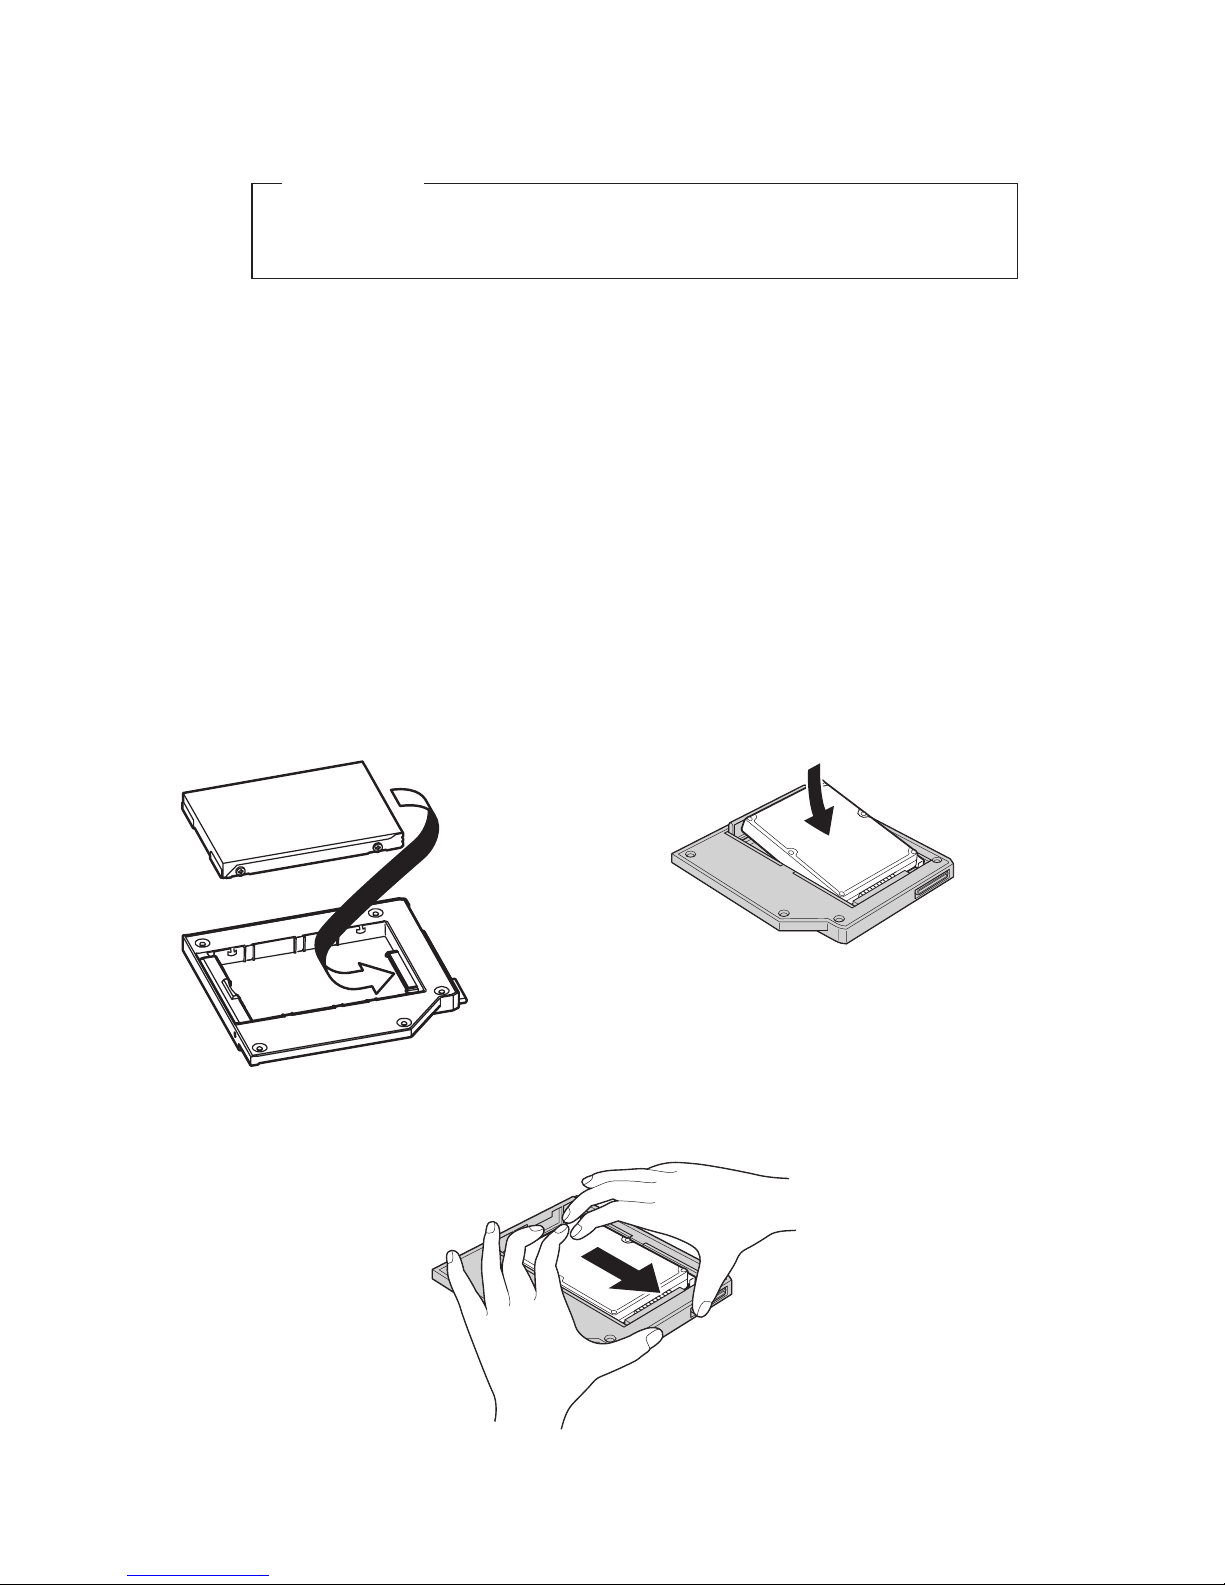
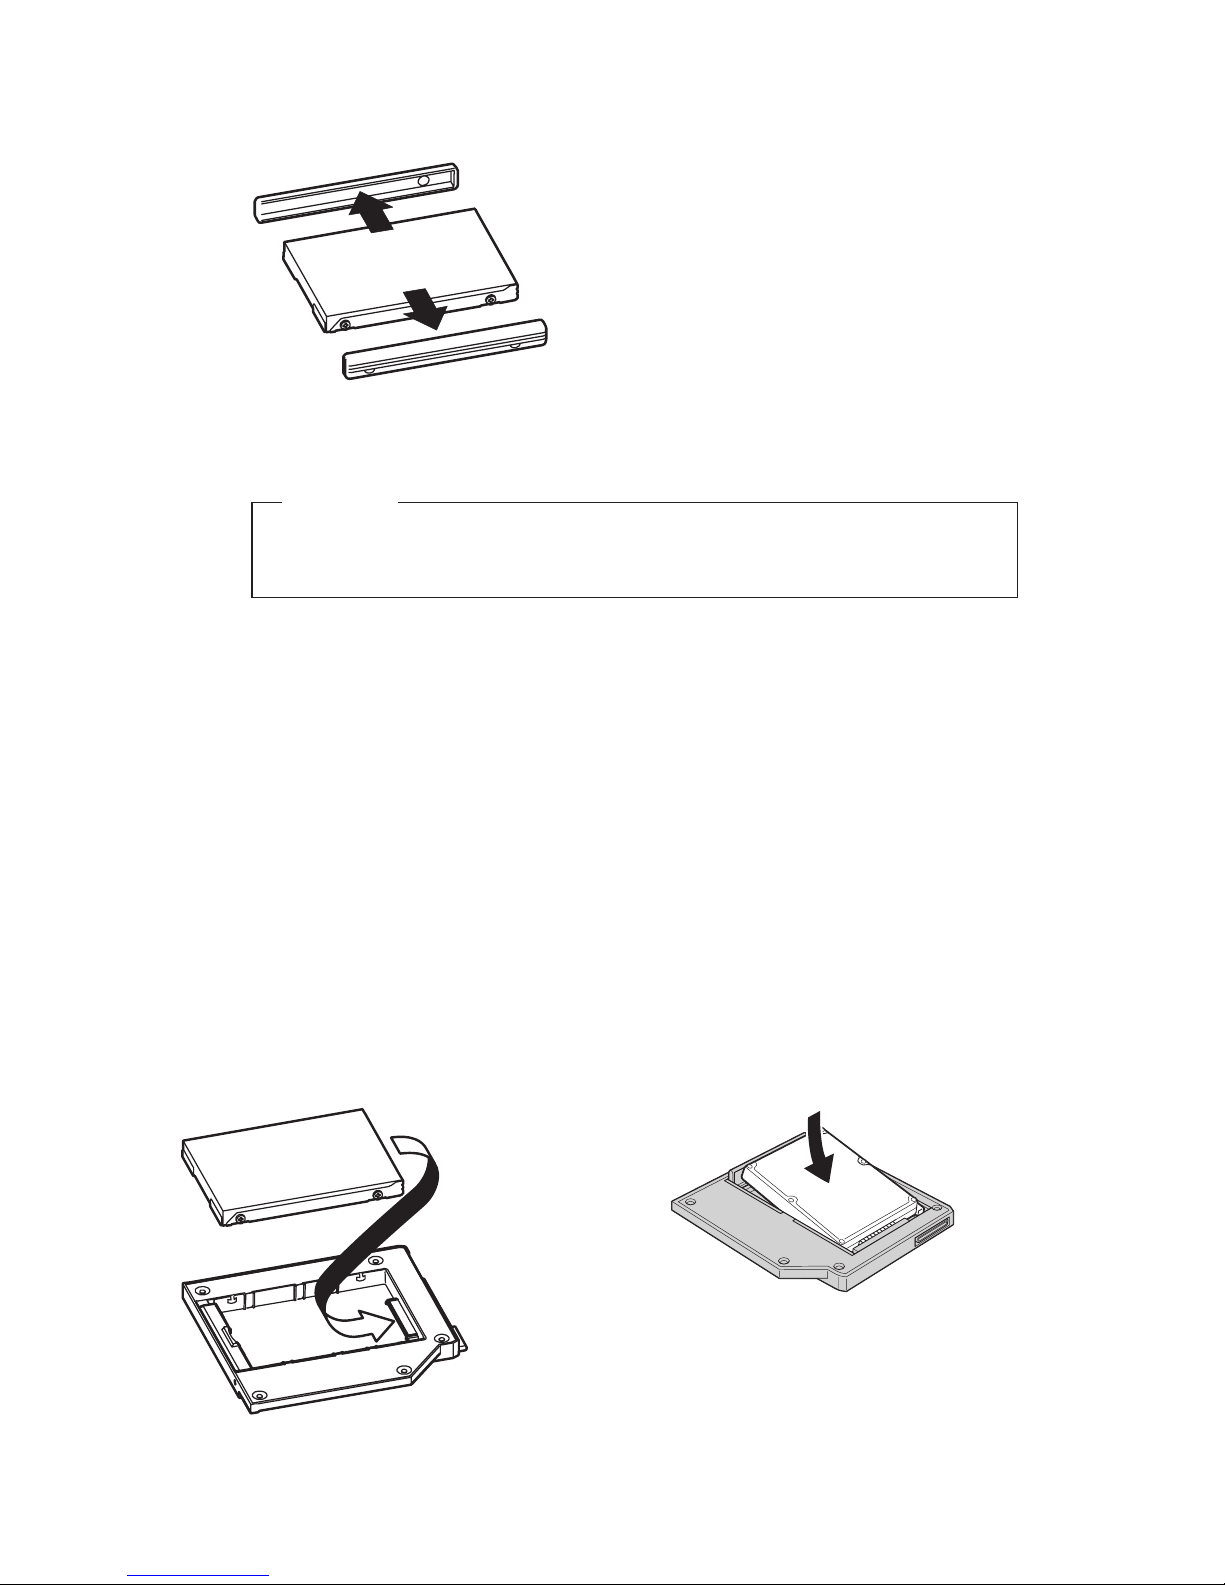
1. Lift the adapter retaining latch.
2. Replace the hard disk drive, if necessary. To replace the hard disk drive, do
the following:
a. Turn off your ThinkPad computer.
b. Disconnect the ac adapter and all cables from the computer.
c. Close the display and turn the computer over.
d. Remove the battery.
e. Remove the screw that secures the hard disk drive.
f. Remove the cover, then remove the hard disk drive by pulling on the
tab.
g. Detach the side rubbers from the hard disk drive.
h. Unpack the new drive.
Installation 1-3
Attention
Before you unpack the hard disk drive, be sure to read “Handling
the drive” on page 1-1.
i. Attach the side rubbers to the new hard disk drive.
j. Insert the hard disk drive with the attached side rubbers into the hard
disk drive bay; then firmly install them and replace the cover.
k. Reinstall the screw.
Note: Yo u can replace the screw with a security screw to prevent the
hard disk drive from being easily removed. The security screw
may not be included in your ship group. However, you can
purchase screws directly from NABS at www.nabsnet.com.
l. Reinstall the battery.
m. Connect the ac adapter and cables to the computer.
3.
Insert the drive into the adapter at an angle.
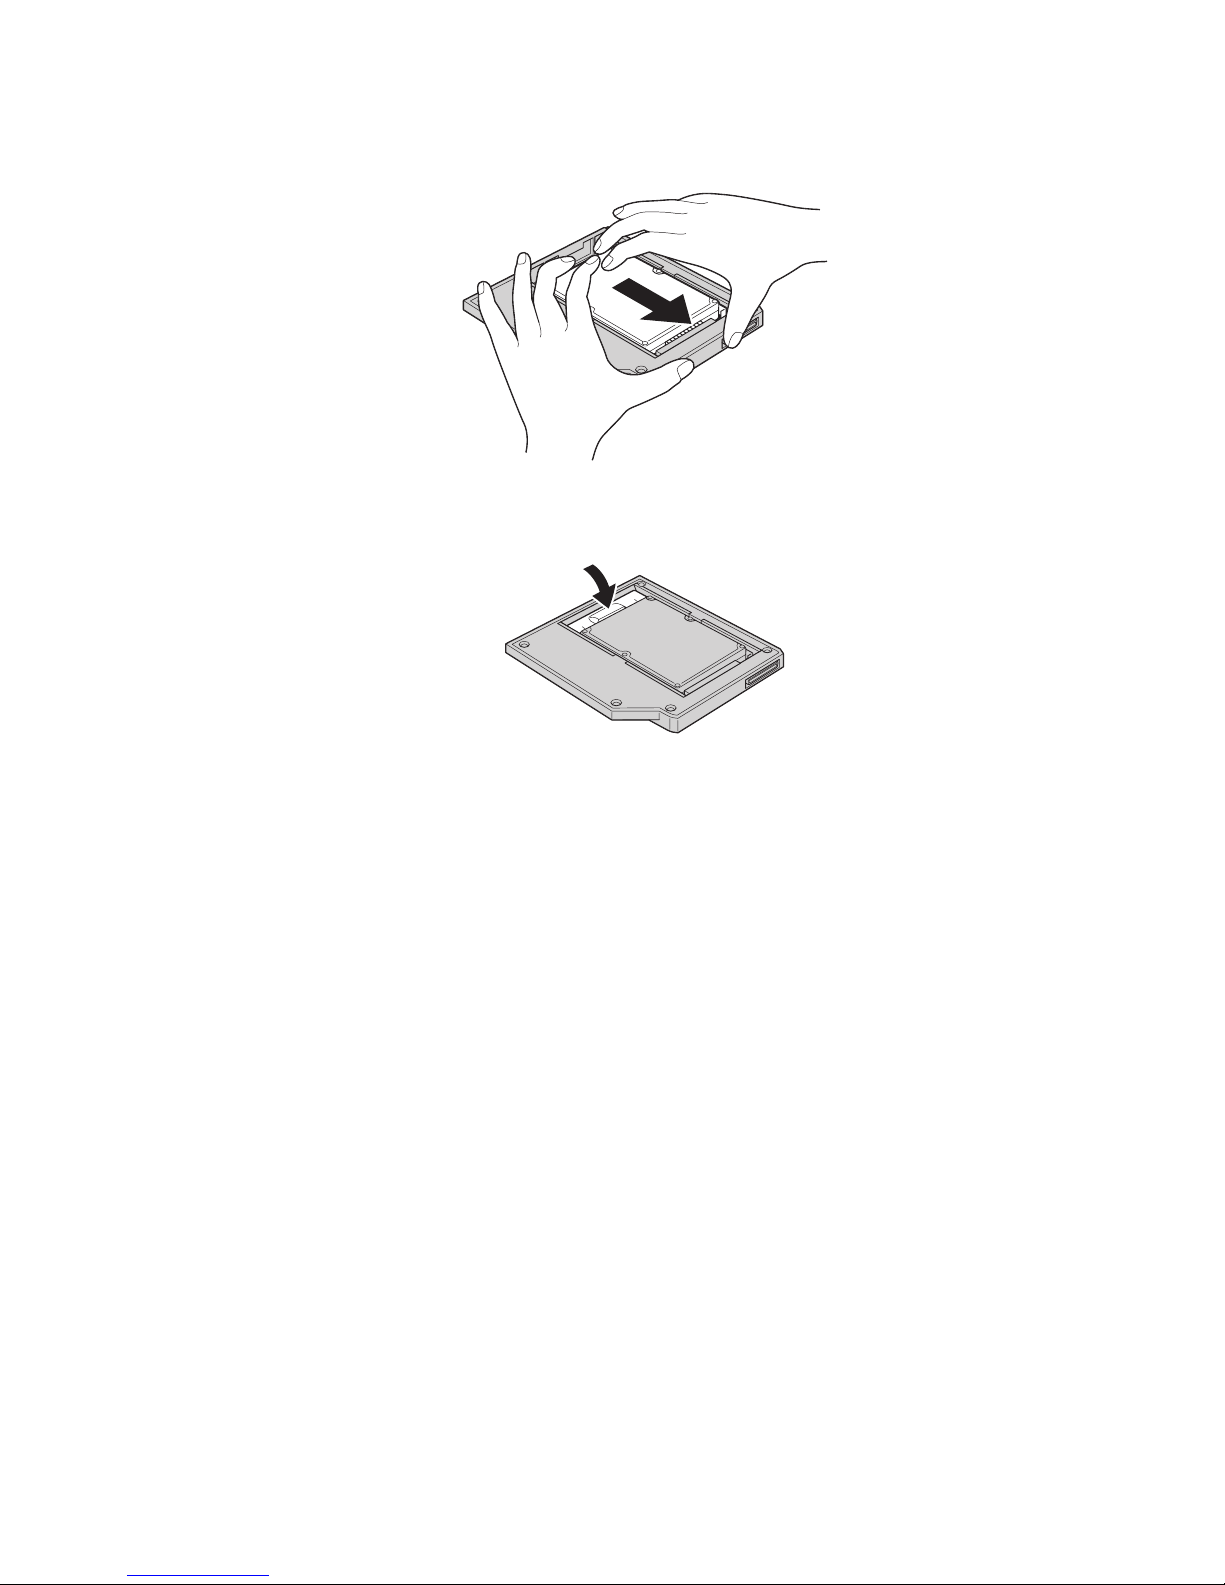
4. Slide the drive into the connector until it locks into place.
5. Lower the adapter retaining latch until it snaps closed.
1-4 Serial Hard Drive Bay Adapter User’s Guide
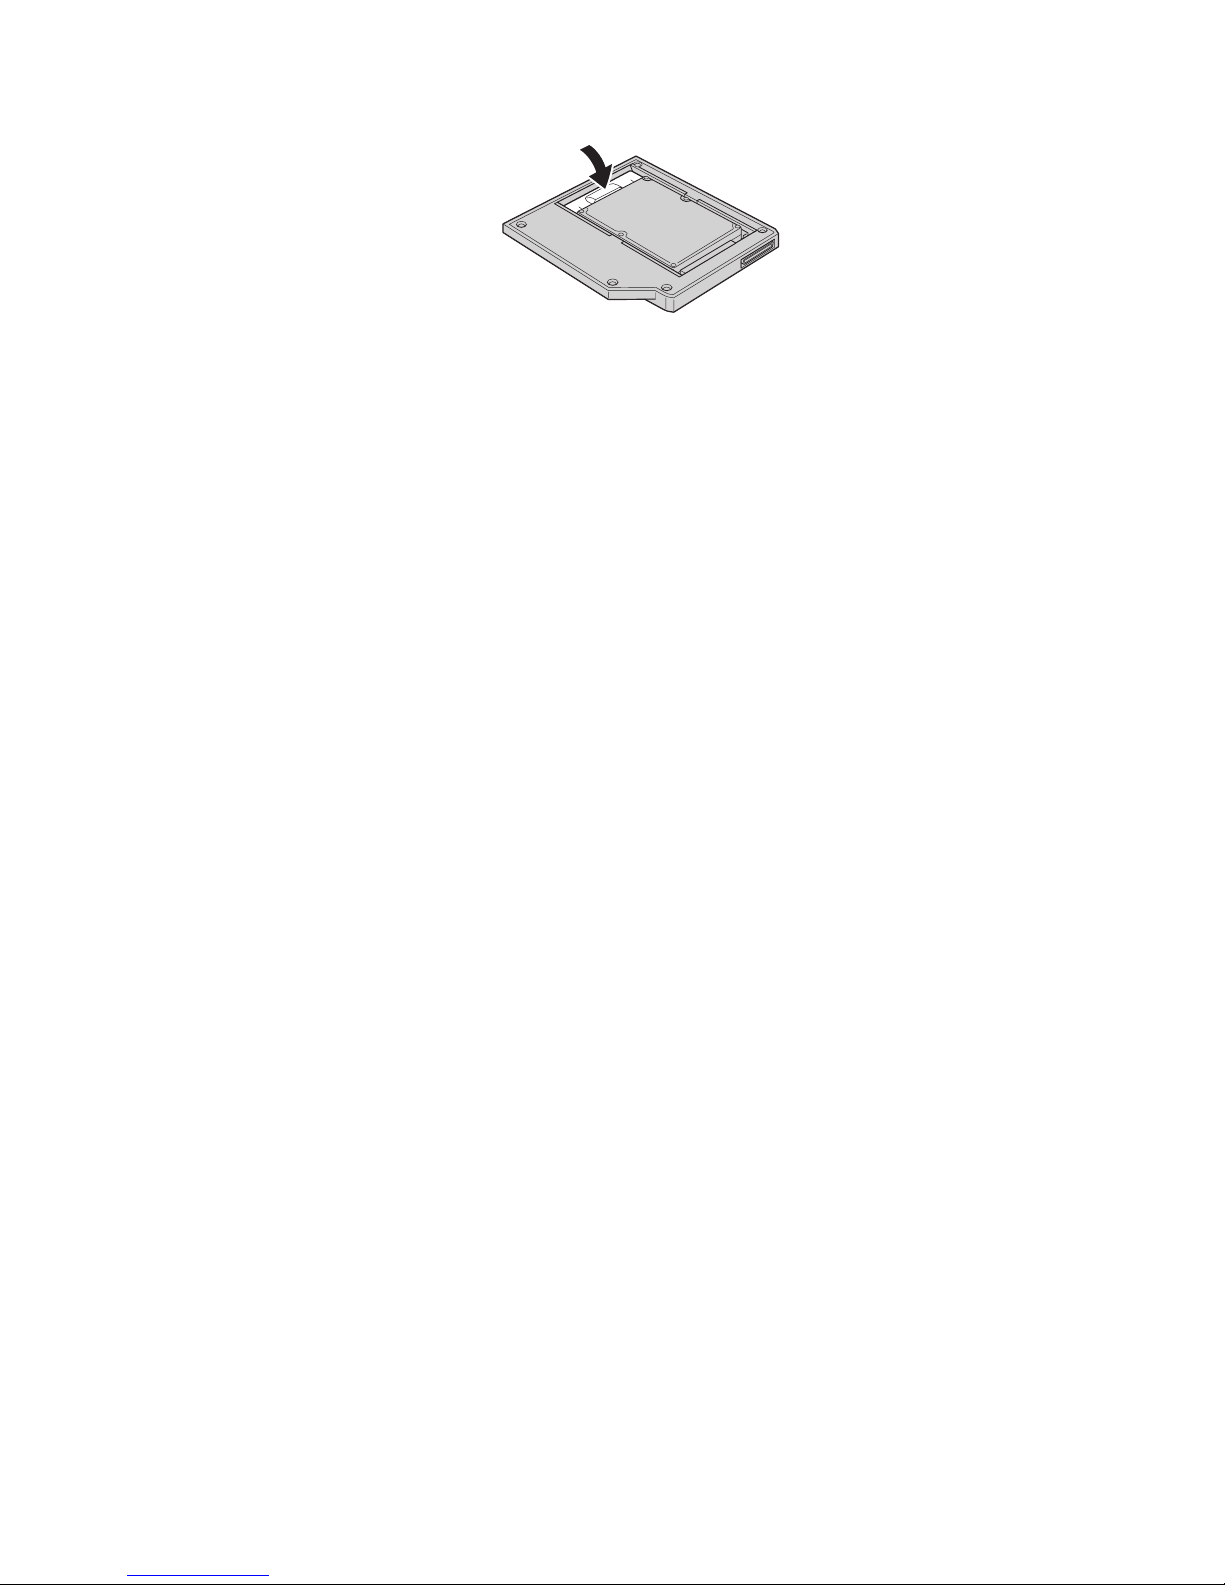
6. Insert the adapter into the drive media bay.
Note:
For information on the drive media bay, refer to your system
documentation.
Installation 1-5

1-6 Serial Hard Drive Bay Adapter User ’s Guide

Installation
La présente section fournit des informations relatives à l’installation d’une
unité de disque dur prise en charge dans une baie d’unité de stockage
Ultrabay en utilisant l’adaptateur de baie d’unité de disque dur série pour
ThinkPad.
Remarque : L’adaptateur ne prend en charge que l’unité de disque dur ATA
série pour ThinkPad de 2,5 pouces. Il n’accepte pas les unités de
disque dur ThinkCentre, Lenovo China ni celles provenant
d’autres entreprises.
Manipulation de l’unité
Pour protéger l’unité de disque dur lors de l’installation, respectez les
précautions suivantes :
v Conservez l’unité dans son emballage antistatique tant que vous n’êtes pas
prêt à l’installer dans votre ThinkPad. Si vous devez poser l’unité, placez
l’emballage antistatique sur une surface plane et rembourrée et posez l’unité
sur l’emballage, composant vers le haut.
v Manipulez l’unité avec précaution. Si vous faites tomber ou heurtez l’unité,
vous risquez d’endommager les composants situés à l’intérieur du logement
de l’unité.
v Limitez vos mouvements. Les mouvements contribuent à générer de
l’électricité statique.
v Ne soumettez pas l’unité à des chocs physiques.
v Manipulez l’unité en la tenant par les bords.
v Ne touchez pas les composants exposés sur l’unité.
v N’effectuez aucune pression sur le capot de l’unité.
Attention
L’unité est très sensible. Une manipulation incorrecte peut provoquer des
dommages et une perte irrémédiable des données sur le disque dur.
© Lenovo 2005. Portions © IBM Corp. 2003. 2-1
Installation d’une nouvelle unité de disque dur dans
l’adaptateur
Pour installer une nouvelle unité de disque dur dans l’adaptateur, procédez
comme suit :
1. Soulevez le loquet de blocage de l’adaptateur.
2. Insérez l’unité dans l’adaptateur, à un angle.
3. Faites glisser l’unité dans le connecteur jusqu’à ce qu’elle s’enclenche.
4. Abaissez le loquet de blocage de l’adaptateur jusqu’à ce qu’il s’enclenche.
2-2 Serial Hard Drive Bay Adapter User ’s Guide
5. Insérez l’adaptateur dans la baie d’unité de stockage.
Remarque
: Pour plus d’informations sur la baie d’unité de stockage, consultez
la documentation du système.
Installation de l’unité de disque dur ThinkPad dans
l’adaptateur
Pour installer une unité de disque dur ThinkPad dans l’adaptateur, procédez
comme suit :
1. Soulevez le loquet de blocage de l’adaptateur.
2. Remplacez l’unité de disque dur, si besoin est. Pour ce faire, procédez
comme suit :
a. Eteignez le ThinkPad.
b. Débranchez le boîtier d’alimentation ainsi que tous les câbles de
l’ordinateur.
c. Rabattez l’écran, puis retournez l’ordinateur.
d. Retirez la batterie.
e. Retirez la vis qui fixe l’unité de disque dur.
f. Retirez le cache, puis tirez sur l’onglet pour retirer l’unité de disque dur.
g. Détachez les parties latérales en caoutchouc de l’unité de disque dur.
Installation 2-3

h. Déballez la nouvelle unité.
Attention
Avant de déballer l’unité de disque dur, veillez à lire la section
«Manipulation de l’unité», à la page 1-1.
i. Fixez les parties latérales en caoutchouc à la nouvelle unité de disque
dur.
j. Insérez l’unité de disque dur avec les parties latérales en caoutchouc
dans la baie d’unité de disque dur, appuyez fermement sur ces parties
latérales en caoutchouc et replacez le cache.
k. Replacez la vis.
Remarque : Vous pouvez replacer la vis à l’aide d’une vis de sécurité
afin que l’unité de disque dur ne puisse pas être facilement
retirée. Il se peut que la vis de sécurité ne soit pas incluse
dans les accessoires livrés. Vous pouvez vous procurer des
vis directement sur le site de NABS, à l’adresse
www.nabsnet.com.
l. Réinstallez la batterie.
m. Rebranchez le boîtier d’alimentation et les câbles sur l’ordinateur.
3.
Insérez l’unité dans l’adaptateur, à un angle.
2-4 Serial Hard Drive Bay Adapter User ’s Guide
4. Faites glisser l’unité dans le connecteur jusqu’à ce qu’elle s’enclenche.
5. Abaissez le loquet de blocage de l’adaptateur jusqu’à ce qu’il s’enclenche.
6. Insérez l’adaptateur dans la baie d’unité de stockage.
Remarque
: Pour plus d’informations sur la baie d’unité de stockage, consultez
la documentation du système.
Installation 2-5

2-6 Serial Hard Drive Bay Adapter User ’s Guide

Installazione
Questa sezione fornisce informazioni sull’installazione dell’unità disco fisso
supportata nel vano del supporto Ultrabay utilizzando ThinkPad Serial Hard
Drive Bay Adapter.
Nota: L’adattatore supporta solo unità disco fisso ThinkPad Serial ATA da 2,5″.
Non supporta le unità disco fisso ThinkCentre®, le unità disco fisso di
Cina Lenovo o le unità disco fisso di altre aziende.
Gestione dell’unità
Per proteggere l’unità disco fisso durante l’installazione, tener presente quanto
segue:
v Conservare l’unità nell’involucro antistatico fino al momento
dell’installazione nell’elaboratore ThinkPad. Se si deve posare l’unità,
collocare l’involucro antistatico su una superficie piana, imbottita e
depositare l’unità sull’involucro rivolta verso l’alto.
v Maneggiare l’unità con attenzione. Lasciar cadere o scuotere l’unità potrebbe
danneggiare le parti interne.
v Limitare i movimenti I movimenti potrebbe generare elettricità statica.
v Non sottoporre l’unità ad urti fisici.
v Afferrare l’unità dalle estremità.
v Non toccare i componenti esposti dell’unità.
v Non fare pressione sul coperchio dell’unità.
Attenzione
L’unità è molto delicata. Una manipolazione non corretta può causare
danni e perdite permanenti di dati sul disco fisso.
© Lenovo 2005. Portions © IBM Corp. 2003. 3-1
Installazione della nuova unità disco fisso nell’adattatore
Per installare la nuova unità disco fisso nell’adattatore, completare la
procedura riportata di seguito:
1. Sollevare il fermo dell’adattatore.
2. Inserire l’unità come mostrato nella figura.
3. Far scorrere l’unità nel connettore fino a quando non si blocca.
4. Abbassare il fermo dell’adattatore fino a quando non si chiude.
3-2 Guida per l’utente Serial Hard Drive Bay Adapters

5. Inserire l’adattatore nel vano supporto dell’unità.
Nota:
Per informazioni sul vano supporto dell’unità, consultare la
documentazione.
Installazione dell’unità disco fisso di sistema ThinkPad
nell’adattatore
Per installare un’unità disco fisso ThinkPad nell’adattatore, completare la
procedura riportata di seguito:
1. Sollevare il fermo dell’adattatore.
2. Se necessario, sostituire l’unità disco fisso. Per sostituire l’unità disco fisso,
effettuare quanto segue:
a. Spegnere l’elaboratore ThinkPad.
b. Scollegare l’adattatore ac e tutti i cavi dall’elaboratore.
c. Spegnere il video e l’elaboratore.
d. Rimuovere la batteria.
e. Rimuovere la vite che blocca l’unità disco fisso.
f. Rimuovere il coperchio, quindi rimuovere l’unità disco fisso sollevando
la scheda.
g. Scollegare i cavi di gomma laterali dall’unità disco fisso.
h. Spacchettare la nuova unità.
Installazione 3-3
Attenzione
Prima di spacchettare l’unità disco fisso, leggere attentamente
“Gestione dell’unità” a pagina 1-1.
i. Collegare i cavi di gomma laterali alla nuova unità disco fisso.
j. Inserire l’unità disco fisso con i cavi di gomma collegati nel vano
dell’unità disco fisso; quindi installarli saldamente e reinserire il
coperchio.
k. Reinserire la vite.
Nota: è possibile sostituire la vite con una vite di sicurezza per
impedire che l’unità disco fisso venga facilmente rimossa. La vite
di sicurezza potrebbe non essere inclusa nella spedizione del
prodotto. Tuttavia, è possibile acquistare le viti direttamente da
NABS all’indirizzo www.nabsnet.com.
l. Reinstallare la batteria.
m. Collegare l’adattatore ac e i cavi all’elaboratore.
3.
Inserire l’unità come mostrato nella figura.
4. Far scorrere l’unità nel connettore fino a quando non si blocca.
3-4 Guida per l’utente Serial Hard Drive Bay Adapters

5. Abbassare il fermo dell’adattatore fino a quando non si chiude.
6. Inserire l’adattatore nel vano supporto dell’unità.
Nota:
Per informazioni sul vano supporto dell’unità, consultare la
documentazione.
Installazione 3-5

3-6 Guida per l’utente Serial Hard Drive Bay Adapters

Installation
Dieser Abschnitt enthält Informationen zur Installation eines unterstützten
Festplattenlaufwerks in der Ultrabay-Datenträgerposition mit Hilfe des ThinkPad-Adapters
für eine serielle Festplattenlaufwerkposition.
Anmerkung: Der Adapter unterstützt nur das 2,5-Zoll-ThinkPad-SATA-Fest-
plattenlaufwerk.
ThinkCentre
®
-Festplattenlaufwerke sowie Festplattenlaufwerke von Lenovo China oder anderen Herstellern
werden nicht unterstützt.
Umgang mit dem Laufwerk
Um das Festplattenlaufwerk während der Installation zu schützen, sollten Sie
die folgenden Vorsichtsmaßnahmen befolgen:
v Bewahren Sie das Laufwerk in der antistatischen Schutzhülle auf, bis Sie das
Laufwerk im ThinkPad installieren. Wenn Sie das Laufwerk absetzen müssen,
legen Sie es mit der Vorderseite nach oben auf die antistatische Schutz-
hülle
auf einer flachen, gepolsterten Unterlage ab.
v Gehen Sie vorsichtig mit dem Laufwerk um. Die Komponenten im Lauf-
werkgehäuse können beschädigt werden, wenn Sie das Laufwerk fallen lassen
oder anstoßen.
v Bewegen Sie sich nicht zu viel. Andernfalls verursachen Sie statische Auf-
ladung.
v Setzen Sie das Laufwerk keinen Erschütterungen aus.
v Fassen Sie das Laufwerk an den Rändern an.
v Berühren Sie keine ungeschützten Teile am Laufwerk.
v Drücken Sie nicht auf die Abdeckung des Laufwerks.
Achtung
Das Laufwerk ist sehr empfindlich. Unsachgemäße Handhabung kann zu
Beschädigungen und dauerhaftem Datenverlust auf dem Festplattenlaufwerk
führen.
© Lenovo 2005. Portions © IBM Corp. 2003. 4-1
Neues Festplattenlaufwerk im Adapter installieren
Gehen Sie wie folgt vor, um ein neues Festplattenlaufwerk im Adapter zu
installieren:
1. Heben Sie die Verriegelung der Adapterhalterung an.
2. Setzen Sie das Laufwerk schräg in den Adapter ein.
3. Schieben Sie das Laufwerk in den Anschluss, bis es ordnungsgemäß einras-
tet.
4-2 Serial Hard Drive Bay Adapter User ’s Guide

4. Drücken Sie die Verriegelung der Adapterhalterung herunter, bis sie in die
geschlossene Position einrastet.
5. Setzen Sie den Adapter in die Laufwerksdatenträgerposition ein.
Anmerkung:
Informationen zur Laufwerksdatenträgerposition finden Sie in
der Dokumentation zu Ihrem System.
ThinkPad-Systemfestplattenlaufwerk im Adapter installieren
Gehen Sie wie folgt vor, um ein ThinkPad-Systemfestplattenlaufwerk im Adapter
zu installieren.
1. Heben Sie die Verriegelung der Adapterhalterung an.
2. Ersetzen Sie bei Bedarf das Festplattenlaufwerk. Gehen Sie dazu wie folgt
vor:
a. Schalten Sie den ThinkPad aus.
b. Trennen Sie das Netzteil vom Computer, und ziehen Sie alle Kabel ab.
c. Schließen Sie den Bildschirm, und drehen Sie den Computer herum.
d. Entfernen Sie den Akku.
e. Entfernen Sie die Schraube, die das Festplattenlaufwerk sichert.
f. Entfernen Sie die Abdeckung. Entfernen Sie anschließend das Festplat-
tenlaufwerk,
indem Sie an der Lasche ziehen.
Installation 4-3
g. Entfernen Sie die seitlichen Gummis vom Festplattenlaufwerk.
h. Entnehmen Sie das neue Laufwerk.
Achtung
Lesen Sie vor dem Entnehmen des Festplattenlaufwerks den
Abschnitt „Umgang mit dem Laufwerk” auf Seite 1-1.
i. Bringen Sie die seitlichen Gummis am neuen Festplattenlaufwerk an.
j. Setzen Sie das Festplattenlaufwerk mit den seitlichen Gummis in die
Position für das Festplattenlaufwerk ein. Drücken Sie es dann fest in die
Position, und bringen Sie die Abdeckung wieder an.
k. Bringen Sie die Schraube wieder an.
Anmerkung: Sie können die Schraube durch eine Sicherheitsschraube
ersetzen, um das Festplattenlaufwerk gegen unberechtigte
Entnahme zu sichern. Die Sicherheitsschraube ist möglicherweise
nicht im Lieferumfang enthalten. Sie können
jedoch Schrauben direkt von NABS im World Wide Web
unter der Adresse www.nabsnet.com erwerben.
l. Setzen Sie den Akku wieder ein.
m. Schließen Sie das Netzteil und alle Kabel wieder an den Computer an.
3.
Setzen Sie das Laufwerk schräg in den Adapter ein.
4-4 Serial Hard Drive Bay Adapter User ’s Guide
4. Schieben Sie das Laufwerk in den Anschluss, bis es ordnungsgemäß einrastet.
5. Drücken Sie die Verriegelung der Adapterhalterung herunter, bis sie in die
geschlossene Position einrastet.
6. Setzen Sie den Adapter in die Laufwerksdatenträgerposition ein.
Anmerkung:
Informationen zur Laufwerksdatenträgerposition finden Sie in
der Dokumentation zu Ihrem System.
Installation 4-5

4-6 Serial Hard Drive Bay Adapter User ’s Guide
 Loading...