

Page 1

IBM Mobile Systems
Hardware Maintenance Manual
SelectaDock II Supplement
November 1996
Use this supplement with the
IBM Mobile Systems
Hardware Maintenance Manual
S84H-4552-00
Page 2

Page 3

IBM Mobile Systems
Hardware Maintenance Manual
SelectaDock II Supplement
November 1996
Use this supplement with the
IBM Mobile Systems
Hardware Maintenance Manual
S84H-4552-00
IBM
Page 4

Note
Before using this information and the product it
supports, be sure to read the general information
under “Notices” on page 56.
First Edition (November 1996)
The following paragraph does not apply to the United
Kingdom or any country where such provisions are
inconsistent with local law: INTERNATIONAL
BUSINESS MACHINES CORPORATION PROVIDES THIS
PUBLICATION “AS IS” WITHOUT WARRANTY OF ANY
KIND, EITHER EXPRESS OR IMPLIED, INCLUDING, BUT
NOT LIMITED TO, THE IMPLIED WARRANTIES OF
MERCHANTABILITY OR FITNESS FOR A PARTICULAR
PURPOSE. Some states do not allow disclaimer of
express or implied warranties in certain transactions,
therefore, this statement may not apply to you.
This publication could include technical inaccuracies or
typographical errors. Changes are periodically made to
the information herein; these changes will be incorporated
in new editions of the publication. IBM may make
improvements and/or changes in the product(s) and/or the
program(s) described in this publication at any time.
It is possible that this publication may contain reference to,
or information about, IBM products (machines and
programs), programming, or services that are not
announced in your country. Such references or
information must not be construed to mean that IBM
intends to announce such IBM products, programming, or
services in your country.
Requests for technical information about IBM products
should be made to your IBM reseller or IBM marketing
representative.
Copyright International Business Machines
Corporation 1996. All rights reserved.
Note to U.S. Government users–Documentation related to
Restricted rights–Use, duplication, or disclosure is subject
to restrictions set forth in GSA ADP Schedule Contract
with IBM Corp.
ii IBM Mobile Systems HMM
Page 5

ThinkPad SelectaDock Docking
System
Copyright IBM Corp. 1996 iii
Page 6

iv IBM Mobile Systems HMM
Page 7

Contents
ThinkPad SelectaDock Docking System ..... iii
Read This First .................. 1
General Preparation . . . . . . . . . . . . . . . . 3
Checkout Guide . . . . . . . . . . . . . . . . . 4
How to Run the Diagnostics ............ 11
Symptom-to-FRU Index . . . . . . . . . . . . . . 18
Undetermined Problems . . . . . . . . . . . . . . 30
Feature Description . . . . . . . . . . . . . . . . 31
Removal and Replacement ............ 33
Locations . . . . . . . . . . . . . . . . . . . . . 49
Parts List . . . . . . . . . . . . . . . . . . . . . 53
Notices . . . . . . . . . . . . . . . . . . . . . . 56
Copyright IBM Corp. 1996 v
Page 8

vi IBM Mobile Systems HMM
Page 9

Read This First
Before you go to the checkout guide, be sure to read this
section.
Important Notes
Only certified trained personnel should
service the computer.
Be extremely careful during write operations
such as copying, saving, or formatting. Drives
in the computer that you are servicing might have
been rearranged; or the drive startup sequence
might have been altered. If you select an
incorrect drive, data or programs can be written
over.
Replace FRUs only for the correct model.
When you replace the FRU, make sure the
model of the machine and FRU part number are
correct by referring to the part list.
FRUs should not be replaced because of a
single, unreproducible failure. Single failures
can occur from a variety of reasons that have
nothing to do with a hardware defect; such as:
cosmic radiation, electrostatic discharge, or
software errors. FRU replacement should be
considered only when a recurring problem exists.
If you suspect an unreproducible failure, clear the
error log and run the test again. Do not replace
any FRUs if log errors do not reappear.
Do not replace a nondefective FRU.
How to Use Error Messages: Use the error
codes displayed on the screen to diagnose failures. If
more than one error code is displayed, begin the diagnosis
with the first error code. The cause of the first error code
can result in false error codes being displayed. If no error
code is displayed, see if the error symptom is listed in the
“Symptom-to-FRU Index” on page 18.
How to Diagnose Multiple FRUs: When the
adapter or device has more than one FRU, the error code
could be caused by either FRU. Before replacing multiple
FRUs, try removing or exchanging each FRU, one by one
in the designated sequence, to see if the symptoms
change.
What to Do First: The servicer must include the
following in the FRU exchange form or FRU return form
that is attached to the returned FRU.
1. Name and phone number of servicer
2. Date of service
3. Date when FRU failed
4. Date of purchase
1
Page 10

5. Failure symptoms, error codes appearing on
display, and beep symptoms
6. Procedure index and page number in which
failing FRU was detected
7. Failing FRU name and FRU number
8. Machine type, model number, and serial number
9. Customer's name and address
Before checking problems with the computer, refer to the
following to determine if the warranty applies.
Warranty Note
During the warranty period, the customer may be
responsible for repair costs if the computer damage
was caused by misuse, accident, modification,
unsuitable physical or operating environment, or
improper maintenance by the customer.
The following is not covered under warranty:
LCD panel cracked by applying excessive force
or by being dropped.
Scratches, cracked, or broken plastic parts,
broken latches, broken pins, or broken
connectors caused by excessive force.
Damage caused by liquid spilled into the system.
Damage caused by improperly inserting a
PCMCIA card or installation of an incompatible
card.
Damage caused by foreign material in the
UltraBay or half-height bay.
Diskette drive damage caused by pressing the
diskette drive cover or inserting diskettes with
multiple labels.
Damaged or bent diskette eject button.
CD-ROM drive damage caused by excessive
force, shock, or by being dropped.
Fuses blown by attaching a nonsupported device.
Forgotten computer or hard disk password
(making computer or hard disk unusable).
If the following symptoms are present, they may
indicate damage caused by nonwarranted activity:
Missing parts may be a symptom of unauthorized
service or modification.
HDD spindles can become noisy if subjected to
excessive force or by being dropped.
I9990303 errors can be caused by exposure to
strong magnetic fields.
2 IBM Mobile Systems HMM
Page 11

General Preparation
Note
In this manual,
Base Model I,
and
SelectaDock Docking System
Model and SelectaDock when docked together as one
unit.
1. The SelectaDock supports the ThinkPad 760E,
760ED, and 760ELD. When any other model is
docked to the SelectaDock, a beep sounds. Check
which model of the ThinkPad is docked to the
SelectaDock before maintenance.
2. Verify the Base Model is correctly docked (connected)
to the SelectaDock.
3. Verify the computer is correctly docked (connected) to
the SelectaDock Docking System.
4. Dock a known-good computer to the Base Model and
verify proper operation. If there is a problem, replace
the Base Model.
5. If possible, make sure there are no hardware setting
conflicts, such as in interrupt levels, memory
addresses, DMA channels, and I/O addresses.
6. If the PCI or the ISA card is installed, verify the card
is supported by the computer.
7. Verify the SCSI ID is set correctly.
8. Test and correct any computer problems before you
test it with the SelectaDock Docking System. Use the
computer documentation to resolve any computer
problems.
9. Test the computer with the external keyboard,
external display, mouse, and parallel and serial
device connectors. (Use the keyboard/mouse
connector to test the external keyboard and mouse.)
If no problems are found, connect the external
keyboard, mouse, parallel and serial devices to the
SelectaDock Docking System. Then connect the
SelectaDock Docking System to the computer and
test it.
10. If external devices are attached to the SelectaDock
Docking System, such as an audio amplifier, check
the device by referring to the manual shipped with it.
11. If the user did not bring the computer with a
SelectaDock Docking System when service is
needed, use a computer that works correctly with the
SelectaDock Docking System.
Base Model
SelectaDock
means the SelectaDock
means the SelectaDock II,
means the Base
3
Page 12
Checkout Guide
Use the following procedure as a guide for computer
problems.
Note
The diagnostic tests are intended to test only IBM
products. Non-IBM products, prototype cards, or
modified options can give false errors and invalid
system responses.
Important
When the problem determination procedure in the
operation manual that is supplied with the adapter or
device says “Have the system unit serviced”, this
means both the computer and the SelectaDock
Docking System.
1. Obtain the failing symptoms in as much detail as
possible.
2. Verify the symptoms by attempting to re-create the
failure by running the diagnostic test or by repeating
the same operation.
Note
To run the diagnostics, refer to “How to Run the
Diagnostics” on page 11.
3. Use the following table with the verified symptom to
determine which page to go to. Search the
symptoms column and find the description that best
matches your symptom; then go to the page shown in
the “Go to” column.
Symptoms (Verified) Go to
Power failure. (The
power indicator does not
go on or stay on.)
POST does not
complete. No beeps or
error code are indicated.
The configuration is not
the same as the
installed devices.
POST beeps, but no
error codes are
displayed.
“Power Supply” on
page 6.
“Symptom-to-FRU
Index” on page 18, and
then use the No Beep
Symptoms table.
“Checking the Installed
Devices List” on page 8.
“Symptom-to-FRU
Index” on page 18, and
then use the Beep
Symptoms table.
4 IBM Mobile Systems HMM
Page 13

Symptoms (Verified) Go to
POST detected an error
and displayed numeric
error codes.
The diagnostic test
detected an error and
displayed a FRU code.
Other symptoms (such
as LCD display
problems).
Symptoms cannot be
re-created (intermittent
problems).
“Symptom-to-FRU
Index” on page 18, and
then use the Numeric
Error Codes table.
“Diagnostic Error Codes”
on page 21.
“Symptom-to-FRU
Index” on page 18, and
then use the other
symptom table.
Use the customer
reported symptoms and
go to “Symptom-to-FRU
Index” on page 18.
5
Page 14
Power Supply
If the power-on indicator is not on but the power supply fan
is not turning, check the power cord for continuity and
correct installation.
If the power cord is not the problem, either the power
supply is defective, or another component is defective
causing the power supply to cut off. To verify the power
supply is operating correctly, do the following:
1. Power-off the computer and disconnect the
SelectaDock Docking System power cord.
2. Remove all internal devices, external devices, and the
computer from the SelectaDock Docking System.
3. Undock the Base Model.
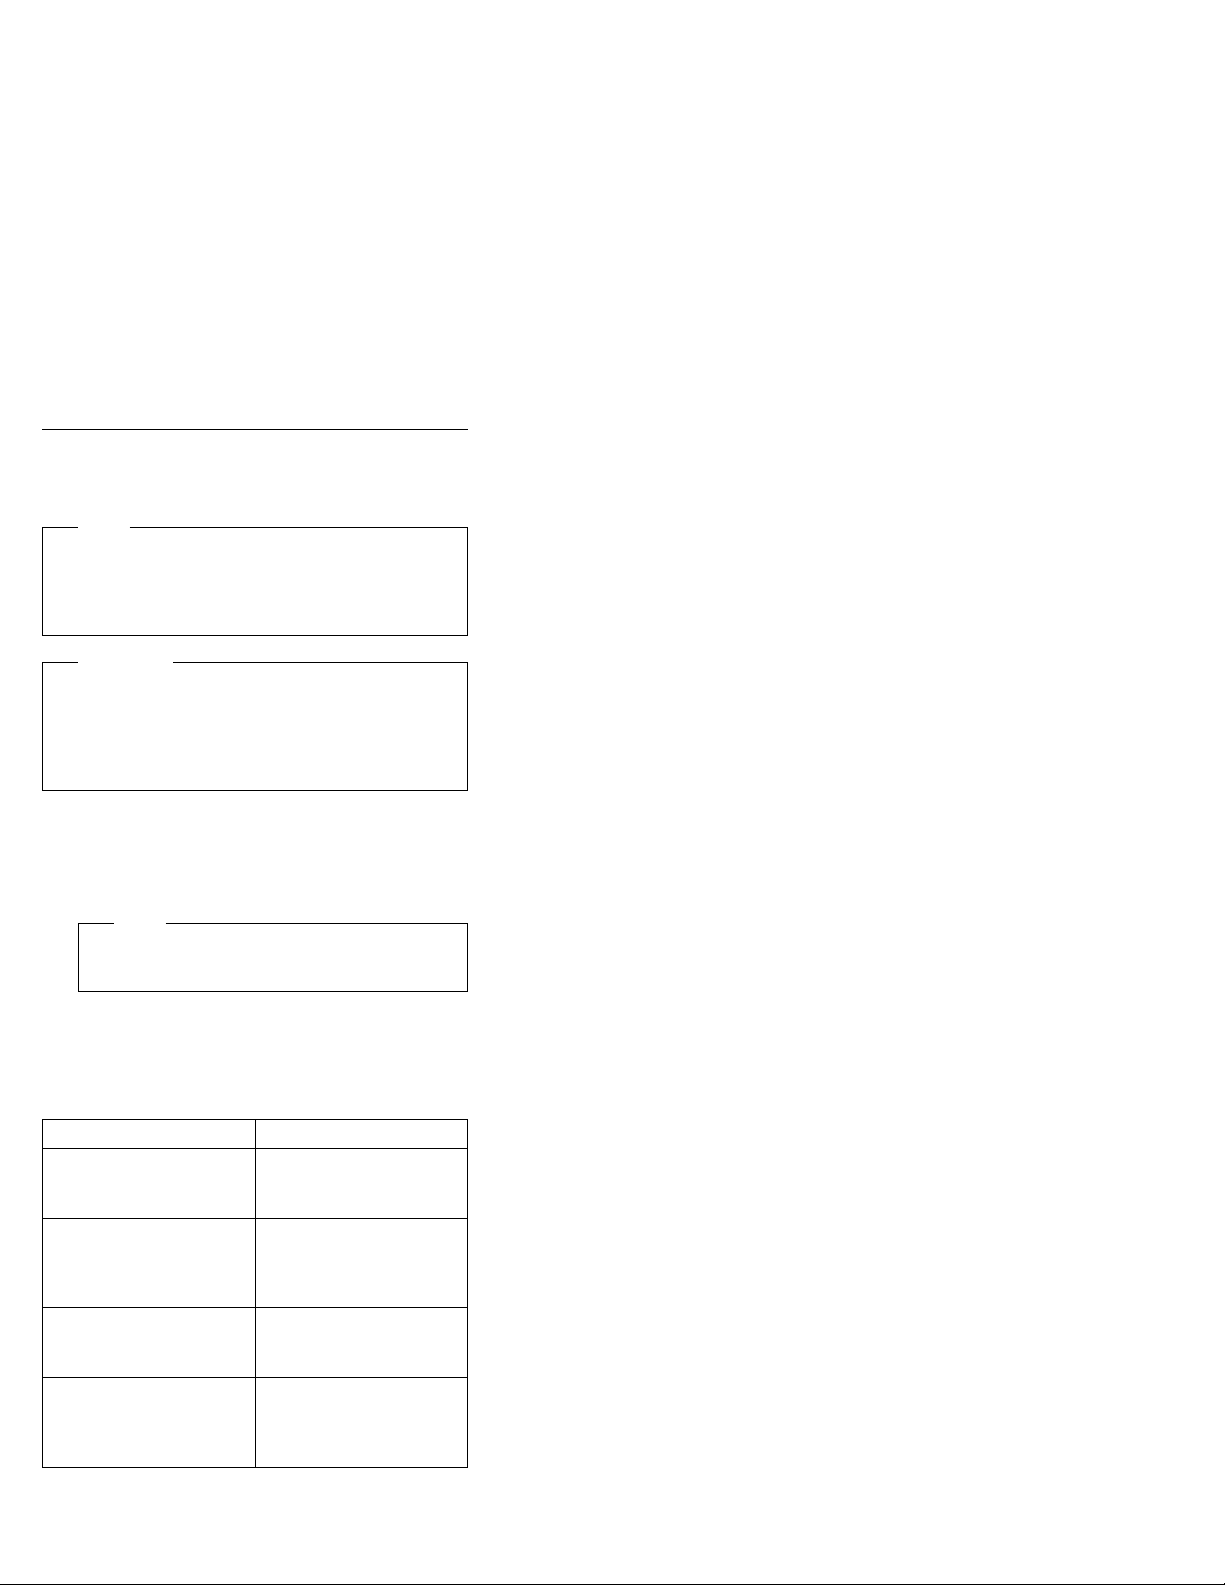
4. Remove the half-height bay frame (see “1050
Half-Height Bay Frame” on page 39).
5. Remove connectors .1/, .2/, .3/, .4/, and .5/ from
the each device, tray, or card.
1
2
3
4
5
6. Short-circuit 1 and 3, 2 and 8 of the connector .5/.
Then check the power supply voltages on each
connector. If the voltage is not correct, replace the
power supply.
If any of the voltages is not correct, replace the power
supply. If replacing the power supply does not correct the
problem, replace the main card.
6 IBM Mobile Systems HMM
Page 15
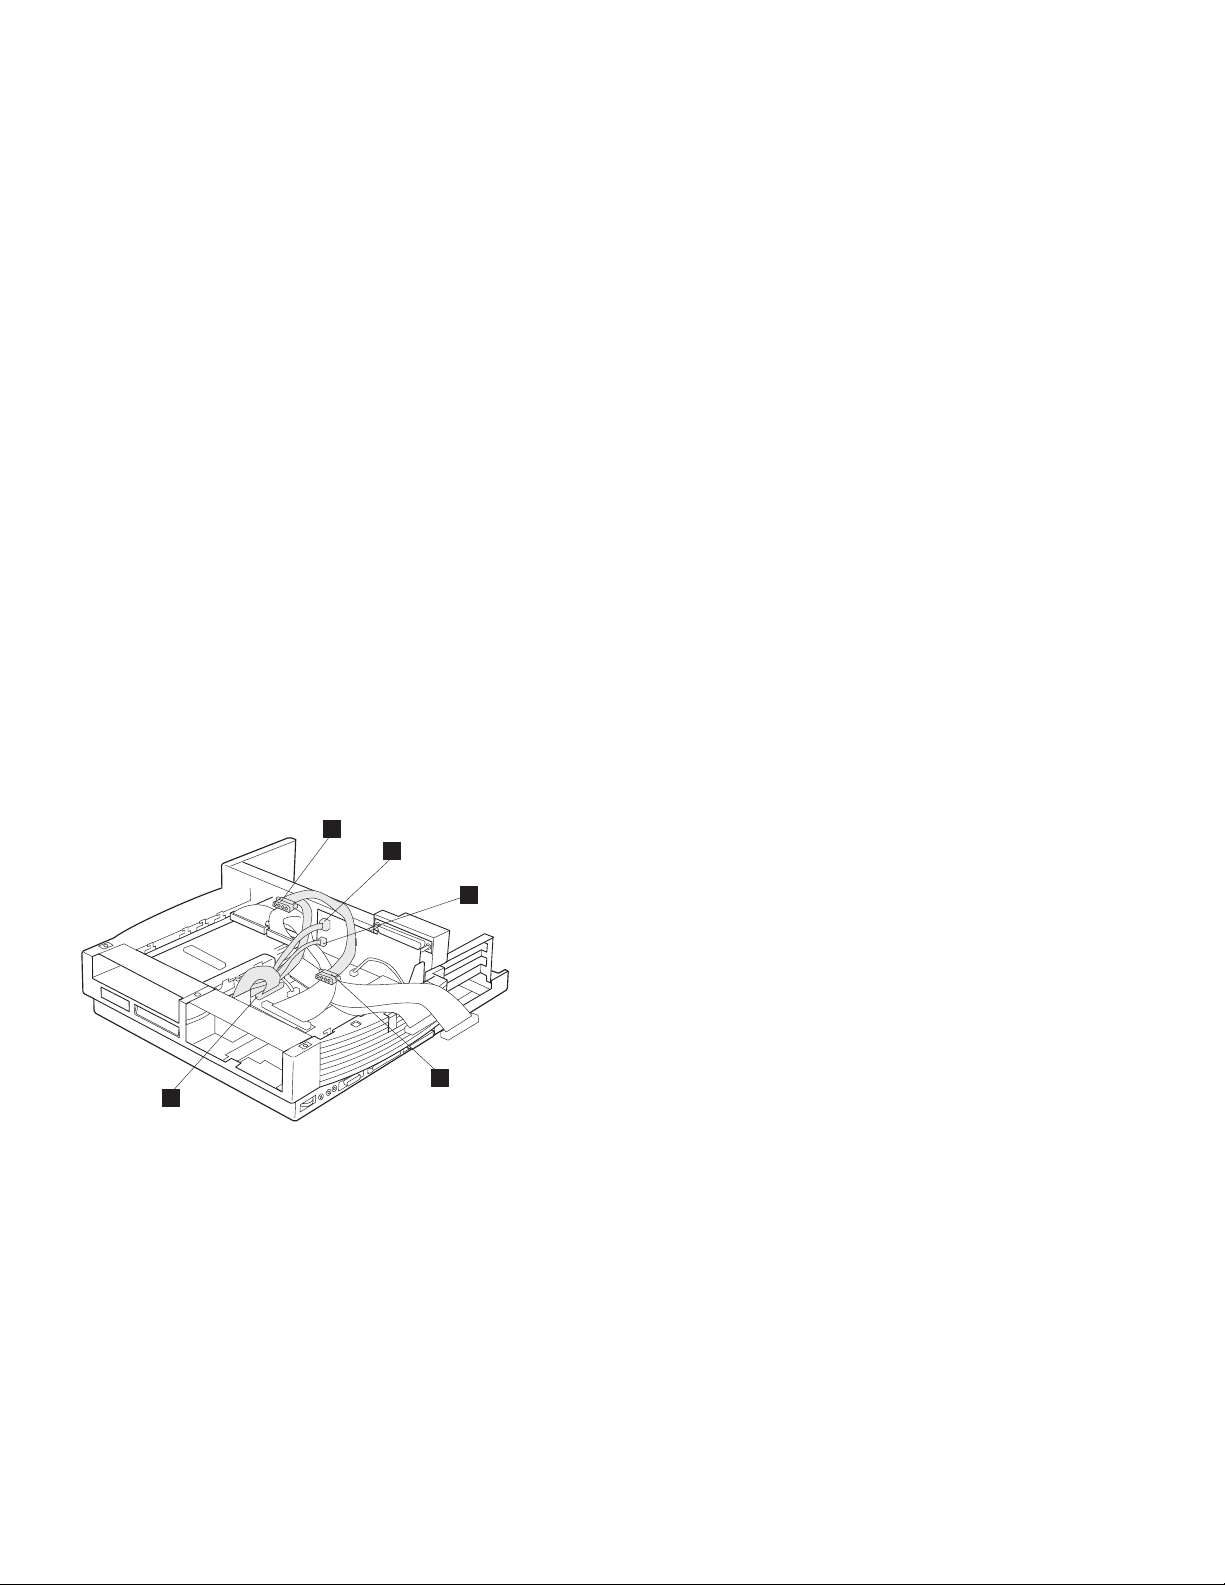
Power Supply Connector .1/ and .4/
Pin V dc
Red cord + 5 V
Yellow cord + 12 V
Power Supply Connector .2/
Pin Signal V dc Min. V dc Max.
1, 2 CVCC + 19 V + 21 V
3, 4 GND – –
Power Supply Connector .3/
Pin Signal V dc Min. V dc Max.
1 − 12 V − 11.4 V − 13.2 V
2, 3 GND – –
4 − 5 V − 4.53 V − 5.5 V
7
Page 16
Power Supply Connector .5/
1
2
19
Pin Signal V dc
2, 3 GND — —
4 SUB 12 +11.4 +12.6
5 GND — —
6, 7 +12 volts +11.4 +12.6
8 GND — —
9—11 +3.3 +3.0 +3.6
12—14 GND — —
15—17 +5 +4.75 +5.25
18—20 GND — —
20
Min.
V dc
Max.
Checking the Installed Devices List
If a device is installed but the icon appears in a gray shade
rather than a dark shade on the basic diagnostics screen,
the device is defective. Reseat the device connectors. If
the symptom remains, replace the device or the system
board. If needed, adjust the contrast control to clearly
distinguish the shades of the icon.
If a device that is not installed appears in a dark shade (for
example, FDD-2 appears in a dark shade when
second FDD is installed), do the following:
1. Replace the first device in the configuration, such as
an FDD-1, HDD-1.
2. If the problem remains, replace the system board.
The PCMCIA-1, parallel, and serial icons are always
displayed in a dark shade because the icons represent
subsystems of the system board and not the attachment of
the devices.
The FDD-1, HDD-1, or PCMCIA-1 icons represent the first
drive in the system configuration for each type of device.
Similarly, the HDD-3, FDD-2, or PCMCIA-2 icons represent
the second drive, usually attached through a port
replicator or an expansion unit.
The HDD-2 icon represents the hard disk drive in the
UltraBay of the computer. The HDD-3 or HDD-4 icons
represent the hard disk drive in the SelectaDock Docking
NO
8 IBM Mobile Systems HMM
Page 17

System (except the SCSI hard disk). The FDD-2 or
PCMCIA-2 icons represent the FDD or PCMCIA attached
through a port replicator or in the SelectaDock Docking
System.
Printer
Test the printer by connecting it to the computer before
testing it on the SelectaDock Docking System.
1. Make sure the printer is correctly connected and is
powered on.
2. Run the printer self-test.
If the printer self-test does not run correctly, the problem is
in the printer. Refer to the printer service manual.
If the printer self-test runs correctly, connect a wrap plug
on the parallel connector on the rear of SelectaDock
Docking System and run the advanced diagnostic tests to
determine the failing FRU.
If the advanced diagnostic tests (with the wrap plug
connected) did not detect a failure, replace the printer
cable.
If the problem is not corrected, do one of the following:
If the printer is attached to the parallel connector of
SelectaDock Docking System, replace the main card
of SelectaDock Docking System.
If the printer is attached to the parallel connector on
the adapter, replace the FRUs in the following order
one at a time until the problem is corrected:
Note
If the replaced FRUs do not resolve the problem,
put the original FRUs back in the SelectaDock
Docking System. Do not replace nondefective
FRUs.
1. Adapter
2. Main card of SelectaDock Docking System
External Display
If the screen is rolling, replace the external display.
If the problem is not corrected, replace FRUs in the
following order one at a time until the problem is corrected:
Note
If the replaced FRUs do not resolve the problem, put
the original FRUs back in the SelectaDock Docking
System. Do not replace nondefective FRUs.
If the external display is attached to the SelectaDock
Docking System:
1. Main card of SelectaDock Docking System
9
Page 18

If the external display is attached to the display
adapter:
1. Display adapter
2. Main card of SelectaDock Docking System
3. Riser card
If the screen is not rolling, do the following to run the
display self-test:
1. Power-off the computer on the SelectaDock Docking
System and the external display.
2. Disconnect the external display signal cable from the
SelectaDock Docking System.
3. Power-on the external display.
4. Turn the contrast control to its maximum position.
5. Turn the brightness control to its center detect
position.
Check for the following conditions:
The screen should be white or light gray, with a black
margin. See the appropriate display manuals for the
correct self-test condition.
The screen contrast and brightness controls should
change the intensity of the screen.
If the external display does not meet these specifications,
replace the external display.
If the external display meets these specifications, replace
FRUs in the following order one at a time until the problem
is corrected.
Note
If the replaced FRUs do not resolve the problem,
put the original FRUs back in the SelectaDock
Docking System. Do not replace nondefective
FRUs.
If the external display is attached to the SelectaDock
Docking System:
1. Main card of SelectaDock Docking System
2. External display
If the external display is attached to the display
adapter:
1. Display adapter
2. Main card of SelectaDock Docking System
3. Riser card
4. External display
10 IBM Mobile Systems HMM
Page 19
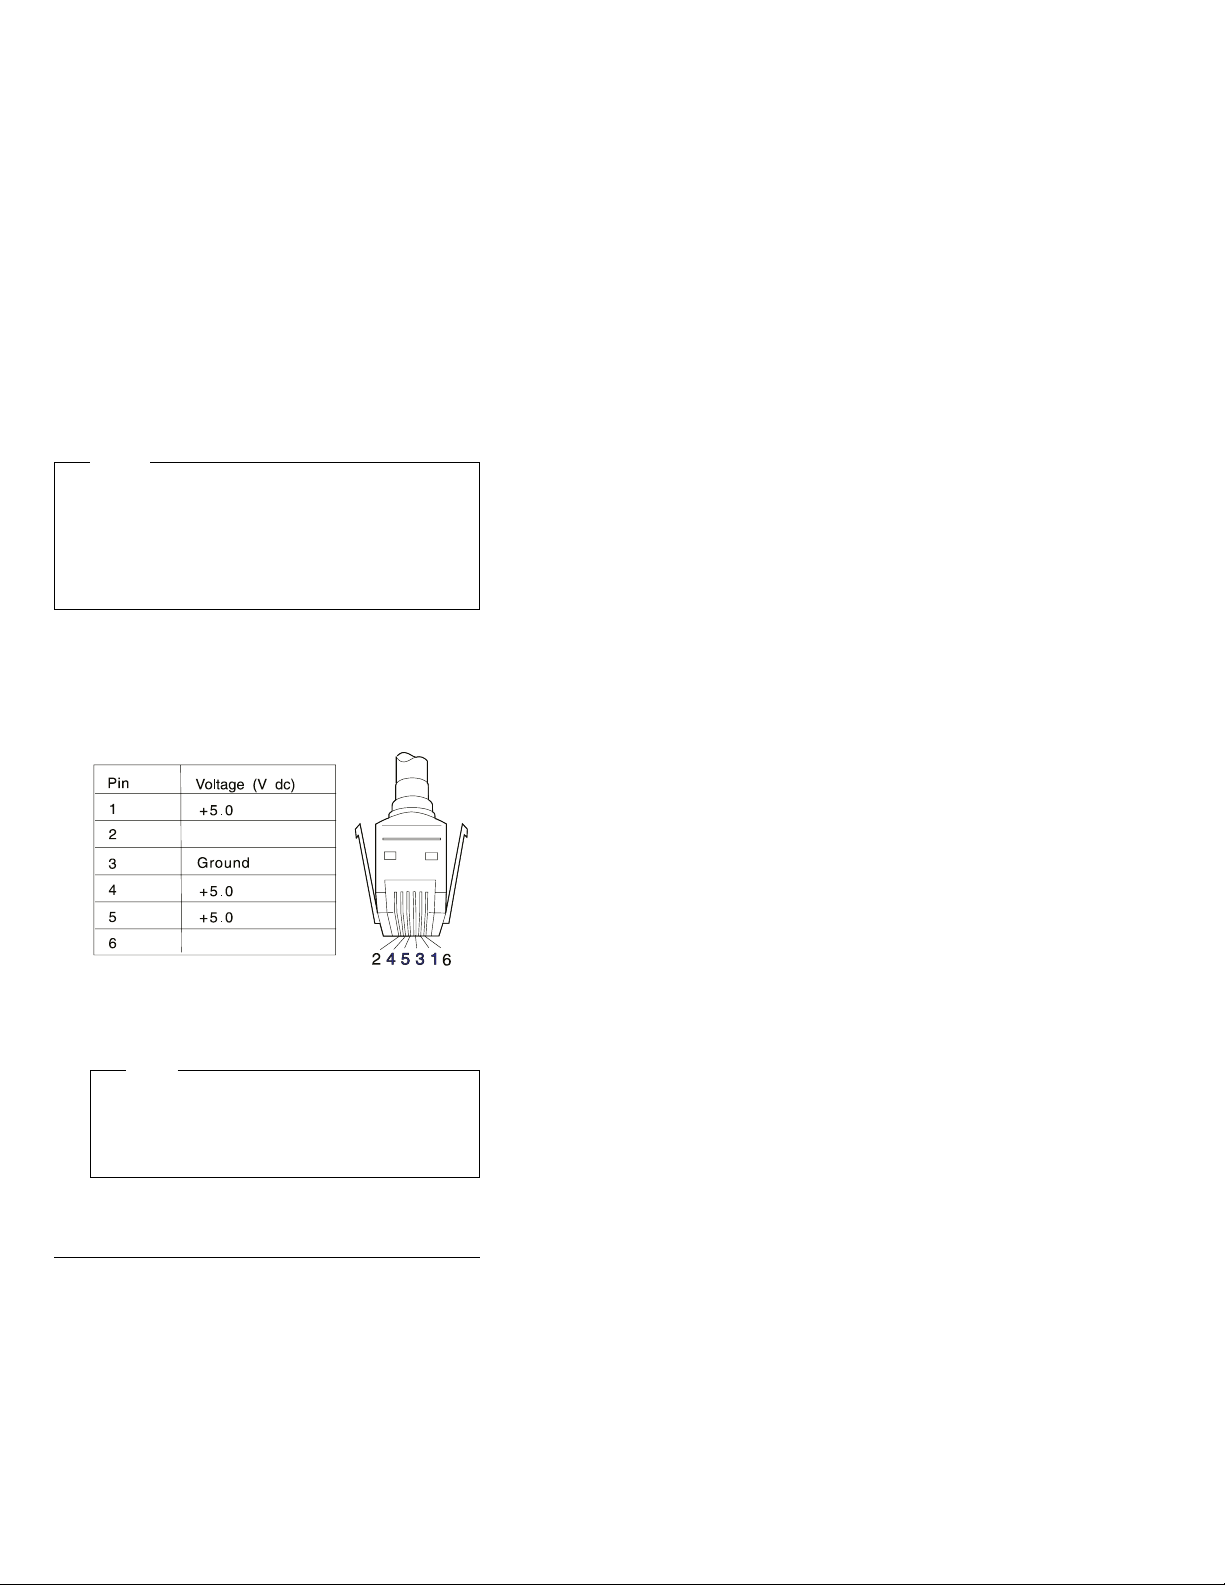
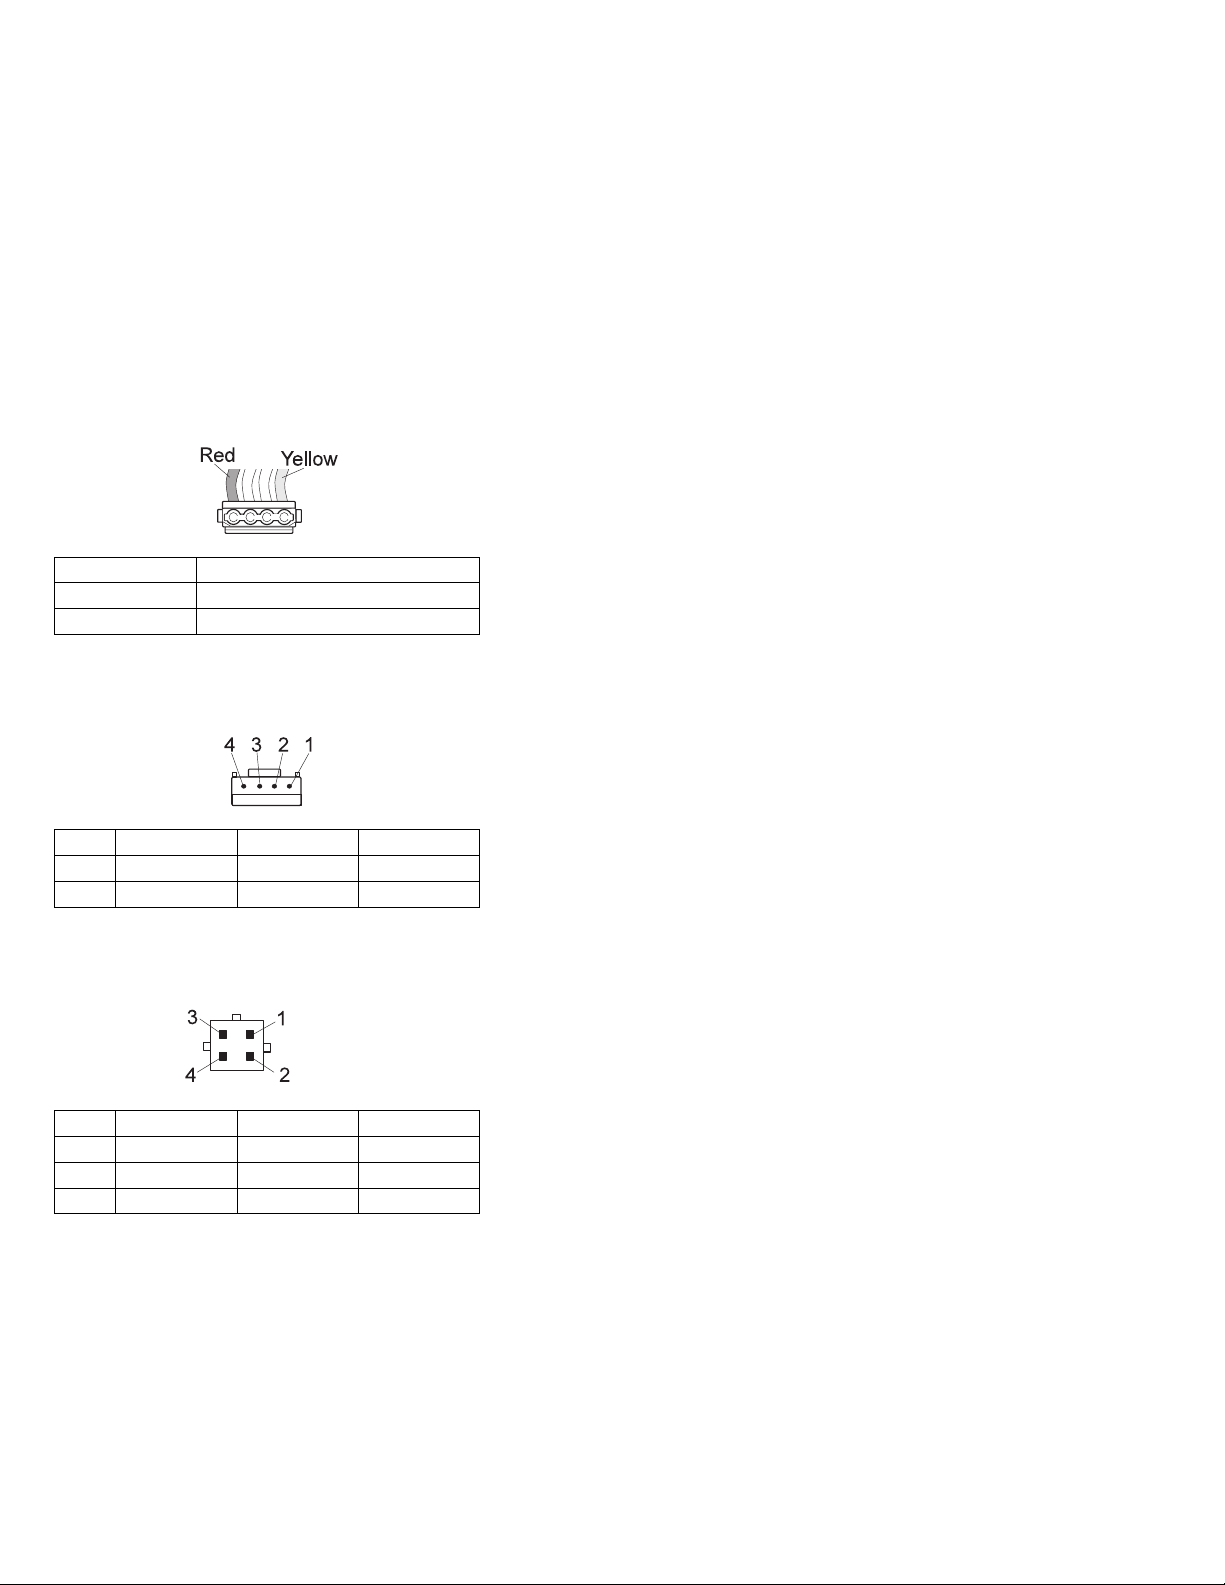
External Keyboard
Notes
If a mouse or other pointing device is attached,
remove it and see if the error symptom goes
away. If the symptom goes away, the mouse or
other pointing device is defective.
The computer keyboard does not work when an
external keyboard is connected.
1. Power-off the computer.
2. Disconnect the keyboard cable from the external
keyboard.
3. Power-on the computer and check the keyboard cable
connector for the following voltages. All voltages
have a ±5% voltage tolerance.
Not used
Not used
4. If all voltages are correct, replace the external
keyboard.
5. If the voltages are not correct, replace the following
FRUs one at a time until the problem is corrected.
Note
If the replaced FRUs do not resolve the problem,
put the original FRUs back in the SelectaDock
Docking System. Do not replace nondefective
FRUs.
a. Keyboard cable
b. Main card of the SelectaDock Docking System
How to Run the Diagnostics
This section describes how to run the diagnostics for both
the computer and the SelectaDock Docking System.
Diagnostics for ThinkPad
Use either the TrackPoint III or the cursor move keys to
interact with the tests. The Enter key works the same as
selecting the OK icon to reply OK.
1. Press and hold F1; then power-on the computer.
Hold F1 down until the Easy-Setup screen appears.
2. Select Test and press Enter.
11
Page 20

3. Select a device and press Enter to run the test.
4. The test progress screen appears.
5. OK appears when the test ends without any errors.
6. Start the Advanced Diagnostic test by pressing
Ctrl+A on the basic diagnostic menu screen.
7. Select Tool to install the tools.
8. Select a device and press the Spacebar and install
the tool. You can select multiple devices by repeating
this step. A √ mark appears beside the selected
devices.
9. Select OK and press Enter if the selection is OK.
10. Select a device and press Enter to start the tests.
11. Select Test All to test all devices.
12. Select Loop Test to run the tests in a repeated loop.
A loop option menu appears in which a device loop or
all-device loop can be selected. Select a device and
press the Spacebar to select a device. Repeat this
step to select multiple devices. Press Enter to start
the diagnostic loop. If no device is selected, all
device tests are looped.
13. To exit the loop, keep pressing Ctrl+Pause until the
test exits. A beep sounds to notify that the exit
interrupt is sensed by the test program.
Error Log: Diagnostic errors are printed on a printer
that is attached to the parallel port when the error is
detected. The error is also logged in the system memory.
Use the following procedure to display the errors:
1. End the test, if it is running.
2. Press Ctrl+A to select the advanced diagnostic mode.
3. Press Ctrl+E.
4. The error log appears.
5. To exit the screen, select the cancel icon or press
Esc.
The error log is not saved when the system is powered off.
How to Run the Keyboard Test: Use the
following procedure to run the keyboard key test.
1. Power-off the computer.
2. Remove the external keyboard, if one is attached.
3. Press and hold F1, then power-on the computer.
Hold F1 until the Easy-Setup screen appears.
4. Select Test and press Enter. The basic diagnostic
screen appears.
5. Press Ctrl+A to go to the advanced diagnostic
screen.
6. Press Ctrl+K. A keyboard picture appears on the
screen.
7. When you press a key, a mark appears or disappears
on the corresponding key position on the screen.
Repeat this step for any keys that need to be tested.
8. To exit the test, press Esc or select the cancel icon.
12 IBM Mobile Systems HMM
Page 21

PC Test Card LED: The green LED on the PC test
card lights when the PCMCIA test is running. If the LED
does not light, check that the card is installed correctly by
reseating the card. If it still does not light after reseating,
try using another slot for the test. If the LED still does not
light and the test fails, replace the FRU shown in the
diagnostic error code.
Errors during the POST: If the POST detects an
error, a three- to eight-digit error code displays.
Memory Errors: If the POST detects a memory error
in the first 640 KB of system memory, all the first bank
memory is deallocated and the test continues with the
second 640 KB of memory. If the total amount of
error-free memory becomes less than 2 MB, a 2XX POST
error occurs and the system stops. All the remaining
memory is used as system memory. When the POST
memory test has completed, the usable memory size is
compared with the configuration data. If a mismatch is
detected, a 2XX error code occurs. Press Esc, and F1
after restart to continue system operation.
Memory sizes, that are deallocated because of the POST
process, are kept by the hibernation or suspend functions.
To test this memory, it must be reconfigured as part of the
original memory size. Configure by turning the power off
and on.
Deallocation support is done only by the POST for memory
errors. All irrecoverable memory errors that occur during
normal operation cause an interrupt to the operating
system.
Diagnostics for the SelectaDock Docking System
The SelectaDock Docking System Options Diskette helps
you troubleshoot the expansion unit, SCSI adapter, and
SCSI device problems through a series of menus.
Run the diagnostics to verify operation of the SelectaDock
Docking System and SCSI devices. Do the following:
1. Power-off the computer on the SelectaDock Docking
System and external SCSI devices.
2. Insert the Option Diskette into drive A.
3. Power-on all attached external SCSI devices and the
computer on the SelectaDock Docking System.
4. The Logo Screen appears.
5. After a few seconds the Main Menu appears.
6. Select a device for testing and go to the respective
section.
13
Page 22

Testing the Expansion Unit
1. The Test Selection Menu appears when you select
Test Expansion Unit on the Main Menu.
2. Select an item on the screen and follow the
instructions that appear on the screen.
Testing the SCSI Subsystem
Note
If a SCSI adapter is installed in an PCI adapter card
slot, remove it before running the SCSI diagnostic
program.
1. When you select Test SCSI Subsystem on the Main
Menu, the diagnostics program checks the system
configuration for SCSI devices and displays the
following if no SCSI controller is found.
If a SCSI controller is found, the computer goes on to
initialize the SCSI devices and displays the following:
SCSI Subsystem Diagnostics Utility V2.1
Scanning Target #n
Enter F3=Exit
14 IBM Mobile Systems HMM
Page 23

2. If the initialization fails, the following screen appears:
SCSI Subsystem Diagnostics Utility V2.1
SCSI Initialization Failed
Enter F3=Exit
If the initialization ends successfully, the following
screen appears. Select an item.
3. The SCSI Devices Test Menu appears. Select one
of the devices.
The device name may be any of the following:
SCSI hard disk
SCSI tape drive
15
Page 24

SCSI CD-ROM
SCSI optical drive
No device
The SCSI controller of SelectaDock Docking System
appears as ID7 on the screen.
4. If a SCSI device exists and a test medium is required
to test the SCSI device, the following pop-up menu
appears (shows the case of a SCSI tape drive).
5. Insert the requested medium and wait approximately
30 seconds until the medium is loaded.
6. Press any key. If no SCSI devices are found, a
pop-up menu appears.
16 IBM Mobile Systems HMM
Page 25

7. The test begins and the following pop-up menu
appears:
8. If the test is successful, the following appears:
If the test is unsuccessful, the following appears:
17
Page 26

Symptom-to-FRU Index
The Symptom-to-FRU Index lists error symptoms and
possible causes. The most likely cause is listed first.
Note
Replace the FRUs one at a time in the sequence
shown in the FRUs of the SelectaDock Sequence of
Action column. If a replaced part did not resolve the
problem, put the original part back in the SelectaDock
Docking System. Do not replace nondefective parts.
Always begin with “General Preparation” on page 3. This
index also can be used to help you decide which FRUs to
have available when servicing the SelectaDock Docking
System.
Numeric error codes show the errors detected in the POST
or system operation. Xs, when included in the error code,
can be any number.
FRU codes are used for errors detected by diagnostic
tests.
If no error codes are available, use narrative symptoms.
If the symptom is not listed or you cannot correct the
problem using this index, go to “Undetermined Problems”
on page 30.
If you cannot correct the problem using this index, go to
“Undetermined Problems” on page 30.
Important
1. Before replacing any SCSI device, verify there
are no duplicate SCSI ID settings.
2. Make sure there are no conflicts of hardware
settings, such as, interrupt level, memory
address, DMA channel, and I/O address.
3. If you have both an error message and an
incorrect audio response, diagnose the error
message first.
4. If you cannot run the advanced diagnostic tests,
but did receive a POST error message, diagnose
the POST error message.
5. If you did not receive an error message, look for
a description of your error symptoms in the first
part of this index.
6. Check all power supply voltages before you
replace the main card, riser card, and audio card
of the SelectaDock Docking System. (See
“Power Supply” on page 6.)
18 IBM Mobile Systems HMM
Page 27

Numeric Error Codes
Symptom or Error FRUs of the SelectaDock
10X, 11X
101: Interrupt failure.
102: Timer failure.
103: Timer interrupt
failure.
104: Protected mode
failure.
105: Last 8042
command not
accepted.
107: NMI test failure.
108: Timer bus test
failure.
109: Low meg-chip
select test.
195
(The computer was docked
to the SelectaDock Docking
System while in hibernation
mode.)
1XX 1. See the Hardware
2XX
201: Memory data
error.
202: Memory line error
00–15.
203: Memory line error
16–23.
205: Memory test
failure on on-board
memory.
221: ROM to RAM
remap error.
3XX 1. See “External
Sequence of Actions
1. Adapter in slot (if
used)
2. Riser card
3. Main card
1. Do the following
steps.
a. Power-off and
undock the
system.
b. Power-on and
shut down the
system.
c. Power-off and
dock the system.
Maintenance Manual
of the computer. If
the problem remains,
go to “Undetermined
Problems” on
page 30.
1. See the Hardware
Maintenance Manual
of the computer.
2. Main card
Keyboard” on
page 11.
19
Page 28

Symptom or Error FRUs of the SelectaDock
6XX 1. Before changing any
11XX, 12XX 1. Serial devices
17XX 1. Hard disk drive
24XX 1. Main card
860X 1. Mouse
I9990301, I9990302
I9990305
Not shown above 1. See the Hardware
Sequence of Actions
devices, run the
diagnostic test. (See
the “How to Run the
Diagnostics” on
page 11.)
2. FDD external
attachment kit
3. Diskette drive
assembly
4. Riser card
2. Communication cable
3. Riser card
(2.5-inch ThinkPad
hard disk drive)
2. Main card
2. Riser card
2. External keyboard
3. Riser card
1. See the Hardware
Maintenance Manual
of the computer.
Maintenance Manual
of the computer.
2. See “Undetermined
Problems” on page 30.
20 IBM Mobile Systems HMM
Page 29

Diagnostic Error Codes
A detected error is shown as in the following example:
A large X to the left of the device icon
Device ID (three digit)
FRU code (four digit)
Error code (two digit)
The device ID and error code are used to indicate the
detail portion of the FRU which caused the error. If
replacing a FRU does not correct the problem, see the
device ID or error code from the previous failure. If they
have changed, the cause might be because the new FRU
is defective or that the FRU was incorrectly installed.
Device ID: If an error is detected by the diagnostic
tests, a three digit device ID is displayed. The device ID
indicates suspected device.
Icon DeviceIDSuspected Device
001 System board
SystemBoard
Memory
Display
1
003 Keyboard
007 Math coprocessor
086 Pointing device
002 Memory
050 Display
053 Enhanced video
052 MPEG
017 Hard disk drive
HDD-1
2
HDD-2
3
HDD-3
151 Hard disk in UltraBay
067 External Hard disk drive
152 Second external hard disk
drive
21
Page 30

Icon DeviceIDSuspected Device
068 External hard disk drive
1
FDD-1
2
FDD-2
1
PCMCIA-1
2
PCMCIA-2
Parallel
Serial
DSP
CDROM-1
2
006 Diskette drive
066 External diskette drive
080 PCMCIA
088 External PCMCIA
009 Parallel
011,
012
113 DSP
1
215 CD-ROM
216 External CD-ROM
Serial
CDROM-2
103 IR
Infrared
150 Audio (ESS)
Audio
22 IBM Mobile Systems HMM
Page 31

FRU Codes: If an error is detected by the diagnostic
tests, a four-digit FRU code is displayed. The FRU code
indicates two suspected FRUs. Replace the FRU that is
indicated by the
FRU that is indicated by the
FRU is assigned to code 00. If only one FRU is
suspected, the other FRU code is filled with zeros. See
the reference page before replacing the FRU.
FRU Code FRU
10 1. System board
30 Reserved
32 1. External keyboard
33 1. External mouse
45 External CRT
51 1. Reseat the diskette drive (FDD-2)
61 1. Reseat the hard disk drive in the
63 1. Reseat the second hard disk drive in
70 PCMCIA-2 (Replicator)
90 CD-ROM drive
91 CD-ROM drive in the SelectaDock
two leftmost digits
first; then replace the
two rightmost digits.
2. Main card
3. Riser card
2. Main card
3. Riser card
2. Diskette drive (FDD-2)
3. Main card
4. Riser card
SelectaDock Docking System (HDD-3)
2. Hard disk drive in the SelectaDock
Docking System (HDD-3)
3. Main card
the SelectaDock Docking System
(HDD-4)
2. Second hard disk drive in the
SelectaDock Docking System (HDD-4)
3. Main Card
No
If the problem still remains after replacement of the FRUs,
go to “Undetermined Problems” on page 30.
23
Page 32

Beep Symptoms
Symptom or Error FRUs of the SelectaDock
Beep sounds continuously. 1. Verify that the
Sequence of Actions
ThinkPad model is
correct. (See “General
Preparation” on
page 3.)
2. Security feature group
3. Main card
4. Audio card
Keyboard-Related Symptoms
Symptom or Error FRUs of the SelectaDock
One or more keys do not
work on the external
keyboard, but the
SelectaDock is otherwise
functional.
Sequence of Actions
1. Go to “External
Keyboard” on
page 11.
Indicator-Related Symptoms
Symptom or Error FRUs of the SelectaDock
Power-good light does not
turn on, fan does not run,
and the computer is not
functional.
Computer is functional and
the fan runs, but the power
on indicator does not turn
on.
LCD (SelectaDock) for the
hard disk drive stays on.
LCD (SelectaDock) for the
hard disk drive is not
working, but the
SelectaDock is functional.
Sequence of Actions
1. See “Undetermined
Problems” on
page 30.
1. Check the connector
of LCD Group
2. Main Card
3. Go to “Power Supply”
on page 6.
1. 2.5-inch hard disk
drive on the UltraBay
tray or IDE drive in
the hall-height bay.
of the SelectaDock
1. Check the connector
of LCD Group
2. LCD Circuit Board
Group
3. Main card
24 IBM Mobile Systems HMM
Page 33

Power-Related Symptoms
Symptom or Error FRUs of the SelectaDock
Although the computer is
powered off, the fan of the
SelectaDock power supply
is running.
The power of SelectaDock
cannot be powered off.
Sequence of Actions
1. Power supply unit
1. Power supply unit
Peripheral-Device-Related Symptoms
Symptom or Error FRUs of the SelectaDock
External display screen
changes colors.
Sequence of Actions
1. Go to “External
Display” on page 9.
UltraBay-Tray-Related Symptoms
Symptom or Error FRUs of the SelectaDock
The HDD or FDD on the
UltraBay tray does not work
correctly.
Sequence of Actions
1. Reseat the drive.
2. Reseat the power
cable and SCSI cable
of the of the UltraBay
tray. (See “UltraBay
Tray” on page 37.)
3. Check that:
a. The drive works
correctly if it is
installed in the
UltraBay of the
computer.
b. Whether the IDE
connector of the
UltraBay tray is
connected
correctly.
c. No more than two
IDE devices are
installed including
a device in the
half-height bay.
4. Run the drive test.
5. Main card
25
Page 34

PC-Card-Related Symptoms
Symptom or Error FRUs of the SelectaDock
PC Card does not work. 1. Reseat the PC card.
Sequence of Actions
2. Check that:
a. The PC card is
functional when
installed in the
computer or
another
SelectaDock.
b. The PC card is
correctly set up,
including the
computer
resource
assignments and
device driver
installation.
3. Run the diagnostic test
for PCMCIA.
4. Main card
SCSI Device-Related Symptoms
Symptom or Error FRUs of the SelectaDock
The external SCSI device
does not work.
The internal SCSI device
does not work.
Sequence of Actions
1. Verify the SCSI
device is powered
on.
2. Verify the SCSI device
is terminated at the
last device.
3. Reseat the drive.
4. Run the drive test.
5. Main card
1. Reseat the drive.
2. Verify the SCSI cable
connections.
3. Verify the terminator
on the SCSI drive in
the SelectaDock is
removed.
4. Run the drive test.
5. Main card
26 IBM Mobile Systems HMM
Page 35

Audio-Related Symptoms
Symptom or Error FRUs of the SelectaDock
Audio equipment does not
work.
Sequence of Actions
Verify that:
1. The audio equipment
works when connected
directly to the
computer.
2. The audio equipment
is designed to be
supported by this
product.
Sound Blaster-Related Symptoms
Symptom or Error FRUs of the SelectaDock
The Sound Blaster or
compatible adapter card
does not work.
Sequence of Actions
Check that:
1. The game switch is set
to the OFF position.
(See “Game Switch”
on page 31.) Because
of a resource conflict,
the Sound Blaster
does not work when
the MIDI/joystick port is
enabled.
2. The MIDI/joystick of
the computer has also
been disabled. See the
user's guide of the
computer.
MIDI/Joystick-Port-Related Symptoms
Symptom or Error FRUs of the SelectaDock
The MIDI/joystick does not
work.
27
Sequence of Actions
Check that:
1. The game switch is set
to the ON position.
(See “Game Switch”
on page 31.)
2. The computer supports
the MIDI device, when
the problem occurs
only during MIDI
operation.
Page 36

Adapter-Related Symptoms
Symptom or Error FRUs of the SelectaDock
The adapter does not work. Verify that:
Sequence of Actions
1. The adapter is
designed for the
docking station adapter
slot.
2. The system resources
are assigned correctly
by its utility program, if
the adapter card is a
non-PnP ISA adapter
bus type.
3. The driver diskette is
up to date. Contact the
driver manufacturer.
The accompanying
diskette may support
only older desktop
computers.
See the adapter
documentation that came
with the option to diagnose
problems.
28 IBM Mobile Systems HMM
Page 37

Intermittent Symptoms
Symptom or Error FRUs of the SelectaDock
An intermittent problem
occurs.
Sequence of Actions
The problem can be difficult
to analyze because it
occurs intermittently. If your
docking station has such a
problem, verify that:
1. The computer is firmly
attached to the docking
station.
2. All cables and power
cords are securely
connected to the
SelectaDock system
and to the attached
options.
3. The SCSI device is
correctly terminated.
4. Do the loop test. (See
“How to Run the
Diagnostics” on
page 11.)
If these items are correct
and the problem still occurs,
go to “Undetermined
Problems” on page 30.
Other Symptoms
Symptom or Error FRUs of the SelectaDock
Computer does not work,
the power-on indicator does
not turn on, but the fan
runs.
Program-load error during
remote IPL from the file
server.
The HDD-3 or HDD-4 is not
recognized and no error
codes appear on the
screen. (The password of
the HDD-3 or HDD-4 is still
set.)
Note: The HDD-3 or
HDD-4 icon
indicates the
2.5-inch ThinkPad
hard disk drive
installed in the
SelectaDock.
Sequence of Actions
1. See “Undetermined
Problems” on
page 30.
1. Network Adapter
1. Remove the hard
disk password for the
ThinkPad hard disk
as follows:
a. Remove the hard
disk drive from
the SelectaDock
Docking System
and install it to the
computer.
b. Remove the hard
disk password.
29
Page 38

Undetermined Problems
Use the following procedure when the diagnostic tests do
not identify the failing adapter or device.
Check that all cables, wires, and connectors are connected
so that they do not cause a short circuit. If any problems
are found, reconnect or replace them.
Check the power supply for correct operation (see “Power
Supply” on page 6). If the power supply is operating
correctly, return here and continue with the following
procedure:
1. Power-off the computer.
2. Remove or disconnect the following adapters or
devices one at a time from the SelectaDock Docking
System. (Do not isolate adapters or devices that are
known to be good.)
a. Non-IBM devices.
b. A modem, printer, mouse, external keyboard,
external display, external diskette drive, numeric
keypad, or other external devices.
c. Any adapter.
Note
Removing an adapter or device may cause
configuration errors. Ignore error code 174.
d. SCSI device.
e. Hard disk drive.
3. Power-on the system and check if the problem has
changed.
4. If the symptom remains, repeat steps 1 through 3
until you find the failing adapter or device, or until all
adapters or devices have been removed.
5. If all adapters or devices have been removed and the
problem remains, replace the following the
SelectaDock Docking System FRUs one at a time.
Note
If a replaced FRUs do not resolve the problem,
put the original FRU back in the SelectaDock
Docking System. Do not replace nondefective
FRUs.
a. Riser card
b. Main card
c. SelectaDock Docking System audio card
If the problem goes away when you remove an adapter,
but replacing the adapter does not correct the problem,
replace the main card of the SelectaDock Docking System.
30 IBM Mobile Systems HMM
Page 39

Feature Description
Game Switch: This switch controls the MIDI/joystick
port. The Sound Blaster cannot be used when the
MIDI/joystick is enabled because of data conflict. Set the
game switch to the OFF position to disable the
MIDI/joystick port. Set the game switch to the ON position
to enable the MIDI/joystick port.
Status Indicator Check the SelectaDock Docking
System status using the following icons:
Icon Meaning
.1/ Power on
.2/ Suspend mode
.3/ Diskette drive in use
.4/ Hard disk in use
.5/ Attention
31
Page 40

Product Overview: The following provides an
overview of the system features:
Feature Description
PCI or ISA slot Two full size PCI slots
or one ISA shared slot
Bays 1-inch-high bay
– ThinkPad option
using the UltraBay
tray
– CD-ROM/FDD/HDD
drive
Half-height bay
– All available
storage SCSI/IDE
devices
Audio subsystem Speaker
Audio line-out
Stereo speaker
Stereo audio amplifier
Headphone
Manual volume control
Ports MIDI/joystick port
SCSI2
Docking connector
PCMCIA One Type-III or two
Type-II PC Card
Security PCI or ISA card
protection
PC card lock
MicroSaver lock hole
32 IBM Mobile Systems HMM
Page 41

Removal and Replacement
This section contains information on removals and
replacements, as well as locations.
The arrows in the removals and replacements show
the direction of movement to remove a field
replaceable unit (FRU), or to turn a screw to release
the FRU. The arrows are marked in numeric order to
show the correct sequence of removal.
When other FRUs must be removed before the failing
FRU is removed, they are listed at the top of the
page. Go to the removal procedure for each FRU
listed, remove the FRU, and then continue with the
removal of the failing FRU.
To replace a FRU, reverse the removal procedure
and follow any notes that pertain to replacement.
See “Locations” on page 49 for internal cable
connections and arrangement information.
In addition to the safety notices below, refer to the
Hardware Maintenance Manual for the computer you are
servicing.
Caution
Before removing any FRU, power-off the SelectaDock
Docking System, remove the computer, unplug all
power cords from electrical outlets, and then
disconnect any interconnecting cables.
Warning
The main board, adapters, and circuit boards on the
drives are sensitive to, and can be damaged by,
electrostatic discharge. You must use an electrostatic
discharge (ESD) strap to establish personal grounding.
33
Page 42

1010 Base Model
Make sure that the security key is set to the Unlock
position .1/ and release the latch .2/; then undock the
Base Model.
3
1
2
34 IBM Mobile Systems HMM
Page 43

1020 Option Card Cover / Option Card
If an option card is installed, remove it.
3
1
2
35
Page 44

1030 PC Card
36 IBM Mobile Systems HMM
Page 45

1040 1-Inch-High Bay
Base Model (1010)
The customer can install the ThinkPad option by using the
UltraBay tray and HDD, FDD, or CD-ROM by using the
device tray in the 1-inch-high bay.
Remove the devices that are installed in the bay; then
remove the UltraBay tray or device tray as follows:
Attention
A hard disk or a diskette drive is sensitive to physical
shock. Be careful not to drop or apply any shock to
these devices.
UltraBay Tray
37
Page 46

Device Tray
5
1
2
3
4
38 IBM Mobile Systems HMM
Page 47

1050 Half-Height Bay Frame
Base Model (1010)
1
3
2
39
Page 48

1060 Upper Cover
Base Model (1010)
Rear Panel / Option Card Cover (1020)
1-Inch-High Bay (1040)
Half-Height Bay Frame (1050)
Caution
Make sure all power cords are unplugged before you
remove the upper cover.
Step Length (Quantity) Memo
.1/ M 2.6 x 5 mm (2)
.2/ M 2.6 x 5 mm (1) Flat head
.3/ M 2.6 x 2.5 mm (1)
.4/ M 2.6 x 5 mm (2)
.6/ M 2.6 x 5 mm (2) Self-tap
.7/ M 2.6 x 5 mm (2) Black
.8/ M 2.6 x 8 mm (2) Black
.9/ M 2.6 x 8 mm (3) Self-tap
40 IBM Mobile Systems HMM
Page 49

When replacing:
The following figure shows the route of the
microphone cable:
The cable goes
through here
Inside view
41
Page 50

1070 Bracket
Base Model (1010)
Rear Panel / Option Card Cover (1020)
1-Inch-High Bay (1040)
Half-Height Bay Frame (1050)
Upper Cover (1060)
Step Length (Quantity) Memo
.1/ M 2.6 x 5 mm (4)
42 IBM Mobile Systems HMM
Page 51

1080 Speaker Assembly
Base Model (1010)
Rear Panel / Option Card Cover (1020)
1-Inch-High Bay (1040)
Half-Height Bay Frame (1050)
Upper Cover (1060)
Bracket (1070)
1
3
Step Length (Quantity) Memo
.1/ M 2.6 x 7 mm (4) Self-tap
2
43
Page 52

1090 Power Supply
Base Model (1010)
Rear Panel / Option Card Cover (1020)
1-Inch-High Bay (1040)
Half-Height Bay Frame (1050)
Upper Cover (1060)
Bracket (1070)
Step Length (Quantity) Memo
.1/ M 2.6 x 5 mm (4)
44 IBM Mobile Systems HMM
Page 53

1100 Cables
Base Model (1010)
Rear Panel / Option Card Cover (1020)
1-Inch-High Bay (1040)
Half-Height Bay Frame (1050)
Upper Cover (1060)
This step is a preparation for removing the main card
assembly. Remove the IDE cables .1/, the SCSI cable
.2/, and the audio cable .3/; then disconnect the speaker
connector .4/.
45
Page 54

1110 Shield Cover
Base Model (1010)
Rear Panel / Option Card Cover (1020)
1-Inch-High Bay (1040)
Half-Height Bay Frame (1050)
Upper Cover (1060)
Bracket (1070)
Step Length (Quantity) Memo
.1/ M 2.6 x 7 mm (3)
.2/ M 2.6 x 6 mm (5)
.3/ M 1.5 x 6 mm (1)
46 IBM Mobile Systems HMM
Page 55

1120 Main Card Assembly
Base Model (1010)
Rear Panel / Option Card Cover (1020)
1-Inch-High Bay (1040)
Half-Height bay Frame (1050)
Upper Cover (1060)
Bracket (1070)
Cables (1100)
Shield Cover (1100)
Step Length (Quantity) Memo
.1/ M 2.6 x 5 mm (1)
.2/ M 2.6 x 3 mm (1)
.4/ M 2.6 x 5 mm (3) Self-tap
.5/ M 1.5 x 6 mm (1)
.6/ M 2.6 x 5 mm (2)
.7/ M 2 x 7 mm (2) Hex head (5 m/m)
47
Page 56

1130 Audio Card / Main Card / Riser Card
Base Model (1010)
Rear Panel / Option Card Cover (1020)
1-Inch-High Bay (1040)
Half-Height Bay Frame (1050)
Upper Cover (1060)
Bracket (1070)
Cables (1100)
Shield Cover (1100)
Main Card Assembly (1120)
.1/: To remove the Audio card
.2/: To remove the Riser card
.1/, .2/: To remove the Main Board
Note
In step .2/, use a tool such as a bladed screwdriver to
easily disconnect the riser card and main card. Be
careful not to damage the connector.
Riser card
Main card
48 IBM Mobile Systems HMM
Page 57

Locations
Front View
.1/ Multiuser lock
.2/ PC Card lock
.3/ SelectaDock base lock
.4/ Docking guide
.5/ Half-height bay
.6/ Status indicators
.7/ UltraBay tray eject hole
.8/ 1-inch-high bay
.9/ UltraBay tray
.1ð/ FDD connector
.11/ HDD connector
.12/ UltraBay tray lock
.13/ MicroSaver lock hole
.14/ Game switch
.15/ Docking connector
49
Page 58

Front View (continue)
.16/ IDE connector
.17/ Internal SCSI connector
.18/ Audio device connector
.19/ Audio device connector
.2ð/ Power supply connector
50 IBM Mobile Systems HMM
Page 59

Side View
.1/ Volume knob
.2/ Headphone jack
.3/ Line-out jack
.4/ Speaker-in jack
.5/ MIDI/joystick port
.6/ PCMCIA slots
.7/ SCSI connector
51
Page 60

Rear View
.1/ Power jack
.2/ PCI connector
.3/ ISA connector
52 IBM Mobile Systems HMM
Page 61

Parts List
53
Page 62

1 Connector cover 73H7450
2 Rear cover 39H7441
3 Bezel (See Upper cover group)
4 Half-height bay frame 82H6729
5 Cable group 73H7453
6 Riser card 39H7442
7 Main card assembly 39H7443
8 Audio card 39H7444
9 Base cover 39H7439
10 Speaker assembly 39H7446
11 Shield cover (See Main card assembly)
12 Power supply (See Power supply group)
13 Bracket (See Power supply group)
14 Upper cover (See Upper cover group)
15 UltraBay tray (See UltraBay group)
16 Blank bezel (See Upper cover group)
FDD bezel
CD-ROM bezel
17 Frame (See UltraBay group)
18 Device tray 82H6728
19 Blank bezel (See Upper cover group)
Miscellaneous kit 39H7447
Power supply group
(Includes the following:)
Power supply
Bracket
SelectaDock Base Model I 39H7416
UltraBay group
(Includes the following:)
UltraBay tray
Blank bezel
Frame
Upper cover group
(Includes the following:)
Bezel
Upper cover
Indicator
Options
Bracket and bezel 84G1291
Option diskette 73H9454
Shelf 84G3631
Tape drive kit 84G1290
Tray cover 84G3632
39H7438
82H6727
39H7440
54 IBM Mobile Systems HMM
Page 63

Power Cords
1
2
3
4
5
6
7
8
9
10
Warning
Use the power cord certified for your country.
1 Colombia, U.S., Venezuela 13F9959
Japan, 2-pin 6454377
Japan, 3-pin 65F0031
2 Hong Kong, Singapore, U.K. 14F0033
3 France, Germany, Spain 13F9979
4 Italy 14F0069
5 Australia, New Zealand 13F9940
6 Denmark 13F9997
7 Israel 14F0087
8 Bangladesh, Pakistan, Sri Lanka, South
Africa
9 Switzerland 14F0051
10 Thailand 1838574
14F0015
55
Page 64

Notices
References in this publication to IBM products, programs,
or services do not imply that IBM intends to make these
available in all countries in which IBM operates. Any
reference to an IBM product, program, or service is not
intended to state or imply that only that IBM product,
program, or service may be used. Subject to IBM’s valid
intellectual property or other legally protectable rights, any
functionally equivalent product, program, or service may be
used instead of the IBM product, program, or service. The
evaluation and verification of operation in conjunction with
other products, except those expressly designated by IBM,
are the responsibility of the user.
IBM may have patents or pending patent applications
covering subject matter in this document. The furnishing
of this document does not give you any license to these
patents. You can send license inquiries, in writing, to:
IBM Director of Licensing
IBM Corporation
500 Columbus Avenue
Thornwood, NY 10594
U.S.A.
Trademarks
The following terms are trademarks or service marks of the
IBM Corporation in the United States and other countries:
IBM ThinkPad TrackPoint
The following terms are trademarks or service marks of
other companies as follows:
MicroSaver Kensington Microware
PCMCIA Personal Computer Memory
Card International Association
SoundBlaster Creative Technology Ltd.
56 IBM Mobile Systems HMM
Page 65

Page 66

IBM
Part Number: 84H4552
Printed in U.S.A.
S84H-4552-ðð
 Loading...