

Page 1
MDV-5 DVD
HOME CINEMA SET
Instruction Manual
Page 2

DIRECTORY
1. Introduction
................................................................................................
.1
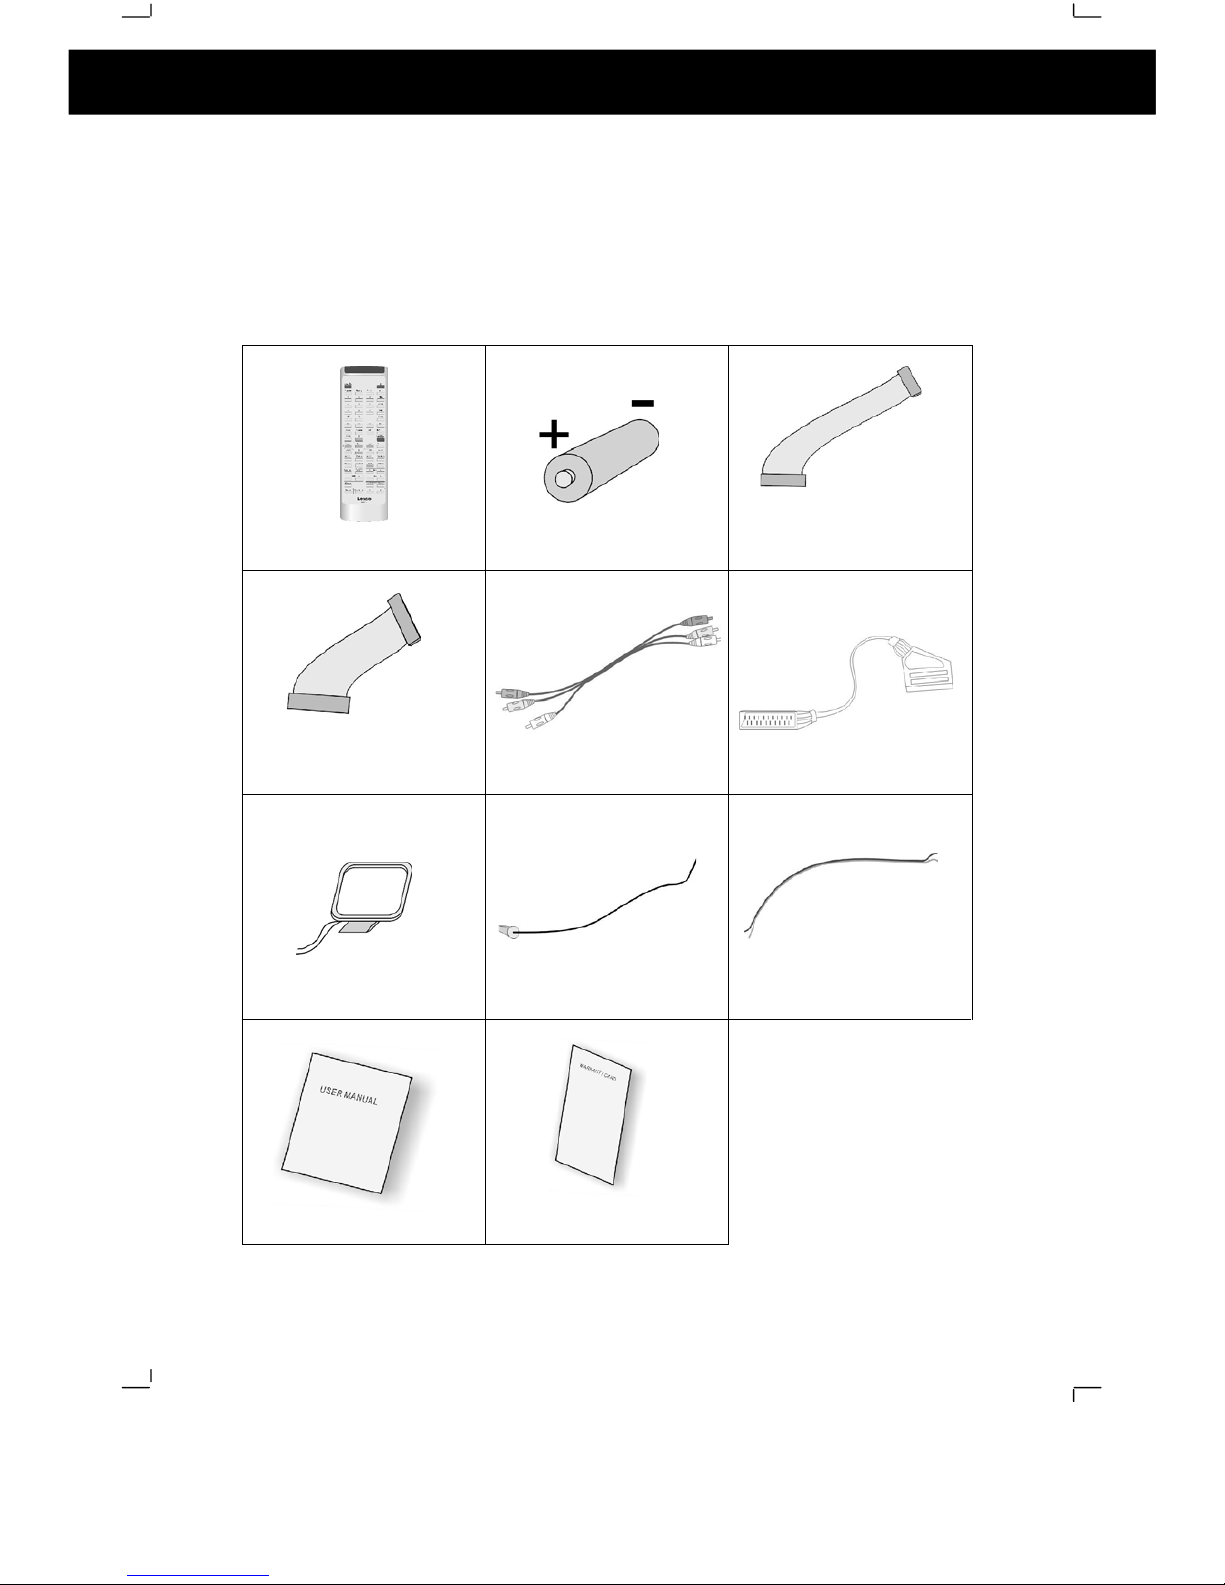
1.1 Pack Contents
...................................................................................
1
1.2 Disc Types
.........................................................................................
2
1.3 DVD Features
....................................................................................
2
1.4 DVD region code
...............................................................................
2
1.5 Glossary of Disc Terms
.....................................................................
2
1.6 Notes on discs
...................................................................................
3
1.7 Inserting Batteries into Remote Control
.............................................
4
2.Location of controls.
.....................................................................................
5
2.1 DVD Component
................................................................................
5
2.2 Stereo Tuner Component
..................................................................
6
2.3 Amplifier Component
.........................................................................
7
2.4 Remote Control
..................................................................................
8
3.Connections.
................................................................................................
9
3.1 Connecting Components
...................................................................
9
3.2 Connections to TV
...........................................................................
10
3.3 Aerial Connections
...........................................................................
11
3.4 Connecting to External Audio Source
..............................................
11
3.5 Speaker Connections
......................................................................
12
4.Basic setup.
...............................................................................................
13
4.1 Setting up the surround sound system
............................................
13
4.2 Master Volume
.................................................................................
14
4.3 Individual Channel Volume
..............................................................
14
4.4 Mute
.................................................................................................15
4.5 Virtual Surround Sound
...................................................................
15
4.6 Treble
..............................................................................................
15
4.7 Bass
.................................................................................................15
4.8 Default Tone Settings
......................................................................
15
5.Setup Menu.
..............................................................................................
16
5.1 System Setup
..................................................................................
16
5.2
Language Setup
..............................................................................
19
5.3 Audio Setup
.....................................................................................
20
5.4
Video Setup
.....................................................................................
21
5.5 Speaker Setup
.................................................................................
22
5.6 Digital
Setup
....................................................................................
23
6.DVD/CD operation.
....................................................................................
25
6.1 Insert a DVD Disc
............................................................................
25
6.2 Play
..................................................................................................
26
6.3 Pre-Stop/Stop
..................................................................................
26
6.4 Pause
..............................................................................................
26
6.5 Previous/Next
..................................................................................
26
6.6 Search Forwards/Backwards
...........................................................
27
6.7 Slow Motion Playback (DVD only)
...................................................
27
6.8 Step (DVD only)
...............................................................................
28
6.9 Repeat/Re
peat A-B..........................................................................
28
6.10 Random Playback
..........................................................................
29
6.11 Programmed Playback
..................................................................
29
6.12 Title Menu (DVD only)
...................................................................
29
6.13 Root Menu (DVD only)
...................................................................
29
Page 3

6.14 Menu Navigation (DVD only)
.........................................................
29
6.15 Audio Language (DVD only)
..........................................................
30
6.16 Subtitle Language (DVD only)
.......................................................
30
6.17 Zoom
.............................................................................................
30
6.18 Angl
e Selection
..............................................................................
30
6.19 Display
...........................................................................................
30
7.MP3/JPEG CD Operation.
.........................................................................
31
7.1 Introduction to MP3/JPEG Playback
................................................
31
7.2 File Selection
...................................................................................
31
7.3 Pre-Stop/Stop
..................................................................................
31
7.4 Pause
..............................................................................................
32
7.5 Previous/Next
..................................................................................
32
7.6 Search Forwards/Backwards
...........................................................
32
7.7 Repeat/Repeat A-B..........................................................................
33
7.8 Random Playb
ack
............................................................................
33
7.9 Rotate/Flip (JPEG CD ONLY)
..........................................................
34
7.10 Sequential Play (JPEG CD ONLY)
................................................
34
7.11 Picture Transition Effects (JPEG CD ONLY)
.................................34
7.12 Thumb
nail View (JPEG CD ONLY)
................................................
34
8.Tuner Operation.
........................................................................................
35
8.1 Tuning
..............................................................................................
35
8.2 Storing Memory Presets
..................................................................
35
8.3 Recalling Memory Presets
...............................................................
35
8.4 Stereo/Mono....................................................................................
35
8.5. Band Selection
................................................................................
35
8.6 Improving Reception
........................................................................
35
9.Listening to an External Source.
................................................................
36
10.Troubleshooting.
......................................................................................
37
11.Specifications.
..........................................................................................
39
11.1 Amplifier Section
............................................................................
39
11.2 Tuner Component
..........................................................................
39
11.3 DVD Component
............................................................................
40
Page 4
1
Thank you for purchasing this state of the a
rt DVD MICRO system. This
instruction manual is important to you. Please read it.
In a short time it shows
exactly how to connect, operate and adjust this unit for best performance.
It can save you money as it shows simple things to do and check before you
call for help and save the cost of unnecessary service or call out charge.
1.1
Pack Contents
REMOTE CONTROLLER
1PC
BATTERIES
2PCS
20PIN IDE CONNECTION
WIRE
1PC
30PIN IDE CONNECTION
WIRE
1PC
AV CONNECTION WIRE
1PC
SCART WIRE
1PC
MW AERIAL
1PC
FM AERIAL
1PC
SPEAKER CONNECTION
WIRES
6PCS
USER M
ANUAL
1PC
WARRANTY CARD
2PCS
1. Introduction
Page 5

2
1.2 Disc Types
The following table shows the type of discs that can be used with this DVD
MICRO system
Type of Disc
Diameter
Playback time
Data Format
Comments
1 Layer: 120 min
DVD Format Disc:
12 cm
2 L
ayer: 240 min
Compressed Digital Audio
1 Layer: 80 min
Compressed Digital Video
DVD
8 cm
2 Layer: 180 min
(Moving picture)
None
SVCD
12 cm
45 min
MPEG2
Compressed Digital Audio
Compressed Digital Video
(Moving Picture)
None
12 cm
74 min
VCD
8 cm
20 min
MPEG1
Compres
sed Digital Audio
Compressed Digital Video
(moving picture)
Includes: VCD2.0,
VCD1.1, VCD1.0
and DVCD
12 cm
74 min
CD
8 cm
20 min
CD-DA:
Digital Audio
None
MP3/WMA
12 cm Variable Compressed Digital Audio
None
JPEG
12 cm
N/A
Picture C
D
None
1.3 DVD Features
DVD discs offer many advantages over VHS tapes and VCD video discs, which
include:
Parental control: Discs with parental control can be restricted so that discs
that are only suitable for the viewers can be viewed (Please note: D
VD disc
must have parental ratings recorded onto the disc for this to work).
Multi-Language support: DVD discs may have recorded on them upto:
8 different audio languages
8 different subtitle languages
6 different OSD (on screen display) languages
Multiple
angles for the same scene: Some DVD discs are recorded with
scenes that are recorded from multiple angles. On these discs the user can
press a button to cycle through the available angles. (Please note: This is
disc dependant, not all DVD discs utilise th
is feature).
1.4 DVD region code
DVD players and discs are designed with region numbers, which dictate the
region that the player is designed for use in. If the region number of the disc does
not match that of the player the disc will not play. The region
number for this DVD
MICRO system is 2.
1.5 Glossary of Disc Terms
Title (DVD)
The longest sections of a picture or a music piece on a DVD. For example on a
movie DVD, the main feature movie would be one title. Each title recorded onto a
disc is given a
number to allow easy access. Often titles are divided into chapters
(see below).
1. Introduction
Page 6
3
Chapter (DVD)
A chapter is normally a section of a title. For example, on a movie DVD the main
feature may be recorded as a TITLE and this title may be split into several sma
ller
sections called CHAPTERS to allow easy navigation to a particular point of a
movie. On some DVD discs there may be no chapters recorded.
Track (Video or audio CD)
Video or audio CDs are split into individual sections each called a track. Each
track i
s given a number, which allows easy access to a specific track.
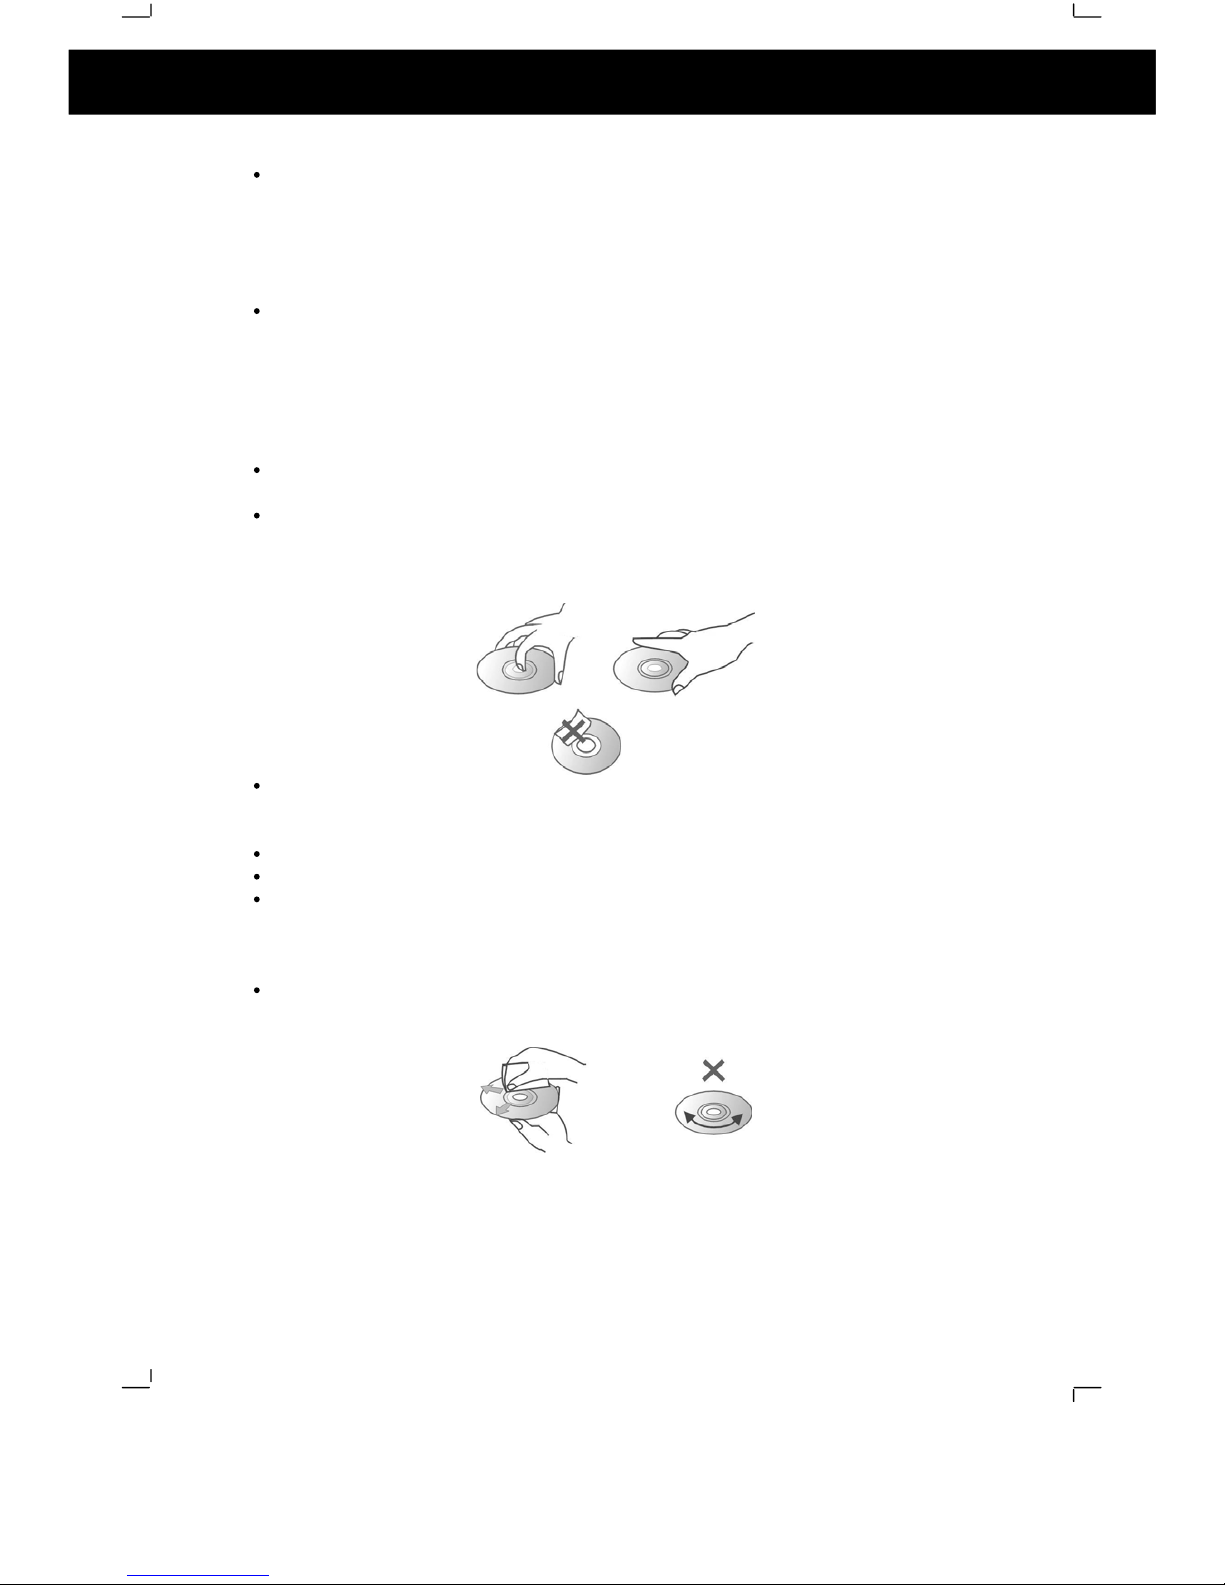
1.6 Notes on discs
Disc handling precautions
To keep the disc surface clean, handle the disc by its edge. Do not touch the
surface.
Do not stick paper or tape on the disc.
If there is glue
(or a similar substance) on the disc, remove the glue completely
before using the disc.
Do not expose the disc to direct sunlight or sources such as hot air ducts or
leave it is a car parked in direct sunlight, as there can be considerable rise in
temperat
ure inside the car.
After playing store the disc in its case.
Do not write on the label side with a ballpoint pen or other writing utensils.
Be careful not to drop or bend the disc
Disc cleaning precautions
Before playing, clean the disc with a cleaning
cloth. Wipe the disc from the
centre out. NEVER wipe the disc in a circular motion.
1. Introduction (cont)
Page 7

4
Do not use solvents such as petrol based products, thinner, commercially
available cleaners or anti-static spray intended for vinyl LPs.
Disc installation precautions
Do not install more than 1 disc on disc tray
Do not place the disc on the tray up side down.
Do not try to close the disc tray when the disc is not inserted properly.
1.7 Inserting Batteries into Remote Control
Insert two AAA batteries into the remote
control observing the polarity markings
inside the remote control compartment.
Notes:
Do not mix old and new batteries
Do not leave the remote in an extremely hot or humid place.
Do not expose the remote sensor to direct sunlight or lighti
ng apparatuses.
Doing so may cause a malfunction.
If the remote control is not to be used for a long time, remove the batteries to
avoid the possible damage from battery leakage and corrosion.
1. Introduction (cont)
Page 8
5
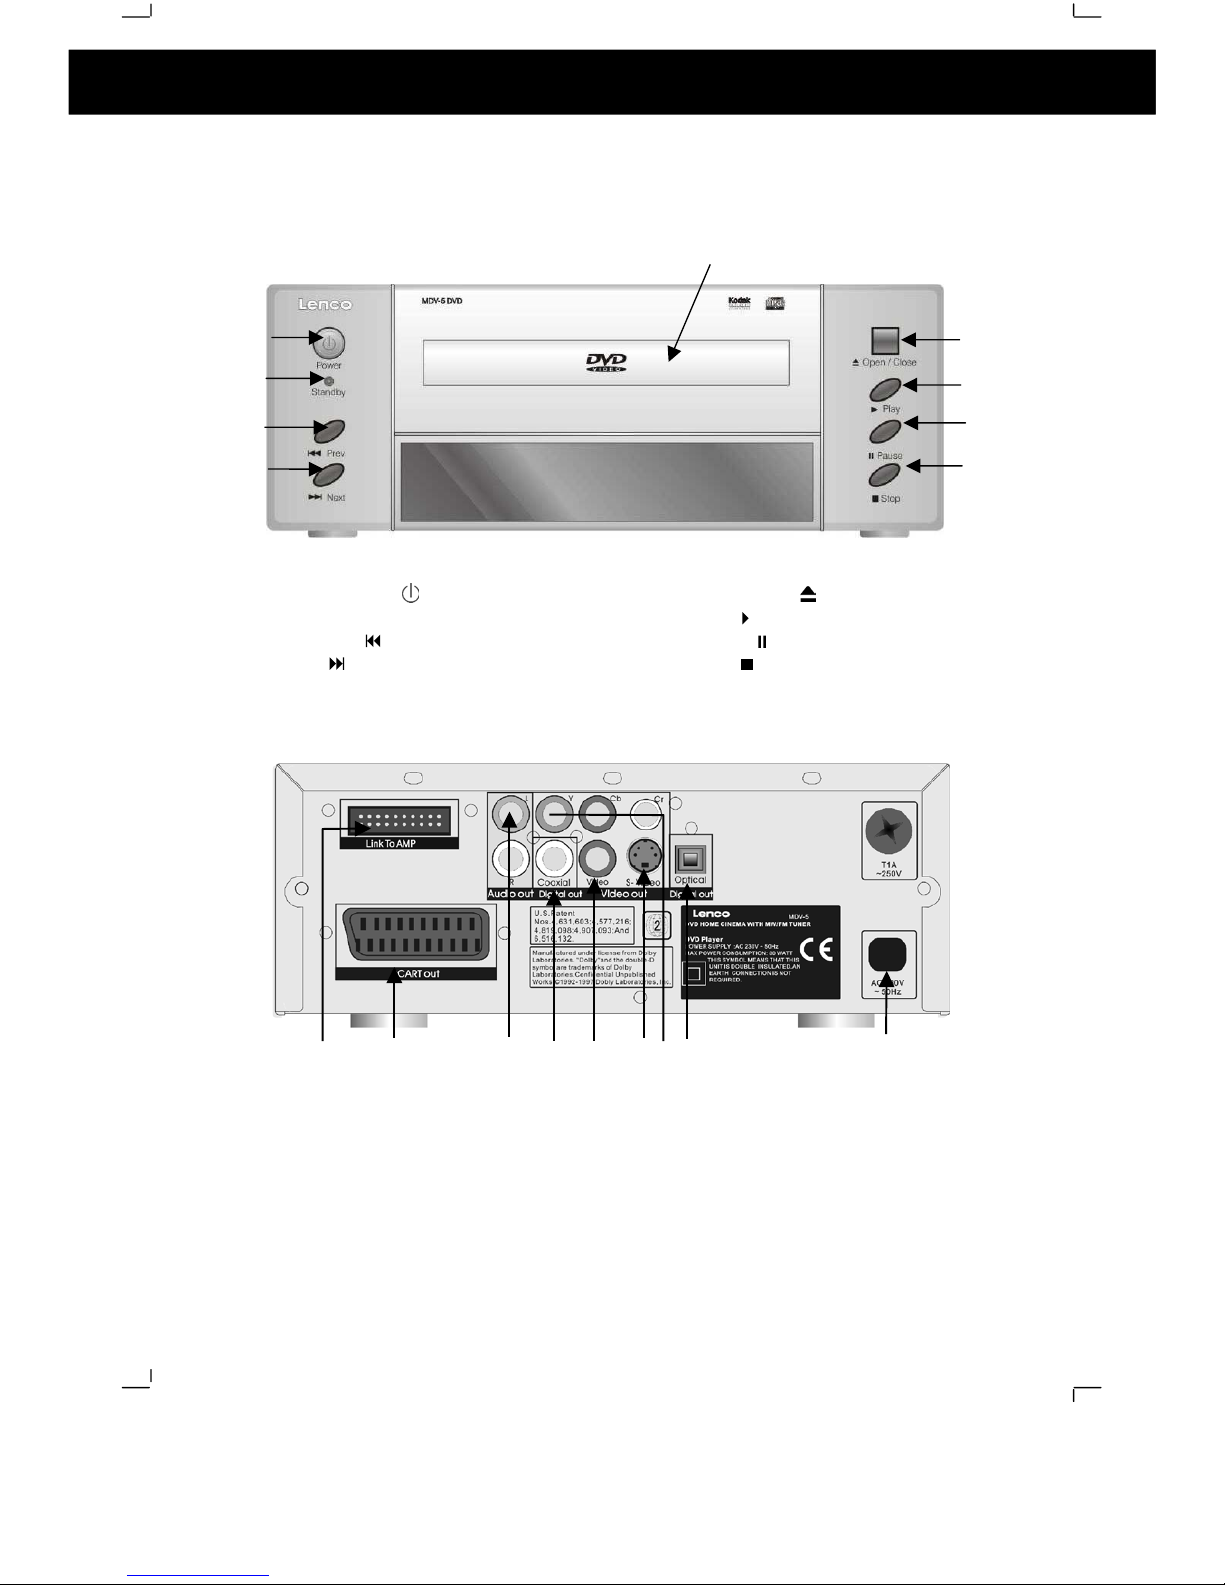
2.1 DVD Component
Front Panel:
1. Power switch (
)
2.
Standby indicator
3. Previous (
) button
4. Next (
) button
5. DVD tray button
6. Open/Close() button
7. Play (
) button
8. Pause (
) button
9. Stop (
) button
Rear Panel
1.
Digital Optical Output
2.
Digital Coaxial Output
3.
Socket to con
nect to amplifier component
4.
Y, Cb, Cr video outputs
5.
Mains Cable
6.S-Video output
7.
Composite Video Output
8.
Audio outputs (Left and Right)
9.
SCART output socket/
2. Location of Controls
2
3
6
7
8
9
3 427 1 569 8
Page 9
6
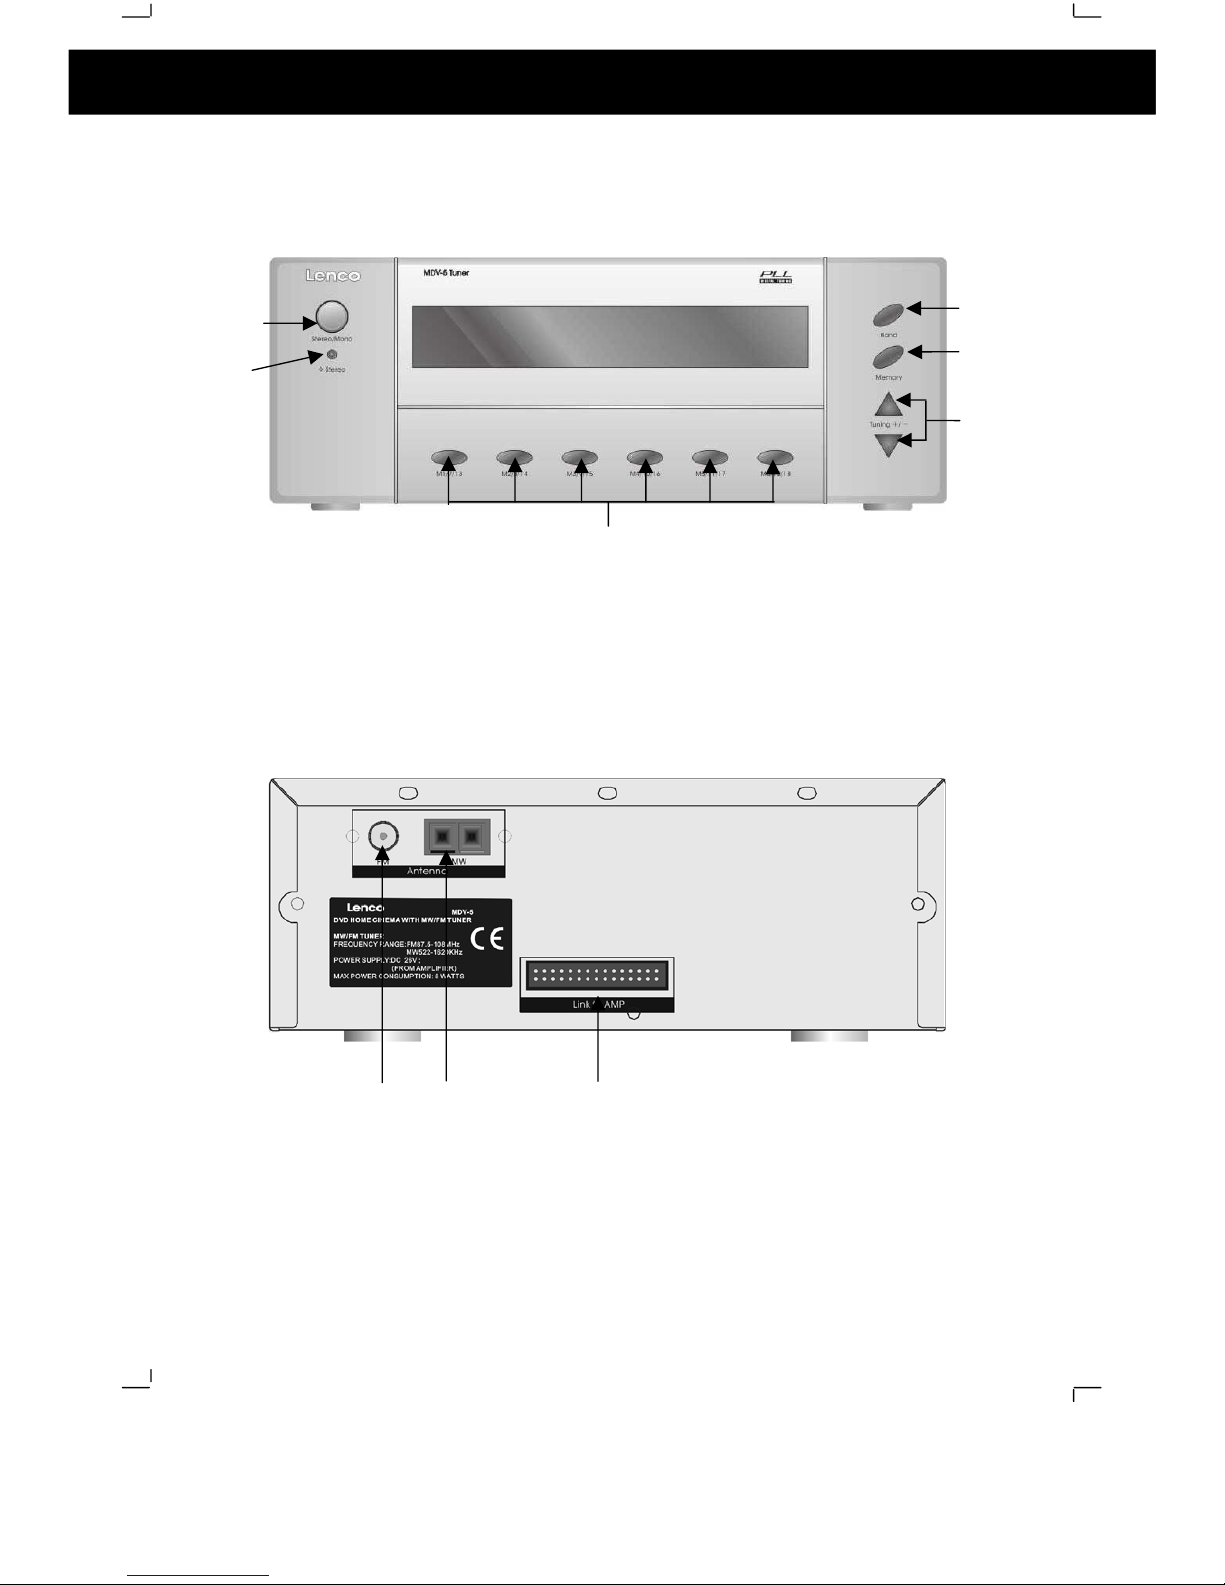
2.2 Stereo Tuner Component
Front Panel
1. Stereo/Mono Switch
2. Stereo/Mono indicator
3. Memory Preset buttons
4. Band button
5. Memory button
6. Tuning +/- buttons
Rear Panel
1. FM Aerial Socket
2. MW Aerial Sockets
3. Socket to connect to amplifier
component
3
1
2
4
5
6
1
2
3
2. Location of Controls (cont)
Page 10
7
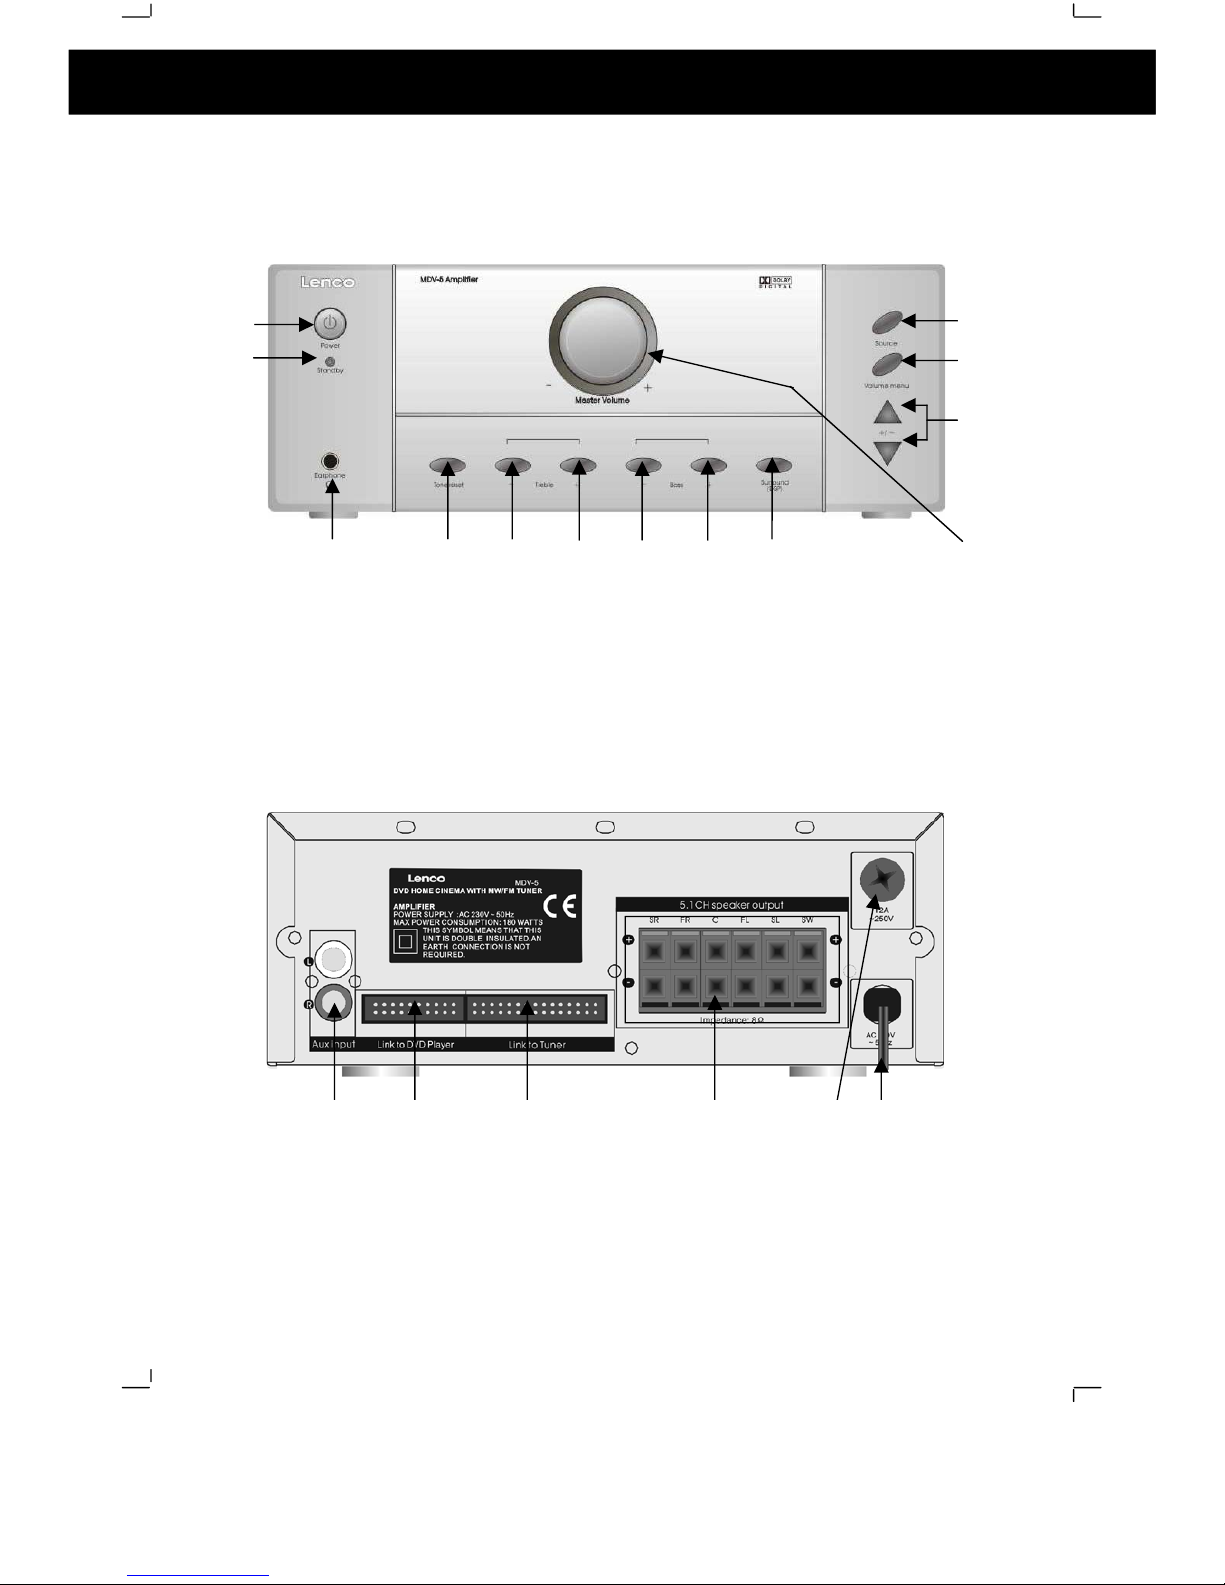
2.3 Amplifier Component
Front Pa
nel
1.
Power switch
2.
Standby indicator
3.
Headphone socket (3.5 mm)
4.
Tone Reset button
5.
Decrease Treble Level button
6.
Increase Treble Level button
7.
Decrease Bass Level button
8.
Increase Bass Level button
9.
Surround (DSP) butt
on
10.
Source Select button
11.
Volume menu button
12.
Volume +/- buttons (for use with
volume menu button)
13.
Master Volume control knob
Rear Panel
1.
Auxiliary input
2. Socket for link cable to DVD player component
3.
Socket for link cable to tuner component
4.
Speaker te
rminals
5.
Fuse
6.
Mains Cable
1
2
10
11
12
3
45
6789
13
1
2 3 4 5
2. Location of Controls (cont)
6
Page 11
8
2.4 Remote Control
2. Location of Controls (cont)
1.DVD display
3.DVD Program
22
.DVD Repeat
4.
Numer
ical Keys
3
6.DVD slow
motion playback
10
.DVD
menu
setup
39.Tuner memory
33
.Amplifier power stand-by
2
1.Amplifier volume menu
20
.Amplifier Audio source select
16
.Virtual surround on/off
19
.Mute audio output
9
.DVD direction up
6
.DVD
rewind
12
.DVD direction left
29
.DVD previous
13
.DVD direction down
15
.Tuner preset stations(1~18)
25
.DVD title
23
.DVD open/close
24
.Repeat A
-B
7
.CD random play
28
.DVD angle select
26
.DVD menu
27
.DVD step play
37
.DVD audio select
8
.Clear
14
.DVD zoom select
40
.Tuningup/
down
42
.Master volume
up/
down
44
.Channels volume
down
31
.DVD play/pause
32
.DVD stop/return
5
.DVD fast forward
34
.DVD direction right
30
.DVD next
35
.DVD Subtitle select
2.DVD player power (stand
-b
y)
18.
Treble level up/down
41. B
ass level up/down
43
.Channels volume up
17
.Tone
level
reset
11. Enter key
38.Tuner FM/MW select
Sensor cover
Page 12
9
Before making/removing any connections ensure that you have
unplugged
the
unit from the mains supply.
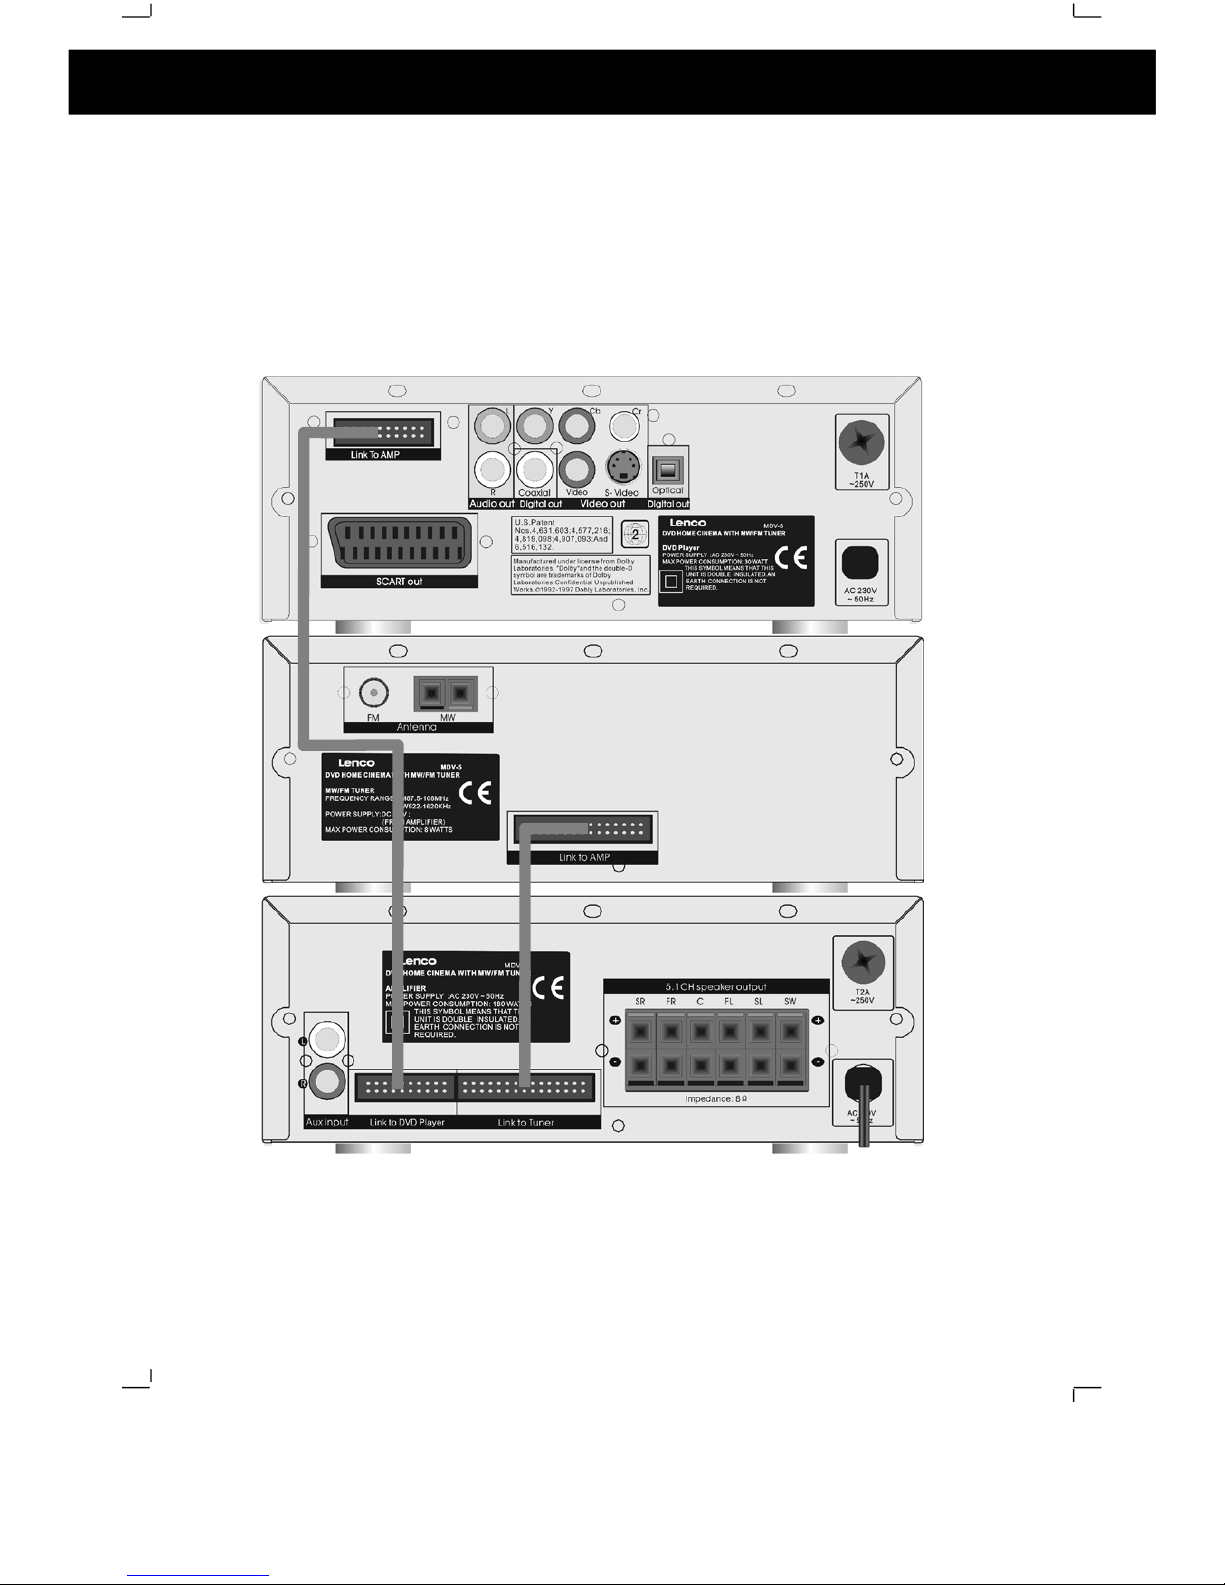
3.1 Connecting Components
Connect the DVD and Tuner components to the amplifier component by using the
ribbon cables. Please note: Due to the amplifier component being heavier than the
rest it is recommended to place this at the bottom of the stack.
3. Connections
Page 13

10
3.2 Connections to TV
SCART CABLE
For ease of use it is recommended that this DVD MICRO system is connected to
the TV using a SCART cable, as shown in the diagram below:
OTHER CONNECTIONS TO TV
This DVD MICRO system also has Y Cr C
b (component), Video (composite) and
S-
Video outputs to allow connection to televisions without SCART sockets. When
using these connections the audio outputs (L & R) must also be connected the
television s audio inputs otherwise no sound will be heard from
the television.
TV
3. Connections (cont)
Page 14

11
3.3 Aerial Connections
FM Aerial
Connect the plug on the supplied FM pigtail aerial to the centre pin of the 75-ohm
socket on the rear of the tuner component. If reception is poor, use a 75 ohm
coaxial cable (not supplied) to connect the system to an outdoor FM aerial.
MW Aerial
Connect the MW loop aerial to two MW aerial terminals on the rear of the tuner
component.
3.4 Connecting to External Audio Source
Connect an external audio source using a twin RCA (normally red and
white) to
the AUX input on the rear of the amplifier component.
External
audio
source
3. Connections
MW AERIAL
FM AERIAL
Page 15

12
3.5 Speaker Connections
When connecting the speakers please ensure that the positive terminal on the
speaker is connected to the positive terminal on the amplifier and the
negative
terminal on the speaker is connected to the negative terminal on the amplifier.
Please use the following diagram to help connect up the speakers.
Centre
Front
Left
Front
Right
Surround
Left
Surround
Right
Subwoofer
3. Connections (cont)
Page 16

13
4.1 Setting up the surround sound sy
stem
Positioning
For the best possible surround sound all the speakers other than the subwoofer
should be the same distance from the listening position (
).
However, this system allows you to place the centre speaker up to 1.6 metres
closer (
) and the re
ar speakers up to 4.6 metres closer (
) to the listening
position.
The front speakers can be placed from 1.0 to 15.0 metres (
) from the listening
position.
The subwoofer can be position at any position. If possible, place the subwoofer
near a corner to m
aximise the bass response.
The rear speakers can be positioned either behind you or to the side depending
on the shape of your room.
4. Basic Setup
Page 17

14
Height
The best height for the front speakers is when the high frequency speakers
(tweeters) are at ear height (while s
eated)
The best height for the centre speaker is also at ear height (while seated).
The rear speakers should not be positioned below ear height (while seated).
See the following diagram. The best position to place the rear speakers is
area, but they can
also be
placed in
area.
4.2 Master Volume
To adjust all of the speaker channels by the same amount use the
Master
Volume +/
- keys on the remote or the master volume control knob on the
amplifier component.
4.3 Individual Channel Vo
lume
Each individual channel volume can be controlled using the volume menu key on
the remote control or on the front panel of the amplifier component. Repeatedly
press the volume menu key to cycle through the channels as follows:
MVOL: Master vol
ume
LVOL: Front Left Channel
RVOL: Front Right Channel
CVOL: Centre Channel
SL:
Rear (Surround) Left Channel
SR:
Rear (Surround) Right Channel
SW:
Subwoofer Channel
4. Basic Setup (cont)
Page 18

15
When the channel required is shown use the vo
lume +/- keys on the remote or the
front panel of the amplifier component to adjust the volume of the selected
channel.
4.4 Mute
To mute the audio output press the MUTE ()button and the sound from the
speakers will be turned off. To restore previous au
dio output press the mute
button again
4.5 Virtual Surround Sound
When listening to a two channel source press the
SURROUND(DSP)
button on
the remote control or the front panel to process the source using virtual surround
sound.
When
SUR 2.1
is selecte
d sound will be heard from
two
speakers
plus
the subwoofer.When
SUR 5.1
is selected sound will be heard from all 5
speakers plus the subwoofer.
When virtual surround is enabled SUR 2.1 or
SUR 5.1 will be briefly shown on the display and DSP will b
e remain in the
display.
When listening to a surround sound source (for example a 5.1 channel
DVD disc) please ensure that this virtual surround sound is turned off otherwise
the sound from the DVD will not be heard correctly.
press the
SURROUND(DSP)
key t
o cycle through the
virtual
surround sound
status as follows:
4.6 Treble
To adjust the treble output of the sound use the TREBLE +/-
buttons on the front
panel. The positive numbers indicate that the treble output is enhanced and
negative numbe
rs indicate that the treble output is attenuated. For example +10
indicates the treble is fully enhanced and
10 indicates the treble is attenuated to
a maximum.
4.7 Bass
To adjust the bass output of the sound use the BASS +/- buttons on the front
panel.
The positive numbers indicate that the bass output is enhanced and
negative numbers indicate that the bass output is attenuated. For example +10
indicates the bass is fully enhanced and 10 indicates the bass is attenuated to a
maximum.
4.8 Default Tone
Settings
Press the TONE RESET button on the front panel to return the tone settings to the
default settings. TONE RS will be shown briefly on the display.
4. Basic Setup (cont)
S
UR OFF: Virtual surround sound off
S
UR 2.1 : Front Left and front right speakers, Subwoofer output
S
UR 5.1 : All 5 speakers plus the subwoofer output
Page 19

16
To enter the setup menu press the SETUP button on the remote control. To
access each submenu one
of the icons along the top of the setup menu must be
selected. The below diagram shows which icon represents which menu.
5.1
System Setup
5.1.1
TV SYSTEM
Select NTSC if the player is
connected to an NTSC TV
Select PAL if the player is
connected to a
PAL TV (PAL TV
are the standard in the UK)
Select AUTO if connected to a
MULTI SYSTEM TV.
DEFAULT: PAL
5.1.2
SCREEN SAVER
When set to on the screen saver will
activate if a disc is stopped, the disc
tray is opened, there is no disc or the
same image is on
the screen for more
than 60 seconds. This can then
prevent screen damage from
stationary pictures.
Select ON to have the screen
saver turn on.
Select OFF so that the screen
saver does not turn on.
DEFAULT: ON
5. Setup Menu
System
Setup
Language
Setup
Audio
Setup
Video
Setup
Speaker
Setup
Digital
Setup
Page 20

17
5.1.3
VIDEO
SCART-RGB: Select this option
if th
e DVD player is connected to
the TV using a SCART cable
S-
VIDEO: Select this option it
the DVD player is connected to the
TV using an S-Video cable
Interlace-YUV: Select this option
if the DVD player is connected to
the TV using component cables.
When conn
ecting using a
composite cable, any of the above
selections can be used.
DEFAULT: SCART
-
RGB
5.1.4
TV TYPE
16:9: Select this setting if the
player is connected to a 16:9
(widescreen) TV. If this option is
selected when viewing on a 4:3
(normal) TV, black lin
es may
appear to the left and right of the
screen.
4:3PS (Pan and Scan): Select
this setting if the player is
connected to a 4:3 (normal) TV.
The movie will fill the entire screen
of the TV, however the left and right edges of the picture may not be seen.
4:3LB (Letterbox): Select this setting if the player is connected to a 4:3
(normal) TV. The movie will be displayed in it s original aspect (height to
width) ratio, however black bars may appear above and below the picture
NOTE:
The image shown is related
to the recorded disc format. Some discs may not
play using the TV TYPE selected.
DEFAULT: 16:9
5. Setup Menu (cont)
Page 21

18
5.1.5
PASSWORD
The password option is used in
conjunction with the parental rating
option (see below) and can be used
so that the player is locked and will
only
play discs with a lower rating
that the one set.
First the old password must be
entered (initial password: 0000)
then press enter. The player will
then be unlocked. To lock the player
again, enter a new password.
Please ensure that it is a
memorable passw
ord as once the
player is locked only the password set will unlock it. Selecting default settings
(see below) will not reset the password.
DEFAULT: 0000
5.1.6
RATING
As described above in the password
option, the player can be set so that
it will only play
discs with a rating
equal or lower than the one set.
VIEW ALL
All DVDs will be
played
NO ADULT
All DVDs except
for those marked as adult we
be played
KID SAFE
Only DVDs that
are marked as safe for children
will be played.
Please note: If there is no
rating set on the DVD the player will play the disc
no matter what value this option is set to.
DEFAULT: VIEW ALL
5.1.7
DEFAULT
Press enter when this option is selected to restore the player to its factory
default settings. Please note this will not reset th
e password
5. Setup Menu (cont)
Page 22

19
5.2
Language Setup
5.2.1
OSD LANGUAGE
This option sets the language that is used
for the OSD (on screen display).
DEFAULT: ENGLISH
5.2.2
AUDIO LANG
This option sets the preferred language
for the audio when a DVD is played. If
this language i
s not recorded on the DVD
then the default language for the DVD
will be used.
DEFAULT: ENGLISH
5.2.3
SUBTITLE LANG
This option sets the preferred language to
be used for the subtitles or sets the
preferred option to off. When set to off no
subtitle will be
displayed unless they are
part of the film and cannot be turned off. If
a language is chosen then this subtitle
language will be shown as default if the
subtitles are recorded on the disc.
DEFAULT: OFF
5. Setup Menu (cont)
Page 23

20
5.2.4
MENU LANG
This option sets the preferred languag
e
for the DVD menu screens. If the
selected language is not recorded on the
disc then the default language recorded
on the disc will be used.
DEFAULT: ENGLISH
5.3
Audio Setup
5.3.1.
AUDIO OUT
If ANALOGUE is selected there will
be no output from the digital coa
xial
and optical outputs.
If SPDIF/RAW is selected the
output from the digital coaxial and
optical outputs will be of RAW
format. This option is usually
selected when connecting to an
external Dolby Digital 5.1 amplifier.
(please see amplifiers instruction
manual for details)
If SPDIF/PCM is selected the output from the digital coaxial and optical
outputs will be of PCM format. This option is usually selected when
connecting to an external two-channel amplifier. (please see amplifiers
instruction manual for
details)
DEFAULT: ANALOGUE
5. Setup Menu (cont)
Page 24

21
5.4
Video Setup
5.4.1.
BRIGHTNESS
When highlighted use the up/down
directional keys to adjust the brightness
of the video output.
DEFAULT: 0
5.4.2.
CONTRAST
When highlighted use the up/down
directional keys to adjust the co
ntrast
of the video output.
DEFAULT: 0
5.4.3.
HUE
When highlighted use the up/down
directional keys to adjust the hue of the
video output.
DEFAULT: 0
5. Setup Menu (cont)
Page 25

22
5.4.4.
SATURATION
When highlighted use the up/down
directional keys to adjust the
saturation of the vid
eo output.
DEFAULT: 0
5.5
Speaker Setup
5.5.1.
DOWNMIX
The downmix specifies what sounds
are heard from which speakers as
follows:
LT/RT: Choose this setting if the
disc is recorded using the Dolby
pro logic audio format
STEREO: Two channels of audio will
be
heard. If a 5.1 channel disc is
used, only the sound from the front
left and right channels will be
heard.
VSS: This option is used when a disc
is recorded only with two channels
and the amplifier will then create a virtual surround sound.
5.1CM: Choose
this option if the disc used has a 5.1 channel audio track.
This option produce surround sound from 6 distinct audio channels and
should be used whenever possible to obtain the best sound.
DEFAULT: 5.1CH
5.5.2.
SUBWOOFER
When ON is chosen, the player will
aut
o detect the subwoofer audio
channel then output it to the
subwoofer. When OFF is chosen and
the subwoofer input will not be
outputted to the subwoofer.
DEFAULT: ON
5. Setup Menu (cont)
Page 26

23
5.5.3.
BASS
MODE
Select the bass mode in accordance
with the type of speakers that are
used.
DEFAULT: ALL LG SPK
5.5.4.
CENTER
DELAY
Set the delay for the Centre speaker.
DEFAULT: 0 ms
5.5.5. REAR DELAY
Set the delay for the rear speakers.
DEFAULT: 0 ms
5.6
Digital
Setup
5.6.1.
OP MODE
Choose LINE OUT or RF REMOD
for output mode.
DEF
AULT: LINE OUT
5. Setup Menu (cont)
Page 27

24
5.6.2.
DYNAMIC RANGE
Dynamic Range Control is used to
suppress loud sounds and enhance
quiet sound for using the player at night.
There are 8 steps between full
compression and no compression.
DEFAULT: OFF
5.6.3.
DUAL MONO
This option sets t
he L and R mono
output mode. Select between
STEREO, MONO L, MONO R and
MIX MONO.
DEFAULT: STEREO
5. Setup Menu (cont)
Page 28

25
Before using the DVD player please ensure that the TV connected to the player is
turned on and the AV channel is selected. Turn t
he power on to both the
AMPLIFIER and DVD components. Using the source button on the remote control
or on the front panel select DVD as the source. DVD will be shown on the
display on the TUNER component.
Please note all instructions below refer to but
tons on the remote control unless
stated otherwise. Many buttons on the remote have the same function as those on
the front panel, if the function name is the same then it will perform the same
function.
If a symbol is shown in the top left of the s
creen this indicates that the
requested action is not possible
When listening to a CD-DA or MP3 disc sound will be heard only through the front
right and front left speakers. The volume for the surround left/right, centre and
subwoofer speakers can still
be adjusted using the VOLUME MENU button
howeverNO sound will be heard from these speakers. To listen to a 2 channel
source in virtual surround press the SURROUND button until the
is shown
on the display and then sound will be heard from
more
speakers
(Refer chapter
4.5).
Please note
: when listening to a 5.1 channel DVD ensure that the virtual surround
function is disabled to obtain true surround sound.
6.1 Insert a DVD Disc
Press the Open/Close (
) button to open the DVD disc tray. Place a disc o
nto the
tray and press the Open/Close (
) button to close the tray. After the DVD disc
tray has closed READ will be shown on the top right of the screen and LOAD
will be shown on the DVD component display. If the inserted disc is of a
recognised format
playback will commence automatically. If the disc is not
recognised or no disc is inserted NO DISC will be shown in the top left corner of
the TV screen.
NO DISC will also be shown on the DVD component display.
6. CD/DVD Operation
READ
NO DISC
Page 29

26
6.2 Play
Press the PLAY/PAUSE (
) b
utton to begin playback of the disc when the disc
is stopped.
6.3 Pre-
Stop/Stop
Press the STOP ( ) button on the remote or the front panel once to enter pre
-
stop mode. In this mode if the PALY/PAUSE (
) button is pressed, playback
will resume from the
point at which the STOP (
) button was pressed. PRE-
STOP
will be shown briefly in the top left corner of the TV screen.
To completely stop the DVD disc press the STOP(
) button when in the PRE
-
STOP mode.
STOP will be shown briefly in the top le
ft corner of the TV
screen. If the PLAY/PAUSE (
) is pressed now playback will commence from
the beginning of the disc.
6.4 Pause
Press the PLAY/PAUSE (
) button to pause playback. When playback is
paused,
PAUSE is shown on the top left corner of
the TV screen. To resume
playback press the PLAY/PAUSE (
) button.
6.5 Previous/Next
Press NEXT (
) repeatedly during playback to skip to subsequent chapters.
PAUSE
PRE STOP
STOP
NEXT
6. CD/DVD Operation (cont)
Page 30

27
Press PREVIOUS (
) repeatedly during playback to skip to previous chapters.
6.6 Search
Forwards/Backwards
Press the SEARCH FORWARD ( ) repeatedly during playback to cycle through
the different speeds (i.e. 2x normal speed, 4x normal speed etc) for search
forward as follows:
To resume normal playback press the PLAY/PAUSE (
) button.
Press the SEARCH BACKWARD ( ) repeatedly during playback to cycle through
the different speeds (i.e. 2x normal speed, 4x normal speed etc) for search
backwards as follows:
To resume normal playback press the PLAY/PAUSE (
) button
6.7 Slow Motion Playback (DVD only)
Press the SLOW button to cycle through the available speeds (i.e. ½ normal
speed, ¼ normal speed etc) for slow motion playback as follows:
To resume normal playback press the PLAY/PAUSE (
) button.
PREV
PLAY
FORWARD X2
FORWARD X4
FORW
ARD X8
FORWARD X20
PLAY
SF 1/2
SF 1/3
SF 1/4
SF 1/5
SF 1/6
SF 1/7
6. CD/DVD Operation (cont)
PLAY
BACKWARD X2
BACKWARD X4 BACKWARD X8
BACKWARD X20
Page 31

28
6.8 Step (DVD only)
Press the STEP button repeatedly to advance playback frame by frame. STEP
will appear in the top left corner of the screen. To resume normal playback
press the PLAY/PAUSE (
) button
6.9 Repeat/Repeat A
-B
DVD:
Press the R
EPEAT button to cycle through the available repeat modes as follows:
A-
B repeat allows a particular section to be repeated. Press the A-B button at the
beginning of the section and the press the A-B button at the end point of the
section. All material between these two point will be repeated. To resume normal
playback press the A-B button again.
CD
:
Press the REPEAT button to cycle through the available repeat modes as follows:
STEP
REP: [CHAPTER]
Repeat Chapter: repeat
the currently playing
chapter
REP: [TI
TLE]
Repeat Title: repeat the
current Title (i.e. repeat
all chapters)
REP: [OFF]
Repeat OFF: repeat is
turned off and disc will
play as normal
REPEAT A
-
REPEAT A
-B
A
-
B CANCEL
Press A-B button to set
the beginning of the
section to be repeated
Press A-B button again
to set the end of the
Press A-B button a third
time to resume normal
playback
Repeat 1: repeat the
currently track
Repeat All: repeat all
Repeat OFF: repeat is turned off
and disc will play as normal
REP: [1]
REP: [ALL]
REP: [OFF]
6. CD/DVD Operation (cont)
Page 32

29
A-
B repeat allows a particular section to
be repeated. Press the A-B button at the
beginning of the section and the press the A-B button at the end point of the
section. All material between these two point will be repeated. To resume normal
playback press the A-B button again.
6.10 Random Playback
Press the RANDOM button to play all chapters/tracks on the DVD/CD in a random
order. To resume normal playback press RANDOM button again.
6.11 Programmed Playback
Press the PROG button. The programme entry screen will be shown on screen.
Enter the first track using the numerical buttons. To enter a track higher than 9
use the +10 key. For example to enter 25 press the +10 twice and then the 5
button. To enter further tracks use the numerical buttons using the same method.
To edit a
programme use the directional buttons to highlight the track that is to be
changed then enter the track as above. To clear a programme use the directional
buttons to highlight CLEAR and then press ENTER. To begin playback of a
programme use the directional buttons to highlight
PLAY and then press ENTER.
6.12 Title Menu (DVD only)
Press the TITLE button to display the title menu of the DVD. (Please note the title
menu varies between discs. Also not all DVD discs will have a title menu).
6.13 Root Menu
(DVD only)
Press the MENU button to display the root menu of the DVD. (Please note the
Root menu varies between discs. Also not all DVD discs will have a root menu).
6.14 Menu Navigation (DVD only)
Use the direction keys to navigate through the options
available when a menu is
displayed on the TV. Directional keys are also used for selecting tracks when
listening to an MP3 CD. After a selection has been highlighted using the
directional keys press the enter button.
REPEAT A
-
REPEAT A
-B
A
-
B CANCEL
Press A-B button to set
the beginning of the
section to be repeated
Press A-B button again
to set the end of the
section to be repeated
Press A-B button a third
time to resume normal
playback
6. CD/DVD Operation (cont)
Page 33

30
6.15 Audio Language (DVD only)
Pre
ss the AUDIO button repeatedly to cycle through all of the available audio
languages for the disc. (Please note: The audio languages available are entirely
disc dependent. Some discs may have only one language recorded)
6.16 Subtitle Language (DVD only)
Press the SUBTITLE button repeatedly to cycle through all of the available subtitle
languages for the disc. (Please note: The subtitle languages available are entirely
disc dependent. Some discs may no subtitles recorded)
6.17 Zoom
Press the ZOOM button repeatedly to zoom in on the TV screen by different
factors. Whilst in ZOOM mode the DIRECTIONAL KEY on the remote control will
pan the picture.
6.18 Angle Selection
If multiple angles are recorded for one particular scene the ANGLE MARK
INDICATOR (
)
will be shown on the screen. To cycle through the available
angles press the ANGLE button repeatedly. Please note this feature is entirely
disc specific and will only be available if the disc has multiple angles recorded.
6.19 Display
Press the display k
ey to show information about the currently playing disc on the
TV screen.
6. CD/DVD Operation (cont)
Page 34

31
7.1 Introduction to MP3/JPEG Playback
This MICRO system will play MP3 or JPEG files that are recorded onto a blank
CD. After inserting the disc the system will
search for MP3 or JPEG files to play.
After searching it will play the MP3/JPEG files in the first directory on the disc. The
following will be shown on the screen:
7.2 File Selection
Use the UP/DOWN DIRECTIONAL button
s to select the required directory. Press
enter to display the files in the directory and playback will commence with the first
file in that directory. Use the UP/DOWN DIRECTIONAL buttons to select a
different file to play. In file list pane (the right han
d pane) each file is given a
number. The numerical buttons can be used to select these files directly
7.3 Pre-
Stop/Stop
Press the STOP ( ) button on the remote or the front panel once to enter pre
-
stop mode. In this mode if the PALY/PAUSE (
) button is
pressed, playback
will resume from the point at which the STOP (
) button was pressed. PRE
STOP
will be shown briefly in the top left corner of the TV screen.
7. MP3/JPEG CD Operation
File currently
playing
Files in the
currently selected
directory
The playing file is a
music file
The playing file is a music file
(when icon appears depressed)
The open folder
symbol
indicates
this is the currently
displayed directory
PRE STOP
Other Directories
on the disc
Page 35

32
To completely stop the DVD disc press the STOP(
) button when in the PRE
-
STOP mode.
STOP will be shown briefly in the top left corner of the TV
screen. If the PLAY/PAUSE (
) is pressed now, playback will commence from
the beginning of the disc.
7.4 Pause
Press the PLAY/PAUSE (
) button to pause playback. When playback is
paused,
PAU
SE
is shown on the top left corner of the TV screen. To resume
playback press the PLAY/PAUSE (
) button.
7.5 Previous/Next
Press NEXT (
) repeatedly during playback to skip to subsequent files.
Press PREVIOUS (
) repeatedly during playback to skip
to previous file.
7.6 Search Forwards/Backwards
Press the SEARCH FORWARD ( ) repeatedly during playback to cycle through
the different speeds (i.e. 2x normal speed, 4x normal speed etc) for search
forward as follows:
NEXT
PREV
7. MP3/JPEG CD Operation (cont)
PAUSE
STOP
PLAY
FORWARD X2
FORWARD X4 FORWARD X8
FORWARD X20
Page 36

33
To resume normal pla
yback press the PLAY/PAUSE (
) button.
Press the SEARCH BACKWARD ( ) repeatedly during playback to cycle through
the different speeds (i.e. 2x normal speed, 4x normal speed etc) for search
backwards as follows:
To resume normal playback
press the PLAY/PAUSE (
) button
7.7 Repeat/Repeat A
-B
Press the REPEAT button to cycle through the available repeat modes as follows:
A-
B repeat allows a particular section to be repeated. Press the A-B button at the
beginning of the s
ection and the press the A-B button at the end point of the
section. All material between these two point will be repeated. To resume normal
playback press the A-B button again.
7.8 Random Playback
Press the RANDOM button to play all fi
les on the CD in a random order. To
resume normal playback press RANDOM button again.
PLAY
BACKWARD X2
BACKWARD X4 BACKWARD X8
BACKWARD X20
7. MP3/JPEG CD Operation (cont)
Press A-B button to set
the beginning of the
section to be repeated
Press A-B button again
to set the end of the
section to be repeated
Press A-B button a third
time to resu
me normal
playback
Repeat 1: repeat
the currently track
Repeat All: repeat
all tracks
Repeat OFF: repeat is
turned off and disc will
play as normal
Repeat Dir: repeat
all tracks in the
cur
rent directory
REP: [1]
REP: [DIR]
REP: [ALL]
REP: [1]
REPEA
T A
-
REPEAT A
-B
A
-
B CANCEL
Page 37

34
7.9 Rotate/Flip (JPEG CD ONLY)
When viewing a picture, use the DIRECTIONAL button to rotate or flip the image.
UP button: Flip Vertically
DOWN button: Flip Horizontal
ly
LEFT button: Rotate by 90
anti-clockwise
RIGHT button: Rotate by 90
clockwise
7.10 Sequential Play (JPEG CD ONLY)
To display all images on the CD press the PLAY (
) button. All pictures will then
be shown as a slide show.
7.11 Picture Transition Effects (JPEG CD ONLY)
When viewing the pictures as a slide show, press the PROGRAM button to cycle
through the picture transitions effects (the method used to change between
photos). The available effects are as follows:
Wipe Top
Wipe Bottom
Wipe Left
Wipe
Right
Diagonal Wipe Left Top
Diagonal Wipe Right Top
Diagonal Wipe Left Bottom
Diagonal Wipe Right Bottom
Extend From Centre Horizontally
Extend From Centre Vertically
Compress To Centre Horizontally
Compress To Centre Vertically
Window Horizontally
Windo
w Vertically
Random Effect
Wipe compress from edge to centre
None
7.12 Thumbnail View (JPEG CD ONLY)
Press the MENU button to view all of the images as thumbnails. To enlarge an
image use the DIRECTIONAL buttons to highlight the image and then press
ENTE
R. Only 6 images will be shown on the screen, to view the other files use the
NEXT (
) and PREVIOUS (
) buttons.
7. MP3/JPEG CD Operation (cont)
Page 38

35
8.1 Tuning
8.1.1 Manual Tuning
Briefly press the TUNING +/- buttons repeatedly to manually tune to the required
station.
8.1.2 Automat
ic Tuning
Press and hold the TUNING +/- buttons until the system starts scan the
frequencies. The tuning will automatically stop at the next receivable station. To
locate the next station repeat the above operation.
8.2 Storing Memory Presets
To store
a station into a memory preset tune to the required station using a tuning
method described above. Press the
MEMORY
button and then press the button of
the memory location to store the station in. Each preset button has 3 presets
assigned to them. For exam
ple to store the station into preset 1, press the
M1/7/13 button once and to store the station into preset 13 press the M1/7/13
button three times.
8.3 Recalling Memory Presets
To access the presets press the button for that preset the relevant number of
times. For example, to select the station stored in preset 2, press M2/8/14 once
and to select the station stored in preset 8, press M2/8/14 button twice.
8.4 Stereo/Mono
Press the STEREO/MONO button on the front panel of the TUNER component to
switch b
etween stereo and mono reception (stereo reception is only available
when the station is broadcasting in stereo on the FM band). When in stereo mode
the STEREO indicator will be illuminated.
If when listening to a station in stereo and the reception is noi
sy (large amount of
hiss), press the STEREO/MONO button to switch to MONO listening to reduce the
amount of noise, however the reception will not be stereo sound.
8.5. Band Selection
To switch between MW and FM band press the BAND button on the front pan
el.
Follow the above instructions for tuning into a station and storing the station into a
preset.
8.6 Improving Reception
FM:
Ensure that the FM pigtail aerial is fully unwound and for best reception the
aerial should be orientated vertically.
MW:
To i
mprove reception rotate the MW aerial until the best reception is found.
8. Tuner Operation
Page 39

36
To listen to an external source, connect the source as shown in section 3.4. Press
the source button until AUX is shown on the TUNER component display.
9. Listening to an External Source
U.S.Patent Nos.4,631,603;4,577,216;
4,819,098;4,907,093;And 6,516,132.
LEGAL NOTICE:
This product incorporates copyright protecti
on technology that is protected by method
claims of certain U.S. Patents and other intellectual property rights owned by Macrovision
corporation and other rights owners. Use of this copyright protection technology must be
authorized by Macrovision Corporat
ion, and is intended for home and other limited viewing
uses only unless otherwise authorized by Macrovision corporation. Reverse engineering or
disassembly is prohibited.
Manufactured under license from Dolby Laboratories."Dolby" and the d
ouble-D symbol
are trademarks of Dolby Laboratories.Confidential Unpublished Works.©1992-1997 Dobly
Laboratories, Inc.
For DVD players with 625p, but not 525p, progressive scan output:
'CONSUMERS SHOULD NOTE THAT NO
T ALL HIGH DEFINITION TELEVISION SETS
ARE FULLY COMPATIBLE WITH THIS PRODUCT AND MAY CAUSE ARTIFACTS TO
BE DISPLAYED IN THE PICTURE. IN CASE OF 625 PROGRESSIVE SCAN PICTURE
PROBLEMS ,IT IS RECOMMENDED THAT THE USER SWITCH THE CONNECTION TO
THE 'STANDARD D
EFINITION' OUTPUT. IF THERE ARE QUESTIONS REGARDING
OUR TV SET COMPATIBILITY WITH THIS MODEL 625p DVD PLAYER, PLEASE
CONTACT OUR CUSTOMER SERVICE CENTER .'
For DVD players with 525p, but not 625p, progressive scan output:
'CONSUMERS SHOULD NOTE THAT NOT A
LL HIGH DEFINITION TELEVISION SETS
ARE FULLY COMPATIBLE WITH THIS PRODUCT AND MAY CAUSE ARTIFACTS TO BE
DISPLAYED IN THE PICTURE. IN CASE OF 525 PROGRESSIVE SCAN PICTURE
PROBLEMS ,IT IS RECOMMENDED THAT THE USER SWITCH THE CONNECTION TO
THE 'STANDARD DEFI
NITION' OUTPUT. IF THERE ARE QUESTIONS REGARDING
OUR TV SET COMPATIBILITY WITH THIS MODEL 525p DVD PLAYER, PLEASE
CONTACT OUR CUSTOMER SERVICE CENTER .'
For DVD players with 625p and 525p, progressive scan output:
'CONSUMERS SHOULD NOTE THAT NOT ALL HIG
H DEFINITION TELEVISION SETS
ARE FULLY COMPATIBLE WITH THIS PRODUCT AND MAY CAUSE ARTIFACTS TO BE
DISPLAYED IN THE PICTURE. IN CASE OF 625 PROGRESSIVE SCAN PICTURE
PROBLEMS ,IT IS RECOMMENDED THAT THE USER SWITCH THE CONNECTION TO
THE 'STANDARD DEFINITION
' OUTPUT. IF THERE ARE QUESTIONS REGARDING
OUR TV SET COMPATIBILITY WITH THIS MODEL 525p AND 625p DVD PLAYER,
PLEASE CONTACT OUR CUSTOMER SERVICE CENTER .'
Page 40

37
In the unlikely event that this DVD MICRO system should fail to work, please
check the following items.
Fault Possible solution
No Power
Are the power leads firmly plugged
into the power outlets?
No Picture
Check that the syste
m is connected
properly
The video cable is damage. Replace
with a new one
Make sure that the system is
connected to a video input socket on
the TV.
Make sure that the TV is turned on.
Make sure that the correct AV
channel on the TV. For detail please
check
the TV s instruction manual
Noisy/Distorted Picture
Clean the disc
Do not connect the system through a
VCR as the VCR has copy protection
which will distort the picture so that it
cannot be copied
Aspect Ratio is incorrect/cannot
be changed
The aspect r
atio is fixed on your DVD
disc.
Depending on the TV the aspect ratio
may not be changed
No/Very low sound
Check that the speakers and
components are connected securely
Ensure that the correct source has
been select on the system
Check audio cables for dam
age
System is in pause/slow motion/fast
forward/rewind. Press PLAY/PAUSE
(
).
Check the settings for each speaker
Sound from left and right speakers
are unbalanced or revered
Check that the speakers and
components are connected correctly
and securely
Adj
ust the individual volume settings
for each speaker
10. Troubleshooting
Page 41

38
Severe hum or noise is heard
Severe hum or noise is heard
(cont)
Check that the speakers and
components are connected securely
Move the stereo/speakers away from
the TV
Clean the disc
When listenin
g to a DVD with
surround sound some sounds are
difficult to hear.
Check the speaker connections
This may be normal operation, on
some discs the range of volume
between certain scenes can be large.
Therefore if the volume has been
turned down during a loud
section the
next quiet section may not be heard.
Sound only comes from centre
speaker
On some disc only the centre speaker
are used. Test the disc on another
player.
The language of the subtitles
cannot be changed when playing
a DVD
Multilingual subtitle
s are not recorded
on the DVD
The subtitles are actually recorded on
the video of the DVD, for example
when viewing a section where foreign
language is spoken.
The angles cannot be changed
when playing a DVD
Multi-angles are not recorded onto the
DVD
If a
ngles are recorded on the DVD they
can only be changed when the angle
mark is shown on the screen.
10. Troubleshooting (cont)
Page 42

39
11.1 Amplifier Section
Frequency Response:-
Main, Centre
and surround channels
20Hz-20kHz,1/3 dB
Frequency Response:-
Subwoofer
80Hz-150Hz
Signal noise ratio:
> 85dB
Harmonic distortion:
0.2%(1kHz/6
/25W)
Power output:- Main Channel
15W + 15W
Power output:- Centre Channel
15W
Power output:- Surround Channel
15W + 15W
Power output:- Subwoofer
35W
Load impedance:- main, centre and
surround chann
el
4-
16
Load impedance:- subwoofer
8-
16
Range of tone regulation:- Bass
100Hz
10dB
Range of tone regulation:- Treble
10KHz
10dB
Line input:
500mV/47k
Distance of remote control
Over 5m
Dimensions
220 (w) x 308 (d) x 82 (h)
Weight
4.6KG
11.2
Tuner Component
Output Level
0.5 V
Load
47K
Frequency Range:- FM
87.50-108.00 MHz
Frequency Range:- MW
522-1611kHz
Sensitivity:- FM
< 20
V
Sensitivity:
-MW
< 3mV/m
Signal noise ratio:-
FM
> 46dB
Signal noise ratio:-
MW
> 40dB
Stereo seperation: >
20dB
Dimensions (mm)
220 (w) x 308 (d) x 82 (h)
Weight
1.5KG
11. Specification
Page 43

40
11.3 DVD Component
Video Format
MPEG2 for DVD
Audio format
MPEG1, MPEG2, PCM, DOLBY
DIGITAL, analogue stereo, virtual
surround
Signal output:- Video System
NTSC or PAL
Signal output:-Video
1.0V p
-p
Signal output:- Audio 5.1 channel 0.5V p-p, mixed
stereo 2V p-p
Output interface SCART, RCA (composite and
component), S-video
Voltage:
AC 110V-240V
Power Consumption:
< 30W
Frequency response:
20Hz-20kHz
Signal noise ratio:
> 90dB
To
tal harmonic distortion
0.003%
Dimensions (mm)
220(w) x 308 (d) x 82 (h)
Weight
2.5KG
Due to the continual improvement of our products the specifications may be
changed without notice.
This symbol means that this unit is double insulated. An ea
rth connection is not
required.
11. Specification
 Loading...