

Page 1
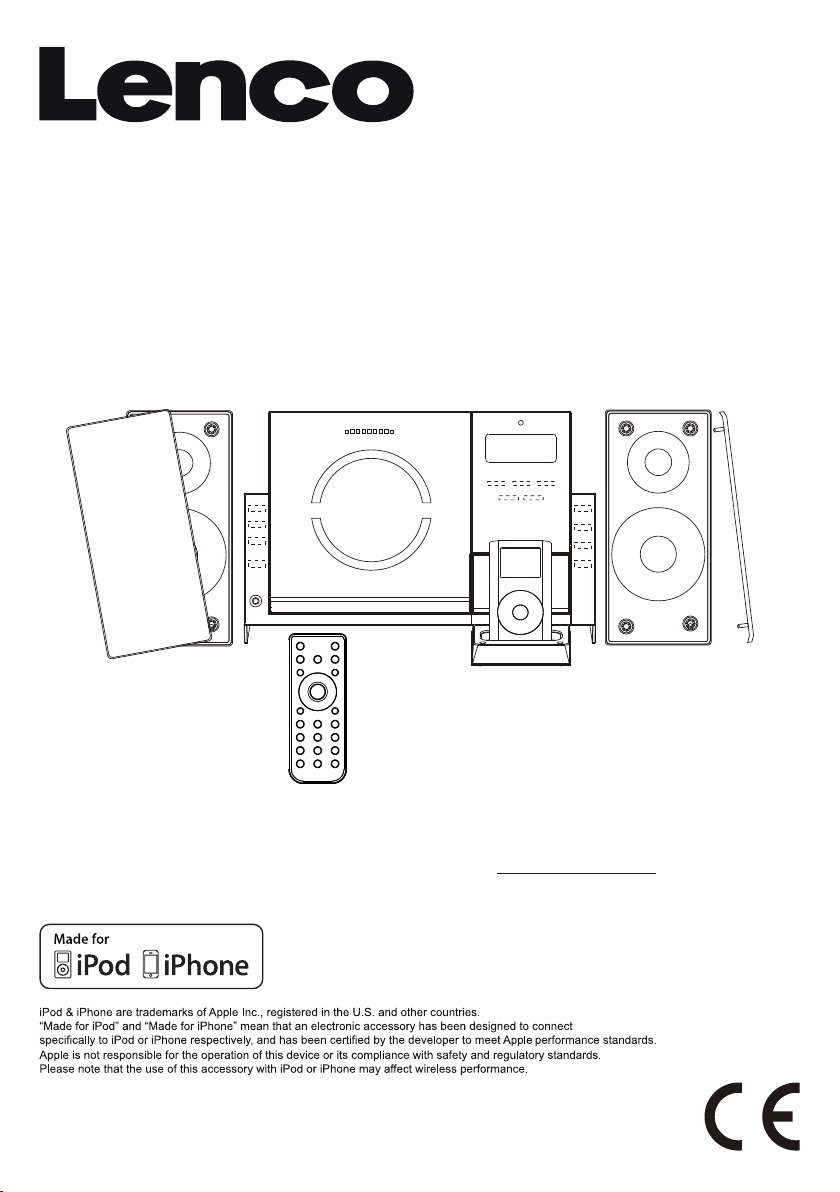
Mci-210Mci-210
MICRO HI-FI SYSTEM
WITH iPod/iPhone DOCKING STATION,
CD/MP3 PLAYER, PLL FM RADIO,
USB AND CARD READER
For information and support, www.lenco.eu
INSTR UCTION MANUAL
iPod/iPhone shown not included
Page 2
SAFETY PRECAUTIONS
To achieve the utmost in enjoyment and performance, and in order to become familiar with its features, please read this manual
carefully before attempting to operate the unit.
This safety and operating instruction should be retained for future reference.
The apparatus shall not be exposed to dripping or splashing and no objects filled with liquids, such as vases, shall be placed
on apparatus.
* - Places exposed to direct sunlight or close to heat radiating appliances such as electric heaters, on top of other stereo
* - Places blocking ventilation or dusty places.
* - Places subject to constant vibration, humid or moist places.
No naked flame sources such as lighted candles should be placed on the unit.
Attention should be drawn to the environmental aspects of battery disposal.
Make sure not to obstruct the ventilation openings, a minimum of 10cm should be kept around the apparatus for ventilation.
The ventilation should not be impeded by covering the ventilation openings with items such as newspaper, table-cloths,
curtains, etc. Use apparatus in moderate climates only.
Operate tuning controls and switches as instructed in the manual.
Before turning on the power for the first time, make sure the power cord is properly installed.
Store your CD in a cool area to avoid damage from heat.
The mains plug is used as the disconnect device and it must remain readily operable. To completely disconnect the power
input, the mains plug of the apparatus must be disconnected from the mains.
The normal function of the product may be disturbed by Strong Electro Magnetic Interference. If so, simply reset the product
to resume normal operation by following the instruction manual. In case the function could not resume, please use the
product in other location.
o not attempt to remove any screws, or open the casing of the unit; there are no user serviceable parts inside, refer all
D
servicing to qualified service personnel.
Avoid installing the unit in locations described below:
equipment that radiate too much heat.
Important Notes
CAUTION:
SERVICEABLE PARTS INSIDE, REFER SERVICING TO QUALIFIED SERVICE PERSONNE L.
WARNING :
Note:
unit. This unit includes micro-processors which may malfunction as a result of external electrical interference/noise or
electrostatic discharge . If the unit is not working properly, disconnect the power source and then reconnect it.
TO REDUCE THE RISK OF ELECTRIC SHOCK DO NOT REMOVE COVER (OR BACK), NO USER
DANGEROUS VOLTAGE
Conductor dangerous voltage, that may be of sufficient magnitude to constitute a risk of electric shock to persons
is present within this product's enclosure.
ATTENTION
The owner's manual contains important operating and maintenance instructions, for your safety, it is necessary to
refer to the manual.
TO PREVENT FIRE OR SHOCK HAZARD, DO NOT EXPOSE THIS APPLIANCE TODRIPPING OR SPLASHING.
This unit will become warm when used for a long period of time. This is normal and does not indicate a problem with the
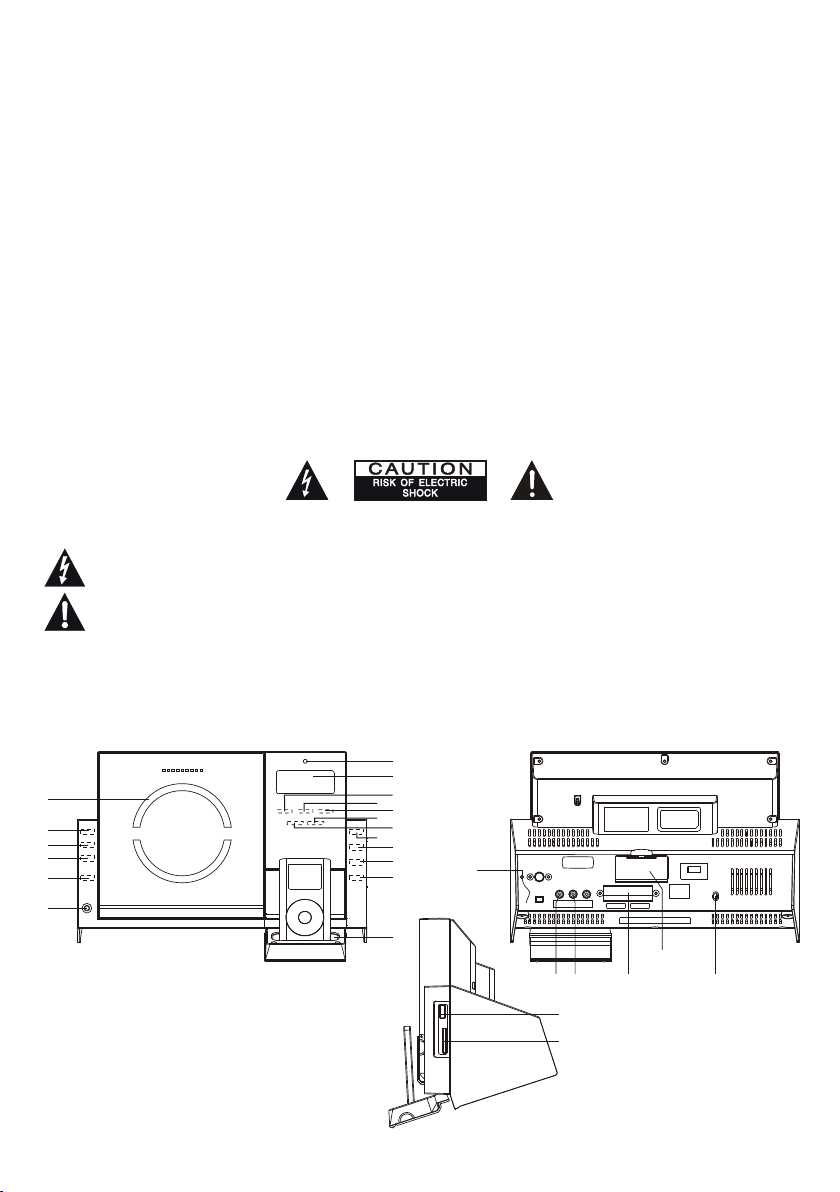
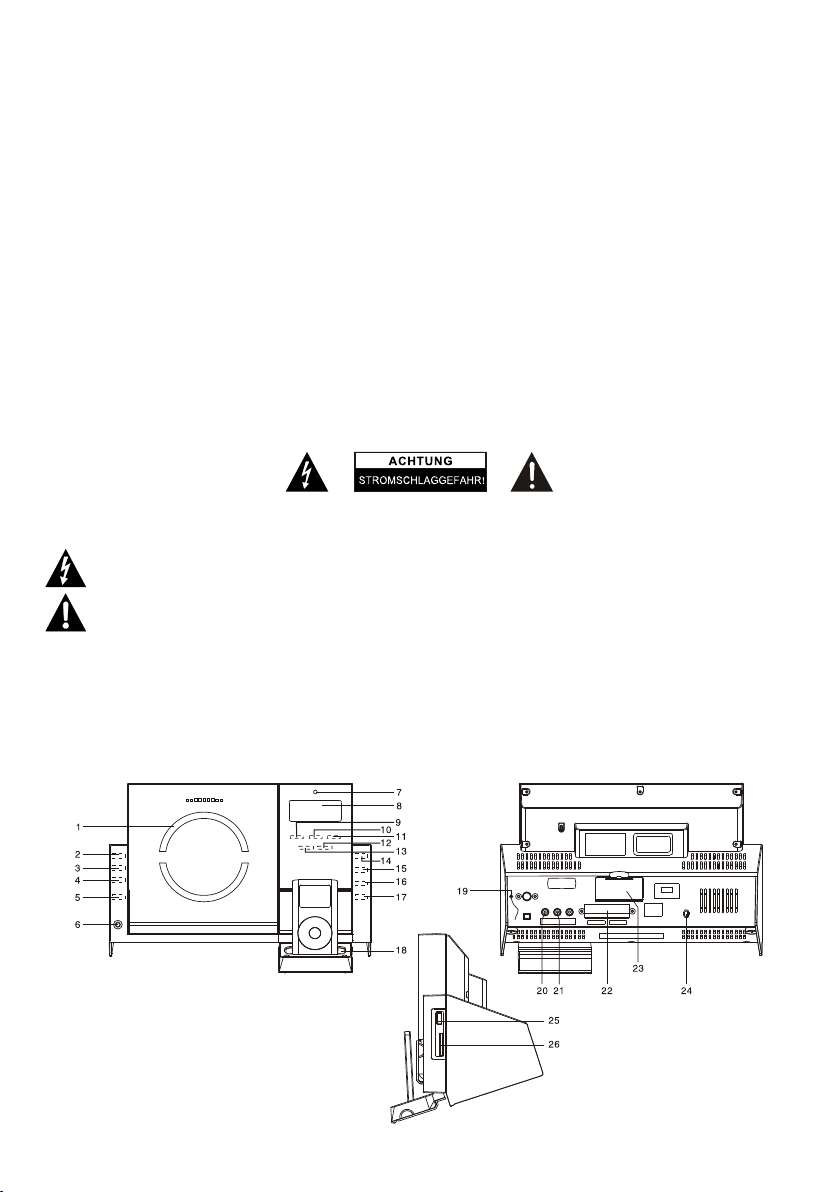
FE ATU RE S AN D CO NT RO LS
7
8
1
2
3
4
5
6
9
10
11
12
13
14
15
16
17
18
19
23
20 21 22
25
26
24
UK-1
Page 3
FE ATU RE S AN D CO NT RO LS
1. CD DOO R
2. CD DOO R OPEN/ CLO SE (to uch pad )
3. SELE CT/RE PEAT (touc h pad )
4. VOLU ME +(to uch p ad )
5. VOLU ME -(to uch p ad )
6. HEAD PHONE J ACK
7. IR SEN SOR
8. LCD DI SPLAY
9. SKIP /TUNE ▼( touch p ad)
10. SKI P ▶▶I/TU NE ▲(t ouch pa d)
I◄◄
11. PL AY/PAUSE(t ouc h pa d)
12. STOP/M ENU(t ouch pa d)
13. CLO CK/DI SPL AY(tou ch pa d)
14. iPo d/CD( touch p ad)
15. TUNER( touch p ad)
16. AUX/ USB/S D(tou ch pa d)
17. STANDBY /ON(t ouch pa d)
18. iPo d DECK
19. FM WI RE ANTEN NA
20. AUX IN (RIGH T) JA CK
RE M OT E CO N TR OL
1. STANDBY/ ON BUTTON
2. iPod /CD BUT TON
3. BACK LIGHT BUTTON
4. PLAY/PAUS E BUT TON
5. I◀ ◀ BUT TON
6. STOP/ME NU BUTTON
7. RAND OM BUTTON
8. PROG RAM BUT TON
9. PS/F OL/ME NU ▼ BU TTON
10. X-B ASS BUT TON
11. VO LUME + BU TTO N
12. EQ BU TTO N
13. VOL UME - BUT TON
14. OPE N/CLO SE BU TTON
15. AUX/ USB/S D BUT TON
16. TUNER BU TTO N
17. CLO CK/DI SPL AY BUT TON
18. ▶▶I BU TTO N
19. SEL ECT/R EPE AT BUTTON
20. INT RO BUTTON
21. PS/ FOL/M ENU ▲ B UT TON
22. SLE EP BU TTO N
23. TIMER BU TTO N
24. SUR ROUND B UTT ON
25. MUT E BUTTON
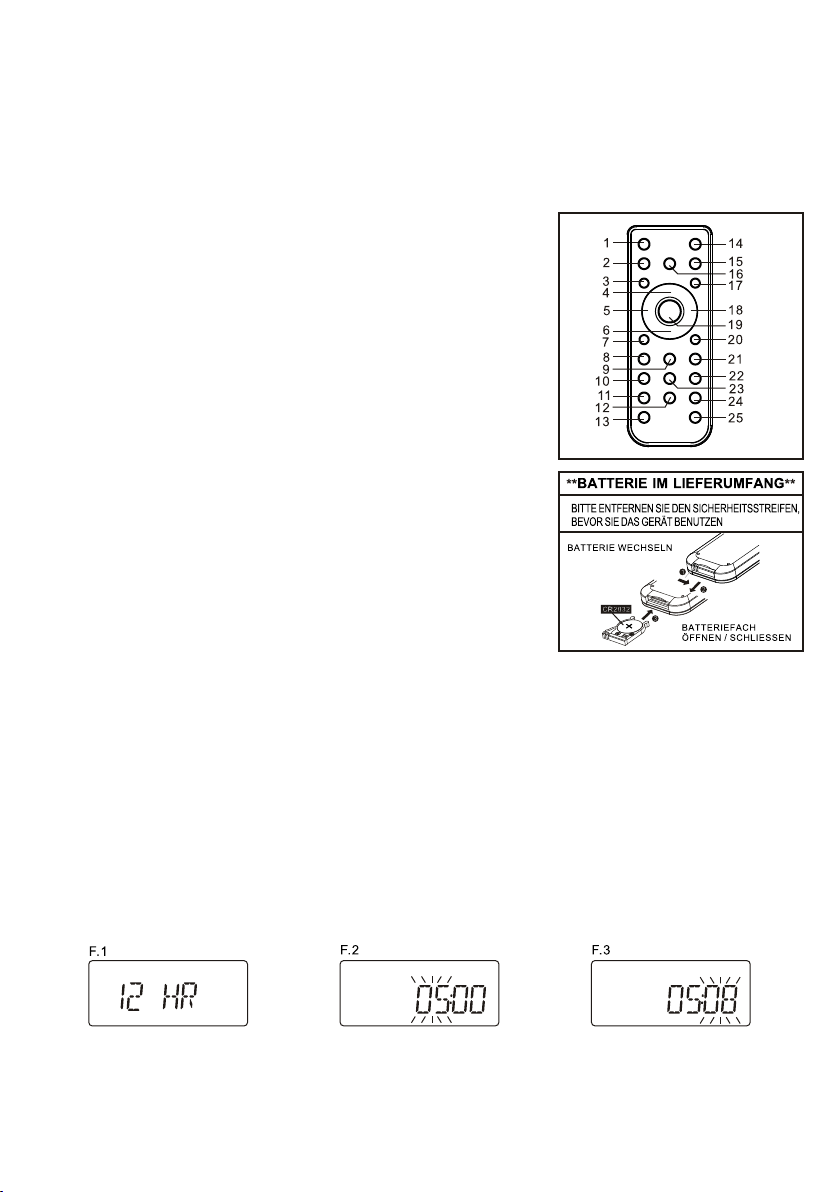
PU TT I NG T HE BATT ERY I NTO TH E RE MOT E C ON TR OL U NI T
1. Press t he b atter y com partm ent g ently acco rdi ng to the di recti on
indic ated in t he illu str ation .
2. Slid e to open t he batt ery com par tment .
3. Insert the s uppli ed CR20 32 b att er y into th e co mpart men t ac cordi ng to
the po larit y m ark ings ( "+ " and " -") in side t he compa rtm ent an d o n the
batte ry. Re place t he batt ery c ompar tment u ntil it c lic ks.
NOTE :Remo ve th e bat te ry fr om th e rem ote c ontro l if not in use f or lo ng
perio d o f t ime. Rep lac e w ith new bat tery whe n t he bat tery bec ome weak ,
other wise th e remot e con trol wi ll not fu nctio n pro perly.
21. AUX IN (LEFT ) JAC K
22 SPEA KER TERMIN ALS
23. BATTERY DOOR
24. AC COR D
25. USB D EVICE I N POR T
26. SD CA RD IN SLO T
1
2
3
4
5
6
7
8
9
10
11
12
13
**BATTERY INCLUDED**
CHANGE OF BATTERY
BATTERY COMPARTMNT
OPEN/CLOSE
14
15
16
17
18
19
20
21
22
23
24
25
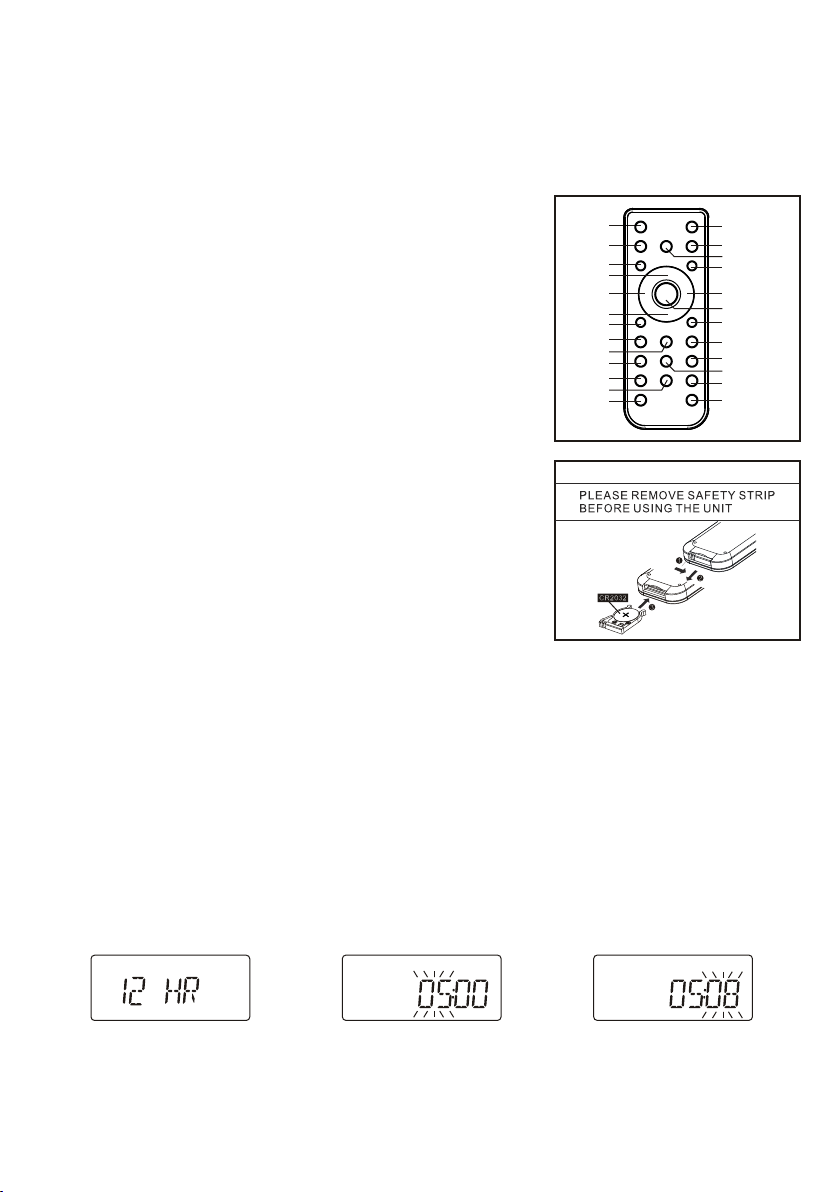
TOUCH S EN SI NG C ON TRO L
The uni t is ut ili zing a human capaci tive sensi ng te chnol ogy, t he fr ont pan el co ntrol s are design ed to be tou ch
sensi ng key p ads ; you ca n o perat e t he unit by the touc h o f y our f ing er ti ps. Th e b lue l igh t dot s o n t he CD fr ont
panel w ill be fl ashin g up ev ery tim e when yo u perfo rm yo ur touc h opera tion.
CLOCK SETTI NG
When th e un it is power ed up for t he f irst ti me, it will b e in s tandb y mo de, t he d ispla y will show t he cloc k an d flash .
To perfor m the clo ck se tt ing , ensur e the uni t is in sta ndb y mode.
1. Se tting t he c lock disp lay for mat - Keep touc hing th e CL OCK/D ISPLAY to uch pad on the fron t pa nel unt il t he
displ ay sh ows “ 12 HR” or “24 HR”, th en to uch o n the I◄◄ or ►►I to uch p ad to s elect the “1 2 HR” (12Hour) or “2 4 HR ” (24-H our) cl ock displ ay form at, whe n yo ur desi red for mat appea rs in the dis play, to uch on
the CLO CK/DI SPL AY to co nfirm . (F. 1)
2. Aft er the cl ock displ ay for mat is set, t he dis play w ill sh ow the clock with t he hou r digi ts fla sh, to uch on the
I◄◄ o r ► ►I to se t t o the co rrect hour, th en to uch on t he CLOCK /DISP LAY t o con firm, fi rst set the hour
and then th e mi nut e, when the dis play sh ows the cor rect ti me, touch on th e CLOCK /DISP LAY ag ain to
confi rm, the c loc k se tti ng is now c omple ted. (F. 2) (F. 3)
3. T he clo ck is dis playe d duri ng uni t s tandb y. To see t he clo ck durin g unit op era tion, re pea te dly to uch on th e
CLOCK /DISP LAY until t he disp lay sho ws th e clock a nd it wil l be disp lay ed for 5 se conds .
F.1
F.2
F.3
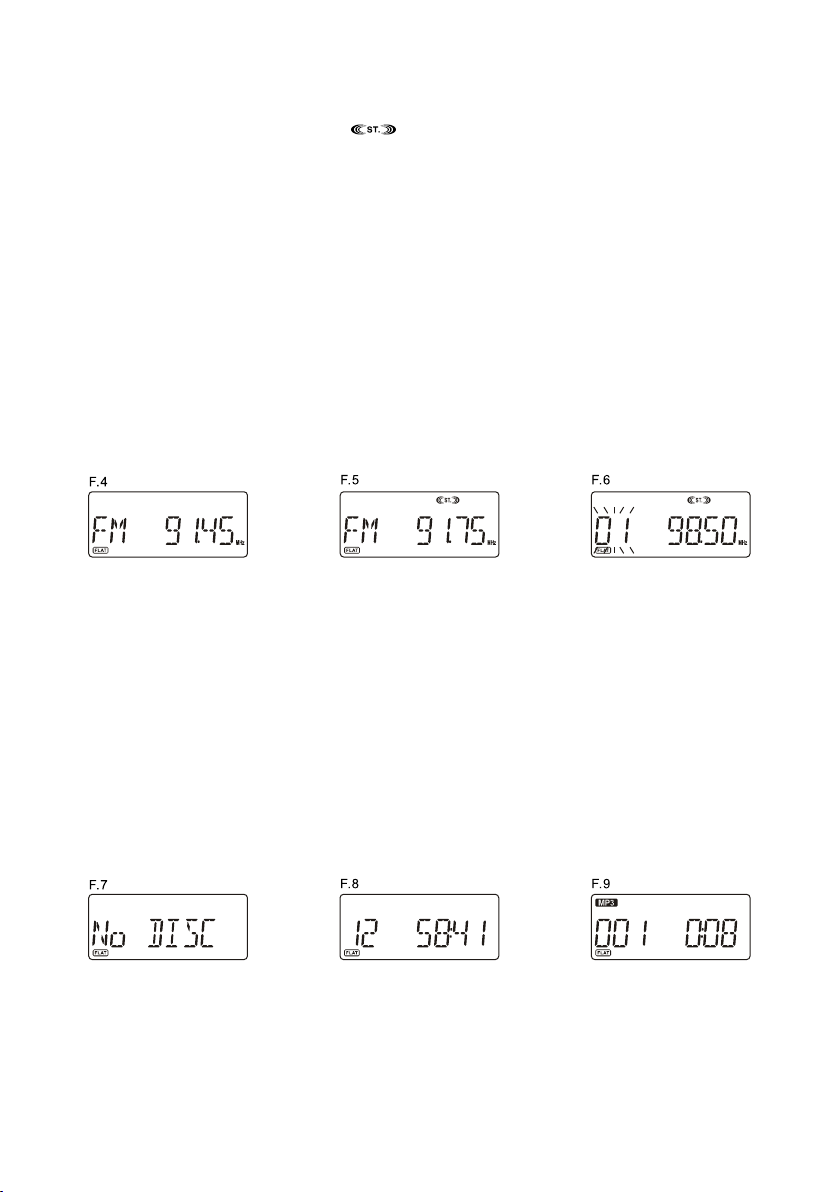
LI ST ENING TO YOU R RA DIO
When th e unit is f irst sw itc hed on fr om stan dby, it will au tomat ica lly ent er into t he FM rad io mode . You sho uld ful ly
exten d th e FM l ead wire ante nna loc ated at the back of the uni t an d ad jus t it s po sitio n an d direc tion unti l yo u find
the bes t recep tion.
To selec t radi o mode du rin g othe r oper ation modes , touc h on th e TUNE R touc h pad on the fro nt pan el, th e
displ ay will s how the F M fre quenc y. (F. 4)
UK-2
Page 4

Manua l tunin g
You ca n use the m anu al tuni ng to tun e to weak s tat ions or y our des ired fr equ ency.
1. Re peate dly touch on the I ◄◄ o r ►► I touc h pa d un til yo u re ad t he c orrec t fr equen cy or the rece ption is a t
its bes t.
2. Th e displ ay will s how the s ter eo icon “ ” i f a FM ster eo stat ion i s recei ved. (F. 5)
Autom atic tu nin g
1. Kee p touch ing on the I◄ ◄ or ►►I to uc h pad unt il it sta rts to sear ch down o r up, it will a utoma tic al ly sear ch
for the f irst st ati on o f suf fic ient si gnal st rengt h.
2. Rep eat the a bove pr ocedu re if y ou wish t o selec t anoth er st ation .
Progr ammin g pre se t sta tions ( remot e con tr ol on ly)
You ca n prese t sta tions o f your ch oice an d sto re up to 30 F M stati ons int o its m emory.
1. Pres s the TUN ER bu tt on on t he remo te to sel ect r ad io mo de, the n tune to t he de si red s tatio n.
2. Pres s the PRO GRA M butto n on the re mote on ce, t he disp lay wil l show “0 1” an d flash , press t he
PS/FO L/MEN U +/- b ut ton s on the re mote to s ele ct the pr eset st ation n umb er. ( F. 6)
3. When your de si red pre set stati on number app ears, pre ss the PROGRA M bu tton agai n to con firm your
selec tion, t he curr ent s tatio n will be s tored i n you r desir ed pres et numb er.
4. R epe at the abov e s teps to pro gram mor e p res et st ati ons or to chan ge the stor ed prese t s tat ion, sto ring a
new sta tion in to a pres et lo catio n will er ase the p rev ious st ored st ation i n tha t locat ion.
Selec ting th e pre se t sta tions ( remot e con tr ol on ly)
1. Pres s the TUN ER bu tt on on t he remo te to sel ect r ad io mo de.
2. Pre ss th e PS/ FOL /MENU +/- butto ns on th e r emote to s ele ct yo ur de sir ed pr eset sta tion, the dis pl ay will
show th e prese t sta ti on nu mber an d the fre quenc y.
F.4
F.5
F.6
LI ST ENING TO YOU R CO MPAC T DI SC S
NOTE : Alth oug h this CD/ MP3 playe r ca n re ad C D-R an d CD -RW dis cs i n addi tio n to norma l CD s, t he p layab ility
of CD- R a nd CD- RW d iscs m ay be a ffect ed by t he typ e of so ftwar e that was us ed to cre ate th e disc s, as w ell as
the quali ty and cond iti on o f th e blank med ia y ou are usin g, 100% pla yab ility can not be guar antee d. Th is i s no t an
indic ation o f a probl em wi th the pl ayer.
IMPOR TANT : T HIS MO DE L HA S A MO TOR IZED E LECTR ONIC C D D OOR . D O N OT ATT EMP T TO OPEN T HE
DOOR MA NUALLY. THI S COULD C AUS E DAMAG E TO THE DOO R OPENI NG ME CHANI SM.
Playi ng the en tir e CD
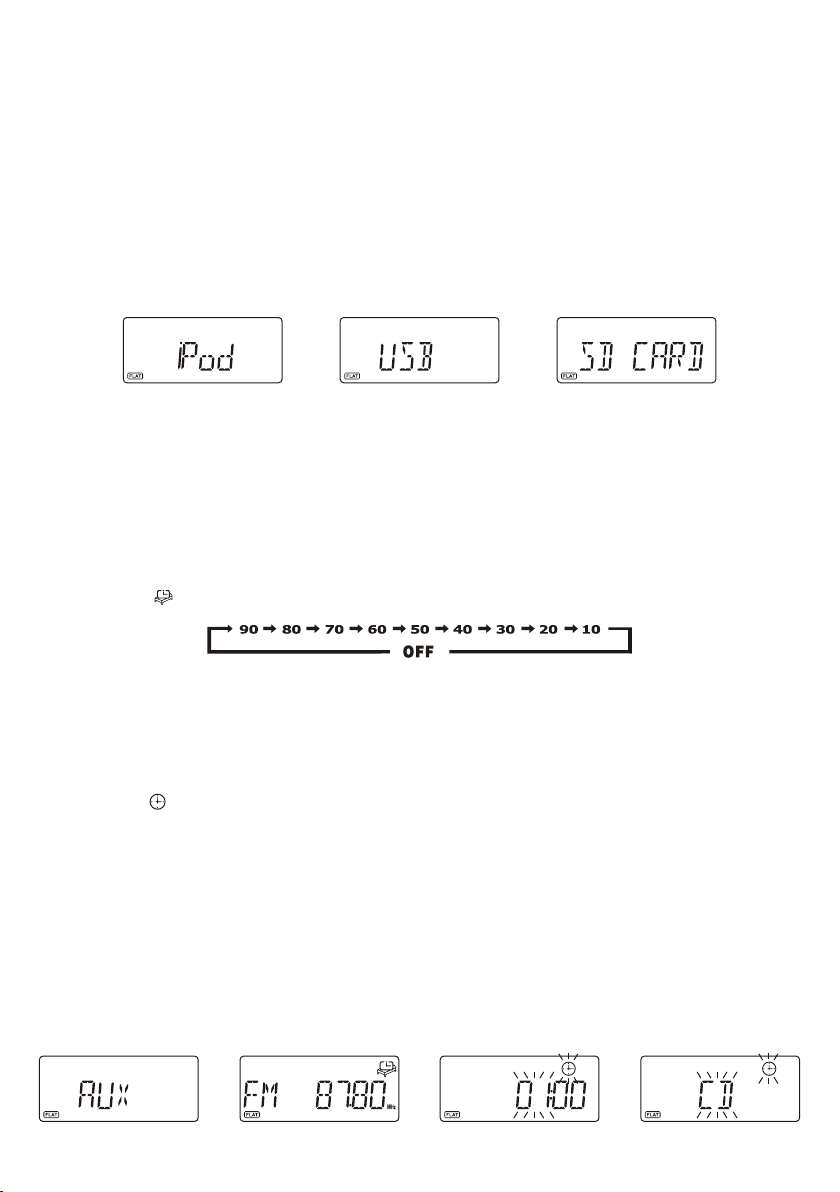
1. When t he unit i s ON, t ou ch on t he CD tou ch pad to s ele ct C D fun ction . The d ispla y will fi rst s how “CD ” and
then fi nally “ No DISC ” to in dicat e that th ere is no d isc i n the pla yer. (F. 7)
2. Touch on th e OPEN/ CLO SE t ouc h pad to op en the CD d oor, the d isp lay wil l show “O PEN”.
3. Load the disc wit h the pri nte d l abel s ide faci ng up and then tou ch on t he OPEN/ CLOSE again to close the
CD door. The dis play wi ll first show “RE ADING ” and then fi nally the tot al trac k nu mber and ti me will be
displ ayed. ( F. 8)
4. To sta rt p layba ck f rom the begin nin g, t ouch on the ►/ I I to uch pad. If a MP 3 di sc i s be ing playe d, “ MP3” will
be disp layed . (F. 9)
5. To interr upt pla yback , tou ch on the ► / II touc h pad , th e ela psed ti me in the d ispla y wil l flash .
6. To resume p layba ck, tou ch on t he ►/ II to uch pad a gain.
7. To stop pla yback , touch o n the ■ t ouch pa d.
F.7
F.8
F.9
Selec ting a di ffe re nt tr ack dur ing pla y
1. Duri ng play back, r epe atedl y touch ing on th e I◄◄ o r ►►I tou ch pad un til y ou r ead y our des ired tr ack i n th e
displ ay, pl aybac k will be s tar ted fro m this tr ack.
2. If a MP3 di sc is bei ng pl ay ed, t he disp lay wil l show th e ID3 t ag if ava ilabl e.
3. To select o ther fo lders i n the M P3 disc , press t he PS /F OL/ MENU +/ - butto ns on t he r emo te.
4. To play the n ext tra ck, tou ch on t he ►►I to uch pad o nce .
5. To play the c urren t track a gai n from th e begin ning, t ouc h on the I◄ ◄ touch p ad once .
6. To play the p revio us trac k, to uch on th e I◄◄ tou ch pa d tw ice .
UK-3
Page 5
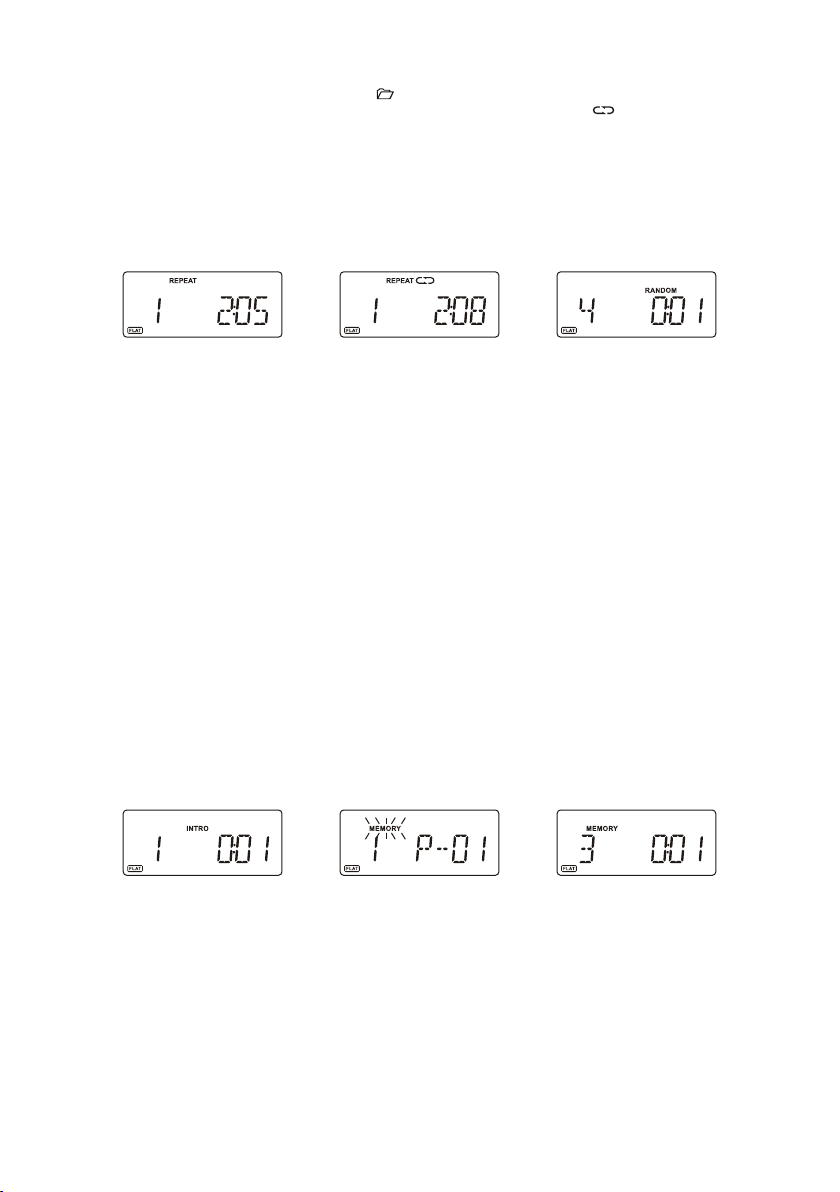
Repea t play
Durin g norma l playb ack , you can t ouch on t he REPE AT tou ch pa d to s ele ct the re peat pl ay fu nc tio n:
1. To rep eat the s ame tra ck, tou ch on t he REPE AT onc e, the di splay w ill sho w “RE PEAT” (F. 10 )
2. If you ar e playi ng a MP3 di sc, a n addit ional “ ” o pti on w ill a ppear. T his w ill rep eat the c urr en t fol der.
3. To repeat t he enti re disc , tou ch on the R EPEAT again , the dis pla y wi ll sh ow “ ”. (F. 11)
4. To cancel r epeat p lay, repeat edl y touch o n the R EPEAT touch p ad un til “RE PEAT ” dis appea rs in the d isp lay.
Rando m play (r emo te c ont rol onl y)
You ca n press t he RA NDOM bu tton on t he remo te co ntrol t o selec t the ran dom p lay fun ction :
1. Durin g C D stop , p res s t he RAN DOM butt on onc e t o sele ct ran dom play, the di splay wi ll sho w “ RAN DOM”,
one tra ck will b e rando mly s elect ed and st arted t o pla y.(F. 12 )
2. Durin g playb ack , first press the RAN DOM b ut ton once, th e dis play wi ll sh ow “RAN DOM”, then p re ss th e
I◄◄ or ►► I butto n, on e track w ill be ra ndoml y sel ected a nd star ted to pl ay.
3. To resume n ormal p layba ck, p ress th e RANDO M butto n aga in unti l “RAND OM” dis app ears.
Intro p lay (re mot e co ntr ol only )
1. Pre ss the IN TRO but ton on the re mote co ntrol t o st art i nt ro play. The di splay w ill sho w “I NTR O” a nd will s tart
playi ng the fi rst 10 se con ds of eac h track . (F. 13)
2. To res ume nor mal pla yback , pre ss the IN TRO but ton aga in, t he “INT RO” in th e displ ay wi ll disa ppear.
Progr am play ( remot e con trol on ly)
You ca n use the p rogra m play fe ature t o play up t o 60 trac ks on a dis c in any de sired o rde r. You ma y also pr ogr am
a parti cular t rack to p lay s evera l times w ithin a p rog ramme d seque nce.
1. Load y our dis c as us ua l and w ait unt il the di splay s how s the tot al numb er of tra cks o n the dis c.
2. Ensue it i s in CD s top mo de, press the PRO GRAM b utt on on the r emote con trol once , th e disp lay will show
“MEMO RY” a nd “P-0 1”. (F. 14)
3. Press th e I ◄◄ or ►►I b utt on to selec t t he first tr ack numb er to be progr ammed . W hen the des ired tra ck
numbe r appea rs in the disp lay, pre ss the PR OGRAM b utton t o confi rm and th e fi rst trac k to p lay is
progr ammed . The p rogra m mem ory num ber wil l advan ce to “ P- 02” a nd read y for the n ext e nt ry.
4. If a MP 3 disc is bei ng loa ded , an ad ditio nal “f older ” op tion w ill ap pear b efore the track selec tion, press the
PS/FO L/MEN U +/- b ut ton s to sele ct the fo lde r.
5. Repea t th e ab ove ste ps to pr ogram oth er tracks , a maxi mum num ber of 60 tr acks can be progr ammed .
When yo u ha ve comp leted pro gramm ing , pr ess the ►/ II but ton to begi n progr am play, playba ck will be
start ed o n the first tra ck you prog ramme d and will co ntinu e un til the las t pr ogram med tra ck h as p lay ed. The
displ ay will s how “ME MOR Y”. ( F. 15)
6. When th e pro gram pl ay is c omple ted, th e pla yer sto ps an d “MEMO RY” w ill be displ ayed. The playe r
remai ns in the p rogra m pla y mode. P ress th e ►/ II b ut ton w ill pla y the pro gramm ed se quenc e again .
F.11F.10 F.12
7. To e ras e the prog ram, in CD stop mode, press the ■ b utton once ; in CD pl ay mo de, p ress the ■ bu tt on
twice . “MEMO RY” w ill be di sap pe are d.
Repea t Progr am pl ay
You may use th e prog ram pl ay and th e re peat pla y fe at ure s toge ther to contin uou sl y re peat a pr ogr am med
seque nce. F ir st use th e remo te contr ol to pro gra m t he desir ed pla yback se que nce, whe n prog ram play begin s,
Touch on th e REPEAT touc h pad to se lec t repea ting th e curre nt tr ack or th e entir e progr amm ed sequ ence.
F.13
F.14
F.15
LI ST ENING TO YOU R iPod& iP ho ne
This unit i ncorp orate s an i Pod /i Pho ne d ockin g funct ion, yo ur f avo ur ite son gs in the iPo d/iPh one can be pl aybac k
throu gh this u nit.
1. To sel ect iPo d opera tion, r epe atedl y touch o n the iPo d/C D touch p ad unti l the dis pla y sh ows “ No iPod ”.
2. Lift d own the iPod d ock ing st ati on loc ated on th e fr ont right sid e unde r th e di splay, ins tall an ad apt or whi ch
match es your i Pod/i Pho ne mode l into th e docki ng tr ay.
3. Inser t you r iPo d/i Phone i nto t he do cki ng tray, th e displ ay wi ll sh ow “i Pod” and now y ou ca n sta rt yo ur iPod o per ati on.
4. To start or i nterr upt p la yba ck, tou ch on the ► /II t ou ch pa d.(F.16 )
5. To skip for ward or b ack to ot her t racks d uring p layba ck, t ouch on t he ►►I or I ◄◄ to uch pad .
6. To select “ iPod Me nu”, pr ess o n the MEN U butto n on the re mot e.
7. To scroll u p or down i n the “iP od Me nu”, pr ess the P S/FOL /ME NU +/- bu ttons o n the r em ote .
8. To confir m the sel ectio n in th e “iPod M enu”, p ress th e SEL ECT but ton on th e remot e.
CH ARGING UP YO UR i Pod&iPh on e
You can char ge y our iPod or iPhon e vi a th e do cki ng t ray in e ither sta ndby or under ope ratio n, t he i Pod or i Pho ne
will be a utoma tical ly ch arged w hen it is d ocked .
UK-4
Page 6
US B & SD /MMC CARD M P3 P LAY BAC K
1. To sel ect USB o r SD/MM C funct ion , repea tedly t ouch on t he AU X/USB /SD tou ch pad un til t he disp lay
shows “ USB” or “ SD CA RD ”. (F. 17 ) (F. 18)
2. Inser t your US B dev ic e to th e USB por t or your S D/M MC c ard t o the mem ory car d slo t.
3. The dis play wi ll firs t sho w “READ ING” an d then th e tot al numb er of fol ders an d tra cks.
4. To s tart pl aybac k from th e first folder and trac k, touc h on the ►/ II to uch pad . The displa y will sh ow the
folde r/tra ck no ., t he ti me and th e ID3 tag i f ava il abl e.
5. To interr upt pla yback , tou ch on the ► / II, the e lap se d tim e in the di splay w ill fla sh.
6. To resume p layba ck, tou ch on t he ►/ II ag ain.
7. To play the n ext fil e/tra ck, t ouch on t he ►►I on ce.
8. To play the c urren t playi ng fi le/tr ack aga in from t he be ginni ng, tou ch on the I ◄◄ on ce.
9. To play the p revio us file /tr ack, to uch on th e I◄◄ t wi ce.
10. To select d iff erent f older i n the d evice , press t he PS/F OL/ MENU +/ - butto ns on the r emo te.
11. To stop pla yback , touch o n the ■ t ouch pa d.
NOTE: D ue to har dware a nd soft ware co mpati bilit y, som e kinds o f “Dual Vo ltage -MMC” c ard o r “M MC- Pl us” c ard
might n ot be sup porte d.
F.16
F.18F.17
AUX INP UT
The AUX IN R CA jack s ar e loca ted at the back of th e un it , an alogu e au dio so und si gna ls fro m ot her so urces can
be inpu t to the sy ste m th rou gh thes e jacks .
1. Use a ca ble wit h RCA jack s to co nnect t he inpu t to othe r ana logue a udio so urce.
2. To se lect the AUX in put fu nctio n, repea tedly to uch on th e A UX/US B/SD tou ch pad un til the dis play sho ws
“AUX” . (F. 19)
3. Adjus t the vol ume con tro l for you r desir ed soun d out put lev el.
SL EE P FUNCTION (r em ot e co nt ro l on ly )
This fu nct ion all ows you to pro gra m the s ystem to swi tch off it self af ter a s et pe riod of time . You can set yo ur
sleep t ime in po wer on mo de:
1. To activ ate th e sl eep fu nctio n, p ress t he S LE EP b utton on t he rem ote, t he d ispla y wi ll sho w the f las h slee p
timer i con “ ” and “ 90” .
2. Repea tedly p ress th e SLE EP butt on to sel ect the s lee p time, i t will ch ange in s equ ence on e very pr ess:
3. When t he dis play s hows y ou r desi red sl eep ti me, re lea se the bu tton, the sl eep ti mer is now ac tivat ed. Th e
sleep i con in th e displ ay wi ll beco me stab le. Whe n the s leep ti me coun ts to zer o, th e unit wi ll go off. (F.20 )
4. To ca ncel sle ep, p res s t he SL EEP bu tton onc e aga in, th e dis pla y wil l s how “SLP OFF” and th e sle ep icon
will di sappe ar.
TI ME R FUNCTIO N (r em ot e co nt ro l on ly )
This fu nctio n allow s you t o switc h on and off the s ystem a t you r desir ed time a nd mode :
1. Pres s the TIM ER bu tton on t he remo te cont rol t o toggl e the tim er func tio n be twe en on and o ff. T he di splay
will sh ow “ ” to ind ica te t ime r funct ion on.
2. To set t he o n ti mer c lo ck, pre ss and hold t he T IME R bu tto n on t he r emo te c ontro l until t he d isp la y shows “ ON
TIME” , the on ti mer c lo ck wi ll be dis playe d and the “ hou r” digi t of the ti mer clo ck wi ll flas h.(F.21 )
3. Pre ss the I◄ ◄ or ►►I b utton to set to the desi red ho ur, the n p res s t he TIM ER but ton to co nfirm , firs t set
the hou r and fin ally th e min ute, th e on time r clock i s set .
4. Th en y ou wil l en ter in to t he off t imer c lock sett ing, t he d ispla y wi ll sho w “O FF T IME”, the off tim er clo ck w ill
be displ ayed and th e “ hou r” di git wi ll flash . P ress the I◄ ◄ o r ► ►I but ton to set to the de sired ho ur, the n
press t he TIME R but to n to co nfirm , first s et th e ho ur an d final ly the mi nut e, t he of f tim er cloc k is set.
5. F inall y y ou will ent er in to the time r o n m ode s ett ing, pre ss th e I ◄◄ or ►►I b utt on to se lect the ti mer o n
mode- iP od, CD, TUN ER, A UX, USB or SD CA RD, then pres s th e TI MER butto n to con firm. The tim er
setti ng is now c omple ted .(F.22)
6. The on and off t im er s ett in gs w ill be d ispla yed in t he fir st f ew s econd s ev ery time w hil e the time r fu nctio n is
set to on .
NOTE: In th e 12 -Hour c lock di splay for mat , th e segme nt on left si de o f the hou r di git wil l light up to rep res ent AM
or PM - the u pper on e is for AM an d the l ower on e is for th e PM.
F.19 F.20
F.21 F.22
UK-5
Page 7
PR ES ET EQ (r emote con tr ol o nl y)
Press the EQ b utton on t he rem ote contr ol t o sele ct d iff erent pre set EQ mod e, t he dis play will sho w in se que nce
of ever y press :
SU RROUND SO UN D (r em ot e co ntrol only)
Press the SUR ROUND but ton on t he r emote con trol to to ggl e th e surr oun d so und mo de b etw een on and off. The
displ ay will s ho w “SURR O N” o r “SURR O FF”. Wh en t he surr oun d so und mod e is o n, the su rroun d so und e ffect i s
activ ated an d the ico n “ ” wil l be disp layed .
X- BASS FUNC TI ON ( re mo te c ontr ol only)
Press t he X -BA SS butt on on the r em ote c on tro l wi ll togg le this f uncti on betw een o n an d off . The dis play wi ll show
“BASS ON ” or “BA SS OF F”. When the X-B ASS i s o n, th e b ass s ound is enhan ced and the icon “ ” wil l be
displ ayed.
MU TE F UNCTION ( remo te c on tr ol o nl y)
Press the MUTE butto n on th e r emo te contr ol to s top th e s oun d f rom th e spea kers t empor arily, the so und st ops
and the d ispla y will sh ow “ ”.
To ca nce l m ute, p ress t he MUT E b utt on again or pre ss the VO LUME + /-, “ ” d isapp ears i n the dis pla y a nd the
sound i s resto red.
BACKL IG HT C ON TROL (r emot e co nt ro l on ly )
Durin g unit on, pr ess the BA CKLIG HT b utton on the remot e co ntrol will t oggle the displ ay bac kligh t be tween on
and off.
HE AD PHONE JACK
The stere o headp hone jack i s lo cated o n th e le ft side of th e fr ont panel . Conne ct a s et o f st ere o he adpho nes (no t
inclu ded) to this ja ck for pr iva te liste ning. When headph ones are in use , the spe akers will be automa tical ly
disco nnect ed.
IMPOR TANT: When usi ng head phone s alwa ys s et the volu me c ont rol to a l ow l evel b efore you put t he
headp hones o n, then p ut th e headp hones o n and gra dua lly inc rease t he volu me to a c omfor table l isten ing l evel.
ME MO RY BACKU P
This uni t i nco rpora tes a bat tery bac k u p c irc uit that wi ll kee p t he clock runni ng in the ev ent of temp ora ry power
inter rupti on.
Inser t 2 x 1. 5V UM-4 , AAA or equi valen t batte ries in to the ba ttery c ompar tment l ocate d at the ba ck of the c ab ine t.
For be st res ul ts, re pla ce wit h f resh b atter ies ev ery 9 t o12 mo nths. Do not mi x old a nd new ba tteri es or d iff erent
types o f batte rie s su ch as a lkali ne and ca rbon- zin c batte ries to gethe r.
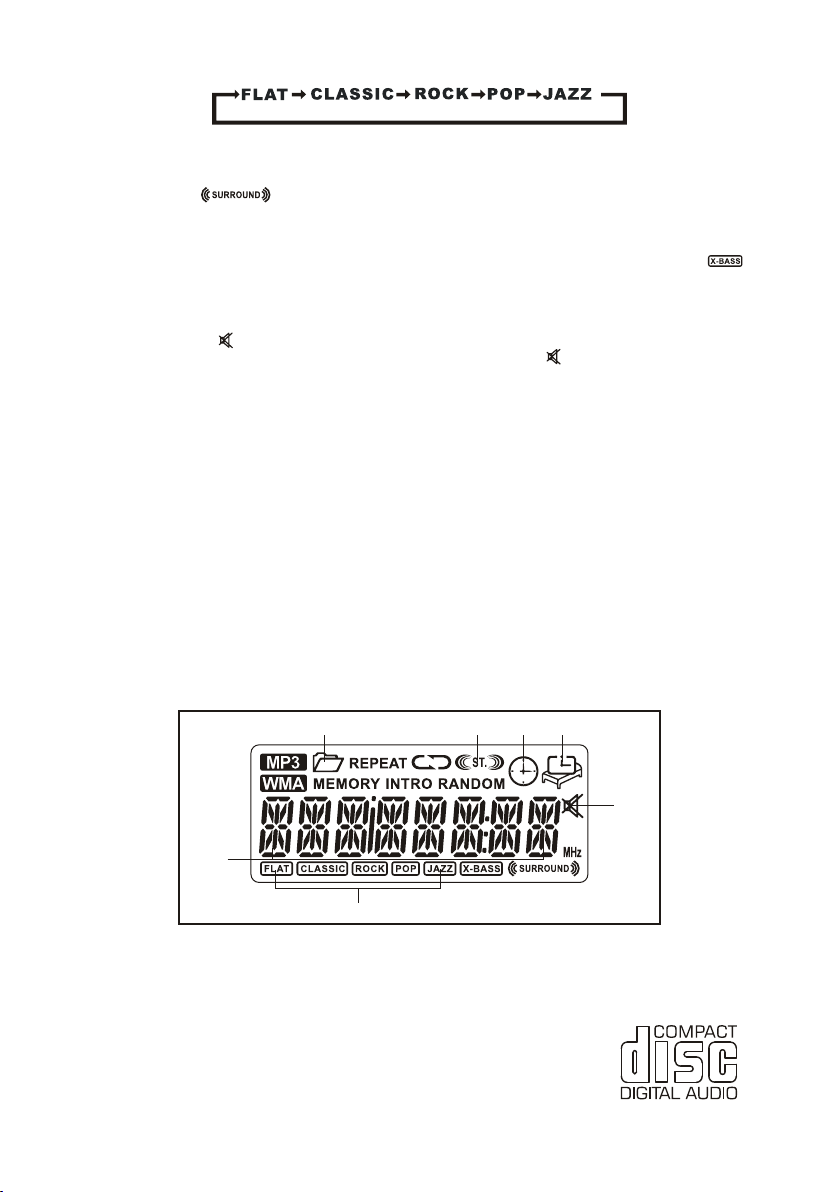
LC D DI SP LAY WI ND OW
A B
C
D
E
F
G
A. MP3 FO LDER IN DIC ATOR B . FM STER EO IN DICATOR
C. TI MER IND ICATOR D. S LEEP INDIC ATOR
E. MUTE I NDICATO R F. BAND/T RACK NU MBE R/FRE QUENC Y/TIM E IND ICATOR
G. EQ IND ICATOR
CO MPA CT D IS C
1. Always us e compa ct disc s be aring t he mark a s sh own.
UK-6
Page 8
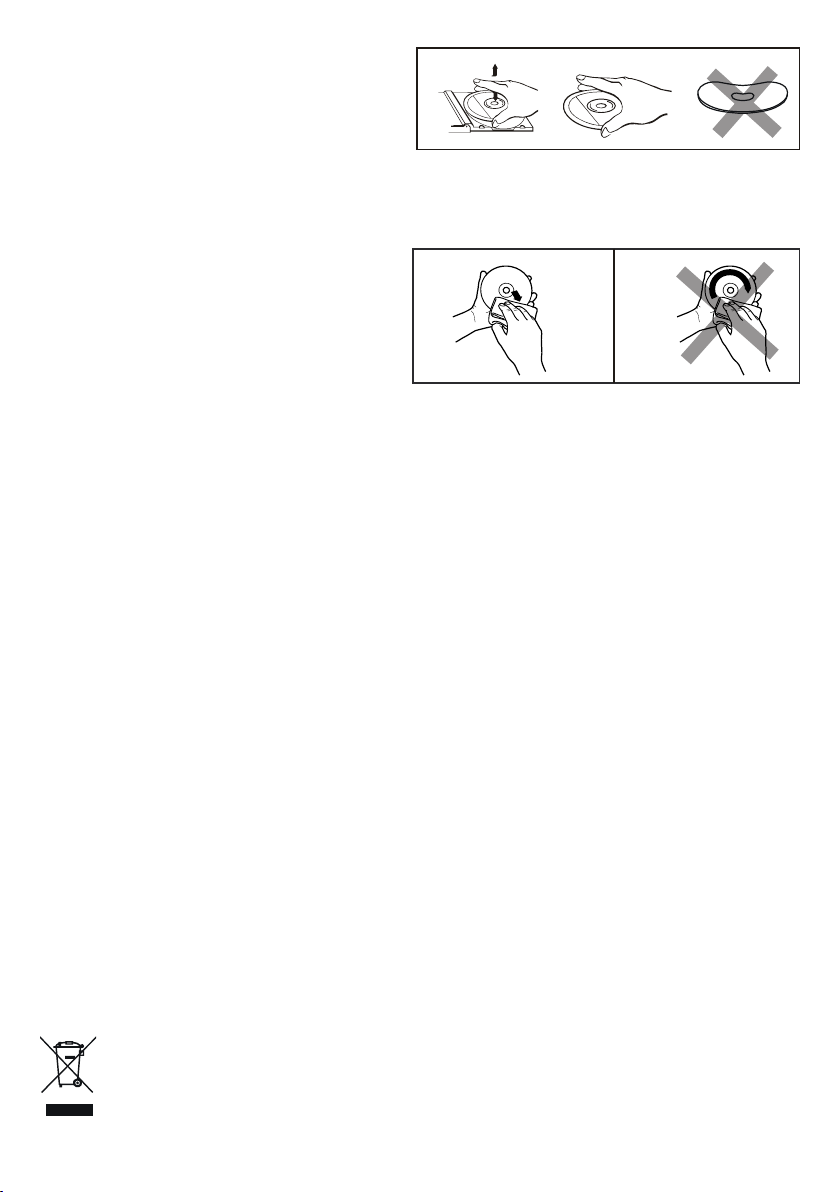
2. Note s on h andli ng discs
Remov in g the dis c from it s st orage c ase.
* Do not to uc h the ref lecti ve r ecord ed surf ac e.
* Do not st ic k paper o r write a ny thing o n the
surfa ce .
* Do not be nd t he disc .
3. Stor ag e
* Store t he d isc in it s case.
* Do not ex po se disc s to dire ct s unlig ht or hig h te mpera tures , hi gh humi dity or d us ty plac es.
4. Clea ni ng a disc
* Shoul d th e disc be come so il ed, wipe off dust,
FROM THE CENTRE TO THE EDGE
dirt and fingerprints wi th a s oft clo th.
* The dis c shoul d be cleane d from th e centre
to the ed ge .
CORRECT
* Never u se b enzen e, thin ne rs, rec ord cle an er flui d or anti sta tic spr ay.
* Be sure t o cl ose the C D door so t he l ens is no t conta mi nated b y dust.
* Do not to uc h the len s.
SP EC IFICATIO N
POWER S UPPLY: 100-2 40V~ 60 /50Hz
OUTPU T POW ER: 10W X2
UNIT DIMEN SION: 300(W ) x 128(D ) x 198(H ) mm
SPEAK ER DIME NSI ON : 91( W) x 128( D) x 198( H) mm
WEIGH T: 2.91k g
RADIO S ECTIO N
FREQU ENCY RANGE : FM 87.5 - 1 08 MHz
COMPACT DIS C SECTI ON
CD MEDI A: CD-DA , CD-RO M, CD -R , CD- RW
SUPPO RTE D FORMATS: ISO96 60, UDF
MP3 DEC ODE
FILE MPEG1 /2 Laye r3 [. mp 3] [. MP3]
SAMPL ING RATE (KHz ) 48, 44. 1, 32, 24 , 22. 05 , 16, 11 .02 5, 8
BIT RATE (kbp s): 8-320 C onsta nt & VBR (Varia ble B it Rate )
ID3 TAG: V2.4, V 2.3 V2. 2, V2 .1 , V1. x
MAX. FI LE NO. 256/5 11 (Di r/Dir +File )
FOLDE R/FIL E NAM E 30/ 30 (M ax. no. o f bytes )
ID3 Titl e/Art ist /A lbu m 30/30 /30 (Ma x. no. of b yte s)
WMA DECODE ( OPT IONAL )
FILE Windo ws Medi a Audio 9 [. wma ] [.WMA ]
SAMPL ING RATE (KHz ) 48, 44. 1, 32, 22 .05 , 16 , 11.0 25, 8
BIT RATE (kbp s): 32-19 2
MAX. FI LE NO. 256/5 11 (Di r/Dir +File )
FOLDE R/FIL E NAM E 3 0/3 0 (Max. n o. of byt es)
ID3 Titl e/Art ist /A lbu m 30/30 /30 (Ma x. no. of b yte s)
AUX INP UT
INPUT VOLTAGE RAN GE: 350mV - 5 00mV
IMPED ANCE: 47K
** SPEC IFICATION S UBJEC T TO CH ANGE WI THO UT FURT HER NOT ICE **
Ω
INCORRECT
If at any time in the fut ur e yo u should need to dispos e of t hi s product please
not that: Waste electrical p ro du cts should not be dispo se d of with household waste .
Please recycle wher e fa cilities exist. Che ck w it h your Local Authority o r re tailer for
recycling advice. (Wast e El ec trical and Electron ic E qu ipment Directive)
UK-7
Page 9
Mci-210
HIFI MICROANLAGE
MIT iPod/iPhone DOCKINGSTATION,
CD/MP3 PLAYER, PLL UKW RADIO,
USB-ANSCHLUSS UND KARTENSLOT
iPod / iPhone nicht im Lieferumfang enthalten
Zur Information und Unterstützung, www.lenco.eu
iPod und iPhone sind eingetragene Markenzeichen der Firma Apple, Inc. und registriert in den USA und anderen Ländern.
"Made for iPod" und "Made for iPhone" stehen für elektronisches Zusatzgeräte, die dafür entwickelt wurden, um an einen
iPod, iPhone oder iPad angeschlossen werden zu können und vom Entwickler zertifiziert wurden Apple-PerformanceStandards einzuhalten.
Apple ist nicht verantwortlich für den Betriebsfähigkeit dieses Geräts oder dessen Einhaltung von Sicherheits- und
Regulierungsstandards.
Bitte beachten Sie, dass die Verwendung dieses Zusatzgeräts zusammen mit iPods oder iPhones, die Leistung des
drahtlosen Datentransfers beeinträchtigen kann.
BEDIENUNGSANLEITUNG
Page 10
SICHERHEITSVORKEHRUNGEN
Um eine optimale Leistung zu gewährleisten und um sich mit dem Funktionsumfang vertraut zu machen, lesen Sie sich
bitte diese Bedienungsanleitung sorgfältig durch, bevor Sie das Gerät in Betrieb nehmen.
Die Sicherheitshinweise und die Bedienungsanleitung sollten für den späteren Gebrauch aufbewahrt werden.
Dieses Gerät sollte keinen Wassertropfen und -spritzern ausgesetzt werden. Gegenstände die mit Flüssigkeiten gefüllt sind sollten
nicht auf das Gerät gestellt werden. Vermeiden Sie die Aufstellung des Geräts an den folgenden Orten:
- Orte an denen das Gerät direktem Sonnenlicht oder Hitze ausgesetzt wird bzw. auf anderen Musikanlangen, die besonders
viel Hitze produzieren.
- Orte ohne ausreichende Ventilation oder mit starker Staubeinwirkung.
- Orte, an denen das Gerät ständigen Vibrationen, Feuchtigkeit oder Nässe ausgesetzt ist.
Gegenstände mit offenen Flammen, wie z. B. Kerzen, sollten niemals auf das Gerät gestellt werden.
Achten Sie beim Entsorgen von Batterien und Akkus auf die Umwelt.
Achten Sie darauf, dass die Lüftungsöffnungen des Geräts in mindestens 10 cm Abstand zu anderen Gegenständen gehalten
werden.
Die Belüftungsöffnungen dürfen nicht mit Gegenständen wie Zeitungen, Tischtüchern, Vorhängen etc. abgedeckt werden.
Verwenden Sie das Gerät nur gemäßigten Klimazonen.
Benutzen Sie die Bedienelemente und Schalter entsprechend den Anweisungen in der Bedienungsanleitung.
Vergewissern Sie sich vor der Inbetriebnahme, dass das Netzkabel richtig angeschlossen wurde.
Bewahren Sie Ihre CDs an einem kühlen Ort auf, um eventuelle Schäden durch Hitze zu vermeiden.
Der Netzstecker dient dazu das Gerät vom Strom zu trennen und sollte deshalb immer leicht zugänglich bleiben. Wenn Sie das
Gerät vollständig vom Strom trennen wollen, ziehen Sie bitte den Netzstecker aus der Steckdose heraus.
Die normale Funktionsweise des Geräts kann durch starke elektromagnetische Interferenzen gestört werden. Sollte dies der Fall
sein, führen Sie einfach einen Reset aus, um den normalen Betrieb wiederherzustellen. Wenn es nicht möglich ist den Betrieb
wiederherzustellen, stellen Sie das Gerät bitte an einem anderen Ort auf.
Versuchen Sie nicht die Schrauben des Geräts zu entfernen oder das Gehäuse zu öffnen. Es sind keine vom Benutzer zu
wartenden Bauteile im Inneren des Geräts vorhanden.
Wichtige Hinweise:
ACHTUNG: ZUR VERMEIDUNG VON STROMSCHLAGGEFAHR, GERÄT NICHT ÖFFNEN! ES BEFINDEN SICH KEINE
TEILE IM INNEREN DES GERÄTS, DIE VOM BENUTZER GEWARTET WERDEN KÖNNEN. WENDEN SIE SICH AN
AUSGEBILDETES WARTUNGSPERSONAL.
GEFÄHRLICHE STROMSPANNUNG
Nicht isolierte, gefährliche Spannung kann innerhalb des Geräts vorhanden sein, die stark genug ist, um für
Personen eine Stromschlaggefahr zu bilden.
ACHTUNG
Die Bedienungsanleitung enthält wichtige Bedienungs- und Wartungsanweisungen, die für Ihre Sicherheit
gedacht sind. Es ist deshalb wichtig die Anleitung vollständig durchzulesen.
WARNUNG: ZUR VERMEIDUNG VON FEUER- UND STROMSCHLAGGEFAHR, SETZEN SIE DIESES GERÄT
NIEMALS TROPF- ODER SPRITZWASSER AUS.
Hinweis: Dieses Gerät wird warm, wenn es über einen längeren Zeitraum nicht benutzt wird. Dies ist normal und kein
Anzeige einer Fehlfunktion des Geräts. Dieses Gerät enthält Mikroprozessoren, bei denen es infolge äußerer elektrischer
Störungen oder elektrostatischer Entladung zu Fehlfunktionen kommen kann. Wenn das Gerät nicht wie gewohnt
funktioniert, trennen Sie es von der Stromversorgung ab und schließen Sie es wieder an.
FUNKTIONEN UND BEDIENELEMENTE
DE-1
Page 11
FUNKTIONEN UND BEDIENELEMENTE
1. CD-LADEFACH
2. CD-LADEFACH ÖFFNEN /
SCHLIESSEN (Tastenfeld)
3. AUSWAHL / WIEDERHOLUNG
(Tastenfeld)
4. LAUTSTÄRKE+ (Tastenfeld)
5. LAUTSTÄRKE- (Tastenfeld)
6. KOPFHÖRERAUSGANG
7. IR-SENSOR
8. LCD-ANZEIGE
ERNBEDIENUNG
F
1. BEREITSCHAFT / E
2. IPOD / CD
3. BELEUCHT
4. WIEDERGABE / P
5. I◄◄
6. STOPP
7. ZUFALLSWIEDER
8. PROGRAMM
9. PS / FOL / MEN
10. X-BASS
11. LAUTSTÄRKE+
12. EQ
13. LAUT
EI
1. Drücken Sie das Batteriefach vorsichtig in die auf der
2. Öffnen Sie das Batteriefach.
3. Legen Sie die mitgelieferte C
INWEIS: Nehmen Sie bitte die Batterie aus der Fernbedienung heraus, wenn
H
/ MENÜ
STÄRKE-
NLEGEN DER FERNBEDIENUNGSBATTERIE
Richtung.
ins Batteriefach ein. Schließen Sie das Batteriefach, bis die Abbdeckung einrastet.
UNG
IN
AUSE
GABE
Ü ▼
9. ZURÜCK I◄◄ /
FREQUENZ▼(Tastenfeld)
10. VOR ►►I / FREQUENZ▲
(Tastenfeld)
11. WIEDERGABE / PAUSE (Tastenfeld)
12. STOPP / MENÜ (Tastenfeld)
13. UHRZEIT / ANZEIGE (Tastenfeld)
14. iPod / CD (Tastenfeld)
15. TUNER (Tastenfeld)
16. AUX / USB / SD (Tastenfeld)
14. ÖFFNEN / SCHLIESSEN
15. AUX / USB
16. TUNER
17. UHRZEIT
18. ►►I
19. AUSW
20. INTROWIEDERGABE
21. PS / FOL / MENÜ ▲
22. EINSCHLAFMODUS
23. TIMER
24. SURROU
25. TON AUS
R2032-Batterie mit der richtigen Polarität (+ und -)
/ ANZEIGE
AHL/ WIEDERHOLUNG
ND
Abbildung angezeigten
17. BEREITSCHAFT / EIN (Tastenfeld)
18. IPOD-ANSCHLUSS
19. UKW-ANTENNENKABEL
20. AUX-EINGANG (RECHTS)
21. AUX-EINGANG (LINKS)
22. LAUTSPRECHERA
23. BATTERIEFAC
24. NETZKABEL
25. USB-EINGANG
26. SD-KARTENSLOT
NSCHLÜSSE
H
Sie sie für längere Zeit nicht benutzen. Legen Sie eine neue Batterie ein, wenn
die Batterie zu schwach geworden ist, da sonst die Fernbedienung nicht richtig
funktionieren kann.
ERÜHRUNGSSENSOR-BEDIENUNG
B
Das Gerät verwendet kapazitive Sensortec
hnologien. An der Gerätevorderseite finden Sie berührungsempfindliche
Tastenfelder, mit denen Sie das Gerät durch die Berührung der Fingerspitzen bedienen können. Die blauen Lichtpunkte
auf der Gerätevorderseite blinken jedes Mal auf, wenn Sie eine Bedienung durchzuführen.
NSTELLEN DER UHRZEIT
EI
Wenn das Gerät bis zum ersten Ma
erscheint blinkend die Uhrzeit. Zum Einstellen der Uhrzeit achten Sie bitte darauf, dass sich das Gerät im Bereitschaftsmodus
befindet.
1. Zum Einstellen des Uhrzeit-Anzeigeformats betätigen Sie das CLOCK/DISPLAY-Tastenfeld auf der Gerätevorderseite, bis in der
Anzeige "12HR" oder "24HR" angezeigt wird. Betätigen Sie dann
Stunden-Anzeigeformat zu wählen. Wenn das gewünschte Format in der Anzeige erscheint, betätigen Sie das
CLOCK/DISPLAY-Tastenfeld erneut zur Bestätigung (Abb. 1).
2.
Nachdem das Uhrzeitformat eingestellt ist, erscheint die Uhrzeit blinkend in der Anzeige. Betätigen Sie I◄◄ oder ►►I zum
Einstellen der Stunden und betätigen Sie das CLOCK/DISPLAY-Tastenfeld zur Bestätigung. Danach können Sie auf die
gleiche Weise die Minuten einstellen. Wenn Sie die Uhrzeit eingestellt haben, betätigen Sie das CLOCK/DISPLAY-Tastenfeld
erneut, um die Einstellung zu bestätigen und abzuschließen (Abb. 2) (Abb. 3)
3. rend des Betriebs die Uhrzeit nachsehen wollen,
Die Uhrzeit wird im Bereitschaftsmodus des Geräts angezeigt. Wenn Sie wäh
betätigen Sie wiederholt das CLOCK/DISPLAY-Tastenfeld, bis in der Anzeige die Uhrzeit für 5 Sekunden erscheint.
l eingeschaltet wird, geht es automatisch in den Bereitschaftsmodus und in der Anzeige
I◄◄ oder ►►I, um entweder das 12-Stunden- oder das 24-
RADIOBETRIEB
Radiomodus. Ziehen Sie die UKW-Kabelantenne auf der Rückseite des Geräts auf volle Länge aus und richten Sie ihre Position für
einen optimalen Empfang aus.
Zum Auswählen des Radiomodus während der Benutzung anderer Betriebsarten, benutzen Sie bitte das TUNER-Feld auf der
Gerätevorderseite. In der Anzeige wird die UKW-Frequenz angezeigt. (Abb. 4)
zum ersten Mal aus dem Bereitschaftsmodus eingeschaltet haben, geht es automatisch in den UKW-Wenn Sie das Gerät
DE-2
Page 12
Manuelle Sendersuche
Sie können die manuell
e Sendersuche dazu nutzen, um direkt nach schwachen Sendern oder die gewünschten
Frequenzen zu suchen.
1. Betätigen Sie wiede
rholt das Tastenfeld
I◄◄ oder ►►I, bis die korrekte Frequenz angezeigt wird oder wiederholen
Sie den Vorgang, bis ein optimales Ergebnis erreicht wird.
2. In der Anzeige erscheint das Stereo-Symbol , wenn ein UKW-Stereo-Sender empfangen wird (Abb. 5).
tomatische Sendersuche
Au
1. Halten Sie die Tastenfelde
r I◄◄ oder ►►I gedrückt, bis die Sendersuche in die entsprechende Richtung beginnt. Das
Gerät sucht dann automatisch nach dem ersten Sender mit ausreichender Signalstärke.
2.
Wiederholen Sie diesen Vorgang zur Auswahl weiterer Sender.
ogrammierung der Senderspeicher (nur über Fernbedienung)
Pr
Sie können bis zu 30 Sender Ihrer Wahl speichern.
1. Betätigen Sie die TUNER-Taste auf der Fern
bedienung, um den Radiomodus aufzurufen. Wählen Sie dann den
gewünschten Sender.
2. GRAM-Taste auf der Fernbedienung und in der Anzeige erscheint blinkend "01". Benutzen Sie
Betätigen Sie die PRO
die PS/FOL/MENU-Tasten +/- auf der Fernbedienung zur Auswahl eines gespeichterten Senders. (Abb. 6)
3. e Auswahl
Sobald der gewünschte Senderspeicher angezeigt wird, betätigen Sie die PROGRAM-Taste erneut, um Ihr
zu bestätigen. Der aktuelle Sender wird dann unter der entsprechenden Speichernummer gespeichert.
4. e Speicher zu
Wiederholen Sie die oben beschriebenen Schritte, um weitere Sender zu speichern oder bereits benutzt
überschreiben.
frufen gespeicherter Sender (nur über Fernbedienung)
Au
1. Betätigen Sie die TUNER-Taste auf der Fernbedienung zu
2. Benutzen Sie die PS/FOL/MENU-Tasten +/- auf der Fernbedienung zur Auswahl des
r Auswahl des Radiomodus.
gewünschten Senders. In der
Anzeige wird der gespeicherte Sender und die Frequenz angezeigt.
COMPACT-DISC-WIEDERGABE
Hinweis: Obwohl dieser CD/MP3-Play
er können in der Lage ist CD-R/RW-Discs wiederzugeben, ist dies u. U. von der Art
der Software, die zur Erstellung der Discs verwendet wurde, sowie der Qualität und dem Zustand der verwendeten
Rohlinge abhängig. Eine 100%ige Abspielbarkeit kann nicht garantiert werden. Dies ist keine Fehlfunktion des Players.
WICHTIG: DIESES MODELL VERFÜGT ÜBER EINE MOTORGESTEUERTE LADEFACHÖFFNUNG. VERSUCHEN S
IE
NICHT DIESE MANUELL ZU ÖFFNEN. DIES KANN ZUR BESCHÄDIGUNG DES ÖFFNUNGSMECHANISMUS FÜHREN.
iedergabe der gesamten CD
W
1.
Betätigen Sie im eingeschalte
erscheint zunächst "CD" und schließlich "NO DISC", um anzuzeigen, dass sich keine CD im Player befindet. (Abb. 7)
2. Betätigen Sie das OPEN/CLOSE-Tastenfeld, um das CD-Ladefach zu öffnen. In der Anzeige erscheint "OPEN".
3. Legen Sie eine Disc mit der bedruckten Seite nach oben ein und betätigen Sie anschließend das OPEN/CLO
ten Zustand des Geräts das CD-Tastenfeld, um den CD-Modus aufzurufen. In der Anzeige
SETastenfeld erneut, um das Ladefach wieder zu schließen. In der Anzeige erscheint zunächst "READING" und
anschließend die Gesamtzahl der Titel und die Uhrzeit. (Abb. 8)
4. / II. Wenn es sich bei der Disc um eine MP3-Disc
Zum Starten der Wiedergabe betätigen Sie das Tastenfeld ►
handelt, erscheint die Anzeige "MP3". (Abb. 9)
5. Sie das Tastenfeld ►/ II. Die Abspielzeit erscheint dann blinkend in
Um die Wiedergabe zu unterbrechen, betätigen
der Anzeige.
6. gabe fortzusetzen, betätigen Sie das Tastenfeld ►/ II einfach erneut.
Um die Wieder
7. Zum Stoppen der Wiedergabe betätigen Sie das Tastenfeld ■.
Titelauswahl
1. Während d
er Wiedergabe können Sie durch wiederholte Betätigung der Tastenfelder
I◄◄
und
►►I
den gewünschten
Titel auf der Disc wählen. Hören Sie auf die Tasten zu betätigen, wenn der Titel in der Anzeige erscheint und die
Wiedergabe des Titels wird gestartet.
2. erden in der Anzeige ID3-Tag-Information angezeigt, falls verfügbar.
Wenn eine MP3-Disc abgespielt wird, w
3. Um auf ein anderes Verzeichnis der MP3-Disc zuzugreifen, benutzen Sie die PS/FOL/MENU-Tasten +/-
auf der
Fernbedienung.
4. es nächsten Titels betätigen Sie das Tastenfeld
Zur Wiedergabe d
5. Um den aktuellen Titel erneut von Anfang an wiederzugeben, betätigen Si
6. Zur Wiedergabe des vorigen Titels betätigen das Tastenfeld
I◄◄
►►I
.
zweimal.
e das Tastenfeld
I◄◄
.
DE-3
Page 13

Wiederholung
1. Zur Wiederholung des gleichen Titels betätigen Sie REPEAT einmal. In der Anzeige erscheint "REPEAT". (Abb. 10)
2. Bei der Wiedergabe einer MP3-Disc erscheint zusätzlich die Option . Damit wird die Wiederholung des aktuellen
Verzeichnisses angezeigt.
3. Zur Wiederholung der gesamten CD, betätigen Sie REPEAT erneut. In der Anzeige erscheint
4. Zum Abbrechen der Wiederholungswiedergabe betätigen Sie solange das REPEAT-Tastenfeld, bis die REPEAT-Anzeige
verschwindet.
fallswiedergabe (nur über Fernbedienung)
Zu
Sie können die RANDOM-Taste auf der Fernbedienun
1. Betätigen Sie die RANDOM-Taste im gestoppten Zustand und betätigen Sie die RANDOM-T
Zufallswiedergabe. In der Anzeige erscheint "RANDOM" und alle Titel werden in
2. Betätigen Sie während der Wiedergabe zunächst die RANDOM-Taste. In der Anzeige erscheint "RANDOM". Benutzen Sie dann
die Taste I◄◄ oder ►►I. Ein Titel wird zufällig ausgewählt werden und die Wiedergabe wird gestartet.
3. Um zur normalen Wiedergabe zurückzukehren, betätigen Sie RANDOM-Taste einfach erneut und die RANDOM-Anzeige
verschwindet.
alen Wiedergabe können Sie mithilfe des REPEAT-Tastenfelds eine Wiederholungsfunktion wählen: Während der norm
. (Abb. 11)
g zum Aktivieren der Zufallswiedergabe benutzen:
zufälliger Reihenfolge wiedergegeben. (Abb. 12)
aste zum Aktivieren der
Intro-Wiedergabe (nur über Fernbedienung)
1. Betätigen Sie die INTRO-Taste auf der Fernbed schei
und bei der Wiedergabe werden jeweils die ersten 10 Sekunden eines jeden Titels abgespielt. (Abb. 13)
2. Um zur normalen Wiedergabe zurückzukehren, betätigen Sie die INTRO-Taste einfach erneut und die INTRO-Anzeige
verschwindet wieder.
rogrammwiedergabe (nur über Fernbedienung)
P
Sie können mit der Programmwiedergabe-Funktion bis
dabei auch bestimmte Titels mehrmals innerhalb einer Programmsequenz abspielen.
1. Legen Sie wie gewohnt eine Disc ein und warten Sie bis die Gesamtzahl der Titel
2. Stellen Sie sicher, dass die Wiedergabe gestoppt wird und betätigen Sie die PROGRAM-Taste au
Anzeige erscheint "MEMORY" und "P-01". (Abb. 14)
3. Betätigen Sie I◄◄ oder ►►I zur Auswahl des ersten Programmtitels. Wenn die gewünschte Titelnummer in der Anzeige
erscheint, betätigen Sie die PROGRAM-Taste erneut, um den Titel zu bestätigen. Sie haben damit den ersten Titel
programmiert. Der Programmnummer geht auf P-02 und Sie können den nächsten Titel programmieren.
4. tätigen Sie, bevor der
Wenn Sie eine MP3-Disc eingelegt haben, steht eine zusätzliche Verzeichnisauswahl zur Verfügung. Be
Auswahl des Titels, Sie die Tasten PS/FOL/MENU +/- zur Auswahl eines Verzeichnisses.
5. önnen bis zu 60 Titel programmiert
Wiederholen Sie die oben genannten Schritte, um weitere Titel zu programmieren. Es k
werden. Wenn Sie mit der Programmierung fertig sind, betätigen Sie die Taste ►/ II zum Starten der Programmwiedergabe.
Die Wiedergabe wird dann vom ersten programmierten Titel gestartet und fortgesetzt, bis der letzte programmierte Titel
abgespielt wurde. In der Anzeige erscheint "MEMORY". (Abb. 15)
6. erät und die MEMORY-Anzeige verschwindet. Das Gerät
Wenn die Programmwiedergabe abgeschlossen ist, stoppt das G
bleibt jedoch weiter im Programmwiedergabemodus. Betätigen Sie die Taste ►/ II, um das Wiedergabeprogramm erscheint
abzuspielen.
7. es Programms gehen Sie in den CD-Stopp-Modus und betätig die Taste ■. Im CD-Wiedergabe-Modus
Zum Löschen d en Sie
betätigen Sie die Taste ■ bitte zweimal. Die MEMORY-Anzeige verschwindet.
ienung, um die Intro-Wiedergabe zu starten. In der Anzeige er nt "INTRO"
zu 60 Titel einer CD in beliebiger Reihenfolge wiedergeben. Sie können
angezeigt wird.
f der Fernbedienung. In der
ogrammwiederholung
Pr
Sie können die Funktionen
Programmsequenz endlos zu wiederholen. Benutzen Sie zunächst die Fernbedienung, um die gewünschte Programmsequenz zu
erstellen. Wenn Sie die Programmwiedergabe gestartet haben, betätigen Sie das REPEAT-Tastenfeld zur Auswahl der
Wiederholung des aktuellen Titels oder der gesamten Programmsequenz.
IPOD/IPHONE-WIEDERGABE
Dieses Gerät verfügt über eine iPod/i
Gerät wiedergeben können.
1. Gehen Sie in den iPod-Modus, indem Sie wiederholt das iPod/CD-Tastenfeld betätigen, bis in der Anzeige "No iPod" erscheint.
2. Öffnen Sie den iPod-Anschluss rechts auf der Vorderseite des Geräts unter der Anzeige und installieren Sie einen Adapter, der
passend für Ihr iPod/iPhone-Modell ist.
3. chluss ein. In der Anzeige erscheint dann "iPod" und Sie können die iPod-Wiedergabe
Setzen Sie Ihr iPod / iPhone in den Ans
starten.
4. rten oder Unterbrechen der Wiedergabe betätigen Sie das Tastenfeld ►/ II. (Abb. 16)
Zum Sta
5. Wählen Sie mithilfe der Tastenfelder ►►I oder I◄◄ eine Musikdatei zu Wiedergabe.
6. Um das iPod-Menü aufzurufen, betätigen die MENU-Taste auf der Fernbedienung.
7. Zur Navigation im iPod-Menü benutzen Sie die PS/FOL/MENU-Tasten +/- auf der Fe
8. Zur Bestätigung der Auswahl im iPod-Menü betätigen Sie bitte die SELECT-Taste auf der Fernbedienung.
der Programmwiedergabe und der Wiederholungswiedergabe miteinander kombinieren, um eine
Phone-Anschluss-Funktion, mit der Sie Musikdateien von Ihrem iPod / iPhone über dieses
rnbedienung.
DE-4
Page 14

IPOD / IPHONE AUFLADEN
Sie können Ihr iPod oder iPhone üb
aufladen. Ihr iPod oder iPhone wird automatisch aufgeladen, wenn er angeschlossen ist.
P3-WIEDERGABE ÜBER USB & SD/MMC M
1. Zur Auswahl der USB- oder SD/MMC-Funktion betäti
"USB" bzw. "SD CARD" erscheint. (Abb. 17, Abb. 18)
2. Schließen Sie Ihr USB-Gerät am USB-Port an bzw. stecken Sie Ihre SD/MMC-Karte in den Kartenslot.
3. In der Anzeige erscheint zunächst "READING" und anschließend die Gesamtzahl der Titel und Verzeich
4. Zum Starten der Wiedergabe vom ersten Titel im ersten Verzeichnis betätigen Sie das Tastenfeld ►/ II.
erscheint das Verzeichnis/Titelnr., die Abspielzeit und ID3-Informationen (falls vorhanden).
5. Um die Wiedergabe zu unterbrechen, betätigen Sie das Tastenfeld ►/ II. Die Abspielzeit erscheint dann blinkend in der
Anzeige.
6. Um die Wiedergabe fortzusetzen, betätigen Sie das Tastenfeld ►/ II einfach erneut.
7. Zur Wiedergabe des nächsten Titels/Datei betätigen Sie das Tastenfeld ►►I.
9. Zur Wiedergabe des vorigen Titels/Datei betätigen das Tastenfeld I◄◄ zweimal.
Fernbedienung.
11. Zum Stoppen der Wiedergabe betätigen Sie das Tastenfeld ■.
HINWEIS: Aufgrund von Hard- und Software-Kompatibilitätsproblem
Karten" oder "MMC-Plus-Karten" nicht unterstützt werden.
er die Docking-Anschluss entweder im Bereitschaftsbetrieb oder im eingeschalteten Zustand
gen Sie wiederholt das AUX/USB/SD-Tastenfeld, bis in der Anzeige
nisse.
In der Anzeige
astenfeld I◄◄.
e das T8. Um den aktuellen Titel/Datei erneut von Anfang an wiederzugeben, betätigen Si
Sie die PS/FOL/MENU-T10. Um auf ein anderes Verzeichnis des Speichermediums zuzugreifen, benutzen
en, können bestimmte Typen von "Dual-Spannungs-MMC-
asten +/- auf der
AUX-EINGANG
Die Cinch-Anschlüss
Audio-Tonsignale von externen Geräten in das System einspeisen.
1. Verwenden Sie ein Cinch-Kabel, um den Eingang mit dem analogen Audiosignal zu verbinden.
2. Zur Auswahl der AUX-Funktion betätigen Sie wiederholt das AUX/USB/SD-Tastenfeld, bis in de
(Abb. 19)
3. Stellen Sie Lautstärke auf ein für Sie angemessenes Maß.
Diese Funktion ermöglicht es Ihnen, das System nach einer vore
Abschaltfunktion im eingeschalteten Zustand programmieren:
1. Zum Aktivieren der Abschaltfunktion betätigen Sie die SLEEP-Taste SLEEP auf der Fernbedienung. In der Anzeige erscheint
das Einschlaf-Timer-Symbol
Betätigen Sie die SLEEP-Taste mehrfach, um2. die Abschaltzeit einzustellen. Mit jeder Tastenbetätigung wird die Abschaltzeit in
folgender Reihenfolge verändert:
3. Wenn in der Anzeige die gewünschte Abschaltzeit angezeigt wird, l nd die
aktiviert. Das Einschlaf-Timer-Symbol in der Anzeige hört auf zu blinken. Wenn die eingestellte Abschaltzeit erreicht wird,
schaltet sich das Gerät automatisch aus. (Abb. 20)
4.
Zum Abbrechen der Abschaltfunktion betätigen Sie die SLEEP-Taste erneut. In der Anzeige erscheint "SLP OFF" und das
Einschlaf-Timer-Symbol verschwindet.
IM ung)
ER-FUNKTION (nur über FernbedienT
Diese Funktion ermöglicht es Ihnen das Gerät zur gewünsch
1. Betätigen Sie die TIMER-Taste auf der Fernbedienung, um die TIMER-Funktion ein- bzw. auszuschalten. Wenn in de
erscheint, wissen Sie, dass die TIMER-Funktion aktiviert wurde.
den Einschaltzeit einzustellen halten Sie die TIMER-Taste auf de2. Um r Fernbedienung gedrückt, bis "ON TIME" in der Anzeige
erscheint. In der Anzeige erscheint das Timer-Symbol und die Stundenziffern der Einschaltzeit fangen an zu blinken. (Abb. 21)
3. Benutzen Sie die Taste I◄◄ oder ►►I, um die Stunde einzustellen. Betätigen Sie dann die TIMER-Taste zur Bestätigung. Sie
können daraufhin die Minuten einstellen und damit die Einschaltzeit zu setzen.
4. Sie können dann die Abschaltzeit eingeben. In der Anzeige erscheint "OFF TIME" und die Stundenziffern fangen an zu blinken.
Benutzen Sie die Taste I◄◄ oder ►►I, um die Stunde einzustellen. Betätigen Sie dann die TIMER-Taste zur Bestätigung. Sie
können daraufhin die Minuten einstellen und damit die Ausschaltzeit zu setzen.
5.
Als letzten Schritt können Sie schließlich den TIMER-Modus mithilfe der Tasten I◄◄ oder ►►I einstellen und auf iPod, CD,
TUNER, AUX, USB oder SD CARD stellen. Betätigen Sie zur Bestätigung die TIMER-Taste erneut. Die Timer-Einstellung ist
damit abgeschlossen. (Abb. 22)
6.
Die Ein- und Ausschalt-Timer-Einstellungen werden jedes Mal in den ersten paar Sekunden angezeigt, wenn Die Timer-
Funktion eingeschaltet wird.
Hinweis: Im 12-Stunden-Anzeigeformat leuchtet das Anzeigesegment auf der linken Seite der Stundenziffern auf, um zwischen
Vor- (AM) und Nachmittagszeiten (PM) zu unterscheiden.
e des AUX-Eingangs befinden sich auf der Rückseite des Geräts. Sie können über den AUX-Eingang analoge
ber Fernbedienung) ABSCHALTFUNKTION (nur ü
und "90".
ingestellten Zeitdauer automatisch auszuschalten. Sie können die
assen Sie die Taste los u Abschaltfunktion wird
ten Uhrzeit im gewünschten Modus ein- und auszuschalten:
r Anzeige "AUX" erscheint.
r Anzeige
DE-5
Page 15

EQUALIZER (nur über Fernbedienung)
Anzeige werden die verschiedenen Einstellungen in der Reihenfolge angezeigt:
nung, um auf verschiedene Equalizer-Einstellungen zuzugreifen. In der Betätigen Sie die EQ-Taste auf der Fernbedie
SURROUND-SOUND-FUNKTION (nur über Fernbedienung)
der Anzeige erscheint entsprechend "SURR ON" oder "SURR OFF". Wenn der Surround-Sound-Modus eingeschaltet ist,
wird der Surround-Sound-Effekt aktiviert und das Anzeigesymbol
X-BASS-FUNKTION (nur über Fernbedienung)
erscheint entsprechend "BASS ON" oder "BASS OFF". Wenn der X-BASS-Modus eingeschaltet ist, werden die Bässe
verstärkt wiedergegeben und das Anzeigesymbol
TON AUS (nur über Fernbedienung)
erscheint entsprechend
Um die Stummschaltun wig eder aufzuheben, betätigen Sie die MUTE-Taste einfach erneut oder betätigen Sie die
VOLUME-Tasten +/-. Das Symbol
hergestellt.
HINTERGRUNDBELEUCHTUNG (nur über Fernbedienung)
Betätigen Sie im eingeschalteten Zustand die BACKLIGHT-Taste auf d
der Anzeige ein- bzw. auszuschalten.
OPFHÖRERAUSGANG
K
Der Stereo-Kopfhörerausgang
Kopfhörer (nicht im Lieferumfang) an diesem Anschluss für nicht-störenden Musikgenuss an. Wenn die Kopfhörer
angeschlossen sind, wird die Tonausgabe über die Lautsprecher automatisch unterbunden.
WICHTIG: Wenn Sie Kopfhörer benutzen, stellen Sie die Lautstärke immer zunächst auf ein
dann die Kopfhörer auf und erhöhen Sie die Lautstärke auf ein angenehmes Maß.
ESERVEBATTERIE
R
Dieses Gerät enthält eine
Stromunterbrechung weiterläuft.
Legen 2 1,5V-Batterien der Größe
Für optimale Ergebnisse tauschen Sie die Batterien alle 9 bis 12 Monate aus. Verwenden Sie niemals alte und neue
Batterien bzw. unterschiedliche Batterietypen, wie z. B. alkalische und Zink-Kohle-Batterien, zusammen.
D-Display
LC
.
befindet sich auf der linken Seite der Gerätevorderseite. Schließen Sie Ihre Stereo-
n Reservebatterie-Schaltkreis, der es ermöglicht, dass die Uhr im Falle einer vorübergehenden
AAA bzw. gleichwertige Batterien in das Batteriefach auf der Rückseite des Gehäuses.
edienung, um die Tonausgabe vorübergehend zu unterbinden. In der Anzeige Betätigen Sie die MUTE-Taste auf der Fernb
verschwindet dann wieder von der Anzeige und die Tonausgabe wird wieder
g, um diese Funktion ein- bzw. auszuschalten. In der Anzeige Betätgen Sie die X-BASS-Taste auf der Fernbedienun
wird angezeigt.
urround-Sound-Modus ein- bzw. auszuschalten. In Betätigen Sie die SURROUND-Taste auf der Fernbedienung, um den S
wird angezeigt.
er Fernbedienung, um die Hintergrundbeleuchtung
niedriges Niveau. Setzen Sie
MP3-VERZEICHNISANZEIGE
A.
B. UKW-STEREO-ANZEIGE
C. TIMER-ANZEIGE
D. SCHLAFANZEIGE
C
ompact Discs
1. Benutzen Sie nur CDs mit dem
E. TON-AUS-ANZEIGE
F. FREQUENZBAND / TI
G. EQ-ANZEIGE
rechts abgebildeten Zeichen.
DE-6
E
TELNUMMER / FREQUENZ / ZEIT
Page 16

2. Hinweise zur Handh on CDs
- Berühren Sie niemals die reflektierende A
- Befestigen Sie nichts auf der Discoberfläche und
schreiben Sie nicht darauf.
- Biegen Sie die Discs niema
Aufbewahrung
3.
- Legen Sie die nach
- Vermeiden Sie direkte Sonneneinwirkung oder extrem
Umgebungen.
Reinigung der Discs
4.
- Sollte eine Disc verschm
Schmutz oder Fingerabdrücke mit einem weichen Tuch
ab.
nigen Sie die Discs immer von der Innenseite nach
- Rei
Außen.
Benutzen Sie niemals Benzin, Verdünnungsmittel, Plat
- tenreiniger oder Antistatik-Sprays.
- Achten Sie darauf, dass das CD-Ladefach geschlossen gehalten wird, damit die Laserlinse
- Nicht die Linse berühren.
ECHNISCHE DATEN
T
STROMVERSORGUNG: 10
AUSGANGSLEISTUNG: 10 W x 2
ABMESSUNGEN: 300 (B) x 128 (T)
LAUTSPRECHER-ABMESSUNGEN: 91 (B) x 128 (
GEWICHT: 2,91 kg
DIO
RA
NZBEREICH: UKW 87,5 - 108 MHz
FREQUE
-PLAYER
CD
CD-MEDIEN: CD-D
UNTERSTÜTZTE FORMATE: ISO9660, UDF
P3-DEKODIERUNG
M
DATEIFORMAT: MPEG
BITRATE (kbps): 8 - 320 konstante oder variable Bi
ID3-TAG: V2.4, V2.3, V2.2, V2.1, V1.x
MAX. DATEIANZAHL: 256/511 (Verz. /
VERZEICHNIS-/DATEINAMEN: 30/30 (Bytes max.)
ID3-Titel/Interpret/Album: 30/30/30 (Bytes max.)
MA-DEKODIERUNG (OPTIONAL)
W
DATEIFORMAT: Windows Media Audi
ABTASTRATE (kHz): 48, 44,1, 32, 22,05, 16, 11,025, 8
BITRATE (kbps): 32 -192
MAX. DATEIANZAHL: 256
VERZEICHNIS-/DATEINAMEN: 30/30 (Bytes max.)
ID3-Titel/Interpret/Album: 30/30/30 (Bytes max.)
X-EINGANG
AU
EINGANGSSPAN
IMPEDANZ: 47 kΩ
ÄNDERUNG DER TECHNISCHEN DATEN VORBEHALTEN**
abung v
ufnahmeseite.
ls.
dem Abspielen ein ihre Hülle zurück.
e Temperaturen, sowie hohe Luftfeuchtigkeit und staubige
utzt sein, wischen Sie Staub,
0 - 240 V ~ 60/50 Hz
x 198 (H) mm
T) x 198 (H) mm
A, CD-ROM, CD-R, CD-RW
1/2 Layer 3 [.mp2] [.mp3]
trate
Verz. + Datei)
o [.wma] [.WMA]
/511 (Verz. / Verz. + Datei)
NUNG: 350 mV - 500 mV
nicht verstaubt.
Sollt en Sie ir gendw ann z u späte rer Zei t diese s Pro dukt en tsorg en woll en, b eacht en Sie bi tte
Folge ndes: E lektr osc hrott s ollte n icht mi t dem H ausha ltsmü ll ents org t werde n. Bitt e recyc eln S ie
ihn, so fern lh nen ent spr echen de Mögl ichke ite n zur Verf ügung s tehen . Set zen Sie s ich mit i hren
kommu nalen B ehörd en od er ihre m Einze lhänd ler i n Verbin dung un d frage n Sie d iese um R at
bezüg lich de r Wiede rve rwert ung.( Elekt ro- und Ele ktron ik-Al tge räte- Richt linie (WE EE))
DE-7
Page 17

Mci-210
MICRO HI-FI SYSTEEM
MET iPod/iPhone DOCKING STATION,
CD/MP3 SPELER, PLL FM RADIO,
USB EN KAARTLEZER
De getoonde iPod/iPhone is niet inbegrepen
Voor informatie en ondersteuning, www.lenco.eu
Ipod&Iphone zijn handelsmerken van Apple Inc., geregistreerd in de V.S. en andere landen.
“Made for iPod” en “Made for iPhone” betekent dat een elektrische accessoire speciaal is ontworpen om verbinding te
maken met iPod of iPhone en gecertificeerd is door de ontwikkelaar naar Apple prestatie-normen te voldoen.
Apple is niet verantwoordelijk voor de werking van het apparaat of de naleving van de veiligheids- en regelgevende
normen.
Houd er rekening mee dat het gebruik van deze accessoire de draadloze prestatie kan beïnvloeden.
HANDLEIDING
Page 18

VEILIGHEIDSMAATREGELEN
Lees deze handleiding zorgvuldig vóór u het apparaat gebruikt, voor maximaal genot en maximale prestaties en om bekend
te raken met de mogelijkheden van het apparaat.
Deze veiligheids- en gebruiksinstructies moeten worden bewaard voor toekomstige referentie.
Het apparaat mag niet worden blootgesteld aan druppend of spattend water en er mogen geen voorwerpen gevuld met vloeistof,
zoals vazen, op het apparaat worden gezet. Vermijd het installeren op de hieronder beschreven locaties:
- Plaatsen waar het apparaat is blootgesteld aan direct zonlicht of in de buurt van apparaten die warmte uitstralen, zoals
elektrische verwarming of op andere stereo-apparatuur die teveel warmte uitstraalt,
- Plaatsen waar de ventilatieopeningen worden geblokkeerd of stoffige plaatsen.
- Plaatsen die onderhevig zijn aan constante trillingen, vochtigheid of natte plaatsen.
Plaats geen voorwerpen met open vlam, zoals kaarsen, op het apparaat.
Besteed aandacht aan de milieuaspecten van de inzameling van batterijen.
Zorg ervoor dat u de ventilatieopeningen niet blokkeert, er moet een minimale ruimte van 10cm rond het apparaat worden
vrijgehouden voor ventilatie.
De ventilatie moet niet worden belemmerd door de ventilatieopeningen te bedekken met voorwerpen, zoals kranten, tafelkleden,
gordijnen, etc. gebruik het apparaat alleen in een gematigd klimaat.
Bedien het apparaat en de schakelaars zoals aangegeven in de handleiding.
Zorg er voordat u het apparaat voor het eerst aanzet voor dat het netsnoer juist is aangesloten.
Bewaar uw CD’s op een koele plaats om schade door warmte te voorkomen.
De stekker wordt gebruikt als ontkoppelapparaat, en moet eenvoudig bedienbaar blijven. Haal de stekker uit het stopcontact om het
apparaat volledig van het lichtnet te ontkoppelen.
De normale functie van het apparaat kan worden verstoord door sterke elektromagnetische interferentie. Als dit het geval is, reset het
product en volg de handleiding om het normaal gebruik te hervatten. Als het apparaat nog steeds niet juist werkt, probeer het product
op een andere locatie.
Probeer geen schroeven te verwijderen of de behuizing van het apparaat te openen; er zitten geen door de gebruiker te
onderhouden onderdelen in het apparaat, laat alle onderhoud over aan gekwalificeerd onderhoudspersoneel.
Belangrijke opmerkingen:
LET OP: OM GEVAAR VAN ELEKTRISCHE SCHOK TE VERMINDEREN, VERWIJDER DE BEHUIZING ( OF
ACHTERKANT) NIET, GEEN DOOR DE GEBRUIKER TE ONDERHOUDEN ONDERDELEN IN APPARAAT, LAAT
ONDERHOUD OVER AAN GEKWALIFICEERD PERSONEEL.
GEVAARLIJK VOLTAGE
Geleider gevaarlijke spanning, die sterk genoeg is om een gevaar van elektrische schokken voor personen te
leveren is aanwezig in de behuizing van dit product
ATTENTIE
De handleiding bevat belangrijke bedienings- en onderhoudsinstructies, het is voor uw veiligheid nodig om de
handleiding te raadplegen
WAARSCHUWING: STEL DIT APPARAAT NIET BLOOT AAN DRUPPEND OF SPATTEND WATER OM BRAND- OF
SCHOKGEVAAR TE VOORKOMEN.
Opmerking: Dit apparaat zal warm worden wanneer het voor een lange periode gebruikt wordt. Dit is normaal en geeft niet
aan dat er een probleem met het apparaat is. Dit apparaat beschikt over microprocessors die kunnen storen als gevolg van
externe elektrische storing/ruis of elektrostatische ontlading. Als het apparaat niet juist werkt, ontkoppel de stroombron en
sluit deze vervolgens opnieuw aan.
FUNCTIES EN BEDIENINGSELEMENTEN.
NL-1
Page 19

FUNCTIES EN BEDIENINGSELEMENTEN
1. CD-DEUR
2. CD-DEUR
OPEN/CLOSE(touchpad)
3. SELECT/REPEAT(touchpad)
4. VOLUME+(touchpad)
5. VOLUME- (touchpad)
6. HOOFDTELEFOONAANSLUITING
7. IR-SENSOR
8. LCD-DISPLAY
9. SKIP I◄◄ / TUNE▼( touchpad)
10. SKIP ►►I / TUNE▲(touchpad)
11. PLAY/PAUSE (touchpad)
12. STOP/MENU(touchpad)
13. CLOCK/DISPLAY(touchpad)
14. iPod/CD (touchpad)
15. TUNER(touchpad)
16. AUX/USB/SD(touchpad)
17. STANDBY/ON(touchpad)
18. IPOD-DECK
19. FM-DRAADANTENNE
20. AUX INGANG (RECHTS)
21. AUX INGANG (LINKS)
22. LUIDSPREKER-AANSLUITINGEN
23. BATTERIJDEUR
24. NETSNOER
25. USB-POORT
26. SD-KAARTSLEUF
AFSTANDSBEDIENING
1. STANDBY/ON-KNOP
2. IPOD/CD-KNOP
3. BACKLIGHT-KNOP
4. PLAY/PAUSE-KNOP
5. I◄◄KNOP
6. STOP/MENU-KNOP
7. RANDOM-KNOP
8. PROGRAM-KNOP
9. PS/FOL/MENU-KNOP▼
10. X-BASS-KNOP
11. VOLUME+-KNOP
12. EQ-KNOP
13. VOLUME-BUTTON
14. OPEN/CLOSE-KNOP
15. AUX/USB-KNOP
16. TUNER-KNOP
17. CLOCK/DISPLAY-KNOP
18. ►►I KNOP
19. SELECT/REPEAT-KNOP
20. INTRO-KNOP
21. PS/FOL/MENU-KNOP▲
22. SLEEP-KNOP
23. TIMER-KNOP
24. SURROUND-KNOP
25. MUTE-KNOP
DE BATTERIJ IN DE AFSTANDSBEDIENING PLAATSEN
1. Druk het batterijcompartiment zacht in de richting die is aangegeven in de
illustratie.
2. Schuif het batterijcompartiment open.
3. Plaats de meegeleverde CR2032 batterij in het compartiment en let daarbij
op de polariteitmarkeringen (+ en -) in het compartiment en op de batterij.
Plaats het batterijcompartiment terug, tot het klikt.
OPMERKING: Haal de batterij uit de afstandsbediening als deze voor lange tijd
niet gebruikt wordt. Vervang de batterij door een nieuwe batterij als de batterij
bijna leeg is, anders zal de afstandsbediening niet goed functioneren.
TOUCHBEDIENING
Dit apparaat maakt gebruik van capacitieve touchtechnologie, het voorpaneel werkt met touch-toetsen; u kunt het apparaat
bedienen door de knoppen aan te raken met uw vingertoppen. De blauwe lichtpuntjes op het CD-voorpaneel zullen elke
keer als u een touch-operatie uitvoert knipperen.
KLOK INSTELLEN
Als het apparaat voor het eerst wordt aangezet dan zal het in standby-modus staan, de klok zal knipperen. Zorg ervoor dat
het apparaat in standby-modus is om de klok in te stellen.
1. Druk op CLOCK DISPLAY op het voorpaneel tot het display “12HR” of “24HR” toont, en druk vervolgens op I◄◄
of►►I om het 12HR(12-uur) of (24HR(24-uur) weergaveformaat voor de klok te selecteren, druk als het gewenste
formaat verschijnt op CLOCK/DISPLAY om te bevestigen (F.1)
2. Als het weergaveformaat voor de klok is ingesteld, dan zal het display de klok tonen en de uren zullen knipperen,druk
op I◄◄ of►►I om het juiste uur in te stellen en druk vervolgens op CLOCK/DISPLAY om te bevestigen, stel eerst de
uren in en vervolgens de minuten. Druk als het display de juiste tijd toont nogmaals op CLOCK/DISPLAY om te
bevestigen, het instellen is nu voltooid (F.2) (F.3)
3. De klok wordt getoond als het apparaat standby staat. Druk tijdens het gebruik van het apparaat herhaaldelijk op
CLOCK/DISPLAY tot het apparaat de klok toont om de tijd te tonen, de klok zal voor 5 seconden worden getoond.
NAAR UW RADIO LUISTEREN
Als het apparaat voor het eerst wordt aangezet, dan zal het automatisch in de FM-modus gaan. U moet de
FM-draadantenne op de achterkant van het apparaat volledig uitstrekken en in de juiste positie leggen voor de beste
ontvangst.
Druk tijdens het gebruik van de radio op TUNER om radio te selecteren, het display toont de FM-frequentie. (F.4)
NL-2
Page 20

Handmatig afstemmen
U kunt handmatig afstemmen gebruiken om af te stemmen op een gewenste frequentie of zwakke zenders.
1. Druk herhaaldelijk op
2. Het display zal het stereo-icoontje
I◄◄ of►►I tot de juiste frequentie wordt getoond of de zender het best wordt gehoord.
tonen als er een FM-stereozender wordt ontvangen (F.5)
Automatisch afstemmen
1. Blijf op
I◄◄ of►►I drukken tot het apparaat omhoog of omlaag begint te zoeken, het apparaat zal automatisch
zoeken naar de eerste zender met voldoende signaalsterkte.
2. Herhaal de bovenstaande procedure om naar een volgende zender te zoeken.
Voorkeurszenders instellen (alleen afstandsbediening)
U kunt tot 30FM-zenders opslaan in het geheugen van de radio.
1. Druk op de TUNER-knop op de afstandsbediening om de radio-modus te selecteren, stem vervolgens af op de
gewenste zender.
2. Druk één keer op de PROGRAM-knop, “01” zal op het display knipperen. Druk op de PS/FOL/MENU +/- knoppen op
de afstandsbediening om het nummer van de voorkeurszender te selecteren. (F.6).
3. Als het gewenste nummer van de voorkeurszender verschijnt, druk nogmaals op de PROGRAM-knop om uw keuze
te bevestigen, de huidige zender zal worden opgeslagen onder het gewenste nummer van de voorkeurszender.
4. Herhaal de bovenstaande stappen om meer voorkeurszenders in te stellen of om de opgeslagen voorkeurszenders te
veranderen. Een nieuwe zender opslaan op een locatie voor een voorkeurszender zal de eerder opgeslagen zender
op die locatie verwijderen.
Voorkeurszenders selecteren (alleen afstandsbediening)
1. Druk op de TUNER-knop op de afstandsbediening om de radiomodus te selecteren.
2. Druk op de PS/FOL/MENU+/- knoppen om de gewenste voorkeurszender te selecteren, het display zal de
voorkeurszender en de frequentie tonen.
NAAR CD’S LUISTEREN
OPMERKING: Deze CD/MP3-speler kan behalve normale CD’s ook CD-R en CD-RW disks lezen, de afspeelbaarheid van
CD-R en CD-RW disks kan echter worden beïnvloed door het soort software dat is gebruikt om de CD’s te schrijven
alsmede de kwaliteit en de conditie van blanke media die u gebruikt, 100% speelbaarheid kan niet worden gegarandeerd.
Dit geeft niet aan dat er een probleem is met de speler.
BELANGRIJK: DIT MODEL HEET EEN GEMOTORISEERDE ELECTRONISCHE CD-DEUR. PROBEER DE DEUR NIET
HANDMATIG TE OPENEN. DIT KAN HET MECHANISME OM DE DEUR TE OPENEN BESCHADIGEN.
Een gehele CD afspelen
1. Druk als het apparaat is ingeschakeld op het CD touchpad om de CD-functie te selecteren. Het display zal eerst “CD”
tonen en vervolgens “No DISC” om aan te geven dat er geen disk in de speler zit. (F.7)
2. Druk op OPEN/CLOSE om de CD-deur te openen, het display zal “OPEN” tonen.
3. Plaats de disk met de bedrukte zijde naar boven en druk nogmaals op OPEN/CLOSE om de CD-deur te sluiten. Het
display zal eerst“READING” tonen en vervolgens het totaal aantal nummers en de tijd tonen. (F.8)
4. Druk om het afspelen vanaf het begin te starten op►/ II. Als er een MP3-disk wordt afgespeeld dan zal “MP3” worden
getoond (F.9)
5. Druk om het afspelen te pauzeren op►/ II, de verstreken tijd zal knipperen op het display.
6. Druk nogmaals op ►/ II om het afspelen te hervatten.
7. Druk op ■ om het afspelen te stoppen.
Een andere track selecteren tijdens het afspelen
1. Druk tijdens het afspelen herhaaldelijk op
I◄◄ of►►I tot u het gewenste tracknummer op het display ziet. Het
afspelen zal vanaf deze track worden gestart.
2. Als er een MP3-disk wordt afgespeeld, dan zal de ID3-tag indien beschikbaar worden getoond.
3. Druk om andere mappen op de MP3-disk te selecteren op de PS/FOL/MENU+/- knoppen op de afstandsbediening.
4. Druk één keer op
5. Druk één keer op
6. Druk twee keer op
►►I om de volgende track af te spelen.
I◄◄ om de huidige track vanaf het begin af te spelen.
I◄◄ om de vorige track af te spelen.
NL-3
Page 21

Herhalen
Druk tijdens het afspelen op REPEAT om de herhaalfunctie in te schakelen:
1. Druk één keer op REPEAT om dezelfde track te herhalen, het display zal “REPEAT” tonen (F.10)
2. Als u een MP3-disk afspeelt, dan zal er een aanvullende
3. Druk om de gehele disk te herhalen nogmaals op REPEAT, het display zal
optie worden getoond. Dit zal de huidige map herhalen.
tonen (F.11)
4. Druk om het herhalen te annuleren op REPEAT tot REPEAT van het display verdwijnt.
Willekeurig afspelen (alleen afstandsbediening)
U kunt tracks in willekeurige volgorde afspelen door op de RANDOM-knop te drukken:
1. Druk als de CD is gestopt één keer op RANDOM om willekeurig afspelen te selecteren, het display zal “RANDOM”
tonen, er zal willekeurig een track worden geselecteerd en afgespeeld. (F.12).
2. Druk tijdens het afspelen één keer op RANDOM, het display toont “RANDOM”, druk vervolgens op
I◄◄ of ►►I, er
zal een willekeurige track worden geselecteerd en afgespeeld.
3. Druk om normaal afspelen te hervatten op RANDOM tot “RANDOM” verdwijnt van het display.
Intro afspelen (alleen afstandsbediening)
1. Druk op de INTRO-knop op de afstandsbediening om het afspelen van intro’s te starten. Het display zal “INTRO”
tonen en zal de eerste 10 seconden van elke track afspelen.(F.13)
2. Druk nogmaals op de INTRO-knop om het normale afspelen te hervatten, “INTRO”zal verdwijnen van het display.
Programma afspelen (alleen afstandsbediening)
U kunt een programma samenstellen om tot 60 tracks op een disk af te spelen in de gewenste volgorde. U kunt een bepaalde track
meerdere keren afspelen in één programma afspelen.
1. Laad uw disk zoals gebruikelijk en wacht tot het display het totaal aantal tracks op de disk toont.
2. Zorg ervoor het apparaat in CD-stopmodus is en druk één keer op PROGRAM op de afstandsbediening , het display toont
“MEMORY” en“P-01” (F.14)
3. Druk op I◄◄ of ►►I om de eerste track die u wilt programmeren te selecteren. Druk als het gewenste tracknummer op het
display verschijnt op de PROGRAM-knop om te bevestigen, de eerste track is nu geprogrammeerd. Het programmanummer
zal nu naar P-02 gaan en is klaar voor de volgende invoer.
4. Als er een MP3-disk wordt geladen, dan zal een aanvullende “map” optie verschijnen voor het selecteren van de track, druk op
de PS/FOL/MENU+/- knoppen om de map te selecteren.
5. Herhaal de bovenstaande stappen om andere tracks te programmeren, er kunnen tot 60 tracks worden geprogrammeerd. Druk
als u klaar bent met het instellen van het programma op de ►/ II knop om het afspelen van het programma te starten. Het
afspelen zal het afspelen starten bij de eerst geprogrammeerde track en zal doorgaan tot de laatst geprogrammeerde track is
afgespeeld. Het display zal “MEMORY” tonen (F.15)
6. Als het programma is voltooid, dan zal de speler stoppen en er zal “MEMORY” worden getoond. De speler blijft in de
programma-afspeelmodus. Druk op de ►/ II knop om het programma nogmaals af te spelen.
7. Druk in CD-stopmodus één keer op de ■ knop om het programma te wissen, druk twee keer op de ■ knop, “MEMORY”zal
verdwijnen.
Programma herhalen
U kunt de programma- en herhaalfunctie samen gebruiken om een programma te herhalen. Gebruik eerst de
afstandsbediening om een programma samen te stellen en druk als het afspelen van het programma is begonnen op
REPEAT om de huidige track of het gehele programma te herhalen.
NAAR UW iPod& iPhone LUISTEREN
Dit apparaat beschikt over een iPod/iPhone-dock, uw favoriete tracks op uw iPod/iPhone kunnen worden afgespeeld met
dit apparaat.
1. Druk om iPod te selecteren herhaaldelijk op iPod/CD tot het display “No iPod” toont.
2. Til de iPod-dock op de rechtervoorkant onder het display omlaag, installeer een adapter die bij uw iPod/iPhone-model
hoort in de docklade.
3. Plaats uw iPod/iPhone op de docklade, het display zal “iPod” tonen, u kunt nu gebruik maken van uw iPod.
4. Druk op ►/ II om het afspelen te starten of pauzeren. (F.16)
5. Druk op
►►I of I◄◄ om naar de volgende of vorige track te gaan.
6. Druk op de MENU-knop op de afstandsbediening om “iPod Menu” te selecteren.
7. Gebruik de PS/FOL/MENU+/- knoppen op de afstandsbediening om omhoog of omlaag te scrollen in het menu.
8. Druk op de SELECT-knop op de afstandsbediening om een selectie in het “iPod Menu” te bevestigen.
UW iPod&iPhone OPLADEN
U kunt uw iPod of iPhone in standby-modus of tijdens gebruik opladen met behulp van de docklade, de iPod of iPhone zal
automatisch worden opgeladen als deze is gedockt.
NL-4
Page 22

AFSPELEN VAN MP3 OP USB& SD/MMC KAART
1. Druk herhaaldelijk op AUX/USB/SD om de USB- of SD/MMC-functie te selecteren tot het display “USB” of “SD CARD”
toont. (F.17, F.18)
2. Plaats uw USB-apparaat in de USB-poort of uw SD/MMC-kaart in de geheugenkaartsleuf.
3. Het display zal “READING” tonen en vervolgens het totaal aantal tracks en mappen tonen.
4. Druk op ►/ II om het afspelen te starten vanaf de eerste map en het eerste bestand. Het display zal het
map-/tracknummer tonen, de tijd en de ID3-tag indien beschikbaar.
5. Druk op ►/ II om het afspelen te pauzeren, de verstreken tijd zal knipperen op het display.
6. Druk nogmaals op ►/ II om het afspelen te hervatten.
7. Druk één keer op
8. Druk één keer op
►►I om de volgende track af te spelen.
I◄◄om de huidige track vanaf het begin af te spelen.
9. Druk twee keer op I◄◄om de vorige track af te spelen.
10. Druk op de PS/FOL/MENU+/- knoppen op de afstandsbediening om een andere map op het apparaat te selecteren.
11. Druk op ■ om het afspelen te stoppen.
OPMERKING: Door hardware- en softwarecomptabiliteit is het mogelijk dat bepaalde typen “Dual Voltage-MMC” kaarten of
“MMC-Plus” kaarten niet worden ondersteund.
AUX INGANG
De AUX IN RCA-ingangen zitten op de achterkant van het apparaat, u kunt analoge geluidssignalen van andere bronnen
kunnen aansluiten op het systeem met behulp van deze ingangen.
1. Gebruik een kabel met RCA-stekkers om de ingang aan te sluiten op een andere analoge audiobron.
2. Druk om de AUX functie te selecteren herhaaldelijk op AUX/USB/SD tot het display “AUX”.toont, (F.19)
3. Stel het volume naar wens in.
SLAAPFUNCTIE (alleen afstandsbediening)
Met deze functie kunt u het apparaat automatisch laten uitschakelen na een vooraf ingestelde tijd. U kunt de slaaptimer
instellen als het apparaat is ingeschakeld:
1. Druk op de SLEEP-knop op de afstandsbediening om de slaapfunctie te activeren. Het display zal knipperend het
slaaptimer-icoontje
en “90” tonen.
2. Druk herhaaldelijk op de SLEEP-knop, de tijd zal met elke druk op de knop veranderen in de volgende volgorde:
3. Laat de knop los als de gewenste slaaptijd op het display verschijnt, de slaaptimer is nu ingeschakeld. Het
slaaptimer-icoontje zal nu oplichten op het display. Als de slaaptimer is afgeteld naar nul dan zal het apparaat worden
uitgeschakeld.(F.20)
4. Druk nogmaals op de SLEEP-knop om de slaaptimer te annuleren. Het display zal “SLP OFF” tonen en het
slaaptimer-icoontje zal verdwijnen.
TIMERFUNCTIE (alleen afstandsbediening)
Met deze functie kunt u het apparaat in- en uitschakelen op de gewenste tijd en in de gewenste modus:
1. Druk op de TIMER-knop op de afstandsbediening om de timerfunctie in of uit te schakelen. Het display zal
tonen
om aan te geven dat de timerfunctie is ingeschakeld.
2. Druk en houd de TIMER-knop op de afstandsbediening ingedrukt tot het display ”ON TIME”toont om de inschakeltimer
in te stellen. De inschakeltimer zal getoond worden en het uurcijfer van de timer zal knipperen (F.21)
3. Druk op de
I◄◄ of ►►I knop om het gewenste uur te selecteren en druk op de TIMER-knop om te bevestigen, stel
eerst het uur in en vervolgens de minuten, de inschakeltimer is ingesteld.
4. U kunt vervolgens de uitschakeltimer instellen, het display zal “OFF TIME” tonen, de uitschakeltimer zal worden
getoond en het uurcijfer zal knipperen. Druk op de
I◄◄ of ►►I knop om het gewenste uur in te stellen en druk
vervolgens op de TIMER-knop om te bevestigen, stel eerst het uur in en vervolgens de minuten, de uitschakeltimer is
ingesteld.
5. U zult ten slotte de modus kunnen instellen bij het inschakelen, druk op de
I◄◄ of ►►I knop om de modus te
selecteren uit iPod, CD, TUNER, AUX, USB of SD CARD, en druk vervolgens op de TIMER-knop om te bevestigen.
Het instellen van de timer is nu voltooid. (F.22)
6. De instellingen van de inschakel- en uitschakeltimer zullen elke keer als de timer wordt ingeschakeld voor een paar
seconden worden getoond.
OPMERKING: Er zal bij gebruik van het 12-uursformaat van de klok aan de linkerkant van de tijdweergave een deel
opzichten om AM of FM weer te geven, het bovenste deel is voor AM en het onderste deel is voor PM.
NL-5
Page 23

PRESET EQ (alleen afstandsbediening)
Druk op de EQ-knop om een vooraf ingestelde EQ te selecteren. Het display zal bij elke druk op de knop de EQ-modus
tonen:
SURROUNDGELUID(alleen afstandsbediening)
Druk op de SURROUND-knop op de afstandsbediening om surround in of uit te schakelen. Het display zal “SURR ON” of
“SURR OFF” tonen. Als surround is ingeschakeld, dan zal het surround-effect zijn ingeschakeld en het icoontje
X-BASS-FUNCTIE(alleen afstandsbediening)
Druk op de X-BASS-knop op de afstandsbediening om deze functie in of uit te schakelen. Het display zal “BASS ON” of
“BASS OFF” tonen. Als X-BASS is ingeschakeld, dan zal het bassgeluid worden verbeterd en het icoontje
worden getoond.
MUTE-FUNCTIE (alleen afstandsbediening)
Druk op de MUTE-knop op de afstandsbediening om het geluid van de luidsprekers tijdelijk te dempen, het display
toont
Druk om het dempen te annuleren nogmaals op de MUTE-knop of druk op the VOLUME+/-, het icoontje
van het display en er klinkt weer geluid uit de luidsprekers.
REGELING ACHTERGRONDVERLICHTING (alleen afstandsbediening)
Druk als het apparaat is ingeschakeld op de BACKLIGHT-knop op de afstandsbediening om de achtergrondverlichting in of
uit te schakelen.
HOOFDTELEFOONAANSLUITING
Er zit een stereo-hoofdtelefoonaansluiting op de linkerkant van het voorpaneel. Sluit een stereo-hoofdtelefoon (niet
meegeleverd) aan op deze aansluiting voor privé luisteren. Als er een hoofdtelefoon wordt gebruikt, dan zullen de
luisprekers automatisch worden gedempt.
BELANGRIJK: Stel het volume altijd laag in voor u een hoofdtelefoon aansluit. Verhoog als de hoofdtelefoon is aangesloten
langzaam het volume naar een comfortabel luisterniveau.
GEHEUGEN BACKUP
Dit apparaat beschikt over een backup-circuit dat de klok kan onthouden in het geval van tijdelijke stroomuitval.
Plaats 2x1.5V UM-4, AAA of soortgelijke batterijen in het batterijcompartiment op de achterkant van de behuizing. Vervang
de batterijen elke 9 tot 12 maanden voor de beste resultaten. Meng geen oude en nieuwe batterijen of verschillende
soorten batterijen, zoals alkaline en koolstofzink batterijen.
LCD-DISPLAY
worden getoond.
zal
.
verdwijnt
A. MP3 MAP-INDICATOR
B. FM STEREO-INDICATOR
C. TIMER-INDICATOR
D. SLAAP-INDICATOR
E. MUTE-INDICATOR
F. BAND/TRACKNUMMER/FREQUENTIE/TIJD-INDICATOR
G. EQ-INDICATOR
COMPACT DISC
1. Gebruik alleen CD’s met het onderstaande logo.
NL-6
Page 24

2. Opmerkingen over de omgang met disks.
- Raak het reflectieve, beschreven/opgenomen
oppervlak niet aan.
- Plak geen papier op de cd en schrijf niets op het
oppervlak.
- Buig de disk niet.
3. Opbergen
- Berg disks op in hun doosje
- Stel disks niet bloot aan direct zonlicht of hoge temperaturen, hoge vochtigheid of stof.
4. Een disk schoonmaken
- Als een disk vuil is, veeg stof, vuil en
vingerafdrukken af met een zachte doek.
- Wrijf bij het schoonmaken van het centrum naar de
buitenkant.
- Gebruik nooit benzeen, thinners, platenschoonmaakmiddel of anti-statische sprays.
- Zorg ervoor de dat CD-deur is gesloten, zodat de lens niet wordt blootgesteld aan stof.
- Raak de lens niet aan.
SPECIFICATIE
VOEDING: 100-240V—60/50Hz
VERMOGEN: 10WX2
AFMETINGEN APPARAAT: 300(B)X128(D)X198(H)mm
AFMETINGEN LUIDSPREKER: 91(B)X128(D)X198(H)mm
GEWICHT: 2.91kg
RADIOSECTIE:
FREQUENTIEBEREIK: FM87.5—108MHz
CD-SECTIE
CD MEDIA: CD-DA, CD-ROM, CD-R, CD-RW
ONDERSTEUNDE FORMATEN: ISO9660, UDF
MP3 DECODEREN
BESTAND: MPEG 1/2 Layer3 [.mp3] [.mp3]
BITRATE(kbps): 8-320 Constant & VBR (Variabele Bitrate)
ID3-TAG: V2.4, V2.3, V2.2, V2.1, V1.x
MAX. AANTAL BESTANDEN. 256/511 (Map/Map+Bestand)
MAP/BESTANDSNAAM: 30/30 (Max. aantal bytes)
ID3 Titel/Artiest/Album:30/30/30(Max. aantal bytes)
WMA DECODEREN (OPTIONEEL)
BESTAND: Windows Media Audio [.wma] [.WMA]
SAMPLINGRATE(KHz): 48, 44.1, 32, 22.05, 16, 11.025, 8
BITRATE(kbps): 32-192
MAX. AANTAL BESTANDEN.: 256/511 (Map/Map+Bestand)
MAP/BESTANDSNAAM: 30/30 (Max. aantal bytes)
ID3 Titel/Artiest/Album: 30/30/30 (Max. aantal bytes)
AUX-INGANG
INGANGSSPANNING: 350mV-500Mv
IMPEDANTIE: 47 kΩ
**SPECIFICATIES ONDERHEVIG AAN VERANDERING ZONDER BERICHTGEVING **
Indie n u zich in d e toeko mst v an dit to estel w enst te o ntd oen, le t er dan op d at elek tri sch
afval mater iaal ni et me t het hui shoud elijk a fva l mag wor den ver wijde rd. B reng he t toest el naar e en
kring loopw inkel o f and erevo orzie ning vo or re cycli ng. Nee m conta ct op m et uw pla atsel ijke
autor iteit o f winke lie r indie n u meer in forma tie w enst ov er recy cling . (Ri chtli jn voor Af val van
Elekt risch e en Elek tro nisch e Appara ten, AEE A).
NL-7
Page 25

Mci-210
MICRO CHAINE
AVEC DOCKING STATION PARA iPod/iPhone,
LECTEUR CD/MP3,
RADIO PLL FM ET PORT USB/CARTE
L’iPod/iPhone illustré est vendu séparément.
Pour information & support technique, www.lenco.eu
Ipod et Iphone sont des marques déposées de Apple, Inc., enregistrées aux Etats-Unis et dans d'autres pays.
« Conçu pour l’iPod » et « Conçu pour l’iPhone » signifient que l'équipement électronique a été conçu pour être
spécifiquement connecté à l’iPod/l’iPhone et sa conformité aux normes de performances d’Apple a été certifiée par le
fabricant.
Apple ne sera en aucun cas tenue responsable du fonctionnement de l’unité ou de sa conformité aux normes de sécurité et
aux lois en vigueur.
Veuillez noter que l’utilisation de cet accessoire avec l’iPod ou l’iPhone peut affecter les performances sans fil.
MANUEL D'UTILISATION
Page 26

PRECAUTIONS DE SECURITE
Afin de garantir un plaisir d’utilisation et des performances optimaux, ainsi que de se familiariser avec les différentes
fonctionnalités de l’unité, lisez attentivement ce manuel d’utilisation avant toute utilisation de l’unité.
Conservez les instructions de sécurité et d’utilisation afin de pouvoir vous y référer ultérieurement.
L’appareil ne doit pas être exposé aux égouttements et éclaboussures et aucun objet rempli de liquide, tel qu’un vase, ne doit être
posé sur l’unité. N’exposez jamais l’unité aux endroits suivants :
- Un endroit au soleil ou à proximité d’un appareil émettant de la chaleur tel qu’un radiateur électrique, sur un autre équipement
stéréo produisant une grande quantité de chaleur.
- Un endroit confiné ou poussiéreux.
- Un endroit soumis à des vibrations constantes ou humide.
Aucune source de flamme nue, telle qu’une bougie allumée, ne doit être posée sur l’unité.
Une attention toute particulière doit être portée sur les aspects environnementaux de la disposition des piles.
Assurez-vous de ne pas obstruer les orifices de ventilation, une distance minimale de 10 cm doit être maintenue autour de l’unité afin
de permettre sa ventilation.
N’obstruez jamais la ventilation de l’unité en couvrant les orifices de ventilation avec des objets tels qu’un journal, une nappe, un
rideau, etc. Utilisez seulement l’unité sous des climats modérés.
Utilisez les commandes conformément aux instructions du manuel.
Avant la première mise sous tension de l’unité, assurez-vous que le cordon d’alimentation est correctement raccordé.
Afin de prévenir tout dommage causé par la chaleur, rangez vos disques dans un endroit frais.
Utilisez la fiche du cordon pour mettre l’unité hors tension, celle-ci doit être rapidement accessible. Pour entièrement mettre l’unité
hors tension, débranchez le cordon d’alimentation de la prise de courant.
Le fonctionnement normal du produit peut être affecté par de puissantes interférences électromagnétiques. Si cela se produit,
réinitialisez le produit en vous référant au manuel d’utilisation afin de rétablir le fonctionnement normal de celui-ci. Lorsqu’il vous est
impossible de rétablir le fonctionnement normal de l’unité, déplacez celle-ci à un autre endroit.
N’essayez pas de retirer les vis ou le boîtier de l’unité ; aucune pièce réparable par l’utilisateur n’est contenue à l’intérieur de celle-ci ;
confiez l’entretien de l’unité à du personnel spécialisé.
Remarques importantes :
ATTENTION : Pour réduire les risques d'électrocution, ne retirez pas le couvercle (ou panneau arrière) de l’unité; L’intérieur
de l’appareil ne contient aucune pièce pouvant être entretenue par l’utilisateur. confiez l’entretien de l’unité à du personnel
spécialisé
TENSION DANGEREUSE
Une tension dangereuse est présente à l’intérieur du boîtier du produit et peut être suffisamment importante pour
constituer un risque d’électrocution.
ATTENTION
Le manuel d’utilisation contient d’importantes instructions d’entretien et d’utilisation. Pour votre sécurité,
référez-vous au manuel d’utilisation.
AVERTISSEMENT : AFIN DE PREVENIR TOUT RISQUE D'INCENDIE ET D'ELECTROCUTION, N'EXPOSEZ PAS CET
APPAREIL AUC EGOUTTEMENTS ET ECLABOUSSURES.
Remarque : L’unité chauffe au bout d’une période d’utilisation prolongée. Ceci ne représente en aucun cas un
dysfonctionnement de l’unité. Cet appareil intègre des microprocesseurs pouvant dysfonctionner en présence
d’interférences électriques externes/décharge électrostatique ou de parasites. En cas de dysfonctionnement, débranchez
puis reconnectez le cordon d’alimentation.
PRESENTATION DES COMMANDES ET DES FONCTIONNALITES
FR-1
Page 27

PRESENTATION DES COMMANDES ET DES FONCTIONNALITES
1. TIROIR CD
2. TOUCHE OUVERTURE/FERMETURE
DU LECTEUR CD (tactile)
3. SELECTION/REPETITION (tactile)
4. AUGMENTER LE VOLUME (tactile)
5. DIMINUER LE VOLUME (tactile)
6. CONNECTEUR POUR ECOUTEURS
7. CAPTEUR INFRAROUGE
8. ÉCRAN LCD
9. SKIP I◄◄ / TUNE▼(tactile)
10. SKIP ►►I / TUNE▲(tactile)
LA TELECOMMANDE
1. TOUCHE ATTENTE/MISE EN
MARCHE
2. TOUCHE IPOD/CD
3. TOUCHE RETRO-ECLAIRAGE
4. TOUCHE LECTURE/PAUSE
5. TOUCHE I◄◄
6. TOUCHE ARRET/MENU
7. TOUCHE ALEATOIRE
8. TOUCHE PROGRAMMATION
9. TOUCHE PS/FOL/MENU ▼
10. TOUCHE ACCELERATION DES
BASSES
11. TOUCHE AUGMENTER LE VOLUME
12. TOUCHE EG
11. LECTURE/PAUSE (tactile)
12. ARRET/MENU (tactile)
13. HORLOGE/AFFICHAGE (tactile)
14. iPod/CD (tactile)
15. REGLAGE (tactile)
16. AUXILIAIRE/USB/CARTE MEMOIRE
SD (tactile)
17. ATTENTE/MARCHE (tactile)
18. STATION D’ACCUEIL POUR IPOD
19. ANTENNE RADIO FM FILAIRE
20. CONNECTEUR D’ENTREE
AUXILIAIRE (DROITE)
13. TOUCHE DIMINUER LE VOLUME
14. TOUCHE
OUVERTURE/FERMETURE
15. TOUCHE AUXILIAIRE/USB
16. TOUCHE DE REGLAGE
17. TOUCHE HORLOGE/AFFICHAGE
18. TOUCHE ►►I
19. TOUCHE SELECTION/REPETITION
20. TOUCHE INTRODUCTION
21. TOUCHE PS/FOL/MENU ▲
22. TOUCHE SOMMEIL
23. TOUCHE MINUTERIE
24. TOUCHE SURROUND
25. TOUCHE MUET
21. CONNECTEUR D’ENTREE
AUXILIAIRE (GAUCHE)
22. CONNECTEURS POUR
HAUT-PARLEURS
23. COUVERCLE DU COMPARTIMENT A
PILES
24. CORDON D’ALIMENTATION CA
25. CONNECTEUR USB
26. EMPLACEMENT POUR CARTE
MEMOIRE SD
INSERTION DES PILES DANS LA TELECOMMANDE
1. Déplacez délicatement sur le couvercle du compartiment à piles selon le
sens indiqué sur l’illustration.
2. Ouvrez le tiroir à piles en sortant celui-ci.
3. Installez la pile CR2032 fournie en respectant la polarité (+ et -) indiquée
sur le tiroir à pile et sur la pile. Remettez en place le tiroir à pile.
REMARQUE : Retirez la pile de la télécommande lorsque vous pensez ne plus
utiliser celle-ci pendant une période prolongée. Remplacez la pile lorsque le
niveau de charge de celle-ci devient insuffisant, ceci permet de garantir le bon
fonctionnement de la télécommande.
COMMANDES TACTILES
L’unité emploie une technologie de commandes tactiles, les commandes du panneau avant de l’unité sont tactiles ; vous pouvez
donc contrôler l’unité avec un doigt. Les témoins lumineux bleus présents sur le tiroir CD s’illuminent lors de la pression d’une
commande tactile.
REGLAGE DE L’HORLOGE
Lors de la première mise en marche de l’unité, le mode Attente s’active automatiquement, l’horloge s’affiche puis clignote. Activez le
mode Attente pour pouvoir régler l’horloge.
1. Réglage du format de l’horloge – maintenez enfoncée la touche HORLOGE/AFFICHAGE du panneau avant jusqu’à ce que
l’écran affiche « 12HR » ou « 24HR », utilisez ensuite les touches I◄◄ ou ►►I pour sélectionner le format 12HR (12 heures)
ou (24HR (24 heures), tapez sur la touche HORLOGE/AFFICHAGE pour confirmer (image 1)
2. Une fois le format de l’horloge réglé, le champ Heure de l’horloge clignote, utilisez les touches I◄◄ ou ►►I pour régler
l’heure, tapez ensuite sur la touche HORLOGE/AFFICHAGE pour confirmer, réglez ensuite les minutes, une fois l’horloge
réglée, tapez sur la touche HORLOGE/AFFICHAGE pour confirmer, le réglage de l’horloge est désormais terminé (image 2)
(image 3).
3. L’horloge s’affiche lorsque le mode Attente est activé. Pour afficher l’horloge lorsque l’unité est en marche, appuyez de
manière répétée sur la touche HORLOGE/AFFICHAGE jusqu’à ce que l’horloge s’affiche, celle-ci reste affichée pendant 5
secondes.
ECOUTER LA RADIO
Lors de la première mise en marche de l’unité depuis le mode Attente, le mode Radio FM s’active automatiquement. Etendez
entièrement l’antenne filaire FM située à l’arrière de l’unité, ajustez ensuite sa position et sa direction jusqu’à ce que vous obteniez
un niveau de réception optimal.
Pour sélectionner le mode Radio depuis un autre mode, tapez sur la touche RADIO située sur le panneau avant de l’unité, l’écran
affiche alors la fréquence radio FM sélectionnée. (image 4)
FR-2
Page 28

Réglage manuel
Vous pouvez utiliser cette fonction pour sélectionner une fréquence radio de signal faible.
1. Utilisez de manière répétée les touches I◄◄ et ►►I jusqu’à ce que la fréquence désirée s’affiche.
2. L’indicateur Stéréo
s’affiche lorsque vos sélectionnez une station radio FM stéréo (image 5).
Réglage automatique
1. Maintenez enfoncée la touche I◄◄ ou ►►I pour effectuer une recherche vers les fréquences radio inférieures ou
supérieures, la recherche s’arrête à la première station radio de signal suffisant détectée.
2. Répétez la procédure ci-dessus pour sélectionner une autre station radio.
Mémorisation de stations radio (seulement possible en utilisant la télécommande)
Il est possible de mémoriser jusqu’à 30 stations radio FM de votre choix.
1. Appuyez sur la touche RADIO de la télécommande pour activer le mode Radio, sélectionnez ensuite la station radio
de votre choix.
2. Appuyez une fois sur la touche PROGRAMMATION de la télécommande, « 01 » clignote à l’écran, utilisez les
touches PS/FOL/MENU +/- de la télécommande pour sélectionner un emplacement de présélection radio. (image 6).
3. Lorsque le numéro de présélection radio de votre choix s’affiche, appuyez à nouveau sur la touche
PROGRAMMATION pour confirmer votre sélection, la station radio est désormais mémorisée sur l’emplacement de
présélection sélectionné.
4. Répétez les étapes ci-dessus pour mémoriser davantage de stations radio ou modifier une présélection radio,
mémoriser une station radio sur un emplacement de présélection occupé entraînera l’effacement de la présélection
actuellement mémorisée.
Rappel de présélections radio (seulement possible en utilisant la télécommande)
1. Appuyez sur la touche RADIO de la télécommande pour activer le mode Radio.
2. Utilisez les touches PS/FOL/MENU+/- de la télécommande pour sélectionner l’emplacement de présélection radio de
votre choix, le numéro et la fréquence de la présélection radio s’affichent.
ECOUTER UN CD
REMARQUE : Bien que ce lecteur CD/MP3 puisse lire les disques CD-R et CD-RW en sus des disques standards, la
lisibilité des disques CD-R et CD-RW peut être affectée par le type de logiciel utilisé pour graver les disques, la qualité et
l’état du disque vierge, aucune lisibilité de ces types de disques n’est garantie. Ceci ne représente en aucun cas un
dysfonctionnement de l’unité.
IMPORTANT : CE MODELE EST DOTE D’UN COUVERCLE CD ELECTRONIQUE MOTORISE. N’ESSAYEZ PAS
D’OUVRIR LE COUVERCLE MANUELLEMENT. CELA PEUT ENDOMMAGER LE MECANISME D’OUVERTURE DU
COUVERCLE.
Lecture de la totalité du contenu du CD
1. Lorsque l’unité est en marche, appuyez sur la touche CD pour activer le mode CD. « CD » s’affiche, suivi de « No
DISC » pour indiquer qu’aucun disque n’est inséré dans le lecteur. (image 7).
2. Tapez sur la touche OUVERTURE/FERMETURE pour ouvrir le couvercle du lecteur CD, « OPEN » s’affiche à l’écran.
3. Chargez un disque l’étiquette dirigée vers le haut, tapez ensuite sur la touche OUVERTURE/FERMETURE pour
refermer le couvercle du lecteur cd. « READING » s’affiche, suivi du nombre total de pistes ainsi que de la durée de
lecture totale du disque. (image 8).
4. Pour démarrer la lecture à partir du début, tapez sur la touche►/ II. En cours de lecture d’un disque MP3, l’indicateur
« MP3 » s’affiche à l’écran (image 9).
5. Pour interrompre la lecture, tapez sur la touche►/ II, la durée de lecture écoulée affichée clignote.
6. Pour reprendre la lecture, tapez à nouveau sur la touche►/ II.
7. Pour arrêter la lecture, tapez sur la touche■.
Sélection d’une autre piste en cours de lecture
1. En cours de lecture, utilisez les touches I◄◄ et ►►I pour afficher la piste désirée, la lecture reprend à partie de
cette piste.
2. En cours de lecture d’un disque MP3, les balises ID3 s’affichent lorsque celles-ci sont disponibles.
3. Pour sélectionner un autre répertoire du disque MP3, utilisez les touches PS/FOL/MENU+/- de la télécommande.
4. Pour démarrer la lecture de la piste suivante, tapez une fois sur la touche ►►I du panneau tactile.
5. Pour reprendre la lecture de la piste sélectionnée à partir du début, tapez une fois sur la touche I◄◄ du panneau
tactile.
6. Pour démarrer la lecture de la piste précédente, tapez deux fois sur la touche I◄◄ du panneau tactile.
FR-3
Page 29

Répétition
En cours de lecture, appuyez sur la touche REPETITION du panneau tactile pour sélectionner un mode de répétition :
1. Pour répéter la lecture de la piste, tapez une fois sur la touche REPETITION, « REPEAT » s’affiche à l’écran (image 10).
2. Lors de la lecture d’un disque MP3, l’indicateur
sélectionné.
3. Pour répéter la lecture du disque entier, tapez à nouveau sur la touche REPETITION, «
4. Pour désactiver la répétition, tapez de manière répétée sur la touche REPETITION du panneau tactile jusqu’à ce que le
message « REPEAT » disparaisse.
Lecture aléatoire (seulement possible en utilisant la télécommande)
Vous pouvez appuyer sur la touche ALEATOIRE de la télécommande pour sélectionner le mode de lecture aléatoire :
1. Lorsque la lecture du disque est arrêtée, appuyez une fois sur la touche ALEATOIRE pour sélectionner le mode de lecture
Aléatoire, « RANDOM » s’affiche, la lecture aléatoire des pistes se lance. (image 12).
2. En cours de lecture, appuyez d’abord sur la touche ALEATOIRE, « RANDOM » s’affiche, utilisez ensuite les touches I◄◄ et
►►I pour sélectionner une autre piste.
3. Pour reprendre la lecture normale, appuyez à nouveau sur la touche ALEATOIRE jusqu’à ce que le message « RANDOM »
disparaisse.
Introduction (seulement possible en utilisant la télécommande)
1. Appuyez sur la touche INTRODUCTION de la télécommande pour démarrer le mode de lecture Introduction. « INTRO »
s’affiche, seules les dix premières secondes de chaque piste sont lues (image 13).
2. Pour reprendre la lecture normale, appuyez à nouveau sur la touche INTRODUCTION jusqu’à ce que le message « INTRO »
disparaisse.
Lecture programmée (seulement possible en utilisant la télécommande)
Vous pouvez utiliser la fonctionnalité Lecture programmée pour programmer la lecture d’un nombre maximal de 60 pistes. Il est
également possible de sélectionner plusieurs fois la même piste.
1. Chargez le disque normalement puis patientez jusqu’à ce que le nombre total de pistes contenues dans le disque s’affiche.
2. Assurez-vous que le mode Arrêt est activé, appuyez une fois sur la touche PROGRAMMATION de la télécommande,
« MEMORY » et « P-01 » s’affichent à l’écran (image 14).
3. Utilisez les touches I◄◄ et ►►I pour sélectionner la première piste du programme. Lorsque le numéro de piste désiré
s’affiche, appuyez sur la touche PROGRAMMATION pour confirmer, la première piste du programme est désormais
programmée. Le numéro de programmation P-02 s’affiche, vous pouvez désormais sélectionner la seconde piste du
programme.
4. Lorsqu’un disque MP3 est inséré, l’indicateur « Répertoire » s’affiche avant l’interface de sélection de la piste, utilisez les
touches PS/FOL/MENU+/- pour sélectionner un répertoire.
5. Répétez les étapes ci-dessus pour programmer d’autres pistes, jusqu’à 60 pistes peuvent être programmées. Une fois la
programmation terminée, utilisez la touche ►/ II pour démarrer la lecture du programme, la lecture démarre à partir de la
première piste du programme et s’arrêtera à la fin de la dernière piste du programme. « MEMORY » s’affiche (image 15).
6. Une fois la lecture du programme terminée, le lecteur s’arrête et « MEMORY » s’affiche. Le mode Lecture de programme reste
activé. Appuyez sur la touche ►/ II pour lire à nouveau le programme par ordre de séquence.
7. Pour effacer le programme, appuyez une fois sur la touche ■ en mode Arrêt du CD; appuyez deux fois sur la touche ■ en
mode Lecture du CD. Le message « MEMORY » disparait.
Répétition du programme
Vous pouvez combiner les fonctions Lecture programmée et Répétition pour lire en boucle une séquence. Utilisez tout d’abord la
télécommande pour programmer la séquence de votre choix, la lecture du programme se lance, tapez sur la touche REPETITION du
panneau tactile pour répéter la piste sélectionnée ou le programme entier.
s’affiche également. Il s’agit de l’indicateur de répétition du répertoire
» s’affiche à l’écran (image 11).
ECOUTER LE CONTENU DE VOTRE iPod/iPhone
Cette unité incorpore une station d’accueil pour iPod/iPhone, vous pouvez donc lire vos musiques favorites contenues dans votre
iPod/iPhone depuis cette unité.
1. Tapez de manière répétée sur la touche iPod/CD du panneau tactile pour sélectionner le mode iPod, «No iPod» s’affiche à
l’écran.
2. Abaissez la station d’accueil iPod située sur le panneau avant droit, sous l'écran, installez un adaptateur de connexion
correspondant à votre modèle d'iPod/iPhone sur le connecteur de la station d’accueil.
3. Connectez votre iPod/iPhone à la station d’accueil, « iPod » s’affiche, vous pouvez désormais utiliser votre iPod.
4. Pour démarrer ou arrêter la lecture, tapez sur la touche ►/ II du panneau tactile. (image 16).
5. Pour sélectionner une autre piste en cours de lecture, utilisez les touches I◄◄ et ►►I du panneau tactile.
6. Pour accéder au menu de l’iPod, appuyez sur la touche MENU de la télécommande.
7. Pour faire défiler le menu de l’iPod, utilisez les touches PS/FOL/MENU+/- de la télécommande.
8. Pour confirmer votre sélection dans menu de l’iPod, appuyez sur la touche SELECTION de la télécommande.
FR-4
Page 30

METTRE EN CHARGE VOTRE iPod/iPhone
Vous pouvez charger la batterie de votre iPod ou iPhone via la station d’accueil de l’unité lorsque celle-ci est en marche ou en mode
Attente, la mise en charge de la batterie de l’iPod/iPhone se lance automatiquement une fois l’iPod/iPhone connecté.
MODE OPERATOIRE DU CONNECTEUR USB ET DE L’EMPLACEMENT POUR CARTE MEMOIRE SD/MMC
(FICHIERS MP3)
1. Tapez de manière répétée sur la touche AUXILIAIRE/USB/CARTE MEMOIRE SD du panneau tactile pour sélectionner le
mode USB ou CARTE MEMOIRE SD/MMC, « USB » ou « CARTE MEMOIRE SD » s’affiche à l’écran. (image 17, image 18).
2. Connectez votre périphérique USB au connecteur USB ou insérez une carte mémoire SD/MMC dans l’emplacement pour
carte mémoire.
3. « READING » s’affiche, suivi du nombre total de répertoires et de fichiers.
4. Pour démarrer la lecture à partir de la première piste du premier répertoire, tapez sur la touche►/ II. Le numéro du répertoire,
le numéro de la piste, la durée de lecture et les informations ID3 (si disponibles) s’affichent.
5. Pour interrompre la lecture, tapez sur la touche►/ II, la durée de lecture écoulée affichée clignote.
6. Pour reprendre la lecture, tapez à nouveau sur la touche►/ II.
7. Pour démarrer la lecture du fichier suivant/ de la piste suivante, tapez une fois sur la touche ►►I du panneau tactile.
8. Pour reprendre la lecture de la piste/du fichier sélectionné à partir du début, tapez une fois sur la touche I◄◄ du panneau tactile.
9. Pour démarrer la lecture du fichier précédent/ de la piste précédente, tapez deux fois sur la touche I◄◄ du panneau tactile.
10. Pour sélectionner un autre répertoire du périphérique, utilisez les touches PS/FOL/MENU+/- de la télécommande.
11. Pour arrêter la lecture, tapez sur la touche ■
REMARQUE : En raison des problèmes courants de compatibilité matérielle et logicielle avec certains modèles de cartes mémoire
MMC, certaines cartes mémoire de type « MMC double tension » et « MMC Plus » peuvent ne pas être supportés.
CONNECTEUR D’ENTREE AUDIO AUXILIAIRE
Les connecteurs d’entrée audio auxiliaire RCA sont situés sur le panneau arrière de l’unité, vous pouvez utiliser ces connecteurs
pour raccorder un équipement audio analogique externe.
1. Utilisez un cordon RCA pour raccorder ces connecteurs à l’équipement audio analogique externe.
2. Tapez de manière répétée sur la touche AUXILIAIRE/USB/CARTE MEMOIRE SD du panneau tactile pour sélectionner le
mode AUXILIAIRE, « AUXILIAIRE » s’affiche à l’écran. (image 19).
3. Réglez le volume sur le niveau de votre choix à l’aide de la commande « Volume ».
LA FONCTION SOMMEIL (seulement possible en utilisant la télécommande)
Cette fonction vous permet d’éteindre automatiquement le système au bout d’une durée définie. Il est seulement possible de
configurer la minuterie Sommeil lorsque l’unité est en marche :
1. Appuyez sur la touche SOMMEIL de la télécommande pour activer la fonction Sommeil, l’indicateur Sommeil
« 90 » s’affichent.
2. Appuyez de manière répétée sur la touche SOMMEIL pour régler la durée Sommeil, chaque pression permet de modifier la
durée dans l’ordre suivant :
et la durée
3. Une fois la durée désirée affichée, relâchez la touche, la minuterie Sommeil est désormais activée. L’indicateur de minuterie
sommeil reste affiché sur l’écran. Une fois la durée écoulée, l’unité s’éteint automatiquement (image 20).
4. Appuyez sur la touche SOMMEIL de la télécommande pour désactiver la fonction Sommeil, le message « SLP OFF » s’affiche,
l’indicateur de la minuterie Sommeil disparaît.
LA FONCTION MINUTERIE (seulement possible en utilisant la télécommande)
Cette fonction vous permet de programmer l’arrêt et la mise en marche de l’unité et de sélectionner un mode de mise en marche :
1. Appuyez sur la touche MINUTERIE de la télécommande pour activer/désactiver la fonction Minuterie.
indiquer que la fonction Minuterie est activée.
2. Pour configurer la minuterie de mise en marche, pressez et maintenez enfoncée la touche MINUTERIE de la télécommande
jusqu’à ce que l’écran affiche « ON TIME », l’heure de mise en marche s’affiche, le champ Heure clignote (image 21).
3. Utilisez les touches I◄◄ et ►►I pour régler l’heure, appuyez ensuite sur la touche MINUTERIE pour confirmer le réglage,
réglez ensuite les minutes, la minuterie de mise en marche est désormais réglée.
4. L’interface de réglage de la minuterie d’arrêt s’affiche ensuite, « OFF TIME » s’affiche, le champ Heure clignote. Utilisez les
touches I◄◄ et ►►I pour régler l’heure, appuyez ensuite sur la touche MINUTERIE pour confirmer le réglage, réglez ensuite
les minutes, la minuterie d’arrêt est désormais réglée.
5. L’interface de sélection du mode d’activation de la minuterie de mise en marche s’affiche, utilisez les touches I◄◄ et ►►I pour
sélectionner un des modes suivants : iPod, CD, RADIO, AUXILIAIRE, USB ou CARTE MEMOIRE SD ; appuyez enfin sur la
touche MINUTERIE pour confirmer. Le réglage de la minuterie est désormais terminé. (image 22).
6. Le réglage de la minuterie de mise en marche et d’arrêt s’affiche pendant les premières secondes d’activation de la minuterie.
REMARQUE : Sous le format d’affichage 12 heures de l’horloge, l’indicateur situé à gauche du champ Heure s’illumine pour
représenter le matin ou l’après-midi - l’indicateur supérieur représente le matin et l’indicateur inférieur représente l’après-midi.
s’affiche pour
FR-5
Page 31

SELECTION D’EGALISEURS (seulement possible en utilisant la télécommande)
Appuyez sur la touche EG de la télécommande pour sélectionner un égaliseur, chaque pression permet de sélectionner un
égaliseur différent par ordre de séquence :
LE SON SURROUND (seulement possible en utilisant la télécommande)
Appuyez sur la touche SURROUND de la télécommande pour activer/désactiver la fonction Son surround. « SURR ON »
ou « SURR OFF » s’affiche. Lorsque le mode Surround est activé, les effets sonores surround sont activés, l’indicateur
LA FONCTION ACCELERATION DES BASSES (seulement possible en utilisant la télécommande)
Appuyez sur la touche ACCELERATION DES BASSES de la télécommande pour activer/désactiver cette fonction. « BASS
ON » ou « BASS OFF » s’affiche. Lorsque le mode Accélération des basses est activé, les basses fréquences sont
améliorées, l’indicateur
LA FONCTION MUET (seulement possible en utilisant la télécommande)
Appuyez sur la touche MUET de la télécommande pour désactiver le son, l'écran affiche alors l’indicateur
Pour désactiver ce mode, appuyez à nouveau sur la touche MUET ou appuyez sur la touche VOLUME+/-, l’indicateur
disparaît, le son est restauré.
CONTROLE DU RETRO ECLAIRAGE (seulement possible en utilisant la télécommande)
Lorsque l’unité est en marche, appuyez sur la touche RETRO ECLAIRAGE de la télécommande pour activer/désactiver le
rétro éclairage de l’écran.
CONNECTEUR POUR ECOUTEURS
Le connecteur pour écouteurs stéréo est situé sur la partie gauche du panneau avant. Pour une écoute privée, raccordez
ce connecteur à un casque d’écoute stéréo (vendu séparément). Lorsqu’une paire d’écouteurs est raccordée, les
haut-parleurs sont automatiquement désactivés.
IMPORTANT : Diminuez toujours le niveau de volume des écouteurs avant de les porter, augmentez ensuite
progressivement le niveau de volume jusqu’à un niveau d’écoute confortable.
MEMOIRE DE SECOURS
Cette unité et doté d’une pile de secours permettant de faire fonctionner l’horloge durant une panne de courant.
Installez 2 piles AAA UM-4 de 1,5 v dans le compartiment à piles situé au dos de l'unité. Pour des performances optimales,
remplacez les piles tous les 9 - 12 mois. Ne mélangez pas des piles neuves et usagées ou des piles de différents types,
telles que des piles de type alcalines et carbone-zinc.
PRESENTATION DE L’ECRAN LCD
s’affiche.
s’affiche.
.
A. INDICATEUR DE REPERTOIRE MP3
B. INDICATEUR STEREO FM
C. INDICATEUR DE LA MINUTERIE
D. INDICATEUR DU MODE SOMMEIL
E. INDICATEUR DU MODE MUET
F. BANDE DE FREQUENCES RADIO/NUMERO DE PISTE/FREQUENCE RADIO/HORLOGE
G. EGALISEURS
LES DISQUES COMPACTS
1. Utilisez seulement les disques compacts portant le logo suivant.
FR-6
Page 32

2. Quelques remarques liées à la manipulation des
disques
- Ne touchez pas la surface réfléchissante du disque.
- Ne collez rien et n’écrivez rien sur le disque.
- Ne tordez pas les disques.
3. Rangement
- Rangez le disque dans son boîtier.
- N’exposez pas vos disques au soleil, à la poussière et aux températures ou taux d’humidité élevés.
4. Nettoyage des disques
- Lorsque le disque est sale, nettoyez la poussière, la
saleté et les traces de doigts à l’aide d’un chiffon
doux.
- Nettoyez les disques en partant du centre vers les
bords.
- N’utilisez jamais de diluants, benzène, nettoyants pour disques ou d’aérosols antistatiques.
- Refermez le couvercle du lecteur CD afin de prévenir toute pénétration de poussière dans l’unité.
- Ne touchez pas la lentille du lecteur CD.
FICHE TECHNIQUE
ALIMENTATION : 100 – 240 V, 60/50 Hz.
PUISSANCE DE SORTIE : 10 W X 2.
DIMENSIONS DE L’UNITE : 300 (L) x 128 (P) x 198 (H) mm.
DIMENSIONS DU HAUT-PARLEUR : 91 (L) x 128 (P) x 198 (H) mm.
POIDS : 2,91 kg.
RADIO :
PLAGE DE FREQUENCES : FM 87,5 MHz – 108 MHz.
DISQUES COMPACTS
DISQUES COMPATIBLES : DISQUES CD-DA, CD-ROM, CD-R, CD-RW.
FORMATS SUPPORTES : ISO9660, UDF.
DECODAGE MP3 :
FICHIERS : MPEG 1/2 Layer3 [.mp3] [.mp3].
DEBIT BINAIRE (kb/s) : Constant de 8-320 et VBR (débit variable).
AFFICHAGE DES BALISES ID3 : V2.4, V2.3, V2.2, V2.1, V1.x.
NOMBRE MAXIMAL DE FICHIERS : 256/511 (Répertoire/ Répertoire + Fichiers)
NOM DU REPERTOIRE/FICHIER : 30/30 (nombre maximal d’octets).
Balises ID3 (Titre/Artiste/Album) : 30/30 (nombre maximal d’octets).
DECODAGE WMA (OPTIONNEL)
FICHIERS : Windows Media Audio [.wma] [.WMA].
FREQUENCE D’ECHANTILLONNAGE (KHz) : 48, 44.1, 32, 22.05, 16, 11.025, 8
DEBIT BINAIRE (kb/s) : 32-192
NOMBRE MAXIMAL DE FICHIERS : 256/511 (Répertoire/ Répertoire + Fichiers).
NOM DU REPERTOIRE/FICHIER : 30/30 (nombre maximal d’octets).
Balises ID3 (Titre/Artiste/Album) : 30/30/30 (nombre maximal d’octets).
CONNECTEUR D’ENTREE AUDIO AUXILIAIRE
PLAGE DE TENSIONS D'ENTREE : 350 mV – 500 mV.
IMPEDANCE : 47 kΩ
**LES CARACTERISTIQUES TECHNIQUES SONT SOUS RESERVE DE CHANGEMENT SANS PREAVIS**
Si vous s ouhai tez vou s déb arras ser ult érieu rem ent du pr oduit , veuil lez n oter qu e: les dé chets
élect rique s ne doiv ent p as être j etés av ec les dé che ts dome stiqu es. Veui lle z les fai re dépo ser
dans le s centr es de rec ycl age exi stant s. Cont act ez les au torié s local es ou d istri buteu rs pour
obtrn ir de plu s ample s inf ormat ions. ( Direc tiv e de I’éq uipem ent éle ctr oniqu e et des dé chets
élect rique s).
FR-7
Page 33

Mci-210
SISTEMA DVD MICRO HI-FI
CON BASE PARA iPod/iPhone,
REPRODUCTOS CD/MP3,RADIO PLL FM,
USB Y LECTOR TARJETAS
Para obtener información y apoyo, www.lenco.eu
iPod/iPhone mostrado no incluido
IPod e iPhone son marcas registradas de Apple Inc., registradas en EE. UU. y en otros países.
“Made for iPod” y “Made for iPhone” significan que un accesorio electrónico ha sido diseñado para conectarse
específicamente con un iPod o un iPhone respectivamente, y que ha sido certificado por el fabricante para cumplir con los
estándares de rendimiento de Apple.
Apple no es responsable por el funcionamiento de este dispositivo ni por su cumplimiento de estándares de seguridad y
regulatorios.
Por favor tome en cuenta que el uso de este accesorio con un iPod o iPhone podría afectar el rendimiento inalámbrico.
MANUAL DE INSTRUCCIONES
Page 34

PRECAUCIONES DE SEGURIDAD
Para obtener lo máximo en disfrute y rendimiento, y para familiarizarse con sus características, por favor lea este manual
con detenimiento antes de intentar utilizar la unidad.
Estas instrucciones de seguridad y funcionamiento deben conservarse para futuras consultas.
El aparato no debe exponerse a goteos ni salpicaduras y ningún objeto con líquido, como un jarrón, debe colocarse encima del
aparato. Evite instalar la unidad en los siguientes lugares:
* - Lugares expuestos a luz solar directa o cerca de aparatos que irradien calor como calentadores eléctricos o encima de otros
equipos estéreos que irradien demasiado calor.
* - Lugares que bloqueen la ventilación o lugares polvorientos.
* - Lugares sujetos a vibraciones constantes; lugares húmedos o mojados.
No debe colocarse ninguna fuente de llama descubierta como velas encendidas sobre la unidad.
Debe prestarse atención a los aspectos ambientales de la eliminación de baterías.
Asegúrese de no obstruir las aberturas de ventilación, debe conservarse un mínimo de 10 cm alrededor del aparato para su
ventilación.
La ventilación no deberá impedirse cubriendo las aberturas de ventilación con artículos como periódicos, manteles, cortinas, etc.
Use el aparato únicamente en climas moderados.
Use los controles de sintonización y los interruptores como se indica en el manual.
Antes de encenderlo por primera vez, asegúrese de que el cable de alimentación esté correctamente instalado.
Guarde su CD en un lugar fresco para evitar daños por el calor.
El cable de alimentación se usa como mecanismo de desconexión y debe permanecer fácilmente utilizable. Para desconectar
completamente la entrada de corriente, el cable de alimentación debe desconectarse de la toma de corriente.
El funcionamiento normal del aparato podría ser afectado por interferencias electromagnéticas fuertes. En este caso, simplemente
reinicie el producto para reanudar el funcionamiento normal, como se indica en el instructivo. En caso de que no pueda reanudarse
su funcionamiento, por favor use el producto en otra ubicación.
No intente quitar ningún tornillo ni abrir la carcasa de la unidad; no hay partes reparables por el usuario dentro, refiera todo servicio
a personal de servicio calificado.
Notas importantes
PRECAUCIÓN: PARA REDUCIR EL RIESGO DE DESCARGA ELÉCTRICA, NO QUITE LA CUBIERTA (NI PARTE
TRASERA), NO HAY PARTES REPARABLES POR EL USUARIO DENTRO, REFIERA LOS TRABAJOS DE
SERVICIO A PERSONAL CALIFICADO.
TENSIÓN PELIGROSA
Hay tensión peligrosa presente dentro de la carcasa del producto que puede ser de magnitud suficiente como
para constituir un riesgo de descarga eléctrica para las personas.
ATENCIÓN
El manual del usuario contiene importantes instrucciones de funcionamiento y mantenimiento; es necesario que
consulte el manual por su seguridad.
ADVERTENCIA: PARA PREVENIR RIESGOS DE INCENDIO Y DESCARGA ELÉCTRICA, NO EXPONGA ESTE
APARATO A GOTEOS NI SALPICADURAS.
Nota: Esta unidad se calentará cuando se use durante un periodo de tiempo extendido. Esto es normal y no indica un
problema con la unidad. Esta unidad incluye microprocesadores que podrían fallar como resultado de una
interferencia/ruido eléctrico externo o una descarga electroestática. Si la unidad no funciona correctamente, desconecte la
fuente de alimentación y después vuélvala a conectar.
CARACTERÍSTICAS Y CONTROLES
ES-1
Page 35

CARACTERÍSTICAS Y CONTROLES
1. PUERTA CD
2. PUERTA CD OPEN/CLOSE (táctil)
3. SELECT/REPEAT (táctil)
4. VOLUME + (táctil)
5. VOLUME – (táctil)
6. TOMA PARA AURICULARES
7. SENSOR IR
8. PANTALLA LCD
9. SKIP I◄◄ / TUNE▼(táctil)
10. SKIP ►►I / TUNE▲(táctil)
11. PLAY/PAUSE (táctil)
12. STOP/MENU (táctil)
13. CLOCK/DISPLAY (táctil)
14. IPod/CD (táctil)
15. TUNER (táctil)
16. AUX/USB/SD (táctil)
17. STANDBY/ON (táctil)
18. IPod DECK
19. CABLE ANTENA FM
20. ENTRADA AUX IN (DERECHA)
21. ENTRADA AUX IN (IZQUIERDA)
22. TERMINALES DE ALTAVOCES
23. PUERTA DE BATERÍAS
24. CABLE AC
25. ENTRADA DE DISPOSITIVO USB
26. RANURA PARA TARJETAS SD
MANDO A DISTANCIA
1. BOTÓN STANDBY/ON
2. BOTÓN iPod/CD
3. BOTÓN BACKLIGHT
4. BOTÓN PLAY/PAUSE
5. BOTÓN I◄◄
6. BOTÓN STOP/MENU
7. BOTÓN RANDOM
8. BOTÓN PROGRAM
9. BOTÓN PS/FOL/MENU ▼
10. BOTÓN X-BASS
11. BOTÓN VOLUME+
12. BOTÓN EQ
13. BOTÓN VOLUME-
14. BOTÓN OPEN/CLOSE
15. BOTÓN AUX/USB/SD
16. BOTÓN TUNER
17. BOTÓN CLOCK/DISPLAY
18. BOTÓN ►►I
19. BOTÓN SELECT/REPEAT
20. BOTÓN INTRO
21. BOTÓN PS/FOL/MENU ▲
22. BOTÓN SLEEP
23. BOTÓN TIMER
24. BOTÓN SURROUND
25. BOTÓN MUTE
COLOCAR LA BATERÍA EN EL MANDO A DISTANCIA
1. Presione el compartimiento de baterías suavemente conforme a la
dirección indicada en la ilustración.
2. Deslice para abrir el compartimiento de baterías.
3. Inserte la batería CR2032 provista en el compartimiento de acuerdo a las
marcas de polaridad (“+” y “-”) dentro del compartimiento y en la batería.
Vuelva a colocar el compartimiento hasta hacer clic.
NOTA: Saque la batería del mando a distancia si dejará de usarlo durante
mucho tiempo. Cámbiela por una batería nueva cuando la batería se debilite, d
e
lo contrario el mando a distancia no funcionará correctamente.
CONTROL SENSIBLE AL TACTO
La unidad utiliza una tecnología sensible al tacto humano; los controles del panel frontal están diseñados como botones
táctiles; podrá utilizar la unidad con las yemas de sus dedos. Los puntos luminosos azules del panel frontal del CD
parpadearán cada vez que realice una operación táctil.
FIJAR LA HORA
Cuando la unidad se haya encendido por primera vez, estará en el modo de suspensión, la pantalla mostrará la hora y
parpadeará. Para fijar la hora, asegúrese de que la unidad esté en el modo de suspensión.
1. Fijar el formato de visión de hora – Continúe pulsando el botón táctil CLOCK/DISPLA Y del panel frontal hasta que
la pantalla muestre “12 HR” o “24 HR”, después toque el botón I◄◄ o ►►I para seleccionar el formato de hora de
“12 HR” (12 horas) o de “24 HR” (24 horas); cuando el formato deseado aparezca en pantalla, toque
CLOCK/DISPLAY para confirmar. (F. 1)
2. Después de fijar el formato de hora, la pantalla mostrará la hora con los dígitos de las horas parpadeando. Toque el
botón I◄◄ o ►►I para fijar la hora correcta, después toque CLOCK/DISPLAY para confirmar, primero fije las
horas y después los minutos, cuando la pantalla muestre la hora correcta, toque CLOCK/DISPLAY de nuevo para
confirmar, el ajuste de hora se habrá completado. (F. 2) (F. 3)
3. La hora se muestra durante la suspensión de la unidad. Para ver la hora durante el funcionamiento de la unidad,
toque repetidamente CLOCK/DISPLAY hasta que la pantalla muestre la hora, que se mostrará durante 5 segundos.
OÍR LA RADIO
Cuando la unidad se encienda por vez primera del estado de suspensión, entra automáticamente al modo de radio FM.
Deberá extender el cable antena FM ubicado en la parte trasera de la unidad por completo y ajustar su posición y
dirección hasta encontrar la mejor recepción.
Para seleccionar el modo de radio durante otros modos de funcionamiento, toque el botón táctil TUNER del panel frontal,
la pantalla mostrará la frecuencia FM. (F. 4)
ES-2
Page 36

Sintonización manual
Podrá usar la sintonización manual para sintonizar estaciones débiles o su frecuencia deseada.
1. Toque repetidamente el botón I◄◄ o ►►I hasta leer la frecuencia correcta o que la recepción esté inmejorable.
2. La pantalla mostrará el icono de estéreo “
” si se está recibiendo una estación FM estéreo. (F. 5)
Sintonización automática
1. Continúe tocando el botón I◄◄ o ►►I hasta que empiece a buscar hacia arriba o abajo; se buscará
automáticamente hasta encontrar la primera estación con suficiente fuerza de señal.
2. Repita el procedimiento anterior si quiere seleccionar otra estación.
Preprogramar estaciones (mando a distancia únicamente)
Podrá preprogramar estaciones a su elección y guardar hasta 30 estaciones FM en la memoria.
1. Pulse el botón TUNER del mando para seleccionar el modo de radio, después sintonice la estación deseada.
2. Pulse el botón PROGRAM del mando una vez, la pantalla mostrará “01” y parpadeará, pulse los botones
PS/FOL/MENU +/- del mando para seleccionar el número de preprogramación. (F. 6)
3. Cuando el número de preprogramación deseado aparezca, pulse el botón PROGRAM de nuevo para confirmar su
selección, la estación actual se guardará en su número de preprogramación deseado.
4. Repita los pasos anteriores para preprogramar más estaciones o para cambiar una estación preprogramada.
Guardar una estación nueva en un número de preprogramación borrará la última estación guardada en ese número.
Sintonizar estaciones preprogramadas (mando a distancia únicamente)
1. Pulse el botón TUNER del mando para seleccionar el modo radio.
2. Pulse los botones PS/FOL/MENU +/- del mando para seleccionar la estación preprogramada deseada, la pantalla
mostrará el número de estación preprogramada y la frecuencia.
OÍR DISCOS COMPACTOS
NOTA: Aunque este reproductor CD/MP3 puede leer discos CD-R y CD-RW además de discos CD normales, la
reproducción de discos CD-R y CD-RW podría ser afectada por el tipo de software utilizado para crear los discos, así
como por la calidad y las condiciones del medio utilizado; no se puede garantizar una reproducibilidad del 100%. Esto no
significa que el reproductor tiene un problema.
IMPORTANTE: ESTE MODELO TIENE UNA PUERTA CD MOTORIZADA. NO INTENTE ABRIR LA PUERTA
MANUALMENTE. ESTO PODRÍA DAÑAR EL MECANISMO DE APERTURA DE LA PUERTA.
Reproducir el CD entero
1. Cuando la unidad esté encendida, toque el botón CD para seleccionar la función CD. La pantalla mostrará primero
“CD” y después “No DISC” para indicar que no hay disco en el reproductor. (F. 7)
2. Toque el botón OPEN/CLOSE para abrir la puerta CD, la pantalla mostrará “OPEN”.
3. Cargue el disco con el lado de la etiqueta hacia arriba y después vuelva a tocar el botón OPEN/CLOSE para cerrar
la puerta CD. La pantalla mostrará primero “READING” y después el número total de pistas y tiempo. (F. 8)
4. Para iniciar la reproducción desde el principio, toque el botón►/ II. Si se está reproduciendo un disco MP3, “MP3”
se mostrará en pantalla. (F. 9)
5. Para interrumpir la reproducción, toque el botón►/ II; el tiempo transcurrido en pantalla parpadeará.
6. Para reanudar la reproducción, vuelva a tocar el botón►/ II.
7. Para detener la reproducción, toque el botón ■.
Seleccionar una pista diferente durante la reproducción
1. Durante la reproducción, toque repetidamente el botón I◄◄ o ►►I hasta ver la pista deseada en la pantalla;
la reproducción empezará desde esta pista.
2. Si se está reproduciendo un disco MP3, la pantalla mostrará la etiqueta ID3 de estar disponible.
3. Para seleccionar otras carpetas del disco MP3, pulse los botones PS/FOL/MENU +/- del mando.
4. Para reproducir la siguiente pista, toque el botón ►►I una vez.
5. Para reproducir la pista actual desde el principio, toque el botón I◄◄ una vez.
6. Para reproducir la pista anterior, toque el botón I◄◄ dos veces.
ES-3
Page 37

Reproducción repetida
Durante la reproducción normal, podrá tocar el botón REPEAT para seleccionar la función de reproducción repetida:
1. Para repetir una pista, toque el botón REPEAT una vez, la pantalla mostrará “REPEAT”. (F. 10)
2. Si está reproduciendo un disco MP3, aparecerá la opción adicional “
3. Para repetir el disco entero, toque el botón REPEAT de nuevo, la pantalla mostrará “
4. Para cancelar la reproducción repetida, pulse repetidamente el botón REPEAT hasta que “REPEAT” desaparezca de la
pantalla.
Reproducción aleatoria (mando a distancia únicamente)
Podrá pulsar el botón RANDOM del mando a distancia para seleccionar la función de reproducción aleatoria:
1. Con el CD detenido, pulse el botón RANDOM una vez para seleccionar la reproducción aleatoria, la pantalla mostrará
“RANDOM”, una pista se seleccionará al azar y empezará a reproducirse. (F. 12)
2. Durante la reproducción, primero pulse el botón RANDOM una vez, la pantalla mostrará “RANDOM”, después pulse el botón
I◄◄ o ►►I, se seleccionará una pista aleatoriamente y empezará a reproducirse.
3. Para reanudar la reproducción normal, pulse el botón RANDOM de nuevo hasta que “RANDOM” desaparezca.
Reproducción intro (mando a distancia únicamente)
1. Pulse el botón INTRO del mando a distancia para empezar la reproducción intro. La pantalla mostrará “INTRO” y empezará a
reproducir los primeros 10 segundos de cada pista. (F. 13)
2. Para reanudar la reproducción normal, pulse el botón INTRO de nuevo, “INTRO” desaparecerá de la pantalla.
Reproducción programada (mando a distancia únicamente)
Podrá usar la función de reproducción programada para reproducir hasta 60 pistas de un disco en cualquier orden deseado.
También podrá programar una pista específica para que se reproduzca varias veces en una secuencia programada.
1. Cargue un disco como siempre y espere hasta que la pantalla muestre el número total de pistas del disco.
2. Asegúrese de estar con el CD detenido, pulse el botón PROGRAM del mando a distancia una vez y la pantalla mostrará
“MEMORY” y “P-01”. (F. 14)
3. Pulse el botón I◄◄ o ►►I para seleccionar el número de la primera pista a programar. Cuando el número de la pista
deseada aparezca en pantalla, pulse el botón PROGRAM para confirmar y se habrá programado la primera pista a
reproducirse. El número de programación avanzará a “P-02” y estará listo para la siguiente introducción.
4. Si se cargó un disco MP3, aparecerá un opción adicional de “carpeta” antes de la selección de pista, pulse los botones
PS/FOL/MENU +/- para seleccionar la carpeta.
5. Repita los pasos anteriores para programar otras pistas, se pueden programar un máximo de 60 pistas. Cuando haya
completado la programación, pulse el botón ►/ II para iniciar la reproducción programada, la reproducción se empezará
desde la primera pista que programó y continuará hasta reproducir la última pista. La pantalla mostrará “MEMORY”. (F. 15)
6. Cuando se haya completado la reproducción programada, el reproductor se detendrá y “MEMORY” se mostrará. El
reproductor continuará en el modo de programación. Pulse el botón ►/ II para reproducir el orden programado nuevamente.
7. Para borrar la programación, con el CD detenido, pulse el botón ■ una vez; en el modo de reproducción CD, pulse el botón
■ dos veces. “MEMORY” desaparecerá.
”. Esto repetirá la carpeta actual.
”. (F. 11)
Repetición de la reproducción programada
Podrá usar las funciones de reproducción programada y repetida de forma conjunta para repetir una secuencia
programada. Primero use el mando a distancia para programar las pistas deseadas, y cuando empiece la reproducción
programada, toque el botón REPEAT para seleccionar repetir la pista actual o la secuencia programada entera.
OÍR SU IPOD E IPHONE
Esta unidad incluye una función de dock para iPod/iPhone. Las canciones favoritas de su iPod/iPhone podrán
reproducirse en esta unidad.
1. Para seleccionar la función de iPod, toque repetidamente el botón iPod/CD hasta que la pantalla muestre “No iPod”.
2. Despliegue la estación dock para iPod ubicado en el lado frontal derecho debajo de la pantalla e instale un
adaptador que coincida con el modelo iPod/iPhone en la bandeja dock.
3. Inserte su iPod/iPhone en la bandeja dock, la pantalla mostrará “iPod” y ahora podrá utilizar su iPod.
4. Para iniciar o interrumpir la reproducción, toque►/ II. (F. 16)
5. Para saltar pistas hacia delante o atrás durante la reproducción, toque el botón I◄◄ o ►►I.
6. Para seleccionar el menú del iPod, pulse el botón MENU del mando.
7. Para desplazarse verticalmente por los menús iPod, pulse los botones PS/FOL/MENU +/- del mando.
8. Para confirmar una seleccione en el menú del iPod, pulse el botón SELECT del mando.
CARGAR SU IPOD E IPHONE
Podrá cargar su iPod o iPhone vía bandeja dock ya sea en suspensión o durante el funcionamiento; el iPod o iPhone se
cargará automáticamente cuando esté conectado.
ES-4
Page 38

REPRODUCCIÓN MP3 USB/TARJETAS SD/MMC
1. Para seleccionar la función USB o SD/MMC, toque repetidamente el botón AUX/USB/SD hasta que la pantalla
muestre “USB” o “SD CARD”. (F. 17) (F. 18)
2. Inserte su dispositivo USB en el puerto USB o su tarjeta SD/MMC en la ranura para tarjetas.
3. La pantalla mostrará primero “READING” y después el número total de carpetas y pistas.
4. Para empezar la reproducción desde la primera carpeta y pista, toque el botón►/ II. La pantalla mostrará el número
de carpeta/pista, el tiempo y la etiqueta ID3 de estar disponible.
5. Para interrumpir la reproducción, toque el botón►/ II, el tiempo transcurrido parpadeará en la pantalla.
6. Para reanudar la reproducción, toque el botón ►/ II de nuevo.
7. Para reproducir el archivo/pista siguiente, toque el botón ►►I una vez.
8. Para reproducir archivo/pista actualmente reproducido desde el principio, toque el botón I◄◄ una vez.
9. Para reproducir el archivo/pista anterior, toque el botón I◄◄ dos veces.
10. Para seleccionar una carpeta distinta del dispositivo, pulse el botón PS/FOL/MENU +/- del mando.
11. Para detener la reproducción, toque el botón
■.
NOTA: Debido a compatibilidad de hardware y software, algunos tipos de tarjetas “Dual Voltage-MMC” o “MMC-Plus”
podrían no admitirse.
ENTRADA AUX
Las entradas RCA AUX IN están ubicadas en la parte trasera de la unidad. Señales de audio analógicas de otras fuentes
pueden transmitirse al sistema a través de estas entradas.
1. Use un cable RCA para conectar la entrada a una fuente de audio analógico.
2. Para seleccionar la función de entrada AUX, pulse repetidamente el botón AUX/USB/SD hasta que la pantalla
muestre “AUX”. (F. 19)
3. Ajuste el control de volumen hasta el nivel de salida de audio deseado.
TEMPORIZACIÓN DE APAGADO (mando a distancia únicamente)
Esta función le permite programar el sistema para que se apague tras un tiempo predeterminado. Podrá fijar el tiempo de
apagado en el modo de encendido:
1. Para activar la función de temporización, pulse el botón SLEEP del mando, la pantalla mostrará el icono de
temporizador “
” y “90” parpadeando.
2. Pulse repetidamente el botón SLEEP para seleccionar el tiempo de apagado, cambiará en secuencia con cada
pulsación:
3. Cuando la pantalla muestre el tiempo deseado, suelte el botón y el temporizador se habrá activado. El icono del
temporizador en la pantalla permanecerá encendido. Cuando el temporizador llegue a cero, la unidad se apagará. (F. 20)
4. Para cancelar la temporización, pulse el botón SLEEP una vez de nuevo, la pantalla mostrará “SLP OFF” y el icono
de temporización desaparecerá.
HORA DE ENCENDIDO/APAGADO (mando a distancia únicamente)
Esta función le permite encender y apagar el sistema a la hora y en el modo deseados:
1. Pulse el botón TIMER del mando para activar/desactivar la función. La pantalla mostrará “
” para indicar que la
hora de encendido/apagado está activada.
2. Para fijar la hora de encendido, pulse y sostenga el botón TIMER del mando a distancia hasta que la pantalla
muestre “ON TIME”, la hora de encendido se mostrará y los dígitos de las horas parpadearán. (F. 21)
3. Pulse el botón
I◄◄ o ►►I para fijar la hora deseada, después pulse el botón TIMER para confirmar, primero fije las
horas y después los minutos, y la hora de encendido se habrá fijado.
4. Después pasará al fijado de hora de apagado, la pantalla mostrará “OFF TIME”, se mostrará la hora de apagado y
los dígitos de la hora parpadearán. Pulse el botón
I◄◄ o ►►I para fijar la hora deseada, después pulse el botón
TIMER para confirmar, primero fije las horas y después los minutos, y la hora de apagado se habrá fijado.
5. Finalmente pasará al ajuste de modo de encendido, pulse el botón
I◄◄ o ►►I para seleccionar el modo de
encendido iPod, CD, TUNER, AUX, USB o SD CARD. Después pulse el botón TIMER para confirmar. Ahora se
habrá completado el ajuste de las horas de encendido/apagado.
6. Los ajustes de encendido y apagado se mostrarán en los primeros segundos cada vez mientras esté activada la
función de encendido/apagado.
NOTA: En el formato de 12 horas, el segmento de la parte izquierda de los dígitos de la hora se iluminará para indicar AM
o PM – el superior es de AM y el inferior de PM.
ES-5
Page 39

PREECUALIZACIONES (mando a distancia únicamente)
Pulse el botón EQ del mando a distancia para seleccionar los distintos modos EQ, la pantalla mostrará los modos en
secuencia con cada pulsación:
SONIDO SURROUND (mando a distancia únicamente)
Pulse el botón SURROUND del mando a distancia para activar/desactivar el modo de sonido surround. La pantalla
mostrará “SURR ON” o “SURR OFF”. Cuando el modo surround esté activado, el efecto de sonido surround se activará y
el icono “
FUNCIÓN X-BASS (mando a distancia únicamente)
Pulse el botón X-BASS del mando a distancia para activar/desactivar esta función. La pantalla mostrará “BASS ON” o
“BASS OFF”. Cuando los graves X-BASS estén activados, el sonido de los graves se mejorará y el icono “
mostrará.
CONTROL DE LUZ DE FONDO (mando a distancia únicamente)
Cuando la unidad esté encendida, pulse el botón BACKLIGHT del mando a distancia para activar y desactivar la luz de
fondo de la pantalla.
TOMA PARA AURICULARES
La toma para auriculares estéreos está ubicada en el lado izquierdo del panel frontal. Conecte un juego de auriculares
estéreos (no incluidos) con esta toma para oír en privado. Cuando se usen auriculares, los altavoces se desconectarán
automáticamente.
IMPORTANTE: Cuando use auriculares siempre fije el volumen a un nivel bajo antes de colocárselos, después colóquese
los auriculares y aumente el volumen gradualmente hasta un nivel confortable.
RESPALDO DE MEMORIA
Esta unidad incorpora un circuito de batería de respaldo que conservará el reloj andando en caso de un corte eléctrico
temporal.
Inserte 2 x baterías 1.5V UM-4 AAA o equivalentes en el compartimiento localizado en la parte trasera de la carcasa. Para
los mejores resultados, cámbielas por unas baterías nuevas cada 9 a 12 meses. No mezcle en un uso conjunto baterías
viejas y nuevas o distintos tipos como alcalinas y de carbono-zinc.
VENTANA DE VISUALIZACIÓN LCD
” se mostrará.
” se
a. INDICADOR DE CARPETA MP3
b. INDICADOR FM ESTÉREO
c. INDICADOR DE HORA DE ENCENDIDO/APAGADO
d. INDICADOR DE TEMPORIZADOR DE APAGADO
e. INDICADOR EQ
f. INDICADOR DE BANDA/NÚMERO DE PISTA/FRECUENCIA/HORA
DISCOS COMPACTOS
1. Siempre use discos compactos con el logotipo mostrado aquí.
ES-6
Page 40

2. Notas sobre el manejo de discos.
Sacar el disco de su caja
* No toque la superficie grabada.
* No pegue papeles ni escriba nada sobre la
superficie.
* No doble el disco.
3. Almacenamiento
* Guarde el disco en su caja.
* No exponga discos a luz solar directa ni a temperaturas elevadas, humedad elevada o lugares polvorientos.
4. Limpiar un disco
* Si el disco se ensucia, limpie el polvo, la suciedad
y las huellas con un paño suave.
* El disco deberá limpiarse del centro afuera.
* Nunca use benceno, disolventes, líquidos
limpiadores de discos ni aerosoles antiestáticos.
* Asegúrese de cerrar la puerta CD para que la
lente no se contamine con polvo.
* No toque la lente.
ESPECIFICACIONES
SUMINISTRO ELÉCTRICO: 100-240V~60/50Hz
POTENCIA DE SALIDA: 10W X2
DIMENSIONES DE LA UNIDAD: 300(A) x 128(F) X 198(L) mm
DIMENSIONES DE ALTAVOCES: 91(A) x 128(F) X 198(L) mm
PESO: 2.91 kg
SECCIÓN DE RADIO
GAMA DE FRECUENCIAS: FM 87.5-108 MHz
SECCIÓN CD
MEDIOS CD: CD-DA, CD-ROM- CD-R, CD-RW
FORMATOS ADMITIDOS: ISO9660, UDF
DESCODIFICACIÓN MP3
ARCHIVO: MPEG 1/2 Layer3 [.mp3] [.MP3]
FRECUENCIA DE MUESTREO (KHz): 48, 44.1, 32, 24, 22.05, 16, 11.025, 8
TASA DE BITS (kbps): 8-320 constante y VBR (tasa de bits variable)
ETIQUETA ID3: V2.4, V2.3, V2.2, V2.1, V1.x
MÁX. NÚM. DE ARCHIVOS: 256/511 (Dir/Dir+Archivo)
NOMBRE DE CARPETA/ARCHIVO: 30/30 (máx. núm. de bytes)
Título/artista/álbum ID3: 30/30/30 (máx. núm. de bytes)
DESCODIFICACIÓN WMA (OPCIONAL)
ARCHIVO: Windows Media Audio 9 [.wma [.WMA]
FRECUENCIA DE MUESTREO (KHz): 48, 44.1, 32, 22.05, 16, 11.025, 8
TASA DE BITS (kbps): 32-192
MÁX. NÚM. DE ARCHIVOS: 256/511 (Dir/Dir+Archivo)
NOMBRE DE CARPETA/ARCHIVO: 30/30 (máx. núm. de bytes)
Título/artista/álbum ID3: 30/30/30 (máx. núm. de bytes)
ENTRADA AUX
GAMA DE TENSIÓN DE ENTRADA: 350mV-500mV
IMPEDANCIA: 47Ω
**ESPECIFICACIONES SUJETAS A CAMBIO SIN NUEVO AVISO**
Si en el fu turo ne cesit a des hacer se de est e produ cto , tenga e n cuent a lo sigu ien te: no de be
desha cerse d e los res idu os de pro ducto s eléct ric os como s i fuera n resid uos d omést icos. P or
favor, r ecicl e en los si tio s en los qu e esto se a posib le. Ac uda a las a utori dades l oca les o al
vende dor en bu sca de as eso ramie nto sob re reci cla je. (Di recti va sobr e res iduos e léctr icos y
equip os elec tróni cos ).
ES-7
 Loading...