

Page 1
55.5cm (22”) Full HD LED TV WITH DVB-S
Model No.: LED-2215
For information and support, www.lenco.eu
Page 2

Contents
1-3 SAFETY INFORMATION
Product Introduction4
4
5
6
7
Front View
Connecting external devices
Remote Control
Basic Operation
8-15
8
10
11
12
13
14
15
16-18
19-21
OSD Menu
Channel menu
Picture menu
Sound menu
Time menu
Option menu
Lock menu
Hotel menu
Multimedia Operation
Recording Operation
22-36 DVBS Operation
37
38
TROUBLE SHOOTING GUIDE
TECHNICAL SPECIFICATIONS
Page 3
SAFETY INFORMATION
IMPORTANT SAFETY INSTRUCTIONS - READ CAREFULLY BEFORE USE.
Take note of the following safety information which appears on the back of the TV.
CAUTION TO PREVENT ELECTRICAL SHOCK, DO NOT REMOVE ANY
COVER SCREWS, NO USER SERVICEABLE PARTS INSIDE, REFER
SERVICING TO QUALIFIED SERVICE PERSONNEL.
This symbol indicates that there are important operating maintenance instructions in
the literature accompanying this unit.
This symbol indicates that dangerous voltage constituting a risk of electric shock is
present within this unit.
Keep these instructions
Do not use this TV near water.
Clean only with a slightly damp cloth.
Do not block any ventilation openings.
Install in accordance with the supplied Quick Start Guide and this User Guide.
Protect the power chord from being walked on or pinched, particularly at plugs, and the
point where it exits from the TV.
Do not allow the power chord to overhang the edge of a table.
Unplug this TV during lightening storms or when unused for long periods of time.
WARNING! TO REDUCE THE RISK OF FIRE OR ELECTRICAL SHOCK, DO NOT
EXPOSE THIS TV TO RAIN OR MOISTURE. THE TV MUST NOT BE EXPOSED
TO DRIPPING AND SPLASHING AND NO OBJECTS FILLED WITH LIQUIDS
SHOULD BE PLACED ON THE TV.
NOTE: No naked flames such as candles should be placed on the TV.
1
Page 4

IMPORTANT SAFETY INFORMATION (Continued)
This unit has been produced according to all current safety regulations. The following safety
tips should safeguard users against careless use and the dangers connected with such use.
Although this appliance has been carefully manufactured and rigorously checked
prior leaving the factory, as with all electrical appliances it is possible for problems to
develop. If you notice smoke, an excessive build up of heat or any other unexpected
phenomena, you should disconnect the plug from the mains power socket
immediately.
Ensure that the unit is sufficiently ventilated! Never place next to or underneath
curtains!
The mains plug or appliance coupler is used as the disconnect device, the disconnect
device shall remain readily operarble.
This set should only be connected to a mains power supply which matches that
stated on the label on the rear of the TV – do not attempt to connect it to any other
type of supply.
The socket – outlet must be installed near the equipment and easily accessible.
To prevent overload, don’t share the same mains supply socket with too many other
items of equipment.
Apparatus with Class 1 construction shall be connected to a mains socket outlet with
a protective earthing connection.
Keep away from rodents. Rodents enjoy biting into electric flexes.
Always hold the plug when pulling out the plug from the mains supply socket. Do not
pull on the flex, the flex can become overloaded and cause a short circuit.
Set up the unit so that no one is able to trip over the flex.
Do not place heavy items on the flex, which may damage it.
Take note that the flex cannot be reached and pulled by young children, avoiding
injury.
Do not set up the unit near to heat sources. The casing and the flex could be
damaged by the impact of heat.
The screen is made of plastic and can break if damage is done to it. Be careful when
collecting sharp edged plastic splinters to avoid injury.
Avoid placing the unit on any surfaces that may be subject to vibrations or shocks.
To protect the unit during a thunderstorm unplug the AC power cable and disconnect
the aerial. Caution: Do not touch the aerial (RF) connector.
When you leave your home for long periods of time, unplug the AC power cable for
safety reasons.
The unit becomes warm when in operation. Do not place any covers or blankets on
the unit in order to prevent overheating. The ventilation holes are not to be blocked.
Do not set up near radiators. Do not place in direct sunshine. When placing on a
shelf leave 5 cm (2”) free space around the whole unit.
Do not allow water or moisture to enter the TV. Do NOT use in wet or moist areas
such as Bathrooms, steamy kitchens or near swimming pools.
Do not use this unit when moisture condensation may occur
Any repairs must be carried out by qualified personnel only.
Do not open this unit. A non – expert attempting to repair the unit could be dangerous
and potentially cause a fire hazard.
2
Page 5

IMPORTANT SAFETY INFORMATION (continued)
Liquids spilt into the unit can cause serious damage. Switch the set OFF and
disconnect the mains power supply, then consult a qualified service person before
attempting to use the unit again.
Do NOT remove the safety covers. There are no useable or serviceable parts inside.
You may invalidate the warranty. Qualified personnel must only service this
apperatus.
Do NOT tap or shake the screen, you may damage the internal circuits. Take good
care of the remote control, do not drop.
Never place hot objects or open flame sources on or close to the TV.
High temperatures can melt plastic and lead to fires.
To clean the TV use a soft dry cloth. Do NOT use solvents or petrol based fluids. For
stubborn stains, you may use a damp cloth with dilute detergent.
Headphone Warning
Loud music can damage your hearing irreversibly, therefore do not set the volume to a high
level when listening through headphones, particularly for lengthy listening periods.
Where to install
Locate the television away from direct sunlight and strong lights, soft indirect lighting is
recommended for comfortable viewing. Use curtains or blinds to prevent direct sunlight
falling on the screen. Place the TV on a sturdy platform of which the surface should be flat
and steady. This will prevent it from falling over.
Make sure the television is located in a position where it cannot be pushed or hit by objects,
as pressure will break or damage the screen, and so that small objects cannot be inserted
into the ventilation slots or openings in the cabinet.
3
Page 6
Product Introduction
Front View
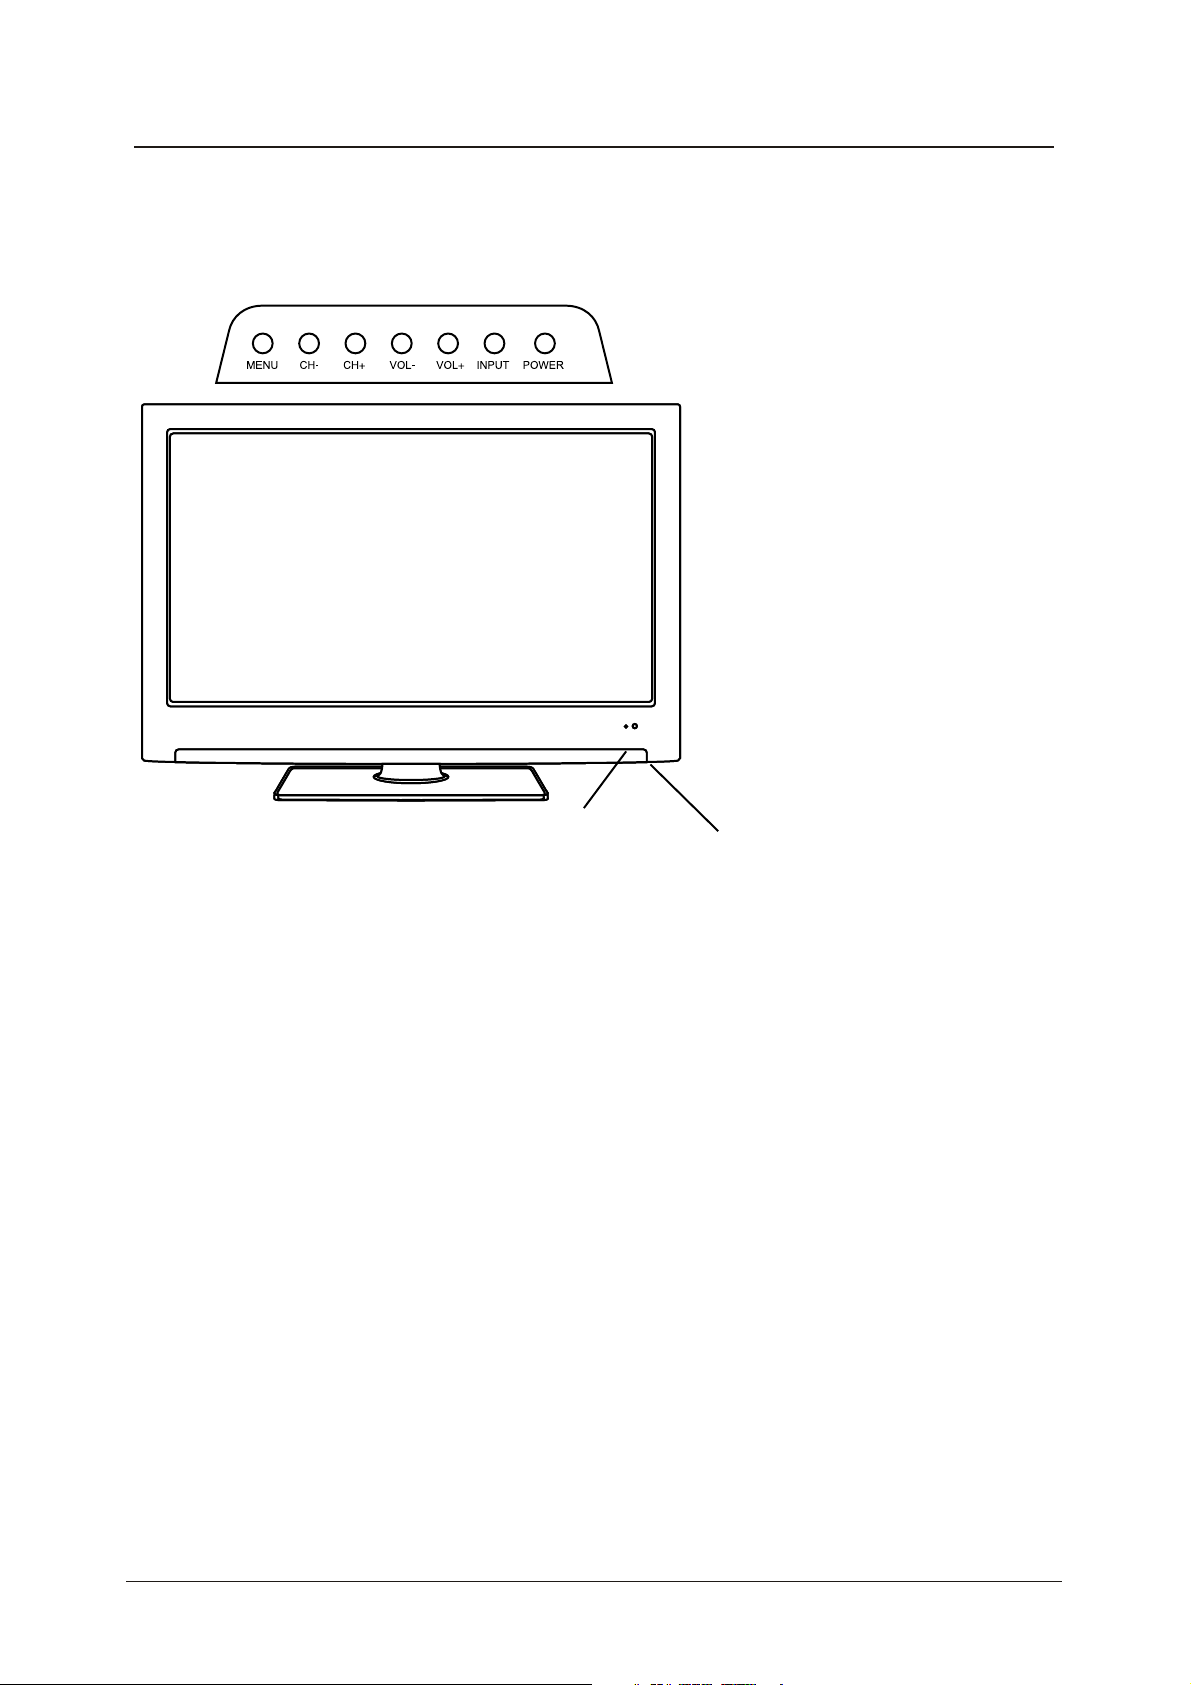
Led Indicator &
Remote Control window
(Keep clear)
SWITCH
Turn on/off the power supply.
The functions of the TV buttons are described below.
MENU Press to display the OSD menu, Press again to exit the menu. :
CH-/CH+: Press to scan through channels.
They are also can be used to move down/up in the OSD menu screen.
VOL-/VOL+: Press to adjust the volume.
They are also can be used to move left/right in the OSD menu screen.
VOL+ button can be used to skip forward to next menu.
INPUT: Press to select the source.
Power: Turn on/off the TV set.
4
Page 7
Connecting external devices (continued)
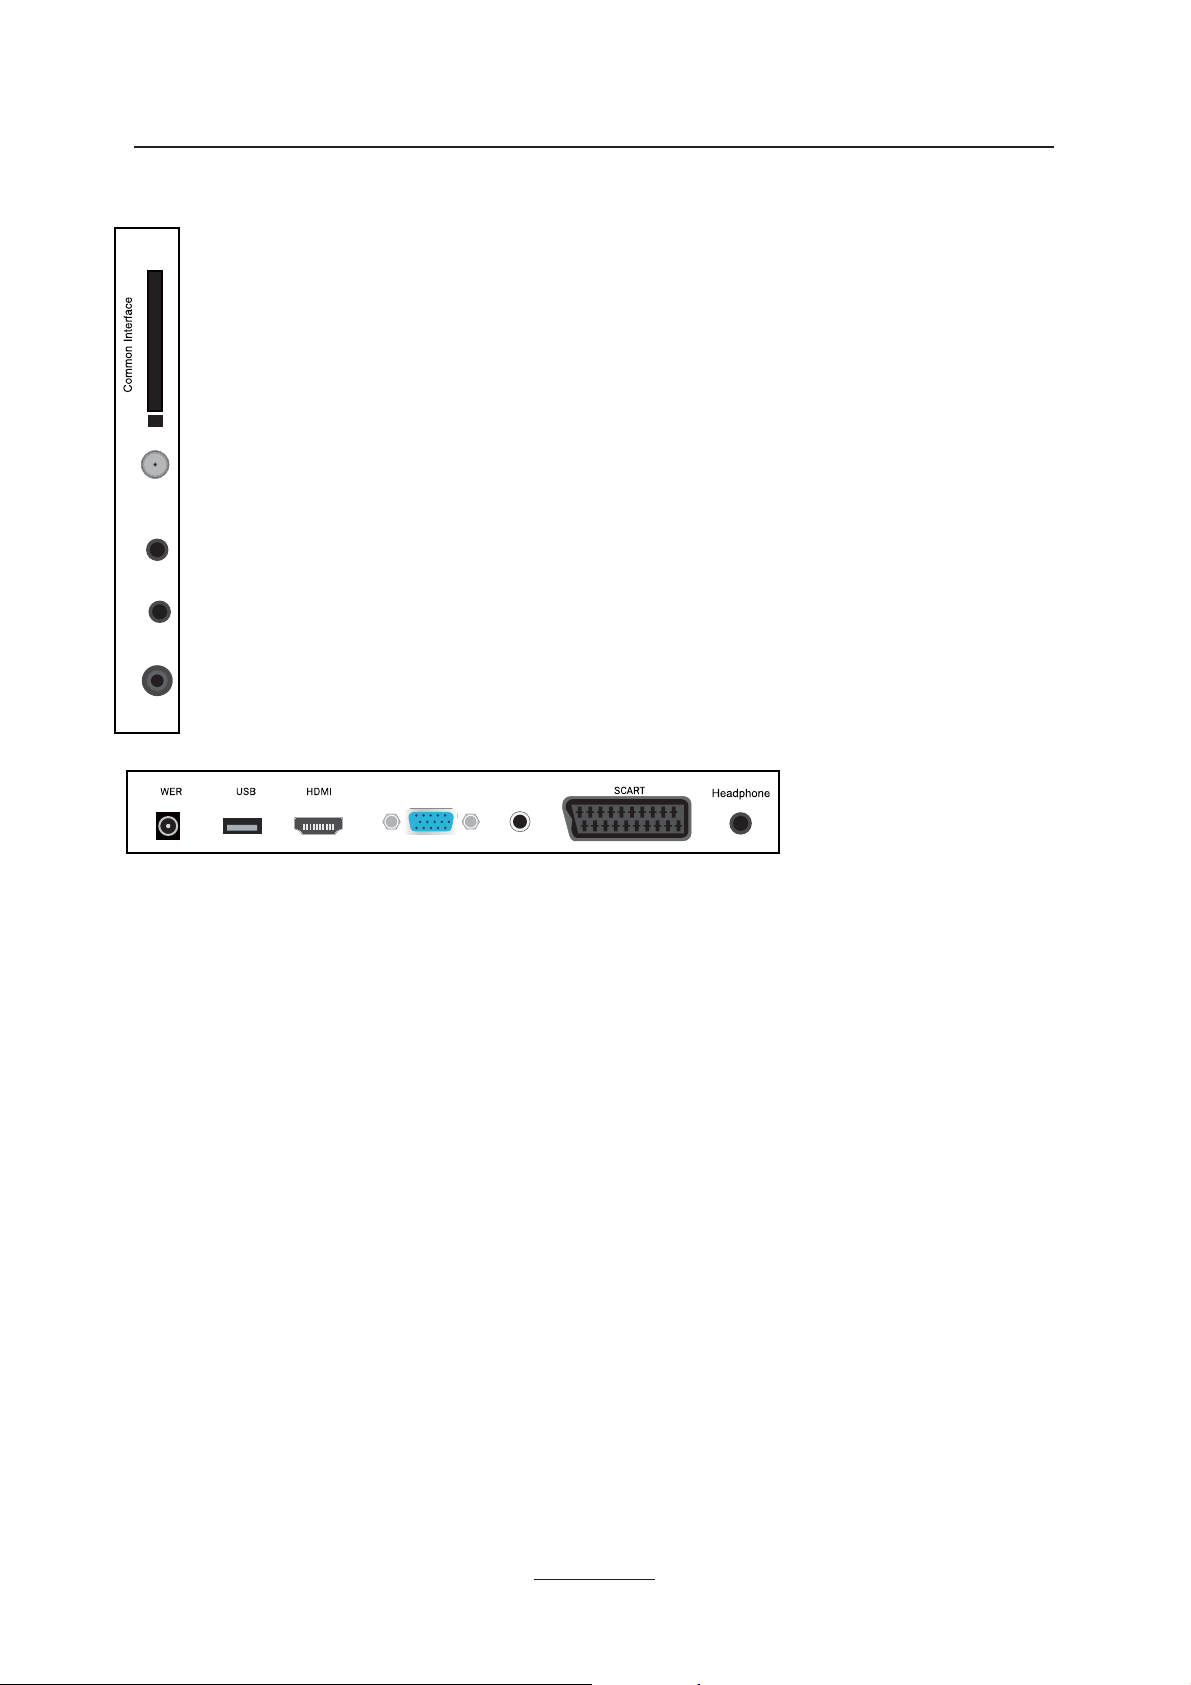
Common Interface: CI slot.
RF
RF: Connect antenna or cable 75 Ohm coaxial to receive TV signal.
MINI AV: Connect it to the audio & video output terminals of DVD with the Converter cable.
MINI AV
MINI YPbPr
Coax
(Audio terminals are shared with YPbPr)
MINI YPbPr: Connect it to the YPbPr video output terminal of DVD with the
Converter cable.
Coax: Digital audio output.
PO
VGA
PC-IN
POWER: Connect to the mains adaptor.
USB: USB jack for Multi-Media playback and PVR.(Do not use USB extension cable to connect any USB device.)
HDMI: Connect it to the HDMI of DVD or other equipment.
SCART: Connect them to the SCART video output terminal of DVD.(used in component source)
PC-IN: Connect it to the audio output terminal of PC.
VGA: For PC display.Connect it to the D-Sub 15 pins analog output connector of the PC.
Headphone: Connect it to your headphone or other audio equipment.
5
Page 8
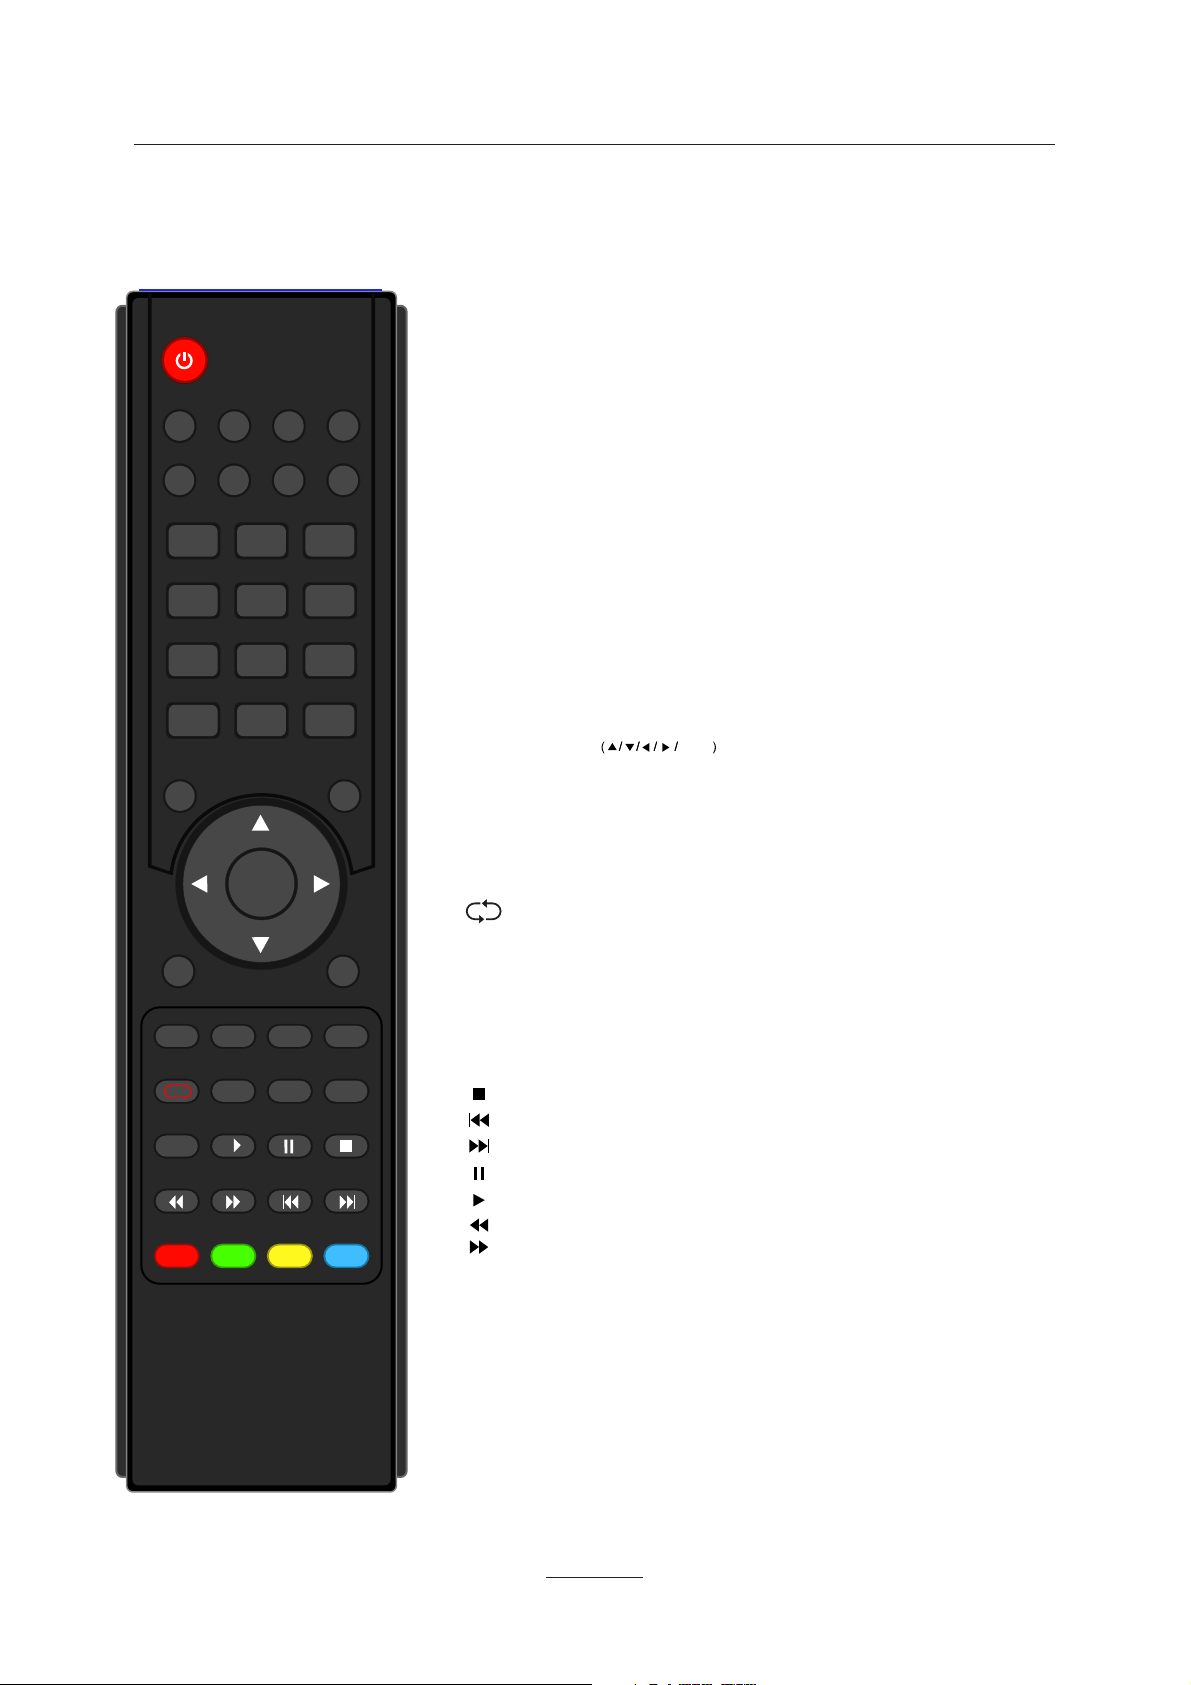
Remote control
The remote control is using Infra-Red(IR). Point it towards the front of the T V. The remote
control may not work correctly if it is operated out of range or out of angle.
POWER
PICTURE SOUND
SLEEP ASPECT MUTE
SUBTITLE
CH.List
INPUT
123
456
789
MENU EXIT
VOL+
0
CH+
OK
POWER: Turn the TV on/standby.
PICTURE: Select the picture mode.
SOUND: Select the sound mode.
CH/LIST: Display the programs list.
INPUT: Press to display the input source menu.
SLEEP: Standby timer.
ASPECT:Adjust picture size
SUBTITLE: Turn on/off the subtitle display in DTV mode
MUTE: Press to mute the sound, press again or press
VOL+ to unmute.
NUMBER BUTTONS
Press0-9 to select a TV channel directly when you
are watching TV.
MENU: System setup menu.
EXIT: Exit the OSD menu.
VOL+/- : Adjust the volume.
CH +/- : Scan through channels.
CURSOR KEYS OK
Allows you to navigate the on-screen menus and adjust the
system settings to your preference.
S-MENU: System setup menu.
AUDIO:
Shows the list of available languages for the channel you are watching.
INFO:Shows information of the current channel.
TXT: Turn off/on the Teletext display.
VOL-
AUDIO
S-MENU
FAV
REC
Timer List REC List
INFO
EPG
CH-
TXT
TV/RADIO
Return to the previous channel viewed.
FAV: Display the favorite program list.
EPG: To show the Electronic Program Guide during no-menu
state only in DTV mode.
TV/RADIO: Disc menu change between TV and Radio.
REC : Press to start record the program in DTV mode.
: Stop program.
: Previous chapter.
: Next chapter.
: Pause program.
: Play program.
: Fast reverse.
: Fast forward.
TIMER LIST: Display the REC schedule list or the reminder programe list.
REC LIST: Display the REC programs list.
6
Page 9
Basic Operation
Power on/off
1. Connect to the power supply with the power cord and turn on the switch
2. -To turn on the TV
Press POWER button on the TV or remote control.
-To turn off the TV
Press POWER button on the TV or remote control.
Input Source select
Press INPUT button on the TV set or remote control to display input
source menu, and use CH+/- button on the TV set or
on remote control to select the input source, press OK button on the
remote control to enter.
Note: Before you select the input source, make sure the
connections are prepared.
button
Basic Operation
Input Source
DTV
CADTV
ATV
SCART
YPBPR
DVB-S
PC
HDMI
AV
USB
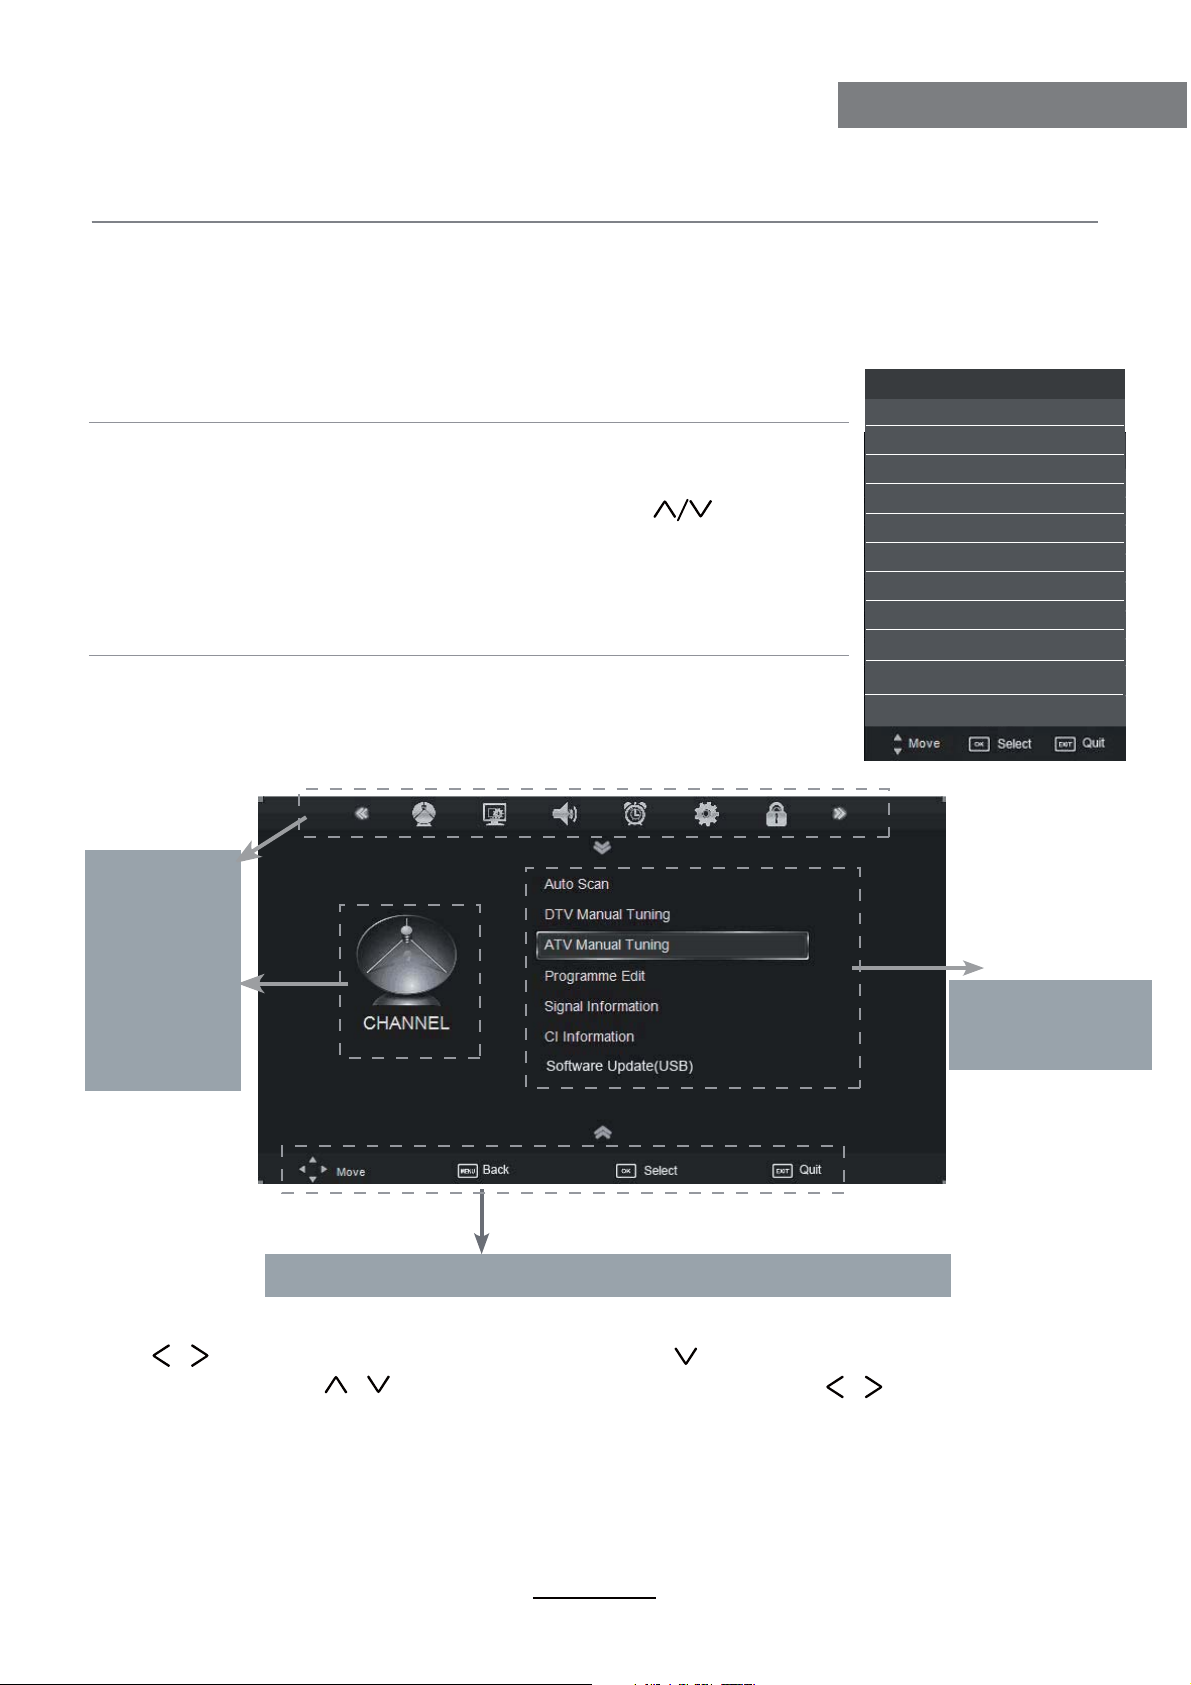
Basic OSD Menu operation
Press MENU button to display the OSD menu as below:
Main menu
CHANNEL
PICTURE
SOUND
TIME
OPTION
LOCK
Hint---you should operate the OSD menu according to the hint.
Submenu
(CHANNEL menu
for example)
Use /
In the submenu, use /
button to select the main menu, and press button to enter the submenu.
button to select the function item, press button to adjust/setup,
/
or press OK button to enter the submenu.
* (Press MENU button to return to the upper menu.)
* (Press EXIT button to exit the menu display.)
Note1: Only when you input the suitable signal, the relevant items can be activated
Note2: Please operating the OSD menu according to hint on the bottom of the banner.
7
Page 10
OSD Menu
OSD Menu
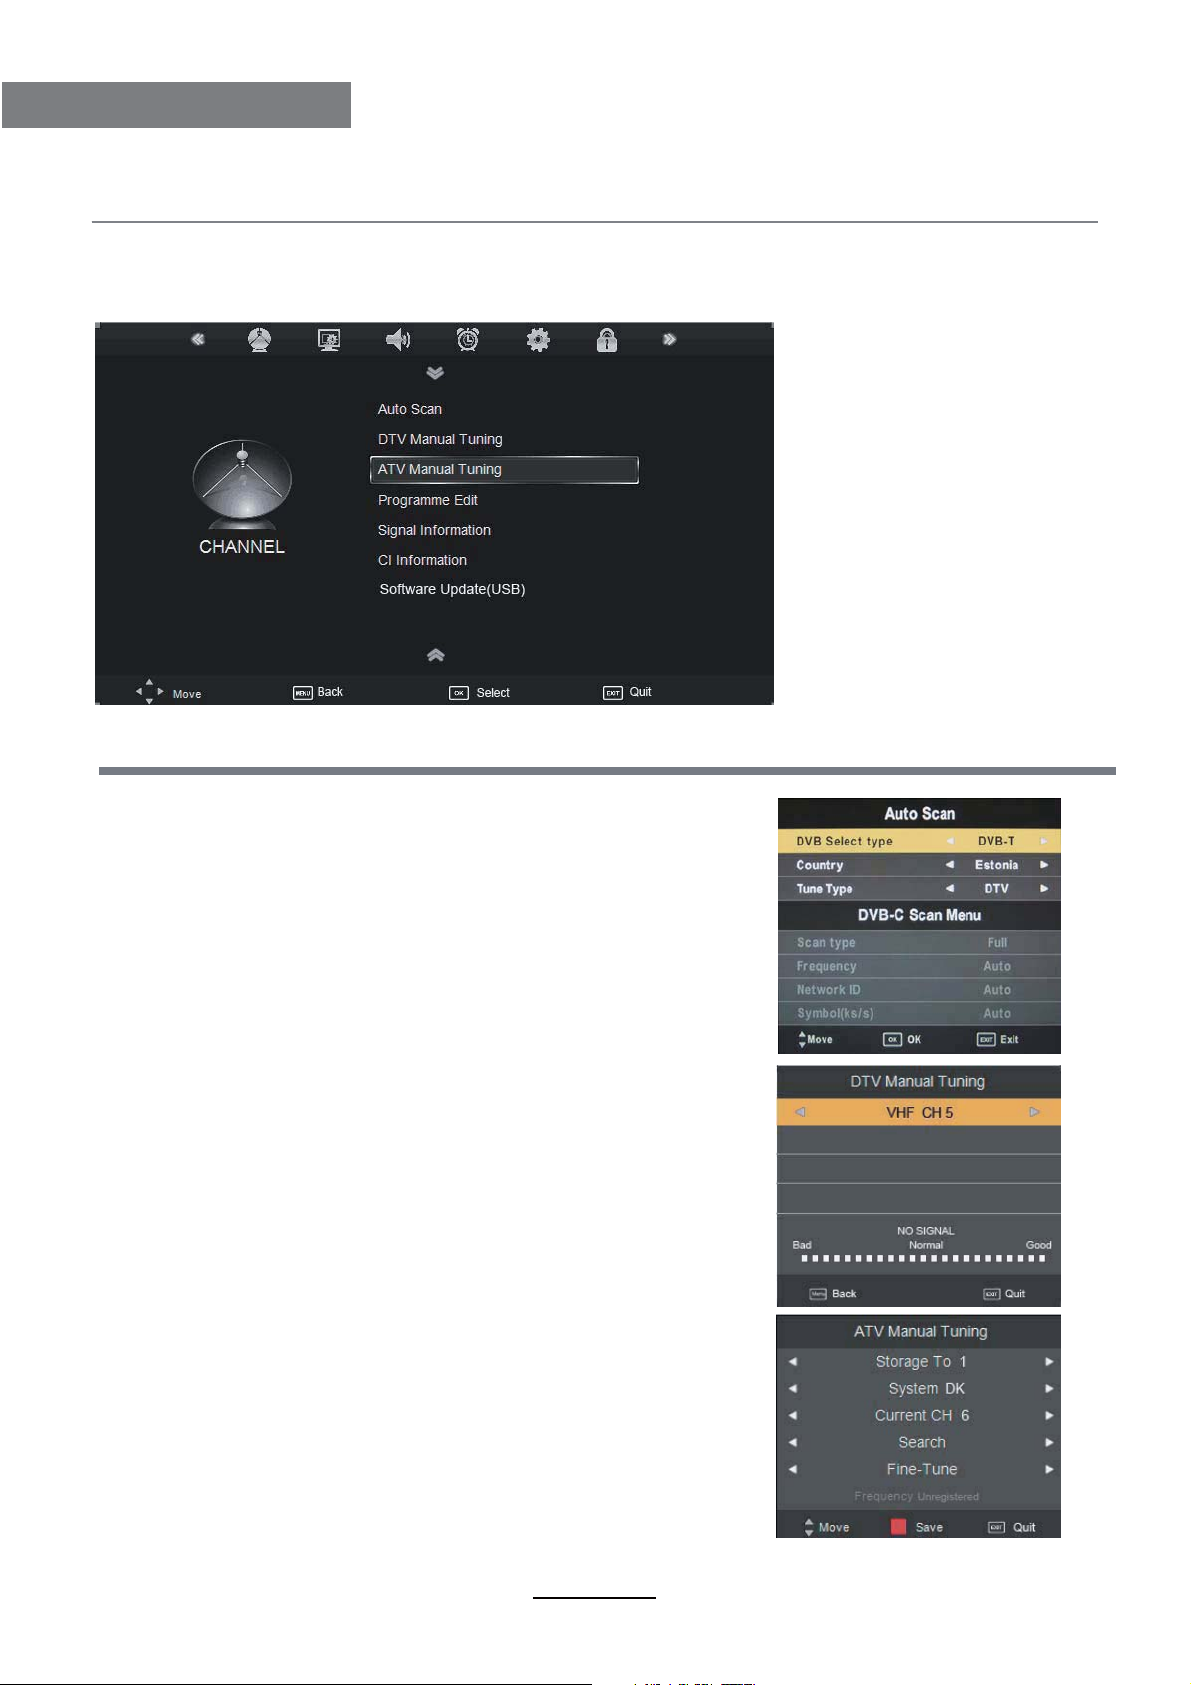
1. CHANNEL menu
Description
Auto Scan
Press OK button to enter the hint menu, and select
the Country and Tune Type mode for the TV, then
press OK button to start auto tuning.
DTV Manual Tuning
Press OK button to enter the DTV Manual Tuning menu,
select a DTV channel, and press OK button to start searching.
ATV Manual Tuning
Press OK button to enter the ATV Manual Tuning menu.
Storage To: Select a position for storing the program.
System: Select a TV system for searching.
Current CH: Select the channel you want to manual tuning.
Search: Press < / > button to manual search.
Fine-Tune: Press < / > button to fine-tune.
Frequency: Display the current frequency.
Note: Press RED button to save all the setups you have
changed.
8
Page 11
OSD Menu
Programme Edit
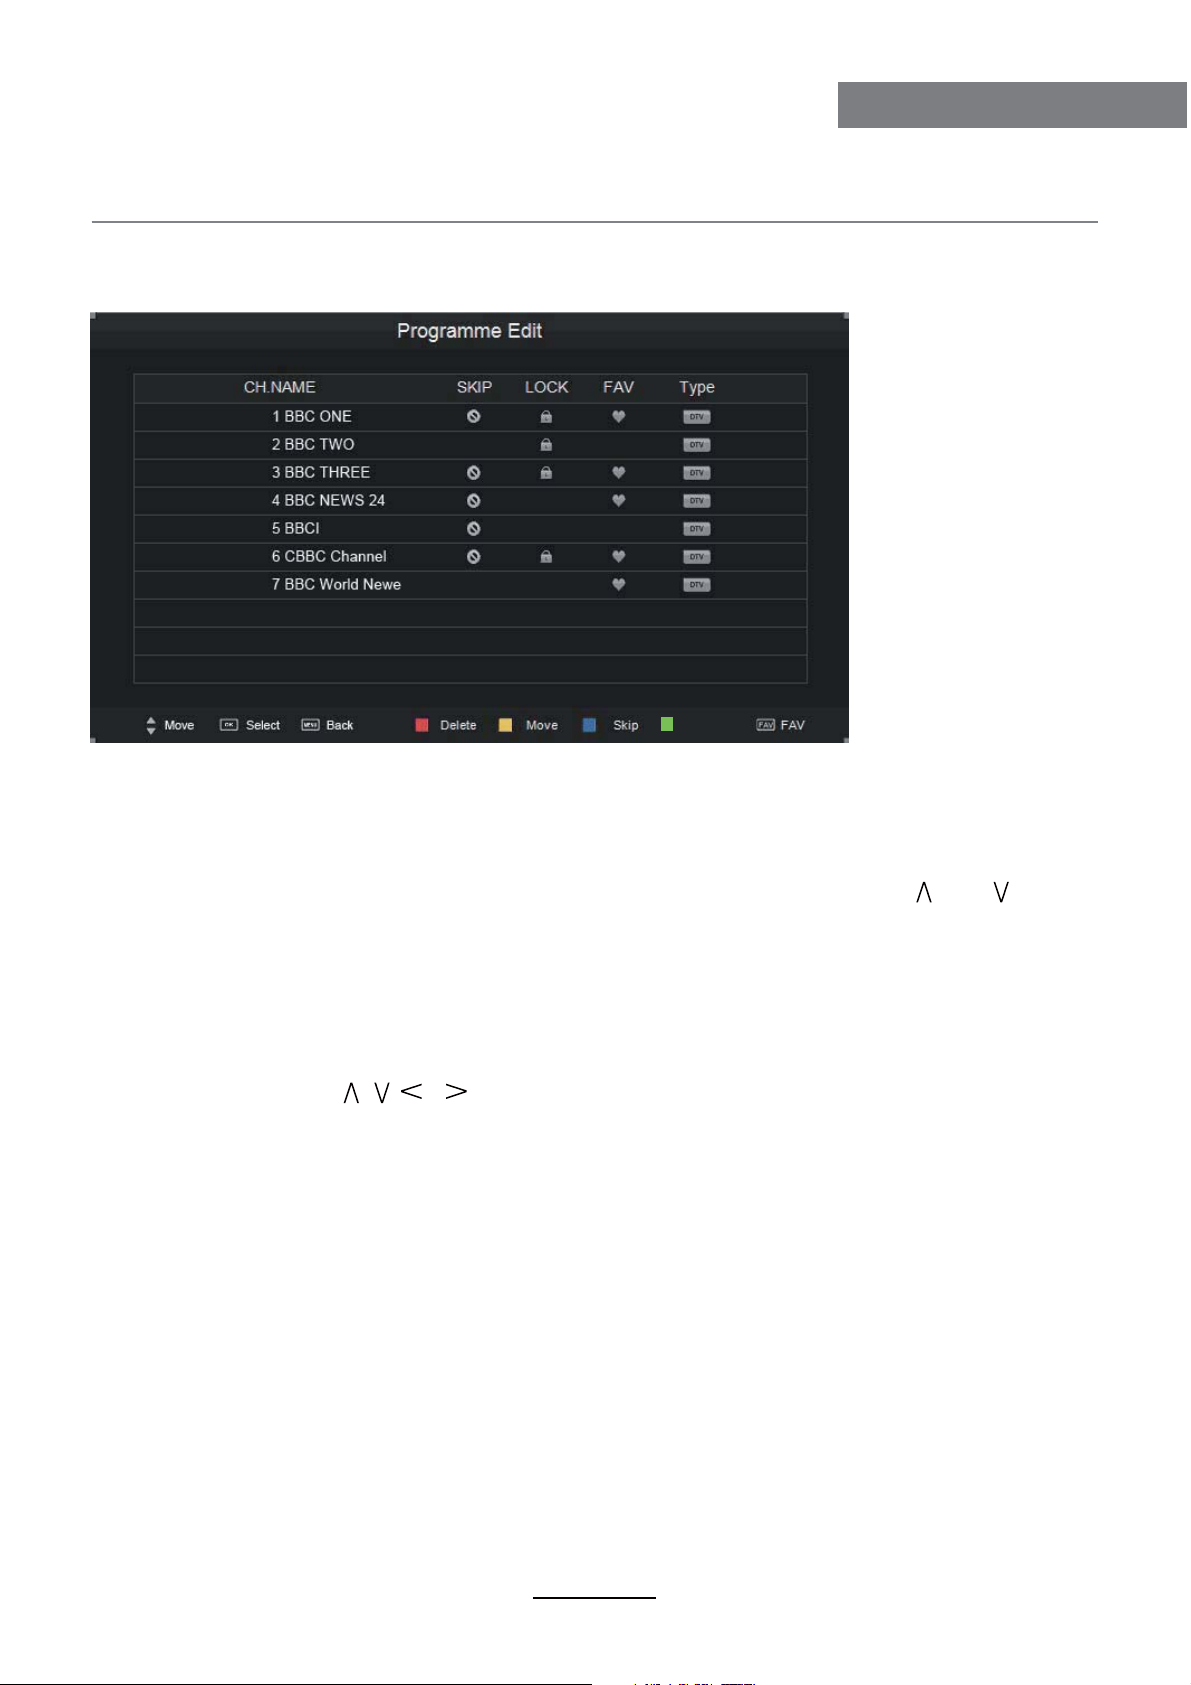
Press OK button to enter the Programme Edit menu as the following picture.
OSD Menu
Rename
Delete: Select a channel and press RED button, “Delete” will appear on the right of the
program edit menu next to the channel you have chosen, then press RED button
again, the program will be deleted. However if you decide not to continue to delete
press the menu button to quit.
Move: Select an channel, and press YELLOW button, then you can use
and
buttons to change the position of the program, press YELLOW again to confirm the
change. Press menu to exit and it will automatically save the current set.
Skip: Select a channel and press the BLUE button to label the channel, as long as the
channel has a skip label it will be skipped when searching through the channels with
the CH+/- buttons.
Rename: Select an ATV channel and press the GREEN button to change the name of the
channel by
buttons
FAV: Select a program, press FAV button to set or delete the program as the favorite
channel.
Signal Information
Display the signal information in DTV mode.
CI Information
Please contact your “pay perview” provider who can supply a viewing card and cam unit with
instructions for their use.
Software Update(USB)
Press OK button to enter the menu, and update the software by the USB device.
9
Page 12
OSD Menu
OSD Menu
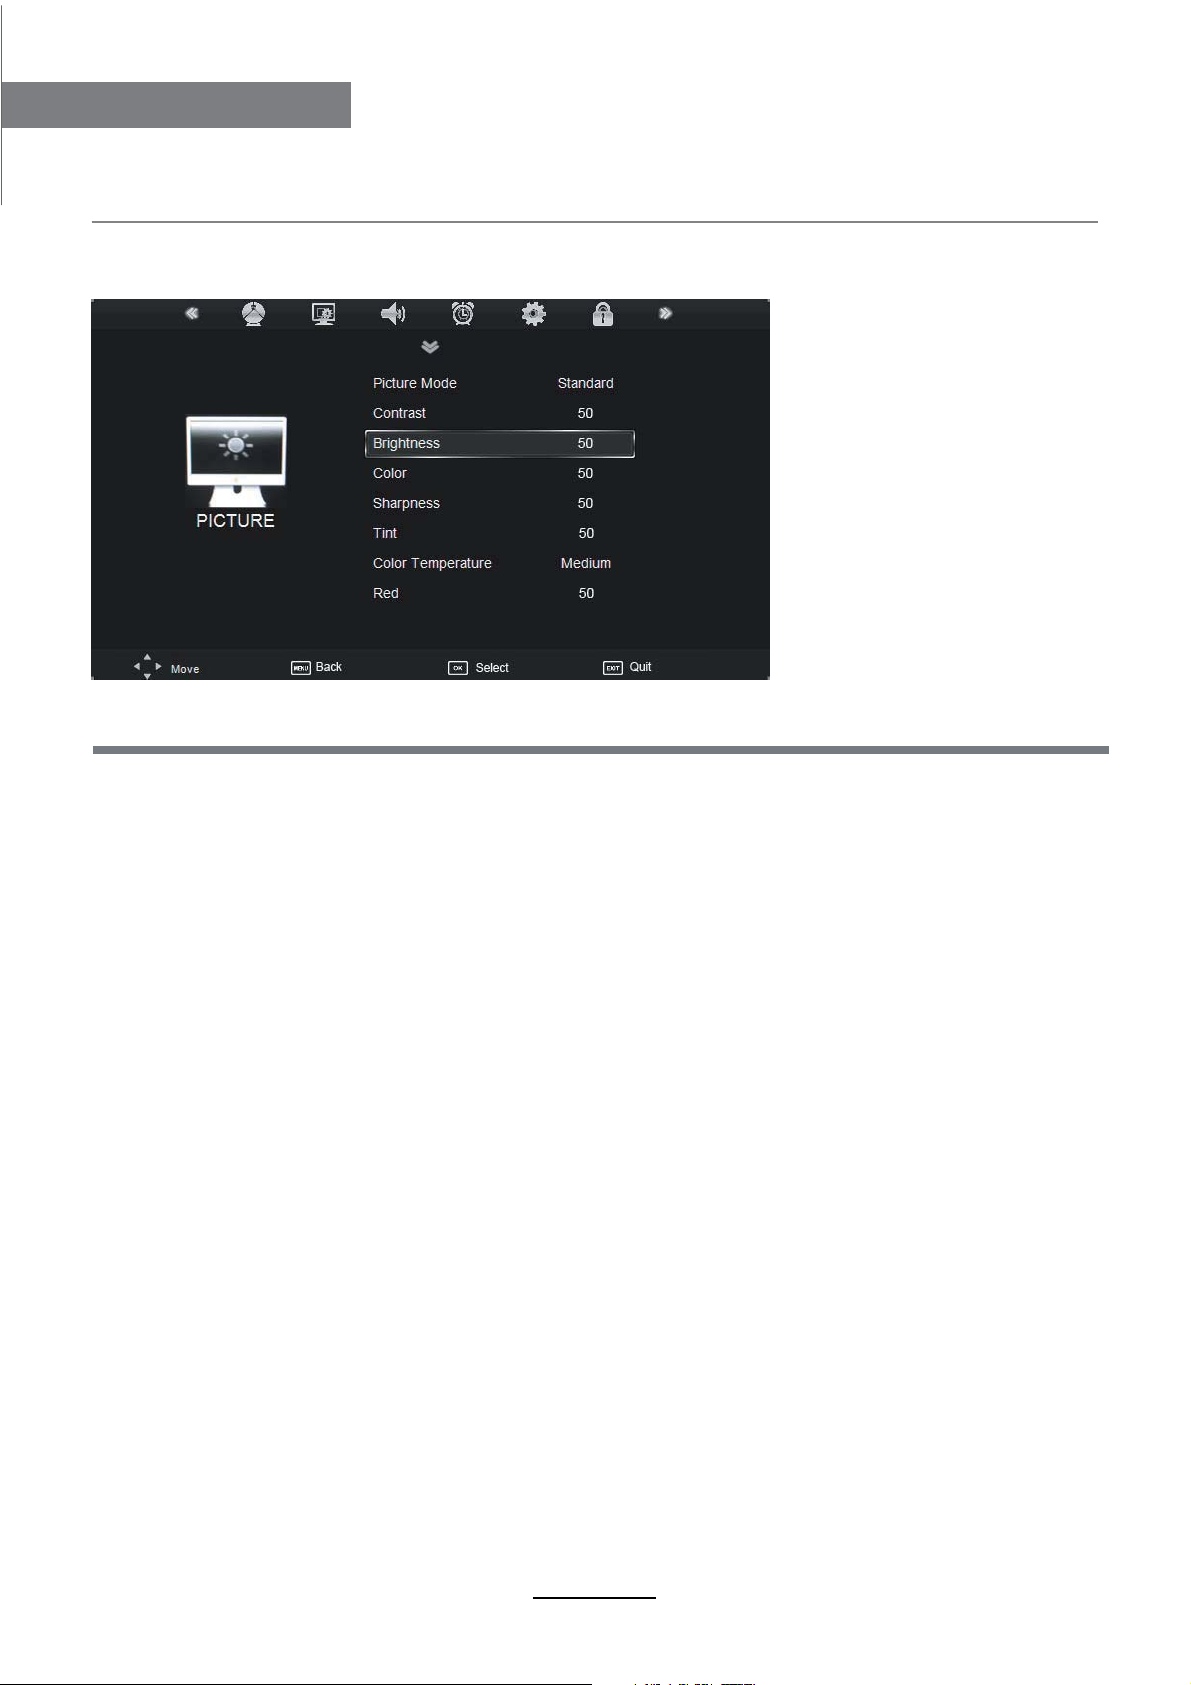
2. PICTURE menu
Description
Picture Mode: Choose from Standard, Dynamic, User and Mild.
Note: Contrast, Brightness, Color and sharpness are only available and can be adjusted in
the User mode option in the Picture Mode Settings.
Contrast: Controls the difference between the brightest and darkest regions of the picture.
Brightness: Controls the overall brightness of the picture.
Color: Control the color.
Sharpness: Increase this setting to see crisp edges in the picture; decrease it for soft edges.
Tint: Controls the tint ( NTSC mode only).
Color Temperature: Choose from Medium, Cool, User and Warm.
Note: Red, Green and Blue are only available in PC, VGA mode when in Colour
Temperature Mode.
Red: Controls the red colour of the picture.
Green: Controls the green colour of the picture.
Blue: Con trols the blue colour of the picture.
Aspect Ratio: Choose from 4:3, 16:9, Zoom1, Zoom2, Just Scan and Panorama.
Note: The aspect ratio modes you can select according to the input source.
Noise Reduction: Choose interference noise modes form Off, Low, Middle, High and Default.
Screen(PC mode only): Press OK button to enter the submenu to adjust Horizontal / Vertical
position, Size or Phase of the picture.
10
Page 13
OSD Menu
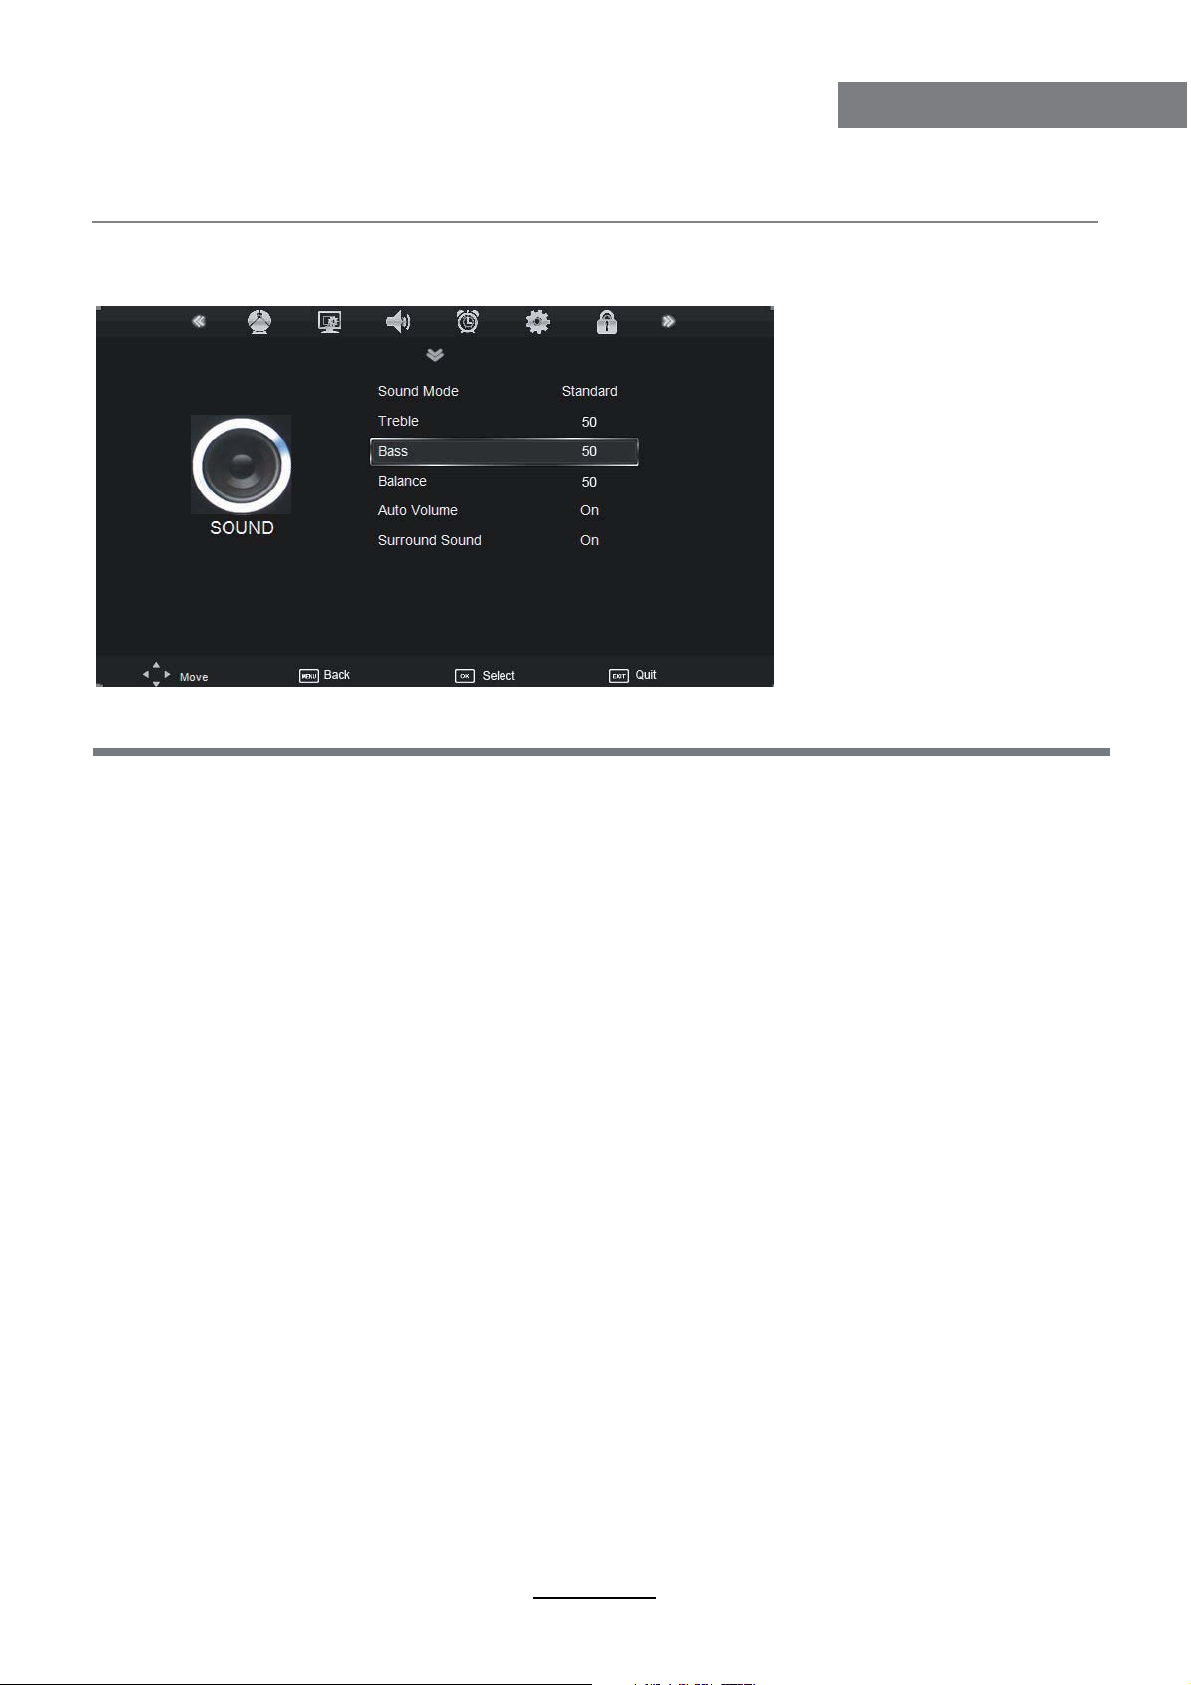
3. SOUND menu
OSD Menu
SPDIF MODE PCM
Description
Sound Mode: Allows you to select among: Standard, Music, Movie, Sports and User.
Treble(Could be adjusted when the sound mode is User): Controls the relative intensity of
higher pitched sounds.
Bass (Can be adjusted when the sound mode is set to User): Controls the relative intensity of
lower pitched sounds.
Balance: To adjust the balance of the left and right sound track, or turn off the volume of the
left and right sound track.
Auto Volume: Control the volume of the program automatically when you turn on the function
by selecting “On”.
Surround Sound: Turn on/off the surround sound function by selecting “off”/“on”.
SPDIF MODE: Allows you to select among: Off, PCM and Auto.
11
Page 14
OSD Menu
OSD Menu
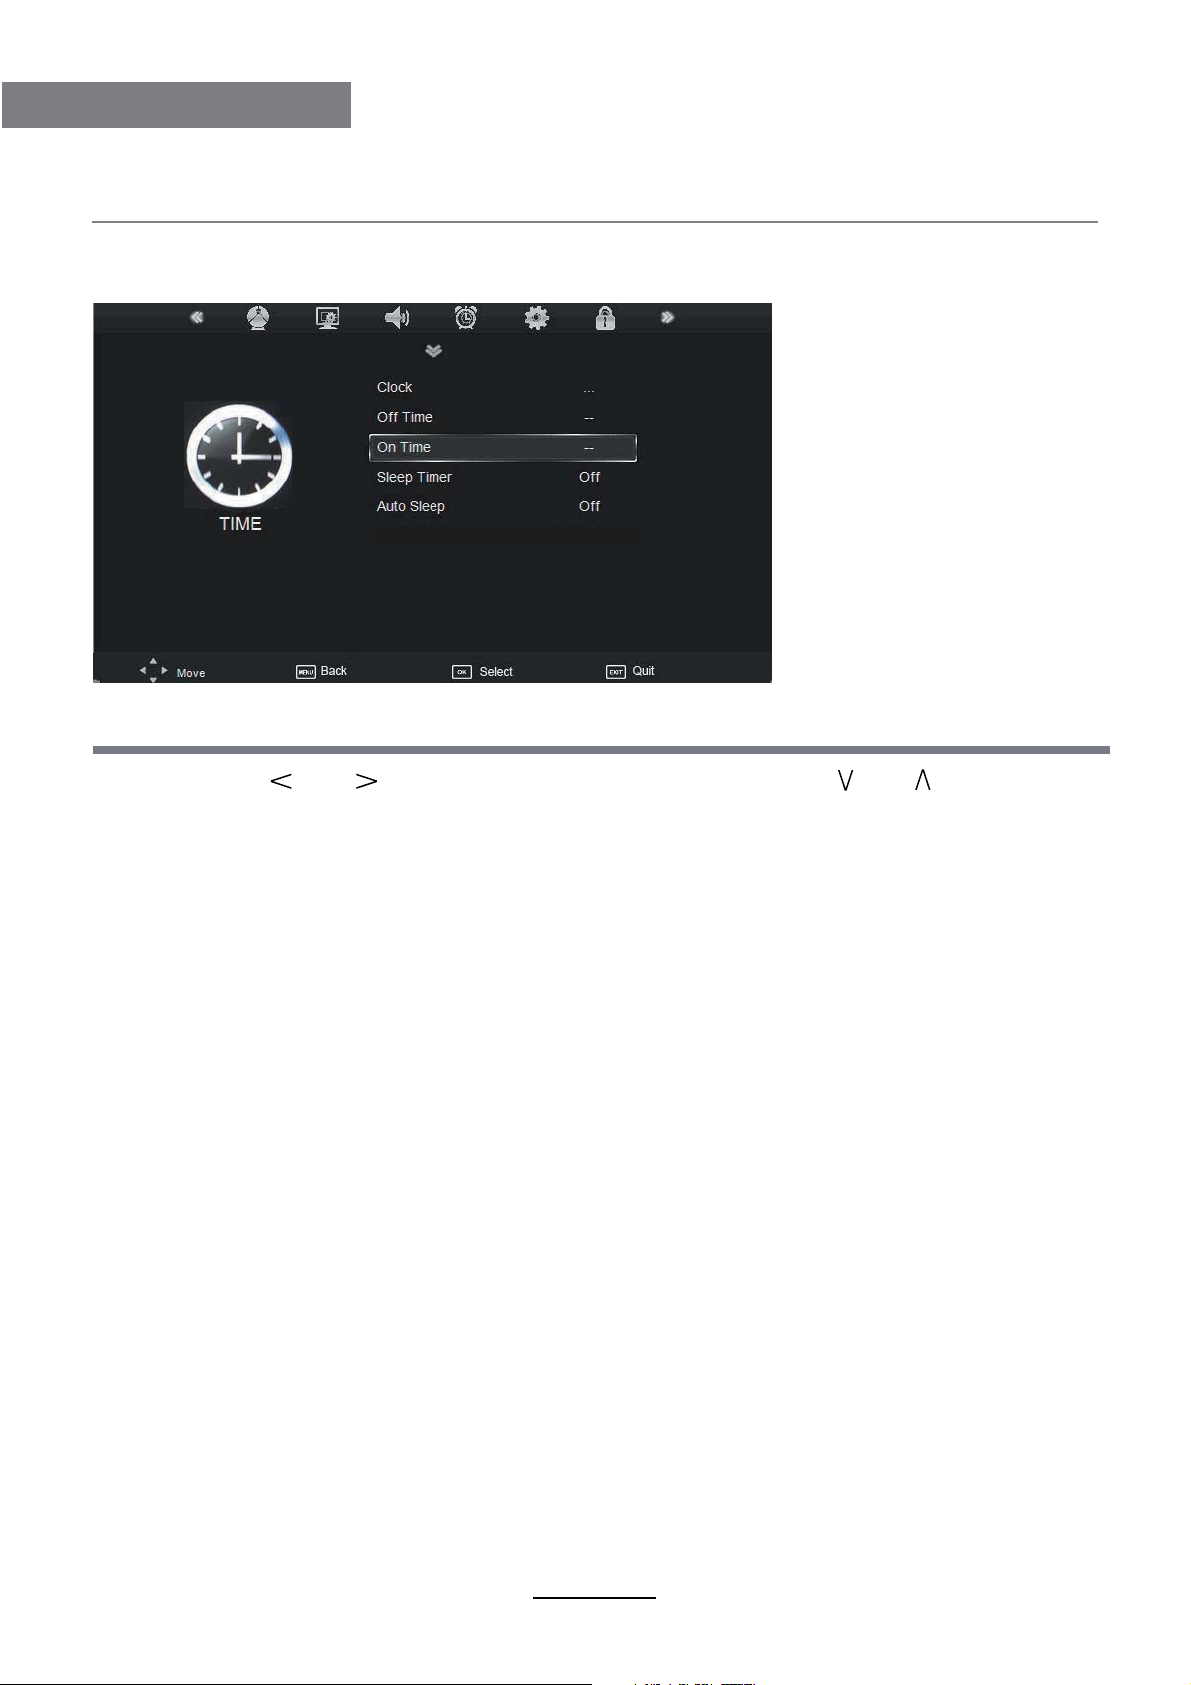
4. TIME menu
No Action Auto Standby
Time Zone
Off
Western Austr..
Description
Clock: Use the and buttons to select the position, and use the and buttons to set the
time.
Note: User can not change time manually during DTV mode, for time is from signal source
directly.
Off Time: Press OK button to enter the submenu, you could set the time when the TV set will
be turned off automatically, you could also set the frequency.
On Time: Press OK button to enter the submenu, you could set the time when the TV set will
be turned on automatically, you could also set the Source, Channel, Volume.
Sleep Timer: Allows you to setup the sleep timer among: 10min, 20min, 30min, 60min, 90min,
120min,180min, 240min and off.
Auto Sleep: Turn on/off the auto standby function.
No Action Auto Standby: According to the latest ERP regulation, this unit will switch off itself
automatically if no change in status within the last 4 hours of operation.
Time Zone: Allows you to select the time zone.
12
Page 15
OSD Menu
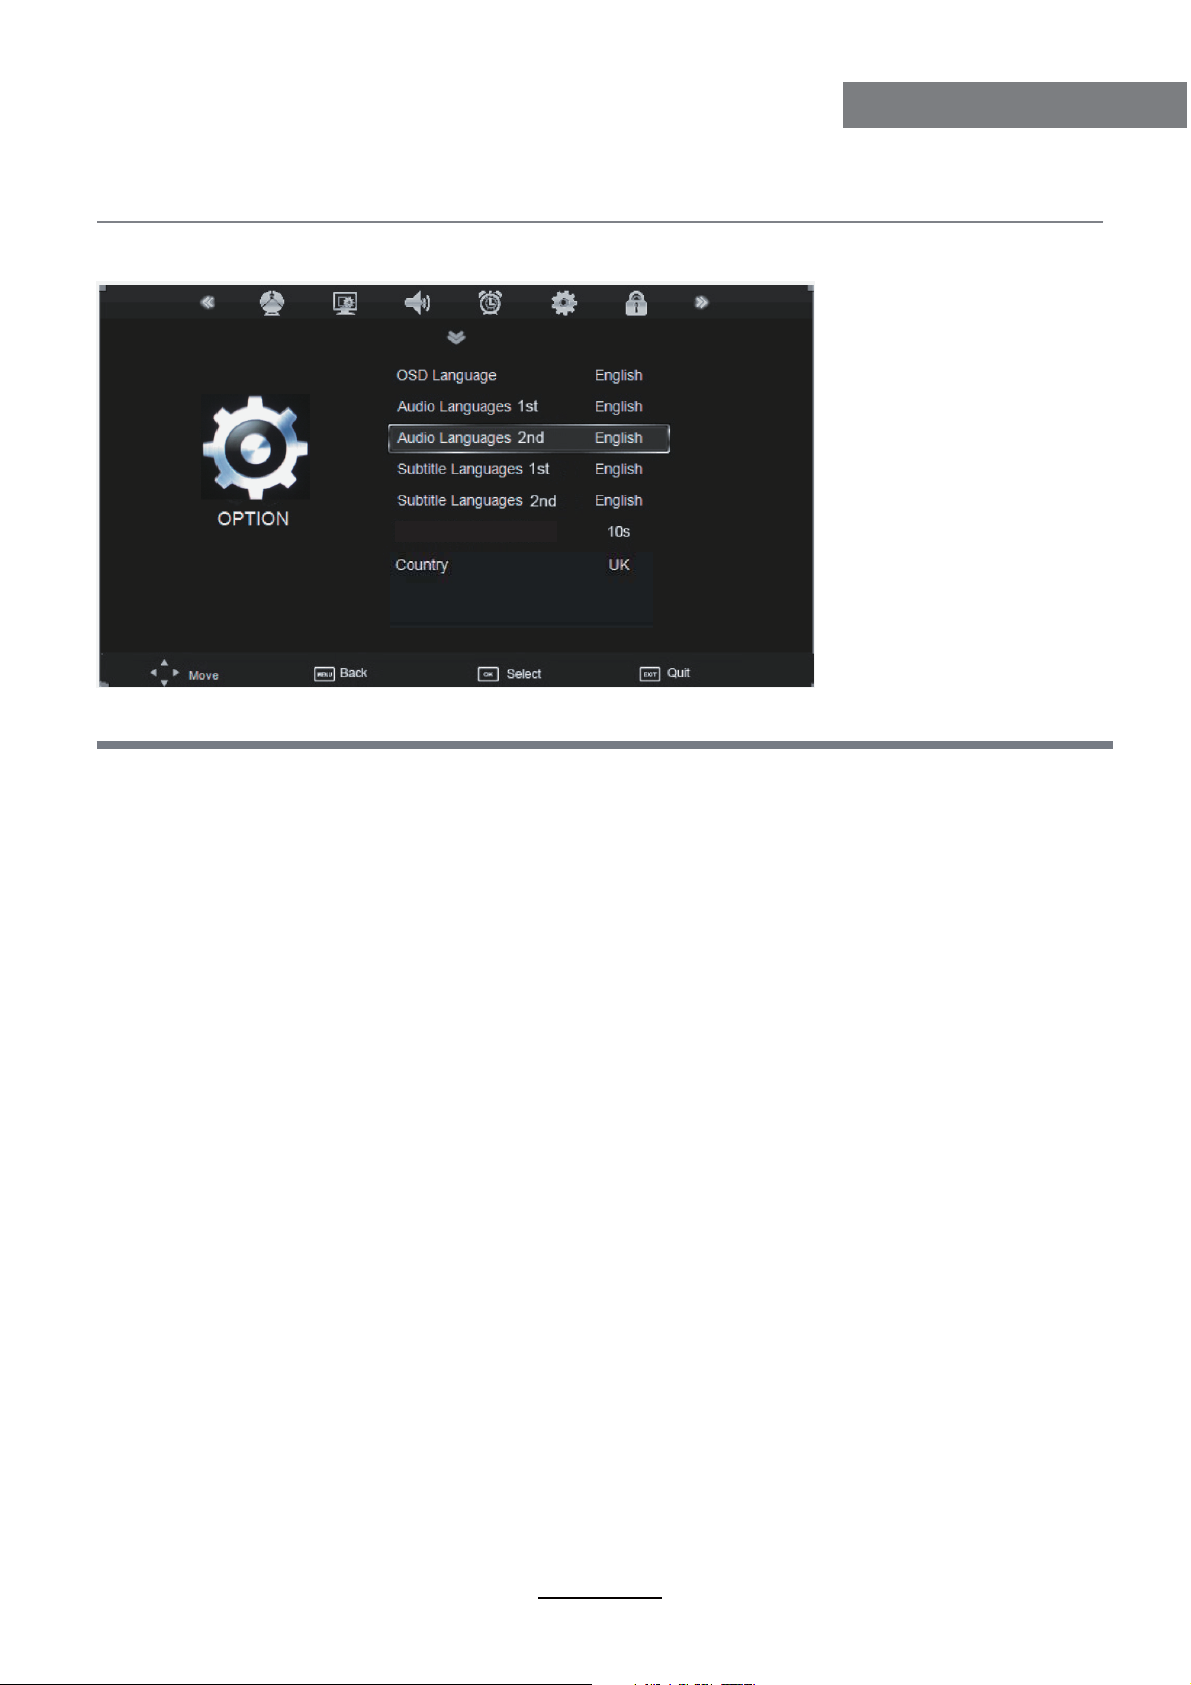
5. OPTION menu
OSD Menu
OSD Duration
Description
OSD Language: Allows you to select menu language.
Audio Language 1st/2nd (can be selected in DTV mode): Allows you to select first and
second audio language.
Subtitle Language 1st/2nd (can be selected in DTV mode): Allows you to select first and
second subtitle language.
OSD Duration: Allows you to setup the time of the menu display on the screen among:
5s, 10s, 15s, 20s, 25s, 30s, 35s, 40s.
Country: Display the current Country, and you should select the Country when you want to
auto tuning.
Restore Factory Default: Press OK button to restore factory default.
13
Page 16
OSD Menu
OSD Menu
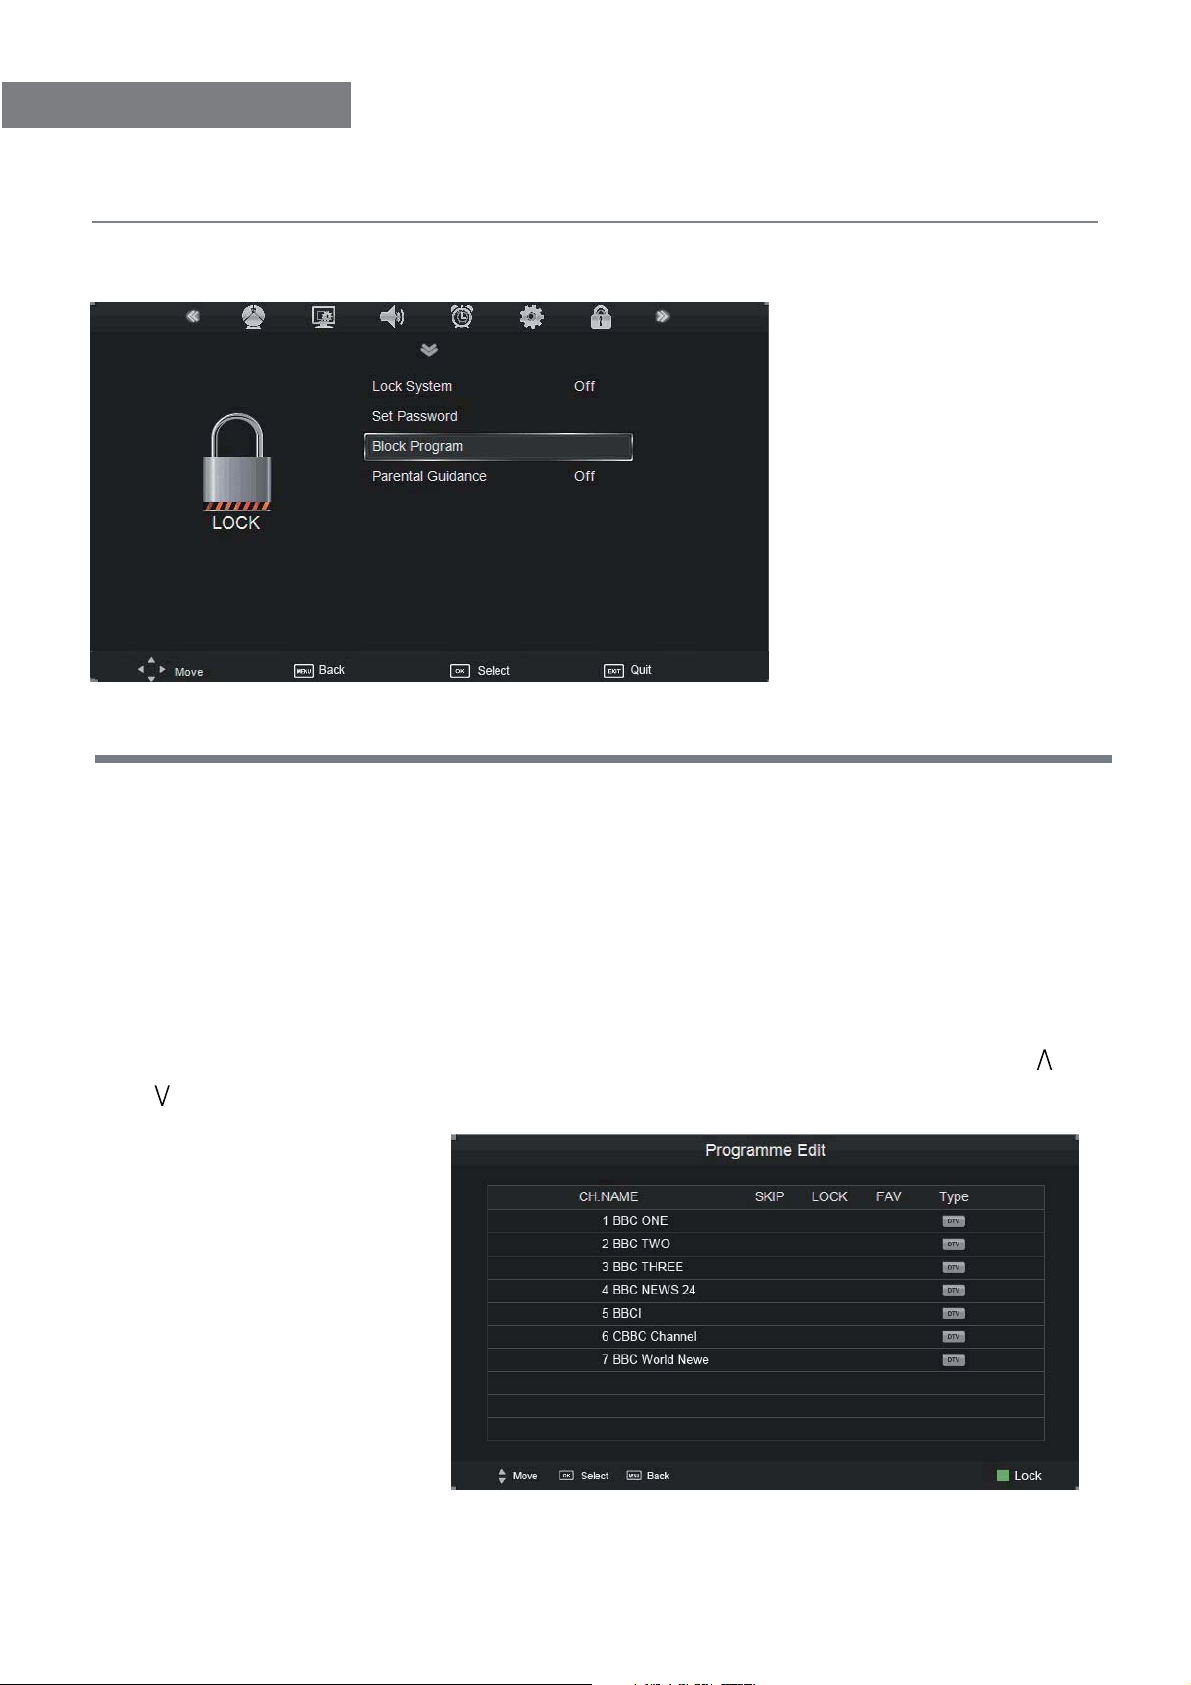
6. LOCK menu
Hotel model
Description
Lock System: Turn on/off the Lock System function.
Note: You should enter the code to operate the menu.(original code is 0000)
Set Password: Set pin code. If the Pin code has been changed you must enter the present
code.
New : Enter the new password.
Confirm: Enter the new password.
Block Program: Lock the channel, you have to enter the code to view the channel. Use
and buttons to select the channel, and press the GREEN button on the remote control to
lock the channel or cancel.
Parental Guidance: Allows you to select the Parental Guidance mode.
14
Page 17
OSD Menu
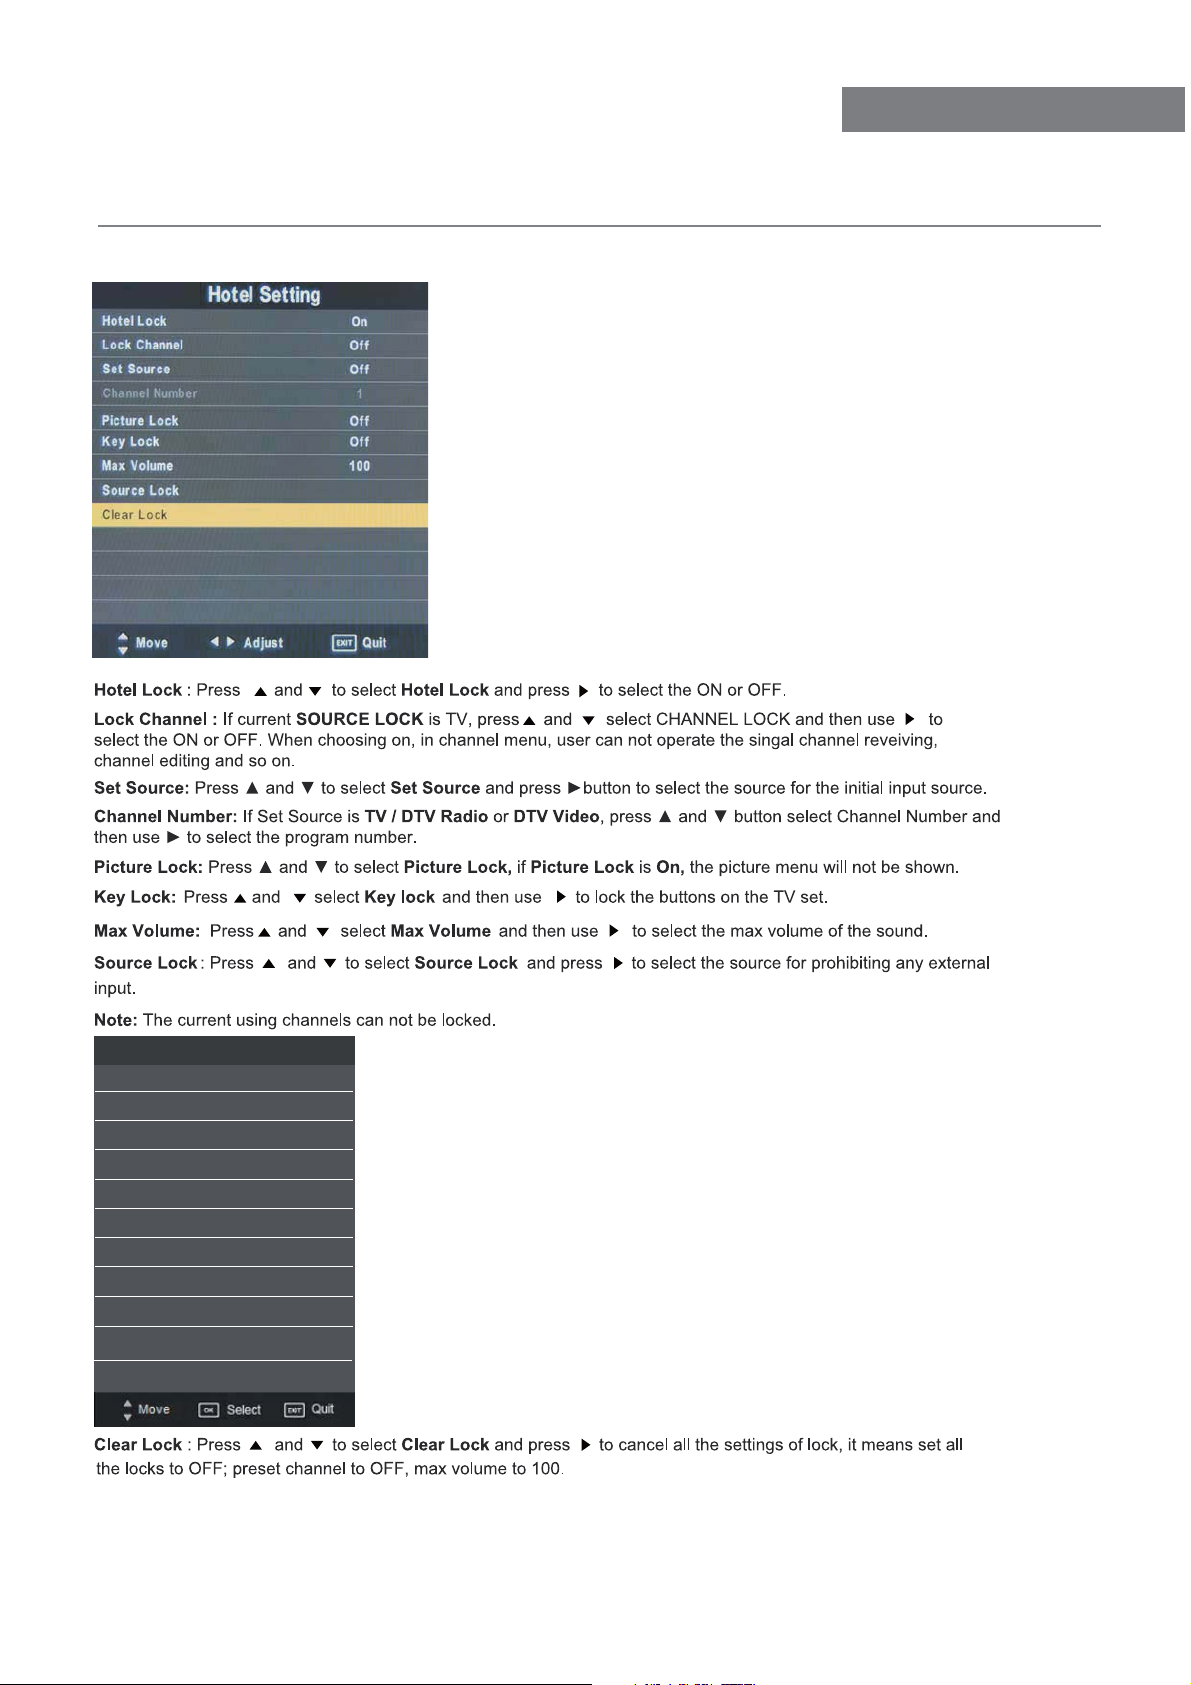
7.Hotel Mode
OSD Menu
Input Source
DTV
CADTV
ATV
SCART
YPBPR
DVB-S
PC
HDMI
AV
USB
15
Page 18
Multimedia Operation
Multimedia Operation
Basic Operation
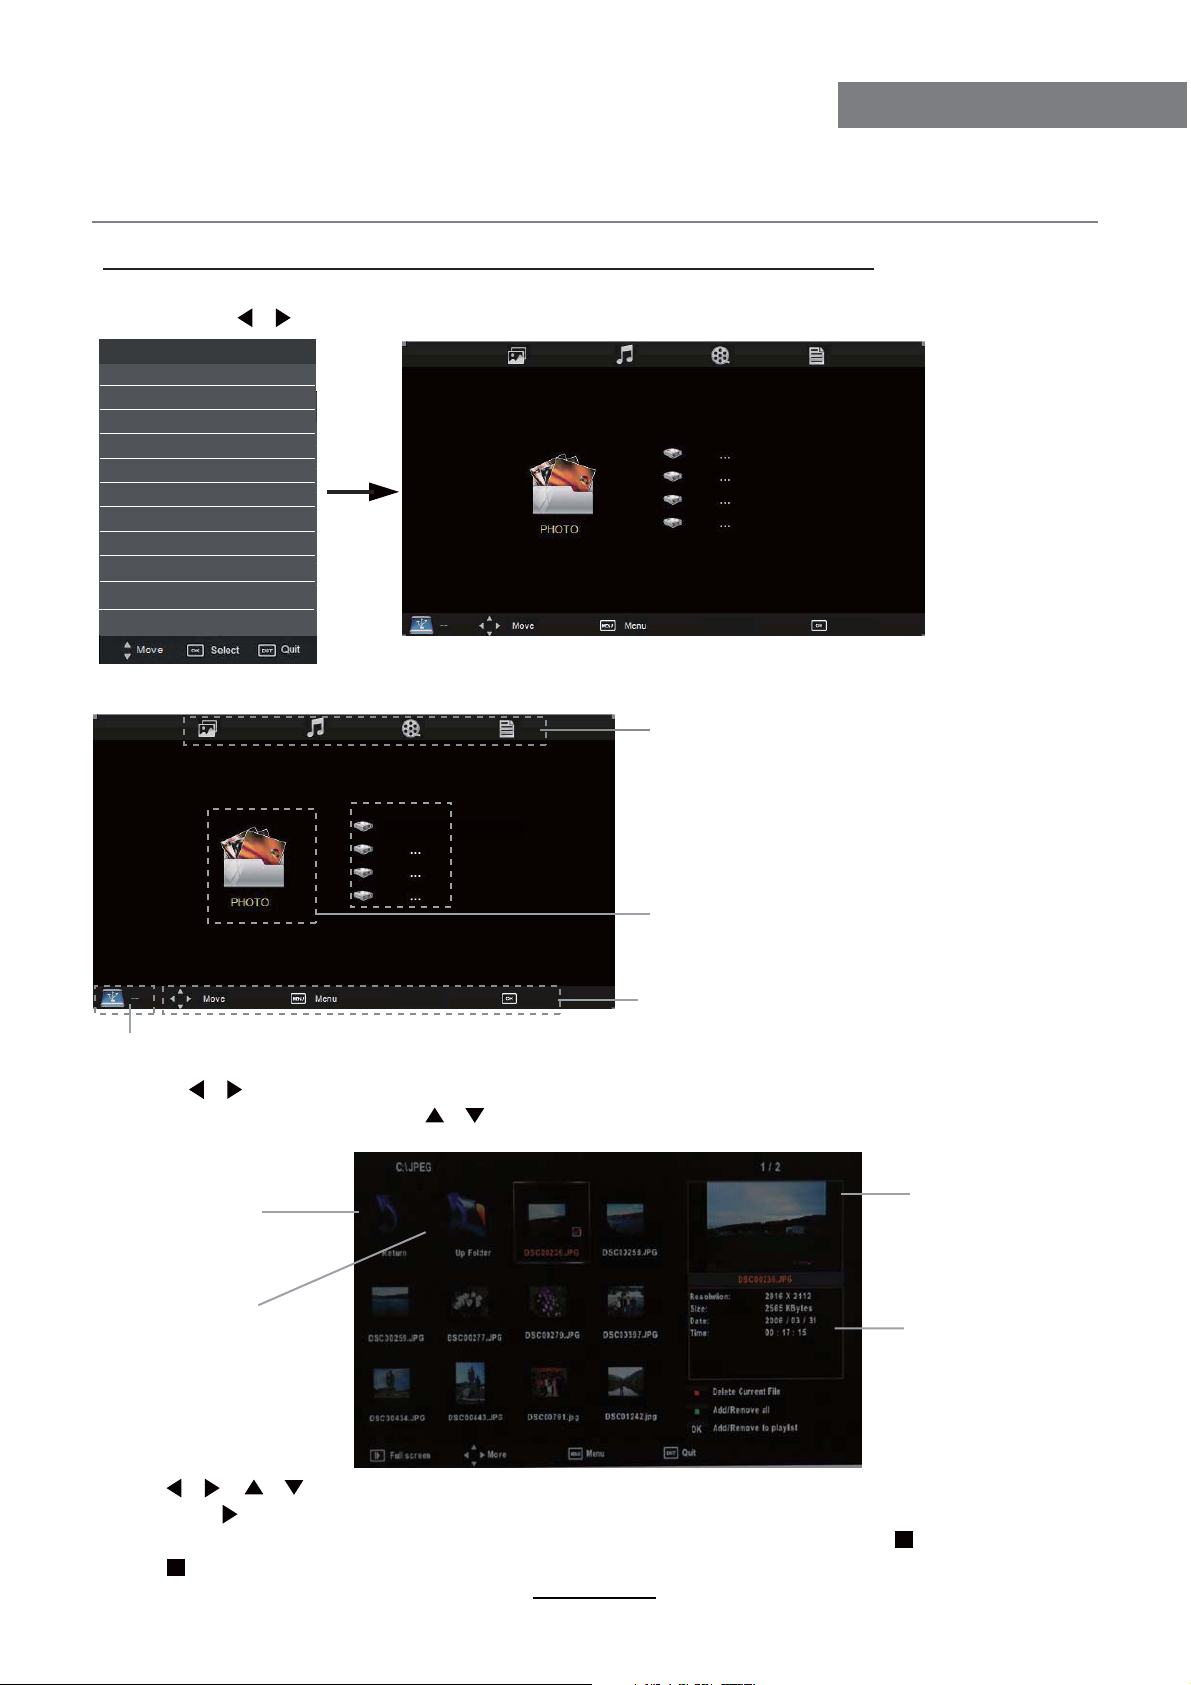
1). Press the INPUT button on the remote control to display the input source menu, select USB
source by the / buttons, and press OK button to enter the Multimedia menu seen below.
Input Source
DTV
CADTV
ATV
SCART
YPBPR
DVB-S
PC
HDMI
AV
USB
Select
2). Insert USB device, you will find the name of the device display on the screen.
MAINS MENU
PHOTO MUSIC MOVIE TEXT
Disk C:
USB device list
MAINS MENU
PHOTO MUSIC MOVIE TEXT
Select
Hints for operation
Hints and informations of USB device
3). Press / button to select the kind of the files in the device you want to program from PHOTO,
MUSIC, MOVIE and TEXT. Press / button to select the device and press OK button to enter.
Return to
Preview
device list
Up Folder
Informations
Press / / / buttons to move , and press OK button to select the file or unfold the folder,
Then press button to program the files (be signed) you select or the files in the fold you select,
You can display the option table on the bottom of the screen by OK button, press button to hide.
Press button to stop and exit the full screen program.
16
Page 19
Multimedia Operation
Multimedia Operation
1. Photo
Play the photo
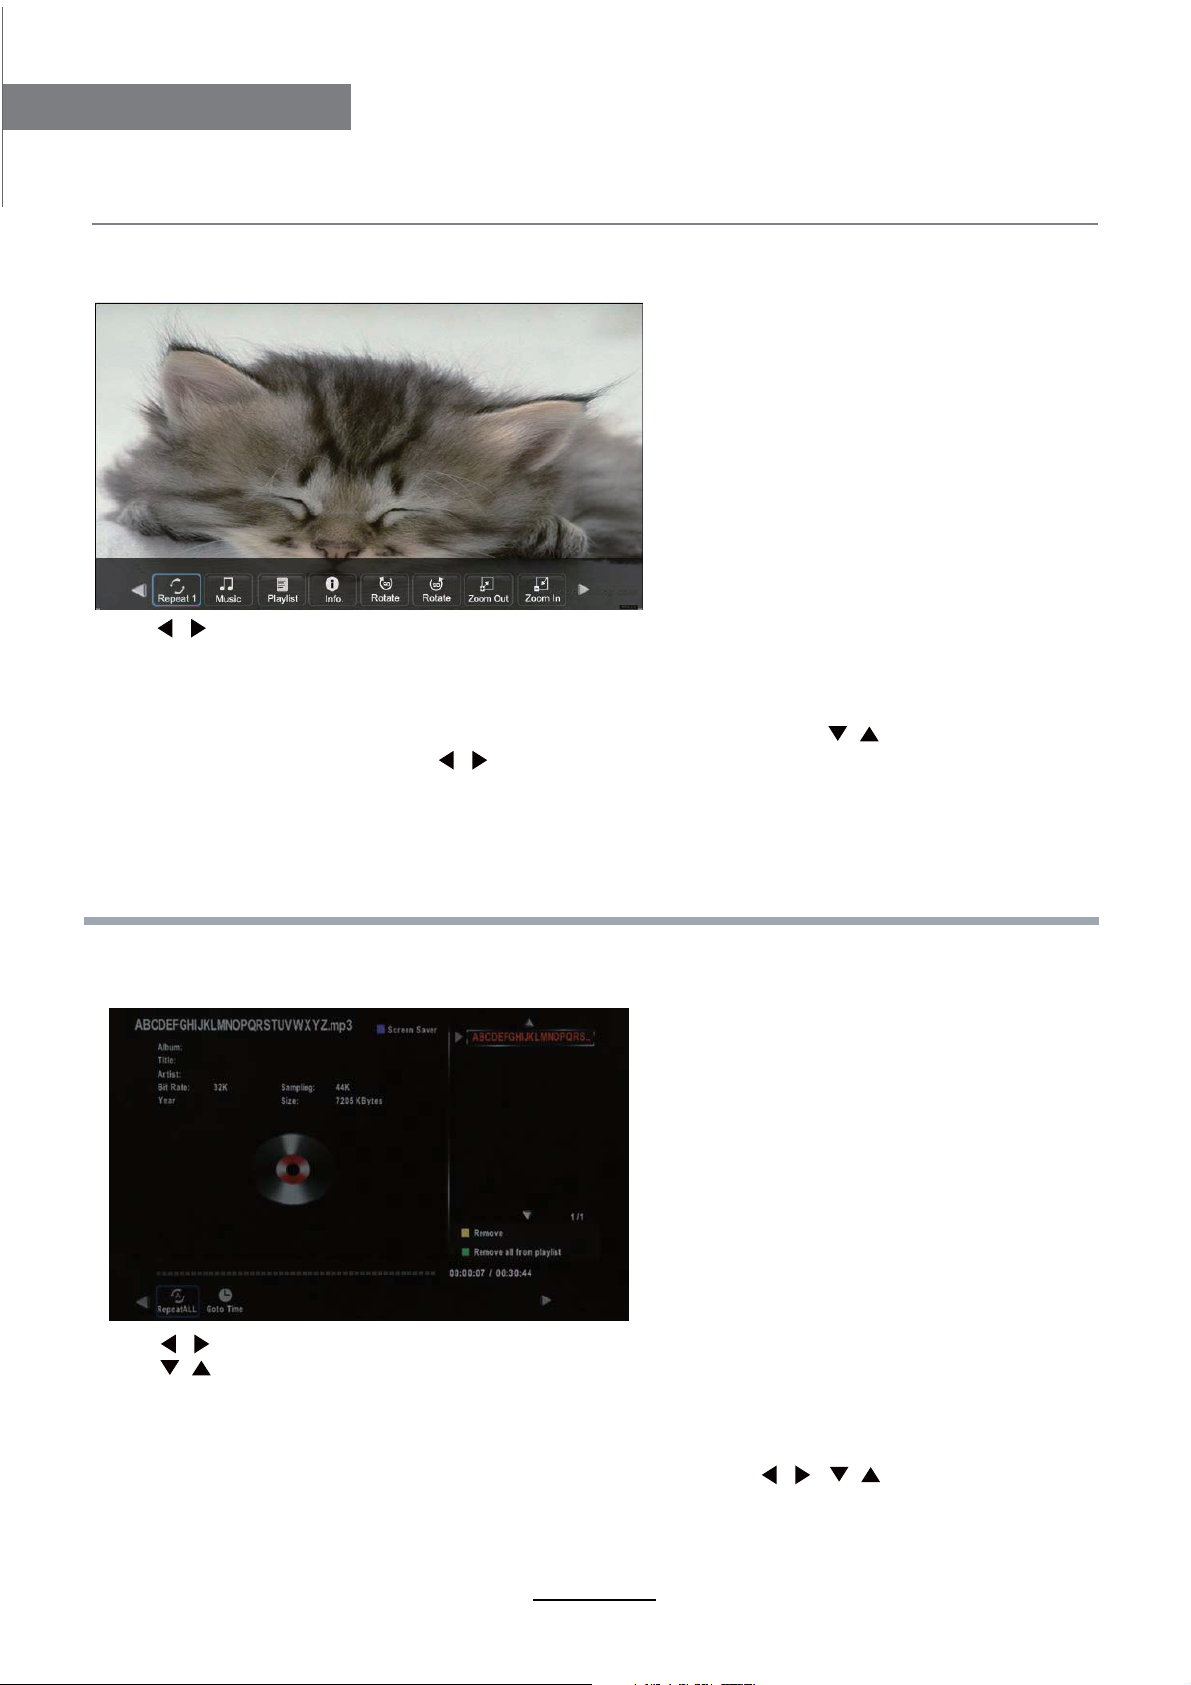
Press / button to select the option on the table, and press OK button to change.
Repeat: Select the repeat mode from Repeat All, Repeat 1, Repeat None.
Music: Play/pause the music program (you can only play or pause the music you have programed).
Playlist: Display the playlist on the screen, and you can select the photo by / button, and
press OK button to program. Press / button to return to the options table.
Info: Display the information of the photo.
Rotate: Rotate the photo clockwise/counterclockwise.
Zoom Out/In: Zoom out/in the photo.
Move View: Move the photo in Zoom in mode.
2. Music
Play the music
Press / button to select the option on the table, and press OK button to change.
Press / button to select the music, and press OK button to program.
Repeat: Select the repeat mode from Repeat All, Repeat 1, Repeat None.
GOTO Time: Program the music form the time you set.
Press OK button to display the time table, and select the position by / / / button,
set the time by the number buttons, select “OK” and press OK button to search.
Screen Saver: Press BLUE button to enter the Screen Saver mode, press again to exit.
17
Page 20
Multimedia Operation
Multimedia Operation
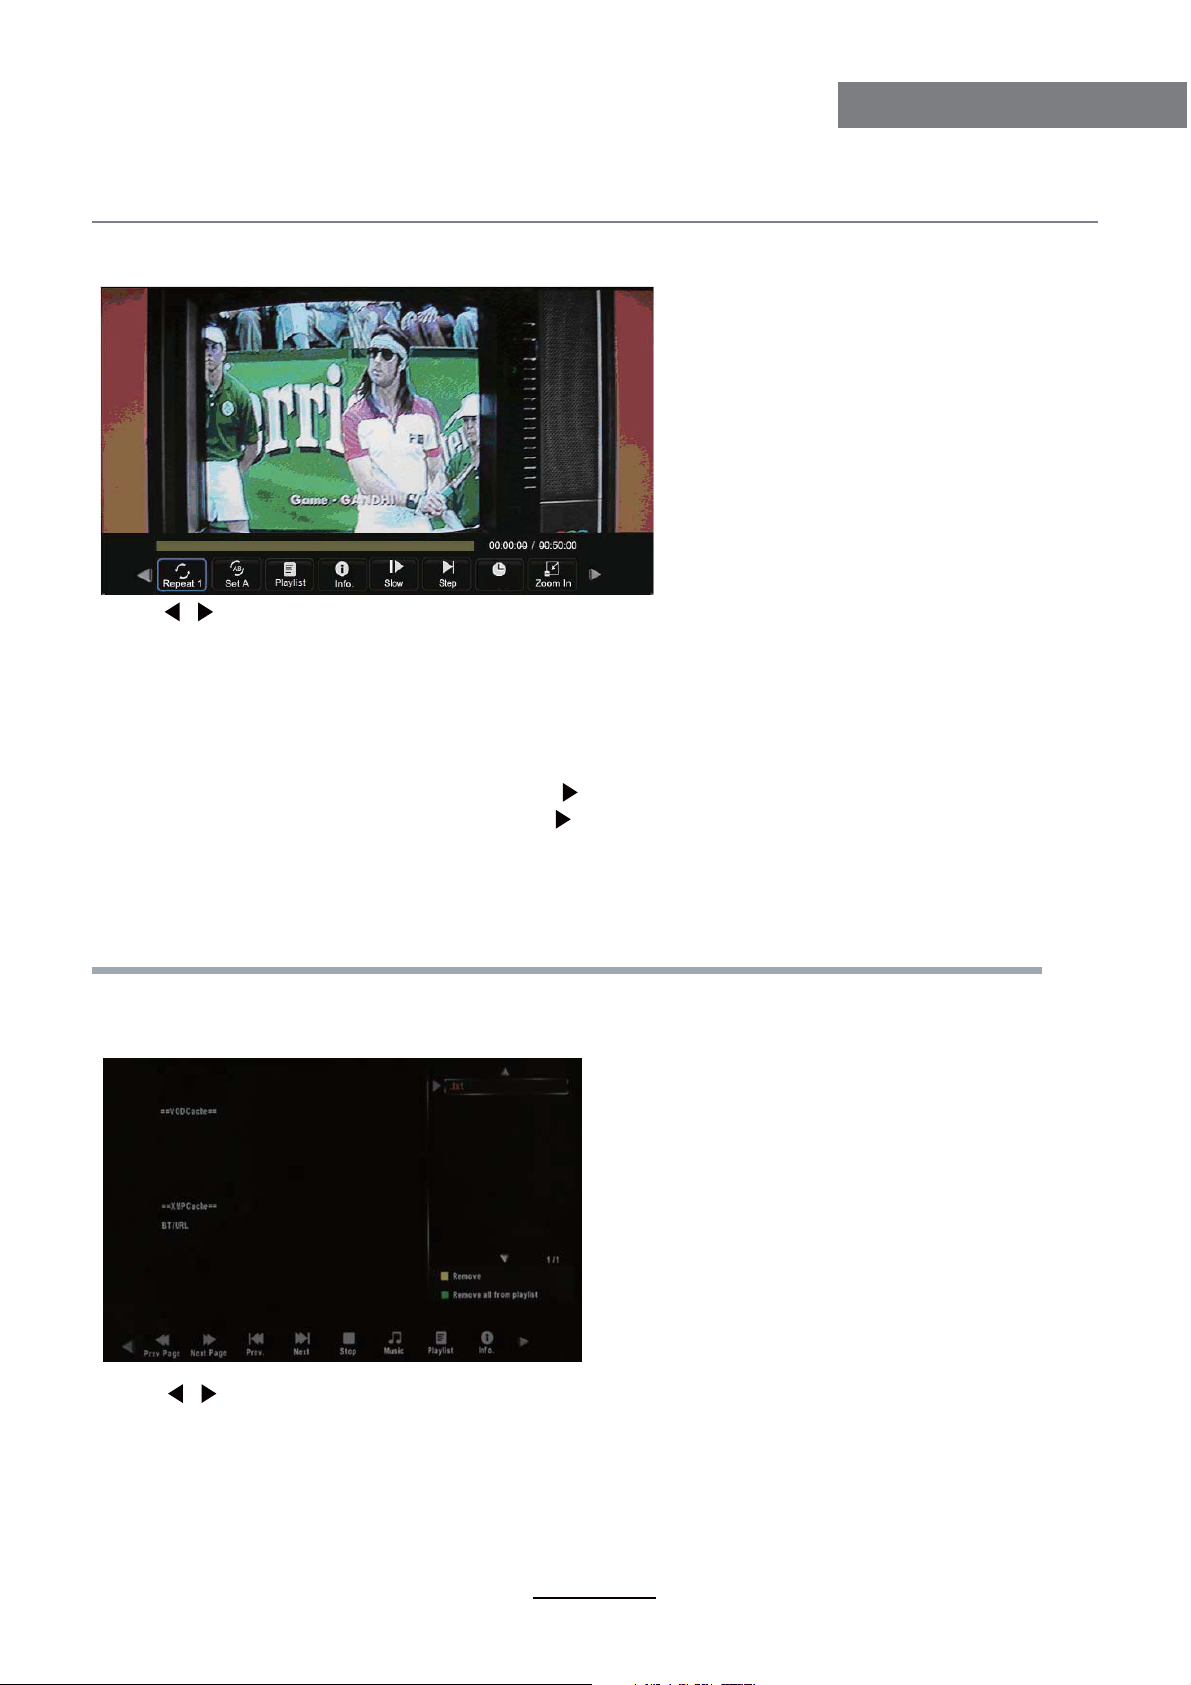
3. Movie
Play the movie
Goto Timer
Press / button to select the option on the table, and press OK button to change.
Repeat: Select the repeat mode from Repeat All, Repeat 1, Repeat None.
Set A-B: Select and play the preferable paragraph of the program by seting A and B at the
beginning and end, and there will be a sign on the left screen, press OK button again to cancel.
Playlist: Display the playlist on the screen.
Info: Display the information of the movie.
Slow: Play the programs at slow speed, press button to cancel.
Step: Step the programs by OK button, press button to cancel.
Goto timer: Program the movie form the time you set.
Zoom out/in: Zoom out/in the movie screen.
Aspect Ratio: Select the aspect ratio of the screen display.
Move View: Move the photo in Zoom in mode.
4. Text
Play the text
Press / button to select the option on the table, and press OK button to change.
Prev/Next page: Turn to previous/next page of the text.
Prev./Next: Turn to previous/next file.
Stop: Stop auto turning pages.
Music: Play/pause the music program.
Playlist: Display the playlist on the screen.
Info: Display the information of the text.
18
Page 21
Recording Operation
Recording Operation
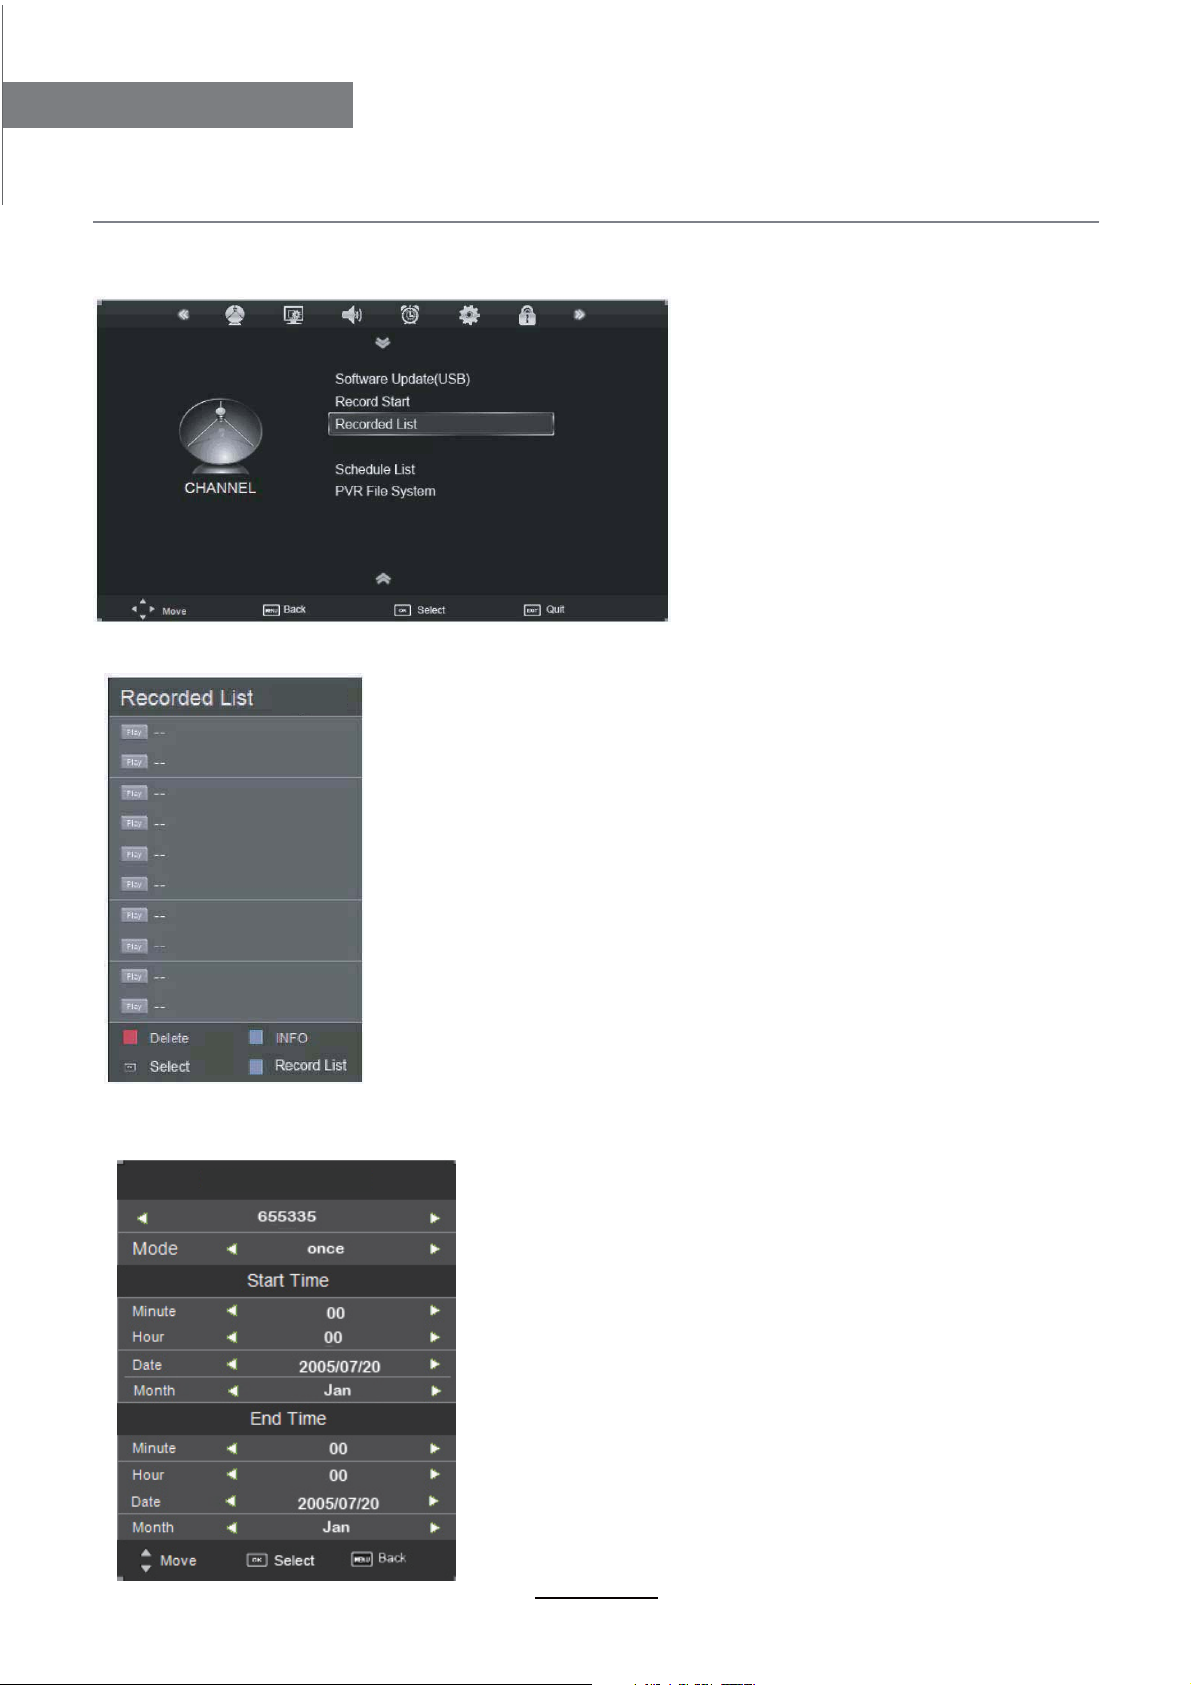
PVR settings
Press the MENU button, and select CHANNEL menu.
1). Recorded List
Recording Timer
2). Recoring Time
Recoring Time
Channel
Recorded list:
INFO: Display the information of the program you recorded.
RED button: Delete the program you select.
Set the recording timer
The TV will record the program automatically according
to your settings.
TITLE: Display the name of the recording program.
MODE: Select the record mode.
Start Time: Select the start recording time.
End Time: Select the end recording time.
Press OK button to save the setting and exit the menu.
Display the Recorder List menu.
19
Page 22
Recording Operation
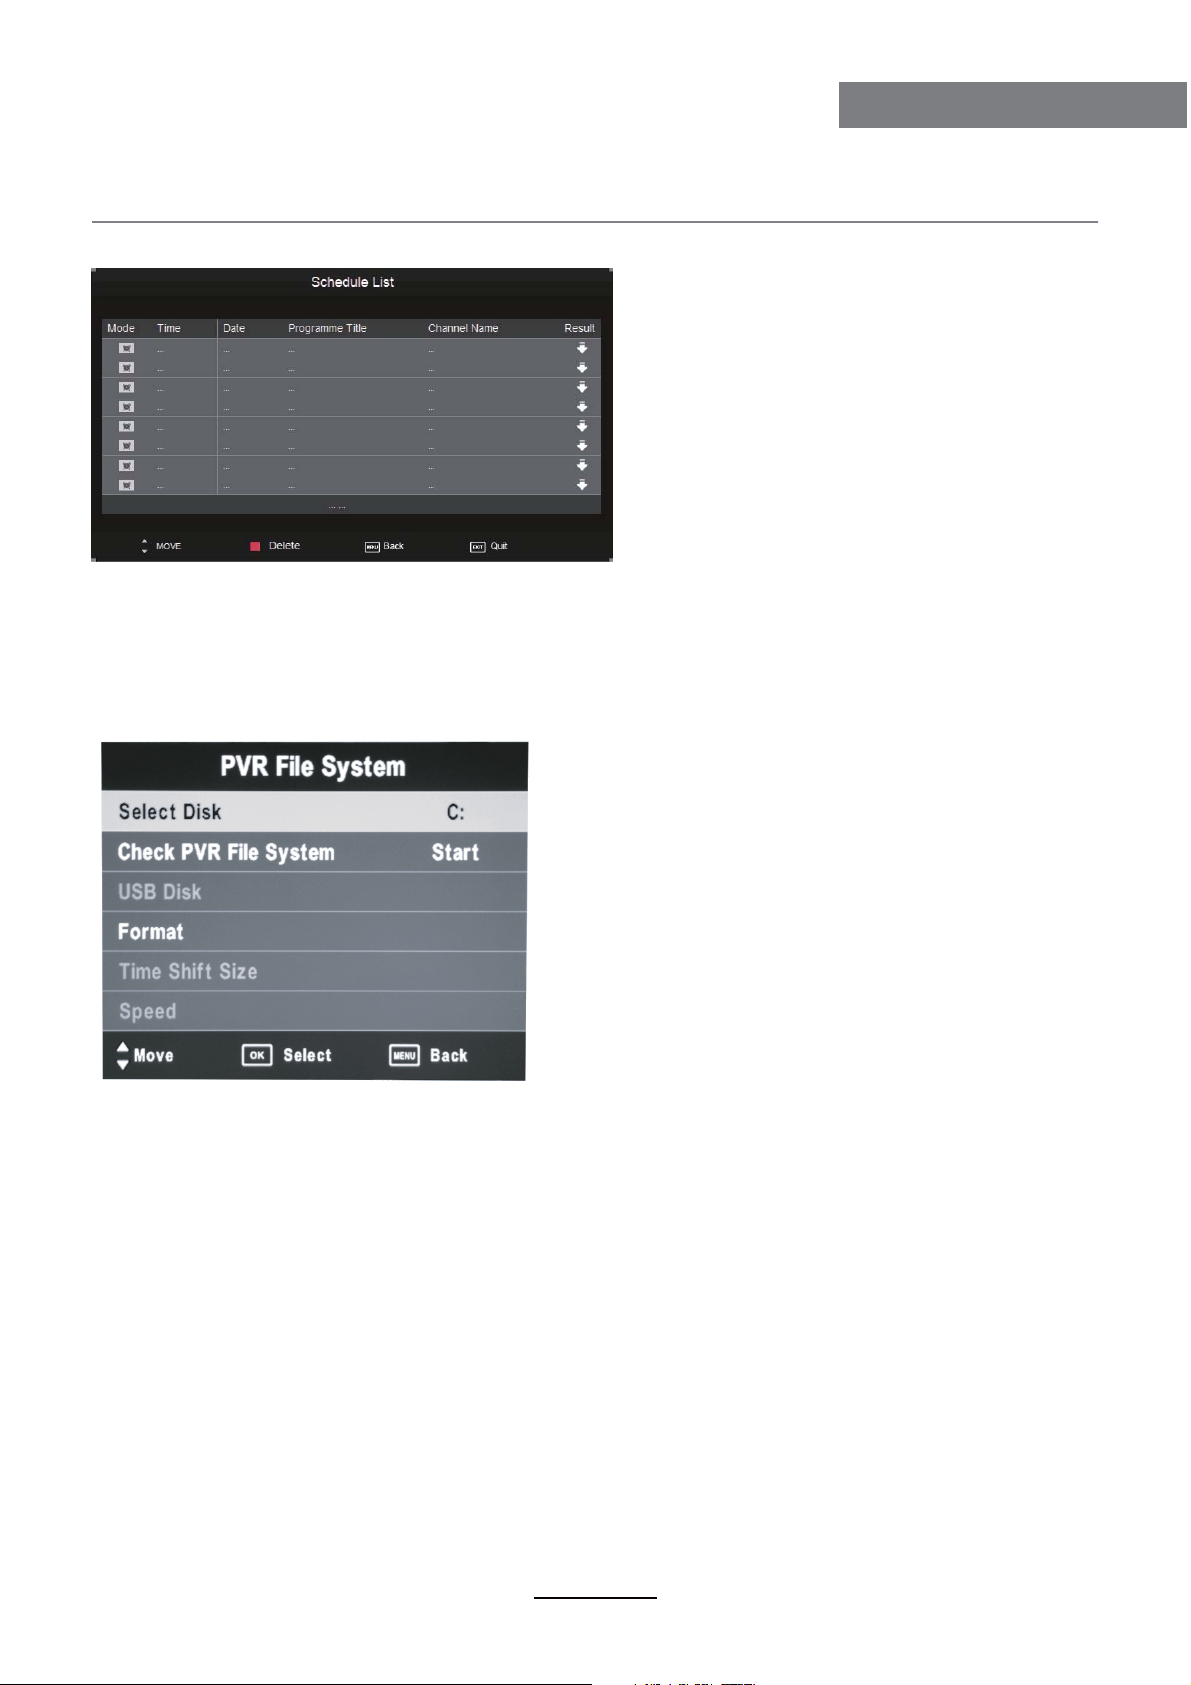
3). Schedule List
Display the recorder shedule
Note: a. Could’t add shedules which have existent on the list;
b. Could’t add shedules when the list is full, you have to delete some schedules;
c. You could delete a schedules by RED button on the remote control.
Recording Operation
4). PVR File System
Setup the PVR File system before you start recording.
Select Disk: Select the device for the Record files.
Check PVR File System
USB Disk: Display the USB state.
Format: Format the USB device for PVR operating.
Time Shift Size: Display the size of the USB device (The device has been formated).
Speed: Display the speed of the USB device (The device has been formated).
20
Page 23
Recording Operation
Recording Operation
5) Record Start
When you finish the settings above, you could start recording by select Start Recording in the
menu and press OK button in DTV mode. (You can also start recording by press the REC button
on the remote control)
Record buttons
REC(Recording): Press to enter the recording mode.
PAUSE: Press to enter the timeshift mode.
Recording list: Press to display the recording list.
Stop: Press to stop recording.
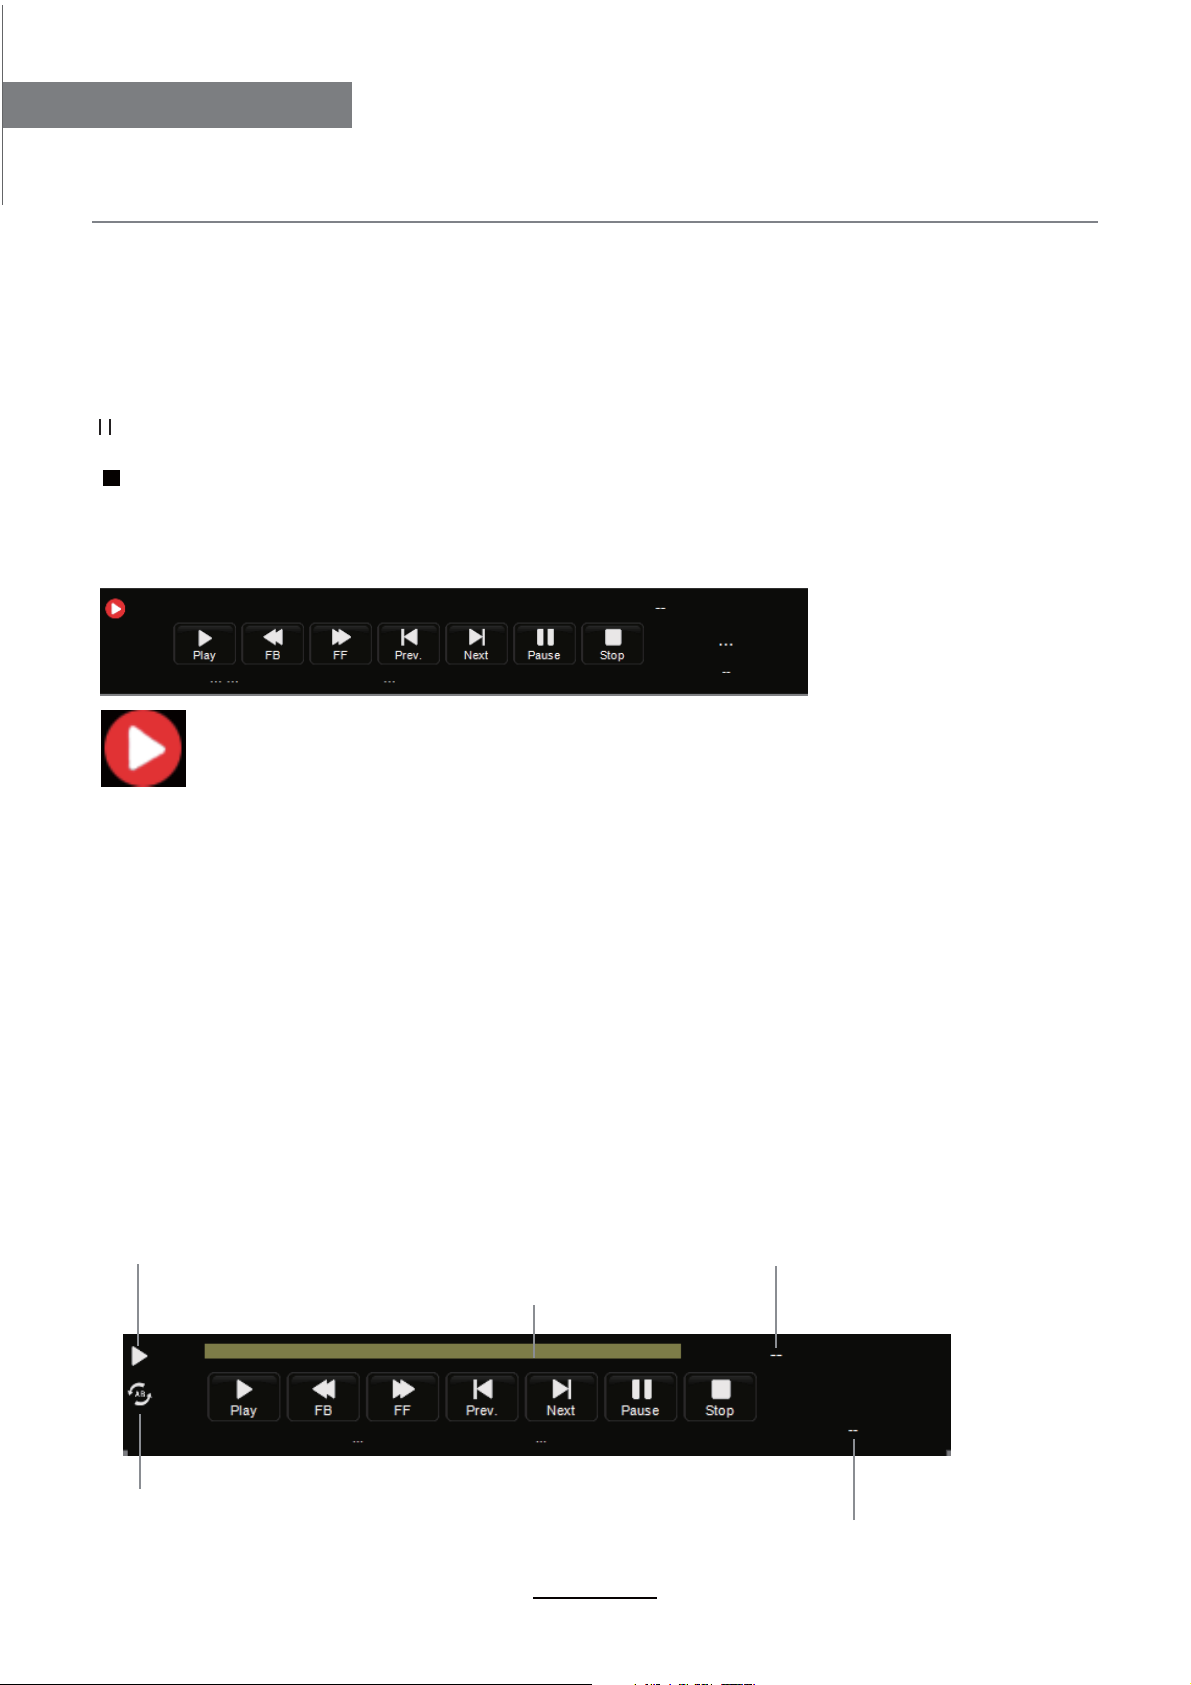
Recording menu
When you press REC button, the screen will display the recording menu as below:
Full mode
Simple mode
Note: a. You could change the mode of Recording menu by REC/Exit button.
b. Press STOP button to exit the recording mode.
c. Press PLAY button to play the program you are recording from the beginning.
d. Press Recording list button to display the Recorder list, and you could play the
program you selected. The recording will be going on, and the Recording menu
will display when you exit the Recorder list.
Timeshift
Press PAUSE button to enter the Timeshift mode, and the picture will be paused, the
recording will begin.
Note: a. You could change the mode of Timeshift menu by REC/Exit button.
b. Press STOP button to exit the Timeshift mode.
c. Press PLAY button to play the program you are recording from the beginning.
Playback
The current state of the program
The current time
The process of the program
A-B mark
The name and number
of the program
21
Page 24
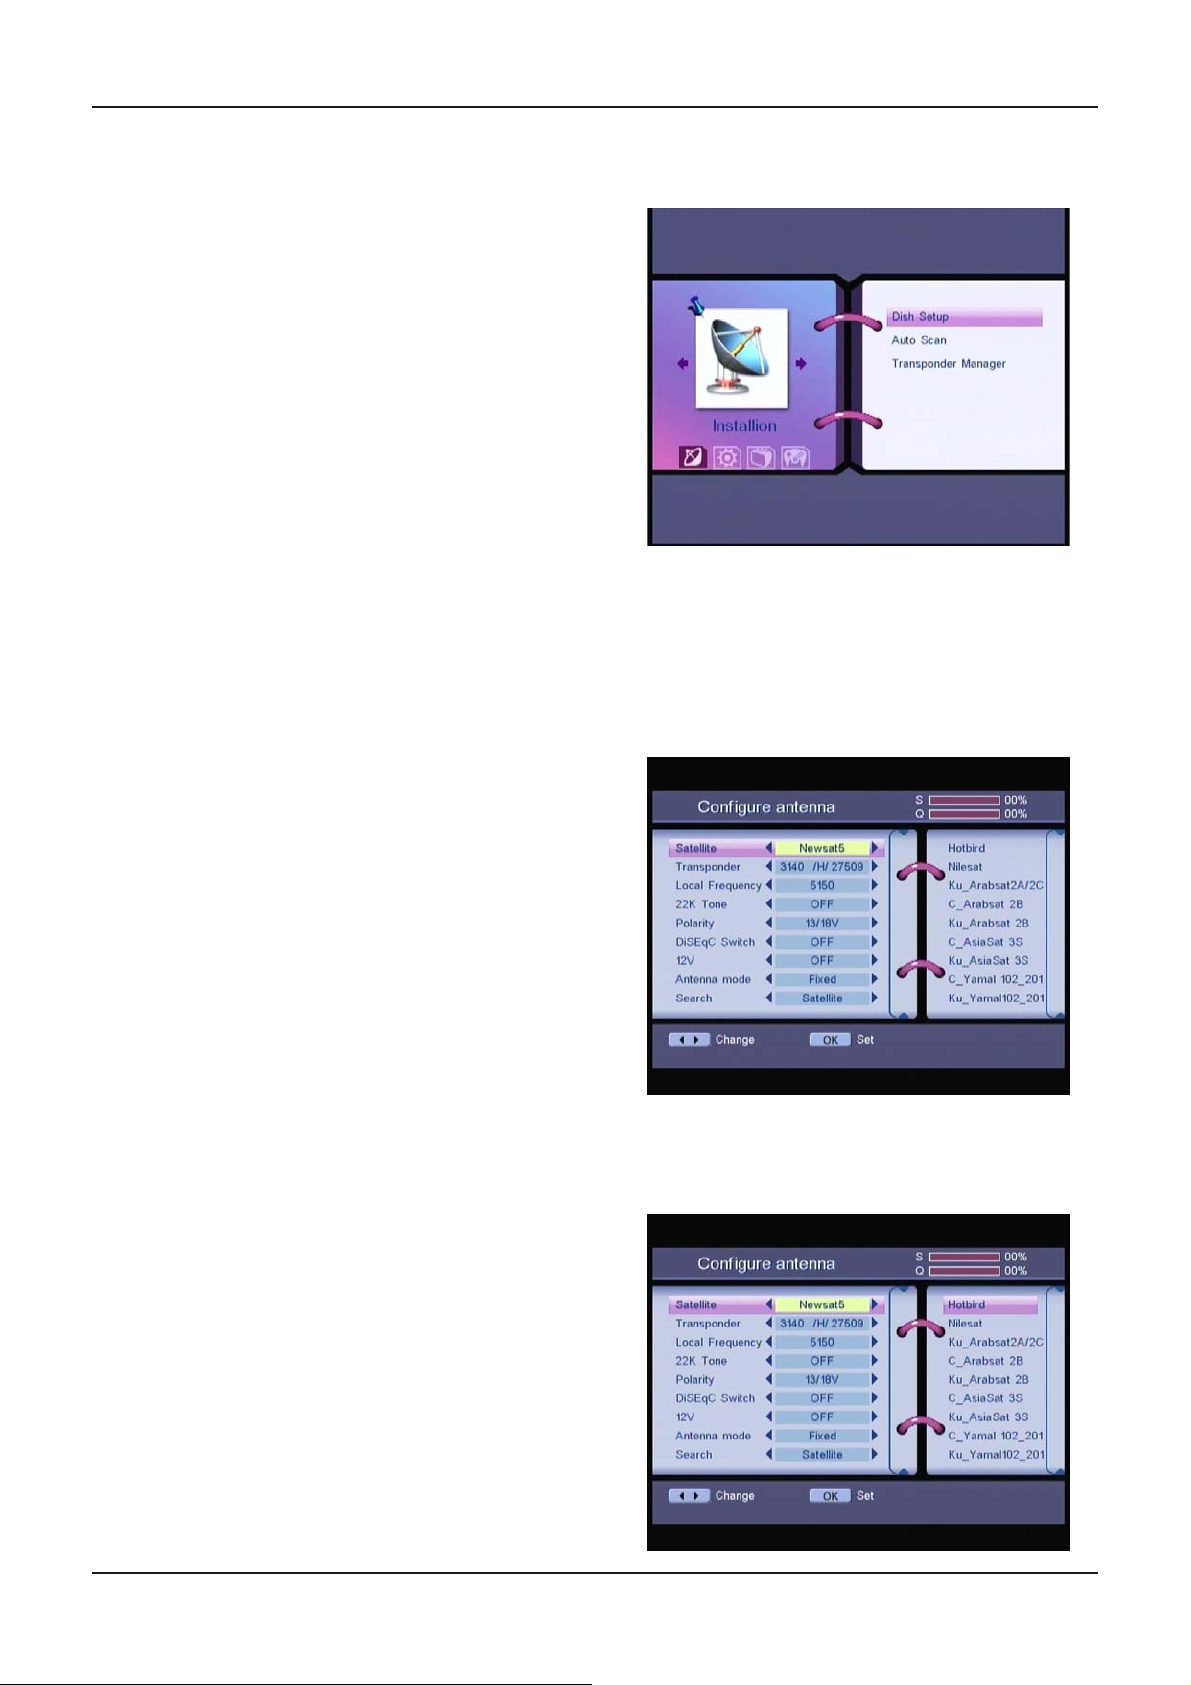
DVBS Operation
1MainMenu
All the important settings and features of your
receiver can be operated in
Main Menu consists of four sub-menus which
Installation",“System setting
are "
" and
Organizer
Press the MENU key when the menu is off, The
MAIN MENU
"Multimedia"
screen will appear
Main Menu
”, "
.
1.1 Installation
.The
Channel
The installation menu contains three sub-menus; “
“Transponder Manager”.
1.1.1 Dish Setup
You
can select satellite ˈ set the parameter of
satellite parameter and enter to install satellite
submenu in this menu.
1.1.1.1 Satellite
Move the curser to the satellite you want to
install.
Press OK to select the satellite you want to
install.
Dish Setup”, “Auto Scan” and
Note:
You
must press OK to save changed date
when the cursor is on the Satellite item
before you select another satellite.
22
Page 25

1.1.1.2 Transponder
You
can select the current Transponder or add the new Transponder.
1.1.1.3 Local Frequency
You
can change the local frequency.
You
Note:
must press OK to save this local frequency when the cursor is on the Local
Frequency item before you select another satellite.
1.1.1.4 22K
can change the 22k tone. Press LEFT/RIGHT select
You
Note:
1.1.1.5 Polarity
You
can change the polarity. Press LEFT/RIGHT select
Note:
1.1.1.6 DiSEqC Switch
You
can change DiSEqC Switch. Press LEFT/RIGHT select
Tone
You
must press OK to save this 22K tone when the cursor is on the
before you select another satellite.
You
must press OK to save this polarity when the cursor is on the
you select another satellite.
OFF.
Note:
1.1.1.7 Antenna mode
You
When you select
Press OK to enter the submenu of the
Press UP/DOWN to move the curser to the item of the
Press LEFT/RIGHT to select the current transponder.
Press UP/DOWN to move the curser to the item of the
You
must press OK to save this DiSEqC Switch when the cursor is on the
Switch
can change the Antenna mode. Press LEFT/RIGHT select
item before you select another satellite.
Goto x::
Adjust Antenna
ON, OFForAUTO.
13V, 18V, 13/18V or OFF
Polarity
LNB1, LNB2, LNB3, LNB4 or
Fixed, Goto x or DiSEqC1.2.
.
Transponder.
Satellite Longitude.
22K Tone
.
item before
DiSEqC
item
Input the data of the Satellite Longitude and press LEFT/RIGHT select
Press UP/DOWN to move the curser to the item of the
Input the date of the My Longitude and press LEFT/RIGHT select
Press UP/DOWN to move the curser to the item of the
Input the date of the My Latitude and press LEFT/RIGHT select
Press UP/DOWN to move the curser to the item of the
Press OK to move the Antenna to the position you want.
My Longitude.
EastorWest.
My Latitude.
SouthorNorth
Goto Position.
23
EastorWest.
.
Page 26

Move the curser to
When you select DiSEqC1.2:
Press OK to enter the submenu of the
Press UP/DOWN to move the curser to the item of the
Press LEFT/RIGHT to select the current transponder.
Press UP/DOWN to move the curser to the item of the
Press LEFT/RIGHT to move dish.
Press UP/DOWN to move the curser to the item of the
PressOKtogoto0.
Press UP/DOWN to move the curser to the item of the
Press LEFT/RIGHT to select the number of the store position.
Press OK to save.
Move the curser to
1.1.1.8 Search
You
can change
Press LEFT/RIGHT select
When you select Satellite, press OK to enter the progress of the satellite search mode.
When you select Transponder, press OK to enter the progress of the Transponder search.
When you select Blind Scan, press OK to enter the progress of the Blind Scan.
When you select NIT Searching, press OK to enter the progress of the NIT Searching.
BackorNext
BackorNext
Search
mode.
button and press OK to exit the submenu to the last menu.
Adjust Antenna.
Transponder.
Move Dish.
Goto Ref..
Store position.
button and press OK to exit the submenu to the last menu.
Satellite, Transponder, Blind Scan, NIT Searching.
24
Page 27
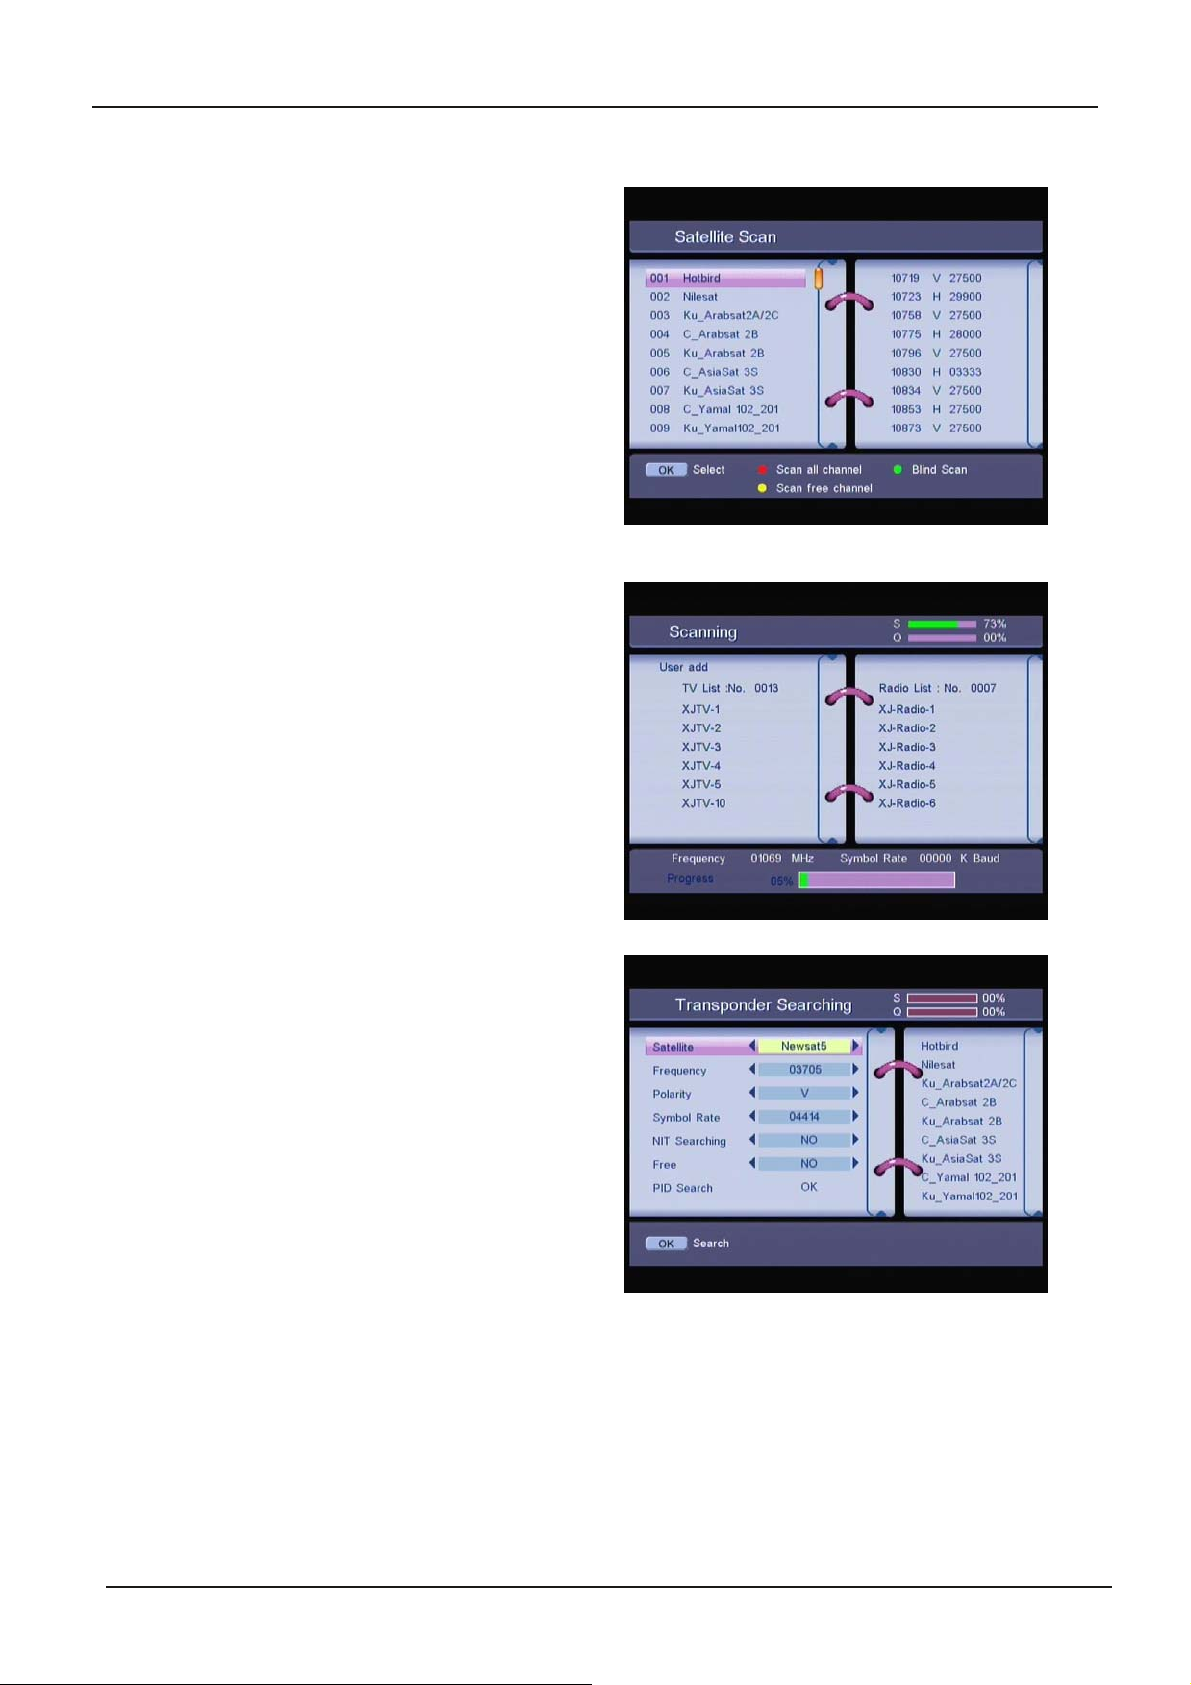
1.1.2 Auto Scan
PressUP/DOWNkeytomovethecursertothe
satellite you want to select, and press OK to
mark or unmark.
Press the RED button to scan all channel of the
marked satellite.
Press the GREEN button to Blind Scan the
marked satellite.
Press the YELLOW button to scan free channel of the marked satellite.
1.1.3 Transponder Manager
In this menu, you can add, edit, and delete the
transponder. you can search transponder.
1.1.3.1 Satellite
You
can select the satellite.
1.1.3.2 Frequency
You
can select the frequency.
Press RED button to enter
Press GREEN button to enter
Add Transponder
Edit Transponder
submenu, you can add the new transponder.
submenu, you can edit the transponder.
25
Page 28
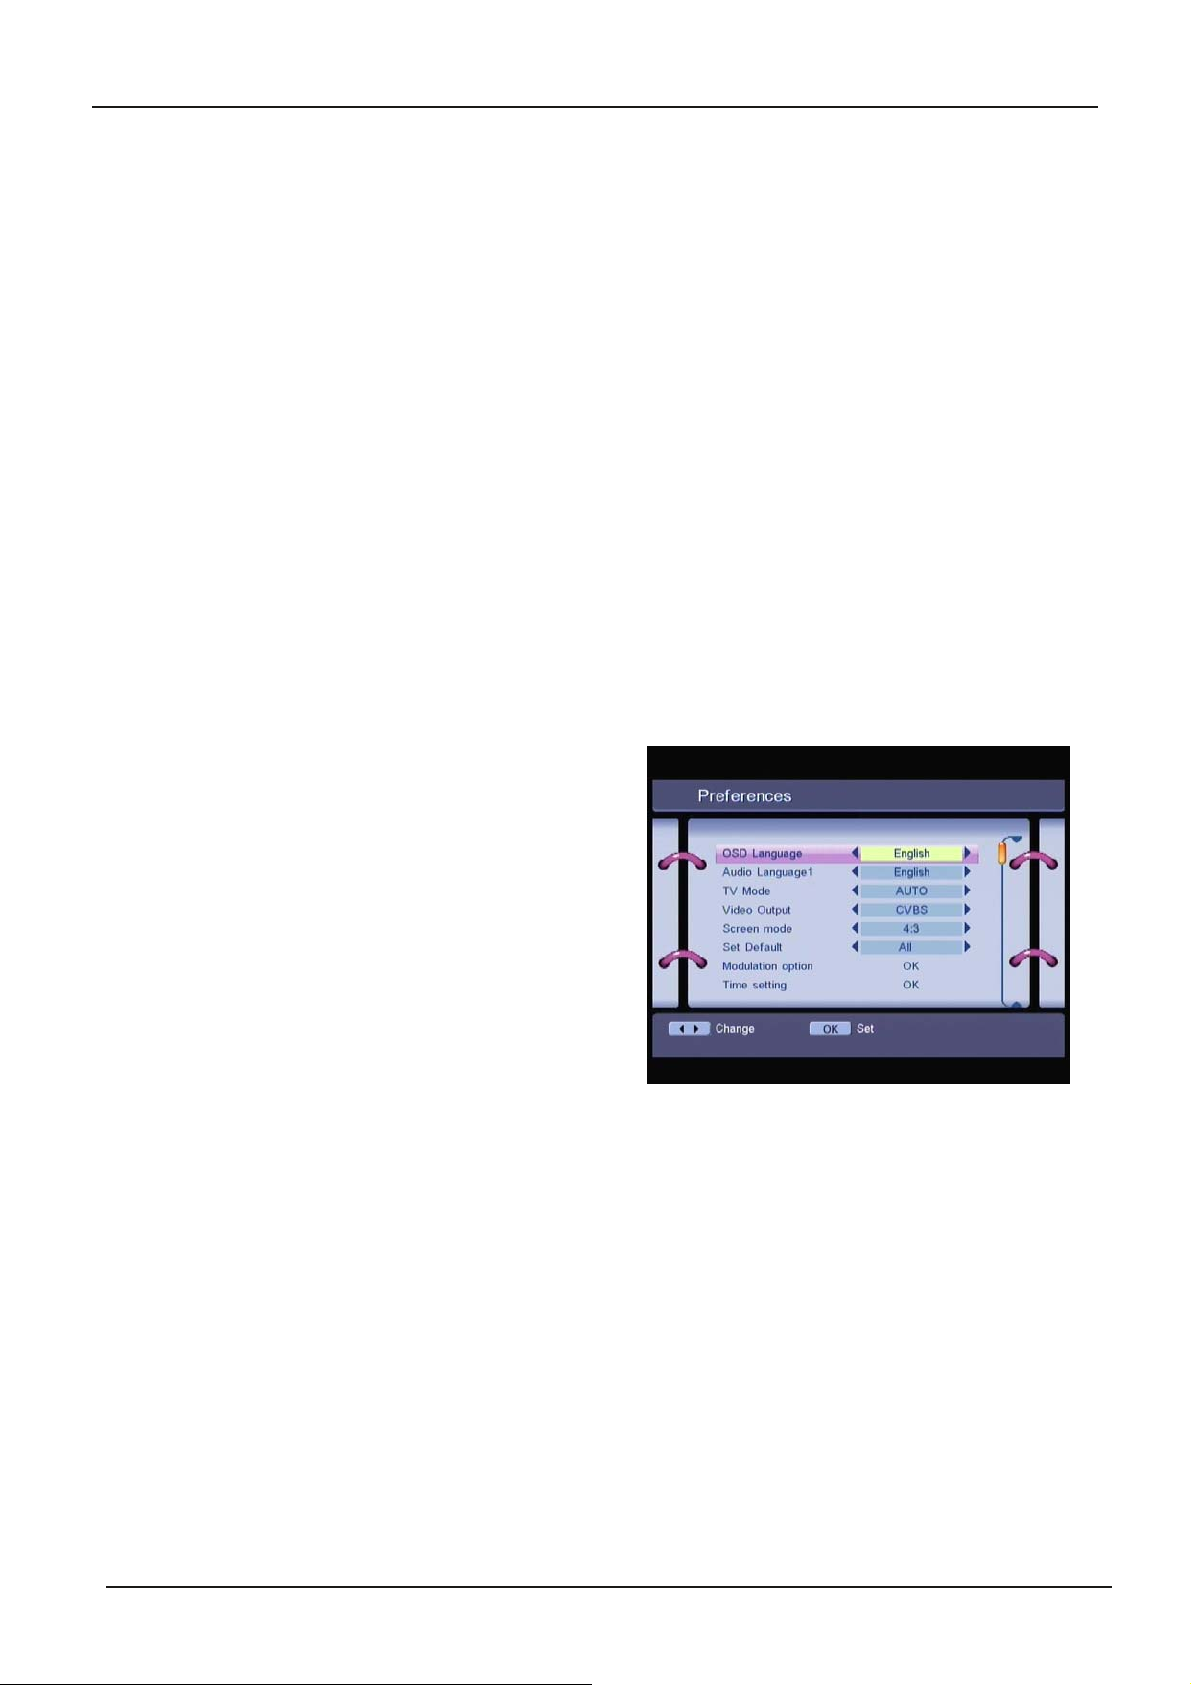
1.1.3.3 Polarity
You
can select the
1.1.3.4 Symbeol Rate
You
can select Symbol Rate.
1.1.3.5 NIT Searching
You
can select the NIT
1.1.3.6 Free
You
can select the
.
polarity.
free mode.
1.2 System setting
Searching.
In this menu, you can configure the systems such as
Control, TV Settings, Time Setting
System Update.
and
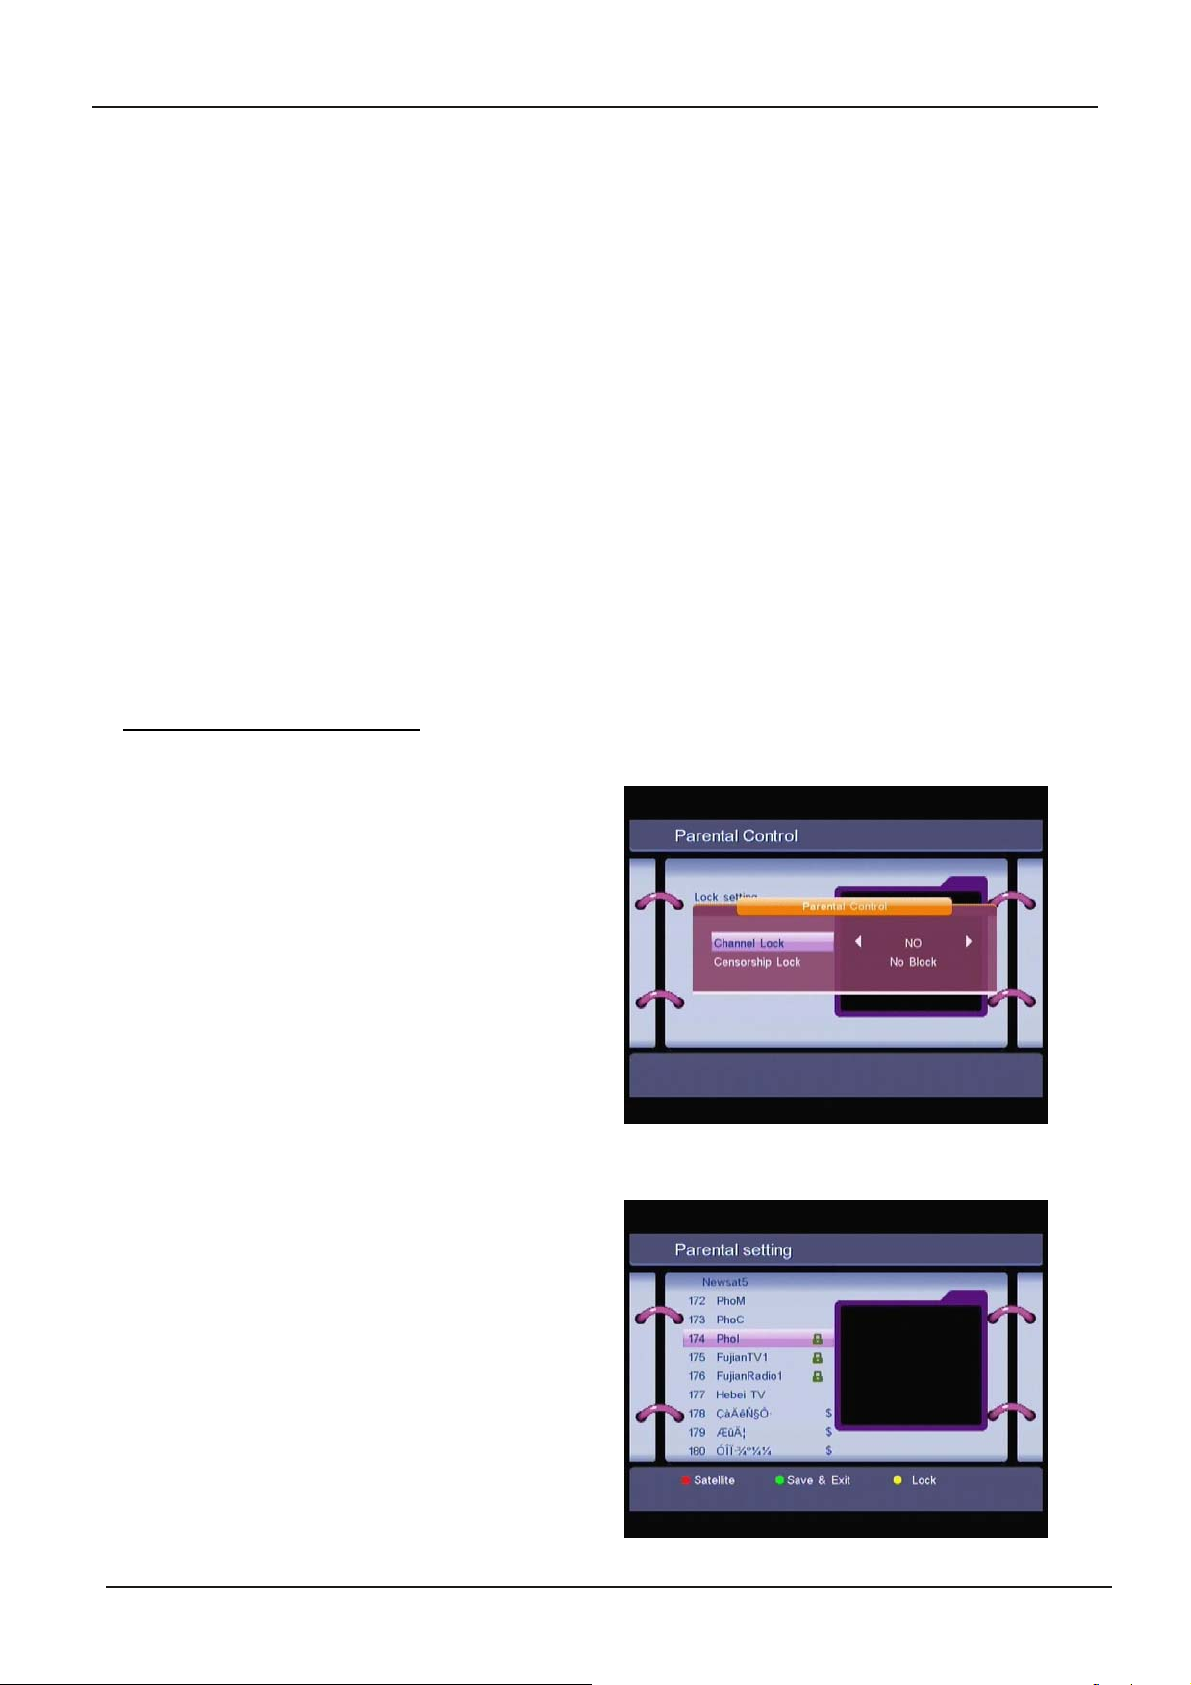
1.2.1 Preference
You
can set the
language, TV mode, Video output, Screen
mode, set factory default, Modulator settings
Time setting.
and
1.2.1.1 OSD Language
Press LEFT/RIGHT to select the
language.
1.2.1.2 Audio Lang
Press LEFT/RIGHT to select the
OSD language, the Audio
OSD
Audio language.
language Setting, OSD style, Parental
1.2.1.3 TV Mode
Press LEFT/RIGHT to select
If you don’t know which standard your TV has, please select
1.2.1.4 Set Default
Press LEFT/RIGHT to select the
Press the OK key, enter the code, the receiver will return to its factory default state, and the
data will be deleted.
NOTE: Your PIN code will change back to the factory setting “0000”.
PAL or NTSC
ALLorScramble
.
AUTO
.
.
26
Page 29
1.2.1.5 Time Setting
Press OK go to
Time Setting
below:
GMT
If a broadcaster provides
yourself. If the
time zone. If your broadcaster provides the correct time offset then your receiver will change
from summertime to wintertime automatically. If you set
Set Time item are displayed.
To
set the time value manually, move the cursor to the time item and use the numeric buttons
on the remote control.
GMT
usage is
, you can set the time using
ON
then the Current time is set automatically or you can set the
GMT
GMT
, or set your own time by
Usage to
OFF
, Set Data and
1.2.2 Parental Control
Parental setting and can change the PIN code
The default PIN code is 0000.
ƔLock Setting
Channel Lock:
NOorYES
has to enter the parental PIN code correctly
before watching the locked channel.
Censorship lock
Ɣ Parental Setting
Press YELLOW key to set some channels to
lock status. If a channel is locked, the user has
to enter the parental PIN code correctly before
watching the locked channel.
Set the system channel lock to
. If the channel lock is
: set the censorship class.
YES
, the user
27
Page 30
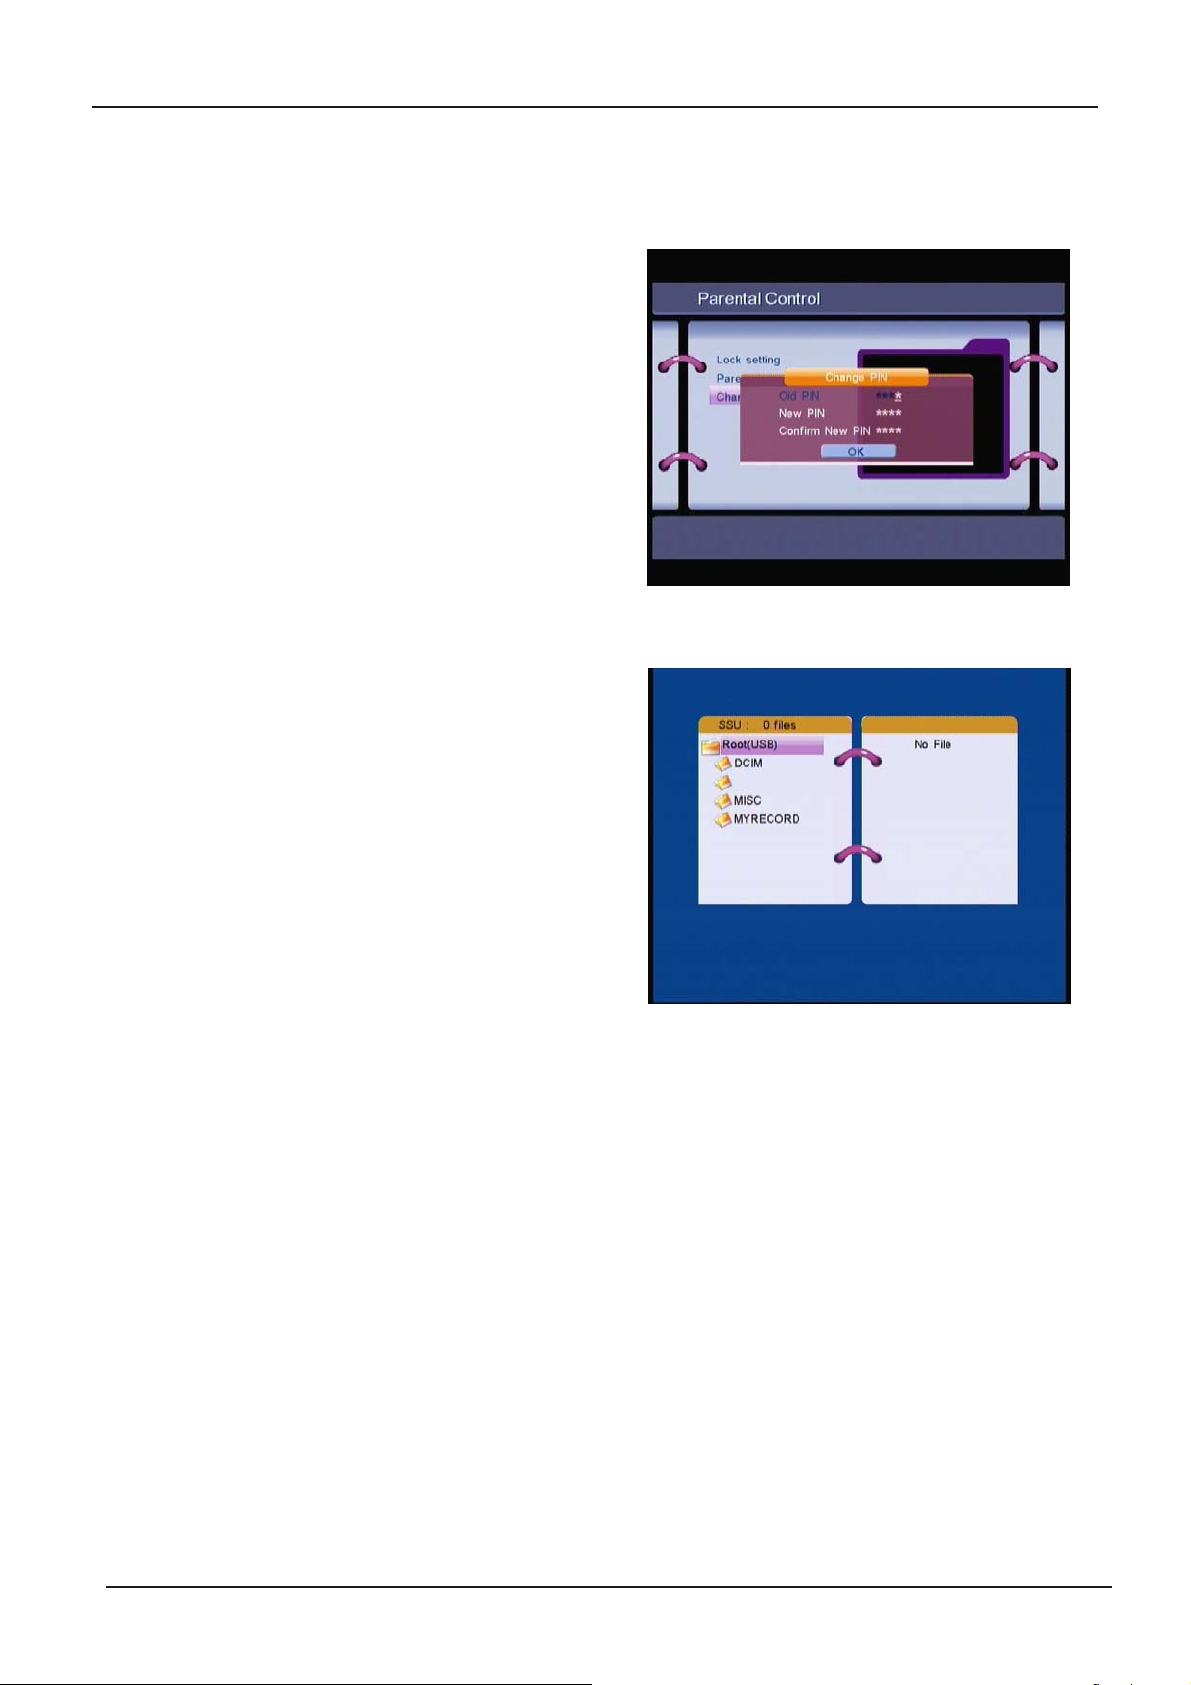
Ɣ Change PIN
Modifying the PIN. You must enter the 4 digits
PIN and confirm it again; the system PIN will be
changed into the new PIN as show on.
1.2.3 System Update
In this menu, you can select “
Ɣ Update by DVBS
You
can update your STB software by USB.
Select “System Update – Update by DEV”, you
can select update software from USB disk, and
press OK key to update your DVBS.
Update by OTA
”, “
Update by DEV
”
28
Page 31
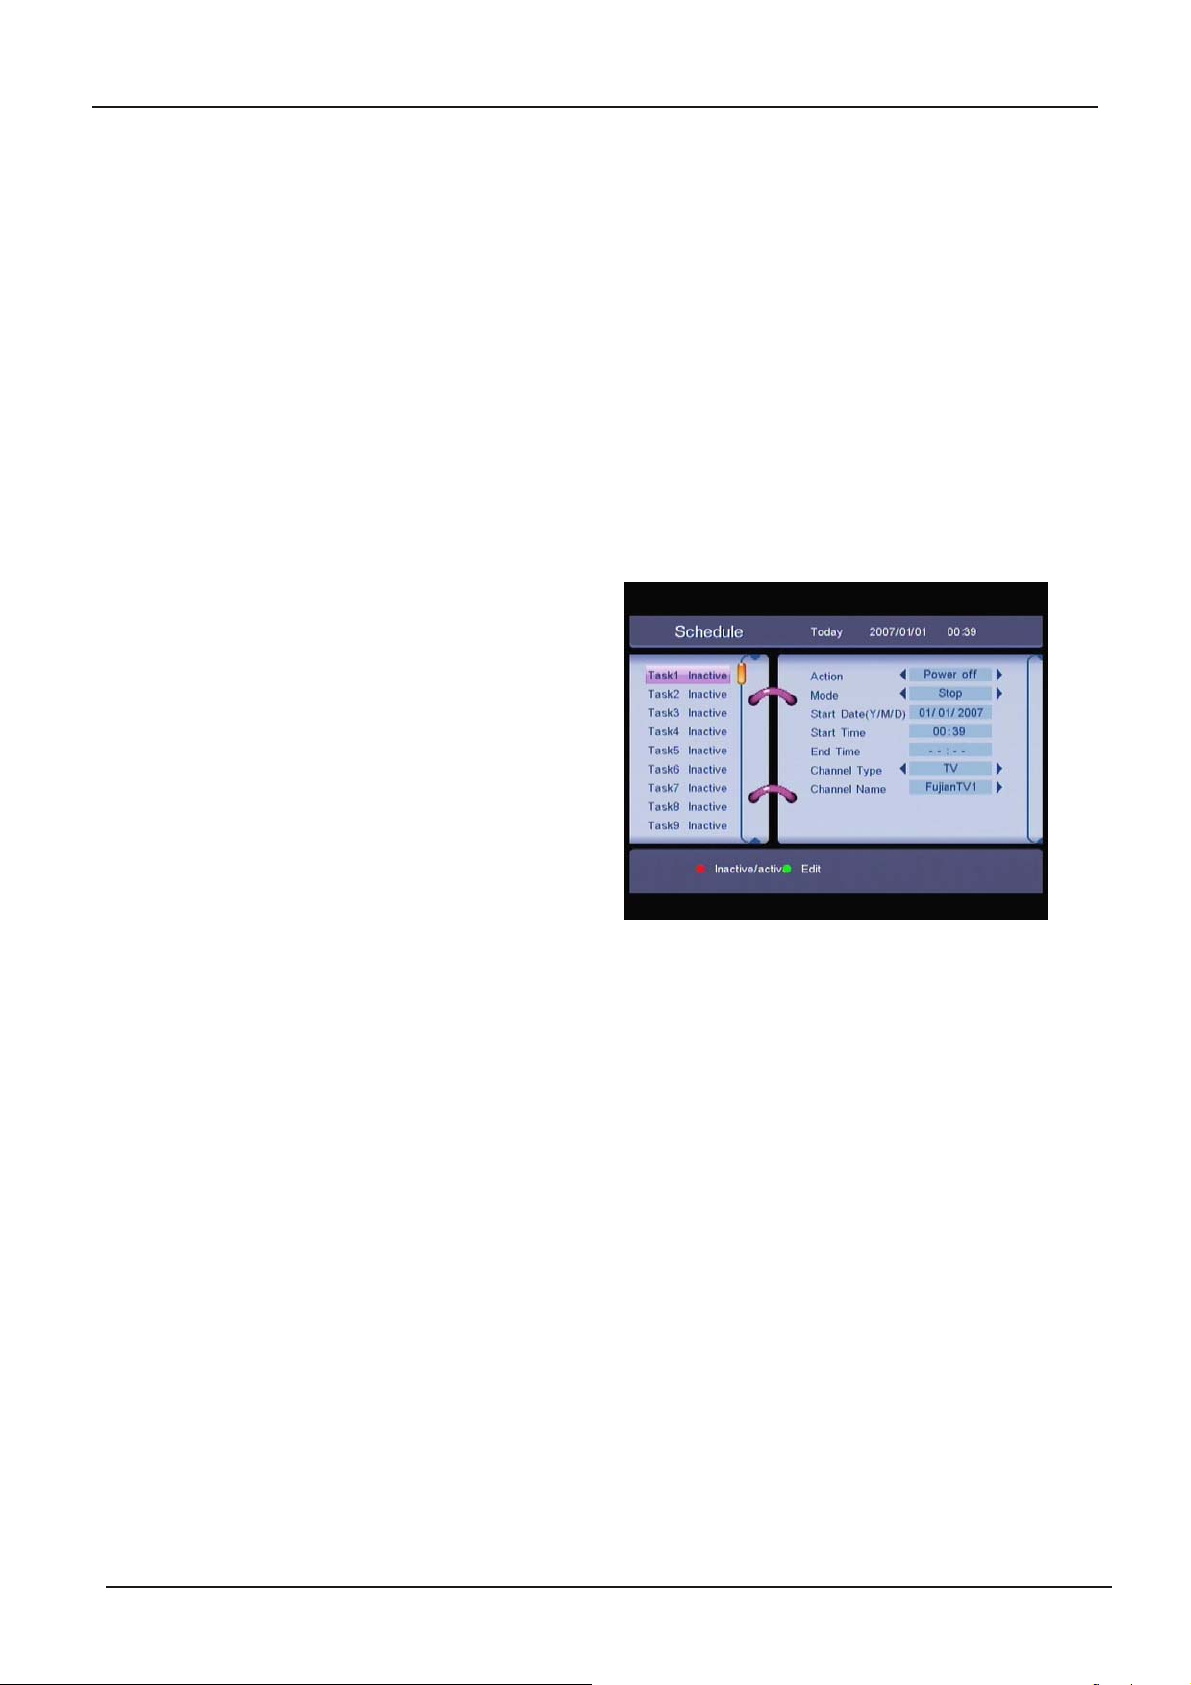
1.2.4 System info
The system information displays information about your receiver such as software hardware
and date.
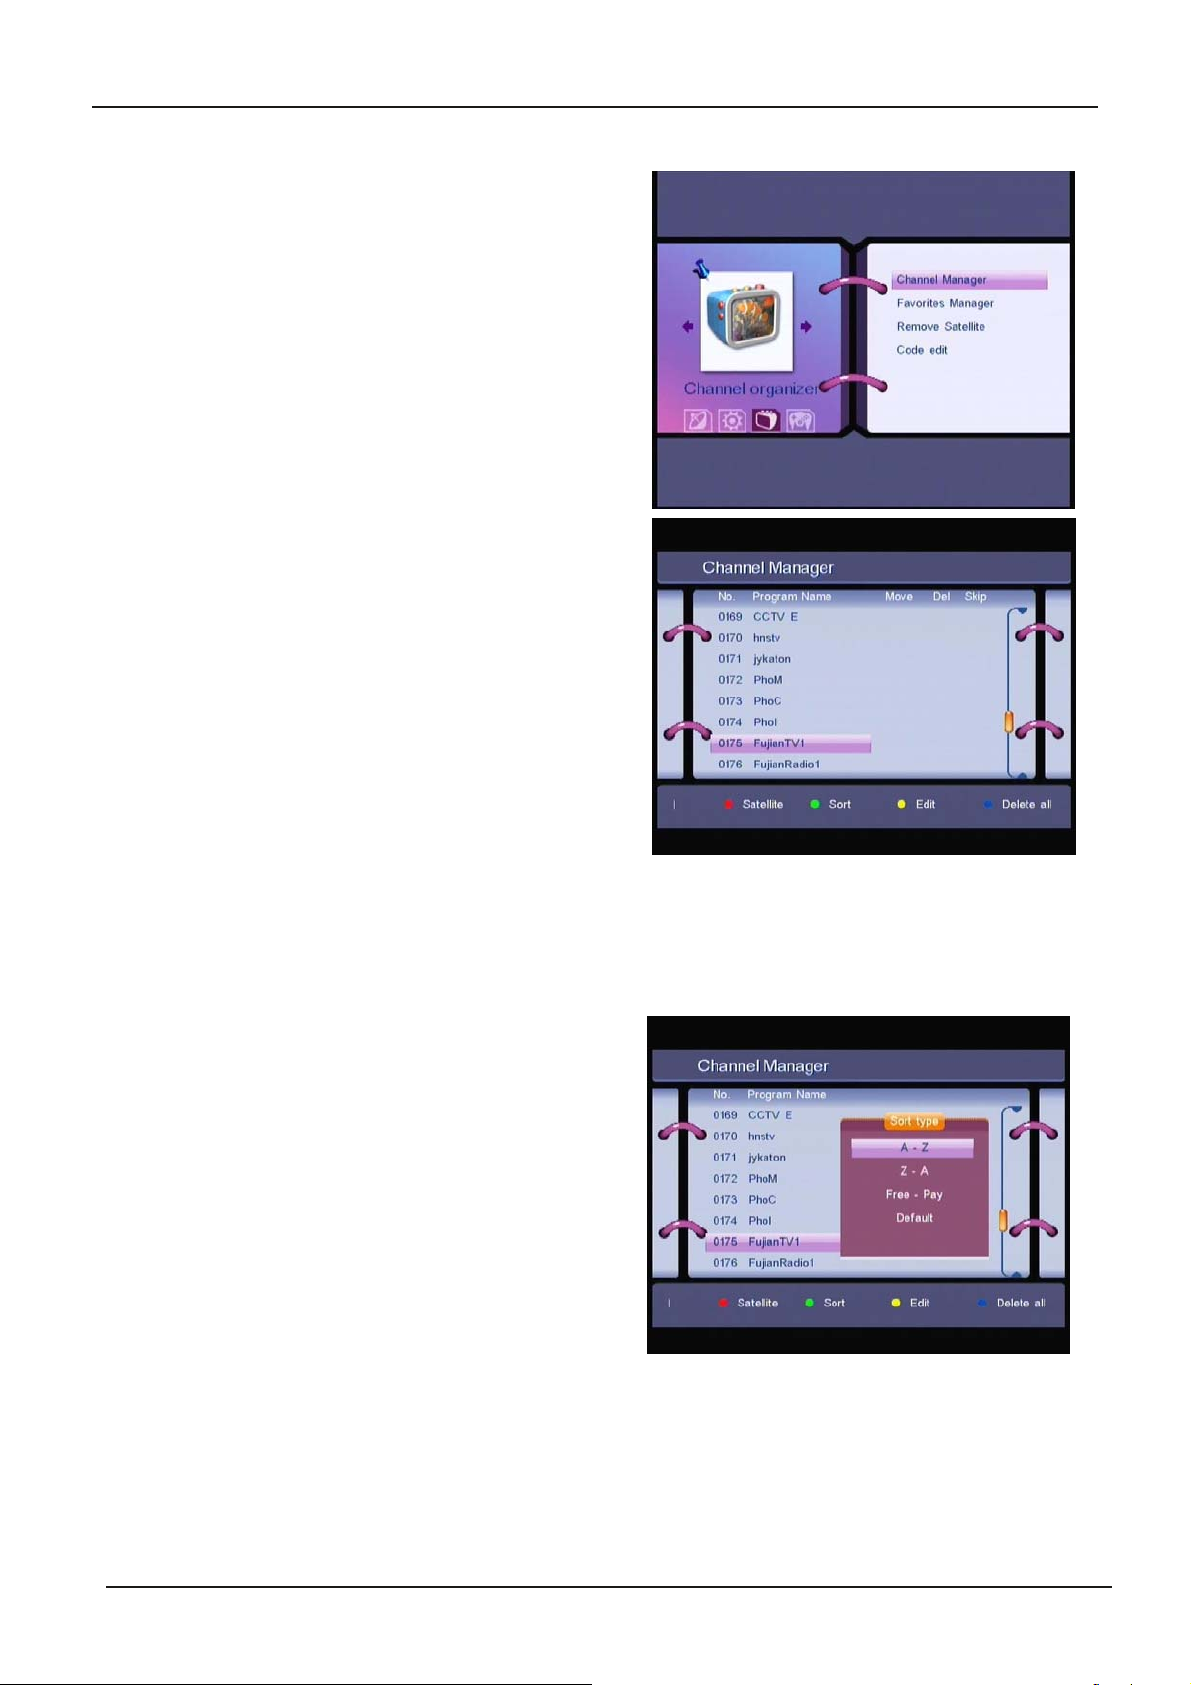
1.2.5 Timer
You
can set the timer to make the receiver
perform designated actions.
Use the UP/DOWN buttons to select timer.
Press the LEFT/RIGHT key to
activate/inactivate current timer. Press the OK
button to enter your selected timer settings.
Action:
“Time interval”
channel and then switches off at the designated date and time (The value set at the end
time).
Cycle
Daily or Weekly).
Start Date
Start Time
End Time
Interval.
Channel Type
You can select the following functions:
: The receiver switches on at the designated date and time, displays the
: You can set the cycle of the action designated in the timer mode (one time,
: You can set the start date of the timer action.
: You can set the start time of the timer action.
: You can set the end time of the channel viewing when the Timer mode is on Time
: Select between TV and Radio.
Channel name
buttons select the channel to be shown when the receiver will power on by the timer.
: Press the RIGHT button to display the channel list and using the navigation
29
Page 32
1.3 Channel Organizer
In the
move the cursor to
then press OK to enter the
menu.
The
sub-menus; “
Manager”
MAIN MENU
screen, press UP/DOWN to
Channel Organiser,
Channel Organizer
Channel Manager” , “Favorites
,
“Remove Satellite” .
and
Channel Organizer
menu consists of three
1.3.1 Channel Manager
In this menu, you can change the order of the
channels, delete and edit channels.
To
change the satellite use the RED button, and
press Left/Right button.
Sort (GREEN button)
You
can sort the channel order in the channel
“FAV
list by “A-Z”, “Z-A”, “Free-Pay”,
type.
” or “Default”
30
Page 33
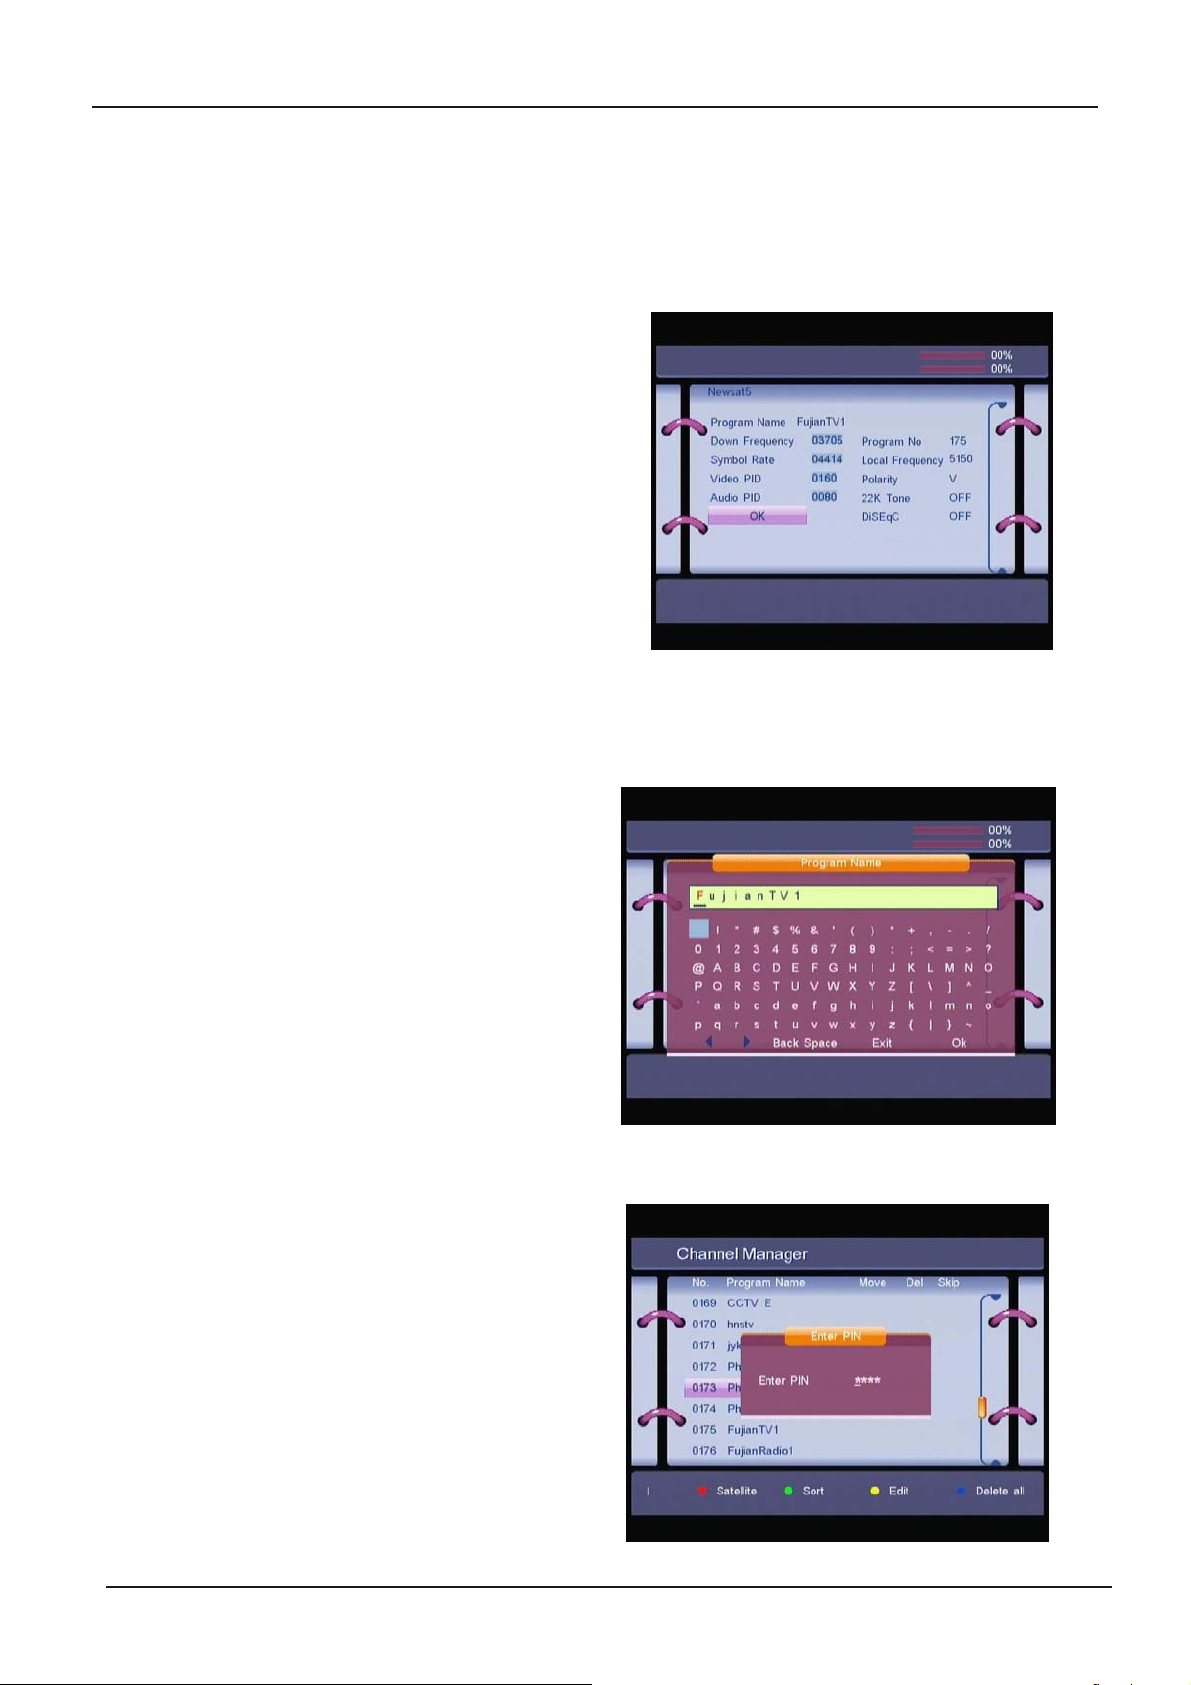
Edit (YELLOW button)
Select the channel that you wish to edit, press the
YELLOW (Edit) button to move into the
program
menu. In this menu, you can modify the
modify
Program Name, Frequency, Symbol rate, Video
PID, Audio PID.
If you want to rename the channel, use the
UP/DOWN keys to select
press OK, the program name dialog will shown
as below.
Use the UP/DOWN or LEFT/RIGHT button to
“program Name
” and
move the cursor to the character you want
character, and press the OK button to select.
When editing is complete, move the cursor to
“
Ok
”, and press the OK button.
Delete all
Press the BLUE key and input the password,
you can delete all channels.
31
Page 34
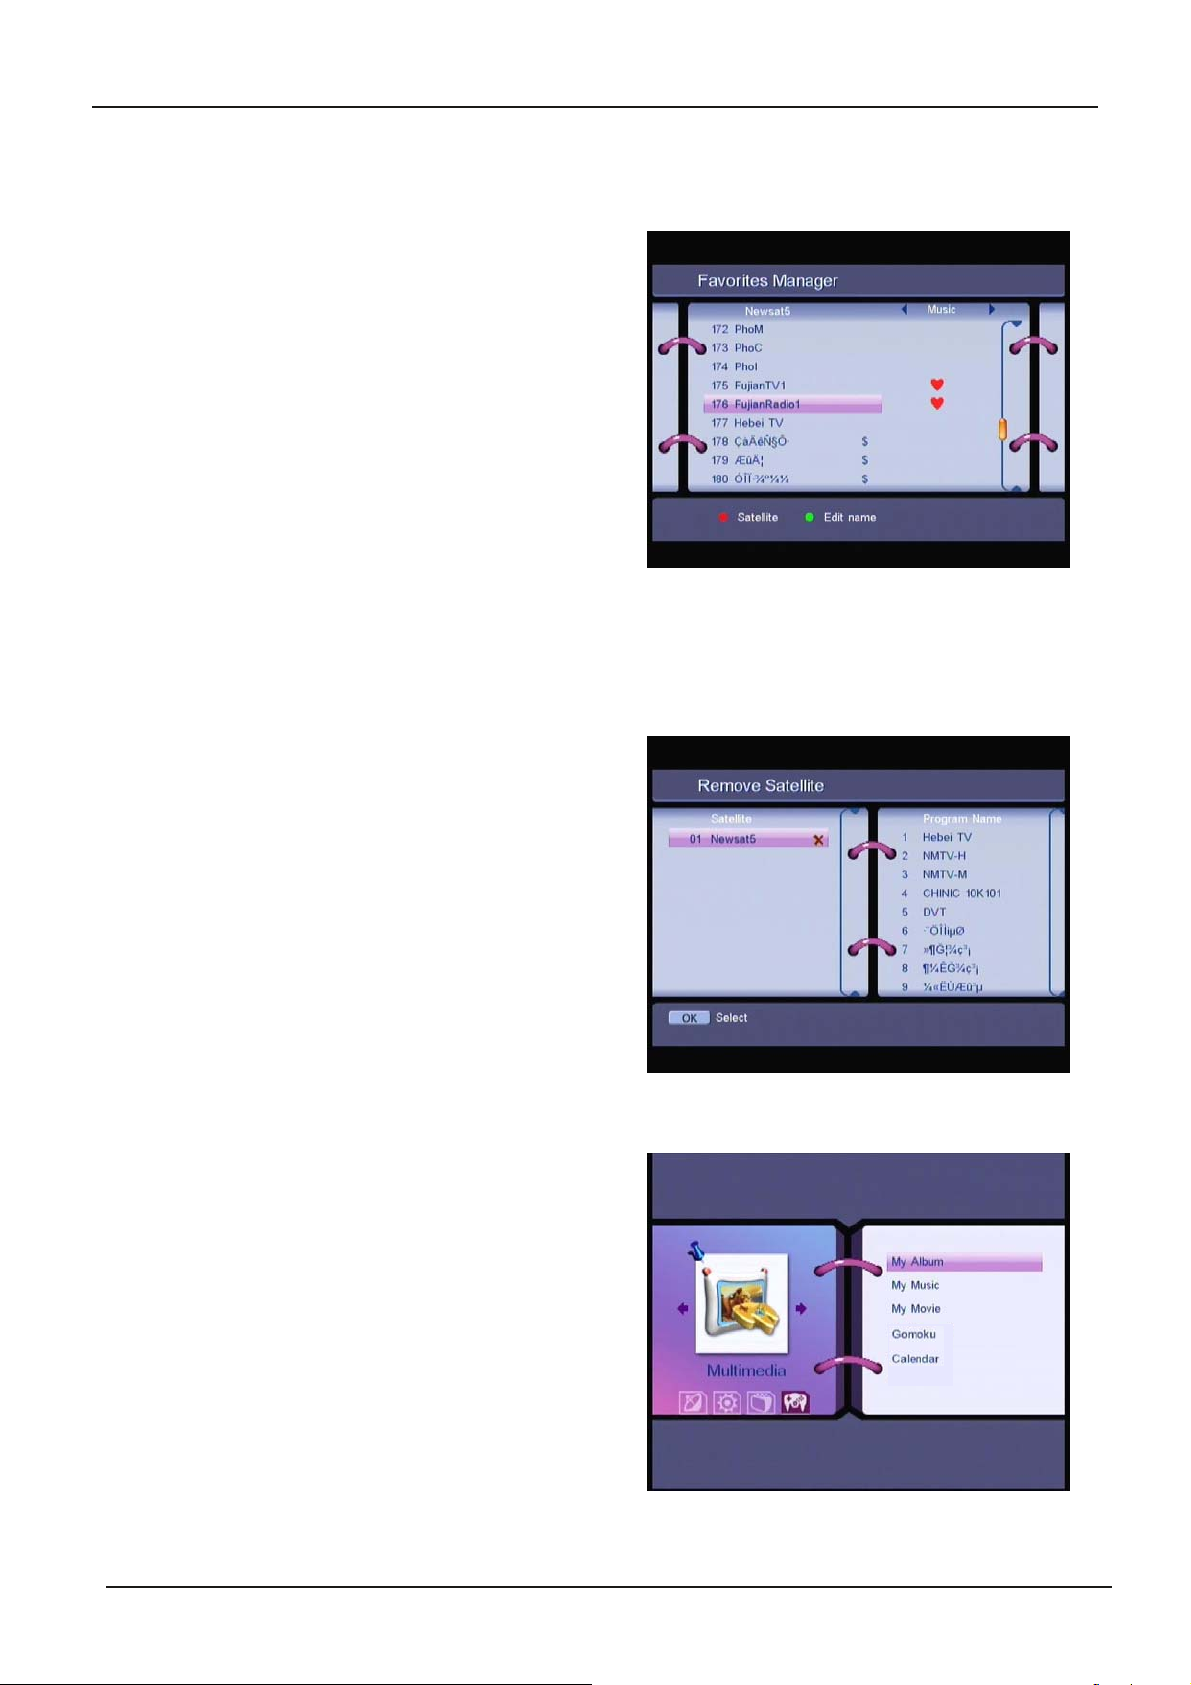
1.3.2 Favorites Manager
Press the UP/DOWN keys to select the channel.
Press the LEFT/RIGHT keys to select the
favorite group. Press the OK button to add the
selected channel to the Favorite group. To
remove the channel from the favorite group,
repeat same operation.
Press RED key, you can sort the channels by
different satellites.
Press GREEN key, you can edit the favorite group name.
1.3.3 Remove Satellite
Press the UP/DOWN keys to select the satellite
Press the OK button to remove the satellite
from the
1.4
In this menu, you can view “My Album”, play
“My Music”, “My Movie” , play “Gomoku” game
and view “Calendar” from a USB key inserted
into the USB slot.
database.
Multimedia
32
Page 35
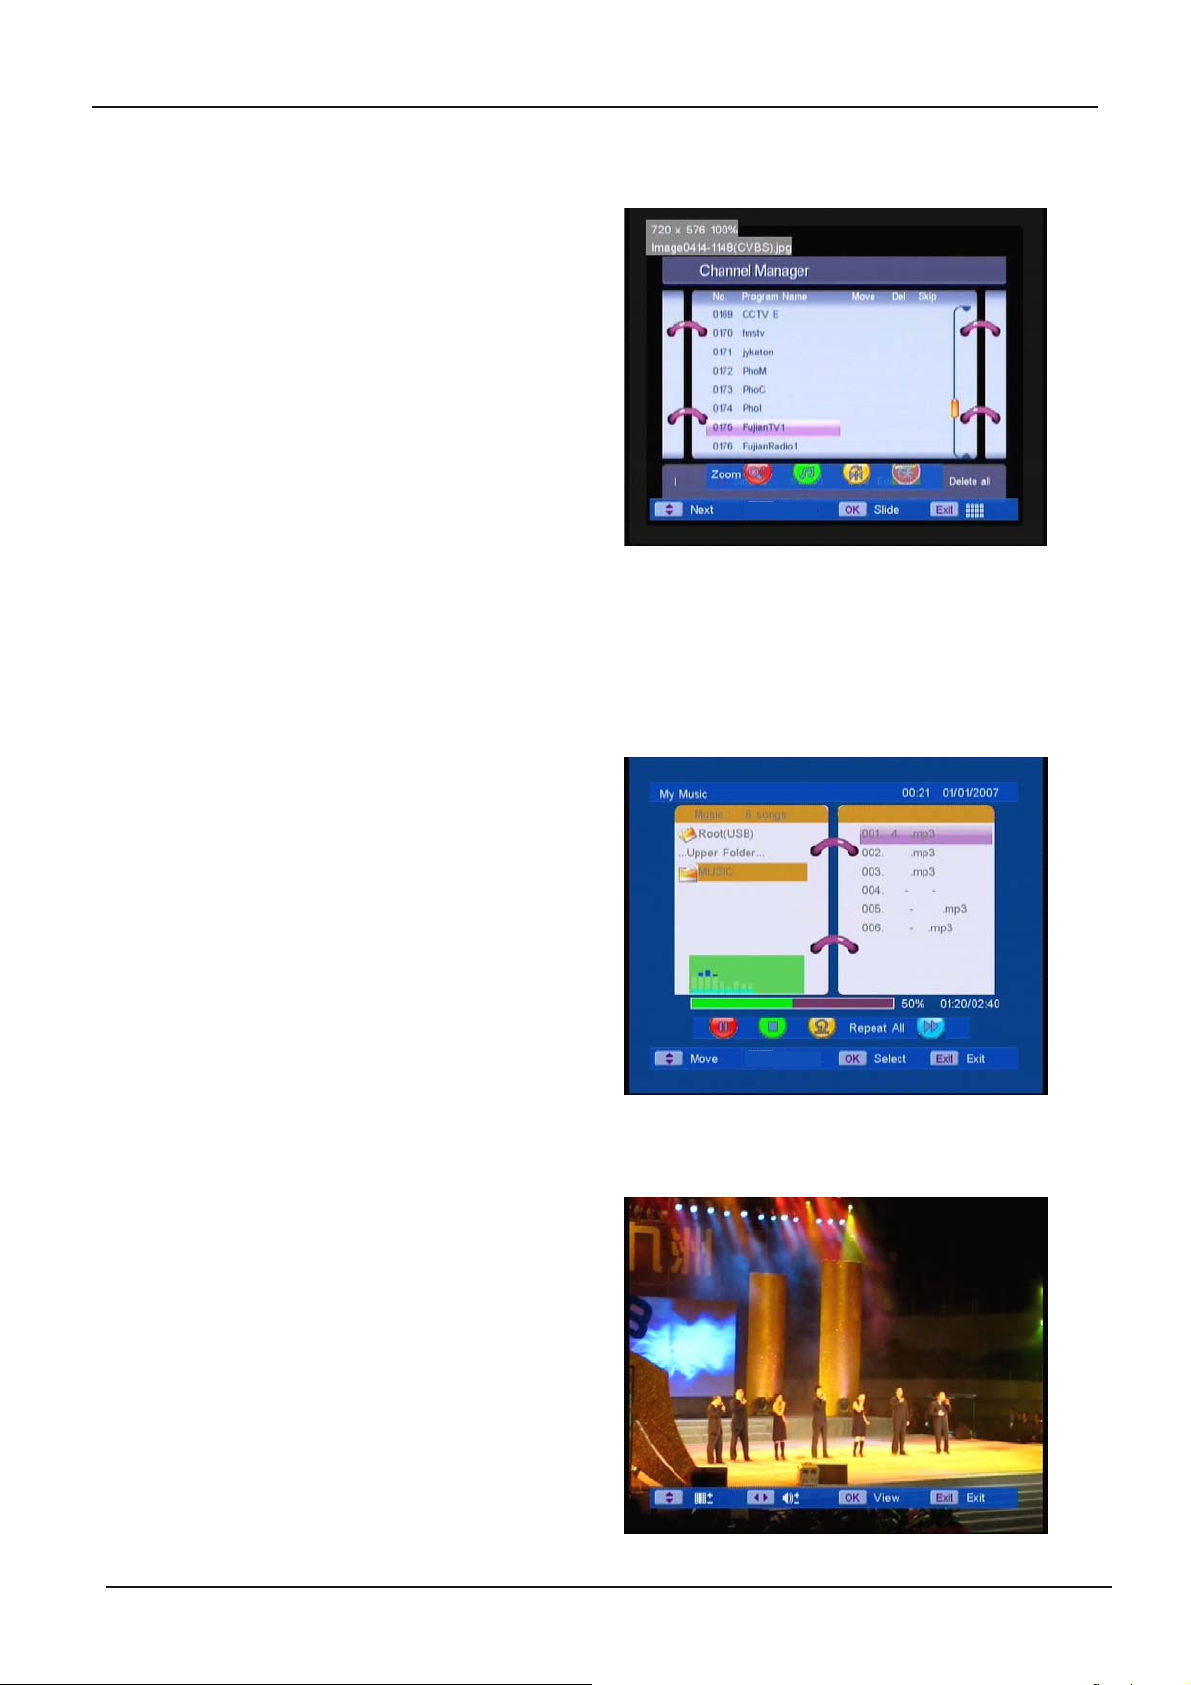
1.4.1 My Album
Select “My Album”,presstheOKkey,then
press BLUE key. Use the ŸźŻŹ keys to
select a picture by thumbprint. To change
Folder
1. Press the OK key to play selected picture
full screen. Files can also be selected by
number keys and pressing the OK key.
Colour keys provide a range of additional
options. Red :
flip horizontal
2. Press OK again and all pictures in the folder selected will play once, with automatic
effects.
3. Whilst playing, press any RCU key to view colour key options. Red
mp3 play
press the Blue key.
zoom
,Green:
. and Blue:
,Yellow:
Repeat / Once
mp3 play
flip vertical
and Blue:
.
,Yellow:
Fast/Medium/Slow
:Play/Stop
.
,Green:
1.4.2 My Music
Select
Select folder through Menu structure on the left
of screen. Use the the Ÿź keys to select an
mp3 file. Press the OK key to play selected
file. Press the Red key to
to return to folder, Yellow to
play or Blue to
Progress bar indicates % and Time remaining
to play. Audio Spectrum Display responds to
the acoustic content of the file playing.
Volume level shows dynamically when the ŻŹ
keys are pressed. Now you can save a whole party of music and play it back – simply!
My Music
and press the OK key.
Play / Pause
Random / Repeat
Fast Forward
in 3 steps.
,Green
1.4.3 My Movie
Select “My Movie”and press the OK key.
Select folder through Menu structure on the left
of screen. Use the the Ÿź keys to select a
movie file. Press the OK key to play selected
file. Press Ÿź keys to play the previous movie
or next movie, press ŻŹ to change the
volume.
33
Page 36
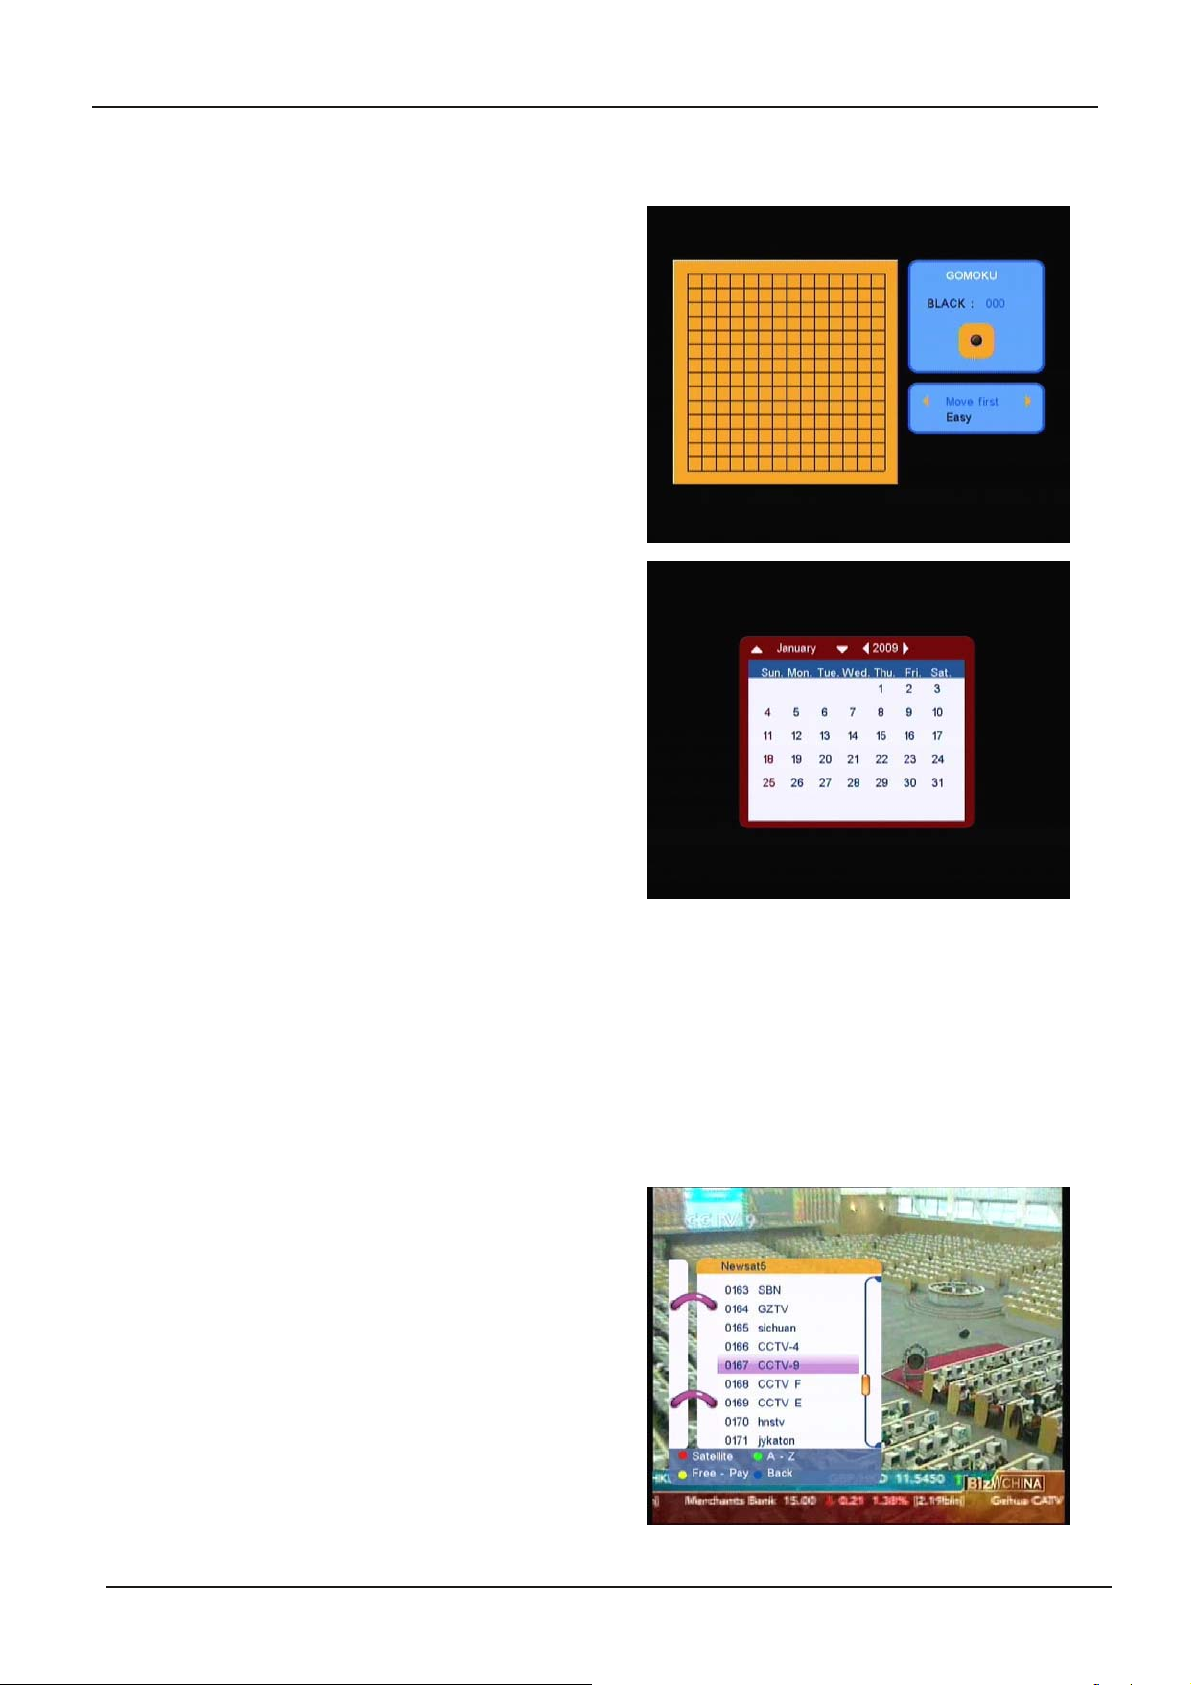
1.4.4 Gomoku
Line up the balls against the computer.
Options include Move First, Move Later,
Human; Easy and Normal.
1.5 Calendar
View Calendars month by month from the year
1900 to 2100. Starts by highlighting today.
Find out what day of the week you were born.
2.Other operation functions
2.1 Program List
In normal operation status (no menu operation),
press the OK button, the Program List menu
will appear on screen.
Press RED button to select sattellite in satellite
list.
Press GREEN button to sort program by A-Z. to
select easy program you want.
34
Page 37
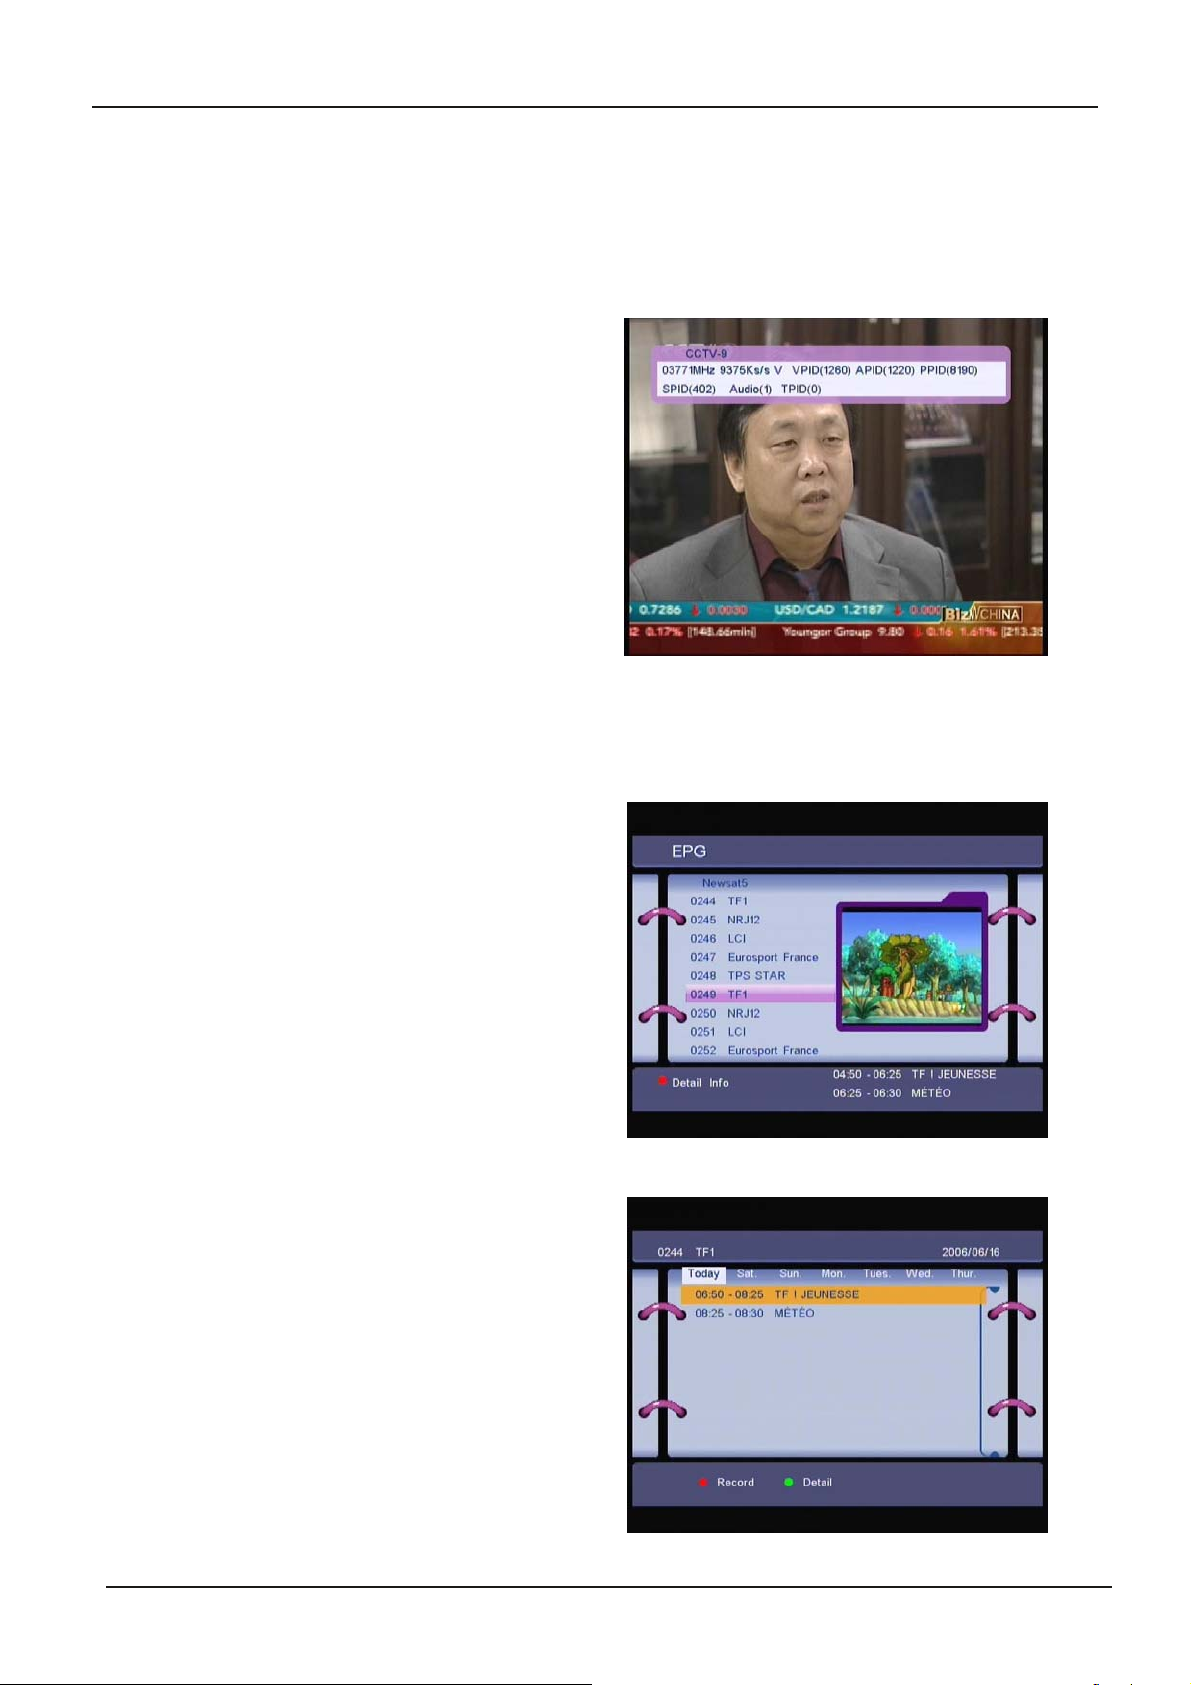
Press YELLOW button to sort program by Free-Pay. to select easy program you want.
Press BLUE button to go back the screen before sorted.
2.2 System Information
In normal operation status (no menu operation),
press the INFO button, the Program
Information menu will appear on screen. In this
menu, the user can view the current program
information.
2.3 EPG (Electronic Program Guide)
The EPG shows the event information on the
current TP channel by time zone.
With MENU off, press the EPG button. The
EPG
Menu will appear:
Press UP / DOWN to choose the channel.
Press RED key to show the
the current channel.
In
EPG schedules
Press the UP / DOWN keys to choose the
schedule items.
Press LEFT/RIGHT or P+ / P- into next /
previous day
Press GREEN KEY to show the details of this
item.
menu:
’
s schedules.
EPG schedule
of
35
Page 38

You
cansetuptheeventtimerbypressingRED
key in the
To
set up an timer event:
1.Press UP/DOWN to move the cursor to the
event for which you want to add a timer.
2.Press RED key to add a timer.
shows you current event timer information
based on the event you have chosen.
also use this screen to modify each value.
save the settings, press OK.Toquit event timer setup, press EXIT.
EPG pre-recorded: the setting is the same as pre-recorded setting of timer.
EPG schedule
screen.
You
can
To
2.4 Selection Audio Language
Press the AUDIO button on the remote control to select the audio language as show in.
Select the
LEFT, RIGHT, MIXorSTEREO
. Press OK to make one selection.
2.5 TELETEXT function
In no-menu state, press TEXT. Press UP / DOWN to move up or down from the displayed
page number.
Press Numeric keys to input page directly. If the current program has no Teletext, you’ll see
the message
“Teletext no data – Press any key to exit”.
2.6 Subtitles
In no-menu state, press SUB. Press LEFT/RIGHT to select between teletext and DVBS
subtitles. Use UP/DOWN to select subtitles language. Confirm your selection with OK button.
36
Page 39
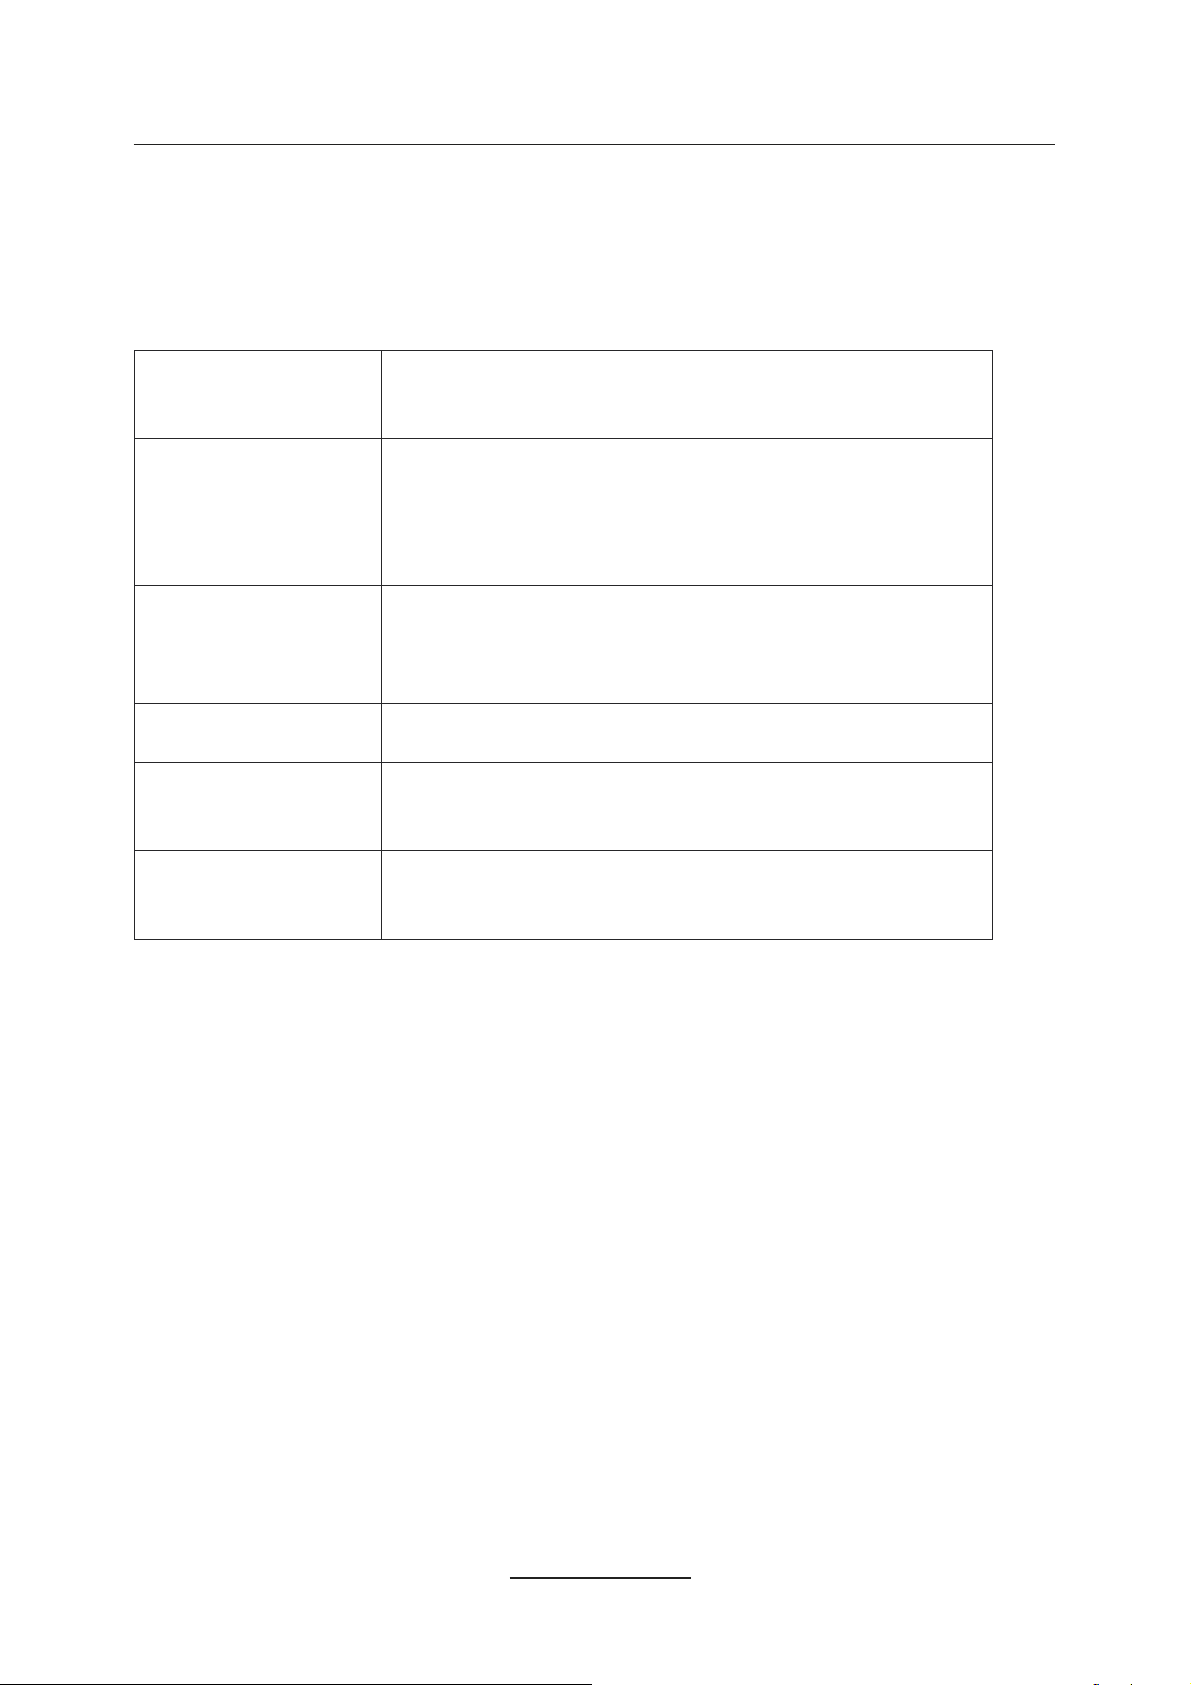
TROUBLE SHOOTING GUIDE
To assist in locating possible faults use the help guide below.
GNITOOHSELBUORTMOTPMYS
No Picture, no sound Check that the TV is correctly plugged in.
Check that the TV is connected to a suitable power source.
Check the electrical supply is turned on.
No Picture Ensure that the TV is powered on.
Check that the cables are fitted securely.
Ensure the aerial and/or external sources are connected.
Press the INPUT button to change the source.
Turn the TV on or off.
No Sound Press the MUTE button and check if Mute mode is set.
Switch to another channel and see if the same problem
occurs.
Press V+ button to see if the problem can be solved.
No picture on some
channels
No colour on some
channels (black &
white)
Noisy, Snowy,
Ghosting picture.
Check that correct channel is selected
Adjust the antenna.
Check if the same problem exists on other channels.
Ensure the correct picture settings are selected.
Check the antenna is connected correctly.
Check that the antenna Is in good condition.
Try moving the antenna.
USER GUIDE
NOTE: The TV must only be repaired by a qualified registered service person. Never
attempt to remove the back cover as the TV has dangerous voltages inside that may cause
fatality or fire.
37
Page 40
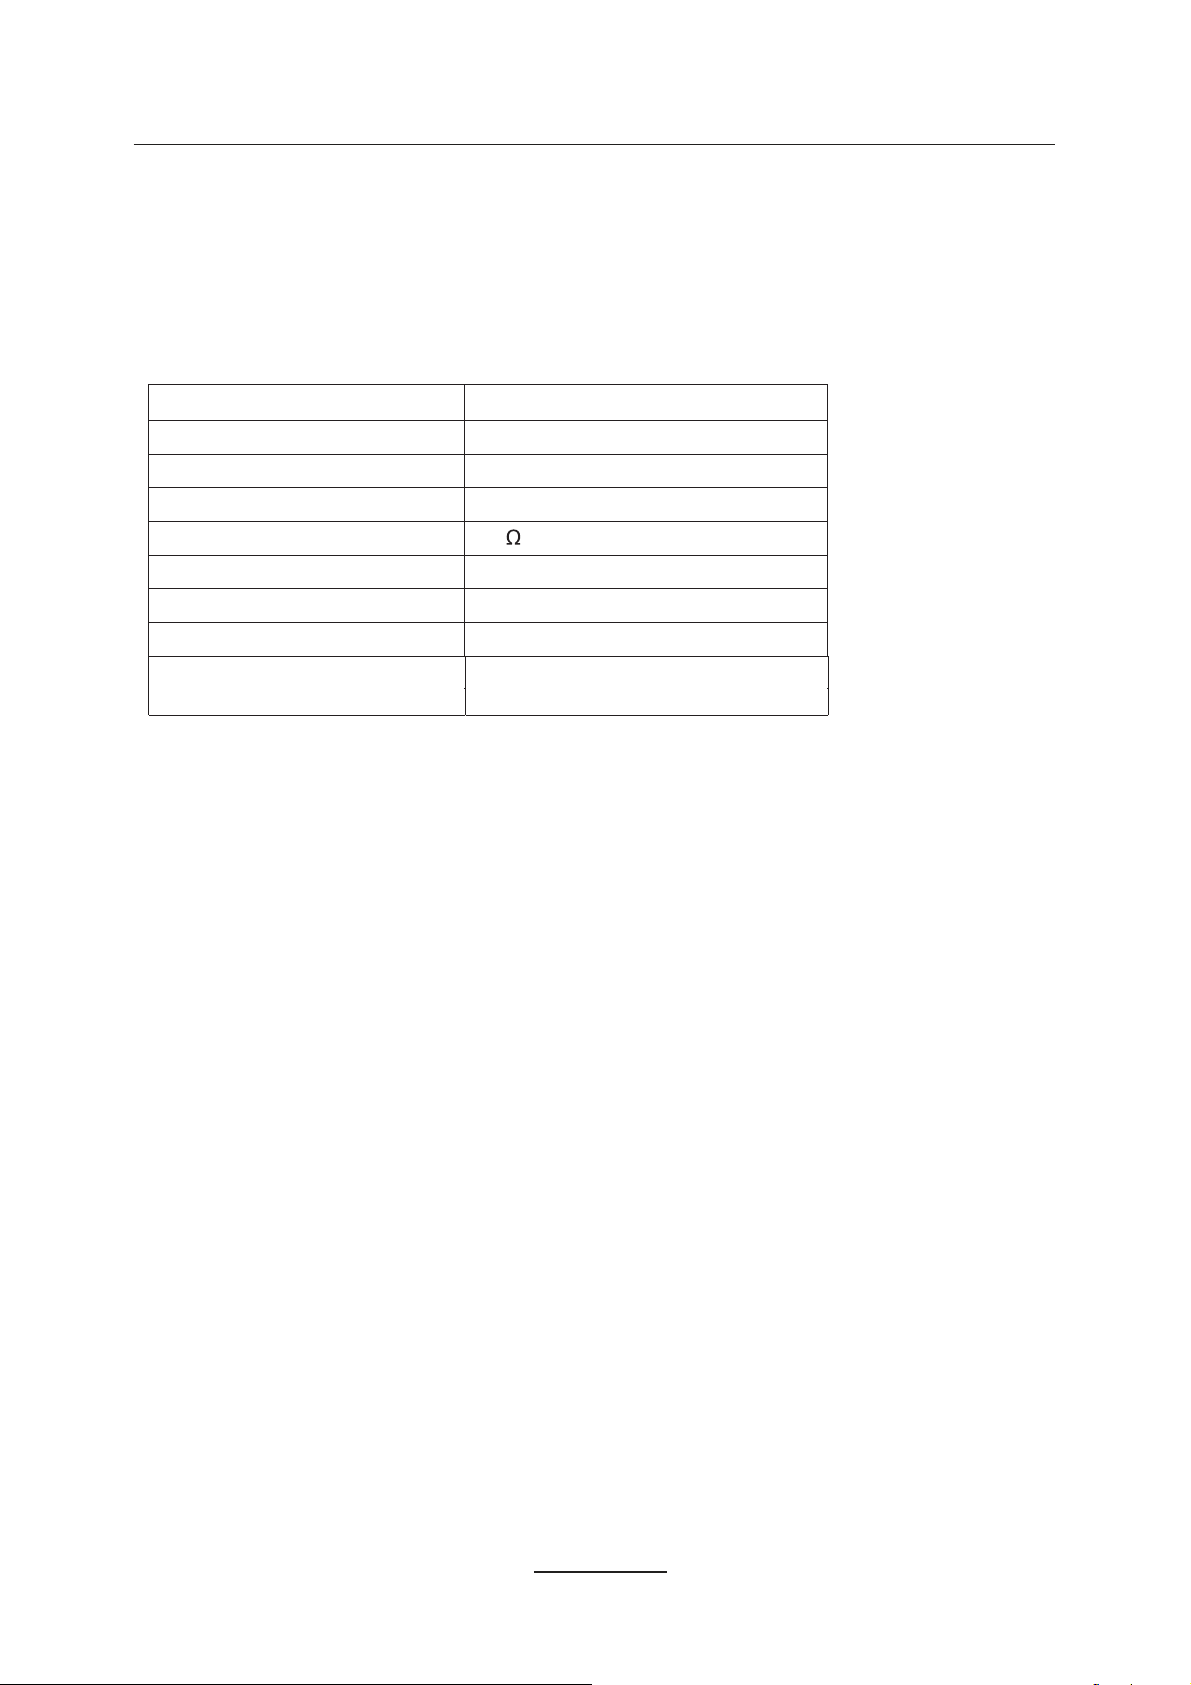
TECHNICAL SPECIFICATIONS
Specifications of the TV that you have just purchased may vary from the information in this
table due to technical innovations.
TV Specifications
TV System
Audio System BG / DK / I SECAM L/L’
Screensize 21.6”(Diagonal)
Resolution 1920 x 1080Pixels(RGB)
Aerial input 75 (unbalanced)
Audio output power 2 x 3W
Power requirements 12V 3.33A
Power consumption 40W
USB File System
PAL / BG / DK / I; SECAM BG/DK/L’L
Hi speed fs,FAT32,FAT16
(max supported size 1TB)
38
Page 41
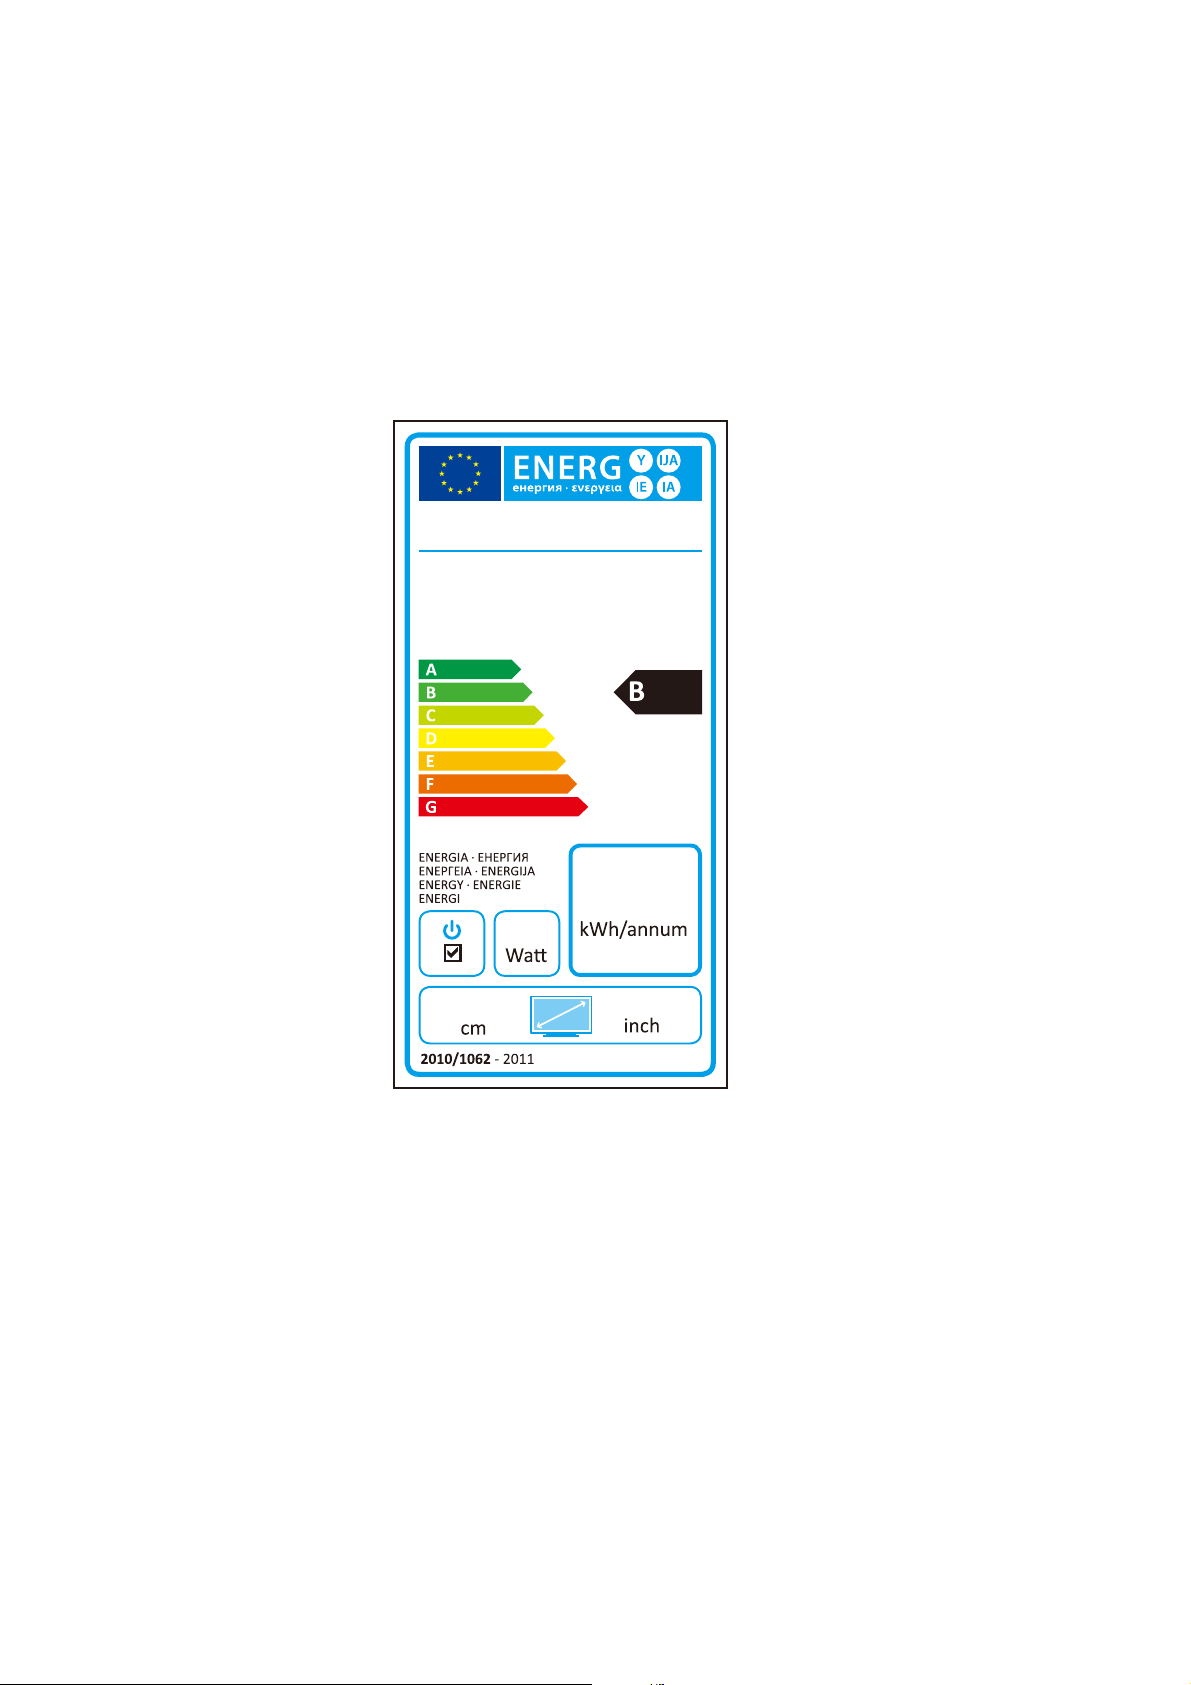
I LENCO II LED-2215
30
44
55,5
22
Page 42

 Loading...