

Page 1
KH-858
MP4 PLAYER / TOUCH SCREEN
User manual
English
For information and support, www.lenco.eu
Page 2
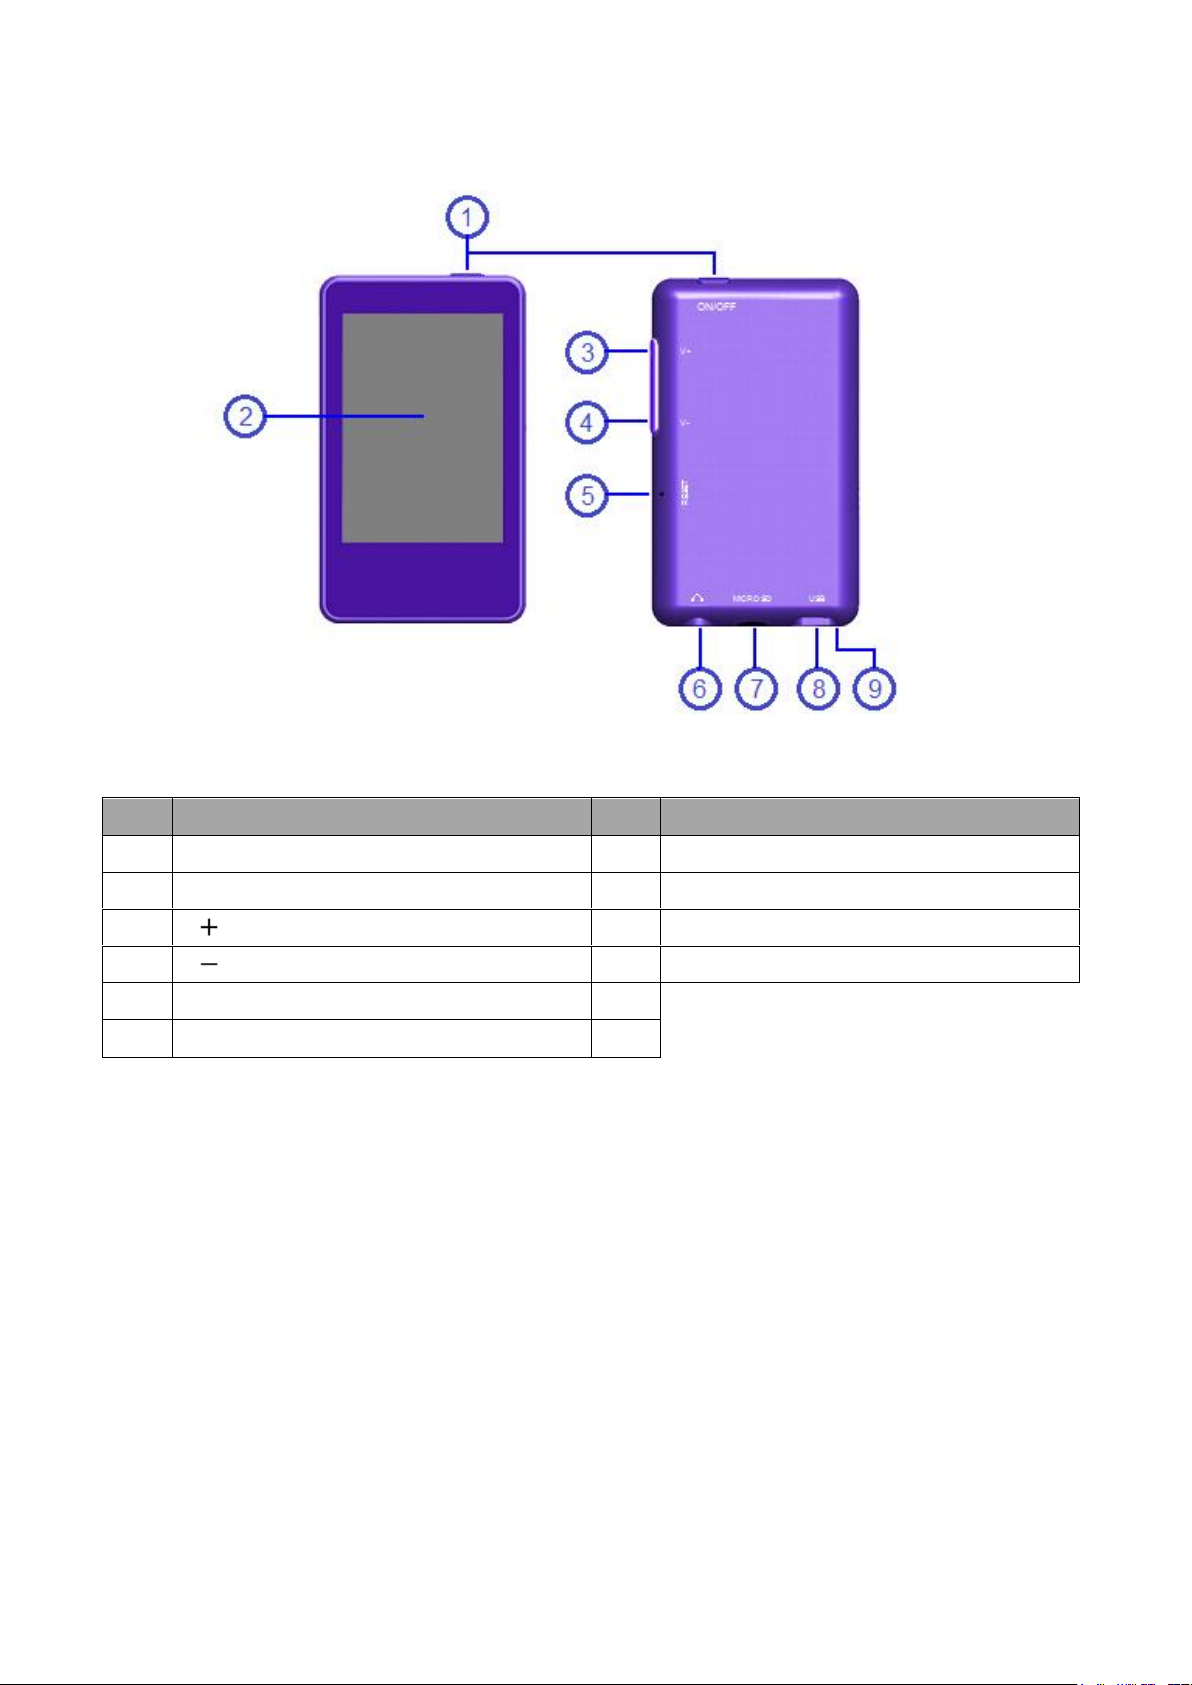
1. Basic controls and interfaces of the player
Item
Description
Item
Description
1
ON / OFF Button (Power)
6
Earphone Output Jack (3.5mm Stereo)
2
TFT Display (Touch Function)
7
Memory Card Slot (Micro SD Card)
3
V Button
8
Mini USB Port (PC Connection / Charge)
4
V Button
9
Microphone (mono)
5
Reset (Built-In Tact Switch)
2. Internal Battery
The player has an internal battery. When using the unit for the first time, charge it for 3 hours
or until the battery icon is show the battery is in full.
Note: The player continues to use battery power after it’s been turned to off, if unit isn’t used for a
while, the battery might need to be charged.
3. Connection and Charging
Once you have connected player with computer / Power charger, then you will see the
“Opening” > “Connect” or “Charging” screen.
In connect screen, the battery is in charging at background.
In charging screen, the bar levels are running in battery icon, the battery is in charging.
The battery icon will show “Full” when the charging is completed. Disconnect it when it is
Page 3

done.
Connect Screen Charging Screen Battery Is In Full
Important: The battery cannot be charged when your computer is in sleep mode. The USB port on
most keyboards does not provide enough power to charge the player. Connect player direct to a
USB port on your computer only to prevent charging problem.
4. Connecting and disconnecting the player
Connect the player to your computer to upload media files to your player; or to download
recorded voice memos to your computer.
Connecting the player
Plug the USB cable to the Player’s mini USB port and into a USB port on your computer, then
the computer will detect and install the driver automatically. Once the installation is complete
the player will be displayed in “My Computer” or for MAC users on the desktop.
Now the player is ready for music files upload / download with your computer.
Transfer the media files by using the computer mouse use drag and place, or copy and paste, in
between the player and your computer. Disconnect it when you’re done.
Note: The player will disconnect with PC and go into charging mode and/or operation mode, when
press once the “ON/OFF” button if in PC connecting mode. Unplug the USB cable and plug it in
again to return to PC connection mode if you want.
Disconnecting the player
Do not disconnect the player while it’s uploading or downloading files with your computer.
Windows system PC, disconnect the player by clicking the “Safely Remove Hardware” icon in
the Windows system tray.
Mac system PC, disconnect the player by dragging the player icon on the desktop to the Trash.
Now it is safe to unplug the USB cable.
Note: If you do not “Safely remove hardware” before disconnecting, data can be lost!
Page 4
5. File Storage
Player will create some default folders, in the internal flash memory, when you use it. However,
for best result, this is recommended you to put files of different types to store under different
directories.
For example, music file should be stored under MUSIC dir. Record file stored under RECORD
directory. Picture files under PICTURES directory. Video files VIDEO directory. Text files TXT
directory. The corresponding application may unable to find the file If it is not saved in this way.
6. Getting Started
This player is equipped with a touch screen so you can choose the items or functions by
tapping the related icons or files.
Turning the player ON and OFF
Press and hold the power “ON/OFF” button, for 3 seconds, to turn the player On and Off.
When the player is turning to On, first the opening screen and then desktop menu will appears
to use, the “generating database” message are display at same time. Now the player is ready to
use.
Turn OFF the player when you’re not uses it for a longer period.
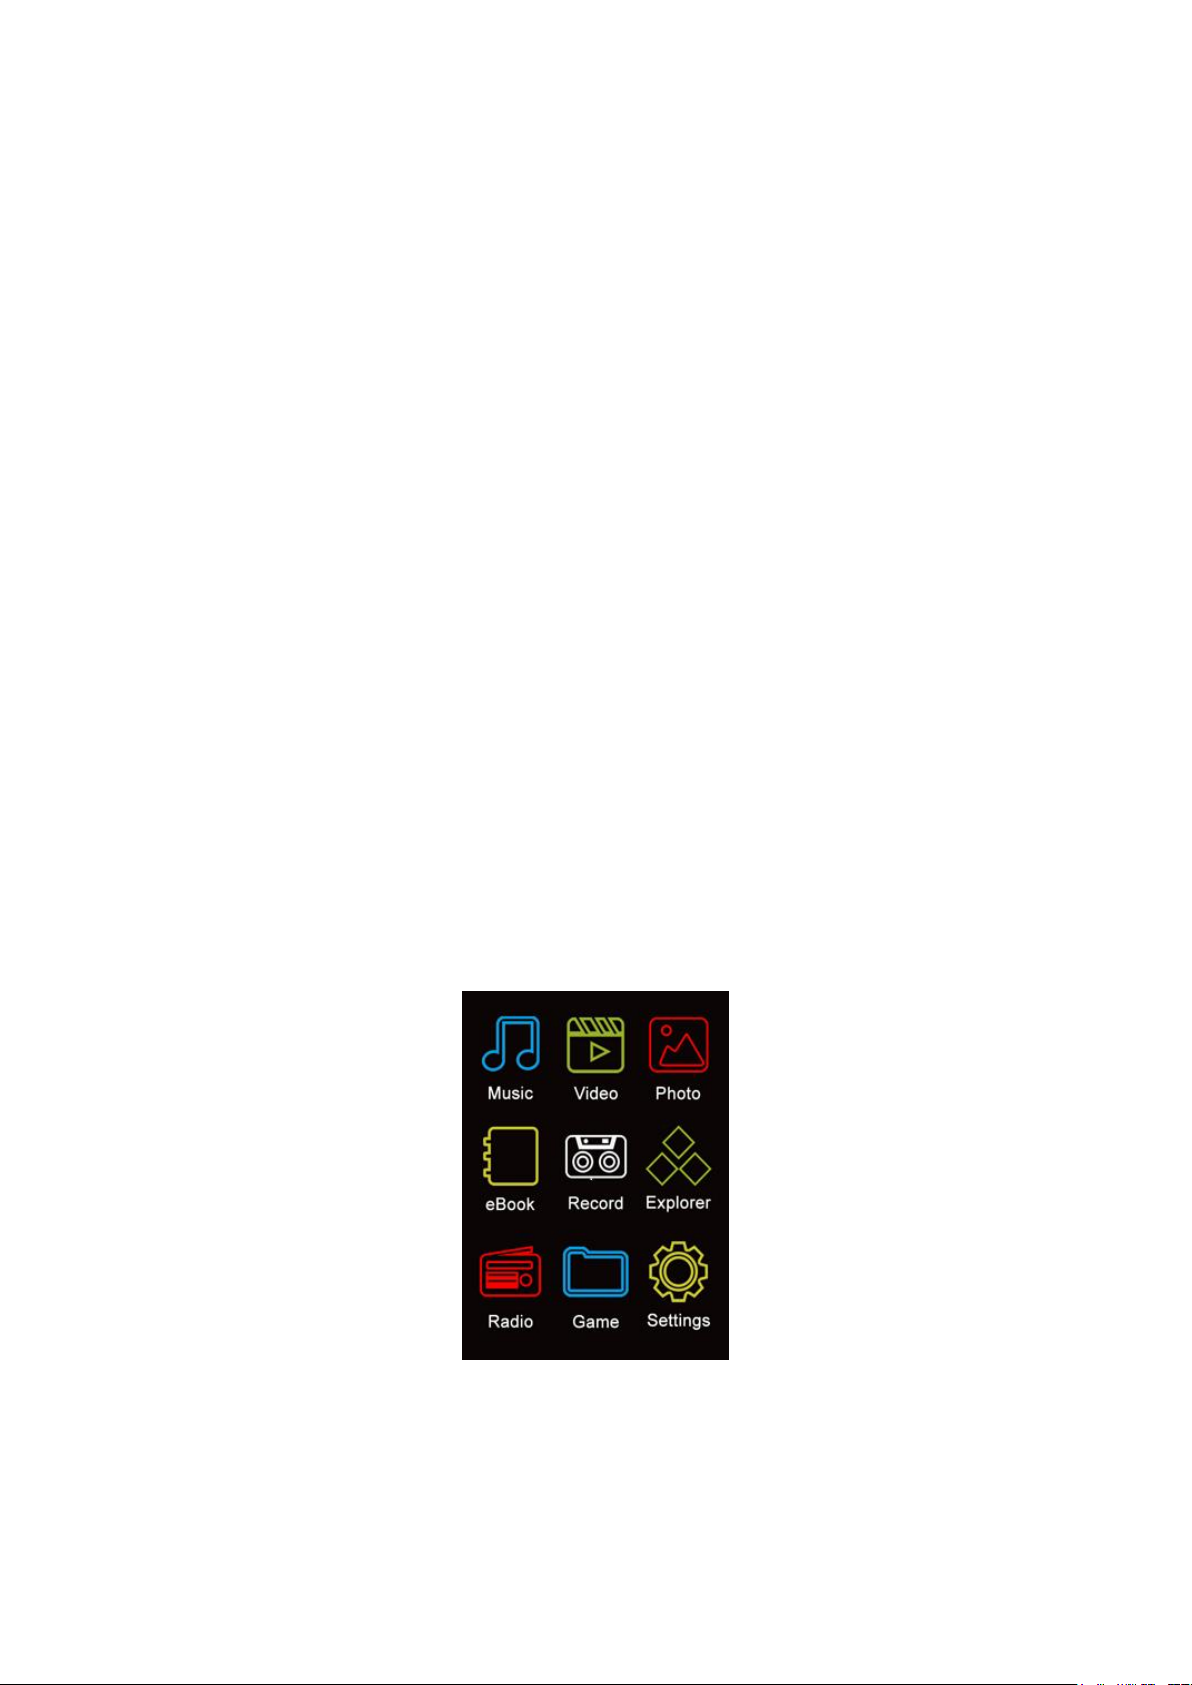
Desktop Menu
Every time you turn on the player, you will see the opening screen followed by the desktop
menu which contains applications of your player. Tap one of the application icons to open it.
Desktop Menu
Page 5
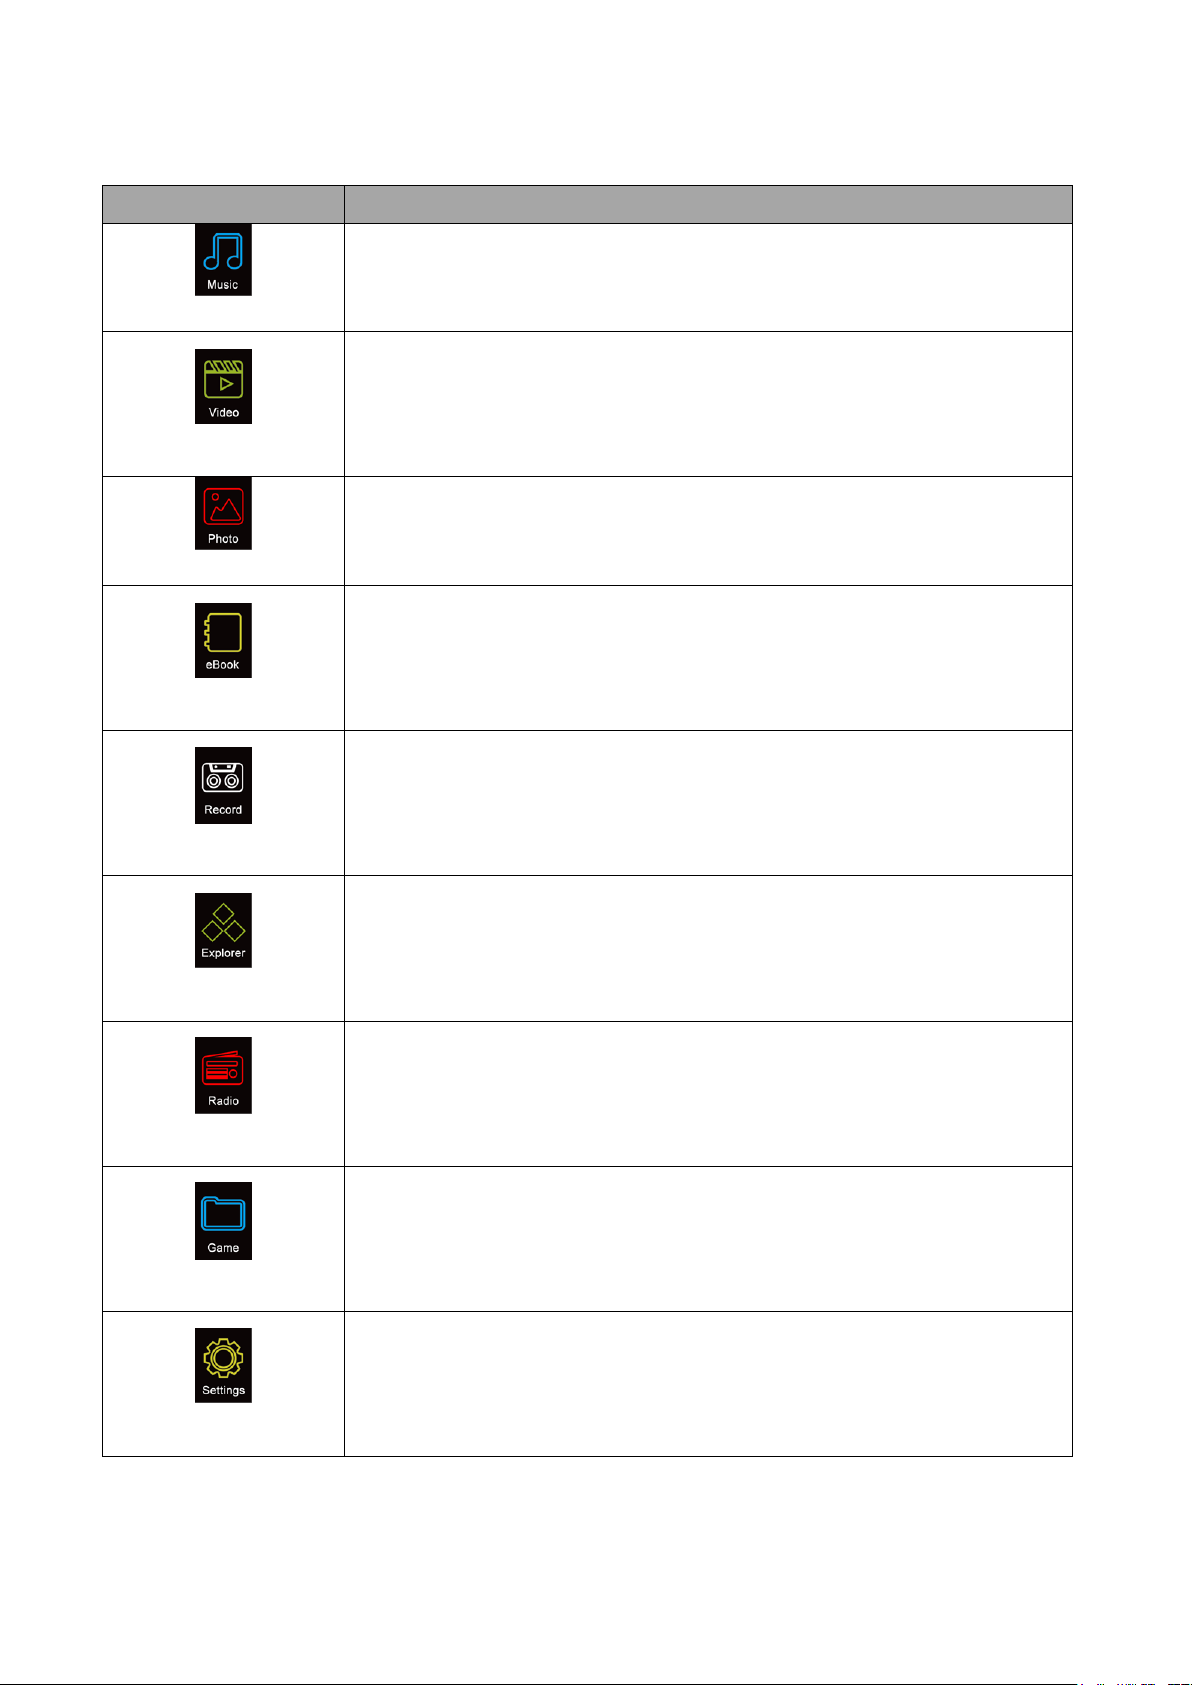
Icon caption
Description
Music
Listen to your songs. Create play list. Listen songs in Artists / Albums /
Genre play lists from your music library.
Video
View your favorite Video / Movie files.
Photo
View your favorite photos and watch them use slide show function.
eBook
Watch your favorite book. Add tag and pick tag. Selecting favorite page
to view.
NOTE: This function only supports .txt files.
Record
Record voice memos with built-in microphone. Playback them on player
or save them to your computer.
Explorer
Browse all type of supported media files and direct selects your favorite
media file to play. Manage to delete those unwanted media files direct
from the player.
Radio
Listen to the radio stations. Set region, search stations by auto / manual
search function, preset / delete stations and FM record.
Game
Provides a little bit of fun.
Settings
Adjust player’s setting; Set time, OSD languages, Display light up time
and brightness, Set power off mode and more……
Player Applications
Page 6
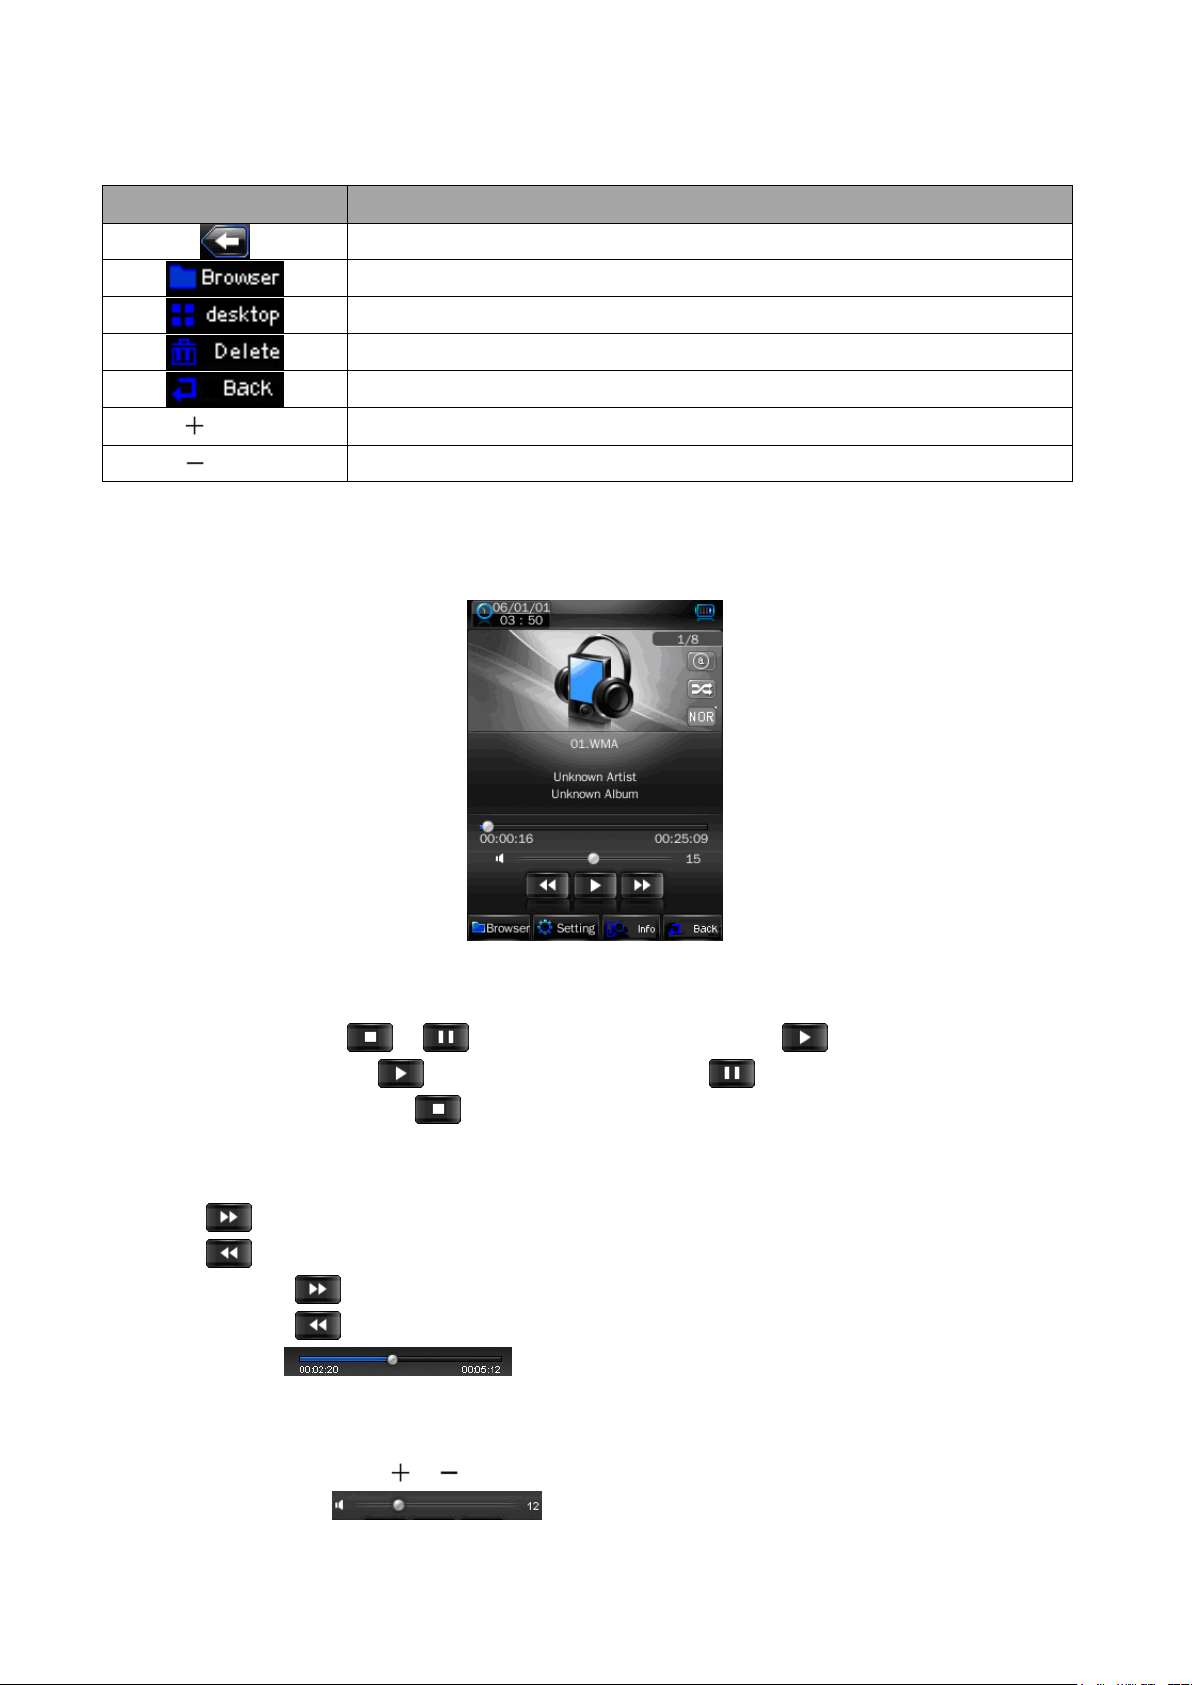
Button / Icon
Description
Return to upper directory
Browse particular application file
Return to desktop menu
Delete file or file folder
Return to previous operation interface or desktop menu
V Button
Volume up
V Button
Volume down
General Icon / Button Function In Operation Interface
7. Music Mode
Tap the “Music” icon; you will now enter the music mode menu as below:
Play / Pause / Stop Music file
To play music, tap / icon and icon will change into , the music is playing.
To pause the play, tap icon and it will change into , the music is pause.
The icon will change into after songs playing are finished as per your default setting.
Change Next / Previous and Fast-Forward / Fast Backward
Tap icon to play next file.
Tap icon to play previous file.
Tap and hold icon to play fast-forward.
Tap and hold icon to play fast-backward.
Or, drag the playing progress bar to adjust the progress.
Change Volume
Press or press and hold / button to increase / decrease volume levels.
Or, direct tag the volume bar to adjust the volume levels.
Page 7

Change Play Mode
Tap / icon to switch to the in-order play / shuffle play.
Change EQ Mode
Tap / / / / / / icon to switch the EQ mode.
Repeat Mode
Tap / / / / / icon to switch the repeat mode.
Note: Icon(s) = Repeat File, = Repeat File Once, = Repeat All Once, =
Repeat All, = Intro (10 seconds)
Choose Songs in All Music / ID3 List / Play List / Tag List
In music mode:
Tap icon, a submenu is appears to choose.
Tap “All Music” to enter the play list containing all audio files. Then choose a desired file to
play.
Tap “ID3 List” > “Artist” to enter the play list sorted by artist. Tab on the artists name to
display a playlist containing all songs from this artist. Then choose you desired file to play.
Tap “ID3 List” > “Album” to enter the play list sorted by the album name. Tab on the album
name to display a playlist containing all songs from this album. Then choose you desired file to
play.
Tap “ID3 List” > “Genre” to enter the play list sorted by the genre name. Tab on the genre
name to display a playlist containing all songs from this album. Then choose you desired file to
play.
Tap “Play List” then choose “My Music List 1 / 2 / 3 / 4 / 5” to enter to your desired play list
which you have created and then choose a file to start the play. Those songs in play list will
play one by one.
Tap “Tag List”, your tag music / voice file list is appears for choose, and then choose your
desired file to play.
Note: “All Music” and “ID3 List” functions are works only for music file(s) which have stored at
(Main Dir) internal memory.
Change / Choose Music Folder (From Flash / Card Memory)
Tap icon, a sub-menu is appears to choose.
Tap “Main Dir / Card Dir”, a list screen appears to use. Choose a folder name which contains
music file and choose your desired file to play. If you choose a folder name which have no
supported music file, then the list will be show blank. Choose another folder.
And then choose a file you want to play.
Page 8

Tap icon to back to music mode.
Note: “Card Dir” will not show folder and file when the Micro SD card is not installed to player.
Add Play List
This player allows you to add the current playing music, if you want to put it group together,
into the play list. Then you can play this group in next when you choose song(s) by using the tag list
function which is mentioned above.
Tap icon, a sub-menu is appears to choose.
Tap “Add List” and then choose “My Music List 1 / 2 / 3 / 4 / 5” where you like them to group.
The submenu will disappears and the music is stored into you desired list number.
Add Tag List
This player also allows you to add tag in the current playing music / voice, if you want to mark
the track time, into the tag list. Then you can playback and recall the marked track time of music /
voice file(s) in next when you choose song(s) by using the play list function which is mentioned
above.
Tap icon, a sub-menu is appears to choose.
Tap “Add Tag”, a “marked” pop up window appears for 1 – 2 seconds. The playing file name
with track time is marked and saved into tag list. And now you can add another tag in same
song or add tag for other play song if you want.
View File Information
Tap icon, an information screen is appears to view, all the information of file will
displayed if they have included in file.
Tap icon to back to music mode.
Lyric / Artist and Album info Display
This player can be display the lyrics at the middle area of the TFT screen if the playing music
file is included lyrics information. However, the Artist and Album information will be displayed if
no lyrics are available in the playing music.
8. Video Mode
Play Video
Tap “Video” icon to enter video mode. Tap “Main Dir / Card Dir” which will appears, when
the Micro SD Card is in used. A list screen appears to use. Choose a file to start the play. Or,
Choose a folder name which contains Video file and choose your desired file to play. If you
choose a folder name which have no supported Video file, then the list will be show blank.
Choose another folder.
Tap a video file to start the play.
Page 9

Video Mode Interface
To Call the Video Tools Menu
Tap any where on the touch screen, the video tools menu will display to use for 3 seconds.
Tap icon to back to file list screen.
Use Play / Pause
In video tools menu:
To pause the play, tap icon and it will change into , the video is pause.
To play the video again, tap icon and icon will change into , the video is continues
to play.
Change Next / Previous and Fast-Forward / Fast Backward
In video tools menu:
Tap icon to play next file.
Tap icon to play previous file.
Tap and hold icon to play fast-forward.
Tap and hold icon to play fast-backward.
Or, drag the playing progress bar to adjust the progress.
Change Volume
Press or press and hold / button to increase / decrease volume levels and the video tools
menu also is appear in screen to use for 3 seconds.
You also can direct tag the volume bar to adjust the volume levels
before the video tools menu is disappear.
In video tools menu:
Tap icon, then direct tag the volume bar to adjust the volume
levels before the video tools menu is disappear.
Change Folder
Tap icon, a sub-menu is appears to choose.
Tap “Main Dir / Card Dir”, a list screen appears to use. Choose a folder name which contains
Page 10

video file and choose your desired file to play. If you choose a folder name which have no
supported video file, then the list will be show blank. Choose another folder.
Note: “Card Dir” will not show folder and file when the Micro SD card is not installed to player.
Add Tag List
Tap icon, a “marked” pop up window appears for 1 – 2 seconds. The playing file name
with track time is marked and saved into tag list. And now you can add another tag in same
video or add tag for other play video if you want.
Play Tag List
Tap icon, a sub-menu is appears to choose.
Tap “Tag List”, your tag video file(s) list is appears for choose, and then choose your desired
file to play.
9. Photo Mode
Tap “Photo” icon to enter to photo browse mode. Tap “Main Dir / Card Dir” which will
appears, when the Micro SD Card is in used. A list screen appears to use. Choose a file to start
the play. Or,
Choose a folder name which contains Photo file and choose your desired file to play. If you
choose a folder name which have no supported photo file, then the list will be show blank.
Choose another folder.
Tap a file to start the play.
Tap icon to change icon view list to file list view list, this will get the quicker
response to list out all photo file by name for choose.
The page will move to different page of submenu, when Micro SD memory card is
in used, tap icon to call the list page up if you want.
Icon View File List View
Tap and hold on the lower / upper side position in list screen, the list files will move down / up
one by one. Chose a desired file to play.
Page 11

To Call the Photo Tools Menu
Tap any where on the touch screen of TFT display, the photo tools menu will display to use for
3 seconds.
Tap icon to back to file list screen.
Change Next / Previous photo file
In photo tools menu:
In photo browsing mode, tap screen to call up the photo tools menu.
Tap icon to play next file.
Tap icon to play previous file.
Use Slide Show and Set Slide Show Time
In photo tools menu:
Tap screen to call up the photo tools menu, tap icon to enter to slide show function and the
icon will change into icon. Tap icon to back to manual change mode.
To set slide show time, tap icon, a list screen appears and then choose “1s / 2s / 3s / 4s /
5s” you want to use.
Move Up / Down List Page
Tap / icon to move the list page down / up.
Or, drag the progress bar to adjust the page down / up, the bar dot will move to the
progress bar where you have drag.
10. Text / eBook Mode
Tap “Text / eBook” icon to enter the mode. Tap “Main Dir / Card Dir” which will appears,
when the Micro SD Card is in used. A list screen appears to use. Choose a file to start the play.
Or,
Choose a folder name which contains Text file and choose your desired file to play. If you
choose a folder name which have no supported text file, then the list will be show blank.
Choose another folder.
Tap a desired file to start Text browsing.
File List Text Browsing
Page 12

Change Next / Previous Page
In Text browsing mode.
Tap icon to play next page.
Tap icon to play previous page.
Or, tap at the lower / upper side position, in Text browsing screen, the page will move once
down and up. Tap and hold the page will move quickly down / up.
Change Folder
Tap icon, a sub-menu is appears to choose.
Tap “Main Dir / Card Dir”, a list screen appears to use. Choose a folder name which contains
Text file and choose your desired file to play. If you choose a folder name which have no
supported Text file, then the list will be show blank. Choose another folder.
And then choose a file you want to play.
Tap icon to back to text mode.
Note: “Card Dir” will not show folder and file when the Micro SD card is not installed to player.
Use Skip to Page
Tap icon to show “Skip to” dialogue box, and then selects the skip percentage (0% –
100%) by using the / icon.
Tap outside area of the “Skip to” box to confirm and exit. Then the page is jump to your
desired percentage of page.
Use Auto Page and Set Auto Page Time
Tap icon to enter to auto page function and the icon will change into icon. Tap
icon to back to manual page mode.
To set slide show time, tap icon, a list screen appears and then chooses “10s / 15s / 20s /
25s / 30s” you want to use.
Use Save Tag / Pick Tag
Tap icon to show the tag setting box.
Tag Setting Box
Page 13

To save tag, tap any one item of “empty” box, in Save tag, to save the current page into the tag
list, and then you will see the page is tag and exist in the list of save tag and pick tag at the
same time.
To pick tag, tap any one item in “Pick tag” list as you want, then the saved page will display on
screen.
Tap icon to exit from the tag setting box. Or, tap the outside area of the “Save tag” and
“Pick tag” box to confirm and exit from the tag setting box.
Note: The save tag can be overwritten by the new save tag when all “empty” item is in used.
11. Record Mode
Tap “Record” icon to enter to voice recorder mode.
To Recording and Pause Recording
To start recording, tap icon and it will change into .
To pause the recording, tap icon to pause the recording and icon will change into .
To Save Record Voice File
Tap icon to save the current recording voice file into memory, the “Saving File…”
dialogues box appears for few seconds. The file is saved.
To Review and Playback Voice File
Tap icon, a files list appears; all the recorded voice file(s) are show for view. Tap a
desired voice file to play if you want it to.
Change Record Setting (Quality and Volume)
To change record quality, tap icon, a submenu list appears to choose, and then tap
“Qual:”, then choose “High / Medi / Low” you want to use.
To change record volume, tap “Volume:”, then choose “+1 / +2 / +3” you want to use.
Page 14

12. Use Explorer Menu
Explorer function is a file manager; let you know very well that all types of file and folder
inside the player, also you can easy manage all types of file, to play or delete them, at those folders
To use explorer function, from desktop menu, tap “Explorer” icon, and then tap “Main Dir /
Card Dir” icon, a list screen will appear to choose.
Choose folder(s) and file(s) by tapping the / icon to move the list page down / up. Or,
drag the progress bar to adjust the page down / up, the bar dot will move to the progress
bar where you have drag.
Note: Only “Main Dir” will show to choose, when the Micro SD card is not in used.
To Play Media File
Tap any type of media file to play and it will go direct to the necessary mode to open and play
the selected file.
To Delete Media File / Folder
Choose a media file or folder which you want to delete, then tap icon, a dialogue
box appear and then tap “Yes / No” to confirm.
Note: The folder, all files in folder, will be deleted once “Yes” is confirmed.
13. Game Mode
Player comes with a game named “Mine”. To play game:
Tap “Game” > “Mine” icon, the game screen appear for play
Tap “Easy / Hard” icon to switch the game level.
Tap “Mine” icon to switch to “Sign” mode, and then you can mark the mines with flags, tap it
again to return to “Mine”.
Tap icon to re-start for a new game .
Tap “Exit” icon to back to game menu and then tap icon to back to desktop menu.
14. Use Radio
Tap “Radio” icon, a Radio Receiving Screen appears to use.
Radio Receiving Screen
Page 15

Set Radio Region:
To change radio region, tap icon, and then tap “CHN / JPN / ERU / USA” you want.
Note:
CNH = China, JPN = Japan, ERU = Europe, USA = USA
All stored stations may be deleted when every time the region has set or changed.
Tune Station:
You can tune the radio stations by using “Auto Search” or “Manual Search”.
Auto Search and Save Station:
Tap icon to enter to auto search and auto preset mode. The radio will searching stations in
the range of frequency “76 – 92MHz / 87 – 108MHz”, all found radio stations will be stored
into “Channel List” table to use. The radio search will stop and show the first received radio
station to listening.
Manual Search and Save Station:
Tap icon to enter to manual search mode.
To tune your desired radio frequency, tapping or icon to change the frequency
Down or Up manually. (0.1MHz by down or up)
Once you desired radio frequency have selected, the station is receiving, by using manual
search function, then tap icon to enter save channel mode. A save channel dialog box
appears to confirm.
Tap “Ok” to save the receiving channel at “Channel List” table to use. Tap “Cancel” to abort.
Tapping or icon to change the frequency to tune and save another desired radio
frequency.
Note: Total 20 stations, CH01 – CH20, can be preset in channel list for use.
Use Channel List and Change Next Station
Tap icon to show all saved radio frequency channels by “Auto Search” and “Manual
Page 16

Search”. A list screen appears to choose.
To select your desired radio station, tap / icon to move the list page down / up. Or,
drag the progress bar to adjust the page down / up, the bar dot will move to the progress
bar where you have drag.
Once selected, tap you desired radio channel / frequency, example “CH03 : 90:30 MHz”, to
enter the radio station. The selected radio frequency is show and radio station is receiving.
To change another stations, tap icon again or direct tap or icon to change the
station(s) down and up according to channel list.
To Delete Station
Select the receiving the unwanted station by tapping or icon, and then tap icon,
a delete station dialog box appears to confirm. Choose “Ok” confirm the delete or choose
“Cancel” to abort. Or,
Tap icon to enter to channel list, and then select the channel station you want to delete, tap
icon and choose “Ok” to confirm.
Change Volume
Press or press and hold / button to increase / decrease volume levels.
Or, direct tag the volume bar to adjust the volume levels.
Mute Radio
To mute the radio, tap icon and it will change into , the sound is mute.
To un-mute, tap icon and icon will change into , the sound is up again.
Use FM Record
Select you desired station, tap icon to enter to record mode.
Start Recording and Pause Recording
To start recording, tap icon and it will change into .
To pause the recording, tap icon to pause the recording and icon will change into .
To Save Record Voice File
Tap icon to save the current recording voice file into memory, the “Saving File…”
dialogues box appears for few seconds. The file is saved.
To Review and Playback Voice File
Tap icon, a files list appears; all the recorded voice file(s) are show for view. Tap a
desired voice file to play if you want it to.
Change Record Setting (Quality and Volume)
Page 17

To change record quality, tap icon, a submenu list appears to choose, and then tap
“Qual:”, then choose “High / Medi / Low” you want to use.
To change record volume, tap “Volume:”, then choose “+1 / +2 / +3” you want to use.
15. Use Settings
Tap “Setting” icon to enter to setup interface.
Settings Interface
Player Information
Tap “Player Information” icon to view relevant read-only product information, such as version,
memory and files information…etc.
Note: Tap icon to back to setting interface.
Set Time
Tap “Set time” to enter date and time setup interface.
Tap and icon to set those relevant numbers to the current year, month, day and time.
Tap icon to back to setting interface and the date and time will be updated at system
clock display icon at the top left corner of the screen.
Set Language
This player can use difference languages.
To set the languages, tap “Language” icon and then choose your desired OSD language.
Set Display
Tap “Display” icon to enter to display setup menu.
Tap and icon to choose “0s / 5s / 10s / 15s / 30s / 1m / 5mi / 15m / 30m” for item
“Auto lock”. (Key / Screen lock time and Screen dark mode)
The TFT backlight will turn Off, and, the touch screen and all keys control are automatically
locked in the selected period of time, if no control is being used, to avoid accidentally key
operation.
Page 18

To unlock, tap anywhere on TFT screen or press once ON/OFF button, the TFT backlight will
turn On, and then double tap the “Double Tap To Unlock” icon. However, the auto lock will
activates again, if no control is being used, as you selected period of time. Cancel the “Auto
lock” function if you want it to.
Note: S = second and m = minute
Tap “ to ” icon to choose the backlight bright levels for item “Brightness”.
Calibrate
In some circumstances, such as electrostatic discharge voltage, you might need to calibrate the
touch allocation on screen for the touch function misplaced if happens.
To calibration the touch panel, tap “Calibrate” icon, a calibration marker “ ” appear on the
left top corner on screen, and then touch the center of this “ ” to start the calibration.
Follow to touch the marker which appears in difference location until calibration is done.
Set Power Off
Tap “Power Off” icon > choose “OFF, 10 minutes, 15 minutes, 30 minutes, 60 minutes and 120
minutes” as you desired by tapping the and icon.
Note: The setting will change to the default value “OFF” if re-start the player.
Default Setting
Tap “Default” icon, the player will prompt “WARNING” about whether to restore system
default setting or not.
Tap “Yes” to restore factory default settings. Tap “No” to abandon this restoration.
Upgrade
You might need to upgrade the firmware for advanced the player performance or firmware
getting trouble or damaged in some circumstance, such as electrostatic voltage discharge issue
happens. Please follow the instruction posted by the dealer (if any) or follow the instruction from
System Utility Tools if provided. It is not recommended to do if the player is proper working.
Tap “Upgrade” icon to enter the firmware upgrade mode, a dialogue box with warning wills
popup for action, and then you can insert USB and running the System Utility Tools with new
firmware for upgrade with your computer.
Tap “NO” to abort the upgrade action.
Reset
If the player encounters dead halt during use, press the “RESET” button by using the suitable
object / tool, such as wooden tooth pick or plastic screw driver, to restart the player.
Page 19

16. Use Micro SD Card Slot (T-Flash Card)
This player allows you to play those support media files from a micro SD memory card
(T-Flash).
Insert / Remove the Micro SD card
To safe to insert / remove the micro SD memory card into/from the card slot. Please must turn
Off the player.
View / play the files on the micro SD Card
From desktop menu, tap “Video / Photo / Text / Explorer” icon, a list screen appears, tap
“Main DIR / Card Dir” and then choose your desire folder(s) and media file to play.
For music mode, tap “Music” icon to music mode, and then tap icon, a list screen
appears, and then tap “Main DIR / Card Dir” and then choose your desire folder(s) and media
file to play.
Notes: “Main DIR” is the internal memory of the player. “Card DIR” is the Micro SD Card that
you have inserted into the player.
17. Use Video Conversion Tool
Video conversion tool is used to convert AV files into advanced AVI or WMV format,
recommended video file format, to make them viewable on this player.
What Format Files Can Be Converted
This tool can converted the video files of the following formats:
1) .AVI format files;
2) .ASF and .WMV Windows Media format files;
3) .MPG, .MPEG and .DAT MPEG1 format files;
4) .RM, .RAM and .RMVB Real Play format files;
5) .MOV Quick Time format files;
6) .VOB MPEG2 format files;
7) .SWF Flash format files (unable to convert into WMV files now);
8) .AVI and .WMV files can be converted into .AVI files again;
9) .AVI and .WMV files can be converted into .WMV files again.
Important: For Video Converter, please make sure you have installed Microsoft DirectX 9.0 or
above. When to convert Real Media, QuickTime, MPEG2 format video files, please install related
DirectShow filter at first. Otherwise, AVI Converter can not work normally.
For Media Manager in Windows XP and Windows 2003, please make sure you have installed
Microsoft Media Player 10.0 or above, and Microsoft .NET framework 3.0.
Page 20

Software Installation
To install this video conversion tool to your computer, click to open the folder named “Utilities
> Video Conversion Software” in provided CD or stored in your Player’ flash memory.
Select “Setup” to start the install program, please follows instructions to click “next” button,
and click “close” button when installation is completed successfully.
Running the Video Conversion Tool
Click 【start】 button > 【program】 menu, select “Media Player Utilities 5.22” > “Video
Converter” to enter the main interface.
Adding AV files
Click button on the right side of the “Input File” column to add AV files to be converted,
and a dialogue box will automatically pop out for adding one or more AV files.
After the file is added, the path of the AV file will be displayed in the “Input File” field as
shown below; and, relevant information of the added file, such as the check box, file name and
path, status and file length, will be displayed in the status column.
Page 21

Input and Output AV file
Play cannot turn ON
Check battery is it charged with enough energy.
No sound is heard from
headphone.
Check whether Volume is set “0” and connect the
headphone plugs firmly.
Check whether the headphone plug is dirty.
Corrupted MP3 may make a static noise and the sound
may cut off. Make sure that the music files are not
corrupted.
Key or touch function does not
work
Check whether key lock switch is in locked position.
Characters in LCD are corrupted
Check whether the right language has been selected.
Download of music files fails.
Check whether USB cable is damaged and is connected
properly.
Check whether driver is installed correctly.
Check whether the player’s memory is in full.
Click button to choose the folder where to save the converted AV files, the “browse file
folder” dialogue box will pop up, select the specified storage path and then click “confirm”
button to complete.
Click button to select the folder where the original files are, a dialogue box will pop up
for adding one or more AV files, the original file will show in the file window once selected.
Select with highlight the unprocessed AV files in the file window, the icon will be
highlighted into . And then click icon and a dialog box will be shown.
Choosing pixels of AVI (Xvid) / WMV to “320x240” .
Frames per second to “Middle / High”
Frame Ratio to “Full Screen”
Click OK to confirm.
Click to start converting.
After conversion, the converted AV files will play automatically for preview.
And now the converted AV file is ready to transfer, you can simply copy and place those
converted AMV files to the media player.
Note: Only pixels in 320x240 can be supported, make sure 320x240 is selected.
18. Troubleshooting
Page 22

19. Specifications
Display
2.4 inches TFT, Resolution 320x240(RGB)
Dimension
86.2mm (H) x 52.5mm (W) x 9.5mm (D)
Weight
52g
PC Connection
USB 2.0 (High Speed)
Earphone Impedance
32 Ohm
External Memory
Micro SD Memory Card; T-Flash (up to 8GB)
Rechargeable Battery
Lithium: 3.7V, 420mAh
Music playing time: > 7 hours (power save mode, 2/3 earphone output)
Video playing time: > 2 hours
Voice Recording format
WAV
32kbps / 64kbps / 192kbps
Music Format
MP3, WMA
32kbps - 320kbps
APE, FLAC, OGG
Video Format
AVI(Xvid), WMV, FLV,
3GP, RM/RMVB,
QVGA resolution 320x240, 30fps (max)
Radio
FM
76 – 90MHz, 87 – 108MHz
Photo Format
JPEG, BMP, GIF, TIF, PNG
eBook Format
TXT
Audio
Earphone Output Power
L: 275mVrms + R: 275mVrms (at 32Ohm)
Frequency response
20Hz – 20,000Hz
SNR
> 70dB
Operation Temperature
0℃ - 40℃
OSD Languages
Multi Languages
Operation Systems
Windows 2000 / XP / Vista/ Win7, Mac OS 9.2 or above
20. DISCLAIMER
Updates to Firmware and/or hardware components are made regularly. Therefore some of the
instruction, specifications and pictures in this documentation may differ slightly from your
particular situation. All items described in this guide for illustration purposes only and may not
apply to particular situation. No legal right or entitlements may be obtained from the description
made in this manual
21. RECYCLING
If at any time in the future you should need to dispose of this product, please
note that: Waste electrical products should not be disposed of with household waste.
Please recycle where facilities exist. Check with your Local Authority or Retailer
for recycling advice. (Waste Electrical and Electronic Equipment Directive)
 Loading...