

Page 1
1
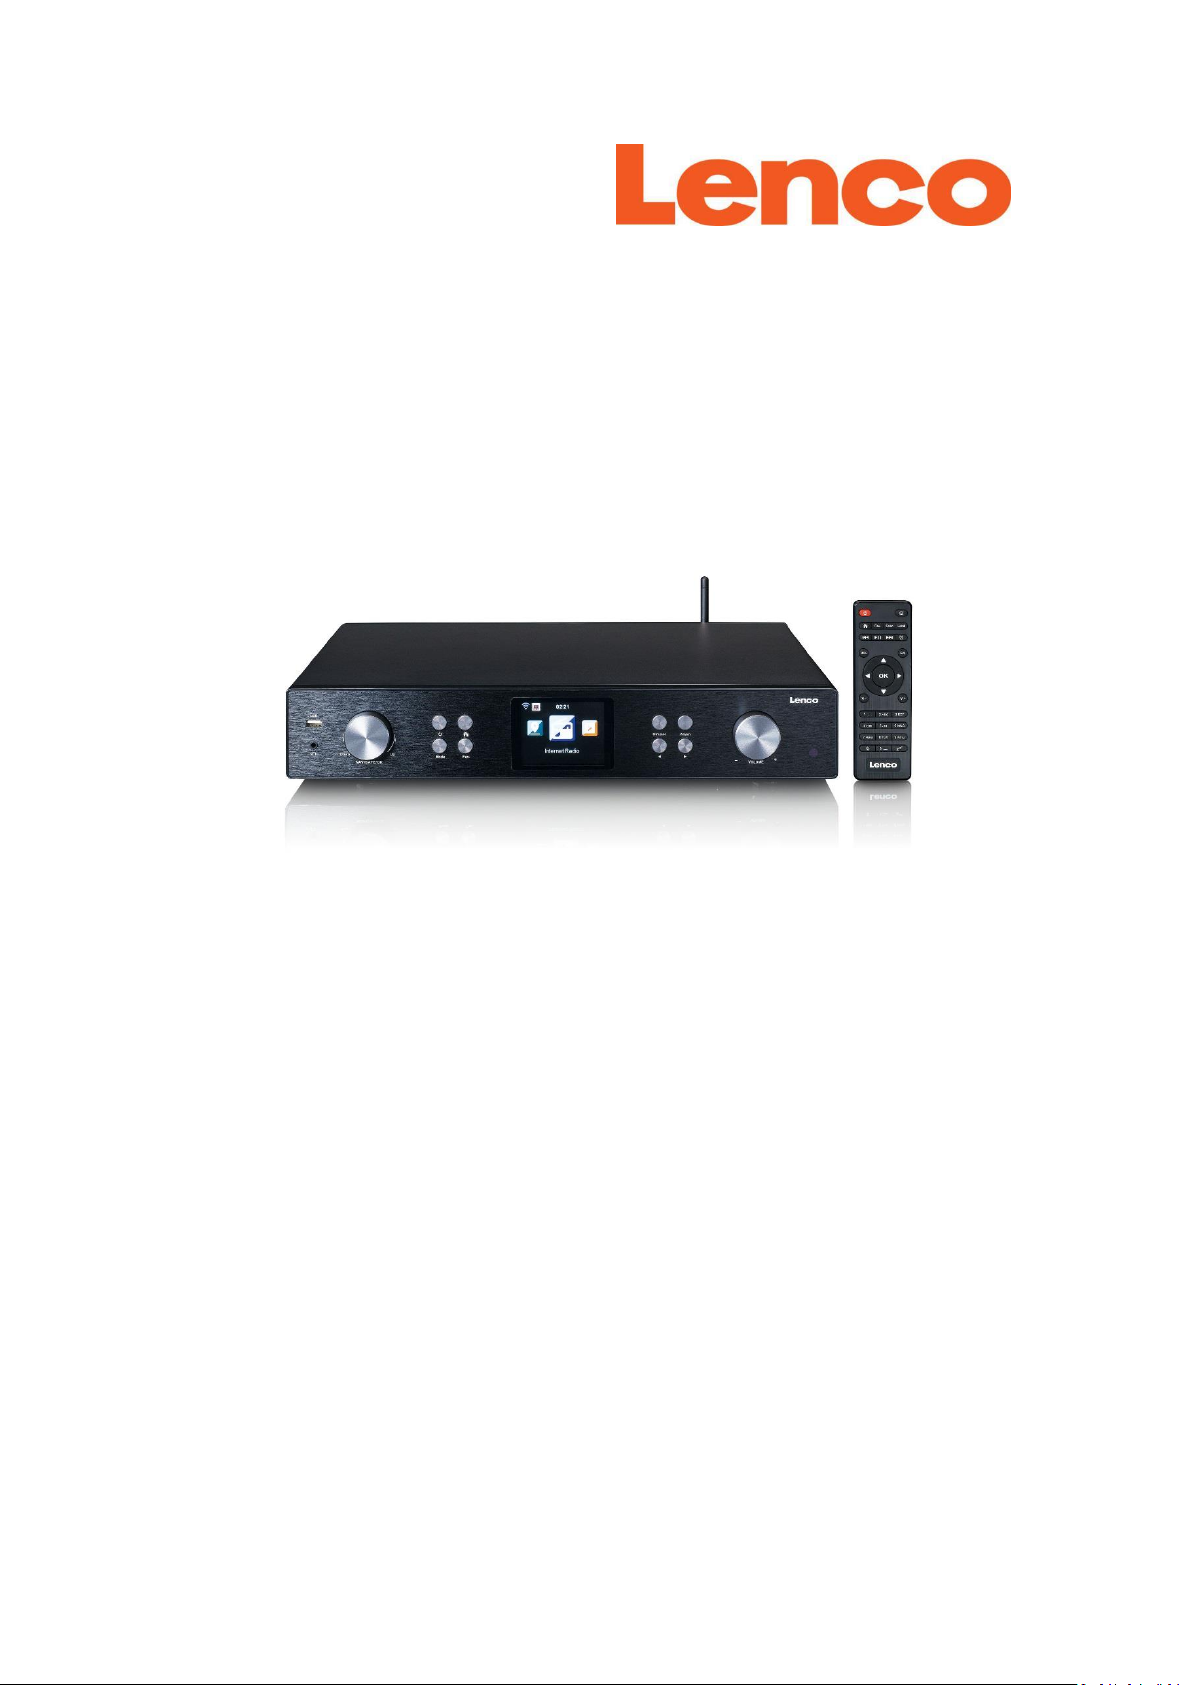
Model: DIR-250
USER MANUAL
Wifi/Lan Internet, Dab+, Fm Tuner with
Bluetooth and Spotify Connect
HANDLEIDING
Wifi/Lan Internet, Dab+, Fm-tuner met
Bluetooth en Spotify Connect
BEDIENUNGSANLEITUNG
WLAN/LAN-Internet-, DAB+- und FM-Tuner
mit Bluetooth- und Spotify-Connect
MODE D’EMPLOI
Internet Wifi/Lan, Dab+, Fm Tuner avec
Bluetooth et Spotify Connect
MANUAL DEL USUARIO
Internet Wifi/Lan, Dab+, radio FM con
conexión Bluetooth y Spotify
MANUALE D'USO
Sintonizzatore Wi-Fi/Lan Internet, Dab+, Fm
con Bluetooth e Spotify Connect
Page 2

2
Index:
English........................................................................................................................................ 3
Nederlands .............................................................................................................................. 45
Deutsch .................................................................................................................................... 91
Français .................................................................................................................................. 138
Español .................................................................................................................................. 184
Italiano ................................................................................................................................... 230
Version: 2.0
Page 3

3
English
DIR-250
CAUTION:
Usage of controls or adjustments or performance of procedures other than those specified
herein may result in hazardous radiation exposure.
PRECAUTIONS BEFORE USE
KEEP THESE INSTRUCTIONS IN MIND:
1. Do not cover or block any ventilation openings. When placing the device on a shelf,
leave
5 cm (2”) free space around the whole device.
2. Install in accordance with the supplied user manual.
3. Keep the device away from heat sources such as radiators, heaters, stoves, candles and
other heat-generating products or naked flame. The device can only be used in
moderate climates. Extremely cold or warm environments should be avoided. Working
temperature between 0° and 35°C.
4. Avoid using the device near strong magnetic fields.
5. Electrostatic discharge can disturb normal usage of this device. If so, simply reset and
restart the device following the instruction manual. During file transmission, please
handle with care and operate in a static-free environment.
6. Warning! Never insert an object into the product through the vents or openings. High
voltage flows through the product and inserting an object can cause electric shock
and/or short circuit internal parts. For the same reason, do not spill water or liquid on
the product.
7. Do not use in wet or moist areas such as bathrooms, steamy kitchens or near
swimming pools.
8. The device shall not be exposed to dripping or splashing and make sure that no objects
filled with liquids, such as vases, are placed on or near the apparatus.
9. Do not use this device when condensation may occur. When the unit is used in a warm
wet room with damp, water droplets or condensation may occur inside the unit and
the unit may not function properly; let the unit stand in power OFF for 1 or 2 hours
before turning on the power: the unit should be dry before getting any power.
10. Although this device is manufactured with the utmost care and checked several times
before leaving the factory, it is still possible that problems may occur, as with all
electrical appliances. If you notice smoke, an excessive build-up of heat or any other
unexpected phenomena, you should disconnect the plug from the main power socket
immediately.
11. This device must operate on a power source as specified on the specification label. If
you are not sure of the type of power supply used in your home, consult your dealer or
local power company.
12. Keep away from animals. Some animals enjoy biting on power cords.
13. To clean the device, use a soft dry cloth. Do not use solvents or petrol based fluids.
To remove severe stains, you may use a damp cloth with dilute detergent.
14. The supplier is not responsible for damage or lost data caused by malfunction, misuse,
modification of the device or battery replacement.
15. Do not interrupt the connection when the device is formatting or transferring files.
Otherwise, data may be corrupted or lost.
16. If the unit has USB playback function, the USB memory stick should be plugged into the
unit directly. Don’t use an USB extension cable because it can cause interference
resulting in failing of data.
17. The rating label has been marked on the bottom or back panel of the device.
18. This device is not intended for use by people (including children) with physical, sensory
or mental disabilities, or a lack of experience and knowledge, unless they’re under
Page 4

4
supervision or have received instructions about the correct use of the device by the
person who is responsible for their safety.
19. This product is intended for non professional use only and not for commercial or
industrial use.
20. Make sure the unit is adjusted to a stable position. Damage caused by using this
product in an unstable position vibrations or shocks or by failure to follow any other
warning or precaution contained within this user manual will not be covered by
warranty.
21. Never remove the casing of this device.
22. Never place this device on other electrical equipment.
23. Do not allow children access to plastic bags.
24. Only use attachments/accessories specified by the manufacturer.
25. Refer all servicing to qualified service personnel. Servicing is required when the device
has been damaged in any way, such as the power supply cord or the plug, when liquid
has been spilled or objects have fallen into the device, when the device has been
exposed to rain or moisture, does not operate normally, or has been dropped.
26. Long exposure to loud sounds from personal music players may lead to temporary or
permanent hearing loss.
27. If the product is delivered with power cable or AC power adaptor:
⚫ If any trouble occur, disconnect the AC power cord and refer servicing to qualified
personnel.
⚫ Don’t step on or pinch the power adaptor. Be very careful, particularly near the plugs
and the cable’s exit point. Do not place heavy items on the power adaptor, which may
damage it. Keep the entire device out of children’s reach! When playing with the
power cable, they can seriously injure themselves.
⚫ Unplug this device during lightning storms or when unused for a long period.
⚫ The socket outlet must be installed near the equipment and must be easily
accessible.
⚫ Do not overload ac outlets or extension cords. Overloading can cause fire or
electric shock.
⚫ Devices with class 1 construction should be connected to a main socket outlet
with a protective earthed connection.
⚫ Devices with class 2 construction do not require a earthed connection.
⚫ Always hold the plug when pulling it out of the main supply socket. Do not pull
the power cord. This can cause a short circuit.
⚫ Do not use a damaged power cord or plug or a loose outlet. Doing so may result
in fire or electric shock.
28. If the product contains or is delivered with a remote control containing coin/cell
batteries:
Warning:
⚫ “Do not ingest battery, Chemical Burn Hazard” or equivalent working.
⚫ [The remote control supplied with] This product contains a coin/button cell battery. If
the battery is swallowed, it can cause severe internal burns in just
2 hours and can lead to death.
⚫ Keep new and used batteries away from children.
⚫ If the battery compartment does not close securely, stop using the product and keep
it away from children.
⚫ If you think batteries might have been swallowed or placed inside any part of the
body, seek immediate medical attention.
29. Caution about the use of Batteries:
⚫ Danger of explosion if battery is incorrectly replaced. Replace only with the same or
equivalent type.
⚫ Battery cannot be subjected to high or low extreme temperatures, low air pressure at
high altitude during use, storage or transportation.
⚫ Replacement of a battery with an incorrect type that can result in an explosion or the
leakage of flammable liquid or gas.
Page 5
5
⚫ Disposal of a battery into fire or a hot oven, or mechanically crushing or cutting of a
battery, that can result in an explosion.
⚫ Leaving a battery in an extremely high temperature surrounding environment that can
result in an explosion or that leakage of flammable liquid or gas.
⚫ A battery subjected to extremely low air pressure that may result in an explosion or
the leakage of flammable liquid or gas.
⚫ Attention should be drawn to the environmental aspects of battery disposal.
INSTALLATION
• Unpack all parts and remove protective material.
• Do not connect the unit to the mains before checking the mains voltage and before all other
connections have been made.
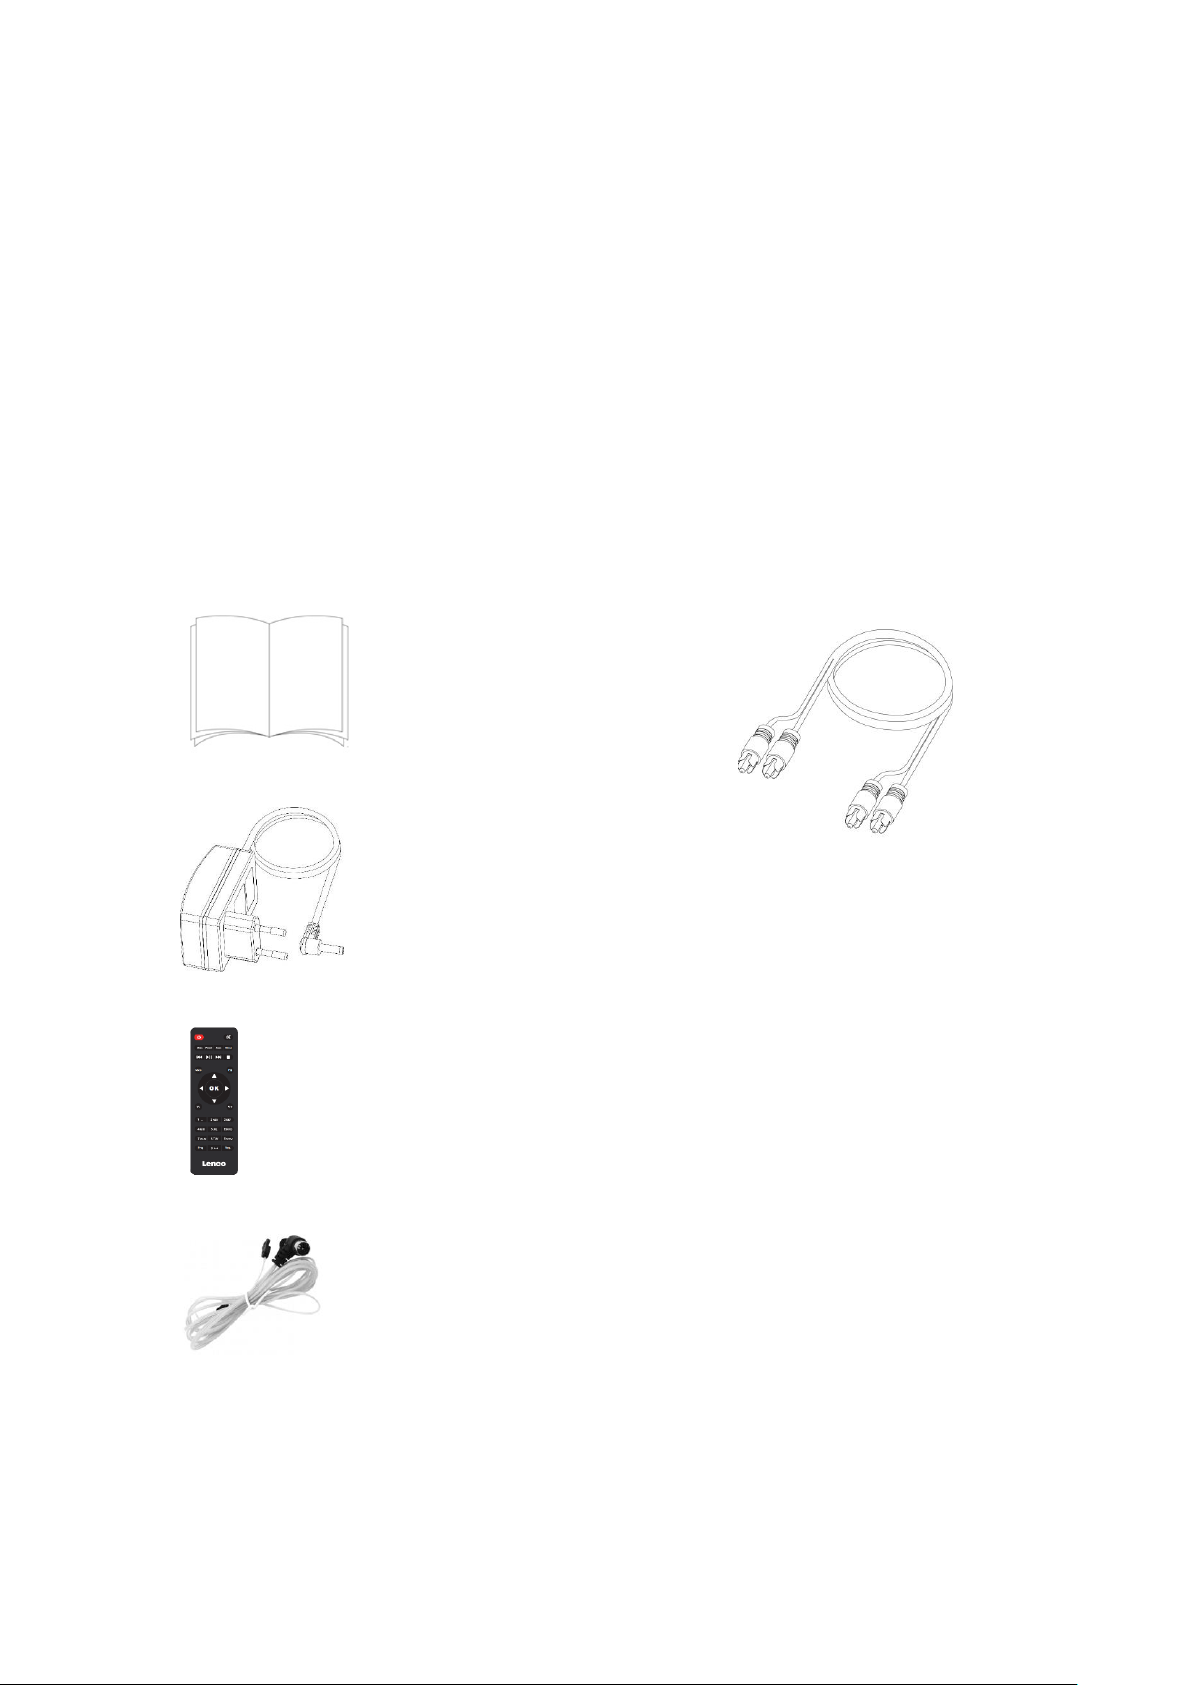
Accessories:
User manual
Power supply
Remote control
DAB/FM indoor antenna
WIFI antenna
RCA cable
Page 6
6
INSTALLATION
• Unpack all parts and remove protective material.
• Do not connect the unit to the mains before checking the mains voltage and before all
other connections have been made.
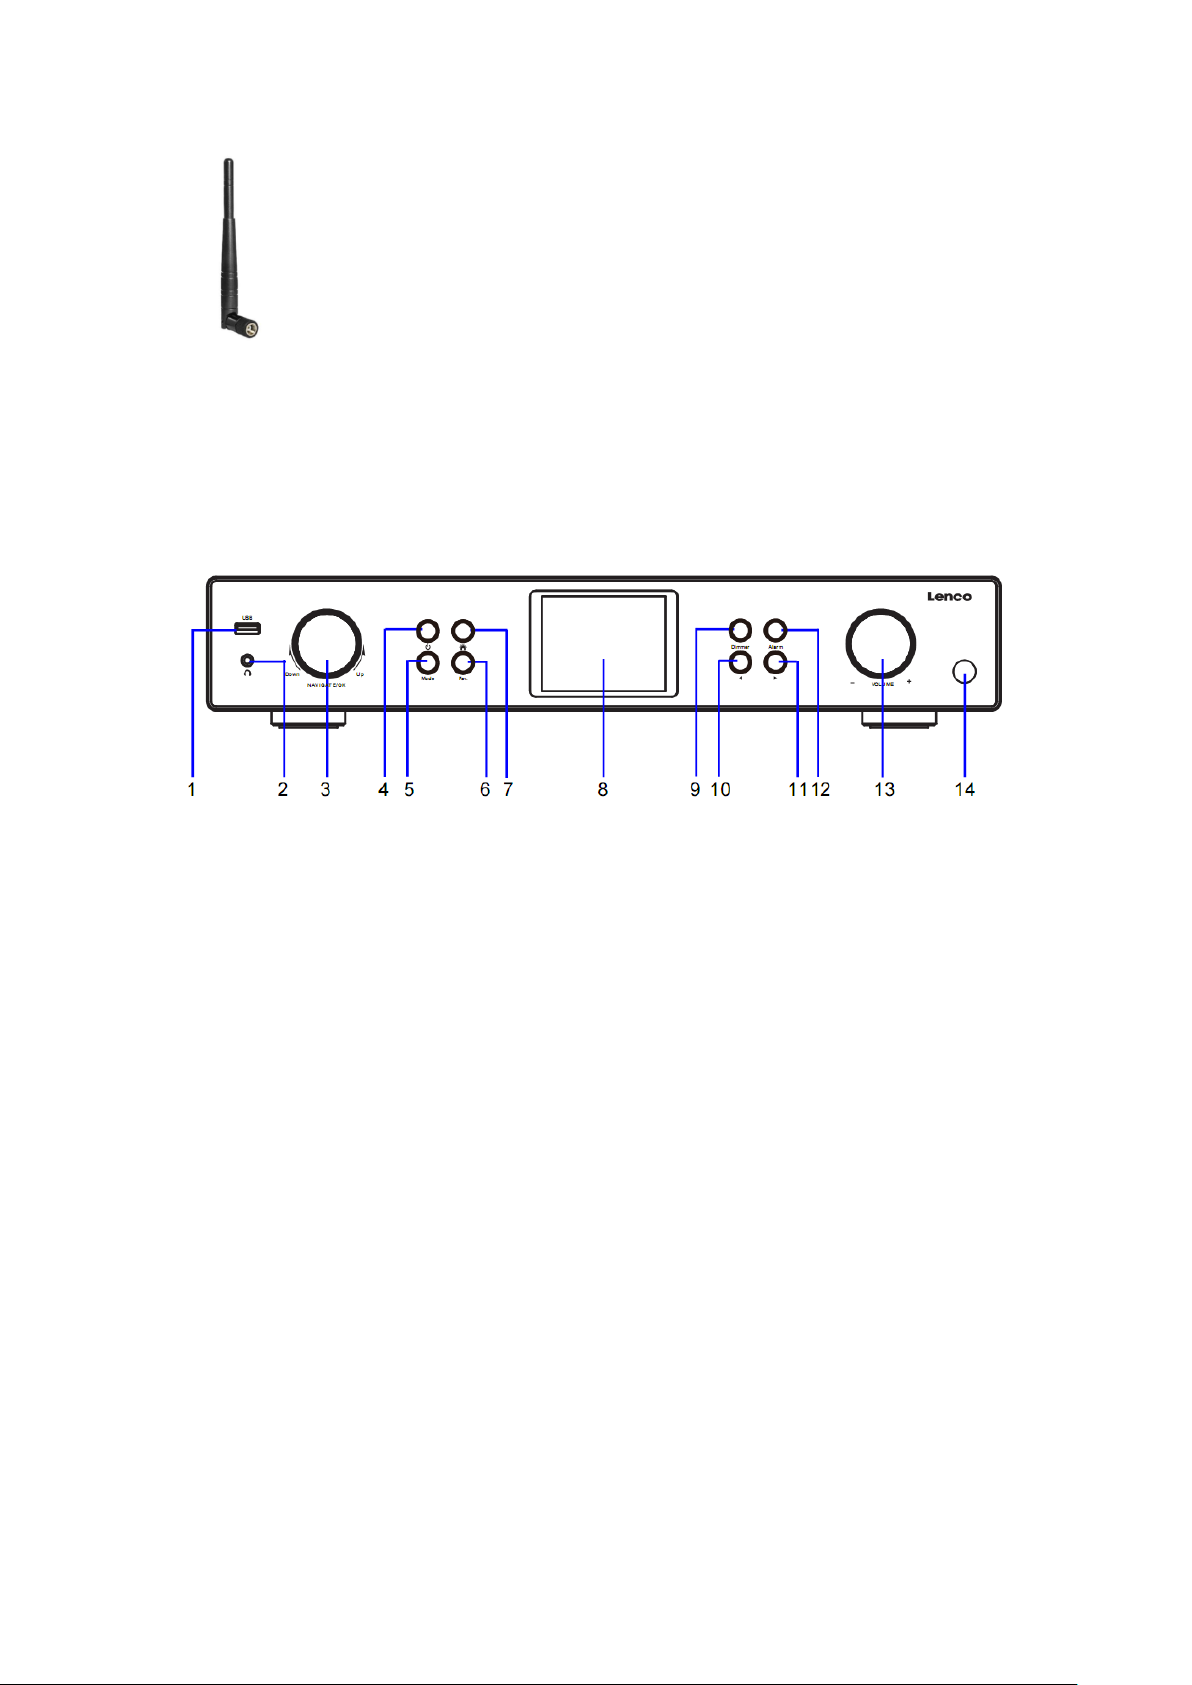
FRONT VIEW
1. USB Port
2. Earphone Jack
3. OK/NAVIGATE Swivel Knob
4. Standby Button
5. MODE Button
6. Fav. Button
7. Home Button
8. LCD Display
9. Dimmer Button
10. Left/Prev Button
11. Right/Next Button
12. Alarm Button
13. VOLUME Knob
14. Remote Control Sensor
REAR VIEW
Page 7
7
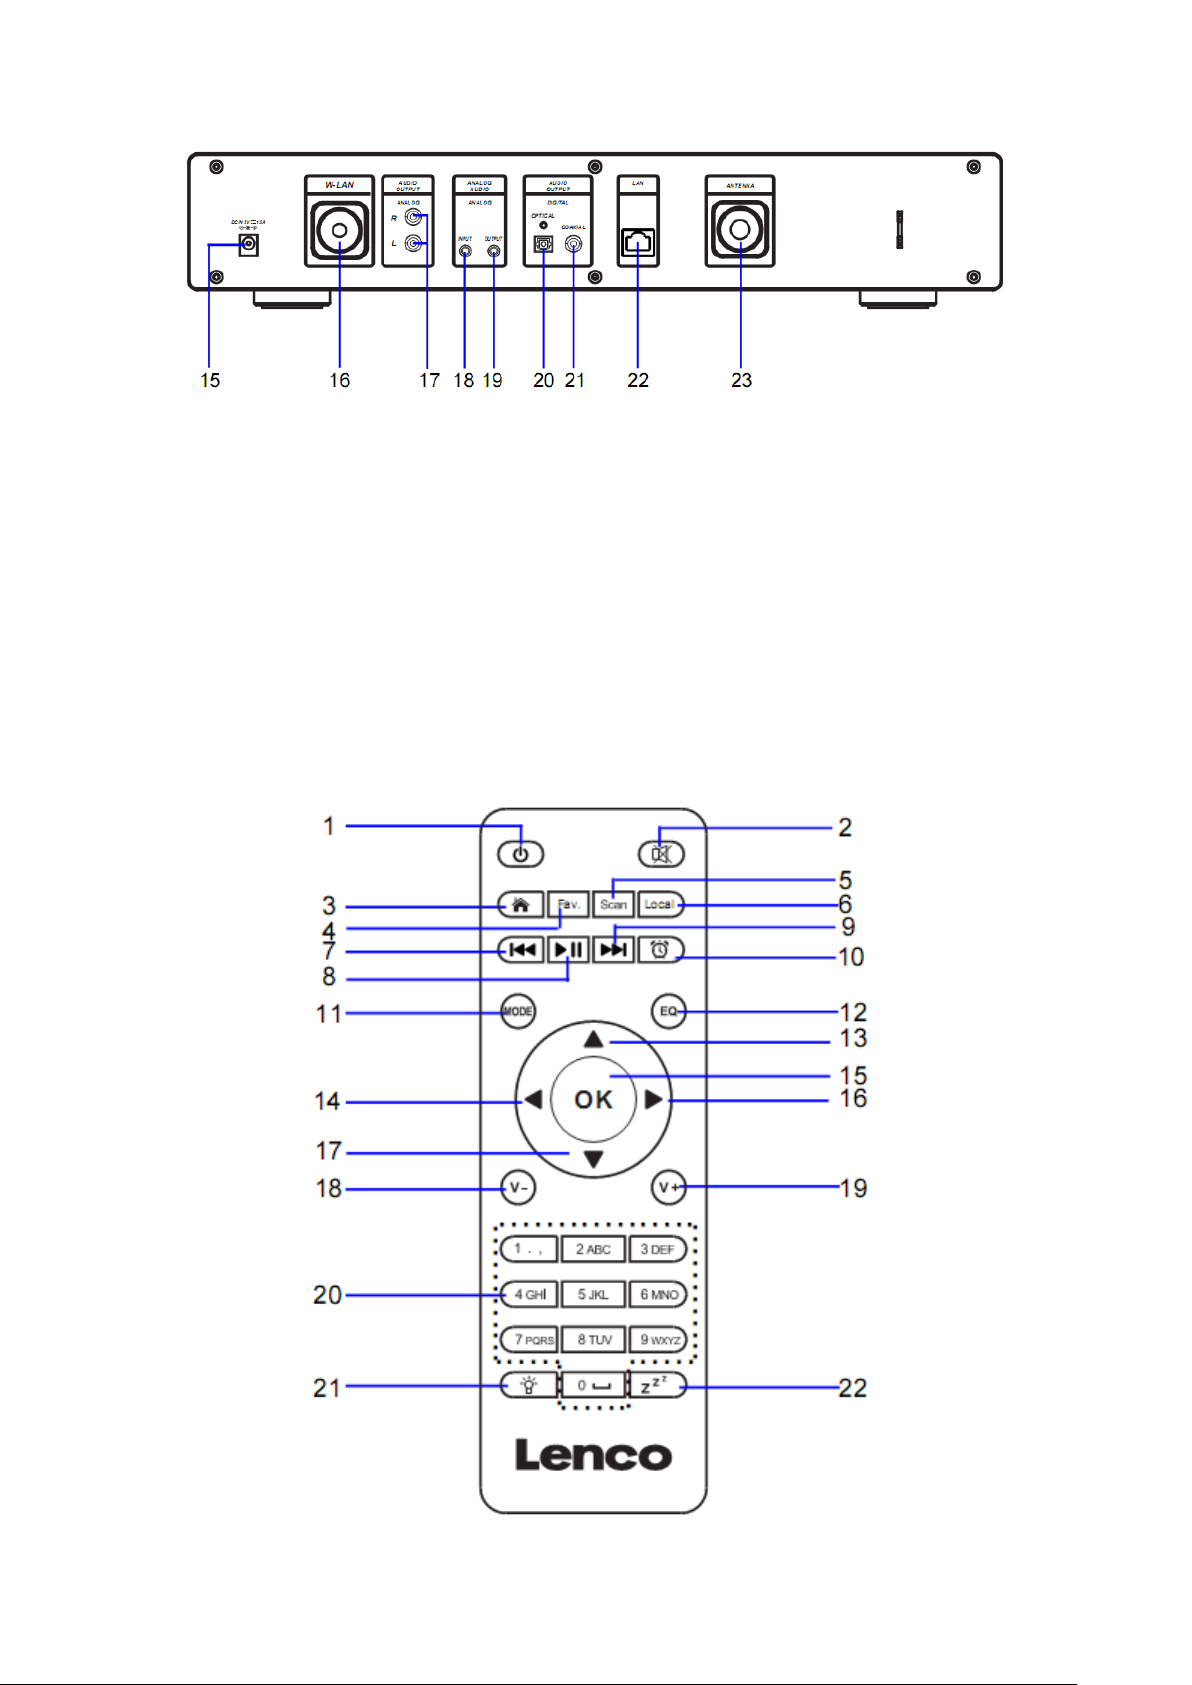
15. DC IN Jack
16. W-LAN Antenna Installation Port
17. AUDIO OUTPUT ANALOG R/L Jack
18. ANALOG AUDIO INPUT Jack
19. ANALOG AUDIO OUTPUT Jack
20. AUDIO OUTPUT DIGITAL OPTICAL Jack
21. AUDIO OUTPUT DIGITAL COAXIAL Jack
22. LAN INPUT Jack
23. Antenna Installation Port
REMOTE CONTROL
Page 8
8
1. Standby button
2. Switch speaker ON/OFF
3. Main menu
4. Saved stations, Favorites, etc
5. DAB/FM scan
6. Local station
7. Go back one track
8. Play/Pause
9. Go forward one track
10. Alarm button
11. MODE-Go to main menu items
12. EQ-Set button
13. Up navigation button
14. Left navigation button
15. Confirm selection
16. Right navigation button
17. Down navigation button
18. Decrease volume
19. Increase volume
20. 0.....9 Select favorites/Fav.; input letters
and numbers
21. Dimmer button
22. Sleep button
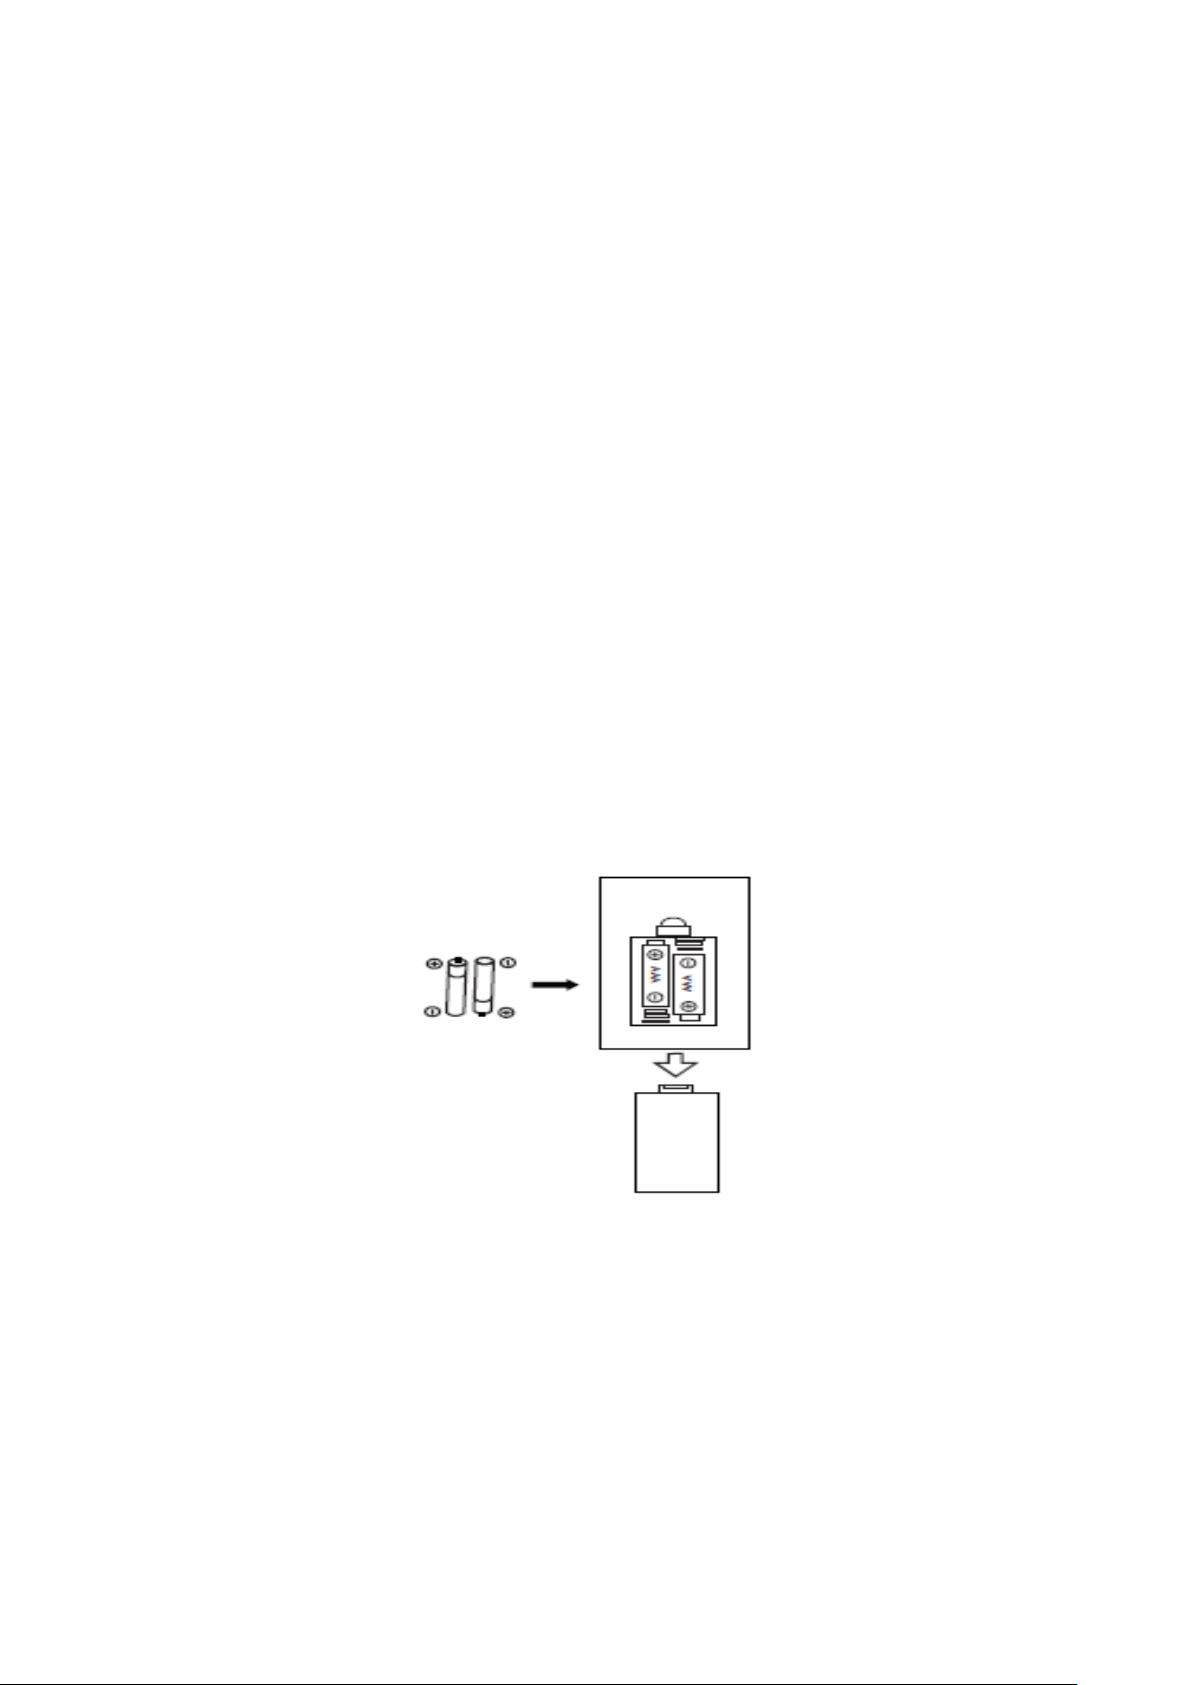
Battery installation for remote control:
1. Push on the ‘open’ marking of the battery cover and slide it downwards
2. Install two (2) x AAA size batteries 1.5V into the battery compartment (check the correct
polarity when inserting)
3. slide the battery cover back
Battery Precautions:
Follow these precautions:
1. Use only the type of battery specified in this manual.
2. Be sure to follow the correct polarity when installing the battery as indicated in the battery
compartment. A battery which is inserted in the wrong way may cause damage to the
device.
3. Do not try to recharge single use batteries. (Follow the battery manufacturer’s directions.)
4. Do not throw batteries into fire because they may explode.
Page 9
9
5. Clean the battery contacts of the device prior to replacing empty batteries.
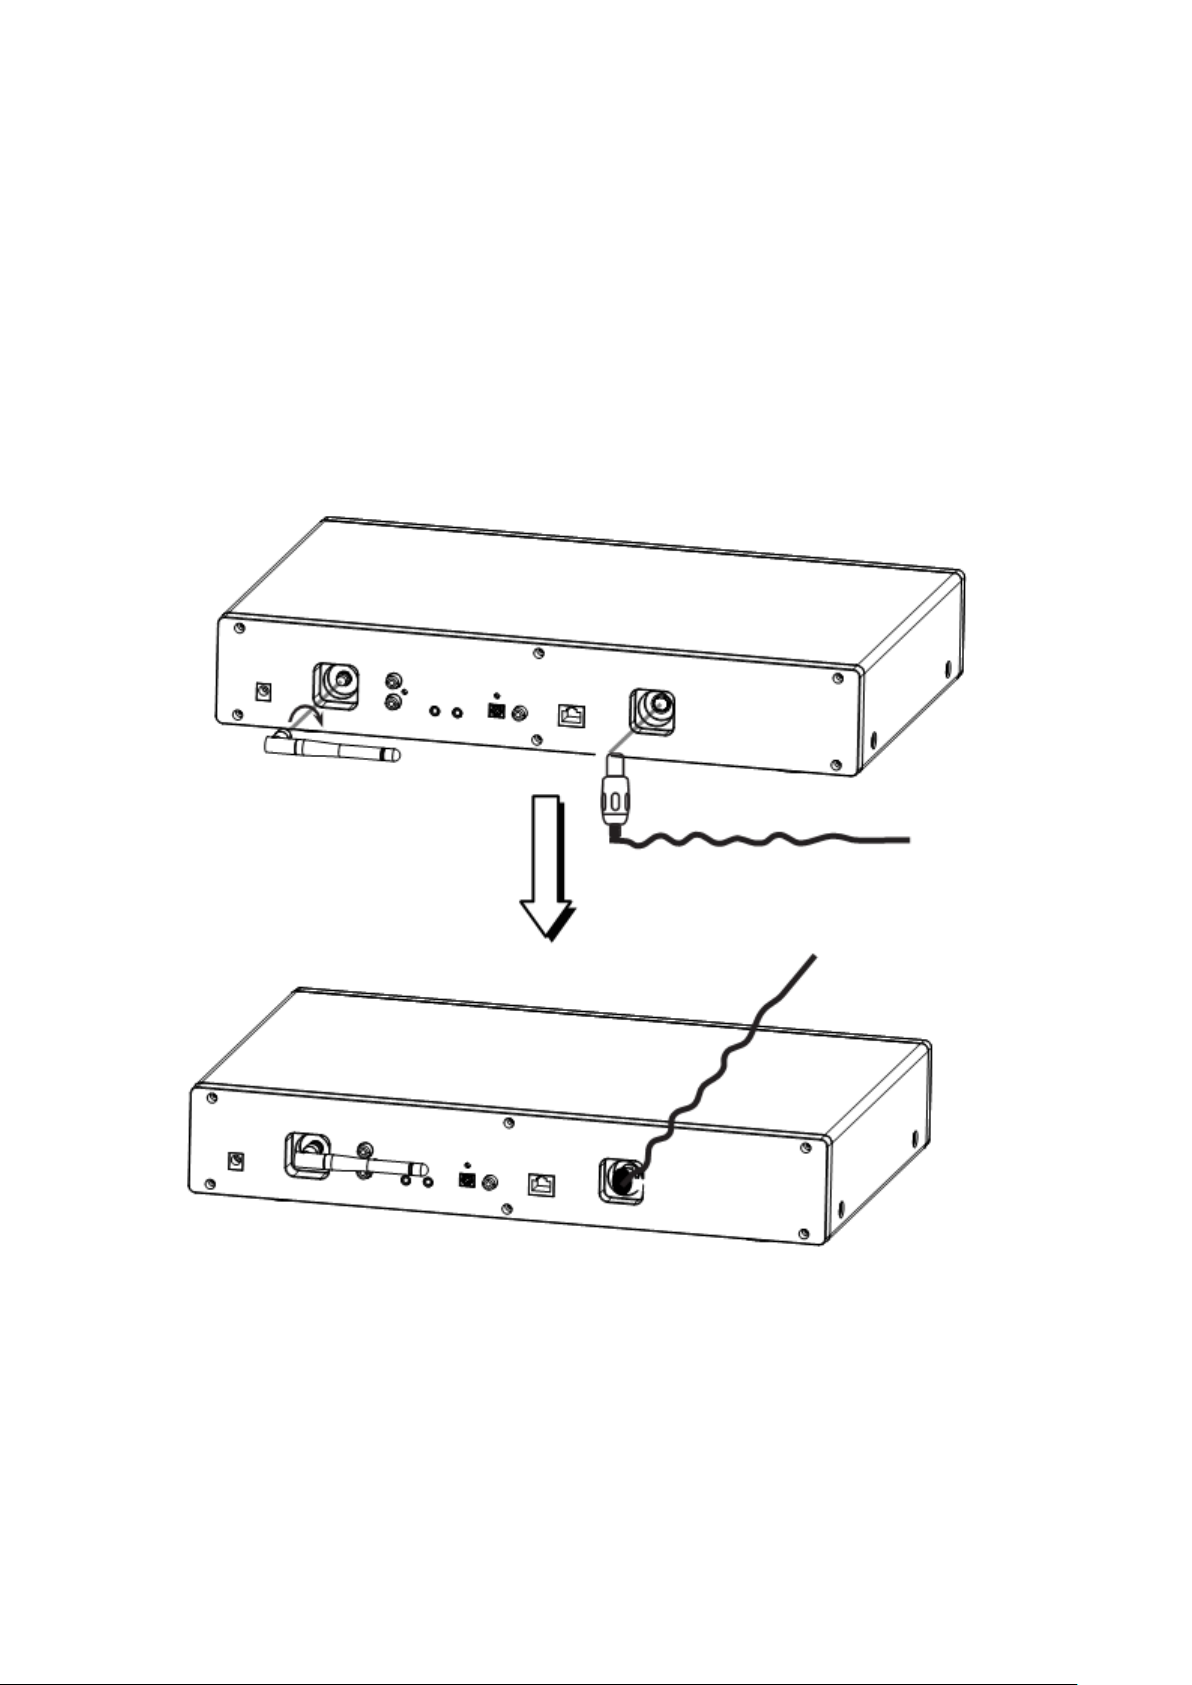
Tighten the W-lan antenna clockwise by using the proper tool as illustrated.
Plug the pig-tail antenna into the Antenna port as illustrated.
Page 10
10
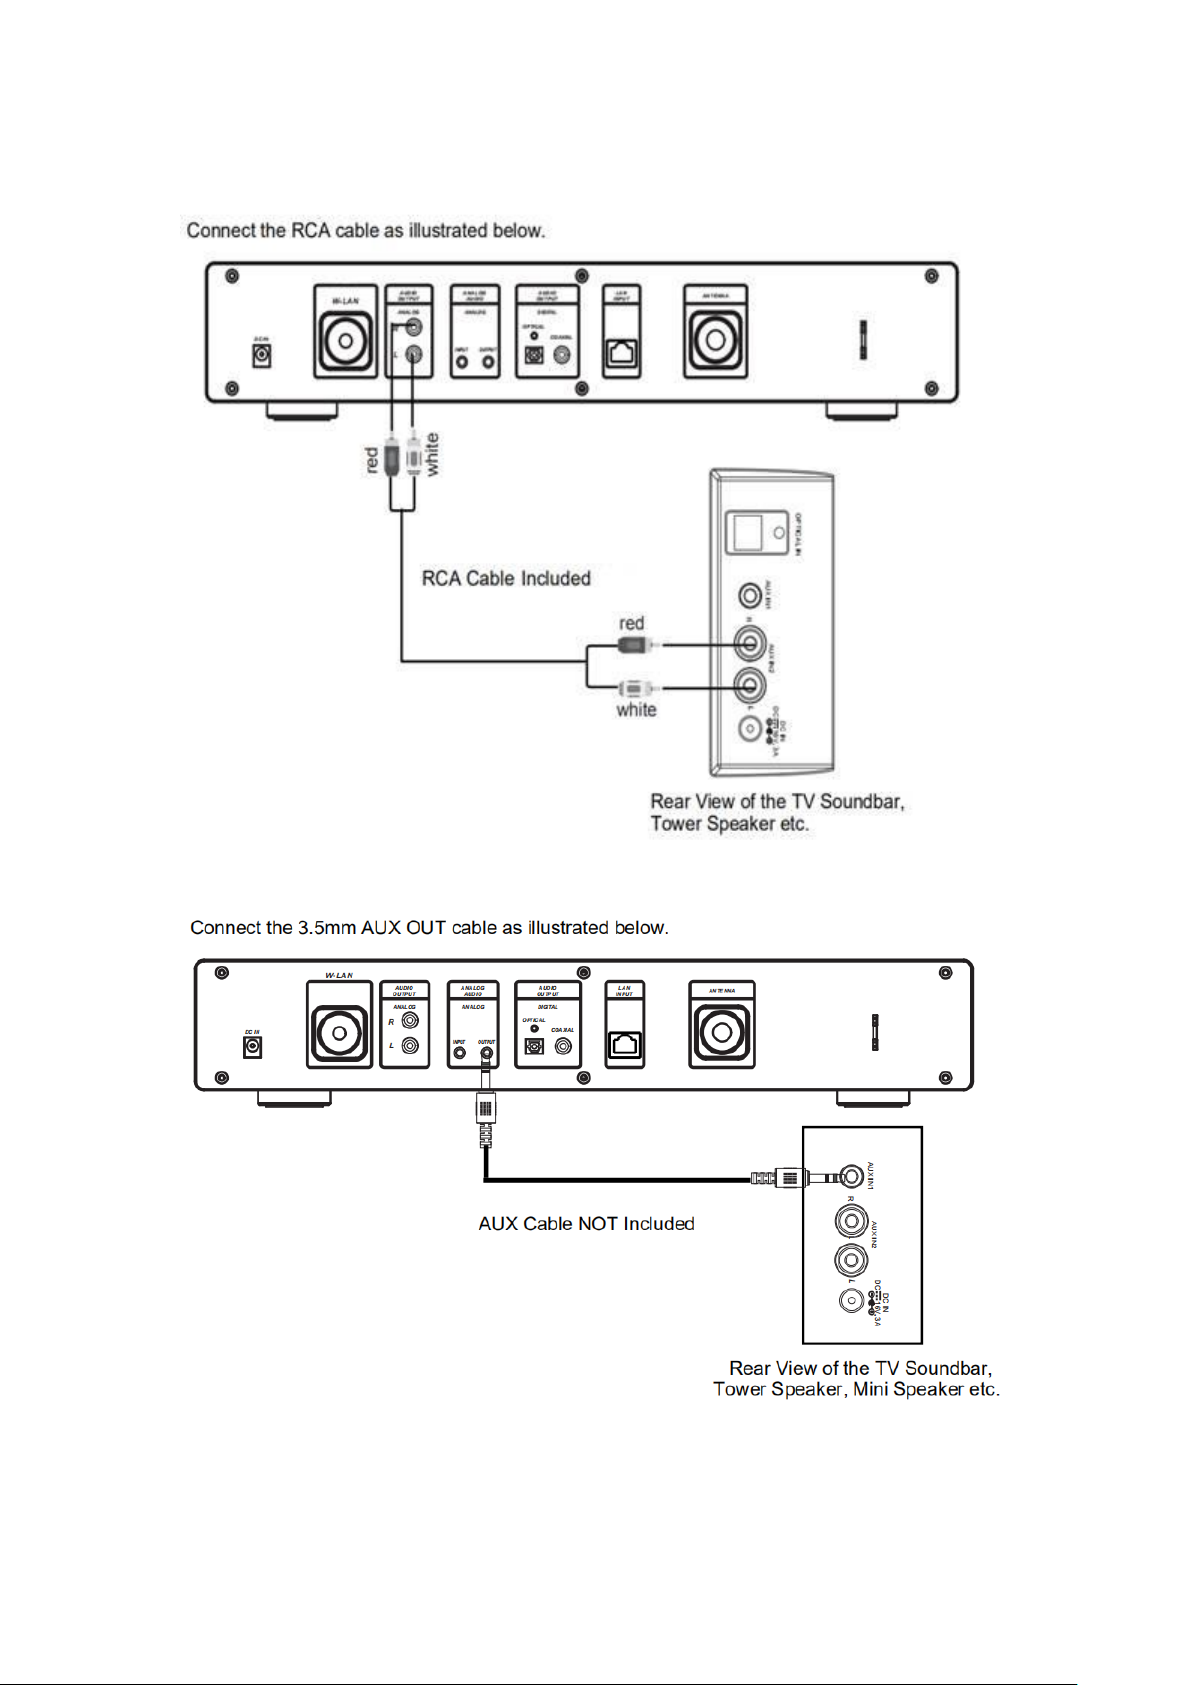
ANALOG AUDIO OUTPUT CONNECTIONS
Page 11
11
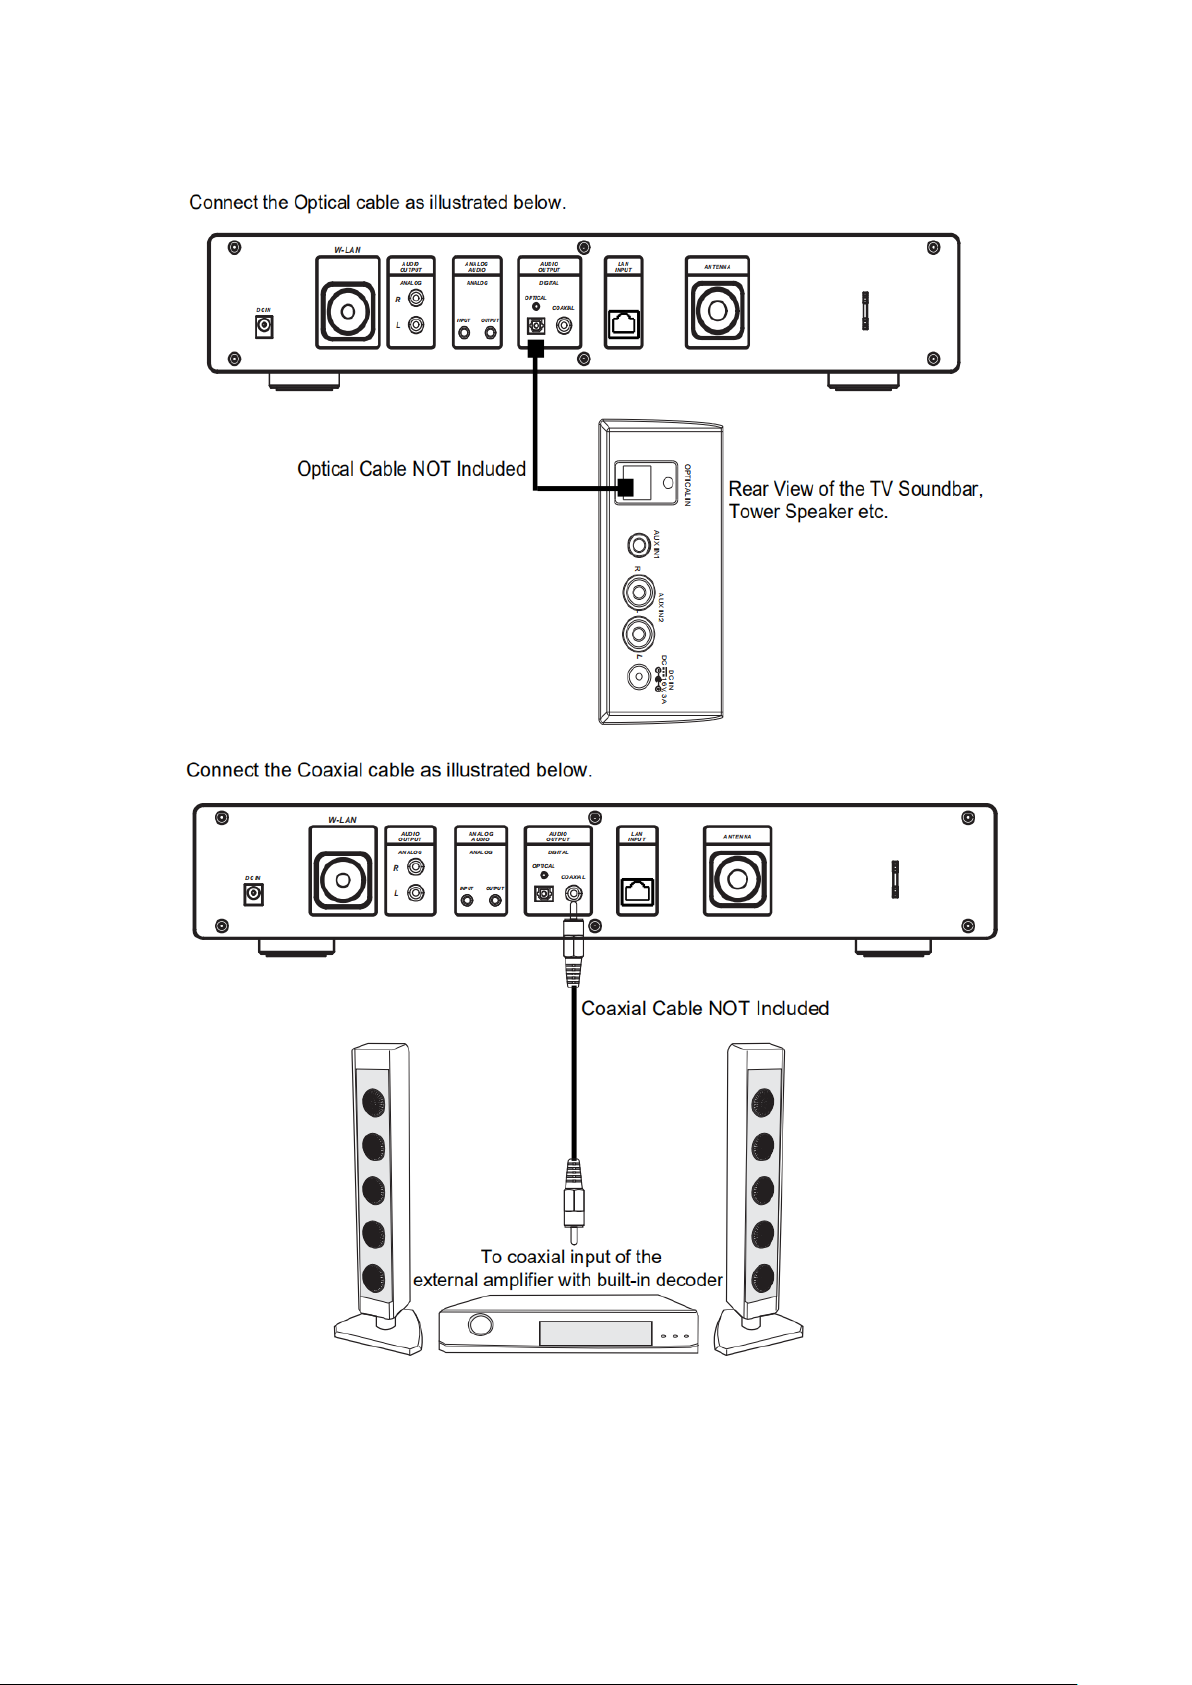
DIGITAL AUDIO OUTPUT CONNECTIONS
Page 12
12
1 Requirements for using the DIR-250
1.1 Network Requirements
Before using the DIR-250, the following requirements are needed:
⚫ A broadband connection in combination with a wired/wireless access point, router or
similar network device.
⚫ The Wifi network router needs to support WIFI (802.11 b/g/n) wireless connection.
⚫ A smart phone, tablet or pc which is on the same network as the DIR-250
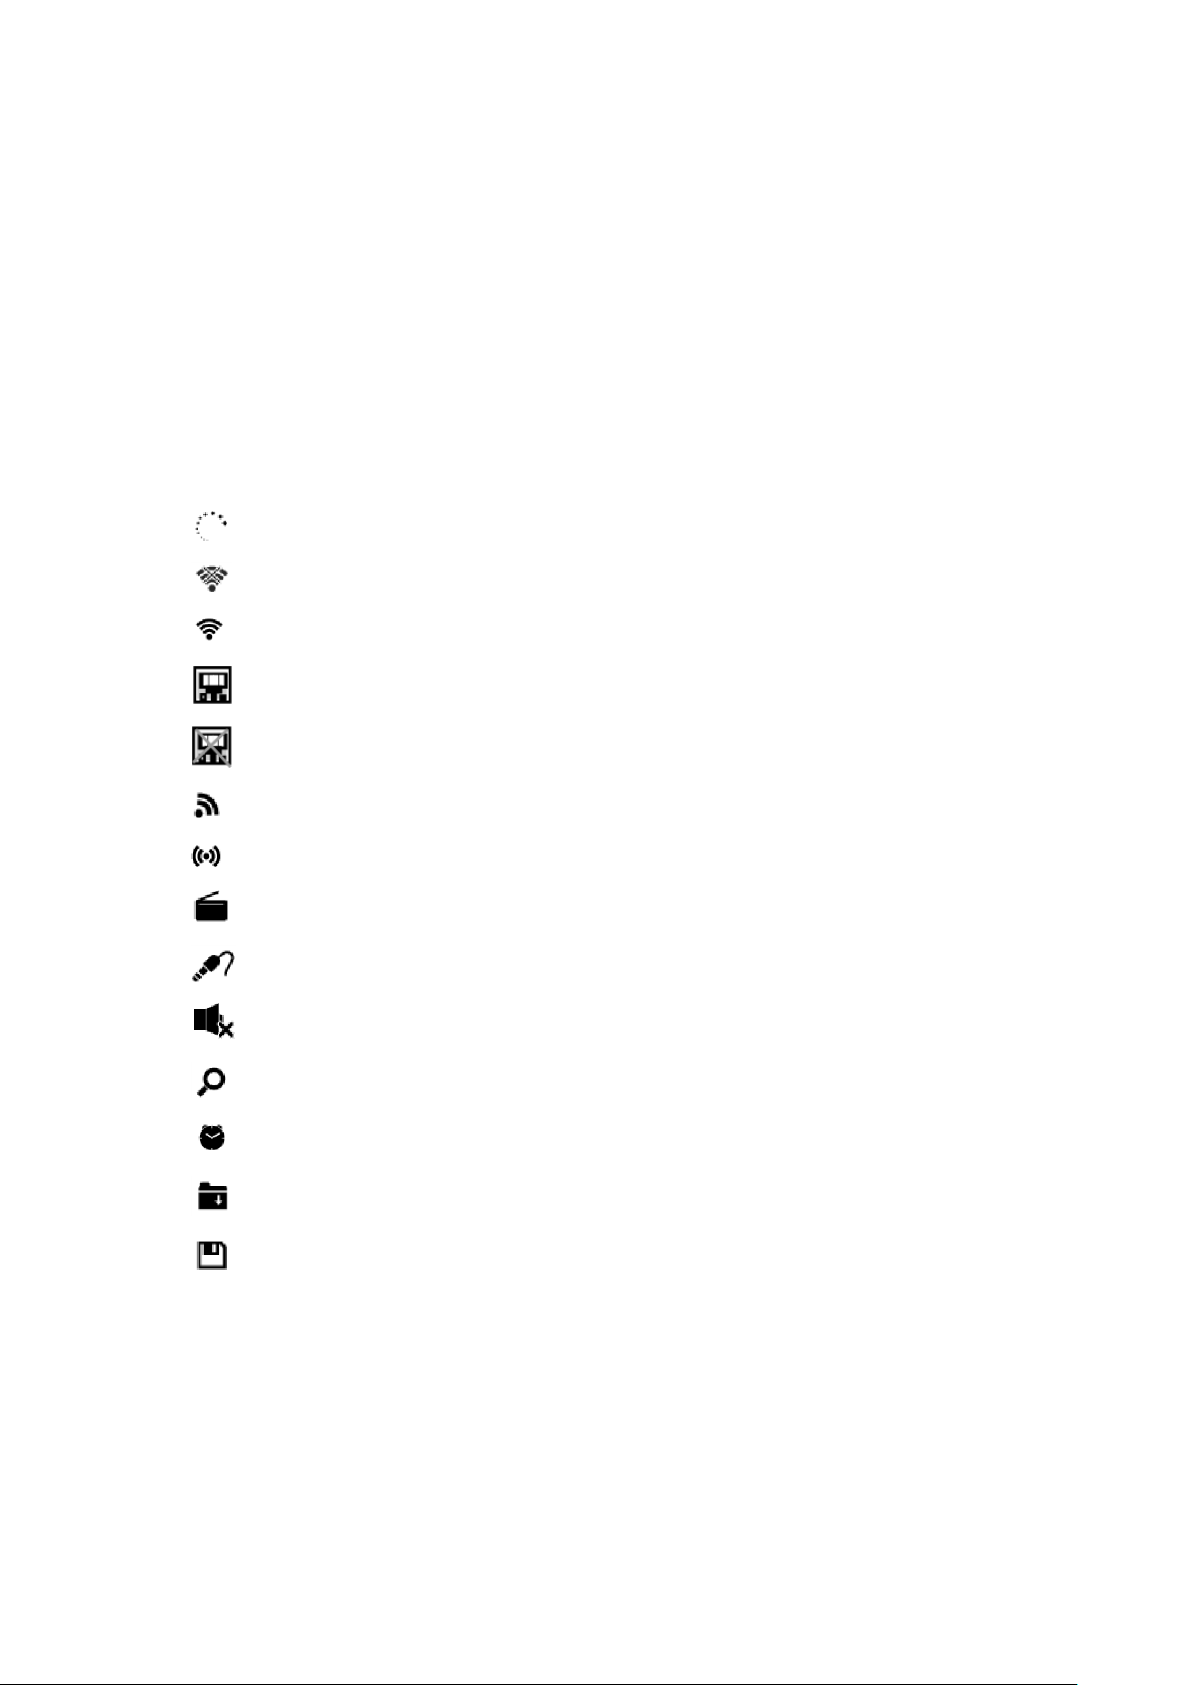
Display symbols
establishing Connection
No wireless connection
Wireless connection established
Wired connection established
No wired connection
VHF radio reception: Mono
VHF radio reception: Stereo
VHF radio function selected
AUX function selected
Speaker off
Search
Alarm on
Internet radio station saved as Fav.
FM radio station saved
2 Getting started
2.1 Get the network ready
● For wireless W-LAN network connection:
Check if WLAN LINK/ACT light of the wired/wireless access point or router is illuminated.
Consult the user guide of that for any questions.
Page 13
13
Note: WiFi allows data transfer over short distances within 20 meters without the need of
cabling between the devices. Walls and ceilings may reduce WIFI range.
Therefore try to locate the DIR-250 and/or the access point within the distance above and
avoid any obstacles between two devices.
● Connect the power adaptor to the mains and plug the DC plug the adaptor into the DC-IN
socket of the DIR-250
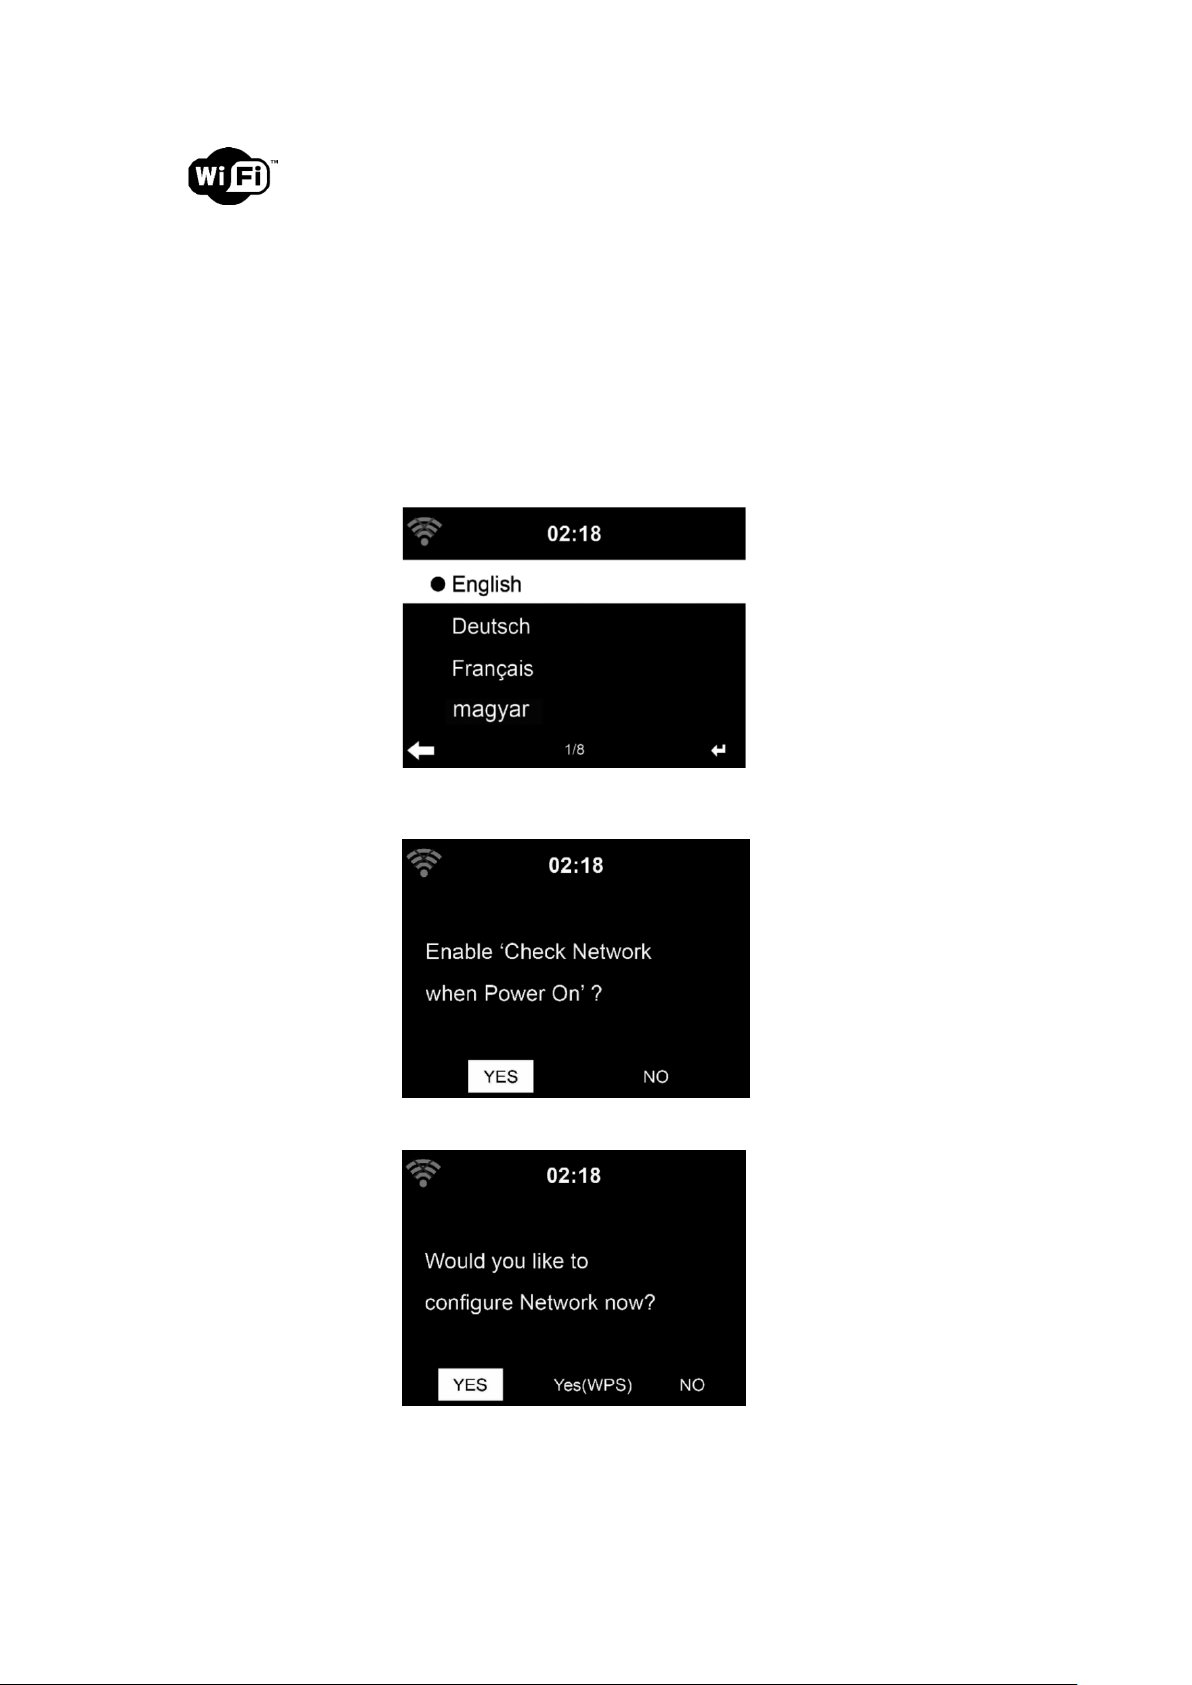
● On first use the DIR-250 will start with the installation wizard. The system will ask you to:
1 set Language and Network Configurations (fig 1.)
(use the navigation knob(3) to select)
1
2 Check network availability on power on (fig 2.)
2
3 Configure the wifi network (fig 3.)
3
● Select Yes to establish connection to a network
Page 14
14
● if you Select Yes(WPS)(Only for WPS routers) and then press the WPS button on your
router.
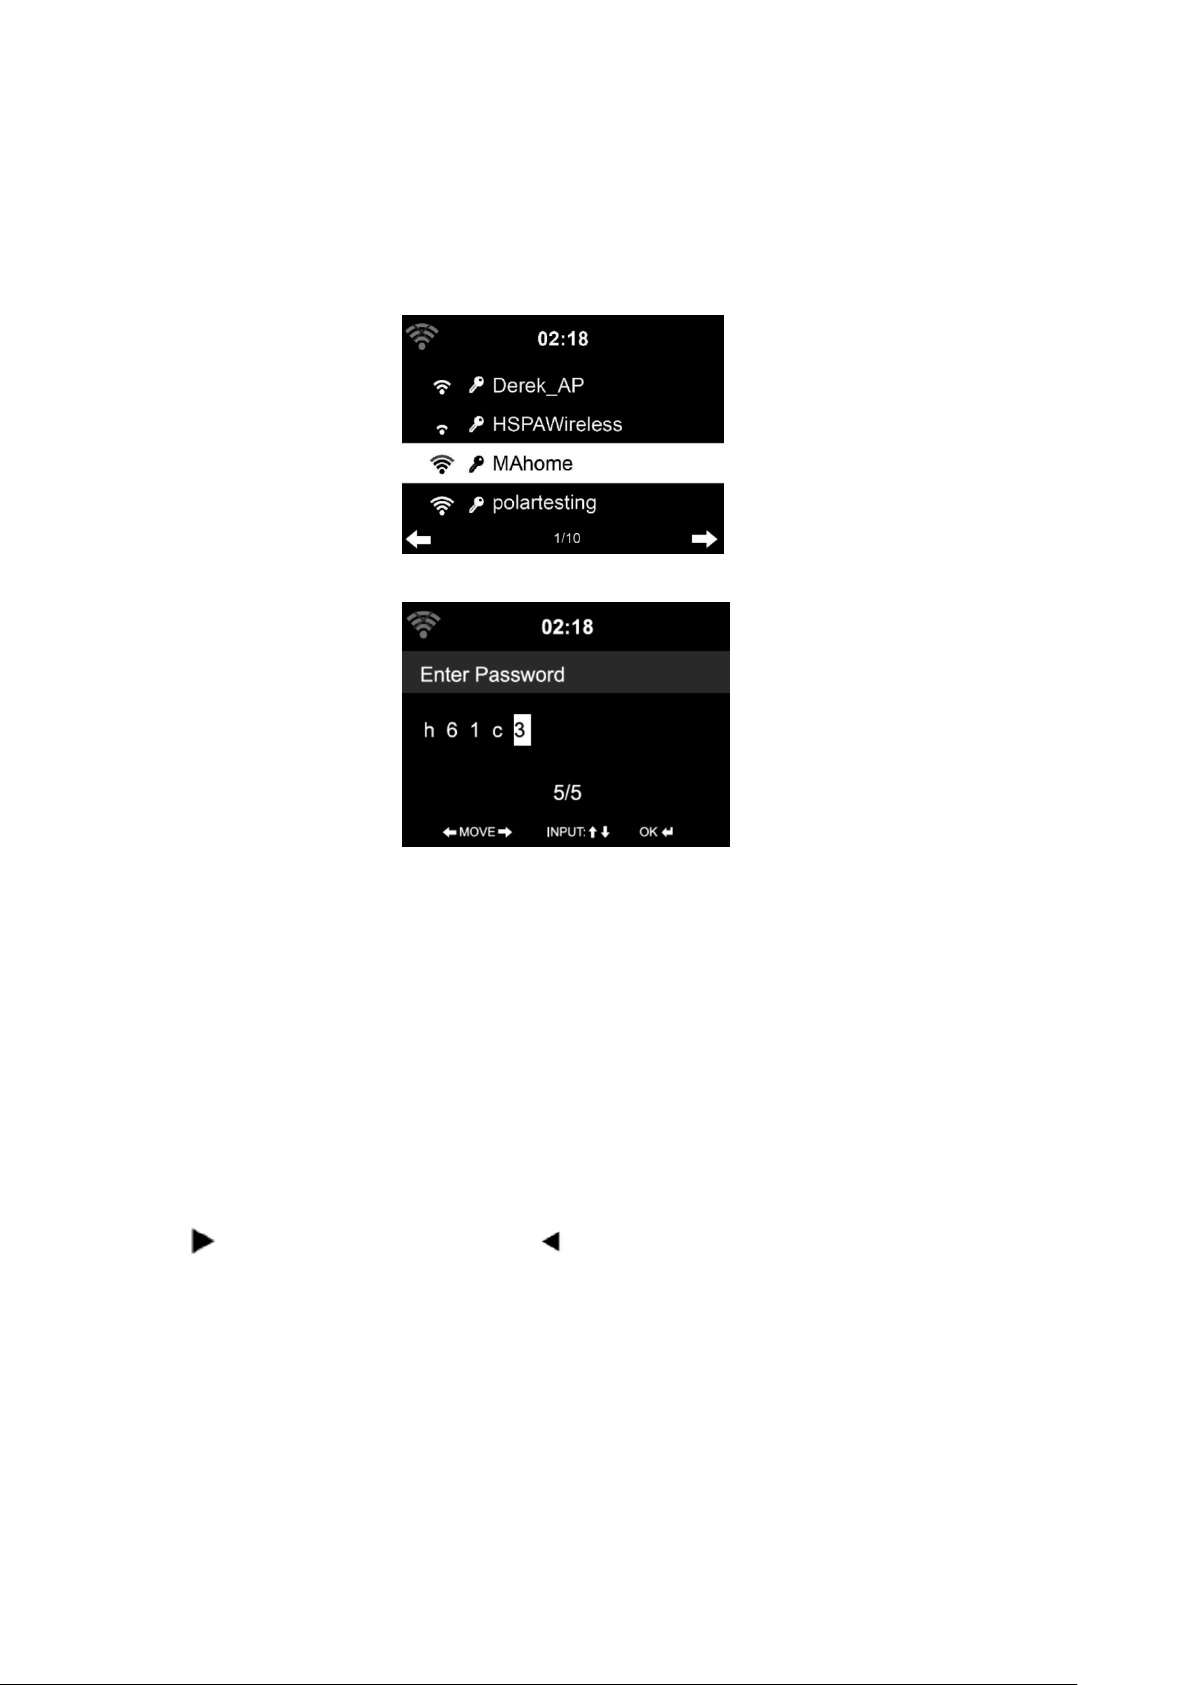
If you answer ‘Yes’, the display goes to scanning for Wireless Network and a list of available
wireless networks will appear.
NOTE: Only 2.4 Ghz networks are supported
1
2
The number of bars in the wireless symbol in front the network name (SSID) indicate the
signal strength of the network. The key symbol indicates that the network is passwordprotected.
If the device does not find any wireless networks, a ‘no wireless Networks found’ appears on
the display. Change your location and if necessary and check your WLAN router. You can find
the SSID of your Access Point in the configuration of the Access Point (Router). Select your
network and confirm with OK, If your WLAN is password-protected, you will be prompted to
enter the wifi password.
Enter the password using the navigation control buttons on the device or remote control.
You can rotate the UP/DOWN knob to input the wifi password. if it is accidentally pressed
‘ ’ to move a redundant entry, press ‘ ’ to correct.
With remote control
The cursor indicates the current entry space.
Press the corresponding number button repeatedly.
0
0(delete entry)
1 1(space) @ ! ” # $ % & () * ’ + - { \ | }< >?........
2 2 A B C a b c
3 3 D E F d e f
Page 15
15
4 4 G H I g h i
5 5 J K L j k l
6 6 M N O m n o
7 7 P Q R S p q r s
8 8 T U V t u v
9 9 W X Y Z w x y z
buttons:
‘ ’Go to previous entry space, entry can be overwritten
‘ ’Go to next entry space, the last entry is saved
‘ ’Select number/letter
Input via front panel
Rotate the UP/DOWN navigation knob(3) to input numbers/letters.
Once you are on the letter you want, press to move to the next entry.
When you are finnished, press OK to confirm. You may press to move to a previous
character entry.
‘OK’ Confirm entire entry
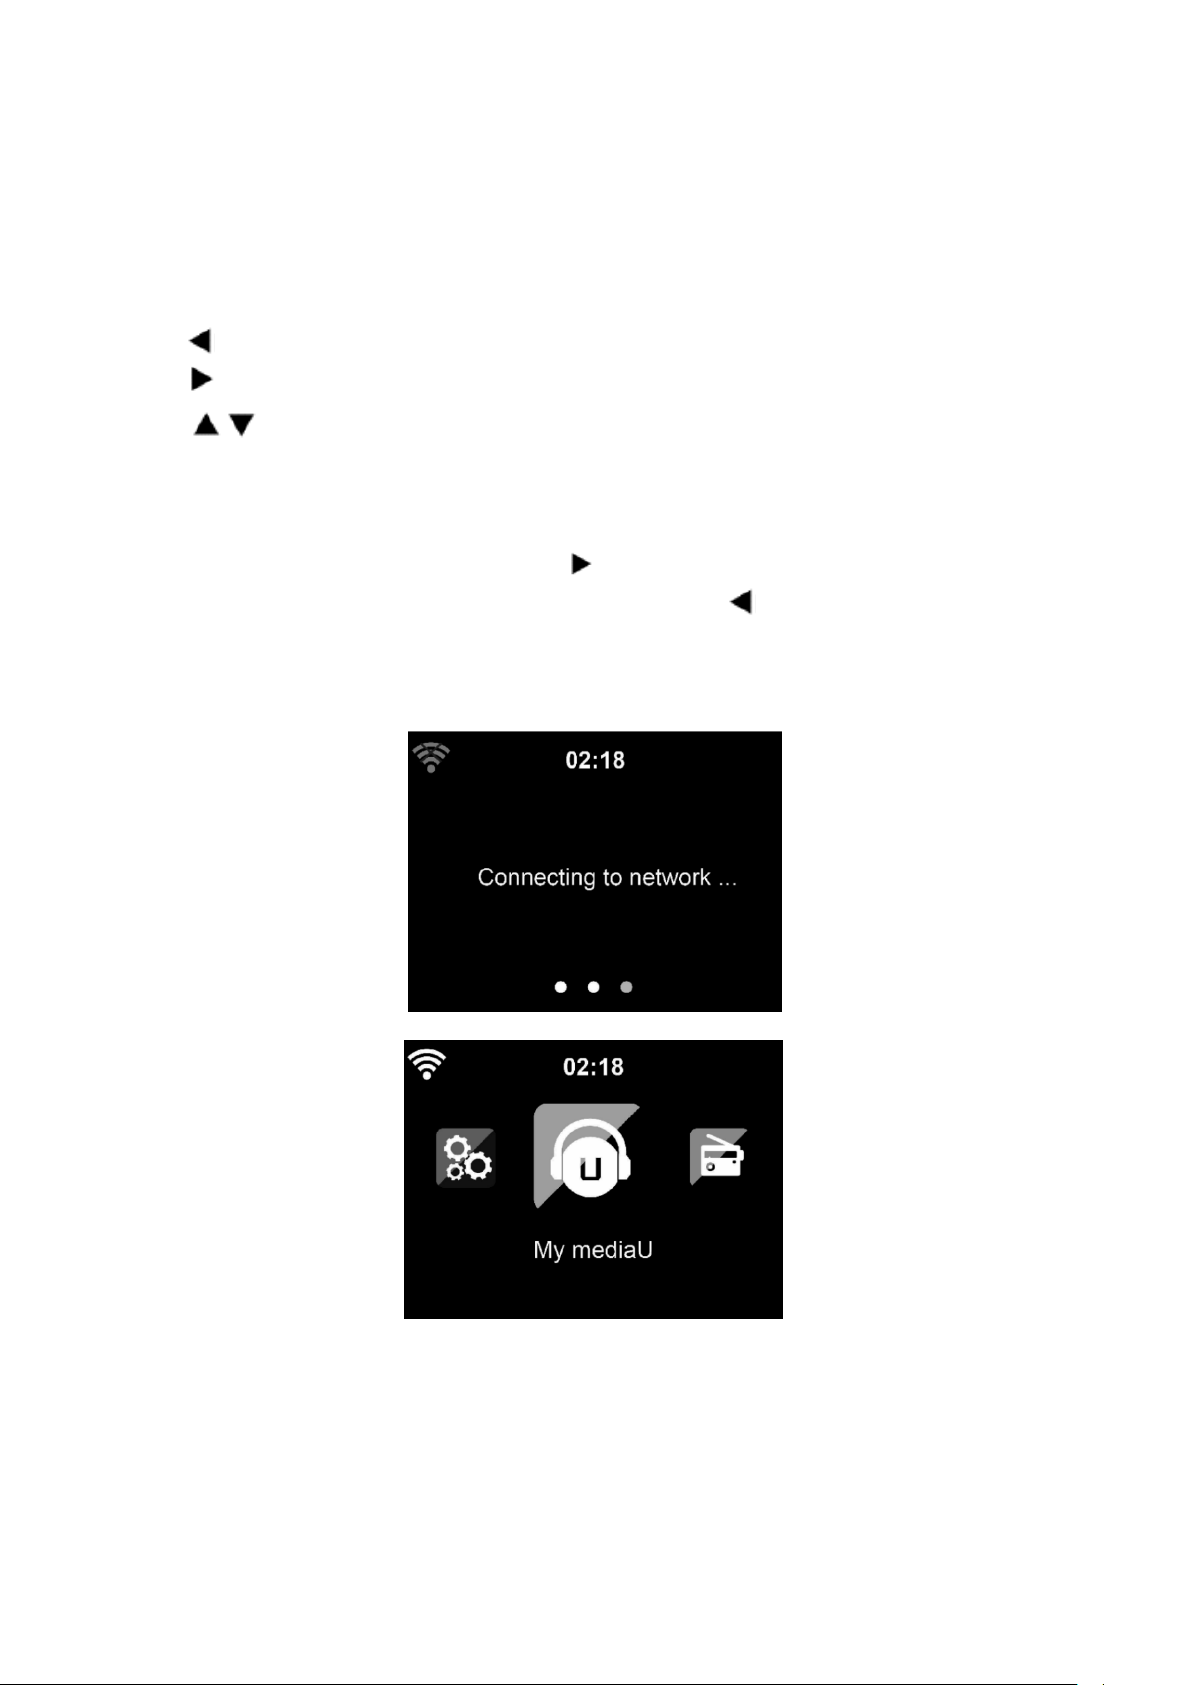
It may take a few seconds to establish the network connection.
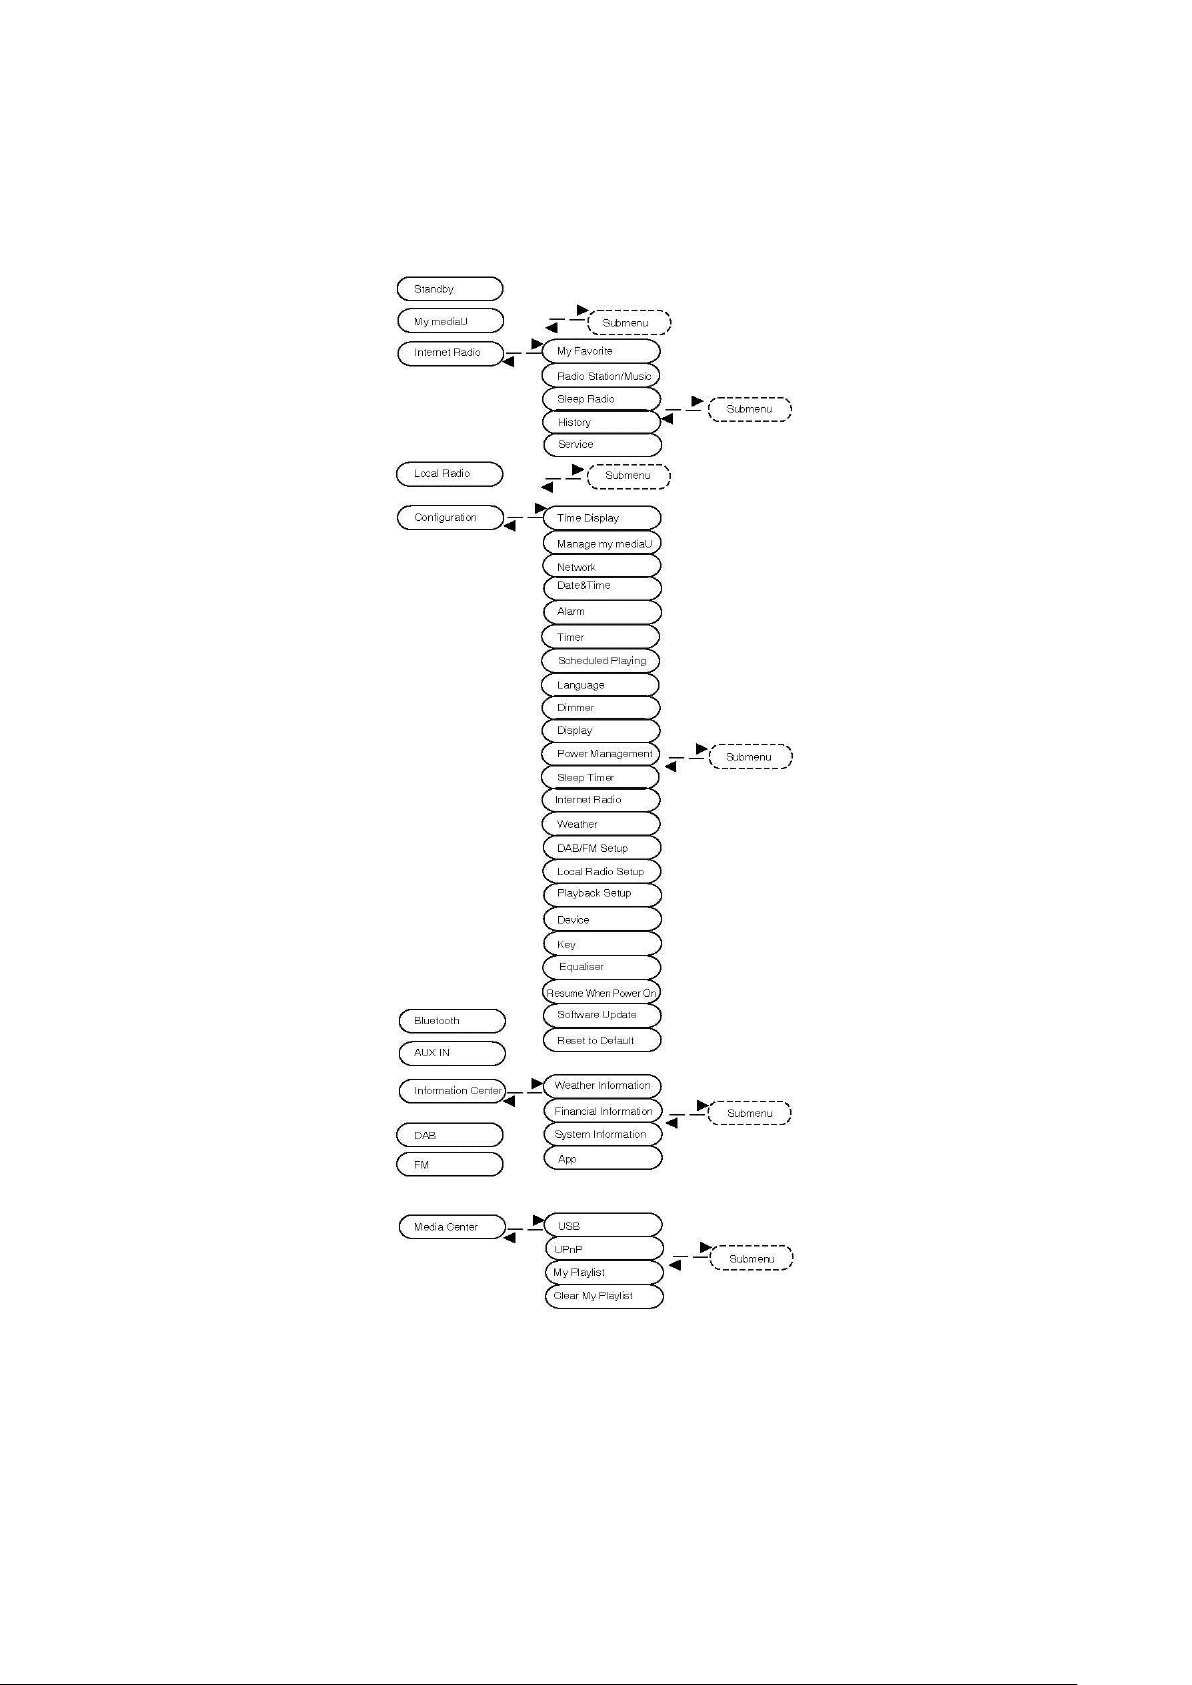
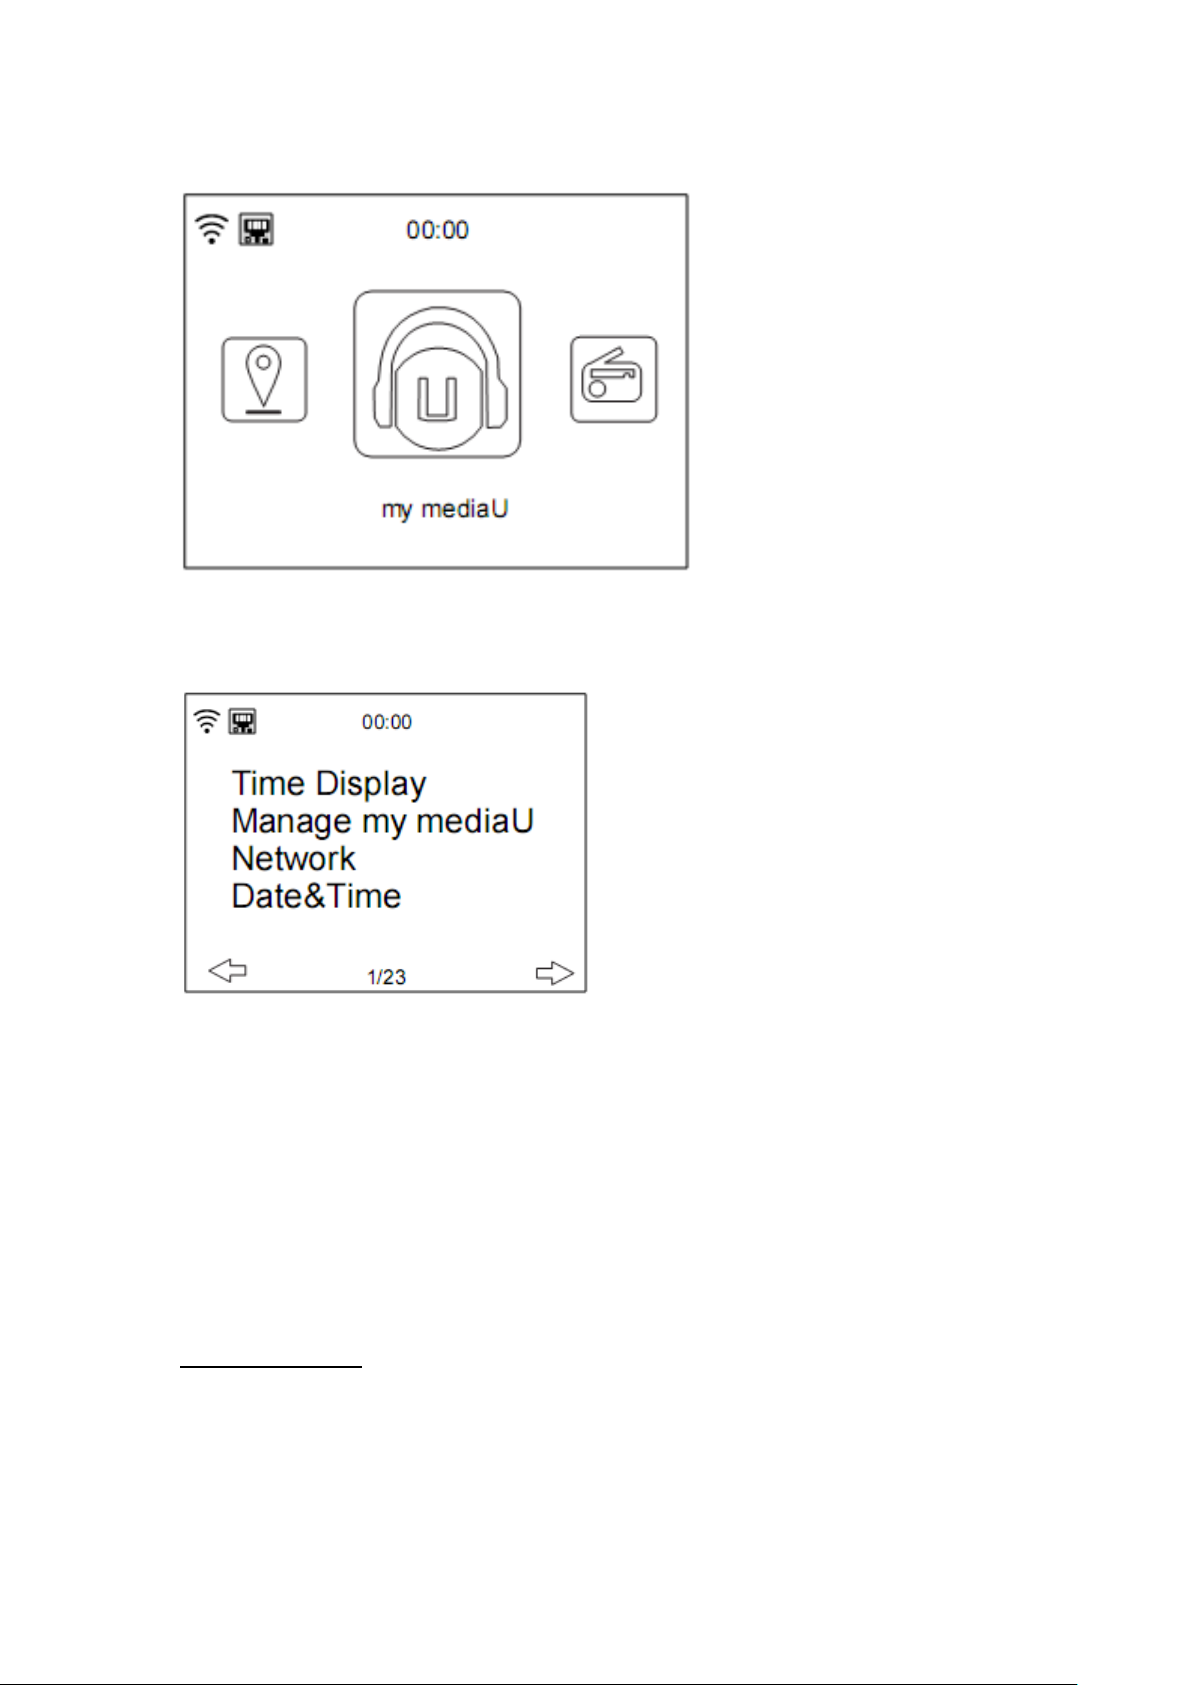
Once the connection is established, the main menu appears with the following menu items:
- Internet Radio: Access to worldwide radio stations
- Media Centre: Access to your UPnP devices via software with streaming capability.
- FM: Enter the FM radio mode
- DAB/DAB+: Enter the DAB radio mode
Page 16
16
- Information Center: Access to weather, financial and system information, App
- AUX: Access to AUX mode
- Bluetooth: Enter the Bluetooth mode
- Configuration: Various system settings
- Local Radio: Access to radio stations in a particular region (e.g. only German
stations)
- My media U: Access to an online media library. This menu item only appears if the
function has already been enabled in the configuration menu -> Manage my
media U.
●
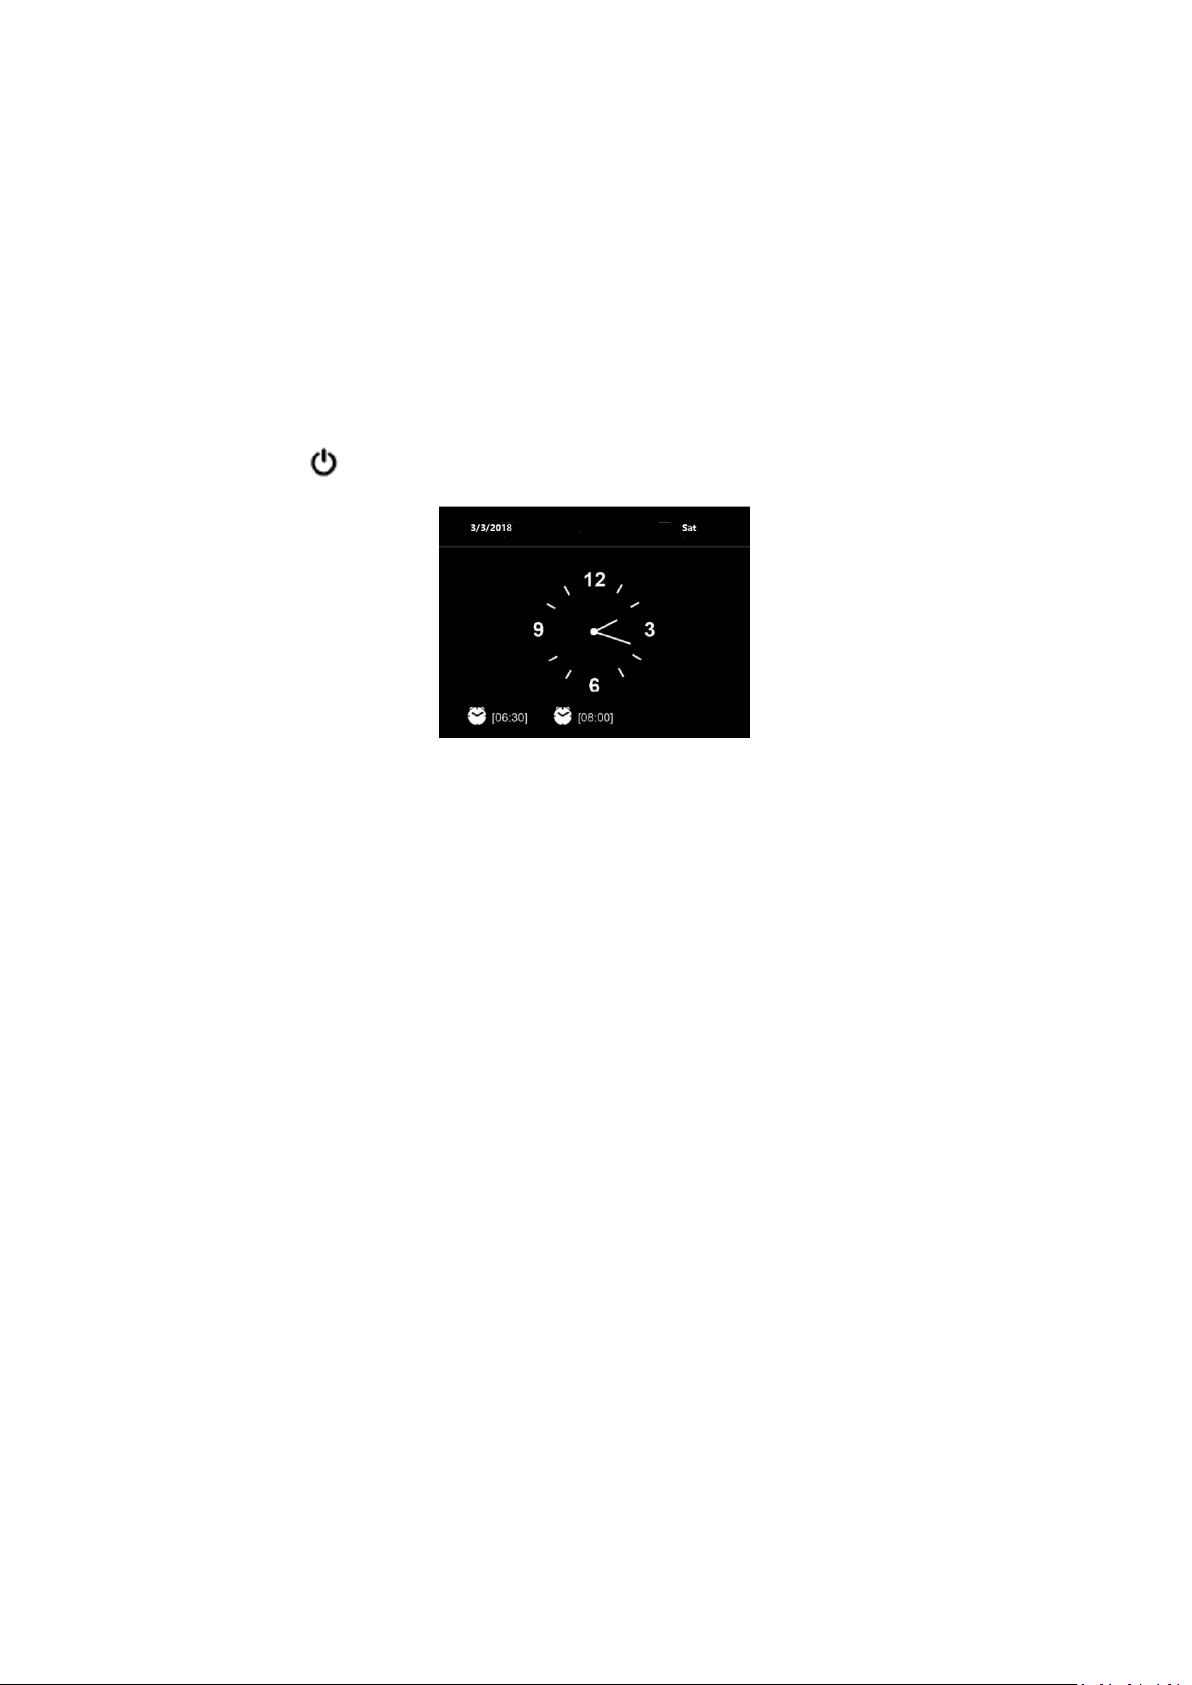
Press the button to enter the standby mode. The time, date and any active Alarm time
is shown on the screen.
●
If you configured a network connection, it will automatically connect to it when the DIR-250
is turned on again. If you need to change the network, go to the configuration - > network
menu to change the connection.
3 About Music Streaming
You can stream music to the DIR-250 with DLNA. DLNA is an industry-wide standard for sharing data
over a home network. Depending on the DLNA-compatible devices you own. With DLNA you are able to stream
mp3 music stored from your laptop/NAS or other DLNA compatible device to play on the DIR-250.
Lenco DIR-250 is the default device name on DLNA but you may rename it as you like. (See
section 5.3)
The information below is the introduction of how to setup up media steaming from PC or
other media server. Use the instruction manual of the software or hardware device you
want to use.
Make sure the music files are in on of the following formats: MP3, WMA, WAV or AAC.
Refer to section 5.7 for the details of the control on DIR-250 for music steaming playback.
3.1 UPnP
● To enjoy the streaming music form PC, the following steps are to be done on the PC:
- Connect the PC to the network.
Page 17
17
- Ensure the DIR-250 is powered on and connected to the same network.
- Open the UPnP platform Windows Media Player (11 or later).
Alternatively, other platforms or server such as Windows Media Connection may be used.
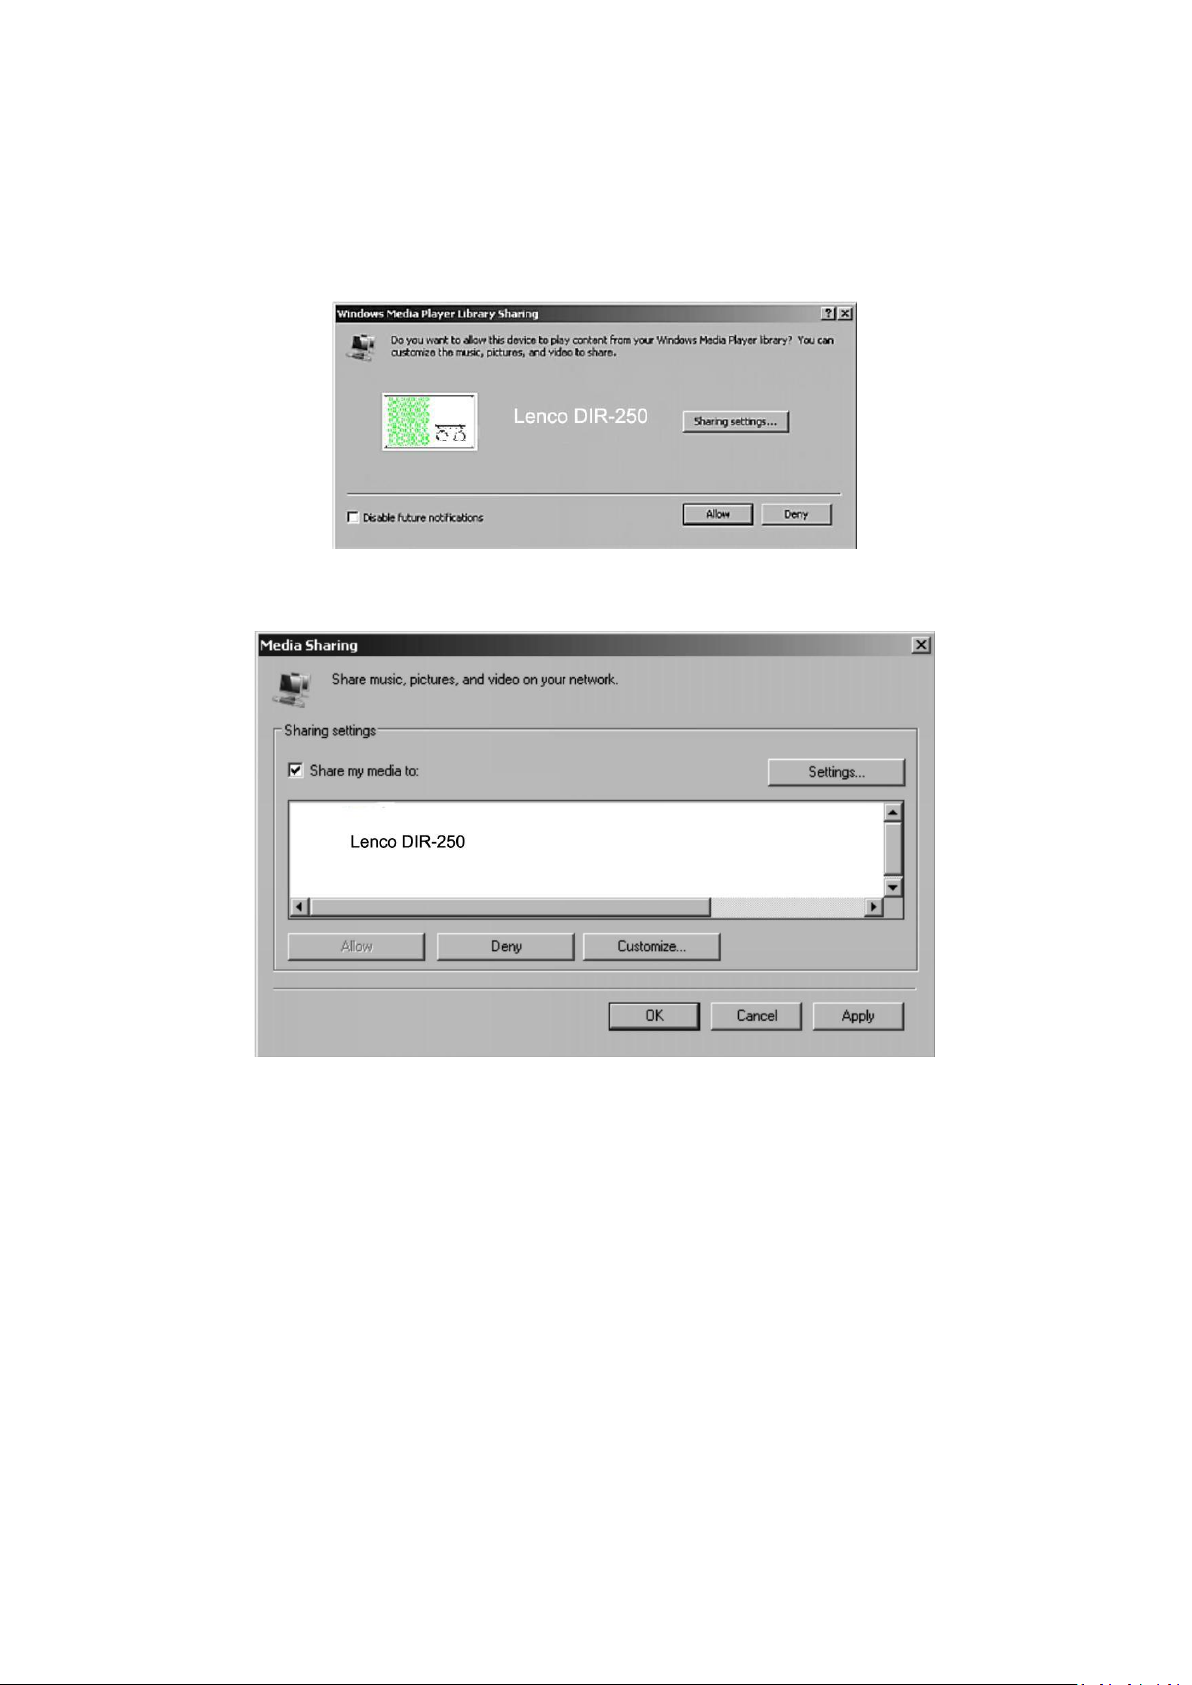
Below set up example is under windows XP and Windows Media player 11 version.
Allow to share your media to Lenco DIR-250
Add the audio files and folders you want to share with Lenco DIR-250 to the media library.
You may also enjoy the streaming music form other music server. Such as smart phone
(Android platform):
- Connect the mobile to the network
- Search and install media sharing apps from Google Play.
- Add the audio files form your mobile you want to share.
● After setup the shared server, choose the music and control playback on the DIR-250. (See
section 5.7)
4 DLNA Function
● Besides UPnP, DIR-250 supports DLNA function, you share the music files from PC or Android
mobile, and you use your PC, Android mobile or iPhone/iPad to control music playback on
Page 18
18
the DIR-250. (It is not required to control each playback on the DIR-250)
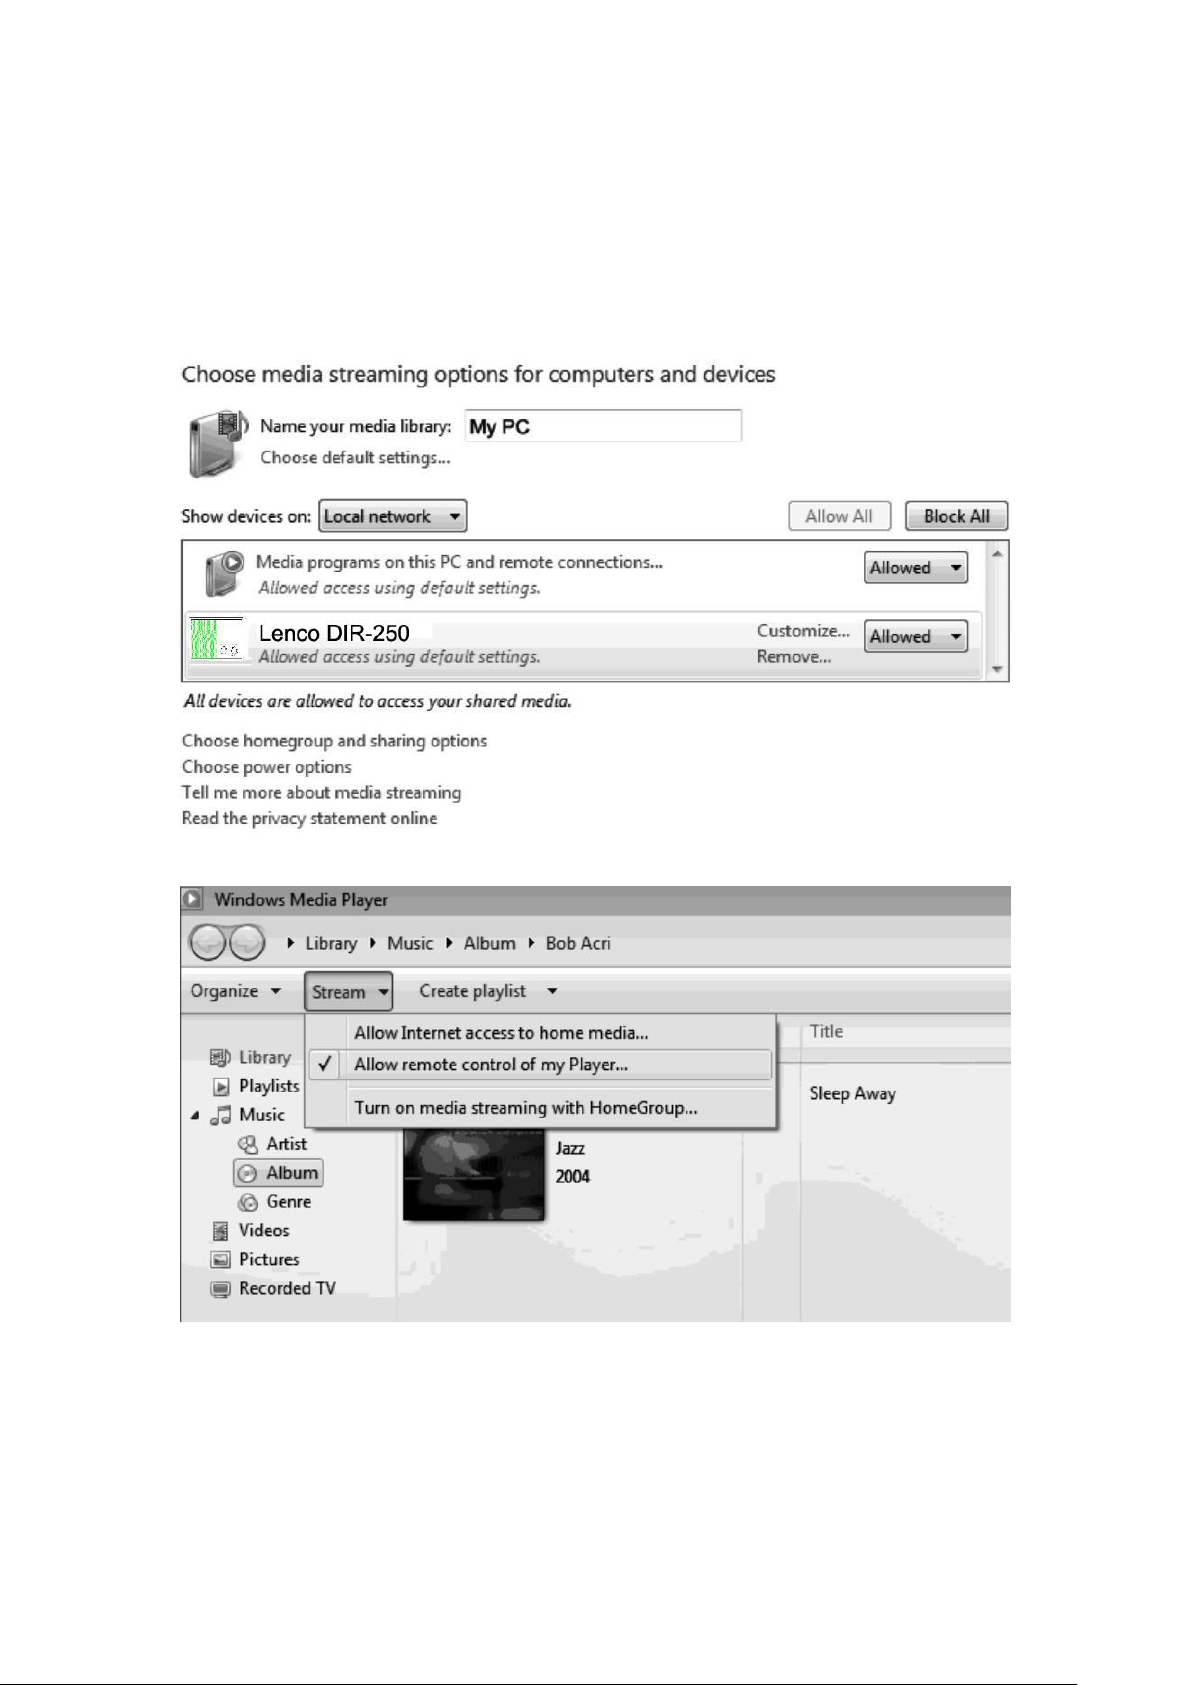
● The PC system requirement for DLNA is Windows 7 and Windows Media Player 12. Setup as
below:
Firstly, share the media on your PC to DIR-250.
Control Panel > Network and Internet〉 Network and sharing COK > Media streaming
options
Open Windows Media Player to enable allow remote control of tried player.
Right click any music in the library and choose Play to Lenco DIR-250.
Page 19

19
There will be a window for controlling music playback on Lenco DIR-250.
You may search and install any free or commercial DLNA apps from Google Play or Apple
Store if you are using Android mobile, tablet or iPhone/iPad. It is suggested to use Bubble
UPnP, Media Share on Android mobile, tablet or iPhone/iPad.
Some apps may not support streaming music form iPhone/iPod but iPhone/iPod could still
be used to control steaming music from other servers.
Procedures for playing shared music on the app are as follows:
Page 20

20
Select Lenco DIR-250 as the player. Some apps may allow to play the music to multi players
at the same time.
Select music server and choose the music. Some app can create a playlist if you choose
several music.
Select server and player Select music
● When using DLNA music steaming function on Music Link, you can only control the volume
and standby via the unit. It is restricted to control the other functions.
● Stop DLNA on PC, mobile or tablet before you resume Music Link’s own control.
Page 21
21
5 DIR-250 Function
5.1 Overview
Page 22
22
5.2 Main menu
Under the main menu, you can scan the QR code to continue
5.3 Configuration
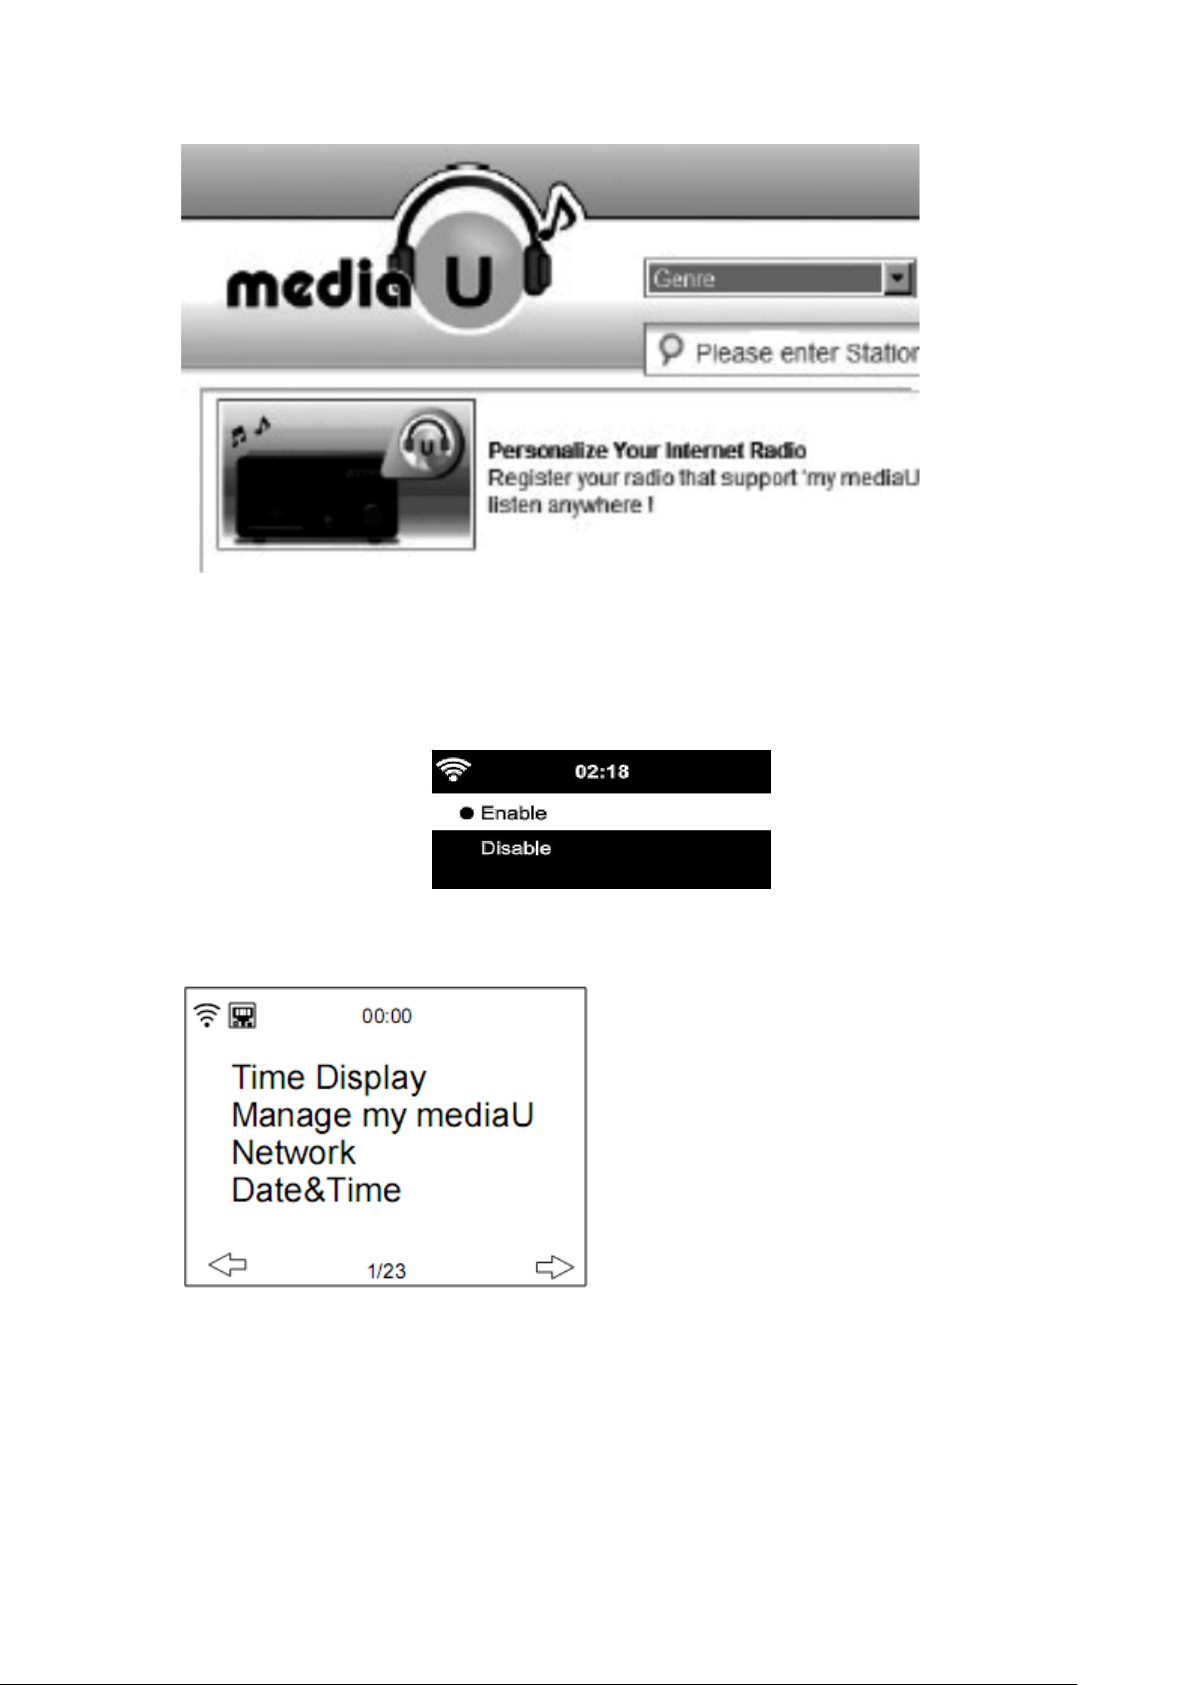
5.3.1 Time Display
Set the time display to analog or digital display.
5.3.2 Manage my mediaU
My mediaU media library – managing radio stations via Internet
In order to access your favourite radio stations worldwide, at any time and using any device
with streaming capability, you can create a free account for a media library at
www.mediayou.net and add as many devices as you like. You can access the service with a
username and password of your choice.
Page 23
23
You must also know the MAC address of your device (called a serial number on Media You)
in order to register this device under” Personalize Your Internet Radio”.
You can find the MAC address of the Internet radio under Information Center > System
information > Wireless Info > MAC Address.
After registering the device, you must enable this function on the DIR-250 under menu
Configuration > Manage my mediaU.
So that the Internet radio can access the media library.
Page 24
24
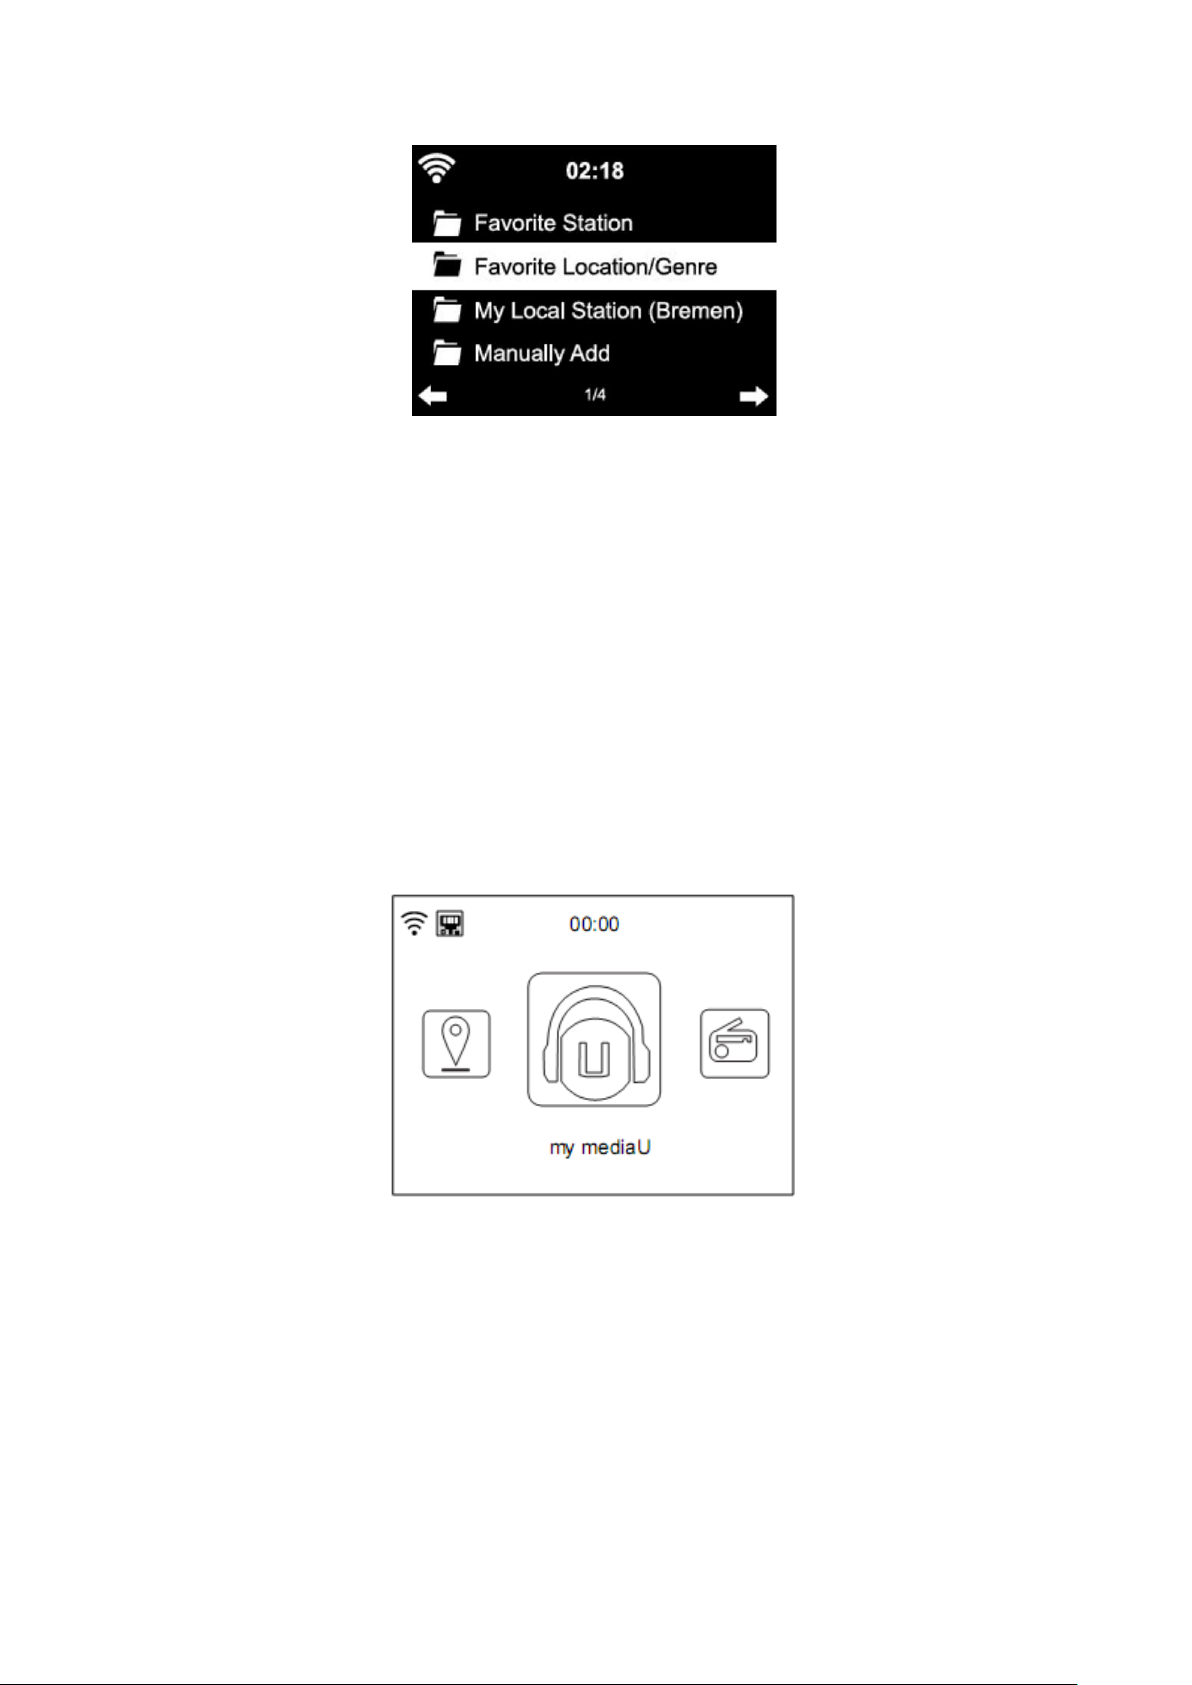
The device automatically connects to your account and displays what has been saved there:
- Favorite Station
- Favorite Location/Genre
- My Local Station
- Manually Add
● Depending on your personal My mediaU settings, the display on the Internet radio may look
different.
● If the device has not yet been registered with MediaYou, a corresponding message appears
when you wish to enable My mediaU.
● if you have registered a device with multiple accounts, these will be displayed after the
activation and you can select the account you wish to use.
To manage your Media U by app you can scan the QR code with your Smartphone/tablet to
show the QR code go to menu - > my media u
The menu Item my mediaU also appears in the main menu. You can find the selection again
here:
- Favorite Station
- Favorite Location/Genre
- My Local Station
- Manually Add
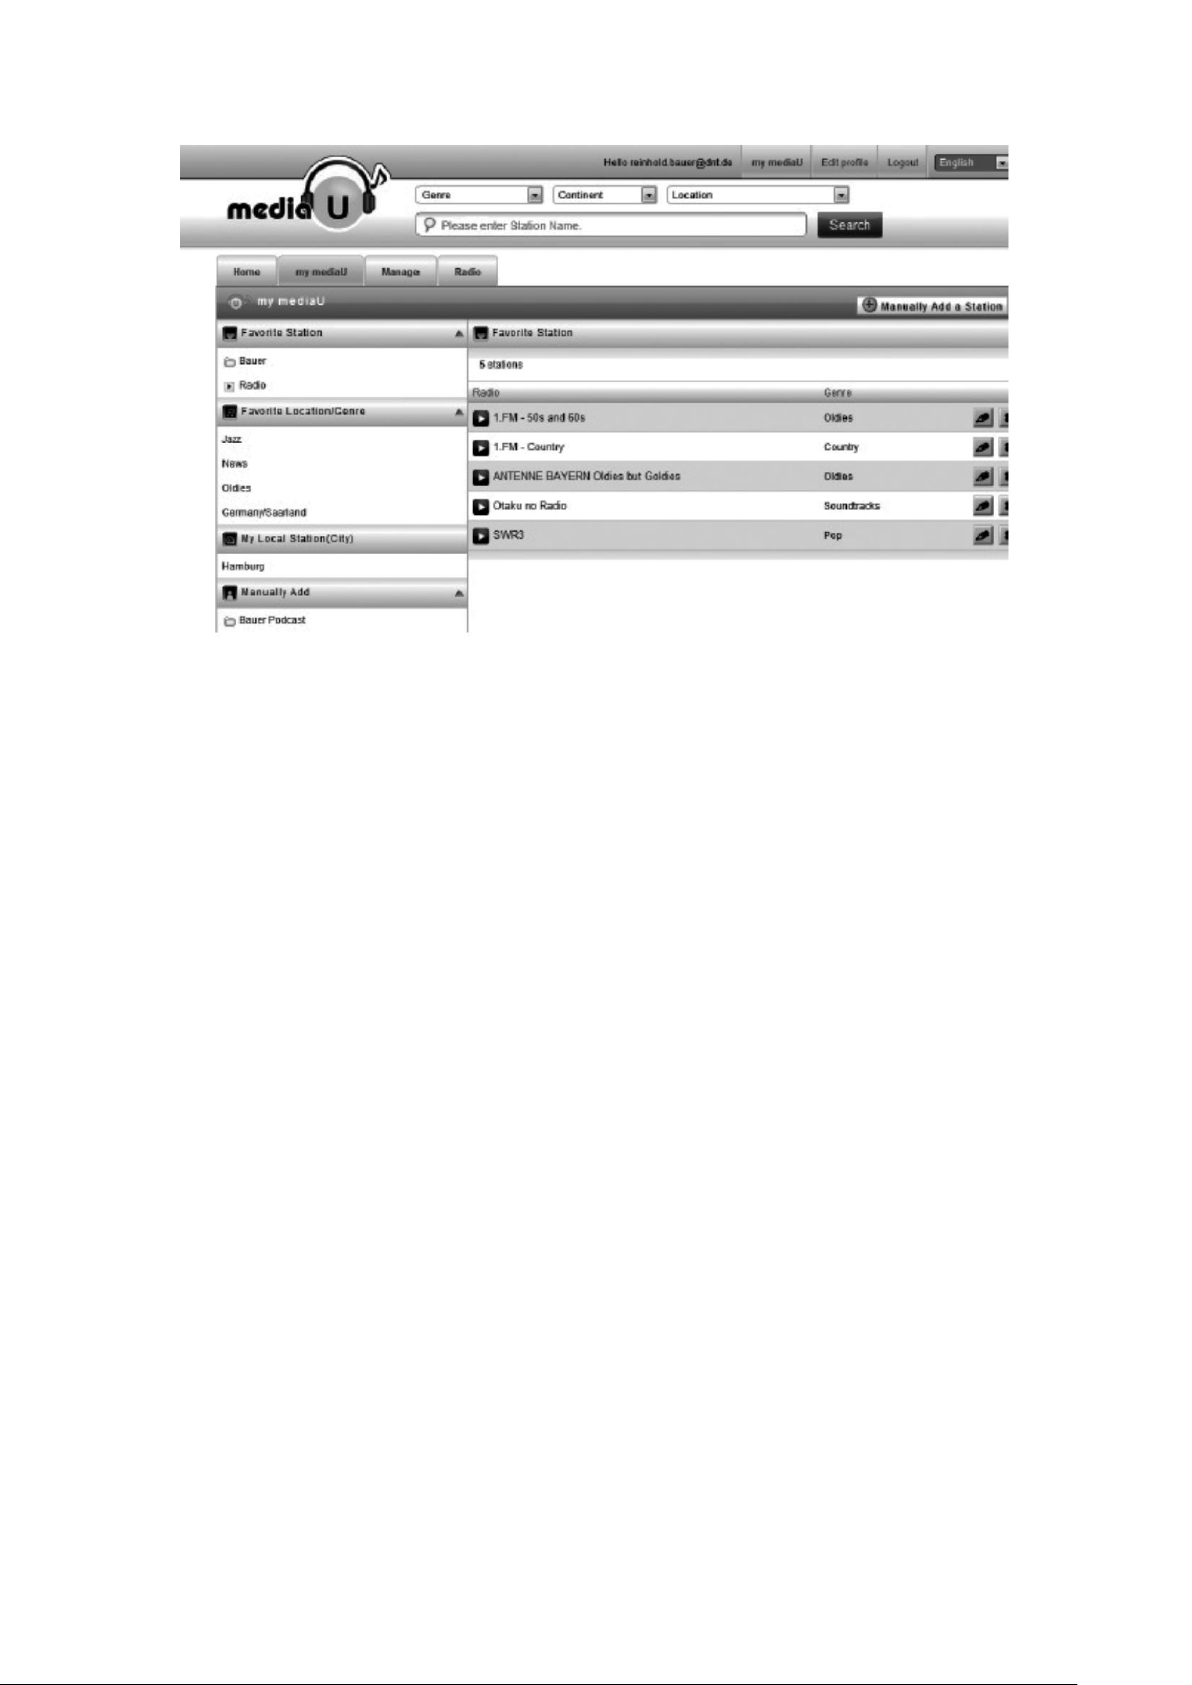
You can also find this selection in the media library, where you can assign and manage the
radio stations accordingly.
Page 25
25
Under add manually, you can link the device to podcasts, for example.
You must know the URL of the podcast for this purpose.
1. Fill in the highlighted fields in your MediaYou account under “Add Manually”.
2. On the Internet radio., go to Configuration > Manage my mediaU and enable
once again.
3. Under My mediaU>Manually Add, you can find all manually added folders
and addresses and can select the podcast.
The following podcast formats are supported:
- asx
- m3u
- pls
- pure streaming with HTTP, RTSP, MMS protocol
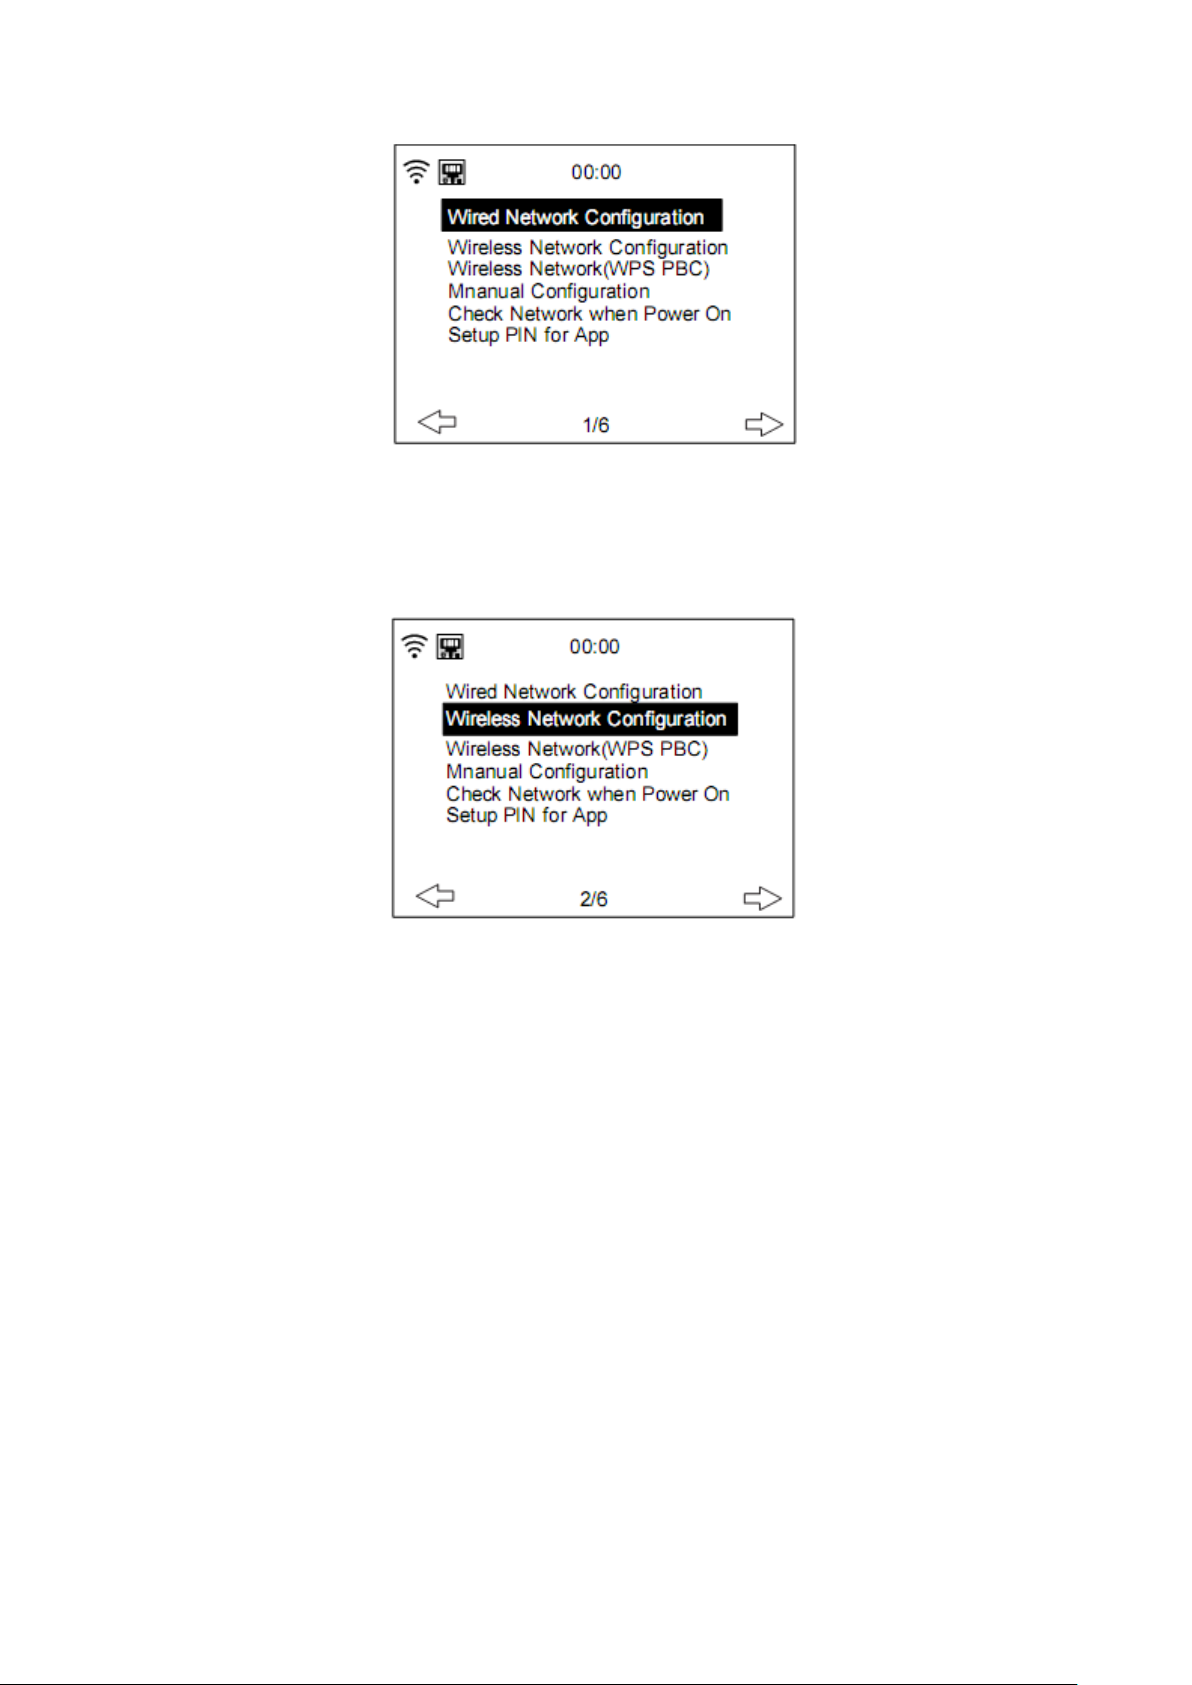
5.3.3 Network
● Wired Network Configuration
Page 26
26
Enable/disable wired network connection
● Wireless Network Configuration
Enable/disable Wifi network. When you choose to enable the WiFi network, the system will
automatically search for available Wifi networks. Select your required Wifi network.
If the Wifi network is selected before, you don’t have to re-enter the Wifi password.
You may refer to the section 3, Getting Started for the network setting.
● Wireless Network (WPS PBC)
If you are using a router with WPS/QSS button, you may want to set up the network
connection via WPS function. Press the WPS/QSS button on your router within 120 seconds.
The connection between the router and DIR-250 will then be configured automatically, so
you don’t have to type in the Wifi password.
Page 27

27
● Manual Configuration
You can choose DHCP (which assigns the IP address automatically) or enter the IP address by
yourself.
When you select manual setting for wired connection, the following to be entered:
1. SSID (the name of Access Point);
2. IP Address;
3. Subnet Mask;
4. Default Gateway;
5. Preferred DNS Server;
6. Alternate DNS Server.
You may choose (Manage) specific network if you have setup more than one network
connection within an area.
● Check Network when Power On
Enable/disable WiFi or wired network.
When you enable the WiFi network, the system will automatically search the available
AP. Select you required AP.
OK WEP or WPA code to connect the WIFI.
if the wireless network connection is not existed or failed, the icon at the top left corner
will have a cross on it. When you enable the wired network, the system will make a
connection check.
● Setup PIN for App
Enable or disable the PIN for App, when enabled, “237992” will prompt you.
Page 28
28
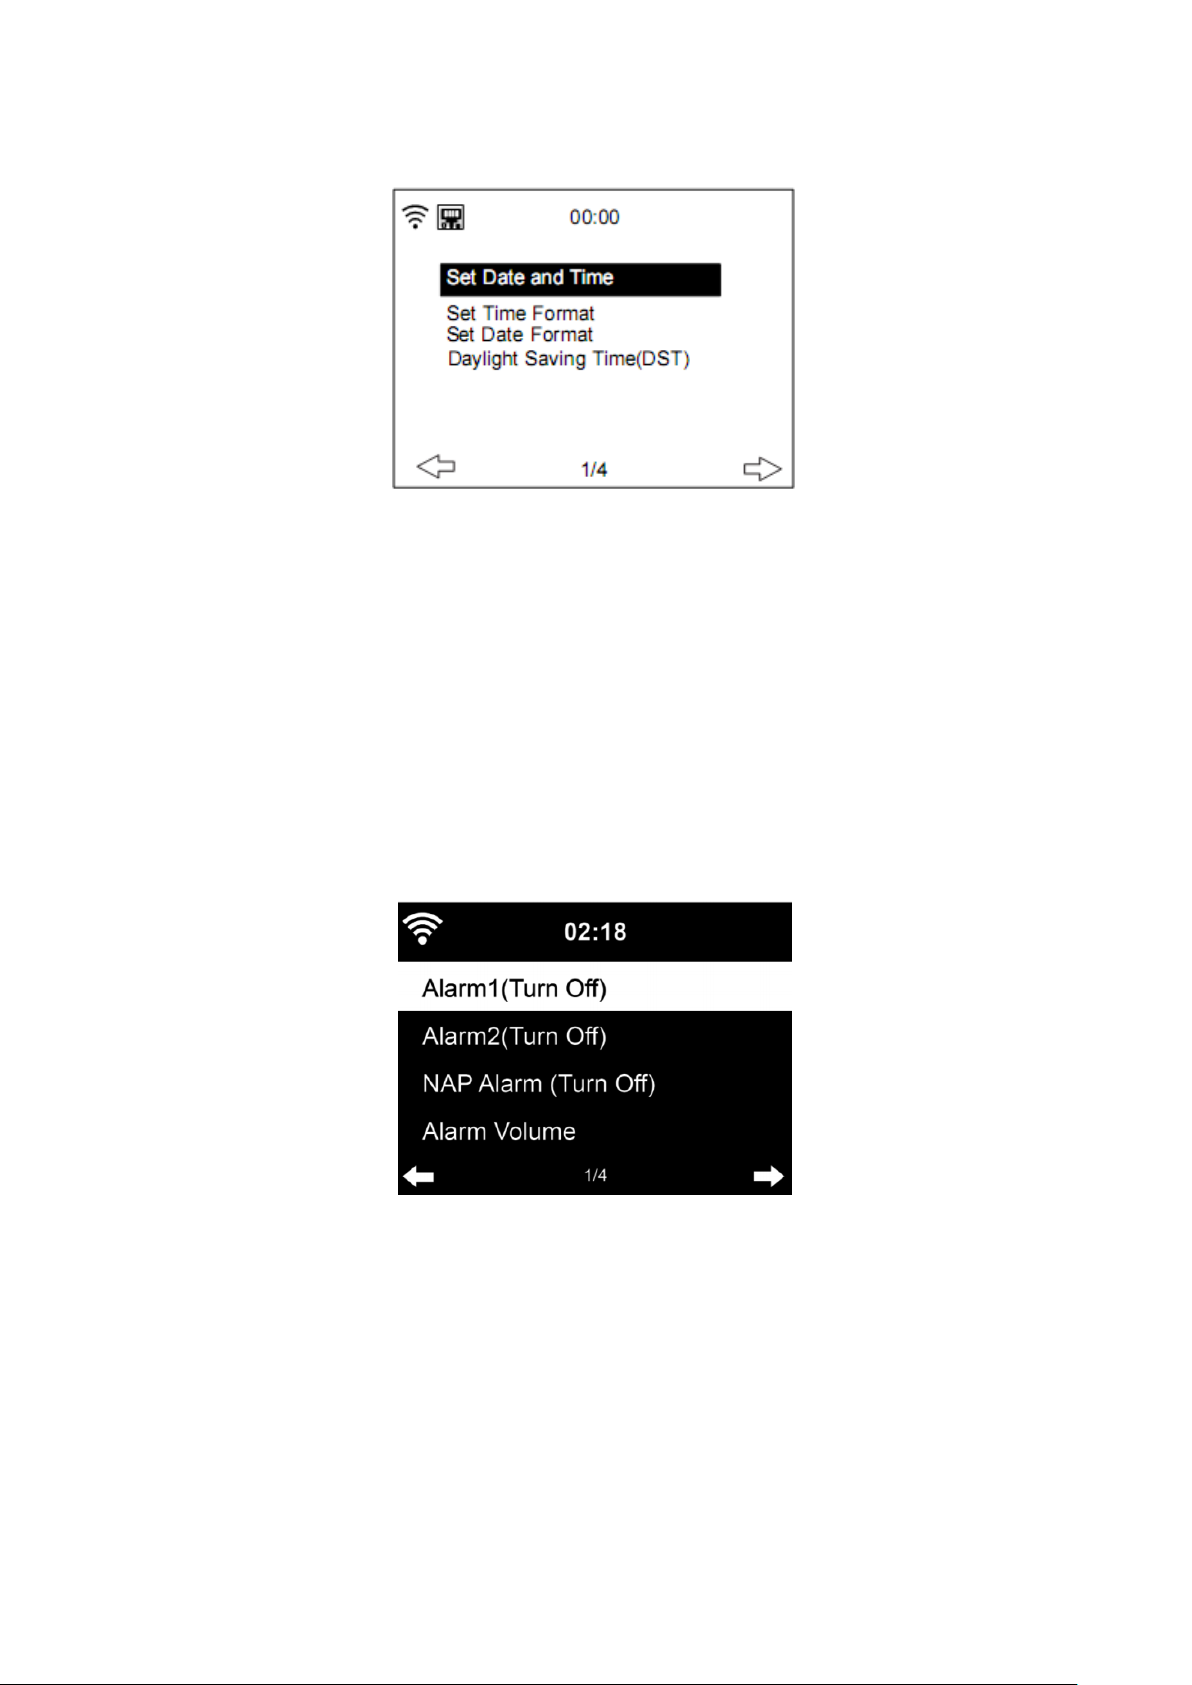
5.3.4 Date & Time
The date and time settings can only be made if the Internet radio is connected to a wireless
network.
Set date and time: The internet radio takes the date and time automatically from a central
server once a network connection has been established. However, you will need to change
the time manually to account for the change from winter time to summer time.
Set time format display as 12 Hour or 24 Hour,
Set date format in the positions of YYYY (year), MM (month) and DD (day)-YYYY/MM/DD,
DD/MM/YYYY or MM/DD/YYYY.
Turn on/off the Daylight Saving Time (DST).
Confirm with OK button on remote control or by pressing OK knob on the unit.
With a wireless network connected, GMT (+01:00) time is a time reference of time setting.
Add or deduce the hour according to your time zone when you set the time.
5.3.5 Alarm
Page 29
29
There are three independent alarms – 2 alarms of absolute time setting (Alarm 1 and Alarm
2) and 1 alarm for relative time setting (NAP Alarm).
Select Alarm in the configuration menu or press the alarm button (12) on the front panel.
The first two alarms (Alarm 1 and 2): turn on alarm 1 or 2, then set the time and set it for
Everyday, Once or every specific day of week.
Then Select the (Alarm) time and set the respective values using the Navigate/OK knob on
the device or using the button of remote control and switch to the next entry field
using the Confirm or by pressing the ok button on the remote or the Navigate/OK knob
on the front panel.
Now choose ‘Sound”: to set the (alarm) sound to Beep, Melody or Internet Radio/FM/DAB
DAB+/USB.
An alarm symbol will appear on the top of the display next to the time indicating that
the alarm is active
Note: if you choose the (alarm) sound Internet Radio/FM/DAB. You have to select a
previously stored ‘Favorite’ preset.
When the alarm source is set to internet Radio, the unit first has to connect to the internet.
Therefore there may be some delay. If no network is connected in one minute, the alarm will
automatically change to melody.
5.3.6 NAP Alarm:
Let’s you do a little nap.
You can set, it for 5/10/20/30/60/90 or 120 minutes.
Page 30
30
Now you can choose Alarm Volume to configure the volume of the alarms.
When the alarm(s) is/are set, there will be a clock icon with alarm time at the top of the
display.
During alarm, press button to stop the alarm, Press the SLEEP button on the device or
press the button on the remote to enter the snooze mode. It will alarm again in 5
minutes.
Note that your external amplifier has to be active for the alarm(s) to be heard!
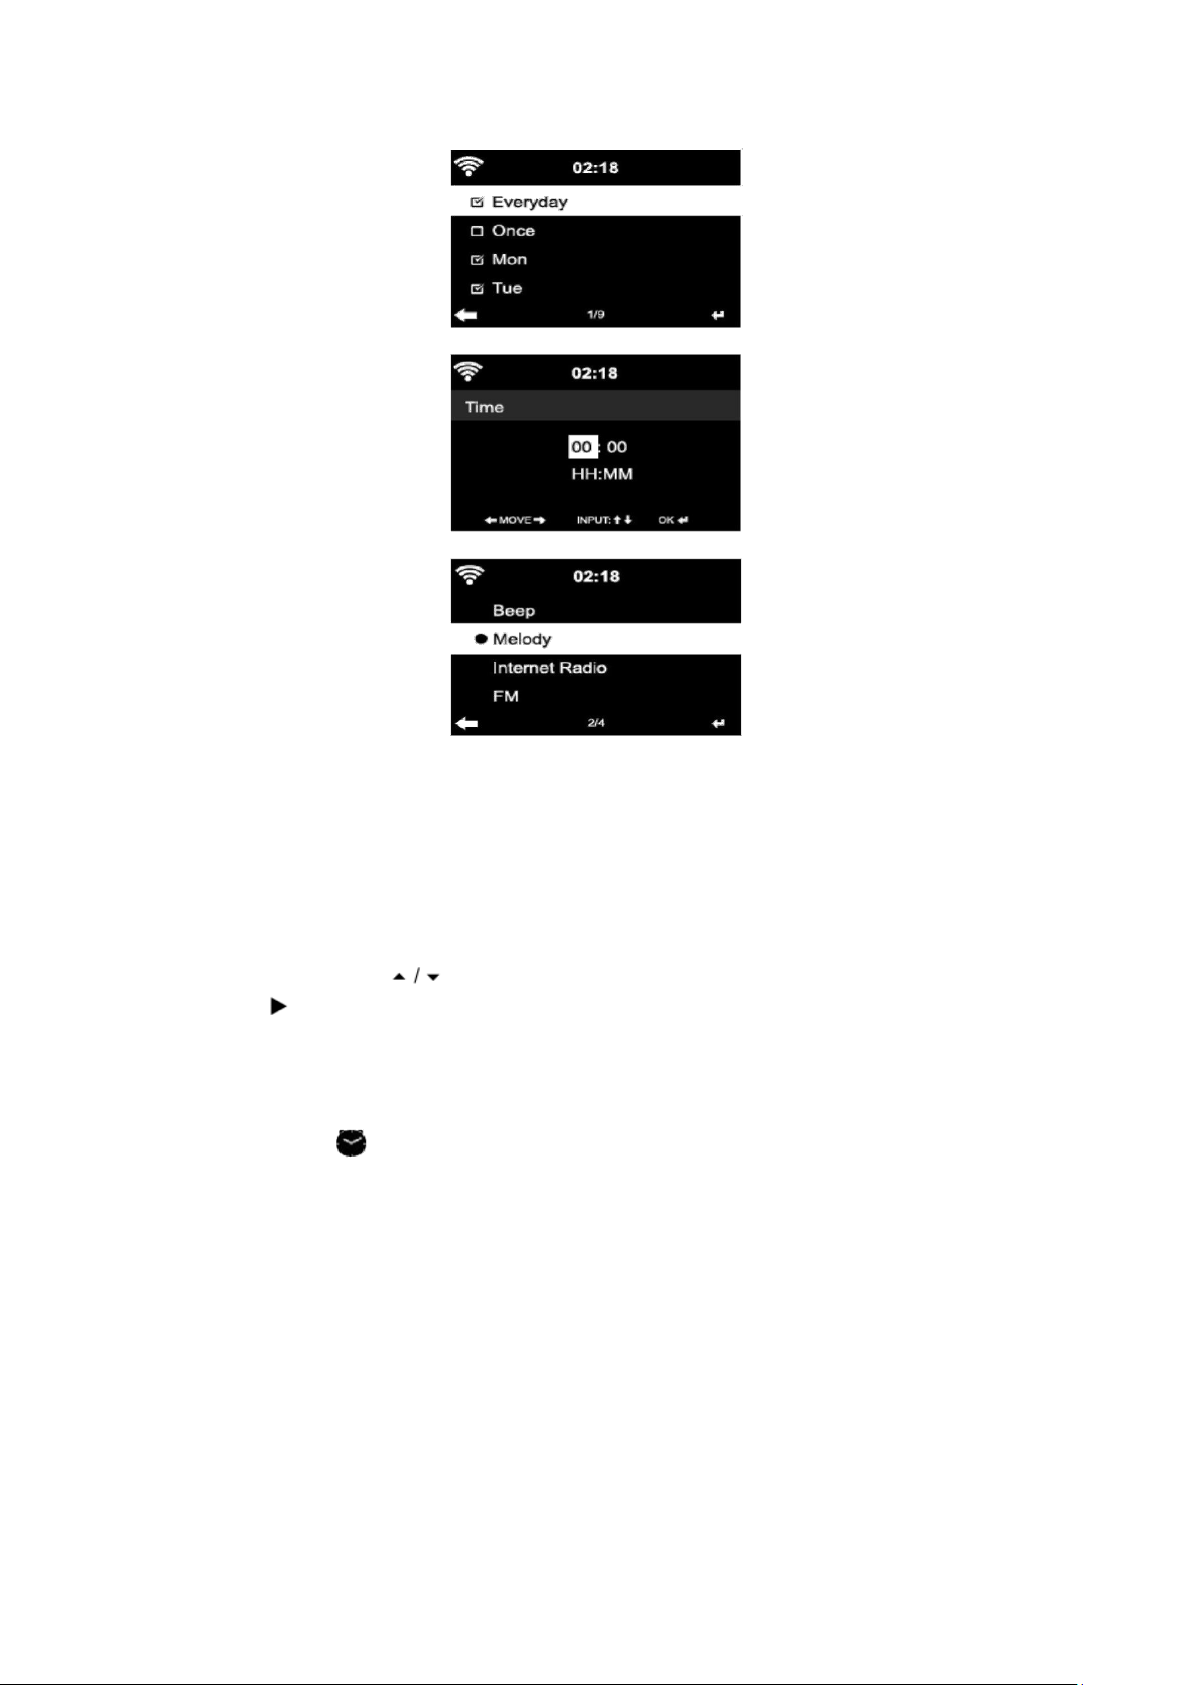
5.3.7 Scheduled Playing
Schedule your playing by setting the repeat mode (Everyday, once, Mon, Tue, Wed, Thu, Fri,
Sat, Sun), time (00:00 HH:MM) and Sound from(Internet Radio, FM, DAB/DAB+).
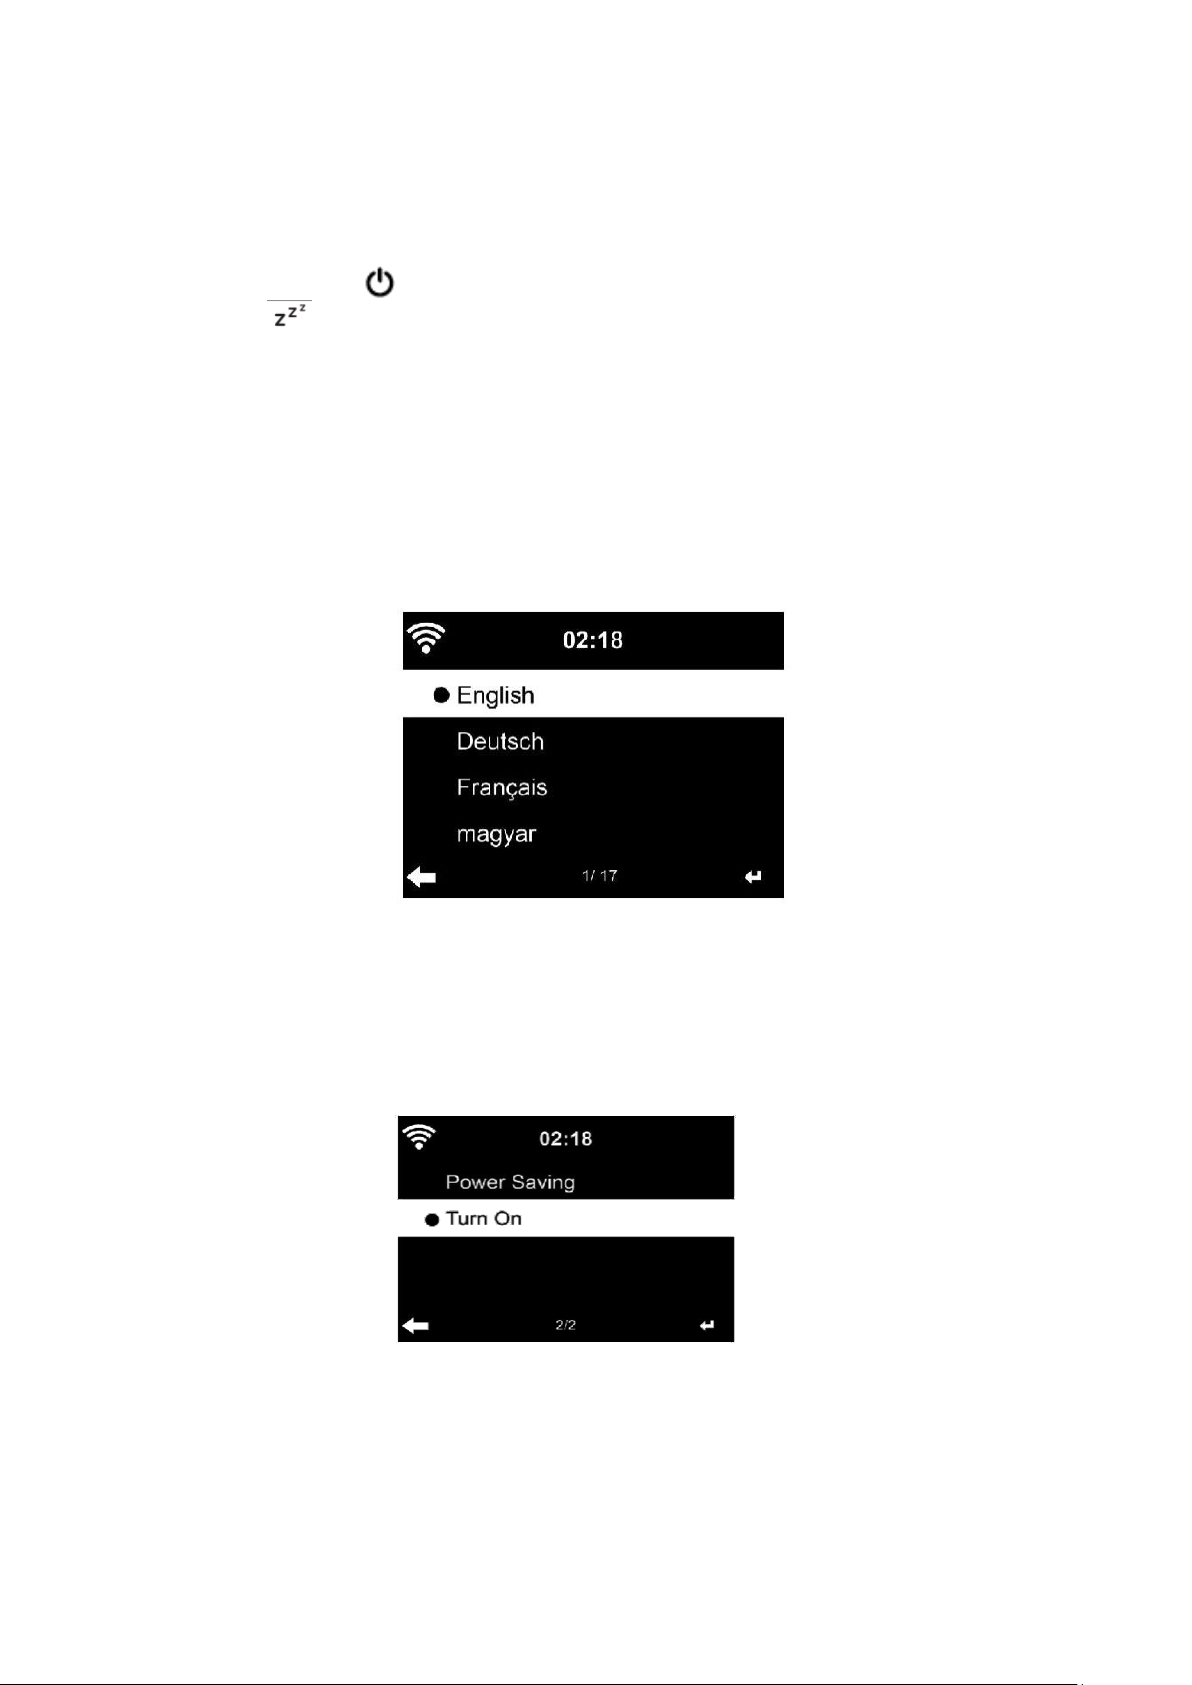
5.3.8 Language
Select the OSD language:
English/German/French/Hungarian/Czech/Slovakian/Polish/Turkish etc, (in total 17 language
are available)
5.3.9 Dimmer
Configure the brightness of the display backlight
Select ”Power Saving” to set the backlight brightness for the standby mode and select “Turn
On” to set the brightness for operation mode.
Page 31

31
5.3.10 Display
Set the display to Color display or Monochrome display.
5.3.11 Power Management
Here you can choose what time must exceed to switch to standby automatically.
Choose the power management timer (5/15/30mins).
The unit will automatically turn to standby when you are not using it. (not playing any music)
Choose “Turn Off” to ignore the power management function.
5.3.12 Sleep Timer
The Sleeptimer can be used to fall asleep with your favorite music.
To use the sleeptimer, turn on the unit choose your favorite input source and press the ‘zzz’
button on the remote control or select ‘sleep timer’ from the configuration menu to set the
duration time to 15/30/60/90/120/150/180 minutes. Once the time is set, there will be a
bed icon with remaining minutes at the top right corner.
The DIR-250 will switch to standby when the configured time is expired.
5.3.13 Internet Radio
Buffer
Configure the buffer time of the music playback, 2/4/8 seconds
Sound quality.
Page 32

32
Set the Sound Quality to High or Low.
5.3.14 Weather
Set the Location for accuracy of weather information.
DIR-250 is able to display the current weather information in standby mode. Turn on
Standby Display and set Temperature Unit (°C or °F) to get the weather displayed at the
standby mode.
When it is turned on, the current time and the current weather will display in alternative 10
seconds.
5.3.15 DAB/FM Setup
FM Mode: Set to Mono or Stereo
FM Threshold: Seek Threshold by strong, default or weak mode. Stereo threshold by strong,
default or weak mode.
DAB Threshold: Set to strong, default or weak mode.
Service following (FM-IR): Enable it to one of 7 continents or disable it.
Service following (DAB-IR): Enable it to one of 7 continents or disable it.
5.3.16 Local Radio Setup
Set location by Auto Detect (Country), Manual Setup (Country), Manual Setup (State)
Manual Setup (City), Manual Setup (US Zip Code)
Page 33

33
5.3.17 Playback Setup
Select the playback mode of media Center – Off (no repeat or shuffle), Repeat all, Repeat
one, or Shuffle.
5.3.18 Device
Enter to rename the unit or use the “App” option to display the QR code for app download.
5.3.19 Key
In this section, the following keys can be customized by the mode button on the unit or the
remote control.
When the setting set to one of following keys, press mode button on the unit to realize their
same function.
⚫ Alarm (For example, when Alarm key set, press the Mode button to realize Alarm key
function)
Dimmer
Equaliser
Local Radio
Mode
Preset
Sleep Timer
Timer
Page 34

34
5.3.20 Equalizer
Default equalizer Setting is Normal.
Possible settings are: Normal, Flat, Jazz, Rock, Soundtracks, Classical, Pop, News or my EQ.
Press EQ button on the remote control to switch between the different EQ settings
5.3.21 Resume When Power On
The system is default to resume the main menu when switching on the unit. If turn this
setting on, the system will remain in the internet radio playback. If you were listening to
internet radio or media Center before switch off the unit.
5.3.22 Software Update
Update software. If there is an updated software version on the server, the system will
notify you when you return to the main menu.
5.3.23 Reset to Default
Restore to the default settings.
After the DIR-250 has been reset, the system will change to the Language setting menu and
it will automatically turn to Network settings menu.
Page 35

35
5.4 My MediaU
Display and playback your own mediaU station list from the mediaU server., but you have to
setup your account first (see the section 5.3.2).
5.5 Internet Radio
After the connection of any station is succeeded, the information of the station will show on
the screen.
5.5.1 Favorites
List of your favorite stations. It supports favorite entries including station and folder.
To save your favorite music station as favorite, press and hold the Fav. Button on the
remote or front panel to save the station as my favorite. You may replace the previous
saved station to the new one. The symbol appears in the top line of the display while the
device is saving. Or press and hold the shortcut Fav. Key on the device to save the station.
If the Selected station have been saved, you cannot save it again.
The saved stations are showed under this menu. You may also press Fav. button to enter the
saved station list.
Page 36

36
Under the Fav. station list, move to your station, press OK to listen, You may also press to
OK its submenu to Delete (deletes a radio station from the favorites list), Shlft Up/down
along the list, Rename (you can give the radio station a name of your choice), or Play.
Press FAV., then Rotate the UP/DOWN knob on the device or using the of remote
control to recall the saved station.
5.5.2 Radio Station/Music
Stations are categorized into Global Top 20, Genre, Country/Location and Highlight.
OK to continue the subcategories and choose the station to listen.
For each station, press OK to play directly. You may press Right to enter its submenu – you
can Add to Favorite, Auto Scan or Play. When you choose Auto Scan, it becomes the
playback of marquee for each station in the subcategory. Each station plays 30 seconds until
all have played. Or press OK to stop the marquee listening.
5.5.3 Sleep Radio
Enter to choose one to listen from (Birds, Lullaby, Piano, Rain, Spa, Space, Wave, White
noise) while sleeping.
5.5.4 History
A list of last listened stations.
For each station, press OK to play directly. You may press to OK its submenu – you can
Add to Favorite, Auto Scan, or Play. When you choose Auto Scan, it becomes the playback
of marquee for each station in the history. Each station plays 30 seconds until all have
played or you press OK to stop the marquee listening.
Page 37

37
5.5.5 Service
Search radio station - Enter your keyword to search radio station from the list.
Add new radio station – The added stations will be stored in My Favorite.
Note that the maximum character of the station name is 250.
App: Enter to scan the QR code.
5.6 Local Radio
There is a shortcut Local Radio under internet radio so that you can easily go to the radio
station list of your location.
The device can use the IP address to detect its current location and can then automatically
generate a list of local radio stations. However, you can also OK a different country.
5.7 Media Center
5.7.1 USB
Enter USB selection, if there is no USB device plugged in the unit, it will indicate “empty” on
display.
Insert the USB device to USB port, then enter USB selection, there will be folders on display,
rotate the NAVIGATE knob on the unit or press the button on the remote control to
select the folder in USB device, press the NAVIGATE knob on the device and remote control
to OK, then select desired file to play.
During playing:
Press the button to pause/Play
Press the button to skip track back and forth
Press the button to return back to current playing file list
NOTE: USB device is selected when inserted
Page 38

38
5.7.2 UPnP
If you have set up shared media, you should see the shared media form UPnP.
If you have more than one computer sharing media, the alternative are listed. SELECT the
shared media you want to play.
TipS. The radio can only read the track with the file name less than 40 characters. And the
characters should be in European language. If you encounter failure of reading the track
under UPnP mode, you may try to rename the file.
However, if the track is still unable to play, you can try converting the file to different
formats.
5.7.3 My Playlist
You can create a play list of favorite music from UPnP. When you playing the music, press
and hold OK button on remote control to save it into My Playlist.
5.7.4 Clear My Playlist
You can remove all the saved music under My Playlist.
5.8 Information Center
5.8.1 Weather Information
There are weather information and forecasts for 2000 cities. Select the country and then the
city for the weather details.
Page 39

39
The DIR-250 is able to display weather information on standby mode.
When weather information is selected, you have to select your location, example ‘europe’
and press ok.
Now select the country and after that select your province and city.
On the weather information page, press Right, then it will show “Add to Standby Display“, if
you want the weather of your favorite city be displayed on Standby, press OK to set the city.
5.8.2 Financial Service
View the stock index from around the world.
5.8.3 System Information
Check out the version of the system, and the details of connected network. The information
includes MAC address which you are required to fill in when registration of my mediaU
membership.
5.8.4 App
Enter to scan the QR code.
5.9 FM
FM radio mode receives analogue radio from the FM band
Press and hold or button on the remote control or press and hold the button
on the unit to search FM station. The frequency display starts to run up as DIR-250 scans the
Page 40

40
FM band, it stops when it has received a station. you may press on the remote
control to fine tune station, each step moves 0.05MHz.
Press and hold the Fav. button on the remote control and the device to save the station.
You can save up to 20 station, press Fav. button on the remote control to enter storing
station list, press the navigator on remote control to select and press OK button to play.
Alternatively, you can let the system scan ALL station for you by pressing OK, The searched
station will automatically be stored in Fav. station list.
6 DAB
Press the MODE on the remote control and the device (if in FM mode) to switch to DAB
mode. The display will show ‘DAB/DAB+’.
* To listen to the stored DAB stations use either and buttons or either and
buttons on the retome control to cycle through the stations. When you reach the desired
station, press the OK button on the remote control and press the NAVIGATE/OK knob on the
device in to begin playback of that station.
DAB quick scan
* Press the Scan button button on the remote control or Left button on the device to begin
the scan. You will see the scan slide chart to indicate the progress.
* Once the scan has finished, the radio will select the first alphanumeric station and begin
playback.
Fav. Recall
Press and hold the Fav. button on the remote control and the device to save the station.
You can save up to 20 station, Press Fav., then press on the remote control or press
Fav. button on the device to recall the saved station.
7 Bluetooth
Press mode repeatedly until “Bluetooth” appears on the display.
Make sure that no other Bluetooth device is connected to the radio. “Bluetooth
Disconnected” will appear on the display.
Enable the Bluetooth mode on the device that you want to connect to the DIR-250 and scan
for new devices.
Select the Lenco DIR-250 from the devices found on your device. If you are required to enter
a PIN code, enter 0000 (four zeros). Certain devices may also require you to approve the
connection.
Once the connection has been successful, “Bluetooth Connected” will appear on the display
of the Lenco DIR-250
Page 41

41
You can now start playback from your Bluetooth device.
Control the playback from the Bluetooth device or from the radio using the Vol+/Vol- on the
device and remote control, Adjust the volume both on the Bluetooth device and the radio.
To disconnect a connected Bluetooth device: Press and hold down the [Enter] button for 3
seconds. The message “Bluetooth Disconnected” will appear on the display.
This product operates at 2400 - 2483.5 MHz and is designated only to be used inside a
normal household environment. This product is suited for this purpose within all EU
countries.
“This product has a bluetooth reception function, you can not transmit any
bluetooth sound with it: this means that you can only receive a bluetooth sound
signal from an external source like a smartphone.”
8 Remote Control Via Apps
Some apps for Android, e.g. Air Music Control, let you control the internet radio from your
smart phone or tablet.
As soon as the devices are connected, the same menu structure shown on the internet radio
will appear on the smart phone/tablet. You can select all functions just like on the radio. The
selected functions/menu items shown on the radio will change according to the actions
taken on your mobile device.
If you are controlling the internet radio via app, a UPnP connection to Windows Media
Player may not be possible.
Spotify
Use your phone, tablet or computer as a remote control for Spotify.
If wifi is enabled on your DIR-250 you can even wake it up when selecting spotify on
your smartphone and select play device Lenco DIR-250.
Go to spotify.com/connect to learn how.
The Spotify Software is subject to third party licenses found here:
https://www.spotify.com/connect/third-partylicenses
Page 42

42
Technical Specifications
Connections
DC, 3.5mm AUX-IN/AUX-OUT, 3.5mm
Headphone-Out, Audio Output ( Analog); Digital
Optical, Digital Coaxial; USB; W-lan; Antenna;
Input
100-240VAC – 50/60Hz
Output
5V/1.5A
Output power
Batteries in remote control
No Built in speaker
AAA*2
Power consumption
Max 7.5W
Power consumption (standby)
<1W
Operating Temperature
0°C-35°C
Operating position
Horizontal
Dim. unit
430*287*72mm(main device)
516*348*132mm (Gift box)
Weight
2.2KG (main device)
3.2KG (Giftbox and all accessories included)
Page 43

43
Power supply adaptor: (For EU only)
Use only original AC adaptor
Use only the power supply listed in the user instructions.
Information
Value and and precision
Manufacturers name or trade mark, commercial
registration and address
SHENZHEN SHI
GUANGKAIYUAN
TECHNOLOGY., LTD
Model Identifier
GKYPS0150050EU1
Input voltage
100-240V
Input AC frequency
50/60Hz
Output voltage
5,0V
Output current
0,5A
Output Power
7,5W
Average active efficiency
77,8%
Efficiency at low load (10%)
70,27%
No load Power consumption
0,06W
Manufacturer:
SHENZHEN SHI GUANGKAIYUAN TECHNOLOGY., LTD
Model Number:
GKYPS0150050EU1
Page 44

44
Guarantee
Lenco offers service and warranty in accordance to European law, which means that in case of
repairs (both during and after the warranty period) you should contact your local dealer.
Important note: It is not possible to send products that need repairs to Lenco directly.
Important note: If this unit is opened or accessed by a non-official service center in any way, the
warranty expires.
This device is not suitable for professional use. In case of professional use, all warranty
obligations of the manufacturer will be voided.
Disclaimer
Updates to Firmware and/or hardware components are made regularly. Therefore some of
the instruction, specifications and pictures in this documentation may differ slightly from
your particular situation. All items described in this guide for illustration purposes only and
may not apply to particular situation. No legal right or entitlements may be obtained from
the description made in this manual.
Disposal of the Old Device
This symbol indicates that the relevant electrical product or battery
should not be disposed of as general household waste in Europe. To
ensure the correct waste treatment of the product and battery, please
dispose them in accordance to any applicable local laws of requirement
for disposal of electrical equipment or batteries. In so doing, you will
help to conserve natural resources and improve standards of
environmental protection in treatment and disposal of electrical waste
(Waste Electrical and Electronic Equipment Directive).
CE Marking
Hereby, Lenco Benelux B.V., Thermiekstraat 1a, 6361 HB Nuth, The Netherlands, declares that this
product is in compliance with the essential EU directive requirements.
The declaration of conformity may be consulted via techdoc@commaxxgroup.com
Service
For more information and helpdesk support, please visit www.lenco.com
Lenco Benelux BV, Thermiekstraat 1a, 6361 HB, The Netherlands.
Page 45

45
Nederlands
LET OP:
Het gebruik van afstandsbedieningen of aanpassingen of de uitvoering van procedures die
niet in dit document zijn gespecificeerd, kan leiden tot gevaarlijke blootstelling aan straling.
VOORZORGSMAATREGELEN VOOR GEBRUIK
ONTHOUD DE VOLGENDE INSTRUCTIES:
1. Bedek of blokkeer de ventilatieopeningen niet. Wanneer u het apparaat op een schap
plaatst, dient u 5 cm (2”) vrije ruimte rondom het gehele apparaat te behouden.
2. Installeer het product volgens de meegeleverde gebruikershandleiding.
3. Houd het apparaat uit de buurt van hittebronnen, zoals radiatoren, verwarmingen,
kachels, kaarsen en andere hittegenererende producten of open vuur. Het apparaat
kan alleen worden gebruikt in een gematigd klimaat. Extreem koude of warme
omgevingen dienen te worden vermeden. Het bedrijfstemperatuurbereik ligt tussen
0 °C en 35 °C.
4. Gebruik dit apparaat niet in de buurt van krachtige magnetische velden.
5. Elektrostatische ontlading kan normaal gebruik van dit apparaat verstoren. U hoeft het
apparaat in dit geval slechts te resetten en opnieuw op te starten volgens de
gebruikershandleiding. Wees voorzichtig tijdens bestandsoverdracht en gebruik het
product in een omgeving zonder statische interferentie.
6. Waarschuwing! Steek nooit een voorwerp via de ventilatie- of andere openingen in het
product. Er is hoogspanning in het product aanwezig en als u er een object insteekt,
kan dat een elektrische schok veroorzaken en/of kortsluiting in de interne onderdelen.
Mors om dezelfde reden geen water of vloeistof op het product.
7. Gebruik het toestel niet in vochtige ruimtes, zoals badkamers, stomende keukens of in
de buurt van zwembaden.
8. Het apparaat mag niet worden blootgesteld aan druppels en spetters en zorg ervoor
dat er geen met vloeistof gevulde voorwerpen, zoals vazen, op of in de buurt van het
apparaat worden geplaatst.
9. Gebruik dit apparaat niet wanneer condensatie kan optreden. Wanneer het apparaat
in een warme, natte ruimte wordt gebruikt, kunnen zich waterdruppels of condens
vormen in het apparaat en kan het apparaat niet goed functioneren. Laat het apparaat
1 of 2 uur uit staan voordat u het inschakelt: het apparaat dient droog te zijn voordat
deze stroom ontvangt.
10. Alhoewel dit apparaat met grote zorg gefabriceerd en verschillende keren
geïnspecteerd is voordat het de fabriek verlaat, is het nog steeds mogelijk dat er
problemen optreden, zoals met alle elektrische apparaten. Als u rook, een overmatige
hitteontwikkeling of enig ander onverwacht verschijnsel opmerkt, moet u onmiddellijk
de stekker van het netsnoer uit het stopcontact halen.
11. Dit apparaat moet worden gebruikt met een voedingsbron zoals gespecificeerd op het
specificatielabel. Als u twijfelt over het type voeding dat gebruikt wordt in uw huis,
raadpleeg dan uw dealer of plaatselijk energiebedrijf.
12. Buiten bereik van dieren houden. Sommige dieren kauwen graag op voedingskabels.
13. Gebruik een zacht, droog doekje om het apparaat te reinigen. Gebruik geen
oplosmiddelen of op benzine gebaseerde vloeistoffen. U kunt een vochtig doekje met
verdund schoonmaakmiddel gebruiken om hardnekkige vlekken te verwijderen.
14. De leverancier is niet verantwoordelijk voor schade of verloren gegevens veroorzaakt
door storing, misbruik, modificatie van het apparaat of batterijvervanging.
15. Onderbreek nooit de verbinding wanneer het apparaat formatteert of bestanden
overdraagt. De gegevens kunnen anders corrupt of verloren raken.
Page 46

46
16. Indien het apparaat een USB-afspeelfunctie heeft, moet de USB-geheugenstick
rechtstreeks op het apparaat worden aangesloten. Gebruik geen USB-verlengkabel,
omdat die kan leiden tot storingen met foutieve gegevens als gevolg.
17. Het classificatielabel bevindt zich op de onderkant of het achterpaneel van het
apparaat.
18. Dit hulpmiddel is niet bedoeld voor gebruik door mensen (inclusief kinderen) met een
fysieke, zintuiglijke of mentale handicap, of een gebrek aan ervaring en kennis, tenzij zij
toezicht of instructies hebben gekregen over het juiste gebruik van het hulpmiddel
door een persoon die verantwoordelijk is voor hun veiligheid.
19. Dit product is alleen voor niet-professioneel gebruik bedoeld en niet voor commercieel
of industrieel gebruik.
20. Verzeker u ervan dat het apparaat in een stabiele positie staat opgesteld. Schade die
wordt veroorzaakt door het gebruik van dit product in een onstabiele positie, trillingen
of schokken of het niet opvolgen van de waarschuwingen of voorzorgsmaatregelen in
deze gebruikershandleiding wordt niet gedekt door de garantie.
21. Verwijder nooit de behuizing van dit apparaat.
22. Plaats dit apparaat nooit op andere elektrische apparatuur.
23. Geef kinderen geen gelegenheid in aanraking met plastic zakken te komen.
24. Gebruik uitsluitend uitbreidingen/accessoires gespecificeerd door de fabrikant.
25. Laat alle reparaties over aan gekwalificeerd onderhoudspersoneel. Onderhoud is nodig
als het apparaat is beschadigd, bijvoorbeeld als de voedingskabel of de stekker is
beschadigd, als er vloeistof op het apparaat is gemorst, als er voorwerpen in het
apparaat zijn gevallen, als het apparaat is blootgesteld aan regen of vocht, als het
apparaat niet normaal werkt of als het is gevallen.
26. Langdurige blootstelling aan harde geluiden van persoonlijke muziekspelers kan leiden
tot tijdelijk of permanent gehoorverlies.
27. Als het product wordt geleverd met voedingskabel of wisselstroomvoedingsadapter:
⚫ Als er zich problemen voordoen, moet u de voedingskabel loskoppelen en het ter
onderhoud aanbieden aan gekwalificeerd personeel.
⚫ Nooit op de voedingsadapter stappen of deze indrukken. Wees zeer voorzichtig,
vooral in het gebied rond de stekkers en de kabelaansluitingen. Plaats geen zware
voorwerpen op de voedingsadapter, om beschadiging ervan te voorkomen. Houd het
gehele apparaat buiten bereik van kinderen! Wanneer kinderen met de voedingskabel
spelen, kunnen zij ernstig letsel oplopen.
⚫ Haal de stekker uit het stopcontact tijdens onweer of wanneer u deze langere tijd
niet gebruikt.
⚫ Het stopcontact moet in de buurt van de apparatuur zijn geïnstalleerd en
eenvoudig te bereiken zijn.
⚫ Laat AC-stopcontacten of verlengsnoeren nooit overbelast raken. Overbelasting
kan brand of een elektrische schok veroorzaken.
⚫ Apparaten met een Klasse 1 structuur dienen te worden aangesloten op een
stopcontact met een beschermende aardverbinding.
⚫ Apparaten met een Klasse 2 structuur vereisen geen aardverbinding.
⚫ Houd altijd de stekker vast wanneer u deze uit het stopcontact trekt. Trek nooit
aan de voedingskabel. Dit kan tot een kortsluiting leiden.
⚫ Gebruik nooit een beschadigde voedingskabel of stekker of een los stopcontact.
Dit vormt namelijk een risico op brand of elektrische schokken.
28. Indien het product knoopcelbatterijen bevat of wordt geleverd met een
afstandsbediening die knoopcelbatterijen bevat:
Waarschuwing:
⚫ “Batterij niet inslikken, chemisch brandgevaar” of gelijkwaardige werking.
⚫ De meegeleverde afstandsbediening bevat een knoopcelbatterij. Als de batterij wordt
ingeslikt, kan deze in slechts 2 uur ernstige interne brandwonden veroorzaken en tot
de dood leiden.
⚫ Houd nieuwe en gebruikte batterijen buiten bereik van kinderen.
Page 47

47
⚫ Als de batterijhouder niet goed kan worden gesloten, dient u het product niet meer te
gebruiken en buiten bereik van kinderen te houden.
⚫ Als u denkt dat batterijen zijn ingeslikt of binnenin een willekeurig lichaamsdeel
terecht zijn gekomen, dient u onmiddellijk medische hulp te zoeken.
29. Waarschuwing m.b.t. het gebruik van batterijen:
⚫ Als de batterij onjuist wordt geplaatst, bestaat er explosiegevaar. Vervang de batterij
alleen door een zelfde of vergelijkbare soort batterij.
⚫ Stel de batterij niet bloot aan extreem hoge of lage temperaturen of een lage
luchtdruk op grote hoogte tijdens gebruik, opslag of transport.
⚫ Vervanging van een batterij door een incorrect type kan leiden tot een ontploffing of
de lekkage van ontvlambare vloeistoffen of gas.
⚫ Het weggooien van een batterij in het vuur of een hete oven, of het mechanisch
verpletteren of insnijden van een batterij, kan leiden tot een explosie.
⚫ Het achterlaten van een batterij in een omgeving met extreem hoge temperaturen
kan leiden tot een explosie of het lekken van brandbare vloeistof of gas.
⚫ Een batterij die aan een extreem lage luchtdruk wordt blootgesteld, kan leiden tot een
explosie of het lekken van brandbare vloeistof of gas.
⚫ Aandacht voor het milieu is nodig bij het verwijderen van de batterijen.
INSTALLATIE
• Pak alle onderdelen uit en verwijder de beschermende materialen.
• Sluit het apparaat niet aan op het stopcontact, voordat u de netspanning hebt gecontroleerd
en voordat alle andere aansluitingen zijn gemaakt.
Accessoires:
Handleiding
Stroomvoorziening
Afstandsbediening
RCA kable
Page 48

48
DAB/FM-binnenantenne
WIFI-antenne
INSTALLATIE
• Pak alle onderdelen uit en verwijder de beschermende materialen.
• Sluit het apparaat niet aan op het stopcontact, voordat u de netspanning hebt
gecontroleerd en voordat alle andere aansluitingen zijn gemaakt.
VOORAANZICHT
1. USB-poort
2. Hoofdtelefoonuitgang
3. Draaitoets OK/NAVIGATE
4. Stand-by-toets
5. MODUS-toets
6. Fav. Toets
7. Home-toets
8. LCD-scherm
9. Dimmertoets
10. Toets Links/Vorige
11. Toets Rechts/Volgende
12. Alarmtoets
13. VOLUME-knop
14. Sensor afstandsbediening
Page 49

49
ACHTERAANZICHT
15. DC IN-aansluiting
16. Installatiepoort W-LAN-antenne
17. AUDIO-INGANG ANALOOG R/Laansluiting
18. Aansluiting ANALOGE AUDIO-INGANG
19. Aansluiting ANALOGE AUDIOUITGANG
20. Aansluiting AUDIO-UITGANG DIGITAAL
OPTISCH
21. Aansluiting AUDIO-UITGANG DIGITAAL
COAXIAAL
22. Aansluiting LAN-INGANG
23. Installatiepoort antenne
Page 50

50
AFSTANDSBEDIENING
1. Stand-by-toets
2. Luidspreker AAN/UIT schakelen
3. Hoofdmenu
4. Opgeslagen stations, Favorieten, enz.
5. DAB/FM zoeken
6. Lokaal station
7. Ga één track terug
8. Afspelen/Pauze
9. Ga één track vooruit
10. Alarmtoets
11. MODE-Ga naar hoofdmenu-items
12. Toets EQ-instellen
13. Navigatietoets omhoog
14. Navigatietoets links
15. Selecties bevestigen
16. Navigatietoets rechts
17. Navigatietoets omlaag
18. Volume verlagen
19. Volume verhogen
20. 0.....9 Selecteer favorieten/Fav.; letters
en cijfers invoeren
21. Dimmertoets
22. Slaap-toets
Page 51

51
Batterijen installeren voor de afstandsbediening:
1.
Druk op de markering ‘open’ op de batterijklep en schuif omlaag
2.
Installeer twee (2) x AAA-batterijen van 1,5 V in het batterijvak (let op de juiste
polariteit bij het plaatsen)
3.
schuif de klep terug op het batterijvak
Voorzorgsmaatregelen m.b.t. batterijen:
Neem deze voorzorgsmaatregelen in acht:
1.
Gebruik uitsluitend het type batterij gespecificeerd in deze handleiding.
2.
Zorg ervoor de juiste polariteit te volgen wanneer u de batterijen installeert, zoals
gemarkeerd in het batterijvak. Het apparaat kan beschadigd raken als u een batterij
verkeerd plaatst.
3.
Probeer geen niet-oplaadbare batterijen op te laden. (Volg de aanwijzingen van de
batterijfabrikant.)
4.
Gooi batterijen nooit in vuur, omdat deze anders kunnen ontploffen.
5.
Maak de batterijcontacten van het apparaat schoon voordat u uitgeputte batterijen
vervangt.
Page 52

52
Draai de W-lan-antenne rechtsom vast met het juiste gereedschap zoals afgebeeld.
Steek de FM-binnenantenne in de antennepoort zoals afgebeeld.
Page 53

53
AANSLUITINGEN ANALOGE AUDIO-UITGANG
EN
NL
Connect the RCA cable as illustrated below.
Sluit de RCA-kabel aan zoals hieronder
afgebeeld.
red
red (rood)
white
wit
RCA Cable NOT Included
RCA-kabel NIET inbegrepen
Rear View of the TV Soundbar, Tower
Speaker etc.
Achteraanzicht van de tv-soundbar,
torenluidspreker enz.
Page 54

54
EN
NL
Connect the 3.5mm AUX OUT cable as
illustrated below.
Sluit de 3,5 mm AUX OUT-kabel aan zoals
hieronder afgebeeld.
AUX Cable NOT Included
AUX-kabel NIET inbegrepen
Rear View of the TV Soundbar, Tower
Speaker, Mini Speaker etc.
Achteraanzicht van de tv-soundbar,
torenluidspreker, miniluidspreker enz.
AANSLUITINGEN DIGITALE AUDIO-UITGANG
Page 55

55
EN
NL
Connect the Optical cable as illustrated
below.
Sluit de optische kabel aan zoals hieronder
afgebeeld.
Optical Cable NOT Included
Optische kabel NIET inbegrepen
Rear View of the TV Soundbar, Tower
Speaker etc.
Achteraanzicht van de tv-soundbar,
torenluidspreker enz.
EN
NL
Connect the Coaxial cable as illustrated
below.
Sluit de coaxkabel aan zoals hieronder
afgebeeld.
Coaxial Cable NOT Included
Coaxkabel NIET inbegrepen
To coaxial input of the external amplifier
with built-in decoder
Naar coaxiale ingang van de externe
versterker met ingebouwde decoder
Page 56

56
1 Vereisten voor het gebruik van de DIR-250
1.1 Netwerkvereisten
Voordat u de DIR-250 gebruikt, zijn de volgende vereisten nodig:
Een breedbandverbinding in combinatie met een bekabeld/draadloos toegangspunt,
router of soortgelijk netwerkapparaat.
De wifi-netwerkrouter moet wifi (802.11 b/g/n) draadloze verbinding ondersteunen.
Een smartphone, tablet of pc die op hetzelfde netwerk zit als de DIR-250
Weergegeven symbolen
verbinding tot stand brengen
Geen draadloze verbinding
Draadloze verbinding tot stand gebracht
Bekabelde verbinding tot stand gebracht
Geen bekabelde verbinding
VHF-radio-ontvangst: Mono
VHF-radio-ontvangst: Stereo
VHF-radiofunctie geselecteerd
AUX-functie geselecteerd
Luidspreker uit
Zoeken
Alarm aan
Internetradiostation opgeslagen als Fav.
FM-radiostation opgeslagen
2 Hoe te beginnen
2.1 Het instellen van het netwerk
● Voor draadloze W-LAN-netwerkverbinding:
Page 57

57
Controleer of WLAN LINK/ACT-lichtje van het bekabelde/draadloze toegangspunt van de
router brandt. Raadpleeg de gebruikershandleiding van de router voor eventuele vragen.
Opmerking: Wifi maakt gegevensoverdracht over korte afstanden binnen 20 meter
mogelijk, zonder de noodzaak van bekabeling tussen de apparaten. Muren en plafonds
kunnen het wifi-bereik verminderen.
Probeer daarom de DIR-250 en/of het accesspunt binnen de bovenstaande afstand te
plaatsen en obstakels tussen twee apparaten te vermijden.
● Sluit de voedingsadapter aan op het stopcontact en steek de DC-stekker van de
adapter in de DC-IN-aansluiting van de DIR-250
● Bij het eerste gebruik start de DIR-250 met de installatiewizard. Het systeem zal u
vragen:
1 Instellen van Language (Taal) en Network Configurations (Netwerkconfiguraties)
(afb 1.)
(gebruik de navigatietoets (3) om te selecteren)
1
2 Controleer de netwerkbeschikbaarheid bij het inschakelen (afb 2.)
2
3 Configureer het wifi-netwerk (afb 3.)
Page 58

58
3
● Selecteer Yes (Ja) om verbinding te maken met een netwerk
● als u Yes (Ja) (WPS) selecteert (alleen voor WPS-routers) en vervolgens op de WPS-toets op
uw router drukt.
Als u ‘Ja’ antwoordt, gaat het scherm naar zoeken voor draadloos netwerk en verschijnt er
een lijst met beschikbare draadloze netwerken.
OPMERKING: Alleen 2,4 Ghz-netwerken worden ondersteund
1
2
Het aantal balken in het draadloze symbool voor de netwerknaam (SSID) geeft de
signaalsterkte van het netwerk aan. Het sleutel-symbool geeft aan, dat het netwerk met een
wachtwoord is beveiligd.
Als het apparaat geen draadloze netwerken vindt, verschijnt op het display No wireless
Networks Found (Geen draadloze netwerken gevonden). Wijzig uw locatie en controleer
indien nodig uw WLAN-router. U kunt de SSID van uw toegangspunt vinden in de
configuratie van het toegangspunt (router). Selecteer uw netwerk en bevestig met OK. Als
Page 59

59
uw WLAN met een wachtwoord is beveiligd, dan wordt u gevraagd het wifi-wachtwoord in
te voeren.
Voer het wachtwoord in met de navigatietoetsen op het apparaat of de afstandsbediening.
U kunt de toets OMHOOG/OMLAAG draaien om het wifi-wachtwoord in te voeren. als er
per ongeluk op ‘ ’ wordt gedrukt om een overbodige invoer te verplaatsen, druk dan op
‘ ’ om te corrigeren.
Met afstandsbediening
De cursor geeft de huidige invoerplaats aan.
Druk herhaaldelijk op de overeenkomstige toets.
0
0 (invoer verwijderen)
1 1 (spatie) @ ! ” # $ % & () * ’ + - { \ | }< >?........
2 2 A B C a b c
3 3 D E F d e f
4 4 G H I g h i
5 5 J K L j k l
6 6 M N O m n o
7 7 P Q R S p q r s
8 8 T U V t u v
9 9 W X Y Z w x y z
toetsen:
‘ ’ Ga naar de vorige invoerplek, invoer kan worden overschreven
‘ ’ Ga naar de volgende invoerplek. De laatste invoer wordt opgeslagen
‘ ’ Selecteer cijfer/letter
Invoer via voorpaneel
Draai de navigatietoets OMHOOG/OMLAAG (3) om cijfers/letters in te voeren.
Als u eenmaal op de gewenste letter hebt gedrukt, druk op om naar de volgende invoer
te gaan.
Druk als u gereed bent op OK om te bevestigen. U kunt op drukken om naar een vorige
tekeninvoer te gaan.
‘OK’ Bevestig de gehele invoer
Page 60

60
Het kan enkele seconden duren voordat de netwerkverbinding tot stand is gebracht.
Zodra de verbinding tot stand is gebracht, verschijnt het hoofdmenu met de volgende menuitems:
- Internet Radio (Internetradio): Toegang tot wereldwijde radiostations
- Media Centre (Mediacentrum): Toegang tot uw UPnP-apparaten via software met
streaming-mogelijkheden.
- FM: Ga naar de FM-radiomodus
- DAB/DAB+: Ga naar de DAB-radiomodus
- Information Center (Informatiecentrum): Toegang tot weer, financiële en
systeeminformatie, App
- AUX: Toegang tot AUX-modus
- Bluetooth: Ga naar de Bluetooth-modus
- Configuration (Configuratie): Diverse systeeminstellingen
- Local Radio (Lokale radio): Toegang tot radiostations in een bepaalde regio
(bijvoorbeeld alleen Duitse stations)
- My media U (Mijn media U): Toegang tot een online mediatheek. Dit menu-item
verschijnt alleen als de functie al is ingeschakeld in configuration menu
(configuratiemenu) -> Manage my media U (Beheer my media U).
●
Druk op de toets om de stand-by-modus te openen. De tijd, datum en eventuele
actieve alarmtijd worden op het scherm weergegeven.
Page 61

61
●
Als u een netwerkverbinding hebt geconfigureerd, dan wordt er automatisch verbinding
mee gemaakt wanneer de DIR-250 weer wordt ingeschakeld. Als u het netwerk moet
wijzigen, ga dan naar het menu configuration (configuratie) - > network (netwerk) om
de verbinding te wijzigen.
3 Over muziek streamen
U kunt met DLNA muziek naar de DIR-250 streamen. DLNA is een industrie-brede standaard
voor het delen van gegevens via een thuisnetwerk. Afhankelijk van de DLNA-compatibele
apparaten die u bezit. Met DLNA kunt u mp3-muziek streamen die is opgeslagen op uw
laptop/NAS of ander DLNA-compatibel apparaat om af te spelen op de DIR-250.
Lenco DIR-250 is de standaard apparaatnaam op DLNA, maar u kunt de naam wijzigen zoals
u wilt. (Zie paragraaf 5.3)
De informatie hieronder betreft de introductie voor het instellen van media streaming vanaf
een pc of andere mediaserver. Gebruik de instructiehandleiding van het software- of
hardwareapparaat dat u wilt gebruiken.
Zorg ervoor dat de muziekbestanden een van de volgende formaten hebben: MP3, WMA,
WAV of AAC.
Raadpleeg hoofdstuk 5.7 voor de details van de bediening op DIR-250 voor het afspelen van
streammuziek.
3.1 UPnP
● Om te genieten van muziek die vanaf de pc wordt gestreamd, zijn de volgende stappen
op de pc nodig:
- Sluit de pc aan op het netwerk.
- Zorg ervoor dat de DIR-250 is ingeschakeld en is verbonden met hetzelfde netwerk.
- Open het UPnP-platform Windows Media Player (11 of hoger).
Als alternatief kunnen andere platforms of servers zoals Windows Media Connection
worden gebruikt.
Onderstaand is een voorbeeld van instellen onder versie Windows XP en Windows Media
Player 11.
Page 62

62
U kunt hiermee uw media delen met de Lenco DIR-250
Voeg de audiobestanden en folders toe aan de mediabibliotheek die u wilt delen met de
Lenco DIR-250.
U kunt ook genieten van de streammuziek van een andere muziekserver. Zoals smartphone
(Android-platform):
- Verbind de mobiele telefoon met het netwerk
- Zoek en installeer apps in Google Play, die media delen.
- Voeg de audiobestanden van uw mobiele telefoon die u wilt delen toe.
● Selecteer na instelling van de gezamenlijk gebruikte server de muziek en gebruik de
bedieningen op de DIR-250 om af te spelen. (Zie hoofdstuk 5.7)
4 DLNA-functie
● Naast UPnP, ondersteunt de DIR-250 ook de DLNA-functie waarmee u de
muziekbestanden vanuit een pc of mobiele Android telefoon kunt delen. U kunt ook uw
pc, mobiele Android telefoon of iPhone/iPad gebruiken om het afspelen van muziek te
regelen op de DIR-250. (het is niet nodig elke bediening voor het afspelen op de DIR250 te regelen)
● De eisen voor de pc voor DLNA zijn Windows 7 en Windows Media Player 12. Stel het in,
zoals hieronder beschreven:
Deel eerst de media op uw pc naar DIR-250.
Page 63

63
Control Panel (Configuratiescherm)> Network and Internet (Netwerk en Internet) >
Network and sharing COK (Network en delen COK) > Media streaming options (Opties
media streamen)
Open Windows Media Player om Allow remote control of my Player (Sta
afstandsbediening vanaf mijn speler toe) in te schakelen.
Rechtsklik op het gewenste muziekbestand in de bibliotheek en selecteer Play to Lenco DIR250 (Afspelen op Lenco DIR-250).
Page 64

64
Er zal een venster verschijnen om het afspelen van de muziek op de Lenco DIR-250 te
regelen.
U kunt elke gratis of commerciële DLNA-app van Google Play of de Apple Store zoeken en
installeren als u gebruik maakt van Android mobiel, tablet of iPhone/iPad. Wij raden u aan
om Bubble UPnP, Media Share op Android-mobiel, tablet of iPhone/iPad te gebruiken.
Sommige apps geven geen ondersteuning voor het streamen van muziek vanaf de
iPhone/iPod, maar de iPhone/iPod kan nog wel worden gebruikt voor de bediening van het
streamen van muziek vanaf andere servers.
Page 65

65
Procedures voor het afspelen van gedeelde muziek op de app zijn:
Selecteer Lenco DIR-250 als speler. Sommige apps staan toe dat de muziek op meerdere
spelers tegelijk wordt afgespeeld.
Selecteer de (music server) muziek-server en kies de muziek. Sommige apps kunnen een
afspeellijst maken als u voor meerdere muziektracks kiest.
Selecteer server en speler Selecteer muziek
● Bij het gebruik van de functie voor de DLNA-streaming van muziek op Music Link, kunt u
alleen het volume en de stand-by via het apparaat bedienen. De bediening van andere
functies is beperkt.
● Stop DLNA op de pc, mobiel of tablet, voordat u de bediening van Music Link zelf hervat.
Page 66

66
5 DIR-250 Functie
5.1 Overzicht
Page 67

67
5.2 Hoofdmenu
Onder het hoofdmenu kunt u de QR-code scannen om door te gaan
5.3 Configuratie
5.3.1 Tijdweergave
Stel de tijdweergave in op analoge of digitale weergave.
5.3.2 Beheer My mediaU
My mediaU mediatheek - het beheren van radiostations via internet
Om toegang te krijgen tot uw favoriete radiostations, wereldwijd, op elk moment, met
streamingsmogelijkheden op al uw apparaten, kunt u een gratis account voor een
mediatheek aanmaken op www.mediayou.net en zoveel apparaten toevoegen als u wilt. U
krijgt toegang tot deze service met een gebruikersnaam en een wachtwoord naar keuze.
Page 68

68
U moet ook het MAC-adres van uw apparaat kennen (op Media You serienummer genoemd)
om dit apparaat onder “Personalize Your Internet Radio” (Personaliseer uw Internetradio) te
registreren.
U vindt het MAC-adres van de internetradio via Information Center > System information >
Wireless Info > MAC Address (Informatiecentrum > Systeeminformatie > Draadloze
informatie > MAC-adres).
Na het registreren van het apparaat, moet u deze functie inschakelen op de DIR-250 in het
menu Configuration (Configuratie) > Manage my mediaU (Beheer my mediaU.
Zodat de internetradio toegang kan krijgen tot de mediabibliotheek.
Page 69

69
Het apparaat maakt automatisch verbinding met uw account en toont wat daar is vastgelegd:
- Favorite Station (Favoriete zender)
- Favorite Location/Genre (Favoriete locatie/Genre)
- My Local Station (Mijn lokale station)
- Manually Add (Handmatig toevoegen)
● Afhankelijk van uw persoonlijke My mediaU-instellingen, kan de weergave op de
internetradio er anders uitzien.
● Als het apparaat nog niet is geregistreerd bij MediaU, verschijnt er een overeenkomstig
bericht wanneer u My mediaU wilt inschakelen.
● Als u een apparaat met meerdere accounts hebt geregistreerd, zullen deze na de
activering worden weergegeven en kunt u het account dat u wenst te gebruiken,
selecteren.
Voor het beheren van uw Media U per app kunt u de QR-code scannen met uw
smartphone/tablet, om de QR-code te tonen ga naar menu - > my media u
Het menu-item My mediaU verschijnt ook in het hoofdmenu. U kunt hier de selectie
opnieuw vinden:
- Favorite Station (Favoriete zender)
- Favorite Location/Genre (Favoriete locatie/Genre)
- My Local Station (Mijn lokale station)
- Manually Add (Handmatig toevoegen)
U kunt deze selectie ook in de mediatheek vinden, waar u de radiozenders kunt toewijzen en
overeenkomstig kunt beheren.
Page 70

70
Onder Add Manually (Handmatig toevoegen), kunt u het apparaat bijvoorbeeld met
podcasts verbinden.
Voor dit doel dient u de URL van de podcast te kennen.
1. Vul in uw MediaYou-account de gemarkeerde velden in via “Add Manually”
(Handmatig toevoegen).
2. Ga op de internetradio naar Configuration> Manage my mediaU
(Configuratie > Beheer My mediaU) en schakel deze nog een keer in.
3. Onder My mediaU > Manually Add (Handmatig toevoegen), vindt u alle
handmatig toegevoegde mappen en adressen en kunt u de podcast
selecteren.
De volgende podcast-formaten worden ondersteund:
- asx
- m3u
- pls
- pure streaming met HTTP, RTSP, MMS-protocol
5.3.3 Netwerk
● Configuratie bekabeld netwerk
Page 71

71
Bekabelde netwerkverbinding in-/uitschakelen
● Wireless Network Configuration (Draadloze netwerkconfiguratie)
In-/uitschakelen wifi-netwerk. Wanneer u ervoor kiest om het wifi-netwerk in te schakelen,
dan zoekt het systeem automatisch naar beschikbare wifi-netwerken. Selecteer uw vereiste
wifi-netwerk.
Als het wifi-netwerk eerder is geselecteerd, dan hoeft u het wifi-wachtwoord niet opnieuw
in te voeren.
Wij verwijzen u naar sectie 3, Aan de slag met de netwerkinstelling.
● Wireless Network (WPS PBC) [Draadloos netwerk (WPS PBC)]
Als u gebruik maakt van een router met een WPS/QSS-toets, dan kunt u de
netwerkverbinding instellen via de WPS-functie. Druk binnen 120 seconden op de WPS/QSStoets op uw router. De verbinding tussen de router en DIR-250 wordt dan automatisch
geconfigureerd, dus u hoeft het wifi-wachtwoord niet in te typen.
Page 72

72
● Handmatige configuratie
U kunt DHCP kiezen (waarmee het IP-adres automatisch wordt toegewezen) of het IP-adres
zelf invoeren.
Wanneer u de handmatige instelling voor de bekabelde verbinding selecteert, dient u het
volgende in te voeren:
1. SSID (de naam van het toegangspunt);
2. IP-adres;
3. Subnetmasker;
4. Standaard toegangspoort;
5. Gewenste DNS-server;
6. Alternatieve DNS-server.
Kies voor (Beheer) specifiek netwerk als u meer dan één netwerkverbinding binnen een
gebied wilt instellen.
● Controleer netwerk bij het inschakelen
Schakel wifi of bedraad netwerk in/uit.
Wanneer u het wifi-netwerk inschakelt, zal het systeem automatisch naar de
beschikbare AP zoeken. Selecteer uw gewenste AP.
OK WEP- of WPA-code om verbinding te maken met de wifi.
Als de draadloze netwerkverbinding niet bestond of is mislukt, dan staat er een kruis op
het icoon in de linker bovenhoek. Wanneer u het bekabelde netwerk inschakelt, zal het
systeem een verbindingscontrole uitvoeren.
● PIN voor app instellen
Schakel de pincode voor de app in of uit, indien ingeschakeld, zal “237992” worden
weergegeven.
Page 73

73
5.3.4 Datum & Tijd
De instellingen voor datum en tijd kunnen alleen worden gemaakt als de internetradio is
verbonden met een draadloos netwerk.
Datum en tijd instellen: De internetradio neemt automatisch de datum en tijd over van de
centrale server als eenmaal de netwerkverbinding tot stand is gebracht. Echter, u dient voor
de overgang van wintertijd naar zomertijd de tijd handmatig te wijzigen.
Stel de tijdweergave in per 12 Hour (12 uur) of 24 Hour (24 uur)
Stel de datumnotatie in op de posities YYYY (JJJJ) (jaar), MM (maand) en DD (dag)-
JJJJ/MM/DD, DD/MM/JJJJ of MM/DD/JJJJ.
Het aan-/uitzetten van de Daylight Saving Time (DST) [Zomertijd (ZT)].
Bevestig met de toets OK op de afstandsbediening of door op de toets op het apparaat te
drukken.
Aangesloten op een draadloos netwerk, is de tijd GMT (+01: 00) de referentietijd voor de
tijdinstelling. Verhoog of verlaag het uur overeenkomstig uw eigen tijdzone wanneer u de
tijd instelt.
5.3.5 Alarm
Page 74

74
Er zijn drie onafhankelijke soorten alarm - 2 keer alarm voor een absolute tijdinstelling
(Alarm 1 en Alarm 2) en 1 alarm voor een relatieve tijdinstelling (NAP-alarm).
Selecteer Alarm in het configuratiemenu of druk op de alarmtoets (12) op het voorpaneel.
De eerste twee alarmen (Alarm 1 en 2): schakel alarm 1 of 2 in, stel vervolgens de tijd in en
stel deze in op Dagelijks, Eenmaal of elke specifieke dag van de week.
Selecteer vervolgens de (Alarm) tijd en stel de respectievelijke waarden in met de toets
Navigate/OK op het apparaat of met de toets van de afstandsbediening en ga naar
het volgende invoerveld met de toets Bevestigen of door op de toets Navigate/OK op de
afstandsbediening of op het voorpaneel.
Kies nu 'Sound (Geluid)’: om het (alarm) geluid in te stellen op Pieptoon, Melodie of
Internetradio/FM/DAB DAB +/USB.
Een alarmsymbool verschijnt bovenaan het display naast de tijd die aangeeft dat het
alarm actief is
Opmerking: als u het (alarm) geluid kiest Internetradio/FM/DAB. U moet een eerder
opgeslagen ‘Favoriet’ voorkeuze selecteren.
Als de alarmbron is ingesteld op internetradio, dan moet het toestel eerst verbinding maken
met internet. Daarom kan er enige vertraging zijn. Als er binnen één minuut geen netwerk is
verbonden, verandert het alarm automatisch in melodie.
5.3.6 NAP-alarm:
Laten we een dutje doen.
U kunt het instellen op 5/10/20/30/60/90 of 120 minuten.
Page 75

75
Nu kunt u Alarm Volume (Alarm-volume) kiezen om het volume van de alarmen te
configureren.
Als het/de alarm(en) is/zijn ingesteld, verschijnt er een klokpictogram met alarmtijd
bovenaan het scherm.
Druk tijdens een alarm op de toets om het alarm te stoppen, druk op de toets SLEEP op
het apparaat of druk op de toets op de afstandsbediening om de sluimerstand te
activeren. Het alarm zal na 5 minuten opnieuw afgaan.
Houd er rekening mee dat uw externe versterker actief moet zijn om het alarm te kunnen
horen!
5.3.7 Gepland afspelen
Plan het afspelen door de herhaalmodus in te stellen (dagelijks, eenmaal, ma, di, wo, do, vr,
za, zo), tijd (00:00 UU:MM) en geluid van (internetradio, FM, DAB/DAB+).
5.3.8 Taal
Selecteer de OSD-taal: English/German/French/Hungarian/Czech/Slovakian/Polish/Turkish
(Engels/Duits/Frans/Hongaars/Tsjechisch/Slowaaks/Pools/Turks) etc. (in totaal 17 talen zijn
beschikbaar)
5.3.9 Dimmer
Configureer de helderheid van de displayverlichting
Selecteer ”Power Saving (Energiebesparing)” om de helderheid van de
achtergrondverlichting in te stellen voor de stand bymodus en selecteer “Turn On
(Aanzetten)” om de helderheid in te stellen voor de bedieningsmodus.
Page 76

76
5.3.10 Weergave
Stel het scherm in op kleurenscherm of monochroom scherm.
5.3.11 Stroombeheer
Hier kunt u kiezen welke tijd moet worden overschreden om automatisch naar stand-by te
schakelen.
Kies de timer voor energiebeheer (5/15/30 minuten).
Het apparaat zal automatisch naar stand-by gaan wanneer u het niet gebruikt. (geen muziek
afspelen)
Kies "Turn Off (Uitschakelen)” om de functie energiemanagement te negeren.
5.3.12 Slaaptimer
De slaaptimer kan worden gebruikt om in slaap te vallen met uw favoriete muziek.
Om de sleeptimer te gebruiken, zet het apparaat aan, kies uw favoriete ingangsbron en druk
op de toets ‘zzz’ op de afstandsbediening of selecteer ‘slaaptimer’ in het configuratiemenu
om de tijdsduur in te stellen op 15/30/60/90/120/150/180 minuten. Nadat de tijd eenmaal
is ingesteld, zal er rechtsboven in de hoek een slaapicoontje verschijnen met de resterende
minuten.
De DIR-250 schakelt naar stand-by wanneer de geconfigureerde tijd is verstreken.
5.3.13 Internetradio
Buffer
Configureer de buffertijd van het afspelen van muziek in 2/4/8 seconden.
Page 77

77
Geluidskwaliteit.
Stel de geluidskwaliteit in op hoog of laag.
5.3.14 Het weer
Stel de locatie in voor de nauwkeurigheid van de weersinformatie.
De DIR-250 kan de huidige weersinformatie weergeven in de stand-bymodus. Zet de standby-weergave aan en stel temperatuureenheid (°C of °F) in om het weer in de stand-bymodus
weer te geven.
Wanneer deze is ingeschakeld, worden de huidige tijd en weersomstandigheden om de 10
seconden weergegeven.
5.3.15 Instellen DAB/FM
FM-modus: Stel in op Mono of Stereo
FM-drempel: Drempel Zoeken op modus sterk, standaard of zwak. Drempel Stereo op
modus sterk, standaard of zwak.
DAB-drempel: Stel in op modus sterk, standaard of zwak.
Service following (FM-IR): Schakel het in op een van de 7 continenten of schakel het uit.
Service following (DAB-IR): Schakel het in op een van de 7 continenten of schakel het uit.
5.3.16 Lokale radio instellen
Stel locatie in met automatische detectie (land), handmatige configuratie (land), handmatige
configuratie (staat)
Handmatig instellen (stad), Handmatig instellen (Amerikaanse postcode)
Page 78

78
5.3.17 Afspelen instellen
Selecteer de afspeelmodus van het mediacentrum - Uit (geen herhaling of shuffle), Alles
herhalen, Eén herhalen of Shuffle.
5.3.18 Apparaat
Voer in om het apparaat een andere naam te geven of gebruik de optie “App” om de QR-
code weer te geven voor het downloaden van de app.
5.3.19 Wachtwoord
In dit hoofdstuk kunnen de volgende toetsen worden aangepast met de modustoets op het
apparaat of de afstandsbediening.
Wanneer de instelling is ingesteld op een van de volgende toetsen, druk dan op de
modustoets op het apparaat om dezelfde functie te realiseren.
Alarm (bijvoorbeeld als de alarmtoets is ingesteld, druk dan op de modustoets om de
alarmtoetsfunctie te realiseren)
Dimmer
Equalizer
Lokale radio
Modus
Voorkeuze
Slaaptimer
Timer
Page 79

79
5.3.20 Equalizer
Standaard instelling van de equalizer is Normal (Normaal).
Mogelijke instellingen zijn: Normal, Flat, Jazz, Rock, Soundtracks, Classical, Pop, News of mijn
EQ.
Druk op de toets EQ op de afstandsbediening om te schakelen tussen de verschillende EQinstellingen
5.3.21 Hervatten bij inschakelen
Het systeem schakelt standaard naar het hoofdmenu bij het inschakelen van het apparaat.
Als u deze instelling hebt ingeschakeld, zal het systeem de internetradio blijven afspelen.
Wat u ook vóór het uitschakelen beluisterde, de internetradio of mediacentrum.
5.3.22 Software-update
Software-update. Als er een bijgewerkte versie van de software op de server staat, zal het
systeem u daarvan op de hoogte brengen wanneer u terugkeert naar het hoofdmenu.
5.3.23 Terugzetten naar standaard
Herstel naar de standaardinstellingen.
Nadat de DIR-250 is gereset, schakelt het systeem over naar het menu Language setting
(Taal instellen) en gaat het automatisch naar het menu Network settings (Netwerk
instellen).
Page 80

80
5.4 Mijn MediaU
Toon uw eigen mediaU-stationslijst en speel deze af vanaf de mediaU-server. Maar u moet
eerst uw account instellen (zie hoofdstuk 5.3.2).
5.5 Internetradio
Nadat de verbinding van een station tot stand is gebracht, wordt de informatie van het
station op het display weergegeven.
5.5.1 Favorieten
Lijst van uw favoriete stations. Het ondersteunt favoriete voorkeuren, waaronder station en
map.
Voor het opslaan van uw favoriete muziekstation als favoriet houdt u de Fav. ingedrukt.
Toets op de afstandsbediening of het voorpaneel om het station op te slaan als mijn
favoriet. U kunt het vorige opgeslagen station vervangen door de nieuwe. Het symbool
verschijnt in de bovenste regel van het scherm, terwijl het apparaat opslaat. Of houd de
snelkoppeling Fav ingedrukt. Toets op het apparaat om het station op te slaan.
Als het geselecteerde station is opgeslagen, kunt u het niet opnieuw opslaan.
De opgeslagen stations worden getoond in dit menu. U kunt ook op de toets Fav. drukken
om de opgeslagen stationslijst te openen.
Page 81

81
Ga in de lijst met favoriete stations naar uw station, druk op OK om te beluisteren. U kunt
ook op drukken om het submenu te Delete (Verwijderen) (een radiostation uit de
favorietenlijst verwijderen), Shlft Up/down (omhoog/omlaag) langs de lijst schuiven,
Rename (Hernoemen) (u kunt het radiostation een naam naar keuze geven), of Play
(Afspelen).
Druk op FAV., draai vervolgens de toets OMHOOG/OMLAAG op het apparaat of op
de afstandsbediening om het opgeslagen station op te roepen.
5.5.2 Radiostation/Muziek
De stations zijn onderverdeeld in Global Top 20, Genre, Country/Location (Wereld Top 20,
Genre, Land/Locatie) en Highlight (Hoogtepunten).
OK om door te gaan met de subcategorieën en kies het station om te luisteren.
Voor elk station drukt u op OK om het direct af te spelen. U kunt op Rechts drukken om het
submenu te openen - u kunt Add to Favorite (Toevoegen aan favorieten), Auto Scan
(Automatisch zoeken) of Play (Afspelen). Wanneer u kiest voor Auto Scan (Automatisch
zoeken), wordt elk station in de subcategorie geselecteerd weergegeven. Elk station speelt
30 seconden totdat ze allemaal zijn afgespeeld. Of druk op OK om te stoppen met luisteren.
5.5.3 Slaapradio
Open om er een te kiezen (Birds (Vogels), Lullaby (Slaapliedje), Piano, Rain (Regen, Spa,
Space (Ruimte), Wave (Golven), White noise (Witte ruis) om te luisteren tijdens het slapen.
5.5.4 Geschiedenis
Een overzicht van de laatst beluisterde stations.
Page 82

82
Voor elk station drukt u op OK om het direct af te spelen. U kunt op drukken op het
submenu te openen – u kunt Add to Favorite (Toevoegen aan favorieten), Auto Scan
(Automatisch zoeken) of Play (Afspelen). Wanneer u kiest voor Auto Scan (Automatisch
zoeken), wordt elk station in de historie geselecteerd weergegeven. Elk station speelt 30
seconden af, totdat zij allemaal hebben gespeeld, of u drukt op OK om het zoeken in het
geselecteerde te stoppen.
5.5.5 Service
Search radio station (Naar een radiostation zoeken), voer een trefwoord in om naar een
radiostation in de lijst te zoeken.
Add new radio station (Nieuw radiostation toevoegen) - De toegevoegde zenders worden
opgeslagen in mijn favorieten.
Merk op dat 250 tekens het maximale aantal tekens van de naam van het station is.
App: Open om de QR-code te scannen.
5.6 Lokale radio
Er is een snelkoppeling Local Radio (Lokale radio) onder Internetradio, zodat u gemakkelijk
naar de stationslijst van uw locatie kunt gaan.
Het apparaat kan het IP-adres gebruiken om de huidige locatie te bepalen en kan dan
automatisch een lijst van lokale radiostations genereren. U kunt echter ook een ander land
selecteren.
5.7 Mediacentrum
5.7.1 USB
Open de USB-selectie. Als er geen USB-apparaat op het apparaat is aangesloten, wordt op
het display “empty (leeg)” weergegeven.
Steek het USB-apparaat in de USB-poort en open vervolgens de USB-selectie. Er worden
mappen weergegeven, draai de NAVIGATIE-toets op het apparaat of druk op de toets
op de afstandsbediening om de map op het USB-apparaat te selecteren. Druk op de
NAVIGATIE-toets op het apparaat en afstandsbediening op OK en selecteer vervolgens het
gewenste bestand om af te spelen.
Page 83

83
Tijdens het afspelen:
Druk op de toets om te pauzeren/starten
Druk op de toets om een track verder of terug te gaan
Druk op de toets om terug te keren naar de huidige afspeellijst
OPMERKING: USB-apparaat is geselecteerd wanneer het is geplaatst
5.7.2 UPnP
Als u gedeelde media hebt ingesteld, moet u de gedeelde media in UPnP zien.
Als u meerdere computers hebt die media delen, worden de alternatieven opgesomd.
SELECTEER de gedeelde media die u wilt afspelen.
Tips De radio kan alleen de tracks met een bestandsnaam van minder dan 40 tekens lezen.
En de tekens moeten in een Europese taal zijn. Als in de UPnP-modus het lezen van een
track fout gaat, kunt u proberen om de bestandsnaam te wijzigen.
Echter, als de track nog steeds niet wil afspelen, kunt u proberen het bestand in een ander
formaat om te zetten.
5.7.3 Mijn afspeellijst
U kunt een afspeellijst met favoriete muziek maken van UPnP. Houd tijdens het afspelen van
de muziek de toets OK op de afstandsbediening ingedrukt om het op te slaan in My Playlist
(Mijn afspeellijst).
5.7.4 Wissen van Mijn afspeellijst
U kunt alle opgeslagen muziek in My Playlist (Mijn afspeellijst) verwijderen.
5.8 Informatiecentrum
5.8.1 Weersinformatie
Er zijn weersinformatie en -prognoses voor 2000 steden. Selecteer het land en daarna de
stad voor de weerdetails.
Page 84

84
De DIR-250 kan de weersinformatie weergeven in de stand-bymodus.
Wanneer weersinformatie is geselecteerd, moet u uw locatie selecteren, bijvoorbeeld
‘europa’ en op OK drukken.
Selecteer nu het land en selecteer daarna uw provincie en stad.
Druk op de weerinformatiepagina op Rechts en vervolgens wordt “Add to Standby Display
(Toevoegen aan stand-byweergave“ weergegeven. Als u wilt dat het weer van uw favoriete
stad op stand-by wordt weergegeven, druk dan op OK om de stad in te stellen.
5.8.2 Financiële informatie
Bekijk de aandelenindex uit de hele wereld.
5.8.3 Systeeminformatie
Controleer de versie van het systeem en de details van het aangesloten netwerk. De
informatie omvat het MAC-adres dat u dient in te vullen bij de registratie van het my
mediaU-lidmaatschap.
5.8.4 App
Open om de QR-code te scannen.
Page 85

85
5.9 FM
In de FM-radiomodus ontvangt de radio analoge radiostations op de FM-band.
Houd de toets of op de afstandsbediening ingedrukt of houd de toets op het
apparaat ingedrukt om naar een FM-station te zoeken. De frequentie op het display begint
op te lopen omdat de DIR-250 de FM-band doorzoekt en stopt wanneer het een station
heeft ontvangen. U kunt op op de afstandsbediening drukken om het station fijn af te
stemmen, elke stap verplaatst 0,05 MHz.
Houd de toets Fav. op de afstandsbediening of het apparaat ingedrukt om het station op te
slaan.
U kunt maximaal 20 stations opslaan. Druk op de toets Fav op de afstandsbediening om de
lijst met opgeslagen stations te openen. Druk op de navigator op de afstandsbediening om
te selecteren en druk op OK om af te spelen.
Als alternatief kunt u het systeem ALLE stations voor u laten zoeken door op OK te drukken.
Het gevonden station wordt automatisch opgeslagen in Fav.
6 DAB
Druk op MODE op de afstandsbediening of het apparaat (indien in FM-modus) om te
schakelen naar DAB-modus. Het display toont ‘DAB/DAB+’.
*
Gebruik voor het luisteren naar de opgeslagen DAB-stations de toetsen en of
de toetsen en op de afstandsbediening om door de stations te bladeren.
Wanneer u het gewenste station hebt gevonden, druk dan op de toets OK op de
afstandsbediening en druk op de toets NAVIGATE/OK op het apparaat om het afspelen
van dat station te starten.
DAB snel zoeken
* Druk op de toets Scan op de afstandsbediening of op de linkertoets op het apparaat om
te beginnen met zoeken. U ziet een zoekgrafiek om de voortgang aan te geven.
* Zodra het zoeken is voltooid, selecteert de radio het eerste alfanumerieke station en
begint het afspelen.
Page 86

86
Fav. Opnieuw oproepen
Houd de toets Fav. op de afstandsbediening of het apparaat ingedrukt om het station op te
slaan.
U kunt maximaal 20 stations opslaan. Druk op Fav en druk vervolgens op op de
afstandsbediening of druk op de toets Fav. op het apparaat om het opgeslagen station op te
roepen.
7 Bluetooth
Druk herhaaldelijk op mode tot “Bluetooth” op het display verschijnt.
Zorg ervoor dat er geen ander Bluetooth-apparaat is verbonden met de radio. “Bluetooth
Disconnected (Bluetooth verbroken)” zal op het display verschijnen.
Schakel de Bluetooth-modus in op het apparaat dat u met de DIR-250 wilt verbinden en zoek
naar nieuwe apparaten.
Selecteer de Lenco DIR-250 uit de apparaten die gevonden zijn op uw apparaat. Als u een
pincode moet invoeren, voer dan 0000 (vier nullen) in. Bepaalde apparaten vragen u
mogelijk om de verbinding toe te staan.
Nadat de verbinding eenmaal is geslaagd, dan zal “Bluetooth Connected (Bluetooth
verbonden)” op het display van de Lenco DIR-250 verschijnen
U kunt nu beginnen met afspelen vanaf uw Bluetooth-apparaat.
Bedien het afspelen via het Bluetooth-apparaat of via de radio met de toets Vol+/Vol- op het
apparaat en de afstandsbediening, pas het volume aan op zowel het Bluetooth-apparaat als
de radio.
Een verbonden Bluetooth-apparaat loskoppelen: Houd de toets [Enter] 3 seconden
ingedrukt. De melding “Bluetooth Disconnected (Bluetooth verbroken)” zal op het display
verschijnen.
Dit product werkt op 2400 - 2483,5 MHz en is ontworpen om alleen te worden gebruikt in
een normale huishoudelijke omgeving. Dit product is geschikt voor dit doel binnen alle EUlanden.
"Dit product is voorzien van een Bluetooth-ontvangstfunctie, u kunt er geen
Bluetooth-audio mee overdragen: dit betekent dat u alleen van een externe bron
zoals een smartphone een Bluetooth-audiosignaal kunt ontvangen.”
8 Afstandsbediening via apps
Met sommige apps voor Android, bijv. Air Music Control, kunt u de internetradio bedienen
vanaf uw smartphone of tablet.
Zodra de apparaten zijn verbonden, wordt dezelfde menustructuur als op de internetradio
weergegeven op de smartphone/tablet. U kunt alle functies selecteren, net als op de radio.
Page 87

87
De geselecteerde functies/menu-items die op de radio worden getoond, zullen wijzigen
overeenkomstig de acties op het mobiele apparaat.
Wanneer u de internetradio via een app bedient, kan de UPnP-verbinding met Windows
Media Player niet mogelijk zijn.
Spotify
Gebruik uw telefoon, tablet of computer als afstandsbediening voor Spotify.
Als wifi is ingeschakeld op uw DIR-250, dan kan het u zelfs wakker maken wanneer u
Spotify selecteert op uw smartphone en het afspeelapparaat Lenco DIR-250
selecteert.
Ga naar spotify.com/connect om te leren hoe.
De Spotify Software is onderworpen aan licenties van derden die u hier kunt vinden:
https://www.spotify.com/connect/third-partylicenses
Page 88

88
Technische specificaties
Aansluitingen
DC, 3,5 mm AUX-IN/AUX-UIT, 3,5 mm
hoofdtelefoonuitgang, audio-uitgang (analoog);
Digitaal optisch, digitaal coaxiaal; USB; W-lan;
Antenne;
Ingang
100-240VAC – 50/60Hz
Uitgang
5 V/1,5 A
Totaal vermogen
Batterijen in de afstandsbediening
Geen ingebouwde luidspreker
AAA x 2
Opgenomen vermogen
Max 7,5 W
Stroomverbruik (in stand-by)
< 1 W
Bedrijfstemperatuur
0°C-35°C
Werkingspositie
Horizontaal
Afmetingen
430 x 287 x 72 mm (hoofdapparaat)
516 x 348 x 132 mm (verpakking)
Gewicht
2,2 kg (hoofdapparaat)
3,2 kg (verpakking en alle accessoires inbegrepen)
Page 89

89
Voedingsadapter: (Alleen voor EU)
Gebruik alleen de originele wisselstroomadapter
Gebruik uitsluitend het voedingsapparaat dat in de gebruiksaanwijzingen staat vermeld.
Informatie
Waarde en precisie
Naam of handelsmerk van de fabrikant,
handelsregistratie en adres
SHENZHEN SHI
GUANGKAIYUAN
TECHNOLOGY., LTD
Modelaanduiding
GKYPS0150050EU1
Ingangsspanning
100-240V
Ingangsfrequentie AC
50/60Hz
Uitgangsspanning
5,0V
Uitgangsstroom
0,5A
Uitgang
7,5W
Gemiddelde actieve efficiëntie
77,8%
Efficiëntie bij lage belasting (10%)
70,27%
Verbruik onbelast vermogen
0,06W
Fabrikant:
SHENZHEN SHI GUANGKAIYUAN TECHNOLOGY., LTD
Modelnummer:
GKYPS0150050EU1
Page 90

90
Garantie
Lenco biedt service en garantie aan overeenkomstig met de Europese wetgeving. Dit houdt in dat
u, in het geval van reparaties (zowel tijdens als na de garantieperiode), uw lokale handelaar moet
contacteren.
Belangrijke opmerking: Het is niet mogelijk om producten die moeten worden gerepareerd
rechtstreeks naar Lenco te sturen.
Belangrijke opmerking: De garantie verloopt als een onofficieel servicecenter het apparaat op
wat voor manier dan ook heeft geopend, of er toegang toe heeft gekregen.
Het apparaat is niet geschikt voor professioneel gebruik. In het geval van professioneel gebruik
worden alle garantieverplichtingen van de fabrikant nietig verklaard.
Disclaimer
Er worden regelmatig updates in de firmware en/of hardwarecomponenten gemaakt.
Daardoor kunnen gedeelten van de instructie, de specificaties en afbeeldingen in deze
documentatie enigszins verschillen van uw eigen situatie. Alle onderwerpen die staan
beschreven in deze handleiding zijn bedoeld als illustratie en zijn niet van toepassing op
specifieke situaties. Aan de beschrijving in dit document kunnen geen rechten worden
ontleend.
Afvoer van het oude apparaat
Dit symbool geeft aan dat het betreffende elektrische product of de
accu/batterij niet mag worden verwijderd als algemeen huishoudelijk
afval in Europa. Zorg voor een juiste afvalverwerking door het product
en de accu/batterij in overeenstemming met alle van toepassing zijnde
lokale wetten voor het verwijderen van elektrische apparatuur of
accu's/batterijen te verwijderen. Als u dit doet, helpt u de natuurlijke
bronnen te behouden en de standaard van milieubescherming te
verbeteren bij de behandeling en verwijdering van elektrisch afval
(Afgedankte Elektrische en Elektronische Apparatuur).
CE-markering
Lenco Benelux B.V., Thermiekstraat 1a, 6361 HB Nuth, Nederland, verklaart hierbij dat dit product
voldoet aan de vereisten van de essentiële EU-richtlijnen.
De verklaring van conformiteit kan worden aangevraagd via techdoc@commaxxgroup.com
Service
Bezoek voor meer informatie en helpdeskondersteuning www.lenco.com
Lenco Benelux BV, Thermiekstraat 1a, 6361 HB, Nederland
Page 91

91
Deutsch
ACHTUNG:
Eine andere als die hier beschriebene Bedienung, Einstellung oder Verwendung der
Funktionen kann zu gefährlicher Strahlenbelastung führen.
VORSICHTSMASSNAHMEN VOR DER BENUTZUNG
BEFOLGEN SIE IMMER FOLGENDE ANWEISUNGEN:
1. Blockieren oder bedecken Sie keine Lüftungsöffnungen. Wenn Sie das Gerät auf ein
Regal stellen, lassen Sie um das gesamte Gerät 5 cm (2”) freien Platz.
2. Stellen Sie das Gerät entsprechend den Anweisungen der mitgelieferten
Bedienungsanleitung auf.
3. Halten Sie das Gerät von Hitzequellen wie Radiatoren, Heizern, Öfen, Kerzen oder
anderen hitzeerzeugenden Produkten oder offenen Flammen fern. Das Gerät darf nur
bei gemäßigtem Klima verwendet werden. Sehr kalte oder heiße Umgebungen sind zu
vermeiden. Der Betriebstemperaturbereich liegt zwischen 0 °C und 35 °C.
4. Meiden Sie bei der Nutzung des Produkts die Nähe starker Magnetfelder.
5. Elektrostatische Entladungen können die normale Verwendung von diesem Gerät
stören. Sollte dies geschehen, führen Sie einfach einen Reset aus und starten Sie dann
das Gerät entsprechend den Anweisungen dieser Bedienungsanleitung neu. Gehen Sie
besonders bei Datenübertragungen mit dem Gerät vorsichtig um und führen Sie diese
nur in einer antielektrostatischen Umgebung aus.
6. Warnung! Niemals Gegenstände durch die Lüftungsschlitze oder Öffnungen in das
Gerät stecken. In diesem Gerät fließt Hochspannung und das Hineinstecken von
Gegenständen kann zu elektrischem Schock und/oder Kurzschluss interner elektrischer
Bauteile führen. Aus dem gleichen Grund kein Wasser oder Flüssigkeiten in das Gerät
geben.
7. Benutzen Sie das Gerät nicht in nasser oder feuchter Umgebung wie Bad, Dampfküche
oder in der Nähe von Schwimmbecken.
8. Das Gerät darf weder Tropf- noch Spritzwasser ausgesetzt werden und es dürfen keine
mit Flüssigkeit gefüllten Behälter wie z.B. Vasen auf das Gerät oder in der Nähe des
Gerätes gestellt werden.
9. Benutzen Sie das Gerät nicht bei Kondensationsgefahr. Wenn Sie das Gerät in einem
warmen feuchten Raum benutzen, dann können sich im Inneren des Geräts
Wassertropfen oder Kondensationen bilden und zu Fehlfunktionen des Geräts führen.
Schalten Sie in diesem Fall das Gerät für 1 – 2 Stunden aus, bevor Sie es erneut
einschalten: Das Gerät sollte vollständig getrocknet sein, wenn Sie es wieder
einschalten.
10. Obwohl dieses Gerät unter größter Sorgfalt und vor Auslieferung mehrmals überprüft
wurde, können trotzdem wie bei jedem anderen elektrischen Gerät auch Probleme
auftauchen. Trennen Sie das Gerät im Falle einer Rauchentwicklung, starker
Hitzeentwicklung oder jeden anderen unnatürlichen Erscheinung sofort vom Netz.
11. Dieses Gerät ist durch eine Stromquelle wie auf dem Typenschild angegeben zu
betreiben. Halten Sie bei Unsicherheiten über die Art Ihrer Stromversorgung in Ihrer
Wohnung Rücksprache mit Ihrem Händler oder Ihrer Stromzuliefererfirma.
12. Halten Sie es von Haustieren fern. Einige Nagetiere lieben es, an Netzkabeln zu nagen.
13. Benutzen Sie für die Reinigung ein weiches und trockenes Tuch. Benutzen Sie niemals
Lösungsmittel oder Flüssigkeiten auf Ölbasis. Benutzen Sie zum Entfernen hartnäckiger
Flecken ein feuchtes Tuch mit mildem Reinigungsmittel.
14. Der Hersteller haftet nicht für Schäden oder Verluste durch Fehlfunktion,
Zweckentfremdung oder Modifikation des Geräts oder durch Wechseln der Batterien.
Page 92

92
15. Unterbrechen Sie die Verbindung nicht während einer Formatierung oder einer
Datenübertragung. Bei Unterbrechung drohen Datenverlust und Datenbeschädigung.
16. Wenn das Gerät eine USB-Wiedergabefunktion besitzt, dann stecken Sie den USB-Stick
direkt in das Gerät. Verwenden Sie kein USB-Verlängerungskabel, weil die erhöhte
Störungsanfälligkeit zu Datenverlust führen könnte.
17. Das Typenschild befindet sich an der Unter- oder Rückseite des Geräts.
18. Dieses Gerät ist nicht zur Benutzung durch Personen (einschließlich Kinder) mit
physischen, sensorischen oder mentalen Beeinträchtigungen oder ohne ausreichender
Erfahrung vorgesehen, es sei denn, sie werden durch eine verantwortliche Person
beaufsichtigt oder wurden in die ordnungsgemäße Bedienung des Gerätes durch eine
für ihre Sicherheit verantwortliche Person eingewiesen.
19. Dieses Produkt ist nur für den nicht-professionellen Gebrauch und nicht für
gewerbliche oder industrielle Zwecke bestimmt.
20. Stellen Sie sicher, dass das Gerät in einer stabilen Position aufgestellt ist. Schäden
aufgrund Verwendung dieses Produkts in einer instabilen Position, Vibrationen, Stöße
oder Nichtbeachtung der anderen in dieser Bedienungsanleitung enthaltenen
Warnungen und Sicherheitshinweise werden nicht durch die Garantie abgedeckt.
21. Entfernen Sie niemals das Gehäuse dieses Produkts.
22. Stellen Sie das Produkt niemals auf andere elektrische Geräte.
23. Halten Sie Kinder von den Plastiktüten fern.
24. Benutzen Sie nur vom Hersteller spezifizierte Erweiterungen/Zubehörteile.
25. Lassen Sie alle Eingriffe von qualifiziertem Servicepersonal ausführen. Eingriffe werden
notwendig, wenn das Gerät auf irgendeine Weise wie beispielsweise am Netzkabel
oder am Netzstecker beschädigt wurde, Flüssigkeit in das Gerät eingedrungen ist,
Gegenstände in das Gerät gefallen sind, das Gerät Regen oder Feuchtigkeit ausgesetzt
war, es heruntergefallen ist oder nicht ordnungsgemäß funktioniert.
26. Langes Hören lauter Töne aus einem Musikgerät kann zum zeitweiligen oder
permanenten Hörverlust führen.
27. Wenn zum Lieferumfang des Produkts ein Netzkabel oder ein Netzadapter gehört:
⚫ Wenn irgendwelche Probleme auftreten, dann ziehen Sie den Netzstecker aus der
Netzsteckdose und setzen Sie sich anschließend mit einer qualifizierten Fachkraft in
Verbindung.
⚫ Treten Sie nicht auf das Netzteil und klemmen Sie es auch nicht ein. Geben Sie
besonders im näheren Bereich des Steckers und der Stelle acht, wo das Kabel aus dem
Gerät herausgeführt wird. Stellen Sie keine schweren Gegenstände auf das Netzteil,
weil es dadurch beschädigt werden könnte. Halten Sie das gesamte Gerät außerhalb
der Reichweite von Kindern! Durch Spielen mit dem Netzkabel können sie sich
ernsthafte Verletzungen zuziehen.
⚫ Trennen Sie das Gerät während eines Gewitters oder bei längerer Nichtbenutzung
vom Netz.
⚫ Die Wandsteckdose muss sich in der Nähe des Geräts befinden und einfach zu
erreichen sein.
⚫ Steckdosen und Verlängerungsleitungen nicht überlasten. Eine Überlastung kann
zu Brandgefahr bzw. Stromschlag führen.
⚫ Geräte der Schutzklasse 1 sind an eine Netzsteckdose mit Schutzleiter
anzuschließen.
⚫ Geräte der Schutzklasse 2 benötigen keinen Schutzleiteranschluss.
⚫ Halten Sie den Netzstecker in der Hand, wenn Sie ihn aus der Netzsteckdose
ziehen. Ziehen Sie ihn nicht durch Zerren am Kabel heraus. Das kann zu einem
Kurzschluss führen.
⚫ Verwenden Sie weder ein beschädigtes Netzkabel noch einen beschädigten
Stecker oder eine lockere Steckdose. Es besteht Brand- und Stromschlaggefahr.
28. Wenn das Produkt mit einer Fernbedienung mit Batterien/Knopfzellen geliefert wird
oder das Produkt eine derartige Fernbedienung umfasst:
Warnung:
⚫ „Die Batterie nicht einnehmen, er besteht Verätzungsgefahr”.
Page 93

93
⚫ [Die mit diesem Produkt mitgelieferte Fernbedienung] enthält eine Knopfbatterie. Das
Verschlucken der Batterie kann innerhalb von nur 2 Stunden zu schwersten inneren
Verbrennungen mit Todesfolge führen.
⚫ Halten Sie neue und gebrauchte Batterien von Kindern fern.
⚫ Verwenden Sie dieses Produkt nicht weiter und halten Sie es von Kindern fern, wenn
das Batteriefach nicht sicher schließt.
⚫ Suchen Sie umgehend ärztliche Hilfe auf, wenn Sie vermuten, dass Batterien
verschluckt oder in Körperöffnungen eingeführt wurden.
29. Warnhinweise bzgl. der Verwendung von Batterien:
⚫ Es besteht Explosionsgefahr, wenn die Batterien nicht korrekt eingelegt werden. Nur
mit Batterien des gleichen oder entsprechenden Typs ersetzen.
⚫ Die Batterie darf während der Benutzung, Aufbewahrung oder des Transports weder
sehr hohen oder sehr niedrigen Temperaturen noch niedrigem Luftdruck in großen
Höhenlagen ausgesetzt werden.
⚫ Die Ersetzung der Batterie mit einem falschen Batterietyp kann zum Explodieren der
Batterie oder dem Auslaufen von entflammbarem Gas oder entflammbarer Flüssigkeit
aus der Batterie führen.
⚫ Die Entsorgung der Batterie in Feuer oder einem heißen Ofen oder das mechanische
Zerkleinern oder Zerteilen der Batterie kann zu Explosionen führen.
⚫ Das Verbleiben der Batterie in einer Umgebung mit sehr hohen Temperaturen kann
zum Explodieren der Batterie oder dem Auslaufen von entflammbarem Gas oder
entflammbarer Flüssigkeit führen.
⚫ Eine einem sehr niedrigen Luftdruck ausgesetzte Batterie kann explodieren oder es
kann aus einer einem sehr niedrigen Luftdruck ausgesetzten Batterie entflammbares
Gas oder entflammbare Flüssigkeit auslaufen.
⚫ Augenmerk ist auf den ökologischen Aspekt der Batterieentsorgung zu legen.
ANSCHLUSS
• Packen Sie alle Teile aus und entfernen Sie danach die Schutzmaterialien.
• Schließen Sie das Gerät nicht eher an das Netz an, bevor Sie die Netzspannung überprüft
haben und alle anderen notwendigen Verbindungen hergestellt sind.
Zubehör:
Bedienungsanleitung
Stromversorgung
Fernbedienung
RCA-Kable
Page 94

94
DAB/FM-Innenraumantenne
WLAN-Antenne
ANSCHLUSS
• Packen Sie alle Teile aus und entfernen Sie danach die Schutzmaterialien.
• Schließen Sie das Gerät nicht eher an das Netz an, bevor Sie die Netzspannung überprüft
haben und alle anderen notwendigen Verbindungen hergestellt sind.
ANSICHT VON VORN
1. USB-Port
2. Kopfhörerbuchse
3. OK/NAVIGATIONS-Drehknopf
4. Standby-Taste
5. Modus-Taste
6. Favorit-Taste
7. Startseite-Taste
8. LCD-Display
9. Dimmer-Taste
10. Nach-links-/Titel-zurück-Taste
11. Nach-rechts-/Titel-vor-Taste
12. Wecker-Taste
13. LAUTSTÄRKE-Drehregler
14. Sensor Fernbedienung
Page 95

95
ANSICHT VON HINTEN
15. DC-Eingangsbuchse:
16. Anschlussbuchse WLAN-Antenne
17. ANALOGE AUDIOAUSGANGSBUCHSE
R/L
18. ANALOGE AUDIOEINGANGSBUCHSE
19. ANALOGE AUDIOAUSGANGSBUCHSE
20. OPTISCHE DIGITALAUDIOAUSGANGSBUCHSE
21. KOAXIALE DIGITALAUDIOAUSGANGSBUCHSE
22. LAN-EINGANGSBUCHSE
23. Antennenanschlussbuchse
Page 96

96
FERNBEDIENUNG
1. Standby-Taste
2. Lautsprecher EIN/AUS
3. Hauptmenü
4. Gespeicherte Radiosender, Favoriten
usw.
5. DAB/FM-Scan
6. Lokale Radiosender
7. Einen Titel zurückspringen
8. Wiedergabe/Pause
9. Einen Titel vorspringen
10. Wecker-Taste
11. MODUS-Taste – Wechsel zu den
Hauptmenüoptionen
12. EQ-Einstelltaste
13. Nach-oben-Navigationstaste
14. Nach-links-Navigationstaste
15. Auswahlbestätigung
16. Nach-rechts-Navigationstaste
17. Nach-unten-Navigationstaste
18. Lautstärke verringern
19. Lautstärke erhöhen
20. 0...9 Favoritenwahl; Buchstaben- und
Zifferneingabe
21. Dimmer-Taste
22. Abschaltautomatik-Taste
Page 97

97
Einlegen der Batterie der Fernbedienung:
1.
Drücken Sie auf die sich auf der Batterieabdeckung befindliche Markierung „OPEN“ und
schieben Sie dann den Batteriedeckel nach unten
2.
Legen Sie zwei (2) 1,5-V-Batterien vom Typ AAA im Batteriefach ein (achten Sie darauf,
dass Sie sie polrichtig einlegen)
3.
Schieben Sie die Batterieabdeckung wieder auf das Batteriefach
Vorsichtsmaßnahmen im Umgang mit Batterien:
Befolgen Sie diese Sicherheitsmaßnahmen:
1.
Benutzen Sie nur den in dieser Bedienungsanleitung angegebenen Batterietyp.
2.
Achten Sie beim Einlegen der Batterie darauf, dass Sie sie entsprechend der im
Batteriefach angegebenen Polarität polrichtig einlegen. Durch eine nicht
ordnungsgemäß eingelegte Batterie kann das Gerät beschädigt werden.
3.
Versuchen Sie nicht, nicht wiederaufladbare Batterien zu laden. (Befolgen Sie die
Anweisungen des Herstellers.)
4.
Werfen Sie Batterien nicht in Feuer, weil diese explodieren könnten.
5.
Reinigen Sie die Batteriekontakte des Geräts, bevor Sie neue Batterien einlegen.
Page 98

98
Schrauben Sie die WLAN-Antenne wie abgebildet in Uhrzeigersinn unter Zuhilfenahme
geeigneter Werkzeuge fest.
Stecken Sie die FM-Innenraumantenne wie abgebildet in die Antennenbuchse.
Page 99

99
ANALOGE AUDIOAUSGANGSVERBINDUNGEN
EN
DE
Connect the RCA cable as illustrated below.
Schließen Sie das Cinchkabel wie
nachstehend abgebildet an.
red
Rot
white
Weiß
RCA Cable NOT Included
Cinchkabel NICHT im Lieferumfang enthalten
Rear View of the TV Soundbar, Tower
Speaker etc.
Rückansicht der TV-Soundbar, des
Turmlautsprechers usw.
Page 100

100
EN
DE
Connect the 3.5mm AUX OUT cable as
illustrated below.
Schließen Sie das 3,5-mm-AUXAusgangskabel wie nachstehend abgebildet
an.
AUX Cable NOT Included
AUX-Kabel NICHT im Lieferumfang enthalten
Rear View of the TV Soundbar, Tower
Speaker, Mini Speaker etc.
Rückansicht der TV-Soundbar, des
Turmlautsprechers, des Minilautsprechers
usw.
DIGITALE AUDIOAUSGANGSVERBINDUNGEN
 Loading...