

Page 1
PS25-PS05/B-PS09/D
PS25
PS05/B
PS09/D
FERRO DA STIRO CON CALDAIA SEPARATA 2,5 LT
STEAM IRONING MACHINE 2,5 LT
CENTRALE A’ REPASSAGE 2,5 LT
DAMPFERZEUGER 2,5 LT
PLANCHA CON CALDERA SEPARATA 2,5 LT
MASINA DE CALCAT CU BOILER 2,5 LT
ЭЛЕКТРОПАРОВОЙ УТЮГ С ПАРОГЕНЕРАТОРОМ 2,5 Л
Page 2

ITALIANO
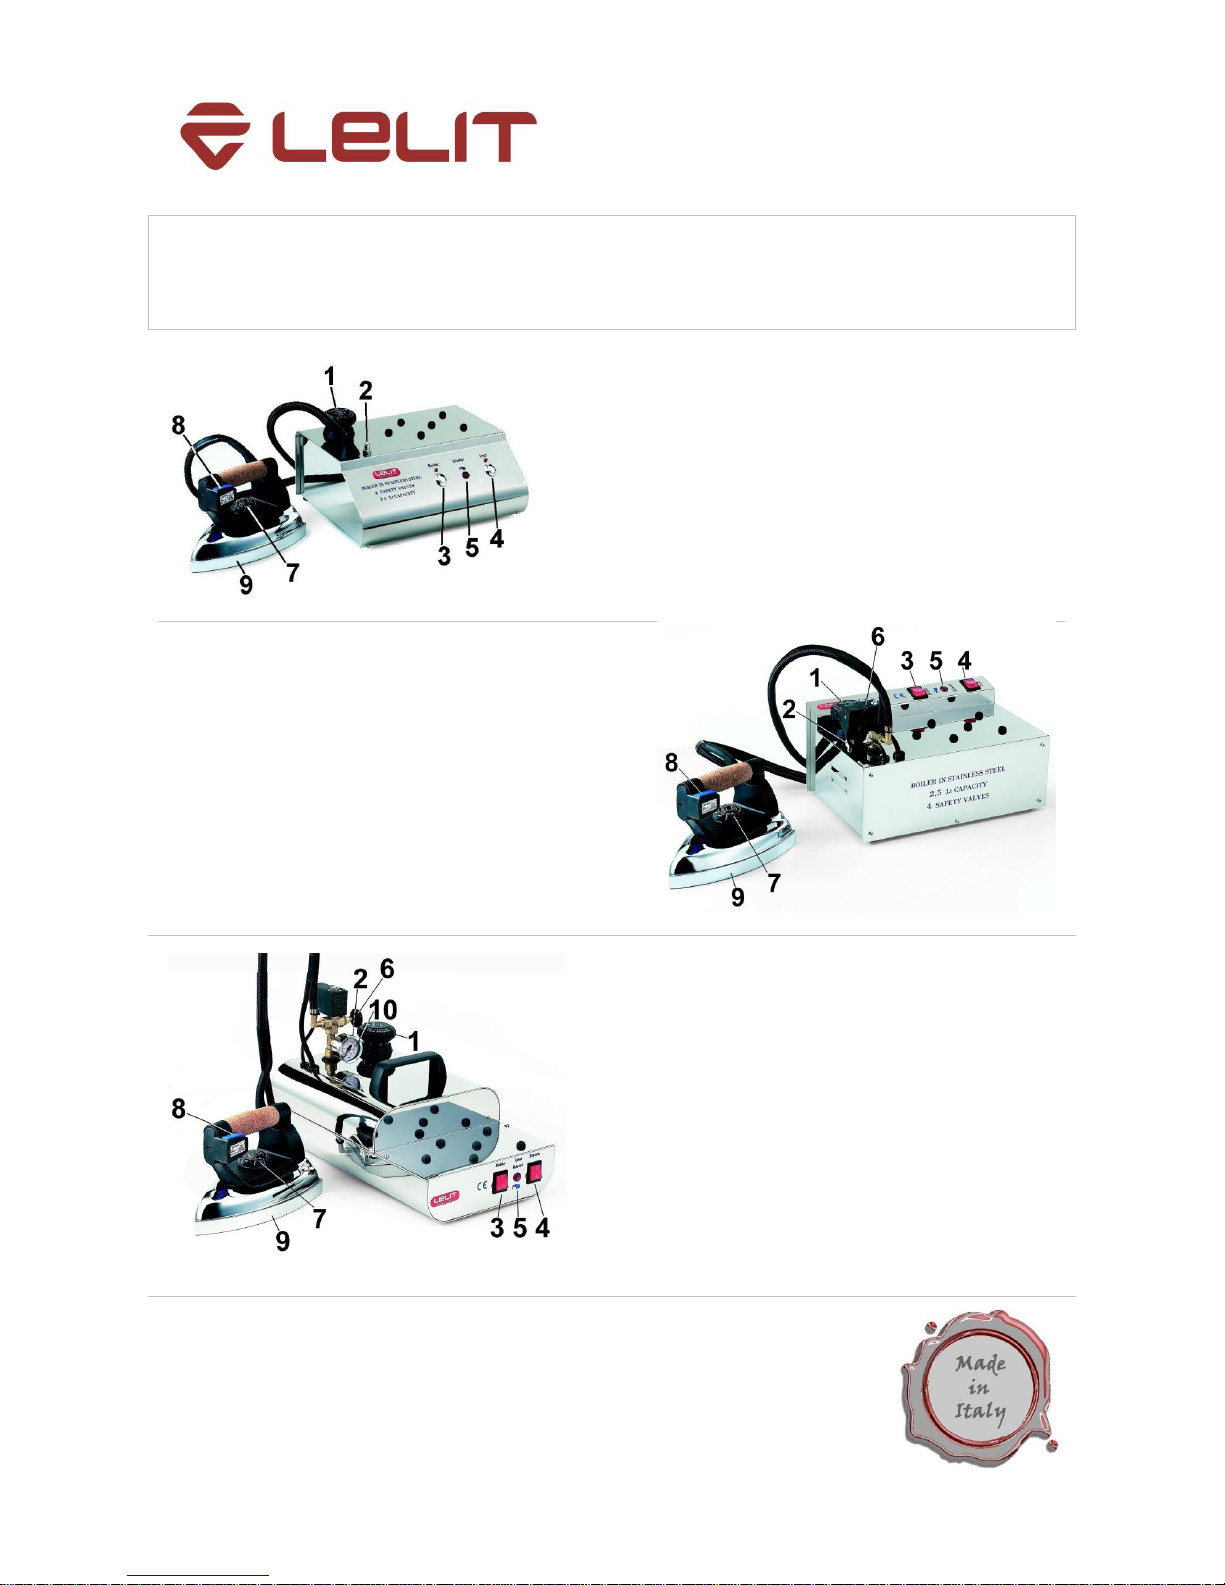
COMPONENTI:
1. Tappo di sicurezza
2. Alloggiamento asta reggi-tubo
3. Interruttore caldaia
4. Interruttore ferro
5. Spia “mancanza d’acqua”
6. Manopola regolazione vapore
7. Manopola regolazione temperatura piastra del ferro
8. Pulsante vapore
9. Piastra ferro
10. Manometro
ISTRUZIONI D’USO:
1. Prima di iniziare ad utilizzare il prodotto toglierlo dalla scatola e assicurarsi di aver rimosso tutti i
componenti di imballaggio, sacchetti di protezione ed accertarsi che la macchina sia posizionata in
modo stabile su una superficie piana e robusta, adatta a sostenerla e nelle vicinanze di una presa
di corrente a muro (massimo 1,5 mt).
2. Inserire l'asta alza filo (in dotazione) nell'apposita sede (2) ed agganciarla con il supporto (o
molla) al tubo di collegamento ferro da stiro-caldaia.
3. Svitare il tappo (1) lasciando sfiatare l’eventuale aria presente nella macchina e riempire la
caldaia con max. 2,0 litri d’acqua usando l'imbuto e facendo attenzione che non trabocchi.
4. Inserire la spina di corrente alla rete, accendere il interruttore caldaia (3) e il interruttore ferro
(4), che si illumineranno a conferma dell'avvenuta accensione.
5. Posizionare la manopola di regolazione della temperatura della piastra del ferro (7) sulla posizione
"cotone" (indicato sulla manopola “°°°”).
6. Attendere che la spia dell’interruttore caldaia (3) si spenga (tempo circa 10 min.); durante
l’esercizio è normale il riattivarsi della spia.
7. La macchina è pronta per l'utilizzo.
8. Premere il pulsante vapore (8).
9. E' possibile regolare la quantità di vapore desiderata per mezzo dell'apposita manopola (6) – solo
per modelli PS05/B e PS09/D.
10. Se durante la stiratura il flusso di vapore dovesse cessare e la spia acqua (5) si accendesse è
segno che l'acqua nella caldaia sta terminando (la caldaia non è completamente vuota); per
riprendere la stiratura spegnere l'interruttore caldaia (3), verificare che non vi sia emissione di
vapore dal ferro da stiro premendo il pulsante vapore (8), spegnere l'interruttore ferro (4),
svitare lentamente il tappo (1) accertandosi che non vi sia emissione di vapore dallo stesso,
disinserire la spina di alimentazione e successivamente, dopo qualche minuto, riempire il
serbatoio con acqua possibilmente calda.
11. Alla prima richiesta di vapore dopo l'accensione potrebbe verificarsi un calo di pressione; ciò è
dovuto al riempimento dei condotti interni della macchina; per ottenere massimo vapore
attendere lo spegnimento dell'interruttore.
12. In qualsiasi momento è possibile visualizzare il livello di pressione interno alla caldaia per mezzo
del manometro (10) – solo per modello PS09/D.
ATTENZIONE:
- Non lasciare incustodito l'apparecchio quando la spina è connessa alle rete.
- Il ferro da stiro raggiunge temperature elevate e le mantiene per 15 minuti anche dopo lo
spegnimento, attenzione pericolo di scottature anche con macchina disinserita dalla rete elettrica.
- La spina di alimentazione deve essere disinserita dalla presa prima di immettere acqua nel
serbatoio.
- Durante l'utilizzo ed anche per circa 15 minuti dalla fine dell'utilizzo la piastra del ferro (9) da
stiro ha temperature pericolose - evitare qualsiasi contatto.
- Non togliere mai il tappo del serbatoio quando è in corso l'uso e bisogna comunque verificare,
prima di toglierlo, che non ci sia più emissione di vapore dal ferro.
- Nell'apparecchio è montato un dispositivo termico di interruzione, il quale non può essere
sostituito da personale non qualificato.
- Il tappo (1) della caldaia deve essere sostituito con ricambi originali.
NOTA BENE:
E' consigliabile per una maggiore durata e una migliore resa dell'apparecchio l'utilizzo di sola acqua
normale; per la pulizia della caldaia dal calcare si consiglia di sciacquarla periodicamente (15-20 litri di
acqua utilizzata o mensilmente) solo con acqua normale (da acquedotto).
Page 3

ITALIANO
DATI TECNICI:
Termostato del ferro regolabile, taratura 60°C–215°C
Termostato bimetallico di sicurezza del ferro a riarmo manuale, taratura 275°C
Potenza del ferro 800W (Versione 230V: 50Hz / Versione 120V: 60Hz)
Potenza della caldaia: 1000W (Versione 230V: 50Hz / Versione 120V: 60Hz)
Pressione d’esercizio: 2,5 bar
Pressione massima: 5,5 bar
Capacita nominale della caldaia in acciaio inox: 2,5 lt.
RISOLUZIONE DEI PROBLEMI PIÙ FREQUENTI:
PROBLEMA
SPIEGAZIONE
SOLUZIONE
Esce del vapore (poco)
dalla caldaia
E’ possibile che, durante il riempimento,
sia fuoriuscita dell’acqua dal tappo e sia
entrata all’interno della carrozzeria,
impregnando l’isolante
Utilizzando la macchina normalmente,
l’isolante si asciuga con il calore della
macchina accesa; se il problema non si risolve
in un ora (macchina accesa), contattare il
servizio tecnico
Dal ferro da stiro esce
vapore misto ad acqua
E’ possibile che, durante il riempimento,
sia stata introdotta una quantità d’acqua
superiore a quella consentita
Svuotare la macchina dell’acqua in eccesso
(eseguire attentamente le istruzioni di sfiato
prima di aprire il tappo della caldaia)
E’ possibile che la piastra del ferro non sia
calda a sufficienza, deve scaldarsi prima
del passaggio del vapore
Verificare che la manopola della regolazione
della temperatura della piastra del ferro sia in
posizione consentita per stirare con il vapore
(posizione “cotone” °°°)
Dal ferro da stiro non
esce vapore
E’ possibile che la spia di riferimento
dell’interruttore del ferro sia spenta
Accendere l’interruttore del ferro: la spia di
riferimento si illuminerà a conferma
dell’avvenuta accensione; attendere almeno 4
minuti, in modo che la piastra del ferro da
stiro si scaldi
E’ possibile che la spia di riferimento
dell’interruttore della caldaia sia spenta
Accendere l’interruttore della caldaia: la spia
di riferimento si illuminerà a conferma
dell’avvenuta accensione; attendere almeno
10 minuti, in modo che la caldaia possa
generare vapore
E’ possibile che sia terminata l’acqua in
caldaia (la spia mancanza acqua è
accesa)
Provvedere al riempimento seguendo
attentamente le istruzioni
L’asse da stiro si bagna
E’ possibile che il telo posto sopra il piano
di lavoro dell’asse da stiro non riesca a
smaltire il vapore prodotto durante la
stiratura
Sostituire il telo con uno di spessore
maggiore, oppure provare con due teli
sovrapposti, in modo da creare una
superficie più consistente, che possa
smaltire il vapore.
Se si sta utilizzando un’asse
termoaspirante, azionare l’aspirazione tutte
le volte che si utilizza il vapore e regolare
l’uscita vapore (tramite la manopola
dell’elettrovalvola, dove previsto) al minimo
E’ possibile che dal ferro esca vapore
misto ad acqua (verificare spruzzando
vapore su un panno asciutto)
Vedere sopra alla voce “dal ferro da stiro esce
vapore misto ad acqua”
Esce acqua sporca dal
ferro da stiro
E’ possibile che sia entrato dello sporco
nella caldaia insieme all’acqua
Riempire la caldaia, spenta, con un litro
d’acqua, chiudere il tappo, scuoterla, riaprire il
tappo e svuotare la caldaia. Ripetere
l’operazione finché l’acqua che ne fuoriesce
risulta pulita. Riprendendo la stiratura,
effettuare le prime spruzzate di vapore su uno
strofinaccio, in quanto i condotti sono ancora
sporchi, finché il vapore che esce risulta pulito.
E’ sconsigliato ogni tipo di additivo da
immettere nella caldaia
L’elenco aggiornato dei centri assistenza autorizzati LELIT è disponibile all’indirizzo
http://www.lelit.com/web/assistenza.asp .
I dati e le immagini riportati potranno subire variazioni senza preavviso al fine del miglioramento delle
prestazioni della macchina.
Page 4

English
COMPONENTS:
1. Safety cap
2. Wand seat
3. Boiler switch
4. Iron switch
5. Low water indicator light
6. Steam regulation knob
7. Temperature regulation knob
8. Steam button
9. Iron plate
10. Gauge
USER INSTRUCTIONS:
1. Remove the ironing machine from its packing and make sure all packing parts have been taken
off (including the protection bags). Lay the machine on a flat and steady surface fitted to support
it next to a wall socket (max. mt. 1,5).
2. Insert in the wand seat (2) the supplied wand to hold the hose up and hook it with the spring up
to the iron-boiler connecting wire.
3. Unscrew the safety cap (1) and let the internal air out. Fill the boiler with max. 2,0 liters of water,
use the funnel supplied, making sure you do not overfill the tank. Close the safety cap (1).
4. Insert the plug into an electrical outlet; switch on boiler (3) and iron switch (4). If the two
buttons come on, iron and boiler are working.
5. Turn the iron plate’s temperature regulating knob (7) to the position “cotton °°°” (indicated on
the iron knob).
6. Wait that the boiler switch’s red light (3) goes off (it takes about 10 minutes). While ironing, the
boiler switch’s red light (4) normally comes on.
7. The machine is ready for use.
8. Push the steam button (8).
9. It is possible to regulate the quantity of steam by the steam knob (6) – only for the models
PS05/B and PS09/D
10. In case the steam stops during ironing and the low water light indicator (5) comes on, it means
that there is not enough water in the tank. To start ironing again, switch off the boiler switch (3);
press the steam iron button (8) to ensure there is no more steam in the boiler, slowly open the
pressure cap (1), disconnect the plug and refill to the required level. Fill the boiler with warm
water and wait for it to build up pressure again.
11. When you first press the steam button (after having turned the boiler on and depressed the
steam button on the iron) you might notice a decrease in pressure. This is because the tank has
air in it. In order to have plenty of steam (after you have depressed the iron) wait until the
pressure goes back up to the maximum level before you begin.
12. It is possible to check the inner pressure level of the boiler by means of the pressure gauge (10)
– only for the model PS09/D.
CAUTION:
- This appliance is not intended for use by persons (including children) with reduced physical,
sensory or mental capabilities, or lack of experience and knowledge, unless they have been given
supervision or instruction concerning use of the appliance by a person responsible for their
safety.
- Children should be supervised to ensure that they do not play with the appliance.
- The iron is not to be used if it has been dropped, if there are visible signs of damage or if it is
leaking.
- Do not leave the machine unattended while the plug is connected to the socket.
- The iron reaches very high temperatures and it keeps being very hot even 15 minutes after it’s
been switching off. Be careful not to burn yourself.
- For complete safety, before filling the boiler, please disconnect the plug.
- While using the machine and 15 afterwards the iron plate (9) has very dangerous temperature –
do not touch it.
- While using the machine, never unscrew or remove the cap (1) while under pressure. Before
removing it, make sure that it does not give off steam anymore by shutting the boiler off, and
pressing the steam iron button (8) to release all remaining steam.
- The machine has a special heating element. Only qualified technician should replace it.
- The safety cap (1) must be replaced with original parts only.
Page 5

English
PLEASE NOTE:
The use of normal tap water is recommended. In order to clean the boiler and remove limestone, rinse it
internally (every 15-20 liters of water used or every month) only with tap water.
TECHNICAL DATA:
Adjustable iron thermostat set from 60°C to 215°C
Bimetallic safety iron thermostat with manual reset at 275°C
Heating element:800W (Version 230V: 50Hz / Version 120V: 60Hz)
Boiler power : 1000W (Version 230V: 50Hz / Version 120V: 60Hz)
Working pressure: 2,5 bar
Max. pressure: 5,5 bar
Tank nominal capacity: 2,5 liters
PROBLEM
CAUSE
SOLUTION
Few steam comes out
of the boiler
It may happen that, while filling the tank,
some water spills over the cap and flows
inside the boiler wetting the insulating
material
In order to solve the problem, we suggest
using the machine as usual so to dry up the
insulating material through the heat of the
machine. In case you still have this
problem after one working hour, please
contact the service shop
Steam mixed with
water comes out of the
iron
While filling the tank you may have poured
too much water into it.
The problem will go on until the excess
water is over. Keep the steam button
pressed until the water in the tank is at the
correct level.
The iron plate is not hot enough
Please check that the temperature knob is
on the right position: “cotton °°°)”
There is no steam
coming out of the iron
The steam knob might be closed
Open the steam knob (on models PS05/B &
PS09/D only)
The iron switch might be off
Switch on the iron switch and the relative
led will come on; wait for 4 minutes so that
the iron plate gets warm enough
The boiler switch might be off
Switch on the boiler switch and the relative
led will come on; wait for 10 minutes so
that the boiler can generate steam
The water might be over (the low water
light indicator might be on)
Fill the boiler with water following the
instructions
The ironing board gets
wet
The ironing board cover might not be able
to absorb the steam completely
You might use a thicker cover (or two
covers) so to create a thicker surface to
absorb the steam better. In case you are
using a vacuum table, switch on the
vacuum function each time you are using
the steam
The steam iron leaks steam mixed with
water (check by spraying some steam on
a dry cloth)
Please see above paragraph “Steam mixed
with water comes out of the iron”
Dirty water comes out
of the iron
Maybe some dirt got into the boiler
together with the water.
Fill the empty tank with 1 litre of water,
screw the cap up, shake it, open the cap
and empty the tank. Repeat this process
until the water is clean. We do not
recommend the use of any additive. Before
ironing again spray some steam on a cloth
until clean steam comes out.
The inserted data and pictures can be subject to changes without previous notice for the improvement of
the machine’s performances.
Page 6

Français
DESCRIPTION :
1. Bouchon de sureté
2. Siege pour la tige du tube
3. Interrupteur avec voyant lumineux pour chaudière
4. Interrupteur avec voyant lumineux pour fer
5. Voyant lumineux ≪ manque d’eau ≫
6. Bouton de réglage vapeur
7. Bouton de réglage de la température du fer
8. Bouton vapeur
9. Plaque
10. Manomètre
MODE D’EMPLOI:
1. Avant la mise en fonction de le machine, ôtez la machine de la boite et assurez-Vous que tout les
components d’emballage et les sachets aient été enlevés. Posez la machine sur une surface
stable et plate auprès d’une prise de terre (max. 1,5 mt).
2. Insérez la tige (2) (en dotation) dans la siège et accrochez-la avec le support au tuyau qui
connecte le fer à la chaudière.
3. Dévissez le bouchon (1) et laissez perdre la vapeur de la machine, remplissez la chaudière avec
max. 2,0 litres avec l’aide de l’entonnoir. Faites attention que l’eau ne déborde pas.
4. Insérez la fiche dans la prise de courant, allumez le bouton de la chaudière (3) et le bouton du fer
(4), ils s’illumineront pour indiquer l’allumage.
5. Mettez le bouton de réglage de la température du fer (7) sur la position ≪ coton°°° ≫ .
6. Attendez jusque l’interrupteur lumineux de chaudière (4) s’est éteint (environ 10 minutes).
Pendant le repassage l’interrupteur lumineux s’allume – c’est normal.
7. La machine est prête à l’usage.
8. Appuyez le bouton de la vapeur (8).
9. Il est possible régler la quantité de vapeur avec le bouton (6) – seulement pour les modèles
PS05/B et PS09/D.
10. Si pendant le repassage le flux de vapeur finit et le voyant lumineux ≪ manque d’eau≫ (5)
s’allume, l’eau dans le réservoir est presque terminée (le réservoir n‘est pas complètement vide).
Pour reprendre le repassage, il faut éteindre l’interrupteur lumineux de la chaudière (3) : vérifiez
avant de le dévisser complètement qu'il n’y a plus de la vapeur dans l’appareil en appuyant le
bouton vapeur (8), dévissez le bouchon (1) un petit peu et laissez perdre la vapeur, dévissez le
bouchon lentement et complètement. Débranchez la machine et, après quelque minute,
remplissez le réservoir avec de l’eau si possible chaude.
11. Apres l’allumage, avec la première demande de vapeur, une freinte de pression pourrait arriver
parce que les tubes internes de la machine se doivent remplir d’eau. Pour avoir le maximum de
vapeur, attendez que l’interrupteur s’éteint.
12. En tout moment il est possible voir le niveau de la pression à l’intérieur de la chaudière avec
l’aide du manomètre (10) – seulement pour le modèle PS09/D.
PRECAUTIONS:
- Ne laissez jamais la machine sans surveillance lorsque elle est connectée à la courant.
- Le fer de repassage arrive à une température très élevée et la maintient pour 15 minutes après
que la machine ait été déconnectée. ATTENTION : même avec la machine débranchée, il y a le
risque de brulures !
- La fiche doit être déconnectée avant de remplir le réservoir.
- Pendant l’usage et pendant 15 minutes après la fin de l’usage la plaque (9) du fer est très chaude
– évitez tout contact!
- Ne dévissez jamais le bouchon (1) pendant l’usage. Avant de l’ôter, il faut contrôler qu’il n’y ait
aucune sortie de vapeur du fer.
- La machine a un dispositif thermique d’arrêt. Il doit être remplacé uniquement par techniciens
autorisés.
- Le bouchon (1) doit être remplacé avec la pièce de rechange originelle.
NOTE BIEN:
Il est conseillée, pour une plus longue vie et une meilleure exécution de la machine, l’utilisation
uniquement avec de l'eau normale. Il est aussi conseillé le nettoyage de la chaudière du calcaire avec un
rinçage périodique de la chaudière (après 15-20 litres d’eau o mensuellement) avec de l'eau normale,
chaude.
Page 7

Français
DONNEES TECHNIQUES:
Thermostat du fer réglable, calibrage 60°C-215°C
Thermostat bimétallique de sureté avec recharge manuel, calibrage: 275°C
Résistance de fer: 800W (version 230V : 50 Hz/version 120V :60Hz)
Puissance de la chaudière: 1000W (version 230V : 50 Hz/version 120V :60Hz)
Pression de service: 2,5 bar
Pression maximale: 5,5 bar
Capacité nominale du réservoir: 2,5 l.
SOLUTION AUX PROBLEMES PLUS FREQUENTS:
PROBLEM
CAUSE
SOLUTION
La chaudière
perd (un peu)
de vapeur
Pendant le remplissage de la chaudière,
un peu d’eau peut couler au delà du
couvercle et entrer à l’intérieur de la
carrosserie, en baignant le matériel
isolant.
En usant la machine, le matériel isolant sèche
grâce à la chaleur de la machine en fonction;
si le problème persiste
pour plus d’une heure (la machine en
fonction), il faut contacter le service aprèsvente.
2) Le fer perd
de la vapeur
mêlée de l’eau.
Probablement on a introduit une
quantité d’eau supérieure à la quantité
consentie.
Il faut vider la machine de l’eau extra (suivez
avec attention les instructions pour faire
échapper la vapeur, avant de dévisser le
bouchon de la chaudière).
La plaque du fer n’est pas assez
chaude; elle doit se réchauffer avant
le passage de la vapeur.
Vérifiez si le bouton de réglage de la
température de la plaque du fer se trouve dans
la position nécessaire pour le repassage a
vapeur (position “coton°°°”).
3) Le fer ne fait
pas de la vapeur.
Le bouton de réglage de la quantité de
vapeur (si prévu) peut être clos.
Ouvrez le bouton de réglage de la quantité de
vapeur en tournant dans le sens inverse aux
aiguilles d’une montre.
L’interrupteur du fer peut être éteint.
Allumez l’interrupteur : le voyant lumineux
s’illuminera à confirmation; attendez au moins
4 minutes, afin que la plaque du fer puisse se
réchauffer.
L’interrupteur lumineux de la chaudière
peut être éteint.
Allumez l’interrupteur lumineux de la
chaudière, qui s’illuminera à confirmation;
attendez au moins 10 minutes, afin que la
chaudière puisse générer de la vapeur.
L’eau à l’intérieur de la chaudière peut
être finie (le voyant “manque d’eau” est
allumé).
Remplissez la chaudière avec de l’eau en suivant
les instructions.
4) La planche à
repasser se
mouille.
Probablement la toile sur la planche à
repasser non réussit pas à évacuer la
vapeur produite pendant le repassage.
Remplacez la toile avec une toile plus épaisse,
ou essayez avec deux toiles superposées, afin
de créer une surface plus épaisse, qui puisse
évacuer la vapeur.
Si on utilise une planche thermo aspirante, il
faut actionner l’aspiration toutes les fois qu’on
utilise la vapeur et il faut régler la sortie de
vapeur (à travers le bouton de l’électrovanne,
où prévu) au minimum.
Le fer perd de la vapeur mêlée de l’eau
(vérifier en vaporisant de la vapeur sur
un chiffon sec).
Lisez au-dessus la voix “le fer perd vapeur
mêlée de l’eau”.
5) Le fer perd de
l’eau sale.
Probablement on a fait entrer, ensemble
avec l’eau, de la saleté à l’intérieur de la
chaudière.
Remplissez la chaudière éteinte avec 1lt d’eau,
serrez le bouton, secouez la chaudière, dévissez
le bouchon et videz la chaudière. Répétez
l’opération, afin que l’eau en sortie soit propre.
En reprenant le repassage, effectuez des
vaporisations sur un chiffon, vu que les conduits
sont encore sales, afin que la vapeur en sotie soit
propre. On ne conseille aucun additif pour l’eau à
verser dans la chaudière.
Les données et les images indiquées peuvent être modifiées sans préavis afin d’améliorer les prestations
du produit même.
Page 8

Deutsch
EINRICHTUNG:
1. Verschlusskappe
2. Schlauchhalter
3. Kesselschalter
4. Bügeleisenschalter
5. „Wasser fehlt“ Anzeige
6. Dampfmengeregelungsknopf
7. Plattetemperaturregelungsknopf
8. Dampftaste
9. Bügeleisenplatte
10. Manometer
BEDIENUNGSANLEITUNG:
1. Öffnen Sie die Verpackung und ziehen Sie das Kessel heraus. Beachten Sie, die Verpackungsteile
und Schutzbeutel weggenommen zu haben. Legen Sie das Kessel auf eine ebene und stabile
Fläche in der Nähe einer Mauersteckdose (Max. 1,5 Mt.).
2. Stecken Sie die Ausgestattensstäbe (2) in ihrem eigenen Platz und haken Sie den Dampfschlauch
durch die Feder.
3. Öffnen Sie die Verschlusskappe (1), lassen Sie den eventuellen Rest-Druck entweichen und füllen
Sie max. 2,0 Liter Wasser mittels des Trichters. Beachten Sie beim Füllung darauf, dass das
Gerät nicht überläuft. Schließen Sie die Kappe (1).
4. Stecken Sie den Stecker an den Stromnetz ein, schalten Sie den Schalter „Kessel (Boiler)“ (3)
und den Schalter „Bügeleisen (Iron)“ (4), die beide erleuchten werden, um die Einschaltung zu
zeigen.
5. Stellen Sie den Temperaturregelungsknopf (7) der Platte an Position „Cotton ooo“ ein.
6. Warten Sie darauf, dass die Leuchte der Kesselschalter (3) (das braucht ca. 10 Minuten)
ausmacht.
7. Während des Bügels erleuchtet diese Leuchte normalerweise.
8. Die Maschine ist betriebsbereit.
9. Drücken Sie die Dampftaste (8).
10. Es ist möglich die Dampfmenge mittels dem Kopf (6) einzustellen – nur für die Modelle PS05/B
und PS09/D.
11. Sollte sich die rote „Wasser fehlt“ Anzeige (5) während des Bügels erleuchten, so ist nicht mehr
genug Wasser im Kessel. Schalten Sie den Kessel mittels des „Kessel (Boiler)“ Schalters (3) aus,
lassen Sie den Rest-Druck durch Drücken der Dampftaste (8) entweichen, schalten Sie das
Bügeleisen mittels „Bügel (Iron)“ Schalters (4) aus. Öffnen Sie vorsichtig die Verschlusskappe
(1). Lassen sie unbedingt den Rest-Druck entweichen, bevor sie die Kappe ganz öffnen. Nach
einer Wartezeit von ca. 5 Minuten ist das Gerät zur erneuten Befüllung mit warmem Wasser
bereit.
12. Beachten Sie, dass ein spontaner Druckabfall nach dem erstmaligen Betätigen völlig normal ist.
Dies hat technische Gründe und das heißt die Füllung der Innenmaschinerohre. Für maximale
Dampfleistung warten Sie bitte auf einige Minuten ein erneutes Erreichen des Betriebsdruckes.
13. Auf jedem Moment ist es möglich den inneren Kesseldruck mittels des Manometers (10) zu
kontrollieren – nur für das Modell PS09/D.
SICHERHEITSHINWEISE:
- Lassen Sie das Gerat niemals unbeaufsichtigt, wenn es in Betrieb ist und halten Sie es von Kinder
und von Minderjährigen fern.
- Beachten Sie, dass die Bügelplatte (9) noch heiß ist sowohl während der Verwendung als auch
nachdem ca. 15 Minuten es ausgeschaltet wurde.
- Ziehen Sie immer den Netzstecker, bevor Sie Wasser erfüllen.
- Öffnen Sie niemals die Verschlusskappe während das Gerat in Betrieb ist. Lassen Sie erst den
Rest-Druck entweichen, bevor Sie die Kappe (1) ganz öffnen.
- Die Maschine ist mit einer Leiterbruchwärmevorrichtung ausgestattet, die unbedingt von
Fachmänner ersetzt werden muss.
- Die Verschlusskappe (1) muss unbedingt mit originellen Ersatzteilen ersetzt werden.
NOTABENE:
Für eine längere Lebensdauer des Kessels empfehlen wir die Benutzung von Leitungswasser und eine
periodische Kesselreinigung (jeder 15-20 Liter Wasser benutzt oder im Monat) mit Leitungswasser.
Page 9

Deutsch
TECHNISCHE DATEN:
Einstellbarer Thermostat geeicht 60°C – 215°C
Biometallischer Schutzthermostat mit manuellem Re-Start Eichung 275°C
Aluminium Heizung 800W (Ausführung 230V: 50Hz / Ausführung 120V: 60Hz)
Leistungsaufnahme Kessel: 1000W (Ausführung 230V: 50Hz / Ausführung 120V: 60Hz)
Arbeitsdruck: 2,5 Bar
Max. Kesseldruck: 5,5 Bar
Nominalkesselvolumen: 2,5 Liter
STÖRUNG
URSACHE
MASSNAHME ZUR BEHEBUNG
1) Lässt der
Kessel wenig
Dampf ab?
Während der Füllung ist Wasser aus
der Kappe übergelaufen und der
Isolierstoff ist nass geworden.
Benutzen Sie die Maschine wie immer, der Isolierstoff
trocknet durch die Wärme der Maschine; falls das
Problem nach einer Stunde nicht aufgelöst ist, wenden
Sie sich dem Kundendienst an.
2) Lässt das
Bügeleisen
Dampf
gemischt mit
Wasser ab?
Während der Füllung könnte man zu
viel Wasser gegossen haben.
Leeren Sie die Maschine von dem übermäßigen Wasser
(Bitte lesen Sie die Bedienungsanleitung bezüglich des
Entweichens, bevor Sie die Kappe öffnen)
Die Bügeleisensohle ist nicht warm
genug. Sie sollte sich vorher des
Dampfdurchgangs wärmen.
Überprüfen Sie, dass der Temperaturregelungsknopf der
Sohle auf der Position “cotton” °°° eingestellt ist.
3) Lässt das
Bügeleisen
keinen Dampf
ab?
Das Licht des Bügeleisenschalters
ist aus.
Schalten Sie den Bügeleisenschalter ein, das Licht
erleucht, um die Einschaltung zu zeigen. Warten Sie 4
Minuten, bis die Bügeleisensohle warm geworden ist.
Das Licht des Kesselschalters ist aus
Schalten Sie den Kesselschalter ein: das Licht erleucht,
um die Einschaltung zu zeigen; warten Sie 10 Minuten,
so dass der Kessel genug Dampf ausströmen kann.
Das Wasser ist verbraucht (die
“Wasser fehlt” Anzeige ist
erleuchtet).
Folgen Sie die Anleitung und füllen Sie den Tank.
4) Ist der
Bügeltisch
nass?
Der Bezug des Bügeltisches lässt
den Dampf nicht abfließen, der
während des Bügeln produziert
wird.
Ersetzen Sie den Bezug mit einem dickeren Bezug oder
legen Sie zwei Bezüge auf den Tisch, um eine dickere
Fläche zu haben, die den Dampf abfließen lässt.
Wenn Sie Absaugend - Blasendbügelbrett verwenden,
betätigen Sie das Absaugen, jedes Mal Sie den Dampf
benutzen und stellen Sie den Dampfausgang mit dem
Knopf auf Min. ein (wo vorgesehen).
Das Bügeleisen lässt Dampf mit
Wasser abfließen ( spritzen Sie
Dampf auf ein Tuch als
Überprüfung).
Sehen Sie „Lässt das Bügeleisen Dampf gemischt mit
Wasser ab?“
5) Lässt das
Bügeleisen
schmutziges
Wasser ab?
Ein bisschen Schmutz zusammen
mit Wasser ist in Kessel
hineingegangen.
Füllen Sie den abgeschalteten Kessel mit einem Liter
Wasser, schließen Sie die Kappe, schütteln Sie die
Bügelstation, öffnen Sie die Kappe und leeren Sie den
Kessel vom Wasser. Wiederholen Sie diesen Vorgang, bis
reines Wasser vom Kessel herauskommt. Vorher Sie
wieder beginnen zu bügeln, spritzen Sie den Dampf auf
einen Tuch, bis kein Schmutz mehr herausgeht. Wir
raten, keine Zusatzstoffe im Kessel zu benutzen.
Die eingefügten Daten und Fotos können ohne Voranmeldung verändert werden, um die Leistungen des
Produkts zu verbessern.
Page 10

Español
COMPONENTES:
1. Tapón de seguridad caldera
2. Alojamiento asta sostén tubo
3. Interruptor luminoso caldera
4. Interruptor luminoso plancha
5. Indicador luminoso ausencia de agua
6. Pomo regulación vapor
7. Pomo regulación temperatura suela de la plancha
8. Botón vapor
9. Suela de la plancha
10. Manometro
INSTRUCCIONES DE USO:
1. Antes de iniciar a usar el producto, quitarlo de la caja y asegurarse de haber removido todos los
componentes del embalaje y bolsas de protección. Controlar que haya sido posicionada en un
modo estable sobre una superficie plana y sólida, capaz de sostener la máquina, y cerca de la
toma de corriente de pared (máximo 1,5 mt).
2. Introducir el asta antena cable (en dotación) en la respectiva sede (2) y engancharla con el
soporte (o muelle) al cable de conexión plancha-caldera.
3. Desenroscar el tapón (1) dejando salir el aire presente en la máquina y llenar la caldera con al
máx. 2,0 litros de agua usando el embudo y cuidando que no desborde el agua.
4. Conectar el enchufe de corriente a la red, encender el ócaldera (3) y el botón plancha (4), que se
iluminaran al encenderse el aparato.
5. Posicionar el pomo de regulacion de la temperatura de la suela de la plancha (7) en la posición
6. “algodón” (indicado en el pomo como “°°°”).
7. Esperar que el indicador luminoso del botón caldera (3) se apague (tiempo aprox. 10 min.);
durante el trabajo es normal que se reactive el indicador.
8. La máquina esta lista para su uso.
9. Pulsar el botón vapor (6).
10. Es posible regular la cantidad de vapor deseada por medio del respectivo pomo (6) – solo para
los modelos PS05/B y PS09/D.
11. Si durante el planchado el flujo de vapor se interrumpe y se enciende el indicador luminoso agua
(5) esto implica que el agua en la caldera se está terminando (la caldera no está completamente
vacía); para continuar con el planchado apagar el interruptor caldera (3), verificar que no salga
más vapor de la plancha pulsando el botón vapor (8), apagar el interruptor plancha (4),
desenroscar lentamente el tapón (1) asegurandose que no salga vapor del mismo, desconectar
el enchufe de alimentación y sucesivamente, luego de cualquier minuto, llenar el tanque con agua
posiblemente caliente.
12. Luego de encenderse la plancha, la primera vez que se requiere la erogación de vapor podría
verificarse una disminución de la presión dado que los conductos internos de la máquina se están
llenando; para obtener una mayor cantidad de vapor esperar a que se apague el interruptor.
13. Se puede constantemente controlar el nivél de presión en la caldera con el manometro (10) –
solo para el modelo PS09/D.
ATENCIÓN:
- No dejar abandonado el aparato cuando el enchufe esté conectado a la red eléctrica.
- La plancha alcanza temperaturas elevadas y las mantiene por 15 minutos incluso aun luego de su
- apagado. Atención: peligro de quemaduras incluso cuando la máquina ha sido desconectada de la
red eléctrica.
- Antes de verter agua en el tanque, verificar que se haya desconectado el enchufe de la toma de
- alimentación.
- Durante el uso y dentro de los 15 minutos posteriores a su apagado, la suela de la plancha
alcanza temperaturas peligrosas – evitar cualquier tipo de contacto.
- No quitar nunca el tapón del tanque cuando se esté utilizando la plancha y, por lo tanto, es
necesario verificar, antes de quitarlo, que la misma no emane mas vapor.
- En el aparato ha sido montado un dispositivo térmico de interrupción, el cual no puede ser
sustituido por personal no calificado.
- El tapón de la caldera debe sustituirse con repuestos originales.
Page 11

Español
NÓTESE BIEN:
Es aconsejable para una mayor duración y un mejor rendimiento del aparato, usar solamente agua
normal del grifo. Para limpiar el calcareo depositado en la caldera se aconseja enjuagarla periodicamente
(cada 15-20 litros de agua utilizada o mensualmente) solo con agua normal del grifo.
DATOS TÉCNICOS:
Termóstato de la plancha regulable, calibrado 60°C–215°C
Termóstato bimetálico de seguridad de la plancha de rearme manual, calibrado 275°C
Resistencia de la plancha 800W (Version 230V: 50Hz / Version 120V: 60Hz)
Potencia de la caldera: 1000W(Version 230V: 50Hz / Version 120V: 60Hz)
Presión de trabajo: 2,5 bar
Presión maxima: 5,5 bar
Capacidad nominal de la caldera en acero inox: 2,5 lt
SOLUCIÓN DEL PROBLEMA MÁS COMÚN
PROBLEMA
EXPLICACIÓN
SOLUCIÓN
¿Poco vapor sale de
la caldera?
Puede suceder que, mientras que
llena el tanque, un poco de agua
se derrama sobre el casquillo y
fluye dentro de la caldera que
moja el material aislador
Col el calor de la máquina funcionante el problema
debería solucionarse. En caso contrario, llamar el
servicio tecnico
¿De la plancha sale
vapor mezclado con
agua?
Puede suceder que la caldera
tiene una cantidad de agua
superior al agua consentida.
La plancha tiene que ser caliente
antes del paso del vapor
Vaciar el tanque hasta el nivel requerido (siempre
desenrosca el tapón (1) dejando salir el aire presente
en la máquina).
Controlar que el pomo regulación temperatura suela de
la plancha esté en la posición correcta: (“°°° del
algodón)”
¿De la plancha no
sale el vapor?
El botón de la plancha puede
estar apagado
El botón de la caldera puede
estar apagado
Puede ser que se haya terminado
el agua en la caldera
Presione el botón de la plancha; esperar 4 minutos de
modo que la placa della plancha será caliente
Presione el botón de la caldera: se debe esperar 10
minutos así que de la caldera salga el vapor.
Llenarla al nivel requerido después de haber leido las
instrucciones cuidadosamente.
¿La tabla de
planchar se moja?
La cubierta de la tabla no puede
absorber el vapor totalmente
De la plancha sale vapor
mezclado con agua (controlar,
vaporizando sobre un paño seco)
Seria mejor utilizar una cubierta más gruesa (o dos
cubiertas) para crear una superficie más gruesa y
para absorber totalmente el vapor. Si Usted està
utilizando una tabla termoaspirante, encender la
función aspirante todas les vezes que se utiliza el
vapor.
Ver # 2
¿De la plancha sale
agua sucia?
Agua sucia puede ser entrada en
el tanque y en la plancha
.
Llenar el tanque vacío con 1 litro de agua, atornillar el
tapón (1), sacudirlo bien, abrir el tapón y vaciar el
tanque. Repetir la acción hasta que se limpie el agua.
No recomendamos añadir ninguna substancia al agua
en el tanque. Antes de planchar otra vez vaporizar
sobre en un paño hasta cuando salga de la plancha
vapor limpio.
Los datos y imagenes insertados pueden ser modificados sin advertencia preliminar para un mejor
funcionamento de la máquina.
Page 12

Romana
COMPONENTE:
1. Capac
2. Sediu antena sustinere tub
3. Intrerupator rezervor
4. Intrerupator fier
5. Bec “lipsa apa”
6. Manometru reglare aburi
7. Manometru reglare temperatura talpa
8. Intrerupator aburi
9. Talpa fier
10. Manometru
ISTRUCTIUNI DE FOLOSINTA:
1. Inainte de a incepe folosirea produsului scoateti-l din cutie, asigurati-va ca ati eliminat toate
partile de ambalaj si pungi de protectie; asigurati-va ca este pozitionat in mod stabil pe o
suprafata plata si solida, facuta pentru a sustine masina insasi, in apropierea unei prize de curent
pe zid (maxim 1,5 m).
2. Introduceti antena ridicare fir (din dotare) in respectivul sediu (2) si agatati la suport (sau arc)
tubul de legatura fier de calcat-rezervor.
3. Desfaceti capacul (1) lasand sa iasa evenutualul abur din masina si umpleti rezervorul cu max.
2,0 litri de apa folosind palnia si avand grija sa nu dea pe dinafara.
4. Introduceti stecherul de curent in retea, aprindeti intrerupatorul rezervor (3) si intrerupatorul fier
(4), care se vor ilumina confirmand respectiva aprindere.
5. Pozitionati butonul de reglare a temperaturii talpii fierului (7) pe "cotone/bumbac" (indicat cu
simbolul “cotone°°°”).
6. Asteptati ca becul intrerupatorului (4) sa se stinga (timp circa 10 min.); in timpul functionarii este
normala reactivarea becului.
7. Masina este gata de folosinta.
8. Apasati intrerupatorul aburi (8).
9. Este posibila reglarea cantitatii de aburi cu ajutorul butonului (6) – doar pentru modelele PS05/B
si PS09/D.
10. Daca in timpul calcatului fluxul de aburi se intrerupe si becul (5) se aprinde inseamna ca apa din
rezervor este pe terminate (rezervorul nu este complect gol); pentru a reincepe calcatul stingeti
intrerupatorul rezervor (3), verificati ca nu sunt iesiri de aburi din fierul de calcat apasand
intrerupator aburi (8), stingeti intrerupator fier (4), desfaceti usor capacul (1) asigurandu-va ca
nu sunt iesiri de abur, scoateti stecheul de alimentare si succesiv, dupa cateva momente,
reumpleti rezervolrul cu apa calda, de la robinet.
11. La prima cerere de aburi dupa reaprindere se poate verifica o cadere de presiune; acest lucru se
datoreaza reumplerii conductelor interne ale masinii; pentru a obtine maximul de abur asteptati
stingerea intrerupatorului.
12. In orice moment se poate vedea nivelul presiunii in interiorul boiler-ului cu ajutorul manometrului
(10)– doar pentru modelul PS09/D.
ATENTIE:
- Nu lasati nepazit aparatul cand aparatul este conectat la retea.
- Fierul de calcat atinge temperaturi elevate si le mentine timp de 15 minute dupa stingere: atentie
pericol de arsuri si cu masina scoasa din reteaua electrica!
- Stecherul de alimentare trebuie sa fie scos din priza inainte de a repune apa in rezervor.
- Pe durata folosintei si timp de circa 15 minute de la sfarsitul folosirii talpa fierului (9) de calcat
are temperaturi periculoase – evitati orice contact!
- Nu luati niciodata capacul rezervorului cand este in curs folosirea si oricum verificati mereu
inainte de a-l scoate, ca nu iese abur din fier.
- In aparat este instalat un dispozitiv termic de intrerupere care nu poate fi inlocuit de catre
persoane necalificate.
- Capacul (1) rezervorului trebuie schimbat cu altul original.
NOTEAZA:
Pentru o durata lunga si o mai buna utilizare a aparatului, este indicata folosirea apei normale de la
robinet; pentru curatarea rezervorului de calcar/tartru este indicata clatirea periodica (la 15-20 litri de
apa folosita sau lunar) doar cu apa normala, calda, de la robinet.
Page 13

Romana
DATE TEHNICE:
Termostat fier reglabil, taratura 60°C–215°C
Termostat bimetalic de siguranta al fierului cu reincarcare manuala, taratura 275°C
Rezistenta fierului: 800W (Versiune 230V:50Hz / Versiune 120V:60Hz)
Putere: 1000W (Versiune 230V:50Hz / Versiune 120V:60Hz)
Presiune de exercitiu: 2,5 bar - Presiune maxima: 5,5 bar
Capacitatate nominala cazan: 2,5l.
REZOLVAREA CELOR MAI FRECVENTE PROBLEME:
PROBLEMA
EXPLICATIE
SOLUTIE
1) Iese abur
(putin) din
cazan
Este posibil ca, in timpul
reincarcarii, sa iasa apa de la capac
si sa intre in interiorul carcasei,
umezind izolantul.
Folosind masina in mod normal, izolantul se usuca cu
caldura masinii aprinse; daca problema nu se rezolva
intr-o ora (masina aprinsa), contactati serviciul tehnic.
2) Daca din
fierul de
calcat iese
abur
amestecat cu
apa
Este posibil ca, in timpul
reincarcarii, sa fii fost introdusa o
cantitate de apa mai mare decat cea
permisa.
Scoateti din masina apa in exces (executati cu atentie
instructiunile de aerisire inainte de a deschide capacul
rezervorului).
Este posibil ca talpa fierului sa nu fie
suficient de calda, trebuie sa se
incalzeasca inainte de trecerea
aburului
Verificati ca butonul de reglare a temperaturii talpii
fierului este in pozitia permisa pentru calcarea cu aburi
(pozitie “cotone/bumbac” °°°)
3) Din fierul
de calcat nu
iese abur
Este posibil ca becul de referinta al
intrerupatorului fierului sa fie stins.
Aprindeti intrelupatorul fierului: becul de referinta se
aprinde confirmand aprinderea; asteptati cel putin 4
minute, in asa fel ca talpa fierului sa se incalzeasca.
Este posibil ca intrerupatorul
luminos al rezervorului sa fie stins.
Aprindeti intrerupatorul luminos al rezervorului care se
ilumineaza confirmand aprinderea; asteptati cel putin 10
minute, in asa fel incat rezervorul sa genereze aburi.
Este posibil ca apa din rezervor sa
se fi terminat (becul lipsa apa este
aprins)
Executati reumplerea urmarind cu atentie instructiunile.
4) Masa de
calcat se uda
Este posibil ca husa pusa deasupra
planului de munca a mesei de calcat
sa nu reuseasca sa elimine aburul
produs pe durata calcatului.
Inlocuiti husa cu o husa mai groasa, sau incercati sa
puneti doua huse suprapuse, in mod de a creea o
suprafata mai consistenta, care poate elimina aburul.
Daca se foloseste o masa termoaspiranta, actionati
aspiratia de fiecare data cand folositi aburul si reglati
iesirea aburului (cu ajutorul manometrul electrovalvei,
unde este prevazut) la minim.
Este posibil ca din fier sa iasa abur
amestecat cu apa (verificati sufland
aburi pe o carpa uscata)
Uitati-va deasupra la explicatia “din fierul de calcat iese
abur amestecat cu apa”
5) Iese apa
murdara din
fierul de
calcat
Este posibil sa fi intrat mizerie in
rezervor impreuna cu apa.
Reumpleti rezervorul, stins, cu un litru de apa, inchideti
capacul, agitati-l, redeschideti capacul si goliti rezervorul.
Repetati operatiunea pana cand apa care iese rezulta
curata. Reincepand calcatul, efectuati primele pulsatii de
aburi pe o carpa, deoarce conductele sunt inca murdare,
pana cand aburul in iesire rezulta curat. Este indicat a NU
folosi nici un fel de aditiv de pus in rezervor pentru
curatare.
Informatiile si fotografiile introduse pot fi modificate fara preaviz pentru imbunatatirea prestatiilor
produsului insusi.
Page 14

Русский
КОМПОНЕНТЫ:
1. Предохранительная пробка бойлера
2. Отверстие для стержня держателя шланга
3. Световой выключатель бойлера
4. Световой выключатель утюга
5. Сигнальная лампочка отсутствия воды
6. Регулятор подачи пара
7. Регулятор температуры подошвы утюга
8. Кнопка подачи пара
9. Подошва утюга
10. Манометр
ИНСТРУКЦИЯ ПО ИСПОЛЬЗОВАНИЮ:
1. Перед тем как пользоваться электроприбором, достаньте его из коробки и освободите все
предметы в оснащении от полиэтиленовой упаковки. Убедитесь, что электроприбор
установлен на прочной горизонтальной поверхности, предназначенной выдержать вес
самого аппарата, а также вблизи от розетки сети электропитания (максимум 1,5 м.)
2. Вставить стержень - держатель парошланга (в оснащении) в отверстие (2), закрепить с
помощью специальной пружины парошланг, соединяющий бойлер с утюгом
3. Открыть предохранительную пробку бойлера (1), давая выйти скопившемуся в нем воздуху,
и наполнить бойлер водой максимум 2,0 литра. Пользуйтесь специальным приспособлением
– воронкой. Желательно, воду не переливать через край.
4. Подключить вилку шнура питания к электросети, включить кнопку бойлера (3) и кнопку
утюга (4), световая индикация кнопок подтверждает включение электроприбора.
5. Установить регулятор температуры подошвы утюга (7) в позицию - ≪cotone ≫ (графическое
изображение на регуляторе "°°°”)
6. Подождать когда световая кнопка бойлера (3) погаснет (около 10 мин.) Во время работы
включение световой кнопки бойлера является нормальным явлением.
7. Электроприбор готов к пользованию
8. Нажать кнопку подачи пара (8) утюга
9. Можно регулировать количество пара с помощью специального регулятора подачи пара (6) –
только для PS05/B и PS09/D.
10. Если во время работы уменьшается количество подаваемого пара, и загорелась сигнальная
лампочка отсутствия воды (5), это значит, что вода в бойлере заканчивается (бойлер еще не
совсем без воды). Чтобы продолжить глажение, необходимо: отключить кнопку бойлера (3),
вывести оставшийся пар в бойлере через утюг с помощью кнопки подачи пара (8) до
полного прекращения выхода пара, отключить кнопку утюга (4), медленно и осторожно
открутить предохранительную пробку бойлера (1), разрешая выйти оставшемуся в бойлере
пару, отсоединить вилку шнура питания от электросети, через несколько минут наполнить
бойлер водой, по возможности горячей.
11. При первом нажатии кнопки пара (8) после включения может произойти снижение давления,
что обусловлено необходимостью заполнения внутренних емкостей машины. Для получения
максимального пара подождать, пока погаснет кнопка-выключатель бойлера.
12. Всегда можно контролировать давление в бойлере, смотря на манометре (10) – только для
PS09/D.
ВНИМАНИЕ:
- Не оставлять аппарат включенным в электросеть без присмотра.
- Во время пользования подошва утюга (10) может достигать высоких температур, которые
- поддерживаются в течение 15 минут и после отключения электроприбора. Внимание:
существует
- опасность обжечься, даже если аппарат находится в отключенном состоянии!
- Перед наполнением бойлера водой обязательно отключить прибор от электросети.
- Во время работы аппарата запрещается открывать предохранительную пробку бака. Всегда,
перед тем как открывать предохранительную пробку бака, убедитесь в отсутствии
скопившегося пара в бойлере. Для этого пользуйтесь кнопкой подачи пара утюга.
- В аппарате вмонтирован термический механизм отключения, который может быть заменен
только
- компетентным персоналом тех. обслуживания
- При замене предохранительной пробки бойлера (1) – запчасти должны быть только
оригинальными.
ПРИМЕЧАНИЕ:
Для увеличения срока службы и более эффективного использования парогенератора, советуем
использовать обычную воду. Для очистки бойлера от накипи советуем периодически промывать его
простой водой. (Например: через каждые 15-20 литров заправки или ежемесячно; споласкивать
бойлер, наполняя и выливая чистой водой)
Page 15

Русский
ТЕХ. ХАРАКТЕРИСТИКИ:
Термостат утюга регулируемый, настроен от 60С – 215С
Биметаллический термостат безопасности утюга, отрегулирован 275С
Мощность нагревательного элемента утюга: 800W – 230V полностью впаян в алюминиевую подошву
утюга
Мощность бойлера: 1000W
Рабочее давление: 2,5 бар
Максимальное давление: 5,5 бар
Номинальный объем бойлера (сталь INOX 18/10): 2,5 л.
РАЗРЕШЕНИЕ ВСТРЕЧАЮЩИХСЯ ПРОБЛЕМ
ПРОБЛЕМА
ОБЪЯСНЕНИЕ
РАЗРЕШЕНИЕ
1) Выходит
пар (мало)
из бойлера
Возможно во время наполнения бойлера
случайное попадание воды вне котла,
намочив изоляционное покрытие
Пользоваться электроприбором в обычном порядке, чтобы в
результате исходящего тепла изоляционное покрытие
высохло. Если в течение часа (вкл. аппарат) проблема не
разрешилась, обратиться в тех. обслуживание.
2) Из утюга
выходит пар
смешанный с
водой
Видимо, во время наполнения было
залито больше воды, чем предусмотрено,
поэтому пока излишек воды не будет
удален, проблема не устраниться.
Освободить аппарат от излишка воды (выполнять
внимательно все пункты инструкции по выводу пара, перед
тем как открывать предохранительную пробку бойлера)
Подошва утюга недостаточно нагрета
(Внимание: подошва утюга должна
разогреться, перед тем как подавать
пар)
Убедиться, что регулятор температуры утюга установлен в
позиции, позволяющей при глажении подачу сухого пара
3) Из утюга
не выходит
пар
Возможно, регулятор подачи количества
пара (где предусмотрено) закрыт
Открыть регулятор подачи количества пара, подкручивая по
часовой стрелке
Световая кнопка утюга выключена
Нажать кнопку утюга, которая загорится, подтверждая
подключение к сети. Подождать, где-то 4 мин. пока утюг
нагреется
Световая кнопка бойлера отключена
Нажать кнопку бойлера, которая загорится. Подождать (10
мин.) пока вода в котле нагреется и выработает пар
Закончилась вода в бойлере (сигнальная
лампочка отсутствия воды загорелась)
Наполнить бойлер водой, внимательно следуя инструкции
4)
Гладильная
доска
намочена
или влажная
Возможно, чехол рабочей поверхности
доски во время глажения с паром не
успевает высохнуть
Попробовать подложить еще ткань или другой чехол, создать
рабочую поверхность более плотной, которая быстрее
испаряет влажность. Если Вы используете глад. Доску с
подогревом и отсосом воздуха, включайте функцию отсоса
воздуха каждый раз как пользуетесь паром. Установить
подачу пара на минимум, с помощью регулятора подачи
количества пара (в мод. где предусмотрено)
Возможно, из утюга выходит пар
смешанный с водой (попробовать
направить пар на отдельную сухую
ткань)
Смотри выше «Из утюга выходит пар смешанный с водой»
5) Из утюга
выходит
грязная вода
Возможно, что в бойлер с водой попала
грязь, которая потом просочилась в утюг
Наполнить пустой бойлер 1 л. воды, закрыть крышкой,
взболтать, открыть крышку и вылить воду. Повторить до тех
пор, пока выходящая вода не будет чистой. Воспрещается
производить любые хим. добавки. Воспроизвести глажение,
попробовав сначала направить пар на отдельную тряпку,
прочищая, таким образом, внутренние паровые проходы,
которые могут быть еще грязными, пока выходящий пар не
будет чистым
Указанные данные и фотографии могут быть изменены без предварительного предупреждения для
улучшения работы парогенератора.
Page 16

ITALIANO
AVVERTENZE PER IL CORRETTO SMALTIMENTO DEL PRODOTTO AI SENSI DELLA
DIRETTIVA EUROPEA 2002/96/EC
Alla fine della sua vita utile il prodotto non deve essere smaltito insieme ai rifiuti urbani.
Può essere consegnato presso gli appositi centri di raccolta differenziata predisposti dalle
amministrazioni comunali, oppure presso i rivenditori che forniscono questo servizio.
Smaltire separatamente un elettrodomestico consente di evitare possibile conseguenze
negative per l’ambiente e per la salute derivanti da un suo smaltimento inadeguato e
permette di recuperare i materiali di cui è composto al fine di ottenere un importante
risparmio di energia e di risorse. Per rimarcare l’obbligo di smaltire separatamente gli
elettrodomestici, sul prodotto è riportato il marchio del contenitore di spazzature mobile
barrato.
DICHIARAZIONE DI CONFORMITA’ CE
Gemme Italian Producers srl dichiara sotto la propria responsabilità che i prodotti PS25PS05/B e PS09/d ai quali è riferita questa dichiarazione, sono conformi alle seguenti
norme: CEI EN 60335-1, CEI EN 60335-2-3
Dichiara inoltre che i prodotti sopra indicati risultano conformi in base alle prove di
compatibilità elettromagnetica EMC.
NB: La presente dichiarazione perde la sua validità se la macchina viene modificata senza
la nostra espressa autorizzazione.
ENGLISH
IMPORTANT INFORMATION FOR CORRECT DISPOSAL OF THE PRODUCT IN
ACCORDANCE WITH EC DIRECTIVE 2002/96/EC
At the end of its working life, the product must not be disposed of as urban waste. It
must be taken to a special local authority differential waste collection centre or to a
dealer providing this service. Disposing of a household appliance separately avoids
possible negative consequences for the environment and health deriving from
inappropriate disposal of enables the constituent materials to be recovered to obtain
significant savings in energy and resources. As a reminder of the need to dispose of
household appliances separately, the products is marked with a crossed-out wheeled
dustbin.
EC DECLARATION OF CONFORMITY
Gemme Italian Producers srl declares under its own responsibility that the products PS25
–PS05/B and PS09/D, to which this declaration relates, are in accordance with the
provisions of the specific directives:CEI EN 60335-1 / CEI EN 60335-2-3
It also declares that the above mentioned products conform with the electromagnetic
compatibility test EMC.
NB: The present declaration voids, should the machines be modified without our specific
authorization.
FRANÇAIS
AVERTISSEMENT POUR L’ÉLIMINATION CORRECTE DU PRODUIT AUX TERMES DE
LA DIRECTIVE EUROPÉENE 200/96/EC
Au terme de son utilisation, le produit ne doit pas être éliminé avec les déchets urbains.
Le produit doit être remis à l’un des centres de collecte sélective prévus par
l’administration communale ou auprès des revendeurs assurant ce service. Éliminer
séparément un appareil électroménager permet d’éviter les retombées négatives pour
l’environnement et la santé dérivant d’une élimination incorrecte, et permet de récupérer
les matériaux qui le composent dans le but d’une économie importante en termes
d’énergie et de ressources. Pour rappeler l’obligation d’éliminer séparément les appareils
électroménagers, le produit porte le symbole d’un caisson à ordures barré.
DECLARATION DE CONFORMITE CE
Gemme Italian Producers srl déclare que les produits PS25 –PS05/B et PS09/D à
laquelle se réfère cette déclaration sont fabbriqués selon les prescriptions des directives
spécifiques:
CEI EN 60335-1 / CEI EN 60335-2-3
Il déclare aussi que le produit se conforme à les essais de compatibilité
électromagnétique EMC.
NB: La Présente déclaration perd sa validité dés lors que la machine est modifiée sans
notre expresse autorisation.
Castegnato, 02/11/2014
Amministratore Delegato
Page 17

DEUTSCH
WICHTIGER HINWEIS FÜR DIE KORREKTE ENTSORGUNG DES PRODUKTS IN
ÜBEREINSTIMMUNG MIT DER EG-RICHTLINIE 2002/96/EG
Am Ende seiner Nutzzeit darf das Produkt NICHT zusammen mit dem Siedlungsabfall
beseitigt werden. Es kann zu den eigens von den städtischen Behören eingerichteten
Sammelstellen oder zu den Fachhändlern, die einen Rücknahmeservice anbieten,
gebracht werden. Die getrennte Entsorgung eines Haushaltsgerätes vermeidet mögliche
negative Auswirkungen auf die Umwelt und die menschliche Gesundheit, die durch eine
nicht vorschriftsmäßige Entsorgung bedingt sind. Zudem ermöglicht wird die
Wiederverwertung der Materialien, aus denen sich das Gerät zusammensetzt, was
wiederum eine bedeutende Einsparung an Energie und Ressourcen mit sich bringt. Zur
Erinnerung an die Verpflichtung, die Elektrohaushalsgeräte zu beseitigen, ist das Produkt
mit einer Mülltonne, die durchgestrichen ist, gekennzeichnet.
CE–KONFORMITÄTSERKLÄRUNG
Gemme Italian Producers srl erklärt auf einige Verantwortung, dass die Produkte PS25 –
PS05/B und PS09/D, auf das sich diese Erklärung bezieht, der Vorschriften der
spezifischen Richtlinien CEI EN 60335-1 / CEI EN 60335-2-3
entsprechen.
Die o.g. Firma erklärt, dass die oben genannten Produkte gemäß der EMC
elektromagnetischen Verträglichkeitstesten produziert sind.
NB: Die vorliegende Erklärung verliert Ihre Gültigkeit, wenn die Maschine ohne unsere
ausdrückliche Genehmigung verändert wird.
ESPAÑOL
ADVERENCIAS PARA LA ELIMINACIÓN CORRECTA DEL PRODUCTO SEGÚN
ESTABLECE LA DIRECTIVA EUROPEA 2002/96/CE
Al final de su vida util, el productio no dbe eliminarse junto a los deschos urbanos. Puede
entregarse a centros especificos de recogida difenciada dispuestos por lad
administraciones municipales, o a distribuidores que facilitan este servicio. Eliminar por
serarado un electrodoméstico significa evita posibles consecuencias negativas para el
medio ambiente y la salud deivadas de una eliminación inadecuada y permite reciclar los
materiales que lo componen, obteniendo así un ahorro importante de energia y recursos.
Para subrayar la obligación de eliminar por separado los electrodomésticos, en el
producto aparece un contenedor de basura móvil tachado.
DECLARACIÓN DE CONFORMIDAD CE
Gemme Italian Producers srl declara bajo nuestra responsabilidad que los productos
PS25 – PS05/B y PS09/D, al cual se refiere esta Declaración, están de acuerdo con lo
prescrito por las especificas directivas:
CEI EN 60335-1 / CEI EN 60335-2-3
La empresa declara también que los productos están de acuerdo con las pruebas de
compatibilidad electromágnetica EMC.
NB: La presente declaraciòn pierde su validez si las máquinas son modificadas sin
nuestra expresa autorización.
ROMANA
AVERTISMENTE PENTRU CORECTA ELIMINARE A PRODUSULUI DEVENIT DESEU
IN BAZA DIRECTIVEI EUROPENE 2002/96/EC
La sfarsitul vietii de folosinta a produsului nu trebuie aruncat impreuna cu gunoaiele
urbane. Poate fi trimis la centrele de colectare diferentiata organizata de administratia
primariilor sau vanzatorilor care furnizeaza acest serviciu. Colectarea separata a unui
electrocasnic permite evitarea posibilelor consecinte negative pentru ambiant si pentru
sanatate derivate de la o colectare inadecvata si permite recuperarea materialelor din
care este compus pentru a obtine o importanta economie de energie si resurse. Pentru a
remarca obligarea de colectare separata a electrocasnicelor, pe produs se gaseste
simbolul containerului de gunoi barat.
DECLARATIE DE CONFORMITATE CE
Gemme Italian Producers srl
Declara pe propria raspundere ca produsele PS25 - PS05/B - PS09/D, la care se refera
aceasta declaratie sunt conform urmatoarelor norme:
CEI EN 60335-1, CEI EN 60335-2-3
In plus declara ca produsele indicate mai sus rezulta conforme pe baza probelor de
compatibilitate electromagnetica ca EMC.
ATENTIE: Prezenta declaratie pierde propria valabilitate daca masina este modificata fara
autorizarea noastra expresa.
Castegnato, 2/11/2014
Amministratore Delegato
Page 18

PУССКИЙ
УКАЗАНИЯ ПО КОРРЕКТНОМУ ИЗБАВЛЕНИЮ ОТ ИЗДЕЛИЯ В СООТВЕТСТВИИ С
ЕВРОПЕЙСКОЙ ДЕРЕКТИВОЙ 2002/96/ЕС
По окончании срока службы, электроприбор не следует помещать в общий контейнер
с мусорными отходами. Его можно сдать в специальные центры по сбору
дифференциальных отходов, предоставленных административными
муниципалитетами, или в специализированные фирмы, которые занимаются таким
обслуживанием. Раздельная переработка электроприборов позволяет избежать
возможные негативные последствия, возникающие из-за не соответствующей
переработки отходов, для окружающей среды и здоровья общества. Дает
возможность достигнуть значительной экономии энергии и ресурсов, благодаря
повторному использованию материалов изготовления электроприбора. Чтобы
подчеркнуть обязательство сдачи электроприбора на раздельную переработку, на
изделие нанесена маркировка в виде зачеркнутого передвижного мусорного
контейнера.
ДЕКЛАРАЦИЯ О СООТВЕТСТВИИ ДИРЕКТИВАМ ЕЭС
Gemme Italian Producers srl заявляет с полной ответственностью, что изделие PS25
– PS05/B и PS09/D, к которым относится эта декларация, соответствуют
следующим нормам: CEI EN 60335-1, CEI EN 60335-2-3
Заявляет также, что вышеуказанные изделия отвечают требованиям, на основании
результатов тестирования по электромагнитной совместимости ЕМС.
НОТА: Настоящая декларация теряет свою силу, если в данное оборудование будут
внесены какие-либо изменения без нашего официального разрешения.
Castegnato, 2/11/2014
Amministratore Delegato
ENGLISH
WARRANTY TERMS
LEGAL WARRANTY
This product is covered by the warranty laws valid in the country where the product has been sold; specific information
about the warranty terms can be given by the seller or by the importer in the country where the product has been
purchased. The seller or importer is completely responsible for the product.
The importer is completely responsible also for the fulfillment of the laws in force in the country where the importer
distributes the product, including the correct disposal of the product at the end of its working life.
Inside the European countries the laws in force are the national laws implementing the EC Directive 44/99/CE.
FRANCAIS
CONDITIONS DE GARANTIE
GARANTIE LEGALE
Ce produit est couvert par les normes de garantie en vigueur dans le pays où il a été vendu; informations plus
spécifiques peuvent être fournies par le revendeur ou par l'importateur dans le pays où le produit a été acheté; le
revendeur ou l'importateur est complètement responsable de ce produit.
L'importateur est complètement responsable même pour l'accomplissement des lois en vigueur dans le pays où
l'importateur distribue le produit, y compris la correcte élimination du produit au terme de son utilisation.
Dans les pays européens il faut prendre en considération les lois nationales relatives à l'application de la Directive EC
44/99/CE.
DEUTSCH
GARANTIEBEDINGUNGEN
GESETZLICHE GARANTIE
Dieses Produkt ist von den Gesetzten gedeckt, die in dem Land gültig sind, wo das Produkt verkauft wurde. Mehrere
Informationen darüber kann der Händler oder der Importeur geben, der für das verkaufte Produkt völlig verantwortlich
ist.
Der Importeur ist auch für die Vollziehung der Gesetzte im dem Land, wo das Produkt verteilt wurde, völlig
verantwortlich. Das enthält auch die Anordnung der korrekten Entsorgung des Produkts am Ende seiner Nutzzeit.
In den EU-Ländern sind die staatlichen Gesetzte bezüglich der EU Richtlinie 44/99/CE zu betrachten.
ITALIANO
Page 19

CONDIZIONI DI GARANZIA
GARANZIA LEGALE
Questo prodotto è soggetto alle norme di garanzia vigenti nello stato in cui viene venduto; informazioni specifiche in
merito verranno fornite dal rivenditore o dall’importatore dello stato in cui avete acquistato il prodotto, che ne è
completamente responsabile.
L’importatore è completamente responsabile anche degli adempimenti necessari a norma di legge dello stato in cui
l’importatore stesso distribuisce il prodotto, compreso la gestione dello smaltimento a fine vita del prodotto.
Nei paesi europei fanno riferimento le leggi nazionali di attuazione della Direttiva Comunitaria 44/99/CE.
GARANZIA DEL PRODUTTORE VALIDA SOLO SUL TERRITORIO ITALIANO PER I PRODOTTI DISTRIBUITI DA
RIVENDITORI AUTORIZZATI “LELIT”
La garanzia del produttore di 24 mesi e di 5 anni totali per il solo componente caldaia interna in acciaio (estensione di garanzia
valida solo ed esclusivamente per gli articoli PS20, PS21, PS25, PS05/B, PS09/D, PS1N) è valida per il territorio italiano e
comunque non sostituisce le leggi in vigore qualora queste ultime risultino migliorative per il consumatore.
La garanzia si intende nella sostituzione o riparazione gratuita dei pezzi che presentano difetti di fabbrica. Sono pertanto
esclusi dalla garanzia:
- le parti estetiche;
- i danni provocati da cattivo uso e/o da uso improprio;
- i fenomeni non dipendenti dal normale funzionamento della macchina;
- le parti soggette a normale usura;
- i danni da trasporto, ovvero danni da circostanze e/o eventi causati da forza maggiore che comunque non possono
farsi risalire a difetti di fabbricazione del prodotto;
- la manutenzione o le riparazioni eseguite da personale non autorizzato e/o dall’utilizzo di ricambi non originali;
- la mancata osservanza delle istruzioni per l’uso e/o la manutenzione riportate nel libretto in dotazione al prodotto.
La garanzia non si estende mai temporalmente oltre quanto indicato, non prevede l’obbligo di risarcimento danni di
qualsiasi natura eventualmente subiti da persone e/o cose, non prevede l’obbligo di sostituzione del prodotto.
Affinché la presente garanzia del produttore abbia piena validità nel corso del periodo indicato, è necessario che:
- il prodotto sia acquistato ed utilizzato per scopi domestici e comunque non da persone giuridiche, società o attività
professionali di fatto;
- tutte le operazioni di installazione e collegamento del prodotto alle reti energetiche (elettriche e idriche) siano
effettuate seguendo scrupolosamente le indicazioni riportate nel libretto di istruzioni d’uso;
- tutte le operazioni di utilizzo del prodotto, così come la manutenzione periodica, avvengano secondo le prescrizioni e
indicazioni riportate nel libretto di istruzioni d’uso;
- qualunque intervento di riparazione sia eseguito dal personale autorizzato dal produttore e che i ricambi utilizzati
siano esclusivamente quelli originali;
- Il prodotto venga consegnato e ritirato dal consumatore a sue spese e responsabilità all’indirizzo autorizzato dal
produttore; l’elenco degli indirizzi autorizzati è disponibile sul sito www.lelit.com alla pagina assistenza.
Per l’applicazione della garanzia è indispensabile presentare un documento (scontrino fiscale o fattura) comprovante la data
d’acquisto; in mancanza di esso, la garanzia decorre dalla data di produzione del prodotto riportata sullo stesso.
Manomissioni di personale non autorizzato fanno decadere automaticamente ogni forma di garanzia.
Qualora il prodotto venga acquistato e/o utilizzato da società, persone giuridiche o attività professionali di fatto, la
garanzia è di 12 mesi.
РУССКИЙ
ГАРАНТИЙНЫЕ ОБЯЗАТЕЛЬСТВА
Эта продукция защищена гарантийным законом, действующим в стране, где она была продана; конкретная
информация о гарантийных сроках может быть дана продавцом/импортером в стране, где продукция была
куплена. Продавец/импортер полностью ответственны за эту продукцию. Импортер ответственен за выполнение
действующих законов в стране, где распространяет продукт, включая правильную утилизацию продукта по
окончании его срока службы.
В европейских странах действуют национальные законы, которые осуществляют деятельность Директивы
44/99/CE EC.
Page 20

Gemme Italian Producers srl
Via del Lavoro 45 - I - 25045 Castegnato (BS) Italy
Tel: +39 030 2141199 - Fax: +39 030 2147637
www.lelit.com - lelit@lelit.com - P.Iva 03426920173
 Loading...