

Page 1
PL1S-PL2S
MANUALE ISTRUZIONI - INSTALLAZIONE - USO - MANUTENZIONE
INSTRUCTION MANUAL - INSTALLATION - USE - MANUTENANCE
GEBRAUCHSANWEISUNGEN - INSTALLATION - GEBRAUCH - WARTUNG
ИНСТРУКЦИЯ ПО ЭКСПЛУАТАЦИИ - УСТАНОВКЕ - ИСПОЛЬЗОВАНИЮ ТЕХНИЧЕСКОМУ ОБСЛУЖИВАНИЮ
MANUAL DE INSTRUCTIUNI - INSTALARE - UTILIZARE - INTRETINERE
MANUEL D’INSTRUCTIONS - INSTALLATION - USAGE - MAINTENACE
Page 2

Italiano
English
Deutsch
Русский
Romana
Manuale istruzioni Pag. 6
……………………………………………………………………………………………………………...
Instruction manual Page 19
……………………………………………………………………………………………………………...
Gebrauchsanweisungen Seite 32
……………………………………………………………………………………………………………...
Инструкция по эксплуатации Стр. 45
……………………………………………………………………………………………………………...
Manual de instructiuni Pag. 58
……………………………………………………………………………………………………………...
Pag. 2
Page 3
Castegnato, via del Lavoro 45/47 (BS) ITALY
Amministratore Delegato
Dichiarazione di conformità CE - EC Declaration of conformity - Declaration de conformite CE
EG Konformitätserklärung - Декларация соответствия CE
GEMME ITALIANS PRODUCERS srl
Dichiara sotto la propria responsabilità che il prodotto: Macchina per caffè per uso professionale
Declare that the following product: Espresso coffee machines for professional use
Déclare que les produits suivants: Machines à café expresso pour usage professionnel
Erklärt, dass die folgenden Produkte: Gewerbe Espresso Kaffeemaschinen
Заявляют, что следующий продукт: кофемашина-эспрессо для профессионального использования,
• Apparecchio/Appliance/Appareil/Gerätes/ Прибор
• Marca/Brand/Marque/Marke/ Марка (vedere targa dati)
• Fabbricante/Manufacturer/Fabricant/Hersteller/ Производитель (refer to machine data)
• Tipo di macchina/Type of machine/Type de la machine (voir étiquette donne)
Maschinentypen/Модель (siehe Angaben zum Maschinentyp)
• N° della macchina/Serial number/N° de la machine (смотреть машинные данные)
Maschinen-Nummer/ Номер машины
al quale è riferita questa Dichiarazione, è conforme alle seguenti direttive:
to which this declaration relates is in compliance with the following directives:
à laquelle se réfère cette dèclaration, est conforme aux normatives suivantes:
auf das sich diese Erklärung bezieht, entspricht den folgenden Gesetzesbestimmungen:
к которой относится настоящая декларация, соответствует требованиям следующих директив:
2006/42/EC Direttiva machine/EC Machinery Directive/Normes CE Machines/EG-Maschinenrichtlinie
Директива по машинному оборудованию
2006/95/EC Direttiva bassa tensione/EC Low Voltage Directive/Normes CE Basse-tension
EG-Niederspannungrichtlinie/ Директива по низкому напряжению
97/23/EC Direttiva attrezzature a pressione (PED) (Vedere art. 1, § 3.6. - Vedere tabella nella pagina successiva)
Pressure Equipment Directive (PED) (See art. 1, § 3.6. - See chart in the following page)
Directive èquipements sous Pression (PED) (Voir art. 1, § 3.6. - Voir tableau dans la page suivant)
Richtlinie-Druckgeräte (PED) (Siehe art. 1, § 3.6. - Siehe Tabelle auf der nächsten Seite)
Директива по Работе под давлением. (PED) (по статью. 1, § 3.6. – как написано в таблице на след. стр.)
2004/108/EC EMC - EC Electromagnetic Compatibility directive/Normes CE Compatibilité électromagnétique
EG-Richtlinie Elektromagnetische Verträglichkeit/ Директива по электромагнитной совместимости.
2011/65/UE Direttiva RoHS2/RoHS2 directive/Normes RoHS2/RoHS2-Richtlinie/ Директива RoHS2
e successive modifiche ed integrazioni/and later modifications and integrations.
et modifications ultérieures et integrations/sowie den nachfolgenden Änderungen und Ergänzungen.
La presente dichiarazione perde la sua validità nel caso in cui l’apparecchio venga modificato senza espressa autorizzazione del costruttore oppure se
installato o utilizzato in modo non conforme a quanto indicato nel manuale d’uso e nelle istruzioni. Il fascicolo tecnico è archiviato da "Product
Development Manager" presso la sede legale.
This declaration is null and void if the machine is modified without the express authorization of the manufacturer or if improperly installed and used in
such a way that does not comply with indications in the users’ manual and the instructions. The technical booklet is archived by the "Product
Development Manager" at the company's legal headquarters.
La présente déclaration perd toute validité dans le cas où l’appareil est modifié sans l’autorisation du constructeur ou si l’appareil est installé ou utilize
de façon non conforme à ce qui est indiqué dans le manuel et dans le mode d’emploi. Le fascicule technique est archivé par "Product Development
Manager" auprès du siège juridique.
Die vorliegende Bescheinigung verliert ihre Gültigkeit, falls das Gerät ohne ausdrückliche Genehmigung des Hersteller modifiziert werden sollte oder
falls es nicht entsprechend der im Bedienungs- und Wartungshandbuch aufgeführten Anleitungen installiert oder benutzt werden sollte. Die technischen
Unterlagen wurden vom "Product Development Manager" am Geschäftssitz archiviert.
Эта декларация теряет силу в том случае, если устройство модифицированной без специального разрешения производителя, установлено
неправильно или используется не в соответствии с указаниями Руководства по эксплуатации. Технический файл сохраняется в качестве
«менеджера по развитию продуктов" в зарегистрированном офисе.
и более поздние модификации и интеграции
Pag. 3
Page 4
P max
[bar]
T max
[°C]
Fluido
Fluid
Fluide
Flüssig
Жидкость
Fluid
Capacità It/Capacity It
Capacité It/ Fähigkeit It/
Объем л / Capacitate lt
PL1S
PL2S
PL3S
Caldaia/Boiler
Chaudière/Kessel
Бойлер / Cazan
2
133
Acqua/Vapore
Water/Steam
Eau/Vapeur
Wasser/Dampf
Вода/Пар
Apa/Abur
5
10
-
Giulietta
S
Scambiatore
Exchanger
Echangeur
Austauscher
Теплообменник
Schimbator
12
133
Acqua
Water
Eau
Wasser
Вода
Apa
0,5
(x1)
0,5
(x2)
-
Descrizione attrezzatura a pressione/Pressure device description/Description de l’appareille sous pression
Beschreibung der unter Druckstehenden Gerät/ Описание прибора под давлением / Descrierea aparatului sub presiune
LELIT si riserva il diritto di apportare cambiamenti all'equipaggiamento della macchina a seconda delle esigenze di singoli
Paesi e di effettuare modifiche dovute agli avanzamenti del progresso tecnico.
LELIT has the right to make changes to the machine according to the needs of the different individual countries and
according to the advancement of the technical progress.
LELIT behält sich das Recht vor, Änderungen an der Maschine nach den Bedürfnissen der einzelnen Länder und
Veränderungen aufgrund der Weiterentwicklung des technischen Fortschritts zu machen.
LELIT имеет право вносить изменения в машины в соответствии с потребностями различных отдельных стран и в
соответствии с развитием технического прогресса.
Pag. 4
Page 5
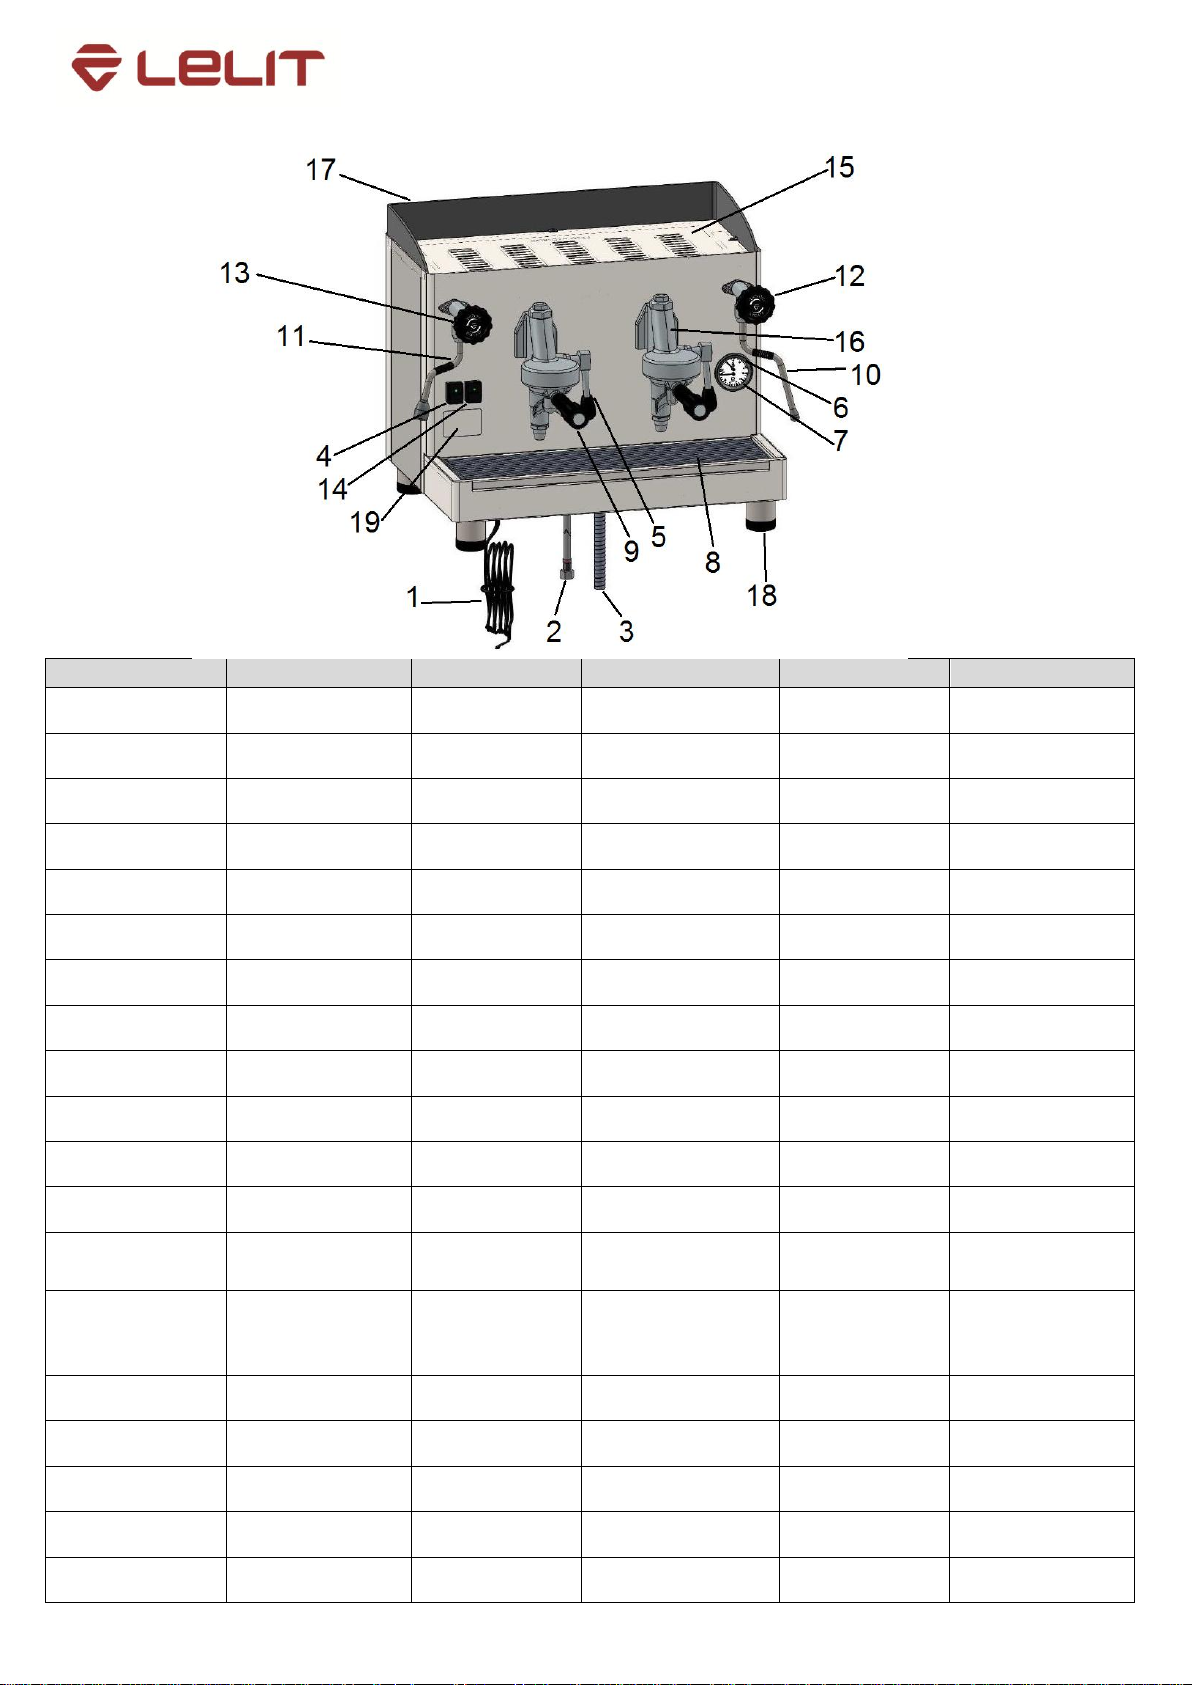
IT LEGENDA
EN LEGEND
FR LEGENDE
DE LEGENDE
RO
RUS
1 Cavo di
alimentazione
1 Power cord
1 Cable
d‘alimentation
1 Kabel
1 Cablu de
alimentare
1 Шнур питания
2 Tubo allacciamento
idrico
2 Tube for water
connection
2 Tuyau pour le
raccordement de l‘eau
2 Rohr für
Wasseranschluß
2 Tub conectare
hidrica
2 Труба для
подключения воды
3 Tubo di scarico
3 Water draining tube
3 Tuyau
d‘évacuation
3 Ablaßleitung
3 Tub de descarcare
3 Труба для слива
воды
4 Interruttore generale
4 Main switch
4 Interrupteur
général
4 Hauptschalter
4 Intrerupator
general
4 Включатель
главный
5 Leva erogazione
caffè
5 Coffee distribution
lever
5 Levier distribution
café
5 Hebel für
Kaffeeabgabe
5 Maner erogare
cafea
5 Рычаг подачи кофе
6 Manometro press.
caldaia vapore
6 Steam boiler
pressure manometer
6 Manomètre pression
chaudière vapeur
6 Manometer für
Dampfkessel
6 Manometru
presiune cazan abur
6 Манометр
давления пара в
7 Manometro
pressione pompa
7 Pump pressure
manometer
7 Manomètre pression
pompe
7 Manometer für
Pumpendruck
7 Manometru
presiune pompa
7 Манометр
давления насоса
8 Bacinella
appoggiatazze
8 Cup and water tray
8 Grille appuie-
tasses
8 Abtropfschale
8 Grila pentru cesti
8 Поддон для чашек
9 Portafiltro
9 Filterholder
9 Porte-filtre
9 Filterträger
9 Port-filtru
9
Фильтродеражатель
10 Lancia vapore
10 Steam wand
10 Tube vaporisant
10 Dampfausgaberohr
10 Tub abur
10 Паровой кран
11 Lancia acqua
calda
11 Hot water wand
11 Bec débit eau
chaude
11 Heißwasserausgabe
11 Distributor apa
calda
11 Кран для выдачи
горячей воды
12 Manopola
erogazione vapore
12 Steam knob
12 Bouton distribution
vapeur
12 Dampfdrehknopf
12 Buton erogare
abur
12 Регулятор пара
13 Manopola
erogazione acqua
calda
13 Hot water knob
13 Bouton distribution
eau chaude
13 Drehknopf für
Heißwasserabgabe
13 Buton erogare
apa calda
13 Регулятор горячей
воды
14 Interruttore
scaldatazze (optional)
14 Switch for electrical
cup warmer (optional)
14 Interrupteur pour
chauffe-tasses
électrique (facultatif)
14 Schalter für
elektronischen
Tassenerwärmer
(Zubehöre)
14 Intrerupator
incalzitor cesti
(optional)
14 Включатель для
электрического
подогрева чашек
(опционально)
15 Piano
appoggiatazze
15 Passive cup
warmer
15 Surface chauffe-
tasses
15 Passiv geheizte
Tassenwarmhalterfläche
15 Incalzitor cesti
15 Пассивный
подогрев чашек
16 Gruppo erogazione
caffè
16 Coffee distribution
grouphead
16 Groupe
distribution cafè
16 Abgabe-Einheit
Kaffee
16 Grup erogare
cafea
16 Кофейные группы
17 Vetrinetta
17 Cup holder
17 Support pour les
tasses
17 Tassenhalter
17 Vitrina sustinere
cesti
17 Держатель чашек
18 Piedini regolabili
18 Adjustable feet
18 Pieds réglables
18 Regelbare Füße
18 Picioare reglabile
18 Регулируемые
ножки
19 Targa dati
19 Technical
nameplate
19 Etiquette
données techniques
19 Datenschild
19 Eticheta date
tehnice
19 Техническая
табличка
Pag. 5
Page 6

Gentile Cliente,
La ringraziamo per aver acquistato un nostro prodotto, costruito secondo le ultime innovazioni tecnologiche. Seguendo
scrupolosamente le semplici operazioni riguardanti l’uso corretto del nostro prodotto in conformità alle prescrizioni
essenziali di sicurezza indicate nel presente manuale, potrà ottenere il massimo delle prestazioni e verificare la notevole
affidabilità di questo prodotto nel corso degli anni.
Le auguriamo buon lavoro.
INDICE GENERALE
PRESCRIZIONI
Dichiarazione CE pag.3
Tabella PED pag.4
Descrizione legenda pag.5
Indice generale pag.6
1. Informazioni generali pag.7
2. Informazioni sull’installazione pag.7
3. Informazioni elettriche di installazione pag.8
4. Collegamento equipotenziale pag.8
5. Informazioni idrauliche di installazione pag.9
6. Messa in funzione pag.9
7. Check-up di installazione pag.9
8. Informazioni per l’operatore pag.10
9. Avvertenze pag.11
10. Manutenzione e riparazioni pag.11
USO
11. Accensione pag.12
12. Riscaldamento pag.12
13. Erogazione caffè pag.12
14. Preparazione altre bevande calde pag.13
15. Pulizia e manutenzione pag.14
16. Anomalie e guasti pag.15-16
17. Consigli – Suggerimenti – Immagini pag.17-18
Messa fuori servizio definitiva pag. 71
Pag. 6
Page 7

1 – INFORMAZIONI GENERALI
Leggere attentamente le avvertenze e le prescrizioni contenute nelle istruzioni di installazione, uso e
manutenzione prima di utilizzare o manipolare in qualsiasi modo la macchina, in quanto forniscono
importanti indicazioni riguardanti la sicurezza ed il rispetto della corretta prassi igienica nell'uso della
macchina stessa.
Conservare questo libretto per ogni ulteriore consultazione.
QUESTI CAPITOLATI SONO AD USO DEL PERSONALE TECNICO QUALIFICATO ED AUTORIZZATO
2 – INFORMAZIONI SULL‘INSTALLAZIONE
L’installazione, lo smontaggio e le regolazioni devono essere eseguite esclusivamente da personale
tecnico qualificato e autorizzato.
Leggere attentamente le avvertenze e le prescrizioni contenute nelle istruzioni di installazione, uso e
manutenzione prima di utilizzare o manipolare in qualsiasi modo la macchina, in quanto forniscono
importanti indicazioni riguardanti la sicurezza di installazione, d’uso e di manutenzione.
Conservare questo libretto per ogni ulteriore consultazione.
La macchina è prevista unicamente per la preparazione di caffè espresso e bevande calde mediante acqua calda
o vapore e per il preriscaldamento delle tazzine.
La macchina deve essere installata in un luogo dove possa essere usata solo da personale opportunamente
formato ed informato sui rischi d’uso della stessa.
La macchina è destinata all’uso professionale.
La macchina non può essere usata da bambini o da persone le cui capacità fisiche, sensoriali o mentali siano
ridotte; nel caso d’uso di dette persone queste devono essere sorvegliate.
I bambini devono essere sorvegliati affinchè non giochino con la macchina.
La macchina non può essere lasciata incustodita e utilizzata all’esterno.
Se la macchina viene immagazzinata in locali in cui la temperatura può scendere sotto il punto di congelamento,
vuotare in ogni caso la caldaia e le tubazioni di circolazione acqua.
Non lasciare la macchina esposta ad agenti atmosferici (pioggia, sole, gelo).
Non pulire la macchina con getti d’acqua.
La rumorosità della macchina non supera i 70 dB(A).
In caso di danneggiamento del cavo di alimentazione, lo stesso deve essere sostituito solo da personale tecnico
qualificato ed autorizzato.
Ogni utilizzazione diversa da quella sopra descritta è impropria e può essere fonte di pericolo; il produttore non
assume responsabilità alcuna in caso di danni risultanti da un uso improprio della macchina.
Il personale addetto allo spostamento della macchina deve essere a conoscenza dei rischi legati alla
movimentazione dei carichi. Movimentare la macchina prestando sempre la massima attenzione, utilizzando un
mezzo di sollevamento adeguato (tipo carrello elevatore). Nel caso di movimentazione manuale assicurarsi di:
essere un numero adeguato di persone in funzione del peso e della difficoltà di presa della macchina. Utilizzare
sempre e comunque i necessari dispositivi antinfortunistici (scarpe, guanti).
Dopo aver tolto l'imballaggio assicurarsi dell'integrità della macchina e dei dispositivi di sicurezza.
Gli elementi dell’imballaggio (sacchetti in plastica, polistirolo espanso, chiodi, ecc.) non devono essere lasciati
alla portata dei bambini in quanto potenziali fonti di pericolo.
Prima di collegare la macchina accertarsi che i dati di targa siano rispondenti a quelli della rete di distribuzione
elettrica ed idrica.
Svolgere per tutta la sua lunghezza il cavo di alimentazione; in caso di danneggiamento, lo stesso deve essere
sostituito solo da personale tecnico qualificato ed autorizzato.
La macchina per caffè deve essere appoggiata su una superficie piana e stabile, ad una distanza minima di 20
mm dalle pareti e dalla superficie d'appoggio; inoltre deve essere installata tenendo conto che la superficie di
appoggio più alta (piano scaldatazze) sia ad una altezza non inferiore a 1,2 m. Prevedere una superficie di
appoggio per gli accessori.
La temperatura ambiente deve essere compresa tra 10° e 32°C (50°F e 90°F).
Deve avere i collegamenti di alimentazione (energia elettrica ed acqua) e lo scarico dell'acqua dotato di sifone
nelle immediate vicinanze.
Non installare in locali (cucine) in cui sia prevista la pulizia mediante getti d'acqua.
Non ostruire le aperture o fessure di ventilazione o di smaltimento calore.
Non installare l’apparecchio all’esterno.
Pag. 7
Page 8

3 – INFORMAZIONI ELETTRICHE DI INSTALLAZIONE
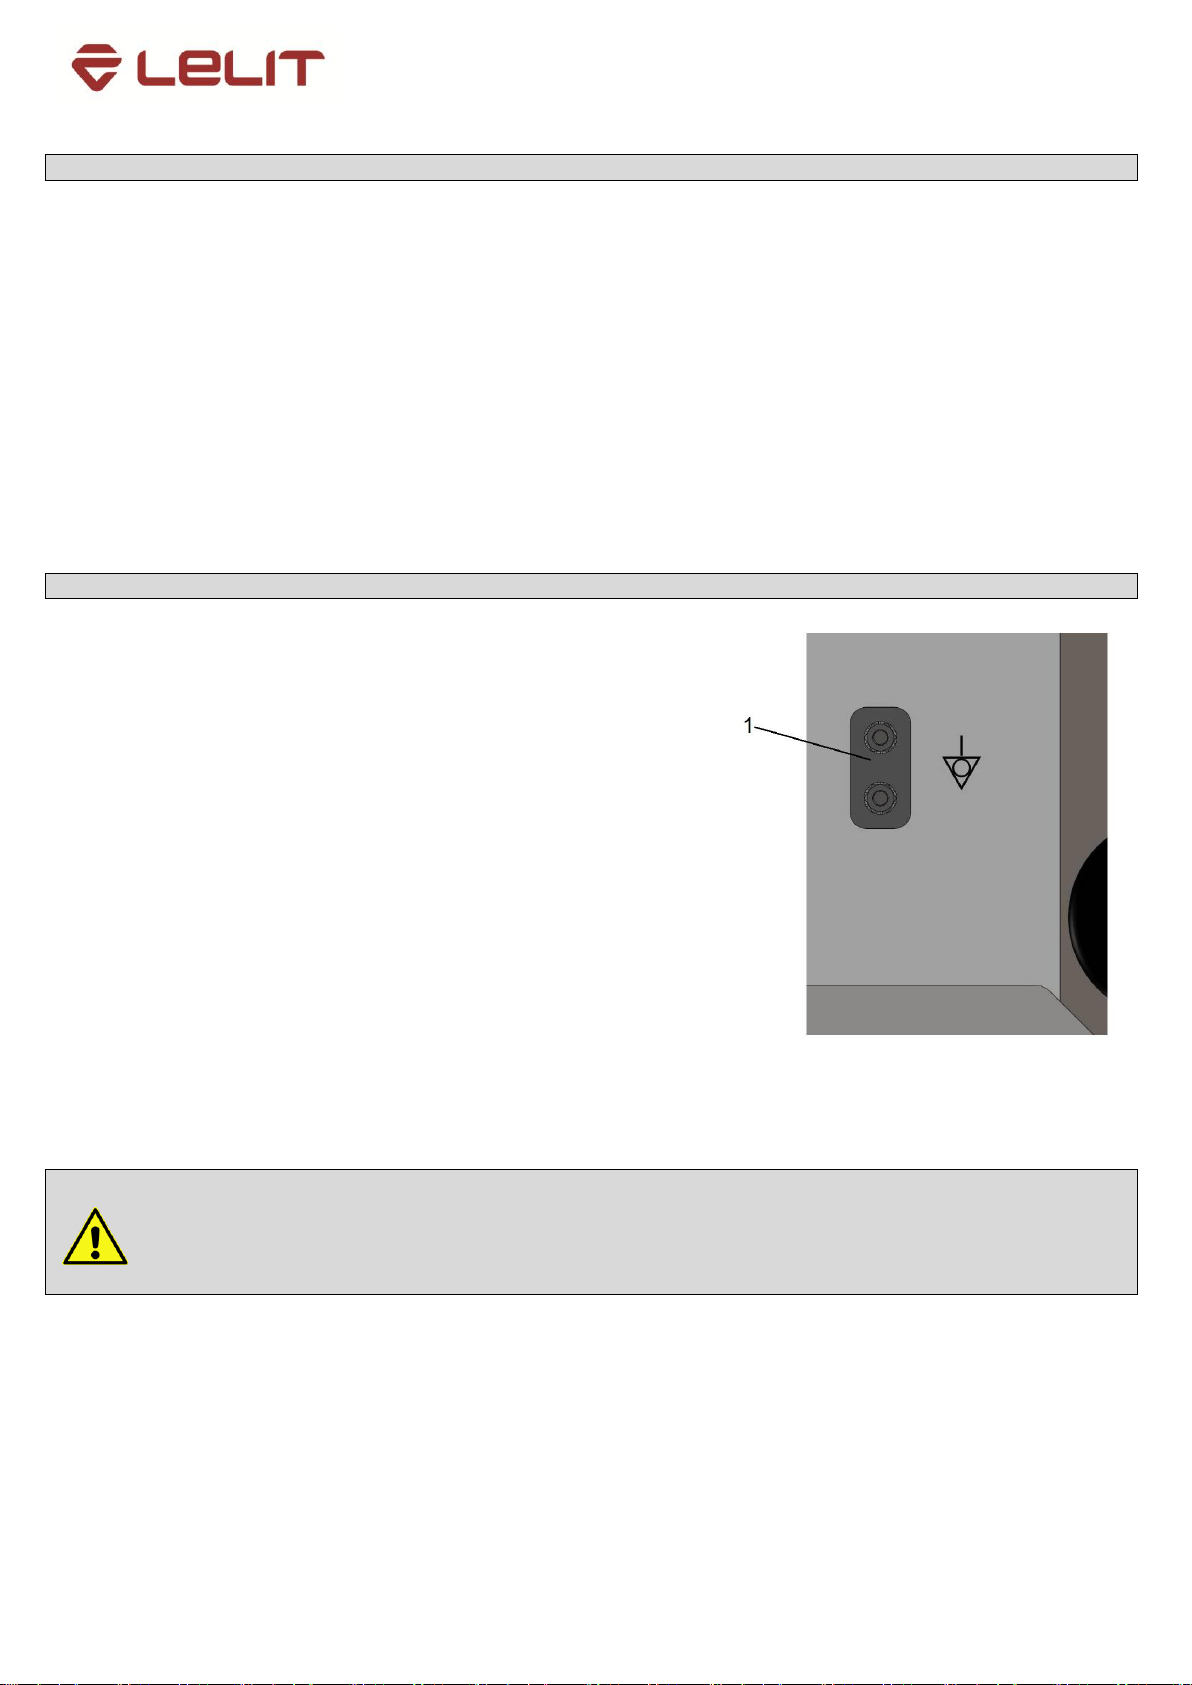
4 – COLLEGAMENTO EQUIPOTENZIALE
Questo collegamento, previsto da alcune norme, ha la
funzione di evitare le differenze di livello di potenziale
elettrico tra le masse delle apparecchiature installate nello
stesso locale. Questo apparecchio è predisposto con un
morsetto (1) posto SOTTO IL BASAMENTO per il
collegamento di un conduttore esterno equipotenziale.
Terminata l'installazione è NECESSARIO eseguire questo
tipo di collegamento.
usare un conduttore avente una sezione nominale in
conformità con le norme vigenti.
collegare un capo del conduttore al morsetto e l'altro capo
alle masse delle apparecchiature adiacenti.
La mancata attuazione di questa norma di sicurezza
scagiona il costruttore da ogni responsabilità per guasti o
danni che possano essere causati a persone o cose.
N.B.: NON COLLEGARE ALLA MESSA A TERRA DELL'IMPIANTO DI DISTRIBUZIONE ELETTRICA IN
QUANTO IL CONDUTTORE DI MESSA A TERRA IN UN CAVO DI ALIMENTAZIONE NON VIENE
CONSIDERATO UN CONDUTTORE DI COLLEGAMENTO EQUIPOTENZIALE.
Ricordiamo che la GEMME ITALIAN PRODUCERS srl non risponde dei danni provocati da un non corretto
collegamento elettrico.
Ricordiamo inoltre la responsabilità dell’installatore nel caso di danni.
All'installazione prevedere un dispositivo che assicuri la disconnessione dalla rete con una distanza di apertura
dei contatti che consenta la disconnessione completa nelle condizioni della categoria di sovratensione III e una
protezione da corrente di dispersione con valore pari a 30mA. Tale dispositivo di disconnessione deve essere
previsto nella rete di alimentazione conformemente alle regole di installazione. Sotto condizioni di alimentazioni
sfavorevoli, la macchina può causare cadute di tensione transitorie.
La sicurezza elettrica di questa macchina è assicurata soltanto quando la stessa è correttamente collegata ad un
efficace impianto di messa a terra come previsto dalle vigenti norme di sicurezza elettrica. E' necessario
verificare questo fondamentale requisito di sicurezza e, in caso di dubbio, richiedere un controllo accurato
dell'impianto da parte di personale professionalmente qualificato. Il costruttore non può essere considerato
responsabile per eventuali danni causati dalla mancanza di messa a terra dell'impianto.
Non utilizzare adattatori, prese multiple e/o prolunghe. Qualora il loro uso si rendesse indispensabile è necessario
utilizzare solamente adattatori semplici o multipli e prolunghe conformi alle vigenti norme di sicurezza, facendo
però attenzione a non superare il limite di portata in valore di corrente, marcato sull'adattatore semplice e sulle
prolunghe, e quello di massima potenza marcato sull'adattatore multiplo.
Controllare che il tipo di collegamento e la tensione corrispondano a quelli indicati sulla targa dati.
Pag. 8
Page 9
5 – INFORMAZIONI IDRAULICHE DI INSTALLAZIONE
6 – MESSA IN FUNZIONE
7 – CHECK-UP DI INSTALLAZIONE
ATTENZIONE: A MACCHINA INSTALLATA E PRONTA PER L’USO, PRIMA DI CONSEGNARE LA
STESSA ALL’OPERATORE PER IL LAVORO, ESEGUIRE UN LAVAGGIO DEI COMPONENTI INTERNI
SEGUENDO LE ISTRUZIONI SOTTO RIPORTATE
L’acqua destinata ad alimentare la macchina per caffè, deve essere acqua adatta per il consumo umano (vedi
direttive e legislazioni vigenti).
Controllare che nel punto di ingresso acqua della macchina il valore di pH sia conforme alle leggi vigenti e che il
valore dei cloruri sia inferiore a 100 mg/l.
Se i valori riscontrati non rientrano nei limiti indicati occorre inserire un appropriato dispositivo di trattamento
dell’acqua (rispettando le norme locali vigenti e compatibili con la macchina).
Nel caso si dovesse alimentare la macchina con acqua di durezza superiore agli 8°F (4,5 °D), per il buon
funzionamento della stessa, occorre applicare un piano di manutenzione specifico in funzione del valore di
durezza rilevato e della modalità d’uso.
Per l’installazione usare esclusivamente i componenti in dotazione; nel caso si dovessero impiegare altri
componenti, utilizzare esclusivamente componenti nuovi, mai usati in precedenza e idonei al contatto con acqua
per consumo umano (secondo le norme locali vigenti).
Posizionare l'apparecchio in perfetto piano orizzontale agendo sui piedini.
Eseguire i collegamenti idraulici rispettando le norme di igiene, di sicurezza idraulica ed antinquinamento vigenti
nel paese di installazione.
Nel caso la pressione di rete possa salire oltre 6 bar, installare un riduttore di pressione tarato a 2÷3 bar.
Mettere l'estremità del tubo di scarico in un pozzetto dotato di sifone per l'ispezione e la pulizia.
Il tubo di scarico, nelle curve, NON deve avere un andamento che possa ostruire o rallentare il corretto deflusso.
Ultimati i collegamenti elettrici ed idraulici si procede alla messa in funzione della macchina.
Aprire il rubinetto della rete idrica e chiudere l’interruttore generale di protezione.
Portare l’interruttore I/O della macchina sulla posizione I, la spia luminosa macchina in tensione si accende.
L’autolivello si metterà in funzione per il caricamento dell’acqua in caldaia fino a quando lo stesso raggiungerà
automaticamente il corretto livello di acqua in caldaia.
Terminata l’operazione di caricamento automatico dell’acqua, la resistenza inizia a riscaldare l’acqua in caldaia.
Attendere che la macchina raggiunga la pressione nominale di esercizio 1÷1,2 bar controllando sul manometro la
pressione caldaia. Qualora la macchina non si dovesse stabilizzare sui valori indicati, si dovrà procedere alla
taratura del pressostato.
La macchina ora è pronta per l’uso
Terminata l’installazione verificare le condizioni di corretto funzionamento.
Verificare l’assenza di perdite dagli allacciamenti idrici o dai tubi
Verificare che la pressione in caldaia e d’esercizio siano rispondenti ai valori nominali.
Verificare il corretto funzionamento del controllo di pressione
Verificare il corretto funzionamento dell’autolivello
Verificare il corretto funzionamento della valvola di espansione
Verificare il corretto funzionamento dello scaldatazze (se previsto sulla macchina).
Gruppi
Agganciare i portafiltri ai gruppi (senza caffè)
Eseguire erogazioni per circa un minuto, per ogni gruppo
Acqua calda
Erogare acqua calda (azionando il relativo comando) sino a prelevare almeno 4 litri di acqua per macchina.
Vapore
Erogare vapore dalle lance per circa un minuto, usando i relativi comandi.
Pag. 9
Page 10

8 – INFORMAZIONI PER L‘OPERATORE
ATTENZIONE: PRIMA DI INIZIARE IL LAVORO ESEGUIRE UN LAVAGGIO DEI COMPONENTI INTERNI
SEGUENDO LE ISTRUZIONI SOTTO RIPORTATE.
DETTE OPERAZIONI DEVONO ESSERE RIPETUTE QUANDO LA MACCHINA NON EFFETTUA
EROGAZIONI PER PIU’ DI 8 ORE E COMUNQUE ALMENO UNA VOLTA AL GIORNO.
INIZIO ATTIVITA’
Gruppi
Agganciare i portafiltri ai gruppi (senza caffè)
Eseguire erogazioni per circa un minuto, per ogni gruppo
Acqua calda
Erogare ripetutamente acqua calda (azionando il relativo comando) sino a prelevare almeno 4 litri di acqua per
macchina.
Vapore
Erogare vapore dalle lance per circa un minuto, usando i relativi comandi.
DURANTE L’ATTIVITA’
Erogazione vapore
Prima di scaldare la bevanda (acqua, latte, ecc…) fare uscire vapore dalla lancia per almeno 2 secondi per
garantire lo scarico della condensa.
Erogazione caffè
Se la macchina è rimasta inattiva per oltre un’ora, prima dell’erogazione eseguire una erogazione a vuoto di circa
100cc.
Erogazione acqua calda
Se la macchina è rimasta inattiva per oltre un’ora, prima dell’erogazione eseguire una erogazione a vuoto di circa
200cc.
Pulizia circuito caffè
Per le modalità e le istruzioni di pulizia consultare la sezione specifica.
Pag. 10
Page 11
9 – AVVERTENZE
ATTENZIONE: le zone contraddistinte dall’etichetta sotto riportata, sono parti calde, quindi avvicinarsi
ed operare con la massima cautela
CAUTION: HOT
10 – MANUTENZIONE E RIPARAZIONI
ATTENZIONE: una manutenzione eseguita da personale non qualificato può pregiudicare la sicurezza
e la conformità alle norme vigenti della macchina. Richiedere l’assistenza solo da personale
qualificato e autorizzato
AVVERTENZE GENERALI
Il costruttore declina ogni responsabilità per danni a cose e persone risultanti da un uso irregolare o non previsto
della macchina per caffè.
Non azionare mai la macchina per caffè con le mani bagnate o a piedi nudi.
Non portare le mani oppure parti del corpo nelle vicinanze dei gruppi di erogazione caffè, oppure delle lance di
erogazione vapore e acqua calda.
Fare attenzione che la macchina non venga azionata da bambini oppure da persone non istruite all’uso della
stessa.
Collocare sul piano scaldatazze solo tazzine, tazze e bicchieri per il servizio della macchina da caffè.
Far asciugare accuratamente le tazzine prima di collocarle sul piano scaldatazze.
Non è ammesso il collocamento di altri oggetti sul piano scaldatazze.
INTERRUZIONE DELL’ATTIVITA’
Quando la macchina rimane a lungo incustodita (di notte, durante la chiusura settimanale o durante le vacanze),
eseguire le seguenti operazioni:
Staccare la spina dalla presa di corrente, oppure disinserire l'interruttore principale.
Chiudere il rubinetto di alimentazione idrica.
L'inosservanza di tali norme di sicurezza scagiona il costruttore da ogni responsabilità per guasti o danni a
persone o cose.
Per la salvaguardia della sicurezza d'esercizio e delle funzioni è indispensabile seguire tutte le istruzioni del
costruttore; far verificare periodicamente a cura di personale qualificato e autorizzato l'integrità delle protezioni ed
il corretto funzionamento di tutti i dispositivi di sicurezza (la prima volta non oltre 3 anni e successivamente ogni
anno).
In caso di cattivo funzionamento, spegnere la macchina, disinserire l'interruttore principale ed avvertire il servizio
assistenza.
In caso di danni al cavo di collegamento elettrico, spegnere la macchina e richiedere un ricambio dal servizio di
assistenza.
Usare solo ed esclusivamente ricambi originali garantiti dalla casa madre; diversamente decade completamente
la responsabilità del costruttore.
Dopo le operazioni di manutenzione eseguire i CHECK-UP di installazione come indicato nella specifica sezione
delle istruzioni.
Pag. 11
Page 12

11 - ACCENSIONE
12 - RISCALDAMENTO
13 – EROGAZIONE CAFFE‘
Prima di mettere in funzione la macchina accertarsi che:
l’interruttore principale dell’alimentazione elettrica sia
inserito.
il rubinetto principale dell'alimentazione idrica sia
aperto.
Accensione elettrica
Schiacciare l’interruttore generale (4) nella posizione I.
La caldaia viene riempita d'acqua fino al raggiungimento del livello
previsto.
A questo punto comincia la "Fase di riscaldamento".
Al termine dell'attività giornaliera, spegnere la macchina schiacciando
l'interruttore generale (4) nella posizione 0.
ATTENZIONE: non ricoprire con panni il ripiano
scaldatazze
In attesa che la macchina sia pronta per l’uso, innestare i portafiltri (9) ai
gruppi.
Per non alterare la termica della macchina, non ricoprire
con panni il piano scalda tazze.
Quando il manometro (6) indica la pressione di regime, la
macchina è pronta per l’uso
1. Sganciare il portafiltro (9) dal gruppo.
2. Riempire il filtro con la dose di caffè macinato.
3. Pressare il caffè con un pressino ed asportare dal bordo del filtro
eventuali residui di caffè macinato.
4. Agganciare il portafiltro (9) al gruppo in modo che faccia bene tenuta
sulla guarnizione sottocoppa.
5. Posizionare la/le tazzina/e sotto i beccucci di erogazione.
6. Alzare la leva (5) del gruppo in posizione orizzontale. Da questo
momento, per i primi secondi non si vede uscire caffè. Questo è infatti
il tempo che impiega la pressione per raggiungere il valore di mandata
della pompa. In questo tempo avviene l'infusione, ossia la preliminare
cottura del caffè. Al termine dell'infusione, inizia l'erogazione, durante
la quale il caffè esce a getto continuo. L'erogazione viene fatta
terminare, riportando la levetta (5) in posizione verticale, quando si è
raggiunta nella tazza la quantità voluta.
7. Se si desidera fare altri caffè, togliere il portafiltro, svuotarlo dai fondi
di caffè e pulirlo accuratamente con un panno umido, quindi ripetere le
operazioni sopra elencate.
Pag. 12
Page 13
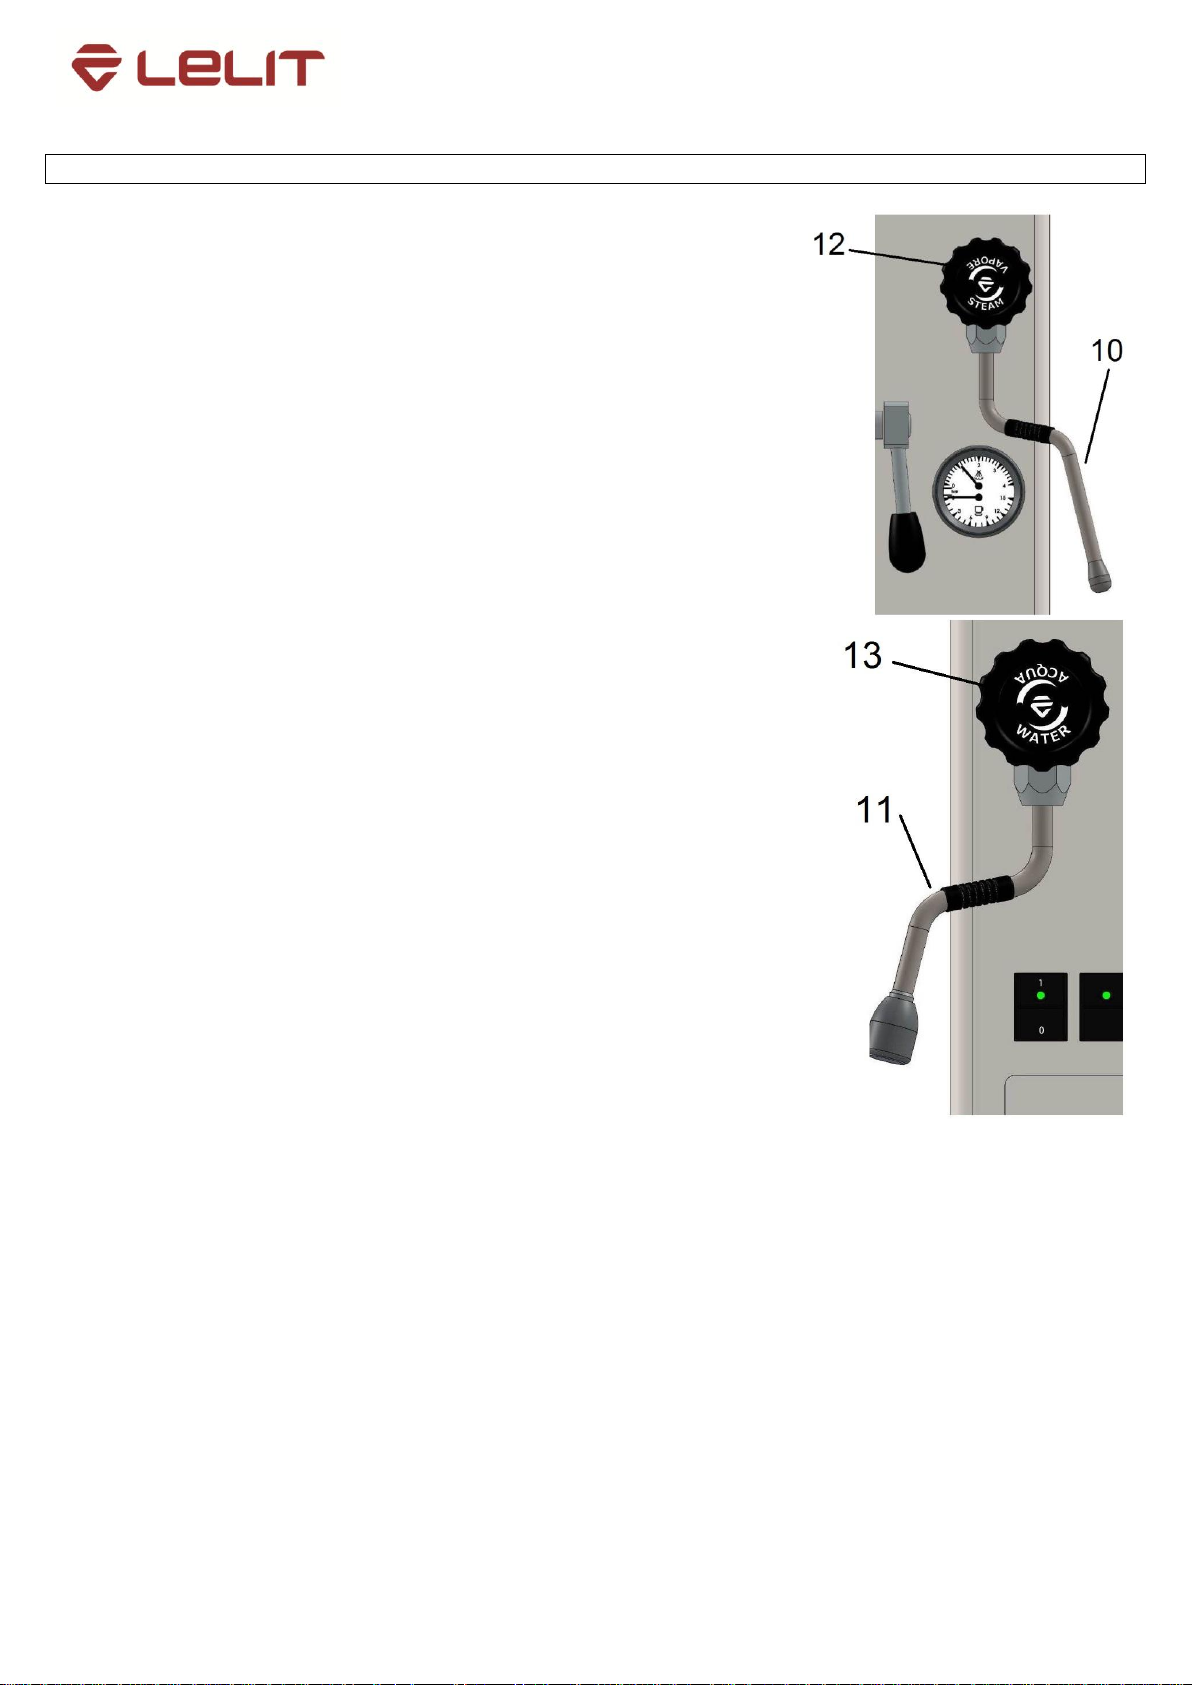
Erogazione vapore
A macchina pronta aprire il volantino vapore (12) in senso antiorario con
la lancia vapore (10) rivolta sulla griglia appoggiatazze e scaricare la
piccola quantità di acqua iniziale; richiudere il volantino vapore.
Introdurre ora la lancia vapore (10) nel contenitore contenente la
bevanda da riscaldare. Ruotare il volantino vapore (12) in senso
antiorario per dare inizio all’erogazione e in senso orario per arrestarla.
Erogazione acqua calda
Posizionare il contenitore in corrispondenza del tubo (11). Ruotare il
volantino acqua (13) in senso antiorario per dare inizio all’erogazione e
in senso orario per arrestarla.
Riscaldamento del latte per il cappuccino
Usare un bricco alto e stretto, riempirlo fino a metà circa.
A macchina pronta aprire il volantino vapore (12) in senso antiorario con
la lancia vapore (10) rivolta sulla griglia appoggiatazze e scaricare la
piccola quantità di acqua iniziale; richiudere il volantino vapore.
Introdurre ora la lancia vapore (10) nel latte.
Aprire ora gradualmente il volantino vapore (12) e riscaldare il latte per
alcuni secondi.
Raggiunta la quantità di schiuma desiderata ed una temperatura
sufficientemente calda, arrestare l'erogazione ruotando in senso orario il
volantino vapore (12).
Finito l'uso del vapore, pulire accuratamente il tubo (10)
con una spugna od uno straccio pulito.
14 – PREPARAZIONE ALTRE BEVANDE CALDE
N.B.: al termine di ogni erogazione vapore, pulire la lancia vapore operando nel seguente modo: indirizzare il
tubo vapore verso la bacinella poggia tazze e, prestando particolare attenzione, erogare almeno una volta
vapore. In seguito pulire accuratamente l’erogatore vapore con una spugna o panno pulito eliminando ogni
residuo organico presente
Pag. 13
Page 14

15 – PULIZIA E MANUTENZIONE
ATTENZIONE: per la corretta applicazione del sistema HACCP attenersi a quanto indicato nel presente
paragrafo
Pulizia dei gruppi
Intervento da effettuarsi al termine della giornata
lavorativa su tutti i gruppi
Pulire la guarnizione sottocoppa con lo
spazzolino.
Introdurre nel portafiltro il filtro cieco.
Versare 3-5 gr di polvere detergente nel filtro
cieco.
Agganciare il portafiltro al gruppo ed eseguire
alcuni cicli (ON/OFF ogni 10 sec per 5 volte).
Togliere il portafiltro, pulire con una spugna la
doccetta.
Eseguire il risciacquo erogando per circa 30 sec
acqua da ogni gruppo.
Pulizia dei portafiltri
In un recipiente adatto versare un litro di acqua
calda e circa 10 gr di polvere detergente.
Togliere i filtri dai portafiltri.
Immergere filtri e portafiltri, nella soluzione per
almeno 20 min.
Rimuovere con una spugna eventuali residui e
sciacquare con acqua calda.
Rimontare i filtri nel portafiltro, accertandosi che
la molla di fissaggio del filtro sia nella sua sede.
Pulizia delle lance vapore e acqua calda
Utilizzando una spugna pulita, lavare con acqua calda rimuovendo eventuali residui organici presenti; sciacquare
accuratamente.
Per pulire la parte interna della lancia operare nel seguente modo: indirizzare il tubo verso la bacinella
appoggiatazze, e prestando particolare attenzione, erogare almeno una volta vapore.
Pulizia della bacinella di gocciolamento
Estrarre la bacinella e completare la pulizia in acqua corrente.
Pulizia vaschetta di scarico
Al termine della giornata di lavoro, versare un bricco di acqua calda nella stessa, questo per rimuovere eventuali
incrostazioni nello scarico.
Pulizia della carrozzeria
Pulire con un panno morbido e prodotti SENZA ammoniaca o abrasivi, eliminando eventuali residui organici
presenti nella zona di lavoro; non spruzzare liquidi nelle cave dei pannelli della carrozzeria.
Pag. 14
Page 15
16 – ANOMALIE E GUASTI
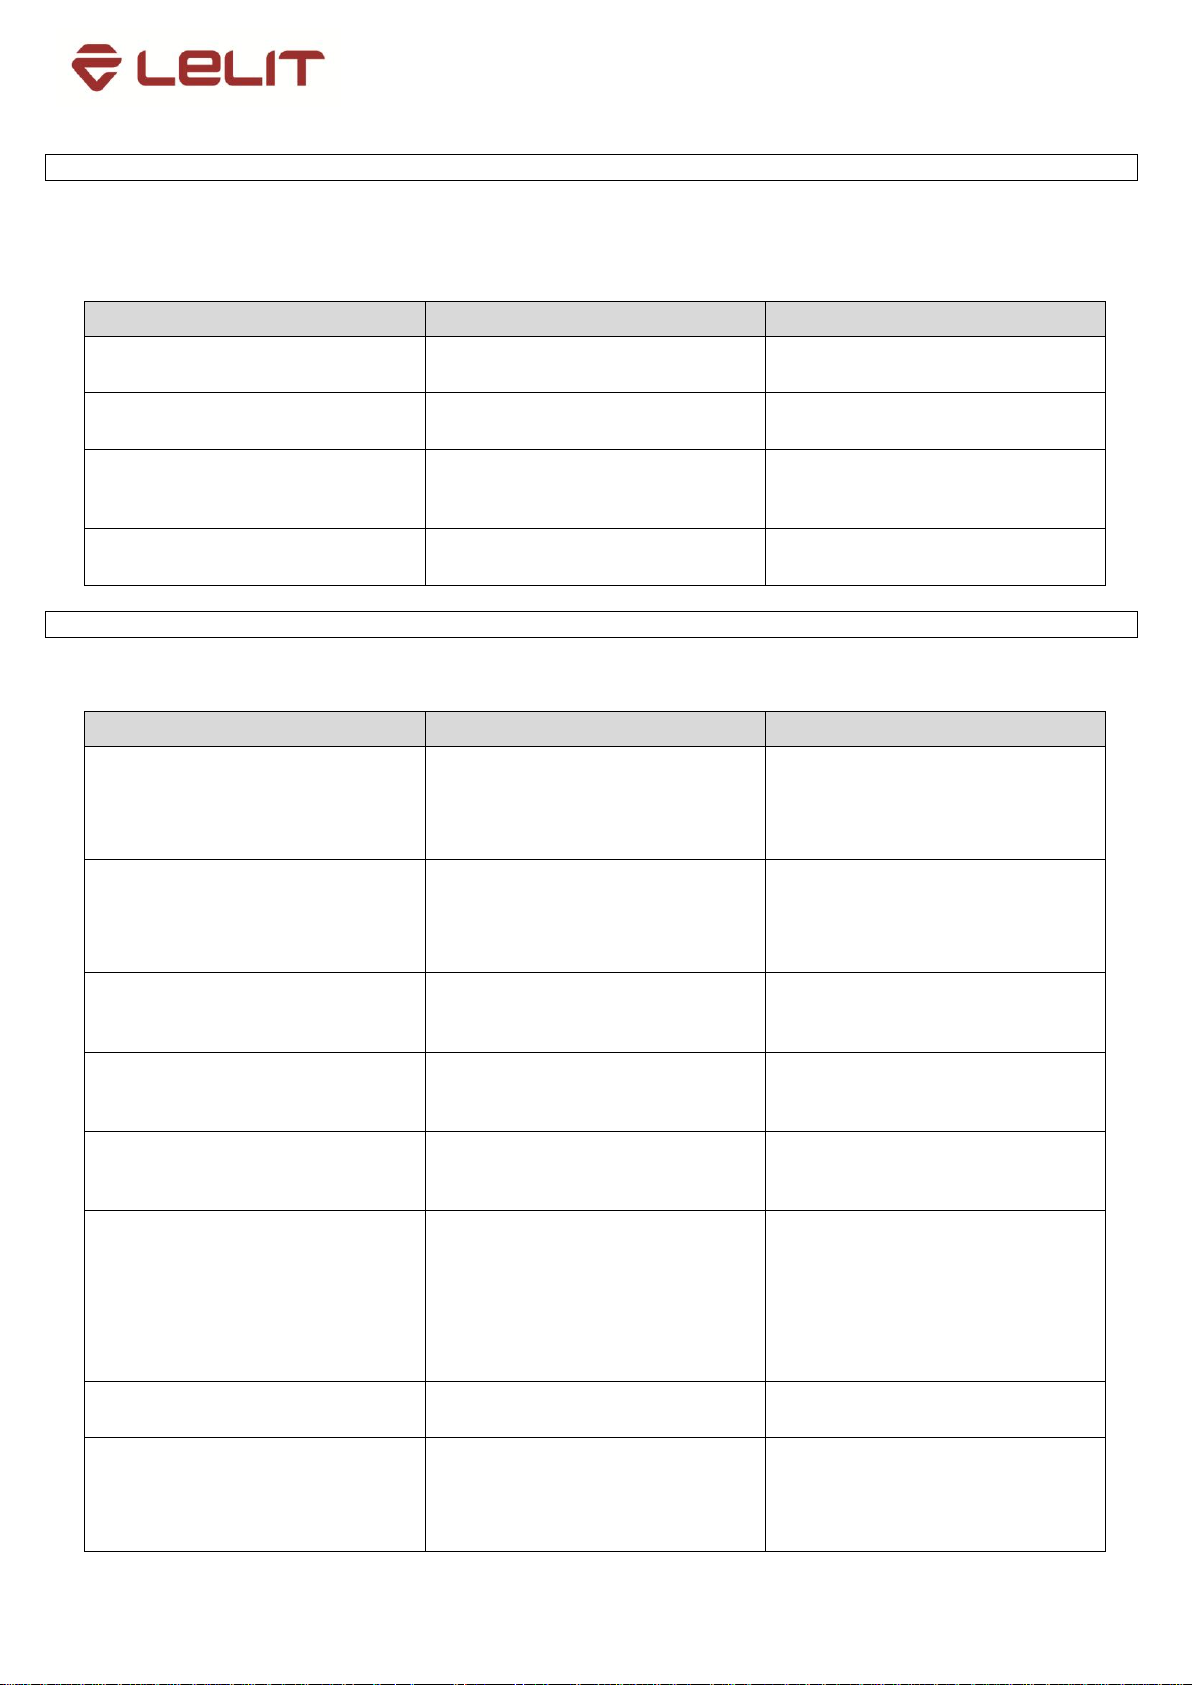
ANOMALIA
CAUSA
RIMEDIO
Perdita dal bordo del portafiltro
Guarnizione sottocoppa sporca di caffè
Pulire con lo spazzolino
Tempo d'erogazione caffè troppo breve
Caffè macinato troppo grosso
Caffè troppo vecchio
Restringere la macinatura
Sostituire il caffè
Caffè scende goccia a goccia
Fori filtro otturati o foro uscita portafiltro
sporco.
Macinatura troppo fine
Pulire
Allargare la macinatura
Perdita di acqua sotto la macchina
Pozzetto di scarico intasato
Foro bacinella di scarico otturato
Pulire
Pulire
16 – ANOMALIE E GUASTI
ANOMALIA
CAUSA
OSSERVAZIONI
Periodo di infusione molto breve
Erogazione rapida
Caffè molto blando, senza crema
(difetti presenti su tutti i gruppi)
Macinatura grossa
Caffè vecchio
Questo difetto associato ad altri sintomi
secondari può essere causato da molteplici
altre cause di cui ai punti seguenti. Non
regolare la macinatura finchè non si sono
escluse tutte le altre cause
Periodo di infusione molto breve
Erogazione rapida
Caffè molto blando, senza crema
(difetti presenti su di un solo gruppo)
Ugello del gruppo allargatosi con l'uso
Guarnizione OR del tronco conico perde
Valvola di infusione rimasta aperta
Filtro rotto sul bordo
La portata del gruppo senza filtro deve
essere di circa 100 cm3 in un tempo di 8÷10
secondi
Scarso sfruttamento del caffè
Erogazione lenta
Caffè freddo e blando
Doccetta sporca
Mettendo in funzione il gruppo senza il
portafiltro, invece di un filone centrale, si
notano dei getti sottili ed isolati
Erogazione veloce, caffè blando
Manometro pompa indica pressione
superiore a 9 bar
Pompa starata
Valvola di by-pass bloccata
Scarso sfruttamento del caffè
Erogazione veloce
Caffè caldo e blando
Filtri con fori allargati
Macinatura grossa
Si riscontra una presenza eccessiva di fondi
di caffè nella tazza
Caffè freddi, blandi e senza crema
Tempi di infusione e di erogazione normali
Bolla d'aria nella circolazione a termosifone
Valvola di ritegno non tiene (con pressione
di rete molto bassa)
Svuotamento degli scambiatori di calore
Manometro caldaia guasto (segna pressioni
più alte del reale)
Manovrare alcune volte il gruppo per
eliminarla
Toccando il tubo di carico acqua si sente
che è caldo in prossimità della macchina
Pressostato di conseguenza tarato a valori
più bassi
Caffè freddi al mattino all'inizio del lavoro
Presenza di aria in caldaia
Vedere le istruzioni per l'accensione
Erogazione lenta
Caffè bruciato e freddo
Crema molto scura, con tendenza a formare
l'occhio
Macinatura troppo fine
Bassa pressione della pompa
Filtro a rete sopra l'ugello sporco
Ugello parzialmente otturato
Interventi diretti da parte dell’operatore
Prima di chiamare il servizio assistenza tecnica, allo scopo di evitare inutili spese, verificare se il problema
presentato dalla macchina rientra nella casistica di seguito riportata.
Interventi diretti da parte del tecnico specializzato
Pag. 15
Page 16
16 – ANOMALIE E GUASTI
ANOMALIA
CAUSA
OSSERVAZIONI
Erogazione lenta, caffè bruciato
Manometro pompa indica pressione inferiore
a 9 bar
Pompa starata
Pompa con portata ridotta
Gruppo in riposo perde dal canotto di scarico
(difetto presente su di un solo gruppo)
Caffè erogato normalmente
Valvola di erogazione non tiene
Non corretto tempestivamente, esaurisce
l'addolcitore molto prima della scadenza
prevista, con conseguenti incrostazioni
calcaree
Gruppo in riposo, guarnizione valvola di
erogazione si guasta rapidamente
Perdita di acqua dal canotto di scarico
Caffè erogato normalmente
Difetto presente su tutti i gruppi
Valvola di espansione con taratura troppo
forte (superiore a 13 bar)
Non corretto tempestivamente, esaurisce
l'addolcitore molto prima della scadenza
prevista, con conseguenti incrostazioni
calcaree
Gruppi in riposo, perdita continua di acqua
fredda nella vaschetta di scarico
Gruppi non erogano più caffè ed il
manometro pompa segna valori bassi
Valvola di espansione rimasta aperta
Non corretto tempestivamente, esaurisce
l'addolcitore molto prima della scadenza
prevista, con conseguenti incrostazioni
calcaree
Gruppo in funzione
Perde dal canotto di scarico
Non si ottiene caffè
Valvola di scarico non tiene
Gruppo in funzione, perdita di acqua fredda
nella vaschetta di scarico
Caffè blando
Erogazione lenta
Valvola di espansione starata (apre a meno
di 9 bar)
Gruppo perde dall'asta della camma
Perdita sui due premistoppa
Togliendo i premistoppa, attenzione a non
rigare le sedi, non usare attrezzi di acciaio o
altri materiali duri
Prima di rimontare, pulire bene l'alberino,
specialmente nelle scanalature
Manovra del gruppo difficoltosa
Profilo della camma usurata
Macchina non va in pressione o va più
lentamente del solito
Manca la corrente
Interruttore automatico scattato
Resistenze bruciate
Circuito elettrico alla resistenza interrotto
Manca acqua in caldaia
Rubinetto vapore perde
Gruppi funzionano regolarmente
Manometro pompa non indica la pressione
corretta (8÷9 bar).
Manometro guasto
Pompa non va in pressione
Non avviene l'erogazione
Motore non funziona:
- manca corrente
- condensatore bruciato
- microinterruttore bruciato
- motore bruciato
- valvole ritegno pompa aperta
- valvola by-pass completamente aperta
Pompa rumorosa
Pompa difettosa
Mancanza di acqua nella rete
Interventi diretti da parte del tecnico specializzato
Pag. 16
Page 17
17 – CONSIGLI – SUGGERIMENTI - IMMAGINI
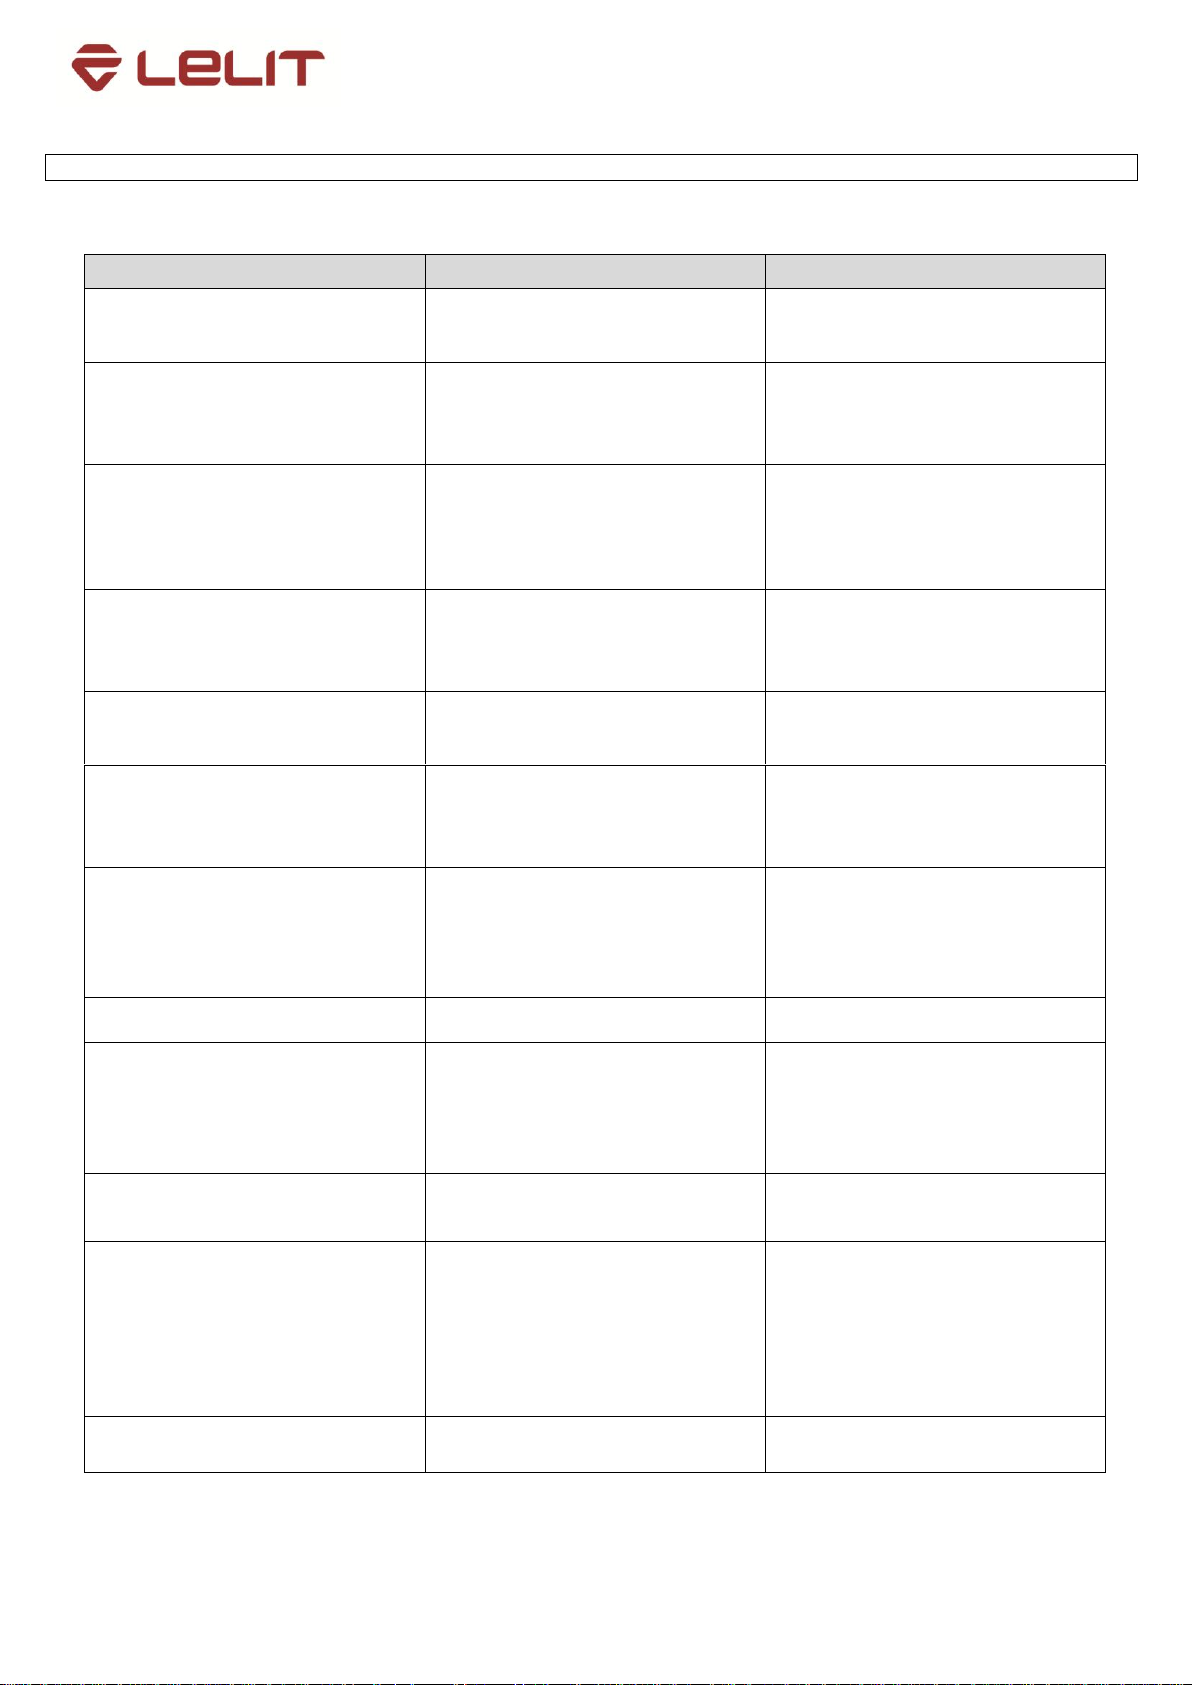
ATTENZIONE: La macchina deve essere alimentata con acqua avente durezza superiore a 8°F. Non è
possibile l'utilizzo di tubi e guarnizioni già utilizzati.
É consigliabile l’installazione di un depuratore (1)
dell’acqua per l’alimentazione idrica della macchina, da
collegare alla rete.
N.B. Prima di allacciare il depuratore alla macchina,
effettuare un lavaggio finché l’acqua non si presenti
limpida, procedere solo dopo quindi al collegamento del
depuratore alla macchina.
Per quanto riguarda la pressione di rete, se essa è al di
sopra di 0,5Mpa (5bar), si consiglia di installare un
riduttore di pressione bilanciato per alta pressione
(dispositivo in cui un eventuale aumento di pressione di
rete non si ripercuote sulla pressione in uscita).
Il tubo di scarico (2) non deve presentare curve che
possano provocare dei ristagni o dei ritorni di acqua
verso la macchina.
Per togliere i fianchi macchina, basta allentare (non
togliere del tutto) la vite (3) in questo modo il fianco può
ruotare e liberarsi completamente dalla struttura della
macchina. Per il montaggio agire in senso contrario,
facendo attenzione di agganciare prima nella parte
inferiore il fianco stesso e serrando quindi
completamente la vite (3).
Pag. 17
Page 18
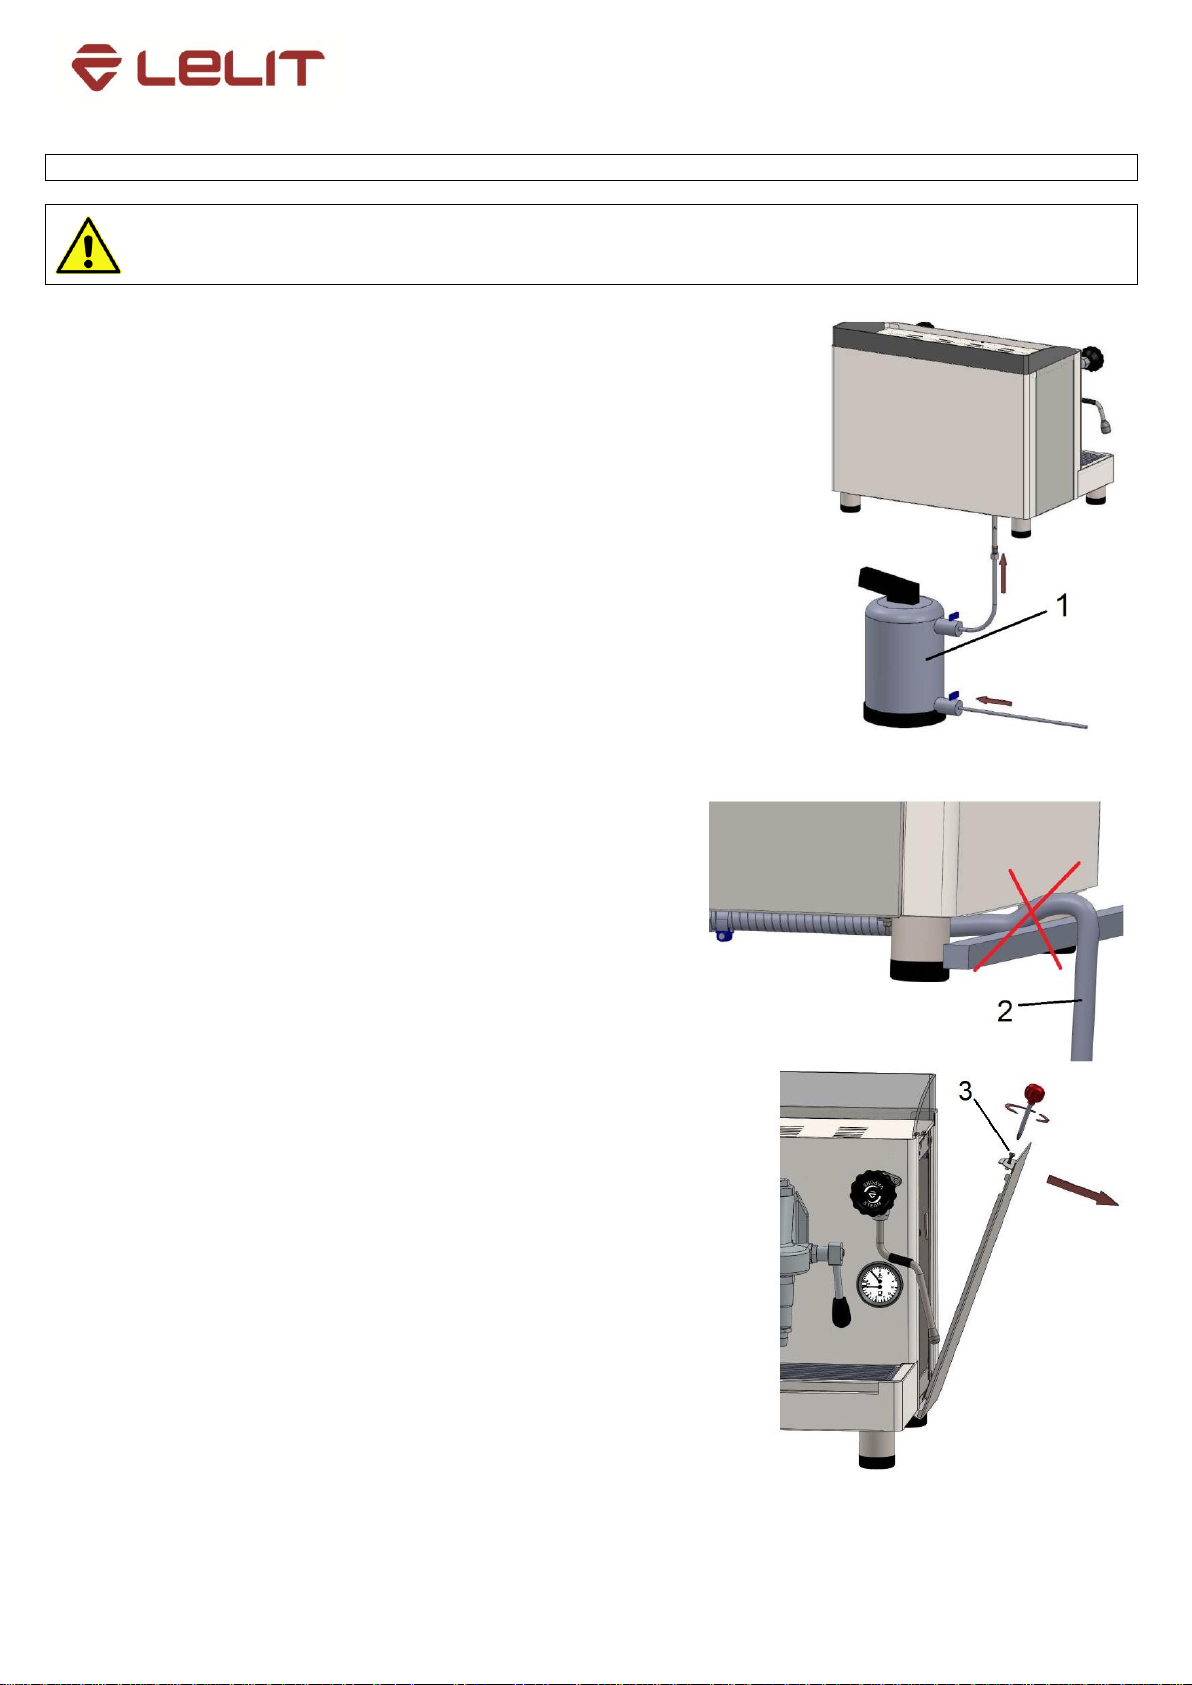
Per togliere la vetrinetta (4) liberare la stessa dalla
piastrina che la tiene fissata allentando la vite (5),
successivamente alzare e far scorrere verso il fronte
macchina la vetrinetta per liberarla completamente
dalla struttura. Per rimontarla agire in senso
contrario, assicurandosi di inserire nella fessura
della vetrinetta la piastrina prima di serrare la vite
(5).
Se si vuole togliere il ripiano scaldatazze (6) dopo
aver tolto i fianchi, svitare completamente le altre
due viti che lo tengono fissato.
Per togliere il pannello posteriore (7), svitare le 4 viti
(8) in questo modo il pannello è completamente
libero dalla struttura.
Per la regolazione della pressione in caldaia, agire
sulla vite (9) del pressostato. Senso orario aumenta.
Senso antiorario diminuisce.
Per la regolazione della pressione pompa , agire
sulla vite (10) dopo aver allentato il controdado.
Senso orario aumenta. Senso antiorario diminuisce.
Al termine serrare di nuovo il controdado.
Pag. 18
Page 19

Dear customer,
Thank you for purchasing our espresso machine, which has been built according to the most up-to- date technologies.
Carefully following the instructions of this booklet, which comply with all the essential safety norms, you’ll be able to get
the most satisfying performances, verifying the remarkable reliability of this espresso machine in the years to come.
We wish you all the best.
INDEX
RULES
CE Declaration page 3
PED chart page 4
Legend page 5
Index page 19
1. General information page 20
2. Installation page 20
3. Electrical installation rules page 21
4. Equipotential connection page 21
5. Water installation rules page 22
6. Getting the machine ready for use page 22
7. Installation check-up page 22
8. Information for end user / page 23
worker operating the machine
9. Caution page 24
10. Maintenance and repairs page 24
USE
11. Turning the machine on page 25
12. Heating phase page 25
13. Coffee dispensing page 25
14. Hot beverages dispensing page 26
15. Cleaning and maintenance page 27
16. Defects and malfunctions pages 28-29
17. Advices – tips – images pages 30-31
Dismantling the machine page 71
Pag. 19
Page 20
1 – GENERAL INFORMATION
Please read the warnings and rules in this User’s Manual carefully before using or handling the machine
in any way because they provide important information regarding safety and hygiene when operating the
machine. Keep this booklet handy for easy reference
THESE CHAPTERS IN THE MANUAL ARE JUST FOR QUALIFIED, AUTHORIZED TECHNICAL STAFF
2 – INSTALLATION
Installation, dismantling, and adjustments must only be performed by qualified and authorized technicians.
Carefully read the warnings and rules in this manual because they provide important information regarding
safe installation, use and maintenance of the machine, before operating with it.
Keep this booklet handy for easy reference.
The machine was designed solely for preparing espresso, coffee and hot beverages using hot water or steam,
and for warming cups.
The machine must be installed in a place where it is only used by carefully trained staff that knows the risks tied
with using the machine.
The machine is for professional use only.
The machine must not be used by children or by people with physical, sensorial, or mental impairments: if such
people use the machine, they must be supervised during operation.
Children must be supervised at all times to prevent them from playing with the machine.
The machine must not be left unattended or used outdoors.
If the machine is stored in rooms where the temperature can drop below freezing, empty the boiler and water
circuit tubes.
Do not expose the machine to atmospheric agents (rain, sun, and cold).
Do not clean the machine with jets of water.
The machine’s noisiness does not overcome 70 dB(A).
Should the power cord be damaged, please let only authorized, technically qualified people replace it.
If the machine is used improperly or for purposes other than those described above, it can be a source of danger.
The manufacturer will not be held responsible for damages caused by improper use of the machine..
Staff responsible for moving the machine must realize the risks in moving heavy loads. Move the machine
carefully, using the correct lifting equipment (fork lift, for example).If moving the machine by hand, make sure:
- enough people are available for the task, depending on the machine weight and difficult handling;
- to always use the necessary safety gear (shoes/gloves).
After removing the machine from its packing materials, make sure that the machine and its safety devices are
intact.
Packing materials (plastic bags, polystyrene foam, staples, etc.) must be kept out of the reach of children
because they are potentially hazardous.
Before plugging in the machine, make sure that the information on the nameplate (voltage, etc.) matches that of
the electrical and water systems.
Completely unwind the power supply cable. Should the power cord be damaged, please let only authorized,
technically qualified people replace it.
The coffee machine should sit on a flat, stable surface at least 20 mm from walls and from the counter. Keep in
mind that the highest surface on the machine (the cup warmer tray) sits at a height of at least 1.2 meters. Make
sure there is a shelf nearby for the accessories.
Room temperature must range between 10° and 32°C (50°F and 90°F).
An electrical outlet, water connections, and a drain with siphon must be in the immediate vicinity.
Do not install in rooms (kitchens) that are cleaned with jets of water.
Do not obstruct openings or ventilation and heat vents.
Do not install the machine outdoors.
Pag. 20
Page 21
3 – ELECTRICAL INSTALLATION RULES
4 – EQUIPOTENTIAL CONNECTION
This type of connection, required by some laws, prevents
differences in the electric potential level between the earthing
connections of equipment installed in the same room. This
machine is provided with a clamp (1) UNDERNEATH THE
BASE for connection to an external equipotential cable. After
installation, this type of connection MUST be made:
use a cable with a nominal section in compliance with the laws
in force;
Connect one end of the cable to the terminal and the other end
to the earthing of adjacent equipment;
Failure to follow this safety norm releases the manufacturer
from any responsibility for machine breakdowns or damage to
people or property.
N.B.: DO NOT CONNECT TO THE POWER SUPPLY EARTHING BECAUSE IT IS NOT CONSIDERED AN
EQUIPOTENTIAL CABLE CONNECTION.
Bear in mind that GEMME ITALIAN PRODUCERS srl is not responsible for damage caused by improper electrical
connections, and that the installer is responsible for any damage.
Prior to installation, make sure there is a circuit breaker installed with a distance between the contacts that allows
for complete disconnection when there is a category III overload and that provides protection against current
leakage equal to 30 mA. The circuit breaker must be installed on the power supply in compliance with installation
rules. If the power supply is not working properly, the machine can cause transitory voltage drops.
The electrical safety of this machine is only ensured when it is correctly connected to an efficient earthing system
in compliance with the electrical safety laws in force. This fundamental safety requirement must be verified. If in
doubt, request that a qualified electrician inspect the system. The manufacturer cannot be held responsible for
any damage caused by the lack of an earthing system on the electrical supply.
It is unadvisable to use adaptors, multiple plugs, and/or extension cords. If their use is indispensable, only use
simple or multiple adaptor plugs and extension cords that are in compliance with safety laws. Make sure that
these devices do not exceed the voltage capacity marked on the simple adaptor and on extension cords, and the
maximum voltage marked on the multiple adaptor.
Check that the type of connection and voltage correspond with the information on the technical nameplate.
Pag. 21
Page 22
5 – WATER INSTALLATION RULES
6 – GETTING THE MACHINE READY FOR USE
7 – INSTALLATION CHECK-UP
WARNING: ONCE THE MACHINE HAS BEEN INSTALLED AND IS READY FOR USE, BEFORE
ALLOWING THE WORKER TO START USING THE MACHINE, WASH THE INTERNAL COMPONENTS
ACCORDING TO THE INSTRUCTIONS BELOW:
Water used in coffee machines must be potable and suitable for human consumption (see laws and regulations in
force).
Check on the machine’s water inlet that the pH level complies with the laws in force and that the chloride value is
less than 100 mg/l
If the values do not fall within the limits, an appropriate water treatment device must be inserted (respecting the
local laws and compatible with the machine).
If the machine uses water with a hardness exceeding 8°F (4.5 °D), a specific maintenance plan must be
implemented according to the hardness detected and machine usage.
Only use the supplied parts for installation. If other parts are installed, they must be new (not used) and they must
be able to come in contact with potable water suitable for human consumption (according to local laws in force).
Place the machine on a flat surface and stabilize it by adjusting and securing the feet.
Hook up the water connections respecting the hygiene, water safety, and antipollution laws in the country of
installation.
If the water pressure can rise above 6 bar, install a pressure reducer set at 2÷3 bar.
Place the end of the water draining tube in a drain with a siphon for inspection and cleaning.
The curves of the draining tube must NOT bend.
Once the hydraulic and electrical installations are over, proceed to get the machine ready for use.
Open the tap of the water mains and close the general protection switch.
Switch on the main switch I/O placing it on the position I, the relative pilot light will go on.
The self-levelling device will start working in order to fill the boiler with water until the right level is automatically
reached.
Once the water has been automatically pumped into the boiler, the boiler heating element will start heating it.
Wait until the machine has reached the exercise nominal pression of 1÷1,2 (check the relative manometer).
Should the machine not reached the above values, the pressure switch will have to be re-calibrated.
The machine is ready for use.
Once the installation is over, check if the machine is working properly.
Verify that there are no leaks from the connections or tubes.
Verify that boiler and operating pressure comply with the nominal values.
Verify that the pressure gauge is working properly.
Verify that the self-leveling device is working properly.
Verify that the expansion valve is working properly.
Verify that the electrical cup warmer (if available) is working properly.
Groups
Hook up the filter holders to the groups (without coffee).
Let each group dispense water for about a minute.
Hot water
Continuously dispense hot water (opening the relative knob) until at least 4 liters of water come out of the
machine.
Steam
Dispense steam from the nozzles for about a minute, using the appropriate knob.
Pag. 22
Page 23

8 – INFORMATION FOR END USER/WORKER OPERATING THE MACHINE
WARNING: BEFORE YOU START OPERATING THE MACHINE, WASH THE INTERNAL COMPONENTS
FOLLOWING THE INSTRUCTIONS INDICATED BELOW. THESE STEPS MUST BE REPEATED AT LEAST
ONCE A DAY AND WHEN THE MACHINE HAS NOT BEEN OPERATED FOR MORE THAN 8 HOURS.
Groups
Hook up the filter holders to the groupheads (without coffee).
Let each group dispense water for about a minute.
Hot water
Continuously dispense hot water (opening the relative knob) until at least 4 liters of water come out of the
machine.
Steam
Dispense steam from the nozzles for about a minute, using the appropriate knob.
Steam dispensing
Before heating the beverage (water, milk, etc.), open the steam knob for at least 2 seconds and let the condense
water get out of the wand.
Coffee dispensing
If the machine has not been used for more than an hour, before making coffee, dispense about 100 cc through
the group.
Hot water dispensing
If the machine has not been used for more than an hour, before using the hot water, dispense about 200 cc.
Cleaning the coffee circuits
Please read the specific section to learn how to clean these circuits.
BEFORE YOU START
DURING DAILY USE/ON THE JOB
Pag. 23
Page 24

9 – CAUTION
DANGER OF BURNS: the areas marked with the below label become really hot. GREAT CARE SHOULD
BE TAKEN WHEN IN VICINITY OF THIS AREAS.
CAUTION: HOT
10 – MAINTENANCE AND REPAIRS
WARNING: maintenance by unqualified people can compromise the safety and conformity of the
machine. Let only qualified, authorized technicians operate/repair the machine.
GENERAL WARNINGS
The manufacturer disclaims all liability for damages to items or persons due to improper use or due to the coffee
machine being used for reasons other than its intended use.
Never operate the espresso machine with wet hands or bare feet.
Do not place hands or other body parts close to the coffee distribution points or near to the steam and hot water
nozzles.
Ensure that the machine is not handled by children or people that have not been properly instructed in its correct
use.
On the cup-warming surface place just the cups/glasses that need to be used in conjunction with the coffee
machine.
Ensure that the cups/glasses are completely drained/dry before placing them on the cup-warming surface.
No other objects should be placed on the cup-warming surface.
MACHINE CLOSE-DOWN
When the machine remains unused for a long period of time (at night or during holidays), the following operations should
be performed:
Unplug the machine or switch off the main switch.
Close the water tap.
Non-compliance with these safety measures exonerates the manufacturer from all liability for malfunctions or
damage to persons or items.
To ensure safety during operation, it is absolutely necessary to: a) follow the manufacturer’s instructions; b) have
qualified, authorized technicians periodically check that all safety devices are intact and work properly (the first
inspection must be done after three years from the purchase date and then every year).
In case of malfunction, turn off the machine, turn off the main on-off switch and call the service center.
If the power supply cord is damaged, turn off the machine and ask for a replacement cord from the service center.
Only use original spare parts guaranteed from the manufacturer. The manufacturer warranty will cease if other
pats will be used.
After maintenance always perform the installation CHECK-UP as indicated in the specific section of the user’s
manual.
Pag. 24
Page 25

4
11 – TURNING THE MACHINE ON
12 - HEATING PHASE
13 – COFFEE DISPENSING
Before setting the machine at work, make sure that:
the main electric power switch is on.
That main water tap is open.
Electric switch on
Press the main switch (4) to the position I.
The boiler will be filled with water until the foreseen level. The
“Heating phase” will start.
At the end of the working day, turn the machine off by pressing the
main switch (4) to the position 0.
WARNING: do not put any cloth on the cup warmer
While waiting for the machine to get ready, insert the filter holders (9)
onto the groupheads.
Do not cover the cup warmer with cloths to prevent over-heating
of the machine.
When the manometer (6) indicates the working pressure, the machine is
ready for use.
1. Unhook the filterholder (9) from the grouphead.
2. Fill the filter with the desired dose of ground coffee.
3. Press it with a tamper and clean the filter edges from eventual coffee
residues/rests.
4. Firmly lock the filterholder (9) to the grouphead and make sure that the
group gasket provides a good seal.
5. Place the cup/cups under the filterholder dispensing spouts.
6. Pull the coffee distribution lever (5) up to a horizontal position. From this
moment, no coffee will be issued for the first few seconds. This is the
time required for the pressure to reach pump delivery head value.
Infusion occurs at this time, i.e. the preliminary “brewing” of the coffee.
Dispensing commences once the infusion is over, during this phase the
coffee flows out continuously. Once the required quantity of coffee has
been obtained, dispensing is stopped by replacing the coffee
distribution lever (5) back into the vertical position.
7. To brew other espressos, remove the filterholder, clean it from the
coffee rests with a wet cloth and repeat the above mentioned
operations.
Pag. 25
Page 26

14 – DISPENSING OTHER HOT BEVERAGES
Steam dispensing
Once the machine is ready, open the steam knob (12) anticlockwise
with the steam wand (10) directed on to the cup tray and let the initial
condense water come out of it; then close the steam knob.
Completely immerse the steam nozzle (10) in the beverage.
Gradually open the steam knob (12) anticlockwise to let the steam come
out and turn it clockwise to stop it.
Hot water dispensing
Place the jug under the hot water wand (11). Open the hot water knob
(13) anticlockwise to let the water come out and turn it clockwise to stop
it.
Milk frothing for cappuccino
Use a tall narrow jug and fill it up to about the half-way mark.
Once the machine is ready, open the steam knob (12) anticlockwise
with the steam wand (10) directed on to the cup tray and let the initial
condense water come out of it; then close the steam knob.
Then plunge the steam wand (10) into the milk.
Gradually open up the steam knob (12) and heat the milk
for a few seconds.
When the required amount of froth has been made and the temperature
is sufficiently warm, stop the steam flow by turning the steam knob (12)
clockwise.
Once the frothing is over, clean the steam wand (10)
thoroughly with a sponge or a clean cloth.
Note: At the conclusion of each steam dispensing phase, clean the inside of the steam nozzle as follows: a) turn
the nozzle towards the cup tray and carefully activate the steam dispensing at least once, b) clean the
steam wand thoroughly with a sponge or a clean cloth.
Pag. 26
Page 27

15 – CLEANING AND MAINTENANCE
WARNING: for the correct application of the food safety system HACCP, please follow the instructions
in this paragraph.
Groupheads cleaning
Procedure to be effected at the end of each work
day on each grouphead.
Clean the group gasket with a brush.
Insert the blind filter in the filterholder.
Pour 3-5 gr of detergent powder in the blind filter.
Hook the filterholder onto the grouphead and pull
up and down the distribution lever 5 times for 10
seconds each time, performing a few cycles.
Remove the filterholder and clean the shower
with a sponge.
Rinse letting water come out of each group for 30
seconds.
Filterholder cleaning
Pour 1 litre of warm water and 10 gr of detergent
powder into a suitable basin.
Remove the filters from the filterholders.
Leave the filters and filterholders in the solution
for at least 20 minutes.
Remove any residues with a sponge and rinse
with plenty of warm water.
Replace the filters in the filterholders, making
sure that the filter fixing spring is in the correct
position.
Cleaning of the steam and hot water wands
Using a clean sponge, wash the wands with hot water removing any eventual organic residue. Rinse carefully.
To clean the inside of the steam nozzle proceed as follows: turn the nozzle towards the cup tray and carefully
activate the steam dispensing at least once.
Cleaning the cup and water tray
Remove the cup tray and the relative water tray and rinse both with water.
Cleaning the water discharge tray
At the end of the working day, pour a jug of hot water into the discharge tray, removing any eventual organic
residue.
Cleaning the appliance body
Use a soft cloth and cleaning products WITHOUT ammonia or abrasives, removing any eventual organic residue
in the work area. Note: do not spray liquids into the panel slots.
Pag. 27
Page 28

16 – DEFECTS AND MALFUNCTIONS
MALFUNCTION
CAUSE
SOLUTION
Leaking from the filterholder edge.
Dirty group gasket.
Clean the group gasket with a brush.
Coffee dispensing time too short.
Coffee ground too coarse.
Coffee is too old.
Use a finer grind.
Use new coffee.
Coffee comes out in drops.
Filter holes blocked or filter holder outlet
dirty.
Coffee ground too fine.
Clean.
Use coarser grind.
Water leak under the machine.
Discharge well clogged up.
Discharge tank hole blocked.
Clean.
Clean.
16 – DEFECTS AND MALFUNCTIONS
MALFUNCTION
CAUSE
NOTES
Infusion time too short.
Rapid dispensing.
Coffee very bland, without cream.
(Same defects on all groups).
Coffee ground too course.
Old coffee.
This defect is associated to other secondary
symptoms which may be caused by a
number of other causes as per the previous
points. Do not adjust the machine until all
other causes have been excluded.
Infusion time too short.
Rapid dispensing.
Coffee very bland, without cream.
(Same defects on 1 group).
Group nozzle widened through use.
OR gasket in cone-shaped section leaks.
Infusion valve remains open
Filter edge broken.
The capacity of the group without filter must
be 100 cm³ in 8 ÷ 10 seconds.
Low coffee yield.
Slow dispensing.
Coffee cold and bland.
Shower dirty.
Letting water come out of the group without
the filterholder, you note thin, isolated jets
instead of one central jet.
Fast dispensing, coffee bland.
Pressure gauge pump indicates pressure
higher than 9 bar.
Pump out of calibration.
By-pass valve blocked.
Low coffee yield.
Quick dispensing.
Coffee hot and bland.
Filters with perforations widened.
Coarse grinding.
Coffee grounds in cup.
Coffee cold, bland and without cream.
Normal infusion and dispensing times.
Air bubble in thermosiphon circulation.
Check valve does not hold (with low
pressure in system).
Heat exchangers emptied.
Pressure gauge defective (shows pressures
higher than real values).
Move the lever to remove air bubble.
When touching the water tube it is warm
near to the machine.
Pressure gauge calibrated with values that
are too low.
Coffee cold in the morning at start of work.
Air in boiler.
See instructions for turning the machine on.
Dispensing slow.
Coffee burnt and cold.
Cream very dark, with tendency of formation
of an “eye”.
Coffee grounds too fine.
Low pressure in pump.
Mesh filter above spout dirty.
Spout partially blocked.
To be done by the end user/worker
Before calling service personnel, to avoid useless expenses, check whether the machine problem corresponds to
one of the cases indicated below.
To be done by authorized, qualified personnel
Pag. 28
Page 29

16 – DEFECTS AND MALFUNCTIONS
MALFUNCTION
CAUSE
NOTES
Dispensing slow, coffee burnt.
Pressure gauge pump lower than 9 bar.
Pump out of calibration.
Pump with reduced capacity.
Drainage tube leaks when group is at rest
(defect only on one group).
Coffee dispensed normally.
Dispensing valve does not hold.
If this defect is not corrected immediately,
the water softener runs out long before the
expiry time, with consequent scale deposit.
Group at rest
Dispensing valve gasket fails rapidly.
Water leak from the drainage tube.
Coffee dispensed normally.
Defect on all groups.
Expansion valve with calibration too high
(above 13 bar).
If this defect is not corrected immediately,
the water softener runs out long before the
expiry time, with consequent scale deposit.
Group at rest.
Continuous loss of cold water in the
drainage tray. Groups do not dispense any
more coffee and the pressure gauge pump
shows low values.
Expansion valve remained open.
If this defect is not corrected immediately,
the water softener runs out long before the
expiry time, with consequent scale deposit.
Group in operation.
Drainage tube leaks.
No coffee.
Drainage valve does not hold.
Group in operation.
Loss of cold water in drainage tray.
Coffee bland.
Dispensing slow.
Expansion valve out of calibration (opens at
less than 9 bar).
Group leaks at cam shaft.
Leak on the two glands.
Remove the glands taking care not to mark
the housings. Do not use tools made of steel
or other hard materials.
Before remounting, clean the shaft
thoroughly, especially the grooves
Difficult to move the groups.
Cam profile worn.
Machine does not go into pressure or
reaches pressure level slowly.
No electricity.
Automatic switch gone off.
Heating elements burned.
Electric circuit to heating element
interrupted.
Steam tap leaks.
Groups function normally.
Pressure gauge pump does not give correct
pressure reading (8 ÷ 9 bar).
Pressure gauge defective.
Pump does not reach pressure level.
No dispensing.
Motor does not work:
- No electricity.
- Capacitor burnt.
- Microswitch burnt.
- Motor burnt.
- Check valve pump open.
- By pass valve completely opened.
Pump noisy.
Pump defective.
No water in system.
To be done by authorized, qualified personnel
Pag. 29
Page 30

17 – ADVICES – TIPS – IMAGES
WARNING: The machine must be fed with water having a hardness higher than 8 ° F. It is not
possible the use of tubes and gaskets that have been already used.
It is advisable to install a water softener (1) for the
water connection of the machine.
N.B. Before connecting the water softener to the
machine, perform a wash cycle and wait until the
water is clear. Only after this you can connect the
water softener to the machine.
As far as regards the pressure of the mains, if it is
above 0.5 Mpa (5 bar), it is recommended to install a
balanced pressure reducing valve for high pressure (a
device in which any increase in the mains pressure
does not affect the output pressure).
The water draining tube (2) must not bend to avoid
water returns to the machine.
To remove the side appliance body, just loosen (do
not unscrew totally) the screw (3). This way the side
can move. To replace it, pay attention to first place the
below part of the side and then screw it as it was
originally (3).
Pag. 30
Page 31

To remove the cup holder (4) unscrew it from the
plate that fixes it (5), then lift it and pull it towards
the machine front part. To place it back, act the
other way round, making sure to insert the plate in
the cup holder hole before fixing it with the screw
(5).
If you want to remove the cup warmer surface (6)
after removing the sides, unscrew the 2 screws
that fix it.
To remove the back panel (7), unscrew the 4
screws (8). This way the back panel will be
completely free.
To regulate/set the boiler pressure, act on the
pressure gauge screw (9). Turning it clockwise, the
pressure increases, anticlockwise it decreases.
To regulate/set the pump pressure, act on the
screw (10) after having loosen the locknut. Turning
it clockwise, then fix the locknut as it was
originally.
Pag. 31
Page 32

Sehr geehrter Kunde,
wir bedanken uns, dass Sie eine von unseren Espressomaschinen erworben haben, die nach den neuesten
technologischen Errungenschaften konstruiert wurde. Bei korrektem Einhalten sämtlicher Bedienungsanweisungen dafür
und bei Einhalten aller unten beschriebenen Vorsichtsmaßnahmen, können Sie von der ganzen Produktqualität, des
ganzen Produktergebnisses und der Produktzuverlässigkeit über Jahre profitieren.
Wir wünschen Ihnen eine gute Arbeit mit unserer Espressomaschine!
INHALTSVERZEICHNIS
ALLGEMEINE VORSCHRIFTEN
EG Konformitätserklärung Seite 3
Tabelle PED Seite 4
Legende Seite 5
Inhaltsverzeichnis Seite 32
1. Allgemeine Vorschriften Seite 33
2. Aufstellung Seiten 33-34
3. Elektrischer Anschluß Seite 34
4. Potentialausgleich Seite 34
5. Anschluß der Wasserkreise Seite 35
6. Inbetriebsetzung Seite 35
7. Kontrollen zur vorschriftsmäßigen Installation Seite 35
8. Vorschriften für den Bediener Seite 36
9. Hinweise Seite 37
10. Außerordentliche Wartung und Reparaturen Seite 37
GEBRAUCH
11. Tägliche Einschaltung Seite 38
12. Vorwärmphase Seite 38
13. Kaffeeabgabe Seite 38
14. Zubereitung sonstiger Heißgetränke Seite 39
15. Reinigung und Wartung Seite 40
16. Anomalien und Störungen Seiten 41-42
17. Ratschläge – Tipps – Bilder Seiten 43-44
Endgültige Ausserbetriebstellung Seite 71
Pag. 32
Page 33

1 – ALLGEMEINE VORSCHRIFTEN
Die vorliegenden Hinweise und Bestimmungen müssen vor Aufstellung und vor Inbetriebnahme der
Maschine genau durchgelesen werden, da sie wichtige Angaben enthalten, die den sicheren Betrieb
der Maschine entsprechend der Vorschriften zur Sicherheit und Hygiene betreffen.
Das vorliegende Handbuch muß sorgfältig aufbewahrt werden, um eine spätere Einsichtnahme zu
ermöglichen.
DIESE KAPITEL DES HANDBUCHES WENDEN SICH NUR AN QUALIFIZIERTE UND OFIZIELL BEFUGTE
FACHTECHNIKER
2 – AUFSTELLUNG
Die Installation, die Demontage und die Einstellung der Maschine dürfen nur von entsprechend
qualifizierten und offiziell zugelassenen Fachtechnikern vorgenommen werden.
Die im vorliegenden Handbuch enthaltenen Hinweise und Bestimmungen müssen genau durchgelesen
werden, da sie wichtige Angaben enthalten, welche die Installation sowie den Gebrauch und die
Wartung der Maschine unter Bedingungen der maximalen Sicherheit betreffen.
Das vorliegende Handbuch muß zwecks späterer Einsichtnahme sorgfältig aufbewahrt werden.
Die Maschine darf nur zur Zubereitung von Espressokaffee und von Heißgetränken mittels Wasser oder
Wasserdampf sowie zum Vorwärmen der Kaffeetassen eingesetzt werden.
Die Maschine darf nur von entsprechend geschulter Fachleute bedient werden, welche mit den einschlägigen
Vorschriften zum Unfallschutz und den während des Betriebs entstehenden potentiellen Gefahren bestens
vertraut sein müssen.
Die Maschine ist für den professionellen Einsatz bestimmt.
Die Maschine darf nicht unbeaufsichtigt von Kindern oder von Personen mit eingeschränkten körperlichen,
geistigen oder sinnlichen Kapazitäten benutzt werden.
Kinder müssen beaufsichtigt werden und dürfen nicht mit der Maschine spielen.
Die Maschine darf nicht unbeaufsichtigt gelassen werden oder im Freien benutzt werden.
Wenn die Maschine in einem Raum abgestellt werden soll, in welchem die Umgebungstemperatur unter den
Gefrierpunkt absinken könnte, muss vor Abstellung der Maschine der Wasserkessel entleert und das Wasser aus
den Leitungen der Maschine abgelassen werden.
Die Maschine darf keinen Witterungseinflüssen (Regen, direkte Sonnenstrahlung, Frost) ausgesetzt werden.
Die Maschine darf nicht mit Wasser abgespritzt werden.
Geräusch: die Maschine überschreitet 70 dB(A) nicht.
Sollte das Netzkabel beschädigt sein, so darf es nur von einem entsprechend qualifizierten und befugten
Fachtechniker ausgetauscht werden.
Gleich welcher Einsatz der Maschine, der von den vorstehend aufgeführten Bestimmungen abweicht, gilt als
unsachgemäß und beinhaltet das Entstehen von Gefahrenquellen. Der Hersteller übernimmt keine Haftung für
Schäden gleich welcher Art, welche auf einen unsachgemäßen Gebrauch der Maschine zurückzuführen wären.
Die mit dem Transport und der Versetzung der Maschine beauftragten Personen müssen die einschlägigen
Bestimmungen zur Bewegung von Lasten kennen. Gehen Sie beim Transport und bei der Versetzung mit
maximaler Umsicht vor und setzen Sie die jeweils angemessenen Transport- und Hebemittel (Gabelstapler) ein.
Bei Transport und der Versetzung der Maschine von Hand müssen folgende Voraussetzungen gewährleistet
sein:
- die Anzahl der zur Anhebung und zur Versetzung der Maschine eingesetzten Personen muss dem Gewicht
der Maschine sowie den durch die Maschine bestehenden Möglichkeiten des festen Griffs entsprechen;
- alle zur Anhebung und zur Versetzung der Maschine eingesetzten Personen müssen mit angemessenen
Mitteln zum Unfallschutz (Sicherheitsschuhe, Handschuhe) ausgestattet sein.
Nehmen Sie die Maschine aus der Verpackung, und vergewissern Sie sich vom einwandfreien Zustand aller
Komponenten und Einheiten zur Betriebssicherheit der Maschine.
Die verschiedenen Bestandteile der Verpackung (Plastikbeutel, Polystyrol-Schaumstoff, Nägel, etc.) dürfen nicht
in Reichweite von Kindern gelassen werden, da sie eine potentielle Gefahrenquelle darstellen.
Vergewissern Sie sich vor Anschluß der Maschine, daß die Angaben auf dem Kenndatenschild der Maschine den
Werten des Strom- und Wassernetzes entsprechen.
Das Netzkabel muß in seiner gesamten Länge abgewickelt werden. Sollte es defekt sein, muss es nur von
Fachleute ausgetauscht werden.
Die Maschine muß auf einer ebenen und stabilen Fläche mit einem Abstand zu Wänden und zur
Aufstellungsfläche von wenigstens 20 mm aufgestellt werden; achten Sie bei der Aufstellung darauf, daß sich die
Pag. 33
Page 34

3 – ELEKTRISCHER ANSCHLUß
4 – POTENTIALAUSGLEICH
Diese Art des Anschlusses, die in einigen der einschlägigen,
Bestimmungen vorgeschrieben ist, dient dazu, Unterschiede des
elektrischen Potentials auszugleichen, welche zwischen zwischen der
Masse der im gleichen Raum installierten Geräte auftreten können.
UNTER DER MASCHINE befindet sich eine Klemmenleiste (1) an
welcher der externe Leiter zum Potentialausgleich abgeschlossen
werden kann.
Nach erfolgter Installation MUSS die Maschine wie folgt angeschlossen
werden.
Der Anschluß muß mit einem Leiter mit Nennquerschnitt gemäß der
einschlägigen Gesetzesbestimmungen erfolgen.
Verbinden Sie ein Ende des Leiters mit der dafür vorgesehenen Klemme
und das andere Ende mit dem Massepol der angrenzenden Geräte.
Der Hersteller übernimmt keine Haftung für Sach- oder Personenschäden
gleich welcher Art, welche auf eine Nichtbeachtung der vorstehend
angegebenen Vorschriften zurückzuführen wären.
N.B.: DER LEITER ZUM POTENTIALAUSGLEICH DARF NICHT AN DIE ERDUNG DES STROMNETZES
ANGESCHLOSSEN WERDEN, DA DER ERDLEITER EINES NETZKABELS NICHT ALS LEITER ZUM
POTENTIALAUSGLEICH ANGESEHEN WIRD.
Es wird daran erinnert, daß GEMME ITALIAN PRODUCERS srl von jeder Haftung für Schäden entbunden
wird, welche auf einen nicht vorschriftsmäßigen elektrischen Anschluß zurückzuführen wären.
Es wird darauf hingewiesen, daß die Haftung im Schadensfall beim Installateur der Maschine liegt.
obere Ebene der Maschine (zur Abstellung und Vorwärmung der Kaffeetassen) in einer Höhe von nicht unter 1,2
Meter befindet und daß eine ausreichende Fläche zur Ablage / Aufstellung der Zubehörteile zur Verfügung steht.
Die Umgebungstemperatur muß im Bereich zwischen 10°C und 32°C (50°F und 90°F) liegen.
Vergewissern Sie sich, daß in unmittelbarer Nähe der Maschine Vorrichtungen zum Anschluß an das Strom- und
Wassernetz sowie ein mit Siphon versehener Wasserablaß vorhanden sind.
Die Maschine darf nicht in Räumen (z. b. in Küchen) aufgestellt werden, in denen eine Reinigung mittels
Strahlwasser vorgesehen ist.
Vergewissern Sie sich, daß die zur Belüftung und Wärmeableitung vorgesehenen Schlitze und Öffnungen der
Maschine nicht verstopft sind.
Die Maschine darf nicht im Freien aufgestellt werden.
Das Netz zum elektrischen Anschluß der Maschine muß mit einem Stromtrenner mit einer Kontaktöffnung
versehen sein, welche die totale Abtrennung gemäß Überspannungskategorie III sowie einen Schutz gegen
Stromverluste von 30mA gewährleistet. Dieser Stromtrenner muß entsprechend der einschlägigen
Gesetzesbestimmungen zur Installation von Elektrogeräten in das Stromnetz eingebunden sein. Bei ungünstigen
Bedingungen der Netzstromversorgung kann ein Abfall der Einschwingungsspannung auftreten.
Die elektrische Sicherheit der Maschine kann nur gewährleistet werden, wenn die Maschine an ein lt. den
einschlägigen Gesetzesbestimmungen vorschriftsmäßig geerdetes Netz angeschlossen wird. Vergewissern Sie
sich vor dem elektrischen Anschluß der Maschine, daß diese Voraussetzungen gewährleistet sind, und wenden
Sie sich im Zweifelsfall zur Kontrolle Ihres Stromnetzes an einen qualifizierten Elektriker. Der Hersteller
übernimmt keine Haftung für Schäden gleich welcher Art, welche auf eine fehlende Erdung des Stromnetzes
zurückzuführen wären.
Von einer Verwendung von Adaptern, Mehrfachsteckern u/o Verlängerungskabeln wird abgeraten. Sollte der
Einsatz dieser Komponenten unerläßlich werden, so dürfen nur Adapter, Mehrfachstecker und
Verlängerungskabel verwendet werden, die den einschlägigen Gesetzesbestimmungen zur Sicherheit
elektrischer Anschlüsse entsprechen, wobei darauf zu achten Ist, daß die auf dem Adapter bzw. auf dem
Verlängerungskabel angegebene Grenzwerte des Stromdurchsatzes und der maximalen Stromlast nicht
überschritten werden.
Kontrollieren Sie des weiteren, daß die Anschlußart und die Netzspannung mit den Angaben auf dem
Kenndatenschild der Maschine übereinstimmen.
Pag. 34
Page 35

5 – ANSCHLUß DER WASSERKREISE
6 – INBETRIEBSETZUNG
7 – KONTROLLEN ZUR VORSCHRIFTSMÄßIGEN INSTALLATION
ZU BEACHTEN: NACH INSTALLATION, ANSCHLUSS UND EINSTELLUNG DER MASCHINE UND VOR
DER ÜBERGABE ZUM BETRIEB MÜSSEN DIE INNENKOMPONENTEN GESPÜLT WERDEN, WOBEI DIE
NACHSTEHENDEN ANGABEN ZU BEFOLGEN SIND:
Das Wasser zur Versorgung der Kaffeemaschine muß Trinkwasser lt. den einschlägigen Gesetzesbestimmungen sein.
Vergewissern Sie sich, daß im Wassereinlauf der Maschine folgende Bedingungen vorliegen: a) pH-Wert gemäß der
einschlägigen Gesetzesbestimmungen; b) Chloridwert unter 100 mg/l.
Sollten die o.a. Werte überschritten werden, so muß eine Einheit zur Wasseraufbereitung (entsprechend der vor Ort
geltenden Gesetzesbestimmungen und dem Maschinentyp) zwischengeschaltet werden.
Sollte der Härtegrad des Wassers zur Versorgung der Kaffeemaschine 8°F (4,5 °D) überschreiten, so empfiehlt sich,
um die vorschriftsmäßige Funktion der Maschine zu gewährleisten, die Zeiträume zur Wartung der Maschine dem
jeweils ermittelten Härtegrad sowie der jeweiligen Art des Einsatzes der Maschine anzupassen.
Zur Installation der Maschine dürfen nur die mitgelieferten Originalteile verwendet werden; in jedem Falle dürfen nur
neue, nicht vorher benutze und (entsprechend der vor Ort geltenden Gesetzesbestimmungen) für Trinkwasser
zugelassene Komponenten benutzt werden.
Achten Sie auf die perfekt waagerechte Positionierung der Maschine, die über entsprechende Regelung und
anschließendes Feststellen der Standfüße der Maschine erzielt wird.
Nehmen Sie den Anschluß an die Wasserleitung entsprechend der einschlägigen, am Aufstellungsort geltenden
Bestimmungen in Sachen der Hygiene, der Unbedenklichkeit der Wasserversorgung und des Umweltschutzes.
Sollte der Druck der Wasserleitung 6 bar überschreiten, so muß ein Druckminderer installiert werden, welcher auf 2 ÷ 3
bar einzustellen ist.
Ablaßleitung: Legen Sie das Ende der Abwasserleitung in einen Ablauf, welcher zu Zwecken der Inspektion und der
Reinigung mit einem Siphon ausgestattet sein muß.
Die Abwasserleitung darf in den Kurvenbereichen NICHT den Wasserfluss blockieren!
Nach erfolgtem elektrischem Anschluß und erfolgtem Anschluß der Wasserkreise kann die Maschine ins Betrieb
gesetzt werden.
Öffnen Sie den Hahn zur Wasserversorgung und die Maschine über den Hauptschalter ausschalten.
Drücken Sie den Hauptschalter I/O zur Position I, das Aufleuchten der Leuchtdiode zeigt Ihnen die Stromversorgung
der Maschine an.
Die elektronische Wasserstandkontrolle setzt sich ins Betrieb, um den Kessel mit Wasser zu füllen, bis das richtige
Wasserniveau automatisch erreicht ist.
Sobald das Wasser automatisch in den Kessel gepumpt worden ist, startet der Kesselheizstab das Wasser zu heizen.
Warten Sie bis die Maschine den optimalen, nominalen Druck von 1÷1,2 Bar erreicht hat (wie im Manometer
gezeichnet). Wenn die Maschine solchen Druck nicht erreicht, muss der Manometer erneut kalibriert werden.
Die Maschine ist jetzt betriebsbereit.
Vergewissern Sie Sich, nach erfolgter Installation, den vorschriftsmäßigen Betrieb der Maschine, d.h daß:
es keine Leckagen an den Anschlußstellen oder den Wasserleitungen gibt;
den Betriebsdruck des Wasserkessels entsprechend der angegebenen Nennwerte ist;
der Druckwächter vorschriftsmäßig funktioniert;
die elektronische Wasserstandkontrolle vorschriftsmäßig funktioniert;
die Expansionsventile vorschriftsmäßig funktioniert;
der elektronische Tassenerwärmer (wenn verfügbar) vorschriftsmäßig funktioniert.
ABGABEEINHEITEN:
Die Filterhalter (ohne Kaffee) an die Abgabeeinheiten anschließen.
Pro Einheit etwa eine Minute lang einen Abgabezyklus ausführen.
HEISSWASSERKREIS:
Den Drehknopf für Heißwasser öffnen und Heißwasser austreten lassen, bis wenigstens 4 Liter abgegeben wurden
DAMPFKREIS:
Den Drehknopf für Dampf öffnen und etwa eine Dampf austreten lassen.
Pag. 35
Page 36

8 – VORSCHRIFTEN FÜR DEN BEDIENER/ENDKUNDE
ZU BEACHTEN: VOR DER INBETRIEBNAHME MÜSSEN DIE INNENKOMPONENTEN DER MASCHINE
GESPÜLT WERDEN, WOBEI DIE NACHSTEHENDEN ANGABEN ZU BEFOLGEN SIND.
DIESE ARBEITSSCHRITTE DER SPÜLUNG MÜSSEN IMMER AUSGEFÜHRT WERDEN, WENN DIE
MASCHINE LÄNGER ALS 8 STUNDEN NICHT IN BETRIEB GENOMMEN WURDE. IN JEDEM FALL MUSS
DIE MASCHINE WENIGSTENS EINMAL PRO TAG GESPÜLT WERDEN.
INBETRIEBNAHME
ABGABEEINHEITEN:
Die Filterhalter (ohne Kaffee) an die Abgabeeinheiten anschließen.
Pro Einheit etwa eine Minute lang einen Abgabezyklus ausführen.
HEISSWASSERKREIS:
Den Drehknopf für Heißwasser öffnen und Heißwasser austreten lassen, bis wenigstens 4 Liter abgegeben
wurden
DAMPFKREIS:
Den Drehknopf für Dampf öffnen und etwa eine Dampf austreten lassen.
WÄHREND DES BETRIEBES
DAMPFABGABE
Vor der Erhitzung des abzugebenden Getränks (auf Wasser- oder Milchbasis) wenigstens 2 Sekunden lang
Dampf austreten lassen, um den vollständigen Austritt von Kondensat zu gewährleisten.
KAFFEEABGABE
Wenn die Maschine länger als 1 Stunde nicht in Betrieb genommen wurde, vor der Kaffeeabgabe etwa 100 cc
Wasser austreten lassen.
HEIßWASSERABGABE
Wenn die Maschine länger als 1 Stunde nicht in Betrieb genommen wurde, vor der Kaffeeabgabe etwa 200 cc
Wasser austreten lassen.
REINIGUNG KAFFEEKREIS
Beziehen Sie Sich dafür auf den entsprechenden Abschnitt des Bedienerhandbuchs.
Pag. 36
Page 37

9 – HINWEISE
VEBRENNUNGSGEFAHR: die durch das unter Symbol gekennzeichneten Bereiche der Maschine
stehen unter hoher Temperatur und dürfen nur mit großer Vorsicht angefaßt werden.
CAUTION: HOT
10 – AUßERORDENTLICHE WARTUNG UND REPARATUREN
ZU BEACHTEN: bitte bedenken Sie, daß die Ausführung von Wartungsmaßnahmen durch nicht
entsprechend qualifizierte Personen die Betriebssicherheit der Maschine beeinträchtigen und die
Entsprechung der Maschine zu den einschlägigen Gesetzesbestimmungen gefährden könnte.
Wenden Sie sich IMMER NUR an qualifizierte und entsprechend befugte Fachleute.
ALLGEMEINE HINWEISE
Der Hersteller haftet nicht für Schäden oder Verletzungen, die auf einen unvorschriftsmäßigen oder
unsachgemäßen Gebrauch der Kaffeemaschine zurückzuführen sind.
Betreiben Sie die Maschine nie mit nassen Händen oder wenn Sie mit nackten Füßen auf dem Boden stehen
sollten.
Nähern Sie sich niemals mit den Händen oder mit anderen Körperteilen den Einheiten zur Abgabe von Kaffee,
Dampf oder Heißwasser.
Achten Sie darauf, daß die Maschine nicht von Kindern oder von nicht mit der Bedienung der Maschine
vertrauten Personen bedient wird.
Stellen Sie auf die Fläche zur Tassenvorwärmung nur Kaffeetassen oder Spezialgefäße, die für den
gemeinsamen Betrieb mit der Kaffeemaschine geeignet sind.
Trocknen Sie die Kaffeetassen gut ab, bevor Sie sie auf die Fläche zur Tassenvorwärmung stellen.
Auf der Fläche zur Tassenvorwärmung dürfen keine anderen Gegenstände abgestellt werden.
NICHTGEBRAUCH DER MASCHINE
Gehen Sie wie nachstehend beschrieben vor, wenn die Maschine für einen längeren Zeitraum (nachts, während Urlaub)
nicht gebraucht bzw. unbeaufsichtigt gelassen wird:
Ziehen Sie den Netzstecker aus der Steckdose, oder schalten Sie die Maschine über den Hauptschalter ab;
Sperren Sie den Hahn zur Wasserversorgung ab.
Die Nichtbeachtung der vorstehend aufgeführten Anweisungen befreit den Hersteller von jeder Art der Haftung
hinsichtlich einer Beschädigung von Gegenständen oder einer Verletzung von Personen.
Folgende Regeln sind hinsichtlich der Betriebssicherheit und der Funktionstüchtigkeit der Maschine
grundlegender Bedeutung. Gehen Sie stets nach den Anleitungen des Herstellers vor; lassen Sie alle
Schutzeinrichtungen der Maschine regelmäßig von spezifisch befugten Fachleute kontrollieren (erste Kontrolle
spätestens 3 Jahre nach Erstinbetriebnahme – alle weiteren Kontrollen einmal pro Jahr).
Im Fall von Störungen die Maschine über den Hauptschalter ausschalten und den Kundendienst benachrichtigen.
Sollte das Netzkabel beschädigt sein, die Maschine über den Hauptschalter ausschalten und beim Kundendienst
ein neues Netzkabel bestellen.
Es dürfen nur die vom Hersteller angebotenen Originalersatzteile eingesetzt werden. Der Einsatz anderer
Ersatzteile beinhaltet den Verfall der Herstellergarantie.
Nach Ausführung von Schritten der außerordentlichen Wartung müssen die KONTROLLEN zur
vorschriftsmäßigen Installation ausgeführt werden, wie im entsprechendem Abschnitt des Bedienerhandbuchs
beschrieben.
Pag. 37
Page 38

11– TÄGLICHE EINSCHALTUNG
12 - VORWÄRMPHASE
13 – KAFFEEABGABE
Vergewissern Sie sich vor Inbetriebnahme der Maschine
von folgenden Gegebenheiten:
- der Hauptschalter zur Stromversorgung der
Maschine muß eingeschaltet sein;
- das Ventil zur Wasserzuführung muß geöffnet sein.
Elektrische Einschaltung
Den Hauptschalter (4) auf I stellen.
Den Kessel wird mit Wasser gefüllt, bis das richtige Wasserniveau
automatisch erreicht ist.
Dann beginnt die “Vorwärmphase”.
Nach dem täglichen Betrieb müssen Sie die Maschine abschalten, indem
Sie den Hauptschalter (4) auf „0“ setzen.
ACHTUNG: das Tassenablagegitter des Tassenheizgerätes
sollte NIE mit Tüchern gedeckt werden.
Während der Vorwärmphase, in der sich die Maschine auf
Betriebsbereitschaft bringt, können Sie die Filterhalter (9)
in die Abgabeeinheiten einsetzen.
Um die Wärmeleistung der Maschine nicht zu verändern, dürfen die
Tassen auf dem Tassenvorwärmer nicht mit mit Lappen oder Tüchern
abgedeckt werden.
Wenn das Manometer (6) den vorgeschriebenen Betriebsdruck anzeigt;
ist die Maschine betriebsbereit.
1. Nehmen Sie den Filterhalter (9) von der Abgabeeinheit ab.
2. Füllen Sie den Filter des Filterhalters mit gemahlenem Kaffee.
3. Drücken Sie das Pulver mit einem Preßstempel/Tamper an, reinigen
Sie den Siebträgerkanten von Kaffeeresten.
4. Setzen den Siebträger dann in die Abgabe-Einheit Kaffee (9) ein, so
daß die Dichtung eine perfekte Dichtigkeit gewährleistet.
5. Stellen Sie die Kaffeetasse(n) unter den Auslauf der Siebträger.
6. Heben Sie den Hebel Kaffee (5) zur horizontalen Position an.
Während der ersten Sekunden tritt kein Kaffee aus der
Abgabeeinheit aus, da die Pumpe den Auslaßdruck erreichen muß.
In dieser Zeit wird der Kaffee aufgegossen d.h. vorgekocht. Nach
dem Aufkochen beginnt der Abgabevorgang und der Kaffee wird in
kontinuierlichem Austritt abgegeben. Um die Kaffeeabgabe
abzubrechen, müssen Sie den Hebel (5) in die vertikale Position
zurückstellen, sobald die gewünschte Menge Kaffee in die Tasse
eingefüllt wurde.
7. Wenn Sie weitere Espresso zubereiten möchten, entnehmen Sie
den Siebträger, entfernen Sie den Kaffeesatz und reinigen Sie den
Siebträger mit einem feuchten Tuch. Wiederholen Sie die oben
beschriebenen Vorgänge.
Pag. 38
Page 39

14 – ZUBEREITUNG SONSTIGER HEIßGETRÄNKE
Dampfabgabe
Sobald die Maschine betriebsbereit ist, verstellen Sie den
Dampfdrehknopf (12) gegen den Uhrzeigersinn mit der
Dampfdüsenspitze (10) auf der Tropfschale und lassen Sie ein wenig
Wasser austreten; schließen Sie dann den Dampfdrehknopf.
Setzen Sie das Dampfabgaberohr (10) in den Behälter mit
dem zu erwärmenden Getränk. Verstellen Sie den Dampfdrehknopf (12)
gegen den Uhrzeigersinn, um die Dampfabgabe zu beginnen und in
Uhrzeigersinn, um den Dampfbezug zu beenden.
Heißwasserabgabe
Stellen Sie ein Gefäß unter das Heißwasserrohr (11) und verstellen Sie
den Drehknopf für Heißwasser (13) gegen den Uhrzeigersinn, um die
Heißwasserabgabe zu beginnen und in Uhrzeigersinn, um den
Heißwasserbezug zu beenden.
Milchaufschäumung zur Cappuccino-Zubereitung
Füllen Sie ein angemessen hohes und schmales Milchkännchen bis
etwa auf halbe Höhe mit Milch.
Sobald die Maschine betriebsbereit ist, verstellen Sie den
Dampfdrehknopf (12) gegen den Uhrzeigersinn mit der
Dampfdüsenspitze (10) auf der Tropfschale und lassen Sie ein wenig
Wasser austreten; schließen Sie dann den Dampfdrehknopf. Stecken
Sie das Wasserdampfrohr (10) in die Milch.
Öffnen Sie langsam den Dampfdrehknopf (12) und erhitzen Sie die
Milch (einige Sekunden lang).
Wenn die Milch aufschäumt und eine angemessene Temperatur erreicht
hat, verstellen Sie den Dampfdrehknopf (12) im Uhrzeigersinn, um die
Dampfabgabe zu unterbrechen.
Nach Benutzung des Dampfes muß das Rohr (10)
sorgfältig mit einem Schwamm oder einem sauberen Lappen
gereinigt werden.
N.B.: Nach jedem Vorgang der Dampfabgabe muß das Abgabedampfrohr auf folgende Weise gereinigt werden:
richten Sie das Rohr zur Tassenaufsatzwanne aus, und führen Sie wenigstens eine Dampfabgabe aus.
Gehen Sie bei diesem Vorgang mit besonderer Umsicht vor.
Reinigen Sie dann das Rohr sorgfältig mit einem Schwamm oder Lappen, um eventuelle organische
Ablagerungen zu beseitigen.
Pag. 39
Page 40

15 – REINIGUNG UND WARTUNG
VORSICHT: Halten Sie sich hinsichtlich des vorschriftsmäßigen Einsatzes des HACCP-Systems an die
im vorliegenden Paragraphen aufgeführten Angaben.
Reinigung der Abgabeeinheiten
Der nachstehend beschriebene Vorgang muß
nach jedem Arbeitstag für alle Abgabeeinheiten
ausgeführt werden!
Reinigen Sie die Dichtung der Abgabeeinheit mit
einer Bürste.
Setzen Sie den Blindfilter in den Filterträger ein.
Füllen Sie den Blindfilter mit 3-5 gr
Reinigungsmittel ein.
Setzen Sie den Filterträger in die Abgabeeinheit,
und führen Sie einige Abgabevorgänge aus
(Ein/ausschalten fünfmal für etwa 10 Sekunden).
Nehmen Sie den Filterträger ab, und reinigen Sie
die Wasserdusche mit einem Schwamm.
Spülen Sie jede Abgabeeinheit, indem Sie etwa
30 Min. lang Wasser abgeben.
Reinigung der Filterträger
Geben Sie einen Liter warmes Wasser und 10 gr
Reinigungsmittel in einen geeigneten Behälter.
Nehmen Sie die Filter aus den Filterträgern.
Lassen Sie die Filter und die Filterträger
wenigstens 20 Minuten in der Reinigungslösung
liegen.
Entfernen Sie mögliche Restablagerungen mit
einen Schwamm, und spülen Sie die Filter und
die Filterträger mit reichlich warmem Wasser gut
aus.
Setzen Sie die Filter wieder in die Filterträger;
vergewissern Sie sich, daß die Feder zur
Festklemmung des Filters in ihren Sitz
einschnappt.
Reinigung der Rohre Dampf- und Heißwasserabgabe
Nehmen Sie einen sauberen Schwamm, reinigen Sie die Rohe mit warmem Wasser, und entfernen Sie möglicherweise
präsente organische Ablagerungen. Spülen Sie die Rohre mit reichlich Wasser.
Gehen Sie zur Reinigung des Inneren des Abgaberohrs wie folgt vor: richten Sie das Rohr zur Tassenaufsatzwanne aus, und
führen Sie wenigstens eine Dampfabgabe aus; gehen Sie bei diesem Vorgang mit besonderer Umsicht vor.
Reinigung der Tropfenauffangwanne
Ziehen Sie die Wanne heraus, und reinigen Sie sie unter fließendem Wasser.
Reinigung der Ausflußwanne
Kippen Sie am Ende jedes Arbeitstages ein Kännchen mit heißem Wasser in die Wanne, um Ablagerungen und
Verkrustungen im Ausfluß zu entfernen.
Reinigung des Gehäuse
Reinigen Sie das Gehäuse der Maschine mit einem weichen Lappen; BENUTZEN SIE WEDER AMMONIAK
NOCH SCHEUERNDE PUTZMITTEL. Entfernen Sie möglicherweise im Arbeitsbereich präsente organische
Ablagerungen. Zu beachten: achten Sie darauf, keine Flüssigkeiten in die Vertiefungen der Paneele des
Gehäuses zu spritzen.
Pag. 40
Page 41

16 – ANOMALIEN UND STÖRUNGEN
STÖRUNG
STÖRUNGURSACHE
MASSNAHME
Austritte aus dem Rand des Filterträgers
Die Dichtung der Abgabeeinheit ist mit
Kaffee verschmutzt.
Die Dichtung mit einer Bürste reinigen.
Zu schnelle Kaffeeabgabe
Kaffee zu grob gemahlen.
Kaffe zu alt.
Feiner mahlen.
Bohnen ersetzen.
Kaffee tritt nur tropfenweise aus.
Die Löcher des Filters sind verstopft oder
der Filterträgerauslauf ist verschmutzt.
Kaffe zu fein gemahlen
Filter / Filterträger reinigen.
Gröber gemahlenen Kaffee verwenden.
Unter der Maschine tritt Wasser aus.
Wasserablaßgully zugesetzt.
Ablaßöffnung in Ablaßwanne zugesetzt.
Wasserablaßgully reinigen.
Ablaßöffnung reinigen.
16 – ANOMALIEN UND STÖRUNGEN
STÖRUNG
STÖRUNGURSACHE
MASSNAHME
Zu kurze Aufgußzeit.
Zu schnelle Abgabe.
Kaffee zu schwach, ohne Schaumkrone
(bei allen Abgabeeinheiten).
Kaffee zu grob gemahlen.
Kaffe zu alt.
Diese Störung kann mit anderen sekundären
Ursachen in Zusammenhang stehen, die
nachstehend beschrieben werden. Verändern Sie
die Mahlfeinheit erst, wenn alle dieser
sekundären Ursachen beseitigt wurden.
Zu schnelle Aufgußzeit.
Zu schnelle Abgabe.
Kaffee zu schwach, ohne Schaumkrone
(nur bei einer Abgabeeinheit).
Die Öffnungen der Düse der Abgabeeinheit
haben sich im Laufe der Zeit vergrößert.
Die O-Ringdichtung des konischen Schaftes
ist undicht.
Aufgußventil geöffnet.
Filterrand defekt.
Der Durchsatz der Abgabeeinheit ohne Filter muß
in einer Zeit zwischen 8 und 10 Sekunden gleich
100 cm3 sein.
Schlechte Kaffeeausbeute.
Zu langsame Abgabe.
Kaffee zu kalt und zu schwach.
Wasserdusche verschmutzt
Abgabeeinheit ohne Filter betreiben: anstatt eines
zentralen Strahls treten einzelne, feinere Strahlen
aus.
Zu schnelle Abgabe, Kaffee zu
schwach.
Das Manometer der Pumpe zeigt einen
Druck über 9 bar an.
Pumpe falsch eingestellt.
By-Pass-Ventil blockiert.
Schlechte Kaffeeausbeute.
Zu schnelle Abgabe.
Kaffee zu heiß und zu schwach
Die Öffnungen der Filter haben sich im Laufe
der Zeit vergrößert.
Kaffee zu grob gemahlen.
Zu viel Kaffeesatz in der Tasse weist auf diese
Anomalie hin.
Kaffee zu kalt und zu schwach und
ohne Schaumkrone.
Aufgußzeiten und Abgabezeiten
normal.
Im Siphon-Wärmeumlaufkreis haben sich
Luftblasen gebildet.
Das Rückschlagventil ist undicht (bei extrem
niedrigem Leitungsdruck).
Entleerung der Wärmetauscher.
Manometer Heizkessel defekt (und zeigt
einen über dem Istdruck liegenden Wert an).
Entfernen Sie die Luftblasen aus dem
Wärmeumlaufkreis.
Bei Berührung der Wassereinlaufleitung kann
man feststellen, daß die Leitung in
Maschinennähe sehr heiß ist.
Der Druckwächter ist auf einen zu niedrigen Wert
eingestellt.
Der erste Kaffee am Morgen, zu Beginn
des Betrieb, ist zu kalt.
Luft im Heizkessel.
Halten Sie sich an die Anleitungen zur
Einschaltung der Maschine.
Zu langsame Abgabe.
Kaffee verbrannt und zu kalt.
Sehr dunkler Schaum, Tendenz zur
Bildung von "Augen".
Kaffee zu fein gemahlen.
Zu niedriger Betriebsdruck der Pumpe.
Netzfilter über der Düse verschmutzt.
Düse teilweise zugesetzt.
Vom Bediener/Endkunden auszuführende Vorgänge
Kontrollieren Sie, bevor Sie sich an den Kundendienst wenden, ob die vorliegende Störung durch Ausführung
einer der nachstehend beschriebenen Maßnahmen behoben werden kann.
Vom Kundendienst auszuführende Vorgänge
Pag. 41
Page 42

16 – ANOMALIEN UND STÖRUNGEN
STÖRUNG
STÖRUNGURSACHE
MASSNAHME
Zu langsame Abgabe.
Kaffee verbrannt. Das Manometer der
Pumpe zeigt einen Druck unter 9 bar an.
Pumpe falsch eingestellt.
Zu niedrige Förderleistung.
Im Ruhestatus leckt das Auslaufrohr (nur bei
einer Abgabeeinheit).
Normale Kaffeeabgabe.
Abgabeventil defekt.
Wenn diese Anomalie nicht rechtzeitig
behoben wird, verliert der Wasserenthärter
vorzeitig seine Wirkung, so daß sich
Kalkablagerungen bilden.
Abgabeeinheit im Ruhestatus, zu
schneller Verschleiß der Dichtung
des Abgabeventils.
Wasseraustritte unter dem Auslaufrohr.
Normale Kaffeeabgabe.
(Die Anomalie tritt bei allen Abgabeeinheiten
auf).
Das Ausdehnungsventil ist auf einen zu
hohen Wert eingestellt (über 13 bar).
Wenn diese Anomalie nicht rechtzeitig
behoben wird, verliert der Wasserenthärter
vorzeitig seine Wirkung, so daß sich
Kalkablagerungen bilden.
Abgabeeinheit im Ruhestatus.
Kontinuierlicher Austritt von kaltem Wasser
in die Ablaßwanne.
Die Abgabeeinheiten geben keinen Kaffee
mehr ab; das Manometer der Pumpe zeigt
einen zu niedrigen Betriebsdruck an.
Das Ausdehnungsventil ist geöffnet
geblieben.
Wenn diese Anomalie nicht rechtzeitig
behoben wird, verliert der Wasserenthärter
vorzeitig seine Wirkung, so daß sich
Kalkablagerungen bilden.
Abgabeeinheit in Betrieb.
Wasseraustritt Auslaufrohr.
Keine Kaffeeabgabe.
Auslaßventil defekt oder verschmutzt.
Abgabeeinheit in Betrieb.
Kontinuierlicher Austritt von kaltem
Wasser in die Ablaßwanne.
Zu schwacher Kaffee.
Zu langsame Abgabe.
Ausdehnungsventil falsch eingestellt (öffnet
bei Werten unter 9 bar).
Die Abgabeeinheit leckt am Stößel
der Nockenwelle.
Verluste an beiden Stopfbuchsen
Bauen Sie die Stopfbuchsen aus; achten Sie
dabei auf die Sitze der Stopfbuchsen.
Benutzen Sie kein Werkzeug aus Stahl oder
anderem harten Werkstoff. Vor dem
erneuten Einbau der Stopfbuchsen muß die
kleine Welle gut gereinigt werden
(insbesonders in den Riefelungen)
Die Abgabeeinheit läßt sich nur
schwer bewegen.
Nockenwelle kaputt.
Der Betriebsdruck wird nicht oder
nur zu langsam erreicht.
Stromausfall.
Auslösung des Leistungsschutzschalters.
Heizelemente durchgebrannt.
Stromversorgung der Heizelemente
unterbrochen.
Kein Wasser im Heizkessel
Das Dampfventil leckt.
Vorschriftsmäßiger Betrieb der
Abgabeeinheiten.
Das Manometer der Pumpe zeigt nicht den
vorschriftsmäßigen Betriebsdruck ( 8 ÷ 9
bar) an.
Manometer defekt.
Der Betriebsdruck der Pumpe wird nicht
erreicht.
Keine Abgabe.
Ausfall des Pumpenmotors:
- Stromausfall;
- Kondensator durchgebrannt;
- Mikroschalter durchgebrannt;
- Motor überhitzt;
- Rückschlagventil der Pumpe geöffnet.
- By-Pass-Ventil vollständig geöffnet.
Exzessives Laufgeräusch der Pumpe.
Pumpe defekt.
Kein Wasser in der Leitung.
Vom Kundendienst auszuführende Vorgänge
Pag. 42
Page 43

17 – RASCHLÄGE – TIPPS - BILDER
VORSICHT: die Maschine muss mit Wasser mit einer Härte von mehr als 8 ° F zugeführt
werden. Die Verwendung von bereits verwendeten Schläuchen und Dichtungen ist nicht
möglich.
Es ist besser, ein Wasserenthärter (1) für die
Maschinewasserversorgung an die Wasserleitung zu
installieren.
N.B. Bevor Sie den Wasserenthärter zu der Maschine
installieren, müss/müssen eine oder mehrere
Spülungen geführt werden, bis wass das Wasser klar
ist. Nur danach können Sie den Wasserenthärter zu
der Maschine installieren.
Was den Netzdruck betrifft, wenn er über 0,5Mpa
(5bar) ist, empfehlen wir den Einbau eines
ausgeglichenen Druckminderventils für Hochdruck
(eine Vorrichtung, in der jede Erhöhung des
Netzdrucks sich nicht auf die Ausgangsdruck wirkt).
Die Abwasserleitung (2) darf nicht in Kurven verlegt
werden, um Wasserstagnation-Retouren zu
vermeiden.
Um die Seiten der Maschine zu entfernen, lösen Sie
die Schraube (3) (nicht ganz entschrauben). Auf diese
Weise kann man die Seite vollständig von der
Maschinenstruktur wegnehmen. Für die Montage
legen Sie erstmal das untere Teil der Seite an die
Maschinenstruktur und dann schrauben Sie die
Schraube (3).
Pag. 43
Page 44

Um den Tassenhalter zu entfernen (4), machen
Sie ihn von der Fixierungsplatte frei beim Lösen
der Schraube (5). Heben und schieben Sie den
Tassenhalter in Richtung der Vorderseite der
Maschine, um ihn vollständig zu befreien. Um den
Tassenhalter zurückzusetzen, legen Sie erstmal
die Fixierungsplatte in den Tassenhalterschlitz ein
und dann schrauben Sie die Schraube (5).
Um die Tassenabstellfläche (6) zu entfernen,
nachdem Sie die Seiten entfernt haben, schrauben
Sie die 2 Fixierungschrauben.
Um die Rückseite zu entfernen (7), schrauben Sie
die 4 Schrauben (8).
Um den Kesseldruck zu regulieren, drehen Sie die
Druckwächterschraube (9). Im Uhrzeigersinn
erhöht sich der Druck, gegen den Uhrzeigersinn
verringert sich.
Um den Pumpendruck zu regulieren, drehen Sie
die Schraube (10) nachdem Sie die Kontermutter
gelöst haben. Im Uhrzeigersinn erhöht sich der
Druck, gegen den Uhrzeigersinn verringert sich.
Am Ende die Kontermutter wiederziehen.
Pag. 44
Page 45

Уважаемый клиент,
благодарим Вас за покупку нашей продукции, производимой в соответствии с последними технологическими
инновациями. Тщательно следуя простым операциям по корректному пользованию нашего электроприбора и в
соответствии с предписаниями по безопасности, изложенными в данном руководстве, вы можете получить
максимальную производительность и обеспечить высокую надежность данного продукта на протяжении многих
лет.
Наслаждайтесь работой!
СОДЕРЖАНИЕ
ТРЕБОВАНИЯ
Декларация CE стр. 3
Схемы стр. 4
Описания стр. 5
Содержание стр. 45
1. Общая информация стр. 46
2. Установка стр. 46-47
3. Правила подключения к электричеству стр. 47
4. Эквипотенцияльное подключение стр. 47
5. Правила подключения к воде стр. 48
6. Подготовка машины к эксплуатации стр. 48
7. Установка и проверка стр. 48
8. Информация для пользователя /работника стр. 49
9. Предупреждения стр. 50
10. Техническое обслуживание и ремонт стр. 50
ИСПОЛЬЗОВАНИЕ
11. Включение машины стр. 51
12. Фаза нагрева стр. 51
13. Приготовление кофе стр. 51
14. Приготовление горячих напитков стр. 52
15. Чистка и тех.обслуживание стр. 53
16. Неисправности и неполадки стр. 54-55
17. Рекомендации-советы-рисунки стр. 56-57
Демонтаж машины стр. 71
Pag. 45
Page 46

1 – ОБЩАЯ ИНФОРМАЦИЯ
Внимательно прочтите предупреждения и правила в этом руководстве, прежде чем приступать к
использованию и управлению кофемашиной, поскольку здесь содержится важная информация,
касающаяся безопасности и гигиены при работе с аппаратом.
Храните буклет под рукой для удобства обращения к нему.
ЭТИ ГЛАВЫ В РУКОВОДСТВЕ ПРЕДНАЗНАЧЕНЫ ТОЛЬКО ДЛЯ КВАЛИФИЦИРОВАННОГО ТЕХНИЧЕСКОГО
ПЕРСОНАЛА
2 – УСТАНОВКА
Внимательно прочтите предупреждения и правила в этом руководстве, прежде чем приступать к
использованию и управлению кофемашиной, поскольку здесь содержится важная информация,
касающаяся безопасности и гигиены при работе с аппаратом.
Храните буклет под рукой для удобства обращения к нему.
Машина была разработана исключительно для приготовления кофе эспрессо и горячих напитков при
помощи горячей воды или пара, а также для подогрева чашек.
Машину необходимо устанавливать в местах, где контроль работы аппарата будет осуществлять
квалифицированными сотрудниками. Машиной могут пользоваться только специально обученные
сотрудники, которые знают о возможных рисках, связанных с работой оборудования.
Машина предназначена только для профессионального использования.
Машина не должна использоваться детьми или людьми с ограниченными физическими, сенсорными или
психическими нарушениями: если такие люди используют машину, они должны находиться под
наблюдением во время работы.
Дети должны находиться под присмотром, чтобы предотвратить их игры с машиной.
Машина не должна оставаться без присмотра или использоваться на открытом воздухе.
Если машина хранится в помещениях, где температура может опускаться ниже нуля, нужно опорожнить
бойлер и циркуляционные трубы от воды.
Не подвергайте устройство воздействию атмосферных факторов (дождь, солнце, мороз).
Не используйте для чистки машины струи воды.
Уровень шума машины не превышает порог в 70 дБ (А).
В случае повреждения сетевого шнура его нужно заменить, сделать это может только
квалифицированный персонал.
Если машина используется неправильно или для целей, не указанных в инструкции, она может быть
источником опасности. ИПроизводитель не несет ответственности за повреждения, вызванные в
результате неправильного использования машины.
Персонал отвечающий за перевозку/перемещение машины должен быть осведомлен о рисках,
связанных с перемещениями тяжелых грузов. Осторожно перемещайте машину, используя правильное
подъемное оборудование (например: вилочных погрузчиков). Если перемещение машины происходит
вручную, убедитесь, что:
- достаточно количество людей для выполнения этой задачи, подъем может быть очень сложным изза веса машины;
- необходимо всегда использовать защитное средства (обувь/перчатки).
После извлечения машины из упаковочных материалов, убедитесь, что машина и ее защитные
устройства не повреждены.
Упаковочные материалы (пластиковые пакеты, пенопласт, скобы и т.д.) должны быть вне досягаемости
детей, так как они потенциально опасны.
Перед включением машины убедитесь, что информация на табличке с заводскими данными
(напряжение и т.д.), соответствуют параментам имеющихся электрической и водной системам.
Полностью размотайте шнур питания. Если шнур питания поврежден, его должен заменить только
квалифицированный и уполномоченный сотрудник.
Машина должна быть установлена на плоской устойчивой поверхности, не менее чем 2 см от стен и от
конца поверхности, на которой ОНА установлена. Помните, что верхняя поверхность машины
(платформа для подогрева чашек) находится на высоте не менее 1,20 метра. Убедитесь, что рядом
есть место для аксессуаров.
Температура в помещении должна составлять от 10 ° до 32 ° C (50 ° F и 90 ° F).
Электрические выключатель, водопроводные шланги и слив сифона должны быть в непосредственной
близости.
Pag. 46
Page 47

3 – ПРАВИЛА ПОДКЛЮЧЕНИЯ К ЭЛЕКТРИЧЕСТВУ
4 – ЭКВИПОТЕНЦИАЛЬНОЕ ПОДКЛЮЧЕНИЕ
Такое подключение требуется по некоторым нормам, оно
служит для предотвращения перепадов уровня
электрического потенциала между массами оборудования,
установленного в одном и том же рабочем помещении.
Данная машина оснащена клейммой (1) ПОД
ОСНОВАНИЕМ, которая предназначена для
подсоединения внешнего провода уравнителя
потенциалов. Это подсоединение необходимо и должно
быть выполнено сразу после установки машины:
используйте провод с номинальным сечением, в
предусмотренным с действующими стандартами;
подсоедините один конец провода к клейме, а другой к
массе установленного рядом оборудования;
Несоблюдение этой нормы безопасности исключает
гарантию производителя от любой ответственности за
неработающее оборудование или повреждения людям и
имуществу.
N.B.: ЗАПРЕЩАЕТСЯ ПОДСОЕДИНЕНИЕ К ПРОВОДУ ЗАЗЕМЛЕНИЯ В ИСТОЧНИКЕ
ЭЛЕКТОРПИТАНИЯ, ПОСКОЛЬКУ ДАННЫЙ ПРОВОД В СЕТЕВОМ ШНУРЕ НЕ ЯВЛЯЕТСЯ
ПРОВОДОМ ПОДСОЕДИНЕНИЯ УРАВНИТЕЛЯ ПОТЕНЦИАЛОВ.
Имейте в виду, что GEMME ITALIAN PRODUCERS srl не несет ответственности за повреждения,
вызванные неправильным подключением к электросети. Ответственность за повреждения, в данном
случае, несет установщик.
Не устанавливайте машину в помещениях (кухнях), которые моются струями воды.
Не создавайте препятствий для вентиляции машины.
Не устанавливайте машину на открытом воздухе.
Перед подключением убедитесь, что автоматический выключатель цепи установлен с таким
расстоянием между контактами, которое позволит полностью разъединить цепь при перегрузке 3-й
категории и обеспечит защиту от утечки тока в 30 мА. Автоматический выключатель должен быть
установлен на шнуре питания в соответствии с правилами установки. Если блок питания не работает
должным образом, машина может вызвать временные падения напряжения.
Электрическая безопасность этой машины гарантируется только при правильном подключении
эффективной системе заземления в соответствии с действующими правилами электрической
безопасности. Если вы сомневаетесь, попросите квалифицированного электрика проверить систему.
Производитель не может нести ответственность за любые повреждения, вызванные недостатками
системы заземления.
Не рекомендуется использовать адаптеры, многополюсные штепсели и/или удлинители. Если их
использование необходимо, применяйте только простые или многоместные штепсели и удлинители,
соответствующие требованиям безопасности. Убедитесь в том, что эти устройства не превышают
пределы по напряжению, указанные на простом адаптере и удлинителе, а также максимальное
напряжение, указанное на многоместном адаптере.
Убедитесь, соответствует ли тип соединения и напряжения параметрам, указанным на технической
табличке.
Pag. 47
Page 48

5 – ПРАВИЛА ПОДКЛЮЧЕНИЯ К ВОДЕ
6 – ПОДГОТОВКА МАШИНЫ К ЭКСПЛУАТАЦИИ
7 – УСТАНОВКА И ПРОВЕРКА
ВНИМАНИЕЕ: ПОСЛЕ УСТАНОВКИ МАШИНЫ, ПЕРЕД НАЧАЛОМ ЭКСПЛУАТАЦИИ НЕОБХОДИМО
ПРОИЗВЕСТИ ПРОМЫВКУ ВНУТРЕННИХ ЧАСТЕЙ, В СООТВЕТСВИИ С НИЖЕ УКАЗАННЫМИ
РЕКОМЕНДИЦИЯМИ:
Вода, используемая в машине должна быть питьевой и подходить для потребления человеком.
Проверьте воду на входе в машину, убедитесь, что уровень рН соответствует действующему
законодательству в вашей стране, а также что значение хлора в воде меньше 100 мг/л.
Если значения не соответствуют пределам, нужно установить фильтр очистки воды (в соответствии с
местными правилами и совместимый с машиной).
Если машина использует воду с жесткостью, превышающей 8 ° F (4,5 ° D), необходимо осуществлять
дополнительное особое техническое обслуживание в соответствии с жесткостью, определенной для
использования машиной.
Для установки пользуйтесь только деталями входящими в комплект к этой машине. Если вы используете
сторонние детали для установки, то они должны быть новыми (не используемыми ранее), пригодные для
контакта с водой для потребления человеком (в соответствии с местными правилами).
Поставьте машину на горизонтальную поверхность и выставьте по уровню, при помощи регулируемых
ножек.
Убедитесь, что подключение к водопроводу и сливу соответствует требованиям по безопасности
действующим в вашей стране.
Если давление воды может повышаться выше 6 бар, установите редукционный клапан с настройкой
давления на 2÷3 бар.
Поместите конец в сливную трубу оборудованную сифоном, обеспечивая доступ для проверки и чистки.
Сливной шланг не должен быть подсоединен так, чтобы это могло привести к замедлению потока воды
или блокировки.
После того, как гидравлические и электрические подключения закончились, перейдите к подготовке
машины к использованию.
Откройте кран водопроводной сети и закройте выключатель общей защиты.
Включите главный выключатель I/O переключив его на позицию I, сигнальная лампа загорится.
Заливные устройства начнут работу и будут закачивать воду в бойлер до достижения необходимого
уровня.
Как только вода автоматически закачается в бойлер, нагревательный элемент начнет нагрев воды.
Подождите, пока машина достигнет рабочего давления 1÷1,2 (проверьте на манометре). Если машина не
достигла указанного значения, реле давления придется заново отрегулировать.
Машина готова к работе.
После завершения установки, проверьте, что машина работает нормально.
Убедитесь, что нет никаких протечек в соединениях воды и слива.
Убедитесь, что давление в бойлере и рабочее давление соответствуют нормальным значениям.
Убедитесь, что манометр работает должным образом.
Убедитесь, что автоматическое заполнение бойлера работает нормально.
Убедитесь, что расширительный клапан работает правильно.
Убедитесь, что электрическая платформа для подогрева чашек (при наличии) работает нормально.
Группы
• Подключите фильтродержатели к группам (без кофе).
• Пропускайте воду через каждую группу в течение приблизительно1минуты.
Горячая вода
• Пропускайте горячую воду из крана (при помощи регулятора), до тех пор, не выйдет примерно 4 л воды
(из каждого).
Пар
• Выпускайте пар из парового крана в течение приблизительно 1 минуты, используя соответствующий
регулятор.
Pag. 48
Page 49

8 – ИНФОРМАЦИЯ ДЛЯ ПОЛЬЗОВАТЕЛЯ / РАБОТНИКА
ВНИМАНИЕ: ПЕРЕД НАЧАЛОМ РАБОТЫ НУЖНО ПРОМЫВАТЬ ВНУТРЕННИЕ ЧАСТИ МАШИНЫ,
СЛЕДУЯ РЕКОМЕНДАЦИЯМ, УКАЗАННЫМ НИЖЕ. ЭТИ РЕКОМЕНДАЦИИ НЕОБХОДИМО
ПОВТОРЯТЬ КАЖДЫЙ РАЗ, ЕСЛИ МАШИНЫ БЫЛА ВЫКЛЮЧЕННА БОЛЕЕ ЧЕМ 8 ЧАСОВ.
ПЕРЕД НАЧАЛОМ РАБОТЫ
Группы
• Подключите фильтродержатели к группам (без кофе).
• Пропускайте воду через каждую группу в течение приблизительно1минуты.
Горячая вода
• Пропускайте горячую воду из крана (при помощи регулятора), до тех пор, не выйдет примерно 4 л воды
(из каждого).
Пар
• Выпускайте пар из парового крана в течение приблизительно 1 минуты, используя соответствующий
регулятор.
ПРИ ЕЖЕДНЕВНОМ ИСПОЛЬЗОВАНИИ / В РАБОТЕ
ПРОИЗВОДСТВО ПАРА
• Перед нагреванием напитка (вода, молоко и т.д.), откройте паровой кран в течение не менее 2 секунд,
чтобы конденсат воды вышел из трубки.
ПРОИЗВОДСТВО КОФЕ
• Если машина не использовалась более 1 часа, прежде чем приготовить кофе, пролейте через группу
около 100 мл воды.
ПРОИЗВОДСТВО ГОРЯЧЕЙ ВОДЫ
• Если машина не используется более 1 часа, прежде чем получить горячую воду, пролейте около 200 мл
воды.
ЧИСТКА ГРУПП ВЫДАЧИ КОФЕ
• Пожалуйста, прочитайте специальный раздел, чтобы узнать, как очистить группы выдачи кофе.
Pag. 49
Page 50

9 – ПРЕДУПРЕЖДЕНИЯ
Опасность ожога: области, помеченные этикеткой, указанной ниже очень горячие.
БОЛЬШОЕ ВНИМАНИЕ СЛЕДУЕТ УДЕЛЯТЬ ПРИ РАБОТЕ В ЭТИХ ОБЛАСТЯХ.
CAUTION: HOT
10 – ТЕХНИЧЕСКОЕ ОБСЛУЖИВАНИЕ И РЕМОНТ
ВНИМАНИЕ: обслуживание неквалифицированным персоналом может негативно отразиться на
безопасности работы машины. Допускайте только квалифицированных и уполномоченных
техников работать / ремонтировать машину.
ОБЩИЕ ПРЕДУПРЕЖДЕНИЯ
Производитель не несет ответственности за ущерб, причиненный предметам или здоровью людей,
произошедший в связи с нарушениями инструкции по эксплуатации и технике безопасности,
использованием машины для других целей, чем ее прямое предназначение.
Никогда не работайте с машиной мокрыми руками или босиком.
Не притрагивайтесь руками или другими частями тела к кофе-группам и к местам расположенными
рядом с ними, к трубкам подачи воды и пара по время приготовления напитков.
Не допускайте детей к машине и убедитесь, что с машиной не работают люди, которые не обучены
должным образом.
Подогреваемая платформа предназначена только для подогрева чашек/стаканов, которые используются в
работе с машиной.
Убедитесь, что чашки /стаканы сухие и в них совсем нет воды, до их размещения на платформу для
подогрева чашек.
Другие предметы не должны быть размещены на платформе для подогрева чашек.
ВЫКЛЮЧАЙТЕ МАШИНУ
Если аппарат не используется в течение длительного периода времени (ночью или во время праздников),
должны быть выполнены следующие операции:
Oтсоединить вилку шнура питания от электросети или отключить главный выключатель машины.
Закрыть кран на водопроводной трубе.
Несоблюдение указанных выше норм снимает всякую ответственность с фирмы-производителя за
неисправности или причиненный ущерб здоровью людей и предметам.
Для обеспечения безопасности во время работы, абсолютно необходимо выполнять следующее: а)
следовать инструкциям производителя; б) периодически вызывать квалифицированных, уполномоченных
техников для проверки защитных устройств безопасности, чтобы убедиться что они не повреждены и
нормально работают (1-я проверка должна быть сделана после 3-х лет с момента покупки, затем каждый
год).
В случае неисправности, выключите главный выключатель машины и обратитесь в сервисный центр.
Если шнур питания поврежден, выключите машину и попросить сервисный центр заменить шнур.
Используйте только оригинальные запасные части, гарантированные от производителя. Гарантия
производителя не будет действовать, если будут использоваться другие запчасти.
После обслуживания всегда осматривайте машину, как указано в конкретном разделе N°7 установка и
проверка.
Pag. 50
Page 51

11 – ВКЛЮЧЕНИЕ МАШИНЫ
12 – ФАЗА НАГРЕВА
13 – ПРИГОТОВЛЕНИЕ КОФЕ
Перед запуском машины для работы, убедитесь, что:
главный выключатель источника питания подключен.
Главный кран на водопроводе открыт
Электрический выключатель
Нажмите главный выключатель (4) в положение I.
Бойлер заполнится до необходимого уровня.
Начнется "Фаза нагрева".
В конце рабочего дня, выключите машину, нажав на главный
выключатель (4) в положение 0.
ВНИМАНИЕ: ПЛАТФОРМУ ДЛЯ ПОДОГРЕВА ЧАШЕК
НЕ НАКРЫВАТЬ ТКАНЬЮ
Во время ожидания прогрева машины, вставьте фильтродержатели
(9) в кофе-группы.
Не накрывайте платформу для подогрева чашек тканью, во
избежание перегрева машины.
Когда манометр (6) покажет рабочее давление, машина готова к
использованию.
1. Снимите фильтродержатель (9) с кофе-группы.
2. Положите молотый кофе в фильтр с желаемой дозой.
3. Утрамбуйте его, затем очистите края фильтродержателя от
остатков кофе.
4. Вставить фильтродержатель (9) в кофейную группу, плотно
закрыв поворотом ручки и убедившись, что группа
обеспечивает хорошее уплотнение.
5. Поставьте чашки под фильтродержатель.
6. Поднимите рычаг (5) в горизонтальное положение. Кофе
начнет выходить не сразу, а через некоторое время. Это
время необходимо для достижения давления и
предварительного «смачивания» кофейной таблетки. Выход
кофе начнется после того, как смачивание будет закончено. Во
время этой фазы кофе течет непрерывно. После того, как
требуемое количество кофе будет получено, выход кофе
остановите опусканием рычага (5) обратно в вертикальное
положение.
7. Для приготовления следующих эспрессо, выньте
фильтродержатель, вытряхните из него кофейные остатки,
протрите влажной тканью и повторите указанные выше
операции.
Pag. 51
Page 52

Приготовление пара
Как только машина готова, направьте трубку пара (10) на решетку
поддона, откройте регулятор пара (12) против часовой стрелки и
пусть конденсат воды выйдет из него; затем закройте регулятор
пара. Полностью погрузите сопло паровой трубки (10) в жидкость,
которую вам нужно нагреть. Постепенно открывайте регулятор пара
(12) против часовой стрелки, а после окончания работы с паром,
поверните регулятор обратно по часовой стрелке.
Приготовление горячей воды
Поместите сосуд под кран выдачи горячей воды (11). Откройте
регулятор (13) против часовой стрелки, вода начнет выходить.
Поверните регулятор по часовой стрелке, чтобы остановить выход
воды.
Вспенивание молока для капучино
Используйте высокий, узкий сосуд (питчер). Залейте в него молоко,
примерно до половины.
Как только машина готова, направьте кран пара (10) на решетку
поддона, откройте регулятор пара (12) против часовой стрелки и
пусть конденсат воды выйдет; затем закройте регулятор.
После погрузите паровое сопло (10) в молоко.
Постепенно открывайте регулятор пара (12) и взбивайте молоко
в течение нескольких секунд.
После получения требуемого количества молочной пены,
остановить поток пара, повернув регулятор пара (12) по часовой
стрелке.
После вспенивания молока, тщательно очистите паровое сопло
(10) от остатков молока при помощи губки или чистой ткани.
14 – ПРИГОТОВЛЕНИЕ ДРУГИХ ГОРЯЧИХ НАПИТКОВ
ВАЖНО: По окончании работы с паром, нужно провести чистку внутри носика парового крана ,
следующим образом: а) направьте кран пара на решетку поддона, откройте регулятор против
часовой стрелки, по крайней мере один раз; б) тщательно очистите паровое сопло при помощи
губки или чистой ткани.
Pag. 52
Page 53

15 – ЧИСТКА И ОБСЛУЖИВАНИЕ
ВНИМАНИЕ: для соблюдения системы обеспечения безопасности пищевых продуктов HACCP,
пожалуйста, следуйте инструкциям этого раздела.
Чистка группы
Процедура должна быть произведена на
каждой группе в конце рабочего дня,
ежедневно.
Очистите прокладку группы с помощью щетки.
Вставьте слепой фильтр в
фильтродержатель.
Положите 3-5 гр моющего порошка в слепой
фильтр.
Вставьте фильтрожержатель в группу и
поднимите рычаг вверх и оставьте на 10 сек,
затем опустите рычаг вниз. Запустить 5 таких
циклов: вкл / выкл по 10 секунд в каждый.
Снимите фильтрожержатель и очистите душ
группы губкой.
Промывайте группу от моющего порошка
пропуская воду из каждой группы в течение 30
секунд.
Чистка фильтродержателя
Влить 1 л теплой воды и 10 гр моющего
средства в подходящую посуду.
Выньте фильтры из фильтродержателей.
Положите фильтры и фильтродеражатели в
посуду с приготовленным раствором на время
не менее 20 минут.
Очищайте все кофейные остатки с помощью
губки и затем промойте большим количеством
теплой воды.
Вставьте фильтры в фильтродержатели,
убедившись, что фиксирующее кольцо
находится в правильном положении.
Чистка кранов для пара и воды.
С помощью чистой губки, вымойте краны горячей водой, удаляя все органические остатки. Тщательно
ополосните их.
Чтобы очистить внутри носик парового крана, действуйте следующим образом: поверните сопло в сторону
поддона и осторожно включайте пар, не менее 1 раза.
Чистка поддон для чашек
Выньте поддон для чашек и промойте её под проточной водой.
Чистка сливного поддона
В конце рабочего дня, залить горячую воду из сосуда в сливной поддон, для удаления возможных
органических остатков.
Чистка корпуса
Используйте мягкую ткань и чистящие средства без аммиака или абразивов для удаления возможных
органических остатков в рабочей зоне. Внимание: не распыляйте жидкости в пазы панелей.
Pag. 53
Page 54

16 – НЕИСПРАВНОСТИ И НЕПОЛАДКИ
ПРОБЛЕМА
ПРИЧИНА
РЕШЕНИЕ
Протечка по краям фильтродержателя.
Прокладка засорена частичками кофе.
Очистите прокладку при помощи
щетки.
Кофе слишком быстро вытекает.
Помол кофе слишком крупный.
Кофе слишком старый.
Сделайте помол мельче.
Используйте свежий кофе.
Кофе выходит каплями.
Забились отверстия фильтра или выход у
фильтродержателя.
Помол кофе слишком мелкий
Прочистите.
Сделайте помол крупнее.
Протечка воды под машиной.
Забился поддон для слива воды.
Забилось отверстие дренажного резервуара.
Провести чистку.
Провести чистку.
16 – НЕИСПРАВНОСТИ И НЕПОЛАДКИ
ПРОБЛЕМА
ПРИЧИНА
КОММЕНТАРИИ
Период предсмачивания короткий.
Кофе проливается быстро.
Кофе не насыщенный, без пенки.
(Те же недостатки на всех группах).
Помол кофе слишком крупный.
Кофе слишком старый.
Эти неполадки могут быть связаны с другими вторичных
симптомами и могут быть вызваны многими другими
причинами, упомянутые в следующих пунктах. Не регулируйте
помол, пока вы не исключите все другие причины.
Период предсмачивания короткий.
Кофе проливается быстро.
Кофе не насыщенный, без пенки.
(Те же недостатки только на одной
группе).
Носик группы расширился в
связи с износом.
Прокладка усеченного конуса
протекает.
Инфузионный клапан оставался
открытым.
Края фильтра сломаны.
Пропускная способность группы без фильтра должно быть 100
см ³ в 8 ÷ 10 секунд.
Плохая подача кофе.
Кофе выходит медленно.
Кофе холодный и слабый.
Душ загрязнился.
В этом случае, при эксплуатации устройства без
фильтродержателя, можно видеть одну центральную струю, а
не изолированные тонкие струйки.
Кофе выходит быстро, не насыщенный.
Манометр насоса указывает давление
выше, чем 9 бар.
Насос не отрегулирован.
By-pass клапан закрыт.
Плохая подача кофе.
Кофе вытекает быстро.
Кофе горячий и слабый.
Отверстия в фильтрах
расширились.
Крупный помол.
Существует чрезмерное присутствие кофейной гуще в чашке.
Кофе холодный, мягкий и без пенки.
Период предсмачивания нормальный
Пузырьки воздуха находятся в
системе термосифона.
Обратный клапан не держит (с
низким давлением в системе).
Теплообменники освобождены.
Манометр неисправен
(показания давление выше, чем
реальные значения).
Поднимите рычаг на группе, для выхода воздуха
Когда прикасаетесь к трубе забора, рядом с машиной воды,
чувствуете, что она теплая.
Датчик давления откалиброван на слишком низких значениях.
По утрам, в начале работы, кофе
выходит холодный
Воздух в бойлере.
См. инструкции по включению машины.
Кофе выходит медленно.
Кофе жжённый и холодный.
Пенка очень темная, с тенденцией
формирования «глаза».
Помол слишком мелкий.
Низкое давление насоса.
Сетевой фильтр над носиком
загрязнился.
Частично забит носик.
Подача медленная, кофе жжённый.
Давление на манометре насоса ниже,
чем 9 бар.
Насос не калиброван.
Насос с пониженной
всасывающей способностью.
Устранение возможных неполадок работником/пользователем машины
Перед обращением к обслуживающему персоналу, чтобы избежать ненужных расходов, проверьте,
соответствует ли проблема с одним из случаев, указанных ниже.
Устранение возможных неполадок уполномоченным квалифицированным обслуживающим персоналом
Pag. 54
Page 55

Дренажная трубка подтекает, когда
группа находится в состоянии покоя
(дефект только на одной группе).
Кофе выходит нормально.
Клапан подачи не держит.
Если этот дефект не будет исправлен немедленно, смягчитель
для воды закончится задолго до истечения своего срока, с
последующей накипью.
С группой в состоянии покоя,
прокладка клапана быстро
выходит из строя.
Утечки воды из дренажной трубки.
Кофе выходит нормально.
Дефект на всех группах.
Терморегулирующий клапан
откалиброван на слишком
высокое давление (выше 13
бар).
Если этот дефект не будет исправлен немедленно, смягчитель
для воды закончится задолго до истечения своего срока, с
последующей накипью.
С группой в состоянии покоя,
непрерывная потеря холодной воды в
дренажном лотке.
Группы не выдают больше кофе и
манометр насоса показывает низкие
значения.
Терморегулирующий клапан
оставался открытым.
Если этот дефект не будет исправлен немедленно, смягчитель
для воды закончится задолго до истечения своего срока, с
последующей накипью.
Группа в работе.
Утечка дренажной трубки.
Кофе не выходит.
Дренажный клапан не держит.
Группа в работе.
Потеря холодной воды в дренажном
лотке.
Кофе не насыщенный.
Выдача кофе медленно.
Предохранительный клапан
откалиброван на слишком
низкое давление (менее 9 бар).
Группа протекает по
распределетельному валу.
Утечка на двух прокладках.
Удалите эти прокладки, стараясь не поцарапать корпус. Не
используйте инструменты, изготовленные из стали или других
твердых материалов.
Перед установкой обратно, очистите pаспределительный вал,
особенно канавки.
Трудно прокручивать
фильтродержатель в группе.
Контур распределительного
вала изношен.
Давление в машине не поднимается или
поднимается слишком медленно.
Нет электричества.
Автоматический
выключатель отключил машину.
Нагревательные элементы
сгорели.
Электрическая цепь для
нагревательного элемента
прерывается.
Нет воды в бойлере.
Паровой кран протекает.
Группы работают нормально.
Манометр насоса не дает правильные
показания давления (8 ÷ 9 бар).
Манометр неисправен
Насос не достигает давления.
Нет выхода кофе.
Мотор не работает:
- Нет электроэнергии.
- Конденсатор сгорел.
- Микровыключатель сгорел.
- Двигатель сгорел.
- Обратный клапан насоса
открыт.
- By-pass клапан полностью
открыт.
Насос шумит.
Насос неисправен.
Нет воды в системе.
Pag. 55
Page 56

17 – РЕКОМЕНДАЦИИ - СОВЕТЫ - РИСУНКИ
ПРЕДУПРЕЖДЕНИЕ: Это оборудование должно работать на воде, имеющей жесткость выше 8° F.
Не возможно применение труб и прокладок, которые уже ранее использовались.
Желательно установить фильтр смягчитель (1)
для подключения машины к воде.
N.B. Перед подключением устройства для
смягчения воды к машине, выполните цикл слива
на нем и подождите, пока вода не станет чистой.
Только после этого вы можете подключить
устройство для смягчения воды к машине.
Что касается давления сети, если оно выше 0,5
МПа (5 бар), рекомендуется установить
редукционный клапан для высокого давления
(устройство, в котором любое увеличение
давления сети не влияет на сбалансированное
давление на выходе).
Трубка слива воды (2) не должна сгибаться, чтобы
избежать возврата воды в машину.
Чтобы снять боковые части корпуса машины,
просто ослабьте (не откручивайте полностью) винт
(3). Таким образом, вы можете их снять. Чтобы
поставить их на место, обратите внимание, что
сначала нужно установить нижнюю часть, а затем
закрутить винт, так как он был вкручен изначально
(3).
Pag. 56
Page 57

Чтобы снять подстаканник (4) открутите его от
пластины, которая фиксирует его (5), затем
поднимите и потяните его в сторону передней
части машины. Чтобы поместить его обратно,
действуйте наоборот. Убедитесь, что вставили
пластину в отверстие подстаканника до её
фиксации винтом (5).
Если вы хотите снять платформу для
подогрева чашек (6) после снятия боковых
сторон, открутите 2 винта, которые крепят ее.
Чтобы снять заднюю панель (7), открутить 4
винта (8). Таким образом, задняя панель будет
полностью снята.
Для регулирования давления в бойлере,
поверните на пресостате винт (9). Поворотом
по часовой стрелке, давление увеличивается,
против часовой стрелки уменьшается.
Для регулирования давления насоса,
поверните винт (10), после того как ослабите
контргайку. Поворотом по часовой стрелке
давление увеличивается. Против часовой
стрелки уменьшается. В конце регулирования
затяните контргайку, как прежде.
Pag. 57
Page 58

Stimate Client,
Va multumim ca ati cumparat produsul nostru, fabricat dupa ultimele inovatii tehnologice. Urmarind cu mare atentie
operatiile simple privind corecta utilizare al produsului nostru in conformitate cu prescrierile esentiale de siguranta
indicate in acest manual, veti putea obtine o prestatie maxima si veti putea verifica afidabilitatea acestui produs de-a
lungul anilor.
Va dorim spor la munca!
INDEX
PRESCRIERI
Declaratie CE pag.3
Tabela PED pag.4
Descriere legenda pag.5
Index general pag.58
1. Informatii generale pag.59
2. Informatii instalare pag.59
3. Informatii electrice pentru installare pag.60
4. Conectare echipotentiala pag.60
5. Informatii hidraulice pentru installare pag.61
6. Punere in functiune pag.61
7. Verificare instalare pag.61
8. Informatii pentru operator pag.62
9. Avertismente pag.63
10. Intretinere si reparatii pag.63
UTILIZARE
11. Aprindere pag.64
12. Incalzire pag.64
13. Erogare cafea pag.64
14. Prepararea altor bauturi calde pag.65
15. Curatare si intretinere pag.66
16. Anomalii si defecte pag.67-68
17. Sfaturi – Recomandari – Imagini pag.69-70
Eliminare definitiva pag. 71
Pag. 58
Page 59

1 – INFORMATII GENERALE
Cititi cu atentie avertismentele si prescrierile continute in instructiunile de instalare, utilizare si
intretinere inainte de a folosi sau manipula in orice mod aparatul, pentru ca acestea contin indicatii
importante privind siguranta si respectul codului igienic in timpul folosirii produsului insusi.
Pastrati acest manual pentru consultari ulteriore.
ACESTE CAPITOLE SUNT DESTINATE PERSONALULUI TEHNIC CALIFICAT SI AUTORIZAT
2 – INFORMATII INSTALARE
Instalarea, dezmontarea si reglarile trebuie sa fie efectuate doar de catre personal tehnic calificat si
autorizat.
Cititi cu atentie avertismentele si prescrierile continute in instructiunile de instalare, utilizare di
intretinere inainte de a utiliza sau manipula in orice mod aparatul, pentru ca acestea contin indicatii
importante privind siguranta in instalare, utilizare si intretinere.
Pastrati acest manual pentru consultari ulteriore.
Aparatul trebuie folosit doar pentru prepararea cafelei espresso si a bauturilor calde prin intermediul apei calde
sau a aburului si pentru pre-incalzirea cestilor.
Aparatul trebuie sa fie instalat intr-un loc unde poate fi folosit doar de catre personal format si informat asupra
riscurilor in utilizarea aparatului insusi.
Aparatul este destinat domeniului profesional.
Aparatul nu poate fi folosit de catre copii sau de persoane cu capacitati fizice, sensoriale sau mentale reduse; in
caz de folosire de catre aceste persoane este obbligatorie supravegherea.
Copiii trebuie sa fie supravegheati pentru a nu se juca cu aparatul.
Aparatul nu poate fi lasat nesupravegheat si utilizat in exterior.
Daca aparatul este inmagazinat in spazii unde temperatura poate scadea sub punctul de congelare, este
necesara golirea cazanului si a circuitelor de apa.
Nu lasati aparatul expus agentilor atmosferici (ploaie, soare, ger).
Nu curatati aparatul cu jet de apa.
Zgomotul produs de aparat nu depaseste 70 dB(A).
In caz de deteriorare a cablului de alimentare, acesta trebuie sa fie inlocuit doar de catre personal tehnic calificat
si autorizat.
Orice utilizare diferita de cea descrisa mai sus este necorespunzatoare si poate fi sursa de pericol; producatorul
nu isi asuma responsabilitatea in caz de daune determinate de o utilizare necorespunzatoare a aparatului.
Personalul insarcinat cu deplasarea aparatului trebuie sa cunoasca riscurile legate de manipularea sarcinilor
grele. Aparatul trebuie manipulat cu mare atentie, folosind un mijloc de ridicare adecvat (de ex. stivuitor de
ridicare). In caz de manipolare manuala este necesara prezenta unui numar adecvat de persoane in functie de
greutatea si de dificultatea de manipolare a aparatului. In orice caz, este obligatorie folosirea dispozitivelor de
protectie (pantofi, manusi).
Dupa ce ati eliminat ambalajut trebuie vericata integritatea aparatului si a dispozitivelor de siguranta.
Elementele de ambalaj (saci de plastic, polistiren expandat, cuie, etc.) nu trebuie lasate la indemana copiilor
pentru ca pot fi sursa de pericol.
Inainte de a conecta aparatul asicurati-va ca datele tehnice de pe eticheta corespund datelor retelelor electrice si
hidrice.
Derulati complet cablul de alimentare; in caz de deteriorare, acesta trebuie sa fie inlocuit doar de catre personal
tehnic calificat si autorizat.
Espressorul trebuie sa fie pozitionat pe o suprafata plana si stabila, la o distanza de minim 20mm de pereti si de
suprafata de pozitionare; apoi, trebuie sa fie instalat tinand cont ca suprafata de pozitionare a cestilor este la o
inaltime superioara a 1,2 m. Considerati si o suprafata pentru pozitionarea accesoriilor.
Temperatura ambientului trebuie sa fie cuprinsa intre 10° si 32°C (50°F si 90°F).
Punctele de conectare la alimentarea cu energie electrica si apa trebuie sa fie aproape, ca si punctul de
descarcare a apei care trebuie sa fie dotat de sifon.
Nu instalati in localuri (bucatarii) unde este prevazuta curatarea cu jet de apa.
Nu obstructionati deschiderile sau gaurile de ventilare sau eliminare a caldurii.
Nu instalati aparatul in exterior.
.
Pag. 59
Page 60

3 – INFORMATII ELECTRICE DE INSTALARE
4 – CONECTARE ECHIPOTENTIALA
Aceasta conectare, prevazuta de anumite norme, are functia
de a evita diferentele la nivel de potential electric intre
masele aparatelor instalate in acelasi local. Acest aparat
este prevazut cu un terminal (1) plasat SUB BAZA pentru
conectarea unui conductor extern echipotential. Odata
terminata instalarea TREBUIE efectuat acest tip de
conexiune.
Folositi un conductor cu sectiune nominala conform
normelor in vigoare.
Conectati un capat al conductorului la terminal si celalalt
capat la masele aparatelor adiacente.
Ignorarea acestei norme de siguranta scuteste producatorul
de orice responsabilitate pentru defecte sua daunele ce pot
fi cauzate pe persoane sau lucruri.
N.B.: A NU SE CONECTA LA IMPAMANTAREA INSTALATIEI DE DISTRIBUIRE ELECTRICA PENTRU CA
CONDUCTORUL DE IMPAMANTARE INTR-UN CABLU DE ALIMENTARE NU ESTE CONSIDERAT UN
CONDUCTOR DE CONEXIUNE ECHIPOTENTIALA.
Va amintim ca GEMME ITALIAN PRODUCERS srl nu raspunde pentru daunele provocate de o conexiune
electrica gresita.
In plus va amintim responsabilitatea instalatorului in caz de daune.
La instalare trebuie prevazut un dispozitiv care sa asigure deconectarea de la retea cu o distanta de deschidere a
contactelor care sa permita deconectarea completa in conditiile categoriei de supra-tensiune III si o protectie
impotriva curentului de dispersie cu valoare de 30mA. Acest dispozitiv de deconectare trebuie sa fie prevazut in
reteaua de alimentare conform regulilor de instalare. In conditii de alimentare nefavorabile, aparatul poate
determina caderi tranzitorii de tensiune.
Siguranta electrica a acestui aparat este asicurata doar cand acesta este conectat complet la o instalatie eficienta
de impamantare cum este dispus de normele de siguranta electrica in vigoare. Trebuie verificata aceasta cerinta
fundamentala de siguranta si, in caz de indoiala, trebuie cerut un control detaliat al instalatie de catre personal
profesional calificat. Producatorul nu poate fi considerat responsabil pentru eventuale daune cauzate de lipsa
impamantarii instalatiei.
Nu folositi adaptatori, prize multiple si/sau extensii. In caz de uz indispensabil a acestor elemente, trebuie
folosite doar adaptatori simpli sau multipli si extensii conforme normelor de siguranta in vigoare, considerand
ca nu trebuie depasita limita de debit in valoare de curent, indicata pe adaptatorul simplu si pe extensii, si
limita de putere maxima indicata pe adaptatorul multiplu.
Controlati ca tipul de conexiune si tensiunea corespund celor indicate pe eticheta date tehnice.
Pag. 60
Page 61

5 – INFORMAZIONI IDRAULICHE DI INSTALLAZIONE
6 – PUNEREA IN FUNCTIUNE
7 – VERIFICARE INSTALARE
ATENTIE: CU APARATUL INSTALAT SI GATA DE FOLOSINTA, INAINTE DE A-L PREDA
OPERATORULUI/UTILIZATORULUI, EFECTUATI O SPALARE A COMPONENTELOR INTERNE
URMARIND INSTRUCTIUNILE INDICATE MAI JOS
Apa destinata alimentarii espresorului trebuie sa fie apa potabila (a se vedea directivele si legislativa in vigoare).
Asicurati-va ca in punctul de intrare apa al aparatului valoarea ph-ului este conforma legilor in vigoare si ca
valoarea clorurilor este inferioara la 100 mg/l.
Daca valorile nu sunt cuprinse intre limitele indicate este necesara introducerea unui dispozitiv corespunzator
pentru tratarea apei (respectand normele locale in vigoare si compatibili cu aparatul).
In cazul in care aparatul este alimentat cu apa cu o duritate superioara la 8°F (4,5 °D), pentru a mentine buna
functionare a acestuia, trebuie aplicat un plan de intretinere specific in functie de valoarea de duritate registrata si
de modalitatea de folosinta.
Pentru instalare folositi doar componentii in dotare; in cazul in care este necesara folosirea altor componenti,
utilizati doar componenti noi, nemaifolositi si adecvati contactului cu apa potabila (conform normelor locale in
vigoare).
Positionati aparatul pe o suprafata perfect orizontala ajutandu-va cu picioarele reglabile, din dotare.
Efectuati conexiunile hidraulice respectand normele de igiena, de siguranta idraulica si anti-poluare in vigoare in
tara de instalare.
In cazul in care presiunea de reata ar putea depasi 6 bar, instalati un reductor de presiune reglat la 2÷3 bar.
Puneti capatul tubului de descarcare intr-un canal dotat de sifon pentru inspectie si curatare.
Tubul de descarcare NU trebuie sa aiba in curbe o pozitie care ar putea obstructiona sau incetini defluirea
corecta.
Odata terminate conexiunile electrice si hidraulice se procedeaza la punerea in functiune a aparatului.
Deschideti robinetul de la reteaua hidrica si inchideti intrerupatorul general de protectie.
Puneti intrerupatorul I/O al aparatului in pozitia I, se va aprinde indicatorul luminos pentru aparat in tensiune.
Dispozitivul de auto-nivel va intra in functiune pentru a incarca apa in boiler (cazan) pana la atingerea nivelului
corect de apa in boiler.
La sfarsitul operatiei de incarcare automatica a apei, rezistenta incede sa incalzeasca apa in boiler.
Asteptati pana cand aparatul atinge presiunea nominala de exercitiu 1÷1,2 bar controland pe manometru
presiunea in boiler. In cazul in care aparatul nu se stablizeaza la valorile indicate, va trebui efectuata calibrarea
presostatului.
Espresorul este acum gata de folosinta.
La sfarsitul instalarii verificati condiziile de functionare corecta.
Verificati absenta piederilor din punctele de conectare hidrica sau din tuburi
Verificati ca presiunea in boiler si de esercitiu corespund valorilor nominale
Verificati functionarea corecta a controlului presiunii
Verificati functioneare corecta a dispozitivului de auto-nivel
Verificati functionarea corecta a valvei de expansiune
Verificati functionarea corecta a incalzitorului de cesti (daca este in dotare cu aparatul)
Grupuri
Introduceti port-filtrele in grupuri (fara cafea)
Efectuati erogari timp de circa un minut, pentru fiecare grup
Apa calda
Erogati apa calda (actionand butonul de comanda) pentru a prelua pana la 4 litri de apa.
Abur
Erogati abur din tuburile vaporizante timp de circa un minut, folosind butoanele de comanda aferente.
Pag. 61
Page 62

8 – INFORMATII PENTRU OPERATOR/UTILIZATOR
ATENTIE: INAINTE DE A INCEPE MUNCA EFECTUATI O SPALARE A COMPONENTELOR INTERNE
URMARIND INSTRUCTIUNILE INDICATE MAI JOS.
ACESTE OPERATIUNI TREBUIE SA FIE REPETATE IN CAZUL IN CARE APARATUL RAMANE
NEFOLOSIT PENTRU MAI MULT DE 8 ORE SI ORICUM CEL PUTIN O DATA PE ZI.
INCEPERE ACTIVITATE
Grupuri
Introduceti port-filtrele in grupuri (fara cafea)
Efectuati erogari timp de circa un minut, pentru fiecare grup.
Apa calda
Erogati apa calda (actionand butonul de comanda) pentru a prelua pana la 4 litri de apa.
Abur
Erogati abur din tuburile vaporizante timp de circa un minut, folosind butoanele de comanda aferente.
IN TIMPUL ACTIVITATII
Erogare abur
Inainte de a incalzi bautura (apa, lapte, etc) erogati abur din tubul vaporizant timp de cel putin 2 secunde pentru a
garanta descarcarea condensului.
Erogare cafea
Daca aparatul a ramas nefolosit mai mult de o ora, efectuati o erogare “oarba” de 100cc inainte de a face prima
erogare de cafea.
Erogare apa calda
Daca aparatul a ramas nefolosit mai mult de o ora, efectuati o erogare “oarba” de 200cc inainte de a face prima
erogare de cafea.
Curatarea circuitului cafea
Pentru modul si instructiunile de curatare consultati sectiunea specifica.
Pag. 62
Page 63

9 – AVERTISMENTE
ATENTIE: partile marcate cu eticheta indicata mai jos, sunt parti calde, deci trebuie prestata maxima
atentie in apropiere si operare
CAUTION: HOT
10 – INTRETINERE SI REPARATII
ATENTIE: intretinerea efectuata de catre personal necalificat poate prejudica siguranta si
conformitatea la normele in vigoare ale produsului insusi. Asistenta trebuie sa fie facuta doar de catre
personal calificat si autorizat.
AVERTISMENTE GENERALE
Producatorul nu isi asuma responsabilitatea pentru daune la lucruri si persoane cauzate de o utilizare neadecvata
sau neprevazuta a espresorului.
Nu actionati niciodata espresorul cu mainile ude sau cu picioarele goale.
Nu puneti mainile sau alte parti ale corpului in zona grupurilor de erogare cafea, sau in apropierea tuburilor de
erogare abur si apa calda.
Luati masurile necesare pentru ca produsul sa nu poata fi actionat de catre copii sau persoane neinstruite in
folosirea acestuia.
Pozitionati pe incalzitorul de cesti doar cescute, cesti si pahare destinate folosirii cu masina de cafea.
Uscati bine cestile inainte de a le pozitiona pe incalzitorul de cesti.
Este interzisa pozitionarea altor obiecte per incalzitorul de cesti.
INTRERUPEREA ACTIVITATII
Daca espresorul ramane nefolosit pentru mult timp (noaptea, in timpul inchiderii saptamanale sau pe perioada
vacantelor), trebuie efectuate urmatoarele operatii:
Scoateti stecher-ul din priza de curent, sau deconectati intrerupatorul principal.
Inchideti rubinetul de alimentare hidrica.
Ignorarea acestor norme de siguranta scuteste producatorul de orice responsabilitate pentru defecte sua daune
ce pot fi cauzate pe persoane sau lucruri.
Pentru a mentine siguranta in esercitiu si a functiilor produsului este indispensabil ca toate instructiunile
producatorului sa fie urmarite cu atentie; integritatea protectiilor si corecta functionare a tuturor dispozitivelor de
siguranta trebuie verificata periodic de catre personal calificat si autorizat (prima verificare trebuie facuta inainte
de 3 ani iar apoi in fiecare an).
In caz de functionare neadecvata, stingeti espresorul, deconectati intrerupatorul principal si chemati centrul de
asistenta/service.
In caz de daune la cablul de alimentare electrica, stingeti espresorul si comandati piesa de schimb la centrul de
asistenta/service.
Folositi doar piese de schimb originale garantate de casa producatoare; in caz contrar responsabilitatea
producatorului decade complet.
Dupa efectuarea operatiilor de intretinere trebuie efectuata o VERIFICARE a instalarii asa cum este indicat in
relativa sectiune a instructiunilor.
Pag. 63
Page 64

11 - APRINDERE
12 - INCALZIRE
13 – EROGARE CAFEA
Inainte de a pune in functiune aparatul asicurati-va ca:
intrerupatorul principal pentru alimentare electrica este
aprins.
robinetul principal pentru alimentare hidrica este deschis.
Aprindere electrica
Apasati intrerupatorul general (4) in pozitia I.
Cazanul se va umple cu apa pana la nivelul prevazut.
Din acest momenti incede "Faza de incalzire".
La sfarsitul activitatii zilnice, stingeti aparatul apasand pe intrerupatorul
general (4) in pozitia 0.
ATENTIE: nu acoperiti suprafata incalzitor de cesti cu
carpe.
Asteptand incalzirea aparatului, introduceti port-filtrii (9) in grupuri.
Pentru a evita supra-incalzirea espresorului, nu acoperiti suprafata
pentru incalzirea cestilor cu carpe varii.
Cand manometrul (6) indica presiunea de regim, aparatul
este gata sa fie folosita.
1. Declipsati port-filtrul (9) din grup.
2. Umpleti filtrul cu cantitatea de cafea rasnita.
3. Presati cafeaua cu un tamper si eliminati resturile de cafea de pe
marginile filtrului.
4. Introduceti port-filtrul (9) in grup in asa fel incat sa preseze bine pe
garnitura grupului.
5. Pozitionati cescuta/cescutele sub duzele de erogare.
6. Ridicati maneta (5) grupului in pozitie orizontala. Din acest moment, in
primele secunde nu se vede cafeaua curgand, acesta fiind timpul
necessar presiunii pentru a atinge valoarea de functionare a pompei.
In acest timp are loc infuzia, adica fierberea preliminara a cafelei. La
sfarsitul infuziunii, incede erogarea, in timpul careia cafeaua curge
continuu. Erogarea se intrerupe aducand maneta (5) in pozitie
verticala, atunci cand cantitatea in cescuta este cea dorita.
7. Daca se doreste a face alte cafele, declipsati port-filtrul, eliminati
resturile de cafea si curatati-l cu atentie cu ajutorul unei carpe umede,
apoi repetati operatiile indicate mai sus.
Pag. 64
Page 65

Erogare abur
Cand aparatul este gata de folosinta, deschideti robinetul (12) invartind
in sens anti-orar, cu tubul vaporizant (10) orientat deasupra grilei de
sustinere a cestilor si lasati sa curga putina apa initiala; inchideti apoi
robinetul abur.
Introduceti tubul vaporizant (10) in recipientul ce contine bautura care
trebuie incalzita. Invartiti robinetul (12) in sens anti-orar pentru a incepe
erogarea si in sens orar pentru a o intrerupe.
Erogare apa calda
Pozitionati recipientul sub tubul (11). Invartiti robinetul apa (13) in sens
anti-orar pentru a incepe erogarea si in sens orar pentru a o intrerupe.
Incalzirea laptelui pentru cappuccino
Folositi un recipient inalt si stramt, umpleti-l pana la jumatate circa.
Cand aparatul este gata de folosinta, deschideti robinetul (12) invartind
in sens anti-orar, cu tubul vaporizant (10) orientat deasupra grilei de
sustinere a cestilor si lasati sa curga putina apa initiala; inchideti
robinetul abur.
Introduceti acum tubul vaporizant (10) in lapte.
Deschideti incet si progresiv robinetul abur (12) si incalziti laptele timp
de cateva secunde.
O data obtinuta spuma dorita si o temperatura suficient de calda,
intrerupeti erogarea invartind robinetul abur (12) in sens orar.
La sfarsitul utilizarii aburului, curatati cu atentie tubul vaporizant (10)
folosind un burete sau o carpa curata.
14 – PREPARAREA ALTOR BAUTURI CALDE
N.B.: la sfarsitul fiecarei erogari de abur, curatati tubul vaporizant facand in felul urmator: indreptati tubul
vaporizant catre grila de sustinere a cestilor si, facand mare atentie, erogati abur cel putin o data. Apoi
curatati bine duza abur cu un burete sau o carpa curata eliminand orice fel de residuu organic.
Pag. 65
Page 66

15 – CURATARE SI INTRETINERE
ATENTIE: pentru o corecta aplicare a sistemului HACCP este necesara urmarirea scrupuloasa a
indicatiilor din acest paragraf
Curatarea grupurilor
Trebuie efectuata la sfarsitul zilei de munca pe
toate grupurile
Curatati garnitura grupului cu ajutorul periutei.
Introduceti filtrul orb in port-filtru.
Versati 3-5 gr de pulbere detergenta in filtrul orb.
Introduceti port-filtrul in grupul de erogare si
efectuati cateva cicluri (ON/OFF la fiecare 10 sec
de 5 ori).
Declipsati port-filtrul, curatati cu un burete discul
perforat.
Efectuati clatirea erogand apa din fiecare grup
timp de 30 sec.
Curatarea port-filtrelor
Varsati un litru de apa calda si circa 10 gr de
pulbere detergenta intr-un recipient.
Scoateti filtrele din port-filtre.
Introduceti filtrele si port-filtrele in solutia obtinuta
timp de cel putin 20 min.
Inlaturati eventuale reziduuri cu ajutorul unui
burete si clatiti cu apa calda.
Montati din nou filtrele in port-filtru, asicurandu-va
ca arcul de fixare al filtrului este la locul lui.
Curatarea tuburilor de abur di apa calda
Folosind un burete curat, spalati cu apa calda inlaturand eventuale reziduuri organice prezente; clatiti cu atentie.
Pentru a curata partea interna a tubului procedati in felul urmator: indreptati tubul catre grila sustinere cesti si,
facand mare atentie, erogati abur cel putin o data.
Curatarea grilei de sustinere a cestilor si a tavitei
Extrageti grila cu tavita si completati curaratea cu apa curenta.
Curatarea tavei de descarcare
La sfarsitul zilei de munca, varsati un recipient de apa calda in tava pentru a facilita descarcarea eventualelor
reziduuri in canal.
Curatarea caroteriei
Curatati folosind o carpa fina si produse FARA amoniac sau particule abrazive, eliminand eventuale reziduuri
prezente in zona de lucru; nu pulverizati lichide in gaurile prezente pe caroterie.
Pag. 66
Page 67

16 – ANOMALII SI DEFECTE
ANOMALIE
CAUZA
REMEDIU
Pierde de la marginea port-filtrului
Garnitura grupului este murdara de cafea
Curatati cu periuta
Durata erogarii cafelei este prea scurta
Cafea rasnita prea grosolan
Cafea prea veche
Schimbati gradul de rasnire, strangandu-l
Inlocuiti cafeaua
Cafeaua curge picatura dupa picatura
Gaurile filtrului sunt blocate sau gaura de
iesire a port-filtrului este murdara
Grad de rasnire prea fin
Curatare
Schimbati gradul de rasnire, largindu-l
Pierdere de apa de sub espresor
Canalul de descarcare este blocat
Gaura tavitei de descarcare este blocata
Curatare
Curatare
16 – ANOMALII SI DEFECTE
ANOMALIE
CAUZA
OBSERVATII
Timp de infuzie foarte scurt
Erogare rapida
Cafea foarte slaba, fara crema
(defecte prezente pe toate grupurile)
Grad de rasnire grosolan
Cafea veche
Acest defect impreuna cu alte simtoame
secundare poate fi determinat de multe
cauze mentionate in punctele urmatoare. Nu
schimbati gradul de rasnire pana cand nu ati
eliminat toate celelalte cauze.
Timp de infuzie foarte scurt
Erogare rapida
Cafea foarte slaba, fara crema
(defecte prezente pe un singur grup)
Duza grupului s-a largit cu timpul
Garnitura OR al trunchiului conic pierde
Valva de infuzie a ramas deschisa
Filtrul este rupt pe margine
Debitul grupului fara filtru trebuie sa fie de
circa 100 cm3 intr-un timp de 8÷10 secunde
Uz deficitar al cafelei
Erogare lenta
Cafea rece si slaba
Filtru perforat murdar
Punand grupul in functiune fara port-filtru se
obtin jet-uri subtiri si izolate in loc de un curs
central
Erogare rapida, cafea slaba
Manometrul pompa arata o presiune
superioara la 9 bar
Pompa nu mai este calibrata
Valva de by-pass este blocata
Uz deficitar al cafelei
Erogare rapida
Cafea calda si slaba
Filtrele au gaurile largite
Grad de rasnire grosolan
Se observa prezenta marcata a resturilor de
cafea in ceasca
Cafea rece, slaba si fara crema
Timp de infuzie si de erogare normal
Bule de aer in circulatia de termo-sifon
Valva de retinere nu mai tine (cu presiune de
retea foarte joasa)
Descarcarea schimbatorilor de caldura
Manometru cazan defect (arata presiuni mai
inalte decat cele reale)
Actionati maneta de cateva ori pentru a le
elimina
Atingand tubul de incarcare apa se simte ca
este cald langa espresor
Presostat calibrat la valori mai joase
Cafea rece dimineata, la inceputul muncii
Este prezent aer in cazan
Vedeti instructiunile relative la aprinderea
aparatului
Erogare lenta
Cafea arsa si rece
Crema foarte inchisa la culoare, cu tendinta
a forma ochiul
Grad de rasnire prea fin
Presiune joasa a pompei
Filtrul pus deasupra duzei este murdat
Duza partial blocata
Interventii directe facute de catre operator
Inainte de a telefona la centrul de asistenta/service, pentru a evita cheltuieli inutile, verificati daca problema
reintra in cazurile prezentate mai jos.
Interventii directe facute de catre tehnician specializat
Pag. 67
Page 68

16 – ANOMALII SI DEFECTE
ANOMALIE
CAUZA
OBSERVATII
Erogare lenta, cafea arsa
Manometrul pompei indica o presiune
inferioara la 9 bar
Pompa nu mai este calibrata
Pompa are un debit redus
Grupul in pauza pierde de la masonul de
descarcare (defect prezent pe un singur
grup)
Cafea erogata normal
Valva de erogare nu tine
Acest defect necorectat in timp util
determina terminarea dedurizatorului inainte
de termenul real de viata, si apoi prezenta
rezidurilor de tartru.
Grup in pauza, garnitura valva de erogare se
defecteaza rapid
Pierdere de apa de la mansonul de
descarcare
Cafea erogata normal .
Defect prezent pe toate grupurile
Valva de expansiune cu calibrare prea
puternica (superioara la 13 bar)
Acest defect necorectat in timp util
determina terminarea dedurizatorului inainte
de termenul real de viata, si apoi prezenta
rezidurilor de tartru.
Grupuri in pauza, pierdere continua de apa
rece in tavita de descarcare
Grupurile nu mai distribuie cafea iar
manometrul pompa arata valori joase
Valva de expansiune a ramas deschisa
Acest defect necorectat in timp util
determina terminarea dedurizatorului inainte
de termenul real de viata, si apoi prezenta
rezidurilor de tartru.
Grup in functiune
Pierdere de la mansonul de descarcare
Nu se obtine cafea
Valva de descarcare nu tine
Grup in functiune, pierdere continua de apa
rece in tavita de descarcare
Cafea slaba
Erogare lenta
Valva de expansiune nu mai este calibrata
(deschide la mai putin de 9 bar)
Grupul pierde de la cama
Pierdere pe cele doua garnituri
Inlaturati garniturile, facand atentie a nu
dauna sediilor, nu folositi instrumente de otel
sau alte materiale dure
Inainte de a monta totul, curatati bine
arborul, mai ales in gaurele
Actionarea grupului este dificila
Profilul camei este uzurat
Espresorul nu intra in presiune sau intra mai
incet decat de obicei
Nu este curent
Intrerupatorul automatic a sarit
Rezistentele sunt arse
Circuitul electric la rezistenta este intrerupt
Nu este apa in cazan
Robinetul abur pierde
Grupurile functioneaza normal
Manometrul pompa nu indica presiunea
corecta (8÷9 bar).
Manometrul este defect
Pompa nu intra in presiune
Nu se obtine erogarea
Motorul nu functioneaza:
- nu este curent
- condensatorul este ars
- micro-intrerupatorul este ars
- motorul este ars
- valvele de retinere pompa sunt deschise
- valvele by-pass sunt complet deschise
Pompa face mult zgomot
Pompa este defecta
Nu este apa in retea
Interventii directe facute de catre tehnician specializat
Pag. 68
Page 69

17 – SFATURI – SUGESTII - IMAGINI
ATENTIE: Espresorul trebuie sa fie alimentat cu apa cu duritate superioara la 8°F. Este interzisa
folosirea tuburilor si garniturilor deja uzate.
Este recomandata instalarea unui dedurizator de apa (1)
pentru alimentarea hidrica a aparatului, care trebuie
conectat la retea.
N.B. Inainte de a conecta dedurizatorul la espresor
efectuati o clatire pana cand apa nu se prezinta limpede,
doar dupa aceea procedati cu conectarea dedurizatorului
la aparat.
In ceea ce priveste presiunea de retea, daca aceasta
este superioara la 0,5Mpa (5bar), este recomandata
instalarea unui reductor de presiune echilibrat pentru
presiune inalta (dispozitiv in care o eventuala marire a
presiunii de retea nu se repercuteaza asupra presiunii in
iesire)
Tubul de descarcare (2) nu trebuie sa aiba curbe care pot
provoca stagnarea sau intorcerea apei catre espresor.
Pentru a inlatura partile laterale ale aparatului, trebuie sa
desurubati (partial) surubul (3) in asa fel incat placa sa
poata rota si sa poata apoi fi luata complet din sediu.
Pentru a o remonta actionati in sens contrar, facand
atentie sa introduceti mai intai partea joasa si doar apoi
sa insurubati surubul (3).
Pag. 69
Page 70

Pentru a inlatura vitrina (4) eliberati-o din placheta
slabind surubul (5), apoi ridicati-o si glisati-o catre
partea frontala a espresorului pentru a o putea in
sfarsit elibera din sediu. Pentru a o remonta actionati
in sensul contrar, asicurandu-va ca ati introdus
placheta in sina vitrinei inainte de a insuruba bine
surubul (5).
Daca se doreste inlaturarea suprafetei de incalzire
cesti (6), trebuie desurubate complet celelalte 2
suruburi care o tin fixata.
Pentru a inlatura placa posterioara (7), desurubati
cele 4 suruburi (8) in asa fel incat placa sa se
elibereze din sediu.
Pentru a regla presiunea in cazan, trebuie actionat
surubul presostatului (9). In sens orar se mareste. In
sens anti-orar se micsoreaza.
Pentru a regla presiunea pompei trebuie actionat
surubul (10) dupa ce a fost slabita piulita. In sens
orar se mareste. In sens anti-orar se micsoreaza. La
sfarsitul operatiei strangeti din nou piulita.
Pag. 70
Page 71

AVVERTENZE PER IL CORRETTO SMALTIMENTO DEL PRODOTTO AI SENSI DELLA DIRETTIVA EUROPEA
2002/96/EC
Alla fine della sua vita utile il prodotto non deve essere smaltito insieme ai rifiuti urbani. Può essere consegnato presso
gli appositi centri di raccolta differenziata predisposti dalle amministrazioni comunali, oppure presso i rivenditori che
forniscono questo servizio. Smaltire separatamente un elettrodomestico consente di evitare possibile conseguenze
negative per l’ambiente e per la salute derivanti da un suo smaltimento inadeguato e permette di recuperare i materiali
di cui è composto al fine di ottenere un importante risparmio di energia e di risorse. Per rimarcare l’obbligo di smaltire
separatamente gli elettrodomestici, sul prodotto è riportato il marchio del contenitore di spazzature mobile barrato.
IMPORTANT INFORMATION FOR CORRECT DISPOSAL OF THE PRODUCT IN ACCORDANCE WITH EC
DIRECTIVE 2002/96/EC
At the end of its working life, the product must not be disposed of as urban waste. It must be taken to a special local
authority differential waste collection centre or to a dealer providing this service. Disposing of a household appliance
separately avoids possible negative consequences for the environment and health deriving from inappropriate disposal
of enables the constituent materials to be recovered to obtain significant savings in energy and resources. As a
reminder of the need to dispose of household appliances separately, the products is marked with a crossed-out
wheeled dustbin.
AVERTISSEMENT POUR L’ÉLIMINATION CORRECTE DU PRODUIT AUX TRMES DE LA DIRECTIVE
EUROPÉENE 200/96/EC
Au terme de son utilisation, le produit ne doit pas être éliminé avec les déchets urbains. Le produit doit être remis à l’un
des centres de collecte sélective prévus par l’administration communale ou auprès des revendeurs assurant ce service.
Éliminer séparément un appareil électroménager permet d’éviter les retombée négatives pou l’environnement et la
santé dérivant d’une élimination incorrecte, et permet de récupérer les matériaux qui le composent dans le but d’une
économie importante en termes d’énergie et de ressources. Pour rappeler l’obligation d’éliminer séparément les
appareils électroménagers, le produit porte le symbole d’un caisson à ordures barré.
WICHTIGER HINWEIS FÜR DIE KORREKTE ENTSORGUNG DES PRODUKTS IN ÜBEREINSTIMMUNG MIT DER
EG-RICHTLINIE 2002/96/EG
Am Ende seiner Nutzzeit darf das Produkt NICHT zusammen mit dem Siedlungsabfall beseitigt werden. Es kann zu den
eigens von den städtischen Behören eingerichteten Sammelstellen oder zu den Fachhändlern, die einen
Rücknahmeservice anbieten, gebracht werden. Die getrennte Entsorgung eines Haushaltsgerätes vermeidet mögliche
negative Auswirkungen auf die Umwelt und die menschliche Gesundheit, die durch eine nicht vorschriftsmäßige
Entsorgung bedingt sind. Zudem ermöglicht wird die Wiederverwertung der Materialien, aus denen sich das Gerät
zusammensetzt, was wiederum eine bedeutende Einsparung an Energie und Ressourcen mit sich bringt. Zur
Erinnerung an die Verpflichtung, die Elektrohaushalsgeräte zu beseitigen, ist das Produkt mit einer Mülltonne, die
durchgestrichen ist, gekennzeichnet.
AVERTISMENTE PENTRU CORECTA ELIMINARE A PRODUSULUI DEVENIT DESEU IN BAZA DIRECTIVEI
EUROPENE 2002/96/EC
La sfarsitul vietii de folosinta, produsul nu trebuie aruncat impreuna cu gunoaiele urbane. Poate fi trimis la centrele de
colectare diferentiata organizate de administratia primariilor sau vanzatorilor care furnizeaza acest serviciu. Colectarea
separata a unui electrocasnic permite evitarea posibilelor consecinte negative pentru ambient si pentru sanatate
derivate de la o colectare inadecvata si permite recuperarea materialelor din care este compus pentru a obtine o
importanta economie de energie si resurse. Pentru a remarca obligatia de colectare separata a electrocasnicelor, pe
produs se gaseste simbolul containerului de gunoi barat.
УКАЗАНИЯ ПО КОРРЕКТНОМУ ИЗБАВЛЕНИЮ ОТ ИЗДЕЛИЯ В СООТВЕТСТВИИ С ЕВРОПЕЙСКОЙ
ДЕРЕКТИВОЙ 2002/96/ЕС
По окончании срока службы, электроприбор не следует помещать в общий контейнер с мусорными отходами.
Его можно сдать в специальные центры по сбору дифференциальных отходов, предоставленных
административными муниципалитетами, или в специализированные фирмы, которые занимаются таким
обслуживанием. Раздельная переработка электроприборов позволяет избежать возможные негативные
последствия, возникающие из-за не соответствующей переработки отходов, для окружающей среды, здоровья
общества. Дает возможность достигнуть значительной экономии энергии и ресурсов, благодаря повторному
использованию материалов изготовления электроприбора. Чтобы подчеркнуть обязательство сдачи
электроприбора на раздельную переработку, на изделие нанесена маркировка в виде зачеркнутого
передвижного мусорного контейнера.
Messa fuori servizio definitiva – Dismantling the machine - Endgültige Ausserbetriebstellung - Демонтаж машины -
Eliminarea definitiva a produsului
Pag. 71
Page 72

Gemme Italian Producers srl
Via del Lavoro 45 - I - 25045 Castegnato (BS) Italy
Tel: +39 030 2141199 - Fax: +39 030 2147637
www.lelit.com - info@lelit.com - P.Iva 03426920173
Pag. 72
 Loading...