

Page 1
Leica LED
Illuminator Manual
●● LED3000●RL
●● LED3000●NVI
●● LED5000●RL
●● LED5000●MCI
●● LED5000●CXI
●● LED5000●HDI™
Page 2

General Instructions
Safety Concept
Before●using●your●microscope●for●the●rst●time,●
please●read●the●"Safety●concept"●brochure●included●with●your● instrument.●●It● contains●additional●information●about●handling●and●care.
Use in clean rooms
Leica● LED● illuminators● can● be● used● in● clean●
rooms●without●any●problems.
Cleaning
●● Do●not●use●any●unsuitable●cleaning ●agents,●
chemicals●or●techniques●for●cleaning.
●● Never● use● chemicals● to● clean● colored●
surfaces● or● accessories● with● rubberized●
parts.●This● could●damage●the●surfaces,●and●
specimens●could●be●contaminated●by●abraded●particles.●
●● In●most●cases,●we●can●provide●spe cial●solu-
tions● on● request.● Some● products● can● be●
modied,● and●we●can●oer●other● accessories●for●use●in●c lean●rooms.●●
Servicing
●● Repairs● may● only● be● carried● out● by● Leica●
Microsystems-trained● service● technicians.●
Only● original● Leica● Microsystems● spare●
parts●may●be ●used.
Responsibilities of person in charge of
instrument
●● Ensure● that● the● Leica● LED● i lluminator● is●
operated,● maintained● and● repaired● by●
authorized●and●trained●personnel●only.
Leica LED Illuminator Manual 2
Page 3

Symbols Used
Warning of a danger
This●symbol●indicates●especially●impor-
tant●information●that●must●be●read●and●
complied● with.● Failure●to●follow● these● instructions● may● pose● hazards● to● personnel,● impair●
the●system's●performance●or●dam age●the● instrument.
Important information
This● symbol● indicates● additional● infor-
mation● or● explanations● that● intend● to●
provide●clarity.
Explanatory notes
●● This●symbol●within●the●text●stands●for●addi-
tional●information●and●explanations.
Leica LED Illuminator Manual 3
Page 4

Table of Contents
About Leica LED Illuminators
LED:●Illuminant●with●a●Future● 6
Control●via●LAS●and●Leica●SmartTouch®● 7
Leica LED3000 RL
About●the●Leica●LED3000●RL● 9
Leica●LED3000●RL:● Assembly● 10
Leica●LED3000●RL:● Use● 12
Control●of●the●Leica●LED5000●3000●Ring●Illuminator● 13
Leica●LED3000●RL:● Dimensional●Drawings● 14
Leica LED3000 NVI™
About●the●Leica●LED3000●NVI™● 16
Leica●LED3000●NVI™ :●Assembly● 17
Leica●LED3000●NVI™ :●Use● 19
Leica●LED3000●NVI™ ●and●Leica●SmartTouch®● 20
Leica●LED3000●NVI™ :●Dimensional●Drawings● 21
Leica LED5000 RL
About●the●Leica●LED5000●RL● 23
Leica●LED5000●RL:● Assembly● 24
Leica●LED5000●RL:● Use● 25
Leica●LED5000●RL●a nd●Leica●SmartTouch®● 26
Leica●LED5000●RL:● Dimensional●Drawings● 27
Leica LED5000 MCI
About●the●Leica●LED5000●MCI● 29
Leica●LED5000●MCI: ●Assembly● 30
Leica●LED5000●MCI: ●Alternative●Assembly● 31
Leica●LED5000●MCI™ :●Use● 32
Leica●LED5000●MCI● and●Leica●SmartTouch®● 34
Leica●LED5000●MCI: ●Dimensional●Drawings● 35
Leica LED5000 CXI
About●the●Leica●LED5000●CXI● 37
Leica●LED5000●CXI:●Assembly● 38
Leica●LED5000●CXI:●Use● 40
Leica●LED5000●CXI●and●Leica●SmartTouch®● 41
Leica●LED5000●CXI:●Dimensional●Drawings● 42
Leica LED5000 HDI™
About●the●Leica●LED5000●HDI™● 44
Leica●LED5000●HDI™ :●Assembly● 45
Leica●LED5000●HDI™ :●Illumination●Scenarios● 46
Leica●LED5000●HDI™ ●and●Leica●SmartTouch®● 48
Leica●LED5000●HDI™ :●Dimensional●Drawings● 49
Leica LED Illuminator Manual 4
Page 5

About Leica LED Illuminators
Leica LED Illuminator Manual 5
Page 6

LED: Illuminant with a Future
Congratulations●on●purchasing●your●LED●illuminator●from●Leica●Microsystems.●You●have●made●
an● excellent● choice:● You● will● enjoy● the● high●
quality●and●well-conceived●operation●for●a●long●
time●to●come●and●it●will●provide●the●best●possible● lighting● for● your●work● –● regardless● of● the●
type●of●specimen●you●would●like●to●examine.
All● of● the● Leica● LED● illuminators● oer● a● great●
number●of●advantages●you●will●not●want●to●do●
without:
●● Constant● color● temperature● (daylight)●
throughout●the●ent ire●lifecycle
●● Extremely● long●service●life●of● up●to●50,000●
hours
●● Absolutely● maintenance-free;● no● lamp●
replacement●required
●● Depending● on● the● illuminator,● individual●
segments● can● be●switched● on●or●o● independently● from● one●another●so●that●dierent●illumination●scenarios●are●possible.
●● It● is● controlled● either● on● the● instrument,●
via●the●Leica●SmartTouch®●panel● or●via●the●
Leica●Application●Suite●software
●● Extremely●low●power●consumption●at● high●
light●eciency
The●Leica●LED●illuminators●work●seamlessly●with●
all●Leica●M●series ●stereomicroscopes.
Using● the● Leica● Application● Suite● software●
(LAS),●users●can●control,● save,●and●later● call●up●
scenarios● with● dierent● microscope● and● light●
settings●at●the●touch●of●a●button.
We● wish● you● great● joy● and●success● with● your●
new●LED●illumin ator●by●Leica●Microsystems!
Leica LED Illuminator Manual 6
Page 7
Control via LAS and Leica SmartTouch®
Each● Leica● LED● illuminator● can● also● be● controlled● via● the● Leica●Application● Suite● (LA S)●or●
the●Leica●SmartTouch®●control●unit.
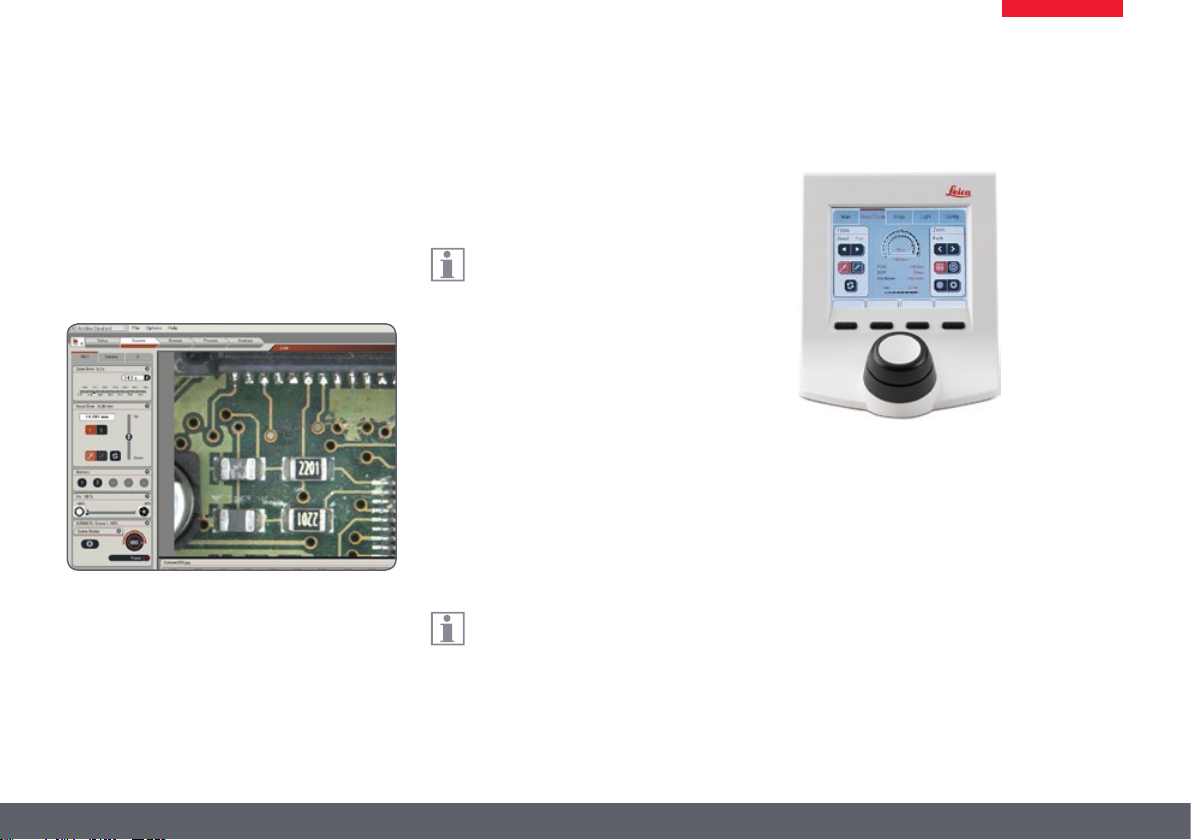
Leica Application Suite (LAS)
The●PC-based●LAS●software●allows●users●to●integrate●each●Leica●LED●illuminator●into●the●workow.● Control● the● intensity● of● the● ill umination●
and●the●desired●illumination●scenario●from●your●
computer.●Stored●scenarios●can●be●called●up●at●
any●time●at●the●touch●of● a● button● so●that●you●
can● be● assured● that● you● will● have● consistent●
conditions●for●your●experiments.
For● information● on● how● to● control● the●
LED●illuminator●via●LAS,●refer●to●the●user●
manual●for●the●LA S●software.
Leica SmartTouch®
All●Leica●LED●illuminators●can●also●be●used●with●
the● Leica● SmartTouch®● control● unit.● Exactly●
as●is●the● case● with●LAS,●the●illuminator●can● be●
switched● on● and● o● or●the●brightness● can● be●
adjusted.●Moreover,●you● can●access●one●of● the●
preset●illumination●scenarios●with●a●single●tap.●
All●settings●can● be●saved●and●retrieved●later● at●
the●touch●of●a●button.
The● instructions●for●controlling● the● illu-
minator●usi ng●Leica●SmartTouch®●can●be●
found●in●this●User●Manual.
Leica SmartTouch™
Leica LED Illuminator Manual 7
Page 8

Leica LED3000 RL
Leica LED Illuminator Manual 8
Page 9

About the Leica LED3000 RL
The●Leica●LED3000●RL●("Ring●Light")●generates●a●
very●bright●and●homogenous●incident●light.●The●
ring●illuminator●illuminates● the●specimen● with●
24●LEDs●that●can●be●switched●on●or●o●together●
or●in●various●combinations.
The●Leica●LED●3000●RL●can●be●used●with●
any●objectives●that●h ave●an●outer●diameter●of●58● mm.●The●supported●working● distance●
is●between●65●mm●and●150●mm.
Controls
It● is● controlled● using● either● the ● integrated●
keypad●or●via●the●Leica●Application●Suite●(LAS)●
or●the●Leica●SmartTouch®.
LAS● and●the●Leica●SmartTouch®● enable● you●to●
create●fully●reproducible●illumination●scenarios●
and● automatically● toggle● between● them.● For●
additional● information●on● controlling● the● illuminator●via●LAS,● please●refer●to●the●LAS●online●
help.
Leica LED Illuminator Manual 9
Page 10
Leica LED3000 RL: Assembly
Required tools
●● None
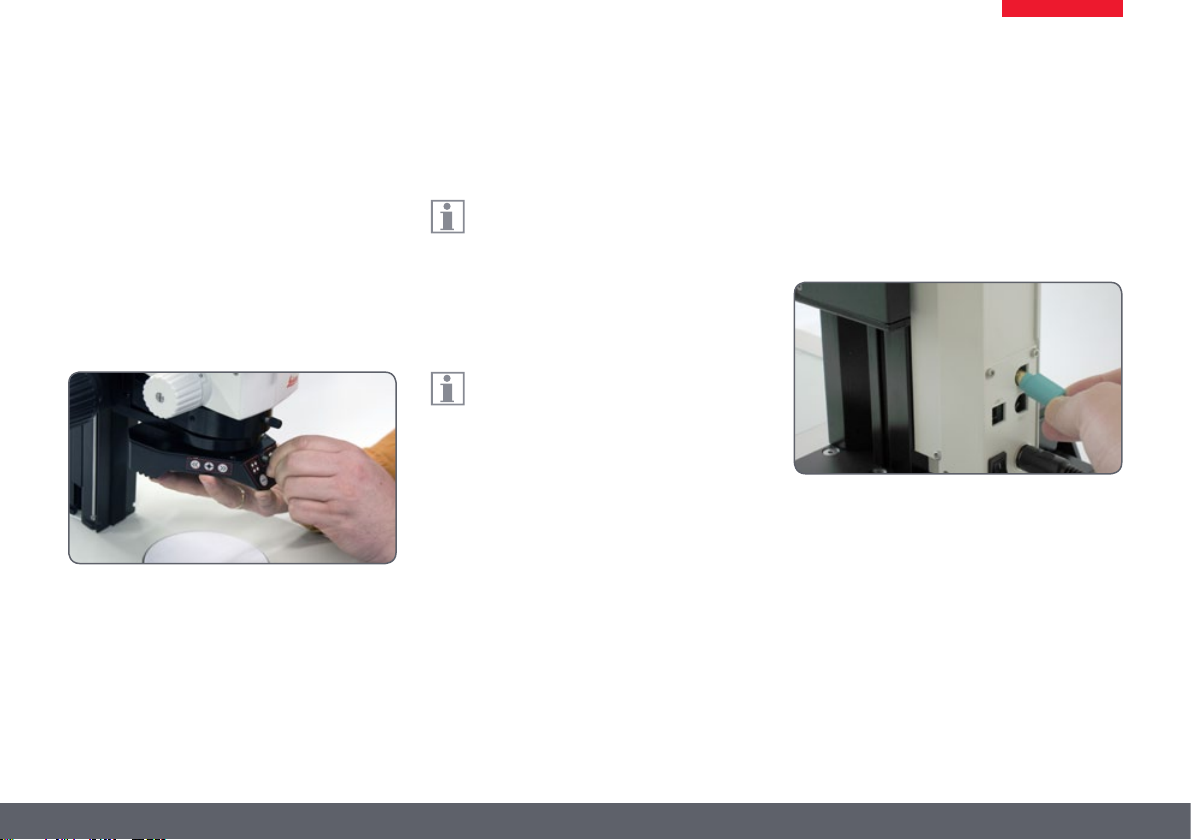
Installing the Leica LED3000 RL
1.● Place●the●Leica●LED3000●RL●on●the●objective●
from●below●and●tighten●the●locking●screw.
Connection and power supply
The●Leica●LED3000●RL●can●be●used●directly●
with●the●electronic●focusing●column.●The●
power● is● then● supplied● via● the● CTL2● connection.●In●addition,●the●com munication●between●
LAS●or●the●Leica●SmartTouch®●is●transferred●via●
the●same●connection.
If● you● work● with● the● manual● focusing●
column,● the● Leica●LED3000● RL● must● be●
supplied● with● power● via● the● external● power●
supply●unit●provided.● Moreover,●the●illuminator●
cannot● be●controlled●via●the●Leica● Application●
Suite●in●this●case.
Connection to the electronic focusing
column
1.● Connect●the●Leica●LED3000●RL●to●the●focusing●column●via●the●CTL2●port.
Leica LED Illuminator Manual 10
Page 11

Leica LED3000 RL: Assembly (cont'd.)
Power supply when using the manual
focusing column
1.● Connect● the● external● power● supply● unit ●
(10●450●266)●to●the●Leica●LED3000●RL.
Installing optional accessories
●● The●optional●diuser●i s●attached● and●scre-
wed●in●below●the●ring●illuminator.
●● The●optional●polarization●set●(polarizer●and●
analyzer)●is●attached●and●screwed●in●below●
the●ring●illumi nator.
Leica LED Illuminator Manual 11
Page 12

Leica LED3000 RL: Use
The● light● of●the● Leica● LED3000● RL● can●
be●very●bright.●Therefore,●always●switch●
on●the●illuminator●before●you●look●through●the●
eyepieces!●Avoid●looking●directly●into●the●LEDs.
Using the keypad
●● Use● the● ● button● to● switch● the● Leica●
LED3000●RL●illu minator●on●or●o.●
●● Use● the● ● and● ● buttons● to● adjust● the●
brightness●in●10●increments.
●● Touch●either●of●the●two● buttons● to● adjust●
the●quantity●o f●light●in●small●increments.
●● Hold● the● button● pressed● to● change● the●
quantity●of●li ght●more●quickly.
The illumination scenarios
You●can● switch● between● dierent● illumination●
scenarios● (full● ring,● half● ring,● quarter● rings,●
opposite● quarter● rings)● using● the● ● button.●
The● active● illuminator● segments● are● displayed●
on● the● front● control● panel● eld● by● means● of●
LEDs.
Use● the● ●and● ● buttons● to● rotate●the●active●
segments●clockw ise●or●counterclockwise.
Leica LED Illuminator Manual 12
Page 13

Control of the Leica LED5000 3000 Ring Illuminator
Using● the● Leica● SmartTouch™,● you● can●
control●both●the●brightness●and●various●
illumination●sce narios●for●the●Leica●LED3000●RL●
("Ring●Light").
Adjusting the illumination
1.● Touch●the●"Light"●tab.
2.● In●the●upper●area,●touch●the●symbol●for●the●
Leica●LED3000●RL.
3.● Switch●on●the●illuminator.
4.● Touch● the● lamp● symbols● to● adjust● the●
intensity●of●the●light.
5.● Touch● one● of● the● symbols● for● the● light●
scenarios● to● adjust● the● lighting● to● your●
needs.
You●cannot● modify● the●default●illumina-
tion●scenarios.
Leica LED Illuminator Manual 13
Page 14
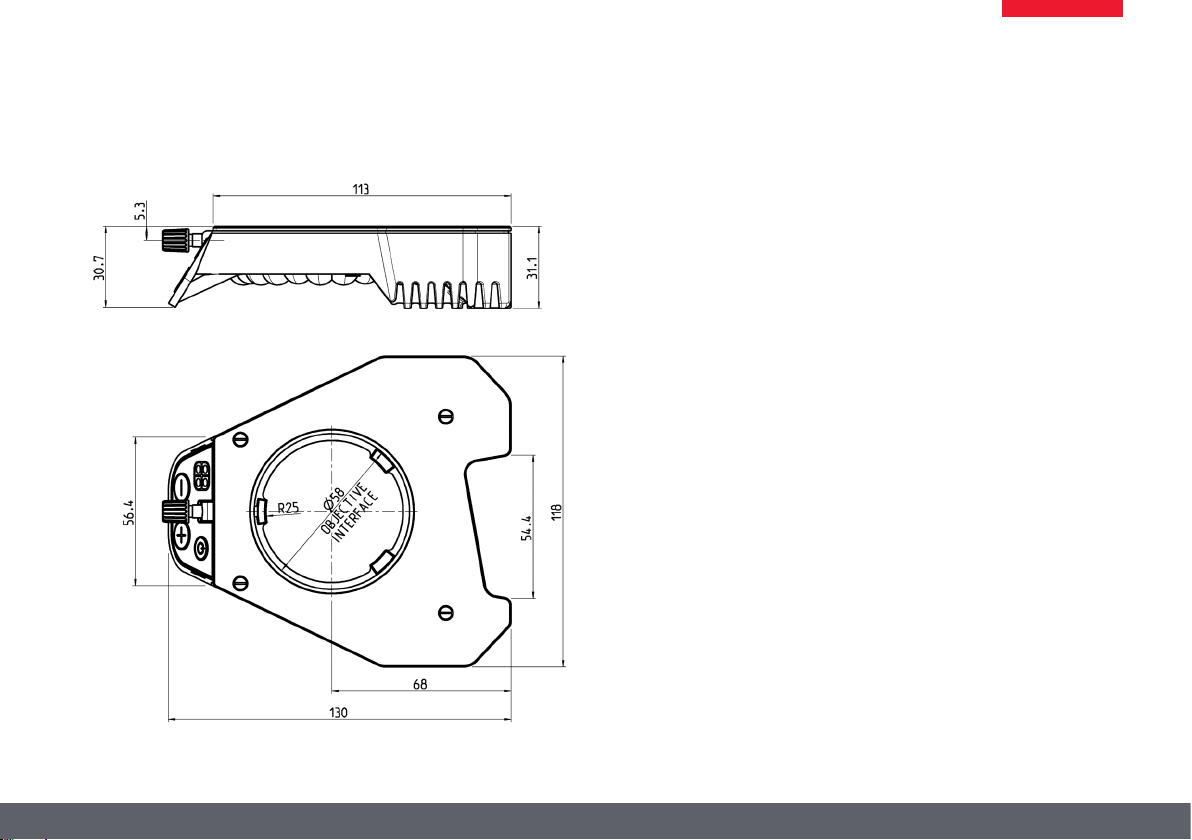
Leica LED3000 RL: Dimensional Drawings
Leica LED3000 RL (dimensions in mm)
Leica LED Illuminator Manual 14
Page 15

Leica LED3000 NVI™
Leica LED Illuminator Manual 15
Page 16

About the Leica LED3000 NVI™
Leica LED3000 NVI™ –
The vertical LED light solution
Unlike● coaxial● illumination,● the● LED3000●NVI™●
also●works●for●uneven●specimens●and●specimens●
that●have●weak●reection.●It●is●ideally●suited●for●
viewing●recesses●and●bores●and●at tains●a●substantially●brighter●illumination●than●comparable●
150● watt● halogen● lamps.● Minimized● shadows●
caused●by●tools●also●contribute●to●an●easier●and●
more●pleasing●work●experience●with●the●microscope.
Leica LED Illuminator Manual 16
Page 17

Leica LED3000 NVI™: Assembly
Required tools
●● None
The● Leica● LED● 3000● NVI™● can● be● used●
with● any● objectives● that● have● an● outer●
diameter●of●58mm.
The● supported● working● distance● is●
between●50mm●and●150mm.
Installing the Leica LED3000 NVI™
1.● Connect● the● Leica● LED3000 ● N VI™● to● the●
focusing●column●via●the●CTL2●connection●if●
the●focusing●column●is●equipped●with●integrated●electronics.
Alternative installation for manual columns
1.● Connect● the● external● power● supply● unit●●
(10●450●266)●to●the●Leica●LED3000●NVI™.
2.● Place●the●Leica●LED3000●NVI™●on●the●optics●
carrier●from●below●and●tighten●the●lockin g●
screw.
Leica LED Illuminator Manual 17
Page 18

Leica LED3000 NVI™: Assembly (cont'd.)
Ensure● that● the● locking● screw● of● the●
•
illuminator●and●the●locking●screw●of●the●
optics●carrier●are●on●a●straight●line,●as●otherwise●
image●shading●m ay ●occur.
Leica LED Illuminator Manual 18
Page 19

Leica LED3000 NVI™: Use
The● intensity● of● the● illuminator● can● be●
adjusted●in●10●increments.
The● Leica● LED3000● NVI™● can● also● be●
controlled●via●the●Leica●Application●Suite●
(LAS)●or●the●Leica ●SmartTouch.
The● supported● working● distance● is●
between●50mm●and●150mm.
When● pressing● the● buttons,● hold● the●
keypad●between●your●thumb●and●index●
nger.●Avoid●tapping●the●keypad●with● just●one●
nger●if●possib le.●
Use
The●light●of●the●Leica●LED3000●NVI™●can●
•
be●very●bright.●Therefore,●always●switch●
on●the●illuminator●before●you●look●through●the●
eyepieces!
1.● Switch● on● the● illuminator● by● briey● pres-
sing●the● ●(ON/OFF)●button.
The● green● LED● on● the● upper● left● corner● now●
lights●up.
2.● Adjust● the● brightness● by● briey● pressing●
the● ●or● ●buttons.
3.● Switch● o● the●illuminator● by● briey● pressing●the● ●button.
Leica LED Illuminator Manual 19
Page 20

Leica LED3000 NVI™ and Leica SmartTouch®
Adjusting the illumination
1.● Touch●the●"Light"●tab.
2.● In●the●upper●area,●touch●the●symbol●of●the●
Leica●LED3000●NVI.
3.● Switch●on●the●illuminator.
4.● Touch● the● lamp● symbols● to● adjust● the●
intensity●of●the●light.
Leica LED Illuminator Manual 20
Page 21

Leica LED3000 NVI™: Dimensional Drawings
Leica LED3000 NVI™ (dimensions in mm)
Leica LED Illuminator Manual 21
Page 22

Leica LED5000 RL
Leica LED Illuminator Manual 22
Page 23

About the Leica LED5000 RL
Use
The●Leica●LED5000●RL●("Ring●Light")●generates●
a● very● bright● and● homogenous●incident●light.●
It●has●a●diameter●of●80●mm●and●illuminates●the●
specimen●with●48●LEDs●that●can●be●switched●on●
and●o●completely●or●in●various●combinations.●It●
is●controlled●using●either●the●integrated●keypad●
or●via●the●Leica●Application●Suite●(LAS).
LAS● enables● you● to● create● fully● reproducible●
illumination●scenarios●and●automatically●toggle●
between●them.●For●additional●information,●refer●
to●the●LAS●online●help.
Leica LED Illuminator Manual 23
Page 24

Leica LED5000 RL: Assembly
The● ring● illuminator,● the● Leica● LED5000● RL●
("Ring● Light"),● is● installed● on● the● objective●
using●a●single●screw.●It●has●been●optimized●for●a●
working●distance●between●60●and●70●mm.
Constraints
The●Leica●LED5000● RL●can●be● used●in●conjunction● with●the● planapochromat● 1×● and● planapochromat● 0.63×● objectives.● With● all● other●
objectives,● the●working●distance●is●too● low●for●
adequate●illumination.
The● ring● illuminator●cannot● be● used● together●
with●the●objective●nosepiece.
Assembly
1.● Connect● the● CAN-bus● cable● to● the●
•
ring●illuminator.●The●at●part●of●the●plug●
must●be●facing● upwards.
2.● Push● the● ring● illuminator● over● the●
•
objective●as●far●as●it●will●go●and●screw●it●
into●place.
3.● Plug●the●other●end● of●the●cable●into●
•
one● of● the●two● "CTL2"● sockets● on● the●
column.
For● optimum● accessibility● of● the● specimen,●
the● ring● illuminator● should● be● installed● with●
the●cable●facing●backwards.● However,●it●is●also●
possible● to●turn●the●ring● illuminator●sideways,●
for● example● if● simultaneously● using● the●Leica●
LED5000● MCI™● system● illumination.● In● this●
case,●the● ring●illum inator●cannot●be●connected●
directly●to●the●Leica●LED5000●MCI™.
Leica LED Illuminator Manual 24
Page 25

Leica LED5000 RL: Use
The● light● of●the● Leica● LED5000● RL● can●
be●very●bright.●Therefore,●always●switch●
on●the●illuminator●before●you●look●through●the●
eyepieces!●Avoid●looking●directly●into●the●LEDs.
Using the keypad
●● Use●the● ●button●to●switch●the●illumination●
on●or●o.●
●● Use●the● ●or● ●buttons●to●adjust●the●bright-
ness● in●10●increments.●Touch●either●of●the●
two●buttons● to●adjust●the●intensity●in●small●
increments.●Hold●a●key●to●change●the●intensity●more●quickly.
The illumination scenarios
Use●the● ●and● ●buttons●to●toggle●between●the●
various●illumination●scenarios.
Constraint
The● Leica● LED5000● RL● has●been● designed● for●
use●with●the●1.0×●and●0.63×●objectives.●For●the●
1.6×● and● 2.0×● objectives,● conventional● ring●
illuminators●from●the●Leica●illuminator●product●
range●are●available.
Leica LED Illuminator Manual 25
Page 26

Leica LED5000 RL and Leica SmartTouch®
Using● the● Leica● SmartTouch™,● you● can●
control●both●the●brightness●and●various●
illumination●sce narios●for●the●Leica●LED3000●RL●
("Ring●Light").
Adjusting the illumination
1.● Touch●the●"Light"●tab.
2.● In●the●upper●area,●touch●the●symbol●for●the●
Leica●LED3000●RL.
3.● Switch●on●the●illuminator.
4.● Touch● the● lamp● symbols● to● adjust● the●
intensity●of●the●light.
5.● Touch● one● of● the● symbols● for● the● light●
scenarios● to● adjust● the● lighting● to● your●
needs.
You●cannot● modify● the●default●illumina-
tion●scenarios.
Leica LED Illuminator Manual 26
Page 27

Leica LED5000 RL: Dimensional Drawings
Leica LED5000 RL (dimensions in mm)
153
153
ø80
ø70
30
120
Leica LED Illuminator Manual 27
Page 28

Leica LED5000 MCI
Leica LED Illuminator Manual 28
Page 29

About the Leica LED5000 MCI
Leica LED5000 MCI™ –
The expert for oblique illumination
The●Leica●LED50 00●MCI™●(Multi●Contrast●Illumination)● is●a●one-of-a-kind● lighting● solution● for●
applications● in● which,● until● now,● goose-neck●
illuminators● had● been● used.● The● at● angle● of●
the● oblique● incident● light● creates● a● particularly● high● contrast● for● viewing● the● specimen,●
allowing●the●user●to●detect●minute●unevenness●
and● faults,● e.g.● scratches● and● dust● particles.●
In● contrast● to● the●goose-neck● illumin ator,●the●
settings● of● the● LED5000●MCI™● are● fully● reproducible.
Advantages
●● Nine●high-performance●LEDs●from●dierent●
angles●and●directions
●● High●contrast●allows●users●to● discover●ne●
structures●on●the●specimen
●● Illumination●angle●of●15●–●40°
●● ●Reproducible●illumination●settings
●● Optimum●access●to●specimen
Of course, the Leica LED5000 MCI™ can also be
controlled by the LAS (Leica Application Suite)
software.
Leica LED Illuminator Manual 29
Page 30

Leica LED5000 MCI: Assembly
The● Leica● LED5000● MCI™● (for● "Multi● Contrast●
Illumination")●is●installed●using●two●screws.●For●
optimum●accessibility,●the●optics●carrier●should●
be●removed●during●installation.
Constraints
The● Leica● LED5000● MCI™● cannot● be● used●
together●with●the●objective●nosepiece.
Assembly
1.● Hold● the● LED5000● MCI™● with● one●
•
hand● and● tightly● screw● the● retraining●
stirrups●on●both●top●holes●on●the●drive●housing.
2.● Connect●the●CAN-bus●cable●to●either●of●the●
two●sockets.●(The●at●part●of●the●plug●must●
be●facing●downwards.)
3.● Plug●the●other●end●of●the●cable●into●one●of●
the●two●"CTL2"●sockets●on●the●column.
Leica LED Illuminator Manual 30
Page 31

Leica LED5000 MCI: Alternative Assembly
Under● certain● circumstances,● the● light● source●
must● not● be● moved● along● with● the● optics●
carrier.●A● typical● example●is●multifocus●images●
in● which● the● Z-stack● changes●while●the● angle●
of●incidence●of●the●light●must●remain●the●same.●
For●such●purposes,●the●Leica●LED5000●MCI™●is●
directly●fastened●to●the●column.
Installation on the column
1.● Pull● the● ret aining● stirrup● out●of● the● Leica●
LED5000●MCI™.
If● using● the● AX● carrier,● use● the● upper●
engaging● position● of● the● retaining● stir-
rup.
2.● Screw●the●retaining●stirrup●into●the●column●
at●the●notch●using● the● single● screw.●If● you●
tighten● the●screw,● the● retaining● stirrup● is●
automatically●moved●into●the●correct● position.
3.● Push● the● Leica● LED5000● MCI™● onto● the●
retaining●stirrup.
Leica LED Illuminator Manual 31
Page 32

Leica LED5000 MCI™: Use
Use
The● Leica● LED5000● MCI™● (for● "Multi● Contrast●
Illumination")● is● a● universal● high-output● illuminator.●Three● groups● of● 3● LEDs● each● can●be●
arranged●as●desired●around● the●specimen.●The●
targeted● control● of● the● LEDs● enables● various●
illumination●scenarios●to●be●implemented.
Preparation
Hold●the●MCI●with●both●hands●and●pull●it●downwards●until●the● illuminator● clicks●into●place● on●
the●bottom●end●of●the●guide●rods.
In●this●position,●you●always●have●the●same●contrast●with●identical●i llumination.●This●guarantees●
the●reproducibility●of●an●experiment.
Installed too high
Optimum height
Contact with the base
If● the● optics● carriers● are● accidentally●
•
lowered● too● far,● conta ct● between● the●
base● and●MCI●may●result.● A● safety● mechanism●
in●the●linkage●ensures●that●in●this●case,●th e●MCI●
is●automatically●pushed●upwards●to●prevent●the●
possibility●of●damage.
●● Be●sure●not●to ●place●any●specimens●directly●
beneath●the●MCI.
●● After●the●optics●carrier●is●li fted,●put●the●MCI●
back●into●the●original●position.
Leica LED Illuminator Manual 32
Page 33

Leica LED5000 MCI™: Use (cont'd.)
Using the keyboard
●● Use●the● ●key●to●switch●the●illumination●on●
or●o.●
●● Use● the● "+"● and● "–"● keys● to● adjust● the●
brightness● i n●10● increments.● Touch● either●
of●the●two●buttons●to●adjust●the●intensity●in●
small●increments.●Hold●a●key●to●change●the●
intensity●more●quickly.
Maximum brightness
Maximum contrast
The illumination scenarios
Use●the●" "●and●" "●keys●to●toggle●between●the●
illumination●scenarios●shown●below.
Maximum brightness
For● temperature● reasons● its ● is●not● possible● to●
switch●on●all●nine● LEDs● simultaneously.●Th erefore,●to● provide●bright●overall●illumination,●the●
top● two● rows● are● activated.●The● bottom● row●
primarily●provides●contrast.
Point illumination
from the rear
Point illumination
from the left
The Leica LED5000 MCI™ can also be controlled
by the LAS (Leica Application Suite) software.
Point illumination
from the right
Leica LED Illuminator Manual 33
Page 34

Leica LED5000 MCI and Leica SmartTouch®
Using● the● Leica● SmartTouch™,● you● can●
control●both●the●brightness●and●various●
illumination● scenarios ● for● the● Leica● LED5000●
MCI●("Multi●Contrast●Illumination").
Adjusting the illumination
1.● Touch●the●"Light"●tab.
2.● In●the●upper●area,●touch●the●symbol●for●the●
Leica●LED5000●MCI.
3.● Switch●on●the●illuminator.
4.● Touch● the● lamp● symbols● to● adjust● the●
intensity●of●the●light.
The●selected●brightness●is●shown●on●the●
right●side●of●the●display.
5.● Touch● one● of● the● symbols● for● the● light●
scenarios● to● adjust● the● lighting● to● your●
needs.
You●cannot● modify● the●default●illumina-
tion●scenarios.
Leica LED Illuminator Manual 34
Page 35

132
112
45
36 22
157
11245112
90
36 22
Leica LED5000 MCI: Dimensional Drawings
Leica LED5000 MCI (dimensions in mm)
45
36 22
112
45112
157
132
83.5
90
275.3
Leica LED Illuminator Manual 35
Page 36

Leica LED5000 CXI
Leica LED Illuminator Manual 36
Page 37

About the Leica LED5000 CXI
Leica LED5000 CXI™ –
The coaxial LED light solution
The●Leica●LED5000●CXI™●is●a●coaxial●illuminator●
that●combines● the●benets●of●LED●technology●
within● the● smallest● space:● long● ser vice● life,●
bright●illumination●in●natural●light●quality,●plus●
integration●into●the●Leica●LAS●software●and●fully●
reproducible●illumination●settings.
The●Leica●LED5000●CXI™●is●ideally●suited●for●illuminating●at,●reective●or●polished● specimens.●
It●oers●substantially●brighter●illumination●than●
comparable●150●watt●halogen●lamps.
Use with the microscope carrier AX
If●the●microscope●carrier●AX●is●used●in●the●vertical●position,●a ●quarter-wave●plate●is●necessary:
1.● Fasten●the●quarter-wave●plate●to●the●objective●using●the●clamping●screw.
2.● Rotate● the● quarter-wave● plate● upwards●
using● the● knurled● ring● until● the● desired●
eect●is●attained.●
Use with the Leica M205 C / M205 A stereomicroscope
If●the●Leica●LED5000●CXI●illuminator●is●used●with●
the●Leica●M205●C●or●Leica●M205●A,●bear●in●mind●
that●an●AX●microscope●carrier●is●used.●The●carrier●
must●be●in●posi tion●(M205)●during●assembly.●
In● order● to● achieve● uniform● illumination● in●
"stereo●viewing",●the●AX●carrier●must●be●moved●
to●the●right●as●far●as●it●will●go.●This●position●deviates●from●the●default●stereo●position●by●2mm.
Leica LED Illuminator Manual 37
Page 38

Leica LED5000 CXI: Assembly
Required tools
●● None
Installing the Leica LED5000 CXI
1.● Connect●the●Leica●LED5000●CXI●to●the●focusing●colum n●via●the●CTL2●connection●if●the●
focusing●column●is● equipped●with●integrated●electronics.
Alternative installation for manual columns
1.● Connect● the● external● power● supply● unit●●
(10●450●266)●to●the●Leica●LED5000●CXI.
2.● Unscrew●the●positioning●screw●and●remove●
the●protective●cover.
Leica LED Illuminator Manual 38
Page 39

Leica LED5000 CXI (continued)
3.● Place●the●Leica●LED50 00●CXI● on● the●optics●
carrier●and●tig h ten●the●positioning●screw.
4.● Push● the● tube● (for● example,● the● inclined●
binocular● tube)● into● the● dovetail ● ring●and●
rotate●it●slightly●in●both●directions●until●the●
positioning● screw● meshes● w ith● the● guide●
groove.
5.● While● holdin g● the● tube● only● slightly,●
carefully● t ighten● the● positioning● screw.●
It● is● automatically● brought● to● the● correct●
●position.
Leica LED Illuminator Manual 39
Page 40

Leica LED5000 CXI: Use
The● intensity● of● the● illuminator● can● be●
adjusted●in●10●increments.
The● Leica● LED3000● NVI™● can● also● be●
controlled●via●the●Leica●Application●Suite●
(LAS)●or●the●Leica ●SmartTouch.
Using●the●Leica●LED5000●CXI●results●in●an●
increased●magnication●level●of●1.5×.
Depending● on● the● components● used,●
dierent● intensities● of● vignetting● may●
occur●at●low●magnication.●Vignetting●is●normal●
and●not●a●malfu nction.
Use
The●light●of● the●Leica●LED5000●CXI ● can●
•
be●very●bright.●Therefore,●always●switch●
on●the●illuminator●before●you●look●through●the●
eyepieces!
1.● Switch● on● the● illuminator● by● briey● pres-
sing●the● ●(ON/OFF)●button.
The● green● LED● on● the● upper● left● corner● now●
lights●up.
2.● Adjust● the● brightness● by● briey● pressing●
the● ●or● ●buttons.
3.● Switch● o● the●illuminator● by● briey● pressing●the● ●button.
Leica LED Illuminator Manual 40
Page 41

Leica LED5000 CXI and Leica SmartTouch®
Adjusting the illumination
1.● Touch●the●"Light"●tab.
2.● In●the●upper●area,●touch●the●symbol●of●the●
Leica●LED5000●CXI.
3.● Switch●on●the●illuminator.
4.● Touch● the● lamp● symbols● to● adjust● the●
intensity●of●the●light.
Leica LED Illuminator Manual 41
Page 42

Leica LED5000 CXI: Dimensional Drawings
Leica LED5000 CXI (dimensions in mm)
Leica LED Illuminator Manual 42
Page 43

Leica LED5000 HDI™
Leica LED Illuminator Manual 43
Page 44

About the Leica LED5000 HDI™
The● Leica● LED5000● HDI™● (for● "High● Diuse●
Illumination")● is●a● newly-designed,●innovative●
high-output● illuminator.● Its● soft● light● reduces●
reection● on● highly● reective● specimens● and●
prevents●stray●light.
The● Leica● LED5000● HDI™● con sists●of●a●exible●
plastic● dome.● It● houses●two●independent● LED●
rings●that●can●be●controlled●individually.
It● is● controlled● using● either● the ● integrated●
keypad●or●via●the●Leica●Application●Suite●(LAS)●
or●the●Leica●SmartTouch®.
The● Leica● LED5000● HDI™● is● installed● on● the●
objective● using● a● single● screw.● The● working●
distance● has● been● optimized● for● a● height●
between●60●and●70●mm.
Constraints
The●Leica●LED5000●HDI™●can●only●be●used●w ith●
objectives● that● have● an● outer● diameter● of● 80●
mm.●
The● Leica● LED5000● HDI™● has● been● optimized●
for● the● planapochromat● 1×●and●planapochromat●0.63×.
Control via Leica Application Suite
The●Leica●LED5000●HDI™●il luminator●will●
be● supported● by● LAS● version● 3.6● and●
higher●(Summer● 2010).
LAS●enables●you● to●create● fully●reprodu-
cible● illumination● scenarios● and ● automatically●toggle●between●them.● For●additional●
information,●refer●to●the●LAS●online●help.
Leica LED Illuminator Manual 44
Page 45

Leica LED5000 HDI™: Assembly
Connection
1.● Connect●the●CAN-bus●cable●to●the●illuminator.●The●at●part●of●the●plug●must●be●facing●
upwards.
2.● In● an● in-focus● state,● slide● the● illuminator●
over● the● objective● until● it● can● no● longer●
touch● the● baseplate● when● folded● down●
and●screw●it●into●place.●When●doing ●so,●the●
control● panel● eld● should● be● facing● the●
user.●
3.● Plug●the●other●end●of●the●cable●into●one●of●
the●two●"CTL2"●s ockets●on● the●rear●side●of●
the●focusing●column.
Depending● on● the● height● of● the● speci-
men●to● be●examined,●the●LED5000●HDI™●
can●be●installed●a●b it●higher●or●lower●along●the●
objective.
Leica LED Illuminator Manual 45
Page 46

Leica LED5000 HDI™: Illumination Scenarios
Using the keypad
●● Use●the● ●button●to●switch●the●illumination●
on●or●o.
●● Use● the
three● illum ination● modes:● Both● LED● rings●
active●>●Top●LED● ring●a ctive●>●Bottom●LED●
ring●active
●● If●both●LED●rings●are●acti ve,●only●the●bright-
ness●of●the●top●ring●can●be●changed.●Depending●on● the●specimen●and●requirements,●it●
is● thus● possible● to● attain● balanced● brightness●conditions●for●both●rings.
● button● to● s witch●between● the●
●
●● Use●the● ●or● ●buttons●to●adjust●the●bright-
ness● in●10●increments.●Touch●either●of●the●
two●buttons● to●adjust●the●intensity●in●small●
increments.● Hold● the● button● pressed● to●
change●the●intensity●more●quickly.
The illumination scenarios
The● exible● plastic● dome● is● the● central●
feature● of● the● Leica● LED5000● HDI™.● It●
allows●two●illuminator●operating●modes.
You● can● switch● between● the● two● modes● by●
moving● the● dome● upwards● or● downwards● at●
the●two●tabs●on●the●left●and● right●of●the●metal●
ring.
Thanks●to●the●high●exibilit y,●it●is●also●possible●
to●just●fold●up●or●down●one●side.
Leica LED Illuminator Manual 46
Page 47

Leica LED5000 HDI™: Illumination Scenarios (continued)
The● use● of● exible● plastic● eliminates●
"hard● collisions"● with● specimens● to●
a● large● extent.● For● ver y● sensitive● specimens,●
however,● even● the● weight● of● the● illuminator●
itself●can●caus e●damage.
1. Dome folded down
In●this●mode,● the●Leica●LED 5000●HDI™● is●particularly● powerful.●Homogeneity● is● at● the● highest● level● and● the● stray● light● from● outside● is●
blocked.●
2. Dome folded up
This●mode●allows●continued●access●to●the●specimen●for●additional●setup.●This●mode●also●ensures●illumination●with●minimal●reections.
Leica LED Illuminator Manual 47
Page 48

Leica LED5000 HDI™ and Leica SmartTouch®
Using● the● Leica● SmartTouch™,● you● can●
control● both● the● brightness● and● the●
various● illumination ● scenarios● for● the● Leica●
LED5000●RL●("Ring●Light").
Adjusting the illumination
1.● Touch●the●"Light"●tab.
2.● In●the●upper●area,●touch●the●symbol●for●the●
Leica●LED5000●HDI.
3.● Switch●on●the●illuminator.
4.● Touch● the● lamp● symbols● to● adjust● the●
intensity●of●the●light.
5.● Touch● one● of● the● symbols● for● the● light●
settings● to● adjust● the● lighting● to● your●
needs.
Leica LED Illuminator Manual 48
Page 49

Leica LED5000 HDI™: Dimensional Drawings
Leica LED5000 HDI™ (dimensions in mm)
Folded●Dome
Unfolded●dome
Leica LED Illuminator Manual 49
 Loading...